Speco Technologies ZIPK4W2 Manual
Speco Technologies
Overvågningskamera
ZIPK4W2
Læs nedenfor 📖 manual på dansk for Speco Technologies ZIPK4W2 (88 sider) i kategorien Overvågningskamera. Denne guide var nyttig for 6 personer og blev bedømt med 4.5 stjerner i gennemsnit af 2 brugere
Side 1/88

USER MAN L UA
1
!
!
!
!
!
!
!
!
!
!
!
!
ZIPK4W2 User Manual
!
!
!
!
!
!
!
!
!
!
!
!
!
!
!
!
!
!
Please!read!this!manual!carefully!before!operating!the!unit!and!keep!it!for!further!reference!

USER MAN L UA
2
Chapter 1 Safety Instruction!................................................................................!4!
Chapter 2 Product Overview! !5............................................................................... !
2.1!Rear!Panel!...............................................................................................................!5!
2.2!Remote!Controller!(For!Reference!Only)!................................................................!6!
Chapter 3 WIRELESS NVR Common Operations!.............................................!7!
3.1!Using!the!Supplied!Mouse!......................................................................................!7!
3.2!Using!the!Virtual!Keyboard!..................................................................................... !7!
3.3!Password!.................................................................................................................!8!
Chapter 4 WIRELESS NVR Starting up!..............................................................!9!
4.1!Startup!Wizard!........................................................................................................!9!
4.1.1 Start Wizard!...................................................................................................!9!
4.1.2 Network Configuration!...............................................................................!10!
4.1.3 Date/Time!................................................................ ................................ ....!12!
4.1.4 Disk!...............................................................................................................!13!
4.1.5 Resolution!....................................................................................................!14!
4.1.6 Mobile!...........................................................................................................!14!
4.1.7 Summary! !..................................................................................................... 14!
4.2!Live!Viewing!Screen!..............................................................................................!15!
4.2.1 Camera Quick Toolbar!...............................................................................!15!
4.2.2 Taskbar!........................................................................................................!16!
4.2.3 Start Menu!...................................................................................................!17!
Chapter 5 WIRELESS NVR System Setup!.......................................................!19!
5.1!Channel!.................................................................................................................!19!
5.1.1 Channel!................................ ................................ ................................ ........!20!
5.1.2. Live!..............................................................................................................!20!
5.1.3 Privacy Mask!...............................................................................................!23!
5.1.4 Motion! !................................................................................................ .......... 24!
5.1.5 PIR!................................................................ ................................ ................!25!
5.2!Record!...................................................................................................................!26!
5.2.1 Record!................................................................ ................................ ..........!26!
5.2.2 Record Schedule!........................................................................................!27!
5.2.3 Capture! !........................................................................................................ 28!
5.3!Alarm! !.................................................................................................................... 30!
5.3.1 Motion! !................................................................................................ .......... 30!
5.3.2 PIR!................................................................ ................................ ................!31!
5.3.3 Exception!.....................................................................................................!32!
5.4!Network!................................................................................................................!33!
5.4.1 General! !........................................................................................................ 33!
5.4.2 DDNS!...........................................................................................................!36!
5.4.3 Email! !............................................................................................................ 37!

USER MAN L UA
3
5.4.4 FTP!...............................................................................................................!39!
5.!5!Device! !..................................................................................................................40!
5. 5.1 Disk!..............................................................................................................!40!
5.5.2 S.M.A.R.T!....................................................................................................!41!
5.5.3 Cloud!............................................................................................................!42!
5.6!System! !..................................................................................................................44!
5.6.1 General! !........................................................................................................ 44!
5.6.2 Output Configuration!..................................................................................!47!
5.6.3 Multi-user!................................................................ ..................................... !49!
5.6.4 Maintenance!................................................................................................!54!
5.6.5 Camera Maintain!........................................................................................!59!
5.6.6 System Information!................................................................ ....................!60!
Chapter 6 Search, Playback & Backup!............................................................!62!
6.1!Using!Search!Function! !.......................................................................................... 62!
6.1.1 Search & Play Video in General!............................................................... !64!
6.1.2 Event Search, Playback & Backup!..........................................................!67!
6.1.3 Sub-periods Playback!................................................................................!70!
6.1.4 Picture Search & View!...............................................................................!71!
6.1.5 Picture Preview Control!.............................................................................!73!
Chapter 7 Remote Access via Web Client!.......................................................!74!
7.1!Web!Plugin!Download!and!Installation!.................................................................!75!
7.2!Web!Client!Manager!.............................................................................................!78!
7.2.1 Live Interface!...............................................................................................!78!
7.3!Playback!................................................................................................................!81!
7.4!Remote!Setting!.....................................................................................................!84!
7.5!Computer!Settings!................................................................................................!84!
Chapter 8 Appendix!............................................................................................!85!
8.1!Troubleshooting!....................................................................................................!85!
8.2!Usage!Maintenance!..............................................................................................!86!
8.3!Accessories!(For!reference!only)!...........................................................................!87!

USER MAN L UA
4
Chapter 1 Safety Instruction
Please carefully read the following safety instruction so as to avoid personal injuries and
prevent the equipment and other connection devices from being damaged.
1. Power sources (note: please use the power supply attached or specified by the
manufacturer)
Never operate the equipment by using unspecified power supply.
2. Never push objects of any kind through openings of WIRELESS NVR
Never push objects of any kind through openings of WIRELESS NVR so as to avoid
electric shock or other accidents.
3. Do not put the equipment in the dusty field
Do not put the equipment in the dusty field.
4. Do not place the equipment under rain or humid environment
Do not place the equipment under humid environment like basement. If the equipment is
accidentally in contact with water, please unplug the power cable and immediately contact
your local dealer.
5. Keep the surface of the equipment clean and dry
Use soft damp cloth to clean the outer case of WIRELESS NVR (do not use liquid aerosol
cleaners)
6. Do not operate if any problems are found
If there are any strange smell or sound from WIRELESS NVR, unplug the power cable
and contact the authorized dealer or service center.
7. Do not try to remove the upper cover
Warning: Do not remove the cap of WIRELESS NVR so as to avoid electric shock.
8. Handle with care
If WIRELESS NVR does not work normally because of hitting on the hard object, please
contact the authorized dealer for repair or replacement.
9. Use standard lithium battery (Note: Use the batteries attached or specified by the
manufacturer)
After cutting off the power supply, if the system clock cannot continue to work, please
replace the standard 3V lithium battery on the main board.
Warning: Turn off WIRELESS NVR before replacing the batteries, or you may be
suffered from serious electric shock. Please properly dispose of the used batteries.
10. Put the equipment in a place with good ventilation
The WIRELESS NVR system includes HDD, which produces large amount of heat during
operation. As a result, do not block the ventilation openings (on the top, bottom, both
sides and the reverse side) for cooling the system during operation. Install or put the
equipment in the place with good ventilation.
11. The attached power adapter can only be used for 1 set of WIRELESS NVR. Do not
connect more equipment, or WIRELESS NVR may be restarted repeatedly because
of insufficient power.
12. Prevent the equipment from water dropping or splashing. Do not place objects
containing water, such as flower vase, on the equipment.

5
Chapter 2 Product Overview
2.1 Rear Panel
NO
Physical interface
Connection
1
Ground connection
A terminal to connect a separate ground cable.
* Make sure to add a ground cable in order to use the equipment safely.
2
Antenna
Receive signal from wireless camera.
3
SD
SD Port
4
USB port
Connect with USB.
5
VGA port
Connect with VGA display
6
HDMI
Connect with HDMI display
7
WAN:(RJ45)
Network port
Connect with WAN,Ethernet cable.
8
Power port
Connect with the power supply DC12V 2A with the device., included

USER MAN L UA
10
4.1.2 Network Configuration
If you connect to a router that allows the use of DHCP, please check the DHCP box. The router
will assign automatically all the network parameters for your WIRELESS NVR. Unless the network
is manually addressed below parameters:
IP Address: The IP address identifies the WIRELESS NVR in the network. It consists of four
groups of numbers between 0 to 255, separated by periods. For example, “192.168.001.100”.
Subnet Mask: Subnet mask is a network parameter which defines a range of IP addresses that
can be used in a network. If IP address is like a street where you live then subnet mask is like a
neighborhood. The subnet address also consists of four groups of numbers, separated by periods.
For example, “255.255.000.000”.
Gateway: This address allows the WIRELESS NVR to access the Internet. The format of the
Gateway address is the same as the IP Address. For example, “192.168.001.001”.
DNS1/DNS2: DNS1 is the primary DNS server and DNS2 is a backup DNS server. Usually should
be enough just to enter the DNS1 server address.
Port
Web Port: This is the port that you will use to log in remotely to the WIRELESS NVR (e.g. using
the Web Client). If the default port 80 is already taken by other applications, please change it.

USER MAN L UA
11
Client Port: This is the port that the WIRELESS NVR will use to send information through (e.g.
using the mobile app). If the default port 9000 is already taken by other applications, please
change it.
RTSP Port: This is the port that the WIRELESS NVR will be allowed to transmit real-time
streaming to other device (e.g. using a streaming Media player.).
UPNP: If you want to log in remotely to the WIRELESS NVR using Web Client, you need to
complete the port forwarding in your router. Enable this option if your router supports the UPnP. In
this case, you do not need to configure manually port forwarding on your router. If your router does
not support UPnP, make sure the port forwarding is completed manually in your router.

USER MAN L UA
12
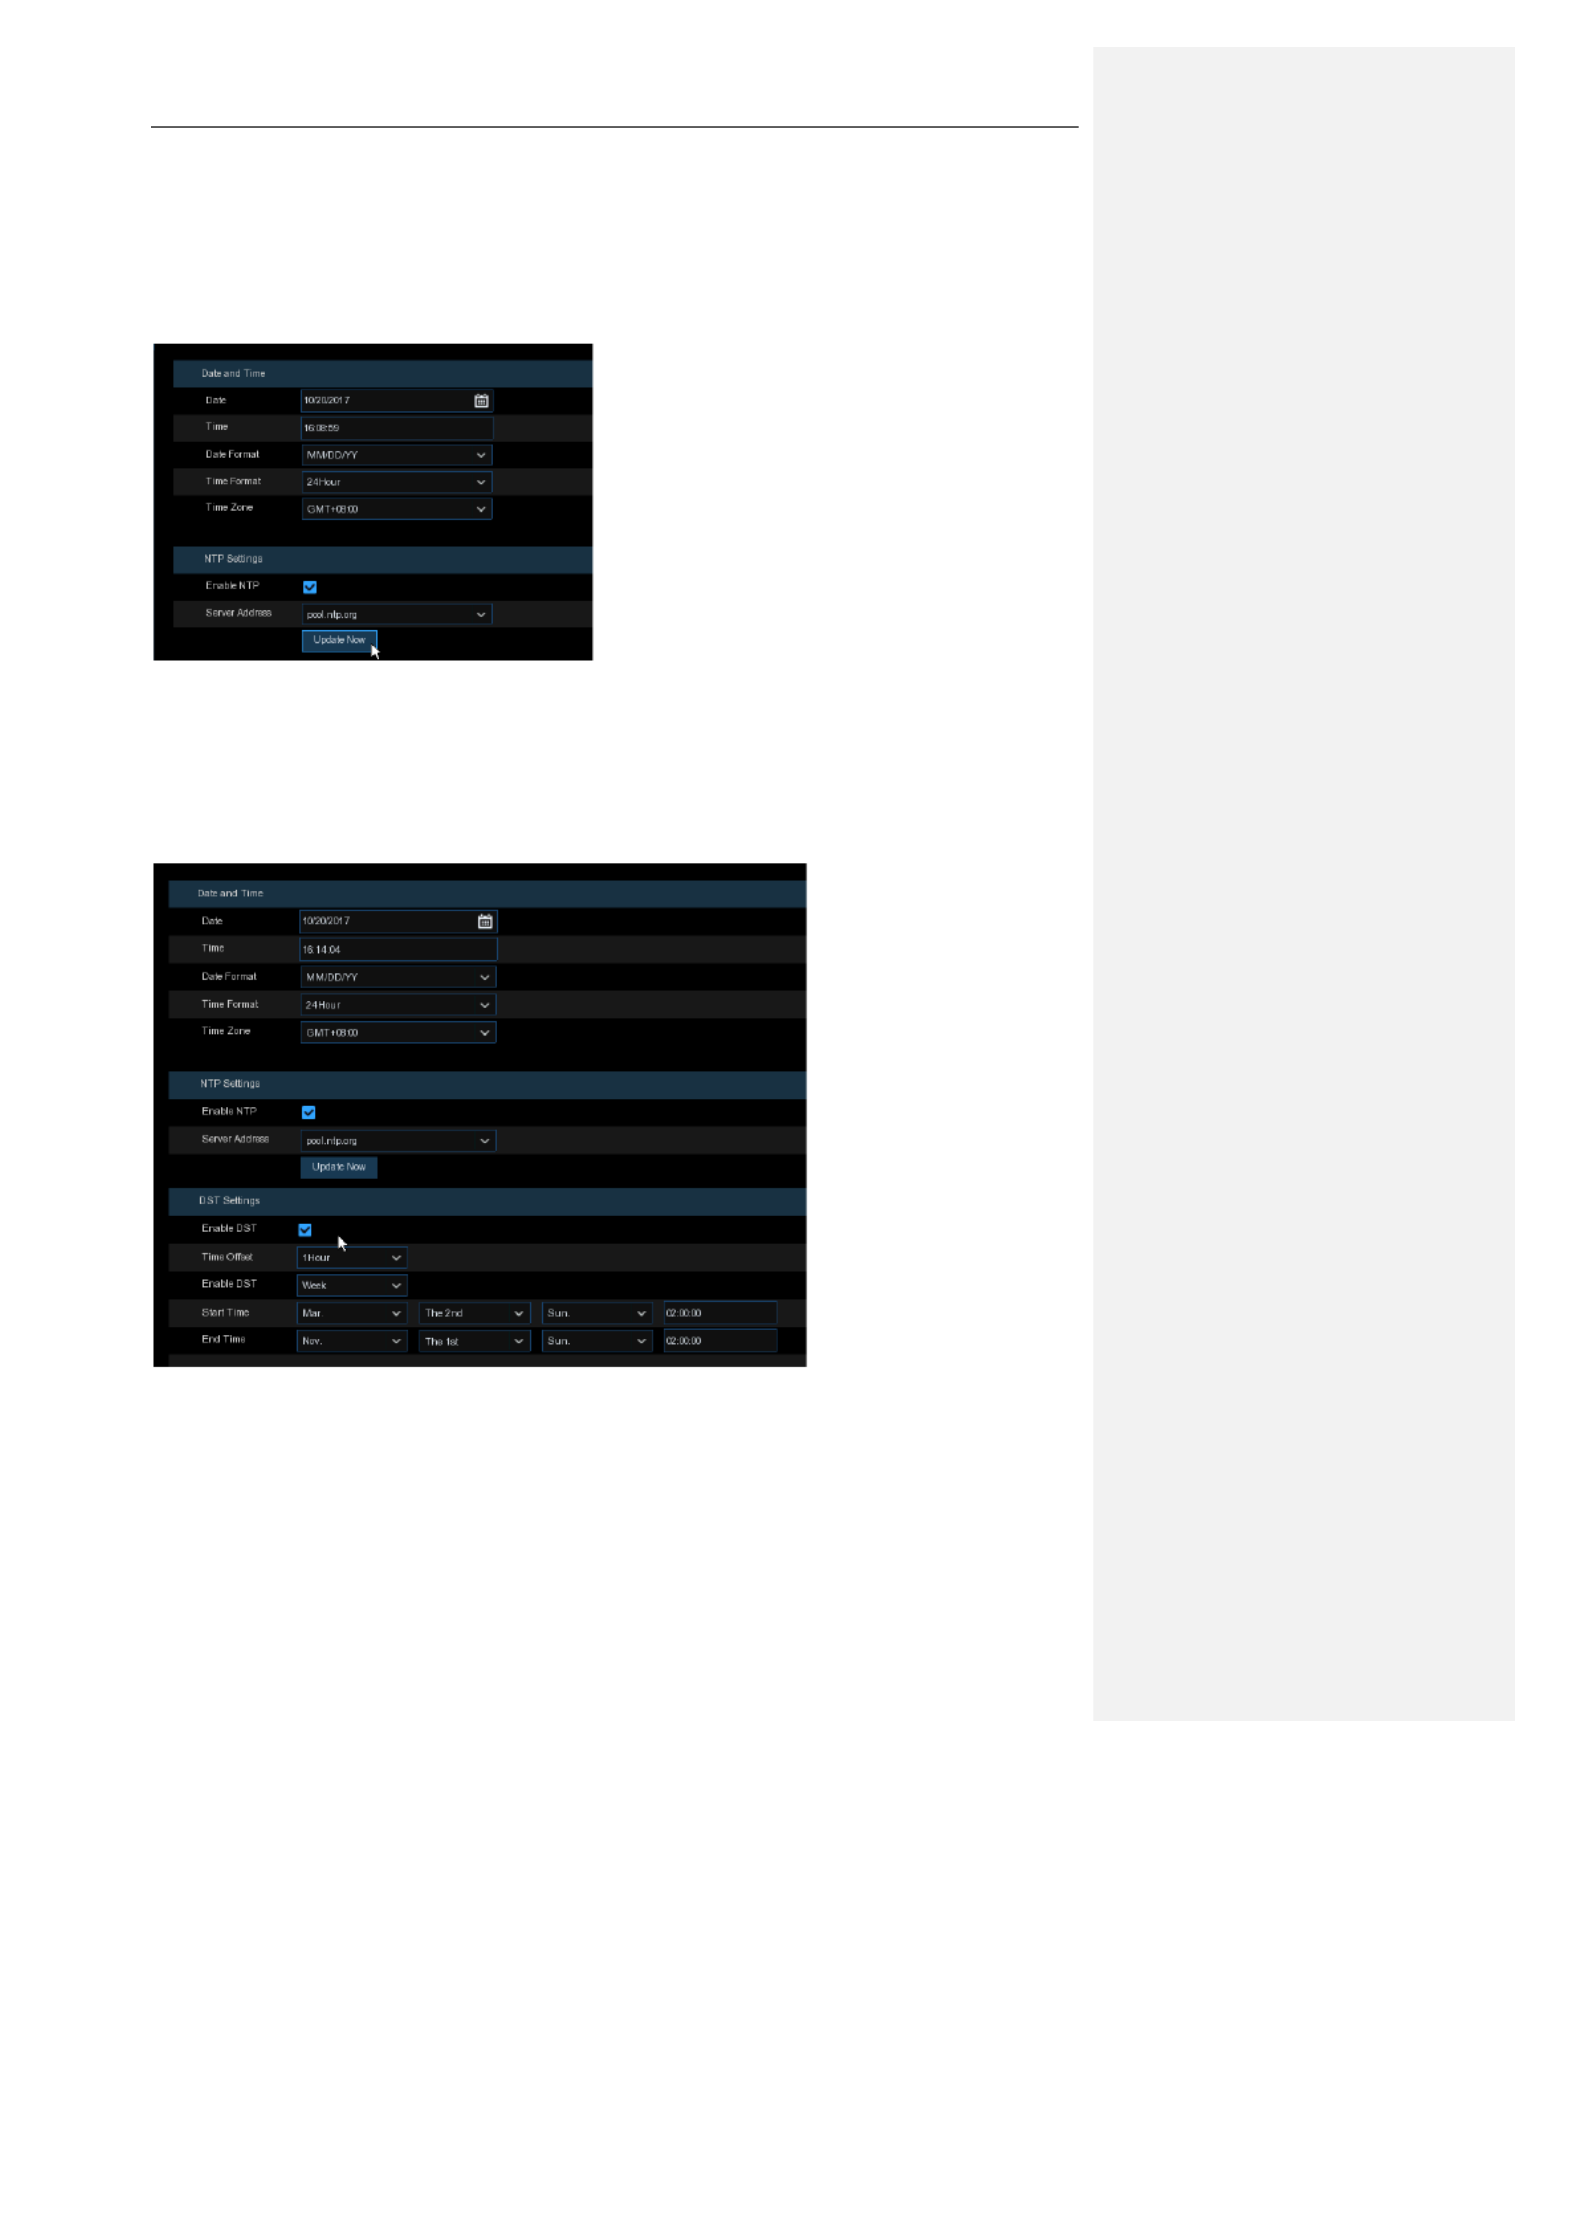
4.1.3 Date/Time
This menu allows you to configure the Date, Time, Date Format, Time Format, Time Zone, NTP
a nd DST.
Date and Time
Click on the calendar icon to set the current system date.
Date: Click on the calendar icon to set the system date.
Time: Click to set the system time.
Date Format: Choose from the dropdown menu to set preferred date format.
Time Format: Choose time format between 24Hour and 12Hour.
Time Zone: Set the correct time zone.
NTP
NTP stands for Network Time Protocol. This feature allows you to synchronize the date and time
automatically on the WIRELESS NVR over Internet. Therefore, the WIRELESS NVR needs to be
connected to the Internet.
Check the “NTP” box, and select the NTP server.

USER MAN L UA
13
DST
DST stands for Daylight Savings Time.
DST: Enable if Daylight Saving Time (DST) is observed in your region
Time Offset: Select the amount of time to offset for DST
Time Mode: Choose to set the daylight saving time in weeks or in days
Start Time/End Time: Set the start time and end time for daylight saving
4.1.4 Disk
If the HDD is installed in the WIRELESS NVR for the first time, it must be formatted. Select the
HDD and then click Format HDD button to format the HDD.
Overwrite: Use this option to overwrite the old recordings on the HDD when the HDD is full. For
example, if you choose the option 7 days then only the last 7 days recordings are kept on the HDD.
To prevent overwriting any old recordings, select Disable. If you have disabled this function,
please check the HDD status regularly, to make sure the HDD is not full.

USER MAN L UA
14
4.1.5 Resolution
Choose an output resolution matches to your monitor. The WIRELESS NVR supports to adjust the
output resolution automatically to match the best resolution of your monitor when the system is
starting up.
4.1.6 Mobile
Scan the QR code with the mobile app to view your WIRELESS NVR remotely through a
smartphone.
4.1.7 Summary
You can check the system summary information you had set in the start wizard and finish the
wizard.
Check “Don't show this window next time" if you don’t want to display Start Wizard when
system reboot next time. Click Finish button to save & exit.

USER MAN L UA
15
4.2 Live Viewing Screen
Status Icons
This indicates that the WIRELESS NVR is currently recording.
This icon appears when the camera has detected motion.
This icon appears when the camera has detected PIR.
4.2.1 Camera Quick Toolbar
In live viewing, click the left button of your mouse on a connected camera to display the Camera
Quick Toolbar.
Click to manually record the channel immediately. If manual record is in process, the icon will
be in red. Click one more time to stop manual record.
Click to save a snapshot of the current camera image. Manual Capture must be enabled to
use this feature. For details on enabling Manual Capture, see 5.2.3.1 Capture.
Camera Quick Toolbar
Status Icons
System Date & Time
Status Icons
Task Menu Bar

USER MAN L UA
16
Click to play the latest 5 minutes recording of this channel
Click to zoom- in the channel. When the icon appears, press and hold the left button of
your mouse to drag the area you want to zoom in.
Click to adjust the image color of the channel. You can adjust the HUE, BRIGHT, CONTRAST
& SATURATION of the image.
To switch the live view video stream between HD & SD. HD is mainstream live view, SD is
substream live view.
Click to enter pairing
4.2.2 Taskbar
Click to open the Start Menu
Click to choose different layout for live view
Click to start viewing channels in a sequence
Quick playback. You can choose to play the latest recording for all channels from the
beginning of the day, or you can choose the playback from the latest 5s, 10s, 30s, 1Min, 5Min.
Click to adjust talk audio volume
Click to switch all Wireless channels between mainstream and substream (for live view
resolution)
Click to switch among real-time, balanced, or smooth view. The view effect modes affect
only the live view video quality by bitrate and frame rate but do not affect the recording quality.
This icon is shows the number of days this space can HDD free record
This icon will appear if the network is disconnected
;
. To start or stop Manual Record
To view system information, and network state.
USER MAN L UA
17
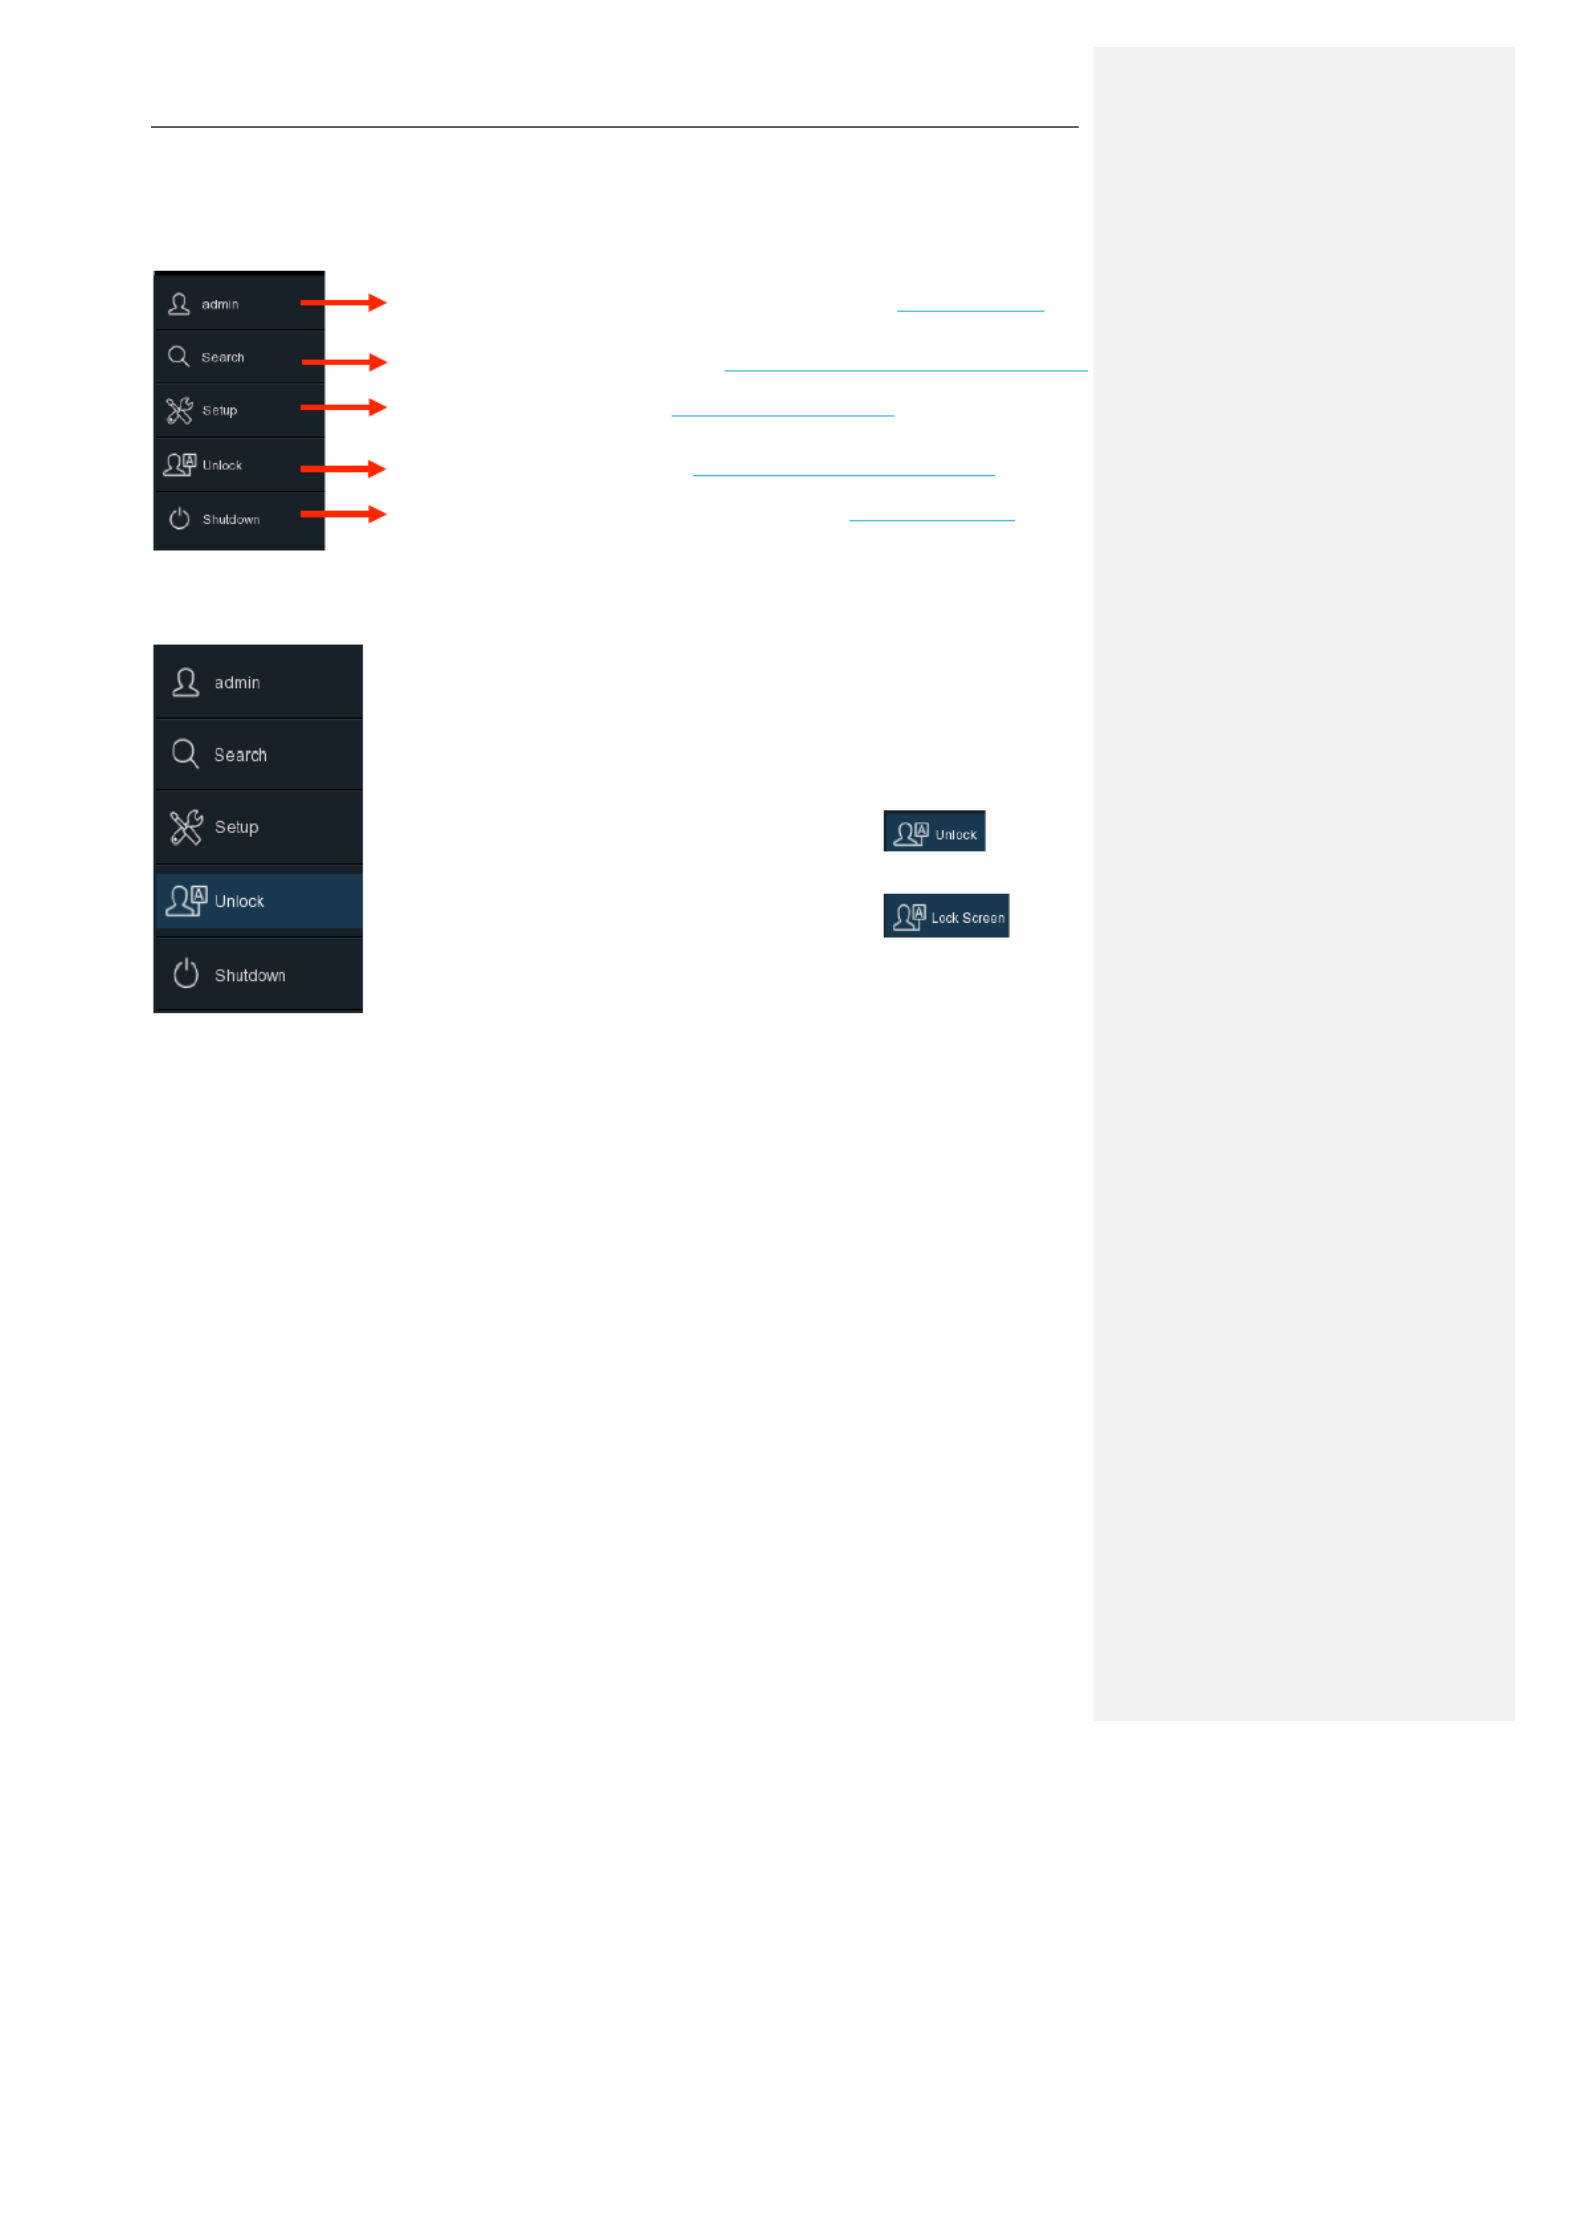
4.2.3 Start Menu
With the start menu, you can switch user, search & playback, enter system setup menu, lock &
unlock the screen, shut down, reboot & logout the system.
4.2.3.1 Unlock and Lock Screen
The screen will be locked to protect unauthorized OSD operation while the
NVR is not in menu operation 1 minute.
If necessary, you can also lock the screen operation manually. To do so,
go to Start Menu, and then click the Lock Screen icon to lock
the system immediately.
If the system is locked, you can click the Unlock icon to
unlock the system for further operation.
To switch user. To enable multi-user, please view on 5.6.3 Multi user- .
Search & Playback. View more on Chapter 6 Search, Playback & Backup
NVR System Setup. View on Chapter 5 NVR System
Lock & unlock screen. View on 4.2.3.1 Unlock and Lock Screen.
Shutdown, reboot & logout the system. View on 4.2.3.2 Shutdown.

USER MAN L UA
18
4.2.3.2 Shutdown
Click Shutdown button from S t tar Menu, and the check the further action you want to move.
Click OK button, system will require to input the Admin password to authenticate.
You may choose Shutdo ootwn to shut system, or choose off your Reb to , If you restart system
choose Logout, your live viewing screen will disappear. You will need to login the system for
further operations.

USER MAN L UA
19
Chapter 5 WIRELESS NVR System Setup
You are able to configure the WIRELESS NVR for Channel, Record, Alarm, Network, Device &
System from Start Menu !Setup.
5.1 Channel
In this section, you are allowed to configure the Wireless camera, live view display, manage
Wireless cameras, motion setup, Video Cover.

USER MAN L UA
20
5.1.1 Channel
Region: ENA/ K/MKK depending on the region.
Wireless Band selection: Auto or Manual optional. Auto is recommended.
Channel: Wireless Channel.
Camera version: Camera firmware Version.
Pair: Click the channel button to do pairing.
5.1.2. Live
To configure camera parameters.

USER MAN L UA
21
Channel: Display channel number.
Setup: Click icon into the setup page.

USER MAN L UA
22
Covert: Choose Display ON is Live view, choose OFF is . covert Live view
Alias: Change or rename name channel .
Position: Hidden channel alias or choose alias positionchannel , you may choose: Left-Top ,
Right-Top,Left-Bottom,Right- tt Bo om.
Date format: MM/DD/YYYY, YYYY MM- -DD, DD/MM/YYYY
Time format: 24 Hour, 12 Hour.
Signal Strength: Choose ON is Display Signal Strength icon, choose OFF to remove from OSD.
Choose a channel to configure
Give a name to the camera
Date format to display for the Wireless camera
Time format to display for the Wireless camera
Adjust the Bright value for the image color
Adjust the Contrast value for the image color
Adjust the Saturation value for the image color
Adjust the Hue value for the image color
Click Default to load default settings, click Apply to save settings,
Right click on your mouse to exit.
Display signal strength

USER MAN L UA
23
5.1.3 Privacy Mask
This menu allows you to create privacy zone(s) if you want to partially cover of the s certain part
image. Enable the Privacy Zone, You can create privacy zones in any size and location on the
camera image. The zone(s) appear as “red box”;if you check Select All, then the entire image is
masked, the image is show blank screen.
Channel: Choose which channel to change settings.
Enable Privacy Zone: Y c ou may heck Enable Privacy Zone to setting the the Privacy Zone on
video area, click the grid cursor and then drag the mouse to highlight the scope to unmark the area
into red blocks. After setting is completed, click the right button of your mouse to return and click
Apply to make the area setup effective.
Select All: to make all area setup effective.
Clear All: to clear all area setup.
Note: The area of privacy zones you have set will be invisible in both live view & recording video.

USER MAN L UA
24
5.1.4 Motion
This menu allows you to configure motion parameters. When motion has been detected
by one or more cameras, your WIRELESS NVR will alert you to a potential threat at your home. It
does this by sending you an email alert with an attached image from the camera to use as a
reference (if this option is enabled) and/or sending push notifications via the mobile app.
Setup: Click icon into the setup page.
Switch: Enable or disable motion detection.
Sensitivity: Set the sensitivity level. Level 1 the lowest
sensitivity level while level 8 is the highest sensitivity level.
Motion Detection Area:
The whole screen is marked for motion
detection (red blocks) as default. If you
want to disable the motion detection on a
certain area, click on the grid and then
drag the mouse to highlight the area to
unmark the area into transparent blocks.
After setting is completed, right click on
of your mouse to return and click Apply
to make the area setup effective.

USER MAN L UA
25
5.1.5 PIR
Setup: Click icon into the setup page.
Switch: Enable or disable motion detection.
Sensitivity: Set the sensitivity level. Level 1 the lowest
sensitivity level while level 8 is the highest sensitivity level.
Motion Detection Area:
The whole screen is marked for motion
detection (red blocks) as default. If you
want to disable the motion detection on a
certain area, click on the grid and then
drag the mouse to highlight the area to
unmark the area into transparent blocks.
After setting is completed, click the right
button of your mouse to return and click
Apply
to make the area setup effective.
USER MAN L UA
26
5.2 Record
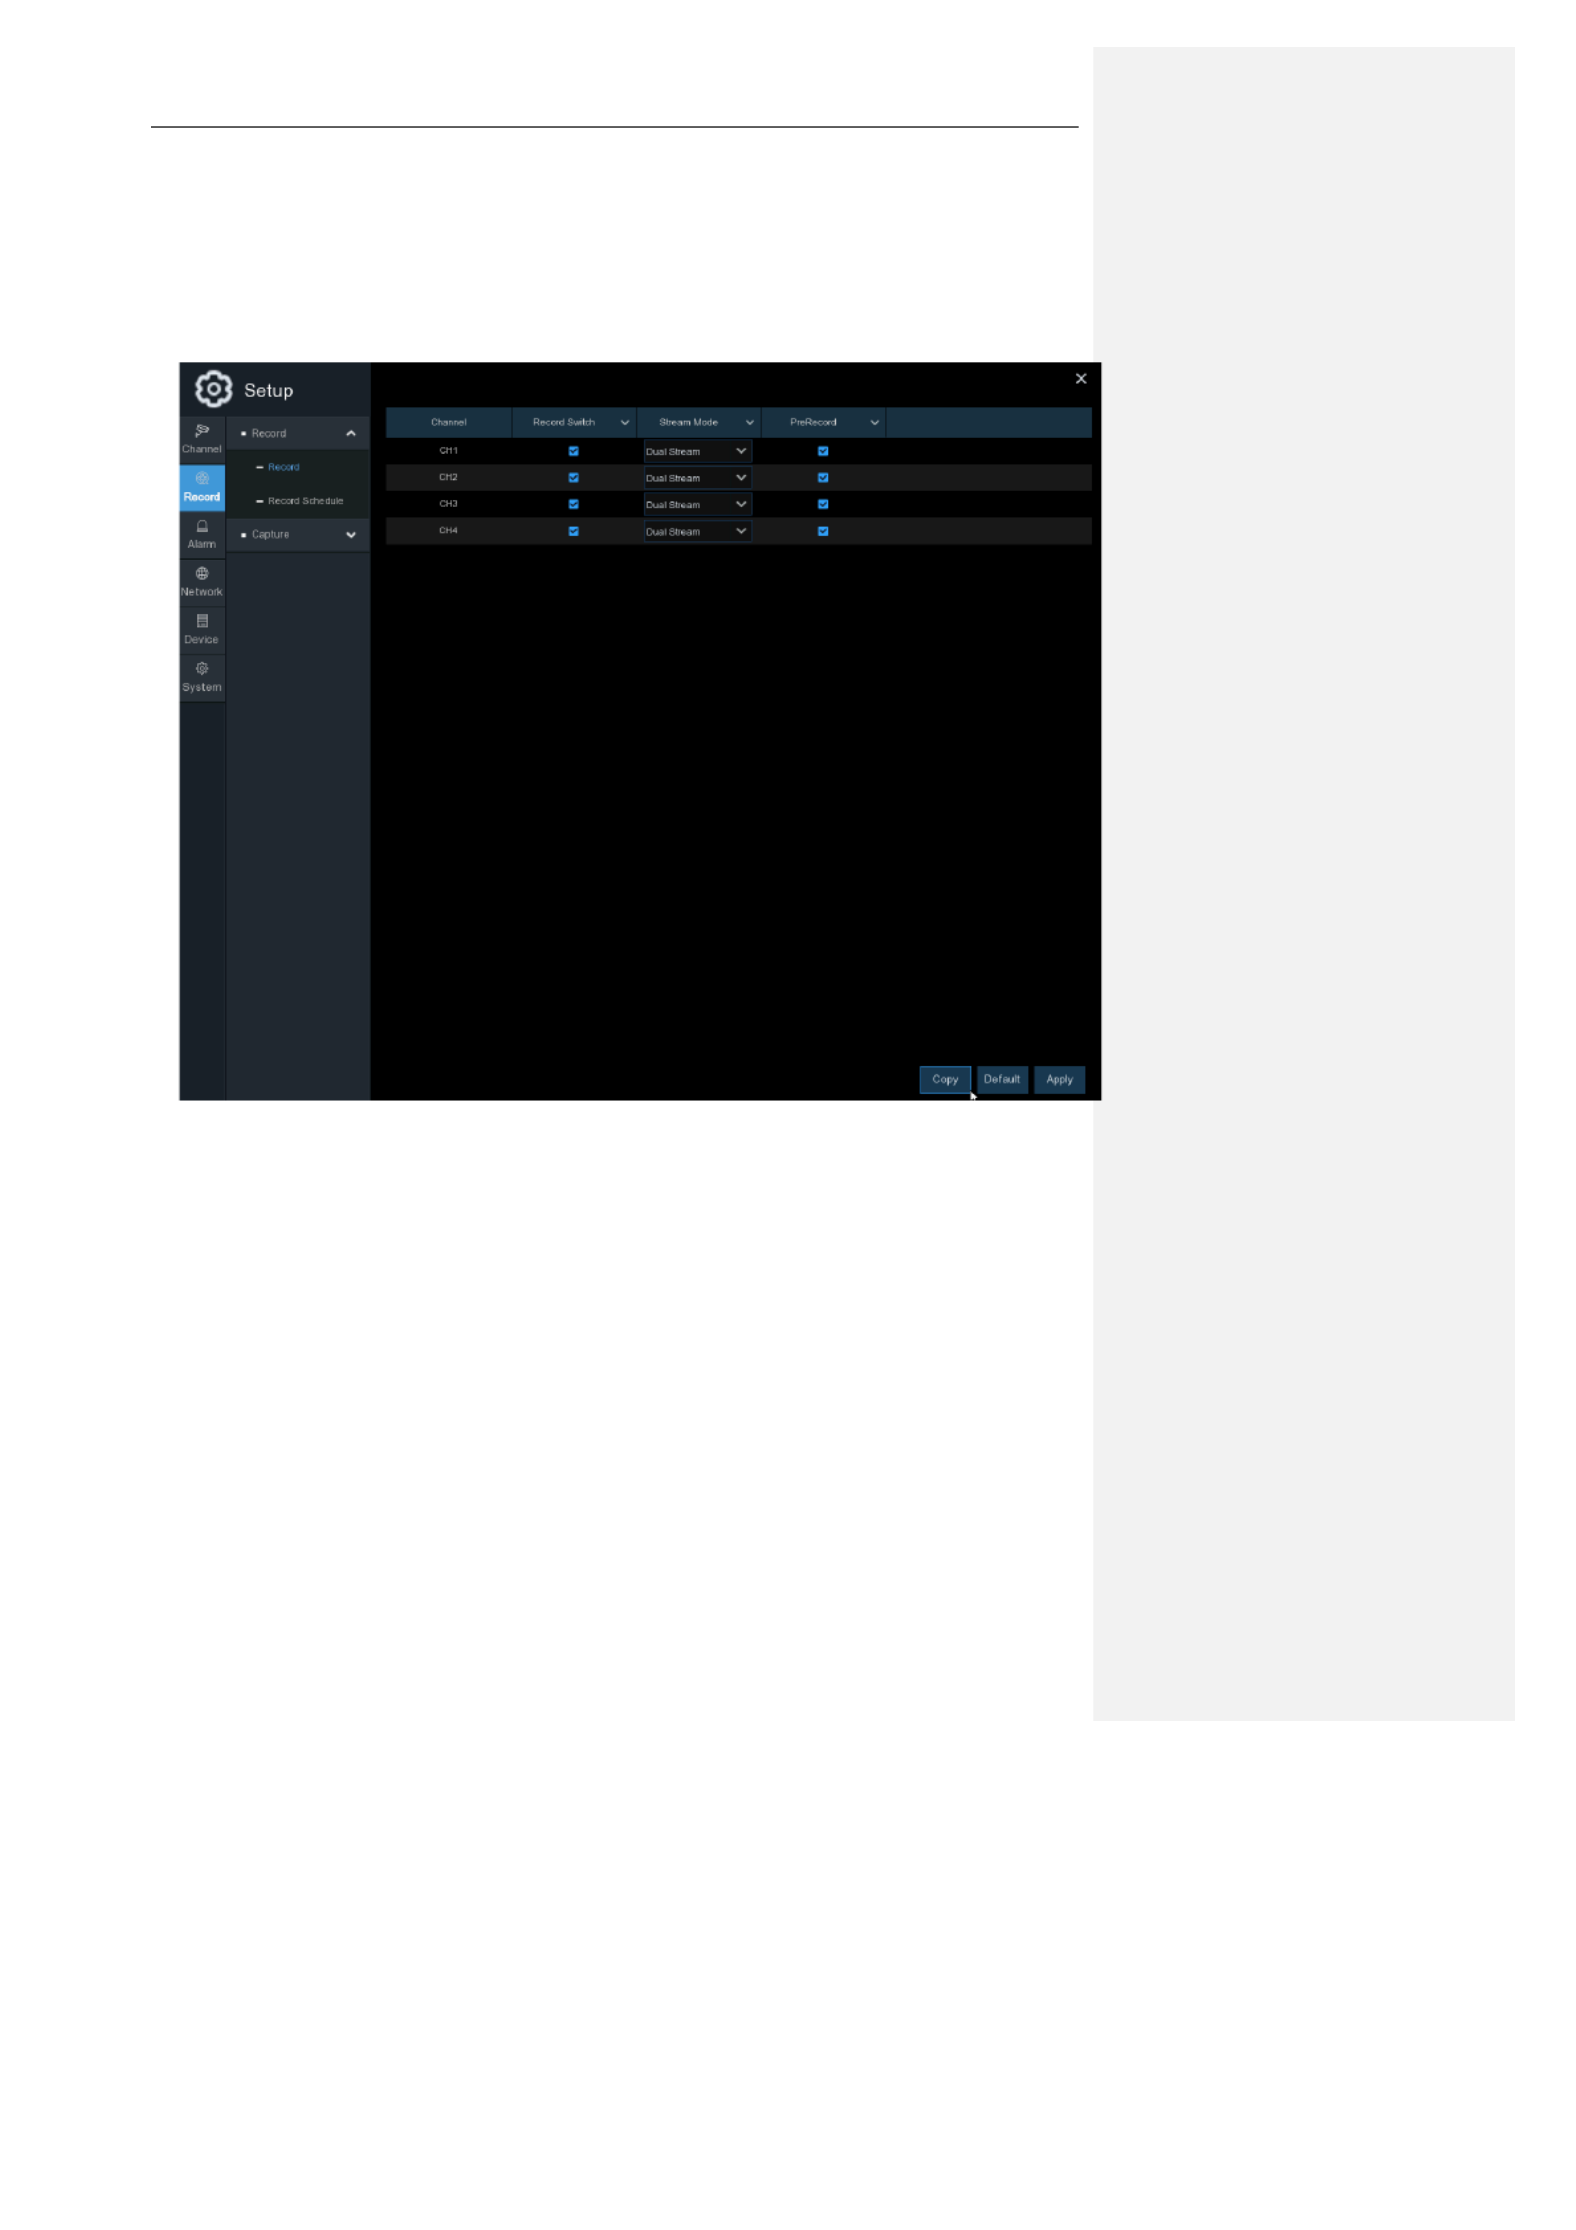
5.2.1 Record
This menu allows you to configure the channel recording parameters.
Channel: Display channel number.
Record Switch: Enable in order to allow the video to be recorded to the HDD.
Stream Mode: Choose the recording resolution. The available options are Mainstream and
DualStream.
PreRecord: If this option is enabled, the WIRELESS NVR starts recording a few seconds before
an event occurs. Use this option if your primary recording type is motion based.
USER MAN L UA
27
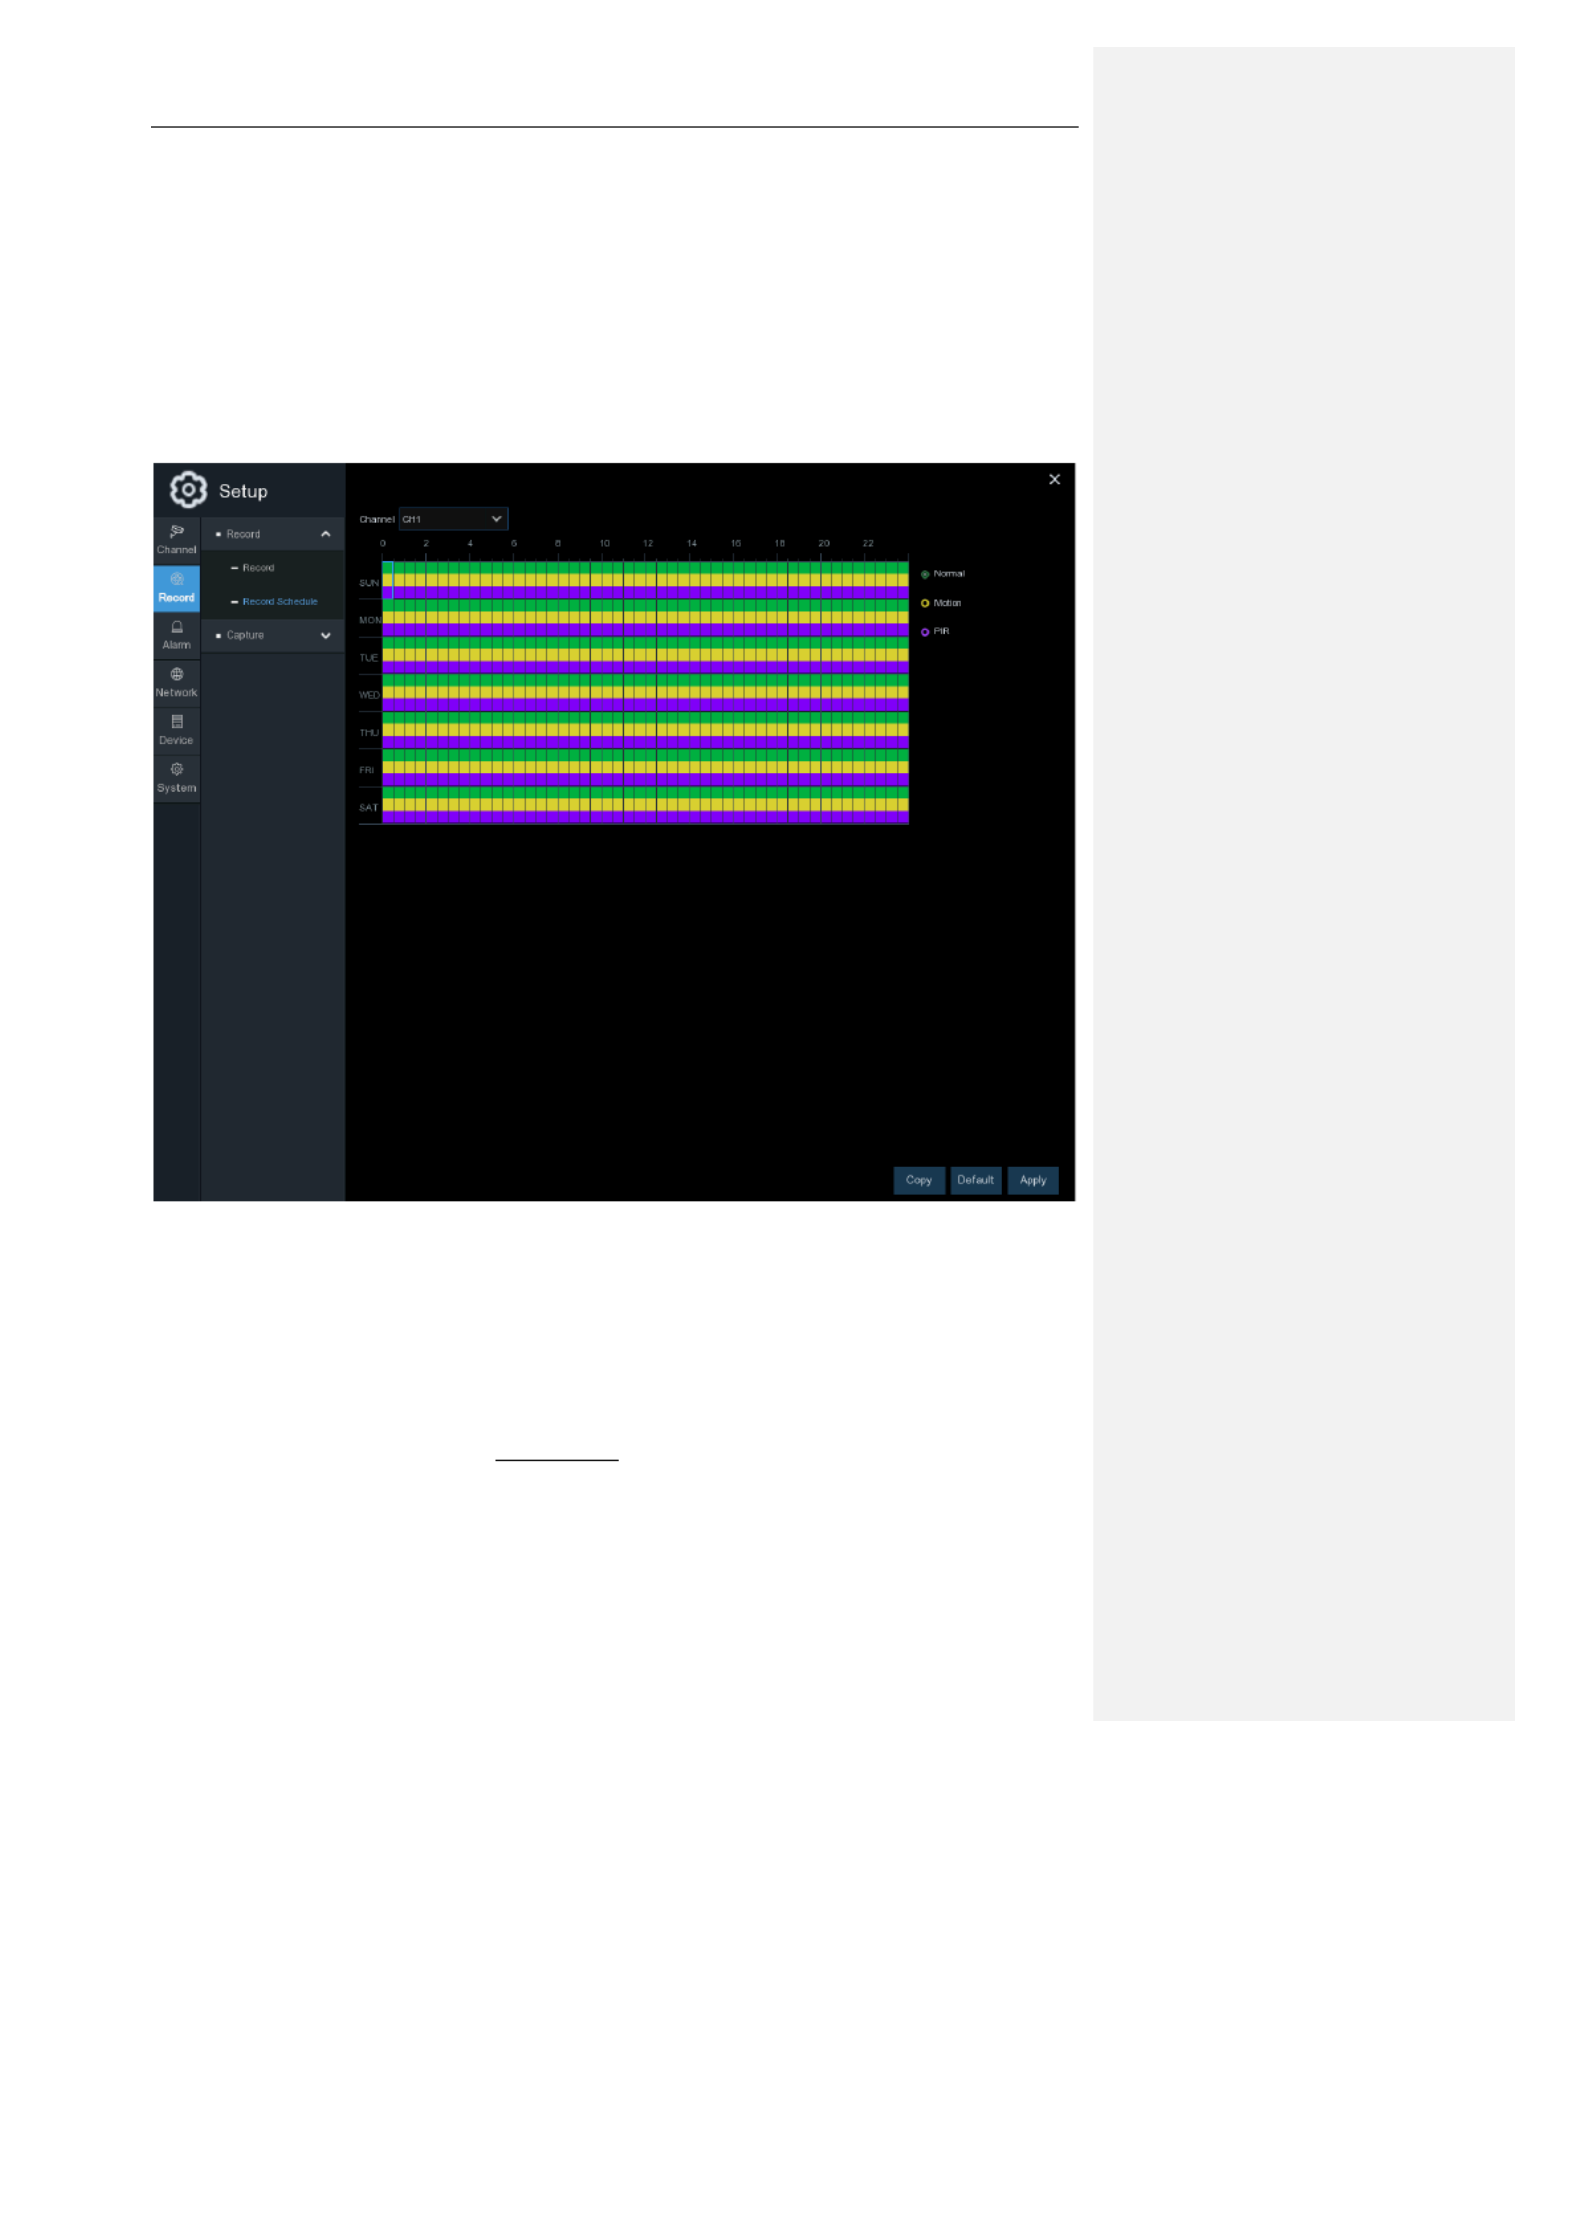
5.2.2 Record Schedule
This menu allows you to specify when the WIRELESS NVR records video and define the
recording mode for each channel. The recording schedule lets you set up a schedule such as,
daily and hourly by normal (continuous) recording, motion recording. To set the recording mode,
click first on the mode radio button (Normal, Motion), then drag the cursor to mark the slots. The
recording schedule is valid only for one channel. If you want to use the same recording schedule
for other channels, use the function.Copy
Channel: Select the channel to set its recording parameters.
Normal: When the time slot is marked green, this indicates the channel performs normal recording
for that time slot.
Motion: When the time slot is marked yellow, this indicates the channel records only when a
motion is detected during that time slot.
NOTE: To use the motion detection, you must enable and configure the motion settings for the
channel in Alarm menu. Please see 5.1.3 Motion
PIR: When the time slot is marked purple, this indicates the channel records only when a motion is
detected during that time slot.

USER MAN L UA
28
NOTE: To use the motion detection, you must enable and configure the motion settings for the
channel in Alarm menu. Please see 5.1.4 P IR
No Record: A time slot marked black means that there is no recording scheduled for the time slot.
5.2.3 Capture
This menu allows to configure the image capture function.
Auto Capture: Enable or disable automatic capturing on the channel. When this feature is
enabled, you can select the snapshot capturing interval.
NOTE: When the Auto Capture is enabled, you can select the image capturing interval.
Stream Mode: Select the image resolution by mainstream or substream.
Normal Interval: Snapshots are captured based on normal interval.
Alarm Interval: Snapshots are captured based on alarm interval only when a motion is detected.

USER MAN L UA
29
Capture Schedule
Channel: Select the channel to set its recording parameters.
Normal: When the time slot is marked green, this indicates the channel performs normal recording
for that time slot.
Motion: When the time slot is marked yellow, this indicates the channel records only when a
motion is detected during that time slot.
NOTE: To use the motion detection, you must enable and configure the motion settings for the
channel in Alarm menu. Please see 5.1.3 Motion
PIR: When the time slot is marked purple, this indicates the channel records only when a motion is
detected during that time slot.
NOTE: To use the motion detection, you must enable and configure the motion settings for the
channel in Alarm menu. Please see 5.1.4 PIR
No Record: A time slot marked black means that there is no recording scheduled for the time slot.
USER MAN L UA
30
5.3 Alarm
In this section, you can configure the alarm parameters.
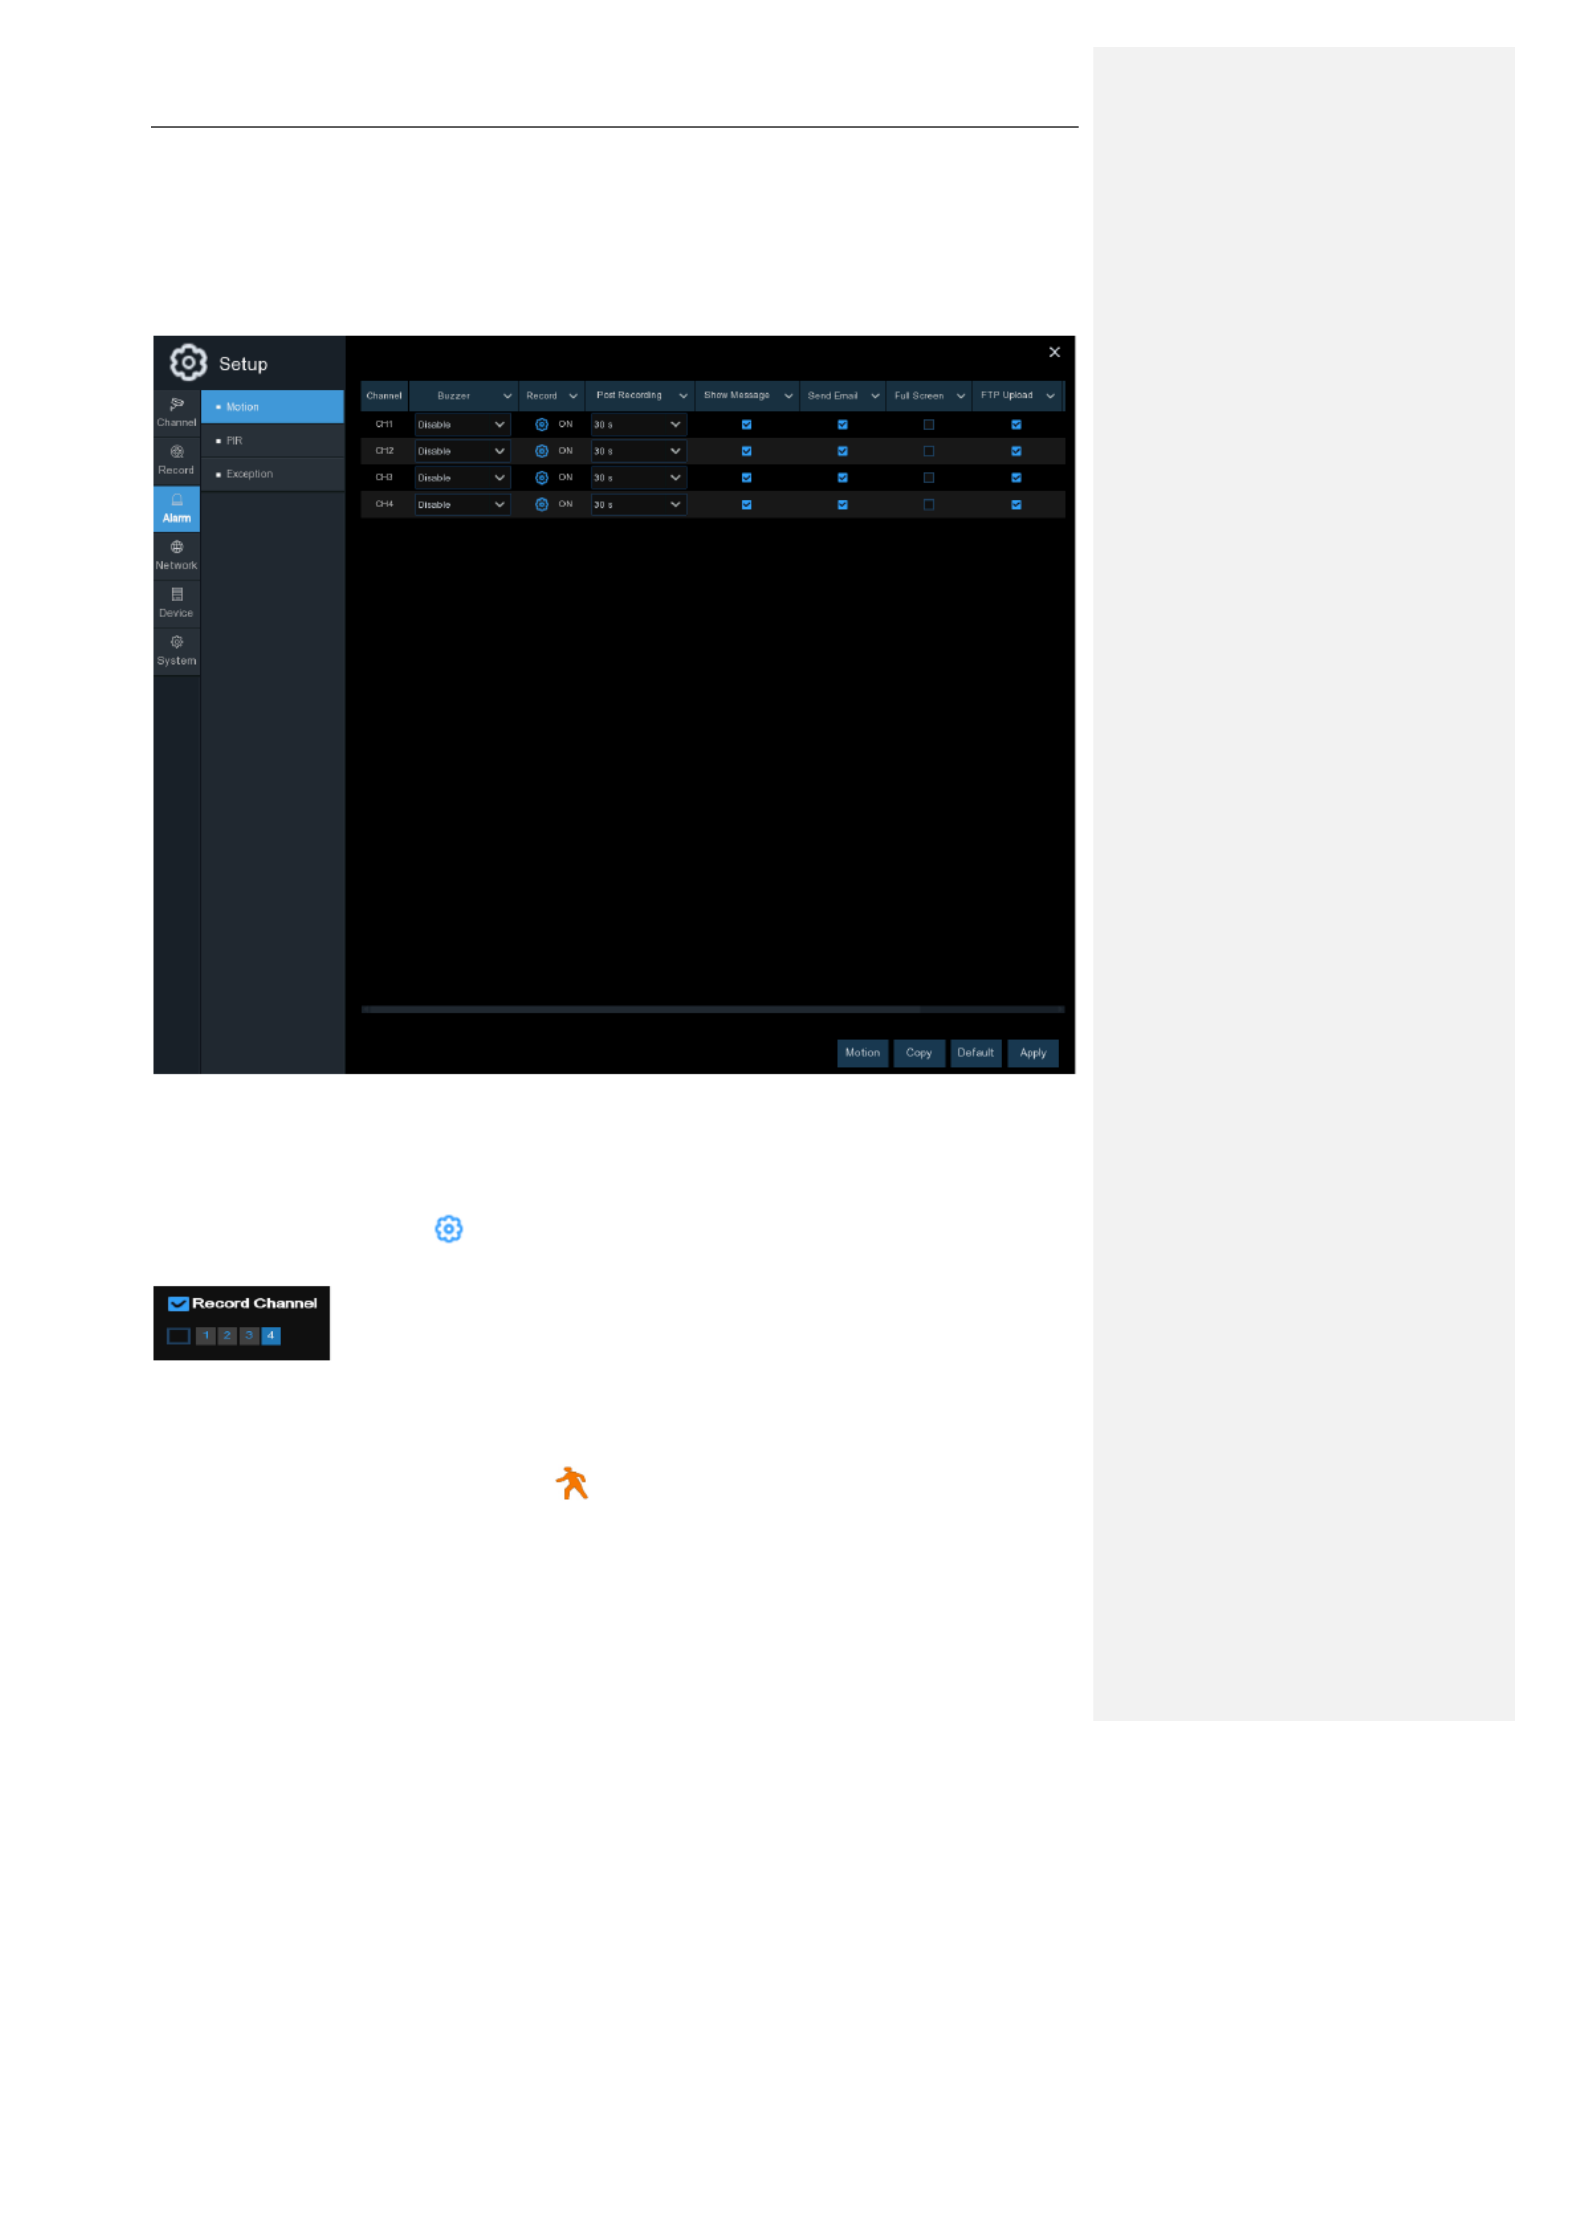
5.3.1 Motion
Channel: C hannel name
Buzzer: The WIRELESS NVR can use its internal buzzer to emit an alarm tone. You can set the
buzzer duration in seconds when the motion is detected, or you can disable the buzzer and it will
not go off when the motion is detected, default it is disable.
Record: Default is Click ON, icon and choose which channel(s) you want to record when the
motion detection is triggered.
Post Recording: You can set how long after an event occurs that the WIRELESS NVR will
continue to record. The recommended set recording length is 30 seconds, or you can 1 minute, 2
minute, 5 minute intervals.
Show Message: Check the box to display icon on the live view screen when the motion is
detected.

USER MAN L UA
31
Send Email: You can let the WIRELESS NVR send you an auto-email when the motion is
detected.
Full Screen: If this function is enabled and a motion is detected in a channel, you will see that
channel in full screen.
FTP Upload: To upload alarm images to FTP server when motion is detected. To enable FTP,
please view 5.4.4 FTP.
5.3.2 PIR
Channel: C hannel name
Buzzer: The WIRELESS NVR can use its internal buzzer to emit an alarm tone. You can set the
buzzer duration in seconds when the motion is detected, or you can disable the buzzer and it will
not turn on when the motion is detected, default it is disable.
Record: Default is Click ON, icon and choose which channel(s) you want to record when the
motion detection is triggered.

USER MAN L UA
32
Post Recording: You can set how long after an event occurs that the WIRELESS NVR will
continue to record. The recommended recording length is 30 seconds set , or may 1 minutes、2
minutes、5 minutes.
Show Message: Check the box to display icon on the live view screen when the motion is
detected.
Send Email: You can let the WIRELESS NVR to send you an auto-email when the motion is
detected.
Full Screen: If this function is enabled and a motion is detected in a channel, you will see that
channel in full screen.
Picture to Cloud: To upload alarm images to Cloud server when PIR is detected.
Video to Cloud: To upload alarm to video Cloud server when PIR is detected.
5.3.3 Exception
This menu allows you to set the type of events that you want the WIRELESS NVR to inform you.
Event Type: Select the event type from below options:
- No Space on Disk: When an HDD is full.
- Disk Error: If the HDD is not detected properly.

USER MAN L UA
33
- Video Loss: If a camera is not connected properly.
Switch: Check the box to enable the monitoring of the event.
Buzzer: Set the buzzer duration when the event occurs (Off/10s/20s/40s/60s). To disable buzzer,
select OFF.
Show Message: Check the box to display a message on the screen when No Space on Disk, Disk
Error, or Video Loss event happens.
Send Email: The WIRELESS NVR s - send you an auto email when an event occurs.
5.4 Network
This menu allows you to configure network parameters, such as PPPoE, DHCP. The most
common types are DHCP. Most probably your network type is DHCP, unless the network is
manually addressed. If you need an authentication user name and password to the Internet, then
choose PPPoE.
5.4.1 General

USER MAN L UA
34
DHCP DHCP: If you connect to a router that allows you to use DHCP, please check the box. The
router will assign automatically all the network parameters for your WIRELESS NVR. Unless the
network is manually addressed below parameters:
IP Address: The IP address identifies the WIRELESS NVR in the network. It consists of four
groups of numbers between 0 to 255, separated by periods. For example, “192.168.001.100”.
Subnet Mask: Subnet mask is a network parameter which defines a range of IP addresses that
can be used in a network. If the IP address is like a street where you live then subnet mask is like a
neighborhood. The subnet address also consists of four groups of numbers, separated by periods.
For example, “255.255.000.000”.
Gateway: This address allows the WIRELESS NVR to access the Internet. The format of the
Gateway address is the same as the IP Address. For example, “192.168.001.001”.
DNS1/DNS2: DNS1 is the primary DNS server and DNS2 is a backup DNS server. Usually should
be enough just to enter the DNS1 server address.
USER MAN L UA
35
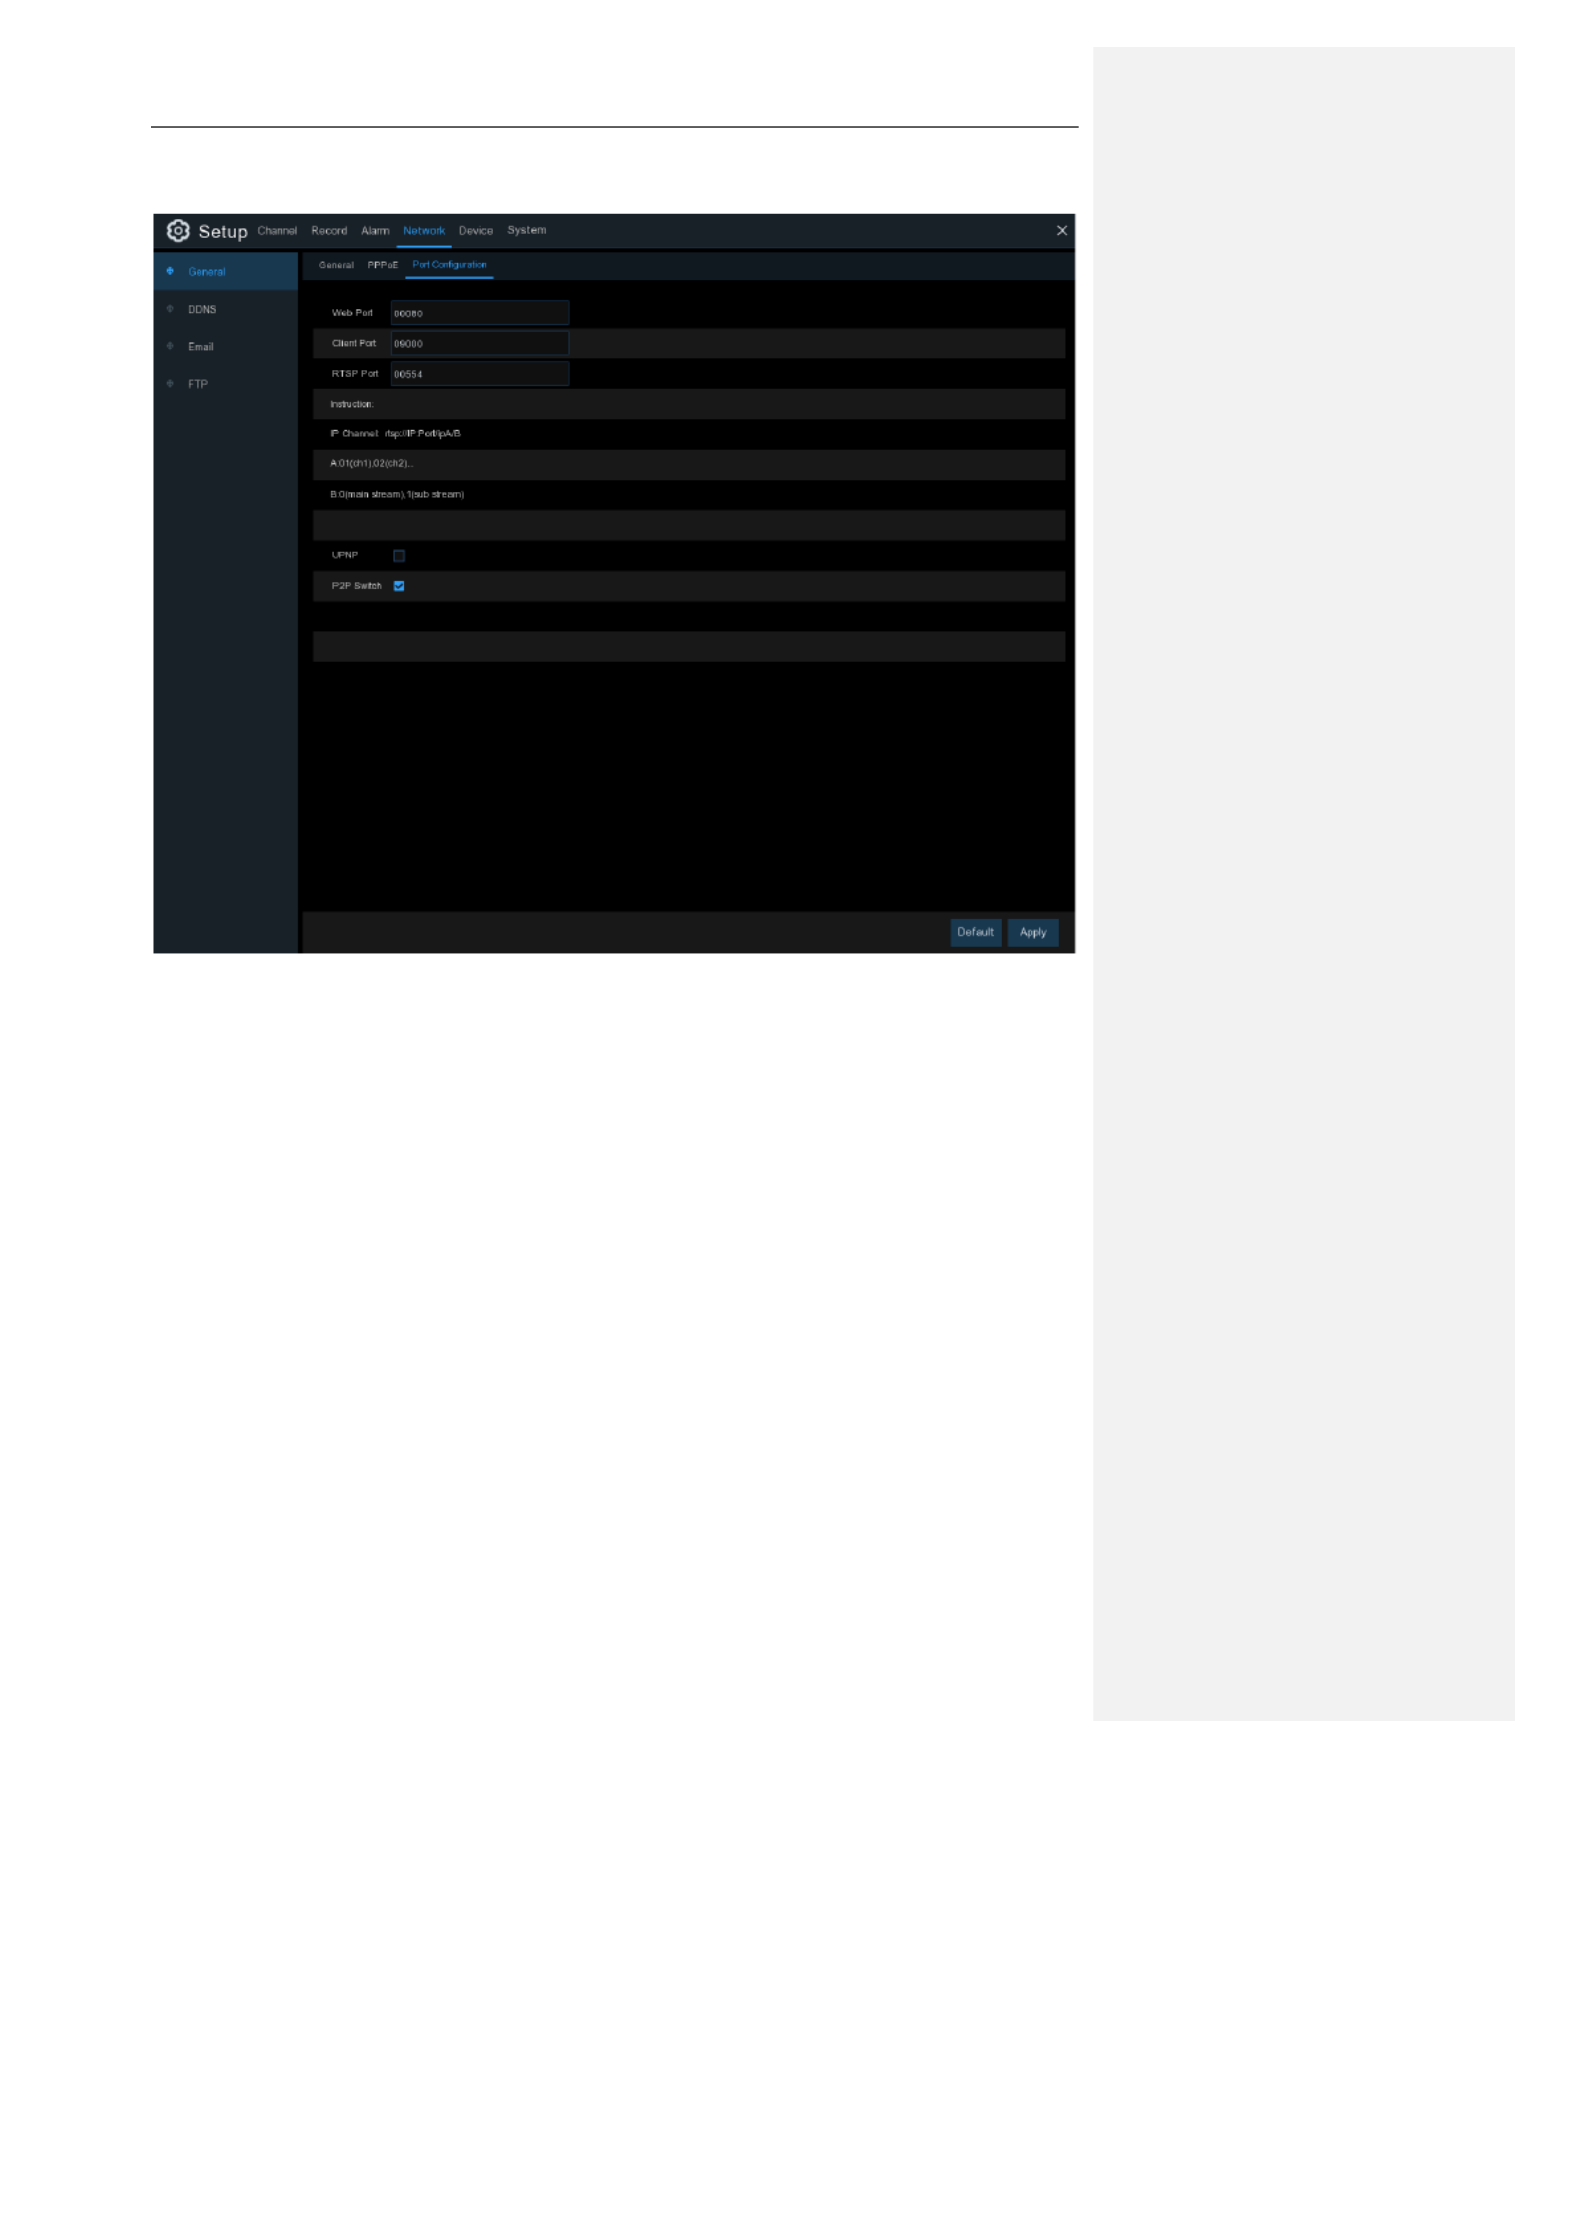
5.4.1.2 Port Configuration
Web Port: This is the port that you will use to log in remotely to the WIRELESS NVR (e.g. using
the Web Client). If the default port 80 is already taken by other applications, please change it.
Client Port: This is the port that the WIRELESS NVR will use to send information through. If the
default port 9000 is already taken by other applications, please change it.
RTSP Port: Default is 554, applications, please if the default port 554 is already taken by other
change it.
UPNP: If you want to log in remotely to the WIRELESS NVR using Web Client, you need to
complete the port forwarding. Enable this option if your router supports the UPnP. You need to
enable UPnP both, on WIRELESS NVR and router. In this case, you do not need to configure
manually port forwarding on your router. If your router does not support UPnP, make sure the port
forwarding is completed manually
P2P: Open/Close P2P

USER MAN L UA
36
5.4.2 DDNS
This menu allows you to configure DDNS settings. The DDNS provides a static address to simplify
remote connection to your WIRELESS NVR. To use the DDNS, you first need to open an account
on the DDNS service provider’s web page.
DDNS: Check to enable DDNS.
Server: Select the preferred DDNS server
Domain: Used Default is OK.
After all parameters are entered, click Test DDNS to test the DDNS settings. If the test result is
“Network is unreachable or DNS is incorrect”, please check whether the network works fine, or the
DDNS information is correct or not.

USER MAN L UA
37
5.4.3 Email
This menu allows you to configure email settings. Please complete these settings if you want to
receive the system notifications on your email when an alarm is triggered, HDD becomes full, HDD
is in error state, or Video Loss occurs.
5.4.3.1 Email Configuration
Email: Check to enable.

USER MAN L UA
38
Encryption: Enable if your email server requires the SSL or TLS verification. If you are not sure,
set to be Auto.
SMTP Port: Enter the SMTP port of your email server.
SMTP Server: Enter the SMTP server address of your email.
User Name: Enter your email address.
Password: Enter the password of your email.
Receiver 1~3: Enter the email address where you want to receive the event notifications from the
WIRELESS NVR.
Interval: Configure the length of the time interval between the notification emails from the
WIRELESS NVR.
To make sure all settings are correct, click Test Email. The system sends an automated email
message to your inbox. If you received the test email, it means the configuration parameters are
correct.
5.4.3.2 Email Schedule
You need to configure the schedule to fully implement the Email notification.
The color codes on email schedule have the following meanings:
Green: Slot for Motion detection.
Red: Slot for Exception (HDD full, HDD error, or Video Loss).
Purple: Slot for PIR detection.
USER MAN L UA
39
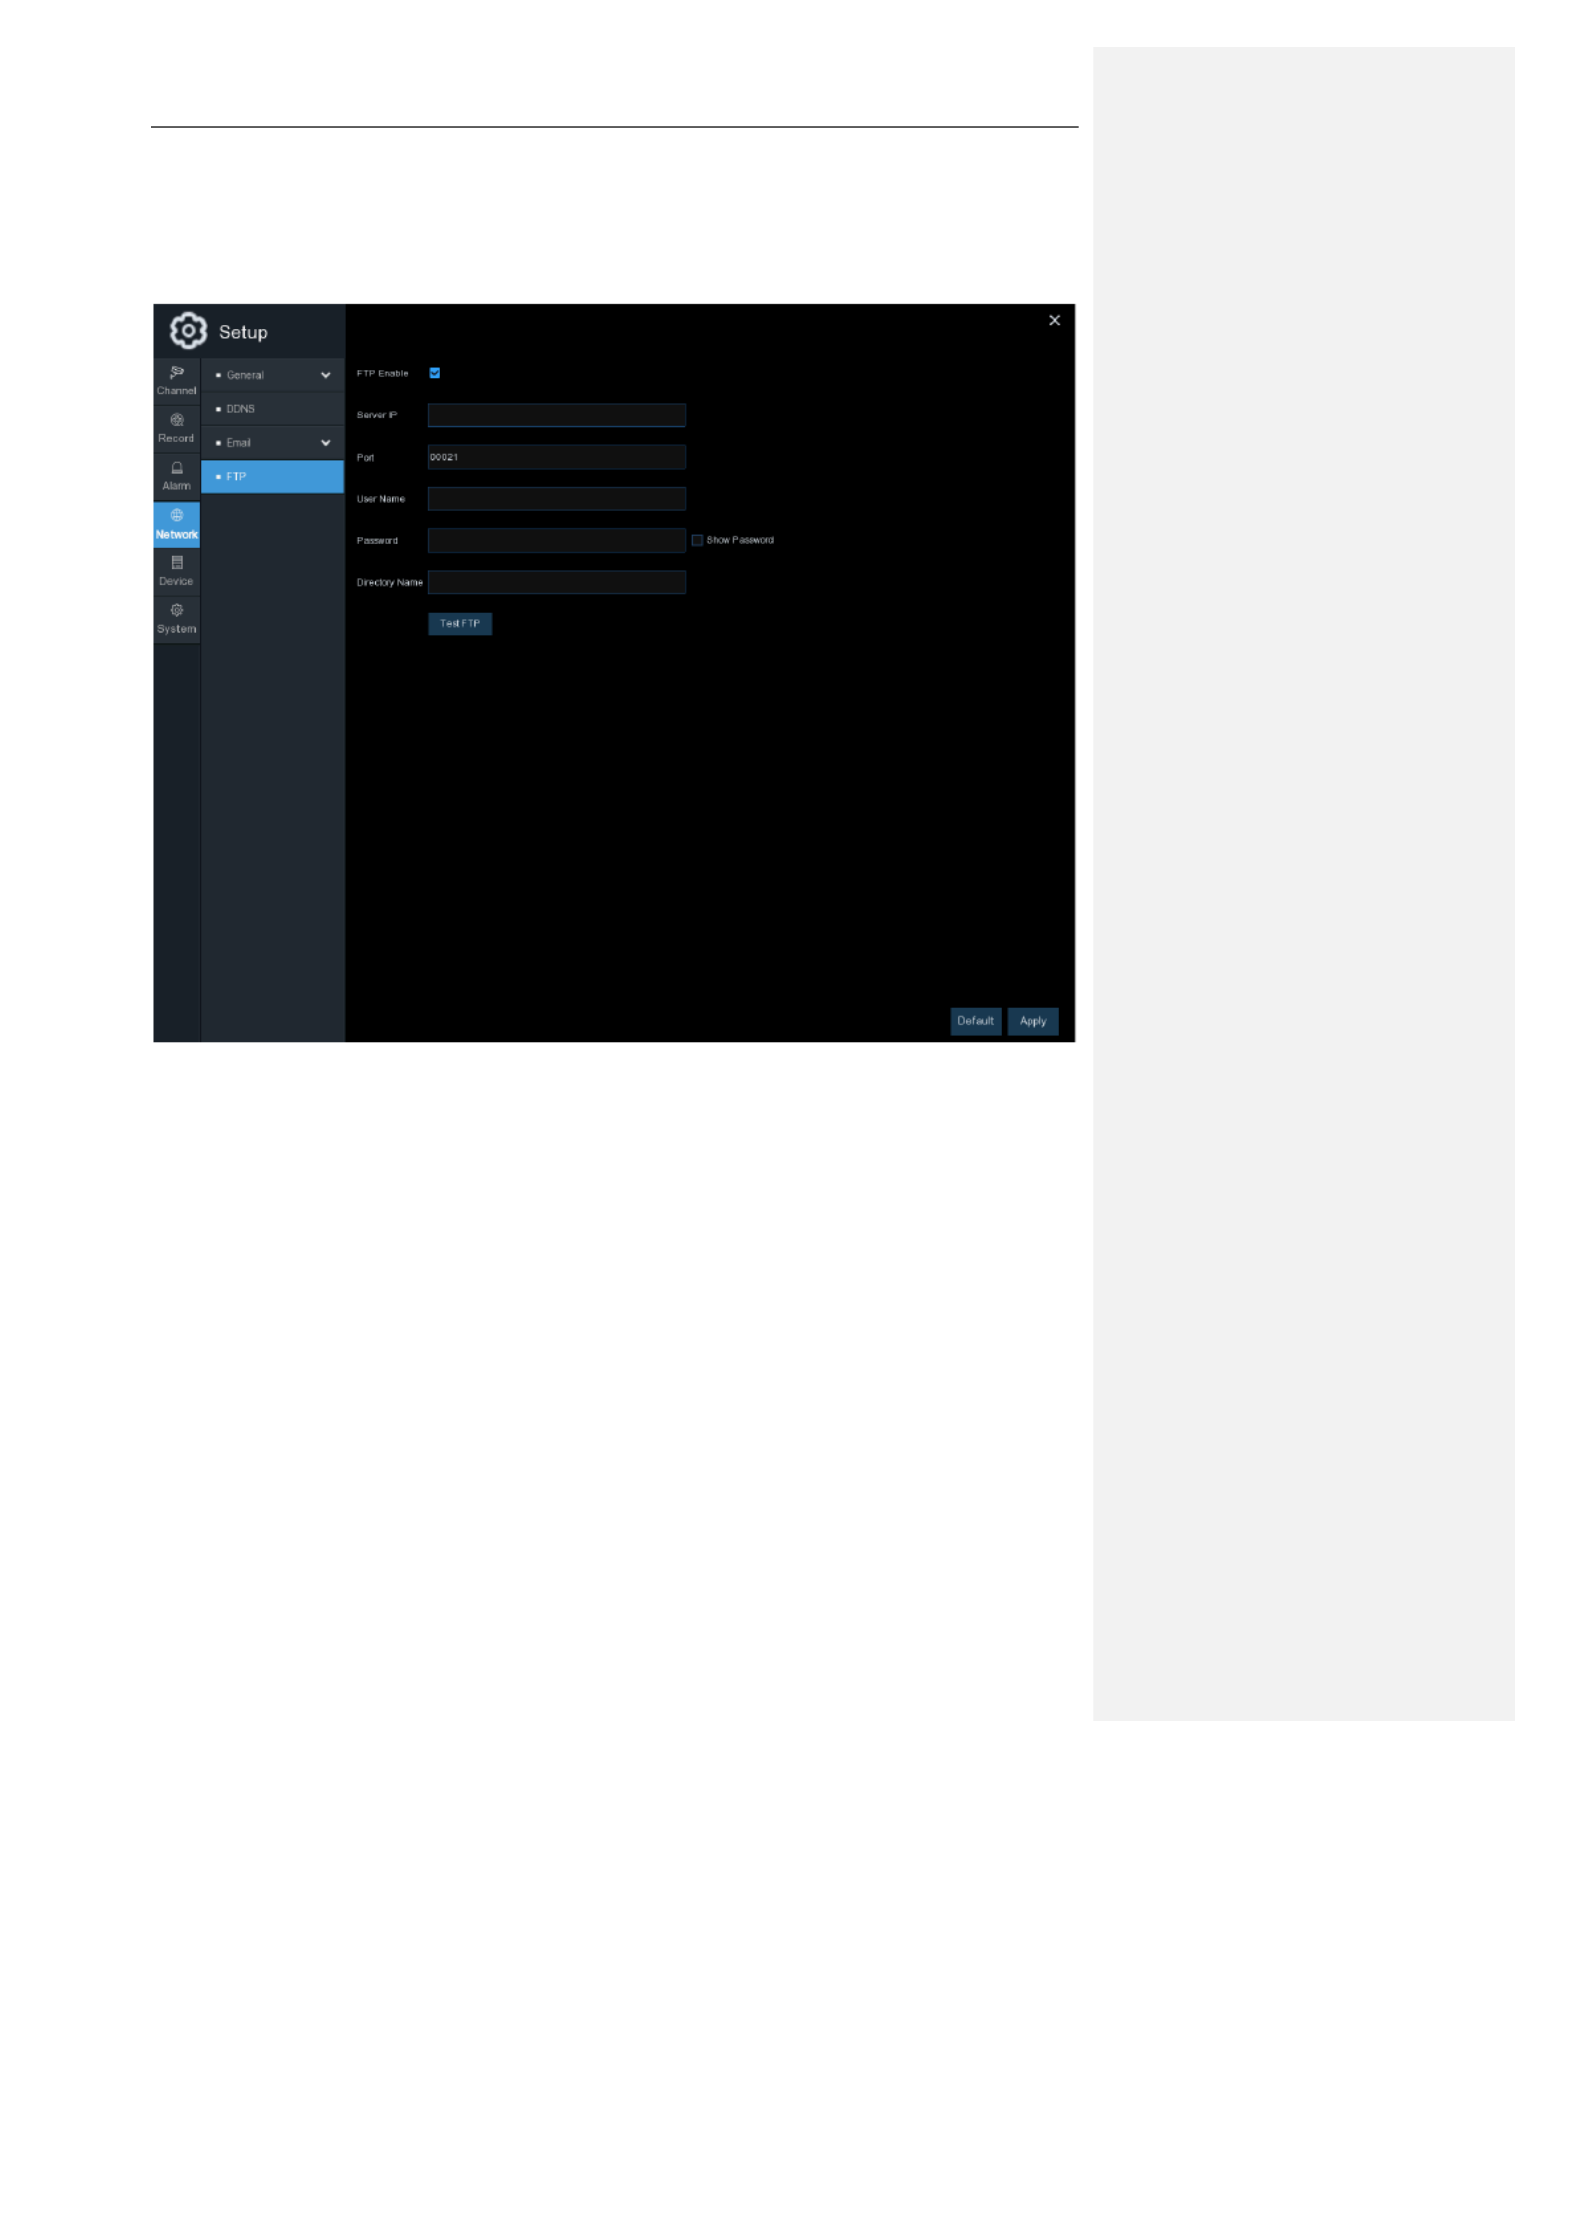
5.4.4 FTP
This menu allows you to enable FTP function to view and load captured snapshots from
WIRELESS NVR to your storage device over FTP.
FTP Enable: Click to enable FTP function.
Server IP: Enter your FTP server IP address or domain name.
Port: Enter the FTP port for file exchange . servers
Name/ Password: Enter your FTP server user name and password.
Directory Name: Enter the default directory name for the FTP file exchange . servers
Test FTP: Click to test the FTP settings.

USER MAN L UA
40
5. 5 Device
In this section, you can configure the internal HDD function.
5. 5.1 Disk.
This menu allows you to check & configure the internal HDD(s). You need to format the HDD only
at the first startup and if you replace a new HDD.
Format HDD: Select the HDD you want to format and then click Format HDD. To start formatting,
you need to enter your user name and password and then click OK to confirm to continue
formatting.
Overwrite: Use this option to overwrite the old recordings on the HDD when the HDD is full. For
example, if you choose the option 7 days then only the last 7 days recordings are kept on the HDD.
To prevent overwriting any old recordings, select OFF. If you have disabled this function, please
check the HDD status regularly, to make sure the HDD is not full. Recording will be stopped if HDD
is full.

USER MAN L UA
41
5.5.2 S.M.A.R.T
This function can be used to display technical information on the hard drive installed inside your
WIRELESS NVR. You can also perform a test (there are three types available) to evaluate and
detect potential drive errors.
Whole Evaluation not passed, continue to use the disk: If for some reason the hard drive has
developed a fault (such as one or more bad sectors), you can instruct your WIRELESS NVR to
continue saving to the drive.
Self-check Type: There are three types available:
Short: This test verifies major components of the hard drive such as read/write heads, electronics
and internal memory.
Long: This is a longer test that verifies the above as well as performing a surface scan to reveal
problematic areas (if any) and forces bad sector relocation
Conveyance: This is a very quick test that verifies the mechanical parts of the hard drive are
working.

USER MAN L UA
42
Note: When performing a test, your WIRELESS NVR will continue to work as normal. If an HDD
S.M.A.R.T error found, the HDD will continue edto be us , but there will be a risk to lose recording
data. It is recommended to replace a new HDD.
5.5.3 Cloud
This menu allows you to see what is happening on your camera site anytime, it can upload the
captured pictures to Dropbox at normal time, or when motion detection happens.
Cloud Storage: Enable to allow cloud settings
Cloud Type: Only Dropbox cloud storage is supported currently
Activate Cloud: Click to activate the function. An activation email will be sent to the Receiver
email account
Cloud Status: Select the channels where you want to upload the snapshots to Dropbox
Capacity: Enable if you want to upload snapshots to Dropbox when the camera detects a motion
Channel: Select the channels where you want to upload the snapshots to Dropbox
Drive Name: Enter the cloud storage name for your WIRELESS NVR

USER MAN L UA
43
Process to start uploading the snapshots
1) To use the cloud backup, you need to register your email first. For the detail,
please refer to the page 35.
2) Register an account on https://www.dropbox.com/.
3) Configure network to ensure DVR is under network.
4) Configure Cloud: Enable Cloud and set the channel. Enable Motion Detection
to have it capture pictures when motion detection happens.
5) Driver Name refers to the name created in the folder of Dropbox and the
name can be defined by the user, e.g. Wireless NVR. The folder is to store
captured pictures from the DVR.
6) Click [Active Cloud] to activate Cloud and Email for the user verification will
be sent. Click the link in the email and then log in to your dropbox account, and
click permit. DVR cloud storage function will be activated. If you have logged
into your dropbox account before Cloud storage activation, then there is no need to relogin.
Just click Permit to complete the activation. Please finish the activation
within 3 minutes. After activation is completed, you can use the Cloud storage
function.
7) Click the icon at the upper- left of dropbox account interface to view the folder
made in the 5th step.
8) Open the Dropbox folder to view the DVR captured pictures.

USER MAN L UA
44
5.6 System
Change general system information such as date, time and region, edit passwords and
permissions, and more.
5.6.1 General
Device Name: Enter the desired name for your WIRELESS NVR. The name can include both
letters and numbers.
Language: Select a language you would like the system menus to be displayed in. Multiple
languages are available.
Video Format: Select the correct video standard for your region.
Menu Timeouts: Click the drop-down menu to select the time your WIRELESS NVR will exit the
Main Menu when idle. You can also disable this by selecting “OFF” (password protection will be
temporarily disabled).
Show Wizard: Click the checkbox if you would like to display the Startup Wizard each time you
turn on or reboot your WIRELESS NVR.

USER MAN L UA
45
5.6.1.1 Date and Time
Date & Time
Date: Click the calendar icon to change the date.
Time: Click the dialogue box to change the time.
Date Format: Select the preferred date format.
Time Format: Select the preferred time format.
Time Zone: Select a time zone relevant to your region or city.
USER MAN L UA
46
5.6.1.2 NTP Settings
The NTP (Network Time Protocol) function allows your WIRELESS NVR to automatically sync its
clock with a time server. This gives it the ability to constantly have an accurate time setting (your
WIRELESS NVR will periodically sync automatically).
5.6.1.3 DST Settings
The DST (Daylight Saving Time) function allows you to select the amount of time that Daylight
Saving has increased by in your particular time zone or region.
Enable DST: If Daylight Saving applies to your time zone or region, check this option to enable.
Time Offset: Select the amount of time that Daylight Saving has increased by in your time zone.
This refers to the difference in minutes, between Coordinated Universal Time (UTC) and the local
time.
Check to enable the NTP, and select a Server
Address, click Update Now to manually sync
the date & time.
Click Apply to save your settings.
When NTP function is enabled, system will
update the system time at 00:07:50 per day, or
every time when the system is starting up.

USER MAN L UA
47
Enable DST: You can select how Daylight Saving starts and ends:
Week: Select the month, a particular day and time when Daylight Saving starts and ends. For
example, 2 a.m. on the first Sunday of a particular month.
Date: Select the start date (click the calendar icon), end date and time when Daylight Saving
starts and ends.
Start Time / End Time: Set the start time and end time for Daylight Saving.
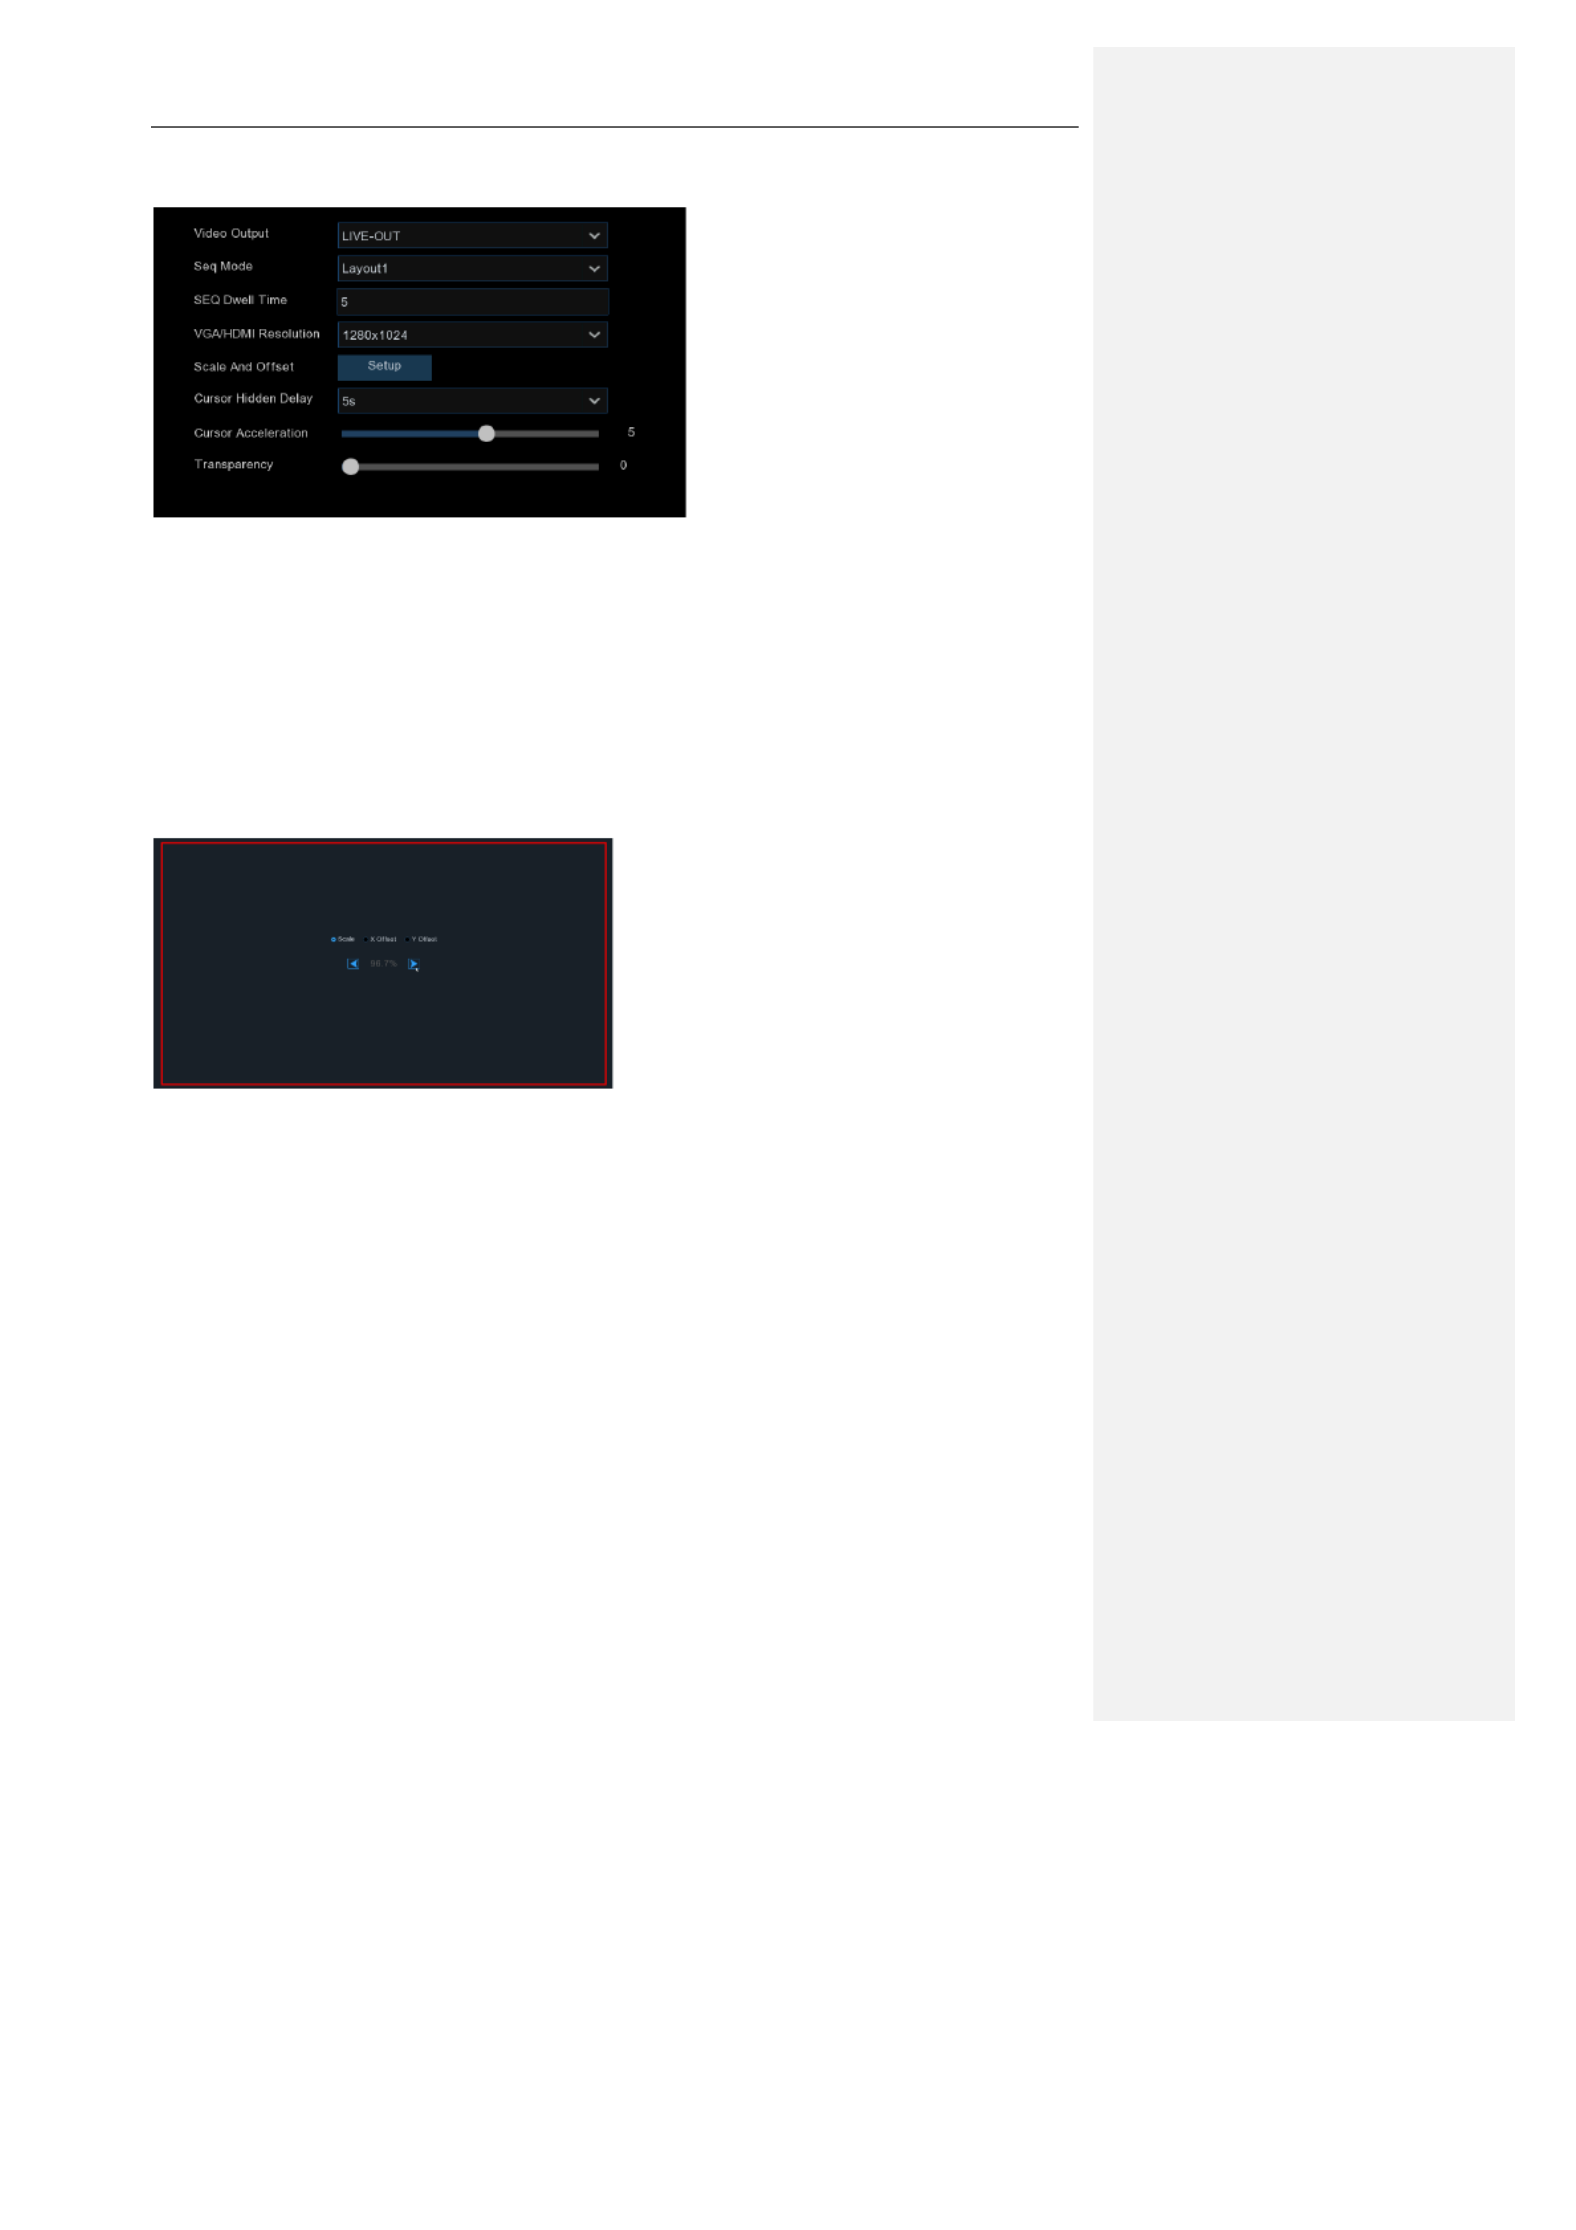
5.6.2 Output Configuration
This menu allows you to configure video output parameters.
Video Output: To choose the output options:
LIVE-OUT: Is used to configure the main output parameters.
USER MAN L UA
48
5.6.2.1 LIVE- OUT
Choose LIVE-OUT from the Video Output drop- down menu.
SEQ Mode: Select how many video channels you would like to display when your WIRELESS
NVR is in sequence mode.
SEQ Dwell Time: Enter in seconds the maximum length of time you would like to display a video
channel in sequence mode before displaying the next video channel (300 seconds is the
maximum).
Output Resolution: Select a display resolution that is suitable for your TV. 1920 x 1080 will suit
most TVs.
Scale and Offset: The WIRELESS NVR supports to adjust the size & position of the display
screen to match your monitor or TV. Click Setup button to adjust.
Click once or long press the left button of your mouse on the arrow to adjust the size and position,
or you can scroll the wheel of the mouse to adjust. Click the right button of your mouse to exit, and
click Apply to save your modifications.
Cursor Hidden Delay : Click the drop-down menu to select the time your WIRELESS NVR will
hide the mouse cursor when idle. You can also disable this by selecting “OFF” (password
protection will be temporarily disabled).
Cursor Acceleration: To adjust the speed to move the mouse cursor.
Transparency: Click and hold the slider left or right to change how transparent the Menu Bar and
Main Menu will appear on-screen. Adjust accordingly.
Scale: To adjust the size of the displayed
screen by scale.
X Offset: To move the displayed screen to left
or right.
Y Offset:
To move the displayed screen to up or
down.

USER MAN L UA
49
5.6.3 Multi- user
This menu allows you to configure the user name, password and user permission.
The system supports the following account types:
• ADMIN — System Administrator: The administrator has full control of the system, and
can change both administrator and user passwords and enable/disable password
protection.
• USER — Normal User: Users only have access to live viewing, search, playback, and
other functions. You may set up multiple user accounts with varying levels of access to the
system.

USER MAN L UA
50
5.6.3.1 Changing Password
To change the password for the administrator or user accounts, click the User Edit icon . The
password has to be a minimum of 8 characters and can contain a mixture of numbers and letters.
Enter your new password again to confirm, and then click Save to save your new password.
You will be required to input your old password to authenticate.

USER MAN L UA
51
Password Enable: It’s strongly recommended to enable the password to protect your privacy. If
you want to disable the password protection, please ensure your WIRELESS NVR is placed in a
secure place.
5.6.3.2 Add New Users
1. Select one of the user accounts that is currently disabled, click the User Edit icon .

USER MAN L UA
52
2. down next to -Select Enable from the drop . User Enable
3. Click the field next to User Name to change the user name for the account.
4. down next to -Select Enable from the drop . Password Enable
5. Click the field next to Password to enter the desired password.
6. Click the field next to Confirm to reenter the password.
7. Click Save. You will be required to input your Admin password to authenticate.

USER MAN L UA
53
5.6.3.3 Setting User Permissions
The administrator account is the only account that has full control of all system functions. You can
enable or disable access to certain menus and functions of each user account.
1. Click the edit icon under Permission tab.
2. Check the boxes next to any system menus or capabilities you would like the user to
access. Click All to check all boxes. Click Clear to check none of the boxes.
3. Click Save to save your modifications.

USER MAN L UA
54
5.6.4 Maintenance
In this section, you will be able to search & view the system log, load default settings, upgrade the
system, export & impo system auto reboot.rt system parameters and manage
5.6.4.1 Log
The system log shows you important system events, such as motion alarms and system
warnings. You can easily create a backup file of the system log for a set time period to a USB
flash drive.
Log Searching and Backing Up:
1. Click the field next to Start Date & Start Time to choose the starting date & time for your
search from the on screen calendar.-
2. Click the field next to & End Date End Time to choose the end date & time for your search
from the on- screen calendar.
3. Select the type of events you would like to search for from the dropdown next to Log Type, or
select logAll to see the entire system for the selected time period.
4. Click Search.
5. Browse system log events from your search period:
Video events can be played back instantly by clicking in the Playback column. Right click to -
return to your search results.

USER MAN L UA
55
Use the / buttons in the bottom-right corner of the menu to move between pages
of system events. log
6. Click Backup to create a backup of the system log for your search period. Please make sure
your flash drive has been connected to the WIRELESS NVR’s USB port.
7. The backup drive menu appears. Navigate to the folder you want the backup file to be saved in,
then click to begin. OK
5.6.4.2 Load Default
Reset the WIRELESS NVR settings to its out- -of box state. You can choose to reset all settings at
once, or just settings on specific menus. Restoring default settings will not delete recordings and
snapshots saved to the hard drive.
Check the items you want restore, or check Select All to choose all items. Click Apply to load
default settings of your chosen items.
Produkt Specifikationer
| Mærke: | Speco Technologies |
| Kategori: | Overvågningskamera |
| Model: | ZIPK4W2 |
Har du brug for hjælp?
Hvis du har brug for hjælp til Speco Technologies ZIPK4W2 stil et spørgsmål nedenfor, og andre brugere vil svare dig
Overvågningskamera Speco Technologies Manualer

12 Januar 2025
11 Januar 2025
3 September 2024
20 August 2024
19 August 2024
18 August 2024
18 August 2024
17 August 2024
17 August 2024
17 August 2024
Overvågningskamera Manualer
- Overvågningskamera Bosch
- Overvågningskamera Denver
- Overvågningskamera Sony
- Overvågningskamera Canon
- Overvågningskamera Netis
- Overvågningskamera Samsung
- Overvågningskamera Panasonic
- Overvågningskamera Extech
- Overvågningskamera Moog
- Overvågningskamera TP-Link
- Overvågningskamera Philips
- Overvågningskamera Vitek
- Overvågningskamera Gigaset
- Overvågningskamera Pioneer
- Overvågningskamera Mitsubishi
- Overvågningskamera Braun
- Overvågningskamera Logitech
- Overvågningskamera Emos
- Overvågningskamera Google
- Overvågningskamera Technaxx
- Overvågningskamera HP
- Overvågningskamera Waeco
- Overvågningskamera Garmin
- Overvågningskamera Sanyo
- Overvågningskamera Grundig
- Overvågningskamera D-Link
- Overvågningskamera Arlo
- Overvågningskamera Motorola
- Overvågningskamera Asus
- Overvågningskamera Toshiba
- Overvågningskamera Pyle
- Overvågningskamera Kodak
- Overvågningskamera Furrion
- Overvågningskamera InFocus
- Overvågningskamera Nedis
- Overvågningskamera Friedland
- Overvågningskamera Abus
- Overvågningskamera Planet
- Overvågningskamera Adj
- Overvågningskamera Hama
- Overvågningskamera Creative
- Overvågningskamera Thomson
- Overvågningskamera Belkin
- Overvågningskamera Edimax
- Overvågningskamera Burg Wächter
- Overvågningskamera Clas Ohlson
- Overvågningskamera DataVideo
- Overvågningskamera Strong
- Overvågningskamera TRENDnet
- Overvågningskamera Smartwares
- Overvågningskamera Trevi
- Overvågningskamera Trust
- Overvågningskamera Laserliner
- Overvågningskamera Blaupunkt
- Overvågningskamera JVC
- Overvågningskamera Honeywell
- Overvågningskamera Uniden
- Overvågningskamera Buffalo
- Overvågningskamera Linksys
- Overvågningskamera Megasat
- Overvågningskamera Cisco
- Overvågningskamera EZVIZ
- Overvågningskamera König
- Overvågningskamera Elro
- Overvågningskamera Gembird
- Overvågningskamera Powerfix
- Overvågningskamera Alpine
- Overvågningskamera Netgear
- Overvågningskamera Maginon
- Overvågningskamera Yale
- Overvågningskamera Withings
- Overvågningskamera Nest
- Overvågningskamera Kerbl
- Overvågningskamera Vtech
- Overvågningskamera Exibel
- Overvågningskamera Genie
- Overvågningskamera Vaddio
- Overvågningskamera Bresser
- Overvågningskamera Western Digital
- Overvågningskamera Anker
- Overvågningskamera Digitus
- Overvågningskamera Zebra
- Overvågningskamera Jensen
- Overvågningskamera Alecto
- Overvågningskamera Flamingo
- Overvågningskamera Rollei
- Overvågningskamera Olympia
- Overvågningskamera Xiaomi
- Overvågningskamera Niceboy
- Overvågningskamera Aiptek
- Overvågningskamera Schneider
- Overvågningskamera B/R/K
- Overvågningskamera Marmitek
- Overvågningskamera Tesla
- Overvågningskamera Imou
- Overvågningskamera Ricoh
- Overvågningskamera Nexxt
- Overvågningskamera Aida
- Overvågningskamera APC
- Overvågningskamera Foscam
- Overvågningskamera Lorex
- Overvågningskamera Ikan
- Overvågningskamera Velleman
- Overvågningskamera LevelOne
- Overvågningskamera Marshall
- Overvågningskamera FLIR
- Overvågningskamera Perel
- Overvågningskamera Swann
- Overvågningskamera Vivotek
- Overvågningskamera Joblotron
- Overvågningskamera JUNG
- Overvågningskamera ORNO
- Overvågningskamera Binatone
- Overvågningskamera ZyXEL
- Overvågningskamera Fortinet
- Overvågningskamera Netatmo
- Overvågningskamera Tenda
- Overvågningskamera Eufy
- Overvågningskamera Ring
- Overvågningskamera M-e
- Overvågningskamera Overmax
- Overvågningskamera Somfy
- Overvågningskamera Y-cam
- Overvågningskamera Hikvision
- Overvågningskamera Monacor
- Overvågningskamera ION
- Overvågningskamera Raymarine
- Overvågningskamera Ubiquiti Networks
- Overvågningskamera AVerMedia
- Overvågningskamera EnGenius
- Overvågningskamera Reolink
- Overvågningskamera Grandstream
- Overvågningskamera Trebs
- Overvågningskamera EVE
- Overvågningskamera Renkforce
- Overvågningskamera Marshall Electronics
- Overvågningskamera Manhattan
- Overvågningskamera SPC
- Overvågningskamera Caliber
- Overvågningskamera Pentatech
- Overvågningskamera Switel
- Overvågningskamera AVtech
- Overvågningskamera LogiLink
- Overvågningskamera Orion
- Overvågningskamera Eminent
- Overvågningskamera Kramer
- Overvågningskamera QSC
- Overvågningskamera Hanwha
- Overvågningskamera Brilliant
- Overvågningskamera Lanberg
- Overvågningskamera Hive
- Overvågningskamera Siedle
- Overvågningskamera BirdDog
- Overvågningskamera Evolveo
- Overvågningskamera Genius
- Overvågningskamera KJB Security Products
- Overvågningskamera Valueline
- Overvågningskamera Provision-ISR
- Overvågningskamera Quantum
- Overvågningskamera Axis
- Overvågningskamera ACTi
- Overvågningskamera CRUX
- Overvågningskamera Avanti
- Overvågningskamera Vimar
- Overvågningskamera Aluratek
- Overvågningskamera Dahua Technology
- Overvågningskamera Chacon
- Overvågningskamera SereneLife
- Overvågningskamera ZKTeco
- Overvågningskamera AG Neovo
- Overvågningskamera Stabo
- Overvågningskamera EtiamPro
- Overvågningskamera First Alert
- Overvågningskamera Boss
- Overvågningskamera Broan
- Overvågningskamera Conceptronic
- Overvågningskamera Avidsen
- Overvågningskamera Crestron
- Overvågningskamera Lindy
- Overvågningskamera Kogan
- Overvågningskamera AVMATRIX
- Overvågningskamera Delta Dore
- Overvågningskamera Promise Technology
- Overvågningskamera Sitecom
- Overvågningskamera DiO
- Overvågningskamera Minox
- Overvågningskamera Intellinet
- Overvågningskamera V-TAC
- Overvågningskamera Qian
- Overvågningskamera August
- Overvågningskamera IDIS
- Overvågningskamera Geovision
- Overvågningskamera Schwaiger
- Overvågningskamera Steren
- Overvågningskamera Elmo
- Overvågningskamera AViPAS
- Overvågningskamera UniView
- Overvågningskamera Equip
- Overvågningskamera Alfatron
- Overvågningskamera REVO
- Overvågningskamera Aqara
- Overvågningskamera Ernitec
- Overvågningskamera Setti+
- Overvågningskamera BZBGear
- Overvågningskamera PTZ Optics
- Overvågningskamera AVer
- Overvågningskamera Ferguson
- Overvågningskamera Moxa
- Overvågningskamera Inovonics
- Overvågningskamera Bea-fon
- Overvågningskamera Profile
- Overvågningskamera WyreStorm
- Overvågningskamera Allnet
- Overvågningskamera Aldi
- Overvågningskamera Airlive
- Overvågningskamera Aritech
- Overvågningskamera ACME
- Overvågningskamera KlikaanKlikuit
- Overvågningskamera Marquant
- Overvågningskamera Ednet
- Overvågningskamera Lumens
- Overvågningskamera Hombli
- Overvågningskamera Naxa
- Overvågningskamera Miniland
- Overvågningskamera Xavax
- Overvågningskamera Gira
- Overvågningskamera Interlogix
- Overvågningskamera DSC
- Overvågningskamera Boyo
- Overvågningskamera Iget
- Overvågningskamera EverFocus
- Overvågningskamera Adesso
- Overvågningskamera Satel
- Overvågningskamera Notifier
- Overvågningskamera Monoprice
- Overvågningskamera Beafon
- Overvågningskamera Chuango
- Overvågningskamera MicroView
- Overvågningskamera ETiger
- Overvågningskamera Videcon
- Overvågningskamera INSTAR
- Overvågningskamera Advantech
- Overvågningskamera Digital Watchdog
- Overvågningskamera Moen
- Overvågningskamera Ganz
- Overvågningskamera MEE Audio
- Overvågningskamera Mobotix
- Overvågningskamera Kwikset
- Overvågningskamera Ikegami
- Overvågningskamera Leviton
- Overvågningskamera Pelco
- Overvågningskamera Approx
- Overvågningskamera ClearOne
- Overvågningskamera Ebode
- Overvågningskamera Oplink
- Overvågningskamera Dorr
- Overvågningskamera Sonic Alert
- Overvågningskamera Linear PRO Access
- Overvågningskamera Summer Infant
- Overvågningskamera SMC
- Overvågningskamera Topica
- Overvågningskamera Iiquu
- Overvågningskamera Verint
- Overvågningskamera Brinno
- Overvågningskamera Rostra
- Overvågningskamera Caddx
- Overvågningskamera Spyclops
- Overvågningskamera EKO
- Overvågningskamera Kguard
- Overvågningskamera Woonveilig
- Overvågningskamera Accsoon
- Overvågningskamera Mobi
- Overvågningskamera Surveon
- Overvågningskamera Hollyland
- Overvågningskamera Epcom
- Overvågningskamera Indexa
- Overvågningskamera Lutec
- Overvågningskamera Whistler
- Overvågningskamera ClearView
- Overvågningskamera VideoComm
- Overvågningskamera IMILAB
- Overvågningskamera 3xLOGIC
- Overvågningskamera Inkovideo
- Overvågningskamera Weldex
- Overvågningskamera SecurityMan
- Overvågningskamera Mach Power
- Overvågningskamera Canyon
- Overvågningskamera CNB Technology
- Overvågningskamera Tapo
- Overvågningskamera Aigis
- Overvågningskamera Exacq
- Overvågningskamera Brickcom
- Overvågningskamera Laxihub
- Overvågningskamera Securetech
- Overvågningskamera EFB Elektronik
- Overvågningskamera NetMedia
- Overvågningskamera Videotec
- Overvågningskamera Illustra
- Overvågningskamera Atlona
- Overvågningskamera Nivian
- Overvågningskamera Arenti
- Overvågningskamera E-bench
- Overvågningskamera Blow
- Overvågningskamera Syscom
- Overvågningskamera Tecno
- Overvågningskamera Night Owl
- Overvågningskamera Guardzilla
- Overvågningskamera Astak
- Overvågningskamera Blink
- Overvågningskamera Milestone Systems
- Overvågningskamera Zavio
- Overvågningskamera Campark
- Overvågningskamera IPX
- Overvågningskamera Dedicated Micros
- Overvågningskamera Hamlet
- Overvågningskamera Annke
- Overvågningskamera Qoltec
- Overvågningskamera Digimerge
- Overvågningskamera Feelworld
- Overvågningskamera Wisenet
- Overvågningskamera Infortrend
- Overvågningskamera Epiphan
- Overvågningskamera HiLook
- Overvågningskamera Compro
- Overvågningskamera Vimtag
- Overvågningskamera Sonoff
- Overvågningskamera Gewiss
- Overvågningskamera Alula
- Overvågningskamera Insteon
- Overvågningskamera Costar
- Overvågningskamera ALC
- Overvågningskamera Security Labs
- Overvågningskamera Comtrend
- Overvågningskamera Seneca
- Overvågningskamera Avigilon
- Overvågningskamera American Dynamics
- Overvågningskamera Vosker
- Overvågningskamera Sentry360
- Overvågningskamera Owltron
- Overvågningskamera Petcube
- Overvågningskamera Enabot
- Overvågningskamera Luis Energy
- Overvågningskamera Sir Gawain
- Overvågningskamera VisorTech
- Overvågningskamera Atlantis Land
- Overvågningskamera B & S Technology
- Overvågningskamera I3International
- Overvågningskamera Ecobee
- Overvågningskamera Turing
- Overvågningskamera Wasserstein
- Overvågningskamera Qolsys
- Overvågningskamera Control4
- Overvågningskamera Milesight
- Overvågningskamera GVI Security
- Overvågningskamera Conbrov
- Overvågningskamera HuddleCamHD
- Overvågningskamera Defender
- Overvågningskamera IOIO
- Overvågningskamera BIRDFY
- Overvågningskamera I-PRO
- Overvågningskamera DVDO
- Overvågningskamera TCP
- Overvågningskamera Bolin Technology
- Overvågningskamera Nextech
- Overvågningskamera Tuya
- Overvågningskamera Bolide
- Overvågningskamera Telycam
- Overvågningskamera Arecont Vision
Nyeste Overvågningskamera Manualer
29 Marts 2025
28 Marts 2025
20 Marts 2025
20 Marts 2025
20 Marts 2025
13 Marts 2025
8 Marts 2025
8 Marts 2025
8 Marts 2025
8 Marts 2025