Trust GXT 166 Manual
Læs nedenfor 📖 manual på dansk for Trust GXT 166 (84 sider) i kategorien Gå. Denne guide var nyttig for 22 personer og blev bedømt med 4.5 stjerner i gennemsnit af 2 brugere
Side 1/84


GXT 166 Gaming Mouse LUSER S MANUA
1
Index
Language
Page
English
2
Deutsch
5
Français
8
Italiano
11
Español
14
Português
17
Nederlands
20
Dansk
23
Suomi
26
Norsk
29
Svenska
32
Polski
35
Česky
38
Slovenčina
41
Magyar
44
Română
47
Български
50
Русский
53
Ελληνικά
56
Türkçe
59
Hrvatski
62
Slovenski
65
српски
68
Brasileiro
71
ةيبرعلا
74
GXT 166 Gaming Mouse LUSER S MANUA
2
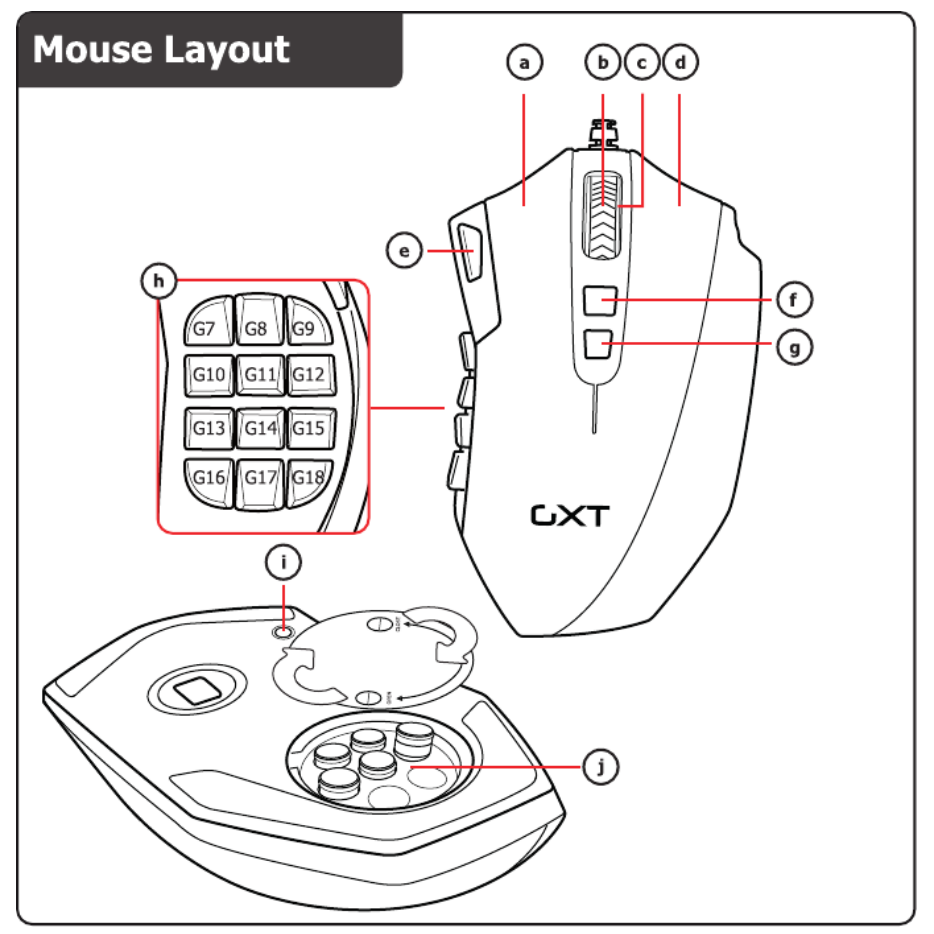
Mouse layout
a
b
c
d
e
f
g
h
i
j
- Button 1 (left mouse button)
- Button 3 (Scroll wheel)
- Scroll wheel LED (DPI indicator)
Yellow
DPI 1
Green
DPI 2
Blue
DPI 3
Purple
DPI 4
Red
DPI 5
- Button 2 (default function = right mouse click)
- Button 4 (default function = triple mouse click)
- Button 5 (default function = DPI+)
- Button 6 (default function = DPI-)
- Side Buttons 7- 18
- Profile switch (not programmable)
- Adjustable weights compartment
Installation
1.
a - Insert the Trust CD-ROM into your CD drive.
- Click “Run Setup.exe – Published by Trust International BV”.
b - . Click “Install driver”
c - Click ‘Finish’ when the installation is completed.
2.
a - Connect the mouse to the USB port of the PC.
b - Wait until the message ‘Your device is ready to use’ appears.
3.
a - Start the mouse configuration software (located in the taskbar).
b - You can now start to configure the mouse. In the manual will be referred to ‘Apply’ to update the
mouse.
The mouse can store 5 different profiles. You can instantly switch between these profiles by assigning the
profile switch function to one of the 18 buttons, or use the profile switch at the bottom of the mouse.

GXT 166 Gaming Mouse LUSER S MANUA
3
Button programming
4.
a
b
c
Assign a function.
- . Click on the ‘General’ tab
- Click on the button which you want to re-assign.
- Click on the function that you want to assign.
- The mouse is beeing updated. Click on ‘Apply’
5.
a
b
c
Assign a function to the side buttons.
- In the ‘General’ tab click on ‘side’ to view the side buttons.
- Click on the button which you want to re-assign.v
- Click on the function that you want to assign.
- The mouse is beeing updated. Click on ‘Apply’
DPI Settings
6.
a
b
c
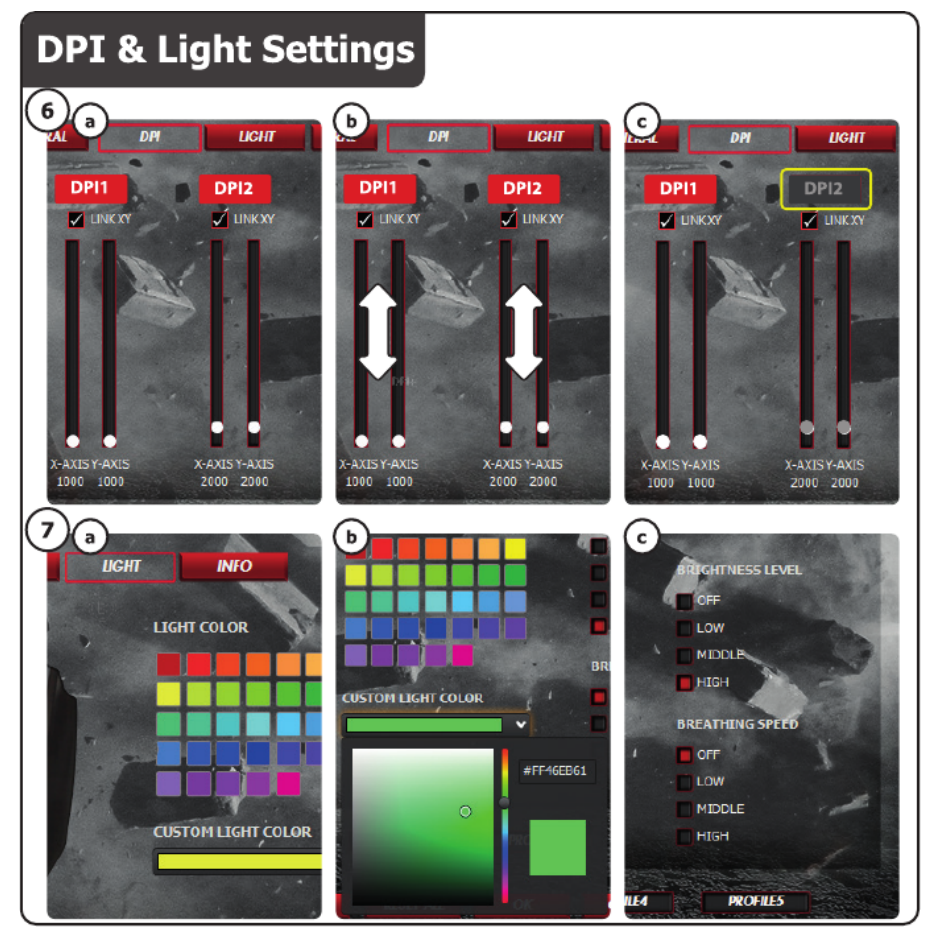
Change the DPI settings
(profiles and DPI settings are linked)
- Click on ‘DPI’.
- Change the DPI settings by moving the sliders.
- Click the DPI number to enable or disable this setting.
- The mouse is beeing updated. Click on ‘Apply’
To set the X and Y axis separately, Untick the ‘LINK XY’ box.
Light Manager Settings
7.
a
b
c
Change the LED light
- Click on ‘Light’.
- Select the desired LED color Or pick a custom color.
- Change the brightness level and breathing speed.
- Cli The mouse is beeing updated. ck on ‘Apply’

GXT 166 Gaming Mouse LUSER S MANUA
4
Macro Settings
8.
a
b
c
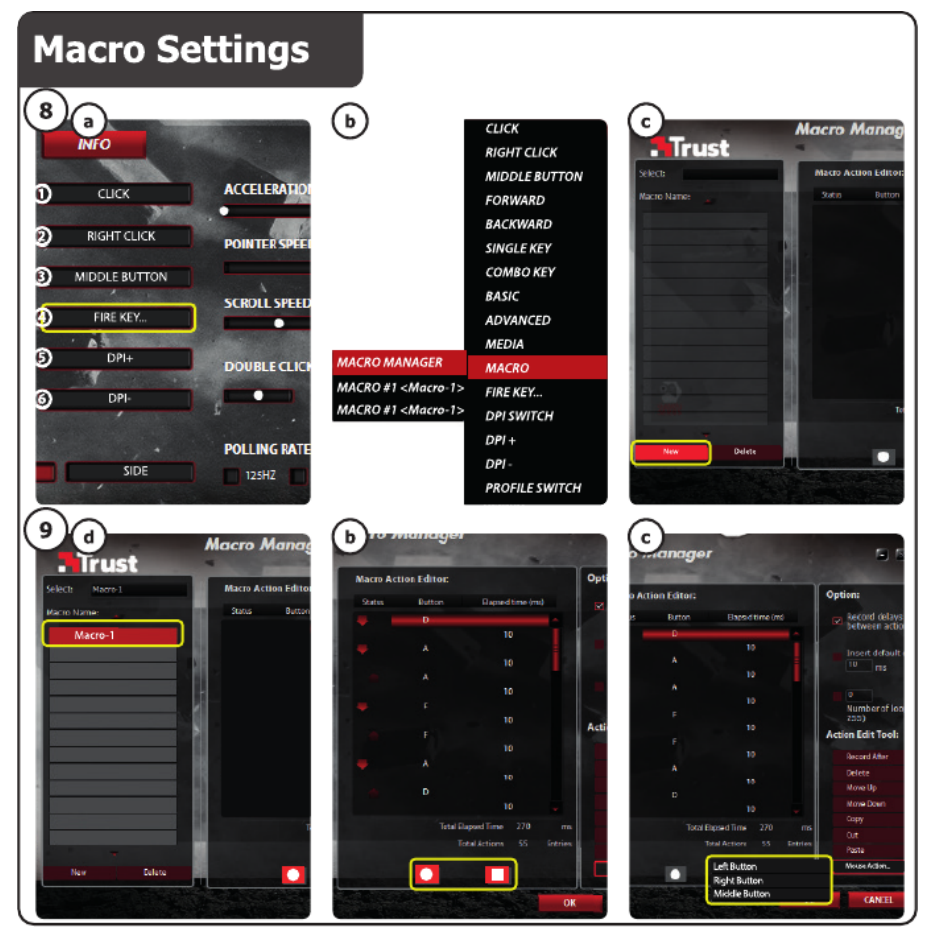
Create a macro.
(Store a sequence of keys in the software)
- . Go to the ‘General’ tab
- Click on the button witch you want to re-assign.
- Hover over . ‘Macro’
- nager . Click on ‘Macro Ma ’
- . Create an new macro by clicking on ‘New’
- Enter the name of the new macro.
- .Click on ‘OK’
9.
a
b
c
Record a macro.
- Select a created macro.
- Click on the record button to start recording the prefferd keyboard sequence.
- ished creating your macro. Click the stop button. When you’re fin
- Mouse actions can be added, by using the menu on the right. (after recording)
- Close the ‘macro manager’ when your done creating macros.
Assign a macro.
- To assign a macro follow steps 8 a/b and choose the prefered macro from the function list.
- The mouse is beeing updated. Click on ‘Apply’
Profile Settings
10.
a
Select a profile
- Select one of the 5 profiles bij clicking on the preffered profile.
10.
a
b
Save or Load custom setup a
- Click o n ‘Save as’ to save a setup or ‘Load File’ to load a setup.
- Enter a name for the mouse setup, or choose the prefered profile to load.
- /Open Click on ‘Save ’
- Your mouse setup is now saved/loaded.
11.
a
b
Restore default settings
- to reset all profiles. Click on ‘Reset All’
- . (currently selected profile) Click on ‘Restore’ to restore 1 profile
- Click on ‘OK’ to reset all settings.
- The mouse is beeing updated. Click on ‘Apply’
Download game specific profiles from the Trust website http://www.trust.com/19816

GXT 166 Gaming Mouse LUSER S MANUA
5
Bedienelemente der Maus
a
b
c
d
e
f
g
h
i
j
– Taste 1 (Linke Maustaste)
– Taste 3 (Scrollrad)
– Scrollrad-LED (DPI-Anzeige)
Gelb
DPI 1
Grün
DPI 2
Blau
DPI 3
Violett
DPI 4
Rot
DPI 5
– te 2 (Standardfunktion = rechter Mausklick) Tas
– Taste 4 (Standardfunktion = dreifacher Mausklick)
– Taste 5 (Standardfunktion = DPI+)
– Taste 6 (Standardfunktion = DPI-)
– Seitentasten 7- 18
– Profilschalter (nicht programmierbar)
– Fach für veränderliche Gewichte
Installation
1.
a Legen Sie die Trust-CD in das CD-ROM-Laufwerk ein. –
– Klicken Sie auf „Run Setup.exe – Published by Trust International BV“ [Setup.exe ausführen –
Veröffentlicht von Trust International BV].
b – Klicken Sie auf „Install driver“ [Treiber installieren].
c – Klicken Sie auf „Finish“ [Fertig stellen], wenn die Installation abgeschlossen ist.
2.
a Schließen Sie die Maus an den USB-Anschluss des PCs an. –
b ann jetzt verwendet werden] – Warten Sie, bis die Meldung „Your device is ready to use“ [Das Gerät k
angezeigt wird.
3.
a Starten Sie die Konfigurationssoftware für die Maus (in der Taskleiste). –
b Sie können nun mit der Konfiguration der Maus beginnen. Die neuen Einstellungen werden mit –
einem Klick auf „Apply“ gespeichert.
Die Maus kann 5 verschiedene Profile speichern. Sie können schnell zwischen diesen Profilen wechseln, indem
Sie die Umschaltfunktion für die Profile einer der 18 Tasten zuweisen, oder indem Sie den Profilschalter an der
Unterseite der Maus verwenden.

GXT 166 Gaming Mouse LUSER S MANUA
6
Tastenprogrammierung
4.
a
b
c
Zuweisen einer Funktion
– Klicken Sie auf die Registerkarte „General“.
– Klicken Sie auf die Taste, deren Belegung geändert werden soll.
– Klicken Sie auf die Funktion, die zugewiesen werden soll.
– Klicken Sie auf „Apply“ Die Einstellungen werden zur Maus übertragen.
5.
a
b
c
Zuweisen einer Funktion zu den Seitentasten.
– Klicken Sie auf der Registerkarte „General“ auf „Side“, um die Seitentasten anzuzeigen.
– Klicken Sie auf die Taste, deren Belegung geändert werden soll.
– Klicken Sie auf die Funktion, die zugewiesen werden soll.
– Klicken Sie auf „Apply“ Die Einstellungen werden zur Maus übertragen.
DPI-Einstellungen
6.
a
b
c
Ändern der DPI-Einstellungen
(Profile und DPI-Einstellungen sind miteinander verknüpft)
– Klicken Sie auf „DPI“.
– Ändern Sie die DPI-Einstellungen über die Schieberegler.
– ken Sie auf die DPI-Zahl, um die Einstellung zu aktivieren oder deaktivieren. Klic
– Klicken Sie auf „Apply“ Die Einstellungen werden zur Maus übertragen.
Um die X- und Y- Achse getrennt einzustellen, entfernen Sie das Häkchen vom Kontrollkästchen „LINK XY“.
Einstellungen des Light Managers [Light Manager Settings]
7.
a
b
c
Ändern des LED-Lichts
– Klicken Sie auf „Light“.
– Wählen Sie die gewünschte LED-Farbe aus, oder wählen Sie eine benutzerdefinierte Farbe aus.
– Ändern Sie die Helligkeit und die Pulsier-Geschwindigkeit.
– Klicken Sie auf „Apply“ Die Einstellungen werden zur Maus übertragen.

GXT 166 Gaming Mouse LUSER S MANUA
7
Makro-Einstellungen
8.
a
b
c
Erstellen eines Makros
(Speichern einer Tastenfolge in der Software)
- Gehen Sie zur Registerkarte „General“.
– Klicken Sie auf die Taste, deren Belegung geändert werden so ll.
– Halten Sie den Mauszeiger über „Macro“.
– Klicken Sie auf „Macro Manager“.
– Erstellen Sie ein neues Makro, indem Sie auf „New“ klicken.
– Geben Sie den Namen des neuen Makros an.
– Klicken Sie auf „OK“.
9.
a
b
c
Aufzeichnen eines Makros
– Wählen Sie ein erstelltes Makro aus.
– Klicken Sie auf die Aufnahme-Schaltfläche, um die Aufzeichnung der gewünschten Tastatureingaben
zu beginnen.
– Nachdem die Makro-Erstellung abgeschlossen ist: Klicken Sie auf die Stopp-Schaltfläche.
– Maus-Aktionen können mit dem Menü auf der rechten Seite (nach der Aufzeichnung) hinzugefügt
werden.
– Schließen Sie den „Macro Manager“, wenn Sie die Makrobearbeitung abgeschlossen haben.
Zuweisen eines Makros
– Folgen Sie zur Zuweisung eines Makros den Schritten 8 a/b, und wählen Sie das gewünschte Makro
aus der Liste der Funktionen aus.
– Klicken Sie auf „Apply“ Die Einstellungen werden zur Maus übertragen.
Profileinstellungen
10.
a
Auswählen eines Profils
– Wählen Sie eines der 5 Profile aus, indem Sie auf das gewünschte Profil klicken.
10.
a
b
Speichern oder Laden einer benutzerdefinierten Konfiguration
- Klicken Sie auf „Save as“, um eine Konfiguration zu speichern, bzw. auf „Load File“, um eine
Konfiguration zu laden.
– Geben Sie einen Namen für die Maus-Konfiguration ein bzw. wählen Sie das zu ladende Profil aus.
– Klicken Sie auf „Save/Open“.
– Die Ma -Konfiguration wird nun gespeichert bzw. geladen. us
11.
a
b
Wiederherstellen der Standardeinstellungen
– Klicken Sie auf „Reset All“, um alle Profile zurückzusetzen.
– Klicken Sie auf „Restore“, um 1 Profil (das derzeit ausgewählte Profil) wiederherzust ellen.
– Klicken Sie auf „OK“, um alle Einstellungen zurückzusetzen.
– Klicken Sie auf „Apply“ Die Einstellungen werden zur Maus übertragen.
Spezielle Profile für Games können von der Trust-Website http://www.trust.com/19816 heruntergeladen
werden.

GXT 166 Gaming Mouse LUSER S MANUA
8
Fonctions de la souris
a
b
c
d
e
f
g
h
i
j
- Bouton 1 (bouton gauche de la souris)
- Bouton 3 (molette de défilement)
- Molette de défilement LED (indicateur
DPI)
jaune
DPI 1
vert
DPI 2
bleu
DPI 3
pourpre
DPI 4
rouge
DPI 5
- Bouton 2 (fonction par défaut = clic droit de la souris)
- Bouton 4 (fonction par défaut = triple clic de la souris)
- Bouton 5 (fonction par défaut = DPI+)
- Bouton 6 (fonction par défaut = DPI-)
- Boutons latéraux 7- 18
- Bouton de profil (non programmable)
- Compartiment avec poids de réglage
Installation
1.
a - Insérez le CD-ROM Trust dans votre lecteur de CD.
- Cliquez sur « Run Setup.exe Published by Trust International BV. » [lancer Setup.exe] –
b - Cliquez sur « Install driver » [installer le pilote].
c - Cliquez sur « Finish » lorsque l'installation est terminée.
2.
a - Connectez la souris au port USB de votre ordinateur.
b - Attendez qu'apparaisse le message « Your device is ready to use » [Votre appareil est prêt à
l'utilisation].
3.
a - Lancez le logiciel de configuration de la souris [situé dans la barre des tâches].
b - Vous pouvez maintenant configurer la souris. Conformément au manuel, le bouton « Apply »
[appliquer] permet de mettre à jour la souris.
La souris peut sauvegarder jusqu'à 5 profils différents. Vous pouvez passer instantanément d'un profil à l'autre
en attribuant la fonction du bouton de profil à l'un des 18 boutons ou bien utiliser le bouton de profil situé sous
la souris.

GXT 166 Gaming Mouse LUSER S MANUA
9
Programmation des boutons
4.
a
b
c
Attribuer une fonction
- Cliquez sur l'onglet « General » [paramètres généraux].
- Cliquez sur le bouton que vous souhaitez réattribuer.
- Cliquez sur la fonction que vous souhaitez attribuer.
- Cliquez sur le bouton « Apply » [appliquer] La souris a été mise à jour.
5.
a
b
c
Attribuer une fonction aux boutons latéraux.
- Dans l'onglet « General » [paramètres généraux], cliquez sur « Side » [latéral] pour visualiser les
boutons latéraux.
- Cliquez sur le bouton que vous souhaitez réattribuer.
- Cliquez sur la fonction que vous souhaitez attribuer.
- Cliquez sur le bouton « Apply » [appliquer] La souris a été mise à jour.
Paramètres DPI
6.
a
b
c
Modifier les paramètres DPI
(les profils et les paramètres DPI sont associés)
- Cliquez sur « DPI ».
- Modifiez les paramètres DPI en déplaçant le curseur.
- Cliquez sur le numéro DPI pour activer ou désactiver ce paramètre.
- Cliquez sur le bouton « Apply » [appliquer] La souris a été mise à jour.
Pour configurer les axes X et Y séparément, décochez la case « LINK XY » [lien XY].
Paramètres de luminosité [Light Manager Settings]
7.
a
b
c
Modifier la luminosité de la LED
- Cliquez sur « Light » [luminosité].
- Sélectionnez la couleur de la LED souhaitée ou choisissez une couleur personnalisée.
- Modifiez le degré de luminosité et la vitesse de clignotement.
- Cliquez sur le bouton « Apply » [appliquer] La souris a été mise à jour.

GXT 166 Gaming Mouse LUSER S MANUA
10
Paramètres des macros
8.
a
b
c
Créer une macro.
(enregistrer une séquence de touches dans le logiciel)
- Allez dans l'onglet « General » [paramètres généraux].
- Cliquez sur le bouton que vous souhaitez réattribuer.
- Déplacez le curseur au-dessus de « Macro » [macro].
- Cliquez sur « Macro manager » [gestionnaire de macros].
- Créez une nouvelle macro en cliquant sur « New » [nouveau].
- Entrez le nom de la nouvelle macro.
- Cliquez sur « OK ».
9.
a
b
c
Enregistrer une macro.
- Sélectionnez une macro créée.
- Cliquez sur le bouton d'enregistrement pour lancer l'enregistrement de la séquence clavier souhaitée.
- Lorsque vous avez fini de créer votre macro, Cliquez sur le bouton « stop » [arrêt].
- Il est possible d'ajouter des actions sur la souris à l'aide du menu situé à droite (après
enregistrement).
- Refermez le « macro manager » [gestionnaire de macros] lorsque vous avez créé les macros.
Attribuer une macro.
- Pour attribuer une macro, suivez les étapes 8 a/b et choisissez la macro souhaitée dans la liste de
fonctions.
- Cliquez sur le bouton « Apply » [appliquer] La souris a été mise à jour.
Paramètres du profil
10.
a
Sélectionner un profil
- Sélectionnez l'un des 5 profils en cliquant sur le profil souhaité.
10.
a
b
Enregistrer ou charger une configuration personnalisée
- Cliquez sur « Save as » [enregistrer sous] pour enregistrer une configuration ou « Load File » [charger
fichier] pour charger une configuration.
- Entrez un nom pour la configuration de la souris ou choisissez le profil souhaité à charger.
- Cliquez sur « Save/Open » [enregistrer/ouvrir].
- Votre configuration est maintenant enregistrée/chargée.
11.
a
b
Restaurer les paramètres par défaut
- Cliquez sur « Reset All » [tout réinitialiser] pour réinitialiser tous les profils.
- Cliquez sur « Restore » [restaurer] pour restaurer un profil (profil actuellement sélectionné).
- Cliquez sur « OK » pour réinitialiser tous les paramètres.
- Cliquez sur le bouton « Apply » [appliquer] La souris a été mise à jour.
Téléchargez les profils de jeu spécifiques sur le site Internet Trust : http://www.trust.com/19816.
GXT 166 Gaming Mouse LUSER S MANUA
11
Struttura del mouse
a
b
c
d
e
f
g
h
i
j
- Pulsante 1 (pulsante sinistro del mouse)
- Pulsante 3 (rotella di scorrimento)
- LED rotella di scorrimento (indicatore
DPI)
Giallo
DPI 1
Verde
DPI 2
Blu
DPI 3
Violetto
DPI 4
Rosso
DPI 5
- Pulsante 2 (funzione predefinita = clic destro del mouse)
- Pulsante 4 (funzione predefinita = tre clic del mouse)
- Pulsante 5 (funzione predefinita = DPI+)
- Pulsante 6 (funzione predefinita = DPI-)
- Pulsanti laterali 7- 18w
- Pulsante di cambio profili (non programmabile)
- Vano pesi regolabili
Installazione
1.
a - Inserire il CD-ROM di installazione fornito da Trust nell'unità CD-ROM.
- Fare clic su “Run Setup.exe – Published by Trust International BV” [Esegui Setup.exe - Autore Trust
International BV].
b - Fare clic su “Install driver” [Installa driver].
c - Fare clic su ‘Finish’ [Fine] quando l'installazione è finita.
2.
a - Collegare il mouse alla porta USB del PC.
b - [Dispositivo pronto per l'uso].Attendere finché non appare il messaggio ‘Your device is ready to use’
3.
a - Avviare il software di configurazione del mouse (situato nella barra delle applicazioni).
b - Ora è possibile iniziare a configurare il mouse. Il manuale usa comando ‘Apply’ (Applica) per
aggiornare il mouse.
Il mouse può memorizzare fino a 5 diversi profili. È possibile passare immediatamente tra questi profili
assegnando la funzione di cambio profilo a uno dei 18 pulsanti oppure usare il pulsante di cambio profili situato
sul lato inferiore del mouse.

GXT 166 Gaming Mouse LUSER S MANUA
12
Programmazione dei pulsanti
4.
a
b
c
Assegnazione di una funzione.
- Fare clic sulla scheda ‘General’.
- Fare clic sul pulsante che si desidera riassegnare.
- Fare clic sulla funzione che si desidera assegnare.
- Il mouse viene aggiornato. Fare clic su ‘Apply’
5.
a
b
c
Assegnazione di una funzione ai pulsanti laterali.
- Nella scheda ‘General’, fare clic su ‘Side’ per visualizzare i pulsanti laterali.
- Fare clic sul pulsante che si desidera riassegnare.
- Fare clic sulla funzione che si desidera assegnare.
- Far Il mouse viene aggiornato. e clic su ‘Apply’
Impostazioni DPI
6.
a
b
c
Modifica delle impostazioni DPI
(i profili e le impostazioni DPI vengono collegate)
- Fare clic su ‘DPI’.
- Modificare le impostazioni DPI spostando i cursori.
- Fare clic sul numero DPI per attivare o disattivare questa impostazione.
- Il mouse viene aggiornato. Fare clic su ‘Apply’
Per impostare l'asse X e Y separatamente, Deselezionare la casella ‘LINK XY’.
Impostazioni della luminosità (Light Manager Settings)
7.
a
b
c
Modifica della luce L ED
- Fare clic su ‘Light’.
- Selezionare il colore desiderato per il LED oppure scegliere un colore personalizzato.
- Modificare il livello di luminosità e la velocità di lampeggio.
- Il mouse viene aggiornato. Fare clic su ‘Apply’

GXT 166 Gaming Mouse LUSER S MANUA
13
Impostazione di mac ro
8.
a
b
c
Creazione di una macro.
(memorizzare una sequenza di tasti nel software)
- Andare alla scheda ‘General’ .
- Fare clic sul pulsante che si desidera riassegnare.
- Puntare su ‘Macro’.
- Fare clic su ‘Macro Manager’.
- Creare una nuova macro f acendo clic su ‘New’.
- Immettere il nome della nome della nuova macro.
- Fare clic su ‘OK’.
9.
a
b
c
Registrazione di macro.
- Selezionare una macro creata.
- Fare clic sul pulsante di registrazione per iniziare a registrare la sequenza preferita da tastiera.
- Al termine della creazione della macro, Fare clic sul pulsante di arresto.
- È possibile aggiungere azioni del mouse tramite il menu a destra (dopo la registrazione).
- Chiudere il ‘macro manager’ al termine della creazione delle macro.
Assegnazione di una macro.
- Per assegnare una macro, seguire i punti 8 a/b e scegliere la macro preferita dall'elenco delle funzioni
- Il mouse viene aggiornato. Fare clic su ‘Apply’
Impostazioni dei profili
10.
A
Selezione di un profilo
- Selezionare uno dei 5 profili facendo cli su quello preferito.
10.
a
b
Salvataggio o caricamento di un'impostazione personalizzata
- Fare clic su ‘Save as’ per salvare un'impostazione o su ‘Load File’ per caricare un'impostazione.
- Inserire un nome per l'impostazione del mouse oppure scegliere il profilo preferito da caricare.
- Fare clic su ‘Save/Open’.
- Ora l'impostazione del mouse è salvata/caricata.
11.
a
b
Ripristino delle impostazioni di default
- Fare clic su ‘Reset All’ per reimpostare tutti i profili.
- Fare clic su ‘Restore’ per ripristinare 1 profilo (profilo attualmente selezionato).
- Fare clic su ‘OK’ per reimpostare tutte le impostazioni.
- Fare c Il mouse viene aggiornato. lic su ‘Apply’
Scaricare i profili specifici del gioco dal sito web Trust all'indirizzo http://www.trust.com/19816.
Produkt Specifikationer
| Mærke: | Trust |
| Kategori: | Gå |
| Model: | GXT 166 |
Har du brug for hjælp?
Hvis du har brug for hjælp til Trust GXT 166 stil et spørgsmål nedenfor, og andre brugere vil svare dig
Gå Trust Manualer

4 Februar 2025
4 Februar 2025
4 Februar 2025
4 Februar 2025
24 December 2024
23 December 2024
23 December 2024
23 December 2024
23 December 2024
23 December 2024
Gå Manualer
- Gå SilverCrest
- Gå Acer
- Gå Philips
- Gå Apple
- Gå Logitech
- Gå HP
- Gå JLab
- Gå Asus
- Gå Gigabyte
- Gå Livoo
- Gå Tracer
- Gå Lenovo
- Gå Biltema
- Gå Nedis
- Gå Logik
- Gå Adj
- Gå Hama
- Gå Belkin
- Gå Sandstrøm
- Gå Buffalo
- Gå Razer
- Gå T'nB
- Gå Medion
- Gå Speedlink
- Gå Sweex
- Gå Haier
- Gå König
- Gå ADX
- Gå Gembird
- Gå Targus
- Gå Goji
- Gå 3M
- Gå BlueBuilt
- Gå BenQ
- Gå Advent
- Gå Cherry
- Gå Labtec
- Gå Mad Catz
- Gå Microsoft
- Gå Rapoo
- Gå Fellowes
- Gå Anker
- Gå Digitus
- Gå SteelSeries
- Gå Turtle Beach
- Gå Xiaomi
- Gå Cougar
- Gå Genesis
- Gå Niceboy
- Gå Techly
- Gå Dell
- Gå Basetech
- Gå NGS
- Gå Roccat
- Gå Cooler Master
- Gå MSI
- Gå Corsair
- Gå Energy Sistem
- Gå Mousetrapper
- Gå Sven
- Gå Ducky
- Gå Thermaltake
- Gå Nova
- Gå Renkforce
- Gå Manhattan
- Gå A4Tech
- Gå Saitek
- Gå Connect IT
- Gå Genius
- Gå Watson
- Gå BakkerElkhuizen
- Gå Ozone
- Gå V7
- Gå Vorago
- Gå Contour Design
- Gå Perixx
- Gå Speed-Link
- Gå Sharkoon
- Gå InLine
- Gå KeySonic
- Gå Kogan
- Gå ADATA
- Gå HyperX
- Gå Steren
- Gå Silvergear
- Gå Savio
- Gå Arctic Cooling
- Gå Media-Tech
- Gå Mad Dog
- Gå GMB Gaming
- Gå Ednet
- Gå Woxter
- Gå Gamesir
- Gå NPLAY
- Gå Approx
- Gå Bluestork
- Gå Goldtouch
- Gå IOPLEE
- Gå Madcatz
- Gå Yeyian
- Gå ModeCom
- Gå SureFire
- Gå ThunderX3
- Gå Hamlet
- Gå I-Tec
- Gå Urban Factory
- Gå KeepOut
- Gå Xtrfy
- Gå Balam Rush
- Gå SMK-Link
- Gå Getttech
- Gå IBox
- Gå HiRO
Nyeste Gå Manualer

9 April 2025
21 Marts 2025
19 Marts 2025
18 Marts 2025
5 Marts 2025
4 Marts 2025
23 Februar 2025
21 Februar 2025
20 Februar 2025
20 Februar 2025