Yamaha MCR-940 Manual
Yamaha
Hi-Fi system
MCR-940
Læs nedenfor 📖 manual på dansk for Yamaha MCR-940 (444 sider) i kategorien Hi-Fi system. Denne guide var nyttig for 15 personer og blev bedømt med 4.5 stjerner i gennemsnit af 2 brugere
Side 1/444

OWNER'S MANUAL
MODE D'EMPLOI
BEDIENUNGSANLEITUNG
BRUKSANVISNING
MANUALE DI ISTRUZIONI
MANUAL DE INSTRUCCIONES
GEBRUIKSAANWIJZING
GF
RECEIVER/BLU-RAY DISC PLAYER
AMPLI-TUNER/LECTEUR BLU-RAY DISC
MCR
-
940
(R-840
+
BD-940
+
NS-BP300)

i
CAUTION
Use of controls or adjustments or performance of procedures
other than those specified herein may result in hazardous
radiation exposure.
AVERTISSEMENT
L’utilisation de commandes et l’emploi de réglages ou de
méthodes autres que ceux décrits ci-dessous, peuvent
entraîner une exposition à un rayonnement dangereux.
VORSICHT
Die Verwendung von Bedienelementen oder die Einstellung
bzw. die Ausführung von anderen als in dieser Anleitung
beschriebenen Vorgängen kann zu Gefährdung durch
gefährliche Strahlung führen.
OBSERVERA
Användning av reglage eller justeringar eller utförande av
åtgärder på annat sätt än så som beskrivs häri kan resultera i
farlig strålning.
ATTENZIONE
L’uso di controlli, regolazioni, operazioni o procedure non
specificati in questo manuale possono risultare in esposizione
a radiazioni pericolose.
PRECAUCIÓN
El uso de los controles, los ajustes o los procedimientos que
no se especifican enste manual pueden causar una exposición
peligrosa a la radiación.
LET OP
Gebruik van bedieningsorganen, instellingen of procedures
anders dan beschreven in dit document kan leiden tot
blootstelling aan gevaarlijke stralen.
ПРЕДОСТЕРЕЖЕНИЕ
Использование органов управления или произведение
настроек или выполнение процедур, не указанных в
данной инструкции, может отразиться на выделении
опасной радиации.
BD-940
ᵈᗧߎߎࠍ㐿ߊߣࠢࠬ㧞ߩนⷞ߮ਇนⷞࠩ߇߹ߔޕ
ࠩࠍߩߙ߈ㄟ߹ߥߢߊߛߐޕ
CAUTION: CLASS 2 VISIBLE AND INVISIBLE LASER
RADIATION WHEN OPEN. DO NOT STARE INTO THE BEAM.
VARNING: KLASS 2 SYNLIG OCH OSYNLIG LASERSTRÅLNING NÄR DENNA
DEL ÄR ÖPPNAD. TITTA INTE IN I STRÅLEN.
HUOMIO: AVATTAESSA OLET ALTTIINA NÄKYVÄLLE JA NÄKYMÄTTÖMÄLLE
LUOKAN 2 LASERSÄTEILYLLE. ÄLÄ KATSO SÄTEESEEN.
ADVARSEL: KLASSE 2 SYNLIG OG USYNLIG LASERSTRÅLING HVIS DENNE
DELEN ÅPNES. STIRR IKKE INN I STRÅLEN.
ADVARSEL: KLASSE 2 SYNLIG OG USYNLIG LASERSTRÅLING VED ÅBNING.
KIG IKKE IND I STRÅLEN.
ACHTUNG: BEI GEÖFFNETER ABDECKUNG IST SICHTBARE UND
UNSICHTBARE LASERSTRAHLUNG DER KLASSE 2 IM
GERÄTEINNEREN VORHANDEN. NICHT IN DEN STRAHL SEHEN.
ATTENTION: RADIATIONS LASER VISIBLES ET INVISIBLES
DE CLASSE 2 OUAND OUVERT. NE PAS REGARDER
FIXEMENT LE FAISCEAU.
SA172WJ
BD-940

ii
VAROITUS
Muiden kuin tässä esitettyjen toimintojen säädön tai asetusten
muutto saattaa altistaa vaaralliselle säteilylle tai muille
vaarallisille toiminnoille.
DK
Advarsel: Usynlig laserstråling ved åbning når
sikkerhedsafbrydere er ude af funktion. Undgå utsættelse for
stråling.
Bemærk: Netafbryderen er sekundært indkoblet og ofbryder
ikke strømmen fra nettet. Den indbyggede netdel er derfor
tilsluttet til lysnettet så længe netstikket sidder i stikkontakten.
N
Observer: Nettbryteren er sekundert innkoplet. Den
innebygdenetdelen er derfor ikke frakoplet nettet så lenge
apparatet er tilsluttet nettkontakten.
S
Klass 1 laseraparat
Varning! Om apparaten används på annat sättþän i denna
bruksanvisning specificerats, kan användaren utsättas för osynlig
laserstrålning, som överskrider gränsen för laserklass 1.
Observera! Strömbrytaren är sekundärt kopplad och inte bryter
inte strömmen från nätet. Den inbyggda nätdelen är därför
ansluten till elnätet så länge stickproppen sitter i vägguttaget.
SF
Luokan 1 laserlaite
Varoitus! Laitteen käyttäminen muulla kuin tässä käyttöohjeessa
mainitulla tavalla saattaa altistaa käyttäjän turvallisuusluokan 1
ylittävälle näkymättömälle lasersäteilylle.
Oikeus muutoksiin varataan. Laite ei saa olla alttiina tippu-ja
roiskevedelle.
Huom. Toiminnanvalitsin on kytketty toisiopuolelle, eikä se
kytke laitetta irti sähköverkosta. Sisäänrakennettu verkko-osa on
kytkettynä sähköverkkoon aina silloin, kun pistoke on
pistorasiassa.
VARO!
AVATTAESSA JA SUOJALUKITUS OHITETTAESSA
OLET ALTTIINA NÄKYMÄTTÖMÄLLE
LASERSÄTEILYLLE.
ÄLÄ KATSO SÄ TEESEEN.
VARNING!
OSYNLIG LASERSTRÅLNING NÄR DENNA DEL ÄR
ÖPPNAD OCH SPÄRREN ÄR URKOPPLAD. BETRAKTA
EJ STRÅLEN.

iii En
1 To assure the finest performance, please read this manual
carefully. Keep it in a safe place for future reference.
2 Install this sound system in a well ventilated, cool, dry, clean
place and away from direct sunlight, heat sources, vibration, dust,
moisture and cold. For proper ventilation, allow the following
minimum clearances.
Top: 30 cm (R-840 Only)
Rear: 10 cm
Sides: 10 cm
3 Locate this unit away from other electrical appliances, motors, or
transformers to avoid humming sounds.
4 Do not expose this unit to sudden temperature changes from cold
to hot, and do not locate this unit in an environment with high
humidity (i.e. a room with a humidifier) to prevent condensation
inside this unit, which may cause an electrical shock, fire,
damage to this unit, and/or personal injury.
5 Avoid installing this unit where foreign object may fall onto this
unit and/or this unit may be exposed to liquid dripping or
splashing. On the top of this unit, do not place:
– Other components, as they may cause damage and/or
discoloration on the surface of this unit.
– Burning objects (i.e. candles), as they may cause fire, damage
to this unit, and/or personal injury.
– Containers with liquid in them, as they may fall and liquid
may cause electrical shock to the user and/or damage to this
unit.
6 Do not cover this unit with a newspaper, tablecloth, curtain, etc.
in order not to obstruct heat radiation. If the temperature inside
this unit rises, it may cause fire, damage to this unit, and/or
personal injury.
7 Do not plug in this unit to a wall outlet until all connections are
complete.
8 Do not operate this unit upside-down. It may overheat, possibly
causing damage.
9 Do not use force on switches, knobs and/or cords.
10 When disconnecting the power cable from the wall outlet, grasp
the plug; do not pull the cable.
11 Do not clean this unit with chemical solvents; this might damage
the finish. Use a clean, dry cloth.
12 Only voltage specified on this unit must be used. Using this unit
with a higher voltage than specified is dangerous and may cause
fire, damage to this unit, and/or personal injury. Yamaha will not
be held responsible for any damage resulting from use of this unit
with a voltage other than specified.
13 To prevent damage by lightning, keep the power cable and
outdoor antennas disconnected from a wall outlet or this unit
during a lightning storm.
14 Do not attempt to modify or fix this unit. Contact qualified
Yamaha service personnel when any service is needed. The
cabinet should never be opened for any reasons.
15 When not planning to use this unit for long periods of time (i.e.
vacation), disconnect the AC power plug from the wall outlet.
16 Be sure to read the “TROUBLESHOOTING” section on
common operating errors before concluding that this unit is
faulty.
17 Before moving this unit, press to set it to standby mode and
disconnect the AC power plug from the wall outlet.
18 Condensation will form when the surrounding temperature
changes suddenly. Disconnect the power cable from the outlet,
then leave this unit alone.
19 When using this unit for a long time, this unit may become warm.
Turn the power off, then leave this unit alone for cooling.
20 Install this unit near the AC outlet and where the AC power plug
can be reached easily.
21 The batteries shall not be exposed to excessive heat such as
sunshine, fire or the like.
22 Excessive sound pressure from earphones and headphones can
cause hearing loss.
LASER SAFETY
This unit employs a laser. Due to possible eye injury, only a
qualified service person should remove the cover or attempt to
service this device.
DANGER
This unit emits visible laser radiation when open. Avoid direct
eye exposure to beam. When this unit is plugged into the wall
outlet, do not place your eyes close to the opening of the disc tray
and other openings to look into inside.
CAUTION: READ THIS BEFORE OPERATING YOUR UNIT.
This unit is not disconnected from the AC power source as
long as it is connected to the wall outlet, even if this unit itself
is turned off by . This state is called standby mode. In this
state, this unit is designed to consume a very small quantity of
power.
WARNING
TO REDUCE THE RISK OF FIRE OR ELECTRIC SHOCK,
DO NOT EXPOSE THIS UNIT TO RAIN OR MOISTURE.
The laser component in this product is capable of emitting
radiation exceeding the limit for Class 1.
LASER Specification:
Class 1 LASER Product
Wave length: 788 nm (CDs)/654 nm (DVDs)/405 nm
(BDs)
Laser power: No hazardous radiation is emitted with
the safety protection

1 En
English
PREPARATIONINTRODUCTION
TUNER
OPERATIONS
OTHER
OPERATIONS
ADDITIONAL
INFORMATION
BASIC
OPERATIONS
FEATURES ............................................................. 2
SUPPLIED ACCESSORIES ................................. 2
ABOUT DISCS ....................................................... 3
Types of Discs that Can Be Used with This Player ... 3
Discs that Cannot Be Used with This Player............. 3
CONTROLS AND FUNCTIONS.......................... 4
Receiver (R-840)........................................................ 4
BD player (BD-940) .................................................. 5
Remote control........................................................... 6
PREPARATIONS ................................................... 8
Connecting speakers/external components/
antennas ................................................................. 8
Connecting a recorder (CDR, MDR, etc.),
AV receiver or decoder (CDR, MDR, etc.) ........... 9
Connecting power cables........................................... 9
Connecting an iPod™.............................................. 10
Connecting to the Internet ....................................... 10
Installing the batteries in the remote control ........... 11
Using the remote control ......................................... 11
Adjusting the Clock ................................................. 12
SETTING THE SYSTEM ................................... 13
Turn on the TV and the system................................ 13
Setting the TV display ............................................. 13
On-screen display (OSD) language ......................... 13
Audio, Subtitle and Disc menu languages............... 14
SYSTEM OPERATIONS..................................... 15
Basic system operations........................................... 15
Changing the brightness of the front panel
display ................................................................. 16
To use headphones................................................... 16
DISC OPERATIONS............................................ 17
Using the on-screen display..................................... 17
Playback operations................................................. 17
Pausing playback ..................................................... 17
Rewind and fast forward.......................................... 18
Selecting chapters and tracks................................... 18
BD/DVD menus....................................................... 18
Slow-motion playback ............................................. 18
Frame-by-frame playback........................................ 18
Selecting languages and audio................................. 19
Selecting subtitles .................................................... 19
Selecting camera angles........................................... 19
Repeat playback....................................................... 19
Repeat playback of a specified part (A-B repeat).... 20
Playing JPEG slideshows......................................... 20
Playing back still images in a selected folder.......... 21
Playing back movies recorded on a DVD-R/
DVD-RW............................................................. 21
Using “Function Control Screen” for BD/DVD...... 22
Using “Functions” menu for Audio CD .................. 23
Viewing disc information......................................... 23
Enjoying BONUSVIEW and BD-LIVE.................. 24
FM TUNING..........................................................26
Automatic tuning ..................................................... 26
Manual tuning.......................................................... 26
Automatic preset tuning........................................... 26
Manual preset tuning ............................................... 27
Selecting preset stations........................................... 27
RADIO DATA SYSTEM TUNING
(EUROPE MODEL ONLY) .............................28
Displaying the Radio Data System information ...... 28
Using the TP (traffic program) data service ............ 29
CT (clock time) settings .......................................... 29
SETTING THE TIMER .......................................30
Setting the clock timer............................................. 30
Setting the sleep timer ............................................. 31
CONTROLLING iPod™......................................32
Using iPod™ ........................................................... 32
SETTINGS OF THE BD PLAYER .....................33
Audio Video Settings............................................... 33
Quick Start............................................................... 35
Auto Power Off........................................................ 35
HDMI Control ......................................................... 35
Playback Setting ...................................................... 35
Communication Setup ............................................. 36
Version ..................................................................... 39
USB Memory Management..................................... 39
Software Update ...................................................... 39
System Reset............................................................ 39
CHANGING THE SETTINGS WHEN
CONNECTING AN HDMI OR
COMPONENT CABLE....................................41
TROUBLESHOOTING........................................42
Receiver (R-840)...................................................... 42
Remote control ........................................................ 44
BD player (BD-940) ................................................ 44
Network ................................................................... 46
Messages Relating to BD disc and DVD disc ......... 46
ABOUT THE JPEG FILE FORMAT .................47
NOTES ABOUT HANDLING DISCS ................48
GLOSSARY...........................................................48
SPECIFICATIONS ...............................................49
LANGUAGE, COUNTRY LISTS........................51
Language list............................................................ 51
Country list .............................................................. 51
(at the end of this manual)
CONTENTS
INTRODUCTION
PREPARATION
BASIC OPERATIONS
TUNER OPERATIONS
OTHER OPERATIONS
ADDITIONAL INFORMATION
Information about software .................................. i

FEATURES
2 En
INTRODUCTION
Receiver (R-840)
•Minimum RMS output power per channel
65W + 65W (6Ω, 1kHz, 10% THD)
•30-station FM preset tuning
•iPod playability (with rechargeable function)
•Pure Direct mode
•Adjustable Display Brightness
BD player (BD-940)
•Plays Blu-ray Discs, DVDs, Audio CDs
•Supports BD-LIVE. When using a BD-LIVE
compatible disc, you can connect the BD player
to the Internet and download various data
•Supports HDMI control function. You can
operate the receiver and BD player with a TV
remote control connected by an HDMI cable
•Linked operation with the receiver such as
Pure Direct mode, Adjustable Display
Brightness and INPUT mode
■About this manual
• In this manual, “R-840” is described as “receiver” and “BD-940” is described as “BD player”.
• This manual describes how to operate the system using a remote control except when it is not available. Some of these operations are
also available using the front panel buttons.
•y indicates a tip for your operation.
• Notes contain important information about safety and operating instructions.
• This manual is printed prior to production. Design and specifications are subject to change in part as a result of improvements, etc. In
case of differences between the manual and the product, the product has priority.
This product includes the following accessories. Before connecting this system, make sure you received all of the following parts.
FEATURES
SUPPLIED ACCESSORIES
1234
56
90
78
E
NT
E
RCL
E
AR
MUT
E
E
NT
E
R
VOLUME
AUX
TUN
E
R
iPod SHUFFLE
R
EPE
AT
MENU
ENTER
E
O
NM
O
N
O
M
E
M
O
R
Y
PRESET TUNING
DISC
DISPLAY TIMER SLEEP DIMMER
OPTION PURE DIRECT
AUDI O SUBTITLE ANGLE
REPEAT
ON SCREEN
RETURN
PinP SETUP
ABCD
EXIT
TOP MENU/TITLE LIST
POP UP MENU
Indoor FM antenna
Batteries (x2)
(AAA, R03, UM-4)
Remote
control
* The Dock cover is supplied with this unit to cover
the iPod dock when not in use.
iPod
INPUT VOLUME
Dock cover*
Receiver
System control
cable (0.6 m)
RCA stereo
cable (1.0 m)
Composite video
cable (1.5 m)

3 En
English
INTRODUCTION
• The following discs can be played back in this Player.
Do not use an 8 cm (3”) to 12 cm (5”) adapter.
• Use discs that conform to compatible standards as
indicated by the presence of official logos on the disc
label. Playback of discs not complying with these
standards is not guaranteed. In addition, the image
quality or sound quality is not guaranteed even if the
discs can be played back.
*1 This Player has been designed on the premise of playing back
Audio CDs that comply with CD (Compact Disc) standards.
CDs containing a signal for the purpose of protecting
copyrights (copy control signal) may not be able to be played
back with this Player.
*2 See “ABOUT THE JPEG FILE FORMAT” on page 47.
• BD/DVD video players and discs have region codes,
which dictate the regions in which a disc can be played.
• BD/DVD Video operations and functions may be
different from the explanations in this manual and
some operations may be prohibited due to disc
manufacturer’s settings.
• If a menu screen or operating instructions are displayed
during playback of a disc, follow the operating
procedure displayed.
• The audio component of a DVD video recorded at 96
kHz (Linear PCM) will be output as 48 kHz audio
during playback.
Notes
• Playback for some of the discs in the left side column tables
may not be possible depending on the disc.
• “Finalize” refers to a recorder processing a recorded disc so that
it will play in other BD players/recorders as well as this player.
Only finalized DVD discs will play back in this player. (This
player does not have a function to finalize discs.)
The following discs cannot be played back or will not play
back properly on this Player. If such a disc is mistakenly
played back, speaker damage may occur.
Discs with unusual shapes cannot be
played.
Discs with unusual shapes (heart-shaped or hexagonal
discs, etc.) cannot be used. The use of such discs will
cause malfunction.
The following BD/DVD video discs cannot
be played.
• Discs not match the region code/number of this Player.
• Discs produced illegally.
• Discs recorded for commercial use.
ABOUT DISCS
Types of Discs that Can Be Used
with This Player
Disc Type Recording
Format Contents Disc Size
BD video -- Audio +
Video
(Movie)
12 cm (5”)
8 cm (3”)
BD-RE DL
BD-R DL
BDMV
format
DVD Video Video format Audio +
Video
(Movie)
12 cm (5”)
8 cm (3”)
DVD+RW/
DVD+R
DVD+R DL
DVD-R DL
DVD-RW/
DVD-R
Video/VR/
AV C H D
format
(finalized disc
only)
Audio +
Video
(Movie)
12 cm (5”)
8 cm (3”)
Audio CD*1 Audio CD
(CD-DA)
Audio 12 cm (5”)
8 cm (3”)
CD-RW/CD-R Audio CD
(CD-DA)
Audio
JPEG*2 Still image
(JPEG file)
Region management information
Model BD-Video DVD-Video
Europe Region code “B” or
“ALL”
Region number “2”
or “ALL”
Russia Region code “C” or
“ALL”
Region number “5”
or “ALL”
2ALL
5ALL
Discs that Cannot Be Used with
This Player
CDG, Video CD, Photo CD, CD-ROM, SVCD,
SA-CD, PD, CDV, CVD, DVD-RAM, DVD-Audio,
BD-RE with the cartridge, CD-MP3, CD-WMA

CONTROLS AND FUNCTIONS
4 En
■Front panel
1INPUT
Selects an input source.
2On/Standby indicator
Lights up in green when the receiver is turned on. Lights
up in amber when the receiver is in standby mode.
3TP indicator
Lights up when the receiver is receiving a Radio Data
System station which contains the TP (Traffic Program)
data service (☞p.29).
4Remote control sensor
Receives signals from the remote control.
5PRESET indicator
Lights up when you select preset radio stations (☞p.27).
6TUNED indicator
Lights up when the receiver is tuned into a station.
7STEREO indicator
Lights up when the receiver is receiving a strong signal
from an FM stereo broadcast.
8SLEEP indicator
Lights up when the sleep timer is on (☞p.31).
9Front panel display
Shows the various information such as the tuning
frequency.
0VOLUME
Adjusts the volume level.
A (On/Standby)
Turns the receiver on or sets it to standby mode.
BPHONES jack
Outputs audio signals for private listening with
headphones.
CTIMER indicator
Lights up when the timer is set (☞p.30).
DBASS
Adjusts the low frequency response (☞p.15).
ETREBLE
Adjusts the high frequency response (☞p.15).
FBALANCE
Adjusts the audio output balance of the left to right
speakers to compensate for imbalances caused by speaker
locations or listening room conditions.
GPRESET d / u
Selects a preset station. The input source is changed to
FM. Operable even when the receiver is in standby mode
(☞p.27).
HPURE DIRECT
Turns on or off Pure Direct mode (☞p.15).
When Pure Direct mode is on, the indicator lights up in
blue.
Ih / e
Starts and pauses the playback of iPod. The input source is
changed to iPod. Operable even when the receiver is in
standby mode.
JiPod dock
Connect your iPod (☞p.10).
CONTROLS AND FUNCTIONS
Receiver (R-840)
INPUT
BASS
PHONES
VOLUME
MIN MAX
TREBLE BALANCE
PRESET PURE DIRECT
LR
PRESET
TP
TUNED
STEREO SLEEP
kHz MHz iPod
TIMER
1@
IJBCD E F G H
234 5 67 98
A
Top viewFront view

5 En
CONTROLS AND FUNCTIONS
English
INTRODUCTION
■Front panel
1Disc tray
Holds a disc to be played back.
2p (play) indicator
Appears during playback.
3REP OFF S ALL A-B indicator
Lights up when Repeat play mode is selected.
4
Opens and closes the disc tray.
When this button is pressed during standby mode, the
receiver automatically turns on and the input source
changes to DISC.
5
Stops playback (☞p.17).
6 (On/Standby)
Turns on the BD player or sets it to standby mode.
When this button is pressed during standby mode, the
receiver automatically turns on and the input source
changes to DISC.
y
If the BD player does not operate properly for some reason, you
can reboot it by holding down this button for about 10 seconds
and pressing it again.
7QUICK indicator
Light up in standby mode when Quick Start function is on
(☞p.35).
Flashes after you connect the power cable to the AC wall
outlet until the BD player enters standby mode.
8e (pause) indicator
Lights up while the BD player is paused.
9Front panel display
Shows the current status of the BD player.
0
Returns to the beginning of the current chapter or track.
Press and hold to fast reverse. Press twice to skip to the
previous chapter or track (☞p.18).
A
Starts or pauses playback (☞p.17).
When this button is pressed during standby mode, the
receiver automatically turns on and the input source
changes to DISC, whichever was last selected.
B
Skips to the next chapter or track. Press and hold to fast
forward (☞p.18).
BD player (BD-940)
QUICK
12 45
798
6
3
AB
@
PROG RANDOMMP3 WMA TRACK TOTAL REMAIN REP OFF S ALL A-B
6 En
CONTROLS AND FUNCTIONS
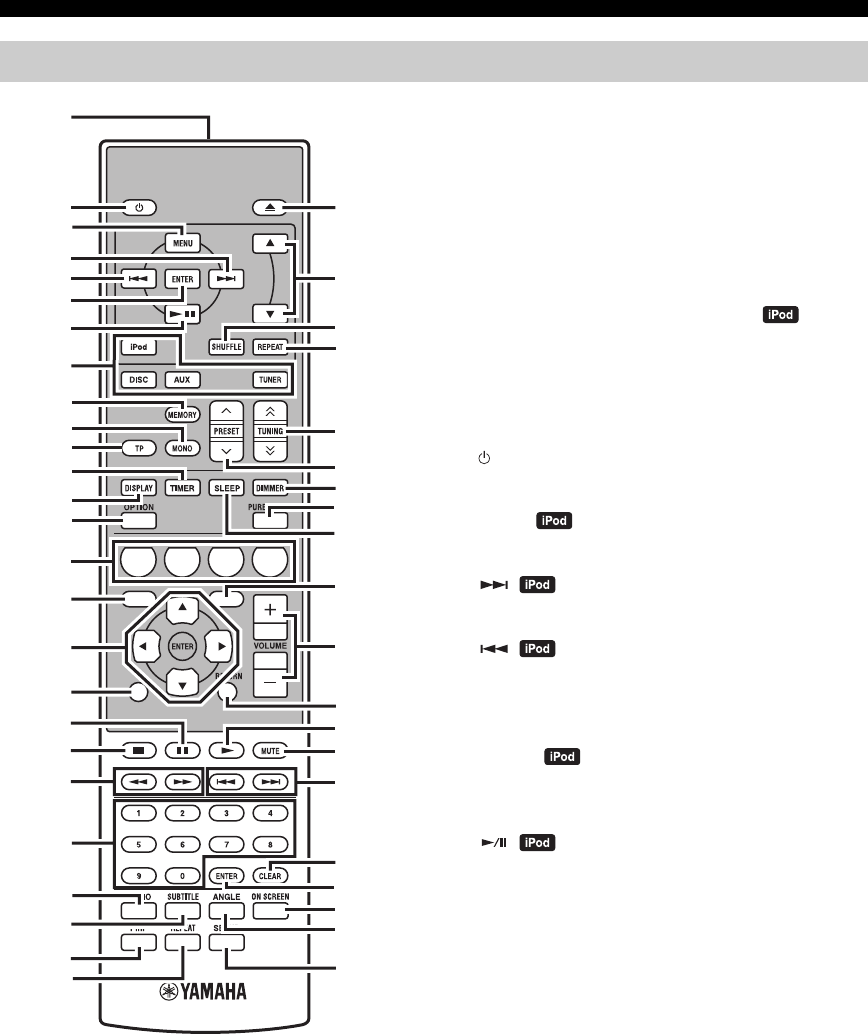
This remote control can operate the system components
(including tuner functions) and an iPod stationed in the
iPod dock on the top of the receiver.
To operate the BD player, tuner functions, or an iPod
using the remote control, you need to set the receiver to
corresponding input mode (☞8Input selection keys).
To operate your iPod
Press the corresponding iPod operation key on the remote
control.
The iPod operation keys are indicated with in the
section below. See page 32 for more information on the
operation of your iPod.
1Infrared signal transmitter
Sends signals to the system you want to control.
2 (On/Standby)
Turns the system on or sets it to standby mode.
3MENU
Returns to the upper level in the iPod menu.
4
Skips to the next song. Press and hold to fast forward.
5
Skips to the beginning of the current track. Press twice to
skip back to the previous track. Press and hold to fast
reverse.
6ENTER
Press ENTER to enter the selected group. (Pressing
ENTER starts playback when a song is selected.)
7
Starts or Pauses Playback.
8Input selection keys
Selects the input source on the receiver.
When selecting an input source, press the corresponding
input selection key (or turn INPUT on the front panel).
The name of the corresponding input source appears on
the front panel display of the receiver.
y
When DISC is selected as an input source, the BD player turns on
automatically and when other input source is selected, the BD
player sets to standby mode.
9MEMORY
Stores a preset station in the memory (☞p.27). Starts
Automatic preset tuning (☞p.26).
0MONO
Sets FM broadcasting receiving mode to monaural mode.
Remote control
1234
56
90
78
E
NT
E
RCL
E
AR
MUT
E
E
NT
E
R
VOLUME
AUX
TUN
E
R
iPod SHUFFLE
R
EPE
AT
MENU
ENTER
E
O
NM
O
N
O
M
E
M
O
R
Y
PRESET TUNING
DISC
DISPLAY TIMER SLEEP DIMMER
OPTION PURE DIRECT
AUDIO SUBTITLE ANGLE
REPEAT
ON SCREEN
RETURN
PinP SETUP
A B C D
EXIT
TOP MENU/TITLE LIST
POP UP MENU
J
1
M
N
O
P
Q
R
S
t
U
V
W
X
Y
Z
[
\
]
`
a
b
c
d
f
e
2
3
4
5
6
7
8
9
0
A
B
C
D
E
F
G
H
I
J
K
L

7 En
CONTROLS AND FUNCTIONS
English
INTRODUCTION
ATP
Enters TP (Traffic Program) data service receiving mode
(☞p.29).
BTIMER
Shows the current time on the front panel display of the
receiver.
And sets the clock (☞p.12) or the timer (☞p.30).
CDISPLAY
Switches the information shown on the front panel display
of the receiver or the TV screen for the BD player (☞p.23,
p.28).
DOPTION
Enters option menu mode.
See pages 27, 29 and 41 for option menu items.
EA/B/C/D
Used when input source is set to DISC.
FTOP MENU/TITLE LIST
Displays the BD/DVD’s top menu (☞p.18).
G, , , , ENTER
For selecting and confirming an item.
HEXIT
Exits the menu screen.
I
Pauses playback (☞p.17).
J
Stops playback (☞p.17).
K,
Rewind and fast-forward.
LNumeric keys
Input numbers.
MAUDIO
Selects the audio format and soundtrack (☞p.19).
NSUBTITLE
Selects subtitles (☞p.19).
OP in P
Uses the Picture in Picture function (☞p.24).
PREPEAT
Selects Repeat Play mode (☞p.19).
Q
Opens and closes the disc tray.
R,
Press or to switch an item in the selected group
(☞p.32).
SSHUFFLE
Selects mode of Shuffle Play (☞p.32).
TREPEAT
Selects mode of Repeat Play (☞p.32).
UTUNING
Press TUNING to Manual tuning and press and
hold TUNING to Automatic tuning (☞p.26).
VPRESET u / d
Select a preset station (☞p.27).
WDIMMER
Changes the brightness of the front panel display (☞p.16).
XPURE DIRECT
Turns on or off Pure Direct mode (☞p.15).
YSLEEP
Sets the sleep timer on the system (☞p.31).
ZPOP UP MENU
Displays the BD’s pop-up menu (☞p.18).
[VOLUME +/–
Adjusts the overall volume level on the receiver.
\RETURN
Returns to the previous menu (☞p.17).
]
Starts playback (☞p.17).
`MUTE
Turn off the volume (☞p.16).
a,
Skips to the beginning of the current or next chapter or
track.
bCLEAR
Clears an entry.
cENTER
Confirms an entry.
dON SCREEN
Displays disc information on-screen (☞p.23).
eANGLE
Selects an camera angle (☞p.19).
fSETUP
Displays the Setup menu (☞p.13).
/ d
d
d
d
/ d
d
d
d
/ d
d
d
d

PREPARATIONS
8 En
PREPARATION
Make sure you read the following procedure and note carefully before connecting the system. The remote control
and linked operation of the system only work when the receiver and the BD player are connected via
the system control cable. For information on the speakers (NS-BP300), refer to the owner’s manual supplied with it.
Connecting the system
1Connect the AUDIO IN ( PLAYER L/R) jacks of the receiver to the AUDIO OUT ( L/R) jacks of the BD player
using the supplied audio RCA stereo cable.
2Connect the SYSTEM CONNECTOR ( TO:PLAYER) jack of the receiver to the SYSTEM CONNECTOR
( TO:RECEIVER) jack of the BD player using the supplied system control cable.
3Connect the speaker terminals (L) of the receiver to the speaker terminals of the left speaker and the speaker terminals
(R) of the receiver to the speaker terminals of the right speaker using the speaker cables supplied with the speaker set
(NS-BP300).
4Connect the supplied FM antenna to the ANTENNA jack.
• Do not connect this unit or other components to the main power until all connections between components are complete.
• Do not let the bare speaker wires touch each other or any metal part of the receiver. This could damage the receiver and/or the
speakers.
• All connections must be correct: L (left) to L, R (right) to R, “+” to “+” and “–” to “–”. If the connections are faulty, no sound will be
heard from the speakers, and if the polarity of the speaker connections is incorrect, the sound will be unnatural and lack bass. Also,
refer to the owner’s manual for each of your components.
Notes
• The system control connection is used to transmit the remote control signals from the receiver to the BD player.
• When connecting speakers other than NS-BP300, use speakers having more than 6Ω impedance.
• If there is a problem of weak radio wave reception in your area or you want to improve radio reception, we recommend that you use
commercially available outdoor antennas. For details, consult the nearest authorized Yamaha dealer or service center.
PREPARATIONS
Connecting speakers/external components/antennas
CAUTION
A A
B
B
Receiver (R-840)
(Europe model)
BD player (BD-940) Left speaker
(NS-BP300)
Right speaker
(NS-BP300)
RCA stereo cable
(supplied)
System control cable
(supplied)
TV etc.
Subwoofer
Audio
out RCA
stereo
cable

PREPARATIONS
9 En
English
PREPARATION
Connecting a TV to the system
1Connect the system and your TV via the HDMI jack, COMPONENT jacks or VIDEO jack of the BD player and the
corresponding jack(s) of your TV.
2Set “TV screen” according to your TV (see “Setting the TV display” on page 13).
When connecting the system and your TV via the COMPONENT jacks, set the BD player as described in “Video Out
Select” (☞p.33).
When connecting the system and your TV via the HDMI jacks, set “HDMI Video Out” and “Audio Out” of “Audio
Video Settings” in the “Settings” menu (☞p.33, 34).
When connecting the system and your TV via the HDMI jacks, use HIGH SPEED HDMI cables that have the HDMI
logo (as shown on the cover).
You can output audio from the DIGITAL OUT jack and record it digitally on another device, or transmit audio signal to
an AV receiver or decoder to enjoy multichannel source audio.
After you made all connections, connect the power cables of this system and other components to AC wall outlets.
Connecting a recorder (CDR, MDR, etc.), AV receiver or decoder (CDR,
MDR, etc.)
Connecting power cables
BD player (BD-940)
Composite video cable
(supplied)
To AC wall outlet
To AC wall outlet
Receiver (R-840)
BD player (BD-940)

PREPARATIONS
10 En
The receiver is equipped with the iPod dock on the top
panel where you can station your iPod and control
playback of your iPod using the supplied remote control.
Use this receiver with iPod dock adapter (supplied with
your iPod or commercially available) appropriate for your
iPod. If you use this receiver without using an appropriate
iPod dock adapter, loose connection may result.
y
When the receiver is turned on or in standby mode, connect the
iPod during the playback. The receiver automatically starts
playback of iPod (for the fifth or later generation of iPod, iPod
touch, iPod Classic, or iPod nano).
Notes
• Only iPod (Click and Wheel), iPod nano, iPod Classic, iPod
mini and iPod touch are supported.
• Do not connect any iPod accessories (such as headphones, a
wired remote control, or an FM transmitter) to your iPod when
it is stationed in the iPod dock.
• Unless your iPod is firmly stationed in the iPod dock, audio
signals may not be output properly.
• Once the connection between your iPod and the receiver is
complete and the receiver is set to iPod mode (☞p.6),
“CONNECTED” appears on the front panel display. If the
connection between your iPod and the receiver fails, a status
message appears on the front panel display. For a complete list
of connection status message, see the iPod section in
“TROUBLESHOOTING” (☞p.42).
• When your iPod is stationed in the iPod dock of the receiver,
your iPod can be charged automatically even when the receiver
is in standby mode.
• You can disconnect the iPod during the playback.
You can enjoy a variety of contents with interactive
functions by connecting to the internet when playing BD-
LIVE compatible discs. See pages 24 and 36 regarding
further information on BD-LIVE functions.
Be sure to turn off the BD player and the equipment
before making any connections.
Notes
• You can connect a USB memory device (2GB or greater and
formatted with FAT 32/16) to the USB BD STORAGE/
SERVICE terminal to save the BD-LIVE data or to update the
software of the BD player.
• A broadband internet connection is required.
• When using a broadband internet connection, a contract with an
internet service provider is required. For more details, contact
your nearest internet service provider.
• Refer to the operation manual of the equipment you have as the
connected equipment and connection method may differ
depending on your internet environment.
• Use a network cable/router supporting 10BASE-T/100BASE-
TX/1000BASE-T.
• Use only an STP (shielded twisted pair) network cable.
■After connecting
• Perform the communication setting (☞p.36).
• Load a BD-LIVE compatible disc and play back the
contents (☞p.24).
Connecting an iPod™
iPod
INPUT
PHONES
BASS
-+ -+ LR
TREBLE BALANCE
PRESET PURE DIRECT
VOLUME
MIN MAX
Receiver
iPod
iPod dock adapter
Connecting to the Internet
CAUTION
LAN
BD player
Internet
Network cable
(commercially available)
2
To LAN
terminal
PC
3To USB BD
STORAGE/
SERVICE
terminal
USB memory device
(commercially available)
Modem Hub or
broadband
router
1
To NETWORK
terminal

PREPARATIONS
11 En
English
PREPARATION
■Notes on batteries
• Change both batteries when the operation range of the
remote control decreases.
• Use AAA, R03, UM-4 batteries.
• Make sure that the polarities are correct. See the
illustration inside the battery compartment.
• Remove the batteries if the remote control is not to be
used for an extended period of time.
• Do not use old batteries together with new ones.
• Do not use different types of batteries (such as alkaline
and manganese batteries) together. Read the packaging
carefully as these different types of batteries may have
the same shape and color.
• If the batteries have leaked, dispose of them
immediately. Avoid touching the leaked material or
letting it come into contact with clothing, etc. Clean the
battery compartment thoroughly before installing new
batteries.
• Do not throw away batteries with general house waste;
dispose of them correctly in accordance with your local
regulations.
The remote control transmits a directional infrared beam.
Be sure to aim the remote control directly at the remote
control sensor on the front panel of the receiver during
operation.
Notes
• The area between the remote control and the receiver must be
clear of large obstacles.
• Do not spill water or other liquids on the remote control.
• Do not drop the remote control.
• Do not leave or store the remote control in the following types
of conditions:
– high humidity, such as near a bath
– high temperature, such as near a heater or a stove
– extremely low temperatures
– dusty places.
• Do not expose the remote control sensor to strong lighting, in
particular, an inverter type fluorescent lamp; otherwise, the
remote control may not work properly. If necessary, position the
system away from direct lighting.
Installing the batteries in the
remote control
13
2
Using the remote control
INPUT
BASS
PHONES
VOLUME
MIN MAX
TREBLE BALANCE
PRESET PURE DIRECT
LR
1234
56
90
78
ENTER CLEAR
MUTE
ENTER
VOLUME
AUX
TUNER
iPod SHUFFLE
REPEAT
MENU
ENTER
EON MONO
MEMORY
PRESET TUNING
DISC
DISPLAY TIMER SLEEP DIMMER
OPTION PURE DIRECT
AUDIO SUBTITLE ANGLE
REPEAT
ON SCREEN
RETURN
PinP SETUP
A B C D
EXIT
TOP MENU/TITLE LIST
POP UP MENU
30˚ 30˚
Within 6 m
(20 feet)
Receiver (R-840)

PREPARATIONS
12 En
Before starting playback operation, follow the procedure
below to adjust the clock setting of the receiver.
Notes
• Use the remote control to set the clock. You cannot set the clock
with the buttons on the receiver.
• The receiver supports 24-hour clock display.
• If you do not touch any key for 90 seconds, the receiver returns
to normal mode.
1Press to turn the receiver on.
The front panel display lights up.
2Press TIMER to show the current time.
If the clock is not set, “SET TIME” flashes on the
display.
Press ENTER to proceed to step 3.
3Press / to select “TIME”, and press
ENTER.
The receiver enters clock setting mode. The hour
digits start flashing.
4Set the hour using / , and press .
The minute digits start flashing.
5Set the minutes using / , and press
ENTER.
The hour and minute digits start flashing.
To change the hour or minutes again, press or ,
do steps 4 and 5, and proceed to step 6.
6Press ENTER.
The clock is set.
The hour and minute segments stop flashing and
remain on. The receiver returns to normal mode.
y
You can return to the previous screen by pressing or
RETURN.
Adjusting the Clock
ABCD
EXIT
TOP MENU/TITLE LIST
POP UP MENU
TIMER
ENTER ,
RETURN
Flashes
Flashes
Flashes

SETTING THE SYSTEM
13 En
English
PREPARATION
Make sure that you have completed all the necessary
connections (see “Connecting a TV to the system” on
page 9).
1Turn on the TV to which the BD player is
connected.
Select the TV input to match the input connected to
the BD player.
2Press to turn on the receiver.
3Press DISC.
Set the aspect ratio of the BD player according to the TV
you have connected (☞p.33).
1Press SETUP.
The setup menu appears on the screen.
2Press /// to select “Settings”, and then
press ENTER.
3Press / to select “Audio Video Settings”,
and then press ENTER.
4Press / to select “TV Aspect Ratio”, and
then press ENTER.
5Press / to select the aspect ratio of the TV
and then press ENTER.
For details on the aspect ratio option, see page 33.
6Press SETUP or EXIT to exit the setup menu.
y
You can return the previous menu by pressing RETURN.
You can select your preferred language settings so that the
BD player will automatically switch to your preferred
language whenever you load a disc. If the language
selected is not available on the disc, the disc’s default
setting language will be used instead. The OSD (on-screen
display) language for the BD/DVD setup menu will
remain as you set it, regardless of various disc languages.
1Press SETUP.
2Press /// to select “On Screen
Language”, and then press ENTER.
3Press / to select a language, and then
press ENTER.
SETTING THE SYSTEM
Turn on the TV and the system
Setting the TV display
EXIT
TOP MENU/TITLE LIST
POP UP MENU
SETUP
, , , ,
ENTER
Settings
Picture
On Screen Language
Displays The Title List
On-screen display (OSD) language
Audio Video Settings
Quick Start
HDMI Control
Playback Setting
Communication Setup
Version
USB Memory Management
Software Update
System Reset

SETTING THE SYSTEM
14 En
1Press SETUP.
2Press /// to select “Settings”, and then
press ENTER.
3Press / to select “Playback Setting”, and
then press ENTER.
4Press / to select “Disc Language”, and
then press ENTER.
5Press / to select the item below.
• Subtitle
• Audio
•Menu
6Press / to select a language, and then
press ENTER.
Audio, Subtitle and Disc menu
languages

SYSTEM OPERATIONS
15 En
English
BASIC
OPERATIONS
BASIC OPERATIONS
Follow the procedure below to select an input source and adjust the sound settings on the system.
1Press (On/Standby) to turn on the receiver.
Depending on input mode of the receiver, the BD
player also turns on by the system control connection
(☞p.8). The front panel display lights up.
2Press one of the input selection keys (or
rotate INPUT on the front panel) to select the
desired input source.
3Start playback on the selected source
component or select a radio station.
For information on the disc playback, see page 17,
and for information on tuning, see page 26.
4Press VOLUME +/– (or turn VOLUME on the
front panel) to adjust the volume to the
desired output level.
5Rotate BASS, TREBLE, or BALANCE on the
front panel of the receiver to adjust the
following settings.
BASS: Adjusts the low frequency response.
TREBLE: Adjusts the high frequency response.
BALANCE: Adjusts the volume level of each left
and right speaker channel.
■Pure Direct mode
Pure Direct mode bypasses the tone control circuit and
turns off the front panel display, allowing you to enjoy
pure high-fidelity sound.
Press PURE DIRECT (or PURE DIRECT on the
front panel) to turn on Pure Direct mode.
The front panel display automatically turns off. PURE
DIRECT on the front panel is backlit in blue.
Notes
• If you carry out operations while Pure Direct mode is turned on,
the front panel display of the receiver lights up briefly to
acknowledge the command.
• While the Pure Direct mode is turned on, neither BASS,
TREBLE, nor BALANCE is available.
To turn off Pure Direct mode
Press PURE DIRECT again. The PURE DIRECT
backlight turns off and the front panel display turns on.
SYSTEM OPERATIONS
INPUT
BASS
PHONES
VOLUME
MIN MAX
TREBLE BALANCE
PRESET PURE DIRECT
LR
TP
TIMER
QUICK
INPUT
(On/Standby) VOLUME
PURE
DIRECTBASS BALANCE
TREBLE
A B C D
EXIT
TOP MENU/TITLE LIST
POP UP MENU
(On/Standby)
VOLUME +/–
Input selection
keys
PURE DIRECT
MUTE
Basic system operations

SYSTEM OPERATIONS
16 En
■Muting the sound (MUTE)
Press MUTE to reduce the current volume level
by approximately 20dB.
“MUTE ON” appears on the front panel display.
Press MUTE again to restore the audio output to the
previous volume level.
You can dim the front panel display of the receiver. The
front panel display of the BD player also dims by the
system control connection (☞p.8). (The default setting is
“DIMMER OFF”.)
Press DIMMER.
You can choose your desired brightness of the front panel
display between normal (bright), mid dim, and dim.
You can connect your headphones to the PHONES jack on
the front panel of the receiver.
The sound from the speakers and the subwoofer stops.
Changing the brightness of the
front panel display
To use headphones
DIMMER
INPUT
PHONES

DISC OPERATIONS
17 En
English
BASIC
OPERATIONS
This chapter explains how to play discs.
When the input source is DISC, you can operate various
functions and settings by using the on-screen menus that
appear on the connected TV.
You can operate these keys when input mode is set to
DISC.
y
• You can change the language of the on-screen display with the
OSD Language setting (☞p.13).
• The buttons that you can use with each menu are shown at the
bottom of each screen.
See page 3 for more details on supported disc types and
file formats.
1Press on the front panel of the BD player.
2Place the disc, label-side up, in the center of
the disc tray, and then press .
The disc tray closes and the disc is loaded.
3Press .
• If you loaded a BD/DVD disc, a menu may appear.
See “BD/DVD menus” (☞p.18) for more details.
• If you loaded a disc containing JPEG pictures, a
slideshow will start. See “Playing JPEG
slideshows” (☞p.20) for more details.
To stop playback, press .
You can later continue playback from where you left
off simply by pressing (Resume function).
Resume function may not work depending on the
disc.
To playback from the beginning of a disc, cancel
resume mode by pressing again.
Notes
• To play a double-sided DVD, load it with the side you want to
play facing down.
• If you press on the front panel while the BD player is on
standby, this system automatically turns on and selects DISC as
the input source. The disc tray opens and the system is now
ready for playback.
• With some discs, some of the playback functions explained in
this chapter may not work as expected, and some may not work
at all.
• Some BD/DVDs restrict the use of certain functions, for
example, resume function, random playback or repeat playback,
in some or all parts of the disc. This is not a malfunction.
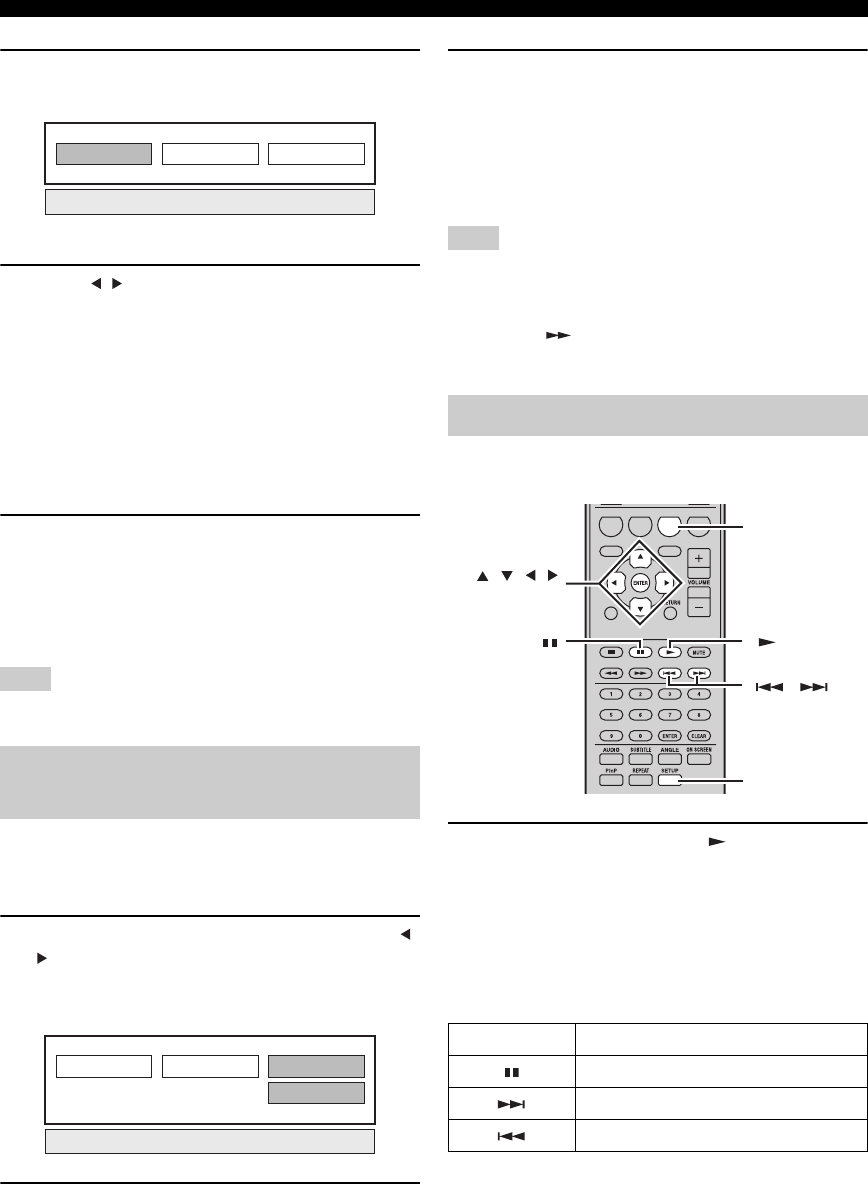
Press .
To resume playback, press again, or press .
For an Audio CD, press or to pause playback.
DISC OPERATIONS
Using the on-screen display
Button Description
SETUP Displays the Setup menu for the BD player
Cursor
()/()
Selects menu items
ENTER Confirms item selection
RETURN Returns to the previous menu
A B C D
EXIT
TOP MENU/TITLE LIST
POP UP MENU
Numeric keys
TOP MENU/
TITLE LIST POP UP MENU
RETURN
, , ,
ENTER
SETUP
, ,
Playback operations
Pausing playback

DISC OPERATIONS
18 En
During playback, you can rewind or fast forward at
various speeds.
Press to rewind or to fast forward.
The rewind or forward speed changes each time you press
or .
The speed is displayed on-screen.
To resume normal playback, press .
■To select the next chapter or track
Press .
■To select the previous chapter or track
Press twice.
If you press only once, playback returns to the
beginning of the current chapter or track.
Most BD/DVD have menus from which you can select
what you want to watch. Usually, the main menu appears
automatically, although with some discs, you may need to
press TOP MENU/TITLE LIST or POP UP MENU to
display the menu.
The following buttons can be used with menus.
*1 Depends on the disc.
*2 May work the same as the TOP MENU/TITLE LIST button
with some discs.
Notes
• The procedure explained on this page is the basic operation
procedure. Procedures vary depending on the BD/DVD, so you
may need to follow the instructions in the BD/DVD manual or
the instructions displayed on the screen.
• With some BD/DVD, the top menu may be referred to as the
“Title Menu”. Use TOP MENU/TITLE LIST when the
instructions refer to “Title Menu”.
• If no top menu is available, TOP MENU/TITLE LIST will have
no effect.
• The top menu screen may be displayed by pressing POP UP
MENU depending on the DVD.
You can play BD/DVD in slow motion. You can also play
DVD in reverse slow motion.
1During playback, press .
2Slow-motion playback functions when
or is pressed for more than 2 seconds
during pause.
To resume normal playback, press .
Notes
• Slow-motion playback does not work for audio CDs.
• Reverse slow-motion playback cannot be performed for BD.
You can play BD/DVD frame-by-frame. You can also play
DVD-Video discs frame-by-frame in reverse.
1During playback, press .
2Press or to play one frame at a
time.
To resume normal playback, press .
Notes
• Frame-by-frame playback may not function properly with discs
other than DVD-RW/R (VR format).
• Some BD/DVD are not compatible with frame-by-frame
playback.
• Frame advance/reverse playback can be performed for DVD by
pressing or during pause.
Rewind and fast forward
Selecting chapters and tracks
BD/DVD menus
Button Description
TOP MENU/
TITLE LIST
Displays the BD/DVD’s top menu*1
POP UP MENU Displays or closes the BD’s pop-up menu*2
()/()Selects menu items
ENTER Confirms item selection
Slow-motion playback
Frame-by-frame playback
,
,
DISC OPERATIONS
19 En
English
BASIC
OPERATIONS
Some BD/DVD discs have soundtracks in multiple
languages or audio formats, such as Dolby Digital and
DTS, that you can select during playback. Similarly, some
DVD-VR discs have dual-mono audio soundtracks.
During playback, press AUDIO repeatedly to
select the available soundtrack languages or
audio formats.
The name of the selected language or audio format is
displayed on-screen.
Notes
• With some discs, you can only select language soundtracks and
audio formats by using the disc’s menu. Use TOP MENU/
TITLE LIST and POP UP MENU to display the disc’s menu.
• You can change the default soundtrack language for BD/DVD
in the “Disc Language” (☞p.35).
Some BD/DVD discs have subtitles in one or more
languages that you can select during playback.
During playback, press SUBTITLE repeatedly to
select the available subtitles.
The name of the selected subtitle language is displayed
on-screen.
Notes
• With some discs, you can only select subtitles by using the
disc’s menu. Use TOP MENU/TITLE LIST and POP UP
MENU to display the disc’s menu.
• You can change the default subtitle language for BD/DVD in
the “Disc Language” (☞p.35).
Some BD/DVD-Video discs have content recorded at
multiple camera angles that you can select during
playback.
You can turn the camera icon ( ) on if you prefer
(☞p.35). This icon appears on-screen when playing
content that features multiple camera angles.
During playback, press ANGLE repeatedly to
select the available camera angles.
Notes
• With some discs, even though the camera icon ( ) is
displayed on-screen, you may not be able to select the camera
angles.
• With some discs, you can also select the camera angles from the
disc’s menu.
You can play a title, chapter, track, or disc repeatedly.
Selecting languages and audio
Selecting subtitles
EXIT
TOP MENU/TITLE LIST
POP UP MENU
AUDIO
TOP MENU/
TITLE LIST POP UP MENU
EXIT
TOP MENU/TITLE LIST
POP UP MENU
SUBTITLE
TOP MENU/
TITLE LIST POP UP MENU
Selecting camera angles
Repeat playback
ANGLE
EXIT
TOP
MENU/TITLE
LIST
POP
UP
MENU
RETURN
ENTER
REPEAT
,
DISC OPERATIONS
20 En
1During playback, press REPEAT.
The Repeat menu appears on-screen.
To close the Repeat menu, press RETURN.
2Press / to select Repeat options.
• Playback Title: Repeats the title currently being
played back.
• Playback Chapter: Repeats the chapter currently
being played back.
• Scene Selection: Repeats the specified scene of
title or chapter (☞“Repeat playback of a specified
part (A-B repeat)”).
For Audio CD, you can select “Playing Disc”,
“Playing Track” or “Specify The Part”.
3Press ENTER.
Repeat playback starts.
The available repeat options differ depending on the
type of disc.
To cancel repeat playback, press REPEAT during
playback.
Note
Repeat playback cannot be used with JPEG discs.
You can specify two points on a disc, and then play the
section between those two points repeatedly.
The A-B repeat function is not available with BD discs.
1During playback, press REPEAT, and then /
to select “Scene Selection”.
“Set Start Point” displays.
“A-” lights up on the BD player’s front panel display.
2Press ENTER at the scene where you want to
set the start point.
“Set End Point” displays.
“B” lights up on the front panel display.
3Press ENTER at the scene where you want to
set the end point.
The section between start point and end point is
played back repeatedly.
“REP” and “A-B” light up on the display.
To cancel repeat playback, press REPEAT.
To close the Repeat menu, press EXIT.
Note
The start and end points must be within the same title (DVD) or
track (Audio CD).
y
You can press to fast forward to the scene where you want
to set the end point.
You can play a slideshow of JPEG pictures on a CD-R/
CD-RW.
Load the disc, and then press to start the
slideshow.
Starting with the first picture in the first folder, the
slideshow displays every picture in every folder on the
disc in alphabetical order.
The pictures will be scaled automatically so that they
appear on-screen at the largest size possible.
The following buttons can be used during slideshow.
Repeat playback of a specified
part (A-B repeat)
Playback Title Scene Selection
Playback Chapter
Playback Title
Set Start Point
Scene SelectionPlayback Chapter
Playing JPEG slideshows
Button Description
Pauses the slideshow
Selects the next picture
Selects the previous picture
ABCD
EXIT
TOP MENU/TITLE LIST
POP UP MENU
, , ,
ENTER
C
SETUP
,

DISC OPERATIONS
21 En
English
BASIC
OPERATIONS
■Setting the slideshow speed or repeat
playback
1Press SETUP.
The Setup menu appears on-screen.
2Select “Picture”, and then press ENTER to
open the picture selection screen.
3Press C (Slideshow Menu).
4Press / to select “Slideshow Speed” or
“Repeat Mode Setting”, and then press
ENTER.
5Press /// to select the desired item,
then press ENTER.
You can select the slideshow speed from “Fast”,
“Normal”, “Slow1” and “Slow2”.
Note
Large pictures take longer to load and may not appear
immediately.
1Press SETUP.
The Setup menu appears on-screen.
2Select “Picture”, and then press ENTER to
open the picture selection screen.
3Use /// to select the folder that
contains the file(s) you want to play, then
press ENTER.
For playing back JPEG files, see “Playing JPEG
slideshows” (☞p.20).
You can play back a recorded disc (DVD: VR format
finalized disc only).
Note
“Finalize” refers to a recorder processing a recorded disc so that it
will play in other DVD players/recorders as well as this player.
Only finalized DVD discs will play back in this player. (This
player does not have a function to finalize discs.)
About Title List
The Title List can be displayed in two types, Thumbnail
and Title List. Each time you press A, the screen changes
between Thumbnail and Title List.
1Information of selected title
2Title Name
Recording Date
Recording Duration
3Caption for Color Button
Playing back still images in a
selected folder
Playing back movies recorded on a
DVD-R/DVD-RW
A B C D
EXIT
TOP MENU/TITLE LIST
POP UP MENU
,
, , , ,
ENTER
C
D
B
A
TOP MENU/
TITLE LIST
By Chapter
Playlist Functions
5/21 Fri 9:30 AM 110 Min.
Program 1
DCB
Title List
A
Program
1Program
2Program
3
Program
4Program
5Program
6
Sorting Playlist Functions
5/21
[From Old]
Fri 9:30 AM
1 Program 1 5/21 Fri 110 Min.
2 Program 2 6/15 Fri 110 Min.
3 Program 3 7/3 Mon 56 Min.
4 Program 4 9/18 Thu 40 Min.
110 Min.
Program 1
DCB
Thumbnail
A
1
2
3
1
3
Thumbnail
Title List

DISC OPERATIONS
22 En
■Playback by selecting a title
1Load a recorded disc.
The Title List screen is displayed.
If the Title List screen is not displayed, press TOP
MENU/TITLE LIST.
2Press /// to select the desired title,
then press ENTER.
Playback of the selected title will begin.
You can playback by pressing instead of pressing
ENTER.
To stop playback, press .
y
• The Title List screen also can be displayed by pressing TOP
MENU/TITLE LIST when playback is stopped or by pressing
ENTER after choosing “Displays The Title List” in Setup Menu
when playback is stopped.
• When the Thumbnail is displayed and seven or more titles exist,
switch pages by pressing or .
■Playback by selecting a chapter
1Press B while the Thumbnail screen is
displayed.
The chapter screen is displayed.
To return to the Thumbnail screen, press B.
2Press / / / to select the desired chapter,
then press ENTER.
Playback of the selected chapter will begin.
You can playback by pressing instead of pressing
ENTER.
To stop playback, press .
■Sorting the titles
Each time you press B while the Title List screen is
displayed, the Title List display changes between
displaying the newest title first and the oldest title first.
■Playback by selecting a Playlist
1Press C while the Thumbnail or Title List
screen is displayed.
The Playlist screen is displayed.
2Press / to select the title, then press
ENTER.
Playback of the selected title will begin.
To stop playback, press .
■Playing back the title you stopped while
being played
1Press D while the Thumbnail or Title List
screen is displayed.
2Press / to select the type of Playback,
then press ENTER.
Playback of the title will begin.
To stop playback, press .
This allows you to adjust various settings at once, like
subtitles, angle settings and the title selection for Direct
Playback. You can adjust the video and audio to suit your
preferences. The operations are the same for BD and
DVD.
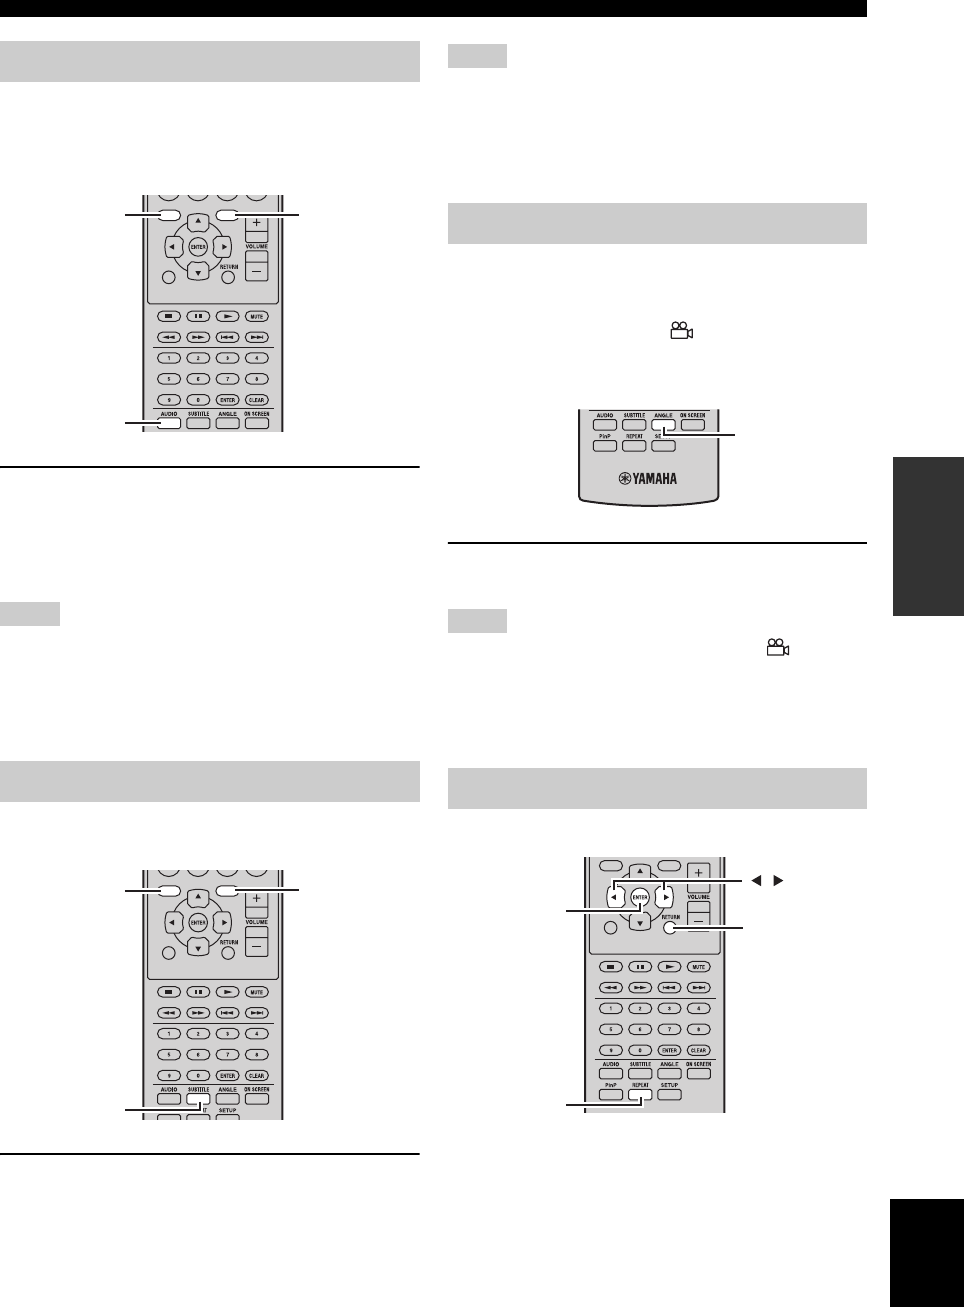
Press ON SCREEN during playback.
The Function Control screen is displayed on the TV.
Original Functions
5/21 Fri 9:30 AM
1 Program 1 5/21 Fri 110 Min.
2 Program 2 6/15 Fri 110 Min.
110 Min.
Program 1
DC
Using “Function Control Screen”
for BD/DVD
From Beginning From Continued
Playback
EXIT
TOP MENU/TITLE LIST
POP UP MENU
, , , ,
ENTER
RETURN
ON SCREEN

DISC OPERATIONS
23 En
English
BASIC
OPERATIONS
Function control screen
1Playback status display
Shows the operation status and the disc type.
2Setting items
Selects a title (or track) or chapter for playback, or
performs video/audio settings.
• Title/Track Number (Direct Title/Track Skip)
• Chapter Number (Direct Chapter Skip)
• Playback Elapsed Time (Direct Time Skip)
• Subtitle Language
• Angle Number
• Audio
•Repeat
3Operation guide display
Provides help on remote control button operations.
To close the Function Control Screen, press RETURN or
ON SCREEN.
Notes
• If “– –” is displayed for an option like title number or subtitles,
the disc has no titles or subtitles which can be selected.
• The displayed items vary depending on the disc.
• If you access the Function Control screen during playback of a
BD/DVD video, it may be impossible to operate the BD/DVD
video playback. In cases like this, close the Function Control
screen.
1Load an audio CD.
The CD Operation Screen is displayed.
2Press D when the CD Operation Screen is
displayed.
The “Functions” menu is activated.
Follow the operation guide.
Notes
• The displayed items vary depending on the disc.
• When playback is stopped, only “Track” can be selected.
You can view title, chapter, track, and other information
during playback.
During playback, press DISPLAY repeatedly to
display the information.
■To hide the information
Press DISPLAY repeatedly until it disappears.
BD-VIDEO
0 3 : 0 2 :0 0
1
1 / 3
5 . 1 c h
Return
Select Enter
5 5 / 2
2 English
1
Off
ENTER
1
2
3
Using “Functions” menu for Audio
CD
Viewing disc information
1Track 015:16
2Track 025:10
3Track 035:23
4Track 045:03
5Track 054:44
6Track 065:08
00:00:11
3/12
3/12
Off
3L+R
ReturnSelect Enter
Track select
5:23
0:00
Track 03Functions
D
Operation guide
DISPLAY
DISC OPERATIONS
24 En
The BD player supports BONUSVIEW (BD-ROM
Profile 1 Version 1.1) and BD-LIVE (BD-ROM Profile 2)
playback functions.
BONUSVIEW: BONUSVIEW compatible discs let you
simultaneously enjoy video sub-channel for two screens,
audio sub-channel and sub-titles. A small screen appears
within the main screen during playback (Picture in
Picture).
BD-LIVE: BD-LIVE compatible discs support all the
functions of BONUSVIEW while also enabling the BD
player to go online and enjoy promotion videos and other
data.
Note
Functions and playback method vary depending on the disc. See
the guidance on the disc or the supplied user’s manual.
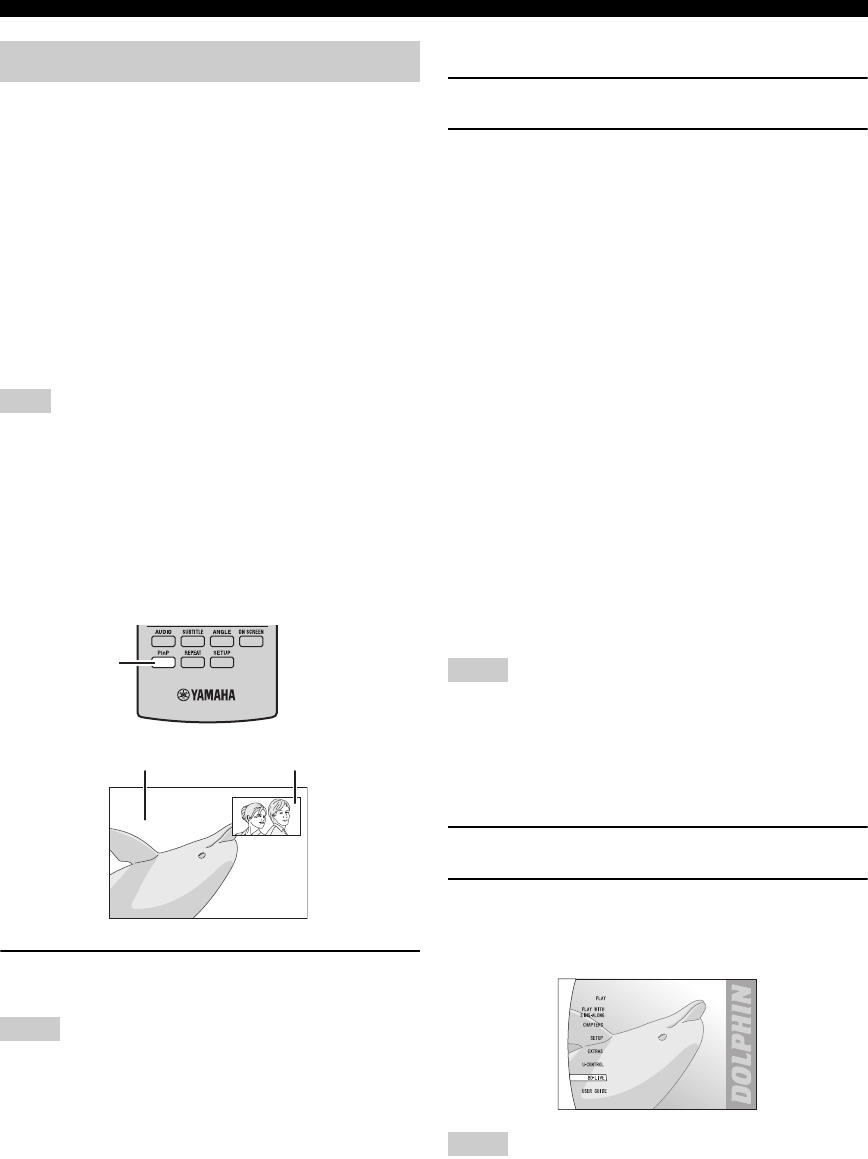
■Using Picture in Picture function
(secondary audio/video playback)
BD-Video that includes secondary audio and video
compatible with Picture in Picture can be played back
with secondary audio and video simultaneously as a small
video in the corner.
During playback, press P in P to turn the Picture
in Picture function on or off.
Notes
• To listen to secondary audio, make sure that “Secondary Audio”
is set to “On” (☞p.34).
• The secondary audio and video for Picture In Picture may
automatically play back and be removed depending on the
content. Also, playable areas may be restricted.
■Using the feature of BD-LIVE
1Set the network setting (☞p.36).
2Connect the USB storage device to the BD
player (☞p.10).
BD-LIVE data is saved in Local Storage (USB
memory device connected to this Player). To enjoy
these functions, connect a USB memory device (2GB
or greater and formatted with FAT 32/16) supporting
USB 2.0 High Speed (480Mbit/s) to the USB BD
STORAGE/SERVICE terminal (☞p.10) on the back
of this player.
• If there is insufficient storage space, the data will
not be copied/downloaded. Delete unneeded data
or use a new USB memory device.
• If a USB memory device containing other data
(previously recorded) is used, the video and audio
may not play back properly.
• If the USB memory device is disconnected from
this player during playback of BD-LIVE data,
playback of the disc will stop.
• Some time may be required for the data to load
(read/write).
• See “USB Memory Management” (☞p.39) for
erasing the BD-LIVE data in the USB memory
device.
Notes
• Yamaha cannot guarantee that all brands’ USB memory devices
will operate with this player.
• Do not use a USB extension cable when connecting a USB
memory device to the USB BD STORAGE/SERVICE terminal
of the player. Using a USB extension cable may prevent the
player from performing correctly.
3Play back the disc.
4Run BD-LIVE according to the instructions
on the disc.
The following illustration is an example.
Notes
• Regarding playback method of BD-LIVE contents, etc.,
perform the operations in accordance with the instructions in
the BD disc manual.
• To enjoy BD-LIVE functions, perform the broadband internet
connection (☞p.10) and communication settings (☞p.36).
• See “BD Internet Access” (☞p.35) regarding the setup to
restrict access to BD-LIVE contents.
Enjoying BONUSVIEW and BD-LIVE
P in P
Secondary video
Primary video

DISC OPERATIONS
25 En
English
BASIC
OPERATIONS
• The time required to download the provided programs into the
USB memory device connected to this player varies depending
on the internet connection speeds and the data volume of the
programs.
• BD-LIVE programs provided through the internet may not be
able to display the connection depending on the status
(updating) of the provider. In such cases, take out the disc and
try again.
• If the BD-LIVE screen does not appear for a while after you
select the BD-LIVE function in the BD disc menu, the USB
memory device may not have enough free space. In such cases,
eject the disc from the player, and then erase the data in the
USB memory device using the Data Erase menu in the “USB
Memory Management” menu (☞p.39).

FM TUNING
26 En
TUNER OPERATIONS
There are 2 tuning methods: automatic and manual. You can also use the automatic and manual preset tuning features to
store up to 30 stations.
Automatic tuning is effective when station signals are
strong and there is no interference.
1
Press TUNER to set the receiver to FM mode.
2Press and hold TUNING for more than
2 seconds to begin automatic tuning.
When the receiver is tuned into a station, the TUNED
indicator lights up and the frequency of the received
station is shown on the front panel display.
• Press to tune into a lower frequency.
• Press to tune into a higher frequency.
If the signal received from the station you want to select is
weak, tune into it manually.
1
Press TUNER to set the receiver to FM mode.
2Press TUNING to tune into the desired
station manually.
Follow the procedure below to preset radio stations
automatically.
1
Press TUNER to set the receiver to FM mode.
2Press and hold MEMORY for more than 2
seconds.
The PRESET indicator starts flashing on the front
panel display and automatic station preset starts.
When all frequencies are searched, preset stops
automatically.
• The search starts at the lowest frequency and goes
toward the highest frequency.
• The receiver automatically applies a preset number
to each detected station.
• To cancel the search, press MEMORY.
Notes
• You can preset up to 30 FM stations.
• Any stored station data existing under a preset station number is
cleared when you store a new station under the same preset
station number.
FM TUNING
Automatic tuning
Manual tuning
TUNING / d
d
d
d
TUNER
/ d
d
d
d
d
d
d
d
/ d
d
d
d
Automatic preset tuning
PRESET u / d
TUNER
MEMORY

27 En
FM TUNING
English
TUNER
OPERATIONS
You can store up to 30 stations.
1Tune into a radio station you want to preset.
See page 26 for tuning instructions.
2Press MEMORY.
The PRESET indicator flashes on the front panel
display for about 5 seconds.
3Press PRESET u / d repeatedly to select a
preset station number while the PRESET
indicator is flashing.
4Press MEMORY to store while the PRESET
indicator is flashing.
The PRESET indicator lights up on the front panel
display.
5Repeat steps 1 to 4 until all desired stations
are preset.
You can tune into any desired station simply by selecting
the preset station under which it was stored (☞p.26).
Press PRESET u / d repeatedly to select a
preset station.
y
• You can also use the front panel to select preset stations. Press
PRESET u / d repeatedly to select a preset station.
• When you press PRESET u / d on the front panel of the
receiver in standby mode, the receiver automatically activates
the tuner and tunes in to the preset station that you selected
previously.
■To delete the preset station
1Press TUNER to set the unit to FM mode.
2Press OPTION to display the option menu.
Press / to select “PRESET DEL” and
press ENTER.
3Press / to select the preset number you
want to delete and press ENTER.
The preset station is now deleted.
You can continue to delete preset stations on this
screen. Repeat steps 2 and 3 until all unnecessary
stations are deleted.
To cancel deleting operation
Press OPTION.
Manual preset tuning
PRESET u / d
MEMORY
Selecting preset stations
PRESET u / d
OPTION
TUNER

RADIO DATA SYSTEM TUNING (EUROPE MODEL ONLY)
28 En
Radio Data System (Europe model only) is a data transmission system used by FM stations in many countries. The Radio
Data System function is carried out among the network stations. This receiver can receive various Radio Data System
information such as PS (program service), PTY (program type), RT (radio text), CT (clock time) and TP (traffic program)
when receiving Radio Data System broadcasting stations.
Use this feature to display the 4 types of the Radio Data
System information: PS (program service), PTY (program
type), RT (radio text) and CT (clock time).
Notes
• You can select only the available Radio Data System modes
being offered by the station.
• If the signals being received are not strong enough, the receiver
may not be able to utilize the Radio Data System data. In
particular, “RT” mode requires a large amount of data and may
not be available even when other Radio Data System modes are
available.
• If the signal strength is weakened by external interference while
the receiver is receiving the Radio Data System data, the
reception may be cut off unexpectedly and “...WAIT” appears
on the front panel display.
• When “RT” mode is selected, the receiver can display the
program information by a maximum of 64 alphanumeric
characters, including the umlaut symbol. Unavailable characters
are displayed with the “_” (underscore).
While tuning into a Radio Data System station,
press DISPLAY repeatedly to select desired
Radio Data System display mode.
For description of program types, see the table below.
RADIO DATA SYSTEM TUNING (EUROPE MODEL ONLY)
Displaying the Radio Data System
information
DISPLAY
PS
PTY
RT
CT
Frequency
(program service)
(program type)
(radio text)
(clock time)
Program type Descriptions
News News
Affairs Current Affairs
Info Information
Sport Sport
Educate Education
Drama Drama
Culture Culture
Science Science
Varied Vari e d
Pop M Pop Music
Rock M Rock Music
Easy M Easy Listening Music
Light M Light Classical Music
Classics Serious Classical Music
Other M Other Music
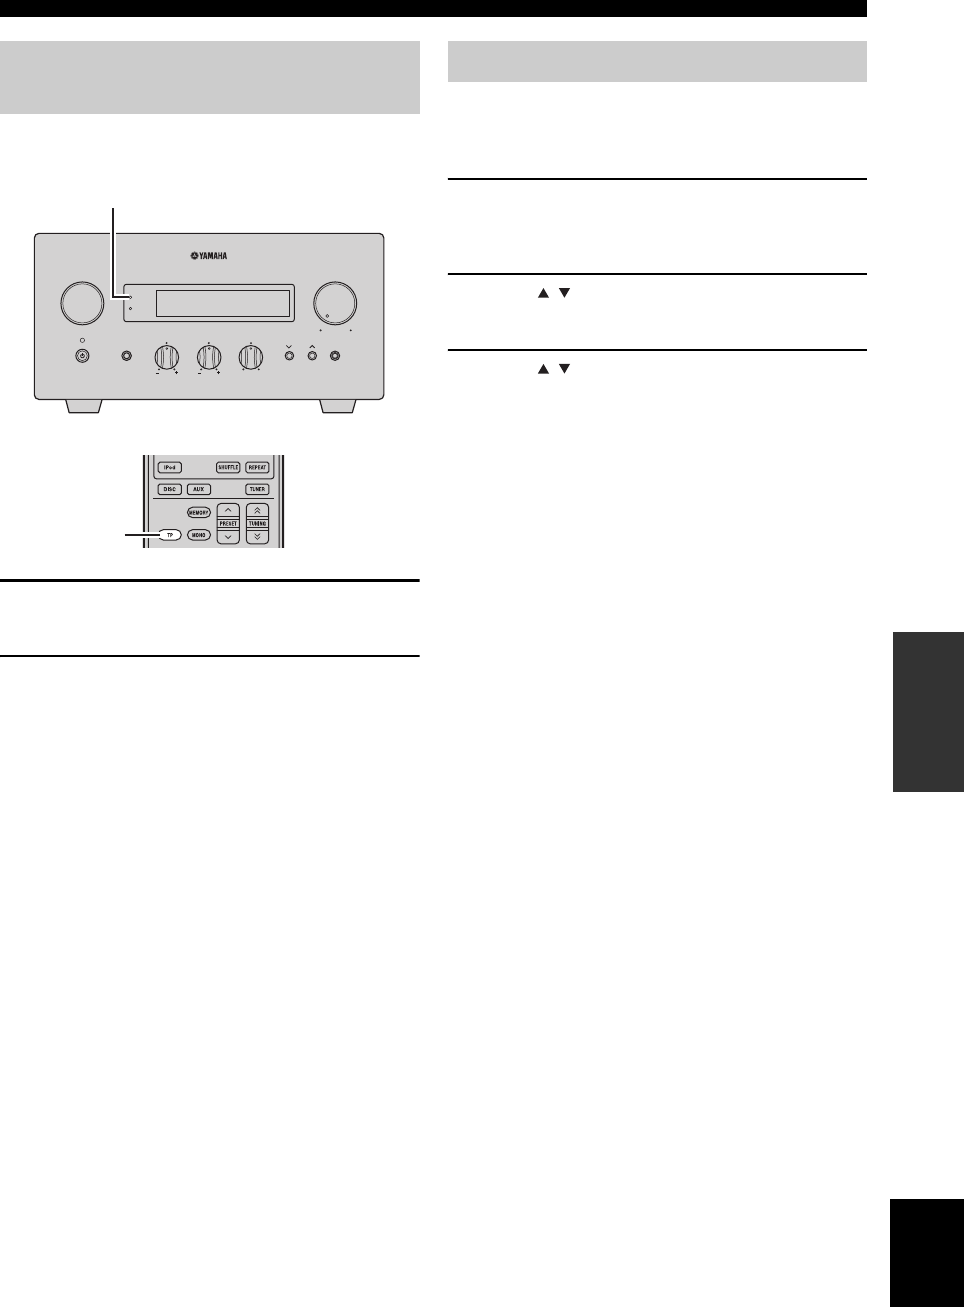
29 En
RADIO DATA SYSTEM TUNING (EUROPE MODEL ONLY)
English
TUNER
OPERATIONS
Use this feature to receive the TP (traffic program) data
service of the Radio Data System station network.
1Tune into the desired Radio Data System
broadcasting station.
2Press TP.
“TP SEARCH” flashes on the front panel display for
about three seconds, and the search starts.
The TP indicator on the receiver flashes during
search.
When the traffic program is received, the TP indicator
stays on and the search stops.
If you press TP, the search starts again.
If the receiver fails to receive the traffic program, the
TP indicator turns off and “NO TP” appears on the
display. The receiver returns to its previous state.
To cancel the search
Press TP during search.
You can use the CT information received from the Radio
Data System stations to adjust the built-in clock of the
receiver.
1Press OPTION.
An option menu item appears on the front panel
display.
2Press / to select “AUTO CLOCK”, and
press ENTER.
3Press / to select “ON” or “OFF”, and
press ENTER.
The “AUTO CLOCK” status is displayed.
The default setting is “ON”.
ON: Automatically adjusts the receiver clock using
the CT information.
OFF: Does not adjust the receiver clock.
To exit the option menu
Press OPTION.
Using the TP (traffic program) data
service
INPUT
BASS
PHONES
VOLUME
MIN MAX
TREBLE BALANCE
PRESET PURE DIRECT
LR
TIMER
TP
TP indicator
TP
CT (clock time) settings

SETTING THE TIMER
30 En
OTHER OPERATIONS
The receiver is equipped with 2 types of timer functions. The BD player also turns on or sets to standby mode
automatically by the system control connection (☞p.8).
The clock timer automatically turns the receiver on or sets
it to standby mode at the specified time. You can also
specify an input which the receiver automatically selects
when the clock timer turns it on.
Notes
• You cannot set the clock timer unless you adjust the clock
(☞p.12).
• If you do not touch any key for more than 30 seconds after the
previous key operation, the operations you made are cleared
from the memory and the normal display reappears.
1Press TIMER and / to select “TIMER”, and
then press ENTER.
The receiver enters timer setting mode. The TIMER
indicator flashes on the front panel display.
2Press or to select “ON” (timer enabled)
or “OFF” (timer disabled), and press ENTER.
ON: The timer clock setting screen appears. Proceed
to step 3.
OFF: The TIMER indicator turns off and the receiver
returns to normal mode.
Note
To disable the timer, select “OFF”. Once the timer is enabled, the
timer setting and the TIMER indicator remain on until “OFF” is
selected.
3Set the starting time of the timer.
For details on how to set the clock, see steps 4
through 6 of “Adjusting the Clock” (☞p.12).
4Press / or an input selection key to select
the input source to be used when the timer
turns on the receiver, and press ENTER.
The receiver automatically selects the input source
when it is turned on by the clock timer.
If FM is selected as the input source, the preset
number (e.g. “P01”) is shown on the front panel
display. Press / to select the preset number of the
station you want to hear when the timer is activated,
and press ENTER.
If you select “---” (default), the receiver selects the
station that you previously tuned in to.
If no station is registered as a preset station, “---” is
shown. Press ENTER and proceed to step 5.
You can only select a preset station. Register a station
that you want to hear when the timer is activated as a
preset station in advance (☞p.27).
Note
You cannot select AUX as an input source.
5Press / to set the operation time length of
the receiver.
You can select a length of time from 30 to 90 minutes
in 10-minute steps. Select “--” if you do not want the
receiver to automatically go to standby mode.
6Press ENTER to complete the timer setting.
The TIMER indicator lights up.
7Press to set the receiver to standby mode.
The receiver will be turned on automatically at the
specified time.
SETTING THE TIMER
Setting the clock timer
INPUT
BASS
PHONES
VOLUME
MIN MAX
TREBLE BALANCE
PRESET PURE DIRECT
LR
TIMER
TP
TIMER indicator
INPUT
ABCD
EXIT
TOP MENU/TITLE LIST
POP UP MENU
TIMER
Input selection
keys
ENTER ,
RETURN
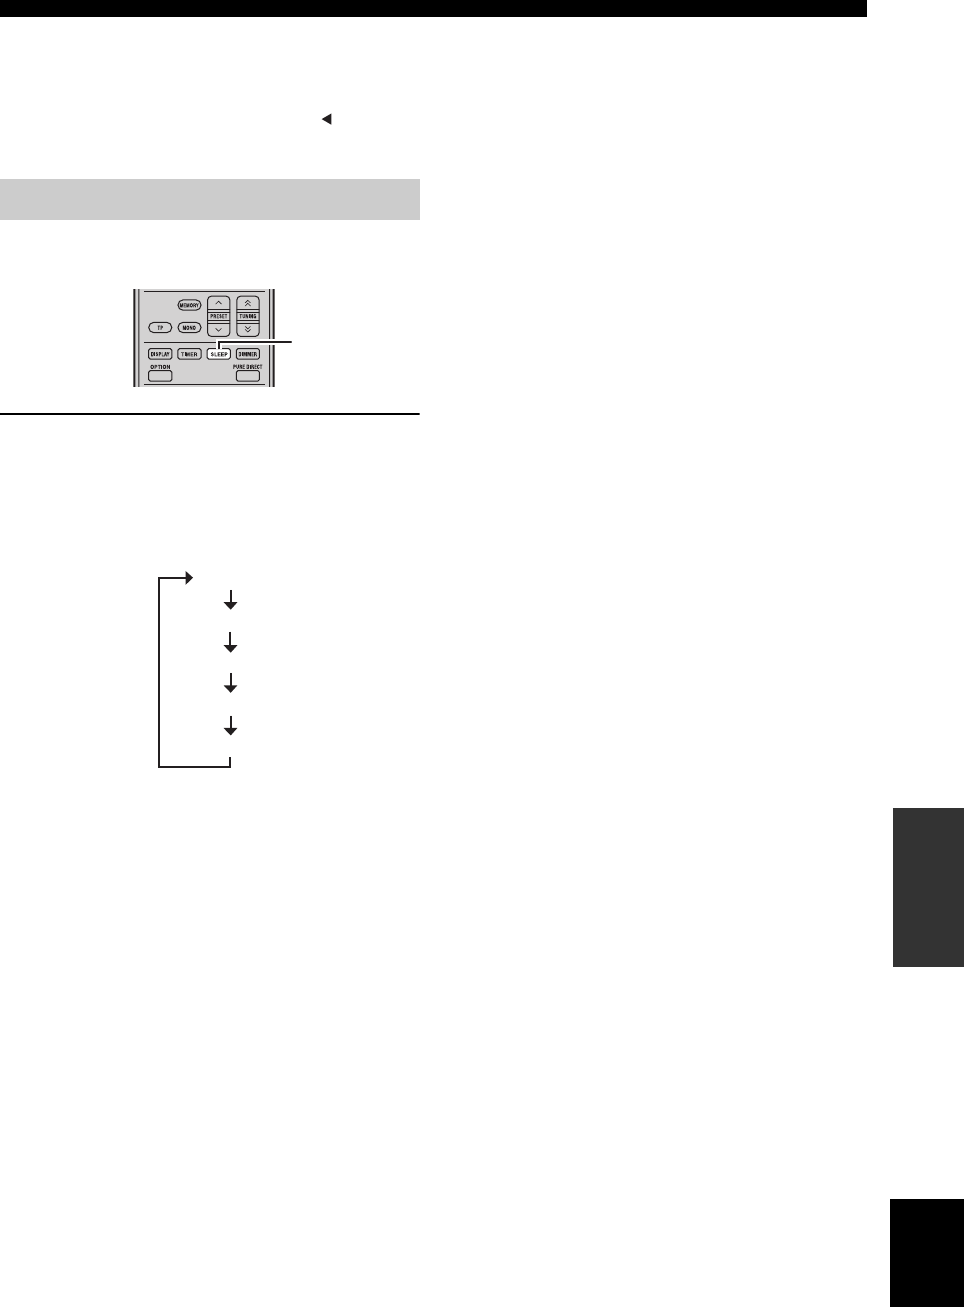
31 En
SETTING THE TIMER
English
OTHER
OPERATIONS
To cancel the timer setting operation
Press TIMER during the operation.
y
You can return to the previous screen by pressing or
RETURN.
The sleep timer sets the receiver to standby mode after the
specified time elapses.
Press SLEEP repeatedly to select the desired
duration.
Each time you press the key, the duration changes as
follows.
The SLEEP indicator lights up on the front panel display.
y
• The sleep timer is canceled if you set the receiver to standby
mode.
• If you press SLEEP once while the sleep timer is set, the
ongoing duration appears on the front panel display.
To cancel the sleep timer
Press SLEEP repeatedly to select “OFF”.
Setting the sleep timer
SLEEP
120min.
90min.
60min.
30min.
OFF

CONTROLLING iPod™
32 En
In addition to controlling the receiver (R-840) and BD player (BD-940), you can operate your iPod stationed in the iPod
dock using the supplied remote control.
Once you have stationed your iPod to the iPod dock, you can enjoy playback of your iPod using the supplied remote
control.
When connecting the iPod during the playback, this system automatically changes to iPod mode.
Notes
• Only iPod (Click and Wheel), iPod nano, iPod Classic, iPod mini and iPod touch are supported.
• Some features may not be compatible depending on the model or the software version of your iPod.
y
For a complete list of status messages that appear on the front panel display of the receiver, see the “iPod” section in
“TROUBLESHOOTING” (☞p.43).
1Press iPod to select the iPod as the input
source.
2Station your iPod to the iPod dock.
3Press / to operate the iPod menu, and
then press ENTER to start playback of the
selected song (or group).
• View the screen of the iPod to control the menu.
• Operate the iPod using the iPod controls or the
supplied remote control.
■Repeating playback (Repeat Play)
You can play back a single track or a group of tracks on
your iPod repeatedly.
Press REPEAT.
Each time you press the key, mode of Repeat Play
changes. The following chart is an example of how mode
changes as you press the key. Check currently selected
mode on your iPod screen.
■Playing back randomly (Shuffle Play)
You can play back songs or albums on your iPod
randomly.
Press SHUFFLE.
Each time you press the key, mode of Shuffle Play
changes. The following chart is an example of how mode
changes as you press the key. Check currently selected
mode on your iPod screen.
CONTROLLING iPod™
Using iPod™
The supplied remote control has the same function keys
with your iPod. So, these keys are corresponding with
each other.
iPod
,
ENTER
REPEAT
SHUFFLE
iPod Remote control
One (Repeat play by song)
All (Repeat play by selected group)
Off
Songs (Shuffle play by song)
Albums (Shuffle play by albums)
Off

33 En
English
OTHER
OPERATIONS
This chapter describes various menu of this unit.
After your turn on this unit and a TV (☞p.13), you can change settings on the TV screen using the remote control.
You can select menu items and change settings in the same way as the procedure of “Setting the TV display” (☞p.13).
Note
When you select “Parental Control” in “Playback Setting” (☞p.35), you must enter a 4-digit password. For the first time, the password
setting screen will appear. To set the password, see “PIN Code Setting” (☞p.35).
y
The default settings are marked with “*”.
■TV Aspect Ratio
You can set the screen aspect ratio of the connected TV,
and adjust the video output.
When replacing a TV with another, check if their aspect
ratio are the same. If not, change the settings of “TV
Aspect Ratio”.
“Normal 4:3” options
When you set “TV Aspect Ratio” to “Normal 4:3” and
watch a 16:9 video on a 4:3 TV, select one of the following
options.
■Component Video Out
You can set the component video output resolution.
Some TV are not fully compatible with the Blu-ray disc
player, which may cause the image distortion. In this case,
set “Component Video Out” to the default setting
(☞p.41).
1080i, 720p, 576/480p, 576/480i*
Note
Some discs prohibit high definition video output from the
COMPONENT jacks. In this case, the video resolution is
converted to 576/480p or 576/480i.
■HDMI Video Out
You can set the HDMI video output resolution.
Some TV are not fully compatible with the Blu-ray disc
player, which may cause the image distortion. In this case,
set “HDMI Video Out” to the default setting (☞p.41).
“HDMI Video Out” will be reset to “Auto” (factory preset
value).
Auto*, 1080p, 1080i, 720p, 576/480p
Note
When the BD player is connected to a 1080p/24Hz compatible
TV and the “HDMI Video Out” is set to “Auto”, 1080p/24Hz will
automatically be displayed when compatible discs are played
back.
At 1080p/24Hz or 1080p/60Hz, there is no output from the
COMPONENT jacks and VIDEO jack.
■Video Out Select
Video signals can be output simultaneously from the
analog video jacks (component or video jacks) and the
HDMI jack. This is called dual output. When using the
component video and HDMI outputs, the video output
resolution is determined based on the settings of
“Component Video Out” or “HDMI Video Out” and
“Video Out Select”. See the table below for details.
SETTINGS OF THE BD PLAYER
Audio Video Settings
Wide 16:9*:Select this when connecting a widescreen
(16:9) TV.
Normal 4:3: Select this when connecting a 4:3 TV.
Letter Box*:Displays an image with black bands at the top
and bottom while maintaining the 16:9 aspect
ratio.
Pan Scan: Displays an image without changing the
aspect ratio by cropping its right and left
edges. This option is available only for discs
labeled with 4:3PS.
HDMI*:Determines video output resolution based on
the HDMI Video Out setting (see “HDMI
Video Out” (☞p.33)).
Component: Determines video output resolution based on
the Component Video Out setting (see
“Component Video Out” (☞p.33)).
34 En
SETTINGS OF THE BD PLAYER
*1 Some discs prohibit high definition video output from
COMPONENT jacks. In this case, video resolution is
converted to 480p/576p (when “Video Out Select” is set to
“Component”) or 480i/576i (when “Video Out Select” is set
to “HDMI”).
*2 No video output when 1080p signal is output from the HDMI
jack.
*3 CVBS Out means the video output signal from the VIDEO
jack.
Note
If your TV is not compatible with the selected resolution, images
may not be displayed correctly.
y
You can also switch between “HDMI” and “Component” by
using “HDMI <-> COMP” (☞p.41).
■Secondary Audio
You can turn on and off secondary audio for the picture in
picture or audio commentaries.
On*, Off
y
When you set “Secondary Audio” to “Off”, this unit does not
output the clicking sound on the menu.
Select “Off” to enjoy high quality BD sound via the HDMI jack.
■Audio Out
You can set the audio output suitable for your playback
environment.
“HDMI Output” options
When you set “Audio Out” to “HDMI Output”, select one
of the following options.
Note
When “Secondary Audio” is set to “On”, the “HDMI Output”
option is automatically set to “PCM”.
“Digital Output” options
When you set “Audio Out” to “Digital Output”, select one
of the following options.
■Dynamic Range Control
You can adjust the dynamic range so that sound is output
at average volume. If you cannot hear dialog clearly,
change the setting of this menu.
Note
Turn the volume down prior to changing this setting; otherwise,
loud sound may be output from speakers or an excessive
electrical load is applied to them.
Settings on this Player Output Resolution
Video Out
Select
HDMI Video
Out
Component
Out CVBS Out*3
HDMI
Auto *1 480i/576i*2
1080p No Output No Output
1080i 1080i*1 480i/576i
720p 720p*1 480i/576i
480p/576p 480p/576p*1 480i/576i
Settings on this Player Output Resolution
Video Out
Select
Component
Video Out HDMI Out CVBS Out*3
Component
1080i*1 1080i*1 480i/576i
720p*1 720p*1 480i/576i
480p/576p 480p/576p 480i/576i
480i/576i 480i/576i 480i/576i
HDMI Output: Outputs an audio signal via the HDMI jack.
Digital Output: Output an audio signal via the DIGITAL OUT
(OPTICAL) jack.
2ch Audio
Output*:
Outputs an audio signal via the AUDIO OUT
jacks.
Bitstream: Outputs a bitstream audio signal.
Select this option when connecting an HDMI
component with a built-in decoder for
DOLBY DIGITAL, etc.
PCM*
(Surround):
Outputs a Linear PCM audio signal.
Audio signals recorded in different format,
such as DOLBY DIGITAL and DTS, are
decoded to Linear PCM and output.
Bitstream: Outputs a bitstream audio signal.
Select this option when connecting a surround
component with a built-in decoder for
DOLBY DIGITAL, etc.
PCM*:Outputs a PCM 2-channel audio signal.
Audio signals recorded in different format are
converted to PCM 2-channel audio signals
and output.
Select this option when connecting a 2-
channel stereo audio component.
Normal: Outputs sound in the same dynamic range as
the original sound.
Shift: Adjusts the dynamic range of Dolby Digital
audio so that dialog is clearly heard.
If sound is abnormal, set this to “Normal”.
Auto*:Automatically adjusts the dynamic range of
Dolby TrueHD audio.

35 En
SETTINGS OF THE BD PLAYER
English
OTHER
OPERATIONS
The Quick Start function lets you start this unit quickly.
Note
When “Quick Start” is set to “Yes”, the BD player requires some
time to turn off.
You can set this unit to automatically turn off after about
10 minutes since playback is stopped.
Yes, No*
You can set this unit to receive an HDMI control signal
from the remote control of your TV if it supports the
HDMI control and is connected to this unit via an HDMI
cable.
Yes, No*
Notes
• For details, refer to the operation manual of TV.
• The HDMI control function may not work during playback or
when the Setup menu is displayed.
• You can use this function only when “Video Out Select” is set
to “HDMI”.
■Parental Control
Some digital broadcasts and BD/DVD include rating code
to block the display of contents for a certain age group.
You can select a level to block BD/DVD with undesired
ratings from playing back on this unit.
“Playback Setting” provides another option “Country
code”. Because the ratings differ depending on countries,
you also need to set the country code.
To set a level or country code, you must set a 4-digit
password and enter it.
For DVD
For BD
Country code
Sets the country code.
See the Country Code List (☞p.51) because the ratings
differ according to the country.
■Disc Language (Disc Priority Language)
You can select the language for subtitles, audio and menus
displayed on the screen.
See “Language list” (☞p.51) for available languages.
■Angle Mark Display
Some BD/DVD videos have multiple angles. When you
watch those videos, you can display an angle mark on the
lower right of the screen.
■PIN Code Setting
You can set the password for setting or changing the
Parental Control level.
Notes
• When you forget the password, you can reset the current
password using “System Reset” (☞p.39).
• You can change the password if desired.
When setting the PIN code for the first time
1Press / to select “Yes”, then press
ENTER.
2Enter a 4-digit number.
3Enter the same 4-digit number again to
confirm.
4Press ENTER to exit the PIN code setting
screen.
y
• You can clear the 4-digit number by pressing CLEAR.
• You can use another ENTER (c☞p.7) on the remote control.
■BD Internet Access
You can set access restriction to BD-LIVE contents.
Quick Start
Yes: Enables the Quick Start function.
The QUICK indicator lights up in standby
mode (☞p.5).
No*:Disables the Quick Start function.
The power consumption in standby mode is
lower.
Auto Power Off
HDMI Control
Playback Setting
Level 8 and Off*:Does not restrict playback of DVD.
Level 1-7: Prohibits playback of DVD with
corresponding ratings.
No Limit*:Does not restrict playback of BD.
0-99 year(s): Prohibits playback of BD with corresponding
ratings.
Yes: Displays the angle mark.
No*:Does not display the angle mark.
Yes: Sets the password.
You are prompted to enter the 4-digit number.
No: Does not set a password.
Permit: Permits internet access for all BD-LIVE discs.
Limit*:Permits internet access for BD-LIVE discs
with owner certification only.
Prohibit: Prohibits internet access to all discs.

36 En
SETTINGS OF THE BD PLAYER
Notes
• The available functions differ depending on the disc.
• Regarding playback method of BD-LIVE contents, etc.,
perform the operations in accordance with the instructions in
the BD disc manual.
• To enjoy BD-LIVE functions, see “Connecting to the Internet”
(☞p.10) and “Communication Setup” (☞p.36).
This allows you to perform and/or change the
communication setting. This setting is required to use BD-
LIVE functions that connect to the internet.
Notes
• Make sure that the LAN cable is connected to this Player
(☞p.10).
• For manually performing the setting, the following information
of the connected router or modem is required. Confirm the
information prior to the setting.
– IP address, netmask, gateway, DNS IP address
• Besides, if specifying a proxy server, the following information
specified from your internet service provider is also required.
Confirm the information prior to the setting.
– IP address and port number of the proxy server
1Press SETUP.
2Press / / / to select “Settings”, then
press ENTER.
3Press / to select “Communication Setup”,
then press ENTER.
4Select “Ethernet Setup (BD-LIVE)”, then
press ENTER.
5Press / to select “Change”, then press
ENTER.
For initializing the current setting, select “Initialize”,
then press ENTER.
6For setting the IP address, press / to
select “Yes” or “No”, then press ENTER.
• If selecting “Yes”: The IP address is automatically
obtained.
• If selecting “No”: The IP address, netmask and
gateway are manually entered using the screen for
inputting characters (☞p.38).
Regarding each of the setup values, confirm the
specifications of your broadband router.
7Select “Next”, then press ENTER.
8Enter the primary and secondary IP
addresses using the screen for inputting
characters (☞p.38).
Regarding each of the setup values, confirm
the specifications of your broadband router.
9Select “Next”, then press ENTER.
Communication Setup
EXIT
TOP MENU/TITLE LIST
POP UP MENU
, , ,
ENTER
SETUP
Setting the info. of the Ethernet
[Current Setup]
: Auto Setup
: Auto Setup
: Auto Setup
: Auto Setup
: Not Use
IP Address
Netmask
Gateway
DNS
Proxy
Change Initialize
Do you obtain the IP address
automatically?
IP Address
Netmask
Gateway
Next
Yes No
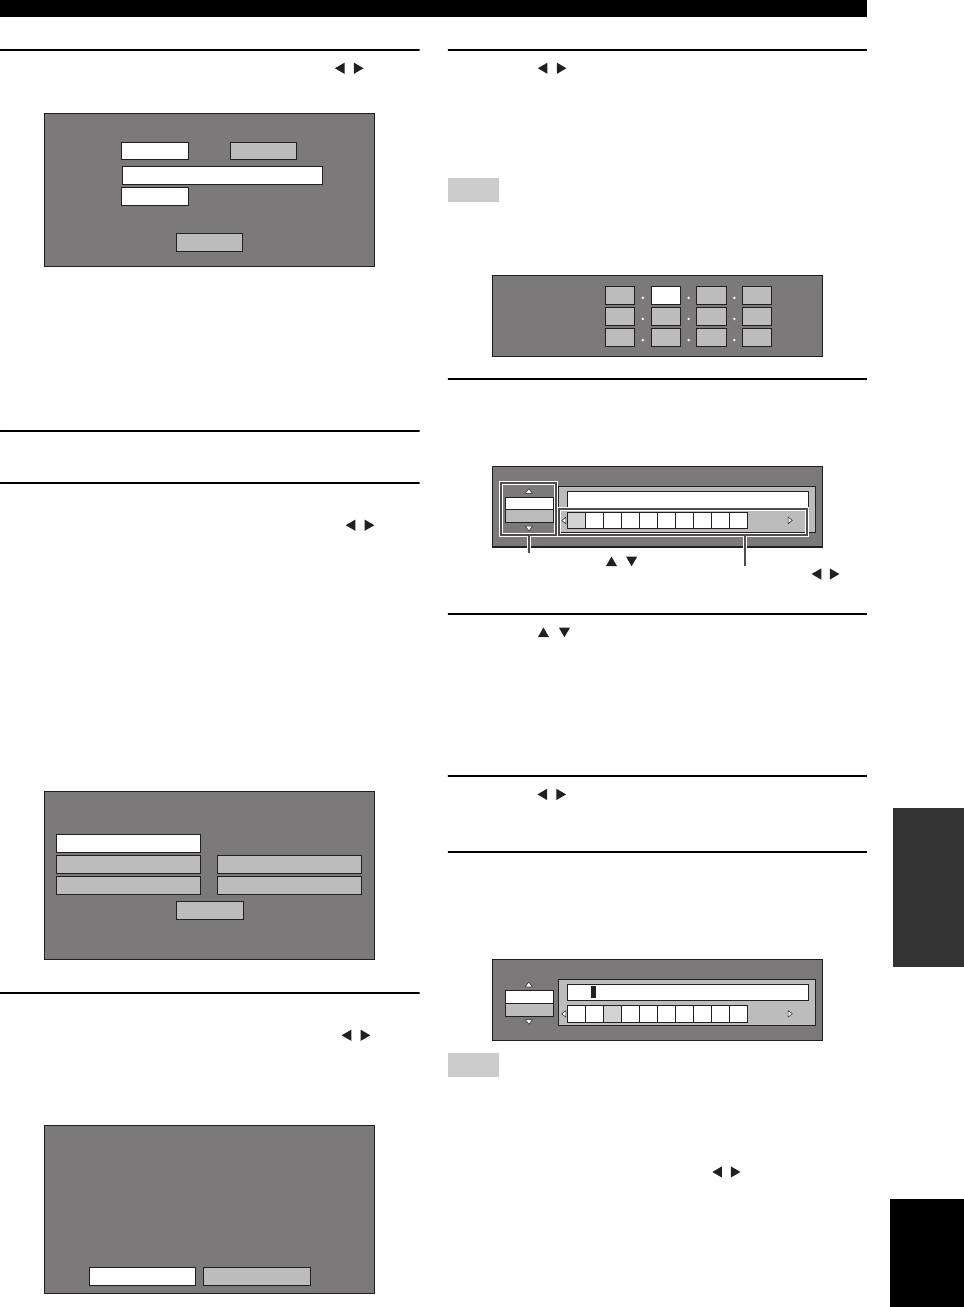
37 En
SETTINGS OF THE BD PLAYER
English
OTHER
OPERATIONS
10 For setting the proxy server, press / to
select “Yes” or “No”, then press ENTER.
• If selecting “Yes”: The IP address or proxy server
name and port number for the proxy server
specified from your internet service provider are
entered using the screen for inputting characters
(☞p.38).
• If selecting “No”: Go to the next step.
11 Select “Next”, then press ENTER.
12 For the advanced setting (the setting of the
Ethernet connection speeds), press / to
select “Yes” or “No”, then press ENTER.
• Normally select “No”, then press ENTER.
• The Ethernet connection speeds can be set when
you select “Yes”, then press ENTER.
• As automatic detection is made (factory preset
mode), this setting is not normally necessary. If a
situation occurs in which the Ethernet connection
fails, etc., change the setting and confirm if the
Ethernet connection successfully works.
When the connection speed is set, select “Next”,
then press ENTER.
13 For testing the connection to the internet,
after confirming the settings, press / to
select “Test”, then press ENTER.
“Test” is available only when setting to obtain the IP
address automatically.
14 Press / to select “Complete”, then press
ENTER.
■The operation procedure for inputting
characters manually
Note
Numeric characters such as IP address can be entered on the input
screen either by selecting each of the characters in the “Numeric”
mode or using the Number buttons on the remote control.
1Press ENTER at the boxes in which
characters are to be entered, and the input
screen will appear.
2Press / to select the desired input mode.
• When inputting the address of the proxy server;
“1ABC” (Alphabet/numeric character) / “Sign” /
“Edit”
• When inputting other values (IP address, etc.);
“Numeric” / “Edit”
3Press / to select a number/character, then
press ENTER.
4Repeat step 3 to display all of the desired
characters/numbers in the input field.
Example: The screen for inputting numeric characters
Note
Press RETURN (Del.Char.) to delete a number/character you
have input.
To change a number/character you have input, press B (Left) or C
(Right) to select the number/character you want to change, and
press RETURN (Del.Char.). Then, press / to select a new
number/character you want to input, and press ENTER.
Do you use the proxy server?
Address
Port
Next
Yes No
Option
Ethernet Connection Speeds
Next
Auto-Detection
10M Half Duplex
100M Half Duplex
10M Full Duplex
100M Full Duplex
Confirm the current setting.
: xxx xxx xxx xxx
: xxx xxx xxx xxx
: xxx xxx xxx xxx
: xxx xxx xxx xxx
xxx xxx xxx xxx
: xx:xx:xx:xx:xx:xx
IP Address
Netmask
Gateway
DNS Address
MAC Address
CompleteTest
IP Address
Netmask
Gateway
123
Numeric
1234567890
Edit
Selected by pressing / Selected by pressing /
Numeric 123
1234567890
Edit

38 En
SETTINGS OF THE BD PLAYER
5Press D (Complete) to fix the numbers which
have been input.
6Repeat step 1 to 5 to finish inputting all the
required characters.
Input character list
IP Address
Netmask
Gateway
123
1ABC (Alphabet/
numeric character)
Numeric
Sign
Edit
* The same operation as the colored buttons and RETURN can be performed by selecting each of the items
and pressing ENTER.“Del.Char.” stands for deleting characters.
Num. ABC DEF GHI JKL MON PQRS TUV WXYZ Spc.
Num. 1234567890 ABC ABCabc DEF D E F d e f
GHI G H I g h i JKL J K L j k l MNO MNOmno
PQRS PQRSpqrs TUV TUVtuv WXYZ WXYZwxyz
Spc. (space)
1234567890
@ . , : ; _ - \ $ % ! ? & # + * = / | ˜ “ ‘ ˆ ` ( ) < > [ ]{ } Spc.
@ . , : @ . , : ; _ - \ ; _ - \ $ % ! ? $ % ! ?
& # + * & # + * = / | ˜ = / | ˜ “ ‘ ˆ ` “ ‘ ˆ `
( ) < > ( ) < > [ ]{ } [ ] { } Spc. (space)
Cancel Left Right Complete Del.Char

39 En
SETTINGS OF THE BD PLAYER
English
OTHER
OPERATIONS
You can display the system software version.
Before using the USB memory device
The following instructions explain how to delete data such
as the BD-LIVE data in a USB memory device.
1Insert the USB memory device into the USB
BD STORAGE/SERVICE terminal on rear of
this player.
2Press SETUP to display the Setup Menu
screen.
3Press / / / to select “Settings”, then
press ENTER.
4Press / to select “USB Memory
Management”, then press ENTER.
“No USB Memory” appears when no USB memory
is inserted.
5Press / , select “Erase” or “Format”, then
press ENTER.
Erase: Deletes only BD-VIDEO data written on the
USB memory device such as BD-LIVE data.
Format: Be aware that all data including BD-VIDEO
data and software update data will be
deleted.
If you want to delete only the unneeded software
update data after the software is updated, delete the
data on the USB memory device using a PC.
Note
Data which has been saved to the player’s internal memory (game
score, etc.) will also be deleted.
6Press / , select “Yes”, and press ENTER.
7Start the process.
The screen for the current operation will display.
8Press ENTER.
This function allows software updates by inserting a USB
memory device with the update file into the USB BD
STORAGE/SERVICE terminal on this player.
The USB memory device must be clear of all files
except software update data to allow new
software uploading.
To check for the availability of a software update,
visit
http://www.yamaha.co.jp/english/product/av/
down/agreement.html.
You can reset all the settings of the BD player to the
factory presets.
Reset, Not Reset
Version
CAUTION:
• Do not remove the USB memory device or unplug
the power cable while the operations for “USB
Memory Management” or “Software Update” are
being performed.
• Do not use a USB extension cable when connecting
a USB memory device to the USB BD STORAGE/
SERVICE terminal of the player. Using a USB
extension cable may prevent the player from
performing correctly.
Note
Yamaha cannot guarantee that all brands’ USB memory
devices will operate with this player.
USB Memory Management
Software Update
System Reset
Erases BD-VIDEO data on USB memory.
Erase all contents on USB memory
including protected contents.
Format
Erase
Yes No
OK
Complete

40 En
SETTINGS OF THE BD PLAYER
Country Code List
Language List
Language Code List
USA / CANADA / JAPAN / GERMANY / FRANCE / UK / ITALY / SPAIN / SWISS / SWEDEN / HOLLAND /
NORWAY / DENMARK / FINLAND / BELGIUM / HONG KONG / SINGAPORE / THAILAND / MALAYSIA /
INDONESIA / TAIWAN /PHILIPPINE / AUSTRALIA / RUSSIA / CHINA
English / Français / Deutsch / Italiano / Español / Japanese / Svenska / Nederlands
AA Afar / AB Abkhazian / AF Afrikaans / AM Ameharic / AR Arabic / AS Assamese / AY Aymara / AZ Azerbaijani
/ BA Bashkir / BE Byelorussian / BG Bulgarian / BH Bihari / BI Bislama / BN Bengali, Bangla / BO Tibetan / BR
Breton / CA Catalan / CO Corsican / CS Czech / CY Welsh / DA Danish / DE German / DZ Bhutani / EL Greek / EN
English / EO Esperanto / ES Spanish / ET Estonian / EU Basque / FA Persian / FI Finnish / FJ Fiji / FO Faroese / FR
French / FY Frisian / GA Irish / GD Scots Gaelic / GL Galician / GN Guarani / GU Gujarati / HA Hausa / HI Hindi /
HR Croatian / HU Hungarian / HY Armenian / IA Interlingua / IE Interlingue / IK Inupiak / IN Indonesian / IS
Icelandic/ IT Italian / IW Hebrew / JA Japanese / JI Yiddish / JW Javanese / KA Georgian / KK Kazakh / KL
Greenlandic / KM Cambodian / KN Kannada / KO Korean / KS Kashmiri / KU Kurdish / KY Kirghiz / LA Latin / LN
Lingala / LO Laothian / LT Lithuanian / LV Latvian, Lettish / MG Malagasy / MI Maori / MK Macedonian / ML
Malayalam / MN Mongolian / MO Moldavian / MR Marathi / MS Malay / MT Maltese / MY Burmese / NA Nauru /
NE Nepali / NL Dutch / NO Norwegian / OC Occitan / OM Afan (Oromo) / OR Oriya / PA Panjabi / PL Polish / PS
Pashto, Pushto / PT Portuguese/ QU Quechua / RM Rhaeto-Romance / RN Kirundi / RO Romanian / RU Russian /
RW Kinyarwanda / SA Sanskrit / SD Sindhi / SG Sangho / SH Serbo-Croatian / SI Singhalese / SK Slovak / SL
Slovenian / SM Samoan / SN Shona / SO Somali / SQ Albanian / SR Serbian / SS Siswat / ST Sesotho / SU
Sundanese / SV Swedish / SW Swahili / TA Tamil / TE Telugu / TG Tajik / TH Thai / TI Tigrinya / TK Turkmen / TL
Tagalog / TN Setswana / TO Tonga / TR Turkish / TS Tsonga / TT Tatar / TW Twi / UK Ukrainian / UR Urdu / UZ
Uzbek / VI Vietnamese / VO Volapuk / WO Wolof / XH Xhosa / YO Yoruba / ZH Chinese / ZU Zulu

41 En
English
OTHER
OPERATIONS
You can change the settings when an HDMI or a component cable is connected using the keys on the BD player. Also see
page 33.
Notes
• Even in Pure Direct mode, you can display and change settings on the front panel display of the BD player.
• You cannot change the settings during playback. Change the settings after stopping playback.
1Press DISC to select an input source, and
press OPTION.
“VIDEO RESET” appears on the front panel display
of the BD player.
2Press / to select “VIDEO RESET” or
“HDMI <-> COMP”.
VIDEO RESET
Restore the resolution of “Component Video Out”
(☞p.33) or “HDMI Video Out” (☞p.33) to the
factory default setting.
HDMI <-> COMP
Set the video output priority to HDMI or Component.
For details, see “Video Out Select” (☞p.33).
3Press ENTER to confirm the setting.
“>> DONE <<” is displayed.
To cancel the setting operation
Press OPTION, EXIT or RETURN.
CHANGING THE SETTINGS WHEN CONNECTING AN HDMI OR
COMPONENT CABLE
A B C D
EXIT
TOP MENU/TITLE LIST
POP UP MENU
DISC
,
OPTION
ENTER
EXIT RETURN

TROUBLESHOOTING
42 En
ADDITIONAL INFORMATION
Refer to the table below when this system does not function properly. If the problem you are experiencing is not listed
below or if the instruction below does not help, turn off this system, disconnect the power cable, and contact the nearest
authorized Yamaha dealer or service center.
■General
TROUBLESHOOTING
Receiver (R-840)
Problem Cause Remedy See
page
The receiver fails to
turn on or enters
standby mode soon
after the power is
turned on.
The power cable is not connected or the
plug is not completely inserted.
Connect the power cable firmly. 8
The receiver has been exposed to a strong
external electric shock (such as lightning
or strong static electricity).
Set the receiver to standby mode, disconnect the
power cable, plug it back in after 30 seconds and
then use it normally.
—
The cable is short-circuited and the
protection circuity has been activated.
Make sure that all speaker wire connections on the
receiver and on all speakers are secure and that the
wire for each connection does not touch anything
other than its respective connection.
8
The internal temperature is too high, the
protection circuity has been activated.
Wait about 1 hour for the receiver to cool down and
then turn it back on.
8
No sound Incorrect input or output cable
connections.
Connect the cables properly. If the problem persists,
the cables may be defective.
8
No appropriate input source has been
selected.
Select an appropriate input source with the INPUT
selector on the front panel (or the input selection
keys on the remote control).
—
Speaker connections are not secure. Secure the connections. 8
The volume is turned down. Turn up the volume. —
The sound is muted. Press MUTE or VOLUME +/– to resume audio
output and then adjust the volume.
7
Signals the receiver cannot reproduce are
being input from a source component,
such as a CD-ROM.
Play a source whose signals can be reproduced by the
receiver.
—
The sound suddenly
goes off.
The timer has turned off the receiver. Turn on the receiver, and play the source again. —
Sound is heard from
the speaker on one
side only.
Cables are not connected properly. Connect the cables properly. If the problem persists,
the cables may be defective.
8
There is noise
interference from
digital or radio
frequency
equipment.
The receiver is too close to the digital or
high-frequency equipment.
Move the receiver further away from such
equipment.
—
The sound is
distorted.
The volume level is too high. Adjust the volume level. 15
“CHK SP WIRE”
appears on the
display.
Speaker cables are short-circuited. Make sure speaker cables are connected correctly. 8

43 En
English
TROUBLESHOOTING
ADDITIONAL
INFORMATION
■FM
■iPod
Note
If a transmission error occurs but no status message is displayed on the front panel display of the receiver, check the connection between
the receiver and your iPod (☞p.10).
Problem Cause Remedy See
page
FM stereo reception is noisy. The characteristics of FM stereo
broadcasts may cause this problem
when the transmitter is too far away or
the antenna input is poor.
Check the antenna connections. 8
Try using a high-quality directional FM
antenna.
—
There is distortion, and clear
reception cannot be obtained
even with a good FM antenna.
There is multi-path interference. Adjust the antenna position to eliminate
multi-path interference.
—
The desired station cannot be
tuned into with the automatic
tuning method.
The signal is too weak. Use a high-quality directional FM antenna. —
Use the manual tuning method. 26
Previously preset stations can
no longer be tuned into.
The receiver has been disconnected for
a long period.
Set preset stations. 26
Status message Cause Remedy See
page
CONNECT ERR There is a problem with the signal path
from your iPod to the receiver.
Turn off the receiver and try resetting your iPod. 10
UNKNOWN TYP The iPod being used is not supported by
the receiver.
Only iPod (Click and Wheel), iPod nano, iPod
Classic, iPod mini and iPod touch are supported.
—
CONNECTED Your iPod is properly stationed in the
iPod dock, and the connection between
your iPod and the receiver is complete.
NOT CONNECT Your iPod was removed from the iPod
dock of the receiver.
Station your iPod back to the terminal of the receiver. 10
CAN'T PLAY The receiver cannot play back the songs
currently stored on your iPod.
Check that the songs currently stored on your iPod
are playable.
—
Store some other playable music files on your iPod. —

44 En
TROUBLESHOOTING
Remote control
Problem Cause Remedy See
page
The remote control
does not work nor
function properly.
The remote control may be operated
outside its operation range.
For information on the remote control operation
range, see “Using the remote control”.
11
The remote control sensor on this system
may be exposed to direct sunlight or
lightening (invented fluorescent lamps).
Change the lighting or orientation of this system. 11
The battery may be worn out. Replace the battery with new one. 11
There are obstacles between the sensor of
this system and the remote control.
Remove the obstacles. 11
The system control cable is disconnected
from the system connector jack of the
receiver and/or the BD player.
Connect the receiver and the BD player securely with
the system control cable.
8
BD player (BD-940)
Problem Cause Remedy See
page
Power does not turn
on.
The plug is not completely inserted. Connect the power cable firmly. 8
The receiver and the BD player are
connected incorrectly.
Check the connection with the receiver. 8
The receiver is set incorrectly. Check the setting (INPUT/Volume/MUTE/
Headphone) of the receiver.
—
Power is turned off. “Auto Power Off” is set to “Yes”. Set “Auto Power Off” to “No”. 35
Disc playback does
not start.
You may use a recordable disc that is not
finalized.
Finalize the recordable disc. —
The disc label may not be facing up. Place the disc in the disc tray with the label facing
up.
—
The disc may be defective. Try to play back another disc. If the same problem
does not occur, the disc you want to play back is
defective.
—
The disc is dirty. Clean the disc surface. 48
The region code on the disc does not
match that of the BD player.
Use a disc with the same region code as the BD
player.
3
If the recorded time of a disc is unusually
short, playback may not be possible.
BD-RE/R discs recorded in a format
other than BDMV cannot be played back.
Video playback
stops.
Excessive force or vibration was applied
to the BD player.
Do not apply excessive force or vibration to the BD
player.
—
The BD player is not placed on a steady
flat surface.
Place the BD player on a steady flat surface. —
The BD player makes
a snapping noise
when a disc is loaded
or played.
The BD player has not been operated for
a while.
This may happen if it has not been operated for a
while. This is not a malfunction.
—

45 En
English
TROUBLESHOOTING
ADDITIONAL
INFORMATION
There is no picture. The video cable is not connected properly
to your TV.
Connect the video cable properly to the TV. 9
The input setting on your TV is not
correct.
Select the correct input setting on the TV. 13
The BD player is not set properly for
HDMI or component video cable
connection.
Set the BD player properly. 33
The screen freezes
and operation
buttons do not work.
The disc is damaged or dirty. Check the disc surface. —
The BD player is frozen. Reboot the BD player. 5
There is sound but
no picture.
The video cable is not connected
properly.
Connect the cable properly. 9
An image is not
output with the
desired resolution.
The video output resolution setting does
not match the resolution of the TV
connected to the BD player.
Perform “VIDEO RESET”. 41
Switch between “HDMI” and “Component” by using
“Video Out Select” or “HDMI <-> COMP”.
33, 41
“Video Out Select” is not set properly. Set “Video Out Select” properly. 33
“Component Video Out” or “HDMI
Video Out” is not set to the desired
resolution.
Set “Component Video Out” or “HDMI Video Out”
to the desired resolution.
33
Widescreen images
look vertically
stretched, or black
bands appear at the
top and bottom of the
screen.
“TV Aspect Ratio” is not set properly for
the connected TV.
Set “TV Aspect Ratio” properly for the connected
TV.
33
A 4:3 standard TV is connected but
“Video Out Select” is not set to
“Component”.
When a widescreen TV is connected, set “TV Aspect
Ratio” to “Wide 16:9”.
When a 4:3 standard TV is connected, set “Video
Out Select” to “Component”.
33
4:3 images look
horizontally
stretched.
When a 4:3 TV is connected, set “Video Out Select”
to “Component”.
33
Block noise (mosaic)
appears on the
screen.
Block noise may appear in fast-moving
scenes due to the characteristics of digital
image compression technology.
Sound or images are
not output properly.
The sound or image may not be output
properly when playing back a copyright-
protected disc.
Sound is distorted or
not output.
The RCA stereo cable is not connected
between the receiver and the BD player.
Connect the RCA stereo cable between the receiver
and the BD player.
8
The audio plugs are dirty. Clean the audio plugs. —
The surface of the disc is dirty. Clean the disc surface. 48
The disc is damaged or dirty. Check the disc surface. —
Problem Cause Remedy See
page

46 En
TROUBLESHOOTING
The following messages appear on the TV screen in case the disc you tried to playback is not appropriate or the operation
is not correct.
Network
Problem Cause Remedy See
page
Cannot connect to
the Internet.
The network cable is not connected
properly.
Connect the network cable properly. 10
The wrong cable is being used, such as a
modular cable.
Use the network cable for connection. 10
The broadband router or modem is not
properly connected.
Connect the broadband router and/or modem
properly.
10
The broadband router or modem is not
turned on.
Turn on the broadband router or modem. —
The network settings are not correct. Check “Communication Setup”. 36
Cannot download
BD-LIVE contents.
The network cable is not connected
properly.
Connect the network cable properly. 10
The USB memory device is not
connected properly.
Check that the USB memory device is connected to
the USB BD STORAGE/SERVICE terminal of the
BD player.
10
The BD disc does not support BD-LIVE. Check if the BD disc supports BD-LIVE. 24
“BD Internet Access” is set to “Prohibit”. Set “BD Internet Access” to “Permit” or “Limit”. 35
Messages Relating to BD disc and DVD disc
Error message Possible Error Remedy
Cannot play. The disc cannot be played back with this Player. Check the disc, and load it correctly.
Incompatible disc. If you load a disc which cannot be played with this
Player (i.e. a scratched disc), or if you load a disc
upside down, this message will appear, and the disc
tray will automatically pop out.
Check the disc, and load it correctly.
Occurs if the loaded disc cannot be played because it
is a non-standard disc or scratched, etc.
Remove the disc.
Cannot operate. Occurs if an operation is incorrect.
This USB memory is
not formatted properly.
Please format the
memory in USB
memory management.
Occurs if there is a formatting error. Format the USB memory again.
Occurs if the USB memory is not formatted with
FAT 32/16.
Format the USB memory with your PC.
The Connected USB
Memory cannot be
used. It should be
compliant with USB 2.0
Occurs if USB memory not compliant with USB 2.0
High Speed (480Mbit/s) is used (i.e. USB 1.0/USB
1.1).
Connect USB 2.0 High Speed (480Mbit/s) compliant
USB memory.

47 En
English
ADDITIONAL
INFORMATION
JPEG is a type of file format for storing still-image files (photos, illustrations, etc.). The Player lets you play JPEG format
still-image files.
■File formats that are not compatible
• Still images in formats other than JPEG (such as TIFF)
cannot be played.
• There may be some files that cannot be played even if
they are in JPEG format.
• Progressive JPEG files cannot be played.
• Moving image files and audio files as well as Motion
JPEG format files cannot be played, even though they
are JPEG files.
■Other files that cannot be played back
You may not be able to play some still images which you
have created, touched up, copied or otherwise edited on
your computer.
■You may experience one or more of the
following symptoms when playing files.
• It may take some time to play files depending on the
number of folders, number of files and volume of data
involved.
• EXIF information will not be displayed. EXIF stands
for Exchangeable Image File Format, and is a standard
for storing interchange information in image files,
especially those using JPEG compression. (Refer to
http://exif.org for more information.)
■When using the unit to play a CD-RW/R
disc with still images stored (recorded)
• With CD-RW/R discs on which still images are mixed
in with music or movies, you will be able to play only
the still images. You may not be able to play some of
these discs at all.
• Multi-session discs cannot be played.
• You may not be able to play some still images you have
processed (rotated or saved by overwriting other
images) using image processing software or some still
images you have imported from the Internet or e-mail.
• The discs which this Player can play back (recognize)
are limited to the following properties:
Contains EXIF format files
Picture resolution: Between 32 ×32 and
7680 ×4320 pixels
Maximum number of folders: 64
Maximum number of files: 256
File size: 20MB or less
■Structure of still images (JPEG) folders
You can play still images (JPEG) with this unit by making
folder on disc as shown below. Images situated on the root
directly cannot be played back.
ABOUT THE JPEG FILE FORMAT
01 Folder
001.jpg
002.jpg
003.jpg
004.jpg
005.jpg
006.jpg
007.jpg
02 Folder
64 Folder
254.jpg
255.jpg
256.jpg
Root
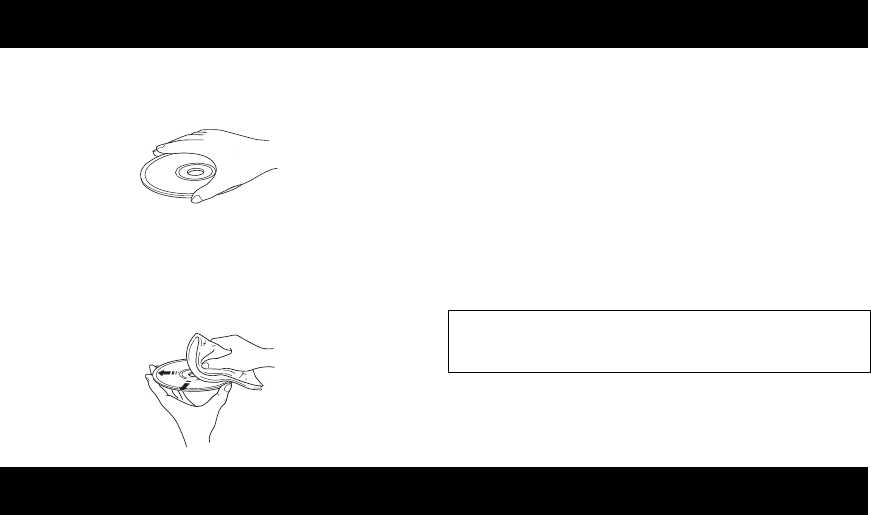
NOTES ABOUT HANDLING DISCS
48 En
• Always handle with care so that the playing surface is
not scratched. Do not warp discs.
• To keep clean the playing surface, wipe with a clean,
dry cloth. Do not use any type of disc cleaner, spray, or
any other chemical-based liquid.
• Do not wipe with a circular motion; wipe straight
outward from the center.
• Use a soft-tipped pen when writing on the label side of
the disc.
• When a disc is not being used, remove it from this unit
and store in an appropriate case.
• Do not expose discs to direct sunlight, high
temperature or high humidity for a long time.
■To play back an 8-cm (3-inch) CD
Place it in the inner recessed area of the disc tray. Do not
put a normal (12-cm) CD on top of an 8-cm (3-inch) CD.
■Analog
Sound that has not been turned into numbers.
Analog sound varies, while digital sound has specific
numerical values. These terminals send audio through two
channels, the left and right.
■Aspect ratio
The ratio of vertical and horizontal sizes of a displayed
image. The horizontal vs. vertical ratio of conventional
TVs. is 4:3, and that of wide-screens is 16:9.
■Component Video
Terminals for inputting or outputting a component video
signal. Component video signal consists of three lines, the
luminance signal (Y) and two color difference signals (PB/
CB, PR/CR), which enable to provide high-quality video.
■Disc menu
A screen display prepared for allowing selection of
images, sounds, subtitles, multi-angles, etc. recorded on a
BD/DVD.
■Dolby Digital
Digital surround sound system which is developed by
Dolby Laboratories provides completely independent
multi-channel audio. With 3 front channels (left, center,
and right) and 2 surround stereo channels, Dolby Digital
provides five full-range audio channels. With an additional
channel especially for bass effects (called LFE, or low
frequency effect), the system has a total of 5.1-channels
(LFE is counted as 0.1 channel). By using 2-channel
stereo for the surround speakers, more accurate moving
sound effects and surround sound environment are
possible than with Dolby Surround.
■DTS (Digital Theater Systems)
Digital surround sound system developed by Digital
Theater Systems, Inc., which provides 5.1 channel audio
(max). With an abundance of audio data, it is able to
provide authentic-sounding effects.
■HDMI
HDMI (High-Definition Multimedia Interface) is the first
industry-supported, uncompressed, all-digital audio/video
interface. Providing an interface between any source (such
as a set-top box or AV controller) and an audio/video
monitor (such as a digital television), HDMI supports
standard, enhanced or high-definition video as well as
multi-channel digital audio using a single cable. HDMI
transmits all ATSC (Advanced Television Systems
Committee) HDTV standards and supports 8-channel
digital audio, with bandwidth to spare to accommodate
future enhancements and requirements.
When used in combination with HDCP (High-bandwidth
Digital Content Protection), HDMI provides a secure
audio/video interface that meets the security requirements
of content providers and system operators.
For further information on HDMI, visit the HDMI website
at “www.hdmi.org/”.
■Interlace
The most common type of scanning used in televisions. It
divides a screen into even and odd numbered fields for
scanning, and then builds an image by combining them
into one image (frame).
NOTES ABOUT HANDLING DISCS
Note: Do not use any lens cleaners as they may be a
cause of malfunction.
GLOSSARY

49 En
English
ADDITIONAL
INFORMATION
■JPEG (Joint Photographic Experts
Group)
A standardized image compression system proposed by
the Joint Photographic Experts Group. It can reduce image
data sizes to 1 to 10% of their original sizes, and works on
digital photographs effectively.
■Parental lock
Limits Disc play according to the age of the users or the
limitation level in each country. The limitation varies from
disc to disc; when it is activated, playback will be
prohibited if the software’s level is higher than the user-set
level.
■Progressive Scan
A method of displaying all scanning lines in a frame at
once, reducing flicker noticeable on a larger screen and
creating a sharp and smooth image.
■Region code
Many BD/DVD discs include a region code so that the
copyright owner can control BD/DVD software
distribution only to regions where they are ready to
distribute. There are six regions codes, which restrict a BD
player to playing a BD/DVD disc with the same region
code.
■VR format (Video Recording format)
A DVD video recording format, which allows editing
DVD video data recorded onto a disc. You need a VR
format compatible player for playback.
■R-840
AMPLIFIER SECTION
• Minimum RMS output power per channel
(6 Ω, 1 kHz, 10 % THD) ...........................................65 W + 65 W
• Input sensitivity/Impedance
PLAYER, etc. ......................................................... 200 mV/47 kΩ
• Frequency Response
PLAYER, etc. ........................................ 20 Hz to 20 kHz ± 0.5 dB
• Total Harmonic Distortion
PLAYER, etc. (30 W/6 Ω)........................................0.04 % or less
• Signal to Noise ratio (IHF-A network)
PLAYER (200 mV, Input shorted)......................... 100 dB or more
TUNER SECTION
GENERAL
• Power Supply.......................................................... AC 230 V, 50 Hz
• Power consumption..................................................................115 W
• Dimensions (W × H × D).................................. 215 × 110 × 348 mm
(8 1/2 × 4 3/8 × 13 3/4 in)
• Weight...................................................................... 5.7 kg (12.6 lbs)
• Standby power consumption......................................less than 0.3 W
■BD-940
PLAYER SECTION
• AUDIO OUT
Output level (1 kHz 0 dB)............................................. 2 V (± 0.3)
Signal to noise ratio............................................ more than 100 dB
Dynamic range (48 kHz, 24 bit)........................... more than 95 dB
Total harmonic distortion ....................................less than 0.005 %
Frequency response
CD-DA .....................................................................20 Hz–20 kHz
BD/DVD (48 kHz) ...................................................20 Hz–22 kHz
BD/DVD (96 kHz) ...................................................20 Hz–44 kHz
• Video output
Composite ...................................................................1 Vp-p/75 Ω
Component ........................................................... 1 Vp-p/75 Ω (Y)
0.7 Vp-p/75 Ω (PB, PR)
• HDMI output...................................................Type A Connector × 1
480p(576p)/720p/1080i/1080p/1080p@24Hz,
Deep Color, x.v.Color support
• USB ..............................Used for:
1) Playback BD-LIVE/BonusView contents
2) Firmware Update
General
• Power supply ...........................................................AC 230 V, 50 Hz
• Power consumption................................................................... 20 W
• Standby power consumption .........................................less than 1 W
• Dimensions (W × H × D) ..................................215 × 108 × 318 mm
(8 1/2 × 4 1/4 × 12 1/2 in.)
• Weight ...................................................................................... 3.4 kg
(7.5 lbs.)
Specifications are subject to change without notice.
SPECIFICATIONS
• Tuning Range................................................... 87.50 to 108.00 MHz

50 En
SPECIFICATIONS
iPod™
“iPod” is a trademark of Apple Inc., registered in the U.S. and
other countries.
“Made for iPod” means that an electronic accessory has been
designed to connect specifically to iPod and has been certified by
the developer to meet Apple performance standards.
Apple is not responsible for the operation of this device or its
compliance with safety and regulatory standards.
Audio-visual material may consist of copyrighted works which
must not be recorded without the authority of the owner of the
copyright. Refer to relevant laws in your country.
This product incorporates copyright protection technology that is
protected by U.S. patents and other intellectual property rights.
Use of this copyright protection technology must be authorized
by Macrovision, and is intended for home and other limited
viewing uses only unless otherwise authorized by Macrovision.
Reverse engineering or disassembly is prohibited.
Manufactured under license from Dolby Laboratories. “Dolby”
and the double-D symbol are trademarks of Dolby Laboratories.
Manufactured under license under U.S. Patent #’s: 5,451,942;
5,956,674; 5,974,380; 5,978,762; 6,226,616; 6,487,535;
7,392,195; 7,272,567; 7,333,929; 7,212,872 & other U.S. and
worldwide patents issued & pending. DTS is a registered
trademark and the DTS logos, Symbol, DTS-HD and DTS-HD
Master Audio | Essential are trademarks of DTS, Inc. ©1996-
2008 DTS, Inc. All Rights Reserved.
is a trademark.
“BD-LIVE” logo is a trademark of Blu-ray Disc Association.
“BONUSVIEW” is a trademark of Blu-ray Disc Association.
is a trademark of DVD Format/Logo Licensing
Corporation.
HDMI, the HDMI logo and High-Definition Multimedia
Interface are trademarks or registered trademarks of HDMI
Licensing LLC.
“x.v.Color” and “x.v.Color” logo are trademarks.
“AVCHD” and the “AVCHD” logo are trademarks of Panasonic
Corporation and Sony Corporation.
Java and all Java-based trademarks and logos are trademarks or
registered trademarks of Sun Microsystems, Inc. in the United
States and/or other countries.
This product is licensed under the AVC patent portfolio license
and VC-1 patent portfolio license for the personal and non-
commercial use of a consumer to (i) encode video in compliance
with the AVC Standard and VC-1 Standard (“AVC/VC-1 Video”)
and/or (ii) decode AVC/VC-1 Video that was encoded by a
consumer engaged in a personal and non-commercial activity
and/or was obtained from a video provider licensed to provide
AVC/VC-1 Video. No license is granted or shall be implied for
any other use. Additional information may be obtained from
MPEG LA, LLC.
See http://www.mpegla.com.
U.S. Patent Nos. 6,836,549; 6,381,747; 7,050,698; 6,516,132;
and 5,583,936

51 En
English
ADDITIONAL
INFORMATION
■Language (abbreviation), code number
■Country, code number, abbreviation
LANGUAGE, COUNTRY LISTS
Language list
Japanese (ja), 1001 Bhutani (dz), 0426 Kirghiz (ky), 1125 Sinhalese (si), 1909
English (en), 0514 Esperanto (eo), 0515 Latin (la), 1201 Slovak (sk), 1911
French (fr), 0618 Estonian (et), 0520 Lingala (ln), 1214 Slovenian (sl), 1912
German (de), 0405 Basque (eu), 0521 Laothian (lo), 1215 Samoan (sm), 1913
Italian (it), 0920 Persian (fa), 0601 Lithuanian (lt), 1220 Shona (sn), 1914
Spanish (es), 0519 Finnish (fi), 0609 Latvian (lv), 1222 Somali (so), 1915
Chinese (zh), 2608 Fiji (fj), 0610 Malagasy (mg), 1307 Albanian (sq), 1917
Dutch (nl), 1412 Faroese (fo), 0615 Maori (mi), 1309 Serbian (sr), 1918
Portuguese (pt), 1620 Frisian (fy), 0625 Macedonian (mk), 1311 Siswati (ss), 1919
Swedish (sv), 1922 Irish (ga), 0701 Malayalam (ml), 1312 Sesotho (st), 1920
Russian (ru), 1821 Scots-Gaelic (gd), 0704 Mongolian (mn), 1314 Sundanese (su), 1921
Korean (ko), 1115 Galician (gl), 0712 Moldavian (mo), 1315 Swahili (sw), 1923
Greek (el), 0512 Guarani (gn), 0714 Marathi (mr), 1318 Tamil (ta), 2001
Afar (aa), 0101 Gujarati (gu), 0721 Malay (ms), 1319 Telugu (te), 2005
Abkhazian (ab), 0102 Hausa (ha), 0801 Maltese (mt), 1320 Tajik (tg), 2007
Afrikaans (af), 0106 Hindi (hi), 0809 Burmese (my), 1325 Thai (th), 2008
Amharic (am), 0113 Croatian (hr), 0818 Nauru (na), 1401 Tigrinya (ti), 2009
Arabic (ar), 0118 Hungarian (hu), 0821 Nepali (ne), 1405 Turkmen (tk), 2011
Assamese (as), 0119 Armenian (hy), 0825 Norwegian (no), 1415 Tagalog (tl), 2012
Aymara (ay), 0125 Interlingua (ia), 0901 Occitan (oc), 1503 Setswana (tn), 2014
Azerbaijani (az), 0126 Interlingue (ie), 0905 Oromo (om), 1513 Tonga (to), 2015
Bashkir (ba), 0201 Inupiak (ik), 0911 Oriya (or), 1518 Turkish (tr), 2018
Byelorussian (be), 0205 Indonesian (in), 0914 Panjabi (pa), 1601 Tsonga (ts), 2019
Bulgarian (bg), 0207 Icelandic (is), 0919 Polish (pl), 1612 Tatar (tt), 2020
Bihari (bh), 0208 Hebrew (iw), 0923 Pashto, Pushto (ps), 1619 Twi (tw), 2023
Bislama (bi), 0209 Yiddish (ji), 1009 Quechua (qu), 1721 Ukrainian (uk), 2111
Bengali (bn), 0214 Javanese (jw), 1023 Rhaeto-Romance (rm), 1813 Urdu (ur), 2118
Tibetan (bo), 0215 Georgian (ka), 1101 Kirundi (rn), 1814 Uzbek (uz), 2126
Breton (br), 0218 Kazakh (kk), 1111 Romanian (ro), 1815 Vietnamese (vi), 2209
Catalan (ca), 0301 Greenlandic (kl), 1112 Kinyarwanda (rw), 1823 Volapük (vo), 2215
Corsican (co), 0315 Cambodian (km), 1113 Sanskrit (sa), 1901 Volof (wo), 2315
Czech (cs), 0319 Kannada (kn), 1114 Sindhi (sd), 1904 Xhosa (xh), 2408
Welsh (cy), 0325 Kashmiri (ks), 1119 Sangho (sg), 1907 Yoruba (yo), 2515
Danish (da), 0401 Kurdish (ku), 1121 Serbo-Croatian (sh), 1908 Zulu (zu), 2621
Country list
Argentina, 0118, ar Finland, 0609, fi Malaysia, 1325, my Singapore, 1907, sg
Australia, 0121, au France, 0618, fr Mexico, 1324, mx Spain, 0519, es
Austria, 0120, at Germany, 0405, de Netherlands, 1412, nl Sweden, 1905, se
Belgium, 0205, be Hong Kong, 0811, hk New Zealand, 1426, nz Switzerland, 0308, ch
Brazil, 0218, br India, 0914, in Norway, 1415, no Taiwan, 2023, tw
Canada, 0301, ca Indonesia, 0904, id Pakistan, 1611, pk Thailand, 2008, th
Chile, 0312, cl Italy, 0920, it Philippines, 1608, ph United Kingdom, 0702, gb
China, 0314, cn Japan, 1016, jp Portugal, 1620, pt USA, 2119, us
Denmark, 0411, dk Korea, Republic of, 1118, kr Russian Federation, 1821, ru

52 En
LANGUAGE, COUNTRY LISTS
Limited Guarantee for European Economic Area (EEA) and Switzerland
Thank you for having chosen a Yamaha product. In the unlikely event that your Yamaha product needs guarantee service, please contact the dealer from
whom it was purchased. If you experience any difficulty, please contact Yamaha representative office in your country. You can find full details on our
website (http://www.yamaha-hifi.com/ or http://www.yamaha-uk.com/ for U.K. resident).
The product is guaranteed to be free from defects in workmanship or materials for a period of two years from the date of the original purchase. Yamaha
undertakes, subject to the conditions listed below, to have the faulty product or any part(s) repaired, or replaced at Yamaha’s discretion, without any charge
for parts or labour. Yamaha reserves the right to replace a product with that of a similar kind and/or value and condition, where a model has been
discontinued or is considered uneconomic to repair.
Conditions
1 The original invoice or sales receipt (showing date of purchase, product code and dealer’s name) MUST accompany the defective product, along with a
statement detailing the fault. In the absence of this clear proof of purchase, Yamaha reserves the right to refuse to provide free of charge service and the
product may be returned at the customer’s expense.
2 The product MUST have been purchased from an AUTHORISED Yamaha dealer within the European Economic Area (EEA) or Switzerland.
3 The product must not have been the subject of any modifications or alterations, unless authorised in writing by Yamaha.
4 The following are excluded from this guarantee:
a. Periodic maintenance and repair or replacement of parts due to normal wear and tear.
b. Damage resulting from:
(1) Repairs performed by the customer himself or by an unauthorised third party.
(2) Inadequate packaging or mishandling, when the product is in transit from the customer. Please note that it is the customer’s responsibility to
ensure the product is adequately packaged when returning the product for repair.
(3) Misuse, including but not limited to (a) failure to use the product for its normal purpose or in accordance with Yamaha’s instructions on the proper
use, maintenance and storage, and (b) installation or use of the product in a manner inconsistent with the technical or safety standards in force in
the country where it is used.
(4) Accidents, lightning, water, fire, improper ventilation, battery leakage or any cause beyond Yamaha’s control.
(5) Defects of the system into which this product is incorporated and/or incompatibility with third party products.
(6) Use of a product imported into the EEA and/or Switzerland, not by Yamaha, where that product does not conform to the technical or safety
standards of the country of use and/or to the standard specification of a product sold by Yamaha in the EEA and/or Switzerland.
5 Where the guarantee differs between the country of purchase and the country of use of the product, the guarantee of the country of use shall apply.
6 Yamaha may not be held responsible for any losses or damages, whether direct, consequential or otherwise, save for the repair or replacement of the
product.
7 Please backup any custom settings or data, as Yamaha may not be held responsible for any alteration or loss to such settings or data.
8 This guarantee does not affect the consumer’s statutory rights under applicable national laws in force or the consumer’s rights against the dealer arising
from their sales/purchase contract.
Information for Users on Collection and Disposal of Old Equipment
and Used Batteries
These symbols on the products, packaging, and/or accompanying documents mean that used electrical and
electronic products and batteries should not be mixed with general household waste.
For proper treatment, recovery and recycling of old products and used batteries, please take them to
applicable collection points, in accordance with your national legislation and the Directives 2002/96/EC
and 2006/66/EC.
By disposing of these products and batteries correctly, you will help to save valuable resources and prevent
any potential negative effects on human health and the environment which could otherwise arise from
inappropriate waste handling.
For more information about collection and recycling of old products and batteries, please contact your local
municipality, your waste disposal service or the point of sale where you purchased the items.
[Information on Disposal in other Countries outside the European Union]
These symbols are only valid in the European Union. If you wish to discard these items, please contact
your local authorities or dealer and ask for the correct method of disposal.
Note for the battery symbol (bottom two symbol examples):
This symbol might be used in combination with a chemical symbol. In this case it complies with the
requirement set by the Directive for the chemical involved.

i Fr
1 Pour utiliser l’appareil au mieux de ses possibilités, lisez
attentivement ce mode d’emploi. Conservez-le soigneusement
pour référence.
2 Installez cette chaîne hi-fi dans un endroit bien ventilé, frais, sec,
propre et hors de portée des rayons directs du soleil, des sources
de chaleur, des vibrations, de la poussière, de l’humidité et du
froid. Pour assurer une bonne ventilation, prévoyez les espaces
libres minimum suivants.
Dessus : 30 cm (R-840 uniquement)
Arrière : 10 cm
Côtés : 10 cm
3 Placez l’appareil loin des équipements, moteurs et
transformateurs électriques, pour éviter les ronflements parasites.
4 N’exposez pas l’appareil à des variations brutales de température,
ne le placez pas dans un environnement très humide (par exemple
dans une pièce contenant un humidificateur) car cela peut
entraîner la condensation d’humidité à l’intérieur de l’appareil
qui elle-même peut provoquer une décharge électrique, un
incendie, des dégâts sur l’appareil et/ou des blessures corporelles.
5 Évitez d’installer l’appareil dans un endroit où des objets peuvent
tomber, ainsi que là ù l’appareil pourrait être exposé à des
éclaboussures ou des écoulements de liquides. Sur le dessus de
cet appareil, ne placez pas :
– D’autres appareils qui peuvent endommager la surface de
l’appareil ou provoquer sa décoloration.
– Des objets se consumant (par exemple, une bougie) qui
peuvent être responsables d’incendies, de dommages sur
l’appareil ou de blessures corporelles.
– Des récipients contenant des liquides qui, en tombant,
pourraient donner une décharge électrique à l’utilisateur et/ou
endommager l’appareil.
6 Ne couvrez pas l’appareil d’un journal, d’une nappe, d’un rideau,
etc. car cela empêcherait l’évacuation de la chaleur. Toute
augmentation de la température intérieure de l’appareil peut
provoquer un incendie, des dommages à l’appareil et/ou des
blessures corporelles.
7 Ne branchez pas l’appareil sur une prise secteur sans avoir au
préalable effectué tous les raccordements.
8 Ne faites pas fonctionner l’appareil à l’envers. Il risquerait de
chauffer et d’être endommagé.
9 N’exercez aucune force excessive sur les commutateurs, les
boutons et/ou les cordons.
10 Pour débrancher la fiche du cordon d’alimentation au niveau de
la prise secteur, saisissez la fiche et ne tirez pas sur le cordon.
11 Ne nettoyez pas l’appareil au moyen d’un solvant chimique, ce
qui pourrait endommager la finition. Utilisez un chiffon sec et
propre.
12 N’alimentez l’appareil qu’à la tension prescrite. L’utilisation de
l’appareil sous une tension supérieure à celle qui est spécifiée est
dangereuse et peut causer un incendie, des dommages sur
l’appareil lui-même et/ou des blessures corporelles. Yamaha
décline toute responsabilité en cas de dommages consécutifs à
une utilisation de l’appareil sous une tension différente de celle
qui est spécifiée.
13 Pour éviter les dommages dus à la foudre, déconnectez le câble
d’alimentation et les antennes extérieures de la prise secteur ou
de l’appareil lors des orages électriques.
14 Ne tentez pas de modifier ni de réparer l’appareil. Consultez le
service Yamaha compétent pour toute réparation qui serait
requise. Le coffret de l’appareil ne doit jamais être ouvert, quelle
que soit la raison.
15 Si vous envisagez de ne pas vous servir de l’appareil pendant une
longue période (par exemple, pendant les vacances), débranchez
la fiche du cordon d’alimentation au niveau de la prise secteur.
16 Lisez la section intitulée « GUIDE DE DEPANNAGE » où figure
une liste d’erreurs de manipulation courantes avant de conclure
que l’appareil présente une anomalie de fonctionnement.
17 Avant de déplacer l’appareil, appuyez sur pour le mettre en
mode veille et débranchez la fiche du cordon d’alimentation au
niveau de la prise secteur.
18 La condensation se forme lorsque la température ambiante
change brusquement. En ce cas, débranchez la fiche du cordon
d’alimentation et laissez l’appareil hors tension.
19 L’appareil peut surchauffer en raison d’une utilisation prolongée.
En ce cas, coupez l’alimentation de l’appareil et laissez-le hors
tension pour qu’il refroidisse.
20 Installez cet appareil à proximité de la prise secteur et à un
emplacement où la fiche du câble d’alimentation est facilement
accessible.
21 Les batteries ne doivent pas être soumises à une chaleur
excessive, comme le soleil, le feu ou autres du même genre.
22 Une pression acoustique excessive au niveau des casques et des
écouteurs peut provoquer des pertes auditives.
SÉCURITÉ LASER
Cet appareil utilise un laser. En raison du risque de lésion oculaire
sous-jacent, seul un technicien qualifié est habilité à soulever le
couvercle ou à essayer d’assurer l’entretien de l’appareil.
DANGER
En cas d’ouverture, cet appareil émet un rayonnement laser
visible. Évitez tout contact direct des yeux avec le rayon. À partir
du moment où cet appareil est alimenté par le secteur,
n’approchez pas vos yeux de l’ouverture du plateau du disque, ni
des autres ouvertures pour en examiner l’intérieur.
ATTENTION : LISEZ CE MANUEL D’UTILISATION AVANT DE FAIRE
FONCTIONNER VOTRE APPAREIL.
Cet appareil n’est pas déconnecté de la source d’alimentation
en courant alternatif tant qu’il reste branché à la prise secteur,
même s’il est éteint par . Il se trouve alors en veille. En
mode veille, cet appareil est conçu pour consommer une très
faible quantité d’énergie.
AVERTISSEMENT
POUR RÉDUIRE LES RISQUES D’INCENDIE OU
D’ÉLECTROCUTION N’EXPOSEZ PAS CET APPAREIL
À LA PLUIE OU À L’HUMIDITÉ.
Le composant laser de cet appareil peut émettre un
rayonnement dépassant les limites du laser de classe 1.
Caractéristiques du LASER :
Produit LASER de Classe 1
Longueur d’onde : 788 nm (pour les CD)/654 nm (pour
les DVD)/405 nm (pour les Blu-ray)
Puissance du laser : Le dispositif de sécurité empêche
l’émission de toute radiation
dangereuse.

1 Fr
Français
PRÉPARATIONSINTRODUCTION
OPÉRATIONS DE
SYNTONISATION
AUTRES
OPÉRATIONS
INFORMATIONS
COMPLÉMENTAIRIES
OPÉRATIONS DE
BASE
CARACTÉRISTIQUES......................................... 2
ACCESSOIRES FOURNIS ................................... 2
A PROPOS DES DISQUES................................... 3
Types de disques pouvant être utilisés avec ce lecteur
.... 3
Disques ne pouvant pas être utilisés avec ce lecteur...... 3
COMMANDES ET FONCTIONS........................ 4
Ampli-tuner (R-840).................................................. 4
Lecteur BD (BD-940)................................................ 5
Boîtier de télécommande ........................................... 6
PRÉPARATIONS ................................................... 8
Raccordement d’enceintes/d’appareils auxiliaires/
d’antennes.............................................................. 8
Raccordement d’un enregistreur (CDR, MDR, etc.),
d’un ampli-tuner AV ou d’un décodeur (CDR,
MDR, etc.)............................................................. 9
Raccordement des câbles d’alimentation................... 9
Raccordement d’un iPod™...................................... 10
Raccordement à l’Internet........................................ 10
Mise en place des piles dans le boîtier de
télécommande...................................................... 11
Utilisation du boîtier de télécommande................... 11
Réglage de l’horloge................................................ 12
RÉGLAGE DU SYSTÈME ................................. 13
Mettre le téléviseur et le système sous tension........ 13
Réglage de l’affichage du téléviseur........................ 13
Langue d’affichage à l’écran ................................... 13
Langue audio, des sous-titres et du menu du disque
..... 14
FONCTIONNEMENT DU SYSTÈME .............. 15
Fonctionnement de base du système........................ 15
Modification de la luminosité de l’afficheur
de la face avant .................................................... 16
Pour utiliser un casque............................................. 16
FONCTIONNEMENT DU DISQUE.................. 17
Utilisation de l’affichage à l’écran........................... 17
Opérations pour la lecture........................................ 17
Interruption de la lecture (Pause)............................. 17
Recul et avance rapide ............................................. 18
Sélection de chapitres et de plages .......................... 18
Menus BD/DVD ...................................................... 18
Lecture au ralenti ..................................................... 18
Lecture image par image ......................................... 18
Choix de la langue et du format audio..................... 19
Sélection des sous-titres........................................... 19
Choix des angles de prise de vue............................. 19
Lecture en boucle..................................................... 19
Lecture en boucle d’une partie spécifiée
(répétition de A-B) .............................................. 20
Lecture de diaporamas JPEG................................... 20
Lecture d’images fixes dans un dossier sélectionné
...... 21
Lecture de films enregistrés sur un DVD-R/DVD-RW
.... 21
Utilisation de « Function Control Screen »
pour BD/DVD...................................................... 22
Utilisation du menu « Functions » pour CD audio
....... 23
Affichage des informations du disque ..................... 23
Plaisir d’utiliser BONUSVIEW et BD-LIVE.......... 24
SYNTONISATION FM ........................................26
Syntonisation automatique ...................................... 26
Syntonisation manuelle............................................ 26
Mise en mémoire automatique des fréquences........ 26
Mise en mémoire manuelle des fréquences............. 27
Accord des stations présélectionnées....................... 27
SYNTONISATION AVEC LE SYSTÈME DE
DIFFUSION DE DONNÉES RADIO
(MODÈLES POUR L’EUROPE
SEULEMENT) ..................................................28
Affichage des informations du système de
diffusion de données radio................................... 28
A l’aide du service de transmission des données TP
(Info trafic) .......................................................... 29
Réglages CT (heure) ................................................ 29
RÉGLAGE DE LA MINUTERIE .......................30
Réglage de la minuterie de mise en service............. 30
Réglage de la minuterie de mise hors service.......... 31
COMMANDE iPod™ ...........................................32
Utilisation d’un iPod™............................................ 32
RÉGLAGES DU LECTEUR BD .........................33
Réglages Audio Vidéo ............................................. 33
Démarrage Rapide ................................................... 35
Extinction Auto........................................................ 35
Control HDMI ......................................................... 35
Réglages De Lecture................................................ 35
Réglage De Communication.................................... 36
Version ..................................................................... 39
Gestion Clé USB ..................................................... 39
Mise À Jour Du Logiciel ......................................... 39
Réinitialisation Sys .................................................. 39
MODIFICATION DES RÉGLAGES LORS DU
RACCORDEMENT D’UN HDMI OR D’UN
CÂBLE COMPOSANT....................................41
GUIDE DE DEPANNAGE ...................................42
Ampli-tuner (R-840)................................................ 42
Boîtier de télécommande ......................................... 44
Lecteur BD (BD-940).............................................. 44
Réseau...................................................................... 46
Messages concernant les disques
BD et les disques DVD........................................ 46
À PROPOS DU FORMAT DE FICHIER JPEG
....47
REMARQUES SUR LA MANIPULATION
DES DISQUES ..................................................48
GLOSSAIRE .........................................................48
CARACTÉRISTIQUES TECHNIQUES............49
LISTES DE LANGUE, PAYS ..............................51
Liste des langues...................................................... 51
Liste de pays ............................................................ 51
TABLE DES MATIÈRES
INTRODUCTION
PRÉPARATIONS
OPÉRATIONS DE BASE
OPÉRATIONS DE SYNTONISATION
AUTRES OPÉRATIONS
INFORMATIONS COMPLÉMENTAIRIES
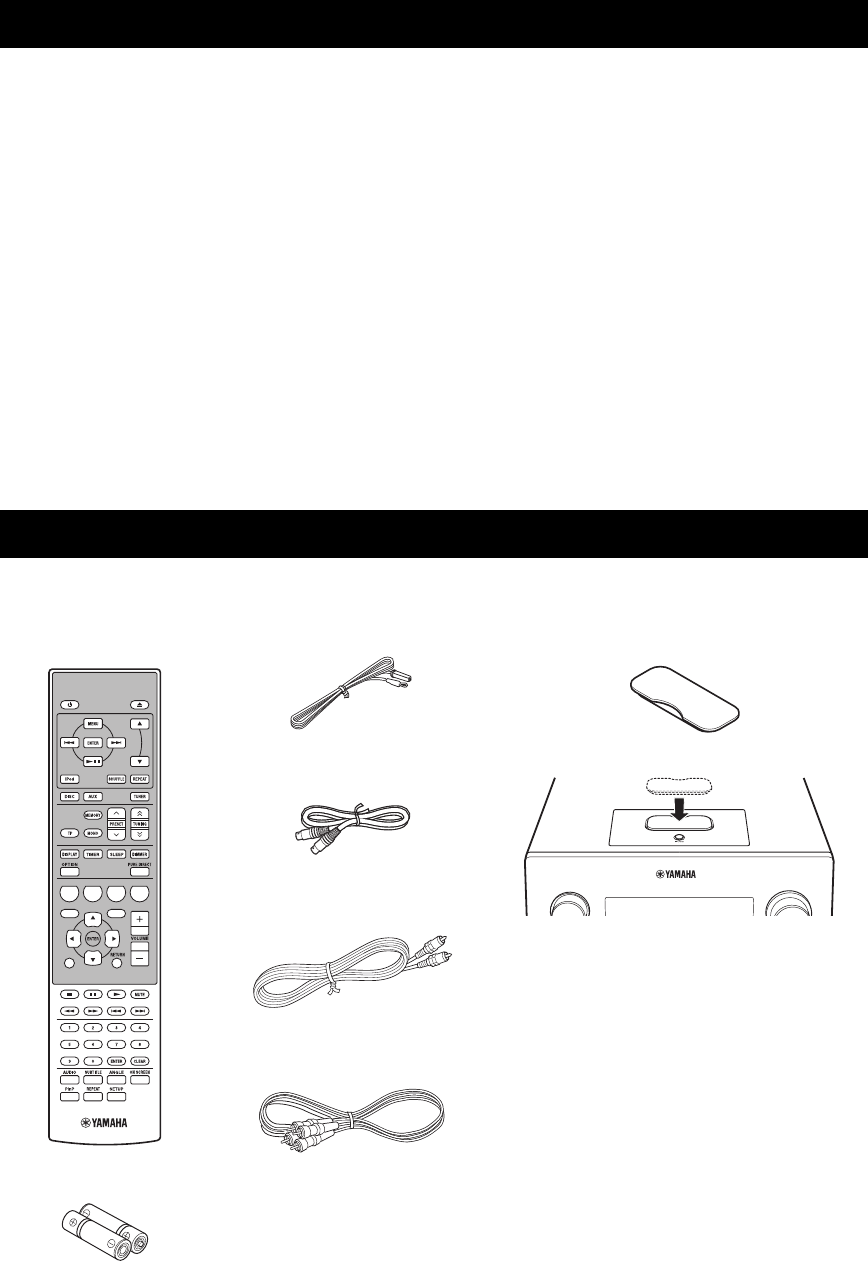
CARACTÉRISTIQUES
2 Fr
INTRODUCTION
Ampli-tuner (R-840)
•Puissance de sortie RMS minimale par voie
65W + 65W (6Ω, 1kHz, 10% DHT)
•Mise en mémoire de 30 stations FM
•iPod Fonctionnalité (avec possibilité de
recharge)
•Mode Pure Direct
•Luminosité de l’afficheur réglable
Lecteur BD (BD-940)
•
Permet de lire des disques Blu-ray, des DVD, des CD audio
•
Reconnaît BD-LIVE. Lors de l’utilisation d’un disque
compatible BD-LIVE, vous pouvez raccorder le lecteur BD à
l’Internet et télécharger diverses données
•
Reconnaît la fonction de commande HDMI. Vous pouvez faire
fonctionner l’ampli-tuner et le lecteur BD à l’aide d’un boîtier
de télécommande de téléviseur raccordé par un câble HDMI
•
Fonctionnement en liaison avec l’ampli-tuner comme le
mode Pure Direct, la Luminosité de l’afficheur réglable et le
mode INPUT
■Quelques mots sur ce mode d’emploi
• Dans ce mode d’emploi, « R-840 » désigne l’« ampli-tuner » et « BD-940 » désigne le « lecteur BD ».
• Ce manuel décrit comment effectuer les différentes opérations au moyen du boîtier de télécommande, sauf lorsque ce n’est pas
possible. Certaines de ces opérations ne sont disponibles qu’avec les touches de la face avant.
• Le symbole y appelle votre attention sur un conseil d’utilisation.
• Les remarques contiennent des informations importantes relatives à la sécurité et aux instructions d’utilisation.
• Ce mode d’emploi a été imprimé avant la fabrication de l’appareil. Les caractéristiques et la présentation peuvent être modifiées
partiellement à la suite d’améliorations, etc. En cas de divergence entre le mode d’emploi et l’appareil, ce dernier prime.
Cet ensemble doit vous être livré accompagné des accessoires suivants. Avant de raccorder ce système, assurez-vous que vous avez reçu
tous les éléments suivants.
CARACTÉRISTIQUES
ACCESSOIRES FOURNIS
1234
56
90
78
E
NT
E
RCL
E
AR
MUT
E
E
NT
E
R
VOLUME
AUX
TUN
E
R
iPod SHUFFLE
R
EPE
AT
MENU
ENTER
E
O
NM
O
N
O
M
E
M
O
R
Y
PRESET TUNING
DISC
DISPLAY TIMER SLEEP DIMMER
OPTION PURE DIRECT
AUDI O SUBTITLE ANGLE
REPEAT
ON SCREEN
RETURN
PinP SETUP
ABCD
EXIT
TOP MENU/TITLE LIST
POP UP MENU
Antenne FM intérieure
Piles (x2)
(AAA, R03, UM-4)
Boîtier de
télécommande
* Le cache de la station est fourni avec cet appareil
pour couvrir la station iPod lorsqu’elle n’est pas
utilisée.
iPod
INPUT VOLUME
Cache de la station*
Ampli-tuner
Câble de commande
du système (0,6 m)
Câble stéréo
RCA (1,0 m)
Câble vidéo
composite (1,5 m)

3 Fr
Français
INTRODUCTION
• Les disques suivants peuvent être lus dans ce lecteur.
N’utilisez pas d’adaptateur d’une longueur comprise entre
8 cm et 12 cm.
• Utilisez des disques qui répondent aux normes compatibles
telles qu’indiquées par la présence de logos officiels sur la
face étiquetée du disque. La lecture de disques n’étant pas
conformes à ces normes n’est pas garantie. En outre, la
qualité de l’image ou la qualité du son n’est pas garantie
même si les disques peuvent être lus.
*1 Ce lecteur a été conçu afin de lire des CD audio qui sont conformes
aux normes CD (Disque compact). Ce lecteur risque de ne pas
pouvoir lire des CD munis d’un signal permettant de protéger des
droits d’auteur (signal de contrôle de copie).
*2 Voir « À PROPOS DU FORMAT DE FICHIER JPEG » à la page 47.
• Les lecteurs et les disques vidéo BD/DVD ont des
codes régionaux qui imposent les régions dans
lesquelles un disque peut être lu.
• Les fonctions et opérations vidéo de BD/DVD peuvent
être différentes des explications fournies dans ce mode
d’emploi et certaines opérations peuvent être interdites
en raison des réglages de disque du fabricant.
• Si un écran de menu ou des instructions d’utilisation
s’affichent pendant la lecture d’un disque, effectuez les
opérations affichées.
• Le composant audio d’un DVD vidéo enregistré à 96
kHz (PCM linéaire) émettra à 48 kHz pendant la
lecture.
Remarques
• La lecture de certains disques dans la colonne de gauche des
tableaux risque de ne pas être possible selon le disque.
• « Finalize » se réfère à un enregistreur traitant un disque
enregistré afin qu’il soit lu dans d’autres lecteurs/enregistreurs
BD ainsi que dans ce lecteur. Seuls des disques DVD clôturés
seront lus dans ce lecteur. (La fonction pour clôturer des disques
n’est pas disponible sur ce lecteur.)
Les disques suivantes ne peuvent pas être lus ou ne seront
pas lus correctement sur ce lecteur. Si un de ces disques
est lu par erreur, les enceintes peuvent être endommagées.
Les disques de forme inhabituelle ne
peuvent pas être lus.
Les disques de forme inhabituelle (disques en forme de
cœur ou de forme hexagonale, etc.) ne peuvent pas être
utilisés. L’utilisation de ce type de disques peut entraîner
un dysfonctionnement.
Les disques vidéo BD/DVD suivants ne
peuvent pas être lus.
• Les disques dont le code/numéro régional ne
correspond pas à celui du lecteur.
• Les disques fabriqués illégalement.
• Les disques enregistrés pour un usage commercial.
A PROPOS DES DISQUES
Types de disques pouvant être
utilisés avec ce lecteur
Type de
disque
Format
d’enregistre
ment
Contenu Taille du
disque
Vidéo BD -- Audio +
Vidéo (Film)
12 cm
8 cm
BD-RE DL
BD-R DL
Format
BDMV
Vidéo DVD Format vidéo Audio +
Vidéo (Film)
12 cm
8 cm
DVD+RW/
DVD+R
DVD+R DL
DVD-R DL
DVD-RW/
DVD-R
Format vidéo/
VR/AVCHD
(disque
clôturé
uniquement)
Audio +
Vidéo (Film)
12 cm
8 cm
CD audio*1 CD audio
(CD-DA)
Audio 12 cm
8 cm
CD-RW/CD-R CD audio
(CD-DA)
Audio
JPEG*2 Image fixe
(fichier JPEG)
Informations de gestion des régions
Modèle BD-Video DVD-Video
Europe Code régional « B »
ou « ALL »
Numéro régional
« 2 » ou « ALL »
Russie Code régional « C »
ou « ALL »
Numéro régional
« 5 » ou « ALL »
2ALL
5ALL
Disques ne pouvant pas être
utilisés avec ce lecteur
CDG, CD vidéo, CD photo, CD-ROM, SVCD,
SA-CD, PD, CDV, CVD, DVD-RAM, DVD-Audio,
BD-RE avec la cartouche, CD-MP3, CD-WMA
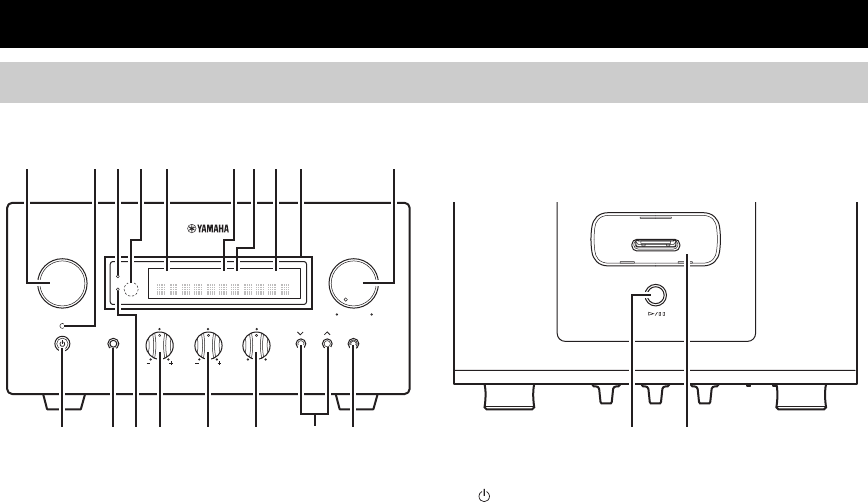
COMMANDES ET FONCTIONS
4 Fr
■Face avant
1INPUT
Sert à sélectionner une source d’entrée.
2Témoin On/Standby
Émet une lumière verte lorsque l’ampli-tuner est en service.
Émet une lumière orange lorsque l’ampli-tuner est en veille.
3Témoin TP
S’allume lorsque l’ampli-tuner reçoit une station du système
de diffusion de données radio qui contient le service de
transmission de données TP (Info trafic) (☞p.29).
4Capteur de télécommande
Il reçoit les signaux émis par le boîtier de télécommande.
5Témoin PRESET
Ce témoin s’allume lorsque vous sélectionnez des stations
radio en mémoire.(☞p.27).
6Témoin TUNED
Ce témoin s’allume lorsqu’une station radio est accordée.
7Témoin STEREO
Ce témoin s’allume lorsque l’ampli-tuner reçoit un signal
puissant d’une émission FM stéréo.
8Témoin SLEEP
Ce témoin s’allume lorsque la minuterie de mise hors
service est activée (☞p.31).
9Afficheur de la face avant
Affiche les différentes informations, notamment la
fréquence radio.
0VOLUME
Sert à régler le volume.
A (On/Standby)
Sert à mettre l’ampli-tuner en service ou en veille.
BPrise PHONES
Restitue des signaux audio pour l’écoute avec casque.
CTémoin TIMER
S’allume lorsque la minuterie est activée (☞p.30).
DBASS
Sert à régler la réponse des basses fréquences (☞p.15).
ETREBLE
Sert à régler la réponse des hautes fréquences (☞p.15).
FBALANCE
Sert à régler la balance de la sortie audio des enceintes de gauche
à droite pour compenser les déséquilibres dus aux emplacements
des enceintes ou aux conditions des salles d’écoute.
GPRESET d / u
Sert à sélectionner une station mise en mémoire. La source
d’entrée passe en FM. Utilisable même lorsque l’ampli-
tuner est en mode veille (☞p.27).
HPURE DIRECT
Sert à mettre en service ou hors service le mode Pure Direct (
☞
p.15).
Lorsque le mode Pure Direct est activé, le témoin s’allume en bleu.
Ih / e
Démarre et met sur pause la lecture de iPod. La source
d’entrée passe en iPod. Utilisable même lorsque l’ampli-
tuner est en mode veille.
JStation iPod
Connectez votre iPod (☞p.10).
COMMANDES ET FONCTIONS
Ampli-tuner (R-840)
INPUT
BASS
PHONES
VOLUME
MIN MAX
TREBLE BALANCE
PRESET PURE DIRECT
LR
PRESET
TP
TUNED
STEREO SLEEP
kHz MHz iPod
TIMER
1@
IJBCD E F G H
234 5 67 98
A
Vue de dessusVue de face

5 Fr
COMMANDES ET FONCTIONS
Français
INTRODUCTION
■Face avant
1Tiroir pour le disque
Contient le disque à lire.
2Témoin p (lecture)
Apparaît pendant la lecture.
3Témoin REP OFF S ALL A-B
S’allume lorsque le mode Lecture répétée est sélectionné.
4
Sert à ouvrir ou fermer le tiroir pour le disque.
Lorsque l’on enfonce cette touche en mode veille, l’ampli-
tuner s’allume automatiquement et la source d’entrée
passe sur DISC.
5
Arrête la lecture (☞p.17).
6 (On/Standby)
Sert à mettre le lecteur BD en service ou en veille.
Lorsque l’on enfonce cette touche en mode veille, l’ampli-
tuner s’allume automatiquement et la source d’entrée
passe sur DISC.
y
Si le lecteur BD ne fonctionne pas correctement pour quelque
raison que ce soit, vous pouvez le redémarrer en maintenant cette
touche enfoncée pendant environ 10 secondes, puis en appuyant
de nouveau dessus.
7Témoin QUICK
S’allume en veille lorsque la fonction Quick Start est
activée (☞p.35).
Clignote une fois le câble d’alimentation raccordé à la
prise secteur jusqu’à ce que le lecteur BD entre en veille.
8Témoin e (pause)
S’allume quand le lecteur BD est sur pause.
9Afficheur de la face avant
Montre l’état actuel du lecteur BD.
0
Revient au début de la plage ou du chapitre en cours.
Maintenez la pression pour accélérer la recherche arrière.
Appuyez deux fois pour accéder à la plage ou au chapitre
précédent (☞p.18).
A
Sert à démarrer la lecture ou à la mettre sur pause (☞p.17).
Lorsque l’on enfonce cette touche en mode veille, l’ampli-
tuner s’allume automatiquement et la source d’entrée
passe sur DISC, quelque soit l’entrée qui ait été
sélectionnée en dernier.
B
Passe à la plage ou au chapitre suivant. Maintenez la
touche enfoncée pour procéder à une avance rapide
(☞p.18).
Lecteur BD (BD-940)
QUICK
12 45
798
6
3
AB
@
PROG RANDOMMP3 WMA TRACK TOTAL REMAIN REP OFF S ALL A-B
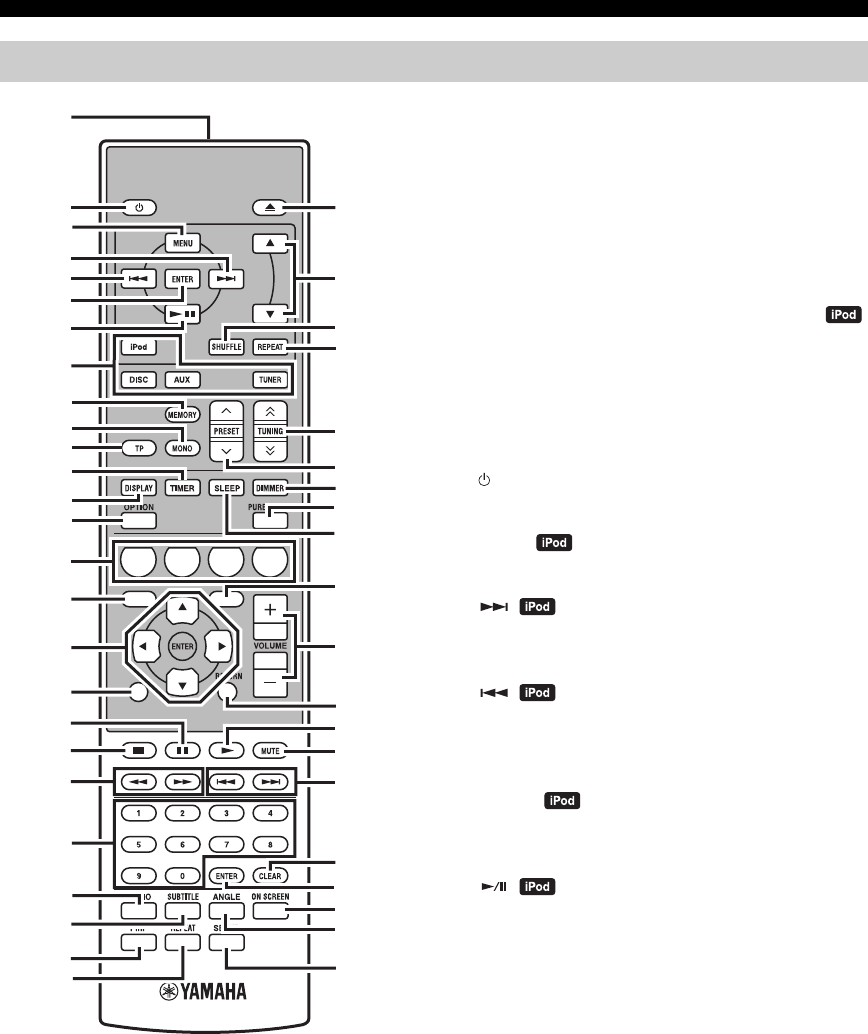
6 Fr
COMMANDES ET FONCTIONS
Ce boîtier de télécommande peut faire fonctionner les
composants du système (y compris les fonctions du syntoniseur)
et un iPod posé sur une station iPod au-dessus de l’ampli-tuner.
Pour faire fonctionner le lecteur BD, les fonctions du tuner ou un iPod à
l’aide du boîtier de télécommande, vous devez régler l’ampli-tuner sur
le mode d’entrée correspondant (
☞8
Touches de sélection d’entrée).
Pour faire fonctionner votre iPod
Appuyez sur la touche de fonction iPod correspondante
sur le boîtier de télécommande.
Les touches de fonction de l’iPod sont indiquées par
dans la section ci-dessous.
Voir page 32 pour plus d’informations sur le
fonctionnement de votre iPod.
1Émetteur de signaux infrarouges
Il envoie des signaux au système sur lequel vous voulez agir.
2 (On/Standby)
Sert à mettre le système en service ou en veille.
3MENU
Revient au niveau précédent dans le menu iPod.
4
Passe à la chanson suivante. Maintenez la touche enfoncée
pour procéder à une avance rapide.
5
Passe au début de la plage en cours. Appuyez deux fois
pour revenir à la plage précédente. Maintenez la pression
pour accélérer la recherche arrière.
6ENTER
Appuyez sur ENTER pour valider le groupe sélectionné. (Lorsque vous
appuyez sur ENTER la lecture commence si un morceau est sélectionné.)
7
Sert à démarrer la lecture ou à la mettre sur pause.
8Touches de sélection d’entrée
Sert à sélectionner la source d’entrée sur l’ampli-tuner.
Lors de la sélection d’une source d’entrée, appuyez sur la touche de
sélection d’entrée correspondante (ou tournez INPUT sur la face avant).
Le nom de la source d’entrée correspondante apparaît sur
l’afficheur de la face avant de l’ampli-tuner.
y
Lorsque DISC est sélectionné en tant que source d’entrée, le
lecteur BD s’allume automatiquement et lorsqu’une autre source
d’entrée est sélectionnée, le lecteur BD se met en mode veille.
9MEMORY
Sert à mettre des fréquences en mémoire (☞p.27). Démarre
la mise en mémoire automatique des fréquences (☞p.26).
0MONO
Sert à régler le mode de réception d’émissions FM en mode mono.
Boîtier de télécommande
1234
56
90
78
E
NT
E
RCL
E
AR
MUT
E
E
NT
E
R
VOLUME
AUX
TUN
E
R
iPod SHUFFLE
R
EPE
AT
MENU
ENTER
E
O
NM
O
N
O
M
E
M
O
R
Y
PRESET TUNING
DISC
DISPLAY TIMER SLEEP DIMMER
OPTION PURE DIRECT
AUDIO SUBTITLE ANGLE
REPEAT
ON SCREEN
RETURN
PinP SETUP
A B C D
EXIT
TOP MENU/TITLE LIST
POP UP MENU
J
1
M
N
O
P
Q
R
S
t
U
V
W
X
Y
Z
[
\
]
`
a
b
c
d
f
e
2
3
4
5
6
7
8
9
0
A
B
C
D
E
F
G
H
I
J
K
L

7 Fr
COMMANDES ET FONCTIONS
Français
INTRODUCTION
ATP
Permet d’accéder au mode de réception du service de
données TP (Info trafic)(☞p.29).
BTIMER
Indique l’heure actuelle sur l’afficheur de la face avant de
l’ampli-tuner.
Et permet de régler l’horloge (
☞
p.12) ou la minuterie (
☞
p.30).
CDISPLAY
Permet de changer les informations apparaissant sur
l’afficheur de la face avant de l’ampli-tuner ou de l’écran
du téléviseur pour le lecteur BD (☞p.23, p.28).
DOPTION
Permet d’accéder au mode du menu options.
Voir pages 27, 29 et 41 pour les éléments du menu options.
EA/B/C/D
Utilisée lorsque la source d’entrée est réglée sur DISC.
FTOP MENU/TITLE LIST
Affiche le menu principal du BD/DVD (☞p.18).
G, , , , ENTER
Pour sélectionner et valider un élément.
HEXIT
Permet de quitter l’écran du menu.
I
Met la lecture sur pause (☞p.17).
J
Arrête la lecture (☞p.17).
K,
Marche arrière et avance rapide.
LTouches numériques
Permet de saisir des numéros.
MAUDIO
Permet de sélectionner le format audio et la bande son (
☞
p.19).
NSUBTITLE
Permet de sélectionner les sous-titres (☞p.19).
OP in P
Permet d’utiliser l’image dans la fonction Image (☞p.24).
PREPEAT
Permet de sélectionner le mode Lecture répétée (☞p.19).
Q
Sert à ouvrir ou fermer le tiroir pour le disque.
R,
Appuyez sur ou sur pour passer d’un élément à un
autre dans le groupe sélectionné (☞p.32).
SSHUFFLE
Permet de sélectionner le mode de lecture aléatoire (☞p.32).
TREPEAT
Permet de sélectionner le mode de lecture répétée (☞p.32).
UTUNING
Appuyez sur TUNING pour la syntonisation
manuelle et appuyez sur TUNING et maintenez-la
enfoncée pour la syntonisation automatique (☞p.26).
VPRESET u / d
Permettent de sélectionner une station présélectionnée (
☞
p.27).
WDIMMER
Permet de changer la luminosité de l’afficheur de la face
avant (☞p.16).
XPURE DIRECT
Sert à mettre en service ou hors service le mode Pure
Direct (☞p.15).
YSLEEP
Sert à mettre la minuterie d’arrêt en service sur le système (
☞
p.31).
ZPOP UP MENU
Affiche le menu instantané du BD (☞p.18).
[VOLUME +/–
Sert à ajuster le volume général de l’ampli-tuner.
\RETURN
Retour au menu précédent (☞p.17).
]
Démarre la lecture (☞p.17).
`MUTE
Permet de couper le volume (☞p.16).
a,
Permet d’accéder au début de la plage ou du chapitre en
cours ou suivant.
bCLEAR
Permet d’effacer une entrée.
cENTER
Permet de valider une entrée.
dON SCREEN
Permet d’afficher des informations du disque à l’écran
(☞p.23).
eANGLE
Permet de sélectionner un angle de caméra (☞p.19).
fSETUP
Affichage du menu Configuration (☞p.13).
/ d
d
d
d
/ d
d
d
d
/ d
d
d
d

PRÉPARATIONS
8 Fr
PRÉPARATIONS
Avant de raccorder le système, veuillez lire attentivement la procédure et les remarques. Le boîtier de télécommande
et le fonctionnement en liaison du système ne sont opérationnels que lorsque l’ampli-tuner et le
lecteur BD sont raccordés via le câble de commande du système. Pour de plus amples informations sur les
enceintes (NS-BP300), reportez-vous au mode d’emploi qui les accompagne.
Raccordement du système
1Raccordez les prises AUDIO IN ( PLAYER L/R) de l’ampli-tuner aux prises AUDIO OUT ( L/R) du lecteur BD
à l’aide du câble audio stéréo RCA fourni.
2Raccordez la prise SYSTEM CONNECTOR ( TO:PLAYER) de l’ampli-tuner à la prise SYSTEM CONNECTOR
( TO:RECEIVER) du lecteur BD à l’aide du câble de commande du système fourni.
3Raccordez les bornes d’enceintes (L) de l’ampli-tuner aux bornes d’enceintes de l’enceinte gauche et les bornes
d’enceintes (R) de l’ampli-tuner aux bornes d’enceintes de l’enceinte droite avec les câbles d’enceintes fournis en
même temps que la paire d’enceintes (NS-BP300).
4Raccordez l’antenne FM fournie à la prise ANTENNA.
•
Ne branchez pas cet appareil ou d’autres composants sur l’alimentation secteur sans avoir effectué au préalable le raccordement des composants entre eux.
• Veillez à ce que les fils nus des enceintes ne puissent pas être en contact, ni entre eux ni avec une pièce métallique de l’ampli-tuner.
L’ampli-tuner et/ou les enceintes risqueraient d’être endommagés.
• Tous les raccordements doivent être exacts : L (gauche) sur L, R (droite) sur R, « + » sur « + » et « – » sur « – ». Si les raccordements
ne sont pas effectués correctement, aucun son ne sortira des enceintes et si la polarité des raccordements des enceintes n’est pas
respectée, la restitution du son sera peu naturelle et dénuée de graves. Consultez également le mode d’emploi pour chacun de vos
composants.
Remarques
• La connexion par le câble de commande du système permet de transmettre les signaux de télécommande de l’ampli-tuner au lecteur BD.
• Dans le cas d’une connexion d’enceintes autres que le modèle NS-BP300, utilisez des enceintes d’une impédance supérieure à 6Ω.
• Si la réception des ondes radioélectriques est médiocre, ou encore si vous désirez l’améliorer, nous vous suggérons d’envisager
l’emploi d’antennes extérieures, disponibles dans le commerce. Pour de plus amples détails concernant cette question, veuillez
consulter le revendeur Yamaha ou un service après-vente.
PRÉPARATIONS
Raccordement d’enceintes/d’appareils auxiliaires/d’antennes
AVERTISSEMENT
A A
B
B
Ampli-tuner (R-840)
(Modèle pour l’Europe)
Lecteur BD (BD-940) Enceinte gauche
(NS-BP300)
Enceinte droite
(NS-BP300)
Câble stéréo RCA
(fourni)
Câble de contrôle du
système (fourni)
Téléviseur, etc.
Caisson
d’extrêmes graves
Sortie
audio RCA
Câble
stéréo

PRÉPARATIONS
9 Fr
Français
PRÉPARATIONS
Raccordement d’un téléviseur au système
1Raccordez le système et votre téléviseur via la prise HDMI, les prises COMPONENT ou la prise VIDEO du lecteur
BD ainsi que la/les prise(s) correspondante(s) de votre téléviseur.
2Réglez « TV screen » en fonction de votre téléviseur (voir « Réglage de l’affichage du téléviseur » à la page 13).
Lors du raccordement du système et de votre téléviseur via les prises COMPONENT, réglez le lecteur BD de la manière
décrite dans « Sélection de la sortie vidéo » (☞p.33).
Lors du raccordement du système et de votre téléviseur via les prises HDMI, réglez « Sortie Vidéo HDMI » et « Sortie
Audio » de « Réglages Audio Vidéo » dans le menu « Réglages » menu (☞p.33, 34).
Lors du raccordement du système et de votre téléviseur via les prises HDMI, utilisez les câbles HIGH SPEED HDMI
présentant le logo HDMI (comme indiqué sur le couvercle).
Vous pouvez restituer du son à partir de la prise DIGITAL OUT et l’enregistrer numériquement sur un autre périphérique
ou transmettre des signaux audio à un ampli-tuner AV ou un décodeur pour écouter le son de source multivoies.
Après avoir effectué tous les raccordements, connectez les câbles d’alimentation de ce système et des autres composants
à des prises secteur murales.
Raccordement d’un enregistreur (CDR, MDR, etc.), d’un ampli-tuner AV
ou d’un décodeur (CDR, MDR, etc.)
Raccordement des câbles d’alimentation
Lecteur de BD (BD-940)
Câble vidéo composite
(fourni)
À la prise secteur
À la prise secteur
Ampli-tuner (R-840)
Lecteur de BD (BD-940)

PRÉPARATIONS
10 Fr
L’ampli-tuner est muni d’une station iPod sur la face
supérieure où vous pouvez poser votre iPod et en
commander la lecture à l’aide du boîtier de télécommande
fourni.
Utilisez cet ampli-tuner avec l’adaptateur de station iPod
(fourni avec votre iPod ou disponible dans le commerce)
approprié à votre iPod. L’utilisation de l’ampli-tuner sans
un adaptateur de station iPod approprié peut induire un
raccordement défectueux.
y
Si l’ampli-tuner est mis sous tension ou est en mode veille,
raccordez l’iPod pendant la lecture. L’ampli-tuner démarre
automatiquement la lecture de l’iPod (pour la cinquième génération
minimum d’iPod, iPod touch, iPod Classic ou iPod nano).
Remarques
• Seuls iPod (Click and Wheel), iPod nano, iPod Classic, iPod
mini et iPod touch sont pris en charge.
• Ne raccordez aucun accessoire iPod (tel qu’un casque, une
télécommande filaire ou un émetteur-récepteur FM) à votre
iPod quand il est posé sur une station iPod.
• À moins que votre iPod soit bien positionné dans la station
iPod, les signaux audio risquent de ne pas être reproduits
correctement.
• Une fois que la connexion entre votre iPod et l’ampli-tuner est
terminée et que l’ampli-tuner est réglé sur le mode iPod (☞p.6),
« CONNECTED » apparaît sur l’afficheur de la face avant. Si la
connexion entre votre iPod et l’ampli-tuner échoue, un message
apparaît sur l’afficheur de la face avant. Pour la liste complète
des messages concernant les connexions, voir la section iPod
dans « GUIDE DE DEPANNAGE » (☞p.42).
• Lorsque votre iPod est posé dans la station iPod de l’ampli-
tuner, votre iPod peut être chargé automatiquement même
lorsque l’ampli-tuner est en mode veille.
• Vous pouvez déconnecter l’iPod pendant la lecture.
Vous pouvez profiter d’une série de contenu grâce aux
fonctions interactives en le raccordant à l’Internet lors de
la lecture de disques compatibles BD-LIVE. Reportez-
vous aux pages 24 et 36 pour obtenir de plus amples
informations concernant les fonctions BD-LIVE.
Veillez à mettre hors tension le lecteur BD ainsi que
l’équipement avant d’effectuer les raccordements.
Remarques
• Vous pouvez raccorder un périphérique de mémoire USB (2 Go
minimum et formaté avec FAT 32/16) à la borne USB BD
STORAGE/SERVICE afin de sauvegarder des données BD-
LIVE ou de mettre à jour le logiciel du lecteur BD.
• Une connexion à haut débit à Internet est requise.
•
Lors de l’utilisation d’une connexion à haut débit à Internet, un contrat
avec un fournisseur de services Internet est requis. Pour plus de
détails, contactez votre fournisseur de services Internet le plus proche.
• Reportez-vous au mode d’emploi de votre équipement étant
donné que l’équipement raccordé et la méthode de connexion
peuvent varier en fonction de votre environnement Internet.
• Utilisez un câble réseau/routeur prenant en charge 10BASE-T/
100BASE-TX/1000BASE-T.
• Utilisez uniquement un câble réseau STP (à paires torsadées
blindées).
■Après le raccordement
• Effectuez le paramètre communication (☞p.36).
• Chargez un disque compatible avec BD-LIVE et lisez-
en le contenu (☞p.24).
Raccordement d’un iPod™
iPod
INPUT
PHONES
BASS
-+ -+ LR
TREBLE BALANCE
PRESET PURE DIRECT
VOLUME
MIN MAX
Ampli-tuner
iPod
Adaptateur de station iPod
Raccordement à l’Internet
AVERTISSEMENT
LAN
Lecteur BD
Internet
Câble réseau
(disponible dans le commerce)
2
À la borne LAN
PC
3À la borne
USB BD
STORAGE/
SERVICE
Périphérique de mémoire USB
(disponible dans le commerce)
Modem Hub ou
routeur à
large bande
1
À la borne
NETWORK

PRÉPARATIONS
11 Fr
Français
PRÉPARATIONS
■Remarques sur les piles
• Remplacez les deux piles lorsque la portée de
fonctionnement du boîtier de télécommande diminue.
• Utilisez des piles AAA, R03, UM-4.
• Assurez-vous que les polarités sont respectées.
Consultez l’illustration à l’intérieur du logement des
piles.
• Retirez les piles si le boîtier de télécommande reste
inutilisé pendant une longue période.
• N’utilisez pas tout à la fois des piles neuves et des piles
usagées.
• N’utilisez pas, en même temps, des piles de type
différent (notamment, une pile alcaline et une pile au
manganèse). Veuillez lire attentivement l’emballage,
étant donné que ces différents types de piles peuvent
avoir la même forme et la même couleur.
• Si les piles ont fui, mettez-les immédiatement au rebut.
Évitez de toucher la substance dérivant de la fuite et de
la laisser entrer en contact avec un vêtement, etc.
Nettoyez à fond le logement des piles avant la mise en
place de nouvelles piles.
• Ne jetez pas les piles avec les autres ordures
ménagères; mettez-les correctement au rebut
conformément à la réglementation locale.
Le boîtier de télécommande transmet un rayon infrarouge
directionnel. Assurez-vous que vous dirigez le boîtier de
télécommande vers le capteur de télécommande sur la face
avant de l’ampli-tuner pendant l’opération.
Remarques
• La zone comprise entre le boîtier de télécommande et l’ampli-
tuner doit être débarrassée de tout obstacle.
• Ne renversez pas d’eau ou d’autres liquides sur le boîtier de
télécommande.
• Ne laissez pas tomber le boîtier de télécommande.
• Ne conservez pas et ne rangez pas le boîtier de télécommande
dans les types de milieux suivants :
– humidité élevée, par exemple près d’un bain
– température élevée, par exemple près d’un appareil de
chauffage ou d’une cuisinière
– très basses températures
– endroits poussiéreux.
• N’exposez pas le capteur de télécommande à un éclairage vif,
en particulier une lampe fluorescente à convertisseur, sinon le
boîtier de télécommande risque de ne pas fonctionner
correctement. Si besoin est, mettez le système à l’abri de tout
éclairage direct.
Mise en place des piles dans le
boîtier de télécommande
13
2
Utilisation du boîtier de
télécommande
INPUT
BASS
PHONES
VOLUME
MIN MAX
TREBLE BALANCE
PRESET PURE DIRECT
LR
1234
56
90
78
ENTER CLEAR
MUTE
ENTER VOLUME
AUX TUNER
iPod SHUFFLE REPEAT
MENU
ENTER
EON MONO
MEMORY
PRESET TUNING
DISC
DISPLAY TIMER SLEEP DIMMER
OPTION PURE DIRECT
AUDIO SUBTITLE ANGLE
REPEAT
ON SCREEN
RETURN
PinP SETUP
A B C D
EXIT
TOP MENU/TITLE LIST
POP UP MENU
30˚ 30˚
Moins de 6 m
Ampli-tuner (R-840)
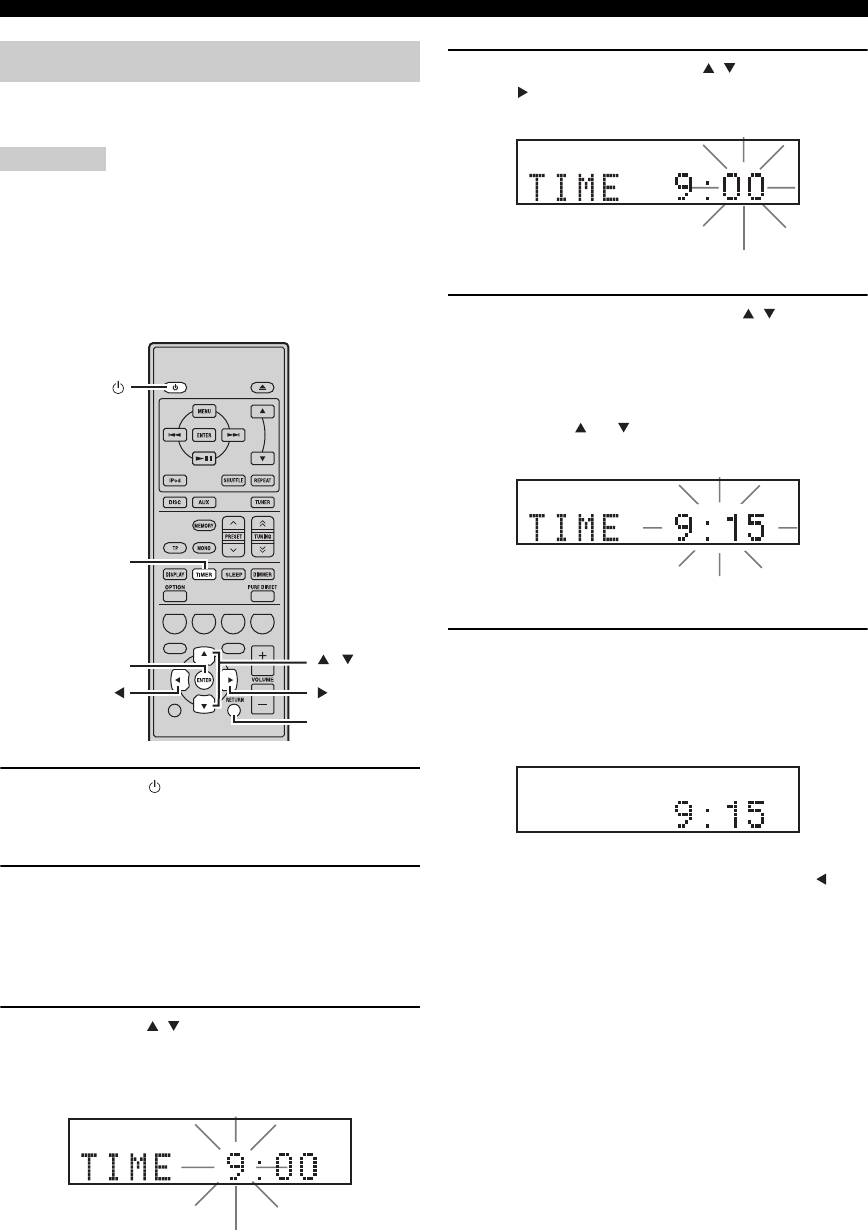
PRÉPARATIONS
12 Fr
Avant de commencer la lecture, effectuez les opérations
suivantes pour régler l’horloge de l’ampli-tuner.
Remarques
• Utilisez le boîtier de télécommande pour régler l’horloge. Il
n’est pas possible de régler l’horloge avec les touches de
l’ampli-tuner.
• L’ampli-tuner prend en charge l’affichage de l’heure en format
24 heures.
• Si vous n’appuyez sur aucune touche pendant 90 secondes,
l’ampli-tuner revient en mode normal.
1Appuyez sur pour mettre l’ampli-tuner
sous tension.
L’afficheur de la face avant s’allume.
2Appuyez sur TIMER pour afficher l’heure
actuelle.
Si l’heure n’est pas réglée, « SET TIME » clignote
sur l’afficheur.
Appuyez sur ENTER pour passer à l’étape 3.
3Appuyez sur / pour sélectionner « TIME »,
et appuyez sur ENTER.
L’ampli-tuner entre en mode de réglage de l’horloge.
Les chiffres des heures commencent à clignoter.
4Réglez l’heure à l’aide de / , et appuyez
sur .
Les chiffres des minutes commencent à clignoter.
5Réglez les minutes à l’aide de / , et
appuyez sur ENTER.
Les chiffres des heures et des minutes commencent à
clignoter.
Pour changer à nouveau l’heure ou les minutes,
appuyez sur ou , effectuez les étapes 4 et 5, et
passez à l’étape 6.
6Appuyez sur ENTER.
L’horloge est réglée.
Les segments des heures et des minutes arrêtent de
clignoter et restent allumés. L’ampli-tuner revient au
mode normal.
y
Vous pouvez revenir à l’écran précédent en appuyant sur ou
RETURN.
Réglage de l’horloge
ABCD
EXIT
TOP MENU/TITLE LIST
POP UP MENU
TIMER
ENTER ,
RETURN
Clignote
Clignote
Clignote

RÉGLAGE DU SYSTÈME
13 Fr
Français
PRÉPARATIONS
Assurez-vous que toutes les connexions nécessaires ont
été effectuées (voir « Raccordement d’un téléviseur au
système » à la page 9).
1Mettez le téléviseur sous tension sur lequel
le lecteur BD est raccordé.
Sélectionnez l’entrée TV pour correspondre à l’entrée
raccordée au lecteur BD.
2Appuyez sur pour mettre l’ampli-tuner
sous tension.
3Appuyez sur DISC.
Définissez le format d’écran du lecteur BD en fonction du
téléviseur raccordé (☞p.33).
1Appuyez sur SETUP.
Le menu de configuration apparaît à l’écran.
2Appuyez sur /// pour sélectionner
« Settings », ensuite, appuyez sur ENTER.
3
Appuyez sur
/
pour sélectionner « Audio
Video Settings », ensuite, appuyez sur ENTER.
4Appuyez sur / pour sélectionner « TV
Aspect Ratio », ensuite, appuyez sur ENTER.
5Appuyez sur / pour sélectionner le format
d’écran du téléviseur, ensuite, appuyez sur
ENTER.
Pour plus de détails concernant l’option de format
d’écran, voir page 33.
6Appuyez sur SETUP ou EXIT pour quitter le
menu de configuration.
y
Vous pouvez revenir au menu précédent en appuyant sur RETURN.
Vous pouvez sélectionner vos paramètres de langue
favoris afin que le lecteur BD passe automatiquement à
votre langue favorite chaque fois que vous chargez un
disque. Si la langue sélectionnée n’est pas disponible sur
le disque, la langue de réglage par défaut du disque sera
utilisée en remplacement. La langue d’affichage à l’écran
pour le menu de configuration BD/DVD restera comme
vous l’avez réglée, sans tenir compte des différentes
langues du disque.
1Appuyez sur SETUP.
2
Appuyez sur
///
pour sélectionner « On
Screen Language », ensuite, appuyez sur ENTER.
3Appuyez sur / pour sélectionner une
langue, ensuite, appuyez sur ENTER.
RÉGLAGE DU SYSTÈME
Mettre le téléviseur et le système
sous tension
Réglage de l’affichage du téléviseur
EXIT
TOP MENU/TITLE LIST
POP UP MENU
SETUP
, , , ,
ENTER
Settings
Picture
On Screen Language
Displays The Title List
Langue d’affichage à l’écran
Audio Video Settings
Quick Start
HDMI Control
Playback Setting
Communication Setup
Version
USB Memory Management
Software Update
System Reset
RÉGLAGE DU SYSTÈME
14 Fr
1Appuyez sur SETUP.
2Appuyez sur /// pour sélectionner
« Réglages », ensuite, appuyez sur ENTER.
3
Appuyez sur
/
pour sélectionner « Réglages
De Lecture », ensuite, appuyez sur ENTER.
4Appuyez sur / pour sélectionner « Langue
du disque », ensuite, appuyez sur ENTER.
5Appuyez sur / pour sélectionner l’élément
ci-dessous.
•SS-Title
• Audio
•Menu
6Appuyez sur / pour sélectionner une
langue, ensuite, appuyez sur ENTER.
Langue audio, des sous-titres et
du menu du disque

FONCTIONNEMENT DU SYSTÈME
15 Fr
Français
OPÉRATIONS DE
BASE
OPÉRATIONS DE BASE
Procédez de la façon suivante pour sélectionner une source d’entrée et régler les paramètres du son sur le système.
1Appuyez sur (On/Standby) pour mettre
l’ampli-tuner en service.
Selon le mode d’entrée de l’ampli-tuner, le lecteur
BD est également mis sous tension par la connexion
de commande du système (☞p.8). L’afficheur de la
face avant s’allume.
2Appuyez sur l’une des touches de sélection
d’entrée (ou tournez INPUT sur la face avant)
pour sélectionner la source d’entrée souhaitée.
3
Commencez la lecture sur l’appareil sélectionné,
ou choisissez une station de radio.
Pour plus d’informations concernant la lecture du
disque, voir page 17, et pour plus d’informations
concernant la syntonisation, voir page 26.
4Appuyez sur VOLUME +/– (ou tournez
VOLUME sur la face avant) pour régler le
volume au niveau de sortie souhaité.
5Tournez BASS, TREBLE ou BALANCE sur la
face avant de l’ampli-tuner pour régler les
paramètres suivants.
BASS : Sert à régler la réponse des basses
fréquences.
TREBLE : Sert à régler la réponse des hautes
fréquences.
BALANCE : Sert à régler le volume des enceintes
gauche et droite.
■Mode Pure Direct
Le mode Pure Direct contourne le circuit de réglage de la
tonalité et éteint l’afficheur de la face avant; ce qui permet
d’écouter un son direct en haute fidélité.
Appuyez sur PURE DIRECT (ou sur PURE DIRECT
sur la face avant) pour activer le mode Pure Direct.
L’afficheur de la face avant s’éteint automatiquement.
PURE DIRECT est rétroéclairé en bleu sur la face avant.
Remarques
• Si vous effectuez une opération quelconque quand le mode Pure
Direct est activé, l’afficheur de la face avant de l’ampli-tuner
s’allume brièvement pour signaler la commande.
• Lorsque le mode Pure Direct est activé, BASS, TREBLE ou
BALANCE ne sont pas disponibles.
FONCTIONNEMENT DU SYSTÈME
INPUT
BASS
PHONES
VOLUME
MIN MAX
TREBLE BALANCE
PRESET PURE DIRECT
LR
TP
TIMER
QUICK
INPUT
(On/Standby) VOLUME
PURE
DIRECTBASS BALANCE
TREBLE
A B C D
EXIT
TOP MENU/TITLE LIST
POP UP MENU
(On/Standby)
VOLUME +/–
Touches de
sélection
d’entrée
PURE DIRECT
MUTE
Fonctionnement de base du système

FONCTIONNEMENT DU SYSTÈME
16 Fr
Pour mettre hors service le mode Pure Direct
Appuyez à nouveau sur PURE DIRECT. Le rétroéclairage
PURE DIRECT s’éteint et l’afficheur de la face avant
s’allume.
■Mise en sourdine du son (MUTE)
Appuyez sur MUTE pour réduire le volume actuel
d’environ 20 dB.
« MUTE ON » apparaît sur l’afficheur de la face avant.
Appuyez à nouveau sur MUTE pour rétablir la sortie
audio au niveau précédent du volume.
Vous pouvez assombrir l’afficheur de la face avant de
l’ampli-tuner. L’afficheur de la face avant du lecteur BD
s’assombrit également dans la mesure où il est relié par le
câble de commande du système (☞p.8). (Le réglage par
défaut est « DIMMER OFF ».)
Appuyez sur DIMMER.
Vous pouvez définir la luminosité souhaitée de l’afficheur
de la face avant en sélectionnant normal (brillant), mi-
sombre ou sombre.
Vous pouvez raccorder votre casque à la prise PHONES
située sur la face avant de l’ampli-tuner.
Le son restitué par les enceintes et le caisson de graves
s’arrête.
Modification de la luminosité de
l’afficheur de la face avant
Pour utiliser un casque
DIMMER
INPUT
PHONES
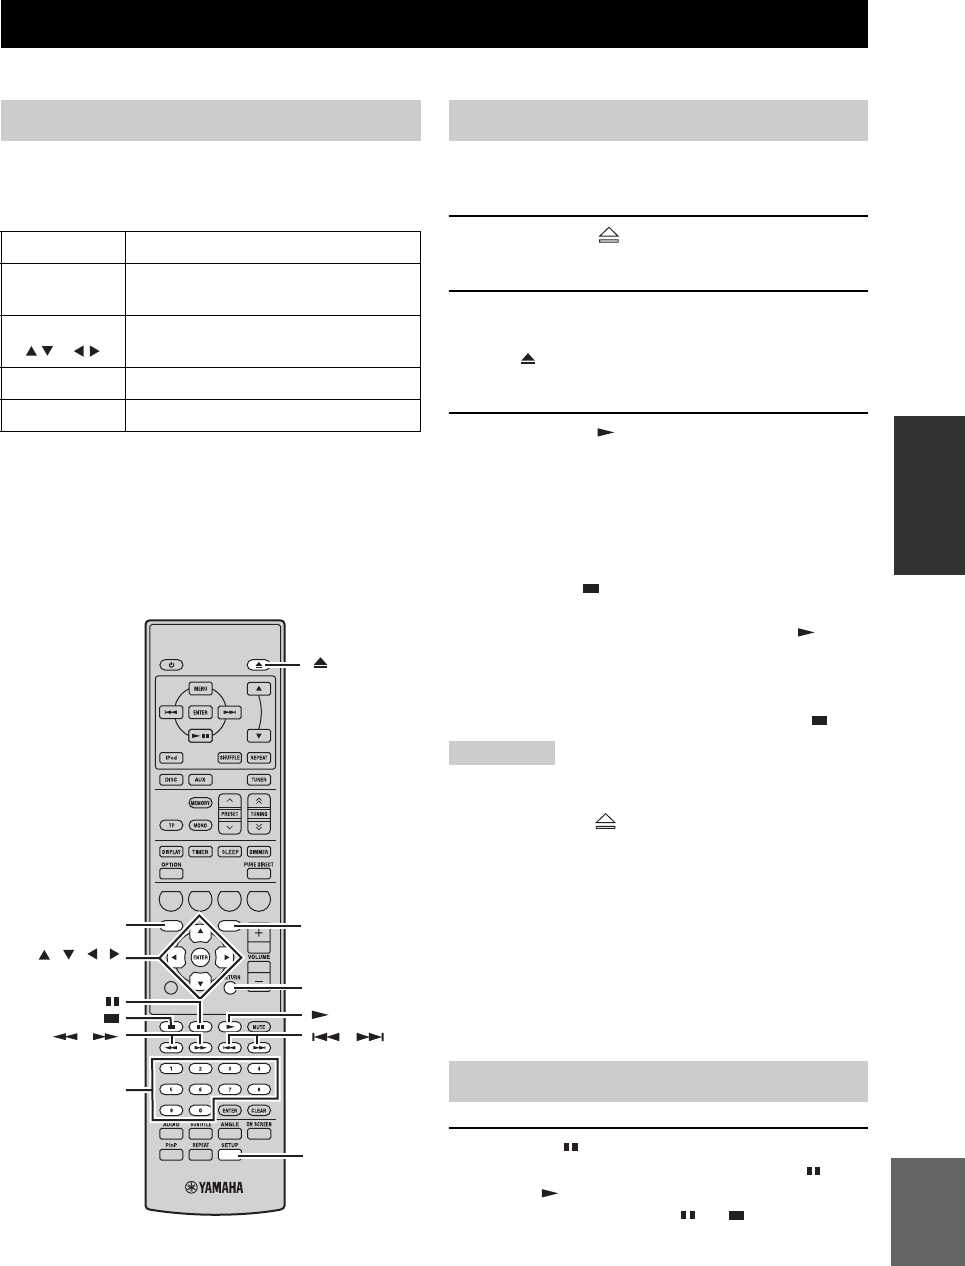
FONCTIONNEMENT DU DISQUE
17 Fr
Français
OPÉRATIONS DE
BASE
Ce chapitre explique comment lire des disques.
Si la source d’entrée est DISC, vous pouvez effectuer
divers réglages et utiliser diverses fonctions à l’aide des
menus affichés à l’écran du téléviseur.
Vous pouvez utiliser ces touches lorsque le mode d’entrée
est réglé sur DISC.
y
• Vous pouvez modifier la langue d’affichage à l’aide du
paramètre de langue d’affichage (☞p.13).
• Les boutons pouvant être utilisés avec les différents menus sont
indiqués dans le bas de chaque page d’écran.
Voir page 3 pour de plus amples détails concernant les
types de disque et les formats de fichier pris en charge.
1Appuyez sur sur la face avant du lecteur
BD.
2Placez le disque au centre du tiroir en
orientant le label vers le haut puis appuyez
sur .
Le tiroir du disque se ferme et le disque est chargé.
3Appuyez sur .
• Si vous avez inséré un disque BD/DVD, un menu
peut apparaître. Voir « Menus BD/DVD » (☞p.18)
pour plus de détails.
• Si vous avez chargé un disque contenant des photos
JPEG, un diaporama démarre. Voir « Lecture de
diaporamas JPEG » (☞p.20) pour plus de détails.
Appuyez sur pour arrêter la lecture.
Vous pouvez reprendre la lecture plus tard là où vous
l’aviez arrêtée en appuyant simplement sur
(fonction Resume). La fonction Resume peut ne pas
fonctionner en fonction du disque.
Pour reprendre la lecture au début d’un disque, annulez
le mode de reprise en appuyant à nouveau sur .
Remarques
• Si vous chargez un DVD double face, faites-le en tournant la
face à lire vers le bas.
• Si vous appuyez sur sur la face avant alors que le lecteur
BD est en veille, ce système s’allume automatiquement et
sélectionne DISC en tant que source d’entrée. Le tiroir de
disque s’ouvre et le système est maintenant prêt pour la lecture.
• Avec certains disques, quelques fonctions de lecture décrites
dans ce chapitre peuvent ne pas fonctionner normalement voire
ne pas fonctionner du tout.
• Certains BD/DVD restreignent l’usage de certaines fonctions
comme la fonction de reprise, la lecture aléatoire ou en boucle
sur certaines parties ou l’ensemble du disque. Il ne s’agit pas
d’un dysfonctionnement.
Appuyez sur .
Pour reprendre la lecture, appuyez à nouveau sur , ou
appuyez sur .
Pour un CD audio, appuyez sur ou pour
interrompre la lecture.
FONCTIONNEMENT DU DISQUE
Utilisation de l’affichage à l’écran
Bouton Description
SETUP Affichage du menu de configuration du
lecteur BD
Curseur
()/()
Sélection des éléments du menu
ENTER Confirmation de la sélection de l’élément
RETURN Retour au menu précédent
A B C D
EXIT
TOP MENU/TITLE LIST
POP UP MENU
Touches
numériques
TOP MENU/
TITLE LIST POP UP MENU
RETURN
, , ,
ENTER
SETUP
, ,
Opérations pour la lecture
Interruption de la lecture (Pause)

FONCTIONNEMENT DU DISQUE
18 Fr
Durant la lecture, vous pouvez procéder à un recul ou une
avance à diverses vitesses.
Appuyez sur pour une marche arrière ou
pour une avance rapide.
La vitesse de marche arrière ou d’avance change à chaque
pression sur ou .
La vitesse est affichée à l’écran.
Appuyez sur pour reprendre la lecture normale.
■
Pour sélectionner la plage ou le chapitre suivant
Appuyez sur .
■
Pour sélectionner la plage ou le chapitre précédent
Appuyez à deux reprises sur .
Si vous appuyez une seule fois sur , la lecture revient
au début du chapitre ou de la plage en cours.
La plupart des BD/DVD disposent de menus permettant
de choisir ce que vous voulez regarder. Généralement, le
menu principal apparaît automatiquement. Pour certains
disques, cependant, il faut appuyer sur TOP MENU/
TITLE LIST ou POP UP MENU pour afficher le menu.
Les boutons suivants peuvent être utilisés avec des menus.
*1 Dépend du disque.
*2 Avec certains disques, il fonctionne comme le bouton TOP
MENU/TITLE LIST.
Remarques
• La procédure expliquée sur cette page est la procédure de
fonctionnement de base. Les procédures varient en fonction du BD/
DVD, vous devrez donc peut-être suivre les instructions dans le
mode d’emploi du BD/DVD ou les instructions affichées à l’écran.
• Avec certains BD/DVD, le menu principal peut être désigné par
le « Title Menu ». Utilisez TOP MENU/TITLE LIST lorsque
les instructions se réfèrent au « Title Menu ».
• Si aucun menu principal n’est disponible, TOP MENU/TITLE
LIST n’aura aucun effet.
• L’écran du menu principal s’affichera peut-être en appuyant sur
POP UP MENU en fonction du DVD.
Vous pouvez lire les BD/DVD au ralenti. Vous pouvez
également lire des DVD au ralenti inversé.
1Durant la lecture, appuyez sur .
2La lecture au ralenti fonctionne lorsque
ou est enfoncée pendant plus de 2
secondes pendant l’interruption.
Appuyez sur pour reprendre la lecture normale.
Remarques
• La lecture au ralenti ne fonctionne pas avec des CD audio.
• La lecture au ralenti inversé ne peut pas être effectuée avec des
BD.
Vous pouvez lire des BD/DVD image par image. Vous
pouvez également lire des disques DVD-Video image par
image en marche arrière.
1Durant la lecture, appuyez sur .
2Appuyez sur ou pour lire une image
à la fois.
Appuyez sur pour reprendre la lecture normale.
Remarques
• La lecture image par image risque de ne pas fonctionner
correctement avec des disques autres que DVD-RW/R (format
VR).
• Certains BD/DVD ne sont pas compatibles avec la lecture
image par image.
• La lecture avance/marche arrière par image peut être réalisée
pour des DVD en appuyant sur ou pendant
l’interruption.
Recul et avance rapide
Sélection de chapitres et de plages
Menus BD/DVD
Bouton Description
TOP MENU/
TITLE LIST
Affiche le menu principal du BD/DVD*1
POP UP MENU Affiche ou ferme le menu instantané du BD*2
()/()Sélection des éléments du menu
ENTER Confirmation de la sélection de l’élément
Lecture au ralenti
Lecture image par image
,
,
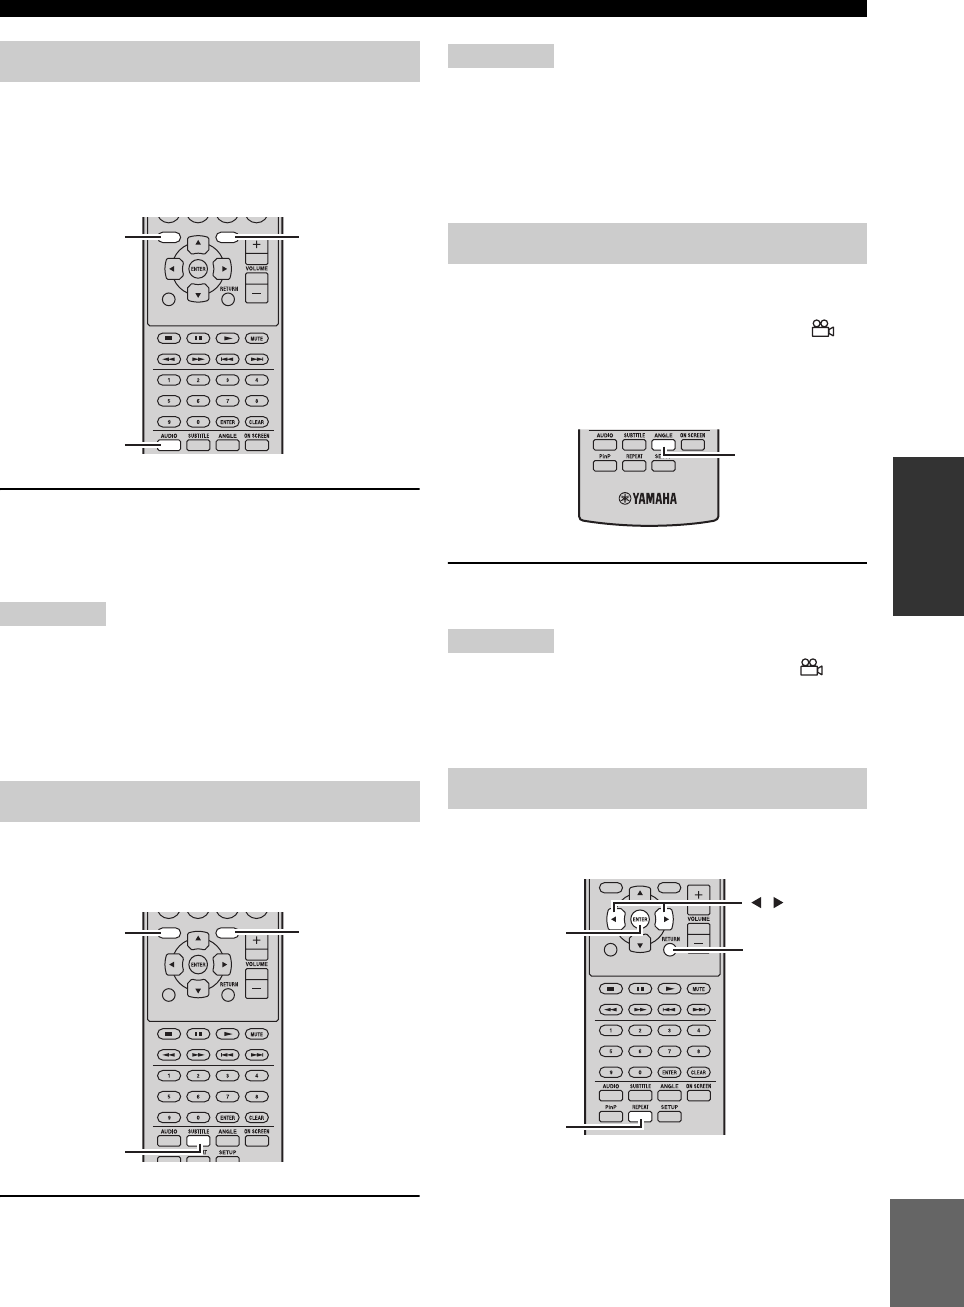
FONCTIONNEMENT DU DISQUE
19 Fr
Français
OPÉRATIONS DE
BASE
Certains BD/DVD ont des bandes sons en plusieurs
langues ou divers formats audio, comme Dolby Digital et
DTS, que vous pouvez sélectionner durant la lecture. De la
même façon, certains disques DVD-VR ont des bandes
sons mono doubles.
Appuyez plusieurs fois sur AUDIO durant la
lecture pour choisir la langue de la bande son ou
le format audio.
La langue ou le format audio choisi est affiché à l’écran.
Remarques
• Sur certains disques, seul le menu du disque permet de
sélectionner la langue de la bande son et le format audio.
Utilisez TOP MENU/TITLE LIST et POP UP MENU pour
afficher le menu du disque.
• Vous pouvez modifier la langue par défaut de la bande son du
BD/DVD dans la section « Langue du disque » (☞p.35).
Certains disques BD/DVD proposent des sous-titres dans
une ou plusieurs langue que vous pouvez choisir pendant
la lecture.
Durant la lecture, appuyez plusieurs fois sur
SUBTITLE pour sélectionner les sous-titres
disponibles.
La langue choisie pour les sous-titres est affichée à
l’écran.
Remarques
• Sur certains disques, seul le menu du disque permet de
sélectionner la langue des sous-titres. Utilisez TOP MENU/
TITLE LIST et POP UP MENU pour afficher le menu du
disque.
• Vous pouvez modifier la langue par défaut des sous-titres du
BD/DVD dans la section « Langue du disque » (☞p.35).
Certains BD/DVD-Video proposent différents angles de
vue que vous pouvez sélectionner durant la lecture.
Vous pouvez mettre en service l’icône de caméra ( ) si
vous préférez (☞p.35). Cet icône apparaît à l’écran lors de
la lecture d’un contenu disposant plusieurs angles de prise
de vue.
Pour changer d’angle de vue durant la lecture,
appuyez plusieurs fois sur le bouton ANGLE.
Remarques
• Certains disques peuvent afficher l’icône de caméra ( ) sans
que différents angles de vue soient disponibles pour autant.
• Certains disques proposent un menu permettant de choisir
l’angle de prise de vue.
Vous pouvez lire un titre, un chapitre, une plage ou un
disque en boucle.
Choix de la langue et du format audio
Sélection des sous-titres
EXIT
TOP MENU/TITLE LIST
POP UP MENU
AUDIO
TOP MENU/
TITLE LIST POP UP MENU
EXIT
TOP MENU/TITLE LIST
POP UP MENU
SUBTITLE
TOP MENU/
TITLE LIST POP UP MENU
Choix des angles de prise de vue
Lecture en boucle
ANGLE
EXIT
TOP
MENU/TITLE
LIST
POP
UP
MENU
RETURN
ENTER
REPEAT
,
FONCTIONNEMENT DU DISQUE
20 Fr
1Durant la lecture, appuyez sur REPEAT.
Le menu Repeat s’affiche à l’écran.
Pour fermer le menu Repeat, appuyez sur RETURN.
2Appuyez sur / pour sélectionner les
options de lecture en boucle.
• Lecture Du Titre : permet de lire en boucle le titre
en cours de lecture.
• Lecture Chapitre : permet de lire en boucle le
chapitre en cours de lecture.
• Choisir Partie : permet de lire en boucle la scène
spécifiée du titre ou du chapitre (☞ « Lecture en
boucle d’une partie spécifiée (répétition de A-B) »).
Pour les CD audio, vous pouvez sélectionner « Lecture
Disque», « Lecture Plage » ou « Choisir Partie ».
3Appuyez sur ENTER.
La lecture en boucle démarre.
Les options de lecture en boucle disponibles varient
en fonction du type de disque.
Pour annuler la lecture en boucle, appuyez sur
REPEAT pendant la lecture.
Remarque
La lecture en boucle ne peut pas être utilisée avec des disques JPEG.
Vous pouvez spécifier deux points sur un disque, ensuite,
lire plusieurs fois la section entre ces deux points.
La fonction de répétition de A-B n’est pas disponible avec
des disques BD.
1Pendant la lecture, appuyez sur REPEAT,
ensuite, sur / pour sélectionner « Choisir
Partie ».
« Régler Pt De Départ » s’affiche.
« A- » s’allume sur l’afficheur de la face avant du
lecteur BD.
2Appuyez sur ENTER à la scène où vous
voulez définir le point de départ.
« Rég. Pos. Fin » s’affiche.
« B » s’allume sur l’afficheur de la face avant.
3Appuyez sur ENTER à la scène où vous
voulez définir le point final.
La section comprise entre le point de départ et le
point final est lue en boucle.
« REP » et « A-B » s’allument sur l’afficheur.
Pour annuler la lecture en boucle, appuyez sur REPEAT.
Pour fermer le menu Repeat, appuyez sur EXIT.
Remarque
Les points de départ et final doivent se situer dans le même titre
(DVD) ou la même plage (CD audio).
y
Vous pouvez appuyer sur pour procéder à une avance
rapide jusqu’à la scène où vous souhaitez définir le point final.
Vous pouvez lire un diaporama d’images JPEG sur un CD-
R/CD-RW.
Chargez le disque, ensuite, appuyez sur pour
démarrer le diaporama.
En commençant par la première image du premier dossier,
le diaporama affiche toutes les images de tous les dossiers
du disque par ordre alphabétique.
Les images sont automatiquement échelonnées pour être
affichées à la taille maximum à l’écran.
Vous pouvez utiliser les boutons suivants durant un
diaporama.
Lecture en boucle d’une partie
spécifiée (répétition de A-B)
Lecture Du Titre. Lecture Chapitre Choisir Partie
Lecture Du Titre. Lecture Chapitre Choisir Partie
Régler Pt De Départ
Lecture de diaporamas JPEG
Bouton Description
Interruption du diaporama
Sélection de l’image suivante
Sélection de l’image précédente
ABCD
EXIT
TOP MENU/TITLE LIST
POP UP MENU
, , ,
ENTER
C
SETUP
,

FONCTIONNEMENT DU DISQUE
21 Fr
Français
OPÉRATIONS DE
BASE
■Réglage de la vitesse du diaporama ou
de la lecture en boucle
1Appuyez sur SETUP.
Le menu de configuration s’affiche à l’écran.
2Sélectionnez « Image », ensuite, appuyez sur
ENTER pour ouvrir l’écran de sélection
d’image.
3Appuyez sur C (Menu du diaporama).
4Appuyez sur / pour sélectionner « Vitesse
Diaporama » ou « Rég.Mode Répétition »,
ensuite, appuyez sur ENTER.
5Appuyez sur / / / pour sélectionner
l’élément souhaité, ensuite, appuyez sur
ENTER.
Vous pouvez choisir la vitesse du diaporama entre
« Rapide », « Normal », « Lent1 » et « Lent2 ».
Remarque
Les grandes images prennent plus de temps à charger et peuvent
mettre du temps à apparaître.
1Appuyez sur SETUP.
Le menu de configuration s’affiche à l’écran.
2Sélectionnez « Image », ensuite, appuyez sur
ENTER pour ouvrir l’écran de sélection
d’image.
3Utilisez / / / pour sélectionner le
dossier qui contient le(s) fichier(s) que vous
souhaitez lire, ensuite, appuyez sur ENTER.
Pour lire des fichiers JPEG, voir « Lecture de
diaporamas JPEG » (☞p.20).
Vous pouvez lire un disque enregistré (DVD : disque
clôturé de format VR uniquement).
Remarque
« Finalize » se réfère à un enregistreur traitant un disque enregistré afin
qu’il soit lu dans d’autres lecteurs/enregistreurs DVD ainsi que dans ce
lecteur. Seuls des disques DVD clôturés seront lus dans ce lecteur. (La
fonction pour clôturer des disques n’est pas disponible sur ce lecteur.)
À propos de la liste des titres
La liste des titres peut être affichée en deux types, Vignette
et Liste des titres. Chaque fois que vous appuyez sur A,
l’écran permute entre Vignette et Liste de titre.
1Informations relatives au titre sélectionné
2Nom du titre
Date d’enregistrement
Durée d’enregistrement
3Légende pour Bouton de couleur
Lecture d’images fixes dans un
dossier sélectionné
1/77
8/15
Lecture de films enregistrés sur un
DVD-R/DVD-RW
A B C D
EXIT
TOP MENU/TITLE LIST
POP UP MENU
,
, , , ,
ENTER
C
D
B
A
TOP MENU/
TITLE LIST
Par Chapitre Playlist Fonctions
DCB
Nom Du Titre
A
5/21 Ven 9:30 AM 110 Min.
Programme 1
5/21
[ Depuis Ancien ]
Ven 9:30 AM
1 Programme 1 5/21 Ven 110 Min.
2 Programme 2 6/15 Ven 110 Min.
3 Programme 3 7/3 Lun 56 Min.
4 Programme 4 9/18 Jeu 40 Min.
110 Min.
Programme 1
Tri Playlist Fonctions
DCB
Aperçu
A
1
2
3
1
3
Nom Du Titre
Aperçu
Programme
1
Programme
4Programme
5Programme
6
Programme
2Programme
3
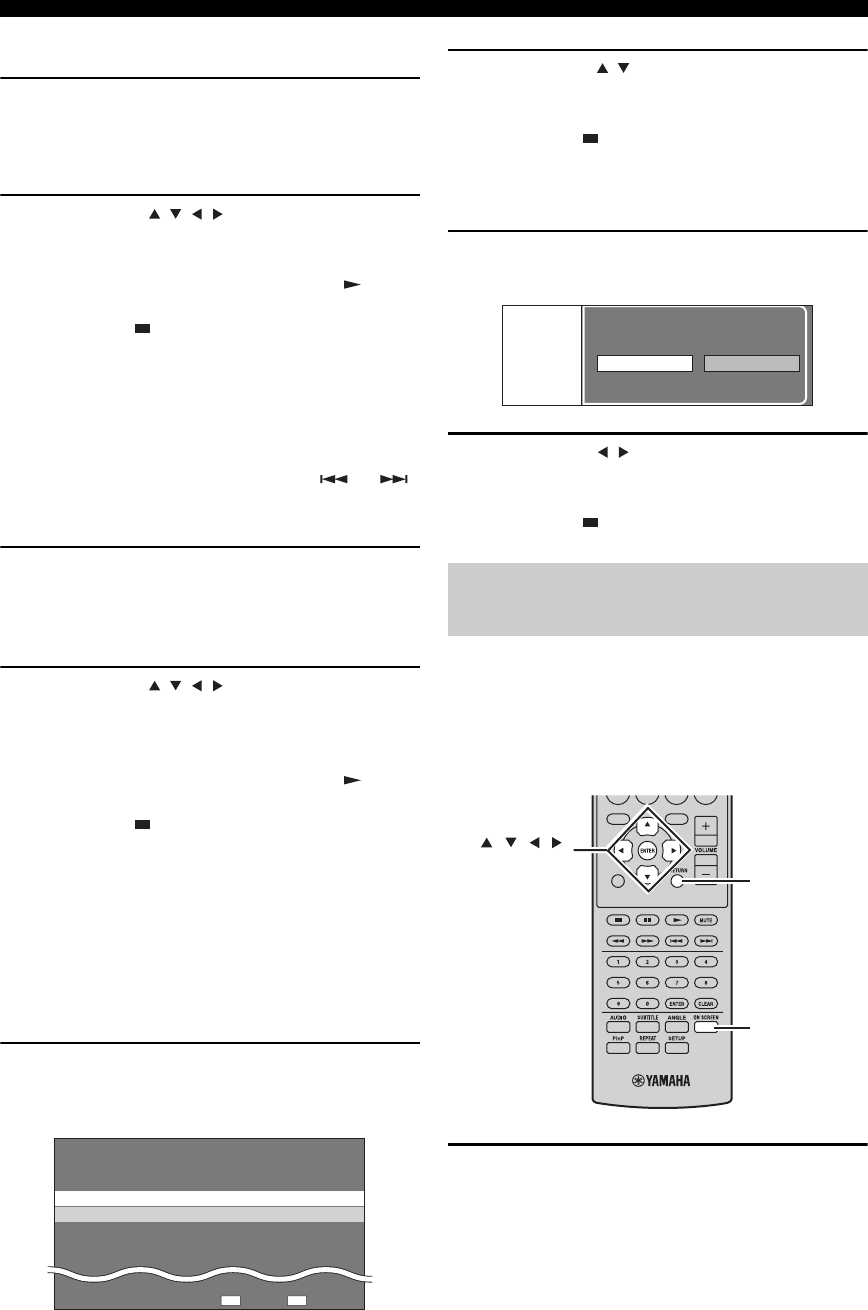
FONCTIONNEMENT DU DISQUE
22 Fr
■Lecture en sélectionnant un titre
1Chargez un disque enregistré.
L’écran de la liste des titres s’affiche.
Si l’écran de la liste des titres ne s’affiche pas,
appuyez sur TOP MENU/TITLE LIST.
2Appuyez sur /// pour sélectionner le
titre souhaité, ensuite, appuyez sur ENTER.
La lecture du titre sélectionné commencera.
La lecture peut être lancée en appuyant sur au lieu
d’appuyer sur ENTER.
Appuyez sur pour arrêter la lecture.
y
• L’écran de la liste des titres peut également être affiché en appuyant
sur TOP MENU/TITLE LIST si la lecture est arrêtée ou en
appuyant sur ENTER après avoir choisi « Afficher Liste Titres »
dans le menu de configuration lorsque la lecture est arrêtée.
• Lorsque le mode Vignette s’affiche qu’il existe sept titres
minimum, parcourez les pages en appuyant sur ou .
■Lecture en sélectionnant un chapitre
1Appuyez sur B alors que l’écran Vignette est
affiché.
L’écran du chapitre s’affiche.
Pour revenir à l’écran Vignette, appuyez sur B.
2Appuyez sur /// pour sélectionner le
chapitre souhaité, ensuite, appuyez sur
ENTER.
La lecture du chapitre sélectionné commencera.
La lecture peut être lancée en appuyant sur au lieu
d’appuyer sur ENTER.
Appuyez sur pour arrêter la lecture.
■Tri des titres
Chaque fois que vous appuyez sur B alors que l’écran
Liste de titres est affiché, l’affichage Liste des titres
permute entre l’affichage en premier du titre le plus récent
et en premier du titre le plus ancien.
■Lecture en sélectionnant une Liste de
lecture
1Appuyez sur C alors que l’écran Vignette ou
Liste de titres est affiché.
L’écran Liste de lecture s’affiche.
2Appuyez sur / pour sélectionner le titre,
ensuite, appuyez sur ENTER.
La lecture du titre sélectionné commencera.
Appuyez sur pour arrêter la lecture.
■Lecture du titre que vous avez arrêté
pendant sa lecture
1Appuyez sur D alors que l’écran Vignette ou
Liste de titres est affiché.
2Appuyez sur / pour sélectionner le type
de lecture, ensuite, appuyez sur ENTER.
La lecture du titre commencera.
Appuyez sur pour arrêter la lecture.
Cette option vous permet de régler plusieurs paramètres à
la fois, tels que des sous-titres, des réglages d’angle et la
sélection du titre pour la lecture directe. Vous pouvez
régler la vidéo et l’audio afin de convenir à vos
préférences. Les opérations sont identiques pour les BD et
les DVD.
Appuyez sur ON SCREEN pendant la lecture.
L’écran de commande de fonction s’affiche sur le
téléviseur.
5/21 Ven 9:30 AM
1 Programme 1 5/21 Ven 110 Min.
2 Programme 2 6/15 Ven 110 Min.
110 Min.
Programme 1
Original Fonctions
DC
Utilisation de « Function Control
Screen » pour BD/DVD
Lecture
Du Debut De La Suite
EXIT
TOP MENU/TITLE LIST
POP UP MENU
, , , ,
ENTER
RETURN
ON SCREEN

FONCTIONNEMENT DU DISQUE
23 Fr
Français
OPÉRATIONS DE
BASE
Ecran de commande de fonction
1Affichage de l’état de la lecture
Indique l’état de fonctionnement et le type de disque.
2Éléments de réglage
Permet de sélectionner un titre (ou une plage) ou un
chapitre à lire, ou d’effectuer des réglages vidéo/audio.
• Numéro de titre/plage (Saut de Titre direct/plage)
• Numéro du chapitre (Saut de chapitre direct)
• Temps écoulé de lecture (Saut de temps direct)
• Langue des sous-titres
• Numéro d’angle
• Audio
• Repeat (Lecture en boucle)
3Affichage du guide de fonctionnement
Vous aide en ce qui concerne les opérations de bouton de
télécommande.
Pour fermer l’écran de commande de fonction, appuyez
sur RETURN ou ON SCREEN.
Remarques
• Si « – – » est affiché pour une option telle que le numéro du titre
ou les sous-titres, le disque ne possède aucun titre ou sous-titre
pouvant être sélectionné.
• Les éléments affichés varient en fonction du disque.
• Si vous accédez à l’écran de commande de fonction pendant la
lecture d’un BD/DVD vidéo, la lecture du BD/DVD vidéo
risque d’être impossible. Dans de tels cas, fermez l’écran de
commande de fonction.
1Chargez un CD audio.
L’écran de fonctionnement du CD s’affiche.
2Appuyez sur D lorsque l’écran de
fonctionnement du CD s’affiche.
Le menu « Functions » est activé.
Suivez le guide de fonctionnement.
Remarques
• Les éléments affichés varient en fonction du disque.
• Si la lecture est arrêtée, seul « Plage » peut être sélectionné.
Vous pouvez afficher le titre, le chapitre, la plage et
d’autres informations durant la lecture.
Pendant la lecture, appuyez plusieurs fois sur le
bouton DISPLAY pour afficher les informations.
■Pour cacher les informations
Appuyez à plusieurs reprises sur DISPLAY
jusqu’à ce qu’elles disparaissent.
BD-VIDÉO
0 3 : 0 2 :0 0
1
1 / 3
5 . 1 c h
Retour
Sélect. Entrer
5 5 / 2
2 English
1
Arrêt
3
1
2
ENTER
RETURN
Utilisation du menu « Functions »
pour CD audio
Affichage des informations du
disque
1Plage 015:16
2Plage 025:10
3Plage 035:23
4Plage 045:03
5Plage 054:44
6Plage 065:08
00:00:11
3/12
3/12
Arrêt
3L+R
RetourSélect. Entrer
Sélect. Plage
5:23
0:00
Plage 03Fonctions
D
Guide de fonctionnement
DISPLAY

FONCTIONNEMENT DU DISQUE
24 Fr
Le lecteur BD prend en charge les fonctions de lecture de
BONUSVIEW (BD-ROM Profil 1 Version 1.1) et de BD-
LIVE (BD-ROM Profil 2).
BONUSVIEW : les disques compatibles avec
BONUSVIEW vous permettent de profiter simultanément
d’un sous-canal vidéo pour deux écrans, d’un sous-canal
audio et de sous-titres. Un petit écran apparaît dans l’écran
principal pendant la lecture (Image dans l’image).
BD-LIVE : les disques compatibles avec BD-LIVE
prennent en charge toutes les fonctions de BONUSVIEW
tout en permettant au lecteur BD d’aller en ligne et de
profiter de vidéos promotionnelles et autres données.
Remarque
Les fonctions et la méthode de lecture varient en fonction du
disque. Consultez les directives sur le disque ou le mode d’emploi
fourni.
■Utilisation de la fonction Image dans
l’image (lecture audio/vidéo secondaire)
BD-Video qui comprend une lecture secondaire audio et
vidéo compatible avec la fonction Image dans l’image
peut être lu avec un canal audio et vidé simultanément
sous forme d’une petite vidéo dans le coin.
Pendant la lecture, appuyez sur P in P pour
activer ou désactiver la fonction Image dans
l’image.
Remarques
• Pour écouter une source audio secondaire, assurez-vous que
« Audio secondaire » est réglé sur « Marche » (☞p.34).
• L’audio et vidéo secondaires pour la fonction Image dans
l’image peuvent lire automatiquement et être supprimés en
fonction du contenu. De même, des zones payantes peuvent être
limitées.
■Utilisation de la fonction de BD-LIVE
1Réglez le paramètre réseau (☞p.36).
2Raccordez le périphérique de mémoire USB
au lecteur BD (☞p.10).
Les données BD-LIVE sont sauvegardées dans le
Stockage local (périphérique de mémoire USB raccordé
à ce lecteur). Pour profiter de ces fonctions, raccordez un
périphérique de mémoire USB (2Go ou supérieur et
formaté avec FAT 32/16) reconnaissant USB 2.0 High
Speed (480Mbit/s) à la borne USB BD STORAGE/
SERVICE (☞p.10) à l’arrière de ce lecteur.
• Si l’espace de stockage est insuffisant, les données
ne seront pas copiées/téléchargées. Supprimez des
données inutiles ou utilisez un nouveau
périphérique de mémoire USB.
• Si un périphérique de mémoire USB contenant
d’autres données (enregistrées précédemment) est
utilisé, la lecture vidéo et audio risque de ne pas se
faire correctement.
• Si le périphérique de mémoire USB est débranché
de ce lecteur pendant la lecture de données BD-
LIVE, la lecture du disque s’arrêtera.
• Le chargement des données risque de prendre un
certain temps (lire/écrire).
• Reportez-vous à « Gestion Clé USB » (☞p.39) en
ce qui concerne l’effacement des données BD-
LIVE dans le périphérique de mémoire USB.
Remarques
• Yamaha ne peut pas garantir que les périphériques de mémoire
USB de toute marque fonctionneront avec ce lecteur.
• N’utilisez pas de câble de rallonge USB lors du raccordement
d’un périphérique de mémoire USB à la borne USB BD
STORAGE/SERVICE du lecteur. L’utilisation d’un câble de
rallonge USB peut empêcher le lecteur de fonctionner
correctement.
3Lisez le disque.
4Exécutez BD-LIVE selon les instructions
indiquées sur le disque.
L’illustration suivante constitue un exemple.
Remarques
• En ce qui concerne la méthode de lecture de contenu BD-LIVE,
etc., effectuez les opérations conformément aux instructions du
mode d’emploi du disque BD.
Plaisir d’utiliser BONUSVIEW et
BD-LIVE
P in P
Vidéo secondaire
Vidéo primaire

FONCTIONNEMENT DU DISQUE
25 Fr
Français
OPÉRATIONS DE
BASE
• Pour utiliser les fonctions BD-LIVE, réalisez la connexion à
haut débit à Internet (☞p.10) ainsi que les paramètres de
communication (☞p.36).
• Voir « Accès À L’Internet BD » (☞p.36) en ce qui concerne la
configuration afin de limiter l’accès au contenu BD-LIVE.
• La durée requise pour télécharger les programmes fournis sur le
périphérique de mémoire USB raccordé à ce lecteur, varie en
fonction des vitesses de connexion à Internet et du volume de
données des programmes.
• Les programmes BD-LIVE fournis via Internet ne pourront
peut-être pas afficher la connexion en fonction du statut du
fournisseur (mise à jour). Dans de tels cas, retirez le disque et
essayez à nouveau.
• Une fois la sélection de la fonction BD-LIVE dans le menu du
disque BD effectuée, si l’écran BD-LIVE n’apparaît pas après
quelques instants, le périphérique de mémoire USB ne contient
peut-être plus d’espace suffisant. Dans de tels cas, éjectez le
disque du lecteur, ensuite, effacez les données dans le
périphérique de mémoire USB à l’aide du menu Effacement des
données dans le menu « Gestion Clé USB » (☞p.39).

SYNTONISATION FM
26 Fr
OPÉRATIONS DE SYNTONISATION
Il existe 2 méthodes de syntonisation : syntonisation automatique et syntonisation manuelle. Vous pouvez aussi utiliser la
syntonisation automatique et la syntonisation manuelle pour mettre en mémoire jusqu’à 30 stations.
La syntonisation automatique est efficace lorsque les
signaux captés sont puissants et qu’il n’existe aucune
interférence.
1
Appuyez sur TUNER pour mettre l’ampli-tuner
en mode FM.
2Appuyez et maintenez enfoncée la touche
TUNING pendant plus de 2 secondes
pour lancer la syntonisation automatique.
Lorsqu’une station est accordée, le témoin TUNED
s’allume et la fréquence de cette station apparaît sur
l’afficheur de la face avant.
• Appuyez sur pour diminuer la fréquence de
syntonisation.
• Appuyez sur pour augmenter la fréquence de
syntonisation.
Si le signal de la station que vous désirez écouter est peu
puissant, effectuez une syntonisation manuelle.
1
Appuyez sur TUNER pour mettre l’ampli-tuner
en mode FM.
2Appuyez sur TUNING pour effectuer
une syntonisation manuelle de la station
souhaitée.
Procédez de la manière ci-dessous pour présélectionner
automatiquement les stations radio.
1
Appuyez sur TUNER pour mettre l’ampli-tuner
en mode FM.
2Appuyez et maintenez enfoncée la touche
MEMORY pendant plus de 2 secondes.
Le témoin PRESET commence à clignoter sur
l’afficheur de la face avant et la présélection
automatique des stations démarre. Une fois toutes les
fréquences recherchées, la présélection s’arrête
automatiquement.
• La recherche débute à la fréquence inférieure et se
poursuit vers la fréquence supérieure.
• L’ampli-tuner attribue automatiquement un numéro
à chaque station détectée.
• Pour annuler la recherche, appuyez sur MEMORY.
Remarques
• Vous pouvez présélectionner jusqu’à 30 stations FM.
• Les données relatives à une station qui peuvent exister sous un
numéro de présélection sont effacées au moment où de
nouvelles données sont sauvegardées sous ce numéro.
SYNTONISATION FM
Syntonisation automatique
Syntonisation manuelle
TUNING / d
d
d
d
TUNER
/ d
d
d
d
d
d
d
d
/ d
d
d
d
Mise en mémoire automatique des
fréquences
PRESET u / d
TUNER
MEMORY

27 Fr
SYNTONISATION FM
Français
OPÉRATIONS DE
SYNTONISATION
Vous pouvez enregistrer jusqu’à 30 stations.
1Réalisez l’accord sur la station radio que
vous voulez présélectionner.
Voir page 26 pour de plus amples détails sur la
syntonisation.
2Appuyez sur MEMORY.
Le témoin PRESET clignote sur l’afficheur de la face
avant pendant environ 5 secondes.
3Appuyez à plusieurs reprises sur PRESET
u / d pour sélectionner un numéro de
station préréglée alors que le témoin
PRESET clignote.
4Appuyez sur MEMORY pour la mettre en
mémoire alors que le témoin PRESET
clignote.
Le témoin PRESET s’allume sur l’afficheur de la face
avant.
5Répétez les étapes 1 à 4 jusqu’à ce que les
stations souhaitées soient présélectionnées.
Vous pouvez accorder n’importe quelle station
simplement en sélectionnant le numéro de présélection sur
lequel elle a été préréglée (☞p.26).
Appuyez à plusieurs reprises sur PRESET u / d
pour sélectionner une station préréglée.
y
• Vous pouvez aussi utiliser la face avant pour accorder une
station présélectionnée. Appuyez à plusieurs reprises sur
PRESET u / d pour accorder une station présélectionnée.
• Lorsque vous appuyez sur PRESET u / d sur la face avant de
l’ampli-tuner en veille, ce dernier active automatiquement le
tuner et syntonise la station préréglée que vous avez
sélectionnée précédemment.
■Pour supprimer la station
présélectionnée
1Appuyez sur TUNER pour mettre l’appareil
en mode FM.
2Appuyez sur OPTION pour afficher le menu
options. Appuyez sur / pour sélectionner
« PRESET DEL », et appuyez sur ENTER.
3Appuyez sur / pour sélectionner le
numéro de présélection à supprimer, puis
appuyez sur ENTER.
La station présélectionnée est maintenant supprimée.
Vous pouvez continuer à effacer les stations
présélectionnées sur cet écran. Répétez les étapes 2 et
3 jusqu’à la suppression de toutes les stations inutiles.
Pour annuler une suppression
Appuyez sur OPTION.
Mise en mémoire manuelle des
fréquences
PRESET u / d
MEMORY
Accord des stations
présélectionnées
PRESET u / d
OPTION
TUNER

SYNTONISATION AVEC LE SYSTÈME DE DIFFUSION DE DONNÉES RADIO (MODÈLES POUR L’EUROPE SEULEMENT)
28 Fr
Le système de diffusion de données radio (modèles pour l’Europe seulement) est un système de transmission de données
utilisé par les stations FM d’un grand nombre de pays. Les services du système de diffusion de données radio sont
assurés par les stations d’un réseau. Cet ampli-tuner peut recevoir différents types d’informations via le système de
diffusion de données radio, par exemple, PS (le nom de l’émission), PTY (le type de l’émission diffusée), RT (le message
écrit), CT (l’heure) et TP (l’info trafic).
Cette fonction permet d’afficher les 4 types
d’informations du système de diffusion de données radio
suivants : PS (nom de l’émission), PTY (type de
l’émission diffusée), RT (message écrit) et CT (heure).
Remarques
• Vous ne pouvez sélectionner que les modes du système de
diffusion de données radio proposés par la station.
• Si les signaux reçus ne sont pas assez forts, l’appareil peut être
incapable d’utiliser le système de diffusion de données radio. Le
mode « RT » diffuse souvent un grand nombre de données qui
ne pourront pas toujours être affichées en même temps que
d’autres modes du système de diffusion de données radio.
• Si le signal est affaibli par des interférences lorsque l’ampli-
tuner reçoit le système de diffusion de données radio, il peut
être soudainement coupé et dans ce cas « ...WAIT » apparaîtra
sur l’afficheur de la face avant.
• Lorsque le mode « RT » est sélectionné, le nombre maximal de
caractères alphanumériques pouvant être affichés s’élève à 64,
symbole de l’umlaut compris. Les caractères ne pouvant pas
être retranscrits sont remplacés par « _ » (soulignement).
Tout en accordant une station du système de
diffusion de données radio, appuyez plusieurs
fois de suite sur DISPLAY pour sélectionner le
mode d’affichage du système de diffusion des
données radio souhaité.
Reportez-vous au tableau ci-dessous pour avoir une
description des types d’émission.
SYNTONISATION AVEC LE SYSTÈME DE DIFFUSION DE DONNÉES
RADIO (MODÈLES POUR L’EUROPE SEULEMENT)
Affichage des informations du
système de diffusion de données
radio
DISPLAY
PS
PTY
RT
CT
Fréquence
(nom de l’émission)
(type d’émission)
(message écrit)
(heure)
Type d’émissions Descriptions
News Informations
Affairs Emissions à thème
Info Informations
Sport Sport
Educate Éducation
Drama Drama (Pièce radiophonique)
Culture Émissions culturelles
Science Émissions scientifiques
Varied Emissions variées
Pop M Musique pop
Rock M Musique Rock
Easy M Musique d’écoute facile
Light M Musique classique légère
Classics Musique classique
Other M Autres musiques

29 Fr
SYNTONISATION AVEC LE SYSTÈME DE DIFFUSION DE DONNÉES RADIO (MODÈLES POUR L’EUROPE SEULEMENT)
Français
OPÉRATIONS DE
SYNTONISATION
Utilisez cette fonction pour recevoir le service de
transmission des données TP (info trafic) du réseau du
système de diffusion des données radio.
1Syntonisez la station diffusant le système de
diffusion des données radio.
2Appuyez sur TP.
« TP SEARCH » clignote sur l’afficheur de la face
avant pendant environ trois secondes puis la
recherche commence.
Le témoin TP de l’ampli-tuner clignote pendant la
recherche.
Lorsque l’émission d’Info trafic est reçue, le témoin
TP reste allumé et la recherche s’arrête.
Si vous appuyez sur TP, la recherche recommence.
Si l’ampli-tuner ne parvient pas à recevoir l’émission
d’info trafic, le témoin TP s’éteint et « NO TP »
apparaît à l’écran. L’ampli-tuner revient à son état
précédent.
Pour annuler la recherche
Appuyez sur TP pendant la recherche.
Vous pouvez utiliser les informations CT reçues par les
émissions du système de diffusion de données radio pour
régler l’heure sur l’ampli-tuner.
1Appuyez sur OPTION.
Un élément du menu options apparaît sur l’afficheur
de la face avant.
2Appuyez sur / pour sélectionner « AUTO
CLOCK », et appuyez sur ENTER.
3Appuyez sur / pour sélectionner « ON »
ou « OFF », et appuyez sur ENTER.
L’état « AUTO CLOCK » est affiché.
Le réglage par défaut est « ON ».
ON : règle automatiquement l’horloge de l’ampli-
tuner à l’aide des informations CT.
OFF : ne règle pas l’horloge de l’ampli-tuner.
Pour quitter le menu options
Appuyez sur OPTION.
A l’aide du service de
transmission des données TP
(Info trafic)
INPUT
BASS
PHONES
VOLUME
MIN MAX
TREBLE BALANCE
PRESET PURE DIRECT
LR
TIMER
TP
Témoin TP
TP
Réglages CT (heure)

RÉGLAGE DE LA MINUTERIE
30 Fr
AUTRES OPÉRATIONS
L’ampli-tuner dispose de 2 types de minuteries. Le lecteur BD est mis également automatiquement en service ou en veille
par la commande du système (☞p.8).
La minuterie de mise en service allume automatiquement
l’ampli-tuner ou le met en veille à l’heure spécifiée. Vous
pouvez aussi spécifier une entrée qui sera sélectionnée par
l’ampli-tuner lorsque la minuterie de mise en service
s’activera.
Remarques
• Vous ne pouvez pas régler la minuterie si l’heure n’a pas été
réglée (☞p.12).
• Si vous ne touchez à aucune touche pendant plus de 30
secondes qui suivent la dernière opération effectuée avec les
touches, les opérations réalisées sont supprimées de la mémoire
et l’affichage normal réapparaît.
1Appuyez sur TIMER et / pour sélectionner
« TIMER », ensuite, appuyez sur ENTER.
L’ampli-tuner entre en mode de réglage de la
minuterie. Le témoin TIMER clignote sur l’afficheur
de la face avant.
2Appuyez sur ou pour sélectionner « ON»
(minuterie activée) ou « OFF » (minuterie
désactivée), ensuite, appuyez sur ENTER.
ON : l’écran de réglage de la minuterie de mise en
service apparaît. Passez à l’étape 3.
OFF : le témoin TIMER s’éteint et l’ampli-tuner
revient en mode normal.
Remarque
Pour désactiver la minuterie, sélectionnez « OFF ». Lorsque la
minuterie est activée, le réglage de la minuterie et le témoin
TIMER demeurent en service jusqu’à ce que vous choisissiez
« OFF ».
3Réglez l’heure de début de la minuterie.
Pour plus d’informations concernant la manière de
régler l’horloge, voir les étapes de 4 à 6 dans
« Réglage de l’horloge » (☞p.12).
4Appuyez sur / ou sur une touche de
sélection d’entrée pour sélectionner la
source d’entrée à utiliser lorsque la minuterie
allume l’ampli-tuner, ensuite appuyez sur
ENTER.
L’ampli-tuner sélectionne automatiquement la source
d’entrée lorsqu’il est mis en service par la minuterie
de mise en service.
Si FM est choisie comme source d’entrée, le numéro
de présélection (par exemple, « P01 ») est présent sur
l’afficheur de la face avant. Appuyez sur / pour
sélectionner le numéro de présélection de la station
que vous désirez écouter lorsque la minuterie est mise
en service puis appuyez sur ENTER.
Si vous sélectionnez « --- » (défaut), l’ampli-tuner
choisit la station sur laquelle il était précédemment
accordé.
Si aucune station n’a été présélectionnée, « --- »
apparaît. Appuyez sur ENTER et passez à l’étape 5.
Vous ne pouvez choisir qu’une station
présélectionnée. Enregistrez par avance la fréquence
de la station que vous aimez écouter quand la
minuterie est mise en service (☞p.27).
Remarque
Vous ne pouvez pas sélectionner AUX en tant que source
d’entrée.
RÉGLAGE DE LA MINUTERIE
Réglage de la minuterie de mise
en service
INPUT
BASS
PHONES
VOLUME
MIN MAX
TREBLE BALANCE
PRESET PURE DIRECT
LR
TIMER
TP
Témoin TIMER
INPUT
ABCD
EXIT
TOP MENU/TITLE LIST
POP UP MENU
TIMER
Touches de
sélection d’entrée
ENTER ,
RETURN

31 Fr
RÉGLAGE DE LA MINUTERIE
Français
AUTRES
OPÉRATIONS
5Appuyez sur / pour régler la durée de
fonctionnement de l’ampli-tuner.
Vous pouvez sélectionner une durée de 30 à 90
minutes par intervalles de 10 minutes. Sélectionnez
« -- » si vous ne souhaitez pas que l’ampli-tuner passe
automatiquement en mode veille.
6Appuyez sur ENTER pour terminer le réglage
de la minuterie.
Le témoin TIMER s’allume.
7Appuyez sur pour mettre l’ampli-tuner en
mode de veille.
L’ampli-tuner sera automatiquement mis en service à
l’heure spécifiée.
Pour annuler l’opération de réglage de la
minuterie
Appuyez sur TIMER pendant son fonctionnement.
y
Vous pouvez revenir à l’écran précédent en appuyant sur ou
RETURN.
La minuterie de mise hors service met l’ampli-tuner en
veille dans le délai spécifié.
Appuyez plusieurs fois de suite sur SLEEP pour
sélectionner le délai souhaité.
Chaque fois que vous appuyez sur la touche, le délai
change de la façon suivante.
Le témoin SLEEP s’allume sur l’afficheur de la face avant.
y
• La minuterie de mise hors service est annulée si l’ampli-tuner
est mis en veille.
• Vous pouvez voir le temps restant sur l’afficheur de la face
avant en appuyant une fois sur SLEEP lorsque la minuterie de
mise hors service est activée.
Pour désactiver la minuterie de mise hors
service
Appuyez plusieurs fois de suite sur SLEEP de façon à
sélectionner « OFF ».
Réglage de la minuterie de mise
hors service
SLEEP
120min.
90min.
60min.
30min.
OFF

COMMANDE iPod™
32 Fr
Avec le boîtier de télécommande fourni, vous pouvez non seulement commander l’ampli-tuner (R-840) et le lecteur BD
(BD-940) mais également votre iPod posé sur la station iPod.
Lorsque vous posez votre iPod sur la station iPod, vous pouvez utiliser le boîtier de télécommande pour écouter de la
musique enregistrée sur votre iPod.
Lors du raccordement de l’iPod pendant la lecture, ce système passe automatiquement en mode iPod.
Remarques
• Seuls iPod (Click and Wheel), iPod nano, iPod Classic, iPod mini et iPod touch sont pris en charge.
• Certaines fonctions risquent de ne pas être compatibles selon le modèle ou la version du logiciel de votre iPod.
y
Voir le paragraphe « iPod » dans « GUIDE DE DEPANNAGE » (☞p.43) pour la liste complète des messages apparaissant sur
l’afficheur de la face avant de l’ampli-tuner.
1Appuyez sur iPod pour sélectionner iPod
comme source d’entrée.
2Posez votre iPod sur la station iPod.
3
Appuyez sur / pour parcourir le menu iPod,
ensuite, appuyez sur ENTER pour écouter la
chanson (ou le groupe) sélectionné(e).
• Affichez l’écran du iPod pour utiliser le menu.
• Faites fonctionner le iPod avec les commandes du
iPod ou le boîtier de télécommande.
■Répétition de la lecture (Repeat Play)
Il est possible de lire à maintes reprises une seule plage ou
un groupe de plages sur votre iPod.
Appuyez sur REPEAT.
Chaque fois que vous appuyez sur la touche, le mode
Lecture répétée change. Le diagramme suivant représente
un exemple de la manière dont change le mode à chaque
pression sur la touche. Vérifiez le mode actuellement
sélectionné sur l’écran de votre iPod.
■Lecture aléatoire (Shuffle Play)
Les chansons ou les albums peuvent être lus dans un ordre
aléatoire sur votre iPod.
Appuyez sur SHUFFLE.
Chaque fois que vous appuyez sur la touche, le mode
Lecture aléatoire change. Le diagramme suivant
représente un exemple de la manière dont change le mode
à chaque pression sur la touche. Vérifiez le mode
actuellement sélectionné sur l’écran de votre iPod.
COMMANDE iPod™
Utilisation d’un iPod™
Le boîtier de télécommande fourni a les mêmes
touches de fonction que votre iPod. Ainsi, ces touches
correspondent les unes aux autres.
iPod
,
ENTER
REPEAT
SHUFFLE
iPod Boîtier de télécommande
Un (lecture répétée de chanson)
Tous (lecture répétée de groupe sélectionné)
Non
Morceaux (lecture répétée de chanson)
Albums (lecture répétée d’album)
Non

33 Fr
Français
AUTRES
OPÉRATIONS
Ce chapitre décrit plusieurs menus de cet appareil.
Après avoir mis sous tension cet appareil ainsi qu’un téléviseur (☞p.13), vous pouvez modifier des réglages sur l’écran
du téléviseur à l’aide du boîtier de télécommande.
Vous pouvez sélectionner des éléments de menu et modifier des réglages de la même manière que dans la procédure du
« Réglage de l’affichage du téléviseur » (☞p.13).
Remarque
Lorsque vous sélectionnez « Censure Parentale » dans « Réglages De Lecture » (☞p.35), vous devez entrer un mot de passe de 4
chiffres. Pour la première fois, l’écran de réglage du mot de passe apparaît. Pour définir le mot de passe, voir « Réglage Mot De Passe »
(☞p.35).
y
Les réglages par défaut sont marqués d’un « * ».
■Format D’image TV
Vous pouvez régler le format d’écran du téléviseur
raccordé et régler la sortie vidéo.
Lors d’un changement de téléviseur, vérifiez si le format
d’écran est le même. Dans le cas contraire, modifiez les
réglages de « Format D’image TV ».
Options « Normal 4:3 »
Lorsque vous réglez « Format D’image TV » sur « Normal
4:3 » et que vous regardez une vidéo 16:9 sur un téléviseur
4:3, sélectionnez une des options suivantes.
■Sortie Vidéo Yuv
Vous pouvez régler la résolution de sortie vidéo
composantes.
Certains téléviseurs ne sont pas entièrement compatibles
avec le lecteur de disques Blu-ray, ce qui peut entraîner
une distorsion de l’image. Dans ce cas, réglez « Sortie
Vidéo Yuv » sur le réglage par défaut (☞p.41).
1080i, 720p, 576/480p, 576/480i*
Remarque
Certains disques ne permettent pas la sortie vidéo haute définition
depuis les prises COMPONENT. Dans ce cas, la résolution vidéo
est convertie en 576/480p ou 576/480i.
■Sortie Vidéo HDMI
Vous pouvez réglez la résolution de sortie vidéo HDMI.
Certains téléviseurs ne sont pas entièrement compatibles
avec le lecteur de disques Blu-ray, ce qui peut entraîner
une distorsion de l’image. Dans ce cas, réglez « Sortie
Vidéo HDMI » sur le réglage par défaut (☞p.41). « Sortie
Vidéo HDMI » sera réinitialisé sur « Auto » (valeur
préréglée en usine).
Auto*, 1080p, 1080i, 720p, 576/480p
Remarque
Lorsque le BD est raccordé à un téléviseur compatible avec
1080p/24Hz et « Sortie Vidéo HDMI » est réglé sur « Auto »,
1080p/24Hz s’affichera automatiquement lorsque des disques
compatibles seront lus.
À 1080p/24Hz ou 1080p/60Hz, aucune sortie ne se fait des prises
COMPONENT et de la prise VIDEO.
■Sélection de la sortie vidéo
Des signaux vidéo peuvent être restitués simultanément
des prises vidéo analogiques (prises vidéo ou
composantes) et de la prise HDMI. Il s’agit de ce qu’on
appelle une sortie double. Lors de l’utilisation du vidéo
composantes et des sorties HDMI, la résolution de sortie
vidéo est déterminée sur base des réglages de « Sortie
Vidéo Yuv » ou « Sortie Vidéo HDMI » et de
« Sélection de la sortie vidéo ». Reportez-vous au tableau
ci-dessous pour de plus amples détails.
RÉGLAGES DU LECTEUR BD
Réglages Audio Vidéo
Large 16:9* : sélectionnez cette option lors du
raccordement d’un téléviseur grand
écran (16:9).
Normal 4:3 : sélectionnez cette option lors du
raccordement d’un téléviseur 4:3.
Letter Box* : affiche une image avec des bandes noires en
haut et en bas tout en conservant un format
d’écran 16:9.
Panoramique : affiche une image sans changer le format
d’écran en rognant les bords droit et gauche.
Cette option est uniquement disponible pour
les disques étiquetés avec 4:3PS. HDMI* : détermine la résolution de sortie vidéo sur
base du réglage de Sortie Vidéo HDMI
(voir « Sortie Vidéo HDMI » (☞p.33)).
Composante : détermine la résolution de sortie vidéo sur
base du réglage de Sortie Vidéo Yuv
(voir « Sortie Vidéo Yuv » (☞p.33)).

34 Fr
RÉGLAGES DU LECTEUR BD
*1 Certains disques ne permettent pas la sortie vidéo haute
définition depuis les prises COMPONENT. Dans ce cas, la
résolution vidéo est convertie en 480p/576p (lorsque
« Sélection de la sortie vidéo » est réglé sur « Composante »)
ou 480i/576i (lorsque « Sélection de la sortie vidéo » est réglé
sur « HDMI »).
*2 Aucune sortie vidéo lorsqu’un signal 1080p est émis depuis la
prise HDMI.
*3 Sortie CVBS signifie que le signal de sortie vidéo est émis de
la prise VIDEO.
Remarque
Si votre téléviseur n’est pas compatible avec la résolution
sélectionnée, des images risquent de ne pas s’afficher
correctement.
y
Vous pouvez également permuter entre « HDMI » et
« Composante » à l’aide de « HDMI <-> COMP » (☞p.41).
■Audio Secondaire
Vous pouvez activer et désactiver l’audio secondaire pour
l’image dans l’image ou les commentaires audio.
Marche*, Arrêt
y
Lorsque vous réglez « Audio Secondaire » sur « Arrêt », cet
appareil ne restitue pas le son du clic sur le menu.
Sélectionnez « Arrêt » pour profiter du son BD de haute qualité
via la prise HDMI.
■Sortie Audio
Vous pouvez régler la sortie audio idéale pour votre
environnement de lecture.
Options « Sortie HDMI »
Lorsque vous réglez « Sortie Audio » sur « Sortie HDMI »,
sélectionnez une des options suivantes.
Remarque
Lorsque « Audio Secondaire » est réglé sur « Marche », l’option
« Sortie HDMI » est automatiquement réglée sur « PCM ».
Options « Sortie Numérique »
Lorsque vous réglez « Sortie Audio » sur « Sortie
Numérique », sélectionnez une des options suivantes.
■Contrôle De plage
Vous pouvez régler la plage dynamique de sorte que le son
soit émis à un volume moyen. Si vous ne pouvez pas
entendre clairement un dialogue, changez le réglage de ce
menu.
Remarque
Baissez le volume avant de changer ce réglage; dans le cas
contraire, un son de volume élevé risque d’être restitué depuis les
enceintes ou une charge électrique excessive leur est appliquée.
Réglages sur ce lecteur Résolution de sortie
Sélection
de la sortie
vidéo
Sortie
Vidéo HDMI
Component
Out
Sortie
CVBS*3
HDMI
Auto *1 480i/576i*2
1080p Pas de sortie Pas de sortie
1080i 1080i*1 480i/576i
720p 720p*1 480i/576i
480p/576p 480p/576p*1 480i/576i
Réglages sur ce lecteur Résolution de sortie
Sélection
de la sortie
vidéo
Sortie
Vidéo Yuv Sortie HDMI Sortie
CVBS*3
Composante
1080i*11080i*1 480i/576i
720p*1720p*1 480i/576i
480p/576p 480p/576p 480i/576i
480i/576i 480i/576i 480i/576i
Sortie HDMI : émet un signal audio via la prise HDMI.
Sortie
Numérique :
émet un signal audio via la prise DIGITAL
OUT (OPTICAL).
Sortie Audio
2ch* :
émet un signal audio via les prises AUDIO
OUT.
Bitstream : émet un signal audio Bitstream.
Sélectionnez cette option lors du
raccordement d’un composant HDMI avec un
décodeur intégré pour DOLBY DIGITAL,
etc.
PCM*
(Surround) :
émet un signal audio PCM linéaire.
Les signaux audio enregistrés dans un autre
format, tel que DOLBY DIGITAL et DTS,
sont décodés en PCM linaire et sont émis.
Bitstream : émet un signal audio Bitstream.
Sélectionnez cette option lors du
raccordement d’un composant surround avec
un décodeur intégré pour DOLBY DIGITAL,
etc.
PCM* : émet un signal audio PCM à 2 canaux.
Des signaux audio enregistrés dans un autre
format sont convertis en signaux audio PCM à
2 canaux et sont émis.
Sélectionnez cette option lors du
raccordement d’un composant audio stéréo à
2 canaux.
Normal : émet un son dans la même plage dynamique
que le son d’origine.
Décalage : règle la plage dynamique du son Dolby
Digital afin que ce dialogue soit clairement
audible.
Si le son est anormal, réglez ce dernier sur
« Normal ».
Auto* : règle automatiquement la plage dynamique du
son Dolby TrueHD.

35 Fr
RÉGLAGES DU LECTEUR BD
Français
AUTRES
OPÉRATIONS
La fonction Quick Start (Démarrage rapide) vous permet
de démarrer cet appareil rapidement.
Remarque
Lorsque « Démarrage Rapide » est réglé sur « Oui », le lecteur
BD nécessite quelques instants pour s’éteindre.
Vous pouvez régler cet appareil sur mise hors tension
automatique après environ 10 minutes suivant l’arrêt de la lecture.
Oui, Non*
Vous pouvez régler cet appareil afin qu’il reçoive une
signal de commande HDMI du boîtier de télécommande
de votre téléviseur s’il reconnaît la commande HDMI et
s’il est raccordé à cet appareil via un câble HDMI.
Oui, Non*
Remarques
• Pour de plus amples détails, reportez-vous au mode d’emploi du
téléviseur.
• La fonction de commande HDMI peut ne pas fonctionner
pendant la lecture ou quand le menu de configuration est affiché.
• Vous pouvez utiliser cette fonction uniquement lorsque
« Sélection de la sortie vidéo » est réglé sur « HDMI ».
■Censure Parentale
Certaines émissions numériques et certains BD/DVD
comprennent des caractéristiques nominales pour bloquer
l’affichage de contenus pour un certain groupe d’âge.
Vous pouvez sélectionner un niveau pour bloquer la
lecture d’un BD/DVD avec des caractéristiques nominales
indésirables dans cet appareil.
« Réglages De Lecture » offre une autre option « Code du pays ».
Étant donné que les caractéristiques nominales varient en
fonction des pays, vous devez également définir le code du pays.
Pour définir un niveau ou un code de pays, vous devez
définir un mot de passe à 4 chiffres et le saisir.
Pour les DVD
Pour les BD
Code du pays
Permet de régler le code du pays.
Reportez-vous à la liste de code de pays (☞p.51) étant
donné que les caractéristiques nominales varient en
fonction du pays.
■Langue Du Disque (Langue prioritaire du
disque)
Vous pouvez sélectionner la langue pour les sous-titres, le
son et les menus affichés à l’écran.
Voir « Liste des langues » (☞p.51) pour les langues
disponibles.
■Aff. Index Angle
Certaines vidéos BD/DVD ont plusieurs angles. Lorsque
vous regardez ces vidéos, vous pouvez afficher un repère
d’angle dans le coin inférieur droit de l’écran.
■Réglage Mot De Passe
Vous pouvez définir le mot de passe pour régler ou
modifier le niveau du contrôle parental.
Remarques
• Si vous avez oublié le mot de passe, vous pouvez réinitialiser le
mot de passe actuel à l’aide de « Réinitialisation Sys » (☞p.39).
• Vous pouvez changer le mot de passe si vous le souhaitez.
Réglage pour la première fois du code PIN
1Appuyez sur / pour sélectionner « Oui »,
ensuite, appuyez sur ENTER.
2Entrez un numéro à 4 chiffres.
3Entrez à nouveau le numéro à 4 chiffre pour
le valider.
4Appuyez sur ENTER pour quitter l’écran de
réglage du code PIN.
y
• Vous pouvez effacer le numéro à 4 chiffres en appuyant sur
CLEAR.
• Vous pouvez utiliser un autre ENTER (c☞p.7) sur le boîtier
de télécommande.
Démarrage Rapide
Oui :
active la fonction Quick Start (démarrage rapide).
Le témoin QUICK s’allume en mode veille (
☞
p.5).
Non* :
désactive la fonction Quick Start (démarrage rapide).
La consommation électrique en mode veille
est plus basse.
Extinction Auto
Control HDMI
Réglages De Lecture
Niveau 8 et Arrêt* : ne limite pas la lecture du DVD.
Niveau 1-7 :
interdit la lecture de DVD avec des
caractéristiques nominales qui correspondent.
Non Limité* : ne limite pas la lecture du BD.
0-99 an(s) : interdit la lecture de BD avec des
caractéristiques nominales qui correspondent.
Oui : affiche le repère d’angle.
Non* : n’affiche pas le repère d’angle.
Oui : définit le mot de passe.
Vous êtes invité à entrer le numéro à 4
chiffres.
Non : ne définit pas de mot de passe.

36 Fr
RÉGLAGES DU LECTEUR BD
■Accès À L’Internet BD
Vous pouvez définir un accès limité au contenu BD-LIVE.
Remarques
• Les fonctions disponibles varient en fonction du disque.
• En ce qui concerne la méthode de lecture de contenu BD-LIVE,
etc., effectuez les opérations conformément aux instructions du
mode d’emploi du disque BD.
• Pour utiliser les fonctions BD-LIVE, voir « Raccordement à
l’Internet » (☞p.10) et « Réglage De Communication » (☞p.36).
Cette option vous permet de réaliser et/ou de changer le
paramètre communication. Ce réglage est requis pour
utiliser les fonctions BD-LIVE qui connectent à Internet.
Remarques
• Assurez-vous que le câble LAN est raccordé à ce lecteur
(☞p.10).
• Pour réaliser le réglage manuellement, les informations
suivantes du routeur ou modem raccordé sont requises. Vérifiez
les informations avant le réglage.
– adresse IP, masque Internet, passerelle, adresse IP DNS
• En outre, lors de la spécification d’un serveur proxy, les
informations suivantes données par votre fournisseur de
services Internet sont également requises. Vérifiez les
informations avant le réglage.
– Adresse IP et numéro de port du serveur proxy
1Appuyez sur SETUP.
2Appuyez sur / / / pour sélectionner
« Réglages », ensuite, appuyez sur ENTER.
3Appuyez sur / pour sélectionner
« Réglage De Communication », ensuite,
appuyez sur ENTER.
4Sélectionnez « Ethernet (BD-LIVE) », ensuite,
appuyez sur ENTER.
5Appuyez sur / pour sélectionner
« Changement », ensuite, appuyez sur ENTER.
Pour initialiser le réglage actuel, sélectionnez
« Initialiser », ensuite, appuyez sur ENTER.
6Pour le réglage de l’adresse IP, appuyez sur
/ pour sélectionner « Oui » ou « Non »,
ensuite, appuyez sur ENTER.
• Si vous sélectionnez « Oui » : l’adresse IP s’obtient
automatiquement.
• Si vous sélectionnez « Non » : l’adresse IP, le
masque Internet et la passerelle sont entrés
manuellement à l’aide de l’écran d’entrée des
caractères (☞p.38).
En ce qui concerne chacune des valeurs de
configuration, vérifiez les spécification de votre
routeur à large bande.
7Sélectionnez « Suivant », ensuite, appuyez
sur ENTER.
8Entrez les adresses IP primaire et secondaire
à l’aide de l’écran d’entrée des caractères
(☞p.38).
En ce qui concerne chacune des valeurs de
configuration, vérifiez les spécification de
votre routeur à large bande.
9Sélectionnez « Suivant », ensuite, appuyez
sur ENTER.
Autoriser : permet l’accès à Internet pour tous les disques
BD-LIVE.
Limite* : permet l’accès à Internet pour les disques BD-
LIVE avec certificat de propriétaire uniquement.
Interdire : interdit l’accès à Internet pour tous les disques.
Réglage De Communication
EXIT
TOP MENU/TITLE LIST
POP UP MENU
, , ,
ENTER
SETUP
L'information actuelle de la configuration Ethernet.
[Installation Actuelle]
: Auto Réglage
: Auto Réglage
: Auto Réglage
: Auto Réglage
: Ne Pas Utiliser
Adresse IP
Netmask
Passerelle
DNS
Proxy
Changement Initialiser
Est-ce que vous obtenez l'adresse IP
automatiquement?
Adresse IP
Netmask
Passerelle
Oui Non
Suivant

37 Fr
RÉGLAGES DU LECTEUR BD
Français
AUTRES
OPÉRATIONS
10 Pour le réglage du serveur proxy, appuyez
sur / pour sélectionner « Oui » ou « Non »,
ensuite, appuyez sur ENTER.
• Si vous sélectionnez « Oui » : l’adresse IP ou le
nom du serveur proxy et le numéro de port pour le
serveur proxy spécifié par votre fournisseur de
services Internet sont entrés à l’aide de l’écran
d’entrée des caractères (☞p.38).
• Si vous sélectionnez « Non » : passez à l’étape
suivante.
11 Sélectionnez « Suivant », ensuite, appuyez
sur ENTER.
12 Pour le réglage approfondi (le réglage des
vitesses de connexion Ethernet), appuyez
sur / pour sélectionner « Oui » ou « Non »,
ensuite, appuyez sur ENTER.
• Normalement, sélectionnez « Non », ensuite,
appuyez sur ENTER.
• Les vitesses de connexion Ethernet peuvent être
réglées lorsque vous sélectionnez « Oui », ensuite,
appuyez sur ENTER.
• Puisqu’une détection automatique est effectuée
(mode de préréglage en usine), ce réglage n’est
normalement pas nécessaire. Si une situation
survient dans laquelle la connexion Ethernet
échoue, etc., modifiez le réglage et vérifiez si la
connexion Ethernet s’établit avec succès.
Dès que la vitesse de connexion est réglée,
sélectionnez « Suivant », ensuite, appuyez sur
ENTER.
13 Pour tester la connexion à Internet, une fois
les réglages vérifiés, appuyez sur / pour
sélectionner « Test », ensuite, appuyez sur
ENTER.
Le « Test » n’est disponible que lors du reglage pour
obtenir l’adresse IP automatiquement.
14 Appuyez sur / pour sélectionner
« Complet », ensuite, appuyez sur ENTER.
■Procédure de fonctionnement pour
saisir manuellement les caractères
Remarque
Les caractères numériques tels que l’adresse IP peuvent être saisis
sur l’écran d’entrée soit en sélectionnant chaque caractère dans le
mode « Numérique » soit en utilisant les touches numériques sur
le boîtier de télécommande.
1Appuyez sur ENTER sur les cases dans
lesquelles les caractères sont saisis, et
l’écran d’entrée apparaît.
2Appuyez sur / pour sélectionner le mode
d’entrée souhaité.
• Lors de la saisie de l’adresse du serveur proxy;
« 1ABC » (alphabet/caractère numérique) /
« Signe » / « Modifier »
• Lors de la saisie d’autres valeurs (adresse IP, etc.);
« Numérique » / « Modifier »
3Appuyez sur / pour sélectionner un
numéro/caractère, ensuite, appuyez sur
ENTER.
Utilisez-vous le serveur du proxy?
Adresse
Port
Oui Non
Suivant
Option
Vitesses De Connexion Ethernet
10M Bidirect. Non Simul. 10M Bidirectionnel Simul.
100M Bidirect. Non Simul. 100M Bidirectionnel Simul.
Auto-Détection
Suivant
Confirmer le réglage actuel.
: xxx xxx xxx xxx
: xxx xxx xxx xxx
: xxx xxx xxx xxx
: xxx xxx xxx xxx
xxx xxx xxx xxx
: xx:xx:xx:xx:xx:xx
Adresse IP
Netmask
Passerelle
Adresse DNS
Adresse MAC
CompletTest
Adresse IP
Netmask
Passerelle
123
1234567890
Numérique
Modifier
Sélectionné en appuyant
sur / Sélectionné en appuyant sur
/

38 Fr
RÉGLAGES DU LECTEUR BD
4Répétez l’étape 3 pour afficher tous les
caractères/chiffres souhaités dans le champ
de saisie.
Exemple : l’écran pour la saisie des caractères
numériques
Remarque
Appuyez sur RETURN (Suppr.Carac.) pour supprimer un chiffre/
caractère que vous avez entré.
Pour changer un chiffre/caractère que vous avez entré, appuyez
sur B (gauche) ou C (droite) pour sélectionner le chiffre/caractère
que vous souhaitez modifier, ensuite, appuyez sur RETURN
(Suppr.Carac.). Puis, appuyez sur / pour sélectionner un
nouveau chiffre/caractère que vous souhaitez entrer, ensuite,
appuyez sur ENTER.
5Appuyez sur D (complet) pour fixer les
chiffres que vous avez saisis.
6Répétez les étapes de 1 à 5 pour terminer la
saisie de tous les caractères requis.
Liste des caractères de saisie
123
1234567890
Numérique
Modifier
Adresse IP
Netmask
Passerelle
123
1ABC (alphabet/
caractère numérique)
Numérique
Signe
Modifier
* La même opération que les touches de couleur et RETURN peut être réalisé en sélectionnant chaque
élément et appuyer sur ENTER. « Suppr.Carac. » permet de supprimer des caractères.
Num. ABC DEF GHI JKL MON PQRS TUV WXYZ Spc.
Num. 1234567890 ABC ABCabc DEF D E F d e f
GHI G H I g h i JKL J K L j k l MNO MNOmno
PQRS PQRSpqrs TUV TUVtuv WXYZ WXYZwxyz
Spc. (espace)
1234567890
@ . , : ; _ - \ $ % ! ? & # + * = / | ˜ “ ‘ ˆ ` ( ) < > [ ]{ } Spc.
@ . , : @ . , : ; _ - \ ; _ - \ $ % ! ? $ % ! ?
& # + * & # + * = / | ˜ = / | ˜ “ ‘ ˆ ` “ ‘ ˆ `
( ) < > ( ) < > [ ]{ } [ ] { } Spc. (espace)
Annuler Gauche Droite Complet Suppr.Carac.

39 Fr
RÉGLAGES DU LECTEUR BD
Français
AUTRES
OPÉRATIONS
Vous pouvez afficher la version du logiciel de système.
Avant d’utiliser le périphérique de mémoire
USB
Les instructions suivantes expliquent comment supprimer
des données telles que les données BD-LIVE sur un
périphérique de mémoire USB.
1Insérez le périphérique de mémoire USB
dans la borne USB BD STORAGE/SERVICE à
l’arrière de ce lecteur.
2Appuyez sur SETUP pour afficher l’écran du
menu de configuration.
3Appuyez sur / / / pour sélectionner
« Réglages », ensuite, appuyez sur ENTER.
4Appuyez sur / pour sélectionner
« Gestion Clé USB », ensuite, appuyez sur
ENTER.
« Pas de clé USB » s’affiche lorsqu’aucune mémoire
USB n’est insérée.
5Appuyez sur / , sélectionnez « Effacer » ou
« Formater », ensuite, appuyez sur ENTER.
Effacer : supprime uniquement les données BD-
VIDEO écrites sur le périphérique de
mémoire USB telles que les données BD-
LIVE.
Formater : sachez que toutes les données comprenant
des données BD-VIDEO et les données de
mise à jour de logiciel seront supprimées.
Si vous souhaitez supprimer uniquement les données
de mise à jour de logiciel inutiles une fois le logiciel
mis à jour, supprimez les données sur le périphérique
de mémoire USB à l’aide d’un PC.
Remarque
Les données qui ont été sauvegardées sur la mémoire interne du
lecteur (score de jeu, etc.) seront également supprimées.
6Appuyez sur / , sélectionnez « Oui »,
ensuite, appuyez sur ENTER.
7Démarrez le processus.
L’écran pour l’opération en cours s’affichera.
8Appuyez sur ENTER.
Cette fonction permet les mises à jour de logiciel en
insérant un périphérique de mémoire USB avec le fichier
de mise à jour dans la borne USB BD STORAGE/
SERVICE sur ce lecteur.
Le périphérique de mémoire USB doit être vide
de tout fichier excepté les données de mise à
jour de logiciel pour permettre le téléchargement
du nouveau logiciel.
Pour vérifier la disponibilité d’une mise à jour de
logiciel, consultez le site
http://www.yamaha.co.jp/english/product/av/
down/agreement.html.
Vous pouvez réinitialiser tous les réglages du lecteur BD
aux réglages préréglés en usine.
Réinitialiser, Ne Pas Réinit.
Version
AVERTISSEMENT :
• N’enlevez pas le périphérique de mémoire USB ni
ne débranchez pas le câble d’alimentation pendant
la réalisation des opérations pour « Gestion Clé
USB » ou « Mise À Jour Du Logiciel ».
• N’utilisez pas de câble de rallonge USB lors du
raccordement d’un périphérique de mémoire USB à
la borne USB BD STORAGE/SERVICE du lecteur.
L’utilisation d’un câble de rallonge USB peut
empêcher le lecteur de fonctionner correctement.
Remarque
Yamaha ne peut pas garantir que les périphériques de mémoire
USB de toute marque fonctionneront avec ce lecteur.
Gestion Clé USB
Mise À Jour Du Logiciel
Réinitialisation Sys
Efface données BD-VIDÉO sur clé USB.
Effacer tout contenu clé USB y compris
éléments protégés.
Effacer
Formater
Oui Non
Terminé
OK

40 Fr
RÉGLAGES DU LECTEUR BD
Liste de code de pays
Liste des langues
Liste de code des langues
ÉTATS-UNIS / CANADA / JAPON / ALLEMAGNE / FRANCE / ROYAUME-UNI / ITALIE / ESPAGNE / SUISSE
/ SUÉDE / PAYS-BAS / NORVÈGE / DANEMARK / FINLANDE / BELGIQUE / HONG KONG / SINGAPOURE /
THAILANDE / MALAISIE / INDONÉSIE / TAIWAN /PHILIPPINES / AUSTRALIE / RUSSIE / CHINE
English / Français / Deutsch / Italiano / Español / Japanese / Svenska / Nederlands
AA Afar / AB Abkhaze / AF Afrikaans / AM Ameharic / AR Arabe / AS Assamais / AY Aymara / AZ Azerbaïdjanais
/ BA Bachkir / BE Biélorusse / BG Bulgare / BH Bihari / BI Bislama / BN Bengali, Bangla / BO Tibétain / BR
Breton / CA Catalan / CO Corse / CS Tchèque / CY Gallois / DA Danois / DE Allemand / DZ Boutani / EL Grec /
EN Anglais / EO Esperanto / ES Espagnol / ET Estonien / EU Basque / FA Perse / FI Finnois / FJ Fijien / FO
Féroïen / FR Français / FY Frison / GA Irlandais / GD Gaélique d’Écosse / GL Galicien / GN Guarani / GU Gujarati
/ HA Haoussa / HI Hindi / HR Croate / HU Hongrois / HY Arménien / IA Interlangue / IE Interlingue / IK Inupiak / IN
Indonésien / IS Islandais / IT Italien / IW Hébreu / JA Japonais / JI Yiddish / JW Javanais / KA Géorgien / KK
Kazakh / KL Groenlandais / KM Cambodgien / KN Kannada / KO Coréen / KS Cachemirien / KU Kurde / KY
Kirghize / LA Latin / LN Lingala / LO Laotien / LT Lithuanien / LV Letton / MG Malgache / MI Maori / MK
Macédonien/ ML Malayalam / MN Mongol / MO Moldave / MR Marathi / MS Malais / MT Maltais / MY Birman /
NA Nauru / NE Népalais / NL Néerlandais / NO Norvégien / OC Occitan / OM Afan (Oromo) / OR Oriya / PA
Panjabi / PL Polonais / PS Pashto, Pushto / PT Portugais / QU Quechua / RM Rhéto-Roman / RN Kirundi / RO
Roumain / RU Russe / RW Kinyarwanda / SA Sanskrit / SD Sindhi / SG Sango / SH Serbo-Croate / SI Cingalais /
SK Slovaque / SL Slovénien / SM Samoan / SN Shona / SO Somali / SQ Albanais / SR Serbe / SS Siswat / ST
Sesotho / SU Soudanais / SV Suédois / SW Swahili / TA Tamoul / TE Télougou / TG Tadjik / TH Thaï / TI Tigrigna /
TK Turkmène / TL Tagalog / TN Setswana / TO Tongan / TR Turc / TS Tsonga / TT Tatar / TW Twi / UK Ukrainien
/ UR Ourdou / UZ Ouzbek / VI Vietnamien / VO Volapük / WO Wolof / XH Xhosa / YO Yoruba / ZH Chinois / ZU
Zoulou

41 Fr
Français
AUTRES
OPÉRATIONS
Vous pouvez modifier les paramètres lorsqu’un HDMI ou un câble composant est raccordé à l’aide des touches du lecteur
BD. De même voir page 33.
Remarques
• Même en mode Pure Direct, vous pouvez afficher et modifier les réglages sur l’afficheur de la face avant du lecteur BD.
• Vous ne pouvez pas modifier les réglages pendant la lecture. Modifiez les réglages une fois la lecture arrêtée.
1Appuyez sur DISC pour sélectionner une
source d’entrée, ensuite, appuyez sur
OPTION.
« VIDEO RESET » apparaît sur l’afficheur de la face
avant du lecteur BD.
2Appuyez sur / pour sélectionner « VIDEO
RESET » ou « HDMI <-> COMP ».
VIDEO RESET
Rétablissez la résolution de « Sortie Vidéo Yuv »
(☞p.33) ou « Sortie Vidéo HDMI » (☞p.33) au
réglage par défaut en usine.
HDMI <-> COMP
Réglez la priorité de sortie vidéo sur HDMI ou
Composant.
Pour plus de détails, voir « Sélection de la sortie
vidéo » (☞p.33).
3Appuyez sur ENTER pour valider le réglage.
« >> DONE << » s’affiche.
Pour annuler le réglage
Appuyez sur OPTION, EXIT ou RETURN.
MODIFICATION DES RÉGLAGES LORS DU RACCORDEMENT D’UN
HDMI OR D’UN CÂBLE COMPOSANT
A B C D
EXIT
TOP MENU/TITLE LIST
POP UP MENU
DISC
,
OPTION
ENTER
EXIT RETURN

GUIDE DE DEPANNAGE
42 Fr
INFORMATIONS COMPLÉMENTAIRIES
Reportez-vous au tableau suivant si l’appareil ne fonctionne pas convenablement. Si l’anomalie constatée n’est pas
mentionnée, ou encore si les actions correctives suggérées sont sans effet, mettez l’appareil hors service, débranchez la
fiche du câble d’alimentation et prenez contact avec le revendeur ou le service après-vente de Yamaha.
■Généralités
GUIDE DE DEPANNAGE
Ampli-tuner (R-840)
Anomalies Causes possibles Actions correctives Voir la
page
L’ampli-tuner ne se
met pas en service
ou se met en veille
lorsque vous
appuyez sur la
touche
d’alimentation.
La fiche du câble d’alimentation n’est pas
convenablement branchée, ou pas
branchée du tout.
Branchez soigneusement le câble d’alimentation. 8
L’ampli-tuner a été soumis à une
secousse électrique puissante (provoquée
par exemple par un orage ou une
décharge d’électricité statique).
Mettez l’ampli-tuner en veille, débranchez le câble
d’alimentation puis rebranchez-le environ 30
secondes plus tard et utilisez l’ampli-tuner comme à
l’accoutumée.
—
Le câble présente un court-circuit et la
protection du circuit a été activée.
Assurez-vous que les raccordements de câble de
l’enceinte sur l’ampli-tuner et sur toutes les enceintes
sont sécurisés et que le câble pour chaque
raccordement ne touche pas autre chose que son
raccordement respectif.
8
La température interne est trop élevée, la
protection du circuit a été activée.
Attendez environ 1 heure pour que l’ampli-tuner
refroidisse et ensuite mettez en service à nouveau.
8
Absence de son Les raccordements des câbles d’entrée ou
de sortie ne sont pas corrects.
Raccordez les câbles comme il convient.
Si l’anomalie persiste, il se peut que les câbles soient
défectueux.
8
Aucune source convenable n’a été
sélectionnée.
Sélectionnez la source appropriée avec le sélecteur
INPUT sur la face avant (ou avec les touches de
sélection d’entrée sur le boîtier de télécommande).
—
Les raccordements des enceintes sont
défectueux.
Corrigez les raccordements. 8
Le volume est réglé au minimum. Augmentez le volume. —
Le son est coupé. Appuyez sur MUTE ou VOLUME +/– pour
reprendre le son et ensuite réglez le volume.
7
Les signaux transmis, par exemple ceux
d’un CD-ROM, ne peuvent pas être reçus
par l’ampli-tuner.
Choisissez une source dont les signaux peuvent être
reproduits par l’ampli-tuner.
—
Le son est
brusquement coupé.
La minuterie a mis l’ampli-tuner hors
service.
Mettez l’ampli-tuner en service et reprenez la
lecture.
—
Le son ne sort des
enceintes que d’un
côté.
Les câbles ne sont pas correctement
raccordés.
Raccordez les câbles comme il convient.
Si l’anomalie persiste, il se peut que les câbles soient
défectueux.
8
Un appareil
numérique ou un
appareil
radiofréquence
génère un brouillage.
L’ampli-tuner est trop proche de
l’appareil numérique ou de l’appareil
radiofréquence.
Éloignez l’ampli-tuner de celui qui est concerné. —
Le son est déformé. Le niveau du volume est trop élevé. Réglez le volume. 15
« CHK SP WIRE »
apparaît sur
l’afficheur.
Les câbles des enceintes sont court-
circuités.
Assurez-vous que les câbles des enceintes sont
correctement branchés.
8
44 Fr
GUIDE DE DEPANNAGE
Boîtier de télécommande
Anomalies Causes possibles Actions correctives Voir la
page
Le boîtier de
télécommande ne
fonctionne pas ou
n’agit pas
convenablement.
Le boîtier de télécommande est peut-être
utilisé en dehors de sa portée de
fonctionnement.
Pour plus d’informations concernant la portée de
fonctionnement du boîtier de télécommande,
reportez-vous à « Utilisation du boîtier de
télécommande ».
11
Le capteur de la télécommande sur cet
appareil est peut-être exposé à la lumière
directe du soleil ou à l’éclairage (lampe
fluorescente inventée).
Changez l’éclairage ou l’orientation de l’appareil. 11
Les piles sont peut-être usées. Remplacez la pile par une neuve. 11
Il y a des obstacles entre le capteur de cet
appareil et la télécommande.
Enlevez les obstacles. 11
Le câble de commande du système est
débranché du connecteur système sur
l’ampli-tuner et/ou sur le lecteur BD.
Raccordez solidement l’ampli-tuner et le lecteur BD
avec le câble de commande du système.
8
Lecteur BD (BD-940)
Anomalies Causes possibles Actions correctives Voir la
page
L’alimentation n’est
pas établie.
La prise n’est pas entièrement insérée. Branchez soigneusement le câble d’alimentation. 8
L’ampli-tuner et le lecteur BD ne sont pas
correctement raccordés.
Vérifiez le raccordement avec l’ampli-tuner. 8
L’ampli-tuner n’est pas correctement
réglé.
Vérifiez le réglage (INPUT/Volume/MUTE/Casque)
de l’ampli-tuner.
—
L’alimentation est
coupée.
« Extinction Auto » est réglé sur « Oui ». Réglez « Extinction Auto » sur « Non ». 35
La lecture de disque
ne démarre pas.
Vous utilisez peut-être un disque
enregistrable qui n’est pas clôturé.
Clôturez le disque enregistrable. —
La face étiquetée du disque n’est peut-
être pas orientée vers le haut.
Placez le disque dans le tiroir face étiquetée orientée
vers le haut.
—
Le disque est peut-être défectueux. Essayez de lire un autre disque. Si le problème ne
survient plus, c’est que le disque était défectueux.
—
Le disque est sale. Nettoyez la surface du disque. 48
Le code régional sur le disque ne
correspond pas à celui du lecteur BD.
Utilisez un disque avec le même code de région que
le lecteur BD.
3
Si le temps enregistré d’un disque est
inhabituellement court, la lecture n’est
peut-être pas possible.
Les disques BD-RE/R enregistrés dans un
format autre que BDMV ne peuvent pas être lus.
La lecture de la vidéo
s’arrête.
Une force ou une vibration excessive a
été appliquée sur le lecteur BD.
N’appliquez pas une force ou une vibration excessive
sur le lecteur BD.
—
Le lecteur BD n’est pas placé sur une
surface plane.
Placez le lecteur BD sur une surface plane. —

45 Fr
Français
GUIDE DE DEPANNAGE
INFORMATIONS
COMPLÉMENTAIRIES
Le lecteur BD fait un
bruit de craquement
quand un disque est
chargé ou lu.
Le lecteur BD n’a pas fonctionné depuis
longtemps.
Cela peut survenir s’il n’a pas fonctionné depuis
longtemps. Il ne s’agit pas d’un dysfonctionnement.
—
Il n’y a pas d’image. Le câble vidéo n’est pas correctement
raccordé à votre téléviseur.
Raccordez correctement le câble vidéo au téléviseur. 9
Le réglage d’entrée sur votre téléviseur
n’est pas correct.
Sélectionnez le réglage d’entrée correct sur le
téléviseur.
13
Le lecteur BD n’est pas correctement
réglé pour la connexion du câble HDMI
ou vidéo composantes.
Réglez correctement le lecteur BD. 33
L’écran se bloque et
les touches ne
fonctionnent pas.
Le disque est endommagé ou sale. Vérifiez la surface du disque. —
Le lecteur BD est gelé. Redémarrez le lecteur BD. 5
Il n’y a du son mais
pas d’image.
Le câble vidéo n’est pas correctement
raccordé.
Raccordez le câble comme il convient. 9
L’image n’est pas
restituée avec la
résolution désirée.
Le réglage de la résolution de sortie ne
correspond pas à la résolution du
téléviseur raccordé au lecteur BD.
Effectuez « VIDEO RESET ». 41
Permutez entre « HDMI » et « Composante » en utilisant
« Sélection de la sortie vidéo » ou « HDMI <-> COMP ».
33, 41
« Sélection de la sortie vidéo » n’est pas
réglé comme il convient.
Réglez « Sélection de la sortie vidéo » comme il
convient.
33
« Sortie Vidéo Yuv » ou « Sortie Vidéo
HDMI » n’est pas réglé à la résolution
désirée.
Réglez « Sortie Vidéo Yuv » ou « Sortie Vidéo
HDMI » sur la résolution désirée.
33
Les images grand
écran semblent
s’étirer
verticalement, ou des
bandes noires
apparaissent en haut
et en bas de l’écran.
« Format D’image TV » n’est pas réglé
correctement pour le téléviseur raccordé.
Réglez « Format D’image TV » correctement pour le
téléviseur raccordé.
33
Un téléviseur standard 4:3 est raccordé
mais « Sélection de la sortie vidéo » n’est
par réglé sur « Component ».
Quand un téléviseur grand écran est raccordé, réglez
« Format D’image TV » sur « Large 16:9 ».
Quand un téléviseur standard 4:3 est raccordé, réglez
« Sélection de la sortie vidéo » sur « Composante ».
33
Les images 4:3
semblent étirées
horizontalement.
Quand un téléviseur 4:3 est raccordé, réglez
« Sélection de la sortie vidéo » sur « Component ».
33
Des blocs de bruit
(mosaïque)
s’affichent à l’écran.
Des blocs de bruit apparaissent dans des scènes à
déplacement rapide en raison des caractéristiques
de la technologie d’image numérique.
Le son ou les images
ne sont pas restitués
correctement.
Le son ou l’image risque de ne pas être
restitué correctement lors de la lecture
d’un disque protégé par les droits d’auteur.
Le son est déformé
ou il n’y a pas de son.
Le câble stéréo RCA n’est pas raccordé
entre l’ampli-tuner et le lecteur BD.
Raccordez le câble stéréo RCA entre l’ampli-tuner et
le lecteur BD.
8
Les prises audio sont sales. Nettoyez les prises audio. —
La surface du disque est sale. Nettoyez la surface du disque. 48
Le disque est endommagé ou sale. Vérifiez la surface du disque. —
Anomalies Causes possibles Actions correctives Voir la
page

46 Fr
GUIDE DE DEPANNAGE
Les messages suivants apparaissent sur l’écran du téléviseur si le disque que vous souhaitez lire n’est pas adéquat ou que
l’opération n’est pas correcte.
Réseau
Anomalies Causes possibles Actions correctives Voir la
page
Connexion à Internet
impossible.
Le câble réseau n’est pas correctement
raccordé.
Raccordez le câble réseau comme il convient. 10
Le câble utilisé tel qu’un câble modulaire
ne convient pas.
Utilisez le câble réseau pour la connexion. 10
Le routeur à large bande ou le modem
n’est pas correctement connecté.
Connectez le routeur et/ou modem à large bande
comme il convient.
10
Le routeur à large bande ou le modem
n’est pas sous tension.
Allumez le routeur à large bande ou modem. —
Les paramètres réseau ne sont pas
corrects.
Vérifiez « Réglage De Communication ». 36
Impossible de
télécharger le
contenu BD-LIVE.
Le câble réseau n’est pas correctement
raccordé.
Raccordez le câble réseau comme il convient. 10
Le périphérique de mémoire USB n’est
pas correctement connecté.
Assurez-vous que le périphérique de mémoire USB
est connecté à la borne USB BD STORAGE/
SERVICE du lecteur BD.
10
Le disque BD ne reconnaît pas BD-LIVE. Vérifiez si le disque BD reconnaît BD-LIVE. 24
« Accès à l’Internet BD » est réglé sur
« Interdire ».
Réglez « Accès à l’Internet BD » sur « Autoriser »
ou « Limite ».
36
Messages concernant les disques BD et les disques DVD
Message d’erreur Erreur possible Actions correctives
Lecture impossible. – Le disque ne peut pas être lu sur ce lecteur. – Vérifiez le disque et insérez-le correctement.
Disque incompatible. – Si vous insérez un disque qui ne peut pas être lu
sur ce lecteur (par exemple, un disque rayé) ou si
vous insérez un disque à l’envers, ce message
apparaît et le plateau de disque sort
automatiquement.
– Si le disque inséré ne peut pas être lu car il est de
forme particulière ou rayé, etc.
– Retirez le disque.
Opération impossible. – En cas d’opération incorrecte.
La clé USB n’est pas
formatée correctement.
La formater dans
gestion clé USB.
– En cas d’erreur de formatage. – Formatez à nouveau la clé USB.
– Si la clé USB n’est pas au format FAT 32/16. – Formatez la clé USB avec votre PC.
Impossible d’utiliser la
clé USB connectée.
Elle doit étre conforme
USB 2.0.
– En cas d’utilisation d’une clé USB incompatible
avec USB 2.0 High Speed (480 Mbit/s) (à savoir
USB 1.0/USB 1.1).
– Raccordez une clé USB compatible avec USB 2.0
High Speed (480 Mbit/s).

49 Fr
Français
INFORMATIONS
COMPLÉMENTAIRIES
■JPEG (Joint Photographic Experts
Group)
Un système de compression d’image standardisé proposé
par le Joint Photographic Experts Group (groupe.d’experts
de l’ISO et de l’UIT-T). Il peut réduire des images jusqu’à
1 à 10% de leurs tailles d’origine et fonctionne
efficacement sur des photographies numériques.
■Verrouillage parental
Limite la lecture du disque en fonction de l’âge des
utilisateurs ou du niveau de limitation dans chaque pays.
La limite varie d’un disque à l’autre; lorsqu’il est activé, la
lecture sera interdite si le niveau du logiciel est supérieur
au niveau réglé par l’utilisateur.
■Balayage progressif
Une méthode d’affichage de toutes les lignes de balayage
dans un cadre en même temps, réduisant de manière
notable le papillotement sur un écran plus large et créant
une image nette et précise.
■Code régional
De nombreux disques BD/DVD incluent un code régional
de sorte que le propriétaire de droits d’auteur puisse
contrôler la distribution de logiciel BD/DVD uniquement
aux régions où ils doivent être distribués. Il existe six
codes régionaux, qui limitent le lecteur BD à lire un
disque BD/DVD avec le même code régional.
■Format VR (Video Recording format)
Un format d’enregistrement vidéo DVD qui permet
d’éditer des données vidéo DVD enregistrées sur un
disque. Vous avez besoin d’un format VR compatible avec
le lecteur.
■R-840
PARTIE AMPLIFICATEUR
• Puissance de sortie RMS minimale par voie
(6 Ω, 1 kHz, 10% DHT) ............................................65 W + 65 W
• Sensibilité d’entrée/Impédance
PLAYER, etc. ......................................................... 200 mV/47 kΩ
• Réponse en fréquence
PLAYER, etc. ..........................................20 Hz à 20 kHz ± 0,5 dB
• Distorsion harmonique totale
PLAYER, etc. (30 W/6 Ω)....................................0,04 % ou moins
• Rapport signal/bruit (Réseau IHF-A)
PLAYER (200 mV, entrée court-circuitée)............. 100 dB ou plus
SECTION SYNTONISEUR
GÉNÉRALITÉS
• Alimentation ........................................................... CA 230 V, 50 Hz
• Consommation.........................................................................115 W
• Dimensions (L × H × P).................................... 215 × 110 × 348 mm
• Poids .........................................................................................5,7 kg
• Consommation en veille .......................................inférieure à 0,3 W
■BD-940
PARTIE LECTEUR
• AUDIO OUT
Niveau de sortie (1 kHz 0 dB)....................................... 2 V (± 0,3)
Rapport signal/bruit ..........................................supérieur à 100 dB
Plage dynamique (48 kHz, 24 bit)..................... supérieure à 95 dB
Distorsion harmonique totale ..........................inférieure à 0,005 %
Réponse en fréquence
CD-DA .....................................................................20 Hz–20 kHz
BD/DVD (48 kHz) ...................................................20 Hz–22 kHz
BD/DVD (96 kHz) ...................................................20 Hz–44 kHz
• Sortie vidéo
Composite ...................................................................1 Vp-p/75 Ω
Composantes ....................................................... 1 Vp-p/75 Ω (Y)
0,7 Vp-p/75 Ω (PB, PR)
• Sortie HDMI.........................................................Prise de type A x 1
480p(576p)/720p/1080i/1080p/1080p@24Hz,
compatible Deep Color, x.v.Color
• USB ................................... Utilisé pour :
1) Lecture de contenus BD-LIVE/
BonusView
2) Mise à jour du micrologiciel
Généralités
• Alimentation............................................................CA 230 V, 50 Hz
• Consommation .......................................................................... 20 W
• Consommation en veille........................................... inférieure à 1 W
• Dimensions (L × H × P)....................................215 × 108 × 318 mm
• Poids ........................................................................................ 3,4 kg
Les caractéristiques peuvent être modifiées sans préavis.
CARACTÉRISTIQUES TECHNIQUES
• Plage d’accord ...................................................87,50 à 108,00 MHz

50 Fr
CARACTÉRISTIQUES TECHNIQUES
iPod™
« iPod » est une marque commerciale de Apple Inc., enregistrée
aux États-Unis et dans d’autres pays.
« Made for iPod » signifie qu’un accessoire électronique a été
conçu pour le raccordement spécifiquement à l’iPod et a été agréé
par le développeur spécifiant qu’il respecte les normes de
performance de Apple.
Apple n’est pas tenu responsable du fonctionnement de ce
périphérique ou de sa conformité vis-à-vis des normes de sécurité
et d’application de la réglementation.
Le matériel audiovisuel peut être composé de travaux protégés
par le droit d’auteur qui ne doivent pas être enregistrés sans
l’autorité du propriété de droit d’auteur. Reportez-vous à la
législation en vigueur dans votre pays.
Ce produit intègre la technologie de protection de droit d’auteur
qui est protégées par des brevets américains et d’autres droits de
propriété intellectuelle. L’utilisation de cette technologie de
protection de droit d’auteur doit être autorisée par Macrovision, et
vise une utilisation à la maison et d’autres utilisations d’affichage
limité à moins qu’elles ne soient autorisées par Macrovision. Une
ingénierie inverse ou un démontage est interdit.
Fabriqué sous licence de Dolby Laboratories. « Dolby » et le
symbole double-D sont des marques de commerce de Dolby
Laboratories.
Fabriqués sous licence sous brevet américain #’s : 5,451,942 ;
5,956,674 ; 5,974,380 ; 5,978,762 ; 6,226,616 ; 6,487,535 ;
7,392,195 ; 7,272,567 ; 7,333,929 ; 7,212,872 et d’autres brevets
américains et mondiaux octroyés et en cours. DTS est une marque
déposée et les logos DTS, Symbole, DTS-HD et DTS-HD Master
Audio | Essential sont des marques de commerce de DTS, Inc.
©1996-2008 DTS, Inc. Tous droits réservés.
est une marque de commerce.
« Le logo BD-LIVE » est une marque de commerce de Blu-ray
Disc Association.
« BONUSVIEW » est une marque de commerce de Blu-ray Disc Association.
est une marque de commerce de DVD Format/Logo
Licensing Corporation.
HDMI, le logo HDMI et High-Definition Multimedia Interface
sont des marques de commerce ou des marques déposées de
HDMI Licensing LLC.
« x.v.Color » et le logo « x.v.Color » sont des marques de
commerce.
« AVCHD » et le logo « AVCHD » sont des marques de
commerce de Panasonic Corporation et Sony Corporation.
Java et toutes les marques et logo sous Java sont des marques de
commerce ou des marques déposées de Sun Microsystems, Inc.
aux États-Unis et/ou dans d’autres pays.
Ce produit est sous licence sous la licence de portefeuille de
brevet AVC et licence de portefeuille de brevet VC-1 pour une
utilisation personnelle et non commerciale d’un utilisateur pour
encoder (i) une vidéo conformément à la norme AVC et à la
norme VC-1 (« AVC/VC-1 Video ») et/ou (ii) décoder AVC/VC-1
Video qui a été encodé par un utilisateur exerçant une activité
personnelle et non commerciale et/ou a été obtenue d’un
fournisseur vidéo possédant une licence pour fournir AVC/VC-1
Video. Aucune licence n’est accordé ou devra être suggérée pour
toute autre utilisation. Des informations supplémentaires peuvent
être obtenues chez MPEG LA, LLC.
Visitez le site http://www.mpegla.com.
Brevets américains numéros 6,836,549 ; 6,381,747 ;
7.050.698 ; 6,516,132 et 5,583.936

51 Fr
Français
INFORMATIONS
COMPLÉMENTAIRIES
■Langue (abréviation), numéro de code
■Pays, numéro de code, abréviation
LISTES DE LANGUE, PAYS
Liste des langues
Japonais (ja), 1001 Boutani (dz), 0426 kirghize (ky), 1125 Cinghalais (si), 1909
Anglais (en), 0514 Esperanto (eo), 0515 Latin (la), 1201 Slovaque (sk), 1911
Français (fr), 0618 Estonien (et), 0520 Lingala (ln), 1214 Slovène (sl), 1912
Allemand (de), 0405 Basque (eu), 0521 Laotien (lo), 1215 Samoan (sm), 1913
Italien (it), 0920 Perse (fa), 0601 Lithuanien (lt), 1220 Shona (sn), 1914
Espagnol (es), 0519 Finnois (fi), 0609 Letton (lv), 1222 Somali (so), 1915
Chinois (zh), 2608 Fidjien (fj), 0610 Malgache (mg), 1307 Albanais (sq), 1917
Néerlandais (nl), 1412 Féroïen (fo), 0615 Maori (mi), 1309 Serbe (sr), 1918
Portugais (pt), 1620 Frison (fy), 0625 Macédonien (mk), 1311 Siswati (ss), 1919
Suédois (sv), 1922 Irlandais (ga), 0701 Malayalam (ml), 1312 Sesotho (st), 1920
Russe (ru), 1821 Gaélique d’Écosse (gd), 0704 Mongol (mn), 1314 Soudanais (su), 1921
Coréen (ko), 1115 Galicien (gl), 0712 Moldave (mo), 1315 Swahili (sw), 1923
Grec (el), 0512 Guarani (gn), 0714 Marathi (mr), 1318 Tamoul (ta), 2001
Afar (aa), 0101 Gujarati (gu), 0721 Malais (ms), 1319 Télougou (te), 2005
Abkhaze (ab), 0102 Haoussa (ha), 0801 Maltais (mt), 1320 Tadjik (tg), 2007
Afrikaans (af), 0106 Hindi (hi), 0809 Birman (my), 1325 Thaï (th), 2008
Amharique (am), 0113 Croate (hr), 0818 Nauru (na), 1401 Tigrigna (ti), 2009
Arabe (ar), 0118 Hongrois (hu), 0821 Népalais (ne), 1405 Turkmène (tk), 2011
Assamais (as), 0119 Arménien (hy), 0825 Norvégien (no), 1415 Tagalog (tl), 2012
Aymara (ay), 0125 Interlangue (ia), 0901 Occitan (oc), 1503 Setswana (tn), 2014
Azerbaïdjanais (az), 0126 Interlingue (ie), 0905 Oromo (om), 1513 Tongan (to), 2015
Bachkir (ba), 0201 Inupiak (ik), 0911 Oriya (or), 1518 Turc (tr), 2018
Biélorusse (be), 0205 Indonésien (in), 0914 Panjabi (pa), 1601 Tsonga (ts), 2019
Bulgare (bg), 0207 Islandais (is), 0919 Polonais (pl), 1612 Tatar (tt), 2020
Bihari (bh), 0208 Hébreu (iw), 0923 Pashto, Pushto (ps), 1619 Twi (tw), 2023
Bislama (bi), 0209 Yiddish (ji), 1009 Quechua (qu), 1721 Ukrainien (uk), 2111
Bengali (bn), 0214 Javanais (jw), 1023 Rhéto-Roman (rm), 1813 Ourdou (ur), 2118
Tibétain (bo), 0215 Géorgien (ka), 1101 Kirundi (rn), 1814 Ouzbek (uz), 2126
Breton (br), 0218 Kazakh (kk), 1111 Roumain (ro), 1815 Vietnamien (vi), 2209
Catalan (ca), 0301 Groenlandais (kl), 1112 Kinyarwanda (rw), 1823 Volapük (vo), 2215
Corse (co), 0315 Cambodgien (km), 1113 Sanskrit (sa), 1901 Volof (wo), 2315
Tchèque (cs), 0319 Kannada (kn), 1114 Sindhi (sd), 1904 Xhosa (xh), 2408
Gallois (cy), 0325 Cachemirien (ks), 1119 Sango (sg), 1907 Yoruba (yo), 2515
Danois (da), 0401 Kurde (ku), 1121 Serbo-croate (sh), 1908 Zoulou (zu), 2621
Liste de pays
Argentine, 0118, ar Finlande, 0609, fi Malaisie, 1325, my Singapour, 1907, sg
Australie, 0121, au France, 0618, fr Mexique, 1324, mx Espagne, 0519, es
Autriche, 0120, at Allemagne, 0405, de Pays-Bas, 1412, nl Suède, 1905, se
Belgique, 0205, be Hong-Kong, 0811, hk Nouvelle Zélande, 1426, nz Suisse, 0308, ch
Brésil, 0218, br Inde, 0914, in Norvège, 1415, no Taïwan, 2023, tw
Canada, 0301, ca Indonésie, 0904, id Pakistan, 1611, pk Thaïlande, 2008, th
Chili, 0312, cl Italie, 0920, it Philippines, 1608, ph Royaume-Uni, 0702, gb
Chine, 0314, cn Japon, 1016, jp Portugal, 1620, pt États-Unis, 2119, us
Danemark, 0411, dk Corée, République de, 1118, kr Fédération russe, 1821, ru

LISTES DE LANGUE, PAYS
52 Fr
Garantie Limitée pour l’Espace Économique Européen et la Suisse
Merci d’avoir porté votre choix sur un produit Yamaha. Dans l’hypothèse où vous devriez recourir au service de notre garantie après-vente, veuillez
contacter votre revendeur Yamaha. Si vous rencontrez la moindre difficulté, n’hésitez pas à contacter directement Yamaha dans votre pays de résidence.
Vous pouvez trouver toutes informations complémentaires sur notre site Web (http://www.yamaha-hifi.com/ ou http://www.yamaha-uk.com/ pour les
résidents au Royaume-Uni).
Yamaha garantit votre produit contre tout défaut de fabrication, pièces et main d’oeuvre, pour une durée de 2 ans à compter de la première date de vente au
détail. Yamaha s’engage, dans les conditions décrites ci-après, à procéder à la réparation du produit défectueux (ou d’un quelconque de ses composants) ou
à son remplacement à l’appréciation de Yamaha en prenant à sa charge les coûts relatifs aux pièces détachées et à la main d’oeuvre. Yamaha se réserve le
droit de remplacer le produit par un modèle semblable, de par sa valeur et ses caractéristiques, dès lors que la commercialisation dudit produit a cessé ou
bien lorsque sa réparation s’avère économiquement injustifiée.
Conditions
1 La facture d’achat originelle ou un justificatif d’achat correspondant (indiquant la date d’achat, la référence du produit et le nom du revendeur) DOIT
accompagner le produit défectueux, ainsi qu’une description précise du dysfonctionnement constaté. En l’absence de cette preuve d’achat, Yamaha se
réserve le droit de refuser le service de la garantie et le produit peut être restitué aux frais du consommateur.
2 Le produit DOIT avoir été acheté chez un distributeur agréé Yamaha au sein de l’Espace Economique Européen ou en Suisse.
3 Le produit doit n’avoir fait l’objet d’aucune modification ou altération, sauf accord écrit de Yamaha.
4 Les cas suivants font obstacle à l’application de la garantie :
a. Entretien périodique et réparation ou remplacement de pièces ayant subi une usure ou défaillance normale.
b. Dommages résulótant de :
(1) réparation effectuée par le consommateur lui-même ou par un tiers non autorisé.
(2) emballage ou manutention inadéquats lors du transport du produit pour réparation. Veuillez noter qu’il est de la responsabilité de l’expéditeur de
s’assurer que le produit est correctement emballé.
(3) utilisation non-conforme du produit, correspondant aux cas non limitatifs (a) d’utilisation non conforme à l’objet normal du produit ou
non-conforme aux instructions d’utilisation, de maintenance ou d’installation publiées par Yamaha, (b) ou d’utilisation du produit incompatible
avec les normes techniques ou de sécurité en vigueur au sein du pays d’utilisation.
(4) accidents, foudre, dégât des eaux, incendie, ventilation incorrecte, fuite de pile ou toute autre cause échappant au contrôle de Yamaha.
(5) les défauts de la configuration dans laquelle ce produit est incorporé et/ou l’incompatibilité avec des produits tiers.
(6) produit importé au sein de l’EEE, et/ou en Suisse, par une autre entité que Yamaha, dès lors que ce produit n’est pas conforme aux normes
techniques ou de sécurité du pays d’utilisation et/ou aux normes des produits commercialisés par Yamaha au sein de l’EEE et/ou en Suisse.
5 Lorsque la garantie diffère entre le pays d’achat et le pays d’utilisation du produit, la garantie du pays d’utilisation est applicable.
6 Yamaha ne saurait être tenu pour responsable de quelconques pertes ou dommages, directs, consécutifs ou autres, sa responsabilité au titre de la garantie
étant strictement limitée à la réparation ou au remplacement du produit.
7 Nous vous invitons à sauvegarder toutes les données ou réglages personnalisés de votre produit, Yamaha ne pouvant être tenu responsable de leur
modification ou perte.
8 La présente garantie laisse intégralement subsister les droits que le consommateur peut détenir au titre de la garantie légale en vigueur ou au titre du
contrat de vente conclu avec son revendeur.
Information concernant la collecte et le traitement des piles usagées et
des déchets d’équipements électriques et électroniques
Les symboles sur les produits, l’emballage et/ou les documents joints signifient que les produits électriques
ou électroniques usagés ainsi que les piles ne doivent pas être mélangés avec les déchets domestiques
habituels.
Pour un traitement, une récupération et un recyclage appropriés des déchets d’équipements électriques et
électroniques et des piles usagées, veuillez les déposer aux points de collecte prévus à cet effet,
conformément à la réglementation nationale et aux Directives 2002/96/EC et 2006/66/EC.
En vous débarrassant correctement des déchets d’équipements électriques et électroniques et des piles
usagées, vous contribuerez à la sauvegarde de précieuses ressources et à la prévention de potentiels effets
négatifs sur la santé humaine qui pourraient advenir lors d’un traitement inapproprié des déchets.
Pour plus d’informations à propos de la collecte et du recyclage des déchets d’équipements électriques et
électroniques et des piles usagées, veuillez contacter votre municipalité, votre service de traitement des
déchets ou le point de vente où vous avez acheté les produits.
[Information sur le traitement dans d’autres pays en dehors de l’Union Européenne]
Ces symboles sont seulement valables dans l’Union Européenne. Si vous souhaitez vous débarrasser de
déchets d’équipements électriques et électroniques ou de piles usagées, veuillez contacter les autorités
locales ou votre fournisseur et demander la méthode de traitement appropriée.
Note pour le symbole « pile » (les deux symboles du bas) :
Ce symbole peut être utilisé en combinaison avec un symbole chimique. Dans ce cas il respecte les
exigences établies par la Directive pour le produit chimique en question.
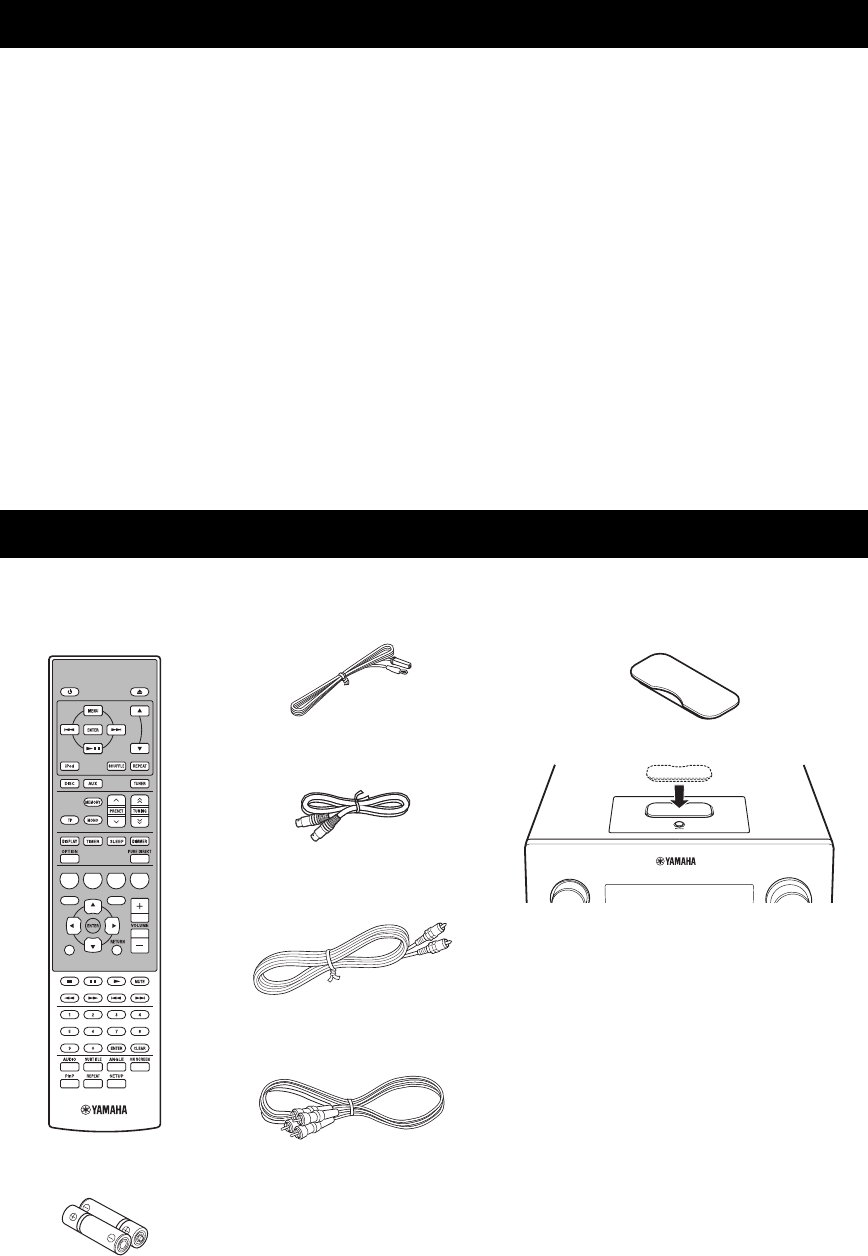
GERÄTEMERKMALE
2 De
EINLEITUNG
Receiver (R-840)
•Minimale RMS-Ausgangsleistung pro Kanal
65 W + 65 W (6 Ω, 1 kHz, 10 % THD)
•UKW-Speichersenderabstimmung für 30
Sender
•iPod -Abspielbarkeit (mit Ladefunktion)
•Pure Direct-Modus
•Einstellbare Display-Helligkeit
BD-Player (BD-940)
•Spielt Blu-ray-Discs, DVDs, Audio-CDs
•
Unterstützt BD-LIVE. Wenn die Disc BD-LIVE-
kompatibel ist, können sie den BD-Player mit dem
Internet verbinden und diverse Daten herunterladen
•
Unterstützt HDMI-Steuerung. Sie können den
Receiver und den BD-Player mit einer per HDMI-
Kabel verbundenen TV-Fernbedienung steuern
•Gekoppelte Funktion mit dem Receiver, z. B.
Pure Direct-Modus, einstellbare Display-
Helligkeit und INPUT-Modus
■Über diese Anleitung
• In dieser Anleitung wird „R-840“ als „Receiver“ und „BD-940“ als „BD-Player“ bezeichnet.
• In dieser Anleitung wird grundsätzlich die Bedienung über Fernbedienung beschrieben, sofern diese möglich ist. Manche dieser
Bedienschritte sind auch über die Tasten an der Frontblende möglich.
•y Verweist auf einen Tipp für die Bedienung.
• „Hinweise“ enthalten wichtige Informationen zu Sicherheit und Betrieb.
• Diese Anleitung wurde vor der Produktion gedruckt. Design und Spezifikationen können sich aufgrund von Verbesserungen usw.
ändern. Bei Abweichungen zwischen Bedienungsanleitung und Produkt hat das Produkt Vorrang.
Dieses Produkt wird mit dem folgenden Zubehör geliefert. Bevor Sie diese Anlage anschließen, stellen Sie sicher, dass Sie die folgenden Artikel erhalten haben.
GERÄTEMERKMALE
ZUBEHÖR
1234
56
90
78
E
NT
E
RCL
E
AR
MUT
E
E
NT
E
R
VOLUME
AUX
TUN
E
R
iPod SHUFFLE
R
EPE
AT
MENU
ENTER
E
O
NM
O
N
O
M
E
M
O
R
Y
PRESET TUNING
DISC
DISPLAY TIMER SLEEP DIMMER
OPTION PURE DIRECT
AUDI O SUBTITLE ANGLE
REPEAT
ON SCREEN
RETURN
PinP SETUP
ABCD
EXIT
TOP MENU/TITLE LIST
POP UP MENU
UKW-Zimmerantenne
Batterien (x 2)
(AAA, R03, UM-4)
Fernbedienung
* Die mit diesem Gerät gelieferte Dock-Abdeckung
bedeckt das unbelegte iPod-Dock.
iPod
INPUT VOLUME
Dock-Abdeckung*
Receiver
Systemsteuerungs
kabel (0,6 m)
RCA-Stereokabel
(1,0 m)
Composite-Video-
Kabel (1,5 m)
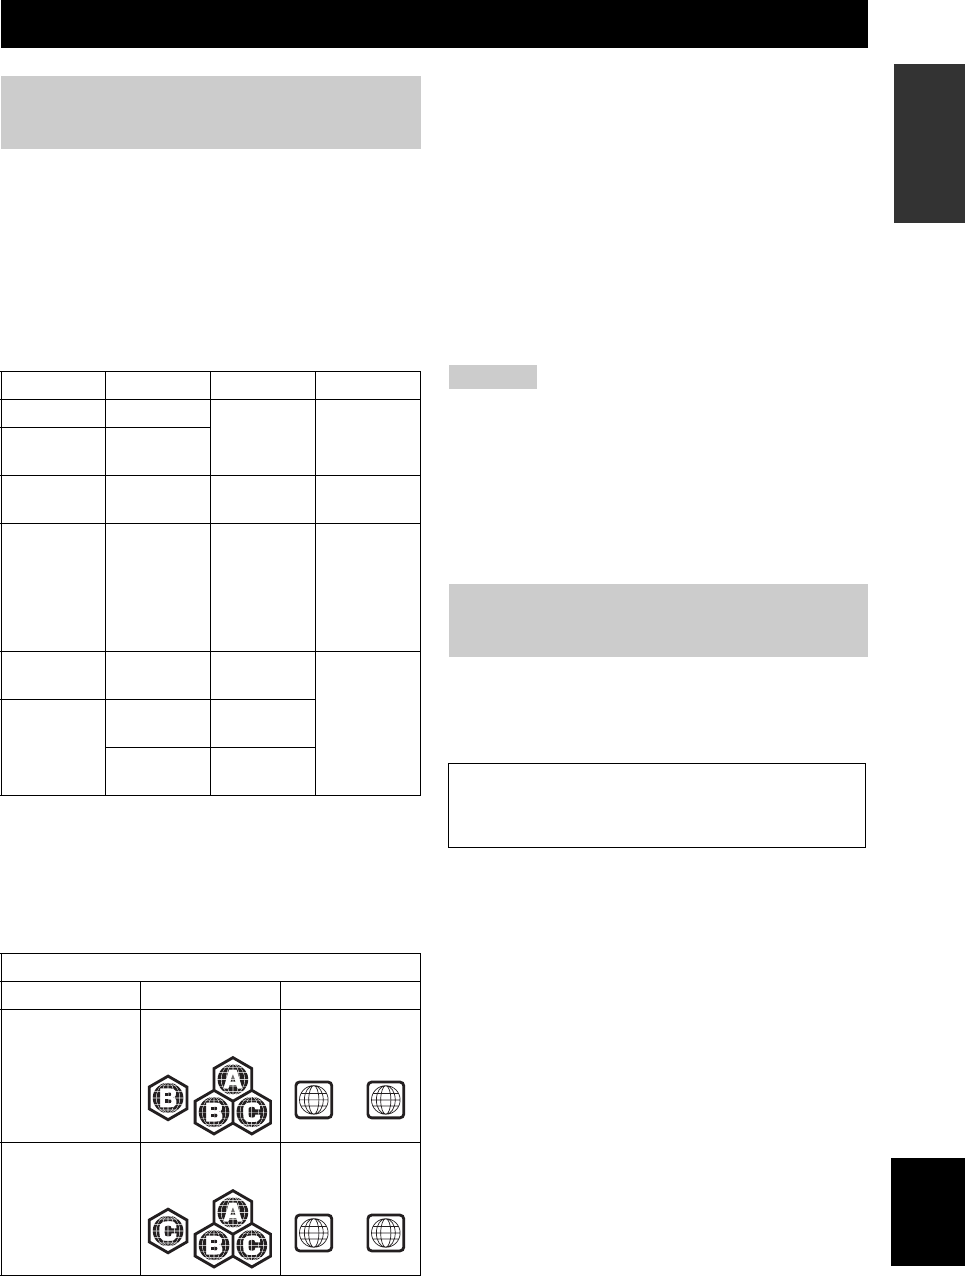
3 De
Deutsch
EINFÜHRUNG
• Die unten genannten Arten von Discs können von
diesem Player wiedergegeben werden. Verwenden Sie
keinen 8 cm-auf-12 cm -Adapter.
•
Die Discs müssen kompatiblen Standards entsprechen,
erkennbar an den offiziellen Logos auf dem Disc-Etikett.
Discs, die nicht mit diesen Standards kompatibel ist, können
eventuell nicht wiedergegeben werden. Außerdem sind,
selbst wenn die Disc wiedergabefähig ist, Bildqualität und
Tonqualität nicht garantiert.
*1 Dieser Player ist für die Wiedergabe von mit den CD
(Compact Disc)-Standards kompatiblen Audio-CDs
bestimmt. CDs, die ein Signal zum Schutz von
Urheberrechten (ein Kopierschutz-Signal) enthalten, sind mit
diesem Player unter Umständen nicht abspielbar.
*2 Siehe „HINWEISE ZUM JPEG-DATEIFORMAT“ auf
Seite 47.
• BD/DVD-Video-Player und -Discs haben
Regionalcodes, die bestimmen, wo eine Disc
abgespielt werden kann.
• Bei BD/DVD-Video können Bedienung und
Funktionen von den Beschreibungen in diesem
Handbuch abweichen, manche Einstellungen des Disc-
Herstellers können auch Funktionen unterbinden.
• Wenn während der Wiedergabe einer Disc ein
Menübildschirm oder Bedienhinweis eingeblendet
wird, folgen Sie der angezeigten Anleitung.
• Die Audio-Komponente eines DVD-Videos, das mit
96 kHz (Linear-PCM) aufgezeichnet wurde, wird bei
der Wiedergabe mit 48 kHz ausgegeben.
Hinweise
• Manche in den Tabellen links aufgeführten Discs können
bedingt durch die Disc selbst nicht wiedergegeben werden.
• „Finalize“ bezieht darauf, dass das Aufnahmegerät die
aufgezeichnete Disc so bearbeitet, dass sie von anderen BD-
Playern/Recordern und von diesem Player wiedergegeben
werden kann. Dieser Player kann nur finalisierte DVD-Discs
abspielen. (Der Player besitzt keine eigene Funktion zum
Finalisieren von Discs.)
Die unten beschriebenen Discs können von diesem Player
nicht oder nicht richtig wiedergegeben werden. Beachten
Sie, dass der Versuch, eine solche Disc abzuspielen, die
Lautsprecher beschädigen kann.
Ausgefallen geformte Discs können nicht
abgespielt werden.
Discs mit ausgefallenen Formen (herzförmig, sechskantig
und dgl.) sollen nicht abgespielt werden. Es besteht die
Gefahr eines Geräteschadens.
Die folgenden BD/DVD-Video-Discs sind
nicht wiedergabefähig:
• Discs mit dem falschen Regionalcode oder der falschen
Regionalnummer für diesen Player.
• Illegal produzierte Discs.
• Für den gewerblichen Gebrauch bestimmte Discs.
ÜBER DISCS
Discs, die mit diesem Player
verwendet werden können
Disc-Typ
Aufnahmeformat
Inhalt Disc-Größe
BD-Video -- Audio +
Video (Film)
12 cm
8 cm
BD-RE DL
BD-R DL
BDMV-
Format
DVD-Video Videoformat Audio +
Video (Film)
12 cm
8 cm
DVD+RW/
DVD+R
DVD+R DL
DVD-R DL
DVD-RW/
DVD-R
Video/VR/
AV C H D -
Format (nur
finalisierte
Disc)
Audio +
Video (Film)
12 cm
8 cm
Audio-CD*1 Audio-CD
(CD-DA)
Audio 12 cm
8 cm
CD-RW/CD-R Audio-CD
(CD-DA)
Audio
JPEG*2 Standbild
(JPEG-Datei)
Region Management-Information
Modell BD-Video DVD-Video
Europa Regionalcode „B“
oder „ALL“
Regionalnummer
„2“ oder „ALL“
Russland Regionalcode „C“
oder „ALL“
Regionalnummer
„5“ oder „ALL“
2ALL
5ALL
Discs, die mit diesem Player nicht
verwendet werden können
CDG, Video-CD, Foto-CD, CD-ROM, SVCD,
SA-CD, PD, CDV, CVD, DVD-RAM, DVD-Audio,
BD-RE mit Kassette, CD-MP3, CD-WMA
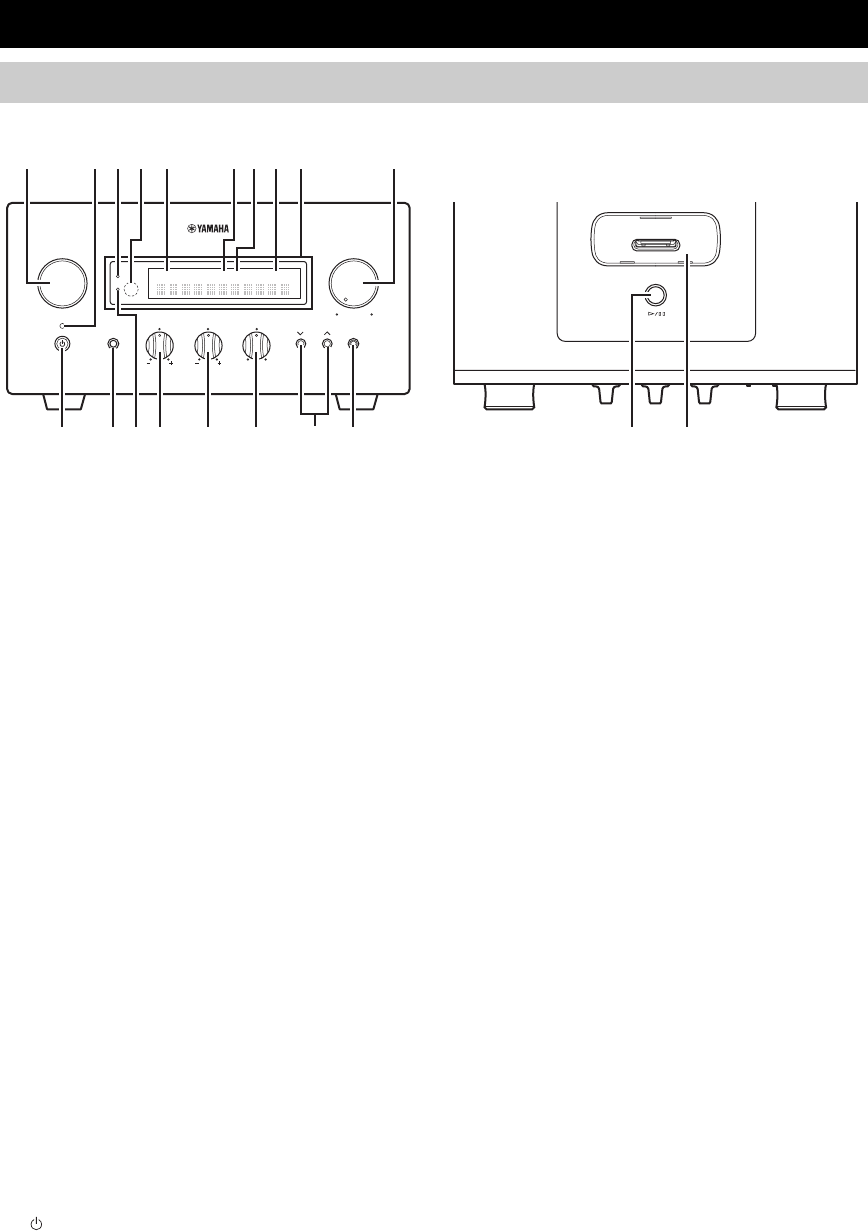
BEDIENELEMENTE UND FUNKTIONEN
4 De
■Frontblende
1INPUT
Wählt eine Eingangsquelle.
2On/Standby-Anzeige
Leuchtet bei eingeschaltetem Receiver grün. Leuchtet im
Bereitschaftsmodus des Receivers bernsteinfarben.
3TP-Anzeige
Leuchtet auf, wenn der Receiver einen Sender mit Radio-
Daten-System empfängt, der den TP (Traffic Program)
Verkehrsdatendienst (☞S.29) überträgt.
4Fernbedienungssensor
Empfängt die Signale von der Fernbedienung.
5PRESET-Anzeige
Leuchtet bei der Auswahl von Speichersendern auf (
☞
S.27).
6TUNED-Anzeige
Leuchtet auf, wenn der Receiver auf einen Sender abgestimmt ist.
7STEREO-Anzeige
Leuchtet auf, wenn der Receiver ein starkes Signal von
einem UKW-Stereosender empfängt.
8SLEEP-Anzeige
Leuchtet auf, wenn der Einschlaf-Timer eingeschaltet ist (
☞
S.31).
9Frontblende-Display
Zeigt verschiedene Informationen, wie beispielsweise die Senderfrequenz.
0VOLUME
Stellt den Lautstärkepegel ein.
A (On/Standby)
Schaltet den Receiver ein bzw. versetzt ihn in den
Bereitschaftsmodus.
BPHONES-Buchse
Gibt die Audiosignale für privates Hörvergnügen mit
einem Kopfhörer aus.
CTIMER-Anzeige
Leuchtet auf, wenn der Timer eingeschaltet ist (☞S.30).
DBASS
Stellt den Niederfrequenzgang ein (☞S.15).
ETREBLE
Stellt den Hochfrequenzgang ein (☞S.15).
FBALANCE
Stellt die Balance des Audioausgangs zwischen den
Lautsprechern links und rechts ein, damit eine unregelmäßige
Lautstärkeverteilung aufgrund der Lautsprecheranordnung oder
der Hörraumbedingungen ausgeglichen werden kann.
GPRESET d / u
Wählt einen Speichersender an. Die Eingangsquelle wird
auf UKW umgeschaltet. Dies ist sogar im
Bereitschaftsmodus des Receivers möglich (☞S.27).
HPURE DIRECT
Schaltet den Pure Direct-Modus ein bzw. aus (☞S.15).
Wenn der Pure Direct-Modus aktiv ist, leuchtet die Anzeige blau.
Ih / e
Startet bzw. pausiert die Wiedergabe vom iPod. Die
Eingangsquelle wird auf iPod umgeschaltet. Dies ist sogar
im Bereitschaftsmodus des Receivers möglich .
JiPod-Dock
Zum Anschluss Ihres iPod (☞S.10).
BEDIENELEMENTE UND FUNKTIONEN
Receiver (R-840)
INPUT
BASS
PHONES
VOLUME
MIN MAX
TREBLE BALANCE
PRESET PURE DIRECT
LR
PRESET
TP
TUNED
STEREO SLEEP
kHz MHz iPod
TIMER
1@
IJBCD E F G H
234 5 67 98
A
Ansicht von obenAnsicht von vorn

6 De
BEDIENELEMENTE UND FUNKTIONEN
Diese Fernbedienung kann die Systemkomponenten
(einschließlich Tunerfunktionen) und einen iPod steuern,
der in das iPod-Dock oben am Receiver eingesteckt ist.
Zur Bedienung des BD-Players, der Tunerfunktionen oder
eines iPod mit der Fernbedienung müssen Sie den
Receiver auf den entsprechenden Eingangsmodus stellen
(☞8Eingangswahltasten).
Bedienung Ihres iPod
Drücken Sie die entsprechende iPod-Funktionstaste an der
Fernbedienung.
Die iPod-Funktionstasten sind in dem folgenden
Abschnitt mit gekennzeichnet.
Siehe Seite 32 für weitere Informationen zur Bedienung
Ihres iPod.
1Infrarot-Signalsender
Sendet Signale an das zu steuernde System.
2 (On/Standby)
Schaltet das System ein bzw. versetzt es in den Bereitschaftsmodus.
3MENU
Kehrt zur obersten Ebene im iPod-Menü zurück.
4
Springt zum nächsten Track. Betätigen und gedrückt
halten, um den schnellen Vorlauf zu aktivieren.
5
Springt an den Anfang des aktuellen Tracks. Zweimal drücken,
um zum vorherigen Track zurückzuspringen. Betätigen und
gedrückt halten, um den schnellen Rücklauf zu aktivieren.
6ENTER
ENTER drücken, um die gewünschte Gruppe aufzurufen.
(Durch Drücken von ENTER wird die Wiedergabe
gestartet, wenn ein Titel gewählt ist.)
7
Startet bzw. pausiert die Wiedergabe.
8Eingangswahltasten
Wählt die Eingangsquelle am Receiver.
Drücken Sie zur Auswahl einer Eingangsquelle die
entsprechende Eingangswahltaste (oder drehen Sie
INPUT an der Frontblende).
Der Name der entsprechenden Eingangsquelle erscheint
auf dem Frontblende-Display des Receivers.
y
Wenn DISC als Eingangsquelle gewählt ist, schaltet sich der BD-
Player automatisch ein, und wenn eine andere Eingangsquelle
gewählt wird, schaltet der BD-Player in den Bereitschaftsmodus.
9MEMORY
Legt einen Speichersender im Speicher ab (☞S.27).
Startet die automatische Speichersendersuche (☞S.26).
Fernbedienung
1234
56
90
78
E
NT
E
RCL
E
AR
MUT
E
E
NT
E
R
VOLUME
AUX
TUN
E
R
iPod SHUFFLE
R
EPE
AT
MENU
ENTER
E
O
NM
O
N
O
M
E
M
O
R
Y
PRESET TUNING
DISC
DISPLAY TIMER SLEEP DIMMER
OPTION PURE DIRECT
AUDIO SUBTITLE ANGLE
REPEAT
ON SCREEN
RETURN
PinP SETUP
A B C D
EXIT
TOP MENU/TITLE LIST
POP UP MENU
J
1
M
N
O
P
Q
R
S
t
U
V
W
X
Y
Z
[
\
]
`
a
b
c
d
f
e
2
3
4
5
6
7
8
9
0
A
B
C
D
E
F
G
H
I
J
K
L

7 De
BEDIENELEMENTE UND FUNKTIONEN
Deutsch
EINFÜHRUNG
0MONO
Stellt den Empfangsmodus für UKW-Rundfunksendungen
auf Mono ein.
ATP
Ruft den Empfangsmodus für den TP (Traffic Program)-
Verkehrsdatendienst auf (☞S.29).
BTIMER
Zur Anzeige der aktuellen Uhrzeit im Frontblende-
Display des Receivers.
Zum Stellen der Uhr (☞S.12) und des Timers (☞S.30).
CDISPLAY
Schaltet die im Frontblende-Display des Receivers oder
TV-Bildschirm angezeigte Information auf den BD-Player
um (☞S.23, S.28).
DOPTION
Ruft den Optionsmenü-Modus auf.
Zu den Einträgen des Optionsmenüs siehe die Seiten 27, 29 und 41.
EA/B/C/D
Verwendet, wenn die Eingangsquelle auf DISC gesetzt ist.
FTOP MENU/TITLE LIST
Ruft das BD/DVD-Hauptmenü auf (☞S.18).
G, , , , ENTER
Zum Auswählen und Bestätigen eines Menüeintrags.
HEXIT
Zum Verlassen des Menübildschirms.
I
Schaltet die Wiedergabe auf Pause (☞S.17).
J
Stoppt die Wiedergabe (☞S.17).
K,
Schneller Rücklauf und schneller Vorlauf.
LZifferntasten
Eingabe von Zahlen.
MAUDIO
Zur Auswahl von Audioformat und Synchronsprache (
☞
S.19).
NSUBTITLE
Zur Auswahl von Untertiteln (☞S.19).
OP in P
Verwendet die Bild-in-Bild-Funktion (☞S.24).
PREPEAT
Wählt den Wiederholungswiedergabemodus (☞S.19).
Q
Öffnet bzw. schließt den Disc-Schacht.
R,
Drücken Sie bzw. , um einen Eintrag in der
gewählten Gruppe umzuschalten (☞S.32).
SSHUFFLE
Wählt den Modus für die Zufallswiedergabe (☞S.32).
TREPEAT
Wählt den Modus für die Wiederholungswiedergabe (
☞
S.32).
UTUNING
Drücken Sie TUNING für manuelle Sendersuche,
und drücken und halten Sie TUNING für
automatische Sendersuche (☞S.26).
VPRESET u / d
Wählt einen Speichersender an (☞S.27).
WDIMMER
Ändert die Helligkeit des Frontblende-Displays (☞S.16).
XPURE DIRECT
Schaltet den Pure Direct-Modus ein bzw. aus (☞S.15).
YSLEEP
Stellt den Einschlaf-Timer des Systems ein (☞S.31).
ZPOP UP MENU
Ruft das BD-Kontextmenü auf (☞S.18).
[VOLUME +/–
Stellt den Gesamtlautstärkepegel am Receiver ein.
\RETURN
Rückkehr zum vorausgegangenen Menü (☞S.17).
]
Startet die Wiedergabe (☞S.17).
`MUTE
Schaltet die Lautstärke aus (☞S.16).
a,
Springt an den Anfang des aktuellen bzw. des nächsten
Kapitels oder Tracks.
bCLEAR
Löscht einen Eintrag.
cENTER
Bestätigt einen Eintrag.
dON SCREEN
Zeigt Disc-Informationen auf dem Bildschirm (☞S.23).
eANGLE
Wählt einen Kamera-Blickwinkel (☞S.19).
fSETUP
Ruft das „Setup“-Menü auf (☞S.13).
/ d
d
d
d
/ d
d
d
d
/ d
d
d
d

VORBEREITUNGEN
8 De
VORBEREITUNG
Machen Sie sich mit den folgenden Verfahren und Hinweisen vertraut, bevor Sie das System anschließen. Die
Fernbedienung und der gekoppelte Betrieb der Anlage funktionieren nur, wenn der Receiver und der
BD-Player über das Systemsteuerungskabel verbunden sind. Informationen über die Lautsprecher (NS-
BP300) entnehmen Sie bitte der damit gelieferten Bedienungsanleitung.
Anschließen der Anlage
1 Verbinden Sie die AUDIO IN ( PLAYER L/R)-Buchsen des Receivers mit den AUDIO OUT ( L/R)-Buchsen
des BD-Players, indem Sie das mitgelieferte Audio-RCA-Stereokabel verwenden.
2 Verbinden Sie die SYSTEM CONNECTOR ( TO:PLAYER)-Buchse des Receivers mit der SYSTEM
CONNECTOR ( TO:RECEIVER)-Buchse des BD-Players, indem Sie das mitgelieferte Systemsteuerungskabel
verwenden.
3Verbinden Sie die Lautsprecherklemmen (L) am Receiver mit den Lautsprecherklemmen am linken Lautsprecher und
die Lautsprecherklemmen (R) am Receiver mit den Lautsprecherklemmen am rechten Lautsprecher, indem Sie die im
Lautsprechersatz (NS-BP300) mitgelieferten Lautsprecherkabel verwenden.
4Verbinden Sie die mitgelieferte UKW-Antenne mit der ANTENNA-Buchse.
• Schließen Sie das Netzkabel nicht an das Gerät oder andere Komponenten an, bevor alle anderen Anschlüsse hergestellt sind.
• Die blanken Lautsprecherkabel dürfen weder sich gegenseitig noch Metallteile am Receiver berühren. Dadurch könnten der Receiver
und/oder die Lautsprecher beschädigt werden.
• Alle Verbindungen müssen korrekt sein: L (links) an L, R (rechts) an R, „+“ an „+“ und „–“ an „–“. Bei falschen Verbindungen kann
kein Ton von den Lautsprechern vernommen werden, und wenn die Polarität der Lautsprecher falsch ist, klingt der Ton unnatürlich
und ohne Bässe. Siehe auch die Bedienungsanleitungen jeder Ihrer Komponenten.
Hinweise
• Der Systemsteuerungsanschluss dient zum Übertragen der Fernbedienungssignale vom Receiver zum BD-Player.
• Wenn Sie andere Lautsprecher als den Typ NS-BP300 anschließen, müssen diese eine Impedanz von mehr als 6 Ω haben.
• Falls ein Problem durch schwachen Rundfunkempfang in Ihrem Gebiet auftreten sollte oder wenn Sie den Rundfunkempfang
verbessern möchten, empfehlen wir die Verwendung von im Handel erhältlichen Außenantennen. Für Einzelheiten wenden Sie sich an
den nächsten autorisierten Yamaha-Fachhändler oder -Kundendienst.
VORBEREITUNGEN
Anschließen von Lautsprechern/externen Komponenten/Antennen
VORSICHT
A A
B
B
Receiver (R-840)
(Modell für Europa)
BD-Player (BD-940) Linker
Lautsprecher
(NS-BP300)
Rechter
Lautsprecher
(NS-BP300)
RCA-Stereokabel
(mitgeliefert)
Systemsteuerungskabel
(mitgeliefert)
TV usw.
Subwoofer
Audio
Out
RCA
-Stereokabel

VORBEREITUNGEN
9 De
Deutsch
VORBEREITUNG
Anschließen eines Fernsehgeräts an die Anlage
1Verbinden Sie die Anlage und das Fernsehgerät über die HDMI-Buchse, die COMPONENT-Buchsen oder die
VIDEO-Buchse am BD-Player und die entsprechende(n) Buchse(n) am Fernsehgerät.
2
Nehmen Sie die Einstellung für „TV screen“ entsprechend Ihrem Fernsehgerät vor (siehe „Einstellen des Fernsehbilds“ auf Seite 13).
Wenn Sie das Fernsehgerät über die COMPONENT-Buchsen an Ihre Anlage anschließen, nehmen Sie die Einstellungen
am BD-Player vor, wie in „Video-Ausgabe Auswählen“ (☞S.33) beschrieben.
Wenn Sie das Fernsehgerät über die HDMI-Buchsen an Ihre Anlage anschließen, nehmen Sie die Einstellungen für „HDMI-
Videoausgabe“ und „Audio-Ausgabe“ unter „Audio-/Video-Einstellungen“ im „Einstellungen“-Menü vor (
☞
S.33, 34).
Verwenden Sie zum Anschluss des Systems und Ihres Fernsehgeräts an die HDMI-Buchsen HIGH SPEED HDMI-Kabel
mit dem (außen gezeigten) HDMI-Logo.
Sie können Audio an der DIGITAL OUT-Buchse ausgeben und mit einem anderen Gerät digital aufzeichnen, oder
Audiosignale für Mehrkanal-Audio an einen AV-Receiver oder -Decoder übertragen.
Schließen Sie nach der Herstellung aller Anschlussverbindungen die Netzkabel dieses Systems und der anderen
Komponenten an die Netzsteckdosen an.
Anschließen eines Recorders (CDR, MDR usw.), AV-Receivers oder
Decoders (CDR, MDR usw.)
Anschließen der Netzkabel
BD-Player (BD-940)
Composite-Video-Kabel
(mitgeliefert)
Zur Netzsteckdose
Zur Netzsteckdose
Receiver (R-840)
BD-Player (BD-940)

VORBEREITUNGEN
10 De
Der Receiver ist an der Oberseite mit dem iPod-Dock
ausgestattet, in das Sie Ihren iPod einstecken und die
Wiedergabe vom iPod über die mitgelieferte
Fernbedienung steuern können.
Verwenden Sie diesen Receiver in Verbindung mit einem
iPod-Dockadapter (mit Ihrem iPod mitgeliefert oder im
Handel erhältlich), der für Ihren iPod vorgesehen ist. Falls
Sie diesen Receiver ohne geeigneten iPod-Dockadapter
verwenden, können Wackelkontakte auftreten.
y
Wenn der Receiver eingeschaltet oder im Bereitschaftsmodus ist,
schließen Sie den iPod während der Wiedergabe an. Der Receiver
startet automatisch die Wiedergabe von iPod (ab der 5.
Generation des iPod, iPod touch, iPod Classic oder iPod nano).
Hinweise
• Es werden nur iPod (Click and Wheel), iPod nano, iPod Classic,
iPod mini und iPod touch unterstützt.
• Schließen Sie keinesfalls iPod-Zubehör (wie Kopfhörer,
Kabelfernbedienung oder UKW-Sender) an Ihren iPod an,
wenn sich dieser im iPod-Dock befindet.
• Sollte Ihr iPod nicht fest im iPod-Dock sitzen, werden
Audiosignale möglicherweise nicht korrekt ausgegeben.
• Wenn die Verbindung zwischen Ihrem iPod und dem Receiver
hergestellt ist und der Receiver auf den iPod-Modus (☞S.6)
eingestellt ist, erscheint „CONNECTED“ im Frontblende-
Display. Wenn die Verbindung zwischen Ihrem iPod und dem
Receiver ausfällt, erscheint eine Statusmeldung im
Frontblende-Display. Eine vollständige Liste der
Verbindungsstatus-Meldungen finden Sie im Abschnitt iPod in
„STÖRUNGSSUCHE“ (☞S.42).
• Während Ihr iPod in das iPod-Dock des Receivers eingesetzt
ist, kann Ihr iPod automatisch geladen werden, auch wenn sich
der Receiver im Bereitschaftsmodus befindet.
• Sie können den iPod während der Wiedergabe abziehen.
Wenn Sie während der Wiedergabe von BD-LIVE-
kompatiblen Discs Verbindung mit dem Internet haben,
können Sie mit interaktiven Funktionen zusätzliche
Inhalte abrufen. Auf den Seiten 24 und 36 sind die BD-
LIVE-Funktionen weiter beschrieben.
Schalten Sie zum Herstellen von Verbindungen den
BD-Player und alle Geräte aus.
Hinweise
• Sie können ein USB-Speichergerät (mit 2 GB oder mehr
Speicherkapazität und auf FAT 32/16 formatiert) an den USB
BD STORAGE/SERVICE-Anschluss anschließen, um BD-
LIVE-Daten zu speichern oder um die Software des BD-Players
zu aktualisieren.
• Hierzu benötigen Sie eine Breitband-Internetverbindung.
• Für eine Breitband-Internetverbindung benötigen Sie einen
entsprechenden Vertrag mit einem Internet-Serviceprovider.
Erkundigen Sie sich bitte bei einem lokalen Anbieter.
• Ziehen Sie bitte die Bedienungsanleitung Ihrer Geräte hinzu,
denn es kann sein, dass sich der Anschluss eines Geräts nach
der verfügbaren Internetverbindung richtet.
• Das Netzwerkkabel bzw. der Router muss 10BASE-T/
100BASE-TX/1000BASE-T unterstützen.
• Verwenden Sie nur ein STP (abgeschirmtes verdrilltes
Zweidraht)-Netzwerkkabel.
Anschließen eines iPod™
iPod
INPUT
PHONES
BASS
-+ -+ LR
TREBLE BALANCE
PRESET PURE DIRECT
VOLUME
MIN MAX
Receiver
iPod
iPod-Dockadapter
Verbindung mit dem Internet
VORSICHT
LAN
BD-Player
Internet
Netzwerkkabel
(handelsüblich)
2
Zum LAN-
Anschluss
PC
3Zum USB BD
STORAGE/
SERVICE-
Anschluss
USB-Speichergerät
(handelsüblich)
Modem Hub oder
Breitband-
Router
1
Zum
NETWORK-
Anschluss

VORBEREITUNGEN
11 De
Deutsch
VORBEREITUNG
■Nach dem Anschluss
•
Nehmen Sie die Kommunikationseinstellungen vor (
☞
S.36).
• Laden Sie eine BD-LIVE-kompatible Disc, und geben
Sie den Inhalt wieder (☞S.24).
■Hinweise zu den Batterien
• Wechseln Sie beide Batterien aus, wenn die
Reichweite der Fernbedienung abnimmt.
• Verwenden Sie Batterien der Typen AAA, R03, UM-4.
• Achten Sie auf korrekte Polarität. Siehe die Abbildung
im Inneren des Batteriefachs.
• Entnehmen Sie die Batterien, wenn die Fernbedienung
lange Zeit nicht betätigt wird.
• Verwenden Sie keinesfalls alte Batterien zusammen
mit neuen Batterien.
• Verwenden Sie keinesfalls gleichzeitig
unterschiedliche Batterietypen (zum Beispiel Alkali-
Batterien und Mangan-Batterien). Lesen Sie die
Angaben auf der Verpackung sorgfältig durch, da diese
Batterietypen trotz identischer Form und Farbe
unterschiedliche Leistungsmerkmale besitzen.
• Ausgelaufene Batterien müssen sofort entsorgt werden.
Achten Sie darauf, dass ausgetretenes Material nicht
auf die Kleidung usw. gelangt. Reinigen Sie das
Batteriefach vor dem Einsetzen neuer Batterien
gründlich.
• Werfen Sie keine Batterien in den Hausmüll; diese
müssen korrekt entsprechend den gesetzlichen
Bestimmungen entsorgt werden.
Die Fernbedienung sendet einen gerichteten Infrarotstrahl
aus. Richten Sie die Fernbedienung während des Betriebs
unbedingt direkt auf den Fernbedienungssensor an der
Frontblende des Receivers.
Hinweise
• Zwischen Fernbedienung und Receiver dürfen sich keine
großen Hindernisse befinden.
• Vergießen Sie kein Wasser oder andere Flüssigkeiten über die
Fernbedienung.
• Lassen Sie die Fernbedienung nicht fallen.
• Legen Sie die Fernbedienung nicht an einem Ort ab, der:
– hohe Luftfeuchtigkeit aufweist, wie beispielsweise in einem
Badezimmer
– hohe Temperaturen aufweist, wie beispielsweise in der Nähe
einer Heizung oder eines Ofens
– extrem kalt ist
– staubig ist.
• Setzen Sie den Fernbedienungssensor keinem hellen Licht aus,
besonders keiner Beleuchtung durch Leuchtstoffröhren, da
andernfalls die Funktion der Fernbedienung beeinträchtigen
werden kann. Drehen Sie gegebenenfalls die Anlage von der
direkten Beleuchtung weg.
Einsetzen der Batterien in die
Fernbedienung
13
2
Verwendung der Fernbedienung
INPUT
BASS
PHONES
VOLUME
MIN MAX
TREBLE BALANCE
PRESET PURE DIRECT
LR
1234
56
90
78
ENTER CLEAR
MUTE
ENTER VOLUME
AUX TUNER
iPod SHUFFLE REPEAT
MENU
ENTER
EON MONO
MEMORY
PRESET TUNING
DISC
DISPLAY TIMER SLEEP DIMMER
OPTION PURE DIRECT
AUDIO SUBTITLE ANGLE
REPEAT
ON SCREEN
RETURN
PinP SETUP
A B C D
EXIT
TOP MENU/TITLE LIST
POP UP MENU
30˚ 30˚
Innerhalb von 6 m
Receiver (R-840)

VORBEREITUNGEN
12 De
Vor dem Starten der Wiedergabe verfahren Sie wie folgt,
um die Uhrzeiteinstellung des Receivers zu konfigurieren.
Hinweise
• Verwenden Sie zum Einstellen der Uhrzeit die Fernbedienung.
Mit den Tasten am Receiver lässt sich die Uhr nicht stellen.
• Der Receiver unterstützt eine 24-Stunden-Uhrzeitanzeige.
• Wenn Sie länger als 90 Sekunden keine Taste betätigen, stellt
der Receiver wieder auf Normalbetrieb um.
1Drücken Sie , um den Receiver
einzuschalten.
Das Frontblende-Display leuchtet auf.
2Drücken Sie TIMER, um die aktuelle Uhrzeit
anzuzeigen.
Wenn die Uhr nicht gestellt ist, blinkt „SET TIME“
im Display.
Drücken Sie ENTER, um mit Schritt 3 fortzufahren.
3Drücken Sie / , um „TIME“ auszuwählen,
und drücken Sie dann ENTER.
Der Receiver startet den Uhrzeit-Einstellmodus. Die
Ziffern der Stundenanzeige beginnen zu blinken.
4Stellen Sie die Stunden mit / ein, und
drücken Sie .
Die Ziffern der Minutenanzeige beginnen zu blinken.
5Stellen Sie die Minuten mit / ein, und
drücken Sie ENTER.
Die Ziffern der Stunden- und Minutenanzeige
beginnen zu blinken.
Wenn Sie die Stunden- oder Minutenanzeige
nochmals ändern möchten, drücken Sie bzw. ,
führen Sie die Schritte 4 und 5 durch und fahren Sie
mit Schritt 6 fort.
6Drücken Sie ENTER.
Damit ist die Uhrzeit eingestellt.
Die Segmente der Stunden- und Minutenanzeige
hören auf zu blinken und leuchten kontinuierlich. Der
Receiver wechselt wieder in den Normalbetrieb.
y
Durch Drücken von oder RETURN können Sie zum
vorausgegangenen Bildschirm zurückkehren.
Einstellen der Uhrzeit
ABCD
EXIT
TOP MENU/TITLE LIST
POP UP MENU
TIMER
ENTER ,
RETURN
Blinkt
Blinkt
Blinkt

INBETRIEBNAHME DER ANLAGE
13 De
Deutsch
VORBEREITUNG
Vergewissern Sie sich, dass Sie alle erforderlichen
Verbindungen hergestellt haben (siehe „Anschließen eines
Fernsehgeräts an die Anlage“ auf Seite 9).
1Schalten Sie das Fernsehgerät ein, mit dem
der BD-Player verbunden ist.
Wählen Sie den TV-Eingang entsprechend dem mit
dem BD-Player verbundenen Eingang.
2Drücken Sie , um den Receiver
einzuschalten.
3Drücken Sie DISC.
Stellen Sie das Bildseitenverhältnis des BD-Players
entsprechend dem angeschlossenen Fernsehgerät ein
(☞S.33).
1Drücken Sie SETUP.
Der Bildschirm zeigt das Einrichtmenü.
2Drücken Sie /// , um „Settings“ zu
wählen, und drücken Sie dann ENTER.
3
Drücken Sie
/
, um „Audio Video Settings“ zu
wählen, und drücken Sie dann ENTER.
4Drücken Sie /, um „TV Aspect Ratio“ zu
wählen, und drücken Sie dann ENTER.
5Drücken Sie /, um das
Bildseitenverhältnis des Fernsehgeräts zu
wählen, und drücken Sie dann ENTER.
Zur Option „Bildseitenverhältnis“ siehe Seite 33.
6Drücken Sie SETUP oder EXIT, um das
Einrichtmenü zu verlassen.
y
Durch Drücken von RETURN können Sie zum vorherigen Menü zurückkehren.
Sie können Ihre bevorzugte Sprache einstellen, sodass der BD-
Player automatisch die bevorzugte Sprache vorwählt, wenn Sie eine
Disc einlegen. Wenn die gewählte Sprache auf der Disc nicht zur
Verfügung steht, wird stattdessen die Vorgabe-Spracheinstellung
der Disc verwendet. Die Sprache der Textanzeige auf dem
Bildschirm (OSD – On-Screen Display) für das BD/DVD-
Einrichtmenü bleibt – unabhängig von den verschiedenen Disc-
Sprachen – so eingestellt, wie von Ihnen gewählt.
1Drücken Sie SETUP.
2
Drücken Sie
/ //
, um „On Screen Language“ zu
wählen, und drücken Sie dann ENTER.
3Drücken Sie /, um eine Sprache zu
wählen, und drücken Sie dann ENTER.
INBETRIEBNAHME DER ANLAGE
Fernsehgerät und Anlage
einschalten
Einstellen des Fernsehbilds
EXIT
TOP MENU/TITLE LIST
POP UP MENU
SETUP
, , , ,
ENTER
Settings
Picture
On Screen Language
Displays The Title List
Sprache der Textanzeige auf dem
Bildschirm (OSD)
Audio Video Settings
Quick Start
HDMI Control
Playback Setting
Communication Setup
Version
USB Memory Management
Software Update
System Reset

INBETRIEBNAHME DER ANLAGE
14 De
1Drücken Sie SETUP.
2Drücken Sie / // , um „Einstellungen“ zu
wählen, und drücken Sie dann ENTER.
3Drücken Sie /, um „Wiedergabe-
Einstellungen“ zu wählen, und drücken Sie
dann ENTER.
4Drücken Sie /, um „Disk-Sparache“ zu
wählen, und drücken Sie dann ENTER.
5Drücken Sie /, um das Einstellelement
unten zu wählen.
• U-Titel
• Audio
•Menü
6Drücken Sie /, um eine Sprache zu
wählen, und drücken Sie dann ENTER.
Synchron-, Untertitel- und Disc-
Menü-Sprache

SYSTEMBEDIENUNG
15 De
Deutsch
GRUNDLEGENDE
BEDIENUNG
GRUNDLEGENDE BEDIENUNG
Gehen Sie wie folgt vor, um eine Eingangsquelle zu wählen und die Klangeinstellungen am System vorzunehmen.
1Drücken Sie (On/Standby), um den
Receiver einzuschalten.
In Abhängigkeit vom Eingangsmodus des Receivers wird der
BD-Player auch über den Systemsteuerungsanschluss
eingeschaltet (
☞
S.8). Das Frontblende-Display leuchtet auf.
2Drücken Sie eine der Eingangswahltasten
(oder drehen Sie INPUT an der Frontblende)
zur Wahl der gewünschten Eingangsquelle.
3Beginnen Sie mit der Wiedergabe der
gewählten Quellenkomponente oder wählen
Sie einen Radiosender.
Zwecks Informationen zur Disc-Wiedergabe siehe
Seite 17, und zwecks Informationen zur Sendersuche
siehe Seite 26.
4
Drücken Sie VOLUME +/– (oder drehen Sie
VOLUME an der Frontblende), um die Lautstärke
auf den gewünschten Pegel einzustellen.
5Drehen Sie BASS, TREBLE oder BALANCE
an der Frontblende des Receivers, um die
folgenden Einstellungen vorzunehmen.
BASS: Stellt den Niederfrequenzgang ein.
TREBLE: Stellt den Hochfrequenzgang ein.
BALANCE: Stellt den Lautstärkepegel jedes linken
und rechten Lautsprecherkanals ein.
■Pure Direct-Modus
Der Pure Direct-Modus umgeht die Klangregelschaltung,
schaltet das Frontblende-Display ab und ermöglicht das
Hören von reinem HiFi-Sound.
Drücken Sie PURE DIRECT (oder PURE DIRECT an der
Frontblende), um den Pure Direct-Modus zu aktivieren.
Das Frontblende-Display schaltet sich automatisch aus.
PURE DIRECT wird auf der Frontblende mit blauer
Hintergrundbeleuchtung angezeigt.
SYSTEMBEDIENUNG
INPUT
BASS
PHONES
VOLUME
MIN MAX
TREBLE BALANCE
PRESET PURE DIRECT
LR
TP
TIMER
QUICK
INPUT
(On/Standby) VOLUME
PURE
DIRECTBASS BALANCE
TREBLE
A B C D
EXIT
TOP MENU/TITLE LIST
POP UP MENU
(On/Standby)
VOLUME +/–
Eingangswahltasten
PURE DIRECT
MUTE
Grundlegende Bedienungsvorgänge
für das System

DISC-FUNKTIONEN
17 De
Deutsch
GRUNDLEGENDE
BEDIENUNG
In diesem Kapitel wird die Wiedergabe von Disc erläutert.
Wenn Sie „DISC“ als Eingangsquelle wählen, können
mehrere Aspekte über den Bildschirm des
angeschlossenen Fernsehers eingestellt werden.
Diese Tasten sind ansprechbar, wenn als Eingangsmodus
DISC gewählt ist.
y
• Mit dem Parameter „Bildschirmsprache“ können Sie eine
Display-Sprache auswählen (☞S.13).
• Die Namen der jeweils verfügbaren Tasten erscheinen am
unteren Fensterrand.
Siehe Seite 3 für weitere Hinweise zu den unterstützten
Disc-Typen und Dateiformaten.
1Drücken Sie an der Frontblende des BD-
Players.
2
Legen Sie die Disc mit der Beschriftung nach oben
in die Mitte des Schlittens und drücken Sie .
Der Schlitten wird eingefahren und die Disc wird geladen.
3Drücken Sie .
• Wenn eine BD/DVD-Disc geladen ist, wird
eventuell ein Menü angezeigt. Siehe „BD/DVD-
Menüs“ (☞S.18) für weitere Informationen.
• Wenn Sie eine Disc mit JPEG-Bildern geladen
haben, wird eine Diashow gestartet. Siehe
„Abspielen von JPEG-Diashows“ (☞S.20) für
weitere Informationen.
Um die Wiedergabe zu stoppen, drücken Sie .
Sie können die Wiedergabe später fortsetzen, indem
Sie einfach drücken (Wiederaufnahme-Funktion).
Bei manchen Discs greift die Wiederaufnahme-
Funktion nicht.
Wenn die Wiedergabe am Anfang der Disc starten
soll, drücken sie noch einmal , um den
Wiederaufnahme-Modus abzubrechen.
Hinweise
• Wenn Sie eine doppelseitige DVD einlegen, muss die Seite, die
Sie abspielen möchten, nach unten zeigen.
• Wenn Sie an der Frontblende drücken, während der BD-
Player in Bereitschaft ist, schaltet sich das System automatisch
ein und wählt DISC als Eingangsquelle. Der Disc-Schlitten
fährt aus, und das System ist bereit zur Wiedergabe.
•
Bei bestimmten Discs verhalten sich manche der hier beschriebenen
Funktionen nicht erwartungsgemäß bzw. werden überhaupt nicht unterstützt.
•
Bei bestimmten BD/DVDs sind Funktionen wie die Wiederaufnahme-
Funktion, Zufallswiedergabe und Wiederholung nicht für alle
Abschnitte der Disc zulässig. Das ist völlig normal.
Drücken Sie .
Drücken Sie erneut oder oder drücken Sie , um die
Wiedergabe fortzusetzen.
Bei einer Audio-CD drücken Sie oder , um die
Wiedergabe anzuhalten.
DISC-FUNKTIONEN
Verwendung der
Bildschirmanzeige
Taste Beschreibung
SETUP Ruft das Setup-Menü des BD-Players auf
Cursor
()/()
Anwahl von Menüeinträgen
ENTER Bestätigung der Anwahl
RETURN Rückkehr zum vorigen Menü
A B C D
EXIT
TOP MENU/TITLE LIST
POP UP MENU
Zifferntasten
TOP MENU/
TITLE LIST POP UP MENU
RETURN
, , ,
ENTER
SETUP
, ,
Bedienungsvorgänge für die
Wiedergabe
Aktivieren der Wiedergabepause

DISC-FUNKTIONEN
18 De
Bei laufender Wiedergabe können Sie mit
unterschiedlichen Geschwindigkeiten zurück- und
vorspulen.
Drücken Sie zum Zurückspulen bzw.
zum Vorspulen.
Die Rückspul- bzw. Vorspulgeschwindigkeit ändert sich
bei jedem Tastendruck auf bzw. .
Die gewählte Geschwindigkeit wird im Display angezeigt.
Drücken Sie , um wieder die Normalgeschwindigkeit
zu wählen.
■Anwählen des nächsten Kapitels oder
Tracks
Drücken Sie .
■Anwählen des vorausgegangenen
Kapitels oder Tracks
Drücken Sie zweimal .
Wenn Sie nur einmal drücken, beginnt die
Wiedergabe wieder am Anfang des aktuellen Kapitels
bzw. Tracks.
Die meisten BD/DVD bieten eine Menüfunktion, über die
man wählen kann, was man sich anschauen möchte. In der
Regel erscheint das Menü automatisch; bei anderen Discs
müssen Sie es mit TOP MENU/TITLE LIST oder POP
UP MENU aufrufen.
Folgende Tasten stehen in Menüs zur Verfügung.
*1 Richtet sich nach der Disc.
*2 Hat bei bestimmten Discs die gleiche Funktion wie die TOP
MENU/TITLE LIST-Taste.
Hinweise
• Der Vorgang wird hier grundsätzlich beschrieben. Die
tatsächlichen Bedienschritte richten sich teilweise nach der BD/
DVD, so dass Sie auch die Anleitung zur BD/DVD und die
Bedienungshinweise auf dem Bildschirm beachten sollten.
• Bei manchen BD/DVD heißt das Hauptmenü auch „Title
Menu“. Verwenden Sie in diesem Fall TOP MENU/TITLE
LIST, wo sich die Anleitung auf das „Title Menu“ bezieht.
• Wenn kein Hauptmenü verfügbar ist, ist TOP MENU/TITLE
LIST gegenstandslos.
• Der Hauptmenü-Bildschirm kann oft mit POP UP MENU
aufgerufen werden, jedoch nicht bei jeder DVD.
Für BD/DVD gibt es eine Zeitlupe. Für DVD gibt es auch
eine rückwärts gerichtete Zeitlupe.
1Drücken Sie bei laufender Wiedergabe .
2Um die Wiedergabe in Zeitlupe zu starten,
drücken Sie während der Pause länger als 2
Sekunden oder .
Drücken Sie , um wieder die
Normalgeschwindigkeit zu wählen.
Hinweise
• Bei Audio-CDs ist keine verlangsamte Wiedergabe möglich.
• Bei BD ist keine Rückwärts-Zeitlupe möglich.
BD/DVD können Bild für Bild wiedergegeben werden.
Für DVD-Video-Discs gibt es auch eine rückwärts
laufende Einzelbildwiedergabe.
1Drücken Sie bei laufender Wiedergabe .
2Drücken Sie oder , um jeweils Bild
für Bild weiterzuschalten.
Drücken Sie , um wieder die
Normalgeschwindigkeit zu wählen.
Hinweise
• Bei anderen als DVD-RW/R-Discs (VR-Format) funktioniert
die Einzelbildwiedergabe eventuell nicht normal.
• Manche BD/DVD unterstützen keine Einzelbildwiedergabe.
• Bei DVD können bei angehaltener Wiedergabe (Pause) mit
oder Einzelbilder vor- und zurückgeblättert
werden.
Zurück- und Vorspulen
Anwahl von Kapiteln und Tracks
BD/DVD-Menüs
Taste Beschreibung
TOP MENU/
TITLE LIST
Aufrufen des BD/DVD-Hauptmenüs*1
POP UP MENU Öffnet und schließt das BD-Kontextmenü*2
()/()Anwahl von Menüeinträgen
ENTER Bestätigung der Anwahl
Zeitlupenwiedergabe
Einzelbildwiedergabe
,
,

DISC-FUNKTIONEN
19 De
Deutsch
GRUNDLEGENDE
BEDIENUNG
Bestimmte BD/DVDs bieten mehrere Synchronsprachen
oder Audioformate (z. B. Dolby Digital und DTS), die
sich während der Wiedergabe beliebig wählen lassen.
Andere DVD-VR-Discs wiederum enthalten zwei Mono-
Synchronsprachen.
Drücken Sie bei laufender Wiedergabe
wiederholt AUDIO, um eine andere Sprache und/
oder ein anderes Audioformat zu wählen.
Der Name der gewählten Sprache bzw. des Audioformats
wird auf dem Bildschirm angezeigt.
Hinweise
• Bei bestimmten Discs müssen die Synchronsprache und das
Audioformat zwingend über ihr Menü gewählt werden. Rufen
Sie das Disc-Menü dann mit TOP MENU/TITLE LIST und
POP UP MENU auf.
• Bei BD/DVD können Sie unter „Disk-Sparache“ eine
bevorzugte Synchronsprache auswählen (☞S.35).
Bei bestimmten BD/DVD-Discs können während der
Wiedergabe Untertitel in einer oder mehreren Sprachen
angewählt werden.
Starten Sie die Wiedergabe und drücken Sie
wiederholt SUBTITLE, um die gewünschte
Untertitelsprache zu wählen.
Der Name der gewählten Untertitelsprache wird im
Display angezeigt.
Hinweise
• Bei bestimmten Discs kann die Untertitelsprache nur über ihr
Menü gewählt werden. Rufen Sie das Disc-Menü dann mit TOP
MENU/TITLE LIST und POP UP MENU auf.
• Bei BD/DVD können Sie unter „Disk-Sparache“ eine
bevorzugte Untertitelsprache auswählen (☞S.35).
Bestimmte BD/DVD-Video-Discs bieten mehrere
Kamerablickwinkel, die sich während der Wiedergabe
beliebig wählen lassen.
Sie können das Kamerasymbol ( ) auf Wunsch drehen
(☞S.35). Wenn das Programm-Material mehrere
Kamerablickwinkel unterstützt, erscheint während der
Wiedergabe dieses Symbol auf dem Bildschirm.
Drücken Sie bei laufender Wiedergabe wiederholt ANGLE,
um einen anderen Kamerablickwinkel zu wählen.
Hinweise
•
Bei bestimmten Discs wird auch dann ein Kamerasymbol ( )
angezeigt, wenn kein anderer Blickwinkel gewählt werden kann.
• Bei bestimmten Discs können Sie den Kamerablickwinkel über
ein Disc-Menü wählen.
Titel, Kapitel, Tracks und Discs können wiederholt
abgespielt werden.
Anwahl der Synchronsprache und
des Audioformats
Anwahl der Untertitel
EXIT
TOP MENU/TITLE LIST
POP UP MENU
AUDIO
TOP MENU/
TITLE LIST POP UP MENU
EXIT
TOP MENU/TITLE LIST
POP UP MENU
SUBTITLE
TOP MENU/
TITLE LIST POP UP MENU
Anwählen von Kamerablickwinkeln
Wiedergabewiederholung
ANGLE
EXIT
TOP
MENU/TITLE
LIST
POP
UP
MENU
RETURN
ENTER
REPEAT
,
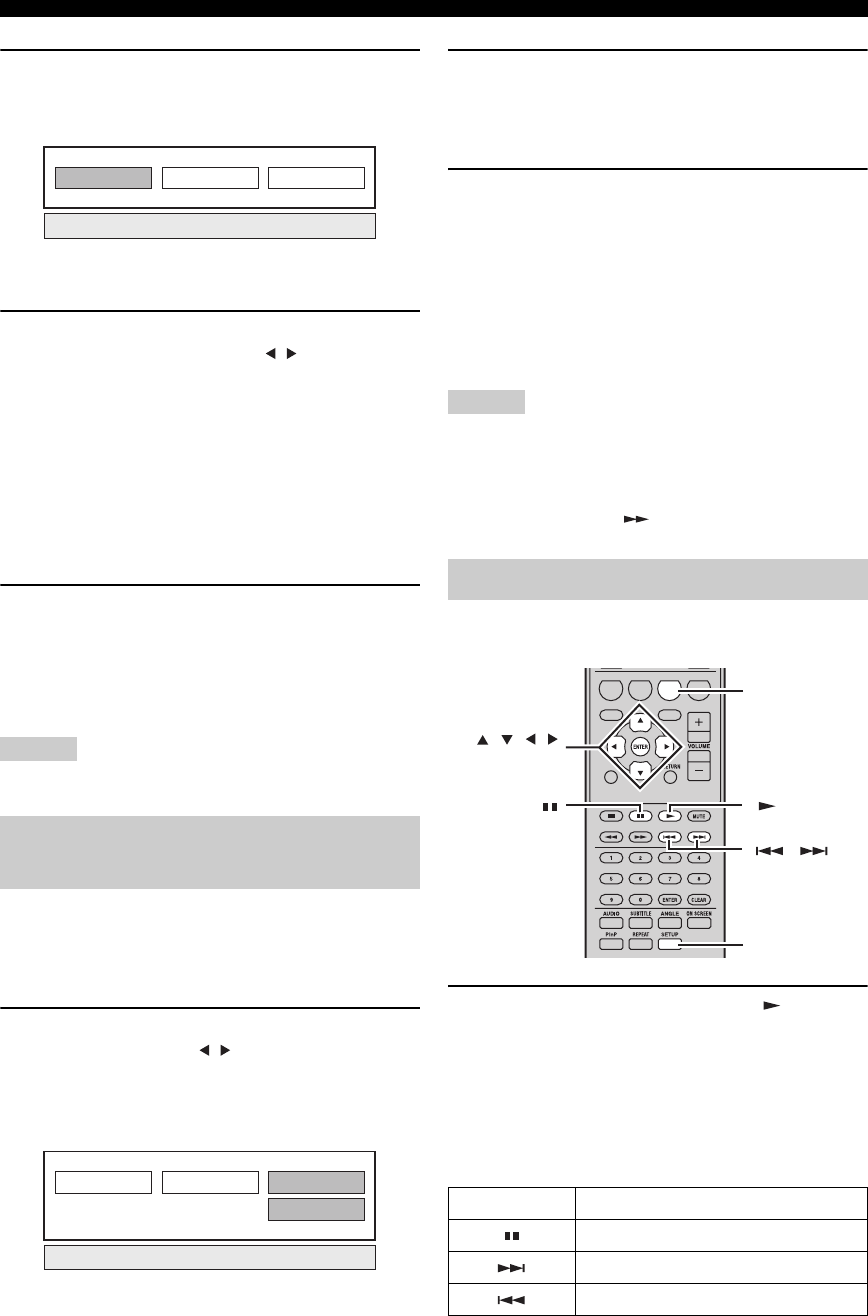
DISC-FUNKTIONEN
20 De
1Drücken Sie bei laufender Wiedergabe
REPEAT.
Der Bildschirm zeigt das Menü „Wiederholen“.
Um das Menü „Wiederholen“ zu schließen, drücken
Sie RETURN.
2Um Optionen im Menü „Wiederholen“
auszuwählen, drücken Sie / .
• Titel abspielen: Der aktuelle Titel wird wiederholt.
• Kapitel abspielen: Das aktuelle Kapitel wird
wiederholt.
• Spezieller Bereich: Eine bestimmte Szene des
Titels oder Kapitels wird wiederholt
(☞„Wiederholung eines bestimmten Teils
(Wiederholung A-B)“).
Bei einer Audio-CD sind „Disk in Betrieb“, „Spur in
Betrieb“ oder „Teilbereich bestimmen“ wählbar.
3Drücken Sie ENTER.
Die Wiedergabewiederholung wird gestartet.
Die verfügbaren Wiederholungsoptionen richten sich
nach dem Disc-Typ.
Um die Wiedergabewiederholung abzubrechen,
drücken Sie während der Wiedergabe REPEAT.
Hinweis
Bei JPEG-Discs ist die Wiederholungsfunktion nicht verfügbar.
Sie können zwei Stellen auf einer Disc angeben, zwischen
denen die Wiedergabe mehrmals wiederholt werden soll.
Die Wiederholfunktion A-B ist nicht für BD-Discs
verfügbar.
1Drücken Sie während der Wiedergabe
REPEAT und dann / , um zur „Spezieller
Bereich“ zu gelangen.
Es wird „Startpunkt Einstellen“ angezeigt.
Im Frontblende-Display des BD-Players leuchtet „A-“.
2Drücken Sie bei der Szene, die Sie als
Startpunkt festlegen wollen, ENTER.
Es wird „Endpunkt wählen“ angezeigt.
Im Frontblende-Display leuchtet „B“.
3Drücken Sie bei der Szene, die Sie als
Endpunkt festlegen wollen, ENTER.
Der Abschnitt zwischen Startpunkt und Endpunkt
wird fortlaufend wiederholt.
Im Display leuchten „REP“ und „A-B“.
Um die Wiedergabewiederholung abzubrechen,
drücken Sie REPEAT.
Um das Menü „Wiederholen“ zu schließen, drücken
Sie EXIT.
Hinweis
Startpunkt und Endpunkt müssen innerhalb desselben Titels
(DVD) oder Tracks (Audio-CD) liegen.
y
Zum schnellen Vorlauf an die Stelle, an der Sie den Endpunkt
setzen wollen, können Sie drücken.
Eine Diashow mit JPEG-Bildern auf einer CD-R/CD-RW
wird unterstützt.
Laden Sie die Disc, und drücken Sie , um die
Diashow zu starten.
Beginnend mit dem ersten Bild im ersten Ordner, werden
jetzt alle Bilder in allen Ordnern der Disc in
alphabetischer Reihenfolge als Diashow angezeigt.
Die Bildgröße wird automatisch gewählt, um eine
möglichst vollständige Bildschirmfüllung zu erzielen.
Die Diashow kann mit folgenden Tasten gesteuert werden.
Wiederholung eines bestimmten
Teils (Wiederholung A-B)
Titel abspielen Kapitel abspielen Spezieller Bereich
Startpunkt Einstellen
Titel abspielen Kapitel abspielen Spezieller Bereich
Abspielen von JPEG-Diashows
Taste Beschreibung
Anhalten der Diashow
Weiter zum nächsten Bild
Zurück zum vorherigen Bild
ABCD
EXIT
TOP MENU/TITLE LIST
POP UP MENU
, , ,
ENTER
C
SETUP
,

DISC-FUNKTIONEN
22 De
■Wiedergabe mit Titelauswahl
1Legen Sie eine beschriebene Disc ein.
Die Titelliste wird angezeigt.
Wenn der Bildschirm „Titelliste“ nicht angezeigt
wird, drücken Sie TOP MENU/TITLE LIST.
2Wählen Sie mit /// den gewünschten
Titel aus, und drücken Sie ENTER.
Die Wiedergabe des gewählten Titels wird gestartet.
Zur Wiedergabe können Sie auch anstelle von
ENTER drücken.
Um die Wiedergabe zu stoppen, drücken Sie .
y
• Den Bildschirm „Titelliste“ können Sie auch aufrufen, indem
Sie während angehaltener Wiedergabe TOP MENU/TITLE
LIST drücken, oder indem Sie ENTER drücken, nachdem Sie
bei angehaltener Wiedergabe im Einrichtmenü „Titelliste
Anzeigen“ gewählt haben.
• In der Miniaturansicht mit sieben oder mehr Titeln blättern Sie
mit und zwischen den Seiten.
■Wiedergabe mit Kapitelauswahl
1Drücken Sie in der Miniaturansicht B.
Es wird der Kapitel-Bildschirm angezeigt.
Um zum Bildschirm „Miniaturansicht“
zurückzukehren, drücken Sie B.
2Wählen Sie mit /// das gewünschte
Kapitel aus, und drücken Sie ENTER.
Die Wiedergabe des gewählten Kapitels wird
gestartet.
Zur Wiedergabe können Sie auch anstelle von
ENTER drücken.
Um die Wiedergabe zu stoppen, drücken Sie .
■Sortieren von Titeln
Jedes Mal, wenn Sie im Bildschirm „Titelliste“ B
drücken, wird in der Titelliste entweder der neueste oder
der älteste Titel zuoberst angezeigt.
■Wiedergabe mit Playliste
1Drücken Sie in der Miniaturansicht oder in
der Titelliste C.
Es wird der Playlist-Bildschirm angezeigt.
2Wählen Sie mit / den Titel aus, und
drücken Sie ENTER.
Die Wiedergabe des gewählten Titels wird gestartet.
Um die Wiedergabe zu stoppen, drücken Sie .
■Titel-Wiedergabe an der Stoppstelle
starten
1Drücken Sie in der Miniaturansicht oder in
der Titelliste D.
2Wählen Sie mit / die Wiedergabeart aus,
und drücken Sie ENTER.
Die Wiedergabe des Titels wird gestartet.
Um die Wiedergabe zu stoppen, drücken Sie .
In diesem Bildschirm können Sie verschiedene globale
Einstellungen, wie z. B. für Untertitel, Winkel und
Titelauswahl, für die direkte Wiedergabe festlegen.
Außerdem können bevorzugte Einstellungen für Bild und
Ton festgelegt werden. Die Vorgehensweise ist bei BD
und DVD dieselbe.
Drücken Sie während der Wiedergabe ON
SCREEN.
Es wird der Bildschirm „Funktionssteuerung“ aufgerufen.
Original Funktionen
21/5 FR 9:30 AM
1 Programm 1 21/5 FR 110 Min.
2 Programm 2 15/6 FR 110 Min.
110 Min.
Programm 1
DC
Verwendung von „Function Control
Screen“ für BD/DVD
Vom Anfang Weiterführend
Wiedergabe
EXIT
TOP MENU/TITLE LIST
POP UP MENU
, , , ,
ENTER
RETURN
ON SCREEN

DISC-FUNKTIONEN
23 De
Deutsch
GRUNDLEGENDE
BEDIENUNG
Bildschirm „Funktionssteuerung“
1Wiedergabe-Statusanzeige
Anzeige von Status und Disc-Typ.
2Einstellelemente
Auswahl eines Titels (oder Tracks) oder Kapitels zur
Wiedergabe, oder Einstellungen für Bild/Ton.
• Titel-/Tracknummer (direkte Titel-/Trackanwahl)
• Kapitelnummer (direkte Kapitelanwahl)
• Zeitanwahl (direkter Zeitsprung)
• Untertitelsprache
•Winkelzahl
• Audio
•Repeat
3Benutzerführung anzeigen
Hilfe zur Funktion der Fernbedienungstasten.
Um den Bildschirm „Funktionssteuerung“ zu schließen,
drücken Sie RETURN oder ON SCREEN.
Hinweise
• Wenn unter Titelnummer oder Untertitel als Option „– –“
angeboten wird, sind auf der Disc kein wählbaren Titel oder
Untertitel vorhanden.
• Die angezeigten Elemente richten sich nach der Disc.
• Wenn der Bildschirm „Funktionssteuerung“ während der
Wiedergabe eines BD/DVD-Videos aufgerufen wird, kann die
BD/DVD-Video-Wiedergabefunktion aussetzen. Schließen Sie
den Bildschirm „Funktionssteuerung“.
1Laden Sie eine Audio-CD.
Es wird der Bildschirm „CD-Steuerung“ angezeigt.
2Drücken Sie im Bildschirm „CD-Steuerung“
D.
Es wird das Menü „Funktionen“ aufgerufen.
Folgen Sie den Hinweisen der Benutzerführung.
Hinweise
• Die angezeigten Elemente richten sich nach der Disc.
• Bei angehaltener Wiedergabe ist nur „Track“ wählbar.
Bei Bedarf können Sie bei laufender Wiedergabe den
Titel, das Kapitel oder den Track und weitere
Informationen aufrufen.
Drücken Sie während der Wiedergabe wiederholt
die DISPLAY-Taste, um die Informationen
anzeigen zu lassen.
■Verbergen der Informationen
Drücken Sie wiederholt DISPLAY, bis die
Informationsanzeige verschwindet.
BD-VIDEO
0 3 : 0 2 :0 0
1
1 / 3
5 . 1 c h
Zurück
Wählen Eingeben
5 5 / 2
2 English
1
Aus
ENTER
1
2
3
RETURN
Verwendung des Menüs
„Funktionen“ für Audio-CD
Überprüfen der Disc-Informationen
1Track 015:16
2Track 025:10
3Track 035:23
4Track 045:03
5Track 054:44
6Track 065:08
00:00:11
3/12
3/12
Aus
3L+R
Wählen Eingeben
Track Auswählen
5:23
0:00
Track 03Funktionen
D
Zurück
Benutzerführung
DISPLAY

DISC-FUNKTIONEN
24 De
Der BD-Player unterstützt die Wiedergabefunktionen
BONUSVIEW (BD-ROM Profile 1 Version 1.1) und BD-
LIVE (BD-ROM Profile 2).
BONUSVIEW: BONUSVIEW-kompatible Discs
unterstützen einen Video-Unterkanal für zwei
Bildschirme, einen Audio-Unterkanal und Untertitel.
Während der Wiedergabe wird im Hauptbildschirm ein
kleiner Unterbildschirm angezeigt (Bild-in-Bild).
BD-LIVE: BD-LIVE-kompatible Discs unterstützen alle
Funktionen von BONUSVIEW und außerdem die Online-
Verbindung des BD-Players zum Laden von Promotion-
Videos und anderen Daten.
Hinweis
Funktionen und Wiedergabeverfahren sind von der Disc
abhängig. Ziehen Sie die Anleitung auf der Disc oder die
mitgelieferte Bedienungsanleitung hinzu.
■Verwendung der Bild-in-Bild-Funktion
(zweite Audio/Video-Wiedergabe)
Bei einem mit zweitem Ton und Bild ausgestattetem,
Bild-in-Bild-kompatiblem BD-Video kann das zweite
Bild einschließlich Ton als Kleinvideo in der
Bildschirmecke mitlaufen.
Drücken Sie während der Wiedergabe P in P, um
die Bild-in-Bild-Funktion ein- und auszuschalten.
Hinweise
• Damit der Ton des Zweitvideos hörbar ist, muss „Audio-
Zweitton (BiB)“ auf „Ein“ gesetzt sein (☞S.34).
• Es kann sein, dass Ton und Bild in Zweitbelegung für die Bild-
in-Bild-Funktion je nach Inhalt automatisch ein- und
ausgeblendet werden. Es kann auch sein, dass der hierfür
nutzbare Bildschirmbereich begrenzt ist.
■Verwendung der Funktion BD-LIVE
1Nehmen Sie die Netzwerkeinstellungen vor
(☞S.36).
2Schließen Sie das USB-Speichergerät an den
BD-Player an (☞S.10).
BD-LIVE-Daten werden im lokalen Speicher (dem
an diesen Player angeschlossenen USB-Speichergerät
abgelegt). Um diese Funktionen zu nutzen, schließen
Sie ein USB-Speichergerät (mit 2 GB oder mehr
Speicherkapazität und auf FAT 32/16 formatiert), das
USB 2.0 High Speed (480 Mbit/s) unterstützt, an den
USB BD STORAGE/SERVICE-Anschluss (☞S.10)
an der Rückseite dieses Players an.
• Wenn der Speicherplatz nicht ausreicht, werden die
Daten nicht kopiert/heruntergeladen. Löschen Sie
nicht benötigte Daten, oder verwenden Sie ein
neues USB-Speichergerät.
• Es ist möglich, dass Bild und Ton von einem USB-
Speichergerät, das andere (früher gespeicherte)
Daten enthält, nicht richtig wiedergegeben werden.
• Wenn das USB-Speichergerät während der
Wiedergabe von BD-LIVE-Daten vom Player
getrennt wird, wird die Wiedergabe von Disc
gestoppt.
• Das Laden (Lesen und Schreiben) der Daten kann
einige Zeit dauern.
• Unter „USB-Speicherverwaltung“ (☞S.39) ist
beschrieben, wie Sie BD-LIVE-Daten in einem
USB-Speichergerät löschen.
Hinweise
• Yamaha kann nicht die Kompatibilität aller verfügbaren USB-
Speichergeräte mit diesem Player garantieren.
• Verwenden Sie kein USB-Verlängerungskabel zur Verbindung
des USB-Speichergeräts mit dem USB BD STORAGE/
SERVICE-Anschluss des Players. USB-Verlängerungskabel
können die normale Funktion des Players beeinträchtigen.
3Starten Sie die Wiedergabe der Disc.
4Führen Sie BD-LIVE laut Anleitung auf der
Disc aus.
Die Abbildung unten ist ein Beispiel.
Hinweise
• Zur Wiedergabe von BD-LIVE-Inhalten usw. beachten Sie bitte
die Gebrauchsanweisungen der BD-Disc.
BONUSVIEW und BD-LIVE
P in P
Zweitvideo
Hauptvideo

DISC-FUNKTIONEN
25 De
Deutsch
GRUNDLEGENDE
BEDIENUNG
• Um die BD-LIVE-Funktionen nutzen zu können, müssen Sie
eine Breitband-Internetverbindung herstellen (☞S.10) und die
Kommunikationseinstellungen anpassen (☞S.36).
• Siehe „BD-Internetzugang“ (☞S.35), dort ist das Einrichten
eines beschränkten Zugangs zu BD-LIVE-Inhalten beschrieben.
• Die Zeit, die benötigt wird, um die bereitgestellten Programme
in das an diesen Player angeschlossene USB-Speichergerät zu
laden, richtet sich nach der Internet-
Verbindungsgeschwindigkeit und dem Datenvolumen der
Programme.
• Es ist möglich, dass über das Internet angebotene BD-LIVE-
Programme je nach Status (Aktualisierung) des Providers die
Verbindung nicht anzeigen. Entnehmen Sie in diesem Fall die
Disc, und versuchen Sie es erneut.
• Wenn der Bildschirm BD-LIVE kurze Zeit, nachdem Sie die
BD-LIVE-Funktion im BD-Disc-Menü aufgerufen haben, nicht
erscheint, ist auf dem USB-Speichergerät eventuell nicht
genügend Platz vorhanden. Werfen Sie die Disc in dem Fall aus,
und löschen Sie Daten im USB-Speichergerät mit dem Menü
„Löschen“ im Menü „USB-Speicherverwaltung“ (☞S.39).

UKW-SENDERSUCHE
26 De
TUNER-BEDIENUNG
Es gibt 2 Methoden für die Sendersuche: automatisch und manuell. Sie können auch die automatische und manuelle
Speichersendersuche verwenden, um bis zu 30 Sender zu speichern.
Die automatische Sendersuche arbeitet, wenn die
Sendersignale stark und ohne Störungen empfangen
werden.
1
Drücken Sie TUNER, um den Receiver auf den
UKW-Modus (FM) zu stellen.
2Drücken und halten Sie TUNING für
länger als 2 Sekunden, um die automatische
Sendersuche zu beginnen.
Wenn der Receiver auf einen Sender abgestimmt ist,
leuchtet die TUNED-Anzeige auf, und die Frequenz
des empfangenen Senders wird im Frontblende-
Display angezeigt.
• Drücken Sie , um auf eine niedrigere Frequenz
abzustimmen.
• Drücken Sie , um eine höhere Frequenz
einzustellen.
Falls das Signal des Senders, den Sie wählen möchten,
schwach ist, muss dieser manuell gesucht werden.
1
Drücken Sie TUNER, um den Receiver auf den
UKW-Modus (FM) zu stellen.
2Drücken Sie TUNING , um manuell auf
den gewünschten Sender abzustimmen.
Verfahren Sie wie folgt, um Radiosender automatisch
vorzuprogrammieren.
1
Drücken Sie TUNER, um den Receiver auf den
UKW-Modus (FM) zu stellen.
2Drücken und halten Sie MEMORY länger als
2 Sekunden.
Die PRESET-Anzeige auf dem Frontblende-Display
beginnt zu blinken, und die automatische
Speichersendereinstellung beginnt. Wenn alle
Frequenzen durchsucht wurden, hält die
Speichersendersuche automatisch an.
• Der Suchlauf beginnt mit der niedrigsten Frequenz
und sucht das Frequenzband nach oben ab.
• Der Receiver weist automatisch jedem erkannten
Sender eine Speichersendernummer zu.
• Zum Abbrechen des Suchlaufs drücken Sie
MEMORY.
Hinweise
• Sie können bis zu 30 UKW-Sender vorprogrammieren.
• Die unter einer Speichersendernummer vorhandenen
Senderdaten werden gelöscht, wenn Sie einen neuen Sender
unter derselben Speichersendernummer speichern.
UKW-SENDERSUCHE
Automatische Sendersuche
Manuelle Sendersuche
TUNING / d
d
d
d
TUNER
/ d
d
d
d
d
d
d
d
/ d
d
d
d
Automatische
Speichersendersuche
PRESET u / d
TUNER
MEMORY

SUCHE VON SENDERN MIT RADIO-DATEN-SYSTEM (NUR EUROPA-MODELL)
28 De
Radio-Daten-System (nur Modelle für Europa) ist ein Datenübertragungssystem, das in vielen Ländern von UKW-
Sendern verwendet wird. Die Radio-Daten-System-Funktion wird unter den Sendern eines Netzwerks ausgeführt. Dieses
Gerät kann verschiedene Daten des Radio-Daten-Systems, wie zum Beispiel PS (Programmdienstname), PTY
(Programmtyp), RT (Radiotext), CT (Uhrzeit) und TP (Verkehrsdatenprogramm), empfangen, wenn Sie einen Sender
mit Radio-Daten-System eingestellt haben.
Verwenden Sie diese Funktion zur Anzeige der 4 Typen
von Radio-Daten-System-Information: PS
(Programmdienst), PTY (Programmtyp), RT (Radiotext)
und CT (Uhrzeit).
Hinweise
• Sie können nur die verfügbaren Modi des Radio-Daten-Systems
wählen, die vom Sender angeboten werden.
• Wenn die empfangenen Signale nicht stark genug sind, kann der
Receiver die Daten des Radio-Daten-Systems möglicherweise
nicht nutzen. Insbesondere der RT-Modus erfordert eine große
Datenmenge und steht möglicherweise nicht zur Verfügung,
auch wenn die anderen Modi des Radio-Daten-Systems
verfügbar sind.
• Falls die Signalstärke während des Empfangs von Radio-Daten-
System-Daten durch externe Interferenzen abgeschwächt wird,
kann der Empfang unter Umständen plötzlich unterbrochen
werden, wobei ...WAIT am Frontblende-Display erscheint.
• Wenn der „RT“-Modus gewählt ist, kann der Receiver die
Programminformationen mit maximal 64 alphanumerischen
Zeichen, einschließlich Umlaut-Zeichen, anzeigen. Nicht
darstellbare Zeichen werden durch „_“
(Unterstreichungszeichen) angezeigt.
Während ein Sender mit Radio-Daten-System
abgestimmt ist, drücken Sie wiederholt DISPLAY,
um den gewünschten Display-Modus für das
Radio-Daten-System zu wählen.
Beschreibungen der Programmtypen entnehmen Sie bitte
der folgenden Tabelle.
SUCHE VON SENDERN MIT RADIO-DATEN-SYSTEM
(NUR EUROPA-MODELL)
Anzeigen der Informationen des
Radio-Daten-Systems
DISPLAY
PS
PTY
RT
CT
Frequenz
(Program Service)
(Program Type)
(Radio Text)
(Clock Time)
Programmtyp Beschreibungen
News Nachrichten
Affairs Aktuelle Neuigkeiten
Info Informationen
Sport Sport
Educate Bildung
Drama Hörspiel
Culture Kultur
Science Wissenschaft
Varied Verschiedene Sprachbeiträge
Pop M Popmusik
Rock M Rockmusik
Easy M Leichte Unterhaltungsmusik
Light M Leichte klassische Musik
Classics Anspruchsvolle klassische Musik
Other M Sonstige Musik
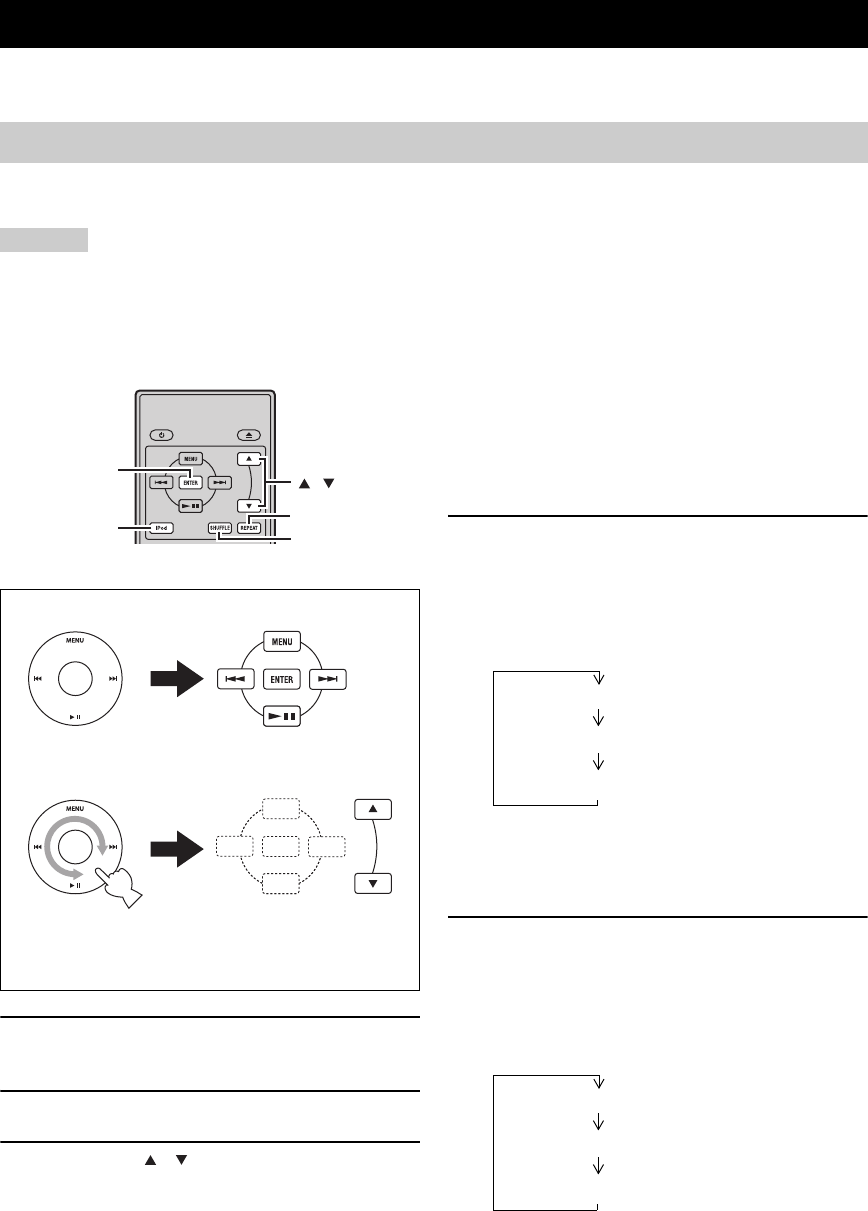
BEDIENUNG EINES iPod™
32 De
Neben der Bedienung des Receivers (R-840) und BD-Players (BD-940) können Sie auch Ihren iPod, der sich im iPod-
Dock befindet, über die mitgelieferte Fernbedienung bedienen.
Sobald Ihr iPod in das iPod-Dock eingesteckt ist, können Sie die Wiedergabe des iPod mit der Fernbedienung steuern.
Wenn Sie den iPod während der Wiedergabe anschließen, wechselt die Anlage automatisch in den iPod-Modus.
Hinweise
• Es werden nur iPod (Click and Wheel), iPod nano, iPod Classic, iPod mini und iPod touch unterstützt.
• Manche Merkmale können je nach dem Modell oder der Software-Version Ihres iPod inkompatibel sein.
y
Für eine komplette Liste der im Frontblende-Display des Receivers angezeigten Statusmeldungen siehe den Abschnitt „iPod“ in „STÖRUNGSSUCHE“ (
☞
S.43).
1Drücken Sie iPod, um iPod als die
Eingangsquelle zu wählen.
2Setzen Sie Ihren iPod in das iPod-Dock ein.
3Drücken Sie / zur Bedienung des iPod-
Menüs und starten Sie die Wiedergabe des
gewählten Titels (bzw. der Gruppe) durch
Drücken von ENTER.
•
Betrachten Sie den Bildschirm des iPod zum Steuern des Menüs.
• Bedienen Sie den iPod mit den iPod-Tasten an der
mitgelieferten Fernbedienung.
■Wiederholungswiedergabe (Repeat Play)
Sie können entweder einen einzelnen Track oder
sämtliche Tracks auf Ihrem iPod wiederholt abspielen.
Drücken Sie REPEAT.
Mit jedem Drücken der Taste ändert sich der
Wiederholungswiedergabemodus. Die folgende Tabelle
zeigt an einem Beispiel, wie sich der Modus beim
Drücken der Taste ändert. Sie können am iPod-Bildschirm
ablesen, welcher Modus momentan gewählt ist.
■Zufallswiedergabe (Shuffle Play)
Sie können Titel oder Alben auf Ihrem iPod in zufälliger
Reihenfolge wiedergeben.
Drücken Sie SHUFFLE.
Mit jedem Drücken der Taste ändert sich der
Zufallswiedergabemodus. Die folgende Tabelle zeigt an
einem Beispiel, wie sich der Modus beim Drücken der
Taste ändert. Sie können am iPod-Bildschirm ablesen,
welcher Modus momentan gewählt ist.
BEDIENUNG EINES iPod™
Verwendung iPod™
Die mitgelieferte Fernbedienung weist dieselben
Funktionstasten wie Ihr iPod auf. Daher stimmen diese
Tasten in Ihrer Funktion überein.
iPod
,
ENTER
REPEAT
SHUFFLE
iPod Fernbedienung
Ein (Wiedergabewiederholung von Titeln)
Alle (Wiedergabewiederholung einer ausgewählten Gruppe)
Aus
Title (Zufallswiedergabe von Titeln)
Alben (Zufallswiedergabe von Alben)
Aus

33 De
Deutsch
ANDERE
BEDIENUNGSVORGÄNGE
In diesem Kapitel werden die Menüs dieses Geräts beschrieben.
Nachdem Sie dieses Gerät und ein Fernsehgerät eingeschaltet haben (☞S.13), können Sie Einstellungen am TV-
Bildschirm mit der Fernbedienung ändern.
Zum Auswählen der Menüeinträge und zum Ändern von Einstellungen gehen Sie wie unter „Einstellen des
Fernsehbilds“ (☞S.13) beschrieben vor.
Hinweis
Wenn Sie „Altersbegrenzung“ unter „Wiedergabe-Einstellungen“ (☞S.35) wählen, muss ein 4-stelliges Passwort eingegeben werden.
Beim ersten Mal wird der Einstellbildschirm für das Passwort angezeigt. Um das Passwort einzurichten, siehe „Passwort-Einstellung“
(☞S.35).
y
Die Standardeinstellungen sind mit „*“ markiert.
■TV-Einstellungen
Sie können das Bildseitenverhältnis des angeschlossenen
Fernsehgeräts und den Videoausgang einstellen.
Wenn ein anderes Fernsehgerät angeschlossen wird,
prüfen Sie, ob beide Geräte dasselbe Bildseitenverhältnis
verwenden. Wenn nicht, ändern Sie die Einstellung „TV-
Einstellungen“.
Optionen „4:3-Format“
Wenn „TV-Einstellungen“ auf „4:3-Format“ gesetzt ist,
und Sie ein 16:9-Video mit einem 4:3-Fernsehgerät
betrachten, wählen Sie eine der unten beschriebenen
Optionen.
■Komponenten-Ausgabe
Sie können die Auflösung für einen Component-Video-
Ausgang einstellen.
Manche Fernsehgeräte sind nicht voll kompatibel mit dem
Blu-ray-Disc-Player. Das Bild erscheint dann verzerrt.
Setzen Sie in diesem Fall „Komponenten-Ausgabe“ auf
die Standardeinstellung (☞S.41).
1080i, 720p, 576/480p, 576/480i*
Hinweis
Manche Discs verhindern die Ausgabe eines High-Definition-
Videosignals an den COMPONENT-Buchsen. Die Bildauflösung
wird in diesem Fall auf 576/480p oder 576/480i umgerechnet.
■HDMI-Videoausgabe
Sie können die Auflösung für einen HDMI-Videoausgang
einstellen.
Manche Fernsehgeräte sind nicht voll kompatibel mit dem
Blu-ray-Disc-Player. Das Bild erscheint dann verzerrt.
Setzen Sie in diesem Fall „HDMI-Videoausgabe“ auf die
Standardeinstellung (☞S.41). „HDMI-Videoausgabe“
wird auf „Auto“ (werkseitige Voreinstellung)
zurückgesetzt.
Auto*, 1080p, 1080i, 720p, 576/480p
Hinweis
Wenn beim Anschluss des BD-Players an ein 1080p/24Hz-
kompatibles Fernsehgerät „HDMI-Videoausgabe“ auf „Auto“
gesetzt ist, wird bei der Wiedergabe kompatibler Discs
automatisch 1080p/24Hz angezeigt.
Bei 1080p/24Hz oder 1080p/60Hz wird an den COMPONENT-
Buchsen und an der VIDEO-Buchse kein Signal ausgegeben.
■Video-Ausgabe Auswählen
Videosignale können gleichzeitig an den analogen
Videobuchsen (Component- oder Videobuchse) und an
der HDMI-Buchse ausgegeben werden. Man spricht von
dualer Ausgabe. Wenn die Component-Video- und die
HDMI-Ausgänge verwendet werden, wird die Auflösung
des Videoausgangssignals von den Einstellungen unter
„Komponenten-Ausgabe“ oder „HDMI-Videoausgabe“
und „Video-Ausgabe Auswählen“ bestimmt. Die Tabelle
unten beschreibt dies näher.
EINSTELLUNGEN DES BD-PLAYERS
Audio-/Video-Einstellungen
16:9-Format*:Wählen Sie diese Option beim Anschluss
eines Breitbild-Fernsehgeräts (16:9).
4:3-Format: Wählen Sie diese Option für ein 4:3-
Fernsehgerät.
Letter Box*:Zeigt das Bild mit schwarzen Bändern oben
und unten an, das Bildseitenverhältnis 16:9
wird beibehalten.
Pan Scan: Zeigt das Bild mit unverändertem
Bildseitenverhältnis an, die Ränder rechts und
links werden beschnitten. Diese Option ist nur
für 4:3PS-Discs verfügbar.
HDMI*:Die Auflösung des Videoausgangssignals
richtet sich nach der HDMI-Videoausgabe-
Einstellung (siehe „HDMI-Videoausgabe“
(☞S.33)).
Komponent: Die Auflösung des Videoausgangssignals
richtet sich nach der Komponenten-Ausgabe-
Einstellung (siehe „Komponenten-Ausgabe“
(☞S.33)).

34 De
EINSTELLUNGEN DES BD-PLAYERS
*1 Manche Discs verhindern die Ausgabe eines High-Definition-
Videosignals an den COMPONENT-Buchsen. In diesem Fall
wird die Bildauflösung auf 480p/576p (wenn „Video-Ausgabe
Auswählen“ auf „Komponent“ gesetzt ist) oder 480i/576i
(wenn „Video-Ausgabe Auswählen“ auf „HDMI“ gesetzt ist)
umgerechnet.
*2 Keine Videoausgabe, wenn ein 1080p-Signal an der HDMI-
Buchse ausgegeben wird.
*3 CVBS Out bezieht sich auf das Videoausgangssignal an der
VIDEO-Buchse.
Hinweis
Wenn Ihr Fernsehgerät mit der gewählten Auflösung nicht
kompatibel ist, wird das Bild eventuell nicht richtig dargestellt.
y
Sie können auch zwischen „HDMI“ und „Komponent“ umstellen.
Dazu verwenden Sie „HDMI <-> COMP“ (☞S.41).
■Audio-Zweitton (BiB)
Hier können Sie den Zweitton für das Bild im Bild oder
gesprochene Kommentare ein- und ausschalten.
Ein*, Aus
y
Wenn „Audio-Zweitton (BiB)“ auf „Aus“ gesetzt ist, gibt dieses
Gerät bei der Bedienung des Menüs keinen Signalton (Klicken)
aus.
Wählen Sie „Aus“, um hochwertigen BD-Klang über die HDMI-
Buchse zu hören.
■Audio-Ausgabe
Die Tonausgabe kann an die Wiedergabeumgebung
angepasst werden.
Optionen „HDMI-Ausgang“
Wenn „Audio-Ausgabe“ auf „HDMI-Ausgang“ gesetzt ist,
wählen Sie eine der unten beschriebenen Optionen.
Hinweis
Wenn „Audio-Zweitton (BiB)“ auf „Ein“ gesetzt ist, wird die
Option „HDMI-Ausgang“ automatisch auf „PCM“ gesetzt.
Optionen „Digitaler-Ausgang“
Wenn „Audio-Ausgabe“ auf „Digitaler-Ausgang“ gesetzt
ist, wählen Sie eine der unten beschriebenen Optionen.
■Klangdynamik
Der Dynamikbereich kann so eingestellt werden, dass der
Ton mit durchschnittlicher Lautstärke ausgegeben wird.
Wenn Dialoge nicht gut zu hören sind, ändern Sie die
Einstellung in diesem Menü.
Hinweis
Regeln Sie zum Ändern dieser Einstellung die Lautstärke
herunter. Die Lautsprecher können lauten Ton ausgeben oder
elektrisch überlastet werden.
Einstellungen dieses
Players Ausgangsauflösung
Video-
Ausgabe
Auswählen
HDMI-
Videoausgabe
Component
Out CVBS Out*3
HDMI
Auto *1 480i/576i*2
1080p Keine
Ausgabe
Keine
Ausgabe
1080i 1080i*1 480i/576i
720p 720p*1 480i/576i
480p/576p 480p/576p*1 480i/576i
Einstellungen dieses
Players Ausgangsauflösung
Video-
Ausgabe
Auswählen
Komponenten
-Ausgabe
HDMI Out CVBS Out*3
Komponent
1080i*11080i*1 480i/576i
720p*1720p*1 480i/576i
480p/576p 480p/576p 480i/576i
480i/576i 480i/576i 480i/576i
HDMI-Ausgang: Ausgabe eines Audiosignals an der HDMI-
Buchse.
Digitaler-
Ausgang:
Ausgabe eines Audiosignals an der DIGITAL
OUT (OPTICAL)-Buchse.
2ch Audio-
Ausgang*:
Ausgabe eines Audiosignals an den AUDIO
OUT-Buchsen.
Bitstream: Ausgabe eines Bitstream-Audiosignals.
Wählen Sie diese Option beim Anschluss
einer HDMI-Komponente mit eingebautem
Decoder für DOLBY DIGITAL usw.
PCM*
(Surround):
Ausgabe eines linearen PCM-Audiosignals.
In anderen Formaten, wie z. B. DOLBY
DIGITAL und DTS, aufgezeichnete
Audiosignale werden zur Ausgabe in das
lineare PCM-Format decodiert.
Bitstream: Ausgabe eines Bitstream-Audiosignals.
Wählen Sie diese Option beim Anschluss
einer Surround-Komponente mit eingebautem
Decoder für DOLBY DIGITAL usw.
PCM*:Ausgabe eines PCM-2-Kanal-Audiosignals.
In einem anderen Format aufgezeichnete
Audiosignale werden vor der Ausgabe in
PCM-2-Kanal-Audiosignale umgesetzt.
Wählen Sie diese Option beim Anschluss
einer 2-Kanal-Stereo-Audiokomponente.
Normal: Tonausgabe im Dynamikbereich des
Originaltons.
Sprache: Verschiebt den Dynamikbereich von Dolby
Digital-Ton, so dass Dialoge besser zu hören
sind.
Wenn der Ton nicht angenehm ist, stellen Sie
„Normal“ ein.
Auto*:Justiert automatisch den Dynamikbereich von
Dolby TrueHD-Ton.

35 De
EINSTELLUNGEN DES BD-PLAYERS
Deutsch
ANDERE
BEDIENUNGSVORGÄNGE
Die Schnellstart-Funktion ermöglicht den schnellen Start
dieses Geräts.
Hinweis
Wenn „Schnellstart“ auf „Ja“ gesetzt ist, dauert es etwas länger,
bis der BD-Player ausschaltet.
Sie können festlegen, dass dieses Gerät 10 Minuten nach
beendeter Wiedergabe automatisch abschaltet.
Ja, Nein*
Sie können bestimmen, dass dieses Gerät ein HDMI-
Steuersignal von der Fernbedienung Ihres Fernsehgeräts
empfangen soll. Dazu muss HDMI-Steuerung unterstützt
werden und mit einem HDMI-Kabel eine Verbindung zu
diesem Gerät hergestellt werden.
Ja, Nein*
Hinweise
• Entnehmen Sie weitere Informationen auch der
Bedienungsanleitung Ihres Fernsehgeräts.
• Die HDMI-Steuerfunktion arbeitet möglicherweise bei der
Wiedergabe oder während der Anzeige des Setup-Menüs nicht.
• Diese Funktion können Sie nur verwenden, wenn „Video-
Ausgabe Auswählen“ auf „HDMI“ gesetzt ist.
■Altersbegrenzung
Manche digitalen Rundfunksendungen und BD/DVD enthalten einen
Klassifizierungscode, der die Anzeige von Inhalten für eine bestimmte
Altersgruppe sperrt. Sie können eine Stufe wählen, um die
Wiedergabe von BD/DVD mit unerwünschten Inhalten zu sperren.
„Wiedergabe-Einstellungen“ enthält als Option den
„Länderkode“. Da die Klassifizierungen von Land zu Land
unterschiedlich sind, müssen Sie auch den Ländercode
einstellen.
Zum Einstellen einer Stufe oder des Ländercodes müssen
Sie ein 4-stelliges Passwort einrichten und eingeben.
Für DVD
Für BD
Länderkode
Zum Einstellen des Ländercodes.
Die Klassifizierungen sind je nach Land verschieden, ziehen
Sie darum bitte die Ländercode-Liste hinzu (☞S.51).
■
Disk-Sparache (Bevorzugte Disc-Sprache)
Sie können die Sprache für Untertitel, Audio und Bildschirmmenüs auswählen.
Siehe „Verzeichnis der Sprachen“ (☞S.51), in der Liste
sind die verfügbaren Sprachen verzeichnet.
■Kamerasymbol Anz.
Manche BD/DVD-Videos haben mehrere Winkel. Sie können
sich während der Wiedergabe solcher Videos rechts unten im
Bildschirm ein Winkelzeichen anzeigen lassen.
■Passwort-Einstellung
Sie können das Passwort zum Einstellen oder Ändern der
Sperrstufe für die Kindersicherung einrichten.
Hinweise
• Wenn Sie das Passwort vergessen, können Sie das aktuelle
Passwort mit „System-Rücksetzung“ (☞S.39) zurücksetzen.
• Sie können das Passwort ändern.
Einrichten des PIN-Codes
1Drücken Sie / , um „Ja“ auszuwählen, und
drücken Sie dann ENTER.
2Geben Sie eine 4-stellige Zahl ein.
3Geben Sie dieselbe 4-stellige Zahl nochmals
zur Bestätigung ein.
4
Drücken Sie ENTER, um den Einstellbildschirm
für den PIN-Code zu verlassen.
y
• Um die 4-stellige Zahl zu löschen, drücken Sie CLEAR.
•
Sie können auch ENTER (
c☞
S.7) an der Fernbedienung drücken.
■BD-Internetzugang
Sie können den Zugriff auf BD-LIVE-Inhalte beschränken.
Schnellstart
Ja: Die Schnellstart-Funktion ist aktiviert.
Im Bereitschaftsmodus leuchtet die QUICK-
Anzeige (☞S.5).
Nein*:Die Schnellstart-Funktion ist deaktiviert.
Der Stromverbrauch im Bereitschaftsmodus
ist niedriger.
Auto-Ausschaltung
HDMI Steuerung
Wiedergabe-Einstellungen
Stufe 8 und Aus*:Die Wiedergabe von DVD ist nicht
beschränkt.
Stufe 1-7: Die Wiedergabe von DVD mit
entsprechenden Klassifizierungen ist
gesperrt.
O. Beschr.*:Die Wiedergabe von BD ist nicht beschränkt.
0-99 Jahre: Die Wiedergabe von BD mit entsprechenden
Klassifizierungen ist gesperrt.
Ja: Das Winkelzeichen wird angezeigt.
Nein*:Das Winkelzeichen wird nicht angezeigt.
Ja: Es wird ein Passwort eingerichtet.
Sie werden zur Eingabe einer 4-stelligen Zahl aufgefordert.
Nein: Es wird kein Passwort eingerichtet.
Zulassen:
Zugang zum Internet ist für alle BD-LIVE-Discs erlaubt.

36 De
EINSTELLUNGEN DES BD-PLAYERS
Hinweise
• Die verfügbaren Funktionen richten sich nach der Disc.
• Zur Wiedergabe von BD-LIVE-Inhalten usw. beachten Sie bitte
die Gebrauchsanweisung der BD-Disc.
• Hinweise zu den BD-LIVE-Funktionen siehe „Verbindung mit
dem Internet“ (☞S.10) und „Kommunikationssetup“ (☞S.36).
Hier können Sie Kommunikationseinstellungen
vornehmen und ändern. Die Einstellung wird für BD-
LIVE-Funktionen benötigt, die sich mit dem Internet
verbinden.
Hinweise
• Stellen Sie sicher, dass das LAN-Kabel mit diesem Player
verbunden ist (☞S.10).
• Um die Einstellung manuell vorzunehmen, benötigen Sie die
untenstehenden Informationen über den verbundenen Router
oder das Modem. Holen Sie diese Informationen vor der
Einstellung ein.
– IP-Adresse, Netzwerkmaske, Gateway, DNS-IP-Adresse
• Wenn Sie einen Proxy-Server angeben, werden außerdem die
untenstehenden Informationen benötigt, die Sie von Ihrem
Internet-Serviceprovider erhalten. Holen Sie diese
Informationen vor der Einstellung ein.
– IP-Adresse und Portnummer des Proxy-Servers
1Drücken Sie SETUP.
2Drücken Sie / / / , um „Einstellungen“
auszuwählen, und drücken Sie dann ENTER.
3Drücken Sie / , um
„Kommunikationssetup“ auszuwählen, und
drücken Sie dann ENTER.
4Wählen Sie „Ethernetsetup (BD-LIVE)“, und
drücken Sie ENTER.
5Drücken Sie / , um „Ändern“ auszuwählen,
und drücken Sie dann ENTER.
Zur Initialisierung der aktuellen Einstellung wählen
Sie „Initialisieren“ und drücken dann ENTER.
6Zum Einstellen der IP-Adresse wählen Sie
mit / „Ja“ oder „Nein“ aus und drücken
dann ENTER.
• Auswahl „Ja“: Die IP-Adresse wird automatisch
bezogen.
• Auswahl „Nein“: IP-Adresse, Netzwerkmaske und
Gateway werden im Zeicheneingabe-Bildschirm
manuell eingegeben (☞S.38).
Ziehen Sie zum Einrichten der Werte die Anleitung
Ihres Breitband-Routers hinzu.
7Wählen Sie „Weiter“, und drücken Sie
ENTER.
8Geben Sie mit Hilfe des Zeicheneingabe-
Bildschirms (☞S.38) die primäre und die
sekundäre IP-Adresse ein.
Ziehen Sie zum Einrichten der Werte die
Anleitung Ihres Breitband-Routers hinzu.
9Wählen Sie „Weiter“, und drücken Sie
ENTER.
Limit*:Zugang zum Internet ist bei BD-LIVE-Discs
nur mit Eigentümernachweis erlaubt.
Sperren:
Der Zugang zum Internet ist für alle Discs gesperrt.
Kommunikationssetup
EXIT
TOP MENU/TITLE LIST
POP UP MENU
, , ,
ENTER
SETUP
Einstellen der Ethernet-Informationen
[Aktuelles Setup]
: Auto-Setup
: Auto-Setup
: Auto-Setup
: Auto-Setup
: Nicht Verwendet
IP-Adresse
Netzmaske
Gateway
DNS
Proxy
Ändern Initialisieren
Beziehen Sie die IP-Adresse automatisch?
IP-Adresse
Netzmaske
Gateway
Weiter
Ja Nein
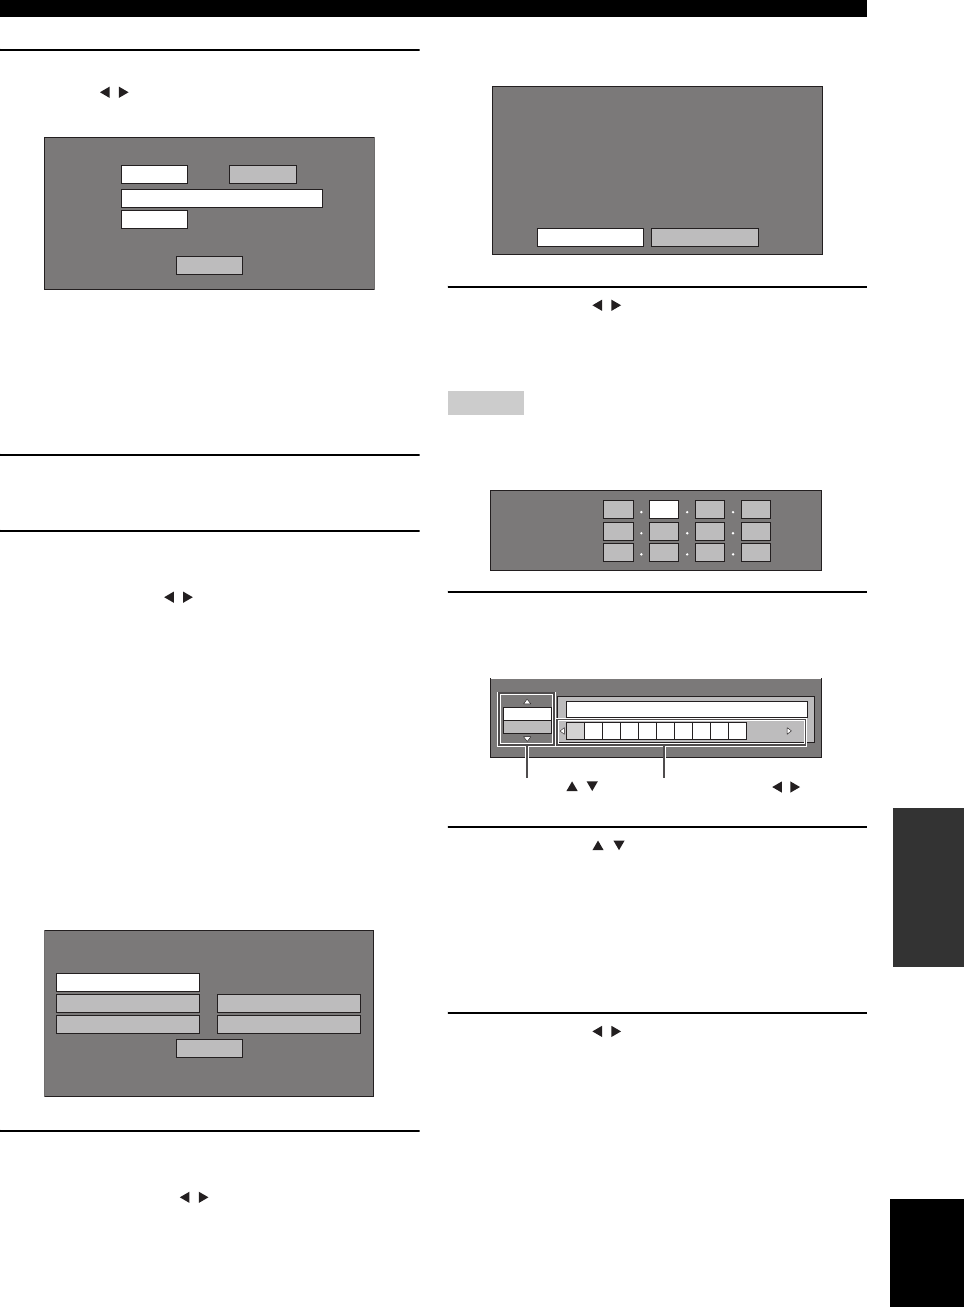
37 De
EINSTELLUNGEN DES BD-PLAYERS
Deutsch
ANDERE
BEDIENUNGSVORGÄNGE
10 Zum Einstellen des Proxy-Servers wählen
Sie mit / „Ja“ oder „Nein“ aus und
drücken dann ENTER.
•
Auswahl „Ja“: Die vom Internet-Serviceprovider
mitgeteilte IP-Adresse, der Name des Proxy-Servers und
die Portnummer für den Proxy-Server werden im
Zeicheneingabe-Bildschirm eingetragen (
☞
S.38).
• Auswahl „Nein“: Fahren Sie mit dem nächsten
Schritt fort.
11 Wählen Sie „Weiter“, und drücken Sie
ENTER.
12 Um erweiterte Einstellungen vorzunehmen
(Ethernet-Verbindungsgeschwindigkeiten),
wählen Sie mit / „Ja“ oder „Nein“ aus und
drücken dann ENTER.
•
Im Normalfall wählen Sie „Nein“ und drücken ENTER.
• Die Ethernet-Verbindungsgeschwindigkeiten
können eingestellt werden, wenn Sie „Ja“ wählen
und ENTER drücken.
• Da werkseitig automatische Erkennung
eingerichtet ist, ist diese Einstellung normalerweise
nicht notwendig. Wenn keine Ethernet-Verbindung
zustande kommt usw., ändern Sie die Einstellung
und prüfen, ob mit der geänderten Einstellung der
Verbindungsaufbau möglich ist.
Wenn eine Verbindungsgeschwindigkeit
eingestellt wurde, wählen Sie „Weiter“ und
drücken dann ENTER.
13 Nachdem alle Einstellungen vorgenommen
sind, wählen Sie zum Testen der Verbindung
zum Internet mit / „Test“ und drücken
dann ENTER.
„Test“ ist nur verfugbar, wenn automatisches
Beziehen der IP-Adresse eingestellt ist.
14 Drücken Sie / , um „Fertigstellen“
auszuwählen, und drücken Sie dann ENTER.
■Manuelle Zeicheneingabe
Hinweis
Zur Eingabe von Ziffern, z. B. für die IP-Adresse, können Sie im
Eingabebildschirm die Zeichen entweder im Modus „Numerisch“
auswählen oder die Zifferntasten der Fernbedienung benutzen.
1Den Eingabebildschirm rufen Sie auf, indem
Sie an einem Feld zur Zeicheneingabe
ENTER drücken.
2Drücken Sie / , um die gewünschte
Eingabeart auszuwählen.
• Zur Eingabe der Adresse des Proxy-Servers:
„1 ABC“ (Alphabet/numerische Zeichen) / „Sign“
/ „Bearbeiten“
• Zur Eingabe anderer Werte (IP-Adresse usw.):
„Numerisch“ / „Bearbeiten“
3Drücken Sie / , um ein Zeichen
auszuwählen, und drücken Sie dann ENTER.
Verwenden Sie die Proxyservers?
Adresse
Port
Weiter
Ja Nein
Option
Ethernet-Verbindungsgeschwindigkeiten
Weiter
Auto-Erkennung
10 M Halbduplex
100 M Halbduplex
10 M Vollduplex
100 M Vollduplex
Bestätigen Sie die aktuelle Einstellung.
: xxx xxx xxx xxx
: xxx xxx xxx xxx
: xxx xxx xxx xxx
: xxx xxx xxx xxx
xxx xxx xxx xxx
: xx:xx:xx:xx:xx:xx
IP-Adresse
Netzmaske
Gateway
DNS-Adresse
MAC-Adresse
FertigstellenTest
IP-Adresse
Netzmaske
Gateway
123
Numerisch
1234567890
Bearbeiten
Ausgewählt mit / Ausgewählt mit /

39 De
EINSTELLUNGEN DES BD-PLAYERS
Deutsch
ANDERE
BEDIENUNGSVORGÄNGE
Sie können sich die Software-Version des Systems
anzeigen lassen.
Vor Verwendung des USB-Speichergeräts
Die folgende Anleitung beschreibt, wie Sie Daten, z. B.
BD-LIVE-Daten, in einem USB-Speichergerät löschen.
1Verbinden Sie das USB-Speichergerät mit
dem USB BD STORAGE/SERVICE-Anschluss
an der Rückseite dieses Players.
2Drücken Sie SETUP, um den Setup-
Menübildschirm aufzurufen.
3Drücken Sie / / / , um „Einstellungen“
auszuwählen, und drücken Sie dann ENTER.
4Drücken Sie / , um „USB-
Speicherverwaltung“ auszuwählen, und
drücken Sie dann ENTER.
„Kein USB-Speicher“ wird angezeigt, wenn kein
USB-Speicher gefunden wird.
5Drücken Sie / , um „Löschen“ oder
„Formatieren“ auszuwählen, und drücken
Sie dann ENTER.
Löschen: Es werden nur BD-VIDEO-Daten in
dem USB-Speichergerät, z. B. BD-
LIVE-Daten, gelöscht.
Formatieren: Es werden alle Daten, einschließlich
BD-VIDEO-Daten und Software-
Aktualisierungen gelöscht.
Wenn Sie nach einer Software-Aktualisierung nur die
nicht benötigten Aktualisierungsdaten löschen
wollen, löschen Sie die Daten mit einem PC aus dem
USB-Speichergerät.
Hinweis
Daten, die im internen Speicher des Players gespeichert wurden
(Spielstände usw.) werden ebenfalls gelöscht.
6Drücken Sie / , um „Ja“ auszuwählen, und
drücken Sie dann ENTER.
7Starten Sie den Vorgang.
Der Bildschirm zu dem aktuellen Vorgang wird
angezeigt.
8Drücken Sie ENTER.
Diese Funktion ermöglicht Software-Aktualisierungen
durch Anschluss eines USB-Speichergeräts mit der
Aktualisierungsdatei an den USB BD STORAGE/
SERVICE-Anschluss dieses Players.
Damit die neue Software hochgeladen werden
kann, darf das USB-Speichergerät außer den
Software-Aktualisierungsdaten keine weiteren
Dateien enthalten.
Prüfen Sie die Verfügbarkeit einer Software-
Aktualisierung auf der Website
http://www.yamaha.co.jp/english/product/av/
down/agreement.html.
Sie können alle Einstellungen des BD-Players auf die
werkseitigen Voreinstellungen zurücksetzen.
Rücksetzen, Nicht Rücksetzen
Softw.-Version
VORSICHT:
• Das USB-Speichergerät oder das Netzkabel dürfen
nicht getrennt werden, während Vorgänge unter
„USB-Speicherverwaltung“ oder „Software-
Update“ ausgeführt werden.
• Verwenden Sie kein USB-Verlängerungskabel zur
Verbindung des USB-Speichergeräts mit dem USB
BD STORAGE/SERVICE-Anschluss des Players.
USB-Verlängerungskabel können die normale
Funktion des Players beeinträchtigen.
Hinweis
Yamaha kann nicht die Kompatibilität aller verfügbaren
USB-Speichergeräte mit diesem Player garantieren.
USB-Speicherverwaltung
Software-Update
System-Rücksetzung
BD-VIDEO-Daten in USB-Speicher löschen.
Alle Inhalte des USB-Speichers einschl.
geschützte Dateien löschen.
Formatieren
Löschen
Ja Nein
OK
Fertig

40 De
EINSTELLUNGEN DES BD-PLAYERS
Verzeichnis der Ländercodes
Verzeichnis der Sprachen
Verzeichnis der Sprachcodes
USA / KANADA / JAPAN / DEUTSCHLAND / FRANKREICH / GB / ITALIEN / SPANIEN / SCHWEIZ /
SCHWEDEN / HOLLAND / NORWEGEN / DÄNEMARK / FINNLAND / BELGIEN / HONG KONG /
SINGAPUR / THAILAND / MALAYSIA / INDONESIEN / TAIWAN /PHILIPPINEN / AUSTRALIEN /
RUSSLAND / CHINA
Englisch / Französisch / Deutsch / Italienisch / Spanisch / Japanisch / Schwedisch / Niederländisch
AA Afar / AB Abchasisch / AF Afrikaans / AM Amharisch / AR Arabisch / AS Assamesisch / AY Aymara / AZ
Aserbaidschanisch / BA Baschkirisch / BE Weißrussisch / BG Bulgarisch / BH Bihari / BI Bislama / BN Bengalisch,
Bangla / BO Tibetisch / BR Bretonisch / CA Katalanisch / CO Korsisch / CS Tschechisch / CY Walisisch / DA
Dänisch / DE Deutsch / DZ Bhutanisch / EL Griechisch / EN Englisch / EO Esperanto / ES Spanisch / ET Estnisch /
EU Baskisch / FA Persisch / FI Finnisch / FJ Fidschi / FO Faröisch / FR Französisch / FY Friesisch / GA Irisch / GD
Schottisch-Gälisch / GL Galizisch / GN Guarani / GU Gujarati / HA Hausa / HI Hindi / HR Kroatisch / HU Ungarisch
/ HY Armenisch / IA Interlingua / IE Interlingue / IK Inupiaq / IN Indonesisch / IS Isländisch / IT Italienisch / IW
Hebräisch / JA Japanisch / JI Jiddisch / JW Javanisch / KA Georgisch / KK Kasachisch / KL Grönländisch / KM
Khmer / KN Kanaresisch / KO Koreanisch / KS Kashmiri / KU Kurdisch / KY Kirgisisch / LA Lateinisch / LN
Lingala / LO Laotisch / LT Litauisch / LV Lettisch / MG Madagassisch / MI Maori / MK Mazedonisch / ML
Malayalam / MN Mongolisch / MO Moldawisch / MR Marathi / MS Malaiisch / MT Maltesisch / MY Birmanisch /
NA Nauruisch / NE Nepalesisch / NL Holländisch / NO Norwegisch / OC Okzitanisch / OM Afan (Oromo) / OR
Oriya / PA Pandschabi / PL Polnisch / PS Paschtunisch, Paschtu / PT Portugiesisch/ QU Quechua / RM
Rätoromanisch / RN Kirundi / RO Rumänisch / RU Russisch / RW Kinyarwanda / SA Sanskrit / SD Sindhi / SG
Sango / SH Serbokroatisch / SI Singhalesisch / SK Slowakisch / SL Slowenisch / SM Samoanisch / SN Shona / SO
Somalisch / SQ Albanisch / SR Serbisch / SS Siswati / ST Sesotho / SU Sundanesisch / SV Schwedisch / SW
Suaheli / TA Tamilisch / TE Telugu / TG Tadschikisch / TH Thai / TI Tigrinya / TK Turkmenisch / TL Tagalog / TN
Setswana / TO Tongaisch / TR Türkisch / TS Tsonga / TT Tatarisch / TW Twi / UK Ukrainisch / UR Urdu / UZ
Usbekisch / VI Vietnamesisch / VO Volapuk / WO Wolof / XH Xhosa / YO Yoruba / ZH Chinesisch / ZU Zulu

41 De
Deutsch
ANDERE
BEDIENUNGSVORGÄNGE
Beim Anschluss eines HDMI- oder Component-Kabels können Sie die Einstellungen mit den Tasten am BD-Player
ändern. Weitere Hinweise siehe Seite 33.
Hinweise
• Auch im Pure Direct-Modus können Einstellungen in das Frontblende-Display des BD-Players zur Anzeige gerufen und geändert
werden.
• Die Einstellungen können nicht während der Wiedergabe verändert werden. Um Einstellungen zu ändern, halten Sie die Wiedergabe
an.
1Drücken Sie DISC, um eine Eingangsquelle
zu wählen, und drücken Sie OPTION.
„VIDEO RESET“ erscheint am Frontblende-Display
des BD-Players.
2Drücken Sie / , um „VIDEO RESET“ bzw.
„HDMI <-> COMP“ auszuwählen.
VIDEO RESET
Setzen Sie die Auflösung von „Komponenten-
Ausgabe“ (☞S.33) oder „HDMI-Videoausgabe“
(☞S.33) auf die werkseitigen Standardeinstellungen.
HDMI <-> COMP
Setzen Sie die Videoausgangspriorität auf HDMI
oder Component.
Weitere Informationen siehe „Video-Ausgabe
Auswählen“ (☞S.33).
3Drücken Sie ENTER, um die Einstellung zu
bestätigen.
„>> DONE <<“ wird angezeigt.
Abrechen des Einstellvorgangs
Drücken Sie OPTION, EXIT oder RETURN.
ÄNDERN DER EINSTELLUNGEN BEIM ANSCHLUSS EINES
HDMI- ODER COMPONENT-KABELS
A B C D
EXIT
TOP MENU/TITLE LIST
POP UP MENU
DISC
,
OPTION
ENTER
EXIT RETURN

STÖRUNGSSUCHE
42 De
ZUSÄTZLICHE INFORMATIONEN
Siehe die nachfolgende Tabelle, wenn das System nicht korrekt funktioniert. Falls das aufgetretene Problem in der
nachfolgenden Tabelle nicht aufgeführt ist oder die nachfolgenden Instruktionen nicht helfen, schalten Sie das Gerät aus,
ziehen Sie den Netzstecker, und wenden Sie sich an den nächsten autorisierten Yamaha-Fachhändler oder -Kundendienst.
■Allgemeines
STÖRUNGSSUCHE
Receiver (R-840)
Problem Ursache Abhilfe Siehe
Seite
Der Receiver schaltet
sich nach dem
Einschalten sofort
wieder aus oder geht
in den
Bereitschaftsmodus.
Das Netzkabel ist nicht angeschlossen
oder der Stecker ist nicht vollständig
eingesteckt.
Stecken Sie das Netzkabel fest ein. 8
Der Receiver wurde einem starken
externen Stromschlag (wie Blitzschlag
oder starke statische Elektrizität)
ausgesetzt.
Schalten Sie den Receiver in den Bereitschaftsmodus,
ziehen Sie den Netzstecker, schließen Sie diesen nach 30
Sekunden wieder an, und verwenden Sie danach das Gerät
im Normalbetrieb.
—
Das Kabel weist einen Kurzschluss auf,
und die Schutzschaltung wurde aktiviert.
Stellen Sie sicher, dass alle Lautsprecherkabel korrekt am
Receiver und allen Lautsprechern angeschlossen sind und
alle Verbindungskabel ausschließlich die entsprechenden
Anschlüsse berühren.
8
Die Innentemperatur ist zu hoch, und die
Überhitzungsschutzschaltung wurde aktiviert.
Lassen Sie den Receiver ungefähr 1 Stunde lang
abkühlen und schalten Sie ihn dann wieder ein.
8
Kein Ton Fehlerhafte Anschlüsse der Eingangs-
oder Ausgangskabel.
Schließen Sie die Kabel korrekt an. Falls das Problem
weiterhin besteht, sind möglicherweise die Kabel defekt.
8
Es wurde keine geeignete Eingangsquelle
gewählt.
Wählen Sie eine geeignete Eingangsquelle mit dem
auf der Frontblende befindlichen INPUT-
Wahlschalter (oder einer der Eingangswahltasten auf
der Fernbedienung).
—
Die Lautsprecheranschlüsse sind nicht
fest.
Schließen Sie die Kabel korrekt an. 8
Die Lautstärke ist auf Minimum gestellt. Erhöhen Sie die Lautstärke. —
Die Stummschaltung ist aktiviert. Drücken Sie MUTE oder VOLUME +/–, um die
Tonausgabe wieder zu aktivieren, und stellen Sie
dann die Lautstärke ein.
7
Von einer Quellenkomponente, zum
Beispiel einer CD-ROM, werden Signale
geliefert, die der Receiver nicht umsetzen
kann.
Verwenden Sie eine Signalquelle, deren Signale vom
Receiver genutzt werden können.
—
Der Ton setzt
plötzlich aus.
Der Einschlaf-Timer hat den Receiver
ausgeschaltet.
Schalten Sie den Receiver ein, und starten Sie die
Wiedergabe der Quelle erneut.
—
Der Ton wird nur aus
dem Lautsprecher
auf einer Seite
ausgegeben.
Die Kabel sind nicht richtig
angeschlossen.
Schließen Sie die Kabel korrekt an. Falls das
Problem weiterhin besteht, sind möglicherweise die
Kabel defekt.
8
Es treten Störungen
durch Digital- oder
Hochfrequenzgeräte
auf.
Der Receiver ist zu nahe an Digital- oder
Hochfrequenzgeräten aufgestellt.
Stellen Sie den Receiver weiter entfernt von solchen
Geräten auf.
—
Die Tonwiedergabe
ist verzerrt.
Der Lautstärkepegel ist zu hoch. Passen Sie den Lautstärkepegel an. 15
„CHK SP WIRE“
leuchtet auf dem
Display auf.
Die Lautsprecherkabel sind
kurzgeschlossen.
Stellen Sie sicher, dass die Lautsprecherkabel korrekt
angeschlossen sind.
8

43 De
Deutsch
STÖRUNGSSUCHE
ZUSÄTZLICHE
INFORMATIONEN
■UKW-Rundfunkempfang
■iPod
Hinweis
Wenn ein Übertragungsfehler auftritt, aber keine Statusmeldung am Frontblende-Display des Receivers angezeigt wird, überprüfen Sie
die Verbindung zwischen dem Receiver und Ihrem iPod (☞S.10).
Problem Ursache Abhilfe Siehe
Seite
Der UKW-Stereo-Empfang ist
verrauscht.
Bei UKW-Stereo-Sendungen kann
dieses Problem prinzipbedingt
auftreten, wenn der Sender zu weit
entfernt oder das
Antenneneingangssignal zu schwach
ist.
Überprüfen Sie die Antennenanschlüsse. 8
Versuchen Sie, durch die Verwendung einer
hochwertigen UKW-Richtantenne das
Empfangsergebnis zu verbessern.
—
Es treten Verzerrungen auf,
und auch mit einer guten
UKW-Antenne ist kein klarer
Empfang möglich.
Es treten Mehrweg-Interferenzen auf. Passen Sie die Antennenposition so an, dass
keine Mehrweg-Interferenzen auftreten.
—
Der gewünschte Sender kann
mit der automatischen
Sendersuchmethode nicht
abgestimmt werden.
Das Signal ist zu schwach. Verwenden Sie eine hochwertige UKW-
Richtantenne.
—
Verwenden Sie die manuelle
Sendersuchmethode.
26
Früher genutzte
Speichersender können nicht
mehr eingestellt werden.
Der Receiver war längere Zeit vom
Netz getrennt.
Speichersender einstellen. 26
Statusmeldung Ursache Abhilfe Siehe
Seite
CONNECT ERR Ein Problem mit dem Signalpfad von
Ihrem iPod zu diesem Receiver liegt vor.
Schalten Sie den Receiver aus und führen Sie einen
Reset Ihres iPod durch.
10
UNKNOWN TYP Der verwendete iPod wird von dem
Receiver nicht unterstützt.
Es werden nur iPod (Click and Wheel), iPod nano,
iPod Classic, iPod mini und iPod touch unterstützt.
—
CONNECTED Ihr iPod ist korrekt in das iPod-Dock
eingesteckt, und die Verbindung
zwischen Ihrem iPod und dem Receiver
ist aufgebaut.
NOT CONNECT Ihr iPod wurde vom iPod-Dock des
Receivers abgezogen.
Stecken Sie Ihren iPod wieder in den Anschluss am
Receiver.
10
CAN'T PLAY Der Receiver kann die aktuell auf Ihrem
iPod gespeicherten Stücke nicht
wiedergeben.
Vergewissern Sie sich, dass die aktuell auf Ihrem
iPod gespeicherten Stücke abspielbar sind.
—
Speichern Sie andere abspielbare Musikdateien auf
Ihrem iPod.
—

44 De
STÖRUNGSSUCHE
Fernbedienung
Problem Ursache Abhilfe Siehe
Seite
Die Fernbedienung
funktioniert nicht
oder nicht richtig.
Die Fernbedienung wird möglicherweise
außerhalb der Reichweite betätigt.
Zur Reichweite der Fernbedienung siehe
„Verwendung der Fernbedienung“.
11
Möglicherweise ist der
Fernbedienungssensor des Systems
direktem Sonnenlicht oder Kunstlicht
(Leuchtstofflampen) ausgesetzt.
Ändern Sie die Beleuchtung oder die Ausrichtung
des Systems.
11
Möglicherweise ist die Batterie entladen. Erneuern Sie die Batterie. 11
Es befinden sich Hindernisse zwischen
dem Sensor des Systems und der
Fernbedienung.
Hindernisse entfernen. 11
Das Systemsteuerungskabel ist von der
Systemsteuerungsanschlussbuchse des
Receivers und/oder BD-Players
abgetrennt.
Stecken Sie das Systemsteuerungskabel am Receiver
und am BD-Player fest ein.
8
BD-Player (BD-940)
Problem Ursache Abhilfe Siehe
Seite
Gerät lässt sich nicht
einschalten.
Der Stecker ist nicht ganz eingesteckt. Stecken Sie das Netzkabel fest ein. 8
Der Receiver und der BD-Player sind
nicht richtig verbunden.
Prüfen Sie die Verbindung zum Receiver. 8
Der Receiver ist nicht richtig eingestellt. Überprüfen Sie die Einstellung (INPUT/Lautstärke/
MUTE/Kopfhörer) am Receiver.
—
Das Gerät ist
ausgeschaltet.
„Auto-Ausschaltung“ ist auf „Ja“ gesetzt. Setzen Sie „Auto-Ausschaltung“ auf „Nein“. 35
Disc-Wiedergabe
startet nicht.
Sie verwenden möglicherweise eine
beschreibbare Disc, die nicht finalisiert
ist.
Finalisieren Sie die beschreibbare Disc. —
Die Disc-Beschriftungsseite weist
möglicherweise nicht nach oben.
Legen Sie die Disc mit der Beschriftungsseite nach
oben auf den Disc-Schlitten.
—
Die Disc ist möglicherweise defekt. Probieren Sie die Wiedergabe einer anderen Disc.
Wenn das gleiche Problem nicht mehr auftritt, ist die
abzuspielende Disc defekt.
—
Die Disc ist verschmutzt. Reinigen Sie die Oberfläche der Disc. 48
Der Regionalcode auf der Disc stimmt
nicht mit dem des BD-Players überein.
Verwenden Sie eine Disc mit dem gleichen
Regionalcode wie der BD-Player.
3
Falls die Aufnahmezeit auf der Disc sehr
kurz ist, ist eventuell keine Wiedergabe
möglich.
BD-RE/R-Discs, die in einem anderen
Format als BDMV aufgezeichnet
wurden, können nicht wiedergegeben
werden.

45 De
Deutsch
STÖRUNGSSUCHE
ZUSÄTZLICHE
INFORMATIONEN
Die Video-
Wiedergabe stoppt.
Der BD-Player wurde überlastet oder
Erschütterungen ausgesetzt.
Setzen Sie den BD-Player keine zu starken
Belastung oder Erschütterungen aus.
—
Der BD-Player steht nicht ruhig und
stabil auf ebener Fläche.
Positionieren Sie den BD-Player auf einer stabilen,
ebenen Fläche.
—
Der BD-Player
„schnappt“ beim
Laden oder bei der
Wiedergabe einer
Disc.
Der BD-Player war längere Zeit nicht in
Gebrauch.
Dieses Phänomen oder Geräusch kann nach
längerem Nichtgebrauch auftreten. Das ist völlig
normal.
—
Es gibt kein Bild. Das Videokabel ist nicht richtig an Ihr
Fernsehgerät angeschlossen.
Schließen Sie das Videokabel vorschriftsmäßig an
dem Fernsehgerät an.
9
Die Eingangseinstellung an Ihrem
Fernsehgerät stimmt nicht.
Wählen Sie die richtige Eingangsquelle an Ihrem
Fernsehgerät.
13
Der BD-Player ist nicht richtig für die
Verbindung per HDMI- oder
Component-Video-Kabel eingerichtet.
Stellen Sie den BD-Player richtig ein. 33
Der Bildschirm friert
ein, und die
Bedientasten
funktionieren nicht.
Die Disc ist beschädigt oder verschmutzt. Prüfen Sie die Oberfläche der Disc. —
Der BD-Player hat sich aufgehängt. Booten Sie den BD-Player neu. 5
Es gibt Ton aber kein
Bild.
Das Videokabel ist nicht richtig
verbunden.
Schließen Sie das Kabel richtig an. 9
Das Bild wird nicht
mit der gewünschten
Auflösung
ausgegeben.
Die Einstellung der Auflösung des
Videoausgangssignals passt nicht zu der
Auflösung des an den BD-Player
angeschlossenen Fernsehgeräts.
Führen Sie „VIDEO RESET“ aus. 41
Schalten Sie zwischen „HDMI“ und „Komponent“
um, indem Sie „Video-Ausgabe Auswählen“ oder
„HDMI <-> COMP“ verwenden.
33, 41
„Video-Ausgabe Auswählen“ ist nicht
richtig eingerichtet.
Stellen Sie „Video-Ausgabe Auswählen“ passend
ein.
33
„Komponenten-Ausgabe“ oder „HDMI-
Videoausgabe“ ist nicht auf die
gewünschte Auflösung gesetzt.
Setzen Sie „Komponenten-Ausgabe“ oder „HDMI-
Videoausgabe“ auf die gewünschte Auflösung.
33
Breitbild-Filme wirken
vertikal gestreckt, oder
oben und unten im
Bildschirm erscheinen
schwarze Balken.
„TV-Einstellungen“ ist nicht auf das
verbundene Fernsehgerät abgestimmt.
Stellen Sie „TV-Einstellungen“ entsprechend dem
angeschlossenen Fernsehgerät ein.
33
Ein 4:3-Standard-Fernsehgerät ist
angeschlossen, aber „Video-Ausgabe
Auswählen“ ist nicht auf „Komponent“
gesetzt.
Wenn ein Breitbild-TV angeschlossen ist, setzen Sie
„TV-Einstellungen“ auf „16:9-Format“.
Wenn ein 4:3-Standard-Fernsehgerät angeschlossen ist,
setzen Sie „Video-Ausgabe Auswählen“ auf „Komponent“.
33
4:3-Bilder wirken
horizontal gestreckt.
Wenn ein 4:3-Fernsehgerät angeschlossen ist, setzen
Sie „Video-Ausgabe Auswählen“ auf „Komponent“.
33
Der Bildschirm zeigt
Blockrauschen
(Mosaik).
Blockrauschen kann bei schnellen Szenen
auftreten und ist durch die digitale
Bildkompressionstechnik bedingt.
Ton oder Bild werden
nicht richtig
ausgegeben.
Von einer kopiergeschützten Disc ist
eventuell keine normale Ton- oder
Bildwiedergabe möglich.
Ton oder Bild sind
verzerrt oder werden
nicht ausgegeben.
Das RCA-Stereokabel ist nicht zwischen
dem Receiver und dem BD-Player
angeschlossen.
Schließen Sie das RCA-Stereokabel zwischen dem
Receiver und dem BD-Player an.
8
Die Audiostecker sind verschmutzt. Reinigen Sie die Audiostecker. —
Die Oberfläche der Disc ist verschmutzt. Reinigen Sie die Oberfläche der Disc. 48
Die Disc ist beschädigt oder verschmutzt. Prüfen Sie die Oberfläche der Disc. —
Problem Ursache Abhilfe Siehe
Seite

46 De
STÖRUNGSSUCHE
Auf dem TV-Bildschirm werden bei einem Problem mit der zur Wiedergabe bestimmten Disc oder mit der Bedienung die
unten aufgeführten Meldungen angezeigt.
Netzwerk
Problem Ursache Abhilfe Siehe
Seite
Keine Verbindung mit
dem Internet
möglich.
Das Netzwerkkabel ist nicht richtig
verbunden.
Schließen Sie das Netzwerkkabel richtig an. 10
Es wird ein falsches Kabel verwendet, z.
B. ein modulares Kabel.
Verwenden Sie für die Verbindung ein
Netzwerkkabel.
10
Der Breitband-Router oder das Modem
sind nicht richtig verbunden.
Verbinden Sie Breitband-Router und/oder Modem
vorschriftsmäßig.
10
Der Breitband-Router oder das Modem
sind nicht eingeschaltet.
Den Brandband-Router bzw. das Modem
einschalten.
—
Die Netzwerkeinstellungen sind nicht
richtig.
Überprüfen Sie „Kommunikationssetup“. 36
Es können keine BD-
LIVE-Inhalte
heruntergeladen
werden.
Das Netzwerkkabel ist nicht richtig
verbunden.
Schließen Sie das Netzwerkkabel richtig an. 10
Das USB-Speichergerät ist nicht richtig
angeschlossen.
Prüfen Sie, dass das USB-Speichergerät mit dem
USB BD STORAGE/SERVICE-Anschluss des BD-
Players verbunden ist.
10
Die BD-Disc unterstützt BD-LIVE nicht. Prüfen Sie, ob die BD-Disc BD-LIVE unterstütz. 24
„BD-Internetzugang“ ist auf „Sperren“
gesetzt.
Setzen Sie „BD-Internetzugang“ auf „Zulassen“ oder
„Limit“.
35
Meldungen zu BD-Discs und DVD-Discs
Fehlermeldung Mögliche Ursache Abhilfe
Wiedergabe nicht
möglich!
– Die Disk kann nicht mit diesem Player abgespielt
werden.
– Kontrollieren Sie die Disk und legen Sie sie
korrekt ein.
Disk nicht kompatibel. – Falls Sie eine Disk einlegen, die nicht mit diesem
Player abspielbar ist (z.B. eine verkratzte Disk),
oder falls Sie eine Disk verkehrt herum einlegen,
erscheint diese Meldung und die Disklade wird
automatisch ausgefahren.
– Tritt auf, wenn die eingelegte Disk nicht
abspielbar ist, weil sie z.B. nicht standardformatig
ist oder Kratzer aufweist.
– Entnehmen Sie die Disk.
Nicht bedienbar! – Tritt bei einem Bedienungsfehler auf.
Der USB-Speicher ist
nicht richtig formatiert.
Bitte den Speicher
über die USB-
Speicher-Verwaltung
formatieren.
– Erscheint, wenn ein Formatierfehler vorliegt. – Formatieren Sie den USB-Speicher erneut.
– Erscheint, wenn der USB-Speicher nicht mit FAT
32/16 formatiert ist.
– Formatieren Sie den USB-Speicher am PC.
Angeschlossener
USB-Speicher nicht
verwendbar. Der
Speicher sollte mit
USB 2.0 konform sein.
– Erscheint, wenn der verwendete USB-Speicher
nicht mit USB 2.0 High Speed (480 MBit/s)
konform ist (z.B. bei USB 1.0/USB 1.1).
– Schließen Sie einen USB 2.0 High Speed
(480 MBit/s)-konformen USB-Speicher an.

47 De
Deutsch
ZUSÄTZLICHE
INFORMATIONEN
JPEG ist ein Dateiformat zum Speichern von Standbild-Dateien (Fotos, Abbildungen usw.). Standbild-Dateien im JPEG-
Format können von dem Player wiedergegeben werden.
■Nicht kompatible Dateiformate
• Standbilder in anderen Formaten als JPEG (wie z. B.
TIFF) können nicht wiedergegeben werden.
• Manche Dateien können nicht wiedergegeben werden,
auch wenn sie das JPEG-Format haben.
• Progressive JPEG-Dateien können nicht
wiedergegeben werden.
• Dateien mit Videosequenzen und Audiodateien sowie
Dateien im Motion JPEG-Format können nicht
wiedergegeben werden, auch wenn es sich um Dateien
im JPEG-Format handelt.
■Sonstige nicht wiedergabefähige
Dateien
Standbilder, die Sie an Ihrem Computer erstellt, optimiert,
kopiert oder anderweitig bearbeitet haben, können
eventuell nicht wiedergegeben werden.
■Bei der Wiedergabe der Dateien können
die unten beschriebenen Symptome
auftreten.
• Der Wiedergabestart kann je nach Anzahl der Ordner,
Anzahl der Dateien und Volumen der Daten verzögert
sein.
• EXIF-Informationen werden nicht angezeigt. EXIF
steht für Exchangeable Image File Format und ist ein
Standard zum Speichern von Austauschinformationen
in Bilddateien, speziell solchen, die die JPEG-
Kompression verwenden. (Informationen unter http://
exif.org.)
■Verwendung des Geräts zur Wiedergabe
einer CD-RW/R-Disc mit gespeicherten
(aufgezeichneten) Standbildern
• Von einer CD-RW/R-Disc, die sowohl Standbilder als
auch Musik oder Videos enthält, können nur die
Standbilder wiedergegeben werden. Manche dieser
Discs sind auch überhaupt nicht abspielbar.
•
Multi-Session-Discs können nicht wiedergegeben werden.
• Standbilder, die Sie mit einer Bildbearbeitungssoftware
bearbeitet (gedreht oder gespeichert und dabei andere
Bilder überschrieben haben), können eventuell nicht
wiedergegeben werden, ebenso Standbilder, die Sie aus
dem Internet oder einer E-Mail importiert haben.
• Discs, die dieser Player wiedergeben (erkennen) kann,
müssen die folgenden Eigenschaften aufweisen:
Enthält Dateien im EXIF-Format
Bildauflösung: Zwischen 32 ×32 und
7680 ×4320 Pixel
Maximale Anzahl Ordner: 64
Maximale Anzahl Dateien: 256
Dateigröße: 20 MB oder weniger
■Struktur von Standbild (JPEG)-Ordnern
Zur Wiedergabe von Standbildern (JPEG) mit diesem
Gerät strukturieren Sie die Ordner auf der Disc wie unten
gezeigt. Bilder, die sich direkt im Wurzelverzeichnis
befinden, können nicht wiedergegeben werden.
HINWEISE ZUM JPEG-DATEIFORMAT
01 Folder
001.jpg
002.jpg
003.jpg
004.jpg
005.jpg
006.jpg
007.jpg
02 Folder
64 Folder
254.jpg
255.jpg
256.jpg
Root

HINWEISE ZUR HANDHABUNG VON DISCS
48 De
• Handhaben Sie Discs stets mit Vorsicht, damit ihre
Abspieloberfläche nicht verkratzt wird. Discs dürfen
keinesfalls durchgebogen werden.
• Die Abspieloberfläche darf nur mit einem sauberen,
trockenen Tuch abgewischt werden. Verwenden Sie
keinerlei Disc-Reiniger, Spray oder sonstige
Flüssigkeiten auf Chemiebasis.
• Wischen Sie nicht in Kreisbewegungen, sondern stets
von der Mitte aus gerade zum Rand.
• Verwenden Sie zum Schreiben auf der
Beschriftungsseite der Disc einen Spezialstift mit
weicher Spitze.
• Nehmen Sie nicht verwendete Discs aus dem Gerät und
bewahren Sie sie in einer geeigneten Hülle auf.
• Setzen Sie Discs nicht längere Zeit direkter
Sonneneinstrahlung, hohen Temperaturen oder hoher
Luftfeuchtigkeit aus.
■Wiedergabe einer 8-cm-CD
Legen Sie die Disc in die innere Vertiefung des CD-Tellers
ein. Legen Sie keinesfalls eine normale (12-cm-) CD oben
auf eine 8-cm-CD.
■Analog
Der Ton ist nicht in Zahlen umgesetzt.
Analoger Sound variiert, während sich digitaler Sound aus
festen numerischen Werten zusammensetzt. Solche
Anschlüsse senden Ton über zwei Kanäle, einen linken
und einen rechten Kanal.
■Bildseitenverhältnis
Das Verhältnis von vertikaler zu horizontaler Größe des
angezeigten Bilds. Konventionelle TV-Geräte haben ein
Verhältnis von Breite zu Höhe von 4:3, Breitbild-
Bildschirme von 16:9.
■Component-Video
Anschlüsse für die Eingabe und Ausgabe eines
Component-Video-Signals. Component-Video-Signale
bestehen aus drei Zeilen, dem Luminanzsignal (Y) und
zwei Farbdifferenzsignalen (PB/CB, PR/CR) und erzeugen
Videobilder von hoher Qualität.
■Disc-Menü
Eine Bildschirmanzeige zur Anwahl von Bildern, Musik,
Untertiteln, Kamerawinkeln usw. auf einer BD/DVD.
■Dolby Digital
Ein von den Dolby Laboratories entwickeltes digitales
Surround-Sound-System mit mehreren, voneinander
vollkommen getrennten Kanälen. Bei 3 Frontkanälen
(links, Mitte und rechts) und 2 Surround-Stereo-Kanälen
bietet Dolby Digital fünf vollwertige Audiokanäle. Mit
einem zusätzlichen Kanal speziell für Basseffekte
(genannt LFE für Low Frequency Effect) kommt ein
solches System auf insgesamt 5.1 Kanäle (der LFE-Kanal
zählt 0.1). Durch die Verwendung von 2-Kanal-Stereo für
die Surround-Lautsprecher entstehen räumlichere
Soundeffekte und eine gehaltvollere Klangumgebung als
bei Dolby Surround.
■DTS (Digital Theater Systems)
Ein von der Digital Theater Systems, Inc. entwickeltes
digitales Surround-Sound-System für (max.) 5.1-Kanal-
Audio. Mit einer Fülle von Audiodaten produziert dieses
System authentische Soundeffekte.
■HDMI
HDMI (High-Definition Multimedia Interface) ist die erste von der
Industrie unterstützte, unkomprimierte, volldigitale Audio/Video-
Schnittstelle. Als Schnittstelle zwischen einer beliebigen Quelle (z. B.
einem Digitalempfänger oder AV-Controller) und einem Audio/Video-
Monitor (z. B. einem digitalen Fernseher) unterstützt HDMI Standard-,
Enhanced- und High-Definition-Video genauso wie mehrkanaliges
digitales Audio über ein einziges Kabel. HDMI überträgt alle ATSC
(Advanced Television Systems Committee)-HDTV-Standards und
unterstützt digitales 8-Kanal-Audio, wobei zusätzliche Bandbreite zur
Unterstützung künftiger Verbesserungen und Anforderungen in Reserve
vorgehalten wird.
HINWEISE ZUR HANDHABUNG VON DISCS
Hinweis: Verwenden Sie keinesfalls Linsenreiniger, da
diese Störungen verursachen können.
GLOSSAR

49 De
Deutsch
ZUSÄTZLICHE
INFORMATIONEN
In Kombination mit HDCP (High-Bandwidth Digital
Content Protection) ist HDMI eine sichere Audio/Video-
Schnittstelle, die die Sicherheitsanforderungen von
Inhalteanbietern und Systembetreibern erfüllt.
Weitere Informationen über HDMI finden Sie auf der
HDMI-Website „www.hdmi.org/“.
■Zeilensprungverfahren
Das am meisten verbreitete Abtastverfahren bei Fernsehgeräten.
Der Bildschirm wird zur Abtastung in gerade und ungerade
nummerierte Felder unterteilt, um diese anschließend zu einem
vollständigen Bild (Frame) zusammenzusetzen.
■JPEG (Joint Photographic Experts
Group)
Ein von der Joint Photographic Experts Group vorgeschlagenes,
standardisiertes Bildkompressionsverfahren. Das Verfahren ist in
der Lage, die Größe von Bilddaten auf 1 bis 10 % der
ursprünglichen Größe zu reduzieren und sehr gut auf digitale
Fotoaufnahmen anwendbar.
■Kindersicherung
Beschränkt die Wiedergabe von Discs entsprechend dem Alter des
Benutzers oder einer landesspezifischen Schutzstufe. Die
Beschränkung ist von Disc zu Disc verschieden. Wenn sie aktiviert ist,
ist die Wiedergabe gesperrt, sobald die in der Software gespeicherte
Stufe höher ist als die vom Benutzer eingerichtete Stufe.
■Progressive Abtastung
Ein Verfahren zur zeitgleichen Darstellung aller
abgetasteten Zeilen eines Vollbilds, bei dem auf einem
großen Bildschirm das Bild deutlich weniger flimmert und
gute Schärfe und Glätte erzielt wird.
■Regionalcode
Viele BD/DVD-Discs enthalten einen Regionalcode, anhand
dessen der Urheberrechtsinhaber die Verbreitung der BD/DVD-
Software steuert. Es gibt sechs Regionalcodes, die einen BD-
Player darauf beschränken, nur BD/DVD-Dics abzuspielen, die
denselben Regionalcode haben.
■VR-Format (Video Recording-Format)
Ein DVD-Videoaufnahmeformat, das die Bearbeitung von DVD-
Videodaten auf einer Disc ermöglicht. Für die Wiedergabe
benötigen Sie einen mit dem VR-Format kompatiblen Player.
■R-840
VERSTÄRKER-BEREICH
• Minimale RMS-Ausgangsleistung pro Kanal
(6 Ω, 1 kHz, 10 % THD) ...........................................65 W + 65 W
• Eingangsempfindlichkeit/Impedanz
PLAYER usw. ......................................................... 200 mV/47 kΩ
• Frequenzgang
PLAYER usw. .......................................20 Hz bis 20 kHz ± 0,5 dB
• Gesamtklirrfaktor
PLAYER usw. (30 W/6 Ω) ............................ 0,04 % oder weniger
• Signal-Rauschspannungsabstand (IHF-A Netzwerk)
PLAYER (200 mV, Eingang kurzgeschlossen)
..............100 dB oder mehr
TUNER-BEREICH
ALLGEMEINES
• Netzspannung/-frequenz................. 230 V Wechselspannung, 50 Hz
• Leistungsaufnahme ..................................................................115 W
• Abmessungen (B × H × T)................................ 215 × 110 × 348 mm
• Gewicht.....................................................................................5,7 kg
• Standby-Leistungsaufnahme............................................unter 0,3 W
■BD-940
PLAYER-BEREICH
• AUDIO OUT
Ausgangspegel (1 kHz 0 dB) ........................................ 2 V (± 0,3)
Signal-Rauschspannungsabstand ........................größer als 100 dB
Dynamikbereich (48 kHz, 24 Bit).........................größer als 95 dB
Klirrfaktor (THD)............................................. kleiner als 0,005 %
Frequenzgang
CD-DA .....................................................................20 Hz–20 kHz
BD/DVD (48 kHz) ...................................................20 Hz–22 kHz
BD/DVD (96 kHz) ...................................................20 Hz–44 kHz
• Video-Ausgang
Composite ...................................................................1 Vp-p/75 Ω
Component ........................................................... 1 Vp-p/75 Ω (Y)
0,7 Vp-p/75 Ω (PB, PR)
• HDMI-Ausgang...................................................... BuchseTyp A x 1
480p(576p)/720p/1080i/1080p/1080p bei 24 Hz,
Unterstützt Deep Color, x.v.Color
• USB............................. Einsatz:
1) Wiedergabe von BD-LIVE/BonusView-
Inhalten
2) Firmware-Aktualisierung
Allgemeines
• Netzspannung/-frequenz .................230 V Wechselspannung, 50 Hz
• Leistungsaufnahme ................................................................... 20 W
• Standby-Leistungsaufnahme.............................................. unter 1 W
• Abmessungen (B × H × T) ................................215 × 108 × 318 mm
• Gewicht .................................................................................... 3,4 kg
Technische Daten können ohne Ankündigung geändert werden.
TECHNISCHE DATEN
• Empfangsbereich ............................................87,50 bis 108,00 MHz

50 De
TECHNISCHE DATEN
iPod™
„iPod“ ist als Marke von Apple Inc. in den USA und anderen
Ländern eingetragen.
„Made for iPod“ bedeutet, dass eine elektronische
Zubehörkomponente speziell für den Anschluss an den iPod
entwickelt wurde und die Erfüllung der Apple-
Leistungsstandards vom Entwickler zertifiziert wurde.
Apple übernimmt keine Verantwortung für die Funktion dieses
Geräts oder seine Einhaltung von Sicherheitsstandards und
Vorschriften.
Audio-visuelles Material kann urheberrechtlich geschützt sein
und darf nicht ohne Genehmigung des Rechteinhabers
aufgezeichnet werden. Beachten Sie bitte die gesetzlichen
Bestimmungen.
Dieses Produkt enthält durch US-Patente und andere
Schutzrechte geschützte Technologie zum Schutz von
Urheberrechten. Die Nutzung dieser Urheberrechtsschutz-
Technologie unterliegt der Genehmigung durch Macrovision und
ist auf den Heimgebrauch und andere eingeschränkte
Aufführungszwecke beschränkt, sofern von Macrovision nicht
ausdrücklich anders genehmigt. Das Zerlegen und
Disassemblieren ist verboten.
Hergestellt unter Lizenz der Dolby Laboratories. „Dolby“ und
das Doppel-D-Symbol sind Marken der Dolby Laboratories.
Hergestellt unter Lizenz gemäß US-Patent Nr. 5,451,942;
5,956,674; 5,974,380; 5,978,762; 6,226,616; 6,487,535;
7,392,195; 7,272,567; 7,333,929; 7,212,872 und anderen in den
USA und weltweit erteilten und angemeldeten Patenten. DTS ist
eine eingetragene Marke, und DTS-Logos, Symbole, DTS-HD
und DTS-HD Master Audio | Essential sind Marken der DTS, Inc.
©1996-2008 DTS, Inc. Alle Rechte vorbehalten.
ist eine Marke.
Das „BD-LIVE“-Logo ist eine Marke der Blu-ray Disc
Association.
„BONUSVIEW“ ist eine Marke der Blu-ray Disc Association.
ist eine Marke der DVD Format/Logo Licensing
Corporation.
HDMI, das HDMI-Logo und High-Definition Multimedia
Interface sind Marken oder eingetragene Marken der HDMI
Licensing LLC.
„x.v.Color“ und das „x.v.Color“-Logo sind Marken.
„AVCHD“ und das „AVCHD“-Logo sind Marken der Panasonic
Corporation und der Sony Corporation.
Java und alle Java-basierten Marken und Logos sind Marken oder
in den USA und anderen Ländern eingetragene Marken der Sun
Microsystems, Inc.
Dieses Produkt ist unter der AVC-Patentportfoliolizenz und der
VC-1-Patentportfoliolizenz für den privaten und nicht-
gewerblichen Gebrauch lizenziert für das (i) Verschlüsseln von
Videomaterial nach dem AVC-Standard und dem VC-1-Standard
(„AVC/VC-1 Video“) und/oder (ii) das Entschlüssen von AVC/
VC-1 Video-Material, das vom Benutzer für private und nicht-
gewerbliche Zwecke verschlüsselt wurde und/oder das von einem
Videoanbieter mit AVC/VC-1 Video-Lizenz bezogen wurde. Die
Lizenz schließt alle anderen Zwecke ausdrücklich aus. Weitere
Informationen erhalten Sie von der MPEG LA, LLC.
Siehe http://www.mpegla.com.
U.S. Patente 6,836,549; 6,381,747; 7,050,698; 6,516,132; und
5,583,936

51 De
Deutsch
ZUSÄTZLICHE
INFORMATIONEN
■Sprache (Abkürzung), Code-Nummer
■Land, Code-Nummer, Abkürzung
VERZEICHNIS DER SPRACHEN UND LÄNDER
Verzeichnis der Sprachen
Japanisch (ja), 1001 Bhutanisch (dz), 0426 Kirgisisch (ky), 1125 Singhalesisch (si), 1909
Englisch (en), 0514 Esperanto (eo), 0515 Lateinisch (la), 1201 Slowakisch (sk), 1911
Französisch (fr), 0618 Estnisch (et), 0520 Lingála (ln), 1214 Slowenisch (sl), 1912
Deutsch (de), 0405 Baskisch (eu), 0521 Laotisch (lo), 1215 Samoanisch (sm), 1913
Italienisch (it), 0920 Persisch (fa), 0601 Litauisch (lt), 1220 Shona (sn), 1914
Spanisch (es), 0519 Finnisch (fi), 0609 Lettisch (lv), 1222 Somalisch (so), 1915
Chinesisch (zh), 2608 Fidschi (fj), 0610 Madagassisch (mg), 1307 Albanisch (sq), 1917
Niederländisch (nl), 1412 Färöisch (fo), 0615 Maori (mi), 1309 Serbisch (sr), 1918
Portugiesisch (pt), 1620 Friesisch (fy), 0625 Mazedonisch (mk), 1311 Siswati (ss), 1919
Schwedisch (sv), 1922 Irisch (ga), 0701 Malayalam (ml), 1312 Sesotho (st), 1920
Russisch (ru), 1821 Schottisch-Gälisch (gd), 0704 Mongolisch (mn), 1314 Sundanisch (su), 1921
Koreanisch (ko), 1115 Galizisch (gl), 0712 Moldawisch (mo), 1315 Suaheli (sw), 1923
Griechisch (el), 0512 Guaraní (gn), 0714 Marathi (mr), 1318 Tamilisch (ta), 2001
Afar (aa), 0101 Gujarati (gu), 0721 Malaiisch (ms), 1319 Telugu (te), 2005
Abchasisch (ab), 0102 Hausa (ha), 0801 Maltesisch (mt), 1320 Tadschikisch (tg), 2007
Afrikaans (af), 0106 Hindi (hi), 0809 Birmanisch (my), 1325 Thai (th), 2008
Amharisch (am), 0113 Kroatisch (hr), 0818 Nauruisch (na), 1401 Tigrinya (ti), 2009
Arabisch (ar), 0118 Ungarisch (hu), 0821 Nepalesisch (ne), 1405 Turkmenisch (tk), 2011
Assamesisch (as), 0119 Armenisch (hy), 0825 Norwegisch (no), 1415 Tagalog (tl), 2012
Aymara (ay), 0125 Interlingua (ia), 0901 Okzitanisch (oc), 1503 Setswana (tn), 2014
Aserbaidschanisch (az), 0126 Interlingue (ie), 0905 Oromo (om), 1513 Tongaisch (to), 2015
Baschkirisch (ba), 0201 Inupiaq (ik), 0911 Oriya (or), 1518 Türkisch (tr), 2018
Weißrussisch (be), 0205 Indonesisch (in), 0914 Pandschabi (pa), 1601 Tsonga (ts), 2019
Bulgarisch (bg), 0207 Isländisch (is), 0919 Polnisch (pl), 1612 Tatarisch (tt), 2020
Bihari (bh), 0208 Hebräisch (iw), 0923 Paschtunisch, Paschtu (ps), 1619 Twi (tw), 2023
Bislama (bi), 0209 Jiddisch (ji), 1009 Quechua (qu), 1721 Ukrainisch (uk), 2111
Bengalisch (bn), 0214 Javanisch (jw), 1023 Rätoromanisch (rm), 1813 Urdu (ur), 2118
Tibetisch (bo), 0215 Georgisch (ka), 1101 Kirundi (rn), 1814 Usbekisch (uz), 2126
Bretonisch (br), 0218 Kasachisch (kk), 1111 Rumänisch (ro), 1815 Vietnamesisch (vi), 2209
Katalanisch (ca), 0301 Grönländisch (kl), 1112 Kinyarwanda (rw), 1823 Volapük (vo), 2215
Korsisch (co), 0315 Khmer (km), 1113 Sanskrit (sa), 1901 Wolof (wo), 2315
Tschechisch (cs), 0319 Kanaresisch (kn), 1114 Sindhi (sd), 1904 Xhosa (xh), 2408
Walisisch (cy), 0325 Kaschmiri (ks), 1119 Sangho (sg), 1907 Yoruba (yo), 2515
Dänisch (da), 0401 Kurdisch (ku), 1121 Serbokroatisch (sh), 1908 Zulu (zu), 2621
Verzeichnis der Länder
Argentinien, 0118, ar Finnland, 0609, fi Malaysia, 1325, my Singapur, 1907, sg
Australien, 0121, au Frankreich, 0618, fr Mexiko, 1324, mx Spanien, 0519, es
Österreich, 0120, at Deutschland, 0405, de Niederlande, 1412, nl Schweden, 1905, se
Belgien, 0205, be Hongkong, 0811, hk Neuseeland, 1426, nz Schweiz, 0308, ch
Brasilien, 0218, br Indien, 0914, in Norwegen, 1415, no Taiwan, 2023, tw
Kanada, 0301, ca Indonesien, 0904, id Pakistan, 1611, pk Thailand, 2008, th
Chile, 0312, cl Italien, 0920, it Philippinen, 1608, ph Großbritannien, 0702, gb
China, 0314, cn Japan, 1016, jp Portugal, 1620, pt USA, 2119, us
Dänemark, 0411, dk Korea, Republik, 1118, kr Russische Föderation, 1821, ru

VERZEICHNIS DER SPRACHEN UND LÄNDER
52 De
Begrenzte Garantie für den Europäischen Wirtschaftsraum (EWR) und die Schweiz
Herzlichen Dank, dass Sie sich für ein Yamaha Produkt entschieden haben. In dem unwahrscheinlichen Fall, dass die Garantie für das Yamaha-Produkt in
Anspruch genommen werden muss, wenden Sie sich bitte an den Händler, bei dem es gekauft wurde. Sollten Sie auf Schwierigkeiten stoßen, wenden Sie
sich bitte an die Yamaha Repräsentanz in Ihrem Land. Auf unserer Internetseite (http://www.yamaha-hifi.com/ oder http://www.yamaha-uk.com/ für
Einwohner Großbritanniens) finden Sie alle Einzelheiten.
Wir garantieren für einen Zeitraum von zwei Jahren ab ursprünglichem Kaufdatum, dass dieses Produkt frei von Verarbeitungs- oder Materialfehlern ist.
Yamaha verpflichtet sich, gemäß der nachstehend angeführten Bedingungen, ein fehlerhaftes Produkt (oder Teile desselben) kostenfrei (gilt für Teile und
Arbeit) zu reparieren oder auszutauschen. Diese Entscheidung obliegt ausschließlich Yamaha. Yamaha behält sich vor, das Produkt gegen ein in Art und/
oder Wert und Zustand ähnliches Produkt auszutauschen, wenn das entsprechende Modell nicht mehr erzeugt wird, oder die Reparatur als unrentabel
angesehen wird.
Bedingungen
1 Dem defekten Produkt MUSS die Originalrechnung oder der Originalkaufbeleg (der Beleg muss das Kaufdatum, den Produkt-Code und den Namen des
Händlers aufweisen) beigelegt werden, ebenso eine Fehlerbeschreibung. Bei Fehlen einer eindeutigen Kaufbestätigung behält sich Yamaha das Recht
vor, den kostenfreien Service abzulehnen und das Produkt auf Kosten des Kunden zu retournieren.
2 Das Produkt MUSS von einem AUTORISIERTEN Yamaha-Händler innerhalb des Europäischen Wirtschaftsraums (EWR) oder der Schweiz gekauft
worden sein.
3 Es wurden keine wie auch immer gearteten Änderungen am Produkt vorgenommen, außer diese wurden von Yamaha schriftlich genehmigt.
4 Folgendes ist von der Garantie ausgeschlossen:
a. Regelmäßige Wartung und Reparatur oder Austausch von Verschleißteilen.
b. Schaden durch:
(1) Vom Kunden selber oder von nichtbefugten Dritten ausgeführte Reparaturen.
(2) Unsachgemäße Verpackung oder Handhabung während des Transports vom Kunden. Beachten Sie bitte, dass die sachgerechte Verpackung des
zur Reparatur gebrachten Produkts in der Verantwortung des Retournierenden liegt.
(3) Unsachgemäße Verwendung, einschließlich der, jedoch nicht beschränkt auf, (a) die Verwendung des Produkts zu anderen als den normalen
Zwecken oder Behandlung entgegen die Anweisungen Yamahas zur korrekten Handhabung, Wartung oder Lagerung und (b) die Installierung
oder Verwendung des Produkts auf andere Weise als dies den technischen oder Sicherheitsstandards jenes Landes entspricht, in dem das Produkt
verwendet wird.
(4) Unfälle, Blitzschlag, Wasser, Feuer, ungeeignete Belüftung, Auslaufen der Batterie oder jedem anderen Grund, den Yamaha nicht beeinflussen
kann.
(5) Defekte an jenem System, an welches dieses Produkt angeschlossen wird und/oder die Inkompatibilität mit Produkten anderer Hersteller.
(6) Die Verwendung eines nicht von Yamaha in den EWR und/oder die Schweiz importierten Produkts, wenn dieses Produkt nicht den technischen
oder Sicherheitsstandards jenes Landes, in dem es verwendet wird, und/oder der standardisierten Produktspezifikation für von Yamaha im EWR
und/oder der Schweiz vertriebene Produkte, entspricht.
5 Wenn es Unterschiede in den Garantiebedingungen zwischen jenem Land in dem das Produkt gekauft wurde, und jenem in dem das Produkt verwendet
wird, finden die Garantiebedingungen jenes Landes Anwendung, in dem das Produkt verwendet wird.
6 Yamaha kann für keinerlei Verluste oder Schäden, ob direkt, in Konsequenz oder anderweitig, verantwortlich gemacht werden, außer bezüglich der
Reparatur oder des Ersatzes eines Produkts.
7 Legen Sie bitte Kopien aller persönlichen Einstellungen und Daten an, da Yamaha weder für irgendwelche Änderungen noch für den Verlust solcher
Daten verantwortlich gemacht werden kann.
8 Diese Garantie beeinflusst nicht die gesetzlichen Verbraucherrechte unter dem geltenden nationalen Recht oder die Verbraucherrechte gegenüber dem
Händler, die durch einen Kaufvertrag entstehen.
Verbraucherinformation zur Sammlung und Entsorgung alter
Elektrogeräte und benutzter Batterien
Befinden sich diese Symbole auf den Produkten, der Verpackung und/oder beiliegenden Unterlagen, so
sollten benutzte elektrische Geräte und Batterien nicht mit dem normalen Haushaltsabfall entsorgt werden.
In Übereinstimmung mit Ihren nationalen Bestimmungen und den Richtlinien 2002/96/EC und
2006/66/EC, bringen Sie bitte alte Geräte und benutzte Batterien zur fachgerechten Entsorgung,
Wiederaufbereitung und Wiederverwendung zu den entsprechenden Sammelstellen.
Durch die fachgerechte Entsorgung der Elektrogeräte und Batterien helfen Sie, wertvolle Ressourcen zu
schützen und verhindern mögliche negative Auswirkungen auf die menschliche Gesundheit und die
Umwelt, die andernfalls durch unsachgerechte Müllentsorgung auftreten könnten.
Für weitere Informationen zum Sammeln und Wiederaufbereiten alter Elektrogeräte und Batterien,
kontaktieren Sie bitte Ihre örtliche Stadt- oder Gemeindeverwaltung, Ihren Abfallentsorgungsdienst oder
die Verkaufsstelle der Artikel.
[Entsorgungsinformation für Länder außerhalb der Europäischen Union]
Diese Symbole gelten nur innerhalb der Europäischen Union. Wenn Sie solche Artikel ausrangieren
möchten, kontaktieren Sie bitte Ihre örtlichen Behörden oder Ihren Händler und fragen Sie nach der
sachgerechten Entsorgungsmethode.
Anmerkung zum Batteriesymbol (untere zwei Symbolbeispiele):
Dieses Symbol kann auch in Kombination mit einem chemischen Symbol verwendet werden. In diesem
Fall entspricht dies den Anforderungen der Direktive zur Verwendung chemischer Stoffe.

i Sv
1 Läs noga denna bruksanvisning för att kunna ha största möjliga
nöje av enheten. Förvara bruksanvisningen nära till hands för
framtida referens.
2 Installera denna ljudanläggning på ett väl ventilerat, svalt, torrt,
rent ställe, och håll den borta från ställen som utsätts för solsken,
värmekällor, vibrationer, damm, fukt och kyla. För god
ventilation bör det minsta fria utrymmet vara följande.
Ovansida: 30 cm (endast R-840)
Baksida: 10 cm
Sidor: 10 cm
3 Placera enheten på behörigt avstånd från andra elapparater,
motorer, transformatorer och annat som kan orsaka störningar.
4 Utsätt inte enheten för hastiga temperaturväxlingar och placera
den inte på ett ställe där luftfuktigheten är hög (t.ex. nära en
luftfuktare) då fuktbildning i enheten skapar risk för brand,
elstötar, skador på enheten eller personskador.
5 Placera inte enheten på ett ställe där främmande föremål kan
tränga in i den eller där den kan utsättas för droppar eller
vattenstänk. Placera aldrig det följande ovanpå enheten:
– Övriga apparater då sådana kan orsaka skador och/eller
missfärgning av enhetens hölje.
– Brännbara föremål (t.ex. stearinljus) då sådana skapar risk för
brand, skador på enheten och/eller personskador.
– Vätskebehållare som kan falla och spilla vätska över enheten,
vilket skapar risk för elstötar och/eller skador på enheten.
6 Täck aldrig över enheten med en tidning, duk, gardin el.dyl. då
detta skapar risk för överhettning. En alltför hög temperatur inuti
enheten kan leda till brand, skador på enheten och/eller
personskador.
7 Anslut inte enheten till ett vägguttag förrän samtliga övriga
anslutningar slutförts.
8 Använd aldrig enheten vänd upp och ned. Detta kan leda till
överhettning som orsakar skador.
9 Hantera inte tangenter, reglage och kablar onödigt hårdhänt.
10 Fatta tag i själva kontakten när nätkabeln kopplas bort från
vägguttaget; dra aldrig i kabeln.
11 Använd aldrig några kemiska lösningar för rengöring då dessa
kan skada ytbehandlingen. Använd en ren, torr trasa.
12 Använd endast den spänning som står angiven på enheten.
Anslutning till en strömkälla med högre spänning än den angivna
kan orsaka brand, skador på enheten och/eller personskador.
Yamaha åtar sig inget ansvar för skador beroende på att enheten
används med en spänning utöver den angivna.
13 Koppla bort nätkabeln från vägguttaget för att undvika skador
p.g.a. blixtnedslag om ett åskväder uppstår.
14 Försök aldrig att utföra egna reparationer. Kontakta en
kvalificerad tekniker från Yamaha om servicebehov föreligger.
Du får inte under några omständigheter ta av höljet.
15 Koppla bort nätkabeln från vägguttaget om enheten inte ska
användas under en längre tid (t.ex. under semestern).
16 Läs avsnittet “FELSÖKNING” om vanligt förekommande
driftsproblem innan du förutsätter att enheten är söndrig.
17 Innan enheten flyttas ska du trycka på för att ställa den i
beredskapsläge och sedan koppla bort nätkabeln från
vägguttaget.
18 Kondensation (imma) uppstår, om den omgivande temperaturen
plötsligt ändras. Koppla i så fall loss nätkabeln från nätuttaget
och låt apparaten vila.
19 Vid långvarig användning kan det hända att apparaten blir väldigt
varm. Slå i så fall av strömmen och låt apparaten vila tills den har
svalnat.
20 Installera receivern nära ett nätuttag och där stickkontakten lätt
kan kommas åt.
21 Utsätt inte batterierna för kraftig värme från exempelvis solljus,
eld eller liknande.
22 För högt ljudtryck från öronsnäckor eller hörlurar kan orsaka
hörselförlust.
LASERSÄKERHET
Apparaten använder sig av en laser. På grund av risken för
ögonskador bör ingen annan än en kvalificerad reparatör öppna
höljet eller försöka reparera apparaten.
FARA!
Apparaten avger en synlig laserstålning i öppet läge. Undvik
direkt ögonkontakt med strålen. Placera inte ögonen i närheten av
skivfacket eller någon annan öppning för att titta in i apparaten,
medan apparaten är ansluten till ett nätuttag.
OBSERVERA: LÄS DETTA INNAN ENHETEN TAS I BRUK.
Den här enheten är inte bortkopplad från nätströmmen så
länge den är inkopplad i vägguttaget, även om själva enheten
är avstängd med . Detta tillstånd kallas för beredskapsläge
(standby). Enheten är konstruerad för att förbruka en mycket
liten mängd ström i detta tillstånd.
VARNING
UTSÄTT INTE ENHETEN FÖR REGN ELLER FUKT DÅ
DETTA SKAPAR RISK FÖR BRAND ELLER ELSTÖTAR.
OBSERVERA
Apparaten kopplas inte bort från växelströmskällan (nätet) så
länge som den är ansluten till vägguttaget, även om själva
apparaten har stängts av.
ADVARSEL
Netspæendingen til dette apparat er IKKE afbrudt, sålæenge
netledningen siddr i en stikkontakt, som er t endt - også
selvom der or slukket på apparatets afbryder.
VAROITUS
Laitteen toisiopiiriin kytketty käyttökytkin ei irroita koko
laitetta verkosta.
Laserkomponenten i denna apparat kan avge en strålning som
överskrider gränsvärdet för klass 1.
LASER-specifikationer:
Klass 1 LASER-produkt
Våglängd: 788 nm (CD)/654 nm (DVD)/405 nm (BD)
Lasereffekt: Ingen farlig strålning utsöndras med
säkerhetsskyddet

1 Sv
INLEDNING Svenska
FÖRBEREDELSE
GRUNDLÄGGANDE
FUNKTIONER
RADIOMOTTAGNING
ÖVRIGA
FUNKTIONER
YTTERLIGARE
INFORMATION
FUNKTIONER ....................................................... 2
MEDFÖLJANDE DELAR .................................... 2
OM SKIVOR........................................................... 3
Typer av skivor kan användas med denna spelare ..... 3
Skivor som inte kan användas med denna spelare..... 3
KONTROLLER OCH FUNKTIONER ............... 4
Mottagare (R-840) ..................................................... 4
BD-spelare (BD-940)................................................. 5
Fjärrkontroll............................................................... 6
FÖRBEREDELSER............................................... 8
Anslutning av högtalare/externa komponenter/
antenner ................................................................. 8
Anslutning av en inspelare (CDR, MDR, etc.),
AV-receiver eller dekoder (CDR, MDR, etc.)........ 9
Anslutning av nätkablar............................................. 9
Anslutning av en iPod™.......................................... 10
Anslutning till Internet............................................. 10
Sätta i batterierna i fjärrkontrollen........................... 11
Använda fjärrkontrollen........................................... 11
Tidsinställning ......................................................... 12
INSTÄLLNING AV SYSTEMET........................ 13
Slå på TV:n och systemet ........................................ 13
Inställning av TV-skärmen....................................... 13
Språk för bildskärmsmenyer.................................... 13
Språk för Audio-, Subtitle- och Disc-meny............. 14
SYSTEMFUNKTIONER..................................... 15
Grundläggande manövrering av systemet................ 15
Ändring av displayens ljusstyrka............................. 16
Använda hörlurar ..................................................... 16
FUNKTIONER FÖR SKIVOR ........................... 17
Användning av bildskärmsmenyer........................... 17
Spelfunktioner.......................................................... 17
Paus vid uppspelning ............................................... 17
Snabbspelning bakåt/framåt..................................... 18
Val av kapitel och spår............................................. 18
BD/DVD-menyer..................................................... 18
Långsam uppspelning .............................................. 18
Bild-för-bild-uppspelning ........................................ 18
Val av språk och ljud................................................ 19
Val av textning ......................................................... 19
Val av kameravinkel................................................. 19
Repeterad uppspelning............................................. 19
Repeterad uppspelning av angiven del
(A-B repetering) .................................................. 20
Uppspelning av JPEG-bildspel ................................ 20
Uppspelning av stillbilder i en vald mapp ............... 21
Uppspelning av filmer inspelade på en
DVD-R/DVD-RW ............................................... 21
Använda “Function Control Screen”
för BD/DVD ........................................................ 22
Använda “Funktions”-menyn för ljud-CD............... 23
Visning av skivinformation...................................... 23
Utnyttja BONUSVIEW och BD-LIVE ................... 24
FM-MOTTAGNING .............................................26
Automatisk stationsinställning ................................ 26
Manuell stationsinställning...................................... 26
Automatisk förinställning ........................................ 26
Manuell förinställning ............................................. 27
Ställa in en förinställd station .................................. 27
RADIODATASYSTEM-INSTÄLLNING
(ENBART EUROPEISK MODELL) ..............28
Visning av radiodatasystem-information................. 28
Använda TP (trafikprogram) dataservice................. 29
CT-inställningar (aktuell tid) ................................... 29
STÄLLA IN TIMERN ..........................................30
Inställning av vanlig timer ....................................... 30
Inställning av insomningstimern.............................. 31
STYRNING AV iPod™.........................................32
Använda iPod™....................................................... 32
INSTÄLLNINGAR FÖR BD-SPELAREN.........33
Inställningar Bild, Ljud............................................ 33
Snabbstart ................................................................ 35
Autoströmavslag ...................................................... 35
HDMI kontroll ......................................................... 35
Uppspelningsinst. .................................................... 35
Kommunikationsinställning..................................... 36
Version ..................................................................... 39
Hantering Av USB-Minne ....................................... 39
Uppdatera Program.................................................. 39
Systemåterställning.................................................. 39
ÄNDRA INSTÄLLNINGARNA VID
ANSLUTNING AV EN HDMI- ELLER
KOMPONENTKABEL ....................................41
FELSÖKNING ......................................................42
Mottagare (R-840) ................................................... 42
Fjärrkontroll............................................................. 44
BD-spelare (BD-940)............................................... 44
Nätverk .................................................................... 46
Meddelanden relaterade till BD-skiva och
DVD-skiva........................................................... 46
ANGÅENDE JPEG FILFORMATET ................47
HANTERING AV SKIVOR .................................48
ORDLISTA ............................................................48
SPECIFIKATIONER............................................49
LISTOR ÖVER SPRÅK, LÄNDER....................51
Lista över språk........................................................ 51
Landslista................................................................. 51
INNEHÅLLSFÖRTECKNING
INLEDNING
FÖRBEREDELSE
GRUNDLÄGGANDE FUNKTIONER
RADIOMOTTAGNING
ÖVRIGA FUNKTIONER
YTTERLIGARE INFORMATION

3 Sv
Svenska
INLEDNING
• Följande skivor kan spelas upp i denna spelare. Använd
inte en 8 cm till 12 cm adapter.
• Använd skivor som överensstämmer med kompatibla
standarder vilket indikeras av officiella logotyper på
skivetiketten. Korrekt uppspelning av skivor som inte
uppfyller dessa standarder garanteras inte. Förväntad
bildkvalitet och ljudkvalitet kan inte heller garanteras
även om det går att spela upp skivorna.
*1 Denna spelare har konstruerats med förutsättningen att den
ska spela upp ljud-CD-skivor som överensstämmer med
standarder för CD-skivor. CD-skivor som inkluderar en signal
med syfte att skydda upphovsrättigheter
(kopieringskontrollsignal) kanske inte kan spelas upp med
denna spelare.
*2 Se “ANGÅENDE JPEG FILFORMATET” på sidan 47.
• BD/DVD-videospelare och -skivor har regionkoder,
som föreskriver i vilka regioner en skiva kan spelas.
• Manövreringar och funktioner för BD/DVD-Video kan
skilja sig från förklaringarna i denna bruksanvisning,
och vissa manövreringar kan vara förhindrade på grund
av skivtillverkarens inställningar.
• Om en menyskärm eller manöverinstruktioner visas
under uppspelning av en skiva, följ anvisningarna som
visas.
• Ljudkomponenten i en DVD-video inspelad vid 96 kHz
(linjär PCM) matas ut som 48 kHz ljud under
uppspelning.
Anmärkningar
• Det är möjligt att det inte går att spela vissa av skivorna i
tabellen i vänstra spalten beroende på skivan.
• “Finalize” syftar på en inspelare som behandlar en inspelad
skiva så att det går att spela den i såväl denna spelare som andra
BD-spelare/inspelare. Endast slutbehandlade DVD-skivor kan
spelas upp i denna spelare. (Denna spelare saknar funktion för
att slutbehandla skivor.)
Följande skivor kan inte spelas upp eller kommer inte att
spelas upp korrekt på denna spelare. Om en sådan skiva av
misstag spelas upp, kan högtalarna skadas.
Skivor med ovanliga former kan inte spelas.
Skivor med ovanliga former (hjärtformade eller
sexkantiga skivor etc.) kan inte användas. Användning av
sådana skivor orsakar funktionsfel.
Följande BD/DVD-videoskivor kan inte
användas.
• Skivor som inte motsvarar regionkoden/numret för
denna spelare.
• Illegalt producerade skivor.
• Skivor inspelade för kommersiellt bruk.
OM SKIVOR
Typer av skivor kan användas med
denna spelare
Skivtyp Inspelnings
format Innehåll Skivstorlek
BD-video -- Ljud + video
(film)
12 cm
8 cm
BD-RE DL
BD-R DL
BDMV-
format
DVD Video Videoformat Ljud + video
(film)
12 cm
8 cm
DVD+RW/
DVD+R
DVD+R DL
DVD-R DL
DVD-RW/
DVD-R
Video/VR/
AV C H D -
format (endast
slutbehandlad
skiva)
Ljud + video
(film)
12 cm
8 cm
Ljud-CD*1 Ljud-CD
(CD-DA)
Ljud 12 cm
8 cm
CD-RW/CD-R Ljud-CD
(CD-DA)
Ljud
JPEG*2 Stillbild
(JPEG-fil)
Information om regionhantering
Modell BD-Video DVD-Video
Europa Regionkod “B”
eller “ALL”
Regionnummer “2”
eller “ALL”
Ryssland Regionkod “C”
eller “ALL”
Regionnummer “5”
eller “ALL”
2ALL
5ALL
Skivor som inte kan användas med
denna spelare
CDG, Video CD, Photo CD, CD-ROM, SVCD,
SA-CD, PD, CDV, CVD, DVD-RAM, DVD-Audio,
BD-RE med kassett, CD-MP3, CD-WMA

KONTROLLER OCH FUNKTIONER
4 Sv
■Frampanel
1INPUT
Väljer en ingångskälla.
2On/Standby-indikator
Lyser grön när mottagaren är påslagen. Lyser gul när
mottagaren står i beredskapsläge.
3Indikatorn TP
Tänds när mottagaren tar emot en radiodatasystem-station
som innehåller TP (Trafikprogram) dataservice (☞s.29).
4Fjärrkontrollsensor
Tar emot signaler från fjärrkontrollen.
5Indikatorn PRESET
Tänds när du väljer förinställda radiostationer (☞s.27).
6Indikatorn TUNED
Tänds när mottagaren ställs in på en station.
7Indikatorn STEREO
Tänds när mottagaren tar emot en stark signal från en FM-
stereosändare.
8Indikatorn SLEEP
Tänds när vilolägestimern är på (☞s.31).
9Frampanelsdisplay
Visar olika typer av information, som
inställningsfrekvens.
0VOLUME
Justerar volymnivån.
A (On/Standby)
Sätter på mottagaren eller ställer den i beredskapsläge.
BPHONES-jack
Utmatning av ljudsignaler för att lyssna privat med
hörlurar.
CIndikatorn TIMER
Tänds när timern är inställd (☞s.30).
DBASS
Reglerar lågfrekvent basljud (☞s.15).
ETREBLE
Reglerar högfrekvent diskantljud (☞s.15).
FBALANCE
Justerar balansen i ljudet från vänster och höger högtalare
för att kompensera för obalans i ljudbilden som orsakas av
högtalarnas placering eller förhållanden i
lyssningsrummet.
GPRESET d / u
Väljer en förinställd station. Ingångskällan ändras till FM.
Kan manövreras även när mottagaren är i beredskapsläge
(☞s.27).
HPURE DIRECT
Sätter på eller stänger av Pure Direct-läget (☞s.15).
När Pure Direct-läget är inkopplat, lyser indikatorn i blått.
Ih / e
Startar och pausar uppspelningen av iPod. Ingångskällan
ändras till iPod. Kan manövreras även när mottagaren är i
beredskapsläge.
JiPod dockningsstation
För anslutning av iPod (☞s.10).
KONTROLLER OCH FUNKTIONER
Mottagare (R-840)
INPUT
BASS
PHONES
VOLUME
MIN MAX
TREBLE BALANCE
PRESET PURE DIRECT
LR
PRESET
TP
TUNED
STEREO SLEEP
kHz MHz iPod
TIMER
1@
IJBCD E F G H
234 5 67 98
A
Sedd uppifrånSedd framifrån

5 Sv
KONTROLLER OCH FUNKTIONER
Svenska
INLEDNING
■Frampanel
1Skivbricka
Fack för skiva som ska spelas upp.
2Indikatorn p (spela)
Visas under uppspelning.
3Indikatorn REP OFF S ALL A-B
Lyser när läget för repetering är valt.
4
Öppnar och stänger skivbrickan.
När man trycker på denna knapp i beredskapsläge, slås
mottagaren på automatiskt och ingångskällan ändras till
DISC.
5
Stoppar uppspelning (☞s.17).
6 (On/Standby)
Slår på BD-spelaren eller ställer den i strömberedskap.
När man trycker på denna knapp i beredskapsläge, slås
mottagaren på automatiskt och ingångskällan ändras till
DISC.
y
Om BD-spelaren inte fungerar ordentligt av någon anledning, kan
du starta om den genom att hålla denna knapp nedtryckt i cirka 10
sekunder och trycka på den igen.
7Indikatorn QUICK
Lyser i beredskapsläge när Snabbstart-funktionen är
inkopplad (☞s.35).
Blinkar när du ansluter nätkabeln till vägguttaget tills BD-
spelaren ställs i beredskapsläge.
8Indikatorn e (pausa)
Lyser medan BD-spelaren är pausad.
9Frampanelsdisplay
Visar BD-spelarens nuvarande status.
0
Går till början av nuvarande kapitel eller spår. Tryck och
håll för snabb tillbakaspolning. Tryck två gånger om du
vill hoppa till det föregående kapitlet eller spåret (☞s.18).
A
Startar eller pausar uppspelning (☞s.17).
När man trycker på denna knapp i beredskapsläge, slås
mottagaren på automatiskt och ingångskällan ändras till
DISC, vilket nu än var valt sist.
B
Hoppar till nästa kapitel eller spår. Tryck och håll för
snabb framspolning (☞s.18).
BD-spelare (BD-940)
QUICK
12 45
798
6
3
AB
@
PROG RANDOMMP3 WMA TRACK TOTAL REMAIN REP OFF S ALL A-B
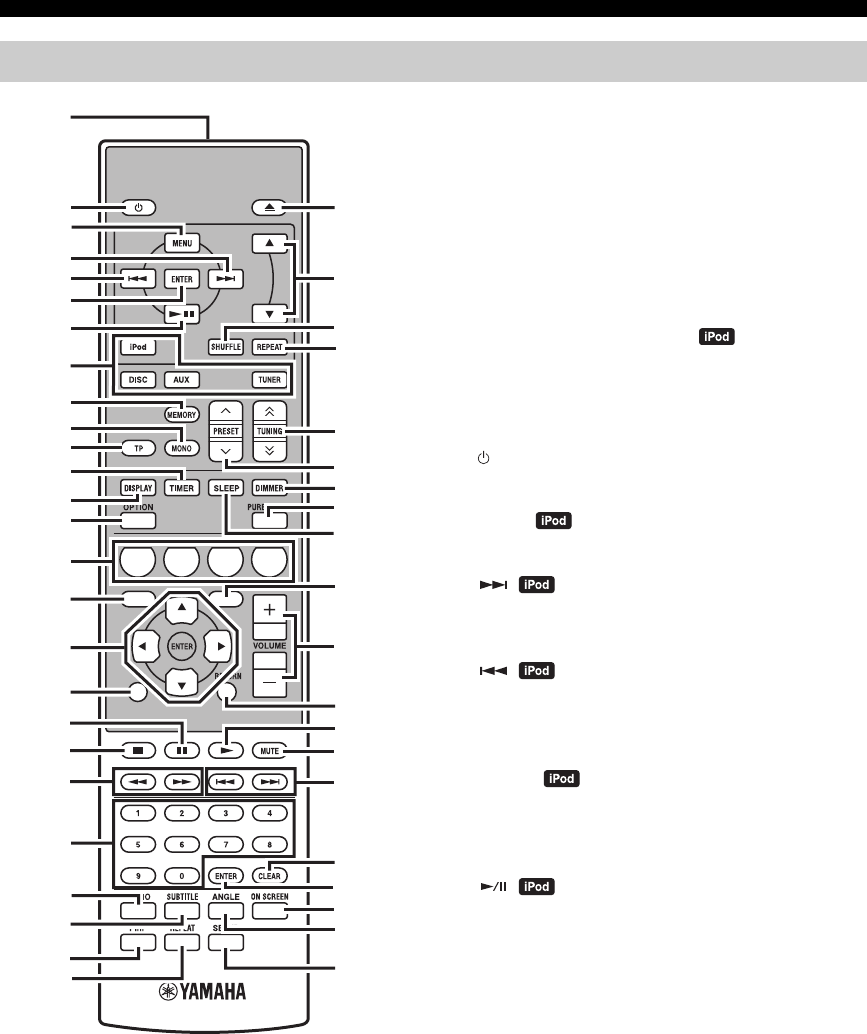
6 Sv
KONTROLLER OCH FUNKTIONER
Fjärrkontrollen kan sköta systemkomponenterna
(inklusive inställningsfunktionerna) och en iPod som
placerats i iPod dockningsstationen på mottagarens
ovansida.
För att sköta BD-spelare, inställningsfunktioner eller en
iPod med hjälp av fjärrkontrollen, måste du ställa in
mottagaren på motsvarande ingångsläge (☞8
Ingångsväljare).
För att manövrera din iPod
Tryck på motsvarande iPod styrknapp på fjärrkontrollen.
iPod styrknapparna indikeras med i avsnittet nedan.
Se sidan 32 för mer information om styrning av din iPod.
1Infraröd signalsändare
Skickar signaler till systemet du vill kontrollera.
2 (On/Standby)
Sätter på systemet eller ställer det i beredskapsläge.
3MENU
Återgår till föregående menynivå på iPod-menyn.
4
Hoppar till nästa låt. Tryck och håll för snabb
framspolning.
5
Hoppar till början av nuvarande spår. Tryck två gånger för
att hoppa till föregående spår. Tryck och håll för snabb
tillbakaspolning.
6ENTER
Tryck på ENTER för att mata in den utvalda gruppen. (Vid
tryckning på ENTER startar uppspelning, när en låt är
vald.)
7
Startar eller pausar uppspelning.
8Ingångsväljare
Väljer ingångskällan på mottagaren.
När en ingångskälla ska väljas, tryck på motsvarande
ingångsväljare (eller vrid på INPUT på frampanelen).
Namnet på motsvarande ingångsväljare visas på displayen
på mottagarens frampanel.
y
När DISC väljs som ingångskälla, slås BD-spelaren på
automatiskt och när någon annan ingångskälla väljs, ställs BD-
spelaren i beredskapsläge.
9MEMORY
Lagrar en förinställd station i minnet (☞s.27). Startar
automatisk förinställning (☞s.26).
0MONO
Ställer mottagningsläget för FM-sändningar i monoläge.
Fjärrkontroll
1234
56
90
78
E
NT
E
RCL
E
AR
MUT
E
E
NT
E
R
VOLUME
AUX
TUN
E
R
iPod SHUFFLE
R
EPE
AT
MENU
ENTER
E
O
NM
O
N
O
M
E
M
O
R
Y
PRESET TUNING
DISC
DISPLAY TIMER SLEEP DIMMER
OPTION PURE DIRECT
AUDIO SUBTITLE ANGLE
REPEAT
ON SCREEN
RETURN
PinP SETUP
A B C D
EXIT
TOP MENU/TITLE LIST
POP UP MENU
J
1
M
N
O
P
Q
R
S
t
U
V
W
X
Y
Z
[
\
]
`
a
b
c
d
f
e
2
3
4
5
6
7
8
9
0
A
B
C
D
E
F
G
H
I
J
K
L

7 Sv
KONTROLLER OCH FUNKTIONER
Svenska
INLEDNING
ATP
Ställs i mottagningsläget TP (Trafikprogram) dataservice
(☞s.29).
BTIMER
Visar aktuell tid på frampanelens display på mottagaren.
Används också för att ställa in klockan (☞s.12) eller
timern (☞s.30).
CDISPLAY
Ändrar informationen som visas på frampanelens display
på receivern eller på TV-skärmen för BD-spelaren (☞s.23,
s.28).
DOPTION
Optionsmenyn öppnas.
Se sidorna 27, 29 och 41 för poster på optionsmenyn.
EA/B/C/D
Används när ingångskällan är ställd på DISC.
FTOP MENU/TITLE LIST
Tar fram BD/DVD-huvudmenyn (☞s.18).
G, , , , ENTER
För val och bekräftelse av en post.
HEXIT
Avslutar menyskärmen.
I
Pausar uppspelning (☞s.17).
J
Stoppar uppspelning (☞s.17).
K,
Snabb tillbaka- eller framspolning.
LSifferknappar
För inmatning av nummer.
MAUDIO
Väljer ljudformat och ljudspår (☞s.19).
NSUBTITLE
Väljer textning (☞s.19).
OP in P
Använder funktionen bild-i-bild (☞s.24).
PREPEAT
Väljer läget repetera uppspelning (☞s.19).
Q
Öppnar och stänger skivbrickan.
R,
Tryck på eller för att växla en funktion i den utvalda
gruppen (☞s.32).
SSHUFFLE
Väljer läge för slumpmässig uppspelning (☞s.32).
TREPEAT
Väljer läge för repetering (☞s.32).
UTUNING
Tryck på TUNING för manuell stationsinställning
och tryck och håll TUNING intryckt för
automatisk stationsinställning (☞s.26).
VPRESET u / d
Väljer en förinställd station (☞s.27).
WDIMMER
Ändrar ljusstyrkan på frampanelens display (☞s.16).
XPURE DIRECT
Sätter på eller stänger av Pure Direct-läget (☞s.15).
YSLEEP
Ställer in systemets vilotimer (☞s.31).
ZPOP UP MENU
Tar fram BD-skivans popup-meny (☞s.18).
[VOLUME +/–
Ställer in mottagarens totala volymnivå.
\RETURN
Väljer föregående meny (☞s.17).
]
Startar uppspelning (☞s.17).
`MUTE
Stänger av volymen (☞s.16).
a,
Hoppar till början av nuvarande eller nästa kapitel eller
spår.
bCLEAR
Rensar en inmatning.
cENTER
Bekräftar en inmatning.
dON SCREEN
Visar skivinformation på skärmen (☞s.23).
eANGLE
Väljer en kameravinkel (☞s.19).
fSETUP
Tar fram inställningsmenyn (☞s.13).
/ d
d
d
d
/ d
d
d
d
/ d
d
d
d

FÖRBEREDELSER
8 Sv
FÖRBEREDELSE
Se till att läsa följande procedurbeskrivning och anteckningar noga innan systemet kopplas. Fjärrkontrollen och den
länkade styrningen av systemet fungerar endast när mottagaren och BD-spelaren är anslutna via
systemets styrkabel. För information om högtalarna (NS-BP300), se bruksanvisningen som medföljer.
Anslutning av anläggningen
1Anslut den medföljande RCA stereokabeln mellan uttagen AUDIO IN ( PLAYER L/R) på mottagaren och uttagen
AUDIO OUT ( L/R) på BD-spelaren.
2Anslut den medföljande styrkabeln mellan uttaget SYSTEM CONNECTOR ( TO:PLAYER) på mottagaren och
uttaget SYSTEM CONNECTOR ( TO:RECEIVER) på BD-spelaren.
3Koppla högtalarterminalerna (L) på mottagaren till högtalarterminalerna på den vänstra högtalaren och
högtalarterminalerna (R) på mottagaren till högtalarterminalerna på den högra högtalaren, med hjälp av
högtalarkablarna som medföljer högtalarsetet (NS-BP300).
4Anslut den medföljande FM-antennen till ANTENNA-uttaget.
• Anslut inte enheten eller andra komponenter till elnätet förrän alla kopplingar är klara mellan delarna.
• Låt inte de bara högtalarledningarna ligga emot varandra eller någon metalldel på mottagaren. Det kan skada mottagaren och/eller
högtalarna.
• Alla kopplingar måste vara korrekt gjorda: L (vänster) till L, R (höger) till R, “+” till “+” och “–” till “–”. Om kopplingarna är
felaktiga, hörs inget ljud från högtalarna och om är högtalarnas polaritet är felaktig, blir ljudet onaturligt och saknar bas. Se också i
bruksanvisningen för information om komponenterna.
Anmärkningar
• Styrkabelanslutningen används för överföring av fjärrstyrningssignaler från mottagaren till BD-spelaren.
• Vid anslutning av andra högtalare än NS-BP300, använd högtalare som har högre än 6Ω impedans.
• Vi rekommenderar att utomhusantenner (finns i handeln) ansluts för att förbättra radiomottagningen om tillfredsställande
mottagningskvalitet inte uppnås. Kontakta närmaste auktoriserade Yamaha-handlare eller servicecenter för mer information.
FÖRBEREDELSER
Anslutning av högtalare/externa komponenter/antenner
VARNING
A
A
B
B
Mottagare (R-840)
(Europa-modell)
BD-spelare (BD-940) Vänster högtalare
(NS-BP300)
Höger högtalare
(NS-BP300)
RCA stereokabel
(medföljer)
Styrkabel (medföljer)
TV etc.
Bashögtalare
Ljud ut
RCA
stereokabel

FÖRBEREDELSER
9 Sv
Svenska
FÖRBEREDELSE
Anslutning av en TV till systemet
1Anslut systemet och TV:n via HDMI-uttaget, COMPONENT-uttagen eller VIDEO-uttaget på BD-spelaren och
motsvarande uttag på TV:n.
2Ställ in “TV screen” i enlighet med TV:n (se “Inställning av TV-skärmen” på sidan 13).
När systemet och TV:n ansluts via COMPONENT-uttagen, ställ in BD-spelaren såsom beskrivs i “Val Videoutgång”
(☞s.33).
När systemet och TV:n ansluts via HDMI-uttagen, ställ in “HDMI Video Utgång” och “Ljudutgång” för “Inställningar
Bild, Ljud” i menyn “Inställningar” (☞s.33, 34).
När du ansluter systemet och TV:n via HDMI-uttagen, använd HIGH SPEED HDMI-kablar som är försedda med
logotypen HDMI (såsom visas på omslaget).
Du kan mata ut ljud från DIGITAL OUT-uttaget och spela in det digitalt på en annan enhet, eller överföra en ljudsignal
till en AV-receiver eller dekoder för återgivning av flerkanaligt ljud.
När du gjort alla kopplingar, kopplas systemets elkablar och andra komponenter till ett vägguttag.
Anslutning av en inspelare (CDR, MDR, etc.), AV-receiver eller dekoder
(CDR, MDR, etc.)
Anslutning av nätkablar
BD-spelare (BD-940)
Kompositvideokabel
(medföljer)
Till AC-uttaget i väggen
Till AC-uttaget i väggen
Mottagare (R-840)
BD-spelare (BD-940)

FÖRBEREDELSER
10 Sv
Mottagaren är utrustad med en iPod dockningsstation på
ovansidans panel, där du kan placera din iPod och
kontrollera uppspelningen från din iPod med hjälp av den
medföljande fjärrkontrollen.
Använd mottagaren med iPod dockningsadapter
(medföljer din iPod eller finns att köpa) som passar din
iPod. Om du använder mottagaren utan att använda en
passande iPod dockningsadapter, kan resultatet bli en lös
koppling.
y
När mottagaren är påslagen eller i beredskapsläge, kan iPod
anslutas under uppspelning. Mottagaren startar uppspelningen av
iPod automatiskt (gäller femte eller senare generation av iPod,
iPod touch, iPod Classic eller iPod nano).
Anmärkningar
• Endast iPod (Click and Wheel), iPod nano, iPod Classic, iPod
mini och iPod touch stöds.
• Koppla inte några iPod-tillbehör (som hörlurar, en fjärrkontroll
med ledning eller en FM-sändare) till din iPod när den placerats
i iPod dockningsstationen.
• Om din iPod inte är ordenligt isatt i iPod dockningsstationen, är
det möjligt att ljudsignaler inte matas ut korrekt.
• När anslutningen mellan din iPod och mottagaren är klar och
mottagaren har ställts i iPod-läget (☞s.6), visas
“CONNECTED” på frampanelens display. Om anslutningen
mellan din iPod och mottagaren misslyckas, så visas ett
statusmeddelande på frampanelens display. För en komplett
lista över statusmeddelanden om anslutning, hänvisas till iPod-
avsnittet i “FELSÖKNING” (☞s.42).
• När din iPod är placerad i iPod dockningsstationen på
mottagaren, laddas din iPod automatiskt även när mottagaren
står i beredskapsläge.
• Du kan koppla loss din iPod under uppspelningen.
Om du är uppkopplad på internet när du spelar BD-LIVE-
kompatibla skivor kan du ta del av diverse extramaterial
med interaktiva funktioner. Se sidorna 24 och 36 för
ytterligare information om BD-LIVE-funktioner.
Se till att stänga av BD-spelaren och annan utrustning
innan några anslutningar görs.
Anmärkningar
• Du kan ansluta ett USB-minne (2GB eller större och formaterat
med FAT 32/16) till USB BD STORAGE/SERVICE-kontakten
för att spara BD-LIVE-data eller för att uppdatera
programvaran i BD-spelaren.
• En bredbandsanslutning till internet krävs.
• Ett kontrakt med en internetleverantör krävs för tillgång till en
bredbandsanslutning till internet. Var god kontakta närmaste
internetleverantör för närmare information.
• Vi hänvisar till bruksanvisningen för den utrustning du har
eftersom den anslutna utrustningen och anslutningsmetoden kan
vara annorlunda beroende på internetmiljön.
• Använd en nätverkskabel/router som stöder 10BASE-T/
100BASE-TX/1000BASE-T.
• Använd endast en STP (skärmad partvinnad) nätverkskabel.
■När anslutningen är klar
• Utför kommunikationsinställningar (☞s.36).
• Sätt i en BD-LIVE-kompatibel skiva och spela upp
extramaterialet (☞s.24).
Anslutning av en iPod™
iPod
INPUT
PHONES
BASS
-+ -+ LR
TREBLE BALANCE
PRESET PURE DIRECT
VOLUME
MIN MAX
Mottagare
iPod
iPod dockningsadapter
Anslutning till Internet
VARNING
LAN
BD-spelare
Internet
Närverkskabel
(finns i handeln)
2
Till LAN-
kontakt
Dator
3Till USB BD
STORAGE/
SERVICE-
kontakt
USB-minne
(finns i handeln)
Modem Hubb eller
bredbands
router
1
Till NETWORK-
kontakt

FÖRBEREDELSER
11 Sv
Svenska
FÖRBEREDELSE
■Observera om batterier
• Byt båda batterierna när fjärrkontrollens funktionsradie
minskar.
• Använd AAA, R03, UM-4 batterier.
• Kontrollera att polariteten är korrekt. Se illustrationen
på batterifackets insida.
• Ta bort batterierna från fjärrkontrollen om den inte ska
användas under en längre tid.
• Använd inte gamla batterier tillsammans med nya.
• Använd inte olika typer av batterier (som alkaliska och
manganbatterier) tillsammans. Läs noga på
förpackningen eftersom dessa olika typer av batterier
kan ha samma form och färg.
• Om batterierna har läckt, ska de genast kastas. Undvik
att röra vid det läckande materialet eller låta det
komma i kontakt med kläder etc. Rengör batterifacket
ordentligt innan nya batterier sätts i.
• Kasta inte batterier tillsammans med vanligt
hushållsavfall. Kasta dem i enlighet med lokala
föreskrifter.
Fjärrkontrollen avger en riktad infraröd stråle. Se till att
rikta fjärrkontrollen direkt mot fjärrkontrollsensorn på
mottagarens frampanel när den används.
Anmärkningar
• Området mellan fjärrkontrollen och mottagaren måste vara fritt
från stora föremål.
• Spill inte vatten eller andra vätskor på fjärrkontrollen.
• Tappa inte fjärrkontrollen.
• Lämna eller förvara inte fjärrkontrollen under följande
förhållanden:
– hög fuktighet, t.ex. i närheten av ett badkar
– hög temperatur, t.ex. i närheten av ett element eller en spis
– extremt låga temperaturer
– dammiga platser.
• Exponera inte fjärrkontrollsensorn för starkt ljus, särskilt lysrör
av inverter-typ, eftersom fjärrkontrollen kanske inte fungerar
riktigt då. Placera vid behov systemet på en plats utan direkt
belysning.
Sätta i batterierna i fjärrkontrollen
13
2
Använda fjärrkontrollen
INPUT
BASS
PHONES
VOLUME
MIN MAX
TREBLE BALANCE
PRESET PURE DIRECT
LR
1234
56
90
78
ENTER CLEAR
MUTE
ENTER VOLUME
AUX TUNER
iPod SHUFFLE REPEAT
MENU
ENTER
EON MONO
MEMORY
PRESET TUNING
DISC
DISPLAY TIMER SLEEP DIMMER
OPTION PURE DIRECT
AUDIO SUBTITLE ANGLE
REPEAT
ON SCREEN
RETURN
PinP SETUP
A B C D
EXIT
TOP MENU/TITLE LIST
POP UP MENU
30˚ 30˚
Inom 6 m
Mottagare (R-840)

FÖRBEREDELSER
12 Sv
Följ nedanstående anvisningar för att ställa in klockan på
mottagaren, innan manövrering för uppspelning påbörjas.
Anmärkningar
• Använd fjärrkontrollen för att ställa in klockan. Det går inte att
ställa in klockan med knapparna på mottagaren.
• Mottagaren stöder 24-timmars tidsvisning.
• Om du inte trycker på någon knapp på 90 sekunder, återgår
mottagaren till normalt läge.
1Tryck på för att slå på mottagaren.
Frampanelens display tänds.
2Tryck på TIMER för att visa aktuell tid.
Om klockan inte är inställd, blinkar “SET TIME” på
displayen.
Tryck på ENTER för att gå vidare till steg 3.
3Tryck på / för att välja “TIME”, och tryck
på ENTER.
Mottagaren ställs i läget för tidsinställning.
Timsiffrorna börjar blinka.
4Ställ in timtalet med / , och tryck på .
Minutsiffrorna börjar blinka.
5Ställ in minuterna med / , och tryck på
ENTER.
Tim- och minutsiffrorna börjar blinka.
Om du vill ändra tim- eller minutsiffrorna igen, tryck
på eller , och genomför steg 4 och 5, och gå
vidare till steg 6.
6Tryck på ENTER.
Klockan är inställd.
Tim- och minutfälten slutar blinka och lyser.
Mottagaren återgår till normalt läge.
y
Du kan gå tillbaka till tidigare skärm genom att trycka på eller
RETURN.
Tidsinställning
ABCD
EXIT
TOP MENU/TITLE LIST
POP UP MENU
TIMER
ENTER ,
RETURN
Blinkar
Blinkar
Blinkar
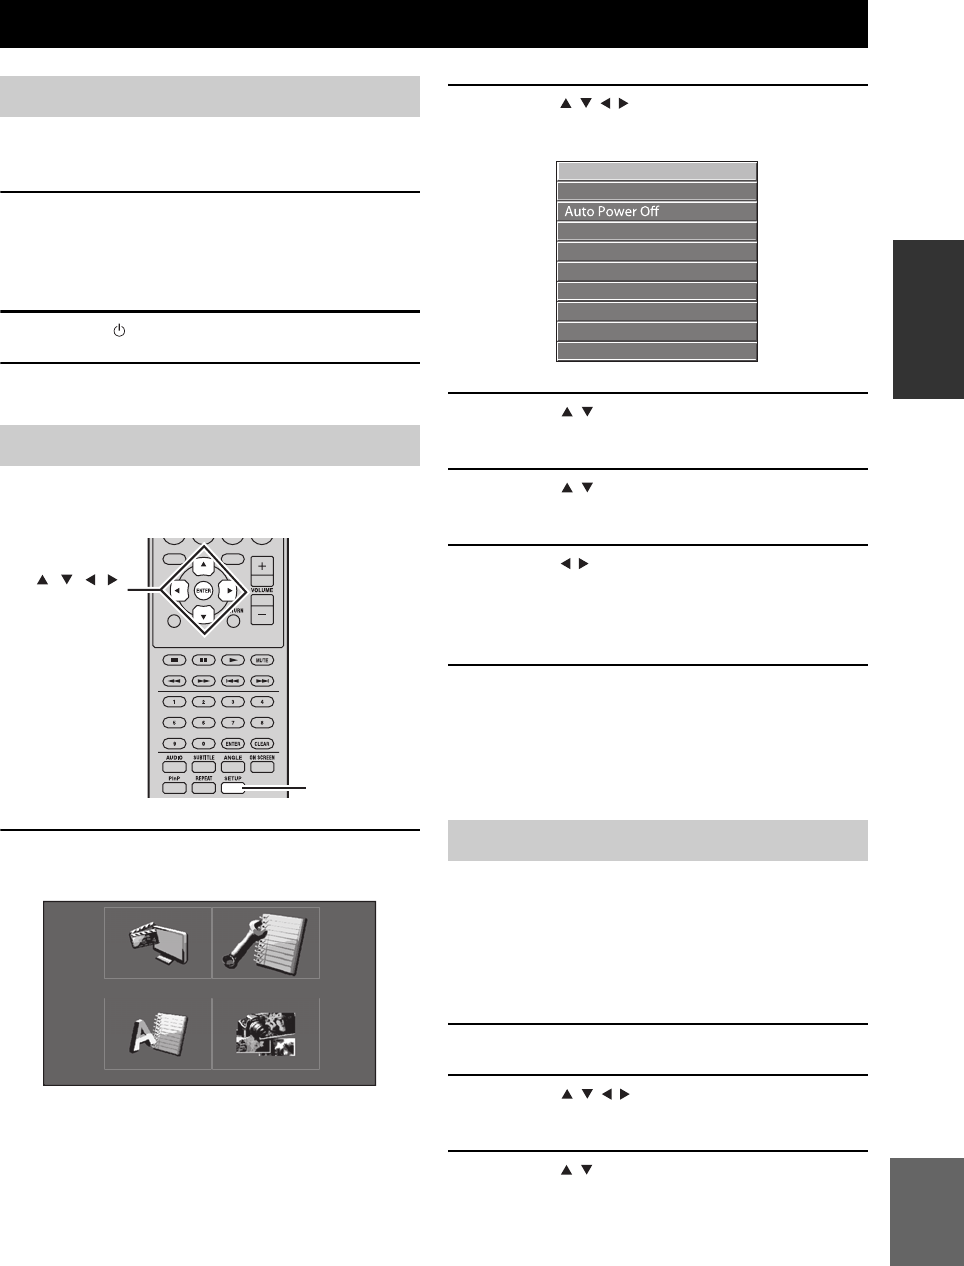
INSTÄLLNING AV SYSTEMET
13 Sv
Svenska
FÖRBEREDELSE
Kontrollera att du har gjort alla nödvändiga anslutningar
(se “Anslutning av en TV till systemet” på sidan 9).
1Slå på TV:n till vilken BD-spelaren är
ansluten.
Välj den TV-ingång som motsvarar ingången till
vilken BD-spelaren är ansluten.
2Tryck på för att slå på mottagaren.
3Tryck på DISC.
Ställ in bildförhållandet för BD-spelaren i enlighet med
den TV som är ansluten (☞s.33).
1Tryck på SETUP.
Inställningsmenyn visas på skärmen.
2Tryck på /// för att välja “Settings”, och
tryck sedan på ENTER.
3Tryck på / för att välja “Audio Video
Settings”, och tryck sedan på ENTER.
4Tryck på / för att välja “TV Aspect Ratio”,
och tryck sedan på ENTER.
5Tryck på / för att välja bildförhållandet för
TV:n och tryck sedan på ENTER.
För närmare information om alternativ för
bildförhållandet, se sidan 33.
6Tryck på SETUP eller EXIT för att avsluta
inställningsmenyn.
y
Du kan gå tillbaka till tidigare meny genom att trycka på
RETURN.
Du kan välja önskad språkinställning så att BD-spelaren
automatiskt växlar till angivet språk varje gång du sätter i
en skiva. Om det valda språket inte finns med på skivan,
används istället skivans standardinställning av språk.
Språket för bildskärmsvisningen för inställningsmenyn
BD/DVD förblir densamma, oavsett olika skivspråk.
1Tryck på SETUP.
2Tryck på /// för att välja “On Screen
Language”, och tryck sedan på ENTER.
3Tryck på / för att välja ett språk, och tryck
sedan på ENTER.
INSTÄLLNING AV SYSTEMET
Slå på TV:n och systemet
Inställning av TV-skärmen
EXIT
TOP MENU/TITLE LIST
POP UP MENU
SETUP
, , , ,
ENTER
Settings
Picture
On Screen Language
Displays The Title List
Språk för bildskärmsmenyer
Audio Video Settings
Quick Start
HDMI Control
Playback Setting
Communication Setup
Version
USB Memory Management
Software Update
System Reset

INSTÄLLNING AV SYSTEMET
14 Sv
1Tryck på SETUP.
2Tryck på /// för att välja “Inställningar”,
och tryck sedan på ENTER.
3Tryck på / för att välja
“Uppspelningsinst.”, och tryck sedan på
ENTER.
4Tryck på / för att välja “Skivspråk”, och
tryck sedan på ENTER.
5Tryck på / för att välja ett alternativ nedan.
• Textning
•Ljud
•Meny
6Tryck på / för att välja ett språk, och tryck
sedan på ENTER.
Språk för Audio-, Subtitle- och
Disc-meny
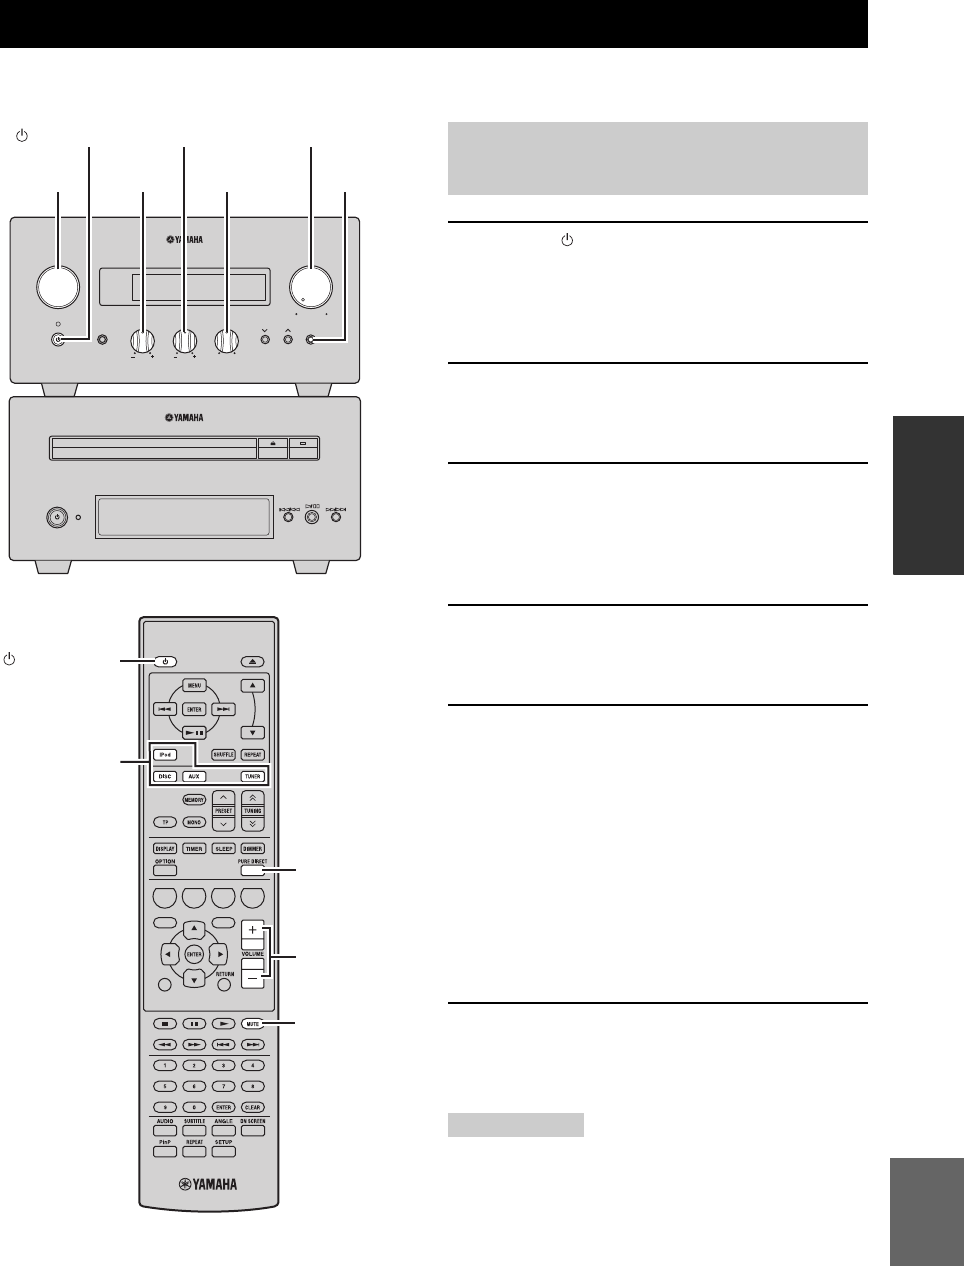
SYSTEMFUNKTIONER
15 Sv
Svenska
GRUNDLÄGGANDE
FUNKTIONER
GRUNDLÄGGANDE FUNKTIONER
Följ proceduren nedan för att välja en ingångskälla och ändra ljudinställningarna på systemet.
1Tryck på (On/Standby) för att sätta på
mottagaren.
Beroende på ingångsläget på mottagaren, sätts även
BD-spelaren på via styrkabelanslutningen (☞s.8).
Frampanelens display tänds.
2Tryck på lämplig ingångsväljare (eller rotera
INPUT på frampanelen) för att välja önskad
ingångskälla.
3Starta uppspelning på vald källkomponent
eller ställ in en radiostation.
För information om uppspelning med skiva, se
sidan 17, och för information om radiomottagning, se
sidan 26.
4Tryck på VOLUME +/– (eller rotera VOLUME
på frampanelen) för att justera volymen till
önskad utnivå.
5Vrid på BASS, TREBLE eller BALANCE på
frampanelen på mottagaren för att ändra
följande inställningar.
BASS: Reglerar lågfrekvent basljud.
TREBLE: Reglerar högfrekvent diskantljud.
BALANCE: Reglerar volymbalansen mellan vänster
och höger högtalarkanaler.
■Pure Direct-läge
Pure Direct-läget förbikopplar kretsarna för
tonklangsreglering och släcker frampanelens display, så
att ett rent och naturtroget ljud återges.
Tryck på PURE DIRECT (eller PURE DIRECT på
frampanelen) för att sätta på Pure Direct-läget.
Frampanelens display stängs av automatiskt. PURE
DIRECT på frampanelen lyser i blått.
Anmärkningar
• Om manövreringar utförs medan läget Pure Direct är inkopplat,
tänds belysningen i frampanelens display på mottagaren
tillfälligt för att visa manövreringen.
• När Pure Direct-läget är aktiverat är varken BASS, TREBLE
eller BALANCE tillgängligt.
SYSTEMFUNKTIONER
INPUT
BASS
PHONES
VOLUME
MIN MAX
TREBLE BALANCE
PRESET PURE DIRECT
LR
TP
TIMER
QUICK
INPUT
(On/Standby) VOLUME
PURE
DIRECTBASS BALANCE
TREBLE
A B C D
EXIT
TOP MENU/TITLE LIST
POP UP MENU
(On/Standby)
VOLUME +/–
Ingångsväljare
PURE DIRECT
MUTE
Grundläggande manövrering av
systemet

SYSTEMFUNKTIONER
16 Sv
Att stänga av Pure Direct-läget
Tryck på PURE DIRECT igen. PURE DIRECT-
belysningen släcks och frampanelens display sätts på.
■Dämpa ljudet (MUTE)
Tryck på MUTE för att sänka inställd volymnivå
med cirka 20dB.
“MUTE ON” visas på frampanelens display.
Tryck på MUTE igen för att återställa ljudutmatningen till
tidigare volymnivå.
Belysningen i frampanelens display på mottagaren kan
dämpas. Belysningen i frampanelens display på BD-
spelaren dämpas också via styrkabelanslutningen (☞s.8).
(Grundinställningen är “DIMMER OFF”.)
Tryck på DIMMER.
Du kan välja om du vill ha normal (ljus), halvsvag och
svag ljusstyrka på frampanelens display.
Du kan koppla hörlurarna till PHONES-urtaget på
mottagarens frampanel.
Ljudet upphör från högtalarna och lågbashögtalaren.
Ändring av displayens ljusstyrka
Använda hörlurar
DIMMER
INPUT
PHONES

FUNKTIONER FÖR SKIVOR
17 Sv
Svenska
GRUNDLÄGGANDE
FUNKTIONER
I detta kapitel beskrivs hur skivor spelas upp.
Medan DISC är valt som ingångskälla kan olika
manövreringar och inställningar utföras med hjälp av
bildskärmsmenyer på ansluten TV.
Du kan använda dessa knappar när ingångsläget DISC är
valt.
y
• Du kan ändra språket för bildskärmsvisningen med OSD
språkinställning (☞s.13).
• De knappar som kan användas till en viss meny visas längst ner
på skärmen.
Se sidan 3 för närmare information om vilka typer av
skivor och filformat som stöds.
1Tryck på på BD-spelarens frampanel.
2Lägg skivan med etikettsidan vänd uppåt i
mitten av skivtallriken och tryck sedan på
.
Skivfacket stängs och skivan sätts i.
3Tryck på .
• Efter isättning av en BD/DVD-skiva visas
eventuellt en meny. Se “BD/DVD-menyer”
(☞s.18) för närmare information.
• Efter isättning av en skiva innehållande JPEG-
bilder startar ett bildspel. Se “Uppspelning av
JPEG-bildspel” (☞s.20) för närmare information.
För att avbryta uppspelning, tryck på .
Du kan senare återuppta uppspelningen från den
punkt där du stoppade, genom att enkelt trycka på
(Funktion för återstart). Det är möjligt att funktionen
för återstart inte fungerar beroende på skivan.
Om du vill spela en skiva från början, avbryt
återupptagningsläget genom att trycka på igen.
Anmärkningar
• Vid isättning av en dubbelsidig DVD ska den sida som ska
spelas upp vändas neråt.
• Om du trycker på på frampanelen medan BD-spelaren står
i beredskapsläge, slås detta system på automatiskt och DISC
väljs som ingångskälla. Skivfacket öppnat och systemet är nu
redo för uppspelning.
• Med vissa skivor kan det hända att vissa av de
uppspelningsfunktioner som beskrivs i detta kapitel inte
fungerar såsom väntas och att vissa inte fungerar alls.
• Med vissa BD/DVD-skivor begränsas vissa funktioner, såsom
funktionen för återstart, slumpvis uppspelning och repeterad
uppspelning, delvis eller helt. Detta tyder inte på något fel.
Tryck på .
För att återupptag uppspelningen, tryck på igen, eller
tryck på .
Om det gäller en ljud-CD, tryck på eller för att
pausa uppspelningen.
FUNKTIONER FÖR SKIVOR
Användning av bildskärmsmenyer
Knapp Beskrivning
SETUP Visar inställningsmenyn för BD-spelaren
Markörknappar
()/()
Väljer menyposter
ENTER Bekräftar val av menypost
RETURN Väljer föregående meny
ABCD
EXIT
TOP MENU/TITLE LIST
POP UP MENU
Sifferknappar
TOP MENU/
TITLE LIST POP UP MENU
RETURN
, , ,
ENTER
SETUP
, ,
Spelfunktioner
Paus vid uppspelning
FUNKTIONER FÖR SKIVOR
18 Sv
Snabbspelning bakåt eller framåt på olika hastigheter kan
kopplas in under pågående uppspelning.
Tryck på snabbspela bakåt eller för att
snabbspela framåt.
Hastigheten för snabbspelning bakåt eller framåt ändras
varje gång du trycker på eller .
Hastigheten visas på skärmen.
Tryck på startknappen för att återgå till normal
uppspelning.
■För att välja nästa kapitel eller spår
Tryck på .
■För att välja föregående kapitel eller spår
Tryck på två gånger.
Om du trycker på endast en gång, går uppspelningen
tillbaka till början av aktuellt kapitel eller spår.
De flesta BD/DVD innehåller menyer med vars hjälp det
är möjligt att välja vad som ska visas. Vanligtvis visas
huvudmenyn automatiskt, men med vissa skivor kan det
vara nödvändigt att trycka på TOP MENU/TITLE LIST
eller POP UP MENU för att ta fram menyn.
Följande knappar kan användas till menyer.
*1 Beror på skivan.
*2 Kan med vissa skivor ha samma funktion som knappen TOP
MENU/TITLE LIST.
Anmärkningar
• Den procedur som beskrivs på denna sida är proceduren för
grundläggande manövrering. Tillvägagångssättet kan skilja sig
beroende på BD/DVD, så det kan hända att du måste att följa
anvisningarna i BD/DVD-manualen eller anvisningarna som
visas på skärmen.
• Med vissa BD/DVD kan det hända att huvudmenyn kallas för
“Title Menu”. Använd TOP MENU/TITLE LIST när
anvisningarna hänvisar till “Title Menu”.
• Om det inte finns någon huvudmeny, så fungerar inte TOP
MENU/TITLE LIST.
• I vissa fall, beroende på DVD, kan man ta fram
huvudmenyskärmen genom att trycka på POP UP MENU.
BD/DVD kan spelas upp långsamt. DVD kan dessutom
spelas upp långsamt bakåt.
1Tryck under pågående uppspelning på .
2Långsam uppspelning fungerar när man
trycker på eller i mer än 2 sekunder
i pausläge.
Tryck på startknappen för att återgå till normal
uppspelning.
Anmärkningar
• Långsam uppspelning fungerar inte med ljud-CD-skivor.
• Långsam uppspelning bakåt kan inte göras med BD.
BD/DVD kan spelas upp en bildruta i taget. DVD-Video-
skivor medger dessutom bild-för-bild-uppspelning bakåt.
1Tryck under pågående uppspelning på .
2Tryck på eller för att spela upp en
bildruta i taget.
Tryck på startknappen för att återgå till normal
uppspelning.
Anmärkningar
• Det kan hända att uppspelning bild-för-bild inte fungerar
korrekt med andra skivor än DVD-RW/R (VR-format).
• Vissa BD/DVD är inte kompatibla med uppspelning bild-för-
bild.
• Bildmatning framåt/bakåtvänd uppspelning kan utföras med
DVD genom att trycka på eller i pausläge.
Snabbspelning bakåt/framåt
Val av kapitel och spår
BD/DVD-menyer
Knapp Beskrivning
TOP MENU/
TITLE LIST
Tar fram BD/DVD-huvudmenyn*1
POP UP MENU Tar fram eller stänger BD-skivans popup-
meny*2
()/()Väljer menyposter
ENTER Bekräftar val av menypost
Långsam uppspelning
Bild-för-bild-uppspelning
,
,
FUNKTIONER FÖR SKIVOR
19 Sv
Svenska
GRUNDLÄGGANDE
FUNKTIONER
En del BD/DVD-skivor innehåller ljudspår med olika
språk eller ljudformat, såsom Dolby Digital och DTS, som
kan väljas vid uppspelning. Likaledes innehåller en del
DVD-VR-skivor dual-mono ljudspår.
Tryck upprepade gånger på AUDIO under
pågående uppspelning för att välja bland
tillgängliga ljudspår för språk eller ljudformat.
Namnet på valt språk eller ljudformat visas på skärmen.
Anmärkningar
• Med vissa skivor kan språk och ljudformat endast väljas med
hjälp av skivmenyn. Använd TOP MENU/TITLE LIST och
POP UP MENU till att ta fram skivmenyn.
• Grundinställt ljudspråk för BD/DVD kan ändras i “Skivspråk”
(☞s.35).
En del BD/DVD-skivor innehåller textning på ett eller
flera språk, som kan väljas vid uppspelning.
Tryck upprepade gånger på SUBTITLE under
pågående uppspelning för att välja bland
tillgängliga textningsspråk.
Namnet på valt textningsspråk visas på skärmen.
Anmärkningar
• Med vissa skivor kan textning endast väljas med hjälp av
skivmenyn. Använd TOP MENU/TITLE LIST och POP UP
MENU till att ta fram skivmenyn.
• Grundinställt språk för textning för BD/DVD kan ändras i
“Skivspråk” (☞s.35).
En del BD/DVD-Video-skivor innehåller scener inspelade
ur olika kameravinklar, som kan väljas vid uppspelning.
Visning av kameraikonen ( ) kan om så önskas kopplas
in (☞s.35) Denna ikon visas på skärmen vid uppspelning
av innehåll som erbjuder alternativa kameravinklar.
Tryck upprepade gånger på ANGLE under
pågående uppspelning för att välja bland
tillgängliga kameravinklar.
Anmärkningar
• Med vissa skivor kan det hända att kameravinkel inte kan väljas
trots att kameraikonen ( ) visas på skärmen.
• Med vissa skivor kan kameravinkel även väljas på skivmenyn.
En titel, ett kapitel, ett spår eller en hel skiva kan repeteras.
Val av språk och ljud
Val av textning
EXIT
TOP MENU/TITLE LIST
POP UP MENU
AUDIO
TOP MENU/
TITLE LIST POP UP MENU
EXIT
TOP MENU/TITLE LIST
POP UP MENU
SUBTITLE
TOP MENU/
TITLE LIST POP UP MENU
Val av kameravinkel
Repeterad uppspelning
ANGLE
EXIT
TOP
MENU/TITLE
LIST
POP
UP
MENU
RETURN
ENTER
REPEAT
,

FUNKTIONER FÖR SKIVOR
20 Sv
1Tryck under pågående uppspelning på
REPEAT.
Repeteringsmenyn visas på skärmen.
För att stänga repeteringsmenyn, tryck på RETURN.
2Tryck på / för att välja
repeteringsalternativ.
• Spela Upp Titel: Repeterar titeln som för tillfället
spelas upp.
• Spela Upp Kapitel: Repeterar kapitlet som för
tillfället spelas upp.
• Specificera val: Repeterar angiven scen i titel eller
kapitel (☞“Repeterad uppspelning av angiven del
(A-B repetering)”).
För ljud-CD kan “Spelar Skiva”, “Spelar Spår” eller
“Ange Delen” väljas.
3Tryck på ENTER.
Repeterad uppspelning startar.
Tillgängliga alternativ för repeterad uppspelning
skiljer sig åt beroende på typen av skiva.
För att avbryta repeterad uppspelning, tryck på
REPEAT under pågående uppspelning.
Anmärkning
Repeterad uppspelning kan inte användas med JPEG-skivor.
Du kan ange två punkter på skivan och sedan spela upp
avsnittet mellan dessa två punkter flera gånger.
Funktionen för A-B repetering är inte tillgänglig för BD-
skivor.
1Under pågående uppspelning, tryck på
REPEAT, och sedan på / för att välja
“Specificera val”.
“Startläge” visas.
“A-” tänds på displayen på BD-spelarens frampanel.
2Tryck på ENTER vid den scen där du vill ange
startpunkten.
“Stoppläge” visas.
“B” tänds på frampanelens display.
3Tryck på ENTER vid den scen där du vill ange
slutpunkten.
Avsnittet mellan startpunkten och slutpunkten spelas
upp flera gånger.
“REP” och “A-B” tänds på displayen.
För att avbryta repetering, tryck på REPEAT.
För att stänga repeteringsmenyn, tryck på EXIT.
Anmärkning
Start- och slutpunkterna måste väljas inom samma titel (DVD)
eller spår (ljud-CD).
y
Du kan trycka på för att snabbspela framåt till den scen där
du vill ange slutpunkten.
Bildspel med JPEG-bilder på en CD-R/CD-RW kan
spelas.
Sätt i skivan och tryck sedan på för att starta
bildspelet.
Från och med den första bilden i den första mappen spelas
samtliga bilder i samtliga mappar på skivan upp och visas
i alfabetisk ordning.
Bildernas format ändras automatiskt, så att de visas i
största möjliga storlek på skärmen.
Följande knappar kan användas vid bildspel.
Repeterad uppspelning av angiven
del (A-B repetering)
Spela Upp Titel Spela Upp Kapitel Specificera val
Startläge
Spela Upp Titel Spela Upp Kapitel Specificera val
Uppspelning av JPEG-bildspel
Knapp Beskrivning
Pausar bildspelet
Väljer nästa bild
Väljer föregående bild
A B C D
EXIT
TOP MENU/TITLE LIST
POP UP MENU
, , ,
ENTER
C
SETUP
,

FUNKTIONER FÖR SKIVOR
21 Sv
Svenska
GRUNDLÄGGANDE
FUNKTIONER
■Ställa in hastigheten för bildspelet eller
repeterad uppspelning
1Tryck på SETUP.
Inställningsmenyn visas på skärmen.
2Välj “Bild”, och tryck sedan på ENTER för att
öppna skärmen för bildval.
3Tryck på C (bildspelsmeny).
4Tryck på / för att välja “Hast. Bildspel”
eller “Repetitionsinst.”, och tryck sedan på
ENTER.
5Tryck på /// för att välja önskat
alternativ, tryck sedan på ENTER.
Du kan välja något av alternativen “Snabb”,
“Normal”, “Långsam1” och “Långsam2” som
hastighet för bildspelet.
Anmärkning
Stora bilder tar längre tid att ladda och visas kanske inte
omedelbart.
1Tryck på SETUP.
Inställningsmenyn visas på skärmen.
2Välj “Bild”, och tryck sedan på ENTER för att
öppna skärmen för bildval.
3Använd /// för att välja mappen som
innehåller filen (filerna) som ska spelas, tryck
sedan på ENTER.
För uppspelning av JPEG-filer, se “Uppspelning av
JPEG-bildspel” (☞s.20).
Du kan spela upp en inspelad skiva (endast slutbehandlad
skiva i DVD: VR-format).
Anmärkning
“Finalize” syftar på en inspelare som behandlar en inspelad skiva
så att det går att spela den i såväl denna spelare som andra DVD-
spelare/inspelare. Endast slutbehandlade DVD-skivor kan spelas
upp i denna spelare. (Denna spelare saknar funktion för att
slutbehandla skivor.)
Om titellistan
Titellistan kan visas på två sätt, som miniatyrer eller
titellista. Varje gång du trycker på A, ändras skärmen
mellan miniatyrer och titellista.
1Information om vald titel
2Titelnamn
Inspelningsdatum
Inspelningslängd
3Rubrik för färgknapp
Uppspelning av stillbilder i en vald
mapp
1/77
8/15
Uppspelning av filmer inspelade
på en DVD-R/DVD-RW
A B C D
EXIT
TOP MENU/TITLE LIST
POP UP MENU
,
, , , ,
ENTER
C
D
B
A
TOP MENU/
TITLE LIST
21/5 Fre 9:30 AM 110 Min.
Program 1
DCBA
21/5
[ Från Gammal ]
Fre 9:30 AM
1 Program 1 21/5 Fre 110 Min.
2 Program 2 15/6 Fre 110 Min.
3 Program 3 3/7 Mån 56 Min.
4 Program 4 18/9 Tor 40 Min.
110 Min.
Program 1
DCBA
1
2
3
1
3
Titelnamn
Miniatyrbild
Program
1Program
2Program
3
Program
4Program
5Program
6
Via KapitelTitelnamn Spellista Funktioner
Sorterar
Miniatyrbild Spellista Funktioner

FUNKTIONER FÖR SKIVOR
22 Sv
■Uppspelning genom att välja en titel
1Sätt i en inspelad skiva.
Skärmen med titellistan visas.
Om skärmen med titellistan inte visas, tryck på TOP
MENU/TITLE LIST.
2Tryck på /// för att välja önskad titel,
tryck sedan på ENTER.
Uppspelning av vald titel påbörjas.
Uppspelning kan också startas genom att trycka på
i stället för ENTER.
För att avbryta uppspelning, tryck på .
y
• Skärmen med titellistan kan också tas fram genom att trycka på
TOP MENU/TITLE LIST när uppspelningen är stoppad eller
genom att trycka på ENTER efter att ha valt “Visar Spår Lista” i
inställningsmenyn när uppspelningen är stoppad.
• När miniatyrer visas och det finns sju eller fler titlar, kan du
bläddra sidor genom att trycka på eller .
■Uppspelning genom att välja ett kapitel
1Tryck på B medan skärmen med miniatyrer
visas.
Kapitelskärmen visas.
Återgå till skärmen med miniatyrer genom att trycka
på B.
2Tryck på /// för att välja önskat kapitel,
tryck sedan på ENTER.
Uppspelning av valt kapitel påbörjas.
Uppspelning kan också startas genom att trycka på
i stället för ENTER.
För att avbryta uppspelning, tryck på .
■Sortering av titlarna
Varje gång du trycker på B medan skärmen med titellistan
visas, ändras titellistan mellan att visa den nyaste titeln
först och den äldsta titeln först.
■Uppspelning genom att välja en spellista
1Tryck på C medan skärmen med miniatyrer
eller titellistan visas.
Skärmen med spellista visas.
2Tryck på / för att välja titeln, tryck sedan
på ENTER.
Uppspelning av vald titel påbörjas.
För att avbryta uppspelning, tryck på .
■Uppspelning av en titel som stoppats
medan den spelades upp
1Tryck på D medan skärmen med miniatyrer
eller titellistan visas.
2Tryck på / för att välja typ av uppspelning,
tryck sedan på ENTER.
Uppspelning av titeln påbörjas.
För att avbryta uppspelning, tryck på .
Denna funktion hjälper dig att göra olika inställningar på
en gång, som t.ex. textning, vinkelinställningar och titelval
för direkt uppspelning. Du kan justera bild och ljud så att
det passar dina önskemål. Åtgärderna är de samma för BD
och DVD.
Tryck på ON SCREEN under uppspelning.
Funktionskontrollskärmen visas på TV:n.
Original Funktioner
21/5 Fre 9:30 AM
1 Program 1 21/5 Fre 110 Min.
2 Program 2 15/6 Fre 110 Min.
110 Min.
Program 1
DC
Använda “Function Control
Screen” för BD/DVD
Från Början Återuppta Avsp.
Uppspeln
EXIT
TOP MENU/TITLE LIST
POP UP MENU
, , , ,
ENTER
RETURN
ON SCREEN

FUNKTIONER FÖR SKIVOR
23 Sv
Svenska
GRUNDLÄGGANDE
FUNKTIONER
Funktionskontrollskärm
1Visning av uppspelningsstatus
Visar operationsstatus och skivtyp.
2Inställningsalternativ
För att välja titel (eller spår) eller kapitel för uppspelning,
eller för att utföra bild/ljudinställningar.
• Titel/spårnummer (direktval av titel/spår)
• Kapitelnummer (direktval av kapitel)
• Förfluten tid uppspelning (direktval av tid)
• Språk för textning
• Vinkelnummer
•Ljud
• Repetering
3Visning av manövreringsguide
Ger hjälp angående användningen av fjärrkontrollknappar.
För att stänga funktionskontrollskärmen, tryck på
RETURN eller ON SCREEN.
Anmärkningar
• Om “– –” visas som ett alternativ för till exempel titelnummer
eller textning, betyder det att skivan inte har några titlar eller
alternativa språk för textning som kan väljas.
• Vad som visas varierar beroende på skivan.
• Om du tar fram funktionskontrollskärmen under pågående
uppspelning av en BD/DVD-videoskiva, kan det hända att det
inte längre går att styra uppspelningen av BD/DVD-
videoskivan. Om det skulle inträffa, stäng
funktionskontrollskärmen.
1Sätt i en ljud-CD.
Manövreringsskärmen för CD visas.
2Tryck på D medan manövreringsskärmen för
CD visas.
“Funktions”-menyn aktiveras.
Följ manövreringsguiden.
Anmärkningar
• Vad som visas varierar beroende på skivan.
• När uppspelningen är stoppad, kan endast “Spår” väljas.
Information om titel, kapitel, spår m.m. kan visas vid
uppspelning.
Tryck under pågående uppspelning upprepade
gånger på DISPLAY för att ta fram önskad
information.
■För att dölja informationen
Tryck upprepade gånger på DISPLAY tills den tas
bort.
BD-VIDEO
0 3 : 0 2 :0 0
1
1 / 3
5 . 1 c h
Återgå
Välj Tryck
5 5 / 2
2 English
1
AV
ENTER
1
2
3
RETURN
Använda “Funktions”-menyn för
ljud-CD
Visning av skivinformation
1Spår 015:16
2Spår 025:10
3Spår 035:23
4Spår 045:03
5Spår 054:44
6Spår 065:08
00:00:11
3/12
3/12
AV
3L+R
ÅtergåVälj Tryck Spårval
5:23
0:00
Spår 03Funktioner
D
Manövreringsguide
DISPLAY
FUNKTIONER FÖR SKIVOR
24 Sv
BD-spelaren stöder uppspelningsfunktionerna
BONUSVIEW (BD-ROM Profile 1 Version 1.1) och BD-
LIVE (BD-ROM Profile 2).
BONUSVIEW: med BONUSVIEW-kompatibla skivor
kan man samtidigt visa en sub-kanal så att man får två
skärmar, dessutom sub-kanal för ljudet och textning. En
liten skärm visas inom huvudskärmen under uppspelning
(bild-i-bild).
BD-LIVE: BD-LIVE-kompatibla skivor stöder alla
funktioner i BONUSVIEW men ger även möjlighet att
låta BD-spelaren gå online för att ta del av
promotionfilmer och annat extramaterial.
Anmärkning
Funktioner och uppspelningssätt kan skilja sig beroende på
skivan. Se anvisningarna på skivan eller den medföljande
användarmanualen.
■Använda funktionen bild-i-bild
(uppspelning av sekundärt ljud/bild)
BD-Video som inkluderar sekundärt ljud och bild
kompatibelt med bild-i-bild (Picture in Picture) kan spelas
upp med sekundärt ljud och bild samtidigt som en liten
bild i hörnet.
Under pågående uppspelning, tryck på P in P för
att slå på eller av funktionen bild-i-bild.
Anmärkningar
• För att lyssna på det sekundära ljudet, kontrollera att “Sekundärt
ljud” är inställt på “På” (☞s.34).
• Det kan hända att det sekundära ljudet och bilden för bild-i-bild
spelas upp och tas bort automatiskt beroende på innehållet. Det
kan finnas begränsningar för vilka områden uppspelning kan
ske.
■Använda funktionen BD-LIVE
1Gör nätverksinställningar (☞s.36).
2Anslut USB-lagringsenheten till BD-spelaren
(☞s.10).
BD-LIVE data sparas i lokal lagringsenhet (USB-
minne anslutet till denna spelare). För att använda
dessa funktioner, anslut ett USB-minne (2GB eller
större och formaterat med FAT 32/16) som stöder
USB 2.0 High Speed (480Mbit/s) till USB BD
STORAGE/SERVICE-kontakten (☞s.10) på denna
spelares baksida.
• Om lagringsutrymmet är otillräckligt, kommer data
inte att kopieras/laddas ner. Radera data som inte
behövs eller använd ett nytt USB-minne.
• Om ett USB-minne innehållande annat material
(inspelat tidigare) används, kan det hända att bilden
och ljudet inte spelas upp korrekt.
• Om USB-minnet kopplas loss från denna spelare
under pågående uppspelning av BD-LIVE-data,
stoppas uppspelningen av skivan.
• Det kan ta en stund för data att laddas in (läs/skriv).
• Se “Hantering Av USB-Minne” (☞s.39) angående
radering av BD-LIVE-data i USB-minnet.
Anmärkningar
• Yamaha kan inte garantera att USB-minnen från alla tillverkare
fungerar med denna spelare.
• Använd inte en USB-förlängningskabel vid anslutning av ett
USB-minne till USB BD STORAGE/SERVICE-kontakten på
spelaren. Om en USB-förlängningskabel används, kan det
orsaka att spelaren inte fungerar korrekt.
3Spela upp skivan.
4Kör BD-LIVE enligt anvisningarna på skivan.
Följande illustration är ett exempel.
Anmärkningar
• Beträffande uppspelningsmetod för BD-LIVE-innehåll etc.,
utför manövreringarna i enlighet med anvisningarna i BD-
skivans manual.
• För att använda BD-LIVE-funktioner, utför
bredbandsanslutning till internet (☞s.10) och
kommunikationsinställningar (☞s.36).
• Se “BD-Internetåtkomst” (☞s.35) angående inställningar för att
begränsa tillgången till BD-LIVE-innehåll.
Utnyttja BONUSVIEW och BD-LIVE
P in P
Sekundär bild
Primär bild

FUNKTIONER FÖR SKIVOR
25 Sv
Svenska
GRUNDLÄGGANDE
FUNKTIONER
• Den tid det tar för att ladda ner tillhandahållna program till
USB-minnet anslutet till denna spelare varierar beroende på
hastigheten för internetanslutningen och programmens storlek.
• BD-LIVE-program som tillhandahålls via internet kanske inte
lyckas visas anslutningen beroende på statusen (uppdatering)
för leverantören. Ta i så fall ut skivan och försök igen.
• Om BD-LIVE-skärmen inte visas på ett tag efter att du valt BD-
LIVE-funktionen i BD-skivan meny, kan det hända att USB-
minnet inte har tillräckligt med ledigt utrymme. Mata i så fall ut
skivan från spelaren, och radera sedan data i USB-minnet
genom att använda menyn för dataradering som finns under
“Hantering Av USB-Minne”-menyn (☞s.39).

FM-MOTTAGNING
26 Sv
RADIOMOTTAGNING
Två inställningsmetoder förekommer: automatisk och manuell. Du kan även använda de automatiska och manuella
förinställningsegenskaperna för att lagra upp till 30 stationer.
Den automatiska stationsinställningen är effektiv när
stationernas signaler är starka och det inte finns någon
interferens.
1
Tryck på TUNER för att ställa mottagaren i FM-
läget.
2Tryck och håll TUNING intryckt under
mer än 2 sekunder för att starta automatisk
inställning.
När mottagaren har ställt in en station visas TUNED-
indikeringen och frekvensen för den station som tas
emot på frampanelens display.
• Tryck på för att ställa in stationer med lägre
frekvens.
• Tryck på för att ställa in stationer med högre
frekvens.
Om de mottagna signalen från en viss önskad station är
svag, kan du prova att ställa in den manuellt.
1
Tryck på TUNER för att ställa mottagaren i FM-
läget.
2Tryck på TUNING för att ställa in den
önskade stationen manuellt.
Följ tillvägagångssättet nedan för automatisk
förinställning av radiostationer.
1
Tryck på TUNER för att ställa mottagaren i FM-
läget.
2Tryck och håll MEMORY intryckt i mer än 2
sekunder.
Indikeringen PRESET börjar blinka på frampanelens
display och automatisk förinställning av stationer
påbörjas. När alla frekvenser har genomsökts, stoppar
förinställningen automatiskt.
• Genomsökningen startar vid den lägsta frekvensen
och går mot den högsta frekvensen.
• Mottagaren tilldelar automatiskt ett förvalsnummer
till varje identifierad station.
• För att avbryta genomsökningen, tryck på
MEMORY.
Anmärkningar
• Du kan förinställa upp till 30 FM-stationer.
• Alla lagrade stationsdata som finns under ett förvalsnummer
raderas om du lagrar en ny station under samma förvalsnummer.
FM-MOTTAGNING
Automatisk stationsinställning
Manuell stationsinställning
TUNING / d
d
d
d
TUNER
/ d
d
d
d
d
d
d
d
/ d
d
d
d
Automatisk förinställning
PRESET u / d
TUNER
MEMORY

27 Sv
FM-MOTTAGNING
Svenska
RADIOMOTTAGNING
Du kan lagra upp till 30 stationer.
1Ställ in en radiostation som ska lagras i
förvalsminnet.
Se sidan 26 för anvisningar om hur man ställer in en
station.
2Tryck på MEMORY.
Indikeringen PRESET blinkar i ungefär fem sekunder
på frampanelens display.
3Tryck på PRESET u / d upprepade gånger
på för att välja ett förvalt stationsnummer
medan PRESET-indikeringen blinkar.
4Tryck på MEMORY för att lagra medan
PRESET-indikeringen blinkar.
Indikeringen PRESET visas på frampanelens display.
5Upprepa stegen 1 till 4 tills alla önskade
stationer har förinställts.
Du kan ställa in vilken station du vill genom att välja den
förvalsstation under vilken stationen har lagrats (☞s.26).
Tryck på PRESET u / d upprepade gånger för att
välja den förinställda stationen.
y
• Förvalsstationer kan också väljas med hjälp av frampanelen.
Tryck på PRESET u / d upprepade gånger för att välja den
förinställda stationen.
• När du trycker på PRESET u / d på mottagarens frampanel i
beredskapsläge, aktiverar mottagaren automatiskt tunern och
ställer in den förvalda station som tidigare var vald.
■Radera en förvald station
1Tryck på TUNER för att ställa enheten i FM-
läget.
2Ta fram optionsmenyn genom att trycka på
OPTION. Tryck på / för att välja
“PRESET DEL” och tryck på ENTER.
3Välj förvalsnumret som du vill radera genom
att trycka på / och sedan trycka på
ENTER.
Förvalsstationen har nu raderats.
Du kan fortsätta att radera förvalsstationer på denna
skärm. Upprepa steg 2 och 3 tills alla stations som
inte behövs har raderats.
Att avbryta raderingsmanövern
Tryck på OPTION.
Manuell förinställning
PRESET u / d
MEMORY
Ställa in en förinställd station
PRESET u / d
OPTION
TUNER

RADIODATASYSTEM-INSTÄLLNING (ENBART EUROPEISK MODELL)
28 Sv
Radiodatasystem (gäller endast modeller till Europa) är ett system för dataöverföring som används av FM-stationer i ett
flertal länder. Radiodatasystem-funktionen verkar mellan stationerna i nätverket. Denna mottagare kan ta emot diverse
radiodatasystem-information, såsom PS (stationsnamn), PTY (programtyp), RT (radiotext), CT (aktuell tid) och TP
(trafikprogram) vid mottagning av radiodatasystem-sändande stationer.
Använd denna funktion till att kontrollera 4 typer av
radiodatasystem-information på displayen: PS
(stationsnamn), PTY (programtyp), RT (radiotext) och CT
(aktuell tid).
Anmärkningar
• Endast de tillgängliga radiodatasystem-lägen som erbjuds av
aktuell station kan väljas.
• Om de signaler som tas emot inte är tillräckligt starka kan det
hända att mottagaren inte kan utnyttja de radiodatasystem-data
som sänds. Särskilt läget ”RT” kräver en stor mängd data och är
kanske inte tillgängligt trots att övriga radiodatasystem-lägen är
tillgängliga.
• Om signalstyrkan försvagas av yttre störningar under pågående
mottagning av radiodatasystem-data, så kan det hända att
mottagningen plötsligt bryts och att meddelandet “...WAIT”
visas på frampanelens display.
• Medan läget “RT” är valt kan mottagaren visa tillgänglig
programinformation med upp till 64 alfanumeriska tecken,
inklusive å, ä och ö. Otillgängliga tecken visas som “_”
(understreck).
Tryck upprepade gånger på DISPLAY under
pågående mottagning av en radiodatasystem-
station för att välja önskat radiodatasystem-
visningssätt.
För beskrivning av programtyper, se tabellen nedan.
RADIODATASYSTEM-INSTÄLLNING (ENBART EUROPEISK MODELL)
Visning av radiodatasystem-
information
DISPLAY
PS
PTY
RT
CT
Frekvens
(stationsnamn)
(programtyp)
(radiotext)
(aktuell tid)
Programtyp Beskrivning
News Nyheter
Affairs Aktualiteter
Info Information
Sport Sport
Educate Utbildning
Drama Drama
Culture Kultur
Science Veten s k ap
Varied Underhållning
Pop M Popmusik
Rock M Rockmusik
Easy M Lättlyssnad musik
Light M Lätt klassisk musik
Classics Klassisk musik
Other M Övrig musik

29 Sv
RADIODATASYSTEM-INSTÄLLNING (ENBART EUROPEISK MODELL)
Svenska
RADIOMOTTAGNING
Använd denna funktion för att ta emot TP (trafikprogram)
dataservice i radiodatasystem-stationsnätverket.
1Ställ in önskad radiodatasystem-sändande
station.
2Tryck på TP.
“TP SEARCH” blinkar på frampanelens display i
ungefär 3 sekunder, och sökningen startar.
Indikeringen TP på mottagaren blinkar under
sökningen.
När trafikprogrammet tas emot, lyser indikeringen TP
och sökningen avbryts.
Om du trycker på TP, startar sökningen igen.
Om mottagaren inte lyckas tas emot
trafikprogrammet, släcks indikeringen TP och “NO
TP” visas på displayen. Mottagaren återgår till det
läge som gällde tidigare.
För att avbryta genomsökningen
Tryck på TP under sökningen.
CT-information som tas emot från en radiodatasystem-
station kan användas till att ställa in den inbyggda klockan
på mottagaren.
1Tryck på OPTION.
En post på optionsmenyn visas på frampanelens
display.
2Tryck på / för att välja “AUTO CLOCK”,
och tryck på ENTER.
3Tryck på / för att välja “ON” eller “OFF”
och tryck på ENTER.
Statusen “AUTO CLOCK” visas.
Grundinställningen är “ON”.
ON: Justerar automatiskt mottagarens klocka med
CT-informationen.
OFF: Justerar inte mottagarens klocka.
För att avsluta optionsmenyn
Tryck på OPTION.
Använda TP (trafikprogram)
dataservice
INPUT
BASS
PHONES
VOLUME
MIN MAX
TREBLE BALANCE
PRESET PURE DIRECT
LR
TIMER
TP
Indikatorn TP
TP
CT-inställningar (aktuell tid)

STÄLLA IN TIMERN
30 Sv
ÖVRIGA FUNKTIONER
Mottagaren är utrustad med 2 typer av timerfunktioner. Även BD-spelaren slås på eller ställs i strömberedskap
automatiskt via styrkabelanslutningen (☞s.8).
Den vanliga timern slår automatiskt på eller ställer
mottagaren i beredskapsläge vid önskade tidpunkter. Det
är också möjligt att ange en ingång som mottagaren
automatiskt väljer vid timerns påslagningstid.
Anmärkningar
• Den vanliga timern kan inte ställas in förrän aktuell tid har
ställts in (☞s.12).
• Om ingen knapp trycks in inom 30 sekunder efter föregående
knapptryckning, så raderas de utförda inmatningarna ur minnet
och displayen återgår till normalt visningssätt.
1Tryck på TIMER och / för att välja
“TIMER”, och tryck sedan på ENTER.
Mottagaren ställs i läget för timerinställning.
Indikeringen TIMER blinkar på frampanelens
display.
2Tryck på eller för att välja “ON” (timer
aktiverad) eller “OFF” (timer inaktiverad) och
tryck på ENTER.
ON: Skärmen för inställning av timern visas. Gå
vidare till steg 3.
OFF: Indikeringen TIMER släcks och mottagaren
återgår till normalt läge.
Anmärkning
För att inaktivera timern, välj “OFF”. När timern har aktiverats, förblir
timerinställningen och TIMER-indikatorn på tills “OFF” väljs.
3Ställ in starttid för timern.
För närmare information om hur klockan ställs in, se
steg 4 till 6 i “Tidsinställning” (☞s.12).
4
Tryck på / eller en ingångsväljare för att
välja den ingångskälla som ska användas när
timern slår på mottagaren, och tryck på ENTER.
Mottagaren väljer automatiskt ingångskällan när den
slås på av klocktimern.
Om FM är valt som ingångskälla, visas förvalsnumret
(t.ex. “P01”) på frampanelens display. Tryck på /
för att välja förvalsnumret för den station som du vill
lyssna på när timern aktiveras, och tryck på ENTER.
Om du väljer “---” (grundinställning),
väljer
mottagaren den station som var inställd senaste gången.
Om ingen station har ställts in som en förvalsstation,
visas “---”. Tryck på ENTER och gå vidare till steg 5.
Endast en förvalsstation kan väljas. Den station som
du vill lyssna på när timern aktiveras, måste lagras i
förväg som en förvalsstation (☞s.27).
Anmärkning
Det går inte att välja AUX som ingångskälla.
5Tryck på / för att ange hur länge
mottagaren ska vara påslagen.
Du kan välja en tidslängd från 30 till 90 minuter i steg
om 10 minuter. Välj “--” om du inte vill att
mottagaren ska ställas i beredskapsläget automatiskt.
6Tryck på ENTER för att slutföra
timerinställningen.
TIMER-indikatorn tänds.
7Tryck på för att ställa mottagaren i
beredskapsläge.
Mottagaren slås på automatiskt vid den angivna tiden.
Att avbryta åtgärden för timerinställning
Tryck TIMER under pågående åtgärd.
y
Du kan gå tillbaka till tidigare skärm genom att trycka på eller
RETURN.
STÄLLA IN TIMERN
Inställning av vanlig timer
INPUT
BASS
PHONES
VOLUME
MIN MAX
TREBLE BALANCE
PRESET PURE DIRECT
LR
TIMER
TP
Indikatorn TIMER
INPUT
ABCD
EXIT
TOP MENU/TITLE LIST
POP UP MENU
TIMER
Ingångsväljare
ENTER ,
RETURN

31 Sv
STÄLLA IN TIMERN
Svenska
ÖVRIGA
FUNKTIONER
Med insomningstimern ställs mottagaren i beredskapsläge
efter att vald insomningstid har gått ut.
Tryck upprepade gånger på SLEEP för att välja
önskad insomningstid.
Vid varje tryckning på knappen ändras insomningstiden
enligt följande.
Indikeringen SLEEP visas på frampanelens display.
y
• Om mottagaren ställs i beredskapsläge kopplas
insomningstimern ur.
• Vid tryckning en gång på SLEEP visas återstående
insomningstid på frampanelens display.
För att koppla ur insomningstimern
Tryck på SLEEP upprepade gånger tills “OFF” visas på
displayen.
Inställning av insomningstimern
SLEEP
120min.
90min.
60min.
30min.
OFF

STYRNING AV iPod™
32 Sv
Utöver att kunna kontrollera mottagaren (R-840) och BD-spelaren (BD-940) med hjälp av fjärrkontrollen, kan du styra
din iPod när den är placerad i iPod dockningsstationen.
När du placerat din iPod i iPod dockningsstationen kan du spela upp från din iPod med hjälp av den medföljande
fjärrkontrollen.
När iPod ansluts under pågående uppspelning, ändrar systemet automatiskt till iPod-läget.
Anmärkningar
• Endast iPod (Click and Wheel), iPod nano, iPod Classic, iPod mini och iPod touch stöds.
• En del funktioner är kanske inte kompatibla beroende på modell eller version på programvaran för din iPod.
y
För en komplett lista över statusmeddelanden som visas på frampanelens display på mottagaren hänvisas till avsnittet “iPod” i
“FELSÖKNING” (☞s.43).
1Tryck på iPod för att välja iPod som
ingångskälla.
2Placera din iPod i iPod dockningsstationen.
3Tryck på / för att manövrera iPod-menyn,
och tryck sedan på ENTER för att starta
uppspelning av valt musikstycke (eller
grupp).
• Titta på skärmen på iPod-spelaren för att använda
menyn.
• Manövrera iPod-spelaren med hjälp av iPod-
spelarens reglage eller den medföljande
fjärrkontrollen.
■Repeterad uppspelning (Repeat Play)
Du kan repetera uppspelningen av ett enstaka spår eller en
grupp av spår på din iPod.
Tryck på REPEAT.
Varje gång du trycker på knappen, ändras läget för
repetering. Följande uppställning är ett exempel på hur
läget ändras var gång du trycker på knappen. Kontrollera
aktuellt valt läge på iPod-skärmen.
■Spela upp slumpmässigt (Shuffle Play)
Du kan spela upp låtar eller album slumpmässigt från din iPod.
Tryck på SHUFFLE.
Varje gång du trycker på knappen, ändras läget för
slumpvis uppspelning. Följande uppställning är ett
exempel på hur läget ändras var gång du trycker på
knappen. Kontrollera aktuellt valt läge på iPod-skärmen.
STYRNING AV iPod™
Använda iPod™
Den medföljande fjärrkontrollen har samma
funktionsknappar som iPod. Därför motsvarar
knapparna varandra.
iPod
,
ENTER
REPEAT
SHUFFLE
iPod Fjärrkontroll
Ett (repeterad uppspelning av spår)
Alla (repeterad uppspelning av vald grupp)
Av
Spår (slumpvis uppspelning av spår)
Album (slumpvis uppspelning av album)
Av

33 Sv
Svenska
ÖVRIGA
FUNKTIONER
I detta avsnitt förklaras olika menyer i denna enhet.
Efter att ha slagit på denna enhet och TV:n (☞s.13), kan du ändra inställningarna på TV-skärmen med fjärrkontrollen.
Du kan välja olika menyalternativ och ändra inställningarna på samma sätt som proceduren för “Inställning av TV-
skärmen” (☞s.13).
Anmärkning
När du väljer “Barnlås” i “Uppspelningsinst.” (☞s.35), måste du mata in ett 4-siffrigt lösenord. Den första gången visas skärmen för
skapande av lösenord. För att skapa ett lösenord, se “Lösordsinställning” (☞s.35).
y
Grundinställningarna är markerade med “*”.
■TV-Bildformat
Du kan ange bildförhållandet för den anslutna TV:n och
göra inställningar för videoutmatningen.
När TV-apparaten byts ut mot en annan, kontrollera då om
bildförhållandet är det samma. Om inte, ändra
inställningen för “TV-Bildformat”.
“Normal 4:3” alternativ
När du har ställt in “TV-Bildformat” på “Normal 4:3” och
tittar på en 16:9 video på en 4:3 TV, välj då ett av följande
alternativ.
■Komponentvideoutgång
Du kan ställa in upplösningen för
komponentvideoutmatning.
Vissa TV-apparater är inte helt kompatibla med Blu-ray-
spelare, vilket kan orsaka bildstörningar. Ställ i så fall
“Komponentvideoutgång” på grundinställningen (☞s.41).
1080i, 720p, 576/480p, 576/480i*
Anmärkning
Vissa skivor förhindrar högdefinitions videoutmatning från
COMPONENT-uttagen. I sådant fall konverteras
videoupplösningen till 576/480p eller 576/480i.
■HDMI Video Utgång
Du kan ställa in upplösningen för HDMI videoutmatning.
Vissa TV-apparater är inte helt kompatibla med Blu-ray-
spelare, vilket kan orsaka bildstörningar. Ställ i så fall
“HDMI Video Utgång” på grundinställningen (☞s.41).
“HDMI Video Utgång” återställs till “Auto”
(grundinställningens värde).
Auto*, 1080p, 1080i, 720p, 576/480p
Anmärkning
När BD-spelaren är ansluten till en 1080p/24Hz kompatibel TV
och “HDMI Video Utgång” är inställt på “Auto”, visas 1080p/
24Hz automatiskt när kompatibla skivor spelas upp.
Vid 1080p/24Hz eller 1080p/60Hz sker ingen utmatning från
COMPONENT-uttaget och VIDEO-uttaget.
■Val Videoutgång
Videosignaler kan matas ut samtidigt från de analoga
videouttagen (komponent- eller videouttagen) och HDMI-
uttaget. Detta kallas för dubbel (dual) utmatning. Vid
användning av komponentvideo och HDMI-utgångar,
bestäms upplösningen för videoutmatning av
inställningarna för “Komponentvideoutgång” eller
“HDMI Video Utgång” och “Val Videoutgång”. Se
tabellen nedan för närmare information.
INSTÄLLNINGAR FÖR BD-SPELAREN
Inställningar Bild, Ljud
Bred 16:9*:Välj detta när en bredbilds-TV (16:9) är
ansluten.
Normal 4:3: Välj detta när en 4:3 TV är ansluten.
Letterbox*:Visar en bild med svarta band upptill och
nertill samtidigt som bildförhållandet 16:9
behålls.
Pan Scan: Visar en bild utan att ändra bildförhållandet
genom att klippa av dess högra och vänstra
kanter. Detta alternativ är endast tillgängligt
för skivor etiketterade med 4:3PS.
HDMI*:Bestämmer upplösningen för
videoutmatningen på grundval av HDMI
Video Utgång-inställningen (se “HDMI Video
Utgång” (☞s.33)).
Komponent: Bestämmer upplösningen för
videoutmatningen på grundval av
Komponentvideoutgång-inställningen (se
“Komponentvideoutgång” (☞s.33)).

34 Sv
INSTÄLLNINGAR FÖR BD-SPELAREN
*1 Vissa skivor förhindrar högdefinitions videoutmatning från
COMPONENT-uttag. I så fall konverteras videoupplösningen
till 480p/576p (när “Val Videoutgång” är inställt på
“Komponent”) eller 480i/576i (när “Val Videoutgång” är
inställt på “HDMI”).
*2 Ingen videoutmatning när 1080p-signalen matas ut från
HDMI-uttaget.
*3 Med CVBS Out menas att utmatad videosignal från VIDEO-
uttaget.
Anmärkning
Om TV:n inte är kompatibel med den valda upplösningen, kan det
hända att bilden inte återges korrekt.
y
Du kan också växla mellan “HDMI” och “Komponent” genom att
använda “HDMI <-> COMP” (☞s.41).
■Sekundärt ljud
Du kan slå på och av det sekundära ljudet för bild-i-bild
eller ljudkommentarer.
På*, Av
y
När du ställer in “Sekundärt ljud” på “Av”, hörs inget klickljud
från menyn på denna enhet.
Välj “Av” för återgivning av högkvalitativt BD-ljud via HDMI-
uttaget.
■Ljudutgång
Du kan välja en inställning för ljudutmatningen som
lämpar sig för uppspelningen.
“HDMI-Utgång” alternativ
När du ställer in “Ljudutgång” på “HDMI-Utgång”, välj
ett av följande alternativ.
Anmärkning
När “Sekundärt ljud” ställs på “På”, ställs alternativet “HDMI-
Utgång” automatiskt på “PCM”.
“Digital Utgång” alternativ
När du ställer in “Ljudutgång” på “Digital Utgång”, välj
ett av följande alternativ.
■Dynamisk Kontroll
Du kan ställa in dynamikomfånget så att ljudet matas ut på
en genomsnittlig volymnivå. Om det är svårt att höra
dialogen tydligt, ändra inställningen på denna meny.
Anmärkning
Sänk ljudvolymen innan denna inställning ändras; i annat fall kan
högt ljud matas ut från högtalarna eller så kan de utsättas för en
stark elektrisk laddning.
Inställningar på denna
spelare Utmatad upplösning
Val
Videoutgång
HDMI Video
Utgång
Component
Out CVBS Out*3
HDMI
Auto *1 480i/576i*2
1080p Ingen
utmatning
Ingen
utmatning
1080i 1080i*1 480i/576i
720p 720p*1 480i/576i
480p/576p 480p/576p*1 480i/576i
Inställningar på denna
spelare Utmatad upplösning
Val
Videoutgång
Komponent-
videoutgång HDMI Out CVBS Out*3
Komponent
1080i*11080i*1 480i/576i
720p*1720p*1 480i/576i
480p/576p 480p/576p 480i/576i
480i/576i 480i/576i 480i/576i
HDMI-Utgång: Matar ut en ljudsignal via HDMI-uttaget.
Digital Utgång: Matar ut en ljudsignal via DIGITAL OUT
(OPTICAL)-uttaget.
2-ch
Ljudutgäng*:
Matar ut en ljudsignal via AUDIO OUT-
uttagen.
Bitstream: Matar ut en bitstream ljudsignal.
Välj detta alternativ vid anslutning av en
HDMI-komponent med inbyggd dekoder för
DOLBY DIGITAL etc.
PCM*
(Surround):
Matar ut en linjär PCM ljudsignal.
Ljudsignaler inspelade i ett annat format, som
t.ex. DOLBY DIGITAL och DTS avkodas till
linjär PCM och matas ut.
Bitstream: Matar ut en bitstream ljudsignal.
Välj detta alternativ vid anslutning av en
surroundkomponent med inbyggd dekoder för
DOLBY DIGITAL etc.
PCM*:Matar ut en PCM 2-kanalig ljudsignal.
Ljudsignaler inspelade i ett annat format
konverteras till PCM 2-kanaliga ljudsignaler
och matas ut.
Välj detta alternativ vid anslutning av en 2-
kanalig stereoljudkomponent.
Normal: Matar ut ljud i samma dynamikomfång som
originalljudet.
Skifta: Justerar dynamikomfånget för Dolby Digital-
ljud så att dialogen hörs tydligare.
Om ljudet låter konstigt, välj “Normal”.
Auto*:Justerar automatiskt dynamikomfånget för
Dolby TrueHD-ljud.

35 Sv
INSTÄLLNINGAR FÖR BD-SPELAREN
Svenska
ÖVRIGA
FUNKTIONER
Med snabbstartfunktionen kan du starta upp denna enhet
snabbare.
Anmärkning
När “Snabbstart” är inställt på “Ja”, behöver BD-spelaren mer tid
för att stängas av.
Du kan ange att denna enhet ska stängas av automatiskt
cirka 10 minuter efter att uppspelningen stoppades.
Ja, Nej*
Du kan ange att denna enhet ska ta emot en HDMI-
styrsignal från TV:ns fjärrkontroll om den stöder HDMI-
styrning och är ansluten till denna enhet via en HDMI-
kabel.
Ja, Nej*
Anmärkningar
• Vi hänvisar till bruksanvisningen för TV:n för närmare
information.
• Det är möjligt att HDMI-styrfunktionen inte fungerar under
uppspelning eller när inställningsmenyn visas.
• Denna funktion kan endast användas när “Val Videoutgång” är
inställt på “HDMI”.
■Barnlås
Vissa digitala sändningar och BD/DVD inkluderar en
klassificeringskod för att blockera visningen av innehållet
för en viss åldersgrupp. Du kan ställa in en nivå för att
blockera uppspelning av BD/DVD med ej önskad
klassificering på denna enhet.
“Uppspelningsinst.” har också alternativet “Landskod”.
Eftersom klassificeringarna skiljer sig i olika länder, kan
det också vara nödvändigt att ställa in landskoden.
För att ange en nivå eller landskod, måste du ange ett 4-
siffrigt lösenord och mata in det.
För DVD
För BD
Landskod
För inställning av landskoden.
Se Landskodlistan (☞s.51) eftersom klassificeringarna
skiljer sig enligt landet.
■Skivspråk (Prioriterat språk för skiva)
Du kan ange språket för textning, ljud och menyer som
visas på skärmen.
Se “Lista över språk” (☞s.51) för tillgängliga språk.
■Visa Vinkelmärke
Vissa BD/DVD-videor har multipla vinklar. När du tittar
på en sådan video, kan du du ta fram ett vinkelmärke nere
till höger på skärmen.
■Lösordsinställning
Du kan skapa ett lösenord för inställning av eller ändring
av Föräldrakontrollnivån.
Anmärkningar
• När du har glömt lösenordet, kan du återställa det aktuella
lösenordet genom att använda “Systemåterställning” (☞s.39).
• Du kan ändra lösenordet om så önskas.
Vid inställning av PIN-koden för första gången
1Tryck på / för att välja “Ja”, tryck sedan
på ENTER.
2Mata in ett 4-siffrigt nummer.
3Mata in samma 4-siffriga nummer en gång till
för bekräftelse.
4Tryck på ENTER för att avsluta skärmen för
inställning av PIN-kod.
y
• Du kan ta bort det 4-siffriga numret genom att trycka på
CLEAR.
• Du kan också använda ENTER (c☞s.7) på fjärrkontrollen.
■BD-Internetåtkomst
Du kan begränsa tillgången till BD-LIVE-innehåll.
Snabbstart
Ja: Aktiverar snabbstartfunktionen.
Indikatorn QUICK lyser i beredskapsläget
(☞s.5).
Nej*:Inaktiverar snabbstartfunktionen.
Strömförbrukningen i beredskapsläget är
lägre.
Autoströmavslag
HDMI kontroll
Uppspelningsinst.
Nivå 8 och Av*:Begränsar inte uppspelningen av DVD.
Nivå 1-7: Förhindrar uppspelning av DVD med
motsvarande klassificering.
Öppen*:Begränsar inte uppspelningen av BD.
0-99 år: Förhindrar uppspelning av BD med
motsvarande klassificering.
Ja: Tar fram vinkelmärket.
Nej*:Tar inte fram vinkelmärket.
Ja: Anger lösenordet.
Du uppmanas att mata in ett 4-siffrigt
nummer.
Nej: Anger inget lösenord.
Tillåt: Medger internetåtkomst för alla BD-LIVE-
skivor.

36 Sv
INSTÄLLNINGAR FÖR BD-SPELAREN
Anmärkningar
• Vilka funktioner som är tillgängliga varierar beroende på
skivan.
• Beträffande uppspelningsmetod för BD-LIVE-innehåll etc.,
utför manövreringarna i enlighet med anvisningarna i BD-
skivans manual.
• För att utnyttja BD-LIVE-funktioner, se “Anslutning till
Internet” (☞s.10) och “Kommunikationsinställning” (☞s.36).
Här kan du utföra och/eller ändra
kommunikationsinställningar. Denna inställning krävs för
att kunna använda BD-LIVE-funktioner som ansluter till
internet.
Anmärkningar
• Kontrollera att LAN-kabeln är ansluten till denna spelare
(☞s.10).
• Om inställningen ska göras manuellt, krävs följande
information om den anslutna routern eller modemet. Hämta
fram information innan inställningen görs.
– IP-adress, nätmask, gateway (nätsluss), DNS IP-adress
• Om dessutom en proxyserver ska anges, krävs också följande
information specificerad från din internetleverantör. Hämta
fram information innan inställningen görs.
– IP-adress och portnummer för proxyservern
1Tryck på SETUP.
2Tryck på / / / för att välja “Inställningar”,
tryck sedan på ENTER.
3Tryck på / för att välja
“Kommunikationsinställning”, tryck sedan
på ENTER.
4Välj “Ethernet inställning (BD-LIVE)”, tryck
sedan på ENTER.
5Tryck på / för att välja “Ändring”, tryck
sedan på ENTER.
För att initiera den aktuella inställningen, välj
“Initialisera”, tryck sedan på ENTER.
6För inställning av IP-adress, tryck på / för
att välja “Ja” eller “Nej”, tryck sedan på
ENTER.
• Om “Ja” väljs: IP-adress hämtas automatiskt.
• Om “Nej” väljs: IP-adressen, nätmasken och
gatewayen (nätslussen) matas in manuellt med
hjälp av skärmen för inmatning av tecken (☞s.38).
Beträffande de enskilda inställningsvärdena,
kontrollera specifikationerna för bredbandsroutern.
7Välj “Nästa”, tryck sedan på ENTER.
8Skriv in primär och sekundär IP-adress med
hjälp av skärmen för inmatning av tecken
(☞s.38).
Beträffande de enskilda inställningsvärdena,
kontrollera specifikationerna för
bredbandsroutern.
9Välj “Nästa”, tryck sedan på ENTER.
Gräns*:Medger internetåtkomst endast för BD-LIVE-
skivor med ägarbehörighet.
Förbjudet: Förhindrar internetåtkomst för alla skivor.
Kommunikationsinställning
EXIT
TOP MENU/TITLE LIST
POP UP MENU
, , ,
ENTER
SETUP
Inställning av info. för Ethernet
[Nuvarande Inställning]
: Auto-Inställning
: Auto-Inställning
: Auto-Inställning
: Auto-Inställning
: Används inte
IP-adress
Nätmask
Nätbrygga
DNS
Proxy
Ändring Initialisera
Erhåller du IP-adressen automatiskt?
IP-adress
Nätmask
Nätbrygga
Nästa
Ja Nej

37 Sv
INSTÄLLNINGAR FÖR BD-SPELAREN
Svenska
ÖVRIGA
FUNKTIONER
10 För inställning av proxyserver, tryck på /
för att välja “Ja” eller “Nej”, tryck sedan på
ENTER.
• Om “Ja” väljs: Mata in IP-adress eller
proxyservernamn och portnummer för
proxyservern specificerad från din
internetleverantör med hjälp av skärmen för
inmatning av tecken (☞s.38).
• Om “Nej” väljs: Gå till nästa steg.
11 Välj “Nästa”, tryck sedan på ENTER.
12 För avancerade inställningar (inställning av
hastighet för Ethernet-anslutning), tryck på
/ för att välja “Ja” eller “Nej”, tryck sedan
på ENTER.
• Välj normalt “Nej”, tryck sedan på ENTER.
• Hastigheten för Ethernet-anslutningen kan ställas
in när du väljer “Ja”, tryck sedan på ENTER.
• Eftersom detta görs automatiskt (grundinställning),
behövs normalt inte denna inställning. Om det
uppstår en situation där Ethernet-anslutningen inte
lyckas etc., ändra då inställningen och bekräfta
därefter att Ethernet-anslutningen fungerar
tillfredsställande.
När anslutningshastigheten har angetts, välj
“Nästa”, tryck sedan på ENTER.
13 För att testa anslutningen till internet, efter
att ha bekräftat inställningarna, tryck på /
för att välja “Test”, tryck sedan på ENTER.
“Test” ar endast tillgangligt efter installning for
automatiskt erhallande av IP-adress.
14 Tryck på / för att välja “Fullföljd”, tryck
sedan på ENTER.
■Hur man gör för att mata in tecken
manuellt
Anmärkning
Numeriska tecken som t.ex. IP-adresser kan matas in på
inmatningsskärmen antingen genom att välja varje tecken i
“Numerisk”-läget eller genom att använda sifferknapparna på
fjärrkontrollen.
1Tryck på ENTER i rutorna där tecken ska
matas in, så visas inmatningsskärmen.
2Tryck på / för att välja önskad
inmatningsläge.
• Vid inmatning av adressen för proxyservern:
“1ABC” (alfabetiska/numeriska tecken) / “Sign” /
“Redigera”
• Vid inmatning av andra värden (IP-adress etc.):
“Numerisk” / “Redigera”
3Tryck på / för att välja en siffra/ett tecken,
tryck sedan på ENTER.
4Upprepa steg 3 tills alla nödvändiga tecken/
siffror har matats in i inmatningsfältet.
Exempel: Skärmen för inmatning av numeriska tecken
Använder du proxyservern?
Adress
Port
Nästa
Ja Nej
Alternativ
Ethernet anslutningshastighet
Nästa
Autodetektering
10M Halv Duplex
100M Halv Duplex
10M Full Duplex
100M Full Duplex
Bekräfta nuvarande inställning.
: xxx xxx xxx xxx
: xxx xxx xxx xxx
: xxx xxx xxx xxx
: xxx xxx xxx xxx
xxx xxx xxx xxx
: xx:xx:xx:xx:xx:xx
IP-adress
Nätmask
Nätbrygga
DNS Adress
MAC-adress
FullföljdTest
IP-adress
Nätmask
Nätbrygga
123
Numerisk
1234567890
Redigera
Väljs genom att trycka på
/Väljs genom att trycka på
/
Numerisk 123
1234567890
Redigera
38 Sv
INSTÄLLNINGAR FÖR BD-SPELAREN
Anmärkning
Tryck på RETURN (Rad.Tecken) för att radera en siffra/ett
tecken som du har matat in.
För att ändra en siffra/ett tecken som du har matat in, tryck på B
(vänster) eller C (höger) för att välja siffran/tecknet som du vill
ändra, tryck sedan på RETURN (Rad.Tecken). Tryck sedan på /
för att välja en ny siffra/ett nytt tecken som ska matas in, och
tryck på ENTER.
5Tryck på D (slutför) för att fastställa siffrorna
som har matats in.
6Upprepa steg 1 till 5 tills inmatningen av alla
erforderliga tecken är klar.
Lista över inmatningstecken
IP-adress
Nätmask
Nätbrygga
123
1ABC (alfabetiska/
numeriska tecken)
Numerisk
Sign
Redigera
* Samma åtgärder som för färgknapparna och RETURN kan utföras genom att välja vart och ett av
alternativen och trycka på ENTER. “Rad.Tecken” står för radering av tecken.
Num. ABC DEF GHI JKL MON PQRS TUV WXYZ Spc.
Num. 1234567890 ABC ABCabc DEF D E F d e f
GHI G H I g h i JKL J K L j k l MNO MNOmno
PQRS PQRSpqrs TUV TUVtuv WXYZ WXYZwxyz
Spc. (mellanrum)
1234567890
@ . , : ; _ - \ $ % ! ? & # + * = / | ˜ “ ‘ ˆ ` ( ) < > [ ]{ } Spc.
@ . , : @ . , : ; _ - \ ; _ - \ $ % ! ? $ % ! ?
& # + * & # + * = / | ˜ = / | ˜ “ ‘ ˆ ` “ ‘ ˆ `
( ) < > ( ) < > [ ]{ } [ ] { } Spc. (mellanrum)
Avbryt Vänster Höger Fullföljd Rad.Tecken

39 Sv
INSTÄLLNINGAR FÖR BD-SPELAREN
Svenska
ÖVRIGA
FUNKTIONER
Systemets programvaruversion kan tas fram.
Innan du använder USB-minnet
Följande anvisningar förklarar hur man raderar data som
till exempel BD-LIVE-data i ett USB-minne.
1Sätt i USB-minnet i USB BD STORAGE/
SERVICE-kontakten på baksidan av denna
spelare.
2Tryck på SETUP för att ta fram skärmen med
inställningsmenyn.
3Tryck på / / / för att välja “Inställningar”,
tryck sedan på ENTER.
4Tryck på / för att välja “Hantering Av USB-
Minne”, tryck sedan på ENTER.
“Inget USB-minne” visas när inte något USB-minne
är isatt.
5Tryck på / , välj “Radera” eller
“Formatera”, tryck sedan på ENTER.
Radera: Endast radering av BD-VIDEO-data som
ligger på USB-minnet, som t.ex. BD-
LIVE-data.
Formatera: Var medveten om att all data inklusive
BD-VIDEO-data och uppdateringar av
programvara raderas.
Om du efter uppdatering av programvaran vill radera
endast uppdateringsdata för programvaran som inte
längre behövs, använd då en dator för att radera data
på USB-minnet.
Anmärkning
Data som har sparats i spelaren internminne (spelresultat etc.)
kommer också att raderas.
6Tryck på / , välj “Ja”, och tryck på ENTER.
7Starta processen.
En skärm som visar aktuell åtgärd visas.
8Tryck på ENTER.
Denna funktion medger programuppdateringar genom att
sätta i USB-minnet med uppdateringsfilen i USB BD
STORAGE/SERVICE-kontakten på denna spelare.
USB-minnet får inte innehålla några andra filer än
programuppdateringsdata för att uppladdning av
ny programvara ska medges.
Gå till
http://www.yamaha.co.jp/english/product/av/
down/agreement.html för att se om det finns
några aktuella programuppdateringar.
Används för att återställa alla inställningar i BD-spelaren
till grundinställningarna.
Återställ, Återställ Inte
Version
OBSERVERA:
• Ta inte ut USB-minnet och koppla inte loss
nätkabeln medan operationer för “Hantering Av
USB-Minne” eller ”Uppdatera Program” utförs.
• Använd inte en USB-förlängningskabel vid
anslutning av ett USB-minne till USB BD
STORAGE/SERVICE-kontakten på spelaren. Om
en USB-förlängningskabel används, kan det orsaka
att spelaren inte fungerar korrekt.
Anmärkning
Yamaha kan inte garantera att USB-minnen från alla
tillverkare fungerar med denna spelare.
Hantering Av USB-Minne
Uppdatera Program
Systemåterställning
Raderar BD-VIDEO-data på USB-minnet.
Radera all information på USB-minnet inklusive
skyddad information.
Formatera
Radera
Ja Nej
Avsluta
OK
40 Sv
INSTÄLLNINGAR FÖR BD-SPELAREN
Lista över landskoder
Lista över språk
Lista över språkkoder
USA / KANADA / JAPAN / TYSKLAND / FRANKRIKE / STORBRITANNIEN / ITALIEN / SPANIEN /
SCHWEIZ / SVERIGE / HOLLAND / NORGE / DANMARK / FINLAND / BELGIEN / HONG KONG /
SINGAPORE / THAILAND / MALAYSIA / INDONESIEN / TAIWAN / FILIPPINERNA / AUSTRALIEN /
RYSSLAND / KINA
English / Français / Deutsch / Italiano / Español / Japanese / Svenska / Nederlands
AA afar / AB abchaziska / AF afrikaans / AM amhariska / AR arabiska / AS assamesiska / AY aymara / AZ
azerbajdzjanska / BA basjkiriska / BE vitryska / BG bulgariska / BH bihari / BI bislama / BN bengali / BO tibetanska
/ BR bretonska / CA katalanska / CO korsikanska / CS tjeckiska / CY kymriska / DA danska / DE tyska / DZ
dzhongkha / EL grekiska / EN engelska / EO esperanto / ES spanska / ET estniska / EU baskiska / FA persiska (farsi)
/ FI finska / FJ fijianska / FO färöiska / FR franska / FY frisiska / GA iriska / GD gaeliska / GL galiciska / GN
guarani / GU gujarati / HA hausa / HI hindi / HR kroatiska / HU ungerska / HY armeniska / IA interlingua / IE
interlingue / IK inupiak / IN indonesiska / IS isländska / IT italienska / IW hebreiska/ JA japanska / JI jiddisch / JW
javanesiska / KA georgiska / KK kazakiska / KL grönländska / KM kambodjanska / KN kannada / KO koreanska / KS
kashmiri / KU kurdiska / KY kirgiziska / LA latin / LN lingala / LO laotiska / LT litauiska / LV lettiska / MG
madagaskiska / MI maori / MK makedonska / ML malayalam / MN mongoliska / MO moldaviska / MR marathi / MS
malajiska / MT maltesiska / MY burmesiska / NA nauriska / NE nepali / NL nederländska / NO norska / OC
occitanska / OM afan (oromo) / OR oriya / PA punjabi / PL polska / PS pashto / PT portugisiska / QU quechua / RM
rätoromanska / RN kirundi / RO rumänska / RU ryska / RW kinyarwanda / SA sanskrit / SD sindhi / SG sangho / SH
serbokroatiska / SI singalesiska / SK slovakiska / SL slovenska / SM samoanska / SN shona / SO somaliska / SQ
albanska / SR serbiska / SS siswati / ST sesotho / SU sundanesiska / SV svenska / SW swahili / TA tamil / TE telugu
/ TG tadzjikiska / TH thailändska / TI tigrinja / TK turkmenska / TL tagalog / TN setswana / TO tonganska / TR
turkiska / TS tsonga / TT tatariska / TW twi / UK ukrainska / UR urdu / UZ uzbekiska / VI vietnamesiska / VO
volapük / WO wolof / XH xhosa / YO yoruba / ZH kinesiska / ZU zulu

41 Sv
Svenska
ÖVRIGA
FUNKTIONER
Du kan använda knapparna på BD-spelaren för att ändra inställningarna när en HDMI- eller komponentkabel har
anslutits. se sidan 33 också.
Anmärkningar
• Även i Pure Direct-läget kan du visa och ändra inställningarna på frampanelens display på BD-spelaren.
• Det går inte att ändra inställningarna under uppspelning. Ändra inställningarna efter att ha stoppat uppspelningen.
1Tryck på DISC för att välja en ingångskälla,
och tryck på OPTION.
“VIDEO RESET” visas på frampanelens display på
BD-spelaren.
2Tryck på / för att välja “VIDEO RESET”
eller “HDMI <-> COMP”.
VIDEO RESET
Återställ upplösningen för “Komponentvideoutgång”
(☞s.33) eller “HDMI Video Utgång” (☞s.33) till
grundinställningen.
HDMI <-> COMP
Ställ in prioritering av videoutmatning till HDMI
eller komponent.
För närmare information, se “Val Videoutgång”
(☞s.33).
3Tryck på ENTER för att bekräfta
inställningen.
“>> DONE <<” visas.
Att avbryta åtgärden för inställning
Tryck på OPTION, EXIT eller RETURN.
ÄNDRA INSTÄLLNINGARNA VID ANSLUTNING AV EN HDMI-
ELLER KOMPONENTKABEL
ABCD
EXIT
TOP MENU/TITLE LIST
POP UP MENU
DISC
,
OPTION
ENTER
EXIT RETURN

FELSÖKNING
42 Sv
YTTERLIGARE INFORMATION
Gå igenom tabellen nedan, om systemet inte verkar fungera korrekt. Om problemet inte finns upptaget i tabellen nedan
eller om det inte kan lösas med hjälp av anvisningarna i felsökningstabellen, ska du slå av mottagaren, koppla ur
nätkabeln och kontakta närmaste auktoriserade Yamaha-handlare eller servicecenter.
■Allmänt
FELSÖKNING
Mottagare (R-840)
Problem Möjlig orsak Åtgärd Se
sidan
Mottagaren slås inte
på eller ställs i
beredskapsläget kort
efter att strömmen
har slagits på.
Nätkabeln är inte ansluten eller
stickkontakten är inte ordentligt isatt.
Anslut nätkabeln ordentligt. 8
Mottagaren har utsatts för en kraftig yttre
elstöt (t.ex. ett blixtnedslag eller kraftig
statisk elektricitet).
Ställ mottagaren i beredskapsläget, koppla loss
nätkabeln, anslut nätkabeln igen efter 30 sekunder
och använd sedan mottagaren normalt.
—
Kabeln har kortslutits och skyddskretsen
har aktiverats.
Se till att högtalarledningarnas kopplingar på
mottagaren och på alla högtalarna sitter ordentligt
och att ledningen till varje kontakt inte rör vid någon
annan ledning än sin egen.
8
Den interna temperaturen är för hög,
skyddskretsen har aktiverats.
Vänta i ca. 1 timma tills mottagaren har svalnat och
sätt därefter på den igen.
8
Inget ljud Felaktiga kabelanslutningar för insignaler
eller utsignaler.
Anslut kablarna ordentligt. Om problemet kvarstår,
kan det bero på defekta kablar.
8
Ingen tillämpbar ingångskälla har valts. Välj en lämplig ingångskälla med hjälp av väljaren
INPUT på frampanelen (eller ingångsväljarna på
fjärrkontrollen).
—
Högtalaranslutningarna är inte ordentligt
gjorda.
Rätta till anslutningarna. 8
Volymen är nerskruvad. Vrid upp volymen. —
Ljudet är avstängt. Tryck på MUTE eller VOLUME +/– för att återuppta
ljudutmatningen och justera därefter volymen.
7
Signaler som mottagaren inte kan återge,
matas in från en källa, t.ex. från en CD-
ROM-skiva.
Spela upp en källa vars signaler kan återges av
mottagaren.
—
Ljudet upphör
plötsligt.
Timern har slagit av mottagaren. Slå på mottagaren och starta uppspelningen på nytt. —
Ljud återges endast
via högtalaren på en
sida.
Kabeln är inte ordentligt ansluten. Anslut kablarna ordentligt. Om problemet kvarstår,
kan det bero på defekta kablar.
8
Det förekommer
störningar från
digital utrustning
eller
radiofrekvensutrustning.
Mottagaren står för nära den digitala
utrustningen eller
högfrekvensutrustningen.
Flytta mottagaren längre bort från sådan utrustning. —
Ljudet är förvrängt. Volymnivån är för hög. Justera volymnivån. 15
“CHK SP WIRE”
visas på displayen.
Högtalarkablarna är kortslutna. Se till att högtalarkablarna är riktigt anslutna. 8

43 Sv
Svenska
FELSÖKNING
YTTERLIGARE
INFORMATION
■FM
■iPod
Anmärkning
Om ett överföringsfel har inträffat utan att något statusmeddelande visas på frampanelens display på mottagaren, så kontrollera
anslutningen mellan mottagaren och din iPod (☞s.10).
Problem Möjlig orsak Åtgärd Se
sidan
FM-mottagningen i stereo är
brusig.
Egenskaperna hos FM-sändningar i
stereo kan orsaka detta problem när
sändaren är för långt bort eller
antennsignalen är för svag.
Kontrollera antennanslutningarna. 8
Försök med att använda en riktad FM-antenn
av hög kvalitet.
—
Distorsion förekommer och
det går inte att få en klar
mottagning ens med en bra
FM-antenn.
Flervägs interferensstörningar
förekommer.
Justera antennens position för att eliminera
flervägs interferens.
—
Önskad station kan inte
ställas in med metoden för
automatisk
stationsinställning.
Signalen är för svag. Använd en riktad FM-antenn av hög kvalitet. —
Använd metoden för manuell
stationsinställning.
26
Tidigare förinställda stationer
kan inte längre ställas in.
Mottagaren har varit urkopplad under
en lång period.
Lagra förvalsstationer på nytt. 26
Statusmeddelande Möjlig orsak Åtgärd Se
sidan
CONNECT ERR Ett problem med signalvägen från en
iPod-spelare till mottagaren förekommer.
Stäng av mottagaren och pröva med att ta ur och sätta
tillbaka iPod-spelaren.
10
UNKNOWN TYP Den iPod-spelare som används stöds inte
av mottagaren.
Endast iPod (Click and Wheel), iPod nano, iPod
Classic, iPod mini och iPod touch stöds.
—
CONNECTED Din iPod är riktigt placerad i iPod
dockningsstationen, och anslutningen
mellan din iPod och mottagaren är klar.
NOT CONNECT Din iPod har tagits bort från iPod
dockningsstationen på mottagaren.
Sätt tillbaka din iPod i kontakten på mottagaren. 10
CAN'T PLAY Mottagaren kan inte spela upp de låtar
som finns lagrade i iPod-spelaren.
Kontrollera att de låtar som finns lagrade i iPod-
spelaren är spelbara.
—
Lagra andra spelbara musikfiler i iPod-spelaren. —

44 Sv
FELSÖKNING
Fjärrkontroll
Problem Möjlig orsak Åtgärd Se
sidan
Fjärrkontrollen kan
inte användas eller
fungerar dåligt.
Fjärrkontrollen kan användas utanför sin
funktionsradie.
För information om fjärrkontrollens räckvidd, se
“Använda fjärrkontrollen”.
11
Systemets fjärrkontrollsensor kan vara
utsatt för direkt solljus eller belysning
(lysrör av invertertyp).
Ändra belysningen eller systemets riktning. 11
Batteriet kan vara slut. Byt ut batteriet mot ett nytt. 11
Det finns hinder mellan systemets sensor
och fjärrkontrollen.
Flytta undan eventuella hinder. 11
Styrkabeln har kopplats loss från
systemkopplingen på mottagaren och/
eller BD-spelaren.
Anslut mottagaren och BD-spelaren ordentligt till
varandra med hjälp av styrkabeln.
8
BD-spelare (BD-940)
Problem Möjlig orsak Åtgärd Se
sidan
Strömmen slås inte
på.
Stickkontakten är inte helt inkopplad. Anslut nätkabeln ordentligt. 8
Mottagaren och BD-spelaren är felaktigt
anslutna.
Kontrollera anslutningen till mottagaren. 8
Mottagaren är felaktigt inställd. Ändra inställningen (INPUT/Volym/MUTE/
Hörlurar) på mottagaren.
—
Strömmen är
avslagen.
“Autoströmavslag” är inställd på “Ja”. Ställ in “Autoströmavslag” på “Nej”. 35
Skivspelning startar
ej.
Kanske används en inspelningsbar skiva
som inte är slutbehandlad.
Slutbehandla den inspelningsbara skivan. —
Skivans etikettsida är kanske vänd neråt. Placera skivan på skivbrickan med etiketten vänd uppåt. —
Skivan är kanske defekt. Prova att spela upp en annan skiva. Om samma
problem inte uppstår, så tyder det på att den första
skivan är defekt.
—
Skivan är smutsig. Rengör skivans yta. 48
Regionkoden på skivan motsvarar inte
regionkoden för BD-spelaren.
Använd en skiva med samma regionkod som BD-
spelaren.
3
Om den inspelade tiden på skivan är
ovanligt kort, kan det hända att det inte
går att spela upp.
BD-RE/R-skivor inspelade i ett annat
format än BDMV kan inte spelas upp.
Videouppspelningen
stoppas.
BD-spelaren har utsatts för hårda stötar
eller vibrationer.
Utsätt inte BD-spelaren för hårda stötar eller
vibrationer.
—
BD-spelaren står inte uppställd på en
stadig och jämn yta.
Ställ BD-spelaren på en stadig och jämn yta. —
Det hörs ett
klickande ljud från
BD-spelaren när en
skiva sätts i eller
spelas.
BD-spelaren har inte använts på ett tag. Detta kan inträffa när den inte har använts på ett tag.
Det tyder inte på något fel.
—

46 Sv
FELSÖKNING
Följande meddelanden visas på TV-skärmen ifall skivan som du försöker spela upp inte är av rätt typ eller om
manövreringen inte är korrekt.
Nätverk
Problem Möjlig orsak Åtgärd Se
sidan
Det går inte att
ansluta till Internet.
Nätverkskabeln är inte ordentligt
ansluten.
Anslut nätverkskabeln ordentligt. 10
En felaktig kabel används, som till
exempel en modulkabel.
Använd nätverkskabeln för anslutning. 10
Bredbandsroutern eller modemet är inte
anslutet på rätt sätt.
Anslut bredbandsroutern och/eller modemet på rätt
sätt.
10
Bredbandsroutern eller modemet är inte
påslaget.
Slå på bredbandsroutern eller modemet. —
Närverksinställningarna är inte korrekta. Kontrollera “Kommunikationsinställning”. 36
Det går inte att ladda
ner BD-LIVE-innehåll.
Nätverkskabeln är inte ordentligt
ansluten.
Anslut nätverkskabeln ordentligt. 10
USB-minnet är inte anslutet på rätt sätt. Kontrollera att USB-minnet är anslutet i USB BD
STORAGE/SERVICE-kontakten på BD-spelaren.
10
BD-skivan stöder inte BD-LIVE. Kontrollera om BD-skivan stöder BD-LIVE. 24
“BD-Internetåtkomst” är inställd på
“Förbjudet”.
Ställ in “BD-Internetåtkomst” på “Tillåt” eller
“Gräns”.
35
Meddelanden relaterade till BD-skiva och DVD-skiva
Felmeddelande Möjligt fel Åtgärd
Kan inte spela. – Skivan kan inte spelas upp med denna spelare. – Kontrollera skivan och sätt i den på rätt sätt.
Inkompatibel skiva. – Efter isättning av en skiva som ej kan spelas upp
med denna spelare (t.ex. en repig skiva) eller
isättning av en skiva upp och ned visas detta
meddelande, varpå skivfacket öppnas automatiskt.
– Visas om den isatta skivan inte kan spelas upp då
den har en onormal form, är repig el.dyl.
– Ta ur skivan.
Kan inte användas. – Visas om en handling utförts felaktigt.
Detta USB-minne är ej
formaterat på rätt sätt.
Formatera USB-minnet med
Hantering av USB-minne.
– Visas om ett formateringsfel förekommer. – Formatera USB-minnet igen.
– Visas om ett USB-minne inte är formaterat med
FAT 32/16.
– Formatera USB-minnet med din dator.
Anslutet USB-minne kan ej
användas. Det bör vara
kompatibelt med USB 2.0.
– Visas om ett USB-minne som inte
överensstämmer med USB 2.0 High Speed (480
Mbit/s) används (d.v.s. USB 1.0/USB 1.1).
– Anslut ett USB-minne kompatibelt med
USB 2.0 High Speed (480 Mbit/s).

47 Sv
Svenska
YTTERLIGARE
INFORMATION
JPEG är en typ av filformat för lagring av stillbildsfiler (foton, illustrationer etc.). Spelaren medger uppspelning av
stillbildsfiler av JPEG-format.
■Filformat som inte är kompatibla
• Stillbilder av andra format än JPEG (såsom TIFF) kan
inte spelas.
• Vissa filer kan kanske inte spelas även om de är av
JPEG-format.
• Progressiva JPEG-filer kan inte spelas.
• Filer med rörliga bilder och ljudfiler liksom filer av
formatet Motion JPEG kan inte spelas, även om det är
JPEG-filer.
■Andra filer som inte kan spelas upp
Det går kanske inte att spela vissa stillbilder som har
skapats, retuscherats, kopierats eller på annat sätt
redigerats på en dator.
■Det kan hända att du erfar en eller flera
av följande symtom vid uppspelning av
filer.
• Beroende på antalet mappar, antalet filer och aktuell
datamängd kan det ta en viss tid att spela upp filer.
• EXIF-information visas inte. EXIF står för
Exchangeable Image File Format och är en standard för
lagring av utbytbar information i bildfiler, särskilt
sådana som använder JPEG-komprimering. (Vi
hänvisar till http://exif.org för mer information.)
■När enheten används för att spela en
CD-RW/R-skiva med stillbilder lagrade
(inspelade)
• För CD-RW/R-skivor där stillbilder förekommer
tillsammans med musik eller filmer, kan endast
stillbilderna spelas upp. Vissa sådana skivor kan
kanske inte spelas alls.
• Multisessionsskivor kan inte spelas.
• Vissa stillbilder som har behandlats (roterats eller
sparats genom överskrivning av andra bilder) med
hjälp av programvara för bildbehandling liksom vissa
stillbilder som har importerats från Internet eller e-post
kan kanske inte spelas.
• De skivor som denna spelare kan spela upp (identifiera)
är begränsade till följande egenskaper:
Innehåller filer av EXIF-format
Bildupplösning: Mellan 32 ×32 och
7680 ×4320 bildpunkter
Maximalt antal mappar: 64
Maximalt antal filer: 256
Filstorlek: 20 MB eller mindre
■Mappstruktur för stillbilder (JPEG)
Du kan spela stillbilder (JPEG) med denna enhet genom
att skapa mappar på skivan enligt nedan. Bilder som ligger
direkt i roten kan inte spelas.
ANGÅENDE JPEG FILFORMATET
01 Folder
001.jpg
002.jpg
003.jpg
004.jpg
005.jpg
006.jpg
007.jpg
02 Folder
64 Folder
254.jpg
255.jpg
256.jpg
Root

HANTERING AV SKIVOR
48 Sv
• Handskas alltid försiktigt så att spårsidan inte repas. Se
till så att dina skivor inte blir skeva.
• För att rengöra spårsidan, torka med en ren, torr
torkduk. Använd inte någon typ av skivrengörare, spray
eller andra kemiskt baserade vätskor.
• Torka av från mitten och rakt utåt mot kanten.
• Använd en penna med mjuk spets när du skriver på
skivans etikettsida.
• När du inte använder en skiva ska du ta ut den ur
apparaten och förvara den i sitt konvolut.
• Skivor ska inte utsättas för direkt solljus, hög
temperatur eller hög fuktighet någon längre tid.
■Spelning av 8 cm CD-skiva
Lägg skivan i skivfackets inre nedsänkning. Lägg inte en
vanlig (12 cm) CD-skiva ovanpå en 8 cm CD-skiva.
■Analog
Ljud som inte har omvandlats till siffror.
Analogt ljud varierar, medan digitalt ljud har specifika
numeriska värden. Analoga utgångar skickar ljud genom
två kanaler, vänster och höger.
■Bildförhållande
Förhållandet mellan de vertikala och de horisontella
måtten på en visad bild. Storleksförhållandet mellan bredd
och höjd är på en konventionell TV-skärm 4:3 och på en
bredbildsskärm 16:9.
■Komponentvideo
Uttag för inmatning eller utmatning av en
komponentvideosignal. Komponentvideosignalen består
av tre delar, luminanssignalen (Y) och två
färgskillnadssignaler (PB/CB, PR/CR), som gör det möjligt
att producera en högkvalitativ videobild.
■Skivmeny
En skärmmeny avsedd för val av bilder, ljud, textning,
kameravinkel etc. inspelat på en BD/DVD.
■Dolby Digital
Ett digitalt surroundljudsystem utvecklat av Dolby
Laboratories vilket ger fullständigt oberoende flerkanaligt
ljud. Med 3 framkanaler (vänster, mitt och höger) och 2
surroundstereokanaler, erbjuder Dolby Digital fem
fullbands ljudkanaler. Med en extra kanal speciellt för
baseffekter (kallad LFE, eller lågfrekvenseffekt) har
systemet totalt 5.1 kanaler (LFE räknas som 0.1 kanal).
Genom att använda 2-kanalig stereo för
surroundhögtalarna, får man mer noggranna rörliga
ljudeffekter och en mer noggrann surroundljudmiljö än
med Dolby Surround.
■DTS (Digital Theater Systems)
Ett digitalt surroundljudsystem utvecklat av Digital
Theater Systems, Inc., som ger 5.1-kanalsljud (max). Med
en stor mängd ljuddata återger detta system ljudeffekter på
ett autentiskt sätt.
■HDMI
HDMI (High-Definition Multimedia Interface) är det
första okomprimerade, helt digitala ljud/videogränssnittet
med industristöd. Genom att erbjuda ett gränssnitt mellan
vilken källa som helst (t.ex. en digitalbox eller en AV-
styrenhet) och en ljud/videomonitor (t.ex. en digital-TV)
stöder HDMI överföring av standard, utvidgad eller
högdefinitionsvideo samt flerkanaligt digitalt ljud via en
enda kabel. HDMI kan överföra alla ATSC (Advanced
Television Systems Committee) HDTV-standarder, stöder
8-kanaligt digitalt ljud och har en bandbredd med extra
utrymme för framtida förbättringar och krav.
Vid användning i kombination med HDCP (High-
bandwidth Digital Content Protection) erbjuder HDMI ett
säkert ljud/videogränssnitt som motsvarar säkerhetskraven
för innehållsleverantörer och systemoperatörer.
För ytterligare information om HDMI, besök hemsidan för
HDMI på “www.hdmi.org/”.
■Sammanflätad (interlace)
Den vanligaste typen av skanning som används i TV-
apparater. Den delar in en skärm i jämna och udda
numrerade fält för skanning, och bygger sedan upp en bild
genom att kombinera dem till en bild (ruta).
HANTERING AV SKIVOR
Anmärkning: Använd inte några linsrengörare
eftersom de kan orsaka funktionsfel.
ORDLISTA

49 Sv
Svenska
YTTERLIGARE
INFORMATION
■JPEG (Joint Photographic Experts
Group)
Ett standardiserat komprimeringssystem för bilder som
föreslagits av expertgruppen Joint Photographic Experts
Group. Bilddatastorlekar reduceras allt från 1 till 10% av
den ursprungliga storleken, och fungerar effektivt för
digitala fotografier.
■Föräldralås
Begränsar uppspelning av skivor enligt användarens ålder
eller begränsningsnivån i varje land. Begränsningen
varierar beroende på skiva. Medan föräldrakontroll är
inkopplat spärras en skiva, om dess klassificeringsnivå är
högre än den nivå som är inställd på spelaren.
■Progressiv skanning
En metod för att visa alla skanningslinjer i en bildruta på
en gång, vilket märkbart reducerar flimmer på en större
skärm och ger en skarp och mjuk bild.
■Regionkod
Många BD/DVD-skivor inkluderar en regionkod så att
upphovsrättsinnehavaren kan styra distributionen av BD/
DVD-mjukvaror endast till regioner vart man avser att
distribuera. Det finns sex regionkoder, som begränsar en
BD-spelare till att endast spela en BD/DVD-skiva med
samma regionkod.
■VR-format (Video Recording-format)
Ett inspelningsformat för DVD-video, som möjliggör
redigering av DVD-videodata inspelade på en skiva. En
spelare som är kompatibel med VR-formatet krävs för
uppspelning.
■R-840
FÖRSTÄRKARE
• Minsta RMS uteffekt per kanal
(6 Ω, 1 kHz, 10 % THD) ...........................................65 W + 65 W
• Ingångskänslighet/impedans
PLAYER etc. .......................................................... 200 mV/47 kΩ
• Frekvensåtergivning
PLAYER etc. ........................................20 Hz till 20 kHz ± 0,5 dB
• Total harmonisk distorsion
PLAYER etc. (30 W/6 Ω)................................... 0,04 % eller lägre
• Signalbrusförhållande (IHF-A nätverk)
PLAYER (200 mV, avkortad inmatning)..............100 dB eller mer
RADIODELEN
ALLMÄNT
• Strömförsörjning........................................ 230 V växelström, 50 Hz
• Effektförbrukning ....................................................................115 W
•Mått (B × H × D) .............................................. 215 × 110 × 348 mm
• Vikt ...........................................................................................5,7 kg
• Strömförbrukning i beredskapsläge.........................mindre än 0,3 W
■BD-940
SPELARDELEN
• AUDIO OUT
Utnivå (1 kHz 0 dB) ...................................................... 2 V (± 0,3)
Signalbrusförhållande ..................................................över 100 dB
Dynamikomfång (48 kHz, 24 bitar) ...............................över 95 dB
Övertonsdistorsion ...................................................under 0,005 %
Frekvensåtergivning
CD-DA .....................................................................20 Hz–20 kHz
BD/DVD (48 kHz) ...................................................20 Hz–22 kHz
BD/DVD (96 kHz) ...................................................20 Hz–44 kHz
• Videoutgångar
Komposit .......................................................................1 Vt-t/75 Ω
Komponent............................................................. 1 Vt-t/75 Ω (Y)
0,7 Vt-t/75 Ω (PB, PR)
• HDMI-utgång........................................................Typ-A-kontakt x 1
480p(576p)/720p/1080i/1080p/1080p@24Hz,
Deep Color, stöd för x.v.Color
• USB ................... använd för:
1) Uppspelning av BD-LIVE/BonusViewinnehåll
2) Uppdatering av inbyggt program
Allmänt
• Strömförsörjning ........................................ 230 V växelström, 50 Hz
• Strömförbrukning...................................................................... 20 W
• Strömförbrukning i beredskapsläge ........................... mindre än 1 W
• Mått (B × H × D)...............................................215 × 108 × 318 mm
• Vikt........................................................................................... 3,4 kg
Tekniska data kan ändras utan föregående meddelande.
SPECIFIKATIONER
• Mottagningsintervall.......................................87,50 till 108,00 MHz

51 Sv
Svenska
YTTERLIGARE
INFORMATION
■Språk (förkortning), kodnummer
■Land, kodnummer, förkortning
LISTOR ÖVER SPRÅK, LÄNDER
Lista över språk
Japanska (ja), 1001 Bhutanesiska (dz), 0426 Kirgisiska (ky), 1125 Singalesiska (si), 1909
Engelska (en), 0514 Esperanto (eo), 0515 Latin (la), 1201 Slovakiska (sk), 1911
Franska (fr), 0618 Estniska (et), 0520 Lingala (ln), 1214 Slovenska (sl), 1912
Tyska (de), 0405 Baskiska (eu), 0521 Laotiska (lo), 1215 Samoanska (sm), 1913
Italienska (it), 0920 Persiska (fa), 0601 Litauiska (lt), 1220 Shona (sn), 1914
Spanska (es), 0519 Finska (fi), 0609 Lettiska (lv), 1222 Somaliska (so), 1915
Kinesiska (zh), 2608 Fidjianska (fj), 0610 Malagassiska (mg), 1307 Albanska (sq), 1917
Nederländska (nl), 1412 Färöiska (fo), 0615 Maori (mi), 1309 Serbiska (sr), 1918
Portugisiska (pt), 1620 Frisiska (fy), 0625 Makedonska (mk), 1311 Siswati (ss), 1919
Svenska (sv), 1922 Irländska (ga), 0701 Malayalam (ml), 1312 Sesotho (st), 1920
Ryska (ru), 1821 Skotsk gaeliska (gd), 0704 Mongoliska (mn), 1314 Sundanesiska (su), 1921
Koreanska (ko), 1115 Galiciska (gl), 0712 Moldaviska (mo), 1315 Swahili (sw), 1923
Grekiska (el), 0512 Guarani (gn), 0714 Marathi (mr), 1318 Tamil (ta), 2001
Afar (aa), 0101 Gujarati (gu), 0721 Malajiska (ms), 1319 Telugo (te), 2005
Abchasiska (ab), 0102 Haussa (ha), 0801 Maltesiska (mt), 1320 Tadzjikiska (tg), 2007
Afrikaans (af), 0106 Hindi (hi), 0809 Burmesiska (my), 1325 Thailändska (th), 2008
Amhariska (am), 0113 Kroatiska (hr), 0818 Nauriska (na), 1401 Tigrinja (ti), 2009
Arabiska (ar), 0118 Ungerska (hu), 0821 Nepali (ne), 1405 Turkmeniska (tk), 2011
Assamesiska (as), 0119 Armeniska (hy), 0825 Norska (no), 1415 Tagalog (tl), 2012
Aymara (ay), 0125 Interlingua (ia), 0901 Occitanska (oc), 1503 Tswana (tn), 2014
Azerbajdzjanska (az), 0126 Interlingue (ie), 0905 Oromo (om), 1513 Tonga (to), 2015
Basjkiriska (ba), 0201 Inupiak (ik), 0911 Oriya (or), 1518 Turkiska (tr), 2018
Vitryska (be), 0205 Indonesiska (in), 0914 Punjabi (pa), 1601 Tsonga (ts), 2019
Bulgariska (bg), 0207 Isländska (is), 0919 Polska (pl), 1612 Tatariska (tt), 2020
Bihari (bh), 0208 Hebreiska (iw), 0923 Pashto (ps), 1619 Twi (tw), 2023
Bislama (bi), 0209 Jiddisch (ji), 1009 Quechua (qu), 1721 Ukrainska (uk), 2111
Bengali (bn), 0214 Javanesiska (jw), 1023 Rätoromanska (rm), 1813 Urdu (ur), 2118
Tibetanska (bo), 0215 Georgiska (ka), 1101 Kirundi (rn), 1814 Uzbekiska (uz), 2126
Bretonska (br), 0218 Kazakiska (kk), 1111 Rumänska (ro), 1815 Vietnamesiska (vi), 2209
Katalanska (ca), 0301 Grönländska (kl), 1112 Kinyarwanda (rw), 1823 Volapük (vo), 2215
Korsikanska (co), 0315 Kambodjanska (km), 1113 Sanskrit (sa), 1901 Wolof (wo), 2315
Tjeckiska (cs), 0319 Kanaresiska (kannada) (kn), 1114 Sindhi (sd), 1904 Xhosa (xh), 2408
Kymriska (walesiska) (cy), 0325 Kashmiri (ks), 1119 Sango (sg), 1907 Yoruba (yo), 2515
Danska (da), 0401 Kurdiska (ku), 1121 Serbokroatiska (sh), 1908 Zulu (zu), 2621
Landslista
Argentina, 0118, ar Finland, 0609, fi Malaysia, 1325, my Singapore, 1907, sg
Australien, 0121, au Frankrike, 0618, fr Mexiko, 1324, mx Spanien, 0519, es
Österrike, 0120, at Tyskland, 0405, de Nederländerna, 1412, nl Sverige, 1905, se
Belgien, 0205, be Hongkong, 0811, hk Nya Zeeland, 1426, nz Schweiz, 0308, ch
Brasilien, 0218, br Indien, 0914, in Norge, 1415, no Taiwan, 2023, tw
Kanada, 0301, ca Indonesien, 0904, id Pakistan, 1611, pk Thailand, 2008, th
Chile, 0312, cl Italien, 0920, it Filippinerna, 1608, ph Storbritannien, 0702, gb
Kina, 0314, cn Japan, 1016, jp Portugal, 1620, pt USA, 2119, us
Danmark, 0411, dk Sydkorea, 1118, kr Ryssland, 1821, ru
i It
1 Per assicurarsi che le prestazioni di questa unità siano ottimali,
leggere attentamente il manuale. Conservarlo in un luogo sicuro
per poterlo riutilizzare al momento del bisogno.
2 Installare l’impianto audio in un punto ben ventilato, fresco,
asciutto e pulito e, comunque, lontano da luce solare diretta,
sorgenti di calore, vibrazioni, polvere, umidità e freddo. Per
un’aerazione corretta, prevedere i seguenti spazi minimi.
Parte superiore: 30 cm (solo R-840)
Parte posteriore: 10 cm
Ai lati: 10 cm
3 Installare questa unità lontano da altri elettrodomestici, motori o
trasformatori, perché possono causare disturbi acustici.
4 Non esporre questa unità alle variazioni repentine della
temperatura ambiente e non installarla in locali molto umide (ad
esempio dove è in uso un umidificatore) per evitare che in essa si
formi condensa che, a sua volta, può causare folgorazioni,
incendi, guasti e/o lesioni.
5 Evitare di installare l’unità in una posizione dove possa essere
soggetta a gocciolamento o scroscio di liquidi. Inoltre, non
posare su di essa:
– altri componenti, dato che possono causare danni e/o lo
scolorimento della superficie dell’apparecchio.
– Oggetti che bruciano (p.es. candele), dato che possono
causare incendi, danni all’unità e/o ferite a persone.
– Contenitori di liquidi, che possono cadere e causare
folgorazioni all’utente e/o guasti a questa unità.
6 Non coprire questa unità con giornali, tovaglie, tende o altro per
non impedirne la dispersione del calore. Se la temperatura al suo
interno dovesse salire, può causare incendi, anomalie e/o ferite.
7 Non collegare questa unità ad una presa di corrente se non dopo
aver completato tutti i collegamenti.
8 Non usare l’unità capovolta. Potrebbe surriscaldarsi e guastarsi.
9 Non agire con forza eccessiva su interruttori, manopole e/o cavi.
10 Per scollegare il cavo di alimentazione dalla presa a muro, tirare
la spina, mai il cavo.
11 Non pulire mai questa unità con solventi ed altre sostanze
chimiche perché possono danneggiare le finiture. Usare solo un
panno pulito e asciutto.
12 Utilizzare esclusivamente la tensione indicata sull’apparecchio.
Se si utilizza una tensione superiore a quella indicata, si possono
provocare incendi e danni all’unità e/o lesioni personali. Yamaha
non può essere considerata responsabile di danni derivanti
dall’uso di tensioni superiori a quelle prescritte.
13 Per evitare i danni dovuti ai fulmini durante i temporali,
scollegare il cavo di alimentazione e l’antenna esterna dalla presa
a muro.
14 Non tentare di modificare o riparare questa unità. Affidare
qualsiasi riparazione a personale qualificato Yamaha. In
particolare, non aprire mai il cabinet per alcun motivo.
15 Se si prevede di non utilizzare questa unità per qualche tempo (ad
esempio per andare in vacanza), scollegare la spina di
alimentazione dalla presa a muro.
16 Prima di concludere che l’unità è guasta, leggere la sezione
“DIAGNOSTICA” relativa agli errori di utilizzo più comuni.
17 Prima di spostare questa unità, premere il pulsante portandolo
nella modalità di attesa, quindi, scollegare la spina di
alimentazione dalla presa di corrente.
18 Quando la temperatura ambiente cambia improvvisamente, si
forma condensa. Scollegare il cavo di alimentazione dalla presa
di corrente e lasciare riposare l’apparecchio.
19 Se viene usato a lungo, l’apparecchio si può surriscaldare.
Spegnerlo e lasciarlo riposare perché si raffreddi.
20 Installare l’apparecchio vicino ad una presa di corrente alternata
dove la spina del cavo di alimentazione possa essere facilmente
raggiunta.
21 Le batterie vanno protette da calore eccessivo, ad esempio luce
solare diretta, fiamme, e così via.
22 Il volume eccessivo in cuffia e l’uso eccessivo di cuffie possono
danneggiare gravemente l’udito.
SICUREZZA DEL LASER
L’unità utilizza un laser. Poiché sono possibili lesioni agli occhi,
solo il personale qualificato di assistenza tecnica può aprire la
copertura o cercare di riparare l’apparecchio.
PERICOLO
Se aperto, questo apparecchio emette radiazioni laser visibili.
Evitare l’esposizione diretta degli occhi al raggio laser. Quando
l’unità è collegata ad una presa a muro, non avvicinare gli occhi
all’apertura del cassetto del disco o ad altre aperture per guardare
all’interno.
ATTENZIONE: LEGGERE QUANTO SEGUE PRIMA DI UTILIZZARE
L’UNITÀ.
Questa unità non viene scollegata dalla fonte di alimentazione
CA fintanto che essa rimane collegata alla presa di rete, anche
se l’unità viene spenta con . Questo stato di attesa viene
chiamato modalità di standby. In questo stato, l’unità
consuma una quantità minima di corrente.
AVVERTENZA
PER RIDURRE IL RISCHIO DI INCENDI O
FOLGORAZIONI, L’UNITÀ NON DEVE ESSERE
ESPOSTA ALLA PIOGGIA O ALL’UMIDITÀ.
Il laser contenuto in questo prodotto è in grado di emettere
radiazioni superiori ai limiti fissati per la Classe 1.
Specifiche LASER:
Prodotto con LASER classe 1
Lunghezza d’onda:
788 nm (CDs)/654 nm (DVDs)/405 nm
(BDs)
Potenza del laser:
Non emette alcuna radiazione dannosa
con la protezione di sicurezza
INDICAZIONI CONCERNENTI
L’APPLICAZIONE DEL D.M. 28.8.95, N. 548
SI DICHIARA CHE:
l’apparecchio: tipo Ricevitore
marca Yamaha
modello R-840
risponde alle prescrizioni dell’art. 2 comma 1 del D.M.
28 agosto 1995, n. 548
Fatto a Rellingen, il 28/8/2009
Yamaha Music Europe GmbH
Siemensstr. 22-34, 25462
Rellingen, b. Hamburg Germany

1 It
INTRODUZIONE PREPARAZIONE
FUNZIONAMENTO
DI BASE
FUNZIONAMENTO
SINTONIZZATORE
ALTRO
FUNZIONAMENTO
INFORMAZIONI
ADDIZIONALI Italiano
CARATTERISTICHE ........................................... 2
ACCESSORI FORNITI......................................... 2
INFORMAZIONI SUI DISCHI............................ 3
Tipi di dischi utilizzabili con il lettore....................... 3
Tipi di dischi che non possono essere utilizzati con il
lettore..................................................................... 3
COMANDI E FUNZIONI ..................................... 4
Ricevitore (R-840) ..................................................... 4
Lettore BD (BD-940)................................................. 5
Telecomando.............................................................. 6
PREPARATIVI ....................................................... 8
Collegamento diffusori/componenti esterni/antenne...... 8
Collegare un registratore (CDR, MDR, ecc.),
ricevitore o decoder AV (CDR, MDR, ecc.).......... 9
Collegamento dei cavi di alimentazione.................... 9
Collegamento di un iPod™...................................... 10
Collegamento ad Internet......................................... 10
Installazione delle batterie nel telecomando............ 11
Uso del telecomando................................................ 11
Regolazione dell’orologio ....................................... 12
CONFIGURAZIONE DELL’IMPIANTO......... 13
Accendere l’impianto e il televisore ........................ 13
Impostazione dello schermo TV.............................. 13
Scelta della lingua (OSD) ........................................ 13
Lingue audio, sottotitoli e menu disco..................... 14
FUNZIONI DEL SISTEMA................................ 15
Funzionamento di base dell’impianto...................... 15
Modifica della luminosità del display del pannello
anteriore............................................................... 16
Per usare le cuffie .................................................... 16
FUNZIONAMENTO DEL DISCO..................... 17
Utilizzando il display su schermo............................ 17
Operazioni di riproduzione...................................... 17
Pausa di riproduzione .............................................. 17
Riavvolgimento e avanzamento rapido.................... 18
Selezionare i capitoli e i brani ................................. 18
Menu BD/DVD........................................................ 18
Riproduzione al rallenti ........................................... 18
Riproduzione fotogramma per fotogramma ............ 18
Selezione della lingua e dell’audio.......................... 19
Selezione dei sottotitoli............................................ 19
Selezione delle angolazioni di ripresa ..................... 19
Riproduzione ripetuta .............................................. 19
Ripetizione di una sezione specifica
(Repeat A-B) ....................................................... 20
Riproduzione di JPEG presentazioni ....................... 20
Riproduzione di immagini fisse in una cartella
selezionata ........................................................... 21
Riproduzione di film registrati su un
DVD-R/DVD-RW ............................................... 21
Uso di “Function Control Screen” per BD/DVD..... 22
Uso del menu “Funzioni” per Audio CD................. 23
Visualizzazione delle informazioni su disco............ 23
Uso di BONUSVIEW e BD-LIVE.......................... 24
SINTONIZZAZIONE FM....................................26
Sintonizzazione automatica ..................................... 26
Sintonizzazione manuale ......................................... 26
Sintonizzazione automatica con preselezione ......... 26
Sintonizzazione preselezione manuale .................... 27
Scelta di stazioni preselezionate .............................. 27
SINTONIZZAZIONE RADIO DATA SYSTEM
(MODELLO SOLO PER EUROPA)...............28
Visualizzazione di informazioni Radio Data
System ................................................................. 28
Uso delle informazioni di servizio TP
(programma sul traffico)...................................... 29
Impostazioni CT (ora esatta) ................................... 29
IMPOSTAZIONE DEL TIMER..........................30
Impostazione del timer di accensione...................... 30
Impostazione del timer di spegnimento................... 31
CONTROLLO iPod™ ..........................................32
Uso iPod™............................................................... 32
IMPOSTAZIONI DEL LETTORE BD...............33
Impostazioni Audio Video....................................... 33
Avvio Rapido........................................................... 35
Spegnimento Automatico ........................................ 35
Controllo HDMI ...................................................... 35
Impostazioni Riproduzione...................................... 35
Installazione Comunicazione................................... 36
Versione ................................................................... 39
Gestione Memoria USB........................................... 39
Aggiornamento Software......................................... 39
Ripristino Sistema.................................................... 39
MODIFICA DELLE IMPOSTAZIONI PER
LA CONNESSIONE DI UN CAVO HDMI
O DI UN CAVO COMPONENT......................41
DIAGNOSTICA ....................................................42
Ricevitore (R-840) ................................................... 42
Telecomando............................................................ 44
Lettore BD (BD-940)............................................... 44
Rete.......................................................................... 46
Messaggi relativi ai dischi BD e ai dischi DVD...... 46
INFORMAZIONI SUL FORMATO DEI FILE
JPEG...................................................................47
NOTE SUL MANEGGIO DEI DISCHI .............48
GLOSSARIO .........................................................48
DATI TECNICI .....................................................49
ELENCO DELLE LINGUE, DELLE
NAZIONI ...........................................................51
Elenco delle lingue .................................................. 51
Elenco dei paesi ....................................................... 51
INDICE
INTRODUZIONE
PREPARAZIONE
FUNZIONAMENTO DI BASE
FUNZIONAMENTO SINTONIZZATORE
ALTRO FUNZIONAMENTO
INFORMAZIONI ADDIZIONALI

CARATTERISTICHE
2 It
INTRODUZIONE
Ricevitore (R-840)
•Potenza per canale RMS minima
65W + 65W (6Ω, 1kHz, 10% THD)
•Preselezione di 30 stazioni in FM
•iPod leggibilità (con funzione ricaricabile)
•Modalità Pure Direct
•Luminosità display regolabile
Lettore BD (BD-940)
•Riproduce dischi blu-ray, DVD, CD audio
•Supporta BD-LIVE. Se si utilizza un disco
compatibile con BD-LIVE si può collegare il
lettore BD ad Internet per scaricare vari dati
•
Supporta la funzione di controllo HDMI. Si può
utilizzare il ricevitore e il lettore BD con un
telecomando per TV collegato tramite un cavo HDMI
•Funzionamento connesso con un ricevitore
tipo modalità Pure Direct, Luminosità display
regolabile e modalità INPUT
■A proposito di questo manuale
• Nel presente manuale, l’apparecchio “R-840” viene descritto come “ricevitore” e il “BD-940” come “lettore BD”.
• Questo manuale descrive l’uso del sistema attraverso un telecomando, salvo quando questo non è disponibile. Alcune delle operazioni
sono possibili anche usando i pulsanti del pannello anteriore.
•y indica un suggerimento riguardante l’operazione.
• Le note contengono informazioni importanti sulla sicurezza e sulle istruzioni per l’uso.
• Questo manuale è stato stampato prima dell’entrata in produzione. Il design e i dati tecnici sono soggetti a modifiche senza preavviso,
in parte dovute a migliorie. Qualora vi fossero differenze tra il manuale e il prodotto, quest’ultimo ha sempre la priorità.
Questo prodotto include i seguenti accessori. Prima di collegare questo sistema, controllare di aver ricevuto tutte le parti che seguono.
CARATTERISTICHE
ACCESSORI FORNITI
1234
56
90
78
E
NT
E
RCL
E
AR
MUT
E
E
NT
E
R
VOLUME
AUX
TUN
E
R
iPod SHUFFLE
R
EPE
AT
MENU
ENTER
E
O
NM
O
N
O
M
E
M
O
R
Y
PRESET TUNING
DISC
DISPLAY TIMER SLEEP DIMMER
OPTION PURE DIRECT
AUDI O SUBTITLE ANGLE
REPEAT
ON SCREEN
RETURN
PinP SETUP
ABCD
EXIT
TOP MENU/TITLE LIST
POP UP MENU
Antenna FM interna
Batterie (x2)
(AAA, R03, UM-4)
Telecomando
* Il coperchio della presa dock viene fornito in
dotazione con l’unità per coprire la presa dock
iPod se non utilizzata.
iPod
INPUT VOLUME
Coperchio presa dock*
Ricevitore
Cavo di comando
impianto (0,6 m)
RCA cavo stereo
(1,0 m)
Cavo video composito
(1,5 m)

3 It
Italiano
INTRODUZIONE
• Nel lettore si possono riprodurre i seguenti dischi. Non
utilizzare un adattatore da 8 cm a 12 cm.
•
Utilizzare soltanto i dischi conformi agli standard
compatibili come indicato dalla presenza dei loghi
ufficiali sull’etichetta dei dischi stessi. La riproduzione di
dischi non conformi agli standard non è garantita. Anche
se è possibile riprodurre tali dischi non è comunque
garantita la qualità dell’immagine o la qualità del suono.
*1 Il lettore è stato progettato per riprodurre CD audio
compatibili con gli standard CD (Compact Disc). Non è
possibile riprodurre con questo lettore CD contenenti un
segnale di protezione dei copyright (copy control signal).
*2 Vedere “INFORMAZIONI SUL FORMATO DEI FILE
JPEG” a pagina 47.
• BD/DVD i lettori video e i dischi sono dotati di codici
regione, che indicano le regioni in cui è possibile
riprodurre i dischi.
• BD/DVD Le operazioni e le funzioni video possono
differire dalle spiegazioni riportate nel presente
manuale e alcune operazioni potrebbero essere
addirittura proibite dalle impostazioni del produttore
dei dischi.
• Se durante la riproduzione di un disco compare una
schermata di menu o alcune istruzioni di
funzionamento, si consiglia di seguire la procedura
visualizzata.
• Il componente audio di un video DVD registrato a 96
kHz (Lineare PCM) verrà riprodotto a 48 KHz durante
la riproduzione.
Note
• La riproduzione di alcuni dischi riportati nella colonna a sinistra
delle tabelle potrebbe non essere possibile a seconda del tipo di
disco.
• “Finalize” si riferisce a un registratore che elabora un disco
registrato per poterlo riprodurre in altri lettori/registratori BD e
con la presente unità. In questo lettore si possono riprodurre
soltanto DVD dischi finalizzati. (Il lettore non ha una funzione
per finalizzare i dischi.)
I seguenti dischi non possono essere riprodotti con il
lettore o comunque la riproduzione non è corretta. In caso
si riproducano erroneamente tali dischi, si rischia di
danneggiare gli altoparlanti.
I dischi non finalizzati non possono essere
riprodotti.
Non si possono utilizzare dischi con forme insolite (a
forma di cuore, esagonali, ecc.). L’uso di tali dischi può
provocare problemi di funzionamento.
Non è possibile riprodurre i seguenti dischi
video BD/DVD.
• Dischi che non corrispondono al codice regionale/
numero del lettore.
• Dischi prodotti illegalmente.
• Dischi registrati per scopi commerciali.
INFORMAZIONI SUI DISCHI
Tipi di dischi utilizzabili con il
lettore
Tipo di
disco
Formato di
registrazione Contenuti Dimensioni
disco
BD video -- Audio +
Video (film)
12 cm
8 cm
BD-RE DL
BD-R DL
BDMV
formato
DVD Video Formato video Audio +
Video (film)
12 cm
8 cm
DVD+RW/
DVD+R
DVD+R DL
DVD-R DL
DVD-RW/
DVD-R
Video/formato
VR/AVCHD
(solo dischi
finalizzati)
Audio +
Video (film)
12 cm
8 cm
CD audio*1 CD audio (CD-
DA)
Audio 12 cm
8 cm
CD-RW/CD-R CD audio (CD-
DA)
Audio
JPEG*2 Immagini
fisse (file
JPEG)
Informazione gestione regioni
Modello BD-Video DVD-Video
Europa Codice regione “B”
o “ALL”
Numero regione
“2” o “ALL”
Russia Codice regione “C”
o “ALL”
Numero regione
“5” o “ALL”
2ALL
5ALL
Tipi di dischi che non possono
essere utilizzati con il lettore
CDG, Video CD, CD di foto, CD-ROM, SVCD,
SA-CD, PD, CDV, CVD, DVD-RAM, DVD audio,
BD-RE con la cartuccia, CD-MP3, CD-WMA

COMANDI E FUNZIONI
4 It
■Pannello anteriore
1INPUT
Seleziona una sorgente d’ingresso.
2Indicatore On/Standby
Si illumina di verde quando si accende il ricevitore. Si illumina
di colore ambra quando il ricevitore è in modalità di attesa.
3Indicatore TP
Si accende quando il ricevitore riceve una stazione Radio
Data System che trasmette informazioni di servizio TP
(Programma sul traffico) (☞p.29).
4Sensore del telecomando
Riceve i segnali dal telecomando.
5Indicatore PRESET
Si illumina quando si scelgono stazioni radio
preselezionate (☞p.27).
6Indicatore TUNED
Si illumina quando il ricevitore viene sintonizzato su una
stazione.
7Indicatore STEREO
Si illumina quando il ricevitore riceve un segnale forte da
una stazione stereo in FM.
8Indicatore SLEEP
Si illumina quando è attiva la funzione di spegnimento via
timer (☞p.31).
9Display del pannello anteriore
Mostra le varie informazioni, come la frequenza di
sintonizzazione.
0VOLUME
Regola il volume di riproduzione.
A (On/Standby)
Accende il ricevitore o lo mette in modalità di attesa (standby).
BPresa PHONES
Emette segnali audio per l’ascolto privato in cuffia.
CIndicatore TIMER
Si illumina quando viene impostato il timer (☞p.30).
DBASS
Regola la risposta alle basse frequenze (☞p.15).
ETREBLE
Regola la risposta alle alte frequenze (☞p.15).
FBALANCE
Regola il bilanciamento di uscita audio dei diffusori da
sinistra a destra per compensare agli squilibri derivanti
dalle posizioni dei diffusori o dalle condizioni di ascolto
dell’ambiente.
GPRESET d / u
Seleziona una preselezione. La sorgente di ingresso è
passata a FM. Utilizzabile quando il ricevitore è in
modalità di attesa (☞p.27).
HPURE DIRECT
Attiva o disattiva la modalità Pure Direct (☞p.15).
Quando la modalità Pure Direct è accesa, l’indicatore si
illumina in blu.
Ih / e
Avvia e mette in pausa la riproduzione di iPod. La
sorgente di ingresso è passata a iPod. Utilizzabile anche
con ricevitore in modalità di attesa.
JiPod dock
Collegare il iPod (☞p.10).
COMANDI E FUNZIONI
Ricevitore (R-840)
INPUT
BASS
PHONES
VOLUME
MIN MAX
TREBLE BALANCE
PRESET PURE DIRECT
LR
PRESET
TP
TUNED
STEREO SLEEP
kHz MHz iPod
TIMER
1@
IJBCD E F G H
234 5 67 98
A
Vista dall’altoVista frontale

5 It
COMANDI E FUNZIONI
Italiano
INTRODUZIONE
■Pannello anteriore
1Piatto portadisco
Contiene il disco da riprodurre.
2Indicatore p (riproduzione)
Compare durante la riproduzione.
3Indicatore REP OFF S ALL A-B
Si accende quando si seleziona la modalità di riproduzione
ripetuta.
4
Apre e chiude il piatto portadisco.
Se si preme questo tasto in modalità di attesa, il ricevitore
si accende automaticamente e la sorgente di ingresso passa
a DISC.
5
Arresta la riproduzione (☞p.17).
6 (On/Standby)
Accende il lettore BD o lo porta in modalità di attesa.
Se si preme questo tasto in modalità di attesa, il ricevitore
si accende automaticamente e la sorgente di ingresso passa
a DISC.
y
Se per qualche motivo il lettore BD non funziona correttamente, è
possibile riavviarlo tenendo premuto questo pulsante per circa 10
secondi e premendolo di nuovo.
7Indicatore QUICK
Si accende in modalità di standby quando la funzione di
avvio rapido (Quick start) è attiva (☞p.35).
Lampeggia dopo aver collegato il cavo di alimentazione
alla presa a corrente alternata fino a quando il lettore non
entra in modalità di standby.
8Indicatore e (pausa)
Si accende quando il lettore BD è in pausa.
9Display del pannello anteriore
Mostra lo stato attuale del lettore BD.
0
Torna all’inizio del capitolo o brano corrente. Tener
premuto per l’inversione rapida. Premere due volte per
passare al brano o traccia precedente (☞p.18).
A
Avvia o mette in pausa la riproduzione (☞p.17).
Se si preme questo tasto in modalità di attesa, il ricevitore
si accende automaticamente e la sorgente di ingresso passa
a DISC o a seconda dell’ultima selezione.
B
Salta al capitolo o brano successivo. Tenere premuto per
l’avanzamento rapido (☞p.18).
Lettore BD (BD-940)
QUICK
12 45
798
6
3
AB
@
PROG RANDOMMP3 WMA TRACK TOTAL REMAIN REP OFF S ALL A-B

6 It
COMANDI E FUNZIONI
Questo telecomando è in grado di controllare i
componenti del sistema (comprese le funzioni di
sintonizzazione) e un iPod inserito nel dock iPod della
parte superiore del ricevitore.
Per mettere in funzione il lettore BD, le funzioni di
sintonizzazione o un iPod con il telecomando, bisogna
impostare il ricevitore sulla modalità di ingresso
corrispondente (☞8 selezione ingresso).
Per accendere il iPod
Premere il tasto iPod sul telecomando.
I tasti di comando iPod sono indicati con nella
sezione che segue.
Vedere pagina 32 per maggiori informazioni sul
funzionamento del proprio iPod.
1Trasmettitore a raggi infrarossi
Manda segnali al sistema che si vuole controllare.
2 (On/Standby)
Accende il sistema o lo mette in modalità di attesa.
3MENU
Riporta al livello superiore del menu iPod.
4
Salta al brano successivo. Per l’avanzamento rapido tenere
premuto.
5
Va all’inizio del brano corrente. Premere due volte per
tornare al brano precedente. Tener premuto per
l’inversione rapida.
6ENTER
Premere ENTER per entrare nel gruppo selezionato. (Premere
ENTER per iniziare la riproduzione di un brano scelto).
7
Avvia o mette in pausa la riproduzione.
8Selettori di ingresso
Permette di scegliere la sorgente di segnale d’ingresso
usata dal ricevitore.
Quando si seleziona una sorgente di segnale in ingresso,
premere il tasto di selezione corrispondente (o ruotare
INPUT sul pannello anteriore).
Il nome della sorgente di segnale corrispondente appare
sul display del pannello anteriore del ricevitore.
y
Quando si seleziona DISC o come sorgente di ingresso, il lettore
BD si accende automaticamente anche scegliendo un’altra
sorgente in ingresso, il lettore BD passa alla modalità di standby.
9MEMORY
Memorizza una stazione preselezionata nella memoria
(☞p.27). Avvia la sintonizzazione automatica con
preselezione (☞p.26).
Telecomando
1234
56
90
78
E
NT
E
RCL
E
AR
MUT
E
E
NT
E
R
VOLUME
AUX
TUN
E
R
iPod SHUFFLE
R
EPE
AT
MENU
ENTER
E
O
NM
O
N
O
M
E
M
O
R
Y
PRESET TUNING
DISC
DISPLAY TIMER SLEEP DIMMER
OPTION PURE DIRECT
AUDIO SUBTITLE ANGLE
REPEAT
ON SCREEN
RETURN
PinP SETUP
A B C D
EXIT
TOP MENU/TITLE LIST
POP UP MENU
J
1
M
N
O
P
Q
R
S
t
U
V
W
X
Y
Z
[
\
]
`
a
b
c
d
f
e
2
3
4
5
6
7
8
9
0
A
B
C
D
E
F
G
H
I
J
K
L

7 It
COMANDI E FUNZIONI
Italiano
INTRODUZIONE
0MONO
Imposta la modalità di ricezione programmi FM su quella
monofonica.
ATP
Accede alla modalità di ricezione informazioni di servizio
TP (Programma sul traffico) (☞p.29).
BTIMER
Mostra l’ora corrente sul display del pannello anteriore del
ricevitore.
E imposta l’orologio (☞p.12) o il timer (☞p.30).
CDISPLAY
Cambia le informazioni visualizzate sul display del
pannello anteriore del ricevitore e dello schermo TV per il
lettore BD (☞p.23, p.28).
DOPTION
Consente di accedere al menu delle opzioni.
Per le voci di menu, vedi pagine 27, 29 e 41.
EA/B/C/D
Utilizzato quando la sorgente d’ingresso è impostata su
DISC.
FTOP MENU/TITLE LIST
Visualizza il menu principale del BD/DVD (☞p.18).
G, , , , ENTER
Per selezionare e confermare una voce.
HEXIT
Esce dalla schermata di menu.
I
Mette in pausa la riproduzione (☞p.17).
J
Arresta la riproduzione (☞p.17).
K,
Riavvolgimento e avanzamento rapido.
LTasti numerici
Numeri immessi.
MAUDIO
Seleziona un formato audio e le colonne sonore (☞p.19).
NSUBTITLE
Seleziona i sottotitoli (☞p.19).
OP in P
Utilizza la funzione immagine nell’immagine (Picture in
Picture) (☞p.24).
PREPEAT
Seleziona la modalità di riproduzione ripetuta (☞p.19).
Q
Apre e chiude il piatto portadisco.
R,
Premere o per scegliere una voce del gruppo scelto
(☞p.32).
SSHUFFLE
Seleziona la modalità di ripetizione casuale (Shuffle)
(☞p.32).
TREPEAT
Seleziona la modalità di ripetizione brano (☞p.32).
UTUNING
Premere TUNING per la sintonizzazione manuale
e tener premuto TUNING per la sintonizzazione
automatica (☞p.26).
VPRESET u / d
Seleziona una preselezione (☞p.27).
WDIMMER
Cambia la luminosità del display del pannello anteriore
(☞p.16).
XPURE DIRECT
Attiva o disattiva la modalità Pure Direct (☞p.15).
YSLEEP
Attiva il timer di spegnimento del sistema (☞p.31).
ZPOP UP MENU
Visualizza il menu pop-up del BD (☞p.18).
[VOLUME +/–
Regola il volume generale del ricevitore.
\RETURN
Fa tornare al menu precedente (☞p.17).
]
Avvia la riproduzione (☞p.17).
`MUTE
Disattiva il volume (☞p.16).
a,
Permette di passare all’inizio del brano corrente o del
brano successivo.
bCLEAR
Annulla una scelta.
cENTER
Conferma una scelta.
dON SCREEN
Visualizza sullo schermo le informazioni sui dischi
(☞p.23).
eANGLE
Seleziona un’angolazioni di ripresa (☞p.19).
fSETUP
Visualizza il menu di Setup (☞p.13).
/ d
d
d
d
/ d
d
d
d
/ d
d
d
d

PREPARATIVI
8 It
PREPARAZIONE
Prima di collegare l’impianto, leggere con attenzione la procedura che segue e le note. Il telecomando e il relativo
funzionamento dell’impianto funziona solo quando il ricevitore e il lettore BD sono collegati tramite il
cavo di comando del sistema. Per informazioni sui diffusori (NS-BP300), consultare il relativo manuale.
Collegamento dell’impianto
1Collegare le prese AUDIO IN ( PLAYER L/R) del ricevitore alle prese AUDIO OUT ( L/R) del lettore BD con il
cavo stereo audio RCA in dotazione.
2Collegare la presa SYSTEM CONNECTOR ( TO:PLAYER) del ricevitore alla presa SYSTEM CONNECTOR
( TO:RECEIVER) del lettore BD utilizzando il cavo di comando del sistema in dotazione.
3Collegare i terminali diffusori (L) del ricevitore ai terminali dei diffusori di sinistra e i terminali diffusori (R) del
ricevitore ai terminali diffusori di destra utilizzando i cavi appositi in dotazione con il set diffusori (NS-BP300).
4Collegare l’antenna FM in dotazione alla presa ANTENNA.
• Non collegare questa unità o altri componenti all’alimentazione principale fino a quando tutti i collegamenti tra i componenti non sono
stati completati.
• Evitare che i cavi nudi dei diffusori si tocchino tra loro o che tocchino una qualsiasi parte metallica del ricevitore. Ciò potrebbe
danneggiare il ricevitore e/o i diffusori.
• Tutti i collegamenti devono essere correttamente eseguiti: L (sinistra) con L, R (destra) con R, “+” con “+” e “–” con “–”. Se i
collegamenti sono difettosi, non si sentirà alcun suono provenire dai diffusori e se le polarità dei collegamenti dei diffusori sono
scorrette, il suono risulterà innaturale e carente nei bassi. Inoltre, consultare il manuale di ciascuno dei propri componenti.
Note
• Il collegamento di comando del sistema è utilizzato per trasmettere i segnali del telecomando dal ricevitore al lettore BD.
• Quando si collegano diffusori diversi dagli NS-BP300, questi devono avere un’impedenza superiore a 6Ω.
• Se ci fossero problemi a causa della debolezza della ricezione radio nella vostra zona e voleste migliorare la ricezione, raccomandiamo
di usare antenne esterne disponibili in commercio. Per maggiori dettagli, consultare il più vicino negoziante o centro assistenza
Yamaha autorizzato.
PREPARATIVI
Collegamento diffusori/componenti esterni/antenne
ATTENZIONE
A A
B
B
Ricevitore (R-840)
(Modello per Europa)
Lettore BD (BD-940) Diffusore sinistro
(NS-BP300)
Diffusore destro
(NS-BP300)
Cavo stereo RCA
(incluso)
Cavo di comando del
sistema (incluso)
TV, ecc.
Subwoofer
Uscita
audio RCA
cavo
stereo
PREPARATIVI
10 It
Il ricevitore è provvisto di un dock iPod sul pannello
superiore che permette di collegare il proprio iPod e di
controllare la riproduzione dell’iPod tramite il
telecomando in dotazione.
Usare questo ricevitore con un adattatore presa dock per
iPod (in dotazione con il vostro iPod o disponibile in
commercio) appropriato per il proprio iPod. Se si usa il
ricevitore senza utilizzare un adattatore presa dock iPod
appropriato, il risultato potrebbe essere un collegamento
poco saldo.
y
Quando si accende il ricevitore o lo si mette in modalità di attesa
(standby), collegare l’iPod durante la riproduzione. Il ricevitore
avvia automaticamente la riproduzione di iPod (per la quinta o
ultima generazione di iPod, iPod touch, iPod Classic o iPod
nano).
Note
• Sono supportati solo iPod (Click and Wheel), iPod nano, iPod
Classic, iPod mini e iPod touch.
• Non collegare alcun accessorio per iPod (come cuffie,
telecomandi cablati o trasmettitori FM) all’iPod mentre è
collegato al relativo dock.
• Se l’iPod non è collegato in modo corretto al proprio dock, i
segnali audio potrebbero non essere generati in modo corretto.
• Una volta che il collegamento fra il proprio iPod ed il ricevitore
è completo ed il ricevitore si trova in modalità iPod (☞p.6),
“CONNECTED” appare sul display del pannello anteriore. Se il
collegamento tra il proprio iPod e il ricevitore non ha luogo, sul
display del pannello anteriore appare un messaggio di stato. Per
una lista completa di messaggi sullo stato di collegamento,
vedere la sezione iPod in “DIAGNOSTICA” (☞p.42).
• Quando il proprio iPod è inserito nel relativo dock del
ricevitore, l’iPod può essere caricato automaticamente anche
quando il ricevitore si trova in modalità di attesa.
• Durante la riproduzione, è possibile scollegare l’iPod.
Si può usufruire di una serie di contenuti con funzioni
interattive effettuando il collegamento ad Internet durante
la riproduzione di dischi BD-LIVE compatibili. Vedere le
pagine 24 e 36 per ottenere maggiori informazioni sulle
funzioni BD-LIVE.
Accertarsi di spegnere il lettore BD e l’apparecchio
prima di effettuare collegamenti.
Note
• Si può collegare un dispositivo di memoria USB (da 2 GB o con
una capacità superiore e formattato con FAT 32/16) al terminale
USB BD STORAGE/SERVICE per memorizzare i dati BD-
LIVE o per aggiornare il software del lettore BD.
• Occorre una connessione ad Internet a banda larga.
• Per utilizzare una connessione ad Internet a banda larga è
necessario un contratto con un provider di servizi Internet. Per
maggiori dettagli, contattare il provider di servizi Internet più
vicino.
• Fare riferimento al manuale d’uso dell’apparecchio collegato in
quanto il metodo di collegamento può variare in funzione del
sistema Internet in uso.
• Utilizzare un cavo di rete/router compatibile con 10BASE-T/
100BASE-TX/1000BASE-T.
• Utilizzare esclusivamente un cavo di rete STP (doppino
intrecciato schermato).
■Dopo il collegamento
• Configurare la comunicazione (☞p.36).
• Inserire un disco BD-LIVE compatibile e riprodurre i
contenuti (☞p.24).
Collegamento di un iPod™
iPod
INPUT
PHONES
BASS
-+ -+ LR
TREBLE BALANCE
PRESET PURE DIRECT
VOLUME
MIN MAX
Ricevitore
iPod
iPod adattatore presa dock
Collegamento ad Internet
ATTENZIONE
LAN
Lettore BD
Internet
Cavo di rete
(disponibile in commercio)
2
Per il terminale
LAN
PC
3Per il
terminale
USB
BD STORAGE/
SERVICE
USB dispositivo di
memoria
(disponibile in
commercio)
Modem
Hub o
router a
banda larga
1
Per il terminale
NETWORK

PREPARATIVI
11 It
Italiano
PREPARAZIONE
■Note sulle batterie
• Sostituire entrambe le batterie quando il raggio
d’azione del telecomando diminuisce.
• Utilizzare batterie AAA, R03 e UM-4.
• Assicurarsi che le polarità siano corrette. Vedere
l’illustrazione all’interno del comparto batterie.
• Rimuovere le batterie se si prevede di non utilizzare il
telecomando per un lungo periodo di tempo.
• Non utilizzare batterie vecchie insieme a quelle nuove.
• Non usare insieme batterie di tipo diverso (come
batterie alcaline e batterie al manganese). Leggere
attentamente quanto riportato sulla confezione, dato
che tipi diversi di batterie possono avere la stessa forma
e colore.
• Se si riscontrano perdite dalle batterie, smaltirle
immediatamente. Evitare di toccare la sostanza
fuoriuscita o di venirne a contatto con i vestiti, ecc.
Pulire accuratamente il comparto batterie prima di
inserire le batterie nuove.
• Non gettare via le batterie assieme ai comuni rifiuti
domestici; smaltirle correttamente secondo le
regolamentazioni locali.
Il telecomando trasmette un raggio infrarosso direzionale.
Durante il funzionamento assicurarsi di puntare il
telecomando direttamente verso il sensore del
telecomando sul pannello anteriore del ricevitore.
Note
• La zona tra il telecomando ed il ricevitore deve essere libera da
grossi ostacoli.
• Non schizzare acqua o altri liquidi sul telecomando.
• Non far cadere il telecomando.
• Non lasciare o conservare il telecomando nelle seguenti
condizioni:
– in ambienti fortemente umidi, come vicino a un bagno
– a temperature elevate, come vicino al riscaldamento o a una
stufa
– a temperature estremamente basse
– in luoghi polverosi
• Non esporre il sensore del telecomando a luce intensa, in
particolare, a lampade di tipo a fluorescenza; altrimenti, il
telecomando potrebbe non funzionare correttamente. Se
necessario, posizionare il sistema lontano dalla luce diretta.
Installazione delle batterie nel
telecomando
13
2
Uso del telecomando
INPUT
BASS
PHONES
VOLUME
MIN MAX
TREBLE BALANCE
PRESET PURE DIRECT
LR
1234
56
90
78
ENTER CLEAR
MUTE
ENTER VOLUME
AUX TUNER
iPod SHUFFLE REPEAT
MENU
ENTER
EON MONO
MEMORY
PRESET TUNING
DISC
DISPLAY TIMER SLEEP DIMMER
OPTION PURE DIRECT
AUDIO SUBTITLE ANGLE
REPEAT
ON SCREEN
RETURN
PinP SETUP
A B C D
EXIT
TOP MENU/TITLE LIST
POP UP MENU
30˚ 30˚
Entro 6 m
Ricevitore (R-840)

PREPARATIVI
12 It
Prima di iniziare la riproduzione, attenersi alla procedura
seguente per regolare l’orologio del ricevitore.
Note
• Uso del telecomando per impostare l’orologio. Non è possibile
regolare l’orologio con i pulsanti del ricevitore.
• Il ricevitore supporta il display orologio in formato 24 ore.
• Se non si tocca alcun tasto per 90 secondi, il ricevitore ritorna in
modalità normale.
1Premere per accendere il ricevitore.
Il display del pannello anteriore si accende.
2Premere TIMER per mostrare l’ora corrente.
Se l’orologio non viene impostato, “SET TIME”
lampeggia sul display.
Premere ENTER per passare al punto 3.
3Premere / per selezionare “TIME”, quindi
premere ENTER.
Il ricevitore entra in modalità di regolazione orologio.
Le cifre delle ore iniziano a lampeggiare.
4Impostare l’ora con / , quindi premere .
Le cifre dei minuti iniziano a lampeggiare.
5Impostare i minuti con / , quindi premere
ENTER.
Le cifre delle ore e dei minuti iniziano a lampeggiare.
Per cambiare nuovamente l’ora o i minuti, premere
o , eseguire le operazioni 4 e 5 e poi passare al
punto 6.
6Premere ENTER.
L’orologio è stato regolato.
I segmenti delle ore e dei minuti cessano di
lampeggiare e restano accesi. Il ricevitore ritorna alla
modalità normale.
y
Si può tornare alla schermata precedente premendo o
RETURN.
Regolazione dell’orologio
ABCD
EXIT
TOP MENU/TITLE LIST
POP UP MENU
TIMER
ENTER ,
RETURN
Lampeggia
Lampeggia
Lampeggia
CONFIGURAZIONE DELL’IMPIANTO
13 It
Italiano
PREPARAZIONE
Accertarsi che tutti i collegamenti siano stati fatti
correttamente (vedere “Collegamento di una TV
all’impianto” a pagina 9).
1Accendere il televisore a cui collegare il
lettore BD.
Selezionare l’ingresso TV in modo che corrisponda
all’ingresso collegato al lettore BD.
2Premere per accendere il ricevitore.
3Premere DISC.
Impostare il rapporto altezza/larghezza del lettore BD in
funzione della TV collegata (☞p.33).
1Premere SETUP.
Sullo schermo appare il menu di configurazione.
2Premere /// per selezionare “Settings”,
quindi premere ENTER.
3Premere / per selezionare “Audio Video
Settings”, quindi premere ENTER.
4Premere / per selezionare “TV Aspect
Ratio”, quindi premere ENTER.
5Premere / per selezionare il rapporto
altezza/larghezza del televisore, quindi
premere ENTER.
Per maggiori dettagli sul rapporto altezza/larghezza,
vedere vedere pagina 33.
6Premere SETUP oppure EXIT per chiudere il
menu di Setup.
y
Si può tornare al menu precedente premendo RETURN.
È possibile selezionare la lingua preferita di modo che il
lettore BD passerà automaticamente ad essa quando si
carica un disco. Se la lingua scelta non è disponibile su
disco, al suo posto verrà utilizzata la lingua predefinita. La
lingua OSD (on-screen display) per il menu di setup BD/
DVD resta quella che si è impostata, indipendentemente
dalla diverse lingue del disco.
1Premere SETUP.
2Premere /// per selezionare “On
Screen Language”, quindi premere ENTER.
3Premere / per selezionare una lingua,
quindi premere ENTER.
CONFIGURAZIONE DELL’IMPIANTO
Accendere l’impianto e il
televisore
Impostazione dello schermo TV
EXIT
TOP MENU/TITLE LIST
POP UP MENU
SETUP
, , , ,
ENTER
Settings
Picture
On Screen Language
Displays The Title List
Scelta della lingua (OSD)
Audio Video Settings
Quick Start
HDMI Control
Playback Setting
Communication Setup
Version
USB Memory Management
Software Update
System Reset

CONFIGURAZIONE DELL’IMPIANTO
14 It
1Premere SETUP.
2Premere /// per selezionare
“Impostazioni”, quindi premere ENTER.
3Premere / per selezionare “Impostazione
Riproduzione”, quindi premere ENTER.
4Premere / per selezionare “Lingua
Disco”, quindi premere ENTER.
5Premere / per selezionare una delle
seguenti voci.
• Sottotitoli
• Audio
•Menu
6Premere / per selezionare una lingua,
quindi premere ENTER.
Lingue audio, sottotitoli e menu
disco

FUNZIONI DEL SISTEMA
15 It
Italiano
FUNZIONAMENTO
DI BASE
FUNZIONAMENTO DI BASE
Per scegliere una sorgente di segnale e regolare i parametri audio del sistema, seguire la procedura indicata sotto.
1Premere (On/Standby) per accendere il
ricevitore.
A seconda della modalità di ingresso del ricevitore, il
lettore BD si accende anche tramite il collegamento
di comando dell’impianto (☞p.8). Il display del
pannello anteriore si accende.
2Premere uno dei selettori di ingresso (o
ruotare INPUT sul pannello anteriore) per
scegliere la sorgente di ingresso desiderata.
3Iniziare la riproduzione con il componente
sorgente del segnale selezionato o scegliere
una stazione radio.
Per informazioni sulla riproduzione del disco vedere
pagina 17, e per informazioni sulla sintonizzazione,
vedere pagina 26.
4
Premere VOLUME +/– (o girare VOLUME sul pannello
anteriore) per regolare il volume desiderato.
5Girare BASS, TREBLE o BALANCE del
pannello anteriore del ricevitore per regolare
i seguenti parametri.
BASS: Regola la risposta alle basse frequenze.
TREBLE: Regola la risposta alle alte frequenze.
BALANCE: Regola il volume dei canali sinistro e
destro dei diffusori.
■Modalità Pure Direct
La modalità Pure Direct by-passa il circuito di controllo
dei toni e disattiva il display del pannello anteriore,
permettendovi di riprodurre suoni puri ad alta fedeltà.
Premere PURE DIRECT (o PURE DIRECT sul pannello
anteriore) per attivare la modalità Pure Direct.
Il display del pannello anteriore si spegne
automaticamente. PURE DIRECT sul pannello anteriore
ha una retroilluminazione blu.
Note
• Se si eseguono operazioni con modalità Pure Direct inserita, il
display del pannello anteriore del ricevitore si accende
brevemente a conferma della ricezione del comando.
• Quando la modalità Pure Direct è attiva, né BASS, né TREBLE,
né BALANCE sono disponibili.
Per disattivare la modalità Pure Direct
Premere di nuovo PURE DIRECT. La retroilluminazione
blu PURE DIRECT si spegne ed il display del pannello
anteriore si accende.
FUNZIONI DEL SISTEMA
INPUT
BASS
PHONES
VOLUME
MIN MAX
TREBLE BALANCE
PRESET PURE DIRECT
LR
TP
TIMER
QUICK
INPUT
(On/Standby) VOLUME
PURE
DIRECTBASS BALANCE
TREBLE
A B C D
EXIT
TOP MENU/TITLE LIST
POP UP MENU
(On/Standby)
VOLUME +/–
Selettori di
ingresso
PURE DIRECT
MUTE
Funzionamento di base dell’impianto

FUNZIONI DEL SISTEMA
16 It
■Eliminazione dell’audio (MUTE)
Premere MUTE per ridurre il volume attuale di
circa 20dB.
“MUTE ON” appare sul display del pannello anteriore.
Premere nuovamente MUTE per ripristinare l’uscita audio
al volume precedente.
È possibile affievolire la luminosità del display del
pannello anteriore del ricevitore. Il display del pannello
anteriore del lettore BD si affievolisce a sua volta grazie al
collegamento di comando dell’impianto (☞p.8).
(L’impostazione predefinita è “DIMMER OFF”.)
Premere DIMMER.
Si può scegliere la luminosità desiderata del display del
pannello anteriore optando tra normale (luminoso),
mediamente affievolito e affievolito.
Le cuffie si possono collegare alla presa PHONES sul
pannello anteriore del ricevitore.
Il suono proveniente dai diffusori e dal subwoofer cessa.
Modifica della luminosità del
display del pannello anteriore
Per usare le cuffie
DIMMER
INPUT
PHONES

FUNZIONAMENTO DEL DISCO
17 It
Italiano
FUNZIONAMENTO
DI BASE
Questo capitolo spiega come riprodurre i dischi.
Se la sorgente d’ingresso è DISC si possono usare varie
funzioni e impostazioni tramite i menu che appaiono sullo
schermo del televisore collegato.
Si possono utilizzare questi tasti quando la modalità
d’ingresso è impostata su DISC.
y
• Con l’impostazione (☞p.13) si può cambiare la lingua
visualizzata sullo schermo.
• I pulsanti che potete utilizzare con i vari menu sono mostrati
nella parte inferiore di ogni schermata.
Vedere pagina 3 per maggiori dettagli sui tipi di dischi e i
formati dei file supportati.
1Premere sul pannello anteriore del lettore
BD.
2Inserire il disco, con l’etichetta verso l’alto, al
centro del vassoio dischi e poi premere .
Il vassoio dei dischi si chiude e il disco viene
caricato.
3Premere .
• Se si carica un disco BD/DVD potrebbe apparire
un menu. Per maggiori dettagli vedere Vedere
“Menu BD/DVD” (☞p.18).
• Se è stato caricato un disco contenente immagini
JPEG, viene avviata una presentazione. Vedere
“Riproduzione di JPEG presentazioni” (☞p.20) per
maggiori informazioni.
Per arrestare la riproduzione .
Si può continuare la riproduzione dal punto in cui è
stata interrotta premendo semplicemente
(funzione Resume). La funzione resume potrebbe non
funzionare a seconda del disco.
Per riprodurre il disco dall’inizio, annullare la
modalità Resume premendo di nuovo .
Note
• Per riprodurre un DVD a due lati, caricarlo con il lato che si
vuole riprodurre rivolto verso il basso.
• Premendo sul pannello anteriore mentre il lettore BD si
trova in standby, il sistema si accende automaticamente e
seleziona DISC come la sorgente d’ingresso. Il vassoio dei
dischi si apre e il sistema è pronto per la riproduzione.
• Con certi dischi, alcune funzioni di riproduzione spiegate nel
presente capitolo potrebbero non funzionare come previsto o
non funzionare affatto.
• Alcuni BD/DVD limitano l’uso di certe funzioni, per esempio la
funzione resume la riproduzione casuale o la riproduzione
ripetuta, in alcune o in tutte le parti del disco. Non si tratta di
cattivo funzionamento.
Premere .
Per riprendere la riproduzione, premere di nuovo
oppure .
Per un Audio CD, premere oppure per
interrompere la riproduzione.
FUNZIONAMENTO DEL DISCO
Utilizzando il display su schermo
Pulsante Descrizione
SETUP Visualizza il menu Setup (configurazione)
per il lettore BD
Cursore
()/()
Seleziona le opzioni di menu
ENTER Conferma la selezione
RETURN Ritorna al menu precedente
A B C D
EXIT
TOP MENU/TITLE LIST
POP UP MENU
Tasti numerici
TOP MENU/
TITLE LIST POP UP MENU
RETURN
, , ,
ENTER
SETUP
, ,
Operazioni di riproduzione
Pausa di riproduzione

FUNZIONAMENTO DEL DISCO
18 It
Durante la riproduzione è possibile riavvolgere o avanzare
velocemente a varie velocità.
Premere per riavvolgere o per
l’avanzamento rapido.
La velocità di riavvolgimento o avanzamento cambia
ogniqualvolta si preme o .
La velocità viene visualizzata sullo schermo.
Per riprendere la riproduzione normale, premere .
■
Per scegliere il capitolo o il brano successivo
Premere .
■
Per scegliere il capitolo o il brano precedente
Premere due volte.
Se si premere una sola volta, la riproduzione ritorna
all’inizio del capitolo o brano attuale.
La maggior parte dei dischi BD/DVD sono dotati di menu
nei quali si può selezionare quello che si desidera
guardare. Di solito, il menu principale appare
automaticamente, anche se con alcuni dischi potreste si
deve premere TOP MENU/TITLE LIST o POP UP
MENU per visualizzare il menu.
Con i menu potete utilizzare i seguenti pulsanti.
*1 Dipende dal disco.
*2 Su alcuni dischi può funzionare come il pulsante TOP
MENU/TITLE LIST.
Note
•
La procedura spiegata in questa pagina è la procedure di
funzionamento base. Le procedure cambiano a seconda del BD/
DVD, per cui potrebbe essere necessario seguire le istruzioni nel
manuale del BD/DVD o le istruzioni visualizzate sullo schermo.
• Con alcuni BD/DVD, il top menu potrebbe essere indicato
come “Title Menu”. Utilizzare TOP MENU/TITLE LIST
quando le istruzioni si riferiscono a “Title Menu”.
• Se non è disponibile un top menu, TOP MENU/TITLE LIST
non produce alcun effetto.
• La schermata top menu potrebbe essere visualizzata premendo
POP UP MENU a seconda del DVD.
Si possono riprodurre dischi BD/DVD al rallentatore. Si
possono anche riprodurre dischi DVD al rallentatore
all’inverso.
1Durante la riproduzione, premere .
2La riproduzione al rallentatore funziona
quando o viene premuto per un
tempo superiore a 2 secondi durante la
pausa.
Per riprendere la riproduzione normale, premere .
Note
• La riproduzione al rallentatore non funzione on i CD audio.
• La riproduzione al rallentatore all’inverso non può essere
effettuata con BD.
Si possono riprodurre dischi BD/DVD fotogramma per
fotogramma. Si possono anche riprodurre dischi DVD-
Video fotogramma per fotogramma in senso contrario.
1Durante la riproduzione, premere .
2Premere o per riprodurre un
fotogramma alla volta.
Per riprendere la riproduzione normale, premere .
Note
• La riproduzione fotogramma per fotogramma non funziona
correttamente con dischi diversi da DVD-RW/R (formato VR).
• Alcuni dischi BD/DVD non sono compatibili con la
riproduzione fotogramma per fotogramma.
• La riproduzione per fotogrammi in avanti/indietro può essere
effettuata con i dischi DVD premendo o durante la
pausa.
Riavvolgimento e avanzamento rapido
Selezionare i capitoli e i brani
Menu BD/DVD
Pulsante Descrizione
TOP MENU/
TITLE LIST
Visualizza il menu principale del BD/
DVD*1
POP UP MENU Visualizza oppure chiude il menu pop-up
del BD *2
()/()Seleziona le opzioni di menu
ENTER Conferma la selezione
Riproduzione al rallenti
Riproduzione fotogramma per
fotogramma
,
,
FUNZIONAMENTO DEL DISCO
20 It
1Durante la riproduzione, premere REPEAT.
Sullo schermo appare il menu Repeat (Ripetizione).
Per chiudere il menu Repeat, premere RETURN.
2Premere / per visualizzare le opzioni del
menu.
• Riprod. Titolo: Ripete il brano attualmente in
riproduzione.
• Riprod. Capitolo: Ripete il capitolo attualmente in
riproduzione.
• Specific. la Parte: Ripete la scena specificata del
brano o del capitolo (☞“Ripetizione di una sezione
specifica (Repeat A-B)”).
Per gli Audio CD, è possibile selezionare “Riproduz.
Disco”, “Riprod. Traccia” oppure “Specific. la Parte”.
3Premere ENTER.
Si avvia la riproduzione ripetuta.
Le opzioni di ripetizione disponibili dipendono dal
tipo di disco.
Per annullare la riproduzione ripetuta, premere
REPEAT durante la riproduzione.
Nota
La riproduzione ripetuta non può essere usata con dischi JPEG.
È possibile specificare due punti su un disco e riprodurre
ripetutamente la sezione compresa tra di essi.
La funzione di ripetizione A-B non è disponibili con
dischi BD.
1Durante la riproduzione, premere REPEAT,
quindi / per selezionare “Specific. la
Parte”.
Appare “Impostare l’Inizio”.
“A-” si accende sul display del pannello anteriore del
lettore BD.
2Premere ENTER nella scena in cui si
desidera impostare il punto d’inizio.
Appare “Specific. il Termine”.
“B” si accende sul pannello anteriore del display.
3Premere ENTER nella scena in cui si
desidera impostare il punto di fine.
La sezione tra il punto d’inizio e il punto di fine viene
riprodotta ripetutamente.
“REP” e “A-B” si accende sul display.
Per annullare la riproduzione programmata, premere
REPEAT.
Per chiudere il menu Repeat, premere EXIT.
Nota
I punti d’inizio e di fine devono fa parte dello stesso titolo (DVD)
o brano (Audio CD).
y
Premere per l’avanzamento rapido alla scena in cui si
desidera impostare il punto di fine.
Si può riprodurre una presentazione di immagini JPEG
contenute su un CD-R/CD-RW.
Caricare il disco, quindi premere per avviare
la presentazione di immagini.
Iniziando dalla prima immagine della prima cartella, la
presentazione mostra tutte le immagini di tutte le cartelle
sul disco in ordine alfabetico.
Le dimensioni delle immagini vengono definite
automaticamente in modo che appaiano sullo schermo
nella dimensione maggiore possibile.
Durante la presentazione si possono utilizzare i seguenti pulsanti.
Ripetizione di una sezione
specifica (Repeat A-B)
Riprod. Capitolo Specific. la Parte
Riprod. Titolo
Riprod. Titolo
Impostare l'Inizio
Riprod. Capitolo Specific. la Parte
Riproduzione di JPEG presentazioni
Pulsante Descrizione
Interrompe la presentazione di immagini
Seleziona l’immagine successiva
Seleziona l’immagine precedente
ABCD
EXIT
TOP MENU/TITLE LIST
POP UP MENU
, , ,
ENTER
C
SETUP
,

FUNZIONAMENTO DEL DISCO
21 It
Italiano
FUNZIONAMENTO
DI BASE
■Configurazione della velocità di
presentazione delle immagini o della
riproduzione programmata
1Premere SETUP.
Sullo schermo appare il menu di Setup.
2Selezionare “Immagine” quindi premere
ENTER per aprire la schermata di selezione
per le immagini.
3Premere C (Menu Slideshow).
4Premere / per selezionare “Velocità Slide
Show” oppure “Impost. Modo Ripet.”, e
quindi premere ENTER.
5Premere /// per selezionare l’opzione
desiderata, quindi premere ENTER.
Si può selezionare la velocità di presentazione delle
immagini tra le opzioni “Veloce”, “Normale”,
“Lento1” e “Lento2”.
Nota
Il caricamento delle immagini di grandi dimensione è più lungo
quindi tali immagini potrebbero non apparire immediatamente.
1Premere SETUP.
Sullo schermo appare il menu di Setup.
2Selezionare “Immagine” quindi premere
ENTER per aprire la schermata di selezione
per le immagini.
3Utilizzare i pulsanti /// per selezionare
la cartella che contiene il (i) che si intende
riprodurre, quindi premete ENTER.
Per riprodurre i file JPEG vedere “Riproduzione di
JPEG presentazioni” (☞p.20).
Si può riprodurre un disco registrato (solo formato disco
finalizzato DVD: VR).
Nota
“Finalize” si riferisce a un registratore che elabora un disco
registrato per poterlo riprodurre in altri lettori/registratori DVD e
con la presente unità. In questo lettore si possono riprodurre
soltanto DVD dischi finalizzati. (Il lettore non ha una funzione
per finalizzare i dischi.)
Informazioni sull’elenco titoli (Title List)
L’elenco titoli (Title List) può essere visualizzato in due
modi, in miniatura (Thumbnail) e come Elenco titoli (Title
List). Ogni volta che si preme A, la schermata passa da
Thumbnail a Title List e viceversa.
1Informazioni sul titolo selezionato
2Nome titolo
Data di registrazione
Durata registrazione
3Caption per pulsante Color
Riproduzione di immagini fisse in
una cartella selezionata
1/77
8/15
Riproduzione di film registrati su
un DVD-R/DVD-RW
A B C D
EXIT
TOP MENU/TITLE LIST
POP UP MENU
,
, , , ,
ENTER
C
D
B
A
TOP MENU/
TITLE LIST
21/5 Ven 9:30 AM 110 Min.
Programma 1
DCB
Nome tit.
A
21/5
[ Dal Vecchio ]
Ven 9:30 AM
1 Programma 1 21/5 Ven 110 Min.
2 Programma 2 15/6 Ven 110 Min.
3 Programma 3 3/7 Lun 56 Min.
4 Programma 4 18/9 Gio 40 Min.
110 Min.
Programma 1
DCB
Miniatura
A
1
2
3
1
3
Nome tit.
Miniatura
Programma
1Programma
2Programma
3
Programma
4Programma
5Programma
6
Per Capitolo El. Riprod. Funzioni
Funzioni
Classificazione
El. Riprod.

FUNZIONAMENTO DEL DISCO
22 It
■
Riproduzione tramite selezione di un titolo
1Caricare un disco registrato.
Viene visualizzato l’elenco titoli.
Se l’elenco titoli non viene visualizzato, premere
TOP MENU/TITLE LIST.
2Premere /// per selezionare il titolo
desiderato, quindi premere ENTER.
In tal modo ha inizio la riproduzione del titolo selezionato.
La riproduzione può essere avviata premendo ,
invece di premere ENTER.
Per arrestare la riproduzione .
y
• La schermata dell’elenco titoli può essere visualizzata
premendo TOP MENU/TITLE LIST quando si arresta la
riproduzione oppure premendo ENTER dopo aver scelto
“Visualizza Titoli” nel menu Setup quando si arresta la
riproduzione.
• Quando appare Thumbnail e sono presenti sette o più titoli,
passare da una pagina all’altra premendo o .
■
Riproduzione tramite selezione di un capitolo
1Premere B mentre è visualizzata la
schermata Thumbnail.
Appare la schermata capitolo.
Per tornare alla schermata Thumbnail, premere B.
2Premere /// per selezionare il capitolo
desiderato, quindi premere ENTER.
In tal modo ha inizio la riproduzione del capitolo
selezionato.
La riproduzione può essere avviata premendo ,
invece di premere ENTER.
Per arrestare la riproduzione .
■Ordinare i titoli
Ogni volta che si preme B mentre è visualizzata la
schermata Title List, il display Title List passa dalla
visualizzazione dei file più recenti per primi a quella dei
file più vecchi per prima.
■
Riproduzione tramite selezione di una Playlist
1Premere C mentre è visualizzata la
schermata Thumbnail o Title List.
Appare la schermata Playlist.
2Premere / per selezionare il titolo, quindi
premere ENTER.
In tal modo ha inizio la riproduzione del titolo
selezionato.
Per arrestare la riproduzione .
■Riproduzione del brano arrestato
durante la riproduzione
1Premere D mentre è visualizzata la
schermata Thumbnail o Title List.
2Premere / per selezionare il tipo di
riproduzione, quindi premere ENTER.
In tal modo ha inizio la riproduzione del titolo.
Per arrestare la riproduzione .
Consente di regolare varie impostazioni quali i sottotitoli,
le impostazioni degli angoli e la scelta del titolo per la
riproduzione diretta (Direct Playback). Le impostazioni
video e audio possono essere impostate secondo le proprie
preferenze. Le procedure sono le stesse di BD e DVD.
Premere ON SCREEN durante la riproduzione.
La schermata Function Control appare sullo schermo del TV.
Originale Funzioni
21/5 Ven 9:30 AM
1 Programma 1 21/5 Ven 110 Min.
2 Programma 2 15/6 Ven 110 Min.
110 Min.
Programma 1
DC
Uso di “Function Control Screen”
per BD/DVD
Dall'Inizio Da Continua
Riproduzione
EXIT
TOP MENU/TITLE LIST
POP UP MENU
, , , ,
ENTER
RETURN
ON SCREEN

FUNZIONAMENTO DEL DISCO
23 It
Italiano
FUNZIONAMENTO
DI BASE
Schermata Function control
1Display dello stato della riproduzione
Mostra lo stato attuale di funzionamento e il tipo di disco.
2Impostazione delle opzioni
Seleziona un titolo (o brano) o un capitolo per la
riproduzione, o regola le impostazioni video/audio.
• Numero titolo/brano (Titolo diretto / Salta brano)
• Numero capitolo (Salta direttamente al capitolo)
• Tempo trascorso di riproduzione (Salta direttamente
tempo)
• Subtitle Language
• Angle Number
• Audio
•Repeat
3Display della guida di funzionamento
Si tratta di una guida che espone le funzioni dei pulsanti
del telecomando.
Per chiudere la schermata Function Control, premere
RETURN o ON SCREEN.
Note
• Se “– –” è visualizzato per un’opzione come il numero del titolo
o i sottotitoli, il disco non contiene titoli o sottotitoli
selezionabili.
• Gli elementi visualizzabili dipendono dal tipo di disco.
• Se si accede alla schermata Function Control durante la
riproduzione di un video BD/DVD potrebbe non essere
possibile far funzionare la riproduzione video BD/DVD. In
taluni casi, chiudere la schermata Function Control.
1Caricare un audio CD.
Appare la schermata CD Operation.
2Premere D quando appare la schermata CD
Operation.
Viene attivato il menu “Funzioni”.
Seguire la guida di funzionamento.
Note
• Gli elementi visualizzabili dipendono dal tipo di disco.
• Quando è arrestata la riproduzione è possibile selezionare
soltanto “Brano”.
Durante la riproduzione si possono visualizzare
informazioni sul titolo, sul capitolo, sul brano e altre
informazioni.
Durante la riproduzione, premere più volte
DISPLAY per visualizzare le informazioni.
■Per nascondere le informazioni
Premere più volte DISPLAY fino a scomparsa.
BD-VIDEO
0 3 : 0 2 :0 0
1
1 / 3
5 . 1 c h
Invio
Selez. Enter
5 5 / 2
2 English
1
Disatt.
1
2
3
ENTER
RETURN
Uso del menu “Funzioni” per
Audio CD
Visualizzazione delle informazioni
su disco
1Brano 015:16
2Brano 025:10
3Brano 035:23
4Brano 045:03
5Brano 054:44
6Brano 065:08
00:00:11
3/12
3/12
Disatt.
3L+R
InvioSelez. Enter Selez. brano
5:23
0:00
Brano 03Funzioni
D
Guida di funzionamento
DISPLAY

FUNZIONAMENTO DEL DISCO
24 It
Il lettore BD supporta le funzioni di riproduzione
BONUSVIEW (BD-ROM Profilo 1 Versione 1.1) e BD-
LIVE (BD-ROM Profilo 2).
I dischi compatibili BONUSVIEW: BONUSVIEW
permettono di di guardare contemporaneamente un
sottocanale video su due schermi e di ascoltare i
sottocanali audio e sottotitoli. Durante la riproduzione
sullo schermo principale appare un piccolo schermo
(Picture in Picture).
I dischi compatibili BD-LIVE: BD-LIVE supportano tutte
le funzioni di BONUSVIEW e permettono inoltre di
collegarsi online con il lettore BD e di vedere video
promozionali e altri dati.
Nota
Le funzioni e il metodo di riproduzione variano a seconda del
disco. Vedere la guida del disco o il manuale utente in dotazione.
■Uso della funzione Picture in Picture
(riproduzione audio/video secondaria)
BD-Video che include audio e video secondario
compatibile con la funzione Picture in Picture può essere
riprodotta con audio e video secondario simultaneamente
in forma di un piccolo video in un angolo.
Durante la riproduzione premere, P in P per
attivare o disattivare la funzione Picture in
Picture.
Note
• Per ascoltare l’audio secondario, accertarsi che “Audio
secondario” sia impostato su “Acceso” (☞p.34).
• L’audio e il video secondario per la funzione Picture In Picture
può essere riprodotto automaticamente e rimosso a seconda del
contenuto. Inoltre è possibile limitare le aree di riproduzione.
■Uso della caratteristica di BD-LIVE
1Configurare le impostazioni di rete (☞p.36).
2Collegare il dispositivo di archiviazione USB
al lettore BD (☞p.10).
I dati BD-LIVE vengono salvati in Dispositivo locale
(USB dispositivo di memoria collegato al lettore). Per
utilizzare queste funzioni collegare un dispositivo di
memoria USB (2GB o superiore e formattato con
FAT 32/16) che supporta la velocità USB 2.0 High
Speed (480Mbit/s) al terminale USB BD STORAGE/
SERVICE (☞p.10) sul retro del lettore.
•
Se lo spazio di archiviazione è insufficiente, i dati non
vengono copiati/scaricati. Eliminare i dati inutili o
utilizzare un nuovo dispositivo di memoria USB.
•
Se si utilizza un dispositivo di memoria USB altri dati
(precedentemente registrati) è probabile che la
riproduzione video e audio non avvenga correttamente.
• Se il dispositivo di memoria USB viene scollegato
dal lettore durante la riproduzione dei dati BD-
LIVE, la riproduzione del disco viene arrestata.
• A volte occorre del tempo per caricare i dati
(lettura/scrittura).
• Vedere “Gestione Memoria USB” (☞p.39) per
cancellare i dati BD-LIVE nel dispositivo di
memoria USB.
Note
• Amaca non può garantire il funzionamento corretto di questo
lettore con qualsiasi dispositivo di memoria USB.
• Non utilizzare una prolunga USB per effettuare il collegamento
di un dispositivo di memoria USB al terminale USB BD
STORAGE/SERVICE del lettore. L’uso di una prolunga USB
può impedire il corretto funzionamento del lettore.
3Riproduzione del disco.
4Utilizzare BD-LIVE secondo le istruzioni del
disco.
La seguente illustrazione serve solo come esempio.
Note
• Per quanto riguarda il metodo di riproduzione di contenuti, ecc.
BD-LIVE effettuare le operazione secondo le istruzioni
contenute nel manuale del disco BD.
• Per usare le funzioni BD-LIVE configurare le impostazioni di
collegamento e comunicazione Internet a banda larga (☞p.10) e
(☞p.36).
• Vedere “Accesso Internet BD” (☞p.35) per le impostazioni di
restrizione d’accesso ai contenuti BD-LIVE.
Uso di BONUSVIEW e BD-LIVE
P in P
Video secondario
Video primario

FUNZIONAMENTO DEL DISCO
25 It
Italiano
FUNZIONAMENTO
DI BASE
• Il tempo richiesto per scaricare i programmi forniti nel
dispositivo di memoria USB collegato al lettore varia a seconda
della velocità di connessione Internet e al volume di dati del
programma.
• I programmi BD-LIVE scaricata da Internet potrebbero non
essere in grado di visualizzare il tipo di connessione a seconda
dello stato (aggiornamento) del provider. In taluni casi, estrarre
il disco e ritentare.
• Se la schermata BD-LIVE non appare dopo qualche secondo
dopo aver selezionato la funzione BD-LIVE nel menu del disco
BD il dispositivo di memoria USB probabilmente non dispone
di spazio libero sufficiente. In tal caso, estrarre il disco dal
lettore, cancellare i dati nel dispositivo di memoria USB
utilizzando il menu Data Erase nel menu “Gestione Memoria
USB” (☞p.39).

SINTONIZZAZIONE FM
26 It
FUNZIONAMENTO SINTONIZZATORE
Ci sono 2 metodi di sintonizzazione: quello automatico e quello manuale. Potete anche usare le caratteristiche di
sintonizzazione con preselezione automatica o manuale per memorizzare fino a 30 stazioni.
La sintonizzazione automatica funziona bene quando i
segnali ricevuti sono forti e non ci sono interferenze.
1
Premere TUNER per portare il ricevitore in
modalità FM.
2Tenere premuto TUNING per più di 2
secondi per avviare la sintonizzazione
automatica.
Quando il ricevitore è sintonizzato su una stazione,
l’indicatore TUNED si accende e la frequenza della
stazione appare sul display del pannello anteriore.
• Premere per sintonizzarsi su una frequenza più
bassa.
• Premere per sintonizzarsi su una frequenza più
alta.
Se il segnale della stazione desiderata è debole, passare
alla sintonizzazione manuale.
1
Premere TUNER per portare il ricevitore in
modalità FM.
2Premere TUNING per sintonizzarsi
manualmente su una stazione.
Seguire la procedura indicata di seguito per preselezionare
automaticamente le stazioni radio.
1
Premere TUNER per portare il ricevitore in
modalità FM.
2Tenere premuto MEMORY per più di 2
secondi.
L’indicatore PRESET inizia a lampeggiare sul
display del pannello anteriore e la preselezione
automatica si avvia. Durante una ricerca su tutte le
frequenze, la preselezione si arresta
automaticamente.
• La ricerca inizia dalla frequenza più bassa e
prosegue verso quella più alta.
• Il ricevitore associa automaticamente un numero di
preselezione a ciascuna stazione rilevata.
• Per annullare la ricerca, premere MEMORY.
Note
• Si possono preselezionare fino a 30 stazioni FM.
• I dati di stazioni memorizzati con un numero di preselezione
vengono cancellati se in esso si memorizza una nuova stazione
con lo stesso numero di preselezione.
SINTONIZZAZIONE FM
Sintonizzazione automatica
Sintonizzazione manuale
TUNING / d
d
d
d
TUNER
/ d
d
d
d
d
d
d
d
/ d
d
d
d
Sintonizzazione automatica con
preselezione
PRESET u / d
TUNER
MEMORY

SINTONIZZAZIONE RADIO DATA SYSTEM (MODELLO SOLO PER EUROPA)
28 It
Il Radio Data System (modello solo per Europa) è un sistema di trasmissione dati usato dalle stazioni FM in molti paesi.
La funzione Radio Data System ha luogo tra stazioni delle reti. Questo ricevitore riceve vari tipi di dati Radio Data
System, ad esempio PS (Program Service, o nome del programma), PTY (Program Type, o tipo di programma), RT
(Radio Text, o testi radio), CT (Clock Time, o ora esatta) e TP (Traffic Program - Programmi sul traffico) dalle stazioni
che effettuano trasmissioni con il Radio Data System.
Usare questa funzione per visualizzare i 4 tipi di
informazione Radio Data System: PS (nome del
programma), PTY (tipo di programma), RT (testi radio) e
CT (ora esatta).
Note
• Si può scegliere solo le modalità Radio Data System offerte
dalla stazione.
• Se i segnali Radio Data System ricevuti non sono
sufficientemente forti, il ricevitore potrebbe non essere in grado
di utilizzarli. In particolare, la modalità “RT” richiede grandi
quantità di dati e potrebbe non funzionare anche quando altre
modalità Radio Data System funzionano.
• Se la forza del segnale è indebolita da interferenze esterna
mentre il ricevitore riceve dati Radio Data System, la ricezione
potrebbe interrompersi inaspettatamente e l’indicazione
“...WAIT” apparire sul display del pannello anteriore.
• Se si sceglie la modalità “RT”, il ricevitore può visualizzare
informazioni sui programmi con un massimo di 64 caratteri,
compreso il simbolo della umlaut. I caratteri non visibili sono
visualizzati con il carattere “_” (sottolineatura).
Quando ci si sintonizza su una stazione Radio
Data System, premere DISPLAY più volte per
scegliere la modalità di visualizzazione Radio
Data System desiderata.
Per la descrizione dei tipi di programma, vedere la tabella
che segue.
SINTONIZZAZIONE RADIO DATA SYSTEM
(MODELLO SOLO PER EUROPA)
Visualizzazione di informazioni
Radio Data System
DISPLAY
PS
PTY
RT
CT
Frequenza
(nome di programma)
(tipo di programma)
(testi radio)
(ora esatta)
Tipo di
programma Descrizioni
News Notizie
Affairs Fatti del giorno
Info Informazioni
Sport Sport
Educate Istruzione
Drama Fiction
Cultura Cultura
Science Scienza
Varied Vari e
Pop M Musica pop
Rock M Musica rock
Easy M Musica commerciale
Light M Musica classica leggera
Classics Musica classica impegnata
Other M Altra musica
29 It
SINTONIZZAZIONE RADIO DATA SYSTEM (MODELLO SOLO PER EUROPA)
Italiano
FUNZIONAMENTO
SINTONIZZATORE
Usare questa funzione per ricevere informazione TP
(programma sul traffico) dalla rete di stazioni Radio Data
System.
1Sintonizzarsi sulla stazione desiderata che
trasmette informazioni Radio Data System.
2Premere TP.
“TP SEARCH” lampeggia sul display del pannello
anteriore per circa 3 secondi e viene avviata la
modalità di ricerca.
Durante la ricerca, l’indicatore TP del ricevitore
lampeggia.
Quando si riceve il programma sul traffico,
l’indicatore TP resta acceso e la ricerca cessa.
Se si preme TP, la ricerca ricomincia.
Se il ricevitore non riesce a ricevere il programma sul
traffico, l’indicatore TP si spegne e “NO TP” appare
sul display. Il ricevitore ritorna alla condizione
precedente.
Per annullare la ricerca
Premere TP durante la ricerca.
Si possono utilizzare le informazioni CT ricevute dalle
stazioni Radio Data System per regolare l’orologio
incorporato nel ricevitore.
1Premere OPTION.
Sul display del pannello anteriore appare una voce del
menu opzioni.
2Premere / per selezionare “AUTO
CLOCK”, quindi premere ENTER.
3Premere / per selezionare “ON” o “OFF”,
quindi premere ENTER.
Viene visualizzato lo stato “AUTO CLOCK”.
L’impostazione predefinita è “ON”.
ON: regola automaticamente l’orologio del ricevitore
tramite le informazioni CT.
OFF: non regola l’orologio del ricevitore.
Per uscire dal menu delle opzioni
Premere OPTION.
Uso delle informazioni di servizio
TP (programma sul traffico)
INPUT
BASS
PHONES
VOLUME
MIN MAX
TREBLE BALANCE
PRESET PURE DIRECT
LR
TIMER
TP
Indicatore TP
TP
Impostazioni CT (ora esatta)
CONTROLLO iPod™
32 It
Oltre a controllare il ricevitore (R-840) e il lettore BD (BD-940), si può controllare il proprio iPod collegato al dock iPod
con il telecomando in dotazione.
Una volta collegato il proprio iPod al dock per iPod, è possibile avviare la riproduzione del proprio iPod utilizzando il
telecomando in dotazione.
Quando si collega l’iPod durante la riproduzione, l’impianto passa automaticamente alla modalità iPod.
Note
• Sono supportati solo iPod (Click and Wheel), iPod nano, iPod Classic, iPod mini e iPod touch.
• Alcune caratteristiche possono non essere compatibili col modello o la versione del software del proprio iPod.
y
Per una lista completa dei messaggi di stato che appaiono sul display del pannello anteriore del ricevitore, vedere la sezione “iPod” in
“DIAGNOSTICA” (☞p.43).
1Premere iPod in modo da scegliere iPod
come sorgente di segnale in ingresso.
2Inserire il proprio iPod nel dock iPod.
3Premere / per controllare il menu iPod,
quindi premere ENTER per iniziare la
riproduzione del brano (o gruppo) scelto.
•
Per controllare il menu, vedere lo schermo dell’iPod.
• Azionare l’iPod con i relativi comandi iPod o con il
telecomando in dotazione.
■Ripetizione della riproduzione (Repeat
Play)
Sul proprio iPod, è possibile riprodurre ripetutamente un
singolo brano o un gruppo di brani.
Premere REPEAT.
Ad ogni pressione del pulsante, la modalità di ripetizione
della riproduzione cambia. Il seguente schema è un
esempio di come le modalità cambino quando si preme il
tasto. Controllare la modalità attualmente selezionata sullo
schermo iPod.
■Riproduzione casuale (Shuffle Play)
Si possono riprodurre brani o album sul proprio iPod in
ordine casuale.
Premere SHUFFLE.
Ad ogni pressione del pulsante, la modalità di riproduzione
casuale (Shuffle Play) cambia. Il seguente schema è un esempio
di come le modalità cambino quando si preme il tasto. Controllare
la modalità attualmente selezionata sullo schermo iPod.
CONTROLLO iPod™
Uso iPod™
Il telecomando in dotazione ha gli stessi tasti funzione del
proprio iPod. Pertanto, questi tasti corrispondono tra loro.
iPod
,
ENTER
REPEAT
SHUFFLE
iPod Telecomando
Uno (ripeti il brano)
Tutto (ripeti il gruppo)
No
Brani (ripeti casualmente i brani)
Album (ripeti casualmente gli album)
No

33 It
Italiano
ALTRO
FUNZIONAMENTO
Questo capitolo descrive i vari menu dell’unità.
Dopo aver acceso l’unità e il TV (☞p.13), si possono modificare le impostazioni sullo schermo del TV utilizzando il
telecomando.
Si possono selezionare le voci del menu e modificare le impostazioni utilizzando la stessa procedura di “Impostazione
dello schermo TV” (☞p.13).
Nota
Se si seleziona “Controllo parentale” in “Impostazioni Riproduzione” (☞p.35), si deve digitare una password di 4 cifre. La schermata di
impostazione password appare la prima volta. Per impostare la password, vedere “Impostazioni Password” (☞p.35).
y
Le impostazioni predefinite sono contrassegnate con “*”.
■Proporzioni Aspetto TV
Si può impostare il rapporto altezza/larghezza del TV
collegato e regolare l’uscita video.
Se si sostituisce il TV con un altro, controllare che il
rapporto altezza/larghezza corrisponda. In caso contrario,
modificare le impostazioni di “Proporzioni Aspetto TV”.
Opzioni “Norm. 4:3”
Se s’imposta “Proporzioni Aspetto TV” su “Norm. 4:3” e
il video è 16:9 su un televisore con rapporto 4:3,
selezionare una delle opzioni seguenti.
■Uscita Video Component
Si può impostare la risoluzione di uscita video component.
Non tutti i televisori sono completamente compatibili con
lettori Blu-ray disc e pertanto l’immagine può risultare
distorta. In questo caso impostare “Uscita Video
Component” sulle impostazioni predefinite (☞p.41).
1080i, 720p, 576/480p, 576/480i*
Nota
Alcuni dischi bloccano le uscite video ad alta definizione dalle
prese COMPONENT. In questo caso, la risoluzione video è
convertita in 576/480p o 576/480i.
■Uscita Video HDMI
Si può impostare la risoluzione di uscita video HDMI.
Non tutti i televisori sono completamente compatibili con
lettori Blu-ray disc e pertanto l’immagine può risultare
distorta. In questo caso impostare “Uscita Video HDMI”
sulle impostazioni predefinite (☞p.41). “Uscita Video
HDMI” viene ripristinato su “Auto” (valore impostato in
fabbrica).
Auto*, 1080p, 1080i, 720p, 576/480p
Nota
Se il lettore BD è collegato a un televisore 1080p/24Hz
compatibile e “Uscita Video HDMI” è impostato su “Auto”,
1080p/24Hz viene visualizzato automaticamente durante la
riproduzione di dischi compatibili.
A 1080p/24Hz o 1080p/60Hz, le prese COMPONENT e VIDEO
sono prive di uscita.
■Selezione Uscita Video
I segnali video possono essere prodotti
contemporaneamente dalle prese video analogiche (prese
componente o video) e la presa HDMI. Si tratta della
funzione a doppia uscita. Se si utilizzano le uscite video
component e HDMI la risoluzione di uscita video è
determinata in base alle impostazioni di “Uscita Video
Component” o “Uscita Video HDMI” e “Selezione Uscita
Video”. Per maggiori dettagli vedere la seguente tabella.
IMPOSTAZIONI DEL LETTORE BD
Impostazioni Audio Video
Largo 16:9*:Selezionare questa voce se si collega un
televisore con schermo panoramico (16:9).
Norm. 4:3: Selezionare questa voce se si collega un
televisore con rapporto 4:3.
Letter Box*:Visualizza un’immagine con una striscia nera
nella parte alta e in quella bassa mantenendo
il rapporto altezza/larghezza a 16/9.
Pan Scan: Visualizza un’immagine senza modificare il
rapporto altezza/larghezza riducendo i
margini a destra e a sinistra. Disponibile solo
per dischi con etichetta 4:3PS. HDMI*:Determina la risoluzione dell’uscita video
sulla base dell’impostazione Uscita Video
HDMI (vedere “Uscita Video HDMI”
(☞p.33)).
Component: Determina la risoluzione dell’uscita video
sulla base dell’impostazione Uscita Video
Component (vedere “Uscita Video
Component” (☞p.33)).

34 It
IMPOSTAZIONI DEL LETTORE BD
*1 Alcuni dischi bloccano le uscite video ad alta definizione
dalle prese COMPONENT. In questo caso la risoluzione
video viene convertita in 480p/576p (quando “Selezione
Uscita Video” è impostato su “Component”) o 480i/576i
(quando “Selezione Uscita Video” è impostato su “HDMI”).
*2 Nessuna uscita video se il segnale 1080p è prodotto dalla
presa HDMI.
*3 CVBS Out vuole dire il segnale di uscita video dalla presa
VIDEO.
Nota
Se il televisore non è compatibile con la risoluzione selezionata,
la visualizzazione delle immagini potrebbe non essere corretta.
y
Si può anche passare da “HDMI” a “Component” e viceversa
utilizzando “HDMI <-> COMP” (☞p.41).
■Audio Secondario
Si può accendere o spegnere l’audio secondario per la
funzione picture in picture o per il commenti audio.
Acceso*, Spento
y
Impostando “Audio Secondario” su “Spento”, non produce il
suono del click nel menu.
Selezionare “Spento” per usare il suono ad alta qualità BD
tramite il jack HDMI.
■Uscita Audio
Si può impostare l’uscita audio indicata per l’ambiente di
riproduzione.
Opzioni “Uscita HDMI”
Se s’imposta “Uscita Audio” su “Uscita HDMI”,
selezionare una delle seguenti opzioni.
Nota
Se “Audio Secondario” è impostato su “Acceso”, l’opzione
“Uscita HDMI” viene impostata automaticamente su “PCM”.
Opzioni “Uscita Digitale”
Se s’imposta “Uscita Audio” su “Uscita Digitale”,
selezionare una delle seguenti opzioni.
■Dynamic Range Control
Si può regolare il range dinamico per produrre il suono a
volume medio. Se i dialoghi non sono facilmente
comprensibili, modificare le impostazioni di questo menu.
Nota
Abbassare il volume prima di effettuare la modifica altrimenti
dagli altoparlanti possono essere emessi dei suoni troppo forti
oppure vengono sottoposti a carica elettrica eccessiva.
Impostazioni del lettore Risoluzione d’uscita
Selezione
Uscita
Video
Uscita
Video HDMI
Component
Out CVBS Out*3
HDMI
Auto *1 480i/576i*2
1080p Senza uscita Senza uscita
1080i 1080i*1 480i/576i
720p 720p*1 480i/576i
480p/576p 480p/576p*1 480i/576i
Impostazioni del lettore Risoluzione d’uscita
Selezione
Uscita
Video
Uscita
Video
Component
Uscita HDMI CVBS Out*3
Component
1080i*11080i*1 480i/576i
720p*1720p*1 480i/576i
480p/576p 480p/576p 480i/576i
480i/576i 480i/576i 480i/576i
Uscita HDMI: Produce un segnale audio attraverso la presa
HDMI.
Uscita Digitale: Produce un segnale audio attraverso la presa
DIGITAL OUT (OPTICAL).
2ch Uscita
Audio*:
Produce un segnale audio attraverso la presa
AUDIO OUT.
Bitstream: Produce un segnale audio bitstream.
Selezionare questa opzione quando si collega
un componente HDMI con decoder integrato
per DOLBY DIGITAL, ecc.
PCM*
(Surround):
Produce un segnale audio PCM lineare.
I segnali audio registrati in formati differenti,
tipo DOLBY DIGITAL e DTS, sono
decodificati su PCM lineare e riprodotti.
Bitstream: Produce un segnale audio bitstream.
Selezionare questa opzione quando si collega
un componente surround con decoder
integrato per DOLBY DIGITAL, ecc.
PCM*:Produce un segnale audio a 2 canali PCM.
I segnali audio registrati in formati differenti
vengono convertiti in segnali audio a 2 canali
PCM e riprodotti.
Selezionare questa opzione se si collega un
componente audio stereo a 2 canali.
Norm.: Produce il suono nello stesso range dinamico
del suono originale.
Sollevamento: Regola il range dinamico dell’audio Dolby
Digital in modo che i dialoghi siano
chiaramente comprensibili.
Se il suono è anomalo, impostare su “Norm.”.
Auto*:Regola automaticamente il range dinamico
dell’audio Dolby TrueHD.
36 It
IMPOSTAZIONI DEL LETTORE BD
Note
• Le funzioni disponibili dipendono dal tipo di disco.
• Per quanto riguarda il metodo di riproduzione di contenuti, ecc.
BD-LIVE effettuare le operazione secondo le istruzioni
contenute nel manuale del disco BD.
• Per usare le funzioni BD-LIVE, vedere “Collegamento ad
Internet” (☞p.10) e “Installazione Comunicazione” (☞p.36).
Questo consente di effettuare e/o modificare le
impostazioni di comunicazione. Questa configurazione è
necessaria per utilizzare le funzioni BD-LIVE per la
connessione ad Internet.
Note
• Controllare il collegamento del cavo LAN al lettore (☞p.10).
• Per effettuare la configurazione manualmente, sono necessarie
le seguenti informazioni del router o del modem collegato.
Confermare le informazioni prima dell’impostazione.
– Indirizzo IP, maschera di rete, indirizzo DNS IP
• Inoltre, se si indica un server proxy, sono necessarie anche le
seguenti informazioni specificate dal provider dei servizi
Internet. Confermare le informazioni prima dell’impostazione.
– Indirizzo IP e numero porta del server proxy
1Premere SETUP.
2Premere / / / pere selezionare
“Impostazioni”, quindi premere ENTER.
3Premere / per selezionare “Installazione
Comunicazione”, quindi premere ENTER.
4Selezionare “Installaz. Ethernet (BD-LIVE)”,
quindi premere ENTER.
5Premere / per selezionare “Cambiare”,
quindi premere ENTER.
Per inizializzare le impostazioni correnti, selezionare
“Inizializzare”, quindi premere ENTER.
6Per impostare l’indirizzo IP, premere / per
selezionare “Si” o “No”, quindi premere
ENTER.
• Selezionando “Si” si ottiene automaticamente
l’indirizzo IP.
• Se si seleziona “No”: inserire manualmente
l’indirizzo IP, la maschera di rete, il gateway
utilizzando lo schermo per immettere i caratteri
(☞p.38).
Per quanto riguarda ciascuno dei valori di
configurazione, confermare le specifiche del router
a banda larga.
7Selezionare “Avanti”, quindi premere ENTER.
8Digitare gli indirizzi IP primario e secondario
utilizzando lo schermo per immettere i
caratteri (☞p.38).
Per quanto riguarda ciascuno dei valori di
configurazione, confermare le specifiche del
router a banda larga.
9Selezionare “Avanti”, quindi premere ENTER.
Installazione Comunicazione
EXIT
TOP MENU/TITLE LIST
POP UP MENU
, , ,
ENTER
SETUP
Impostazione dell'info della Ethernet.
[Installazione Corrente]
: Auto-Installazione
: Auto-Installazione
: Auto-Installazione
: Auto-Installazione
: Non usare
Indirizzo IP
Netmask
Gateway
DNS
Proxy
Cambiare Inizializzare
Si ottiene l'indirizzo IP automaticamente?
Indirizzo IP
Netmask
Gateway
Avanti
Sì No

37 It
IMPOSTAZIONI DEL LETTORE BD
Italiano
ALTRO
FUNZIONAMENTO
10
Per impostare il server proxy, premere / per
selezionare “Si” o “No”, quindi premere ENTER.
• Se si seleziona “Si”: l’indirizzo IP o il nome del
server proxy e il numero porta per il server proxy
specificato dal provider di servizi Internet vengono
immessi utilizzando lo schermo per l’immissione
dei caratteri (☞p.38).
• Se si seleziona “No”: proseguire con il passaggio
successivo.
11 Selezionare “Avanti”, quindi premere ENTER.
12 Per le impostazioni avanzate (l’impostazione
delle velocità di connessione Ethernet),
premere / per selezionare “Si” o “No”,
quindi premere ENTER.
•
Di norma selezionare “No”, quindi premere ENTER.
•
Le velocità di connessione Ethernet possono essere
impostate se si seleziona “Si”, quindi premere ENTER.
•
Dato che è previsto il rilevamento automatico (modalità
predefinita in fabbrica) questa impostazione di norma è
necessario. Se si verifica la condizione per cui il
collegamento Ethernet fallisce, ecc. modificare
l’impostazione e confermare il corretto funzionamento
del collegamento Ethernet.
Se la velocità di connessione è impostata, selezionare
“Avanti”, quindi premere ENTER.
13
Per provare la connessione ad Internet, dopo
aver confermato le impostazioni, premere /
pere selezionare “Test”, quindi premere ENTER.
“Test” e disponibile solo quando si effettua l’impostazione
per ottenere automaticamente l’indrizzo IP.
14 Premere / per selezionare “Completo”,
quindi premere ENTER.
■Procedura per l’inserimento manuale dei
caratteri
Nota
I caratteri numerici quali l’indirizzo IP, possono essere immessi
sullo schermo o selezionando ciascuno dei caratteri nella
modalità “Numerico” oppure utilizzando i pulsanti numerici sul
telecomando.
1Premere ENTER nelle caselle in cui
immettere i caratteri, e appare lo schermo
per la digitazione.
2Premere / per selezionare la modalità
d’immissione desiderata.
• Quando si digita l’indirizzo del server proxy;
“1ABC” (carattere alfabetico/numerico) / “Firma” /
“Modificare”
• Quando si digitano altri valori (indirizzo IP, ecc.);
“Numerico” / “Modificare”
3Premere / per selezionare un numero/
carattere, quindi premere ENTER.
4Ripetere il passaggio 3 per visualizzare tutti i
caratteri/numeri desiderati nel campo
d’immissione.
Esempio: lo schermo per immettere i caratteri numerici
Nota
Premere RETURN (Canc.Carat.) per eliminare un numero/
carattere immesso.
Per modificare un numero/carattere immesso, premere B
(sinistra) oppure C (destra) per selezionare il numero/carattere
che si desidera modifica, quindi premere RETURN (Canc.Carat.).
Quindi, premere / per selezionare un nuovo numero/carattere
che si desidera immettere e premere ENTER.
Si desidera utilizzare il server proxy?
Indirizzo
Porta
Avanti
Sì No
Opzione
Velocità di Connessione Ethernet
Avanti
Auto-Rilevamento
10M Half Duplex
100M Half Duplex
10M Full Duplex
100M Full Duplex
Confermare le impostazioni attuali.
: xxx xxx xxx xxx
: xxx xxx xxx xxx
: xxx xxx xxx xxx
: xxx xxx xxx xxx
xxx xxx xxx xxx
: xx:xx:xx:xx:xx:xx
Indirizzo IP
Netmask
Gateway
Indirizzo DNS
Indirizzo MAC
CompletoTest
Indirizzo IP
Netmask
Gateway
123
Numerico
1234567890
Modificare
Selezionato premendo / Selezionato premendo /
Numerico 123
1234567890
Modificare

38 It
IMPOSTAZIONI DEL LETTORE BD
5Premere D (Completo) per confermare i
numeri immessi.
6Ripetere i passaggi da 1 a 5 per ultimare
l’immissione di tutti i caratteri richiesti.
Elenco caratteri d’immissione
Indirizzo IP
Netmask
Gateway
123
1ABC (carattere
alfabetico/
numerico)
Numerico
Firma
Modificare
* La stessa funzione dei pulsanti colorati e RETURN può essere eseguita selezionando ciascuna delle voci e
premendo ENTER.“Canc.Carat.” indica l’eliminazione dei caratteri.
Num. ABC DEF GHI JKL MON PQRS TUV WXYZ Spec.
Num. 1234567890 ABC ABCabc DEF D E F d e f
GHI G H I g h i JKL J K L j k l MNO MNOmno
PQRS PQRSpqrs TUV TUVtuv WXYZ WXYZwxyz
Spec. (spazio)
1234567890
@ . , : ; _ - \ $ % ! ? & # + * = / | ˜ “ ‘ ˆ ` ( ) < > [ ]{ } Spec.
@ . , : @ . , : ; _ - \ ; _ - \ $ % ! ? $ % ! ?
& # + * & # + * = / | ˜ = / | ˜ “ ‘ ˆ ` “ ‘ ˆ `
( ) < > ( ) < > [ ]{ } [ ] { } Spec. (spazio)
Cancellare Sinis. Destra Completo Canc.Carat.

40 It
IMPOSTAZIONI DEL LETTORE BD
Elenco dei codici dei paesi
Elenco delle lingue
Elenco dei codici delle lingue
USA / CANADA / GIAPPONE/ GERMANIA / FRANCIA / GB/ ITALIA / SPAGNA / SVIZZERA / SVEZIA /
OLANDA / NORVEGIA / DANIMARCA / FINLANDIA / BELGIO / HONG KONG / SINGAPORE / TAILANDIA
/ MALESIA / INDONESIA / TAIWAN / ISOLE FILIPPINE / AUSTRALIA / RUSSIA / CINA
Inglese / Francese / Tedesco / Italiano / Spagnolo / Giapponese / Svedese / Olandese
AA Afar / AB Abkhazian / AF Afrikaans / AM Amarico AR Arabo/ AS Assamese / AY Aymara / AZ Azerbaijani /
BA Bashkir / BE Bielorusso / BG Bulgaro / BH Bihari / BI Bislama / BN Bengali, Bangla / BO Tibetano / BR
Bretone / CA Catalano / CO Corso / CS Ceco / CY Welsh / DA Danish / DE Tedesco / DZ Bhutani / EL Greco / EN
Inglese / EO Esperanto / ES Spagnolo / ET Estone / EU Basco / FA Persiano / FI Finlandese / FJ Fiji / FO Faroese /
FR Francese / FY Friso / GA Irlandese / GD Gaelico scozzese / GL Gallese / GN Guarani / GU Gujarati / HA Hausa
/ HI Hindi / HR Croato / HU Ungherese / HY Armeno / IA Interlingua / IE Interlingue / IK Inupiak / IN Indonesiano /
IS Islandese / IT Italiano / IW Ebreo / JA Giapponese / JI Yiddish / JW Giavanese / KA Georgiano / KK Kazakh / KL
Esquimese / KM Cambogiano / KN Kannada / KO Coreano / KS Kashmiri / KU Curdo / KY Kirghizistano / LA Latin
/ LN Lingala / LO Laothian / LT Lituano / LV Latvian, Lettish / MG Malagasy / MI Maori / MK Macedone / ML
Malayalam / MN Mongolo / MO Moldavo / MR Marathi / MS Malay / MT Maltese / MY Burmese / NA Nauru / NE
Nepalese / NL Danese / NO Norwegese / OC Occitan / OM Afan (Oromo) / OR Oriya / PA Panjabi / PL Polacco /
PS Pashto, Pushto / PT Portoghese / QU Quechua / RM Rhaeto-Romance / RN Kirundi / RO Rumeno / RU Russo /
RW Kinyarwanda / SA Sanscrito / SD Sindhi / SG Sangho / SH Serbo-Croato / SI Singhalese / SK Slovacco / SL
Sloveno / SM Samoan / SN Shona / SO Somalo / SQ Albanese / SR Serbo / SS Siswat / ST Sesotho / SU Sudanese
/ SV Svedese / SW Swahili / TA Tamil / TE Telugu / TG Tagico / TH Thai / TI Tigrinya / TK Turkmeno / TL Tagalog
/ TN Setswana / TO Tonga / TR Turco / TS Tsonga / TT Tatar / TW Twi / UK Ucraino / UR Urdu / UZ Uzbeco / VI
Vietnamita / VO Volapuk / WO Wolof / XH Xhosa / YO Yoruba / ZH Cinese / ZU Zulu

43 It
Italiano
DIAGNOSTICA
INFORMAZIONI
ADDIZIONALI
■FM
■iPod
Nota
In caso di errori di trasmissione senza che un messaggio di stato appaia sul pannello anteriore del ricevitore, controllare il collegamento
tra ricevitore e iPod (☞p.10).
Problema Causa Rimedio Vedere
pagina
Ricezione stereo FM
disturbata.
Le caratteristiche delle trasmissioni
stereo in FM possono causare questo
problema se l’emittente è troppo
lontana o l’ingresso dell’antenna è
scadente.
Controllare i collegamenti dell’antenna. 8
Provare un’antenna FM direzionale di alta
qualità.
—
C’è distorsione e la ricezione
non migliora neppure con una
buona antenna FM.
Ci sono interferenze dovute a percorsi
multipli.
Regolare la posizione dell’antenna in modo
da eliminare le interferenze dai percorsi
multipli.
—
La stazione desiderata non è
ricevibile con la
sintonizzazione automatica.
Il segnale è troppo debole. Provare un’antenna FM direzionale di alta
qualità.
—
Usare il metodo di sintonizzazione manuale. 26
Sintonizzazione impossibile
sulle stazioni già
preselezionate.
Il ricevitore è stato scollegato per
molto tempo.
Impostare le stazioni preselezionate. 26
Messaggio di stato Causa Rimedio Vedere
pagina
CONNECT ERR Presenza di un problema sul percorso del
segnale da iPod a ricevitore.
Spegnere il ricevitore e cercare di reinizializzare il
proprio iPod.
10
UNKNOWN TYP L’iPod usato non è compatibile con il
ricevitore.
Sono supportati solo iPod (Click and Wheel), iPod
nano, iPod Classic, iPod mini e iPod touch.
—
CONNECTED L’iPod è collegato correttamente al
relativo dock e il collegamento tra iPod è
ricevitore è completo.
NOT CONNECT L’iPod è stato rimosso dal relativo dock
sul ricevitore.
Ricollegare l’iPod al terminale del ricevitore. 10
CAN'T PLAY Il ricevitore non può riprodurre i brani al
momento memorizzati nel proprio iPod.
Controllare che i brani memorizzati nell’iPod siano
riproducibili.
—
Memorizzare altri brani riproducibili sul proprio
iPod.
—

44 It
DIAGNOSTICA
Telecomando
Problema Causa Rimedio Vedere
pagina
Il telecomando non
funziona o funziona
male.
Il telecomando può essere azionato fuori
dal suo raggio d’azione.
Per maggiori informazioni sul raggio d’azione del
telecomando, consultare la sezione “Uso del
telecomando”.
11
Il sensore del telecomando di questo
sistema può essere esposto alla luce
diretta del sole o a illuminazione
artificiale intensa (lampade a
fluorescenza).
Cambiare l’illuminazione o l’orientamento del
sistema.
11
La batteria potrebbe essere scarica. Sostituire la batteria con una batteria nuova. 11
Ci sono degli ostacoli tra il sensore del
sistema e il telecomando.
Eliminare gli ostacoli. 11
Il cavo di controllo del sistema è
scollegato dalla presa connettore
impianto del ricevitore e/o del lettore BD.
Collegare bene il ricevitore e il lettore BD al cavo di
controllo del sistema.
8
Lettore BD (BD-940)
Problema Causa Rimedio Vedere
pagina
Manca
l’alimentazione.
Spina non completamente inserita. Collegare bene il cavo di alimentazione. 8
Il ricevitore e il lettore BD non sono bene
collegati.
Controllare i collegamenti con il ricevitore. 8
Il ricevitore è stato mal configurato. Controllare la configurazione (INPUT/volume/
MUTE/cuffie) del ricevitore.
—
L’alimentazione è
spenta.
“Spegnimento Automatico” è impostato
su “Si”.
Impostare “Spegnimento Automatico” su “No”. 35
La riproduzione di un
disco non inizia.
Forse si sta utilizzando un disco non
finalizzato.
Finalizzare il disco di registrazione. —
Forse il disco è rovesciato (etichetta non
rivolta verso l’alto).
Inserire il disco nel piatto con l’etichetta rivolta verso
l’alto.
—
Il disco potrebbe essere difettoso. Provarne un altro. Se il problema non si ripresenta,
significa che il disco era difettoso.
—
Il disco è sporco. Pulire la superficie del disco. 48
Il codice regione del disco non coincide
con quello del lettore BD.
Utilizzare un disco con lo stesso codice regione del
lettore BD.
3
Se il tempo di registrazione del disco è
molto breve, potrebbe non essere
possibile effettuare la riproduzione.
I dischi BD-RE/R registrati in un formato
diverso da BDMV non possono essere
riprodotti.
La riproduzione
video cessa.
Forza o vibrazione eccessiva applicata al
lettore BD.
Non applicare forza o vibrazione eccessiva al lettore
BD.
—
Il lettore BD non è posizionato su una
superficie solida e piatta.
Posizionare il lettore BD su una superficie solida e
piatta.
—

45 It
Italiano
DIAGNOSTICA
INFORMAZIONI
ADDIZIONALI
Il lettore BD produce
un suono a scatti
durante il
caricamento o la
riproduzione dei
dischi.
Il lettore BD non ha funzionato per un
certo periodo di tempo.
Può accadere se il lettore BD non ha funzionato per
un certo periodo di tempo. Questo non indica un
malfunzionamento.
—
Nessuna immagine. Il cavo video non è collegato
correttamente al televisore.
Collegare il cavo video collegato correttamente al
televisore.
9
La configurazione d’ingresso sul
televisore è sbagliata.
Selezionare la configurazione d’ingresso corretta sul
televisore.
13
Il lettore BD non è configurato
correttamente per il collegamento con
cavo HDMI o component.
Configurare correttamente il lettore BD. 33
Lo schermo si blocca
e i pulsanti non
funzionano.
Il disco è danneggiato o sporco. Controllare la superficie del disco. —
Il lettore BD è bloccato. Riavviare il lettore BD. 5
Nessuna immagine
ma il suono è
presente.
Il cavo video non è collegato
correttamente.
Collegare il cavo correttamente. 9
Le immagini non
vengono riprodotto
con la risoluzione
desiderata.
La configurazione relativa alla
risoluzione dell’uscita video non
corrisponde alla risoluzione del televisore
collegato al lettore BD.
Eseguire “VIDEO RESET”. 41
Passare da “HDMI” e “Component” e viceversa
utilizzando “Selezione Uscita Video” o “HDMI <->
COMP”.
33, 41
“Selezione Uscita Video” non è
configurato correttamente.
Impostare “Selezione Uscita Video” correttamente. 33
“Uscita Video Component” o “Uscita
Video HDMI” non è impostato alla
risoluzione desiderata.
Impostare “Uscita Video Component” o “Uscita
Video HDMI” alla risoluzione desiderata.
33
Le immagini a
schermo panoramico
sono allungate
verticalmente oppure
nella parte alta e
bassa dello schermo
compaiono delle
strisce nere.
“Proporzioni Aspetto TV” non è
configurato correttamente per il televisore
collegato.
Impostare “Proporzioni Aspetto TV” correttamente
per il televisore collegato.
33
“Selezione Uscita Video” non è
impostato su “Component” anche se è
collegato un televisore con rapporto 4:3
standard.
Quando si collega un televisore a schermo
panoramico, impostare “Proporzioni Aspetto TV” su
“Largo 16:9”.
Quando si collega un televisore con rapporto 4:3
standard, impostare “Selezione Uscita Video” su
“Component”.
33
Le immagini 4:3 sono
allungate
orizzontalmente.
Quando si collega un televisore con rapporto 4:3
standard, impostare “Selezione Uscita Video” su
“Component”.
33
Sullo schermo
appare il disturbo a
blocchi (mosaico).
Il disturbo a blocchi può comparire in
scene in rapido movimento per le
caratteristiche del sistema di
compressione delle immagini digitali.
Il suono o le
immagini non
vengono riprodotte
correttamente.
Il suono o le immagini non vengono
riprodotte in modo appropriato durante la
riproduzione di dischi protetti da
copyright.
Il suono è distorto o
assente.
Il cavo stereo RCA è scollegato tra il
ricevitore e il lettore BD.
Collegare il cavo stereo RCA tra il ricevitore e il
lettore BD.
8
Le prese audio sono sporche. Pulire le prese audio. —
La superficie del disco è sporca. Pulire la superficie del disco. 48
Il disco è danneggiato o sporco. Controllare la superficie del disco. —
Problema Causa Rimedio Vedere
pagina

46 It
DIAGNOSTICA
I seguenti messaggi appaiono sullo schermo del televisore se il disco che si tenta di riprodurre non è appropriato o il
funzionamento non è corretto.
Rete
Problema Causa Rimedio Vedere
pagina
Impossibile
collegarsi ad
Internet.
Il cavo di rete non è collegato
correttamente.
Collegare il cavo di rete correttamente. 10
Il cavo utilizzato è sbagliato, per esempio
è un cavo modulare.
Utilizzare un cavo di rete per la connessione. 10
Il router o il modem a banda larga non è
collegato correttamente.
Collegare il router e/o il modem a banda larga
correttamente.
10
Il router o il modem a banda larga non è
acceso.
Accendere il router e/o il modem a banda larga. —
Le impostazioni di rete non sono corrette. Controllare “Installazione Comunicazione”. 36
Impossibile scaricare
i contenuti BD-LIVE.
Il cavo di rete non è collegato
correttamente.
Collegare il cavo di rete correttamente. 10
Il dispositivo di memoria USB non è
collegato correttamente.
Controllare che il dispositivo di memoria USB sia
collegato al terminale USB BD STORAGE/
SERVICE del lettore BD.
10
Il disco BD non supporta BD-LIVE. Controllare che il disco BD supporta BD-LIVE. 24
“Accesso Internet BD” è impostato su
“Impedire”.
Impostare “Accesso Internet BD” su “Permettere” o
“Limite”.
35
Messaggi relativi ai dischi BD e ai dischi DVD
Messaggio di errore Possibile errore Rimedio
Riproduzione
impossibile.
– Il disco non può essere riprodotto con questo
lettore.
– Controllare il disco e caricarlo correttamente.
Disco non compatibile. – Se si carica un disco che non può essere riprodotto
con questo lettore (per es. un disco graffiato) o se
si carica un disco capovolto appare questo
messaggio e il vassoio del disco si aprirà
automaticamente.
– Si verifica se il disco caricato non può essere
riprodotto perché non è un disco standard, è
graffiato, ecc.
– Rimuovere il disco.
Funzionamento
impossibile.
– Si verifica se l’operazione è scorretta.
Questa memoria USB
non è stata formattata
correttamente. Si prega
di formattare la
memoria nella gestione
memoria USB.
– Si verifica in presenza di un errore di
formattazione.
– Formattare nuovamente la memoria USB.
– Si verifica se la memoria USB non è formattata
con FAT 32/16.
– Formattare la memoria USB con il proprio PC.
La memoria USB
collegata non può
essere utilizzata. Deve
essere compatibile con
USB 2.0.
– Si verifica se la memoria USB usata non è
conforme con USB 2.0 ad alta velocità
(480Mbit/s) (p.es. USB 1.0/USB 1.1).
– Collegare una memoria USB conforme con 2.0 ad
alta velocità (480Mbit/s).
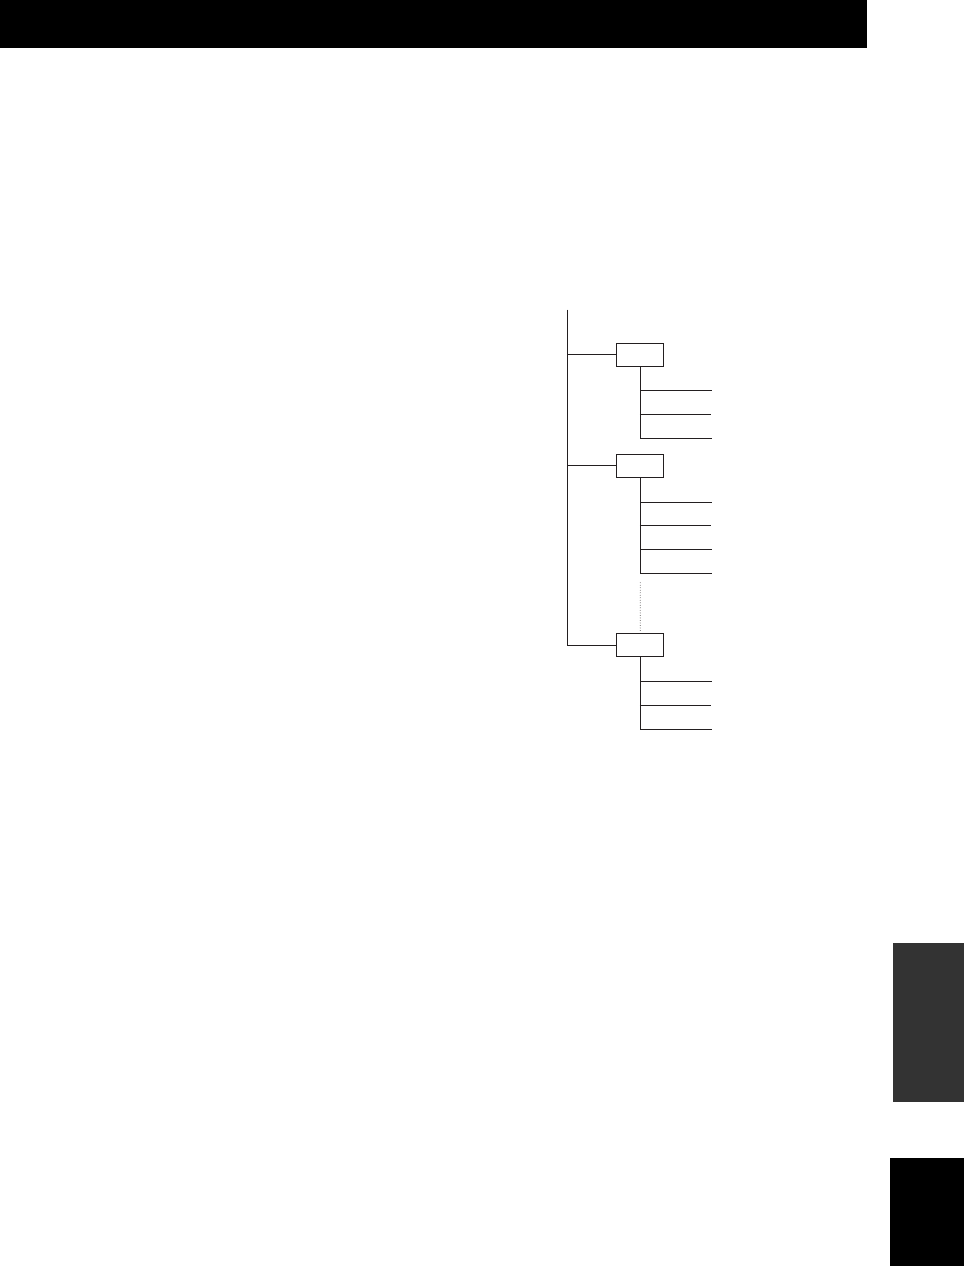
47 It
Italiano
INFORMAZIONI
ADDIZIONALI
JPEG è un tipo di formato di file per salvare i file delle immagini fisse (fotografie, illustrazioni, ecc.). Il lettore può
riprodurre i file di immagine con formato JPEG.
■Formati di file non compatibili
• Le immagini fisse con formato diverso da JPEG (tipo
TIFF) non sono riproducibili.
• Non è possibile riprodurre alcuni file anche se sono nel
formato JPEG.
• Non è possibile riprodurre i file JPEG progressivi.
• I file di immagini in movimento, i file audio e i file
Motion in formato JPEG non possono essere riprodotti
anche se sono sono file JPEG.
■Altri file che non possono essere
riprodotti
Potrebbe non essere possibile la riproduzione di alcuni
immagini fisse create, ritoccate, copiate o altrimenti
modificate con il computer.
■Durante la riproduzione dei file si
possono verificare una o più delle
seguenti condizioni.
• Può occorrere del tempo per riprodurre i file a seconda
del numero delle cartelle, dei file e del volume dei file
coinvolti.
• L’informazione EXIF non viene visualizzata. EXIF è
l’acronimo di Exchangeable Image File Format ed è
uno standard per la memorizzazione di informazioni di
scambio per i file d’immagine, specialmente quelli che
utilizzano la compressione JPEG. (Visitare il sito http:/
/exif.org per maggiori informazioni.)
■Uso dell’unità per riprodurre un disco
CD-RW/R con immagini fisse registrate
• Con i dischi CD-RW/R su cui le immagini fisse sono
mischiate con la musica o i filmati, sarà possibile
riprodurre solo le immagini fisse. Addirittura potrebbe
non essere possibile riprodurre del tutto tali dischi.
• I dischi multisessione non possono essere riprodotti.
• Potrebbe non essere possibile riprodurre immagini
fisse elaborate (ruotate o salvate sovrascrivendo altre
immagini) utilizzando software per l’elaborazione di
immagini o alcune immagini fisse importate da Internet
o per e-mail.
• I dischi riproducibili con il lettore (riconosciuti)
presentano le seguenti proprietà:
Contengono file di formato EXIF
Risoluzione immagine: tra 32 ×32 e 7680 ×4320 pixel
Numero massimo di cartelle: 64
Numero massimo di file: 256
Dimensioni dei file: 20MB o meno
■Struttura delle cartelle con immagini
fisse (JPEG)
Si possono riprodurre le immagini fisse (JPEG) con l’unità
creando sul disco una cartella come illustrato di seguito.
Non è possibile riprodurre le immagini che si trovano
direttamente sulla radice della cartella.
INFORMAZIONI SUL FORMATO DEI FILE JPEG
01 Folder
001.jpg
002.jpg
003.jpg
004.jpg
005.jpg
006.jpg
007.jpg
02 Folder
64 Folder
254.jpg
255.jpg
256.jpg
Root

NOTE SUL MANEGGIO DEI DISCHI
48 It
• Maneggiare sempre con cura in modo che la superficie
non si graffi. Non deformare i dischi.
•
Per tenere pulita la superficie di riproduzione, passare un
panno pulito e asciutto. Non utilizzare alcun tipo di
prodotto pulente per dischi, spray o altri liquidi chimici.
• Non pulire con movimenti circolari; pulire in linea retta
dal centro verso l’esterno.
• Per scrivere sul lato dell’etichetta del disco, utilizzare
una penna con punta morbida.
• Quando un disco non viene utilizzato, toglierlo
dall’unità e conservarlo nell’apposita custodia.
• Non esporre i dischi alla luce diretta del sole, a
temperature elevate o ad umidità elevata per lunghi
periodi di tempo.
■Per riprodurre un CD da 8 cm
Inserirlo nella parte interna incassata del piatto portadisco.
Non mettere un CD normale (12 cm) sopra un CD da 8 cm.
■Analogico
Suono che non è stato trasformato in numeri.
I suoni analogici sono variabili, mentre i suoni digitali
hanno specifici valori numerici. Questi terminali inviano
l’audio attraverso due canali, il sinistro e il destro.
■Rapporto altezza/larghezza
Il rapporto tra le dimensioni verticali e orizzontali delle
immagini visualizzate. Il rapporto tra orizzontale e
verticale dei televisori convenzionali è 4:3 e quello degli
schermi panoramici è 16:9.
■Video a componenti
I terminali per l’ingresso e l’uscita di un segnale video a
componenti. Il segnale video a componenti è formato da
tre linee, il segnale di luminanza (Y) e due segnali di
differenza colore (PB/CB, PR/CR), che permettono di
ottenere video di alta qualità.
■Menu disco
Una schermata preparata per consentire la selezione di
immagini, suoni, sottotitoli, angolazioni multiple, ecc.
registrate su un BD/DVD.
■Dolby Digital
Il sistema sound digital surround sviluppato da Dolby
Laboratories fornisce audio multicanale completamente
indipendente. Con 3 canali anteriori (sinistra, centro e
destra) e 2 canali stereo surround, Dolby Digital fornisce
cinque canali audio a gamma completa. Con un canale
aggiuntivo specifico per gli effetti dei bassi (denominato
LFE, o effetto a bassa frequenza) il sistema è provvisto di
5.1 canali in totale (LFE è calcolato come un canale 0.1).
Utilizzando 2 canali stereo per gli altoparlanti surround, si
possono ottenere effetti sonori più accurati e un ambiente
sound surround grazie al Dolby Surround.
■DTS (Digital Theater System)
Il sistema sound digital surround sviluppato da Digital
Theater Systems, Inc., che fornisce 5.1 canali audio (max).
Grazie all’abbondanza di dati audio è in grado di creare
degli effetti sonori autentici.
■HDMI
HDMI (High-Definition Multimedia Interface) è la prima
interfaccia tutta digitale audio/video non compressa,
supporta a livello industriale. Essa fornisce un’interfaccia
tra qualsiasi sorgente (come una set-top box o un AV
controller) e un monitor audio/video (per es. un televisore
digitale), HDMI supporta video standard, migliorati o ad
alta definizione e audio digitale multicanale utilizzando un
solo cavo. HDMI trasmette tutti gli standard HDTV ATSC
(Advanced Television Systems Committee) e supporta 8
canali con audio digitale, con una larghezza di banda per
futuri miglioramenti e requisiti.
Se utilizzato in combinazione con HDCP (High-
bandwidth Digital Content Protection), HDMI fornisce
una interfaccia audio/video sicura che soddisfa i requisiti
di sicurezza di fornitori di contenuti e degli operatori di
sistema.
Per maggiori informazioni su HDMI, visitare il sito web
HDMI all’indirizzo “www.hdmi.org/”.
■Interlace
Il tipo più comune di sistema di scansione utilizzato nei
televisori. Divide lo schermo in campi con numerazione
para e dispari per effettuare la scansione e quindi
combinandoli insieme crea un’immagine (fotogramma).
NOTE SUL MANEGGIO DEI DISCHI
Nota: Non usare detergenti per lenti poiché potrebbero
essere la causa di un cattivo funzionamento.
GLOSSARIO

50 It
DATI TECNICI
iPod™
“iPod” è un marchio di fabbrica di Apple Inc., registrato negli
USA ed in altri paesi.
“Made for iPod” significa che un apparecchio elettronico è stato
progettato per un collegamento specifico con iPod e che è stato
certificato dallo sviluppatore per essere conforme agli standard di
prestazione di Apple.
Apple non è responsabile per il funzionamento di questo
dispositivo o della sua conformità alle norme di sicurezza e di
regolamentazione.
Il materiale audio-visivo può essere formato da lavori protetti da
copyright che non devono essere registrati senza il permesso del
proprietario dei diritti. Fare riferimento alle relative leggi del
proprio paese.
Il prodotto comprende un sistema di protezione del copyright
protetto da brevetto negli USA e dagli altri diritti di proprietà
intellettuale. L’uso di questo sistema di protezione del copyright
deve essere autorizzato da Macrovision, ed è rivolto all’uso
casalingo e agli altri tipi di utilizzo limitato se non diversamente
autorizzato da Macrovision. Si vieta qualsivoglia modifica o
tipologia di smontaggio.
Fabbricato con licenza di Dolby Laboratories. “Dolby” e il simbolo
della doppia B sono marchi di fabbrica di Dolby Laboratories.
Fabbricato con licenza di brevetto USA n.: 5,451,942; 5,956,674;
5,974,380; 5,978,762; 6,226,616; 6,487,535; 7,392,195;
7,272,567; 7,333,929; 7,212,872 e altri brevetti sia USA che
internazionali approvati o in fase di approvazione. DTS è un
marchio registrato e i loghi DTS, il simbolo DTS-HD e DTS-HD
Master Audio | Essential sono marchi di fabbrica di DTS, Inc.
©1996-2008 DTS, Inc.. Tutti i diritti riservati.
è un marchio di fabbrica.
“Il logo BD-LIVE” è un marchio di fabbrica di Blu-ray Disc Association.
“BONUSVIEW” è un marchio di fabbrica di Blu-ray Disc Association.
è un marchio di fabbrica di DVD Format/Logo Licensing
Corporation.
HDMI, il logo HDMI e High-Definition Multimedia Interface son
marchi di fabbrica o marchi registrati di HDMI Licensing LLC.
“Il logo x.v.Color” e“x.v.Color” sono marchi di fabbrica.
“Il logo AVCHD” e “AVCHD” sono marchi di fabbrica di
Panasonic Corporation e Sony Corporation.
Java e tutti i marchi di fabbrica e loghi inerenti Java sono marchi
di fabbrica o marchi registrati di Sun Microsystems, Inc. negli
Stati Uniti e/o negli altri paesi.
Questo prodotto è concesso in licenza in base alla licenza d’uso
del portafoglio di brevetti AVC alla licenza d’uso del portafoglio
di brevetti VC-1 per scopo privato e non commerciale dei
consumatori per (i) codificare i video secondo lo standard AVC e
lo standard VC-1 (“AVC/VC-1 Video”) e/o (ii) decodificare AVC/
VC-1 Video codificati da consumatori interessati in attività
private e non commerciali e/o che è stato ottenuto da un fornitore
di video abilitato alla fornitura di AVC/VC-1 Video. Le licenze
d’uso non sono garantite e non implicano altri scopi. Per
informazioni aggiuntive contattare MPEG LA, LLC.
Vedere http://www.mpegla.com.
N. brevetto USA 6,836,549; 6,381,747; 7,050,698; 6,516,132;
e 5,583,936

51 It
Italiano
INFORMAZIONI
ADDIZIONALI
■Lingua (abbreviazione), codice numerico
■Paese, codice numerico, abbreviazione
ELENCO DELLE LINGUE, DELLE NAZIONI
Elenco delle lingue
Giapponese (ja), 1001 Butani (dz), 0426 Chirghiso (ky), 1125 Cingalese (si), 1909
Inglese (en), 0514 Esperanto (eo), 0515 Latino (la), 1201 Slovacco (sk), 1911
Francese (fr), 0618 Estone (et), 0520 Lingala (ln), 1214 Sloveno (sl), 1912
Tedesco (de), 0405 Basco (eu), 0521 Laotiano (lo), 1215 Samoano (sm), 1913
Italiano (it), 0920 Persiano (fa), 0601 Lituano (lt), 1220 Shona (sn), 1914
Spagnolo (es), 0519 Finlandese (fi), 0609 Lettone (lv), 1222 Somalo (so), 1915
Cinese (zh), 2608 Figiano (fj), 0610 Malagascio (mg), 1307 Albanese (sq), 1917
Olandese (nl), 1412 Faroese (fo), 0615 Maori (mi), 1309 Serbo (sr), 1918
Portoghese (pt), 1620 Frisone (fy), 0625 Macedone (mk), 1311 Siswati (ss), 1919
Svedese (sv), 1922 Irlandese (ga), 0701 Malayalam (ml), 1312 Sesotho (st), 1920
Russo (ru), 1821 Scozzese gaelico (gd), 0704 Mongolo (mn), 1314 Sundanese (su), 1921
Coreano (ko), 1115 Galiziano (gl), 0712 Moldavo (mo), 1315 Swahili (sw), 1923
Greco (el), 0512 Guarani (gn), 0714 Marathi (mr), 1318 Tamil (ta), 2001
Afar (aa), 0101 Gujarati (gu), 0721 Malese (ms), 1319 Telugu (te), 2005
Abkazo (ab), 0102 Hausa (ha), 0801 Maltese (mt), 1320 Tagico (tg), 2007
Afrikaans (af), 0106 Hindi (hi), 0809 Burmese (my), 1325 Thai (th), 2008
Amharic (am), 0113 Croato (hr), 0818 Nauru (na), 1401 Tigrinya (ti), 2009
Arabo (ar), 0118 Ungherese (hu), 0821 Nepalese (ne), 1405 Turkmeno (tk), 2011
Assamese (as), 0119 Armeno (hy), 0825 Norvegese (no), 1415 Tagalog (tl), 2012
Aymara (ay), 0125 Interlingua (ia), 0901 Occitano (oc), 1503 Setswana (tn), 2014
Azerbaijano (az), 0126 Interlingue (ie), 0905 Oromo (om), 1513 Tonga (to), 2015
Bashkir (ba), 0201 Inupiak (ik), 0911 Oriya (or), 1518 Turco (tr), 2018
Bielorusso (be), 0205 Indonesiano (in), 0914 Panjabi (pa), 1601 Tsonga (ts), 2019
Bulgaro (bg), 0207 Islandese (is), 0919 Polacco (pl), 1612 Tataro (tt), 2020
Bihari (bh), 0208 Ebraico (iw), 0923 Pashto, Pushto (ps), 1619 Twi (tw), 2023
Bislama (bi), 0209 Yiddish (ji), 1009 Quechua (qu), 1721 Ucraino (uk), 2111
Bengali (bn), 0214 Javanese (jw), 1023 Reto-romanzo (rm), 1813 Urdu (ur), 2118
Tibetano (bo), 0215 Georgiano (ka), 1101 Kirundi (rn), 1814 Uzbeko (uz), 2126
Bretone (br), 0218 Kazako (kk), 1111 Rumeno (ro), 1815 Vietnamese (vi), 2209
Catalano (ca), 0301 Groenlandese (kl), 1112 Kinyarwanda (rw), 1823 Volapük (vo), 2215
Corso (co), 0315 Cambogiano (km), 1113 Sanscrito (sa), 1901 Volof (wo), 2315
Ceco (cs), 0319 Kannada (kn), 1114 Sindhi (sd), 1904 Xhosa (xh), 2408
Gallese (cy), 0325 Kashmiri (ks), 1119 Sangho (sg), 1907 Yoruba (yo), 2515
Danese (da), 0401 Curdo (ku), 1121 Serbocroato (sh), 1908 Zulu (zu), 2621
Elenco dei paesi
Argentina, 0118, ar Finlandia (fi), 0609 Malaysia, 1325, my Singapore, 1907, sg
Australia, 0121, au Francia, 0618, fr Messico, 1324, mx Spagna, 0519, es
Austria, 0120, at Germania, 0405, de Paesi Bassi, 1412, nl Svezia, 1905, se
Belgio, 0205, be Hong Kong, 0811, hk Nuova Zelanda, 1426, nz Svizzera, 0308, ch
Brasile, 0218, br India, 0914, in Norvegia, 1415, no Taiwan, 2023, tw
Canada, 0301, ca Indonesia, 0904, id Pakistan, 1611, pk Tailandia, 2008, th
Cile, 0312, cl Italia, 0920, it Filippine, 1608, ph Regno Unito, 0702, gb
Cina, 0314, cn Giappone, 1016, jp Portogallo, 1620, pt USA, 2119, us
Danimarca, 0411, dk Corea, Repubblica di, 1118, kr Federazione Russa, 1821, ru

ELENCO DELLE LINGUE, DELLE NAZIONI
52 It
Garanzia limitata per l’Area Economica Europea (AEE) e la Svizzera
Vi ringraziamo per aver scelto un prodotto Yamaha. Nel caso raro in cui il vostro prodotto abbia bisogno di riparazioni in garanzia, entrare in contatto con il
negozio in cui era stato acquistato. Se si avessero difficoltà, entrare in contatto con il rappresentante di Yamaha per il proprio paese. Sono disponibili
maggiori dettagli nel nostro sito (http://www.yamaha-hifi.com/ o http://www.yamaha-uk.com/, per i residenti nel Regno Unito).
Il prodotto viene garantito esente da difetti di fabbricazione e di materiali per un periodo di due anni a partire dalla data di acquisto originale. Yamaha si
impegna, entro i limiti delle condizioni illustrate di seguito, a riparare (o sostituire, a discrezione esclusiva di Yamaha) il prodotto difettoso o qualsiasi sua
parte senza alcun addebito per le parti o per il lavoro. Yamaha si riserva il diritto di sostituire un prodotto con uno di tipo, valore e/o condizione simile nel
caso un modello particolare non sia più in produzione o sia considerato troppo costoso da riparare.
Condizioni della garanzia
1 La fattura o ricevuta originale di pagamento (recante la data di acquisto, il numero di codice del prodotto e il nome del negozio di acquisto) DEVE
accompagnare sempre il prodotto difettoso unita ad una dichiarazione descrivente il problema accusato. In mancanza di prova esaustiva dell’avvenuto
acquisto, Yamaha si riserva il diritto di rifiutare di fornire riparazioni gratuite ed il prodotto può venire restituito a spese dell’utente.
2 Il prodotto DEVE esser stato acquistato da un rivenditore Yamaha AUTORIZZATO all’interno dell’Area Economica Europea (AEE) o in Svizzera.
3 Il prodotto non deve esser modificato o alterato se non dietro autorizzazione scritta di Yamaha.
4 Quanto segue viene escluso dalla presente garanzia:
a. Manutenzione periodica e riparazioni o sostituzione di pezzi dovute a normale invecchiamento.
b. Danni risultato di:
(1) Riparazioni eseguite dal cliente stesso o da terze parti non autorizzate.
(2) Imballaggio o trattamento inadeguato nel corso della spedizione del prodotto da parte del cliente. Tener presente che, al momento dell’invio del
prodotto per riparazioni, è responsabilità del cliente l’assicurarsi che questo sia imballato adeguatamente.
(3) L’uso scorretto, compresi ma senza limitazioni
(a) il mancato uso del prodotto per il suo scopo previsto o in accordo con le istruzioni di Yamaha per l’uso corretto, la manutenzione e la
conservazione e
(b) l’installazione o uso del prodotto in modo non conforme agli standard tecnici e di sicurezza in vigore nel paese di uso.
(4) Gli incidenti, i fulmini, l’acqua, gli incendi, la ventilazione scorretta, la perdita di acido dalle batterie o qualsiasi altra causa non sotto il controllo
di Yamaha.
(5) Difetti di un sistema nel quale il prodotto è stato incorporato e/o incompatibilità con prodotti di terze parti.
(6) L’uso di un prodotto importato nella AEE e/o in Svizzera, non prodotto da Yamaha, nel caso il prodotto non sia conforme agli standard tecnici o
di sicurezza del paese di uso e/o alle caratteristiche tecniche standard dei prodotti Yamaha da vendersi nell’AEE e/o in Svizzera.
5 Dove i termini della garanzia differiscono fra il paese di acquisto e il paese di uso del prodotto, vale la garanzia del paese di uso.
6 Yamaha non può venire considerata responsabile di perdite o danni, diretti, indiretti, consequenziali o di altro tipo, se non in termini di riparazione o
sostituzione del prodotto.
7 Fare una copia di riserva di impostazioni o dati personalizzati, dato che Yamaha non può venire considerata responsabile di qualsiasi alterazione o
perdita di tali impostazioni o dati.
8 Questa garanzia non influenza i diritti statutari dell’utente stabiliti dalle leggi applicabili in vigore o i diritti sul negoziante derivanti dal contratto di
vendita/acquisto.
Informazioni per gli utenti sulla raccolta e lo smaltimento di vecchia
attrezzatura e batterie usate
Questi simboli sui prodotti, sull’imballaggio, e/o sui documenti che li accompagnano significano che i
prodotti e le batterie elettriche e elettroniche non dovrebbero essere mischiati con i rifiuti domestici
generici.
Per il trattamento, recupero e riciclaggio appropriati di vecchi prodotti e batterie usate, li porti, prego, ai
punti di raccolta appropriati, in accordo con la Sua legislazione nazionale e le direttive 2002/96/CE e 2006/
66/CE.
Smaltendo correttamente questi prodotti e batterie, Lei aiuterà a salvare risorse preziose e a prevenire
alcuni potenziali effetti negativi sulla salute umana e l’ambiente, che altrimenti potrebbero sorgere dal
trattamento improprio dei rifiuti.
Per ulteriori informazioni sulla raccolta e il riciclaggio di vecchi prodotti e batterie, prego contatti la Sua
amministrazione comunale locale, il Suo servizio di smaltimento dei rifiuti o il punto vendita dove Lei ha
acquistato gli articoli.
[Informazioni sullo smaltimento negli altri Paesi al di fuori dell’Unione europea]
Questi simboli sono validi solamente nell’Unione europea. Se Lei desidera disfarsi di questi articoli, prego
contatti le Sue autorità locali o il rivenditore e richieda la corretta modalità di smaltimento.
Noti per il simbolo della batteria (sul fondo due esempi di simbolo):
È probabile che questo simbolo sia usato in combinazione con un simbolo chimico. In questo caso è
conforme al requisito stabilito dalla direttiva per gli elementi chimici contenuti.

i Es
1 Para asegurar el mejor rendimiento de este aparato, lea
atentamente este manual. Y luego guárdelo en un lugar seguro
para poder consultarlo en el futuro si fuese necesario.
2 Instale este sistema de sonido en un lugar bien ventilado, fresco,
seco y limpio, apartado de la luz directa del sol, fuentes de calor,
vibración, polvo, humedad y frío. Para crear unas condiciones de
ventilación óptimas, respete las distancias mínimas siguientes:
Superior: 30 cm (Sólo R-840)
Posterior: 10 cm
Laterales: 10 cm
3 Coloque este aparato lejos de otros aparatos eléctricos, motores o
transformadores, para evitar así los ruidos de zumbido.
4 No exponga este aparato a cambios bruscos de temperaturas, del frío al
calor, ni lo coloque en lugares muy húmedos (una habitación con
humidificador, por ejemplo), para impedir así que se forme
condensación en su interior, lo que podría causar una descarga
eléctrica, un incendio, daños en el aparato y/o lesiones a las personas.
5 Evite instalar este aparato en un lugar donde puedan caerle
encima objetos extraños o donde quede expuesto al goteo o a la
salpicadura de líquidos. Encima de este aparato no ponga:
– Otros componentes, porque pueden causar daños y/o
decoloración en la superficie de este aparato.
–
Objetos con fuego (velas, por ejemplo), porque pueden causar
un incendio, daños en el aparato y/o lesiones a las personas.
– Recipientes con líquidos, porque pueden caerse y derramar el
líquido, causando descargas eléctricas al usuario y/o dañando
el aparato.
6 No tape este aparato con un periódico, mantel, cortina, etc. para
no impedir el escape del calor. Si aumenta la temperatura en el
interior del aparato, esto puede causar un incendio, daños en el
aparato y/o lesiones a las personas.
7 No enchufe este aparato a una toma de corriente hasta no haber
realizado todas las conexiones.
8 No ponga el aparato boca abajo. Podría recalentarse y
posiblemente causar daños.
9 No utilice una fuerza excesiva con los conmutadores, los
controles y/o los cables.
10 Cuando desconecte el cable de alimentación de la toma de
corriente, sujete el enchufe y tire de él; no tire del propio cable.
11 No limpie este aparato con disolventes químicos porque podría estropear
el acabado. Utilice un paño limpio y seco para limpiar el aparato.
12 Utilice solamente la tensión especificada en este aparato. Utilizar el
aparato con una tensión superior a la especificada resulta peligroso
y puede producir un incendio, daños en el aparato y/o lesiones a las
personas. Yamaha no se hace responsable de ningún daño debido al
uso de este aparato con una tensión diferente de la especificada.
13 Para impedir daños ocasionados por relámpagos, desconecte el
cable de alimentación y las antenas exteriores de la toma mural o
de este aparato durante una tormenta eléctrica.
14 No intente modificar ni arreglar este aparato. Póngase en
contacto con el personal de servicio Yamaha cualificado cuando
necesite realizar alguna reparación. La caja no deberá abrirse
nunca por ningún motivo.
15 Cuando no piense utilizar este aparato durante mucho tiempo (es
decir, cuando se ausente de casa por vacaciones, etc.) desconecte
el cable de alimentación de la toma de corriente.
16 Asegúrese de leer la sección “SOLUCIÓN DE PROBLEMAS”
sobre errores de funcionamiento habituales antes de dar por
concluido que su aparato está averiado.
17 Antes de trasladar este aparato, pulse para ponerlo en el modo
de espera, y luego desconecte el cable de alimentación de CA de
la toma de corriente.
18 La condensación se formará cuando cambie de repente la
temperatura ambiental. Desconecte en este caso el cable de
alimentación de la toma de corriente y no utilice la unidad.
19 La unidad se calienta cuando se utiliza durante mucho tiempo. En
tal caso, desconecte la alimentación y no utilice la unidad para
permitir que se enfríe.
20 Instale esta unidad cerca de la toma de CA donde se pueda
acceder fácilmente al enchufe de alimentación.
21 Las baterías y las pilas no deberán exponerse a un calor excesivo
como, por ejemplo, el que producen los rayos del sol, el fuego y
similares.
22 La presión acústica excesiva de los auriculares puede causar
pérdida auditiva.
SEGURIDAD CONTRA LA RADIACIÓN LÁSER
Esta unidad utiliza rayos láser. Debido a la posibilidad de que se
produzcan daños en los ojos, la extracción de la cubierta de la
unidad o las reparaciones solamente deberán ser realizadas por un
técnico cualificado.
PELIGRO
Esta unidad emite radiación láser visible cuando se abre. Evite la
exposición directa a los rayos láser. Cuando esta unidad está
conectada a una toma de corriente, no acerque sus ojos a la
abertura de la bandeja del disco ni a otras aberturas para mirar al
interior.
PRECAUCIÓN: LEA LAS INDICACIONES SIGUIENTES ANTES DE
UTILIZAR ESTE APARATO.
Esta unidad no se desconecta de la fuente de alimentación de
CA mientras esté conectada a una toma de corriente, aunque
el aparato en sí se haya apagado con . Este estado se
denomina modo de espera. En este estado, el aparato ha sido
diseñado para consumir un cantidad de corriente muy
pequeña.
ADVERTENCIA
PARA REDUCIR EL RIESGO DE INCENDIO O
DESCARGA ELÉCTRICA, NO EXPONGA ESTA
UNIDAD A LA LLUVIA NI A LA HUMEDAD.
El componente láser de este producto es capaz de emitir
radiación que sobrepasa el límite establecido para la clase 1.
Especificaciones LÁSER:
Producto LÁSER de Clase 1
Longitud de onda: 788 nm (CD)/654 nm (DVD)/
405 nm (BD)
Potencia del láser: Con la protección de seguridad no se
emiten radiaciones perjudiciales

1 Es
Español
PREPARACIÓNINTRODUCCIÓN
OPERACIONES DEL
SINTONIZADOR
OTRA
OPERACIONES
INFORMACIÓN
ADICIONAL
OPERACIONES
BÁSICAS
CARACTERÍSTICAS............................................ 2
ACCESORIOS SUMINISTRADOS ..................... 2
ACERCA DE LOS DISCOS.................................. 3
Tipos de discos que se pueden utilizar en este
reproductor ............................................................ 3
Discos que no se pueden utilizar en este reproductor
..... 3
CONTROLES Y FUNCIONES............................. 4
Receptor (R-840) ....................................................... 4
Reproductor BD (BD-940) ........................................ 5
Mando a distancia...................................................... 6
PREPARATIVOS ................................................... 8
Conexión de altavoces/componentes externos/
antenas ................................................................... 8
Conexión de una grabadora (CDR, MDR, etc.), un
receptor AV o un decodificador (CDR, MDR, etc.)
.... 9
Conexión de los cables de alimentación.................... 9
Conexión de un iPod™............................................ 10
Conexión a Internet.................................................. 10
Colocación de las pilas en el mando a distancia...... 11
Utilización del mando a distancia............................ 11
Ajuste del reloj......................................................... 12
AJUSTE DEL SISTEMA..................................... 13
Encienda el televisor y el sistema ............................ 13
Ajuste de la pantalla del televisor............................ 13
Idioma de visualización en pantalla (OSD)............. 13
Idiomas de audio, subtítulos y menús de discos...... 14
OPERACIONES DEL SISTEMA....................... 15
Operaciones básicas del sistema.............................. 15
Ajuste del brillo del visualizador del panel delantero
.... 16
Para utilizar auriculares ........................................... 16
OPERACIONES CON DISCOS ......................... 17
Utilización de la visualización en pantalla .............. 17
Operaciones de reproducción .................................. 17
Introducción de una pausa en la reproducción ........ 17
Rebobinar y avanzar rápido ..................................... 18
Selección de capítulos y pistas ................................ 18
Menús de BD/DVD ................................................. 18
Reproducción en movimiento lento......................... 18
Reproducción fotograma a fotograma ..................... 18
Selección de idiomas y audio .................................. 19
Selección de subtítulos ............................................ 19
Selección de ángulos de la cámara .......................... 19
Repetir la reproducción............................................ 19
Repetir la reproducción de un fragmento
especificado (repetir A-B) ................................... 20
Reproducción de pases de diapositivas JPEG.......... 20
Reproducción de imágenes fijas de una carpeta
seleccionada......................................................... 21
Reproducción de películas grabadas en un
DVD-R/DVD-RW ............................................... 21
Utilización de “Function Control Screen” para
BD/DVD.............................................................. 22
Utilización del menú “Funciones” para Audio CD
..... 23
Visualización de información del disco................... 23
Utilización de BONUSVIEW y BD-LIVE.............. 24
SINTONIZACIÓN DE FM ..................................26
Sintonización automática......................................... 26
Sintonización manual .............................................. 26
Presintonización automática .................................... 26
Presintonización manual.......................................... 27
Selección de emisoras presintonizadas.................... 27
SINTONIZACIÓN DEL SISTEMA
DE DATOS DE RADIO
(MODELOS DE EUROPA SOLAMENTE)
.....28
Visualización de información del sistema de
datos de radio....................................................... 28
Utilización del servicio de datos TP
(programa de tráfico)........................................... 29
Ajustes CT (hora del reloj) ...................................... 29
AJUSTE DEL TEMPORIZADOR......................30
Ajuste del temporizador de encendido y espera ...... 30
Ajuste del temporizador para dormir....................... 31
CONTROL iPod™................................................32
Utilización del iPod™ ............................................. 32
AJUSTES DEL REPRODUCTOR BD ...............33
Ajustes De Audio Vídeo .......................................... 33
Inicio Rápido ........................................................... 35
Apagado Automático............................................... 35
Control HDMI ......................................................... 35
Ajustes De La Reproducción................................... 35
Configuración De Comunicaciones......................... 36
Versión ..................................................................... 39
Manejo De Memoria USB....................................... 39
Actualiz. Software ................................................... 39
Reinicio Sistema ...................................................... 39
CAMBIAR LA CONFIGURACIÓN AL
CONECTAR UN CABLE HDMI O DE
COMPONENTE................................................41
SOLUCIÓN DE PROBLEMAS...........................42
Receptor (R-840) ..................................................... 42
Mando a distancia.................................................... 44
Reproductor BD (BD-940) ...................................... 44
Red........................................................................... 46
Mensajes relacionados con el disco
BD y el disco DVD.............................................. 46
ACERCA DEL FORMATO DE
ARCHIVO JPEG ..............................................47
NOTAS SOBRE EL MANEJO DE DISCOS......48
GLOSARIO ...........................................................48
ESPECIFICACIONES .........................................49
LISTAS DE IDIOMAS Y PAÍSES.......................51
Lista de idiomas....................................................... 51
Lista de países.......................................................... 51
CONTENIDO
INTRODUCCIÓN
PREPARACIÓN
OPERACIONES BÁSICAS
OPERACIONES DEL SINTONIZADOR
OTRA OPERACIONES
INFORMACIÓN ADICIONAL

CARACTERÍSTICAS
2 Es
INTRODUCCIÓN
Receptor (R-840)
•Potencia de salida RMS mínima por canal
65W + 65W (6Ω, 1kHz, 10% THD)
•Presintonización de 30 emisoras de FM
•iPod Reproducción de iPod (con función para
recargar)
•Modo Pure Direct
•Brillo del visualizador ajustable
Reproductor BD (BD-940)
•
Reproduce discos Blu-ray, DVD y Audio CD
•
Compatible con BD-LIVE. Si utiliza un disco compatible
con BD-LIVE, puede conectar el reproductor BD a
Internet y descargar información diversa
•
Compatible con la función de control HDMI. Puede
manejar el receptor y el reproductor BD con un mando
a distancia de televisor conectado a través de un cable
HDMI
•
Operación vinculada con el receptor, como modo Pure
Direct, Brillo del visualizador ajustable y el modo INPUT
■Acerca de este manual
• En este manual, “R-840” es el “receptor ” y “BD-940”es el “reproductor BD”.
• Este manual describe cómo utilizar el sistema con un mando a distancia, excepto cuando éste no se encuentre disponible. Algunas de
estas operaciones también pueden realizarse con los botones del panel delantero.
•y indica un consejo para su utilización.
• Notas con información importante de seguridad e instrucciones de utilización.
• Este manual se imprime antes de la producción. El diseño y las especificaciones están sujetos a cambios por motivo de mejoras, etc. Si
hay diferencias entre el manual y el producto, el producto tiene prioridad.
Este producto incluye los accesorios siguientes. Antes de conectar este sistema, asegúrese de haber recibido todos los componentes siguientes.
CARACTERÍSTICAS
ACCESORIOS SUMINISTRADOS
1234
56
90
78
E
NT
E
RCL
E
AR
MUT
E
E
NT
E
R
VOLUME
AUX
TUN
E
R
iPod SHUFFLE
R
EPE
AT
MENU
ENTER
E
O
NM
O
N
O
M
E
M
O
R
Y
PRESET TUNING
DISC
DISPLAY TIMER SLEEP DIMMER
OPTION PURE DIRECT
AUDI O SUBTITLE ANGLE
REPEAT
ON SCREEN
RETURN
PinP SETUP
ABCD
EXIT
TOP MENU/TITLE LIST
POP UP MENU
Antena de FM interior
Pilas (x2)
(AAA, R03, UM-4)
Mando a
distancia
* La tapa del Acoplador se suministra con este
unidad para cubrir el acoplador para iPod cuando
éste no se esté utilizando.
iPod
INPUT VOLUME
Tapa del Acoplador*
Receptor
Cable de control
del sistema (0,6 m)
Cable estéreo
RCA (1,0 m)
Cable de vídeo
compuesto (1,5 m)

3 Es
Español
INTRODUCCIÓN
• En este reproductor se pueden reproducir los discos
siguientes. No utilice ningún adaptador de 8 cm o 12 cm.
• Utilice discos que se justen a las normas compatibles, lo
cual se indica mediante la presencia de los logotipos
oficiales en la etiqueta de los discos. No se garantiza la
reproducción de aquellos discos que no cumplan dichas
normas. Tampoco se garantiza la calidad de imagen o la
calidad de sonido aunque se pueda reproducir los discos.
*1 Este reproductor ha sido diseñado para reproducir discos
Audio CD que cumplan la normativa CD (disco compacto).
Los CD que contengan una señal destinada a salvaguardar los
derechos de autor o copyright (señal de control de copia) no se
podrán reproducir en este reproductor.
*2 Vea “ACERCA DEL FORMATO DE ARCHIVO JPEG” en la
página 47.
• Los discos y reproductores de vídeo BD/DVD poseen
códigos de región, que indican las regiones donde se
puede reproducir un disco.
• BD/DVD Las operaciones y funciones de vídeo pueden
varias respecto de las explicaciones contenidas en este
manual; algunas operaciones pueden estar prohibidas
según la configuración del fabricante.
• Si durante la reproducción de un disco aparece una
pantalla de menú o instrucciones de funcionamiento,
siga el procedimiento operativo indicado.
• El componente de audio de un vídeo DVD grabado a
96 kHz (PCM lineal) se emitirá como audio a 48 kHz
durante la reproducción.
Notas
• Algunos discos de la columna izquierda de la tabla
posiblemente no se puedan reproducir según el tipo de disco de
que se trate.
• “Finalize” hace referencia al procesamiento que realiza una
grabadora de un disco grabado para que se pueda reproducir en
otros reproductores/grabadoras BD así como en este
reproductor. En este reproductor sólo se pueden reproducir
discos DVD finalizados. (Este reproductor no dispone de una
función para finalizar discos.)
Los discos que se indican a continuación no se pueden
reproducir o no se reproducirán correctamente en este
reproductor. Si por error se reproduce uno de estos discos,
los altavoces podrían sufrir daños.
Los discos con formas extrañas no se
pueden reproducir.
Los discos con formas extrañas (discos hexagonales o en
forma de corazón) no se pueden utilizar. El uso de dichos
discos puede ocasionar fallos.
Los discos de vídeo BD/DVD siguientes no
se pueden reproducir.
• Los discos que no coincidan con el número/código de
región de este reproductor.
• Los discos producidos de forma ilegal.
• Los discos grabados para uso comercial.
ACERCA DE LOS DISCOS
Tipos de discos que se pueden
utilizar en este reproductor
Tipo de
disco
Formato de
grabación Contenido Tamaño del
disco
BD de vídeo -- Audio + vídeo
(película)
12 cm
8 cm
BD-RE DL
BD-R DL
Formato
BDMV
DVD Video Formato de
video
Audio + vídeo
(película)
12 cm
8 cm
DVD+RW/
DVD+R
DVD+R DL
DVD-R DL
DVD-RW/
DVD-R
Formato
Video/VR/
AV C H D
(sólo discos
finalizados)
Audio + vídeo
(película)
12 cm
8 cm
Audio CD*1 Audio CD
(CD-DA)
Audio 12 cm
8 cm
CD-RW/CD-R Audio CD
(CD-DA)
Audio
JPEG*2
Imágenes fijas
(archivo JPEG)
Información de gestión regional
Modelo BD-Video DVD-Video
Europa Código de región
“B” o “ALL”
Número de región
“2” o “ALL”
Rusia Código de región
“C” o “ALL”
Número de región
“5” o “ALL”
2ALL
5ALL
Discos que no se pueden utilizar
en este reproductor
CDG, Video CD, Photo CD, CD-ROM, SVCD,
SA-CD, PD, CDV, CVD, DVD-RAM, DVD-Audio,
BD-RE con el cartucho, CD-MP3, CD-WMA

5 Es
CONTROLES Y FUNCIONES
Español
INTRODUCCIÓN
■Panel delantero
1Bandeja de disco
Porta el disco que se va a reproducir.
2Indicador p (reproducción)
Aparece durante la reproducción.
3Indicador REP OFF S ALL A-B
Se ilumina cuando se selecciona el modo de repetición de
reproducción.
4
Abre y cierra la bandeja del disco.
Cuando se pulsa este botón estando en modo de espera, el
receptor se enciende automáticamente y la fuente de
entrada cambia a DISC.
5
Detiene la reproducción (☞p.17).
6 (Encendido/en espera)
Enciende el reproductor BD o lo pone en modo de espera.
Cuando se pulsa este botón estando en modo de espera, el
receptor se enciende automáticamente y la fuente de
entrada cambia a DISC.
y
Si el reproductor BD no funciona adecuadamente por alguna
razón, podrá reiniciarlo manteniendo pulsado este botón durante
10 segundos aproximadamente y volviéndolo a pulsar.
7Indicador QUICK
Se ilumina en modo de espera cuando la función Quick
Start está activada (☞p.35).
Parpadea cuando conecta el cable de alimentación a la toma
de CA hasta que el reproductor BD entra en modo de espera.
8Indicador e (pausa)
Se ilumina mientras el reproductor BD está en pausa.
9Visualizador del panel delantero
Muestra el estado actual del reproductor BD.
0
Vuelve al principio del capítulo o pista actual. Manténgala
pulsada para retroceder rápidamente. Púlselo dos veces
para saltar al capítulo o pista anterior (☞p.18).
A
Inicia la reproducción o hace una pausa en ella (☞p.17).
Cuando se pulsa este botón estando en modo de espera, el
receptor se enciende automáticamente y la fuente de
entrada cambia a DISC, según cuál estuviera seleccionada
la última vez.
B
Salta al capítulo o pista siguiente. Manténgalo pulsado
para avanzar rápidamente (☞p.18).
Reproductor BD (BD-940)
QUICK
12 45
798
6
3
AB
@
PROG RANDOMMP3 WMA TRACK TOTAL REMAIN REP OFF S ALL A-B
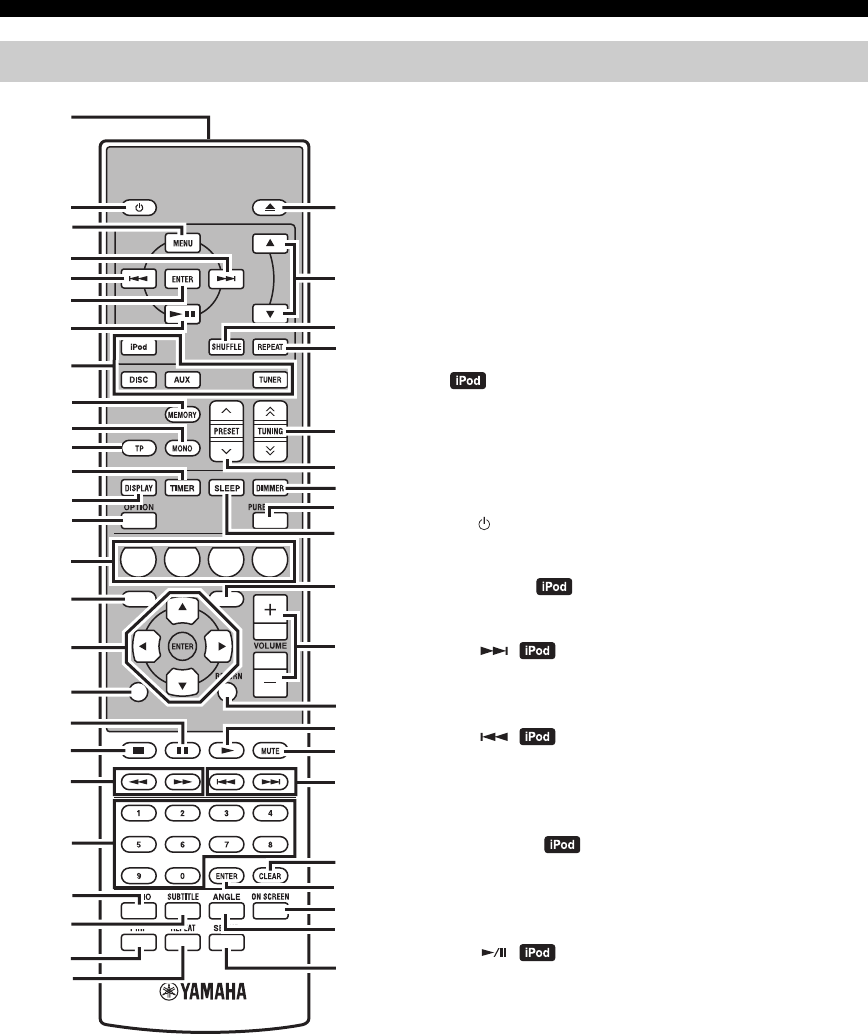
6 Es
CONTROLES Y FUNCIONES
Este mando a distancia puede controlar los componentes
del sistema (incluidas las funciones de sintonizador) y un
iPod colocado en el acoplador para iPod de la parte
superior del receptor.
Para controlar el reproductor BD, las funciones del
sintonizador o un iPod con el mando a distancia, debe
poner el receptor en el modo de entrada correspondiente
(☞8Teclas selectoras de entrada).
Para controlar su iPod
Pulse la tecla de funcionamiento del iPod correspondiente
en el mando a distancia.
Las teclas de funcionamiento del iPod se indican mediante
en la sección siguiente.
Vea la página 32 para obtener más información sobre el
funcionamiento de su iPod.
1Transmisor de señal infrarroja
Envía señales al sistema que desee controlar.
2 (Encendido/en espera)
Enciende el sistema o lo pone en el modo de espera.
3MENU
Vuelve al nivel superior en el menú iPod.
4
Salta a la canción siguiente. Manténgala pulsada para
avanzar rápidamente.
5
Salta al principio de la pista actual. Púlsela dos veces para
saltar a la pista anterior. Manténgala pulsada para
retroceder rápidamente.
6ENTER
Pulse ENTER para acceder al grupo seleccionado. (Al
pulsar ENTER empieza la reproducción cuando se ha
seleccionado una canción.)
7
Inicia la reproducción o hace una pausa en ella .
8Teclas selectoras de entrada
Seleccionan la fuente de entrada del receptor.
Cuando seleccione una fuente de entrada, pulse la tecla
selectora de entrada (o seleccione INPUT en el panel
delantero).
El nombre de la fuente de entrada correspondiente aparece
en el visualizador del panel delantero del receptor.
y
Cuando DISC se selecciona como fuente de entrada, el
reproductor BD se enciende automáticamente y cuando se
selecciona otra fuente de entrada, el reproductor BD pasa a modo
de espera.
Mando a distancia
1234
56
90
78
E
NT
E
RCL
E
AR
MUT
E
E
NT
E
R
VOLUME
AUX
TUN
E
R
iPod SHUFFLE
R
EPE
AT
MENU
ENTER
E
O
NM
O
N
O
M
E
M
O
R
Y
PRESET TUNING
DISC
DISPLAY TIMER SLEEP DIMMER
OPTION PURE DIRECT
AUDIO SUBTITLE ANGLE
REPEAT
ON SCREEN
RETURN
PinP SETUP
A B C D
EXIT
TOP MENU/TITLE LIST
POP UP MENU
J
1
M
N
O
P
Q
R
S
t
U
V
W
X
Y
Z
[
\
]
`
a
b
c
d
f
e
2
3
4
5
6
7
8
9
0
A
B
C
D
E
F
G
H
I
J
K
L

7 Es
CONTROLES Y FUNCIONES
Español
INTRODUCCIÓN
9MEMORY
Guarda una emisora presintonizada en la memoria
(☞p.27). Inicia la presintonización automática (☞p.26).
0MONO
Ajusta el modo de recepción de emisión de FM en modo monoaural.
ATP
Entra en el modo de recepción de servicios de datos TP
(programa de tráfico) (☞p.29).
BTIMER
Muestra la hora actual en el visualizador del panel delantero del receptor.
Ajusta asimismo el reloj (☞p.12) o el temporizador (☞p.30).
CDISPLAY
Cambia la información mostrada en el visualizador del
panel delantero del receptor o en la pantalla del televisor
del reproductor BD (☞p.23, p.28).
DOPTION
Entra en el modo de menú de opciones.
Vea las páginas 27, 29 y 41 para conocer los elementos del
menú de opciones.
EA/B/C/D
Se utiliza cuando la fuente de entrada está ajustada en DISC.
FTOP MENU/TITLE LIST
Muestra el menú superior del BD/DVD (☞p.18).
G, , , , ENTER
Para seleccionar y confirmar un elemento.
HEXIT
Cierra la pantalla de menús.
I
Hace una pausa en la reproducción (☞p.17).
J
Detiene la reproducción (☞p.17).
K,
Rebobina o avanza rápidamente.
LTeclas numéricas
Introducen números.
MAUDIO
Selecciona un formato de audio y la pista de audio (☞p.19).
NSUBTITLE
Selecciona los subtítulos (☞p.19).
OP in P
Utiliza la función Picture in Picture (☞p.24).
PREPEAT
Selecciona el modo de repetición de reproducción (☞p.19).
Q
Abre y cierra la bandeja del disco.
R,
Pulse o para cambiar de elemento en el grupo seleccionado (
☞
p.32).
SSHUFFLE
Selecciona el modo de reproducción aleatoria (☞p.32).
TREPEAT
Selecciona el modo de repetición de reproducción (☞p.32).
UTUNING
Pulse TUNING para una sintonización manual y mantenga
pulsada TUNING para una sintonización automática (
☞
p.26).
VPRESET u / d
Seleccionan las emisoras presintonizadas (☞p.27).
WDIMMER
Cambia el brillo del visualizador del panel delantero (
☞
p.16).
XPURE DIRECT
Activa o desactiva el modo Pure Direct (☞p.15).
YSLEEP
Ajusta el temporizador para dormir del sistema (☞p.31).
ZPOP UP MENU
Muestra el menú emergente del BD (☞p.18).
[VOLUME +/–
Ajusta el nivel del sonido general del receptor.
\RETURN
Vuelve al menú anterior (☞p.17).
]
Inicia la reproducción (☞p.17).
`MUTE
Desactiva el volumen (☞p.16).
a,
Salta al principio del capítulo o de la pista actual o siguiente.
bCLEAR
Borra una entrada.
cENTER
Confirma una entrada.
dON SCREEN
Muestra la información del disco en pantalla (☞p.23).
eANGLE
Selecciona un ángulo de la cámara (☞p.19).
fSETUP
Muestra el menú Setup (☞p.13).
/ d
d
d
d
/ d
d
d
d
/ d
d
d
d

PREPARATIVOS
8 Es
PREPARACIÓN
Asegúrese de leer atentamente el procedimiento y las notas siguientes antes de conectar el sistema. El mando a
distancia y la operación vinculada del sistema solamente funcionan cuando el receptor y el
reproductor BD están conectados a través del cable de control del sistema. Para obtener información sobre
los altavoces (NS-BP300), consulte el manual de instrucciones de los mismos.
Conexión del sistema
1 Conecte los jacks AUDIO IN ( PLAYER L/R) del receptor a los jacks Salida De Audio ( L/R) del reproductor
BD usando el cable de audio estéreo RCA suministrado.
2 Conecte el jack SYSTEM CONNECTOR ( TO:PLAYER) del receptor al jack SYSTEM CONNECTOR
( TO:RECEIVER) del reproductor BD usando el cable de control del sistema suministrado.
3Conecte los terminales de altavoz (L) del receptor a los terminales de altavoz del altavoz izquierdo y los terminales de
altavoz (R) del receptor a los terminales de altavoz del altavoz derecho empleando los cables de altavoz suministrados
con el juego de altavoces (NS-BP300).
4Conecte la antena FM suministrada al jack ANTENNA.
• No conecte esta unidad u otros componentes a la corriente eléctrica hasta que todas las conexiones entre los componentes se hayan
completado.
• No deje que los cables de altavoz pelados hagan contacto entre sí ni toquen otras partes metálicas del receptor. Esto podría dañar el
receptor y/o los altavoces.
• Todas las conexiones deben ser correctas: L (izquierda) a L, R (derecha) a R, “+” a “+” y “–” a “–”. Si las conexiones están mal, no se
oirá ningún sonido a través de los altavoces, y si la polaridad de las conexiones de los altavoces está mal, el sonido no será natural y
faltarán los graves. Consulte asimismo el manual de instrucciones de cada uno de los componentes.
Notas
• La conexión de control del sistema se usa para transmitir señales de mando a distancia desde el receptor al reproductor BD.
• Si va a conectar unos altavoces distintos de los NS-BP300, utilice altavoces con una impedancia de más de 6 Ω.
• Si la recepción de las ondas de radio es débil en su zona o desea mejorar la recepción, le recomendamos usar antenas exteriores
disponibles para su compra. Para obtener información detallada, consulte al concesionario o centro de servicio Yamaha autorizado más
cercano.
PREPARATIVOS
Conexión de altavoces/componentes externos/antenas
PRECAUCIÓN
A A
B
B
Receptor (R-840)
(Modelo de Europa)
Reproductor BD (BD-940) Altavoz izquierdo
(NS-BP300)
Altavoz derecho
(NS-BP300)
Cable estéreo RCA
(suministrado)
Cable de control del
sistema (suministrado)
TV etc.
Altavoz de
graves
Salida
de audio RCA
Cable
estéreo

PREPARATIVOS
9 Es
Español
PREPARACIÓN
Conexión de un televisor al sistema
1Conecte el sistema y el televisor a través del jack HDMI, los jacks COMPONENT o el jack VIDEO del reproductor
BD y el jack o jacks correspondientes del televisor.
2Ajuste “TV screen” según el (vea “Ajuste de la pantalla del televisor” en la página 13).
Si conecta el sistema y el televisor a través de los jacks COMPONENT, ajuste el reproductor BD como se indica en
“Selección Salida De Vídeo” (☞p.33).
Si conecta el sistema y el televisor a través de los jacks HDMI, ajuste “Salida De Vídeo HDMI” y “Salida De Audio” de
“Ajustes De Audio Vídeo” en el menú “Ajustes” (☞p.33, 34).
Cuando conecte el sistema al televisor a través de los jacks HDMI, utilice los cables HIGH SPEED HDMI con el
logotipo HDMI (que figura en el forro).
Puede dar salida a audio a través del jack DIGITAL OUT y grabarlo en digital en otro dispositivo, o bien transmitir la
señal de audio a un decodificador o receptor AV para disfrutar de audio de fuente multicanal.
Una vez realizadas todas las conexiones, conecte los cables de alimentación de este sistema y demás componentes a las
tomas de CA.
Conexión de una grabadora (CDR, MDR, etc.), un receptor AV o un
decodificador (CDR, MDR, etc.)
Conexión de los cables de alimentación
Reproductor BD (BD-940)
Cable de vídeo compuesto
(suministrado)
A la toma de CA
A la toma de CA
Receptor (R-840)
Reproductor BD (BD-940)

PREPARATIVOS
11 Es
Español
PREPARACIÓN
■Notas sobre las pilas
• Cambie las dos pilas cuando disminuya el radio de
acción del mando a distancia.
• Use pilas AAA, R03, UM-4.
• Asegúrese de que las polaridades son correctas.
Observe la ilustración del interior del compartimento
de las pilas.
• Extraiga las pilas si el mando a distancia no se va a
utilizar durante un periodo de tiempo largo.
• No utilice pilas antiguas junto con las nuevas.
• No use pilas de tipos diferentes juntas (alcalinas y de
manganeso, por ejemplo). Lea el envoltorio
atentamente, ya que existen pilas de distinto tipo que
pueden tener la misma forma y color.
• Si las pilas tienen fugas de ácido, deséchelas
inmediatamente. Evite el contacto directo con el ácido
o de éste con la ropa, etc. Limpie el compartimento de
las pilas a fondo antes de colocar pilas nuevas.
• No tire las pilas con el resto de desperdicios
domésticos; deséchelas de forma apropiada de acuerdo
con la normativa local vigente.
El mando a distancia transmite un haz infrarrojo
direccional. Debe orientar el mando a distancia
directamente hacia el sensor del mismo situado en el panel
delantero del receptor durante su funcionamiento.
Notas
• El área entre el mando a distancia y el receptor debe estar libre
de obstáculos.
• No derrame agua u otros líquidos sobre el mando a distancia.
• No deje caer el mando a distancia.
• No deje ni guarde el mando a distancia en los siguientes tipos
de condiciones:
– alta humedad, por ejemplo, cerca de un baño
– alta temperatura, por ejemplo, cerca de un calefactor o una
estufa
– temperaturas extremadamente bajas
– lugares polvorientos.
• No exponga el sensor del mando a distancia a fuentes de luz
intensa, en concreto, a lámparas fluorescentes tipo inversor. Si
lo hace, es posible que el mando a distancia no funcione
correctamente. En caso necesario, coloque el sistema lejos de
fuentes de luz directa.
Colocación de las pilas en el
mando a distancia
13
2
Utilización del mando a distancia
INPUT
BASS
PHONES
VOLUME
MIN MAX
TREBLE BALANCE
PRESET PURE DIRECT
LR
1234
56
90
78
ENTER CLEAR
MUTE
ENTER VOLUME
AUX TUNER
iPod SHUFFLE REPEAT
MENU
ENTER
EON MONO
MEMORY
PRESET TUNING
DISC
DISPLAY TIMER SLEEP DIMMER
OPTION PURE DIRECT
AUDIO SUBTITLE ANGLE
REPEAT
ON SCREEN
RETURN
PinP SETUP
A B C D
EXIT
TOP MENU/TITLE LIST
POP UP MENU
30˚ 30˚
Menos de 6 m
Receptor (R-840)

PREPARATIVOS
12 Es
Antes de iniciar la operación de reproducción, siga el
procedimiento que se describe a continuación para ajustar
el reloj del receptor.
Notas
• Utilice el mando a distancia para ajustar el reloj. El reloj no se
puede ajustar mediante los botones del receptor.
• El receptor permite visualizar el reloj en formato de 24 horas.
• Si no toca ninguna tecla durante 90 segundos, el receptor vuelve
al modo normal.
1Pulse para encender el receptor.
El visualizador del panel delantero se enciende.
2Pulse TIMER para ver la hora actual.
Si el reloj no está ajustado, “SET TIME” parpadeará
en el visualizador.
Pulse ENTER para proseguir desde el paso 3.
3Pulse / para seleccionar “TIME” y pulse
ENTER.
El receptor entra en el modo de ajuste del reloj. Los
dígitos de la hora empiezan a parpadear.
4Ajuste la hora utilizando / y pulse .
Los dígitos de los minutos empiezan a parpadear.
5Ajuste los minutos utilizando / y pulse
ENTER.
Los dígitos de la hora y de los minutos empiezan a
parpadear.
Para modificar la hora o los minutos de nuevo, pulse
o , siga los pasos 4 y 5 y prosiga desde el paso 6.
6Pulse ENTER.
El reloj ya está ajustado.
Los segmentos de la hora y de los minutos dejan de
parpadear y permanecen fijos. El receptor vuelve al
modo normal.
y
Puede volver a la pantalla anterior pulsando o RETURN.
Ajuste del reloj
ABCD
EXIT
TOP MENU/TITLE LIST
POP UP MENU
TIMER
ENTER ,
RETURN
Parpadea
Parpadea
Parpadea

AJUSTE DEL SISTEMA
13 Es
Español
PREPARACIÓN
Asegúrese de haber realizado todas las conexiones
necesarias (vea “Conexión de un televisor al sistema” en
la página 9).
1Encienda el televisor al que está conectado
el reproductor BD.
Seleccione la entrada del televisor correspondiente a
la entrada conectada al reproductor BD.
2Pulse para encender el receptor.
3Pulse DISC.
Ajuste la relación de aspecto del reproductor BD según el
televisor que haya conectado (☞p.33).
1Pulse SETUP.
El menú de configuración aparece en pantalla.
2Pulse /// para seleccionar “Settings” y
luego pulse ENTER.
3Pulse / para seleccionar “Audio Video
Settings” y pulse ENTER.
4Pulse / para seleccionar “TV Aspect
Ratio” y pulse ENTER.
5Pulse / para seleccionar la relación de
aspecto del televisor, y luego pulse ENTER.
Para obtener más información sobre la relación de
aspecto, vea la página 33.
6Pulse SETUP o EXIT para cerrar el menú de
configuración.
y
Puede volver al menú anterior pulsando RETURN.
Puede seleccionar los ajustes de su idioma preferido para
que el reproductor BD cambie automáticamente a dicho
idioma cada vez que cargue un disco. Si el idioma
seleccionado no se encuentra en el disco, en su lugar se
utilizará el idioma predeterminado del disco. El idioma
OSD (visualización en pantalla) para el menú de
configuración del BD/DVD permanecerá tal como lo
ajuste, con independencia de los demás idiomas que tenga
el disco.
1Pulse SETUP.
2Pulse /// para seleccionar “On Screen
Language” y luego pulse ENTER.
AJUSTE DEL SISTEMA
Encienda el televisor y el sistema
Ajuste de la pantalla del televisor
EXIT
TOP MENU/TITLE LIST
POP UP MENU
SETUP
, , , ,
ENTER
Settings
Picture
On Screen Language
Displays The Title List
Idioma de visualización en
pantalla (OSD)
Audio Video Settings
Quick Start
HDMI Control
Playback Setting
Communication Setup
Version
USB Memory Management
Software Update
System Reset

AJUSTE DEL SISTEMA
14 Es
3Pulse / para seleccionar un idioma, y
luego pulse ENTER.
1Pulse SETUP.
2Pulse /// para seleccionar “Ajustes” y
luego pulse ENTER.
3Pulse / para seleccionar “Ajustes De La
Reproducción” y pulse ENTER.
4Pulse / para seleccionar “Idioma De
Disco” y pulse ENTER.
5Pulse / para seleccionar el elemento
siguiente.
• Subtít.
• Audio
•Menú
6Pulse / para seleccionar un idioma, y
luego pulse ENTER.
Idiomas de audio, subtítulos y
menús de discos

OPERACIONES DEL SISTEMA
15 Es
Español
OPERACIONES
BÁSICAS
OPERACIONES BÁSICAS
Siga el procedimiento que se describe a continuación para seleccionar una fuente de entrada y ajustar la configuración del
sonido en el sistema.
1Pulse (Encendido/en espera) para
encender el receptor.
Según el modo de entrada del receptor, el reproductor
BD también se enciende mediante la conexión de
control del sistema (☞p.8). El visualizador del panel
delantero se enciende.
2Pulse una de las teclas selectoras de entrada
(o gire INPUT en el panel delantero) para
seleccionar la fuente de entrada deseada.
3
Inicie la reproducción en el componente
seleccionado o seleccione una emisora de radio.
Para obtener información sobre la reproducción de
discos, vea la página 17, y para obtener información
sobre la sintonización, vea la página 26.
4Pulse VOLUME +/– (o gire VOLUME en el
panel delantero) para ajustar el volumen al
nivel deseado.
5Gire BASS, TREBLE o BALANCE en el panel
delantero del receptor para ajustar los
parámetros siguientes.
BASS: Ajusta la repuesta de frecuencia baja.
TREBLE: Ajusta la repuesta de frecuencia alta.
BALANCE: Ajusta el nivel del sonido de cada canal
de altavoz derecho e izquierdo.
■Modo Pure Direct
El modo Pure Direct omite el circuito de control de tono y
apaga el visualizador del panel delantero, permitiéndole
disfrutar de un sonido de alta fidelidad puro.
Pulse PURE DIRECT (o PURE DIRECT en el panel
delantero) para activar el modo Pure Direct.
El visualizador del panel delantero se apagará
automáticamente, y PURE DIRECT aparecerá
retroiluminado en azul en el panel delantero.
Notas
• Si realiza cualquier operación mientras el modo Pure Direct está
activado, el visualizador del panel delantero del receptor se
encenderá brevemente para indicar que se ha recibido el comando.
• Con el modo Pure Direct encendido, no estarán disponibles las
opciones BASS, TREBLE ni BALANCE.
OPERACIONES DEL SISTEMA
INPUT
BASS
PHONES
VOLUME
MIN MAX
TREBLE BALANCE
PRESET PURE DIRECT
LR
TP
TIMER
QUICK
INPUT
(Encendido/
en espera) VOLUME
PURE
DIRECTBASS BALANCE
TREBLE
A B C D
EXIT
TOP MENU/TITLE LIST
POP UP MENU
(Encendido/
en espera)
VOLUME +/–
Teclas
selectoras de
entrada
PURE DIRECT
MUTE
Operaciones básicas del sistema
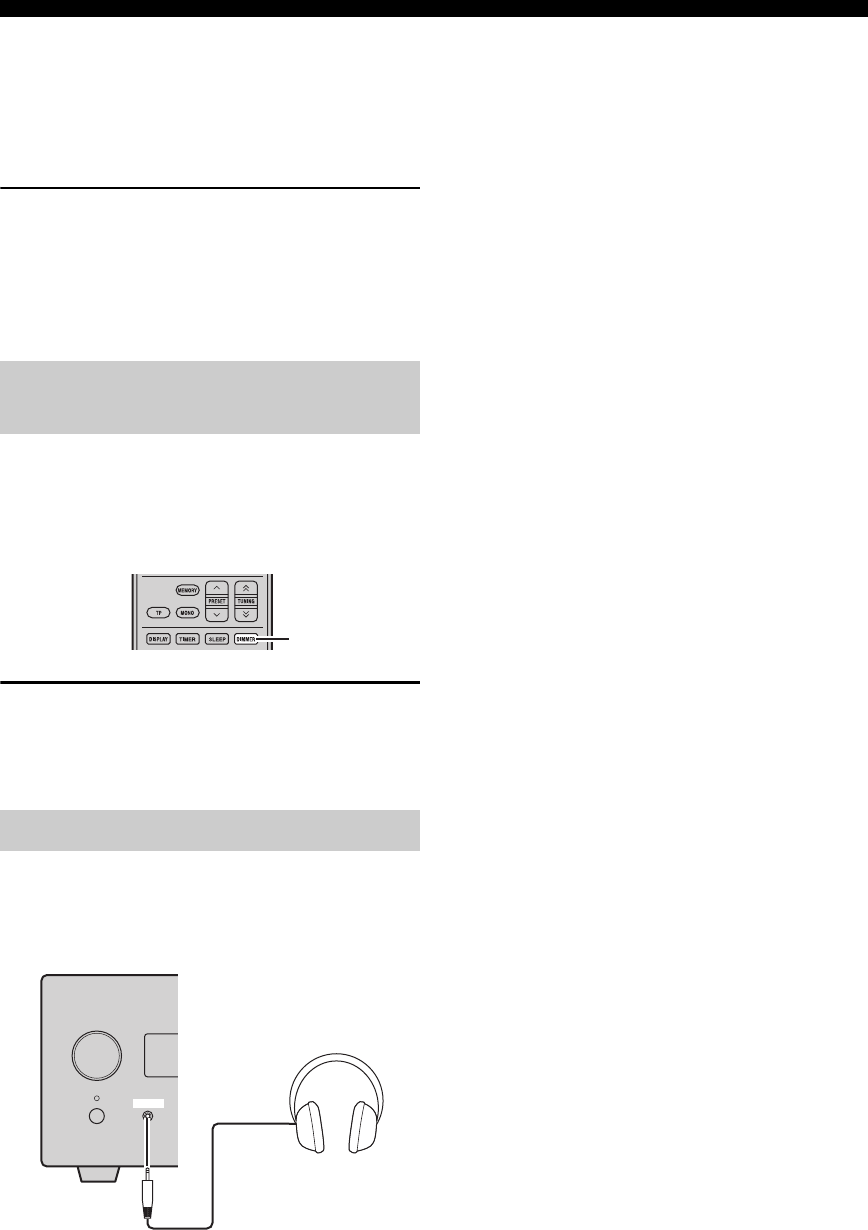
OPERACIONES DEL SISTEMA
16 Es
Para desactivar el modo Pure Direct
Pulse PURE DIRECT de nuevo. La luz de fondo con el
mensaje PURE DIRECT se apaga y el visualizador del
panel delantero se enciende.
■Silenciamiento del sonido (MUTE)
Pulse MUTE para reducir el nivel de sonido
actual en 20dB aproximadamente.
Aparecerá “MUTE ON” en el visualizador del panel
delantero.
Pulse MUTE de nuevo para restaurar la salida de audio en
el nivel de sonido anterior.
Puede reducir la iluminación del visualizador del panel
delantero del receptor. El visualizador del panel delantero
del reproductor BD también reduce su iluminación
mediante la conexión de control del sistema (☞p.8). (El
ajuste predeterminado es “DIMMER OFF”.)
Pulse DIMMER.
Puede elegir el brillo deseado para el visualizador del
panel delantero entre normal (brillante), intermedio y
reducido.
Puede conectar los auriculares al jack PHONES del panel
delantero del receptor.
El sonido de los altavoces y del altavoz de graves se
detendrá.
Ajuste del brillo del visualizador
del panel delantero
Para utilizar auriculares
DIMMER
INPUT
PHONES

OPERACIONES CON DISCOS
17 Es
Español
OPERACIONES
BÁSICAS
Este capítulo explica cómo reproducir discos.
Cuando la fuente de entrada es DISC, puede realizar
varias funciones y ajustes utilizando los menús en pantalla
que aparecen en el televisor conectado.
Puede utilizar estas teclas cuando el modo de entrada está
ajustado en DISC.
y
• Puede cambiar el idioma de la visualización en pantalla con el
ajuste Idioma OSD (☞p.13).
• En la parte inferior de cada pantalla se muestran los botones que
puede utilizar con cada menú.
Vea la página 3 para obtener más información acerca de los
tipos de discos y de los formatos de archivo compatibles.
1Pulse en el panel delantero del
reproductor BD.
2Coloque el disco, con la etiqueta boca arriba,
en el centro de la bandeja y, a continuación,
pulse .
La bandeja del disco se cierra y el disco se carga.
3Pulse .
• Si ha cargado un disco BD/DVD, es posible que
aparezca un menú. Vea “Menús de BD/DVD”
(☞p.18) para más información.
• Si ha cargado un disco que contiene imágenes
JPEG, se iniciará un pase de diapositivas. Vea
“Reproducción de pases de diapositivas JPEG”
(☞p.20) para más información.
Para detener la reproducción, pulse .
Podrá continuar la reproducción desde donde la dejó
simplemente pulsando (función Resume). Puede que
la función Resume no función según el tipo de disco.
Para reproducir desde el principio de un disco, cancele el
modo de reanudación pulsando de nuevo.
Notas
• Para reproducir un DVD de dos caras, cárguelo con el lado que
desee reproducir hacia abajo.
• Si pulsa en el panel delantero estando el reproductor BD en
espera, este sistema se enciende automáticamente y selecciona
DISC como fuente de entrada. La bandeja del disco se abre y el
sistema ya está listo para reproducir.
• Con algunos discos, puede que algunas de las funciones de
reproducción descritas en este capítulo no funcionen como se
espera y puede que otras no funcionen en absoluto.
• Algunos discos BD/DVD restringen el uso de ciertas funciones,
por ejemplo, la reanudación, la reproducción aleatoria o la
repetición de reproducción, en algunas las partes del disco o en
todas. No se trata de una anomalía.
Pulse .
Para reanudar la reproducción, pulse de nuevo o pulse .
Con los discos Audio CD, pulse o para hacer una
pausa en la reproducción.
OPERACIONES CON DISCOS
Utilización de la visualización en
pantalla
Botón Descripción
SETUP Muestra el menú Setup del reproductor BD
Cursor
()/()
Selecciona los elementos del menú
ENTER Confirma la selección del elemento
RETURN Vuelve al menú anterior
A B C D
EXIT
TOP MENU/TITLE LIST
POP UP MENU
Teclas
numéricas
TOP MENU/
TITLE LIST POP UP MENU
RETURN
, , ,
ENTER
SETUP
, ,
Operaciones de reproducción
Introducción de una pausa en la
reproducción

OPERACIONES CON DISCOS
18 Es
Durante la reproducción, puede rebobinar o avanzar
rápido a varias velocidades.
Pulse para rebobinar o para avanzar
rápidamente.
La velocidad de rebobinado o avance varía cada vez que
pulsa o .
La velocidad se muestra en pantalla.
Para reanudar la reproducción normal, pulse .
■
Para seleccionar el capítulo o la pista siguiente
Pulse .
■
Para seleccionar el capítulo o la pista anterior
Pulse dos veces.
Si pulsa una sola vez, la reproducción vuelve al
principio del capítulo o pista actual.
La mayoría de los discos BD/DVD disponen de menús en
los que puede seleccionar lo que desea ver. Normalmente,
el menú principal aparece automáticamente, aunque con
algunos discos es posible que tenga que pulsar TOP
MENU/TITLE LIST o POP UP MENU para ver el menú.
Pueden utilizarse los siguientes botones con los menús.
*1 Depende del disco.
*2 Puede funcionar igual que el botón TOP MENU/TITLE LIST
con algunos discos.
Notas
• El procedimiento descrito en esta página es el procedimiento de
funcionamiento básico. Los procedimientos varían según el BD/
DVD, por lo que deberá seguir las instrucciones del manual del
BD/DVD o las instrucciones en pantalla.
• Con algunos discos BD/DVD, puede que el menú superior se le
denomine “Title Menu”. Utilice TOP MENU/TITLE LIST
cuando las instrucciones hagan referencia a “Title Menu”.
• Si no hay ningún menú superior disponible, TOP MENU/
TITLE LIST no surtirá efecto alguno.
• La pantalla del menú superior se puede abrir pulsando POP UP
MENU según el DVD.
También puede reproducir discos BD/DVD en
movimiento lento. También puede reproducir discos DVD
en movimiento lento a la inversa.
1Durante la reproducción, pulse .
2La reproducción en movimiento lento
funciona cuando se pulsa o durante
más de 2 segundos estando en pausa.
Para reanudar la reproducción normal, pulse .
Notas
• La reproducción en movimiento lento no funciona con los CD
de audio.
• La reproducción en movimiento lento a la inversa no funciona
con discos BD.
Puede reproducir discos BD/DVD fotograma a fotograma.
También puede reproducir discos DVD-Video fotograma a
fotograma a la inversa.
1Durante la reproducción, pulse .
2Pulse o para reproducir fotograma
a fotograma.
Para reanudar la reproducción normal, pulse .
Notas
• Puede que la reproducción fotograma a fotograma no funcione
correctamente con discos que no sean DVD-RW/R (formato VR).
• Algunos BD/DVD no son compatibles con la reproducción
fotograma a fotograma.
• La reproducción progresiva/a la inversa fotograma a fotograma
puede realizarse en DVD pulsando o durante la pausa.
Rebobinar y avanzar rápido
Selección de capítulos y pistas
Menús de BD/DVD
Botón Descripción
TOP MENU/
TITLE LIST
Muestra el menú superior del BD/DVD*1
POP UP MENU Muestra o cierra el menú emergente del BD *2
()/()Selecciona los elementos del menú
ENTER Confirma la selección del elemento
Reproducción en movimiento lento
Reproducción fotograma a
fotograma
,
,

OPERACIONES CON DISCOS
19 Es
Español
OPERACIONES
BÁSICAS
Algunos discos BD/DVD tienen pistas de audio en
múltiples idiomas o formatos de audio, como Dolby
Digital y DTS, que puede seleccionar durante la
reproducción. De igual modo. algunos discos DVD-VR
cuentan con dos pistas de audio mono duales.
Durante la reproducción, pulse AUDIO varias
veces para seleccionar los idiomas de la pista de
audio o los formatos de audio disponibles.
El nombre del idioma o formato de audio seleccionado
aparece en la pantalla.
Notas
• Con algunos discos, sólo puede seleccionar los idiomas de las
pistas de audio y los formatos de audio a través del menú del
disco. Utilice TOP MENU/TITLE LIST y POP UP MENU para
ver el menú del disco.
• Puede cambiar el idioma predeterminado de la pista de audio de
los discos BD/DVD en “Idioma De Disco” (☞p.35).
Algunos discos BD/DVD tienen subtítulos en uno o más
idiomas que puede seleccionar durante la reproducción.
Durante la reproducción, pulse SUBTITLE varias
veces para seleccionar los subtítulos
disponibles.
El nombre del idioma de subtítulos seleccionado aparece
en pantalla.
Notas
• Con algunos discos, sólo puede seleccionar los subtítulos
utilizando el menú del disco. Utilice TOP MENU/TITLE LIST
y POP UP MENU para ver el menú del disco.
• Puede cambiar el idioma de subtítulos predeterminado de los
discos BD/DVD en “Idioma De Disco” (☞p.35).
Algunos discos BD/DVD-Video tienen contenidos
grabados desde varios ángulos de la cámara que puede
seleccionar durante la reproducción.
Si lo prefiere, puede activar el icono de cámara ( )
(☞p.35). Este icono aparece un icono aparece en pantalla
al reproducir contenidos que ofrezcan múltiples ángulos
de cámara.
Durante la reproducción, pulse ANGLE varias
veces para seleccionar los ángulos de cámara
disponibles.
Notas
• Con algunos discos, aunque el icono de cámara ( ) aparezca
en pantalla, es posible que no pueda seleccionar los ángulos de
la cámara.
• Con algunos discos, también puede seleccionar los ángulos de
la cámara a través del menú del disco.
Puede reproducir un título, un capítulo, una pista o un
disco varias veces.
Selección de idiomas y audio
Selección de subtítulos
EXIT
TOP MENU/TITLE LIST
POP UP MENU
AUDIO
TOP MENU/
TITLE LIST POP UP MENU
EXIT
TOP MENU/TITLE LIST
POP UP MENU
SUBTITLE
TOP MENU/
TITLE LIST POP UP MENU
Selección de ángulos de la cámara
Repetir la reproducción
ANGLE
EXIT
TOP
MENU/TITLE
LIST
POP
UP
MENU
RETURN
ENTER
REPEAT
,

OPERACIONES CON DISCOS
20 Es
1Durante la reproducción, pulse REPEAT.
El menú Repeat aparece en pantalla.
Para cerrar el menú Repeat, pulse RETURN.
2
Pulse / para seleccionar las opciones de Repeat.
• Reproducción Título: Repite el título que se está
reproduciendo en ese momento.
• Reproducción Capit: Repite el capítulo que se está
reproduciendo en ese momento.
• Selección De Escena: Repite la escena especificada
del título o capítulo (☞“Repetir la reproducción de
un fragmento especificado (repetir A-B)”).
Con los discos CD de audio, puede seleccionar
“Reproducción Disco”, “Reproducción Pista” o
“Especificar Parte”.
3Pulse ENTER.
Comienza la repetición de la reproducción.
Las opciones de repetición disponibles varían según
el tipo de disco.
Para cancelar la repetición de reproducción, pulse
REPEAT durante la reproducción.
Nota
La repetición de reproducción no se puede utilizar con los discos JPEG.
Puede especificar dos puntos en un disco y a continuación
reproducir varias veces el fragmento entre ambos puntos.
La función de repetición A-B no está disponible en los discos BD.
1Durante la reproducción, pulse REPEAT y
/ para seleccionar “Selección De Escena”.
Aparece “Fijar Punto Inicio”.
“A-” se enciente en el visualizador del panel
delantero del reproductor BD.
2Pulse ENTER en la escena donde desea fijar
el punto de inicio.
Aparece “Fije Punto Fin”.
“B” se enciende en el visualizador del panel delantero.
3Pulse ENTER en la escena donde desea fijar
el punto de inicio.
El fragmento comprendido entre el punto de inicio y
el punto de finalización se reproduce varias.
“REP” y “A-B” se encienden en el visualizador.
Para cancelar la repetición de reproducción, pulse
REPEAT.
Para cerrar el menú Repeat, pulse EXIT.
Nota
Los puntos de inicio y finalización deben estar dentro del mismo
título (DVD) o pista (Audio CD).
y
Puede pulsar para avanzar rápidamente hasta la escena
donde desea fijar el punto de finalización.
Puede reproducir un pase de diapositivas de imágenes
JPEG contenidas en un disco CD-R/CD-RW.
Cargue el disco y pulse para iniciar el pase de
diapositivas.
Empezando por la primera imagen de la primera carpeta,
el pase de diapositivas muestra todas las imágenes de
todas las carpetas del disco en orden alfabético.
Las imágenes se escalarán automáticamente para que
aparezcan en pantalla con el mayor tamaño posible.
Se pueden utilizar los siguientes botones durante el pase
de diapositivas.
Repetir la reproducción de un
fragmento especificado (repetir A-B)
Reproducción Título Reproducción Capít Selección De Escena
Reproducción Capít Selección De Escena
Fijar Punto Inicio
Reproducción Título
Reproducción de pases de
diapositivas JPEG
Botón Descripción
Introduce una pausa en el pase de
diapositivas
Seleccione la siguiente imagen
Seleccione la imagen anterior
ABCD
EXIT
TOP MENU/TITLE LIST
POP UP MENU
, , ,
ENTER
C
SETUP
,

OPERACIONES CON DISCOS
21 Es
Español
OPERACIONES
BÁSICAS
■Ajuste de la velocidad o la repetición de
reproducción del pase de diapositivas
1Pulse SETUP.
El menú Setup aparece en pantalla.
2Seleccione “Imagen” y pulse ENTER para
abrir la pantalla de selección de imágenes.
3Pulse C (menú de pase de diapositivas).
4Pulse / para seleccionar “Vel. Present.
Diapos.” o “Ajus. Modo Repetición” y luego
pulse ENTER.
5Pulse /// para seleccionar el elemento
deseado y, a continuación, pulse ENTER.
Puede seleccionar la velocidad del pase de
diapositivas entre “Rápido”, “Normal”, “Lento1” y
“Lento2”.
Nota
Las imágenes más grandes necesitan más tiempo para cargarse y
es posible que no aparezcan de inmediato.
1Pulse SETUP.
El menú Setup aparece en pantalla.
2Seleccione “Imagen” y pulse ENTER para
abrir la pantalla de selección de imágenes.
3Utilice /// para seleccionar la carpeta
que contiene el archivo o archivos que desea
reproducir y, a continuación, pulse ENTER.
Para reproducir archivos JPEG, vea “Reproducción
de pases de diapositivas JPEG” (☞p.20).
Puede reproducir un disco grabado (DVD: Sólo discos
finalizados con formato VR).
Nota
“Finalize” hace referencia al procesamiento que realiza una
grabadora de un disco grabado para que se pueda reproducir en
otros reproductores/grabadoras DVD así como en este
reproductor. En este reproductor sólo se pueden reproducir discos
DVD finalizados. (Este reproductor no dispone de una función
para finalizar discos.)
Acerca de Title List
La Title List puede visualizarse de dos formas, como
Thumbnail (miniaturas) y Title List (lista de títulos). Cada vez
que pulsa A, la pantalla cambia entre Thumbnail y Title List.
1Información del título seleccionado
2Nombre del título
Fecha de grabación
Duración de la grabación
3Leyenda para botón de color
Reproducción de imágenes fijas
de una carpeta seleccionada
1/77
8/15
Reproducción de películas
grabadas en un DVD-R/DVD-RW
A B C D
EXIT
TOP MENU/TITLE LIST
POP UP MENU
,
, , , ,
ENTER
C
D
B
A
TOP MENU/
TITLE LIST
5/21 Vie 9:30 AM 110 Min.
Programa 1
DCBA
5/21
[ A Partir De Antiguo ]
Vie 9:30 AM
1 Programa 1 5/21 Vie 110 Min.
2 Programa 2 6/15 Vie 110 Min.
3 Programa 3 7/3 Lun 56 Min.
4 Programa 4 9/18 Jue 40 Min.
110 Min.
Programa 1
Ordenando Lista Repr Funciones
DCB
Miniatura
A
1
2
3
1
3
Nombre Del Título
Miniatura
Programa
1Programa
2Programa
3
Programa
4Programa
5Programa
6
Por Capítulo Lista Repr Funciones
Nombre Del Título

OPERACIONES CON DISCOS
22 Es
■
Reproducción mediante la selección de título
1Cargue un disco grabado.
Aparece la pantalla Title List.
Si no aparece la pantalla Title List, pulse TOP
MENU/TITLE LIST.
2Pulse /// para seleccionar el título
deseado y, a continuación, pulse ENTER.
Comenzará la reproducción del título seleccionado.
También puede iniciar la reproducción pulsando
en lugar de ENTER.
Para detener la reproducción, pulse .
y
• La pantalla Title List también se puede ver pulsando TOP
MENU/TITLE LIST o pulsando ENTER después de elegir
“Muestra Lista Títulos” en el menú Setup, en ambos casos con
la reproducción detenida.
• Si la pantalla Thumbnail aparece con siete o más títulos, puede
pasar de una página a otra pulsando o .
■Reproducción mediante la selección de
capítulo
1Pulse B mientras la pantalla Thumbnail está
visible.
Aparece la pantalla de capítulo.
Para volver a la pantalla Thumbnail, pulse B.
2Pulse /// para seleccionar el capítulo
deseado y, a continuación, pulse ENTER.
Comenzará la reproducción del capítulo seleccionado.
También puede iniciar la reproducción pulsando
en lugar de ENTER.
Para detener la reproducción, pulse .
■Clasificación de los títulos
Cada vez que pulsa B con la pantalla Title List visible, la
visualización de Title List (lista de títulos) cambia para
mostrar el título más reciente primero o el título más
antiguo primero.
■Reproducción mediante la selección de
lista de reproducción
1Pulse C mientras la pantalla Thumbnail o
Title List está visible.
Aparece la pantalla Playlist (lista de reproducción).
2Pulse / para seleccionar el título y, a
continuación, pulse ENTER.
Comenzará la reproducción del título seleccionado.
Para detener la reproducción, pulse .
■Reproducir el titulo detenido durante su
reproducción
1Pulse D mientras la pantalla Thumbnail o
Title List está visible.
2Pulse / para seleccionar el tipo de
reproducción y, a continuación, pulse
ENTER.
Comenzará la reproducción del título.
Para detener la reproducción, pulse .
Esta función le permite configurar varios ajustes a la vez,
tales como subtítulos, ajustes de ángulo y la selección de
títulos para Direct Playback (reproducción directa). Puede
ajustar el vídeo y el audio según sus preferencias. Las
operaciones son iguales tanto para BD como para DVD.
Pulse ON SCREEN durante la reproducción.
La pantalla Function Control (control de funciones)
aparece en el televisor.
5/21 Vie 9:30 AM
1 Programa 1 5/21 Vie 110 Min.
2 Programa 2 6/15 Vie 110 Min.
110 Min.
Programa 1
Original Funciones
DC
Utilización de “Function Control
Screen” para BD/DVD
Desde Principio Continuar
Reproducción
EXIT
TOP MENU/TITLE LIST
POP UP MENU
, , , ,
ENTER
RETURN
ON SCREEN

OPERACIONES CON DISCOS
23 Es
Español
OPERACIONES
BÁSICAS
Pantalla de control de funciones
1Visualizador del estado de reproducción
Muestra el estado operativo y el tipo de disco.
2Elementos de configuración
Selecciona un título (o pista) o capítulo para su
reproducción, o configura ajustes de vídeo/audio.
• Número de título/pista (saltar directamente a título/
pista)
• Número de capítulo (saltar directamente a capítulo)
• Tiempo transcurrido de reproducción (saltar
directamente a tiempo)
• Idioma de subtítulos
• Número de ángulo
• Audio
•Repeat
3Visualizador guía de operaciones
Proporciona ayuda sobre las operaciones con los botones
del mando a distancia.
Para cerrar la pantalla Function Control, pulse RETURN o
ON SCREEN.
Notas
• Si aparece “– –” para una opción, como número de título o
subtítulos, es que el disco no tiene títulos o subtítulos que se
puedan seleccionar.
• Los elementos que aparecen varían según el disco.
• Si accede a la pantalla de control de funciones durante la
reproducción de un vídeo BD/DVD, quizás no pueda utilizar la
reproducción de vídeo BD/DVD. En casos como éste, cierre la
pantalla Function Control.
1Cargue un CD de audio.
Aparece la pantalla CD Operation (operaciones con
CD).
2Pulse D cuando aparezca la pantalla CD
Operation.
El menú “Funciones” se activa.
Siga la guía de operaciones.
Notas
• Los elementos que aparecen varían según el disco.
• Cuando se detiene la reproducción, sólo se puede seleccionar
“Pista”.
Puede visualizar el título, capítulo, pista u otra
información durante la reproducción.
Durante la reproducción, pulse DISPLAY varias
veces para visualizar la información.
■Para ocultar la información
Pulse DISPLAY varias veces hasta que
desaparezca.
BD-VÍDEO
0 3 : 0 2 :0 0
1
1 / 3
5 . 1 c h
Volv.
Selecc Intro.
5 5 / 2
2 English
1
Desac.
3
1
2
ENTER
RETURN
Utilización del menú “Funciones”
para Audio CD
Visualización de información del
disco
1Pista 015:16
2Pista 025:10
3Pista 035:23
4Pista 045:03
5Pista 054:44
6Pista 065:08
00:00:11
3/12
3/12
Desac.
3L+R
Volv.Selecc Intro.
Selecc Pista
5:23
0:00
Pista 03Funciones
D
Guía de operaciones
DISPLAY
OPERACIONES CON DISCOS
24 Es
El reproductor BD permite utilizar las funciones de
reproducción BONUSVIEW (BD-ROM Perfil 1 Versión
1.1) y BD-LIVE (BD-ROM Perfil 2).
BONUSVIEW: Los discos compatibles con
BONUSVIEW le permiten disfrutar simultáneamente de
subcanal de vídeo para dos pantalla y subcanal de audio y
subtítulos. Durante la reproducción aparece una pequeña
pantalla dentro de la pantalla principal (Picture in Picture).
BD-LIVE: Los discos compatibles con BD-LIVE admiten
todas las funciones de BONUSVIEW a la vez que
permiten al reproductor BD conectarse a Internet para
disfrutar de vídeos promocionales y otros datos.
Nota
Las funciones y el método de reproducción varían según el disco.
Vea las indicaciones en el disco o el manual de usuario
suministrado.
■Usar la función Picture in Picture
(reproducción de audio/video
secundaria)
Si BD-Video incluye audio y video secundario compatible
con Picture in Picture, éste se puede reproducir con audio
y video secundario de forma simultánea como un vídeo
reducido en la esquina.
Durante la reproducción, pulse P in P para
activar o desactivar la función Picture in Picture.
Notas
• Para escuchar audio secundario, compruebe que “Audio
Secundario” está ajustado en “Encender” (☞p.34).
• El audio y el video secundarios para Picture in Picture se
pueden reproducir y quitar automáticamente en función del
contenido. También se pueden restringir las áreas de
reproducción.
■Utilización de la función de BD-LIVE
1Configure los ajustes de red (☞p.36).
2Conecte el dispositivo de almacenamiento
USB al reproductor BD (☞p.10).
Los datos BD-LIVE se guardan de forma local
(dispositivo de memoria USB conectado a este
reproductor). Para aprovechar estas funciones,
conecte un dispositivo de memoria USB (de 2GB o
más con formato FAT 32/16) compatible con USB 2.0
de alta velocidad (480Mbit/s) al terminal USB BD
STORAGE/SERVICE (☞p.10) situado en la parte
trasera de este reproductor.
• Si no hay espacio de almacenamiento suficiente,
los datos no se copiarán/descargarán. Borre los
datos innecesarios o utilice un dispositivo de
memoria USB nuevo.
• Si utiliza un dispositivo de memoria USB que
contiene otros datos (previamente grabados), puede
que el video y el audio no se reproduzcan
correctamente.
• Si el dispositivo de memoria USB es desconectado
de este reproductor durante la reproducción de
datos BD-LIVE, la reproducción del disco se
detendrá.
• Los datos pueden tardar cierto tiempo en cargar
(leer/escribir).
• Vea “Manejo De Memoria USB” (☞p.39) para
obtener información sobre cómo borrar los datos
BD-LIVE del dispositivo de memoria USB.
Notas
• Yamaha no puede garantizar el funcionamiento de los
dispositivos de memoria USB de todas las marcas con este
reproductor.
• No utilice un cable prolongador USB para conectar un
dispositivo de memoria USB al terminal USB BD STORAGE/
SERVICE del reproductor. El uso de un cable prolongador USB
podría impedir el correcto funcionamiento del reproductor.
3Reproduzca el disco.
4Ejecute BD-LIVE según las instrucciones del
disco.
La ilustración siguiente es un ejemplo.
Utilización de BONUSVIEW y
BD-LIVE
P in P
Vídeo secundario
Vídeo principal

OPERACIONES CON DISCOS
25 Es
Español
OPERACIONES
BÁSICAS
Notas
• En relación con el método de reproducción de contenidos BD-
LIVE, etc., realice las operaciones siguiendo las instrucciones
que se describen en el manual del disco BD.
• Para utilizar las funciones de BD-LIVE, realice la conexión de
banda ancha a Internet (☞p.10) y configure los ajustes de
comunicación (☞p.36).
• Vea “Acceso A BD Internet” (☞p.36) para obtener información
sobre cómo restringir el acceso a contenidos BD-LIVE.
• El tiempo necesario para descargar los programas
proporcionados en el dispositivo de memoria USB conectado a
este reproductor varía en función de las velocidades de
conexión a Internet y el volumen de datos de dichos programas.
• Los programas BD-LIVE proporcionados a través de Internet
puede que no dejen ver la conexión según el estado
(actualización) del proveedor. En tal caso, extraiga el disco e
inténtelo de nuevo.
• Si la pantalla BD-LIVE no aparece durante unos instantes
después de haber seleccionado la función BD-LIVE en el menú
del disco BD, es posible que el dispositivo de memoria USB no
disponga de espacio libre suficiente. En casos como éste,
expulse el disco del reproductor y, a continuación, borre los
datos del dispositivo de memoria USB mediante el menú de
eliminación de datos del menú “Manejo De Memoria USB”
(☞p.39).

SINTONIZACIÓN DE FM
26 Es
OPERACIONES DEL SINTONIZADOR
Hay 2 métodos de sintonización: automático y manual. También puede utilizar las funciones de presintonización
automática y manual para guardar hasta 30 emisoras.
La sintonización automática es eficaz cuando las señales
de emisoras son intensas y no hay interferencias.
1
Pulse TUNER para poner el receptor en el modo
FM.
2Mantenga pulsado TUNING durante
más de 2 segundos para comenzar la
sintonización automática.
Cuando el receptor sintoniza una emisora, el
indicador TUNED se enciende y la frecuencia de la
emisora recibida se muestra en el visualizador del
panel delantero.
• Pulse para sintonizar una frecuencia más baja.
• Pulse para sintonizar una frecuencia más alta.
Si la señal recibida de la emisora que desea seleccionar es
débil, sintonícela manualmente.
1
Pulse TUNER para poner el receptor en el modo
FM.
2Pulse TUNING para sintonizar
manualmente la emisora deseada.
Siga el procedimiento que se describe a continuación para
presintonizar automáticamente emisoras de radio.
1
Pulse TUNER para poner el receptor en el modo
FM.
2Mantenga pulsado MEMORY durante más de
2 segundos.
El indicador PRESET empieza a parpadear en el
visualizador del panel delantero y comienza la
presintonización automática de emisoras. Una vez
finalizada la búsqueda en todas las frecuencias, la
presintonización se detiene automáticamente.
• La búsqueda empieza por la frecuencia más baja y
prosigue hasta la frecuencia más alta.
• El receptor asigna automáticamente un número de
presintonización a cada emisora detectada.
• Para cancelar la búsqueda, pulse MEMORY.
Notas
• Puede presintonizar hasta 30 emisoras de FM.
• Cualquier dato de emisora guardado con un número de emisora
presintonizada se cancela al guardar una emisora nueva con el
mismo número de emisora presintonizada.
SINTONIZACIÓN DE FM
Sintonización automática
Sintonización manual
TUNING / d
d
d
d
TUNER
/ d
d
d
d
d
d
d
d
/ d
d
d
d
Presintonización automática
PRESET u / d
TUNER
MEMORY

SINTONIZACIÓN DEL SISTEMA DE DATOS DE RADIO (MODELOS DE EUROPA SOLAMENTE)
28 Es
El sistema de datos de radio (modelos de Europa solamente) es un sistema de transmisión de datos usado por emisoras de
FM de muchos países. La función de sistema de datos de radio se realiza entre las emisoras que forman la red. Este
receptor puede recibir varios datos del sistema de datos de radio como PS (servicio de programas), PTY (tipo de
programa), RT (texto de radio), CT (hora del reloj) y TP (programa de tráfico) cuando se reciben emisoras del sistema de
datos de radio.
Use esta función para visualizar los 4 tipos de información
del sistema de datos de radio: PS (servicio de programas),
PTY (tipo de programa), RT (texto de radio) y CT (hora
del reloj).
Notas
• Sólo puede seleccionar los modos del sistema de datos de radio
que ofrece la emisora.
• Si las señales que están siendo recibidas no son lo
suficientemente intensas, el receptor no podrá utilizar los datos
del sistema de datos de radio. En particular, el modo “RT”
requiere una gran cantidad de datos y puede no estar disponible
incluso cuando otros modos del sistema de datos de radio sí lo
están.
• Si la intensidad de señal se debilita debido a interferencias
externas mientras el receptor está recibiendo datos del sistema
de datos de radio, puede que la recepción se corte
repentinamente y “...WAIT” aparezca en el visualizador del
panel delantero.
• Cuando se selecciona el modo “RT”, el receptor puede mostrar
información del programa mediante un máximo de 64
caracteres alfanuméricos, incluida la diéresis. Los caracteres no
disponibles se muestran con “_” (subrayado).
Mientras sintoniza una emisora del sistema de
datos de radio, pulse repetidamente DISPLAY
para seleccionar el modo de visualización del
sistema de datos de radio.
Para obtener una descripción de los tipos de programa, vea
la tabla siguiente.
SINTONIZACIÓN DEL SISTEMA DE DATOS DE RADIO
(MODELOS DE EUROPA SOLAMENTE)
Visualización de información del
sistema de datos de radio
DISPLAY
PS
PTY
RT
CT
Frecuencia
(servicio de programas)
(tipo de programa)
(texto de radio)
(hora del reloj)
Tipo de programa Descripciones
News Noticias
Affairs Temas actuales
Info Información
Sport Deportes
Educate Educación
Drama Teatro
Culture Cultura
Science Ciencia
Varied Vari o s
Pop M Música Pop
Rock M Música rock
Easy M Música ligera
Light M Música clásica ligera
Classics Música clásica seria
Other M Otra música
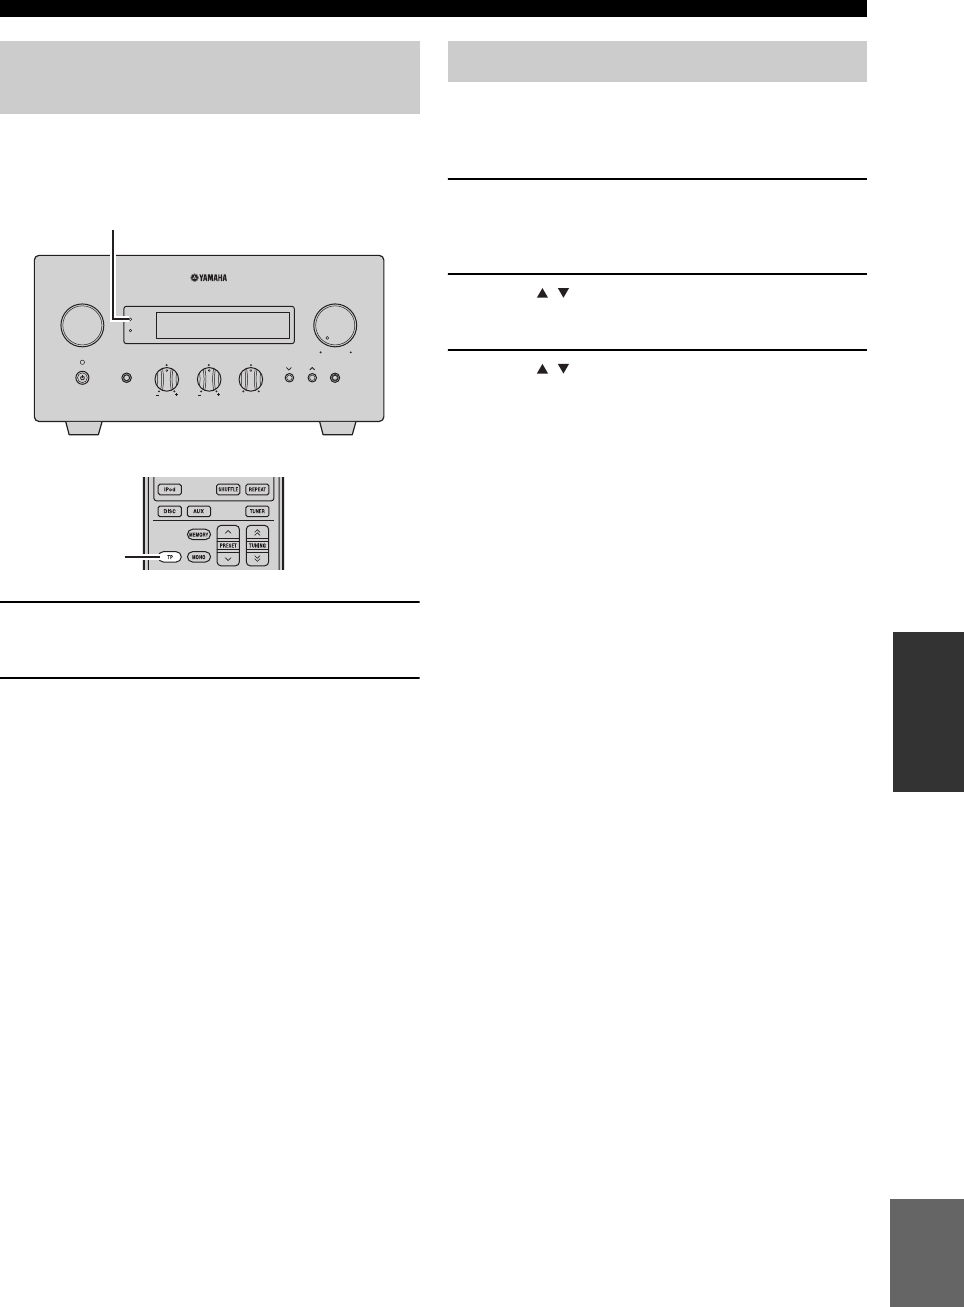
29 Es
SINTONIZACIÓN DEL SISTEMA DE DATOS DE RADIO (MODELOS DE EUROPA SOLAMENTE)
Español
OPERACIONES DEL
SINTONIZADOR
Utilice esta función para recibir el servicio de datos TP
(programa de tráfico) de la red de emisoras que conforman
el sistema de datos de radio.
1Sintonice la emisora del sistema de datos de
radio deseada.
2Pulse TP.
“TP SEARCH” parpadea en el visualizador del panel
delantero durante unos tres segundos y se inicia la
búsqueda.
El indicador TP del receptor parpadea durante la
búsqueda.
Cuando se recibe el programa de tráfico, el indicador
TP permanece fijo y la búsqueda se detiene.
Si pulsa TP, se reanudará la búsqueda.
Si el receptor no recibe el programa de tráfico, el
indicador TP se apaga y aparece “NO TP” en el
visualizador. El receptor vuelve su estado anterior.
Para cancelar la búsqueda
Pulse TP durante la búsqueda.
Puede utilizar la información CT recibida de las emisoras
del sistema de datos de radio para ajustar el reloj
incorporado del receptor.
1Pulse OPTION.
Aparecerá un elemento del menú de opciones en el
visualizador del panel delantero.
2Pulse / para seleccionar “AUTO CLOCK”
y pulse ENTER.
3Pulse / para seleccionar “ON” u “OFF” y
luego pulse ENTER.
Se muestra el estado “AUTO CLOCK”.
El ajuste predeterminado es “ON”.
ON: ajusta automáticamente el reloj del receptor
utilizando la información CT.
OFF: no ajusta el reloj del receptor.
Para salir el menú de opciones
Pulse OPTION.
Utilización del servicio de datos
TP (programa de tráfico)
INPUT
BASS
PHONES
VOLUME
MIN MAX
TREBLE BALANCE
PRESET PURE DIRECT
LR
TIMER
TP
Indicador TP
TP
Ajustes CT (hora del reloj)

AJUSTE DEL TEMPORIZADOR
30 Es
OTRA OPERACIONES
El receptor dispone de 2 tipos de funciones de temporizador. El reproductor BD también se enciende o se pone en modo
de espera automáticamente mediante la conexión de control del sistema (☞p.8).
El temporizador de encendido y espera automáticamente
enciende el receptor o lo pone en modo de espera a la hora
especificada. También puede especificar una entrada que
el receptor seleccionará automáticamente cuando el
temporizador de encendido y espera la encienda.
Notas
• No puede ajustar el temporizador de encendido y espera si antes
no ajusta el reloj (☞p.12).
• Si no toca ninguna tecla durante más de 30 segundos desde que
realiza la última operación con teclas, las operaciones que haya
realizado se borrarán de la memoria y aparecerá la visualización
normal.
1Pulse TIMER y / para seleccionar
“TIMER” y luego pulse ENTER.
El receptor entra en el modo de ajuste del
temporizador. El indicador TIMER parpadea en el
visualizador del panel delantero.
2Pulse o para seleccionar “ON”
(temporizador activado) o “OFF”
(temporizador desactivado) y pulse ENTER.
ON: aparece la pantalla de ajuste del reloj
temporizador. Prosiga desde el paso 3.
OFF: el indicador TIMER se apaga y el receptor
vuelve al modo normal.
Nota
Para desactivar el temporizador, seleccione “OFF”. Una vez
activado el temporizador, el ajuste del temporizador y el
indicador TIMER permanecen encendidos hasta que se
seleccione “OFF”.
3Ajuste la hora de inicio del temporizador.
Para conocer detalles sobre cómo ajustar el reloj, vea
los pasos 4 al 6 de “Ajuste del reloj” (☞p.12).
4Pulse / o una tecla selectora de entrada
para seleccionar la fuente de entrada que se
va a utilizar cuando el temporizador encienda
el receptor, y pulse ENTER.
El receptor selecciona la fuente de entrada
automáticamente cuando se enciende mediante el
temporizador de encendido y espera.
Si se ha seleccionado FM como fuente de entrada, el
número de presintonización (p.ej., “P01”) aparecerá
en visualizador del panel delantero. Pulse / para
seleccionar el número de presintonización de la
emisora que desee oír cuando se active el
temporizador y, a continuación, pulse ENTER.
Si selecciona “---” (predeterminado), el receptor
seleccionará la emisora que sintonizó previamente.
Si no se ha registrado ninguna emisora como emisora
presintonizada, aparecerá “---”. Pulse ENTER y
prosiga desde el paso 5.
Sólo puede seleccionar una emisora presintonizada.
Registre de antemano la emisora que desee oír como
emisora presintonizada cuando se active el
temporizador (☞p.27).
Nota
No puede seleccionar AUX como fuente de entrada.
5Pulse / para ajustar el tiempo de
funcionamiento del receptor.
Puede seleccionar una extensión de tiempo de 30 a 90
minutos, en pasos de 10 minutos. Seleccione “--” si
no desea que el receptor pase automáticamente al
modo de espera.
AJUSTE DEL TEMPORIZADOR
Ajuste del temporizador de
encendido y espera
INPUT
BASS
PHONES
VOLUME
MIN MAX
TREBLE BALANCE
PRESET PURE DIRECT
LR
TIMER
TP
Indicador TIMER
INPUT
ABCD
EXIT
TOP MENU/TITLE LIST
POP UP MENU
TIMER
Teclas selectoras
de entrada
ENTER ,
RETURN
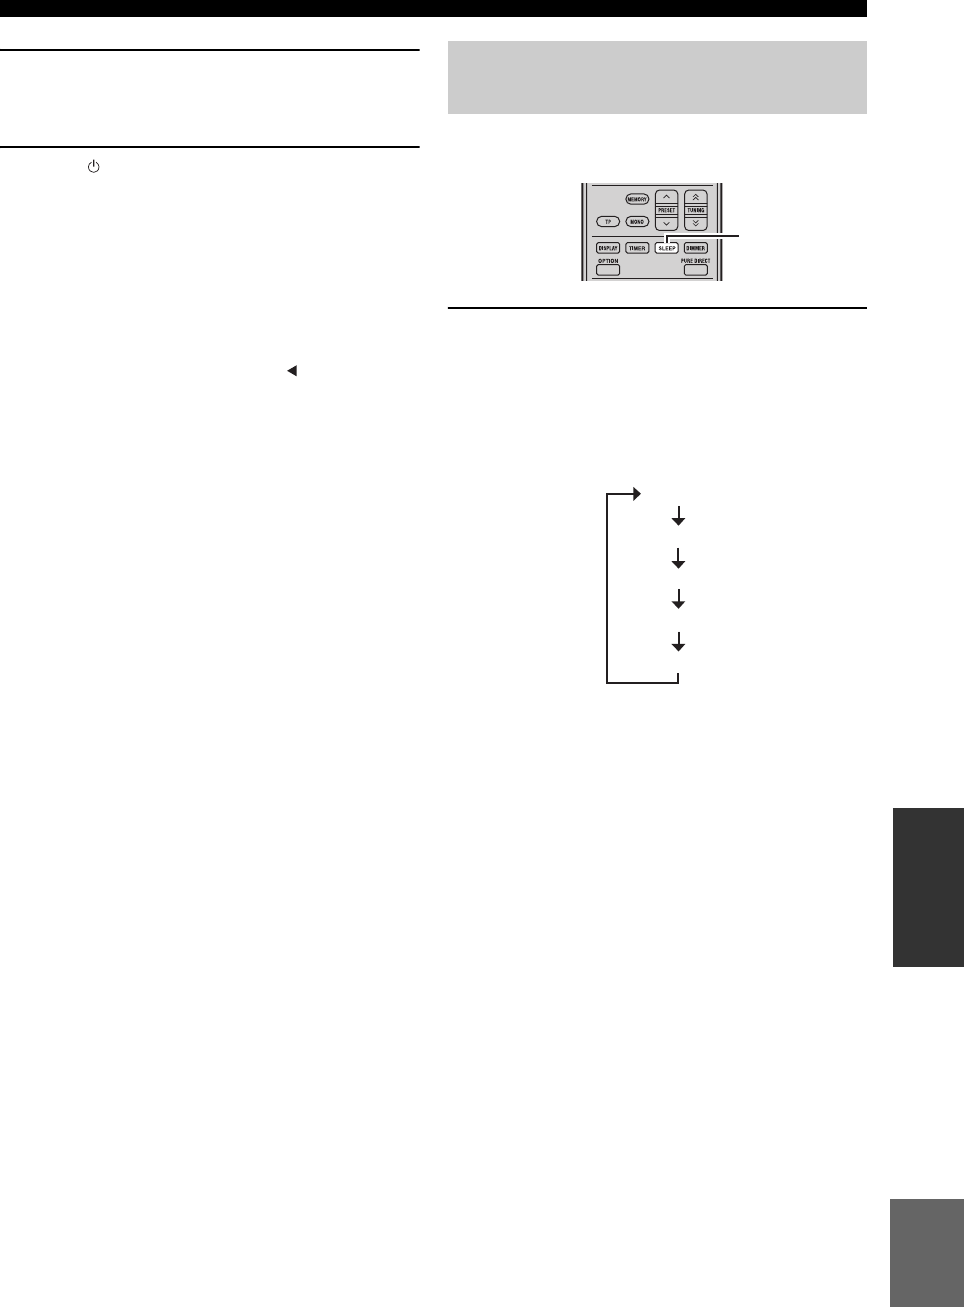
31 Es
AJUSTE DEL TEMPORIZADOR
Español
OTRA
OPERACIONES
6Pulse ENTER para completar el ajuste del
temporizador.
El indicador TIMER se ilumina.
7Pulse para poner el receptor en el modo de
espera.
El receptor se encenderá automáticamente a la hora
especificada.
Para cancelar la operación de ajuste del
temporizador
Pulse TIMER durante la operación.
y
Puede volver a la pantalla anterior pulsando o RETURN.
El temporizador para dormir pone el receptor en modo de
espera después de transcurrido un tiempo especificado.
Pulse repetidamente SLEEP para seleccionar la
duración deseada.
Cada vez que pulsa la tecla, la duración cambia de la
forma siguiente.
El indicador SLEEP se enciende en el visualizador del
panel delantero.
y
• El temporizador para dormir se cancela si pone el receptor en
modo de espera.
• Si pulsa SLEEP una vez mientras el temporizador para dormir
está activado, el tiempo restante aparecerá en el visualizador del
panel delantero.
Para cancelar el temporizador para dormir
Pulse repetidamente SLEEP para seleccionar “OFF”.
Ajuste del temporizador para
dormir
SLEEP
120min.
90min.
60min.
30min.
OFF

CONTROL iPod™
32 Es
Además de controlar el receptor (R-840) y el reproductor BD (BD-940), puede controlar su iPod colocado en el
acoplador para iPod a través del mando a distancia suministrado.
Una vez colocado el iPod en el acoplador para iPod, podrá disfrutar de la reproducción de su iPod utilizando el mando a
distancia suministrado.
Cuando conecta el iPod durante la reproducción, el sistema cambia automáticamente al modo iPod.
Notas
• Sólo son compatibles los iPod (Click and Wheel), iPod nano, iPod Classic, iPod mini e iPod touch.
• Algunas funciones pueden no ser compatibles dependiendo del modelo o de la versión del software de su iPod.
y
Para conocer una lista completa de los mensajes de estado que aparecen en el visualizador del panel delantero del receptor, vea la
sección “iPod” en “SOLUCIÓN DE PROBLEMAS” (☞p.43).
1Pulse iPod para seleccionar iPod como
fuente de entrada.
2Coloque el iPod el acoplador para iPod.
3Pulse / para utilizar el menú del iPod y, a
continuación, pulse ENTER para comenzar la
reproducción de la canción seleccionada (o
grupo de canciones).
• Vea la pantalla del iPod para controlar el menú.
• Utilice el iPod mediante los controles del iPod o el
mando a distancia suministrado.
■Repetición de la reproducción
(Repetición de reproducción)
Puede reproducir repetidamente una sola pista o un grupo
de pistas del iPod.
Pulse REPEAT.
Cada vez que pulsa la tecla, cambia el modo de repetición de
reproducción. El cuadro siguiente es un ejemplo de cómo
cambia el modo con cada pulsación de la tecla. Compruebe el
modo actualmente seleccionado en la pantalla del iPod.
■Reproducción en orden aleatorio
(Reproducción aleatoria)
Puede reproducir canciones o álbumes de su iPod de forma aleatoria.
Pulse SHUFFLE.
Cada vez que pulsa la tecla, cambia el modo de reproducción
aleatoria. El cuadro siguiente es un ejemplo de cómo cambia
el modo con cada pulsación de la tecla. Compruebe el modo
actualmente seleccionado en la pantalla del iPod.
CONTROL iPod™
Utilización del iPod™
El mando a distancia suministrado dispone de las
mismas teclas de función que el iPod. De este modo,
las teclas se corresponden entre sí.
iPod
,
ENTER
REPEAT
SHUFFLE
iPod Mando a distancia
Una (repetición de reproducción por canción)
Todas (repetición de reproducción por grupo seleccionado
)
No
Canciones (reproducción aleatoria por canción)
Albumes (reproducción aleatoria por álbum)
No

33 Es
Español
OTRA
OPERACIONES
En este capítulo se describen varios menús de esta unidad.
Una vez encendida esta unidad y un televisor (☞p.13), puede modificar los ajustes en la pantalla del televisor utilizando
el mando a distancia.
Puede seleccionar elementos de menú y modificar ajustes de igual forma que en el procedimiento de “Ajuste de la
pantalla del televisor” (☞p.13).
Nota
Cuando seleccione “Control Paterno” en “Ajustes De La Reproducción” (☞p.35), debe introducir una clave de 4 dígitos. La primera que
lo haga aparecerá la pantalla de definición de la contraseña. Para definir la contraseña, vea “Ajuste De Contraseña” (☞p.35).
y
Los ajustes predeterminados están marcados con “*”.
■Relación Aspecto TV
Puede definir la relación de aspecto de la pantalla del
televisor conectado y ajustar la salida de vídeo.
Cuando cambie de televisor, compruebe si ambos tienen la
misma relación de aspecto. De no ser así, modifique los
ajustes de “Relación Aspecto TV”.
Opciones de “Normal 4:3”
Si ajusta “Relación Aspecto TV” en “Normal 4:3” y
contempla vídeo 16:9 en un televisor 4:3, seleccione una
de las opciones siguientes.
■Salida De Vídeo Componente
Puede definir la resolución de salida de vídeo.
Algunos televisores no son totalmente compatibles con el
reproductor de discos Blu-ray, lo que puede provocar
distorsión de la imagen. En tal caso, ajuste “Salida De
Vídeo Componente” en su valor predeterminado (☞p.41).
1080i, 720p, 576/480p, 576/480i*
Nota
Algunos discos no permiten salida de vídeo de alta definición a
través de los jacks COMPONENT. En tal caso, la resolución de
vídeo se convierte a 576/480p o a 576/480i.
■Salida De Vídeo HDMI
Puede definir la resolución de salida de vídeo HDMI.
Algunos televisores no son totalmente compatibles con el
reproductor de discos Blu-ray, lo que puede provocar
distorsión de la imagen. En tal caso, ajuste “Salida De
Vídeo HDMI” en su valor predeterminado (☞p.41).
“Salida De Vídeo HDMI” se ajustará en “Auto” (valor
predeterminado de fábrica).
Auto*, 1080p, 1080i, 720p, 576/480p
Nota
Cuando el reproductor BD se conecta a un televisor compatible
con 1080p/24Hz y “Salida De Vídeo HDMI” está ajustado en
“Auto”, 1080p/24Hz aparecerá automáticamente cuando se
reproduzcan discos compatibles.
A 1080p/24Hz o 1080p/60Hz, no hay salida a través de los jacks
COMPONENT y el jack VIDEO.
■Selección Salida De Vídeo
Las señales de vídeo pueden salir de forma simultánea a
través de los jacks de vídeo analógico (jacks de vídeo o
componente) y del jack HDMI. Esto se denomina salida
dual. Cuando utiliza el vídeo componente y las salidas
HDMI, la resolución de salida de vídeo se determina
según los ajustes de “Salida De Vídeo Componente” o
“Salida De Vídeo HDMI” y “Selección Salida De Vídeo”.
Vea la tabla siguiente para más información.
AJUSTES DEL REPRODUCTOR BD
Ajustes De Audio Vídeo
Panor. 16:9*:Seleccione esta opción cuando vaya a
conectar un televisor de pantalla panorámica
(16:9).
Normal 4:3: Seleccione esta opción cuando vaya a
conectar un televisor 4:3.
Buzón*:Muestra una imagen con bandas negras arriba
y abajo manteniendo la relación de aspecto
16:9.
Expl. Panor.: Muestra una imagen sin alterar su relación de
aspecto recortando sus bordes derecho e
izquierdo. Esta opción sólo está disponible
para los discos que porten una marca 4:3PS.
HDMI*:Determina la resolución de salida de vídeo
según la configuración de Salida De Vídeo
HDMI (vea “Salida De Vídeo HDMI”
(☞p.33)).
Componente: Determina la resolución de salida de vídeo
según la configuración de Salida De Vídeo
Componente (vea “Salida De Vídeo
Componente” (☞p.33)).

34 Es
AJUSTES DEL REPRODUCTOR BD
*1 Algunos discos no permiten salida de vídeo de alta definición
a través de los jacks COMPONENT. En tal caso, la resolución
de vídeo se convierte a 480p/576p (cuando “Selección Salida
De Vídeo” está ajustado en “Componente”) o 480i/576i
(cuando “Selección Salida De Vídeo” está ajustado en
“HDMI”).
*2 No hay salida de vídeo cuando la señal 1080p sale a través del
jack HDMI.
*3 CVBS Out hace referencia a la señal de salida de vídeo a
través del jack VIDEO.
Nota
Si su televisor no es compatible con la resolución seleccionada,
puede que las imágenes no se vean correctamente.
y
También puede cambiar entre “HDMI” y “Componente”
utilizando “HDMI <-> COMP” (☞p.41).
■Audio Secundario
Puede activar y desactivar el audio secundario para Picture
in Picture o los comentarios de audio.
Encender*, Apagar
y
Cuando ajusta “Audio Secundario” en “Apagar”, esta unidad no
emite el sonido de “clic” del menú.
Seleccione “Apagar” para disfrutar de sonido BD de alta calidad
a través del jack HDMI.
■Salida De Audio
Puede ajustar la salida de audio adecuada a su entorno de
reproducción.
Opciones de “Salida De HDMI”
Si ajusta “Salida De Audio” en “Salida De HDMI”,
seleccione una de las opciones siguientes.
Nota
Cuando se ajusta “Audio Secundario” en “Encender”, la opción
“Salida De HDMI” se ajusta automáticamente en “PCM”.
Opciones de “Salida Digital”
Si ajusta “Salida De Audio” en “Salida Digital”,
seleccione una de las opciones siguientes.
■Control Gama dinámica
Puede ajustar la gama dinámica de forma que el sonido se
emita a un volumen medio. Si no puede escuchar
claramente los diálogos, cambie el ajuste de este menú.
Nota
Baje el volumen antes de cambiar este ajuste; de lo contrario, se
puede emitir sonido con volumen alto desde los altavoces o se
puede aplicar una carga eléctrica excesiva a los mismos.
Ajustes de este
reproductor Resolución de salida
Selección
Salida De
Vídeo
Salida De
Vídeo HDMI
Component
Out CVBS Out*3
HDMI
Auto *1 480i/576i*2
1080p No Output No Output
1080i 1080i*1 480i/576i
720p 720p*1 480i/576i
480p/576p 480p/576p*1 480i/576i
Ajustes de este
reproductor Resolución de salida
Selección
Salida De
Vídeo
Salida De
Vídeo
Componente
HDMI Out CVBS Out*3
Componente
1080i*11080i*1 480i/576i
720p*1720p*1 480i/576i
480p/576p 480p/576p 480i/576i
480i/576i 480i/576i 480i/576i
Salida De HDMI:Emite una señal de audio a través del jack
HDMI.
Salida Digital: Emite una señal de audio a través del jack
DIGITAL OUT (OPTICAL).
Salida Audio
2ch*:
Emite una señal de audio a través de los jacks
Salida De Audio.
Bitstream: Genera una señal de audio en series de bits.
Seleccione esta opción cuando conecte un
componente HDMI con un decodificador
incorporado para DOLBY DIGITAL, etc.
PCM*
(Envolvente):
Genera una señal de audio PCM Lineal.
Las señales de audio grabadas en un formato
diferente, como, por ejemplo, DOLBY
DIGITAL y DTS, se descodifican en PCM
Lineal y se emiten.
Bitstream: Genera una señal de audio en series de bits.
Seleccione esta opción cuando conecte un
componente surround con un decodificador
incorporado para DOLBY DIGITAL, etc.
PCM*:Emite una señal de audio de 2 canales PCM.
Las señales de audio grabadas en un formato
diferente se convierten en señales de audio de
2 canales PCM y se emiten.
Seleccione esta opción cuando conecte un
componente de audio estéreo de 2 canales.
Normal: Emite sonido en la misma gama dinámica que
el sonido original.
Cambiar: Ajusta la gama dinámica del audio de Dolby
Digital de forma que los diálogos se escuchen
claramente.
Si el sonido es anómalo, ajuste esta opción en
“Normal”.
Auto*:Ajusta automáticamente la gama dinámica del
audio de Dolby TrueHD.

36 Es
AJUSTES DEL REPRODUCTOR BD
■Acceso A BD Internet
Puede ajustar la restricción de acceso a contenidos BD-LIVE.
Notas
• Las funciones disponibles difieren en función del disco.
• En cuanto al método de reproducción de contenidos BD-LIVE,
etc., realice las operaciones siguiendo las instrucciones que se
describen en el manual del disco BD.
• Para disfrutar de las funciones BD-LIVE, vea “Conexión a
Internet” (☞p.10) y “Configuración De Comunicaciones”
(☞p.36).
Esto le permite realizar y/o cambiar el ajuste de
comunicación. Este ajuste se requiere para utilizar
funciones BD-LIVE que conectan con Internet.
Notas
• Asegúrese de que el cable LAN está conectado a este
Reproductor (☞p.10).
• Para realizar el ajuste manualmente, es necesaria la siguiente
información del router o módem conectado. Compruebe la
información antes de realizar el ajuste.
– Dirección IP, máscara de red, puerta de enlace, dirección IP
DNS
• Además, si se especifica un servidor Proxy, también se requiere
la siguiente información especificada por su proveedor de
servicios de Internet. Compruebe la información antes de
realizar el ajuste.
– Dirección IP y número de puerto del servidor Proxy
1Pulse SETUP.
2Pulse / / / para seleccionar “Ajustes” y,
a continuación, pulse ENTER.
3Pulse / para seleccionar “Configuración
De Comunicacione” y, a continuación, pulse
ENTER.
4Seleccione “Ethernet (BD-LIVE)” y pulse
ENTER.
5Pulse / para seleccionar “Cambiar” y, a
continuación, pulse ENTER.
Para inicializar el ajuste actual seleccione “Initialize”
y después pulse ENTER.
6Para especificar la dirección IP pulse /
para seleccionar “Sí” o “No” y, a
continuación, pulse ENTER.
• Si se selecciona “Sí”: se obtiene automáticamente
la dirección IP.
• Si se selecciona “No”: se introducen manualmente
la dirección IP, la máscara de red y la puerta de
enlace, utilizando la pantalla para introducir
caracteres (☞p.38).
Compruebe cada uno de los valores de
configuración en las especificaciones de su router
de banda ancha.
7Seleccione “Siguiente” y pulse ENTER.
8Introduzca las direcciones IP primaria y
secundaria utilizando la pantalla para
introducir caracteres (☞p.38).
Compruebe cada uno de los valores de
configuración en las especificaciones de su
router de banda ancha.
9Seleccione “Siguiente” y pulse ENTER.
Permitir: Permite el acceso a Internet de todos los
discos BD-LIVE.
Limitar*:Permite el acceso a Internet solamente de
discos BD-LIVE con certificación de
propietario.
Prohibir: Prohibe el acceso a Internet de todos los discos.
Configuración De Comunicaciones
EXIT
TOP MENU/TITLE LIST
POP UP MENU
, , ,
ENTER
SETUP
Información actual de la configuración Ethernet.
[Configuración Actual]
: Auto-Configurar
: Auto-Configurar
: Auto-Configurar
: Auto-Configurar
: No Usar
Dirección IP
Máscara De Red
Puerta De Enlace
DNS
Proxy
Cambiar Incializar
¿Obtiene la dirección IP automáticamente?
Dirección IP
Máscara De Red
Puerta De Enlace
Sí No
Siguiente

37 Es
AJUSTES DEL REPRODUCTOR BD
Español
OTRA
OPERACIONES
10 Para especificar el servidor Proxy pulse /
para seleccionar “Sí” o “No” y, a
continuación, pulse ENTER.
• Si se selecciona “Sí”: la dirección IP o el nombre
del servidor Proxy y el número de puerto del
servidor Proxy especificados por su proveedor de
servicios de Internet se introducen utilizando la
pantalla para introducir caracteres (☞p.38).
• Si se selecciona “No”: Vaya al paso siguiente.
11 Seleccione “Siguiente” y pulse ENTER.
12 Para el ajuste avanzado (el ajuste de las
velocidades de conexión Ethernet), pulse
/ para seleccionar “Sí” o “No” y pulse
ENTER.
• Normalmente seleccione “No” y pulse ENTER.
• Las velocidades de conexión Ethernet se pueden
ajustar cuando seleccione “Sí” y, a continuación,
pulse ENTER.
• Como se realiza una detección automática (modo
predeterminado de fábrica), este ajuste no es
necesario normalmente. Si se produce una
situación en la que la conexión Ethernet falla, etc.,
cambie el ajuste y compruebe si la conexión
Ethernet funciona correctamente.
Cuando haya especificado la velocidad de
conexión, seleccione “Siguiente” y pulse ENTER.
13 Para probar la conexión a Internet, después
de confirmar los ajustes, pulse / para
seleccionar “Prueba” y, a continuación,
pulse ENTER.
“Prueba” solo esta disponible cuando el ajuste se
hace para obtener automaticamente la direccion IP.
14 Pulse / para seleccionar “Completo” y, a
continuación, pulse ENTER.
■Procedimiento operativo para introducir
caracteres manualmente
Nota
Los caracteres numéricos tales como una dirección IP se pueden
introducir en la pantalla de entrada o bien seleccionando cada uno
de los caracteres en el modo “Numérico” o utilizando los botones
numéricos del mando a distancia.
1Pulse ENTER en los cuadros en los que se
van a introducir caracteres y aparecerá la
pantalla de entrada.
2Pulse / para seleccionar el modo de
entrada deseado.
• Cuando se introduzca la dirección del servidor
Proxy;
“1ABC” (Carácter Alfabeto/Numérico) /
“Carácter” / “Editar”
•
Cuando se introduzcan otros valores (dirección IP, etc.);
“Numérico” / “Editar”
3Pulse / para seleccionar un número/
carácter y luego pulse ENTER.
¿Usa un servidor proxy?
Dirección
Puerto
Sí No
Siguiente
Opción
Velocidades de Conexión Ethernet
Auto-Detectar
10M Medio Duplex 10M Duplex Completo
100M Medio Duplex 100M Duplex Completo
Siguiente
Confirme la configuración actual.
: xxx xxx xxx xxx
: xxx xxx xxx xxx
: xxx xxx xxx xxx
: xxx xxx xxx xxx
xxx xxx xxx xxx
: xx:xx:xx:xx:xx:xx
Dirección IP
Máscara De Red
Puerta De Enlace
Dirección DNS
Dirección MAC
CompletoPrueba
Dirección IP
Mascara De Red
Puerta De Enlace
123
1234567890
Numérico
Editar
Se selecciona pulsando / Se selecciona pulsando /

38 Es
AJUSTES DEL REPRODUCTOR BD
4Repita el paso 3 para ver todos los
caracteres/números deseados en el campo
de entrada.
Ejemplo: la pantalla para introducir caracteres numéricos
Nota
Pulse RETURN (Borr.Carác.) para eliminar un número/carácter
que haya introducido.
Para cambiar un número/carácter que haya introducido, pulse B
(Izquierda) o C (Derecha) para seleccionar el número/carácter
que desee cambiar y pulse RETURN (Borr.Carác.). A
continuación, pulse / para seleccionar un número/carácter
que desee introducir y pulse ENTER.
5Pulse D (Completar) para fijar los números
que ha introducido.
6Repita los pasos 1 a 5 para terminar de
introducir todos los caracteres requeridos.
Lista de caracteres introducidos
123
1234567890
Numérico
Editar
Dirección IP
Mascara De Red
Puerta De Enlace
123
1ABC (Carácter
Alfabeto/
Numérico)
Numérico
Carácter
Editar
* La misma operación que con los botones de color y RETURN se puede realizar seleccionando cada uno de
los elementos y pulsando ENTER.“Borr.Carác.” quiere decir eliminar caracteres.
Num. ABC DEF GHI JKL MON PQRS TUV WXYZ Esp.
Num. 1234567890 ABC ABCabc DEF D E F d e f
GHI G H I g h i JKL J K L j k l MNO MNOmno
PQRS PQRSpqrs TUV TUVtuv WXYZ WXYZwxyz
Esp. (espacio)
1234567890
@ . , : ; _ - \ $ % ! ? & # + * = / | ˜ “ ‘ ˆ ` ( ) < > [ ]{ } Esp.
@ . , : @ . , : ; _ - \ ; _ - \ $ % ! ? $ % ! ?
& # + * & # + * = / | ˜ = / | ˜ “ ‘ ˆ ` “ ‘ ˆ `
( ) < > ( ) < > [ ]{ } [ ] { } Esp. (espacio)
Cancelar Izqui. Dere. Completo Borr.Carác.

39 Es
AJUSTES DEL REPRODUCTOR BD
Español
OTRA
OPERACIONES
Puede visualizar la versión del software del sistema.
Antes de utilizar el dispositivo de memoria
USB
En las instrucciones siguientes se explica cómo eliminar
datos tales como los datos BD-LIVE en un dispositivo de
memoria USB.
1Introduzca el dispositivo de memoria USB en
el terminal USB BD STORAGE/SERVICE de la
parte posterior de este reproductor.
2Pulse SETUP para que se muestre el menú
Setup.
3Pulse / / / para seleccionar “Ajustes” y,
a continuación, pulse ENTER.
4Pulse / para seleccionar “Manejo De
Memoria USB” y, a continuación, pulse
ENTER.
“No hay memoria USB” aparece cuando no se ha
introducido ninguna memoria USB.
5Pulse / , seleccione “Borrar” o
“Formatear” y luego pulse ENTER.
Borrar: Elimina solamente datos BD-VIDEO
escritos en el dispositivo de memoria
USB tales como datos BD-LIVE.
Formatear: Tenga en cuenta que se eliminarán todos
los datos, incluidos los datos BD-VIDEO
y los datos de actualización de software.
Si desea eliminar solamente los datos de
actualización de software innecesarios después de
haber actualizado el software, elimine los datos en el
dispositivo de memoria USB utilizando un PC.
Nota
También se eliminarán los datos que se hayan guardado en la
memoria interna del reproductor (resultados de juegos, etc.).
6Pulse / , seleccione “Sí” y pulse ENTER.
7Inicie el proceso.
Aparecerá la pantalla de la operación actual.
8Pulse ENTER.
Esta función permite actualizaciones de software
introduciendo un dispositivo de memoria USB con el
archivo de actualización en el terminal USB BD
STORAGE/SERVICE de este reproductor.
El dispositivo de memoria USB debe estar libre
de todos los archivos, salvo de los datos de
actualización de software, para permitir que se
cargue nuevo software.
Para comprobar la disponibilidad de una
actualización de software, visite
http://www.yamaha.co.jp/english/product/av/
down/agreement.html.
Puede restablecer todos los ajustes del reproductor BD a
los ajustes de fábrica.
Reponer, No Reponer
Versión
PRECAUCIÓN:
• No retire el dispositivo de memoria USB ni
desenchufe el cable de alimentación mientras se
realizan las operaciones para “Manejo De Memoria
USB” o “Actualiz. Software”.
• No utilice un cable prolongador USB para conectar
un dispositivo de memoria USB al terminal USB
BD STORAGE/SERVICE del reproductor. El uso
de un cable prolongador USB podría impedir el
correcto funcionamiento del reproductor.
Nota
Yamaha no puede garantizar el funcionamiento de los
dispositivos de memoria USB de todas las marcas con este
reproductor.
Manejo De Memoria USB
Actualiz. Software
Reinicio Sistema
Borra datos BD-Vídeo en la memoria USB.
Borra todo el contenido en la memoria USB
incluyendo contenido protegido.
Formatear
Borrar
NoSí
OK
Completo

40 Es
AJUSTES DEL REPRODUCTOR BD
Lista de códigos de país
Lista de idiomas
Lista de códigos de idioma
EE.UU. / CANADÁ / JAPÓN / ALEMANIA / FRANCIA / REINO UNIDO / ITALIA / ESPAÑA / SUIZA / SUECIA
/ HOLANDA / NORUEGA / DINAMARCA / FINLANDIA / BÉLGICA / HONG KONG / SINGAPUR /
TAILANDIA / MALASIA / INDONESIA / TAIWÁN / FILIPINAS / AUSTRALIA / RUSIA / CHINA
English / Français / Deutsch / Italiano / Español / Japanese / Svenska / Nederlands
AA Afar / AB Abjasio / AF Afrikaans / AM Amárico / AR Árabe / AS Asamés / AY Aymara / AZ Azerbaiyano / BA
Baskir / BE Bielorruso / BG Búlgaro / BH Bihari / BI Bislama / BN Bengalí, Bangla / BO Tibetano / BR Bretón /
CA Catalán / CO Corso / CS Checo / CY Galés / DA Danés / DE Alemán / DZ Butanés / EL Griego / EN Inglés / EO
Esperanto / ES Español / ET Estonio / EU Euskera / FA Persa / FI Finlandés / FJ Fiyiano / FO Feroés / FR Francés /
FY Frisio / GA Irlandés / GD Gaélico escocés / GL Gallego / GN Guaraní / GU Gujarati / HA Hausa / HI Hindi / HR
Croata / HU Húngaro / HY Armenio / IA Interlingua / IE Interlingue / IK Inupiak / IN Indonesio / IS Islandés / IT
Italiano / IW Hebreo / JA Japonés / JI Yiddish / JW Javanés / KA Georgiano / KK Kazajo / KL Groenlandés / KM
Camboyano / KN Canarés / KO Coreano / KS Cachemiro / KU Kurdo / KY Kirguiz / LA Latín / LN Lingala / LO
Laosiano / LT Lituano / LV Letón / MG Malgache / MI Maorí / MK Macedonio / ML Malabar / MN Mongol / MO
Moldavo / MR Marathi / MS Malayo / MT Maltés / MY Birmano / NA Nauruano / NE Nepalí / NL Holandés / NO
Noruego / OC Occitano / OM Oromo (Afan) / OR Oriya / PA Panyabí / PL Polaco / PS Pashto, Pushto / PT
Portugués / QU Quechua / RM Retorromance / RN Kirundi / RO Rumano / RU Ruso / RW Kinyarwanda / SA
Sánscrito / SD Sindhi / SG Sangho / SH Serbocroata / SI Cingalés / SK Eslovaco / SL Esloveno / SM Samoano / SN
Shona / SO Somalí / SQ Albanés / SR Serbio / SS Siswati / ST Sesotho / SU Sondanés / SV Sueco / SW Swahili /
TA Tamil / TE Telugu / TG Tayiko / TH Tailandés / TI Tigrinya / TK Turkmeno / TL Tagalo / TN Setswana / TO
Tongano / TR Turco / TS Tsonga / TT Tártaro / TW Twi / UK Ucraniano / UR Urdu / UZ Uzbeko / VI Vietnamita /
VO Volapük / WO Wolof / XH Xhosa / YO Yoruba / ZH Chino / ZU Zulú

41 Es
Español
OTRA
OPERACIONES
Cuando conecta un cable HDMI o de componente puede cambiar la configuración utilizando las teclas del reproductor
BD. Asimismo, vea la página 33.
Notas
• Incluso en el modo Pure Direct, puede ver y modificar la configuración en el visualizador del panel delantero del reproductor BD.
• La configuración no se puede modificar durante la reproducción. Detenga la reproducción para modificar la configuración.
1Pulse DISC para seleccionar una fuente de
entrada y luego pulse OPTION.
“VIDEO RESET” aparece en el visualizador del
panel delantero del reproductor BD.
2Pulse / para seleccionar “VIDEO RESET”
o “HDMI <-> COMP”.
VIDEO RESET
Ajuste la resolución de “Salida De Vídeo
Componente” (☞p.33) o “Salida De Vídeo HDMI”
(☞p.33) en sus valores predeterminados de fábrica.
HDMI <-> COMP
Ajuste la prioridad de salida de vídeo en HDMI o
Component.
Para conocer más detalles, vea “Selección Salida De
Vídeo” (☞p.33).
3Pulse ENTER para confirmar el ajuste.
>> DONE Aparece “<<”.
Para cancelar la operación de ajuste
Pulse OPTION, EXIT o RETURN.
CAMBIAR LA CONFIGURACIÓN AL CONECTAR UN CABLE HDMI O
DE COMPONENTE
A B C D
EXIT
TOP MENU/TITLE LIST
POP UP MENU
DISC
,
OPTION
ENTER
EXIT RETURN

SOLUCIÓN DE PROBLEMAS
42 Es
INFORMACIÓN ADICIONAL
Consulte la tabla siguiente cuando este sistema no funcione correctamente. Si el problema que está teniendo no se
encuentra en la lista o las instrucciones no sirven de ayuda, apague el sistema, desconecte el cable de alimentación y
póngase en contacto con el centro de servicio o un concesionario de Yamaha autorizado.
■General
SOLUCIÓN DE PROBLEMAS
Receptor (R-840)
Problema Causa Remedio Vea la
página
El receptor no se
enciende o entra en
el modo de espera
poco después de
conectarse la
alimentación.
El cable de alimentación no está
conectado o la clavija no está totalmente
insertada.
Conecte firmemente el cable de alimentación. 8
El receptor ha sido expuesto a una
descarga eléctrica externa intensa (rayo o
electricidad estática intensa).
Ponga el receptor en el modo de espera, desconecte
el cable de alimentación, vuelva a conectarlo después
de 30 segundos y luego utilice normalmente el
receptor.
—
Se ha producido un cortocircuito en el
cable y se ha activado el circuito de
protección.
Asegúrese de que todas las conexiones de los cables
de altavoz del receptor y de todos los altavoces se
han realizado correctamente y que todos los cables
de las conexiones existentes están en contacto
exclusivo con su conexión correspondiente.
8
La temperatura interna es demasiado alta
y el circuito de protección se ha activado.
Espere aproximadamente 1 hora para que se enfríe el
receptor y, a continuación, vuelva a encenderlo.
8
No hay sonido Conexiones de los cables de entrada o
salida mal hechas.
Conecte los cables correctamente. Si el problema
persiste, es posible que los cables estén dañados.
8
No se ha seleccionado una fuente de
entrada apropiada.
Seleccione una fuente de entrada apropiada con el
selector INPUT del panel delantero (o con las teclas
selectoras de entrada del mando a distancia).
—
Las conexiones de los altavoces no están
seguras.
Asegure las conexiones. 8
El volumen está bajo. Suba el volumen. —
El sonido está en silencio. Pulse MUTE o VOLUME +/– para reactivar la salida
de audio y ajuste el volumen.
7
Hay señales que el reproductor no puede
reproducir y que están introduciéndose
desde un componente fuente como puede
ser un CD-ROM.
Reproduzca una fuente cuyas señales pueda
reproducir el receptor.
—
El sonido se apaga
repentinamente.
El temporizador ha apagado el receptor. Encienda el receptor y reproduzca la fuente de
nuevo.
—
Sólo se oye sonido a
través del altavoz de
un lado.
Los cables no están bien conectados. Conecte los cables correctamente. Si el problema
persiste, es posible que los cables estén dañados.
8
Hay interferencia de
ruido procedente de
un equipo digital o de
radiofrecuencia.
El receptor está demasiado cerca de un
equipo digital o de alta frecuencia.
Separe más el receptor de ese equipo. —
El sonido está
distorsionado.
El nivel de sonido es demasiado alto. Ajuste el nivel del sonido. 15
“CHK SP WIRE”
aparece en el
visualizador.
Se ha producido un cortocircuito en los
cables de los altavoces.
Asegúrese de que los cables de altavoz están
conectados correctamente.
8

43 Es
Español
SOLUCIÓN DE PROBLEMAS
INFORMACIÓN
ADICIONAL
■FM
■iPod
Nota
Si se produce un error de transmisión pero no se muestra ningún mensaje de estado en el visualizador del panel delantero, compruebe la
conexión entre el receptor y el iPod (☞p.10).
Problema Causa Remedio Vea la
página
La recepción estéreo por FM
tiene ruido.
Las características de las emisiones en
estéreo de FM pueden causar este
problema cuando el transmisor está
muy lejos o la entrada de la antena es
mala.
Verifique las conexiones de la antena. 8
Procure utilizar una antena de FM direccional
de alta calidad.
—
Hay distorsión y no se puede
obtener una recepción nítida a
pesar de utilizar una buena
antena de FM.
Hay interferencias de trayectorias
múltiples.
Ajuste la posición de la antena para eliminar
las interferencias de trayectorias múltiples.
—
La emisora deseada no se
puede sintonizar con el
método de sintonización
automática.
La señal es demasiado débil. Utilice una antena de FM direccional de alta
calidad.
—
Utilice el método de sintonización manual. 26
Las emisoras presintonizadas
previamente ya no se pueden
sintonizar.
El receptor ha estado desconectada
durante mucho tiempo.
Ajuste de emisoras presintonizadas. 26
Mensaje de estado Causa Remedio Vea la
página
CONNECT ERR Hay un problema con la trayectoria de
señal de su iPod al receptor.
Apague el receptor e intente restablecer su iPod. 10
UNKNOWN TYP El iPod que está siendo usado no es
compatible con el receptor.
Sólo son compatibles los iPod (Click and Wheel),
iPod nano, iPod Classic, iPod mini e iPod touch.
—
CONNECTED El iPod está correctamente colocado en el
acoplador para iPod y la conexión entre
su iPod y el receptor se ha realizado
correctamente.
NOT CONNECT El iPod se ha extraído del acoplador para
iPod del receptor.
Vuelva a colocar su iPod en el terminal del receptor. 10
CAN'T PLAY El receptor no puede reproducir las
canciones actualmente guardadas en su
iPod.
Compruebe que las canciones actualmente guardadas
en su iPod puedan reproducirse.
—
Guarde en su iPod algunos otros archivos de música
que puedan reproducirse.
—
44 Es
SOLUCIÓN DE PROBLEMAS
Mando a distancia
Problema Causa Remedio Vea la
página
El mando a distancia
no funciona o no
funciona bien.
Es posible que el mando a distancia se
esté utilizando fuera de su radio de
acción.
Para obtener información sobre el radio de acción del
mando a distancia, vea “Utilización del mando a
distancia”.
11
El sensor del mando a distancia de este
sistema puede ser expuesto a rayos de luz
solar o eléctrica directa (lámparas
fluorescentes tipo inversor).
Cambie la iluminación o la orientación de este
sistema.
11
Es posible que las pilas se hayan agotado. Sustituya las pilas por otras nuevas. 11
Hay obstáculos entre el sensor de este
sistema y el mando a distancia.
Retire los obstáculos. 11
El cable de control del sistema está
desconectado del jack conector del
sistema del receptor y/o reproductor BD.
Conecte firmemente el receptor y el reproductor BD
con el cable de control del sistema.
8
Reproductor BD (BD-940)
Problema Causa Remedio Vea la
página
No se conecta la
alimentación
eléctrica.
El enchufe no está completamente insertado.
Conecte firmemente el cable de alimentación. 8
El receptor y el reproductor BD no están
bien conectados.
Compruebe la conexión con el receptor. 8
El receptor está ajustado incorrectamente. Compruebe el ajuste (INPUT/Volumen/MUTE/
Auriculares) del receptor.
—
La alimentación está
desconectada.
“Apagado Automático” está ajustado en
“Sí”.
Ajuste “Apagado Automático” en “No”. 35
El disco no se
reproduce.
Es posible que esté utilizando un disco
grabable no finalizado.
Finalice el disco grabable. —
Puede que la etiqueta del disco no esté
hacia arriba.
Coloque el disco en la bandeja del disco con la
etiqueta mirando hacia arriba.
—
El disco puede estar defectuoso. Pruebe a reproducir otro disco. Si no se produce el
mismo problema, el disco que quiere reproducir está
defectuoso.
—
El disco está sucio. Limpie la superficie del disco. 48
El código de región no se corresponde
con el del reproductor BD.
Cargue un disco con el mismo código de región que
el del reproductor BD.
3
Si el tiempo grabado de un disco sea
inusualmente corto, quizá no es posible la
reproducción.
Los discos BD-RE/R grabados en un
formato distinto a BDMV no se pueden
reproducir.
La reproducción del
vídeo se detiene.
Se aplicó una fuerza o vibración
excesivas al reproductor BD.
No aplique fuerza o vibración excesivas al
reproductor BD.
—
El reproductor BD no está colocado sobre
una superficie plana y estable.
Coloque el reproductor BD sobre una superficie
plana y estable.
—

45 Es
Español
SOLUCIÓN DE PROBLEMAS
INFORMACIÓN
ADICIONAL
El reproductor BD
produce un ruido
seco cuando se
carga o reproduce un
disco.
No se ha hecho funcionar el reproductor
BD durante cierto período de tiempo.
Esto puede ocurrir si no se ha hecho funcionar
durante cierto período de tiempo. No se trata de una
anomalía.
—
No hay imagen. El cable de vídeo no está conectado
correctamente al televisor.
Conecte correctamente el cable de vídeo al televisor. 9
El ajuste de entrada del televisor no es
correcto.
Seleccione el ajuste de entrada correcto en el
televisor.
13
El reproductor BD no está ajustado
correctamente a HDMI o a la conexión
del cable de vídeo componente.
Ajuste correctamente el reproductor BD. 33
La pantalla se
bloquea y los
botones de
funcionamiento no
responden.
El disco está dañado o sucio. Compruebe la superficie del disco. —
El reproductor BD está bloqueado. Reinicie el reproductor BD. 5
Hay sonido pero no
hay imagen.
El cable de vídeo no está conectado
correctamente.
Conecte el cable correctamente. 9
No se produce
imagen con la
resolución deseada.
El ajuste de resolución de salida de vídeo
no concuerda con la resolución del
televisor conectado al reproductor BD.
Realice “VIDEO RESET”. 41
Cambie entre “HDMI” y “Componente” utilizando
“Selección Salida De Vídeo” o “HDMI <-> COMP”.
33, 41
“Selección Salida De Vídeo” no está
ajustado correctamente.
Ajuste correctamente “Selección Salida De Vídeo”. 33
“Salida De Vídeo Componente” o “Salida
De Vídeo HDMI” no están ajustados a la
resolución deseada.
Ajuste “Salida De Vídeo Componente” o “Salida De
Vídeo HDMI” a la resolución deseada.
33
Las imágenes de
pantalla panorámica
parecen alargadas en
sentido vertical o
aparecen bandas
negras en la parte
superior e inferior de
la pantalla.
“Relación Aspecto TV” no está bien
ajustado para el televisor conectado.
Ajuste “Relación Aspecto TV” correctamente para el
televisor conectado.
33
Está conectado un televisor estándar de
4:3 pero “Selección Salida De Vídeo” no
está ajustado en “Componente”.
Cuando esté conectado un televisor de pantalla
panorámica, ajuste “Relación Aspecto TV” en
“Panor. 16:9”.
Cuando esté conectado un televisor estándar de 4:3,
ajuste “Selección Salida De Vídeo” en “Componente”.
33
Las imágenes de 4:3
parecen alargadas en
sentido horizontal.
Cuando esté conectado un televisor de 4:3, ajuste
“Selección Salida De Vídeo” en “Componente”.
33
En la pantalla
aparece ruido de
bloque (mosaico).
El ruido de bloque puede aparecer en
escenas de movimiento rápido debido a
las características de la tecnología de
compresión de la imagen digital.
El sonido o las
imágenes no se
producen
correctamente.
Es posible que no se produzcan
correctamente el sonido o una imagen
cuando se reproduce un disco protegido por
copyright.
El sonido está
distorsionado o no
sale.
El cable estéreo RCA no está conectado
entre el receptor y el reproductor BD.
Conecte cable estéreo RCA entre el receptor y el
reproductor BD.
8
Las clavijas de audio están sucias. Limpie las clavijas de audio. —
La superficie del disco está sucia. Limpie la superficie del disco. 48
El disco está dañado o sucio. Compruebe la superficie del disco. —
Problema Causa Remedio Vea la
página
46 Es
SOLUCIÓN DE PROBLEMAS
Los mensajes siguientes aparecen en la pantalla del televisor si el disco que intenta reproducir no es apropiado o el
funcionamiento no es correcto.
Red
Problema Causa Remedio Vea la
página
No se puede
conectar a Internet.
El cable de red no está conectado
correctamente.
Conecte el cable de red correctamente. 10
Se está utilizando un cable inadecuado,
como, por ejemplo, un cable modular.
Utilice el cable de red para la conexión. 10
El router o módem de banda ancha no
está conectado correctamente.
Conecte correctamente el router y/o módem de
banda ancha.
10
El router o módem de banda ancha no
está encendido.
Encienda el router o módem de banda ancha. —
Los ajustes de red no son correctos. Compruebe “Configuración De Comunicaciones”. 36
No se pueden
descargar los
contenidos de BD-
LIVE.
El cable de red no está conectado
correctamente.
Conecte el cable de red correctamente. 10
El dispositivo de memoria USB no está
conectado correctamente.
Compruebe que el dispositivo de memoria USB esté
conectado al terminal USB BD STORAGE/
SERVICE del reproductor BD.
10
El disco BD no admite BD-LIVE. Compruebe si el disco BD admite BD-LIVE. 24
“Acceso a BD Internet” está ajustado en
“Prohibir”.
Ajuste “Acceso a BD Internet” en “Permitir” o
“Limitar”.
36
Mensajes relacionados con el disco BD y el disco DVD
Mensaje de error Posible error Remedio
Imposible reproducir. – El disco no se puede reproducir con este
reproductor.
– Revise el disco y cárguelo correctamente.
Disco incompatible. – Este mensaje aparecerá si se carga un disco que no
se puede reproducir en este reproductor (p. ej., un
disco rayado), o si se carga un disco al revés, y la
bandeja portadiscos se abrirá automáticamente.
– Ocurrirá si el disco que se ha cargado no se puede
reproducir porque no es estándar, está rayado, etc.
– Extraiga el disco.
Imposible operar. – Ocurrirá si la operación es incorrecta.
Esta memoria USB no
está formateada
correctamente.
Formatee la memoria
en gestión de la
memoria USB.
– Ocurrirá si hay un error de formateo. – Formatee nuevamente la memoria USB.
– Ocurre si la memoria USB no está formateada con
FAT 32/16.
– Formatee la memoria USB en su PC.
No se puede usar la
memoria USB
conectada. La misma
debe ser compatible
con USB 2.0.
– Ocurrirá si se utiliza una memoria USB que no es
compatible con USB 2.0 de alta velocidad (480
MB/S) (p.ej. USB 1.0/USB 1.1).
– Conecte una memoria USB compatible con USB
2.0 de alta velocidad (480 MB/S).
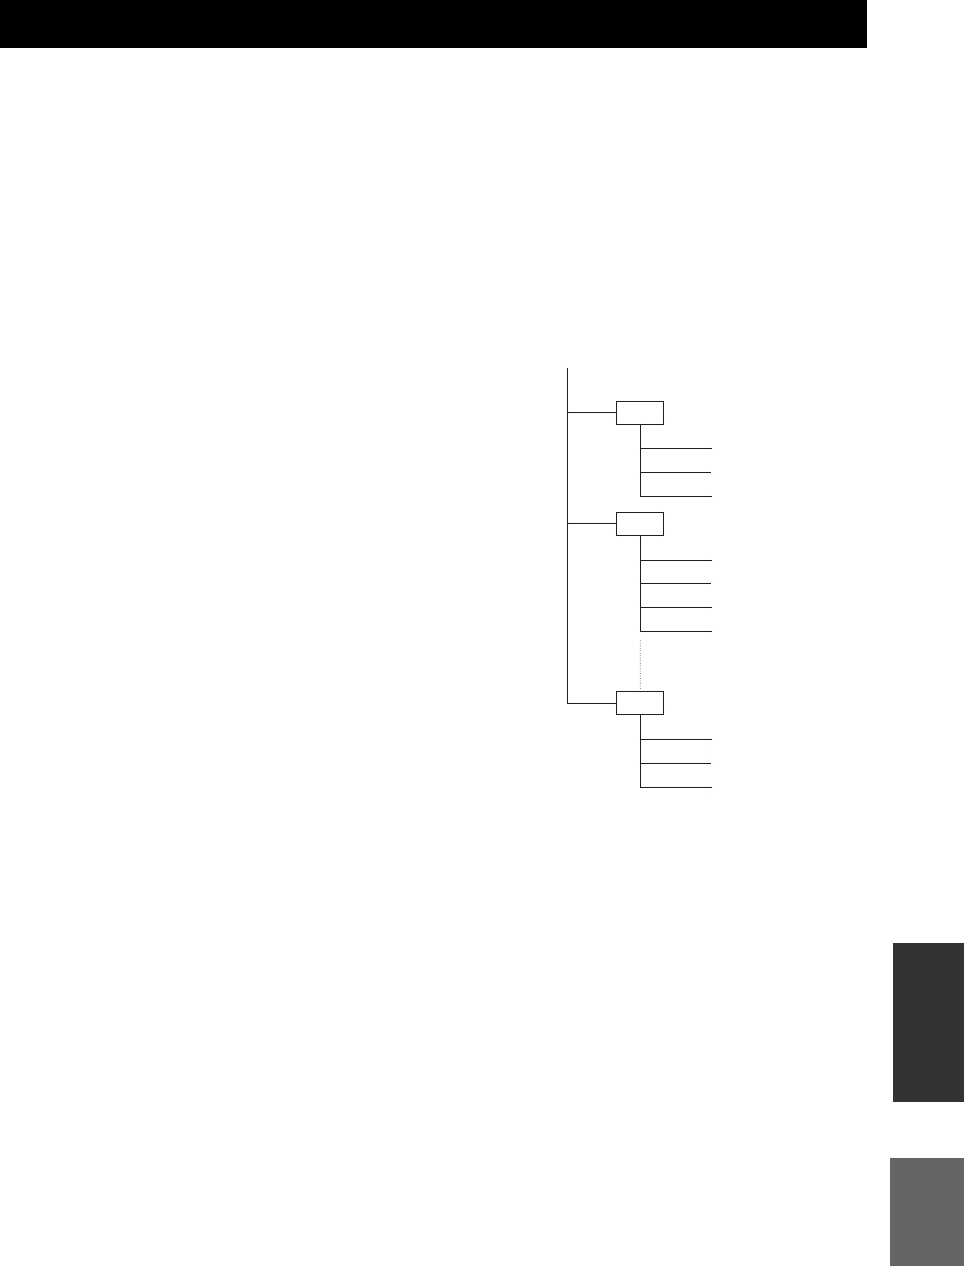
47 Es
Español
INFORMACIÓN
ADICIONAL
JPEG es un tipo de formato de archivo para almacenar archivos de imágenes fijas (fotos, ilustraciones, etc.).
El reproductor le permite reproducir archivos de imágenes fijas en formato JPEG.
■Formatos de archivo que no son
compatibles
• Las imágenes fijas en formatos distintos a JPEG (tales
como TIFF) no se pueden reproducir.
• Es posible que algunos archivos no se puedan
reproducir aunque estén en formato JPEG.
• Los archivos JPEG progresivos no se pueden
reproducir.
• No se pueden reproducir los archivos de imágenes en
movimiento y los archivos de audio, así como los
archivos de formato JPEG de movimiento, aunque sean
archivos JPEG.
■Otros archivos que no se pueden
reproducir
Es posible que no pueda reproducir algunas imágenes fijas
que haya creado, retocado, copiado o editado de cualquier
otra manera en su ordenador.
■Al reproducir archivos puede
experimentar algunos de los siguientes
indicios.
• Se puede tardar cierto tiempo en reproducir archivos,
dependiendo del número de carpetas, número de
archivos y volumen de datos de que se trate.
• La información EXIF no se mostrará. EXIF son las
siglas de Exchangeable Image File Format (Formato de
Archivo de Imágenes Intercambiables) y es un estándar
para almacenar información de intercambio en archivos
de imagen, especialmente aquellos que utilizan
compresión JPEG. (Para obtener más información
consulte http://exif.org).
■Si utiliza la unidad para reproducir un
disco CD-RW/R con imágenes fijas
almacenadas (grabadas)
• Con los discos CD-RW/R, en los que las imágenes fijas
se mezclan con música o películas, solamente podrá
reproducir las imágenes fijas. Es posible que no pueda
reproducir algunos de estos discos en absoluto.
• No se pueden reproducir los discos multisesión.
• Es posible que no pueda reproducir algunas imágenes
fijas que haya procesado (girado o guardado
sobrescribiendo otras imágenes) mediante software de
tratamiento de imágenes o algunas imágenes fijas que
haya importado de Internet o correo electrónico.
• Los discos que este reproductor puede reproducir
(reconocer) se limitan a las siguientes propiedades:
Contiene archivos de formato EXIF
Resolución de imagen: Entre 32 ×32 y
7680 ×4320 píxeles
Número máximo de carpetas: 64
Número máximo de archivos: 256
Tamaño de archivo: 20 MB o menos
■Estructura de las carpetas de imágenes
fijas (JPEG)
Puede reproducir imágenes fijas (JPEG) con esta unidad
creando una carpeta en el disco como se indica a
continuación. Las imágenes situadas en el directorio raíz
no se pueden reproducir.
ACERCA DEL FORMATO DE ARCHIVO JPEG
01 Folder
001.jpg
002.jpg
003.jpg
004.jpg
005.jpg
006.jpg
007.jpg
02 Folder
64 Folder
254.jpg
255.jpg
256.jpg
Root
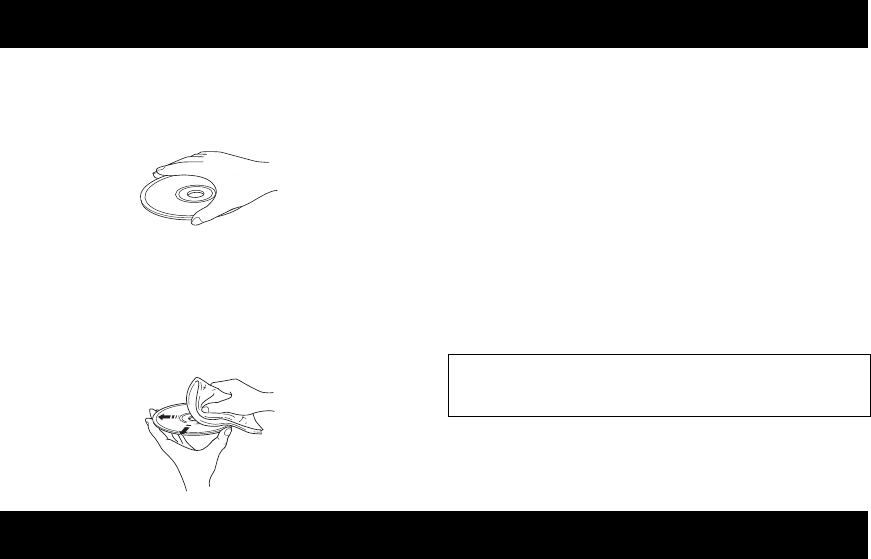
NOTAS SOBRE EL MANEJO DE DISCOS
48 Es
• Debe manipularlos con cuidado en todo momento para
no arañar la superficie de reproducción. No deforme
los discos.
• Para mantener la superficie de reproducción limpia,
pásele un trapo limpio y seco. No utilice ningún
limpiador para discos, pulverizador u otro líquido con
componentes químicos.
• No los limpie con un movimiento circular, hágalo del
centro hacia el borde.
• Utilice un bolígrafo de punta blanda para escribir en el
lado de la etiqueta del disco.
• Cuando no vaya a utilizar un disco, extráigalo de esta
unidad y guárdelo en su carátula.
• No exponga los discos a la luz directa del sol, a altas
temperaturas o a una elevada humedad durante mucho
tiempo.
■Para reproducir un CD de 8 cm
Colóquelo en el área interior adaptada de la bandeja del
disco. No coloque un CD normal (12 cm) encima de un
CD de 8 cm.
■Analógico
Sonido que no ha sido convertido a números.
El sonido analógico varía, mientras que el sonido digital
posee valores numéricos específicos. Estos terminales envían
audio a través de dos canales, el izquierdo y el derecho.
■Relación de aspecto
Relación de los tamaños vertical y horizontal de una
imagen mostrada. La relación horizontal-vertical de los
televisores convencionales es de 4:3, mientras que la de
las pantallas panorámicas es de 16:9.
■Vídeo componente
Terminales de entrada o salida de señales de vídeo
componente. Estas señales consisten en tres líneas, la señal de
luminancia (Y) y dos señales de diferencia de colores (PB/
CB, PR/CR), que permiten ofrecer vídeo de alta calidad.
■Menú de disco
Visualización en pantalla preparada para elegir imágenes, sonidos,
subtítulos, múltiples ángulos, etc., grabados en un BD/DVD.
■Dolby Digital
El sistema de sonido surround digital desarrollado por Dolby
Laboratories ofrece un audio multicanal totalmente independiente.
Con 3 canales delanteros (izquierdo, central y derecho) y 2 canales
surround estéreo, Dolby Digital proporciona cinco canales de
audio de gama completa. Con un canal adicional especial para
efectos graves (llamado LFE, o efecto de baja frecuencia), el
sistema posee un total de 5.1 canales (LFE cuenta como canal
0.1). Al emplear estéreo de 2 canales para los altavoces surround,
es posible obtener efectos de sonido en movimiento y ambientes
de sonido surround más precisos que con Dolby Surround.
■DTS (Digital Theater Systems)
Sistema de sonido surround digital desarrollado por Digital
Theater Systems, Inc., que proporciona audio de 5.1 canales
(máx.). Con una abundancia de datos de audio es capaz de
proporcionar unos efectos que suenan auténticos.
■HDMI
HDMI (High-Definition Multimedia Interface) es la
primera interfaz de audio/vídeo completamente digital sin
comprimir admitida por el sector. Proporcionando una
interfaz entre cualquier fuente (como, por ejemplo, un
receptor digital multimedia o controlador de AV) y un
monitor de audio/vídeo (como una televisión digital),
HDMI admite vídeo estándar, mejorado o de alta
definición, así como audio digital multicanal por medio de
un único cable. HDMI transmite todos los estándares de
HDTV de ATSC (Advanced Television Systems
Committee) y admite audio digital de 8 canales, con ancho
de banda de sobra para acomodar futuras mejoras y
requisitos.
Utilizado junto con HDCP (High-bandwidth Digital
Content Protection), HDMI ofrece una interfaz de audio/
vídeo segura que cumple los requisitos de seguridad de
proveedores de contenido y operadores de sistemas.
Para obtener más información sobre HDMI, visite el sitio
Web de HDMI en “www.hdmi.org/”.
■Entrelazado
El tipo más común de exploración usado en televisores.
Divide la pantalla en campos numerados pares e impares
para la exploración, y luego los combina para crear una
imagen (cuadro).
NOTAS SOBRE EL MANEJO DE DISCOS
Nota: No utilice limpiadores de lentes ya que podrían
dar lugar a un funcionamiento anómalo.
GLOSARIO

49 Es
Español
ESPECIFICACIONES
INFORMACIÓN
ADICIONAL
■JPEG (Joint Photographic Experts Group)
Sistema de compresión de imagen estandarizado
propuesto por el Joint Photographic Experts Group. Este
sistema puede reducir los datos de imagen a entre 1 y 10%
de sus tamaños originales, y funciona eficazmente con las
fotografías digitales.
■Control de los padres
Limita la reproducción de los discos según la edad de los
usuarios o el nivel de limitación de cada país. La
limitación varía de un disco a otro; cuando está activada,
se prohibirá la reproducción si el nivel del software es
mayor que el nivel establecido por el usuario.
■Exploración progresiva
Método de visualización simultánea de todas las líneas de
exploración de un cuadro, reduciendo el parpadeo
apreciable de las pantallas grandes y creando una imagen
más nítida y suave.
■Código de región
Muchos discos BD/DVD incluyen un código de región, de
forma que el propietario del copyright pueda controlar la
distribución del software BD/DVD solamente a regiones
en las que estén preparados para la distribución. Hay seis
códigos de región, que restringen a un reproductor BD a la
reproducción de un disco BD/DVD con el mismo código
de región.
■Formato VR
(Video Recording format)
Formato de grabación de vídeo DVD que permite editar datos
de vídeo DVD grabados en un disco. Para su reproducción se
necesita un reproductor compatible con el formato VR.
■R-840
SECCIÓN DEL AMPLIFICADOR
• Potencia de salida RMS mínima por canal
(6 Ω, 1 kHz, 10% THD) ............................................65 W + 65 W
• Sensibilidad/impedancia de entrada
PLAYER, etc .......................................................... 200 mV/47 kΩ
• Respuesta de frecuencia
PLAYER, etc ...........................................20 Hz a 20 kHz ± 0,5 dB
• Distorsión armónica total
PLAYER, etc (30 W/6 Ω)......................................0,04 % o menos
• Relación señal a ruido (red IHF-A)
PLAYER (200 mV, entrada en cortocircuito) ............100 dB o más
SECCIÓN DEL SINTONIZADOR
GENERALIDADES
• Alimentación........................................................... CA 230 V, 50 Hz
• Consumo..................................................................................115 W
• Dimensiones (An × Al × Prof).......................... 215 × 110 × 348 mm
• Peso...........................................................................................5,7 kg
• Consumo en espera...................................................menos de 0,3 W
■BD-940
SECCIÓN DEL REPRODUCTOR
• Salida De Audio
Nivel de salida (1 kHz 0 dB)......................................... 2 V (± 0,3)
Relación señal a ruido............................................. más de 100 dB
Gama dinámica (48 kHz, 24 bits) ............................. más de 95 dB
Distorsión armónica total ..................................menos del 0,005 %
Respuesta de frecuencia
CD-DA .....................................................................20 Hz–20 kHz
BD/DVD (48 kHz) ...................................................20 Hz–22 kHz
BD/DVD (96 kHz) ...................................................20 Hz–44 kHz
• Salida de vídeo
Compuesta...................................................................1 Vp-p/75 Ω
Componente ................................................................1 Vp-p/75 Ω
0,7 Vp-p/75 Ω (PB, PR)
• Salida HDMI ...................................................... Conector tipo A x 1
480p(576p)/720p/1080i/1080p/1080p@24 Hz,
Soporte Deep Color, x.v.Color
• USB ................................ Utilizado para:
1) Reproducción de contenidos BD-LIVE/
BonusView
2) Actualización del firmware
General
• Alimentación...........................................................CA 230 V, 50 Hz
• Consumo ................................................................................... 20 W
• Consumo en espera ..................................................... menos de 1 W
• Dimensiones (An × Al × Prof) ..........................215 × 108 × 318 mm
• Peso .......................................................................................... 3,4 kg
Las especificaciones están sujetas a cambios sin previo aviso.
ESPECIFICACIONES
• Gama de sintonización.......................................87,50 a 108,00 MHz

50 Es
ESPECIFICACIONES
iPod™
“iPod” es una marca comercial de Apple Inc., registrada en los
EE.UU. y en otros países.
“Made for iPod” significa que un accesorio electrónico ha sido
diseñado para conectarse específicamente a iPod y ha sido
homologado por el desarrollador para cumplir las
especificaciones de funcionamiento de Apple.
Apple no se hace responsable del funcionamiento de este
dispositivo o de si cumple las normas reguladoras y de seguridad.
El material audiovisual puede constar de obras protegidas por
copyright que no deben ser grabadas sin la autorización del
propietario del copyright. Consulte la legislación pertinente de su
país.
Este producto incorpora tecnología de protección del copyright
que está protegida por patentes de EE.UU. y otros derechos de
propiedad intelectual. El uso de esta tecnología de protección del
copyright debe contar con la autorización de Macrovision, y ha
sido diseñada para ser usada en casa y otros lugares de visión
limitada, a menos que Macrovision autorice lo contrario. El
cambio de ingeniería o el desmontaje están prohibidos.
Fabricado bajo licencia de Dolby Laboratories. “Dolby” y el
símbolo de la doble D son marcas comerciales de Dolby
Laboratories.
Fabricado bajo licencia con las patentes de EE.UU. con los
números: 5,451,942; 5,956,674; 5,974,380; 5,978,762;
6,226,616; 6,487,535; 7,392,195; 7,272,567; 7,333,929;
7.212.872 y otras patentes de EE.UU. e internacionales emitidas
o pendientes. DTS es una marca registrada y los logotipos y el
símbolo DTS, DTS-HD y DTS-HD Master Audio | Essential son
marcas comerciales de DTS, Inc. ©1996-2008 DTS, Inc. Todos
los derechos reservados.
es una marca comercial.
“El logotipo BD-LIVE” es una marca comercial de Blu-ray Disc
Association.
“BONUSVIEW” es una marca comercial de Blu-ray Disc Association.
es una marca comercial de DVD Format/Logo Licensing
Corporation.
HDMI, el logotipo HDMI y High-Definition Multimedia
Interface son marcas comerciales o marcas comerciales
registradas de HDMI Licensing LLC.
“Los logotipos x.v.Color” y “x.v.Color” son marcas comerciales.
“AVCHD” y el logotipo “AVCHD” son marcas comerciales de
Panasonic Corporation y Sony Corporation.
Java y todas las marcas comerciales y logotipos basados en Java
son marcas comerciales o marcas comerciales registradas de Sun
Microsystems, Inc. en Estados Unidos y/o otros países.
Este producto está autorizado bajo la licencia de cartera de
patentes de AVC y la licencia de cartera de patentes de VC-1 para
el uso personal y no comercial de un usuario para (i) codificar
vídeo en conformidad con la norma AVC y la norma VC-1
(“AVC/VC-1 Video”) y/o (ii) descodificar AVC/VC-1 Video que
fue codificado por un usuario que participaba en una actividad
personal y no comercial y/o se obtuvo de un proveedor de vídeo
autorizado para suministrar AVC/VC-1 Video. No se otorga
ninguna licencia ni estará implícita para ningún otro uso. Se
puede obtener información adicional de MPEG LA, LLC.
Vea http://www.mpegla.com.
Patentes de EE.UU. con los números: 6,836,549; 6,381,747;
7,050,698; 6,516,132; y 5,583,936

51 Es
Español
INFORMACIÓN
ADICIONAL
■Idioma (abreviación), número de código
■País, número de código, abreviación
LISTAS DE IDIOMAS Y PAÍSES
Lista de idiomas
Japonés (ja), 1001 Butanés (dz), 0426 Kirguiz (ky), 1125 Sinhala(si), 1909
Inglés (en), 0514 Esperanto (eo), 0515 Latín (la), 1201 Eslovaco (sk), 1911
Francés (fr), 0618 Estonio (et), 0520 Lingala (ln), 1214 Esloveno (sl), 1912
Alemán (de), 0405 Euskera (eu), 0521 Laosiano (lo), 1215 Samoano (sm), 1913
Italiano (it), 0920 Persa (fa), 0601 Lituano (lt), 1220 Shona (sn), 1914
Español (es), 0519 Finés (fi), 0609 Letón (lv), 1222 Somalí (so), 1915
Chino (zh), 2608 Fiyiano (fj), 0610 Malgache (mg), 1307 Albanés (sq), 1917
Holandés (nl), 1412 Feroés (fo), 0615 Maorí (mi), 1309 Serbio (sr), 1918
Portugués (pt), 1620 Frisio (fy), 0625 Macedonio (mk), 1311 Siswati (ss), 1919
Sueco (sv), 1922 Irlandés (ga), 0701 Malabar (ml), 1312 Sesotho (st), 1920
Ruso (ru), 1821 Gaélico escocés (gd), 0704 Mongol (mn), 1314 Sondanés (su), 1921
Coreano (ko), 1115 Gallego (gl), 0712 Moldavo (mo), 1315 Swahili (sw), 1923
Griego (el), 0512 Guaraní (gn), 0714 Marathi (mr), 1318 Tamil (ta), 2001
Afar (aa), 0101 Gujarati (gu), 0721 Malayo (ms), 1319 Telugu (te), 2005
Abjasio (ab), 0102 Hausa (ha), 0801 Maltés (mt), 1320 Tayiko (tg), 2007
Afrikaans (af), 0106 Hindi (hi), 0809 Birmano (my), 1325 Tailandés (th), 2008
Amárico (am), 0113 Croata (hr), 0818 Nauriano (na), 1401 Tigrinya (ti), 2009
Árabe (ar), 0118 Húngaro (hu), 0821 Nepalí (ne), 1405 Turkmeno (tk), 2011
Asamés (as), 0119 Armenio (hy), 0825 Noruego (no), 1415 Tagalo (tl), 2012
Aymara (ay), 0125 Interlingua (ia), 0901 Occitano (oc), 1503 Setchwana (tn), 2014
Azerí (az), 0126 Interlingue (ie), 0905 Oromo (om), 1513 Tonga (to), 2015
Bashkir (ba), 0201 Inupiak (ik), 0911 Oriya (or), 1518 Turco (tr), 2018
Bielorruso (be), 0205 Indonesio (in), 0914 Panyabí (pa), 1601 Tsonga (ts), 2019
Búlgaro (bg), 0207 Islandés (is), 0919 Polaco (pl), 1612 Tártaro (tt), 2020
Bihari (bh), 0208 Hebreo (iw), 0923 Pastún, Pushto (ps), 1619 Twi (tw), 2023
Bislama (bi), 0209 Yidis (ji), 1009 Quechua (qu), 1721 Ucraniano (uk), 2111
Bengalí (bn), 0214 Javanés (jw), 1023 Reto-romance (rm), 1813 Urdu (ur), 2118
Tibetano (bo), 0215 Georgiano (ka), 1101 Kirundi (rn), 1814 Uzbeko (uz), 2126
Bretón (br), 0218 Kazajo (kk), 1111 Rumano (ro), 1815 Vietnamita (vi), 2209
Catalán (ca), 0301 Groenlandés (kl), 1112 Kinyarwanda (rw), 1823 Volapuk (vo), 2215
Corso (co), 0315 Camboyano (km), 1113 Sánscrito (sa), 1901 Volof (wo), 2315
Checo (cs), 0319 Canarés (kn), 1114 Sindhi (sd), 1904 Xhosa (xh), 2408
Galés (cy), 0325 Cachemiro (ks), 1119 Sango (sg), 1907 Yoruba (yo), 2515
Danés (da), 0401 Kurdo (ku), 1121 Serbocroata (sh), 1908 Zulú (zu), 2621
Lista de países
Argentina, 0118, ar Finlandia, 0609, fi Malasia, 1325, my Singapur, 1907, sg
Australia, 0121, au Francia, 0618, fr México, 1324, mx España, 0519, es
Austria, 0120, at Alemania, 0405, de Países Bajos, 1412, nl Suecia, 1905, se
Bélgica, 0205, be Hong Kong, 0811, hk Nueva Zelanda, 1426, nz Suiza, 0308, ch
Brasil, 0218, br India, 0914, in Noruega, 1415, no Taiwán, 2023, tw
Canadá, 0301, ca Indonesia, 0904, id Pakistán, 1611, pk Tailandia, 2008, th
Chile, 0312, cl Italia, 0920, it Filipinas, 1608, ph Reino Unido, 0702, gb
China, 0314, cn Japón, 1016, jp Portugal, 1620, pt EE.UU., 2119, us
Dinamarca, 0411, dk Corea, Repúbilca de, 1118, kr Rusia, 1821, ru

LISTAS DE IDIOMAS Y PAÍSES
52 Es
Garantía limitada para el Área Económica Europea (AEE) y Suiza
Gracias por haber elegido un producto Yamaha. En el caso poco probable de que su producto Yamaha necesite el servicio que concede la garantía, póngase
en contacto por favor con el concesionario a quien adquirió el producto. Si usted tiene alguna dificultad, póngase en contacto por favor con la oficina
representativa de Yamaha en su país. Podrá encontrar todos los detalles necesarios en nuestros sitios Web (http://www.yamaha-hifi.com/ o
http://www.yamaha-uk.com/ para los residentes del Reino Unido).
El producto tiene una garantía de dos años, a partir de la fecha de la compra original, que cubre las reparaciones de las averías que pueda tener debido a
defectos en la mano de obra o en los materiales empleados en su fabricación. Yamaha se compromete, sujeto a las condiciones listadas más abajo, a reparar
el producto o cualquier pieza (o piezas) que tenga defectos, o a sustituirlo, a discreción de Yamaha, sin cobrar ningún honorario por las piezas o la mano de
obra. Yamaha se reserva el derecho de reemplazar un producto por otro de clase y/o precio y condiciones similares, en el caso de que éste no se fabrique
más o se considere que las reparaciones resultan poco económicas.
Condiciones de la garantía
1 El producto defectuoso DEBERÁ ir acompañado de la factura o recibo de venta original (que muestre la fecha de la compra, el código del producto y el
nombre del concesionario), junto con una explicación que describa detalladamente la avería. Si falta esta prueba clara de la compra, Yamaha se reserva
el derecho a no proveer el servicio de reparaciones gratis, y el producto podrá ser devuelto al cliente corriendo éste con todos los gastos relacionados
con el envío.
2 El producto DEBERÁ haber sido adquirido en el establecimiento de un concesionario Yamaha AUTORIZADO dentro del Área Económica Europea
(AEE) o Suiza.
3 El producto no deberá haber sido sometido a ninguna modificación ni alteración, a menos que ésta haya sido autorizada por escrito por Yamaha.
4 De esta garantía se excluye lo siguiente:
a. El mantenimiento periódico y la reparación o sustitución de piezas debidos al desgaste natural.
b. Los daños debidos a:
(1) Reparaciones realizadas por el propio cliente o por un tercero que no cuente con ninguna autorización.
(2) Embalaje inadecuado o maltrato, cuando el producto está siendo transportado desde el lugar de residencia del cliente. Tenga en cuenta que el
cliente es el responsable de embalar el producto adecuadamente cuando éste es devuelto para ser reparado.
(3) Mal uso, incluyendo, pero sin limitarse a:
(a) no usar el producto de forma normal o no seguir las instrucciones de uso, mantenimiento y almacenamiento apropiadas indicadas por Yamaha, y
(b) instalación o uso del producto de forma inconsistente con las normas técnicas o de seguridad vigentes en el país donde éste se utiliza.
(4) Accidentes, rayos, agua, fuego, ventilación inadecuada, fuga de baterías o cualquier otra causa fuera del control de Yamaha.
(5) Defectos del sistema en el que se incorpora este producto e/o incompatibilidad con productos de terceros.
(6) Uso de un producto importado en la AEE y/o Suiza, no por Yamaha, donde ese producto no cumple con las normas técnicas o de seguridad del
país donde se usa y/o con la especificación estándar de un producto vendido por Yamaha en la AEE y/o en Suiza.
5 Cuando las garantías del país donde se compra el producto y del país donde éste se usa son diferentes se aplicará la garantía del país donde se usa el
producto.
6 Yamaha no se hará responsable de ninguna pérdida o daño directo, emergente o de cualquier otro tipo; sólo se hará responsable de la reparación o
sustitución del producto.
7 Haga una copia de seguridad de cualquier configuración o datos personalizados, ya que Yamaha no se hará responsable de ninguna alteración o pérdida
que tal configuración o datos puedan sufrir.
8 Esta garantía no afecta a los derechos legales del consumidor bajo las leyes nacionales aplicables vigentes, ni a los derechos del consumidor contra el
concesionario surgidos de su contrato de venta/compra.
Información para usuarios sobre recolección y disposición de
equipamiento viejo y baterías usadas
Estos símbolos en los productos, embalaje, y/o documentación que se acompañe significan que los
productos electrónicos y eléctricos usados y las baterías usadas no deben ser mezclados con desechos
domésticos corrientes.
Para el tratamiento, recuperación y reciclado apropiado de los productos viejos y las baterías usadas, por
favor llévelos a puntos de recolección aplicables, de acuerdo a su legislación nacional y las directivas
2002/96/EC y 2006/66/EC.
Al disponer de estos productos y baterías correctamente, ayudará a ahorrar recursos valiosos y a prevenir
cualquier potencial efecto negativo sobre la salud humana y el medio ambiente, el cual podría surgir de un
inapropiado manejo de los desechos.
Para más información sobre recolección y reciclado de productos viejos y baterías, por favor contacte a su
municipio local, su servicio de gestión de residuos o el punto de venta en el cual usted adquirió los
artículos.
[Información sobre la disposición en otros países fuera de la Unión Europea]
Estos símbolos sólo son válidos en la Unión Europea. Si desea deshacerse de estos artículos, por favor
contacte a sus autoridades locales y pregunte por el método correcto de disposición.
Nota sobre el símbolo de la batería (ejemplos de dos símbolos de la parte inferior)
Este símbolo podría ser utilizado en combinación con un símbolo químico. En este caso el mismo obedece
a un requerimiento dispuesto por la Directiva para el elemento químico involucrado.

i Nl
1 Om er zeker van te kunnen zijn dat u de optimale prestaties uit
uw toestel haalt, dient u deze handleiding zorgvuldig door te
lezen. Bewaar de handleiding op een veilige plek zodat u er later
nog eens iets in kunt opzoeken.
2 Installeer dit geluidssysteem op een goed geventileerde, koele,
droge en schone plek uit de buurt van direct zonlicht,
warmtebronnen, trillingen, stof, vocht en kou. Houd de volgende
minimale ruimtes aan voor voldoende ventilatie.
Boven: 30 cm (alleen R-840)
Achter: 10 cm
Zijkanten: 10 cm
3 Plaats dit toestel uit de buurt van andere elektrische apparatuur,
motoren of transformatoren om storend gebrom te voorkomen.
4 Stel dit toestel niet bloot aan plotselinge
temperatuurschommelingen van koud naar warm en plaats het
toestel niet in een omgeving met een hoge vochtigheidsgraad
(bijv. in een ruimte met een luchtbevochtiger) om te voorkomen
dat zich binnenin het toestel condens vormt, wat zou kunnen
leiden tot elektrische schokken, brand, schade aan dit toestel en/
of persoonlijk letsel.
5 Vermijd plekken waar andere voorwerpen op het toestel kunnen
vallen, of waar het toestel bloot staat aan druppelende of
spattende vloeistoffen. Plaats de volgende dingen niet bovenop
dit toestel:
– Andere componenten, daar deze schade kunnen veroorzaken
en/of de afwerking van dit toestel kunnen doen verkleuren.
– Brandende voorwerpen (bijv. kaarsen), daar deze brand,
schade aan dit toestel en/of persoonlijk letsel kunnen
veroorzaken.
– Voorwerpen met vloeistoffen, daar deze elektrische schokken
voor de gebruiker en/of schade aan dit toestel kunnen
veroorzaken als de vloeistof in het toestel terecht komt.
6 Dek het toestel niet af met een krant, tafellaken, gordijn enz.
zodat de koeling niet belemmerd wordt. Als de temperatuur
binnenin het toestel te hoog wordt, kan dit leiden tot brand,
schade aan het toestel en/of persoonlijk letsel.
7 Steek de stekker van dit toestel pas in het stopcontact als alle
aansluitingen gemaakt zijn.
8 Gebruik het toestel niet wanneer het ondersteboven is geplaatst.
Het kan hierdoor oververhit raken wat kan leiden tot schade.
9 Gebruik geen overdreven kracht op de schakelaars, knoppen en/
of snoeren.
10 Wanneer u de stekker uit het stopcontact haalt, moet u aan de
stekker zelf trekken, niet aan het snoer.
11 Maak dit toestel niet schoon met chemische oplosmiddelen; dit
kan de afwerking beschadigen. Gebruik alleen een schone, droge
doek.
12 Gebruik alleen het op dit toestel aangegeven voltage. Gebruik
van dit toestel bij een hoger voltage dan aangegeven is gevaarlijk
en kan leiden tot brand, schade aan het toestel en/of persoonlijk
letsel. Yamaha aanvaardt geen aansprakelijkheid voor enige
schade veroorzaakt door gebruik van dit toestel met een ander
voltage dan hetgeen aangegeven staat.
13 Om schade door blikseminslag te voorkomen dient u de stekker
uit het stopcontact te halen wanneer het onweert.
14 Probeer niet zelf wijzigingen in dit toestel aan te brengen of het te
repareren. Neem contact op met erkend Yamaha servicepersoneel
wanneer u vermoedt dat het toestel reparatie behoeft. Probeer in
geen geval de behuizing open te maken.
15 Wanneer u dit toestel voor langere tijd niet gebruikt (bijv.
vakantie), dient u de stekker uit het stopcontact te halen.
16 Lees het hoofdstuk “PROBLEMEN OPLOSSEN” over veel
voorkomende vergissingen bij de bediening voor u de conclusie
trekt dat het toestel een storing of defect vertoont.
17 Voor u deze unit verplaatst, dient u op te drukken om het
apparaat op stand-by te zetten en de stekker uit het stopcontact te
halen.
18 Er vormt zich condens wanneer de omgevingstemperatuur
plotseling verandert. Haal de stekker uit het stopcontact en laat
het toestel met rust.
19 Wanneer het toestel langere tijd achter elkaar gebruikt wordt, kan
het warm worden. Schakel de stroom uit en laat het toestel
afkoelen.
20 Installeer dit toestel in de buurt van een stopcontact op een plek
waar u de stekker gemakkelijk kunt bereiken.
21 De batterijen mogen niet worden blootgesteld aan hitte, zoals
door direct zonlicht, vuur of iets dergelijks.
22 Een te hoge geluidsdruk (volume) van een oortelefoon of
hoofdtelefoon kan leiden tot gehoorschade.
VEILIGHEIDSINFORMATIE BETREFFENDE DE LASER
Dit apparaat is voorzien van een laser. Om oogletsel te
voorkomen, mag u het verwijderen van de afdekking en het
uitvoeren van reparaties aan deze inrichting uitsluitend door een
bevoegde servicemonteur laten uitvoeren.
GEVAAR
Zichtbare laserstraling indien geopend. Voorkom rechtstreekse
blootstelling aan de laserstraal. Als dit toestel is aangesloten op
een stopcontact, houdt u uw ogen niet dicht bij de opening van de
disklade en andere openingen om naar binnen te kijken.
OPGELET: LEES HET VOLGENDE VOOR U DE UNIT IN GEBRUIK
NEEMT.
De stroomvoorziening van deze unit is niet afgesloten zolang
de stekker in het stopcontact zit, ook al is het apparaat zelf
uitgeschakeld. Dit is de zogenaamde stand-bystand. In deze
toestand is het toestel ontworpen een zeer kleine hoeveelheid
stroom te verbruiken.
WAARSCHUWING
OM RISICO’S VAN BRAND OF ELEKTRISCHE
SCHOKKEN TE VERMINDEREN, MAG U DIT TOESTEL
IN GEEN GEVAL BLOOTSTELLEN AAN VOCHT OF
REGEN.
De lasercomponent in dit product is in staat stralen te
produceren die de limiet voor Klasse 1 overstijgen.
LASER specificatie:
Klasse 1 LASER product
Golflengte: 788 nm (CD's)/654 nm (DVD's)/405 nm
(BD's)
Laservermogen: Er wordt geen risicovolle straling
uitgezonden met de
veiligheidsbescherming

1 Nl
Nederlands
VOORBEREIDINGEN
INLEIDING
BEDIENING VAN
DE TUNER
OVERIGE
BEWERKINGEN
AANVULLENDE
INFORMATIE
BASISBEDIENING
EIGENSCHAPPEN................................................ 2
BIJGELEVERDE ACCESSOIRES...................... 2
OVER DISKS.......................................................... 3
De type disks die op deze speler gebruikt kunnen
worden ................................................................... 3
Disks die niet op deze speler kunnen worden
afgespeeld.............................................................. 3
BEDIENINGSELEMENTEN EN FUNCTIES.... 4
Receiver (R-840)........................................................ 4
Bd-speler (BD-940) ................................................... 5
Afstandsbediening ..................................................... 6
VOORBEREIDINGEN.......................................... 8
Luidsprekers/externe componenten/antennes
aansluiten............................................................... 8
Aansluiten van een recorder (CDR, MDR, enz.),
AV-recorder of decoder (CDR, MDR, enz.) .......... 9
Aansluiten van stroomkabels..................................... 9
Aansluiten van een iPod™ ...................................... 10
Bezig met de verbinding naar het internet............... 10
Plaatsen van batterijen in de afstandsbediening ...... 11
Gebruiken van de afstandsbediening ....................... 11
Instellen van de klok................................................ 12
HET SYSTEEM INSTELLEN............................ 13
Zet de tv en het systeem aan .................................... 13
Instellen van het tv-scherm...................................... 13
(OSD)-schermweergavetaal..................................... 13
Taalinstellingen voor audio, ondertiteling en het
diskmenu ............................................................. 14
BEDIENING VAN HET TOESTEL ................... 15
Bediening basissysteem........................................... 15
De helderheid van het display op het voorpaneel
instellen ............................................................... 16
Gebruiken van een hoofdtelefoon............................ 16
DISKBEWERKINGEN ....................................... 17
Gebruiken van de beeldschermaanduidingen .......... 17
Bediening voor het afspelen .................................... 17
Afspelen pauzeren ................................................... 17
Terugspoelen en snel vooruitspoelen....................... 18
Selecteren van hoofdstukken en tracks.................... 18
BD/DVD-menu’s ..................................................... 18
Vertraagde weergave................................................ 18
Beeld-voor-beeld weergave ..................................... 18
Selecteren van geluid en taal ................................... 19
Selecteren van ondertiteling..................................... 19
Selecteren van camerahoeken.................................. 19
Herhaald afspelen .................................................... 20
Herhaal het afspelen van een specifiek gedeelte
(A-B herhalen)..................................................... 20
Afspelen van JPEG diavoorstellingen ..................... 21
Stilstaande beelden in een geselecteerde map
afspelen................................................................ 21
Films afspelen die opgenomen zijn op een
DVD-R/DVD-RW ............................................... 21
Het gebruik van “Function Control Screen”
voor BD/DVD...................................................... 23
Het gebruik van “Functies”-menu voor
audio-cd ............................................................... 23
Bekijken van de diskinformatie ............................... 24
Genieten van BONUSVIEW en BD-LIVE ............. 24
FM AFSTEMMEN................................................26
Automatisch afstemmen .......................................... 26
Handmatig afstemmen ............................................. 26
Automatisch voorprogrammeren ............................. 26
Handmatig voorprogrammeren................................ 27
Selecteren van voorkeurzenders .............................. 27
AFSTEMMEN OP RADIO DATA
SYSTEEM-ZENDERS
(ALLEEN EUROPESE MODELLEN)...........28
Tonen van Radio Data Systeeminformatie .............. 28
Gebruiken van de TP (verkeersprogramma)
dataservice ........................................................... 29
CT (kloktijd) instellingen ........................................ 29
INSTELLEN VAN DE TIMER............................30
Instellen van de kloktimer ....................................... 30
Instellen van de slaaptimer ...................................... 31
BEDIENEN iPod™ ...............................................32
Gebruiken iPod™ .................................................... 32
INSTELLINGEN VAN DE BD-SPELER ...........33
Audio-Video Instellingen......................................... 33
Snelstart ................................................................... 35
Automatisch Uitschakelen ....................................... 35
HDMI Instelling ...................................................... 35
Afspeelinstellingen .................................................. 35
Communicatie-Instelling ......................................... 36
Versie ....................................................................... 39
Beheer USB-Geheugen............................................ 39
Software-Update ...................................................... 39
Systeemreset ............................................................ 39
DE INSTELLINGEN VERANDEREN BIJ
HET AANSLUITEN VAN EEN HDMI
OF COMPONENTENKABEL ........................41
PROBLEMEN OPLOSSEN.................................42
Receiver (R-840)...................................................... 42
Afstandsbediening ................................................... 44
Bd-speler (BD-940) ................................................. 44
Netwerk ................................................................... 46
Meldingen met betrekking tot BD-disk en
DVD-disk............................................................. 46
OVER DE JPEG BESTANDSINDELING..........47
OPMERKINGEN OVER HET OMGAAN
MET COMPACT DISKS .................................48
WOORDENLIJST ................................................48
TECHNISCHE GEGEVENS...............................49
TALENLIJST, LANDENLIJST...........................51
Talenlijst .................................................................. 51
Landenlijst ............................................................... 51
INHOUD
INLEIDING
VOORBEREIDINGEN
BASISBEDIENING
BEDIENING VAN DE TUNER
OVERIGE BEWERKINGEN
AANVULLENDE INFORMATIE

EIGENSCHAPPEN
2 Nl
INLEIDING
Receiver (R-840)
•Minimum RMS uitgangsvermogen per kanaal
65W + 65W (6Ω, 1kHz, 10% THD)
•30 FM-voorkeurzenders
•iPod afspeelbaarheid (met functie voor
opladen)
•Pure Direct-stand
•Regelbare displayhelderheid
Bd-speler (BD-940)
•Speelt Blu-ray disks, dvd’s, audio cd’s
•Ondersteunt BD-LIVE. Wanneer u een disk
gebruikt die geschikt is voor BD-LIVE, kunt u
de bd-speler op het internet aansluiten en
verschillende gegevens downloaden
•Ondersteunt HDMI bedieningsfunctie. U kunt
de receiver en de bd-speler bedienen met een
afstandsbediening van de tv die aangesloten
is op een HDMI-kabel
•Bedieningsfuncties gekoppeld aan de
receiver, zoals Pure Direct-stand, Regelbare
displayhelderheid en INPUT-modus
■Over deze handleiding
• In deze handleiding wordt “R-840” beschreven als een “receiver” en “BD-940” wordt beschreven als “bd-speler”.
• In deze handleiding wordt uitgelegd hoe dit systeem gebruikt kan worden met behulp van de afstandsbediening, behalve als deze niet
beschikbaar is. Sommige van de beschreven handelingen kunnen ook worden uitgevoerd met de toetsen op het voorpaneel.
•y geeft een bedieningstip aan.
• Opmerkingen bevatten belangrijke informatie betreffende veiligheid en bedieningsinstructies.
• Deze handleiding is gedrukt voordat uw apparaat geproduceerd werd. Daarom kunnen ontwerp en specificaties gewijzigd zijn als
gevolg van verbeteringen enz. Als de handleiding en het product van elkaar verschillen, heeft het product de prioriteit.
Bij dit product worden de volgende accessoires meegeleverd. Voor u dit systeem gaat aansluiten, moet u controleren of u alle volgende
onderdelen heeft ontvangen.
EIGENSCHAPPEN
BIJGELEVERDE ACCESSOIRES
1234
56
90
78
E
NT
E
RCL
E
AR
MUT
E
E
NT
E
R
VOLUME
AUX
TUN
E
R
iPod SHUFFLE
R
EPE
AT
MENU
ENTER
E
O
NM
O
N
O
M
E
M
O
R
Y
PRESET TUNING
DISC
DISPLAY TIMER SLEEP DIMMER
OPTION PURE DIRECT
AUDI O SUBTITLE ANGLE
REPEAT
ON SCREEN
RETURN
PinP SETUP
ABCD
EXIT
TOP MENU/TITLE LIST
POP UP MENU
FM-binnenantenne
Batterijen (x2)
(AAA, R03, UM-4)
Afstandsbediening
* De dockdeksel is bij dit apparaat inbegrepen om de
iPod-dock te bedekken wanneer deze niet gebruikt
wordt.
iPod
INPUT VOLUME
Dockdeksel*
Receiver
Systeembedieningskabel
(0,6 m)
RCA-stereokabel
(1,0 m)
Composiet videokabel
(1,5 m)

3 Nl
Nederlands
INLEIDING
• De volgende disks kunnen niet worden afgespeeld op
deze speler. Gebruik geen adapter van 8 tot 12 cm.
•
Gebruik disks die voldoen aan de juiste standaarden zoals
aangegeven door de aanwezige officiële logo’s op het
label van de disk. Het afspelen van disks die niet aan deze
standaarden voldoen, is niet gegarandeerd. Bovendien
wordt de beeld- en geluidskwaliteit ook niet gegarandeerd,
ook al kunnen deze disks worden afgespeeld.
*1 Deze speler is ontwikkeld voor het afspelen van audio-cd’s die
voldoen aan de cd (compact disk)-standaarden. Cd’s die
voorzien zijn van een signaal ter bescherming van het
auteursrecht (kopieer controlesignaal) kunnen mogelijk niet
op deze speler worden afgespeeld.
*2 Zie “OVER DE JPEG BESTANDSINDELING” op bladzijde 47.
• BD/DVD-videospelers en disks zijn voorzien van
regiocodes die aangeven in welke regio een disk kan
worden afgespeeld.
• BD/DVD Videobediening en functies kunnen
verschillen van de uitleg in deze handleiding en
sommige bediening kan verboden zijn door de
instellingen van de fabrikant van de disks.
• Als een menuscherm of bedieningsinstructies tijdens
het afspelen van een disk worden weergegeven, volg
dan de weergegeven bedieningsprocedure.
• Het audiocomponent van een DVD-video die
opgenomen is op 96 kHz (lineair PCM) wordt
weergegeven als 48 kHz audio tijdens het afspelen.
Opmerkingen
• Afhankelijk van de disk is het afspelen van sommige disks aan
de linkerkant van de tabelkolom niet mogelijk.
• “Finalize” verwijst naar een recorder die een opgenomen disk
verwerkt zodat het net als in deze speler ook in andere BD
spelers/recorders kan worden afgespeeld. Alleen DVD-disks die
voltooid zijn, kunnen in deze speler worden afgespeeld. (Deze
speler heeft geen functie om disks te voltooien.)
De volgende disks zullen niet of niet goed op deze speler
worden afgespeeld. Als zo’n disk per ongeluk wordt
afgespeeld, kan er schade aan de luidsprekers ontstaan.
Disks met ongewone vormgeving kunnen
niet worden afgespeeld.
Disks met ongewone vormgeving (hartvormig, zeskantig,
enz.) kunnen niet worden afgespeeld. Het gebruik van
dergelijke disks zorgt voor storing.
De volgende BD/DVD-videodisks kunnen
niet worden afgespeeld.
• disks waarvan de regiocode/nummer niet overeenkomt
met de speler.
• disks die illegaal gemaakt zijn.
• disks die voor commercieel gebruik zijn opgenomen.
OVER DISKS
De type disks die op deze speler
gebruikt kunnen worden
Type disk Opname-
indeling Inhoud Diskformaat
BD-video -- Audio +
Video (film)
12 cm
8 cm
BD-RE DL
BD-R DL
BDMV-
indeling
DVD-video Video-
indeling
Audio +
Video (film)
12 cm
8 cm
DVD+RW/
DVD+R
DVD+R DL
DVD-R DL
DVD-RW/
DVD-R
Video/VR/
AV C H D
indeling
(alleen
voltooide
disks)
Audio +
Video (film)
12 cm
8 cm
Audio-cd*1 Audio-cd
(CD-DA)
Audio 12 cm
8 cm
CD-RW/CD-R Audio-cd
(CD-DA)
Audio
JPEG*2 Stilstaand
beeld (JPEG-
bestand)
Regio beheerinformatie
Model BD-Video DVD-Video
Europa Regiocode “B” of
“ALL”
Regionummer “2”
of “ALL”
Rusland Regiocode “C” of
“ALL”
Regionummer “5”
of “ALL”
2ALL
5ALL
Disks die niet op deze speler
kunnen worden afgespeeld
CDG, Video-cd, foto-cd, CD-ROM, SVCD,
SA-CD, PD, CDV, CVD, DVD-RAM, dvd-audio,
BD-RE met de cassette, CD-MP3, CD-WMA

BEDIENINGSELEMENTEN EN FUNCTIES
4 Nl
■Voorpaneel
1INPUT
Hiermee kunt u een ingangsbron selecteren.
2Aan/Stand-byindicator
Licht groen op wanneer de receiver is aangezet. Licht
amber op wanneer de receiver in stand-bystand staat.
3TP-indicator
Licht op wanneer de receiver een radiodatasysteem-station
met de TP (verkeersprogramma) dataservice ontvangt
(☞b.29).
4Sensor voor de afstandsbediening
Deze ontvangt de signalen van de afstandsbediening.
5PRESET-indicator
Licht op wanneer u voorkeurzenders selecteert (☞b.27).
6TUNED-indicator
Licht op wanneer de receiver is afgestemd op een zender.
7STEREO-indicator
Licht op wanneer de receiver een sterk FM-stereosignaal
ontvangt.
8SLEEP-indicator
Licht op wanneer de slaaptimer is ingeschakeld (☞b.31).
9Display voorpaneel
Laat verschillende gegevens zien, zoals de frequentie
waarop afgestemd is.
0VOLUME
Past het geluidsniveau aan.
A (Aan/Stand-by)
Hiermee zet u het systeem aan of in de stand-bystand.
BPHONES-aansluiting
Produceert audiosignalen waarnaar u ongestoord kunt
luisteren via een hoofdtelefoon.
CTIMER-indicator
Licht op wanneer de timer is ingesteld (☞b.30).
DBASS
Hiermee kunt u de weergave van de lage tonen regelen (
☞
b.15).
ETREBLE
Hiermee kunt u de weergave van de hoge tonen regelen (
☞
b.15).
FBALANCE
Hiermee kunt u de geluidsbalans van de linker- en rechter
luidspreker compenseren die door de plaatsing van de
luidsprekers of door de omstandigheden van de
luisteromgeving uit balans is.
GPRESET d / u
Met deze knop kunt u een voorkeurzender selecteren. De
ingangsbron wordt gewijzigd naar FM. Dit werkt zelfs
wanneer de receiver in stand-by staat (☞b.27).
HPURE DIRECT
Hiermee zet u de Pure Direct-stand aan of uit (☞b.15).
Wanneer de Pure Direct-stand aan is, licht de indicator
blauw op.
Ih / e
Start en pauzeert het afspelen van iPod. De ingangsbron
wordt gewijzigd naar iPod. Dit werkt zelfs wanneer de
receiver in stand-by staat.
JiPod-dock
Sluit uw iPod aan (☞b.10).
BEDIENINGSELEMENTEN EN FUNCTIES
Receiver (R-840)
INPUT
BASS
PHONES
VOLUME
MIN MAX
TREBLE BALANCE
PRESET PURE DIRECT
LR
PRESET
TP
TUNED
STEREO SLEEP
kHz MHz iPod
TIMER
1@
IJBCD E F G H
234 5 67 98
A
BovenaanzichtVooraanzicht
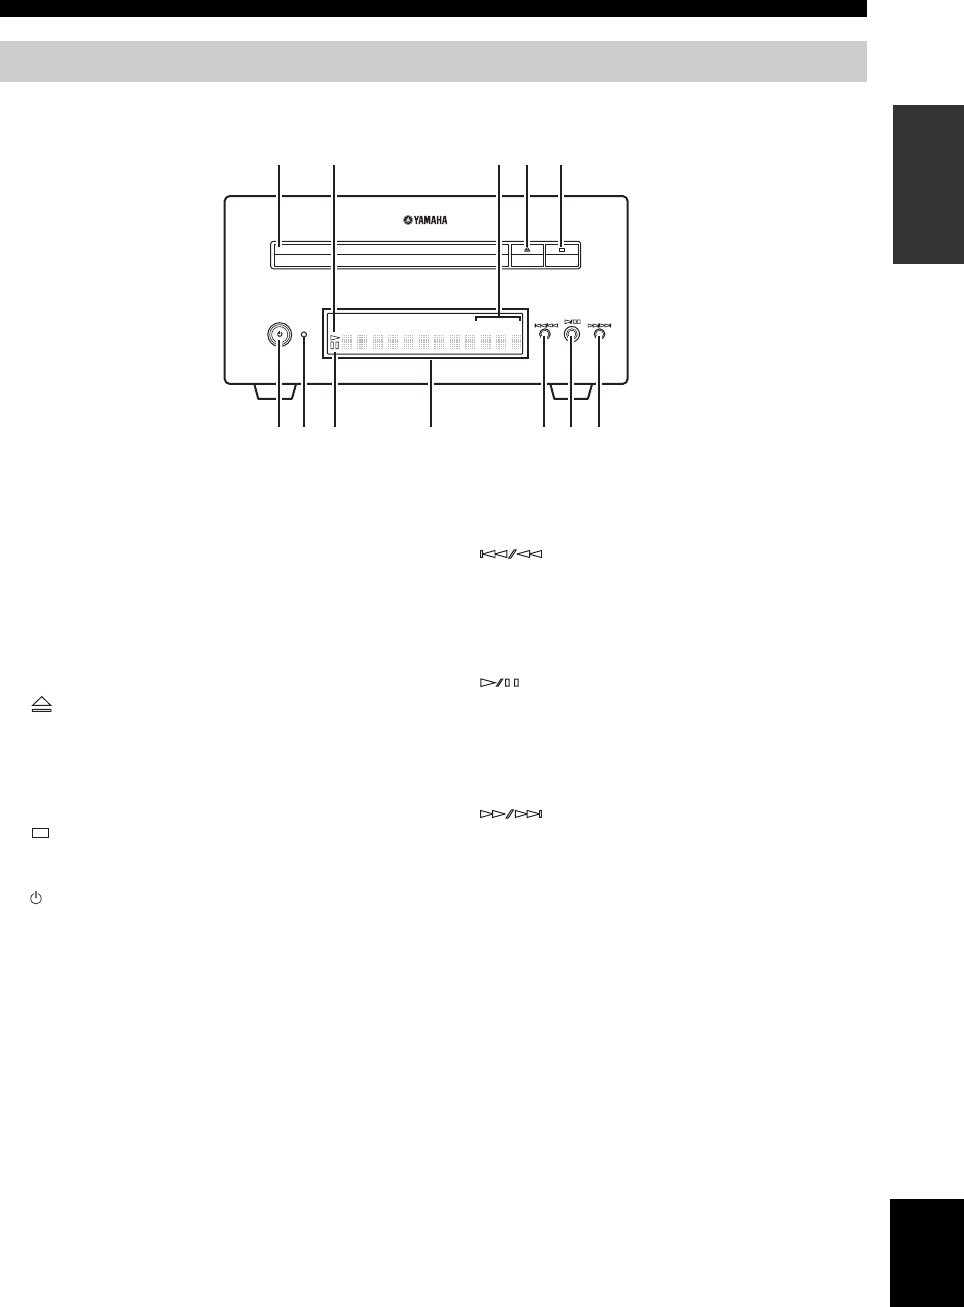
5 Nl
BEDIENINGSELEMENTEN EN FUNCTIES
Nederlands
INLEIDING
■Voorpaneel
1Disklade
Hier doet u de af te spelen disk in.
2p (afspelen)-indicator
Verschijnt tijdens het afspelen.
3REP OFF S ALL A-B-indicator
Licht op wanneer de modus Herhaald afspelen wordt
geselecteerd.
4
Hiermee opent en sluit u de disklade.
Als u op deze knop in de stand-bymodus drukt, gaat de
receiver automatisch aan en wijzigt de ingangsbron naar
DISC.
5
Hiermee stopt u het afspelen (☞b.17).
6 (Aan/Stand-by)
Hiermee zet u de bd-speler aan of in stand-by.
Als u op deze knop tijdens de stand-bymodus indrukt, gaat
de receiver automatisch aan en wijzigt de ingangsbron
naar DISC.
y
Wanneer de bd-speler om de een of andere reden niet goed werkt,
kunt u hem opnieuw starten door deze knop gedurende 10
seconden ingedrukt te houden en dan nogmaals in te drukken.
7QUICK-indicator
Licht op in standby-modus wanneer de functie Snelle Start
aan is (☞b.35).
Knippert nadat de de stekker van het stroomsnoer in het
stopcontact hebt gestoken totdat de bd-speler in de
standby-modus gaat.
8e (pauze)-indicator
Licht op wanneer de bd-speler wordt gepauzeerd.
9Display voorpaneel
Dit toont de huidige status van de bd-speler.
0
Keert terug naar het begin van de huidige track. Houd de
toets ingedrukt om snel terug te spoelen. Druk er
tweemaal op om naar het vorige hoofdstuk te springen
(☞b.18).
A
Hiermee begint of pauzeert u de weergave (☞b.17).
Als u op deze knop tijdens de standby-modus indrukt, gaat
de receiver automatisch aan en wijzigt de ingangsbron
naar DISC, afhankelijk van de laatst geselecteerde bron.
B
Hiermee springt u naar de volgende track of het volgende
hoofdstuk. Houd de toets ingedrukt om snel vooruit te
spoelen (☞b.18).
Bd-speler (BD-940)
QUICK
12 45
798
6
3
AB
@
PROG RANDOMMP3 WMA TRACK TOTAL REMAIN REP OFF S ALL A-B

6 Nl
BEDIENINGSELEMENTEN EN FUNCTIES
Met deze afstandsbediening kunt u de
systeemcomponenten (inclusief tunerfuncties) bedienen
en een iPod die is geplaatst in de iPod-dock boven op de
ontvanger.
Om de bd-speler, tunerfuncties of een iPod te kunnen
bedienen met de afstandsbediening, moet u eerst op de
receiver de bijbehorende invoerstand instellen
(☞8Ingangskeuzetoetsen).
Voor bediening van uw iPod
Druk op de bijbehorende iPod-bedieningstoets op de
afstandsbediening.
De bedieningstoetsen van de iPod worden in het
onderstaande gedeelte aangegeven met .
Zie bladzijde 32 voor meer informatie over de bediening
van uw iPod.
1Infraroodzender
Hiermee kunt u infraroodsignalen naar het apparaat
zenden dat u wilt bedienen.
2 (Aan/Stand-by)
Hiermee zet u het systeem aan of in stand-bystand.
3MENU
Hiermee keert u terug naar een hoger niveau in het iPod-
menusysteem.
4
Hiermee springt u naar de volgende track. Houd de toets
ingedrukt om snel vooruit te spoelen.
5
Hiermee springt u naar het begin van de huidige track.
Druk twee keer op de toets om naar de vorige track terug
te springen. Houd de toets ingedrukt om snel terug te
spoelen.
6ENTER
Druk op ENTER om de geselecteerde groep te openen.
(Als u op ENTER drukt wanneer een track geselecteerd is,
begint de weergave daarvan.)
7
Hiermee begint of pauzeert u de weergave.
8Ingangskeuzetoetsen
Hiermee kiest u de signaalbron voor de receiver.
Druk wanneer u een ingangsbron selecteert op de bijbehorende
ingangskeuzetoets (of zet INPUT aan op het voorpaneel).
De naam van de bijbehorende ingangsbron verschijnt op
het display op het voorpaneel van de ontvanger.
y
Wanneer u DISC selecteert als een ingangsbron, gaat de bd-speler
automatisch aan. Als u een andere ingangsbron selecteert, gaat de
bd-speler in stand-by.
9MEMORY
Hiermee kunt u een voorkeurzender in het geheugen
opslaan (☞b.27). Hierdoor begint Automatisch
voorprogrammeren (☞b.26).
Afstandsbediening
1234
56
90
78
E
NT
E
RCL
E
AR
MUT
E
E
NT
E
R
VOLUME
AUX
TUN
E
R
iPod SHUFFLE
R
EPE
AT
MENU
ENTER
E
O
NM
O
N
O
M
E
M
O
R
Y
PRESET TUNING
DISC
DISPLAY TIMER SLEEP DIMMER
OPTION PURE DIRECT
AUDIO SUBTITLE ANGLE
REPEAT
ON SCREEN
RETURN
PinP SETUP
A B C D
EXIT
TOP MENU/TITLE LIST
POP UP MENU
J
1
M
N
O
P
Q
R
S
t
U
V
W
X
Y
Z
[
\
]
`
a
b
c
d
f
e
2
3
4
5
6
7
8
9
0
A
B
C
D
E
F
G
H
I
J
K
L

VOORBEREIDINGEN
8 Nl
VOORBEREIDING
Lees de volgende procedure en opmerking zorgvuldig door voordat u het systeem aansluit. De afstandsbediening en
gekoppelde bediening van het systeem werken alleen als de receiver en de bd-speler zijn aangesloten
via de systeemkabel.Voor informatie over uw luidsprekers (NS-BP300) dient u de daarbij behorende handleiding te
raadplegen.
Aansluiten van het systeem
1Verbind de AUDIO IN ( PLAYER L/R) aansluitingen van de receiver op de Audio-uitgang ( L/R) aansluitingen
van de bd-speler met behulp van de meegeleverde RCA-stereokabel.
2Verbind de SYSTEM CONNECTOR ( TO:PLAYER) aansluitingen van de receiver op de SYSTEM CONNECTOR
( TO:RECEIVER) aansluitingen van de bd-speler met behulp van de meegeleverde systeemkabel.
3Verbind de linker luidsprekeraansluitingen (L) van de receiver op de aansluitingen van de linker luidspreker en de
rechter luidsprekeraansluitingen (R) van de receiver op de aansluitingen van de rechter luidspreker met behulp van de
luidsprekerkabels die worden meegeleverd met de luidsprekerset (NS-BP300).
4Verbind de meegeleverde FM-antenne op de ANTENNA-aansluiting.
• Sluit dit apparaat of andere componenten pas aan op de stroom als alle aansluitingen tussen de componenten gemaakt zijn.
• Zorg ervoor dat de blote luidsprekerdraden elkaar niet kunnen raken en dat ze geen metalen onderdelen van de receiver kunnen raken.
Hierdoor zou de receiver en/of de luidsprekers beschadigd kunnen raken.
• Alle aansluitingen moeten goed zijn: L (links) naar L, R (rechts) naar R, “+” naar “+” en “–” naar “–”. Als de aansluitingen niet goed
zijn, komt er geen geluid uit de luidsprekers, en als de polariteit van de luidsprekeraansluitingen verkeerd is, klinkt het geluid
onnatuurlijk zonder lage tonen. Raadpleeg ook de gebruikershandleiding van elke component.
Opmerkingen
• De systeemaansluiting wordt gebruikt om signalen van de afstandsbediening over te brengen van de receiver naar de bd-speler.
• Als u andere dan NS-BP300-luidsprekers aansluit, gebruik dan luidsprekers met meer dan 6Ω-impedantie.
• Als u op uw locatie geen goede radio-ontvangst heeft, of als u de ontvangst wilt verbeteren, dan raden we u aan om in de handel
verkrijgbare buitenantennes te gebruiken. Voor details kunt u contact opnemen met uw dichtstbijzijnde erkende Yamaha dealer of
servicecentrum.
VOORBEREIDINGEN
Luidsprekers/externe componenten/antennes aansluiten
LET OP
A A
B
B
Receiver (R-840)
(model voor Europa)
Bd-speler (BD-940) Linker luidspreker
(NS-BP300)
Rechterluidspreker
(NS-BP300)
RCA-stereokabel
(meegeleverd)
Systeembedieningskabel
(meegeleverd)
Tv enz.
Subwoofer
Audio-
uitgang
RCA -
stereokabel
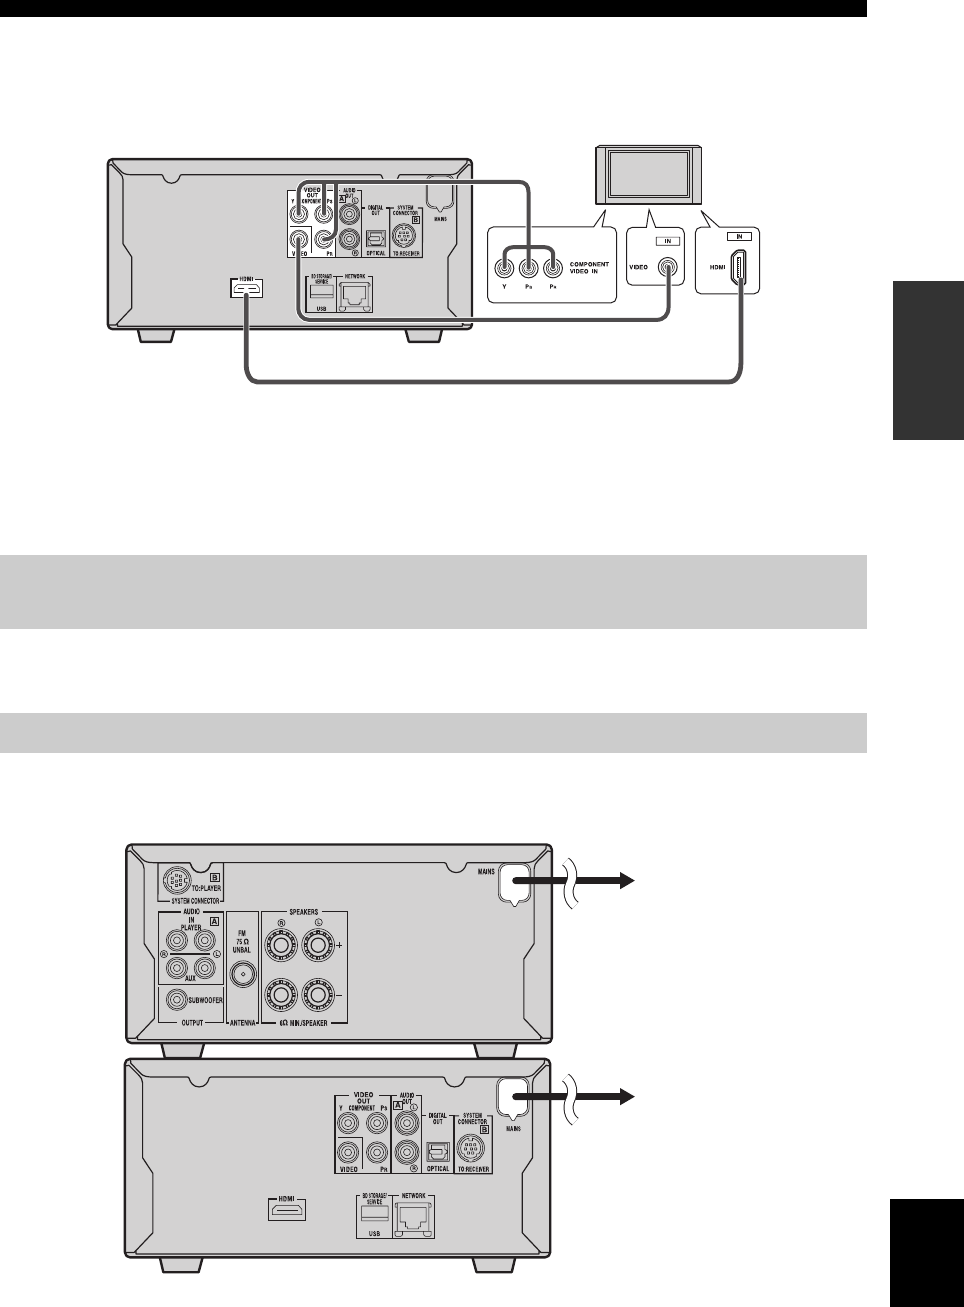
VOORBEREIDINGEN
9 Nl
Nederlands
VOORBEREIDINGEN
Een tv aansluiten op het systeem
1Verbind het systeem en uw tv via de HDMI-aansluiting, COMPONENT-aansluitingen of VIDEO-aansluiting van de
bd-speler en de bijbehorende aansluiting(en) van uw tv.
2Stel “TV screen” afhankelijk van uw tv in (zie “Instellen van het tv-scherm” op bladzijde 13).
Als u het systeem en uw tv op elkaar aansluit via de COMPONENT-aansluitingen, stelt u de bd-speler is zoals
beschreven in “Selectie Video-Uitgang” (☞b.33).
Als u het systeem en uw tv op elkaar aansluit via de HDMI-aansluitingen, stel “HDMI-Video-Uitgang” en “Audio-
uitgang” van de “Audio-Video Instellingen” in het “Instellingen”-menu in (☞b.33, 34).
Wanneer u het systeem en uw tv via de HDMI-aansluitingen aansluit, gebruik dan HIGH SPEED HDMI-kabels die het
HDMI-logo hebben (zoals afgebeeld op het voorblad).
U kunt audio weergeven vanaf de DIGITAL OUT-aansluiting en het digitaal op een ander apparaat opnemen, of
audiosignalen versturen naar de AV-receiver of decoder voor het gebruik van meerkanaals audiobronnen.
Sluit de stroomkabels van dit systeem en andere componenten pas aan op stopcontacten nadat u alle aansluitingen hebt
gemaakt.
Aansluiten van een recorder (CDR, MDR, enz.), AV-recorder of decoder
(CDR, MDR, enz.)
Aansluiten van stroomkabels
Bd-speler (BD-940)
Composiet videokabel
(meegeleverd)
Naar stopcontact
Naar stopcontact
Receiver (R-840)
Bd-speler (BD-940)
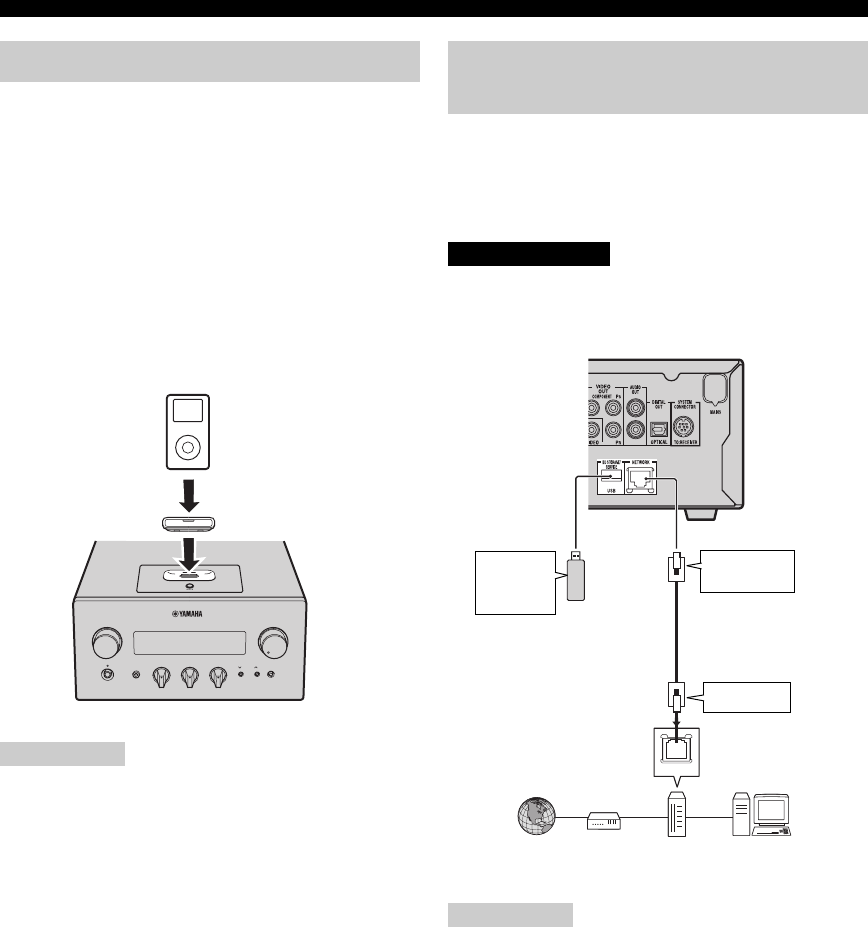
VOORBEREIDINGEN
10 Nl
De receiver bevat de iPod-dock op het bovenpaneel waarin
u uw iPod kunt plaatsen. U kunt het afspelen van uw iPod
bedienen met de meegeleverde afstandsbediening.
Gebruik deze receiver met een iPod-dockadapter
(meegeleverd met uw iPod of in de handel verkrijgbaar)
die geschikt is voor uw iPod. Als u deze receiver gebruikt
zonder een geschikte dockadapter voor een iPod, kan de
aansluiting los zitten.
y
Sluit wanneer de receiver aan staat of in stand-by staat de iPod
aan tijdens het afspelen. De receiver begint automatisch met
afspelen van iPod (voor de vijfde of latere generatie van de iPod,
iPod touch, iPod Classic of iPod nano).
Opmerkingen
• Alleen iPod (Click and Wheel), iPod nano, iPod Classic, iPod
mini en iPod touch worden ondersteund.
• Sluit geen iPod-accessoires aan (zoals koptelefoons, een
bekabelde afstandsbediening of een FM-zender) op uw iPod
wanneer die zich in de iPod-dock bevindt.
• Tenzij uw iPod stevig in in de iPod-dock zit, is het mogelijk dat
audiosignalen niet goed worden uitgezonden.
• Wanneer de verbinding tussen uw iPod en de receiver tot stand
is gebracht en de receiver is ingesteld op de iPod-stand (☞b.6)
“CONNECTED”, verschijnt op het display op het voorpaneel.
Als de verbinding tussen uw iPod en de receiver mislukt,
verschijnt er een melding van die strekking op het display op
het voorpaneel. Voor een complete lijst van meldingen met
betrekking tot deze verbindingen, raadpleeg het iPod-gedeelte
in het hoofdstuk “PROBLEMEN OPLOSSEN” (☞b.42).
• Wanneer u uw iPod plaatst in de iPod-dock van de receiver, kan
uw iPod automatisch worden opgeladen, zelfs als de receiver in
stand-by stand.
• U kunt de iPod tijdens het afspelen afsluiten.
Met interactieve functies kunt u gebruikmaken van diverse
inhoud door verbinding met het internet te maken tijdens
het afspelen van BD-LIVE-geschikte disks. Zie de
pagina’s 24 en 36 voor meer informatie over de BD-LIVE-
functies.
Zorg ervoor dat u de bd-speler en de apparatuur uitzet
voordat u verbinding maakt.
Opmerkingen
• U kunt een USB-geheugenapparaat (2GB of groter en
geformatteerd met FAT 32/16) op de USB BD STORAGE/
SERVICE-poort aansluiten om de BD-LIVE-gegevens op te
slaan of de software van de bd-speler te updaten.
• Daarvoor is een breedbandverbinding nodig.
• Voor het gebruik van een breedband internetverbinding is een
contract met een internetprovider nodig. Neem voor meer
informatie contact op met uw dichtstbijzijnde service-provider.
• Raadpleeg de bedieningshandleiding van uw apparatuur, omdat
de aangesloten apparatuur en de verbindingswijze kan afwijken,
afhankelijk van uw internetomgeving.
• Maak gebruik van een netwerkkabel/router die 10BASE-T/
100BASE-TX/1000BASE-T ondersteunt.
•
Gebruik uitsluitend een STP (shielded twisted pair) netwerkkabel.
■Na het aansluiten
• Stel de communicatie-instelling (☞b.36) in.
• Plaats een BD-LIVE-geschikte disk en speel de inhoud
af (☞b.24).
Aansluiten van een iPod™
iPod
INPUT
PHONES
BASS
-+ -+ LR
TREBLE BALANCE
PRESET PURE DIRECT
VOLUME
MIN MAX
Receiver
iPod
iPod-dockadapter
Bezig met de verbinding naar het
internet
LET OP
LAN
Bd-speler
Internet
Netwerkkabel
(verkrijgbaar in de winkel)
2
Naar LAN-
poort
pc
3Naar USB BD
STORAGE/
SERVICE-
poort
USB geheugenapparaat
(verkrijgbaar in de winkel)
Modem Hub of
breedband
router
1
Naar NETWORK-
poort

VOORBEREIDINGEN
11 Nl
Nederlands
VOORBEREIDINGEN
■Opmerkingen over batterijen
• Vervang beide batterijen als het werkingsbereik van de
afstandsbediening afneemt.
• Gebruik AAA-, R03-, UM-4-batterijen.
• Zorg dat de polariteit klopt. Bekijk de illustratie in het
batterijvak.
• Verwijder de batterijen als de afstandsbediening
gedurende lange tijd niet wordt gebruikt.
• Gebruik geen oude en nieuwe batterijen door elkaar.
• Gebruik geen verschillende types batterijen door elkaar
(zoals alkaline- en mangaanbatterijen). Lees
aandachtig de informatie op de verpakking, want de
verschillende soorten batterijen kunnen dezelfde vorm
en kleur hebben.
• Als de batterijen lek zijn, dient u ze onmiddellijk weg
te gooien. Raak het uit de batterijen gelekte materiaal
niet aan en zorg ervoor dat het niet op uw kleding enz.
komt. Maak het batterijvak grondig schoon voor u er
nieuwe batterijen in plaatst.
• Gooi batterijen nooit samen met gewoon huishoudelijk
afval weg; neem bij het weggooien van batterijen de
plaatselijk geldende regelgeving in acht.
De afstandsbediening zendt een gerichte infraroodstraal
uit. Richt de afstandsbediening rechtstreeks op de
afstandsbedieningsensor op het voorpaneel van de receiver
als u het apparaat wilt bedienen.
Opmerkingen
• Er mogen zich geen grote obstakels bevinden tussen de
afstandsbediening en de receiver.
• Mors geen water of andere vloeistoffen op de
afstandsbediening.
• Laat de afstandsbediening niet vallen.
• Laat de afstandsbediening niet liggen of bewaar ze niet op de
volgende plaatsen:
– hoge vochtigheid, zoals dicht bij een bad
– hoge temperatuur, zoals dicht bij de verwarming of een kachel
– extreem lage temperatuur
– stoffige plekken.
• Stel de afstandsbediening niet bloot aan sterke verlichting, in
het bijzonder van fluorescentielampen met een
voorschakelapparaat; anders is het mogelijk dat de
afstandsbediening niet goed werkt. Indien nodig dient u dit
apparaatl uit direct licht te plaatsen.
Plaatsen van batterijen in de
afstandsbediening
13
2
Gebruiken van de
afstandsbediening
INPUT
BASS
PHONES
VOLUME
MIN MAX
TREBLE BALANCE
PRESET PURE DIRECT
LR
1234
56
90
78
ENTER CLEAR
MUTE
ENTER VOLUME
AUX TUNER
iPod SHUFFLE REPEAT
MENU
ENTER
EON MONO
MEMORY
PRESET TUNING
DISC
DISPLAY TIMER SLEEP DIMMER
OPTION PURE DIRECT
AUDIO SUBTITLE ANGLE
REPEAT
ON SCREEN
RETURN
PinP SETUP
A B C D
EXIT
TOP MENU/TITLE LIST
POP UP MENU
30˚ 30˚
Binnen 6 m
Receiver (R-840)

VOORBEREIDINGEN
12 Nl
Voordat u afspeelt, dient u de onderstaande procedure te
volgen om de klok van de receiver correct in te stellen.
Opmerkingen
• Gebruik de afstandsbediening om de klok in te stellen. U kunt
de klok niet instellen met de toetsen op de receiver.
• De receiver ondersteunt een tijdnotatie van 24 uur.
• Als u 90 seconden lang geen enkele toets aanraakt, gaat de
receiver terug naar de standaardmodus.
1Druk op om de receiver aan te zetten.
Het display op het voorpaneel licht nu op.
2Druk op TIMER voor weergave van de
huidige tijd.
Als de klok niet is ingesteld, knippert “SET TIME”
op het display.
Druk op ENTER om door te gaan naar 3.
3Druk op / om “TIME” te selecteren en
druk op ENTER.
De receiver opent de instelfunctie van de klok. De
uurcijfers gaan knipperen.
4Stel het uur in met / en druk op .
De minuutcijfers gaan knipperen.
5Stel de minuten in met / en druk op
ENTER.
De uur- en minuutcijfers gaan knipperen.
Druk om het uur en de minuten opnieuw te wijzigen
op of . Voer stap 4 en 5 uit en ga door naar stap
6.
6Druk op ENTER.
De klok is ingesteld.
De uur- en minuutsegmenten stoppen met knipperen
en blijven branden. De receiver keert terug naar de
normale functie.
y
Druk op of RETURN om terug te keren naar het vorige
scherm.
Instellen van de klok
ABCD
EXIT
TOP MENU/TITLE LIST
POP UP MENU
TIMER
ENTER ,
RETURN
Knippert
Knippert
Knippert

HET SYSTEEM INSTELLEN
13 Nl
Nederlands
VOORBEREIDINGEN
Zorg ervoor dat u alle nodige aansluitingen hebt gemaakt
(zie “Een tv aansluiten op het systeem” op bladzijde 9).
1Zet de tv aan waarop de bd-speler is
aangesloten.
Selecteer de tv-invoer die overeenkomt met de invoer
die aangesloten is op de bd-speler.
2Druk op om de receiver aan te zetten.
3Druk op DISC.
Stel de beeldverhouding van het door de bd-speler
geproduceerde beeld in aan de hand van de aangesloten tv
(☞b.33).
1Druk op SETUP.
Het Setup-menu verschijnt op het scherm.
2Druk op / // te selecteren “Settings” en
druk op ENTER.
3Druk op / om “Audio Video Settings” te
selecteren en druk op ENTER.
4Druk op / om “TV Aspect Ratio” te
selecteren en druk op ENTER.
5Druk op /, om de verhouding van de tv te
selecteren en druk op ENTER.
Voor informatie over de mogelijkheden voor de
verhouding, zie bladzijde 33.
6Druk op SETUP of EXIT om het Setup-menu
af te sluiten.
y
Druk op RETURN om terug te keren naar het vorige menu.
U kunt uw eigen taal instellen zodat de bd-speler
automatisch overschakelt naar die taal wanneer u een disk
met die taal erop in het apparaat plaatst. Als de ingestelde
taal niet op de disk staat, zal in plaats daarvan de
standaardtaal voor die disk worden gebruikt. De OSD (on-
screen display)-weergavetaal voor het BD/DVD-
instelmenu blijft zoals u die heeft ingesteld, ongeacht
welke taal er op de disk staat.
1Druk op SETUP.
2Druk op / // te selecteren “On Screen
Language” en druk op ENTER.
3Druk op / om een taal te selecteren en
druk op ENTER.
HET SYSTEEM INSTELLEN
Zet de tv en het systeem aan
Instellen van het tv-scherm
EXIT
TOP MENU/TITLE LIST
POP UP MENU
SETUP
, , , ,
ENTER
Settings
Picture
On Screen Language
Displays The Title List
(OSD)-schermweergavetaal
Audio Video Settings
Quick Start
HDMI Control
Playback Setting
Communication Setup
Version
USB Memory Management
Software Update
System Reset
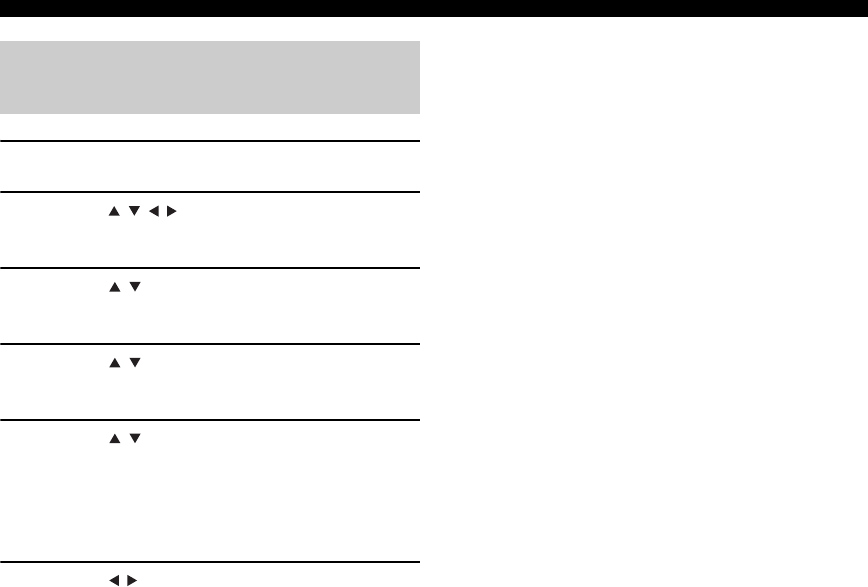
HET SYSTEEM INSTELLEN
14 Nl
1Druk op SETUP.
2Druk op / // te selecteren “Instellingen”
en druk op ENTER.
3Druk op / om “Afspeelinstellingen” te
selecteren en druk op ENTER.
4Druk op / om “Disctaal” te selecteren en
druk op ENTER.
5Druk op / om het onderstaande item te
selecteren.
• Ondert
• Audio
•Menu
6Druk op / om een taal te selecteren en
druk op ENTER.
Taalinstellingen voor audio,
ondertiteling en het diskmenu
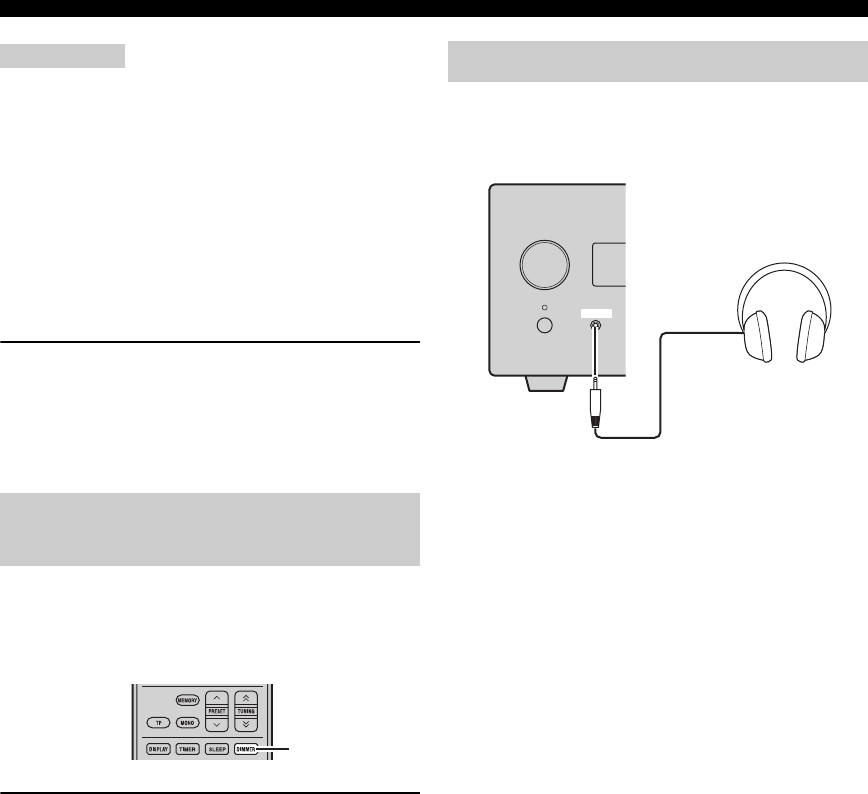
BEDIENING VAN HET TOESTEL
16 Nl
Opmerkingen
• Als u een handeling uitvoert terwijl de Pure Direct-stand is
aangezet, licht het display op het voorpaneel van de receiver
even op om te laten zien dat uw opdracht wordt uitgevoerd.
• Terwijl de Pure Direct-stand is ingeschakeld, zijn BASS,
TREBLE en BALANCE niet beschikbaar.
Uitschakelen van de Pure Direct-stand
Druk nogmaals op PURE DIRECT. De PURE DIRECT-
achtergrondverlichting schakelt uit en het display van het
voorpaneel gaat aan.
■Het geluid onderdrukken (MUTE)
Druk op MUTE om het huidige volumeniveau met
ongeveer 20 dB te verminderen.
“MUTE ON” verschijnt op het display van het voorpaneel.
Druk nogmaals op MUTE om het vorige volumeniveau te
herstellen.
U kunt het display op het voorpaneel van de receiver
dimmen. Het display op het voorpaneel van de bd-speler
wordt ook donker door de systeemaansluiting (☞b.8). (De
standaardinstelling is “DIMMER OFF”.)
Druk op DIMMER.
U kunt de gewenste helderheid van het display op het
voorpaneel kiezen tussen normaal (helder), licht gedimd
en gedimd.
U kunt uw hoofdtelefoon aansluiten op de PHONES-
aansluiting op het voorpaneel van de receiver.
Het geluid van de luidsprekers en de subwoofer stopt.
De helderheid van het display op
het voorpaneel instellen
DIMMER
Gebruiken van een hoofdtelefoon
INPUT
PHONES

DISKBEWERKINGEN
18 Nl
Tijdens het afspelen kunt u terugspoelen of snel
vooruitspoelen met verschillende snelheden.
Druk op om achteruit te spoelen of om
snel vooruit te spoelen.
De snelheid voor terugspoelen of snel vooruitspoelen
verandert iedere keer wanneer u op of drukt.
De gekozen snelheid wordt op het scherm aangegeven.
Druk op om de normale weergave te hervatten.
■Hiermee springt u naar de volgende
track of het volgende hoofdstuk
Druk op .
■Hiermee springt u naar de vorige track of
het vorige hoofdstuk
Druk tweemaal op .
Als u één keer op drukt, gaat de weergave terug naar
het begin van het huidige hoofdstuk of de huidige track.
De meeste BD/DVD hebben menu’s waarin u kunt kiezen
wat u wilt bekijken. Gewoonlijk verschijnt het hoofdmenu
automatisch, alhoewel het bij sommige disks nodig kan
zijn om op TOP MENU/TITLE LIST of POP UP MENU
te drukken om het menu te tonen.
De volgende toetsen zijn te gebruiken voor de menu-
bediening.
*1 Hangt van de disk af.
*2 Kan op dezelfde manier functioneren als de TOP MENU/
TITLE LIST-knop bij sommige disks.
Opmerkingen
• De op deze pagina uitgelegde procedure is de procedure voor de
basisbediening. Procedures variëren afhankelijk van de BD/
DVD, dus dient u mogelijk de instructies te volgen in de BD/
DVD-handleiding of de instructies die op het scherm worden
weergegeven.
• Met sommige BD/DVD, wordt naar het topmenu verwezen als
de “Title Menu”. Gebruik TOP MENU/TITLE LIST wanneer
de instructies verwijzen naar “Title Menu”.
• Als er geen topmenu beschikbaar is, heeft TOP MENU/TITLE
LIST geen effect.
• Het scherm van het topmenu wordt mogelijk weergegeven door
het indrukken van POP UP MENU afhankelijk van de DVD.
U kunt BD/DVD vertraagd afspelen. U kunt DVD ook
vertraagd achterwaarts afspelen.
1Druk tijdens de weergave op .
2Het in vertraagde weergave afspelen
functioneert wanneer of tijdens
pauze meer dan 2 seconden wordt ingedrukt.
Druk op om de normale weergave te hervatten.
Opmerkingen
• Het vertraagd afspelen werkt niet voor audio-cd’s.
• Het achterwaarts vertraagd afspelen kan niet worden uitgevoerd
voor BD.
U kunt BD/DVD beeld-voor-beeld afspelen. DVD-Video-
disks kunt u ook achterwaarts beeld-voor-beeld
weergeven.
1Druk tijdens het afspelen op .
2Druk op of om één beeld tegelijk af
te spelen.
Druk op om normaal afspelen te hervatten.
Terugspoelen en snel
vooruitspoelen
Selecteren van hoofdstukken en
tracks
BD/DVD-menu’s
Knop Beschrijving
TOP MENU/
TITLE LIST
Toont het hoofdmenu van de bd/dvd *1
POP UP MENU Toont of sluit het pop-upmenu*2 van de bd-
speler
()/()Hiermee selecteert u menu-items
ENTER Hiermee bevestigt u de selectie
Vertraagde weergave
Beeld-voor-beeld weergave
,
,

DISKBEWERKINGEN
19 Nl
Nederlands
BASISBEDIENING
Opmerkingen
• Het beeld-voor-beeld afspelen functioneert mogelijk niet goed
met disks anders dan DVD-RW/R (VR-indeling).
• Sommige BD/DVD zijn niet geschikt voor het afspelen van
beeld-voor-beeld.
• Het vooruit/achteruit afspelen van het beeld kan worden
uitgevoerd voor DVD door tijdens de pauze op of te
drukken.
Sommige BD/DVD-disks bevatten geluidssporen in
verschillende talen of audioformaten, zoals Dolby Digital
en DTS, waaruit u tijdens het afspelen kunt kiezen.
Vergelijkbaar hebben sommige DVD-VR-disks dubbel-
mono geluidssporen.
Tijdens het afspelen drukt u enkele malen op
AUDIO om te kiezen uit de beschikbare talen of
audioformaten die u kunt beluisteren.
De naam van de gekozen taal of het audioformaat
verschijnt op het scherm.
Opmerkingen
• Bij sommige disks zult u de gewenste taal of het audioformaat
alleen kunnen kiezen via het menu van de disk zelf. Gebruik
TOP MENU/TITLE LIST en POP UP MENU om het menu van
de disk te zien.
• U kunt de oorspronkelijke taal voor het afspelen van BD/DVD
wijzigen in de “Disctaal” (☞b.35).
Sommige BD/DVD-disks bevatten ondertiteling in een of
meer talen waaruit u kunt kiezen tijdens het afspelen.
Druk tijdens afspelen enkele malen op SUBTITLE
om een van de beschikbare talen voor
ondertiteling te kiezen.
De naam van de gekozen taal voor ondertiteling verschijnt
op het scherm.
Opmerkingen
• Bij sommige disks zult u de gewenste taal voor de ondertiteling
alleen kunnen kiezen via het menu van de disk zelf. Gebruik
TOP MENU/TITLE LIST en POP UP MENU om het menu van
de disk te zien.
• U kunt de oorspronkelijke taal voor de ondertitels voor het
afspelen van BD/DVD wijzigen in de “Disctaal” (☞b.35).
Sommige BD/DVD-Video-disks bevatten beelden die zijn
opgenomen vanuit diverse camerahoeken waaruit u kunt
kiezen tijdens het afspelen.
Desgewenst kunt u het camerasymbool ( ) inschakelen
(☞b.35). Dit symbool verschijnt op het scherm wanneer u
beeldmateriaal afspeelt dat vanuit verschillende
camerahoeken is opgenomen.
Tijdens het afspelen drukt u enkele malen op
ANGLE om een van de beschikbare
camerahoeken te kiezen.
Opmerkingen
• Bij sommige disks kunt u geen andere camerahoek kiezen, ook
al wordt er wel een camerasymbool ( ) op het scherm
getoond.
Selecteren van geluid en taal
EXIT
TOP MENU/TITLE LIST
POP UP MENU
AUDIO
TOP MENU/
TITLE LIST POP UP MENU
Selecteren van ondertiteling
Selecteren van camerahoeken
EXIT
TOP MENU/TITLE LIST
POP UP MENU
SUBTITLE
TOP MENU/
TITLE LIST POP UP MENU
ANGLE

DISKBEWERKINGEN
20 Nl
• Bij sommige disks kunt u de camerahoek ook kiezen via het
menu van de disk zelf.
U kunt een titel, hoofdstuk, track of de gehele disk
meermalen achtereen weergeven.
1Druk tijdens het afspelen op REPEAT.
Het Herhaal-menu verschijnt op het scherm.
Om het Herhaal-menu te sluiten, druk op RETURN.
2Druk op / om de Herhaalopties te
selecteren.
• Titel afspelen: Herhaalt de titel die momenteel
wordt afgespeeld.
• Hfdstk. afspelen: Herhaalt het hoofdstuk dat
momenteel wordt afgespeeld.
• Kies Gedeelte: Herhaalt de specifieke scene of titel
of hoofdstuk (☞“Herhaal het afspelen van een
specifiek gedeelte (A-B herhalen)”).
Voor audio-cd kunt u “Disc Afspelen”, “Nummer
Afspelen” of “Geeg Gedeelte op” selecteren.
3Druk op ENTER.
Het herhaald afspelen begint.
Welke herhaalfuncties er beschikbaar zijn, is
afhankelijk van de disk.
Druk tijdens het afspelen op REPEAT om het
herhaald afspelen te stoppen.
Opmerking
Het herhaald afspelen kan niet worden gebruikt met JPEG-disks.
U kunt twee punten op een disk specificeren en het
gedeelte daartussen herhaaldelijk afspelen.
De A-B herhaalfunctie is niet beschikbaar bij BD-disks.
1Druk tijdens het afspelen op REPEAT, en
daarna op / om “Kies Gedeelte” te
selecteren.
“Kies Begin Punt” wordt weergegeven.
“A-” licht op op de display van de BD-speler.
2Druk op de scene op ENTER waar u het
startpunt wilt instellen.
“Kies Eindpunt” wordt weergegeven.
“B” licht op het display op het voorpaneel op.
3Druk op de scene op ENTER waar u het
eindpunt wilt instellen.
Het gedeelte tussen het startpunt en het eindpunt
wordt dan herhaaldelijk afgespeeld.
“REP” en “A-B” lichten op het display op.
Om herhaald afspelen te stoppen, druk op REPEAT.
Om het Herhaal-menu te sluiten, druk op EXIT.
Opmerking
Het start- en eindpunt moeten zich binnen dezelfde titel (DVD) of
track bevinden (audio-cd).
y
U kunt op drukken om snel naar de scene te gaan waar u het
eindpunt wilt instellen.
Herhaald afspelen
EXIT
TOP
MENU/TITLE
LIST
POP
UP
MENU
RETURN
ENTER
REPEAT
,
Titel afspelen Hfdstk. afspelen Kies Gedeelte
Herhaal het afspelen van een
specifiek gedeelte (A-B herhalen)
Kies Begin Punt
Titel afspelen Hfdstk. afspelen Kies Gedeelte
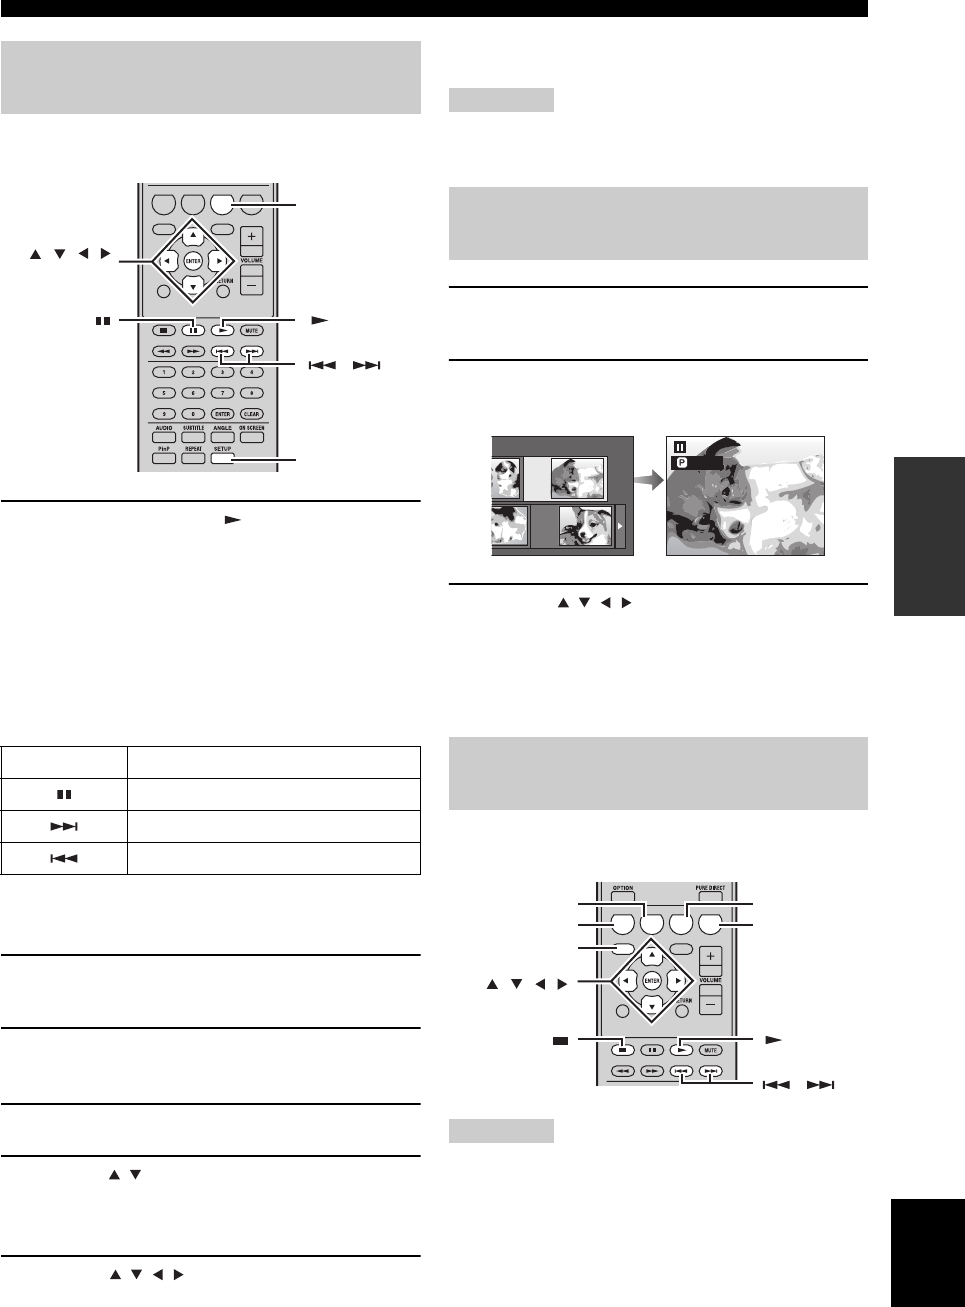
DISKBEWERKINGEN
21 Nl
Nederlands
BASISBEDIENING
U kunt een diavoorstelling van JPEG beelden op een CD-
R/CD-RW afspelen.
Plaats de disk en druk op om de
diavoorstelling te starten.
Beginnend met de eerste afbeelding in de eerste map,
toont de diavoorstelling alle afbeeldingen uit alle mappen
op de disk in alfabetische volgorde.
Het formaat van de afbeeldingen wordt automatisch
aangepast, zodat alle beelden op maximaal formaat op het
scherm verschijnen.
De volgende toetsen zijn te gebruiken tijdens de
diavoorstelling.
■De snelheid of herhaald afspelen van de
diavoorstelling instellen
1Druk op SETUP.
Het Setup-menu verschijnt op het scherm.
2Selecteer “Beeld” en druk op ENTER om het
scherm voor de beeldselectie te openen.
3Druk op C (Menu diavoorstelling).
4Druk op / om “Diashowsnelheid” of “Inst.
Herhaalfunctie” te selecteren en druk op
ENTER.
5Druk op /// om het gewenste item te
selecteren en druk daarna op ENTER.
U kunt voor de snelheid van de diavoorstelling kiezen
uit “Snel”, “Norm.”, “Langzm1” en “Langzm2”.
Opmerking
Grote afbeeldingen vergen meer tijd om te laden en verschijnen
mogelijk niet onmiddellijk.
1Druk op SETUP.
Het Setup-menu verschijnt op het scherm.
2Selecteer “Beeld” en druk op ENTER om het
scherm voor de beeldselectie te openen.
3Gebruik /// om de map te selecteren
met het/de bestand/bestanden die u wilt
afspelen en druk daarna op ENTER.
Voor het afspelen van JPEG bestanden, zie “Afspelen
van JPEG diavoorstellingen” (☞b.21).
U kunt een opgenomen disk afspelen (alleen voltooide
disks met DVD: VR indeling).
Opmerking
“Finalize” verwijst naar een recorder die een opgenomen disk
verwerkt zodat het net als in deze speler ook in andere DVD
spelers/recorders kan worden afgespeeld. Alleen DVD-disks die
voltooid zijn, kunnen in deze speler worden afgespeeld. (Deze
speler heeft geen functie om disks te voltooien.)
Afspelen van JPEG
diavoorstellingen
Knop Beschrijving
Pauzeert de diavoorstelling
Selecteert het volgende beeld
Selecteert het vorige beeld
A B C D
EXIT
TOP MENU/TITLE LIST
POP UP MENU
, , ,
ENTER
C
SETUP
,
Stilstaande beelden in een
geselecteerde map afspelen
Films afspelen die opgenomen zijn
op een DVD-R/DVD-RW
1/77
8/15
A B C D
EXIT
TOP MENU/TITLE LIST
POP UP MENU
,
, , , ,
ENTER
C
D
B
A
TOP MENU/
TITLE LIST

DISKBEWERKINGEN
22 Nl
Over de titellijst
De titellijst kan op twee manieren worden weergegeven,
als miniatuur of als titellijst. Telkens wanneer u op A
drukt, wijzigt het scherm tussen miniatuur en titellijst.
1Informatie van een geselecteerde titel
2Titelnaam
Opnamedatum
Opnameduur
3Knop voor kleurvastlegging
■Afspelen door het selecteren van een
titel
1Plaats een opgenomen disk.
Het scherm met de titellijst wordt weergegeven.
Als het scherm met de titellijst niet wordt
weergegeven, druk dan op TOP MENU/TITLE LIST.
2Druk op /// om de gewenste titel te
selecteren en druk daarna op ENTER.
Het afspelen van de geselecteerde titel begint.
U kunt gaan afspelen door het indrukken van in
plaats van ENTER.
Om met afspelen te stoppen, druk op .
y
• Het scherm met de titellijst kan ook worden weergegeven door
het indrukken van TOP MENU/TITLE LIST wanneer het
afspelen is gestopt of door het indrukken van ENTER na het
kiezen van “Toonlijst Met Titels” in het Setup-menu wanneer
het afspelen gestopt is.
• Wanneer de miniatuur wordt weergegeven en er zijn zeven of
meer titels, wissel dan tussen de pagina’s door het indrukken
van of .
■Afspelen door het selecteren van een
hoofdstuk
1Druk op B terwijl het scherm met de
miniaturen wordt weergegeven.
Het scherm met de hoofdstukken wordt weergegeven.
Om naar het scherm met de miniaturen terug te keren,
druk op B.
2Druk op /// om het gewenste
hoofdstuk te selecteren en druk daarna op
ENTER.
Het afspelen van de geselecteerde hoofdstuk begint.
U kunt gaan afspelen door het indrukken van in
plaats van ENTER.
Om met afspelen te stoppen, druk op .
■De titels sorteren
Telkens wanneer u op B drukt terwijl het scherm met de
titels wordt weergegeven, wisselt de weergave van de
titellijst tussen het weergeven van de nieuwste titel eerst
en de oudste titel eerst.
■Afspelen door het selecteren van een
afspeellijst
1Druk op C terwijl het scherm met de
miniaturen of de titellijst wordt weergegeven.
Het scherm met de afspeellijst wordt weergegeven.
2Druk op / om de titel te selecteren en druk
daarna op ENTER.
Het afspelen van de geselecteerde titel begint.
Om met afspelen te stoppen, druk op .
■Het afspelen van de titel die u hebt
gestopt tijdens het afspelen
1Druk op D terwijl het scherm met de
miniaturen of de titellijst wordt weergegeven.
21/5 Vr 9:30 AM 110 Min.
Programma 1
DCBA
21/5
[ Vanaf oud ]
Vr 9:30 AM
1 Programma 1 21/5 Vr 110 Min.
2 Programma 2 15/6 Vr 110 Min.
3 Programma 3 3/7 MA 56 Min.
4 Programma 4 18/9 DO 40 Min.
110 Min.
Programma 1
DCBA
1
2
3
1
3
Titelnaam
Miniatuurafbeelding
Programma
1
Programma
4Programma
5Programma
6
Programma
3
Programma
2
Titel naam Op Hoofdstuk Afspeellijst Functies
Miniatuur Sorteren Afspeellijst Functies
Origineel Functies
21/5 Vr 9:30 AM
1 Programma 1 21/5 Vr 110 Min.
2 Programma 2 15/6 Vr 110 Min.
110 Min.
Programma 1
DC
Vanaf begin Vanaf vervolg
Afspelen

FM AFSTEMMEN
26 Nl
BEDIENING VAN DE TUNER
Er zijn 2 manieren om af te stemmen: automatisch en handmatig. U kunt ook maximaal 30 zenders automatisch of met de
hand voorprogrammeren.
Automatisch afstemmen gaat goed wanneer u sterke
signalen ontvangt en er weinig storing is.
1
Druk op TUNER om de receiver in de FM-stand
te zetten.
2Houd TUNING gedurende meer dan 2
seconden ingedrukt om het automatisch
afstemmen te beginnen.
Wanneer de receiver is afgestemd op een zender, licht
de TUNED indicator op en wordt de frequentie
waarop is afgestemd getoond op het display op het
voorpaneel.
• Druk op om af te stemmen op een lagere
frequentie.
• Druk op om af te stemmen op een hogere
frequentie.
Als het signaal van de zender waar u op wilt afstemmen te
zwak is, moet u er met de hand op afstemmen.
1
Druk op TUNER om de receiver in de FM-stand
te zetten.
2Druk op TUNING om met de hand af te
stemmen op de gewenste zender.
Volg de procedure hieronder om automatisch radiozenders
voor te programmeren.
1
Druk op TUNER om de receiver in de FM-stand
te zetten.
2Hou MEMORY langer dan 2 seconden
ingedrukt.
De PRESET-indicator begint te knipperen op het
display op het voorpaneel en het automatisch
afstemmen begint. Wanneer alle frequenties zijn
afgelopen, stopt voorkeurzoeken automatisch.
• Het zoeken begint vanaf de laagste frequentie en
zoekt naar steeds hogere frequenties.
• De receiver wijst automatisch een
voorkeuzenummer toe aan elk van de gevonden
zenders.
• Druk op MEMORY om het zoeken te annuleren.
Opmerkingen
• U kunt maximaal 30 FM-zenders voorprogrammeren.
• Gegevens voor een zender die reeds zijn opgeslagen onder een
bepaald nummer zullen worden gewist wanneer u een andere
zender onder dat voorkeuzenummer opslaat.
FM AFSTEMMEN
Automatisch afstemmen
Handmatig afstemmen
TUNING / d
d
d
d
TUNER
/ d
d
d
d
d
d
d
d
/ d
d
d
d
Automatisch voorprogrammeren
PRESET u / d
TUNER
MEMORY

27 Nl
FM AFSTEMMEN
Nederlands
BEDIENING VAN
DE TUNER
U kunt tot 30 zenders opslaan.
1Stem af op de radiozender die u wilt
voorprogrammeren.
Zie bladzijde 26 voor aanwijzingen over hoe u moet
afstemmen op een zender.
2Druk op MEMORY.
De PRESET-indicator knippert ongeveer 5 seconden
lang op het display op het voorpaneel.
3Druk herhaaldelijk op PRESET u / d om het
gewenste voorkeuzenummer te selecteren
terwijl de PRESET-indicator nog aan het
knipperen is.
4Druk op MEMORY om op te slaan terwijl de
PRESET-indicator nog aan het knipperen is.
De PRESET-indicator licht op het display van het
voorpaneel op.
5Herhaal de stappen 1 t/m 4 tot u alle
gewenste zenders heeft
voorgeprogrammeerd.
U kunt op de gewenste zender afstemmen door
eenvoudigweg de voorkeurzender waaronder die zender is
opgeslagen te selecteren (☞b.26).
Druk herhaaldelijk op PRESET u / d om een
voorkeurzender te selecteren.
y
• U kunt ook voorkeurzenders selecteren op het voorpaneel. Druk
herhaaldelijk op PRESET u / d om een voorkeurzender te
selecteren.
• Wanneer u op PRESET u / d drukt op het voorpaneel van de
receiver in stand-by, activeert de receiver automatisch de tuner
en stemt af op de voorkeurzender die u eerder selecteerde.
■Om de voorkeurzender te wissen
1Druk op TUNER om de unit in de FM-stand te
zetten.
2Druk op OPTION om het optiemenu te
bekijken. Druk op / om “PRESET DEL” te
selecteren en druk op ENTER.
3Druk op / om de voorkeurzender te
selecteren die u wilt verwijderen en druk op
ENTER.
De voorkeurzender is nu verwijderd.
U kunt op dit scherm doorgaan met het verwijderen
van voorkeurzenders. Herhaal de stappen 2 en 3 tot u
alle onnodige zenders hebt verwijderd.
Om het wissen te annuleren
Druk op OPTION.
Handmatig voorprogrammeren
PRESET u / d
MEMORY
Selecteren van voorkeurzenders
PRESET u / d
OPTION
TUNER
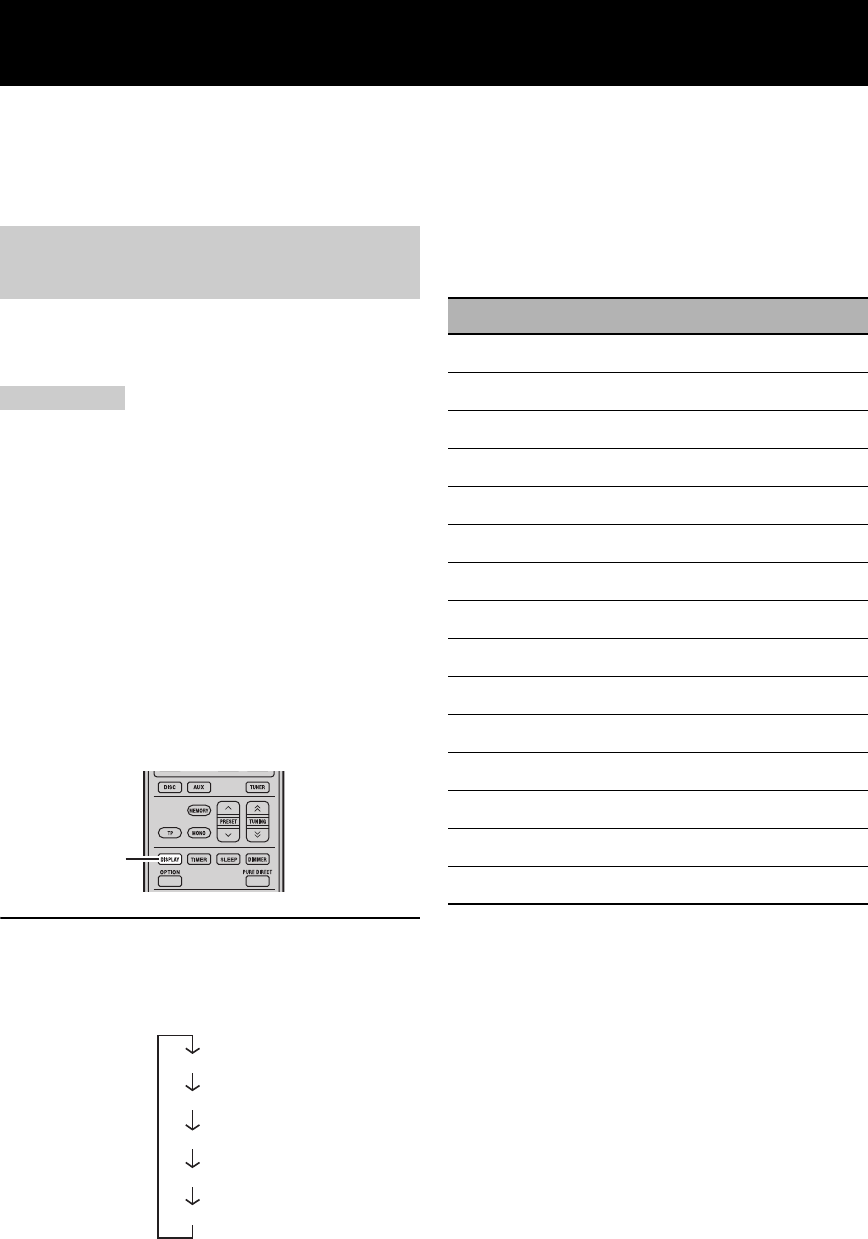
AFSTEMMEN OP RADIO DATA SYSTEEM-ZENDERS (ALLEEN EUROPESE MODELLEN)
28 Nl
Het Radio Data Systeem (alleen Europese modellen) is een systeem voor gegevensoverdracht dat door FM-zenders in
een groot aantal landen worden gebruikt. De Radio Data Systeem-functie wordt verzorgd door zenders in een netwerk.
Dit apparaat is geschikt voor verschillende soorten Radio Data Systeeminformatie, zoals PS (programmaservice), PTY
(programmatype), RT (radiotekst), CT (kloktijd), TP (verkeersprogramma) wanneer u afstemt op Systeem-
broadcastingzenders.
Gebruik deze functie voor het weergeven van de 4 typen
Radio Data Systeeminformatie: PS (programmaservice),
PTY (programmatype), RT (radiotekst) en CT (kloktijd).
Opmerkingen
• U kunt alleen de door de zender aangeboden Radio Data
Systeemfuncties selecteren.
• Als de signalen niet goed genoeg kunnen worden ontvangen, is
het mogelijk dat dit apparaat geen gebruik kan maken van de
Radio Data Systeemgegevens. Vooral de “RT”-functie vergt een
grote hoeveelheid gegevens en het is daarom mogelijk dat deze
functie niet beschikbaar is, zelfs wanneer de andere Radio Data
Systeemfuncties wel beschikbaar zijn.
• Als het signaal externe storing ondervindt terwijl de receiver de
Radio Data Systeemgegevens aan het ontvangen is, kan de
ontvangst onverwacht onderbroken worden en kan de melding
“...WAIT” verschijnen op het display op het voorpaneel.
• Wanneer de “RT”-functie wordt geselecteerd, kan de receiver
maximaal 64 alfanumerieke tekens, inclusief het trema, aan
programmagegevens op het display tonen. Tekens die niet
kunnen worden weergegeven worden vervangen door een “_”
(underscore).
Druk, terwijl u afstemt op een Radio Data
Systeemzender, herhaaldelijk op DISPLAY om de
gewenste weergavefunctie voor Radio Data
Systeeminformatie te selecteren.
Zie de onderstaande tabel voor een beschrijving van
programmatypes.
AFSTEMMEN OP RADIO DATA SYSTEEM-ZENDERS
(ALLEEN EUROPESE MODELLEN)
Tonen van Radio Data
Systeeminformatie
DISPLAY
PS
PTY
RT
CT
Frequentie
(programmaservice)
(programmatype)
(radiotekst)
(kloktijd)
Programmatype Beschrijving
News Nieuws
Affairs Huidige actualiteiten
Info Informatie
Sport Sport
Educate Onderwijs
Drama Drama
Culture Cultuur
Science Wetenschap
Varied Wisselend
Pop M Popmuziek
Rock M Rockmuziek
Easy M Lichte luistermuziek
Light M Lichte klassieke muziek
Classics Zware klassieke muziek
Other M Overige muziek
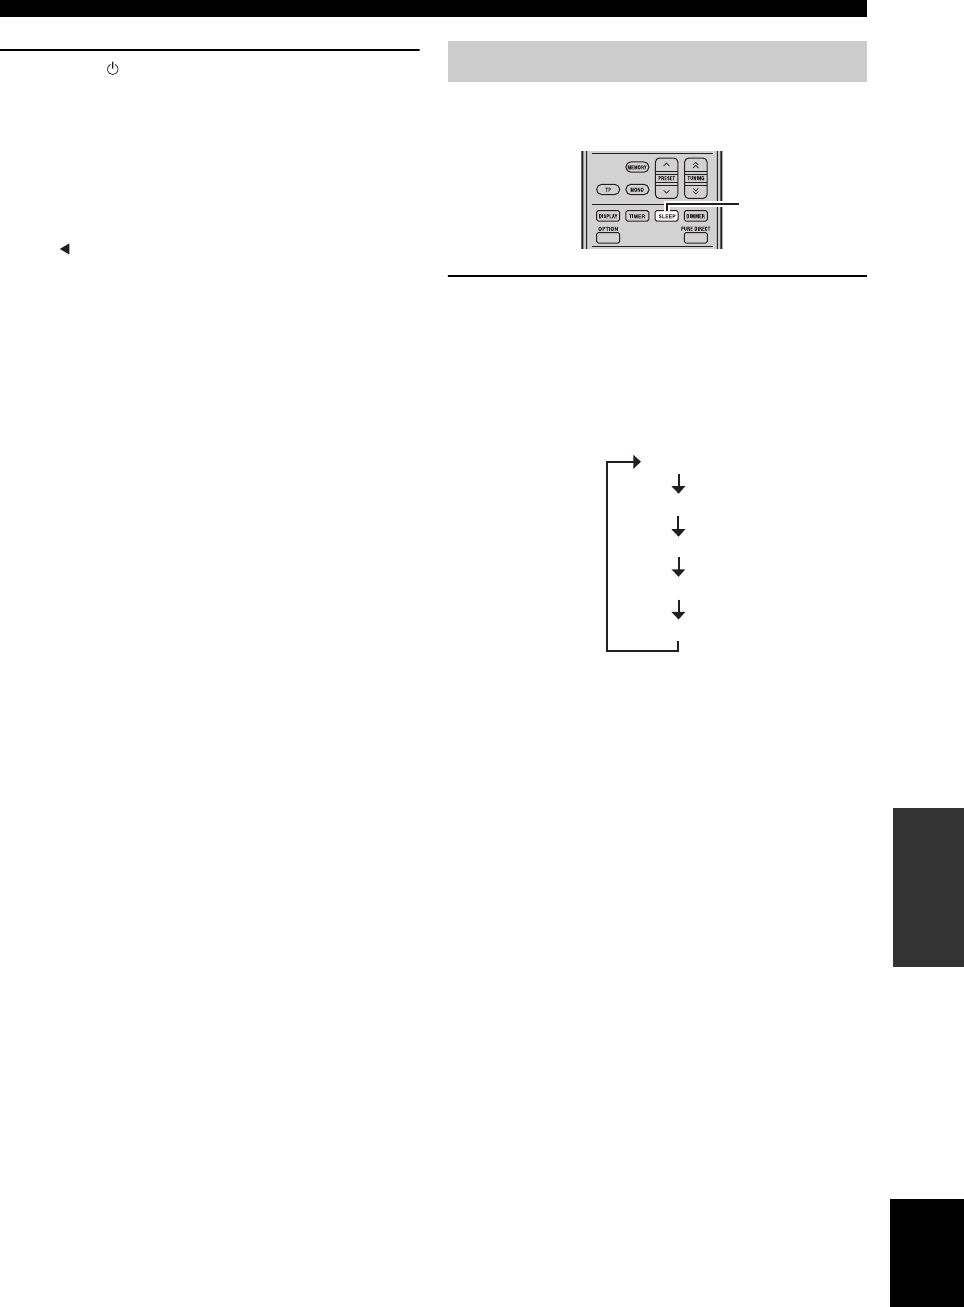
31 Nl
INSTELLEN VAN DE TIMER
Nederlands
OVERIGE
BEWERKINGEN
7Druk op om de receiver in de standbystand
te zetten.
De receiver schakelt automatisch in op de opgegeven
tijd.
Om de timerinstelling te annuleren
Druk op TIMER tijdens de instelling.
y
Druk op of RETURN om terug te keren naar het vorige
scherm.
De slaaptimer zet de receiver in stand-bystand nadat een
bepaalde tijd verlopen is.
Druk herhaaldelijk op SLEEP om de gewenste
tijdsduur te selecteren.
Met elke druk op de toets verandert de ingestelde tijdsduur
als volgt.
De SLEEP-indicator licht op het display van het
voorpaneel op.
y
• De slaaptimer wordt geannuleerd wanneer u de receiver in
stand-bystand zet.
• Als u één keer op SLEEP drukt terwijl de slaaptimer in werking
is, toont het display op het voorpaneel hoeveel tijd er nog
resteert.
Annuleren van de slaaptimer
Druk net zo vaak op SLEEP tot u “OFF” geselecteerd
hebt.
Instellen van de slaaptimer
SLEEP
120min.
90min.
60min.
30min.
OFF

BEDIENEN iPod™
32 Nl
Naast de receiver (R-840) en de bd-speler (BD-940) kunt u met de meegeleverde afstandsbediening ook uw iPod
bedienen wanneer deze in de iPod-dock geplaatst is.
Wanneer uw iPod in de iPod-dock geplaatst is, kunt u het afspelen van uw iPod bedienen met de meegeleverde
afstandsbediening.
Wanneer u de iPod tijdens het afspelen aansluit, gaat dit systeem automatisch naar de iPod-modus.
Opmerkingen
• Alleen iPod (Click and Wheel), iPod nano, iPod Classic, iPod mini en iPod touch worden ondersteund.
• Afhankelijk van het model of de softwareversie van uw iPod is het mogelijk dat sommige functies daarmee niet compatibel zijn.
y
Voor een complete lijst met statusmeldingen die op het display op het voorpaneel van de receiver kunnen verschijnen, zie het “iPod”-
gedeelte in het hoofdstuk “PROBLEMEN OPLOSSEN” (☞b.43).
1Druk op iPod om uw iPod als ingangsbron te
selecteren.
2Plaats uw iPod in de iPod-dock.
3Druk op / om het iPod-menu te bedienen
en druk op ENTER om het afspelen van de
geselecteerde track (of groep) te beginnen.
• Kijk op het scherm van uw iPod om het menu te
bedienen.
• Bedien de iPod met de bedieningselementen op de
iPod zelf, of met de meegeleverde
afstandsbediening.
■Herhaald afspelen (Repeat Play)
U kunt afzonderlijke tracks of een groep van tracks
herhaaldelijk afspelen op uw iPod.
Druk op REPEAT.
Met elke druk op deze toets verandert de Herhaalde
afspeelfunctie. Het volgende schema is een voorbeeld van hoe
de functie verandert wanneer u op de toets drukt. Controleer
de huidig geselecteerde modus op uw iPod-scherm.
■Willekeurige weergave (Shuffle Play)
U kunt tracks of albums op uw iPod in een willekeurige
volgorde laten afspelen.
Druk op SHUFFLE.
Met elke druk op de toets verandert de Willekeurige
afspeelfunctie. Het volgende schema is een voorbeeld van hoe
de functie verandert wanneer u op de toets drukt. Controleer
de huidig geselecteerde modus op uw iPod-scherm.
BEDIENEN iPod™
Gebruiken iPod™
De meegeleverde afstandsbediening heeft dezelfde
functietoetsen als uw iPod. Deze toetsen komen dus
overeen met elkaar.
iPod
,
ENTER
REPEAT
SHUFFLE
iPod Afstandsbediening
Eén (herhaalde weergave per nummer)
Alles (herhaalde weergave per geselecteerde groep)
Uit
Nummers (willekeurige weergave per nummer)
Albums (willekeurige weergave per album)
Uit

33 Nl
Nederlands
OVERIGE
BEWERKINGEN
Dit hoofdstuk beschrijft de verschillende menu’s van dit apparaat.
Nadat u dit apparaat en een tv hebt aangezet (☞b.13), kunt u de instellingen op het tv-scherm wijzigen met behulp van de
afstandbediening.
U kunt onderdelen in het menu selecteren en instellingen wijzigen op dezelfde manier als de procedure van “Instellen van
het tv-scherm” (☞b.13).
Opmerking
Wanneer u “Ouderlijk Toezicht” in “Afspeelinstellingen” (☞b.35) selecteert, moet u een 4-cijferig wachtwoord invoeren. Bij de eerste
keer verschijnt het scherm voor het instellen van een wachtwoord. Om het wachtwoord in te stellen, zie “Wachtwoord Inst” (☞b.35).
y
De standaard instellingen zijn gemarkeerd met “*”.
■Bldverhouding Van TV
U kunt de beeldverhouding van de aangesloten tv instellen
en de uitvoer van de video aanpassen.
Controleer bij vervanging van uw oude tv of de
verhouding van de nieuwe tv hetzelfde is. Zo niet, wijzig
dan de instellingen van “Bldverhouding Van TV”.
“Norm. 4:3” opties
Wanneer u “Bldverhouding Van TV” op “Norm. 4:3”
instelt en een 16:9 video op een 4:3 tv bekijkt, selecteert u
dan een van de volgende opties.
■Comp. Video-Uitgang
U kunt de component video-uitvoerresolutie instellen.
Sommige tv’s zijn niet geschikt voor de Blu-ray
diskspeler, wat de oorzaak van de beeldvervorming kan
zijn. Zet in dit geval “Comp. Video-Uitgang” op de
standaard instelling (☞b.41).
1080i, 720p, 576/480p, 576/480i*
Opmerking
Sommige disks verbieden de uitvoer van hoge definitie video die
van de COMPONENT-aansluiting komt. In dit geval is de
videoresolutie geconverteerd naar 576/480p of 576/480i.
■HDMI-Video-Uitgang
U kunt de HDMI video-uitvoerresolutie instellen.
Sommige tv’s zijn niet geschikt voor de Blu-ray
diskspeler, wat de oorzaak van de beeldvervorming kan
zijn. Zet in dit geval “HDMI-Video-Uitgang” op de
standaard instelling (☞b.41). “HDMI-Video-Uitgang” zal
worden teruggezet naar “Autom.” (fabrieksinstelling).
Autom.*, 1080p, 1080i, 720p, 576/480p
Opmerking
Wanneer de bd-speler is aangesloten op een 1080p/24Hz
compatibele tv en de “HDMI-Video-Uitgang” is ingesteld op
“Autom.”, wordt 1080p/24Hz automatisch weergegeven wanneer
de compatibele disks worden afgespeeld.
Op 1080p/24Hz of 1080p/60Hz, er is geen uitvoer afkomstig van
de COMPONENT-aansluitingen en VIDEO-aansluiting.
■Selectie Video-Uitgang
Videosignalen kunnen gelijktijdig worden uitgevoerd van
de analoge video-aansluitingen (component of video-
aansluiting) en de HDMI-aansluiting. Dit wordt dubbele
uitvoer genoemd. Bij gebruik van de component video en
HDMI-uitvoer, wordt de uitvoerresolutie van de video
bepaald op basis van de instellingen van “Comp. Video-
Uitgang” of “HDMI-Video-Uitgang” en “Selectie Video-
Uitgang”. Zie onderstaande tabel voor details.
INSTELLINGEN VAN DE BD-SPELER
Audio-Video Instellingen
Br.bld 16:9*:Selecteer dit bij het aansluiten van een
breedbeeld (16:9) tv.
Norm. 4:3: Selecteer dit bij het aansluiten van een 4:3 tv.
Letterbox*:Geeft een beeld weer met zwarte randen aan
de boven- en onderkant en houdt de
verhouding 16:9.
Pan-Scan: Geeft een beeld zonder de verhouding te
wijziging door het afsnijden van de rechter-
en linkerranden. Deze optie is alleen
beschikbaar voor disks die gelabeld zijn met
4:3PS.
HDMI*:Bepaalt de video uitvoerresolutie op basis van
de HDMI-Video-Uitgang-instelling (zie
“HDMI-Video-Uitgang” (☞b.33)).
Component: Bepaalt de video uitvoerresolutie op basis van
de Comp. Video-Uitgang-instelling (zie
“Comp. Video-Uitgang” (☞b.33)).

34 Nl
INSTELLINGEN VAN DE BD-SPELER
*1 Sommige disks verbieden de uitvoer van hoge definitie video
die van de COMPONENT-aansluitingen komt. In dit geval is
de videoresolutie geconverteerd naar 480p/576p (wanneer
“Selectie Video-Uitgang” is ingesteld op “Component”) of
480i/576i (wanneer “Selectie Video-Uitgang” is ingesteld op
“HDMI”).
*2 Geen video-uitvoer wanneer het 1080p-signaal uitvoer van de
HDMI-aansluiting is.
*3 CVBS Out betekent het video uitvoersignaal van de VIDEO-
aansluiting.
Opmerking
Als uw tv niet geschikt is voor de geselecteerde resolutie worden
beelden mogelijk niet goed weergegeven.
y
U kunt ook schakelen tussen “HDMI” en “Component” door het
gebruik van “HDMI <-> COMP” (☞b.41).
■Secundaire Audio
U kunt secundaire audio aan- en uitzetten voor het beeld in
het beeld- of geluidscommentaren.
Aan*, Uit
y
Wanneer u “Secundaire Audio” op “Uit” instelt, maakt dit
apparaat geen klikgeluid op het menu.
Selecteer “Uit” voor het plezier van hoge kwaliteit BD geluid via
de HDMI-aansluiting.
■Audio-Uitgang
U kunt de audio-uitvoer instellen dat geschikt is voor de
omgeving van afspelen.
“HDMI-Uitgang” opties
Wanneer u “Audio-Uitgang” op “HDMI-Uitgang” instelt,
selecteer dan een van de volgende opties.
Opmerking
Wanneer “Secundaire Audio” is ingesteld op “Aan”, wordt de
“HDMI-Uitgang”-optie automatisch ingesteld op “PCM”.
“Digitale Uitgang” opties
Wanneer u “Audio-Uitgang” op “Digitale Uitgang” instelt,
selecteer dan een van de volgende opties.
■Dynamiekregeling
U kunt de dynamische reeksen aanpassen zodat het geluid
wordt weergegeven op een gemiddeld volume. Als u de
dialoog niet goed kan horen, wijzig dan de instelling van
dit menu.
Opmerking
Zet het volume zacht voordat u deze instelling gaat wijzigen;
anders komt er een hard geluid uit de luidsprekers of wordt er een
zeer zware elektrische lading op uitgeoefend.
Instellingen op deze
speler Uitvoerresolutie
Selectie
Video-
Uitgang
HDMI-
Video-
Uitgang
Component
Out CVBS Out*3
HDMI
Autom. *1 480i/576i*2
1080p Geen uitvoer Geen uitvoer
1080i 1080i*1 480i/576i
720p 720p*1 480i/576i
480p/576p 480p/576p*1 480i/576i
Instellingen op deze
speler Uitvoerresolutie
Selectie
Video-
Uitgang
Comp.
Video-
Uitgang
HDMI Out CVBS Out*3
Component
1080i*11080i*1 480i/576i
720p*1720p*1 480i/576i
480p/576p 480p/576p 480i/576i
480i/576i 480i/576i 480i/576i
HDMI-Uitgang: Geeft een audiosignaal via de HDMI-
aansluiting.
Digitale
Uitgang:
Geeft een audiosignaal via de DIGITAL OUT
(OPTICAL)-aansluiting.
2ch Audio
Uitgang*:
Geeft een audiosignaal via de Audio-uitgang-
aansluitingen.
Bitstream: Geeft als uitvoer een bitstream audiosignaal.
Selecteer deze optie bij het aansluiten van een
HDMI-component met een ingebouwde
decoder voor DOLBY DIGITAL, enz.
PCM*
(Surround):
Geeft als uitvoer een lineair PCM
audiosignaal.
Audiosignalen die opgenomen zijn in
verschillende indelingen, zoals DOLBY
DIGITAL en DTS, zijn gedecodeerd tot
lineair PCM en uitvoer.
Bitstream: Geeft als uitvoer een bitstream audiosignaal.
Selecteer deze optie bij het aansluiten van een
surround component met een ingebouwde
decoder voor DOLBY DIGITAL, enz.
PCM*:Geeft als uitvoer een PCM2-kanaals
audiosignaal.
Audiosignalen die in verschillende indelingen
zijn opgenomen, zijn geconverteerd naar
PCM2-kanaals audiosignalen en uitvoer.
Selecteer deze optie bij het aansluiten van een
2-kanaals stereo audiocomponent.
Norm.: Geeft als uitvoer geluid in dezelfde
dynamische reeks als het oorspronkelijke
geluid.
Verschuiven: Pas de dynamische reeks van Dolby Digital
audio aan zodat de dialoog goed kan worden
gehoord.
Als het geluid abnormaal klinkt, stel dit dan in
op “Norm.”.
Autom.*:Pas automatisch de dynamische reeks van
Dolby TrueHD audio aan.

35 Nl
INSTELLINGEN VAN DE BD-SPELER
Nederlands
OVERIGE
BEWERKINGEN
Met de snelstartfuncties kunt u dit apparaat snel starten.
Opmerking
Wanneer “Snelstart” is ingesteld op “Ja”, heeft de bd-speler enige
tijd nodig om ui te gaan.
U kunt instellen dat dit apparaat automatisch uit gaat na 10
minuten nadat het afspelen is gestopt.
Ja, Nee*
U kunt instellen dat dit apparaat een HDMI
besturingssignaal van de afstandsbediening van uw
ontvangt als het de HDMI besturing ondersteunt en
aangesloten is op dit apparaat via een HDMI kabel.
Ja, Nee*
Opmerkingen
• Zie de bedieningshandleiding van uw tv voor meer informatie.
• Misschien werkt de HDMI-regelfunctie niet tijdens het afspelen
of wanneer het instelmenu wordt weergegeven.
• U kunt deze functie alleen gebruiken wanneer “Selectie Video-
Uitgang” is ingesteld op “HDMI”.
■Ouderlijk Toezicht
Sommige digitale uitzendingen en BD/DVD hebben een
toelatingscode om de weergave van de inhoud voor een
bepaalde leeftijdsgroep te blokkeren. U kunt een niveau
selecteren voor het blokkeren van BD/DVD met
ongewenste toelatingen voor het afspelen op dit apparaat.
“Afspeelinstellingen” geeft een andere optie “Landcode”.
Omdat de toelating per land verschilt, dient u tevens de
landcode in te stellen.
Om een niveaucode of landcode in te stellen, dient u een
4-cijferig wachtwoord in te stellen en deze in te vullen.
Voor DVD
Voor BD
Landcode
Hiermee stelt u de landcode in.
Zie de landencodelijst (☞b.51) omdat de toelatingen per
land kunnen verschillen.
■Disctaal (Disk prioriteitstaal)
Op het scherm kunt u de taal voor ondertiteling selecteren,
audio en de menu’s.
Zie “Talenlijst” (☞b.51) voor beschikbare talen.
■Hoekaanduiding Dsp
Sommige BD/DVD video’s hebben meerdere hoeken.
Wanneer u deze video’s bekijkt, kunt u rechtsonder in het
scherm een hoekteken weergeven.
■Wachtwoord Inst
U kunt het wachtwoord instellen voor het instellen van het
kinderslot.
Opmerkingen
• Wanneer het wachtwoord bent vergeten, kunt u het huidige
wachtwoord resetten met behulp van “Systeemreset” (☞b.39).
• U kunt het wachtwoord desgewenst wijzigen.
Wanneer u de Pincode voor de eerste keer instelt
1Druk op / om “Ja” te selecteren en druk
op ENTER.
2Vul een 4-cijferig getal in.
3Vul hetzelfde 4-cijferige getal nogmaals ter
bevestiging in.
4Druk op ENTER om het scherm voor het
instellen van de Pincode af te sluiten.
y
• U kunt het 4-cijferige getal wissen door te drukken op CLEAR.
• U kunt een andere ENTER (c☞b.7) gebruiken op de
afstandsbediening.
■BD-internettoegang
U kunt toegangsbeperking instellen tot BD-LIVE inhoud.
Snelstart
Ja: Schakelt de snelstartfunctie in.
De QUICK indicator licht op in stand-
bymodus (☞b.5).
Nee*:Schakelt de snelstartfunctie uit.
Het stroomverbruik is in de stand-bystand
lager.
Automatisch Uitschakelen
HDMI Instelling
Afspeelinstellingen
niveau 8 en Uit*:Beperken het afspelen van DVD niet.
niveau 1-7: Verbiedt het afspelen van DVD met de
bijbehorende toelatingen.
Onbeperkt*:Beperken het afspelen van BD niet.
0-99 jaar/jaren: Verbiedt het afspelen van BD met de
bijbehorende toelatingen.
Ja: Geeft het hoekteken weer.
Nee*:Geeft het hoekteken niet weer.
Ja: Stelt het wachtwoord in.
U wordt gevraagd een 4-cijferig getal in te
vullen.
Nee: Stelt geen wachtwoord in.
Toestaan: Staat internettoegang toe voor alle BD-LIVE
disks.

36 Nl
INSTELLINGEN VAN DE BD-SPELER
Opmerkingen
• De beschikbare functies verschillen, afhankelijk van de disk.
• Met betrekking tot de afspeelmethode van BD-LIVE inhoud,
enz. voer de bewerking uit volgens de instructies in de
handleiding van de BD-disk.
• Voor het genieten van BD-LIVE functies, zie “Bezig met de
verbinding naar het internet” (☞b.10) en “Communicatie-
Instelling” (☞b.36).
Hiermee kunt u de instelling voor communicatie uitvoeren
en/of wijzigen. Deze instelling is verplicht om BD-LIVE
functies te gebruiken die verbinding maken met het
internet.
Opmerkingen
• Zorg ervoor dat de LAN kabel op deze speler is aangesloten
(☞b.10).
• Voor het handmatig uitvoeren van deze instelling is de volgende
informatie van de aangesloten router of modem noodzakelijk.
Bevestig de informatie voorafgaand aan de instelling.
– IP- adres, netmask, gateway, DNS IP-adres
• Daarnaast is voor het specificeren van een proxyserver de
volgende informatie die afkomstig is van uw internetprovider
ook noodzakelijk. Bevestig de informatie voorafgaand aan de
instelling.
– IP-adres en poortnummer van de proxyserver
1Druk op SETUP.
2Druk op / / / om “Instellingen” te
selecteren en druk op ENTER.
3Druk op / om “Communicatie-Instelling”
te selecteren en druk op ENTER.
4Selecteer “Ethernet-Instelling (BD-LIVE)” en
druk op ENTER.
5Druk op / om “Wijzigen” te selecteren en
druk op ENTER.
Voor het voltooien van de huidige instelling, selecteer
“Initialiseren”, en druk op ENTER.
6Druk, voor het instellen van het IP-adres, op
/ om “Ja” of “Nee” te selecteren, en druk
op ENTER.
• Als “Ja” wordt geselecteerd, wordt het IP-adres
automatisch verkregen.
• Als wordt “Nee” geselecteerd, moeten het IP-adres,
de netmask en gateway handmatig worden
ingevoerd met behulp van het invoerscherm
(☞b.38).
Bevestig met betrekking tot alle instelwaarden de
specificaties van uw breedband router.
7Selecteer “Volgende” en druk op ENTER.
8Vul het primaire en secundaire IP-adres in
met behulp van het invoerscherm (☞b.38).
Bevestig met betrekking tot alle
instelwaarden de specificaties van uw
breedband router.
9Selecteer “Volgende” en druk op ENTER.
Limiet*:Staat internettoegang toe voor BD-LIVE disks
met alleen eigenaarcertificaat.
Verbieden: Verbiedt internettoegang voor alle disks.
Communicatie-Instelling
EXIT
TOP MENU/TITLE LIST
POP UP MENU
, , ,
ENTER
SETUP
De info over het Ethernet instellen.
[Huidige Instelling]
: Automatische Instelling
: Automatische Instelling
: Automatische Instelling
: Automatische Instelling
: Niet gebruiken
IP-adres
Netmasker
Gateway
DNS
Proxy
Wijzigen Initialiseren
Wilt u het IP-adres automatisch verkrijgen?
IP-adres
Netmasker
Gateway
Volgende
Ja Nee

37 Nl
INSTELLINGEN VAN DE BD-SPELER
Nederlands
OVERIGE
BEWERKINGEN
10 Druk, voor het instellen van de proxyserver,
op / om “Ja” of “Nee” te selecteren, en
druk op ENTER.
• Als “Ja” geselecteerd wordt: het IP-adres of de
naam van de proxyserver en het poortnummer voor
de proxyserver die door uw internet service-
provider zijn opgegeven worden ingevoerd met
behulp van het invoerscherm (☞b.38).
• Als “Nee” geselecteerd wordt: ga naar de volgende
stap.
11 Selecteer “Volgende” en druk op ENTER.
12 Druk voor geavanceerde instellingen (de
instelling van de snelheid van de
ethernetverbinding) op / om “Ja” of “Nee”
te selecteren en druk op ENTER.
• Selecteer in normale situaties “Nee” en druk op
ENTER.
• De snelheid voor de ethernetverbinding kan
worden ingesteld wanneer u “Ja” selecteert en op
ENTER drukt.
• Omdat automatische detectie aan staat
(fabrieksinstelling), is deze instelling normaal niet
nodig. Als er een situatie ontstaat waarin de
ethernetverbinding niet werkt, wijzig dan de
instelling en bevestig als de ethernetverbinding
daarna goed werkt.
Wanneer de verbindingssnelheid is ingesteld,
selecteer dan “Volgende” en druk op ENTER.
13 Om de internetverbinding te testen na het
bevestigen van de instellingen, druk op /
om “Test” te selecteren en druk op ENTER.
“Test” is alleen beschikbaar wanneer de instelling is
gekozen voor het automatisch verkrijgen van het IP-
adres.
14 Druk op / om “Voltooid” te selecteren en
druk op ENTER.
■De bedieningsprocedure voor het
handmatig invoeren van de tekens
Opmerking
Numerieke tekens zoals het IP-adres kunnen op het invoerscherm
worden ingevuld door elk van de tekens te selecteren in de
“Numeriek”-modus of gebruik te maken van de cijfertoetsen op
de afstandsbediening.
1Druk op ENTER in de velden waarin de
tekens moeten worden ingevuld en het
invoerscherm verschijnt.
2Druk op / om de gewenste invoerstand te
selecteren.
• Wanneer het adres van de proxyserver wordt
ingevuld; “
1ABC” (Alfabetiche/numerieke tekens) /
“Tekenen” / “Bewerken”
• Wanneer ander waarden worden ingevuld (IP-
adres, enz.); “Numeriek” / “Bewerken”
3Druk op / om een nummer/teken te
selecteren en druk op ENTER.
Gebruikt u de proxyserver?
Adres
Poort
Volgende
Ja Nee
Optie
Ethernet-verbindingssnelheden
Volgende
Automatische Detectie
10M Half Duplex
100M Half Duplex
10M Full Duplex
100M Full Duplex
Bevestig de huidige instelling.
: xxx xxx xxx xxx
: xxx xxx xxx xxx
: xxx xxx xxx xxx
: xxx xxx xxx xxx
xxx xxx xxx xxx
: xx:xx:xx:xx:xx:xx
IP-adres
Netmasker
Gateway
DNS-adres
MAC-adres
VoltooidTest
IP-adres
Netmasker
Gateway
123
Numeriek
1234567890
Bewerken
Geselecteerd door op te
/ drukken
Geselecteerd door op te
/ drukken
38 Nl
INSTELLINGEN VAN DE BD-SPELER
4Herhaal stap 3 om alle gewenste tekens/
nummers in het invoerveld weer te geven.
Voorbeeld: Het scherm voor het invoeren van de
numerieke tekens
Opmerking
Druk op RETURN (teken wissen) om een ingevoerd nummer/
teken te verwijderen.
Druk op B (links) om een ingevoerd nummer/teken te wijzigen of
op C (rechts) om het nummer/teken te selecteren dat u wilt
wijzigen en druk op RETURN (teken wissen). Druk daarna op
/ om een nieuw nummer/teken te selecteren dat u wilt
invoeren en druk op ENTER.
5Druk op D (Voltooien) om de nummers die u
hebt ingevuld, vast te zetten.
6Herhaal stap 1 t/m 5 om het invoeren van alle
benodigde tekens af te ronden.
Lijst met invoertekens
Numeriek 123
1234567890
Bewerken IP-adres
Netmasker
Gateway
123
1ABC (Alfabetiche/
numerieke tekens)
Numeriek
Tekenen
Voltooid
* Dezelfde bewerking als de gekleurde toetsen en RETURN kan worden uitgevoerd door elk van de items te
selecteren en drukken op ENTER. “Teken verw.” staat voor het wissen van tekens.
Num. ABC DEF GHI JKL MON PQRS TUV WXYZ Spc.
Num. 1234567890 ABC ABCabc DEF D E F d e f
GHI G H I g h i JKL J K L j k l MNO MNOmno
PQRS PQRSpqrs TUV TUVtuv WXYZ WXYZwxyz
Spc. (spatie)
1234567890
@ . , : ; _ - \ $ % ! ? & # + * = / | ˜ “ ‘ ˆ ` ( ) < > [ ]{ } Spc.
@ . , : @ . , : ; _ - \ ; _ - \ $ % ! ? $ % ! ?
& # + * & # + * = / | ˜ = / | ˜ “ ‘ ˆ ` “ ‘ ˆ `
( ) < > ( ) < > [ ]{ } [ ] { } Spc. (spatie)
Annuleren Links Rechts Voltooien Teken verw.

39 Nl
INSTELLINGEN VAN DE BD-SPELER
Nederlands
OVERIGE
BEWERKINGEN
U kunt de versie van de systeemsoftware weergeven.
Voor gebruik van het USB-
geheugenapparaat
De volgende instructies leggen uit hoe gegevens zoals de
BD-LIVE-gegevens in het USB-geheugenapparaat
verwijdert moeten worden.
1Steek het USB-geheugenapparaat in de USB
BD STORAGE/SERVICE-poort aan de
achterkant van deze speler.
2Druk op SETUP om het scherm van het
Setup-menu weer te geven.
3Druk op / / / om “Instellingen” te
selecteren en druk op ENTER.
4Druk op / om “Beheer USB-Geheugen” te
selecteren en druk op ENTER.
“Geen USB-geheugen.” verschijnt wanneer er geen
USB-geheugen is ingestoken.
5Druk op / , selecteer “Wis” of
“Formatteer” en druk op ENTER.
Wis: Verwijdert alleen BD-VIDEO-
gegevens die geschreven zijn op het
USB- geheugenapparaat, zoals BD-
LIVE-gegevens.
Formatteer: Weest u zich ervan bewust dat alle
gegevens, inclusief BD-VIDEO-
gegevens en gegevens van software-
updates verwijderd zullen worden.
Als u alleen de gegevens van de onnodige software-
update wilt verwijderen nadat de software is
geüpdatet, verwijder dan de gegevens op het USB-
geheugenapparaat met behulp van een pc.
Opmerking
Gegevens die zijn opgeslagen op het interne geheugen van de
speler (spelscores enz.) zullen ook worden verwijderd.
6Druk op / , selecteer “Ja” en druk op
ENTER.
7Start het proces.
Het scherm voor de huidige bewerking verschijnt.
8Druk op ENTER.
Deze functie staat software-updates toe door het insteken
van een USB-geheugenapparaat met de update-bestand in
de USB BD STORAGE/SERVICE-poort op deze speler.
Het USB geheugenapparaat moet geschoond zijn
van alle bestanden, behalve de software-update
om de nieuwe software te uploaden.
Om de beschikbaarheid van een software-update
te controleren, bezoek
http://www.yamaha.co.jp/english/product/av/
down/agreement.html.
U kunt alle instellingen van de bd-speler naar de
fabrieksinstellingen terugzetten.
Reset, Geen Reset
Versie
OPGELET:
• Verwijder het USB-geheugenapparaat niet en haal
de stekker niet uit het stopcontact als de
bewerkingen voor “Beheer USB-Geheugen” of
“Software-Update” worden uitgevoerd.
• Gebruik geen USB verlengsnoer voor het aansluiten
van een USB geheugenapparaat op de USB BD
STORAGE/SERVICE-poort van de speler. Het
gebruik van een USB verlengsnoer kan het goed
functioneren van de speler belemmeren.
Opmerking
Yamaha kan niet garanderen dat USB geheugenapparaten van
alle merken met deze speler functioneren.
Beheer USB-Geheugen
Software-Update
Systeemreset
Wist BD-VIDEO-gegevens op USB-geheugen.
Wis alle contents op USB-geheugen
incusief beveiligde contents.
Formatteer
Wis
Ja Nee
OK
Voltooid

40 Nl
INSTELLINGEN VAN DE BD-SPELER
Lijst met landcodes
Talenlijst
Lijst met talencodes
VERENIGDE STATEN / CANADA / JAPAN / DUITSLAND / FRANKRIJK /VK / ITALIË / SPANJE /
ZWITSERLAND / ZWEDEN / NEDERLAND / NOORWEGEN / DENEMARKEN / FINLAND / BELGIË / HONG
KONG / SINGAPORE / THAILAND / MALEISIË / INDONESIË / TAIWAN /FILIPPIJNEN / AUSTRALIË /
RUSLAND / CHINA
Engels / Frans / Duits / Italiaans / Spaans / Japans / Zweeds / Nederlands
AA Afar / AB Abchazisch / AF Afrikaans / AM Ameharic / AR Arabisch / AS Assamees / AY Aymara / AZ
Azerbaijani / BA Bashkir / BE Byelorussian / BG Bulgaars / BH Bihari / BI Bislama / BN Bengaals, Bangla / BO
Tibetaans / BR Bretons / CA Catalaans / CO Corsicaans / CS Tsjechisch / CY Welsh / DA Deens / DE Duits / DZ
Bhutani / EL Grieks / EN Engels / EO Esperanto / ES Spaans / ET Estisch / EU Baskisch / FA Persisch / FI Fins / FJ
Fiji / FO Faroese / FR Frans / FY Fries / GA Iers / GD Scots Gaelic / GL Galicia / GN Guarani / GU Gujarati / HA
Hausa / HI Hindi / HR Kroatisch / HU Hungaars / HY Armeens / IA Interlingua / IE Interlingue / IK Inupiak / IN
Indonesisch / IS Ijslands/ IT Italiaans / IW Hebreeuws / JA Japans / JI Yiddish / JW Javaans / KA Georgiaans / KK
Kazachstaans / KL Groenlands / KM Cambodjaans / KN Kannada / KO Koreaans / KS Kashmiri / KU Koerdisch /
KY Kirghiz / LA Latijn / LN Lingala / LO Laotiaans / LT Lithuaniaans / LV Lets, Lettish / MG Malagasy / MI Maori
/ MK Macedoniaans / ML Malayalam / MN Mongools / MO Moldavisch / MR Marathi / MS Maleis / MT Maltees /
MY Burmees / NA Nauruaans / NE Nepalaans / NL Nederlands / NO Noors / OC Occitaans / OM Afan (Oromo) /
OR Oriya / PA Panjabi / PL Pools / PS Pashto, Pushto / PT Portugees/ QU Quechua / RM Rhaeto-Romance / RN
Kirundi / RO Roemeens / RU Russisch / RW Kinyarwanda / SA Sanskrit / SD Sindhi / SG Sangho / SH Servisch
Kroatisch / SI Singhalees / SK Slovaaks / SL Sloveens / SM Samoa / SN Shona / SO Somali / SQ Albanees / SR
Servisch / SS Siswat / ST Sesotho / SU Sundanees / SV Zweeds / SW Swahili / TA Tamil / TE Telugu / TG Tajik /
TH Thais / TI Tigrinya / TK Turkmeens / TL Tagalog / TN Setswana / TO Tongaans / TR Turks / TS Tsonga / TT
Tatar / TW Twi / UK Oekraïens / UR Urdu / UZ Oezbeeks / VI Vietnamees / VO Volapük / WO Wolof / XH Xhosa /
YO Yoruba / ZH Chinees / ZU Zoeloe
41 Nl
Nederlands
OVERIGE
BEWERKINGEN
U kunt de instellingen wijzigen wanneer een HDMI of een componentenkabel is aangesloten met behulp van de toetsen
op de bd-speler. Tevens zie bladzijde 33.
Opmerkingen
• Zelfs in de stand Pure Direct kunt u instellingen tonen en wijzigen op het display van het voorpaneel van de bd-speler.
• Tijdens het afspelen kunnen de instellingen niet worden gewijzigd. Wijzig de instellingen nadat het afspelen beëindigd is.
1Druk op DISC om een ingangsbron te
selecteren en druk op OPTION.
“VIDEO RESET” verschijnt op het display op het
voorpaneel van de bd-speler.
2Druk op / om “VIDEO RESET” of
“HDMI <-> COMP” te selecteren.
VIDEO RESET
Herstel de resolutie van “Comp. Video-Uitgang”
(☞b.33) of “HDMI-Video-Uitgang” (☞b.33) naar de
fabrieksinstellingen.
HDMI <-> COMP
Zet de prioriteit van video-uitvoer op HDMI of
Component.
Voor details, zie “Selectie Video-Uitgang” (☞b.33).
3Druk op ENTER om de instelling te
bevestigen.
“>> DONE <<” wordt weergegeven.
Om de instelling te annuleren
Druk op OPTION, EXIT of RETURN.
DE INSTELLINGEN VERANDEREN BIJ HET AANSLUITEN VAN EEN
HDMI OF COMPONENTENKABEL
A B C D
EXIT
TOP MENU/TITLE LIST
POP UP MENU
DISC
,
OPTION
ENTER
EXIT RETURN

PROBLEMEN OPLOSSEN
42 Nl
AANVULLENDE INFORMATIE
Raadpleeg de tabel hieronder wanneer het apparaat niet naar behoren functioneert. Als het probleem niet hieronder
vermeld staat, of als de aanwijzingen het probleem niet verhelpen, zet het apparaat dan uit, haal de stekker uit het
stopcontact en neem contact op met uw dichtstbijzijnde Yamaha-dealer of servicecentrum.
■Algemeen
PROBLEMEN OPLOSSEN
Receiver (R-840)
Probleem Oorzaak Oplossing
Zie
bladzijde
De receiver gaat niet
aan, of gaat direct
weer in stand-by
zodra de stroom
wordt ingeschakeld.
Het netsnoer of de stekker is niet of niet
goed aangesloten.
Sluit het netsnoer stevig aan. 8
De receiver heeft blootgestaan aan een
sterke, externe elektrische schok
(bijvoorbeeld een blikseminslag of een
ontlading van statische elektriciteit).
Zet de receiver in stand-by, haal de stekker uit het
stopcontact, wacht 30 seconden voor u de stekker
weer terug doet en probeer het apparaat gewoon
opnieuw te gebruiken.
—
De kabel heeft kortsluiting veroorzaakt
en de beveiliging is in werking getreden.
Zorg ervoor dat alle luidsprekeraansluitingen op de
receiver en op alle luidsprekers veilig en stevig
vastgemaakt zijn en dat de draad voor elke
aansluiting niets anders raakt dan zijn eigen
aansluiting.
8
De interne temperatuur is te hoog en de
beveiliging is in werking getreden.
Wacht ongeveer 1 uur tot de receiver afgekoeld is en
zet hem daarna opnieuw aan.
8
Geen geluid In- of uitgangskabels niet op de juiste
manier aangesloten.
Sluit de kabels op de juiste manier aan. Als dit het
probleem niet verhelpt, is het mogelijk dat er iets mis
is met de kabels.
8
Er is geen geschikte ingangsbron
geselecteerd.
Selecteer een geschikte ingangsbron met de INPUT-
selectieknop op het voorpaneel (of met de
ingangskeuzetoetsen op de afstandsbediening).
—
De luidsprekers zijn niet goed
aangesloten.
Sluit de luidsprekers op de juiste manier aan. 8
Het volume staat laag. Zet het volume hoger. —
Het geluid is gedempt. Druk op MUTE of VOLUME +/– om de
geluidsuitvoer te hervatten en pas vervolgens het
volume aan.
7
Er worden signalen ontvangen van een
broncomponent zoals een CD-ROM die
de receiver niet kan weergeven.
Gebruik een bron waarvan de signalen wel door de
receiver kunnen worden gereproduceerd.
—
Het geluid valt
plotseling uit.
De timer heeft de receiver uitgeschakeld. Zet de receiver aan en speel de gewenste bron weer
af.
—
Er klinkt alleen geluid
uit de luidspreker aan
één kant.
Kabels zijn niet correct aangesloten. Sluit de kabels op de juiste manier aan. Als dit het
probleem niet verhelpt, is het mogelijk dat er iets mis
is met de kabels.
8
U ondervindt storing
van digitale of andere
apparatuur die
radiogolven
genereert.
De receiver staat te dicht bij de digitale of
hoogfrequente apparatuur.
Zet de receiver verder van dergelijke apparatuur. —
Het geluid is
vervormd.
Het volumeniveau is te hoog. Pas het volumeniveau aan. 15
“CHK SP WIRE”
verschijnt op het
display.
De luidsprekerkabels zijn kortgesloten. Zorg ervoor dat de luidsprekerkabels correct
aangesloten zijn.
8

43 Nl
Nederlands
PROBLEMEN OPLOSSEN
AANVULLENDE
INFORMATIE
■FM
■iPod
Opmerking
Controleer de aansluiting tussen de receiver en uw iPod (☞b.10) als een verzendingsfout optreedt zonder dat er een statusmelding op het
display op het voorpaneel van de receiver verschijnt.
Probleem Oorzaak Oplossing
Zie
bladzijde
Veel ruis in de FM-stereo-
ontvangst.
Dit probleem is inherent aan FM-
stereo-uitzendingen wanneer de zender
te ver weg is of het ontvangstsignaal
dat binnenkomt via de antenne niet
sterk genoeg is.
Controleer de aansluitingen van de antenne. 8
Probeer een hoogwaardige directionele FM-
antenne.
—
Er is vervorming en ook een
betere FM-antenne zorgt niet
voor een betere ontvangst.
U ondervindt interferentie doordat
hetzelfde signaal op verschillende
manieren ontvangen wordt.
Verander de opstelling van de antenne zodat
u van deze interferentie geen last meer hebt.
—
Er kan niet automatisch
worden afgestemd op de
gewenste zender.
Het radiosignaal is te zwak. Probeer een hoogwaardige directionele FM-
antenne.
—
Stem met de hand af. 26
Er kan niet langer worden
afgestemd op eerder
voorkeurzenders.
De receiver is te lang zonder stroom
geweest.
Stel voorkeurzenders in. 26
Statusbericht Oorzaak Oplossing
Zie
bladzijde
CONNECT ERR Er is een probleem met het signaal dat de
receiver ontvangt van uw iPod.
Zet de receiver uit en probeer uw iPod te resetten. 10
UNKNOWN TYP De gebruikte iPod wordt niet ondersteund
door de receiver.
Alleen iPod (Click and Wheel), iPod nano, iPod
Classic, iPod mini en iPod touch worden
ondersteund.
—
CONNECTED Uw iPod is correct in de iPod-dock
geplaatst en de verbinding tussen uw iPod
en de receiver is voltooid.
NOT CONNECT Uw iPod is uit de iPod-dock van de
receiver verwijderd.
Plaats uw iPod terug in de aansluiting van de
receiver.
10
CAN'T PLAY De receiver kan de op dit moment op uw
iPod opgeslagen tracks niet weergeven.
Controleer of de tracks op uw iPod inderdaad
weergegeven kunnen worden.
—
Sla andere muziekbestanden op uw iPod op die wel
kunnen worden weergegeven.
—

44 Nl
PROBLEMEN OPLOSSEN
Afstandsbediening
Probleem Oorzaak Oplossing
Zie
bladzijde
De
afstandsbediening
werkt niet of niet naar
behoren.
Het is mogelijk dat de afstandsbediening
buiten zijn werkingsbereik gebruikt is.
Zie voor informatie over de bedieningsreeks van de
afstandsbediening “Gebruiken van de
afstandsbediening”.
11
Het is mogelijk dat de infraroodsensor op
dit apparaat blootgesteld is aan direct
zonlicht of sterke verlichting (TL-
lampen).
Verander de verlichting of de richting van dit
systeem.
11
De batterij is misschien leeg. Vervang de batterij door een nieuwe. 11
Er bevinden zich hindernissen tussen de
sensor van dit apparaat en de
afstandsbediening.
Verwijder de hindernissen. 11
De systeemkabel is losgeraakt uit de
aansluiting op de receiver en/of de
aansluiting op de bd-speler.
Sluit de receiver en de bd-speler goed op elkaar aan
met de systeemkabel.
8
Bd-speler (BD-940)
Probleem Oorzaak Oplossing
Zie
bladzijde
Het apparaat gaat
niet aan.
De stekker is niet volledig ingestoken. Sluit het netsnoer stevig aan. 8
De receiver en de bd-speler zijn niet juist
aangesloten.
Controleer de aansluiting met de receiver. 8
De receiver is onjuist ingesteld. Controleer de instelling (INPUT/Volume/MUTE/
Hoofdtelefoon) van de receiver.
—
De stroom is
uitgezet.
“Automatisch Uitschakelen” is ingesteld
op “Ja”.
Stel “Automatisch Uitschakelen” in op “Nee”. 35
Het afspelen van de
disk begint niet.
U gebruikt mogelijk een opneembare disk
die nog niet voltooid is.
Voltooi de opneembare disk. —
Het disklabel wijst mogelijk niet naar
boven.
Plaats de disk in de disklade met de label naar boven. —
De disk kan defect zijn. Probeer een andere disk af te spelen. Als hetzelfde
probleem zich nu niet voordoet, is de kans groot dat
de disk die u eerst probeerde niet goed is.
—
De disk is vies. Reinig het oppervlak van de disk. 48
De regiocode van de disk komt niet
overeen met die van de bd-speler.
Gebruik een schijf met dezelfde regiocode als de bd-
speler.
3
Wanneer de opgenomen tijd van de disk
ongewoon kort is, is het afspelen
misschien niet mogelijk.
BD-RE/R disks die in andere indeling
zijn opgenomen dan BDMV kunnen niet
worden afgespeeld.
De video stopt met
afspelen.
De bd-speler ondergaat een te grote
kracht of trillingen.
Zorg ervoor dat de bd-speler geen te grote kracht of
trillingen ondergaat.
—
De bd-speler staat niet op een stevige,
platte ondergrond.
Plaats de bd-speler op een stevige, platte ondergrond. —

45 Nl
Nederlands
PROBLEMEN OPLOSSEN
AANVULLENDE
INFORMATIE
De bd-speler maakt
een haperend geluid
tijdens het laden of
afspelen van een
disk.
De bd-speler is een tijd niet gebruikt. Dit kan optreden als het een tijd niet gebruikt is. Dit
duidt niet op een storing of defect.
—
Geen beeld. De videokabel is niet goed aangesloten
op uw tv.
Sluit de videokabel goed aan op de tv. 9
Een invoerinstelling op uw tv is niet
goed.
Selecteer de juiste invoerinstelling op de tv. 13
De bd-speler is niet goed ingesteld voor
HDMI of de kabelaansluiting van het
videocomponent.
Stel de bd-speler goed in. 33
Het beeld staat stil en
de bedieningstoetsen
werken niet meer.
De disk is beschadigd of vies. Controleer het oppervlak van de disk. —
De bd-speler blokkeert. Start de bd-speler opnieuw. 5
Er is geluid, maar
geen beeld.
De videokabel is niet goed aangesloten. Sluit de kabel goed aan. 9
Een beeld wordt niet
met de gewenste
resolutie
weergegeven.
De instelling voor de resolutie van de
video-uitgang komt niet overeen met de
resolutie van de tv die is aangesloten op
de bd-speler.
Verricht de “VIDEO RESET”. 41
Schakel met behulp van “Selectie Video-Uitgang” of
“HDMI <-> COMP” tussen “HDMI” en
“Component”.
33, 41
“Selectie Video-Uitgang” is niet goed
ingesteld.
Stel “Selectie Video-Uitgang” goed in. 33
“Comp. Video-Uitgang” of “HDMI-
Video-Uitgang” is niet ingesteld op de
gewenste resolutie.
Stel “Comp. Video-Uitgang” of “HDMI-Video-
Uitgang” in op de gewenste resolutie.
33
De beelden zien er op
het
breedbeeldscherm
verticaal opgerekt
uit, of er verschijnen
zwarte randen aan de
boven- en onderkant
van het scherm.
“Bldverhouding Van TV” is niet goed
ingesteld voor de aangesloten tv.
Stel “Bldverhouding Van TV” goed in voor de
aangesloten tv.
33
Er is een 4:3 standaard tv aangesloten,
maar “Selectie Video-Uitgang” is niet
ingesteld op “Component”.
Wanneer een breedbeeld-tv is aangesloten, stelt u
“Bldverhouding Van TV” in op “Br.bld 16:9”.
Wanneer een 4:3 standaard tv is aangesloten, stelt u
“Selectie Video-Uitgang” in op “Component”.
33
4:3 beelden zien er
horizontaal uitgerekt
uit.
Wanneer een 4:3 tv is aangesloten, stelt u “Selectie
Video-Uitgang” in op “Component”.
33
Blokruis (mozaïek)
verschijnt op het
scherm.
Blokruis kan voorkomen in
snelbewegende scènes als gevolg van de
eigenschappen van de technologie voor
digitale beeldcompressie.
Geluid of beelden
wordt niet goed
weergegeven.
Het geluid of het beeld wordt mogelijk
niet goed weergegeven tijdens het
afspelen van een auteursrechtelijk
beschermde disk.
Geen geluid of
vervormd geluid.
De RCA stereokabel is niet aangesloten
tussen de receiver en de bd-speler.
Sluit de RCA stereokabel aan tussen de receiver en
de bd-speler.
8
De audiostekker is vies. Reinig de audiostekkers. —
Het oppervlak van de disk is vies. Reinig het oppervlak van de disk. 48
De disk is beschadigd of vies. Controleer het oppervlak van de disk. —
Probleem Oorzaak Oplossing
Zie
bladzijde

46 Nl
PROBLEMEN OPLOSSEN
De volgende meldingen verschijnen op het tv-scherm als de disk die u probeert af te spelen niet geschikt is of de
bediening niet goed is.
Netwerk
Probleem Oorzaak Oplossing
Zie
bladzijde
Verbinding met
internet lukt niet.
De netwerkkabel is niet goed
aangesloten.
Sluit de netwerkkabel goed aan. 10
Er is een verkeerde kabel gebruikt, zoals
een modulaire kabel.
Gebruik de netwerkkabel voor aansluiting. 10
De breedband router of modem is niet
goed aangesloten.
Sluit de breedband router en/of modem goed aan. 10
De breedband router of modem is niet
ingeschakeld.
Zet de breedband router of het modem aan. —
De netwerkinstellingen zijn niet goed. Controleer “Communicatie-Instelling”. 36
De BD-LIVE-inhoud
kan niet worden
gedownload.
De netwerkkabel is niet goed
aangesloten.
Sluit de netwerkkabel goed aan. 10
Het USB-geheugenapparaat is niet goed
aangesloten.
Controleer of het USB-geheugenapparaat is
aangesloten op de USB BD STORAGE/SERVICE-
aansluiting van de bd-speler.
10
De BD disk ondersteunt geen BD-LIVE. Controleer of de BD disk BD-LIVE ondersteunt. 24
“BD-internettoegang” is ingesteld op
“Verbieden”.
Stel “BD-internettoegang” in op “Toestaan” of
“Limiet”.
35
Meldingen met betrekking tot BD-disk en DVD-disk
Foutmelding Mogelijke fout Oplossing
Kan niet afspelen. – De disc kan niet met deze speler worden
afgespeeld.
– Controleer de disc en plaats deze op de juiste
wijze.
Incompatibele disc. – Als u een disc plaatst die niet met deze speler kan
worden afgespeeld (bijv. een disc met krassen
erop) of als u een disc ondersteboven plaatst,
verschijnt deze melding en gaat de disclade
automatisch open.
– Deze melding verschijnt als de geplaatste disc niet
kan worden afgespeeld omdat het een niet-
standaard disc is, er krassen op de disc zijn, enz.
– Haal de disc eruit.
Geen bediening
mogelijk.
– Deze melding verschijnt als de bediening niet juist
is.
Dit USB geheugen is
niet juist
geformatteerd.
Formatteer het
geheugen in USB
geheugenbeheer.
– Deze melding verschijnt als er een formatteerfout
optreedt.
– Formatteer het USB geheugen opnieuw.
– Treedt op als het USB geheugen niet
geformatteerd is met FAT 32/16.
– Formatteer het USB geheugen met uw PC.
Het aangesloten USB
geheugen kan niet
worden gebruikt. Het
moet compatibel zijn
met USB 2.0.
– Deze melding verschijnt als een USB
geheugenapparaat wordt gebruikt dat niet voldoet
aan USB 2.0 High Speed (480 Mbit/s) (bijv. USB
1.0/USB 1.1).
– Sluit een USB geheugenapparaat aan dat voldoet
aan USB 2.0 High Speed (480 Mbit/s).

OPMERKINGEN OVER HET OMGAAN MET COMPACT DISKS
48 Nl
• Ga steeds voorzichtig om met een disk zodat u geen
krassen maakt op het oppervlak. Buig de disks niet.
• Veeg het afspeeloppervlak met een droge, schone doek
schoon. Gebruik geen diskreinigers, sprays of andere
vloeistoffen op chemische basis.
• Wrijf niet met een cirkelvormige beweging; wrijf
steeds vanaf het middelpunt recht naar buiten.
• Gebruik een viltstift om op het label van de disk te
schrijven.
• Verwijder een disk die niet gebruikt wordt uit het
apparaat en bewaar deze in een geschikt doosje.
• Stel de disks gedurende een lange periode niet bloot
aan direct zonlicht, hoge temperaturen of een hoge
vochtigheidsgraad.
■Om een cd van 8 cm af te spelen
Plaats de disk in de binnenste uitsparing van de disklade.
Plaats geen normale cd (12 cm) bovenop een cd van 8 cm.
■Analoog
Geluid dat niet in getallen is omgezet.
Analoog geluid varieert, terwijl digitaal geluid specifieke
numerieke waarden bevat. Deze uitgangen zenden audio
door twee kanalen, het linker- en rechterkanaal.
■Verhouding
De verhouding van verticale en horizontale afmetingen
van een weergegeven beeld. De horizontale versus de
verticale verhouding van conventionele tv’s is 4:3 en dat
van breedbeeldschermen 16:9.
■Videocomponent
Uitgangen voor het invoeren of uitvoeren van een signaal
van of naar een videocomponent. Component
videosignaal bestaat uit drie lijnen, het luminantiesignaal
(Y) en twee kleurverschilsignalen (PB/CB, PR/CR),
waardoor video van hoge kwaliteit mogelijk is.
■Diskmenu
Een voorbereid venster voor het kunnen selecteren van
beelden, geluiden, ondertiteling, meervoudige hoeken,
enz., opgenomen op een BD/DVD.
■Dolby Digital
Digitaal surround-geluid dat ontwikkeld is door Dolby
Laboratories geeft volledig onafhankelijk meermaals-
geluid. Met 3 kanalen aan de voorkant (links, midden, en
rechts) en 2 surround stereo-kanalen, Dolby Digital geeft
vijf geluidskanalen met volledig bereik. Met een extra
kanaal speciaal voor bas-effecten (LFE genaamd, of laag
frequentie-effect), heeft het systeem totaal 5.1-kanalen
(LFE wordt geteld als 0.1-kanaal). Door het gebruik van
2-kanaals stereo voor de surround-luidsprekers zijn er
nauwkeuriger filmgeluidseffecten en surround-geluid van
de omgeving mogelijk dan met Dolby Surround.
■DTS (Digital Theater Systems)
Digitaal systeem met surround-geluid, ontwikkeld door
Digital Theater Systems, Inc., die 5.1 kanaalgeluid levert
(max). Met een overvloed aan audiogeluid is het in staat
om authentiek klinkende effecten te leveren.
■HDMI
HDMI (High-Definition Multimedia Interface) is de
eerste, door de industrie ondersteunde,
ongecomprimeerde, volledig digitale audio/video-
interface. Levert een interface tussen elke bron (zoals een
settopbox of AV-controller) en een audio-/videomonitor
(zoals een digitale televisie), HDMI ondersteunt
standaard, verbeterde of hoge-definitie video evenals
meerkanaals digitaal geluid met één kabel. HDMI
verstuurt alle ATSC (Advanced Television Systems
Committee) HDTV-standaarden en ondersteunt
8-kanaals digitaal geluid, met genoeg bandbreedte ter
voorbereiding op toekomstige verbeteringen en
benodigdheden.
OPMERKINGEN OVER HET OMGAAN MET COMPACT DISKS
Opmerking: gebruik geen lensreinigers aangezien die
een storing kunnen veroorzaken.
WOORDENLIJST

49 Nl
Nederlands
AANVULLENDE
INFORMATIE
Wanneer dat wordt gebruikt in combinatie met HDCP
(Hoge-bandbreedte digitale inhoud bescherming), HDMI
levert een veilige audio-/video-interface die voldoet aan de
beveiligingseisen van leveranciers van inhoud en systeem-
operators.
Voor meer informatie over HDMI, bezoek de HDMI
website op “www.hdmi.org/”.
■Interlace
De meest gebruikte type scanning die gebruikt wordt in
televisies. Het verdeelt een scherm in even en oneven
genummerde velden voor het scannen en bouwt
vervolgens een beeld op door ze te combineren in één
beeld (frame).
■JPEG (Joint Photographic Experts
Group)
Een gestandaardiseerd systeem voor beeldcompressie,
voorgesteld door de Joint Photographic Experts Group.
Het kan de grootte van beeldgegevens verkleinen tot 1 tot
10% van hun oorspronkelijke grootte en werkt effectief op
digitale foto’s.
■Kinderslot
Beperkt het afspelen van disks in overeenstemming met de
leeftijd van de gebruikers of de beperking in een land. De
beperking varieert van disk tot disk; als het geactiveerd is,
wordt het afspelen beperkt als het niveau van de software
hoger is dan het niveau dat door de gebruiker is ingesteld.
■Progressieve scan
Een methode voor het tegelijkertijd weergeven van alle
scanlijnen in een frame, waardoor het merkbare flikkering
vermindert op een groter scherm en een scherp en helder
beeld creëert.
■Regiocode
Veel BD/DVD-disks zijn voorzien van een regiocode
zodat de eigenaar van de auteursrechten de controle heeft
over de BD/DVD softwaredistributie naar alleen regio’s
waar ze er klaar voor zijn om naar gedistribueerd te
worden. Er zijn zes regiocodes, waardoor een bd-speler
de beperking heeft om een BD/DVD-disk af te spelen met
dezelfde regiocode.
■VR-indeling (Video Recording format)
Een DVD indeling voor video-opname, waardoor DVD
videogegevens op een disk bewerkt kunnen worden.
Daarvoor is een speler nodig die geschikt is voor het
afspelen van VR indeling.
■R-840
VERSTERKERGEDEELTE
• Minimaal RMS-uitgangsvermogen per kanaal
(6 Ω, 1 kHz, 10 % THD) ...........................................65 W + 65 W
• Ingangsgevoeligheid/impedantie
PLAYER, etc. ......................................................... 200 mV/47 kΩ
• Frequentierespons
PLAYER, etc. ...................................... 20 Hz t/m 20 kHz ± 0,5 dB
• Totale harmonische vervorming
PLAYER, etc. (30 W/6 Ω)...................................0,04 % of minder
• Signaal/ruis-verhouding (IHF-A-netwerk)
PLAYER (200 mV, ingang kortgesloten) ...............100 dB of meer
TUNERGEDEELTE
ALGEMEEN
• Stroomvoorziening...................................230 V, 50 Hz wisselstroom
• Stroomverbruik........................................................................115 W
• Afmetingen (B × H × D)................................... 215 × 110 × 348 mm
• Gewicht.....................................................................................5,7 kg
• Stand-by stroomverbruik .......................................minder dan 0,3 W
■BD-940
GEDEELTE VAN DE SPELER
• Audio-uitgang
Uitgangsniveau (1 kHz 0 dB)........................................ 2 V (± 0,3)
Signaal/ruisverhouding ........................................meer dan 100 dB
Dynamisch bereik (48 kHz, 24-bits) ......................meer dan 95 dB
Totale harmonische vervorming......................minder dan 0,005 %
Frequentierespons
CD-DA .....................................................................20 Hz–20 kHz
BD/DVD (48 kHz) ...................................................20 Hz–22 kHz
BD/DVD (96 kHz) ...................................................20 Hz–44 kHz
• Video-uitgangen
Composiet ...................................................................1 Vp-p/75 Ω
Component ........................................................... 1 Vp-p/75 Ω (Y)
0,7 Vp-p/75 Ω (PB, PR)
• HDMI uitgangt ................................................Type A Connector x 1
480p(576p)/720p/1080i/1080p/1080p@24Hz,
Deep Color, x.v.Color ondersteuning
• USB ...........................Gebruikt voor:
1) Afspelen van BD-LIVE/BonusView inhoud
2) Firmware update
Algemeen
• Stroomvoorziening.................................. 230 V, 50 Hz wisselstroom
• Stroomverbruik ......................................................................... 20 W
• Stand-by stroomverbruik.......................................... minder dan 1 W
• Afmetingen (B × H × D) ...................................215 × 108 × 318 mm
• Gewicht .................................................................................... 3,4 kg
Specificaties kunnen veranderen zonder nadere berichtgeving.
TECHNISCHE GEGEVENS
• Afstembereik.................................................. 87,50 t/m 108,00 MHz
50 Nl
TECHNISCHE GEGEVENS
iPod™
“iPod” is een handelsmerk van Apple Inc., geregistreerd in de
V.S. en andere landen.
“Made for iPod” betekent dat een elektronisch accessoire is
ontworpen voor aansluiting op iPod en is gecertificeerd door de
ontwikkelaar dat het voldoet aan de prestatienormen van Apple.
Apple is niet verantwoordelijk voor de bediening van dit apparaat
of het voldoen hiervan aan veiligheids- en reglementaire normen.
Audiovisueel materiaal kan bestaan uit auteursrechtelijke werken
die niet mogen worden opgenomen zonder toestemming van de
eigenaar van dit auteursrecht. Raadpleeg de relevante wetgeving
op dit gebied in uw land.
Dit product is voorzien van technologie ter bescherming van het
auteursrecht die beschermd is door patenten uit de V.S. en overige
intellectuele eigendomsrechten. Voor gebruik van deze
technologie ter bescherming van auteursrechten dient u
toestemming te hebben van Macrovision en is uitsluitend bedoeld
voor thuisgebruik en ander beperkt gebruik, tenzij anders
toegestemd door Macrovision. Reverse engineering of demontage
is verboden.
Geproduceerd onder licentie van Dolby Laboratories. “Dolby” en
het dubbele -D symbool zijn handelsmerken van Dolby
Laboratories.
Geproduceerd onder licentie onder V.S.-Patent #’s: 5,451,942;
5,956,674; 5,974,380; 5,978,762; 6,226,616; 6,487,535;
7,392,195; 7,272,567; 7,333,929; 7,212,872 & andere V.S. en
wereldwijde uitgegeven en aangevraagde patenten. DTS is een
gedeponeerd handelsmerk en de DTS logo’s, symbool, DTS-HD
en DTS-HD Master Audio | Essential zijn handelsmerken van
DTS, Inc. ©1996-2008 DTS, Inc. Alle rechten voorbehouden.
is een handelsmerk.
“BD-LIVE” logo is een handelsmerk van Blu-ray Disc
Association.
“BONUSVIEW” is een handelsmerk van Blu-ray Disc
Association.
is een handelsmerk van DVD Format/Logo Licensing
Corporation.
HDMI, het HDMI logo en High-Definition Multimedia Interface
zijn handelsmerken of gedeponeerde handelsmerken van HDMI
Licensing LLC.
“x.v.Color” en het “x.v.Color”-logo zijn handelsmerken.
“AVCHD” en het “AVCHD”-logo zijn handelsmerken van
Panasonic Corporation en Sony Corporation.
Java en alle op Java gebaseerde handelsmerken en logo’s zijn
handelsmerken of gedeponeerde handelsmerken van Sun
Microsystems, Inc. in de Verenigde Staten en/of overige landen.
Dit product is gelicenseerd onder de AVC patent portfolio licentie
en VC-1 patent portfolio licentie voor het persoonlijke en niet-
commerciële gebruik van een consument voor het (i) coderen van
video in navolging van de AVC-standaard en VC-1-standaard
(“AVC/VC-1 Video”) en/of (ii) decoderen van AVC/VC-1 Video
dat door een consument gecodeerd was voor een persoonlijke en
niet-commerciële aangelegenheid en/of verkregen was van een
videoleverancier die een licentie heeft voor het leveren van een
AVC/VC-1 Video. Er wordt geen licentie verleend of
geïmpliceerd voor ander gebruik. Aanvullende informatie is
verkrijgbaar bij MPEG LA, LLC.
Zie http://www.mpegla.com.
V.S. Patentnummers 6,836,549; 6,381,747; 7,050,698;
6,516,132; en 5,583,936

51 Nl
Nederlands
AANVULLENDE
INFORMATIE
■Taal (afkorting), codenummer
■Land, codenummer, afkorting
TALENLIJST, LANDENLIJST
Talenlijst
Japans (ja), 1001 Bhutani (dz), 0426 Kirgizisch (ky), 1125 Singalees (si), 1909
Engels (en), 0514 Esperanto (eo), 0515 Latijn (la), 1201 Slowaaks (sk), 1911
Frans (fr), 0618 Ests (et), 0520 Lingala (ln), 1214 Sloveens (sl), 1912
Duits (de), 0405 Baskisch (eu), 0521 Laotiaans (lo), 1215 Samoaans (sm), 1913
Italiaans (it), 0920 Perzisch (fa), 0601 Litouws (lt), 1220 Shona (sn), 1914
Spaans (es), 0519 Fins (fi), 0609 Lets (lv), 1222 Somalisch (so), 1915
Chinees (zh), 2608 Fidzjiaans (fj), 0610 Malagassisch (mg), 1307 Albaans (sq), 1917
Nederlands (nl), 1412 Faroriaans (fo), 0615 Maori (mi), 1309 Servisch (sr), 1918
Portugees (pt), 1620 Fries (fy), 0625 Macedonisch (mk), 1311 Siswati (ss), 1919
Zweeds (sv), 1922 Iers (ga), 0701 Malayalam (ml), 1312 Sesotho (st), 1920
Russisch (ru), 1821 Schots-Keltisch (gd), 0704 Mongools (mn), 1314 Soendanees (su), 1921
Koreaans (ko), 1115 Galicisch (gl), 0712 Moldavisch (mo), 1315 Swahili (sw), 1923
Grieks (el), 0512 Guarani (gn), 0714 Marathi (mr), 1318 Tamil (ta), 2001
Afarensisch (aa), 0101 Gujarati (gu), 0721 Maleis (ms), 1319 Teloegoe (te), 2005
Abchazisch (ab), 0102 Hausa (ha), 0801 Maltees (mt), 1320 Tadzjiek (tg), 2007
Afrikaans (af), 0106 Hindi (hi), 0809 Birmaans (my), 1325 Thais (th), 2008
Amharisch (am), 0113 Kroatisch (hr), 0818 Nauru (na), 1401 Tigrinya (ti), 2009
Arabisch (ar), 0118 Hongaars (hu), 0821 Nepalees (ne), 1405 Toerkmeens (tk), 2011
Assamees (as), 0119 Armeens (hy), 0825 Noors (no), 1415 Tagalog (tl), 2012
Aymara (ay), 0125 Interlingua (ia), 0901 Occitaans (oc), 1503 Setswana (tn), 2014
Azerbeidzjaans (az), 0126 Interlingue (ie), 0905 Oromo (om), 1513 Tonganees (to), 2015
Bashkiers (ba), 0201 Inupiak (ik), 0911 Oriya (or), 1518 Turks (tr), 2018
Wit-Russisch (be), 0205 Indonesisch (in), 0914 Punjabi (pa), 1601 Tsonga (ts), 2019
Bulgaars (bg), 0207 IJslands (is), 0919 Pools (pl), 1612 Tataars (tt), 2020
Bihaars (bh), 0208 Hebreeuws (iw), 0923 Afghaans (ps), 1619 Twi (tw), 2023
Bislama (bi), 0209 Jiddisch (ji), 1009 Quechua (qu), 1721 Oekraïens (uk), 2111
Bengaals (bn), 0214 Javaans (jw), 1023 Rheto-Romaans (rm), 1813 Urdu (ur), 2118
Tibetaans (bo), 0215 Georgisch (ka), 1101 Kiroendi (rn), 1814 Oezbeeks (uz), 2126
Bretons (br), 0218 Kazachstaans (kk), 1111 Roemeens (ro), 1815 Vietnamees (vi), 2209
Catalaans (ca), 0301 Groenlands (kl), 1112 Kinyarwanda (rw), 1823 Volapük (vo), 2215
Corsicaans (co), 0315 Cambodjaans (km), 1113 Sanskriet (sa), 1901 Volof (wo), 2315
Tsjechisch (cs), 0319 Kannada (kn), 1114 Sindhi (sd), 1904 Xhosa (xh), 2408
Wels (cy), 0325 Kashmiri (ks), 1119 Sangho (sg), 1907 Yoruba (yo), 2515
Deens (da), 0401 Koerdisch (ku), 1121 Servo-Kroatisch (sh), 1908 Zoeloe (zu), 2621
Landenlijst
Argentinië, 0118, ar Finland, 0609, fi Maleisië, 1325, my Singapore, 1907, sg
Australië, 0121, au Frankrijk, 0618, fr Mexico, 1324, mx Spanje, 0519, es
Oostenrijk, 0120, at Duitsland, 0405, de Nederland, 1412, nl Zweden, 1905, se
België, 0205, be Hongkong, 0811, hk Nieuw-Zeeland, 1426, nz Zwitserland, 0308, ch
Brazilië, 0218, br India, 0914, in Noorwegen, 1415, no Taiwan, 2023, tw
Canada, 0301, ca Indonesië, 0904, id Pakistan, 1611, pk Thailand, 2008, th
Chili, 0312, cl Italië, 0920, it Filippijnen, 1608, ph Groot-Brittannië, 0702, gb
China, 0314, cn Japan, 1016, jp Portugal, 1620, pt Verenigde Staten, 2119, us
Denemarken, 0411, dk Korea, Republiek, 1118, kr Russische Federatie, 1821, ru

TALENLIJST, LANDENLIJST
52 Nl
Beperkte garantie voor de Europese Economische Ruimte en Zwitserland
Hartelijk dank dat u een Yamaha-product hebt gekozen. In het onwaarschijnlijke geval dat uw Yamaha-product tijdens de garantie dient te worden
gerepareerd, dient u contact op te nemen met de dealer bij wie u het hebt gekocht. Indien u moeilijkheden ervaart, gelieve dan contact op te nemen met de
vertegenwoordiging van Yamaha in uw land. U vindt de gegevens op onze website (http://www.yamaha-hifi.com/ of http://www.yamaha-uk.com/ voor
inwoners van het V.K.).
Er wordt gegarandeerd dat het product vrij is van gebreken in fabricage en materialen voor een periode van twee jaar te rekenen vanaf de originele aankoop.
Yamaha zorgt ervoor, met inachtneming van onderstaande voorwaarden, dat een product dat gebreken vertoont, wordt gerepareerd of dat om het even welke
onderdelen worden gerepareerd of vervangen (naar goeddunken van Yamaha) zonder kosten voor de onderdelen of werkuren. Yamaha behoudt zich het
recht voor om een product te vervangen door een gelijkaardig met dezelfde eigenschappen en waarde, indien een model niet meer leverbaar is of
het onrendabel is dit te repareren.
Voorwaarden
1 De originele factuur of de kassabon (met vermelding van de aankoopdatum, de productcode en de naam van de dealer) MOET worden gevoegd bij het
product dat gebreken vertoont, samen met een verklaring waaruit het gebrek blijkt. In geval van afwezigheid van dit duidelijk aankoopbewijs, behoudt
Yamaha zich het recht voor om gratis service te weigeren en kan het product op kosten van de klant worden teruggezonden.
2 Het product MOET zijn gekocht bij een ERKENDE Yamaha dealer binnen de Europese Economische Ruimte (EEA) of Zwitserland.
3 Het product mag geen wijzigingen of veranderingen hebben ondergaan, tenzij deze schriftelijk door Yamaha werden toegestaan.
4 Het volgende is van garantie uitgesloten:
a. Regelmatig onderhoud of reparaties of vervanging van onderdelen vanwege normale slijtage.
b. Schade die voortkomt uit:
(1) Reparaties uitgevoerd door de klant zelf of een ongemachtigde derde.
(2) Een onjuiste verpakking of oneigenlijk gebruik wanneer het product door de klant wordt verstuurd. Het is belangrijk te weten dat het de
verantwoordelijkheid is van diegene die het product terugstuurt dat het product adequaat is ingepakt wanneer hij of zij het product terugstuurt met
het oog op reparatie.
(3) Oneigenlijk gebruik, met inbegrip van maar niet beperkt tot
(a) verzuim om het product voor normale doeleinden te gebruiken of te gebruiken overeenkomstig de instructies van Yamaha met betrekking tot
eigenlijk gebruik, onderhoud en opslag, en
(b) installatie of gebruik van het product op een manier die niet overeenkomt met de van toepassing zijnde technische of veiligheidsnormen in de
landen van gebruik.
(4) Ongevallen, blikseminslag, waterschade, brandschade, een onjuiste ventilatie, lekkende batterijen of een oorzaak die buiten de controle van
Yamaha ligt.
(5) Gebreken aan het systeem waarin het product wordt ingebouwd en/of onverenigbaarheid met derde producten.
(6) Gebruik van een product dat in de Europese Economische Ruimte en/of Zwitserland werd ingevoerd, maar niet door Yamaha, en dat niet voldoet
aan de technische of veiligheidsnormen van het land van gebruik en/of de standaardspecificaties van producten die door Yamaha in de Europese
Economische Ruimte en/of Zwitserland worden verkocht.
5 Indien de garantie verschilt tussen het land van aankoop en het land van gebruik, zal de garantie van het land van gebruik van toepassing zijn.
6 Yamaha kan niet aansprakelijk worden gesteld voor verlies of beschadiging, hetzij rechtstreekse schade of gevolgschade of anders, behalve voor de
reparatie of vervanging van het product.
7 Maak kopieën van standaardinstellingen of -gegevens omdat Yamaha niet aansprakelijk kan worden gesteld voor om het even welke wijzigingen aan of
verlies van dergelijke instellingen of gegevens.
8 Deze garantie heeft noch invloed op de statutaire rechten van klanten die van toepassing zijn binnen het kader van de nationale wetgevingen, noch op de
rechten van klanten ten opzichte van de dealer die voortkomen uit hun overeenkomst tot verkoop/aankoop.
Informatie voor gebruikers over inzameling en verwijdering van oude
apparaten en gebruikte batterijen
Deze tekens op de producten, verpakkingen en/of bijgaande documenten betekenen dat gebruikte
elektrische en elektronische producten en batterijen niet mogen worden gemengd met algemeen
huishoudelijk afval.
Breng alstublieft voor de juiste behandeling, herwinning en hergebruik van oude producten en gebruikte
batterijen deze naar daarvoor bestemde verzamelpunten, in overeenstemming met uw nationale wetgeving
en de instructies 2002/96/EC en 2006/66/EC.
Door deze producten en batterijen correct te verwijderen, helpt u natuurlijke rijkdommen te beschermen en
voorkomt u mogelijke negatieve effecten op de menselijke gezondheid en de omgeving, die zich zouden
kunnen voordoen door ongepaste afvalverwerking.
Voor meer informatie over het inzamelen en hergebruik van oude producten en batterijen kunt u contact
opnemen met uw plaatselijke gemeentebestuur, uw afvalverwerkingsbedrijf of het verkooppunt waar u de
artikelen heeft gekocht.
[Informatie over verwijdering in andere landen buiten de Europese Unie]
Deze symbolen zijn alleen geldig in de Europese Unie. Mocht u artikelen weg willen gooien, neem dan
alstublieft contact op met uw plaatselijke overheidsinstantie of dealer en vraag naar de juiste manier van
verwijderen.
Opmerking bij het batterijteken (onderste twee voorbeelden):
Dit teken wordt mogelijk gebruikt in combinatie met een scheikundig symbool. In dat geval voldoet het aan
de eis en de richtlijn, die is opgesteld voor het betreffende chemisch product.
i Ru
1 Для обеспечения наилучшего результата, пожалуйста,
внимательно изучите данную инструкцию. Храните ее в
безопасном месте для будущих справок.
2 Данную звуковую систему следует устанавливать в хорошо
проветриваемом, прохладном, сухом, чистом месте и вдали от
прямого воздействия солнечных лучей, источников тепла,
вибрации, пыли, влаги и холода. Для обеспечения надлежащей
вентиляции обеспечьте следующие минимальные просветы.
Сверху: 30 см (только R-840)
Сзади: 10 см
По бокам: 10 см
3 Во избежание шумов и помех, данный аппарат следует
размещать на некотором расстоянии от других
электрических приборов, двигателей, или трансформаторов.
4 Во избежание накопления влаги внутри данного аппарата, что может
вызвать поражение электрическим током, пожар, привести к поломке
данного аппарата, и/или представлять угрозу жизни, не следует
размещать данный аппарат в среде, подверженной резким изменениям
температуры с холодной на жаркую, или в среде с повышенной
влажностью (например, в комнате с увлажнителем воздуха).
5 Не устанавливайте данный аппарат в местах, где есть риск падения
других посторонних объектов на данный аппарат, и/или где данный
аппарат может подвергнуться попаданию капель или брызгов
жидкостей. На крышке данного аппарата, не следует располагать:
–
Другие компоненты, так как это может привести к поломке
и/или обесцвечиванию поверхности данного аппарата.
– Горящие объекты (например, свечи), так как это
может привести к пожару, поломке данного
аппарата, и/или представлять угрозу жизни.
–
Емкости с жидкостями, так как при их падении, жидкости
могут вызвать поражение пользователя электрическим
током и/или привести к поломке данного аппарата.
6 Во избежание прерывания охлаждения данного аппарата,
не следует покрывать данный аппарат газетой, скатертью,
занавеской и т.д. Повышение температуры внутри данного
аппарата может привести к пожару, поломке данного
аппарата, и/или представлять угрозу жизни.
7 Пока все соединения не завершены, не следует
подключать данный аппарат к розетке.
8 Не используйте данный аппарат, установив его верхней стороной
вниз. Это может привести к перегреву и возможной поломке.
9 Не применяйте силу по отношению к переключателям,
ручкам и/или проводам.
10 При отсоединении силового кабеля питания от розетки, вытягивайте
его, удерживая за вилку; ни в коем случае не тяните кабель.
11 Не применяйте различные химические составы для очистки
данного аппарата; это может привести к разрушению
покрывающего слоя. Используйте чистую сухую ткань.
12 Используйте данный аппарат с соблюдением напряжения,
указанном на данном аппарате. Использование данного
аппарата при более высоком напряжении, превышающем
указанное, является опасным, и может стать причиной пожара,
поломки данного аппарата, и/или представлять угрозу жизни.
Yamaha не несет ответственности за любую поломку или
ущерб вследствие использования данного аппарата при
напряжении, не соответствующем указанному напряжению.
13 Во избежание поломки от молнии, отключите силовой
кабель питания от розетки во время грозы.
14 Не пробуйте модифицировать или починить данный
аппарат. При необходимости, свяжитесь с
квалифицированным сервисным центром Yamaha. Корпус
аппарата не должен открываться ни в коем случае.
15 Если вы не собираетесь использовать данный аппарат в
течение продолжительного промежутка времени
(например, во время отпуска), отключите силовой
кабель переменного тока от розетки.
16 Перед тем как прийти к заключению о поломке данного
аппарата, обязательно изучите раздел “УСТРАНЕНИЕ
НЕИСПРАВНОСТЕЙ”, описывающий часто
встречающиеся ошибки во время использования.
17 Перед перемещением данного аппарата, установите его
в режим ожидания нажатием кнопки , и отсоедините
силовой кабель переменного тока от розетки.
18 При внезапном изменении окружающей температуры
образовывается конденсация. Отсоедините силовой
кабель питания от сети и не пользуйтесь аппаратом.
19 Аппарат может нагреваться при его продолжительном
использовании. Отключите питание, затем дайте аппарату остыть.
20 Данный аппарат следует устанавливать возле розетки переменного
тока, куда можно свободно протянуть силовой кабель.
21 Батарейки не должны подвергаться нагреву от
солнечных лучей, огня или похожих источников.
22 Излишнее звуковое давление от внутриушных
телефонов и наушников может привести к потере слуха.
БЕЗОПАСНОЕ ИСПОЛЬЗОВАНИЕ ЛАЗЕРА
Данное устройство содержит лазер. Из-за опасности травмы глаз,
снимать крышку или обслуживать данное устройство должен
только сертифицированный обслуживающий персонал.
ОПАСНОСТЬ
Данное устройство в открытом состоянии излучает видимые
лазерные лучи. Не допускайте непосредственного воздействия
лазерных лучей на глаза. Когда данное устройство подключено
к розетке, не приближайте глаза к отверстию лотка диска и
другим отверстиям, и не смотрите внутрь аппарата.
ПРЕДУПРЕЖДЕНИЕ: ВНИМАТЕЛЬНО ИЗУЧИТЕ ЭТО
ПЕРЕД ИСПОЛЬЗОВАНИЕМ АППАРАТА.
Данный аппарат считается не отключенным от источника
переменного тока все то время, пока он подключен к розетке,
даже если данный аппарат находится в выключенном
положении через . Данное положение является режимом
ожидания. В этом режиме электропотребление данного
аппарата снижается до минимума.
ПРЕДУПРЕЖДЕНИЕ
ВО ИЗБЕЖАНИЕ ПОЖАРА ИЛИ ПОРАЖЕНИЯ
ЭЛЕКТРИЧЕСКИМ ТОКОМ, НЕ ПОДВЕРГАЙТЕ ДАННЫЙ
АППАРАТ ВОЗДЕЙСТВИЯМ ДОЖДЯ ИЛИ ВЛАГИ.
Лазерный компонент данного изделия может являться
источником излучения, мощность которого превышает
предельный уровень излучения для Класса 1.
Технические характеристики ЛАЗЕРА:
ЛАЗЕРНОЕ изделие класса 1
Длина волны: 788 нм (CD)/654 нм (DVD)/405 нм (BD)
Мощность лазера: При использование защитного приспособления
опасное излучение не выделяется.

1 Ru
ПОДГОТОВКАВВЕДЕНИЕ
ОСНОВНЫЕ
ОПЕРАЦИИ
ОПЕРАЦИИ
ТЮНЕРА
ДРУГИЕ
ОПЕРАЦИИ
ДОПОЛНИТЕЛЬНАЯ
ИНФОРМАЦИЯ
Русский
ОПИСАНИЕ ........................................................ 2
ПРИЛАГАЕМЫЕ
ПРИНАДЛЕЖНОСТИ.................................. 2
СВЕДЕНИЯ О ДИСКАХ .................................. 3
Типы дисков, которые могут использоваться
с данным проигрывателем .............................. 3
Диски, которые не могут использоваться с
данным проигрывателем ................................. 3
СИСТЕМЫ УПРАВЛЕНИЯ И
ФУНКЦИИ ....................................................... 4
Ресивер (R-840) ...................................................... 4
BD-проигрыватель (BD-940).............................. 5
Пульт ДУ................................................................. 6
ПОДГОТОВКА.................................................... 8
Подключение колонок/внешних
компонентов/антенн ......................................... 8
Подключение рекордера (CDR, MDR и т.п.),
AV-ресивера или декодера (CDR, MDR и т.п.)
....... 9
Подключение силовых кабелей......................... 9
Подключение iPod™........................................... 10
Подключение к Интернет................................. 10
Установка батареек в пульт ДУ....................... 11
Использование пульта ДУ................................. 11
Регулировка часов............................................... 12
УСТАНОВКА СИСТЕМЫ............................. 13
Включите телевизор и систему........................ 13
Установка экрана телевизора .......................... 13
Язык экранной индикации (OSD) ................... 13
Языки звукового сопровождения, субтитров
и меню диска .................................................... 14
СИСТЕМНЫЕ ОПЕРАЦИИ ......................... 15
Основные операции системы............................ 15
Настройка яркости дисплея передней
панели ресивера............................................... 16
Для использования наушников......................... 16
ОПЕРАЦИИ С ДИСКАМИ............................ 17
Использование экранной индикации .............. 17
Операции воспроизведения............................... 17
Приостановка воспроизведения....................... 17
Быстрая перемотка назад и вперед................. 18
Выбор разделов и звуковых дорожек............. 18
Меню BD/DVD .................................................... 18
Замедленное воспроизведение......................... 18
Покадровое воспроизведение........................... 18
Выбор языков и звука ........................................ 19
Выбор субтитров................................................. 19
Выбор углов камеры .......................................... 19
Повторное воспроизведение............................. 19
Повторное воспроизведение заданного
фрагмента (повтор A-B)................................ 20
Воспроизведение слайд-шоу JPEG.................. 20
Воспроизведение неподвижных
изображений в выбранной папке ................ 21
Воспроизведение видеозаписей, записанных
на дисках DVD-R/DVD-RW.......................... 21
Использование “Function Control Screen”
для дисков BD/DVD ....................................... 22
Использование меню “Functions” для Аудио
CD-дисков......................................................... 23
Просмотр информации о диске........................ 23
Использование BONUSVIEW и BD-LIVE.... 24
НАСТРОЙКА РАДИОСТАНЦИЙ ЧМ .......26
Автоматическая настройка............................... 26
Ручная настройка ................................................ 26
Автоматическая предустановка....................... 26
Ручная предустановка ........................................ 27
Выбор предустановленных радиостанций..... 27
НАСТРОЙКА СИСТЕМЫ РАДИОДАННЫХ
(ТОЛЬКО МОДЕЛЬ ДЛЯ ЕВРОПЫ)
.............28
Отображение информации Системы
Радиоданных..................................................... 28
Использование службы передачи
данных TP (программа движения) .............. 29
Установки CT (текущее время) ....................... 29
УСТАНОВКА ТАЙМЕРА...............................30
Установка таймера часов .................................. 30
Установка таймера сна....................................... 31
УПРАВЛЕНИЕ iPod™......................................32
Использование iPod™ ........................................ 32
УСТАНОВКИ BD-ПРОИГРЫВАТЕЛЯ .....33
Audio Video Settings ............................................ 33
Quick Start ............................................................. 35
Auto Power Off...................................................... 35
HDMI Control....................................................... 35
Playback Setting .................................................... 35
Communication Setup .......................................... 36
Version .................................................................... 39
USB Memory Management ................................. 39
Software Update.................................................... 39
System Reset .......................................................... 39
ИЗМЕНЕНИЕ УСТАНОВКИ ПРИ
ПОДКЛЮЧЕНИИ HDMI ИЛИ
КОМПОНЕНТНОГО КАБЕЛЯ.................41
УСТРАНЕНИЕ НЕИСПРАВНОСТЕЙ .......42
Ресивер (R-840) .................................................... 42
Пульт ДУ............................................................... 44
BD-проигрыватель (BD-940)............................ 44
Сеть ........................................................................ 46
Сообщения, связанные с дисками BD
и дисками DVD ................................................ 46
СВЕДЕНИЯ О ФОРМАТЕ ФАЙЛОВ
JPEG..................................................................47
ПРИМЕЧАНИЯ ПО ОБРАЩЕНИЮ С
ДИСКАМИ ......................................................48
ГЛОССАРИЙ......................................................48
ТЕХНИЧЕСКИЕ ПАРАМЕТРЫ..................49
СПИСКИ ЯЗЫКОВ И СТРАН ......................51
Список языков ..................................................... 51
Список стран ........................................................ 51
СОДЕРЖАНИЕ
ВВЕДЕНИЕ
ПОДГОТОВКА
ОСНОВНЫЕ ОПЕРАЦИИ
ОПЕРАЦИИ ТЮНЕРА
ДРУГИЕ ОПЕРАЦИИ
ДОПОЛНИТЕЛЬНАЯ ИНФОРМАЦИЯ

ОПИСАНИЕ
2 Ru
ÂÂÅÄÅÍÈÅ
Ресивер (R-840)
•
Минимальное
RMS
выходное напряжение на канал
65 Вт + 65 Вт (6
Ω
, 1 кГц, 10%
THD
)
•Настройка и предустановка 30 ЧМ-
радиостанций
•iPod поддерживается (с функцией зарядки)
•Режим Pure Direct
•Регулируемая яркость дисплея
BD-проигрыватель (BD-940)
•
Воспроизводит диски Blu-ray, DVD, Audio CD
•Поддерживает BD-LIVE. При использовании
BD-LIVE-совместимого диска можно
подключить BD-проигрыватель к сети
Интернет и загружать различные данные
•
Поддерживает функцию управления
HDMI
. Вы
можете управлять ресивером и BD-
проигрывателем с помощью пульта ДУ телевизора,
подсоединенного с помощью кабеля
HDMI
•
Связанная работа с ресивером, например, режим Pure
Direct, регулируемая яркость дисплея и режим
INPUT
■О настоящем руководстве
•
В данной инструкции устройство “R-840” называется “ресивером”, а устройство “BD-940” называется “BD-проигрывателем”.
• В данной инструкции описаны операции по управлению системой с помощью пульта ДУ, кроме случаев, когда это
невозможно. Некоторые из данных операций также выполняются с помощью кнопок передней панели.
•y означает совет для облегчения управления.
• В примечаниях содержится важная информация по безопасности и инструкции по управлению.
•
Данное руководство отпечатано до производства. Дизайн и технические характеристики могут частично изменяться с целью
улучшения качества и т.д. В случае, если имеются различия между руководством и аппаратом, приоритет отдается аппарату.
К данному аппарату прилагаются следующие принадлежности. Перед подключением данной системы, убедитесь, что
имеются следующие детали.
ОПИСАНИЕ
ПРИЛАГАЕМЫЕ ПРИНАДЛЕЖНОСТИ
1234
56
90
78
E
NT
E
RCL
E
AR
MUT
E
E
NT
E
R
VOLUME
AUX
TUN
E
R
iPod SHUFFLE
R
EPE
AT
MENU
ENTER
E
O
NM
O
N
O
M
E
M
O
R
Y
PRESET TUNING
DISC
DISPLAY TIMER SLEEP DIMMER
OPTION PURE DIRECT
AUDI O SUBTITLE ANGLE
REPEAT
ON SCREEN
RETURN
PinP SETUP
ABCD
EXIT
TOP MENU/TITLE LIST
POP UP MENU
Внутренняя
ЧМ-антенна
Батарейки (х2)
(AAA, R03, UM-4)
Пульт ДУ
* Крышка дока, поставляемая с данным
устройством, используется для того, чтобы
закрывать док iPod, когда он не используется.
iPod
INPUT VOLU ME
Крышка дока*
Ресивер
Кабель управления
системой (0,6 м)
Стереокабель
RCA (1,0 м)
Композитный
видеокабель (1,5 м)

3 Ru
Русский
ВВЕДЕНИЕ
•
С помощью данного проигрывателя можно воспроизводить
следующие диски. Не используйте адаптер с 8 см на 12 см.
•
Используйте диски, которые соответствуют совместимым
стандартам, указанным путем наличия официальных
логотипов на этикетке диска. Воспроизведение дисков, не
совместимых с этими стандартами, не гарантируется. Кроме
того, качество изображения или звука не гарантируется
даже в том случае, когда воспроизведение дисков возможно.
*1 Данный проигрыватель был разработан с условием
возможности воспроизведения Аудио CD-дисков, совместимых
со стандартами CD (Compact Disc). CD-диски, содержащие
сигнал для защиты авторского права (сигнал контроля
копирования) могут не воспроизводиться с помощью данного
проигрывателя.
*2 Смотрите “СВЕДЕНИЯ О ФОРМАТЕ ФАЙЛОВ JPEG” на стр 47.
•
BD/DVD-видеопроигрыватели и диски имеют коды
региона, предписывающие регионы, в которых
возможно воспроизведение данного диска.
•
Операции и функции с BD/DVD-видео могут
отличаться от пояснений в данной инструкции, а
некоторые операции могут быть запрещены из-за
установок изготовителя диска.
•
Если во время воспроизведения диска отображается
экран меню или инструкции по управлению, выполняйте
отображаемую последовательность операций.
•
Аудиосигнал DVD-видео, записанный с частотой
96 кГц (Линейный PCM), во время воспроизведения
будет воспроизводиться с частотой 48 кГц.
Примечания
•
Воспроизведение некоторых дисков в левом столбце таблиц
может быть невозможным в зависимости от диска.
•
“Finalize” соответствует обработке рекордером записанного
диска с тем, чтобы его можно было воспроизводить на других
BD-проигрывателях/рекордерах, а также на этом проигрывателе.
На этом проигрывателе будут воспроизводиться только
финализированные DVD-диски. (Данный проигрыватель не
оснащен функцией финализации дисков.)
С помощью данного проигрывателя не могут
воспроизводиться или не будут воспроизводиться
надлежащим образом следующие диски. В случае
ошибочного воспроизведения такого диска может
произойти повреждение колонки.
Воспроизведение дисков необычной
формы невозможно.
Использование дисков необычной формы
(в форме сердца или шестиугольной формы)
невозможно. Использование таких дисков может
привести к неисправности.
Невозможно воспроизведение
следующих BD/DVD-видеодисков.
•
Диски, у которых код/номер региона не совпадает с
кодом и номером региона данного проигрывателя.
• Диски, изготовленные нелегальным образом.
• Диски, записанные для коммерческого
использования.
СВЕДЕНИЯ О ДИСКАХ
Типы дисков, которые
могут использоваться с
данным проигрывателем
Ти п д и ск а Формат
записи
Содержание
Размер
диска
BD-видео -- Аудио +
Видео
(Видеозапись)
12 см
8 см
BD-RE DL
BD-R DL
Формат
BDMV
Видео DVD
Видеоформат
Аудио +
Видео
(Видеозапись)
12 см
8 см
DVD+RW/
DVD+R
DVD+R DL
DVD-R DL
DVD-RW/
DVD-R
Видео/VR/
AVCHD-
формат
(только
финализиров
анные диски)
Аудио +
Видео
(Видеозапись)
12 см
8 см
Аудио CD*1 Аудио CD
(CD-DA)
Аудио 12 см
8 см
CD-RW/CD-R
Аудио CD
(CD-DA)
Аудио
JPEG*2
Неподвижное
изображение
(JPEG-файл)
Управляющая информация о регионе
Модель BD-Video DVD-Video
Европа Код региона “B”
или “ALL”
Номер региона
“2” или “ALL”
Россия Код региона “C”
или “ALL”
Номер региона
“5” или “ALL”
2ALL
5ALL
Диски, которые не могут
использоваться с данным
проигрывателем
CDG, Видео CD, Фото CD, CD-ROM, SVCD,
SA-CD, PD, CDV, CVD, DVD-RAM, DVD-Аудио,
BD-RE с картриджем, CD-MP3, CD-WMA

СИСТЕМЫ УПРАВЛЕНИЯ И ФУНКЦИИ
4 Ru
■Передняя панель
1INPUT
Выбор источника приема.
2Индикатор On/Standby
При включенном ресивере горит зеленым светом. В
режиме ожидания ресивера горит красным светом.
3Индикатор TP
Загорается при приеме ресивером радиостанций
Системы Радиоданных со службой передачи
данных TP (Программа движения) (☞c.29).
4Датчик дистанционного управления
Прием сигналов от пульта ДУ.
5Индикатор PRESET
Загорается при выборе предустановленных радиостанций (
☞
c.27).
6Индикатор TUNED
Загорается при настройке ресивера на радиостанцию.
7Индикатор STEREO
Загорается при приеме ресивером сильного
сигнала от стереофонической ЧМ-трансляции.
8Индикатор SLEEP
Загорается при включении таймера сна (☞c.31).
9Дисплей передней панели
Отображение различной информации, например,
частоты настройки.
0VOLUME
Регулировка уровня громкости.
A (On/Standby)
Включение системы или ее установка в режим ожидания.
BГнездо PHONES
Вывод аудиосигналов для индивидуального
прослушивания через наушники.
CИндикатор TIMER
Загорается при установке таймера (☞c.30).
DBASS
Регулировка низкочастотной характеристики (
☞
c.15).
ETREBLE
Регулировка высокочастотной характеристики (
☞
c.15).
FBALANCE
Регулировка баланса выводимого звука левой и
правой колонки с целью компенсации дисбаланса,
вызванного расположением колонок или
особенностями помещения для прослушивания.
GPRESET d / u
Выбор предустановленной радиостанции. В качестве
источника приема будет выбран ЧМ. Работает даже тогда,
когда ресивер находится в режиме ожидания (
☞
c.27).
HPURE DIRECT
Включение или выключение режима Pure Direct (
☞
c.15).
При включенном режиме Pure Direct данный
индикатор будет гореть синим светом.
IКнопка h / e
Начало и приостановка воспроизведения с iPod. В качестве
источника приема будет выбран iPod. Работает даже тогда,
когда ресивер находится в режиме ожидания.
JДок iPod
Подключение устройства iPod (☞c.10).
СИСТЕМЫ УПРАВЛЕНИЯ И ФУНКЦИИ
Ресивер (R-840)
INPUT
BASS
PHONES
VOLUME
MIN MAX
TREBLE BALANCE
PRESET PURE DIRECT
LR
PRESET
TP
TUNED
STEREO SLEEP
kHz MHz iPod
TIMER
1@
IJBCD E F G H
234 5 67 98
A
Вид сверхуВид спереди
5 Ru
СИСТЕМЫ УПРАВЛЕНИЯ И ФУНКЦИИ
Русский
ВВЕДЕНИЕ
■Передняя панель
1Лоток диска
Удержание диска для воспроизведения.
2Индикатор p (воспроизведение)
Появляется во время воспроизведения.
3Индикатор REP OFF S ALL A-B
Загорается при выборе режима повторного
воспроизведения.
4
Открытие и закрытие лотка диска.
В случае нажатия данной кнопки в режиме
ожидания ресивер автоматически включится и
источник приема изменится на DISC.
5
Остановка воспроизведения (☞c.17).
6 (On/Standby)
Включение BD-проигрывателя или его установка
в режим ожидания.
В случае нажатия данной кнопки в режиме
ожидания ресивер автоматически включится и
источник приема изменится на DISC.
y
Если по определенным причинам BD-проигрыватель не
работает надлежащим образом, Вы можете
перезагрузить его, удерживая нажатой эту кнопку в
течение 10 секунд, а затем нажимая ее снова.
7Индикатор QUICK
Горит в режиме ожидания, когда включена
функция быстрого запуска (☞c.35).
Мигает после подключения силового кабеля к
розетке переменного тока до тех пор, пока BD-
проигрыватель не перейдет в режим ожидания.
8Индикатор e (пауза)
Загорается при приостановке BD-проигрывателя.
9Дисплей передней панели
Отображает текущее состояние BD-
проигрывателя.
0
Возврат на начало текущего раздела или звуковой
дорожки. Нажмите и удерживайте для быстрой
прокрутки назад. Нажмите дважды, чтобы
перейти к предыдущему разделу или звуковой
дорожке (☞c.18).
A
Начало или приостановка воспроизведения
(☞c.17).
В случае нажатия данной кнопки в режиме
ожидания ресивер автоматически включится и
источник приема изменится на DISC, в
зависимости от того, какой из них был выбран
последним.
B
Переход на следующий раздел или звуковую
дорожку. Нажмите и удерживайте для быстрой
прокрутки вперед (☞c.18).
BD-проигрыватель (BD-940)
QUICK
12 45
798
6
3
AB
@
PROG RANDOMMP3 WMA TRACK TOTAL REMAIN REP OFF S ALL A-B
6 Ru
СИСТЕМЫ УПРАВЛЕНИЯ И ФУНКЦИИ
Данный пульт ДУ может управлять системными компонентами
(включая функции тюнера) и iPod, установленного в док для
iPod на верхней поверхности ресивера.
Для управления BD-проигрывателем, функциями
тюнера, или iPod с пульта ДУ, требуется
установить ресивер на соответствующий режим
приема (☞8Кнопки выбора источника).
Для управления iPod
Нажмите соответствующую iPod кнопку
управления на пульте ДУ.
Кнопки управления iPod обозначены с помощью
в приведенном ниже разделе.
Смотрите стр. 32 для получения подробной
информации о работе с iPod.
1Передатчик инфракрасного сигнала
Посылает сигналы на управляемую систему.
2 (On/Standby)
Включение ресивера или его установка в режим ожидания.
3MENU
Возврат на верхний уровень меню iPod.
4
Переход к следующей композиции. Нажмите и
удерживайте для быстрой прокрутки вперед.
5
Переход на начало текущей звуковой дорожки. Нажмите
дважды, чтобы пропустить предыдущую звуковую дорожку.
Нажмите и удерживайте для быстрой прокрутки назад.
6ENTER
Нажмите кнопку ENTER для ввода выбранной
группы. (При нажатии ENTER, начинается
воспроизведение, если выбрана композиция.)
7
Начало или приостановка воспроизведения.
8Кнопки выбора источника
Выбор источника приема на ресивере.
Во время выбора источника приема нажмите
соответствующую кнопку выбора источника
(или поверните INPUT на передней панели).
На дисплее передней панели ресивера появится
название соответствующего источника приема.
y
Если в качестве источника приема выбран DISC, BD-проигрыватель
включится автоматически, а в случае выбора другого источника
приема BD-проигрыватель перейдет в режим ожидания.
9MEMORY
Сохранение предустановленной радиостанции в памяти
(
☞
c.27). Запуск автоматической предустановки (
☞
c.26).
Пульт ДУ
1234
56
90
78
E
NT
E
RCL
E
AR
MUT
E
E
NT
E
R
VOLUME
AUX
TUN
E
R
iPod SHUFFLE
R
EPE
AT
MENU
ENTER
E
O
NM
O
N
O
M
E
M
O
R
Y
PRESET TUNING
DISC
DISPLAY TIMER SLEEP DIMMER
OPTION PURE DIRECT
AUDIO SUBTITLE ANGLE
REPEAT
ON SCREEN
RETURN
PinP SETUP
A B C D
EXIT
TOP MENU/TITLE LIST
POP UP MENU
J
1
M
N
O
P
Q
R
S
t
U
V
W
X
Y
Z
[
\
]
`
a
b
c
d
f
e
2
3
4
5
6
7
8
9
0
A
B
C
D
E
F
G
H
I
J
K
L

ПОДГОТОВКА
8 Ru
ÏÎÄÃÎÒÎÂÊÀ
Перед подключением системы внимательно изучите следующую процедуру и примечания. Пульт ДУ и
связанная работа системы функционируют только в том случае, если ресивер и BD-
проигрыватель соединены с помощью кабеля управления системой. Более подробно о колонках
(NS-BP300) смотрите в руководстве по их эксплуатации.
Подключение системы
1Подключите гнезда AUDIO IN ( PLAYER L/R) ресивера к гнездам AUDIO OUT ( L/R) BD-
проигрывателя с помощью поставляемого стереофонического аудиокабеля RCA.
2Подключите гнездо SYSTEM CONNECTOR ( TO:PLAYER) ресивера к гнезду SYSTEM
CONNECTOR ( TO:RECEIVER) BD-проигрывателя с помощью поставляемого кабеля управления
системой.
3Подключите разъемы колонки (L) ресивера к разъемам левой колонки, а разъемы колонки (R)
ресивера к разъемам правой колонки, используя кабели колонок, поставляемые с акустической
системой (NS-BP300).
4Подключите поставляемую внутреннюю ЧМ-антенну к гнезду ANTENNA.
• Не подключайте это устройство и другие компоненты к сети до того, как будут соединены все компоненты.
• Открытые провода колонок не должны соприкасаться друг с другом или с любой металлической частью ресивера.
Это может привести к поломке ресивера и/или колонок.
• Все соединения должны быть выполнены верно: L (левый) к L, R (правый) к R, “+” к “+” и “–” к “–”. Звучание от
колонок будет отсутствовать при неправильном выполнении подключений, и звучание будет неестественным с
отсутствием низкочастотного сигнала при несоблюдении полярности при подключении колонок.
За дополнительными сведениями обращайтесь к руководствам по эксплуатации каждого компонента.
Примечания
• Соединение управления системой используется для передачи сигналов ДУ от ресивера на BD-проигрыватель.
• При подключении колонок, отличных от NS-BP300, используйте колонки с сопротивлением свыше 6Ω.
•
При слабом приеме радиоволн в вашем регионе или если вы хотите улучшить радиоприем, рекомендуется использовать имеющиеся в
продаже внешние антенны. Более подробно, обратитесь к ближайшему авторизованному дилеру Yamaha или сервис-центр.
ПОДГОТОВКА
Подключение колонок/внешних компонентов/антенн
ПРЕДОСТЕРЕЖЕНИЕ
A A
B
B
Ресивер (R-840)
(модель для Европы)
BD-проигрыватель
(BD-940)Левая колонка
(NS-BP300)
Правая колонка
(NS-BP300)
Стереокабель RCA
(прилагается)
Кабель управления
системой (прилагается)
Телевизор и т.д.
Сабвуфер
Аудиов
ыход
RCA
Стереокабель

ПОДГОТОВКА
9 Ru
Русский
ПОДГОТОВКА
Подключение телевизора к системе
1Соедините систему и телевизор через гнездо HDMI, гнезда COMPONENT или гнездо VIDEO BD-
проигрывателя и соответствующее(ие) гнездо(а) телевизора.
2
Установите “TV screen” в соответствии с телевизором (Смотрите “Установка экрана телевизора” на стр 13).
При соединении системы и телевизора через гнезда COMPONENT, установите BD-проигрыватель, как
описано в “Video Out Select” (☞c.33).
При соединении системы и телевизора через гнезда HDMI, установите параметры “HDMI Video Out” и
“Audio Out” опции “Audio Video Settings” в меню “Settings” (☞с.33, 34).
При соединении системы и телевизора через гнезда HDMI, используйте кабели HIGH SPEED HDMI с
логотипом HDMI (как показано на крышке).
Вы можете выводить звук через гнездо DIGITAL OUT и записывать его в цифровом виде на другом устройстве,
либо передавать аудиосигнал на AV-ресивер или декодер, воспроизводя звук с многоканального источника.
После выполнения всех подключений подключите силовые кабели системы и остальных компонентов к
розеткам переменного тока.
Подключение рекордера (CDR, MDR и т.п.), AV-ресивера или
декодера (CDR, MDR и т.п.)
Подключение силовых кабелей
BD-проигрыватель (BD-940)
Композитный видеокабель
(прилагается)
К розетке переменного тока
К розетке переменного тока
Ресивер (R-840)
BD-проигрыватель (BD-940)
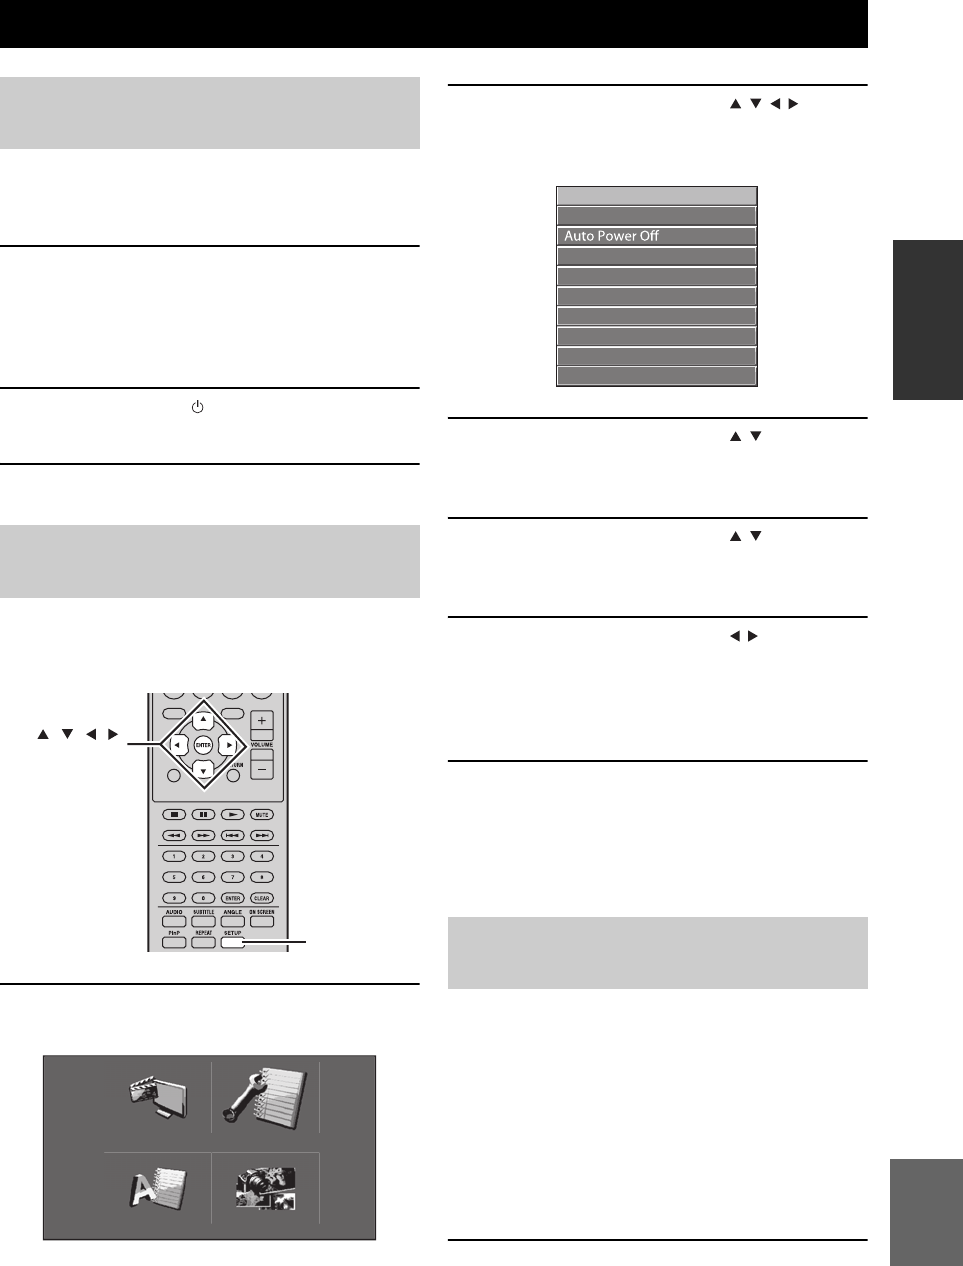
УСТАНОВКА СИСТЕМЫ
13 Ru
Русский
ПОДГОТОВКА
Убедитесь, что все необходимые подключения
выполнены (Смотрите “Подключение телевизора
к системе” на стр 9).
1Включите телевизор, к которому
подключен BD-проигрыватель.
Выберите вход телевизора в соответствии с
входным сигналом подключенного BD-
проигрывателя.
2Нажмите кнопку для включения
ресивера.
3Нажмите кнопку DISC.
Установите формат экрана BD-проигрывателя в
соответствии с форматом подключенного
телевизора (☞с.33).
1Нажмите кнопку SETUP.
На экране появится меню установки.
2Воспользуйтесь кнопками /// для
выбора опции “Settings”, а затем нажмите
кнопку ENTER.
3Воспользуйтесь кнопками / для
выбора опции “Audio Video Settings”, а
затем нажмите кнопку ENTER.
4Воспользуйтесь кнопками / для
выбора опции “TV Aspect Ratio”, а затем
нажмите кнопку ENTER.
5Воспользуйтесь кнопками / для
выбора формата экрана телевизора, а
затем нажмите кнопку ENTER.
Для получения информации об опциях
формата экрана, смотрите стр. 33.
6Нажмите кнопку SETUP или EXIT для
выхода из меню установки.
y
Вернуться к предыдущему меню можно, нажав кнопку
RETURN.
Вы можете выбрать настройки предпочитаемого
языка, чтобы BD-проигрыватель автоматически
переключался на предпочитаемый язык всякий
раз во время загрузки диска. Если на диске не
будет доступен выбранный язык, вместо него
будет использован язык, который установлен на
диске по умолчанию. Язык OSD (экранной
индикации) для меню установки BD/DVD будет
сохранять установленное значение независимо от
различных языков диска.
1Нажмите кнопку SETUP.
УСТАНОВКА СИСТЕМЫ
Включите телевизор и
систему
Установка экрана
телевизора
EXIT
TOP MENU/TITLE LIST
POP UP MENU
SETUP
, , , ,
ENTER
Settings
Picture
On Screen Language
Displays The Title List
Язык экранной индикации
(OSD)
Audio Video Settings
Quick Start
HDMI Control
Playback Setting
Communication Setup
Version
USB Memory Management
Software Update
System Reset

УСТАНОВКА СИСТЕМЫ
14 Ru
2Воспользуйтесь кнопками /// для
выбора опции “On Screen Language”, а
затем нажмите кнопку ENTER.
3Воспользуйтесь кнопками / для
выбора языка, а затем нажмите кнопку
ENTER.
1Нажмите кнопку SETUP.
2Воспользуйтесь кнопками /// для
выбора опции “Settings”, а затем нажмите
кнопку ENTER.
3Воспользуйтесь кнопками / для
выбора опции “Playback Setting”, а затем
нажмите кнопку ENTER.
4Воспользуйтесь кнопками / для
выбора опции “Disc Language”, а затем
нажмите кнопку ENTER.
5Воспользуйтесь кнопками / для
выбора показанной ниже опции.
•Subtitle
•Audio
•Menu
6Воспользуйтесь кнопками / для
выбора языка, а затем нажмите кнопку
ENTER.
Языки звукового
сопровождения, субтитров
и меню диска

СИСТЕМНЫЕ ОПЕРАЦИИ
15 Ru
Русский
ОСНОВНЫЕ
ОПЕРАЦИИ
ÎÑÍÎÂÍÛÅ ÎÏÅÐÀÖÈÈ
Следуя нижеуказанной процедуре, выберите источник приема и настройте звуковые параметры
системы.
1Нажмите кнопку (On/Standby) для
включения ресивера.
В зависимости от режима приема устройства,
BD-проигрыватель также включается через
соединение управления системой (☞с.8).
Включается дисплей передней панели.
2Нажмите одну из кнопок выбора
источника (или поверните переключатель
INPUT на передней панели) для выбора
требуемого источника приема.
3Начните воспроизведение на выбранном
компоненте-источнике или выберите
радиостанцию.
Для получения информации о
воспроизведении диска, смотрите стр. 17, и
получения информации о настройке, смотрите
стр. 26.
4Воспользуйтесь кнопками VOLUME +/–
(или поверните регулятор громкости
VOLUME на передней панели) для
установки звука на требуемый уровень
громкости.
5Поворачивая BASS, TREBLE или BALANCE
на передней панели ресивера, настройте
следующие параметры.
BASS: Настройка низкочастотной
характеристики.
TREBLE: Настройка высокочастотной
характеристики.
BALANCE: Настройка уровня громкости
отдельно левого и правого канала
колонок.
■Режим Pure Direct
В режиме Pure Direct блокируется цепь
регулировки тембра и выключается дисплей
передней панели, что позволяет наслаждаться
чистым высокоточным звучанием.
СИСТЕМНЫЕ ОПЕРАЦИИ
INPUT
BASS
PHONES
VOLUME
MIN MAX
TREBLE BALANCE
PRESET PURE DIRECT
LR
TP
TIMER
QUICK
INPUT
(On/Standby) VOLUME
PURE
DIRECTBASS BALANCE
TREBLE
A B C D
EXIT
TOP MENU/TITLE LIST
POP UP MENU
(On/Standby)
VOLUME +/–
Кнопки
выбора
источника
PURE DIRECT
MUTE
Основные операции
системы
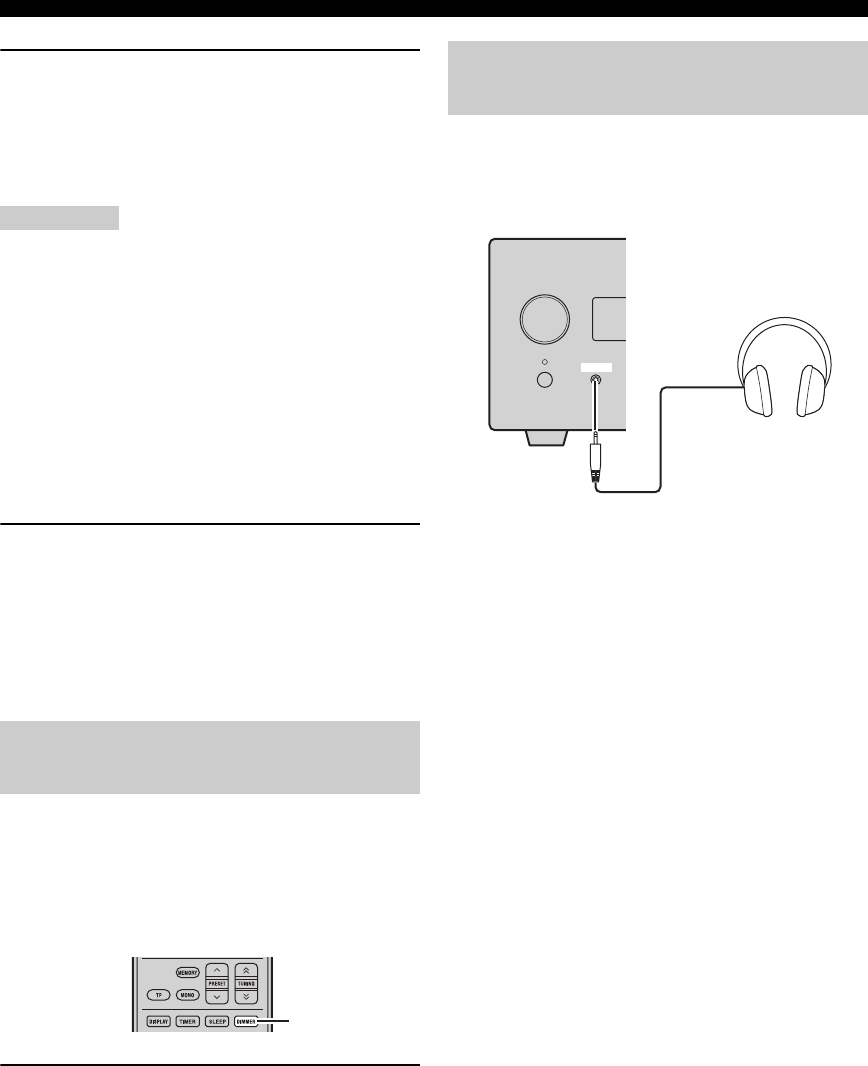
СИСТЕМНЫЕ ОПЕРАЦИИ
16 Ru
Нажмите кнопку PURE DIRECT (или PURE
DIRECT на передней панели) для включения
режима Pure Direct.
Дисплей передней панели автоматически
выключится. Кнопка PURE DIRECT на передней
панели имеет подсветку синего цвета.
Примечания
• Во время выполнения операций при включенном
режиме Pure Direct, дисплей передней панели ресивера
высвечивается на короткий момент для подтверждения
команды.
• Если включен режим Pure Direct, параметры BASS,
TREBLE и BALANCE становятся недоступны.
Для отключения режима Pure Direct
Снова нажмите кнопку PURE DIRECT.
Подсветка PURE DIRECT выключится и
включится дисплей передней панели.
■Приглушение звука (MUTE)
Нажмите кнопку MUTE для уменьшения
текущего уровня громкости приблизительно
на 20 дБ.
“MUTE ON” появится на дисплее передней
панели.
Снова нажмите кнопку MUTE для восстановления
вывода звука к прежнему уровню громкости.
Можно уменьшить яркость дисплея передней
панели ресивера. Дисплей передней панели BD-
проигрывателя также делается более тусклым
через соединение управления системой (☞с.8).
(Настройкой по умолчанию является “DIMMER
OFF”.)
Нажмите кнопку DIMMER.
Вы можете выбирать требуемую яркость дисплея
передней панели ресивера из трех значений:
нормальная яркость, средняя тусклость и
тусклость.
Наушники можно включать в гнездо PHONES на
передней панели ресивера.
При этом прекращается передача звука через
колонки и сабвуфер.
Настройка яркости дисплея
передней панели ресивера
DIMMER
Для использования
наушников
INPUT
PHONES
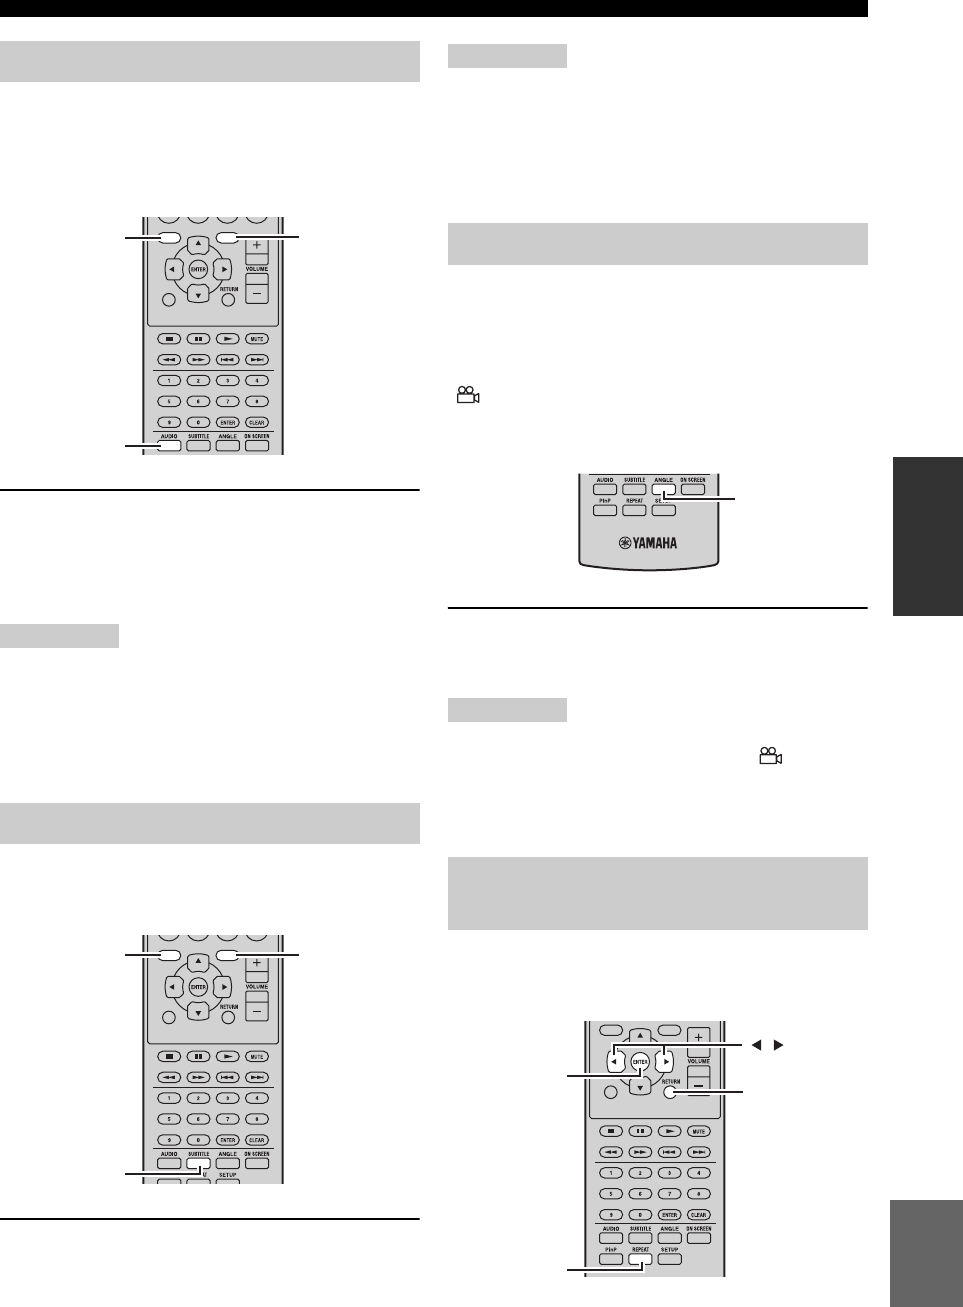
ОПЕРАЦИИ С ДИСКАМИ
19 Ru
Русский
ОСНОВНЫЕ
ОПЕРАЦИИ
Некоторые диски BD/DVD имеют звуковое сопровождение на
нескольких языках или в нескольких аудиоформатах, например,
Dolby Digital и DTS, которые можно выбирать во время
воспроизведения. Аналогично, некоторые диски DVD-VR
имеют двойное монофоническое звуковое сопровождение.
Нажимайте повторно кнопку AUDIO во время
воспроизведения для выбора доступных языков
звукового сопровождения или аудиоформатов.
Название выбранного языка или аудиоформата
будет отображаться на экране.
Примечания
•
При использовании некоторых дисков язык звукового
сопровождения и аудиоформаты можно выбирать только с
помощью меню диска. Воспользуйтесь кнопкой TOP MENU/
TITLE LIST и POP UP MENU для отображения меню диска.
•
Вы можете изменить язык звукового сопровождения по
умолчанию для диска BD/DVD в пункте “Disc Language” (
☞
с.35).
Некоторые диски BD/DVD имеют субтитры на одном
или более языках, которые можно выбирать во время
воспроизведения.
Нажимайте повторно кнопку SUBTITLE во время
воспроизведения для выбора доступных субтитров.
Название выбранного языка субтитров будет
отображаться на экране.
Примечания
• При использовании некоторых дисков субтитры
можно выбирать только с помощью меню диска.
Воспользуйтесь кнопкой TOP MENU/TITLE LIST и
POP UP MENU для отображения меню диска.
• Вы можете изменить язык субтитров по умолчанию
для диска BD/DVD в пункте “Disc Language” (☞с.35).
Некоторые диски BD/DVD-Video имеют
содержимое, записанное камерами под разными
углами, которые можно выбирать во время
воспроизведения.
Если хотите, вы можете включить значок камеры
() (☞с.35). При воспроизведении содержимого,
которое записано камерами под разными углами,
на экране будет появляться этот значок.
Нажимайте повторно кнопку ANGLE во время
воспроизведения для выбора доступных
углов камеры.
Примечания
• При использовании некоторых дисков, несмотря на
отображение на экране значка камеры ( ), вы
можете не иметь возможности выбирать углы камеры.
• При использовании некоторых дисков углы камеры
также можно выбирать с помощью меню диска.
Вы можете выполнять повторное
воспроизведение заголовка, раздела, звуковой
дорожки или диска.
Выбор языков и звука
Выбор субтитров
EXIT
TOP MENU/TITLE LIST
POP UP MENU
AUDIO
TOP MENU/
TITLE LIST POP UP MENU
EXIT
TOP MENU/TITLE LIST
POP UP MENU
SUBTITLE
TOP MENU/
TITLE LIST POP UP MENU
Выбор углов камеры
Повторное
воспроизведение
ANGLE
EXIT
TOP
MENU/TITLE
LIST
POP
UP
MENU
RETURN
ENTER
REPEAT
,

ОПЕРАЦИИ С ДИСКАМИ
20 Ru
1
Нажмите кнопку REPEAT во время воспроизведения.
На экране появится меню повтора.
Для закрытия меню повтора нажмите кнопку RETURN.
2Воспользуйтесь кнопками / для
выбора опций повтора.
• Playback Title: Повтор заголовка, который
воспроизводится в данный момент.
• Playback Chapter: Повтор раздела, который
воспроизводится в данный момент.
•
Scene Selection: Повтор заданной сцены заголовка или
раздела (
☞
“Повторное воспроизведение заданного
фрагмента (повтор A-B)”).
Для Аудио CD-диска можно выбрать опцию “Playing
Disc”, “Playing Track” или “Specify The Part”.
3Нажмите кнопку ENTER.
Начнется повторное воспроизведение.
Доступные опции повтора отличаются в зависимости от типа диска.
Для отмены повторного воспроизведения нажмите
кнопку REPEAT во время воспроизведения.
Примечание
Повторное воспроизведение не может использоваться с
дисками JPEG.
Вы можете задать две точки на диске, а затем повторно
воспроизводить фрагмент между этими двумя точками.
Функция повтора A-B недоступна с дисками BD.
1
Нажмите кнопку REPEAT во время воспроизведения,
а затем воспользуйтесь кнопками / для выбора
опции “Scene Selection”.
“Set Start Point” отобразится.
“A-” загорится на дисплее передней панели
BD-проигрывателя.
2
Нажмите кнопку ENTER на сцене, которую вы хотите
установить в качестве начальной точки.
“Set End Point” отобразится.
“B” загорится на дисплее передней панели.
3
Нажмите кнопку ENTER на сцене, которую вы хотите
установить в качестве конечной точки.
Отрезок между начальной и конечной
точками будет воспроизводиться повторно.
“REP” и “A-B” загорится на дисплее.
Для отмены повторного воспроизведения
нажмите кнопку REPEAT.
Для закрытия меню повтора нажмите кнопку EXIT.
Примечание
Начальная и конечная точки должны находиться в пределах одного
заголовка (DVD) или звуковой дорожки (Аудио CD-диск).
y
Вы можете нажать кнопку для ускоренного перехода вперед к
сцене, где необходимо установить конечную точку.
Вы можете воспроизводить слайд-шоу
изображений JPEG на дисках CD-R/CD-RW.
Загрузите диск, а затем нажмите кнопку
для запуска слайд-шоу.
Начав с первого изображения в первой папке,
слайд-шоу будет отображать каждое изображение
в каждой папке на диске в алфавитном порядке.
Масштаб изображений будет выбираться
автоматически, чтобы они отображались на
экране с наибольшим размером.
Во время слайд-шоу можно использовать следующие кнопки.
Повторное воспроизведение
заданного фрагмента (повтор A-B)
Playback Title Scene Selection
Playback Chapter
Playback Title
Set Start Point
Scene SelectionPlayback Chapter
Воспроизведение слайд-
шоу JPEG
Кнопка Описание
Приостановка слайд-шоу
Выбор следующего изображения
Выбор предыдущего изображения
ABCD
EXIT
TOP MENU/TITLE LIST
POP UP MENU
, , ,
ENTER
C
SETUP
,

ОПЕРАЦИИ С ДИСКАМИ
22 Ru
■
Воспроизведение путем выбора заголовка
1Загрузите записанный диск.
Отобразится экран списка заголовков.
Если экран списка заголовков не отобразился,
нажмите кнопку TOP MENU/TITLE LIST.
2
Воспользуйтесь кнопками / / / для выбора
нужного заголовка, а затем нажмите кнопку ENTER.
Начнется воспроизведение выбранного заголовка.
Вы можете выполнить воспроизведение, нажав кнопку
вместо нажатия кнопки ENTER.
Для остановки воспроизведения нажмите кнопку .
y
•
Экран списка заголовков также можно отобразить путем
нажатия кнопки TOP MENU/TITLE LIST, когда
воспроизведение остановлено, или путем нажатия кнопки
ENTER после выбора опции “Displays The Title List” в меню
установки, когда воспроизведение остановлено.
•
При отображении пиктограмм более чем семи заголовков, воспользуйтесь
переключением страниц с помощью кнопки или .
■
Воспроизведение путем выбора раздела
1Нажмите кнопку B во время отображения
экрана пиктограмм.
Отобразится экран разделов.
Для возврата к экрану пиктограмм нажмите кнопку B.
2
Воспользуйтесь кнопками / / / для выбора
нужного раздела, а затем нажмите кнопку ENTER.
Начнется воспроизведение выбранного раздела.
Вы можете выполнить воспроизведение, нажав кнопку
вместо нажатия кнопки ENTER.
Для остановки воспроизведения нажмите кнопку .
■Сортировка заголовков
При каждом нажатии кнопки B во время отображения экрана
списка заголовков, индикация списка заголовков будет
переключаться с отображения первым самого нового заголовка на
отображение первым самого старого заголовка и обратно.
■Воспроизведение путем выбора
списка воспроизведения
1
Нажмите кнопку C во время отображения экрана
пиктограмм или списка заголовков.
Отобразится экран списка воспроизведения.
2
Воспользуйтесь кнопками / для выбора
заголовка, а затем нажмите кнопку ENTER.
Начнется воспроизведение выбранного заголовка.
Для остановки воспроизведения нажмите
кнопку .
■Воспроизведение заголовка, на
котором была сделана остановка во
время воспроизведения
1
Нажмите кнопку D во время отображения экрана
пиктограмм или списка заголовков.
2Воспользуйтесь кнопками / для
выбора типа воспроизведения, а затем
нажмите кнопку ENTER.
Начнется воспроизведение заголовка.
Для остановки воспроизведения нажмите кнопку .
Позволяет настраивать одновременно различные
установки, например, субтитры, установки угла и
выбора заголовков для прямого воспроизведения.
Вы можете настроить видео и аудио в
соответствии со своими предпочтениями. Данные
операции аналогичны операциям для BD и DVD.
Нажмите кнопку ON SCREEN во время воспроизведения.
На экране телевизора отобразится экран
управления функциями.
Original Functions
5/21 Fri 9:30 AM
1 Program 1 5/21 Fri 110 Min.
2 Program 2 6/15 Fri 110 Min.
110 Min.
Program 1
DC
Использование “Function
Control Screen” для дисков
BD/DVD
From Beginning From Continued
Playback
EXIT
TOP MENU/TITLE LIST
POP UP MENU
, , , ,
ENTER
RETURN
ON SCREEN

ОПЕРАЦИИ С ДИСКАМИ
25 Ru
Русский
ОСНОВНЫЕ
ОПЕРАЦИИ
Следующий рисунок приведен в качестве
примера.
Примечания
• Что касается способа воспроизведения содержимого
BD-LIVE и т.п., выполните операции в соответствии с
инструкциями в руководстве к диску BD.
• Для использования функций BD-LIVE, выполните
широкополосное подключение к Интернет (☞с.10) и
настройки связи (☞с.36).
• Смотрите “BD Internet Access” (☞c.36) для настройки
ограничения доступа к содержимому BD-LIVE.
• Время, которое требуется для загрузки необходимых
программ в запоминающее устройство USB,
подключенное к данному проигрывателю, зависит от
скорости соединения с Интернет и объема данных этих
программ.
• Программы BD-LIVE, передаваемые через Интернет,
могут не отображать соединение в зависимости от
статуса (обновления) провайдера. В таких случаях
извлеките диск и повторите попытку.
• Если экран BD-LIVE не будет появляться в течение
некоторого времени после выбора функции BD-LIVE
в меню диска BD, это может означать, что на
запоминающем устройстве USB недостаточно
свободного места. В таких случаях извлеките диск из
проигрывателя, а затем удалите данные в
запоминающем устройстве USB с помощью меню
удаления данных в меню “USB Memory Management”
(☞с.39).

НАСТРОЙКА РАДИОСТАНЦИЙ ЧМ
26 Ru
ÎÏÅÐÀÖÈÈ ÒÞÍÅÐÀ
Существуют 2 метода настройки: автоматическая и ручная. Также можно использовать автоматическую
или ручную настройку для сохранения до 30 радиостанций.
Автоматическая настройка эффективна в тех
случаях, когда поступающие от радиостанций
сигналы достаточно сильны и отсутствуют
помехи.
1
Нажмите кнопку TUNER для установки
ресивера в режим ЧМ.
2Нажмите и удерживайте одну из кнопок
TUNING в течение более 2 секунд
для начала автоматической настройки.
При настройке ресивера на радиостанцию,
загорается индикатор TUNED и частота
принимаемой радиостанции отображается на
дисплее передней панели.
• Нажмите кнопку для настройки на
низкую частоту.
• Нажмите кнопку для настройки на
высокую частоту.
При слабом поступающем сигнале нужной
радиостанции выполните ручную настройку.
1
Нажмите кнопку TUNER для установки
ресивера в режим ЧМ.
2Нажмите кнопку TUNING для
ручной настройки на желаемую
радиостанцию.
Для автоматической предустановки радиостанций
следуйте процедуре ниже.
1
Нажмите кнопку TUNER для установки
ресивера в режим ЧМ.
2Нажмите и удерживайте кнопку MEMORY
более 2 секунд.
Индикатор PRESET на дисплее передней
панели начнет мигать и начнется
автоматическая предустановка станций.
После выполнения поиска на всех частотах
предустановка автоматически завершится.
• Поиск начнется с наименьшей частоты и
будет выполняться в направлении
наибольшей частоты.
• Ресивер автоматически присваивает номер
предустановки для каждой обнаруженной
радиостанции.
• Для отмены поиска нажмите кнопку
MEMORY.
Примечания
• Можно предустановать до 30 ЧМ-радиостанций.
• Любая информация о радиостанции, сохраненной под
существующим номером предустановки, стирается при
сохранении новой радиостанции на тот же номер.
НАСТРОЙКА РАДИОСТАНЦИЙ ЧМ
Автоматическая настройка
Ручная настройка
TUNING / d
d
d
d
TUNER
/ d
d
d
d
d
d
d
d
/ d
d
d
d
Автоматическая
предустановка
PRESET u / d
TUNER
MEMORY

НАСТРОЙКА СИСТЕМЫ РАДИОДАННЫХ (ТОЛЬКО МОДЕЛЬ ДЛЯ ЕВРОПЫ)
28 Ru
Система Радиоданных (только модель для Европы) – это система передачи информации, используемая
ЧМ-радиостанциями многих стран. Функция Системы Радиоданных осуществляется сетевыми
радиостанциями. Во время приема станций Системы Радиоданных этот ресивер может принимать
различную информацию Системы Радиоданных, например PS (наименование программы), PTY (тип
программы), RT (радиотекст), CT (текущее время) и TP (программу движения).
Данная функция используется для отображения 4
типов информации Системы Радиоданных: PS
(наименование программы), PTY (тип
программы), RT (радиотекст) и CT (текущее
время).
Примечания
• Можно выбрать только доступные режимы Системы
Радиоданных, предоставляемые радиостанцией.
• При слабом поступающем сигнале ресивер может не
обработать информацию Системы Радиоданных. В
частности, режим “RT” содержит большое количество
информации и может быть недоступен, даже при
наличии других режимов Системы Радиоданных.
• Если сила сигнала ослаблена по причине внешних
помех во время приема ресивером информации
Системы Радиоданных, прием может внезапно
прерваться и на дисплее передней панели появится
индикация “...WAIT”.
• При выборе режима “RT” ресивер может отображать
программную информацию из максимум 64 буквенно-
цифровых символов, включая символ умляут.
Недоступные символы отображаются как “_”
(подчеркивание).
Во время настройки на радиостанцию
Системы Радиоданных, повторно нажимая
DISPLAY, выберите нужный режим дисплея
Системы Радиоданных.
Описание типов программы приведено в таблице
ниже.
НАСТРОЙКА СИСТЕМЫ РАДИОДАННЫХ
(ТОЛЬКО МОДЕЛЬ ДЛЯ ЕВРОПЫ)
Отображение информации
Системы Радиоданных
DISPLAY
Тип программы Описание
News Новости
Affairs Текущие актуальные вопросы
Info Информация
Sport Спорт
Educate Образование
Drama Драма
Culture Культура
Science Наука
Varied Разное
Pop M Поп-музыка
Rock M Рок-музыка
Easy M Легкая музыка
Light M Легкая классическая музыка
Classics Серьезная классическая музыка
Other M Другие виды музыки
PS
PTY
RT
CT
Частота
(наименование программы)
(тип программы)
(радиотекст)
(текущее время)

29 Ru
НАСТРОЙКА СИСТЕМЫ РАДИОДАННЫХ (ТОЛЬКО МОДЕЛЬ ДЛЯ ЕВРОПЫ)
Русский
ОПЕРАЦИИ
ТЮНЕРА
Воспользуйтесь этой функцией для приема
службы передачи данных TP (программа
движения) сети станций Системы Радиоданных.
1Настройтесь на нужную станцию,
транслирующую Систему Радиоданных.
2Нажмите кнопку TP.
На дисплее фронтальной панели около трех
секунд будет мигать индикатор “TP
SEARCH”, а затем начнется поиск.
Во время выполнения поиска на ресивере
будет мигать индикатор TP.
В случае приема программы движения
индикатор будет оставаться включенным TP,
а поиск остановится.
При нажатии кнопки TP, поиск начнется
снова.
Если ресивер не сможет настроиться на
программу, индикатор TP выключится и на
дисплее появится индикация “NO TP”.
Ресивер вернется в предыдущее состояние.
Для отмены поиска
Нажмите кнопку TP во время выполнения поиска.
С помощью информации CT, получаемой от
радиостанций Системы Радиоданных, можно
настраивать встроенные часы ресивера.
1Нажмите кнопку OPTION.
На дисплее передней панели появится пункт
меню опций.
2Воспользуйтесь кнопками / для
выбора опции “AUTO CLOCK”, а затем
нажмите ENTER.
3Воспользуйтесь кнопками / для
выбора опции “ON” или “OFF”, а затем
нажмите кнопку ENTER.
Отобразится состояние “AUTO CLOCK”.
Настройкой по умолчанию является “ON”.
ON: Автоматическая настройка часов
ресивера с помощью информации CT.
OFF: Часы ресивера не настраиваются.
Для выхода из меню опций
Нажмите кнопку OPTION.
Использование службы
передачи данных TP
(программа движения)
INPUT
BASS
PHONES
VOLUME
MIN MAX
TREBLE BALANCE
PRESET PURE DIRECT
LR
TIMER
TP
Индикатор TP
TP
Установки CT
(текущее время)

УСТАНОВКА ТАЙМЕРА
30 Ru
ÄÐÓÃÈÅ ÎÏÅÐÀÖÈÈ
Данный ресивер оснащен 2 типами функций таймера. BD-проигрыватель также автоматически
включается или устанавливается в режим ожидания через соединение управления системой (☞с.8).
Таймер автоматически включает ресивер или
устанавливает его в режим ожидания в указанное
время. Также можно указать источник,
автоматически выбираемый ресивером при
включении таймера.
Примечания
• Установка таймера невозможна, пока не будут
настроены часы (☞с.12).
• Если в течение более чем 30 секунд не была нажата
никакая кнопка после предыдущего нажатия,
выполненные операции удаляются из памяти, и
отображается обычный дисплей.
1Воспользуйтесь кнопками TIMER и /
для выбора опции “TIMER”, а затем
нажмите кнопку ENTER.
Ресивер перейдет в режим установки таймера.
На дисплее передней панели будет мигать
индикатор TIMER.
2Воспользуйтесь кнопками или для
выбора опции “ON” (таймер включен) или
“OFF” (таймер выключен), а затем
нажмите кнопку ENTER.
ON: Появится экран установки таймера.
Перейдите к шагу 3.
OFF: Индикатор TIMER выключится и
ресивер вернется в обычный режим.
Примечание
Для выключения таймера выберите “OFF”. Как только
будет включен таймер, установка таймера ииндикатор
TIMER начнут гореть непрерывно до тех пор, пока
выбрано “OFF”.
3
Установите время начала работы таймера.
Для получения подробной информации об
установке часов, см. шаги 4 - 6 раздела
“Регулировка часов” (☞c.12).
4Воспользуйтесь кнопками / или
кнопкой выбора источника для выбора
источника приема, используемого во
время включения таймером ресивера, и
нажмите кнопку ENTER.
Ресивер автоматически выбирает источник приема во
время его включения с помощью таймера.
Если в качестве входного источника выбран сигнал
ЧM, номер предустановки (например, “P01”) будет
отображаться на дисплее фронтальнойпанели.
Нажмите / для выбора номера предустановки
радиостанции, необходимой для прослушивания,
при включенном таймере, азатем нажмите ENTER.
Привыборе “---” (поумолчанию) ресивер выберет
радиостанцию, на которую он был настроен ранее.
Если нет сохраненной радиостанции в качестве
предустановленной радиостанции, отобразится “---”.
Нажмите ENTER и перейдите кшагу 5.
Можно выбрать только предустановленную
радиостанцию. Сохраните радиостанции, которую
хотите прослушать, привключенном таймере в
качестве предустановленной радиостанции заранее
(
☞
с.27).
Примечание
Нельзя выбрать AUX в качестве источника приема.
УСТАНОВКА ТАЙМЕРА
Установка таймера часов
INPUT
BASS
PHONES
VOLUME
MIN MAX
TREBLE BALANCE
PRESET PURE DIRECT
LR
TIMER
TP
Индикатор TIMER
INPUT
ABCD
EXIT
TOP MENU/TITLE LIST
POP UP MENU
TIMER
Кнопки выбора
источника
ENTER ,
RETURN

31 Ru
УСТАНОВКА ТАЙМЕРА
Русский
ДРУГИЕ
ОПЕРАЦИИ
5Воспользуйтесь кнопками / для
установки промежутка времени работы
ресивера.
Промежуток времени можно выбирать в диапазоне
от 30 до 90 минут с шагом в 10 минут. Выберите “--”,
если не хотите, чтобы ресивер автоматически
перешел в режим ожидания.
6
Нажмите ENTER для завершения установки
таймера.
Высвечивается индикатор TIMER.
7Нажмите кнопку для установки
ресивера врежим ожидания.
Ресивер будет настроен автоматически на
указанное время.
Для отмены операции установки таймера
Нажмите кнопку TIMER во время работы таймера.
y
Вернуться к предыдущему экрану можно, нажав кнопку
или RETURN.
Таймер сна устанавливает ресивер в режим
ожидания после окончания указанного времени.
Повторно нажимая кнопку SLEEP, выберите
желаемую продолжительность.
При каждом нажатии кнопки продолжительность
переключается следующим образом.
На дисплее передней панели загорится индикатор
SLEEP.
y
• Таймер сна отменяется при установке ресивера в
режим ожидания.
• Если снова нажать SLEEP при установленном таймере
сна, на дисплее передней панели отображается
текущая продолжительность.
Отмена таймера сна
Повторно нажимая кнопку SLEEP выберите
“OFF”.
Установка таймера сна
SLEEP
120min.
90min.
60min.
30min.
OFF

УПРАВЛЕНИЕ iPod™
32 Ru
С помощью поставляемого пульта ДУ кроме управления ресивером (R-840) и BD-проигрывателем (BD-
940), также можно управлять устройством iPod установленным в док iPod.
После подключения iPod к доку iPod можно воспроизводить данные с iPod с помощью поставляемого пульта ДУ.
При подключении iPod во время воспроизведения, данная система автоматически перейдет в режим iPod.
Примечания
• Поддерживаются только iPod (Click and Wheel), iPod nano, iPod Classic, iPod mini и iPod touch.
•
Некоторые функции могут не поддерживаться, в зависимости от модели или версии программного обеспечения iPod.
y
Для получения полного списка сообщений о состоянии работы, появляющихся на дисплее передней панели ресивера,
см. раздел “iPod” в главе “УСТРАНЕНИЕ НЕИСПРАВНОСТЕЙ” (☞с.43).
1Нажимая iPod, выберите функцию iPod
как источник поступающего сигнала.
2Подключите iPod к доку iPod.
3
Воспользуйтесь кнопками / для
перемещения по меню iPod, а затем нажмите
кнопку ENTER для запуска воспроизведения
выбранной композиции (или группы).
•
Для управления меню, смотрите на экран iPod.
•
Управляйте iPod с помощью органов управления
iPod или поставляемого пульта ДУ.
■
Повторное воспроизведение (Repeat Play)
Можно повторно воспроизводить одну звуковую
дорожку или группу дорожек на iPod.
Нажмите кнопку REPEAT.
При каждом нажатии кнопки происходит смена режима
повторного воспроизведения. В приведенной ниже
таблице показан пример изменения режима при
нажатии кнопки. Проверьте на экране iPod режим,
выбранный в данный момент.
■Воспроизведение в случайном
порядке (Shuffle Play)
Композиции или альбомы на iPod можно
воспроизводить в случайном порядке.
Нажмите кнопку SHUFFLE.
При каждом нажатии кнопки происходит смена режима
воспроизведения в случайном порядке. В приведенной
ниже таблице показан пример изменения режима при
нажатии кнопки. Проверьте на экране iPod режим,
выбранный в данный момент.
УПРАВЛЕНИЕ iPod™
Использование iPod™
Прилагаемый пульт ДУ имеет те же самые
функциональные кнопки, что и iPod. Таким
образом, назначение этих кнопок совпадает.
iPod
,
ENTER
REPEAT
SHUFFLE
iPod Пульт ДУ
Одну (повтор воспроизведения
отдельных композиций)
Все (повтор воспроизведения
выбранной группы композиций)
Выки.
Песни (случайное воспроизведение
отдельных композиций)
Дпьбомов (случайное воспроизведение
отдельных альбомов)
Выки.

33 Ru
Русский
ДРУГИЕ
ОПЕРАЦИИ
В данном разделе описаны различные меню данного аппарата.
После включения данного аппарата и телевизора (☞с.13), вы можете изменять установки на экране
телевизора с помощью пульта ДУ.
Вы можете выбирать пункты меню и изменять установки так же, как в процедуре “Установка экрана телевизора” (
☞
c.13).
Примечание
В случае выбора “Parental Control” в “Playback Settings” (☞с.35), необходимо ввести 4-значный пароль. В первый раз
появится экран установки пароля. Для установки пароля, смотрите “PIN Code Setting” (☞c.35).
y
Установки по умолчанию отмечены “*”.
■TV Aspect Ratio
Вы можете установить формат экрана подключенного
телевизора и настроить вывод видеосигнала.
В случае замены одного телевизора другим, проверьте
соответствие формата экрана. Если он не совпадает,
измените установку “TV Aspect Ratio”.
“Normal 4:3” опции
В случае установки опции “TV Aspect Ratio” в положение
“Normal 4:3” и просмотра видеосигнала в формате 16:9 на
телевизоре с экраном 4:3, выберите одну из следующих опций.
■Component Video Out
Вы можете установить разрешение компонентного выходного
видеосигнала.
Некоторые телевизоры не являются полностью совместимыми
с проигрывателем дисков Blu-ray, что может привести к
искажению изображения. В этом случае установите опцию
“Component Video Out” в значение по умолчанию (
☞
с.41).
1080i, 720p, 576/480p, 576/480i*
Примечание
Некоторые диски запрещают вывод видеосигнала высокого
разрешения через гнезда COMPONENT. В этом случае
разрешение видеосигнала будет преобразовано в формат 576/
480p или 576/480i.
■HDMI Video Out
Вы можете установить разрешение выходного
видеосигнала HDMI.
Некоторые телевизоры не являются полностью
совместимыми с проигрывателем дисков Blu-ray,
что может привести к искажению изображения. В
этом случае установите опцию “HDMI Video Out”
в значение по умолчанию (☞с.41). “HDMI Video
Out” будет переустановлено в положение “Auto”
(заводское предустановленное значение).
Auto*, 1080p, 1080i, 720p, 576/480p
Примечание
При подключении данного BD-проигрывателя к 1080p/
24Гц-совместимому телевизору и установке опции
“HDMI Video Out” в положение “Auto”, сигнал 1080p/
24Гц будет автоматически отображаться при
воспроизведении совместимых дисков.
При выборе формата 1080p/24Гц или 1080p/60Гц, будет
отсутствовать выходной сигнал на гнездах
COMPONENT и гнезде VIDEO.
■Video Out Select
Видеосигналы могут выводиться одновременно с
аналоговых видеогнезд (компонентных или
видеогнезд) и гнезда HDMI. Это называется
двойным выводом. При использовании
компонентного видеовыхода и выходов HDMI,
разрешение выходного видеосигнала будет
определяться на основе установок “Component
Video Out” или “HDMI Video Out” и “Video Out
Select”. См. таблицу ниже для получения
подробных сведений.
УСТАНОВКИ BD-ПРОИГРЫВАТЕЛЯ
Audio Video Settings
Wide 16:9*:Выберите данную установку при
подключении телевизора с широким
экраном (16:9).
Normal 4:3: Выберите данную установку при
подключении телевизора с обычным
экраном (4:3).
Letter Box*:Вывод изображения с черными
полосами вверху и внизу с сохранением
формата экрана 16:9.
Pan Scan:
Вывод изображения без изменения формата
экрана путем отрезания правого и левого
краев. Данная опция доступна только для
дисков, имеющих обозначение 4:3PS.
HDMI*:Определение разрешения выходного
видеосигнала на основе установки
HDMI Video Out (смотрите “HDMI
Video Out” (☞c.33)).
Component: Определение разрешения выходного
видеосигнала на основе установки
Component Video Out (смотрите
“Component Video Out” (☞c.33)).

34 Ru
УСТАНОВКИ BD-ПРОИГРЫВАТЕЛЯ
*1 Некоторые диски запрещают вывод видеосигнала
высокого разрешения через гнезда COMPONENT. В
этом случае разрешение видеосигнала будет
преобразовано в формат 480p/576p (при установке
опции “Video Out Select” в положение “Component”)
или 480i/576i (при установке опции “Video Out Select”
в положение “HDMI”).
*2 Выходной видеосигнал отсутствует, если сигнал 1080p
выводится через гнездо HDMI.
*3 Выход CVBS означает вывод видеосигнала через
гнездо VIDEO.
Примечание
Если телевизор несмовместим с выбранным
разрешением, изображения могут отображаться
неправильно.
y
Вы также можете переключаться между опциями
“HDMI” и “Component” с помощью “HDMI <-> COMP”
(☞с.41).
■Secondary Audio
Вы можете включать и выключать
дополнительный аудиосигнал для картинки в
картинке или аудиокомментариев.
On*, Off
y
В случае установки опции “Secondary Audio” в
положение “Off”, данный аппарат не будет выводить звук
щелчка в меню.
Выберите опцию “off” для вывода высококачественного
BD-звука через гнездо HDMI.
■Audio Out
Вы можете установить выходной аудиосигнал в
соответствии с окружением при воспроизведении.
“HDMI Output” опции
В случае установки параметра “Audio Out” в
положение “HDMI Output”, выберите одну из
следующих опций.
Примечание
В случае установки опции “Secondary Audio” в
положение “On”, опция “HDMI Output” будет
автоматически установлена в положение “PCM”.
“Digital Output” опции
В случае установки параметра “Audio Out” в
положение “Digital Output”, выберите одну из
следующих опций.
■Dynamic Range Control
Вы можете настроить динамический диапазон,
чтобы звук выводился со средней громкостью.
Если диалог невозможно четко расслышать,
измените установку данного меню.
Установки данного
проигрывателя
Разрешение выходного
сигнала
Video Out
Select
HDMI Video
Out
Компонент
ный выход
Выход
CVBS*3
HDMI
Auto *1 480i/576i*2
1080p
Выходной
сигнал
отсутствует
Выходной
сигнал
отсутствует
1080i 1080i*1 480i/576i
720p 720p*1 480i/576i
480p/576p 480p/576p*1 480i/576i
Установки данного
проигрывателя
Разрешение выходного
сигнала
Video Out
Select
Component
Video Out
Выход
HDMI
Выход
CVBS*3
Component
1080i*11080i*1 480i/576i
720p*1720p*1 480i/576i
480p/576p 480p/576p 480i/576i
480i/576i 480i/576i 480i/576i
HDMI Output: Вывод аудиосигнала через гнездо
HDMI.
Digital Output: Вывод аудиосигнала через гнездо
DIGITAL OUT (OPTICAL).
2ch Audio
Output*:
Вывод аудиосигнала через гнезда
AUDIO OUT.
Bitstream: Вывод двоичного аудиосигнала.
Выберите эту опцию при подключении
HDMI компонента со встроенным
декодером для DOLBY DIGITAL и т.п.
PCM*
(Окружающий
звук):
Вывод аудиосигнала линейного PCM.
Аудиосигналы, записанные в
различных форматах, например
DOLBY DIGITAL и DTS, будут
декодироваться в линейный PCM и
выводиться.
Bitstream: Вывод двоичного аудиосигнала.
Выберите эту опцию при подключении
компонента окружающего звука со
встроенным декодером для DOLBY
DIGITAL и т.п.
PCM*:Вывод PCM 2-канального
аудиосигнала.
Аудиосигналы, записанные в разном
формате, будут преобразованы в PCM
2-канальные аудиосигналы и выведены.
Выберите эту опцию при подключении
2-канального стереофонического
аудиокомпонента.
Normal: Вывод звука с тем же самым
динамическим диапазоном, что и у
оригинального звука.
Shift: Регулировка динамического диапазона
аудиосигнала Dolby Digital, чтобы
диалог можно было четко расслышать.
Если звук искажен, установите эту
опцию в положение “Normal”.
Auto*:Автоматическая настройка
динамического диапазона аудиосигнала
Dolby TrueHD.

35 Ru
УСТАНОВКИ BD-ПРОИГРЫВАТЕЛЯ
Русский
ДРУГИЕ
ОПЕРАЦИИ
Примечание
Уменьшите громкость перед изменением данной
установки, иначе через колонки может быть выведен
громкий звук, или на них может быть подана
избыточная электрическая нагрузка.
Функция быстрого запуска позволяет быстро
запускать данный аппарат.
Примечание
В случае установки опции “Quick Start” в положение
“Yes”, BD-проигрывателю требуется больше времени
на выключение.
Вы можете настроить данный аппарат на
автоматическое выключение примерно через 10
минут после остановки воспроизведения.
Yes, No*
Вы можете настроить данный аппарат на прием
управляющего сигнала HDMI от пульта ДУ
телевизора, если он поддерживает управление
HDMI и подключен к данному аппарату через
кабель HDMI.
Yes, No*
Примечания
• Для получения подробных сведений, обратитесь к
инструкции по эксплуатации телевизора.
• Функция управления HDMI может не работать во
время воспроизведения или при отображении меню
установки.
• Вы можете использовать данную функцию только в
случае установки опции “Video Out Select” в
положение “HDMI”.
■Parental Control
Некоторые транслируемые цифровые сигналы и
диски BD/DVD содержат код рейтинга с целью
блокировки отображения содержимого для
определенной возрастной группы. Вы можете
выбрать уровень блокировки воспроизведения на
данном аппарате дисков BD/DVD с
нежелательными рейтингами.
“Playback Setting” предоставляет другую опцию
“Country code”. Поскольку данные рейтинги
отличаются в разных странах, вам также
необходимо установить код страны.
Для установки кода страны необходимо
установить 4-значный пароль и ввести его.
Для DVD
Для BD
Код страны
Установка кода страны.
См. список кодов страны (☞с.51), поскольку
данные рейтинги отличаются в зависимости от
страны.
■Disc Language (Приоритетный язык
диска)
Вы можете выбрать язык для субтитров,
звукового сопровождения и меню, отображаемых
на экране.
смотрите “Список языков” (☞c.51) для получения
информации о доступных языках.
■Angle Mark Display
Некоторые диски BD/DVD содержат съемку под
несколькими углами. При просмотре данных
видеофрагментов вы можете выбрать
отображение значка угла в нижнем правом углу
экрана.
■PIN Code Setting
Вы можете установить пароль для установки или
изменения уровня родительского контроля.
Quick Start
Yes: Включение функции быстрого запуска.
Индикатор QUICK загорается в
режиме ожидания (☞с.5).
No*:Выключение функции быстрого
запуска.
Более низкое потребление
электроэнергии в режиме ожидания.
Auto Power Off
HDMI Control
Playback Setting
Level 8 и Off*:Неограниченное воспроизведение
DVD.
Level 1-7: Запрет воспроизведения DVD с
соответствующими рейтингами.
No Limit*:Неограниченное воспроизведение BD.
0-99 лет: Запрет воспроизведения BD с
соответствующими рейтингами.
Ye s : Отображать значок угла.
No*:Не отображать значок угла.
Ye s : Установить пароль.
Вам будет предложено ввести 4-
значное число.

39 Ru
УСТАНОВКИ BD-ПРОИГРЫВАТЕЛЯ
Русский
ДРУГИЕ
ОПЕРАЦИИ
Вы можете отобразить версию программного
обеспечения системы.
Перед использованием запоминающего
устройства USB
Следующие инструкции используются для пояснения
операции удаления таких данных, как данные BD-LIVE
в запоминающем устройстве USB.
1Вставьте запоминающее устройство USB
в разъем USB BD STORAGE/SERVICE с
задней стороны данного проигрывателя.
2Нажмите кнопку SETUP для отображения
меню установки.
3Воспользуйтесь кнопками / / / для
выбора опции “Settings”, а затем нажмите
кнопку ENTER.
4Воспользуйтесь кнопками / для
выбора опции “USB Memory Management”,
а затем нажмите кнопку ENTER.
“No USB Memory” появится в том случае, если
запоминающее устройство USB не вставлено.
5Воспользуйтесь кнопками / , выберите
опцию “Erase” или “Format”, а затем
нажмите кнопку ENTER.
Erase:
Удаление только данных BD-VIDEO,
записанных на запоминающем устройстве
USB, например, данных BD-LIVE.
Format:Имейте в виду, что все данные,
включая данные BD-VIDEO и
обновления программного
обеспечения, будут удалены.
Если вам необходимо удалить только ненужные
данные по обновлению программного обеспечения
после его выполнения, удалите эти данные на
запоминающем устройства USB с помощью ПК.
Примечание
Данные, которые были сохранены во внутренней памяти
проигрывателя (результат игры и т.п.), также будут
удалены.
6
Воспользуйтесь кнопками / , выберите
опцию “Yes”, а затем нажмите кнопку ENTER.
7Начните процесс.
Для данной операции будет отображен следующий экран.
8Нажмите кнопку ENTER.
Данная функция позволяет осуществлять
обновление программного обеспечения путем
установки запоминающего устройства USB с
файлом обновления в разъем USB BD STORAGE/
SERVICE на данном проигрывателе.
На запоминающем устройстве USB не должно
быть никаких файлов за исключением
данных для обновления программного
обеспечения, позволяющих загрузить новое
программное обеспечение.
Чтобы проверить доступность обновления
программного обеспечения, посетите сайт
http://www.yamaha.co.jp/english/product/av/
down/agreement.html.
Вы можете вернуть все установки BD-
проигрывателя к заводским предустановкам.
Reset, Not Reset
Version
ПРЕДОСТЕРЕЖЕНИЕ:
• Не извлекайте запоминающее устройство
USB и не отключайте силовой кабель во
время выполнения операций “USB Memory
Management” или “Software Update”.
•
Не используйте удлинительный кабель USB при
подключении запоминающего устройства USB к
разъему USB BD STORAGE/SERVICE данного
проигрывателя. Использование удлинительного
кабеля USB может помешать правильной работе
проигрывателя.
Примечание
Yamaha не может гарантировать функционирование на данном
проигрывателе запоминающих устройств USB всех марок.
USB Memory Management
Software Update
System Reset
Erases BD-VIDEO data on USB memory.
Erase all contents on USB memory
including protected contents.
Format
Erase
Yes No
OK
Complete
40 Ru
УСТАНОВКИ BD-ПРОИГРЫВАТЕЛЯ
Список кодов стран
Список языков
Список кодов языков
США / КАНАДА / ЯПОНИЯ / ГЕРМАНИЯ / ФРАНЦИЯ / ВЕЛИКОБРИТАНИЯ / ИТАЛИЯ /
ИСПАНИЯ / ШВЕЙЦАРИЯ / ШВЕЦИЯ / ГОЛЛАНДИЯ / НОРВЕГИЯ / ДАНИЯ / ФИНЛЯНДИЯ /
БЕЛЬГИЯ / ГОНКОНГ / СИНГАПУР / ТАИЛАНД / МАЛАЙЗИЯ / ИНДОНЕЗИЯ / ТАЙВАНЬ /
ФИЛИППИНЫ / АВСТРАЛИЯ / РОССИЯ / КИТАЙ
English / Franзais / Deutsch / Italiano / Espaсol / Japanese / Svenska / Nederlands
AA Афар / AB Абхазский / AF Африкаанс / AM Амхарский / AR Арабский / AS Ассамский / AY Аймара
/ AZ Азербайджанский / BA Башкирский / BE Белорусский / BG Болгарский / BH Бихари / BI Бислама
/ BN Бенгали / BO Тибетский / BR Бретонский / CA Каталанский / CO Корсиканский / CS Чешский /
CY Валлийский / DA Датский / DE Немецкий / DZ Бутанский / EL Греческий / EN Английский / EO
Эсперанто / ES Испанский / ET Эстонский / EU Баскский / FA Персидский / FI Финский / FJ
Фиджийский / FO Фарерский / FR Французский / FY Фризский / GA Ирландский / GD Гэльский / GL
Галисийский / GN Гуарани / GU Гуджарати / HA Хауса / HI Хинди / HR Хорватский / HU Венгерский / HY
Армянский / IA Интерлингва / IE Интерлингве / IK Инупиак / IN Индонезийский / IS Исландский/ IT
Итальянский / IW Иврит / JA Японский / JI Идиш / JW Яванский / KA Грузинский / KK Казахский / KL
Гренландский / KM Камбоджийский / KN Каннада / KO Корейский / KS Кашмири / KU Курдский / KY
Киргизский / LA Латинский / LN Лингала / LO Лаосский / LT Литовский / LV Латышский / MG
Малагасийский / MI Маори / MK Македонский / ML Малаялам / MN Монгольский / MO Молдавский /
MR Маратхи / MS Малайский / MT Мальтийский / MY Бирманский / NA Науру / NE Непальский / NL
Голландский / NO Норвежский / OC Окситанский / OM Афан (Оромо) / OR Ория / PA Панджаби / PL
Польский / PS Пушту / PT Португальский / QU Кечуа / RM Ретороманский / RN Рунди / RO Румынский
/ RU Русский / RW Киньяруанда / SA Санскрит / SD Синдхи / SG Санго / SH Сербскохорватский / SI
Сингальский / SK Словацкий / SL Словенский / SM Самоанский / SN Шона / SO Сомали / SQ
Албанский / SR Сербский / SS Свази / ST Сото / SU Сунданский / SV Шведский / SW Суахили / TA
Тамильский / TE Те луг у / TG Таджикский / TH Та и / TI Тигринья / TK Туркменский / TL Тагалог / TN
Тсвана / TO То н г а / TR Турецкий / TS Тсонга / TT Татарский / TW Тви / UK Украинский / UR Урду / UZ
Узбекский / VI Вьетнамский / VO Волапюк / WO Волоф / XH Коса / YO Йоруба / ZH Китайский / ZU
Зулу

УСТРАНЕНИЕ НЕИСПРАВНОСТЕЙ
42 Ru
ÄÎÏÎËÍÈÒÅËÜÍÀß ÈÍÔÎÐÌÀÖÈß
Если у вас возникли любые из следующих трудностей во время эксплуатации данной системы,
воспользуйтесь нижеприведенной таблицей для устранения неисправности. В случае если неисправность
не указана в таблице или вы не смогли исправить ее, следуя инструкциям таблицы, отключите данную
систему, отсоедините кабель питания и обратитесь к ближайшему официальному дилеру или в
сервисный центр Yamaha.
■Общая часть
УСТРАНЕНИЕ НЕИСПРАВНОСТЕЙ
Ресивер (R-840)
Неисправность Причина Способ устранения
Смотрите
стр.
Ресивер не
включается или
устанавливается в
режим ожидания
после включения
питания.
Не был подключен силовой кабель,
или вилка не полностью вставлена в
розетку.
Подключите силовой кабель
соответствующим образом. 8
Ресивер подвергся сильному
электрическому напряжению от
внешних источников (например,
молния или сильное статическое
электричество).
Установите ресивер в режим ожидания,
отключите силовой кабель, подключите его к
розетке через 30 секунд, и пользуйтесь как
обычно.
—
Произошло короткое замыкание
кабеля, поэтому была активирована
система защиты.
Убедитесь, что кабельные соединения всех
колонок с ресивером выполнены надежно и что
провод в каждом соединении не касается ничего
лишнего, кроме надлежащего соединения.
8
Внутренняя температура слишком
велика, поэтому была активирована
система защиты.
Подождите прибл. 1 час, пока не остынет
ресивер, а затем снова включите его. 8
Отсутствует звук Кабели входа/выхода были
подключены неправильно.
Подключите кабели соответствующим
образом. Если неисправность не была
устранена, это означает, что используемые
кабели могут быть неисправны.
8
Не был выбран соответствующий
источник.
Выберите соответствующий источник приема
с помощью селектора INPUT на передней
панели (или кнопок выбора источника на
пульте ДУ).
—
Колонки подключены ненадежно. Надежно подключите колонки. 8
Низкий уровень громкости. Увеличьте уровень громкости. —
Исчез звук. Нажмите кнопку MUTE или VOLUME +/–,
чтобы возобновить подачу звука, а затем
настройте громкость.
7
От компонента источника,
например CD-ROM были получены
сигналы, не воспроизводимые
ресивером.
Воспроизведите источник, сигналы которого
можно воспроизвести на ресивере. —
Внезапное
отключение звука.
Ресивер был отключен таймером. Включите ресивер и заново начните
воспроизведение источника. —
Слышится звучание
от колонки только
на одной стороне.
Кабели не подключены
надлежащим образом.
Подключите кабели соответствующим
образом. Если неисправность не была
устранена, это означает, что используемые
кабели могут быть неисправны.
8
Слышатся шумовые
помехи от
цифрового или
радиочастотного
оборудования.
Ресивер очень близко расположен к
цифровому или высокочастотному
оборудованию.
Передвиньте ресивер подальше от такого
оборудования. —

43 Ru
Русский
УСТРАНЕНИЕ НЕИСПРАВНОСТЕЙ
ДОПОЛНИТЕЛЬНАЯ
ИНФОРМАЦИЯ
■ЧМ-приемник
■iPod
Примечание
При возникновении ошибки передачи без появления сообщения о рабочем состоянии на дисплее передней панели
ресивера, проверьте соединение между ресивером и iPod (☞с.10).
Звук искажен. Слишком высокий уровень
громкости.
Отрегулируйте уровень громкости. 15
“CHK SP WIRE”
появляется на
дисплее.
Короткое замыкание в кабелях
колонок.
Проверьте правильность подключения
кабелей колонок. 8
Неисправность Причина Способ устранения
Смотрите
стр.
Слышится шум во время
стереофонического приема
ЧМ-радиостанции.
Это может быть вызвано
характеристиками самих
стереофонических ЧМ-
трансляций, когда передающая
антенна находится очень далеко
или при слабом сигнале,
поступающем на антенну.
Проверьте подключения антенны. 8
Старайтесь пользоваться
высококачественной направленной
ЧМ-антенной.
—
Искажение звучания,
невозможно добиться
лучшего приема даже с
использованием хорошей
ЧМ-антенны.
Многоканальные помехи. Отрегулируйте расположение антенны
для избежания многоканальных помех. —
Невозможно настроиться на
желаемую радиостанцию в
режиме автоматической
настройки.
Очень слабый сигнал
передающей радиостанции.
Используйте высококачественную
направленную ЧМ-антенну. —
Попробуйте настроиться вручную. 26
Невозможно настроиться на
ранее предустановленные
радиостанции.
Ресивер был отключен в течение
продолжительного промежутка
времени.
Установите предустановленные
радиостанции. 26
Сообщение о
состоянии Причина Способ устранения
Смотрите
стр.
CONNECT ERR Возникла проблема во время
передачи сигнала от iPod на
ресивер.
Выключите ресивер и попробуйте
перезапустить iPod. 10
UNKNOWN TYP Используемый iPod не
поддерживается ресивером.
Поддерживаются только iPod (Click and
Wheel), iPod nano, iPod Classic, iPod mini и iPod
touch.
—
CONNECTED iPod надлежащим образом
установлен в доке iPod и
подключение iPod к ресиверу
завершено.
NOT CONNECT iPod был извлечен из дока iPod
ресивера.
Установите iPod обратно в разъем ресивера. 10
CAN'T PLAY Ресивер не может воспроизвести
композиции, записанные на iPod.
Убедитесь, что композиции на iPod могут
проигрываться. —
Сохраните некоторые другие
воспроизводимые музыкальные файлы на
iPod.
—
Неисправность Причина Способ устранения
Смотрите
стр.

46 Ru
УСТРАНЕНИЕ НЕИСПРАВНОСТЕЙ
Следующее сообщение появляется на экране телевизора в том случае, если диск, который вы
попытались воспроизвести, не соответствует проигрывателю, или операция неверна.
Сеть
Неисправность Причина Способ устранения
Смотрите
стр.
Не удается
подключиться к
сети Интернет.
Сетевой кабель не подключен
надлежащим образом.
Подключите сетевой кабель надлежащим
образом. 10
Используется неподходящий кабель,
например, модульный кабель.
Используйте для подключения сетевой
кабель. 10
Широкополосный коммутатор или модем не
подключен надлежащим образом.
Подключите широкополосный коммутатор и/
или модем надлежащим образом. 10
Широкополосный коммутатор или
модем не включен.
Включите широкополосный коммутатор или
модем. —
Параметры сети неправильные. Проверьте “Communication Setup”.36
Не удается
загрузить
содержимое BD-
LIVE.
Сетевой кабель не подключен
надлежащим образом.
Подключите сетевой кабель надлежащим
образом. 10
Запоминающее устройство USB не
подключено надлежащим образом.
Убедитесь, что запоминающее устройство
USB подключено к разъему USB BD
STORAGE/SERVICE BD-проигрывателя.
10
Диск BD не поддерживает функцию
BD-LIVE.
Проверьте, поддерживает ли диск BD
функцию BD-LIVE. 24
“BD Internet Access” установлено в
положение “Prohibit”.
Установите опцию “BD Internet Access” в
положение “Permit” или “Limit”.36
Сообщения, связанные с дисками BD и дисками DVD
Сообщение об
ошибке Возможная ошибка Способ устранения
Cannot play. С помощью данного проигрывателя этот диск
нельзя воспроизвести.
Проверьте диск и правильно загрузите его.
Incompatible disc.
В случае загрузки диска, который не может быть
воспроизведен с помощью данного проигрывателя
(например, поцарапанного диска), или загрузки диска
верхней стороной вниз, появится данное сообщение и
лоток диска автоматически выдвинется.
Проверьте диск и правильно загрузите его.
Возникает в том случае, если загруженный диск не
может быть воспроизведен, поскольку он не
является стандартным, поцарапан и т.п.
Извлеките диск.
Cannot operate. Возникает, если операция неверна.
This USB memory is
not formatted properly.
Please format the
memory in USB
memory management.
Возникает при наличии ошибки форматирования. Снова отформатируйте запоминающее устройство USB.
Возникает в случае, если запоминающее устройство
USB не отформатировано с использованием
FAT 32/16
.
Отформатируйте запоминающее устройство
USB с помощью ПК.
The Connected USB
Memory cannot be
used. It should be
compliant with USB
2.0.
Возникает, если используется запоминающее
устройство USB, не совместимое со
стандартом USB 2.0 High Speed (480 Мбит/с)
(т.е. USB 1.0/USB 1.1).
Подключите запоминающее устройство USB,
совместимое со стандартом USB 2.0 High
Speed (480 Мбит/с).

47 Ru
Русский
ДОПОЛНИТЕЛЬНАЯ
ИНФОРМАЦИЯ
JPEG представляет собой формат файлов для хранения файлов неподвижных изображений
(фотоснимков, иллюстраций и т.п.). Данный проигрыватель позволяет воспроизводить файлы
неподвижных изображений в формате JPEG.
■Несовместимые форматы файлов
• Воспроизведение неподвижных изображений в
форматах, отличных от JPEG (например, TIFF)
невозможно.
• Могут существовать некоторые файлы,
воспроизведение которых невозможно даже в
том случае, если они записаны в формате JPEG.
• Воспроизведение файлов прогрессивного JPEG
невозможно.
• Воспроизведение файлов с движущимися
изображениями и аудиофайлов, а также файлов
в формате Motion JPEG невозможно даже в то
случае, если они записаны в формате JPEG.
■Прочие файлы, воспроизведение
которых невозможно
Возможно, вы не сможете воспроизвести
некоторые неподвижные изображения,
созданные, отретушированные, скопированные
или отредактированные иным образом на
компьютере.
■Во время воспроизведения файлов
вы можете столкнуться с одной или
большим числом следующих
проблем.
• Для воспроизведения файлов может
потребоваться некоторое время, в зависимости
от числа папок, числа файлов и объема
используемых данных.
• Информация EXIF не будет отображаться.
EXIF является сокращением от Exchangeable
Image File Format, и представляет собой
стандарт для хранения определенной
информации в графически файлах, особенно
тех, в которых используется JPEG-сжатие.
(Обратитесь к сайту http://exif.org for more
information.)
■При использовании данного аппарата
для воспроизведения диска CD-RW/R
с хранящимися (записанными)
неподвижными изображениями
• При использовании дисков CD-RW/R, на
которых неподвижные изображения смешаны с
музыкой или видеозаписями, вы сможете
воспроизводить только неподвижные
изображения. Возможно, вы вообще не
сможете воспроизвести такие диски.
• Воспроизведение многосессионных дисков
невозможно.
• Возможно, вы не сможете воспроизвести
некоторые неподвижные изображения,
обработанные (повернутые или сохраненные
путем перезаписи других изображений) с
помощью программного обеспечения для
обработки изображений, или некоторые
неподвижные изображения, полученные из
сети Интернет или по электронной почте.
• Диски, которые данный проигрыватель может
воспроизводить (распознавать), ограничены
следующими параметрами:
Содержат файлы в формате EXIF
Разрешение изображений: от 32 ×32 до
7680 ×4320 пикселей
Максимальное число папок: 64
Максимальное число файлов: 256
Размер файла: не больше 20 Мб
■Структура папок с неподвижными
изображениями (JPEG)
Вы можете воспроизводить с помощью данного
аппарата неподвижные изображения (JPEG),
создав на диске папку со следующей структурой.
Воспроизведение изображений, размещенных
непосредственно в корневой папке, невозможно.
СВЕДЕНИЯ О ФОРМАТЕ ФАЙЛОВ JPEG
01 Folder
001.jpg
002.jpg
003.jpg
004.jpg
005.jpg
006.jpg
007.jpg
02 Folder
64 Folder
254.jpg
255.jpg
256.jpg
Root

50 Ru
ТЕХНИЧЕСКИЕ ПАРАМЕТРЫ
iPod™
“iPod” является товарным знаком компании Apple Inc.,
зарегистрированной в США и других странах.
Надпись “Made for iPod” означает, что данная
электронная принадлежность была разработана для
подключения специально к iPod и сертифицирована
разработчиком в соответствии со стандартами качества
компании Apple.
Компания Apple не несет ответственности за
функционирование данного устройства или его
совместимость со стандартами безопасности и
регулятивными нормами.
Аудиовизуальные материалы могут содержать
защищенные авторским правом произведения, которые
не подлежат записи без разрешения владельца
авторского права. Обратитесь к соответствующим
законам вашей страны.
Данное изделие содержит технологию защиты
авторского права, защищенную патентами США и
другими правами интеллектуальной собственности.
Использование этой технологии защиты авторского
права должно быть разрешено компанией Macrovision, и
предназначено только для целей домашнего и другого
ограниченного просмотра, если иное не разрешено
компанией Macrovision. Обратный инжиниринг или
разборка запрещены.
Изготовлено по лицензии Dolby Laboratories. “Dolby” и
символ двойной буквы D являются товарными знаками
Dolby Laboratories.
Изготовлено по лицензии в соответствии с патентами
США №: 5,451,942; 5,956,674; 5,974,380; 5,978,762;
6,226,616; 6,487,535; 7,392,195; 7,272,567; 7,333,929; 7,212,872 и
другими патентами США и мировыми патентами,
выданными и ожидающими выдачи. DTS является
зарегистрированным товарным знаком, а логотипы
DTS, Символ, DTS-HD и DTS-HD Master Audio |
Essential являются товарными знаками DTS, Inc. ©1996-
2008 DTS, Inc. Все права защищены.
является товарным знаком.
“BD-LIVE” логотип является товарным знаком Blu-ray
Disc Association.
“BONUSVIEW” является товарным знаком Blu-ray Disc
Association.
является товарным знаком DVD Format/Logo
Licensing Corporation.
HDMI, логотип HDMI и High-Definition Multimedia
Interface являются товарными знаками HDMI Licensing
LLC.
“x.v.Color” и логотип “x.v.Color” являются товарными
знаками.
“AVCHD” и логотип “AVCHD” являются товарными
знаками Panasonic Corporation и Sony Corporation.
Java и все товарные знаки и логотипы, основанные на
Java, являются товарными знаками или
зарегистрированными товарными знаками Sun
Microsystems, Inc. в США и/или других странах.
Данное изделие лицензировано в соответствии с
лицензией на пакет патентов AVC и лицензией на пакет
патентов VC-1 для личного и некоммерческого
использования потребителем для (i) декодирования
видеосигнала в соответствии со стандартом AVC и
стандартом VC-1 (“AVC/VC-1 Video”) и/или (ii)
декодирования AVC/VC-1 Video, закодированного
потребителем, принимающим участие в личной и
некоммерческой деятельности и/или полученного от
видеопровайдера, обладающего лицензией на
предоставление AVC/VC-1 Video. Выдача какой-либо
лицензии для любого другого использования или
применения невозможна. Дополнительную информацию
можно получить от компании MPEG LA, LLC.
См. http://www.mpegla.com.
Патенты США № 6,836,549; 6,381,747; 7,050,698;
6,516,132; и 5,583,936

51 Ru
Русский
ДОПОЛНИТЕЛЬНАЯ
ИНФОРМАЦИЯ
■Язык (сокращение), кодовый номер
■Страна, кодовый номер, сокращение
СПИСКИ ЯЗЫКОВ И СТРАН
Список языков
Японский (ja), 1001 Бутанский (dz), 0426 Киргизский (ky), 1125 Сингальский (si), 1909
Английский (en), 0514 Эсперанто (eo), 0515 Латинский (la), 1201 Словацкий (sk), 1911
Французский (fr), 0618 Эстонский (et), 0520 Лингала (ln), 1214 Словенский (sl), 1912
Немецкий (de), 0405 Баскский (eu), 0521 Лаосский (lo), 1215 Самоанский (sm), 1913
Итальянский (it), 0920 Персидский (fa), 0601 Литовский (lt), 1220 Шона (sn), 1914
Испанский (es), 0519 Финский (fi), 0609 Латвийский (lv), 1222 Сомали (so), 1915
Китайский (zh), 2608 Фиджийский (fj), 0610 Малагасийский (mg), 1307 Албанский (sq), 1917
Голландский (nl), 1412 Фарерский (fo), 0615 Маори (mi), 1309 Сербский (sr), 1918
Португальский (pt), 1620 Фризский (fy), 0625 Македонский (mk), 1311 Свази (ss), 1919
Шведский (sv), 1922 Ирландский (ga), 0701 Малаялам (ml), 1312 Сесото (st), 1920
Русский (ru), 1821 Гэльский (gd), 0704 Монгольский (mn), 1314 Сунданский (su), 1921
Корейский (ko), 1115 Галисийский (gl), 0712 Молдавский (mo), 1315 Суахили (sw), 1923
Греческий (el), 0512 Гуарани (gn), 0714 Маратхи (mr), 1318 Тамильский (ta), 2001
Афар (aa), 0101 Гуджарати (gu), 0721 Малайский (ms), 1319 Телугу (te), 2005
Абхазский (ab), 0102 Хауса (ha), 0801 Мальтийский (mt), 1320 Таджикский (tg), 2007
Африкаанс (af), 0106 Хинди (hi), 0809 Бирманский (my), 1325 Таи (th), 2008
Амхарский (am), 0113 Хорватский (hr), 0818 Науру (na), 1401 Тигринья (ti), 2009
Арабский (ar), 0118 Венгерский (hu), 0821 Непальский (ne), 1405 Туркменский (tk), 2011
Ассамский (as), 0119 Армянский (hy), 0825 Норвежский (no), 1415 Тагалог (tl), 2012
Аймара (ay), 0125 Интерлингва (ia), 0901 Окситанский (oc), 1503 Тсвана (tn), 2014
Азербайджанский (az), 0126 Интерлингве (ie), 0905 Оромо (om), 1513 Тонга (to), 2015
Башкирский (ba), 0201 Инупиак (ik), 0911 Ория (or), 1518 Турецкий (tr), 2018
Белорусский (be), 0205 Индонезийский (in), 0914 Панджаби (pa), 1601 Тсонга (ts), 2019
Болгарский (bg), 0207 Исландский (is), 0919 Польский (pl), 1612 Татарский (tt), 2020
Бихари (bh), 0208 Иврит (iw), 0923 Пушту (ps), 1619 Тви (tw), 2023
Бислама (bi), 0209 Идиш (ji), 1009 Кечуа (qu), 1721 Украинский (uk), 2111
Бенгали (bn), 0214 Яванский (jw), 1023 Ретороманский (rm), 1813 Урду (ur), 2118
Тибетский (bo), 0215 Грузинский (ka), 1101 Рунди (rn), 1814 Узбекский (uz), 2126
Бретонский (br), 0218 Казахский (kk), 1111 Румынский (ro), 1815 Вьетнамский (vi), 2209
Каталанский (ca), 0301 Гренландский (kl), 1112 Киньяруанда (rw), 1823 Волапюк (vo), 2215
Корсиканский (co), 0315 Камбоджийский (km), 1113 Санскрит (sa), 1901 Волоф (wo), 2315
Чешский (cs), 0319 Каннада (kn), 1114 Синдхи (sd), 1904 Коса (xh), 2408
Валлийский (cy), 0325 Кашмири (ks), 1119 Санго (sg), 1907 Йоруба (yo), 2515
Датский (da), 0401 Курдский (ku), 1121 Сербскохорватский (sh), 1908 Зулу (zu), 2621
Список стран
Аргентина, 0118, ar Финляндия, 0609, fi Малайзия, 1325, my Сингапур, 1907, sg
Австралия, 0121, au Франция, 0618, fr Мексика, 1324, mx Испания, 0519, es
Австрия, 0120, at Германия, 0405, de Нидерланды, 1412, nl Швеция, 1905, se
Бельгия, 0205, be Гонконг, 0811, hk Новая Зеландия, 1426, nz Швейцария, 0308, ch
Бразилия, 0218, br Индия, 0914, in Норвегия, 1415, no Тайвань, 2023, tw
Канада, 0301, ca Индонезия, 0904, id Пакистан, 1611, pk Таиланд, 2008, th
Чили, 0312, cl Италия, 0920, it Филиппины, 1608, ph
Великобритания, 0702, gb
Китай, 0314, cn Япония, 1016, jp Португалия, 1620, pt США, 2119, us
Дания, 0411, dk Республика Корея, 1118, kr Российская Федерация, 1821,
ru

СПИСКИ ЯЗЫКОВ И СТРАН
52 Ru
Информация для пользователей по сбору и утилизации старой
аппаратуры и использованных батареек
Эти знаки на аппаратуре, упаковках и в сопроводительных документах указывают на то, что
подержанные электрические и электронные приборы и батарейки не должны
выбрасываться вместе с обычным домашним мусором.
Для правильной обработки, хранения и утилизации старой аппаратуры и использованных
батареек пожалуйста сдавайте их в соответствующие сборные пункты, согласно вашему
национальному законодательству и директив 2002/96/EC и 2006/66/EC.
При правильном отделении этих товаров и батареек, вы помогаете сохранять ценные
ресурсы и предотвращать вредное влияние на здоровье людей и окружающую среду,
которое может возникнуть из-за несоответствующего обращения с отходами.
За более подробной информацией о сборе и утилизации старых товаров и батареек
пожалуйста обращайтесь в вашу локальную администрацию, в ваш приёмный пункт или в
магазин где вы приобрели эти товары.
[Информация по утилизации в других странах за пределами Европейского
Союза]
Эти знаки действительны только на территории Европейского Союза. Если вы хотите
избавиться от этих предметов, пожалуйста обратитесь в вашу локальную администрацию
или продавцу и спросите о правильном способе утилизации.
Обратите внимание на знак для батареек (два знака на задней стороне):
Этот знак может использоваться в комбинации со знаком указывающим о содержании
химикалий. В этом случае это удовлетворяет требованиям установленными Директивой по
использованию химикалий.
i
Information about software
This product uses the following software.
For information (copyright, etc) about each software, read the original sentences stated below.
■About linux and busybox
GNU GENERAL PUBLIC LICENSE
Version 2, June 1991
Copyright (C) 1989, 1991 Free Software Foundation, Inc.
51 Franklin St, Fifth Floor, Boston, MA 02110-1301 USA
Everyone is permitted to copy and distribute verbatim copies of this license document,
but changing it is not allowed.
Preamble
The licenses for most software are designed to take away your freedom to share and
change it. By contrast, the GNU General Public License is intended to guarantee your
freedom to share and change free software--to make sure the software is free for all its
users. This General Public License applies to most of the Free Software Foundation’s
software and to any other program whose authors commit to using it. (Some other Free
Software Foundation software is covered by the GNU Library General Public License
instead.) You can apply it to your programs, too.
When we speak of free software, we are referring to freedom, not price. Our General
Public Licenses are designed to make sure that you have the freedom to distribute
copies of free software (and charge for this service if you wish), that you receive source
code or can get it if you want it, that you can change the software or use pieces of it in
new free programs; and that you know you can do these things.
To protect your rights, we need to make restrictions that forbid anyone to deny you
these rights or to ask you to surrender the rights.
These restrictions translate to certain responsibilities for you if you
distribute copies of the software, or if you modify it.
For example, if you distribute copies of such a program, whether gratis or for a fee, you
must give the recipients all the rights that you have. You must make sure that they, too,
receive or can get the source code. And you must show them these terms so they know
their rights.
We protect your rights with two steps: (1) copyright the software, and (2) offer you this
license which gives you legal permission to copy, distribute and/or modify the software.
Also, for each author’s protection and ours, we want to make certain that everyone
understands that there is no warranty for this free software. If the software is modified
by someone else and passed on, we want its recipients to know that what they have is
not the original, so that any problems introduced by others will not reflect on the
original authors’ reputations.
Finally, any free program is threatened constantly by software patents. We wish to
avoid the danger that redistributors of a free program will individually obtain patent
licenses, in effect making the program proprietary. To prevent this, we have made it
clear that any patent must be licensed for everyone’s free use or not licensed at all.
The precise terms and conditions for copying, distribution andmodification follow.
GNU GENERAL PUBLIC LICENSE
TERMS AND CONDITIONS FOR COPYING, DISTRIBUTION AND
MODIFICATION
0. This License applies to any program or other work which contains a notice placed
by the copyright holder saying it may be distributed under the terms of this General
Public License. The “Program”, below, refers to any such program or work, and a
“work based on the Program” means either the Program or any derivative work
under copyright law: that is to say, a work containing the Program or a portion of it,
either verbatim or with modifications and/or translated into another language.
(Hereinafter, translation is included without limitation in the term “modification”.)
Each licensee is addressed as “you”.
Activities other than copying, distribution and modification are not covered by this
License; they are outside its scope. The act of running the Program is not restricted,
and the output from the Program is covered only if its contents constitute a work
based on the Program (independent of having been made by running the Program).
Whether that is true depends on what the Program does.
1. You may copy and distribute verbatim copies of the Program’s source code as you
receive it, in any medium, provided that you conspicuously and appropriately
publish on each copy an appropriate copyright notice and disclaimer of warranty;
keep intact all the notices that refer to this License and to the absence of any
warranty; and give any other recipients of the Program a copy of this License along
with the Program.
You may charge a fee for the physical act of transferring a copy, and you may at
your option offer warranty protection in exchange for a fee.
2. You may modify your copy or copies of the Program or any portion of it, thus
forming a work based on the Program, and copy and distribute such modifications
or work under the terms of Section 1 above, provided that you also meet all of these
conditions:
a) You must cause the modified files to carry prominent notices stating that you
changed the files and the date of any change.
b) You must cause any work that you distribute or publish, that in whole or in part
contains or is derived from the Program or any part thereof, to be licensed as a
whole at no charge to all third parties under the terms of this License.
c) If the modified program normally reads commands interactively when run, you
must cause it, when started running for such interactive use in the most
ordinary way, to print or display an announcement including an appropriate
copyright notice and a notice that there is no warranty (or else, saying that you
provide a warranty) and that users may redistribute the program under these
conditions, and telling the user how to view a copy of this License. (Exception:
if the Program itself is interactive but does not normally print such an
announcement, your work based on the Program is not required to print an
announcement.)
These requirements apply to the modified work as a whole. If identifiable sections of
that work are not derived from the Program, and can be reasonably considered
independent and separate works in themselves, then this License, and its terms, do not
apply to those sections when you distribute them as separate works. But when you
distribute the same sections as part of a whole which is a work based on the Program,
the distribution of the whole must be on the terms of this License, whose permissions
for other licensees extend to the entire whole, and thus to each and every part regardless
of who wrote it.
Thus, it is not the intent of this section to claim rights or contest your rights to work
written entirely by you; rather, the intent is to exercise the right to control the
distribution of derivative or collective works based on the Program.
In addition, mere aggregation of another work not based on the Program with the
Program (or with a work based on the Program) on a volume of a storage or distribution
medium does not bring the other work under the scope of this License.
3. You may copy and distribute the Program (or a work based on it, under Section 2)
in object code or executable form under the terms of Sections 1 and 2 above
provided that you also do one of the following:
a) Accompany it with the complete corresponding machine-readable source code,
which must be distributed under the terms of Sections 1 and 2 above on a
medium customarily used for software interchange; or,
b) Accompany it with a written offer, valid for at least three years, to give any
third party, for a charge no more than your cost of physically performing source
distribution, a complete machine-readable copy of the corresponding source
code, to be distributed under the terms of Sections 1 and 2 above on a medium
customarily used for software interchange; or,
c) Accompany it with the information you received as to the offer to distribute
corresponding source code. (This alternative is allowed only for
noncommercial distribution and only if you received the program in object
code or executable form with such an offer, in accord with Subsection b
above.)
The source code for a work means the preferred form of the work for making
modifications to it. For an executable work, complete source code means all the source
code for all modules it contains, plus any associated interface definition files, plus the
scripts used to control compilation and installation of the executable. However, as a
special exception, the source code distributed need not include anything that is
normally distributed (in either source or binary form) with the major components
(compiler, kernel, and so on) of the operating system on which the executable runs,
unless that component itself accompanies the executable.
If distribution of executable or object code is made by offering access to copy from a
designated place, then offering equivalent access to copy the source code from the same
place counts as distribution of the source code, even though third parties are not
compelled to copy the source along with the object code.
4. You may not copy, modify, sublicense, or distribute the Program except as
expressly provided under this License. Any attempt otherwise to copy, modify,
sublicense or distribute the Program is void, and will automatically terminate your
rights under this License. However, parties who have received copies, or rights,
from you under this License will not have their licenses terminated so long as such
parties remain in full compliance.
5. You are not required to accept this License, since you have not signed it. However,
nothing else grants you permission to modify or distribute the Program or its
derivative works. These actions are prohibited by law if you do not accept this
License. Therefore, by modifying or distributing the Program (or any work based
on the Program), you indicate your acceptance of this License to do so, and all its
terms and conditions for copying, distributing or modifying the Program or works
based on it.
6. Each time you redistribute the Program (or any work based on the Program), the
recipient automatically receives a license from the original licensor to copy,
distribute or modify the Program subject to these terms and conditions. You may
not impose any further restrictions on the recipients’ exercise of the rights granted
herein. You are not responsible for enforcing compliance by third parties to this
License.
7. If, as a consequence of a court judgment or allegation of patent infringement or for
any other reason (not limited to patent issues), conditions are imposed on you
(whether by court order, agreement or otherwise) that contradict the conditions of
this License, they do not excuse you from the conditions of this License. If you
cannot distribute so as to satisfy simultaneously your obligations under this License
and any other pertinent obligations, then as a consequence you may not distribute
the Program at all. For example, if a patent license would not permit royalty-free
redistribution of the Program by all those who receive copies directly or indirectly
through you, then the only way you could satisfy both it and this License would be
to refrain entirely from distribution of the Program.
If any portion of this section is held invalid or unenforceable under any particular
circumstance, the balance of the section is intended to apply and the section as a whole
is intended to apply in other circumstances.
ii
It is not the purpose of this section to induce you to infringe any patents or other
property right claims or to contest validity of any such claims; this section has the sole
purpose of protecting the integrity of the free software distribution system, which is
implemented by public license practices. Many people have made generous
contributions to the wide range of software distributed through that system in reliance
on consistent application of that system; it is up to the author/donor to decide if he or
she is willing to distribute software through any other system and a licensee cannot
impose that choice.
This section is intended to make thoroughly clear what is believed to be a consequence
of the rest of this License.
8. If the distribution and/or use of the Program is restricted in certain countries either
by patents or by copyrighted interfaces, the original copyright holder who places
the Program under this License may add an explicit geographical distribution
limitation excluding those countries, so that distribution is permitted only in or
among countries not thus excluded. In such case, this License incorporates the
limitation as if written in the body of this License.
9. The Free Software Foundation may publish revised and/or new versions of the
General Public License from time to time. Such new versions will be similar in
spirit to the present version, but may differ in detail to address new problems or
concerns.
Each version is given a distinguishing version number. If the Program specifies a
version number of this License which applies to it and “any later version”, you have the
option of following the terms and conditions either of that version or of any later
version published by the Free Software Foundation. If the Program does not specify a
version number of this License, you may choose any version ever published by the Free
Software Foundation.
10. If you wish to incorporate parts of the Program into other free programs whose
distribution conditions are different, write to the author to ask for permission. For
software which is copyrighted by the Free Software Foundation, write to the Free
Software Foundation; we sometimes make exceptions for this. Our decision will be
guided by the two goals of preserving the free status of all derivatives of our free
software and of promoting the sharing and reuse of software generally.
NO WARRANTY
11. BECAUSE THE PROGRAM IS LICENSED FREE OF CHARGE, THERE IS NO
WARRANTY FOR THE PROGRAM, TO THE EXTENT PERMITTED BY
APPLICABLE LAW. EXCEPT WHEN OTHERWISE STATED IN WRITING
THE COPYRIGHT HOLDERS AND/OR OTHER PARTIES PROVIDE THE
PROGRAM “AS IS” WITHOUT WARRANTY OF ANY KIND, EITHER
EXPRESSED OR IMPLIED, INCLUDING, BUT NOT LIMITED TO, THE
IMPLIED WARRANTIES OF MERCHANTABILITY AND FITNESS FOR A
PARTICULAR PURPOSE. THE ENTIRE RISK AS TO THE QUALITY AND
PERFORMANCE OF THE PROGRAM IS WITH YOU. SHOULD THE
PROGRAM PROVE DEFECTIVE, YOU ASSUME THE COST OF ALL
NECESSARY SERVICING, REPAIR OR CORRECTION.
12. IN NO EVENT UNLESS REQUIRED BY APPLICABLE LAW OR AGREED
TO IN WRITING WILL ANY COPYRIGHT HOLDER, OR ANY OTHER
PARTY WHO MAY MODIFY AND/OR REDISTRIBUTE THE PROGRAM AS
PERMITTED ABOVE, BE LIABLE TO YOU FOR DAMAGES, INCLUDING
ANY GENERAL, SPECIAL, INCIDENTAL OR CONSEQUENTIAL
DAMAGES ARISING OUT OF THE USE OR INABILITY TO USE THE
PROGRAM (INCLUDING BUT NOT LIMITED TO LOSS OF DATA OR DATA
BEING RENDERED INACCURATE OR LOSSES SUSTAINED BY YOU OR
THIRD PARTIES OR A FAILURE OF THE PROGRAM TO OPERATE WITH
ANY OTHER PROGRAMS), EVEN IF SUCH HOLDER OR OTHER PARTY
HAS BEEN ADVISED OF THE POSSIBILITY OF SUCH DAMAGES.
END OF TERMS AND CONDITIONS
How to Apply These Terms to Your New Programs
If you develop a new program, and you want it to be of the greatest possible use to the
public, the best way to achieve this is to make it free software which everyone can
redistribute and change under these terms.
To do so, attach the following notices to the program. It is safest to attach them to the
start of each source file to most effectively convey the exclusion of warranty; and each
file should have at least the “copyright” line and a pointer to where the full notice is
found.
<one line to give the program’s name and a brief idea of what it does.>
Copyright (C) <year> <name of author>
This program is free software; you can redistribute it and/or modify it under the
terms of the GNU General Public License as published by the Free Software
Foundation; either version 2 of the License, or (at your option) any later version.
This program is distributed in the hope that it will be useful, but WITHOUT ANY
WARRANTY; without even the implied warranty of MERCHANTABILITY or
FITNESS FOR A PARTICULAR PURPOSE. See the GNU General Public
License for more details.
You should have received a copy of the GNU General Public License along with
this program; if not, write to the Free Software Foundation, Inc., 51 Franklin St,
Fifth Floor, Boston, MA 02110-1301 USA
Also add information on how to contact you by electronic and paper mail.
If the program is interactive, make it output a short notice like this when it starts in an
interactive mode:
Gnomovision version 69, Copyright (C) year name of author Gnomovision comes
with ABSOLUTELY NO WARRANTY; for details type ‘show w’.
This is free software, and you are welcome to redistribute it under certain
conditions; type ‘show c’ for details.
The hypothetical commands ‘show w’ and ‘show c’ should show the appropriate parts
of the General Public License. Of course, the commands you use may be called
something other than ‘show w’ and ‘show c’; they could even be mouse-clicks or menu
items--whatever suits your program.
You should also get your employer (if you work as a programmer) or your school, if
any, to sign a “copyright disclaimer” for the program, if necessary. Here is a sample;
alter the names:
Yoyodyne, Inc., hereby disclaims all copyright interest in the program
‘Gnomovision’ (which makes passes at compilers) written by James Hacker.
<signature of Ty Coon>, 1 April 1989
Ty Coon, President of Vice
This General Public License does not permit incorporating your program into
proprietary programs. If your program is a subroutine library, you may consider it more
useful to permit linking proprietary applications with the library. If this is what you
want to do, use the GNU Library General Public License instead of this License.
■About uClibc
GNU LIBRARY GENERAL PUBLIC LICENSE
Version 2, June 1991
Copyright (C) 1991 Free Software Foundation, Inc.
675 Mass Ave, Cambridge, MA 02139, USA
Everyone is permitted to copy and distribute verbatim copies of this license document,
but changing it is not allowed.
[This is the first released version of the library GPL. It is numbered 2 because it goes
with version 2 of the ordinary GPL.]
Preamble
The licenses for most software are designed to take away your freedom to share and
change it. By contrast, the GNU General Public Licenses are intended to guarantee
your freedom to share and change free software--to make sure the software is free for
all its users.
This license, the Library General Public License, applies to some specially designated
Free Software Foundation software, and to any other libraries whose authors decide to
use it. You can use it for your libraries, too.
When we speak of free software, we are referring to freedom, not price. Our General
Public Licenses are designed to make sure that you have the freedom to distribute
copies of free software (and charge for this service if you wish), that you receive source
code or can get it if you want it, that you can change the software or use pieces of it in
new free programs; and that you know you can do these things.
To protect your rights, we need to make restrictions that forbid anyone to deny you
these rights or to ask you to surrender the rights. These restrictions translate to certain
responsibilities for you if you distribute copies of the library, or if you modify it.
For example, if you distribute copies of the library, whether gratis or for a fee, you must
give the recipients all the rights that we gave you. You must make sure that they, too,
receive or can get the source code. If you link a program with the library, you must
provide complete object files to the recipients so that they can relink them with the
library, after making changes to the library and recompiling it. And you must show
them these terms so they know their rights.
Our method of protecting your rights has two steps: (1) copyright the library, and (2)
offer you this license which gives you legal permission to copy, distribute and/or
modify the library.
Also, for each distributor’s protection, we want to make certain that everyone
understands that there is no warranty for this free library. If the library is modified by
someone else and passed on, we want its recipients to know that what they have is not
the original version, so that any problems introduced by others will not reflect on the
original authors’ reputations.
Finally, any free program is threatened constantly by software patents. We wish to
avoid the danger that companies distributing free software will individually obtain
patent licenses, thus in effect transforming the program into proprietary software. To
prevent this, we have made it clear that any patent must be licensed for everyone’s free
use or not licensed at all.
Most GNU software, including some libraries, is covered by the ordinary GNU General
Public License, which was designed for utility programs. This license, the GNU
Library General Public License, applies to certain designated libraries. This license is
quite different from the ordinary one; be sure to read it in full, and don’t assume that
anything in it is the same as in the ordinary license.
The reason we have a separate public license for some libraries is that they blur the
distinction we usually make between modifying or adding to a program and simply
using it. Linking a program with a library, without changing the library, is in some
sense simply using the library, and is analogous to running a utility program or
application program. However, in a textual and legal sense, the linked executable is a
combined work, a derivative of the original library, and the ordinary General Public
License treats it as such.
Because of this blurred distinction, using the ordinary General Public License for
libraries did not effectively promote software sharing, because most developers did not
use the libraries. We concluded that weaker conditions might promote sharing better.
However, unrestricted linking of non-free programs would deprive the users of those
programs of all benefit from the free status of the libraries themselves. This Library
General Public License is intended to permit developers of non-free programs to use
free libraries, while preserving your freedom as a user of such programs to change the
free libraries that are incorporated in them. (We have not seen how to achieve this as
regards changes in header files, but we have achieved it as regards changes in the actual
functions of the Library.) The hope is that this will lead to faster development of free
libraries.
The precise terms and conditions for copying, distribution and modification follow.
Pay close attention to the difference between a “work based on the library” and a “work
that uses the library”. The former contains code derived from the library, while the
latter only works together with the library.
iii
Note that it is possible for a library to be covered by the ordinary General Public
License rather than by this special one.
GNU LIBRARY GENERAL PUBLIC LICENSE
TERMS AND CONDITIONS FOR COPYING, DISTRIBUTION AND
MODIFICATION
0. This License Agreement applies to any software library which contains a notice
placed by the copyright holder or other authorized party saying it may be
distributed under the terms of this Library General Public License (also called “this
License”). Each licensee is addressed as “you”.
A “library” means a collection of software functions and/or data prepared so as to
be conveniently linked with application programs (which use some of those
functions and data) to form executables.
The “Library”, below, refers to any such software library or work which has been
distributed under these terms. A “work based on the Library” means either the
Library or any derivative work under copyright law: that is to say, a work
containing the Library or a portion of it, either verbatim or with modifications and/
or translated straightforwardly into another language. (Hereinafter, translation is
included without limitation in the term “modification”.)
“Source code” for a work means the preferred form of the work for making
modifications to it. For a library, complete source code means all the source code
for all modules it contains, plus any associated interface definition files, plus the
scripts used to control compilation and installation of the library.
Activities other than copying, distribution and modification are not covered by this
License; they are outside its scope. The act of running a program using the Library
is not restricted, and output from such a program is covered only if its contents
constitute a work based on the Library (independent of the use of the Library in a
tool for writing it). Whether that is true depends on what the Library does and what
the program that uses the Library does.
1. You may copy and distribute verbatim copies of the Library’s complete source
code as you receive it, in any medium, provided that you conspicuously and
appropriately publish on each copy an appropriate copyright notice and disclaimer
of warranty; keep intact all the notices that refer to this License and to the absence
of any warranty; and distribute a copy of this License along with the Library.
You may charge a fee for the physical act of transferring a copy, and you may at
your option offer warranty protection in exchange for a fee.
2. You may modify your copy or copies of the Library or any portion of it, thus
forming a work based on the Library, and copy and distribute such modifications or
work under the terms of Section 1 above, provided that you also meet all of these
conditions:
a) The modified work must itself be a software library.
b) You must cause the files modified to carry prominent notices stating that you
changed the files and the date of any change.
c) You must cause the whole of the work to be licensed at no charge to all third
parties under the terms of this License.
d) If a facility in the modified Library refers to a function or a table of data to be
supplied by an application program that uses the facility, other than as an
argument passed when the facility is invoked, then you must make a good faith
effort to ensure that, in the event an application does not supply such function
or table, the facility still operates, and performs whatever part of its purpose
remains meaningful.
(For example, a function in a library to compute square roots has a purpose that
is entirely well-defined independent of the application. Therefore, Subsection
2d requires that any application-supplied function or table used by this function
must be optional: if the application does not supply it, the square root function
must still compute square roots.)
These requirements apply to the modified work as a whole. If identifiable sections of
that work are not derived from the Library, and can be reasonably considered
independent and separate works in themselves, then this License, and its terms, do not
apply to those sections when you distribute them as separate works. But when you
distribute the same sections as part of a whole which is a work based on the Library, the
distribution of the whole must be on the terms of this License, whose permissions for
other licensees extend to the entire whole, and thus to each and every part regardless of
who wrote it.
Thus, it is not the intent of this section to claim rights or contest your rights to work
written entirely by you; rather, the intent is to exercise the right to control the
distribution of derivative or collective works based on the Library.
In addition, mere aggregation of another work not based on the Library with the Library
(or with a work based on the Library) on a volume of a storage or distribution medium
does not bring the other work under the scope of this License.
3. You may opt to apply the terms of the ordinary GNU General Public License
instead of this License to a given copy of the Library. To do this, you must alter all
the notices that refer to this License, so that they refer to the ordinary GNU General
Public License, version 2, instead of to this License. (If a newer version than
version 2 of the ordinary GNU General Public License has appeared, then you can
specify that version instead if you wish.) Do not make any other change in these
notices.
Once this change is made in a given copy, it is irreversible for that copy, so the ordinary
GNU General Public License applies to all subsequent copies and derivative works
made from that copy.
This option is useful when you wish to copy part of the code of the Library into a
program that is not a library.
4. You may copy and distribute the Library (or a portion or derivative of it, under
Section 2) in object code or executable form under the terms of Sections 1 and 2
above provided that you accompany it with the complete corresponding machine-
readable source code, which must be distributed under the terms of Sections 1 and 2
above on a medium customarily used for software interchange.
If distribution of object code is made by offering access to copy from a designated
place, then offering equivalent access to copy the source code from the same place
satisfies the requirement to distribute the source code, even though third parties are not
compelled to copy the source along with the object code.
5. A program that contains no derivative of any portion of the Library, but is designed
to work with the Library by being compiled or linked with it, is called a “work that
uses the Library”. Such a work, in isolation, is not a derivative work of the Library,
and therefore falls outside the scope of this License.
However, linking a “work that uses the Library” with the Library creates an executable
that is a derivative of the Library (because it contains portions of the Library), rather
than a “work that uses the library”. The executable is therefore covered by this License.
Section 6 states terms for distribution of such executables.
When a “work that uses the Library” uses material from a header file that is part of the
Library, the object code for the work may be a derivative work of the Library even
though the source code is not. Whether this is true is especially significant if the work
can be linked without the Library, or if the work is itself a library. The threshold for
this to be true is not precisely defined by law.
If such an object file uses only numerical parameters, data structure layouts and
accessors, and small macros and small inline functions (ten lines or less in length), then
the use of the object file is unrestricted, regardless of whether it is legally a derivative
work. (Executables containing this object code plus portions of the Library will still
fall under Section 6.)
Otherwise, if the work is a derivative of the Library, you may distribute the object code
for the work under the terms of Section 6. Any executables containing that work also
fall under Section 6, whether or not they are linked directly with the Library itself.
6. As an exception to the Sections above, you may also compile or link a “work that
uses the Library” with the Library to produce a work containing portions of the
Library, and distribute that work under terms of your choice, provided that the
terms permit modification of the work for the customer’s own use and reverse
engineering for debugging such modifications.
You must give prominent notice with each copy of the work that the Library is used in
it and that the Library and its use are covered by this License. You must supply a copy
of this License. If the work during execution displays copyright notices, you must
include the copyright notice for the Library among them, as well as a reference
directing the user to the copy of this License. Also, you must do one of these things:
a) Accompany the work with the complete corresponding machine-readable
source code for the Library including whatever changes were used in the work
(which must be distributed under Sections 1 and 2 above); and, if the work is an
executable linked with the Library, with the complete machine-readable “work
that uses the Library”, as object code and/or source code, so that the user can
modify the Library and then relink to produce a modified executable containing
the modified Library. (It is understood that the user who changes the contents
of definitions files in the Library will not necessarily be able to recompile the
application to use the modified definitions.)
b) Accompany the work with a written offer, valid for at least three years, to give
the same user the materials specified in Subsection 6a, above, for a charge no
more than the cost of performing this distribution.
c) If distribution of the work is made by offering access to copy from a designated
place, offer equivalent access to copy the above specified materials from the
same place.
d) Verify that the user has already received a copy of these materials or that you
have already sent this user a copy.
For an executable, the required form of the “work that uses the Library” must include
any data and utility programs needed for reproducing the executable from it. However,
as a special exception, the source code distributed need not include anything that is
normally distributed (in either source or binary form) with the major components
(compiler, kernel, and so on) of the operating system on which the executable runs,
unless that component itself accompanies the executable.
It may happen that this requirement contradicts the license restrictions of other
proprietary libraries that do not normally accompany the operating system. Such a
contradiction means you cannot use both them and the Library together in an executable
that you distribute.
7. You may place library facilities that are a work based on the Library side-by-side in
a single library together with other library facilities not covered by this License,
and distribute such a combined library, provided that the separate distribution of the
work based on the Library and of the other library facilities is otherwise permitted,
and provided that you do these two things:
a) Accompany the combined library with a copy of the same work based on the
Library, uncombined with any other library facilities. This must be distributed
under the terms of the Sections above.
b) Give prominent notice with the combined library of the fact that part of it is a
work based on the Library, and explaining where to find the accompanying
uncombined form of the same work.
8. You may not copy, modify, sublicense, link with, or distribute the Library except as
expressly provided under this License. Any attempt otherwise to copy, modify,
sublicense, link with, or distribute the Library is void, and will automatically
terminate your rights under this License. However, parties who have received
copies, or rights, from you under this License will not have their licenses
terminated so long as such parties remain in full compliance.
9. You are not required to accept this License, since you have not signed it. However,
nothing else grants you permission to modify or distribute the Library or its
derivative works. These actions are prohibited by law if you do not accept this
License. Therefore, by modifying or distributing the Library (or any work based on
the Library), you indicate your acceptance of this License to do so, and all its terms
and conditions for copying, distributing or modifying the Library or works based
on it.
iv
10. Each time you redistribute the Library (or any work based on the Library), the
recipient automatically receives a license from the original licensor to copy,
distribute, link with or modify the Library subject to these terms and conditions.
You may not impose any further restrictions on the recipients’ exercise of the rights
granted herein. You are not responsible for enforcing compliance by third parties to
this License.
11. If, as a consequence of a court judgment or allegation of patent infringement or for
any other reason (not limited to patent issues), conditions are imposed on you
(whether by court order, agreement or otherwise) that contradict the conditions of
this License, they do not excuse you from the conditions of this License. If you
cannot distribute so as to satisfy simultaneously your obligations under this License
and any other pertinent obligations, then as a consequence you may not distribute
the Library at all. For example, if a patent license would not permit royalty-free
redistribution of the Library by all those who receive copies directly or indirectly
through you, then the only way you could satisfy both it and this License would be
to refrain entirely from distribution of the Library.
If any portion of this section is held invalid or unenforceable under any particular
circumstance, the balance of the section is intended to apply, and the section as a whole
is intended to apply in other circumstances.
It is not the purpose of this section to induce you to infringe any patents or other
property right claims or to contest validity of any such claims; this section has the sole
purpose of protecting the integrity of the free software distribution system which is
implemented by public license practices. Many people have made generous
contributions to the wide range of software distributed through that system in reliance
on consistent application of that system; it is up to the author/donor to decide if he or
she is willing to distribute software through any other system and a licensee cannot
impose that choice.
This section is intended to make thoroughly clear what is believed to be a consequence
of the rest of this License.
12. If the distribution and/or use of the Library is restricted incertain countries either by
patents or by copyrighted interfaces, the original copyright holder who places the
Library under this License may add an explicit geographical distribution limitation
excluding those countries, so that distribution is permitted only in or among
countries not thus excluded. In such case, this License incorporates the limitation
as if written in the body of this License.
13. The Free Software Foundation may publish revised and/or new versions of the
Library General Public License from time to time. Such new versions will be
similar in spirit to the present version, but may differ in detail to address new
problems or concerns.
Each version is given a distinguishing version number. If the Library specifies a
version number of this License which applies to it and “any later version”, you have the
option of following the terms and conditions either of that version or of any later
version published by the Free Software Foundation. If the Library does not specify a
license version number, you may choose any version ever published by the Free
Software Foundation.
14. If you wish to incorporate parts of the Library into other free programs whose
distribution conditions are incompatible with these, write to the author to ask for
permission. For software which is copyrighted by the Free Software Foundation,
write to the Free Software Foundation; we sometimes make exceptions for this.
Our decision will be guided by the two goals of preserving the free status of all
derivatives of our free software and of promoting the sharing and reuse of software
generally.
NO WARRANTY
15. BECAUSE THE LIBRARY IS LICENSED FREE OF CHARGE, THERE IS NO
WARRANTY FOR THE LIBRARY, TO THE EXTENT PERMITTED BY
APPLICABLE LAW. EXCEPT WHEN OTHERWISE STATED IN WRITING
THE COPYRIGHT HOLDERS AND/OR OTHER PARTIES PROVIDE THE
LIBRARY “AS IS” WITHOUT WARRANTY OF ANY KIND, EITHER
EXPRESSED OR IMPLIED, INCLUDING, BUT NOT LIMITED TO, THE
IMPLIED WARRANTIES OF MERCHANTABILITY AND FITNESS FOR A
PARTICULAR PURPOSE. THE ENTIRE RISK AS TO THE QUALITY AND
PERFORMANCE OF THE LIBRARY IS WITH YOU. SHOULD THE
LIBRARY PROVE DEFECTIVE, YOU ASSUME THE COST OF ALL
NECESSARY SERVICING, REPAIR OR CORRECTION.
16. IN NO EVENT UNLESS REQUIRED BY APPLICABLE LAW OR AGREED
TO IN WRITING WILL ANY COPYRIGHT HOLDER, OR ANY OTHER
PARTY WHO MAY MODIFY AND/OR REDISTRIBUTE THE LIBRARY AS
PERMITTED ABOVE, BE LIABLE TO YOU FOR DAMAGES, INCLUDING
ANY GENERAL, SPECIAL, INCIDENTAL OR CONSEQUENTIAL
DAMAGES ARISING OUT OF THE USE OR INABILITY TO USE THE
LIBRARY (INCLUDING BUT NOT LIMITED TO LOSS OF DATA OR DATA
BEING RENDERED INACCURATE OR LOSSES SUSTAINED BY YOU OR
THIRD PARTIES OR A FAILURE OF THE LIBRARY TO OPERATE WITH
ANY OTHER SOFTWARE), EVEN IF SUCH HOLDER OR OTHER PARTY
HAS BEEN ADVISED OF THE POSSIBILITY OF SUCH DAMAGES.
END OF TERMS AND CONDITIONS
Appendix: How to Apply These Terms to Your New Libraries
If you develop a new library, and you want it to be of the greatest possible use to the
public, we recommend making it free software that everyone can redistribute and
change. You can do so by permitting redistribution under these terms (or, alternatively,
under the terms of the ordinary General Public License).
To apply these terms, attach the following notices to the library. It is safest to attach
them to the start of each source file to most effectively convey the exclusion of
warranty; and each file should have at least the “copyright” line and a pointer to where
the full notice is found.
<one line to give the library’s name and a brief idea of what it does.>
Copyright (C) <year> <name of author>
This library is free software; you can redistribute it and/or modify it under the terms
of the GNU Library General Public License as published by the Free Software
Foundation; either version 2 of the License, or (at your option) any later version.
This library is distributed in the hope that it will be useful, but WITHOUT ANY
WARRANTY; without even the implied warranty of MERCHANTABILITY or
FITNESS FOR A PARTICULAR PURPOSE. See the GNU Library General
Public License for more details.
You should have received a copy of the GNU Library General Public License along
with this library; if not, write to the Free Software Foundation, Inc., 675 Mass Ave,
Cambridge, MA 02139, USA.
Also add information on how to contact you by electronic and paper mail.
You should also get your employer (if you work as a programmer) or your school, if
any, to sign a “copyright disclaimer” for the library, if necessary. Here is a sample;
alter the names:
Yoyodyne, Inc., hereby disclaims all copyright interest in the library ‘Frob’ (a library
for tweaking knobs) written by James Random Hacker.
<signature of Ty Coon>, 1 April 1990
Ty Coon, President of Vice
That’s all there is to it!
■About DirectFB
GNU LESSER GENERAL PUBLIC LICENSE
Version 2.1, February 1999
Copyright (C) 1991, 1999 Free Software Foundation, Inc.
59 Temple Place, Suite 330, Boston, MA 02111-1307 USA
Everyone is permitted to copy and distribute verbatim copies of this license document,
but changing it is not allowed.
[This is the first released version of the Lesser GPL. It also counts as the successor of
the GNU Library Public License, version 2, hence the version number 2.1.]
Preamble
The licenses for most software are designed to take away your freedom to share and
change it. By contrast, the GNU General Public Licenses are intended to guarantee
your freedom to share and change free software--to make sure the software is free for
all its users.
This license, the Lesser General Public License, applies to some specially designated
software packages--typically libraries--of the Free Software Foundation and other
authors who decide to use it. You can use it too, but we suggest you first think carefully
about whether this license or the ordinary General Public License is the better strategy
to use in any particular case, based on the explanations below.
When we speak of free software, we are referring to freedom of use, not price. Our
General Public Licenses are designed to make sure that you have the freedom to
distribute copies of free software (and charge for this service if you wish); that you
receive source code or can get it if you want it; that you can change the software and
use pieces of it in new free programs; and that you are informed that you can do these
things.
To protect your rights, we need to make restrictions that forbid distributors to deny you
these rights or to ask you to surrender these rights. These restrictions translate to
certain responsibilities for you if you distribute copies of the library or if you modify it.
For example, if you distribute copies of the library, whether gratis or for a fee, you must
give the recipients all the rights that we gave you. You must make sure that they, too,
receive or can get the source code. If you link other code with the library, you must
provide complete object files to the recipients, so that they can relink them with the
library after making changes to the library and recompiling it. And you must show
them these terms so they know their rights.
We protect your rights with a two-step method: (1) we copyright the library, and (2) we
offer you this license, which gives you legal permission to copy, distribute and/or
modify the library.
To protect each distributor, we want to make it very clear that there is no warranty for
the free library. Also, if the library is modified by someone else and passed on, the
recipients should know that what they have is not the original version, so that the
original author’s reputation will not be affected by problems that might be introduced
by others.
Finally, software patents pose a constant threat to the existence of any free program.
We wish to make sure that a company cannot effectively restrict the users of a free
program by obtaining a restrictive license from a patent holder. Therefore, we insist
that any patent license obtained for a version of the library must be consistent with the
full freedom of use specified in this license.
Most GNU software, including some libraries, is covered by the ordinary GNU General
Public License. This license, the GNU Lesser General Public License, applies to
certain designated libraries, and is quite different from the ordinary General Public
License. We use this license for certain libraries in order to permit linking those
libraries into non-free programs.
When a program is linked with a library, whether statically or using a shared library, the
combination of the two is legally speaking a combined work, a derivative of the original
library. The ordinary General Public License therefore permits such linking only if the
entire combination fits its criteria of freedom. The Lesser General Public License
permits more lax criteria for linking other code with the library.
We call this license the “Lesser” General Public License because it does Less to protect
the user’s freedom than the ordinary General Public License. It also provides other free
software developers Less of an advantage over competing non-free programs. These
disadvantages are the reason we use the ordinary General Public License for many
libraries. However, the Lesser license provides advantages in certain special
circumstances.
v
For example, on rare occasions, there may be a special need to encourage the widest
possible use of a certain library, so that it becomes a de-facto standard. To achieve this,
non-free programs must be allowed to use the library. A more frequent case is that a
free library does the same job as widely used non-free libraries. In this case, there is
little to gain by limiting the free library to free software only, so we use the Lesser
General Public License.
In other cases, permission to use a particular library in non-free programs enables a
greater number of people to use a large body of free software. For example, permission
to use the GNU C Library in non-free programs enables many more people to use the
whole GNU operating system, as well as its variant, the GNU/Linux operating system.
Although the Lesser General Public License is Less protective of the users’ freedom, it
does ensure that the user of a program that is linked with the Library has the freedom
and the wherewithal to run that program using a modified version of the Library.
The precise terms and conditions for copying, distribution and modification follow.
Pay close attention to the difference between a “work based on the library” and a “work
that uses the library”. The former contains code derived from the library, whereas the
latter must be combined with the library in order to run.
GNU LESSER GENERAL PUBLIC LICENSE
TERMS AND CONDITIONS FOR COPYING, DISTRIBUTION AND
MODIFICATION
0. This License Agreement applies to any software library or other program which
contains a notice placed by the copyright holder or other authorized party saying it
may be distributed under the terms of this Lesser General Public License (also
called “this License”). Each licensee is addressed as “you”.
A “library” means a collection of software functions and/or data prepared so as to
be conveniently linked with application programs (which use some of those
functions and data) to form executables.
The “Library”, below, refers to any such software library or work which has been
distributed under these terms. A “work based on the Library” means either the
Library or any derivative work under copyright law: that is to say, a work
containing the Library or a portion of it, either verbatim or with modifications and/
or translated straightforwardly into another language. (Hereinafter, translation is
included without limitation in the term “modification”.)
“Source code” for a work means the preferred form of the work for making
modifications to it. For a library, complete source code means all the source code
for all modules it contains, plus any associated interface definition files, plus the
scripts used to control compilation and installation of the library.
Activities other than copying, distribution and modification are not covered by this
License; they are outside its scope. The act of running a program using the Library
is not restricted, and output from such a program is covered only if its contents
constitute a work based on the Library (independent of the use of the Library in a
tool for writing it). Whether that is true depends on what the Library does and what
the program that uses the Library does.
1. You may copy and distribute verbatim copies of the Library’s complete source
code as you receive it, in any medium, provided that you conspicuously and
appropriately publish on each copy an appropriate copyright notice and disclaimer
of warranty; keep intact all the notices that refer to this License and to the absence
of any warranty; and distribute a copy of this License along with the Library.
You may charge a fee for the physical act of transferring a copy, and you may at
your option offer warranty protection in exchange for a fee.
2. You may modify your copy or copies of the Library or any portion of it, thus
forming a work based on the Library, and copy and distribute such modifications or
work under the terms of Section 1 above, provided that you also meet all of these
conditions:
a) The modified work must itself be a software library.
b) You must cause the files modified to carry prominent notices stating that you
changed the files and the date of any change.
c) You must cause the whole of the work to be licensed at no charge to all third
parties under the terms of this License.
d) If a facility in the modified Library refers to a function or a table of data to be
supplied by an application program that uses the facility, other than as an
argument passed when the facility is invoked, then you must make a good faith
effort to ensure that, in the event an application does not supply such function
or table, the facility still operates, and performs whatever part of its purpose
remains meaningful.
(For example, a function in a library to compute square roots has a purpose that
is entirely well-defined independent of the application. Therefore, Subsection
2d requires that any application-supplied function or table used by this function
must be optional: if the application does not supply it, the square root function
must still compute square roots.)
These requirements apply to the modified work as a whole. If identifiable sections of
that work are not derived from the Library, and can be reasonably considered
independent and separate works in themselves, then this License, and its terms, do not
apply to those sections when you distribute them as separate works. But when you
distribute the same sections as part of a whole which is a work based on the Library, the
distribution of the whole must be on the terms of this License, whose permissions for
other licensees extend to the entire whole, and thus to each and every part regardless of
who wrote it.
Thus, it is not the intent of this section to claim rights or contest your rights to work
written entirely by you; rather, the intent is to exercise the right to control the
distribution of derivative or collective works based on the Library.
In addition, mere aggregation of another work not based on the Library with the Library
(or with a work based on the Library) on a volume of a storage or distribution medium
does not bring the other work under the scope of this License.
3. You may opt to apply the terms of the ordinary GNU General Public License
instead of this License to a given copy of the Library. To do this, you must alter all
the notices that refer to this License, so that they refer to the ordinary GNU General
Public License, version 2, instead of to this License. (If a newer version than
version 2 of the ordinary GNU General Public License has appeared, then you can
specify that version instead if you wish.) Do not make any other change in these
notices.
Once this change is made in a given copy, it is irreversible for that copy, so the
ordinary GNU General Public License applies to all subsequent copies and
derivative works made from that copy.
This option is useful when you wish to copy part of the code of the Library into a
program that is not a library.
4. You may copy and distribute the Library (or a portion or derivative of it, under
Section 2) in object code or executable form under the terms of Sections 1 and 2
above provided that you accompany it with the complete corresponding machine-
readable source code, which must be distributed under the terms of Sections 1 and 2
above on a medium customarily used for software interchange.
If distribution of object code is made by offering access to copy from a designated
place, then offering equivalent access to copy the source code from the same place
satisfies the requirement to distribute the source code, even though third parties are not
compelled to copy the source along with the object code.
5. A program that contains no derivative of any portion of the Library, but is designed
to work with the Library by being compiled or linked with it, is called a “work that
uses the Library”. Such a work, in isolation, is not a derivative work of the Library,
and therefore falls outside the scope of this License.
However, linking a “work that uses the Library” with the Library creates an executable
that is a derivative of the Library (because it contains portions of the Library), rather
than a “work that uses the library”. The executable is therefore covered by this License.
Section 6 states terms for distribution of such executables.
When a “work that uses the Library” uses material from a header file that is part of the
Library, the object code for the work may be a derivative work of the Library even
though the source code is not. Whether this is true is especially significant if the work
can be linked without the Library, or if the work is itself a library. The threshold for
this to be true is not precisely defined by law.
If such an object file uses only numerical parameters, data structure layouts and
accessors, and small macros and small inline functions (ten lines or less in length), then
the use of the object file is unrestricted, regardless of whether it is legally a derivative
work. (Executables containing this object code plus portions of the Library will still
fall under Section 6.)
Otherwise, if the work is a derivative of the Library, you may distribute the object code
for the work under the terms of Section 6. Any executables containing that work also
fall under Section 6, whether or not they are linked directly with the Library itself.
6. As an exception to the Sections above, you may also combine or link a “work that
uses the Library” with the Library to produce a work containing portions of the
Library, and distribute that work under terms of your choice, provided that the
terms permit modification of the work for the customer’s own use and reverse
engineering for debugging such modifications.
You must give prominent notice with each copy of the work that the
Library is used in it and that the Library and its use are covered by
this License. You must supply a copy of this License. If the work
during execution displays copyright notices, you must include the
copyright notice for the Library among them, as well as a reference
directing the user to the copy of this License. Also, you must do one
of these things:
a) Accompany the work with the complete corresponding machine-readable
source code for the Library including whatever changes were used in the work
(which must be distributed under Sections 1 and 2 above); and, if the work is an
executable linked with the Library, with the complete machine-readable “work
that uses the Library”, as object code and/or source code, so that the user can
modify the Library and then relink to produce a modified executable containing
the modified Library. (It is understood that the user who changes the contents
of definitions files in the Library will not necessarily be able to recompile the
application to use the modified definitions.)
b) Use a suitable shared library mechanism for linking with the Library. A
suitable mechanism is one that (1) uses at run time a copy of the library already
present on the user’s computer system, rather than copying library functions
into the executable, and (2) will operate properly with a modified version of the
library, if the user installs one, as long as the modified version is interface-
compatible with the version that the work was made with.
c) Accompany the work with a written offer, valid for at least three years, to give
the same user the materials specified in Subsection 6a, above, for a charge no
more than the cost of performing this distribution.
d) If distribution of the work is made by offering access to copy from a designated
place, offer equivalent access to copy the above specified materials from the
same place.
e) Verify that the user has already received a copy of these materials or that you
have already sent this user a copy.
For an executable, the required form of the “work that uses the Library” must include
any data and utility programs needed for reproducing the executable from it. However,
as a special exception, the materials to be distributed need not include anything that is
normally distributed (in either source or binary form) with the major components
(compiler, kernel, and so on) of the operating system on which the executable runs,
unless that component itself accompanies the executable.
vi
It may happen that this requirement contradicts the license restrictions of other
proprietary libraries that do not normally accompany the operating system. Such a
contradiction means you cannot use both them and the Library together in an executable
that you distribute.
7. You may place library facilities that are a work based on the Library side-by-side in
a single library together with other library facilities not covered by this License,
and distribute such a combined library, provided that the separate distribution of the
work based on the Library and of the other library facilities is otherwise permitted,
and provided that you do these two things:
a) Accompany the combined library with a copy of the same work based on the
Library, uncombined with any other library facilities. This must be distributed
under the terms of the Sections above.
b) Give prominent notice with the combined library of the fact that part of it is a
work based on the Library, and explaining where to find the accompanying
uncombined form of the same work.
8. You may not copy, modify, sublicense, link with, or distribute the Library except as
expressly provided under this License. Any attempt otherwise to copy, modify,
sublicense, link with, or distribute the Library is void, and will automatically
terminate your rights under this License. However, parties who have received
copies, or rights, from you under this License will not have their licenses
terminated so long as such parties remain in full compliance.
9. You are not required to accept this License, since you have not signed it. However,
nothing else grants you permission to modify or distribute the Library or its
derivative works. These actions are prohibited by law if you do not accept this
License. Therefore, by modifying or distributing the Library (or any work based on
the Library), you indicate your acceptance of this License to do so, and all its terms
and conditions for copying, distributing or modifying the Library or works based
on it.
10. Each time you redistribute the Library (or any work based on the Library), the
recipient automatically receives a license from the original licensor to copy,
distribute, link with or modify the Library subject to these terms and conditions.
You may not impose any further restrictions on the recipients’ exercise of the rights
granted herein. You are not responsible for enforcing compliance by third parties
with this License.
11. If, as a consequence of a court judgment or allegation of patent infringement or for
any other reason (not limited to patent issues), conditions are imposed on you
(whether by court order, agreement or otherwise) that contradict the conditions of
this License, they do not excuse you from the conditions of this License. If you
cannot distribute so as to satisfy simultaneously your obligations under this License
and any other pertinent obligations, then as a consequence you may not distribute
the Library at all. For example, if a patent license would not permit royalty-free
redistribution of the Library by all those who receive copies directly or indirectly
through you, then the only way you could satisfy both it and this License would be
to refrain entirely from distribution of the Library.
If any portion of this section is held invalid or unenforceable under any particular
circumstance, the balance of the section is intended to apply, and the section as a whole
is intended to apply in other circumstances.
It is not the purpose of this section to induce you to infringe any patents or other
property right claims or to contest validity of any such claims; this section has the sole
purpose of protecting the integrity of the free software distribution system which is
implemented by public license practices. Many people have made generous
contributions to the wide range of software distributed through that system in reliance
on consistent application of that system; it is up to the author/donor to decide if he or
she is willing to distribute software through any other system and a licensee cannot
impose that choice.
This section is intended to make thoroughly clear what is believed to be a consequence
of the rest of this License.
12. If the distribution and/or use of the Library is restricted in certain countries either
by patents or by copyrighted interfaces, the original copyright holder who places
the Library under this License may add an explicit geographical distribution
limitation excluding those countries, so that distribution is permitted only in or
among countries not thus excluded. In such case, this License incorporates the
limitation as if written in the body of this License.
13. The Free Software Foundation may publish revised and/or new versions of the
Lesser General Public License from time to time. Such new versions will be similar
in spirit to the present version, but may differ in detail to address new problems or
concerns.
Each version is given a distinguishing version number. If the Library specifies a
version number of this License which applies to it and “any later version”, you have the
option of following the terms and conditions either of that version or of any later
version published by the Free Software Foundation. If the Library does not specify a
license version number, you may choose any version ever published by the Free
Software Foundation.
14. If you wish to incorporate parts of the Library into other free programs whose
distribution conditions are incompatible with these, write to the author to ask for
permission. For software which is copyrighted by the Free Software Foundation,
write to the Free Software Foundation; we sometimes make exceptions for this.
Our decision will be guided by the two goals of preserving the free status of all
derivatives of our free software and of promoting the sharing and reuse of software
generally.
NO WARRANTY
15. BECAUSE THE LIBRARY IS LICENSED FREE OF CHARGE, THERE IS NO
WARRANTY FOR THE LIBRARY, TO THE EXTENT PERMITTED BY
APPLICABLE LAW. EXCEPT WHEN OTHERWISE STATED IN WRITING
THE COPYRIGHT HOLDERS AND/OR OTHER PARTIES PROVIDE THE
LIBRARY “AS IS” WITHOUT WARRANTY OF ANY KIND, EITHER
EXPRESSED OR IMPLIED, INCLUDING, BUT NOT LIMITED TO, THE
IMPLIED WARRANTIES OF MERCHANTABILITY AND FITNESS FOR A
PARTICULAR PURPOSE. THE ENTIRE RISK AS TO THE QUALITY AND
PERFORMANCE OF THE LIBRARY IS WITH YOU. SHOULD THE
LIBRARY PROVE DEFECTIVE, YOU ASSUME THE COST OF ALL
NECESSARY SERVICING, REPAIR OR CORRECTION.
16. IN NO EVENT UNLESS REQUIRED BY APPLICABLE LAW OR AGREED
TO IN WRITING WILL ANY COPYRIGHT HOLDER, OR ANY OTHER
PARTY WHO MAY MODIFY AND/OR REDISTRIBUTE THE LIBRARY AS
PERMITTED ABOVE, BE LIABLE TO YOU FOR DAMAGES, INCLUDING
ANY GENERAL, SPECIAL, INCIDENTAL OR CONSEQUENTIAL
DAMAGES ARISING OUT OF THE USE OR INABILITY TO USE THE
LIBRARY (INCLUDING BUT NOT LIMITED TO LOSS OF DATA OR DATA
BEING RENDERED INACCURATE OR LOSSES SUSTAINED BY YOU OR
THIRD PARTIES OR A FAILURE OF THE LIBRARY TO OPERATE WITH
ANY OTHER SOFTWARE), EVEN IF SUCH HOLDER OR OTHER PARTY
HAS BEEN ADVISED OF THE POSSIBILITY OF SUCH DAMAGES.
END OF TERMS AND CONDITIONS
How to Apply These Terms to Your New Libraries
If you develop a new library, and you want it to be of the greatest possible use to the
public, we recommend making it free software that everyone can redistribute and
change. You can do so by permitting redistribution under these terms (or, alternatively,
under the terms of the ordinary General Public License).
To apply these terms, attach the following notices to the library. It is safest to attach
them to the start of each source file to most effectively convey the exclusion of
warranty; and each file should have at least the “copyright” line and a pointer to where
the full notice is found.
<one line to give the library’s name and a brief idea of what it does.>
Copyright (C) <year> <name of author>
This library is free software; you can redistribute it and/or modify it under the terms
of the GNU Lesser General Public License as published by the Free Software
Foundation; either version 2 of the License, or (at your option) any later version.
This library is distributed in the hope that it will be useful, but WITHOUT ANY
WARRANTY; without even the implied warranty of MERCHANTABILITY or
FITNESS FOR A PARTICULAR PURPOSE. See the GNU Lesser General Public
License for more details.
You should have received a copy of the GNU Lesser General Public License along
with this library; if not, write to the Free Software Foundation, Inc., 59 Temple
Place, Suite 330, Boston, MA 02111-1307 USA
Also add information on how to contact you by electronic and paper mail.
You should also get your employer (if you work as a programmer) or your school, if
any, to sign a “copyright disclaimer” for the library, if necessary. Here is a sample;
alter the names:
Yoyodyne, Inc., hereby disclaims all copyright interest in the library ‘Frob’ (a library
for tweaking knobs) written by James Random Hacker.
<signature of Ty Coon>, 1 April 1990
Ty Coon, President of Vice
That’s all there is to it!
■About OpenSSL
OpenSSL License
Copyright (c) 1998-2007 The OpenSSL Project. All rights reserved.
Redistribution and use in source and binary forms, with or without modification, are
permitted provided that the following conditions are met:
1. Redistributions of source code must retain the above copyright notice, this list of
conditions and the following disclaimer.
2. Redistributions in binary form must reproduce the above copyright notice, this list
of conditions and the following disclaimer in the documentation and/or other
materials provided with the distribution.
3. All advertising materials mentioning features or use of this software must display
the following acknowledgment:
“This product includes software developed by the OpenSSL Project for use in the
OpenSSL Toolkit. (http://www.openssl.org/)”
4. The names “OpenSSL Toolkit” and “OpenSSL Project” must not be used to
endorse or promote products derived from this software without prior written
permission. For written permission, please contact openssl-core@openssl.org.
5. Products derived from this software may not be called “OpenSSL” nor may
“OpenSSL” appear in their names without prior written permission of the
OpenSSL Project.
6. Redistributions of any form whatsoever must retain the following
acknowledgment:
“This product includes software developed by the OpenSSL Project for use in the
OpenSSL Toolkit (http://www.openssl.org/)”
THIS SOFTWARE IS PROVIDED BY THE OpenSSL PROJECT ‘‘AS IS’’ AND
ANY EXPRESSED OR IMPLIED WARRANTIES, INCLUDING, BUT NOT
LIMITED TO, THE IMPLIED WARRANTIES OF MERCHANTABILITY AND
FITNESS FOR A PARTICULAR PURPOSE ARE DISCLAIMED. IN NO EVENT
vii
SHALL THE OpenSSL PROJECT OR ITS CONTRIBUTORS BE LIABLE FOR
ANY DIRECT, INDIRECT, INCIDENTAL, SPECIAL, EXEMPLARY, OR
CONSEQUENTIAL DAMAGES (INCLUDING, BUT NOT LIMITED TO,
PROCUREMENT OF SUBSTITUTE GOODS OR SERVICES;
LOSS OF USE, DATA, OR PROFITS; OR BUSINESS INTERRUPTION)
HOWEVER CAUSED AND ON ANY THEORY OF LIABILITY, WHETHER IN
CONTRACT, STRICT LIABILITY, OR TORT (INCLUDING NEGLIGENCE OR
OTHERWISE) ARISING IN ANY WAY OUT OF THE USE OF THIS
SOFTWARE, EVEN IF ADVISED OF THE POSSIBILITY OF SUCH DAMAGE.
This product includes cryptographic software written by Eric Young
(eay@cryptsoft.com). This product includes software written by Tim Hudson
(tjh@cryptsoft.com).
Original SSLeay License
Copyright (C) 1995-1998 Eric Young (eay@cryptsoft.com) All rights reserved.
This package is an SSL implementation written by Eric Young (eay@cryptsoft.com).
The implementation was written so as to conform with Netscapes SSL.
This library is free for commercial and non-commercial use as long as the following
conditions are aheared to. The following conditions apply to all code found in this
distribution, be it the RC4, RSA, lhash, DES, etc., code; not just the SSL code. The
SSL documentation included with this distribution is covered by the same copyright
terms except that the holder is Tim Hudson (tjh@cryptsoft.com).
Copyright remains Eric Young’s, and as such any Copyright notices in the code are
not to be removed.
If this package is used in a product, Eric Young should be given attribution as the
author of the parts of the library used.
This can be in the form of a textual message at program startup or in documentation
(online or textual) provided with the package.
Redistribution and use in source and binary forms, with or without modification, are
permitted provided that the following conditions are met:
1. Redistributions of source code must retain the copyright notice, this list of
conditions and the following disclaimer.
2. Redistributions in binary form must reproduce the above copyright notice, this list
of conditions and the following disclaimer in the documentation and/or other
materials provided with the distribution.
3. All advertising materials mentioning features or use of this software must display
the following acknowledgement:
“This product includes cryptographic software written by Eric Young
(eay@cryptsoft.com)”
The word ‘cryptographic’ can be left out if the rouines from the library being used
are not cryptographic related :-).
4. If you include any Windows specific code (or a derivative thereof) from the apps
directory (application code) you must include an acknowledgement:
“This product includes software written by Tim Hudson (tjh@cryptsoft.com)”
THIS SOFTWARE IS PROVIDED BY ERIC YOUNG ‘’AS IS’’ AND ANY
EXPRESS OR IMPLIED WARRANTIES, INCLUDING, BUT NOT LIMITED TO,
THE IMPLIED WARRANTIES OF MERCHANTABILITY AND FITNESS FOR A
PARTICULAR PURPOSE ARE DISCLAIMED. IN NO EVENT SHALL THE
AUTHOR OR CONTRIBUTORS BE LIABLE FOR ANY DIRECT, INDIRECT,
INCIDENTAL, SPECIAL, EXEMPLARY, OR CONSEQUENTIAL DAMAGES
(INCLUDING, BUT NOT LIMITED TO, PROCUREMENT OF SUBSTITUTE
GOODS OR SERVICES; LOSS OF USE, DATA, OR PROFITS; OR BUSINESS
INTERRUPTION) HOWEVER CAUSED AND ON ANY THEORY OF
LIABILITY, WHETHER IN CONTRACT, STRICT LIABILITY, OR TORT
(INCLUDING NEGLIGENCE OR OTHERWISE) ARISING IN ANY WAY
OUT OF THE USE OF THIS SOFTWARE, EVEN IF ADVISED OF THE
POSSIBILITY OF SUCH DAMAGE.
The licence and distribution terms for any publically available version or derivative
of this code cannot be changed. i.e. this code cannot simply be copied and put under
another distribution licence [including the GNU Public Licence.]
■About zlib
Copyright notice:
(C) 1995-2004 Jean-loup Gailly and Mark Adler
This software is provided ‘as-is’, without any express or implied warranty. In no event
will the authors be held liable for any damages arising from the use of this software.
Permission is granted to anyone to use this software for any purpose, including
commercial applications, and to alter it and redistribute it freely, subject to the
following restrictions:
1. The origin of this software must not be misrepresented; you must not claim that you
wrote the original software. If you use this software in a product, an
acknowledgment in the product documentation would be appreciated but is not
required.
2. Altered source versions must be plainly marked as such, and must not be
misrepresented as being the original software.
3. This notice may not be removed or altered from any source distribution.
Jean-loup Gailly Mark Adler
jloup@gzip.org madler@alumni.caltech.edu
If you use the zlib library in a product, we would appreciate *not* receiving lengthy
legal documents to sign. The sources are provided for free but without warranty of any
kind. The library has been entirely written by Jean-loup Gailly and Mark Adler; it does
not include third-party code.
If you redistribute modified sources, we would appreciate that you include
in the file ChangeLog history information documenting your changes. Please
read the FAQ for more information on the distribution of modified source
versions.

Printed in Malaysia WS51530
© 2009 Yamaha Corporation All rights reserved.
Produkt Specifikationer
| Mærke: | Yamaha |
| Kategori: | Hi-Fi system |
| Model: | MCR-940 |
| Type: | Home audio micro system |
| Vægt: | 17700 g |
| Brugervejledning: | Ja |
| Produktfarve: | Black, White |
| Tuner type: | Digital |
| Antal højttalere: | 2 |
| Udgangseffekt (RMS): | 130 W |
| Lyddekodere: | Dolby TrueHD, DTS-HD, DTS-HD Master Audio |
| Antal USB 2.0-porte: | 1 |
| Udgange til hovedtelefoner: | 1 |
| Ethernet LAN: | Ja |
| Understøttede lydformater: | MP3 |
| Volumenkontrol: | Dreje |
| Understøttede billedformater: | JPG |
| Fjernbetjening inkluderet: | Ja |
| Frekvensområde: | 55 - 28000 Hz |
| Impedens: | 6 ohm (Ω) |
| Strømkilde: | Vekselstrøm |
| Understøttede disktyper: | BD, CD, CD-R, CD-RW, DVD |
| Indbygget kortlæser: | Ingen |
| Videooptagelse: | Ja |
| AUX-indgang: | Ja |
| Understøttede radiobånd: | AM, FM |
| RDS Tuner inkluderet: | Ja |
| MP3-afspilning: | Ja |
| Tilslutning af hovedtelefoner: | 3,5 mm |
| Afspilning af diskformater: | Blu-Ray audio, Blu-Ray video, CD audio, CD video |
| klirfaktor (THD): | 0.04 % |
| Signal/støjforhold: | 100 dB |
| Diskant diameter: | 25 mm |
| Woofer diameter: | 130 mm |
| Kampatibilitet med Apple-docking: | iPhone, iPod |
| Antal forudindstillede stationer: | 30 |
| Kassettebåndoptager: | Ingen |
| Karaoke: | Ingen |
| Optisk diskafspiller: | Ja |
| Højttaler bredde: | 176 mm |
| Højttaler dybde: | 305 mm |
| Højttaler højde: | 318 mm |
| Antal optiske diske: | 1 diske |
| Subwoofer-udgang: | Ja |
Har du brug for hjælp?
Hvis du har brug for hjælp til Yamaha MCR-940 stil et spørgsmål nedenfor, og andre brugere vil svare dig
Hi-Fi system Yamaha Manualer

31 December 2025
6 Oktober 2024
21 August 2024
20 August 2024
20 August 2024
3 August 2024
31 Juli 2024
30 Juli 2024
21 Juli 2024
20 Juli 2024
Hi-Fi system Manualer
- Hi-Fi system SilverCrest
- Hi-Fi system Denver
- Hi-Fi system Sencor
- Hi-Fi system TCL
- Hi-Fi system Sony
- Hi-Fi system Fenton
- Hi-Fi system Samsung
- Hi-Fi system Panasonic
- Hi-Fi system Sony Ericsson
- Hi-Fi system Pro-Ject
- Hi-Fi system Anthem
- Hi-Fi system Philips
- Hi-Fi system Lenco
- Hi-Fi system OK
- Hi-Fi system LG
- Hi-Fi system AEG
- Hi-Fi system Audio-Technica
- Hi-Fi system Peavey
- Hi-Fi system Pioneer
- Hi-Fi system TOA
- Hi-Fi system Sharp
- Hi-Fi system Qtx
- Hi-Fi system Logitech
- Hi-Fi system Behringer
- Hi-Fi system Kenwood
- Hi-Fi system Technaxx
- Hi-Fi system Lowrance
- Hi-Fi system MB Quart
- Hi-Fi system Sennheiser
- Hi-Fi system Harman Kardon
- Hi-Fi system AOC
- Hi-Fi system Garmin
- Hi-Fi system Grundig
- Hi-Fi system Nikkei
- Hi-Fi system D-Link
- Hi-Fi system Motorola
- Hi-Fi system Roland
- Hi-Fi system Toshiba
- Hi-Fi system Pyle
- Hi-Fi system Argon
- Hi-Fi system Denon
- Hi-Fi system Olympus
- Hi-Fi system Bowers & Wilkins
- Hi-Fi system Avante
- Hi-Fi system Scansonic
- Hi-Fi system AVM
- Hi-Fi system Nedis
- Hi-Fi system Sonoro
- Hi-Fi system Logik
- Hi-Fi system Kicker
- Hi-Fi system LD Systems
- Hi-Fi system Hama
- Hi-Fi system Auna
- Hi-Fi system Muse
- Hi-Fi system Thomson
- Hi-Fi system Hyundai
- Hi-Fi system Aiwa
- Hi-Fi system Nokia
- Hi-Fi system Rega
- Hi-Fi system Belkin
- Hi-Fi system Pyle Pro
- Hi-Fi system JBL
- Hi-Fi system AKAI
- Hi-Fi system TriStar
- Hi-Fi system Teufel
- Hi-Fi system DataVideo
- Hi-Fi system Audio Pro
- Hi-Fi system RCF
- Hi-Fi system Pure
- Hi-Fi system Trevi
- Hi-Fi system Topcom
- Hi-Fi system Adler
- Hi-Fi system Camry
- Hi-Fi system Blaupunkt
- Hi-Fi system JVC
- Hi-Fi system Champion
- Hi-Fi system Clatronic
- Hi-Fi system Hitachi
- Hi-Fi system Crunch
- Hi-Fi system Razer
- Hi-Fi system Skytec
- Hi-Fi system Medion
- Hi-Fi system Cambridge
- Hi-Fi system Huawei
- Hi-Fi system König
- Hi-Fi system TechniSat
- Hi-Fi system Massive
- Hi-Fi system Tivoli Audio
- Hi-Fi system Gembird
- Hi-Fi system Sanus
- Hi-Fi system Bang And Olufsen
- Hi-Fi system Bose
- Hi-Fi system Geemarc
- Hi-Fi system Jabra
- Hi-Fi system Klipsch
- Hi-Fi system Vivax
- Hi-Fi system Loewe
- Hi-Fi system Crosley
- Hi-Fi system Alpine
- Hi-Fi system Netgear
- Hi-Fi system EnVivo
- Hi-Fi system Kärcher
- Hi-Fi system Telefunken
- Hi-Fi system Vtech
- Hi-Fi system Tripp Lite
- Hi-Fi system Exibel
- Hi-Fi system BeamZ
- Hi-Fi system Dali
- Hi-Fi system KEF
- Hi-Fi system Technics
- Hi-Fi system Jensen
- Hi-Fi system Plantronics
- Hi-Fi system SteelSeries
- Hi-Fi system Homedics
- Hi-Fi system Krüger&Matz
- Hi-Fi system Marmitek
- Hi-Fi system Oppo
- Hi-Fi system NGS
- Hi-Fi system PreSonus
- Hi-Fi system Soundmaster
- Hi-Fi system Victrola
- Hi-Fi system Sonos
- Hi-Fi system NAD
- Hi-Fi system ESI
- Hi-Fi system Tascam
- Hi-Fi system Cobra
- Hi-Fi system DPA
- Hi-Fi system Omnitronic
- Hi-Fi system Velleman
- Hi-Fi system Marshall
- Hi-Fi system Energy Sistem
- Hi-Fi system Sonance
- Hi-Fi system Zoom
- Hi-Fi system TC Helicon
- Hi-Fi system Geneva
- Hi-Fi system Bush
- Hi-Fi system Honor
- Hi-Fi system Apogee
- Hi-Fi system MIPRO
- Hi-Fi system Dual
- Hi-Fi system Electro-Voice
- Hi-Fi system Korg
- Hi-Fi system Arturia
- Hi-Fi system RME
- Hi-Fi system Salora
- Hi-Fi system Sagem
- Hi-Fi system Onkyo
- Hi-Fi system Focal
- Hi-Fi system Nevir
- Hi-Fi system HK Audio
- Hi-Fi system Teac
- Hi-Fi system Imperial
- Hi-Fi system Autotek
- Hi-Fi system Nextbase
- Hi-Fi system Magnat
- Hi-Fi system Saramonic
- Hi-Fi system Marantz
- Hi-Fi system Anchor Audio
- Hi-Fi system ELAC
- Hi-Fi system Sven
- Hi-Fi system McIntosh
- Hi-Fi system IDance
- Hi-Fi system American Audio
- Hi-Fi system Albrecht
- Hi-Fi system Scott
- Hi-Fi system ART
- Hi-Fi system Bluesound
- Hi-Fi system Rode
- Hi-Fi system Polk
- Hi-Fi system Monacor
- Hi-Fi system Samson
- Hi-Fi system ION
- Hi-Fi system Audizio
- Hi-Fi system JL Audio
- Hi-Fi system ADE
- Hi-Fi system Alba
- Hi-Fi system RCA
- Hi-Fi system ECG
- Hi-Fi system Jamo
- Hi-Fi system FiiO
- Hi-Fi system DBX
- Hi-Fi system Digigram
- Hi-Fi system Galaxy Audio
- Hi-Fi system General Electric
- Hi-Fi system Chord
- Hi-Fi system Cardo
- Hi-Fi system Alto
- Hi-Fi system Shokz
- Hi-Fi system AudioSonic
- Hi-Fi system Manhattan
- Hi-Fi system SPC
- Hi-Fi system Aquatic AV
- Hi-Fi system Caliber
- Hi-Fi system OneConcept
- Hi-Fi system Native Instruments
- Hi-Fi system Audiolab
- Hi-Fi system Music Hall
- Hi-Fi system Electro Harmonix
- Hi-Fi system Numan
- Hi-Fi system WAGAN
- Hi-Fi system Altec Lansing
- Hi-Fi system Brandson
- Hi-Fi system IK Multimedia
- Hi-Fi system Lynx
- Hi-Fi system Kramer
- Hi-Fi system Rotel
- Hi-Fi system ILive
- Hi-Fi system Gemini
- Hi-Fi system Solid State Logic
- Hi-Fi system Paradigm
- Hi-Fi system Motu
- Hi-Fi system Senal
- Hi-Fi system Roadstar
- Hi-Fi system VIZIO
- Hi-Fi system Clarion
- Hi-Fi system Watson
- Hi-Fi system Sound Devices
- Hi-Fi system Universal Audio
- Hi-Fi system Hercules
- Hi-Fi system M-Audio
- Hi-Fi system Monster
- Hi-Fi system Fender
- Hi-Fi system Vision
- Hi-Fi system Majestic
- Hi-Fi system Morel
- Hi-Fi system Steinberg
- Hi-Fi system Xantech
- Hi-Fi system Walrus Audio
- Hi-Fi system ATen
- Hi-Fi system Shure
- Hi-Fi system Sangean
- Hi-Fi system Vimar
- Hi-Fi system Power Dynamics
- Hi-Fi system Continental Edison
- Hi-Fi system Dynaudio
- Hi-Fi system Rockford Fosgate
- Hi-Fi system Oregon Scientific
- Hi-Fi system Smart-AVI
- Hi-Fi system GPX
- Hi-Fi system Canton
- Hi-Fi system Lenoxx
- Hi-Fi system Terratec
- Hi-Fi system Sharkoon
- Hi-Fi system Memphis Audio
- Hi-Fi system Duronic
- Hi-Fi system Vonyx
- Hi-Fi system Scosche
- Hi-Fi system Speco Technologies
- Hi-Fi system Boss
- Hi-Fi system Ruark Audio
- Hi-Fi system Focusrite
- Hi-Fi system Crestron
- Hi-Fi system DAP-Audio
- Hi-Fi system Kunft
- Hi-Fi system SPL
- Hi-Fi system GoGen
- Hi-Fi system Arcam
- Hi-Fi system Russound
- Hi-Fi system Audison
- Hi-Fi system Crown
- Hi-Fi system Rolls
- Hi-Fi system Cyrus
- Hi-Fi system Werma
- Hi-Fi system Adastra
- Hi-Fi system Konig & Meyer
- Hi-Fi system Atlas Sound
- Hi-Fi system Boston Acoustics
- Hi-Fi system AKG
- Hi-Fi system Tannoy
- Hi-Fi system MXL
- Hi-Fi system DreamGEAR
- Hi-Fi system Xoro
- Hi-Fi system AudioControl
- Hi-Fi system Starkey
- Hi-Fi system Ibiza Sound
- Hi-Fi system Steren
- Hi-Fi system PowerBass
- Hi-Fi system Reflexion
- Hi-Fi system HiFi ROSE
- Hi-Fi system REVO
- Hi-Fi system Audioengine
- Hi-Fi system Musical Fidelity
- Hi-Fi system BSS Audio
- Hi-Fi system Glide Gear
- Hi-Fi system Hosa
- Hi-Fi system Key Digital
- Hi-Fi system KanexPro
- Hi-Fi system Sonifex
- Hi-Fi system TV One
- Hi-Fi system RGBlink
- Hi-Fi system AVer
- Hi-Fi system Stereoboomm
- Hi-Fi system Ferguson
- Hi-Fi system Goodis
- Hi-Fi system WyreStorm
- Hi-Fi system The Box
- Hi-Fi system IFi Audio
- Hi-Fi system Orbitsound
- Hi-Fi system House Of Marley
- Hi-Fi system Brigmton
- Hi-Fi system Sunstech
- Hi-Fi system Swissvoice
- Hi-Fi system Marquant
- Hi-Fi system AudioAffairs
- Hi-Fi system Magnum
- Hi-Fi system Coby
- Hi-Fi system Mac Audio
- Hi-Fi system Bigben Interactive
- Hi-Fi system Nacon
- Hi-Fi system Bigben
- Hi-Fi system Laser
- Hi-Fi system Naxa
- Hi-Fi system Mpman
- Hi-Fi system Peaq
- Hi-Fi system Ematic
- Hi-Fi system Vankyo
- Hi-Fi system Superior
- Hi-Fi system Quantis
- Hi-Fi system Irradio
- Hi-Fi system Karcher Audio
- Hi-Fi system Cmx
- Hi-Fi system Revox
- Hi-Fi system Comica
- Hi-Fi system Audient
- Hi-Fi system PAC
- Hi-Fi system Luxman
- Hi-Fi system Infinity
- Hi-Fi system Wolfgang
- Hi-Fi system Elta
- Hi-Fi system Iluv
- Hi-Fi system Monitor Audio
- Hi-Fi system Aplic
- Hi-Fi system Nxg
- Hi-Fi system OSD Audio
- Hi-Fi system Andover
- Hi-Fi system Mark Levinson
- Hi-Fi system Soundstream
- Hi-Fi system Block
- Hi-Fi system SVS
- Hi-Fi system JB Systems
- Hi-Fi system HUMANTECHNIK
- Hi-Fi system SIIG
- Hi-Fi system Primare
- Hi-Fi system Griffin
- Hi-Fi system MoFi
- Hi-Fi system Eissound
- Hi-Fi system MTX Audio
- Hi-Fi system Astell&Kern
- Hi-Fi system Mission
- Hi-Fi system Extron
- Hi-Fi system Franklin
- Hi-Fi system Leviton
- Hi-Fi system ClearOne
- Hi-Fi system Ebode
- Hi-Fi system Vocopro
- Hi-Fi system Glorious
- Hi-Fi system Devialet
- Hi-Fi system TCM
- Hi-Fi system Zvox
- Hi-Fi system Antelope Audio
- Hi-Fi system CE Labs
- Hi-Fi system Z CAM
- Hi-Fi system Avid
- Hi-Fi system Roku
- Hi-Fi system Accsoon
- Hi-Fi system Icon
- Hi-Fi system Parasound
- Hi-Fi system Promate
- Hi-Fi system SoundCast
- Hi-Fi system Hollyland
- Hi-Fi system Boytone
- Hi-Fi system ESX
- Hi-Fi system Maretron
- Hi-Fi system Xact
- Hi-Fi system Magnavox
- Hi-Fi system Lotronic
- Hi-Fi system Esoteric
- Hi-Fi system ANT
- Hi-Fi system Rane
- Hi-Fi system NUVO
- Hi-Fi system JK Audio
- Hi-Fi system Lexicon
- Hi-Fi system Fluance
- Hi-Fi system Altra
- Hi-Fi system Kiloview
- Hi-Fi system On-Q
- Hi-Fi system Vantage Point
- Hi-Fi system Planet Audio
- Hi-Fi system Fluid
- Hi-Fi system Atlona
- Hi-Fi system IFi
- Hi-Fi system E-bench
- Hi-Fi system Roon
- Hi-Fi system Voco
- Hi-Fi system Linear
- Hi-Fi system SSV Works
- Hi-Fi system DAP
- Hi-Fi system 2N
- Hi-Fi system SWIT
- Hi-Fi system CAD Audio
- Hi-Fi system Polsen
- Hi-Fi system AmpliVox
- Hi-Fi system Audiofrog
- Hi-Fi system Juke Audio
- Hi-Fi system Best Buy
- Hi-Fi system Meridian
- Hi-Fi system DiGiGrid
- Hi-Fi system CLXmusic
- Hi-Fi system Nuheara
- Hi-Fi system Majority
- Hi-Fi system Acoustic Solutions
- Hi-Fi system Metric Halo
- Hi-Fi system Universal Remote Control
- Hi-Fi system Prism Sound
- Hi-Fi system Antelope
- Hi-Fi system Auvi
- Hi-Fi system Technical Pro
- Hi-Fi system Switchcraft
- Hi-Fi system CSL
- Hi-Fi system Defender
- Hi-Fi system Titanwolf
- Hi-Fi system Liam&Daan
- Hi-Fi system Crystal Video
- Hi-Fi system Atoll
- Hi-Fi system Bennett & Ross
- Hi-Fi system Pronomic
- Hi-Fi system Beatfoxx
- Hi-Fi system NEAR
- Hi-Fi system INKEE
- Hi-Fi system Vaxis
Nyeste Hi-Fi system Manualer

8 April 2025
1 April 2025
31 Marts 2025
26 Marts 2025
26 Marts 2025

12 Marts 2025

5 Marts 2025
5 Marts 2025
4 Marts 2025
4 Marts 2025