Zebra GX420d Manual
Zebra
Etiketprinter
GX420d
Læs nedenfor 📖 manual på dansk for Zebra GX420d (128 sider) i kategorien Etiketprinter. Denne guide var nyttig for 10 personer og blev bedømt med 4.5 stjerner i gennemsnit af 2 brugere
Side 1/128

User Guide
Zebra® GX420d™ / GX430d™
Desktop Thermal Printer

ii
980611-001 Rev. C GX420d™ / GX430d™ User Guide 8/4/10

iii
8/4/10 GX420d™ / GX430d™ User Guide 980611-001 Rev. C
©2010 ZIH Corp. G-Series,GX420d, GX430d, ZBI, ZBI 2.0, ZBI-Developer,
ZebraDesigner, Uni-Ribbon, ZebraNet, EPL, EPL2, ZPL, ZPL II, OpenACCESS and all
product names and numbers are Zebra trademarks, and Zebra, the Zebra head graphic, and
ZebraNet are registered trademarks of ZIH Corp. All rights reserved. All other trademarks
are the property of their respective owners.
This product may contain ZPL®, ZPL II®, and ZebraLink™ programs; Element Energy
Equalizer™ Circuit; E3®; and Monotype Imaging fonts. Software ©ZIH corp. All rights
reserved worldwide.
ZebraLink and all product names and numbers are trademarks, and Zebra, the Zebra logo,
ZPL, ZPL II, Element Energy Equalizer circuit, and E3 Circuit are registered trademarks
of ZIH Corp. All rights reserved worldwide.Monotype®, Intellifont® and UFST® are
trademarks of Monotype Imaging, Inc. registered in the United States Patent and
Trademark Office and may be registered in certain jurisdictions.
CG Triumvirate is a trademark of Monotype Imaging, Inc. and may be registered in some
jurisdictions.
TrueType® is a trademark of Apple Computer, Inc. registered in the United States Patent
and Trademark Office and may be registered in certancertain jurisdictions.
Proprietary Statement
This manual contains proprietary information of Zebra Technologies Corporation and its
subsidiaries (“Zebra Technologies”). It is intended solely for the information and use of
parties operating and maintaining the equipment described herein. Such proprietary
information may not be used, reproduced, or disclosed to any other parties for any other
purpose without the express written permission of Zebra Technologies.
Product Improvements
Continuous improvement of products is a policy of Zebra Technologies. All specifications
and designs are subject to change without notice.
Liability Disclaimer
Zebra Technologies takes steps to ensure that its published Engineering specifications and
manuals are correct; however, errors do occur. Zebra Technologies reserves the right to
correct any such errors and disclaims liability resulting therefrom.
Limitation of Liability
In no event shall Zebra Technologies or anyone else involved in the creation, production,
or delivery of the accompanying product (including hardware and software) be liable for
any damages whatsoever (including, without limitation, consequential damages including
loss of business profits, business interruption, or loss of business information) arising out
of the use of, the results of use of, or inability to use such product, even if Zebra
Technologies has been advised of the possibility of such damages. Some jurisdictions do
not allow the exclusion or limitation of incidental or consequential damages, so the above
limitation or exclusion may not apply to you.
Canadian DOC Compliance Statement
This Class B digital apparatus complies with Canadian ICES-003.
Cet appareil numérique de la classe B est conforme à la norme NMB-003 du Canada.

iv
980611-001 Rev. C GX420d™ / GX430d™ User Guide 8/4/10
FCC Compliance Statement
This device complies with Part 15 rules. Operation is subject to the following two conditions:
1.
This device may not cause harmful interference, and
2.
This device must accept any interference received, including interference that may cause
undesired operation.
This equipment has been tested and found to comply with the limits for Class B Digital
Devices, pursuant to Part 15 of the FCC Rules. These limits are designed to provide reasonable
protection against harmful interference when the equipment is operated in a residential
environment. This equipment generates, uses, and can radiate radio frequency energy and, if
not installed and used in accordance with the product manuals, may cause harmful interference
to radio communications. However, there is no guarantee that interference will not occur in a
particular installation. If this equipment does cause harmful interference to radio or television
reception, the user is encouraged to do one or more of the following measures:
• Reorient or relocate the receiving antenna.
• Increase the separation between the equipment and receiver.
• Connect the equipment into an outlet on a circuit different from that to which the receiver
is connected.
• Consult the dealer or an experienced RF service technician for help.
The user is cautioned that any changes or modifications not expressly approved by Zebra
Technologies could void the user’s authority to operate the equipment. To ensure compliance,
this printer must be used with fully shielded communication cables.
Environmental Management
Caution • The optional RTC assembly has a three volt lithium battery. Battery replacement
must be performed by a qualified service technician. Only use a Zebra approved replacement
battery.
Important • Recycle batteries according to local your guidelines and regulations. Wrap the
battery when disposing (or storing) to avoid a short circuit.
DO NOT short circuit the battery. Short circuiting the battery may result in heat
generation, fire or bursting.
DO NOT heat, disassemble or dispose of battery in fire.
Do not dispose of this product in unsorted municipal waste. This product is recyclable, and
should be recycled according to your local standards.
For more information, please see our website at:
Web address: www.zebra.com/environment

About This Document
Who Should Use This Document
vi
980611-001 Rev. C GX420d™ / GX430d™ User Guide 8/4/10
Who Should Use This Document
This User Guide is intended for use by any person who needs to operate or to troubleshoot
problems with the printer.
How This Document Is Organized
The User Guide is set up as follows:
Section Description
Introduction on page 1 This section describes what you get in your
shipping box and provides an overview of printer
features. This section also has procedures that
describe how to open and close the printer and
report any problems.
Getting Started on page 13 This section describes how to set up your printer
for the first time and use the most common
operating procedures for loading media.
Print Operations on page 31 This section provides media and print handling,
font and language support, and the set up of less
common printer configurations.
Printer Options on page 45 This section covers the common printer options
and accessories with brief descriptions and how to
get you started using or configuring your printer
option or accessory.
Control Panel Operation on page 69 This section describes the operation, navigation
and parameters displayed by printers equipped
with the LCD control panel option.
Maintenance on page 75 This section provides routine cleaning and
maintenance procedures.
Troubleshooting on page 85 This section provides information about printer
error reporting that you might need for printer
troubleshooting. Assorted diagnostic tests are
included.
Appendix: Interface Wiring
on page 99 This section provides additional interface
information and wiring diagrams to assist with
printer to host system integration (typically a PC).
Appendix: Dimensions on page 105 This section provides external printer dimensions
for the standard printer and printer with options.
Appendix: ZPL Configuration
on page 109 This section briefly covers printer configuration
and includes a cross-reference to ZPL printer
configuration commands.

vii
About This Document
Contacts
8/4/10 GX420d™ / GX430d™ User Guide 980611-001 Rev. C
Contacts
Technical Support via the Internet is available 24 hours per day, 365 days per year.
Web Site:
www.zebra.com
E-mail Back Technical Library:
•E-mail address:
emb@zebra.com
•Subject line:
Emaillist
Self Service Knowledge Base:
www.zebra.com/knowledgebase
Online Case Registration:
www.zebra.com/techrequest
Which Department
Do You Need? The Americas Europe, Africa,
Middle East, India Asia Pacific
Regional Headquarters Zebra Technologies International, LLC
333 Corporate Woods Parkway
Vernon Hills, IL 60061-3109
U.S.A.
T: +1 847 793 2600
Toll-free +1 800 423 0422
F: +1 847 913 8766
Zebra Technologies Europe Limited
Dukes Meadow
Millboard Road
Bourne End
Buckinghamshire, SL8 5XF
United Kingdom
T: +44 (0) 1628 556000
F: +44 (0) 1628 556001
Zebra Technologies Asia
Pacific Pte. Ltd.
120 Robinson Road
#06-01 Parakou Building
Singapore 068913
T: + 65 6858 0722
F: +65 6885 0838
Technical Support
For questions on the
operation of Zebra
equipment and software,
please call your distributor.
For additional assistance,
contact us.
Please have your model and
serial numbers available.
T: +1 877 ASK ZEBRA (275 9327)
F: +1 847 913 2578
Hardware: ts1@zebra.com
Software: ts3@zebra.com
T: +44 (0) 1628 556039
F: +44 (0) 1628 556003
E: Tseurope@zebra.com
T: +65 6858 0722
F: +65 6885 0838
E: China: tschina@zebra.com
All other areas:
tsasiapacific@zebra.com
Repair Service
Department
For back-to-base service and
repair.
T: +1 877 ASK ZEBRA (275 9327)
F: +1 847 821 1797
E: repair@zebra.com
To request a repair in the U.S.,
go to www.zebra.com/repair.
T: +44 (0) 1772 693069
F: +44 (0) 1772 693046
New requests: ukrma@zebra.com
Status updates:
repairupdate@zebra.com
T: +65 6858 0722
F: +65 6885 0838
E: China: tschina@zebra.com
All other areas:
tsasiapacific@zebra.com
Technical Training
Department
For Zebra product training
courses.
T: +1 847 793 6868
T: +1 847 793 6864
F: +1 847 913 2578
E: ttamerica@zebra.com
T: +44 (0) 1628 556000
F: +44 (0) 1628 556001
E: Eurtraining@zebra.com
T: + 65 6858 0722
F: +65 6885 0838
E: China: tschina@zebra.com
All other areas:
tsasiapacific@zebra.com
Inquiry Department
For product literature and
distributor and dealer
information.
T: +1 877 ASK ZEBRA (275 9327)
E: inquiry4@zebra.com
T: +44 (0) 1628 556037
F: +44 (0) 1628 556005
E: mseurope@zebra.com
E: China: GCmarketing@zebra.com
All other areas:
APACChannelmarketing@zebra.com
Customer Service
Department (US)
Internal Sales
Department (UK)
For printers, parts, media,
and ribbon, please call your
distributor or contact us.
T: +1 877 ASK ZEBRA (275 9327)
E: clientcare@zebra.com
T: +44 (0) 1628 556032
F: +44 (0) 1628 556001
E: cseurope@zebra.com
T: +65 6858 0722
F: +65 6885 0836
E: China: order-csr@zebra.com
All other areas:
csasiapacific@zebra.com
Key:
T: Telephone
F: Facsimile
E: E-mail

About This Document
Document Conventions
viii
980611-001 Rev. C GX420d™ / GX430d™ User Guide 8/4/10
Document Conventions
The following conventions are used throughout this document to convey certain information.
Alternate Color (online only) Cross-references contain hot links to other sections in this
guide. If you are viewing this guide online in .pdf format, you can click the cross-reference
(blue text) to jump directly to its location.
Command Line Examples Command line examples appear in Courier New font. For
example, type
ZTools
to get to the Post-Install scripts in the
bin
directory.
Files and Directories File names and directories appear in Courier New font. For
example, the
Zebra<version number>.tar
file and the
/root
directory.
Icons Used
Caution • Warns you of the potential for electrostatic discharge.
Caution • Warns you of a potential electric shock situation.
Caution • Warns you of a situation where excessive heat could cause a burn.
Caution • Advises you that failure to take or avoid a specific action could result in physical
harm to you.
Caution • (No icon) Advises you that failure to take or avoid a specific action could result in
physical harm to the hardware.
Important •
Advises you of information that is essential to complete a task.
Note •
Indicates neutral or positive information that emphasizes or supplements important
points of the main text.
Example •
Provides an example, often a scenario, to better clarify a section of text.

8/4/10 GX420d™ / GX430d™ User Guide 980611-001 Rev. C
Contents
About This Document . . . . . . . . . . . . . . . . . . . . . . . . . . . . . . . . . . . . . . . . . . . . . . . v
Who Should Use This Document . . . . . . . . . . . . . . . . . . . . . . . . . . . . . . . . . . . . . . . . . . . . vi
How This Document Is Organized . . . . . . . . . . . . . . . . . . . . . . . . . . . . . . . . . . . . . . . . . . . vi
Contacts . . . . . . . . . . . . . . . . . . . . . . . . . . . . . . . . . . . . . . . . . . . . . . . . . . . . . . . . . . . . . . .vii
Document Conventions. . . . . . . . . . . . . . . . . . . . . . . . . . . . . . . . . . . . . . . . . . . . . . . . . . . viii
1 • Introduction . . . . . . . . . . . . . . . . . . . . . . . . . . . . . . . . . . . . . . . . . . . . . . . . . . . . 1
GX Series Thermal Printers . . . . . . . . . . . . . . . . . . . . . . . . . . . . . . . . . . . . . . . . . . . . . . . . 2
What’s in the Box? . . . . . . . . . . . . . . . . . . . . . . . . . . . . . . . . . . . . . . . . . . . . . . . . . . . . . . . 4
Unpack and Inspect the Printer . . . . . . . . . . . . . . . . . . . . . . . . . . . . . . . . . . . . . . . . . . 4
Your Printer. . . . . . . . . . . . . . . . . . . . . . . . . . . . . . . . . . . . . . . . . . . . . . . . . . . . . . . . . . 5
Printer Features . . . . . . . . . . . . . . . . . . . . . . . . . . . . . . . . . . . . . . . . . . . . . . . . . . . . . . 6
Operator Controls . . . . . . . . . . . . . . . . . . . . . . . . . . . . . . . . . . . . . . . . . . . . . . . . . . . . . 9
2 • Getting Started . . . . . . . . . . . . . . . . . . . . . . . . . . . . . . . . . . . . . . . . . . . . . . . . . 13
Attaching Power . . . . . . . . . . . . . . . . . . . . . . . . . . . . . . . . . . . . . . . . . . . . . . . . . . . . . . . . 14
Loading Roll Media . . . . . . . . . . . . . . . . . . . . . . . . . . . . . . . . . . . . . . . . . . . . . . . . . . . . . . 15
Preparing Media . . . . . . . . . . . . . . . . . . . . . . . . . . . . . . . . . . . . . . . . . . . . . . . . . . . . . 15
Placing the Roll in the Media Compartment . . . . . . . . . . . . . . . . . . . . . . . . . . . . . . . . 16
Printing a Test (Printer Configuration) Label. . . . . . . . . . . . . . . . . . . . . . . . . . . . . . . . . . . 19
Pre-install Windows® Printer Drivers . . . . . . . . . . . . . . . . . . . . . . . . . . . . . . . . . . . . . . . . 20
Connecting your Printer to a Computer . . . . . . . . . . . . . . . . . . . . . . . . . . . . . . . . . . . . . . 22
Interface Cable Requirements . . . . . . . . . . . . . . . . . . . . . . . . . . . . . . . . . . . . . . . . . . 22
After Your Printer is Connected. . . . . . . . . . . . . . . . . . . . . . . . . . . . . . . . . . . . . . . . . . . . . 28
3 • Print Operations . . . . . . . . . . . . . . . . . . . . . . . . . . . . . . . . . . . . . . . . . . . . . . . 31
Determining Printer Configuration. . . . . . . . . . . . . . . . . . . . . . . . . . . . . . . . . . . . . . . . . . . 32
Localizing the Printer Status Configuration Label . . . . . . . . . . . . . . . . . . . . . . . . . . . . 32

x
980611-001 Rev. C GX420d™ / GX430d™ User Guide 8/4/10
Long Term Printer In-activity or Storage . . . . . . . . . . . . . . . . . . . . . . . . . . . . . . . . . . . . . . 32
Thermal Printing . . . . . . . . . . . . . . . . . . . . . . . . . . . . . . . . . . . . . . . . . . . . . . . . . . . . . . . . 32
Modes of Printing . . . . . . . . . . . . . . . . . . . . . . . . . . . . . . . . . . . . . . . . . . . . . . . . . . . . . . . 33
Print Media Types . . . . . . . . . . . . . . . . . . . . . . . . . . . . . . . . . . . . . . . . . . . . . . . . . . . . . . . 33
Determining Thermal Media Types. . . . . . . . . . . . . . . . . . . . . . . . . . . . . . . . . . . . . . . 35
Replacing Supplies . . . . . . . . . . . . . . . . . . . . . . . . . . . . . . . . . . . . . . . . . . . . . . . . . . . . . . 35
Adjusting the Print Width. . . . . . . . . . . . . . . . . . . . . . . . . . . . . . . . . . . . . . . . . . . . . . . . . . 35
Adjusting the Print Quality. . . . . . . . . . . . . . . . . . . . . . . . . . . . . . . . . . . . . . . . . . . . . . . . . 36
Media Sensing . . . . . . . . . . . . . . . . . . . . . . . . . . . . . . . . . . . . . . . . . . . . . . . . . . . . . . . . . 37
Printing on Fan-Fold Media. . . . . . . . . . . . . . . . . . . . . . . . . . . . . . . . . . . . . . . . . . . . . . . . 38
Printing with Externally Mounted Roll Media. . . . . . . . . . . . . . . . . . . . . . . . . . . . . . . . . . . 40
Fonts and Your Printer . . . . . . . . . . . . . . . . . . . . . . . . . . . . . . . . . . . . . . . . . . . . . . . . . . . 41
Identifying Fonts in Your Printer . . . . . . . . . . . . . . . . . . . . . . . . . . . . . . . . . . . . . . . . . 41
Localizing the Printer with Code Pages . . . . . . . . . . . . . . . . . . . . . . . . . . . . . . . . . . . 42
Asian fonts and Other Large Font Sets. . . . . . . . . . . . . . . . . . . . . . . . . . . . . . . . . . . . 42
Getting Asian Fonts . . . . . . . . . . . . . . . . . . . . . . . . . . . . . . . . . . . . . . . . . . . . . . . . . . 42
Stand Alone Printing . . . . . . . . . . . . . . . . . . . . . . . . . . . . . . . . . . . . . . . . . . . . . . . . . . . . . 43
Sending Files to the Printer. . . . . . . . . . . . . . . . . . . . . . . . . . . . . . . . . . . . . . . . . . . . . . . . 44
Print Meter . . . . . . . . . . . . . . . . . . . . . . . . . . . . . . . . . . . . . . . . . . . . . . . . . . . . . . . . . . . . 44
EPL Line Mode . . . . . . . . . . . . . . . . . . . . . . . . . . . . . . . . . . . . . . . . . . . . . . . . . . . . . . . . . 44
4 • Printer Options . . . . . . . . . . . . . . . . . . . . . . . . . . . . . . . . . . . . . . . . . . . . . . . . 45
Label Dispenser Option . . . . . . . . . . . . . . . . . . . . . . . . . . . . . . . . . . . . . . . . . . . . . . . . . . 46
Moveable Blackline Sensor Option . . . . . . . . . . . . . . . . . . . . . . . . . . . . . . . . . . . . . . . . . . 49
Adjusting the Moveable Sensor for Black Marks or Notches . . . . . . . . . . . . . . . . . . . 50
Adjusting the Moveable Sensor for Web (Gap) Sensing . . . . . . . . . . . . . . . . . . . . . . 52
Cutter Option. . . . . . . . . . . . . . . . . . . . . . . . . . . . . . . . . . . . . . . . . . . . . . . . . . . . . . . . . . . 53
Loading Media with the Cutter Option . . . . . . . . . . . . . . . . . . . . . . . . . . . . . . . . . . . . 54
ZebraNet® 10/100 Internal (Wired) Print Server Option . . . . . . . . . . . . . . . . . . . . . . . . . . 57
Printer Network Configuration Status Label . . . . . . . . . . . . . . . . . . . . . . . . . . . . . . . . 58
ZebraNet® Internal Wireless Print Server Option . . . . . . . . . . . . . . . . . . . . . . . . . . . . . . . 59
Printer Network Configuration Status Label . . . . . . . . . . . . . . . . . . . . . . . . . . . . . . . . 60
Bluetooth Option . . . . . . . . . . . . . . . . . . . . . . . . . . . . . . . . . . . . . . . . . . . . . . . . . . . . . . . . 61
Printer Network Configuration Status Label . . . . . . . . . . . . . . . . . . . . . . . . . . . . . . . . 61
RTC and Full Flash Memory Option . . . . . . . . . . . . . . . . . . . . . . . . . . . . . . . . . . . . . . . . . 64
Asian Fonts - Printer Accessory . . . . . . . . . . . . . . . . . . . . . . . . . . . . . . . . . . . . . . . . . . . . 65
Zebra® KDU — Printer Accessory . . . . . . . . . . . . . . . . . . . . . . . . . . . . . . . . . . . . . . . . . . 66
KDU Plus™ — Printer Accessory . . . . . . . . . . . . . . . . . . . . . . . . . . . . . . . . . . . . . . . . . . . 67
ZBI 2.0™ — Zebra Basic Interpreter . . . . . . . . . . . . . . . . . . . . . . . . . . . . . . . . . . . . . . . . 68
5 • Control Panel Operation . . . . . . . . . . . . . . . . . . . . . . . . . . . . . . . . . . . . . . . . . 69
LCD Display Overview . . . . . . . . . . . . . . . . . . . . . . . . . . . . . . . . . . . . . . . . . . . . . . . . . . . 70
Menu Customization and WML. . . . . . . . . . . . . . . . . . . . . . . . . . . . . . . . . . . . . . . . . . 70

xi
8/4/10 GX420d™ / GX430d™ User Guide 980611-001 Rev. C
Normal Operation Display. . . . . . . . . . . . . . . . . . . . . . . . . . . . . . . . . . . . . . . . . . . . . . . . . 71
Display Settings . . . . . . . . . . . . . . . . . . . . . . . . . . . . . . . . . . . . . . . . . . . . . . . . . . . . . . . . 71
Printer Settings . . . . . . . . . . . . . . . . . . . . . . . . . . . . . . . . . . . . . . . . . . . . . . . . . . . . . . . . . 72
802.11 WLAN Settings . . . . . . . . . . . . . . . . . . . . . . . . . . . . . . . . . . . . . . . . . . . . . . . . . . . 73
Bluetooth Settings. . . . . . . . . . . . . . . . . . . . . . . . . . . . . . . . . . . . . . . . . . . . . . . . . . . . . . . 73
6 • Maintenance . . . . . . . . . . . . . . . . . . . . . . . . . . . . . . . . . . . . . . . . . . . . . . . . . . . 75
Cleaning . . . . . . . . . . . . . . . . . . . . . . . . . . . . . . . . . . . . . . . . . . . . . . . . . . . . . . . . . . . . . . 76
Cleaning the Printhead . . . . . . . . . . . . . . . . . . . . . . . . . . . . . . . . . . . . . . . . . . . . . . . . 77
Media Path Considerations. . . . . . . . . . . . . . . . . . . . . . . . . . . . . . . . . . . . . . . . . . . . . 78
Platen Cleaning and Replacement . . . . . . . . . . . . . . . . . . . . . . . . . . . . . . . . . . . . . . . 80
Other Printer Maintenance . . . . . . . . . . . . . . . . . . . . . . . . . . . . . . . . . . . . . . . . . . . . . 81
Replacing the Printhead . . . . . . . . . . . . . . . . . . . . . . . . . . . . . . . . . . . . . . . . . . . . . . . . . . 82
7 • Troubleshooting . . . . . . . . . . . . . . . . . . . . . . . . . . . . . . . . . . . . . . . . . . . . . . . 85
Status Light Descriptions . . . . . . . . . . . . . . . . . . . . . . . . . . . . . . . . . . . . . . . . . . . . . . . . . 86
Status Light Error Resolutions . . . . . . . . . . . . . . . . . . . . . . . . . . . . . . . . . . . . . . . . . . . . . 87
Print Quality Problems . . . . . . . . . . . . . . . . . . . . . . . . . . . . . . . . . . . . . . . . . . . . . . . . . . . 89
Manual Calibration . . . . . . . . . . . . . . . . . . . . . . . . . . . . . . . . . . . . . . . . . . . . . . . . . . . . . . 92
Troubleshooting Tests. . . . . . . . . . . . . . . . . . . . . . . . . . . . . . . . . . . . . . . . . . . . . . . . . . . . 93
Printing a Configuration Label . . . . . . . . . . . . . . . . . . . . . . . . . . . . . . . . . . . . . . . . . . 93
Recalibration. . . . . . . . . . . . . . . . . . . . . . . . . . . . . . . . . . . . . . . . . . . . . . . . . . . . . . . . 93
Resetting the Factory Default Values . . . . . . . . . . . . . . . . . . . . . . . . . . . . . . . . . . . . . . . . 94
Communications Diagnostics . . . . . . . . . . . . . . . . . . . . . . . . . . . . . . . . . . . . . . . . . . . . . . 94
Feed Button Modes. . . . . . . . . . . . . . . . . . . . . . . . . . . . . . . . . . . . . . . . . . . . . . . . . . . . . . 96
A • Appendix: Interface Wiring . . . . . . . . . . . . . . . . . . . . . . . . . . . . . . . . . . . . . . 99
Universal Serial Bus (USB) Interface . . . . . . . . . . . . . . . . . . . . . . . . . . . . . . . . . . . . . . . 100
Parallel Interface. . . . . . . . . . . . . . . . . . . . . . . . . . . . . . . . . . . . . . . . . . . . . . . . . . . . . . . 101
Ethernet Interface . . . . . . . . . . . . . . . . . . . . . . . . . . . . . . . . . . . . . . . . . . . . . . . . . . . . . . 102
Serial Port Interface . . . . . . . . . . . . . . . . . . . . . . . . . . . . . . . . . . . . . . . . . . . . . . . . . . . . 103
B • Appendix: Dimensions . . . . . . . . . . . . . . . . . . . . . . . . . . . . . . . . . . . . . . . . . 105
External GX Printer Dimensions . . . . . . . . . . . . . . . . . . . . . . . . . . . . . . . . . . . . . . . . . . . 106
C • Appendix: ZPL Configuration . . . . . . . . . . . . . . . . . . . . . . . . . . . . . . . . . . . 109
Managing the ZPL Printer Configuration. . . . . . . . . . . . . . . . . . . . . . . . . . . . . . . . . . . . . .110
ZPL Configuration Status to Command Cross-reference . . . . . . . . . . . . . . . . . . . . . . . . .111
Printer Memory Management and Related Status Reports . . . . . . . . . . . . . . . . . . . . . . .114
ZPL Programming for Memory Management . . . . . . . . . . . . . . . . . . . . . . . . . . . . . . .114

xii
980611-001 Rev. C GX420d™ / GX430d™ User Guide 8/4/10
Notes • ___________________________________________________________________
__________________________________________________________________________
__________________________________________________________________________
__________________________________________________________________________
__________________________________________________________________________
__________________________________________________________________________
__________________________________________________________________________
__________________________________________________________________________
__________________________________________________________________________
__________________________________________________________________________

Introduction
GX Series Thermal Printers
2
980611-001 Rev. C GX420d™ / GX430d™ User Guide 8/4/10
GX Series Thermal Printers
The Zebra
®
GX models are the Best in Class™ desktop thermal printer with the widest range
of features. The GX420d™ printer provides direct thermal printing at speeds up to 6 ips
(inches per second) at a 203 dpi (dots per inch) print density. The GX430d™ printer provide
direct thermal printing at speeds up to 4 ips at a 300 dpi print density. Both the GX420d™ and
GX430d™ support both ZPL™ and EPL™ Zebra printer programming languages and a wide
variety of interface and feature options.
The G-Series™ printer features:
• Automatic printer language detection and switching between ZPL and EPL programming
and label formats.
• OpenAccess™ design for simplified media loading.
• The industry’s easiest ribbon loading design.
• Color-coded operator controls and media guides.
• Zebra™ Global Printing Solution – supports Microsoft Windows keyboard encoding (and
ANSI), Unicode UTF-8 and UTF 16 (Unicode Transformation Formats), XML, ASCII (7
and 8 bit used by legacy programs and systems), basic single and double byte font
encoding, JIS and Shift-JIS (Japanese International Standards), Hexadecimal encoding,
and custom character mapping (DAT table creation, font linking, and character
remapping).
• On–The –Fly OpenType and TrueType font scaling and import, Unicode, preloaded Swiss
721 Latin 1 font, one resident scalable font, and a selection of resident bitmap fonts.
• Improved printer performance: faster print speeds and a 32-bit processor.
• Adaptive auto serial port cable sensing and configuration for plug-and-play integration.
• A complete suite of free software applications and drivers to configure printer settings,
design and print labels and receipts, get printer status, import graphics and fonts, send
programming commands, update firmware, and download files. Clone printer settings and
send graphics, files, fonts, and firmware (updates) to one or more Zebra
®
Ethernet and
locally connected printers with ZebraNet™ Bridge.
• Printhead test and maintenance reporting enabled and customizable by the user.
• The G-Series™ direct thermal printer models also include support for Line Mode printing
to support EPL1 legacy programming based printing applications.
The GX printers offer a wide range of printer options:
• Label Dispense (Peel-Off).
• Internal 10/100 Print Server and Ethernet Interface.
• Wi-Fi (802.11b/g) with user display.
• Bluetooth with user display.
• Moveable Blackline Sensor: A full width moveable black mark sensor and multi position
transmissive (label gap) sensor.”
• General purpose media cutter.
• On-board RTC (Real Time Clock) and 68MB Full Flash memory
(12MB Full Flash Memory prior to July 24, 2009).

3
Introduction
GX Series Thermal Printers
8/4/10 GX420d™ / GX430d™ User Guide 980611-001 Rev. C
• Asian Language support with printer configuration options for the large Simplified and
Traditional Chinese, Japanese, or Korean character sets.
• Zebra
®
ZBI™ 2 (Zebra BASIC Interpreter) programming language. ZBI allows you to
create custom printer operations that can automate processes, use peripherals (i.e.
scanners, scales, keyboards, Zebra
®
KDU or KDU Plus™, etc.) all without being attached
to a PC or network.
This users guide provides all the information you need to operate your printer on a daily basis.
To create label formats, refer to your programming guides or label design applications such as
ZebraDesigner™.
Your printer, when connected to a host computer, functions as a complete system for printing
labels and tags.
Note •
Many printer settings may also be controlled by your printer’s driver or label design
software. Refer to the driver or software documentation for more information.

Introduction
What’s in the Box?
4
980611-001 Rev. C GX420d™ / GX430d™ User Guide 8/4/10
What’s in the Box?
Save the carton and all packing materials in case you need to ship or store the printer later.
After unpacking, make sure you have all parts. Follow the procedures for inspecting the
printer to familiarize yourself with printer parts so you can follow the instructions in this book.
Unpack and Inspect the Printer
When you receive the printer, immediately unpack it and inspect for shipping damage.
• Save all packing materials.
• Check all exterior surfaces for damage.
• Open the printer and inspect the media compartment for damage to components.
If you discover shipping damage upon inspection:
• Immediately notify the shipping company and file a damage report. Zebra
Technologies Corporation is not responsible for any damage to the printer incurred
during shipment, and will not cover the repair of this damage under its warranty
policy.
• Keep all packaging material for shipping company inspection.
• Notify your authorized Zebra
®
reseller.
Power Cord
varies by locale or region
Documentation
and Software
Power
Supply
USB Cable
Printer
Cleaning
Pen

5
Introduction
What’s in the Box?
8/4/10 GX420d™ / GX430d™ User Guide 980611-001 Rev. C
Your Printer
Opening the printer
To access the media compartment, you must open the printer. Pull the release latches towards
you and lift the cover. Check the media compartment for loose or damaged components.
Interface
Connectors
Feed
Button
Status
Light
Release
Latches
Release
Latches
DC Power
Receptacle Power
Switch
Fan-Fold
Media
Entry Slot
Caution • The discharge of electrostatic energy that accumulates on the surface of the
human body or other surfaces can damage or destroy the printhead or electronic
components used in this device. You must observe static-safe procedures when working
with the printhead or the electronic components under the top cover.

7
Introduction
What’s in the Box?
8/4/10 GX420d™ / GX430d™ User Guide 980611-001 Rev. C
Moveable Blackline
Sensor (Option)
Media Cutter
(Option)

Introduction
What’s in the Box?
8
980611-001 Rev. C GX420d™ / GX430d™ User Guide 8/4/10
Wireless Printer Display and Controls
(Wi-Fi and Bluetooth Options)

9
Introduction
What’s in the Box?
8/4/10 GX420d™ / GX430d™ User Guide 980611-001 Rev. C
Operator Controls
Power Switch
Press up to turn ON or down to turn OFF the printer.
Feed Button
• Tap the Feed button once to force the printer to feed one blank label.
• Press the Feed button to take “pause” condition. The the printer out of a printer is put into
“pause” by either a programming command or an error condition. See What the Status
Light is Telling You on page 86 in the Troubleshooting chapter.
• Use the Feed button for printer setup and status (see Feed Button Modes on page 96 in the
Troubleshooting chapter).
Scroll Button (Wireless Printers Only)
Press the Scroll button to step through the menu, displayed printer parameters or settings.
Select Button (Wireless Printers Only)
Press the Select button to choose a menu branch or select a printer setting.
Caution • The printer power should be turned off before connecting or disconnecting the
communications and power cables.
Power OFF Power ON
Power Switch
Power Switch

Introduction
What’s in the Box?
10
980611-001 Rev. C GX420d™ / GX430d™ User Guide 8/4/10
Status Light
Located on the top case next to the feed button, the status light functions as a printer
operational indicator (see Status Light Descriptions on page 86).
Wireless Printer Display and Controls (Wi-Fi and Bluetooth Options)
Feed
Button
Status
Light
Feed Button
Scroll Button Select Button
Display Status Light

11
Introduction
What’s in the Box?
8/4/10 GX420d™ / GX430d™ User Guide 980611-001 Rev. C
Closing the printer
1.
Lower the top cover.
2.
Press down until the cover snaps closed.

Introduction
What’s in the Box?
12
980611-001 Rev. C GX420d™ / GX430d™ User Guide 8/4/10
Notes • ___________________________________________________________________
__________________________________________________________________________
__________________________________________________________________________
__________________________________________________________________________
__________________________________________________________________________
__________________________________________________________________________
__________________________________________________________________________
__________________________________________________________________________
__________________________________________________________________________
__________________________________________________________________________

8/4/10 GX420d™ / GX430d™ User Guide 980611-001 Rev. C
2
Getting Started
This section describes how to set up your printer for the first time and use the most common
operating procedures for loading media.
Contents
Attaching Power . . . . . . . . . . . . . . . . . . . . . . . . . . . . . . . . . . . . . . . . . . . . . . . . . . . . . . . . 14
Loading Roll Media . . . . . . . . . . . . . . . . . . . . . . . . . . . . . . . . . . . . . . . . . . . . . . . . . . . . . 15
Printing a Test (Printer Configuration) Label . . . . . . . . . . . . . . . . . . . . . . . . . . . . . . . . . . 19
Printing a Test (Printer Configuration) Label . . . . . . . . . . . . . . . . . . . . . . . . . . . . . . . . . . 19
Pre-install Windows® Printer Drivers . . . . . . . . . . . . . . . . . . . . . . . . . . . . . . . . . . . . . . . . 20
Connecting your Printer to a Computer . . . . . . . . . . . . . . . . . . . . . . . . . . . . . . . . . . . . . . 22
After Your Printer is Connected . . . . . . . . . . . . . . . . . . . . . . . . . . . . . . . . . . . . . . . . . . . . 28
Getting Started
Attaching Power
14
980611-001 Rev. C GX420d™ / GX430d™ User Guide 8/4/10
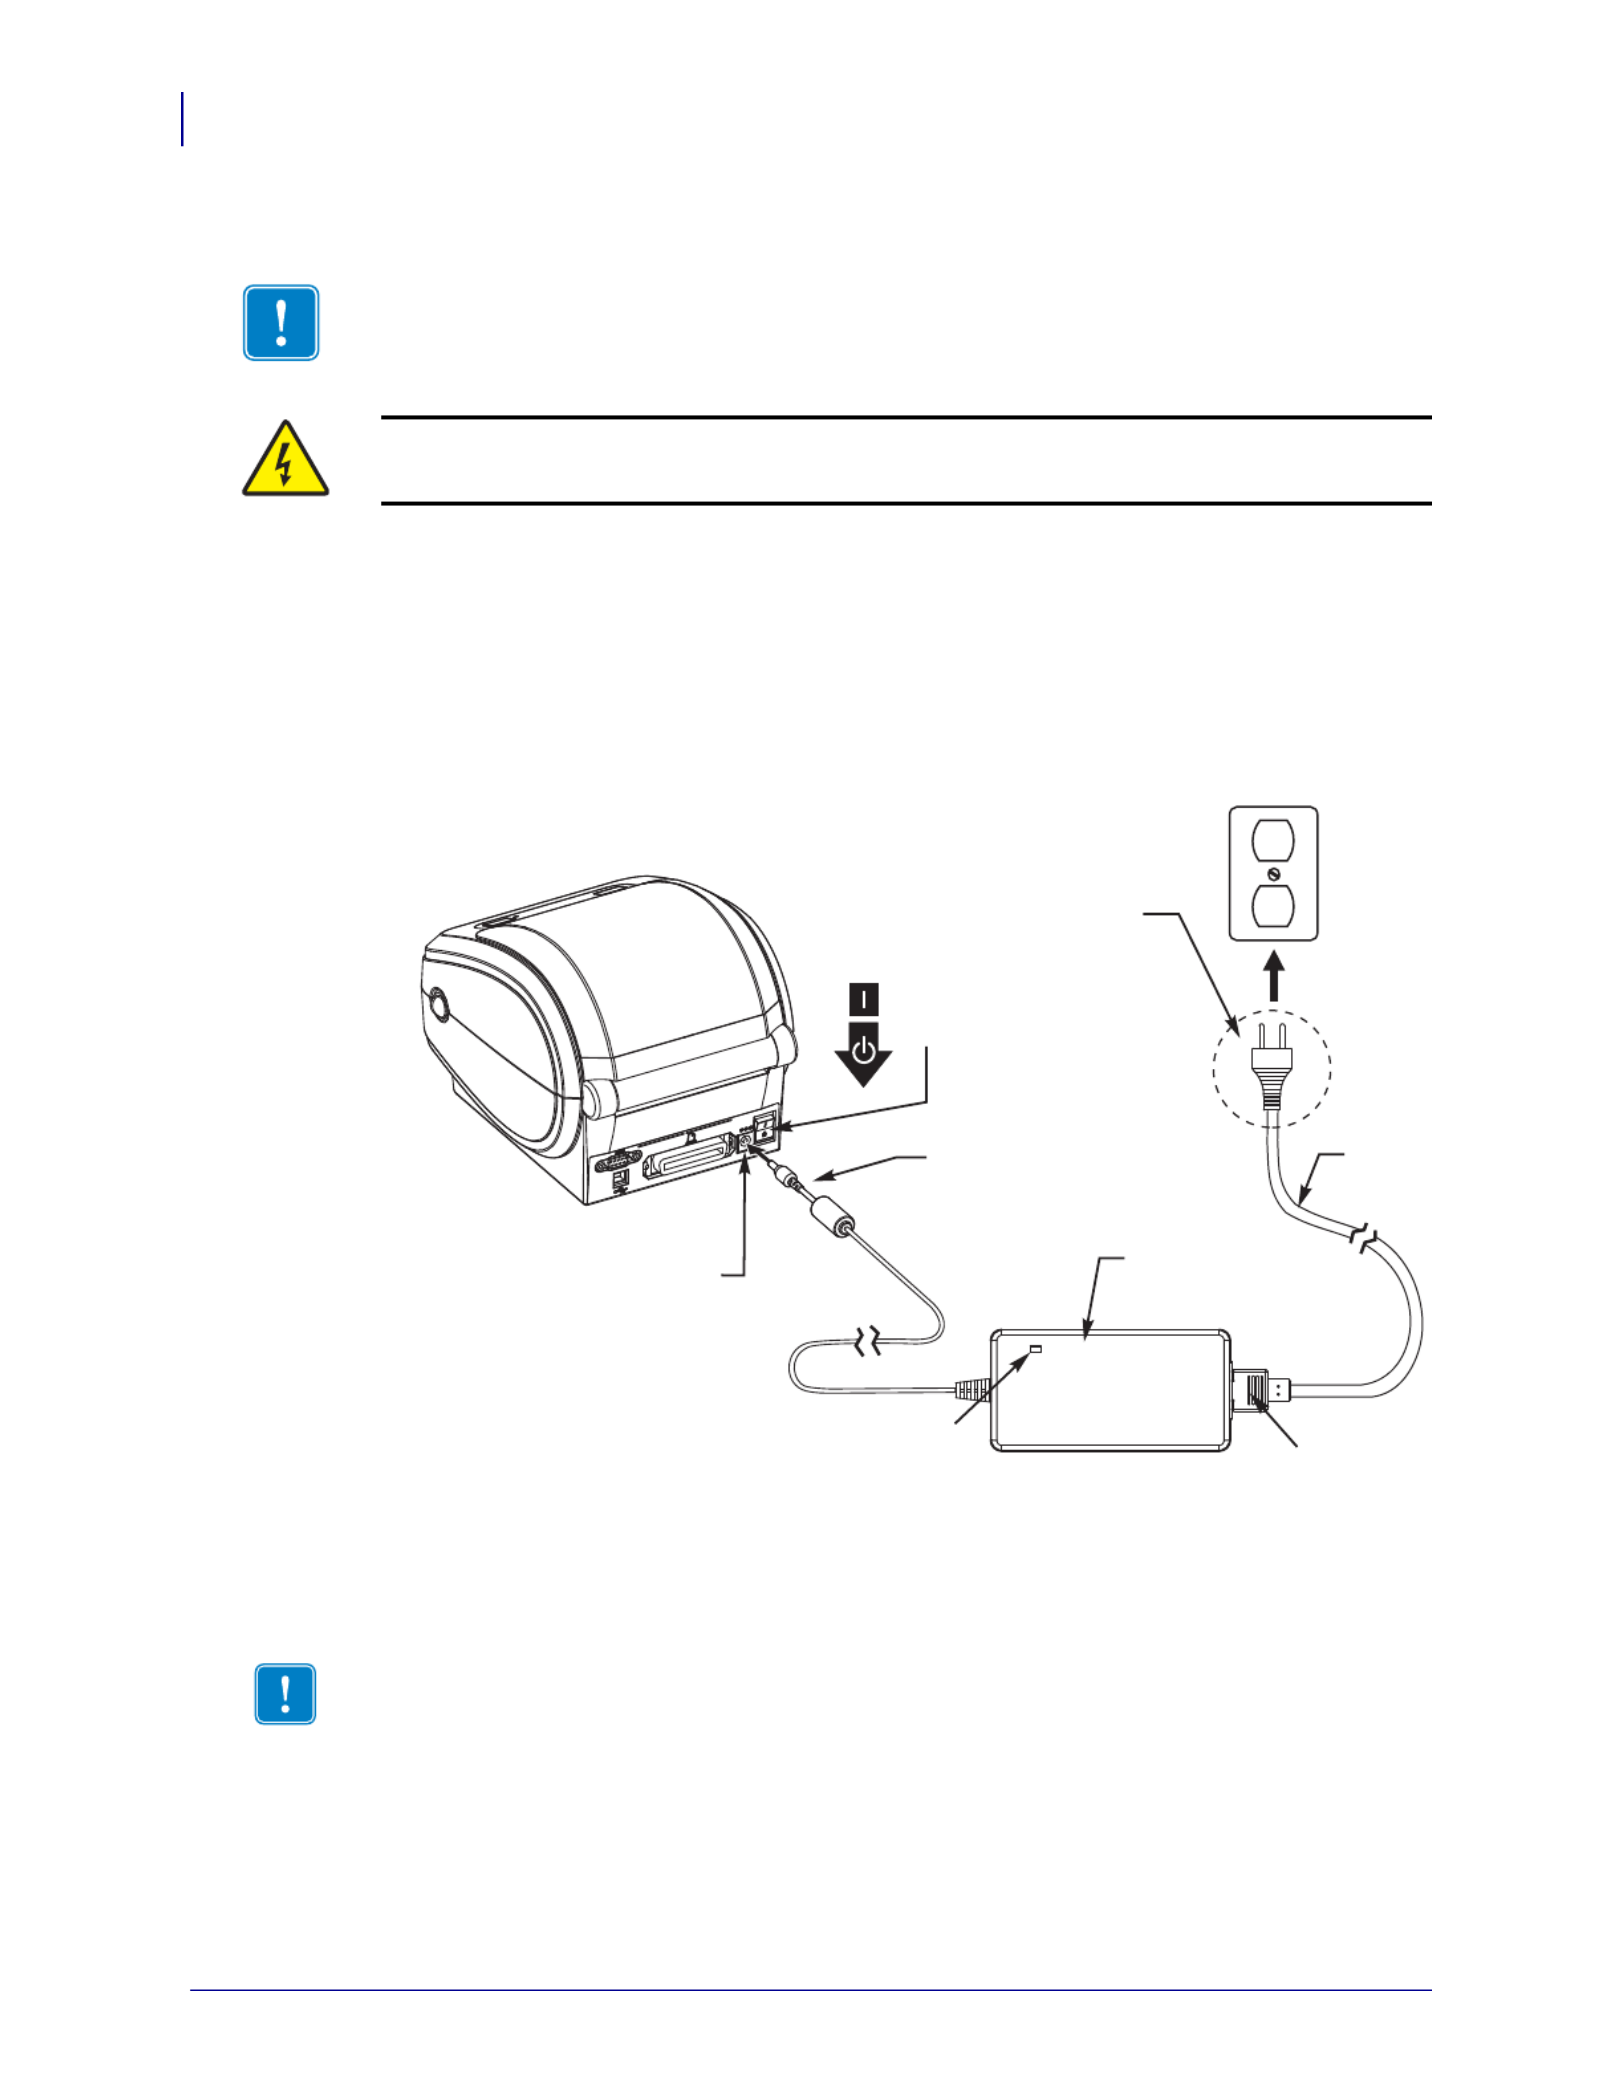
Attaching Power
1.
Make sure the printer’s power switch is in the off position (down).
2.
Insert the AC power cord into the power supply.
3.
Plug the other end of the cord into an appropriate AC electrical outlet. Note: The active
power light will go on if power is on at the AC outlet.
4.
Insert the power supply’s power connector into the printer’s power receptacle.
Important •
Set up your printer so that you can handle the power cord easily if needed. To
make certain the printer cannot carry electrical current, you must separate the power cord
from the power supply receptacle or AC electrical outlet.
Caution • Never operate the printer and power supply in an area where they can get wet.
Serious personal injury could result!
Power
Connector
Power
Switch
Plug Varies
by Country
Active Power Light
Power
Receptacle
AC
Power
Cord
Printer
Power
Supply
IEC 60320
C-13
Note • Ensure the appropriate power cord with a three (3) prong plug and an IEC 60320-C13
connector are used at all times. These power cords must bear the relevant certification mark of
the country in which the product is being used.
15
Getting Started
Loading Roll Media
8/4/10 GX420d™ / GX430d™ User Guide 980611-001 Rev. C
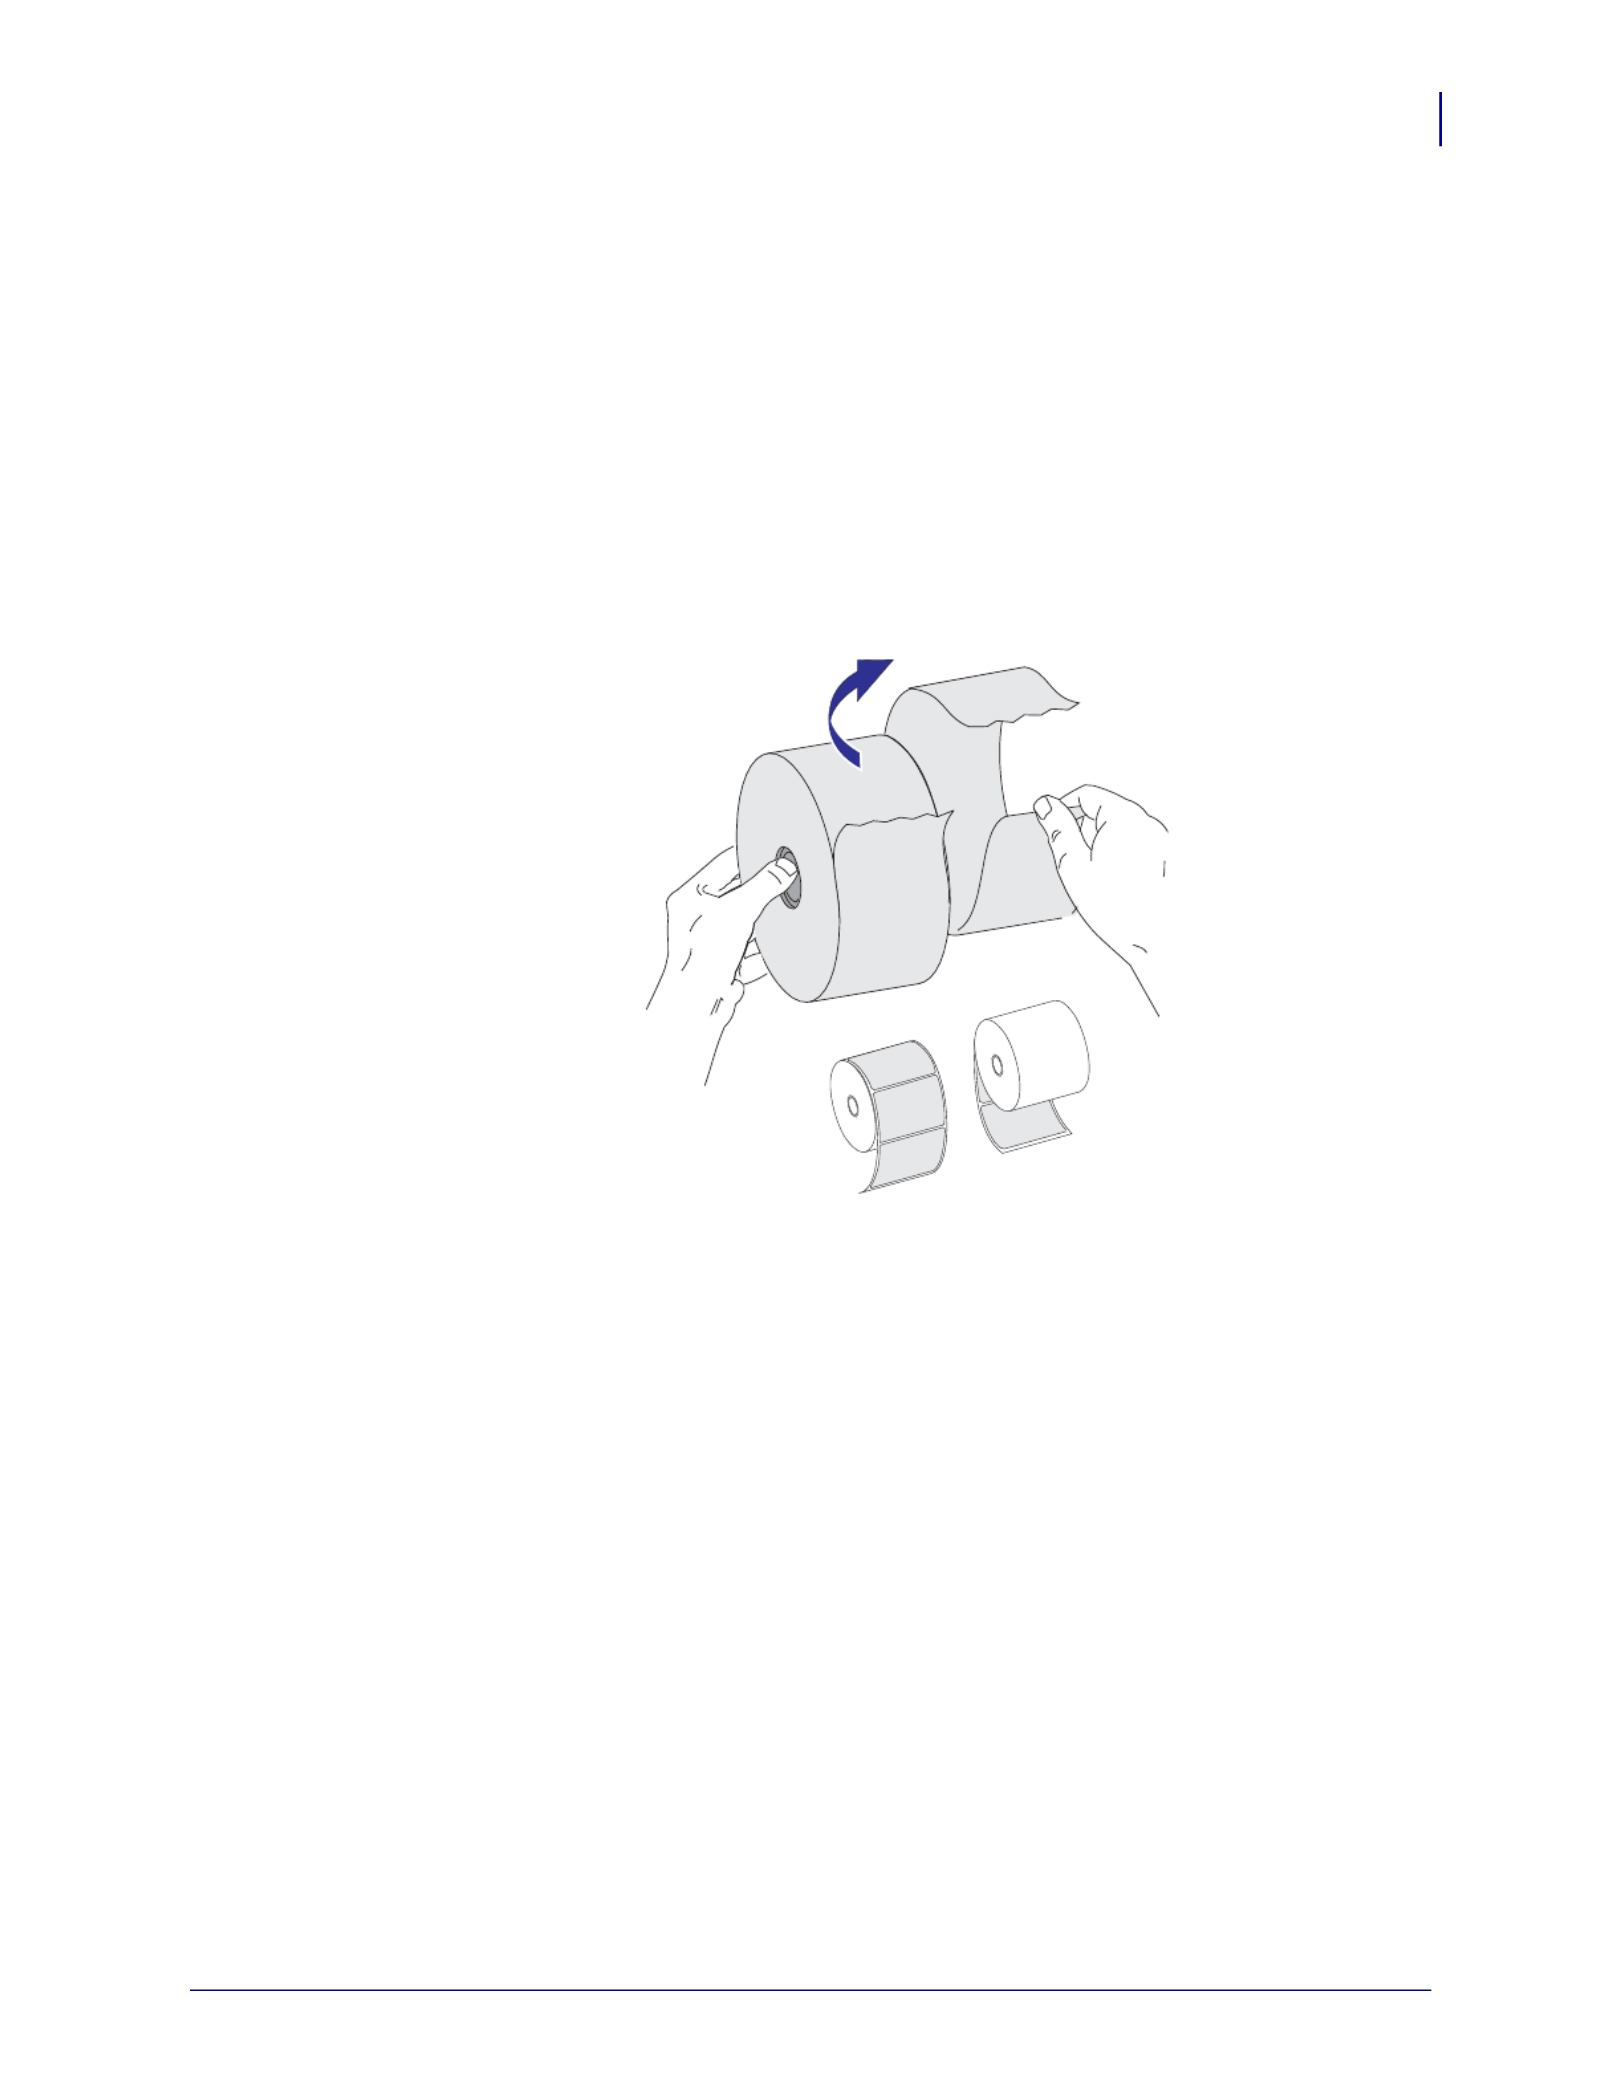
Loading Roll Media
When you load media, you must place the roll onto the media hangers.
You must use the correct media for the type of printing you require.
Preparing Media
Whether your roll media is inside or outside wound, you load it into the printer the same way.
• Remove the outside length of media. During shipment, handling, or storage, the roll may
become dirty or dusty. Removing the outside length of media avoids dragging adhesive or
dirty media between the printhead and platen.

Getting Started
Loading Roll Media
16
980611-001 Rev. C GX420d™ / GX430d™ User Guide 8/4/10
Placing the Roll in the Media Compartment
1.
Open the printer. Remember that you need to pull the release latch levers toward the front
of the printer.
2.
Open the media roll holders. Pull the media guides open with your free hand and place the
media roll on the roll holders and release the guides. Orient the media roll so that its
printing surface will face up as it passes over the platen (drive) roller.

17
Getting Started
Loading Roll Media
8/4/10 GX420d™ / GX430d™ User Guide 980611-001 Rev. C
3.
If your printer includes the moveable blackline sensor option, verify that the sensor is
aligned in the center default position. This is the standard operating position for media
sensing. When the sensor is moved from the default label web (gap) sensing area, the
printer will only detect blackline, black mark and die-cut notched media. See Moveable
Blackline Sensor Option on page 49 for more details on adjusting this sensor option.
Printer Optional:
Moveable
Blackline Sensor
Off Center
Blackline Sensing Only
Default - Gap (Web) Sensing
Standard Operating Position

19
Getting Started
Printing a Test (Printer Configuration) Label
8/4/10 GX420d™ / GX430d™ User Guide 980611-001 Rev. C
Printing a Test (Printer Configuration) Label
Before you connect the printer to your computer, make sure that the printer is in proper
working order.
You can do this by printing a configuration status label.
1.
Make sure the media is properly loaded and the top cover of the printer is closed. Then,
turn the printer powe . If the printer inr on if you have not already done so itializes with the
status light blinking green (pause mode), press the Feed button once to set the printer in
Ready (to print) mode. See the Troubleshooting on page 85 if the printer’s status light
does not turn solid green (Ready).
2.
Press the Feed button two to three times to allow the printer to calibrate the printer for the
installed media. The printer may feed several labels during this process.
3.
When the status light is solid green, press and hold the Feed button until the status light
flashes once.
4.
Release the Feed button. A configuration label will print.
If you cannot get this label to print, refer to Getting Started on page 13.

Getting Started
Pre-install Windows® Printer Drivers
20
980611-001 Rev. C GX420d™ / GX430d™ User Guide 8/4/10
Pre-install Windows
®
Printer Drivers
Zebra is changing the way you install and use your printer with your Windows based PC
systems. We recommend that at minimum, the ZebraDesigner™ Windows
®
driver be pre-
installed to take advantage of the advancements in ease of use and simplicity of the Windows
operating systems since the release of Windows XP
®
SP2.
Zebra provides the Zebra Setup Utilities (ZSU); a suite of Zebra
®
printer drivers, utilities, and
communications and installation tools for use with most Windows PC operating systems.
Zebra Setup Utilities and Zebra Windows printer drivers are available on the user’s CD and the
Zebra web site (www.zebra.com) for latest versions.
ZebraDesigner™ Driver and Zebra Setup Utilities (includes the driver): Supports
Windows 7
®
, Windows Vista
®
, Windows XP
®
, Windows
®
2000
®
, Windows Server
®
2008,
and Windows Server
®
2003 operating systems. The driver supports 32 bit and 64 bit Windows
operating systems and is Microsoft Certified. Zebra Setup Utilities and the ZebraDesigner
driver support the following G-Series printer communication interfaces: USB, parallel, serial,
Wired and Wireless Ethernet and Bluetooth (using a Bluetooth virtual printer port).
Install the Zebra Setup Utilities before applying power to the printer connected to the PC
(running a Zebra driver supported Windows operating system). The Zebra Setup Utility will
prompt you to apply the printer power. Continue to follow the instructions to complete your
printer installation.
Plug’N’Play (PnP) Printer Detection and Windows
®
operating systems
More recent Windows operating systems automatically detect the printer when it is connected
via the USB interface. Depending on the hardware configuration and the Windows version,
your printer may be Plug-and-Play (PnP) detected when connecting to the USB, parallel, or
serial port interfaces. The printer drivers do not support serial port PnP installation at this
time.The printer’s PC interface configuration for the parallel port must support and have
bidirectional communications for PnP operations.
The operating system automatically starts a “Add new hardware’ wizard when connecting the
printer for the first time to the PC. If you have pre-loaded the driver suite with the Zebra Setup
Utility, then the printer driver will automatically install. Go to your Windows printer directory
and right-click and select ‘Properties’. Click on the ‘Print test page’ button to verify a
successful installation.
The Windows operating system will detect and re-link a previously installed printer if it is
reconnected to the USB interface or if printer power is turned on after the PC has finished its
restart of the operating system. Ignore the new device detected warnings and close the Task bar
prompts. Wait several seconds for the operating system to match the printer to the driver
software. The warnings will quit and the printer now should be ready to begin printing.
Universal Serial Bus (USB) Device Communications
The printer is a terminal device (not a host or hub) when using a USB interface. You can refer
to the USB Specification for details regarding this interface.
Note •
Scanners, scales or other data input (terminal) devices must use the serial port (not the
USB port) to send data to the printer.

21
Getting Started
Pre-install Windows® Printer Drivers
8/4/10 GX420d™ / GX430d™ User Guide 980611-001 Rev. C
Serial Port and Windows
®
operating systems
The Windows operating system default settings for the serial port communication closely
match the printer’s defaults settings with one exception; the data Flow Control settings. The
Windows default data Flow Control setting is NONE. The G-Series printer requires data Flow
Control set to Hardware.
Ethernet
This printer option has a variety of methods and utilities to assist with printer connection to a
network (WAN or LAN) and to configure Wired and Wireless (WiFi) printers. The Zebra
Setup Utility configuration wizards support creating a connection to the printer on a shared
network with Windows based systems by using the printer’s IP address. The printer includes
internal Web pages to provide easy access to printer and network configuration. The web
pages are accessible via the printers IP address using any web browser. The free version of
ZebraNet™ Bridge software allows you to centrally deploy, manage, and monitor your Zebra
®
printers with automatic Zebra
®
printer discovery up to 3 printers from a single PC screen
anywhere on your global network. ZebraNet™ Bridge Enterprise is available for purchase to
manage larger numbers of Zebra
®
printers.
Note • The G-Series™ printer does not support Windows
®
Serial Port Plug and Play (PnP)
device detection at this time.

Getting Started
Connecting your Printer to a Computer
22
980611-001 Rev. C GX420d™ / GX430d™ User Guide 8/4/10
Connecting your Printer to a Computer
The Zebra
®
G-Series™ printers support a variety of interface options and configurations.
These include: Universal Serial Bus (USB) interface, RS232 Serial, Parallel (IEEE 1284.4)
and 10/100 Ethernet.
• USB, Serial and Parallel
• Optional: USB, Serial, and Ethernet (Wired)
• Optional: USB, Serial, and Ethernet (Wireless-WiFi) with LCD display
• Optional: USB, Serial, and Bluetooth with LCD display
The Zebra Setup Utility is designed to assist you with installing these interfaces. The
cabling and unique parameters for each of these physical printer communication interfaces is
discussed in the following pages to assist you with making configuration setup choices prior to
and immediately following applying power. The Zebra Setup Utilities configuration wizards
will instruct you to turn the printer’s power on at the appropriate time to complete the
installation of your printer.
For Connecting to Wireless Communication Interfaces:
• Wi-Fi (Ethernet), see the ZebraNet® 10/100 Internal Print Server manual.
• Bluetooth, see the Bluetooth Option on page 61.
Interface Cable Requirements
Data cables must be of fully shielded construction and fitted with metal or metallized
connector shells. Shielded cab ed to prevent radiation and les and connectors are requir
reception of electrical noise.
To minimize electrical noise pickup in the cable:
• Keep data cables as short as possible (6 foot [1.83 m] recommended).
• Do not tightly bundle the data cables with power cords.
• Do not tie the data cables to power wire conduits.
.
Caution • Keep the power switch in the OFF position when attaching the interface cable.
The power cord must be inserted into the power supply and the power receptacle on the
back of the printer before connecting or disconnecting the communications cables.
Important •
This printer complies with FCC “Rules and Regulations,” Part 15, for Class B
Equipment, using fully shielded data cables. Use of un-shielded cables may increase radiated
emissions above the Class B limits.

23
Getting Started
Connecting your Printer to a Computer
8/4/10 GX420d™ / GX430d™ User Guide 980611-001 Rev. C
USB Interface Requirements
Universal Serial Bus (version 2.0 compliant) provides a fast interface that is compatible with
your existing PC hardware. USB’s “plug and play” design makes installation easy. Multiple
printers can share a single USB port/hub.
When using a USB cable (not supplied with your printer), verify that the cable or cable
packaging bears the “Certified USB™” mark (see below) to guarantee USB 2.0 compliance.
.
USB Cable
27
Getting Started
Connecting your Printer to a Computer
8/4/10 GX420d™ / GX430d™ User Guide 980611-001 Rev. C
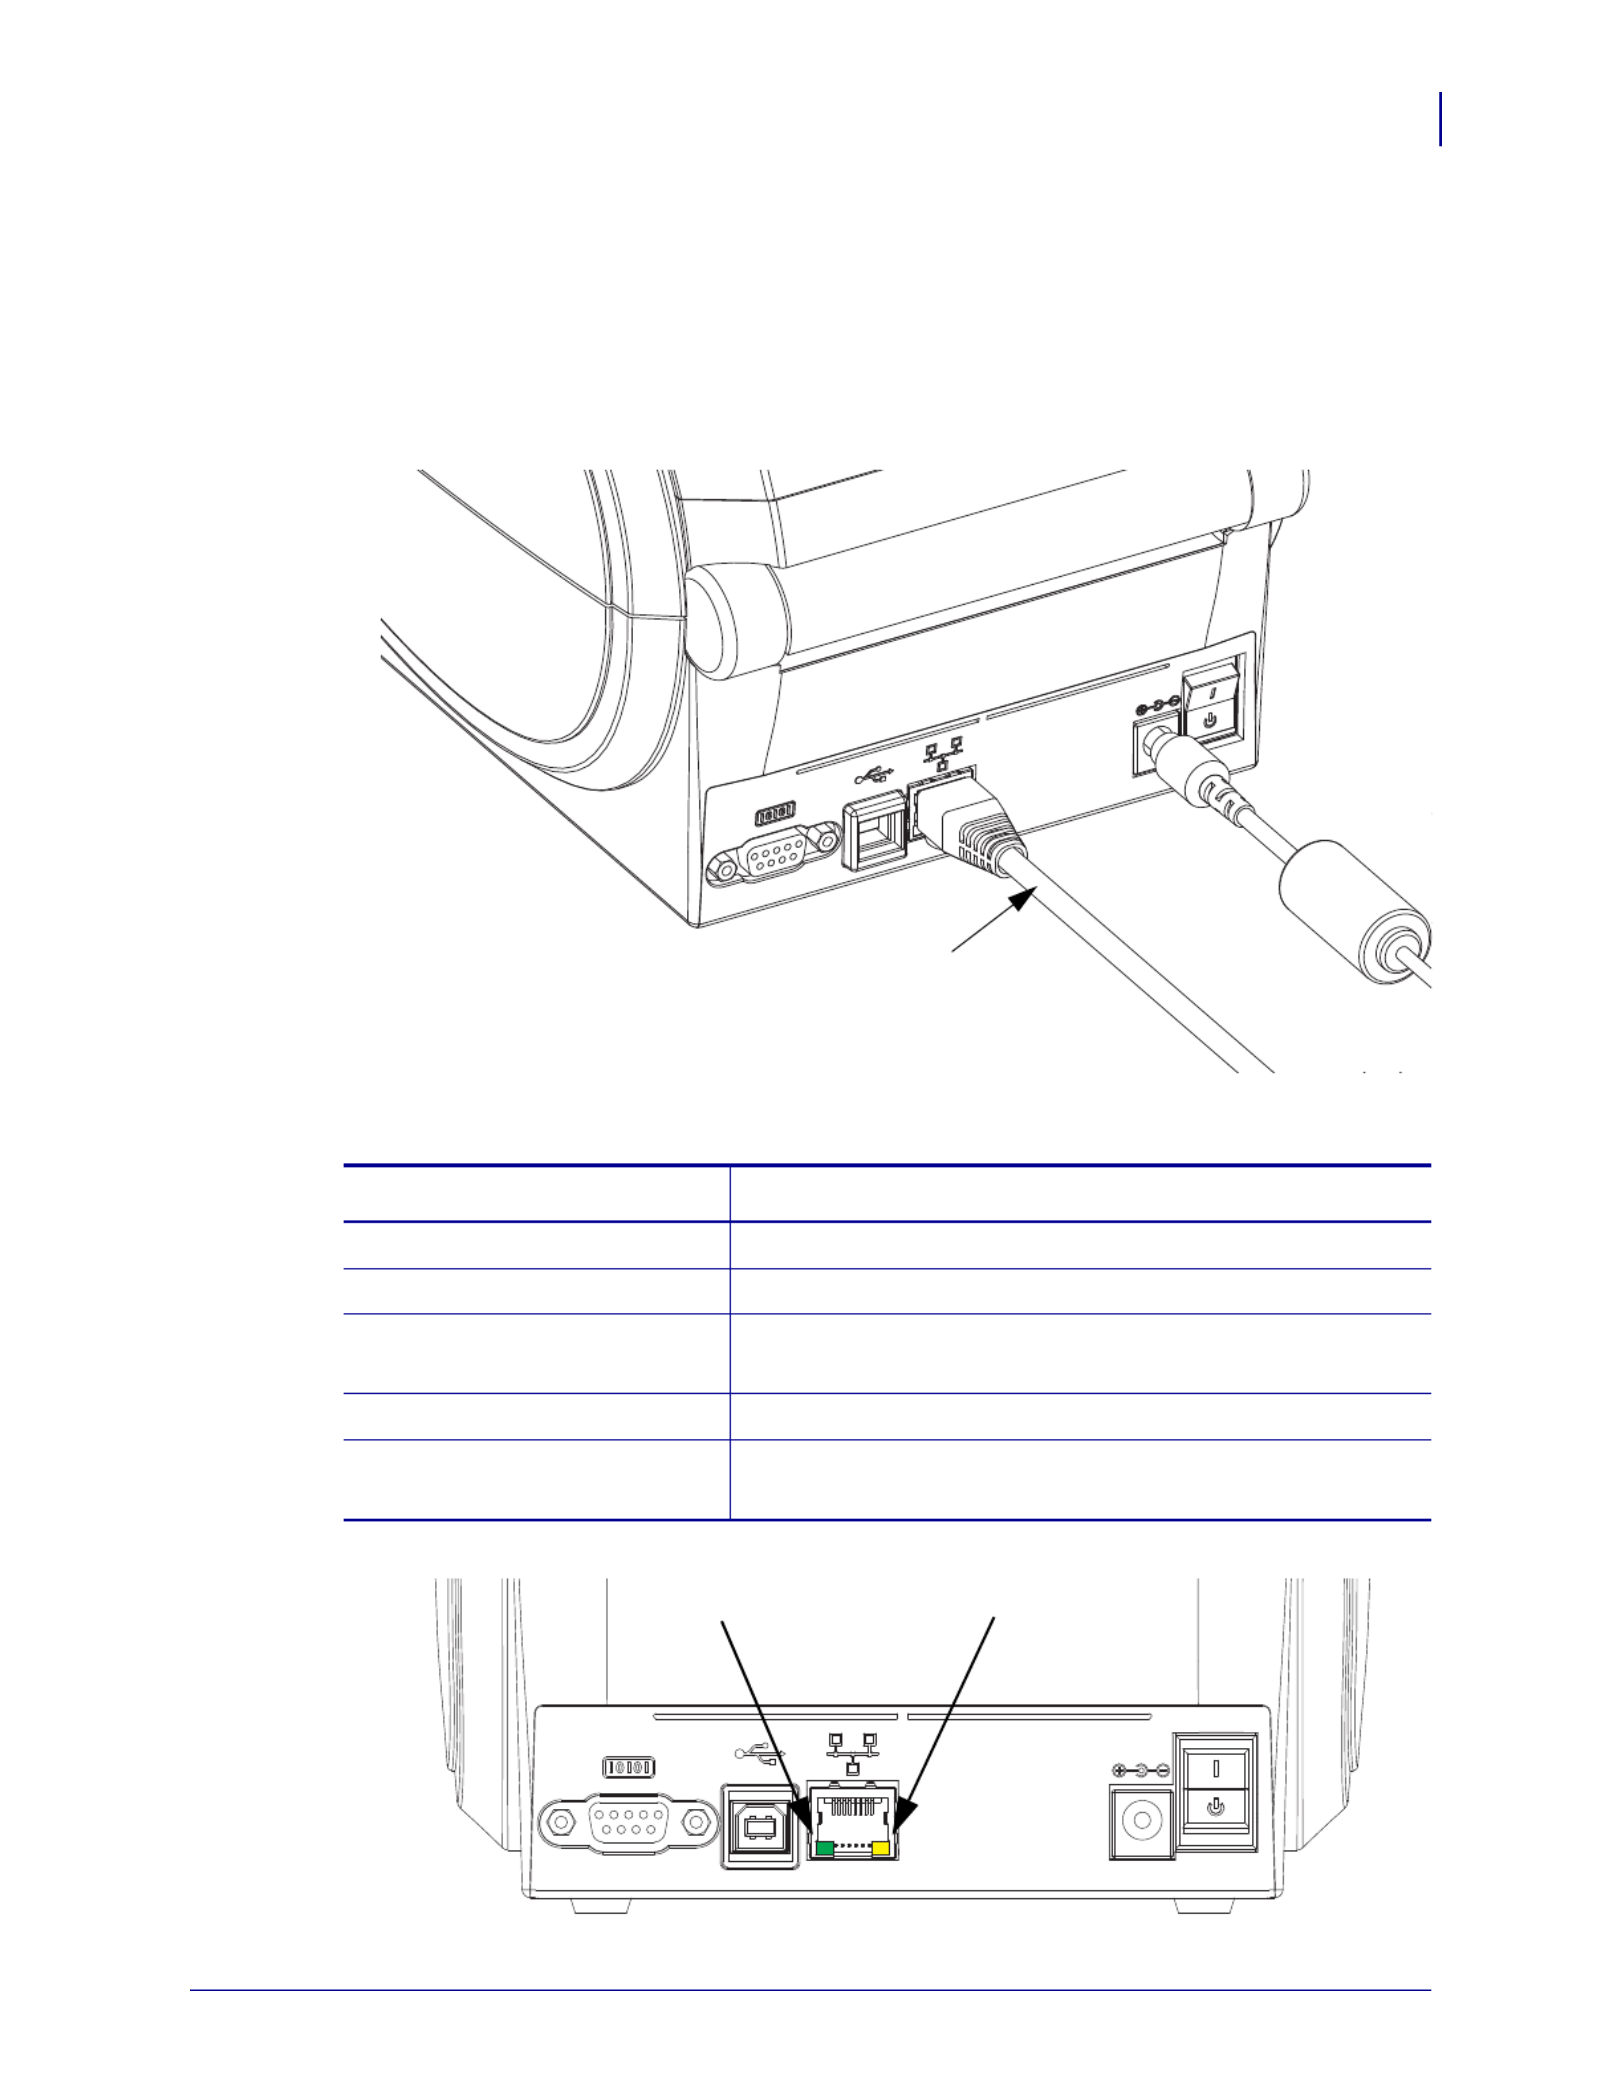
Ethernet
The printer requires UTP RJ45 Ethernet cable rated CAT-5 or better.
For more information on configuring your printer to run on a compatible Ethernet based
network, see the ZebraNet® 10/100 Internal Print Server manual. The printer must be
configured to run on your LAN (local area network) or WAN (wide area network). The print
server on board your printer can be accessed through the printer’s Web pages.
Ethernet Status/Activity Indicators
Ethernet Cable
(RJ45 Connector)
LED Status Description
Both OFF No Ethernet link detected
Green 100 Mbps link detected
Green with the Amber
flickering on and off
100 Mbps link and Ethernet activity detected
Amber 10 Mbps link detected
Amber with the Green
flickering on and off
10 Mbps link and Ethernet activity detected
Green LED Amber LED

Getting Started
After Your Printer is Connected
28
980611-001 Rev. C GX420d™ / GX430d™ User Guide 8/4/10
After Your Printer is Connected
Now that you have basic communication to your printer, you may want to test printer
communications and then install other printer related applications, drivers or utilities.
Testing Communications by Printing
Verifying the print system’s operation is a relatively simple process. For Windows operating
systems, the Zebra Setup Utility or the Windows ‘Printers and Faxes’ Control Panel to access
and print a test label. For non-Windows operation systems, coping a basic ASCII text file with
a single command (~WC) to print a configuration status label.
Test Printing with Zebra Setup Utility:
1.
Open the Zebra Setup Utility.
2.
Click on the newly install printer’s icon to select the printer and active the printer
configuration buttons below it in the window.
3.
Click the ‘Open Printer Tools’ button.
4.
In the ‘Print’ tab window, click on the ‘Print configuration label’ line and click on the
‘Send’ button. The printer should print a configuration status label.
Test Printing with Windows ‘Printer and Faxes’ menu:
1.
Click on the Windows ‘Start’ menu button, to access the ‘Printers and Faxes’ menu or
‘Control Panel’ to access the ‘Printers and Faxes’ menu. Open the menu.
2.
Select the newly install printer’s icon to select the printer and right-click the mouse to
access the printer ‘Properties’ menu.
3.
From the printer’s ‘General’ tab window, click on the ‘Print Test Page’ button. The printer
should print a Windows test print page.
Test Print on a Ethernet printer connected to a network (LAN or WAN) with a
(MS-DOS) ‘Command Prompt’ (or ‘Run’ from the Windows XP Start menu):
1.
Create a text file with the following ASCII three characters: ~WC
2.
Save the file as: TEST.ZPL (an arbitrary file name and extension name).
3.
Read the IP address off the printer’s Configuration Status Label’s Network Status printout.
On a system that is connected to the same LAN or WAN as the printer, type the following
in the Web browser window’s address bar and enter:
fpt (IP address)
(for IP address 123.45.67.01 it would be: ftp 123.45.67.01)
4.
Type the word ‘put’ followed by the file name and enter. For this ‘test print’ file, it would
be: put TEST.ZPL
The printer should print a new Print Configuration Status label.

29
Getting Started
After Your Printer is Connected
8/4/10 GX420d™ / GX430d™ User Guide 980611-001 Rev. C
Test Print with a Copied ZPL Command File for Non-Windows Operating Systems:
1.
Create a text file with the following ASCII three characters: ~WC
2.
Save the file as: TEST.ZPL (an arbitrary file name and extension name).
3.
Copy the file to the printer. For DOS, a file sent to a printer connected to the system’s
parallel port would be as simple as:
COPY TEST.ZPL LPT1
Other interface connection types and operating systems will have different command
strings. See your operating system documentation for detailed instructions to copy to the
appropriate printer interface for this test.

8/4/10 GX420d™ / GX430d™ User Guide 980611-001 Rev. C
3
Print Operations
This section provides media and print handling, font and language support, and the setup of
less common printer configurations.
Contents
Determining Printer Configuration . . . . . . . . . . . . . . . . . . . . . . . . . . . . . . . . . . . . . . . . . . 32
Localizing the Printer Status Configuration Label . . . . . . . . . . . . . . . . . . . . . . . . . . . . . . 32
Long Term Printer In-activity or Storage. . . . . . . . . . . . . . . . . . . . . . . . . . . . . . . . . . . . . . 32
Modes of Printing . . . . . . . . . . . . . . . . . . . . . . . . . . . . . . . . . . . . . . . . . . . . . . . . . . . . . . . 33
Print Media Types . . . . . . . . . . . . . . . . . . . . . . . . . . . . . . . . . . . . . . . . . . . . . . . . . . . . . . 33
Replacing Supplies . . . . . . . . . . . . . . . . . . . . . . . . . . . . . . . . . . . . . . . . . . . . . . . . . . . . . 35
Adjusting the Print Width . . . . . . . . . . . . . . . . . . . . . . . . . . . . . . . . . . . . . . . . . . . . . . . . . 35
Adjusting the Print Quality . . . . . . . . . . . . . . . . . . . . . . . . . . . . . . . . . . . . . . . . . . . . . . . . 36
Media Sensing . . . . . . . . . . . . . . . . . . . . . . . . . . . . . . . . . . . . . . . . . . . . . . . . . . . . . . . . . 37
Printing on Fan-Fold Media . . . . . . . . . . . . . . . . . . . . . . . . . . . . . . . . . . . . . . . . . . . . . . . 38
Printing with Externally Mounted Roll Media . . . . . . . . . . . . . . . . . . . . . . . . . . . . . . . . . . 40
Fonts and Your Printer . . . . . . . . . . . . . . . . . . . . . . . . . . . . . . . . . . . . . . . . . . . . . . . . . . . 41
Localizing the Printer with Code Pages . . . . . . . . . . . . . . . . . . . . . . . . . . . . . . . . . . . . . . 42
Asian fonts and Other Large Font Sets . . . . . . . . . . . . . . . . . . . . . . . . . . . . . . . . . . . . . . 42
Stand Alone Printing. . . . . . . . . . . . . . . . . . . . . . . . . . . . . . . . . . . . . . . . . . . . . . . . . . . . . 43
Sending Files to the Printer . . . . . . . . . . . . . . . . . . . . . . . . . . . . . . . . . . . . . . . . . . . . . . . 44
Print Meter . . . . . . . . . . . . . . . . . . . . . . . . . . . . . . . . . . . . . . . . . . . . . . . . . . . . . . . . . . . . 44
EPL Line Mode. . . . . . . . . . . . . . . . . . . . . . . . . . . . . . . . . . . . . . . . . . . . . . . . . . . . . . . . . 44
Produkt Specifikationer
| Mærke: | Zebra |
| Kategori: | Etiketprinter |
| Model: | GX420d |
| Vægt: | 1400 g |
| Pakkevægt: | 3200 g |
| Opbevaringstemperatur (T-T): | -40 - 140 °F |
| Relativ luftfugtighed ved drift (H-H): | 10 - 90 % |
| Relativ luftfugtighed ved opbevaring (H-H): | 5 - 95 % |
| Driftstemperatur (T-T): | 5 - 41 °C |
| Udskrivningsteknologi: | Direkte termisk |
| Maksimal opløsning: | 203 x 203 dpi |
| Intern hukommelse: | 8 MB |
| Dimensioner (BxDxH): | 171 x 209 x 152 mm |
| Forbindelsesteknologi: | Ledningsført |
| Certificering: | FCC Part 15, Subpart 15, VCCI, C-Tick, EN55022 Class-B, EN6100-3-2, EN6100-3-3, EN55024, CCC, CB Scheme IEC 60950: 1991 +A1 +A2 + A3 +A4, TUV NRTL, IRAM, NOM, AAMI |
| Effektkrav: | 100-240VAC, 50-60Hz |
| Standard grænseflader: | RS-232,USB 1.1,Parallel |
| Flashhukommelse: | 4 MB |
| Understøttet papirbredde: | 104 mm |
| Udskrivningshastighed: | 152 mm/sek. |
| RS-232-porte: | 1 |
| Maksimal rullediameter: | 127 mm |
| Medietykkelse: | 0.08 - 0.2 mm |
| Indbyggede stregkoder: | Code 39,Code 49,Code 93,MaxiCode,PDF417,Postnet,QR Code,UPC-A,UPC-E |
| Antal USB 1.1-porte: | 1 |
| Maksimal medielængde: | 991 mm |
| Medietykkelse (efter britisk standard): | 0.003 - 0.0075 " |
| Maksimal medielængde (efter britisk standard): | 39 " |
| Supported paper width: | 4.09 " |
Har du brug for hjælp?
Hvis du har brug for hjælp til Zebra GX420d stil et spørgsmål nedenfor, og andre brugere vil svare dig
Etiketprinter Zebra Manualer

12 Januar 2025
5 Januar 2025
1 September 2024
31 August 2024
30 August 2024
17 August 2024
8 August 2024
6 August 2024
5 August 2024
2 August 2024
Etiketprinter Manualer
- Etiketprinter Epson
- Etiketprinter Leitz
- Etiketprinter Toshiba
- Etiketprinter Brother
- Etiketprinter Dymo
- Etiketprinter Casio
- Etiketprinter Honeywell
- Etiketprinter Citizen
- Etiketprinter Olivetti
- Etiketprinter 3M
- Etiketprinter Seiko
- Etiketprinter Intermec
- Etiketprinter Bixolon
- Etiketprinter Renkforce
- Etiketprinter Primera
- Etiketprinter Star Micronics
- Etiketprinter Panduit
- Etiketprinter CUSTOM
- Etiketprinter Qian
- Etiketprinter Godex
- Etiketprinter Argox
- Etiketprinter Phoenix
- Etiketprinter POSline
- Etiketprinter Kroy
- Etiketprinter Metapace
- Etiketprinter Datacard
- Etiketprinter Labelmate
- Etiketprinter Brady
- Etiketprinter Datamax-O'neil
- Etiketprinter Dascom
- Etiketprinter DULA
- Etiketprinter TSC
- Etiketprinter EC Line
- Etiketprinter Tach-It
- Etiketprinter Colop
- Etiketprinter Qoltec
- Etiketprinter SATO
- Etiketprinter SII
- Etiketprinter Start International
- Etiketprinter Ruggard
Nyeste Etiketprinter Manualer

12 Januar 2025
12 Januar 2025
11 Januar 2025
11 Januar 2025
11 Januar 2025
5 Januar 2025
30 December 2025
27 December 2024
27 December 2024
25 December 2024