Acer HE-720 Manual
Læs nedenfor 📖 manual på dansk for Acer HE-720 (69 sider) i kategorien Beamer. Denne guide var nyttig for 11 personer og blev bedømt med 4.5 stjerner i gennemsnit af 2 brugere
Side 1/69

Acer Projector
P1183/M403/PE-S42/X1183A/D603P/
EV-S62T/X114/X1183/D603/EV-S62/
X113/D600/EV-S60/V10S/AS201/
P1283/M413/PE-X42/V12X/AX316/
P1283n/M413T/PE-X42G/X1283/
X1280/D613/EV-X62/P1383W/
X1383WH/M423/PE-W42/V12W/
AW316/P1380W/X1380WH/M420/
PE-W40/V11W/AW216/H5380BD/
E230/HE-720/P1510/M450/PE-840
Series
User's Guide

iv
•
•
•
•• To avoid damage of internal components and to prevent battery leakage,
do not place the product on a vibrating surface.
•
•
•
•• Never use it under sporting, exercising, or any vibrating environment
which will probably cause unexpected short current or damage rotor
devices, lamp.
Using electrical power
•
•
•
•• This product should be operated from the type of power indicated on the
marking label. If you are not sure of the type of power available, consult
your dealer or local power company.
•
•
•
•• Do not allow anything to rest on the power cord. Do not locate this
product where people will walk on the cord.
•
•
•
•• If an extension cord is used with this product, make sure that the total
ampere rating of the equipment plugged into the extension cord does not
exceed the extension cord ampere rating. Also, make sure that the total
rating of all products plugged into the wall outlet does not exceed the fuse
rating.
•
•
•
•• Do not overload a power outlet, strip or receptacle by plugging in too
many devices. The overall system load must not exceed 80% of the branch
circuit rating. If power strips are used, the load should not exceed 80% of
the power strip's input rating.
•
•
•
•• This product's AC adapter is equipped with a three-wire grounded plug.
The plug only fits in a grounded power outlet. Make sure the power outlet
is properly grounded before inserting the AC adapter plug. Do not insert
the plug into a non-grounded power outlet. Contact your electrician for
details.
Warning! The groundin
Warning! The groundin
Warning! The groundin
Warning! The groundinWarning! The grounding pin is a safety featur
g pin is a safety featur
g pin is a safety featur
g pin is a safety featurg pin is a safety feature. Using a power out
e. Using a power out
e. Using a power out
e. Using a power oute. Using a power outlet that is
let that is
let that is
let that is let that is
not properly grounded may
not properly grounded may
not properly grounded may
not properly grounded maynot properly grounded may result in electric shock and/or injury.
result in electric shock and/or injury.
result in electric shock and/or injury.
result in electric shock and/or injury. result in electric shock and/or injury.
Note: The grounding pin also provi
Note: The grounding pin also provi
Note: The grounding pin also provi
Note: The grounding pin also proviNote: The grounding pin also provides good protection from unexpected
des good protection from unexpected
des good protection from unexpected
des good protection from unexpected des good protection from unexpected
noise produced by other nearby electr
noise produced by other nearby electr
noise produced by other nearby electr
noise produced by other nearby electrnoise produced by other nearby electrical devices that may interfere with
ical devices that may interfere with
ical devices that may interfere with
ical devices that may interfere with ical devices that may interfere with
the performance of this produ
the performance of this produ
the performance of this produ
the performance of this produthe performance of this product.
ct.
ct.
ct.ct.
•
•
•
•• Use the product only with the supplied power supply cord set. If you need
to replace the power cord set, make sure that the new power cord meets
the following requirements: detachable type, UL listed/CSA certified, VDE
approved or its equivalent, 4.5 meters (15 feet) maximum length.

v
Product servicing
Do not attempt to service this product yourself, as opening or removing covers
may expose you to dangerous voltage points or other risks. Refer all servicing to
qualified service personnel.
Unplug this product from the wall outlet and refer servicing to qualified service
personnel when:
•
•
•
•• the power cord or plug is damaged, cut or frayed
•
•
•
•• liquid was spilled into the product
•
•
•
•• the product was exposed to rain or water
•
•
•
•• the product has been dropped or the case has been damaged
•
•
•
•• the product exhibits a distinct change in performance, indicating a need
for service
•
•
•
•• the product does not operate normally after following the operating
instructions
Note: Adjust only thos
Note: Adjust only thos
Note: Adjust only thos
Note: Adjust only thosNote: Adjust only those controls that are covered by the operati
e controls that are covered by the operati
e controls that are covered by the operati
e controls that are covered by the operatie controls that are covered by the operating
ng
ng
ng ng
instruction
instruction
instruction
instructioninstructions, since i
s, since i
s, since i
s, since is, since improper
mproper
mproper
mproper mproper adjustme
adjustme
adjustme
adjustmeadjustment of othe
nt of othe
nt of othe
nt of othent of other contro
r contro
r contro
r contror controls may re
ls may re
ls may re
ls may rels may result in
sult in
sult in
sult in sult in
damage and will often require extensive work by a qualified technician to
damage and will often require extensive work by a qualified technician to
damage and will often require extensive work by a qualified technician to
damage and will often require extensive work by a qualified technician to damage and will often require extensive work by a qualified technician to
restore the product t
restore the product t
restore the product t
restore the product trestore the product to normal condit
o normal condit
o normal condit
o normal condito normal condition.
ion.
ion.
ion.ion.
Warning! For safety reasons,
Warning! For safety reasons,
Warning! For safety reasons,
Warning! For safety reasons,Warning! For safety reasons, do not use non-compliant parts when addi
do not use non-compliant parts when addi
do not use non-compliant parts when addi
do not use non-compliant parts when addi do not use non-compliant parts when adding
ng
ng
ng ng
or changing components. Consult your reseller
or changing components. Consult your reseller
or changing components. Consult your reseller
or changing components. Consult your reseller or changing components. Consult your reseller for purchase options.
for purchase options.
for purchase options.
for purchase options.for purchase options.
Your device and its enhancements may contain small parts. Keep them out of
the reach of small children.
Additional safety information
•
•
•
•• Do not look into the projector's lens when the lamp is on. The bright may
hurt your eyes.
•
•
•
•• Turn on the projector first and then signal sources
•
•
•
•• Do not place the product in following environments:
• Space that is poorly ventilated or confined. At least 50cm clearance from walls
and free flow of air around the projector is necessary.
• Locations where temperatures may become excessively high, such as inside of a
car with all windows rolled up.
• Locations where excessive humidity, dust, or cigarette smoke may contaminate
optical components, shortening the life span and darkening the image.
• Locations near fire alarms.
• Locations with an ambient temperature above 40 ºC/104 ºF.
• Locations where the altitudes are higher than 10000 feet.
•
•
•
•• Unplug immediately if there is something wrong with your projector. Do
not operate if smoke, strange noise or odor comes out of your projector. It

2
English
Package Overview
Package Overview
Package Overview
Package OverviewPackage Overview
This projector comes with all the items shown below. Check to make sure your
unit is complete. Contact your dealer immediately if any thing is missing.
Projector Power cord VGA cable
2 x Batteries
(option)
Security card User’s guide
Quick start guide Carrying case
(option)
Dust filters
(option)
Remote control
(option)
Remote control
(option)
HIDE
RATIO
S OURCE
MODE
MEDIA
S ETUP
Z OOM
FREEZE
HIDE
MEDIA
SETUP
MODE
SOURCE
Z OOM
FREEZ E

6
English
Note:
Note:
Note:
Note:Note: Functions vary depending on model definition.
13 Four
directional
select keys
Use up, down, left, right buttons to select items or make
adjustments to your selection.
14 Pre./Rewind No function.
Enter/ Play/
Pause
No function.
Back/Stop No function.
Next/Fast
forward
No function.
15 KeyPad 0~9 Press "0~9
0~9
0~9
0~90~9" to input a password in the "Security" OSD.
16 PgUp/PgDn For computer mode only. Use this button to select the next or
previous page. This function is only available when USB Ctrl
connector (mini type B) is connected to a computer via a USB
cable.
17 COMPONENT No function.
18 VIDEO To change source to COMPOSITE VIDEO.
19 VGA Press "VGA
VGA
VGA
VGAVGA" to change source to the VGA connector. This
connector supports analog RGB, YPbPr (480p/576p/720p/
1080i), YCbCr (480i/576i) and RGBsync.
20 S-VIDEO To change source to S-Video.
21 SD/USB A No function.
22 USB B For USB control and firmware upgrade.
23 HDMI/DVI To change source to HDMI/MHL. (no DVI function)
24 LAN/WiFi No function.
25 Laser pointer Aim the remote at the viewing screen.
26 Laser button Aim the remote at the viewing screen, press and hold this
button to activate the laser pointer.
This function is not supported in Japanese market.
#
#
#
## Icon
Icon
Icon
IconIcon Function
Function
Function
FunctionFunction Description
Description
Description
DescriptionDescription
14
English
•
•
•
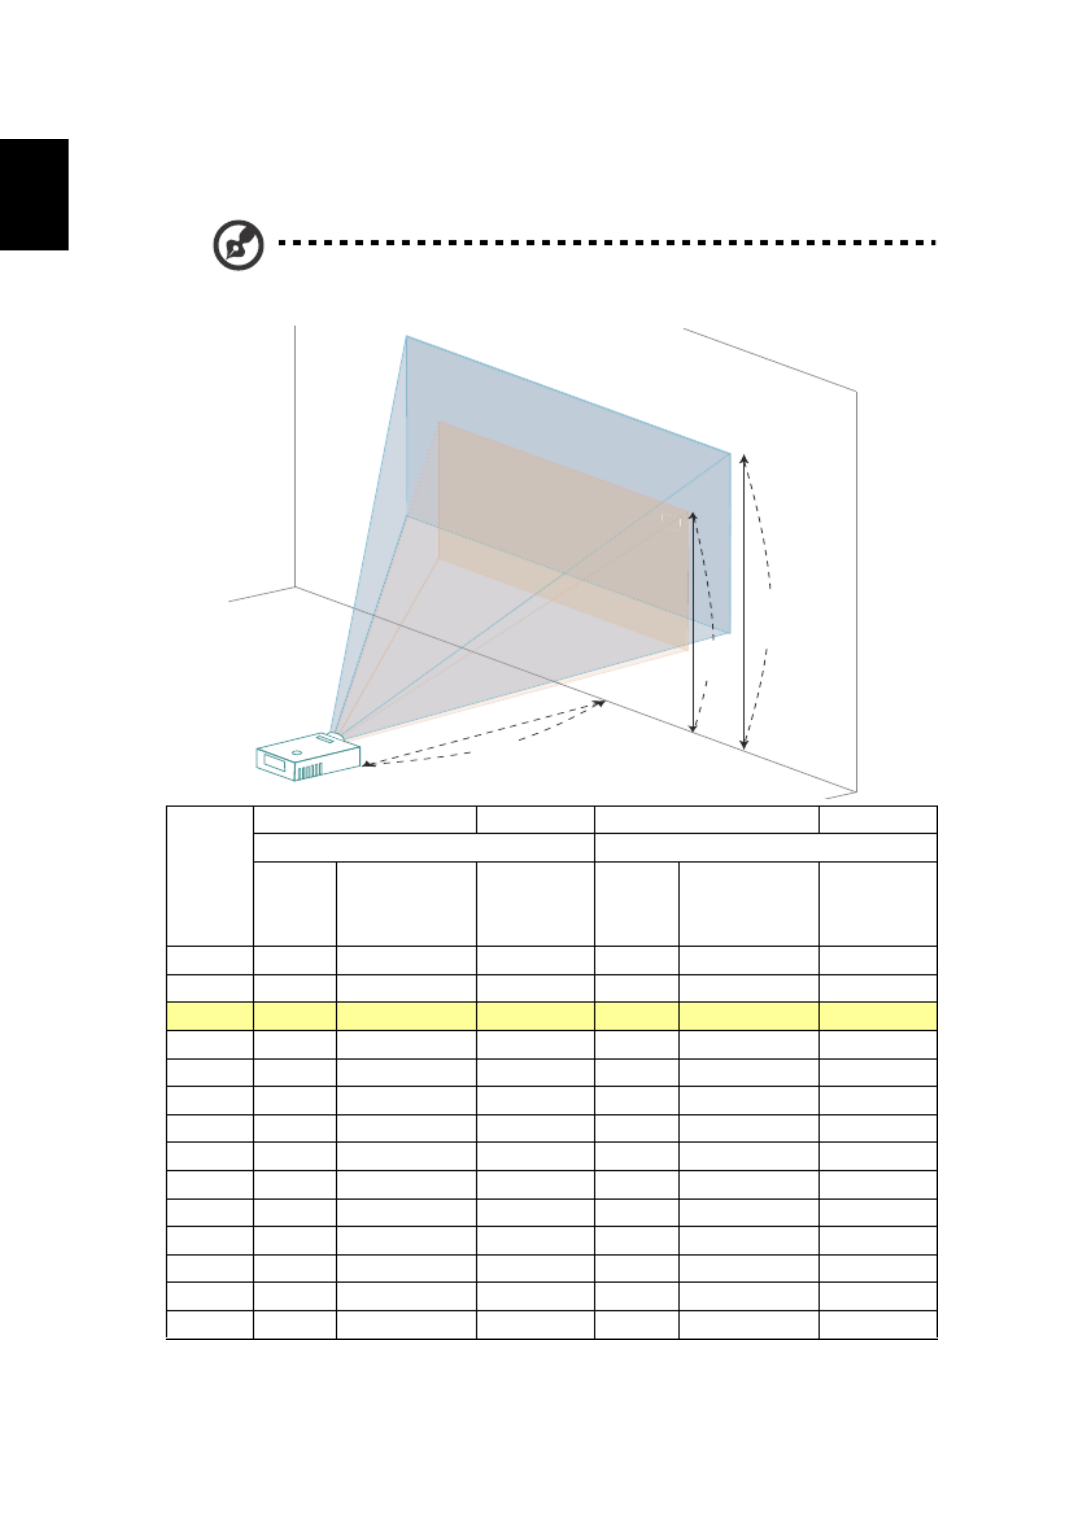
•• WXGA series
If the projector is 2.0 m from the screen, good image quality is possible for
image sizes between 55" and 60".
Note:
Note:
Note:
Note:Note: Remind as below figure, the space of 91 cm height is
required when located at 2.0 m distance.
Desired
Distance
(m)
<A>
Screen size Top Screen size Top
(Min zoom) (Max zoom)
Diagonal
(inch)
<B>
W (cm) x H (cm)
From base
to top of
image (cm)
<C>
Diagonal
(inch)
<B>
W (cm) x H (cm)
From base to
top of image
(cm)
<C>
1 27 59 x 37 41 30 65 x 40 45
1.5 41 88 x 55 62 45 97 x 60 68
2 55 83 60 91118 x 74 129 x 81
2.5 68 147 x 92 103 75 161 x 101 113
3 82 176 x 110 124 90 194 x 121 136
3.5 96 206 x 129 145 105 226 x 141 159
4 109 235 x 147 165 120 258 x 161 181
4.5 123 265 x 165 186 135 290 x 181 204
5 137 294 x 184 207 150 323 x 202 227
6 164 353 x 221 248 180 387 x 242 272
7 191 412 x 257 289 210 452 x 282 317
8 218 471 x 294 331 240 516 x 323 363
9 246 529 x 331 372 270 581 x 363 408
10 273 588 x 368 413 300 645 x 403 453
Zoom Ratio: 1.1x
60"
55"
55"
55
A
C
B
Height: 91 cm
from base to
top of image
Height:
83 cm
2.0 m
Desired Distance
Max screen size
Min screen size

16
English
•
•
•
•• 1080p series
If the projector is 3 m from the screen, good image quality is possible for image
sizes between 74" and 90".
Note:
Note:
Note:
Note:Note: Remind as below figure, the space of 130 cm height is
required when located at 3 m distance.
Desired
Distance
(m)
<A>
Screen size Top Screen size Top
(Min zoom) (Max zoom)
Diagonal
(inch)
<B>
W (cm) x
H (cm)
From base to
top of image
(cm) <C>
Diagonal
(inch)
<B>
W (cm) x
H (cm)
From base to top
of image (cm)
<C>
1.5 37 82 x 46 53 45 99 x 56 65
2 49 109 x 61 71 60 132 x 75 86
2.5 62 137 x 77 89 75 166 x 93 108
3 74 107 90 130164 x 92 199 x 112
3.5 86 191 x 108 125 105 232 x 130 151
4 99 219 x 123 143 120 265 x 149 173
4.5 111 246 x 138 160 135 298 x 168 194
5 123 273 x 154 178 150 331 x 186 216
6 148 328 x 184 214 179 397 x 224 259
7 173 383 x 215 250 209 464 x 261 302
8 197 437 x 246 285 239 530 x 298 346
9 222 492 x 277 321 269 596 x 335 389
10 247 546 x 307 357 299 662 x 373 432
Zoom Ratio: 1.2x
90"
74"
74"
4
A
C
B
Height: 130 cm
from base to
top of image
Height:
107 cm
3 m
Desired Distance
Max screen size
Min screen size

18
English
•
•
•
•• WXGA series
To obtain an image size of 60" set the projector at a distance 2.0 m and 2.2 m
from the screen.
Desired Image Size Distance (m) Top (cm)
Diagonal (inch)
<A> W (cm) x H (cm) Max zoom
<B>
Min zoom
<C>
From base to top of
image
<D>
30 65 x 40 1.0 1.1 45
40 86 x 54 1.3 1.5 61
50 108 x 67 1.7 1.8 76
60 129 x 81 2.0 2.2 91
70 151 x 94 2.3 2.6 106
80 172 x 108 2.7 2.9 121
90 194 x 121 3.0 3.3 136
100 215 x 135 3.3 3.7 151
120 258 x 162 4.0 4.4 182
150 323 x 202 5.0 5.5 227
180 388 x 242 6.0 6.6 272
200 431 x 269 6.7 7.3 303
250 538 x 337 8.3 9.2 378
300 646 x 404 10.0 11.0 454
Zoom Ratio: 1.1x
A
C
D
B
Desired Distance
2.2 m
2.0 m
Height: 91 cm
from base to top
of image
60"
Desired
image size

21
English
User Controls
User Controls
User Controls
User ControlsUser Controls
Installation menu
Installation menu
Installation menu
Installation menuInstallation menu
The installation menu provides an onscreen display (OSD) for projector
installation and maintenance. Use the OSD only when the message "No signal
input" is displayed on the screen.
The menu options include settings and adjustments for screen size and distance,
focus, keystone correction and more .
1 Turn on the projector by pressing "Power
Power
Power
PowerPower" button on the control pad.
2 Press the "MENU
MENU
MENU
MENUMENU" button on the control pad to launch the OSD for
projector installation and maintenance.
3 The background pattern acts as a guide to adjusting the calibration and
alignment settings, such as screen size and distance, focus and more .
4 The Installation menu includes the following options:
•Projection Mode
•Projection Location
•Auto Keystone settings
•Manual Keystone settings
•Language settings
•Reset to factory default function
Use the up and down arrow keys to select an option, the left and right
arrow keys to adjust selected option settings, and the right arrow key to
enter a submenu for feature setting. The new settings will be saved
automatically upon exiting the menu.
5 Push the menu button anytime to exit the menu and return to the Acer
welcome screen.
Note:
Note:
Note:
Note:Note: Functions vary depending on model definition.

23
English
Color
Color
Color
ColorColor
Display Mode There are many factory presets optimized for various types of
images.
•
•
•
•• Bright: For brightness optimization.
•
•
•
•• Presentation: For meeting presentation.
•
•
•
•• Standard: For common environment.
•
•
•
•• Video: For playing video in a bright environment.
•
•
•
•• Game: For game content.
•
•
•
•• Education: For education environment.
•
•
•
•• Movie: For brighter and general movie/video/photo playing.
•
•
•
•• Dark Cinema: For dark movie content.
•
•
•
•• Sports: For sport picture.
•
•
•
•• User: Memorize user's settings.
Wall color Use this function to choose a proper color according to the wall.
There are several choices, including white, light yellow, light blue,
pink, dark green. It will compensate the color deviation due to the
wall color to show the correct image tone.
Brightness Adjust the brightness of the image.
•
•
•
•• Press to darken the image.
•
•
•
•• Press to lighten the image.
Contrast "Contrast" controls the difference between the lightest and
darkest parts of the picture. Adjusting the contrast changes the
amount of black and white in the image.
•
•
•
•• Press to decrease the contrast.
•
•
•
•• Press to increase the contrast.
Saturation Adjusts a video image from black and white to fully saturated
color.
•
•
•
•• Press to decrease the amount of color in the image.
•
•
•
•• Press to increase the amount of color in the image.
Tint Adjusts the color balance of red and green.
•
•
•
•• Press to increase the amount of green in the image.
•
•
•
•• Press to increase the amount of red in the image.

26
English
Note:
Note:
Note:
Note:Note: "H. Position", "V. Position", "Frequency" and "Tracking" functions
are not supported under HDMI or Video mode.
Note:
Note:
Note:
Note:Note: "HDMI Color Range" and "HDMI Scan Info" functions are only
supported under HDMI mode.
Note:
Note:
Note:
Note:Note: Functions vary depending on model definition.
V. Keystone Press the or button to adjust image distortion vertically and
makes a squarer image.
H. Position
(Horizontal
position)
•
•
•
•• Press to move the image left.
•
•
•
•• Press to move the image right.
V. Position
(Vertical position)
•
•
•
•• Press to move the image down.
•
•
•
•• Press to move the image up.
Frequency "Frequency" changes the projector's refresh rate to match the
frequency of your computer’s graphics card. If you can see a vertical
flickering bar in the projected image, use this function to make the
necessary adjustments.
Tracking Synchronizes the signal timing of the projector with the graphics card.
If you experience an unstable or flickering image, use this function to
correct it.
HDMI Color Range Adjust the color range of the HDMI image data to correct color display
error.
•
•
•
•• Auto: Automatically adjust by information from player.
•
•
•
••
Limited Range: Prosess the input image as limited color range data.
•
•
•
•• Full Range: Prosess the input image as full color range data.
HDMI Scan Info Adjust the overscan ratio of the HDMI image on screen.
•
•
•
•• Auto: Automatically adjust by information from player.
•
•
•
•• Underscan: Always no overscan on HDMI image.
•
•
•
•• Overscan: Always keep overscan on HDMI image.
29
English
Note:
Note:
Note:
Note:Note: Functions vary depending on model definition.
LAN LAN
LAN
LAN
LANLAN
Default is "Off". Choose "On" to enable LAN connection.
<Note> If users want to do LAN control under standby mode,
change VGA OUT (Standby) from Off to On.
LAN IP/Mask
LAN IP/Mask
LAN IP/Mask
LAN IP/MaskLAN IP/Mask
Identify IP and Mask address.
LAN Reset
LAN Reset
LAN Reset
LAN ResetLAN Reset
Reset LAN function.
Produkt Specifikationer
| Mærke: | Acer |
| Kategori: | Beamer |
| Model: | HE-720 |
Har du brug for hjælp?
Hvis du har brug for hjælp til Acer HE-720 stil et spørgsmål nedenfor, og andre brugere vil svare dig
Beamer Acer Manualer

30 Januar 2025
30 Januar 2025
30 Januar 2025
30 Januar 2025
30 Januar 2025
30 Januar 2025
13 Januar 2025
10 Januar 2025
10 Januar 2025
9 Januar 2025
Beamer Manualer
- Beamer Sony
- Beamer Canon
- Beamer Samsung
- Beamer Panasonic
- Beamer Philips
- Beamer Lenco
- Beamer OK
- Beamer Derksen
- Beamer LG
- Beamer Mitsubishi
- Beamer Sharp
- Beamer Epson
- Beamer Technaxx
- Beamer Smart
- Beamer HP
- Beamer Sanyo
- Beamer D-Link
- Beamer Asus
- Beamer Toshiba
- Beamer Pyle
- Beamer Klarstein
- Beamer Kodak
- Beamer InFocus
- Beamer Lenovo
- Beamer Adj
- Beamer Optoma
- Beamer Da-Lite
- Beamer Hama
- Beamer Auna
- Beamer Casio
- Beamer Hisense
- Beamer Maxell
- Beamer Smartwares
- Beamer Blaupunkt
- Beamer JVC
- Beamer Leica
- Beamer Hitachi
- Beamer Medion
- Beamer 3M
- Beamer BenQ
- Beamer Acco
- Beamer Anker
- Beamer Aiptek
- Beamer Viewsonic
- Beamer Dell
- Beamer Vivitek
- Beamer Polaroid
- Beamer Ricoh
- Beamer NEC
- Beamer Stairville
- Beamer OKI
- Beamer Reflecta
- Beamer Nebula
- Beamer Salora
- Beamer Vogel's
- Beamer Overmax
- Beamer RCA
- Beamer Prixton
- Beamer Renkforce
- Beamer Christie
- Beamer Eurolite
- Beamer Yaber
- Beamer XGIMI
- Beamer GPX
- Beamer Dahua Technology
- Beamer Cameo
- Beamer Kogan
- Beamer Barco
- Beamer Planar
- Beamer Speaka
- Beamer ASK Proxima
- Beamer Eiki
- Beamer Naxa
- Beamer Vankyo
- Beamer Emtec
- Beamer Promethean
- Beamer Odys
- Beamer Laserworld
- Beamer Ibm
- Beamer La Vague
- Beamer Tzumi
- Beamer EKO
- Beamer MicroVision
- Beamer Elite Screens
- Beamer Celexon
- Beamer Fun Generation
- Beamer PLUS
- Beamer Futurelight
- Beamer Varytec
- Beamer Ultimea
- Beamer Dracast
- Beamer Dukane
- Beamer Dream Vision
- Beamer Knoll
- Beamer DTS
- Beamer Touchjet
- Beamer Boxlight
- Beamer AAXA Technologies
- Beamer Miroir
- Beamer Mimio
- Beamer AWOL Vision
- Beamer Smart Tech
- Beamer Atlantis Land
- Beamer KickAss
- Beamer Microtek
- Beamer Panamorph
Nyeste Beamer Manualer

5 Marts 2025
5 Marts 2025

29 Januar 2025

12 Januar 2025

12 Januar 2025

11 Januar 2025

11 Januar 2025

4 Januar 2025
4 Januar 2025
3 Januar 2025