AgfaPhoto Realikids Cam Mini Manual
Læs nedenfor 📖 manual på dansk for AgfaPhoto Realikids Cam Mini (2 sider) i kategorien Kamera. Denne guide var nyttig for 16 personer og blev bedømt med 4.5 stjerner i gennemsnit af 2 brugere
Side 1/2
DCTE-英语说明书-
DCTE-法语说明书-
70mm
90mm
Button function description
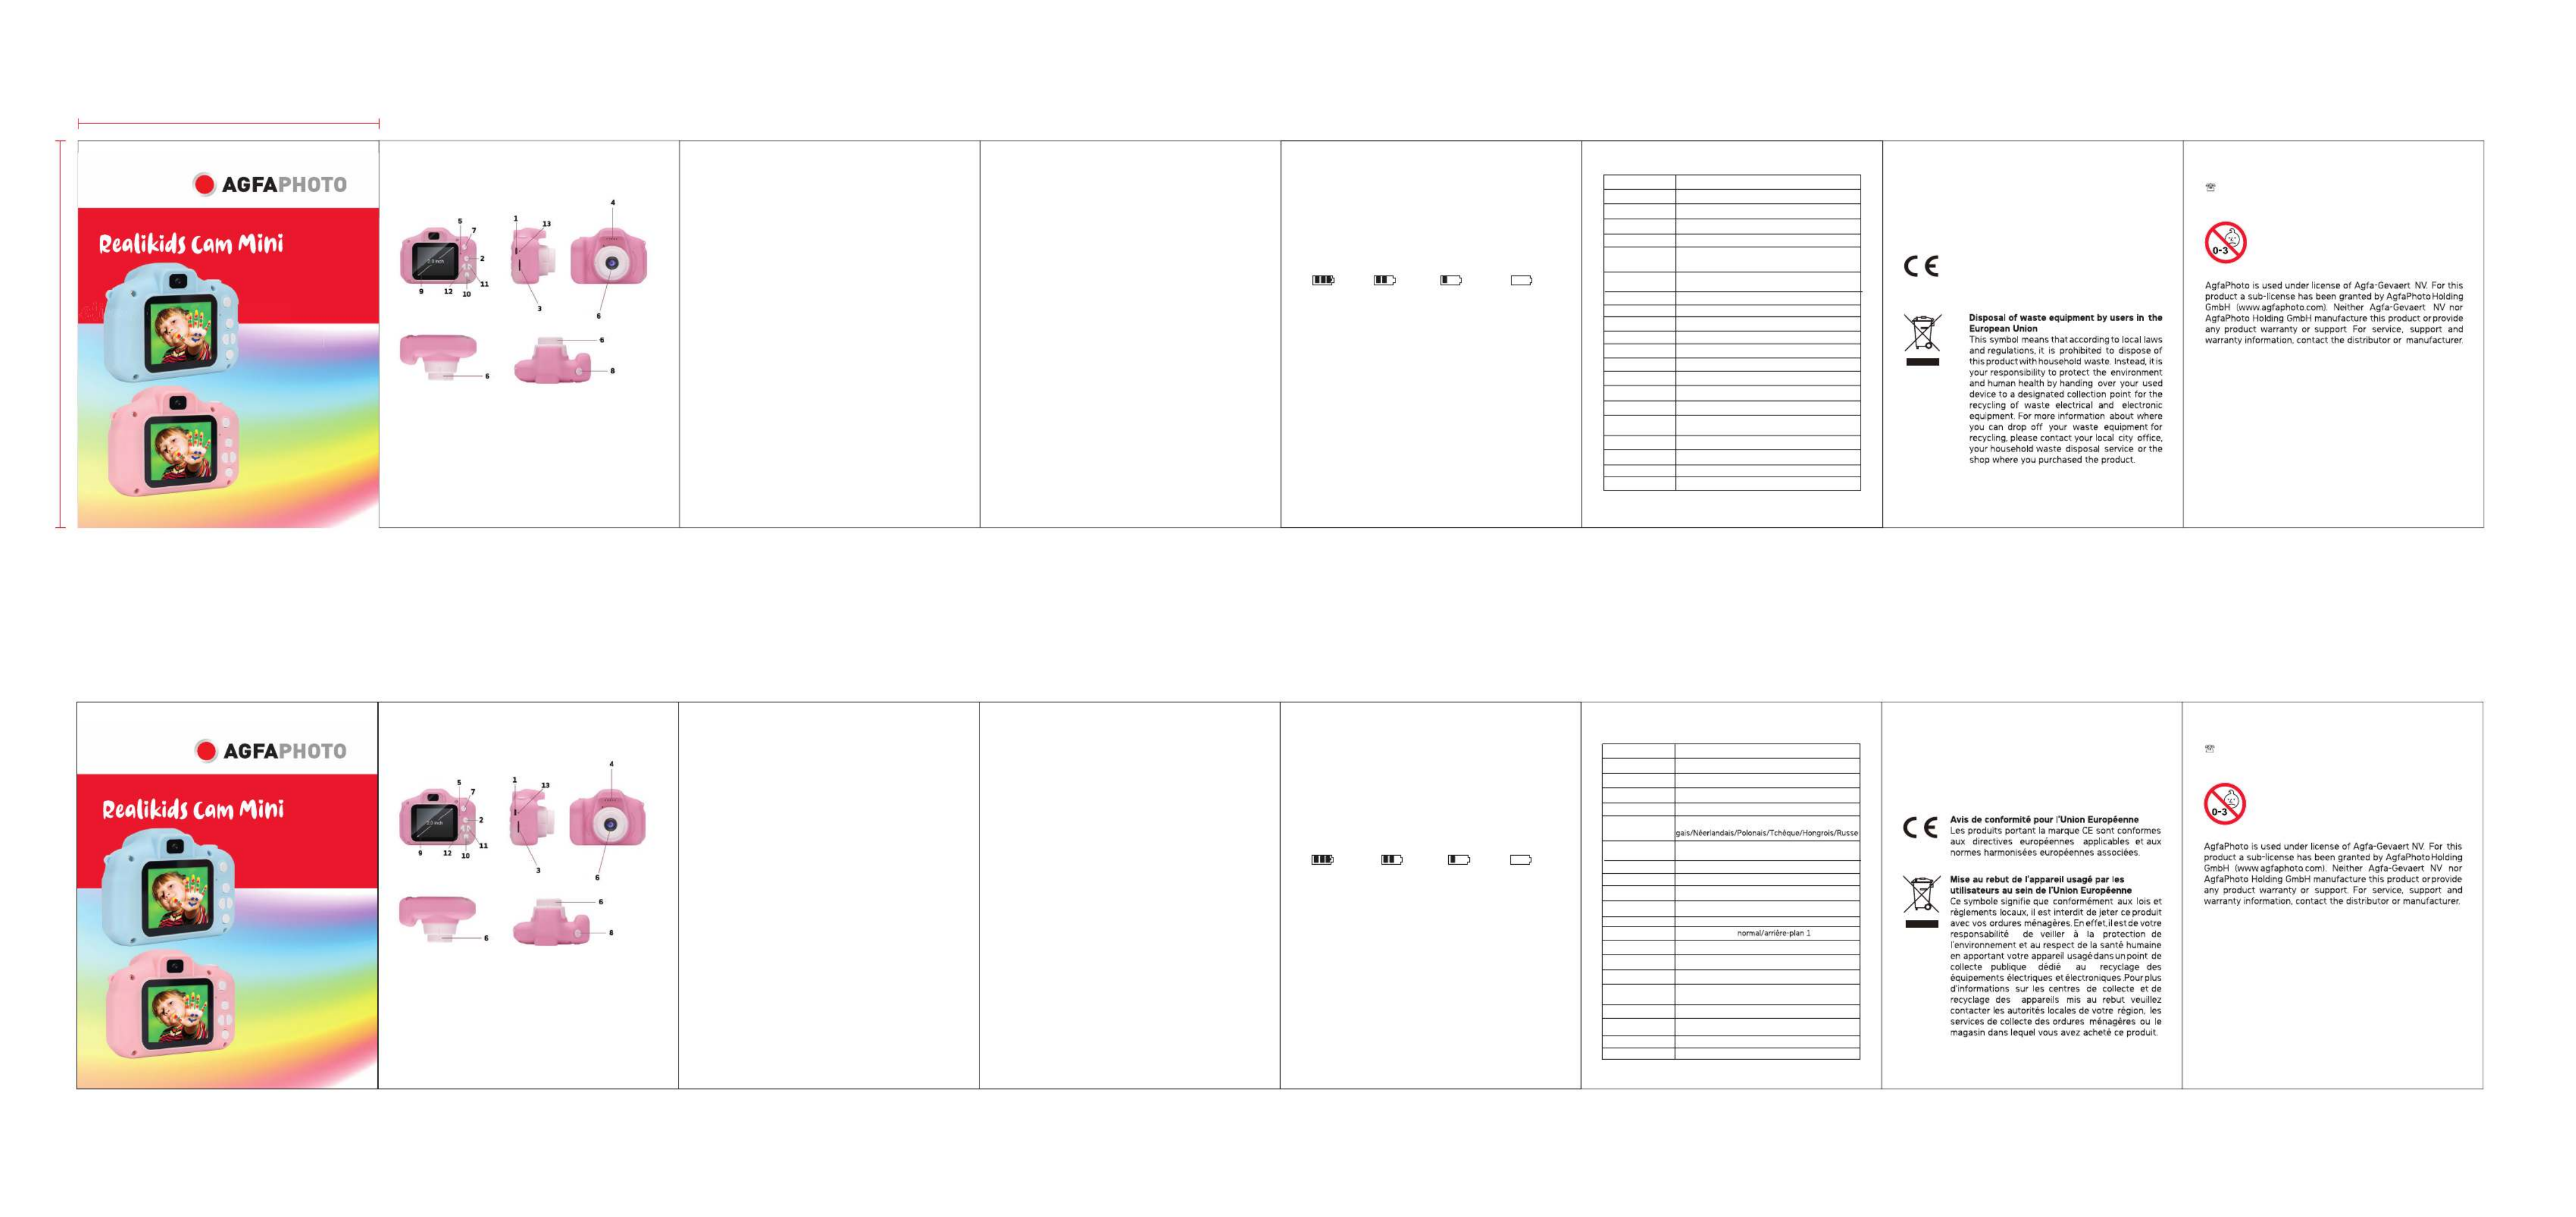
1. USB port
With the supplied USB cable, you can connect the camera either to
a PC for data transfer or to a power source to recharge its battery.
2. Mode key
Once the camera is on, press this button to successively move from
a mode to another: video recording / camera / video playback and
photo browsing.
3. SD card slot
Before use, insert an SD card in this slot to save your videos and
photos.
4. Speaker
It plays the sound of a video or an audio recording.
5. Microphone
It records the sound of a video or an audio recording.
6.Lens
Viewfinder window.
7. Power button
This button turns the camera on/off and also serves as a charging
indicator.
8. Shutter button
1. In video recording mode, short press this button to start
recording and press to again to stop it.
2. In camera mode, short press this button to take photos.
3. In settings menu, this button is used to validate each setting
change.
9. Screen
Its 2-inch size allows comfortable viewing of video and photo files.
10. Menu button
Short press this button to enter the setting menu and press it
again to exit.
11. Up/Down buttons
Use these buttons to move up and down in a list of options.
Product overview
1.USB 2.Up button 3.SD card slot
4.Speaker 5.Indicator light 6.Lens
7.Power button 8.Shutter button 9.Screen
10.Down button 11.Mode button 12.Menu button
13.Reset button
Product specifications Warranty: this product is one-year guaranteed.
Product manufactured for and distributed by :
GT COMPANY - 5 rue de la Galmy - 77700 Chessy - France -
+33 (0) 1.61.10.09.25 - www.gtcompany.fr
Made in China
Notice of compliance for the European Union
Products bearing the CE mark comply with the
applicable European directives and associated
harmonised European standards.
WARNING! Not suitable for children under 36
months.
Small parts and long cord.
Choking and strangulation hazards.
Basic operation instructions
1. Power on and off
Press a few seconds the power button to turn the camera on, the blue
light indicator will then light up once the camera is on. Press this button
again to turn the camera off, the blue light indicator will also stop lighting
up.
2. Video mode
Short press mode button to switch to video mode then the camera
resolution and icon will be displayed in the upper right corner of the
3. Photo mode
6. Exit the setup menu
Short press the menu button to exit the setting menu.
USB mode
Connect the USB cable to the computer and the child camera wil!
automatically switch to USB mode.
In this mode, you can read or transfer video or photo files saved on the
memory card.
Battery instructions
1. Battery indicator, please refer to the illustration:
Image sensor
Display
Lens
Storage media
Photo format
Language
TFT display
Time stamp
Motion detection
Loop recording
Photo resolution
Photo frame
Delete
Format
Charging voltage
GC0308
color display
fixed lens, 100 degree angle
micro SD card, up to 32G
JPG
English/French/German/Spanish/Italian/Portuguese/
Dutch/Polish/Czech/Hungarian/Russian
2. 0 inch screen (720x320)
on/off
on/off
off/1 minute/3 minutes/5 minutes/10 minutes
3M/2M/1.3M/VGA
delete one single file/delete all files
cancel/execute
DC-5V
Windows me/2000/2003/Win7/XP/Vista;
Mac/Linux
50HZ 60HZ
cancel/executeReset system
Version
snakeGame
USER
MANUAL
Kids Digital Camera
After-sales service :
@ : aftersaleservice@gtcompany.fr
: + 33 (0) 1.85.49.10.26
screen. Short press the shutter button to start video recording, the
recording indicator will then start flashing indicating that the camera is
recording.
Short press the mode button to switch to the camera mode, then the
camera resolution and icon will be displayed in the upper right
corner of the screen.
Short press the shutter button to take a picture.
When the picture is taken, the indicator flashes once indicating that the
picture is saved.
4. Video photo playback
Short press the mode button to switch to the playback mode, then
the playback icon will be displayed in the upper right corner of the screen.
Short press the up/down buttons to select a file up or down.
5. Setting menu
Short press menu button to enter the setting menu. By pressing the
up/down buttons you can go up and down in each setting item.
Select the setting item that needs to be changed, and confirm the
change by short pressing the shutter button.
Full battery Lower battery Low battery Empty battery
2. There are three ways to charge the battery, please note that
the blue charging indicator will light up during charging.
1: Charging with an AC adapter.
2: Charging with a computer.
3: Charging with a USB car charger.
Note: If bug occur during use, remove the battery or press the reset button
and then turn the camera on again to return to normal.
Camera resolution
normal/background 1
S pport systemu
Optical frequ ncye
D600-0164-3703
1080p: 1440 1080 720p: 1280x720 GA: 640x480 x / /V
正面
反面
Description des fonctions des boutons
1. USB
Avec le câble USB fourni, vous pouvez connecter l'appareil photo soit à un
PC pour y transférer des fichiers, soit à une source d'alimentation pour
recharger sa batterie.
2. Bouton Mode
Une fois l'appareil photo allumé, appuyez plusieurs fois sur ce bouton pour
passer successivement d'un mode à l'autre : enregistrement vidéo / appareil
photo / lecture vidéo et visualisation de photos.
3. Fente carte SD
Avant toute utilisation, insérez une carte SD dans cette fente pour
enregistrer vos vidéos et vos photos.
4. Haut-parleur
Lit le son d'une vidéo ou d'un enregistrement audio.
5. Microphone
Enregistre le son d'une vidéo ou d'un enregistrement audio.
6. Objectif
Viseur de prise de vue.
7. Bouton d’alimentation
Ce bouton permet d'allumer et d'éteindre l'appareil photo et sert également
d'indicateur de charge.
8. Bouton obturateur
1. En mode d'enregistrement vidéo, appuyez brièvement sur ce
bouton pour démarrer l'enregistrement puis appuyez à nouveau
pour l'arrêter.
2. En mode appareil photo, appuyez brièvement sur ce bouton
pour prendre des photos.
3. Dans le menu des réglages, ce bouton permet de valider chaque
modification de réglage.
9. Écran
Sa taille de 2 pouces permet de visualiser confortablement des fichiers
vidéo et photo.
10. Bouton Menu
Appuyez brièvement sur ce bouton pour entrer dans le menu des réglages
et appuyez à nouveau pour quitter.
11. Boutons Haut/Bas
Utilisez ces boutons pour vous déplacer de haut en bas dans une liste
d'options.
Aperçu du produit
1. USB 2. Bouton Haut 3. Fente carte SD
4. Haut-parleur 5. Indicateur lumineux 6. Objectif
7. Bouton d’alimentation 8. Bouton obturateur 9. Écran
10. Bouton Bas 11. Bouton Mode 12. Bouton Menu
13. Bouton de réinitialisation
Caractéristiques produit Garantie : ce produit est garanti un an.
Produit fabriqué pour et distribué par :
GT COMPANY – 5 rue de la Galmy - 77700 Chessy - France -
+33 (0) 1.61.10.09.25 - www.gtcompany.fr
Fabriqué en Chine ATTENTION! Ne convient pas à un enfant de
moins de 36 mois.
Petites pièces et long tour de cou.
Risques d'étouffement et de strangulation.
Instructions pour fonctionnement de base
1. Mise en marche/arrêt
Appuyez quelques secondes sur le bouton d'alimentation pour allumer
l'appareil photo, l’indicateur lumineux s'allumera alors en bleu une fois la
mise en marche effectuée. Appuyez à nouveau sur ce bouton pour
éteindre l'appareil photo, l’indicateur lumineux va également s’éteindre.
2. Mode vidéo
Appuyez brièvement sur le bouton mode pour passer en mode
enregistrement vidéo, puis la résolution et l'icône de la caméra s'afficheront
dans le coin supérieur droit de l'écran. Appuyez brièvement sur le bouton
obturateur pour lancer l'enregistrement vidéo, l’indicateur lumineux se met
alors à clignoter indiquant que la caméra est en train d'enregistrer.
3. Mode appareil photo
Appuyez brièvement sur le bouton mode pour passer en mode appareil
photo, puis la résolution et l'icône de l’appareil photo s'afficheront dans le coin
supérieur droit de l'écran. Appuyez brièvement sur le bouton obturateur
pour prendre une photo. Lorsque la photo est prise, l'indicateur lumineux
s’allume une fois indiquant que la photo a bien été enregistrée.
4. Lecture photo et vidéo
Appuyez brièvement sur le bouton mode pour passer en mode lecture,
puis l'icône de lecture s'affichera dans le coin supérieur droit de l'écran.
Appuyez brièvement sur les boutons haut/bas pour sélectionner une
photo à visualiser ou une vidéo à lire.
5. Menu de réglage
Appuyez brièvement sur le bouton menu pour entrerdans le menu de
réglage. En appuyant sur les touches haut/bas, vous pouvez monter et
descendre dans chaque liste d’options de réglage. Sélectionnez le
paramètre devant être modifié et confirmez le changement en appuyant
brièvement sur le bouton obturateur.
6. Quitter le menu de réglage
Appuyez brièvement sur le bouton menu pour quitter le menu de réglage.
Mode USB
Une fois branché par USB à l’ordinateur, l’appareil photo passe
automatiquement en mode USB.
Dans ce mode, vous pouvez lire ou transférer des fichiers vidéo ou photo
enregistrés sur la carte mémoire.
Instructions concernant la batterie
1. Veuillez vous référer aux illustrations ci-dessous pour les diverses
significations de l’icône de la batterie:
2. La batterie se recharge de 3 façons différentes, notez que l’indicateur
de charge lumineux s’allume en bleu pendant le chargement.
1. Avec un adaptateur sur prise secteur
2. Avec le câble USB sur ordinateur
appuyez sur le bouton de réinitialisation puis rallumer l’appareil photo pour
que son fonctionnement revienne à la normale.
Capteur d’image
Affichage
Objectif
Support de
stockage
Format photo
Langues
Résolution vidéo
Écran TFT
Affichage de la date
Détection de
mouvement
Enregistrement
en boucle
Résolution photo
Cadres photo
Suppression
Formatage
Tension de charge
Configuration
système requise
Fréquence optique
GC0308
affichage en couleur
objectif fixe, angle de 100 degrés
carte micro SD jusqu’à 32GB
JPEG
Anglais/Français/Allemand/Espagnol/Italien/Portu
1080p : 1440x1080
720p : 1280x720/VGA : 640x480
2 pouces (720x320)
on/off
on/off
off/1 minute/3 minutes/5 minutes/10 minutes
3M/2M/1.3M/VGA
supprimer un seul fichier/supprimer tout
annuler/exécuter
DC-5V
Windows me/2000/2003/Win7/XP/Vista;
Mac/Linux
50HZ 60HZ
annuler/exécuter
Réinitialisation
système
D600-0164-3703Version
SerpentJeu
MANUEL
D’UTILISATION
Kids Digital Camera
Service après-vente :
@ : aftersaleservice@gtcompany.fr
: + 33 (0) 1.85.49.10.26
Batterie pleine Batterie légèrement
déchargée Batterie faible Batterie épuisée
3. Sur ch USB allume-cigare en voiture
Remarque : Si un bug survient pendant l'utilisation, retirez la batterie ou
argeur
Produkt Specifikationer
| Mærke: | AgfaPhoto |
| Kategori: | Kamera |
| Model: | Realikids Cam Mini |
Har du brug for hjælp?
Hvis du har brug for hjælp til AgfaPhoto Realikids Cam Mini stil et spørgsmål nedenfor, og andre brugere vil svare dig
Kamera AgfaPhoto Manualer

2 September 2024
15 August 2024
14 August 2024
13 August 2024
12 August 2024
10 August 2024
9 August 2024
8 August 2024
8 August 2024
7 August 2024
Kamera Manualer
- Kamera Bosch
- Kamera SilverCrest
- Kamera Acer
- Kamera Ozito
- Kamera Denver
- Kamera Sony
- Kamera Canon
- Kamera Samsung
- Kamera GE
- Kamera Panasonic
- Kamera TP-Link
- Kamera Philips
- Kamera Lenco
- Kamera Gigaset
- Kamera Braun
- Kamera Logitech
- Kamera Epson
- Kamera Daewoo
- Kamera Technaxx
- Kamera HP
- Kamera Sanyo
- Kamera Easypix
- Kamera Grundig
- Kamera D-Link
- Kamera Arlo
- Kamera Bushnell
- Kamera Pyle
- Kamera Fujifilm
- Kamera Nikon
- Kamera Kodak
- Kamera Lenovo
- Kamera Olympus
- Kamera Nedis
- Kamera Zorki
- Kamera Optoma
- Kamera Creative
- Kamera Azden
- Kamera Casio
- Kamera Trevi
- Kamera Trust
- Kamera Laserliner
- Kamera Blaupunkt
- Kamera JVC
- Kamera Leica
- Kamera Hitachi
- Kamera Medion
- Kamera Exakta
- Kamera EZVIZ
- Kamera König
- Kamera Gembird
- Kamera Powerfix
- Kamera Alpine
- Kamera Netgear
- Kamera Maginon
- Kamera Avaya
- Kamera Nest
- Kamera Vtech
- Kamera BenQ
- Kamera Bresser
- Kamera Anker
- Kamera Sigma
- Kamera Pentax
- Kamera Rollei
- Kamera Xiaomi
- Kamera Moultrie
- Kamera Viewsonic
- Kamera Imou
- Kamera Polaroid
- Kamera Ricoh
- Kamera Aida
- Kamera Konica-Minolta
- Kamera Foscam
- Kamera Kyocera
- Kamera GoPro
- Kamera Lorex
- Kamera Cobra
- Kamera Velleman
- Kamera FLIR
- Kamera Swann
- Kamera Eufy
- Kamera Celestron
- Kamera Ring
- Kamera Fluke
- Kamera Hikvision
- Kamera AVerMedia
- Kamera Reolink
- Kamera EVE
- Kamera Prixton
- Kamera Marshall Electronics
- Kamera General Electric
- Kamera SPC
- Kamera Hanwha
- Kamera ARRI
- Kamera BirdDog
- Kamera Bauhn
- Kamera MuxLab
- Kamera Spypoint
- Kamera Vivitar
- Kamera Ansco
- Kamera Vimar
- Kamera Oregon Scientific
- Kamera Dahua Technology
- Kamera SereneLife
- Kamera Lexibook
- Kamera Intel
- Kamera SJCAM
- Kamera Scosche
- Kamera Speco Technologies
- Kamera Joy-It
- Kamera Kogan
- Kamera Levenhuk
- Kamera Emerson
- Kamera Minox
- Kamera Burris
- Kamera Silvergear
- Kamera Elmo
- Kamera AViPAS
- Kamera UniView
- Kamera AquaTech
- Kamera Alfatron
- Kamera BZBGear
- Kamera PTZ Optics
- Kamera Daitsu
- Kamera Agfa
- Kamera Argus
- Kamera Lumens
- Kamera Yashica
- Kamera Sygonix
- Kamera Mamiya
- Kamera Zenit
- Kamera Fuji
- Kamera Minolta
- Kamera EverFocus
- Kamera RunCam
- Kamera SeaLife
- Kamera Aplic
- Kamera FIMI
- Kamera Meade
- Kamera Contax
- Kamera Sinji
- Kamera Traveler
- Kamera Digital Watchdog
- Kamera Getac
- Kamera Ikegami
- Kamera Pelco
- Kamera ZeissIkon
- Kamera Dorr
- Kamera HOLGA
- Kamera Praktica
- Kamera Hasselblad
- Kamera Moto Mods (Motorola)
- Kamera Fantasea Line
- Kamera Brinno
- Kamera Z CAM
- Kamera General
- Kamera Ergoguys
- Kamera Strex
- Kamera Berger & Schröter
- Kamera Leitz Focomat IIc
- Kamera Cosina
- Kamera Videology
- Kamera InfiRay
- Kamera Videotec
- Kamera GoXtreme
- Kamera IOptron
- Kamera Cambo
- Kamera Kobian
- Kamera Kyocera Yashica
- Kamera Red Digital Cinema
- Kamera Konica
- Kamera Akaso
- Kamera Seek Thermal
- Kamera Ikelite
- Kamera Adeunis
- Kamera Hoppstar
- Kamera PatrolEyes
- Kamera Camouflage
- Kamera HuddleCamHD
- Kamera Linhof
- Kamera Aquapix
- Kamera KanDao
Nyeste Kamera Manualer
29 Marts 2025
29 Marts 2025
27 Marts 2025
12 Marts 2025
12 Marts 2025

14 Januar 2025

13 Januar 2025
12 Januar 2025
11 Januar 2025
11 Januar 2025