BlackBerry 6230 Manual
BlackBerry
Mobiltelefon
6230
Læs nedenfor 📖 manual på dansk for BlackBerry 6230 (2 sider) i kategorien Mobiltelefon. Denne guide var nyttig for 27 personer og blev bedømt med 4.5 stjerner i gennemsnit af 2 brugere
Side 1/2
Refer to your for more detailedGetting Started Guide and Handheld User Guide
information about your handheld.
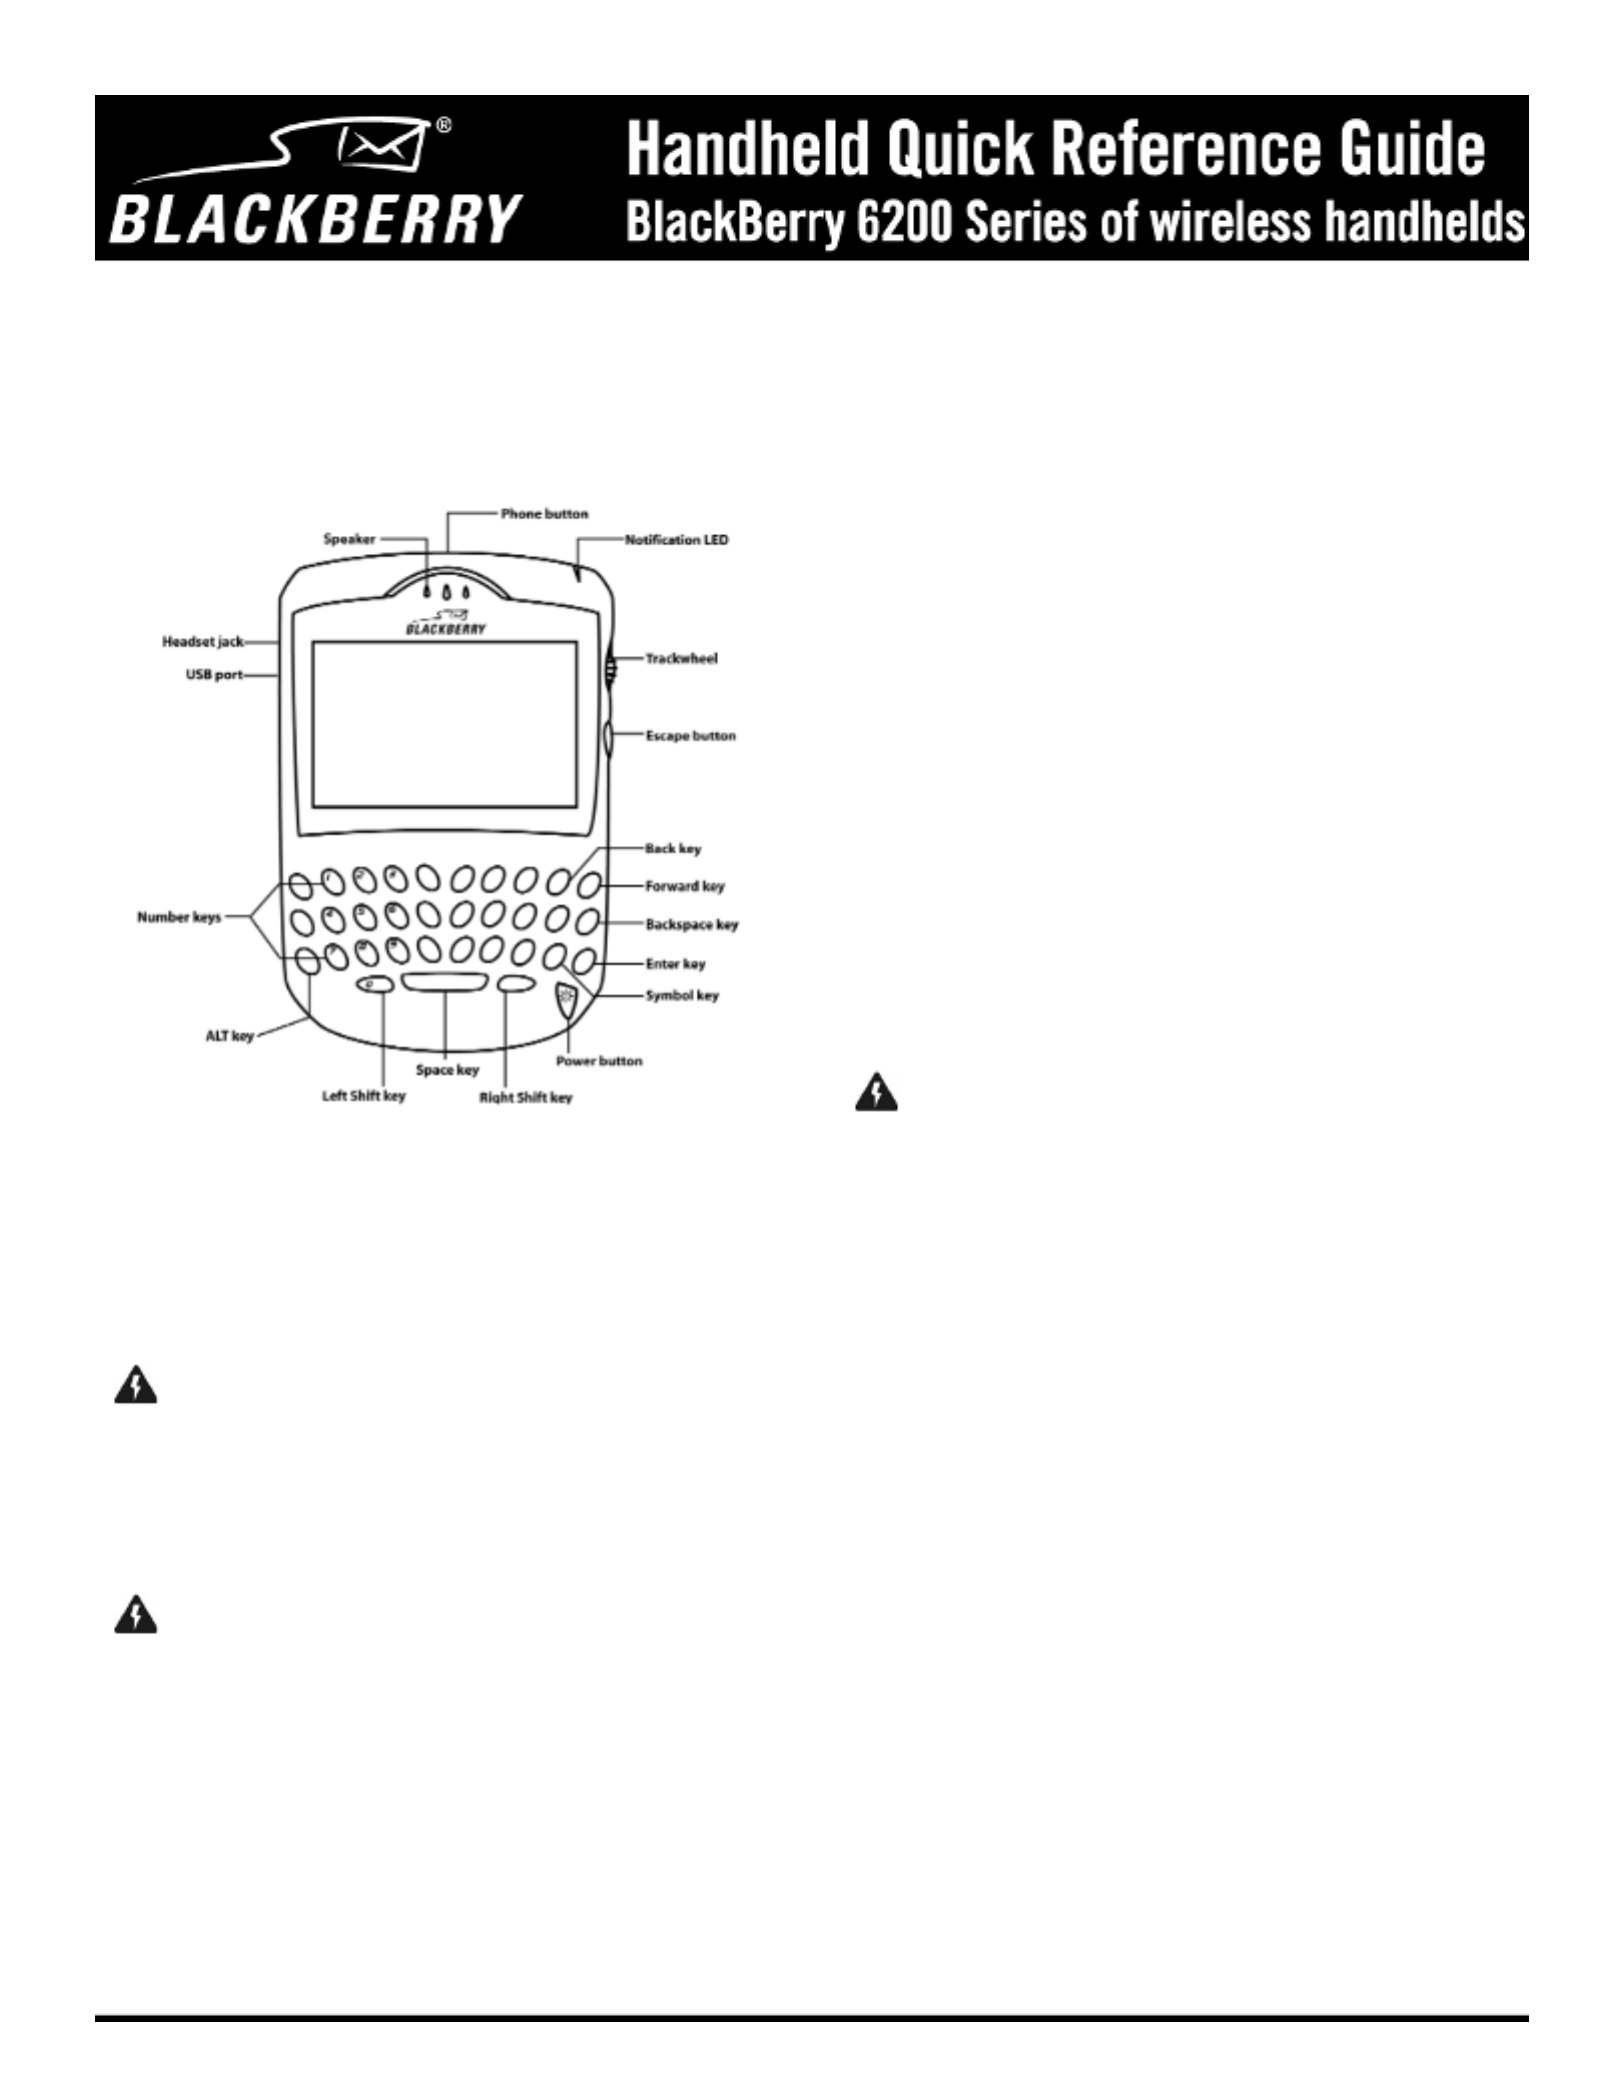
Using the keyboard and trackwheel
The handheld includes a keyboard and a trackwheel. The trackwheel helps
you navigate, view, and select items on each screen. To scroll though menu
items or text, roll the trackwheel. To select applications and menu options,
click (press) the trackwheel.
Inserting the SIM card
Your Subscriber Identity Module (SIM) card stores information about your
service plan. You must insert the SIM card into your handheld before you
can send and receive messages, place and answer phone calls, or browse
web pages. The SIM card fits into a card holder that is under the battery.
Refer to the for more information on inserting theGetting Started Guide
SIM card.
Inserting the battery
Before you insert the battery, verify that the SIM card holder is locked into
place. Insert the battery so that its metal connectors align with the
connectors in the handheld. Refer to the for moreGetting Started Guide
information on inserting the battery.
Charging your handheld
Your handheld is powered by an external, rechargeable battery.
1. Verify that the battery is properly inserted into your handheld.
2. Connect the USB cable to your handheld.
3. Connect the other end of the USB cable to your computer.
4. Let the battery charge to full power before you use the handheld.
When your handheld battery is charging, the battery power indicator
(in the upper right corner of the handheld Home screen) changes to a
charging indicator. When your handheld is fully charged, the battery
power indicator replaces the charging indicator.
Installing the desktop software
You must install the desktop software to use the desktop software tools.
You must install handheld applications to update your handheld software.
Refer to the for more information on installing theGetting Started Guide
desktop software and handheld applications.
Turning on and turning off your handheld
To turn on your handheld, press the button. The Home screenPower
appears.
To turn off your handheld, hold the button. You can also click thePower
Turn Power Off icon on the Home screen.
Turning on and turning off your radio
When you first receive your handheld, the wireless radio might be turned
off. On the Home screen, click the Turn Wireless On icon. The Turn
Wireless On icon is an antenna, but when you click the icon, the
application name changes to Turn Wireless Off and the icon changes to an
airplane. To turn off the radio, click the Turn Wireless Off icon. The
airplane icon is a reminder to turn off your handheld radio when you are
on an airplane, in a hospital, or in any place in which your handheld might
interfere with other radio transmissions and frequencies.
Setting the date and time
1. On the Home screen, click the icon. The Options screenOptions
appears.
2. Click Date/Time. The Date/Time screen appears.
3. In the field that you want to set, press the key until theSpace
preferred option appears.
4. Click the trackwheel to view the menu. Click Save.
Enabling a password
1. On the Home screen, click the icon. The Device OptionsOptions
screen appears.
2. Click Security. The Security screen appears.
3. In the field, press the Password Space key.
4. In the Security Timeout field, set how much idle time should pass
before the Lock screen appears. Press the key until theSpace
preferred option appears.
5. Click the trackwheel to view the menu. Click Save.
6. Type a password of at least four characters. Click the trackwheel.
7. Type your new password again to verify it. Click the trackwheel.
The Options screen appears and your password is enabled.
Sending messages
After you activate your handheld, you can send and receive email, peer-to-
peer (PIN) messages, and Short Message Service (SMS) messages.
Refer to the for more information on sendingGetting Started Guide
messages.
To send an email or PIN message
1. On the Home screen, click the icon. The To screen appears. Compose
2. Select [Use Once]. Click the trackwheel to view the menu.
3. Click a send method (email or PIN). Type an email address or PIN.
4. In the field, type a subject and press the Subject Enter key.
5. Type your message.
6. Click the trackwheel to view the menu. Click Send.
To send an SMS message
1. On the Home screen, click the icon. The To screen appears.Compose
2. Select .[Use Once]. Click the trackwheel to view the menu. Click SMS
3. Type your message. As you type, the number of characters that you
Warning: If the password that you set is typed incorrectly ten times, all
information is erased from your handheld for security reasons. Refer to the
Desktop Software Online Help for information on reloading your handheld
applications.
Warning: When you connect your handheld to your computer, use only the
cradle provided by Research In Motion®.
Warning: Use only the battery that Research In Motion® specifies for use with
your BlackBerry wireless handheld model. The use of another battery might
present a risk of fire or explosion, or it might damage the handheld.
Produkt Specifikationer
| Mærke: | BlackBerry |
| Kategori: | Mobiltelefon |
| Model: | 6230 |
Har du brug for hjælp?
Hvis du har brug for hjælp til BlackBerry 6230 stil et spørgsmål nedenfor, og andre brugere vil svare dig
Mobiltelefon BlackBerry Manualer

30 August 2024
30 August 2024
13 August 2024
13 August 2024
13 August 2024
13 August 2024
13 August 2024
13 August 2024
13 August 2024
13 August 2024
Mobiltelefon Manualer
- Mobiltelefon Acer
- Mobiltelefon Amplicomms
- Mobiltelefon Denver
- Mobiltelefon Sencor
- Mobiltelefon Sony
- Mobiltelefon Siemens
- Mobiltelefon Samsung
- Mobiltelefon Panasonic
- Mobiltelefon Sony Ericsson
- Mobiltelefon Philips
- Mobiltelefon LG
- Mobiltelefon AEG
- Mobiltelefon Doro
- Mobiltelefon AT&T
- Mobiltelefon Mitsubishi
- Mobiltelefon Apple
- Mobiltelefon Sharp
- Mobiltelefon Google
- Mobiltelefon HP
- Mobiltelefon Emporia
- Mobiltelefon Garmin
- Mobiltelefon Sanyo
- Mobiltelefon Motorola
- Mobiltelefon Asus
- Mobiltelefon Gigabyte
- Mobiltelefon Toshiba
- Mobiltelefon InFocus
- Mobiltelefon Lenovo
- Mobiltelefon OnePlus
- Mobiltelefon Thomson
- Mobiltelefon Hyundai
- Mobiltelefon Aiwa
- Mobiltelefon Nokia
- Mobiltelefon Casio
- Mobiltelefon Palm
- Mobiltelefon AKAI
- Mobiltelefon Hisense
- Mobiltelefon Fysic
- Mobiltelefon Blaupunkt
- Mobiltelefon Leica
- Mobiltelefon Razer
- Mobiltelefon Medion
- Mobiltelefon Huawei
- Mobiltelefon Telefunken
- Mobiltelefon BenQ
- Mobiltelefon Primo
- Mobiltelefon Alcatel
- Mobiltelefon Plum
- Mobiltelefon Olympia
- Mobiltelefon Xiaomi
- Mobiltelefon Viewsonic
- Mobiltelefon Dell
- Mobiltelefon CAT
- Mobiltelefon Oppo
- Mobiltelefon Polaroid
- Mobiltelefon Crosscall
- Mobiltelefon NGM
- Mobiltelefon NEC
- Mobiltelefon Kyocera
- Mobiltelefon Energy Sistem
- Mobiltelefon Bush
- Mobiltelefon Binatone
- Mobiltelefon Honor
- Mobiltelefon Bixolon
- Mobiltelefon Tiptel
- Mobiltelefon Sagem
- Mobiltelefon Lava
- Mobiltelefon Vivo
- Mobiltelefon Infinix
- Mobiltelefon Archos
- Mobiltelefon MaxCom
- Mobiltelefon Pantech
- Mobiltelefon SPC
- Mobiltelefon ZTE
- Mobiltelefon Switel
- Mobiltelefon Brondi
- Mobiltelefon HTC
- Mobiltelefon Lupilu
- Mobiltelefon Evolveo
- Mobiltelefon GPO
- Mobiltelefon BLU
- Mobiltelefon Oricom
- Mobiltelefon MyPhone
- Mobiltelefon Realme
- Mobiltelefon Micromax
- Mobiltelefon Cyrus
- Mobiltelefon I.safe Mobile
- Mobiltelefon Bea-fon
- Mobiltelefon Allview
- Mobiltelefon Amplicom
- Mobiltelefon Sonim
- Mobiltelefon Sunstech
- Mobiltelefon Swissvoice
- Mobiltelefon Profoon
- Mobiltelefon Hammer
- Mobiltelefon Mpman
- Mobiltelefon Logicom
- Mobiltelefon Beafon
- Mobiltelefon Teleline
- Mobiltelefon Benefon
- Mobiltelefon Doogee
- Mobiltelefon Syco
- Mobiltelefon GSmart
- Mobiltelefon Auro
- Mobiltelefon Oukitel
- Mobiltelefon NUU Mobile
- Mobiltelefon Orange
- Mobiltelefon Telme
- Mobiltelefon Hummer
- Mobiltelefon Modu
- Mobiltelefon Maxwest
Nyeste Mobiltelefon Manualer
2 April 2025
2 April 2025
2 April 2025
9 Marts 2025

20 Februar 2025
20 Februar 2025
20 Februar 2025
20 Februar 2025
20 Februar 2025

5 Februar 2025