Bluebird EF401 Manual
Bluebird
Stregkodelæser
EF401
Læs nedenfor 📖 manual på dansk for Bluebird EF401 (53 sider) i kategorien Stregkodelæser. Denne guide var nyttig for 25 personer og blev bedømt med 4.5 stjerner i gennemsnit af 2 brugere
Side 1/53

USER
Manual
ENTERPRISE FULLTOUCH HANDHELD COMPUTER
EF401

This user manual is protected by copyright.
Copyright © 1995-2018 Bluebird Inc. All rights reserved.
Bluebird Inc. is the designer and manufacturer of Bluebird handheld mobiles.
This manual and the programs in this device are protected under international copyright laws, and may not
be copied, distributed, translated, or removed by any means.
Registered Trademark
BLUEBIRD is an emerging global brand, striving to lead the market in performance
and mobility. Their products represent reliability, innovation, and innovative technology.
Bluebird is a registered trademark from the global brand of Bluebird Inc. and is
copyright protected.
• Bluebird and stylized Bluebird Logo are registered trademarks and symbols of Bluebird Inc.
• Qualcomm® IZat™ is a registered trademark of Qualcomm Atheros, Inc.trademark of Qualcomm Atheros,
Inc.
• Adobe® is a registered trademark of Adobe Systems Inc.
• Google™, Android™, Google Play™ and other marks are trademarks of Google LLC.
• All other trademarks and copyrights are the property of their respective owners.
User’s Guidance
Device type User’s guidance
Class B Device
(Household Information & Communication)
This device has qualified the electromagnetic wave suitable
registration and can be used as a household device at a
residential area as well as any other areas.
Type Registration This wireless device may cause propagation interference,
and so, it cannot be used for life-saving services.
Revision History
Revised Version Revised Date Revised Details
1.0.0 14 March 2018 First version released.
1.0.1 03 2018September Updated the device specification.

Contents
This user manual is protected by copyright.
Registered Trademark
User’s Guidance
Revision History
Contents
1 About This Manual
2 Safety Information
2.1 Symbols ............................................................................................................................................... 2
2.2 Device .................................................................................................................................................. 2
2.3 Environment ......................................................................................................................................... 3
2.4 Battery and Charging 3 ...........................................................................................................................
2.5 Distraction ............................................................................................................................................ 3
2.6 Frequency Interference 3 ........................................................................................................................
3 Overview
3.1 Package Contents 4 ...............................................................................................................................
3.2 Your Device 5 ..........................................................................................................................................
3.2.1 Front ............................................................................................................................................... 5
3.2.2 Back ............................................................................................................................................... 7
3.2.3 Bottom and Top 8 ..............................................................................................................................
4 Getting Started
4.1 Cards ................................................................................................................................................... 9
4.1.1 Installing the Cards 9 ..........................................................................................................................
4.1.2 Removing the Cards 10 .....................................................................................................................
4.2 Battery ............................................................................................................................................... 11
4.2.1 Installing the Battery 11 ......................................................................................................................
4.2.2 Removing the Battery 12 ....................................................................................................................
4.2.3 Charging the Battery 13 ....................................................................................................................
4.2.4 Extending the Battery Life 14 .............................................................................................................
5 Basics
5.1 Turning the Device On and Off........................................................................................................... 15
5.1.1 Using Airplane Mode 15 .....................................................................................................................
5.1.2 Using the Hot Swap Function 15 ........................................................................................................
5.2 Resetting the Device 16 ..........................................................................................................................
5.3 Using the Touchscreen 17 ......................................................................................................................
5.4 Locking and Unlocking the Device 18 ....................................................................................................
5.5 Using the Home Screen 19 .....................................................................................................................
5.5.1 Viewing the Status Bar 20 ..................................................................................................................
5.5.2 Notification Icons 20 .........................................................................................................................
5.5.3 Status Icons 21 ..................................................................................................................................

Contents
5.6 Customizing Your Home Screen 22 ........................................................................................................
5.6.1 Adding Shortcuts or Widgets 22 ........................................................................................................
5.6.2 Arranging Shortcuts or Widgets 22 ....................................................................................................
5.6.3 Removing Shortcuts or Widgets 23 ....................................................................................................
5.7 Using Your Device with Ease 23 .............................................................................................................
5.7.1 Quick Actions 23 ................................................................................................................................
5.7.2 Setting Date and Time 24 ..................................................................................................................
5.7.3 Setting the Keyboard and Language 24 .............................................................................................
5.7.4 Adjusting the Screen Brightness 24 ...................................................................................................
5.8 Connectivity ....................................................................................................................................... 25
5.8.1 Wi-Fi ............................................................................................................................................. 25
5.8.2 Bluetooth ...................................................................................................................................... 25
6 Applications
6.1 Installing and Uninstalling Apps......................................................................................................... 27
6.1.1 Installing App 27 ................................................................................................................................
6.1.2 Uninstalling App 27 ............................................................................................................................
6.2 Overview of Apps............................................................................................................................... 28
6.3 Phone ................................................................................................................................................. 29
6.3.1 Making Calls 29 .................................................................................................................................
6.3.2 Answering Calls 34 ............................................................................................................................
6.3.3 Viewing Call Log 35 ...........................................................................................................................
6.3.4 Making Conference Calls 35 ..............................................................................................................
6.3.5 Making Emergency Calls 36 ...............................................................................................................
6.3.6 Making Speed dial 36 ........................................................................................................................
6.3.7 Phone Settings 36 .............................................................................................................................
6.4 Contacts ............................................................................................................................................ 38
6.4.1 Creating Contacts 38 .........................................................................................................................
6.4.2 Editing Contacts 39 ...........................................................................................................................
6.4.3 Finding Contacts 40 ...........................................................................................................................
6.4.4 Calling Contacts 40 ............................................................................................................................
6.4.5 Messaging Contacts 40 .....................................................................................................................
6.5 Gmail .................................................................................................................................................. 40
6.6 Barcode ............................................................................................................................................. 41
6.7 Camera .............................................................................................................................................. 42
6.7.1 Taking Photos 42 ...............................................................................................................................
6.7.2 Taking Photos in Panoramic Mode 42 ................................................................................................
6.7.3 Recording Videos 43 ..........................................................................................................................
6.7.4 Camera Settings 43 ...........................................................................................................................
6.7.5 Video Settings 44 ...............................................................................................................................
6.8 Calendar ............................................................................................................................................ 45
6.8.1 Creating Events 45 .............................................................................................................................
6.8.2 Changing Calendar View 45 ...............................................................................................................
6.8.3 Viewing Events 45 ..............................................................................................................................
6.8.4 Editing and Deleting Events 46 ...........................................................................................................
6.8.5 Refreshing the Calendar 46 ................................................................................................................
6.8.6 Searching for Events 46 .....................................................................................................................
6.8.7 Syncing Events 46 .............................................................................................................................

Contents
6.9 Clock .................................................................................................................................................. 47
6.9.1 Alarm and clock 48 ............................................................................................................................
6.9.2 Timer ............................................................................................................................................ 49
6.9.3 Stopwatch .................................................................................................................................... 49
6.9.4 Settings ........................................................................................................................................ 50
6.10 Downloads ....................................................................................................................................... 51
6.11 Calculator ......................................................................................................................................... 51
6.12 Google Apps 51 ....................................................................................................................................
6.12.1 Chrome ....................................................................................................................................... 51
6.12.2 Gmail .......................................................................................................................................... 51
6.12.3 Google ........................................................................................................................................ 51
6.12.4 Maps .......................................................................................................................................... 51
6.12.5 Play Music 51 ..................................................................................................................................
6.12.6 Play Movies & TV 51 ........................................................................................................................
6.12.7 Drive ........................................................................................................................................... 52
6.12.8 YouTube ...................................................................................................................................... 52
6.12.9 Photos ........................................................................................................................................ 52
6.12.10 Voice Search 52 .............................................................................................................................
7 Settings
7.1 Wi-Fi ................................................................................................................................................... 53
7.2 Bluetooth ........................................................................................................................................... 53
7.3 Ethernet ............................................................................................................................................. 53
7.4 Data Usage 54 ........................................................................................................................................
7.5 More Settings..................................................................................................................................... 54
7.6 Display ............................................................................................................................................... 55
7.7 Notifications ....................................................................................................................................... 56
7.8 Sound ................................................................................................................................................ 56
7.9 Apps ................................................................................................................................................... 57
7.10 Storage ............................................................................................................................................ 57
7.11 Battery ............................................................................................................................................. 58
7.12 Memory ............................................................................................................................................ 58
7.13 Users ................................................................................................................................................ 58
7.14 Peripheral Device 58 .............................................................................................................................
7.15 Location ........................................................................................................................................... 59
7.16 Security ............................................................................................................................................ 59
7.17 Accounts .......................................................................................................................................... 60
7.18 Google ............................................................................................................................................. 61
7.19 Language and Input 62 .........................................................................................................................
7.20 Backup and Reset 63 ...........................................................................................................................
7.21 Date and Time.................................................................................................................................. 63
7.22 Scheduled power on and off 63 ...........................................................................................................
7.23 Accessibility ..................................................................................................................................... 63
7.24 Printing ............................................................................................................................................. 65
7.25 About Phone 65 ....................................................................................................................................

Contents
Appendix A Device Specification
Appendix B Accessories
Appendix C Troubleshooting
Appendix D Safety Regulatory
Appendix E Warranty and Support

1
1 About This Manual
The EF401 provides high quality features as a smart terminal using Bluebird’s creative ideas and
technological expertise. This user manual is designed to help users effectively operate the device.
• Please read this manual carefully before using the device for safe and proper use.
• This device may only be used in countries where it is sold.
• The components and colors of this device in this manual may differ from the actual product.
• Features and specifications are subject to change without prior notice.
• Content may vary by software version or by service provider.
• Apps and features may vary by country or region.
• Certain features of this device may have performance issues due to user environment, programs in use, or
peripheral device usage. Bluebird is not liable for any issues caused by third-party apps or accessories.
• Modifying the device’s operating system or installing software from unknown sources may cause device
malfunction or data loss. Improper or unauthorized use of the device is a violation of the Bluebird license
agreement and void your one-year limited warranty.

2
2 Safety Information
2.1 Symbols
This manual uses the following symbols to indicate hazards and additional information.
Symbol Name Description
Warning Indicates situations that could cause injury to yourself or others.
Caution Indicates situations that could cause damage to your device or other
equipment.
Note Indicates additional information that can help you get the most out of the
device.
Please read this safety precaution information carefully. Failure to follow the information provided may
result in fire, electric shock, or other property damage or bodily injuries.
2.2 Device
• Do not press the Power button on the device if the device is wet or do not touch adapter or power
cord with wet hands. There is risk of electric shock.
• Do not use your device in an explosive danger zone.
• If your device becomes wet, do not put your device in heaters, microwaves, etc. to dry it. There is a
risk of explosion or malfunction.
• Do not scratch the device’s touchscreen. Use only your fingers or a compatible pen. Never use an
actual pen, or any other sharp object on the touchscreen.
• Although this device is very sturdy, do not drop, hit, bend, or sit on it on purpose. It can be broken.
• Do not modify, take apart, or repair the device. Contact to your customer service center. Failure to do
so will void your warranty.
• Do not attempt to modify your hardware or software. It may cause device malfunction and void your
warranty.
• You may not be able to use this wireless device in basements, open fields, skyscrapers, or other
places where the signal is weak.
• Backup the data and information from your device. Your data, such as ringtones, texts, and voice
messages, may be erased during repairs or upgrades.
• Do not paint your device. It can damage your screen or your device’s exterior.
• Avoid using or storing this device at extreme temperatures. This device is designed to work at
temperatures between - 0°C and 0°C (- °F and 1 °F), and humidity level between 5% and 95%. 1 5 2 22

2 Safety Information
3
2.3 Environment
• Do not use the device while driving or operating heavy machinery. Doing so may result in death or
serious injury.
• Do not use the device in locations with combustible goods. Doing so may result in an explosion.
• Do not use the device in dusty or hot locations. Doing so may damage the device.
• Do not expose your device to direct sunlight such as on the dashboard of a car for extended periods
of time.
• Do not use the device in humid locations. Doing so may damage the device and void the warranty.
• Do not keep the device close to air conditioner vents. Corrosion within the device may occur due to
condensation from changes in temperature.
• Do not allow children to play with the device.
2.4 Battery and Charging
• Improper battery use may cause fire, explosion, or other hazard.
• If the battery is removed due to impact, heat, submersion, or other damage, there is a risk of
explosion. Keep away from children and animals.
• Do not allow the battery’s contacts to touch things like necklaces, coins, or electric conductors. Do
not give any impact with sharp objects. There is a risk of explosion.
• Use only the approved battery and charger. Using an incompatible battery or charger may cause
device malfunction or other damage, such as fire.
• When you are not using the device for a long period, take out the battery and keep the device and
the battery in a dry, cool place. Also, charge the battery at least once a year. If you keep it without
charging for a long time, it may cause device malfunction.
2.5 Distraction
In some situations, using your device may distract you and cause serious injuries and damages. For
example, avoid talking on the phone or texting while driving or riding a bicycle. It is strictly prohibited by
law in some jurisdictions. If you cannot avoid using your device while driving, stop your vehicle or use
hand-free kit.
2.6 Frequency Interference
• This wireless device may cause radio frequency interference, so use Airplane mode or turn off the
device when prohibited.
• The device emits an electromagnetic fields. It may interfere with your medical devices.
• Do not place credit cards, phone cards, bankbook, and tickets next to the device. The magnetic field
of the device can damage their magnetic strips.

4
3 Overview
3.1 Package Contents
The package includes:
EF401 device Battery
Battery cover Micro USB cable
• The illustrations may differ from your actual items.
• To purchase additional accessories, contact your sales representative.
• You can download your User Manual from www. .combluebirdcorp . The paper version may be
available for some regions.
• For the power adapter, use the product listed below.
- PSAC30U-090 by Phihong Technology Co., Ltd. (Input: AC 100 ~ 240 V, 50 ~ 60 Hz, 0.5 A /
Output: DC 9.3 V, 3 A)
3 Overview
5
3.2 Your Device
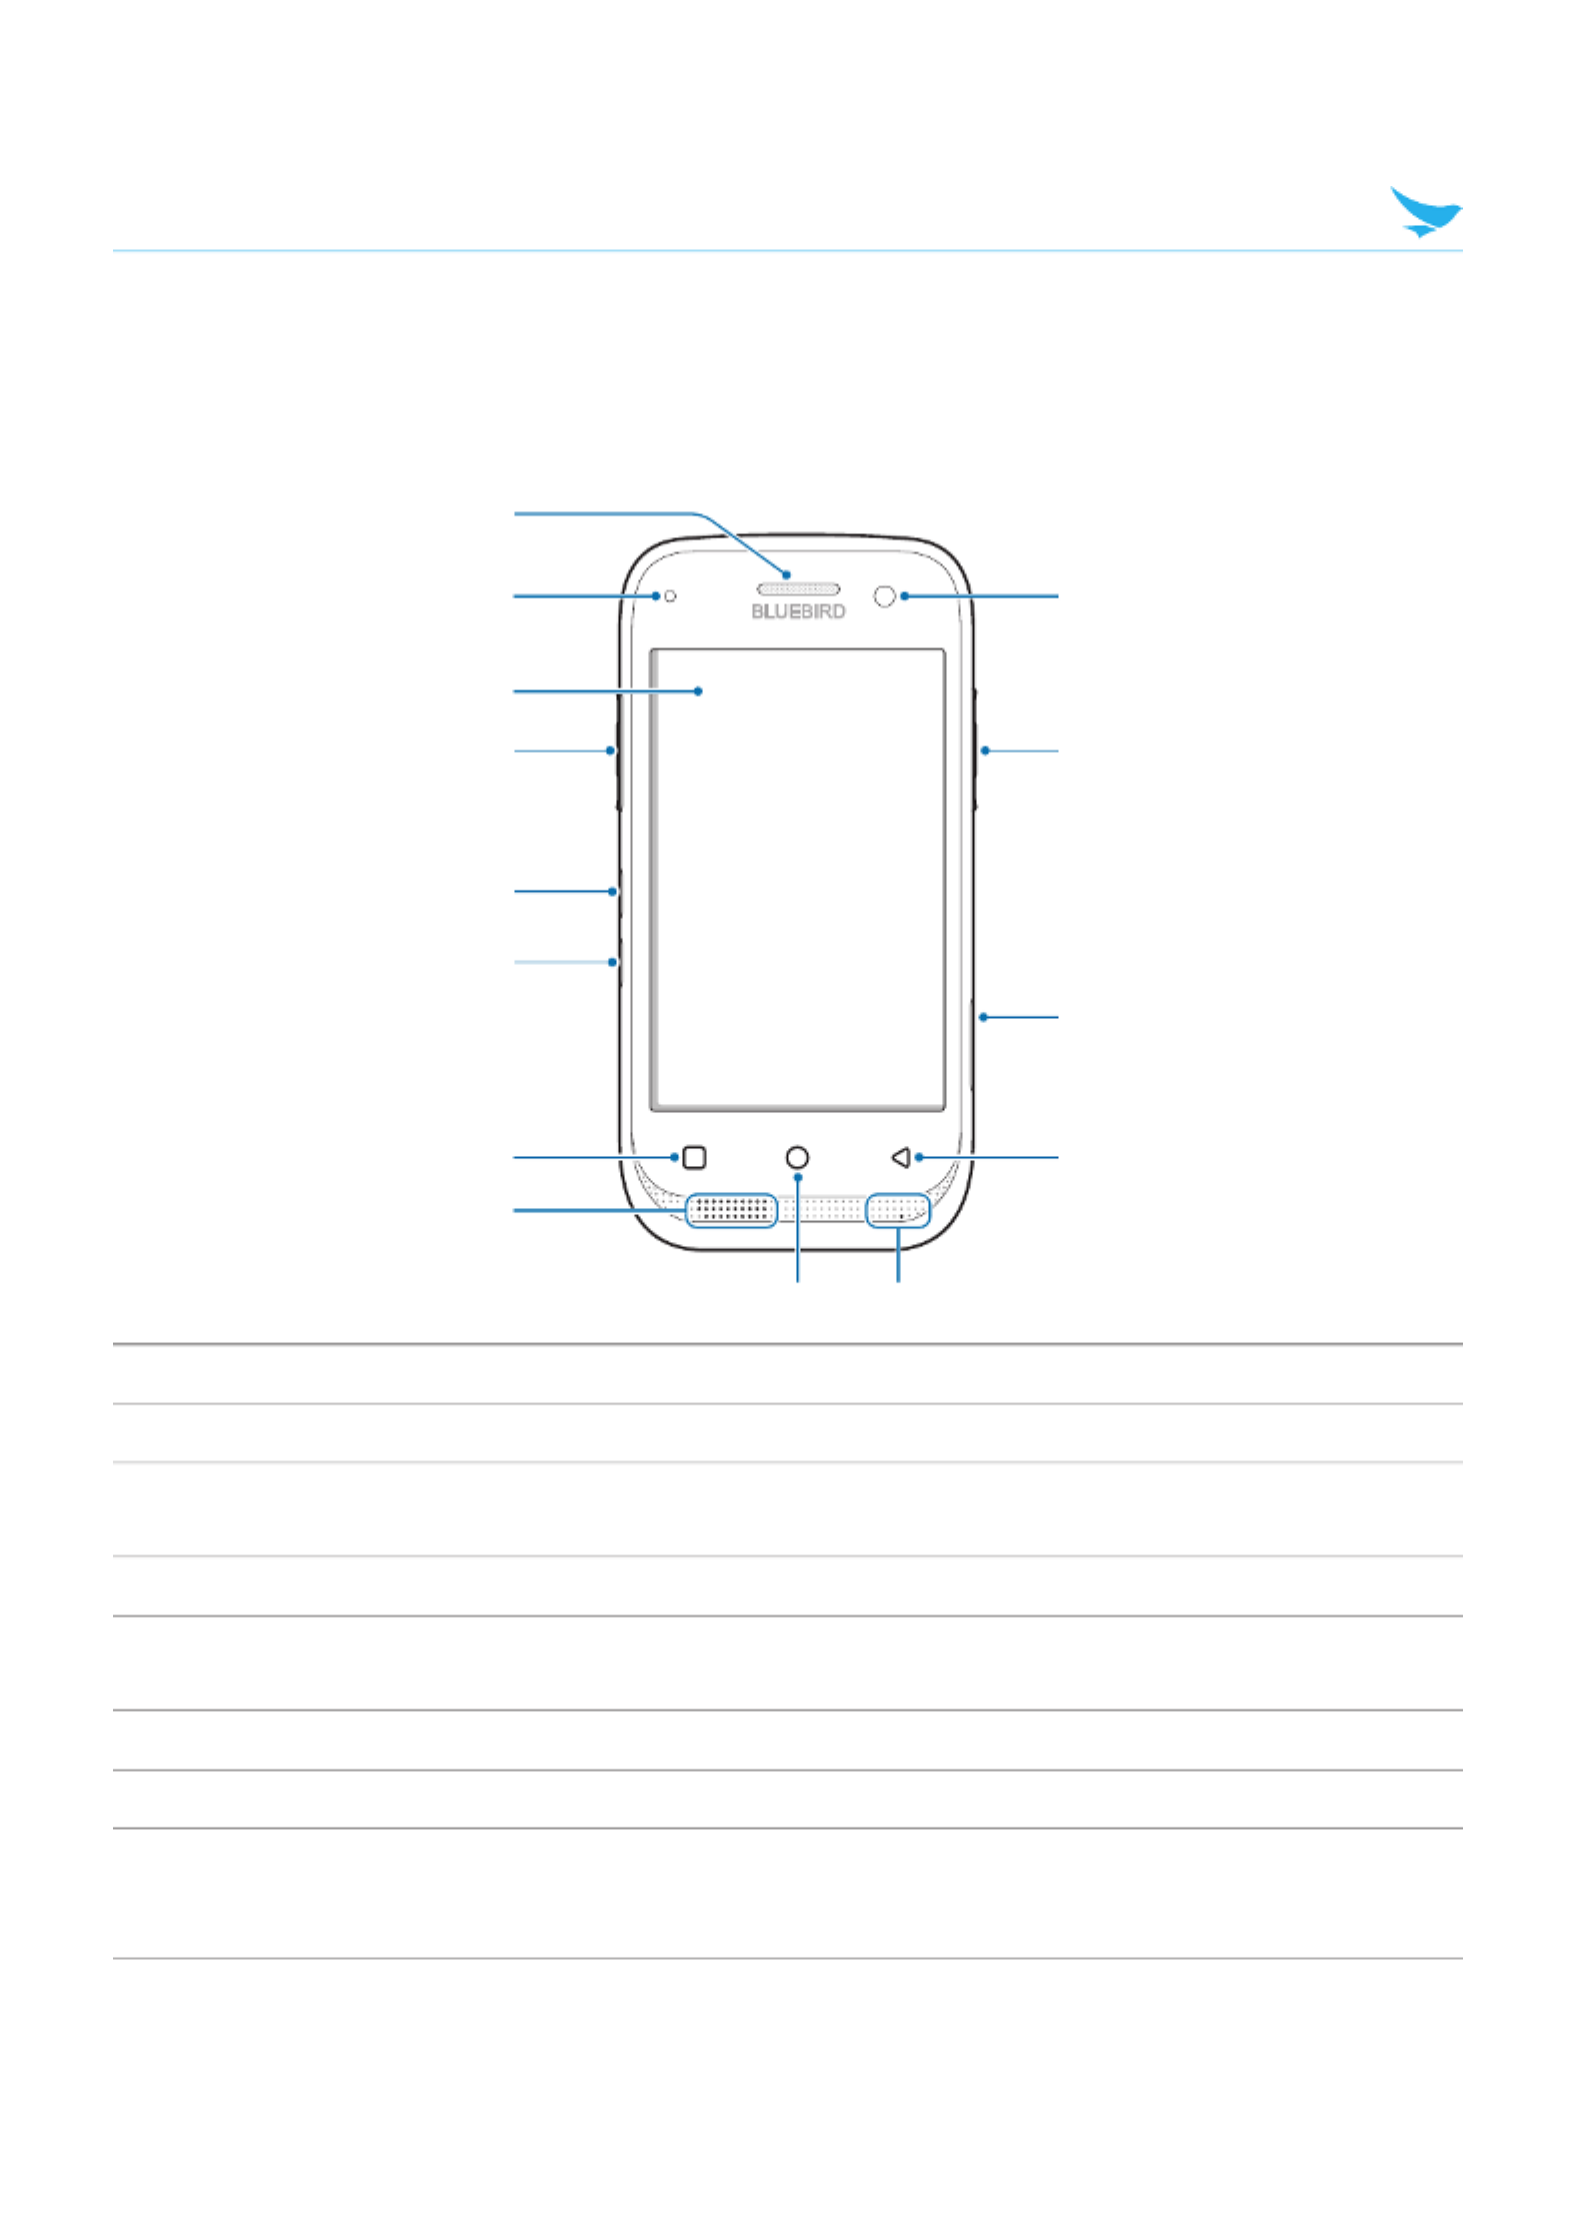
3.2.1 Front
1
2
4
3
5
6
#
@
$
8
7
9 0
!
No. Name Description
1Receiver Allows user to hear the person they are talking to while on the phone.
2Charging LED Indicates the status of the battery. The charging LED turns red when the
battery is charging and turns green when the battery is fully charged.
3Touchscreen Displays apps and acts as a multi-touch interface.
4Left button Functions as the barcode scan button. You can also change the functions of
the Left button.
5Volume up button Turns the volume up.
6Volume down button Turns the volume down.
7Menu button
Displays more option menus. If you tap and hold this button for a few
seconds, the apps you previously opened will be listed. Tap any app to open
it.
8Speaker Emits sound.

3 Overview
6
No. Name Description
9Home button Returns to the Home screen.
0Primary microphone Captures sound for calling, video recording, and speech recognition.
!Back button Returns to the previous page or menu.
@Multi-purpose jack Connects your device with other devices, such as a computer, via a micro-
USB cable.
#Right button Functions as the barcode scan button. You can also change the functions of
the Right button.
$Front camera Takes selfies and records videos (1.3 Megapixel). You can use it when you
have a video call.

3 Overview
8
3.2.3 Bottom and Top
1 4
2 3
No. Name Description
1Barcode scanner Scans barcodes by emitting a red laser when you press the related button.
2Headset jack Connects to the headset.
3Power button Turns the device or screen on or off. You can lock the device by turning off
the screen.
4Charging contacts Allows the device to be charged.
9
4 Getting Started
4.1 Cards
There are two slots for a micro SD and a micro SIM card in the inner compartment on the back of your
device.
• A micro SD card is required for external storage.
• A micro SIM card is required for using mobile services.
All cards should be purchased separately if necessary. The specifications may differ according to
country where the device is purchased. Contact your sales representative for more information.
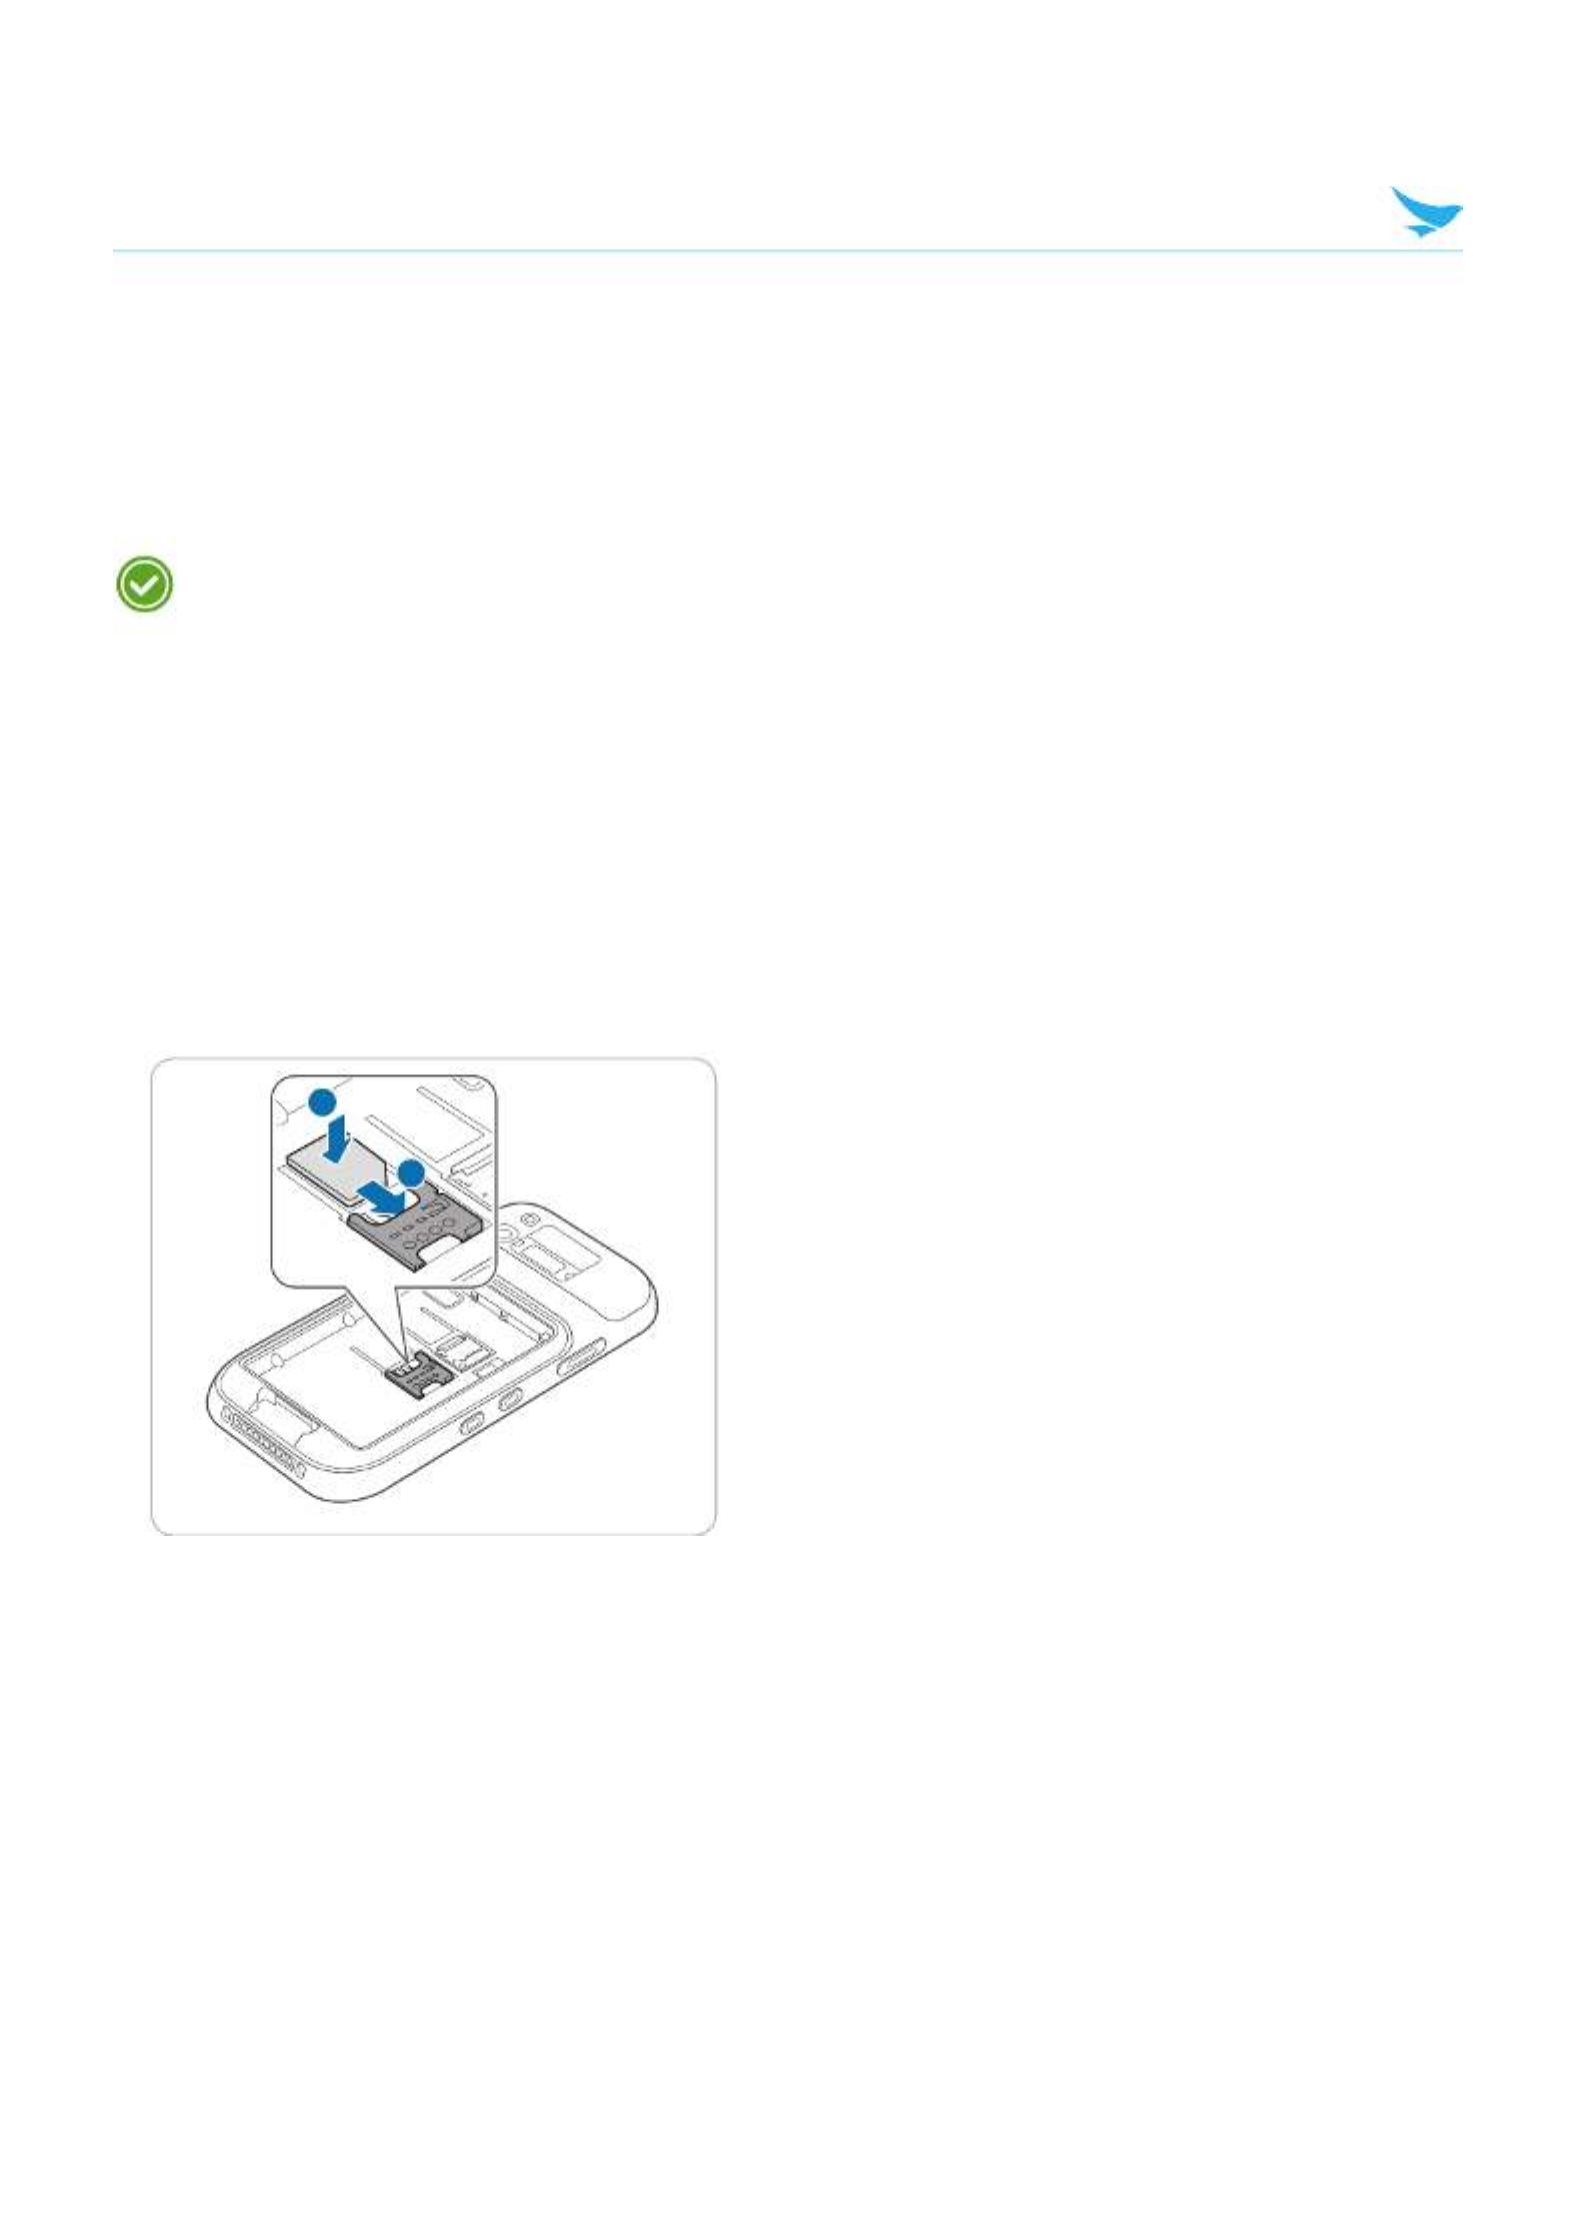
4.1.1 Installing the Cards
To insert the cards, the battery cover must be removed first. For information on how to remove the battery
cover, refer to . Before installing a card, make sure you are using the Installing the Battery on page 11
correct slot.
To insert the micro SIM card
Insert a micro SIM card into the slot, pressing the lock with a card.
• Make sure that the gold contacts on the card are facing down.
2
1

4 Getting Started
10
To insert the micro SD card
Insert a micro SD card into the slot, pressing the lock with a card.
• Make sure that the gold contacts on the card are facing down.
2
1
4.1.2 Removing the Cards
Pull the cards out to remove them, pressing the lock with your finger.

4 Getting Started
11
4.2 Battery
EF401 uses a Lithium-ion rechargeable battery. Install the provided battery before charging the device.
4.2.1 Installing the Battery
1 Slide the battery lock and lift up the battery cover.
2
1
• When removing the battery cover, be careful not to damage your fingernail.
• Do not try to pull the battery cover excessively. It may damage the cover.
2 Insert the battery. Make sure the gold contacts are aligned.
2
1

4 Getting Started
12
3 Replace the cover. Insert the top of the cover first and then press around the edges of the cover until it
clicks into place.
2
1
4 Close the battery lock to lock the battery cover.
4.2.2 Removing the Battery
1 Remove the battery cover as described in .Installing the Battery on page 11
2 Lift up the bottom of the battery and pull it out of the compartment as shown in the image below.
Before removing the battery, turn off the power. Failure to do so it may cause damage to the device.

4 Getting Started
13
4.2.3 Charging the Battery
The device can be charged with a charger or a cradle. You can also charge the battery by connecting it to
your computer with the provided micro USB cable. Check the device’s battery status on the status bar. You
can also check the battery status on the lock screen.
• When the battery is low, the device will emit a sound and display a low power message.
• When the battery is charging, the charging LED will be red.
• When the battery is fully charged, the charging LED will be green.
Charge the device before using it for the first time or after not using it for a long time.
To charge with the charger
Plug the micro 5-pin end of the charger into the device’s multi-purpose jack. Connect the micro USB cable
of the charger with power adapter. Plug the charger into a power outlet.
When the battery is extremely low on power, the device may not turn on. Charge the device enough
and try to turn it on again. You can use the device while charging. But it may take longer to fully charge
the device.
• Connect the charger properly. Failure to do so may cause damage to the device.
• The device may heat up when charging. If it gets hotter than usual, stop charging.
• Do not remove the battery before disconnecting the charger. Doing so may cause damage to the
device.
To charge with the cradle
Connect the power adapter with the cradle, and plug it into a power outlet.
You can also take out the battery from the device and charge it separately in a cradle.

4 Getting Started
14
4.2.4 Extending the Battery Life
You can improve the battery life in various ways. The easiest way is to use battery saver mode. When
the device goes into battery saver mode, some background features and app settings may not function
normally.
There are some other ways to improve your device’s battery life.
• Always fully charge the battery.
• Mute unnecessary sounds, such as keypad sounds.
• Use a wired headset, rather than the loudspeaker.
• Close the Camera app whenever you have finished taking photos.
– Tap the Back button on Android devices.
• Decrease the length of the screen time-out.
– On the Home screen, tap > > and set a shorter duration on Android device.Display Sleep
• Lower the screen brightness.
– On the Home screen, tap > , and turn off, then tap the Display Adaptive brightness Brightness
level to adjust the brightness level lower on Android device.
• Set your device to check for new mail less frequently, or even by request only.
– On the Home screen, tap > > > and, tap an account, and then change theAccounts Google
settings for Google on Android device.
• Disable Bluetooth when you are not using it.
• Use a Wi-Fi connection to connect to the Internet, rather than a mobile data connection.
• Prevent your device from scanning for available wireless networks.
– On the Home screen, tap > and switch the Wi-Fi to Wi-Fi Off on Android device.

15
5.1 Turning the Device On and Off
To turn on the device, press and hold the Power button for a few seconds.
To turn off the device, press and hold the Power button, then tap Power off.
• To turn the screen on or off, press the Power button.
• Registering the accounts without turning on the Wi-Fi may incur extra charges depending on your
data plan.
Do not turn off the device by removing the battery, as this may damage the device.
5.1.1 Using Airplane Mode
On the Home screen, tap > and turn on. This feature disables all wireless andMore Airplane mode
mobile services. Repeat the step to deactivate Airplane mode.
You can activate Wi-Fi and Airplane mode from the quick action center. Drag down from the top of the
screen at any time from any menu or app and tap the button or button.Wi-Fi Airplane mode
5.1.2 Using the Hot Swap Function
The Hot swap function refers to changing the device’s components without shutting down the system.
1 Remove the battery cover.
The screen will be turned off automatically.
2 Replace the battery with charged one.
3 Insert the battery cover and lock it to attach the device.
4 Press the Power button to turn on the screen.
After swapping the battery, you should insert and lock the battery cover. If not, the screen will not be
turned on.
5 Basics

5 Basics
16
5.2 Resetting the Device
If your device does not work properly or freezes due to unknown errors, you can force the device to restart.
To reset the device’s hardware
Press and hold the Power button and the Volume down button simultaneously until the device vibrates, and
then release the buttons.
The data on the device will remain saved when you perform the hardware reset.
To reset the device’s software
On the Home screen, tap > > Backup & reset Factory data reset. All settings and data, including
apps and personal content, will initialize, and the factory settings will be restored.
• Reset the device whose battery is charged enough not to make the device turn off suddenly during
resetting. You can reset the device, charging the battery with USB cable when the device has low
battery power.
• Back up any data and settings you want to keep before resetting the device to the factory default
settings.

5 Basics
17
5.3 Using the Touchscreen
Use finger gestures to use the touchscreen effectively.
• Do not touch the screen with any sharp objects.
• Do not apply too much pressure to the touchscreen.
Gesture Name Description
Tap Briefly touch an item to open, launch, or select it.
Zoom in or out
Place two fingers on the screen and spread them apart to zoom
in. Pull the fingers together to zoom out. You can also double-
tap the screen quickly to zoom in or out.
Tap and hold Touch an item or the screen for a few seconds to access more
detailed menus or options.
Swipe Touch the screen and quickly flick in any direction to scroll
through menus or pages.
Drag
Touch an item or the screen for a few seconds and move your
finger around the screen to move the item or move through
screens.

5 Basics
18
5.4 Locking and Unlocking the Device
Lock the screen to protect your device and its data.
The device locks if it is not in use for a specified period by default. To unlock the device, press the Power
button to turn on the screen and drag upward from the bottom of the screen.
1
2
You can increase security by creating a screen pattern, a PIN, or password. For more information about how
to configure and change screen lock settings, refer to .Security on page 59

5 Basics
19
5.5 Using the Home Screen
The Home screen is the starting point for all apps and features. It displays icons, shortcuts, and widgets for
apps.
1
2
4
3
No. Description
1Status bar
2Widget
3Location indicator
4App icons
The Home screen has multiple pages. To view other pages, swipe left or right. The white bar at the bottom
of the Home screen indicates the current page you are viewing.
You can add or delete shortcuts, and widgets on the Home screen. You can also arrange the shortcuts
and widgets. For more information about personalizing your Home screen, refer to Customizing Your Home
Screen on page 22.
• To return to the Home screen, tap Home button at any time from any menu or app.
• To view the previously opened apps, tap Menu button and swipe between the apps. Tap any app
to open it again.

5 Basics
20
5.5.1 Viewing the Status Bar
The status bar appears at the top of the screen. It displays the status icons and the current time on the
right, and the notification icons on the left.
1 2
No. Description
1Notification icons
2Status icons and the current time
5.5.2 Notification Icons
Notification icons in the status bar alert you to notifications, such as upcoming events, messaging, emails,
missed calls, data usage, and much more.
Icon Description
Indicates that there are more notifications that are not displayed in the status bar.
Indicates that data is syncing.
Alerts you to an upcoming event.
Indicates that a song is playing.
Indicates that your device is uploading data.
Indicates that your device is downloading data.
Indicates that the micro SD card is almost full.
Your device has detected an active USB connection.
Indicates that your device has received a new text or multimedia message.
Indicates that you have missed calls.
5 Basics
21
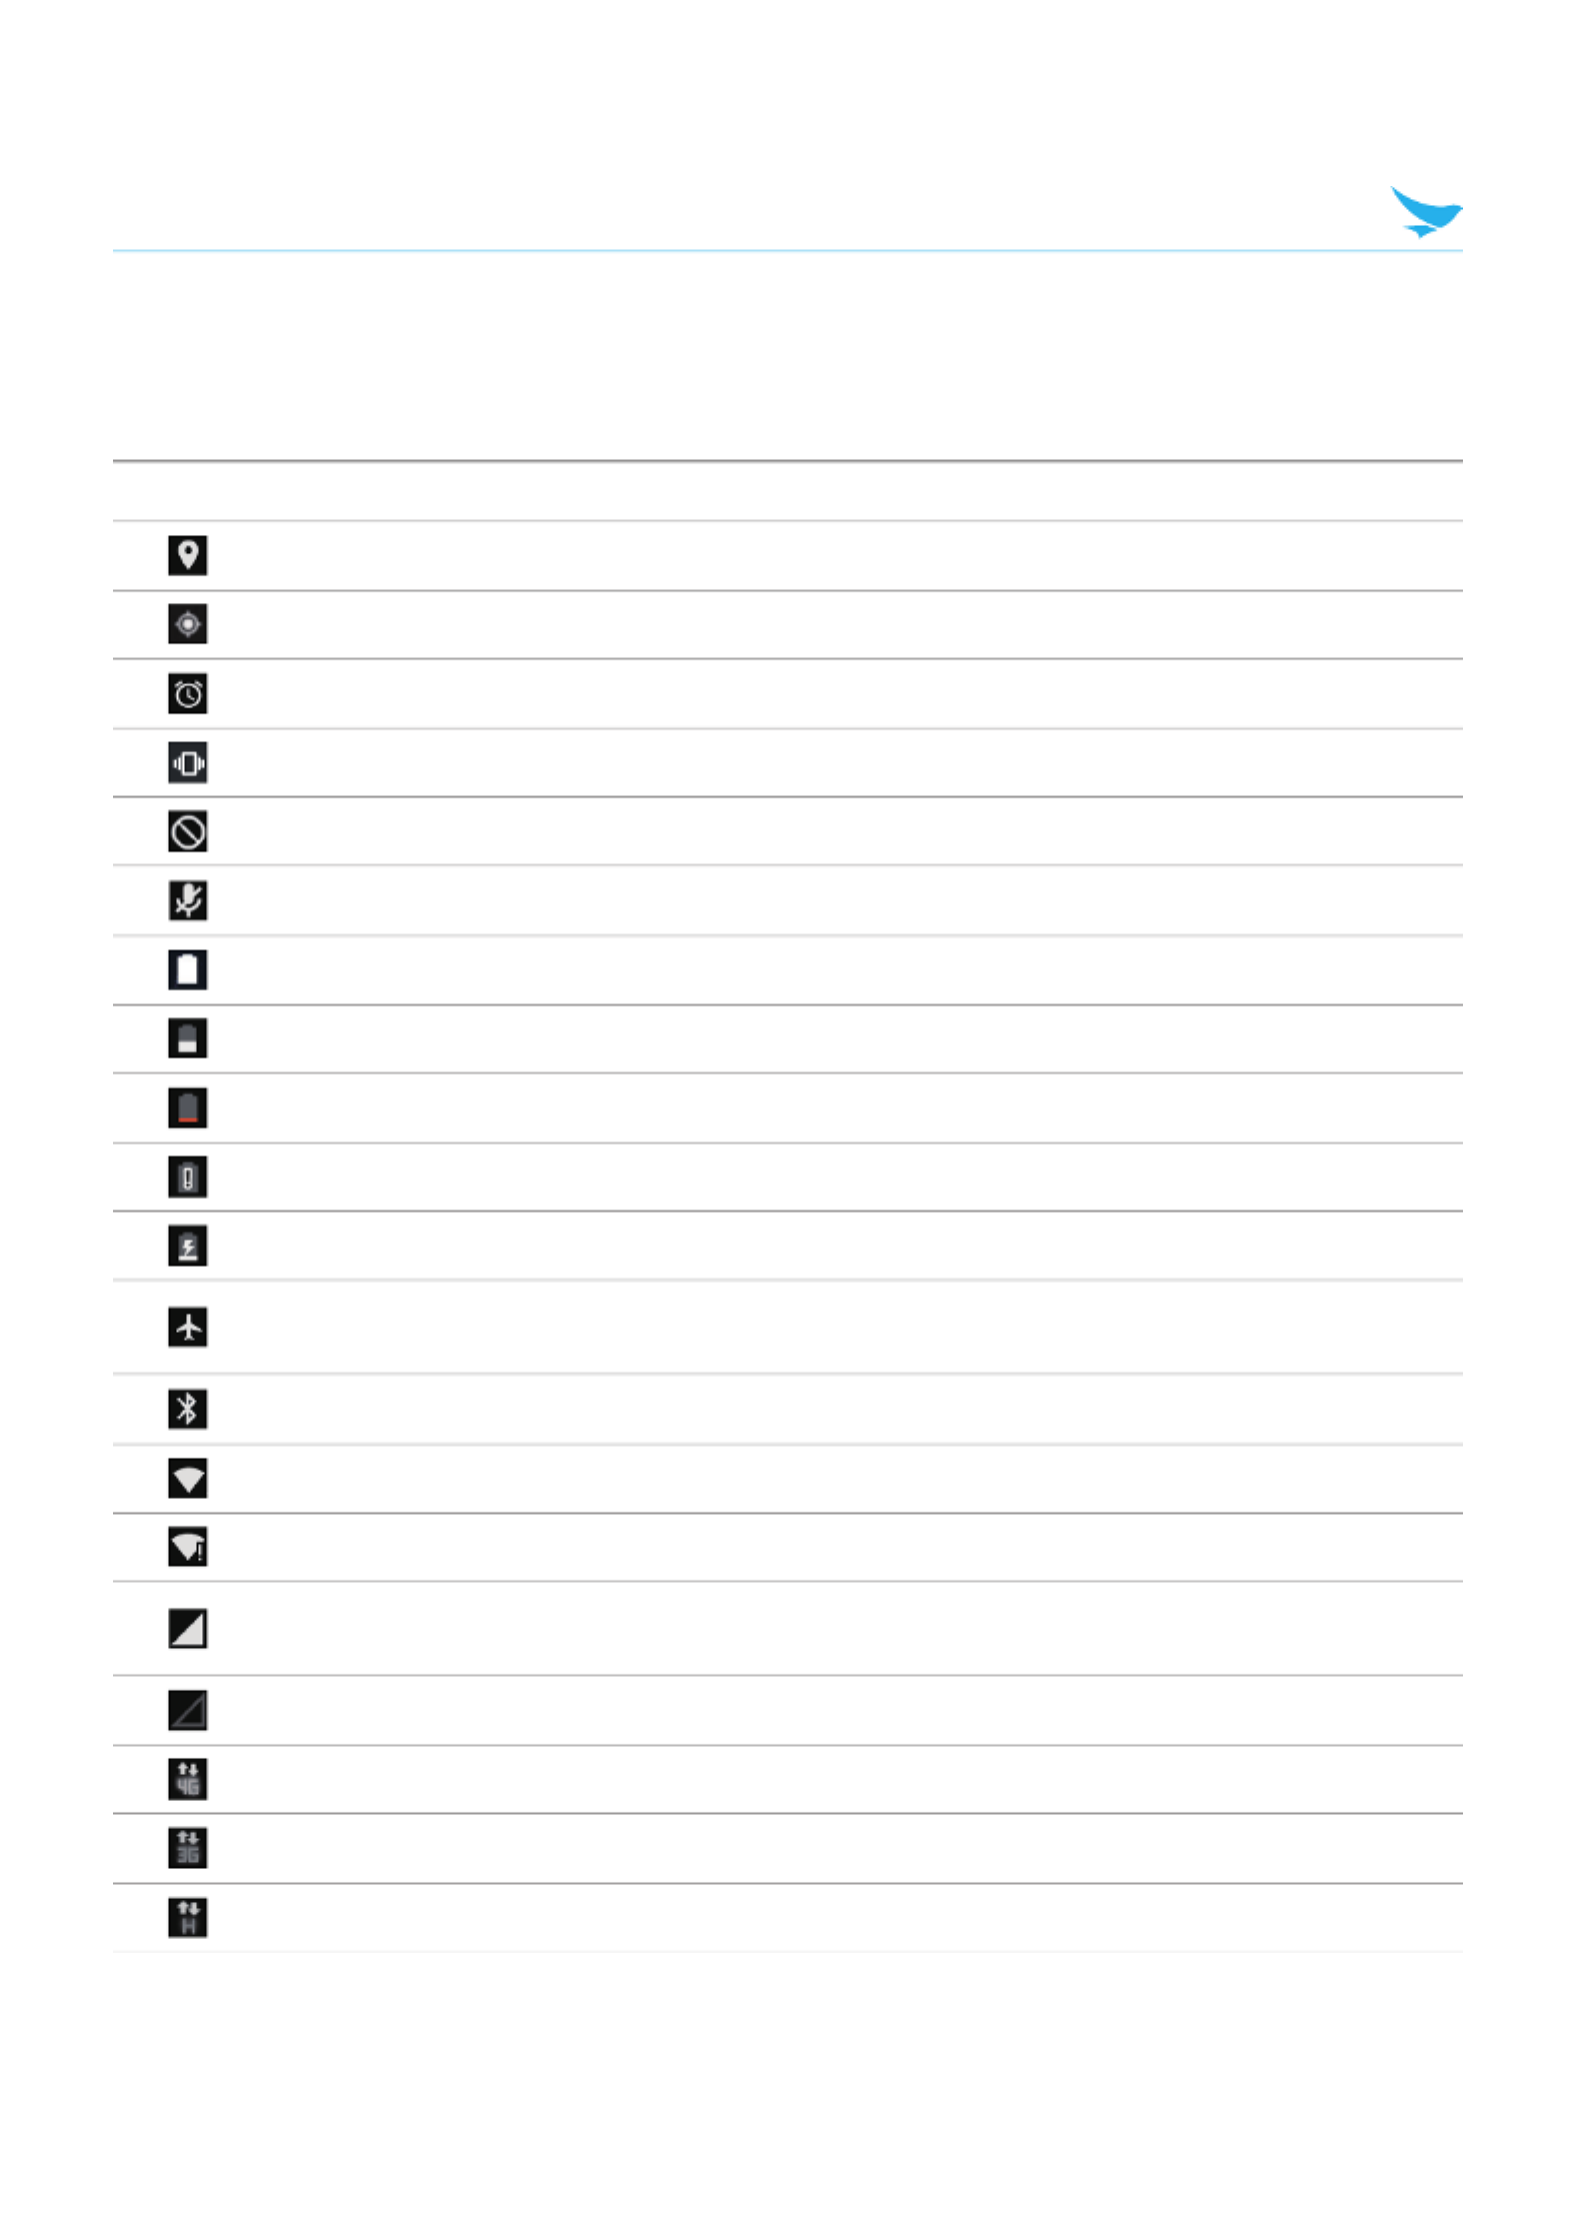
5.5.3 Status Icons
The status icons in the status bar provides information about your device’s status, such as GPS, signal
strength, roaming, battery charge, data, alarm, etc.
Icon Description
Indicates that GPS is in on.
Indicates that your device is searching for location data.
Indicates that the alarm is set.
Indicates that the device is set to vibrate.
Indicates that all sounds are turned off.
Indicates that the microphone is muted during a call.
Indicates that the battery is fully charged.
Indicates that the battery is partially drained.
Indicates that the battery is low.
Indicates that the battery is very low.
Indicates that the battery is charging.
Indicates that Airplane mode is active—you cannot make any calls, and other wireless
functions are disabled.
Indicates that Bluetooth is on.
Indicates that your device is connected to a Wi-Fi network.
Indicates that there is no Wi-Fi signal.
Indicates that you are in range of your mobile network and it indicates the mobile network’s
signal strength.
Indicates that there is no mobile network signal.
Indicates that your device is connected to a 4G network.
Indicates that your device is connected to a 3G network.
Indicates that your device is connected to an HSPA network.

5 Basics
22
Icon Description
Indicates that your device is connected to an EDGE network.
Indicates that your device is connected to an GPRS network.
Indicates that there is no SIM card installed.
• Other than the icons described in the table above, there are various other notifications and status
icons that are displayed on the status bar depending on the situation.
• When the icons on the status bar are hidden, tap the status bar on the screen to display icons
temporarily.
• The appearance of icons may vary depending on your region or network service provider.
5.6 Customizing Your Home Screen
You can customize the Home screen by adding shortcuts and widgets.
5.6.1 Adding Shortcuts or Widgets
Shortcuts added on the Home screen allows you to access and launch apps or activate a feature quickly
and easily. Widgets appear as on-screen apps.
To add a shortcut
On the Home screen, tap to view your all apps. Locate an app, and tap and hold the item until the Home
screen appears. Position the item on the screen and release.
To add a widget
On the Home screen, tap and hold the screen until the WIDGETS icon appears on the bottom of the screen.
Tap and select a widget option you want to set.WIDGETS
The same shortcuts or widgets can be added to any of the available screens.
5.6.2 Arranging Shortcuts or Widgets
Tap and hold the shortcut icon or widget you want to move. Drag the shortcut icon or widget to a new
location. To place the item on a different page, drag it to the edge of the screen.
To change the size of your widget, tap and hold the widget on the Home screen. Release the item
and a white box will be displayed around the widget. Drag the white dots to change the size. It is not
available for some widgets.

5 Basics
23
5.6.3 Removing Shortcuts or Widgets
Tap and hold an shortcut icon or widget. Drag it to at the top of the screen and release it to X Remove
remove the shortcut icon or widget.
5.7 Using Your Device with Ease
Make it easier to see, hear, and use the device with its built-in accessibility features.
On the Home screen, tap > and make the text size bigger, increase text contrast, Accessibility
and more to fit your individual needs. For more information on configuring Accessibility settings, refer to
Accessibility on page 63.
5.7.1 Quick Actions
Access the most frequently used settings quickly with quick action, turning them on or off in an instance.
1 Drag down from the top of the screen at any time from any app and tap a quick action button to turn it on
or off.
2 Drag up from the bottom of the screen or tap the Back button .

5 Basics
24
5.7.2 Setting Date and Time
The date and time are automatically set based on the network you are connected to.
To set the date and time manually
On the Home screen, tap > , then disable . If you turn off thisDate & time Automatic date & time
option, the options for setting date and time will be activated.
To set the date and time automatically
On the Home screen, tap > , then enable .Date & time Automatic date & time
To set the time zone manually
On the Home screen, tap > , then disable . If you turn off thisDate & time Automatic time zone
option, the option for setting time zone will be activated.
To set the time zone automatically
On the Home screen, tap > , then enable .Date & time Automatic time zone
To set the date and time format
On the Home screen, tap > , then turn on or off.Date & time Use 24-hour format
5.7.3 Setting the Keyboard and Language
On the Home screen, tap > to change the language and the keyboard you use.Language & input
For more information, refer to .Language and Input on page 62
5.7.4 Adjusting the Screen Brightness
1 On the Home screen, tap > > .Display Brightness level
2 Tap and move the slider to adjust the screen brightness.
5 Basics
25
5.8 Connectivity
5.8.1 Wi-Fi
Connecting to a Wi-Fi network is an easy way of accessing the Internet. When you are out, you can connect
to Wi-Fi networks in public places.
1 On the Home screen, tap > .Wi-Fi
2 Make sure to turn Wi-Fi on.
3 Tap the network you want to join.
4 If necessary, enter the password for the network and tap .CONNECT
To disconnect the network connection, turn Wi-Fi off.
Your device periodically checks for and notifies you of available connections. The notification appears
briefly at the top of the screen.
5.8.2 Bluetooth
You can connect wirelessly to various Bluetooth-compatible devices, such as phones, computers, headsets,
and car kits. You can also send your photos to Bluetooth-compatible phones or to your computer.
On the Home screen, tap > Bluetooth.
Because devices with Bluetooth wireless technology communicate using radio waves, they do not need
to have a direct line of sight. However, they must be within 10 meters (33 feet) of each other, although the
connection may be subject to interference from obstructions, such as walls or from other electronic devices.
• Paired devices can be connected to your device when Bluetooth turns on.
• Other devices can detect your device only if the Bluetooth settings view is open.
Do not accept the requests from unknown devices and also do not try to pair with an unknown devices.
This helps to protect your device from harmful content.

5 Basics
26
To pair with a Bluetooth device
Pair your device with Bluetooth compatible devices.
1 On the Home screen, tap >
Bluetooth.
2 Turn the Bluetooth .On
• Make sure the devices you want to pair with have Bluetooth enabled.
• You may need to start the pairing process from the headset. For details, see your headset user
guide.
3 On the Bluetooth device list, tap the device you want to pair with.
4 Type or confirm the PIN, and tap PAIR, if required.
• The passcode, which you can create, must be entered on both devices. The PIN in some devices
is fixed. For details, see the user guide of the other device.
• A PIN is only used when you connect to something for the first time.
When your device has paired with other devices via Bluetooth, your devices will automatically pair in the
future when in range.
To unpair a Bluetooth device
Unpair your device with other device you paired.
1 On the Home screen, tap >
Bluetooth.
2 Tap device’s name to disconnect.
3 Tap .FORGET
To send content via Bluetooth
Use Bluetooth to wirelessly share your photos or other content with Bluetooth-compatible devices or to your
computer. You can use more than one Bluetooth connection at a time.
For example, while using a Bluetooth headset, you can still send things to another device.
1 Pair your device with another Bluetooth device.
2 Tap the content you want to share then tap > .Bluetooth
3 On the Bluetooth devices list, tap the device you want to share with.

27
6 Applications
6.1 Installing and Uninstalling Apps
You can purchase and download apps.
Tap on the Apps screen.
6.1.1 Installing App
In the Play Store, browse apps by category or enter the keywords on search field to search for a keyword.
Select an app you want to install and see whether the app is free or not.
• To download a free app, tap INSTALL.
• To purchase and download a paid app, tap the price and follow the on-screen instructions.
To change the auto update settings, tap > and tap the , and thenSettings Auto-update apps
select an option.
6.1.2 Uninstalling App
On the Home screen, tap to view all your apps. Tap and hold the app icon you want to uninstall until the
Home screen appears. Drag it to and release it to uninstall the app. Uninstall
6 Applications
28
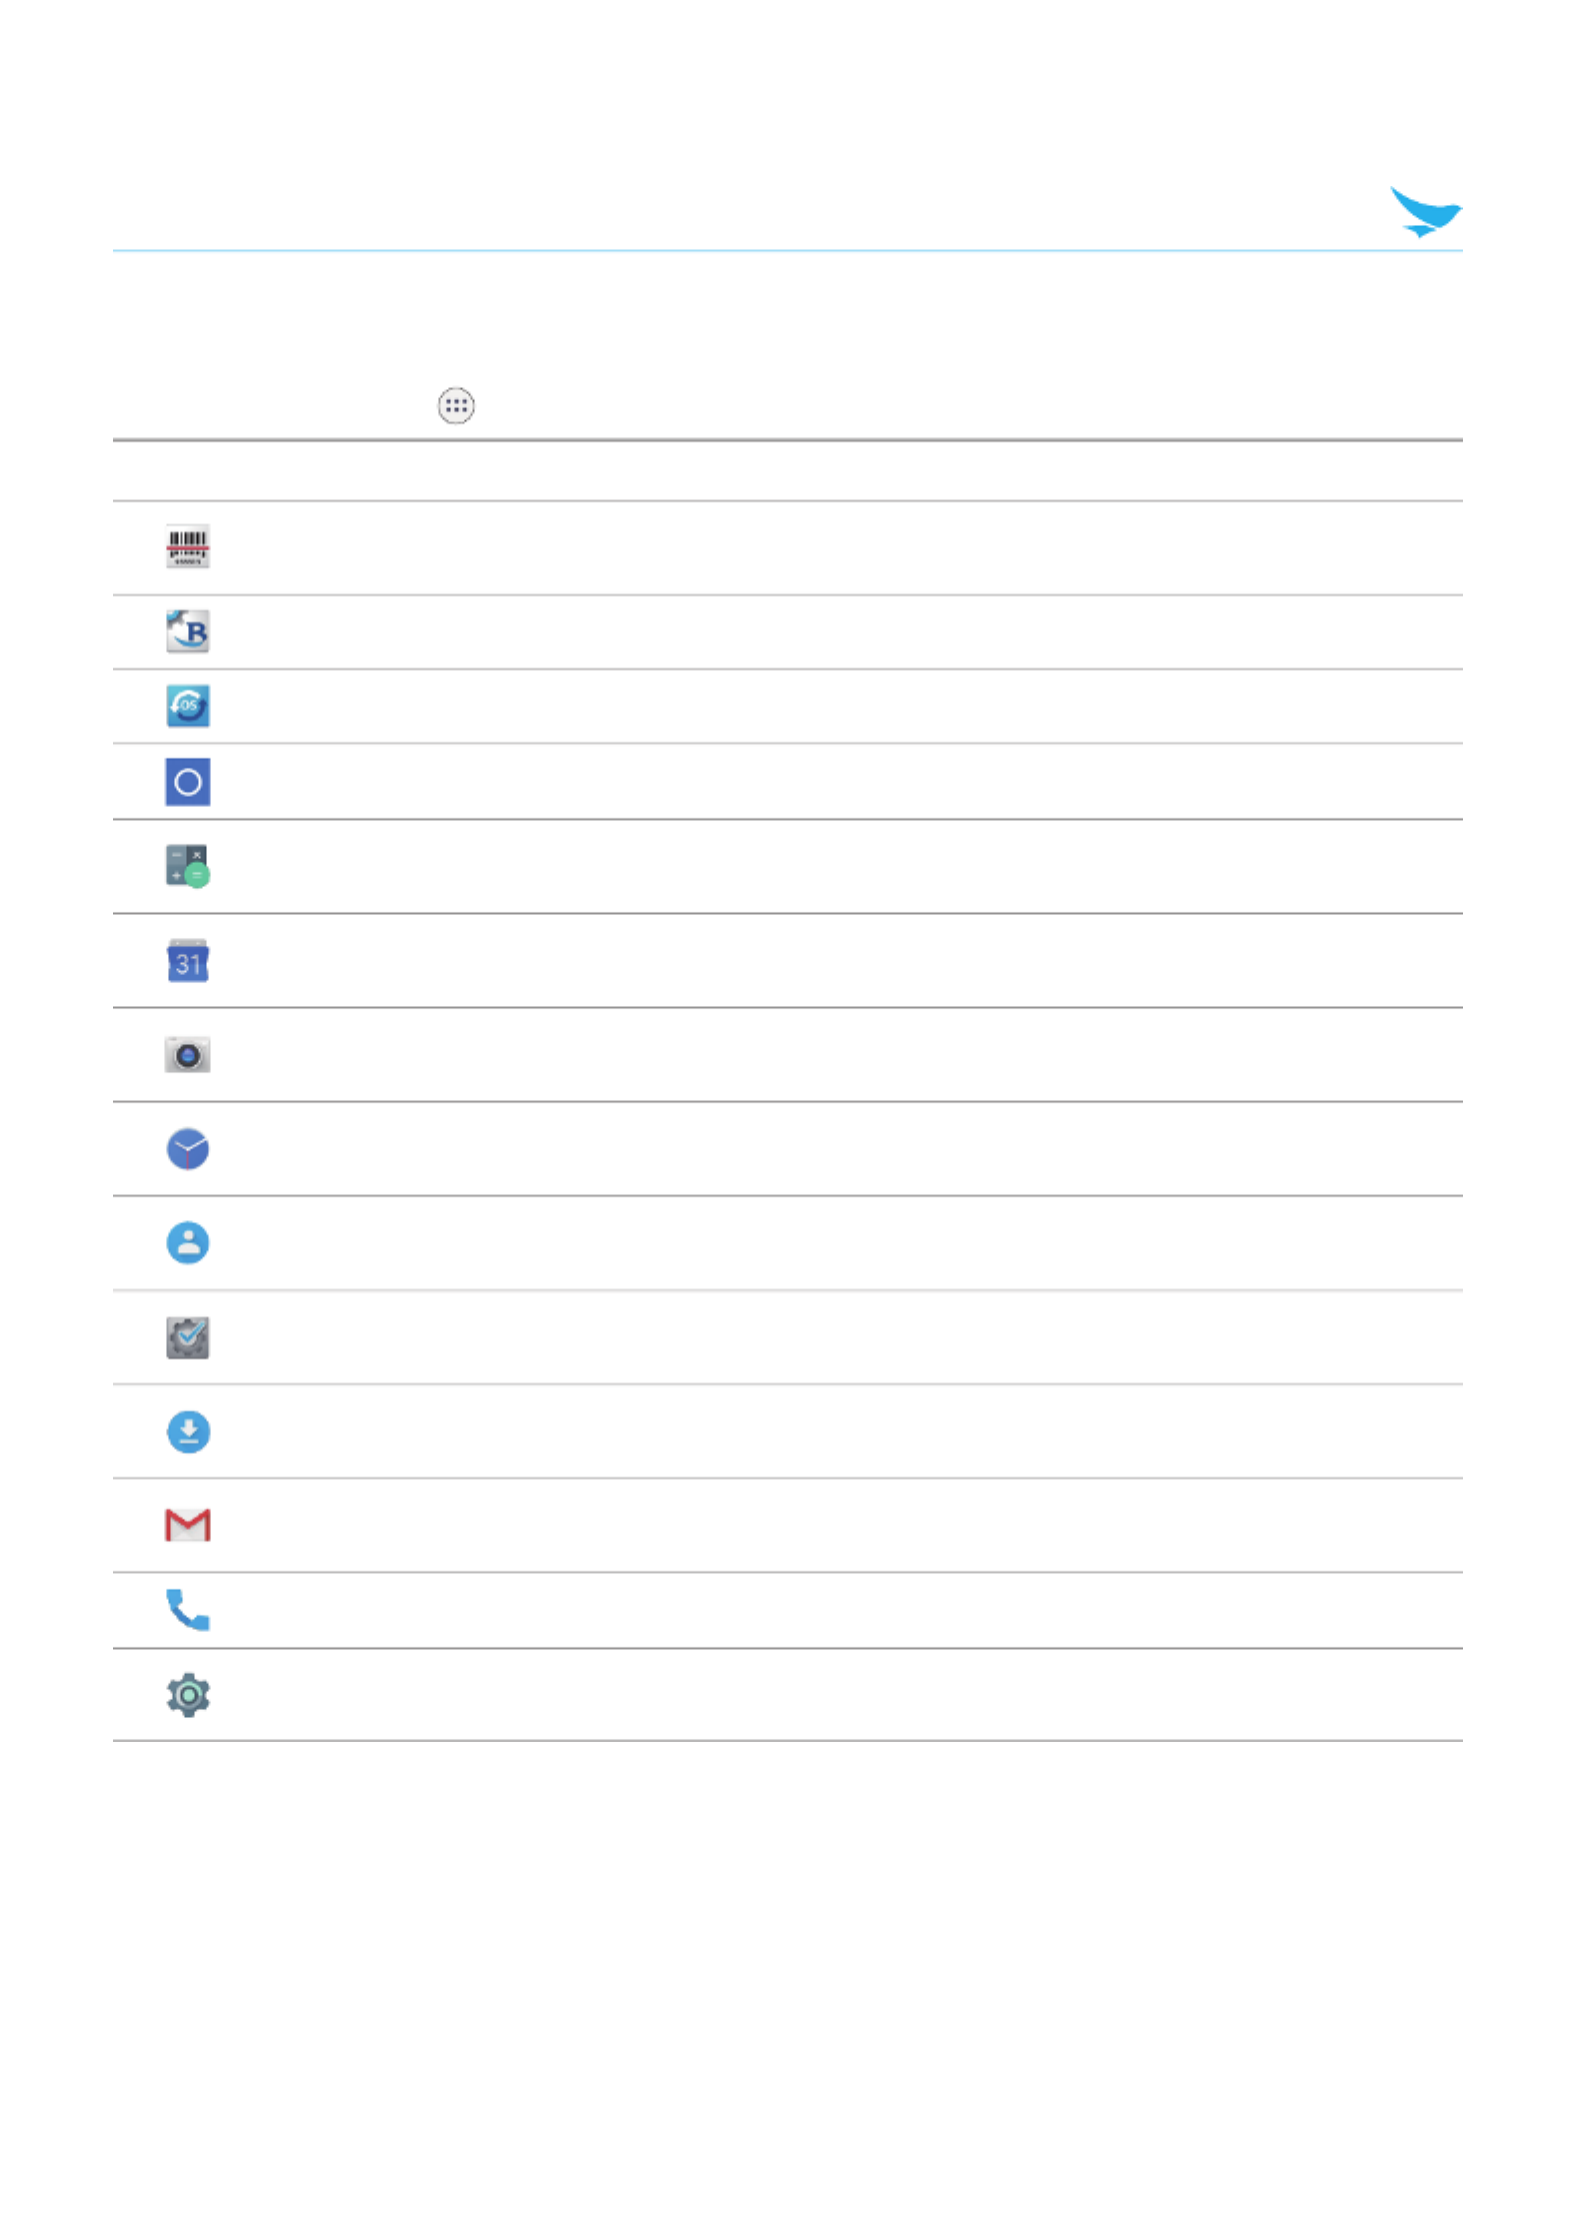
6.2 Overview of Apps
On the Home screen, tap to view all the apps on your device.
Icon Name Description
BarcodeTest Use to scan and read the barcode information. For more information, refer to
Barcode on page 41.
BBSettings Use to change your Bluebird settings in Symbology and Fix/Volume/Mode.
BBUpdate Use to update your device.
File Manager Use to organize and manage your files.
Calculator Use for mathematical calculations. For more information, refer to Calculator
on page 51.
Calendar Use to create, view, and manage events. For more information, refer to
Calendar on page 45.
Camera Use to take photos or record videos. For more information, refer to Camera
on page 42.
Clock Use to set an alarm, view current times around the world, and use a timer or
a stopwatch. For more information, refer to . Clock on page 47
Contacts Use to add, view, and edit your contacts. For more information, refer to
Contacts on page 38.
DevCheck Use to view device version information, check your device, or to reset your
device.
Downloads Use to view all downloaded files. For more information, refer to Downloads
on page 51.
Gmail Use to send or view emails. For more information, refer to Gmail on page
40.
Phone Use to make phone calls. For more information, refer to .Phone on page 29
Settings Use to configure your device. For more information, refer to Settings on page
53.

6 Applications
29
6.3 Phone
6.3.1 Making Calls
On the Home screen, tap > .
You can simply dial the number, tap on a number on the call log, or choose a number in your contacts.
To make a call on the dialer screen
1 On the Home screen, tap
>
.
2 Tap on your Phone app.
3 Tap the keypad, enter a phone number, then tap to call.
Touch and hold number 1 key to use voicemail.
Enter digits and the following options appear on the top of the screen.
• Create new contact: Select to add a new contact.
• Add to a contact: Select to add a number to the contact list as an existing contact.
• Send SMS: Select to send a text message to the dialed number.
Tap on this screen for dialing options.
• Add 2-sec pause: Select to add a two-second pause before the phone dials the following sequence of
digits. Multiple pauses can be added.
• Add wait: Select to make the phone dial the sequence of digits when you tap Yes on the pop-up screen.
6 Applications
30
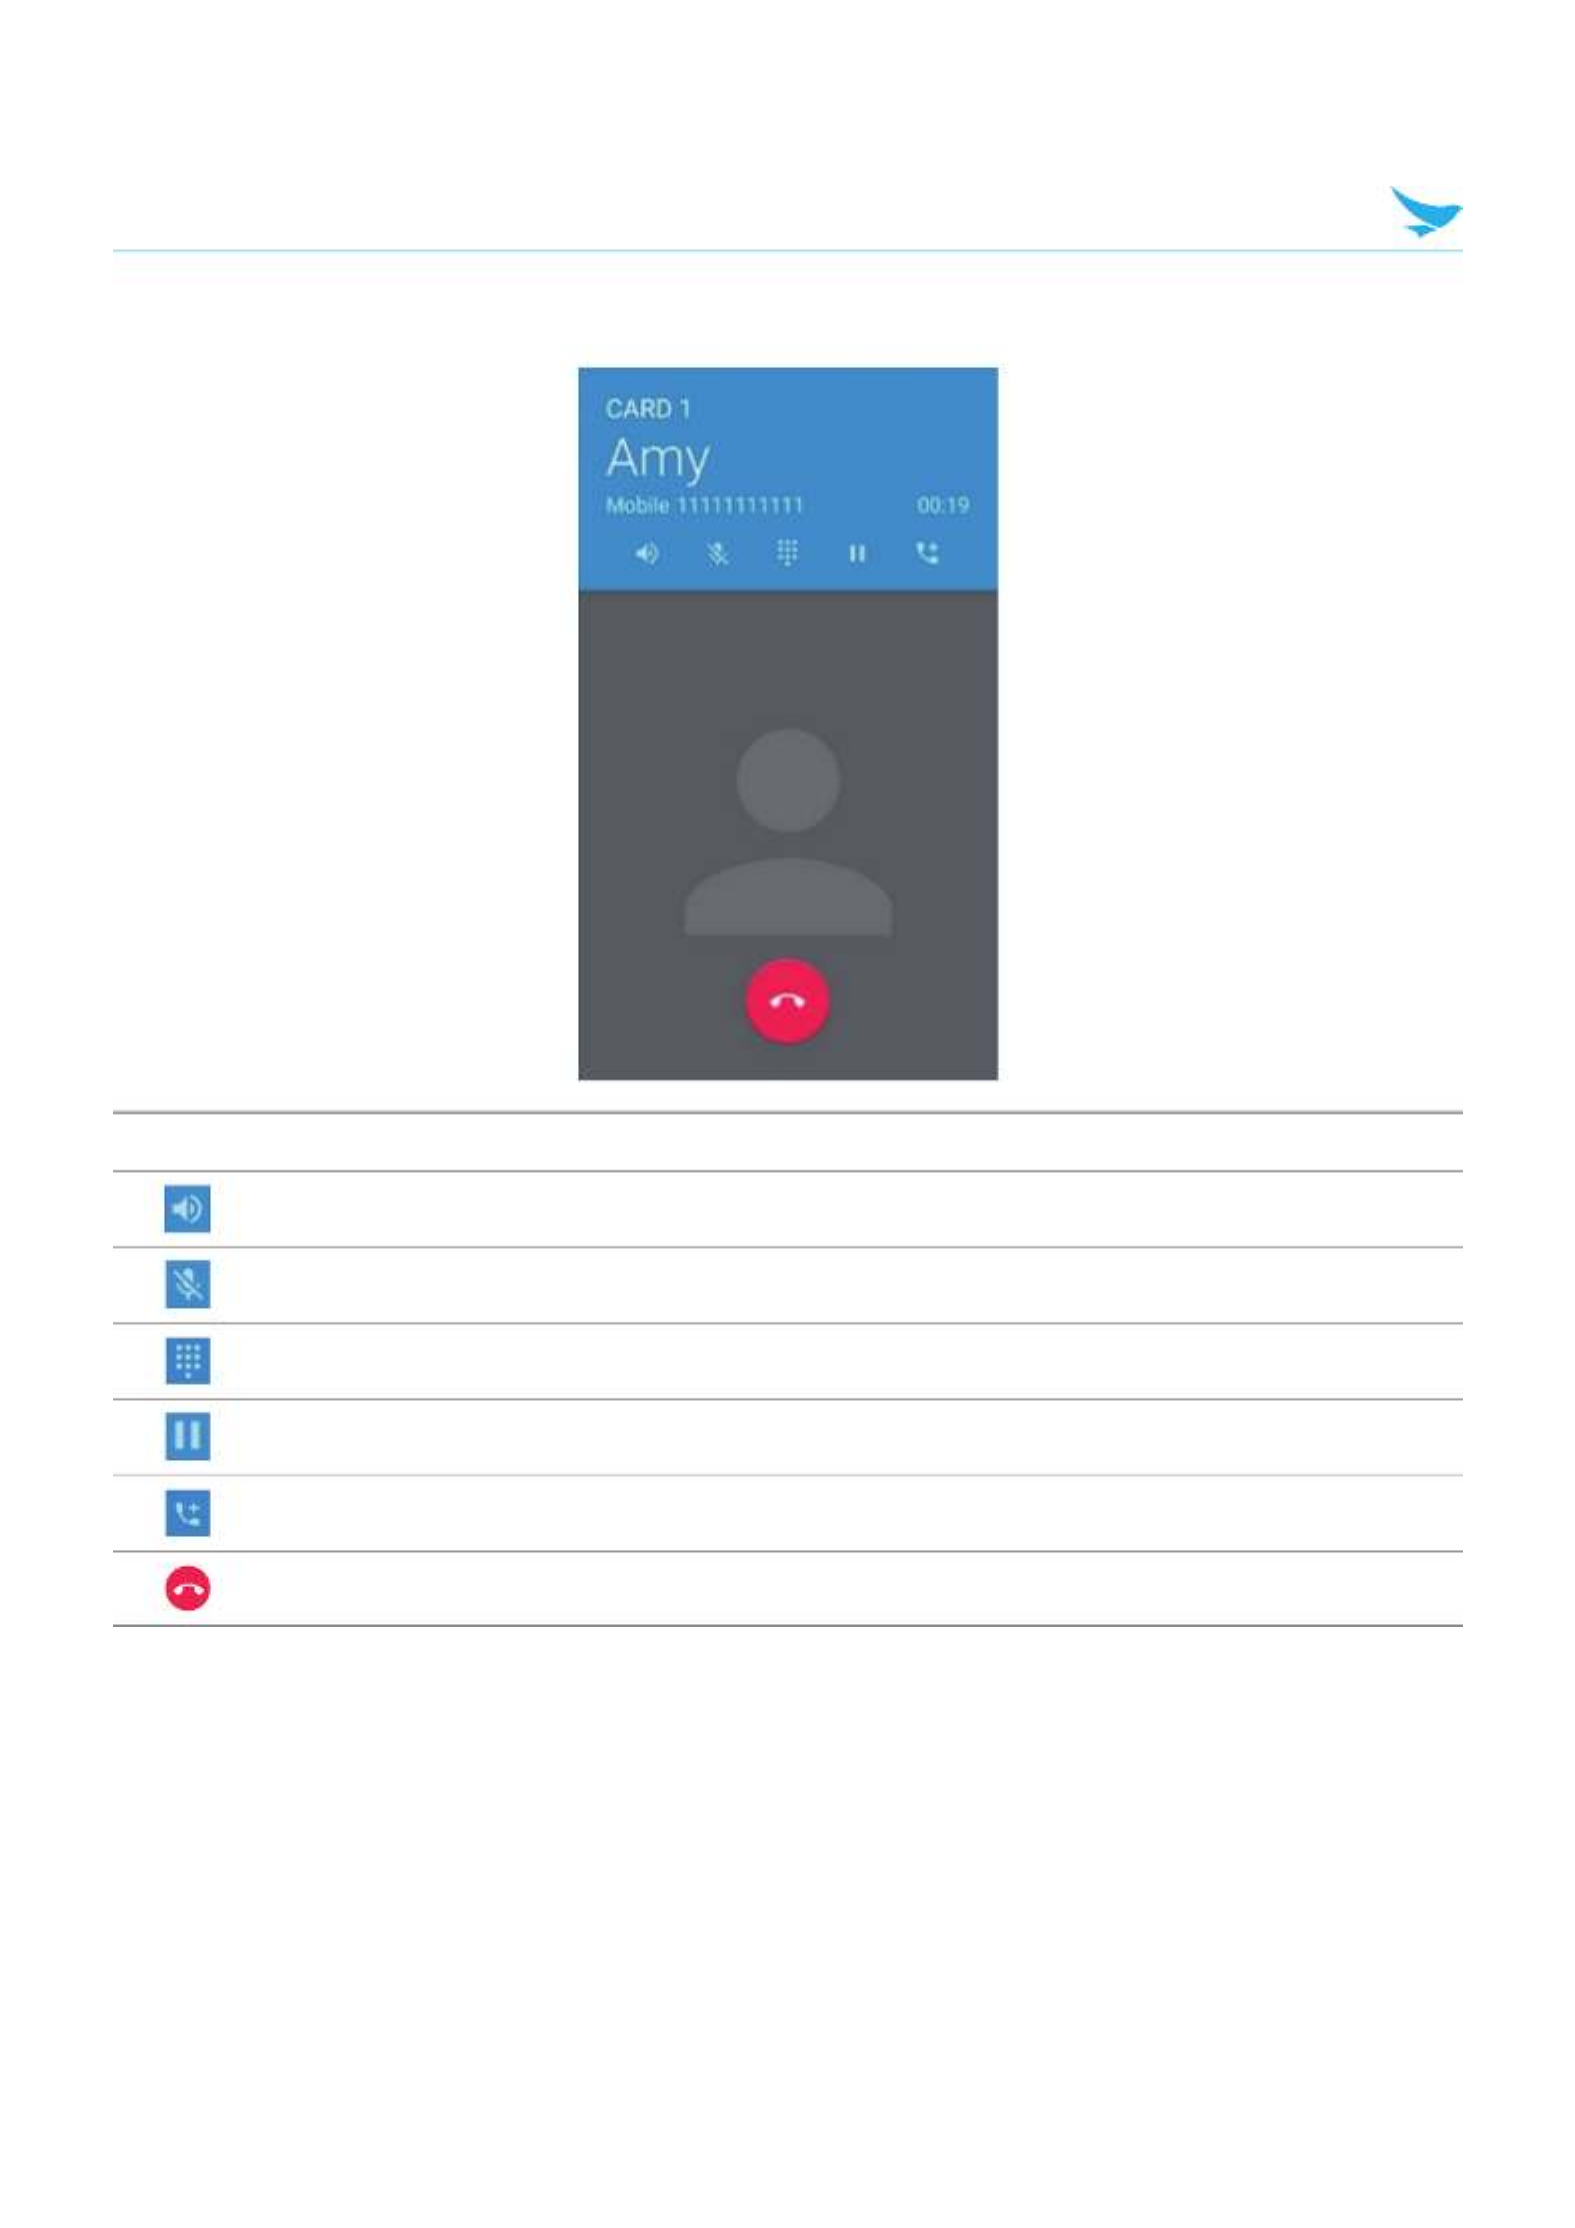
To use options during your call
Icon Description
Turn the speakerphone on.
Mute your microphone.
Open the keypad.
Hold a call.
Add another person to the call.
End the call.

6 Applications
31
To make a call from contacts list
1 On the Home screen, tap
>
.
2 Tap on your Phone app.
3 Tap a name in your contacts list and then tap a phone number to dial the number.
6 Applications
32
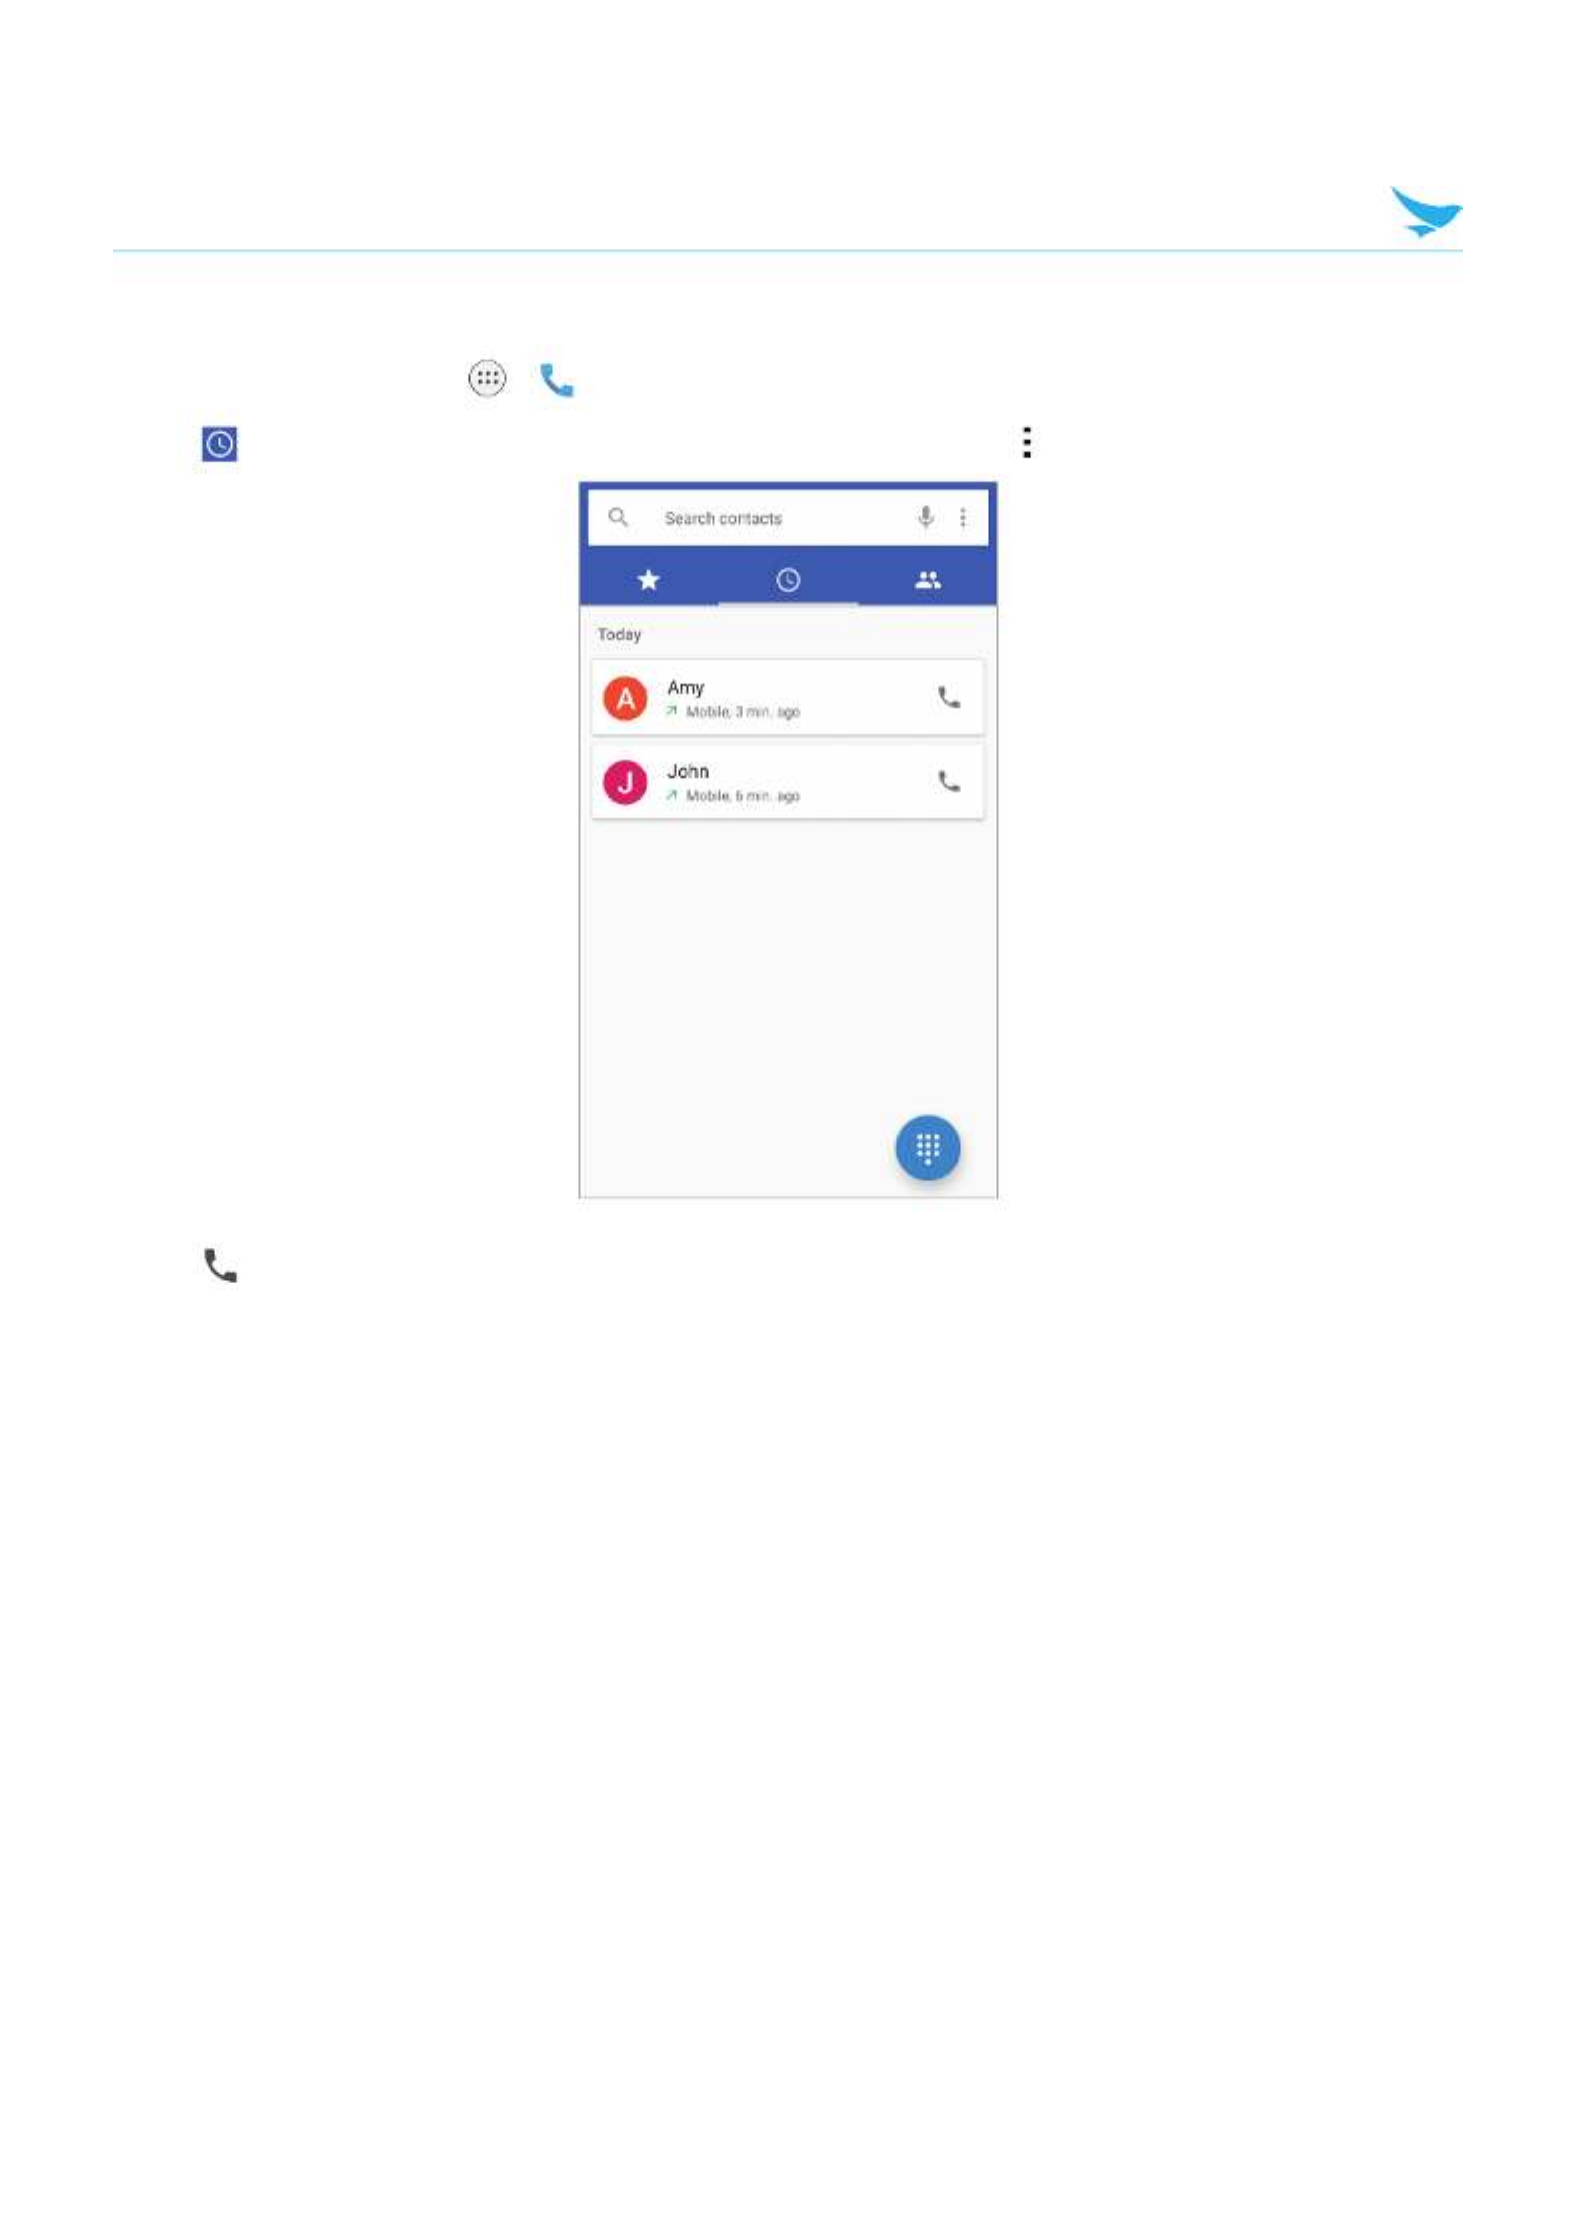
To make a call from call log
1 On the Home screen, tap
>
.
2 Tap on your Phone app. You can also open the call log by tapping > .Call History
3 Tap to dial the number.

6 Applications
33
To make a call from speed dial
You can make quick calls without entering a phone number or searching for a contact with the speed dial
function. You should assign a speed dial number to a contact first. For more information on creating new
speed dial, refer to .Making Speed dial on page 36
1 On the Home screen, tap
>
.
2 Tap on your Phone app.
3 Tap any speed dial contact to dial the number.

6 Applications
37
Quick responses
Tap and edit the quick responses to use when declining a call.
Speed dial settings
• Voicemail: Tap to set up your voicemail.
– : Tap to set the provider of the voicemail service.Service
– : Tap to set the voicemail number.Setup
– : Tap to select the ringtone to alert you of a new voicemail message.Sound
– Tap and select the checkbox to set your device to vibrate for a new voicemail message.Vibrate:
• No.2 to 9: Tap to add speed dials.
Calls
• Calling accounts
– : Tap to choose to receive Internet calls for an account added to the device, to view orSIP accounts
change SIP accounts, or to add accounts.
– : Tap to select the situations when you will use SIP calling.Use SIP calling
– : Tap and select the checkbox to receive incoming SIP calls. If you enable thisReceive incoming calls
option, the device will consume more power.
• Voicemail: Refer to .Speed dial settings on page 37
• Fixed Dialing Numbers: Use a Fixed Dialing Number (FDN) to limit your phone to dial only the phone
numbers or area codes saved in the FDN list.
– : Tap to enable FDN by entering the PIN.Enable FDN
– : Tap to change the PIN for FDN access.Change PIN2
– : Tap to manage the FDN list.FDN list
• Wi-Fi calling: Tap to switch Wi-Fi mode on. You can select a preferred Wi-Fi calling mode.
• Turn on video calling: Tap to turn on video calling.
• GSM call settings: Tap to set the additional Global System for Mobile communications (GSM) only call
settings.
– : Tap and set to forward incoming calls to a different phone number.Call forwarding
– : Tap to select to activate the caller ID and call waiting feature.Additional settings
– Tap to set outgoing and incoming call barring settings.Call barring:
• CDMA call settings: Tap to set the additional Code Division Multiple Access for mobile communication.
– Tap and set to forward incoming calls to a different phone number.Call forwarding:
– Tap to activate the call waiting feature.Call waiting:
– Voice privacy: Tap and select the checkbox to enable enhanced privacy mode.
• IMS Settings: Tap to set the IP Multimedia Subsystem for mobile communication.
– Tap to set the VT call quality between Low and High.VT Call Quality:
Call blocking
Tap to add a number you want to block.

6 Applications
38
Accessibility
• TTY mode: Tap to select the TTY mode.
– : TTY mode is off.TTY Off
– : Turn TTY on.TTY Full
– : Enable HCO (Hearing Carry over). HCO feature is designed for the people who can hear, butTTY HCO
have difficulty speaking on the phone. You type the outgoing text but listen to the incoming text.
– : Enable VCO (Voice Carry over). VCO feature is designed for the people who can speak,TTY VCO
but have difficulty hearing on the phone. You can use your voice to speak and read the other person’s
response in a text typed by the operator.
• Use a TSB-121 cable to connect the TTY device to your phone. If this cable is not provided with
your TTY device, contact your TTY device manufacturer.
• Use the ear pieces and headsets with caution when increasing the volume while using the HCO
feature.
• Teletypewriter or text telephone (TTY) mode is a telecommunications service that allows people
with hearing problems, or speech or language disabilities, to send and receive text information
over a telephone connection.
6.4 Contacts
Use the Contacts app to add, view, and edit your contacts. The app has three tabs to view your contacts:
FAVORITES ALL, GROUPS, and .
On the Home screen, tap
> , or you can add widgets for your most frequently used contacts to the
Home screen.
6.4.1 Creating Contacts
You can add contacts and synchronize them with your accounts that support syncing contacts.
1 On the Home screen, tap
>
.
All your contacts are listed in the tab.ALL
2 Tap at the bottom right of the screen.
3 Add information and photo to the contact.
4 When you are finished, tap on the top right of the screen.

6 Applications
40
6.4.3 Finding Contacts
You can search for contacts by name or number.
1 On the Home screen, tap
>
.
All your contacts are listed in the tab.ALL
2 Tap and enter letters of their name or digits of their phone number.
As you type, contacts that includes the letters or numbers will appear below the search box.
3 Tap the contact you are searching for to view it.
6.4.4 Calling Contacts
1 On the Home screen, tap
>
.
All your contacts are listed in the tab.ALL
2 Tap the name of a contact to view their details.
3 Tap the phone number.
It calls the number at once. For more information, refer to .Making Calls on page 29
6.4.5 Messaging Contacts
1 On the Home screen, tap
>
.
All your contacts are listed in the tab.ALL
2 Tap the name of a contact to view their details.
3 Tap .
6.5 Gmail
Use this app to send or view emails.
On the Home screen, tap > . Enter your email address and password to set up your email account(s).
• To set up your email account(s), tap > > . Complete the setup by entering DONE Add an email address
your email address and password.
• To add another account, tap > > .Accounts Add account
• To use web and data services, your device must be connected to the Wi-Fi or data networks. For
more information on how to connect to networks, refer to or Wi-Fi on page 53 More Settings on
page 54.
• Using the Internet browser or downloading from the Internet via your data network may incur extra
charges depending on your data plan.
6 Applications
41
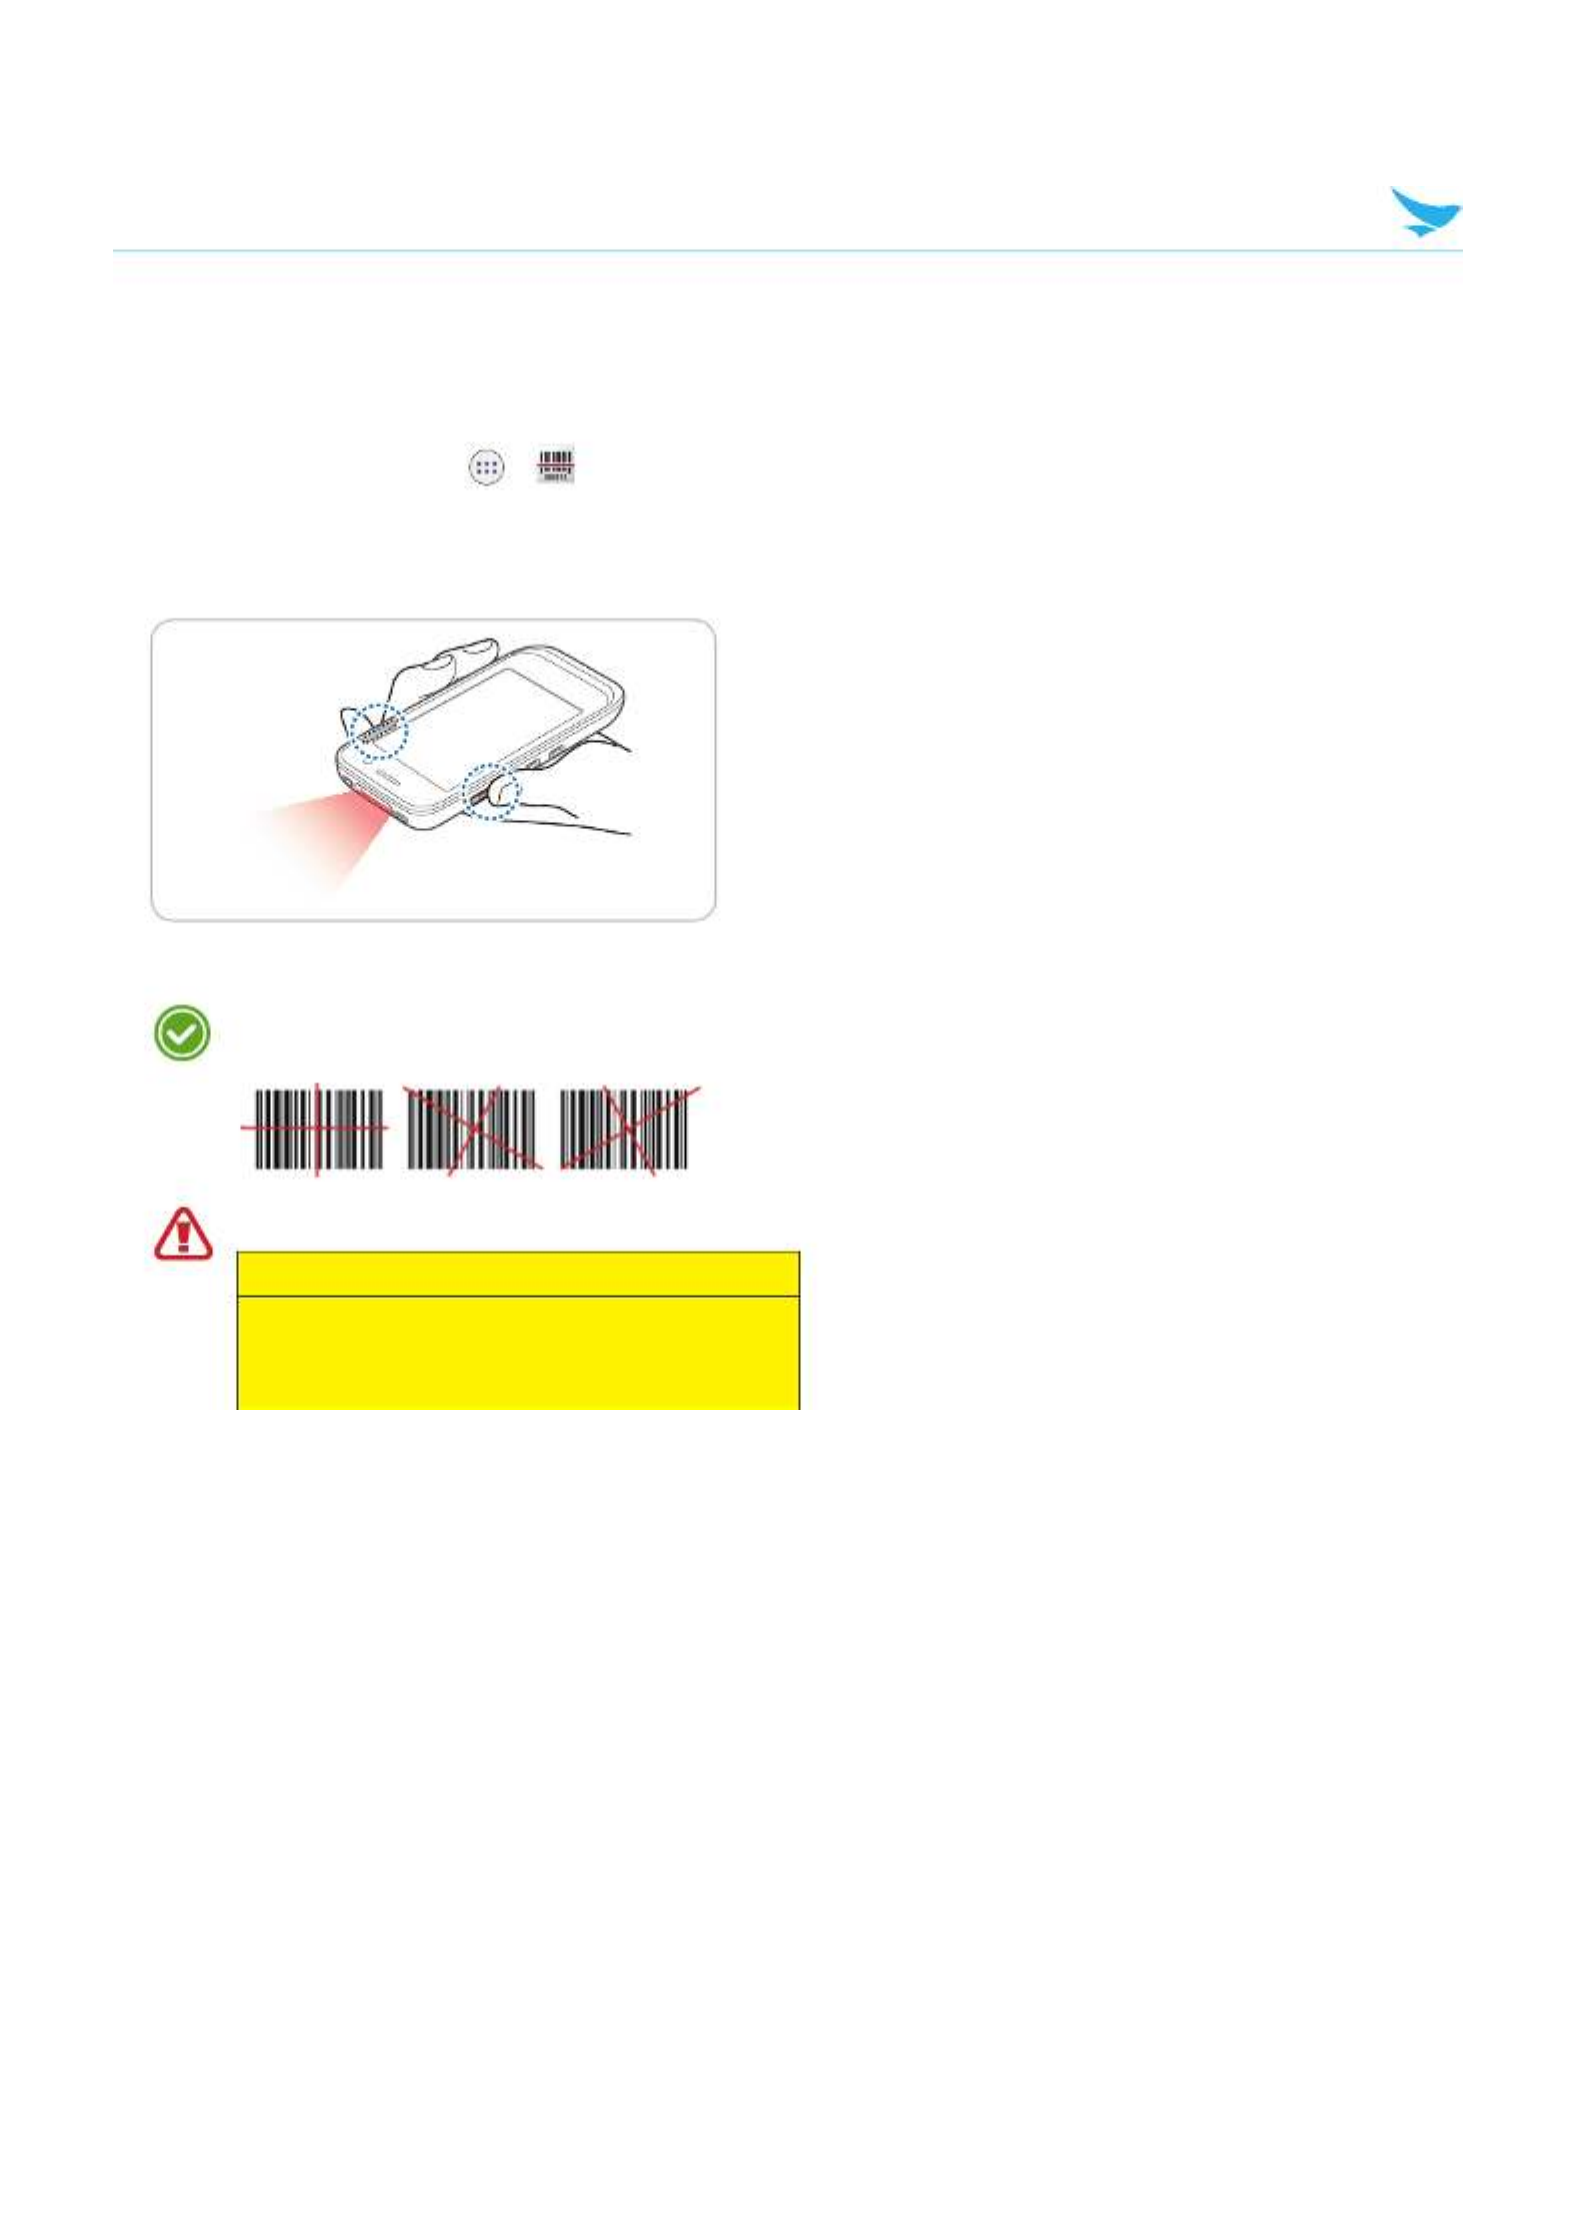
6.6 Barcode
The EF401 includes a 2D barcode scanner. To use the barcode scanning function,
1 On the Home screen, tap
> .
2 Tap to start scanning the barcode.Open
3 Press the Right or Left button. A red laser will come from the top of your device.
4 Aim the red beam across the barcode you want to scan.
When scanning, maintain a distance of about 10 cm or 4 in. for the best result and aim it at an
appropriate angle as shown the following image.
Do not stare into the LED aimer of the barcode scanner. It may injure your eyes.
RISK GROUP 2
CAUTION
Possibly hazardous optical radiation
emitted from this product
When the barcode is scanned successfully, you can hear a beep sound and the results will appear on the
screen.
Produkt Specifikationer
| Mærke: | Bluebird |
| Kategori: | Stregkodelæser |
| Model: | EF401 |
Har du brug for hjælp?
Hvis du har brug for hjælp til Bluebird EF401 stil et spørgsmål nedenfor, og andre brugere vil svare dig
Stregkodelæser Bluebird Manualer

2 September 2024
Stregkodelæser Manualer
- Stregkodelæser Nilox
- Stregkodelæser IFM
- Stregkodelæser Motorola
- Stregkodelæser Nedis
- Stregkodelæser Casio
- Stregkodelæser Palm
- Stregkodelæser Trimble
- Stregkodelæser Honeywell
- Stregkodelæser König
- Stregkodelæser Deltaco
- Stregkodelæser Digitus
- Stregkodelæser Zebra
- Stregkodelæser Olympia
- Stregkodelæser ELO
- Stregkodelæser Intermec
- Stregkodelæser Datalogic
- Stregkodelæser Newland
- Stregkodelæser Renkforce
- Stregkodelæser Manhattan
- Stregkodelæser DeLOCK
- Stregkodelæser Opticon
- Stregkodelæser Qian
- Stregkodelæser Godex
- Stregkodelæser Steren
- Stregkodelæser Argox
- Stregkodelæser IC Intracom
- Stregkodelæser Adesso
- Stregkodelæser POSline
- Stregkodelæser Metapace
- Stregkodelæser Wasp
- Stregkodelæser Approx
- Stregkodelæser Brady
- Stregkodelæser Baracoda
- Stregkodelæser Posiflex
- Stregkodelæser Datamax-O'neil
- Stregkodelæser CipherLab
- Stregkodelæser Cypress
- Stregkodelæser DENSO
- Stregkodelæser Socket Mobile
- Stregkodelæser Mach Power
- Stregkodelæser QUIO
- Stregkodelæser EC Line
- Stregkodelæser Tecno
- Stregkodelæser ZBA
- Stregkodelæser Code Corporation
- Stregkodelæser Hamlet
- Stregkodelæser Qoltec
- Stregkodelæser Vultech
- Stregkodelæser Psion
- Stregkodelæser Koamtac
- Stregkodelæser Unitech
- Stregkodelæser Atlantis Land
- Stregkodelæser ID-Tech
- Stregkodelæser Code
- Stregkodelæser Cognex
Nyeste Stregkodelæser Manualer
24 Marts 2025
24 Marts 2025
26 Februar 2025
23 Februar 2025
23 Februar 2025
23 Februar 2025
23 Februar 2025
23 Februar 2025
21 Februar 2025
20 Februar 2025