BOOX Leaf Manual
BOOX
Tegnetablet
Leaf
Læs nedenfor 📖 manual på dansk for BOOX Leaf (127 sider) i kategorien Tegnetablet. Denne guide var nyttig for 60 personer og blev bedømt med 4.5 stjerner i gennemsnit af 2 brugere
Side 1/127
BOOX Leaf
Mighty E-ink Tablet
User Manual

Conten
Conten
Conten
ContenContents
ts
ts
tsts
1. Standard Accessories...........................................................................................3
2. Safety Guide........................................................................................................... 4
3. Product Views........................................................................................................ 6
4. Main Interface........................................................................................................ 8
5. Library.................................................................................................................... 26
6. Reader.................................................................................................................... 37
7. Store....................................................................................................................... 67
8. Storage...................................................................................................................70
9. Apps........................................................................................................................74
10. Settings............................................................................................................. 108
11. Specifications.................................................................................................. 126
12. Declaration........................................................................................................127

1.
1.
1.
1.1. St
St
St
StStandard
andard
andard
andardandard Acces
Acces
Acces
AccesAccessories
sories
sories
soriessories
(1) BOOX Leaf x1
(2) Type-C Cable x1
(3) Quick Start Guide x1
(4) Warranty Sheet x1
Optional Accessories (purchased separately)
(1) Adapter
(2) Protective case
(Note
(Note
(Note
(Note(Note:
:
:
:: The
The
The
TheThe E-b
E-b
E-b
E-bE-books
ooks
ooks
ooksooks in
in
in
inin t
t
t
tthe
he
he
hehe f
f
f
ffollowin
ollowin
ollowin
ollowinollowing
g
g
gg illust
illust
illust
illustillustration
ration
ration
rationration are
are
are
areare not
not
not
notnot pre
pre
pre
prepre-stor
-stor
-stor
-stor-stored)
ed)
ed)
ed)ed)

2.
2.
2.
2.2. Sa
Sa
Sa
SaSafety
fety
fety
fetyfety Guide
Guide
Guide
GuideGuide
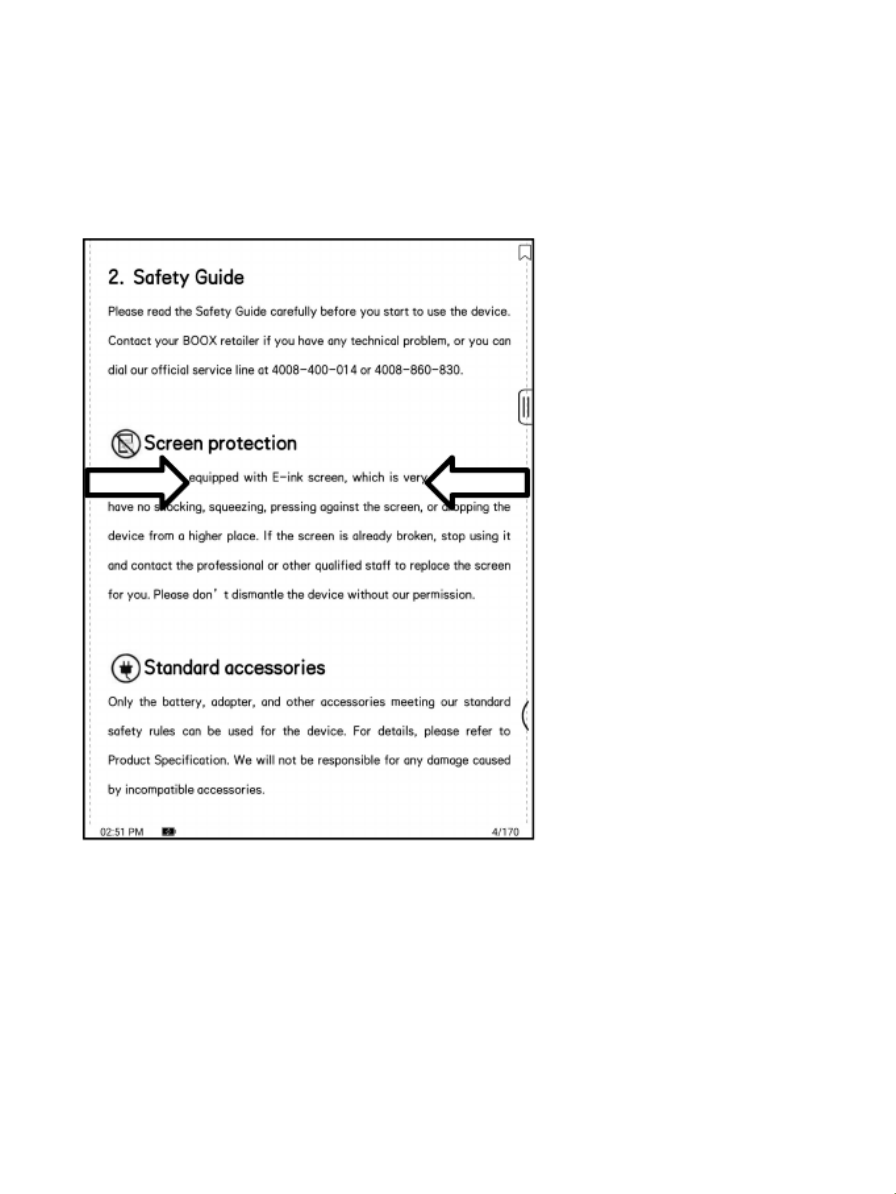
Please read the Safety Guide carefully before you start to use the device.
Contact your BOOX retailer if you have any technical problem, or you can
dial our official service line at 4008-400-014 or 4008-860-830.
Scree
Scree
Scree
ScreeScreen
n
n
nn protec
protec
protec
protecprotection
tion
tion
tiontion
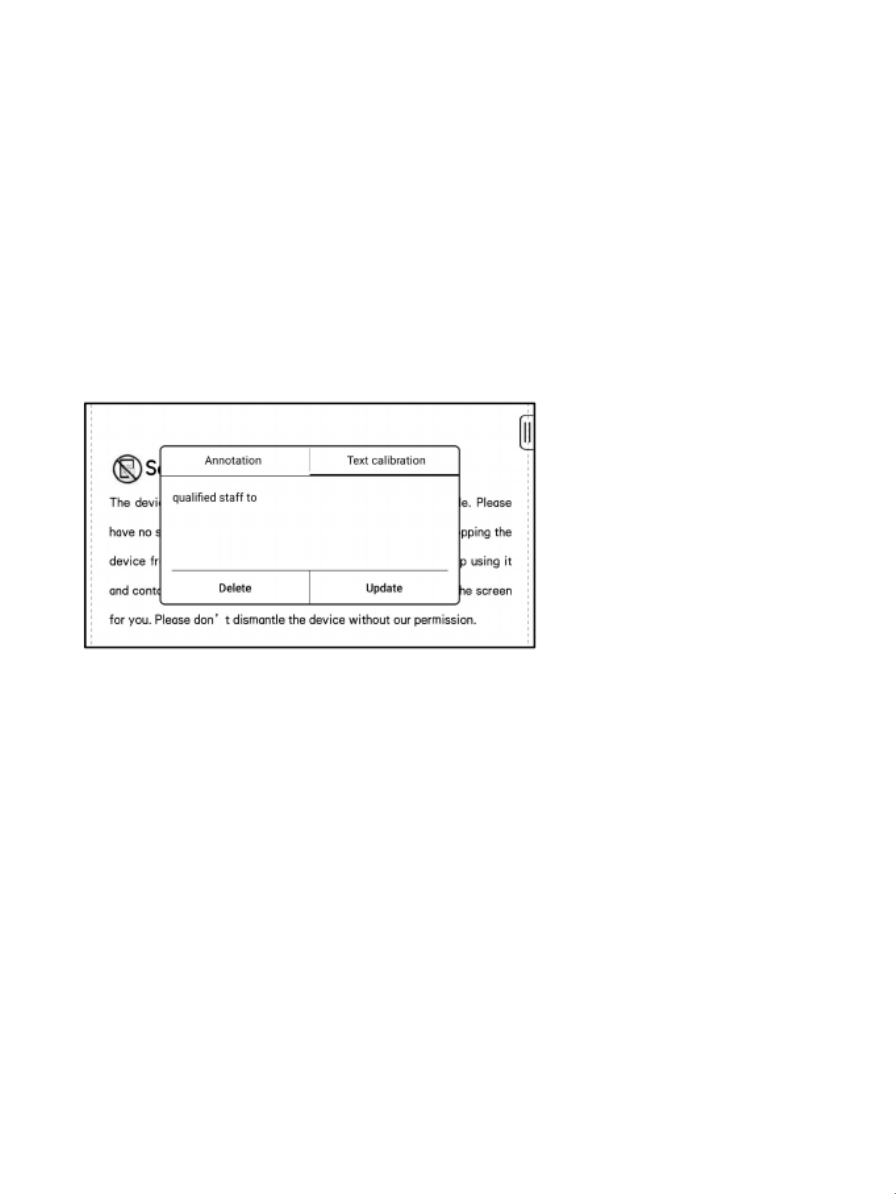
The device is equipped with E-ink screen, which is very fragile. Please
have no shocking, squeezing, pressing against the screen, or dropping the
device from a higher place. If the screen is already broken, stop using it
and contact the professional or other qualified staff to replace the screen
for you. Please don’t dismantle the device without our permission.
Stan
Stan
Stan
StanStandard
dard
dard
darddard accesso
accesso
accesso
accessoaccessories
ries
ries
riesries
Only the battery, adapter, and other accessories meeting our standard
safety rules can be used for the device. For details, please refer to
Product Specification. We will not be responsible for any damage caused
by incompatible accessories.

Stay
Stay
Stay
StayStay away
away
away
awayaway from
from
from
fromfrom liquids
liquids
liquids
liquidsliquids
The device is not waterproof. Don ’ t expose the device to a humid
environment or use it in the rain. Please keep it away from any corrosive
liquids.
Don’t
Don’t
Don’t
Don’tDon’t disman
disman
disman
dismandismantle
tle
tle
tletle the
the
the
thethe device
device
device
devicedevice
Please don’t dismantle the device in case of any damage.
Inapp
Inapp
Inapp
InappInappropria
ropria
ropria
ropriaropriate
te
te
tete battery
battery
battery
batterybattery mod
mod
mod
modmodel
el
el
elel may
may
may
maymay cause
cause
cause
causecause e
e
e
eexplosion
xplosion
xplosion
xplosionxplosion.
.
.
.. Please
Please
Please
PleasePlease con
con
con
concontact
tact
tact
tacttact offi
offi
offi
offiofficial
cial
cial
cialcial
after
after
after
afterafter-sale
-sale
-sale
-sale-sale te
te
te
teteam
am
am
amam for
for
for
forfor b
b
b
bbatter
atter
atter
atterattery
y
y
yy replac
replac
replac
replacreplacement
ement
ement
ementement if
if
if
ifif n
n
n
nneeded.
eeded.
eeded.
eeded.eeded. U
U
U
UUsers
sers
sers
serssers s
s
s
sshall
hall
hall
hallhall un
un
un
unundertak
dertak
dertak
dertakdertakes
es
es
eses
the
the
the
thethe r
r
r
rresponsi
esponsi
esponsi
esponsiesponsibility
bility
bility
bilitybility an
an
an
anand
d
d
dd dea
dea
dea
deadeal
l
l
ll with
with
with
withwith t
t
t
tthe
he
he
hehe obsole
obsole
obsole
obsoleobsolete
te
te
tete bat
bat
bat
batbattery
tery
tery
terytery if
if
if
ifif us
us
us
ususers
ers
ers
ersers r
r
r
rreplace
eplace
eplace
eplaceeplace
batte
batte
batte
battebatteries
ries
ries
riesries thems
thems
thems
themsthemselves.
elves.
elves.
elves.elves.
Using
Using
Using
UsingUsing envi
envi
envi
envienvironment
ronment
ronment
ronmentronment
The using environment of the device is 0°C-50°C.

3.
3.
3.
3.3. Pr
Pr
Pr
PrProduct
oduct
oduct
oductoduct Views
Views
Views
ViewsViews
Front
Front
Front
FrontFront View
View
View
ViewView
Power
Page-turning
Cover interface

Bot
Bot
Bot
BotBottom
tom
tom
tomtom View
View
View
ViewView
Butto
Butto
Butto
ButtoButton
n
n
nn Func
Func
Func
FuncFunction
tion
tion
tiontion
Power
Power
Power
PowerPower/
/
/
//
sleep
sleep
sleep
sleepsleep Button
Button
Button
ButtonButton
⚫Press the power button to turn on the device
⚫Long-press the power button for secs, then select2
“Power off” in the menu to turn off the device
⚫Press the power button and release quickly to let the
device goes into sleep mode
⚫Press it again to wake up
⚫Long-press for 10 secs to force shutdown
Microphone
Microphone
Microphone
MicrophoneMicrophone
⚫Record voice
⚫Recognize speech
Type-C
Type-C
Type-C
Type-CType-C Por
Por
Por
PorPort
t
t
tt
⚫Connect the device with PC to transfer data or charge
device.
⚫Support Type-C earphone
⚫Support OTG USB drive
Mic
Type-C

4.
4.
4.
4.4. M
M
M
MMain
ain
ain
ainain Int
Int
Int
IntInterfa
erfa
erfa
erfaerface
ce
ce
cece
The main interface contains a system bar, content area, and function area.
The function area contains certain modules.
Double-click icons in function area can return to the main page of the
specific module.
Con
Con
Con
ConContent
tent
tent
tenttent Area
Area
Area
AreaArea
Func
Func
Func
FuncFunction
tion
tion
tiontion Are
Are
Are
AreArea
a
a
aa
Syste
Syste
Syste
SysteSystem
m
m
mm Bar
Bar
Bar
BarBar

Syst
Syst
Syst
SystSystem
em
em
emem Bar
Bar
Bar
BarBar
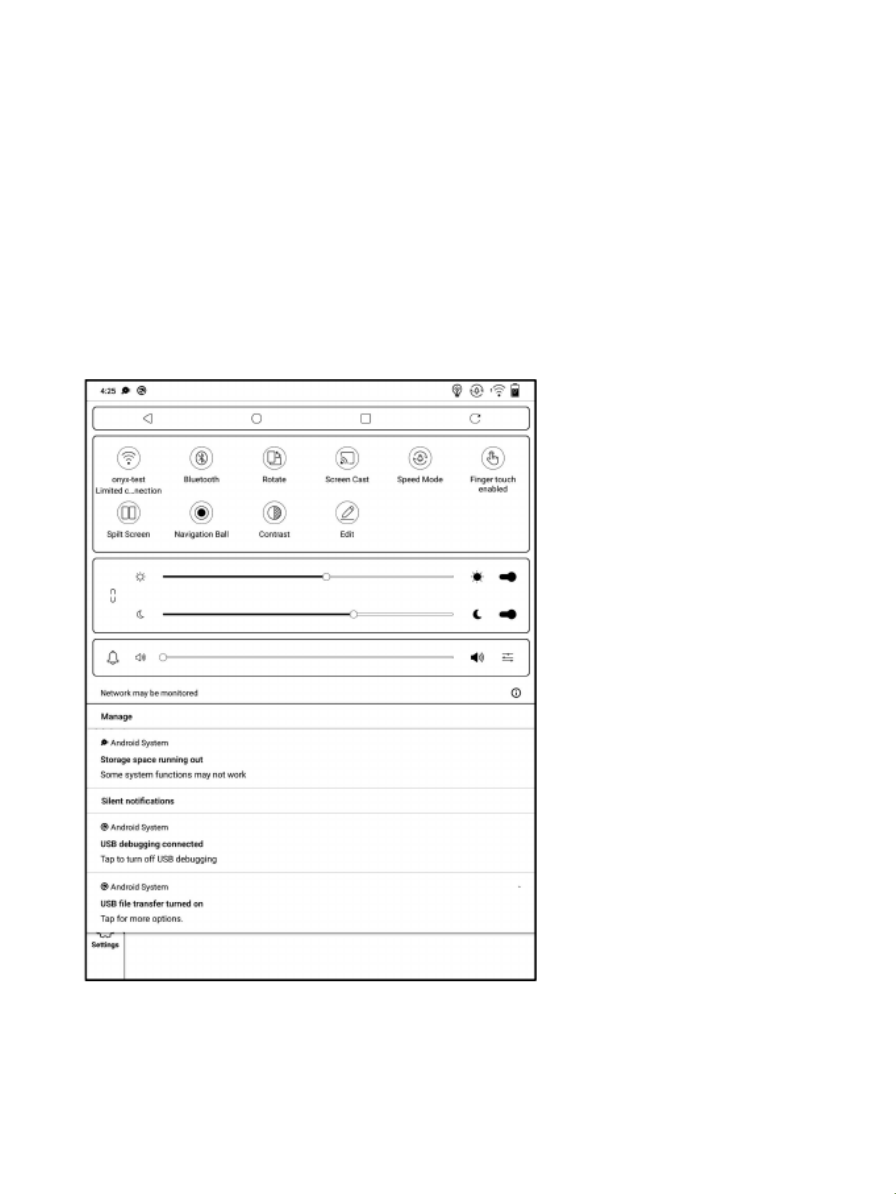
This section displays the current state of the device, including: Time,
Notification, Refresh Mode, Wi-Fi Connection, Battery Usage. It is only
for status indication.
Split Mode (default):
Pull down " Notification Center" from the left side and pull-down Control
Panel from the right side.
Classic Mode:
Pull down both Notification Center and Control Panel in the same time.

Con
Con
Con
ConControl
trol
trol
troltrol Pan
Pan
Pan
PanPanel
el
el
elel
This panel contains Date and Time, Wi-Fi, Bluetooth, E Ink Center (swipe
up from the screen bottom to call out), Brightness adjustment, Volume
adjustment. The above-mentioned items are permanent and cannot be
removed or edited.
Screen orientation, Hand Touch On/Off, Screencast, Screen Record,
BooxDrop, and Feedback are optional items. You can edit them.
Shortcut switch
Edit
Volume adjustment
Brightness adjustment

E
E
E
EE Ink
Ink
Ink
InkInk Cente
Cente
Cente
CenteCenter
r
r
rr
Open it from Control Panel or swipe up from the bottom to open it. This
section includes Dark Color Enhancement, Light Color Filter, Refresh
Modes (System), Shortcuts...etc.
Back
Homepage
Multitask switcher
Full screen refresh
App Optimization
Reset
Optimization Guidence
More refresh settings

Ref
Ref
Ref
RefRefresh
resh
resh
reshresh Mode
Mode
Mode
ModeModes
s
s
ss
The system-level Refresh Mode takes precedence over the application
Refresh Mode. That is: when the system is set to the Normal Mode, the
application uses its own refresh settings; When the system is set to the
other modes, the applications will use the system's refresh mode.
There are 4 Refresh Modes:
Norm
Norm
Norm
NormNormal
al
al
alal Mod
Mod
Mod
ModMode
e
e
ee (
(
(
((Default)
Default)
Default)
Default)Default):
:
:
:: Good display effect, suitable for ordinary text
reading.
Speed
Speed
Speed
SpeedSpeed Mod
Mod
Mod
ModMode:
e:
e:
e:e: Slight ghosting and aliasing effect, suitable for thumbing
through eBooks with text and images.
A2
A2
A2
A2A2 M
M
M
MMode:
ode:
ode:
ode:ode: Slightly heavier ghosting and aliasing effect, suitable for
browsing images and text by quick sliding.
X
X
X
XX Mode:
Mode:
Mode:
Mode:Mode: Heaviest ghosting and aliasing effect accompanying detail
loss, suitable for browsing websites and video playback.
Use A2 Mode by default for scrolling
After you change the Refresh Mode, you can change contrast for a better

Wi-
Wi-
Wi-
Wi-Wi-Fi
Fi
Fi
FiFi Set
Set
Set
SetSetting
ting
ting
tingting
When using at the first time, you should enter into the Wi-Fi setting
interface to get a accessible connection. Then click the icon to turn on/off
the auto connection.
Blue
Blue
Blue
BlueBluetoot
toot
toot
toottooth
h
h
hh Set
Set
Set
SetSetting
ting
ting
tingting
When using for the first time, you should enter into the Bluetooth setting
interface to match a device you want. The matched earphone, page turner
can be auto-connected by clicking the icon. Certain devices do not
support auto connection after disconnected.
Rot
Rot
Rot
RotRotation
ation
ation
ationation
Easily change the orientation of the screen by clicking the direction you
want.

Funct
Funct
Funct
FunctFunction
ion
ion
ionion Area
Area
Area
AreaArea
The function area includes Library, Store, Storage, Apps, and Settings.
The default Homepage is Library. Double-tap the Navigation Ball to return
to the Homepage
Users can go to Settings / More Settings to set any of the other function
pages as a default Homepage.
Co
Co
Co
CoContent
ntent
ntent
ntentntent Ar
Ar
Ar
ArArea
ea
ea
eaea
The contents are sorted by time by default. The contents includes the
following items.
Lib
Lib
Lib
LibLibrary
rary
rary
raryrary
All books in supported format from internal storage are displayed here.
The scanning path can be modified via Library Settings.

Sto
Sto
Sto
StoStore
re
re
rere
Enter into an online eBook store. Users can view more book information
and make a purchase. Purchased books will be added to the list of Library.
Sto
Sto
Sto
StoStorage
rage
rage
ragerage
All folders from internal storage will be displayed here. Users can manage
documents and folders from the page.
Ap
Ap
Ap
ApApps
ps
ps
psps
All third-party apps are displayed here. Users are allowed to manage or
optimize the apps.
Set
Set
Set
SetSettings
tings
tings
tingstings
The list of system settings help to manage the device.

Screen
Screen
Screen
ScreenScreenCast
Cast
Cast
CastCast
1. This only supports Windows10. Win7/XP and MacOS are not
supported currently.
2. Please make sure that the computer itself supports the screencast
function, which can be checked in the computer system settings:
System-Projecting to this PC.
Please pay attention to the 4 related settings, which will affect the results
of searching the computer on the device side and the confirmation of the
connection request;
This computer can support the state of screen projection

This computer does not support screen projection
3. Please make sure that the computer and your BOOX are in the same
Wi-Fi environment.
If a desktop computer is connected to Wi-Fi via wireless network card,
please confirm whether it is supported in step 2.
Some computer configurations and wireless network cards do not support
this function;
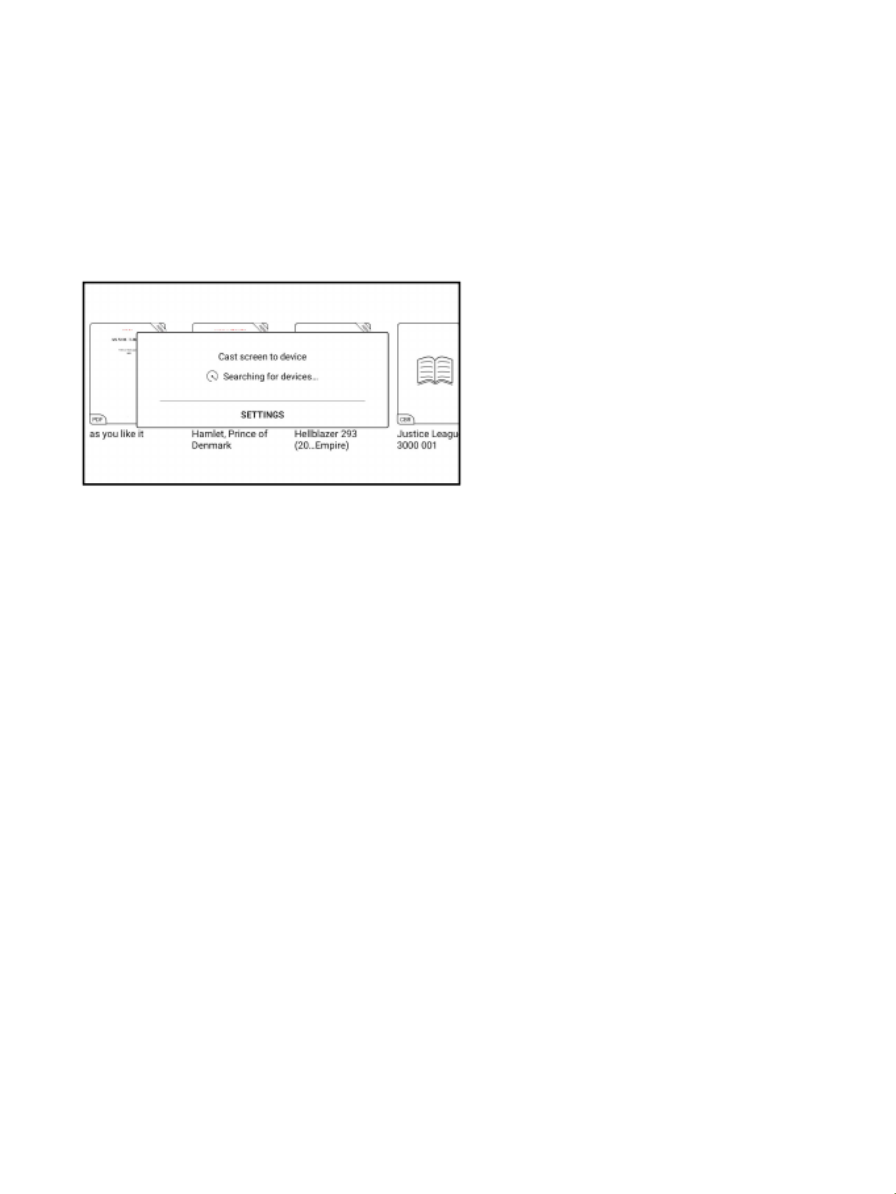
4. On the device side, select screencast from the system drop-down list.
Then the automatic search will start, and the name of the computer will be
shown when found.

5. In the search window, select the found computer. If there are multiple
supported computers, click Settings to enter the list of supported
computers. Then select the computer that you want to project to from the
list.
6. After you select the computer that you want to project to, the
computer will pop up a notice to confirm whether to accept the projecting
request;
7. After you confirm it, it will automatically connect and the screen will be
mirrored successfully;

If the "Unable to view protected content on this device" appears on the
screen, the connection may be unsuccessful. Please disconnect the
device, and request the screencast connection again.
8. When the devices are connected, please tap the system bar of the
device- Screencast again, and select“disconnect”. The computer cannot
disconnect the connection.
If the computer supports screencast but cannot receive the request,
please restart the computer and try to reconnect again and check whether
the computer configuration rejects the request (see step 2).
Screen
Screen
Screen
ScreenScreen Recor
Recor
Recor
RecorRecord
d
d
dd
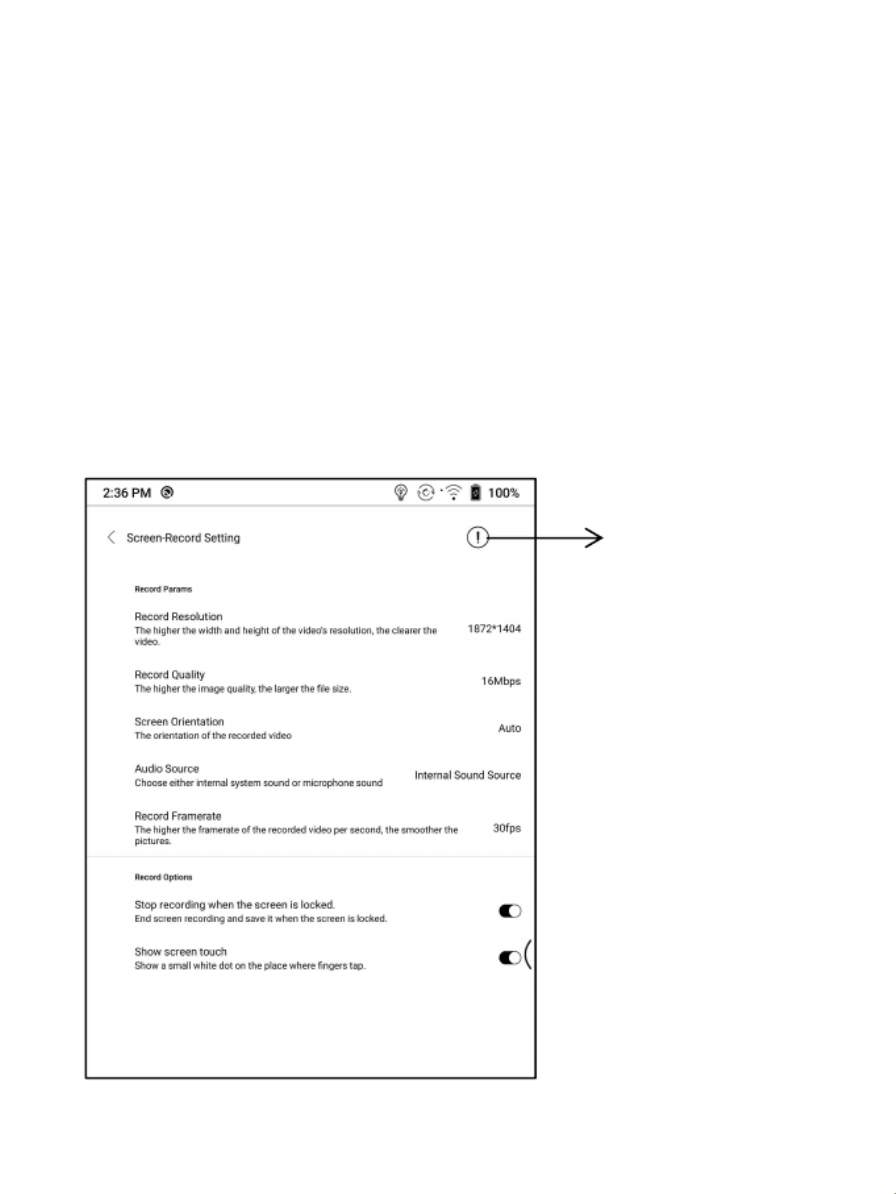
Long press Recording button on the screen to enter the Screen Recording
settings. You can customize Resolution, Image Quality, Screen
Orientation, Sound Source, etc.;
When you use Screen Recording for the first time, you are recommended
to adjust the relevant settings first.
Instructions

Tap the Screen Record icon to open the floating window of screen
recording. Tap the “Start” icon to start recording and tap the Close icon
to stop recording;
After you stop recording, there will a thumbnail displayed in the upper
right corner, and you can tap it to play or share; Long press the floating
window to drag it around on the screen. The floating window will not be
recorded into the video;
After the Screen Record is enabled, the floating window will always stay
on the upper layer of the screen. You can create new screen recordings
continuously. If you need to close it, you can manually tap X to close it.
The Recordings’ format is MP4 and the save path is:
Storage/Movies/Captures
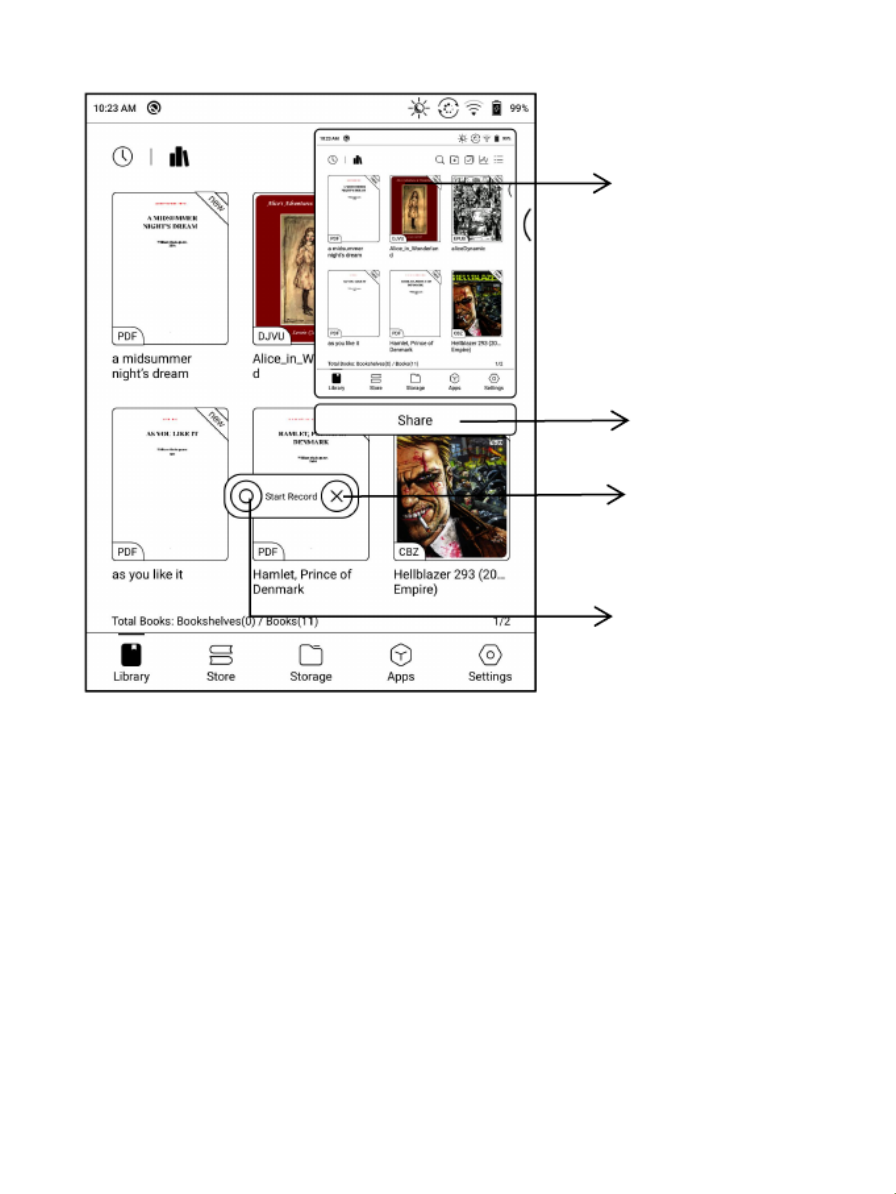
Preview
Share
Close
Start / Pause

5.
5.
5.
5.5. Libr
Libr
Libr
LibrLibrary
ary
ary
aryary
The library only displays E-book documents in supported formats in the
storage. Book cover thumbnail is displayed by default. E-books are sorted
by the creation time.
On the upper right working area of the Library, users can search, create a
new bookshelf, manage books in bulk, check Reading Statistics, pop up
the drop-down menu (including Filter, Refresh Library, Scan Covers,
Library Setting, Switch to List View)...etc.

Library Display Switch
Click on these icons to switch the library display. By default, it
auto-scans and loads all the supported documents in specified paths,
sorted by a specified way.
Another one is to display the content based on the structure of storage.
The icons change after clicking on it.
Switch mode

Filter & Sort
By default, it shows all books in descending order.
Refresh Library
“Refresh Library” gets all documents in supported formats scanned and
rebuild library list. This function does not delete the reading history.

Librar
Librar
Librar
LibrarLibrary
y
y
yy Settin
Settin
Settin
SettinSettings
gs
gs
gsgs
It supports custom scan path. You can set certain storing path as
Automatic Scan;
After the scan path is set, the Library will be reloaded. The books that are
not in the scan path will be removed. If you need to read the books, you
can find the original file in the storage;
Sub-
Sub-
Sub-
Sub-Sub-lib
lib
lib
liblibrary
rary
rary
raryrary Att
Att
Att
AttAttribut
ribut
ribut
ributribute
e
e
ee
Long-press on sub-library cover to view more information about
sub-library. To delete or rename sub-library are allowed. When deleting
sub-library, the containing books will be moved to Library and will not be
deleted with the sub-library.
E-b
E-b
E-b
E-bE-book
ook
ook
ookook Att
Att
Att
AttAttribute
ribute
ribute
ributeribute
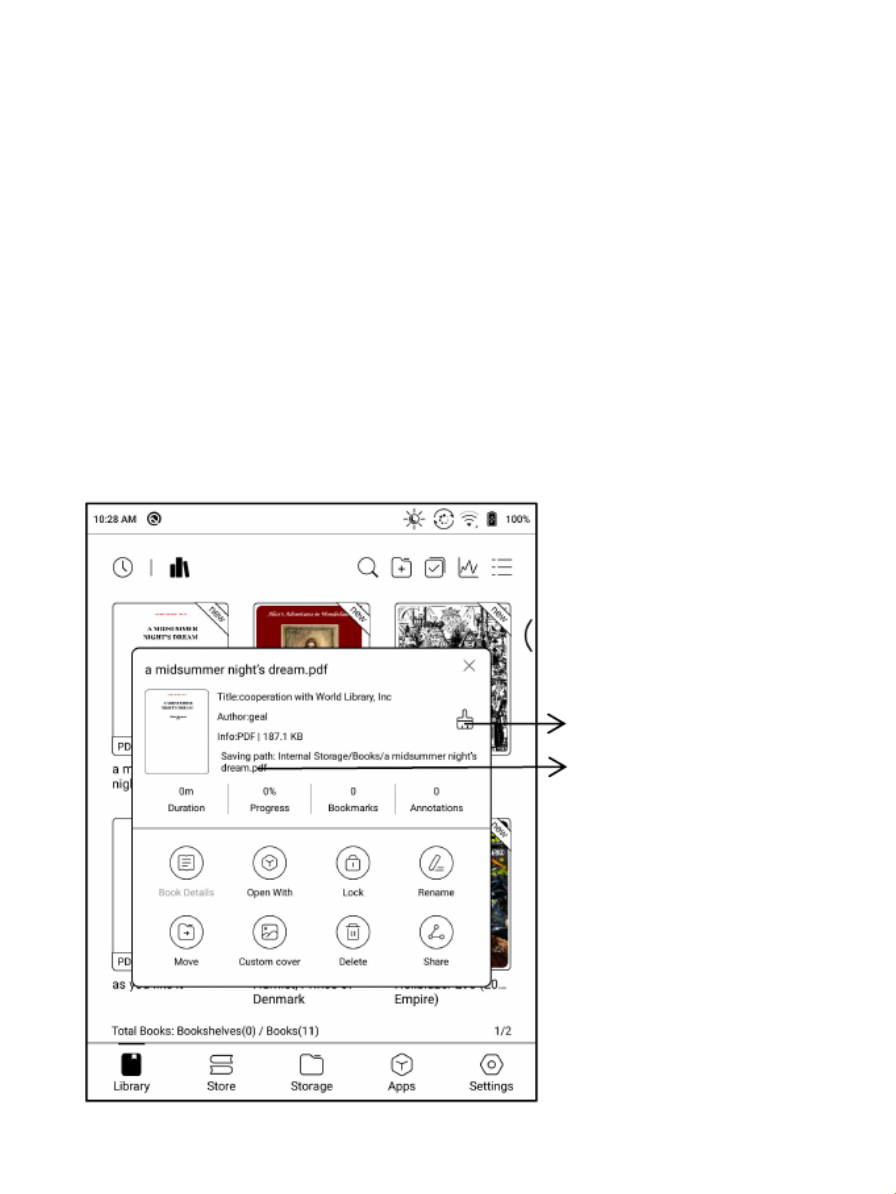
Long-press on book cover to view more information about E-book name,
author, format, size, reading progress, book detail(only available for the
E-books of Store), open way, Lock 、 rename, move(to sub-library) and
delete. One E-book only can be added to one Sub-library.
As for the books purchased from the Store, is allowed to view book details
by jumping to the Store page.
Clear settings
Jump to Storage

Clear settings including : clear password default settings , clear reading
data , Clear Cache、Clear book Cover;

Lock ( Reading Password)
User can add (reading) Password to lock each file in order to protect
personal reading data;
The Password is used to open the file, but it only applies to the same
device and NeoReader. If you copy and export the file to other devices or
Apps, the Password will become invalid.
You can use the same Password as the Screen Lock. Or you can set a
different digits Password.

Digits Password only support one Password. After you have set the digits
Password, you do not need to set another digits Password and only need
to add the Lock.
Reading Password supports individual setting or setting in bulk (setting in
bulk is to add Locks). Currently It does not support to add Passwords to all
files directly.
If you choose to use this Password Setting by default, you can add
Password to other files quickly and do not need to re-select the Add Lock
Option every time after the Password is set for the first time.
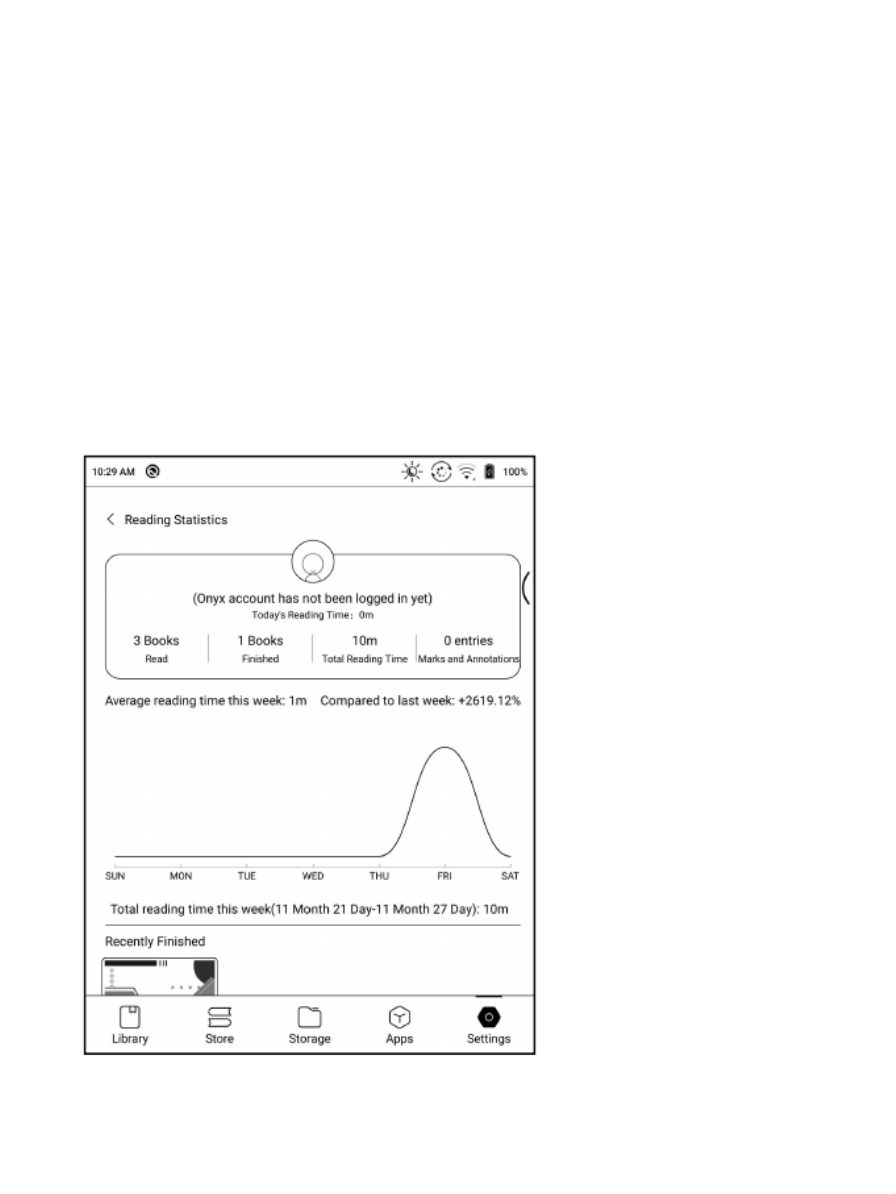
Reading Statistics
This page includes the Reading Time of Today, The Books that Have Been
read, The Books that Have Been Finished, Total Time, Highlights and
Annotations, and Recently Finished Books;
The average reading time this week is based on 7 days and calculates the
average daily reading time during the week;

Average Reading Time Distribution includes the reading time of all days
since Reading Statistics is turned on.
Under Reading Statistics, only highlights and annotations can be jumped
to and the books that recently have been finished can be opened. Other
data is only for analysis purpose.
The reading data of each device can only be available on the same device.
You cannot check the statistics of this device on another device.
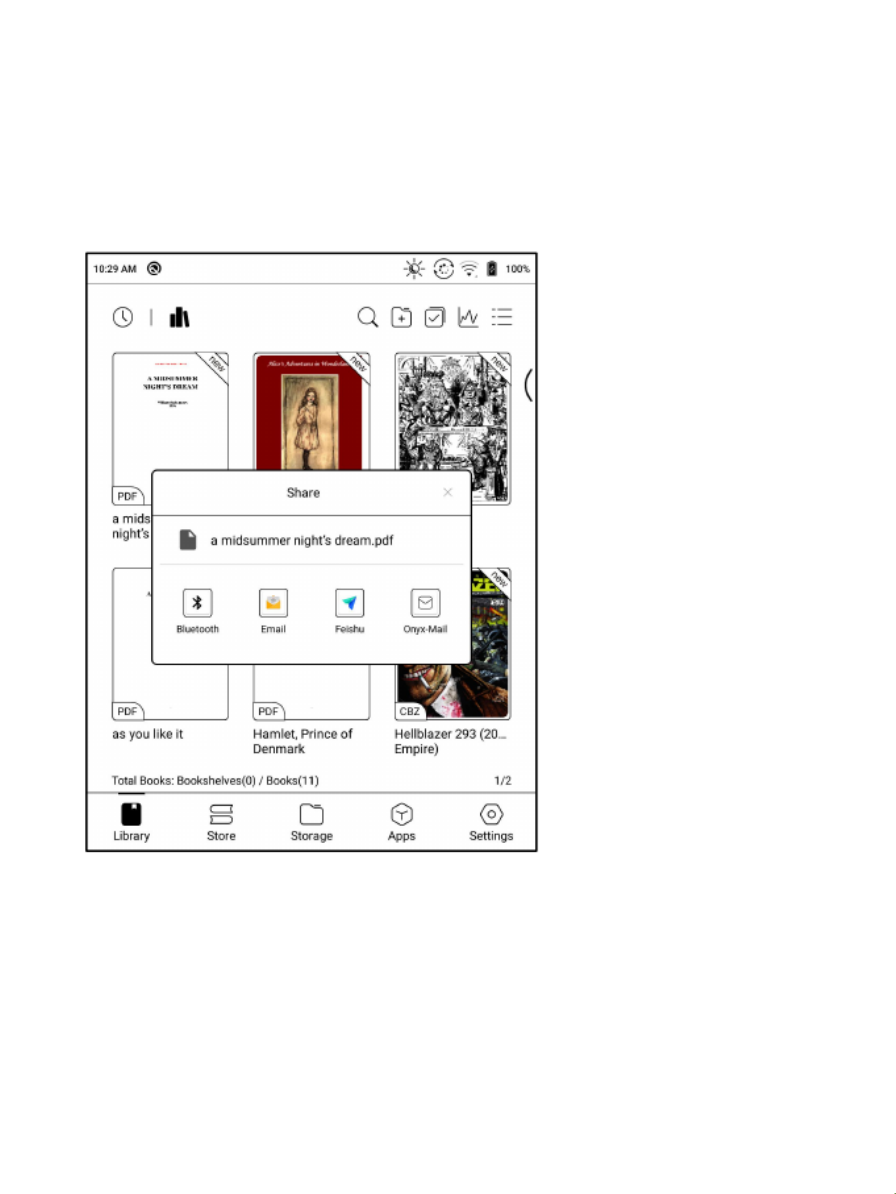
Shar
Shar
Shar
SharShare
e
e
ee (Third
(Third
(Third
(Third(Third-party
-party
-party
-party-party A
A
A
AApp)
pp)
pp)
pp)pp)
This supports sharing files through third-party App. The sharing path is
automatically obtained according to the installed Apps.

6.
6.
6.
6.6. R
R
R
RRead
ead
ead
eadeader
er
er
erer
Tap any E-book cover to open an E-book. Full-screen reading without
showing status bar is set by default.
To pull down from the top of the screen can call out the status bar.
To tap on the center of the screen can call out the menu bar for switch
among different documents or other functions
Dictionary
Search
Other functions
TTS
Slideshow
Thumbnail view
redo
OCR
Open file
undo

Float
Float
Float
FloatFloating
ing
ing
inging Toolb
Toolb
Toolb
ToolbToolbar
ar
ar
arar
You can choose to activate the Floating Toolbar for the first time when
you open a file. Or you can go to Settings / Floating Toolbar Settings to
enable it and customize the function buttons in the Floating Toolbar.
The Floating Toolbar includes: Hide, Menu, Prev Page, Next Page, Cancel
(Progress)
Long press on the Floating Toolbar, you can drag it around on the screen.
You can expand or contract the Toolbar to the edge to avoid cover any
text on the screen. When you need it, just swipe from either side of edge
to the other side to expand it.

When the page is zoomed in, the Floating Toolbar would automatically
expand proportionally in order to manage the zoomed-in page better.
Under zooming status, singe tap on the screen is set for turning
sub-pages of each page(each original page will require several time
page-turns to be completed). But tapping the virtue page-turn buttons on
the Floating Toolbar is set for turning the whole original page.
You can disable the Floating Toolbar by going to Setting - General Setting.
When it is contracted to the edge, you can swipe from either side of edge
to the center of the screen to expand it.

Word
Word
Word
WordWord Menu
Menu
Menu
MenuMenu
Long-press on the word to pop up dictionary dialog for look-ups.
English word recognition and look-ups are supported.
Through the drop-down list on the top right of the dialog, the dictionary
can be switched to others.
Users can download and install the dictionary themselves. Put dictionary
file on the path root directory\dicts\xxx (e.g
Storage\dicts\English-French), or download dictionary online directly.
Dictionary is available to use after being installed.
Tap on any position out of the dialog to exit the dialog.
Swit
Swit
Swit
SwitSwitch
ch
ch
chch Dic
Dic
Dic
DicDictiona
tiona
tiona
tionationary
ry
ry
ryry
Jump
Jump
Jump
JumpJump t
t
t
tto
o
o
oo Dict
Dict
Dict
DictDict A
A
A
AApp
pp
pp
pppp
Add
Add
Add
AddAdd to
to
to
toto Voca
Voca
Voca
VocaVocabula
bula
bula
bulabulary
ry
ry
ryry Bui
Bui
Bui
BuiBuilder
lder
lder
lderlder
Jump
Jump
Jump
JumpJump t
t
t
tto
o
o
oo Voca
Voca
Voca
VocaVocabulary
bulary
bulary
bularybulary B
B
B
BBuild
uild
uild
uilduilder
er
er
erer
Turn
Turn
Turn
TurnTurn pa
pa
pa
papage
ge
ge
gege
Swip
Swip
Swip
SwipSwipe
e
e
ee to
to
to
toto tra
tra
tra
tratransla
nsla
nsla
nslanslation
tion
tion
tiontion
wind
wind
wind
windwindow
ow
ow
owow
Third-party Dict
(Required to install separately)
Search
Highlight
Web search
TTS
TTS
TTS
TTSTTS
Copy
Copy
Copy
CopyCopy
Annot
Annot
Annot
AnnotAnnotation
ation
ation
ationation

Long press on any word and drag to select the text you want to mark.
The highlight is set by default for selected text. Users can switch among
highlight, underline and others, the color highlight can be in black or grey.
The mark setting remains after a change. The marks before the change will
not be affected.
Tap on any position out of the dialog to exit the dialog.
Choose “Annotation” to pop out a text box to add notes if needed.
Dele
Dele
Dele
DeleDelete
te
te
tete highligh
highligh
highligh
highlighhighlight
t
t
tt
Swit
Swit
Swit
SwitSwitch
ch
ch
chch transl
transl
transl
transltranslation
ation
ation
ationation
Third
Third
Third
ThirdThird-par
-par
-par
-par-party
ty
ty
tyty Dict
Dict
Dict
DictDict
(Req
(Req
(Req
(Req(Required
uired
uired
uireduired to
to
to
toto instal
instal
instal
instalinstall
l
l
ll
sepa
sepa
sepa
sepaseparatel
ratel
ratel
ratelrately)
y)
y)
y)y)

OCR
OCR
OCR
OCROCR (Beta
(Beta
(Beta
(Beta(Beta Versi
Versi
Versi
VersiVersion)
on)
on)
on)on)
Only supports pages in image formats PDF, CBR, CBZ, DJVU, and PNG.
Recognize one page only each time.
Choosing horizontal or vertical according to the document layout can
improve the recognition accuracy.
Recognize 5 times a day when you are not logged in to your ONYX
account.
Recognize 10 times a day when you are logged in to your ONYX account.
You can long-press text to add annotation and lookup dictionary on the
recognized pages
If some individual characters are not recognized correctly, you can switch
to the original text in the annotation pop-up window to correct them, and
manually modify the recognized text content (Do not change the original
page text);
Pages recognized by OCR show the recognition mark in the upper right
corner, and the recognized pages can be viewed in the
Directory-Bookmark, which is convenient for quick locating and jumping;
Tapping the recognition icon again will clear the OCR content;

Bott
Bott
Bott
BottBottom
om
om
omom Menu
Menu
Menu
MenuMenu B
B
B
BBar
ar
ar
arar (PDF
(PDF
(PDF
(PDF(PDF f
f
f
fforma
orma
orma
ormaormat)
t)
t)
t)t)
This bar includes settings of TOC, Progress, Layout, Contrast, Navigation.
TOC
TOC
TOC
TOCTOC
TOC contains Table of Content, Bookmark, Annotation.
TOC supports three-layer hierarchy. The current layer is underlined. Jump
to the corresponding page when tapping any of the layers.
Tap on any position out of the TOC to exit.
Order
Full screen

Boo
Boo
Boo
BooBookmar
kmar
kmar
kmarkmarks
ks
ks
ksks
Without calling out the menu, bookmark the reading page by simply
tapping a tag on the top right corner of the screen. Tap it again to
un-bookmark the page.
The bookmarks can be checked under the path of Doc-Bookmark, where
users can delete bookmarks.
Jump to the corresponding page by tapping any of the bookmarks.
Anno
Anno
Anno
AnnoAnnota
ta
ta
tatation
tion
tion
tiontion
All highlighted/underlined/annotated content would be listed under the
page of Doc-Notes for further searching, editing and deleting.
Jump to the corresponding page/content by tapping any of the lists.
All contents on the Annotation page can be exported in txt format.
Exported files are saved under the directory folder Storage\Note\(same
name as the source file).
Prog
Prog
Prog
ProgProgres
res
res
resress
s
s
ss
It displays the chapter name (book name if no chapter), page progress,
last/next chapter, page number, slideshow, undo, and redo.

Zoom
Zoom
Zoom
ZoomZoom:
Zoom in, zoom out, and partial zoom are supported. Users can also pinch
fingers together or apart to zoom out or in on the reading pages.
When a single page exceeds the display area of the screen after zooming,
you can long press and drag the display area around. Single tap is to turn
sub-pages. You need to use the virtual page-turn buttons to turn the
original whole page;
Crop
Crop
Crop
CropCrop:
Auto-crop according to the margin set by users.
Margi
Margi
Margi
MargiMargin:
n:
n:
n:n:
The default reserved blank area during automatic cropping. You can
manually modify the automatic cropping area.

Co
Co
Co
CoContras
ntras
ntras
ntrasntrast
t
t
tt
Embolden only applies to text in PDF.
Sharpen Imag can sharpen the images.
Watermark Whitening can whiten the light-colored images or background
in the pages.
Dark Color Enhancement applies darker display to either the whole pages
or text only.

Nav
Nav
Nav
NavNaviga
iga
iga
igaigation
tion
tion
tiontion
Navigation allows users to have options of Reset, Comic Mode, Article
Mode, and More Settings including Crop, Split, and Subpage Order.
Com
Com
Com
ComComic
ic
ic
icic Mode
Mode
Mode
ModeMode: the screen will be divided into four subpages and the
reading order is upper right – upper left – bottom right – bottom left.
Artic
Artic
Artic
ArticArticle
le
le
lele Mode
Mode
Mode
ModeMode: the screen will be divided into four subpages and the
reading order is upper left – bottom left – upper right – bottom right.
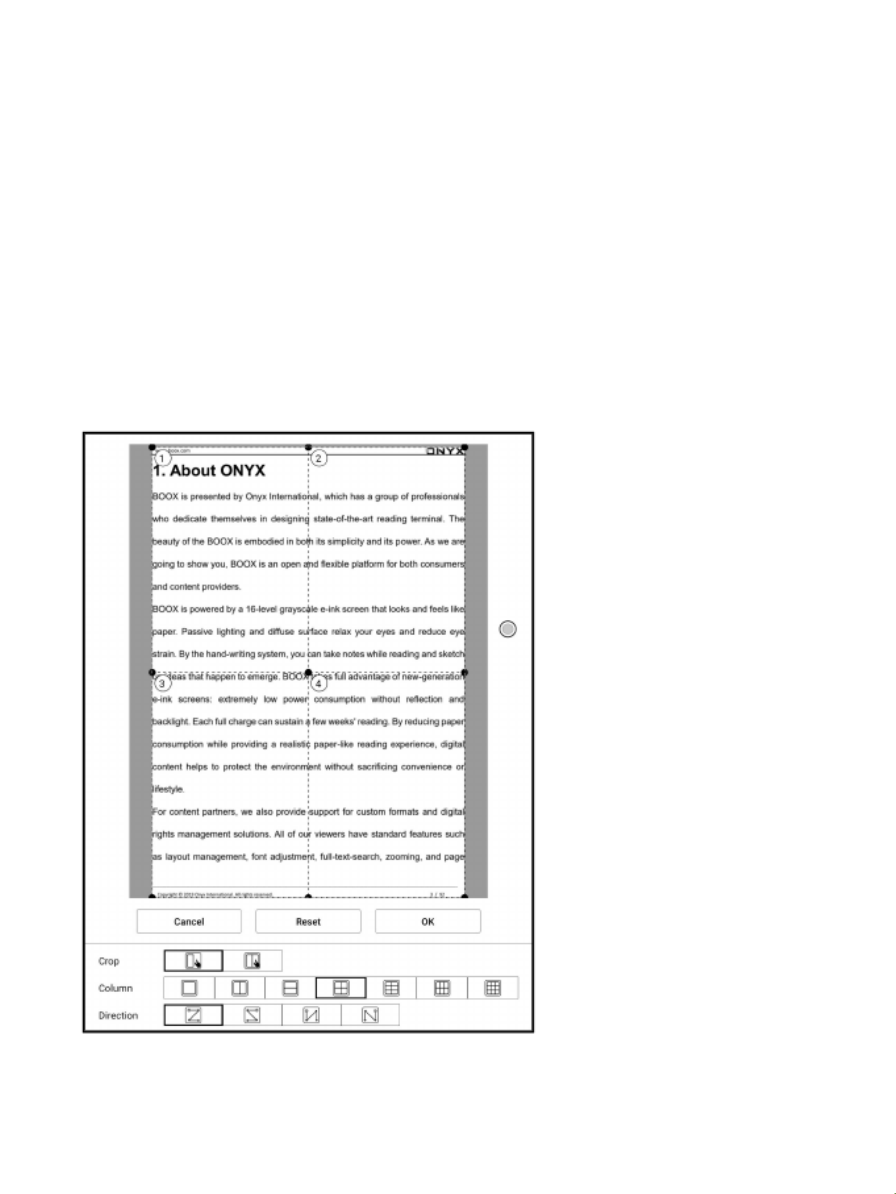
Mor
Mor
Mor
MorMore
e
e
ee set
set
set
setsettings
tings
tings
tingstings
Manually adjust the settings of area cropping, page split, and subpage
order.
Crop: Manually select the cropping area for single or double pages.
Split: Split the pages into specified subpages in different ways.
Order: Decide the initial position and reading order for subpages.

Ref
Ref
Ref
RefReflow
low
low
lowlow
Reflow now supports both scanned and text versions.
Reflow is only available for PDF/DJVU/CBR/CBZ documents.
Scan Type
Reflow allows users to further customize the layout of documents
including: Line Spacing, Margin, Text Direction, Font Size, Columns, and
Skew Correction (for italic documents).

Text Type
Applicable to the digital PDFs or PDFs that have been recognized by OCR
(you can press and hold to look up words) PDF. The reflowed files can use
the features of flow documents.
Bott
Bott
Bott
BottBottom
om
om
omom Menu
Menu
Menu
MenuMenu (
(
(
((other
other
other
otherother f
f
f
fformats)
ormats)
ormats)
ormats)ormats)
This includes settings of TOC, Progress, Format, Contrast, and Split View
and supports flow formats such as EPUB\TXT\MOBI\AZW3.
V2
V2
V2
V2V2 En
En
En
EnEngine
gine
gine
ginegine
Some flow formats (ePub\mobi\azw3\txt\word\jeb\html) use V2 engine
by default. Go to Reading Settings/Other Settings to switch to NeoReader
V2 engine supports the original layout of the document, including font, line
spacing, margin, graphic typesetting, indentation, etc.;
After being switched the V2 engine, the document will be closed
automatically, and the V2 engine will be used when you reopen the files; If
you need to switch back to NeoReader, you can cancel the V2 engine and
reopen the document;
V2 engine does not support to sync data from NeoReader such as
Bookmarks, Annotations, and Handwritten notes.
Progre
Progre
Progre
ProgreProgress
ss
ss
ssss
The document needs to be paginated again after switched to V2 engine, or
font and spacing adjustment. You can check the pagination progress in the
reading Menu>Progress. After the progress bar is loaded, it means the
pagination is completed. You can drag the progress bar to jump pages
after the pagination is completed.
Finished loading
Loading

For
For
For
ForFormat
mat
mat
matmat
The settings include Font Face, Display and Spacing.
Loading font face in the directory Storage\fronts is supported.
The settings for font size, font face, contrast, bold, spacing work on all
newly opened documents, but not work on the documents before settings.
First
First
First
FirstFirst line
line
line
lineline
inde
inde
inde
indeindent
nt
nt
ntnt
Line
Line
Line
LineLine brea
brea
brea
breabreak
k
k
kk
hyph
hyph
hyph
hyphhyphen
en
en
enen switch
switch
switch
switchswitch
Screen
Screen
Screen
ScreenScreenshot
shot
shot
shotshot
Diagonally tap on two corners of the screen to capture the screen in PNG
format. The function is only available on the reading page.
The screenshot will be saved to the local, or shared by scanning QR code.
The save path is Storage\Screenshots.
Refre
Refre
Refre
RefreRefresh
sh
sh
shsh
Tap the hamburger menu located at the upper right corner to choose
Refresh and other related settings of refresh
Regal refresh and partial refresh are by default
When scrolling the page, speed mode is by default.

Setti
Setti
Setti
SettiSettings
ngs
ngs
ngsngs
There are General Settings, Touch Settings, TTS Settings, Export Settings,
Screenshot Settings, Floating Toolbar Settings 、 Other Settings and
Version Name.
Ge
Ge
Ge
GeGeneral
neral
neral
neralneral Set
Set
Set
SetSettings
tings
tings
tingstings
There are Enable page close reminder, Enable system status bar, Enable
reader status bar, Enable multiple documents, Show file borderline, Enable
Floating Toolbar, Show hyperlink, Show bookmark position, Apply certain
options to all documents、Annotation Font Size Setting;.

To
To
To
ToTouch
uch
uch
uchuch Set
Set
Set
SetSettings
tings
tings
tingstings
Users are able to customize the touch settings for different areas. There
are six default touch modes can be chosen and users can customize three
more.

TTS
TTS
TTS
TTSTTS Set
Set
Set
SetSettings
tings
tings
tingstings
The built-in Baidu TTS is set by default. English is supported. A network
connection is required at first use.
Switching to third-party TTS system is allowed. The built-in TTS
settings are not synchronized with the system TTS settings. The system
TTS settings work on the third-party TTS by default.

Ex
Ex
Ex
ExExport
port
port
portport Set
Set
Set
SetSetting
ting
ting
tingtings
s
s
ss
The default storage path is Storage\Note.
The export files can be also saved to the same directory as the source file.

Float
Float
Float
FloatFloating
ing
ing
inging Toolb
Toolb
Toolb
ToolbToolbar
ar
ar
arar Settings
Settings
Settings
SettingsSettings
This page offers General Settings of Floating Toolbar Settings;
Gener
Gener
Gener
GenerGeneral
al
al
alal Setting
Setting
Setting
SettingSettings
s
s
ss
It is enabled by default and can be turned off manually. After disabled, it
can no longer be called out;
It can be customized whether the indicator is displayed after it is
collapsed. Call out the Floating Toolbar by swiping from the screen edges.
The Toolbar’s size, display style and functions buttons are customizable.
Custom function buttons support up to 11 in horizontal style and up to 14
in vertical style;

Press and hold the function button icon to display the definition of the
function button;

Other
Other
Other
OtherOther Settin
Settin
Settin
SettinSettings
gs
gs
gsgs
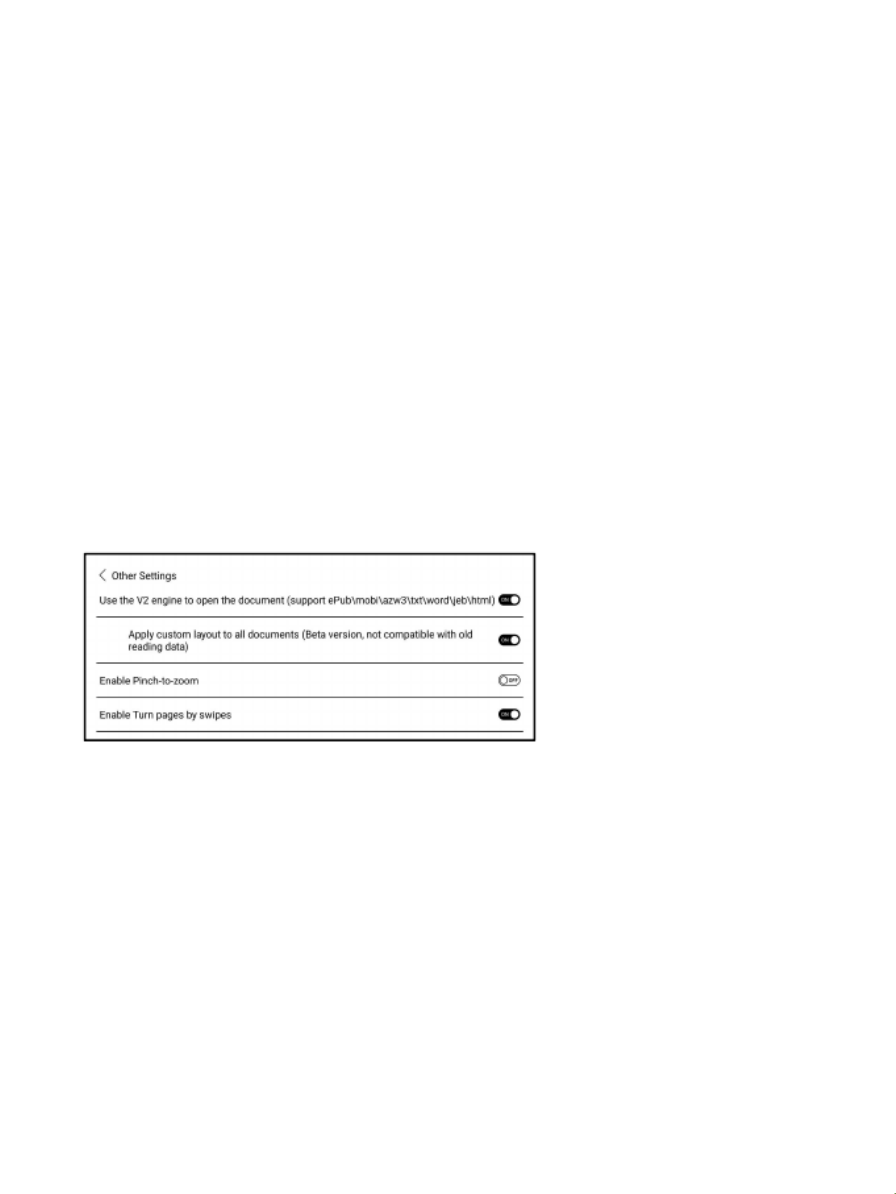
This setting page includes “Open ePUB documents with V2 engine ” ,
Enable “Pinch-to-Zoom”, and Enable “Turn pages by swipes”
When “Turn pages by swipes” is disabled, you can only turn pages by
tapping on the screen. This can avoid accidental page-turnings when you
are taking handwritten notes.

7.
7.
7.
7.7. St
St
St
StStore
ore
ore
oreore
In the language of non-Chinese, the Store is offering free publications
E-books from the Internet.

Ca
Ca
Ca
CaCategor
tegor
tegor
tegortegory
y
y
yy
Books can be screened according to different categories.

Boo
Boo
Boo
BooBook
k
k
kk Deta
Deta
Deta
DetaDetail
il
il
ilil
Click a book cover to open up book detail. The specific book information.
Click “Full Edition Download” to download the book, then you can see
this book cover in Library .
Long-press the folder to pop up Property Window and choose “Set as
Shortcut”, which offers quick access to open it.

OTG
OTG
OTG
OTGOTG Extern
Extern
Extern
ExternExternal
al
al
alal Disk
Disk
Disk
DiskDisk
OTG is supported. Users can connect the device with USB drive through a
Type-C cable. The device will detect USB drive afterwards.
The OTG feature would consume more power since it supplies power to a
USB drive.
It supports analog and digital Type-C earphones ( You can use 3.5mm
audio jack converter);
Low
Low
Low
LowLow stor
stor
stor
storstorage
age
age
ageage space
space
space
spacespace war
war
war
warwarning
ning
ning
ningning
Please reserve at least 300M of available storage space to ensure the
normal operation of the system and saving related data;
When it is lower than 300M, a warning icon will be displayed in the system
bar, indicating that the storage space is insufficient;

App
App
App
AppApp Mana
Mana
Mana
ManaManagement
gement
gement
gementgement
This page includes USB Debugging Mode, Application Info, Location
Settings, Auto-start Settings, Refresh Mode Settings, Freeze Settings,
Automatically update the Optimization config of third-party apps, Fill in
available space automatically, Enable Google Play.
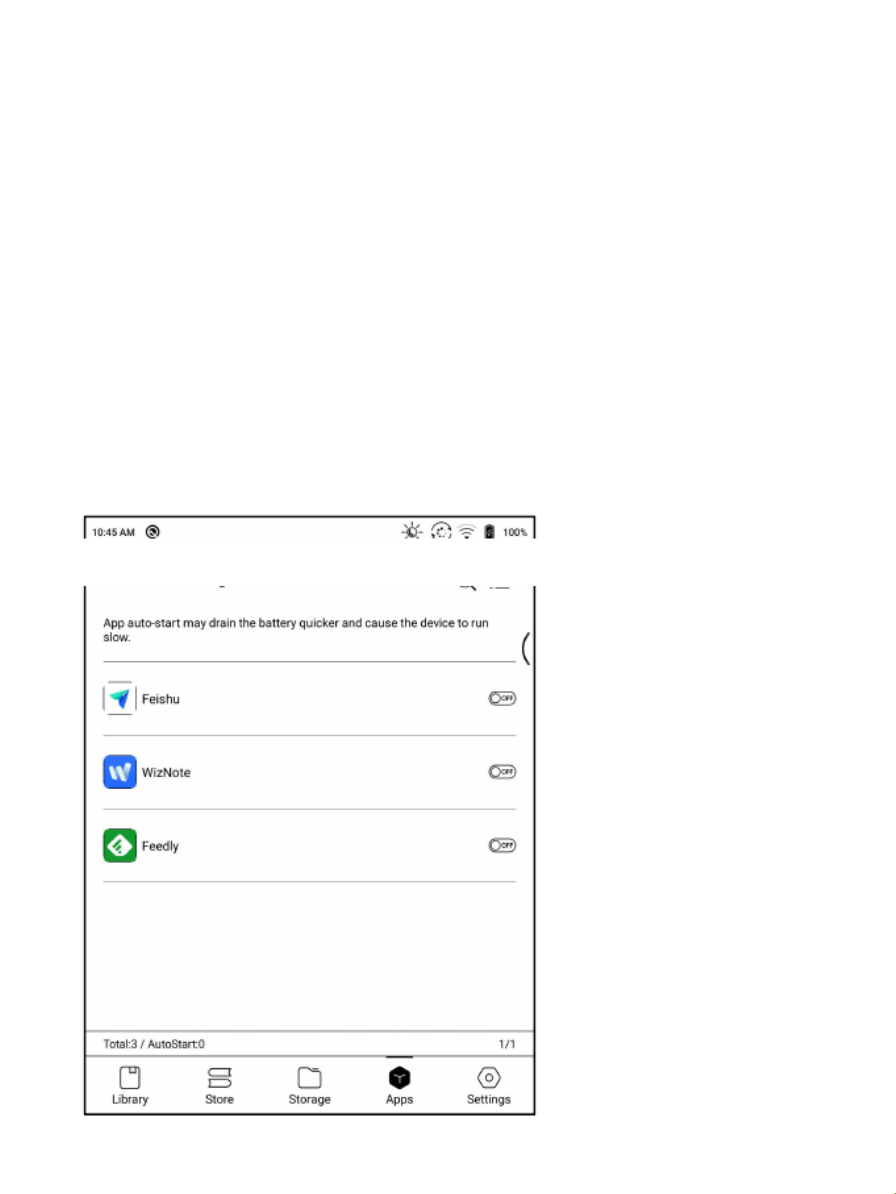
Au
Au
Au
AuAuto-st
to-st
to-st
to-stto-start
art
art
artart Set
Set
Set
SetSetting
ting
ting
tingtings
s
s
ss
Only applicable to device auto-start. After it is enabled, the applications
may take up more storage space and consumes more power.
Apps need to monitor the system start. After apks are installed, you need
to tap the app icon to start it once.
After it starts successfully, it only runs in the background and will not
show in recent running tasks.

Ref
Ref
Ref
RefRefresh
resh
resh
reshresh Mode
Mode
Mode
ModeMode Set
Set
Set
SetSetting
ting
ting
tingtings
s
s
ss
This allows you to set the refresh modes of third-party apps in bulk.
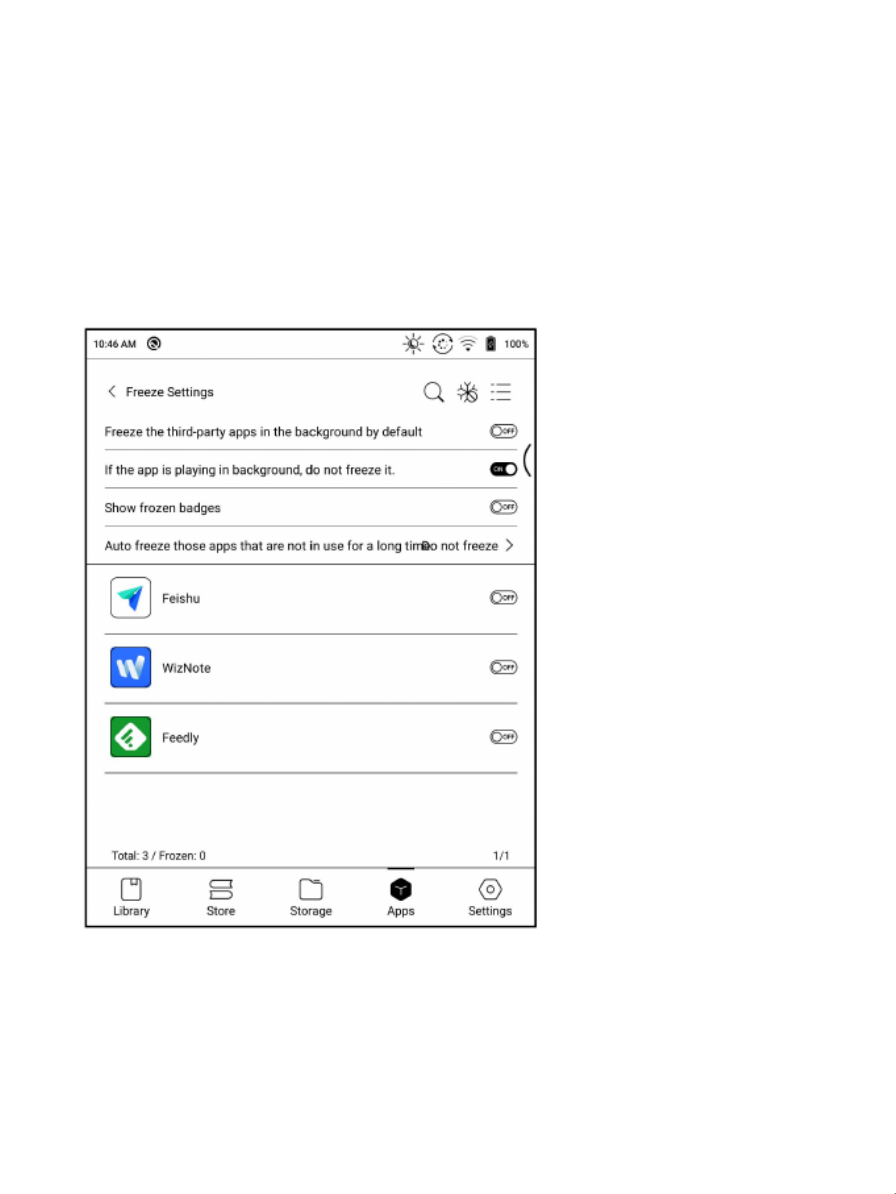
Fre
Fre
Fre
FreFreeze
eze
eze
ezeeze Set
Set
Set
SetSetting
ting
ting
tingtings
s
s
ss
You can obtain the optimization settings of third-party apps with one
click and freeze all apps in the background with one click for a better user
experience and saving power.

Ena
Ena
Ena
EnaEnable
ble
ble
bleble Go
Go
Go
GoGoogle
ogle
ogle
ogleogle Pla
Pla
Pla
PlaPlay
y
y
yy
If you want to use Google Play, you need to enable Google suite by the
following steps:
1. Connect to internet. Go to Apps, drop down the menu on upper right
corner, select Application Management > Enable Google Play

1. Tap “OK”when asked “Do you want to go to the activation page to
enable Google Play?”.Then log in your Google account. A note will pop up
saying “This device is not verified by Google”.

2. Go back to App Management page and tap GSF ID. You will go to GSF
ID application page. Tick Human-machine Authentication and tap “Sign
up”. (Google frame ID is automatically obtained and you do not need to
enter.)

3. When you sign up successfully, there will be a note saying“The device
has been registered”

6. If it jumps to the login page here, it means it has been passed. You can
restart the device after logging in to the account.
B. If it does not jump the protection mechanism page, it means it still
hasn’t passed. Please wait for a bit long and try again.
7. If you wait for too long and it still shows that the device is not verified
by Google, it means the verification has not passed. Please start again
from step 3.

Bold Font: Embolden fonts of titles, menus and body text.
Cloud Optimization: Some apps are specifically optimized and you can
retrieve the cloud optimization configuration to obtain better results than
local optimization;
Reset All: Reset all modified configurations to the original configurations.
Optimization Switch: when it is turned off, some optimization effects will
be canceled, but it won’t reset the configurations.

Ble
Ble
Ble
BleBleach
ach
ach
achach
Add strokes to text: The text and background on the same layer will not be
visible after being bleached together. This setting will add strokes to text
and make the text visible.
Icon Color: this darkens the colors of small color icons in the Menu.
Cover Color: This darkens the colors of big cover icons.
Background Color: This bleaches the background colors.
It is recommended to use it along with Font Color Enhancement and Icon
Color. Otherwise, the text and small icons on the background may be
hardly seen.
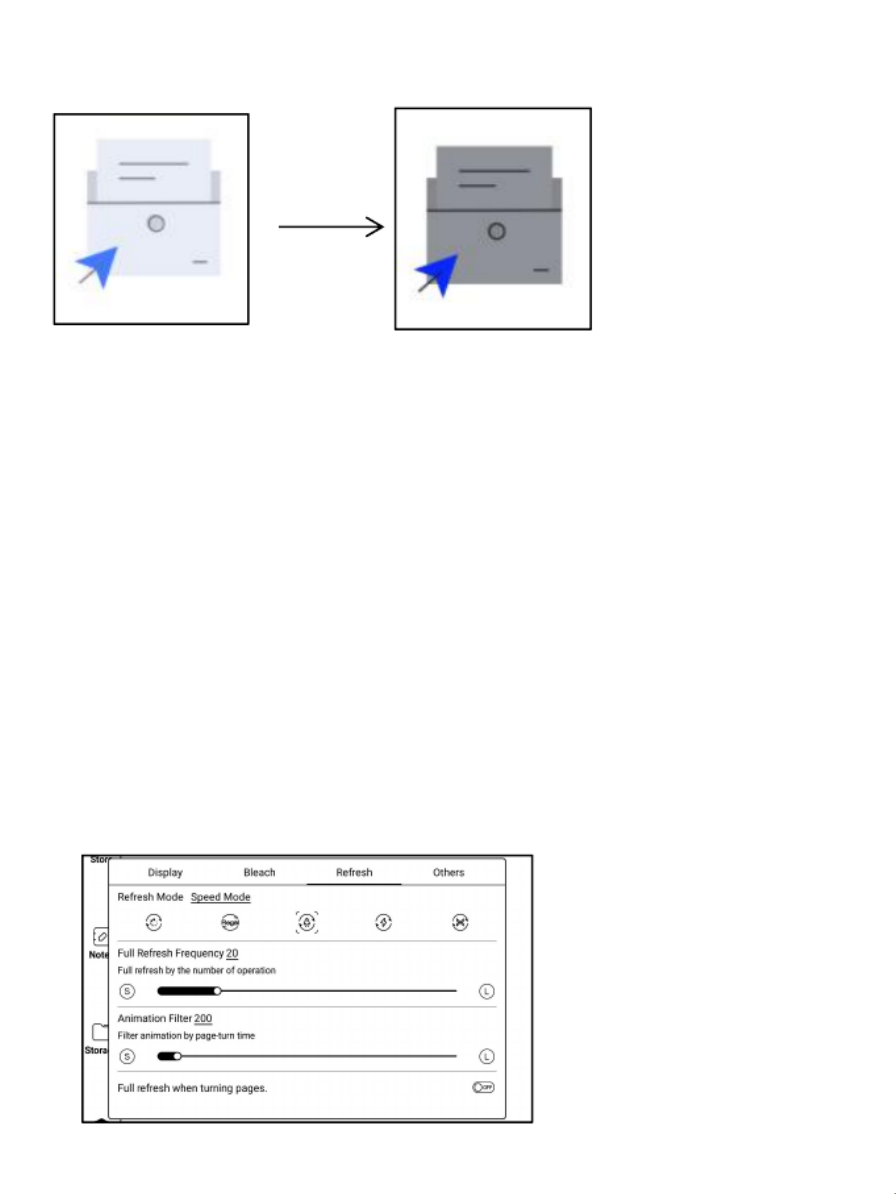
Ref
Ref
Ref
RefRefresh
resh
resh
reshresh

Refresh Mode: This sets the refresh mode for individual apps. Normally
the default refresh mode is Speed Mode.
Only when system's refresh mode is Normal Mode, the app's refresh mode
will take effect.
When system's refresh mode is set to Speed\A2\X Mode, the system
mode has priority. And the app's refresh mode will not take effect.
Full Refresh Frequency: In app, fully refresh the screen by the number of
tapping in order to reduce ghosting.
The actual number of taps is related to the app's configuration. Sometimes
a single tap may have several consecutive responses. E.g, you've set 20
times, but full refresh may be initated after 15 taps.
Animation Filter: Filter the animation of turning pages in the app. Time
indicates the duration of the animation effect to be filtered. Generally, the
page animation is about 200 ms;
Oth
Oth
Oth
OthOthers
ers
ers
ersers
Full refresh when turning pages. : When the main function bar in the app is
switched, full refresh is performed to reduce ghosting;
Switching some app function bar does not actually switch the pages, so
full refresh would not be performed.
Webpage Font Size: Adjust the font size of the web view embedded in the
app. When adjusting DPI does not work, try to adjust the font size of the
webpage;

Webpage Text Color: When the adjustment of the bleaching does not work,
you can try to adjust the color of the webpage;
Embolden Webpage Text: When Bold Font under Display tab does not
work, try to embolden the text on the webpage;
Allow the app to run in the background:
For apps that need to run continuously in the background, such as Alarms,
Notifications, Downloads, Time statistics and other apps, you can allow
them to run in the background. But the continuous running in the
background may increase power consumption!

Navi
Navi
Navi
NaviNavigation
gation
gation
gationgation Ball
Ball
Ball
BallBall
Navigation Ball is a circular ball that floats above all the apps on the screen.
9 buttons can be customized.
Single click on the ball to expand and collapse navigation menu.
It requires to turn off and on again after the new button settings.
The Navigation Ball by fault is in Fan-shaped style. You can choose other
display styles (Horizontal Style, Vertical Style) from Navigation Setting.
You can also adjust the transparency of the Navigation Ball.
This supports to set as a resident button. After being set as a resident
button, the button will always be floating on the top layer;

The 9 buttons can be set as multiple common functions including system
operation, app switching, app optimization and so on.
The app optimization can be called out in an app through the Navigation
Ball, for real-time review after optimization.

Dicti
Dicti
Dicti
DictiDictionary
onary
onary
onaryonary
If users use dictionary apps the first time, to download dictionary package
to local will be asked.
This function requires network connection.
Word pronunciation needs a dictionary file comes with voice files,
currently TTS is not supported.
Add to vocabulary
Search Online
Pronunciation
Settings
Switch Dictionary

Users can install dictionaries themselves by putting the dictionary files to
designated directory Storage\dicts\.
Please save the files under a folder, e.g., dicts\English-English
Dictionary.
For the preferred dictionary settings, users can select up to 20 preferred
dictionaries. Users will be asked to select again if the select number is

less than 1 or more than 20.
After dictionaries are installed, users can look up new words in the search
bar. Switch between different dictionaries by tapping a corresponding
dictionary title on the bottom.
The search result is in terms of the related dictionary. If the word is
unfound, try to use other dictionaries.
Looked-up words can be added to Vocabulary.
Users can divide the Vocabulary into groups. The words will be saved into
the specified group once the group is selected.
BOO
BOO
BOO
BOOBOOXDrop
XDrop
XDrop
XDropXDrop
Connect your BOOX with PC or mobile phone. You can send files to your
BOOX from PC or BOOX Assistant app, or save files on your BOOX to PC
or mobile phone.
Instruction:
1. Open BooxDrop from Apps page or drop-down Control Panel
2. Open a browser on your PC
2.1 Without login: Make sure your BOOX and PC are in the same network.
Enter the IP address on your BOOX to the browser on your PC.

BooxDrop does not disconnect automatically. If you want to disconnect it,
please do it manually or switch it off from Control Panel.
Records
Disconnect
2.2 Logged in to ONYX Account: log in to push.boox.com. You can see the
connected devices on Push page. Click it to open.
3. When you open the web browser on your PC, it will automatically
confirm whether your PC and BOOX are in the same Wi-Fi network. If not,
the page cannot be opened. Please connect to the same Wi-Fi.
4. When web end and your BOOX are connected successfully, you can
load files and contents from your BOOX on your PC.
5. Send to BOOX: Select files from your PC and send to BOOX.
The sent files are automatically classified into the corresponding
directory according to the format types.

Recent Files: include all files and are sorted by time
Library: Books/xxx.epub ( This includes all supported eBook formats in the Library)
Pictures: Pictures/xxx.png
Music: Music/xxxx.mp3
Videos: Movies/xxxx.mp4
Downloads: Download/xxx.xxx
Internal Storage: Transfer the selected directories.
6. Save to Computer: Select the files on BOOX and save them to
computer.
Records
You can only check the transfer history on BOOX devices.

PushR
PushR
PushR
PushRPushRead
ead
ead
eadead
From the Subscription section of push.boox.com or BOOX Assistant, you
can enter a webpage address, push it to your BOOX, and read the page in
html format.
To use the PushRead for the first time, you need to bind the same ONYX
account on the website push.boox.com and your BOOX;

App
App
App
AppApp Store
Store
Store
StoreStore (
(
(
((E-ink)
E-ink)
E-ink)
E-ink)E-ink)
There are some usual third-party apps provided here. These apps are free
versions from developers and their compatibility are not verified as full to
the system. Paid apps download is not supported for now.
Users can choose to delete the installation package automatically after
Apps are installed.
Produkt Specifikationer
| Mærke: | BOOX |
| Kategori: | Tegnetablet |
| Model: | Leaf |
Har du brug for hjælp?
Hvis du har brug for hjælp til BOOX Leaf stil et spørgsmål nedenfor, og andre brugere vil svare dig
Tegnetablet BOOX Manualer

23 Juli 2024
20 Juli 2024
Tegnetablet Manualer
- Tegnetablet SilverCrest
- Tegnetablet Acer
- Tegnetablet Denver
- Tegnetablet Samsung
- Tegnetablet Panasonic
- Tegnetablet Doro
- Tegnetablet HP
- Tegnetablet Leitz
- Tegnetablet Asus
- Tegnetablet Gigabyte
- Tegnetablet Toshiba
- Tegnetablet InFocus
- Tegnetablet Lenovo
- Tegnetablet Creative
- Tegnetablet Thomson
- Tegnetablet Trust
- Tegnetablet Trimble
- Tegnetablet Medion
- Tegnetablet Vivax
- Tegnetablet Wacom
- Tegnetablet Alcatel
- Tegnetablet Zebra
- Tegnetablet Boogie Board
- Tegnetablet Viewsonic
- Tegnetablet Archos
- Tegnetablet Prixton
- Tegnetablet Manhattan
- Tegnetablet Barnes & Noble
- Tegnetablet Genius
- Tegnetablet BakkerElkhuizen
- Tegnetablet XP-PEN
- Tegnetablet Boss
- Tegnetablet Royole
- Tegnetablet Sylvania
- Tegnetablet Laser
- Tegnetablet Ematic
- Tegnetablet Huion
- Tegnetablet Vankyo
- Tegnetablet Monoprice
- Tegnetablet Beafon
- Tegnetablet Rocketbook
- Tegnetablet Getac
- Tegnetablet Vulcan
- Tegnetablet Cydle
- Tegnetablet Cybernet
- Tegnetablet Xplore
- Tegnetablet Punos
- Tegnetablet Tivax
- Tegnetablet Kocaso
- Tegnetablet Wikipad
- Tegnetablet ICAN!
- Tegnetablet Leotec
- Tegnetablet Sungale
- Tegnetablet Veikk
- Tegnetablet Xencelabs
- Tegnetablet Ugee
- Tegnetablet AARP
- Tegnetablet Aegex
- Tegnetablet Zeki
- Tegnetablet Iskn
Nyeste Tegnetablet Manualer
27 December 2024
27 December 2024
27 December 2024
27 December 2024
27 December 2024
18 December 2024
8 December 2024
8 December 2024

13 Oktober 2024

9 Oktober 2024