Bushnell BackTrack HuntTrack Manual
Bushnell
Smartwatch
BackTrack HuntTrack
Læs nedenfor 📖 manual på dansk for Bushnell BackTrack HuntTrack (76 sider) i kategorien Smartwatch. Denne guide var nyttig for 24 personer og blev bedømt med 4.5 stjerner i gennemsnit af 2 brugere
Side 1/76

Instruction Manual
R e co R d Yo u R T R a c k F i n d Yo u R WaY B a c k
B
c
Lit# 98-2348/03-12
Model#: 360500


TABLE OF CONTENTS PAGE #
ENGLISH
FrANçAIS
ESPAñOL
DEuTSCH
ITALIANO
POrTuGuêS
4-15
16-27
28-39
40-51
52-63
64-75

4
9
Control & Display Guide
1. POWER Button
2. MARK Button
3. TRIP/DATA Button
4. SETUP Button
5. USB Port
6. Location Icon (1 of 5)
7. Local Time
8. Direction to Location
9. Distance to Location
10. Battery Level
Indicator
11. Satellite Lock Icon
12. Trip Icon
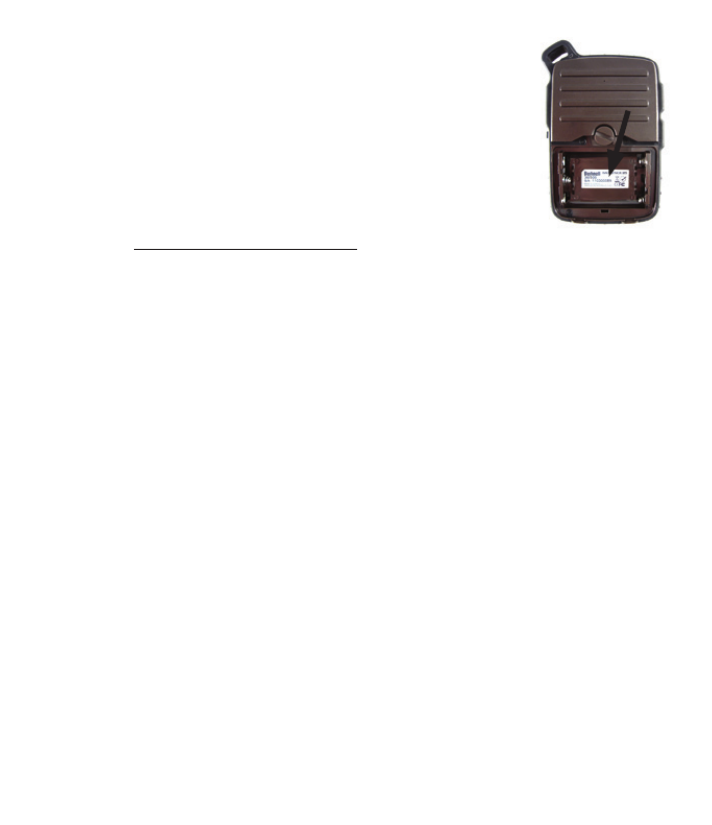
Battery
Cover
Lock
Fig. 1
Note: Serial # is
inside battery
compartment.
Right Side
2
45
Left Side
1 3
FRONT VIEW
SIDE & BACK VIEWS
1 2
3
4
5
6
7
810
11
12
ENGLISH

5
BASIC SETUP
• Openbatterycoverandinsert3AAAbatteries(Fig 1,
pg 4).Recordtheserial#inside-you’llneeditlaterto
registeryourHuntTrackonline.Closethecover.
• Go outdoors. HOLD POWER (1) (keep the button
pressed) until the display comes on. Wait for GPS
satellitelock(iconstopsblinking)( ).Thismaytake11
afewminutesafterthefirstpower-upinanewarea.
• PressSETUP(4).PressMARK(2),thenpresstheTRIP
( ) or button to set the Hour for your area3SETUP
(Fig. 2).Pressthe buttontoreturntotheSetupMARK
screen.
• Tochangethetimeandtemp/distanceformats,press
SETUPtoselect“12h”or“0F/yd”,thenpressMARKto
setto“24h”or“0C/m”. .Thearrow’sfunctionis(Fig. 3)
explainedon .Press toexitSetup.page 6 POWER
MARKING/RETURNING to a LOCATION
• Press to select one of five Location icons/POWER
or 5-20 numbers ( ) (Tent, Truck, Tree, Treestand,6
Deer, #1-20). While standing at the Location you
want to mark, HOLD to save its position inMARK
the HuntTrack’s memory (the display will change
as shown) (Fig. 4).You can now turn the power off
(HOLD )andleavethelocation.POWER
• To return to the location you marked, turn the
HuntTrack on.Makesurethesameiconor#youused
to markthe location isshown (if not,press POWER
to select it).The displayindicates the direction and
distance back to the location (Fig. 5). Move in the
direction ofthe arrow, watching forthe distance to
decrease. When you reach the location, the “Mark”
iconwillflashinthecenterofthedisplay.
Fig. 2
Fig. 4
Fig. 5
Fig. 3

6
Fig. 6
Fig. 7
8
• You can use the five icons (and up to 20 numbers)
to mark different locations of any kind (your truck,
treestand, a campsite, etc.). Be sure you select a
differenticonor #to storeeach newlocation. If you
hold down with a previously used locationMARK
iconstillselected,youwillreplacethatonewithyour
currentlocation.
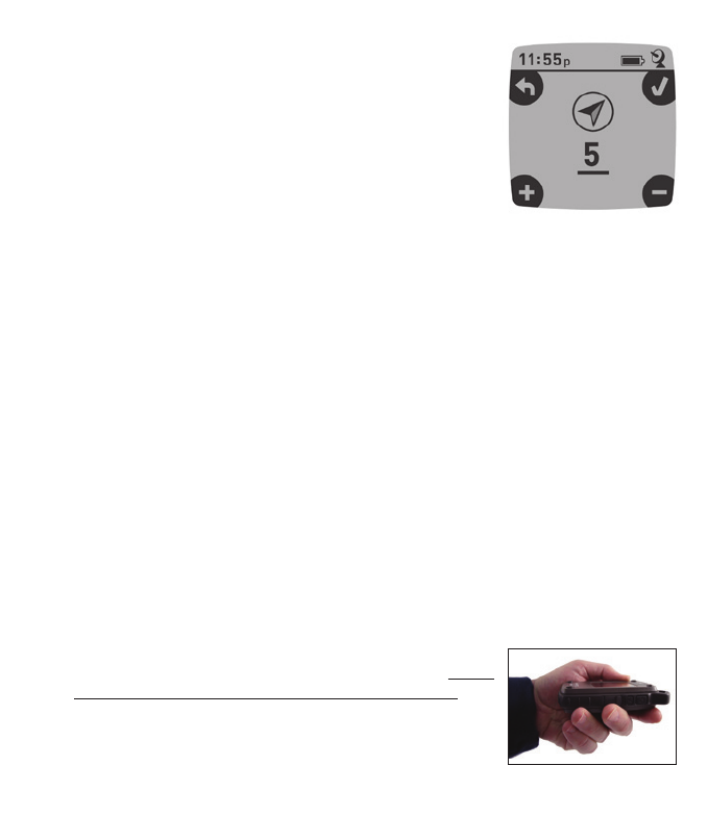
• To expandor restrict thenumber of“extra” locations
(numbersfrom1to20)thatareavailable,Press SETUP
( )three timesuntilthe locationarrowon the lower4
right is highlighted. Press MARK (2), then use the
TRIP/DATA SETUPor buttonstodecreaseorincrease
thenumberbelowthearrow(Fig. 6).Pressthe MARK
buttontoconfirmandreturntotheSetupscreen.
AUTO POWER OFF/BACKLIGHT
• Power automatically turns off after 10 minutes if no
buttons have been pressed (except in Trip mode,
described next). HOLD to turn the unit offPOWER
manually.
• Pressthe button toturnthe displaybacklightMARK
on.Itautomaticallyturnsoffafter30seconds.
COMPASS CALIBRATION
• To ensure directional accuracy, hold the HuntTrack
outinfrontofyouandmoveitina“Figure8”pattern
a few times to re-calibrate the compass (Fig. 7). A
compasscalibrationvideoisavailableat:http://www.
bushnell.com/products/gps/instruction-videos/.
• For best results, we recommend holding the
HuntTrack inahorizontalposition(nottilted)during
use(Fig. 8).
Fig. 8
7
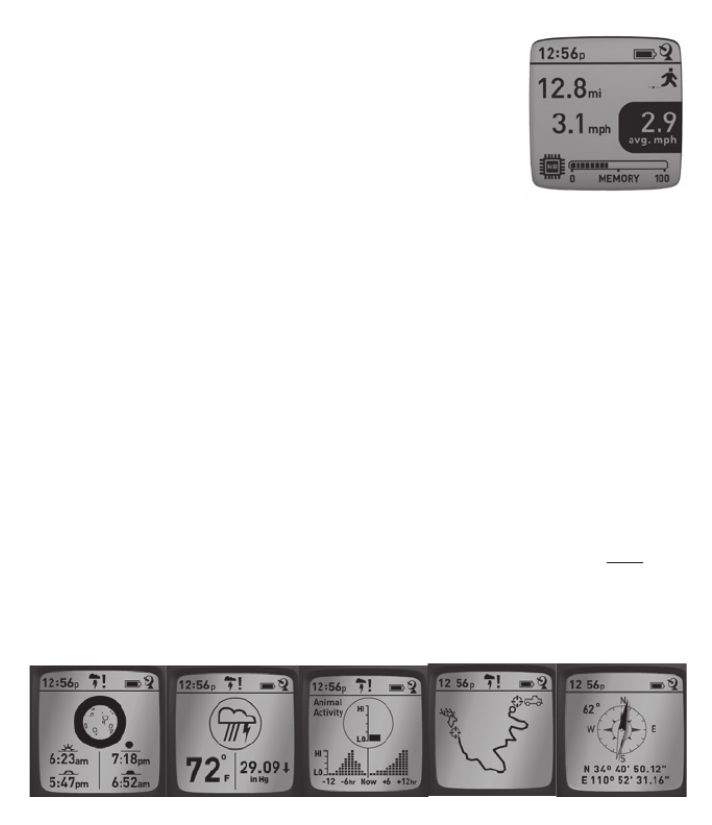
RECORDING A NEW TRIP (ROUTE)
• Press TRIP/DATA (3) to enter Trip mode. HOLD the
TRIP/DATAbuttontostartrecordingnewtripdata.The
displayshowsamoving“hiker”icon,alongwithupdated
readoutsofelapseddistanceandaveragespeedduring
your trip . Keep the(Fig. 9) HuntTrack powered ON
duringyourtrip.
• To stop recording the trip data, HOLD the TRIP/DATA
buttonagain.
• The HuntTrack automatically saves the data it collects between the time
youstart and stoprecordingyour trip,including the dateand time ofthe
trip,totaldistancetraveled,youraveragespeed,andchangesinaltitudeand
temperature.
VIEWING THE DATA SCREENS
Press TRIP/DATA (3) briefly to view and cycle through the HuntTrack’s data
screens(when in Trip mode, don’t hold the button down or you will start a new trip or
stop your current trip).Press brieflytoreturntothemainnavigationscreen.POWER
The6datascreensdisplay(inorder)thefollowingdataforyourcurrentlocation:
1. Sunrise/SunsetandMoonPhase
2. Temperature,BarometricPressure,andWeatherTrend
3. AnimalActivity(currentlevelandgraphover+/-12hourperiod)
4. DistanceandAverageSpeed(currentorlasttrip)andRemainingMemory
(%oftripdataused).TheHuntTrackcanstoreupto48hoursoftotaltrip
data(canbemultipletripsondifferentdays). See Fig. 9 above.
5. RouteTraveled(fromstarttostoppointsofcurrentorlasttrip)
6. Compassw/AltitudeandLat/Long
Fig. 9
1 2 3 5 6

8
VIEWING TRIP DATA
Afterrecordingatleastonetrip,connectingtheHuntTrackto
yourcomputerwillenableyoutoseethepathyoutookonany
of4typesofmap,viewatripdatagraph,andshareyourtrip
viaemailorsocialmedia.Togetthesoftware:
• Go to http://www.hunttrackgps.com/ and follow the
directions to create an account (free) and register your
HuntTrack,anddownloadthesoftwareapp(Fig. 11, next
pg.).Youraccountprovidesonlinebackupforallyourtrip
data.(Serial number is inside the battery compartment-(Fig.
10). Afterregistering,you’llbetakentoascreentodownloadtheHuntTrack
application (Fig. 12) (Adobe Air® is required-it will be installed automatically
if you do not already have it on your computer).Click“Download Now”, then
select“Open”.Alinktodownloadthesoftwarewillalsobeprovidedinyour
confirmationemail.TurnontheHuntTrackandconnectitsUSBporttoyour
computerwith the supplied USB cable.OnWindows®PCs, theapp should
openautomatically(ifnot,clickthedesktopicon ).(Fig. 13) Note: if you get a
Windows “AutoPlay” popup when you connect your HuntTrack, click “Open Folder
to View Files”, then double click a .btk (trip data) file). OnMac®,doubleclickthe
“HuntTrack”iconinyourApplicationsfoldertolaunchtheapplication.
• EntertheUserName(emailaddress)andPasswordyouusedwhensettingup
youraccount,thenselect“LOGIN” .Thiswillenableallyourtripdata(Fig. 14)
tobestoredwithinyouronlineaccount,soitwillbeautomaticallybackedup,
andaccessibletoyoufromanycomputer.
USING THE HUNTTRACK APP (Fig. 15)
• AftertheHuntTrackappopens,youwillseeoneormoregrayfoldersonthe
left below“MyDownloadedTracks”,eachlabeledwithadate.Eachfolder(a)
containsinformationonthetripstakenina24hourperiod.
• Clickthefoldertoopenitandviewtheindividualtrips youmadeonthat(b)
date (the durationof each trip is based on the time elapsed between the
startingandstoppingofanewtriprecordingwhenyouhelddownthe TRIP
button).
Fig. 10

9
a
b
c
d
f
e
Fig. 11
Fig. 15 Fig. 14
Fig. 13
Fig. 12

10
• Therouteyoutraveledforeachtripisshownasacoloredline onamap.(c)
Four types of maps are available-click on the name of a map type (d) to
changetheview:
MAP-a“roadmap”styleview,completewithroadnames.
SATELLITE-anaerialphotoofthearea.
HYBRID-acombinationofthefirsttwomaps.
TERRAIN-thisisatopographicmapshowingelevationdataforthearea.
• Thezoomsliderandpositionarrowpadallowyoutozoomin/outandmove
aroundonthemap(e).
• Clickonthenameofatriptohighlightitonthemap.Youcanhideanytripby
clickingonthe“eye”iconnexttoit’sname(f).
• To change the name of a folder (from the defaultdate to something like
“CanyonTripDay1”),rightclickonitsname.Youcanalsorightclickonatrip
withinthefoldertorenameit.
USING THE HUNTTRACK APP (Fig. 16)
• Clickingonthe“handle” atthebottomcenterofthemapscreenwillopen(g)
a popup graph window. This will allow you to view graphs for elevation,
temperatureorspeed(anytwoofthese)overdistancetraveled,orovertime
elapsedduringanypartofyourtrip.Thegraphlinecolormatchestheselected
tripsegment’scolor.Usethepull-downs toselectwhatdataisdisplayed.(h)
• Tocreateanewfolder,clicktheplus(+)icononthebottomleft .Existing(i)
tripscanbedraggedfromtheiroriginalfolderintothenewone.
• Todeleteatriportripsfolder,dragittothetrashicon(j).
• Click“Share” topostyourtripmaponFacebook.(k)
• Click“ExportCurrentMap” andtosaveasa.jpgimage,orsendviaemail(l)
• Click“Settings” toselectthemenulanguageandEnglish/metricunits.(m)
• When you have finished using the HuntTrack application, simply click
“Logout” .Yourtripdataisautomaticallysavedinyouraccount.(n)
ADDITIONAL APP FEATURES
• Clickingonthetargeticonontherightsideofthemap willallow(Fig. 17, A)
youtoaddcustomlocationmarks anywhereonthemap,usingoneoffive
icons.Movethe cursorwhereyouwant iton themap,click, thenselectan

11
Please read the Google™ Maps Terms of Service at:
http://maps.google.com/intl/en/help/terms_maps.html
g
ij
h
Fig. 16
k ml n

12
iconandclick“+”toaddthelocationtothemap(Fig. 18).Toremoveacustom
location,clickitagainandselect“Remove”(Fig. 19).
• To view an animal activity graph for any point on the map (based on its
location, current date/time and solunar tables built into the app), click the
deericon(Fig. 17, B),thenanywhereonthemap.Youcanevenviewpredicted
(or past) animal activity for that location by changing the date and time
withintheanimalactivitypop-upwindow(Fig. 20).
USING THE HUNTTRACK APP ON OTHER COMPUTERS
IfyouwanttoaccessyourHuntTracktripinformationfromanothercomputer,it
isnotnecessaryforyoutocreateanewaccount.Simplylogintoyouraccountat
http://hunttrackgps.com ,clickonthedownloadlink,andinstalltheapp.
LOGIN/CHANGE PASSWORD
IfyoulogoutoftheHuntTrackapplication,youwillbepromptedtologinagain
the next time you launch the application. If you forget your password or want
tochangeit,youmayclickonthe“ForgotPassword?”linkontheapplicationlog
inscreen Youmay alsochange yourpasswordafterloggingin toyour(Fig. 21).
existingaccountathttp://hunttrackgps.com.Click“MyProfile”inthemenuatthe
topofthescreen(Fig. 22).
Fig. 21 Fig. 22

13
Fig. 17
Fig. 18
Fig. 19
Fig. 20
A
B

ONE YEAR LIMITED WARRANTY
Your Bushnell® HuntTrack™ GPS unit is warranted to be free of defects in materials and
workmanship for one year after the date of purchase. In the event of a defect under this
warranty, we will, at our option, repair or replace the product, provided that you return
the product postage prepaid. This warranty does not cover damages caused by misuse,
improper handling, installation, or maintenance provided by someone other than a Bushnell
Authorized Service Department.
Any return made under this warranty must be accompanied by the items listed below:
1) A check/money order in the amount of $10.00 to cover the cost of postage and handling
2) Name and address for product return
3) An explanation of the defect
4) Proof of Date Purchased
5) Product should be well packed in a sturdy outside shipping carton, to prevent damage
in transit, with return postage prepaid to the address listed below:
IN U.S.A. Send To: IN CANADA Send To:
Bushnell Outdoor Products Bushnell Outdoor Products
Attn.: Repairs Attn.: Repairs
9200 Cody 25A East Pearce Street, Unit 1
Overland Park, Kansas 66214 Richmond Hill, Ontario L4B 2M9
For products purchased outside the United States or Canada please contact your local
dealer for applicable warranty information.
In Europe you may also contact
Bushnell at:
Bushnell Germany GmbH
European Service Centre
Mathias-Brüggen-Str. 80
D-50827 Köln
GERMANY
Tel: +49 221 995568-0
Fax: +49 221 995568-20
This warranty gives you specific legal rights.
You may have other rights which vary from country to country.
©2012 Bushnell Outdoor Products

Warnings and Notices
GPS System & Location Accuracy Notice:
The Global Positioning System (GPS) is operated by the government of the United States, which is solely responsible for its accuracy a
maintenance. The system is subject to changes which could affect the accuracy and performance of all GPS equipment. The inherent
nature of the GPS system itself limits the accuracy of the distance indicated on the unit’s display to within about ±3~5 meters (or yards)
of the actual marked location.
Warning:
This device is intended as a supplemental handheld navigation aide only. The user assumes all responsibility associated with the use of
this product. It must not be used for any purpose requiring precise measurement of location, direction, distance, velocity or topography.
This device should not be used for any aircraft navigation applications.
Vehicular Use Notice:
Bushnell is committed to the safe and responsible enjoyment of the outdoors.
Do not use this product while driving. An accident can result in property damage, injury or death if the operator fails to practice pruden
driving practices. It is the sole responsibility of the driver of any vehicle to operate the motor vehicle in a safe manner. Information from
the GPS unit can distract the operator of a motor vehicle. It is unsafe to operate the controls of the GPS unit while operating a motor
vehicle. If used in a motor vehicle, it must not be used by the operator of the motor vehicle. If it is used in a motor vehicle it must be
mounted in a manner such that it does not distract the operator, does not interfere with the operator’s eld of view, and does not block
or interfere with the air bags or other safety mechanisms of the motor vehicle. Windshields and car windows with integrated metallic
materials, such as defrosters, or car window tinting lms, can degrade GPS reception inside a car.
Liability Notice:
In no event shall Bushnell be liable for any incidental, special, indirect or consequential damages, whether resulting from the use, misus
or inability to use this product or from defects in the product.
Some states do not allow the exclusion of incidental or consequential damages, so the above limitations may not apply to you.
FCC Note:
This equipment has been tested and found to comply with the limits for a Class B digital device, pursuant to Part 15 of the
FCC Rules. These limits are designed to provide reasonable protection against harmful interference in a residential installation.
This equipment generates, uses and can radiate radio frequency energy and, if not installed and used in accordance with the
instructions, may cause harmful interference to radio communications. However, there is no guarantee that interference will not
occur in a particular installation. If this equipment does cause harmful interference to radio or television reception, which can be
determined by turning the equipment off and on, the user is encouraged to try to correct the interference by one or more of the
following measures:
· Reorient or relocate the receiving antenna.
· Increase the separation between the equipment and receiver.
· Connect the equipment into an outlet on a circuit different from that to which the receiver is connected.
· Consult the dealer or an experienced radio/TV technician for help.
Shielded interface cable must be used with the equipment in order to comply with the limits for a digital device pursuant to
Subpart B of Part 15 of FCC Rules.
Adobe®,Air®, Copyright © 2011 Adobe Systems Incorporated. All rights reserved.
Windows® Copyright © 2011 Microsoft. Windows® is a registered trademark of Microsoft Corporation in the United States and other
countries. All rights reserved.
Mac®, Copyright © 2011 Apple Inc. Mac® is a registered trademark of Apple Inc. in the United States and other countries. All rights
reserved.
Third-party marks and brands are the property of their respective owners. All products, dates, and gures are preliminary and subject to
change without notice.
Google is the registered trademark of Google, Inc.
Please read the Google® Maps Terms of Service at: http://maps.google.com/intl/en/help/terms_maps.html

16
9
Guide d’achage et de contrôle
1. Touche Marche/Arrêt
2. Touche REPÈRE
3. Bouton ITINÉRAIRE/
DONNÉES
4. Touche RÉGLAGE
5. Port USB
6. Icône d’emplacement
(1 sur 5)
7. Heure locale
8. Direction vers le lieu
9. Distance par rapport
au lieu
10. Indicateur de charge
des piles
11. Icône du verrouillage
sur les satellites
12. Icône Itinéraire
Système de
verrouillage du
couvercle des
piles
Fig. 1
Remarque : N° de
série à l’intérieur
du compartiment
à piles.
Côté droit
2
45
Côté gauche
1 3
VUE DE FACE
VUES DE CÔTÉ ET ARRIÈRE
1 2
3
4
5
6
7
810
11
12
FrANçAIS

17
CONFIGURATION DE BASE
• Ouvrez le cache des piles et insérez 3 piles AAA (Fig. 1,
page 16). Notez le numéro de série situé à l’intérieur
du compartiment, vous en aurez besoin plus tard pour
enregistrervotreHuntTrackenligne.Fermezlecouvercle.
• Sortez. APPUYEZ SUR LA TOUCHE MARCHE/ARRÊT (1)
(maintenez la touche enfoncée) jusqu’à ce que l’écran
s’allume. Attendez le verrouillage du satellite GPS (l’icône
cessedeclignoter) .Celapeutprendrequelquesminutes(11)
aprèslapremièremisesoustensiondansunenouvellezone.
• Appuyez sur . Appuyez sur REPÈRE , puisRÉGLAGE (4) (2)
appuyezsur ousurlatouche pourITINÉRAIRE (3) RÉGLAGE
réglerl’heurelocale(Fig. 2).Appuyezsurlebouton REPÈRE
pourreveniràl’écranConfiguration.
• Pourchangerleformatdel’heureetdelatempérature/des
distances,appuyezsur poursélectionner«12h»RÉGLAGE
ou«0F/yd»,puisappuyezsur pourréglersur«24hREPÈRE
»ou«0C/m». .Lafonctiondesflèchesestexpliquée(Fig. 3)
page 6.Appuyezsurlebouton poursortirMARCHE/ARRÊT
dumenuConfiguration.
REPÉRER/REVENIR VERS un LIEU
• Appuyezsur lebouton poursélectionnerMARCHE/ARRÊT
une des cinq icônes d’emplacement / ou les nombres de
5 à 20 (tente, véhicule, arbre, mirador, cerf, n° 1 à 20).(6)
Envoustenantàl’emplacementquevousvoulezmarquer
d’un repère, MAINTENEZ la touche appuyée pourREPÈRE
enregistrer sa position dans la mémoire du HuntTrack
(l’affichage illustré apparaît) . Vous pouvez mettre(Fig. 4)
l’appareil hors tension (MAINTENEZ la touche MARCHE/
ARRÊTappuyée)etquitterlelieu.
• Pour revenir au lieu que vous avez repéré, mettez le
HuntTrack sous tension. Assurez-vous que l’icône (ou le
numéro) utilisée pour repérer l’emplacement apparaît (si
tel n’est pas le cas, appuyez sur pour laMARCHE/ARRÊT
sélectionner).L’affichageindiqueladirectionetladistanceà
parcouriravantd’atteindrel’emplacement(Fig. 5).Déplacez-
Fig. 2
Fig. 4
Fig. 5
Fig. 3
18
Fig. 6
Fig. 7
8
vousdanslesensdelaflècheetregardezladistancerestante
diminuer.Lorsquevousarrivezàdestination,l’icône«Repère
»clignoteaucentredel’écran.
• Vouspouvezutiliserlescinqicônes(etjusqu’à20nombres)
pour repérer différents emplacements (votre véhicule, un
mirador,uncampement,etc.).Assurez-vousdesélectionner
une icône ou un numéro différent pour sauvegarder
chaque nouveaulieu. Si vous maintenez la touche REPÈRE
appuyée alors qu’une icône de lieu utilisée auparavant
est sélectionnée, cette dernière sera remplacée par votre
positionactuelle.
• Pour augmenter ou limiter le nombre d’emplacements «
supplémentaires»(nombresde1à20)disponibles,appuyez
sur trois fois jusqu’à ce que la flèche deRÉGLAGE (4)
l’emplacementenbasàdroitesoitensurbrillance.Appuyezsur
REPÈRE (2), puis utilisez les boutons ITINÉRAIRE/DONNÉES
ou pour augmenter ou baisser le nombre enRÉGLAGE
dessousdelaflèche .Appuyezsurlebouton (Fig. 6) REPÈRE
pourconfirmeretreveniràl’écranConfiguration.
ARRÊT AUTOMATIQUE / RÉTRO-ÉCLAIRAGE
• L’alimentation est automatiquement coupée après 10
minutes si aucune touche n’a été pressée (sauf en mode
Itinéraire,voir ci-après). MAINTENEZ LATOUCHE MARCHE/
ARRÊTpourmettrel’appareilhorstensionmanuellement.
• AppuyezsurlatoucheREPÈREpouractiverlerétro-éclairage.
Ils’éteintautomatiquementaprès30secondes.
ÉTALONNAGE DE LA BOUSSOLE
• Pourgarantirlaprécisiondirectionnelle,placezleHuntTrack
devantvousetfaites-luidécrireun«huit»plusieursfoispour
étalonner à nouveau la boussole . Une vidéo pour(Fig. 7)
l’étalonnagedelaboussoleestdisponibleàl’adresse:http://
www.bushnell.com/products/gps/instruction-videos/.
• Pourde meilleurs résultats, nous vous conseillons de tenir
le HuntTrack horizontalement (non incliné) lors de son
utilisation(Fig. 8).
Fig. 8

19
ENREGISTREMENT D’UN NOUVEL ITINÉRAIRE (TRAJET)
• Appuyez sur pour passer en modeITINÉRAIRE/DONNÉES (3)
Itinéraire.MAINTENIRlatouche appuyéeITINÉRAIRE/DONNÉES
pour commencer l’enregistrement des données d’un nouvel
itinéraire.L’écranaffiche une icônede «randonneur »animée
avec un affichage en temps réel de la distance parcourue et
la vitesse moyenne au cours de votre itinéraire . Le(Fig. 9)
HuntTrackdoitrestersoustensionpendantvotreitinéraire.
• Pour arrêter l’enregistrement des données de l’itinéraire,
appuyez à nouveau sur la touche deITINÉRAIRE/DONNÉES
façonprolongée.
• LeHuntTrackenregistreautomatiquementlesdonnéesqu’ilrecueilleentrelemoment
oùvouslancezetceluioùvousarrêtezl’enregistrementdevotreitinéraire,ycomprisla
dateetl’heure,ladistancetotaleparcourue,votrevitessemoyenneetleschangements
d’altitudeetdetempérature.
LES ÉCRANS DE DONNÉES
Appuyez brièvement sur pour visualiser et naviguer parmi lesITINÉRAIRE/DONNÉES (3)
écransde données du HuntTrack (en mode Itinéraire, n’appuyez pas sur le bouton de façon
prolongée, sinon vous lancerez un nouvel enregistrement ou arrêterez celui en cours).Appuyez
brièvementsur pourreveniràl’écrandenavigationprincipal.Les6écransMARCHE/ARRÊT
dedonnéesaffichent(dansl’ordre)lesdonnéessuivantesconcernantl’emplacementactuel:
1. Lever/coucherdusoleiletphaselunaire
2. Température,pressionbarométriqueettendancemétéo
3. Activitéanimale(niveauactueletgraphiquesurunepériodede+/-12heures)
4. Distanceetvitessemoyenne(actuellesoududernieritinéraire)ainsiquelamémoire
restante(en%desdonnéesd’itinéraireutilisées).LeHuntTrackpeutstockerjusqu’à
48heuresautotaldedonnéesd’itinéraires(celapeutconcernerplusieursitinéraires
effectuéssurdesjoursdifférents).Voir Fig. 9 ci-dessus.
Fig. 9
1 2 3 5 6
20
5. L’itinéraireparcouru(dupointdedépartaupointd’arrivée,de
l’itinéraireencoursoududernieritinéraire)
6. Boussoleavecaltitude,latitudeetlongitude.
AFFICHAGE DES DONNÉES D’ITINÉRAIRE
Aprèsl’enregistrementd’unvoyageaumoins,connecterleHuntTrack
àvotreordinateurvouspermettradevisualiserletrajetparcourusur
l’undes 4 types decarte, visualiser un graphiquedeces données et
partager votre itinéraire par e-mail ou via les réseaux sociaux. Pour
obtenirlelogiciel:
• Allezsurhttp://www.hunttrackgps.com/etsuivezlesinstructions
pourcréeruncompte(gratuit)et enregistrervotreHuntTrack;
téléchargezensuitel’application(Fig. 11, page suivante).Votrecomptevousoffreune
sauvegardeenlignepourtoutesvosdonnéesd’itinéraire.(Le numéro de série se trouve
à l’intérieur du compartiment des piles(Fig. 10)).Unefoisinscrit,vousserezredirigévers
unécranvouspermettantdetéléchargerl’applicationHuntTrack (Fig. 12) (Adobe Air®
est nécessaire ; ce logiciel sera installé automatiquement si vous ne l’avez pas déjà sur votre
ordinateur).Cliquezsur«Téléchargermaintenant»puissélectionnez«Ouvrir».Unlien
vous permettant de télécharger le logicielvous sera égalementproposé dansvotre
e-maildeconfirmation.MettezsoustensionleHuntTracketconnectezsonportUSBà
votreordinateuraveclecâbleUSBfourni.SurlesPCavecWindows®,l’applicationdoit
s’ouvrirautomatiquement(sicen’estpaslecas,cliquezsurl’icônedubureau ).(Fig. 13)
Remarque : si une fenêtre « Exécution automatique » apparaît lorsque vous connectez votre
HuntTrack, cliquez sur « Ouvrir le dossier pour afficher les fichiers », puis double-cliquez sur
un fichier .btk. (données d’itinéraire).SurMac®,double-cliquezsurl’icône«HuntTrack»
dansvotredossierApplicationspourlancerl’application.
• Entrezlenomd’utilisateur(adressee-mail)etlemotdepasseutilisélorsdelacréation
de votre compte, puis sélectionnez « CONNEXION » . Cela vous permettra(Fig. 14)
d’enregistrertoutes vosdonnées d’itinéraire sur votrecompte en ligne ; elles seront
automatiquementsauvegardéesetaccessiblesàpartird’unordinateur.
UTILISATION DE L’APPLICATION HUNTTRACK (Fig. 15)
• Aprèsl’ouverturedel’applicationHuntTrack,vousverrezunouplusieursdossiersgris
surlagauche sous « Mesitinéraires téléchargés »,chacun avec unedate.Chaque(a)
dossiercontientdesinformationsconcernantlesitinéraireseffectuésdansunepériode
de24heures.
• Cliquezsurledossierpourl’ouvriretafficherchaqueitinéraire effectuéàcettedate(b)
(laduréedechaqueitinéraireestbaséesurletempsécouléentreledébutetlafinde
Fig. 10

21
a
b
c
d
f
e
Fig. 11
Fig. 15 Fig. 14
Fig. 13
Fig. 12
Produkt Specifikationer
| Mærke: | Bushnell |
| Kategori: | Smartwatch |
| Model: | BackTrack HuntTrack |
Har du brug for hjælp?
Hvis du har brug for hjælp til Bushnell BackTrack HuntTrack stil et spørgsmål nedenfor, og andre brugere vil svare dig
Smartwatch Bushnell Manualer

23 Juli 2024
22 Juli 2024
28 Maj 2024
18 Oktober 2023
19 September 2023
7 Maj 2023
19 December 2022
9 December 2022
1 November 2022
Smartwatch Manualer
- Smartwatch Nilox
- Smartwatch SilverCrest
- Smartwatch Acer
- Smartwatch Denver
- Smartwatch TCL
- Smartwatch Sony
- Smartwatch Suunto
- Smartwatch Samsung
- Smartwatch Beurer
- Smartwatch Medisana
- Smartwatch LG
- Smartwatch Doro
- Smartwatch VitalMaxx
- Smartwatch Apple
- Smartwatch Michael Kors
- Smartwatch Epson
- Smartwatch Amazfit
- Smartwatch Technaxx
- Smartwatch Emporia
- Smartwatch Garmin
- Smartwatch Motorola
- Smartwatch Asus
- Smartwatch Livoo
- Smartwatch Pyle
- Smartwatch Tracer
- Smartwatch Lenovo
- Smartwatch OnePlus
- Smartwatch Nedis
- Smartwatch Polar
- Smartwatch Hama
- Smartwatch Thomson
- Smartwatch Aiwa
- Smartwatch Nokia
- Smartwatch Casio
- Smartwatch Hannspree
- Smartwatch Trevi
- Smartwatch Omron
- Smartwatch Mio
- Smartwatch Blaupunkt
- Smartwatch Geonaute
- Smartwatch Alpina
- Smartwatch Razer
- Smartwatch Medion
- Smartwatch Soehnle
- Smartwatch Huawei
- Smartwatch König
- Smartwatch Echo
- Smartwatch Vivax
- Smartwatch TAG Heuer
- Smartwatch Withings
- Smartwatch Vtech
- Smartwatch Microsoft
- Smartwatch Alcatel
- Smartwatch Sigma
- Smartwatch Bryton
- Smartwatch Xiaomi
- Smartwatch Niceboy
- Smartwatch Krüger&Matz
- Smartwatch Skagen
- Smartwatch Oppo
- Smartwatch Ice Watch
- Smartwatch Mondaine
- Smartwatch Timex
- Smartwatch Fossil
- Smartwatch MyKronoz
- Smartwatch TomTom
- Smartwatch Cobra
- Smartwatch Xblitz
- Smartwatch Calypso
- Smartwatch Honor
- Smartwatch Fitbit
- Smartwatch GlobalSat
- Smartwatch Lamax
- Smartwatch Overmax
- Smartwatch SBS
- Smartwatch Archos
- Smartwatch ADE
- Smartwatch Prixton
- Smartwatch Renkforce
- Smartwatch SPC
- Smartwatch MOTA
- Smartwatch Otium
- Smartwatch HTC
- Smartwatch GoClever
- Smartwatch Immax
- Smartwatch Misfit
- Smartwatch Quadro
- Smartwatch Bauhn
- Smartwatch Garett
- Smartwatch Runtastic
- Smartwatch Wiko
- Smartwatch MiTone
- Smartwatch Umidigi
- Smartwatch IGPSport
- Smartwatch Nordväl
- Smartwatch Xplora
- Smartwatch Oregon Scientific
- Smartwatch MyPhone
- Smartwatch Realme
- Smartwatch Kogan
- Smartwatch Manta
- Smartwatch Media-Tech
- Smartwatch Oromed
- Smartwatch Bea-fon
- Smartwatch Aligator
- Smartwatch Allview
- Smartwatch ACME
- Smartwatch Diesel
- Smartwatch Emporio Armani
- Smartwatch Brigmton
- Smartwatch Sunstech
- Smartwatch Belesy
- Smartwatch Qilive
- Smartwatch Hammer
- Smartwatch Naxa
- Smartwatch Mpman
- Smartwatch IHealth
- Smartwatch Valante
- Smartwatch Ematic
- Smartwatch Tikkers
- Smartwatch Iget
- Smartwatch COGITO
- Smartwatch Ticwatch
- Smartwatch Pebble
- Smartwatch Jawbone
- Smartwatch Martian
- Smartwatch Beafon
- Smartwatch Guardo
- Smartwatch Fen (Fit Electronics Nutrition)
- Smartwatch Ninetec
- Smartwatch Swisstone
- Smartwatch Crane
- Smartwatch Spotter
- Smartwatch One2track
- Smartwatch Sempre
- Smartwatch Sinji
- Smartwatch Kidswatch
- Smartwatch OOQE
- Smartwatch VEA
- Smartwatch Xlyne
- Smartwatch Growing
- Smartwatch Uwatch
- Smartwatch Setracker
- Smartwatch IOPLEE
- Smartwatch SimWatch
- Smartwatch U8
- Smartwatch Forever
- Smartwatch Guess
- Smartwatch Jay-tech
- Smartwatch Lookit
- Smartwatch Veadigital
- Smartwatch Scinex
- Smartwatch Merlin
- Smartwatch Armodd
- Smartwatch Stenlille
- Smartwatch Fibian
- Smartwatch Lintelek
- Smartwatch Qlokkie
- Smartwatch Perfect Choice
- Smartwatch Smartbook
- Smartwatch Galesto
- Smartwatch Canyon
- Smartwatch KoreHealth
- Smartwatch METAWATCH
- Smartwatch X-unknown
- Smartwatch Kronoz
- Smartwatch FlinQ
- Smartwatch X-WATCH
- Smartwatch BEMI
- Smartwatch Mega P
- Smartwatch Motus
- Smartwatch Lifetrak
- Smartwatch JTC Jay-Tech
- Smartwatch Oura
- Smartwatch Cubot
- Smartwatch Leotec
- Smartwatch Papago
- Smartwatch Kiprun
- Smartwatch Time 2
- Smartwatch INOC
- Smartwatch Dfit
- Smartwatch IZZO Golf
- Smartwatch Quazar
- Smartwatch DCU
- Smartwatch Mibro
- Smartwatch Spacetalk
- Smartwatch XCOAST
- Smartwatch Newgen Medicals
Nyeste Smartwatch Manualer

8 April 2025
27 Februar 2025
27 Februar 2025
26 Februar 2025
21 Februar 2025

19 Februar 2025
3 Februar 2025
13 Januar 2025
10 Januar 2025
8 Januar 2025