Casio FX-115ES Manual
Casio
Regnemaskine
FX-115ES
Læs nedenfor 📖 manual på dansk for Casio FX-115ES (75 sider) i kategorien Regnemaskine. Denne guide var nyttig for 40 personer og blev bedømt med 4.5 stjerner i gennemsnit af 2 brugere
Side 1/75

http://world.casio.com/edu/
RCA502160-001V01
E
fx-115ES
fx-991ES
User's Guide

CASIO Europe GmbH
Bornbarch 10, 22848 Norderstedt, Germany

E-1
About this Manual
• The MATH mark indicates an example that uses Math format,
while the mark indicates Linear format. For details aboutLINE
input/output formats, see “Specifying the Input/Output Format”.
• Keycap markings indicate what a key inputs or what function it
performs.
Example: , , 1 2 + -, , !, A, etc.
• Pressing the 1 S or key followed by a second key performs
the alternate function of the second key. The alternate function is
indicated by the text printed above the key.
• The following shows what the different colors of the alternate
function key text mean.
If key marking It means this:
text is this color:
Ye llow Press 1 and then the key to access
the applicable function.
Red Press S and then the key to input the
applicable variable, constant, or symbol.
Purple (or enclosed Enter the CMPLX Mode to access the
in purple brackets) function.
Green (or enclosed Enter the BASE-N Mode to access the
in green brackets) function.
• The following shows an example of how an alternate function
operation is represented in this User’s Guide.
Example: 1s(sin–1)1=
Indicates the function that is accessed by the key
operation ( ) before it. Note that this is not part1s
of the actual key operation you perform.
sin
–1
{ }D
s
Keycap function
Alternate function

E-3
Safety Precautions
Be sure to read the following safety precautions before using this
calculator. Keep this manual handy for later reference.
Caution
This symbol is used to indicate information that can result in
personal injury or material damage if ignored.
Battery
• After removing the battery from the calculator, put it in a safe
place where it will not get into the hands of small children and
accidentally swallowed.
• Keep batteries out of the reach of small children. If accidentally
swallowed, consult with a physician immediately.
• Never charge the battery, try to take the battery apart, or allow
the battery to become shorted. Never expose the battery to
direct heat or dispose of it by incineration.
• Improperly using a battery can cause it to leak and damage
nearby items, and can create the risk of fire and personal injury.
• Always make sure that the battery’s positive
k and negative
l ends are facing correctly when you load it into the
calculator.
• Use only the type of battery specified for this calculator in
this manual.
Disposing of the Calculator
• Never dispose of the calculator by burning it. Doing so can
cause certain components to suddenly burst, creating the risk
of fire and personal injury.

E-4
Handling Precautions
• Be sure to press the key before using the calculator forO
the first time.
• Even if the calculator is operating normally, replace the battery
at least once every three years.
A dead battery can leak, causing damage to and malfunction of
the calculator. Never leave a dead battery in the calculator.
• The battery that comes with this unit discharges slightly during
shipment and storage. Because of this, it may require
replacement sooner than the normal expected battery life.
• Low battery power can cause memory contents to become
corrupted or lost completely. Always keep written records of
all important data.
• Avoid use and storage of the calculator in areas subjected to
temperature extremes.
Very low temperatures can cause slow display response, total
failure of the display, and shortening of battery life. Also avoid
leaving the calculator in direct sunlight, near a window, near a heater
or anywhere else it might be exposed to very high temperatures.
Heat can cause discoloration or deformation of the calculator’s
case, and damage to internal circuitry.
• Avoid use and storage of the calculator in areas subjected to
large amounts of humidity and dust.
Take care never to leave the calculator where it might be splashed
by water or exposed to large amounts of humidity or dust. Such
conditions can damage internal circuitry.
• Never drop the calculator or otherwise subject it to strong
impact.
• Never twist or bend the calculator.
Avoid carrying the calculator in the pocket of your trousers or other
tight-fitting clothing where it might be subjected to twisting or
bending.
• Never try to take the calculator apart.
• Never press the keys of the calculator with a ballpoint pen or
other pointed object.
• Use a soft, dry cloth to clean the exterior of the calculator.
If the calculator becomes very dirty, wipe it off with a cloth moistened
in a weak solution of water and a mild neutral household detergent.
Wring out all excess liquid before wiping the calculator. Never use
thinner, benzene or other volatile agents to clean the calculator.
Doing so can remove printed markings and can damage the case.

E-5
Before Using the Calculator
k Removing the Hard Case
Before using the calculator, slide its hard case downwards to remove
it, and then affix the hard case to the back of the calculator as shown
in the illustration below.
k Turning Power On and Off
• Press O to turn on the calculator.
• Press 1A(OFF) to turn off the calculator.
k Adjusting Display Contrast
1N(SETUP) CONTc ]6(')
This displays the contrast adjustment screen. Use d e and to
adjust display contrast. After the setting is the way you want, press
A.
• You can also adjust contrast using while the moded e and
menu (which appears when you press N) is on the display.
Important!
• If adjusting display contrast does not improve display readability, it
probably means that battery power is low. Replace the battery.

E-6
k About the Display
Your calculator has a 31-dot 96-dot LCD screen.×
Example:
k Display Indicators
Sample Display:
This Means this:
indicator:
The keypad has been shifted by pressing the 1
key. The keypad will unshift and this indicator will
disappear when you press a key.
The alpha input mode has been entered by pressing
the S key. The alpha input mode will be exited
and this indicator will disappear when you press a
key.
M There is a value stored in independent memory.
STO
The calculator is standing by for input of a variable
name to assign a value to the variable. This indicator
appears after you press 1t(STO).
RCL
The calculator is standing by for input of a variable
name to recall the variable’s value. This indicator
appears after you press t.
STAT The calculator is in the STAT Mode.
CMPLX The calculator is in the CMPLX Mode.
MAT The calculator is in the MATRIX Mode.
VCT The calculator is in the VECTOR Mode.
7 The default angle unit is degrees.
8 The default angle unit is radians.
9 The default angle unit is grads.
FIX A fixed number of decimal places is in effect.
SCI A fixed number of significant digits is in effect.
Math Math style is selected as the input/output format.
$`
Calculation history memory data is available and can
be replayed, or there is more data above/below the
current screen.
Disp The display currently shows an intermediate result
of a multi-statement calculation.
{
Input expression
Calculation result
CMPLX
A
S
E-7
Important!
• For a very complex calculation or some other type of calculation
that takes a long time to execute, the display may show only the
above indicators (without any value) while it performs the calculation
internally.
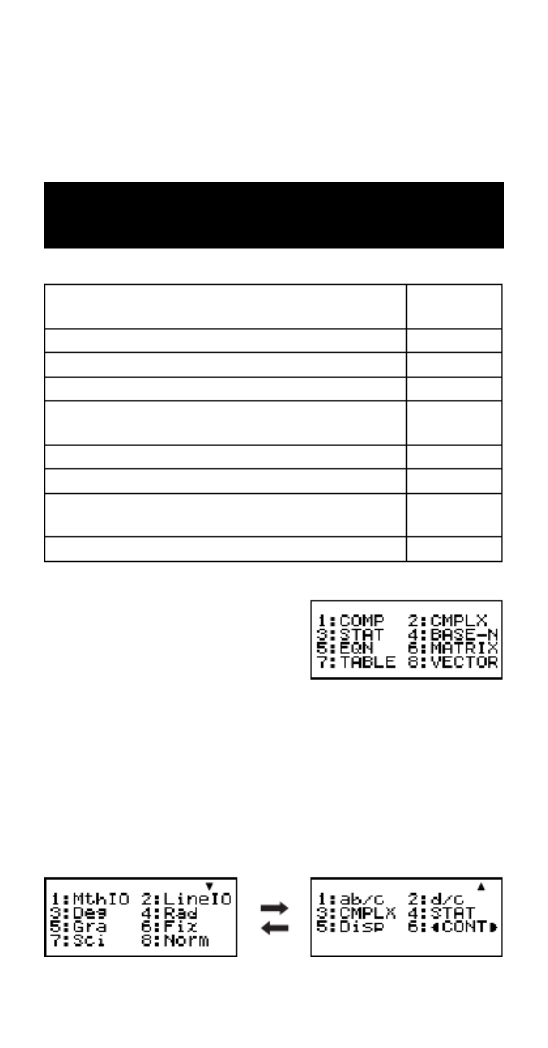
Calculation Modes and
Calculator Setup
k Calculation Modes
When you want to perform this type of Select this
operation: mode:
General calculations COMP
Complex number calculations CMPLX
Statistical and regression calculations STAT
Calculations involving specific number systems
BASE-N
(binary, octal, decimal, hexadecimal)
Equation solution EQN
Matrix calculations MATRIX
Generation of a number table based on an TABLE
expression
Vector calculations VECTOR
Specifying the Calculation Mode
(1) Press N to display the mode
menu.
(2) Press the number key that corresponds to the mode you want to
select.
• To select the CMPLX Mode, for example, press 2.
k Configuring the Calculator Setup
Pressing 1N(SETUP) displays the setup menu, which you can
use to control how the calculations are executed and displayed. The
setup menu has two screens, which you can jump between using
c and f.
c
f

E-8
• See “Adjusting Display Contrast” for information about how to use
“]CONT'”.
Specifying the Input/Output Format
For this input/output format: Perform this key operation:
Math 1N1(MthIO)
Linear 1N2(LineIO)
• Math format causes fractions, irrational numbers, and other
expressions to be displayed as they are written on paper.
• Linear format causes fractions and other expressions to be
displayed in a single line.
Specifying the Default Angle Unit
To specify this as the default Perform this key operation:
angle unit:
Degrees 1N3(Deg)
Radians 1N4(Rad)
Grads 1N5(Gra)
90° = radians = 100 grads
Specifying the Number of Display Digits
To specify this: Perform this key operation:
Number of Decimal Places 1N6(Fix)0 9–
Number of Significant Digits 1N7 0 9(Sci) –
Exponential Display Range 1N8 1(Norm) (Norm1)
or (Norm2)2
Calculation Result Display Examples
• Fix: The value you specify (from 0 to 9) controls the number of
decimal places for displayed calculation results. Calculation results
are rounded off to the specified digit before being displayed.
Example: 100 ÷ 7 = 14.286 (Fix3)
14.29 (Fix2)
• Sci: The value you specify (from 1 to 10) controls the number of
significant digits for displayed calculation results. Calculation results
are rounded off to the specified digit before being displayed.
Example: 1 ÷ 7 = 1.4286 × 10
–1 (Sci5)
1.429 × 10⁻¹ (Sci4)
Linear FormatMath Format
Math
π
2

E-9
• Norm: Selecting one of the two available settings (Norm1, Norm2)
determines the range in which results will be displayed in non-
exponential format. Outside the specified range, results are
displayed using exponential format.
Norm1: 10–2 > 10 x, x >10
Norm2: 10–9 > 10 x, x >10
Example: 1 ÷ 200 = 5 × 10
–3 (Norm1)
0.005 (Norm2)
Specifying the Fraction Display Format
To specify this fraction Perform this key operation:
display format:
Mixed 1Nc1(ab/c)
Improper 1Nc2(d/c)
Specifying the Complex Number Display Format
To specify this complex
number format: Perform this key operation:
Rectangular Coordinates 1Nc3 1(CMPLX) ( + )a bi
Polar Coordinates 1Nc3 2(CMPLX) (r∠
θ
)
Specifying the Statistical Display Format
Use the following procedure to turn display of the frequency (FREQ)
column of the STAT Mode STAT editor screen on or off.
To specify this: Perform this key operation:
Show FREQ Column 1Nc4(STAT)1(ON)
Hide FREQ Column 1Nc4(STAT) (OFF)2
Specifying the Decimal Point Display Format
To specify this decimal Perform this key operation:
point display format:
Dot (.)1Nc5(Disp)1(Dot)
Comma (,)1Nc5(Disp)2(Comma)
• The setting you configure here is applied for calculation results
only. The decimal point for input values is always a dot (.).

E-10
k Initializing the Calculation Mode and Other
Settings
Performing the following procedure initializes the calculation mode
and other setup settings as shown below.
19 1 =(CLR) (Setup) (Yes)
This setting: Is initialized to this:
Calculation Mode COMP
Input/Output Format MthIO
Angle Unit Deg
Display Digits Norm1
Fraction Display Format d/c
Complex Number Format a b+i
Statistical Display OFF
Decimal Point Dot
• To cancel initialization without doing anything, press A(Cancel)
instead of =.
Inputting Expressions and
Values
k Inputting a Calculation Expression Using
Standard Format
Your calculator lets you input calculation expressions just as they
are written. Then simply press the = key to execute it. The calculator
automatically judges the calculation priority sequence for addition,
subtraction, multiplication, and division, functions, and parentheses.
Example: 2 (5 + 4) – 2 × (–3) =
LINE
2(5+4)-
2* 3=y
Inputting a Function with Parenthesis
When you input any of the functions shown below, it is automatically
input with the open parenthesis (
(
) character. Next, you need to
input the argument and the closing parenthesis (
)
).
sin(, cos(, tan(, sin–1(, cos–1(, tan–1(, sinh(, cosh(, tanh(, sinh–1(,
cosh–1(, tanh–1(, log(, ln(, ^(, 10^(, e'(, 3
'(, Abs(, Pol(, Rec(,
∫(, d/dx(, Σ(, P(, Q(, R(, arg(, Conjg(, Not(, Neg(, det(, Trn(, Rnd(
E-11
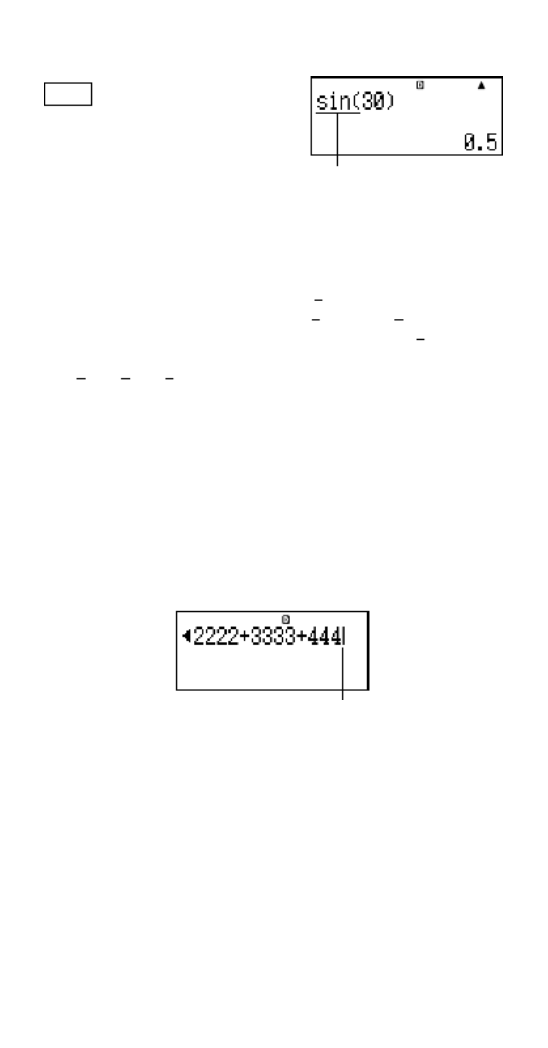
Example: sin 30 =
LINE
s30)=
Pressing sinputs “sin(”.
• Note that the input procedure is different if you want to use Math
format. For more information, see “Inputting with Math Format”.
Omitting the Multiplication Sign
You can omit the multiplication sign (×) in any of the following cases.
• Before an open parentheses (
(
): 2 (5 + 4), etc.×
• Before a function with parenthesis: 2 × × sin(30), 2 '(3), etc.
• Before a prefix symbol (excluding the minus sign): 2 h123, etc.×
• Before a variable name, constant, or random number:
20 × A, 2 × π, 2 × i, etc.
Final Closed Parenthesis
You can omit one or more closed parentheses that come at the end
of a calculation, immediately before the y is pressed. For= ke
details, see “Omitting a Final Closed Parenthesis”.
Displaying a Long Expression
The display can show up to 14 characters at a time. Inputting the
15th character causes the expression to shift to the left. At this time,
the ] indicator appears to the left of the expression, indicating that
it runs off the left side of the screen.
Input expression: 1111 + 2222 + 3333 + 444
Displayed portion:
• When the ] indicator is displayed, you can scroll left and view the
hidden part by pressing the d key. This will cause the ' indicator
to appear to the right of the expression. At this time, you can use
the e key to scroll back.
Number of Input Characters (Bytes)
• You can input up to 99 bytes of data for a single expression.
Basically, each key operation uses up one byte. A function that
requires two key operations to input (like 1s(sin
–1)) also uses
only one byte. Note, however, that when you are inputting functions
with Math format, each item you input uses up more than one
byte. For more information, see “Inputting with Math Format”.
Cursor
Math

E-12
• Normally the input cursor appears as a straight vertical (
I) or
horizontal ( ) flashing line on the display screen. When there are
10 or fewer bytes of input remaining in the current expression, the
cursor changes shape to
I
to let you know. If the
I
cursor
appears, terminate the expression at a convenient point and
calculate the result.
k Correcting an Expression
This section explains how to correct an expression as you are
inputting it. The procedure you should use depends on whether you
have insert or overwrite selected as the input mode.
About the Insert and Overwrite Input Modes
With the insert mode, the displayed characters shift to the left to
make room when you input a new character. With the overwrite mode,
any new character you input replaces the character at the current
cursor position. The initial default input mode is insert. You can change
to the overwrite mode when you need it.
• The cursor is a vertical flashing line (
I) when the insert mode is
selected. The cursor is a horizontal flashing line ( ) when the
overwrite mode is selected.
• The initial default for Linear format input is the insert mode. You
can switch to the overwrite mode by pressing 1Y(INS).
• With Math format, you can only use the insert mode. Pressing
1Y(INS) when the Math format is selected does not switch to
the overwrite mode. See “Incorporating a Value into a Function” for
more information.
• The calculator automatically changes to the insert mode whenever
you change the input/output format from Linear to Math.
Changing the Character or Function You Just Input
Example: To correct the expression 369 × 13 so it becomes
369 × 12
LINE 369*13
Y
2

E-13
Deleting a Character or Function
Example: To correct the expression 369 × × 12 so it becomes
369 × 12
LINE Insert Mode:
369**12
dd
Y
Overwrite Mode:
369**12
ddd
Y
Correcting a Calculation
Example: To correct cos(60) so it becomes sin(60)
LINE Inser t Mode:
c60)
dddY
s
Overwrite Mode:
c60)
dddd
s
Inserting Input into a Calculation
Always use the insert mode for this operation. Use d e or to
move the cursor to the location where you want to insert new input,
and then input what you want.

E-14
k Displaying the Location of an Error
If an error message (like “Math ERROR” or “Syntax ERROR”)
appears when you press , press =d or e. This will display the
part of the calculation where the error occurred, with the cursor
positioned at the error location. You can then make necessary
corrections.
Example: When you input 14 ÷ × ÷ 0 2 = by mistake instead of 14
10 × 2 =
Use the insert mode for the following operation.
LINE
14/0*2=
Press e or d.
This is causing the error.
d1
=
You can also exit the error screen by pressing , which clears theA
calculation.
k Inputting with Math Format
When inputting with Math format, you can input and display fractions
and some functions using the same format as they appear in your
textbook.
Important!
• Certain types of expressions can cause the height of a calculation
formula to be greater than one display line. The maximum allowable
height of a calculation formula is two display screens (31 dots × 2).
Further input will become impossible if the height of the calculation
you are inputting exceeds the allowable limit.
• Nesting of functions and parentheses is allowed. Further input will
become impossible if you nest too many functions and/or
parentheses. If this happens, divide the calculation into multiple
parts and calculate each part separately.
Produkt Specifikationer
| Mærke: | Casio |
| Kategori: | Regnemaskine |
| Model: | FX-115ES |
| Type: | Videnskabelig |
| Produktfarve: | Sølv |
| Kontroltype: | Knapper |
| Formfaktor: | Lomme |
| Automatisk slukning: | Ja |
| Husmateriale: | Plast |
| Strømkilde: | Batteri/Solar |
| Anden skærm: | Ingen |
| Baggrundsbelysning: | Ingen |
| Tekstlinjer: | 2 Linier |
| Hukommelsesregistre: | 7 |
| Overdækning: | Ja |
| Cifre: | 12 cifre |
Har du brug for hjælp?
Hvis du har brug for hjælp til Casio FX-115ES stil et spørgsmål nedenfor, og andre brugere vil svare dig
Regnemaskine Casio Manualer

7 April 2025
7 April 2025
22 Marts 2025
26 Maj 2024
22 April 2024
20 April 2024
16 April 2024
12 April 2024
5 April 2024
24 Marts 2024
Regnemaskine Manualer
- Regnemaskine Sencor
- Regnemaskine Canon
- Regnemaskine Sharp
- Regnemaskine HP
- Regnemaskine Trevi
- Regnemaskine Quigg
- Regnemaskine United Office
- Regnemaskine Citizen
- Regnemaskine Olivetti
- Regnemaskine Texas Instruments
- Regnemaskine Genie
- Regnemaskine Olympia
- Regnemaskine GlobalTronics
- Regnemaskine XD Enjoy
- Regnemaskine Milan
- Regnemaskine Aurora
Nyeste Regnemaskine Manualer

16 November 2024

10 Juni 2024
10 Juni 2024
10 Juni 2024
10 Juni 2024
10 Juni 2024
10 Juni 2024
29 Maj 2024
25 Maj 2024

24 Maj 2024