Casio XJ-H2650 Manual
Casio
videoprojektorer
XJ-H2650
Læs nedenfor 📖 manual på dansk for Casio XJ-H2650 (74 sider) i kategorien videoprojektorer. Denne guide var nyttig for 38 personer og blev bedømt med 4.5 stjerner i gennemsnit af 2 brugere
Side 1/74

DATA PROJECTOR
User’s Guide
zBe sure to read the precautions in the Quick Start Guide that
comes with the Data Projector.
zBe sure to keep all user documentation handy for future
reference.
zTo obtain the latest version of this manual visit the website at the
URL below.
http://world.casio.com/manual/projector/
XJ-H2600/XJ-H2650*
* USB Port Models
E

2
zDLP is a registered trademark of Texas Instruments of the United States.
zMicrosoft, Windows, and Windows Vista are registered trademarks or trademarks of Microsoft
Corporation in the United States and other countries.
zHDMI, the HDMI Logo and High-Definition Multimedia Interface are trademarks or registered
trademarks of HDMI Licensing, LLC.
zXGA is a registered trademark of IBM Corporation of the United States.
zPJLink is a trademark applied for registration or is already registered in Japan, the United States
of America and other countries and areas.
zCrestron is a registered trademark of Crestron Electronics, Inc. of the United States.
zAMX is a registered trademark of AMX LLC of the United States.
zOther company and product names may be registered product names or trademarks of their
respective owners.
zPortions of this product are based in part on the work of the Independent JPEG Group.
zThe contents of this User’s Guide are subject to change without notice.
zCopying of this manual, either in part or its entirety is forbidden. You are allowed to use this
manual for your own person is forbidden without thal use. Any other use e permission of CASIO
COMPUTER CO., LTD.
zCASIO COMPUTER CO., LTD. shall not be held liable for any lost profits or claims from third
parties arising out of the use of this product or this manual.
zCASIO COMPUTER CO., LTD. shall not be held liable for any loss or lost profits due to loss of
data due to malfunction or maintenance of this product, or any other reason.
zThe sample screens shown in this manual are for illustrative purposes only, and may not be
exactly the same as the screens actually produced by the product.
zUnless specifically stated otherwise, all illustrations in this manual show the XJ-H2650.
B

3
Contents
About this manual... ...............................................................................5
Projector Overview ......................................................... 6
Projector Features and Main Functions .................................................6
Remote Controller and Projector Keys...................................................8
Back Terminals.......................................................................................9
Loading Remote Controller Batteries...................................................10
Setting Up the Projector.......................................................................10
Setup Precautions................................................................................11
Connecting to an Image Output Device...................... 12
Connecting the Analog RGB Output of a
Computer to the Projector....................................................................12
Connecting the HDMI Output of a Video Device or
Computer to the Projector....................................................................13
Connecting to a Video Device..............................................................14
Connection to a composite video output or S-video output .....................................14
Connection to a component video output.................................................................15
Operation During Projection ........................................ 16
Selecting the Input Source ...................................................................16
To select a different input source ..............................................................................16
Resolution .................................................................................................................. 16
3D Input Mode ...........................................................................................................17
Horizontal Flipping in the 3D Input Mode ..................................................................18
Image Operations During Projection ....................................................19
Adjusting Image Brightness....................................................................................... 19
To use manual keystone correction...........................................................................19
Selecting the Color Mode .......................................................................................... 20
Zooming an Image..................................................................................................... 20
Momentarily Blanking the Image and Muting the Audio............................................21
Freezing an Image......................................................................................................21
Displaying a Pointer in the Projected Image..............................................................22
Changing the Aspect Ratio of the Projected Image .................................................. 23

4
Adjusting the Volume Level..................................................................24
To adjust the volume level .........................................................................................24
To mute the audio...................................................................................................... 24
Eco Mode (Power Saving, Low Noise) .................................................25
To select the Eco Mode............................................................................................. 25
Using the [FUNC] Key ..........................................................................26
Configuring Advanced Projector Settings.................. 27
Basic Setup Menu Operations .............................................................27
Displaying the Setup Menu........................................................................................ 27
Configuring Setup Menu Settings.............................................................................. 27
Basic Setup Menu Example....................................................................................... 28
Direct Power On......................................................................................................... 29
Custom Logo Capture..........................................................................30
Password Protection ............................................................................32
Inputting a Password ................................................................................................. 32
Using the Password Feature...................................................................................... 32
Control Panel Lock...............................................................................35
Restoring Projector Settings to Their Initial Factory Defaults ..............36
Setup Menu Contents ..........................................................................38
Image Adjustment 1 Main Menu ................................................................................38
Image Adjustment 2 Main Menu ................................................................................40
Volume Adjustment Main Menu.................................................................................40
Screen Settings Main Menu.......................................................................................41
Input Settings Main Menu..........................................................................................43
Option Settings 1 Main Menu ....................................................................................44
Option Settings 2 Main Menu ....................................................................................46
Wired LAN Settings Main Menu (USB Port Models Only) ......................................... 48
USB Settings Main Menu (USB Port Models Only) ................................................... 48
Operational Info Main Menu ......................................................................................49
Restore All Defaults Main Menu................................................................................. 49
Cleaning the Projector.................................................. 50
Cleaning the Projector Exterior ............................................................50
Cleaning the Lens.................................................................................50
Cleaning the Vents ...............................................................................50

5
Troubleshooting ........ ...................... 51..............................
Indicators..............................................................................................51
Error Indicators and Warning Messages ..............................................51
Projector Troubleshooting....................................................................54
Appendix ........................................................................ 56
Remote Controller Signal Range..........................................................56
Using the MONITOR OUT Terminal .....................................................57
Hanging the Projector from a Ceiling ...................................................58
Projection Distance and Screen Size ...................................................59
Aspect Ratio Setting and Projection Image .........................................60
Supported Signals................................................................................62
Using Wired LAN to Control the Projector
(XJ-H1650, XJ-H1750, XJ-H2650, XJ-ST145, XJ-ST155)....................65
Supported External Devices ......................................................................................65
Controlling the Projector from a Computer ............................................................... 65
Projector RS-232C Control ..................................................................70
Connecting the Projector to a Computer................................................................... 70
Specifications .......................................................................................73
All of the operations in this manual are explained using the remote controller that comes with the
projector.
About this manual...

6
Projector Overview
This section describes the features of the projector, and explains the functions of the projector and
remote controller keys.
XJ-H1600/XJ-H1650/XJ-H1700/XJ-H1750/XJ-H2600/XJ-H2650/XJ-ST145/
XJ-ST155
zMercury-free Hybrid Light Source:
A CASIO-original laser and LED hybrid light source delivers high luminance from 2,500 to 4,000
lumens. This projector does not use a mercury lamp, making it environmentally friendly.
zA wide selection of input sources:
Analog RGB, composite video, S-video, component video (Y·Cb·Cr, Y·Pb·Pr), and HDMI input
sources are supported.
zIntelligent Brightness Control function (Eco Mode):
The projector senses surrounding light levels and adjusts projection brightness automatically as
required for efficient low-power operation. (Requires “Eco Mode” setting to be set to “On (Auto)”.)
z3D image projection support:
Projection of a 3D image signal (60Hz/120Hz field sequential protocol) via one of three input
sources (analog RGB, composite video, S-video) is supported.
zPointer:
The remote controller can be used to select one of a variety of different pointers for use during
projection.
zDirect Power On:
The projector can be configured to turn on automatically and start projecting as soon as it is
plugged into a power outlet.
XJ-H2600/XJ-H2650
zWXGA Resolution:
The XJ-H2600/XJ-H2650 models support WXGA (1280 × 800) resolution for optimal viewing of
content formatted for today’s widescreen displays. This makes it perfect for projecting images from
widescreen notebook PCs and HD video input sources.
Projector Features and Main Functions
*Separately available 3D glasses (YA-G30) are required in order to view a projected 3D image in
3D. Also, separately available special software (CASIO 3D Converter) is required to project a 3D
image with the projector when a computer (analog RGB) is the input source.
*3D image projection is not supported via an HDMI connection or component video connection.

7
XJ-H1650/XJ-H1750/XJ-H2650/XJ-ST145/XJ-ST155
zProjection of Data from USB Memory or a Memory Card without a Computer*1:
USB memory or a memory card (using a commercially available USB card reader) can be connected
directly to the projector’s USB-A port. Special EZ-Converter FA software, which is available by
download from the CASIO website, nt data to a format that is can be used to convert PowerPoi
compatible with the projector. The projector-compatible data can be saved to USB memory or a
memory card and used as presentation data without a computer. Images and movies also can be
projected directly from USB memory or a memory card.
zInteractive Pointing Function:
You can use a separately available interactive pointer (YA-P10) to draw lines and figures directly on
an image being projected by the projector from a connected computer. You can also use the
pointer to perform mouse operations.
zMulti Projection Camera (YC-400, YC-430) Connection*1:
A CASIO Multi Projection Camera can be connected directly to the projector’s USB-A port for fine
resolution projection of documents and other images. Document camera capabilities allow
projection of data without going through a computer.
zGraphic Scientific Function Calculator Connection*1:
Certain CASIO graphic scientific calculator models can be connected directly to the projector’s
USB-A port for projection of the calculator screen contents.
zProjection of Computer Screen Contents via Wireless LAN*2:
The projector comes with a wireless LAN adapter. After a wireless LAN connection is established,
the contents of the computer screen can be sent to the projector for projection.
zSupport for Wireless projection from MobiShow*2:
You can install AWIND’s MobiShow (client software for wireless connection to a projector) on a
smartphone or mobile terminal, and then use the projector to project photographs and presentation
files stored in the smartphone or terminal memory.
zProjector operation via wired or wireless LAN:
Remote control of the projector is supported via a wired connection to the LAN port on the back or
the projector or via wireless LAN. For details, see “Using Wired LAN to Control the Projector” (page
65).
*Note that the type of terminal and the MobiShow version can limit certain functions or can even
make projection impossible.
*1 For details, see the “USB Function Guide”.
*2 For details, see the “Wireless Function Guide”.

8
Operations in this manual are presented based on the remote controller that comes with the projector.
Major operation keys are also provided on the projector unit, so the most of the same procedures can
also be performed directly on the projector.
Remote Controller Keys
The remote controller does not come with batteries loaded. You need to load the two supplied
batteries before use.
Important!
To avoid running down the batteries, store the remote control unit so its keys are not pressed
inadvertently.
Projector Keys and Indicators
Note
You can configure the projector so operations of its keys are disabled and only remote controller
operations are valid. This helps to protect against accidental mis-operation. For details, see
“Control Panel Lock” (page 35).
Remote Controller and Projector Keys
Remote control signal emitter
CLASS 1 LED PRODUCT
Cursor keys (S T W X/ / / )
[ENTER] key ([STYLE] key)
[D-ZOOM +] [D-ZOOM –] keys
[KEYSTONE +] [KEYSTONE –] keys
[POINTER] key
[FUNC] key
[AUTO] key
[BLANK] key
[FREEZE] key
[COLOR MODE] key
[VOLUME] key
[BRIGHT] key ([O] key)
[ECO] key ([f] key)
[ASPECT] key ([Z] key)
[INPUT] key
[MENU] key
[P] (Power) key
[ESC] key
TEMP indicator
LIGHT indicator
[ENTER] key
POWER/STANDBY indicator
[MENU] key
[P] (Power) key [ESC] key
[INPUT] key Cursor keys (q w U I/ / / )
[AUTO] key

9
1 USB-A port (XJ-H1650/XJ-H1750/XJ-H2650/XJ-ST145/XJ-ST155 only)
2 LAN port (XJ-H1650/XJ-H1750/XJ-H2650/XJ-ST145/XJ-ST155 only)
3 HDMI port
4 MONITOR OUT terminal
5 COMPUTER IN 1 terminal
6 COMPUTER IN 2 terminal
7 Remote control signal receiver
8 Power connector
9 SERIAL port*1
bk AUDIO OUT terminal
bl Anti-theft lock hole
bm AUDIO IN 1 terminal
bn AUDIO IN 2 terminal
bo AUDIO IN L/R terminals
bp VIDEO terminal
bq S-VIDEO terminal
br USB-B port*2 (XJ-H1650/XJ-H1750/XJ-H2650/XJ-ST145/XJ-ST155 only)
Back Terminals
*1 This terminal is for controlling the projector from an external device. It normally is not used. For
information about using control commands and other details, See “Projector RS-232C Control”
(page 70).
*2 This port is for USB connection between the projector and a computer when using the optionally
available interactive pointer (YA-P10).
87 9 bk bl bm bn bp bq brbo
1 2 3 4 5 6

10
Important!
Be sure to use alkaline batteries only.
Replacing Remote Controller Batteries
Open the battery cover on the back of the remote controller, replace the old batteries with new ones,
and then close the battery cover.
Place the projector onto a table, desk, or stand that is level and firm, making sure you allow enough
room around it. Best results can be obtained when the projector is pointed directly at the screen, and
not at an angle.
zThe projector can be configured for projection from the back of a screen. For details, see
“Projection Mode” (page 42) under “Screen Settings Main Menu”.
Loading Remote Controller Batteries
*Caution RISK OF EXPLOSION IF BATTERY IS REPLACED BY AN INCORRECT TYPE.
DISPOSE OF USED BATTERIES ACCORDING TO THE INSTRUCTIONS.
1.
Open the battery cover on the back
of the remote controller.
2.
Load two new batteries into the
case, making sure that their positive
(+) and negative (–) ends are facing
correctly.
3.
Close the battery cover on the back of the remote controller.
Setting Up the Projector
XJ-H1600/XJ-H1650/XJ-H1700/XJ-H1750 XJ-H2600/XJ-H2650/XJ-ST145/XJ-ST155
Screen Screen

11
zUse a conveniently located power outlet that you can reach easily when you need to unplug the
projector.
zDo not allow any objects to be within the area indicated by the dashed line below, which is an area
within 30cm (11.8 inches) of the projector. Keep all obstacles and other objects at least 30cm away
from the projector’s vents.
zAirflow from air conditioning equipment can blow the heat being exhausted from the area around
the projector’s lens in a way that causes heat ripples to appear in the projected image. If this
happens, adjust the airflow of the air conditioning equipment or move the projector.
Setup Precautions
Intake-exhaust vents
Intake-exhaust vents
30cm
(11.8 inches)
Intake-exhaust vents
Intake vents

13
The projector supports projection and output of HDMI video and audio output from a computer or
video device.
Important!
Turn off the projector and the computer or video device before connecting them.
zYou will need to obtain a commercially available HDMI cable with a connector that matches the
terminal of the output device on one end and a connector that matches the projector’s HDMI port
(HDMI Type A Socket) on the other end.
zFor information about HDMI video signal supported by the projector, see page 64.
zThe projector supports L-PCM 32kHz, 44.1kHz, and 48kHz HDMI audio signals.
Connecting the HDMI Output of a Video Device or
Computer to the Projector
Projector
HDMI port
To HDMI output terminal
Computer or video device
HDMI cable (commercially available)

14
The projector is able to project images from the composite video output, S-video output, or
component video output of a connected video device.
Important!
Always turn off the projector and the video device before connecting them.
Connection to a composite video output or S-video output
Note
Note that regardless of whether the image being projected is being input via the projector’s
S-VIDEO terminal or VIDEO terminal, the projector outputs audio that is input via the projector’s
AUDIO IN L/R terminals.
Connecting to a Video Device
To S-video output terminal
To video/audio output
terminal
Yellow: To VIDEO terminal
To S-VIDEO terminal
Red: To AUDIO IN R terminal
White: To AUDIO IN L terminal
Projector Video device
S-video cable (commercially available)
Pin plug type video/audio cable
(commercially available)

15
Connection to a component video output
zComponent video output terminals come in 3-terminal sets: Y·Cb·Cr or Y·Pb·Pr. Be sure to match
the colors of the plugs on a component video cable with the colors of the terminals (Green: Y;
Blue: Cb/Pb; Red: Cr/Pr).
zNote that connection only to an analog component video output terminal is supported.
Connection to a digital output terminal is not supported.
Projector
AUDIO IN 1 terminal
COMPUTER IN 1 terminal
Stereo mini plug
Ù Pin plug type audio cable
(commercially available)
Component video cable (commercially available)
To component video output
terminals
To audio output terminals
Video device
RedWhite
AUDIO IN 2 terminal
COMPUTER IN 2 terminal

16
Operation During Projection
Turning on the projector initially causes the same input source that was selected the last time it was
turned off to be selected.
To select a different input source
1.
Press the [INPUT] key.
zThis displays the input source selection screen.
2.
Select either the Normal Input Mode or 3D Input Mode depending on the type of
image you want to project.
zFor details, see “3D Input Mode” (page 17).
3.
Use the [T
T
T
TT] and [S
S
S
SS] keys to select the name of the input source you want to
select and then press the [ENTER] key.
zThe name of the input source you select appears in the upper right corner of the projection
screen for a few seconds.
zThe message “No signal input” will appear if no input signal can be selected.
Resolution
Depending on the projector model, its video resolution will be fixed at XGA (1024 × 768 pixels) or
WXGA (1280 × 800 pixels). Images may appear coarse, text and othe fficult to read r figures may be di
or a moire pattern may appear when the input signal from a computer does not match the projector’s
video resolution. If this happens, try doing the following.
zChange the computer’s output resolution setting so it matches the projector’s video resolution.
For information about the video resolution of your projector, see the “DLP chip” item of the
“Specifications” (page 73). See the user documentation that comes with your computer for details
about changing its settings.
zChange the “Aspect Ratio” setting to “True” (Applies only to models that support WXGA video
resolution).
With the “True” setting, the projector projects the input signal at its actual size (1 input source dot
equal to one projector output pixel dot).
For information about configuring the Aspect Ratio setting, see “Changing the Aspect Ratio of the
Projected Image” (page 23).
Selecting the Input Source

17
3D Input Mode
Your projector supports projection of 3D images. To project a 3D image, first enter the projector’s 3D
input mode, and then select the input source.
Important!
zSeparately available 3D glasses (YA-G30) are required in order to view a projected 3D image in
3D.
zSeparately available special software (CASIO 3D Converter) is required to project a 3D image
with the projector when a computer (analog RGB) is the input source.
z3D image projection is not supported via an HDMI connection or component video
connection.
The input sources described below can be selected for projection in the 3D Input Mode.
Note
See “3D Signals (3D Input Mode)” (page 64) for a list of 3D image signals supported by this
projector.
Entering the 3D Input Mode
1.
Press the [INPUT] key to display the input source selection screen.
2.
Select Computer 1 (RGB), Computer 2 (RGB), S-video, or Video as the input
source.
3.
Use the [T
T
T
TT] and [S
S
S
SS] keys to move the highlighting to “To 3D input mode” and
then press the [ENTER] key.
zThis enters the 3D input mode and closes the input source selection screen.
Important!
zYou cannot select HDMI or USB as the input source in the 3D input mode. To use either of
these input sources, change the input source setting back to normal input mode.
zWhen Computer 1 (or Computer 2) is selected as the input source in the 3D input mode, a
component video signal input through the projector’s COMPUTER IN 1 (or COMPUTER IN 2)
terminal is treated as an RGB signal resulting in abnormal image projection.
zExcept when using the projector for 3D image projection, you should normally leave it in the
normal input mode.
Input Source Projection Conditions
Computer (Analog RGB) zAny of the following types of 3D image data played back using separately available
special software (CASIO 3D Converter).
– 2D image file converted to a 3D image file using CASIO 3D Converter
– Side-by-side 3D format files
zSignal with 60Hz/120Hz vertical scan frequency
Composite Video, S-video zField sequential 3D format files recorded with field sequential DVD software, etc.
zSignal with 60Hz vertical scan frequency

18
Returning to the Normal Input Mode from the 3D Input Mode
1.
Press the [INPUT] key to display the input source selection screen.
2.
Use the [T
T
T
TT] and [S
S
S
SS] keys to move the highlighting to “To normal input mode”
and then press the [ENTER] key.
zThis enters the normal input mode and closes the input source selection screen.
Horizontal Flipping in the 3D Input Mode
In side-by-side 3D, a full frame consists of two halves on the left and right for each eye. In rare cases,
the left and right images may be reversed, which causes a loss of 3D depth. If this happens, try using
the following procedure to swap the left and right images with each other.
To swap the left and right images
In the 3D input mode, press the [ENTER] key.
19
You can perform the following operations while projecting an image.
zImage brightness adjustment
zManual keystone correction
zColor mode selection
zImage zooming
zMomentarily blanking the image and muting the audio
zImage freeze
zPointer display in the projected image
zAspect ratio switching
Adjusting Image Brightness
Note
(for USB port model users)
Use the setup menu (page 27) to adjust image brightness when the input source is an external
device connected to the USB-A port.
1.
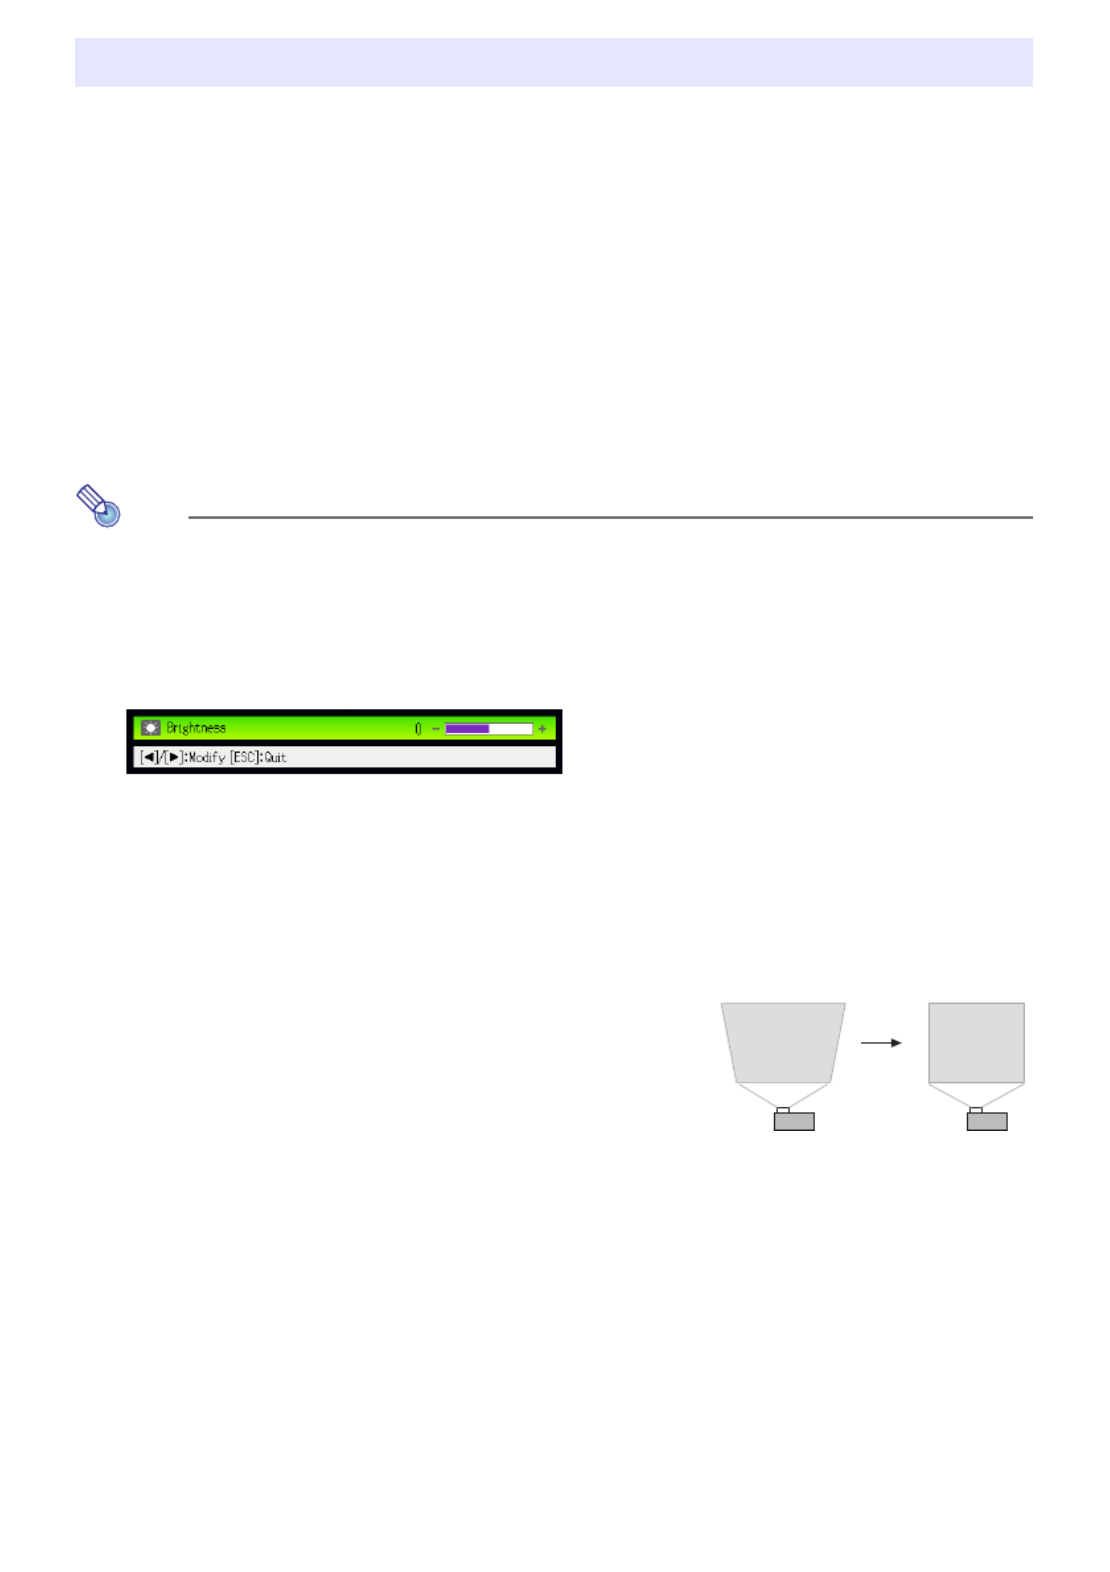
Press the [BRIGHT] key.
zThis displays the brightness adjustment window.
2.
Use the [W
W
W
WW] and [X
X
X
XX] keys to adjust image brightness.
3.
To hide the window, press the [ESC] key.
To use manual keystone correction
The projector has a keystone correction feature that prevents
distortion of the projected image when projecting from an
angle. The projector detects when it is at a vertical angle to the
screen and performs keystone correction automatically.
You can use the [KEYSTONE +] and [KEYSTONE –] keys to
adjust keystone correction manually.
Image Operations During Projection

20
Selecting the Color Mode
You can select from among various different color mode settings in accordance with image contents
and projection conditions.
Important!
zThe color mode cannot be selected in the following cases.
zThe color mode cannot be selected while “On” is selected for the setup menu “Option
Settings 2 J Interactive Pointer” setting. Though the color mode change operation may be
possible on some projector models, doing so may cause problems with the optional
interactive pointer (YA-P10) in some color modes.
To change the color mode
1.
Press the [COLOR MODE] key.
zThis displays the color mode selection window. The currently selected color mode is the one
whose button is selected (filled in).
2.
Use the [T
T
T
TT] and [S
S
S
SS] keys to move the highlighting to the color mode you want to
select, and then press the [ENTER] key.
zThis will select the button next to the highlighted color mode name.
zFor details on what each color mode does, see “Color Mode” (page 39) under “Image
Adjustment 1 Main Menu”.
3.
To hide the window, press the [ESC] key.
Zooming an Image
1.
Press the [D-ZOOM +] key.
zThis will enlarge the center of the projected image one step.
2.
To zoom in on the center of the projected image more, press the [D-ZOOM +]
key again. To zoom out, press the [D-ZOOM –] key.
zEach press of [D-ZOOM +] zooms in (increases the zoom factor), while [D-ZOOM –] zooms
out. Holding down either key continuously scrolls the zoom factor.
3.
While an image is zoomed, use the [S
S
S
SS], [ ], [
T
T
T
TT W
W
W
WW], and [X
X
X
XX] keys to scroll the view
to other parts of the image.
4.
To exit the zoom operation, press the [ESC] key.
zWhen “Off” is selected for the Eco Mode setting (page 25)
zWhen the projector is in the 3D input mode. See “3D Input Mode” (page 17).
22
Displaying a Pointer in the Projected Image
You can select from among different pointer styles, including various arrow styles, for display in the
projected image. Pointers can be used during a presentation to indicate or highlight a specific part of
the image.
Note
Depending on the pointer style you are using, the pointer may not display properly when you are
using keystone correction. If this happens, use the [KEYSTONE +] and [KEYSTONE –] keys to
change the keystone correction value to zero.
To display a pointer in the image
1.
Press the [POINTER] key.
zThis will cause a pointer to appear in the image.
zYou also can use the setup menu to specify the pointer type that appears first when you press
the [POINTER] key. For details, see “Pointer” (page 46) under “Option Settings 2 Main Menu”.
2.
Use the cursor keys to move the pointer to the location you want.
zHolding down a cursor key moves the cursor at high speed.
3.
To modify the pointer as described below, press the [STYLE] key.
To select the pointer type
1.
Press the [POINTER] key to display the pointer.
2.
Keep pressing the [POINTER] key until the pointer you want is displayed.
zEach press of the [POINTER] key cycles through the available pointer types.
To clear the pointer from the image
Press the [ESC] key.
For this pointer type: Pressing [STYLE] will change it like this:
J J J
J J J
J J J
J J J
Toggle between flashing and not flashing

23
Changing the Aspect Ratio of the Projected Image
Press the [ASPECT] key to cycle through the aspect ratio settings for the projected image.
Available settings depend on your projector model as shown below. For details about the meaning of
each setting, see “Aspect Ratio” (page 41) under “Screen Settings Main Menu”.
XJ-H2600/XJ-H2650
Pressing the [ASPECT] key will cycle through settings in accordance with the current input source as
shown below.
XJ-H1600/XJ-H1650/XJ-H1700/XJ-H1750/XJ-ST145/XJ-ST155
Pressing the [ASPECT] key s in accordance with the current input source as will toggle between setting
shown below.
Note
zFor details about how the aspect ratio setting affects the projected image, see “Aspect Ratio
Setting and Projection Image” (page 60).
zYou also can change the aspect ratio setting using the setup menu. For details, see “Aspect
Ratio” (page 41) under “Screen Settings Main Menu”.
Important!
Note that enlarging or reducing the size of an image using the [ASPECT] key for commercial
purposes or public presentation may infringe on the legally protected copyright of the copyright
holder of the original material.
Input Source Pressing [ASPECT] will cycle through these settings:
Video, S-video, Component, HDMI (DTV) Normal J 16:9 J 4:3 J Letter Box
RGB, HDMI (PC) Normal J Full J 4:3 J True
Input Source Pressing [ASPECT] will toggle between these settings:
Video, S-video, Component, HDMI (DTV) Normal
16:9
RGB, HDMI (PC) Normal
Full

24
You can use the remote controller keys to adjust the volume level of the audio that is output from the
projector’s speaker or the AUDIO OUT terminal.
To adjust the volume level
1.
Press the [VOLUME] key.
zThis causes the [Volume] screen to appear on the projected image.
2.
Press the [X
X
X
XX] key to increase the volume, or the [W
W
W
WW] key to lower the volume.
3.
After the setting is the way you want, press the [ESC] key.
zThis causes the [Volume] screen to disappear.
Note
You also can use the setup menu to adjust the volume level. For details, see “Volume
Adjustment Main Menu” on page 40.
To mute the audio
1.
Press the [VOLUME] key.
2.
Press the [ENTER] key.
zThis stops output from the speaker.
3.
To restore the audio, press the [VOLUME] key again.
Adjusting the Volume Level
25
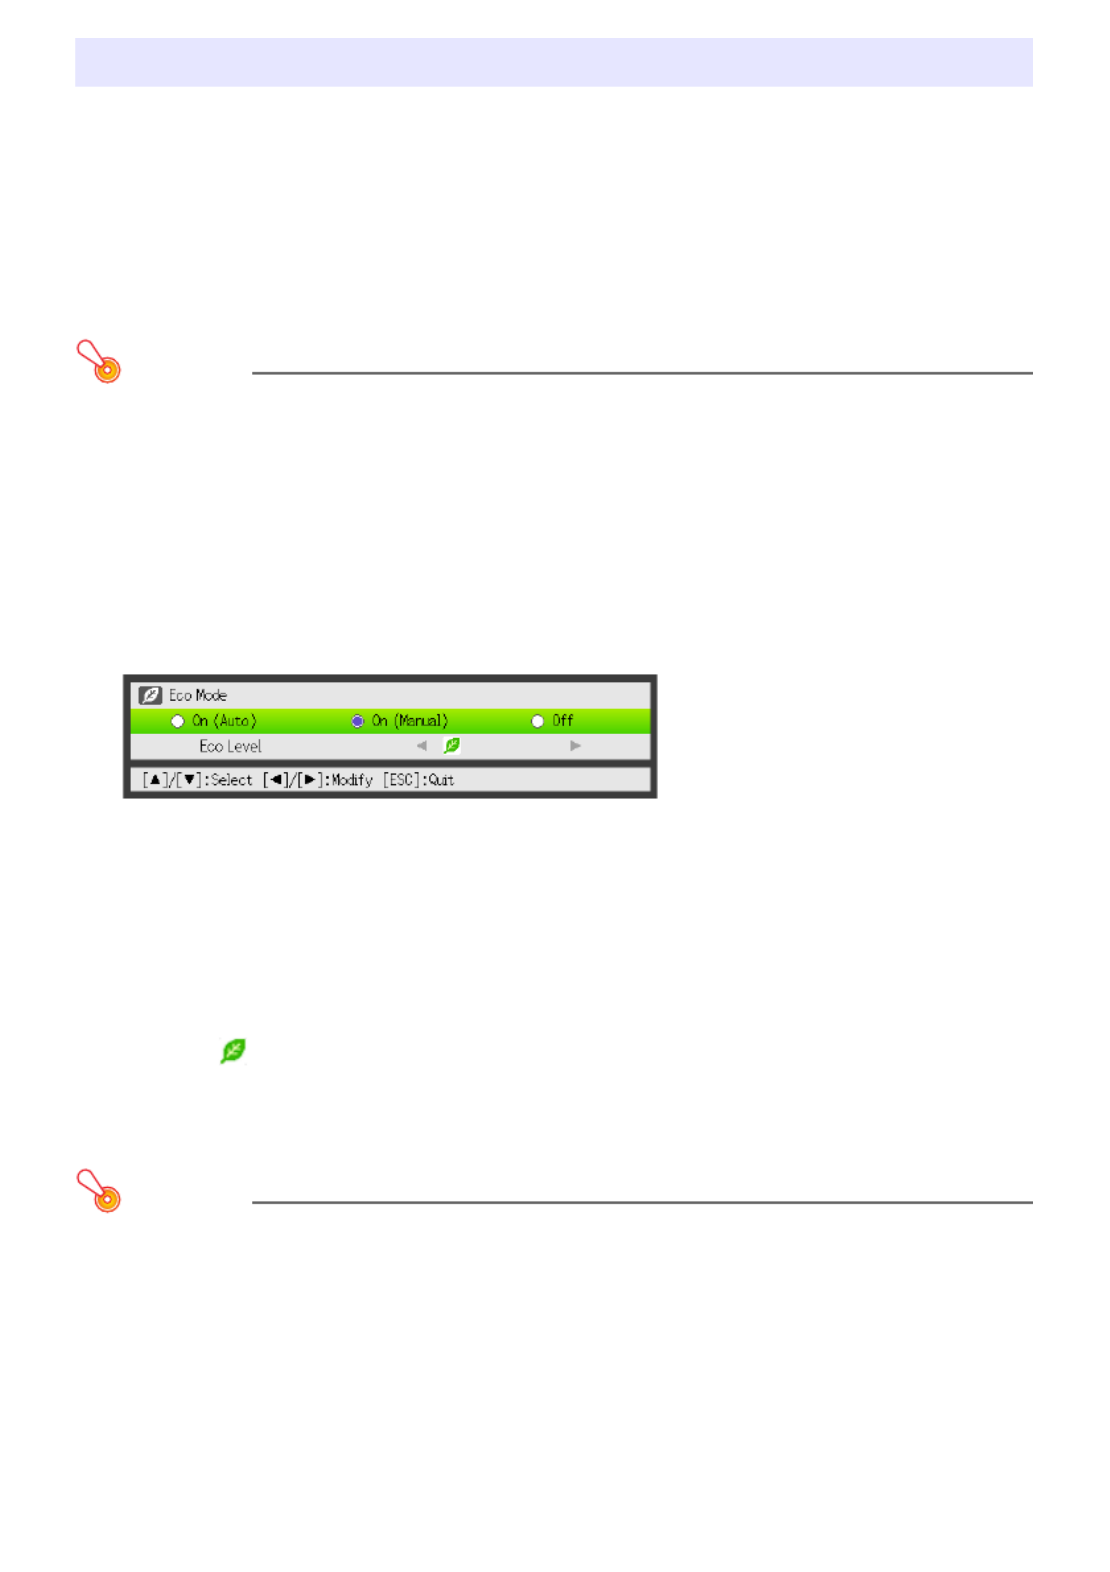
The following three Eco Mode settings are available to specify whether priority should be given to
low-power, low-noise operation or to projection brightness.
Important!
zWhile “On (Auto)” is selected as the Eco Mode setting, make sure that the brightness sensor
on the top of the projector is not blocked by anything.
zThe local environment and setup conditions affect the brightness sensor, so operation when
“On (Auto)” is selected for the Eco Mode depends on these factors.
To select the Eco Mode
1.
Press the [ECO] key.
zThis causes “Eco Mode” window to appear on the projection screen.
2.
Use the [W] and [X] keys to select the setting you want.
zIf you select “On (Manual)” here, go to step 3. If you select another setting, jump to step 4.
3.
Perform the following steps to adjust the “Eco Level” (the balance between
low-power, quiet operation and projection brightness).
4.
To hide the window, press the [ESC] key.
Important!
zThe Eco Mode level is fixed whenever the projector is in the 3D input mode (“3D Input Mode”,
page 17) or when “On” is selected for the “Option Settings 2J Interactive Pointer” setting.
Because of this the Eco Mode setting cannot be changed.
zThe “On (Auto)” setting cannot be selected for the Eco Mode while “Rear” is selected for
“Screen Settings J Projection Mode” (page 42) on the setup menu. If the “Projection Mode”
setting is changed to “Rear” while “On (Auto)” is selected for the Eco Mode setting, the Eco
Mode setting will automatically change to “On (Manual)”.
Eco Mode (Power Saving, Low Noise)
On (Auto) : A brightness sensor on the top of the projector senses surrounding light, and
automatically adjusts projection brightness and color accordingly. Brightness is
reduced for darker surroundings, which saves power and reduces operation noise.
On (Manual): Enables manual adjustment to balance the needs of low-power, quiet operation and
projection brightness.
Off : Give top priority to projection brightness.
1Press the [T] key to move the highlighting to the Eco Level.
2Use the [W] and [X] keys to adjust the Eco Level to the setting you want.
Fewer marks gives higher priority to projection brightness. A greater number gives high
priority to low-power, quiet operation.

26
Note
zWhile “Off” is selected for the Eco Mode setting, you also can specify whether brightness or
color should be given emphasis. For details, see “Eco Off Mode” (page 39) under “Image
Adjustment 1 Main Menu”.
z(for USB port model users)
Use the setup menu (page 27) to select the Eco Mode when the input source is an external
device connected to the USB-A port.
Pressing the [FUNC] key displays the menu shown below.
You can use this menu to perform the operations described below.
zAdjust image brightness
Highlight “Brightness” and then press the [ENTER] key.
zTurn the Eco Mode on or off
Highlight “Eco Mode” and then press the [ENTER] key.
zSelect the aspect ratio of the projected image
Highlight “Aspect Ratio” and then press the [ENTER] key.
Note
(for USB port model users)
When the input source is an external device connected to the USB-A port, use the [FUNC], [O],
[f], and [Z] keys to control the connected device. For details, see the “USB Function Guide”
and “Wireless Function Guide”.
Using the [FUNC] Key
J This performs the same operation as pressing the [BRIGHT] key (O key) described on page 19.
J This performs the same operation as pressing the [ECO] key (
f key) described on page 25.
J This performs the same operation as pressing the [ASPECT] key (
Z key) described on page 23.

27
Configuring Advanced Projector Settings
Your projector has a setup menu that you can use to configure advanced settings.
Displaying the Setup Menu
Pressing the [MENU] key displays the menu shown below in the center of the projection screen.
To exit the setup menu
Press the [MENU] key.
Configuring Setup Menu Settings
1.
Press the [MENU] key to display the setup menu.
2.
Use the [T
T
T
TT] and [S
S
S
SS] keys to select the main menu item you want by highlighting
it.
3.
Press the [ENTER] key.
4.
Use the [T
T
T
TT] and [S
S
S
SS] keys to select the sub-menu item you want by highlighting it.
5.
Perform the required operation on the selected sub-menu item screen.
zThe guidance text explains the operations you need to perform to configure each setting.
6.
To return to the main menu from the sub-menu, press the [ESC] key.
7.
To exit the setup menu, press the [MENU] key.
Basic Setup Menu Operations
Main menu
Pressing the [MENU] key displays the main menu.
The currently selected menu item is the one that is
highlighted.
Sub-menu
The sub-menu shows each individual setting under each
main menu item, and its current setting.
Guidance text
Guidance text provides a brief description of the main
key operations available for the operation you are
currently performing.

28
Basic Setup Menu Example
The procedure below shows how to configure the following three settings:
zImage Adjustment 1 J Contrast
zImage Adjustment 1 J Color Mode
zInput Settings J Signal Name Indicator
Note
zThe setup menu items that you can change depend on whether or not an image signal is being
input to the projector, and on the currently selected input source. Perform the procedure
below after starting projection of an image from an input source in the normal input mode. See
“3D Input Mode” on page 17 for information about how to do this.
zThis example covers basic steps only. For more detailed information, see “Setup Menu
Contents” on page 38.
To configure the “Image Adjustment 1 J
J
J
JJ Contrast” setting
1.
Press the [MENU] key to display the setup menu.
2.
“Image Adjustment 1” is initially selected on the main menu, so simply press the
[ENTER] key.
3.
Use the [T
T
T
TT] key to select “Contrast”.
4.
Use the [W
W
W
WW] (lighter) and [X
X
X
XX] (darker) keys to adjust contrast.

30
You can capture a projected screen and save it as image data in the projector’s built-in memory.
Image data you save in projector memory is called a custom logo.
The following are ways you could use a custom logo.
– As a startup screen image that appears first whenever the projector is turned on
– As a default projection image whenever there is no input signal to the projector (No Signal Screen)
– As the screen projected whenever the [BLANK] key is pressed (Blank Screen)
Important!
Note that using the projector to save image data for commercial purposes or public presentation
may infringe on the legally protected copyright of the copyright holder of the original material.
To capture a screen and save it as the custom logo
Important!
zAs soon as you start a screen capture with the operation below, any custom logo currently
stored in the projector’s memory is deleted.
zIf you press the [ESC] key to interrupt an ongoing screen capture operation or if the capture
operation is interrupted for any other reason before it is complete, your custom logo data will
revert to the initial factory default image (light green image). However, depending on the timing
of the interruption, you may end up with a partial capture with part of the screen image being
registered as your custom logo.
zOnce a screen capture operation is started, it takes a number of minutes for it to complete.
1.
If the projector is in the 3D Input Mode, switch it to the Normal Input Mode (page
18).
2.
Project the image you want to save as a custom logo onto the projection screen.
zNot all types of projection images are supported. For more information, see “Supported
Capture Images” (page 31).
3.
Press the [MENU] key to display the setup menu.
4.
Use the [T
T
T
TT] key to select “Option Settings 1”, and then press the [ENTER] key.
5.
Use the [T
T
T
TT] key to select “Custom Logo Capture” and then press the [ENTER]
key.
zIf “On” is selected for “Option Settings 1 J Password protection J Logo Password”, a dialog
box prompting for input of the pa me. If this happens, input the ssword will appear at this ti
password and then press the [ENTER] key. For details about the logo password, see
“Password Protection” (page 32).
6.
When a dialog box with the confirmation message “Starts capture of the current
screen. OK to continue?” appears, press the [ENTER] key.
zAs soon as you press the [ENTER] key, the projected image will become frozen and capture
will begin.
zThe message “Screen capture complete.” will appear when capture is complete.
Custom Logo Capture

31
Supported Capture Images
Not all types of projection images are supported. Note the following precautions that correspond to
each specific input source.
To specify a custom logo as the startup screen, no signal screen, or blank
screen
1.
Press the [MENU] key to display the setup menu.
2.
Use the [T
T
T
TT] key to select “Screen Settings”, and then press the [ENTER] key.
3.
To specify the custom logo as the Startup Screen, use the [T
T
T
TT] key to select
“Startup Screen”, and then press the [ENTER] key.
zYou also could select “No Signal Screen” or “Blank Screen” in place of “Startup Screen” to
use the custom logo for another type of screen.
4.
Use the [W
W
W
WW] and [X
X
X
XX] keys to select “Custom Logo”.
5.
After you are finished, press the [MENU] key to exit the setup menu.
Input Source Precautions
RGB Use an image with a resolution no greater than 1280 × 800. You will not be able to execute
the screen capture operation if the projected image has a resolution larger than this.
Video, S-video Any closed captioning included in the projected image is not included in the captured
image.
USB Basically screens projected from the input source can be captured. The following types of
images are supported.
zStill images or movie images being projected with Viewer
zPC screens projected by Wireless
zImages projected by YC Camera
zGraphic calculator screen image projected via a USB connection
For details about projecting these types of screens, see the “USB Function Guide” and
“Wireless Function Guide”.
All input sources The projected screen of protected contents cannot be captured.

32
The operations described below can be password protected on the projector. You can have only one
password assigned to the projector at any time, and the same password is used for operations.
zProjector startup protection
The projector can be configured so a dialog box prompting input of the password is displayed
whenever the projector is turned on. In this case, further operation of the projector is not possible
unless the correct password is input. This protects against unauthorized use of the projector.
zCustom logo capture protection
The projector can be configured so a dialog box prompting input of the password is displayed
whenever someone attempts to perform the custom logo capture (page 30) operation. This protects
against inadvertent and unauthorized changing of the custom logo.
Use the “Power On Password” and “Logo Password” settings to turn password protection for the
above operations on or off individually.
Inputting a Password
The password of your projector is not really a “word” made up of letters, but rather a sequence of
remote controller key inputs. The following is the 8-key sequence that represents the initial factory
default password.
Using the Password Feature
Note the following precautions whenever you use the password feature.
zThe password feature protects against unauthorized use of the projector. Note that it is not an
anti-theft measure.
zYou will need to enter the initial factory default password the first time you use the projector after
turning on the password feature. Change the initial factory default password to a different one of
your choice as soon as possible after turning on the password feature.
zRemember that password operations are always performed using the remote controller, so you
should take care not to lose or misplace the remote controller.
zAlso note that you will not be able to input the password if the remote controller batteries are dead.
Replace the remote control batteries as soon as possible after it starts to go low.
Password Protection
[INPUT] [AUTO] [BLANK] [FREEZE] [S] [T] [ ] [W X]

33
If you forget your password...
If you forget the password, you will need to bring the following two items to your CASIO distributor to
have the password cleared. Note that you will be charged to have the password cleared.
Note that your CASIO distributor will not be able to clear the password of your projector unless you
bring both of the items listed above.
Also, keep the projector’s warranty in a safe place.
Important!
Having your password cleared using the procedure described above will return all of the settings
of your projector, except for the Light Time, to their initial factory defaults.
Keep a written record of your password!
You will not be able to use the projector if you forget its password. We strongly suggest that you keep
a written or other type of record of the password so you can look it up when necessary.
To change the password
1.
Press the [MENU] key to display the setup menu.
2.
Use the [T
T
T
TT] key to select “Option Settings 1”, and then press the [ENTER] key.
3.
Use the [T
T
T
TT] key to select “Password protection”, and then press the [ENTER]
key.
zThis will display a dialog box prompting you to enter the current password.
4.
Enter the current password.
zIf the projector is still protected by the factory default password, perform the key operation
shown below to enter it.
5.
After entering the current password, press the [ENTER] key.
zThis displays the Password protection screen.
6.
Use the [T
T
T
TT] key to select “Change Password”, and then press the [ENTER] key.
zThis will display a dialog box prompting you to enter the new password.
7.
Enter a key sequence up to eight key operations long.
zYou can use any of the following keys as part of your password key sequence.
[INPUT], [AUTO], [BLANK], [FREEZE], [VOLUME], [COLOR MODE], [D-ZOOM +], [D-ZOOM –],
[KEYSTONE +], [KEYSTONE –], [MENU], [POINTER], [O], [ ], [ ], [ ], [f Z], [S], [T W X], [FUNC]
1. Personal identification (original or copy of your driver’s license, employee I.D., etc.)
2. Projector unit
[INPUT] [AUTO] [BLANK] [FREEZE] [S] [T] [ ] [W X]

35
Control panel lock disables (locks) all of the projectors keys, except for the [P] (Power) key. This limits
projector operation to the remote controller, which protects against inadvertent mis-operation.
To lock the control panel
1.
Press the [MENU] key to display the setup menu.
2.
Use the [T
T
T
TT] key to select “Option Settings 2”, and then press the [ENTER] key.
3.
Use the [T
T
T
TT] key to select “Control Panel Lock” and then press the [ENTER] key.
4.
Use the [W
W
W
WW] key to select “On”.
5.
When the confirmation dialog box appears, press the [ENTER] key.
zThis disables (locks) all projector keys except for the [P] (Power) key.
6.
After you are finished, press the [MENU] key to exit the setup menu.
Note
Even if the control panel is locked, you can clear a warning message (page 51) that appears on
the projection screen by pressing the projector’s [ESC] key.
To unlock the control panel
Perform either of the following operations.
zOn the projector, hold down the [T] key until the message “Control panel was unlocked.” appears.
zTo use the remote controller to unlock the control panel, perform the procedure under “To lock the
control panel” above. In step 4, press the [X] key of the remote controller to select “Off” and then
press the [MENU] key.
Control Panel Lock

36
You can use the procedures in this section to restore all of the settings on a particular main menu or all
of the settings on the setup menu to their initial factory defaults.
To restore all settings on a particular main menu to their initial factory
defaults
1.
Press the [MENU] key to display the setup menu.
2.
Use the [T
T
T
TT] and [S
S
S
SS] keys to select the main menu whose settings you want to
restore to their initial factory defaults.
z You can select Image Adjustment 1, Image Adjustment 2, Volume Adjustment, Screen
Settings, Input Settings, Option Settings 1, or Option Settings 2.
3.
Press the [ENTER] key.
4.
Use the [T
T
T
TT] key to select “Restore Menu Defaults”.
5.
Press the [ENTER] key.
z This will display a confirmation screen like the screen shown below.
6.
Use the [S
S
S
SS] key to select “Yes”.
7.
To restore the settings of the main menu to their initial defaults, press the
[ENTER] key.
z To exit the operation without doing anything, press [ESC] instead of [ENTER].
8.
After you are finished, press the [MENU] key to exit the setup menu.
Note
For details about how the above procedure initializes settings, see the explanations of the
settings under “Setup Menu Contents” on page 38.
Restoring Projector Settings to Their Initial Factory
Defaults

37
To restore all settings on the setup menu to their initial factory defaults
1.
Press the [MENU] key to display the setup menu.
2.
Use the [T
T
T
TT] key to select “Restore All Defaults” and then press the [ENTER] key.
3.
After confirming that “Restore All Defaults” sub-menu is selected, press the
[ENTER] key.
zThis displays a confirmation message asking if you want to initialize all settings.
4.
Use the [S
S
S
SS] key to select “Yes”.
5.
To restore all settings on the setup menu to their initial defaults, press the
[ENTER] key.
zThis will restore all setup menu settings to their initial factory defaults except the following:
Language, Light Time, Unit Operating Time, password set with Password protection, custom
logo registered with Custom Logo Capture.
zTo exit the operation without doing anything, press [ESC] instead of [ENTER].
6.
After you are finished, press the [MENU] key to exit the setup menu.

38
This section contains tables that provide detailed explanations of all of the items included on the setup
menu. The following describes the type of information that appears in each of the columns of the
tables.
Image Adjustment 1 Main Menu
Setup Menu Contents
Setting Name: This column shows the names of the settings as they appear on the sub-menu.
Input: This column shows the input source for which each setting is supported.
Input source names are abbreviated as follows:
R : RGB input
C : Component video input
V : Video or S-video input
H : HDMI (PC) input
D : HDMI (DTV) input
U : USB input (USB port models only)
The letter N indicates that the setting can be configured while there is no input signal.
Setting Unit: The setting unit indicates how a setting is stored.
“Source Specific” in this column indicates that separate settings can be stored for each
individual input source.
“Single” in this column indicates that a single setting is stored and applied, regardless of
the input source.
Description: This column provides details about the setting item and how to select it. The initial
default setting is indicated by an asterisk (*).
Setting Name Input Setting Unit Description
Brightness
R C V H D U
Source
Specific
Use this sub-menu to adjust the brightness of the projected image. A
larger value produces a brighter image.
Contrast
R C V H D U
Source
Specific
Use this sub-menu to adjust the contrast of the projected image.
A larger value produces a stronger contrast.
Sharpness
V
Source
Specific
Use this sub-menu to adjust the sharpness of the outlines in the
projected image. A larger value makes the image sharper, while a
smaller value makes it softer.
Saturation
V
Source
Specific
Use this sub-menu to adjust the color saturation of the projected
image. A larger value increases color saturation.
Tint
V
Source
Specific
Use this sub-menu to adjust the tint of the projected image.
A larger value makes the overall image more bluish, while a smaller
value makes the overall image more reddish. This setting is
supported only when the signal is NTSC or NTSC4.43.

39
Color Mode
R C V H D U
Source
Specific
You can select from among various different color mode settings in
accordance with image contents and projection conditions.
Standard:
Use this setting when you want to highlight the colors of your
presentation.
Graphics:
Use this setting when you want photographs and graphics to
appear natural.
Theater:
Use this setting to bring out the dark portions of your images.
Blackboard:
Use this setting for easy viewing when projecting onto a
blackboard.
Game:
Use this setting to optimize hue and brightness.
Color Balance
R C V H D U
Source
Specific
This sub-menu lets you adjust the color balance of the projected
image.
Preset:
You can select from among three preset color balance settings:
Warm, Normal,* Cold.
Color:
You can adjust the intensity of red, green, and blue within the
range of –50 to +50. The intensity of a color increases along with
the setting value. Color settings can be adjusted individually only
when “Normal” is selected as the “Preset” setting.
Eco Off Mode
R C V H D U
Single When “Off” is selected for “Option Settings 1 J Eco Mode”, you can
select either of the following projection image modes.
Bright:
Gives priority to brightness.
Normal:
Suppresses brightness slightly and gives priority to color balance.
Restore Menu
Defaults
R C V H D U
Source
Specific
Use this sub-menu to return all of the sub-menu items on the Image
Adjustment 1 main menu to their initial default settings.
zRestoring menu defaults when there is no input signal will restore
defaults for the currently selected input source.
Setting Name Input Setting Unit Description

40
Image Adjustment 2 Main Menu
About the “Signal Specific” Setting Unit
For the items that have “Signal Specific” in the “Setting Unit” column of the above table, the setting is
saved for the specific type of signal (XGA/60Hz, SXGA/60Hz, etc.) that is being input when the setting
is performed, and not for a specific input source.
Volume Adjustment Main Menu
Setting Name Input Setting Unit Description
Vertical
Position
R C V
Signal
Specific
Use this sub-menu to adjust the vertical position of the input source
image within the projection area.
Horizontal
Position
R C V
Signal
Specific
Use this sub-menu to adjust the horizontal position of the input
source image within the projection area.
Frequency
R
Signal
Specific
When vertical bands appear in the projected image while RGB is
selected as the input source, it means that the frequency setting is
not correct. When this happens, use this setting to adjust the
frequency manually.
Important!
If, for some reason, your manual frequency settings cause the
image input from the computer to disappear from the
projection, you can press the [AUTO] key to perform an auto
adjust operation, which should cause the image to appear.
Phase
R
Signal
Specific
When there is flickering in the projected image while RGB is selected
as the input source, it means that the phase setting is not correct.
When this happens, use this setting to adjust the phase manually.
Restore Menu
Defaults
R C V
Source
Specific
Use this sub-menu to return all of the sub-menu items on the Image
Adjustment 2 main menu to their initial default settings.
zRestoring menu defaults will restore defaults for the current signal
type (XGA/60Hz, SXGA/60Hz, etc.) only.
Setting Name Input Setting Unit Description
Volume
R C V H D U N
Source
Specific
Use this sub-menu to adjust the volume level of the projector’s
speaker or the AUDIO OUT terminal.
zChanging this setting when there is no input signal changes the
volume setting of the currently selected signal source.
Restore Menu
Defaults
R C V H D U N
Source
Specific
Use this sub-menu to return Volume to its initial default setting.
zRestoring menu defaults when there is no input signal will restore
defaults for the currently selected input source.

41
Screen Settings Main Menu
Setting Name Input Setting Unit Description
Keystone
Correction
R C V H D U N
Single Use this sub-menu to perform vertical keystone correction of the
projected image.
Aspect Ratio
R C V H D
Source
Specific
Use this sub-menu to select an aspect ratio setting for the projected
image.
Input Source: RGB or HDMI (PC)
Normal*:
Projects at the projector’s maximum possible size while
maintaining the input signal aspect ratio.
Full:
Projects at the projector’s maximum possible size by enlarging or
reducing the input signal.
4:3 (XJ-H2600/XJ-H2650 only):
Regardless of the input signal aspect ratio, the image is always
resized to an aspect ratio of 4:3 for projection.
True (XJ-H2600/XJ-H2650 only):
Projects the input signal at its actual size (1 input source dot equal
to one projector output pixel dot) in the center of the projector’s
projection screen. If the input signal resolution exceeds the
projector’s output resolution, the excess is cut off.
Input Source: Video, S-video, Component or
HDMI (DTV)
Normal*:
Projects at the projector’s maximum possible size while
maintaining the input signal aspect ratio.
16:9 :
This setting specifies a 16:9 aspect ratio, which is the same as a
movie screen, high-definition TV, etc. Using this setting when the
input signal is a 16:9 image that has been squeezed to a 4:3
image causes the image to be displayed with its normal 16:9
aspect ratio.
4:3 (XJ-H2600/XJ-H2650 only):
Regardless of the input signal aspect ratio, the image is always
resized to an aspect ratio of 4:3 for projection.
Letter Box (XJ-H2600/XJ-H2650 only):
This will resize the image horizontally to 1280 dots and project
800 vertical dots of the center of the image, maintaining the
aspect ratio of the input signal.
Note
zWhen projecting while “True” is selected as the aspect ratio
setting for an RGB signal with a resolution that is less than
SVGA, the image is enlarged to SVGA and projected.
zFor details about projection screen display conditions for
different aspect ratio settings, see “Aspect Ratio Setting
and Projection Image” (page 60).
Important!
Note that enlarging or reducing the size of an image for
commercial purposes or public presentation may infringe on
the legally protected copyright of the copyright holder of the
original material.

42
Projection
Mode
R C V H D U N
Single Use this sub-menu to specify whether projection will be from the
front of the screen or the back of the screen.
Front*:
Select this option to project from the front of the screen.
Rear:
Select this option to project from the back of the screen. This
setting flips the front projected image horizontally.
Ceiling Mount
R C V H D U N
Single Use this sub-menu to configure the projector for use in an
installation in which it is positioned upside down.
On:
Flips the projected image horizontally and vertically.
Off*:
Projects a normal image.
Startup Screen
R C V H D U N
Single Use this sub-menu to specify whether or not a startup screen should
be projected whenever the projector is turned on.
Logo:
Select this option to project the projector’s built-in logo screen.
Custom Logo:
Select this option to project the custom logo registered with
“Custom Logo Capture” (page 30).
None*:
Select this option when you do not want to project a startup
screen.
No Signal
Screen
R C V H D U N
Single Use this sub-menu to specify what should be projected when there
is no input signal to the projector.
Blue*:
Select this option to project a blue screen.
Black:
Select this option to project a black screen.
Logo:
Select this option to project the projector’s built-in logo screen.
Custom Logo:
Select this option to project the custom logo registered with
“Custom Logo Capture” (page 30).
Blank Screen
R C V H D U N
Single Use this sub-menu to specify what should be projected after the
[BLANK] key is pressed.
Blue:
Select this option to project a blue screen.
Black*:
Select this option to project a black screen.
Logo:
Select this option to project the projector’s built-in logo screen.
Custom Logo:
Select this option to project the custom logo registered with
“Custom Logo Capture” (page 30).
Setting Name Input Setting Unit Description

43
Input Settings Main Menu
Restore Menu
Defaults
R C V H D U N
Source
Specific
Use this sub-menu to return all of the sub-menu items on the Screen
Settings main menu to their initial default settings.
zRestoring menu defaults when there is no input signal will restore
defaults for the currently selected input source.
zNote that the “Keystone Correction”, “Projection Mode”, “Ceiling
Mount”, “Startup Screen”, “No Signal Screen”, and “Blank
Screen” settings are always returned to their initial defaults,
regardless of the currently selected input source.
Setting Name Input Setting Unit Description
COMPUTER1
Terminal/
COMPUTER2
Terminal
R C N
Single Use this sub-menu to specify manually the type of signal being input
from the projector’s COMPUTER IN 1/COMPUTER IN 2 terminal.
Auto*:
Automatically detects the signal being input from the COMPUTER
IN 1/COMPUTER IN 2 terminal and configures the appropriate
input protocol.
RGB:
Select this option when a computer is connected to the
COMPUTER IN 1/COMPUTER IN 2 terminal. For details about
connecting a computer, see “Connecting the Analog RGB Output
of a Computer to the Projector” (page 12).
Component:
Select this setting when the projector’s COMPUTER IN 1/
COMPUTER IN 2 terminal is connected to the component video
output terminal of a video device using a commercially available
component video cable. For information about connection, see
“Connecting to a Video Device” (page 14).
Note
The setting of this item cannot be changed while the projector
is in the 3D input mode (“3D Input Mode”, page 17) or “On” is
selected for the “Option Settings 2 J Interactive Pointer”
setting.
Video Signal/
S-Video Signal
V N
Single Use this sub-menu to specify manually the type of signal being input
from the projector’s VIDEO terminal or S-VIDEO terminal.
Auto*:
Select this setting to have the projector switch the video signal
system automatically in accordance with the input signal from the
video device that is connected to the VIDEO terminal or S-VIDEO
terminal.
NTSC / NTSC4.43 / PAL / PAL-M / PAL-N / PAL60 / SECAM:
Each setting selects the applicable video system. Use these
settings when you want to specify only one specific video signal
for the VIDEO terminal or S-VIDEO terminal.
Setting Name Input Setting Unit Description

44
Option Settings 1 Main Menu
Signal Name
Indicator
R C V H D U N
Single Use this sub-menu to specify whether or not the name of the
currently selected signal source should be displayed in the projected
image.
On*:
Select this option to turn on display of the name of the currently
selected signal source in the projected image.
Off:
Select this option to turn off display of the signal source name.
Restore Menu
Defaults
R C V H D U N
Source
Specific
Use this sub-menu to return all of the sub-menu items on the Input
Settings main menu to their initial default settings.
zRestoring menu defaults when there is no input signal will restore
defaults for the currently selected input source.
zNote that the “Signal Name Indicator” setting is always returned
to its initial default, regardless of the currently selected input
source.
Setting Name Input Setting Unit Description
Auto Keystone
Correction
R C V H D U N
Single Use this sub-menu to turn auto keystone correction on or off.
On*:
Select this option to turn on auto keystone correction.
Off:
Select this option to turn off auto keystone correction.
Auto Adjust
R N
Source
Specific
Use this sub-menu to select whether the projector should detect the
RGB input signal type (resolution, frequency) and adjust the
projection image accordingly (auto adjust).
1 :*
Select this option to turn on auto adjust.
2:
Select this option to turn on auto adjust when a 1360 × 768 or
1400 × 1050 signal is not projected correctly.
3:
Select this option to turn on auto adjust when a 1366 × 768 signal
is not projected correctly.
Off:
Select this option to turn off auto adjust.
Eco Mode
R C V H D U N
Single See “Eco Mode (Power Saving, Low Noise)” (page 25).
Auto White
Balance
R C V H D U N
Single Turns automatic white balance adjustment on or off.
On*:
White balance adjusted automatically. Can improve color
reproduction.
Off:
White balance not adjusted automatically.
Setting Name Input Setting Unit Description

45
Auto Power Off
R C V H D U N
Single Auto Power Off lets you specify the amount of time of projector
operation and input signal inactivity to be allowed before Auto Power
Off is triggered to turn off projector power automatically. Auto Power
Off can be disabled, if you want.
5 min, 10 min*, 15 min, 20 min, 30 min:
Time until Auto Power off is triggered.
Off:
Disables Auto Power Off.
Note
(for USB port model users)
Auto Power Off is disabled whenever the projector is doing
any one of the following.
– Projecting the Viewer initial screen
– Projecting the Wireless standby screen
– Using Wireless for a wireless LAN connection between
the projector and a computer or other terminal
Password
protection
R C V H D U N
Single See “Password Protection” on page 32.
Direct Power
On
R C V H D U N
Single Use this sub-menu to turn Direct Power On on or off. See “Direct
Power On” on page 29.
On:
Select this option to turn on Direct Power On.
Off*:
Select this option to turn off Direct Power On.
Language
R C V H D U N
Single Use this sub-menu to specify the language to use for messages,
setup menus, etc.
English / French / German / Italian / Spanish / Swedish /
Portuguese / Dutch / Norwegian / Polish / Finnish / Czech / Turkish /
Russian / Chinese (Simplified) / Chinese (Traditional) / Korean /
Japanese
Note
(for USB port model users)
If you have Portuguese, Dutch, Norwegian, Polish, Finnish,
Czech, Turkish, or Russian selected as the projector’s
language, selecting an external device connected to the
projector’s USB-A port as the input source will cause some
menus and messages to be displayed in English.
Restore Menu
Defaults
R C V H D U N
Single This sub-menu returns all of the sub-menu items on the Option
Settings 1 main menu to their initial default settings.
zThe language setting and the password are not returned to their
initial factory defaults.
zThe “Auto Adjust” item is returned to its initial default only when
RGB input is selected for the input source. All of the other items
are returned to their initial defaults regardless of the currently
selected input source.
Setting Name Input Setting Unit Description

46
Option Settings 2 Main Menu
Setting Name Input Setting Unit Description
Pointer
R C V H D U N
Single Use this sub-menu to specify the type of pointer that appears first
when you press the [POINTER] key.
Plug and Play
(USB port
models only)
R C V H D U N
Single Use this sub-menu to turn plug-and-play on or off.
On*:
Select this option to turn on plug-and-play. This will allow the
projector detect when an external USB device is connected and
make that device the input source automatically.
Off:
Select this option to turn off plug-and-play.
Note
zFor details about plug-and-play, see the “USB Function
Guide”.
zRegardless of the setting of this item, plug-and-play is
disabled while the projector is in the 3D input mode (“3D
Input Mode”, page 17) or “On” is selected for the “Option
Settings 2 J Interactive Pointer” setting.
Audio Out
R C V H D U N
Single Specifies whether the input audio signal should be output from the
projector’s built-in speaker or to the line output.
Speaker*:
Outputs the audio signal being input to the projector from the
speaker.
Line:
Outputs the audio signal being input to the projector from the
AUDIO OUT terminal.
High Altitude
R C V H D U N
Single Use this sub-menu to turn the high-altitude fan speed setting on or
off in accordance with the altitude of the area where you are using
the projector.
On:
Select this setting when using the projector in a high altitude
(1,500 to 3,000 meters above sea level) area where air is thin. This
setting increases cooling efficiency.
Off*:
Select this setting at normal altitudes (up to 1,500 meters).
Important!
Do not use this projector at altitudes greater than
3,000 meters above sea level.
Control Panel
Lock
R C V H D U N
Single Use this sub-menu to disable (lock) and enable (unlock) the
projector’s control panel.
On:
Select this setting to disable (lock) all projector key operations
except for [P] (Power).
Off*:
Select this setting to enable (unlock) projector key operations.
Custom Logo
Capture
R C V H D U
Single See “Custom Logo Capture” (page 30).
Produkt Specifikationer
| Mærke: | Casio |
| Kategori: | videoprojektorer |
| Model: | XJ-H2650 |
| Vekselstrømsindgangsspænding: | 100 - 240 V |
| Vekselstrømsindgangsfrekvens: | 50 - 60 Hz |
| Bredde: | 400 mm |
| Dybde: | 323 mm |
| Højde: | 106 mm |
| Vægt: | 7100 g |
| Brugervejledning: | Ja |
| Produktfarve: | Hvid |
| Indbygget skærm: | Ingen |
| Produkttype: | Standard kasteprojektor |
| Wi-Fi: | Ja |
| Naturligt aspektforhold: | 16:10 |
| 3D: | Ja |
| Indbyggede højttaler(e): | Ja |
| Format til analogt signal: | NTSC, PAL 60, PAL M, PAL N, SECAM |
| Udgangseffekt (RMS): | 10 W |
| Antal HDMI-porte: | 1 |
| DVI-port: | Ingen |
| Ethernet LAN-porte (RJ-45): | 1 |
| Antal USB 2.0-porte: | 2 |
| Ethernet LAN: | Ja |
| Wi-Fi-standarder: | 802.11b, 802.11g |
| Skærmvisning (OSD): | Ja |
| OSD-sprog: | CHI (SIMPL), CHI (TR), CZE, DEU, ENG, ESP, FIN, FRE, ITA, JPN, KOR, NOR, POL, POR, RUS, SWE, TUR |
| Strømforbrug (standby): | 0.4 W |
| Strømforbrug (typisk): | 430 W |
| Driftstemperatur (T-T): | 5 - 35 °C |
| Kabler inkluderet: | AC, AV, VGA |
| Sammensat videoindgang: | 1 |
| Understøttede billedformater: | 16:10 |
| Støjniveau: | 33 dB |
| Fjernbetjening inkluderet: | Ja |
| Strømkilde: | Vekselstrøm |
| Strømforbrug (strømbesparelse): | 350 W |
| Placering: | Desktop |
| Indbygget kortlæser: | Ingen |
| Full HD: | Ingen |
| HDMI: | Ja |
| Antal indbyggede højttalere: | 1 |
| Slot til kabellås: | Ja |
| Fokus: | Vejledning |
| Antal farver: | 16,78 millioner farver |
| Lyd (L, R) indgang: | 1 |
| Kontrastforhold (typisk): | 1400:1 |
| Antal VGA-porte (D-sub): | 3 |
| AC (strøm) indgang: | Ja |
| Kabellåseslids type: | Kensington |
| Zoom kapacitet: | Ja |
| Brændviddeområde: | - mm |
| Fjernbetjeningstype: | IR |
| Projektor lysstyrke: | 3500 ANSI lumens |
| Projektionsteknologi: | DLP |
| Projektor indbygget opløsning: | WXGA (1280x800) |
| Skærmstørrelse kompatibilitet: | 30 - 300 " |
| Projiceringsafstand: | 3.5 - 4.2 m |
| Trapezkorrektion, vertikal: | 30 ° |
| Forskydning: | 111 % |
| Zoom type: | Vejledning |
| Maksimal digital opløsning: | 1600 x 1200 pixel |
| RS-232-porte: | 1 |
| Levetid for lyskilde: | 20000 t |
| Lyskilde type: | Laser/LED hybrid |
| 3D Ready: | Ja |
| Antal af S-video-indgange: | 1 |
| Seriel grænsefladetype: | RS-232 |
| Støjniveau (økonomisk tilstand): | 28 dB |
Har du brug for hjælp?
Hvis du har brug for hjælp til Casio XJ-H2650 stil et spørgsmål nedenfor, og andre brugere vil svare dig
videoprojektorer Casio Manualer

7 Juli 2024
4 Juli 2024
4 Juli 2024
4 Juli 2024
4 Juli 2024
21 Maj 2024
18 Maj 2024
3 Maj 2024
19 April 2024
21 Marts 2024
videoprojektorer Manualer
- videoprojektorer Acer
- videoprojektorer Sony
- videoprojektorer Canon
- videoprojektorer Samsung
- videoprojektorer Panasonic
- videoprojektorer Philips
- videoprojektorer Lenco
- videoprojektorer OK
- videoprojektorer Derksen
- videoprojektorer LG
- videoprojektorer Mitsubishi
- videoprojektorer Sharp
- videoprojektorer Epson
- videoprojektorer Technaxx
- videoprojektorer Smart
- videoprojektorer HP
- videoprojektorer Sanyo
- videoprojektorer D-Link
- videoprojektorer Asus
- videoprojektorer Livoo
- videoprojektorer Toshiba
- videoprojektorer Pyle
- videoprojektorer Klarstein
- videoprojektorer Kodak
- videoprojektorer InFocus
- videoprojektorer Lenovo
- videoprojektorer Yamaha
- videoprojektorer Adj
- videoprojektorer Optoma
- videoprojektorer Hama
- videoprojektorer Hisense
- videoprojektorer Maxell
- videoprojektorer Smartwares
- videoprojektorer Blaupunkt
- videoprojektorer JVC
- videoprojektorer Hitachi
- videoprojektorer 3M
- videoprojektorer BenQ
- videoprojektorer Xiaomi
- videoprojektorer Aiptek
- videoprojektorer Krüger&Matz
- videoprojektorer Viewsonic
- videoprojektorer Dell
- videoprojektorer Vivitek
- videoprojektorer Polaroid
- videoprojektorer Bauer
- videoprojektorer Ricoh
- videoprojektorer NEC
- videoprojektorer Stairville
- videoprojektorer Reflecta
- videoprojektorer Nebula
- videoprojektorer Salora
- videoprojektorer Marantz
- videoprojektorer Overmax
- videoprojektorer ION
- videoprojektorer Renkforce
- videoprojektorer Christie
- videoprojektorer Sapphire
- videoprojektorer Genee World
- videoprojektorer Eurolite
- videoprojektorer Yaber
- videoprojektorer XGIMI
- videoprojektorer Kogan
- videoprojektorer Barco
- videoprojektorer Steren
- videoprojektorer Elmo
- videoprojektorer Vankyo
- videoprojektorer Celly
- videoprojektorer VAVA
- videoprojektorer Beghelli
- videoprojektorer AOpen
- videoprojektorer AAXA Technologies
- videoprojektorer Miroir
- videoprojektorer AWOL Vision
- videoprojektorer Panamorph
- videoprojektorer Mirabella Genio
Nyeste videoprojektorer Manualer

13 Marts 2025

26 Februar 2025

26 Februar 2025
25 Februar 2025
21 Februar 2025

21 Februar 2025
21 Februar 2025

18 Februar 2025

18 Februar 2025
18 Februar 2025