Christie Secure SUHD983-P Manual
Læs nedenfor 📖 manual på dansk for Christie Secure SUHD983-P (45 sider) i kategorien overvåge. Denne guide var nyttig for 13 personer og blev bedømt med 4.5 stjerner i gennemsnit af 2 brugere
Side 1/45

User Guide
020 001715 01- -
SUHD983-P LCD Panel

SUHD983-P LCD Panel 3
020 01 12 2019-001715- Rev. 1 ( - )
Copyright © 2019 Christie Digital Systems USA, Inc. All rights reserved.
Content
Package handling .......................................................................................................... 5
Unpacking the panel .............................................................................................................. 5
Handling and mounting guidelines for extreme narrow bezel series panels ................................... 6
Cleaning the panel ................................................................................................................ 6
Product documentation .......................................................................................................... 6
Related documentation ....................................................................................................... 7
Important safeguards ............................................................................................................ 7
General safety precautions .................................................................................................. 7
Introduction .................................................................................................................... 9
Description, Features and Benefits .......................................................................................... 9
Controls and Functions .............................................................................................. 10
Display at a Glance .............................................................................................................10
In/Output Panel .................................................................................................................. 12
Remote Control Unit ............................................................................................................ 13
Installation .................................................................................................................... 14
Remote Control ................................................................................................................... 14
Notes on Batteries ........................................................................................................... 14
Notes on Remote Control Operation ................................................................................... 14
Quick Setup ........................................................................................................................15
Installation Considerations ................................................................................................... 15
Mounting the Display ........................................................................................................... 16
Connections to the Display ................................................................................................... 16
Connecting a Control System or PC ....................................................................................... 17
IR Receiver Kit Connection ................................................................................................... 18
Connecting Source Components to the Display .......................................................................19
Turning ON the Power .......................................................................................................... 20
Avoiding Image Retention .................................................................................................... 21
Avoid Static Content ............................................................................................................ 21
Changing the OSD Language ................................................................................................ 21

Content
SUHD983-P LCD Panel 4
020 01 12 2019-001715- Rev. 1 ( - )
Copyright © 2019 Christie Digital Systems USA, Inc. All rights reserved.
Operation ...................................................................................................................... 22
Using the On-Screen Menus .................................................................................................. 22
Picture Settings .................................................................................................................. 24
Sound Settings ................................................................................................................... 27
OSD Settings ...................................................................................................................... 28
Setup Settings .................................................................................................................... 29
Multi-Window ...................................................................................................................... 30
Multi-Window Edit ............................................................................................................... 32
About ................................................................................................................................ 34
OPS (Open Plugable Standard) ............................................................................................. 34
Supported Timings .............................................................................................................. 36
Network Guide ............................................................................................................. 38
Connection Setting .............................................................................................................. 38
PC Setting .......................................................................................................................... 39
Ping Test ............................................................................................................................ 39
Connect Web server ............................................................................................................ 40
Maintenance and Troubleshooting ............................................................................ 42
Maintenance ....................................................................................................................... 42
Troubleshooting .................................................................................................................. 42

SUHD983-P LCD Panel 5
020 01 12 2019-001715- Rev. 1 ( - )
Copyright © 2019 Christie Digital Systems USA, Inc. All rights reserved.
Package handling
Learn how to remove the display panel from the packaging and how to handle the display panel.
Unpacking the panel
Learn how to remove the panel from the packaging.
Each LCD panel is packed inside a box carton. protect the panel during transportation, additional packing To
material has been placed within the carton.
1. Before unpacking, prepare a stable, level, and clean surface near a wall outlet.
2. Set the box in an upright position and pull out the white carton locks.
3. Lift up the top cover carton.
4. Remove the polybag before removing the display from the bottom tray carto n.
5. Remove any additional packaging, such as protective stickers, from the display panel.

Package handling
SUHD983-P LCD Panel 6
020 01 12 2019-001715- Rev. 1 ( - )
Copyright © 2019 Christie Digital Systems USA, Inc. All rights reserved.
Handling and mounting guidelines for extreme
narrow bezel series panels
Follow these best practices when handling and mounting extreme narrow bezel panels.
Notice. If not avoided, the following could result in property damage.
• When moving the panel, always use the handles. Do not carry the panel the frame. by
• Do not twist, bend, or tilt the panel.
• Do not apply excessive force to the sides of the bezel when mounting the panel or pushing into
its locked position.
• Always handle the display panel from the sides or handles.
Follow the following guidelines before removing the panel from the packaging.
• To verify normal operation before handling, power on the panel in the packaging.
• Always use the handles to pick up and carry the panel.
• Leave the panel in the box until the mount is on the wall and you are ready to install the panel.
• To avoid putting undue stress on the panel when mounted, make sure the mount is square, flat, and
level.
• Do not rest panels on top of a lower panel.
• When inserting the panel into the wall, pay close attention to adjacent panels.
• Make sure there is a minimum of 0.5 mm between mounted panels to allow for thermal expansion.
Cleaning the panel
Learn how to clean the display panel.
After disconnecting the power cable, wipe contaminated parts and each part of the product screen lightly with
a dry and soft cloth.
Do not use a liquid, spray cleaners, or any abrasive cleaners to clean the LCD panel.
Washing with various cleaning agents, brighteners, abrasives, waxes, benzene, alcohol, solvent, surface active
agent, may damage the surface of the product.
Product documentation
For installation, setup, and user information, see the product documentation available on the Christie website.
Read all instructions before using or servicing this product.
1. Access the documentation from the Christie website:
• Go to this URL: http://bit.ly/2CqwJJO .

Package handling
SUHD983-P LCD Panel 7
020 01 12 2019-001715- Rev. 1 ( - )
Copyright © 2019 Christie Digital Systems USA, Inc. All rights reserved.
• Scan the QR code using a QR code reader app on a smartphone or tablet.
2. On the product page, select the model and switch to the tab. Downloads
Related documentation
Additional information on the LCD panels is available in the following documents.
• SUHD -P LCD Panels Product Safety Guide (P/N: 020-001714- 983 XX)
• SUHD983- LCD Display Panels External Commands (P/N: 020-001766- P XX)
• SUHD983- LCD Panels Service Guide (P/N: 020-001723- P XX)
Important safeguards
To prevent personal injury and to protect the device from damage, read and follow these safety precautions.
General safety precautions
Observe these important safety rules to avoid personal injury or damage to the product.
Warning! If not avoided, the following could result in death or serious injury.
• Christie products must be installed and serviced by Christie qualified technicians.
• A minimum of four people or adequately rated lifting equipment are required to safely lift,
install, or move the product.
• SHOCK HAZARD! Only use the AC power cord provided with the product or recommended by
Christie.
• SHOCK HAZARD! Disconnect the product from AC before servicing, cleaning, removing
components, or opening any enclosure.
• FIRE HAZARD! Do not use a power cord that appears damaged.
• SHOCK HAZARD! Do not attempt operation if the AC supply is not within the specified voltage
and power range, as specified on the license label.
• SHOCK HAZARD! The AC power cord must be inserted into an outlet with grounding.
• Always connect the ground first to reduce shock hazard.
• TRIP OR FIRE HAZARD! Position all cables where they cannot contact hot surfaces, be pulled, be
tripped over, or damaged by persons walking on or objects rolling over the cables.
• Do not drop the panel (even a short distance), or apply pressure to the sides of the bezel. The
small size of the bezel, means there is reduced protection of the LCD glass and components.
Dropping the panel or applying unnecessary force to the sides of the bezel will result in
permanent damage.
• To avoid serious injury and/ or serious damage to the LCD panel, moving the panel requires at
least four people.
• Extreme care must be taken when pushing the mounted display into its locked position. Always
handle the display on the opposing corners of the frame to avoid direct contact with the LCD
glass.

Introduction
SUHD983-P LCD Panel 9
020 01 12 2019-001715- Rev. 1 ( - )
Copyright © 2019 Christie Digital Systems USA, Inc. All rights reserved.
Introduction
This User Guide describes how to install, set up and operate the SUHD983-P LCD Panels. Throughout this
manual, the SUHD983-P LCD Panels are referred to collectively as the “display.”
Christie has prepared this manual to help end users get the most out of the display.
Christie has made every effort to ensure that this manual is accurate as of the date it was printed. However,
because of ongoing product improvements and customer feedback, it may require updating without notice
from time to time.
Description, Features and Benefits
The SUHD983-P LCD Panels a 98” high performance UHD display featuring 500 nits brightness, advance input
connectivity and multi-source viewing
Key Features and Benefits
The display offers these key features and benefits:
• Ultra-HD Native Resolution: 3840 x 2160 (16:9 Native Aspect Ratio)
• High Brightness: Up to around 500 nits
• Ultra-wide 178-degree Viewing Angle
• Modern connectivity with Display Port 1.4, HDMI2.0 Inputs with High-bandwidth Digital Content
Protection(HDCP)
• Supported OPS(Open Pluggable Specification) slot : HDMI2.0, Display Port 1.2, RS232
Parts List
Your display is shipped with the following items. If any items are missing or damaged, please contact your
dealer or Customer Service.
• SUHD983-P LCD Panel
• IR Remote Controller Unit and battery (AAA Size x 2ea)
• RS232 Cable (Length 1800mm)
• HDMI Cable (Length 3000mm)
• External IR Receiver Kit
• Screw (M3x6) 2ea

Controls and Functions
SUHD983-P LCD Panel 10
020 01 12 2019-001715- Rev. 1 ( - )
Copyright © 2019 Christie Digital Systems USA, Inc. All rights reserved.
Controls and Functions
The appearance of actual components may differ from the image shown.
Display at a Glance
The illustration below shows the key display components, and the paragraphs that follow describe them.
①
①
①
①① MAIN POWER INPUT & SWITCH
Connects or disconnects the display panel from the AC power source.
100 to 240 VAC, 50/60Hz
②
②
②
②② IR RECEIVER / POWER STATUS LED
Power Status LED
On
No color
Standby
Red
Power Save
Red blink ing
③
③
③
③③ KEYPAD
You can use the keypad instead of the remote control unit to operate the on-screen display (OSD)
controls. The keypad operates as follows:
On/Standby ( )
Press once to toggle from standby mode to on mode.

Controls and Functions
SUHD983-P LCD Panel 11
020 01 12 2019-001715- Rev. 1 ( - )
Copyright © 2019 Christie Digital Systems USA, Inc. All rights reserved.
Press it again to return to standby mode.
▲ (SOURCE)
To select a source, press the button repeatedly (with no menus visible on-screen). ▲(SOURCE)
When a menu is visible on-screen, this button operates identically to the up-arrow..
▼
When a menu is visible on-screen, this button operates identically to the down- w button on the arro
display remote control unit.
+
Press this button to increase the volume.
When a menu is visible on-screen, this button operates identically to the right-arrow (or ) button SEL
on the display remote control unit.
-
Press this button to decrease the volume.
When a menu is visible on-screen, this button operates identically to the left-arrow button on the
display remote control unit.
M (MENU)
Press this button to display the on-screen display (OSD), or to exit the on-screen display (OSD) and
return to the previous one.

Controls and Functions
SUHD983-P LCD Panel 12
020 01 12 2019-001715- Rev. 1 ( - )
Copyright © 2019 Christie Digital Systems USA, Inc. All rights reserved.
In/Output Panel
The illustration below shows the display input panel.
①
①
①
①① RS232C In (3.5phi 3pole)
To connect RS232 input cable with control device.
②
②
②
②② Service In (USB A type)
To connect with USB device for software update.
③
③
③
③③ Ethernet In
To connect Ethernet input cable with control device
④
④
④
④④ IR In (3.5 phi 4pole)
To connect external IR receiver kit .
⑤⑥
⑤⑥
⑤⑥
⑤⑥⑤⑥ DP1~2 In
To connect DisplayPort 1.4 video & audio input.
⑦
⑦
⑦
⑦⑦ DVI D In –
To connect DVI video input.
⑧⑨
⑧⑨
⑧⑨
⑧⑨⑧⑨⑩
⑩
⑩
⑩⑩⑪
⑪
⑪
⑪⑪ HDMI 1 ~ 4 In
To connect HDMI 2.0 video & audio input.
⑫
⑫
⑫
⑫⑫ Audio In/Out (3.5 phi 3pole)
To connect audio stereo Input/output.
⑬
⑬
⑬
⑬⑬ OPS Slot (optional)
To connect OPS (Open Pluggable Specification) PC
⑭
⑭
⑭
⑭⑭ Internal Speaker (15W x 2ea)
①
①
①
①①
②
②
②
②②
③
③
③
③③
④
④
④
④④
⑤
⑤
⑤
⑤⑤
⑥
⑥
⑥
⑥⑥
⑧
⑧
⑧
⑧⑧
⑦
⑦
⑦
⑦⑦
⑨
⑨
⑨
⑨⑨
⑩
⑩
⑩
⑩⑩
⑪
⑪
⑪
⑪⑪
⑫
⑫
⑫
⑫⑫
⑬
⑬
⑬
⑬⑬
⑭
⑭
⑭
⑭⑭

Controls and Functions
SUHD983-P LCD Panel 13
020 01 12 2019-001715- Rev. 1 ( - )
Copyright © 2019 Christie Digital Systems USA, Inc. All rights reserved.
Remote Control Unit
The illustration below shows the display remote control, and the table that follows describes its functionality.
Label
Description
Turns on or off the product
SOURCE
Select a connected source device
▲
Move to the up menu
▼
Move to the down menu
SEL
Confirm a menu selection
◀ or -
Decreases the sound volume or Move to the left menu
▶ or +
Increases the sound volume or Move to the right menu
MENU
Opens the product on-screen menu system. When the menu
system is already open, pressing this button will select the
previous submenu
INFO
Provides source and resolution information
MUTE
Turns off the sound
1
Direct Key Preset 1
2
Direct Key Preset 2
3
Direct Key Preset 3
4
Direct Key Preset 4
5
Direct Key Preset 5
6
Direct Key Preset 6
7
Direct Key Preset 7
8
Direct Key Preset 8
9
Direct Key Preset 9
0
Direct Key Preset 10

Installation
SUHD983-P LCD Panel 14
020 01 12 2019-001715- Rev. 1 ( - )
Copyright © 2019 Christie Digital Systems USA, Inc. All rights reserved.
Installation
Installation must be performed by a qualified installation specialist.
Remote Control
The appearance of actual components may differ from the image shown.
To install batteries in the remote control:
1. Press the tab on the battery case and open it.
2. Insert the battery (1.5V AAA) into the battery case.
3. Insert the battery case until clack sounds.
Notes on Batter ies
• Make sure that the battery polarities are correct when installing the batteries.
• If you will not use the remote control for a long time, remove the batteries to avoid damage from
battery leakage.
• Do not expose batteries to excessive heat such as from sunshine, fire or the like.
Notes on Remote Control Operation
• Make sure that there is nothing obstructing the infrared beam between the remote control and the IR
receiver on the display.
• If the effective range of the remote control decreases, or it stops working, replace the batteries with
new ones.
• The remote control may fail to operate if the infrared remote sensor is exposed to bright sunlight or
fluorescent lighting.

Installation
SUHD983-P LCD Panel 15
020 01 12 2019-001715- Rev. 1 ( - )
Copyright © 2019 Christie Digital Systems USA, Inc. All rights reserved.
Quick Setup
Here is a quick overview of the display installation process. The following sections provide detailed
instructions.
Step
Procedure
More details
1
Mount the display(s) on a wall (optional)
Mounting the Display on page 16
2
Connect other external equipment to the display :
Automation/control system (RS232)
Connecting a Control System or
PC on page 17
3
Connect signal sources to the display
Connecting Source Components
to the Display on page 19
4
Apply power to the display
Turning ON the Power on page 20
5
Change the OSD language
Changing the OSD Language on
page 21
6
Display calibration: adjust the following for each input:
• Brightness
• Contrast
• Black level
• Color
• Sharpness
• Color temperature
Picture Settings on page 24
Installation Considerations
Proper installation of your display will ensure a satisfying viewing experience. Whether you are installing a
display temporarily or permanently, you should take the following into account to ensure your display
performs optimally.
Ambient Light
In general, minimize or eliminate light sources directed at the screen. Images may then appear washed out
and less vibrant if light, such as sunlight through a window or floodlight, directly strikes the screen.
Ambient Heat
Your display will perform best and achieve longer life if it is operated in normal office environment conditions.
The ambient temperature should be kept ow 40°C (95°F). Keep the display away from heating and/or air bel
conditioning vents.
Ventilation Considerations
The appearance of actual components may differ from the image shown.
If you are mounting the display in an enclosure, leave sufficient space on all sides between it and surrounding
objects, as shown below. This allows heat to disperse, maintaining the proper operating temperature.

Installation
SUHD983-P LCD Panel 16
020 01 12 2019-001715- Rev. 1 ( - )
Copyright © 2019 Christie Digital Systems USA, Inc. All rights reserved.
Mounting the Display
If you do decide to wall-mount the display, ensure that the wall-mount bracket is installed according to the
instructions included with it. The wall must be capable of supporting a multiple weight factor of three (3) times
the weight of the display, or be reinforced. We recommend that this be done by a custom installation
specialist.
• Use only the approved wall-mount kit designed for your display
• When mounting the SUHD983-P in portrait mode, connect signal cables before mounting the
panel.
Connections to the Display
The appearance of actual components may differ from the image shown.
Proceed as follows to connect the display to your video sources, external controller(s) if present and AC – –
power.
When connecting your equipment:
• Turn off all equipment before making any connections.
• Use the correct signal cables for each source.
• For best performance and to minimize cable clutter, use high-quality cables that are only as long as
necessary to connect two devices. (Don’t use a 20-foot cable when a 6-foot cable will suffice.)
Installation
SUHD983-P LCD Panel 18
020 01 12 2019-001715- Rev. 1 ( - )
Copyright © 2019 Christie Digital Systems USA, Inc. All rights reserved.
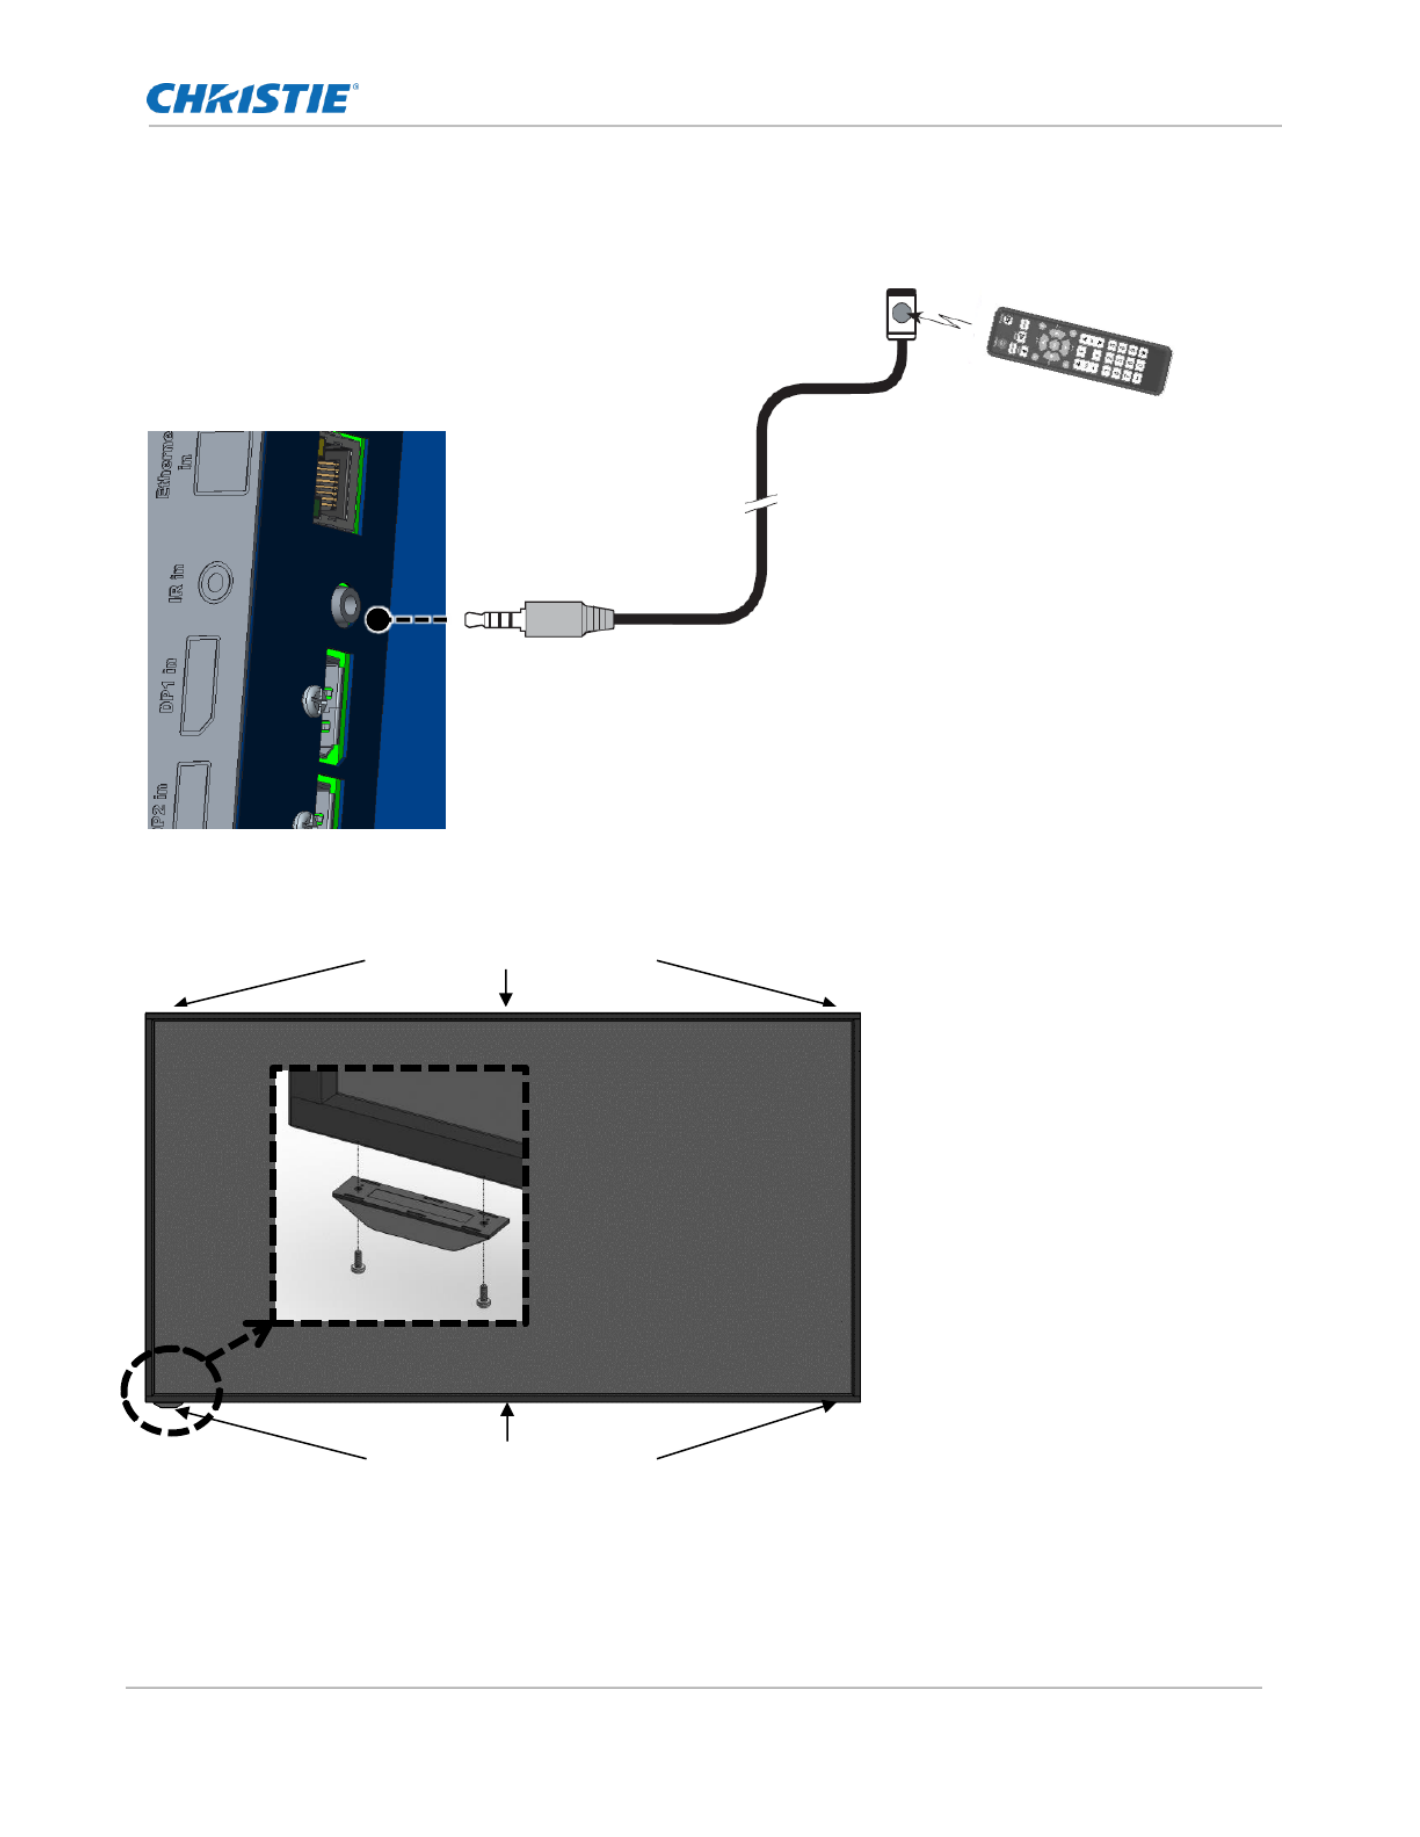
IR Receiver Kit Connection
Connect the provided External to the as shown below.IR Receiver Kit IR input
The included external remote sensor should be fixed to external remote sensor on the product by removing
two screws on the top/bottom of the left/middle/right of the front, and -using the screw. re
Screw holes
Screw holes

Installation
SUHD983-P LCD Panel 19
020 01 12 2019-001715- Rev. 1 ( - )
Copyright © 2019 Christie Digital Systems USA, Inc. All rights reserved.
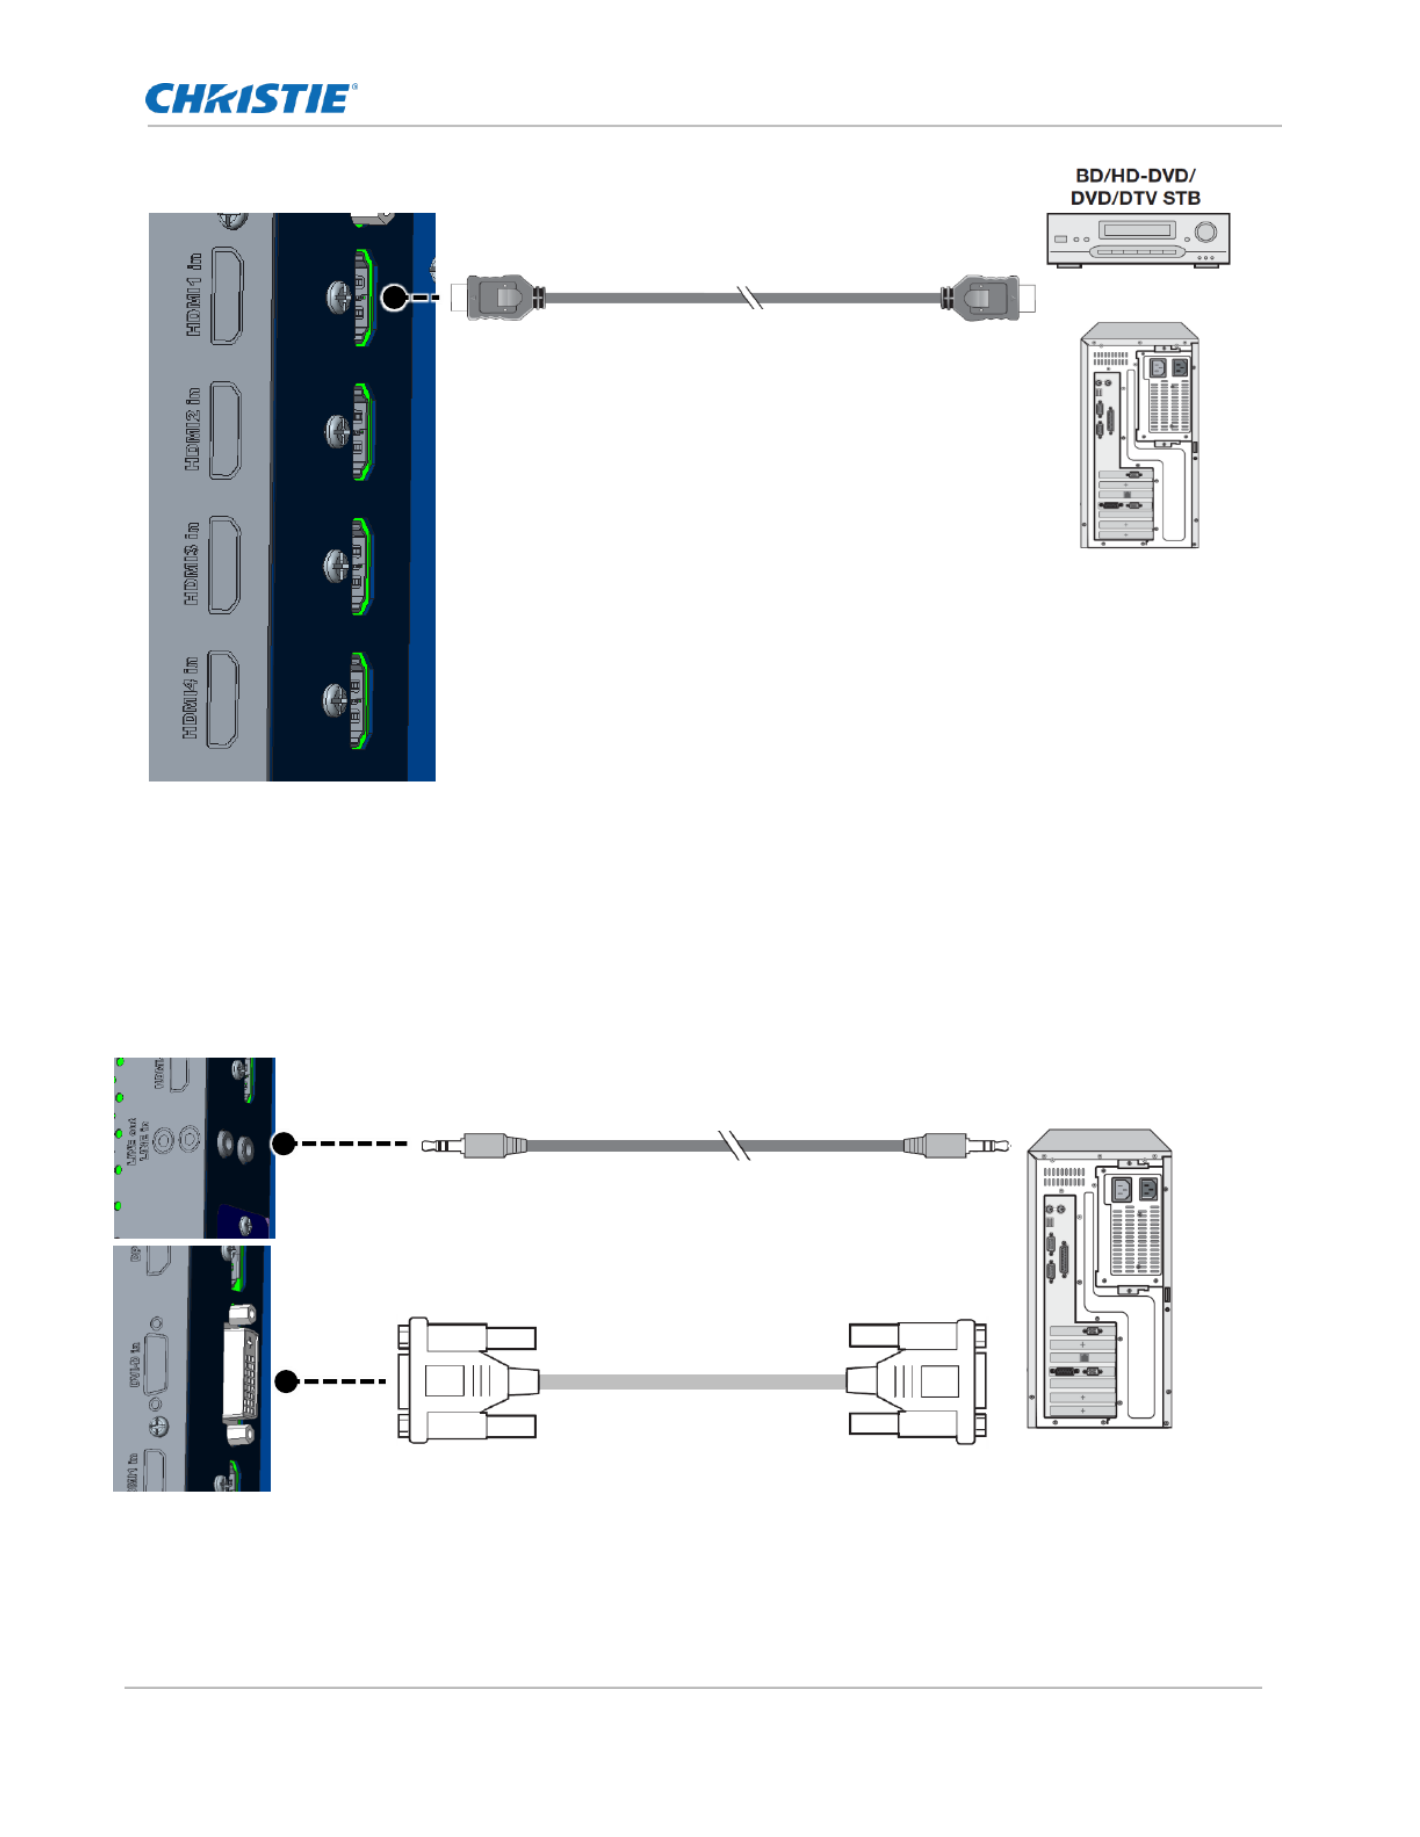
Connecting Source Components to the Display
Connect your video sources to the display as shown and described in the sections that follow.
DP(DisplayPort) Source Connection
Refer to on page for a list of compatible input signals. This display supports the VESA Supported Timings 36
Display Data Channel (DDC) standard. This standard provides “Plug and Play” capability; the display and a
VESA DDC-compatible computer communicate their setting requirements, allowing for quick and easy setup.
For Plug and Play to work correctly, you must turn on the display before you turn on the connected computer
Ensure the use of a certified Display Port cable. Otherwise, the picture may not display or a connection error
may occur.
HDMI Source Connections
Use the HDMI inputs whenever possible. This ensures the highest video quality because the signal is carried in
the digital domain throughout the entire signal path, from source component output into the display.
Refer on page for a list of compatible input signals. This display supports the VESA to Supported Timings 36
Display Data Channel (DDC) standard. This standard provides “Plug and Play” capability; the display and a
VESA DDC-compatible computer communicate their setting requirements, allowing for quick and easy setup.
For Plug and Play to work correctly, you must turn on the display before you turn on the connected computer.
DP Cable
(Sold Separately)
Installation
SUHD983-P LCD Panel 20
020 01 12 2019-001715- Rev. 1 ( - )
Copyright © 2019 Christie Digital Systems USA, Inc. All rights reserved.
Ensure the use of a certified HDMI cable. Otherwise, the picture may not display or a connection error may
occur.
DVI Source Connection
Connect a personal computer or other DVI source to the DVI input as shown below.
Refer to on page for a list of compatible input signals. Supported Timings 36
Turning the Power ON
1. Connect the power cable of the display into an outlet with AC 100-240V 50/60Hz.
2. Turn on the main AC power switch.
HDMI Cable
(Sold Separately)
DVI-D Cable
(Sold Separately)
Audio Cable
(Sold Separately)

Installation
SUHD983-P LCD Panel 21
020 01 12 2019-001715- Rev. 1 ( - )
Copyright © 2019 Christie Digital Systems USA, Inc. All rights reserved.
3. If the power indicator is green, the screen turns on automatically.
4. If the power indicator is red not green, press the power key on the remote control or on the keypad to
turn on the power.
Avoiding Image Retention
Follow the recommendations below to prolong the life of the display.
• Operate the Display Within Its Rated Ambient Environment
• Operating temperature: 5°C to 35°C (41°F to 95°F)
• Relative humidity: 80%, maximum.
Notice. If not avoided, the following could result in property damage.
• Do not display static (non-moving) content on the display for long periods of time. This may
cause image image retention, which is not covered under warranty.
Avoid Static Content
• Display dynamic (moving) images whenever possible consider using a screen saver to avoid displaying
static (fixed) video content continuously.
• Turn off the display when not in use.
Changing the OSD Language
Select the language used for the menus and on screen display.
1. Press the button to go to the menu. Menu
2. Select the from the main menu. OSD
3. Select . Language
4. Select the preferred language, and then exit the menu.

Operation
SUHD983-P LCD Panel 23
020 01 12 2019-001715- Rev. 1 ( - )
Copyright © 2019 Christie Digital Systems USA, Inc. All rights reserved.
Setup
Power Save
On
Off/On
Default : On
Power off Mode
Standby
Standby, Sleep, Deep Sleep
Default : Standby
Movie Mode
Off
Off / Low / Middle / High
Default : Off
Interface Select
Off
Off/RS232/OPS-RS232t
Default : RS232
FRC Mode
Free run
Lock/Free run
Default : Free run
CEC Control
O ff
Off/On
Default : Off
Factory Reset
Reset the all MENU
Multi-
Window
O ff
Off
-
Default : Off
Preset1
One /HDMI1
Preset2
Dual1 /HDMI1/HDMI2
Preset3
Dual2 /HDMI1/HDMI2
Preset4
Dual3 /HDMI1/HDMI2
Preset5
Dual4 /HDMI1/HDMI2
Preset6
Triple1/HDMI1/HDMI2/HDMI3
Preset7
Triple2/HDMI1/HDMI2/HDMI3
Preset8
Triple3/HDMI1/HDMI2/HDMI3
Preset9
Triple4/HDMI1/HDMI2/HDMI3
Preset10
Quad/HDMI1/HDMI2/
HDMI3/HDMI4
Preset11
One /DP1
Preset12
Dual1 /DP1/DP2
Preset13
Dual2 /DP1/DP2
Preset14
Dual3 /DP1/DP2
Preset15
Dual4 /DP1/DP2
Preset16
Triple1/DP1/DP2/HDMI1
Preset17
Triple2/DP1/DP2/HDMI1
Preset18
Triple3/DP1/DP2/HDMI1
Preset19
Triple4/DP1/DP2/HDMI1
Preset20
Quad/DP1/DP2/
HDMI1/HDMI2
Multi-
Window
Edit
Multi-Window Mode
Off/One/Dual1/Dual2/Dual3/Dual4/
Triple1/Triple2/Triple3Triple4/
Quad
Default : Off
Window1
DP1/DP2/HDMI1/HDMI2/HDMI3/
HDMI4/DVI/OPS-HDMI/OPS- DP
Window2
Window3
Window4
LAN
Setting
DHCP
O ff
Off/On
Default : Off
IP Address
192.168.10.10
Default : 192.168.10.10
Operation
SUHD983-P LCD Panel 25
020 01 12 2019-001715- Rev. 1 ( - )
Copyright © 2019 Christie Digital Systems USA, Inc. All rights reserved.
Picture Mode
Select from the Picture Picture Mode Settings menu, then press or to select one of two image quality presets ▲ ▼
(Standard or Dynamic) depending on the type of program material you are viewing. These presets
automatically adjust the other image settings for optimal image quality. Or, select User to adjust Brightness,
Contrast and other settings manually.
Brightness
The Brightness control changes the apparent brightness of the displayed image.
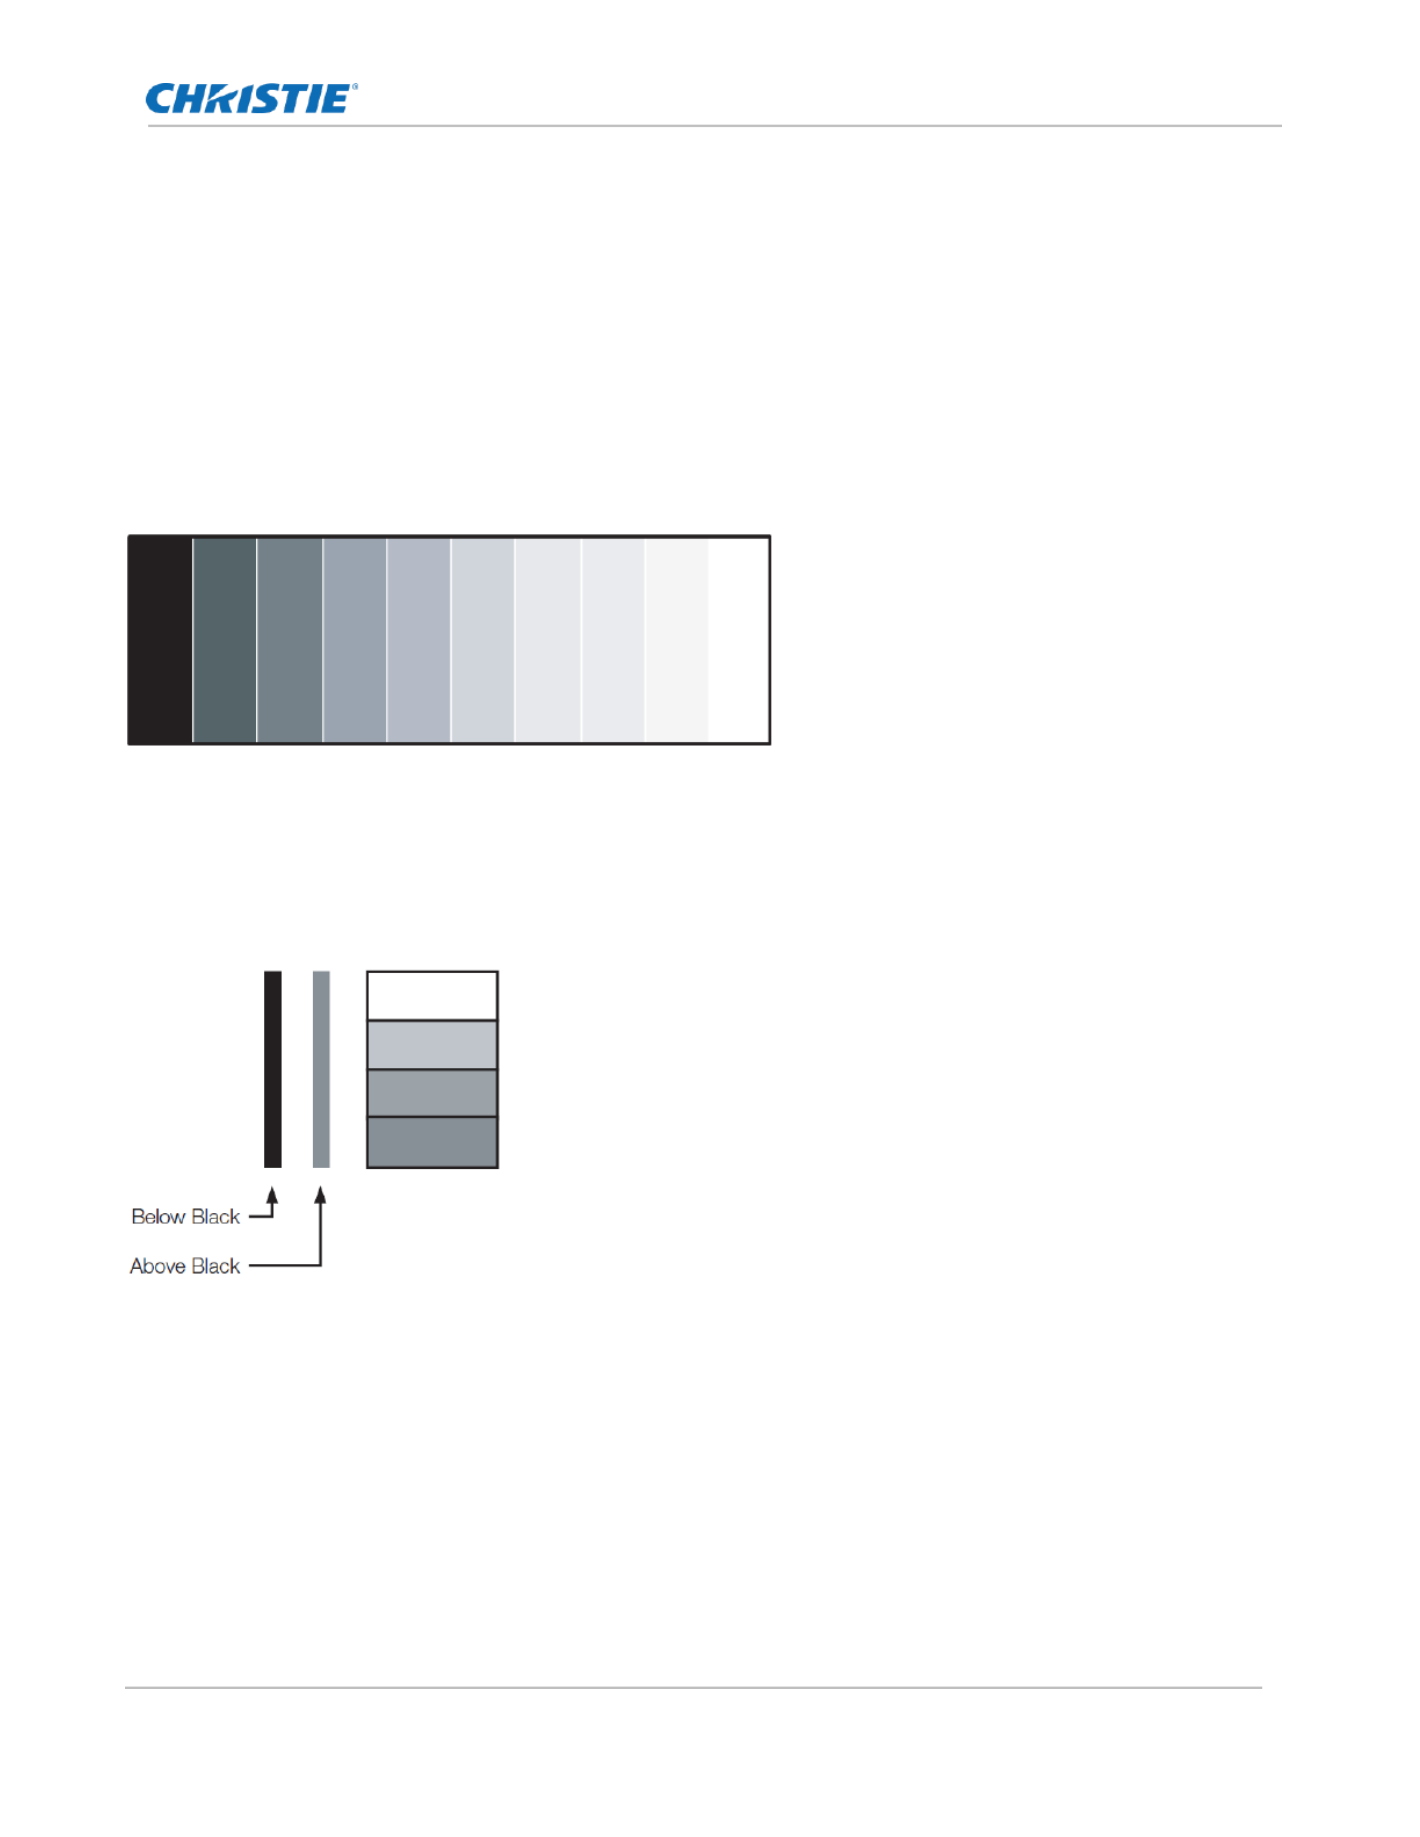
Contrast
On your external test pattern source, select a stepped, gray-bar pattern like the one shown below.
Select and press or to adjust the contrast to a point just below which the white rectangle starts Contrast ▲ ▼
to increase in size.
Black Level
On your external test pattern source, select a PLUGE pattern. (PLUGE is an acronym for “Picture Line- Up
Generation Equipment.”)
PLUGE patterns vary but generally consist of some combination of black, white and gray areas against a black
background. The example above includes two vertical bars and four shaded boxes.
Select from the Picture Settings menu and press or to adjust th black level so that: Black Level ▲ ▼ e
• • The darkest black bars disappear into the background.
• • The dark gray areas are barely visible.
• • The lighter gray areas are clearly visible.
• • The white areas are a comfortable level of true white.
• • The image contains only black, gray and white (no color).
Produkt Specifikationer
| Mærke: | Christie |
| Kategori: | overvåge |
| Model: | Secure SUHD983-P |
Har du brug for hjælp?
Hvis du har brug for hjælp til Christie Secure SUHD983-P stil et spørgsmål nedenfor, og andre brugere vil svare dig
overvåge Christie Manualer

3 Januar 2025
26 August 2024
26 August 2024
26 August 2024
26 August 2024
26 August 2024
26 August 2024
26 August 2024
26 August 2024
26 August 2024
overvåge Manualer
- overvåge Bosch
- overvåge SilverCrest
- overvåge Acer
- overvåge Denver
- overvåge TCL
- overvåge Sony
- overvåge Samsung
- overvåge Panasonic
- overvåge Philips
- overvåge Vitek
- overvåge IFM
- overvåge LG
- overvåge Pioneer
- overvåge Mitsubishi
- overvåge Sharp
- overvåge Behringer
- overvåge Emos
- overvåge Epson
- overvåge Neumann
- overvåge Smart
- overvåge HP
- overvåge AOC
- overvåge Sanyo
- overvåge Akuvox
- overvåge Asus
- overvåge Gigabyte
- overvåge Toshiba
- overvåge Pyle
- overvåge InFocus
- overvåge Lenovo
- overvåge Asrock
- overvåge Yamaha
- overvåge Abus
- overvåge Optoma
- overvåge Da-Lite
- overvåge Westinghouse
- overvåge Element
- overvåge Thomson
- overvåge Hyundai
- overvåge Yorkville
- overvåge JBL
- overvåge Hisense
- overvåge DataVideo
- overvåge RCF
- overvåge Maxell
- overvåge Hannspree
- overvåge Omron
- overvåge Blaupunkt
- overvåge JVC
- overvåge Honeywell
- overvåge Hitachi
- overvåge Medion
- overvåge Citizen
- overvåge Haier
- overvåge Huawei
- overvåge König
- overvåge ProXtend
- overvåge Deltaco
- overvåge NewStar
- overvåge Alpine
- overvåge 3M
- overvåge Festo
- overvåge Danfoss
- overvåge Sunny
- overvåge BlueBuilt
- overvåge Tripp Lite
- overvåge BenQ
- overvåge Packard Bell
- overvåge Mad Catz
- overvåge Jensen
- overvåge Plantronics
- overvåge Xiaomi
- overvåge Peerless-AV
- overvåge Viewsonic
- overvåge Dell
- overvåge Schneider
- overvåge ELO
- overvåge Fujitsu
- overvåge Cooler Master
- overvåge Zalman
- overvåge PreSonus
- overvåge MSI
- overvåge Ricoh
- overvåge NEC
- overvåge Godox
- overvåge APC
- overvåge CTOUCH
- overvåge Ikan
- overvåge AJA
- overvåge GlobalTronics
- overvåge Velleman
- overvåge Marshall
- overvåge JUNG
- overvåge Fostex
- overvåge Salora
- overvåge Focal
- overvåge Genelec
- overvåge KRK
- overvåge NZXT
- overvåge Newline
- overvåge Hikvision
- overvåge Samson
- overvåge Yealink
- overvåge Allen & Heath
- overvåge Midas
- overvåge Simrad
- overvåge Renkforce
- overvåge Marshall Electronics
- overvåge Caliber
- overvåge I3-Technologies
- overvåge Viessmann
- overvåge Brandson
- overvåge Orion
- overvåge QSC
- overvåge BOOX
- overvåge Hanwha
- overvåge LaCie
- overvåge ARRI
- overvåge Onyx
- overvåge ITek
- overvåge Prowise
- overvåge Seiki
- overvåge Ozone
- overvåge M-Audio
- overvåge Bauhn
- overvåge V7
- overvåge Provision-ISR
- overvåge Vorago
- overvåge Atomos
- overvåge EMachines
- overvåge Eurolite
- overvåge Mackie
- overvåge ACTi
- overvåge Faytech
- overvåge Krom
- overvåge Voxicon
- overvåge Chauvet
- overvåge Shure
- overvåge Vimar
- overvåge Continental Edison
- overvåge Dynaudio
- overvåge Iiyama
- overvåge PeakTech
- overvåge Dahua Technology
- overvåge AG Neovo
- overvåge Speco Technologies
- overvåge Prestigio
- overvåge Joy-It
- overvåge Boss
- overvåge IStarUSA
- overvåge Crestron
- overvåge SPL
- overvåge Kogan
- overvåge Barco
- overvåge SMART Technologies
- overvåge Insignia
- overvåge LC-Power
- overvåge AMX
- overvåge Tannoy
- overvåge Qian
- overvåge Xoro
- overvåge HyperX
- overvåge TVLogic
- overvåge Geovision
- overvåge Postium
- overvåge Planar
- overvåge Ernitec
- overvåge Bearware
- overvåge Sonifex
- overvåge TV One
- overvåge AVer
- overvåge Alienware
- overvåge Aputure
- overvåge Maxdata
- overvåge Sunstech
- overvåge Marquant
- overvåge Kubo
- overvåge Swissonic
- overvåge IHealth
- overvåge Peaq
- overvåge Avocor
- overvåge Interlogix
- overvåge Eizo
- overvåge Kindermann
- overvåge EverFocus
- overvåge POSline
- overvåge Peerless
- overvåge Monoprice
- overvåge Promethean
- overvåge Odys
- overvåge HKC
- overvåge Ibm
- overvåge Drawmer
- overvåge Iadea
- overvåge Advantech
- overvåge Kali Audio
- overvåge Ganz
- overvåge Extron
- overvåge Legamaster
- overvåge Ikegami
- overvåge Pelco
- overvåge Approx
- overvåge Belinea
- overvåge Palmer
- overvåge Adam
- overvåge GVision
- overvåge Posiflex
- overvåge Jay-tech
- overvåge MicroTouch
- overvåge X-Rite
- overvåge EKO
- overvåge IBoardTouch
- overvåge Mirai
- overvåge Elite Screens
- overvåge Hollyland
- overvåge Mitsai
- overvåge Skytronic
- overvåge COMMBOX
- overvåge Yiynova
- overvåge Lilliput
- overvåge LightZone
- overvåge AOpen
- overvåge Planet Audio
- overvåge EC Line
- overvåge Datacolor
- overvåge Fluid
- overvåge Atlona
- overvåge HELGI
- overvåge Desview
- overvåge Syscom
- overvåge Allsee
- overvåge Alogic
- overvåge Night Owl
- overvåge ProDVX
- overvåge Varad
- overvåge DoubleSight
- overvåge CTL
- overvåge Game Factor
- overvåge Nixeus
- overvåge Chimei
- overvåge Blue Sea
- overvåge AMCV
- overvåge Hamlet
- overvåge Wyse - Dell
- overvåge SWIT
- overvåge Feelworld
- overvåge GeChic
- overvåge Oecolux
- overvåge ADS-TEC
- overvåge Casalux
- overvåge Positivo
- overvåge Jupiter
- overvåge Transvideo
- overvåge Innocn
- overvåge KeepOut
- overvåge Shimbol
- overvåge Raysgem
- overvåge Motrona
- overvåge AORUS
- overvåge Elvid
- overvåge Wohler
- overvåge Portkeys
- overvåge Mimo Monitors
- overvåge Gamber-Johnson
- overvåge Enttec
- overvåge American Dynamics
- overvåge AIS
- overvåge Eve Audio
- overvåge Wortmann AG
- overvåge Viotek
- overvåge Vidi-Touch
- overvåge KTC
- overvåge CoolerMaster
- overvåge Atlantis Land
- overvåge HEDD
- overvåge Colormetrics
- overvåge Monkey Banana
- overvåge SmallHD
- overvåge UPERFECT
- overvåge Freedom Scientific
- overvåge OSEE
- overvåge CSL
- overvåge Mybeo
- overvåge IOIO
- overvåge DTEN
- overvåge Cocopar
- overvåge Titan Army
- overvåge Delvcam
- overvåge Xenarc
- overvåge Wimaxit
Nyeste overvåge Manualer

4 April 2025
5 Marts 2025
5 Marts 2025

27 Februar 2025

21 Februar 2025

18 Februar 2025
11 Februar 2025
11 Februar 2025
11 Februar 2025
11 Februar 2025