Crestron UC-P110-T Manual
Crestron
Videokonferencesystem
UC-P110-T
Læs nedenfor 📖 manual på dansk for Crestron UC-P110-T (62 sider) i kategorien Videokonferencesystem. Denne guide var nyttig for 24 personer og blev bedømt med 4.5 stjerner i gennemsnit af 2 brugere
Side 1/62

UC UC-P -HONE T & - -T- PHONE PLUS
Crestron Flex VoIP Desk Phones for
Microsoft Teams® Software
Supplemental Guide
Crestron Electronics, Inc.

Crestron product development software is licensed to Crestron dealers and Crestron Service Providers (CSPs) under a
limited non- -exclusive, non transferable Software Development Tools License Agreement. Crestron product operating system
software is licensed to Crestron dealers, CSPs, and end-users -under a separate End User License Agreement. Both of these
Agreements can be found on the Crestron website at www.crestron.com/legal/software_license_agreement.
The product warranty can be found at www.crestron.com/legal/sales- - -terms conditions warranties.
The specific patents that cover Crestron products are listed at www.crestron.com/legal/patents.
Certain Crestron products contain open source software. For specific information, visit www.crestron.com/legal/open-
source-software.
Crestron, the Crestron logo, Crestron XiO Cloudand are either trademarks or registered trademarks of Crestron Electronics,
Inc. in the United States and/or other countries. Microsoft Teams is of Microsoft either a trademark red trademark or registe
Corporation in the United States and/or other countries. Other trademarks, registered trademarks, and trade names may be
used in this document to refer to either the entities claiming the marks and names or their products. Crestron disclaims any
proprietary interest in the marks and names of others. Crestron is not responsible for errors in typography or photography.
This document was written by the Technical Publications department at Crestron.
©2019 Crestron Electronics, Inc.

Supplemental G
Supplemental G
Supplemental G
Supplemental GSupplemental Guide
uide
uide
uide uide –
–
–
– –
i
i
i
ii
DOC
DOC
DOC
DOCDOC.
.
.
. . 8413A
8413A
8413A
8413A8413A Contents
Contents
Contents
ContentsContents
•
•
•
••
Contents
Contents
Contents
ContentsContents
Introducti
Introducti
Introducti
IntroductiIntroduction
on
on
onon 1
Deploym
Deploym
Deploym
DeploymDeployment
ent
ent
entent 1
Requir
Requir
Requir
RequirRequirement
ement
ement
ementements
s
s
ss 2
IT Administrator .............................................................................................................. 2
End User............................................................................................................................ 2
Conf
Conf
Conf
ConfConfigura
igura
igura
iguraiguration
tion
tion
tiontion 2
Phone Settings ................................................................................................................ 2
Set Language 3.....................................................................................................................................................
Time & Date 4.........................................................................................................................................................
Display ...................................................................................................................................................................... 5
Phone Lock ............................................................................................................................................................ 6
Bluetooth® 7.............................................................................................................................................................
Debug ....................................................................................................................................................................... 8
About ........................................................................................................................................................................ 8
Network (Admin Only) ................................................................................................................................ 9
Debug (Admin Only) ................................................................................................................................... 13
Admin Password (Admin Only) ......................................................................................................... 15
Web Configuration ....................................................................................................... 17
Connect to the Device ............................................................................................................................... 17
Log Out from the Device ........................................................................................................................18
Status ...................................................................................................................................................................... 19
Network ................................................................................................................................................................. 19
Features ................................................................................................................................................................ 24
Settings ................................................................................................................................................................. 27
Security .................................................................................................................................................................. 36
Crest
Crest
Crest
CrestCrestron X
ron X
ron X
ron Xron XiO Clo
iO Clo
iO Clo
iO CloiO Cloud Servic
ud Servic
ud Servic
ud Servicud Service
e
e
ee 39
Claim a Single Device ................................................................................................... 39
Claim Multiple Devices................................................................................................ 40
Startup & Sig
Startup & Sig
Startup & Sig
Startup & SigStartup & Sign In
n In
n In
n Inn In 43
Phone
Phone
Phone
Phone Phone Operation
Operation
Operation
OperationOperation 46
Physical Description ..................................................................................................... 46
Sign In .............................................................................................................................. 47
The Teams Phone Display ........................................................................................... 49
Calls Screen ....................................................................................................................................................... 50

ii
ii
ii
iiii Supplemental Guide
Supplemental Guide
Supplemental Guide
Supplemental Guide Supplemental Guide
•
•
•
•• Con
Con
Con
ConContents
tents
tents
tentstents
–
–
–
– –
D
D
D
DDOC.
OC.
OC.
OC.OC.
841
841
841
8418413A
3A
3A
3A3A
Meetings Screen ............................................................................................................................................. 53
Voicemail ..............................................................................................................................................................55
Micro
Micro
Micro
MicroMicrosoft
soft
soft
softsoft Teams
Teams
Teams
Teams Teams Rollout
Rollout
Rollout
Rollout Rollout 56

Supplemental G
Supplemental G
Supplemental G
Supplemental GSupplemental Guide
uide
uide
uide uide –
–
–
– –
-
-
-
-- -
-
-
-- -
-
-
-- -T
-T
-T
-T-T-
-
-
--
1
1
1
1 1
DOC
DOC
DOC
DOCDOC.
.
.
. . 8413A
8413A
8413A
8413A8413A UC
UC
UC
UCUC PHONE
PHONE
PHONE
PHONEPHONE T &
T &
T &
T &T & UC
UC
UC
UC UC PH
PH
PH
PHPHON
ON
ON
ONONE
E
E
EE PL
PL
PL
PLPLUS
US
US
US US •
•
•
••
UC- -PHONE T & UC- -T- PHONE PLUS
Crestron Flex VoIP Desk Phones for
Microsoft Teams® Software
Introduction
The PLUS UC- -PHONE T & UC- -T-PHONE Crestron Flex VoIP Desk Phones for Microsoft
Teams are® - -T - -software UC(respectively sold as P100 & UC P110 T) designed for use
with the Microsoft Teams intelligent communications platform. These phones enable
superior voice calling and full-duplex hands-free conferencing in a stylish desktop
package. A consistent user experience at every desk, workstation, and meeting space is
provided via the familiar and intuitive Microsoft Teams touch screen UI, affording simple
operation with comprehensive call and contact management features, built-in
calendaring, and one- . touch meeting joins
This supplemental guide discusses the requirements and configuration instructions for
the UC-PHONE- - -T- . T & UC PHONE PLUS phones For information on installing these
phones, refer to the UC- -S -PHONE /UC PHONE-T 8 DO Guide (Doc 835 ) and the
UC-PHONE-S- - -T- PLUS/UC PHONE PLUS DO Guide (Doc 8359) at
www.crestron.com/manuals.
Deployment
To make the most of Microsoft Teams, refer to https://docs.microsoft.com/en-
us/MicrosoftTeams/teams-overview for recommendations on deploying Microsoft
Teams throughout an organization.

2
2
2
22 -
-
-
-- -
-
-
-- -
-
-
-- -T
-T
-T
-T-T-
-
-
--
•
•
•
••
UC
UC
UC
UCUC PH
PH
PH
PHPHONE
ONE
ONE
ONEONE T &
T &
T &
T &T & UC
UC
UC
UC UC PH
PH
PH
PHPHONE
ONE
ONE
ONEONE PLU
PLU
PLU
PLUPLUS
S
S
S S Supplem
Supplem
Supplem
SupplemSupplemental G
ental G
ental G
ental Gental Guide
uide
uide
uide uide –
–
–
– –
DOC.
DOC.
DOC.
DOC.DOC.
8413A
8413A
8413A
8413A8413A
Requirements
IT Administrator
The IT administrator should have the following knowledge and skills:
• General Skills
− IP Networking
− Basic phone terminology
• Crestron- specific skills
− Crestron XiO Cloud™ service (Cloud Provisioning) helps an administrator
quickly manage all devices within an an environment. The platform allows
administrator a to add devices to system in order to manage device status,
change settings, update firmware, set up new users, manage access levels
and manage automated alerts. For training, visit
https://www.crestron.com/en- -US/Support/Tools/Applications/Training
Online-Course?id=31.
NOTE:
NOTE:
NOTE:
NOTE:NOTE:
You must be logged in to your Crestron.com account to access the
training course.
End User
The end user should have the following:
• A Microsoft Teams account
• Knowledge of Microsoft Teams
Configuration
The phone is configured with the touch screen ( phone settings) and a computer with
web browser software (device settings) . When he using a computer, t phone and
computer must be connected to a commonly accessible network.
Phone Settings
T he device’s phone settings can be used view information about the device, adjust the to
volume, set the language, view the privacy policy, and configure the device.
To access the partner settings, tap on the Microsoft Teams start screen. The Phone
settings menu is displayed.
NOTE:
NOTE:
NOTE:
NOTE:NOTE:
Partner settings can also be accessed from the main application. To access the
partner settings, tap , Settings
Settings
Settings
SettingsSettings, and then Device
Device
Device
DeviceDevice
Se
Se
Se
SeSettings
ttings
ttings
ttingsttings.

Supplemental G
Supplemental G
Supplemental G
Supplemental GSupplemental Guide
uide
uide
uide uide –
–
–
– –
-
-
-
-- -
-
-
-- -
-
-
-- -T
-T
-T
-T-T-
-
-
--
3
3
3
3 3
DOC
DOC
DOC
DOCDOC.
.
.
. . 8413A
8413A
8413A
8413A8413A UC
UC
UC
UCUC PHONE
PHONE
PHONE
PHONEPHONE T &
T &
T &
T &T & UC
UC
UC
UC UC PH
PH
PH
PHPHON
ON
ON
ONONE
E
E
EE PL
PL
PL
PLPLUS
US
US
US US •
•
•
••
Phone
Phone
Phone
PhonePhone Settings
Settings
Settings
SettingsSettings
(
(
(
((Language screen shown)
Language screen shown)
Language screen shown)
Language screen shown)Language screen shown)
To exit the Phone settings menu, tap ←.
Set Language
The currently selected language is displayed in the language field.
To select a new language:
1. T ap Lang
Lang
Lang
LangLanguage
uage
uage
uageuage. A list of languages will display on the right side of the screen.
Langu
Langu
Langu
LanguLanguage
age
age
ageage
2. to Tap a language . select it
3. A message will display asking to confirm the change. Tap OK
OK
OK
OKOK to change the
language, or tap CANCEL
CANCEL
CANCEL
CANCELCANCEL to cancel.

4
4
4
44 -
-
-
-- -
-
-
-- -
-
-
-- -T
-T
-T
-T-T-
-
-
--
•
•
•
••
UC
UC
UC
UCUC PH
PH
PH
PHPHONE
ONE
ONE
ONEONE T &
T &
T &
T &T & UC
UC
UC
UC UC PH
PH
PH
PHPHONE
ONE
ONE
ONEONE PL
PL
PL
PLPLUS
US
US
US US Supplem
Supplem
Supplem
SupplemSupplemental G
ental G
ental G
ental Gental Guide
uide
uide
uide uide –
–
–
– –
DOC.
DOC.
DOC.
DOC.DOC.
8413A
8413A
8413A
8413A8413A
Time & Date
Tap Time
Time
Time
Time Time & Date
& Date
& Date
& Date& Date to configure the settings the phone will use for determining the time
and date. Settings are displayed on the right side of the screen.
Time & Date
Time & Date
Time & Date
Time & DateTime & Date
Type
Tap Type
Type
Type
TypeType and select whether manual settings or an SNTP (time) server will be used.
• Manual Settings
Manual Settings
Manual Settings
Manual SettingsManual Settings
When choosing , tap on the following fields and set as needed
Manual Settings
Manual Settings
Manual Settings
Manual SettingsManual Settings .
− Date
Date
Date
DateDate:
:
:
:: Touch and drag up or down to scroll through settings for year, month,
and date. Tap OK
OK
OK
OKOK when done or tap CANCEL
CANCEL
CANCEL
CANCELCANCEL to cancel.
− Time:
Time:
Time:
Time:Time: Touch and drag up or down to scroll through settings for hour, minutes,
seconds, and AM or PM. Tap OK
OK
OK
OKOK when done or tap CANCEL
CANCEL
CANCEL
CANCELCANCEL to cancel.
− DHCP
DHCP
DHCP
DHCPDHCP
Time
Time
Time
TimeTime:
:
:
:: s Select whether the phone update time with the offset time
offered by the DHCP server.
− Date & T
Date & T
Date & T
Date & TDate & Time Format:
ime Format:
ime Format:
ime Format:ime Format: Select the formats for the date (WWW M
WWW M
WWW M
WWW MWWW MMM DD
MM DD
MM DD
MM DDMM DD, DD
DD
DD
DDDD-
-
-
--
MMM
MMM
MMM
MMMMMM MM
MM
MM
MMMM
-
-
-
-- -
-
-
--
YY
YY
YY
YYYY YYYY
YYYY
YYYY
YYYYYYYY, -
-
-
--DD
DD
DD
DDDD, DD/MM/YYYY
DD/MM/YYYY
DD/MM/YYYY
DD/MM/YYYYDD/MM/YYYY, MM/DD
MM/DD
MM/DD
MM/DDMM/DD/YY
/YY
/YY
/YY/YY, DD MMM YYYY
DD MMM YYYY
DD MMM YYYY
DD MMM YYYYDD MMM YYYY, or
WWW D
WWW D
WWW D
WWW DWWW DD MMM
D MMM
D MMM
D MMMD MMM) and time (12 Ho
12 Ho
12 Ho
12 Ho12 Hour
ur
ur
urur or 24 H
24 H
24 H
24 H24 Hour
our
our
ourour). Tap OK
OK
OK
OKOK when done or tap
CANCEL
CANCEL
CANCEL
CANCELCANCEL to cancel.
• SNTP Setting
SNTP Setting
SNTP Setting
SNTP SettingSNTP Settings
s
s
ss
When choosing , tap on the following fields and set as needed.
SNTP
SNTP
SNTP
SNTPSNTP Settings
Settings
Settings
SettingsSettings
− Time Zone:
Time Zone:
Time Zone:
Time Zone:Time Zone: Touch and drag up or down to scroll through the amount of time
difference from Greenwich Mean Time (GMT). Tap OK
OK
OK
OKOK when done or tap
CANCEL
CANCEL
CANCEL
CANCELCANCEL to cancel.
NOTE:
NOTE:
NOTE:
NOTE:NOTE:
Some settings will prompt for locale selection after selecting the time
difference. Tap the desired locale and tap OK
OK
OK
OKOK.
Supplemental G
Supplemental G
Supplemental G
Supplemental GSupplemental Guide
uide
uide
uide uide –
–
–
– –
-
-
-
-- -
-
-
-- -
-
-
-- -T
-T
-T
-T-T-
-
-
--
5
5
5
5 5
DOC
DOC
DOC
DOCDOC.
.
.
. . 8413A
8413A
8413A
8413A8413A UC
UC
UC
UCUC PHONE
PHONE
PHONE
PHONEPHONE T &
T &
T &
T &T & UC
UC
UC
UC UC PH
PH
PH
PHPHON
ON
ON
ONONE
E
E
EE PL
PL
PL
PLPLUS
US
US
US US •
•
•
••
− NTP Se
NTP Se
NTP Se
NTP SeNTP Ser
r
r
rrver
ver
ver
verver 1:
1:
1:
1: 1: . Enter the URL of the primary time server and tap Next
Next
Next
NextNext
− NTP Server 2:
NTP Server 2:
NTP Server 2:
NTP Server 2:NTP Server 2: Enter the URL of the secondary time server and tap Next
Next
Next
NextNext.
− Dayli
Dayli
Dayli
DayliDaylight S
ght S
ght S
ght Sght Savi
avi
avi
aviaving:
ng:
ng:
ng:ng: Tap Disabled
Disabled
Disabled
DisabledDisabled, Enabled
Enabled
Enabled
EnabledEnabled, or Aut
Aut
Aut
AutAuto
o
o
oomat
mat
mat
matmatic
ic
ic
icic. Tap OK
OK
OK
OKOK when done or
tap CANCEL
CANCEL
CANCEL
CANCELCANCEL to cancel.
− Location:
Location:
Location:
Location:Location: Select the location of the phone.
− DHCP Ti
DHCP Ti
DHCP Ti
DHCP TiDHCP Time:
me:
me:
me:me: s Select whether the phone update time with the offset time
offered by the DHCP server.
− Date & T
Date & T
Date & T
Date & TDate & Time Format:
ime Format:
ime Format:
ime Format:ime Format: Select the formats for the date (WW
WW
WW
WWWWW MMM
W MMM
W MMM
W MMMW MMM
DD
DD
DD
DDDD, DD
DD
DD
DDDD-
-
-
--
MMM
MMM
MMM
MMMMMM MM
MM
MM
MMMM
-
-
-
-- -
-
-
--
YY
YY
YY
YYYY YYYY
YYYY
YYYY
YYYYYYYY, -
-
-
--DD
DD
DD
DDDD, DD/MM/YYYY
DD/MM/YYYY
DD/MM/YYYY
DD/MM/YYYYDD/MM/YYYY, MM/DD/Y
MM/DD/Y
MM/DD/Y
MM/DD/YMM/DD/YY
Y
Y
YY, DD MMM YYYY
DD MMM YYYY
DD MMM YYYY
DD MMM YYYYDD MMM YYYY, or
WWW D
WWW D
WWW D
WWW DWWW DD M
D M
D M
D MD MMM
MM
MM
MMMM) and time (12
12
12
1212 Ho
Ho
Ho
Ho Hour
ur
ur
urur or 24
24
24
2424 H
H
H
H Hour
our
our
ourour). Tap OK
OK
OK
OKOK when done or tap
CANCEL
CANCEL
CANCEL
CANCELCANCEL to cancel.
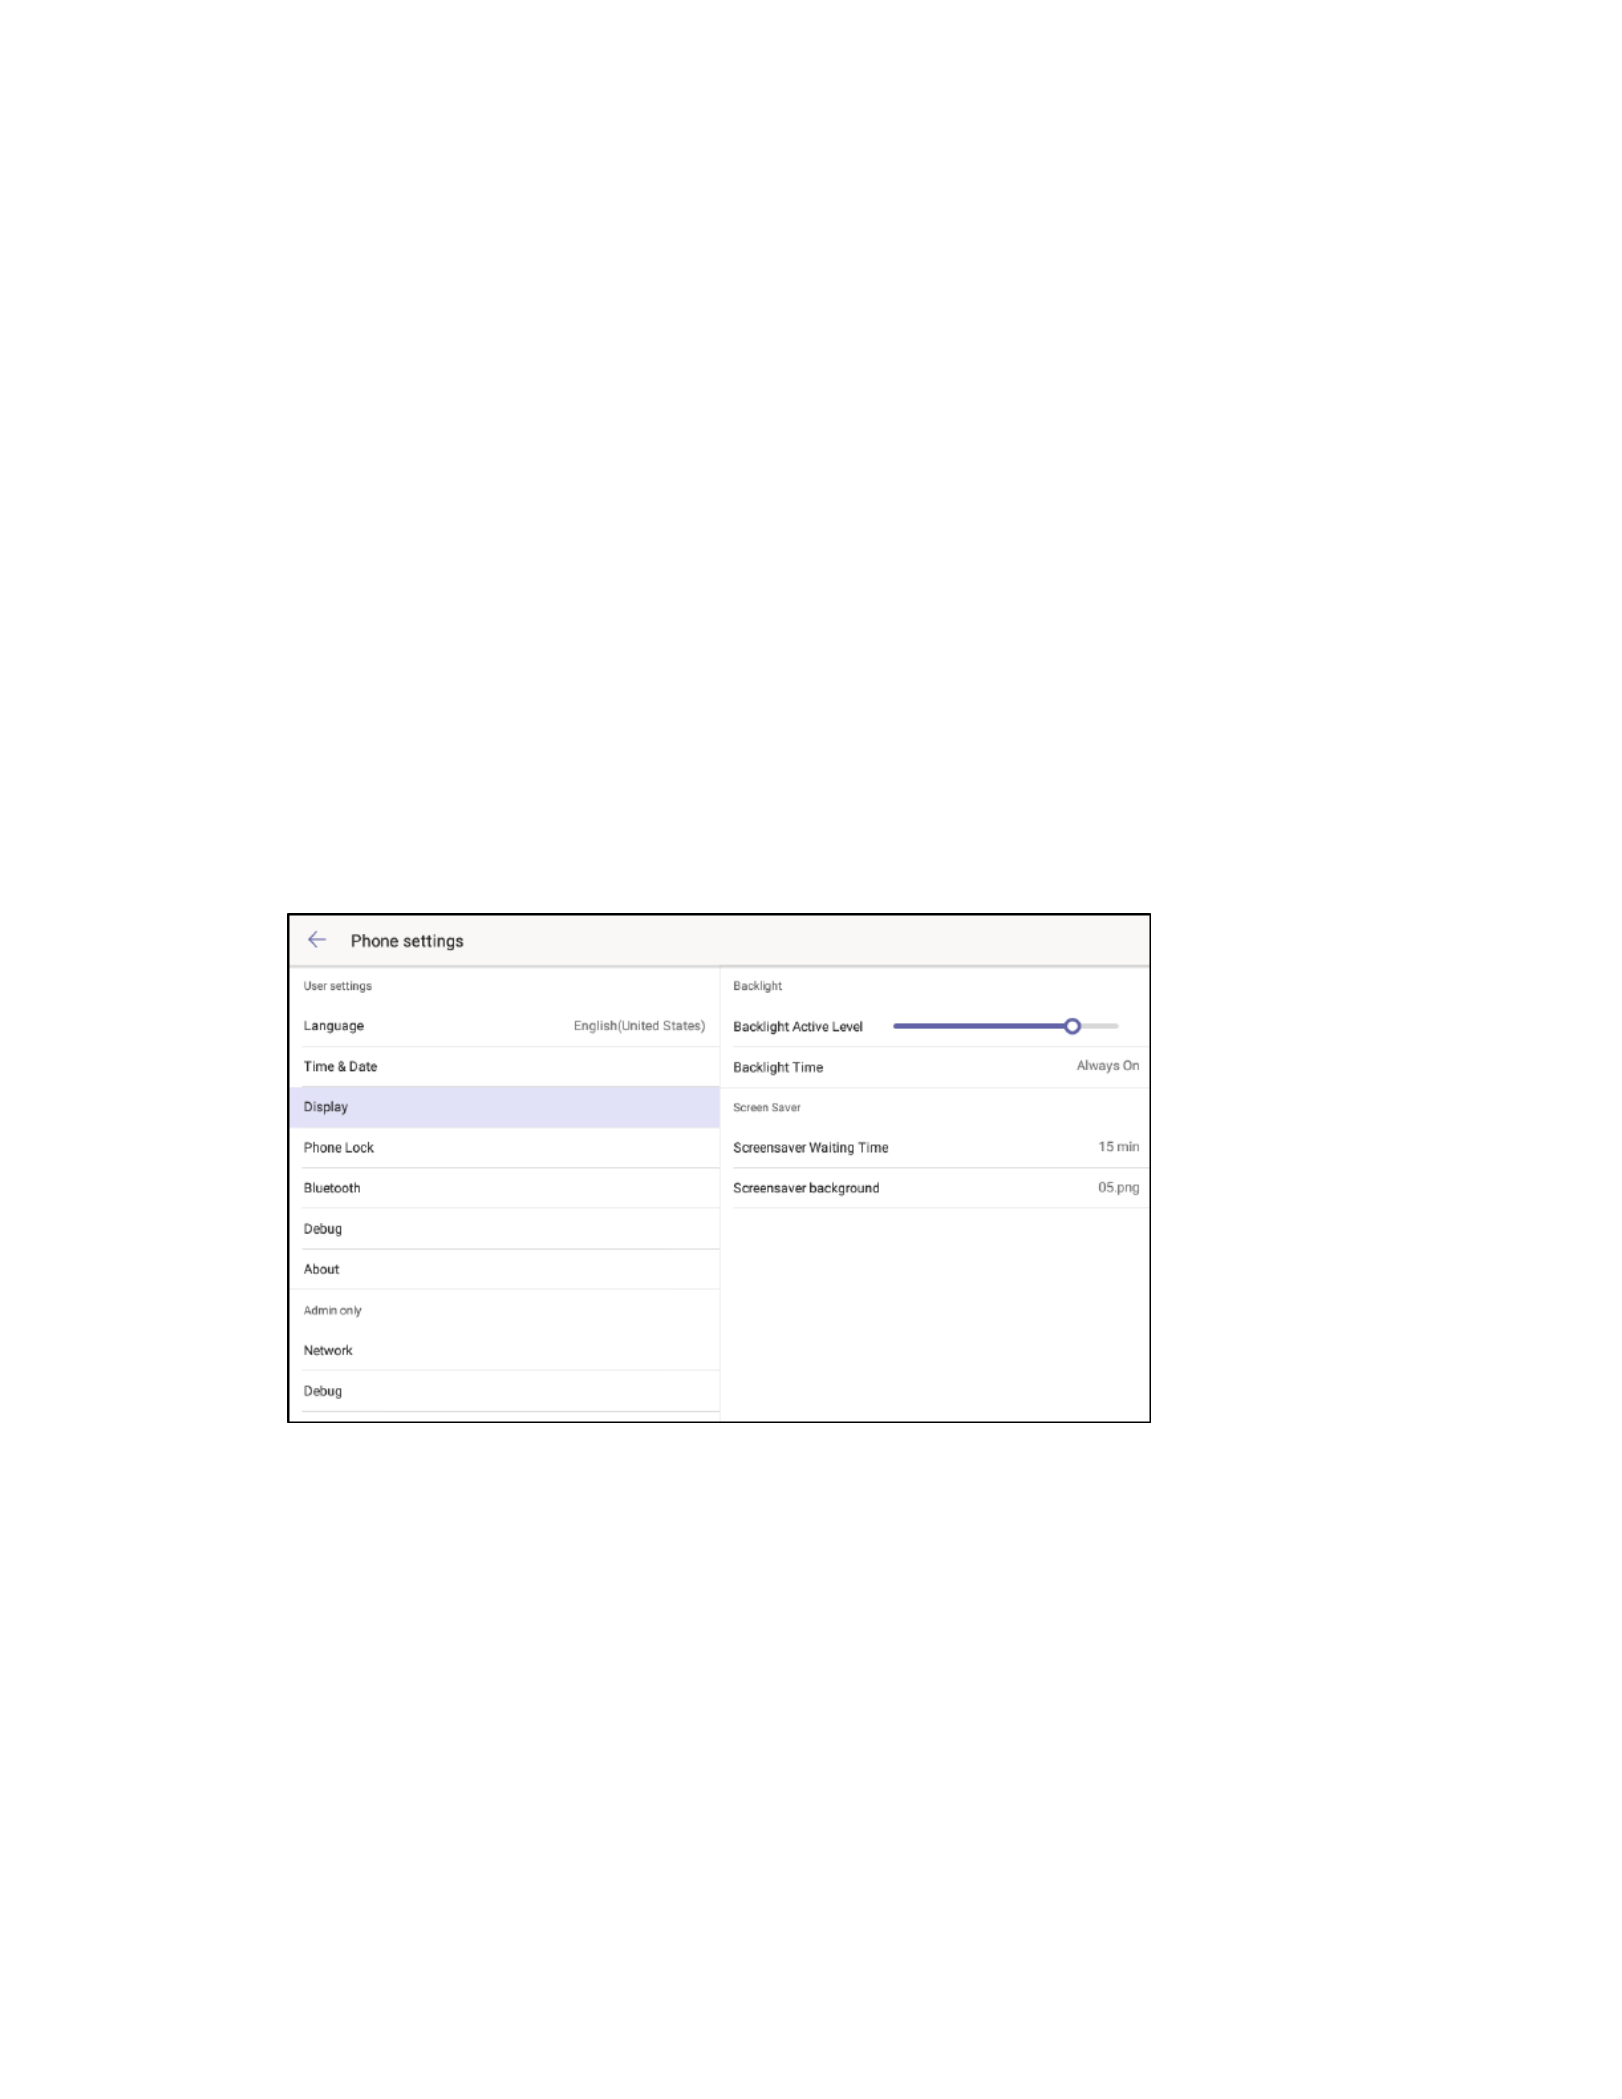
Display
Tap Display
Display
Display
DisplayDisplay to configure the display’s backlight and screen saver settings. Settings are
displayed on the right side of the screen.
Display
Display
Display
DisplayDisplay
• Backlight Settings
Backlight Settings
Backlight Settings
Backlight SettingsBacklight Settings
The backlight level and duration can be set from the Backlight
Backlight
Backlight
BacklightBacklight section of the
Display
Display
Display
DisplayDisplay settings.
− Backlight A
Backlight A
Backlight A
Backlight ABacklight Active Level:
ctive Level:
ctive Level:
ctive Level:ctive Level: Touch and drag left or right to adjust the amount of
backlighting.
− Backlight Time:
Backlight Time:
Backlight Time:
Backlight Time:Backlight Time: Touch and drag up or down to scroll through the amount of
time the backlight stays lit. Tap OK
OK
OK
OKOK when done or tap CANCEL
CANCEL
CANCEL
CANCELCANCEL to cancel.
• Screen Saver S
Screen Saver S
Screen Saver S
Screen Saver SScreen Saver Settings
ettings
ettings
ettingsettings
The screen saver wait time and background can be set from the Screen Saver
Screen Saver
Screen Saver
Screen Saver Screen Saver
section of the Display
Display
Display
DisplayDisplay settings.
Supplemental G
Supplemental G
Supplemental G
Supplemental GSupplemental Guide
uide
uide
uide uide –
–
–
– –
-
-
-
-- -
-
-
-- -
-
-
-- -T
-T
-T
-T-T-
-
-
--
7
7
7
7 7
DOC
DOC
DOC
DOCDOC.
.
.
. . 8413A
8413A
8413A
8413A8413A UC
UC
UC
UCUC PHONE
PHONE
PHONE
PHONEPHONE T &
T &
T &
T &T & UC
UC
UC
UC UC PH
PH
PH
PHPHON
ON
ON
ONONE
E
E
EE PL
PL
PL
PLPLUS
US
US
US US •
•
•
••
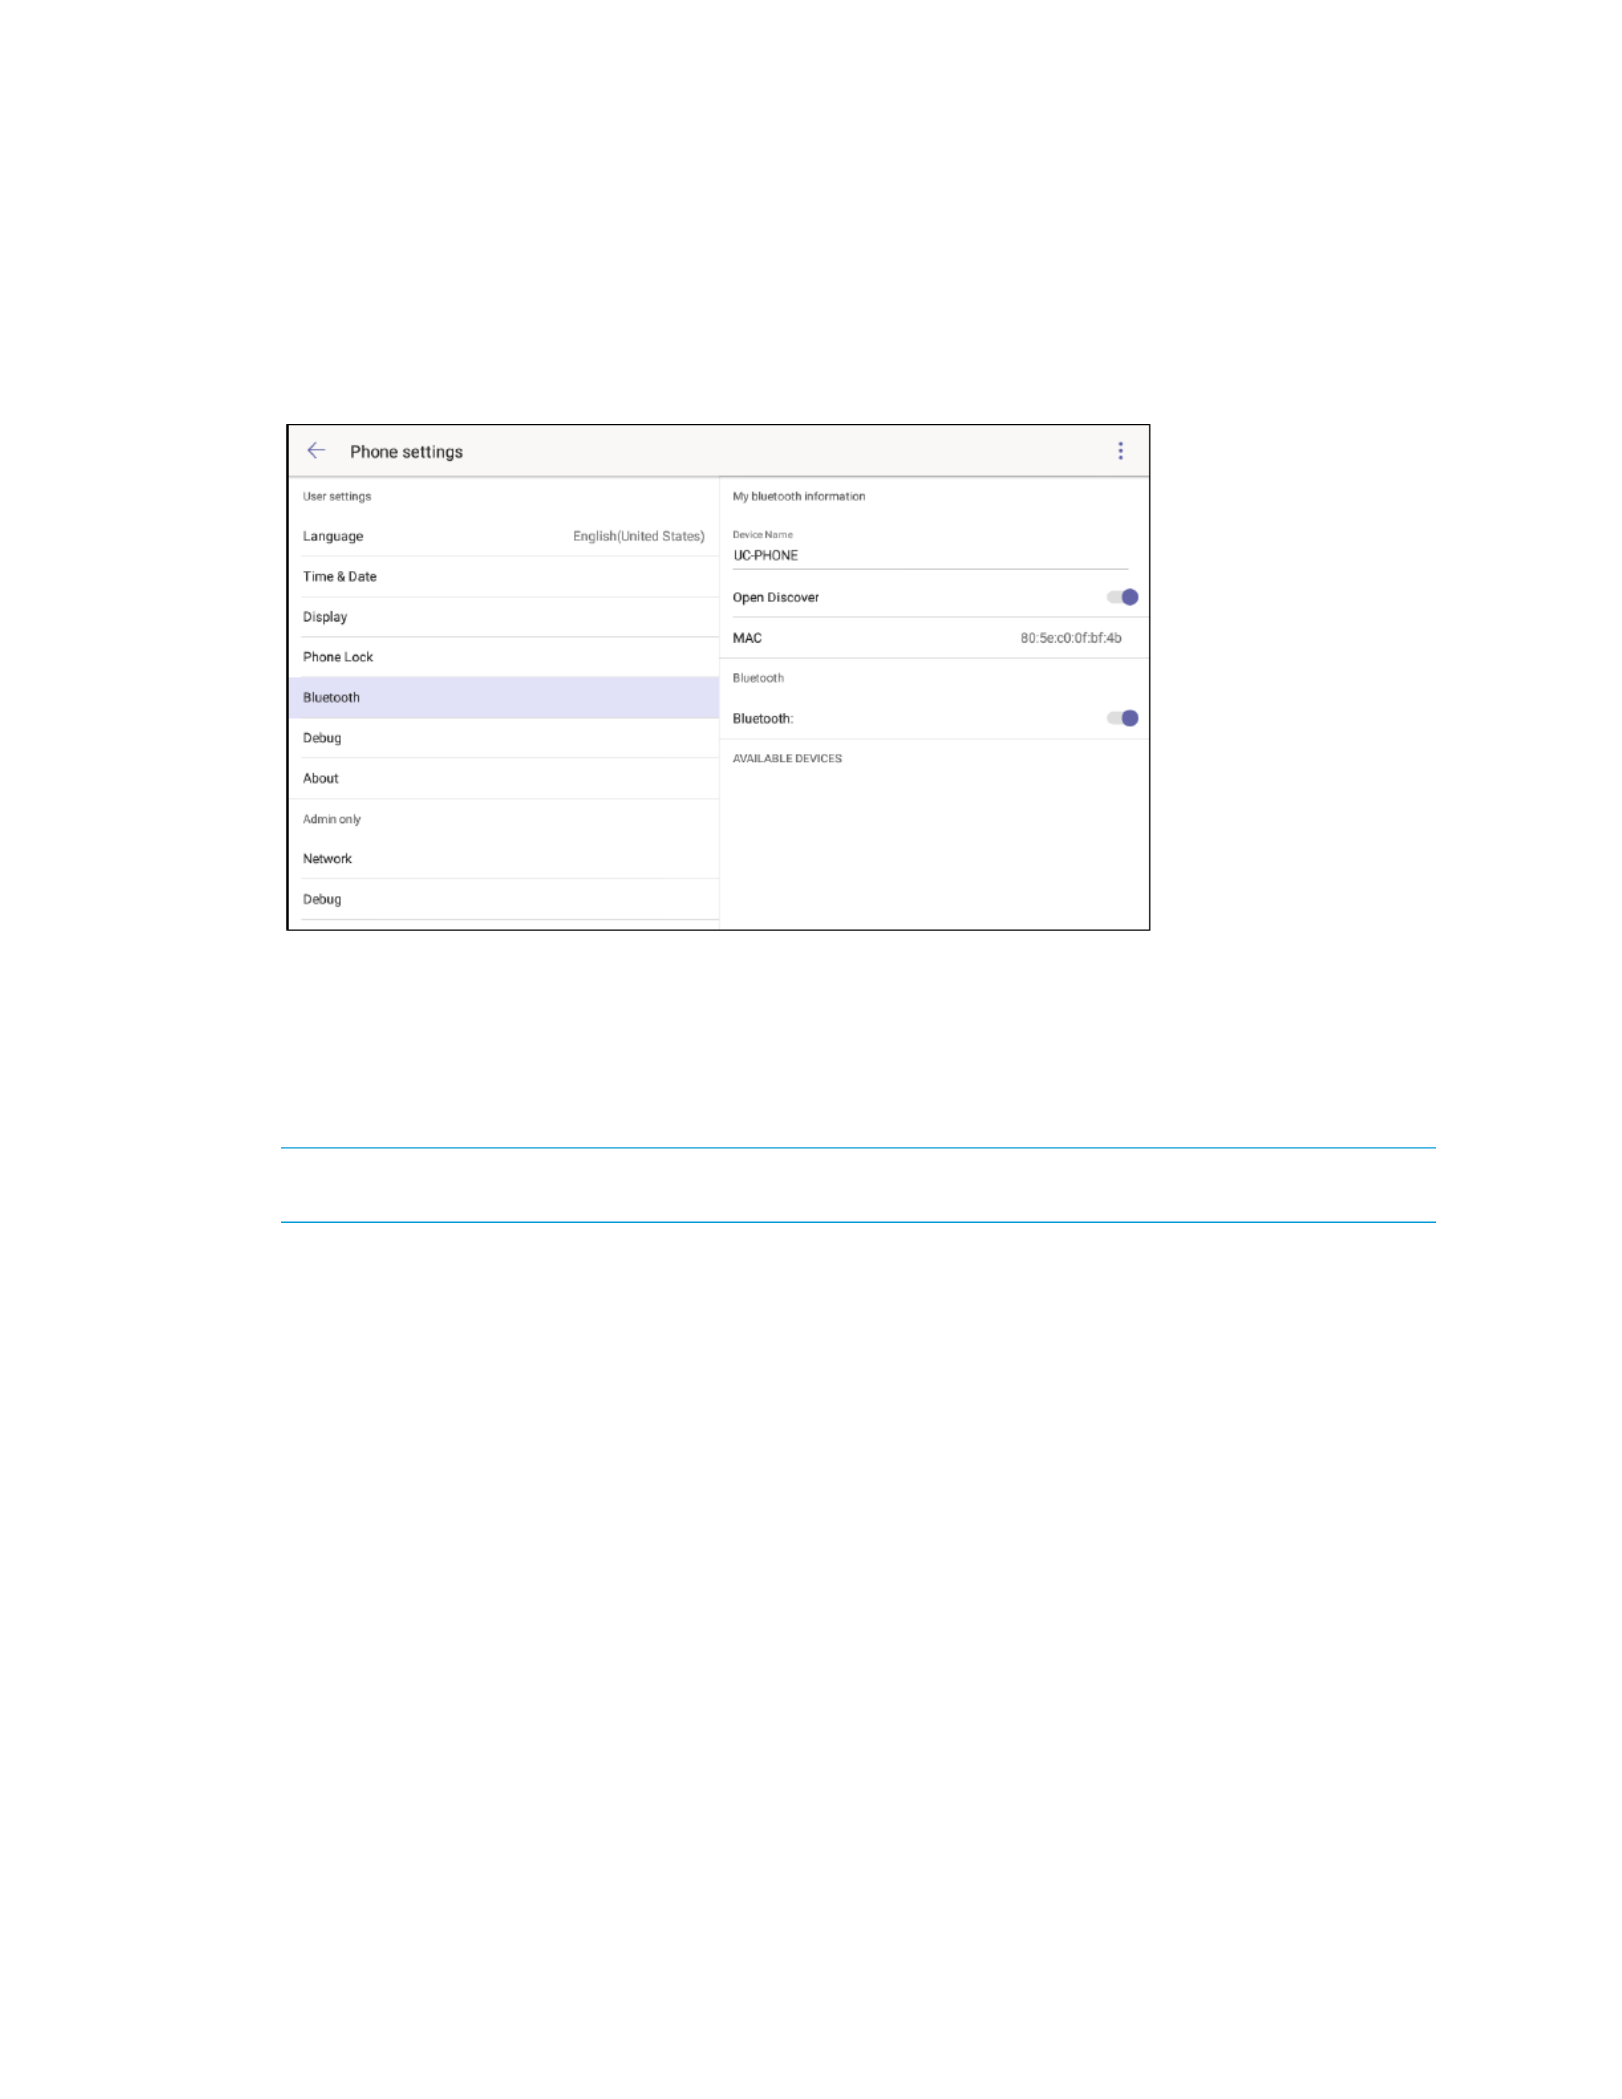
Bluetooth®
The phone can connect with a compatible Tap Bluetooth headset for wireless operation.
Bluetooth
Bluetooth
Bluetooth
BluetoothBluetooth to configure the phone’s Bluetooth feature. Settings are displayed on the
right side of the screen.
Bluetooth
Bluetooth
Bluetooth
BluetoothBluetooth
To enable and configure the Bluetooth feature, move the Bluetooth
Bluetooth
Bluetooth
Bluetooth Bluetooth switch to the right.
To disable the Bluetooth feature, move the Bluetooth
Bluetooth
Bluetooth
Bluetooth Bluetooth switch to the left.
When enabled, a list of available Bluetooth devices that are in pairing mode are
displayed under AVAI
AVAI
AVAI
AVAIAVAILA
LA
LA
LALABLE DE
BLE DE
BLE DE
BLE DEBLE DEVIC
VIC
VIC
VICVICES
ES
ES
ESES. Tap the device that is to be connected.
NOTE:
NOTE:
NOTE:
NOTE:NOTE:
To avoid conflicts, only one phone and one Bluetooth device should be in pairing
mode at a time.
Once Bluetooth is enabled, the phone’s device name can be set and the phone can be
configured to be discoverable by other devices.
• Device
Device
Device
Device Device Name
Name
Name
NameName: To change the device name, tap the device name and enter a new
device name. Tap Done
Done
Done
DoneDone when finished.
• Open Di
Open Di
Open Di
Open DiOpen Discover
scover
scover
scoverscover: To allow the phone to be discovered by Bluetooth devices, move
the Open Di
Open Di
Open Di
Open DiOpen Discover
scover
scover
scoverscover switch to the right.

8
8
8
88 -
-
-
-- -
-
-
-- -
-
-
-- -T
-T
-T
-T-T-
-
-
--
•
•
•
••
UC
UC
UC
UCUC PH
PH
PH
PHPHONE
ONE
ONE
ONEONE T &
T &
T &
T &T & UC
UC
UC
UC UC PH
PH
PH
PHPHONE
ONE
ONE
ONEONE PL
PL
PL
PLPLUS
US
US
US US Supplem
Supplem
Supplem
SupplemSupplemental G
ental G
ental G
ental Gental Guide
uide
uide
uide uide –
–
–
– –
DOC.
DOC.
DOC.
DOC.DOC.
8413A
8413A
8413A
8413A8413A
Debug
Tap Debu
Debu
Debu
DebuDebug
g
g
gg to view controls for rebooting the phone. The reboot control appears on the
right side of the screen.
Debug
Debug
Debug
DebugDebug
Tap
Reboot phon
Reboot phon
Reboot phon
Reboot phonReboot phone
e
e
ee to reboot the phone.
About
Tap About
About
About
AboutAbout to view information about the phone’s IP address, MAC address, firmware
and software versions, the privacy statement, and the Crestron Unified Communication
Software License Agreement.
About
About
About
AboutAbout

Supplemental G
Supplemental G
Supplemental G
Supplemental GSupplemental Guide
uide
uide
uide uide –
–
–
– –
-
-
-
-- -
-
-
-- -
-
-
-- -T
-T
-T
-T-T-
-
-
--
9
9
9
9 9
DOC
DOC
DOC
DOCDOC.
.
.
. . 8413A
8413A
8413A
8413A8413A UC
UC
UC
UCUC PHONE
PHONE
PHONE
PHONEPHONE T &
T &
T &
T &T & UC
UC
UC
UC UC PH
PH
PH
PHPHON
ON
ON
ONONE
E
E
EE PL
PL
PL
PLPLUS
US
US
US US •
•
•
••
The privacy statement and the Crestron® Unified Communications software license
agreement are available for viewing.
• Tap
Privacy statement
Privacy statement
Privacy statement
Privacy statementPrivacy statement to view the privacy statement.
• Tap Crestron U
Crestron U
Crestron U
Crestron UCrestron Unified Communication Softw
nified Communication Softw
nified Communication Softw
nified Communication Softwnified Communication Software License Agreement
are License Agreement
are License Agreement
are License Agreementare License Agreement to view the
license agreement.
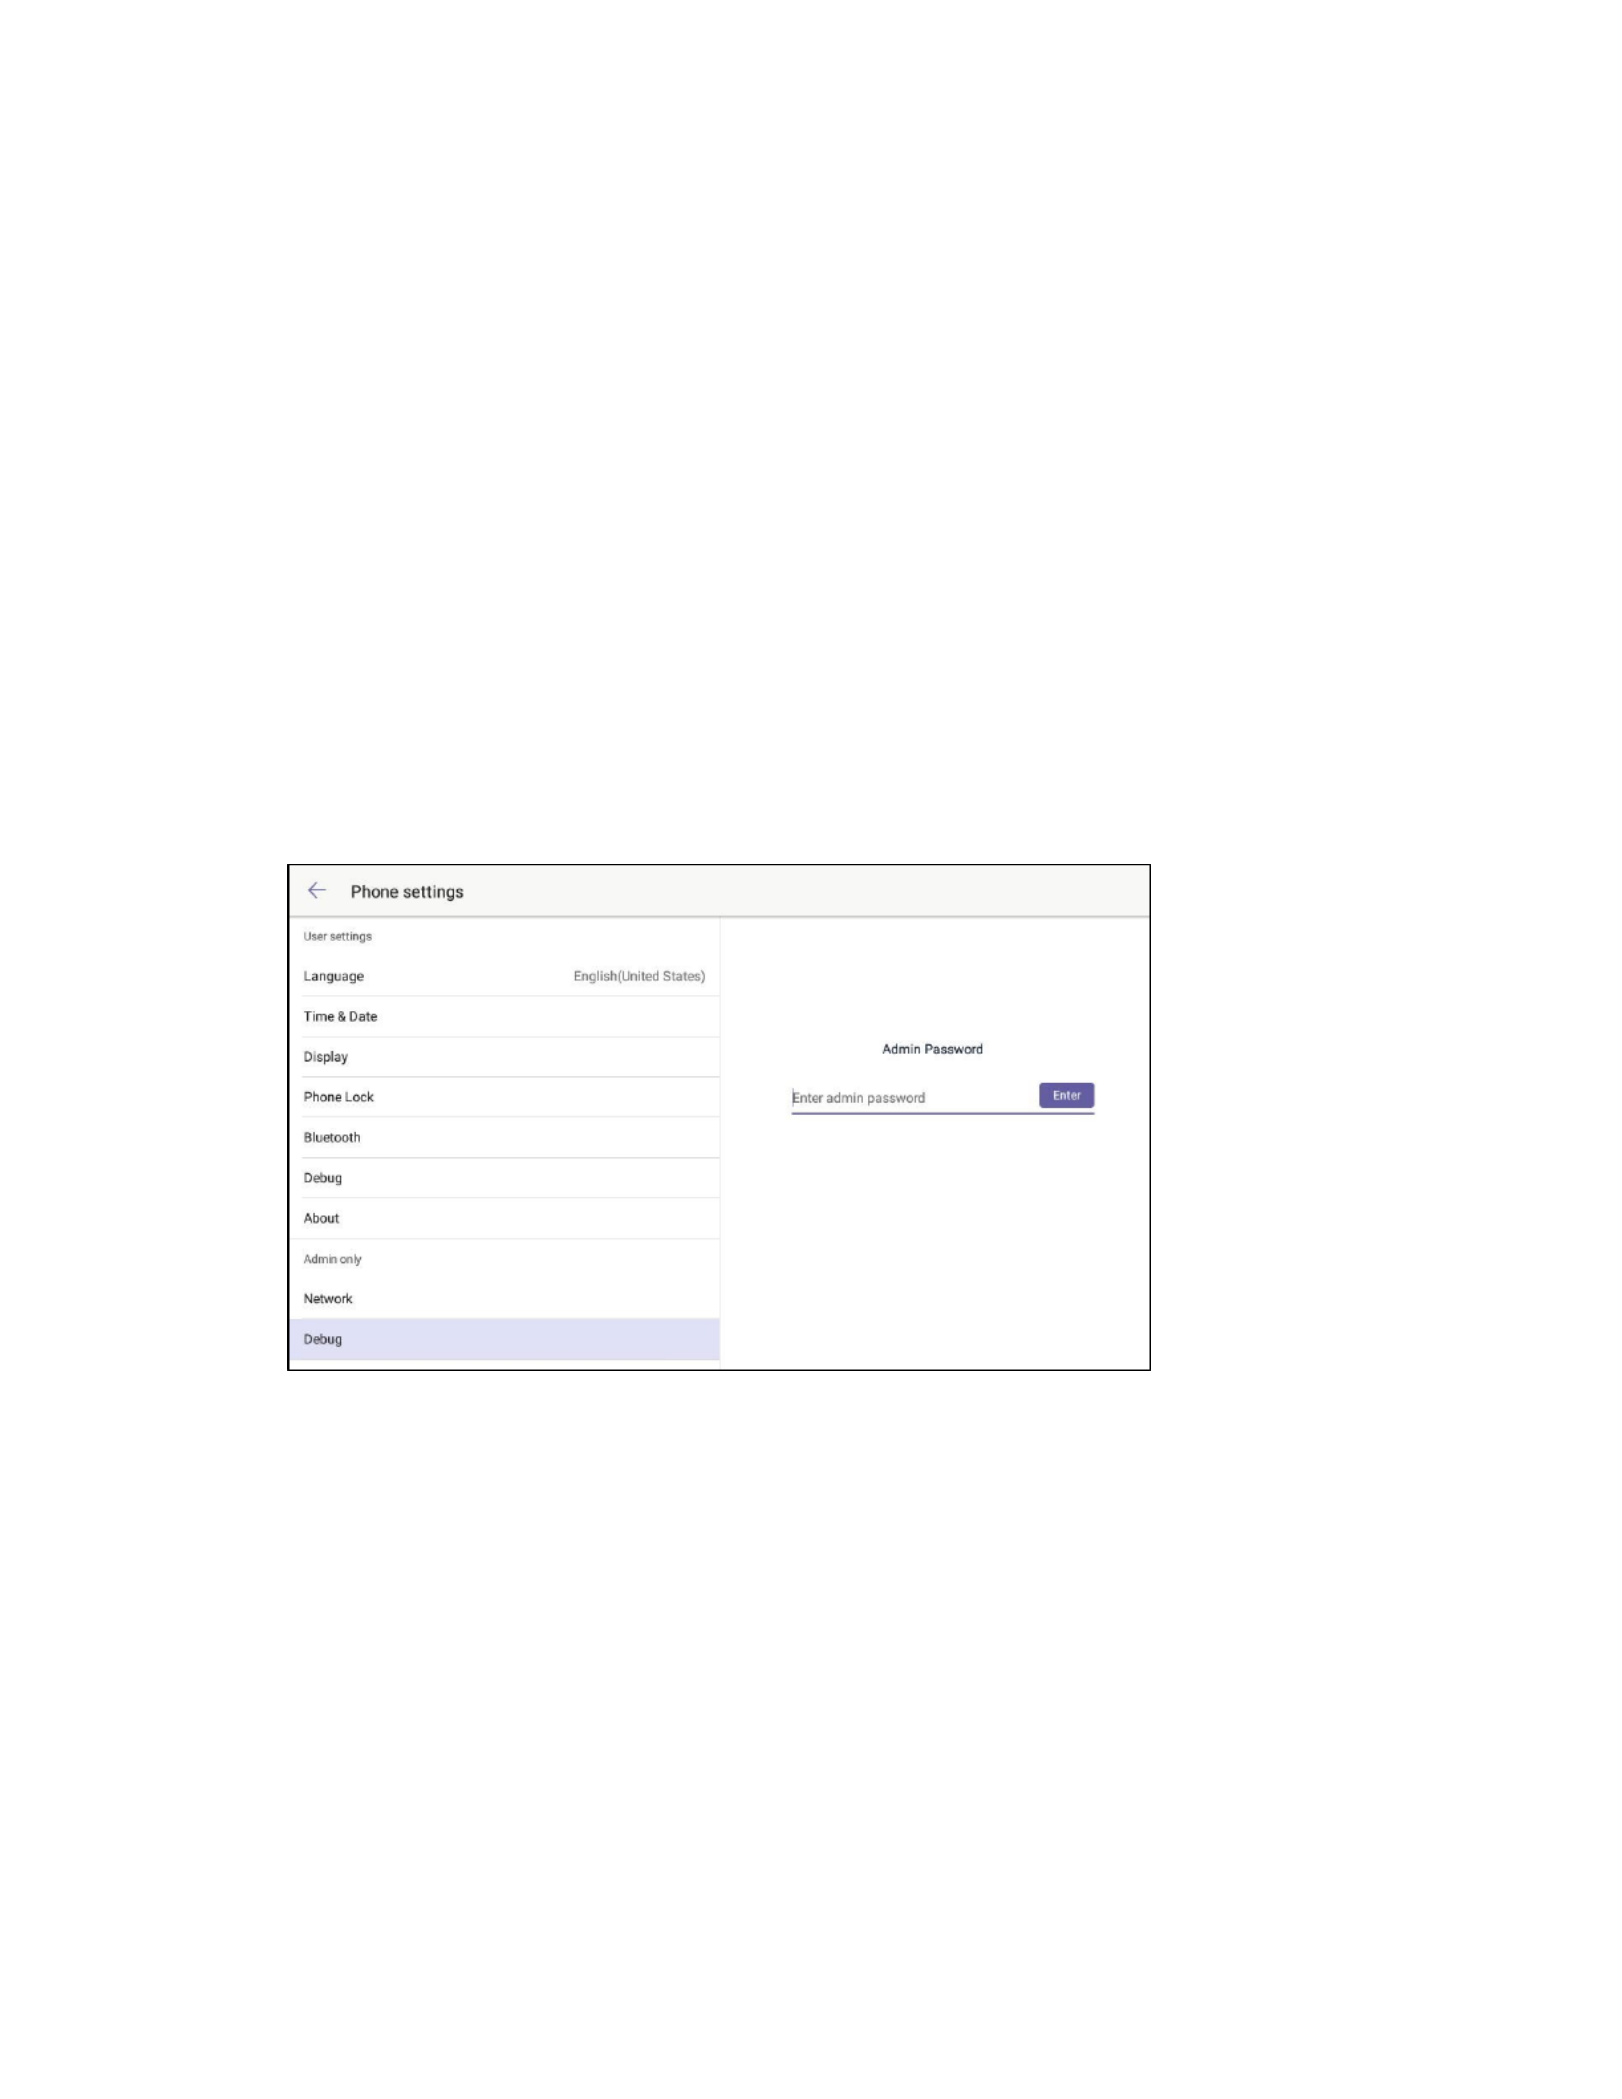
Network (Admin Only)
Tap Network
Network
Network
NetworkNetwork to view and configure the phone’s network settings.
Viewing and configuring the network settings requires the admin password. After
tapping Network
Network
Network
NetworkNetwork, the display prompts the user to enter the admin password.
Admin Password
Admin Password
Admin Password
Admin PasswordAdmin Password
Enter the admin password (default password = “admin”) and tap Enter
Enter
Enter
EnterEnter. The network
settings are displayed on the right side of the screen.
NOTE:
NOTE:
NOTE:
NOTE:NOTE:
For information on changing the admin password, refer to “Admin Password
(Admin Only)” on page 15.

10
10
10
1010
•
•
•
•• UC
UC
UC
UCUC-
-
-
-- -
-
-
-- -
-
-
-- -T-
-T-
-T-
-T--T-
PHONE
PHONE
PHONE
PHONEPHONE T & UC
T & UC
T & UC
T & UCT & UC PHONE
PHONE
PHONE
PHONEPHONE P
P
P
PPLUS
LUS
LUS
LUS LUS Supplem
Supplem
Supplem
SupplemSupplemental G
ental G
ental G
ental Gental Guide
uide
uide
uide uide –
–
–
– –
DOC.
DOC.
DOC.
DOC.DOC.
8413A
8413A
8413A
8413A8413A
Network
Network
Network
NetworkNetwork
WAN Port
The WAN Port
WAN Port
WAN Port
WAN PortWAN Port section determines the IP address format to use (IPv4, IPv6, or IPv4 and
IPv6), the methods for obtaining an IP address (DHCP or Static), and the static IP
address of the DNS servers.
• IP Mode
IP Mode
IP Mode
IP ModeIP Mode:
:
:
:: Touch and drag up or down to specify the IP addressing mode to use
(IPv4
IPv4
IPv4
IPv4IPv4 I
I
I
IIPv6
Pv6
Pv6
Pv6Pv6 IPv4
IPv4
IPv4
IPv4IPv4 I
I
I
IIPv6
Pv6
Pv6
Pv6Pv6, , or and ). Tap OK
OK
OK
OKOK when done or tap CANCEL
CANCEL
CANCEL
CANCELCANCEL to cancel.
• IPv4 Typ
IPv4 Typ
IPv4 Typ
IPv4 TypIPv4 Type:
e:
e:
e:e: Touch and tap the the method used for obtaining an IPv4 address
(DHCP
DHCP
DHCP
DHCPDHCP or Static
Static
Static
StaticStatic). Tap OK
OK
OK
OKOK when done or tap CANCEL
CANCEL
CANCEL
CANCELCANCEL to cancel.
• IPv4 Static DNS:
IPv4 Static DNS:
IPv4 Static DNS:
IPv4 Static DNS:IPv4 Static DNS: Move the IPv4 Static DNS
IPv4 Static DNS
IPv4 Static DNS
IPv4 Static DNSIPv4 Static DNS switch to the right to enter static
IPv4 addresses for the primary and secondary DNS servers. When the switch is
moved to the left, DHCP will be used to obtain addresses for the DSN servers.
• IPv6
IPv6
IPv6
IPv6IPv6 Type:
Type:
Type:
Type: Type: Touch and tap the the method used for obtaining an IPv6 address
(DHCP
DHCP
DHCP
DHCPDHCP or Static
Static
Static
StaticStatic). Tap OK
OK
OK
OKOK when done or tap CANCEL
CANCEL
CANCEL
CANCELCANCEL to cancel.
• IPv6 Static
IPv6 Static
IPv6 Static
IPv6 Static IPv6 Static DNS:
DNS:
DNS:
DNS:DNS: Move the IPv6 Static DNS
IPv6 Static DNS
IPv6 Static DNS
IPv6 Static DNSIPv6 Static DNS switch to the right to enter static
IPv6 addresses for the primary and secondary DNS servers. When the switch is
moved to the left, DHCP will be used to obtain addresses for the DSN servers.
VLAN
The V
V
V
VVLAN
LAN
LAN
LANLAN section configures the phone’s Internet and PC ports as part of a VLAN.
• WAN Po
WAN Po
WAN Po
WAN PoWAN Port:
rt:
rt:
rt:rt: Move the WAN Port
WAN Port
WAN Port
WAN PortWAN Port switch to the right to connect the Internet port
and configure the port for operation. When the switch is moved to the left, the
Internet port is no longer connected to the VLAN.
Once the Internet port is assigned to the VLAN, enter values for VID
VID
VID
VIDVID -(1 4094) and
Priority
Priority
Priority
PriorityPriority - (1 7).

Supplemental G
Supplemental G
Supplemental G
Supplemental GSupplemental Guide
uide
uide
uide uide –
–
–
– –
-
-
-
-- -
-
-
-- -
-
-
-- -T
-T
-T
-T-T-
-
-
--
DOC
DOC
DOC
DOCDOC.
.
.
. . 8413A
8413A
8413A
8413A8413A UC
UC
UC
UCUC PHONE
PHONE
PHONE
PHONEPHONE T &
T &
T &
T &T & UC
UC
UC
UC UC PH
PH
PH
PHPHON
ON
ON
ONONE
E
E
EE PL
PL
PL
PLPLUS
US
US
US US •
•
•
••
11
11
11
1111
• PC Por
PC Por
PC Por
PC PorPC Port:
t:
t:
t:t: Move the PC Po
PC Po
PC Po
PC PoPC Port
rt
rt
rtrt switch to the right to connect the PC port and
configure the port for operation. When the switch is moved to the left, the PC
port is no longer connected to the VLAN.
Once the PC port is assigned to the VLAN, enter values for VID
VID
VID
VIDVID -(1 4094) and
Priority
Priority
Priority
PriorityPriority (0- 7).
• DHCP
DHCP
DHCP
DHCPDHCP VLAN
VLAN
VLAN
VLAN VLAN:
:
:
:: Move the DHC
DHC
DHC
DHCDHCP VL
P VL
P VL
P VLP VLAN
AN
AN
ANAN switch to the right to enable and configure
the DHCP VLAN discovery feature. When the switch is moved to the left, the
DHCP VLAN discovery feature is disabled.
Once the PC port is assigned to the VLAN, enter values for VID
VID
VID
VIDVID -(1 4094) and
Option
Option
Option
OptionOption (1- 255).
Web Server
The Web Server
Web Server
Web Server
Web Server Web Server section enables and configures the web access types to be used
(HT
(HT
(HT
(HT(HTTP
TP
TP
TP TP
and
HTTPS
HTTPS
HTTPS
HTTPSHTTPS) by the phone.
• HTTP S
HTTP S
HTTP S
HTTP SHTTP Status:
tatus:
tatus:
tatus:tatus: Move the HTTP Sta
HTTP Sta
HTTP Sta
HTTP StaHTTP Status
tus
tus
tustus switch to the right to enable HTTP
addressing. When the switch is moved to the left, HTTP addressing is no longer
available.
Once the HTTP is enabled, enter the port number (1 through 65535) that should
be used for HTTP communication in the HTTP Po
HTTP Po
HTTP Po
HTTP PoHTTP Port
rt
rt
rtrt . field
• HTTPS Status:
HTTPS Status:
HTTPS Status:
HTTPS Status:HTTPS Status: Move the HTTPS S
HTTPS S
HTTPS S
HTTPS SHTTPS Status
tatus
tatus
tatustatus switch to the right to enable HTTPS
addressing. When the switch is moved to the left, HTTPS addressing is no longer
available.
Once HTTPS is enabled, enter the port number (1 through 65535) that should be
used for HTTPS communication in the HTTPS
HTTPS
HTTPS
HTTPSHTTPS Por
Por
Por
Por Port
t
t
tt . field
802.1x Mode
The 80
80
80
80802.1x
2.1x
2.1x
2.1x 2.1x section enables and configures the phone to use 802.1x. authentication.
Select an Auth
Select an Auth
Select an Auth
Select an AuthSelect an Authenticati
enticati
enticati
enticatientication Method
on Method
on Method
on Methodon Method
To select a method of authentication:
• Tap the name of the authentication method to display a list of available
authentication methods.
• Touch and drag up or down to scroll through the list of available methods. Refer
to “ for details.Available Authentication Methods” below
• Tap the method name to select, and then tap OK
OK
OK
OKOK. The phone will prompt to
reboot.
• Click OK
OK
OK
OKOK to reboot the phone, or click CANC
CANC
CANC
CANCCANCEL
EL
EL
ELEL to continue configuration without
rebooting.

12
12
12
1212
•
•
•
•• UC
UC
UC
UCUC-
-
-
-- -
-
-
-- -
-
-
-- -T-
-T-
-T-
-T--T-
PHONE
PHONE
PHONE
PHONEPHONE T & UC
T & UC
T & UC
T & UCT & UC PHONE
PHONE
PHONE
PHONEPHONE P
P
P
PPLUS
LUS
LUS
LUS LUS Supplem
Supplem
Supplem
SupplemSupplemental G
ental G
ental G
ental Gental Guide
uide
uide
uide uide –
–
–
– –
DOC.
DOC.
DOC.
DOC.DOC.
8413A
8413A
8413A
8413A8413A
Availa
Availa
Availa
AvailaAvailable Au
ble Au
ble Au
ble Auble Authen
then
then
thenthenticati
ticati
ticati
ticatitication
on
on
onon Method
Method
Method
Method Methods
s
s
ss
• EAP None:
EAP None:
EAP None:
EAP None:EAP None: When selected, authentication protocols are not used.
• EAP
EAP
EAP
EAPEAP-
-
-
-- :
:
:
::
M
M
M
MMD5
D5
D5
D5D5 When selected, MD5 authentication is used. MD5 is the base security
requirement in the EAP standard and uses the username and password as the
authentication credentials. Enter the identity and password in the Identity and
MD5 Password fields.
• EAP
EAP
EAP
EAPEAP-
-
-
-- :
:
:
::
TLS
TLS
TLS
TLSTLS When selected, TLS authentication is used. Enter the identity and
password in the Identity and MD5 Password fields. Other parameters are
managed from the web interface. For details, refer to “802.1x” . on page 23
• EAP
EAP
EAP
EAPEAP-
-
-
-- /
/
/
// :
:
:
::
PEAP
PEAP
PEAP
PEAPPEAP M
M
M
MMSCHAP
SCHAP
SCHAP
SCHAPSCHAPv2
v2
v2
v2v2 When selected, PEAP/MSCHAPv2 authentication is
used. Enter the identity and password in the Identity and MD5 Password fields.
Other parameters are managed from the web interface. For details, refer to
“802.1x” . on page 23
• EAP
EAP
EAP
EAPEAP-
-
-
-- -
-
-
-- :
:
:
::
TTLS/E
TTLS/E
TTLS/E
TTLS/ETTLS/EAP
AP
AP
APAP M
M
M
MMSCHAP
SCHAP
SCHAP
SCHAPSCHAPv2
v2
v2
v2v2 - When selected, TTLS/EAP MSCHAPv2
authentication is used. Enter the identity and password in the Identity and MD5
Password fields. Other parameters are managed from the web interface. For
details, refer to “802.1x” . on page 23
• EAP
EAP
EAP
EAPEAP-
-
-
-- :
:
:
::
PEAP/GTC
PEAP/GTC
PEAP/GTC
PEAP/GTCPEAP/GTC When selected, PEAP/GTC authentication is used. Enter the
identity and password in the Identity and MD5 Password fields. Other
parameters are managed For d from the web interface. etails, refer to “802.1x”
on page 23.
• EAP
EAP
EAP
EAPEAP-
-
-
-- -
-
-
--
TTLS/E
TTLS/E
TTLS/E
TTLS/ETTLS/EAP
AP
AP
APAP GTC
GTC
GTC
GTCGTC:
:
:
: : When selected, TTLS/GTC authentication is used. Enter
the identity and password in the Identity and MD5 Password fields. Other
parameters are managed from the web interface. For details, refer to “802.1x”
on page 23.
• EAP
EAP
EAP
EAPEAP F
F
F
FFAST
AST
AST
ASTAST
-
-
-
-- :
:
:
: : When selected, FAST authentication is used. Enter the identity and
password in the Identity and MD5 Password fields. Other parameters are
managed from the web interface. For details, refer to “802.1x” . on page 23
LLDP
The LLDP
LLDP
LLDP
LLDPLLDP
section enables or disables the ) feature Link Layer Discovery Protocol (LLDP
on the phone and configures the interval (in seconds) for the Phone to send the LLDP
request. To configure LLDP:
1. Move the LLDP St
LLDP St
LLDP St
LLDP StLLDP Status
atus
atus
atusatus switch to the right to enable . When the switch is LLDP
moved to the left, LLDP . is disabled
2. Enter the interval (in seconds for the phone to send the LLDP request in the )
Packet Interv
Packet Interv
Packet Interv
Packet IntervPacket Interval
al
al
alal field.
Supplemental G
Supplemental G
Supplemental G
Supplemental GSupplemental Guide
uide
uide
uide uide –
–
–
– –
-
-
-
-- -
-
-
-- -
-
-
-- -T
-T
-T
-T-T-
-
-
--
DOC
DOC
DOC
DOCDOC.
.
.
. . 8413A
8413A
8413A
8413A8413A UC
UC
UC
UCUC PHONE
PHONE
PHONE
PHONEPHONE T &
T &
T &
T &T & UC
UC
UC
UC UC PH
PH
PH
PHPHON
ON
ON
ONONE
E
E
EE PL
PL
PL
PLPLUS
US
US
US US •
•
•
••
13
13
13
1313
CDP
The CD
CD
CD
CDCDP
P
P
P P section enables or disables the Cisco Discovery Protocol (CDP) feature on the
phone and configures the interval (in seconds) for the to send the Phone CDP request.
To configure CDP:
1. Move the CDP St
CDP St
CDP St
CDP StCDP Stat
at
at
atatus
us
us
usus switch to the right to enable CDP. When the switch is
moved to the left, CDP . is disabled
2. Enter the interval (in seconds for the phone to send the ) CDP request in the
Packet Interv
Packet Interv
Packet Interv
Packet IntervPacket Interval
al
al
alal field.
Debug (Admin Only)
Tap Debu
Debu
Debu
DebuDebug
g
g
gg to view and configure the phone’s logging settings, reset the phone, and
enable and/or disable screen captures.
Viewing and configuring the network settings requires the admin password. After
tapping Network
Network
Network
NetworkNetwork, the display prompts the user to enter the admin password.
Admin Password
Admin Password
Admin Password
Admin PasswordAdmin Password
Supplemental G
Supplemental G
Supplemental G
Supplemental GSupplemental Guide
uide
uide
uide uide –
–
–
– –
-
-
-
-- -
-
-
-- -
-
-
-- -T
-T
-T
-T-T-
-
-
--
DOC
DOC
DOC
DOCDOC.
.
.
. . 8413A
8413A
8413A
8413A8413A UC
UC
UC
UCUC PHONE
PHONE
PHONE
PHONEPHONE T &
T &
T &
T &T & UC
UC
UC
UC UC PH
PH
PH
PHPHON
ON
ON
ONONE
E
E
EE PL
PL
PL
PLPLUS
US
US
US US •
•
•
••
15
15
15
1515
2. Tap OK
OK
OK
OKOK to continue or CA
CA
CA
CACANCEL
NCEL
NCEL
NCELNCEL to cancel.
Screen Capture
The Screen Capture
Screen Capture
Screen Capture
Screen CaptureScreen Capture section allows you to use a web browser to view screen captures of
the phone’s display.
Move the Screen Captu
Screen Captu
Screen Captu
Screen CaptuScreen Capture
re
re
rere switch to the right to enable the screen capture feature.
When the switch is moved to the left, the screen capture feature is disabled.
Requirem
Requirem
Requirem
RequiremRequirements
ents
ents
entsents
To take screen captures, the following is required:
• The IP address of the phone
• A PC with a web browser. The PC and phone should be on a commonly accessible
network.
• The phone’s administrative login credentials.
Proced
Proced
Proced
ProcedProcedure
ure
ure
ureure
Perform the following procedure to take screen captures.
1. Open the web browser and navigate to the XXX.
XXX.
XXX.
XXX.XXX.XXX.XXX.XXX/scree
XXX.XXX.XXX/scree
XXX.XXX.XXX/scree
XXX.XXX.XXX/screeXXX.XXX.XXX/screencapture
ncapture
ncapture
ncapturencapture
where XXX.XXX.XXX.XXX is the IP address of the phone.
2. Enter the administrative login credentials. The browser will display a screen
capture of whatever is on the phone’s display.
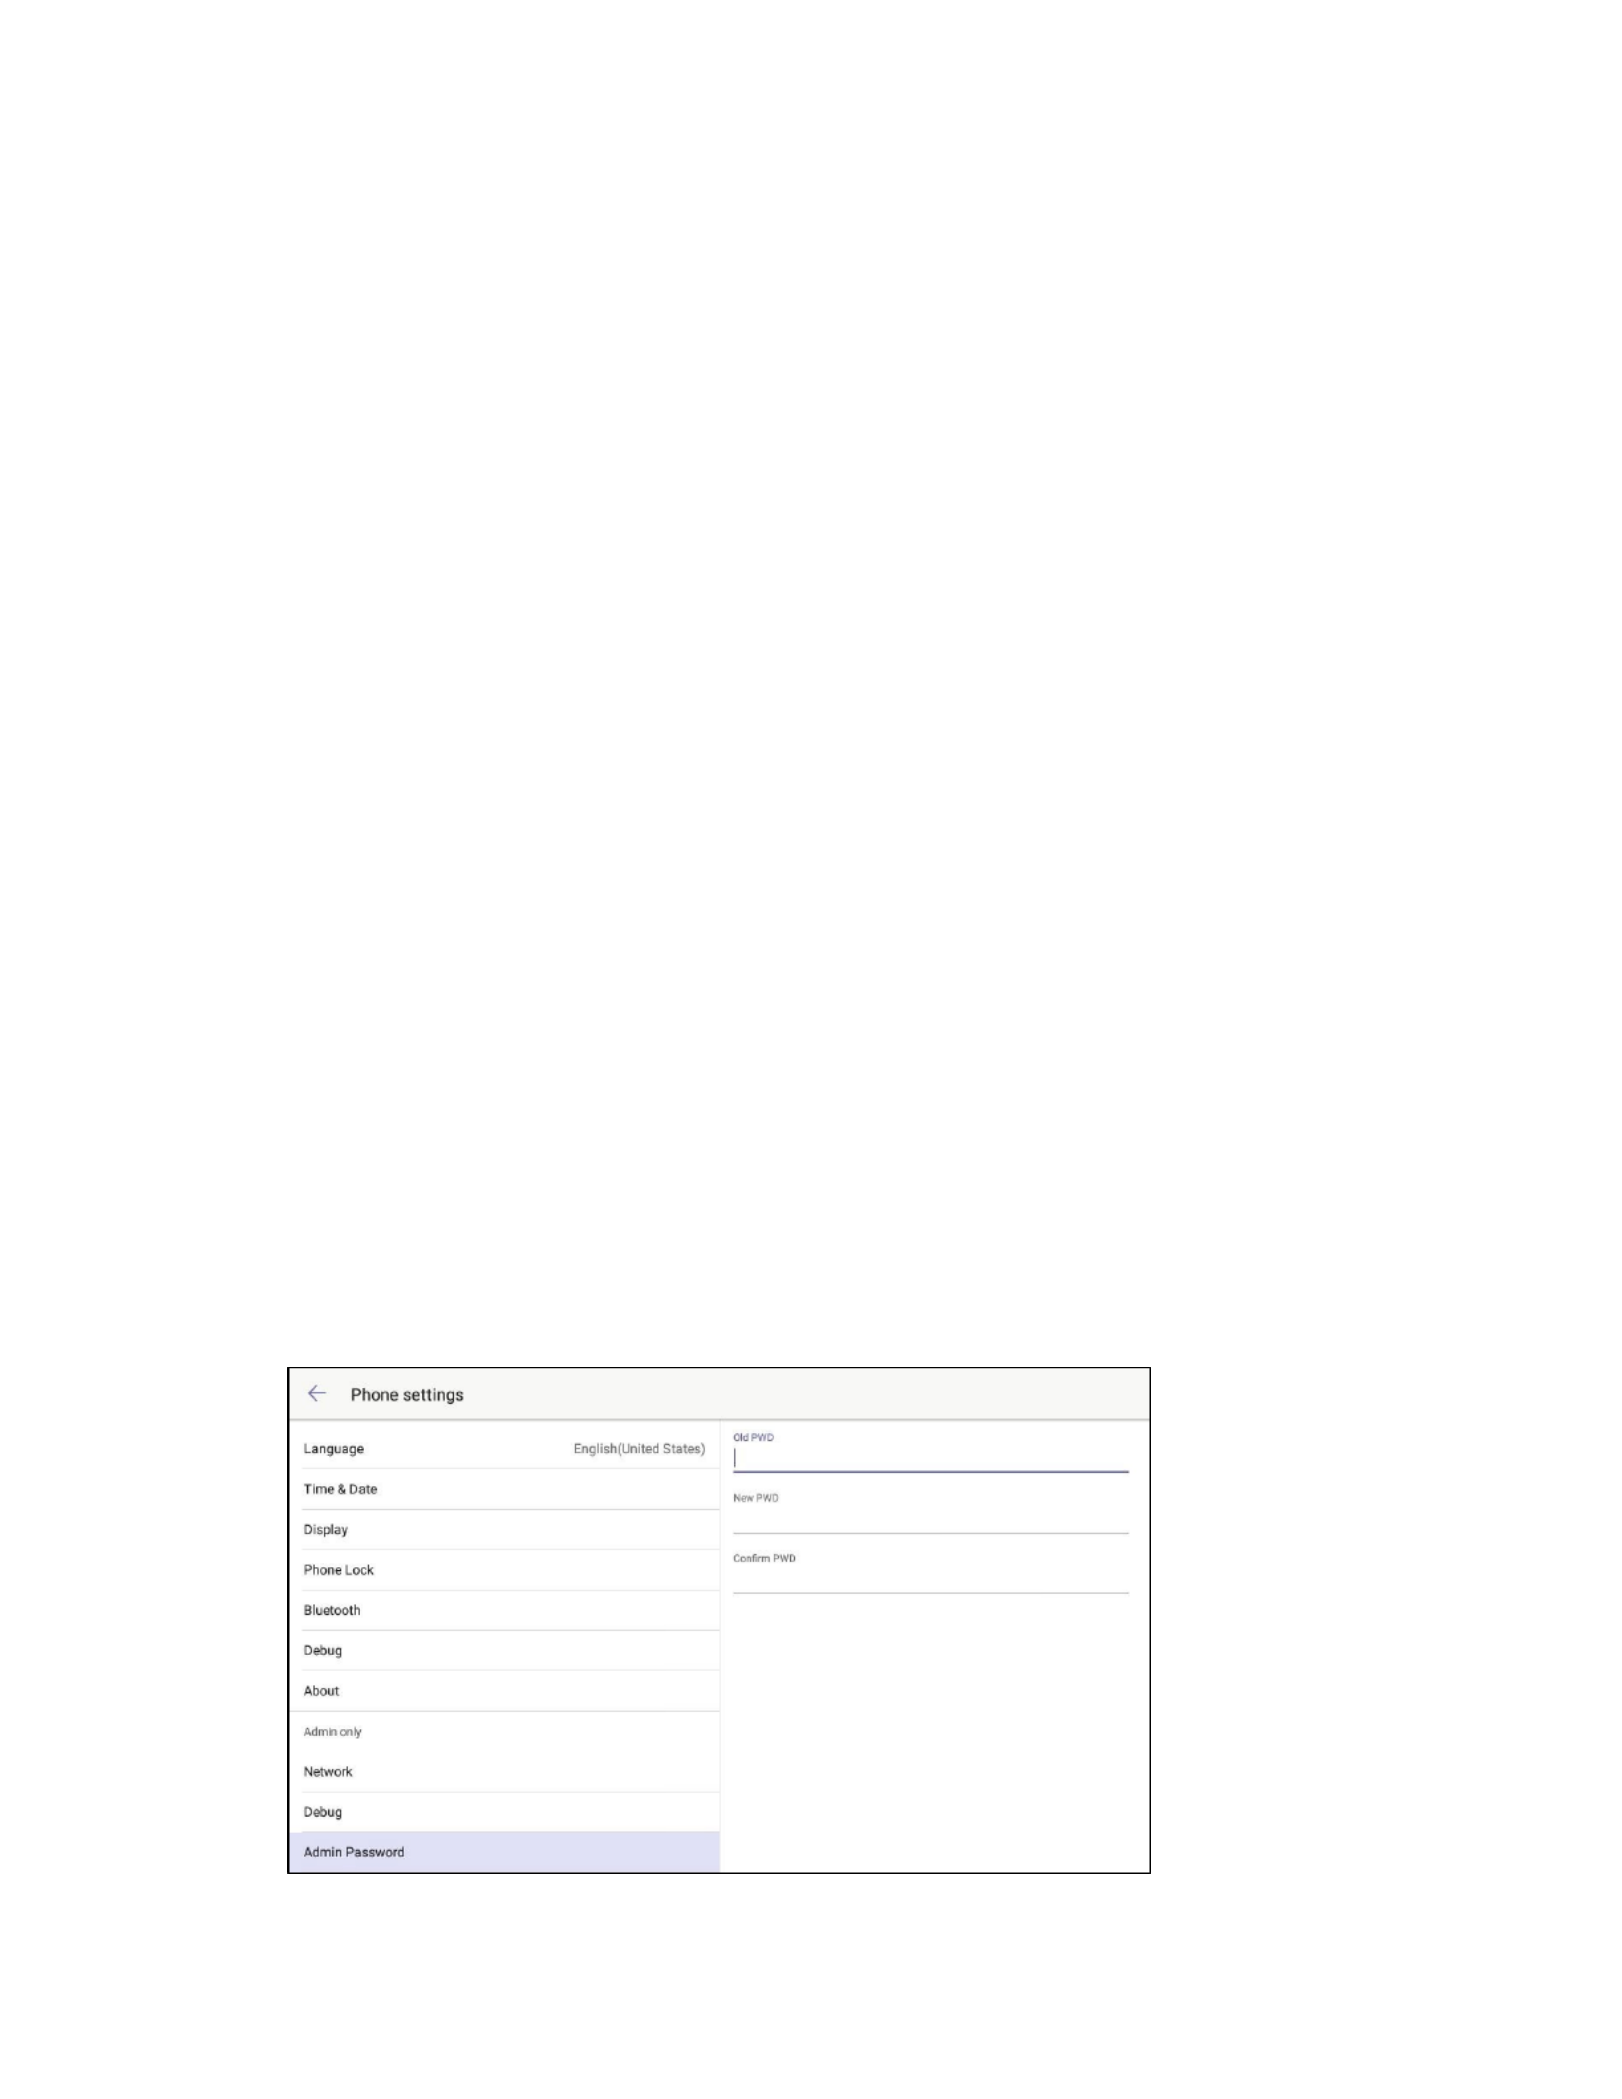
Admin Password (Admin Only)
Tap Admin Pas
Admin Pas
Admin Pas
Admin PasAdmin Password
sword
sword
swordsword to change the admin password. Controls for changing the
password are displayed on the right side of the screen.
Admin Password
Admin Password
Admin Password
Admin PasswordAdmin Password

16
16
16
1616
•
•
•
•• UC
UC
UC
UCUC-
-
-
-- -
-
-
-- -
-
-
-- -T
-T
-T
-T-T-
-
-
--
PHONE
PHONE
PHONE
PHONEPHONE T & UC
T & UC
T & UC
T & UCT & UC P
P
P
PPHONE
HONE
HONE
HONEHONE P
P
P
PPLUS
LUS
LUS
LUS LUS Supplem
Supplem
Supplem
SupplemSupplemental G
ental G
ental G
ental Gental Guide
uide
uide
uide uide –
–
–
– –
DOC
DOC
DOC
DOCDOC.
.
.
. . 8413A
8413A
8413A
8413A8413A
1. Enter the old password in the Old PWD
Old PWD
Old PWD
Old PWDOld PWD field.
2. Enter the new password in the Ne
Ne
Ne
NeNew PWD
w PWD
w PWD
w PWDw PWD field.
3. Confirm the new password in the Confirm
Confirm
Confirm
ConfirmConfirm PWD
PWD
PWD
PWD PWD . field and tap DONE
DONE
DONE
DONEDONE
Produkt Specifikationer
| Mærke: | Crestron |
| Kategori: | Videokonferencesystem |
| Model: | UC-P110-T |
Har du brug for hjælp?
Hvis du har brug for hjælp til Crestron UC-P110-T stil et spørgsmål nedenfor, og andre brugere vil svare dig
Videokonferencesystem Crestron Manualer

23 December 2024
21 December 2024
21 December 2024
21 December 2024
21 August 2024
21 August 2024
21 August 2024
21 August 2024
21 August 2024
21 August 2024
Videokonferencesystem Manualer
- Videokonferencesystem Sony
- Videokonferencesystem Panasonic
- Videokonferencesystem Philips
- Videokonferencesystem AT&T
- Videokonferencesystem TOA
- Videokonferencesystem Logitech
- Videokonferencesystem HP
- Videokonferencesystem Sennheiser
- Videokonferencesystem Roland
- Videokonferencesystem Asus
- Videokonferencesystem InFocus
- Videokonferencesystem Yamaha
- Videokonferencesystem Da-Lite
- Videokonferencesystem Black Box
- Videokonferencesystem DataVideo
- Videokonferencesystem Cisco
- Videokonferencesystem B-Tech
- Videokonferencesystem Bose
- Videokonferencesystem Jabra
- Videokonferencesystem Totolink
- Videokonferencesystem Vtech
- Videokonferencesystem Vaddio
- Videokonferencesystem Plantronics
- Videokonferencesystem Tork
- Videokonferencesystem Viewsonic
- Videokonferencesystem JPL
- Videokonferencesystem Marantz
- Videokonferencesystem Anchor Audio
- Videokonferencesystem Newline
- Videokonferencesystem Yealink
- Videokonferencesystem AVerMedia
- Videokonferencesystem Grandstream
- Videokonferencesystem Marshall Electronics
- Videokonferencesystem Kramer
- Videokonferencesystem MuxLab
- Videokonferencesystem PanaCast
- Videokonferencesystem Iiyama
- Videokonferencesystem Aluratek
- Videokonferencesystem Chief
- Videokonferencesystem AVMATRIX
- Videokonferencesystem AMX
- Videokonferencesystem Legrand
- Videokonferencesystem Neat
- Videokonferencesystem Alfatron
- Videokonferencesystem BZBGear
- Videokonferencesystem Gefen
- Videokonferencesystem Heckler
- Videokonferencesystem AVer
- Videokonferencesystem WyreStorm
- Videokonferencesystem Lumens
- Videokonferencesystem Ipevo
- Videokonferencesystem Monoprice
- Videokonferencesystem Polycom
- Videokonferencesystem Extron
- Videokonferencesystem Legamaster
- Videokonferencesystem ClearOne
- Videokonferencesystem Middle Atlantic
- Videokonferencesystem KONFTEL
- Videokonferencesystem Owl Labs
- Videokonferencesystem Atlona
- Videokonferencesystem Huddly
- Videokonferencesystem Angekis
- Videokonferencesystem VDO360
- Videokonferencesystem VFI
- Videokonferencesystem PulseAudio
- Videokonferencesystem HuddleCamHD
- Videokonferencesystem DVDO
- Videokonferencesystem KanDao
Nyeste Videokonferencesystem Manualer

7 Februar 2025
23 Januar 2025
12 Januar 2025
11 Januar 2025
3 Januar 2025
26 December 2024
26 December 2024
26 December 2024
25 December 2024
20 December 2024