Danby DDR050BSWDB Manual
Læs nedenfor 📖 manual på dansk for Danby DDR050BSWDB (28 sider) i kategorien Affugter. Denne guide var nyttig for 30 personer og blev bedømt med 4.5 stjerner i gennemsnit af 2 brugere
Side 1/28

Danby Products Ltd, Guelph, Ontatrio, Canada N1H 6Z9
Danby Products Inc, Findlay, Ohio, USA 45840
Printed in China2024.03.13
WIRELESS CONNECTION MANUAL
MANUEL DE CONNEXION SANS FIL
MANUAL DE CONEXIÓN INALÁMBRICA
Model Number
Numéro de modèle
Número de modelo
DDR022BSWDB
DDR050BSWDB
DDR050BSPWDB
Important Note: Read this manual carefully before connecting the wireless application.
Make sure to save the manual for future reference. Illustrations are for reference purposes
only. The app may look slightly different on your device.
Remarque importante : Lisez attentivement ce manuel avant de connecter l’application sans
fil. Assurez-vous de conserver le manuel pour référence future. Les illustrations sont fournies
à titre indicatif uniquement. L’application peut être légèrement différente sur votre appareil.
Nota importante: Lea atentamente este manual antes de conectar la aplicación
inalámbrica. Asegúrese de guardar el manual para referencia futura. Las ilustraciones
son solo para fines de referencia. La aplicación puede verse ligeramente diferente en su
dispositivo.

2
OPERATING INSTRUCTIONS
SPECIFICATION
Model Number: DDR022BSWDB, DDR050BSWDB, DDR050BSPWDB
Wireless Module Model Number: US-SK105
Antenna Type: Printed PCB Antenna
Frequency Band: 2400-2483.5MHz
Operation Temperature: 0°C ~ 45°C (32°F ~ 113°F)
Operation Humidity: 10% ~ 85%
Power Input: DC 5V/300mA
Maximum TX Power: <20dBm
Note: Danby will not be liable for any issues or problems caused by the internet, wireless router or any
other Smart devices. Please contact the original provider for further help with these issues.
DOWNLOAD AND INSTALL THE APP
Caution: The below QR codes are used to download the wireless connection app. They are different than
the QR code that may appear on the side of the unit below the rating plate.
PREPARATION
• Ensure your mobile device is connected to your wireless router. Also ensure that the wireless router is
connected to the internet.
• Ensure you mobile device is already connected to the wireless network that you wish to use. Remove
any other unused wireless networks from your deivce history to avoid confusion.
• Images in this manual are for instructional purposes only. The actual app may appear slightly different.
Android users: scan the below QR code or go to
Google Play and search “Danby” to download and
install the wireless app.
iOS users: scan the below QR code or go to the
APP Store and search “Danby” to download and
install the wireless app. If you see more than one
version of the app in the APP Store, choose the one
named “Danby”.

5
OPERATING INSTRUCTIONS
Successful configuration
will be indicated by a
checkmark.
The appliance will now
appear on your app home
page.
You can now see the appliance in the
device list. You can choose from the
recommended names or you can set a
custom name.
Network Configuration by Manual Selection
If the Bluetooth connection does not work, you can
manually choose the appliance to add it. From the home
page of the app, press “Add Device”.
Choose the type of appliance
from the provided list.

6
OPERATING INSTRUCTIONS
Select your home WLAN. If the display does not automatically show “AP”,
press and hold the “Power” button for 3 seconds
until “AP” shows on the display.
Go to the WLAN settings in your wireless device.
Connect to the network “net_ac_XXXX” using
password “12345678”. This will connect your
wireless device to the appliance.
Connect your device network.

OPERATING INSTRUCTIONS
The appliance will now appear on your app home
page.
You can now see the appliance in the device list.
You can choose from the recommended names or
you can set a custom name.
Configuration is successful.
Note: When the manual connection is successfully completed, the appliance status may still show “offline”.
To correct this, either refresh the device list in the app or turn the appliance off and then on again and the
app should show the appliance as “online” within a few minutes.
When the wireless connection is active, AP will disappear from the display and the wireless connection
light on the control panel will illuminate.
7
9
OPERATING INSTRUCTIONS
SPECIAL FEATURES
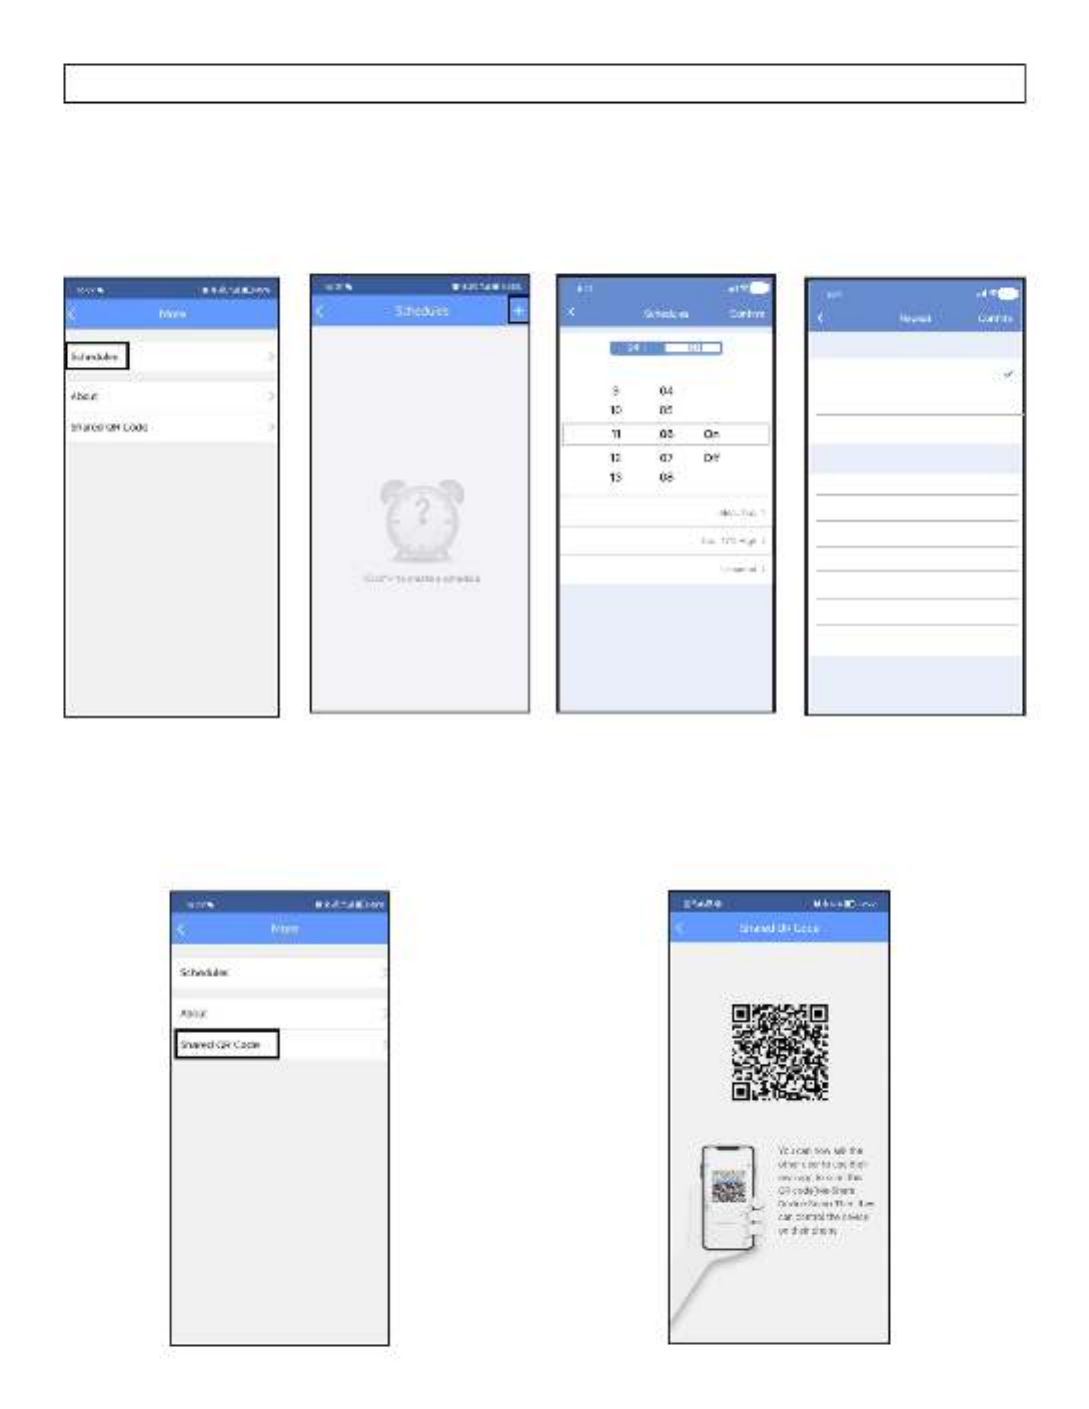
Share QR Code
The appliance can be controlled by multiple users at the same time using the Share QR Code feature. Click
“Share QR Code” and the QR code will display.
Schedule
You can set the appliance to turn on and off based on a set schedule by
pressing “Schedules” and following the prompts.
Repeat
Sengs
Label
Commonly used:
Every day
Weekdays
Only once
Custom:
Monday
Tuesday
Wednesday
Thursday
Friday
Saturday
Sunday

OPERATING INSTRUCTIONS
10
APP DECLARATION
Applicable system: Android and Apple iOS
• The app is not compatible with software versions below 4.4 Android and 9.0 iOS.
• Due to the variables involved in your specific installation, we must advise that not all Android and iOS
operating systems will be compatible with the wireless app. We cannot be responsible for any issues
resulting from incompatibility.
Wireless Safety Strategy
The wireless application only supports WPA-PSK/WPA2-PSK encryption. WPA-PSK/WPA2-PSK encryption
is recommended.
Cautions
• Due to different network situations, control processes might sometimes return a time out error. If this
occurrs, unplug the appliance and plug it back in. If it does not automatically reconnect, you may need
to reconnect the appliance to the app.
• Your smart device camera requires at least 5 million pixels to be able to scan a QR code.
• The wireless app is subject to updates without prior notice for functional improvement. The actual
network connection process may be slightly different than outlined in the manual. The actual process
shall prevail.
DECLARATION OF CONFORMITY
Contains FCC ID: 2ADQOMDNA21
Contains IC: 12575A-MDNA21
This device complies with Part 15 of the FCC Rules and it contains licence-exempt transmitter(s)/receiver(s)
that comply with Innovation, Science and Economic Development Canada’s licence-exempt RSS(s).
Operation is subject to the following two conditions:
1. This device may not cause interference;
2. This device must accept any interference, including interference that may cause undesired operation of
the device.
Only operate the device in accordance with the instructions supplied. Changes or modifications to this
unit not expressly approved by the party responsible for compliance could void the user’s authority to
operate the equipment.This device complies with FCC radiation exposure limits set forth for an uncontrolled
environment. In order to avoid the possibility of exceeding the FCC radio frequency exposure limits, human
proximity to the antenna shall not be less than 20cm (8 inches) during normal operation.
NOTE: This equipment has been tested and found to comply with the limits for a Class B digital device,
pursuant to part 15 of the FCC Rules. These limits are designed to provide reasonable protection against
harmful interference in a residential installation. This equipment generates, uses and can radiate radio
frequency energy and, if not installed and used in accordance with the instructions, may cause harmful
interference to radio communications. However, there is no guarantee that interference will not occur in a
particular installation.
If this equipment does cause harmful interference to radio or television reception, which can be determined
by turning the equipment off and on, the user is encouraged to try to correct the interference by one or
more of the following measures:
• Reorient or relocate the receiving antenna.
• Increase the separation between the equipment and receiver.
• Connect the equipment into an outlet on a circuit different from that to which the receiver is connected.
• Consult the dealer or an experienced radio/TV technician for help.

11
SPÉCIFICATION
Numéro de modèle: DDR022BSWDB, DDR050BSWDB, DDR050BSPWDB
Numéro de modèle du module sans fil : US-SK105
Type d’antenne: antenne PCB imprimée
Bande de fréquence : 2400-2483.5MHz
Température de fonctionnement : 0°C ~ 45°C (32°F ~ 113°F)
Humidité de fonctionnement: 10% ~ 85%
Entrée d’alimentation: 5VCC/300mA
Puissance d’émission maximale: <20dBm
Remarque : Danby ne sera pas responsable des problèmes ou problèmes causés par Internet, un routeur
sans fil ou tout autre appareil intelligent. Veuillez contacter le fournisseur d’origine pour obtenir de l’aide
concernant ces problèmes.
TÉLÉCHARGER ET INSTALLER L’APPLICATION
Attention : Les codes QR ci-dessous sont utilisés pour télécharger l’application de connexion sans fil. Ils sont
différents du code QR qui peut apparaître sur le côté de l’appareil sous la plaque signalétique.
PRÉPARATION
• Assurez-vous que votre appareil mobile est connecté à votre routeur sans fil. Assurez-vous également
que le routeur sans fil est connecté à Internet.
• Assurez-vous que votre appareil mobile est déjà connecté au réseau sans fil que vous souhaitez utiliser.
Supprimez tous les autres réseaux sans fil inutilisés de l’historique de votre appareil pour éviter toute
confusion.
• Les images de ce manuel sont fournies à titre indicatif uniquement. L’application réelle peut sembler
légèrement différente.
Utilisateurs d’Android: scannez le code QR ci-
dessous ou accédez à GooglePlay et recherchez
«Danby» pour télécharger et installer l’application
sans fil.
Utilisateurs iOS: scannez le code QR ci-dessous
ou accédez à l’AppStore et recherchez «Danby»
pour télécharger et installer l’application sans fil. Si
vous voyez plus d’une version de l’application dans
l’APP Store, choisissez celle nommée “Danby”.
INSTRUCTIONS D’UTILISATION

12
CRÉER UN COMPTE
Lorsque vous ouvrez l’application pour la première fois, il vous sera demandé de lire et d’accepter l’avis de
confidentialité des données.
CONFIGURATION DU RÉSEAU
• Il peut être utile de supprimer les réseaux sans fil inutilisés de la mémoire de votre appareil pour vous
assurer que vous vous connectez au bon réseau.
• Assurez-vous que l’appareil sans fil et le réseau fonctionnent correctement avant de commencer à
connecter l’appareil sans fil. Vous devez terminer toutes les étapes de connexion dans les 8 minutes
suivant l’entrée en mode AP ou la connexion sera réinitialisée et vous devrez réactiver le mode AP pour
redémarrer la connexion.
• Il existe deux façons de connecter la fonction sans fil, par connexion Bluetooth ou par sélection
manuelle. Nous vous recommandons d’utiliser la connexion Bluetooth car elle est simple et rapide
et vous fera gagner du temps. Si la connexion Bluetooth ne fonctionne pas, suivez les étapes de
connexion manuelle.
Pour commencer le processus de connexion, branchez l’appareil, puis maintenez enfoncé le bouton
d’alimentation sur le panneau de commande pendant 3 secondes. “AP” s’affichera à l’écran. Cela signifie
« Point d’accès » et signifie que le mode AP est activé et que le récepteur sans fil de l’appareil est prêt à
établir une connexion.
Android Apple iOS
1. Appuyez sur “Créer un compte” ou sur “Se
connecter avec un compte tiers”.
2. Entrez votre adresse e-mail et votre mot de
passe, puis appuyez sur “S’inscrire”.
INSTRUCTIONS D’UTILISATION

13
Configuration réseau par analyse Bluetooth
Assurez-vous que votre Bluetooth fonctionne
correctement avant de continuer. Depuis la page
d’accueil de l’application, appuyez sur “Ajouter un
appareil”.
L’application recherchera automatiquement les
appareils à proximité.
Attendez que l’appareil
intelligent soit trouvé, puis
choisissez-le dans la liste
fournie.
Attendez que le
réseau se connecte à
l’appliance.
Sélectionnez le réseau
sans fil souhaité dans la
liste et saisissez le mot de
passe.
INSTRUCTIONS D’UTILISATION

14
La configuration réussie
sera indiquée par une
coche.
L’appareil apparaîtra
maintenant sur la page
d’accueil de votre
application.
Vous pouvez maintenant voir
l’appareil dans la liste des appareils.
Vous pouvez choisir parmi les noms
recommandés ou définir un nom
personnalisé.
Configuration réseau par sélection manuelle
Si la connexion Bluetooth ne fonctionne pas, vous
pouvez choisir manuellement l’appareil pour l’ajouter.
Depuis la page d’accueil de l’application, appuyez sur
“Ajouter un appareil”.
Choisissez le type d’appareil
dans la liste fournie.
INSTRUCTIONS D’UTILISATION

15
Sélectionnez le WLAN de votre domicile. Si l’écran n’affiche pas automatiquement “AP”,
appuyez sur le bouton “d’alimentation” et
maintenez-le enfoncé pendant 3 secondes jusqu’à
ce que “AP” s’affiche à l’écran.
Accédez aux paramètres WLAN de votre appareil
sans fil. Connectez-vous au réseau “net_ac_XXXX”
en utilisant le mot de passe “12345678”. Cela
connectera votre appareil sans fil à l’appareil.
INSTRUCTIONS D’UTILISATION
Connectez votre appareil au réseau.
Produkt Specifikationer
| Mærke: | Danby |
| Kategori: | Affugter |
| Model: | DDR050BSWDB |
Har du brug for hjælp?
Hvis du har brug for hjælp til Danby DDR050BSWDB stil et spørgsmål nedenfor, og andre brugere vil svare dig
Affugter Danby Manualer

22 September 2024
7 September 2024
4 September 2024
4 September 2024
3 September 2024
1 September 2024
30 August 2024
28 August 2024
23 August 2024
11 August 2024
Affugter Manualer
- Affugter DeLonghi
- Affugter SilverCrest
- Affugter Sencor
- Affugter TCL
- Affugter Siemens
- Affugter Wilfa
- Affugter GE
- Affugter Beurer
- Affugter Breville
- Affugter Panasonic
- Affugter Philips
- Affugter Concept
- Affugter Steba
- Affugter Electrolux
- Affugter Whirlpool
- Affugter Mitsubishi
- Affugter Master
- Affugter Sharp
- Affugter ARGO
- Affugter Qlima
- Affugter Soler & Palau
- Affugter Meaco
- Affugter Toshiba
- Affugter Klarstein
- Affugter Güde
- Affugter Infiniton
- Affugter Princess
- Affugter Nedis
- Affugter Hyundai
- Affugter Hisense
- Affugter TriStar
- Affugter Blyss
- Affugter Fysic
- Affugter Adler
- Affugter Black And Decker
- Affugter Eurom
- Affugter Trotec
- Affugter Einhell
- Affugter Becken
- Affugter BEKO
- Affugter Costway
- Affugter Honeywell
- Affugter Clatronic
- Affugter Quigg
- Affugter Rowenta
- Affugter Noveen
- Affugter Ariston Thermo
- Affugter Fagor
- Affugter Haier
- Affugter Russell Hobbs
- Affugter Innoliving
- Affugter Thermex
- Affugter Stadler Form
- Affugter Comfee
- Affugter Fral
- Affugter Gree
- Affugter Wood's
- Affugter Dimplex
- Affugter Primo
- Affugter Orbegozo
- Affugter Taurus
- Affugter Exquisit
- Affugter Boneco
- Affugter Toyotomi
- Affugter Lanaform
- Affugter G3 Ferrari
- Affugter Munters
- Affugter Domo
- Affugter Heylo
- Affugter Ambiano
- Affugter Olimpia Splendid
- Affugter Swan
- Affugter Dantherm
- Affugter Midea
- Affugter Frigidaire
- Affugter Suntec
- Affugter RCA
- Affugter Cotech
- Affugter Aerial
- Affugter Trebs
- Affugter Renkforce
- Affugter Eldom
- Affugter Sonnenkönig
- Affugter Hunter
- Affugter Be Cool
- Affugter Turmix
- Affugter Rotel
- Affugter Gemini
- Affugter Cecotec
- Affugter Solac
- Affugter Anslut
- Affugter REMS
- Affugter Supra
- Affugter Clean Air Optima
- Affugter Kenmore
- Affugter SereneLife
- Affugter Friedrich
- Affugter Whynter
- Affugter Magic Chef
- Affugter Duronic
- Affugter Broan
- Affugter Philco
- Affugter Pingi
- Affugter Kunft
- Affugter Kogan
- Affugter Hacienda
- Affugter Jocel
- Affugter Keystone
- Affugter HTW
- Affugter Create
- Affugter Flama
- Affugter Haus & Luft
- Affugter Daitsu
- Affugter Air Naturel
- Affugter Salton
- Affugter Heinner
- Affugter Guzzanti
- Affugter Kubo
- Affugter Oasis
- Affugter Igenix
- Affugter Winix
- Affugter Edgestar
- Affugter Arovec
- Affugter Argoclima
- Affugter Imarflex
- Affugter Calorex
- Affugter Chigo
- Affugter Gutfels
- Affugter Ausclimate
- Affugter Perfect Aire
- Affugter Dedra
- Affugter Strex
- Affugter SPT
- Affugter Aktobis
- Affugter PureGuardian
- Affugter XPower
- Affugter JAP
- Affugter Magnavox
- Affugter B-Air
- Affugter IRIS
- Affugter Saneo
- Affugter BlueDri
- Affugter Columbia Vac
- Affugter House & Luft
- Affugter MSW
- Affugter Artrom
- Affugter Commercial Cool
- Affugter Norpole
- Affugter Ionmax
- Affugter Airo
- Affugter JHS
- Affugter FREONIC
- Affugter Electroline
- Affugter Schimmel-DRY
- Affugter Yamazen
- Affugter Air&Me
Nyeste Affugter Manualer

7 April 2025
4 April 2025
19 Marts 2025
18 Marts 2025
1 Marts 2025
1 Marts 2025
12 Februar 2025
12 Februar 2025
12 Februar 2025