Emporia Euphoria LTE Manual
Emporia
Smartphones
Euphoria LTE
Læs nedenfor 📖 manual på dansk for Emporia Euphoria LTE (32 sider) i kategorien Smartphones. Denne guide var nyttig for 38 personer og blev bedømt med 4.5 stjerner i gennemsnit af 2 brugere
Side 1/32

EUPHORIA
LTE
Eveline Pupeter, emporia Telecom
www.emporia.eu
Thank you for purchasing an emporia product!
Please read this user guide before attempting to use your phone.
English
Mobile data
tariff required
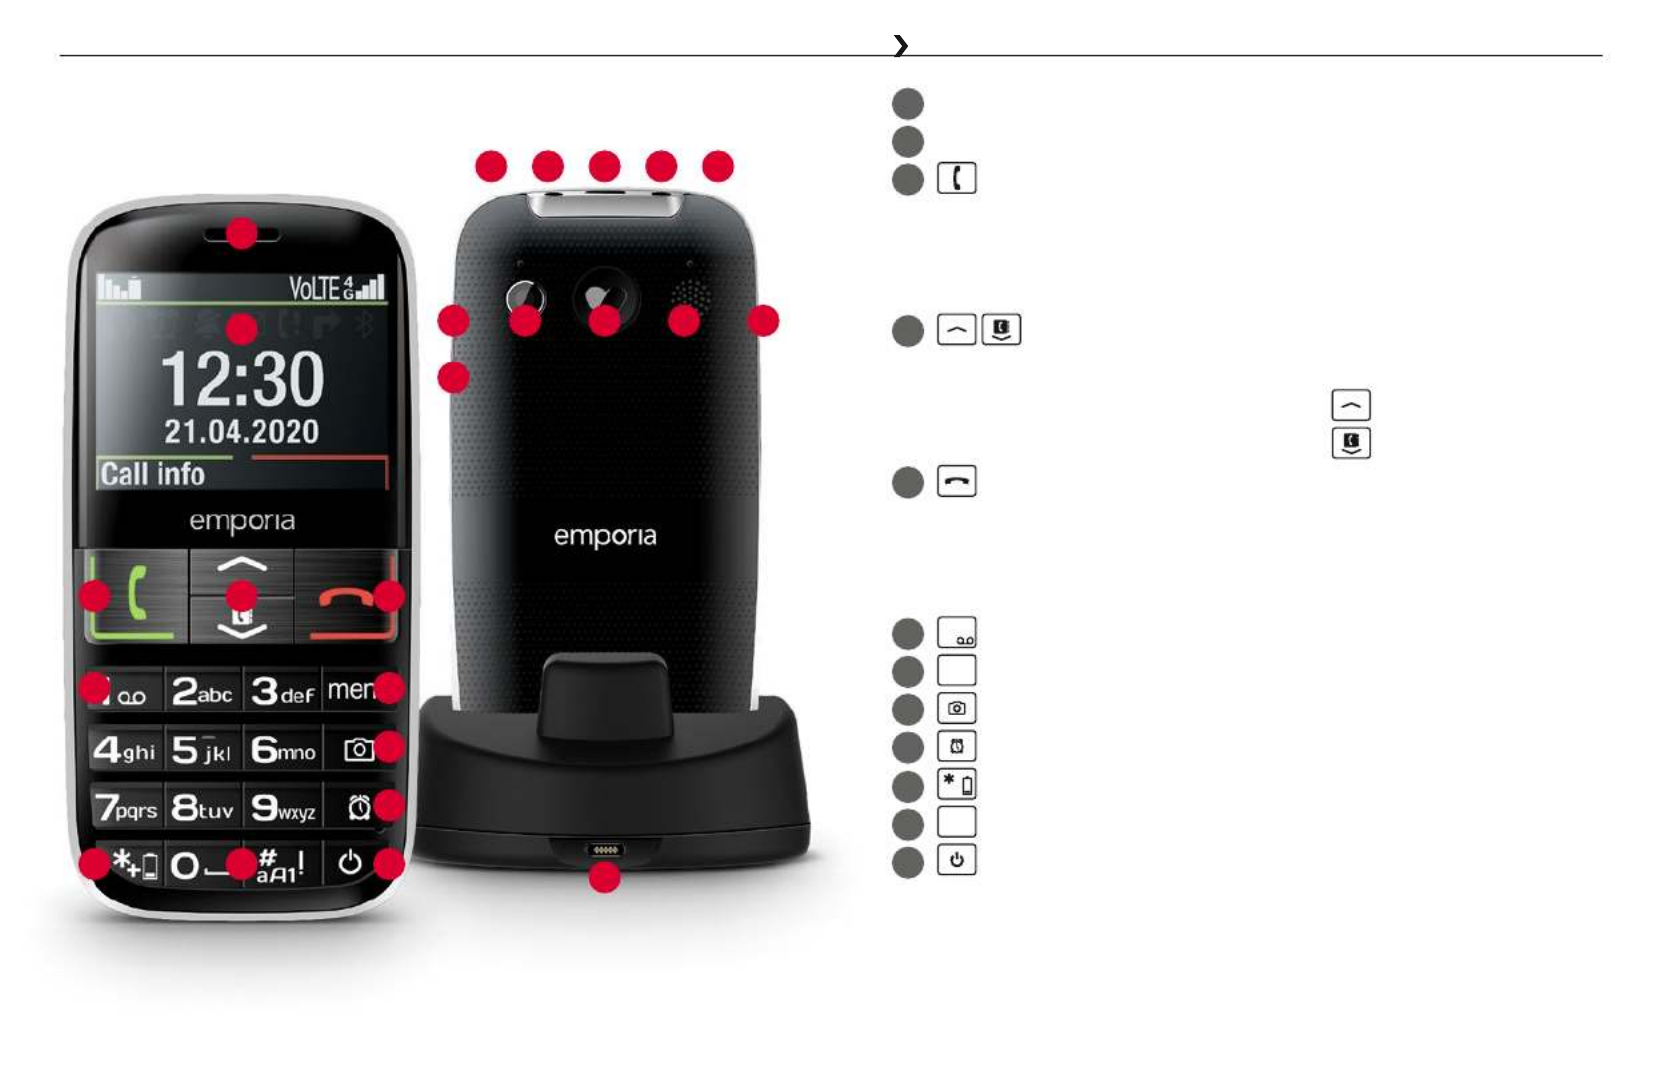
1 Speaker
2 Display (screen)
3 Green key
• Start or accept a call
• In the menu: Conrm selection
• On standby: Access Call history
4 Arrow keys
• Use these to ick through your and the .Contacts Menu
• When the phone is on standby, press to access Favourites.
• When the phone is on standby, press to access Contacts.
5 Red key
• When in a call: End
• When in the menu: One step back
• When entering digits or letters: Delete
6
1
key (voicemail)
7
menu
Menu key
8 Camera key
9 Alarm key
10
+
Star key
11
#
a A1 !
Hash key
12 On/O key
YOUR MOBILE PHONE AT A GLANCE
2
1
3 4
1413
1918
22
14
15
20 1 21
5
8
7 6
9
1210 11
1716

13 Opening for removing
thebattery cover
14 Torch (LED)
15 Port for USB
chargingcable
16 Headset port (Attention:
This is not a charger port!)
17 Wrist strap holder
18 Torch button
When the phone is on,
the torch can be on
continuously:
• Press this button for 2sec.
toturn the torch on.
• To turn the torch o,
pressthe button briey.
19 Camera lens
20 Emergency button
(optional)
21 Volume buttons
22 Keypad lock button
Press this button for 2sec. to
lock or unlock the keypad.
Symbols on the screen
Network signal
strength
Roaming (abroad)
Battery indicator
Keypad locked
Missed call
Call forwarding
New text (SMS)
message
Prole: Silent/Sleep
mode
Alarm on
Headset connected
Bluetooth activated
Bluetooth connected

ENGLISH–04
1. SETTING UP YOUR PHONE
1.1 Inserting a SIM card and a Micro SD card (optional)
1. Remove the battery cover (opening in the bottom left-hand
corner).
2. Insert the SIM card into the SIM card holder with the gold
contacts facing down.
3. Insert your Micro SD card into the memory card holder with
thegold contacts facing down.
1.2 Inserting the battery
1. Insert the battery, making sure that the battery contacts touch
the phone's gold contacts.
2. Place the battery cover over the battery and click it into place.
1.3 Charging the battery
Before you use the phone for the rst time, charge the battery for
at least 4 hours. If you don't charge the phone for this period of
time, the battery life could be reduced.

ENGLISH–05
Never connect the phone to the charger or a PC if a battery has
not been inserted. Do not attempt to operate the phone without a
battery inserted. Doing this can damage the phone.
Charging with the charging cable
To avoid contact faults with the USB connector, only use
thecharging cable supplied with the phone for charging.
• Connect the USB cable to the mains plug.
• Plug the charging cable into the USB port on the phone.
• Then plug the mains plug into a wall socket.
Using the charging cradle
• Connect the USB cable to the mains plug.
• Plug the charging cable into the USB port on the back of
thecharging cradle and then
• place the phone in the charging cradle.
If you intend to use this method to charge your phone every time,
you can leave the charging cable plugged into the charging cradle
permanently.
Using a computer
Plug the phone into a USB port on your computer. If necessary,
disconnect the USB cable from the mains plug to do this.

ENGLISH–06
1.4 Turning on the phone
• Press and hold the key for at least 2 seconds until
theemporia logo appears. It will take a few seconds for
thehome screen to be displayed.
1.5 Entering a PIN code
Enter the four-digit PIN code for your SIM card when asked to
do so and conrm the entry.
You have a maximum of three attempts to enter the correct
number. If you enter the wrong number three times in a row,
you will only be able to unblock the SIM card with the PUK
code. Youwill nd your original PIN code and PUK code in the
documents supplied with your SIM card by your network operator.
1.6 Setting the language, time and date
1. Use to select a and then conrm your selection Language
by pressing OK.
2. Set the and then save these settings.Time and Date
1.7 Saving battery power
After a few seconds of inactivity, the screen will turn o to save
battery power. In the event of an incoming call or you pressing
any key, the screen will light up again.
ENGLISH–07
2. USING THE PHONE
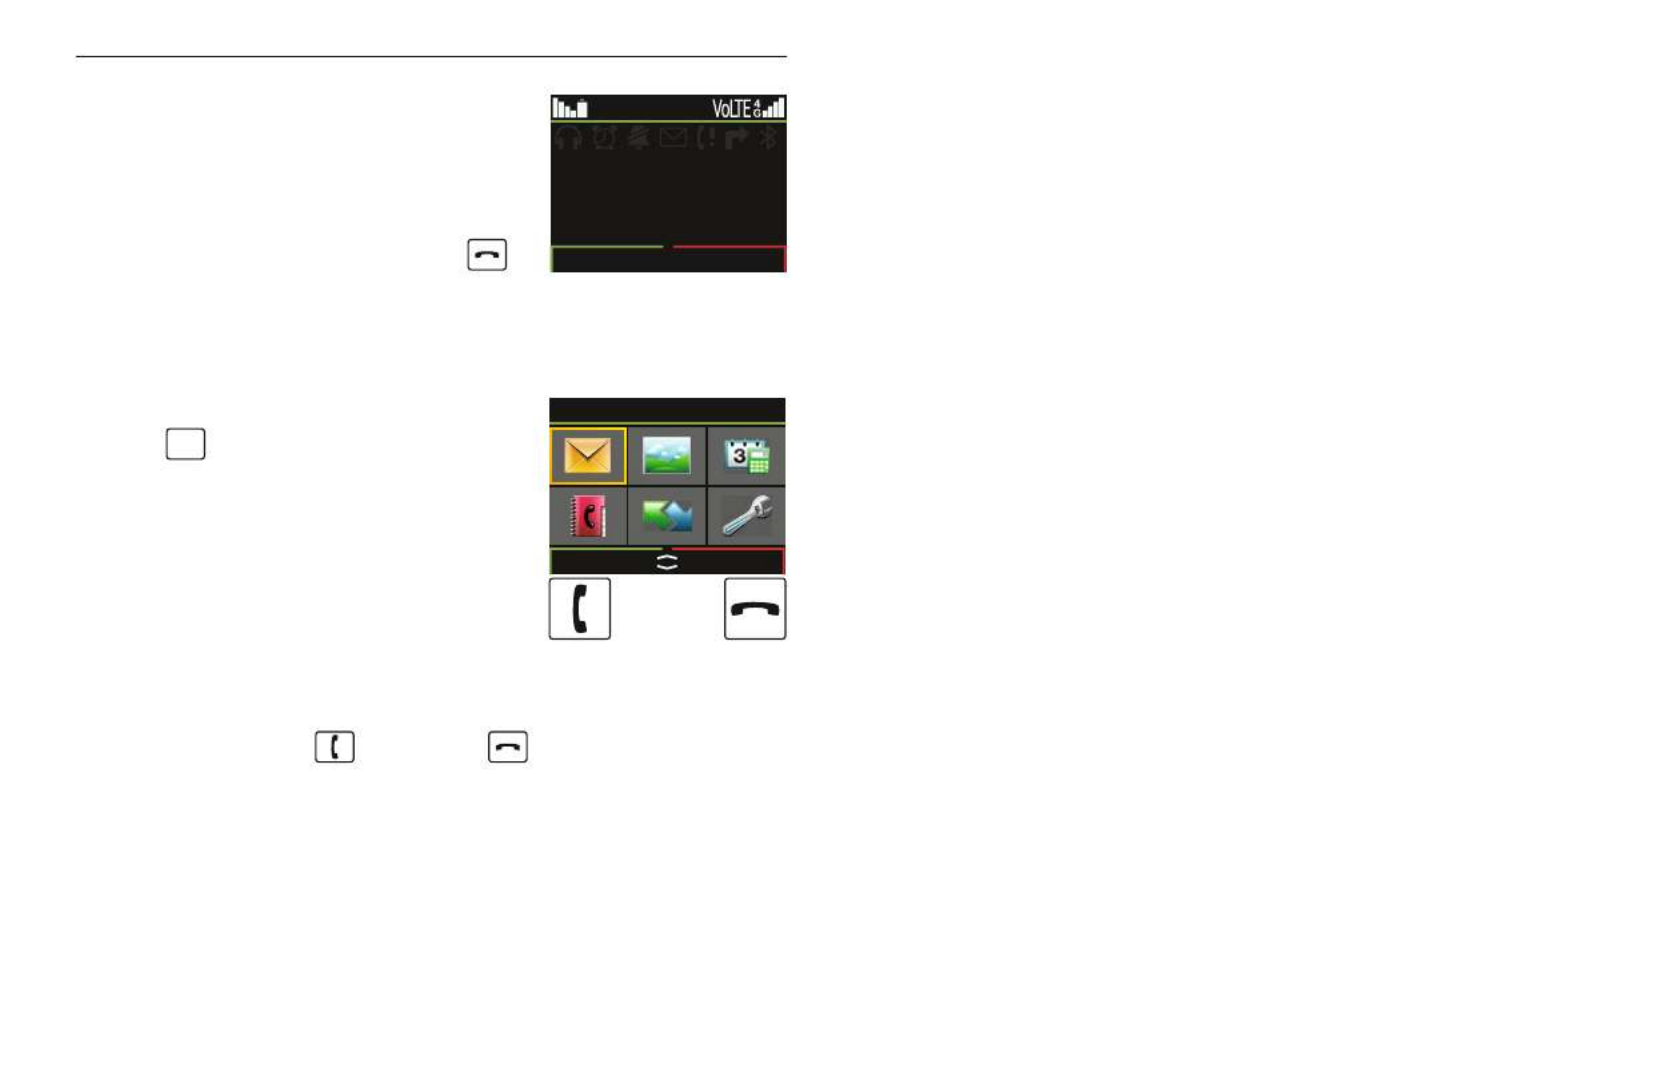
2.1 Home screen
If your phone is on but not using a
function, it will display the home screen.
You can return to the home screen
anytime by pressing the redkey
several times.
2.2 Menu
The
menu
keywill display the menu.
Themenu is a list that enables you to
manage the phone's various functions
and adapt the phone to your needs.
• Use the arrow keys to scroll through
themenu.
• ,
The items available in the menu are: Messages Photo
album, Tools, Contacts, Call history Settings and .
• Use the green key and red key beneath the screen to
conrm your selection or to return to the home screen.
12:30
Su, 21.04
Call Info
OK Back
Messages

ENGLISH–08
2.3 Dual-function keys
Pressing and holding the key: Allows you to listen to your
voicemail
Pressing and holding the
#
aA1
!
key: Turns on Silent/Sleep mode
Pressing the
+
key twice: + for a country code,
such as +49 for Germany
2.4 Writing text
You enter text using the keypad in or Manual mode T9 mode
(software-supported suggested words).
Use the
#
aA1!
key to switch between the input methods.
• All letters in lower caseabc:
• All letters in upper caseABC:
• The rst letter is in upper case and all the letters Abc:
thatfollow are in lower case.
• Digits123:
• T9 English for Abc sEn:
• T9 English for abcsen:
• T9 English for ABCsEN:

ENGLISH–09
Inputting text in T9 mode
• Find the key bearing the letter you require and press it once
only. After a few entries, the software will start to detect word
patterns and suggest appropriate words,
(e.g. 4 2 5 5 6 for Hallo).
• Use the arrow keys and to move between
the suggested words.
• Press the green button to select your required word and
itwill be added to the message you're writing.
Inputting text in manual mode
Press a number key multiple times
(e.g. 4 4 2 5 5 5 5 5 5 6 6 6 for Hallo).
• Special characters and symbols have been assigned to
thevarious keys, but can dier in some languages:
. , - ? ! 1 ' @ : ; ( ) *
2
a b c
abc2äàåāâæçáć
3
d e f
def3đéē€èêë
4
gh i
ghi4îïíìğι
5j k l
j k l 5 £
6
mn o
m n o 6 ö ñ ô œ ó ò
7
pqrs
pqrs7ß$ş
8
tu v
t u v 8 ü ù û ú
9
wxyz
wxyz9ŵýÿ
0
Space 0
+
.,?!'"()@\/:_;+-*=%&<>₤$¥§€¤[]{}~#

ENGLISH–10
3. CALLS
3.1 Accepting, declining or ending a call
• To answer: Press the green key for Answer.
• or : Press the red keyTo reject end a call .
• To mute the ringtone temporarily,
press the volume control button.
3.2 Calling someone
Dialling a number
1. Enter the phone number you want to dial (incl. the area code)
using the keypad.
2. Start the call by pressing the green key .
Using the redial function
1. When on the home screen, press the green key .
Your will be displayed.Chats
2. Use the arrow keys and to select a number.
3. Start the call by pressing the green key .
To go hands-free during a call, open and turn on Options
thespeaker.

ENGLISH–11
4. MESSAGES (SMS)
Menu items: Write message SMS settings, Chats, and
MMS settings
4.1 Writing and sending a message
1. Open .Menu _Messages
2. Select Write message.
3. Enter the text using the keypad.
4. To specify a recipient for the SMS,
open Options and select .Send
5. You can now select a from the phone book or Contact
type in a Phone number using the keypad.
4.2 Reading a message
1. When you receive a new message,
a symbol will appear on the home screen.
2. Press the green key for View and
to read the message immediately.
3. You can nd the text message again later on in Menu
_ _ Messages .Chats
4. To read a message, tap on it.

ENGLISH–12
5. PHOTO ALBUM AND CAMERA
5.1 Taking photos and recording videos
1. When on the home screen, press the camera button on
theside of the phone or open .Menu _Tools _Camera
2. in or out on the camera frame, use the volume To Zoom
buttons and on the side of the phone.
3. Thearrow key will open for the camera: Options
• : Specify the resolution for your photo or video.Image size
• : Select whether the photo or video you're capturing Memory
should be stored in your phone's internal memory or
on the SD card.
4. Pressing the camera button or
the arrow key will Take a photo.
5. The photo you've taken will immediately be stored in
thephoto album.
6. Press the green key to go straight from the camera to
thephoto album.
5.2 Viewing photos
All the photos you take will be sorted and displayed
chronologically.
1. Open Menu _Photo album.
2. Use the arrow keys to scroll through the photos on
theoverview screen.

ENGLISH–13
3. Pressing the green key will open for Options
the selected photo:
• : A complete, full-screen version of the selected photo View
will be displayed. You can use the arrow keys to move to other
photos.
• : This option allows you to send the selected photo to a Send
recipient as an MMS message. (Please not that this will incur
additional costs.)
• : You can use the selected photo as your wallpaper Wallpaper
on the home screen.
• : You can give the selected photo or Rename
video a new le name.
• : This option will delete the selected photo or video.Delete
• Delete all: This option will delete the entire photo album.
5.3 Backing up photos on your PC
1. Plug the USB connector end of the USB cable supplied with
thephone into your PC and the other end into your phone.
2. Select Transferles from the list displayed.
3. The PC will now detect your phone and display the phone's
internal memory.
4. You can then select les from the album and copy PHOTOS
them to your PC.

ENGLISH–14
6. TOOLS
Menu items: , Alarm clock Birthday reminder, Calendar,
Calculator, Bluetooth, FM radio and Camera
6.1 Alarm clock
1. Open .Set time
2. Enter your desired and then Alarm time Save it.
3. The alarm clock is activated and will now go o at the time you
have set every day.
4. When the alarm is ringing, you can press the red key to
turn it o or the green key to activate the snooze function.
5. Select Off to deactivate the alarm permanently.
If the phone is turned o, the alarm is turned o as well.
The alarm will therefore not sound when the phone is o.
6.2 Bluetooth
1. Turn the Bluetooth function . On
2. Tap on and on Connect Search for new devices.
A list of available devices will be displayed.
3. Select the device you want to pair the phone with from the list.
4. Follow the instructions to pair the devices.
Devices that have been connected before will be recognised and
connected automatically.

ENGLISH–15
6.3 FM radio
• Searching for a station
You can set the station using the arrow keys .
• Adjusting the volume
You can adjust the volume of the radio with and on
theside of the phone.
You cannot change the volume if you are in an Options menu
item. In this case, close the Options menu rst.
• Station list
This list will display all the radio stations that have already
been saved.
• Manual input
If you know the frequency of the station you want, you can
enter it here directly. Use this key
+
for the decimal point.
• Auto search
This function searches for all detectable stations and
savesthem in the station list together with their frequencies.
• Loudspeaker
Turn hands-free mode on to listen to the radio without
aheadset.
• Exit
Turn the radio o.
The FM radio will only work with a headset plugged in.
Theheadset takes on the role of the antenna.

ENGLISH–16
Menu items: Search for name, Add contact Edit contact, ,
Delete, Send contact via SMS, Copy contacts, My number,
Speed-dial keys, Emergency contacts, Contact settings,
SMS's in Contacts and Blocked numbers
7.1 Searching for a contact in the phone book
1. When on the home screen, press the phone book key or
open Menu _Contacts _Search for name.
2. Use the arrow keys and to scroll through the entries
or use the keypad to type the rst letter of the contact you are
looking for.
3. Start the call by pressing the green key .
7. CONTACTS

ENGLISH–17
7.2 Adding a contact
1. Open .Menu _Contacts _Add contact
2. Enter the phone number and the person's name and
then them.Save
Always save names and numbers with the international dialling
code, e.g. +41 for Switzerland, +43 for Austria and +49 for Germany.
3. Decide whether you want to save a photo for the contact.
This photo will be displayed on the screen when the contact
calls and you open the phone. If the contact is saved on your
phone, the exterior screen will display the name of the caller,
otherwise it will just display the phone number.
4. Select a photo from the photo album and set it as a newphoto.
Contacts with a photo cannot be saved on the SIM card and have
to be saved on the phone only.
7.3 Editing contact
Edit the previously saved entries and save your changes.
7.4 Deleting a contact
• Select a contact you want to delete. Single:
• Delete all: Specify whether you want to delete all the contacts
from the SIM card or from the phone.

ENGLISH–18
7.5 Sending contact via SMS
1. Select the contact you want to send.
2. Enter the recipient's or for their name in Number Search
yourcontacts.
3. You'll then send an SMS that the contact receives as text in
theformat #Name#Number#.
7.6 Copying contacts
You can save one or all the contacts on your SIM card in
thephone's memory or vice versa.
7.7 My number
Save your own phone number so that you never forget it again.
7.8 Saving or changing a speed dial key
1. Open .Menu _Contacts _Speed dial keys
2. Select a vacant position from the list.
3. Enter a or for a contact in Name and Number Search
thephone book.
4. To change a speed dial key, select a position from the list
and change or delete its link to the contact it's currently
associatedwith.

ENGLISH–20
8. CALL HISTORY
Menu items: , , Missed calls Dialled calls Received calls,
Call duration and Delete
Each list is sorted chronologically and shows the date and
timeof each call beneath the contact's name or number.
Options: , , , Call Save in Contacts Edit number before call
Write message, and Delete
When on the home screen, you can access your Chats
containing all your calls by pressing the green key .
The symbols indicate the following:
• Missed calls
• Dialled calls
• Received calls
• Call duration
Duration of the last call
Total duration of all outgoing calls
Total duration of all received calls
Total duration of all calls

ENGLISH–21
Menu items: , , Mobile network Silent/Sleep mode
Sound and alerts, Handset volume, Hands-free volume,
Display and light Time and date, , Language, Call waiting,
Call forwarding, Suppress number, , Auto keypad lock
Favourite key, Voicemail number, , Emergency numbers
Emergency button, Security settings Contact settings, ,
0000 to enter settings, and System updates Master reset
9.1 Mobile network
• on/o (preset to be on)Mobile data:
• : on/o (preset to be o)Data roaming
9.2 Silent/Sleep mode
In this mode, incoming calls will only be indicated by a visual
alert. The phone's ringtone and vibration are turned o.
If you receive a call while the phone is closed,
the exterior screen will display the name of a saved contact or
the phonenumber.
9. SETTINGS

ENGLISH–22
9.3 Sound and alerts
You can personalise the settings for tones, alerts and vibration
or select a set of predened settings (prole).
Menu items: , Ringtone Alarm melody, , Ringer volume
Silent/Sleep mode Meeting/Theatre mode, ,
Maximum/Bus mode, , Vibra for calls Vibra for alarm clock,
Key tones, Message tone Vibra for messages, ,
Handset volume, Hands-free volume, Conrmationtone,
Emergency tone and Power on/off sound
9.4 Display and lights
Among other things, here you need to specify how long a
period of inactivity the screen should wait before going into
sleep mode. Select settings for the screen brightness level,
thekeypad light and your wallpaper.
9.5 Auto keypad lock
Prevent keys on your phone from being pressed accidentally
and specify how long a period of no key pressing the phone
should wait before locking the keys. To release the keypad
lock, press the keypad lock button .
If the keypad lock is active, the phone will only respond if the
green button or the key is pressed. If any other key is pressed,
thescreen will remain dark to save energy.

ENGLISH–23
9.6 Favourite key
You can assign a function you intend to use frequently
to the key.
A phone number cannot be assigned to the favourite key.
Speeddial must be used to do that.
Selectable functions: Write message Messages, ,
Calculator, Calendar, and History FM radio
9.7 Voicemail number
Enter the number for your voicemail. You will nd this number
in the documents supplied by your network provider.
9.8 Security settings
• : PIN request on/o and Change PINPIN
• : On/O and Change (factory preset code 1234)Phone code
9.9 0000 to enter settings
Activate this safety mode to prevent changes being made to
settings unintentionally.

ENGLISH–24
9.10 System updates
You can download the latest software for the phone yourself
and therefore update the system and improve applications
yourself. However, only perform updates if your tari includes
mobile data!
1. Check that the battery is at least 30% charged.
If it isn't, thedownload cannot start.
2. Open Menu _Settings _System updates.
3. Tap on Check.
4. A message will appear telling you whether or not there is any
new software available. If there is, select to start Download
theupdate process.
5. Once the download has been completed, select Update now.
You will be informed that you cannot use the phone during
the update process.
Do not press the on/okey during the update process and do not
start using your phone again until this message has appeared:
The installation was successful.
9.11 Master reset
You can restore all the factory settings on your phone
(factory preset phone code: 1234).

ENGLISH–25
10. EMPORIA EMERGENCY CALL FUNCTION
Your phone has an emergency call function that you can tailor
to your specic needs. The Emergency button on the
back of the device enables you to call people you trust for help
quickly in an emergency.
• Use the battery cover with the
opening for the emergency button.
• The Emergency button is switched
off by default.
• Open in the menu Settings
_Emergency contacts _Add emergency contact.
• Save your . personal emergency contacts 1
• have Do not enable the emergency button until you
specied your . emergency contacts 2
How do I make an emergency call?
Press and hold the Emergency button on the back of
thephone for 3 seconds.
How do I stop an accidental emergency call?
1. If you've started an emergency call by mistake,
press the for 3 seconds . red key to hang up
This will interrupt the .emergency call cycle
2. Next, turn the phone o and on again to restore your
emergency call status settings.
Emergency contacts
OK Back
Add eme gency conta
Delete emergency co
Emergency button
Pre-alarm
1
2
3
4
1
2

ENGLISH–26
How do I save an emergency contact?
1. Open › .Emergency call settings‹
2. Select an empty position.
3. The list of your contacts will open.
Tap on a contact you want to be notied in an emergency.
4. Specify whether the contact is a or a private individual
help organisation and also whether they should be sent an
emergency call message in addition to receiving the call itself.
What does the recipient of an emergency call have to do?
1. The emergency contact has to end the call and
ring back the person in need of help. If this doesn't happen,
the call will be ended automatically after 1 minute and the
next emergency contact will be called.
2. The emporia phone will automatically answer the callback,
re-establishing the connection to the emergency contact.
What do I have to take into consideration if I want to use a
help organisation?
• If you want to add a help organisation or an ocial institution
such as a rescue service, the police or the re brigade as an
emergency contact, it is imperative that you check this is okay
with the respective institution beforehand.

ENGLISH–27
• If you do not have any emergency contacts saved, have no
credit on your prepaid phone card or have no reception, the
European emergency number 112 will be dialled when the
enabled button is pressed. This will put your call through to
the nearest police station.
Important! Emporia does not assume liability for any costs
incurred through you calling such an institution by mistake.
How do I delete a saved emergency contact?
1. Open in the menu Settings _Emergency contacts
_Delete emergency contact.
2. Select an entry, such as Emergency Contact 1,
using the arrow keys.
3. Select OK by pressing the green key.
For more information on emergency calls, you can scan this
QR code or visit: https://www.emporiamobile.com/en/
service/service/frequently-asked-questions
Produkt Specifikationer
| Mærke: | Emporia |
| Kategori: | Smartphones |
| Model: | Euphoria LTE |
Har du brug for hjælp?
Hvis du har brug for hjælp til Emporia Euphoria LTE stil et spørgsmål nedenfor, og andre brugere vil svare dig
Smartphones Emporia Manualer

23 November 2024
23 November 2024
27 April 2024
11 Marts 2024
1 Januar 2024
26 December 2023
31 August 2023
29 August 2023
29 April 2023
21 December 2022
Smartphones Manualer
- Smartphones Acer
- Smartphones Amplicomms
- Smartphones Denver
- Smartphones Sencor
- Smartphones TCL
- Smartphones Sony
- Smartphones Samsung
- Smartphones Panasonic
- Smartphones Sony Ericsson
- Smartphones TP-Link
- Smartphones Philips
- Smartphones OK
- Smartphones LG
- Smartphones AEG
- Smartphones Doro
- Smartphones Gigaset
- Smartphones AT&T
- Smartphones Mitsubishi
- Smartphones Apple
- Smartphones Sharp
- Smartphones Konrow
- Smartphones Google
- Smartphones HP
- Smartphones Garmin
- Smartphones Sanyo
- Smartphones Easypix
- Smartphones Motorola
- Smartphones Asus
- Smartphones Gigabyte
- Smartphones Toshiba
- Smartphones Kodak
- Smartphones InFocus
- Smartphones Lenovo
- Smartphones Infiniton
- Smartphones OnePlus
- Smartphones Nedis
- Smartphones Thomson
- Smartphones Aiwa
- Smartphones Nokia
- Smartphones Palm
- Smartphones Hisense
- Smartphones Hannspree
- Smartphones Trevi
- Smartphones Fysic
- Smartphones Mio
- Smartphones Blaupunkt
- Smartphones Honeywell
- Smartphones Razer
- Smartphones Medion
- Smartphones Intex
- Smartphones Haier
- Smartphones Huawei
- Smartphones Echo
- Smartphones Vivax
- Smartphones TAG Heuer
- Smartphones BenQ
- Smartphones Microsoft
- Smartphones Alcatel
- Smartphones Plum
- Smartphones Olympia
- Smartphones Xiaomi
- Smartphones Krüger&Matz
- Smartphones Dell
- Smartphones RugGear
- Smartphones Intermec
- Smartphones CAT
- Smartphones Oppo
- Smartphones Tesla
- Smartphones Polaroid
- Smartphones Crosscall
- Smartphones NGM
- Smartphones NEC
- Smartphones Alcatel-Lucent
- Smartphones Aspera
- Smartphones Kyocera
- Smartphones Energy Sistem
- Smartphones Bush
- Smartphones Binatone
- Smartphones Honor
- Smartphones Tiptel
- Smartphones Sagem
- Smartphones Nevir
- Smartphones TrekStor
- Smartphones Lava
- Smartphones Vivo
- Smartphones Vodafone
- Smartphones Overmax
- Smartphones Infinix
- Smartphones Archos
- Smartphones Alba
- Smartphones RCA
- Smartphones MaxCom
- Smartphones Pantech
- Smartphones ZTE
- Smartphones Verykool
- Smartphones Lark
- Smartphones Switel
- Smartphones Brondi
- Smartphones Garmin-Asus
- Smartphones Amazon
- Smartphones HTC
- Smartphones YEZZ
- Smartphones ITTM
- Smartphones ITT
- Smartphones BlackBerry
- Smartphones Evolveo
- Smartphones Coolpad
- Smartphones Wiko
- Smartphones ESTAR
- Smartphones Umidigi
- Smartphones ToughGear
- Smartphones BLU
- Smartphones Lexibook
- Smartphones Prestigio
- Smartphones MyPhone
- Smartphones Micromax
- Smartphones Cyrus
- Smartphones Energizer
- Smartphones Tecdesk
- Smartphones Bea-fon
- Smartphones Sonim
- Smartphones Hammer
- Smartphones Fairphone
- Smartphones GSmart
- Smartphones NGM-Mobile
- Smartphones HMD
- Smartphones Unitech
- Smartphones POCO
- Smartphones Noabe
- Smartphones Volla
- Smartphones Logic Instrument
- Smartphones Maxwest
- Smartphones Kiano
Nyeste Smartphones Manualer

10 April 2025
19 Marts 2025
27 Februar 2025

25 Februar 2025
25 Februar 2025

25 Februar 2025
25 Februar 2025

23 Februar 2025
22 Februar 2025
22 Februar 2025