Epson EF12 Manual
Læs nedenfor 📖 manual på dansk for Epson EF12 (120 sider) i kategorien Beamer. Denne guide var nyttig for 12 personer og blev bedømt med 4.5 stjerner i gennemsnit af 2 brugere
Side 1/120

EF12 User's Guide


3
Contents
EF12 User's Guide....................................................................................................................................... 7
Introduction to Your Projector ................................................................................................................... 8
Projector Features................................................................................................................................ 8
Product Box Contents...................................................................................................................... 9
Additional Components .................................................................................................................. 9
Optional Equipment and Replacement Parts................................................................................. 10
Warranty and Registration Information (U.S. and Canada) ........................................................... 11
Warranty and Registration Information (Latin America)................................................................. 11
Notations Used in the Documentation ................................................................................................ 12
Where to Go for Additional Information .............................................................................................. 12
Projector Part Locations..................................................................................................................... 12
Projector Parts - Front/Top ............................................................................................................ 13
Projector Parts - Rear.................................................................................................................... 14
Projector Parts - Base.................................................................................................................... 15
Projector Parts - Control Panel...................................................................................................... 16
Projector Parts - Remote Control................................................................................................... 17
Setting Up the Projector ........................................................................................................................... 19
Projector Placement........................................................................................................................... 19
Projector Setup and Installation Options ....................................................................................... 19
Projection Distance........................................................................................................................ 21
Installing the Projector in a Mount or Tripod .................................................................................. 25
Projector Connections........................................................................................................................ 29
Connecting to an HDMI Video Source ........................................................................................... 30
Connecting Headphones............................................................................................................... 30
Connecting External Speakers Using HDMI ARC ......................................................................... 31
Installing Batteries in the Remote Control .......................................................................................... 32
Setting Up Android TV........................................................................................................................ 34
Using Basic Projector Features ............................................................................................................... 36
Turning On the Projector .................................................................................................................... 36
Using the Home Screen................................................................................................................. 38

5
Projector Feature Settings - Display Menu......................................................................................... 66
Projector Feature Settings - Settings Menu........................................................................................ 67
Maintaining and Transporting the Projector ........................................................................................... 70
Projector Maintenance ....................................................................................................................... 70
Cleaning the Lens.......................................................................................................................... 71
Cleaning the Projector Case.......................................................................................................... 71
Air Filter and Vent Maintenance ......................................................................................................... 71
Cleaning the Air Filter and Vents ................................................................................................... 72
Replacing the Air Filter .................................................................................................................. 73
Replacing the Remote Control Batteries ............................................................................................ 77
Transporting the Projector.................................................................................................................. 79
Solving Problems ...................................................................................................................................... 80
Projection Problem Tips ..................................................................................................................... 80
Projector Light Status......................................................................................................................... 81
Solving Image or Sound Problems..................................................................................................... 83
Solutions When No Image Appears............................................................................................... 83
Solutions When "No Signal" Message Appears............................................................................. 84
Displaying From a PC Laptop ................................................................................................... 85
Displaying From a Mac Laptop ................................................................................................. 85
Solutions When the Image is Not Rectangular .............................................................................. 85
Solutions When Only a Partial Image Appears.............................................................................. 86
Solutions When the Image Contains Noise or Static ..................................................................... 86
Solutions When the Image is Fuzzy or Blurry ................................................................................ 87
Solutions When the Image Brightness or Colors are Incorrect ...................................................... 88
Solutions to Sound Problems ........................................................................................................ 88
Solutions to Bluetooth Audio Problems ......................................................................................... 89
Solving Projector or Remote Control Operation Problems ................................................................. 90
Solutions to Projector Power or Shut-Off Problems....................................................................... 91
Solutions to Remote Control Problems.......................................................................................... 91
Solutions to HDMI Link Problems....................................................................................................... 92
Solving Network Problems ................................................................................................................. 93
Solutions When Wireless Authentication Fails .............................................................................. 93
Where to Get Help (U.S. and Canada) ............................................................................................... 93

6
Where to Get Help (Latin America)..................................................................................................... 94
Technical Specifications .......................................................................................................................... 97
General Projector Specifications ........................................................................................................ 97
Projector Light Source Specifications................................................................................................. 98
Remote Control Specifications ........................................................................................................... 99
Projector Dimension Specifications.................................................................................................... 99
Projector Electrical Specifications ...................................................................................................... 99
Projector Environmental Specifications............................................................................................ 100
Bluetooth Specifications................................................................................................................... 100
Projector Safety and Approvals Specifications................................................................................. 101
Supported Video Display Formats.................................................................................................... 101
Notices ..................................................................................................................................................... 103
Recycling (U.S. and Canada)........................................................................................................... 103
Important Safety Information............................................................................................................ 103
Laser Safety Information .................................................................................................................. 104
Important Safety Instructions............................................................................................................ 106
Restriction of Use ........................................................................................................................ 110
List of Safety Symbols...................................................................................................................... 111
FCC Compliance Statement ............................................................................................................. 115
Binding Arbitration and Class Waiver ............................................................................................... 116
Trademarks...................................................................................................................................... 119
Copyright Notice............................................................................................................................... 119
A Note Concerning Responsible Use of Copyrighted Materials................................................... 120
Copyright Attribution.................................................................................................................... 120

7
EF12 User's Guide
Welcome to the EF12 User's Guide.
For a printable click PDF copy of guide, this here.

8
Introduction to Your Projector
Refer to these sections to learn more about your projector and this manual.
Projector Features
Notations Used in the Documentation
Where to Go for Additional Information
Projector Part Locations
Projector Features
The EF12 projector includes these special features:
Bright, high-resolution projection system
• Up to 1000 lumens of color brightness (color light output) and white brightness (white light output)
Note: Color brightness (color light output) and white brightness (white light output) will vary depending
on usage conditions. Color light output measured in accordance with IDMS 15.4; white light output
measured in accordance with ISO 21118.
• High-definition mini cinema lens
• Advanced 3LCD technology
• Epson microlaser array projection technology
• Up to 150 inches (12.5 ft diagonal) projected image size (no screen required)
Flexible connectivity
• Built-in Android TV
• Built-in Chromecast functionality
• Two HDMI ports for streaming devices or other HDMI sources
• Small, portable design
• Audio out port for connecting headphones
• Powerful 5W, 2-channel Yamaha stereo speaker system
Innovative display and operation features
• Long-life laser light source

9
• 200,000:1 contrast ratio and Dynamic Contrast control for sharp, detailed images
• Use the projector as a Bluetooth speaker
• One remote controls projector and connected HDMI CEC devices
Product Box Contents
Additional Components
Optional Equipment and Replacement Parts
Warranty and Registration Information (U.S. and Canada)
Warranty and Registration Information (Latin America)
Parent topic: Introduction to Your Projector
Product Box Contents
Save all the packaging in case you need to ship the projector. Always use the original packaging (or
equivalent) when shipping.
Make sure your projector box included all of these parts:
1 Projector
2 Projector remote control and 2 AAA batteries
3 AC adapter
4 Power cord
Parent topic: Projector Features
Additional Components
Depending on how you plan to use the projector, you may need to obtain additional components.

10
Note: To connect a Mac that does not include a compatible HDMI output port, you need to obtain an
adapter that allows you to connect to the HDMI port on the projector. Contact Apple for compatible HDMI
adapter options. To connect a smartphone or tablet, you may need to obtain an adapter that allows you
to connect to the projector. This allows you to mirror your smartphone or tablet screens, watch movies,
and more. Contact your device manufacturer for compatible adapter options.
Note: The projector's HDMI port does not support MHL.
Unless listed as available from Epson in this table, see your local computer or electronics dealer for
purchase information.
Signal or connection
type
Additional component necessary
HDMI Compatible HDMI cable
U.S. and Canada: Available for purchase from Epson or an authorized
Epson reseller.
Latin America: Available for purchase from an authorized Epson reseller.
Note: Older Mac computers (2009 and earlier) may not support HDMI
audio.
USB Compatible USB cable
Audio out Commercially available 3.5 mm mini jack stereo cable
Parent topic: Projector Features
Optional Equipment and Replacement Parts
U.S. and Canada: You can purchase screens, other optional accessories, and replacement parts from
an Epson authorized reseller. To find the nearest reseller, call 800-GO-EPSON (800-463-7766) in the
U.S. or 800-807-7766 in Canada. Or you can purchase online at (U.S. sales) orepsonstore.com
epsonstore.ca (Canadian sales).
Latin America: You can purchase screens, other optional accessories, and replacement parts from an
Epson authorized reseller. To find the nearest reseller, go to . Or you can click thelatin.epson.com
"Where to Get Help" link below to contact your nearest sales office.
Note: Availability of accessories varies by country.
11
Epson offers the following optional accessories and replacement parts for your projector:
U.S. and Canada:
Option or part Part number
Mounting plate (ELPMB65) V12HA40AA0
Safety wire set (ELPWR01) V12H003W01
Air filter set (ELPAF61) V13H134AA0
In addition to the accessories listed above, a 1-year extended service plan is available.
Latin America:
Option or part Part number
Mounting plate (ELPMB65) V12HA40AA0
Safety wire set (ELPWR01) V12H003W01
Air filter set (ELPAF61) V13H134AA0
Parent topic: Projector Features
Related references
Where to Get Help (U.S. and Canada)
Where to Get Help (Latin America)
Warranty and Registration Information (U.S. and Canada)
Your projector comes with a basic warranty that lets you project with confidence. For details, see the
warranty brochure that came with your projector.
Register your product online at this site: epson.com/webreg
Registering also lets you receive special updates on new accessories, products, and services.
Parent topic: Projector Features
Warranty and Registration Information (Latin America)
Your projector comes with a basic warranty that lets you project with confidence. For details, see the
warranty that came with your projector.
Register your product online at , search for your product, and select .latin.epson.com/support Register
13
Projector Parts - Front/Top
1 Remote receiver
2 Camera (for adjusting images)
3 Air intake vent
4 Lens
5 Air intake vent (air filter)
6 Kensington security slot
7 AC adapter port
8 portHDMI1
9 portHDMI2 (ARC)
10 portUSB-A

14
11 Service port
12 Audio out port
13 Status indicator
14 Control panel
Parent topic: Projector Part Locations
Projector Parts - Rear
1 Speaker
2 Air exhaust vents
Warning: While projecting, do not put your face or hands near the air exhaust vents, and do not place
objects that may become warped or damaged by heat near the vents. Hot air from the air exhaust vents
could cause burns or other injuries, or warping of projector parts.
Parent topic: Projector Part Locations

15
Projector Parts - Base
1 Foot release lever
2 Air intake vent
3 Mount plate attachment point (M4 × 6 mm screws)
4 Rear feet (removable for mounting)
5 Air filter cover
6 Front adjustable foot
Parent topic: Projector Part Locations

16
Projector Parts - Control Panel
1 Status indicator
2power button
3 Blank button
4 Bluetooth Speaker mode button
5 Volume buttons
Parent topic: Projector Part Locations

17
Projector Parts - Remote Control
1Microphone (listens for voice commands after pressing the mic button)
2 button (opens the YouTube app)YouTube

18
3Bluetooth Speaker mode button (switches to Bluetooth Speaker mode)
4 Arrow buttons (move through on-screen options)
5 Esc button (cancels/exits function)
6 Volume up and volume down buttons
7 Corner Adjustment button (displays the Corner Adjustment screen to adjust the image shape)
8Blank button (turns off picture)
9Settings button (accesses projector menus)
10 Home button (accesses Android TV Home screen)
11 mic button (operates Android TV using voice commands)
12 button (selects options)Enter
13 Source Search button (changes the input source)
14 button (displays available Android TV apps)Apps
15 Power button
16 Remote control emitter
Parent topic: Projector Part Locations

19
Setting Up the Projector
Follow the instructions in these sections to set up your projector for use.
Projector Placement
Projector Connections
Installing Batteries in the Remote Control
Setting Up Android TV
Projector Placement
You can place the projector on almost any flat surface to project an image.
You can also install the projector in a ceiling mount if you want to use it in a fixed location. A mounting
plate is required when installing the projector on a VESA-compliant mount.
There is no vertical or horizontal limit to how the projector can be installed.
Keep these considerations in mind as you select a projector location:
• Place the projector on a sturdy, level surface or install it using a compatible mount.
• Place the projector parallel to the screen.
• Leave plenty of space around and under the projector for ventilation, and do not place it on top of or
next to anything that could block the vents.
• Position the projector within reach of a grounded electrical outlet or extension cord.
Make sure you read the safety instructions when placing or mounting your projector. See the link below.
Projector Setup and Installation Options
Projection Distance
Installing the Projector in a Mount or Tripod
Parent topic: Setting Up the Projector
Related references
Important Safety Instructions
Projector Setup and Installation Options
You can set up or install your projector in the following ways:

20
Front
Front ceiling
Toward the ceiling
Note: We recommend installing the projector on a protective mat to prevent the projector or the cloth
covering the speaker from being damaged, or the color from staining unprotected surfaces. The sound
from the projector's speaker may be muffled.
21
Note: Be sure to leave the following amount of space around the projector to avoid blocking the air
exhaust and intake vents.
1 3.94 inches (10 cm)
2 7.87 inches (20 cm)
3 11.81 inches (30 cm)
Caution: Install the AC adapter more than 11.8 inches (30 cm) away from the projector. If the
temperature of the AC adapter rises due to heat from the projector, the projector may not operate
properly.
If you project from the ceiling, be sure to select the correct setting in the Display menu.Projection
Parent topic: Projector Placement
Related references
Projector Feature Settings - Display Menu
Projection Distance
The distance at which you place the projector from the screen determines the approximate size of the
image. The image size increases the farther the projector is from the screen, but can vary depending on
the zoom factor, aspect ratio, and other settings.
22
Use the tables here to determine approximately how far to place the projector from the screen based on
the size of the projected image. (Conversion figures may have been rounded up or down.) You can also
use the Projection Distance Calculator (U.S.), (Canada), or (Caribbean).here here here
1 Projection distance
2 Distance from the center of the lens to the base of the screen
16:9 Aspect Ratio Image or Screen
Screen or image size Projection distance (1) Distance from center of lens to
base of screen (2)
30 inches 26 inches
(65 cm)
0 inches (0 cm)
40 inches 35 inches
(88 cm)
0 inches (0 cm)
50 inches 43 inches
(110 cm)
0 inches (0 cm)
23
16:9 Aspect Ratio Image or Screen
Screen or image size Projection distance (1) Distance from center of lens to
base of screen (2)
60 inches 52 inches
(133 cm)
0 inches (0 cm)
70 inches 61 inches
(156 cm)
0 inches (0 cm)
80 inches 70 inches
(179 cm)
0 inches (0 cm)
90 inches 79 inches
(202 cm)
0 inches (0 cm)
100 inches 88 inches
(224 cm)
0 inches (0 cm)
120 inches 106 inches
(270 cm)
0 inches (0 cm)
150 inches 133 inches
(338 cm)
0 inches (0 cm)
16:10 Aspect Ratio Image or Screen
Screen or image size Projection distance (1)
Wide to Tele
Distance from center of lens to
base of screen (2)
30 inches 28 inches
(70 cm)
0 inches (0 cm)
40 inches 37 inches
(95 cm)
0 inches (0 cm)
50 inches 47 inches
(120 cm)
0 inches (0 cm)

24
16:10 Aspect Ratio Image or Screen
Screen or image size Projection distance (1)
Wide to Tele
Distance from center of lens to
base of screen (2)
60 inches 57 inches
(144 cm)
0 inches (0 cm)
70 inches 66 inches
(169 cm)
0 inches (0 cm)
80 inches 76 inches
(194 cm)
0 inches (0 cm)
90 inches 86 inches
(218 cm)
0 inches (0 cm)
100 inches 96 inches
(243 cm)
0 inches (0 cm)
120 inches 115 inches
(292 cm)
0 inches (0 cm)
130 inches 125 inches
(317 cm)
0 inches (0 cm)
140 inches 134 inches
(341 cm)
0 inches (0 cm)
4:3 Aspect Ratio Image or Screen
Screen or image size Projection distance (1)
Wide to Tele
Distance from center of lens to
base of screen (2)
30 inches 32 inches
(80 cm)
0 inches (0 cm)
40 inches 43 inches
(108 cm)
0 inches (0 cm)

25
4:3 Aspect Ratio Image or Screen
Screen or image size Projection distance (1)
Wide to Tele
Distance from center of lens to
base of screen (2)
50 inches 54 inches
(136 cm)
0 inches (0 cm)
60 inches 64 inches
(164 cm)
0 inches (0 cm)
70 inches 75 inches
(192 cm)
0 inches (0 cm)
80 inches 86 inches
(220 cm)
0 inches (0 cm)
90 inches 97 inches
(247 cm)
0 inches (0 cm)
100 inches 108 inches
(2275 cm)
0 inches (0 cm)
120 inches 130 inches
(331 cm)
0 inches (0 cm)
Parent topic: Projector Placement
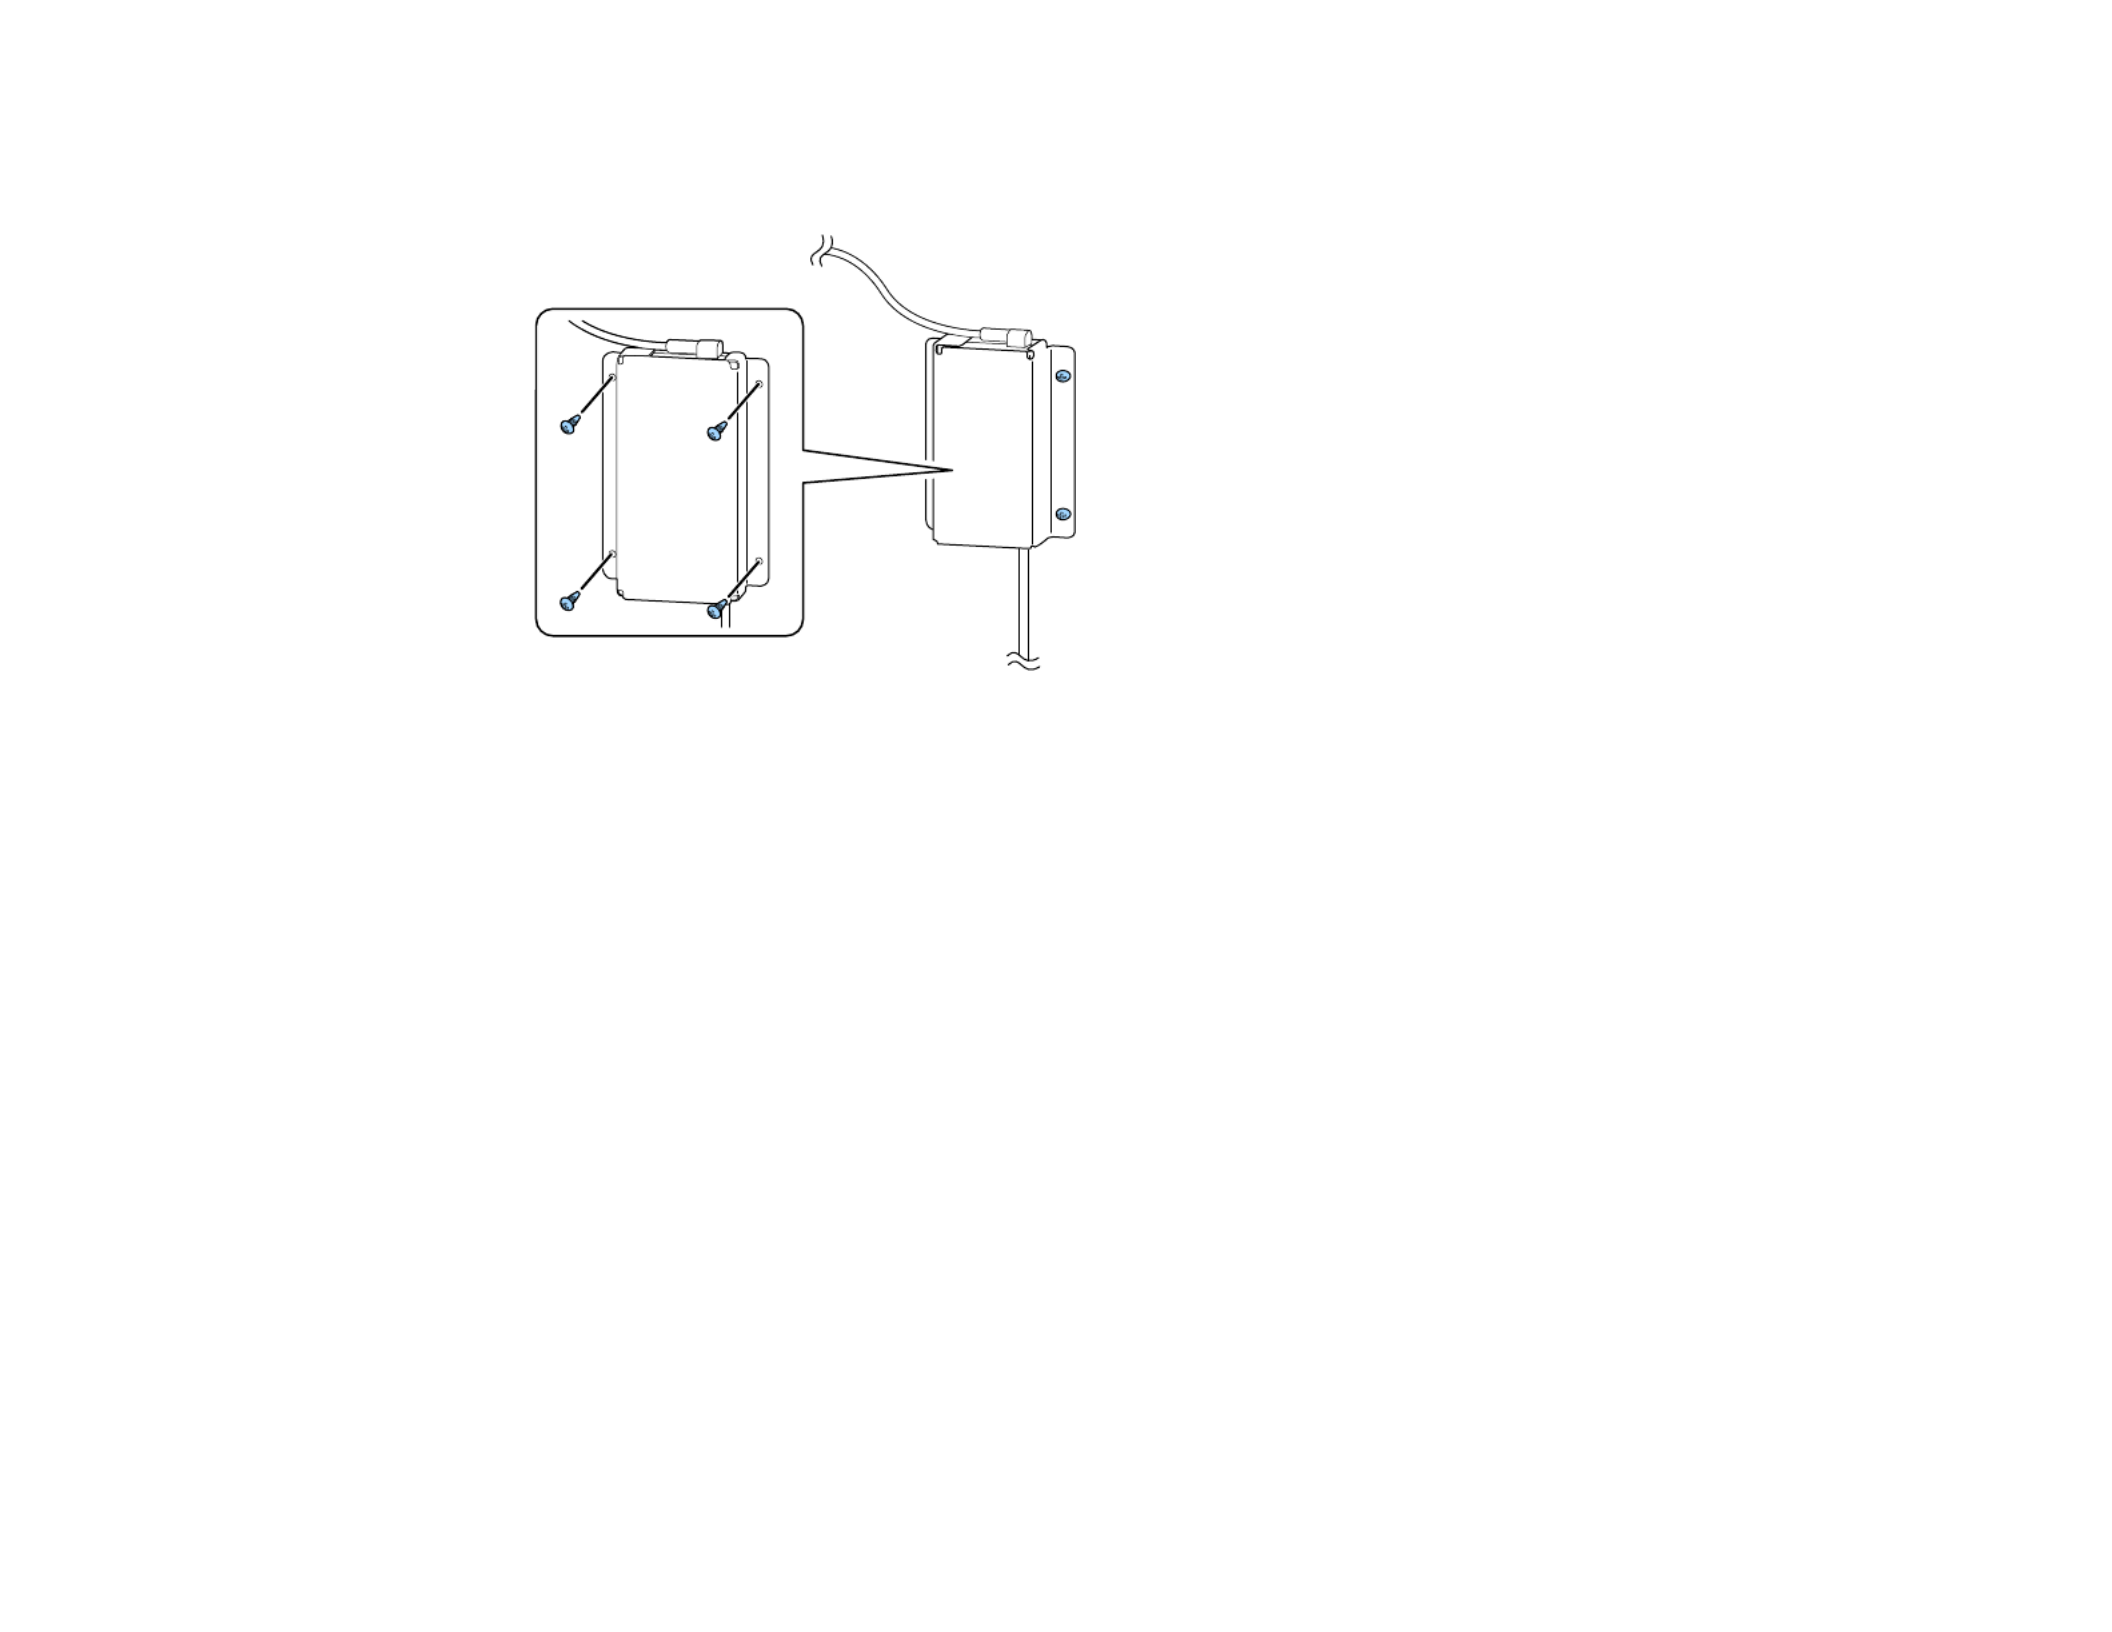
Installing the Projector in a Mount or Tripod
When installing the projector in an optional mount, follow these guidelines:
Note: You will require the optional mounting plate (ELPMB65) to install the projector in a mount.
• You can install the projector on VESA-compliant (75 × 75 mm) mounting hardware.
• You can install the projector on a tripod that uses 1/4-20UNC size fixed screws
• When installing the projector in a high place, be sure to install the optional security wire set
(ELPWR01) for safety purposes
1. Turn the projector upside down.

26
2. Remove the rear feet by turning them clockwise.
29
6. If necessary, mount the AC adapter on the wall or ceiling using the AC adapter holder that is
included with the mounting plate.
Caution: Install the AC adapter at least 11.8 inches (30 cm) away from the projector. If the
temperature of the AC adapter rises due to heat from the projector, the projector may not operate
properly.
Note: When mounting the AC adapter on the wall or ceiling, use screws suitable for the material of
the wall or ceiling. If you are unsure what screws to use, consult a professional.
Parent topic: Projector Placement
Related references
Projector Parts - Base
Optional Equipment and Replacement Parts
Projector Connections
See these sections to connect the projector to a variety of projection sources.
Caution: Check the shape and orientation of the connectors on any cable you plan to connect. Do not
force a connector into a port if it does not fit. The device or your projector could be damaged or could
malfunction.
Connecting to an HDMI Video Source

30
Connecting Headphones
Connecting External Speakers Using HDMI ARC
Parent topic: Setting Up the Projector
Connecting to an HDMI Video Source
If your video source has an HDMI port, you can connect it to the projector using an HDMI cable. The
video source's sound is output to the projector's speaker.
Note: If the port on the connected device has an unusual shape, use the cable supplied with the device
or a optional cable to connect the device.
Note: You can also connect a computer or laptop to the projector using an HDMI cable.
Caution: Do not turn on the video source before connecting it to the projector; otherwise, you may
damage the projector.
1. Connect one end of an HDMI cable to your video source's HDMI port.
2. Connect the other end of the HDMI cable to one of the projector's HDMI ports.
Parent topic: Projector Connections
Connecting Headphones
You can connect headphones to the projector's audio out port. You can control the volume using the
projector remote control.

31
Note: The projector's audio out port only supports 3-pin stereo headphones using a 3.5-mm mini-stereo
cable. If you use any other type of headphones, audio may not be output normally.
Parent topic: Projector Connections
Connecting External Speakers Using HDMI ARC
If your external speakers or A/V receiver are HDMI ARC-compatible, you can connect them to the
projector's port using an optional HDMI cable. Make sure the setting isHDMI2 (ARC) HDMI2 ARC
enabled and is selected as the setting.ARC Sound Output Device
Note: HDMI2 ARCIf the setting is enabled, the projector's internal speakers are disabled.
If you want to output higher-quality audio, select as the setting in theAuto Sound Output Format
Sound menu.
1. Connect the HDMI cable to the ARC-compatible HDMI port on your external speakers or A/V
receiver.
2. Connect the other end to the port on the rear of the projector.HDMI2 (ARC)
Parent topic: Projector Connections

32
Related references
Sound Quality Settings - Sound Menu
Installing Batteries in the Remote Control
The remote control uses the two AAA batteries that came with the projector.
Caution: Use only the type of batteries specified in this manual. Do not install batteries of different types,
or mix new and old batteries.
1. Remove the battery cover.
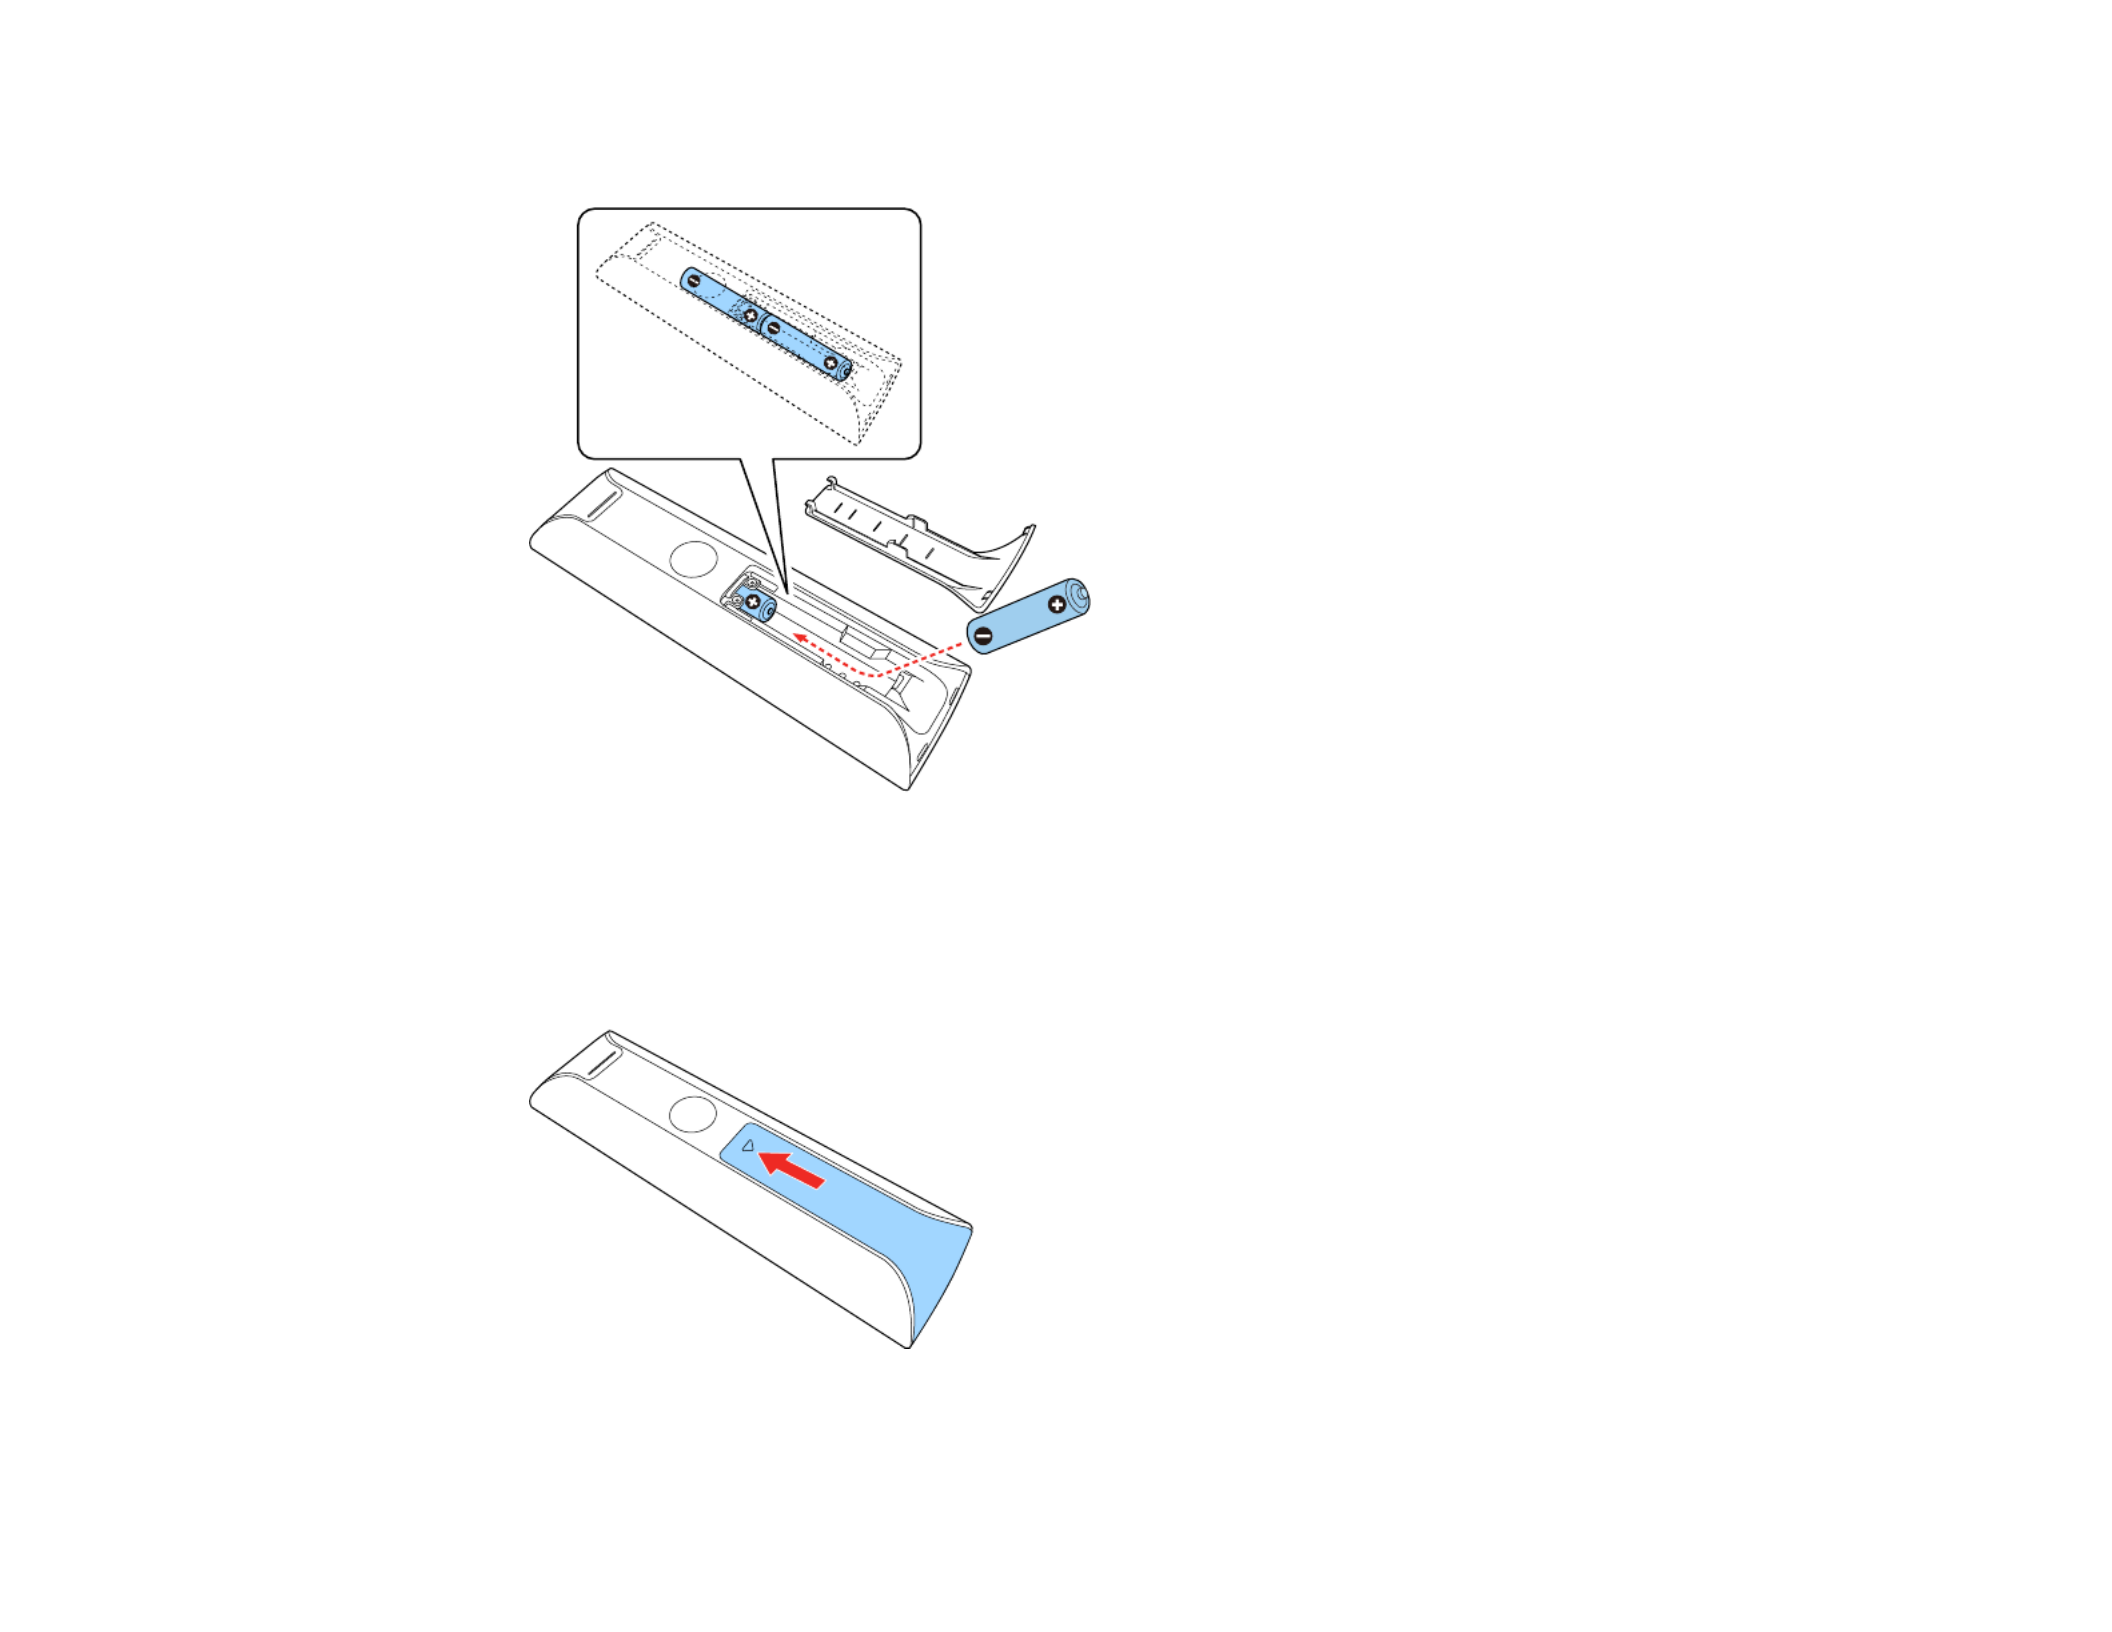
33
2. Insert the batteries with the and ends facing as shown.+ –
Warning: Make sure the batteries are inserted in the correct positions. If the batteries are not
inserted correctly, they could explode or leak, causing a fire, injury, or damage to the product.
3. Replace the battery cover and press it down until it clicks into place.

35
5. Select the wireless network you want to use from the Wi-Fi setting screen and then follow the on-
screen instructions to make any necessary settings.
6. At the Google account sign-in screen, do one of the following:
• Select to sign-in to your Google account. Follow the on-screen instructions.Sign In
• Select to use the projector without signing in to a Google accountSkip
Note: A Google account is required to use certain features.
7. Follow the on-screen instructions to proceed with initial setup, selecting settings as desired.
The Home screen is displayed when initial setup is completed.
Note: For Android TV support, visit .https://support.google.com/androidtv/
Parent topic: Setting Up the Projector

36
Using Basic Projector Features
Follow the instructions in these sections to use your projector's basic features.
Turning On the Projector
Turning Off the Projector
Projection Modes
Adjusting the Image Height
Image Shape
Remote Control Operation
Using Voice Commands to Control Your Projector
Pairing the Remote Control
Selecting an Image Source
Using Your Projector as a Chromecast
Image Aspect Ratio
Color Mode
Turning On Automatic Luminance Adjustment
Adjusting Picture Quality in Detail
Controlling the Volume with the Volume Buttons
Changing the Sound Mode
Turning On the Projector
Turn on the projector before you turn on the video source you want to use.
Caution: Do not turn on the video source before connecting it to the projector; otherwise, you may
damage the projector.
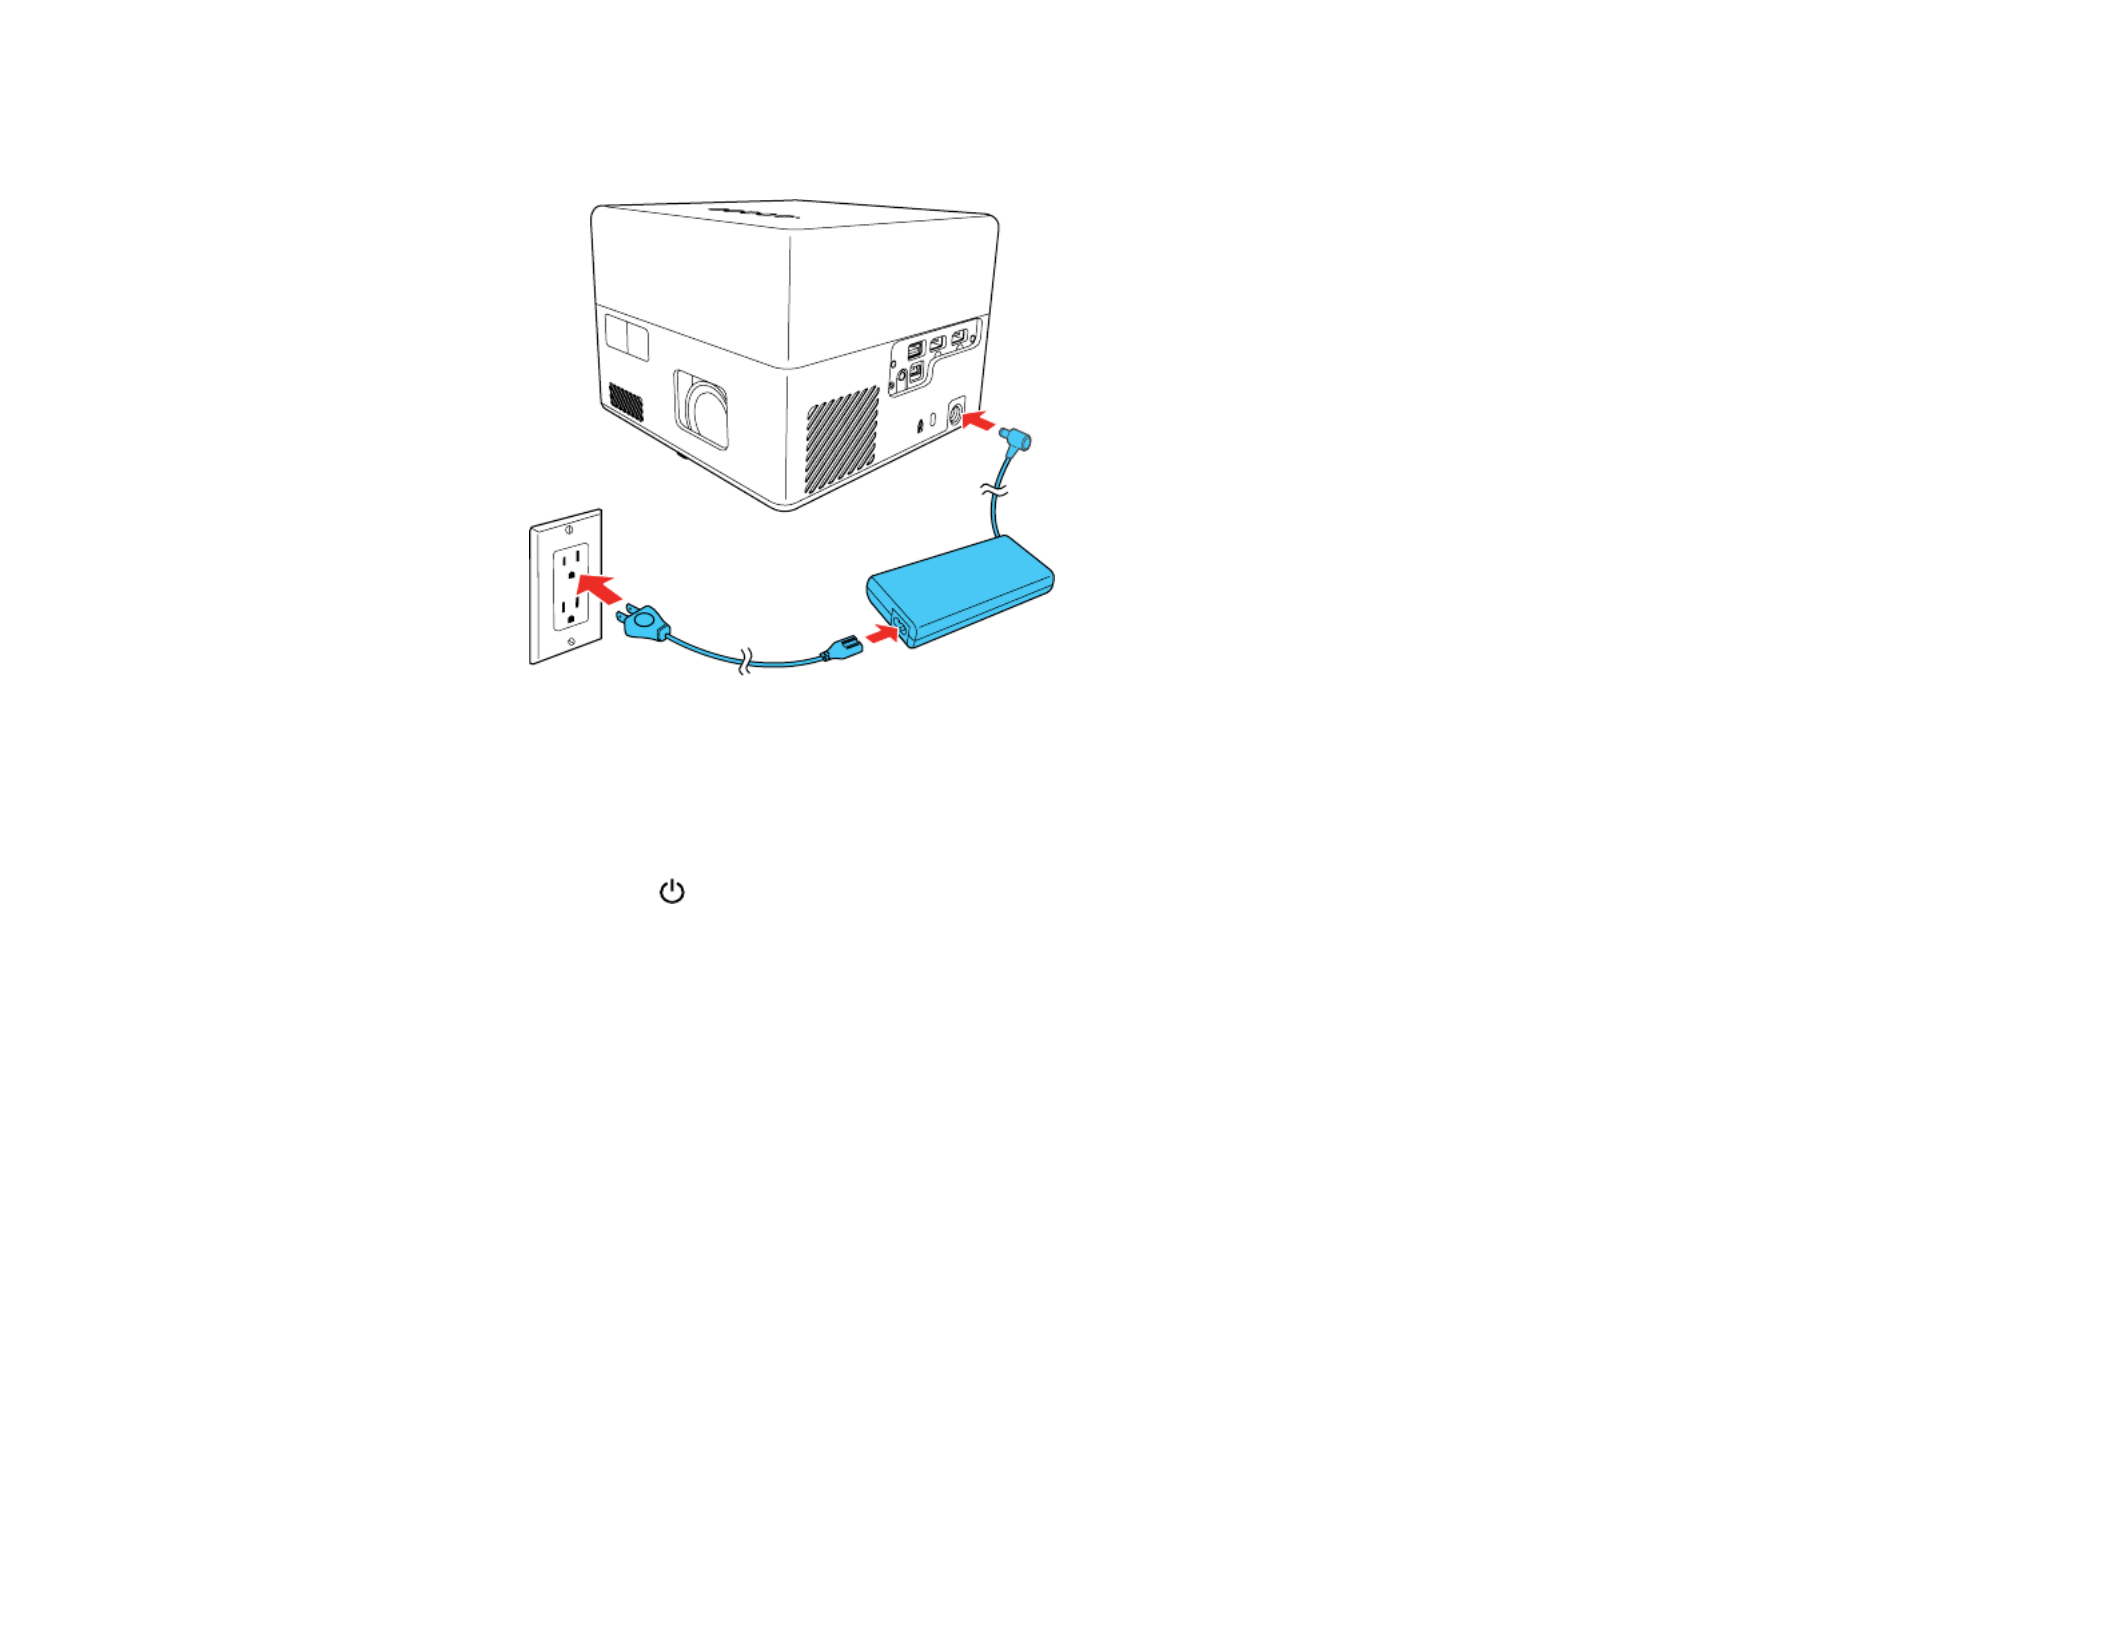
37
1. Connect the AC adapter to the projector's power inlet.
2. Plug the power cord into an electrical outlet and connect it to the AC adapter
The projector enters standby mode. This indicates that the projector is receiving power, but is not
turned on.
3. Press the Power button on the projector or the projector remote control to turn on the projector.
The status indicator flashes blue as the projector warms up. After the projector is warmed up, the
status light stops flashing and turns blue.
Warning: Never look into the projector lens when the light is on. The light can damage your eyes
and is especially dangerous for children and pets.
Caution: Make sure no objects are blocking the light from the projector lens. Objects blocking the
lens for an extended time can melt and light that is reflected back into the lens can cause the
projector to malfunction.
The first time you turn on the projector, the remote control pairing screen and initial setup screen are
displayed. Follow the on-screen instructions to complete the initial setup.
Using the Home Screen
Parent topic: Using Basic Projector Features
38
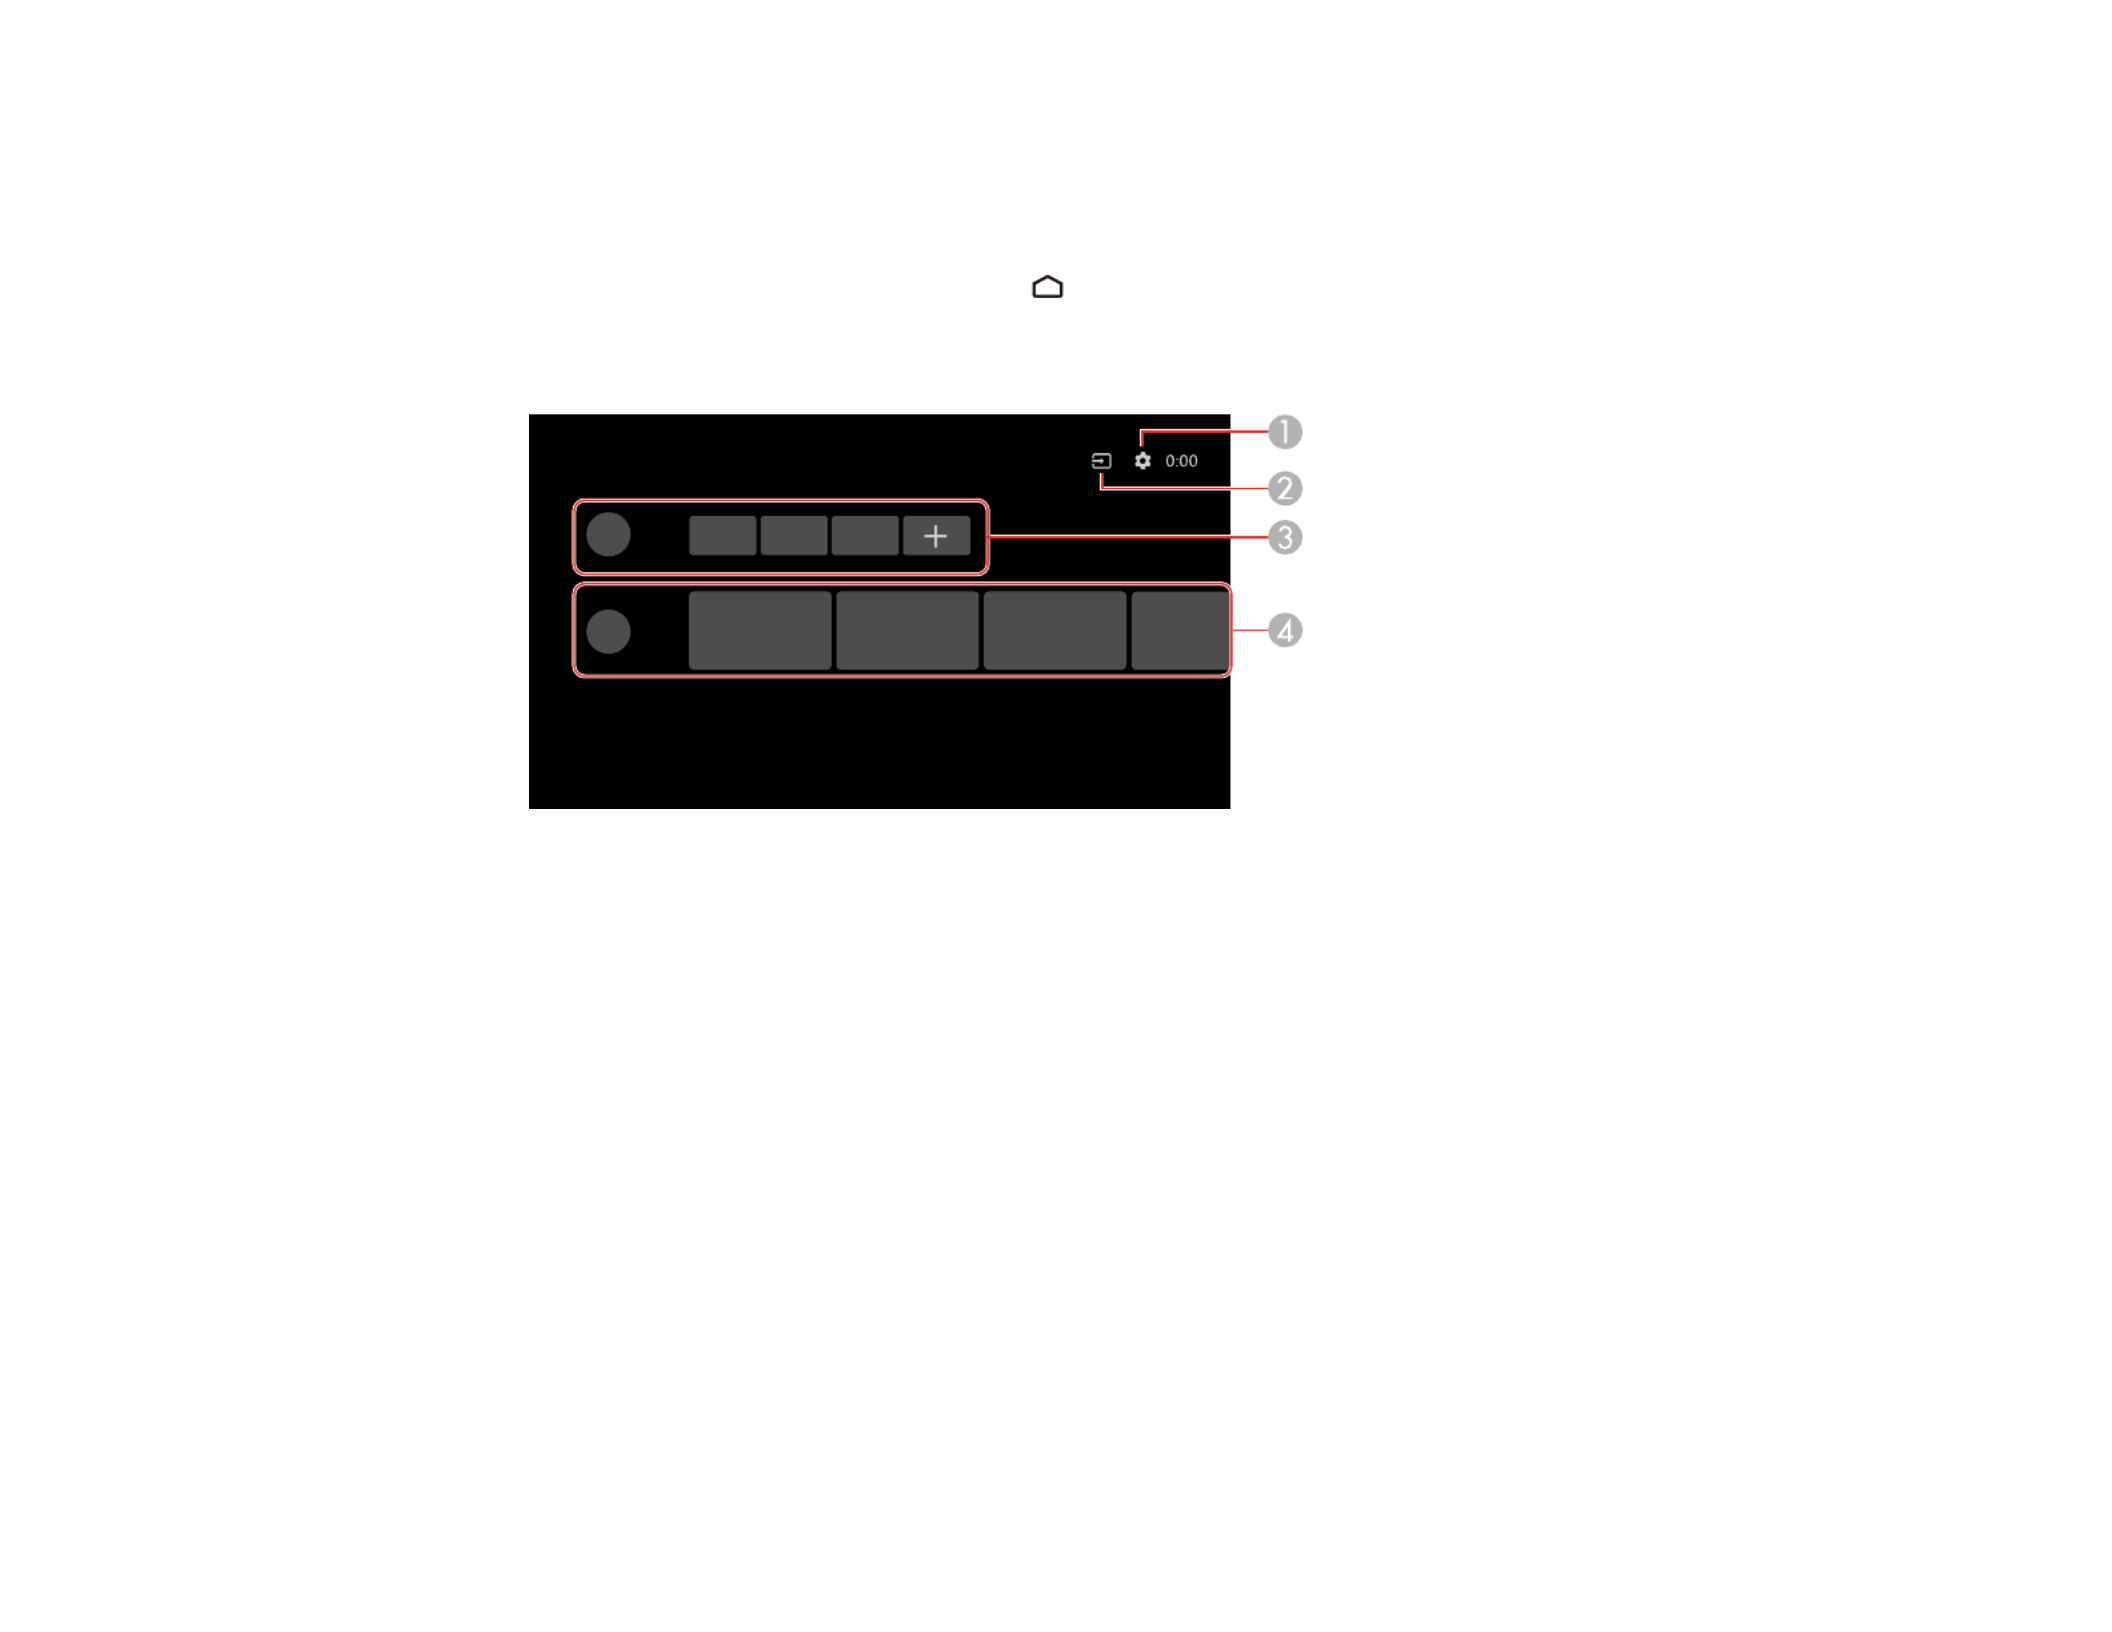
Using the Home Screen
You can easily access online content, applications, and projector settings from the Android TV home
screen.
1. To display the Home screen, press the Home button on the remote control.
2. Press the arrow buttons on the remote control to navigate the screen, and press to select anEnter
option.
1 Displays the Settings menu for Android TV (you can select various settings such as Wi-Fi,
language, and Google account information)
2 Displays a list of available input sources
3 Displays the applications downloaded to your Android TV (add applications to this list by
selecting the icon)+
4 Displays recommended content from your applications
Note: The content of the Home screen may change depending on the Android TV version.
Parent topic: Turning On the Projector
Turning Off the Projector
Before turning off the projector, shut down any computer connected to it so you can see the computer
display during shutdown.

39
Note: Turn off this product when not in use to prolong the life of the projector. Laser life will vary
depending upon mode selected, environmental conditions, and usage. Brightness decreases over time.
Note: When using the Blank feature, the laser is still on. To turn off the laser, turn off the projector.
1. Press the power button on the projector or remote control.
The laser turns off and the Status light turns off.
Note: Power Button SettingYou can keep supplying power to the projector by setting the to
Suspend in the projector's Settings menu. You can then press any button on the projector or remote
control to turn on the projector and the projector will also start up faster.
2. To transport or store the projector, make sure the Status light is off, then unplug the power cord.
Parent topic: Using Basic Projector Features
Related references
Projector Feature Settings - Settings Menu
Projector Light Status
Projection Modes
Depending on how you positioned the projector, you may need to change the projection mode so your
images project correctly.
• (default setting) lets you project from a table in front of the screen or onto the ceiling.Standard
• flips the image over top-to-bottom to project upside-down from a ceiling or wall mount.Upside Down
Changing the Projection Mode Using the Menus
Parent topic: Using Basic Projector Features
Changing the Projection Mode Using the Menus
You can change the projection mode to flip the image over top-to-bottom using the projector menus.
1. Turn on the projector and display an image.
2. Press the Settings button on the projector remote control.

40
3. Press the arrow buttons to select the menu and press .Display Enter
4. Select the setting and press .Projection Enter
5. Select the projection mode you want to use and press .Enter
6. Press the Settings button to exit the menu or the Esc button to return to the previous screen.
Parent topic: Projection Modes
Adjusting the Image Height
If you are projecting from a table or other flat surface and the image is too high or low, you can adjust the
image height using the projector's adjustable foot.
1. Turn on the projector and display an image.
2. Press and hold the foot release lever to extend or retract the front adjustable foot.

41
Note: You can adjust the position up to 9°.
3. Release the lever to lock the foot when the image is at the position you want.
If the projected image is unevenly rectangular, you need to adjust the image shape.
Parent topic: Using Basic Projector Features
Related references
Projector Feature Settings - Settings Menu
Related tasks
Correcting Image Shape with H/V Keystone
Correcting Image Shape with Corner Adjustment
Image Shape
You can project an evenly rectangular image by placing the projector directly in front of the center of the
screen and keeping it level. If you place the projector at an angle to the screen, or tilted up or down, or off
to the side, you may need to correct the image shape for the best display quality.
When you turn on automatic keystone correction in your projector's Settings menu, your projector
automatically corrects keystone effects when you reposition the projector.
You can also press the Auto Keystone button to automatically correct horizontal and vertical
keystoning.
Automatic keystone adjustment can occur under the following conditions:
• Screen size is less than 100 inches (250 cm)
• The setting is set toProjection Standard
• Projection distance is between 28 to 86 inches (0.7 to 2.2 meters)
Correcting Image Shape with H/V Keystone
Correcting Image Shape with Corner Adjustment
Parent topic: Using Basic Projector Features
Correcting Image Shape with H/V Keystone
You can use the projector remote control to correct the shape of an image that is unevenly rectangular
on the sides.

42
Note: Display H/V KeystoneYou can also adjust the keystone settings from the > menu.
Note: KeystoneYou cannot combine correction with other image shape correction methods.
1. Turn on the projector and display an image.
2. Press the Settings button on the projector remote control.
3. Select > and press .Display H/V Keystone Enter
4. Use the arrow buttons on the projector remote control to select between vertical and horizontal
keystone correction, and to adjust the image shape as necessary.
V-Keystone
H-Keystone

43
5. Press the Esc button when you are finished.
After correction, your image is slightly smaller.
Parent topic: Image Shape
Related references
Projector Feature Settings - Display Menu
Correcting Image Shape with Corner Adjustment
You can use the projector's Corner Adjustment feature to correct the shape and size of an image that is
unevenly rectangular on all sides.
Note: To provide the best possible image quality, adjust the projector's position to correct the image
shape. If this isn't possible, use the Corner Adjustment feature to correct the image shape.
1. Turn on the projector and display an image.
2. Press the Auto Keystone button on the remote control.
The projector runs through the automatic keystone correction sequence.
Note: The projector will always run automatic keystone correction when you press the Auto
Keystone button, even if the setting is turned off.Auto Keystone
3. Select the setting.Corner Adjustment
You see the Corner Adjustment screen:
44
4. Use the arrow buttons on the remote control to select the point on the image you want to adjust.
Then press .Enter
5. Press the arrow buttons to adjust the image shape as necessary.
Note: If the direction key on the screen turns gray, you cannot make further adjustments in that
direction.
6. Press the Esc button on the remote control to return to the point selection screen.
7. Repeat steps 4-6 to adjust any other points.
8. When you are finished, press the Esc button to exit.
You may see a light shadow around the screen or projected image. This is normal.
Parent topic: Image Shape
Related references
Projector Feature Settings - Display Menu
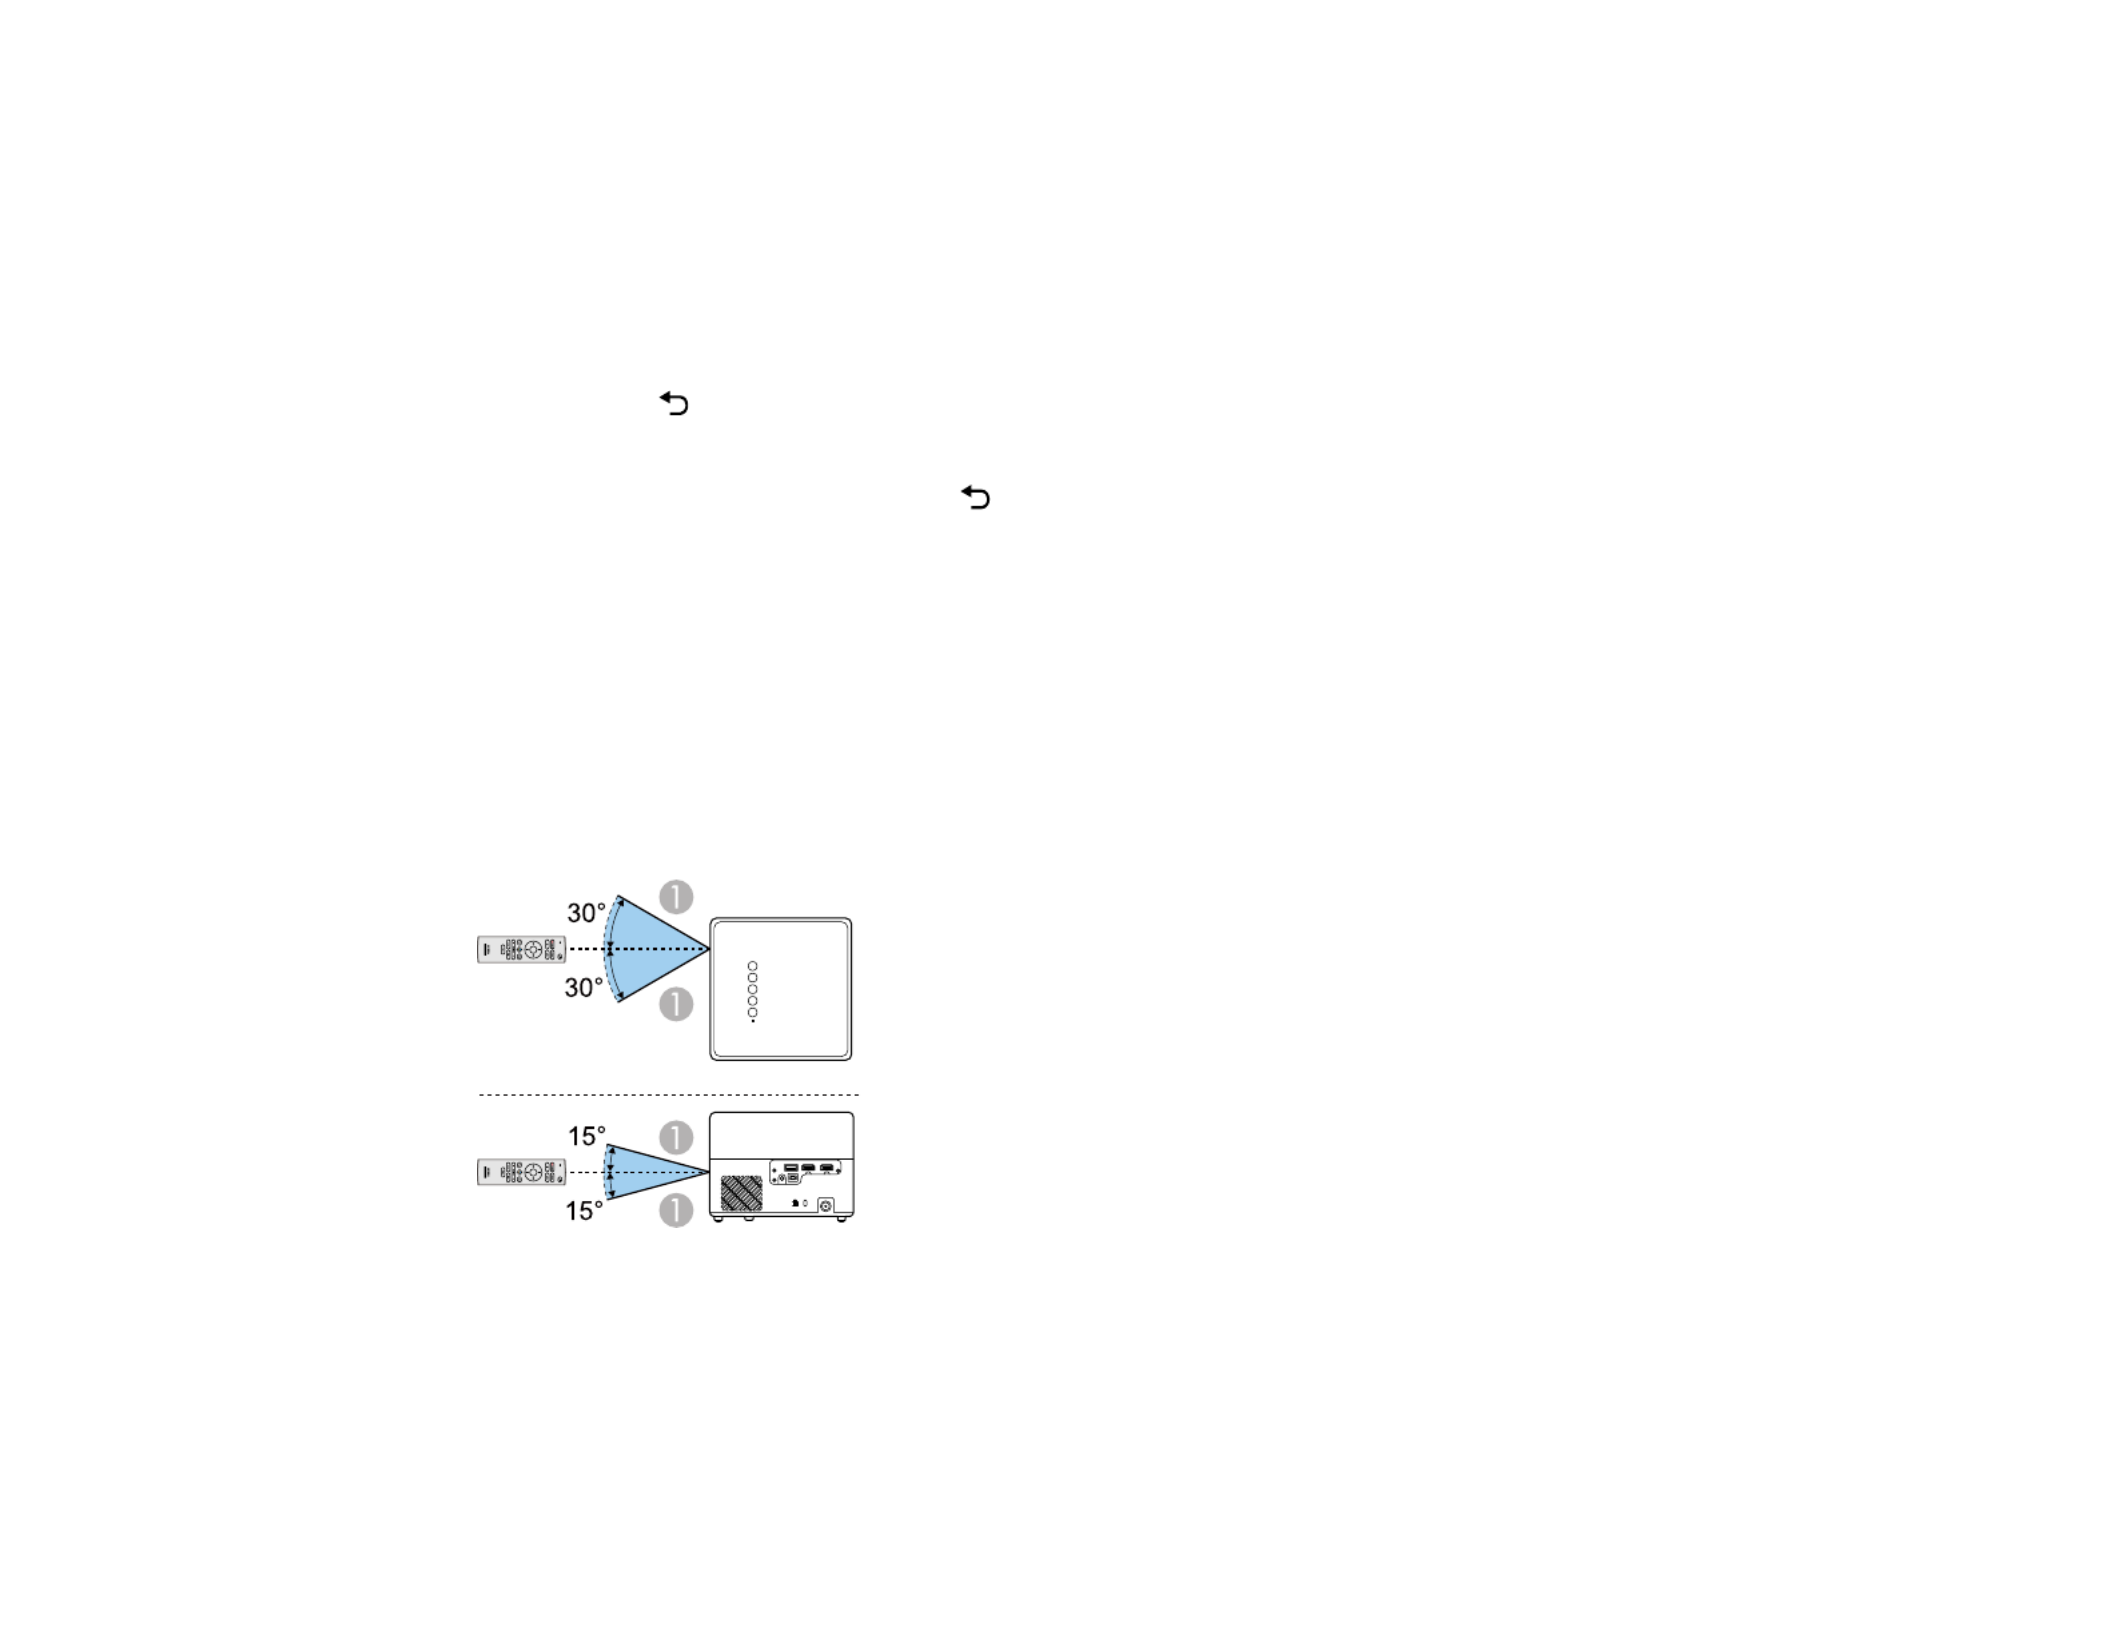
Remote Control Operation
The remote control lets you control the projector from almost anywhere in the room, up to 16.4 feet (5 m)
away. You can point it at the front or back of the projector.
1 16.4 feet (5 m)

45
Note: Avoid using the remote control in conditions with bright fluorescent lights or in direct sunlight, or
the projector may not respond to commands. If you will not use the remote control for a long time,
remove the batteries.
Parent topic: Using Basic Projector Features
Using Voice Commands to Control Your Projector
You can use your remote control or linked Google Home device to control your projector using voice
commands.
Note: Make sure the remote control is paired to the projector.
1. To use voice commands with your projector using your remote, press and release the mic button,
then say the command you want to perform.
You can use voice commands to search for actors or shows, open installed apps, and control media
playback.
2. To use a Google Home device to send voice commands to your projector, link the device with your
projector using the Google Home app. You may also need to link streaming apps to your Google
account. For detailed instructions, go to your device's support page.
Parent topic: Using Basic Projector Features
Pairing the Remote Control
To use Android TV and video-on-demand features, you must pair the remote control to the projector.
Note: When you first turn on the projector, instructions for pairing the remote control are displayed on
the screen.
1. Turn on the projector.
2. When the pairing screen is displayed, press and hold the Home and buttons on the remoteEnter
control until the indicator starts blinking.
A message appears on the screen when the remote control is paired.
Parent topic: Using Basic Projector Features

46
Selecting an Image Source
If you connected multiple image sources to the projector, such as a computer and DVD player, you may
want to switch from one image source to the other.
1. Make sure the connected image source you want to use is turned on.
2. For video image sources, insert a DVD or other video media and press its play button, if necessary.
3. Press the Source Search button on the remote control. Press the up or down buttons to select
the image source.
Note: If no image signal is detected, check the cable connections between the projector and the
image source.
Parent topic: Using Basic Projector Features
Related references
Solutions When "No Signal" Message Appears
Using Your Projector as a Chromecast
Your projector has Chromecast built-in, allowing you to cast content from Chromecast-enabled apps.
1. Connect your device or computer to the same wireless network as the projector.
2. Open the Chromecast-enabled app and press the Cast button.
3. Select your projector from the list of devices.
Note: By default, the name of the projector is Projector. To select another name or use a custom
name, select the Settings icon on the Home screen.
The app connects and starts casting to the projector.
4. To stop casting, press the Cast button in the app and choose the disconnect option.
Parent topic: Using Basic Projector Features
Image Aspect Ratio
The projector can display images in different width-to-height ratios called aspect ratios. Normally the
input signal from your video source determines the image's aspect ratio. However, for certain images

47
you can change the aspect ratio to fit your screen. If you cannot change the aspect ratio using the
projector menus, check the settings on your video source.
Changing the Image Aspect Ratio
Available Image Aspect Ratios
Parent topic: Using Basic Projector Features
Changing the Image Aspect Ratio
You can change the aspect ratio of the displayed image to resize it.
1. Turn on the projector and switch to the image source you want to use.
2. Press the Settings button on the remote control.
3. Select the menu and press .Picture Enter
4. Select and press .Aspect Ratio Enter
5. Select the aspect ratio setting you want to use for your input signal and press .Enter
6. Press the Esc button to exit the menus.

48
Parent topic: Image Aspect Ratio
Related references
Available Image Aspect Ratios
Available Image Aspect Ratios
You can select the following image aspect ratio settings, depending on the input signal from your image
source.
Note: You may see a light shadow around the screen or projected image. This is normal.
Note: Using the aspect ratio function to reduce, enlarge, or split the projected image for commercial
purposes or for public viewing may infringe upon the rights of the copyright holder of that image based
on copyright law.
Aspect ratio setting Description
Normal Displays images using the full projection area and maintains the
aspect ratio of the image.
Zoom Displays images using the full width of the projection area and
maintains the aspect ratio of the image.
Full Displays images using the full width of the projection area, but does
not maintain the aspect ratio.
Parent topic: Image Aspect Ratio
Color Mode
The projector offers different Color Modes to provide optimum brightness, contrast, and color for a
variety of viewing environments and image types. You can select a mode designed to match your image
and environment, or experiment with the available modes.
If you always want to use a particular color mode for a certain video input source, you can select it using
the projector menus.
Changing the Color Mode
Available Color Modes
Parent topic: Using Basic Projector Features

49
Changing the Color Mode
You can change the projector's Color Mode to optimize the image for your viewing environment.
1. Turn on the projector and switch to the image source you want to use.
2. If you are projecting from a DVD player or other video source, insert a disc or other video media and
press the play button, if necessary.
3. Press the Settings button on the remote control.
4. Select the menu and press .Picture Enter
5. Select and press .Color Mode Enter
6. Press the arrow buttons to select a color mode setting and press .Enter
7. When you are finished, press Esc.
Parent topic: Color Mode

50
Available Color Modes
You can set the projector to use these Color Modes, depending on the input source you are using:
Color Mode Description
Dynamic Best for optimizing brightness
Vivid Best for projecting general content in a bright environment
Bright Cinema Best for projecting movies in a bright environment
Cinema Best for projecting movies in a dark environment
Natural Best for projecting the image as is (choose this mode when
making color adjustments)
Parent topic: Color Mode
Turning On Automatic Luminance Adjustment
You can turn on the setting to automatically optimize the image luminance. ThisDynamic Contrast
improves the image contrast based on the brightness of the content you project.
1. Turn on the projector and switch to the image source you want to use.
2. Press the Settings button on the remote control.

52
3. Select the menu and press .Picture Enter
4. Select the setting and press .Custom Settings Enter
5. Select one of the following options and press .Enter
• : Adjusts overall color brightnessBrightness
• : Adjusts the difference between light and dark areas of the imageContrast
• : Adjusts the overall color densitySaturation
• : Adjusts the balance of green and magenta in the imageTint
• : Adjusts the outline of the imageSharpness
6. Press the Esc button to exit the menus.
Parent topic: Using Basic Projector Features

53
Controlling the Volume with the Volume Buttons
You can use the buttons on the projector or the remote control to adjust the volume of yourVolume
projected content. The volume buttons control the projector’s internal speaker system or any external
speakers you connected to the projector.
You must adjust the volume separately for each connected input source.
Warning: Do not start playback at a high volume. Sudden loud noises may cause hearing loss. Always
lower the volume before turning off the projector. Gradually increase the volume after turning the
projector on.
1. Turn on the projector and start a presentation that includes audio.
2. To lower or raise the volume, press the volume buttons on the projector's control panel or remote
control.
Parent topic: Using Basic Projector Features
Changing the Sound Mode
You can change the projector's sound mode to provide optimal sound for a variety of image types.
1. Turn on the projector and start a video.
2. Press the Settings button on the remote control.

54
3. Press the arrow buttons to select the menu and press .Sound Enter
4. Select the setting and press .Sound Mode Enter
5. Select a sound mode and press .Enter
6. Press the Settings button to exit the menu or the Esc button to return to the previous screen.
Available Sound Modes
Parent topic: Using Basic Projector Features
Available Sound Modes
You can set the projector to use these sound modes, depending on the input source you are using:
Color Mode Description
Theatre Mimics the acoustics of a theater environment; best used for
watching movies

55
Color Mode Description
TV Clearly plays back voices for content such as news and
documentaries; best used for watching TV shows
Studio Reproduces sound with a wide frequency and balanced sound
quality to mimic a studio environment; best used for listening to
music
Stadium Emphasizes voices and recreates the atmosphere of stadiums and
crowds. Best used for watching sports.
Concerts Mimics the acoustics of a concert venue; best used for listening to
live music performances
Karaoke Mode Accentuates combined vocals and music. Allows you to play
songs while using effects provided by karaoke apps and
microphones.
Parent topic: Changing the Sound Mode

56
Adjusting Projector Features
Follow the instructions in these sections to use your projector's feature adjustments.
Using the Projector as a Bluetooth Speaker
Operating Connected Devices Using the HDMI Link Features
Shutting Off the Picture Temporarily
Updating the Firmware
Resetting the Projector
Using the Projector as a Bluetooth Speaker
You can use the projector's speakers to output audio from a compatible device connected by Bluetooth.
Note: Bluetooth audio devices are not supported in some countries and regions. You cannot connect
multiple audio/video devices by Bluetooth at the same time. You may not be able to connect depending
on type of device and its Bluetooth standards. Several attempts may be required before pairing is
successful. Even when connecting within the specified communication distance, connections can be lost
due to the signal status.
1. Press the Bluetooth Speaker mode button on the projector or remote control to turn on Bluetooth
Speaker mode.
You see a confirmation on the screen.
2. Enable the Bluetooth function on the device you want to connect to and select from theProjector
available device list. See the documentation for the connected device for more information.
Note: There is a delay in the audio output from any Bluetooth audio device. If you want to
temporarily turn off the projected image, press the Blank button on the projector or remote control.
To cancel a Bluetooth connection, disconnect from the connected device.
3. To exit Bluetooth Speaker mode, press the Bluetooth Speaker mode button again.
Note: While the projector is in Bluetooth Speaker mode, you can connect input devices such as
smartphones or tablets, but you cannot pair output devices such as headphones or external
speakers. If you are having trouble pairing speakers or headphones, make sure the Bluetooth
Speaker mode is disabled.
58
• : select whether to switch the language settings of the connected deviceAuto Language Change
to match the projector's language settings.
• : select whether to output audio to an HDMI ARC compatible audio/video system.HDMI2 ARC
6. When you are finished, press Esc.
Parent topic: Adjusting Projector Features
Shutting Off the Picture Temporarily
You can temporarily turn off the projected picture if you want to redirect your audience's attention during
a presentation. Any sound or video action continues to run, however, so you cannot resume projection at
the point that you stopped it.
1. Press the Blank button on the projector or remote control to temporarily stop projection.
The light source turns off and projection is interrupted.
2. To turn the picture back on, press the Blank button again.
Parent topic: Adjusting Projector Features
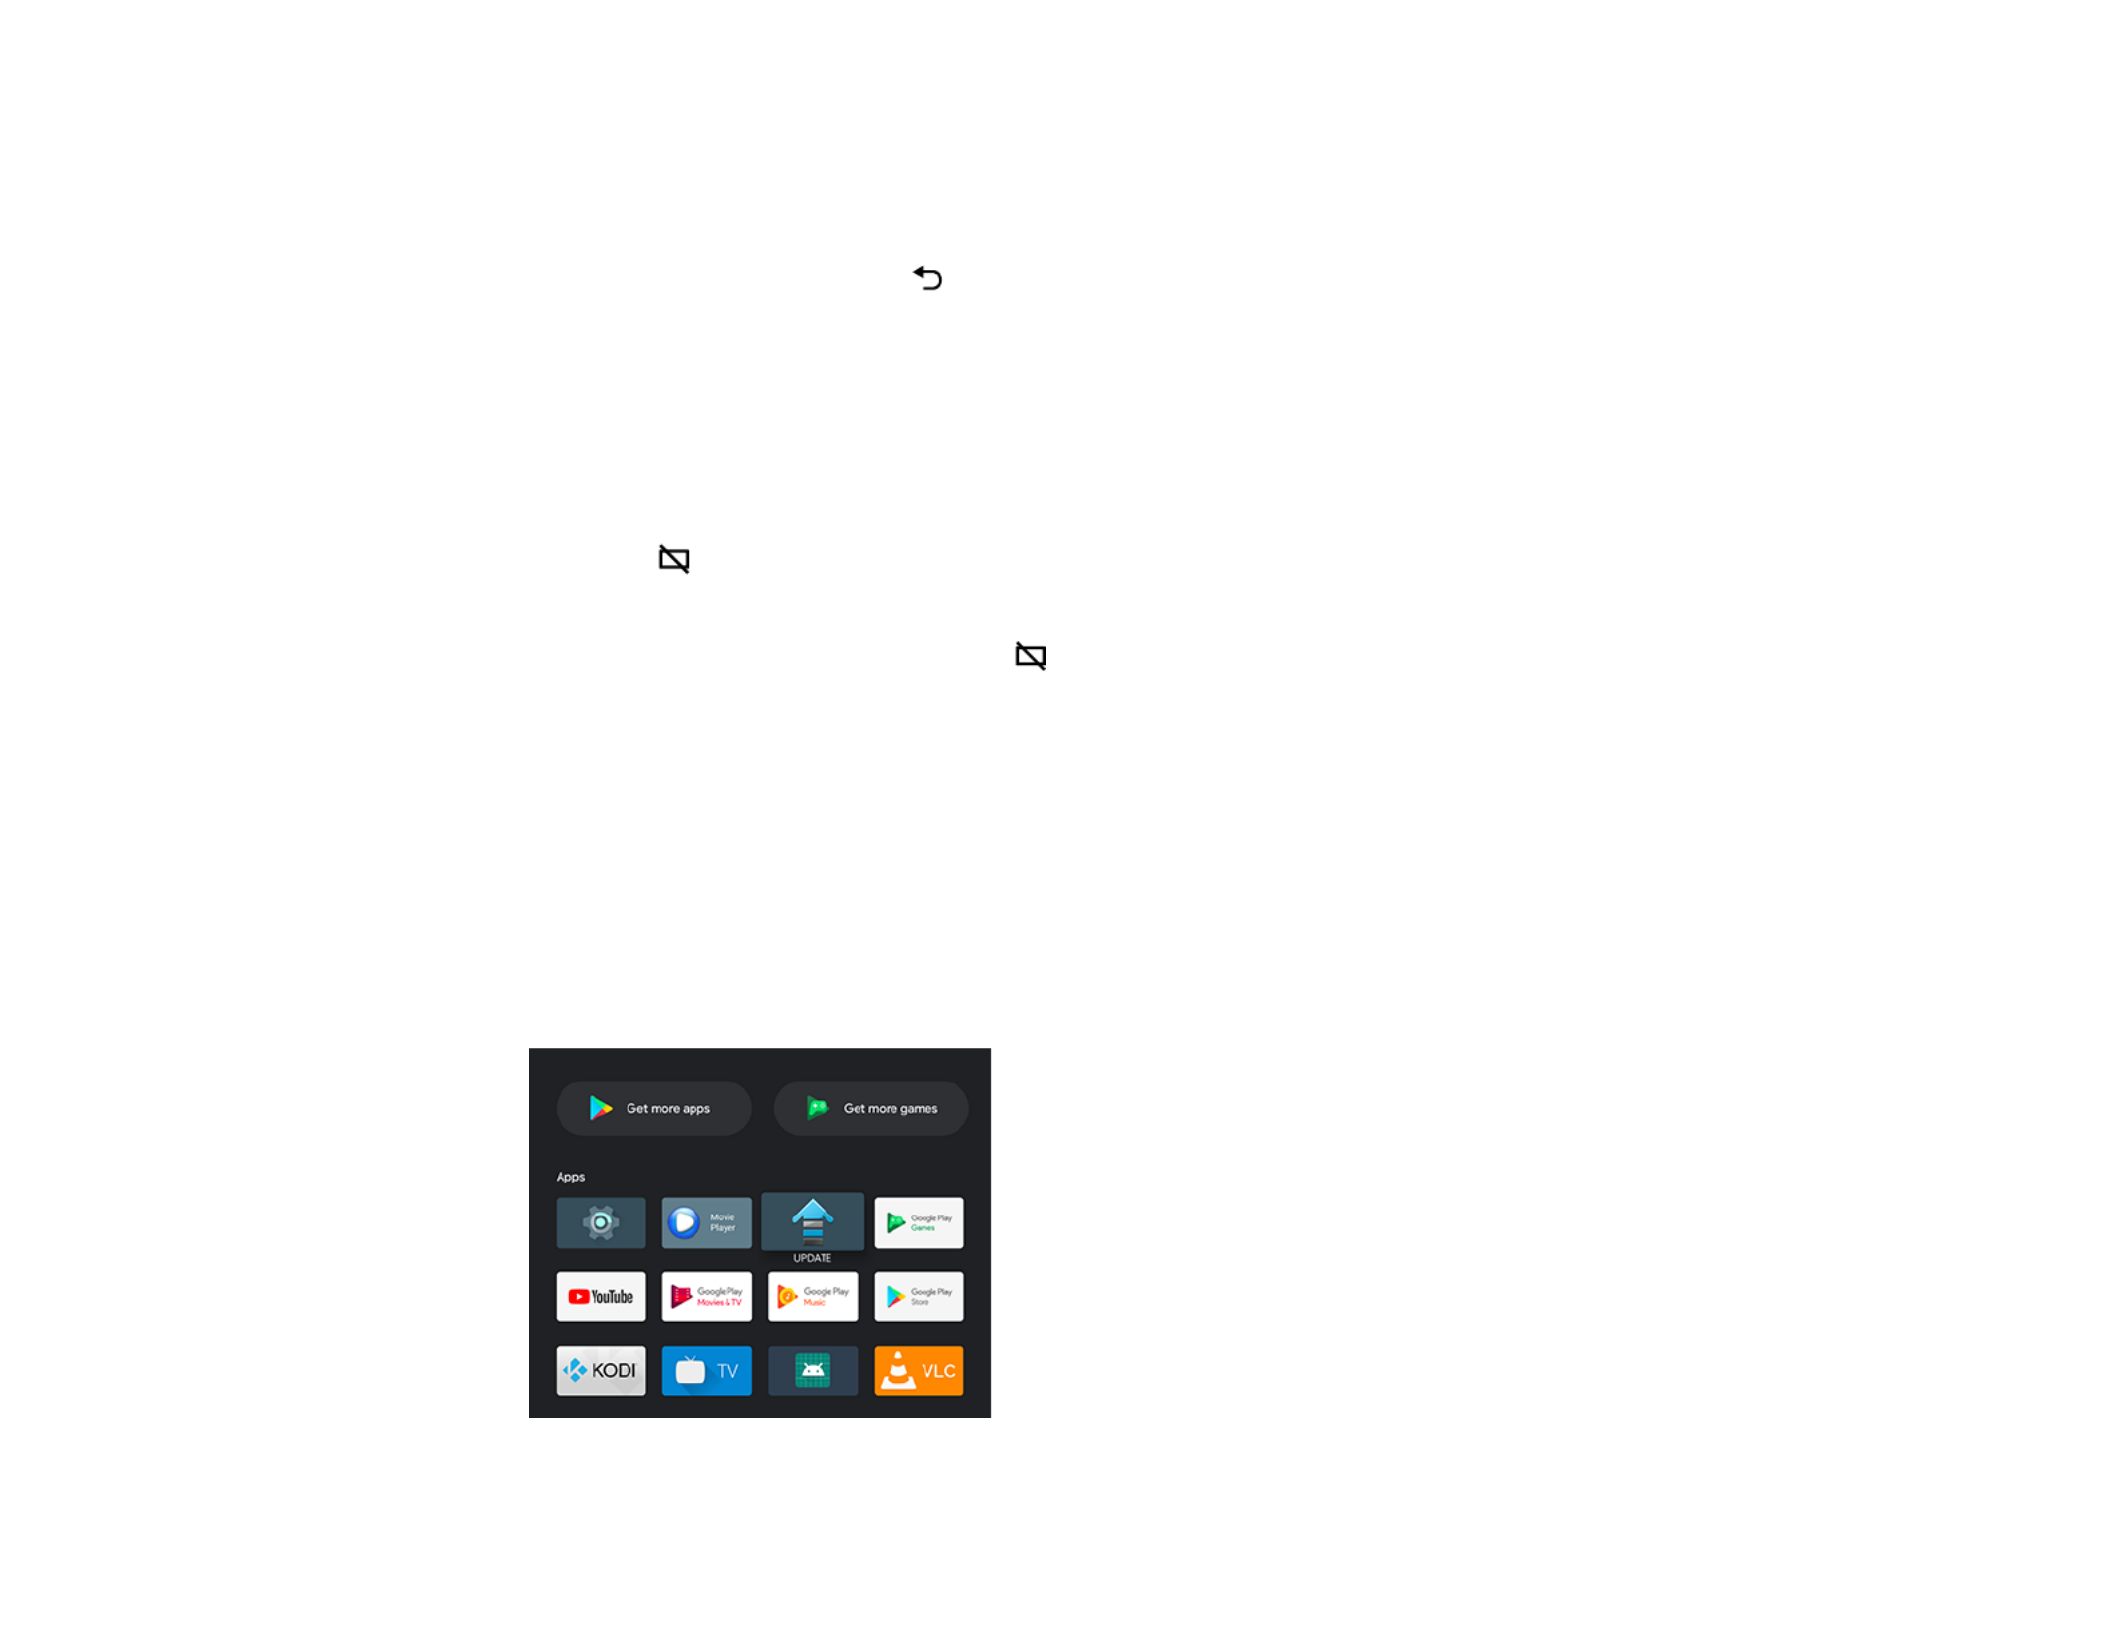
Updating the Firmware
You can get the latest version of the projector firmware over a network.
When the latest projector firmware is available, a notification is automatically displayed on the screen.
Follow the on-screen instructions to update the firmware.
1. Press the button on the remote control.Apps
You see a menu like this:

59
2. Select from the application list and press .UPDATE Enter
3. Follow the on-screen instructions to update the firmware.
Caution: Do not turn off the projector while updating the firmware.
Parent topic: Adjusting Projector Features
Resetting the Projector
You can reset the projector and all settings to their default values.
Note: Write down the settings you do not want to lose before resetting the projector. When you reset the
projector, all information, including installed apps, Google account login information, and Projector
Settings, is deleted.
1. Press the Home button on the remote control.
2. Select the icon at the top right of the Android TV Home screen and press .Enter
3. Select and press .Device Preferences Enter
4. Select and press .Reset Enter
A confirmation screen is displayed.
5. Select and press to reset the projector.Reset Enter
Parent topic: Adjusting Projector Features

60
Adjusting the Menu Settings
Follow the instructions in these sections to access the projector menu system and change projector
settings.
Using the Projector's Menus
Image Quality Settings - Picture Menu
Sound Quality Settings - Sound Menu
Projector Feature Settings - Display Menu
Projector Feature Settings - Settings Menu
Using the Projector's Menus
You can use the projector's menus to adjust the settings that control how your projector works. The
projector displays the menus on the screen.
1. Press the Settings button on the remote control.
You see the Projector Settings menu.
2. Press the up or down arrow button on the remote control to move through the menu selections.
3. To change settings in the displayed menu, press .Enter
4. Use the arrow and buttons to adjust the menu settings as desired.Enter
5. When you finish changing settings on a menu, press Esc to exit the menus.
Parent topic: Adjusting the Menu Settings
61
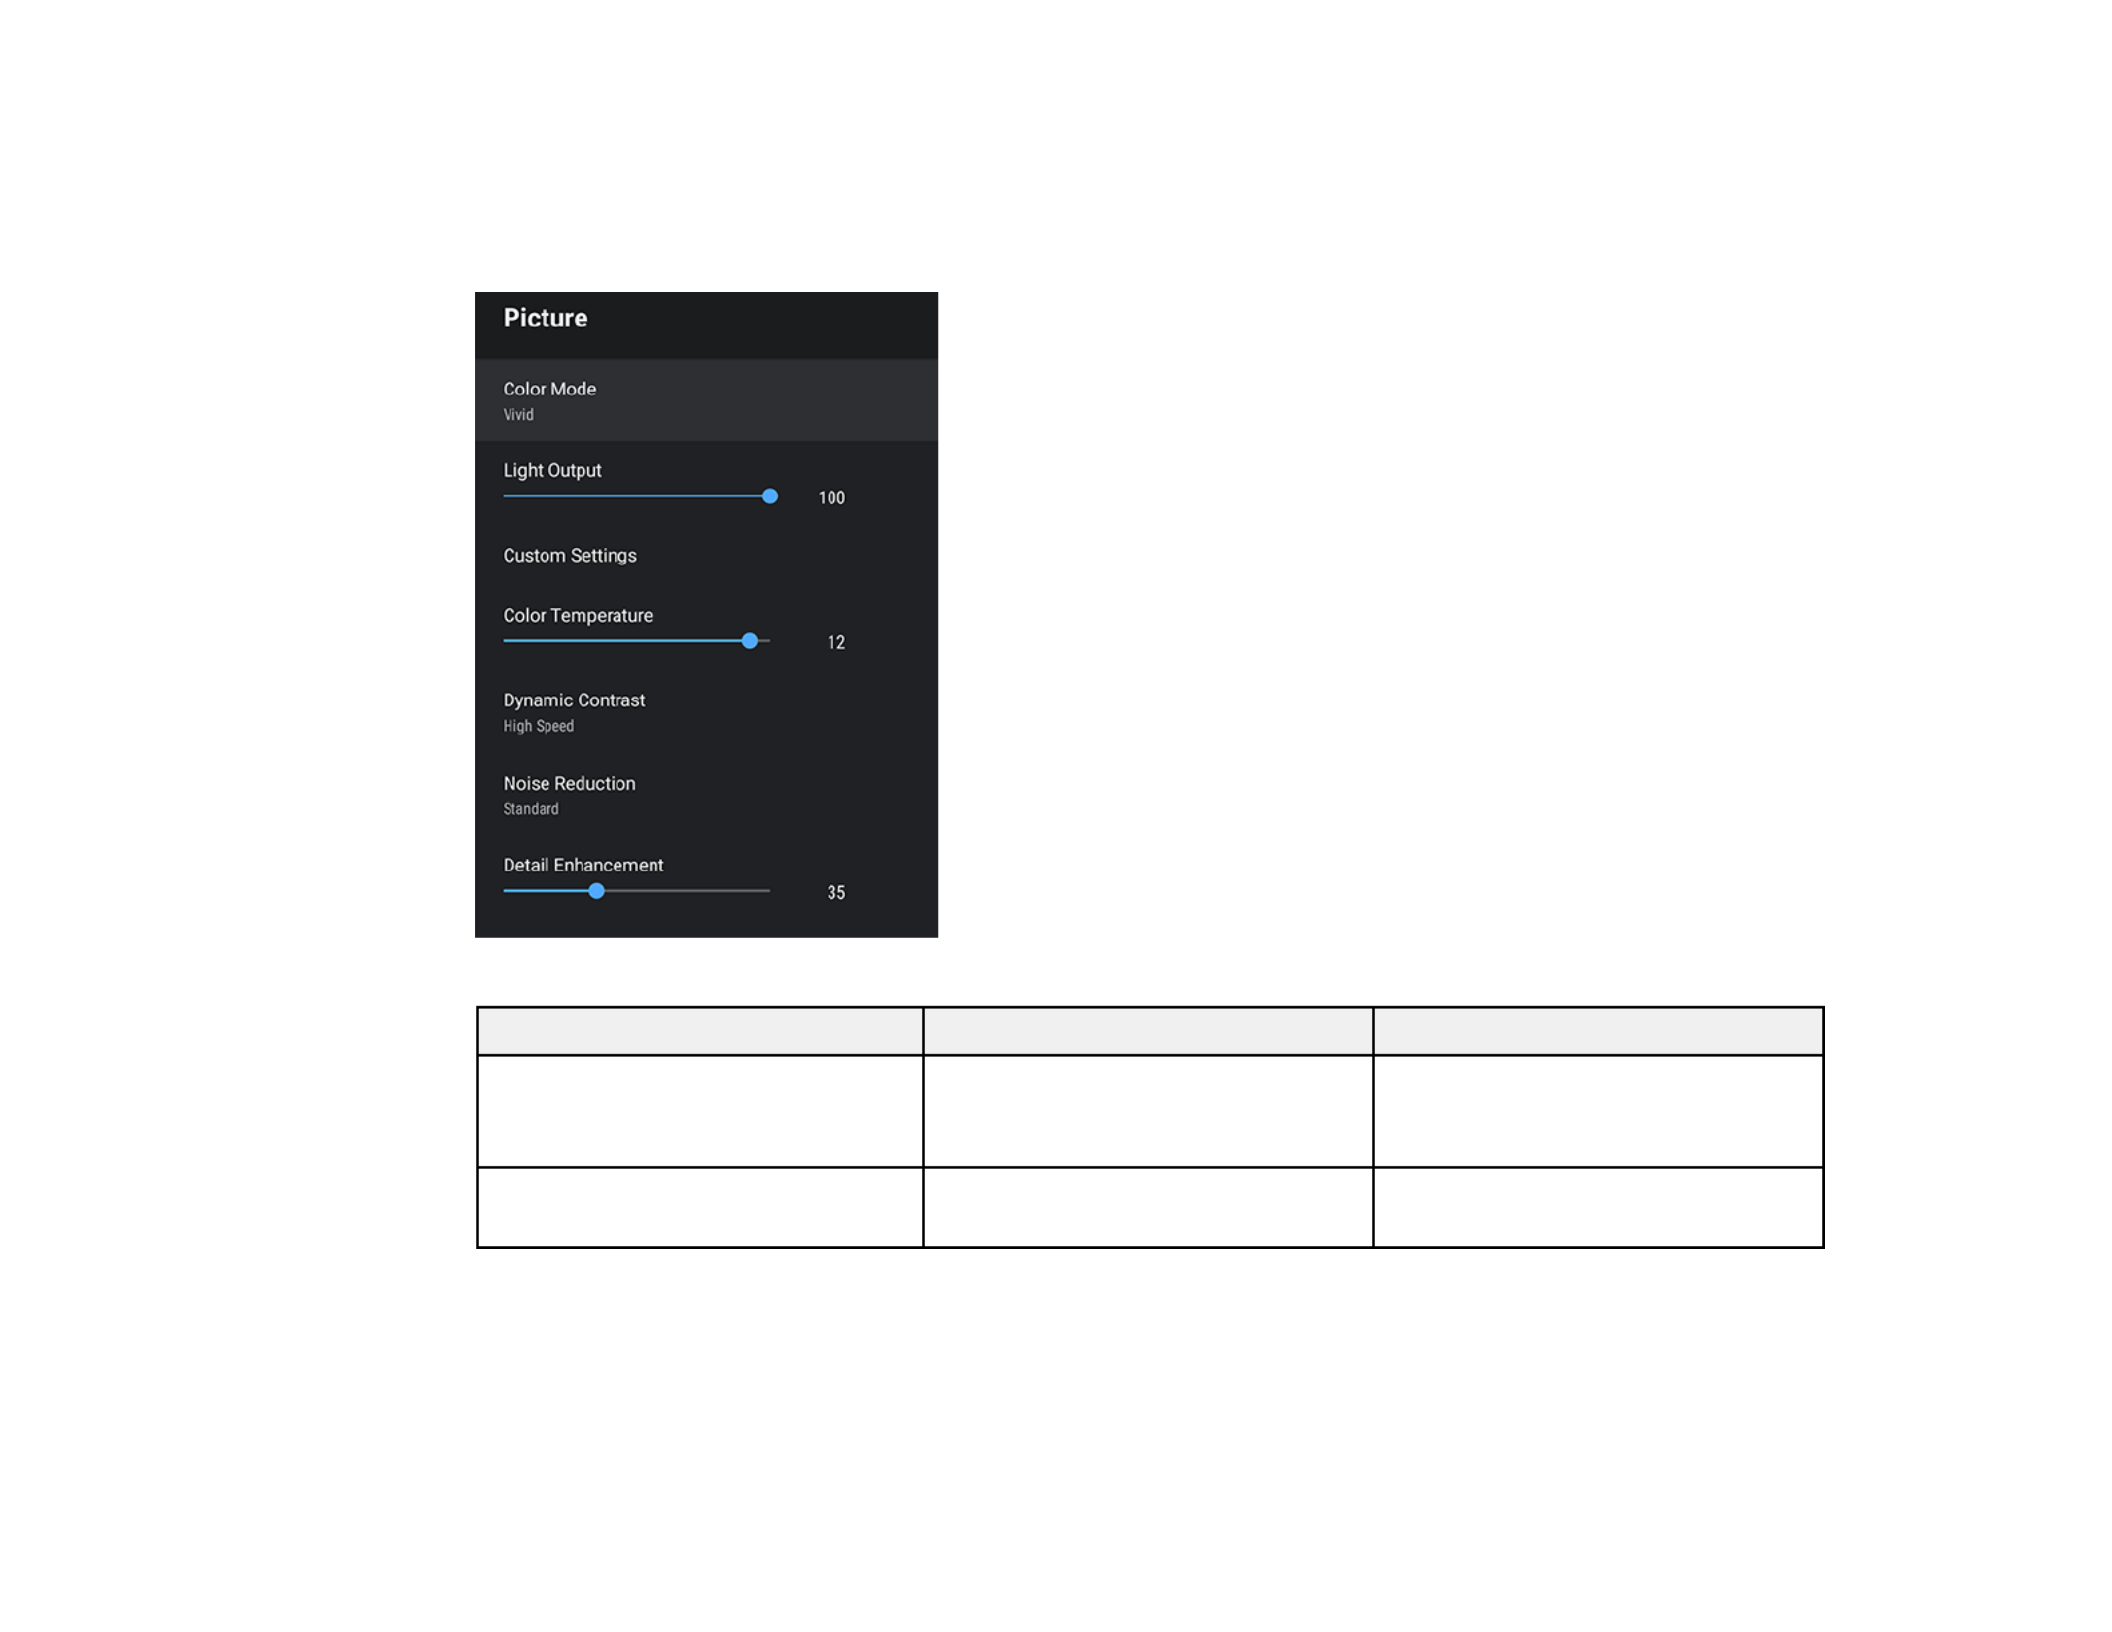
Image Quality Settings - Picture Menu
Settings on the Picture menu let you adjust the quality of your image for the input source you are
currently using.
Setting Options Description
Color Mode See the list of available Color
Modes
Adjusts the vividness of image
colors for various image types
and environments
Light Output Varying levels available Sets the brightness for the light
source for each Color Mode

62
Setting Options Description
Custom Settings Brightness
Contrast
Saturation
Tint
Sharpness
Scene Adaptive Gamma
Brightness: Lightens or darkens
the overall image
Contrast: Adjusts the difference
between light and dark areas of
the image
Saturation: Adjusts the intensity
of the image colors
Tint: Adjusts the balance of
green to magenta tones in the
image
Sharpness: Adjusts the
sharpness or softness of image
details
Scene Adaptive Gamma:
Adjusts the gamma depending
on the displayed scene
Color Temperature Varying levels available Sets the color temperature
according to the selected color
mode; lower values tint the image
red, and higher values tint the
image blue
Dynamic Contrast Off
Normal
High Speed
Adjusts the projected luminance
based on the image brightness
when certain Color Modes are
selected
Noise Reduction Strong
Standard
Weak
Off
Reduces flickering in analog
images
Detail Enhancement Varying levels available Creates a more textured image

63
Setting Options Description
Aspect Ratio Normal
Full
Zoom
Sets the aspect ratio for the
selected input source
HDMI Video Range Auto
Full
Limited
Sets the video range to match
the setting of the device
connected to the HDMI input port
Parent topic: Adjusting the Menu Settings
Sound Quality Settings - Sound Menu
Settings on the Sound menu allow you to optimize the audio for a variety of projected content. You can
select from presets or experiment with available modes.

64
Setting Options Description
Sound Mode Theatre
TV
Studio
Stadium
Concert
Karaoke Mode
Sets a sound mode for the type of
playback content (music, movie, etc.)
Virtual Surround High
Low
Off
Adjusts the strength of the surround
effect. This setting is saved for each
Sound Mode
Clear Voice High
Low
Off
Adjusts output so that voices can be
heard clearly. This setting is saved for
each Sound Mode
Auto Loudness On
Off
Automatically corrects the balance
between high and low tones in the audio
so that they are not out of balance, even
when playing at low volume
Bass Extension On
Off
Emphasizes the bass levels in the audio
output
Sound Space Right
Center
Left
Adjusts the sound quality to suit your
viewing position
Sound Output Device Speaker
ARC
Selects the sound output device
Speaker: Outputs sound from the
projector's speakers
ARC: Outputs sound from an ARC-
compatible AV system. Make sure to
connect the AV system to the projector's
HDMI2 (ARC) port. Disables internal
speakers when selected.

65
Setting Options Description
Sound Output Format PCM
Auto
Selects the sound output format when
you output audio to an external audio
device
PCM: Outputs sound in PCM format (2-
channel)
Auto: Outputs higher quality sound. The
following codecs are supported:
• PCM (2 ch)
• AC-3 (up to 5.1 ch)
• DTS (up to 5.1 ch)
If sound is not output correctly, select
PCM.
Audio Output Latency Varying levels available Adjusts the audio latency. If the audio is
fast, select a higher value. This setting is
only available for the following types of
audio:
• audio output from the projector's
speaker
• audio output from the HDMI2 (ARC)
port
• audio output from a Bluetooth device
Note: This setting will not compensate for
delayed audio.
Parent topic: Adjusting the Menu Settings

66
Projector Feature Settings - Display Menu
Settings on the Display menu let you customize the image projection.
Setting Options Description
Auto Keystone On
Off
Select to automaticallyOn
correct focus and image
keystone if you move the
projector
H/V Keystone H-Keystone
V-Keystone
Lets you manually correct the
angles of the horizontal and
vertical sides
Corner Adjustment — Corrects image shape and
alignment using an on-screen
display
Focus — Manually overrides the automatic
keystone settings
Projection Standard
Upside Down
Flips the image to match the
orientation of the projector
Parent topic: Adjusting the Menu Settings

67
Projector Feature Settings - Settings Menu
Options on the Settings menu let you customize various projector features.
Setting Options Description
Sleep Timer Off
15min.
30min.
45min.
60min.
90min.
120min.
Sets the interval before the
projector automatically turns off;
if canceled during on-screen
countdown, setting will be
changed to Off
Menu Timer Off
15sec.
30sec.
60sec.
120sec.
240sec.
Sets the interval before
automatically closing the
projector's menu
Produkt Specifikationer
| Mærke: | Epson |
| Kategori: | Beamer |
| Model: | EF12 |
Har du brug for hjælp?
Hvis du har brug for hjælp til Epson EF12 stil et spørgsmål nedenfor, og andre brugere vil svare dig
Beamer Epson Manualer

12 Januar 2025
4 Januar 2025
3 Januar 2025
3 Januar 2025
3 Januar 2025
3 Januar 2025
3 Januar 2025
3 Januar 2025
23 December 2024
14 December 2024
Beamer Manualer
- Beamer Acer
- Beamer Sony
- Beamer Canon
- Beamer Samsung
- Beamer Panasonic
- Beamer Philips
- Beamer Lenco
- Beamer OK
- Beamer Derksen
- Beamer LG
- Beamer Mitsubishi
- Beamer Sharp
- Beamer Technaxx
- Beamer Smart
- Beamer HP
- Beamer Sanyo
- Beamer D-Link
- Beamer Asus
- Beamer Toshiba
- Beamer Pyle
- Beamer Klarstein
- Beamer Kodak
- Beamer InFocus
- Beamer Lenovo
- Beamer Adj
- Beamer Optoma
- Beamer Da-Lite
- Beamer Hama
- Beamer Auna
- Beamer Casio
- Beamer Hisense
- Beamer Maxell
- Beamer Smartwares
- Beamer Blaupunkt
- Beamer JVC
- Beamer Leica
- Beamer Hitachi
- Beamer Medion
- Beamer 3M
- Beamer BenQ
- Beamer Acco
- Beamer Anker
- Beamer Aiptek
- Beamer Viewsonic
- Beamer Dell
- Beamer Vivitek
- Beamer Polaroid
- Beamer Ricoh
- Beamer NEC
- Beamer Stairville
- Beamer OKI
- Beamer Reflecta
- Beamer Nebula
- Beamer Salora
- Beamer Vogel's
- Beamer Overmax
- Beamer RCA
- Beamer Prixton
- Beamer Renkforce
- Beamer Christie
- Beamer Eurolite
- Beamer Yaber
- Beamer XGIMI
- Beamer GPX
- Beamer Dahua Technology
- Beamer Cameo
- Beamer Kogan
- Beamer Barco
- Beamer Planar
- Beamer Speaka
- Beamer ASK Proxima
- Beamer Eiki
- Beamer Naxa
- Beamer Vankyo
- Beamer Emtec
- Beamer Promethean
- Beamer Odys
- Beamer Laserworld
- Beamer Ibm
- Beamer La Vague
- Beamer Tzumi
- Beamer EKO
- Beamer MicroVision
- Beamer Elite Screens
- Beamer Celexon
- Beamer Fun Generation
- Beamer PLUS
- Beamer Futurelight
- Beamer Varytec
- Beamer Ultimea
- Beamer Dracast
- Beamer Dukane
- Beamer Dream Vision
- Beamer Knoll
- Beamer DTS
- Beamer Touchjet
- Beamer Boxlight
- Beamer AAXA Technologies
- Beamer Miroir
- Beamer Mimio
- Beamer AWOL Vision
- Beamer Smart Tech
- Beamer Atlantis Land
- Beamer KickAss
- Beamer Microtek
- Beamer Panamorph
Nyeste Beamer Manualer

5 Marts 2025
5 Marts 2025

30 Januar 2025
30 Januar 2025
30 Januar 2025
30 Januar 2025
30 Januar 2025
30 Januar 2025

29 Januar 2025
13 Januar 2025