Fujifilm FinePix J250 Manual
Læs nedenfor 📖 manual på dansk for Fujifilm FinePix J250 (116 sider) i kategorien Kamera. Denne guide var nyttig for 23 personer og blev bedømt med 4.5 stjerner i gennemsnit af 2 brugere
Side 1/116

Before You Begin
First Steps
Basic Photography and Playback
More on Photography
More on Playback
Movies
Connections
Menus
Technical Notes
Troubleshooting
Appendix
For information on related products, visit our website at
http://www.fujifilm.com/products/index.html
Owner’s Manual
Thank you for your purchase of
this product. This manual de-
scribes how to use your FUJIFILM
FinePix J250 or J210 digital cam-
era and the supplied software.
Be sure that you have read and
understood its contents before
using the camera.
BL00830 -202 E

ii
Camera Q & A
Find items by task.
Camera S
Camera S
Camera S
Camera Setu
etu
etu
etup
p
p
pCamera Setup
Que
Que
Que
Quest
st
st
stion
ion
ion
ionQuestion Key phr
Key phr
Key phr
Key phras
as
as
ase
e
e
eKey phrase See p
See p
See p
See page
age
age
ageSee page
How do I set the camera clock? Date and time 13
Can I set the clock to local time when I travel? Time di erence 79
How do I keep the monitor from turning o automatically? Auto power o 78
How do I stop the camera beeping and clicking? Operation and shutter volume 74
Silent mode 18
What are the parts of the camera called? Parts of the camera 2
What do the icons in the monitor mean? Monitor 3
How do I use the menus? Menus 57
What’s behind that ashing icon or error message in the monitor? Messages and displays 89
How much charge is left in the battery? Battery level 14
T
T
T
Tak
ak
ak
aking Pic
ing Pic
ing Pic
ing Pictur
tur
tur
tures
es
es
esTaking Pictures
Que
Que
Que
Quest
st
st
stion
ion
ion
ionQuestion Key phr
Key phr
Key phr
Key phras
as
as
ase
e
e
eKey phrase See p
See p
See p
See page
age
age
ageSee page
How many pictures can I take? Memory capacity 94
Is there a quick and easy way to take snapshots? B mode 14
How can I avoid blurred pictures? DUAI IS mode (FinePix J250) 16
Picture stabilization (FinePix J210)
33
How can I make good portraits? Intelligent Face Detection 20
Can the camera automatically adjust settings for di erent scenes? M mode 30
Can I choose my own settings for di erent scenes? Scene position 32
Is there a simple way to adjust settings for di erent scenes? Shooting mode 30
How do I shoot close-ups? Close-ups (macro mode) 25

iii
Camera Q & A
Que
Que
Que
Questi
sti
sti
stion
on
on
onQuestion Key phr
Key phr
Key phr
Key phrase
ase
ase
aseKey phrase See p
See p
See p
See page
age
age
ageSee page
How do I keep the ash from ring?
Flash mode 26
How do I stop my subjects’ eyes glowing red when I use the ash?
How do I “ ll-in” shadows on back-lit subjects?
How do I take a group portrait that includes the photographer? Self-timer mode 28
How do I frame pictures with the subject o to one side? Focus lock 23
How do I shoot movies? Recording movies 40
Viewi
Viewi
Viewi
Viewing Pict
ng Pict
ng Pict
ng Pictures
ures
ures
uresViewing Pictures
Que
Que
Que
Questi
sti
sti
stion
on
on
onQuestion Key phr
Key phr
Key phr
Key phrase
ase
ase
aseKey phrase See p
See p
See p
See page
age
age
ageSee page
How do I view my pictures? Single-frame playback 35
How do I delete the current picture? The b button 19
Can I select other pictures for deletion? Deleting pictures 38
Can I zoom in on pictures during playback? Playback zoom 36
How do I view a lot of pictures at once? Multi-frame playback 36
How do I view all pictures taken on the same day? Sort by date 37
Can I protect my pictures from accidental deletion? Protect 68
Can I hide the icons in the monitor when viewing my pictures? Choosing a display format 35
How do I view my pictures on TV? Viewing pictures on TV 43
Sharin
Sharin
Sharin
Sharing Pictu
g Pictu
g Pictu
g Pictures
res
res
resSharing Pictures
Que
Que
Que
Questi
sti
sti
stion
on
on
onQuestion Key phr
Key phr
Key phr
Key phrase
ase
ase
aseKey phrase See p
See p
See p
See page
age
age
ageSee page
Can I print pictures on my home printer? Printing pictures 44
Can I copy my pictures to my computer? Viewing pictures on a computer 50

iv
Camera Q & A ..................................................................................... ii
About This Manual ......................................................................... vi
Be
Be
Be
Before
fore
fore
fore Y
Y
Y
You Be
ou Be
ou Be
ou Begi
gi
gi
gin
n
n
nBefore You Begin
Introduction ....................................................................................... 1
Symbols and Conventions .......................................................... 1
Supplied Accessories .................................................................... 1
Parts of the Camera ....................................................................... 2
The Monitor ................................................................................... 3
The Mode Dial .............................................................................. 4
First S
First S
First S
First Step
tep
tep
teps
s
s
sFirst Steps
Charging the Battery ..................................................................... 5
Inserting the Battery...................................................................... 7
Inserting a Memory Card ............................................................. 9
Turning the Camera on and O ...............................................12
Shooting Mode .............................................................................12
Playback Mode ..............................................................................12
Basic Setup .......................................................................................13
Bas
Bas
Bas
Basic Pho
ic Pho
ic Pho
ic Photog
tog
tog
tography an
raphy an
raphy an
raphy and Playba
d Playba
d Playba
d Playback
ck
ck
ckBasic Photography and Playback
Taking Pictures in B (Auto) Mode ........................................ 14
Viewing Pictures ............................................................................19
Mor
Mor
Mor
More on Pho
e on Pho
e on Pho
e on Photog
tog
tog
tography
raphy
raphy
raphyMore on Photography
Intelligent Face Detection and Red-Eye Removal .......... 20
Focus Lock ........................................................................................23
F Macro Mode (Close-ups) ......................................................25
N Using the Flash ........................................................................... 26
h Using the Self-Timer ............................................................... 28
Shooting Mode ...............................................................................30
B AUTO ..........................................................................................30
M SCENE RECOGNITION .................................................30
Y BABY MODE ..............................................................................30
J RED-EYE REDUCTION ..........................................................30
k DIGITAL ZOOM ........................................................................31
C PORTRAIT ...................................................................................31
H SCENE POSITION ..................................................................32
Mor
Mor
Mor
More on Playb
e on Playb
e on Playb
e on Playback
ack
ack
ackMore on Playback
Playback Options ...........................................................................35
Playback Zoom ..............................................................................36
Multi-Frame Playback .................................................................36
Sort by Date ....................................................................................37
A Deleting Pictures .....................................................................38
Movi
Movi
Movi
Movies
es
es
esMovies
F Recording Movies ...................................................................40
a Viewing Movies .......................................................................42
Table of Contents

v
Table of Contents
Conne
Conne
Conne
Connect
ct
ct
ction
ion
ion
ions
s
s
sConnections
Viewing Pictures on TV ...............................................................43
Printing Pictures via USB ...........................................................44
Connecting the Camera ............................................................44
Printing Selected Pictures ........................................................44
Printing the DPOF Print Order ................................................45
Creating a DPOF Print Order ....................................................47
Viewing Pictures on a Computer ............................................50
Installing FinePixViewer ............................................................50
Connecting the Camera ............................................................55
Me
Me
Me
Menus
nus
nus
nusMenus
The Shooting Menu ...................................................................... 57
Using the Shooting Menu .........................................................57
Shooting Menu Options ............................................................58
N ISO .............................................................................................59
O QUALITY ..................................................................................60
V EXP. COMPENSATION .........................................................61
C PHOTOMETRY .......................................................................62
D WHITE BALANCE ..................................................................62
R CONTINUOUS (Continuous Shooting) ........................63
The Playback Menu.......................................................................64
Using the Playback Menu .........................................................64
Playback Menu Options .............................................................65
B RED EYE REMOVAL ..............................................................66
I SLIDE SHOW ..........................................................................67
D PROTECT .................................................................................68
E COPY ........................................................................................69
C IMAGE ROTATE .....................................................................71
G TRIMMING ..............................................................................72
The Setup Menu .............................................................................73
Using the Setup Menu ...............................................................73
Setup Menu Options ...................................................................74
A IMAGE DISP. ..........................................................................75
B FRAME NO. ............................................................................76
D DIGITAL ZOOM ....................................................................77
U LCD POWER SAVE ...............................................................77
I PLAYBACK VOLUME ...........................................................77
J LCD BRIGHTNESS ................................................................77
K FORMAT..................................................................................78
M AUTO POWER OFF ..............................................................78
N TIME DIFFERENCE ...............................................................79
T
T
T
Tec
ec
ec
echnic
hnic
hnic
hnical Not
al Not
al Not
al Notes
es
es
esTechnical Notes
Optional Accessories ...................................................................80
Accessories from FUJIFILM .......................................................81
Caring for the Camera .................................................................82
T
T
T
Trou
rou
rou
rouble
ble
ble
blesho
sho
sho
shooti
oti
oti
oting
ng
ng
ngTroubleshooting
Troubleshooting ............................................................................83
Warning Messages and Displays ............................................ 89
App
App
App
Appendi
endi
endi
endix
x
x
xAppendix
Glossary .............................................................................................93
Internal Memory/Memory Card Capacity ..........................94
Speci cations .................................................................................. 95
FUJIFILM Digital Camera Worldwide Network ............. 100

1
Before You Begin
Introduction
Sym
Sym
Sym
Symbols and Conv
bols and Conv
bols and Conv
bols and Conventions
entions
entions
entionsSymbols and Conventions
The following symbols are used in this manual:
3 Caution: This information should be read before use to ensure correct operation.
1 Note: Points to note when using the camera.
2 Tip: Additional information that may be helpful when using the camera.
Menus and other text in the camera monitor are shown in bold. In the illustrations in this manual, the
monitor display may be simpli ed for explanatory purposes.
Suppl
Suppl
Suppl
Supplied Accessories
ied Accessories
ied Accessories
ied AccessoriesSupplied Accessories
The following items are included with the camera:
or
FinePix software CD
(IMPORTANT: read
license agreement
on the last page of
this manual before
opening)
NP-45 rechargeable
battery
BC-45A battery charger (with
power cable or built-in plug)
USB cable
Attaching the Strap
Owner’s Manual
(this manual)
Attach the strap as
shown.
Strap

2
Introduction
Parts of t
Parts of t
Parts of t
Parts of the Camera
he Camera
he Camera
he CameraParts of the Camera
For more information, refer to the page listed to the right of each item.
2 Tip: Monitor Brightness
Pressing the m button brie y increases monitor brightness, making the display easier to see in bright light. Nor-
mal brightness is restored when a photograph is taken.
Selector button
MENU/OK button
(pg. 13)
Move cursor left
F (macro)
button (pg. 25)
Move cursor right
N ( ash) button
(pg. 26)
Move cursor up
m (monitor brightness)
button (see below)
b (delete) button (pg. 19)
Move cursor down
h (self-timer) button (pg. 28)
16 Battery-chamber cover .......................... 7
17 Speaker ...........................................................42
18 Tripod mount
19 Memory card slot .....................................10
20 Battery chamber ......................................... 7
21 Battery latch .................................................. 7
9 button .......... 16, 35DISP (display)/BACK
10 Indicator lamp ............................................ 18
11 Mode dial ........................................................ 4
12 Connector for USB cable .............44, 55
Connector for A/V cable .....................43
13 (playback) button ............................35a
14 Strap eyelet .................................................... 1
15 DC coupler cable cover ........................81
1 Shutter button ...........................................17
2 Zoom control ..............................................15
3 Flash ..................................................................26
4 Lens and lens cover ................................12
5 button ......................................... 12G
6 Microphone .................................................40
7 Self-timer lamp ..........................................29
8 Monitor ............................................................. 3

3
Before You Begin
Introduction
The Mon
The Mon
The Mon
The Monitor
itor
itor
itorThe Monitor
The following indicators may appear in the monitor during shooting and playback. The indicators dis-
played vary with camera settings.
■
■
■
■■
Shoot
Shoot
Shoot
Shooting
ing
ing
ing Shooting
*
10
10
10
10 :
:
:
:00
00
00
00
AM
AM
AM
AM
10 : 00
AM
2
2
2
2
2
3
3
3
3
3
-
-
-
-
1
1
1
1
-
1
ISO
ISO
ISO
ISO
100
100
100
100
ISO
100
N
N
N
N
N
9
9
9
9
9
250
250
250
250
250
F
F
F
F
3.3
3.3
3.3
3.3
F
3.3
12
12
12
12 /
/
/
/31
31
31
31 /
/
/
/2050
2050
2050
2050
12 /31 / 205012 /31 / 2050
* a: Indicates that no memory card
is inserted and that pictures will
be stored in the camera’s internal
memory (pg. 9).
■
■
■
■■
Playback
Playback
Playback
Playback Playback
ISO
ISO
ISO
ISO
100
100
100
100
ISO
100
100-
100-
100-
100-0001
0001
0001
0001
100-0001
250
250
250
250
250
F
F
F
F
3.3
3.3
3.3
3.3
F
3.3
2
2
2
2
2
3
3
3
3
3
-
-
-
-
1
1
1
1
-
1
N
N
N
N
N
10
10
10
10 :
:
:
:00
00
00
00
AM
AM
AM
AM
10 : 00
AM
12
12
12
12 /
/
/
/31
31
31
31 /
/
/
/2050
2050
2050
2050
12 /31 / 205012 /31 / 2050
11 Self timer indicator ..................................28
12 Focus frame .................................................17
13 Date and time.............................................13
14 Quality .............................................................60
15 Number of available frames ..............94
16 Sensitivity ......................................................59
17 Focus warning ...........................................17
18 Blur warning ................................................26
19 Bright monitor indicator ........................ 2
20 Internal memory indicator * ................. 9
21 Exposure compensation .....................61
1 Metering ........................................................62
2 White balance ............................................62
3 Flash mode...................................................26
4 Silent mode .................................................18
5 Intelligent Face Detection
indicator ......................................................... 20
6 DUAL IS mode ............................................16
7 Shooting mode .........................................30
8 Battery level .................................................14
9 Macro (close-up) mode........................25
10 Continuous shooting mode .............63
1 Gift image .....................................................35
2 Protected image .......................................68
3 DPOF print indicator ..............................47
4 Red-eye removal indicator ................66
5 Intelligent Face Detection
indicator ................................................. 20, 66
6 Silent mode .................................................18
7 Playback mode indicator ....................35
8 Frame number ...........................................76

4
Introduction
The Mo
The Mo
The Mo
The Mode Di
de Di
de Di
de Dial
al
al
alThe Mode Dial
To select a shooting mode, align the mode icon with the mark next
to the mode dial.
C (PORTRAIT): Use for soft-toned por-
traits with natural skin tones (pg. 31).
k (DIGITAL ZOOM): Increase zoom so
that small or distant subjects ll the
frame (pg. 31).
J (RED-EYE REDUCTION): Reduce “red-
eye” in portraits taken with the ash
under low light (pg. 30).
M (SCENE RECOGNITION): A “point-
and-shoot” mode in which the camera
automatically adjusts settings to suit
the scene (pg. 30).
F (MOVIE): Record movies with sound
(pg. 40).
Y (BABY MODE): Choose for natural
skin tones in portraits of infants. The
ash turns o automatically (pg. 30).
H (SCENE POSITION): Choose a scene
suited to the subject or shooting
conditions and let the camera do the
rest (pg. 32).
B (AUTO): A simple “point-and-shoot”
mode recommended for rst-time us-
ers of digital cameras (pg. 30).

First Steps
5
Charging the Battery
The battery is not charged at shipment. Charge the battery before use.
1 Place the battery in the charger.
Insert the battery into the supplied battery
charger as shown, making sure that the bat-
tery is in the correct orientation. The battery
charger comes in one of two types, depend-
ing on the country or region of sale: one with
a built-in plug that plugs directly into the
power outlet (A), and another that connects
to the power outlet via a power cable (B).
2 Plug the charger in.
Plug the charger into a power outlet. The
charging indicator will light.
Type A Type B
The Charging Indicator
The charging indicator shows battery charge
status as follows:
Cha
Cha
Cha
Charg
rg
rg
rgin
in
in
ing ind
g ind
g ind
g indic
ic
ic
icato
ato
ato
ator
r
r
rCharging indicator Bat
Bat
Bat
Batte
te
te
ter
r
r
ry s
y s
y s
y stat
tat
tat
tatus
us
us
usBattery status Ac
Ac
Ac
Acti
ti
ti
tion
on
on
onAction
O
Battery not
inserted.
Insert the
battery.
Battery fully
charged.
Remove the
battery.
On Battery
charging. —
Blinking Battery fault.
Unplug the
charger and
remove the
battery.
rechargeable battery
Terminals
Arrow
battery charger
(type B)
battery charger
(type A)

6
Charging the Battery
3
Charge the battery.
Charging is complete when the charging in-
dicator turns o .
3 Cautions: Caring for the Battery
• Do not a x stickers or other objects to the battery.
Failure to observe this precaution could make it im-
possible to remove the battery from the camera.
• Do not short the battery terminals. The battery could
overheat.
• Use only rechargeable batteries. Failure to observe
this precaution could result in product malfunction.
• Do not remove the labels from the battery or attempt
to split or peel the outer casing.
• The battery gradually loses its charge when not in
use. Charge the battery one or two days before use.
• Read the supplied documentation for additional cau-
tions concerning battery use.
3 Cautions: Using the Battery Charger
• Unplug the charger when it is not in use.
• Remove dirt from the battery terminals with a clean,
dry cloth. Failure to observe this precaution could
prevent the battery from charging.
• Charging times increase at low temperatures.
First Steps
7
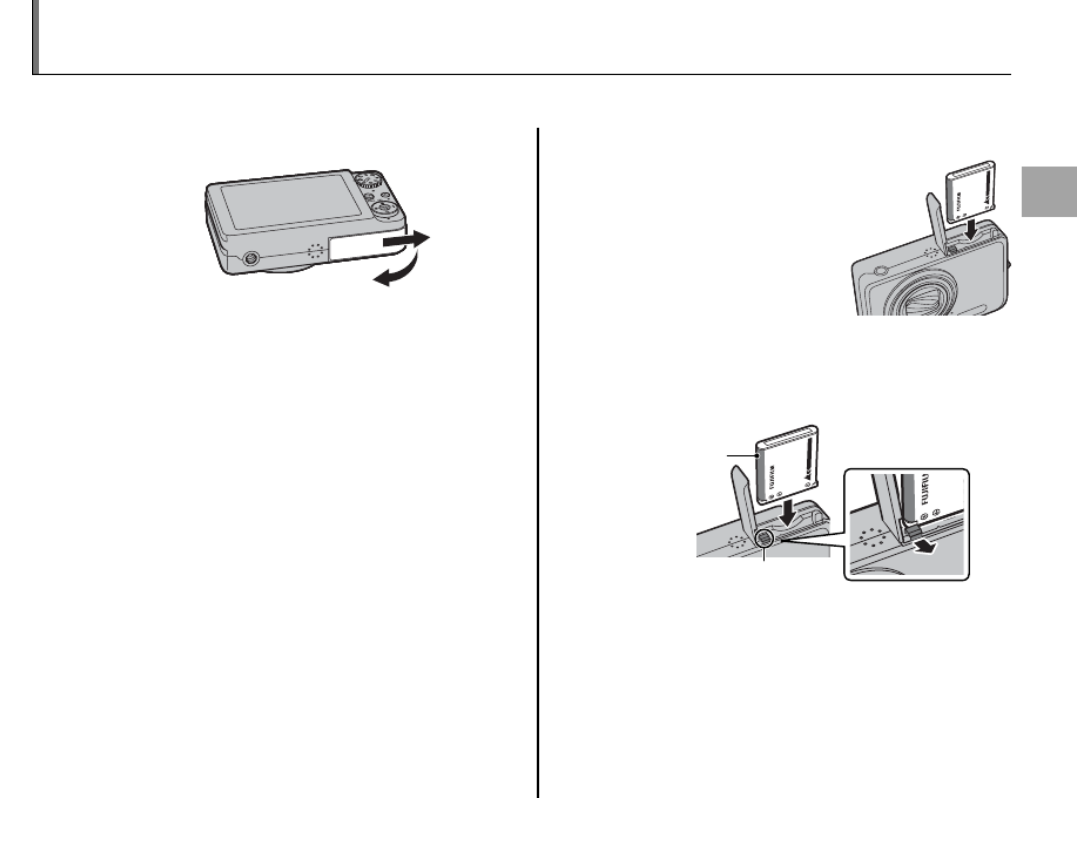
Inserting the Battery
After charging the battery, insert it in the camera as described below.
1
Open the battery-chamber cover.
1 Note
Be sure the camera is o before opening the bat-
tery-chamber cover.
3 Cautions
• Do not open the battery-chamber cover when
the camera is on. Failure to observe this pre-
caution could result in damage to image les or
memory cards.
• Do not use excessive force when handling the
battery-chamber cover.
2
Insert the battery.
Insert the battery with the
terminals rst and the or-
ange stripe aligned with
the orange battery latch.
Slide the battery into
the camera, keeping the
battery latch pressed to one side as shown
below. Con rm that the battery is securely
latched.
3 Caution
Insert the battery in the correct orientation. Do
NOT use force or attempt to insert the battery up-
side down or backwards. The camera will not
function if the battery is inserted backwards or
upside down.
Battery latch
Orange
stripe

8
Inserting the Battery
3
Close the battery-chamber cover. Removing the Battery
After turning the camera o , open the battery-cham-
ber cover, press the battery latch to the top, and slide
the battery out of the camera as shown.
3 Caution
Turn the camera o before removing the battery.
2 Tip: Using an AC Adapter
The camera can be powered by an optional AC adapter
and DC coupler (sold separately, pg. 81).
Battery latch
10
Inserting a Memory Card
■
■
■
■■
Inser
Inser
Inser
Inserti
ti
ti
ting a Mem
ng a Mem
ng a Mem
ng a Memor
or
or
ory Card
y Card
y Card
y Card Inserting a Memory Card
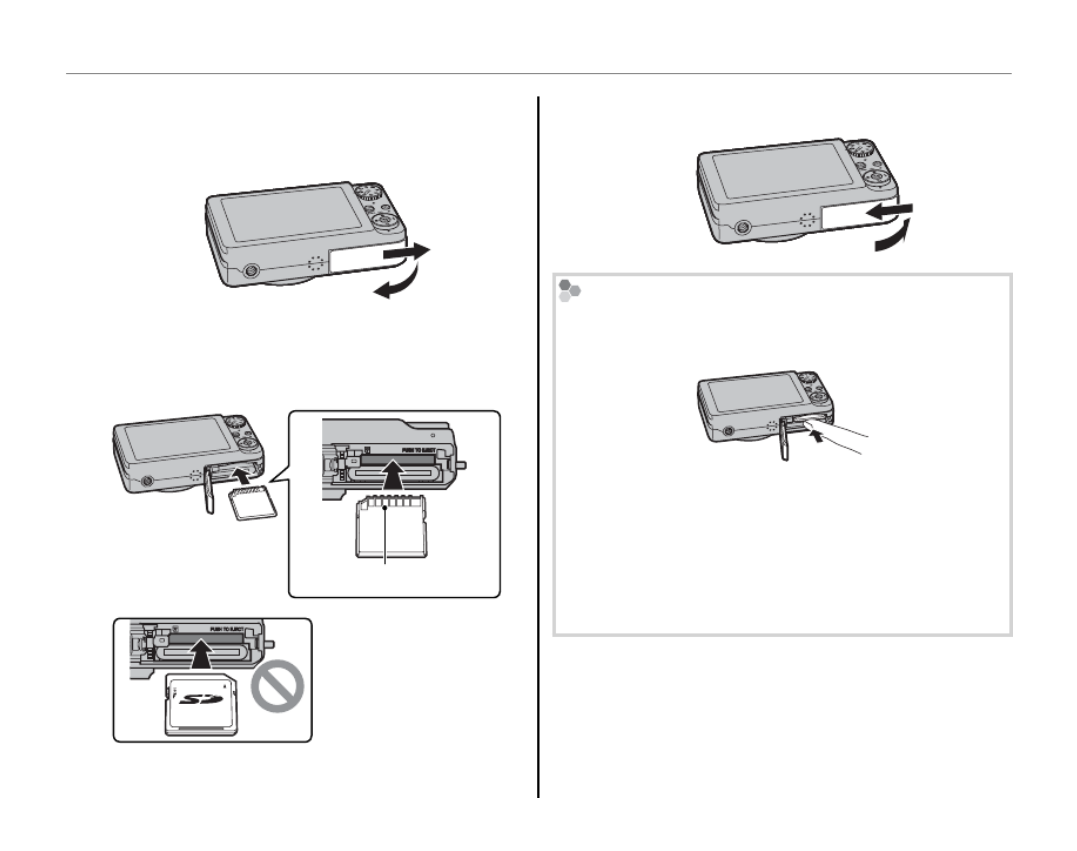
1 Open the battery-chamber cover.
2 Insert the memory card.
Holding the memory card in the orientation
shown below, slide it all the way in.
Be sure card is in cor-
rect orientation; do not
insert at an angle or use
force.
3 Close the battery-chamber cover.
Removing Memory Cards
Turn the camera o , and press the card to release it
slowly. The card can now be removed by hand.
3 Cautions
• The memory card may spring out if you remove
your nger immediately after pushing the card in.
• Memory cards may be warm to the touch after be-
ing removed from the camera. This is normal and
does not indicate a malfunction.
Gold contacts

First Steps
11
Inserting a Memory Card
3 Cautions
• Format memory cards before rst use, and be sure to reformat all memory cards after using them in a computer
or other device. For more information on formatting memory cards, see page 78.
• Memory cards are small and can be swallowed; keep out of reach of children. If a child swallows a memory card,
seek medical assistance immediately.
• Do not use miniSD or microSD adapters that expose the back of the card. Failure to observe
this precaution may cause damage or malfunction. Adapters that are larger or smaller than the
standard dimensions of an SD card may not eject normally; if the card does not eject, take the
camera to an authorized service representative. Do not forcibly remove the card.
• Do not turn the camera o or remove the memory card while the memory card is being formatted or data are
being recorded to or deleted from the card. Failure to observe this precaution could damage the card.
• Do not a x labels to memory cards. Peeling labels can cause camera malfunction.
• Movie recording may be interrupted with some types of memory card.
• The data in internal memory may be erased or corrupted when the camera is repaired. Please note that the
repairer will be able to view pictures in internal memory.
• Formatting a memory card or internal memory in the camera creates a folder in which pictures are stored. Do
not rename or delete this folder or use a computer or other device to edit, delete, or rename image les. Always
use the camera to delete pictures from memory cards and internal memory; before editing or renaming les,
copy them to a computer and edit or rename the copies, not the originals.

12
Turning the Camera on and O
Shooti
Shooti
Shooti
Shooting Mode
ng Mode
ng Mode
ng ModeShooting Mode
Press the G button to turn the camera on.
The lens will extend and the lens cover will open.
Press G again to turn the camera o .
2 Tip: Switching to Playback Mode
Press the a button to start playback. Press the shutter
button halfway to return to shooting mode.
3 Cautions
• Pictures can be a ected by ngerprints and other
marks on the lens. Keep the lens clean.
• The G button does not completely disconnect
the camera from its power supply.
Playback Mode
Playback Mode
Playback Mode
Playback ModePlayback Mode
To turn the camera on and begin playback, press
the a button for about a second.
Press the a button again to turn the camera o .
2 Tip: Switching to Shooting Mode
To exit to shooting mode, press the shutter button
halfway. Press the a button to return to playback.
2 Tip: Auto Power O
The monitor will dim to save power if no operations are performed for a while in shooting mode. Full brightness
can be restored by operating any of the camera controls. The camera will turn o automatically if no operations
are performed for the length of time selected in the AUTO POWER OFF menu (see page 78). To turn the camera
on, press the G button or press the a button for about a second.

First Steps
13
Basic Setup
A language-selection dialog is displayed the rst time the camera is turned on. Set up the camera as
described below (for information on resetting the clock or changing languages, see page 74).
1
Choose a language.
SET NO
START MENU
1.1 Press the selector up, down,
left, or right to highlight a lan-
guage.
1.2 Press MENU/OK.
2
Set the date and time.
SET NO
DATE / TIME NOT SET
2011
2010
2008
2007
1. 1 12
:
00
AM
2009
YY. MM. DD
2.1 Press the selector left or right
to highlight the year, month,
day, hour, or minute and press
up or down to change. To change the or-
der in which the year, month, and day are
displayed, highlight the date format and
press the selector up or down.
2.2 Press MENU/OK.
2 Tip: The Camera Clock
If the battery is removed for an extended period, the camera clock will be reset and the language-selection dialog
will be displayed when the camera is turned on. If the battery is left in the camera for about two hours, the bat-
tery can be removed for about 24 hours without resetting the clock or language selection.

14
Basic Photography and Playback
Taking Pictures in B (Auto) Mode
This section describes how to take pictures in B (auto) mode.
1
Turn the camera on.
Press the G button to turn the camera
on.
2 Tip: Intelligent Face Detection
The rst time the camera is turned on, Intelligent
Face Detection is automatically activated and the
camera is optimized for taking portrait photo-
graphs. For more information on using Intelligent
Face Detection, see page 20.
2
Select B mode.
Rotate the mode dial to B.
3
Check the battery level.
Check the battery level in the monitor.
r
q w e
Ind
Ind
Ind
Indic
ic
ic
icato
ato
ato
ator
r
r
rIndicator Des
Des
Des
Descr
cr
cr
crip
ip
ip
ipti
ti
ti
tion
on
on
onDescription
q(white) Battery partially discharged.
w(white) Battery more than half discharged.
e(red) Low battery. Charge as soon as pos-
sible.
r(blinks red) Battery exhausted. Turn camera o
and charge battery.

15
Basic Photography and Playback
Taking Pictures in B (Auto) Mode
4 Frame the picture.
Position the main subject in the focus area
and use the zoom control to frame the pic-
ture in the monitor.
Holding the Camera
Hold the camera steady
with both hands and brace
your elbows against your
sides. Shaking or unsteady
hands can blur your shots.
To prevent pictures that are
out of focus or too dark (un-
derexposed), keep your n-
gers and other objects away
from the lens and ash.
2 Tip: Focus Lock
Use focus lock (pg. 23) to focus on subjects that are not in the focus frame.
2 Tip: Digital Zoom
Digital zoom can be activated by rotating the mode dial to k (pg. 31) or using the D DIGITAL ZOOM option in
the setup menu (pg. 77).
By default, the camera uses
optical zoom. If desired,
digital zoom (see below)
can be used to zoom in
closer.
Select j to zoom out Select i to zoom in
Zoom indicator

16
Taking Pictures in B (Auto) Mode
Framing Guideline
To display a framing grid or to view or hide other indi-
cators in the monitor, press the DISP/BACK button.
Indicators
displayed
Indicators
hidden
Best Framing
To use the best framing, position the main subject at
the intersection of two lines or align one of the hori-
zontal lines with the horizon. Use focus lock (pg. 23)
to focus on subjects that will not be in the center of
the frame in the nal photograph.
DUAL IS MODE (FinePix J250 only)
Choose L DUAL IS MODE (pg.
58) in the shooting menu, and
choose l CONTINUOUS or
m SHOOTING ONLY option.
If the subject is poorly lit, blur-
ring caused by camera shake
can be reduced.
SHOOTING MENU
OFF
FACE DETECTION
QUALITY
ISO
CONTINUOUS
DUAL IS MODE
AUTO
OFF
N
OFF
CONTINUOUS
SHOOTING ONLY
Sensitivity is raised when DUAL
IS is in e ect. Note that blurring
may still occur depending on the
scene or shooting condition.

17
Basic Photography and Playback
Taking Pictures in B (Auto) Mode
5 Focus.
Press the shutter button halfway to focus on
the main subject in the focus frame.
If the camera is able to focus, it will beep twice
and the indicator lamp will glow green.
If the camera is unable to focus, the focus frame
will turn red, a s indicator will appear in
the monitor, and the indicator lamp will blink
green. Change the composition or use focus
lock (pg. 23).
1 Note
The lens may make a noise when the camera focuses.
This is normal.
6 Shoot.
Smoothly press the shutter button
the rest of the way down to take
the picture.
2 Tip: The Shutter Button
The shutter button has two
positions. Pressing the shutter
button halfway (q) sets focus
and exposure; to shoot, press
the shutter button the rest of
the way down (w).
1 Note
If the subject is poorly lit, the ash may re when the
picture is taken. To take pictures without the ash,
choose another ash mode (pg. 26).
1
1
1
1/
/
/
/250
250
250
250
1 / 250
F
F
F
F
3.3
3.3
3.3
3.3
F
3.3
Focus frame Press
halfway
Camera selects small
focus frame and
focuses on subject
Double
beep CLICK
q w

18
Taking Pictures in B (Auto) Mode
The Indicator Lamp
Indicator lamp
The indicator lamp shows camera status as follows:
Ind
Ind
Ind
Indic
ic
ic
icator l
ator l
ator l
ator lam
am
am
amp
p
p
pIndicator lamp Cam
Cam
Cam
Camer
er
er
era st
a st
a st
a statu
atu
atu
atus
s
s
sCamera status
Glows green Focus locked.
Blinks green Camera unable to focus or picture
may be blurred. Picture can be taken.
Blinks green
and orange
Recording pictures. Additional pic-
tures can be taken.
Glows
orange
Recording pictures. No additional pic-
tures can be taken at this time.
Blinks orange Flash charging; ash will not re when
picture is taken.
Blinks red
Lens or memory error (internal memory
or memory card full or not formatted,
format error, or other memory error).
2 Tip: Warnings
Detailed warnings appear in the monitor. See pages
89–92 for more information.
h Silent Mode
In situations in which camera sounds or lights may
be unwelcome, hold the DISP/BACK button down until
h is displayed (note that silent mode is not available
during movie playback).
The camera speaker, ash, and AF-assist illuminator/
selftimer lamp turn o ; ash and volume settings can
not be adjusted. To restore normal operation, press
the DISP/BACK button until the h icon is no longer
displayed.
19
Basic Photography and Playback
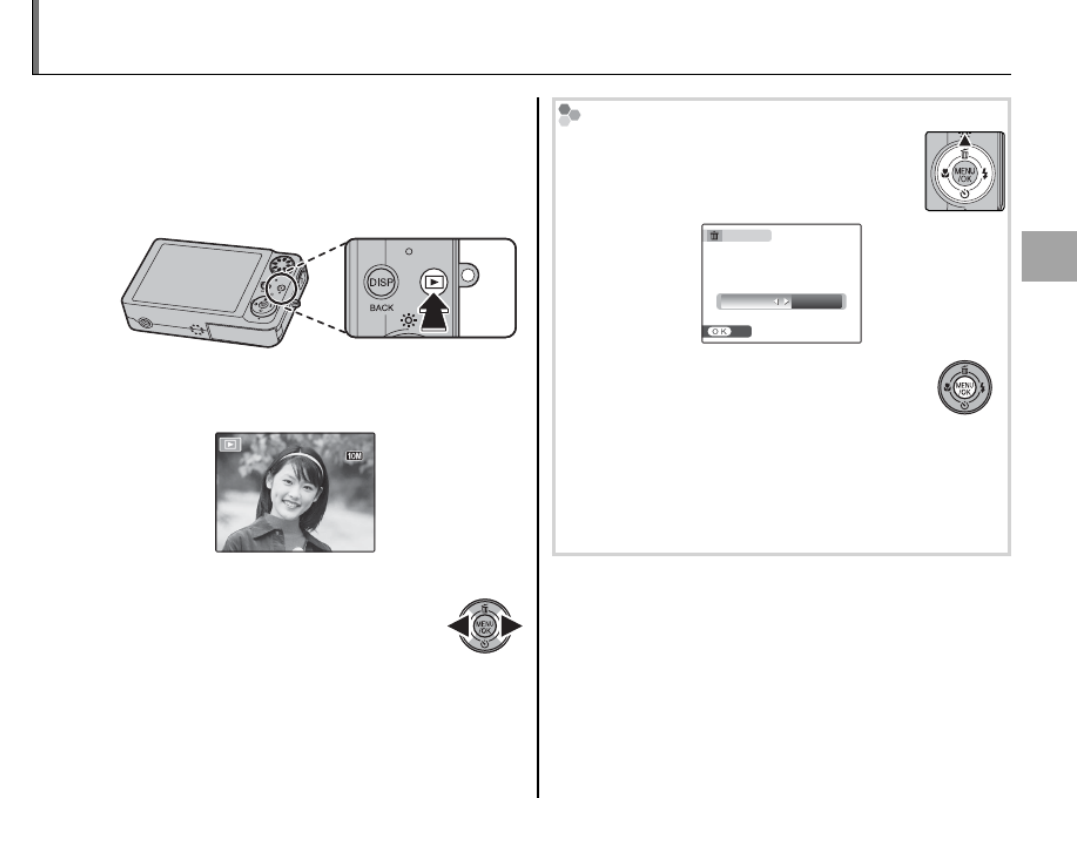
Viewing Pictures
Pictures can be viewed in the monitor. When tak-
ing important photographs, take a test shot and
check the results.
1 Press the a button for about a second.
The most recent picture will be displayed in
the monitor.
ISO
ISO
ISO
ISO
100
100
100
100
ISO
100
100-0001
100-0001
100-0001
100-0001
100-0001
12
12
12
12 /
/
/
/31
31
31
31 /
/
/
/2050
2050
2050
2050
12 / 31 / 2050
10
10
10
10 :
:
:
:00
00
00
00
AM
AM
AM
AM
10: 00
AM
N
N
N
N
N
250
250
250
250
250
F
F
F
F
3.3
3.3
3.3
3.3
F
3.3
2 View additional pictures.
Press the selector right to view
pictures in the order recorded, left
to view pictures in reverse order.
Press the shutter button to exit to shooting
mode.
Deleting Pictures
To delete the picture currently displayed
in the monitor, press the selector up (b).
The following dialog will be displayed.
SET
ERASE OK?
OK CANCEL
To delete the picture, press the selector
left to highlight OK and press MENU/OK.
To exit without deleting the picture, high-
light CANCEL and press MENU/OK.
2 Tip: The Playback Menu
Pictures can also be deleted from the playback menu
(pg. 38).

20
More on Photography
Intelligent Face Detection and Red-Eye Removal
Intelligent Face Detection allows the camera to automatically detect human faces and set focus and
exposure for a face anywhere in the frame for shots that emphasize portrait subjects. Intelligent Face
Detection also o ers a red-eye removal option for removing “red-eye” e ects caused by the ash.
1 Turn Intelligent Face Detection on.
1.1 Press MENU/OK to display the
shooting menu.
OFF
FACE DETECTION
QUALITY
ISO
SHOOTING MENU
CONTINUOUS
DUAL IS MODE
AUTO
OFF
N
1.2 Press the selector up or down
to highlight U FACE DETEC-
TION.
1.3 Press the selector right to dis-
play Intelligent Face Detection
options.
1.4 Press the selector up or down
to highlight the desired op-
tion.
Opt
Opt
Opt
Option
ion
ion
ionOption Des
Des
Des
Descri
cri
cri
cription
ption
ption
ptionDescription
g ON
J ON
Intelligent Face Detection and red-eye
removal on. Use with the ash.
g ON
J OFF
Intelligent Face Detection on; red-eye
removal o .
OFF Intelligent Face Detection and red-eye
removal o .
1.5 Press MENU/OK to select the
highlighted option and return
to shooting mode.
g icon appears in monitor
when Intelligent Face Detec-
tion is on.

21
More on Photography
Intelligent Face Detection and Red-Eye Removal
2 Frame the picture.
If a face is detected, it will
be indicated by a green
border. If there is more
than one face in the frame,
the camera will select the
face closest to the center;
other faces are indicated by white borders.
3 Focus.
Press the shutter button halfway
to set focus and exposure for the
subject in the green border.
3 Cautions
• If no face is detected when the shutter button is
pressed halfway (pg. 85), the camera will focus
on the subject at the center of the monitor and
red-eye will not be removed.
• In each mode, exposure will be optimized for
the entire scene rather than the selected por-
trait subject.
Green border

22
Intelligent Face Detection and Red-Eye Removal
4 Shoot.
Press the shutter button all the
way down to shoot.
3 Caution
If the subject moves as the shutter button is
pressed, their face may not be in the area indicat-
ed by the green border when the picture is taken.
If g ON J ON is se-
lected, the picture will
be processed to reduce
red-eye before it is re-
corded (the B RED-EYE
REMOVAL option in the playback menu can
also be used to reduce red-eye; pg. 66).
Intelligent Face Detection
The camera can zoom in on pic-
tures taken with Intelligent Face
Detection during slide shows
(pg. 67) and when pictures are
displayed automatically after
shooting (pg. 75).
7
7
7
7
7
7
7
7
77
REMOVINGREMOVING

23
More on Photography
Focus Lock
To compose photographs with o -center subjects:
1
Position the subject in the focus frame.
2
Focus.
Press the shutter button halfway to set fo-
cus and exposure. Focus and exposure will
remain locked while the shutter button is
pressed halfway (AF/AE lock).
250
250
250
250
250
F
F
F
F
3.3
3.3
3.3
3.3
F
3.3
Press
halfway
Repeat steps 1 and 2 as desired to refocus
before taking the picture.
3
Recompose the picture.
Keeping the shutter button pressed halfway,
recompose the picture.
250
250
250
250
250
F
F
F
F
3.3
3.3
3.3
3.3
F
3.3
4
Shoot.
Press the shutter-release button the rest of
the way down to take the picture.
Press the rest of
the way down

24
Focus Lock
Autofocus
Although the camera boasts a high-precision autofocus system, it may be unable to focus on the subjects listed
below. If the camera is unable to focus using autofocus, use focus lock (pg. 23) to focus on another subject at
the same distance and then recompose the photograph.
• Very shiny subjects such as mirrors or car bodies.
• Fast-moving subjects.
• Subjects photographed through a window or other re ective object.
• Dark subjects and subjects that absorb rather than re ect light, such as hair or fur.
• Insubstantial subjects, such as smoke or ame.
• Subjects that show little contrast with the background (for example, subjects in clothing that is the same color
as the background).
• Subjects positioned in front of or behind a high-contrast object that is also in the focus frame (for example, a
subject photographed against a backdrop of highly contrasting elements).
25
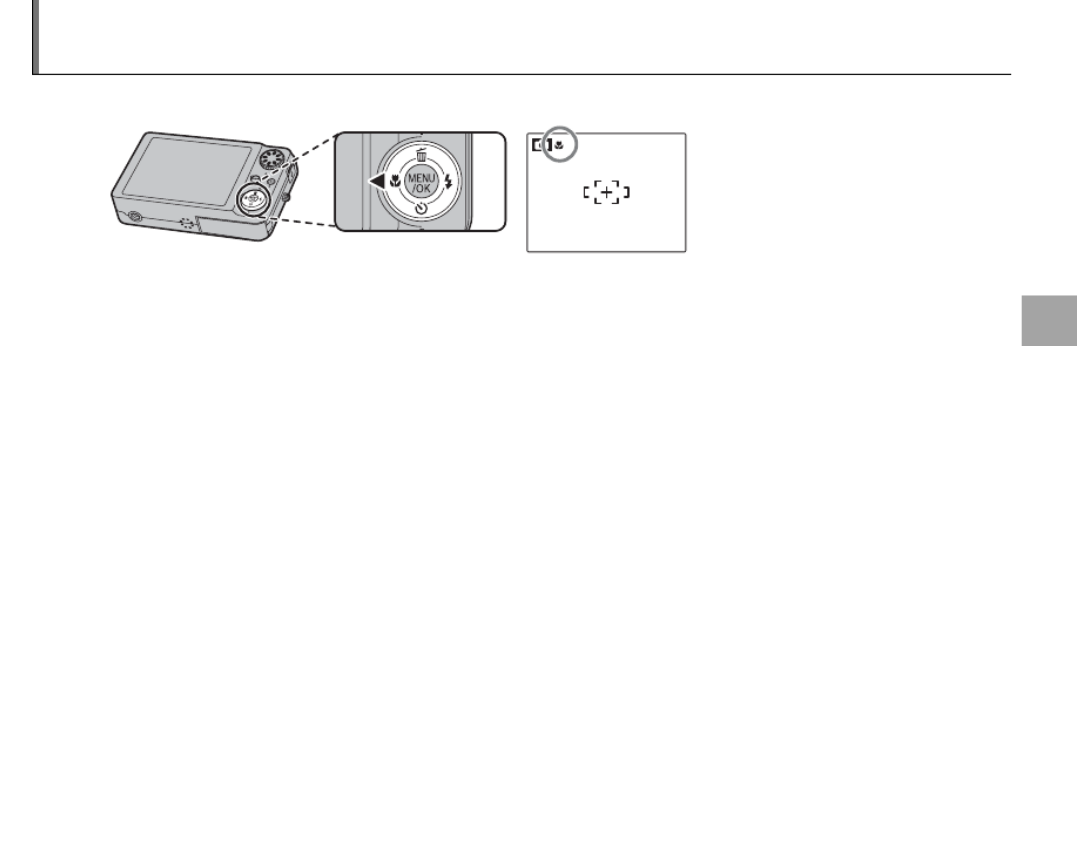
More on Photography
F Macro Mode (Close-ups)
For close-ups, press the selector left (F).
F icon appears in monitor when
camera is in macro mode
When macro mode is in e ect, the camera focuses on subjects near the center of the monitor. Use the
zoom control to frame pictures.
To exit macro mode, press the selector left (F).
1 Note
Use of a tripod is recommended to prevent blur caused by camera shake.

26
N Using the Flash
Use the ash when lighting is poor, for example when shooting at night or indoors under low light.
To choose a ash mode, press the selector right (N). The ash mode
changes each time the selector is pressed; in modes other than AUTO, the
current mode is indicated by an icon in the monitor.
Mod
Mod
Mod
Mode
e
e
eMode Des
Des
Des
Descr
cr
cr
crip
ip
ip
ipti
ti
ti
tion
on
on
onDescription
AUTO (no icon) The ash res when required. Recommended in most situations.
N (forced ash) The ash res whenever a picture is taken. Use for backlit subjects or for natural coloration
when shooting in bright light.
P (suppressed ash)
The ash does not re even when the subject is poorly lit. k will appear in the monitor
at slow shutter speeds to warn that pictures may be blurred. Use of a tripod is recom-
mended.
O (slow synchro) Capture both the main subject and the background when shooting at night (note that
brightly lit scenes may be overexposed).
If the ash will re, p will be displayed in the monitor when the shutter button is pressed halfway.
3 Caution
The ash may re several times with each shot. Do not move the camera until shooting is complete.

27
More on Photography
Red-Eye Removal
When g ON J ON is selected for Intelligent Face Detection (pg. 20), red-eye removal (J) is avail-
able in AUTO (K), forced ash (L), and slow synchro (M) modes. Red-eye removal minimizes
“red-eye” caused when light from the ash is re ected from the subject’s retinas as shown in the
illustration at right.
N Using the Flash

28
h Using the Self-Timer
The camera o ers a ten-second timer that allows photographers to appear in their own photographs,
and a two-second timer that can be used to avoid blur caused by the camera moving when the shutter
button is pressed. The self-timer is available in all shooting modes.
1
Set the timer.
The current self-timer mode is displayed in the monitor. To choose a di erent setting, press the
selector down (h). The selection changes each time the selector is pressed.
Choose from T (self-timer o ),
S (10 s delay), or R (2 s delay)
2
Focus.
Press the shutter button halfway to focus.
3 Caution
Stand behind the camera when using the shutter button. Standing in front
of the lens can interfere with focus and exposure.
3
Start the timer.
Press the shutter button the rest of the way down to start the timer.
The display in the monitor shows the number of seconds remaining
until the shutter is released. To stop the timer before the picture is
taken, press DISP/BACK.
9
9
9
9
9

29
More on Photography
h Using the Self-Timer
The self-timer lamp on the front of the camera will blink
immediately before the picture is taken. If the two-sec-
ond timer is selected, the self-timer lamp will blink as
the timer counts down.
Intelligent Face Detection
Because it ensures that the faces of portrait subjects will be in focus, Intelligent Face Detection (pg. 20) is recom-
mended when using the self-timer for group portraits or self-portraits. To use the self-timer with Intelligent Face
Detection, set the timer as described in Step 1 and then press the shutter button all the way down to start the
timer. The camera will detect faces while the timer is counting down and adjust focus and exposure immedi-
ately before the shutter is released. Be careful not to move until the picture has been recorded.
1 Note
The self-timer turns o automatically when the picture is taken, a di erent shooting mode is selected, playback
mode is selected, or the camera is turned o .

30
Shooting Mode
Choose a shooting mode according to the scene or type of subject.
To choose a shooting mode, rotate the mode dial to the desired
setting. The following modes are available:
B
B
B
BB AUT
AUT
AUT
AUTO
O
O
O AUTO
Choose for crisp, clear snapshots (pg. 14). This
mode is recommended in most situations.
M
M
M
MM SCENE R
SCENE R
SCENE R
SCENE RECOGNITION
ECOGNITION
ECOGNITION
ECOGNITION SCENE RECOGNITION
In this mode, the camera automatically analyzes
the composition and selects the appropriate
scene mode according to the subject and shoot-
ing conditions. The selected mode is displayed
when the shutter button is pressed halfway.
Mod
Mod
Mod
Mode
e
e
eMode Type of s
Type of s
Type of s
Type of sub
ub
ub
ubjec
jec
jec
ject or s
t or s
t or s
t or scen
cen
cen
cene dete
e dete
e dete
e detec
c
c
cted
ted
ted
tedType of subject or scene detected
bPortrait: Human portrait subject.
cLandscape: Man-made or natural landscape.
dNight: Poorly lit landscape.
eMacro: Subject close to camera. Camera focuses in F
(macro) range.
fNight portrait: Poorly lit portrait subject.
gBack-lit portrait: Back-lit portrait subject.
1 Notes: M
• a (AUTO) will be selected if the subject does not
match the scenes listed above.
• The camera focuses continuously on the faces of
portrait subjects or on subjects near the center of the
frame. This increases the drain on the battery, and
the sound of the camera focusing may be audible.
Y
Y
Y
YY BAB
BAB
BAB
BABY MODE
Y MODE
Y MODE
Y MODE BABY MODE
Choose for natural skin tones when taking por-
traits of infants. The ash turns o automatically.
J
J
J
JJ RED
RED
RED
RED-E
-E
-E
-EYE REDUCTION
YE REDUCTION
YE REDUCTION
YE REDUCTION RED-EYE REDUCTION
Reduce red-eye in portraits taken with the ash
under low light (pg. 27).

31
More on Photography
Shooting Mode
k
k
k
kk DIGIT
DIGIT
DIGIT
DIGITAL ZOOM
AL ZOOM
AL ZOOM
AL ZOOM DIGITAL ZOOM
Choose for more powerful zoom when framing
small or distant objects. Digital zoom is xed
whereas optical zoom can be adjusted using the
zoom control to zoom in, setting a combined
zoom.
Zoom indicator
ji
Optical zoomDigital zoom
Combined zoom
3 Caution
Digital zoom produces lower quality images than opti-
cal zoom.
2 Tip: D DIGITAL ZOOM
The D DIGITAL ZOOM option in the setup menu
can be used to enable digital zoom in other shooting
modes. This option also allows digital zoom to be ad-
justed using the zoom control.
C
C
C
CC PORTRAIT
PORTRAIT
PORTRAIT
PORTRAIT PORTRAIT
Choose this mode for soft-
toned portraits with natural
skin tones.

32
Shooting Mode
The camera o ers a choice of “scenes,” each
adapted to particular shooting conditions or a
speci c type of subject, which can be assigned to
the SP position on the mode dial:
1 Rotate the mode dial to H.
2 Press MENU/OK to display the shoot-
ing menu.
AUTO
N
SHOOTING MODE
FACE DETECTION
QUALITY
ISO
SHOOTING MENU
CONTINUOUS OFF
3 Press the selector up or down to
highlight A SHOOTING MODE.
4 Press the selector right to display a
list of scenes.
SET CANCEL
MANUAL
NIGHT
LANDSCAPE
Clear scenic shots
SPORT
5 Press the selector up or down to
highlight a scene (pp. 33–34).
6 Press MENU/OK to select the high-
lighted option.
Until the setting is changed as described above,
the chosen scene will be selected whenever the
mode dial is rotated to H.
H
H
H
HH SCENE P
SCENE P
SCENE P
SCENE POSITION
OSITION
OSITION
OSITION SCENE POSITION

33
More on Photography
Shooting Mode
Sce
Sce
Sce
Scene
ne
ne
neScene Des
Des
Des
Descr
cr
cr
crip
ip
ip
iptio
tio
tio
tion
n
n
nDescription
I MANUAL Choose this mode for complete control of shooting settings.
E PICTURE
STABILIZATION
(FinePix J210 only)
It reduces blurring caused by camera shake. Faster shutter speeds reduce blur caused by
subject movement also. Choose this mode when shooting fast moving subjects like chil-
dren or animals.
M LANDSCAPE Choose this mode for crisp, clear daylight shots of buildings and landscapes. The ash turns
o automatically.
N SPORT Choose this mode when photographing moving subjects. Priority is given to faster shutter
speeds.
O NIGHT Choose this mode for poorly lit twilight or night scenes. Sensitivity is automatically raised to
reduce blur caused by camera shake.
H NIGHT (TRIPOD)
Choose this mode for slow shutter speeds when shooting at night. Use a tripod to prevent
blur.
D NATURAL LIGHT
Capture natural light indoors, under low light, or where the ash can not be used. The ash
turns o and sensitivity is raised to reduce blur.
S BEACH Choose for crisp, clear shots that capture the brightness of sunlit beaches.
R SNOW Choose for crisp, clear shots that capture the brightness of scenes dominated by shining
white snow.
P FIREWORKS
Slow shutter speeds are used to capture the expanding burst of light from a rework. Press
the selector left or right to choose from shutter speeds. Use of a tripod is recommended to
prevent blur.
Q SUNSET Choose this mode to record the vivid colors in sunrises and sunsets.
V FLOWER Choose for vivid close-ups of owers. The camera focuses in the macro range and the ash
turns o automatically.

34
Shooting Mode
Sce
Sce
Sce
Scene
ne
ne
neScene Des
Des
Des
Descr
cr
cr
crip
ip
ip
iptio
tio
tio
tion
n
n
nDescription
U PARTY Capture indoor background lighting under low-light conditions.
T MUSEUM Choose where ash photography is prohibited or the sound of the shutter may be unwel-
come. The ash, speaker, and self-timer lamp turn o automatically.
W TEXT
Take clear pictures of text or drawings in print. The camera focuses in the macro range.

35
More on Playback
Playback Options
To view the most recent picture in the monitor,
press the a button for about a second.
ISO
ISO
ISO
ISO
100
100
100
100
ISO
100
100-0001
100-0001
100-0001
100-0001
100-0001
12
12
12
12 /
/
/
/31
31
31
31 /
/
/
/2050
2050
2050
2050
12 / 31 / 2050
10
10
10
10 :
:
:
:00
00
00
00
AM
AM
AM
AM
10 : 00
AM
N
N
N
N
N
250
250
250
250
250
F
F
F
F
3.3
3.3
3.3
3.3
F
3.3
Press the selector right to view pictures
in the order recorded, left to view pic-
tures in reverse order. Keep the selector
pressed to scroll rapidly to the desired frame.
Choosing a Display Format
Press the DISP/BACK button to cycle through playback
display formats as shown below.
1 Note
Pictures taken using other cameras are indicated by a m (“gift image”) icon during playback.
Indicators
displayed
Indicators
hidden
ISO
ISO
ISO
ISO
100
100
100
100
ISO
100
100-0001
100-0001
100-0001
100-0001
100-0001
12
12
12
12 /
/
/
/31
31
31
31 /
/
/
/2050
2050
2050
2050
12 / 31 / 2050
10
10
10
10 :
:
:
:00
00
00
00
AM
AM
AM
AM
10 : 00
AM
N
N
N
N
N
250
250
250
250
250
F
F
F
F
3.3
3.3
3.3
3.3
F
3.3
Sort by date
2050
2
2
2
2/13
/13
/13
/13
2 /1 3
12/31

36
Playback Options
Playback Zoom
Playback Zoom
Playback Zoom
Playback ZoomPlayback Zoom
Select i to zoom in the picture currently dis-
played full frame in the monitor; select j to
zoom out. When the picture is zoomed in, the
selector can be used to view areas of the image
not currently visible in the display.
Press DISP/BACK to exit zoom.
1 Note
The maximum zoom ratio varies with image size. Play-
back zoom is not available with pictures taken at an
image size of J.
Mult
Mult
Mult
Multi
i
i
i-
-
-
-Frame Playback
Frame Playback
Frame Playback
Frame PlaybackMulti-Frame Playback
To change the number of images dis-
played, select j when a picture is
shown full-frame in the monitor.
Select j to in-
crease the number
of pictures dis-
played.
ISO
ISO
ISO
ISO
100
100
100
100
ISO
100
100-0001
100-0001
100-0001
100-0001
100-0001
12
12
12
12/ 31/ 2050
/ 31/ 2050
/ 31/ 2050
/ 31/ 2050
12 / 3 1 / 205 0
10
10
10
10:
:
:
:00
00
00
00
AM
AM
AM
AM
10:00
AM
N
N
N
N
N
Select i to reduce
the number of im-
ages displayed.
Use the selector to highlight images and press
MENU/OK to view the highlighted image full frame.
In the two-, nine-, and hundred-frame displays,
press the selector up or down to view more pic-
tures.
Navigation
window shows
portion of image
currently displayed
in monitor
Zoom indicator

38
A Deleting Pictures
The ERASE option in the playback menu can be used to delete still pictures and movies, increasing
the amount of space available on the memory card or in internal memory (for information on deleting
pictures in single-frame playback, see page 19). Note that deleted pictures can not be recovered. Copy
important pictures to a computer or other storage device before proceeding.
1 Press MENU/OK to display the play-
back menu.
PLAYBACK MENU
SLIDE SHOW
RED EYE REMOVAL
PRINT ORDER (DPOF )
PROTECT
ERASE
2 Press the selector up or down to
highlight ERASE.
3 Press the selector right to display de-
lete options.
PLAYBACK MENU
SLIDE SHOW
RED EYE REMOVAL
PRINT ORDER (DPOF )
PROTECT
ERASE
FRAME
BACK
ALL FRAMES
4 Press the selector up or down to
highlight FRAME or .ALL FRAMES
5 Press MENU/OK to display options for
the selected item (see pg. 39).
2 Tips: Deleting Pictures
• When a memory card is inserted, pictures will be de-
leted from the memory card; otherwise, pictures will
be deleted from internal memory.
• Protected pictures can not be deleted. Remove pro-
tection from any pictures you wish to delete (pg. 68).
• If a message appears stating that the selected images
are part of a DPOF print order, press MENU/OK to delete
the pictures.

39
More on Playback
■
■
■
■■
FRAM
FRAM
FRAM
FRAME
E
E
EFRAME
: Dele
: Dele
: Dele
: Deletin
tin
tin
ting Selec
g Selec
g Selec
g Selecte
te
te
ted Image
d Image
d Image
d Images
s
s
s: Deleting Selected Images
Selecting FRAME displays the
dialog shown at right.
YES CANCEL
ERASE OK?
Press the selector left or right to scroll
through pictures and press MENU/OK to
delete the current picture (the picture
is deleted immediately; be careful not
delete the wrong picture).
Press DISP/BACK to exit when all the desired pic-
tures have been deleted.
■
■
■
■■
ALL FRAMES
ALL FRAMES
ALL FRAMES
ALL FRAMESALL FRAMES
: Dele
: Dele
: Dele
: Deletin
tin
tin
ting All Im
g All Im
g All Im
g All Image
age
age
ages
s
s
s: Deleting All Images
Selecting ALL FRAMES dis-
plays the con rmation shown
at right.
ERASE ALL OK?
IT MAY TAKE A WHILE
YES CANCEL
Press MENU/OK to delete all un-
protected pictures.
The dialog shown at right is
displayed during deletion.
Press DISP/BACK to cancel be-
fore all pictures have been
deleted (any pictures deleted
before the button was pressed
can not be recovered).
CANCEL
A Deleting Pictures
40
Movies
F Recording Movies
Shoot short movies at 30 frames per second. Sound is recorded via the built in microphone; do not
cover the microphone during the recording.
1 Rotate the mode dial to F (movie
mode).
STA
STA
STA
STANDBY
NDBY
NDBY
NDBY
STANDBY
12
12
12
12
s
s
s
s
12
s
Time available is
displayed in moni-
tor
2 Press the shutter button all the way
down to start recording.
REC
12
12
12
12
s
s
s
s
12
s
z REC and time
remaining are dis-
played in monitor
3 During the recording, zoom can be
adjusted using the zoom control.
Note that sounds made by the cam-
era may be recorded.
1 Note
Exposure and white balance are adjusted automatically
throughout recording. The color and brightness of the
image may vary from that displayed before recording
begins.
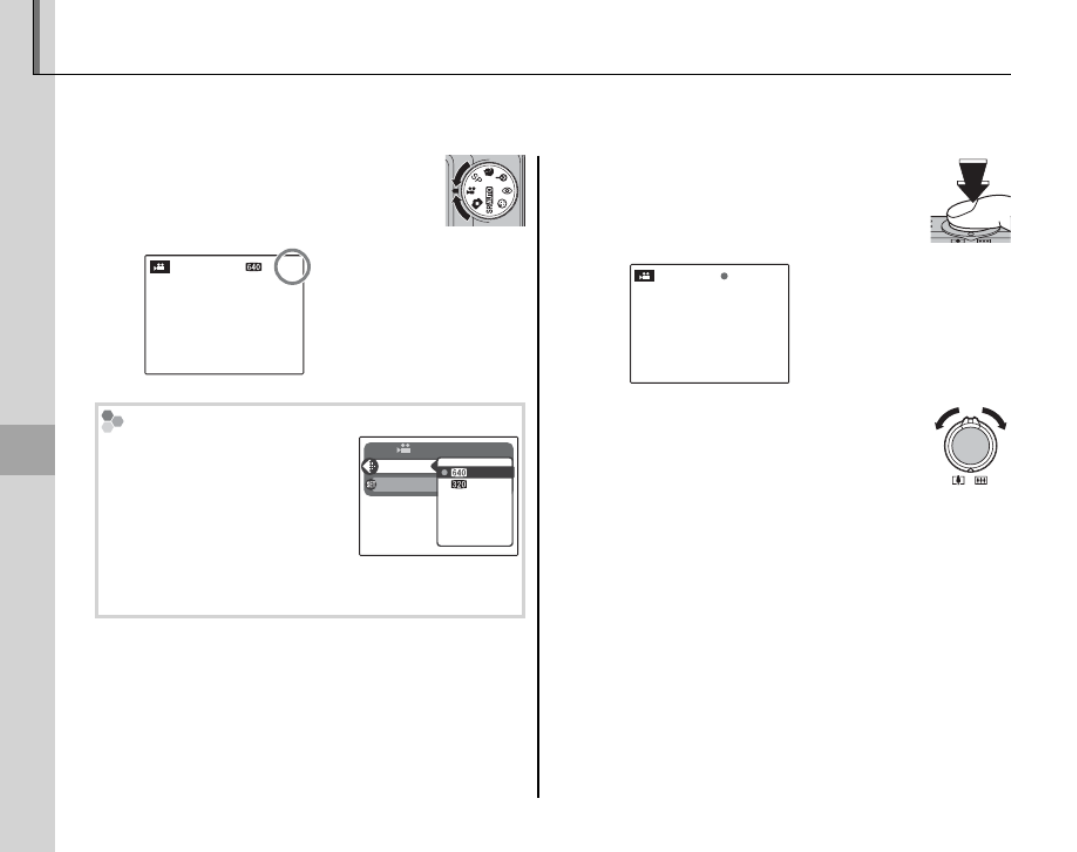
Choosing the Frame Size
To choose the frame size,
press MENU/OK and select
O QUALITY. Choose a
(640 × 480 pixels) for better
quality, b (320 × 240 pix-
els) for longer movies. Press MENU/OK to return to
movie recording mode.
SHOOTING MENU
SET-UP
QUALITY
53
s
29
s

41
Movies
Recording Movies
4 Press the shutter button halfway to
end recording. Recording ends au-
tomatically when the movie reaches
maximum length or memory is full.
2 Tip
There is no need to keep the shutter button pressed
during recording.
1 Note
Movies are recorded as monaural motion JPEG les.
F Recording Movies

43
Connections
Viewing Pictures on TV
Connect the camera to a TV and tune the television to the video channel to show pictures to a group.
The A/V cable connects as shown below.
Press a for about a second to turn the camera on. The camera monitor turns o and pictures and
movies are played back on the TV. Note that the camera volume controls have no e ect on sounds
played on the TV; use the television volume controls to adjust the volume.
1 Note
Image quality drops during movie playback.
3 Caution
When connecting the A/V cable (sold separately), be sure the connectors are fully inserted.
Connect yellow plug
to video-in jack
Connect white plug
to audio-in jack
Insert into A/V cable
connector (sold separately)
44
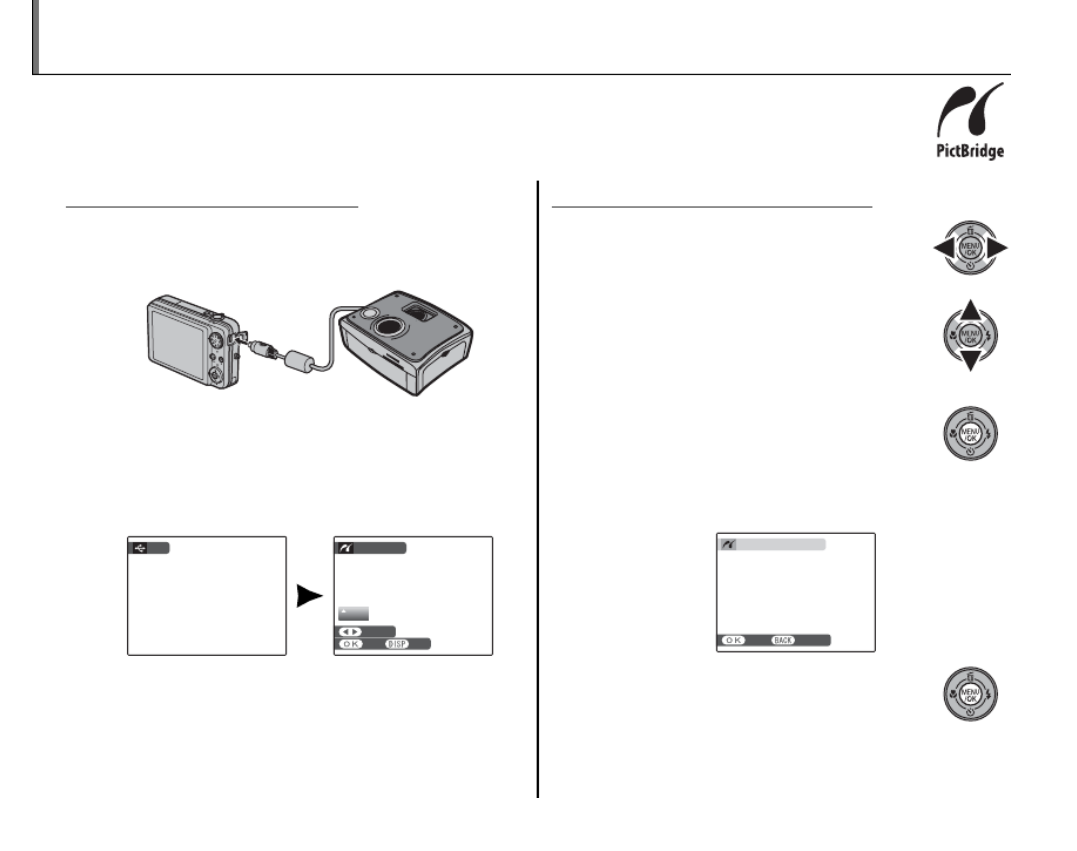
Printing Pictures via USB
If the printer supports PictBridge, the camera can be connected directly to the printer and
pictures can be printed without rst being copied to a computer. Note that depending on
the printer, not all the functions described below may be supported.
Connecting the Camera
Connecting the Camera
Connecting the Camera
Connecting the CameraConnecting the Camera
1 Connect the supplied USB cable as shown and
turn the printer on.
2 Press the a button for about a second to turn
the camera on. t USB will be displayed in
the monitor, followed by the PictBridge dis-
play shown below at right.
USB
00
OK SET
FRAME
PICTBRIDGE
TOTAL:
00000
SHEETS
Printi
Printi
Printi
Printing Selected Pictures
ng Selected Pictures
ng Selected Pictures
ng Selected PicturesPrinting Selected Pictures
1 Press the selector left or right to dis-
play a picture you wish to print.
2 Press the selector up or down to
choose the number of copies (up to
99).
3 Repeat steps 1–2 to select additional
pictures. Press MENU/OK to display a
con rmation dialog when settings
are complete.
PRINT THESE FRAMES
TOTAL:
9
SHEETS
YES CANCEL
4 Press MENU/OK to start printing.

45
Connections
Printing Pictures via USB
2 Tip: Printing the Date of Recording
To print the date of recording on pictures, press DISP/
BACK in steps 1–2 to display the PictBridge menu (see
“Printing the DPOF Print Order,” below). Press the se-
lector up or down to highlight PRINT WITH DATE s
and press MENU/OK to return to the PictBridge display
(to print pictures without the date of recording, select
PRINT WITHOUT DATE). The date will not be printed
if the camera clock was not set when the picture was
taken.
1 Note
If no pictures are selected when the MENU/OK button is
pressed, the camera will print one copy of the current
picture.
Printi
Printi
Printi
Printing the DPOF Print O
ng the DPOF Print O
ng the DPOF Print O
ng the DPOF Print Order
rder
rder
rderPrinting the DPOF Print Order
To print the print order created with K PRINT
ORDER (DPOF) in the playback menu (pg. 64):
1 In the PictBridge display, press DISP/
BACK to open the PictBridge menu.
PRINT DPOF
PRINT WITH DATE
PRINT WITHOUT DATE
PICTBRIDGE
2 Press the selector up or down to
highlight u PRINT DPOF.
3 Press MENU/OK to display a con rma-
tion dialog.
YES CANCEL
PRINT DPOF OK?
TOTAL:
9
SHEETS
46
Printing Pictures via USB
4 Press MENU/OK to start printing.
Disconnecting the Camera
Con rm that “PRINTING” is not displayed in the moni-
tor and press a to turn the camera o . Disconnect
the USB cable.
1 Notes
• Print pictures from internal memory or a memory
card that has been formatted in the camera.
• If the printer does not support date printing, the
PRINT WITH DATE s option will not be available in
the PictBridge menu and the date will not be printed
on the pictures in the DPOF print order.
• Default printer page size and print quality settings are
used when printing via direct USB connection.
During Printing
The message shown at right is
displayed during printing. Press
DISP/BACK to cancel before all
pictures are printed (depending
on the printer, printing may end
before the current picture has printed).
If printing is interrupted, press a to turn the camera
o and then on again.
PRINTING
CANCEL

47
Connections
Printing Pictures via USB
The K
K
K
KK PRINT ORDER (DPOF) option in the play-
back menu can be used to create a digital “print
order” for PictBridge-compatible printers (pg. 44)
or devices that support DPOF.
■
■
■
■■
WITH DA
WITH DA
WITH DA
WITH DATE
TE
TE
TE WITH DATE s/
/
/
/ WITH
WITH
WITH
WITHOUT DA
OUT DA
OUT DA
OUT DATE
TE
TE
TE/ WITHOUT DATE
To modify the DPOF print order, select K
K
K
KK PRINT
ORDER (DPOF) in the playback menu and press
the selector up or down to highlight WITH
DATE or sWITHOUT DATE.
Press MENU/OK and follow the steps below.
1 Press the selector left or right to dis-
play a picture you wish to include in
or remove from the print order.
Creati
Creati
Creati
Creating a DPOF Print Orde
ng a DPOF Print Orde
ng a DPOF Print Orde
ng a DPOF Print Order
r
r
rCreating a DPOF Print Order
DPOF
DPOF (Digital Print Order Format) is standard
that allows pictures to be printed from “print
orders” stored in internal memory or on a
memory card. The information in the order includes
the pictures to be printed and the number of copies
of each picture.
SLIDE SHOW
RED EYE REMOVAL
PRINT ORDER (DPOF )
PROTECT
ERASE
PLAYBACK MENU
WITHOUT DATE
RESET ALL
WITH DATE
WITH DATE s: Print date of
recording on pictures.
WITHOUT DATE: Print pictures without
date.

49
Connections
Printing Pictures via USB
■
■
■
■■
RESE
RESE
RESE
RESET ALL
T ALL
T ALL
T ALLRESET ALL
To cancel the current print order, select RESET ALL in the K PRINT ORDER (DPOF)
menu. The con rmation shown at right will be displayed; press MENU/OK to remove
all pictures from the order.
1 Notes
• Remove the memory card to create or modify a print order for the pictures in internal
memory.
• Print orders can contain a maximum of 999 pictures.
• If a memory card is inserted containing a print order created by another camera, the mes-
sage shown at right will be displayed. Pressing MENU/OK cancels the print order; a new print
order must be created as described above.
YES CANCEL
RESET DPOF OK?
YES CANCEL
RESET DPOF OK?
YES NO
RESET DPOF OK?
YES NO
RESET DPOF OK?

50
Viewing Pictures on a Computer
The supplied FinePixViewer software can be used to copy pictures to a computer, where they can be
stored, viewed, organized, and printed. Before proceeding, install FinePixViewer as described below.
Do NOT connect the camera to the computer until installation is complete.
Insta
Insta
Insta
Installi
lli
lli
lling FinePixViewer
ng FinePixViewer
ng FinePixViewer
ng FinePixViewerInstalling FinePixViewer
FinePixViewer is available in a Windows version (FinePixViewer S) and a Macintosh version (FinePixViewer).
Installation instructions for Windows are on pages 50–52, those for the Macintosh on pages 53–54.
Inst
Inst
Inst
Installin
allin
allin
alling FinePixV
g FinePixV
g FinePixV
g FinePixViewer S: Wind
iewer S: Wind
iewer S: Wind
iewer S: Windows
ows
ows
owsInstalling FinePixViewer S: Windows
1 Con rm that the computer meets the following system requirements:
OS
OS
OS
OSOS Preinstalled versions of Windows Vista, Windows XP Home Edition (Service Pack 2), Windows XP Professional
(Service Pack 2), or Windows 2000 Professional (Service Pack 4)
CPU
CPU
CPU
CPUCPU
• Windows Vista: 800 MHz Pentium 4 or better (3 GHz Pentium 4 or better recommended)
• Windows XP: 800 MHz Pentium 4 or better (2 GHz Pentium 4 or better recommended)
• Windows 2000: 200 MHz Pentium or better
RA
RA
RA
RAM
M
M
MRAM
• Windows Vista: 512 MB or more (1 GB or more recommended)
• : 512 MB or moreWindows XP
• : 128 MB or moreWindows 2000
Free d
Free d
Free d
Free dis
is
is
isk
k
k
k Free disk
sp
sp
sp
space
ace
ace
acespace
A minimum of 450 MB required for installation with 600 MB available when FinePixViewer is running (15 GB or
more recommended under Windows Vista, 2 GB or more recommended under Windows XP)
Vi
Vi
Vi
Video
deo
deo
deo
Video 800 × 600 pixels or more with 16-bit color or better (1,024 × 768 pixels or more with 32-bit color recommended)
Ot
Ot
Ot
Othe
he
he
her
r
r
rOther
• Built-in USB port recommended. Operation is not guaranteed other USB ports.
• Internet connection (56 kbps or faster recommended) required to use FinePix Internet Service; Internet con-
nection and e-mail software required to use e-mail option.

51
Connections
Viewing Pictures on a Computer
3 Caution
Other versions of Windows are not supported. Operation is not guaranteed on home-built computers or
computers that have been upgraded from earlier versions of Windows.
2 Start the computer. Log in to an account with administrator privileges before proceeding.
3 Exit any applications that may be running and insert the installer CD in a CD-ROM drive.
Windows Vista
If an AutoPlay dialog is displayed, click SETUP.exe. A “User Account Control” dialog will then be displayed;
click Allow.
The installer will start automatically; click Installing FinePixViewer and follow the on-screen in-
structions to install FinePixViewer S. Note that the Windows CD may be required during installa-
tion.
If the Installer Does Not Start Automatically
If the installer does not start automatically, select Computer or My Computer from the Start menu (Win-
dows Vista/XP) or double-click the icon on the desktop (Windows 2000), then double-click My Computer
the FINEPIX CD icon to open the FINEPIX CD window and double-click SETUP or SETUP.exe.

52
Viewing Pictures on a Computer
4 If prompted to install Windows Media Player or DirectX, follow the on-screen instructions to com-
plete installation.
5 When prompted, remove the installer CD from the CD-ROM drive and click Restart to restart the
computer. Store the installer CD in a dry location out of direct sunlight in case you need to re-install
the software. The version number is printed at the top of the CD label for reference when updating
the software or contacting customer support.
Installation is now complete. Proceed to “Connecting the Camera” on page 55.

54
Viewing Pictures on a Computer
4 Remove the installer CD from the CD-ROM drive. Note that you may be unable to remove the CD
if Safari is running; if necessary, quit Safari before removing the CD. Store the installer CD in a dry
location out of direct sunlight in case you need to re-install the software. The version number is
printed at the top of the CD label for reference when updating the software or contacting customer
support.
5 Select Applications in the Finder Go menu to open the applications folder.
Double-click the Image Capture icon and select Preferences… from the Im-
age Capture application menu.
The Image Capture preferences dialog will be displayed. Choose Other… in
the When a camera is connected, open menu, then select FPVBridge in
the “Applications/FinePixViewer” folder and click Open.
Select Quit Image Capture from the Image Capture application menu.
Installation is now complete. Proceed to “Connecting the Camera” on page 55.

56
Viewing Pictures on a Computer
3 Cautions
• Use only memory cards that have been formatted
in the camera and contain pictures taken with the
camera. If a memory card containing a large num-
ber of images is inserted, there may be a delay before
FinePixViewer starts and FinePixViewer may be un-
able to import or save images. Use a memory card
reader to transfer pictures.
• Make sure the indicator lamp is out before turning
the camera o , disconnecting the USB cable. Failure
to observe this precaution could result in loss of data
or damage to internal memory or the memory card.
• Disconnect the camera before inserting or removing
memory cards.
• In some cases, it may not be possible to access pic-
tures saved to a network server using FinePixViewer
in the same way as on a standalone computer.
• The user bears all applicable fees charged by the
phone company or Internet service provider when
using services that require an Internet connection.
Disconnecting the Camera
After con rming that the indicator lamp is out, follow
the on-screen instructions to turn the camera o and
disconnect the USB cable.
Updating FinePixViewer
The latest version of FinePixViewer can be download-
ed from http://www.fujifilm.com/.
Uninstalling FinePixViewer
Only uninstall FinePixViewer before reinstalling the
software or when it is no longer required. After quit-
ting FinePixViewer and disconnecting the camera,
drag the “FinePixViewer” folder from “Applications”
into the Trash and select Empty Trash in the Finder
menu (Macintosh), or open the control panel and use
“Programs and Features” (Windows Vista) or “Add or
remove Programs” (other versions of Windows) to un-
install FinePixViewer. Under Windows, one or more
con rmation dialogs may be displayed; read the con-
tents carefully before clicking OK.
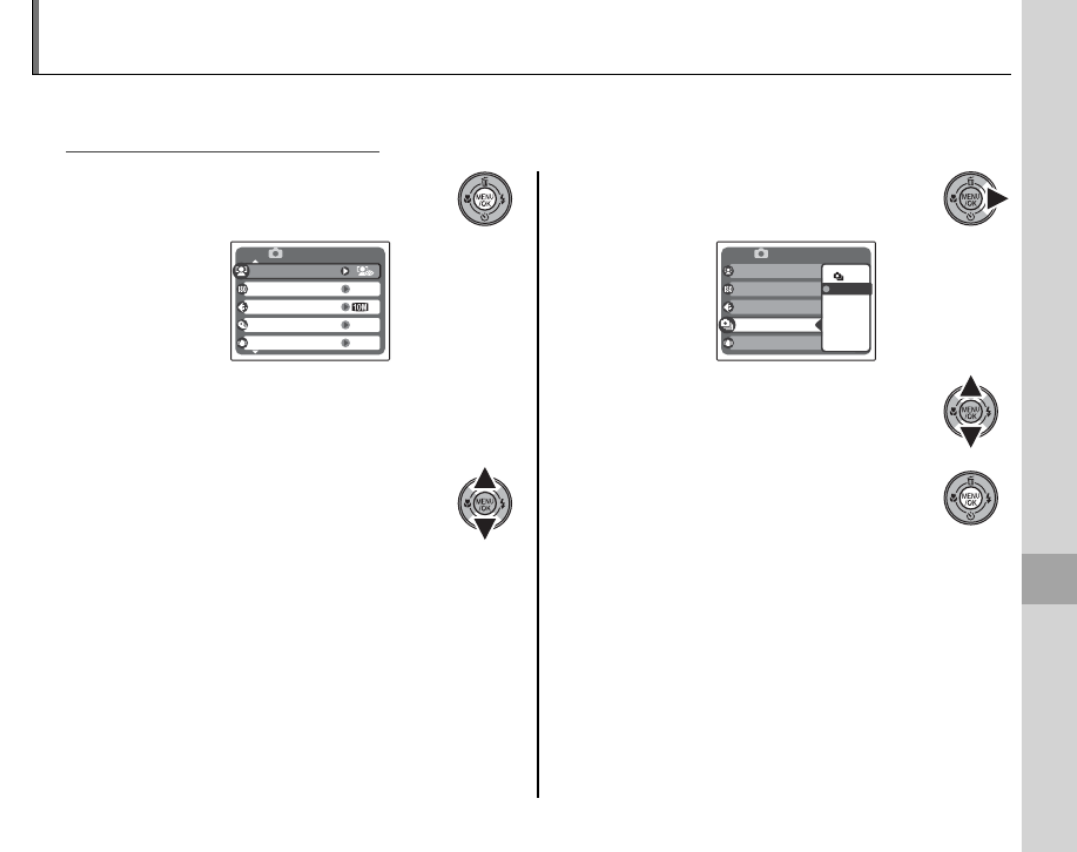
57
Menus
The Shooting Menu
The shooting menu is used to adjust settings for a wide range of shooting conditions.
Using t
Using t
Using t
Using the Shooting Me
he Shooting Me
he Shooting Me
he Shooting Menu
nu
nu
nuUsing the Shooting Menu
1 Press MENU/OK to display the shoot-
ing menu.
OFF
FACE DETECTION
QUALITY
ISO
SHOOTING MENU
CONTINUOUS
DUAL IS MODE
AUTO
OFF
N
1 Note
The options displayed in the shooting menu vary
depending on the shooting mode.
2 Press the selector up or down to
highlight the desired menu item.
3 Press the selector right to display
options for the highlighted item.
AUTO
OFF
N
FACE DETECTION
QUALITY
ISO
CONTINUOUS
OFFDUAL IS MODE
SHOOTING MENU
ON
OFF
4 Press the selector up or down to
highlight the desired option.
5 Press MENU/OK to select the high-
lighted option.

58
The Shooting Menu
Shooti
Shooti
Shooti
Shooting Menu Opt
ng Menu Opt
ng Menu Opt
ng Menu Options
ions
ions
ionsShooting Menu Options
Men
Men
Men
Menu ite
u ite
u ite
u item
m
m
mMenu item Des
Des
Des
Descr
cr
cr
crip
ip
ip
ipti
ti
ti
tion
on
on
onDescription Opt
Opt
Opt
Optio
io
io
ions
ns
ns
nsOptions Def
Def
Def
Defau
au
au
ault
lt
lt
ltDefault
A SHOOTING MODE Choose a scene for H mode (pg. 32).
M N/ /O/H/D/S/R/P/
Q/V/U/T/ /W I/
E (FinePix J210 only)
M
U FACE DETECTION
Turn Intelligent Face Detection and red-eye re-
moval on or o (pg. 20).
g ON J ON /
g ON J OFF OFF /
g ON
J ON
N ISO Adjust ISO sensitivity (pg. 59). Choose higher
values when the subject is poorly lit.
AUTO/ 3200 H / 1600 / 800 /
400 / 200 / 100 / 64 AUTO
O QUALITY Choose image size and quality (pg. 60). BF / / / /BN C3:2 G
H I J/ / BN
V EXP. COMPENSATION
Adjust exposure for bright, dark, or high-con-
trast scenes (pg. 61).
–2 EV to +2 EV in increments of
1
/
3 EV ±0
C PHOTOMETRY Choose how exposure is metered in I mode
(pg. 62). o p/ /q o
D WHITE BALANCE
Adjust color for di erent light sources (pg. 62). AUTO/i/j k l m/ / / /n AUTO
R CONTINUOUS Shoot a series of pictures (pg. 63). I/OFF OFF
L DUAL IS MODE
(FinePix J250 only)
Choose whether image stabilization is per-
formed at all times when the camera is in
shooting mode (l
CONTINUOUS), or only
when the shutter button is pressed halfway
(m
SHOOTING ONLY).
l/m/OFF l

59
Menus
The Shooting Menu
Men
Men
Men
Menu ite
u ite
u ite
u item
m
m
mMenu item Des
Des
Des
Descr
cr
cr
crip
ip
ip
iptio
tio
tio
tion
n
n
nDescription Opt
Opt
Opt
Optio
io
io
ions
ns
ns
nsOptions Def
Def
Def
Defau
au
au
ault
lt
lt
ltDefault
M SET-UP
Perform basic camera setup such as choosing
a language and setting the time and date (pg.
73).
W X Y Z/ / / —
N
N
N
NN ISO
ISO
ISO
ISO ISO
Control the camera’s sensitivity to light. Higher values can be used to reduce blur when lighting is
poor; note, however, that mottling may appear in pictures taken at high sensitivities. If AUTO is se-
lected, the camera will adjust sensitivity automatically in response to shooting conditions.
In shooting modes other than I, sensitivity is set to AUTO; other values can not
be selected. Settings other than AUTO are shown by an icon in the monitor.
M
ISO
ISO
ISO
ISO
100
100
100
100
ISO
100
M
ISO
ISO
ISO
ISO
100
100
100
100
ISO
100

60
The Shooting Menu
Choose the size and quality at which still pictures
are recorded. Large pictures can be printed at
large sizes with no drop in quality; small pictures
require less memory, allowing more pictures to
be recorded.
Opt
Opt
Opt
Optio
io
io
ion
n
n
nOption Pri
Pri
Pri
Print
nt
nt
nts at si
s at si
s at si
s at size
ze
ze
zes up to
s up to
s up to
s up toPrints at sizes up to
BF 31 × 23 cm/12 × 9 in. (B) or 31 × 21 cm/
12 × 8 in. (C3:2). Choose BF for high-qual-
ity prints, C3:2 for an aspect ratio of 3 : 2.
BN
C3:2
G22 × 16 cm (8.5 × 6.5 in.).
H17 × 13 cm (7 × 5 in.).
I14 × 10 cm (5.3 × 4 in.).
J
5 × 4 cm (2 × 1.5 in.). Suited to e-mail or the web.
The number of pictures that can be taken at cur-
rent settings (pg. 94) is displayed to the right of
the image quality icon in the monitor.
Aspect Ratio
Pictures taken at an image quality setting of C3:2
have an aspect ratio of 3 : 2, the same as a frame of
35-mm lm. Pictures taken at other settings have an
aspect ratio of 4 : 3.
3
3
3
3:
:
:
:2
2
2
2
3: 2
4 : 3 3 : 2
1 Note
Image quality is not reset when the camera is turned
o or another shooting mode is selected.
O
O
O
OO QUALITY
QUALITY
QUALITY
QUALITY QUALITY

61
Menus
The Shooting Menu
V
V
V
VV EXP
EXP
EXP
EXP. COMPEN
. COMPEN
. COMPEN
. COMPENSA
SA
SA
SATIO
TIO
TIO
TION
N
N
N EXP. COMPENSATION
Use exposure compensation when photograph-
ing very bright, very dark, or high-contrast sub-
jects.
Choosing an Exposure Compensation Value
• Backlit subjects: choose values
from +2
/
3 EV to +1
2
/
3 EV (for an
explanation of the term “EV”,
see the Glossary on page 93)
• Highly re ective subjects or very
bright scenes (e.g., snow elds):
+1 E V
• : +1 EV Scenes that are mostly sky
• Spotlit subjects (particularly if photographed against
dark backgrounds): –
2
/
3 EV
• Subjects with low re ectivity (pine trees or dark-col-
ored foliage): –
2
/
3 EV
1 Note
At settings other than ±0, a d icon is displayed in the monitor. Exposure compensation is not reset when the
camera is turned o ; to restore normal exposure control, choose a value of ±0.
Choose positive (+) values
to increase exposure
Choose negative (–) values
to reduce exposure

62
The Shooting Menu
C
C
C
CC PHOTOMETRY
PHOTOMETRY
PHOTOMETRY
PHOTOMETRY PHOTOMETRY
Choose how the camera meters exposure when
Intelligent Face Detection is o .
• o MULTI: Automatic scene recognition is used
to adjust exposure for a wide range of shooting
conditions.
• p SPOT: The camera meters lighting conditions
at the center of the frame. Recommended when
the background is much brighter or darker than
the main subject. Can be used with focus lock
(pg. 23) to meter o -center subjects.
• q AVERAGE: Exposure is set to the average for
the entire frame. Provides consistent exposure
across multiple shots with the same lighting.
D
D
D
DD WHITE BAL
WHITE BAL
WHITE BAL
WHITE BALANCE
ANCE
ANCE
ANCE WHITE BALANCE
For natural colors, choose a setting that matches
the light source (for an explanation of “white bal-
ance,” see the Glossary on page 93).
Opt
Opt
Opt
Optio
io
io
ion
n
n
nOption Des
Des
Des
Descr
cr
cr
cri
i
i
ipti
pti
pti
ption
on
on
onDescription
AUTO White balance adjusted automatically.
iFor subjects in direct sunlight.
jFor subjects in the shade.
kUse under “daylight” uorescent lights.
lUse under “warm white” uorescent lights.
mUse under “cool white” uorescent lights.
nUse under incandescent lighting.
If AUTO does not produce the desired results (for
example, when taking close-ups), choose the op-
tion that matches the light source.
1 Notes
• Auto white balance is used with the ash. Turn the
a s h o (pg. 26) to take pictures at other settings.
• Results vary with shooting conditions. Play pictures
back after shooting to check colors in the monitor.

63
Menus
The Shooting Menu
R
R
R
RR CONTIN
CONTIN
CONTIN
CONTINUOUS (Continuou
UOUS (Continuou
UOUS (Continuou
UOUS (Continuous Shoo
s Shoo
s Shoo
s Shooting)
ting)
ting)
ting) CONTINUOUS (Continuous Shooting)
Select I ON to capture motion in a series of pictures. The camera takes up to three pictures while the
shutter-release button is pressed.
1 Notes
• The ash turns o automatically (pg. 26), and focus and exposure are determined by the rst frame in each
series. The previously-selected ash mode is restored when OFF is selected for R CONTINUOUS.
• Frame rate varies with shutter speed.
• The number of pictures that can be recorded depends on the memory available. Addition-
al time may be required to record pictures when shooting ends. The pictures are displayed
in the monitor while recording is in progress.
STORINGSTORING
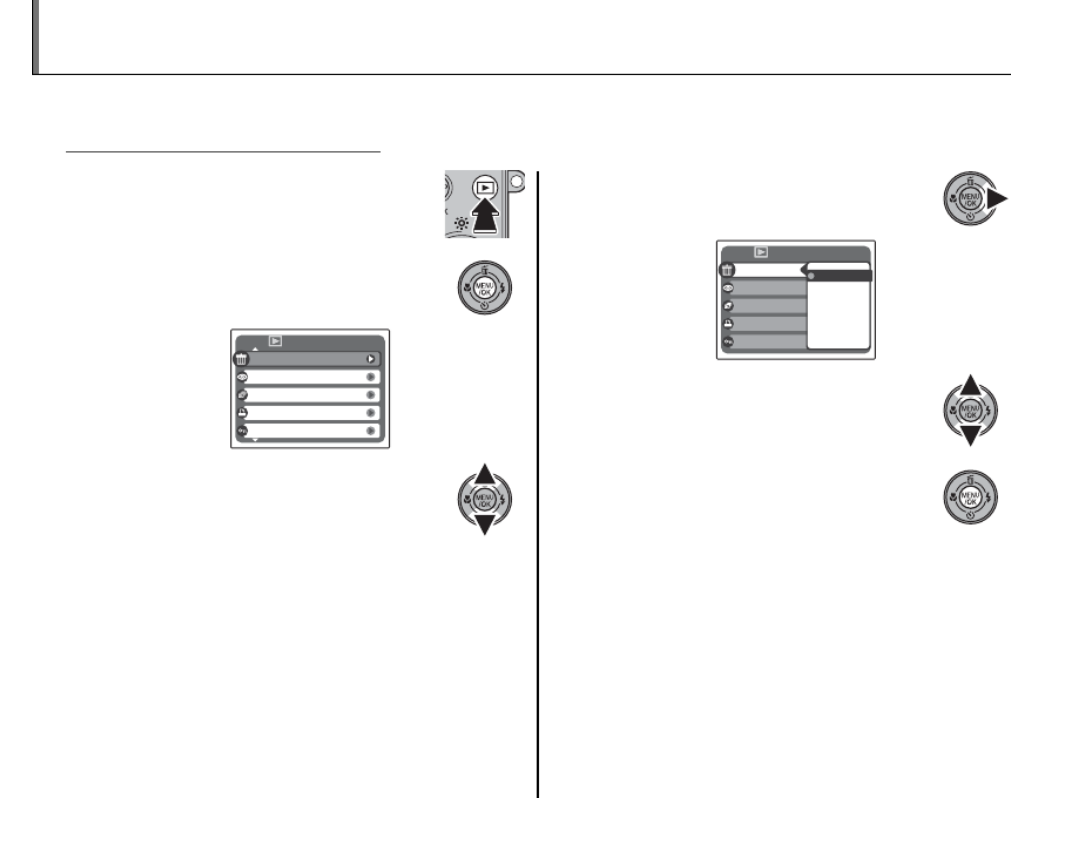
64
The Playback Menu
The playback menu is used to manage the pictures in internal memory or on the memory card.
Using t
Using t
Using t
Using the Play
he Play
he Play
he Playbac
bac
bac
back Menu
k Menu
k Menu
k MenuUsing the Playback Menu
1 Press a for about a second to enter
playback mode (pg. 35).
2 Press MENU/OK to display the play-
back menu.
PLAYBACK MENU
SLIDE SHOW
RED EYE REMOVAL
PRINT ORDER (DPOF)
PROTECT
ERASE
3 Press the selector up or down to
highlight the desired menu item.
4 Press the selector right to display
options for the highlighted item.
PLAYBACK MENU
SLIDE SHOW
RED EYE REMOVAL
PRINT ORDER (DPOF)
PROTECT
ERASE
FRAME
BACK
ALL FRAMES
5 Press the selector up or down to
highlight the desired option.
6 Press MENU/OK to select the high-
lighted option.

65
Menus
The Playback Menu
Playback Menu Opt
Playback Menu Opt
Playback Menu Opt
Playback Menu Options
ions
ions
ionsPlayback Menu Options
The following options are available:
Opt
Opt
Opt
Option
ion
ion
ionOption Des
Des
Des
Descr
cr
cr
cripti
ipti
ipti
iption
on
on
onDescription
A ERASE Delete all or selected pictures (pg. 38).
B RED-EYE REMOVAL Create copies with reduced red eye (pg. 66).
I SLIDE SHOW View pictures in a slide show (pg. 67).
K PRINT ORDER (DPOF) Select pictures for printing on DPOF- and PictBridge-compatible devices (pg. 47).
D PROTECT Protect pictures from accidental deletion (pg. 68).
E COPY Copy pictures between internal memory and a memory card (pg. 69).
C IMAGE ROTATE Rotate pictures (pg. 71).
G TRIMMING Create cropped copies of pictures (pg. 72).
M SET-UP Perform basic camera setup (pg. 73).
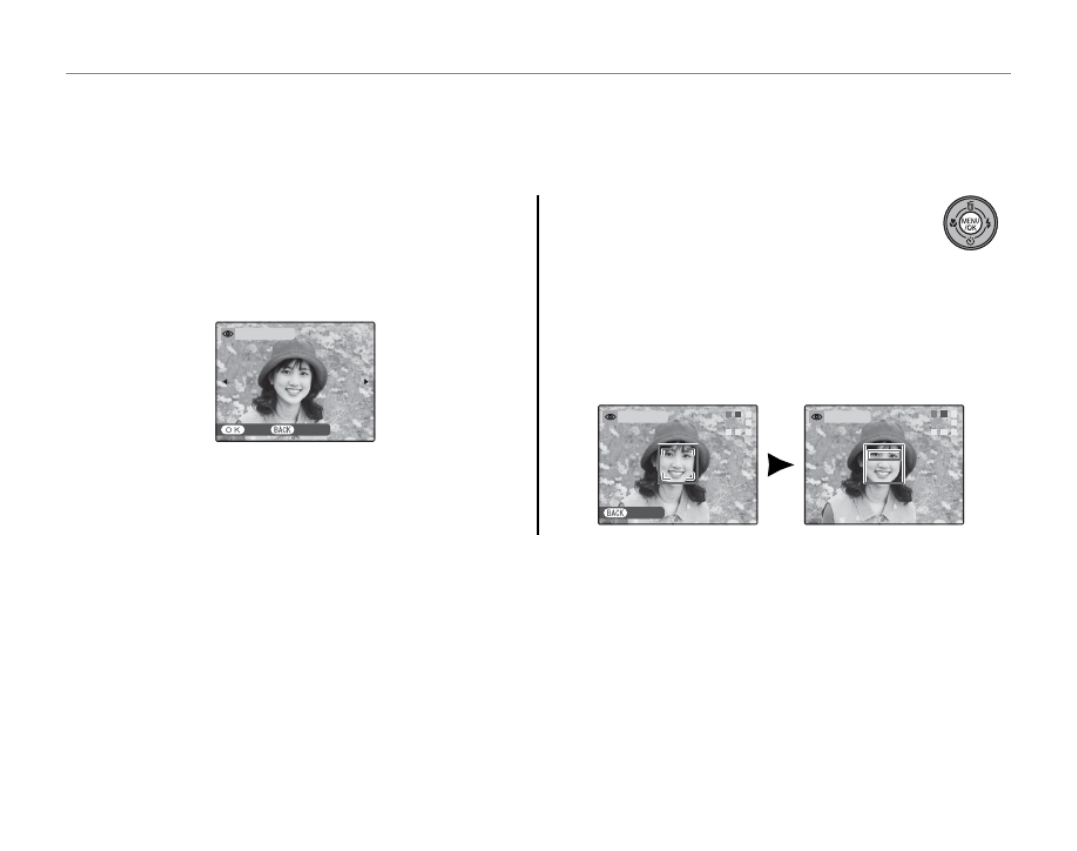
66
The Playback Menu
1 Play the picture back in the monitor (pictures
taken with Intelligent Face Detection are in-
dicated by a g icon) and select B RED EYE
REMOVAL in the playback menu (pg. 64).
YES CANCEL
REMOVAL OK?
2 Press MENU/OK. The message shown
below at left will be displayed while
the camera analyses the image; if
red-eye is detected, the message shown be-
low at right will be displayed while the camera
processes the image to create a copy with re-
duced red-eye.
DETECTING
CANCEL
REMOVING
B
B
B
BB RE
RE
RE
RED EYE R
D EYE R
D EYE R
D EYE REM
EM
EM
EMOV
OV
OV
OVA
A
A
AL
L
L
L RED EYE REMOVAL
This option is used with pictures taken using Intelligent Face Detection to create copies that have been
processed to remove red eye.
1 Notes
• Red eye may not be removed if the camera is unable to detect a face or the face is in pro le. Results may di er
depending on the scene. Red eye can not be removed from pictures that have already been processed using
red-eye removal or pictures created with other devices.
• The amount of time needed to process the image varies with the number of faces detected.
• Copies created with B RED EYE REMOVAL are indicated by a e icon during playback.

67
Menus
The Playback Menu
I
I
I
II SLID
SLID
SLID
SLIDE SHOW
E SHOW
E SHOW
E SHOW SLIDE SHOW
View pictures in an automated
slide show. Choose the type
of show and press MENU/OK
to start. Press DISP/BACK at
any time during the show to
view on-screen help. When a movie is displayed,
movie playback will begin automatically, and the
slide show will continue when the movie ends.
The show can be ended at any time by pressing
MENU/OK.
1 Note
The camera will not turn o automatically while a slide
show is in progress.
PLAYBACK MENU
SLIDE SHOW
RED EYE REMOVAL
PRINT ORDER (DPOF)
PROTECT
ERASE
FADE-IN
FADE-IN
MULTIPLE
NORMAL
NORMAL
PLAYBACK MENU
SLIDE SHOW
RED EYE REMOVAL
PRINT ORDER (DPOF)
PROTECT
ERASE
FADE-IN
FADE-IN
MULTIPLE
NORMAL
NORMAL
Opt
Opt
Opt
Option
ion
ion
ionOption Des
Des
Des
Descr
cr
cr
crip
ip
ip
iptio
tio
tio
tion
n
n
nDescription
NORMAL Press selector left or right to go back or
skip ahead one frame. Select FADE-IN
for fade transitions between frames.
FADE-IN
NORMAL gAs above, except that camera automati-
cally zooms in on faces selected with
Intelligent Face detection (pg. 20).
FADE-IN g
MULTIPLE Display several pictures at once.
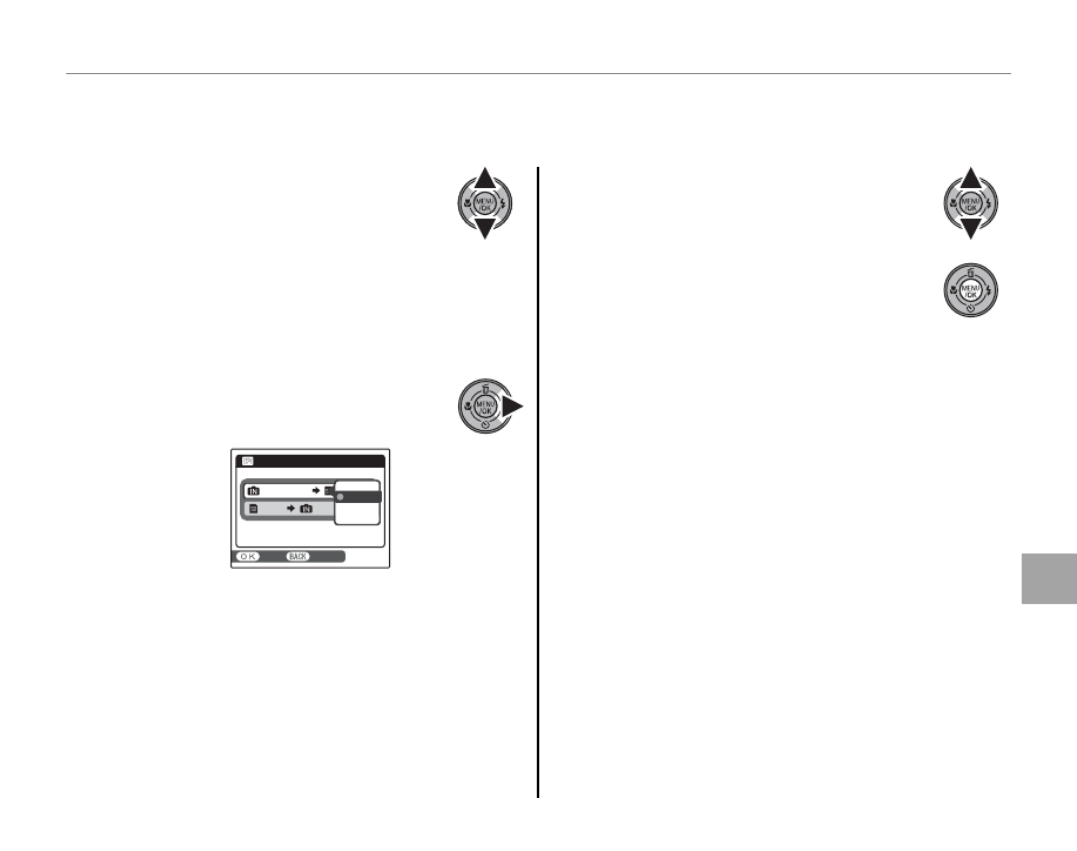
69
Menus
The Playback Menu
E COPY
COPY
COPY
COPY COPY
Copy pictures between internal memory and a memory card.
1 Press the selector up or down to
highlight a INTERNAL MEMORY
y bCARD (copy pictures from
internal memory to the memory card) or
b CARD yaINTERNAL MEMORY (copy
pictures from a memory card to internal mem-
ory).
2 Press the selector right to display
options for the highlighted item.
YES CANCEL
COPY
CARD
INTERNAL MEMORY
CARD
INTERNAL MEMORY
CARD
FRAME
ALL FRAMES
3 Press the selector up or down to
highlight FRAME or .ALL FRAMES
4 Press MENU/OK.
2 Tip: Copying Pictures Between Memory Cards
To copy pictures between two memory cards, insert
the source card and copy the pictures to internal mem-
ory, then remove the source card, insert the destination
card, and copy the pictures from internal memory.
Produkt Specifikationer
| Mærke: | Fujifilm |
| Kategori: | Kamera |
| Model: | FinePix J250 |
Har du brug for hjælp?
Hvis du har brug for hjælp til Fujifilm FinePix J250 stil et spørgsmål nedenfor, og andre brugere vil svare dig
Kamera Fujifilm Manualer

14 Januar 2025
14 December 2024
14 December 2024
14 December 2024
28 August 2024
24 August 2024
23 August 2024
22 August 2024
22 August 2024
21 August 2024
Kamera Manualer
- Kamera Bosch
- Kamera SilverCrest
- Kamera Acer
- Kamera Ozito
- Kamera Denver
- Kamera Sony
- Kamera Canon
- Kamera Samsung
- Kamera GE
- Kamera Panasonic
- Kamera TP-Link
- Kamera Philips
- Kamera Lenco
- Kamera Gigaset
- Kamera Braun
- Kamera Logitech
- Kamera Epson
- Kamera Daewoo
- Kamera Technaxx
- Kamera HP
- Kamera Sanyo
- Kamera Easypix
- Kamera Grundig
- Kamera D-Link
- Kamera Arlo
- Kamera Bushnell
- Kamera Pyle
- Kamera Nikon
- Kamera Kodak
- Kamera Lenovo
- Kamera Olympus
- Kamera Nedis
- Kamera Zorki
- Kamera Optoma
- Kamera Creative
- Kamera Azden
- Kamera Casio
- Kamera Trevi
- Kamera Trust
- Kamera Laserliner
- Kamera Blaupunkt
- Kamera JVC
- Kamera Leica
- Kamera Hitachi
- Kamera Medion
- Kamera Exakta
- Kamera EZVIZ
- Kamera König
- Kamera Gembird
- Kamera Powerfix
- Kamera Alpine
- Kamera Netgear
- Kamera Maginon
- Kamera Avaya
- Kamera Nest
- Kamera Vtech
- Kamera BenQ
- Kamera Bresser
- Kamera Anker
- Kamera Sigma
- Kamera Pentax
- Kamera Rollei
- Kamera Xiaomi
- Kamera Moultrie
- Kamera Viewsonic
- Kamera Imou
- Kamera Polaroid
- Kamera Ricoh
- Kamera Aida
- Kamera Konica-Minolta
- Kamera Foscam
- Kamera Kyocera
- Kamera GoPro
- Kamera Lorex
- Kamera Cobra
- Kamera Velleman
- Kamera FLIR
- Kamera Swann
- Kamera Eufy
- Kamera Celestron
- Kamera Ring
- Kamera Fluke
- Kamera Hikvision
- Kamera AVerMedia
- Kamera Reolink
- Kamera EVE
- Kamera Prixton
- Kamera Marshall Electronics
- Kamera General Electric
- Kamera SPC
- Kamera Hanwha
- Kamera ARRI
- Kamera BirdDog
- Kamera Bauhn
- Kamera MuxLab
- Kamera Spypoint
- Kamera Vivitar
- Kamera Ansco
- Kamera Vimar
- Kamera Oregon Scientific
- Kamera Dahua Technology
- Kamera SereneLife
- Kamera Lexibook
- Kamera Intel
- Kamera SJCAM
- Kamera Scosche
- Kamera Speco Technologies
- Kamera Joy-It
- Kamera Kogan
- Kamera Levenhuk
- Kamera Emerson
- Kamera Minox
- Kamera Burris
- Kamera Silvergear
- Kamera Elmo
- Kamera AViPAS
- Kamera UniView
- Kamera AquaTech
- Kamera Alfatron
- Kamera BZBGear
- Kamera PTZ Optics
- Kamera Daitsu
- Kamera Agfa
- Kamera AgfaPhoto
- Kamera Argus
- Kamera Lumens
- Kamera Yashica
- Kamera Sygonix
- Kamera Mamiya
- Kamera Zenit
- Kamera Fuji
- Kamera Minolta
- Kamera EverFocus
- Kamera RunCam
- Kamera SeaLife
- Kamera Aplic
- Kamera FIMI
- Kamera Meade
- Kamera Contax
- Kamera Sinji
- Kamera Traveler
- Kamera Digital Watchdog
- Kamera Getac
- Kamera Ikegami
- Kamera Pelco
- Kamera ZeissIkon
- Kamera Dorr
- Kamera HOLGA
- Kamera Praktica
- Kamera Hasselblad
- Kamera Moto Mods (Motorola)
- Kamera Fantasea Line
- Kamera Brinno
- Kamera Z CAM
- Kamera General
- Kamera Ergoguys
- Kamera Strex
- Kamera Berger & Schröter
- Kamera Leitz Focomat IIc
- Kamera Cosina
- Kamera Videology
- Kamera InfiRay
- Kamera Videotec
- Kamera GoXtreme
- Kamera IOptron
- Kamera Cambo
- Kamera Kobian
- Kamera Kyocera Yashica
- Kamera Red Digital Cinema
- Kamera Konica
- Kamera Akaso
- Kamera Seek Thermal
- Kamera Ikelite
- Kamera Adeunis
- Kamera Hoppstar
- Kamera PatrolEyes
- Kamera Camouflage
- Kamera HuddleCamHD
- Kamera Linhof
- Kamera Aquapix
- Kamera KanDao
Nyeste Kamera Manualer

29 Marts 2025
29 Marts 2025
27 Marts 2025
12 Marts 2025
12 Marts 2025

13 Januar 2025
12 Januar 2025
11 Januar 2025
11 Januar 2025
11 Januar 2025