Gigaset AL410A Manual
Gigaset
Trådløse DECT telefoner
AL410A
Læs nedenfor 📖 manual på dansk for Gigaset AL410A (2 sider) i kategorien Trådløse DECT telefoner. Denne guide var nyttig for 23 personer og blev bedømt med 4.5 stjerner i gennemsnit af 2 brugere
Side 1/2
Gigaset AL410A_UK _ A31008-M2237-L151-1-7619
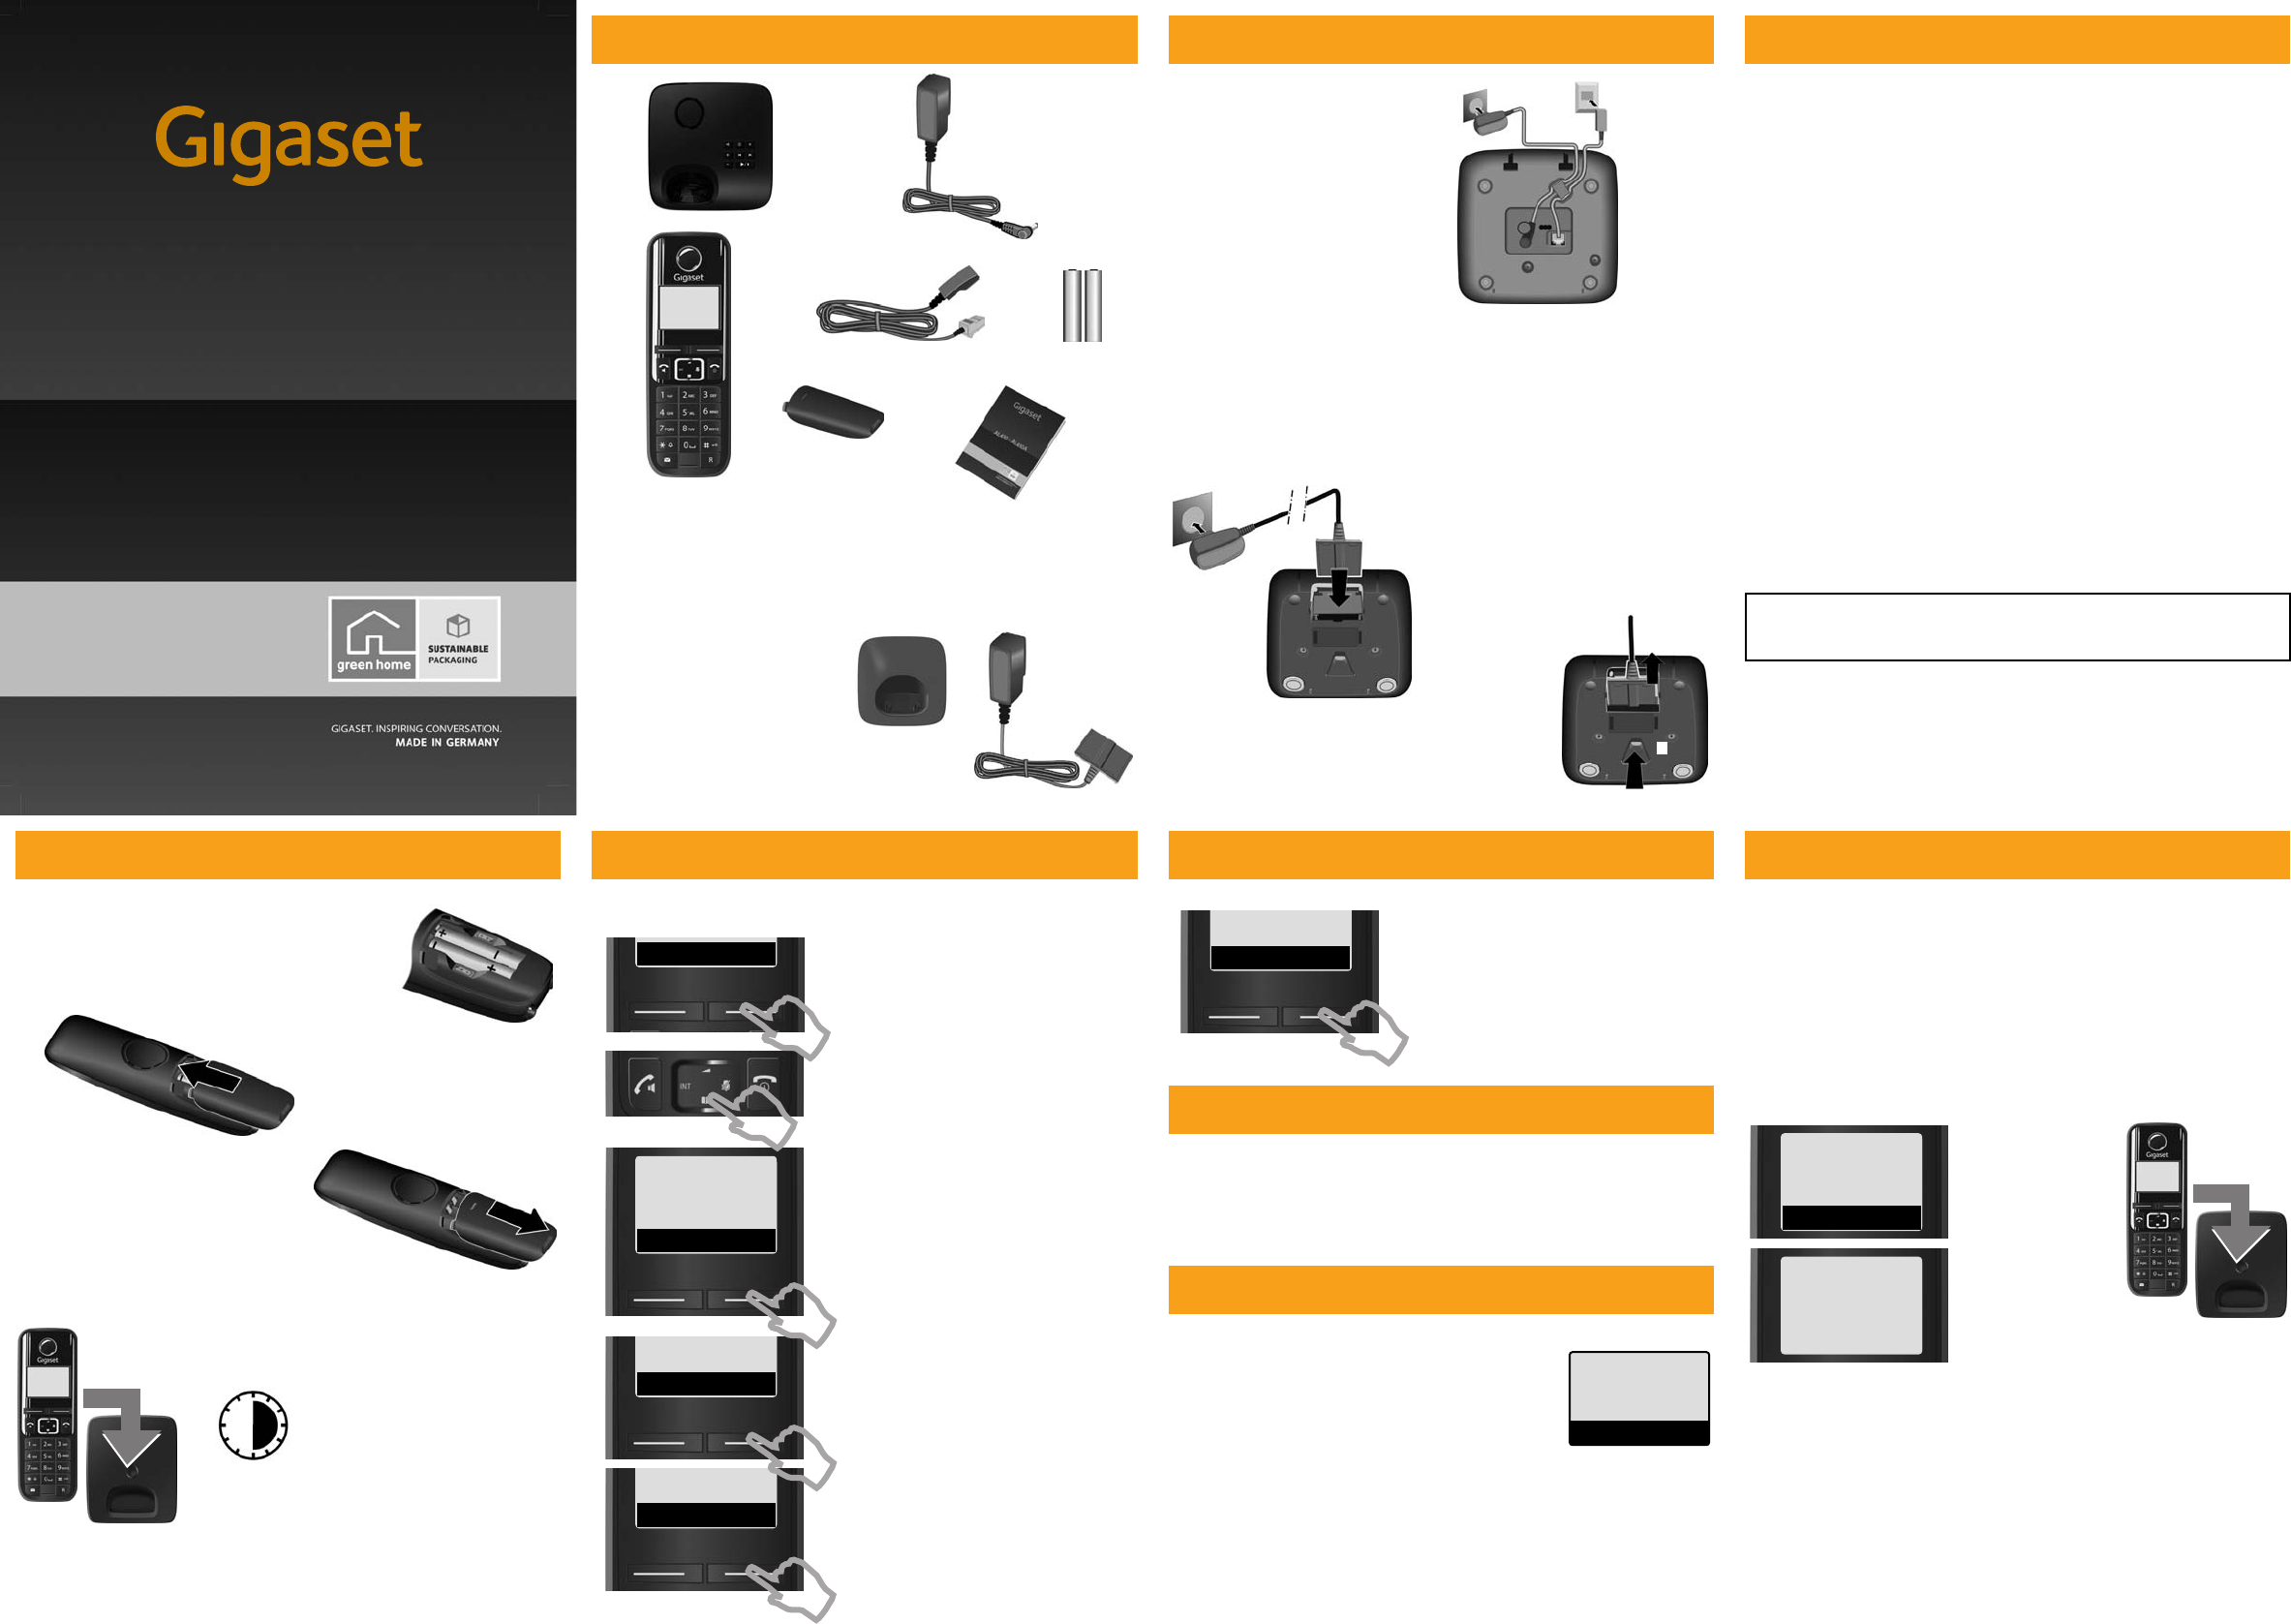
Pack contents
If you have purchased a
model with multiple
handsets the package should
contain two batteries, a
battery cover, a charging
cradle 8 with mains adapter
9 for each additional
handset.
1
1one Gigaset AL410A Base station
2one mains adapter
3one Gigaset AL410 handset
4one phone cord
2
3
45
7
6
5two batteries
6one battery cover
7this Quick start guide
89
Connecting the base station
¤Connect power adapter 1
and Phone jack 2 to the
base and place the cable
recesses.
Please ensure the power
lead is fully inserted.
Please note:
uThe mains adapter must always be connected, as the Phone will not
operate without a mains connection.
uAlways use the power adapter and Phone cord supplied. Pin
connections on Telephone cables can vary.
Connecting the charging cradle (if included)
1
1
1
2
¤Plug the mains adapter into the
plug socket 2.
¤Connect the flat plug from the
mains adapter 1.
If you need to disconnect the plug from the
charging cradle, press the release button 3 and
disconnect the plug 4.
1
2
4
3
Frequently asked questions
Q: There is no dial tone.
A: Press call button for 2 seconds (long press) to obtain dial tone.
A short press opens the redial list.
Q: The line is crackling / not clear.
A: Have you used the new line cable provided? Please do not use an old cable.
Q: The display is not clear / seems to be broken.
A: The display is protected by a plastic film, please make sure you have removed
the protective film.
Q: The handset is not registered.
A: If your handset is not registered, please follow the Registration handset proce-
dure.
(see user manual)
Q: The caller ID is not working.
A: Have you subscribed to this service (CLIP) from your provider?
Q: Message indicator flashing and I cannot retrieve my message.
A: Message indicator will flash to indicate missed calls as well as new messages
of text messages. (see user manual)
Please check:
Have you used the phone cord supplied ¨
Have you fully inserted the power cable into the base station ¨
Have you inserted the batteries correctly ¨
Have you charged the battery for 9.5 hours ¨
Have you set up the Date/Time ¨
To download the latest manuals, visit our web-site: http://www.gigaset.com
You have questions? As a Gigaset customer, you can take advantage of our comprehensive
service offerings. You can find help quickly in this User Manual and in the service pages of
our Gigaset online portal: http://www.gigaset.com
Product may not be fully compatible with the national telephone network. It is clearly
specified on the box near the CE mark for which country/countries the equipment has been
developed. If the equipment is used in a manner inconsistent with this advice or with the
instructions of the manual and on the product itself, this may have implications on the
conditions for warranty or guarantee claims (repair or exchange of product).
In order to make use of the warranty, the product purchaser is asked to submit a receipt
which proves the date of purchase (date from which the warranty period starts) and the
type of goods that have been purchased.
If you have problems setting up or operation this product please call
GIGASET UK HELPLINE 084503 18190
GIGASET IRL HELPLINE 0818 200 033
Preparing the handset
Initial charging and discharging of the batteries
¤Insert the batteries the right way round. The
polarity is indicated
in/on the battery compartment.
¤Then slide the battery cover back into the
main casing until it clicks into place.
If you need to open the battery cover,
for instance to replace the batteries,
place your fingertip in the grooved area
on the top of the cover and slide down.
The correct charge status can only be displayed if the
batteries are first fully charged and discharged.
¤Place the handset in the charger
for 6 hours.
Then remove the handset from the charger,
make and receive Phone calls, setup the Phone
etc. and do not put it on the charger until the
batteries are fully discharged.
6 h
Setting the date and time
Set the date and time so that the correct date and time can be assigned to
incoming calls, and so that the alarm can be used.
ÞMENU
¤Press the key below MENU on the
display screen to open the main
menu.
¤Press the key below OK on the display
screen to confirm your selection.
The Date/Time menu item appears on the
display.
¤Press the key below OK on the display
screen to open the input field.
ç
Settings
”U
OK
¤The active cursor position is flashing.
Enter day, month and year as an
6-digit number via the handset,
e.g. 150912 for
15.09.2012.
¤Press the key below OK on the display
screen to confirm your setting.
Date/Time
”U
OK
Date 15.09.12
”OK
¤Press the bottom of the control
key ...
... until the Settings menu item
appears.
Setting the date and time
Message indication
Message Indication Key ‘ on handset will flash to indicate one or all of the
following events:
umissed calls (if caller ID is enabled for your line numbers will be shown)
unew messages on the answer machine
To retrieve your messages, just press the flashing ‘ key on your handset.
Display in idle status
The strength of the reception signal between base and handset:
– Good to poor: © ¨ § ¦
– No reception: ¥
Charge status of the batteries:
–¤ Batteries charged to over 66 %
–£ Batteries charged to between 34 % and 66 %
–¢ Batteries charged to between 11 % and 33 %
–¡ Flashes: batteries charged to below 11 %
–Ÿ ¡ Ÿ ¢ Ÿ £ Ÿ ¤ Charging
If Eco Mode+ is activated, the ½ icon is displayed in the top left corner of the
display.
Time 16:09
”OK
¤The active cursor position is flashing.
Enter hours and minutes in 4-digit
format, e.g. 1609 for 16:09.
¤Press the key below OK on the display
screen to confirm your setting.
¤Press and hold a to return to idle
status.
© ±£
INT 1
11.12. 11:56
ÞMenu
Registration handset
You can register up to four handsets to your base. You can also register other
Gigaset handsets and handsets from other devices with GAP functionality.
Your handset should already be registered by default. Nevertheless, if your
handset is flashing Put into base you have to register your handset.
If your handset is flashing Base then it can be that:
uYour base station is not switched on, please check if the power supply is
connected properly.
uThere is too much distance between the handset and base.
Automatic registering procedure
In the case the automatic registering procedure failed or you want to
register an additional handset, use the manual registration procedure.
Manual registration procedure
1. On the handset:
MENU ¤ Settings ¤ OK ¤ Handset ¤ OK ¤ Register HS ¤ OK ¤ enter the system
PIN for the base and press OK. Default PIN = 0000
2. On the base station:
Within 60 seconds of entering the system PIN, press and hold the
registration/paging key (min. 3 seconds). Registration takes approx.
1 minute.
Place the handset
with the display
facing up in the base
station.
£
Put into base
ÞMenu
Registering
The handset registers
automatically.
Registration can take
up to 5 minutes.
Do not remove the handset from
the base station during this time.
AL410A
Congratulations
By purchasing a Gigaset, you have chosen a brand
that is fully committed
to sustainability. This product’s packaging
is eco-friendly!
To learn more, visit www.gigaset.com.
Produkt Specifikationer
| Mærke: | Gigaset |
| Kategori: | Trådløse DECT telefoner |
| Model: | AL410A |
Har du brug for hjælp?
Hvis du har brug for hjælp til Gigaset AL410A stil et spørgsmål nedenfor, og andre brugere vil svare dig
Trådløse DECT telefoner Gigaset Manualer

8 Juli 2024
8 Juli 2024
7 Juli 2024
6 Juli 2024
5 Juli 2024
5 Juli 2024
5 Juli 2024
4 Juli 2024
4 Juli 2024
4 Juli 2024
Trådløse DECT telefoner Manualer
- Trådløse DECT telefoner SilverCrest
- Trådløse DECT telefoner Amplicomms
- Trådløse DECT telefoner Siemens
- Trådløse DECT telefoner Panasonic
- Trådløse DECT telefoner AEG
- Trådløse DECT telefoner Doro
- Trådløse DECT telefoner Emporia
- Trådløse DECT telefoner Grundig
- Trådløse DECT telefoner Motorola
- Trådløse DECT telefoner AVM
- Trådløse DECT telefoner Thomson
- Trådløse DECT telefoner Fysic
- Trådløse DECT telefoner Topcom
- Trådløse DECT telefoner Uniden
- Trådløse DECT telefoner Medion
- Trådløse DECT telefoner Sweex
- Trådløse DECT telefoner Linksys
- Trådløse DECT telefoner Ranex
- Trådløse DECT telefoner Geemarc
- Trådløse DECT telefoner Lifetec
- Trådløse DECT telefoner Jacob Jensen
- Trådløse DECT telefoner Alcatel
- Trådløse DECT telefoner Olympia
- Trådløse DECT telefoner Ericsson
- Trådløse DECT telefoner MT Logic
- Trådløse DECT telefoner Binatone
- Trådløse DECT telefoner Tiptel
- Trådløse DECT telefoner Sagem
- Trådløse DECT telefoner Archos
- Trådløse DECT telefoner Switel
- Trådløse DECT telefoner ITT
- Trådløse DECT telefoner Audioline
- Trådløse DECT telefoner BT
- Trådløse DECT telefoner Mitel
- Trådløse DECT telefoner Aastra
- Trådløse DECT telefoner Phonak
- Trådløse DECT telefoner Sitecom
- Trådløse DECT telefoner Alcon
- Trådløse DECT telefoner AGFEO
- Trådløse DECT telefoner Proximus
- Trådløse DECT telefoner Swatch
- Trådløse DECT telefoner Swissvoice
- Trådløse DECT telefoner KPN
- Trådløse DECT telefoner Profoon
- Trådløse DECT telefoner Esscom
- Trådløse DECT telefoner Hagenuk
- Trådløse DECT telefoner Logicom
- Trådløse DECT telefoner Peaq
- Trådløse DECT telefoner Sagemcom
- Trådløse DECT telefoner Premier
- Trådløse DECT telefoner DeTeWe
- Trådløse DECT telefoner Multi Care Systems
- Trådløse DECT telefoner US Robotics
- Trådløse DECT telefoner Novero
- Trådløse DECT telefoner Startel
- Trådløse DECT telefoner Nortel
- Trådløse DECT telefoner AT-T
- Trådløse DECT telefoner Eurostar
- Trådløse DECT telefoner Auro
- Trådløse DECT telefoner Philips-NEC
- Trådløse DECT telefoner Bang Olufsen
- Trådløse DECT telefoner Telekom
- Trådløse DECT telefoner PhonicEar
- Trådløse DECT telefoner Futiro
- Trådløse DECT telefoner RTX
- Trådløse DECT telefoner T-com
- Trådløse DECT telefoner Orchid
- Trådløse DECT telefoner IDECT
Nyeste Trådløse DECT telefoner Manualer

15 Januar 2025

15 Januar 2025

15 Januar 2025
15 Januar 2025
15 Januar 2025
14 Januar 2025

12 Januar 2025
12 Januar 2025
11 Januar 2025
11 Januar 2025