Hitachi 57F59 Manual
Hitachi
televisión
57F59
Læs nedenfor 📖 manual på dansk for Hitachi 57F59 (75 sider) i kategorien televisión. Denne guide var nyttig for 6 personer og blev bedømt med 4.5 stjerner i gennemsnit af 2 brugere
Side 1/75

PROJECTION COLOR TELEVISION
IMPORTANT SAFETY INSTRUCTIONS....................................................................................... 2-3
FIRST TIME USE ....................................................................................................................... 4-17
THE REMOT CONTRO ....................................................................................................... 18-E L . 31
ON-SCREEN DISPL ...........................................................................................................AY . 32-60
USEFUL INFORMATION.......................................................................................................... -61 71
END USER LICENSE AGREEMENT FOR HI ACHI DTV SOFT AR ...........................................T W E 71
51F59, 51F59A
Operating Guide for
As an Energy Star®Partner,
Hitachi, Ltd. has determined
that this product meets the
Energy Star ®guidelines for
energy efficiency.
INDE ......................................................................................................................... ...................X . 72
51F59J, 57F59, 57F59A, 57F59J
65F59, 65F59A, 65F59J.

2
SAFETY POINTS YOU SHOULD KNOW ABOUT
YOUR HITACHI TELEVISION
Our reputation has been built on the quality,
performance, and ease of service of HITACHI
televisions.
Safety is also foremost in our minds in the design of
these units. To help you operate these products
properly, this section illustrates safety tips which will be
of benefit to you. Please read it carefully and apply the
knowledge you obtain from it to the proper operation of
your HITACHI television.
Please fill out your warranty card and mail it to
HITACHI HITACHI . This will enable to notify you
promptly in the improbable event that a safety problem
should be discovered in your product model.
Follow all wa nings and instructions marked onr
this television.
The lightning flash with arrowhead symbol,
within an equilateral triangle, is intended to
alert the user to the presence of
uninsulated “dangerous voltage” within the
product’s enclosure that may be of a sufficient
magnitude to constitute a risk of electric shock to a
person.
The exclamation point within an equilateral
triangle, is intended to alert the user to the
presence of important operating and
maintenance (servicing) instructions in the
literature accompanying the appliance.
READ BEFORE OPERATING EQUIPMENT
Follow all warnings and instructions marked on this
television.
1. Read these instructions.
2. Keep these instructions.
3. Heed all warnings.
4. Follow all instructions.
5. Do not use this apparatus near water.
6. Clean only with a dry cloth.
7. Do not block any ventilation openings. Install in
accordance with the manufacturer’s instructions.
8. Do not install near any heat sources such as
radiators, heat registers, stoves, or other apparatus
(including amplifiers) that produce heat.
9. Do not defeat the safety purpose of the polarized or
grounding-type plug. A polarized plug has two
blades with one wider than the other. A grounding
type plug has two blades and a third grounding
prong. The wide blade or the third prong are
provided for your safety. If the provided plug does
not fit into your outlet, consult an electrician for
replacement of the obsolete outlet.
10. Protect the power cord from being walked on or
pinched particularly at plugs, convenience
receptacles, and the point where they exit from the
apparatus.
11. Only use the attachments/accessories specified by
the manufacturer.
12. Use only with the cart, stand, tripod,
bracket, or table specified by the
manufacturer, or sold with the
apparatus. When a cart is used, use
caution when moving the cart/apparatus
combination to avoid injury from tip-over.
13. Unplug this apparatus during lightning storms or
when unused for long periods of time.
14. Refer all servicing to qualified service personnel.
Servicing is equi ed when the apparatus has beenr r
damaged in any way, such as power-supply cord or
plug is damaged, liquid has been spilled or objects
have fallen into apparatus, the apparatus has been
exposed to rain or moisture, does not operate
normally, or has been dropped.
15. Televisions are designed to comply with the
recommended safety standards for tilt and stability.
Do not apply excessive pulling force to the front, or
top, of the cabinet which could cause the p oductr
to overturn resulting in product damage and/or
personal injury.
16. Follow instructions for wall, shelf or ceiling
mounting as recommended by the manufacturer.
17. An outdoor antenna should not be located in the
vicinity of overhead power lines or other electrical
circuits.
18. If an outside antenna is connected to the receiver
be sure the antenna system is grounded so as to
provide some protection against voltage surges and
built up static charges. Section 810 of the National
Electric Code, ANSI/NFPA No. 70-1984, provides
information with respect to proper grounding for the
mast and supporting structure, grounding of the
lead-in wire to an antenna discharge unit, size of
grounding connectors, location of antenna-
discharge unit, connection to grounding electrodes
and requirements for the grounding electrode.
Note to the CATV system installer: This reminder is
provided to call the CATV system installer’s attention to
Article 820-44 of the NEC that provides guidelines for
proper grounding and, in particular, specifies that the
cable ground shall be connected to the grounding
system of the building, as close to the point of cable
entry as practical.
Important Safety Instructions
CAUTION: TO REDUCE THE RISK OF ELECTRIC SHOCK,
DO NOT REMOVE COVER (OR BACK).
NO USER SERVICEABLE PARTS INSIDE.
REFER SERVICING TO QUALIFIED SERVICE PERSONNEL.
CAUTION
RISK OF ELECTRIC SHOCK
DO NOT OPEN

4
Accessories
Check to make sure you have the following accessories before disposing of the packing material.
Remote Cont ol Unit CLU-436r 1S (Part No. HL02291).
Two “AA” size, 1.5V batteries (For Remote Control Unit).
“Z” Allen Key (Part No. 61010122). Provided only when Allen Screws are used.
REMOTE CONTROL BATTERY INSTALLATION AND REPLACEMENT
1. Open the battery compartment cover of the remote control
by pulling back the TAB and lifting up to remove the cover.
2. Insert two new “AA” size batteries the remote control. into
When replacing old batteries, push them back towards
the springs and lift out.
3. Match the batteries to the (+) and (-) marks in the battery
compartment.
4. Insert the (-) side , into the battery compartment, the slide
the battery inwards and insert the second battery. Do not
force the battery into the battery compartment.
5. Replace the battery compartment cove . r
“Z” Allen Key
(65" Models Only)
Remote Control Two “AA” size,
1.5V batteries
Bottom View (Remote Control)
Pull up tab to emove back cove .r r
First time use
CAUTION: Do not insert batteries with ‘+’ and ‘-’ polarities reversed as this may cause the batteries
to swell or rupture resulting in leakage.

5
How to set up your new HITACHI Projection Television
ANTENNA
Unless your TV is connected to a cable TV system or to a centralized antenna system, a good outdoor TV antenna
is recommended for best performance. However, if you are located in an exceptionally good signal area that is free
from interference and multiple image ghosts, an indoor antenna may be sufficient.
LOCATION
Select an area where sunlight or bright indoor illumination will not fall directly on the picture screen. Also, be sure
that the location selected allows a free flow of air to and from the perforated back cover of the set. To avoid
cabinet warping, cabinet color changes, and increased chance of set failure, do not place the TV where
temperatu es can become excessively hot, for example, in di ect sunlight or near a heating appliance, etc.r r
VIEWING
The major benefit of the HITACHI Projection Television
is its large viewing screen. To see this large screen at its
best, test various locations in the room to find the
optimum spot for viewing.
The best picture is seen by sitting directly in front of the
TV and about 10 to 18 feet from the screen. Picture
brightness decreases as the viewer moves to the left
and right of the receiver.
During daylight hours, reflections from outside light may
appear on the screen. If so, drapes or screens can be
used to reduce the reflection or the TV can be located in
a different section of the room.
If the TV’s audio output will be connected to a Hi-Fi
system’s external speakers, the best audio performance
will be obtained by placing the speakers equidistant
from each side of the receiver cabinet and as close as
possible to the height of the picture screen center. For
best stereo separation, place the external speakers at
least four feet from the side of the TV, place the
surround speakers to the side or behind the viewing
area. Differences in room sizes and acoustical
environments will require some experimentation with
speaker placement for best performance.
CAUTION: Magnetic fields, such as those of external speakers, may cause the picture to distort if
they are placed too close to the television. Move the magnetic field source away from the television
until there is no picture distortion.
First time use
BEST
VERTICAL VIEWING
ANGLE
20
3'
0' 5' 10' 15' 20'
50
50
4" Minimum
4" Minimum
BEST
HORIZONTAL
VIEWING ANGLE
5' 10' 15' 20'
20'
S
S
R
L

6
Most video/audio connections between components can be made with shielded video and audio cables that have
phono connectors. For best performance, video cables should use 75-Ohm coaxial shielded wire. Cables can be
purchased from most stores that sell audio/video products. Below are illustrations and names of common
connectors. Before purchasing any cables, be sure of the output and input connector types required by the
various components and the length of each cable.
300-Ohm Twin Lead Cable
This outdoor antenna cable must be connected to an
antenna adapter (300-Ohm to 75-Ohm).
Phono Cable
Used on all standard video and audio cables which
connect to inputs and outputs located on the
television’s rear jack panel and front control panel.
“F” Type 75-Ohm Coaxial Antenna Cable
For connecting RF signals (antenna or cable TV) to the
antenna jack on the television.
S-Video (Super Video) Cable
This connector is used on camcorders, VCRs and laser-
disc players with an S-Video feature in place of the
standard video cable to produce a high quality picture.
Optical Cable
This cable is used to connect to an audio amplifier with
an Optical Audio In jack. Use this cable for the best
sound quality.
HDMI Cable
This cable is used to connect your external devices
such as Set-Top-Boxes or DVD players equipped with
an HDMI output connection to the TV’s HDMI input.
ANTENNA CONNECTIONS TO REAR JACK PANEL
(75-Ohm) antenna/C TV (Cable TV)A
When using a 75-Ohm coaxial cable system, connect
Antenna AIR/or CATV coaxial cable to the CABLE
(75-Ohm) terminal .
VHF (300-Ohm) antenna/UHF antenna
When using a 300-Ohm twin lead from an outdoor
antenna, connect the antenna leads toVHF or UHF
sc ews of the r VHF or UHF adapte . Plug the adapterr
into the AIR/CABLE terminal on the T .V
When both VHF and UHF antennas are
connected
Attach an optional antenna cable mixer to the TV
AIR/CABLE terminal, and connect the cables to the
antenna mixer. Consult your dealer or service store
for the antenna mixe .r
Hook-up Cables and Connectors
First time use
or

7
Quick Reference Remote Control Buttons and Functions
First time use
POWER BUTTON
(TV, CBL, VCR, DVD, SAT)
Turns the selected device on
and off.
INPUTS BUTTON (TV)
Accesses the INPUTS menu
system.
ASPECT BUTTON (TV)
Changes the aspect ratio while
watching TV.
MENU BUTTON
(CBL, DVD, SAT, TV)
Accesses the OSD menu
system.
CURSOR/SELECT BUTTONS
(TV, DVD, CBL, SAT)
The CURSOR buttons are used
to navigate the cursor through
the OSD and INPUTS menu
systems, and the SELECT
button is used to
Select/Activate the highlighted
menu item.
VOLUME BUTTONS (TV)
Adjusts the audio level of your
TV.
MUTE BUTTON (TV)
Reduces the audio level to 50%
if pressed once, and to
complete mute if pressed twice.
Press it a third time to restore
audio level.
NUMERIC BUTTONS
(TV, DVD, CBL, SAT, VCR)
Used to manually enter the TV
channel, and used for numeric
entry when navigating through
the OSD menu system.
(-) BUTTON (TV, SAT)
The (-) button is used when the
remote is in Set-Top-Box (STB)
mode or when the TV uses a
digital input.
RECORD BUTTON (VCR)
Press twice (2 times) to record
programs.
SOURCE ACCESS BUTTONS
(TV, DVD, VCR, CBL, SAT)
Changes the mode of the
Universal Remote Control to
control the device selected.
DAY/NIGHT BUTTON (TV)
Select picture mode settings
between DAY and NIGHT mode.
PIP BUTTON (TV)
Press to show and change the
Picture-in-Picture mode.
EXIT BUTTON
(TV, CBL, SAT)
Exits out of the OSD or INPUTS
menu systems if their menu is
displayed.
FAVORITE CHANNEL
( V CH) button (TV)FA
P ess to enter/access Favorite r
Channel ( V) mode.FA
GUIDE BUTTON
(SAT/STB, CBL)
Accesses the program guide of
other devices.
INFO BUTTON
(T , CBL, S T)V A
Displays various information on
the sc een.r
CHANNEL BUTTONS
(TV, CBL, SAT, VCR)
Changes the channel.
LAST CHANNEL (LC) BUTTON
(T , CBL, S T)V A
Switches between the cur ent r
and last channel viewed.
DVD/VCR CONTROL
BUTTONS (DVD, VCR)
Controls the precode functions
of your VCR and DVD.
PAUSE BUTTON
(TV, VCR, DVD)
Press to show and change the
Freeze mode of the TV or pause
other devices.
In addition to cont olling all of the functions on your HI ACHI P ojection T , the new emote cont ol is designed tor T r V r r
operate di fe ent types of devices, such as, DVD Players, CBL (Cable Boxes), set-top-boxes, satellite eceivers,f r r
and VCRs. The emote cont ol must be p ogrammed to cont ol the chosen device. Please see page 18-31 for ar r r r
complete description of all featu es and p ogramming of the Remote Cont ol.r r r
LEGEND
TV – Television VCR – Video Cassette Recorder/Player
CBL – DVD – Cable Box Digital Video Disc Player
STB – Set-Top-Box SAT – Satellite Receiver
NOTE: STB precode is included in the
SAT mode.
9
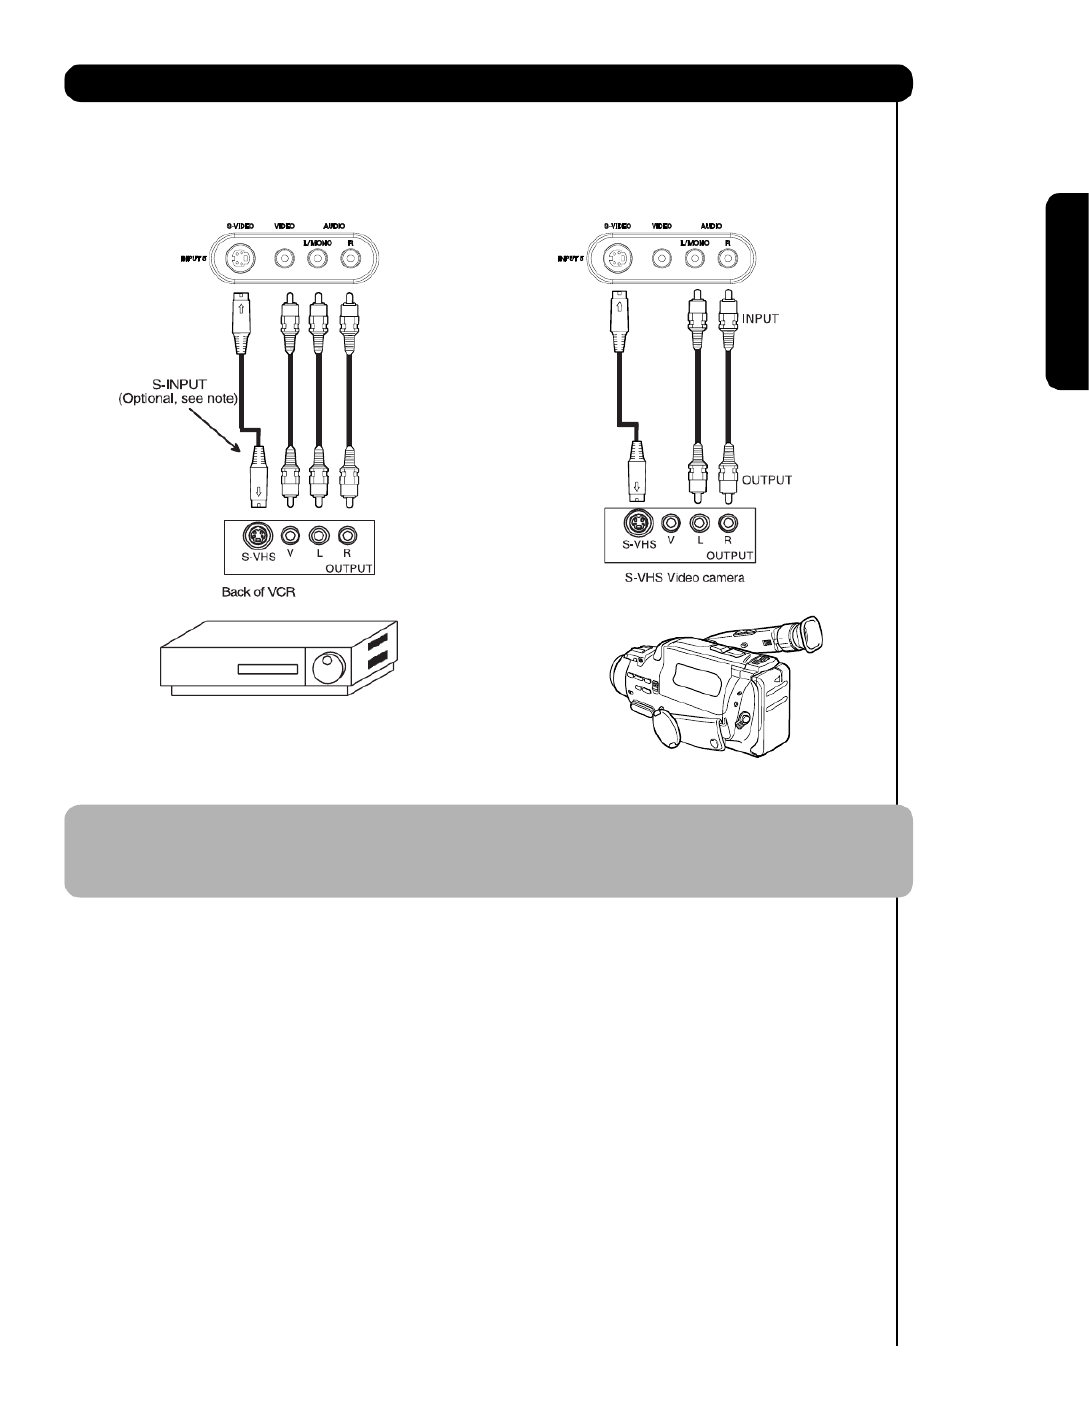
Front Panel Jacks and Connections
First time use
The front panel jacks are provided as a convenience to allow you to easily connect a camcorder or VCR as shown
in the following examples:
NOTE: 1. Completely insert connection cord plugs when connecting to front panel jacks. If you do not, the
played back picture may be abnormal.
2. If you have a S-VHS VCR, use the S-INPUT cable in place of the standard video cable.
3. If you have a mono VCR, insert the audio cable into the left audio jack of your TV.

10
Rear Panel Connections
First time use
AIR /CABLE Input
A 75-Ohm RF ntenna orA C TA V (Cable
TV) input.
NOTE: You may ask your local cable company
whether DTV services are available.
Audio/Video INPUTS 1, 2, 3 and 4
By using the INPUTS CURSORbutton, buttons
and SELECT button of the remote control you can
select each video source. Use the audio and video
inputs to connect external devices, such as VCRs,
camcorders, laserdisc players, DVD players etc. (If
you have mono sound, insert the audio cable into
the left audio jack.)
NOTE: You may use inputs toVIDEO S-VIDEOor
connect to , but only one ofINPUT 1 and 2
these inputs may be used at a time.
Audio Out
These jacks p ovide fixed or variable audio r
signals which a e used for eco ding. r r r
S-Video INPUTS 1 and 2
INPUTS 1 and 2 provide S-Video (Super Video)
jacks for connecting equipment with S-Video
output capability.
Component: Y-P B RP INPUTS
INPUTS 3 and 4 provide Y-P B RP jacks for
connecting equipment with this capability, such as
a DVD player or Set Top Box. You may use
composite video signal for both inputs.
NOTE: 1. Do not connect composite VIDEO and
S-VIDEO to INPUT 1, 2 or 5 at the same
time. input.S-VIDEO has priority over VIDEO
2. Your component outputs may be labeled
Y, B-Y, and R-Y. In this case, connect the
components B-Y output to the TV’s P B
input and the components R-Y output to
the TV’s P Rinput.
3. Your component outputs may be labeled
Y-CBCR. In this case, connect the component
CBoutput to the TV’s P input and theB
component C Routput to the TV’s PRinput.
4. It may be necessary to adjust TINT to
obtain optimum picture quality when using
the -PY BPRinputs (see page 3 ).4
5. To ensure no copyright infringement, the
MONITOR OUT output will be abnormal,
when using the Y-P B RP jacks.
6. and INPUT 3 INPUT 4 (Y/VIDEO) can be
used for composite video and component
video input.
HDMI1 (High Definition Multimedia
Interface) (INPUT 1)
ABOUT HDMI – HDMI is the
next-generation all digital interface for consumer
electronics. HDMI enables the secure distribution
of high-definition video and multi-channel audio in
a single cable. Because digital television (DTV)
signals remain in digital format, assures thatHDMI
pristine high-definition images retain the highest
video quality from the source all the way to your
television screen.
Use the HDMI input for your external devices such
as Set-Top-Boxes or DVD players equipped with an
HDMI output connection.
HDMI HDMI , the logo and High-Definition
Multimedia Interface are trademarks or registered
trademarks of HDMI Licensing LLC.
NOTE: 1. The HDMI input is not intended for use
with personal computers.
2. Only DTV formats such as 1080i 720p 480i, ,
and 480p HDMIare available for input.
MONOMONOMONO
TV AS CENTER
INPUT 1 INPUT 2 INPUT 3 INPUT 4
OPTICAL OUT
Digital Audio
VIDEO
AUDIO TO Hi-Fi
S - VIDEO
Upgrade Card
AUDIO
L
R
MISE EN GARDE
RISK OF ELECTRIC SHOCK
DO NOT OPEN
CAUTION
RISQUE DE CHOC ELECTRIQUE
NE PAS OUVRIR
Y
VIDEO Y
VIDEO
P
B
P
B
P
R
P
R
HIGH-DEFINITION MULTIMEDIA INTERFACE
AIR / CABLE
MONO

TV AS CENTER (INPUTS 1-4)
These jacks a e for ste eo amplifiers with centerr r
signal output capabilit . This featu e allows the TVy r
speakers to be used as a center speake . The TVr
must be set as a center channel by selecting TV
AS CENTER on the Inte nal Speakers Settings ofr
the Audio Menu (see page 38 ).
11
Rear Panel Connections
First time use
Optical Out (Digital Audio)
This jack p ovides Digital Audio Output forr
your audio device that is Dolby Digital®
compatible, such as an audio amplifie .r
Manufactured under license from Dolby
Laboratories. and the “ ” DOLBY DOUBLE-D
symbol a e trademarks of Dolby Laboratories. r
Upgrade Ca dr
This ca d slot is for futu e softwa e upgrades.r r r
Hitachi will notify you if a softwa e upgrade isr
r r r requi ed for your T . In oV der to eceive written
notification, please complete and etu n yourr r
warranty ca d.r
NOTE : This OUTPUT is for DIGITAL channels only.
MONOMONOMONO
TV AS CENTER
INPUT 1 INPUT 2 INPUT 3 INPUT 4
OPTICAL OUT
Digital Audio
VIDEO
AUDIO TO Hi-Fi
S - VIDEO
Upgrade Card
AUDIO
L
R
MISE EN GARDE
RISK OF ELECTRIC SHOCK
DO NOT OPEN
CAUTION
RISQUE DE CHOC ELECTRIQUE
NE PAS OUVRIR
Y
VIDEO Y
VIDEO
P
B
P
B
P
R
P
R
HIGH-DEFINITION MULTIMEDIA INTERFACE
AIR / CABLE
MONO

Match the numbers below to the diagram for
speaker placement.
The television’s internal speakers will act as
center speaker (select AUDIO INTERNAL-
SPEAKERS - TV AS CENTER).
These FRONT left and right speakers are
connected to the FRONT output of a
separate audio amplifier.
These REAR left and right speakers are
connected to the Rear output of a separate
audio amplifier.
This subwoofer is connected to the LFE/SUB
Out output of a separate audio amplifier.
NOTE: 1. The Optical Out (Digital Audio) provides a
fixed digital audio output to your external
component such as an A/V receiver with
optical input capability. The audio level
can only be controlled through the volume
control of the external audio amplifier.
2. See page for AUDIO-Digital Output.39
13
Connecting External Audio Sources
First time use
CENTER
OUT
OPTICAL
IN
Stereo System Amplifier
or DVD Player
Optical
Cable
RCA
Cable
14
BEFORE OPERATING
EXTERNAL VIDEO SOURCE
Connect an external source to the INPUT terminal, then
press the INPUTS button to show the INPUTS menu.
Use the CURSOR PAD CABLE, AIR to select the or
INPUT SELECTof your choice. Then press the button
to confirm your choice (see page 21).
NOTE: When the TV is set to VIDEO and a video
signal is not received from the VIDEO INPUT
JACK on the back panel of the TV (i.e.,
VCR/laserdisc player, etc. is not connected or
the video device is OFF), the set will appear
to be OFF.
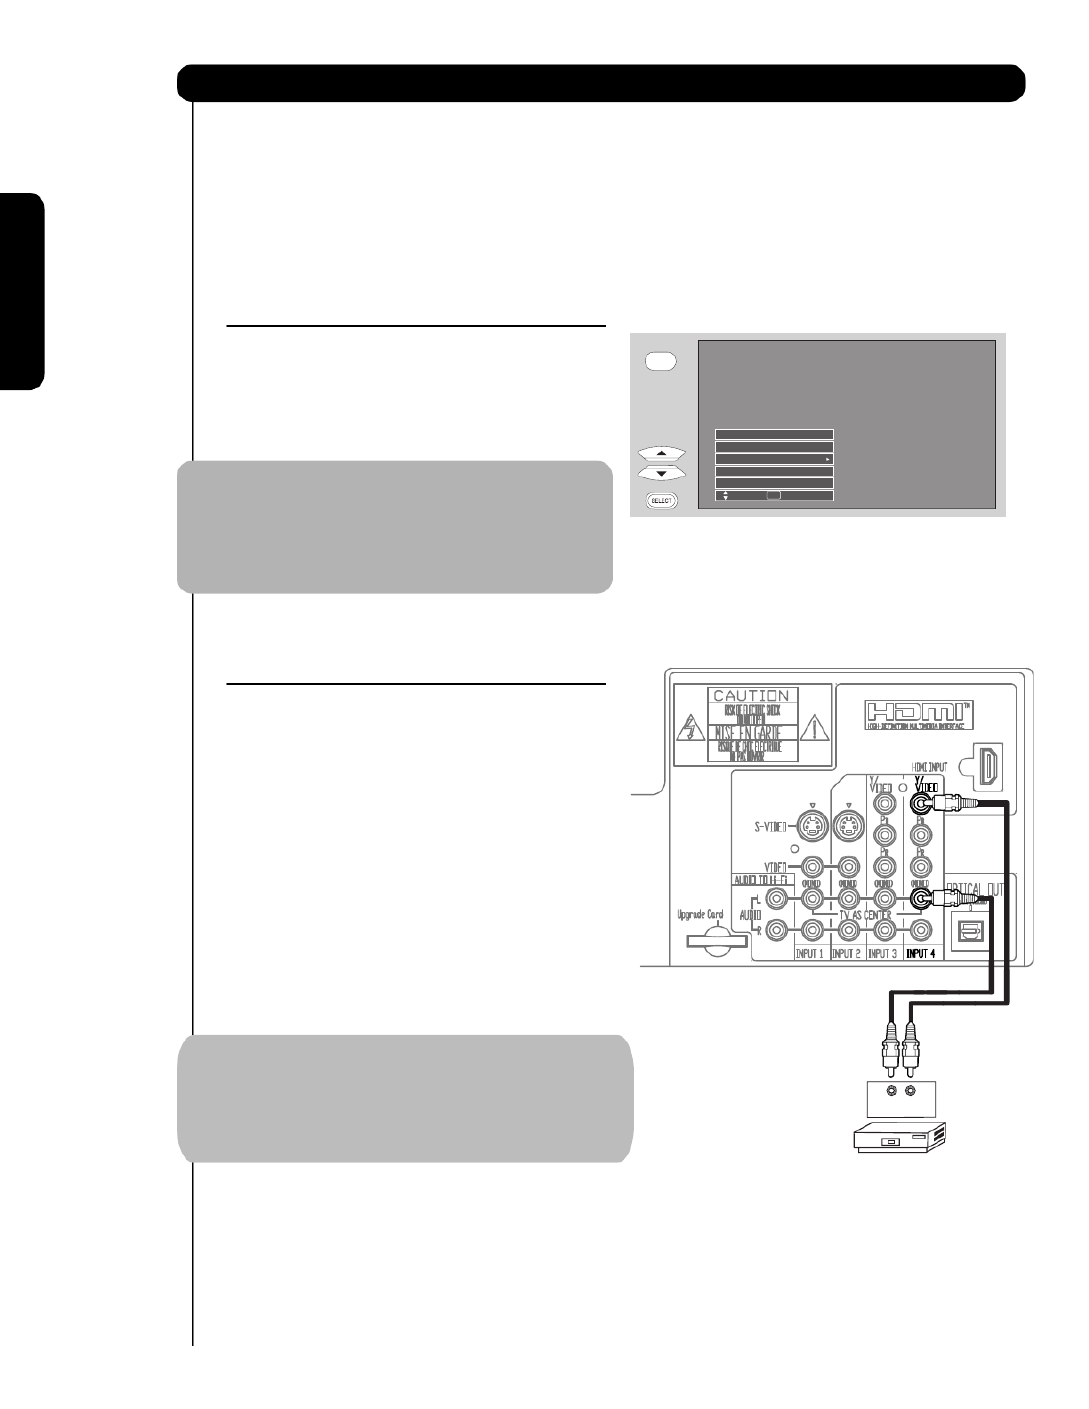
CONNECTING A COMPOSITE VIDEO
AND A MONAURAL AUDIO SOURCE
TO INPUT1 – INPUT5
1. Connect the cable from the VIDEO OUT of the VCR
or the laserdisc player to the INPUT (VIDEO) jack,
as shown on the TV to the right.
2. Connect the cable from the AUDIO OUT of the
VCR or the laserdisc player to the INPUT
(MONO)/L(AUDIO) jack.
3. Press the INPUTS button, then select INPUT 4
from the INPUTS menu to view the program from
the VCR or the laserdisc player. The VIDEO OSD
label disappears automatically after approximately
four seconds.
4. Select from the menu to return CABLE /AIR INPUTS
to the last channel tuned.
NOTE: 1) INPUT 3 can be used in the same manner
as INPUT 4.
INPUTS
Input 4
Input 5
Cable / Air
Input 1
Input 2
Move SEL Select
The exact arrangement you use to connect the VCR, camcorder, laserdisc player, DVD player, or HDTV Set Top
Box to your TV set is dependent on the model and features of each component. Check the owner’s manual of
each component for the location of video and audio inputs and outputs.
The following connection diagrams are offered as suggestions. However, you may need to modify them to
accommodate your particular assortment of components and features. For best performance, video and audio
cables should be made from coaxial shielded wire.
Connecting External Video Sources
First time use
Audio Video
VCR
OUTPUT
2) AIR signal will change to CABLE signal when the
Antenna Source is select as Cable(1) or Cable(2)
in the Channel Manager menu. See page (42)
15
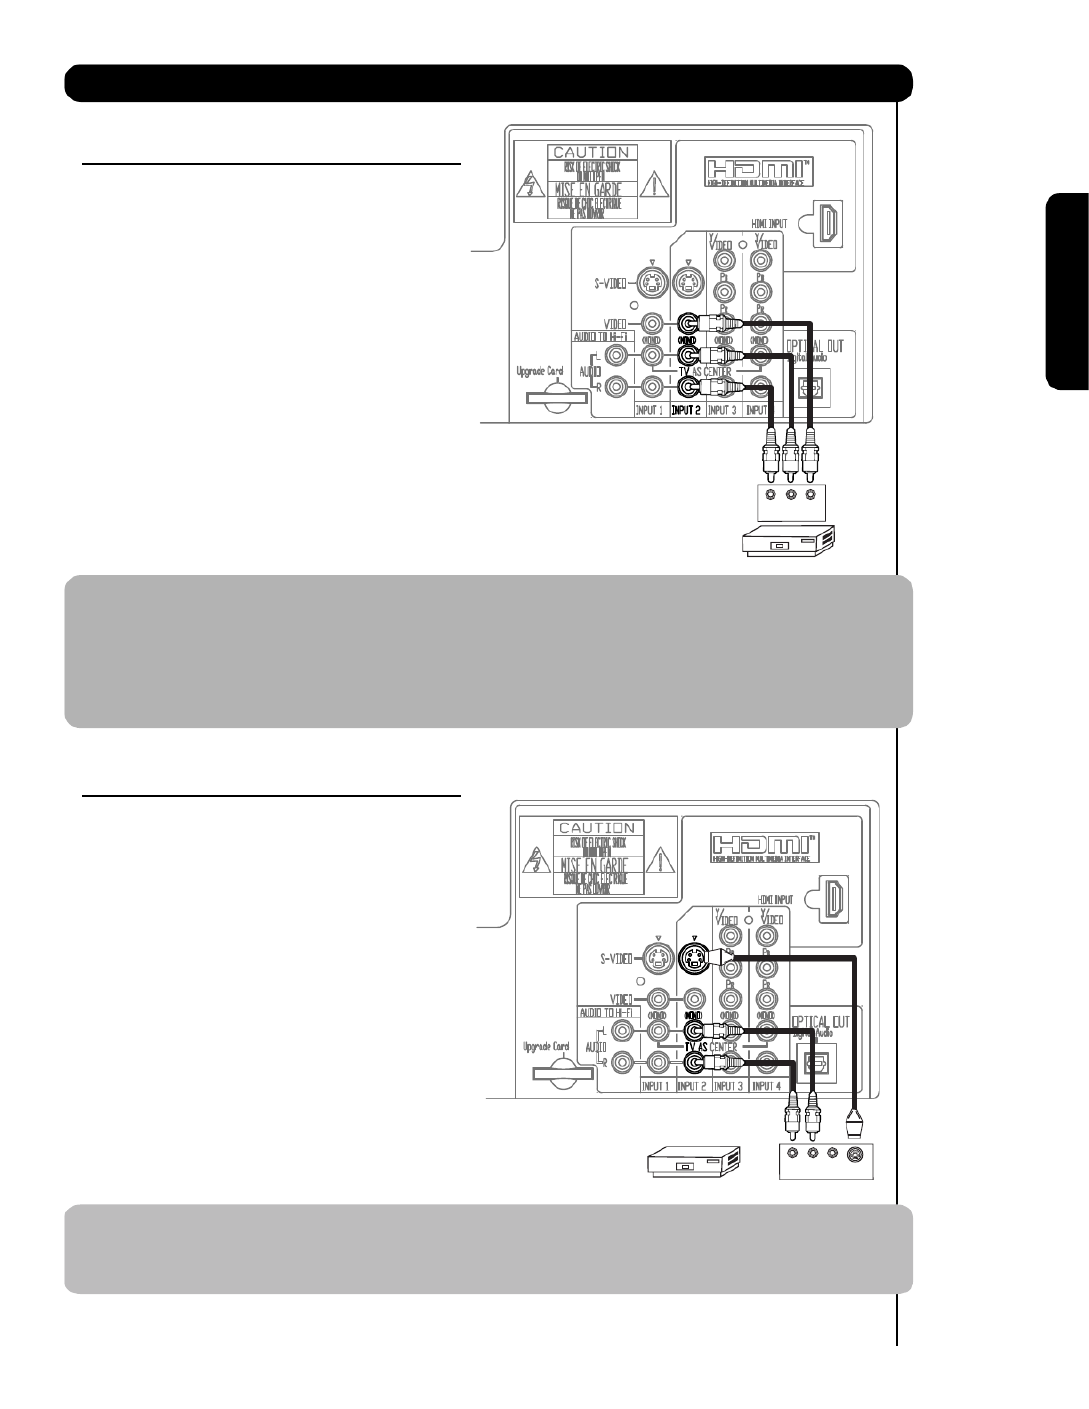
Connecting External Video Sources
First time use
CONNECTING A COMPOSITE VIDEO AND A
STEREO AUDIO SOURCE TO INPUT1 – INPUT5
1. Connect the cable from the VIDEO OUT of the VCR
or the laserdisc player to the INPUT (VIDEO) jack,
as shown on the TV to the right.
2. Connect the cable from the AUDIO OUT R of the
VCR or the laserdisc player to the INPUT
(AUDIO/R) jack.
3. Connect the cable from the AUDIO OUT L of the VCR
or the laserdisc player to the INPUT (AUDIO/L) jack.
4. Press the INPUTS button, then select INPUT 2
from the INPUTS menu to view the program from
the VCR or laserdisc player. The VIDEO OSD label
disappears automatically after approximately four
seconds.
5. Select CABLE/AIR f om the r INPUTS menu to etu nr r
to the last channel tuned.
NOTE:
1. Completely insert the connection cord plugs when connecting to rear panel jacks. The picture and
sound that is played back will be abnormal if the connection is loose.
2. When INPUT 3 or 4 are used, it is necessa y to connect the video output from the device to the r
Y-VIDEO INPUT jack of the T .V
CONNECTING AN S-VIDEO
SOURCE TO INPUT 1, 2 AND 5
1. Connect the cable from the S-VIDEO OUT of the
VCR or the laserdisc player to the INPUT (S-VIDEO)
jack, as shown on the TV to the right.
2. Connect the cable from the AUDIO OUT R of the
VCR or the laserdisc player to the INPUT
(AUDIO/R) jack.
3. Connect the cable from the AUDIO OUT L of the VCR
or the laserdisc player to the INPUT (AUDIO/L) jack.
4. Press the INPUTS button, then select INPUT 2
from the INPUTS menu to view the program from
the VCR or laserdisc player. The VIDEO OSD label
disappears automatically after approximately four
seconds.
5. Select CABLE/AIR f om the r INPUTS menu to etu nr r
to the last channel tuned.
NOTE: 1. Completely insert the connection cord plugs when connecting to rear panel jacks. The picture and
sound that is played back will be abnormal if the connection is loose.
VLR
VCR
OUTPUT
VS-VIDEO
LR
VCR
OUTPUT

18
In addition to controlling all the functions on your
HITACHI Projection TV, the new remote control is
designed to operate different types of VCRs, CATV
(Cable TV) converters, set-top-boxes, satellite receivers
(SAT) and DVD players with one touch. Basic operation
keys are grouped together in one area.
To operate your TV, point the remote control at the
screen of the TV and press the TV button. The remote
will now control your television.
To operate your VCR, point the remote at the remote
sensor of the VCR and press the button. TheVCR
r remote will now cont ol your VCR (see page for31
instructions on how to program the remote to control
your VCR).
To operate your cable box, point the remote at the
remote sensor of the cable box and press the CABLE
(CBL) button. The remote will now control your cable
box (see page for instructions on how to p ogram28 r
the remote to control your cable box).
To operate your set-top-box or satellite receiver, point
the remote at the remote sensor of the set-top-box or
satellite receiver and press the SAT button. The remote
will now control your set-top-box or satellite receiver. If
you have a satellite receiver, use this button to program
your satellite eceiver (see page for instructions onr 29
how to program the remote to control your SAT).
To operate your DVD player, point the remote at the
remote sensor of the DVD player and press the DVD
button. The remote will now control your DVD player
(see page for instruction on how to p ogram the30 r
remote to control your DVD player).
The Remote Control
The Remote Control

20
ASPECT button
Press this button to quickly change the picture format ASPECT ratio. Depending on the input signal format
received, the picture format ratio allows you to adjust the images through the following options.
• Antenna-Analog CH
• S-Video/Video Input
(Auto Aspect: Off)
• HDMI-480i/480p Input
(Auto Aspect: Off)
• Component-480i/480p
Input (Auto Aspect: Off)
• Antenna-Digital (4:3) CH
• S-Video/Video 4:3 Letter
Input (Auto Aspect: On)
• HDMI-480i/480p 4:3/
Letter Input (Auto Aspect: On)
• Component-480i/480p 4:3
Letter Input
(Auto Aspect: On)
• S-Video/Video 16:9 Input
(Auto Aspect: On)
• HDMI-480i/480p 16:9 Input
(Auto Aspect: On)
• Component-480i/480p
16:9 Input
(Auto Aspect: On)
• Antenna-Digital (16:9)CH
• HDMI-720p/1080i Input(16:9)
• Component-720p/1080i
(16:9)Input
NOTE:
1. All five video inputs have independent Aspect Style settings.
2. Vertical position adjustments are directly available when you choose 4:3
EX ANDED/ZOOM1/ZOOM2 or 16:9 ZOOM aspect style (see also page ).P 40
4:3 STANDARD
Use this aspect mode to display conventional (4:3)
images. Side panels (gray areas) are placed to the
left and right of the image to preserve the original
aspect ratio of the source. Note: Use this mode for
only 15% of your total viewing time to prevent
uneven aging of the phosphors. Phosphors in the
lighted area of the picture will age more rapidly
than the gray areas.
4:3 EXPANDED
Use this aspect mode to display conventional (4:3)
sources by linearly increasing image expansion
from the center towards the edges of the display
area in order to fill it.
4:3 ZOOM1/ZOOM2
Use these aspect modes to zoom in on
conventional (4:3) sources.
16:9 STANDARD
Use this aspect mode to display 16:9 sources like
HDTV and DVD’s preserving the original 16:9
aspect ratio.
16:9 ZOOM
Use this aspect to Zoom-in once while in 16:9
aspect.
How to Use the Remote to Control Your TV
The Remote Control

INPUTS button
When the remote control is in TV mode, press this
button to access the INPUTS menu. Use the
CURSOR SELECT and buttons to scroll and select
the inputs that are being used. Pressing the
INPUTS button repeatedly will also cycle through
the Inputs menu items. Then press the SELECT
button to select.
INPUT 1 Select to choose Input 1.
INPUT 2 Select to choose Input 2.
INPUT 3 Select to choose Input 3.
INPUT 4 Select to choose Input 4.
INPUT 5 Select to choose Input 5.
CABLE
AIR/ Select to choose Ai .r or Cable signal
PICTURE-IN-PICTURE button
See separate section on pages 23-2 for a7
description.
MENU button
The MENU button will start the On-Screen Display.
GUIDE button
[Cable Box (CBL), Satellite Receiver (SAT)/
Set-Top-Box (STB) mode only]
The use of this button is only applicable when the
remote control is in (CBL) and (SAT/STB) mode.
Press this button to access the Channel Guide of
the (CBL), and (SAT/STB).
EXIT button
This button will exit all On-Screen Displays.
CURSOR buttons/SELECT button
All the On-Screen Display features can be set or
adjusted by using the buttons and theCURSOR
SELECT button, except for numeric entries. Press
the CURSOR buttons toward desired direction and
press the SELECT button to select.
INFO button
Press this button when you want to check the
channel being received, the picture source, if the
channel has stereo (ST) or second audio program
(SA), the time, CHANNEL ID and if the TIMER is set.
INFO button display for Analog Channels
INFO button display for Digital Channels
INFO button display when an S-VIDEO Input is
connected to INPUT 1
INFO button display for when a COMPONENT
VIDEO: Y-PB RP Input is connected to INPUT 3
NOTE: 1. Press the INFO button again or the EXIT
button to return to normal viewing.
2. The ASPECT INFORMATION will show
the aspect condition of a channel before
it is blocked.
INFO
YPBPR : 3
12:00PM
1080i Format
Day AUTO HD 1080i 16:9 Standard
VIEW
--:--AM --:--AM
INFO
S - IN : 1
12:00PM
TV-PG DLSV
Day AUTO HD 1080i 16:9 Standard
VIEW
--:--AM --:--AM
INFO
Worl w d ew f o h on s n e b CBd i e n s r m t e nati s po sor d y S
p v de th at ew an inf rm io ayro i d e l est n s d o at n n i d s
an n gd i h st .
Mai as er r Rober r an Lisn c t s a e t Bu t d a.
CBS Nigthly News
Scroll INFO Return
INFO
Air 118 - 111
12:00PM
CBS
DTVCC
MULTI
TV-PG DLSV
Day AUTO HD 1080i 16:9 Standard
VIEW
--:--AM --:--AM
1080i Format
INFO
Air 8
12:00PM
FOX
CC
ST STEREO
TV-PG DLSV
Day AUTO HD 1080i 16:9 Standard
VIEW
--:--AM --:--AM
INPUTS
Input 3
Input 4
Input 5
Cable
Move SEL Select
21
How to Use the Remote to Control Your TV
The Remote Control
Air /
Input 1
NOTE: When the INFO button is pressed twice in
a 4:3 Digital Channel the ASPECT mode
will change ,but It will return to normal view
when the INFO OSD disappears.
and many occasions and fields. Mainly it is

Audio Video
VCR
OUTPUT
Your HI ACHIT P ojection TV incorporates unerr one T
technology designed for improved viewing enjoyment.
This Tuner feature allows you to view antenna input
on the main picture and a Video Input on sub-picture
simultaneously.
When an channel or is viewed as ANALOG INPUT
the main picture, an channel or can ANALOG INPUT
not be viewed as a sub picture.
To select between main picture and PIP sub-picture
use the buttons on the remote. The greenCURSOR
highlighted channel display will move with every
p ess of the r CURSOR buttons ( or ).
The Pictu e-in-Pictu e featu e is convenient when your r r
want to watch more than one program at the same time.
You can watch a TV p ogram while viewing otherr
programs from any of the video inputs.
Use the connection diagram to the right to view VCR
program as a sub-picture while viewing another program
as main picture . You may also view the(CABLE or AIR)
VCR program as a main picture while viewing another
program as a sub-picture (CABLE or AIR).
PIP button
Press the button and a sub-picture will appear in one of the fourPIP
di fe ent modes (f r PO , PIP P or SPLIT ), depending on the INPUT
signal. o change the PIP mode, use the T PIP button to cycle th oughr
the four different modes.
POP Mode Picture-in-Picture
POP MODE PIP displays the sub-picture outside of the main picture.
Use the buttons (CURSOR or ) to move the sub-picture. This
feature is not available with a 720p and 1080i signal.480p,
Please refer to the Picture-in-Picture Modes Table (see page 2 ).6 & 27
NOTE: 1. Press the CURSOR buttons ( or ) to enable the
sub-picture sound.
2. Two INPUTS cannot be viewed simultaneously in
PIP MODE. Only one INPUT (1-5) and one antenna
(CABLE OR AIR).
PIP
MAIN PICTURE
MAIN PICTURE
MAIN PICTURE
MAIN PICTURE
MAIN PICTURE
SUB
SUB
SUB
SUB
SUB
PICTURE
PICTURE
PICTURE
PICTURE
PICTURE
23
Picture-in-Picture (PIP)
The Remote Control

24
PIP Mode Picture-in-Picture
This feature is only available with a 1080i
signal. To prevent a pattern burn, occasionally
move the sub-picture using the CURSOR
buttons.
SPLIT Mode Picture-in-Picture
Split Mode PIP displays the main picture and sub-
picture evenly on the screen.
PAUSE button
If you wish to freeze the sub-picture, press the
PAUSE button. This is convenient when trying to
write down the address for a mail order company,
recording statistics for a sporting event, etc. To return
the picture to motion, press the button. PressEXIT
the button repeatedly to toggle betweenPAUSE
FREEZE modes (Main Freeze, SPLIT and STROBE).
EXIT
Freeze
Freeze
Freeze
Freeze
Freeze
MAIN PICTURE
MAIN PICTURE
MAIN PICTURE
MAIN PICTURE
MAIN PICTURE
SUB PICTURE
SUB PICTURE
SUB PICTURE
SUB PICTURE
SUB PICTURE
PIP
MAIN PICTURE
MAIN PICTURE
MAIN PICTURE
MAIN PICTURE
MAIN PICTURE
SUB PICTURE
SUB PICTURE
SUB PICTURE
SUB PICTURE
SUB PICTURE
Picture-in-Picture (PIP)
The Remote Control
Note : PIP Specifications in the following pages 26 & 27.
Note : PIP Specifications in the following pages 26 & 27.
Note : PIP Specifications in the following pages 26 & 27.
Note : PIP Specifications in the following pages 26 & 27.Note : PIP Specifications in the following pages 26 & 27.

Pictu e-in-Pictu e (PIP)r r
The Remote Control
PIP Specifications (cont.)
SPLITMode
DigitalCH
480i
Analog
CH
1080i 720p 480p 480i S/VideoScan
Mode
Sub
Main
Aspect
16x9 4x3 4x3 16x9 16x9 16x9
4x3
16x9 4x3
16x9 4x3
DigitalCH
(480i)
16x9
4x3
Yes Yes Yes Yes Yes Yes Yes
AnalogCH 4x3
Yes Yes Yes Yes Yes Yes Yes
1080i 16x9
Yes Yes Yes Yes Yes Yes Yes Yes Yes Yes
720p 16x9
Yes Yes Yes Yes Yes Yes Yes Yes Yes Yes
480p
16x9/4x3 Yes Yes Yes Yes Yes Yes Yes Yes Yes Yes
480i
16x9/4x3 Yes Yes Yes Yes Yes Yes Yes Yes Yes Yes
540p
S/Video
16x9/4x3 Yes Yes Yes Yes Yes Yes Yes Yes Yes Yes
STR BEMo eO d
DigitalCH
480i
Analog
CH
1080i 720p 480p 480i S/VideoScan
Mode
Sub
Main
Aspect
16x9 4x3 4x3 16x9 16x9 16x9
4x3
16x9 4x3 16x9 4x3
DigitalCH
(480i)
16x9
4x3
AnalogCH
4x3
1080i
16x9
720p
16x9
480p
16x9/4x3
480i
16x9/4x3 Yes Yes Yes Yes
540p
S/Video
16x9/4x3 Yes Yes Yes Yes
27
Yes Yes
Yes

28
OPERATING THE PRECODED
FUNCTION FOR YOUR CABLE BOX.DIGITAL/ANALOG
This remote is designed to operate different types of
cable boxes. You must first program the remote to
match the remote system of your DIGITAL or ANALOG
Cable Box (refer below for p e-codes).r
1. Turn ON your cable box.
2. Aim the remote control at the front of your cable
box.
3. To switch to Cable (CBL) pre-coded mode, press
and release the CABLE (CBL) button.
4. Hold down the CBL button on the remote and
enter the two digit preset code that matches your
cable box, as shown below. Release the CBL
button.
5. Aim the remote at the cable box and press the
POWER button. The remote will turn off your cable
box when the correct two digit preset code is
entered. When this occurs, the remote control is
programmed for your cable box. If the cable box
does not turn off, try a different two digit preset
code.
6. The remote will now control your Cable box.
NOTE: 1. If your cable box cannot be operated after
performing the above procedures, your
cable box code has not been precoded
into the remote.
2. In the unlikely event that your cable box
cannot be operated after performing the
above procedures, please consult your
cable box operating guide.
3. The remote control will remember the
codes you have programmed until the
batteries are removed from the remote
control. After replacing the batteries
repeat the entire programming procedure
as stated above.
CABLE (CBL) button
This button allows the remote to control your cable
box by setting it to CABLE mode.
PRECODED CABLE BOX buttons
These buttons transmit the chosen precoded cable
codes.
EXCLUSIVE TV buttons
These buttons are for operating the TV. MY CABLE BOX CODE IS: _______________________
NOTE: Refer to instruction manual of the Cable Box
for operation of the buttons exclusively for
the Cable Box.
The Remote Control for Cable Box Functions
The Remote Control
CABLE BRAND DIGITAL TYPE CODES
ADELPHIA......................................................18
CABLEVISION .............................................................. 19
COMCAST..................................................................20
COX............................................................................ 21
MOTOROLA................................................................17,22,24
PIONEER..............................................................15
SCIENTIFIC ATLANTA ..................................................................16
TIMEWARNER...................................................................23
CABLE BRAND CODES ANALOG TYPE
HAMLIN......................................................11,12
JERROLD .................................................... 00, 01, 02
OAK..................................................................13,14
PANASONIC................................................................ 10
PIONEER................................................................08,09
SCIENTIFIC ATLANTA......................................03,04,05
ZENITH...................................................................06,07

OPERATING THE PRECODED FUNCTION FOR
YOUR SET-TOP-BOX/SATELLITE RECEIVER.
This remote is designed to operate different types of
set-top-box/satellite systems. You must first program
the remote to match the remote system of your set-
top-box/satellite systems (refer below for pre-codes).
1. Turn ON your set-top-box/satellite systems.
2. Aim the remote control at the front of your set-top-
box/satellite systems.
3. To switch to set-top-box/satellite (STB) pre-coded
mode, press and release the SAT button.
4. Hold down the SAT button on the remote and enter
the two digit preset code that matches your set-
top-box/satellite receiver, as shown below. Release
the SAT button.
5. Aim the remote at the set-top-box/satellite receiver
and press the POWER button. The remote will turn
off your set-top-box/satellite receiver when the
correct two digit preset code is entered. When this
occurs, the remote control is programmed for your
set-top-box/satellite receiver. If the set-top-
box/satellite receiver does not turn off, try a
different two digit preset code.
6. The remote will now control your set-top-
box/satellite receiver.
NOTE: 1. If your set-top-box/satellite receiver
cannot be operated after performing the
above procedures, your set-top-
box/satellite receiver code has not been
precoded into the remote.
2. In the unlikely event that your set-top-
box/satellite receiver cannot be operated
after performing the above procedures,
please consult your set-top-box/satellite
receiver operating guide.
3. The remote control will remember the
codes you have programmed until the
batteries are removed from the remote
control. After replacing the batteries
repeat the entire programming procedure
as stated above.
SAT (Set-Top-Box/Satellite) button
This button allows the remote to control your set-
top-box/satellite receiver by setting it to SET-TOP-
BOX/SATELLITE mode.
PRE-CODED SET-TOP-BOX/SATELLITE
RECEIVER buttons
These buttons transmit the chosen pre-coded set-
top-box/satellite codes.
EXCLUSIVE TV buttons
These buttons are for operating the TV.
SATELLITE BRAND CODES
ECOSTAR .....................................................................03
HITACHI....................................................................... 00
HUGHES ......................................................................04
RCA ..............................................................................01
SONY ...........................................................................02
SET TOP BOX BRAND CODES
PANASONIC .................................................................05
RCA ............................................................................. 06
SAMSUNG ...................................................................07
ZENITH.........................................................................08
MY SATELLITE RECEIVER/
SET TOP BOX CODE IS: _________________________
NOTE: Refer to instruction manual of the set-top-
box/satellite receiver for operation of the
buttons exclusively for the set-top-
box/satellite receiver.
29
The Remote Control for Set-Top Box/Satelite Receiver Functions
The Remote Control

30
OPERATING THE PRECODED
FUNCTION FOR YOUR DVD PLAYER.
This remote is designed to operate different types of
DVD players. You must first program the remote to
match the remote system of your DVD player (refer
below for pre-codes).
1. Turn ON your DVD player.
2. Aim the remote control at the front of your DVD
player.
3. To switch to DVD pre-coded mode, press and
release the DVD button.
4. Hold down the DVD button on the remote and
enter the two digit preset code that matches your
DVD player, as shown below. Release the DVD
button.
5. Aim the remote at the DVD player and press the
POWER button. The remote will turn off your DVD
player when the correct two digit preset code is
entered. When this occurs, the remote control is
programmed for your DVD player. If the DVD player
does not turn off, try a different two digit preset
code.
6. The remote will now control your DVD player.
7. You will need to set the display type of your DVD
player to 16:9 WIDESCREEN.
NOTE: 1. If your DVD player cannot be operated
after performing the above procedures,
your DVD player’s code has not been
precoded into the remote.
2. In the unlikely event that your DVD player
cannot be operated after performing the
above procedures, please consult your
DVD player operating guide.
3. The remote control will remember the
codes you have programmed until the
batteries are removed from the remote
control. After replacing the batteries
repeat the entire programming procedure
as stated above.
DVD button
This button allows the remote to control your DVD
player by setting it to DVD mode.
PRECODED DVD Buttons
These buttons transmit the chosen precoded DVD
codes.
EXCLUSIVE TV Buttons
These buttons are for operating the TV.
DVD BRAND CODES
APEX ............................................................................09
GO VIDEO ................................................................... 08
HITACHI........................................................................00
KENWOO ...................................................................1D 0
PANASONIC .................................................................02
PIONEER..................................................................... 03
RCA ............................................................................. 04
SAMSUNG ...................................................................06
SANYO .........................................................................07
SONY ...........................................................................01
TOSHIBA ......................................................................05
MY DVD PLAYER CODE IS: ______________________
NOTE: Refer to instruction manual of the DVD player
for operation of the buttons exclusively for
the DVD player.
The Remote Control for DVD Functions
The Remote Control
쐋
쐋
쐋
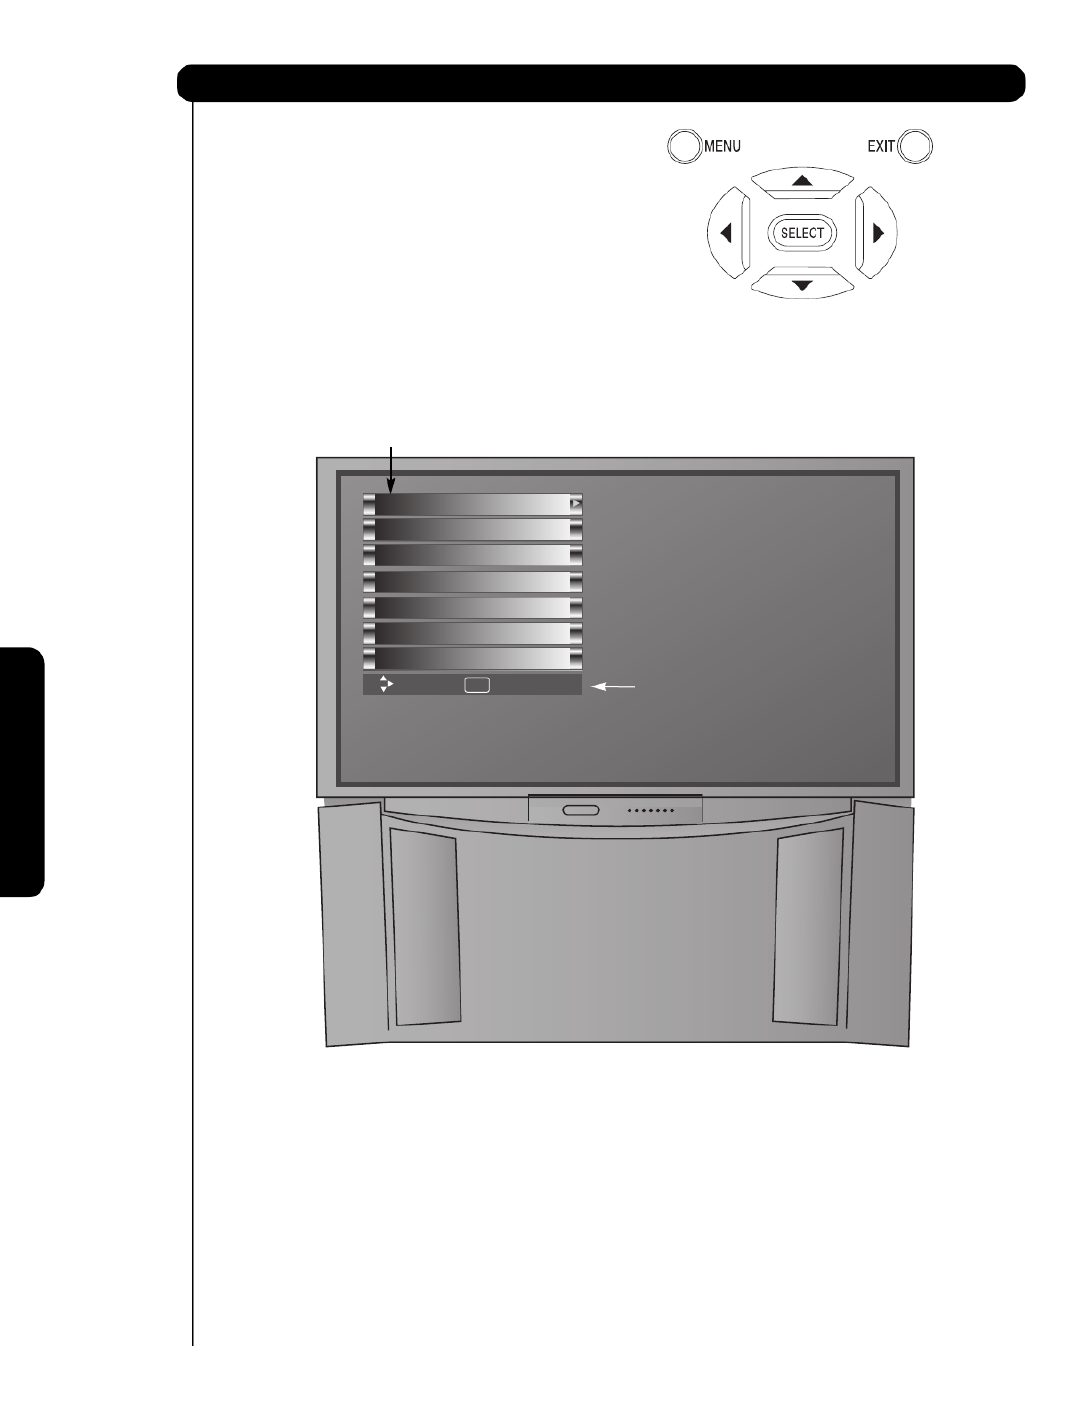
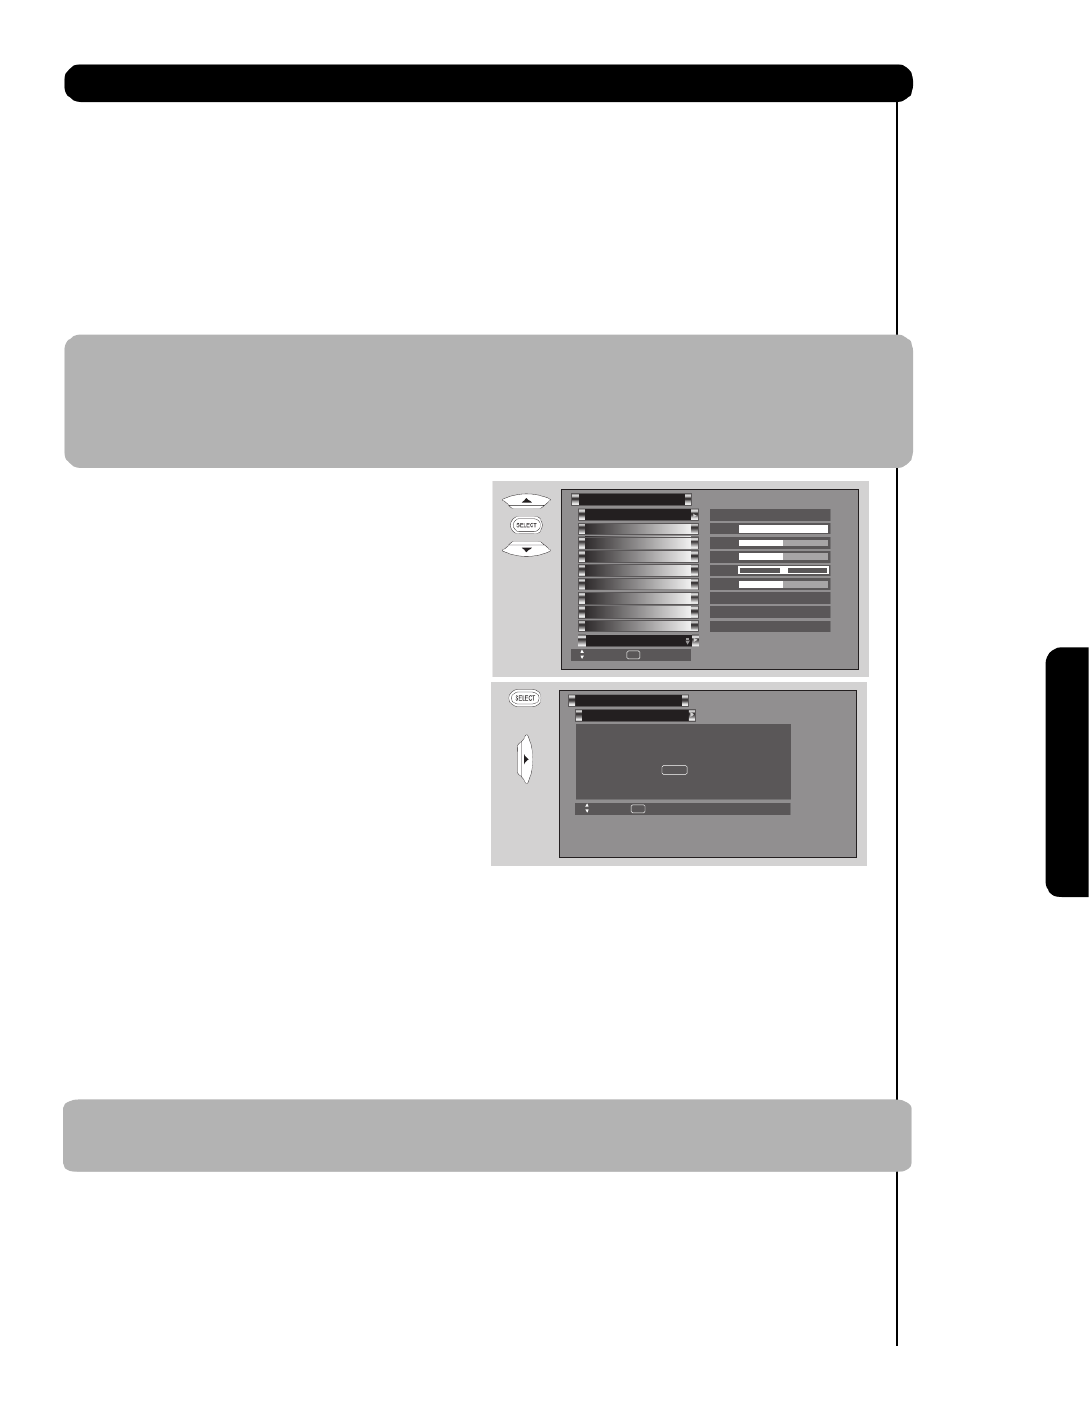
32
1. Press MENU on the remote control to display the
different features on your HITACHI Projection TV.
2. Press the CURSOR buttons to navigate and
highlight a different feature of the On-Screen
Display menu. Press the button to select.SELECT
3. Press EXIT on the remote control to quickly exit
from a menu.
On-Screen Display
On-Screen Display
Move SelectSEL
Setup
Timers
Locks
Channel Manager
Audio
Video
This part of the screen shows
which selections are available.
This part of the screen shows which
Remote Control buttons to use.
Aspect

Picture Mode Select between the two picture
modes; Day and Night.
Contrast Adjust contrast.
Brightness Adjust brightness.
Color Adjust color.
Tint Adjust tint.
Sharpness Adjust sharpness.
Color Temperature Set this to High for less intense
color with more blue, set to
Medium for natural color, set to
Standa d for standa d colorsr r .
Black Enhancement Enhance picture brightness in
light scenes.
Edge Enhancement Automatically enhances the
edges between light and dark
areas.
Noise Reduction Reduces conspicuous noise in
the picture.
Mode Choose the pictu e format r
aspect ratio.
Black Side Panel Set the gray side bars on/off
when watching 4:3 signals in
standard mode.
Virtual HD Select between 1080i and 540p
Scan mode.
Reset Video Settings Choose the Reset Video
settings.
Treble Adjust the treble.
Bass Adjust the bass.
Balance Adjust the balance.
Surround Select Surround settings (O f, f
Wide,Normal)
Audio Source Select between three Audio
Sources.
Internal Speakers Select internal or external
speakers.
Auto Noise Cancel Eliminates the noise between
stations.
Perfect Volume Adjust volume in fixed setting.
Loudness Adjust Loudness.
Language Select Language options if
available.
DRC Select Dynamic Range
Compression to ON or OFF.
Signal Meter Access Signal Meter.
Auto Channel Scan Set Auto Channel Scan.
Channel List Set Channel List.
Change Access Code Change Lock access code.
Engage Lock Choose to lock channel or
front panel.
Movie Ratings Block various types of movies
and video types based on
motion picture ratings.
TV Ratings Block various types of movies
and television programming
based on a parental guide
ratings.
Canadian Ratings (ENG)
Block various types of movies
and television programming
based on the Canadian ratings
system.
Canadian Ratings (FRN)
Block various types of movies
and television programming
based on the Canadian French
ratings system .
Set the Clock Set Clock Settings.
Set Sleep Timer Set Sleep Timer intervals
(30 min. intervals, 00:30-3:00).
Set Day/Night Timer Set Day/Night picture mode
settings.
Set Event Timer Set viewing reservation for TV
programs.
Magic Focus Tune Up Automatic and manual
alignment of the red, green and
blue colors to make white.
Menu Preference Choose English, French, or
Spanish text.
Set The Inputs
Label Video Inputs, VCR, DVD,
etc.
Set Closed Captions Feature to display dialogue/text.
Set OutAudio Set Out sou ce.Audio r
Upgrades Select to upgrade TV software.
Setup
Timers
Locks
Channel Manager
Audio
Video
33
On-Screen Display
On-Screen Display
NOTE: 1. The Language and the Dynamic Range Compression feature of the Audio OSD are
only available for Digital channels.
2. The Signal Meter feature of the Channel Manager OSD is only available for Digital signals.
Auto Color Adjusts the color to maintain
constant color levels
Auto Movie Mode Turn ON/OFF the 3:2 Pulldown
detection feature.
Auto Aspect Auto adjust the Aspect Ratio
Vertical Position Adjust the position of the picture
Aspect
Alternate Ratings Ratings system for DTV Signal
to block various types of programs

34
Select VIDEO to adjust picture settings and improve
picture quality. You can independently customize each
of the Video Inputs to your preference to increase
viewing performance and pleasure depending upon the
video program being viewed. If RESET is selected, only
the selected input will reset to initial conditions.
Picture Mode
Use this function to choose from automatic picture
settings to optimize your TV’s performance.
1. Use the CURSOR buttons or to highlight and
select settings.PICTURE MODE
2. Press EXIT PICTUREto quit menu or select
MODE to return to previous menu.
Function Day Night
Contrast 100% 70%
Brightness 50% 55%
Color 50% 50%
Tint 50% 50%
Sharpness 50% 40%
Color Temperature High Standard
Black Enhancement Middle Low
Edge Enhancement High Low
Noise Reduction Off Off
1. Use the CURSOR buttons or to highlight the function to be adjusted.
2. Press the CURSOR buttons or to adjust the function. Press the button to select the functionSELECT
settings.
3. Press MENU to return to main menu or select PICTURE MODE to return to previous menu.
4. Press EXIT to quit menu.
Contrast
Use this function to change the contrast between black
and white levels in the picture.
Brightness
Use this function to adjust overall picture brightness.
Color
Use this function to adjust the level of color in the
picture.
Tint
Use this function to adjust flesh tones so they appear
natural.
Sharpness
Use this function to adjust the amount of fine detail in
the picture. Sharpness function will be disabled when
Noise Reduction is set to High.
Pictu e Moder Day
Next/Prev Select SEL Return
MENU
Video
Video
On-Screen Display
Edge Enhancement
Black Enhancement
Color Temperature
Sharpness
Tint
Color
Brightness
Contrast
Pictu re Mode Day
100%
50%
50%
50%
High
Middle
High
Vide o
Move SEL Return
Reset Video Settings
OR
Air / Cable
Edge Enhancement
Black Enhancement
Color Temperature
Sharpness
Tint
Color
Brightness
Contrast
Pictu re Mode Day Night
100%
50%
50%
50%
High
Middle
High
Vide o
Move SEL Return
Reset Video Settings
Move SelectSEL
Setup
Channel Manager
Timers
Locks
Aspect
Audio
Video
On-Screen Display
Reset ideo SettingsV
This function allows you to Reset the Video Menu
Settings of the p resent input and etu n it to the Dayr r
VIDEO mode.
1. Use the CURSOR buttons or to highlight the
function to be adjusted.
2. P ress the SELECT button to select RESET VIDEO
SETTINGS.
3. Use the CURSOR button to access other video
settings.
You can customize each of the Video Inputs to your
pr r refe ence to inc ease viewing performance and
pleasu r re, depending upon the video p ogram being
viewed. If RESET is selected, only the selected Input
will reset to the initial conditions as explained above.
If RESET is selected in Input 1, only Input 1
will retu n to factory conditions.r
Reset ideo SettingsV
Vi ed o
Move SEL Retu nr
Select “Reset” to etu n the video menu settings r r
on this Input to the original factory settings.
Reset
OR
Video
Color emperatu eT r
Set this to High for cooler color with mo e blue, set to Medium for mo e natural colo , set to Standa d for accurater r r r
color.
Black Enhancement
Use this function to enhance Pictu e brightness in light scenes using the settings o f, lo , middle and high.r f w
Edge Enhancement
Use this function to automatically enhance the edges between light and dark a eas using the settings O f, Lo ,r f w
Middle and High.
NOTE: 1. If CONTRAST is selected, you are adjusting . The additional menu items CONTRAST BRIGHTNESS,
COLOR, TIN ,T and SHARPNESS can be selected and adjusted in the same manne .r
2. It may be necessa y to adjust r TINT to obtain optimum picture quality when using the COMPONENT
VIDEO -PY B RP input jacks.
3. CABLE and AIR share a ideo setting. Also, each of the video inputs have their own independentV
settings.
35
The AU O COLOR function automatically monitors and adjusts the color to maintain natural flesh tonesT
while preserving fidelity of background colors.
NOTE: When using Component, HDMI input, Auto Color will not be available (grayed out).
Auto Color
Auto Color
Auto Color
Auto ColorAuto Color
Edge Enhancement
Black Enhancement
Color Temperatu re
Sharpness
Tint
Color
Brightness
Contrast
Pictu re Mode Day
100%
50%
50%
50%
High
Middle
High
Video
Move SEL Retu rn
Reset Video Settings

Video
On-Screen Display
Auto Movie Mode
Noise Reduction
Auto color Off
Off
Off
Video
Move SEL
Return
Noise Reduction
The function automatically educes conspicuous noise in the pictu e without degradingNOISE REDUCTION r r
pictu e qualit . Set r y NOISE REDUCTION to OFF if the TV experiences pictu e blocking. When Noise Reduction isr
set to High, Sharpness function is disabled (grayed out).
The Auto Movie Mode function turns ON or OFF the 3:2 PULLDOWN DETECTION SPECIAL FE TURE. A
Theatrical movies are shot on film at 24 frames or still pictures per second, instead of 30 frames or 60 fields
like video. When film is transferred to video for television viewing, the disparity between the two frame rates
must be reconciled. This involves a process known as 3:2 pulldown.
When Auto Movie Mode is turned ON from the VIDEO menu, your Hitachi Projection elevision will activate T
the circuitry for this special feature to improve video performance when watching film based sources.
NOTES: 1. When using Progressive Scan Component HDMI input (Ex. 480p, 720p, 1080i), Auto Movie Mode or
will not be available (grayed out).
2. All ideo settings are independent of each other based on it s input (A , Input 1~5). V ’ ir/Cable
Auto Movie Mode
36

Aspect
Aspect
On-Screen Display
MENU
Move SelectSEL
Setup
Channel Manager
Timers
Locks
Aspect
Audio
Video
Use this function to select the Picture Format Aspect
Ratio.
1. Use the CURSOR buttons or to highlight the
ASPECT MODE.
2. P ess the r SELECT button to select ON or .OFF
Auto Aspect
Automatically adjust the Aspect Ratio depending on the input signal to fill the screen.
NOTE: 1. The Auto Aspect function is recommended on an input signal with VIDEO ID.
2. The Auto Aspect function is best used on COMPOSITE VIDEO, , S-VIDEO 480i 480pand
COMPONENT/HDMI signals.
3
. P ess the r CURSOR buttons or to select VE TICAL POSITION.R
Vertical Position
This function allows you to select when aspect style is either 4:3 EXPANDED/ZOOM1/ZOOM2 or
16:9 ZOOM. Vertical position can be changed with these modes. For example, it will be useful for
centering the picture area at both the top and bottom of the picture with 480i/480P signal. Adjustable
range is -10 (video center is toward bottom of screen) to +10 (video center is toward top of screen).
NOTE: Vertical Position will not be available in 4:3 STANDARD 16:9 STANDARD MODES.and
4. P ress MENU to etu n to main menu or select r r ASPECT to etu n to p evious menu.r r r
5. Press EXIT to quit menu.
Au to A sp ec t
Aspect
OR
1 6 : 9 S t a n d a r d
Move SelectSEL
1 6 : 9 Z o o m
4 : 3 S t a n d a r d 4: 3 Ex p a n d e d
4 : 3 Z o o m 1 4: 3 Zo o m 2
M o d e
V e r t i c a l P o s i t i o n + 1 0
40

41
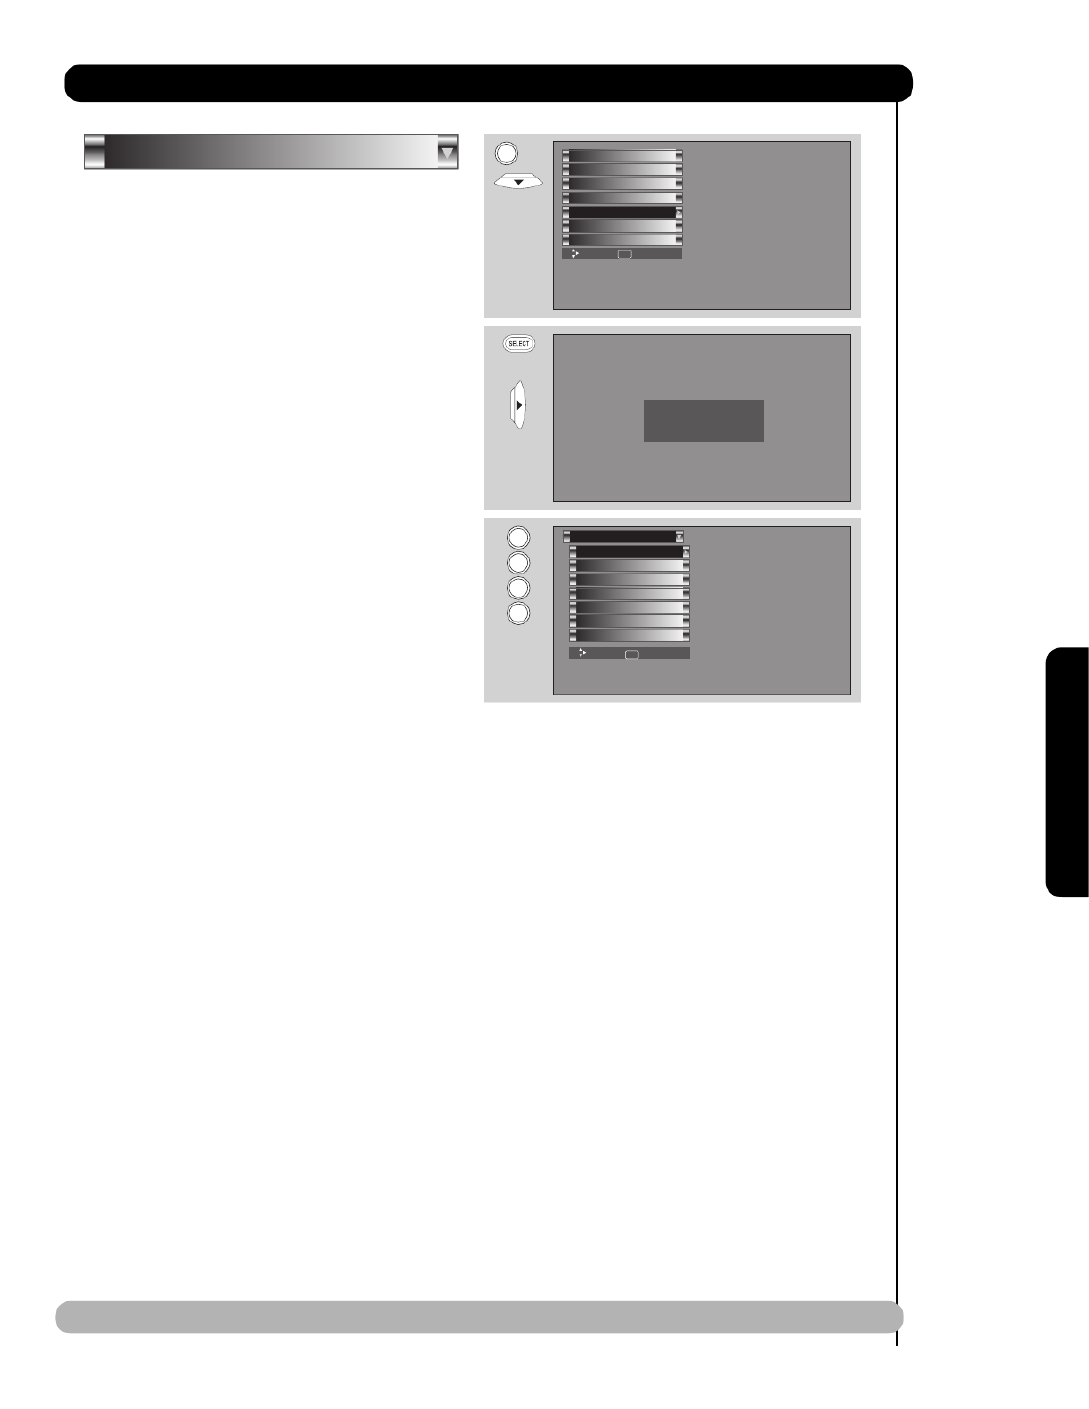
Select CHANNEL MANAGER to set your Antenna
options, run Auto Channel Scan, Check Signal Meter
and Set Channel List.
1. Use the CURSOR buttons or to highlight the
function to be adjusted.
2. Press the SELECT button or CURSOR button to
select.
Signal Meter
Select SIGNAL METER when using an indoor or
outdoor antenna. This feature will show the signal
strength and peak values of the Antenna signal to help
you adjust your antenna to optimize signal reception.
1. Use the CURSOR buttons or to highlight
SIGNAL METER.
2. Press the SELECT button to select.
NOTE: The Signal Meter will not be available (grayed
out) when watching analog channels.
Channel List
Auto Channel Scan
Signal Meter
Channel Manager
Move SEL Return
Signal Meter
Channel Manager
Move ReturnSEL
Channel 15-1
Strength 91
Peak 91
Close
Channel List
Auto Channel Scan
Signal Meter
Channel Manager
Move SEL Return
OR
Channel Manager MENU
Move SelectSEL
Setup
Channel Manager
Timers
Locks
Aspect
Audio
Video
On-Screen Display
Channel Manager

On-Screen Display
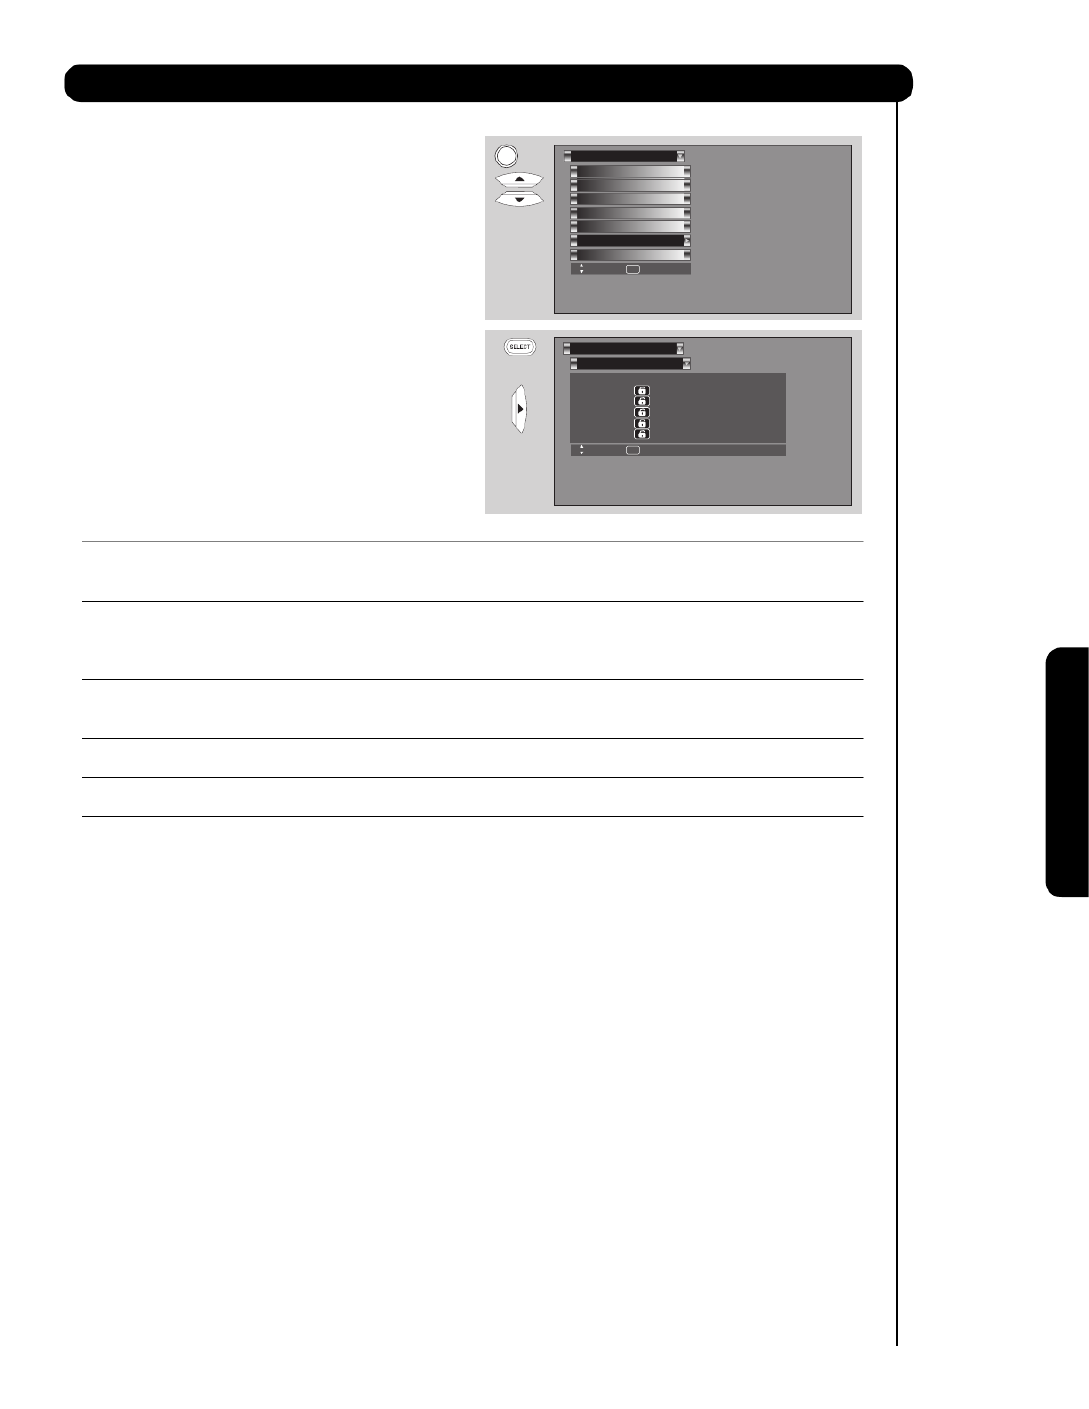
Auto Channel Scan
This feature will automatically store active TV channels
in Auto Channel Scan memory.
1. Use the buttons CURSOR
to highlight
AIR, CABLE (1) or CABLE(2) source.
2. P ess the r CURSOR buttons or to highlight the
START or RESET option.
3. P ess the r SELECT button to select.
NOTE: 1. When changing cable sources from CABLE (1) to CABLE (2), the AUTO CHANNEL SCAN needs to
be repeated for the Channel List to be updated.
Channel List
Auto Channel Scan
Signal Meter
Channel Manager
Move SEL Return
Channel List
Channel Manager
Move On/O SEL INFO Detail
INFO
FAV CH# Scan Lock ID
6 O -------On
7 On O -------
8 On O -------
9 On O -------
10 On O -------
11 On O -------
12 On O -------
13 On O -------
Channel List
Auto Channel Scan
Signal Meter
Channel Manager
Move SEL Return
Auto C l S n h nna e ca
C l rh na ne M a an ge
S ourc e
C able(2)
Auto C hannel S can
S tart R es et
OR
Move R eturnSEL
C able(1) Air
42
Channel Manager
Channel List
This function allows you to review which channels are
labeled (CH ID), which have been added to CHANNEL
MEMORY (SCAN), which are protected by LOCK and
which are your FAVORITE (FAV) CHANNELS.
1. Use the buttons navigate the ChannelCURSOR
List.
2. Press the SELECT button to select ON or OFF on
the and SCAN LOCK Columns.
3. To select the column, input the accessLOCK
code. (Default access code: 0000)
4. Press the FAV button to set or remove the
FAVORITES settings.
5. Press the EXIT button to return to normal viewing.
or
This function will block out the picture and sound of the
selected channel or video input.
The code to enter the Locks featur e is a four digit
access code number. The factory preset code is 0000.
Use the NUMBER buttons to enter the access code.
1. Use the buttons to highlightCURSOR
function.
2. P ess ther SELECT button to select.
Change Access Code
1. To change the ACCESS CODE NUMBER, select CHANGE ACCESS CODE to change the factory pr eset
code (0000) to your pr eference.
If you fo get yourr ACCESS CODE NUMBER, use the factory code 7777 to erase your key numbe . This willr
reset the access code number back to the factory pr eset ( .0000)
2. Enter a new four digit number.
3. Press EXIT to quit the menu or select CHANGE ACCESS CODE to etu n to the p evious menu.r r r
Engage Lock
When is selected, and can be set individuall .ENGAGE LOCK SET CHANNEL LOCK SET FRONT ANEL LOCKP y
When is tu ned on, the pictu e and sound for the chosen channel will be blocked out.SET CHANNEL LOCK r r
When is tu ned on, all buttons on the F ont Panel will be deactivated, except the SET FRONT ANEL LOCKP r r
POWER button.
When MOVIE R TINGSA is selected, you can block various types of movies and video tapes based on motion
pictu e ratings. Pictu e-in-Pictu e will also be blocked automatically (see page 4 ).r r r 4
When is selected, various types of television programming based on a pa ental guide ratings will beTV R TINGSA r
blocked. Pictu e-in-Pictu e will also be blocked automatically (see page 4 ).r r 5
Use to block various types of movies and television programs based on the two ratingCANADIAN R TINGSA
systems used in Canada that you feel may be inapp opriate due to its content (see pages 4 -4 ). r 6 7
Use ALTERNATE RATINGS (U.S.) to block various types of movies and television pograms based on ratings
systems used in U.S. that you feel may be inappropriate due to its content (see page 4 ). 8
OR
Locks
Canadian Ratings(F n)r
Canadian Ratings(Eng)
TV Ratings
Movie Ratings
Engage Lock
Change Access Code
Please Enter Access Code
Access Code: - - - -
[#Keys] Enter Code
Locks
Move SelectSEL
0
0
0
0
Alternate Ratings U.S.
MENU
Move SelectSEL
Setup
Channel Manager
Timers
Locks
Aspect
Audio
Video
43
Locks
On-Screen Display
NOTE: The ALTERNATE RATINGS (US) option is available for Digital Channels only.
or

44
Locks
On-Screen Display
Movie Ratings
Use Movie Ratings to prevent viewing of any movie that
you feel may be inappropriate due to its content.
1. Use the CURSOR buttons or to select the
MOVIE RATING category that you want to block.
2. Press SELECT to block the MOVIE RATING that
you have selected. Once rating is selected, for
example PG-13, all movies rated PG-13 and higher
(R, NC-17, and X) will be blocked.
3. Press EXIT MOVIEto quit the menu or select
RATING to return to the previous menu.
Motion Picture Ratings Table
NOT RATED Contains no rating. Not Rated (NR) and Not Applicable (NA) programs. Movie has not
been rated or ratings do not apply.
G General audiences. All ages admitted.
PG Parental guidance suggested. Some material may not be suitable for children.
PG-13 Parents strongly cautioned. Some material may be inappropriate for children under 13.
R Restricted. Under 17 requires accompanying parent or adult guardian.
NC-17 No one 17 and under admitted.
X Adults only
NOTE: 1. A movie rating is dependent upon the movie that is viewed. If the movie does not carry a rating, the
TV will not block it.
2. Blocking NOT RATED programs may block emergency programming, sports, news, public service
announcements, religious programs and weather.
Canadian Ratings(Frn)
Canadian Ratings(Eng)
TV Ratings
Movie Ratings
Engage Lock
Change Access Code
Locks
Move SelectSEL
MENU
Movie Ratings
Locks
Move ReturnSEL
sutatS
detaR toN
G
PG
PG-13
R
NC-17
X
OR
Alternate Ratings U.S.

45
Locks
On-Screen Display
TV Ratings
Use TV RATINGS to prevent the viewing of any TV
program that you feel may be inappropriate due to its
content.
1. Use the CURSOR buttons or to select the TV
RATING category that you want to block.
2. Press SELECT to block the TV RATING that you
have selected.
3. Press EXIT to quit the menu or select TV RATING
to return to the previous menu.
TV Parental Guide Ratings Table
TV-Y All children. The themes and elements in this program are specifically designed for a very
young audience, including children from ages 2-6.
TV-Y7 Directed to older children. Themes and elements in this program may include mild
physical or comedic violence, or may frighten children under the age of 7.
TV-G General audience. It contains little or no violence, no strong language, and little or no
sexual dialogue or situations.
TV-PG Parental guidance suggested. The program may contain infrequent coarse language,
limited violence, some suggestive sexual dialogue and situations.
TV-14 Parents strongly cautioned. This program may contain sophisticated themes, intense
sexual situation, more intense violence and intensely suggestive dialogue.
TV-MA Mature audiences only. This program may contain mature themes, indecent language,
graphic violence, and explicit sexual content.
FV Fantasy Violence
V Violence
S Sexual Situation
L Adult Language
D Sexually Suggestive Dialogue
NOTE: 1. If you Block TV-14D TV-MA TV-14V, you will still permit programs; If you block , you will
automatically block TV-MAV TV-MALSprograms, but you will still permit programs. This means that
the TV will block violence in TV-14 TV-MAand higher ( ), but not language and sex.
2. TV program ratings are dependent on the broadcaster. If the program is not rated, the TV will not
block it.
Canadian Ratings(Frn)
Canadian Ratings(Eng)
TV Ratings
Movie Ratings
Engage Lock
Change Access Code
Locks
Move SelectSEL
MENU
TV Ratings
Locks
Move ReturnSEL
Sub Rating
Status D L S V FV
TV-Y
TV-Y7
TV-G
TV-PG
TV-14
TV-MA
OR
Alternate Ratings U.S.

46
Locks
On-Screen Display
Canadian Ratings (Eng)
Use CANADIAN RATINGS (ENG) to block any type of
movie and television program in Canada that you feel
might be inappropriate in its content.
1. Use the CURSOR buttons or to select the
CANADIAN RATINGS (ENG) category that you
want to block.
2. Press SELECT to block the CANADIAN RATINGS
(ENG) that you have selected. Once rating is
selected, for example , all movies andC8+
television programs rated C8+ and higher (G, PG,
14+ 18+and ) will be blocked automatically.
3. Press EXIT CANADIANto quit the menu or select
RATINGS (ENG) to return to the previous menu.
Canadian Ratings English Table
C Programming intended for children under age 8 - Violence Guidelines; Careful attention is
paid to themes, which could threaten children’s sense of security and well-being. There will
be no realistic scenes of violence. Depictions of aggressive behaviour will be infrequent
and limited to portrayals that are clearly imaginary, comedic or unrealistic in nature. Other
Content Guidelines: There will be no offensive language, nudity or sexual content.
C8+ Programming generally considered acceptable for children 8 years and over to watch on
their own - Violence Guidelines: Violence will not be portrayed as the preferred, acceptable,
or only way to resolve conflict; or encourage children to imitate dangerous acts which they
may see on television. Any realistic depictions of violence will be infrequent, discreet, of
low intensity and will show the consequences of the acts. Other Content Guidelines: There
will be no profanity, nudity or sexual content.
G General Audience - Violence Guidelines: Will contain very little violence, either physical or
verbal or emotional. Will be sensitive to themes which could frighten a younger child, will
not depict realistic scenes of violence which minimize or gloss over the effects of violent
acts. Other Content Guidelines: There may be some inoffensive slang, no profanity and
no nudity.
PG Parental Guidance - Programming intended for a general audience but which may not be
suitable for younger children. Parents may consider some content inappropriate for
unsupervised viewing by children ages 8-13. Violence Guidelines: Depictions of conflict
and/or aggression will be limited and moderate; may include physical, fantasy, or
supernatural violence. Other Content Guidelines: May contain infrequent mild profanity, or
mildly suggestive language. Could also contain brief scenes of nudity.
14+ Programming contains themes or content which may not be suitable for viewers under the
age of 14 - Parents are strongly cautioned to exercise discretion in permitting viewing by
pre-teens and early teens. Violence Guidelines: May contain intense scenes of violence.
Could deal with mature themes and societal issues in a realistic fashion. Other Content
Guidelines: May contain scenes of nudity and/or sexual activity. There could be frequent
use of profanity.
18+ Adult - Violence Guidelines: May contain violence integral to the development of the plot,
character or theme, intended for adult audiences. Other Content Guidelines: May contain
graphic language and explicit portrayals of nudity and/or sex.
Canadian Ratings(Frn)
Canadian Ratings(Eng)
TV Ratings
Movie Ratings
Engage Lock
Change Access Code
Locks
Move SelectSEL
MENU
Canadian Ratings(Eng)
Locks
Move ReturnSEL
Status
C
C8+
G
PG
14+
18+
OR
Alternate Ratings U.S.
47
Locks
On-Screen Display
Canadian Ratings (Frn)
Use CANADIAN RATINGS (FRN) to block Canadian
French programs according to various program ratings
that you feel might be inappropriate in its content.
1. Use the CURSOR buttons or to select the
CANADIAN RATINGS (FRN) category that you
want to block.
2. Press SELECT to block the CANADIAN RATINGS
(FRN) that you have selected. Once rating is
selected, for example , all movies and8 ANS+
television programs rated and higher will8 ANS+
be blocked automatically.
3. Press EXIT CANADIANto quit the menu or select
RATINGS (FRN) to return to the previous menu.
Canadian Ratings French Chart
G General - Programming intended for audiences of all ages. Contains no violence, or the
violence content is minimal or is depicted appropriately with humor or caricature or in an
unrealistic manner.
8 ans + 8 + General - Not recommended for young children - Programming intended for a broad
audience but contains light or occasional violence that could disturb young children.
Viewing with an adult is therefore recommended for young children (under the age of 8)
who cannot differentiate between real and imaginary portrayals.
13 ans + Programming may not be suitable for children under the age of 13 - Contains either a few
violent scenes or one or more sufficiently violent scenes to affect them. Viewing with an
adult is therefore strongly recommended for children under 13.
16 ans + Programming is not suitable for children under the age of 16 - Contains frequent scenes of
violence or intense violence.
18 ans + Programming restricted to adults - Contains constant violence or scenes of extreme
violence.
Alternate Ratings U.S.
Canadian Ratings(Frn)
Canadian Ratings(Eng)
TV Ratings
Movie Ratings
Engage Lock
Change Access Code
Locks
Move SelectSEL
MENU
Canadian Ratings(Frn)
Locks
Move ReturnSEL
Status
G
8 ans +
13 ans +
16 ans +
18 ans +
OR

Locks
48
Alternate Ratings (Example Only) :
G General audiences. All ages admitted.
PG Parental guidance suggested. Some material may not be suitable for children.
PG-13 Parents strongly cautioned. Some material may be inappropriate for children under 13.
R Restricted. Under 17 requires accompanying parent or adult guardian.
NC-17 No one 17 and under admitted.
X Adults only
Alternate Ratings U.S.
Use Alternate Ratings to prevent viewing of any movie or
program that you feel may be inappropriate due to its content.
1.
2.
3.
Use the CURSOR buttons or to select the
ALTERNATE RATIN G category that you want to block.
Press SELECT to block the ALTERNATE TINGRA
that you have selected. Once rating is selected, for
example PG-13, all movies rated PG-13 and higher
(R NC-17 ) will be blocked., and X
Press EXIT to quit the menu or select ALTERNATE
R TINGSA t t t to re urn o he s n . previou me u
This feature will be available only for ATSC Digital signal.
In case only NTSC analog signal is received this feature will
be unavailable (grayed out).
Alternate Ratings U.S.
Canadian Ratings(Frn)
Canadian Ratings(Eng)
TV Ratings
Movie Ratings
Engage Lock
Change Access Code
Locks
Move SelectSEL
MENU
OR
Status (1 / 10) CATEGORY NAME
:
:
:
:[ ]
Move SEL View Block
Alternate Ratings U.S.
Locks
Y Adults only
TV-Y
TV-Y7
12345678
ABCDEFJH
Directed to older children. Themes and elements in
this program may include mild physical or comedic
violence, or may frighten children under the age of 7.
OR
Move SEL View Block
TV-Y
TV-Y7
12345678
ABCDEFJH
:
:
:
:[ ]
Status (1 / 10) CATEGORY NAME
Alternate Ratings U.S.
Locks
INFO
Air 8 - 1
12:00PM
FOX
DTVCC
ST STEREO
Day AUTO HD 1080i 16:9 Standard
VIEW
--:--AM --:--AM
ALT.
US
B caro da st Received
Alternate Ratings
In order to set the Alternate Ratings the ATSC Digital channel
received must include Alternate Ratings data .To see
if the channel has Alternate Ratings , press the INFO key
on the R/C. See fig. (1) for reference.
Fig. (1)
On-Screen Display
Once the TV has received Alternate Ratings data , the
Alternate Ratings US in the lock menu will become
available.

49
On-Screen Display
This page is left blank intentionally

50
Timers
On-Screen Display
Select TIMERS to set your Clock, Sleep Timer, Event
Timer and Day/Night Timer Recordings.
1. Use the CURSOR buttons or to highlight the
function to be adjusted.
2. Press the SELECT button or CURSOR button to
select.
Set The Clock
The Clock must be before you can use theset
SET EVENT TIMER DAY/NIGHT TIMER or feature.
1. Use the CURSOR buttons , , or to
highlight the chosen TIME ZONE settings.
2. Press the SELECT button to select. If you observe
daylight savings, use buttons to highlightCURSOR
DAYLIGHT SAVING CORRECTION and press the
SELECT button to select.
3. Use the CURSOR buttons , , or to
highlight the (hour and minute),CURRENT TIME
AM DAYor PM, MONTH, , and YEAR.
4. Use the CURSOR buttons and to adjust
settings.
5. Press the SELECT button to set the TIME AND DATE.
6. Press EXIT to quit the menu or select to return to the previous menu.SET THE CLOCK
NOTE: 1. When AUTOMATICALLY ADJUST CLOCK FOR DAYLIGHT SAVING CHANGES is checked ■
✔, the TV
will automatically calculate the clock adjustment for Daylight Saving.
Set The Clock
Timers
Set Day/Night Timer
Set Sleep Timer
Set Event Timer
Set The Clock
Timers
Move SetSEL
Move SEL Retu nr
Time Zone :
P S T M S T C S T E S T
OR
Set Day/Night Timer
Set Sleep Timer
Set Event Timer
Set The Clock
Timers
Move SetSEL
OR
Timers
2. The TV counts electrical pulses for regulating the . When the power cord is unplugged then TIMERS
plugged in quickl , the clock is stopped momentarily and the y TIME indication will become slo .w
A K S T H S T A T L
D a y l ig h t S a v i n g C o r r e c t i o n s
Time : -- : -- AM Jan. 01 2006
MENU
Move SelectSEL
Setup
Channel Manager
Timers
Locks
Aspect
Audio
Video
.
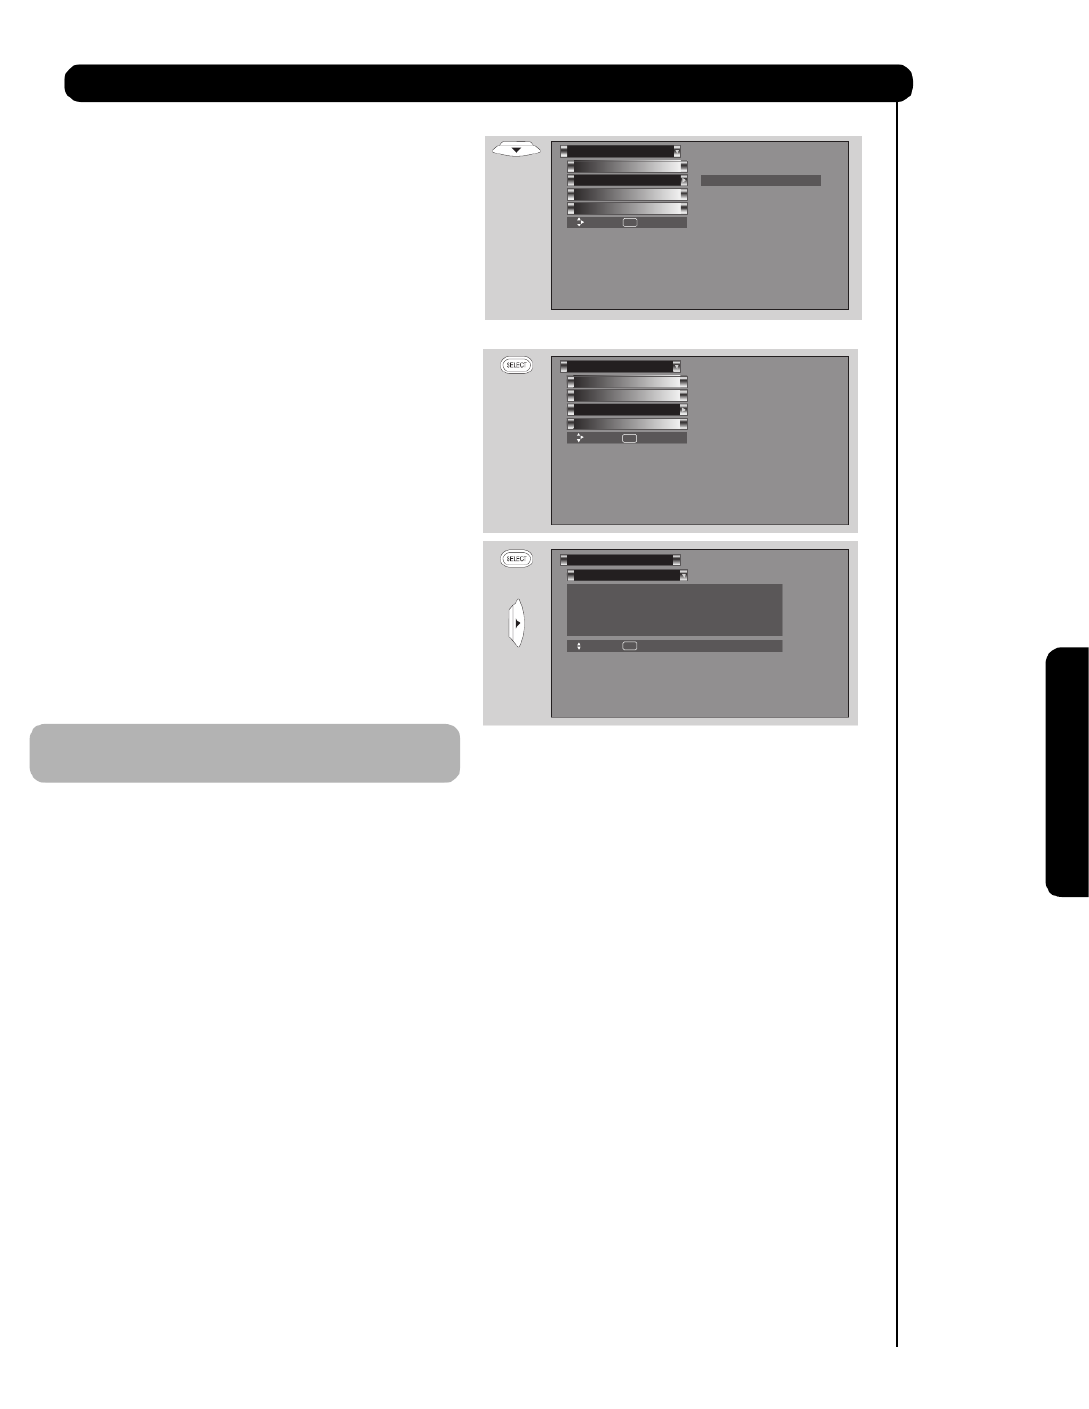
Timers
On-Screen Display
Set Sleep Timer
Select this feature to set your SLEEP TIMER from 30
minutes to 3 hours (30 minute increments).
1. Press the CURSOR buttons or repeatedly to
set your Timer from 0:00 0:30 1:00 1:30 2:00, , , , ,
2:30 3:00and .
Set Day/Night Timer
Select this feature to activate and set your TV’s
DAY/NIGHT PICTURE MODE automatically.
1. Use the CURSOR buttons or to highlight SET
DAY/NIGHT TIMER settings.
2. Press the SELECT CURSORbutton or button
to select.
3. Use the CURSOR buttons , , or to select
DAY MODE ON and to set it’s TIMER.
4. Use the CURSOR buttons , , or to select
DAY MODE OFF and to set it’s TIMER.
5. Press EXIT SETto quit the menu or select
DAY/NIGHT TIMER to return to the previous
menu.
NOTE: When the clock is changed in the SET THE
CLOCK function, this feature is disabled.
Set Day/Night Timer
Timers
Set Day/Night Timer
Set Sleep Timer
Set Event Timer
Set The Clock
Timers
Move SetSEL
Move ReturnSEL
❑ ctivateA
OR
Set Day/Night Timer
Set Sleep Timer
Set Event Timer
Set The Clock
Timers
Move SetSEL
0:00
Day Mode On : 06:00 AM
Day Mode Off : 06:00 PM
51
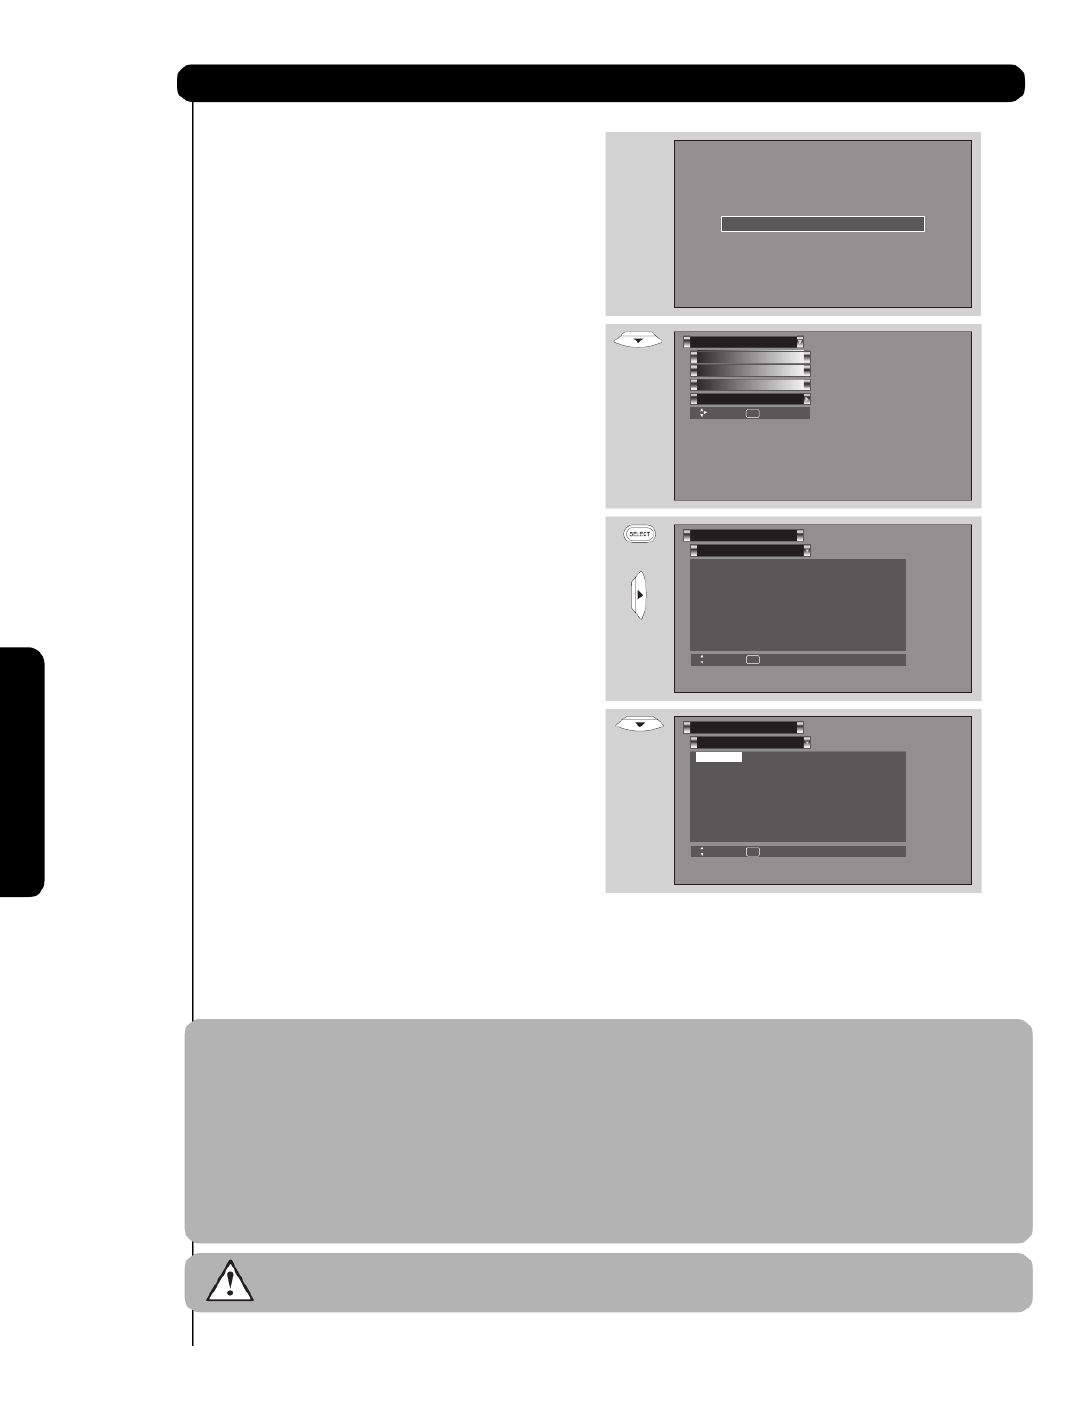
52
Timers
On-Screen Display
Set Event Timer
This function will automatically operate the Projection
TV viewing reservation of a program. If the clock is not
set, you can not use this function and the screen below
will appear. The message on the screen will disappear
after 3 seconds, then the screen automatically goes to
the clock setup mode (see page 45).
1. Use the CURSOR buttons or to highlight
EVENT 1 EVENT 2 EVENT 3 EVENT 4 , , , and then
press the SELECT button to select.
2. Use the CURSOR buttons , or to highlight
and select START TIME HOUR/MINUTE.
3. Use the CURSOR buttons , or to highlight
and select START TIME AM/PM.
4. Use the CURSOR buttons , or to highlight
and select FINISH TIME HOUR/MINUTE.
5. Use the CURSOR buttons , or to highlight
and select FINISH TIME AM/PM.
6. Use the CURSOR button to highlight the
MONTH.
7. Use the CURSOR button to select a MONTH or
CURSOR button to select DAILY, WEEKLY -
SUNDAY TO MONDAY. Use the CURSOR button
to return to MONTH.
8. Use the CURSOR buttons , or to highlight
and select the DAY of the MONTH.
9. Use the CURSOR buttons , or to highlight
and select the YEAR.
10. Use the CURSOR buttons , or to highlight
and select CABLE AIR.or
11. Use the CURSOR buttons , or to set the channel the TV will tune into.
12. Use the button to enable SELECT EVENT SETTINGS. A ✔ in the box means it is enabled.
NOTE: 1. When the INFO button is pressed, the Event Timer Icon will only display the current date ON/OFF
timer.
2. The OFF TIMER ON TIMER will only activate if the TV was turned on by the and no channel
selection was made after this time. If you change the channel after the has beenON TIMER
activated, the will deactivate.OFF TIMER
3. If no remote control button is pressed after viewing reservation is activated, the TV will
automatically turn off after three hours. Therefore, do not for more than threeSET EVENT TIMER
hours if you do not plan to control your television with the remote control.
CAUTION: Do not use your TV as a deterrent when away from home by using the ON and OFF
TIMERS. For safety, the TV should be turned off when you are away from home.
Set Event Timer
Timers
Set Day/Night Timer
Set Sleep Timer
Set Event Timer
Set The Clock
Timers
Move SetSEL
Move SEL Return
Please Set Clock First
4:11 PM
❑ Event1 -- : -- AM : -
-- : -- AM Jan. 1 2006
A ir -------
❑ Event2 -- : -- AM : -
-- : -- AM Jan. 1 2006
Air -------
❑ Event3 -- : -- AM : -
-- : -- AM Jan. 1 2006
Air -------
❑ Event4 -- : -- AM : -
-- : -- AM Jan. 1 2006
Air -------
Set Event Timer
Timers
Move SEL Return
4:11 PM
❑ Event1 : -- : -- AM -
-- : -- AM Jan. 1 2006
Air -------
❑ Event2 -- : -- AM : -
-- : -- AM Jan. 1 2006
Air -------
❑ Event3 -- : -- AM : -
-- : -- AM Jan. 1 2006
Air -------
❑ Event4 -- : -- AM : -
-- : -- AM Jan. 1 2006
Air -------
OR
4. When the CLOCK is changed in the SET THE CLOCK function, events are disabled and the check
mark is removed

Setup
On-Screen Display
Select SETUP when setting your TV up for the first
time.
1. Use the CURSOR buttons or to highlight the
function to be adjusted.
2. Press the SELECT button or CURSOR button
to select.
Magic Focus Tune Up
Auto Digital Convergence Adjustment
Please turn your television for at least 20 minutesON
before using this feature.
The MAGIC FOCUS button on control panel will not
work when adjustment mode is set to MANUAL (see
page 55 or 56).
Your HITACHI Projection TV has three color projection
tubes: one for red, one for green, one for blue. When
mixed together in the proper proportion, the output of
these three color tubes can produce any color. To
produce these colors, however, the beams must be
precisely aligned over each other so that the colors can
be mixed. The process of aligning these picture beams
is called “convergence”.
Over a period of time, the picture tubes can drift out of
alignment due to normal bumps and vibrations or
moving the TV. If you move your TV, or if, after a time,
you notice color rings or halos around objects in the
picture, you may want to converge (align) the colors.
Properly converged, the lines appear white, which is
actually a combination of the outputs of the three color
tubes. The output of the green tube is stationary. The
outputs of the red and blue tubes can be adjusted.
When properly aligned, the outputs of all three tubes
should be directly over each other to produce the white
lines.
To simplify convergence, HITACHI incorporates a function called located on the front controlMAGIC FOCUS
panel, which allows the TV to self-adjust. Press this button and the convergence self adjustmentMAGIC FOCUS
will start and this process will take approximately 20 seconds. If this button is pressed during this process, no
change in picture quality will occur. After this 20 second self-adjust period, picture quality will be optimum (do not
move the TV during self-adjust).
You may also select from the Setup Menu.MAGIC FOCUS TUNE UP
M A G I C F O C U S
>>>>> <<<<<
MAGIC
FOCUS
Set The Inputs
Menu Preference
Set Virtual HD
Magic Focus Tune Up
Set Closed Captions
Set Black Side Panel
Set Audio Out
Setup
Move SetSEL
OR
Setup MENU
Move SelectSEL
Setup
Channel Manager
Timers
Locks
Aspect
Audio
Video
Upgardes
53
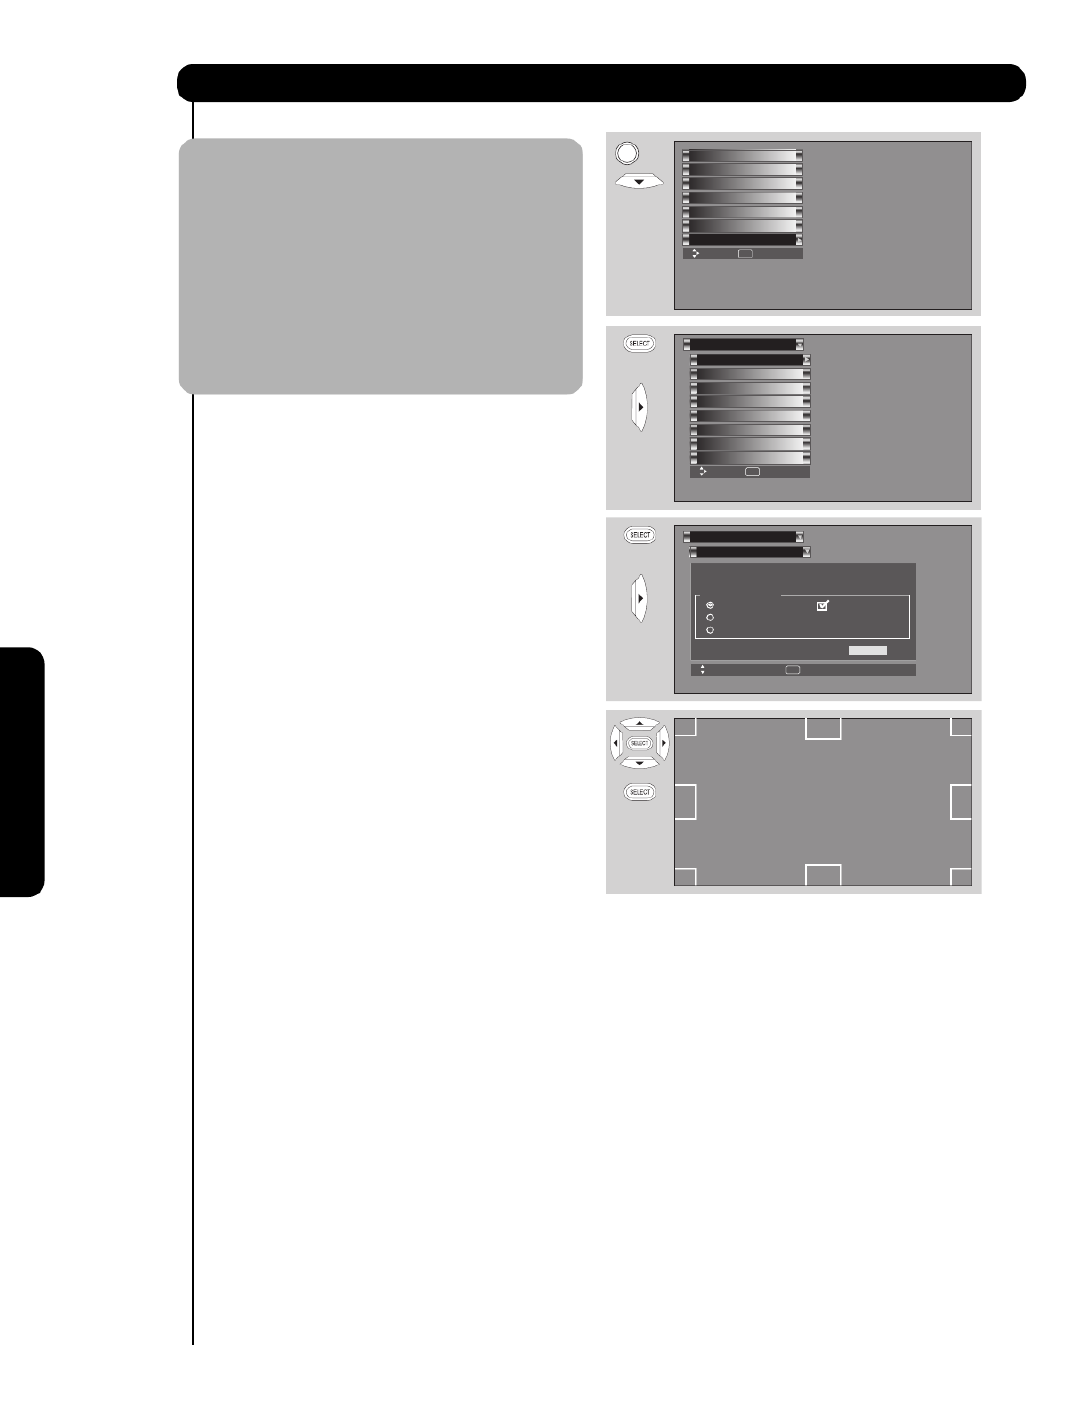
Setup
On-Screen Display
NOTE: 1. Only a momentary press of the MAGIC
FOCUS button is necessary to start AUTO
DIGITAL CONVERGENCE. At any time
during this convergence correction
process, you may press the MAGIC
FOCUS MAGIC FOCUSbutton to exit the
mode. However, the convergence
correction process needs to be completed
to SAVE the new corrected convergence
data.
2. When Auto ■
✔ AT TURN OFF is selected,
the TV will adjust itself after 90 days.
M A G I C F O C U S
>>>>> <<<<<
MENU
Move SelectSEL
Setup
Channel Manager
Timers
Locks
Aspect
Audio
Video
OR
Set The Inputs
Menu Preference
Set Virtual HD
Magic Focus Tune Up
Set Closed Captions
Set Black Side Panel
Set Audio Out
Setup
Move SetSEL
Upgardes
54
OR
Adjustment Mode
Magic Focus Tune Up
Setup
Move ReturnSEL
Ali gns the Red, Gree n and Bl ue colo rs
to cor rect fo r Magn etic I nflue nces .
Auto ffonruttA
9 Poi nt Manual afte r 90 day s.
117 Point Manual
If you wan t to adj ust now sta r t

Setup
On-Screen Display
Manual Convergence Adjustment Mode
(9 Point Manual Adjustment)
NOTE: 1. Please turn ON your television for at least
20 minutes before using this feature.
2. AUTO ADJUSTMENT MODE is
recommended. If convergence is still not
acceptable, use the MANUAL
ADJUSTMENT MODE.
3. If AUTO ADJUSTMENT MODE is selected
or the MAGIC FOCUS button is pressed,
all manual adjust mode settings will be
erased.
Using the Remote Control, select SETUP, MAGIC
FOCUS TUNE UP, MANUAL ADJUSTMENT MODE, 9
POINT MANUAL, START to access convergence 9
point pattern. The adjustment point is indicated by the
Adjustment Point Cursor.
To Move Adjustment Point
To move the Adjustment Point Cursor using the
CURSOR buttons, the Adjustment Point Cursor must
be WHITE. Another way to move the Adjustment Point
Cursor is to press the following buttons: [2] [4] up, left,
[5] [6]down, right. If you use the number buttons while
the adjustment point is , it will change to WHITE RED.
To Change the Color of Adjustment Point
Press the button repeatedly SELECT (WHITE-RED-
BLUE-WHITE...) GREEN. color is fixed and cannot be
adjusted.
To Adjust the Convergence
Move the Adjustment Point Cursor to the point to be
adjusted. Use the buttons to match the CURSOR RED
and BLUE GREENcolors to (reference color). Properly
aligned, all three colors should appear white.
If convergence is acceptable after MANUAL
CONVERGENCE EXITadjustment, press button to
access menu mode.
1. Use the buttons to highlight your chosenCURSOR
option.
2. Press the SELECT button to select.
3. Select CANCEL to cancel adjusted data and return
to main picture.
4. Select DONE to save your adjustments and return to main picture.
5. Select BACK to return to the manual convergence adjustment mode.
6. Select RESET to recall the factory pre-set convergence data.
Magic Focus Tune Up
Setup
Move R eturnSEL
Ma anu l t Adjus
P e t nlea s s e el c butto
Done
B kac
R te es
C la nc e
EXIT
Adjustment
Point
Cursor
MENU
Move SelectSEL
Setup
Channel Manager
Timers
Locks
Aspect
Audio
Video
OR
Set The Inputs
Menu Preference
Set Virtual HD
Magic Focus Tune Up
Set Closed Captions
Set Black Side Panel
Set Audio Out
Setup
Move SetSEL
Upgrades
OR
Adjustment Mode
Magic Focus Tune Up
Setup
Move SEL Return
Ali g ns the R ed, Green and B l ue colo r s
to co rre ct fo r Magnetic In fl u ences.
Auto At turn o ff
9 Poi nt Manual after 90 d a ys.
117 Point Manual
If you wa nt to ad just now sta r t
55

Setup
On-Screen Display
Manual Convergence Adjustment Mode
(117 Point Manual Adjustment)
NOTE: 1. Please turn ON your television for at least
20 minutes before using this feature.
2. AUTO ADJUSTMENT MODE is
recommended. If convergence is still not
acceptable, use the MANUAL
ADJUSTMENT MODE.
3. If AUTO ADJUSTMENT MODE is selected
or the MAGIC FOCUS button is pressed,
all manual adjust mode settings will be
erased.
Using the Remote Control, select SETUP, MAGIC
FOCUS TUNE UP, MANUAL ADJUSTMENT MODE,
117 POINT MANUAL, START to access convergence
117 point pattern. The adjustment point is indicated by
the Adjustment Point Cursor.
To Move Adjustment Point
To move the Adjustment Point Cursor using the
CURSOR buttons, the Adjustment Point Cursor must
be WHITE. Another way to move the Adjustment Point
Cursor is to press the following buttons: [2] [4] up, left,
[5] [6]down, right. If you use the number buttons while
the adjustment point is , it will change to WHITE RED.
To Change the Color of Adjustment Point
Press the button repeatedly SELECT (WHITE-RED-
BLUE-WHITE...) GREEN. color is fixed and cannot be
adjusted.
To Adjust the Convergence
Move the Adjustment Point Cursor to the point to be
adjusted. Use the buttons to match the CURSOR RED
and BLUE GREENcolors to (reference color). Properly
aligned, all three colors should appear white.
If convergence is acceptable after MANUAL
CONVERGENCE EXITadjustment, press button to
access menu mode.
1. Use the buttons to highlight your chosenCURSOR
option.
2. Press the SELECT button to select.
3. Select CANCEL to cancel adjusted data and return
to main picture.
4. Select DONE to save your adjustments and return to main picture.
5. Select BACK to return to the manual convergence adjustment mode.
6. Select RESET to recall the factory pre-set convergence data.
Adjustment
Point
Cursor
MENU
Move SelectSEL
Setup
Channel Manager
Timers
Locks
Aspect
Audio
Video
OR
Set The Inputs
Menu Preference
Set Virtual HD
Magic Focus Tune Up
Set Closed Captions
Set Black Side Panel
Set Audio Out
Setup
Move SetSEL
Upgrades
OR
Adjustment Mode
Magic Focus Tune Up
Setup
Move SEL Return
Aligns the Red, Green and Blue colors
to correct f or M agnetic Influences.
Auto A
A
A
AAt
t
t
t t t
t
t
ttur
ur
ur
ururn
n
n
nn
of
of
of
ofoff
f
f
ff
9 Point Manual a
a
a
aaft
ft
ft
ftft e
e
e
eer
r
r
rr
90
90
90
9090
da
da
da
daday
y
y
yy s.
s.
s.
s.s.
117 Point Manual
If you want to adjust now st ar t
Magic Focus Tune Up
Setup
Mo ve SE L R eturn
Manual Adjus t
Please select button
D eon
B kac
R te es
C lance
EXIT
56

Setup
On-Screen Display
57
Menu Preference
This feature will allow you to select any one of three
different languages for all on-screen displays.
Set the Language
This function allows you to choose from three menu
languages.
1. Use the CURSOR buttons or to highlight the
language of your choice.
2. Press EXIT to quit menu or select MENU
PREFERENCE to return to previous menu.
Set the Menu Background
This function allows you to choose from two menu
backgrounds.
1. Use the CURSOR buttons or to highlight
SET THE MENU BACKGROUND (SHADED OR
SOLID).
2. Press EXIT CURSORto quit menu or button to
return to previous menu.
3. Select SOLID for a black background (no picture
can be seen behind menu screen), or select
SHADED for a light background.
Set The Inputs
Use this feature to give a name to any of the five video
inputs. A named input is shown in the INPUTS menu.
1. Press the CURSOR buttons , , or to
highlight the name of the video inputs.
2. Select from one of the following choices to set an
input name:
AVR,CAM,CBL,CBL2, DVD, DVD2, DVD3,LD
VCR,VCR2,VCR3,PVR,PVR2,SAT,STB,STB2.
Set The Inputs
Setup
Input1
Input2
Input3
Input4
Move Retur nSEL
Auto Link
Auto Remote Off
Rename List
AVR DVD PVR STB2
CAM DVD2 PVR2 VCR
CBL DVD3 SAT VCR2
CBL2 LD STB VCR3
Reset
OR
Français Español
Shaded Solid
O R
Mo ve S EL R etu rn
English
Set The Language
Set The Menu Background
Menu Preference
Setup
Français Español
Shaded Solid
O R
Mo ve S EL R etu rn
English
Set The Language
Set The Menu Background
Menu Preference
Setup
Français Español
Shaded Solid
O R
Mo ve S EL R etu rn
English
Set The Language
Set The Menu Background
Menu Preference
Setup
Français Español
Shaded Solid
O R
Mo ve S EL R etu rn
English
Set The Language
Set The Menu Background
Menu Preference
Setup
OR
Set The Inputs
Menu Preference
Set Virtual HD
Magic Focus Tune Up
Set Closed Captions
Set Black Side Panel
Set Audio Out
Setup
Move SetSEL
Upgrades
OR
Set The Inputs
Menu Preference
Set Virtual HD
Magic Focus Tune Up
Set Closed Captions
Set Black Side Panel
Set Audio Out
Setup
Move SetSEL
Upgrades
Input 5

Setup
On-Screen Display
58
INPUT Auto Link3
Use this function to automatically turn the TV on and
tune to INPUT 3 when it detects a video signal to
INPUT 3.
1. Use the CURSOR buttons or to highlight the
AUTO LINK setting of your choice.
2. When AUTO is selected, the TV will turn on and
tune to INPUT 3 automaticall , when the y INPUT 3
input device is turned on. This is convenient when
you want to watch a movie with your VCR,
laserdisc player or DVD player.
3. When REMOTE is selected, the TV will tu n on and switch to r INPUT 3 automatically when the INPUT 3 input
device is turned on and the VCR, laserdisc, or DVD play button on your remote control is pressed. This is
convenient when you want to record a movie with your VCR and watch it later.
4. Select OFF to disable this function.
5. Press EXIT to quit menu or select AUTO LINK to return to previous menu.
NOTE: 1. Once the TV has been turned on using the feature, it must be reset before AUTO LINK AUTO LINK
is used again. To do this, turn your VCR, laserdisc or DVD player OFF. This feature is now reset and
will turn on your TV as described above.
2. When using mode, any remote control button will substitute for your video input deviceREMOTE
play button. However, intended operation is for use with your VCR, laserdisc, or DVD play button.
3. If no remote control button is pressed after the TV is turned on by , the TV willAUTO LINK
automatically turn off after three hours.
Set Virtual HD
Set The Inputs
Setup
Input5
Input1
Input2
Input3
Input4
Move SEL Return
Auto Link
Auto Remote Off
Rename List
AVR DVD PVR STB2
CAM DVD2 PVR2 VCR
CBL DVD3 SAT VCR2
CBL2 LD STB VCR3
Reset
OR
1080i
OR
Set Virtual HD
Next/Prev. SEL Return Select
Use t th si fea ure to select between 1080i and 540p
scan mode.
N O T E : VIRTUAL HD is not available (grayed out) in Digital Channels, 1080i input, HDMI and components.
Off
OR
Set Black Side Panel
Next/Prev. SEL Return On/o
The BLACK SIDE PANEL function turns the gray side
bars on/off when watching 4:3 signals in Standard mode.
Set Black Side Panel
NOTE: To maximize operating life of the TV s picture tubes when watching 4:3 signal, Black Side Panel is’
cancelled at Power OFF. It is recommended to watch 4:3 signal with gray side bar.
The top/bottom gray bar will appear in SPLIT MODE PIP
and SPLIT FREEZE. The TV set will always return to "Set
Black Side Panel -OFF" setting every time the TV is
powered "OFF".
When content from film is sent to your home it requires processing that can cause picture noise or distortion.
Virtual HD technology reduces this noise to a minimum, recreating the smooth curves and high fidelity image of
the original film source.

Setup
On-Screen Display
59
Set Closed Captions
Closed Captions are the dialogue, narration, and/or
sound effects of a television program or home video
which are displayed on the TV screen. Your local TV
program guide denotes these programs as or .
1. Use the CURSOR buttons , , or to
highlight and select the function to change.
2. Press EXIT CURSORto quit menu or button to
return to previous menu.
Caption Display:
ON/OFF will turn the display on or off.
AUTO will turn the display on when
Mute/Soft Mute is on.
Analog Caption:
Sets CAPTIONS for analog programs.
This function will help choose available
mode and channel.
Caption Mode:
CAPTIONS is for the program you are viewing. TEXT is for additional information such as news reports or
a TV program guide. This information covers the entire screen and viewing the TV program is not possible.
Text may not be available with every program.
Channel:
1is used for the primary language (usually English).
2is sometimes used for a second language (may vary by region).
3is sometimes used for a third language (may vary by region).
4is sometimes used for a fourth language (may vary by region).
Set Closed Captions
Setup
OR
OR
Set The Inputs
Menu Preference
Set Virtual HD
Magic Focus Tune Up
Set Closed Captions
Set Black Side Panel
Set Audio Out
Setup
Move SetSEL
Upgrades
A n a l o g C a p t i o n s
Off On Auto
Mode : Captions Text
Channel : 1 2 3 4
C a p t i o n D i s p l a y
D i g i t a l C a p t i o n s Set
ReturnMove SEL
Digital Captions
Set captions for digital p ograms. This functionr
will help choose and set available language,
font, size and style of digital captions.
1. Use the CURSOR buttons , , or to
highlight and select DIGITAL CAPTIONS feature.
2. Press EXIT CURSORto quit menu or button to
return to previous menu.
NOTE: 1. Some types of digital closed captions will not work with this TV.
2. Caption Display will not work when viewing a 480p, 720p or 1080i input via the
COMPONENT: Y-P B RPinputs.
3. There are 2 types of Closed Captions in a Digital channel Analog & Digital captions
4. Digital Captions Font Style are sometimes different from the Font Style of Analog Captions.
5. Closed Caption and Digital Captions availability and content depends on the broadcaster. Closed
Caption is available when Closed Caption icon is displayed on screen.
6. Digital Captions will not be available (grayed out) when using analog channels. Options
OR
Set Closed Captions
Setup
Language [ French ]
Service 1 2 3
Font Default 1 2 3 4
D i g i t a l C a p t i o n s
ReturnMove SEL
5 6 7 8
Standard Standard High Visibility
Size Standard Small Large
[ HITACHI ]
7. When ANALOG captions in a Digital channel are displayed and the ASPECT mode is changed; it will
not change position of the captions in the picture.
8. When DIGITAL captions in a Digital channel are displayed and the ASPECT mode is changed; it will
change position of the picture and the captions ; so it may require to change the ASPECT mode in
order to display the captions correctly.
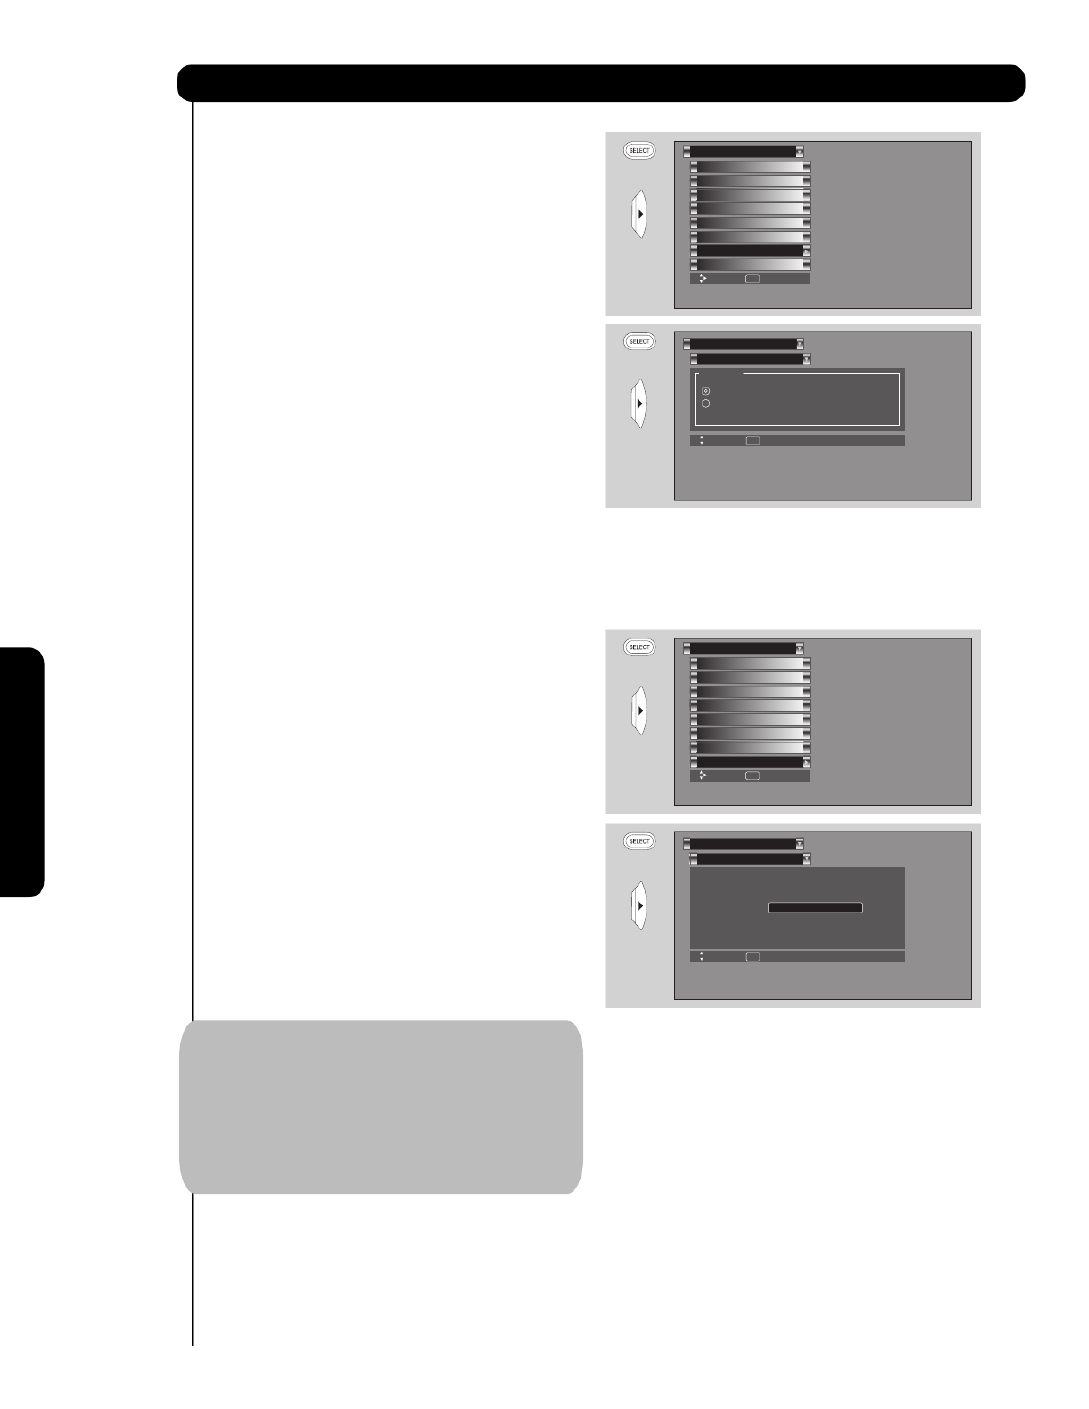
Setup
On-Screen Display
Set Audio Out
This featu e will select the sou ce of the Audior r
Output.
Fixed:
S te el c AU UDIO O T EDFIX to have the Audio
a xt fi ed . v molu e
Variable :
S te el c A A AU UDIO O T V RI B E L o h e ot av Audi
settings that can be controlled.
Set OutAudio
Setup
Move SEL Return
Audio Out
Va ria ble
Fixed
OR
1. Use CURSOR buttons or to highlight the
2. Use the button to select the function. SELECT
3. Press EXIT to quit menu or CURSOR button
function to change.
to return to previous menu.
OR
Set The Inputs
Menu Preference
Set Virtual HD
Magic Focus Tune Up
Set Closed Captions
Set Black Side Panel
Set Audio Out
Setup
Move SetSEL
Upgrades
OR
Set The Inputs
Menu Preference
Set Virtual HD
Magic Focus Tune Up
Set Closed Captions
Set Black Side Panel
Set Audio Out
Setup
Move SetSEL
Upgrades
Upgrades
It shows software information and easy upgrade
procedure. This function allows the TV software to be
upgraded by using a flash card (MMC CARD). If a
future software upgrade is required for your TV,
HITACHI will notify and provide you with a flash card.
In order to receive written notification and the flash
card, please complete and return the warranty card.
1. Insert MMC CARD
2. Press the CURSOR buttons or to highlight
UPGRADE NOW.
3. Press the SELECT button to select and start
upgrading.
4. Unplug the power cord when the upgrade is
complete.
Upgrades
Setup
Move ReturnSEL
Software Version # : Main Vxxxx.xxxx
MMC Software Upgrade
Upgrade Now
Please Insert MMC card
before upgrading.
OR
MMC Vxxxx.xxxx
60
1. Any power interruption during the upgrade
process will cancel the upgrade. When this
happens, repeat the upgrade procedure.
2. The name of MMC Vxxx.xxxx upgrade
will only appears when a MMC or SD
card is inserted on the back of the TV ;
then it will show the MMC Vxxx.xxxx
file number.
NOTE:

61
57” Disassembly/Assembly Instructions
Useful Information
IMPORTANT POINTS:
(a) Do not attempt to perform this work by yourself.
(b) Request an installation specialist to install this unit.
(c) HI ACHIT assumes no esponsibility or liability for injury/damage as a esult of consumer installation andr r
handling. Be advised that imp oper consumer installation/handling is not cove ed by manufactu er s warrant .r r r ’ y
(d) This P ojection elevision weighs 205 pounds and has many sensitive components.r T
CAUTION: DISCONNECT UNIT FROM POWER SOURCE BEFORE DISASSEMB Y/ASSEMB YL L
STEP 2
Remove 4 screws ( , , , ) that hold the
screen frame to the cabinet on the Right side, see
(a) and (b). Repeat to remove 4 screws on the Left
side.
STEP 3
Please emove the sc ew r r () below sc eenr
frame that hold the back cover to the cabinet as the
ar ow shows, see (a).r
Please emove the sc ew ( r r ) below sc eenr
frame that hold the back cover to the cabinet as the
ar ow shows, see (b).r
(a) (b)
(a) (b)
(a) left side (b) right side
DISASSEMB Y PROCEDUREL
NOTE: Read all instructions and understand how to properly and safely disassemble and assemble unit
STEP 1
Before disassembling this projection TV set, you
must first remove the two screws that hold the
speaker grill on each side of the TV(a)(b). Thene
(d)
(c)
(e) (f) (g)
(a) (b)
by pulling outwards remove the speaker grill (c)(d).e
Remove the front decoration panels by unscrewing
the 2 screws from each panel (left & right), see (e),
then remove from the original position, see (f)(g).

57” Disassembly/Assembly Instructions
Useful Information
STEP 4
STEP 5
Remove the joint connector bolts f om each side r
of the back cover using the allen w ench that isr
p ovided inside of the instruction bag, see (a) r
and (b). In case that the screw is different type
STEP 6
Remove from the
back side of the TV
set only the top 4
screws of the lower
rear cover, see (b),
as shown by the
arrows on the rear
cabinet label, see (a). Do not remove the rear cover board. Remove the (4) four side screws that hold the back
cover to the cabinet, see (c) as shown on the label (a). Total of 8 screws will be removed.
STEP 7
CAUTION: When the TV is separated, the top
portion weights 45 lbs. This task should be done by
two persons when separating this TV.
This assembly contains fragile parts, such as glass
and the viewing screen. Avoid any type of impact
that could cause breakage of these components.
Remove top portion
by grabbing the
bottom corner of
frame and the back
cover, see (a)(b). Lift
upwards, see (c)(d),
gently place the top
portion on the the
floor, see (e).
(a) (b)
(a)
(a) (b)
(c) (d) (e)
62
Locate the SENSOR PWB attaced to the cabinet
(a). Losen the sensor wires from the plastic holders
in order to remove the 3 wires that comes from
the screen, see (b). Disconnect the 3 connector wires
as it shows on picture (c) & (d).
(a)
(b)
(b)
(c)
(c)
(d)
use the proper screwdriver to remove the screws.

57” Disassembly/Assembly Instructions
Useful Information
ASSEMBLY PROCEDURE
STEP 10
Re-install the top (4) four screws into the lower rear
cover, see (a). Re-install the (4) four side screws that
hold the back cover to the cabinet, see (b).
STEP 12
Re-install 4 screws ( , , , ) that hold the
screen frame to the cabinet on the Right side, see
(a) and (b). Repeat to re-install 4 screws on the
Left side.
STEP 14
STEP 8
To re-assemble the set,
lift the top portion and
align onto the bottom
cabinet. Gently lower the
top portion until it sits
flush on the bottom.
STEP 9
Re-install the joint
connector bolts ( pcs.)2
that were removed in
step 5 of the
disassembly.
63
(a) (b)
(a)
(b)
(a) (b)
(a) (b)
(a) left side (b) right side
(b)
STEP 13
Please e-install sc ew (r r ) below sc eenr
frame that hold the back cover to the cabinet as the
arrows shows.
Please e-install sc ew (r r ) below sc eenr
frame that hold the back cover to the cabinet as the
arrows shows.
STEP 11
Re-connect the sensor wires connector to the sensor
sensor board, see (a). Hold the wires with the
plastic holders ; so the wires do not become losse(b).
NOTE : On step 5 and 8 it might be a different type of screw , so the Allen Key to remove the screws
will not be included in the accessories.
Re-install both of the
front decoration panels
see (a) and reinstall
the speaker grille by
aligning it with the bo-
ttom cabinet (b), finally
put the two screws of
the speaker grille as seen on (c).
This completes the Disassembly and Assembly instructions.
( )a ( )c

65 ” Disassembly/Assembly Instructions
IMPORTANT POINTS:
(a) Do not attempt to perform this work by yourself.
(b) Request an installation specialist to install this unit.
(c) HI ACHIT assumes no esponsibility or liability for injury/damage as a esult of consumer installation andr r
handling. Be advised that imp oper consumer installation/handling is not cove ed by manufactu er s warrant .r r r ’ y
(d) This P ojection elevision weighs 309 pounds and has many sensitive components.r T
CAUTION: DISCONNECT UNIT FROM POWER SOURCE BEFORE DISASSEMBLY/ASSEMBLY
DISASSEMBLY PROCEDURE
NOTE: Read all instructions and understand how to properly and safely disassemble and assemble unit
STEP 1
Before disassembling this projection TV set, you
must first remove the speaker grille by grabbing the
sides and pulling left and right side see (a)(b).
STEP 3
(a)
(b)
(a) (b) (c)
(c)
(d)
(e)
Remove the front decoration panels by unscrewing
the 2 screws from each panel (left & right), see (c),
then remove from the original position, see (d)(e).
STEP 2
Remove the 8
screws that hold
the screen frame to
the cabinet on the
front side. DO NOT
remove the right and
left edge screen
frame screws (c).
Locate the SENSOR PWB attaced to the cabinet
(a). Losen the sensor wires from the plastic holders
in order to remove the 3 wires that comes from
the screen, see (b). Disconnect the 3 connector wires
as it shows on picture (c) & (d).
(a)
(c) (d)
(b)
65 ” Disassembly/Assembly Instructions
Useful Information
64
Produkt Specifikationer
| Mærke: | Hitachi |
| Kategori: | televisión |
| Model: | 57F59 |
Har du brug for hjælp?
Hvis du har brug for hjælp til Hitachi 57F59 stil et spørgsmål nedenfor, og andre brugere vil svare dig
televisión Hitachi Manualer

11 Januar 2025
10 Oktober 2024
5 Oktober 2024
4 Oktober 2024
27 September 2024
23 September 2024
22 September 2024
22 September 2024
20 September 2024
19 September 2024
televisión Manualer
- televisión SilverCrest
- televisión Acer
- televisión Denver
- televisión Sencor
- televisión TCL
- televisión Sony
- televisión Siemens
- televisión Samsung
- televisión Panasonic
- televisión VOX
- televisión Philips
- televisión Lenco
- televisión OK
- televisión LG
- televisión AEG
- televisión Pioneer
- televisión Mitsubishi
- televisión Sharp
- televisión Daewoo
- televisión Arçelik
- televisión AOC
- televisión Sanyo
- televisión Grundig
- televisión Nikkei
- televisión Toshiba
- televisión Pyle
- televisión Furrion
- televisión Lenovo
- televisión Infiniton
- televisión Nedis
- televisión Logik
- televisión Abus
- televisión Optoma
- televisión Westinghouse
- televisión Element
- televisión Thomson
- televisión Hyundai
- televisión Aiwa
- televisión Nokia
- televisión Casio
- televisión AKAI
- televisión Hisense
- televisión Strong
- televisión Brandt
- televisión Hannspree
- televisión Trevi
- televisión Blaupunkt
- televisión JVC
- televisión BEKO
- televisión Uniden
- televisión Clatronic
- televisión Medion
- televisión Sweex
- televisión Citizen
- televisión Megasat
- televisión Haier
- televisión TechniSat
- televisión Innoliving
- televisión NewStar
- televisión Bang And Olufsen
- televisión Luxor
- televisión Vivax
- televisión Loewe
- televisión Walker
- televisión Sunny
- televisión Finlux
- televisión Telefunken
- televisión Kernau
- televisión BenQ
- televisión Packard Bell
- televisión Xiaomi
- televisión Peerless-AV
- televisión Krüger&Matz
- televisión Viewsonic
- televisión Schneider
- televisión Fujitsu
- televisión Oppo
- televisión Zalman
- televisión Tesla
- televisión Polaroid
- televisión NEC
- televisión TERRIS
- televisión OKI
- televisión MT Logic
- televisión Yasin
- televisión Bush
- televisión Dual
- televisión Aspes
- televisión Salora
- televisión Sagem
- televisión Nevir
- televisión Teac
- televisión Nextbase
- televisión Techwood
- televisión Vivo
- televisión Albrecht
- televisión SVAN
- televisión Sogo
- televisión Alba
- televisión RCA
- televisión ECG
- televisión AudioSonic
- televisión Manhattan
- televisión Proline
- televisión JGC
- televisión Orion
- televisión ITT
- televisión ILive
- televisión Intenso
- televisión Fantec
- televisión Cecotec
- televisión Roadstar
- televisión VIZIO
- televisión XD Enjoy
- televisión Wharfedale
- televisión Technika
- televisión Seiki
- televisión TechLine
- televisión Monster
- televisión Bauhn
- televisión V7
- televisión Airis
- televisión Majestic
- televisión Star-Light
- televisión Vestel
- televisión Continental Edison
- televisión Iiyama
- televisión RevolutionHD
- televisión GPX
- televisión CHiQ
- televisión MBM
- televisión Orima
- televisión SereneLife
- televisión Lexibook
- televisión AG Neovo
- televisión Philco
- televisión Kunft
- televisión GoGen
- televisión Kogan
- televisión Graetz
- televisión Emerson
- televisión Kemo
- televisión Insignia
- televisión Xoro
- televisión Manta
- televisión SunBriteTV
- televisión JTC
- televisión Reflexion
- televisión Planar
- televisión QBell Technology
- televisión SYLVOX
- televisión Dyon
- televisión Schaub Lorenz
- televisión Daitsu
- televisión Xiron
- televisión Alden
- televisión Alphatronics
- televisión Aldi
- televisión Allview
- televisión AYA
- televisión Aristona
- televisión Apex
- televisión Ziggo
- televisión Icy Box
- televisión Palsonic
- televisión Funai
- televisión Saba
- televisión Antarion
- televisión Tevion
- televisión Proscan
- televisión Tucson
- televisión Sunstech
- televisión Nabo
- televisión Sylvania
- televisión Marquant
- televisión Nordmende
- televisión AudioAffairs
- televisión Magnum
- televisión Kubo
- televisión Coby
- televisión Seg
- televisión Metz
- televisión Qilive
- televisión Changhong
- televisión Naxa
- televisión Mpman
- televisión Cello
- televisión Mx Onda
- televisión Peaq
- televisión Humax
- televisión Superior
- televisión Difrnce
- televisión Grunkel
- televisión Avtex
- televisión Odys
- televisión NPG
- televisión Bluesky
- televisión Videocon
- televisión Durabase
- televisión HKC
- televisión Edenwood
- televisión Woxter
- televisión Premier
- televisión Teleco
- televisión Opera
- televisión LTC
- televisión Horizon
- televisión Elements
- televisión Viewpia
- televisión CGV
- televisión Online
- televisión Doffler
- televisión DirecTV
- televisión Tele 2
- televisión Mystery
- televisión Telesystem
- televisión Jay-tech
- televisión EKO
- televisión E-motion
- televisión Mitsai
- televisión Selfsat
- televisión High One
- televisión Tve
- televisión ISymphony
- televisión Pantel
- televisión Magnavox
- televisión ATYME
- televisión HCI
- televisión Inno-Hit
- televisión Lin
- televisión Engel
- televisión Digihome
- televisión Englaon
- televisión Reflex
- televisión Astar
- televisión Visco
- televisión Tivax
- televisión H&B
- televisión Norcent
- televisión TELE System
- televisión TIM
- televisión Oyster
- televisión Belson
- televisión Vision Plus
- televisión Sbr
- televisión Voxx
- televisión Rm 2000
- televisión Hoher
- televisión Felson
- televisión Elbe
- televisión Axing
- televisión FFalcon
- televisión Smart Tech
- televisión Séura
- televisión Mitzu
- televisión Caratec
- televisión JTC24
- televisión Kivi
- televisión Smart Brand
- televisión FOX Electronics
Nyeste televisión Manualer

20 Februar 2025

19 Februar 2025
19 Februar 2025

10 Februar 2025
5 Februar 2025
30 Januar 2025

30 Januar 2025

15 Januar 2025
15 Januar 2025

15 Januar 2025