InfiRay TX60C Manual
Læs nedenfor 📖 manual på dansk for InfiRay TX60C (27 sider) i kategorien Kikkert. Denne guide var nyttig for 37 personer og blev bedømt med 4.5 stjerner i gennemsnit af 2 brugere
Side 1/27

I N F I R A Y O U T D O O R
BOLT TX60C
Bolt Action Optimized Thermal Rifle Scope
User’s Manual
Outdoor

W A R N I N G !
ITA R R E Q U I R E M E N T S
These products may be subject to export and foreign trade
control laws of the United States and may not be exported
without prior approval of the U.S. Department of State.
Learn more at irayusa.com/ITAR.
FCC ID 2AYGT-2D-00
This device complies with part 15 of the FCC Rules. Operation is subject
to the following two conditions: (1) This device may not cause harmful
interference, and (2) this device must accept any interference received,
including interference that may cause undesired operation.
CAUTION: Changes or modifications not expressly approved by
IRayUSA could void the user’s authority to operate the equipment.
NOTE: This equipment has been tested and found to comply with
the limits for a Class B digital device, pursuant to part 15 of the FCC
Rules. These limits are designed to provide reasonable protection
against harmful interference in a residential installation. This equipment
generates, uses and can radiate radio frequency energy and, if not
installed and used in accordance with the instructions, may cause
harmful interference to radio communications. However, there is no
guarantee that interference will not occur in a particular installation. If
this equipment does cause harmful interference to radio or television
reception, which can be determined by turning the equipment o and on,
the user is encouraged to try to correct the interference by one or more
of the following measures:
• Reorient or relocate the receiving antenna.
• Increase the separation between the equipment and receiver.
• Connect the equipment into an outlet on a circuit dierent from that
to which the receiver is connected.
• Consult the dealer or an experienced radio/TV technician for help.
This device was tested for typical body-supported operations and
use. To comply with RF exposure requirements, a minimum separation
distance of 0.5cm must be maintained between the user’s body and
the handset, including the antenna. Third-party belt-clips, holsters, and
similar accessories used by this device should not contain any metallic
components. Body accessories that do not meet these requirements may
not comply with RF exposure requirements and should be avoided. Use
only the supplied or an approved antenna.
WARNING: CHOKING HAZARD
Children under 3 years old can choke or suocate on small parts of this
product. This product is not a toy; keep out of reach of children.
TA B L E O F C O N T E N

2
1 . OV E R V I E W
The BOLT TX60C provides hunters with a high-resolution 1024×1024
InfiRay Micro II thermal sensor at a native 3× magnification and digital
zoom up to 16×, ideal for predator hunting and longer-range shots. A
fast f1.0 germanium objective lens, a sensitivity rating of ≤18mK, and
a 1.03-inch round 2560×2560 AMOLED display provide exceptional
detail and precision. The round 30mm body design allows for easy
mounting with the included one-piece cantilever mount or standard
scope rings.
2 . F E AT U R E S
• 12 μm iRay Micro II thermal sensor
• ≤18 mK sensitivity
• 1.03-inch large-format AMOLED display with ultra-high
2560×2560 resolution
• High frame frequency: 50hz
• T-6061 aluminum housing
• 2700-yard detection range
• Dual power supply solution for extended operation
• Compatible with ILR-1200-1 Bluetooth Laser Rangefinder
Module (optional/not included)
• Four ballistics profiles and a user-defined, multi-variable
ballistics calculator
• 16.0× stepped digital zoom
• Multiple zero profiles and ranges
• Traditional 30 mm diameter housing design
• Built-in 128 GB storage to support image capture and
video recording
• Built-in Wi-Fi module
• Mobile device App compatible
• Built-in digital compass and gravity sensor
• Multiple reticle types and color options
• Ultra-Clear mode for advanced image detail
• Picture in Picture (PIP)
• Defective pixel correction
• Extended eye relief
• Cold and warm image hue options
• User-friendly interface
3 . T E C H S P E C S
4
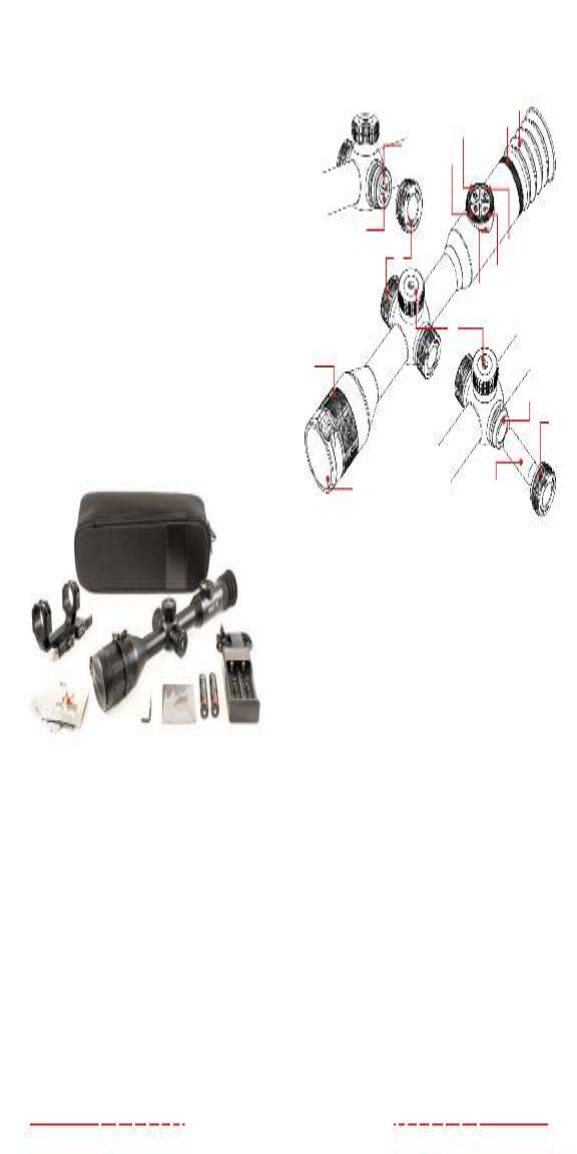
4 . AC C E S SO RI E S
The BOLT TX60C rifle scope ships with everything you need to get
out and hunt.
• BOLT TX60C Thermal Imaging Rifle Scope
• Objective Lens Cap
• Eyeguard
• IRAY-AC112 30 mm One-Piece Scope Mount
• 18650 Battery ×2
• Battery Charger
• USB-C Cable for Data/Video
• USB Power Adapter
• Lens Cloth
• Soft Case
• User Manual
Optional accessories, such as the IRAY-AC96 ILR-1200-1 Bluetooth
Laser Rangefinder Module, as well as various replacement
accessories, including cables and factory mounts, are available for
purchase. Contact 800-769-7125 or .
irayusa.com/support
5 . C O M P O N E N T S

6
6 . D E S C R I P T I O N O F C O N T R O L
B U T TO N S A N D S H O R T C U TS
Power Button
Current Screen / Menu
or Device Status Short Press Long Press
Device o —— Power on the device
Home screen Perform a manual
non-uniformity correction
Power o the device;
enter standby mode
In standby mode Exit standby mode ——
Main menu Return to the previous
without saving changes ——
Defective pixel
correction interface
Add or remove a
defective pixel from the
“to be corrected” list
——
Reticle zeroing
interface
Exit interface and return
the reticle to the last
saved zero position
——
Palette Button
Current Screen / Menu Short Press Long Press
Home screen Switch the color palette Turn PIP window on / o
Brightness Button
Current Screen / Menu Short Press Long Press
Home screen Adjust the screen
brightness
Enter / exit the
stadiametric rangefinder
Photo Button
Current Screen / Menu Short Press Long Press
Home screen Take a photo Start / stop recording
a video

8
7. Q UI C K S TA R T G UI D E
Step 1: Prepare to Use the BOLT TX60C
1. Compare the box contents to the accessories list and examine
each for any shipping damage. See on page4. Accessories
2. Check the lens to ensure there are no smudges or dirt present.
Clean with the included lens cloth, as needed.
3. Charge the built-in battery pack before using the TX60C for the
first time. See Charging the Built-in Battery Pack on page10.
4. Install the eyeguard .(1)
5. Mount the TX60C to the weapon using the included IRAY-AC112
30 mm One-Piece Scope Mount. See Mounting the BOLT TX60C
on page14.
Step 2: Turn On and Adjust the Focus
1. Open the objective lens cap . (16)
2. Long press the Power Button for 2 seconds to power on the
TX60C.
3. Rotate the diopter adjustment ring of the eyepiece until the (2)
interface icons are clear.
WARNING: Do not point the objective lens toward intense
energy sources, such as the sun. This may render the electronic
components inoperative. The warranty does not cover damage
caused by improper operation.
Step 3: Adjust the Device Settings
From the home screen:
1. Short press the Palette Button to set the color palette to
white hot , black hot , red hot , color , violet ,
crimson , or viridian . The icon for the selected color palette
appears briefly in the bottom-right corner of the screen.
2. Short press the Brightness Button to adjust the screen
brightness, from 1–5.
3. Short press the Power Button to perform a non-uniformity
correction, as needed.
4. Rotate the Control Turret to zoom in and out on the observed
object.
5. Long press the Palette Button to turn on the PIP window.
6. Short press the Control Turret to enter the quick menu (see
Using the Quick Menu on page18):
a. Adjust the image sharpness, from 1–5.
b. Adjust the image contrast, from 1–5.
7. Long press the Control Turre

10
8 . C H A R G I N G T H E B U I LT- I N
B AT T E RY PAC K
The BOLT TX60C has a dual power supply: a built-in rechargeable
lithium-ion battery pack and an optional auxiliary 18650 battery. The
TX60C supports a run time of 8 hours out of the box and 11+hours
when using an 18650 battery. The built-in battery pack is not
removable or replaceable. Please ensure the battery pack is fully
charged before the first use.
To charge the battery pack:
1. Remove the USB-C port cover by turning it counterclockwise.(9)
2. Connect the USB-C end of the data cable to the USB-C (17)
port . (10)
3. Connect the standard USB end of the data cable to:
a. Any standard USB 3.0 port on a laptop or computer; OR
b. The included 5V–2A USB power adapter and plug the (18),
power adapter into an electrical outlet.
4. While charging:
a. The LED status indicator above the USB-C port will turn (11)
red. When the indicator LED turns green, the battery is fully
charged.
b. A charging icon appears above the battery status
indicator in the bottom-right corner of the screen.
Data Cable (17)
USB-C
Connector
USB Connector
USB-C Port
Cover (9)
USB-C
Port (10)
LED Status
Indicator (11)
5. When fully charged, disconnect the data cable from the USB-C
port and replace the USB-C port cover. Do not overcharge.
WARNING: Never charge the battery pack with a USB adapter
that is greater than 5V–2A.
NOTES:
• You may charge and operate the TX60C at the same time.
• When the battery status icon turns red and only one bar remains,
charge the battery right away to avoid over-discharge and a
reduction in battery capacity or servicelife.
• Only the built-in battery pack will be charged while connected
via the USB-C port.
9. INSTALLING AN
12
The color and fill level of the active battery status indicator indicates
the current battery charge level. The battery charging icon
appears above the built-in battery status indicator when the TX60C is
connected to an external power source. See the table below.
NOTE: Charge the battery promptly when its status indicator shows
one bar (5–20%) to avoid over-discharge and potential damage to
the battery.
ICON ICONSTATUS STATUS
81% – 100% 21% – 40%
61% – 80%
5% – 20%; charge
the battery
promptly.
41% – 60%
The built-in
battery is charging
(external power is
connected via the
data cable).
1 1 . S W I T C H I N G T H E B AT T E RY
P O W E R S U P P LY
The BOLT TX60C’s dual power supply system works seamlessly to
power the device:
• When the 18650 battery is installed and fully charged, it will be
the preferred power source.
• If the power of the 18650 battery is low, or the 18650 battery
is removed, the TX60C will automatically switch to the built-in
battery pack as its primary power supply. Operation will not be
interrupted during this time.
• When the TX60C is in use, the 18650 battery may be replaced
at any time. During replacement, power will switch to the internal
battery pack and then switch back to the new 18650 battery after
replacement automatically.
• When the TX60C is connected via USB-C, the device will switch
to the external power supply automatically, and the charging
icon will appear above its battery status indicator in the
bottom-right corner.
1 2 . BAT T E RY S A F E
16
STANDBY MODE
Standby mode may be activated to conserve the battery life of the
rifle scope. When in standby mode, short press the Power Button
to exit standby and return to the home screen.
Manually Enter Standby Mode
The user may enter standby mode manually at any time.
1. From the home screen, long press the Power Button to bring
up the shutdown screen.
2. Release the Power Button before the 3-second countdown
finishes to enter standby.
Automatically Enter Standby Mode
The rifle scope may be set to automatically enter standby mode.
1. In the main menu, set the standby time to 2, 4, or 6 minutes.
Once set, the system will automatically enter standby according
to the set time.
AUTOMATIC STANDBY NOTES:
• When , , or is selected:2min 4min 6min
• After the set number of minutes of inactivity, the TX60C will
enter standby automatically when it is tilted up or down at
an angle of more than 70° or left or right at an angle of more
than 30°.
• The TX60C will not enter standby mode while it is in a level
(horizontal) position.
• When is selected, standby mode is turned o and the rifle o
scope will operate until the batteries run out.
• See on page37. Main Menu > Standby
Adjusting the Focus
ADJUSTING THE DIOPTER/EYEPIECE
1. Rotate the eyepiece diopter adjustment ring at the rear of the (2)
rifle scope right or left until the user interface is clear.
2. Look closely to ensure all icons, the status bars, and the reticle
appear sharp and in focus. No additional diopter adjustments are
required unless the user wishes to make changes.
NOTES:
• After this initial adjustment, there is no need to rotate the
eyepiece adjustment ring for long distances or any other (2)
conditions.
• If necessary during standard use, you may rotate the objective
lens focus ring to adjust fine focus on the target object being (15)
observed. See on the next page.Focusing the Objective Lens
FOCUSING THE OBJECTIVE
18
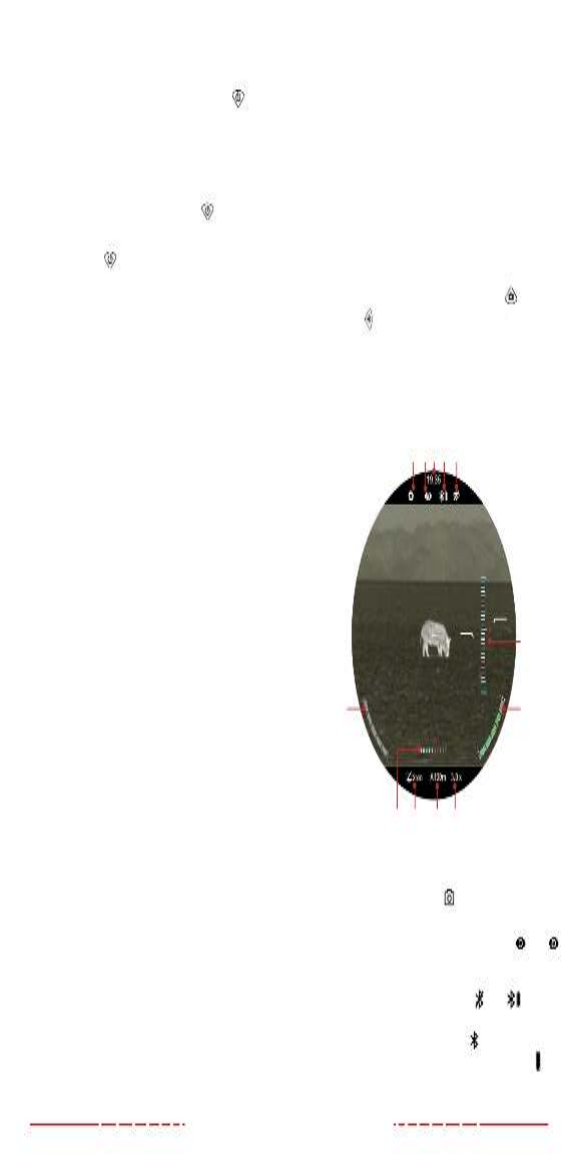
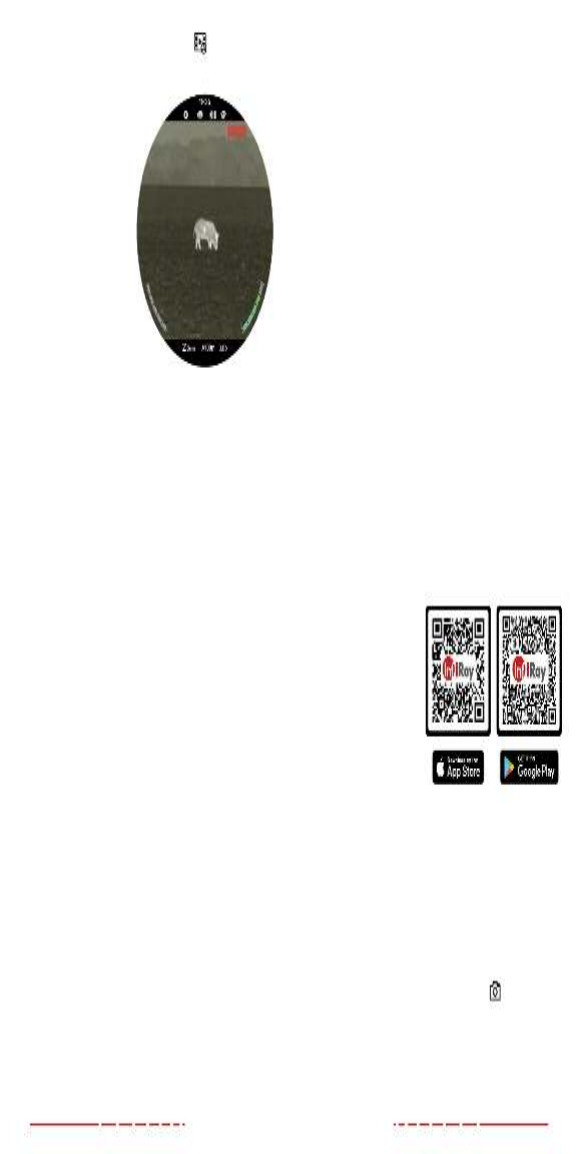
5 Wi-Fi: Shows the Wi-Fi status, on or o .
6 Gravity Sensor: The two gravity sensor indicators (tilt and pitch)
display when the gravity sensor is turned on.
7 Built-in Battery Status Indicator: Shows the battery status
of the built-in battery pack. When the TX60C is receiving
power from the battery pack, the battery indicator is in color;
when inactive, the battery indicator is gray. The charging
icon appears above the status indicator when the TX60C is
connected to an external power source.
8 18650 Battery Status Indicator: Shows the battery status of
the rechargeable 18650 battery. When the TX60C is receiving
power from the 18650 battery, the battery indicator is in color;
when inactive, the battery indicator is gray.
9 Digital Compass: Displays when the compass is turned on.
10 Standby: Shows the standby icon and status, 2min, 4min,
6min, or o.
11 Zeroing Profile & Distance: Shows the selected zero profile,
A, B, or C, and the zero distance.
12 Digital Zoom: Shows the selected digital zoom level,
3.0–16.0×.
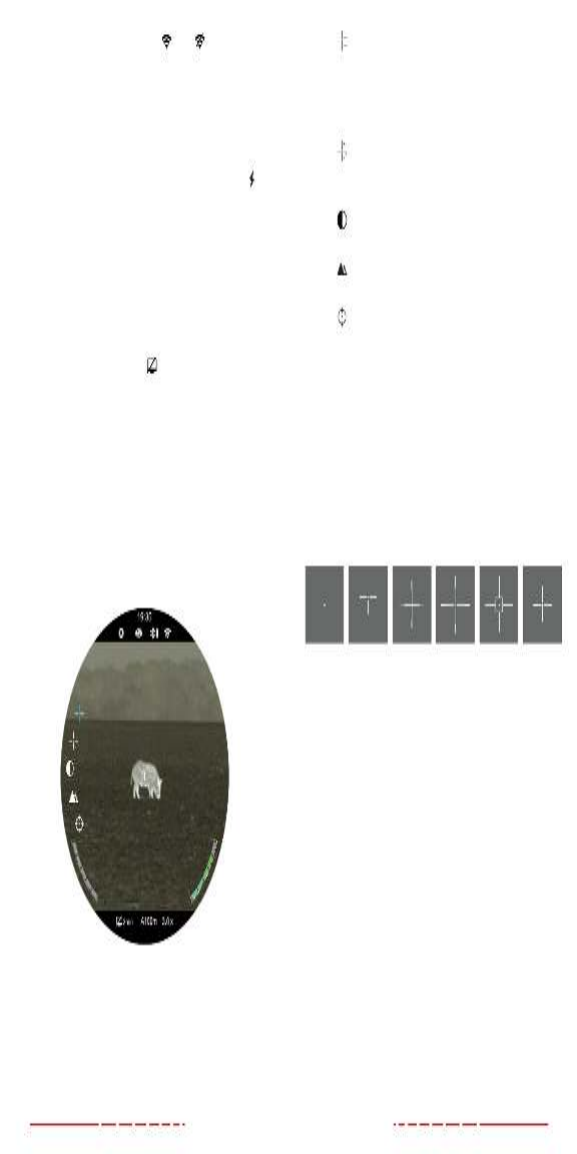
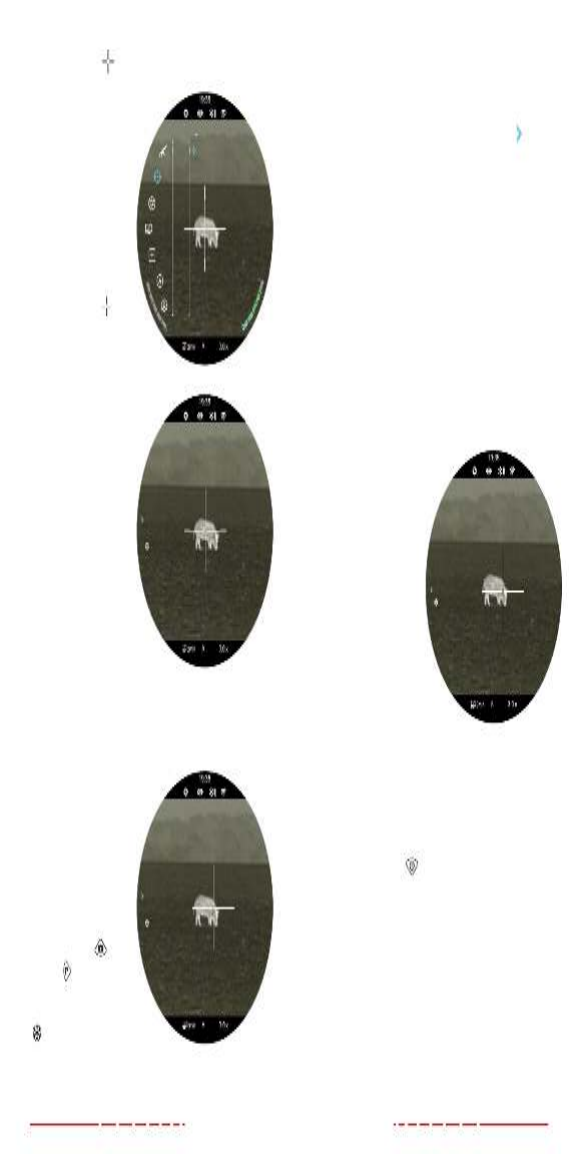
Using the Quick Menu
In the quick menu, the reticle type and color, the image contrast and
sharpness, and the zeroing distance may be quickly adjusted.
• From the home screen, short press the Control Turret to enter
the quick menu.
• Menu icons and text turn blue to indicate the current selection
and cursor position in the quick menu.
• Rotate the Control Turret to switch between the quick menu
items, described on the next page.
1
1
1
100m
1
A
• (Reticle Type): Short

20
1 6 . Z E R O I N G T H E
Navigating the Main Menu
In all menu interfaces:
• From the home screen, long press the Control Turret to enter
the main menu.
• Menu icons and text turn blue to indicate the current selection
and cursor position in the main menu.
• Use the Control Turret to navigate the menu:
•Rotate to move up and down through the menu options.
• to change the current parameters for the Short press
selected menu option, enter the submenu, or confirm
submenu changes.
• to save any changes and exit to the home Long press
screen.
• Short press the Power Button to return to the previous menu
without saving.
• After 15 seconds of inactivity, the menu will automatically close
and the interface will return to the home screen. Changes are
NOT saved automatically, except changes to toggle on / o
menu items, such as Ultra-Clear and Wi-Fi.
• Upon exiting from the main menu, the cursor location is stored
for a single working session (until the TX60C is turned o). After
restarting the TX60C and entering the menu, the cursor position
will be at the first menu item.
A

22
1 7. N O N - U N I F O R M I T Y C O R R E C T I O N
A non-uniformity correction (NUC) allows a thermal imager’s sensors
to correct its pixels and eliminate any image defects caused by pixel
drift. A NUC will be performed automatically each time the BOLT
TX60C is powered on.
The TX60C has three NUC modes, automatic , manual , and (A) (M)
background . The selected NUC mode, A, M, or B, appears in the (B)
top status bar. For instructions on setting the NUC mode in the main
menu, see on page36.Main Menu > Calibration
Automatic Mode
In automatic mode , the TX60C will perform a NUC automatically (A)
according to the internal software algorithm. There is no need to
close the objective lens cap as the TX60C’s internal shutter covers
the sensor.
NOTE: A manual NUC (see below) may be performed at any time
while in Automatic mode. (A)
Manual Mode
In manual mode , the user independently determines the need to (M)
perform a NUC based on the quality of the observed image. It is not
necessary to close the objective lens cap during a manual NUC, as
the internal shutter covers the sensor.
To perform a manual NUC while in manual mode (or automatic mode):
1. From the home screen, short press the Power Button.
2. A manual NUC is performed instantly.
Background Mode
In background mode , the user independently determines the (B)
need to perform a background NUC based on the quality of the
observed image. A background NUC uses less power than an
automatic or manual NUC because it does not use the imager shutter
to cover the sensor; instead, the user must close the lens cap.
To perform a background NUC while in background mode:
1. Close the objective lens cap .(16)
2. From the home screen, short press the Power Button.
3. A prompt to close the lens cap appears onscreen. The
background NUC starts after about 4seconds.
NOTE: If the lens is not properly covered, a temporary “image
burn” will remain in the image until the next non-uniformity
correction. This “image burn” is temporary and is not a defect or
sign of permanent damage.
1 8 . P H O T O G R A P H
24
Recoil Activated Video Recording
When recoil activated video
is turned on in the main
menu, a video is automatically
recorded when a shot is
taken. The TX60C will
record 3seconds before
the shot and 2minutes and
57seconds after the shot.
The video recording timer,
in HH:MM:SS (hour, minute,
second) format, will appear
in the upper-right corner of
the screen. See Main Menu
> Recoil Activated Video on
page31 for instructions.
NOTES:
• When multiple shots are taken within the same 30-second
period, only one video will be taken.
• When recoil activated video recording is turned on, standard
video recording is unavailable.
Video and Photography Notes
• You may enter and navigate the menu as normal during video
recording.
• Only the reticle appears in recorded photos and video; the user
interface (status bar and menu) is not captured.
• Recorded photos and videos are saved to the internal memory
card:
• Photos are saved in IMG_HHMMSS_XXX.jpg format.
• Videos are saved in VID_HHMMSS.mp4 format.
• RAV videos are saved in RAV_HHMMSS.mp4 format.
• HHMMSS is hour/minute/second.
• XXX is a 3-digit counter number used for image files. The
counter cannot be reset. If a file is deleted from the list, its
counter number is not taken by another file.
• The number of recorded files is limited only by the capacity of
the internal memory.
• Check the available space of the internal storage card regularly
and transfer video footage and images to other storage media to
free up the memory card space.
02:20:22
A
1 9 . A C C E S S I N G T H

26
e. Select the TX60C from the list of Wi-Fi networks. It will
appear in the list as “BOLT_XXXXX_YYYYYYYY”, where
YYYYYYYY is the eight-digit device serial number.
f. Enter the Wi-Fi password and tap the . The Join button
default password is 12345678.
3. Operate the TX60C via the App:
a. Take real-time photos and videos, with or without audio.
b. View, share, download, and delete photos and videos taken
via the App, which are saved to the mobile device.
c. Change the Wi-Fi password and SSID.
d. Synchronize the date and time from the mobile device to the
TX60C.
e. Update the TX60C firmware.
NOTE: When a factory reset is performed, the Wi-Fi password and
SSID are reset to the defaults, BOLT_XXXXX_YYYYYYYY and
12345678. See Settings Menu > Factory Reset on page44.
2 1 . DI G I TA L Z O O M
The BOLT TX60C uses stepped zoom and can quickly increase the
base magnification up to16.0× by enlarging the image from 3to 16
times digitally.
To use digital zoom:
1. From the home screen, rotate the control turret to zoom in and
out on the observed object.
a. Rotate clockwise to zoom in and counterclockwise to zoom
out.
b. Each rotation click zooms in / out in increments of 1.0×.
2. The selected digital zoom, 3.0–16.0×, appears in the bottom
status bar.
2 2 . P I C T U R E I N P I

28
2 4 . S TA D I A M E T R I C R A N G E F I N D E R
The BOLT TX60C is
equipped with a stadiametric
rangefinder, which allows
the user to calculate the
approximate distance to an
object if its size is known.
1. Long press the
Brightness Button
from the home screen
to enter the stadiametric
rangefinder.
2. The stadiametric
rangefinder interface has
the following features:
1 Stadia Lines: The two horizontal lines in the center of the
screen can be adjusted to measure the size of the target
object.
2 Icons and Distances: Icons and distance values for three
pre-configured objects will be displayed on the left side of
the screen. The pre-configured objects are Deer: 5.6’ tall,
Hog: 3.0’ tall, and Rabbit: 7.9” tall.
Calculate the approximate distance of the observed object:
1. Locate the target and position it between the stadia lines.
2. Rotate the Control Turret to expand or contract the space
between the horizontal lines until they touch the top and bottom
edges of the target object.
a. Rotate clockwise to expand the space between the lines.
b. Rotate counterclockwise to shrink the space between the
lines.
c. As you adjust the space between the horizontal lines, the
rangefinder distance values on the left side of the screen
are automatically recalculated.
3. Long press the Brightness Button to exit the stadiametric
rangefinder mode.
NOTES:
• The horizontal stadia lines are centered on the reticle, which
remains onscreen.
• To change the units of measurement (meters or yards), see
Settings Menu > Units of Measure on page43.
6
00yd
200yd
45yd
A
2 5 . U LT R A- C L E A R

30
2. Rotate the Control Turret to select the Ultra-Clear menu item.
Ultra-Clear is selected by default when the menu is accessed for
the first time.
3. Short press the Control Turret to toggle Ultra-Clear mode
on / o. The Ultra-Clear status, on or o , appears in the top
status bar.
4. Long press the Control Turret to save and return to the home
screen.
NOTE: When Ultra-Clear mode is turned on and o, the TX60C will
automatically perform a shuttered non-uniformity correction.
Wi-Fi
Turn Wi-Fi on / o
Turn on Wi-Fi to manipulate
the TX60C via the InfiRay
Outdoor App.
1. Long press the Control
Turret to enter the main
menu.
2. Rotate the Control Turret
to select the Wi-Fi
menu item.
3. Short press the Control
Turret to toggle Wi-Fi on / o. The first three times Wi-Fi is turned
on, the default Wi-Fi password will appear briefly to the right of
the toggle. The password will no longer be displayed after the
default password is changed.
4. The Wi-Fi status, on or o , appears in the top status bar.
5. Long press the Control Turret to save and return to the home
screen.
Bluetooth
The Bluetooth function of the BOLT TX60C requires an IRAY-AC96
ILR-1200-1 Laser Rangefinder Module (optional/not included). Please
consult the documentation included with your ILR-1200-1 for more
information on its operation.
WIFI
12345678
A
Recoil Activated Video

32
Laser Calibration
The laser rangefinder function of the BOLT TX60C requires an
IRAY-AC96 ILR-1200-1 Laser Rangefinder Module (optional/not
included). Please consult the documentation included with your
ILR-1200-1 for more information on its operation.
Ballistics Calculation
The laser rangefinder function of the BOLT TX60C requires an
IRAY-AC96 ILR-1200-1 Laser Rangefinder Module (optional/not
included). Please consult the documentation included with your
ILR-1200-1 for more information on its operation.
Zeroing Profile
Select the zeroing profile
To zero the TX60C, you must
first select a zeroing profile.
Each of the three zeroing
profiles, A, B, and C, have
three preset zero distances.
1. Long press the Control
Turret to enter the main
menu.
2. Rotate the Control Turret
to select the zeroing
profile menu item.
3. Short press the Control
Turret to enter the
zeroing profile submenu.
4. Rotate the Control Turret
to move through the
zeroing profile options,
A, B, andC. The selected
zeroing profile appears
in the bottom status bar
with the zero distance.
5. Short press the Control
Turret to confirm the
selection and return to
the main menu.
Zeroing Profile
A
Zeroing Profile
A
B
C
A
Zeroing
34
ZEROING MENU > ZERO DISTANCE SUBMENU >
RETICLE ZEROING
Adjust the reticle position
of the selected zero
distance.
In the reticle zeroing interface,
the X/Y position of the reticle
may be adjusted to match the
point of impact.
1. In the submenu for the
selected zero distance,
the reticle zeroing
menu item is selected by
default. Short press the
Control Turret to select it
and enter the reticle
zeroing interface.
2. The reticle zeroing
interface has the
following features:
1 X: Horizontal point
of impact change (in
cm or inches).
2 Y: Vertical point of
impact change (in cm
or inches).
3 Freeze Icon: The
icon appears when
the image is frozen.
4 Reticle: Shows the new reticle position.
5 White Dot: Indicates center of original reticle position.
NOTE: The red “X”
indicates an example point
of impact. It is shown in
the figure for illustration
purposes and is not an
interface element.
3. Center the reticle on the
aiming point and long
press the Photo and
Palette Buttons at the
same time to freeze the
image. The image freeze
icon will appear below
the X/Y coordinates.
Zeroing
109y
219y
109y
328
A
109y
X=0.00in
Y=0.00in
A
109y
X=15.00in
Y=0.00in
A
4. Select the axis (X or Y) along

36
ZEROING MENU > ZERO DISTANCE SUBMENU >
CUSTOMIZE ZERO DISTANCE
Customize a preset zero
distance
The BOLT TX60C supports
custom zero distances of 1 to
999 yards or 1 to 999 meters.
1. In the submenu for the
selected zero distance,
rotate the Control Turret
to select the distance
customization menu
item.
2. Short press the Control
Turret to customize the
zero distance. A blue
arrow will appear above and below the first digit.
3. Rotate the Control Turret to increase or decrease the value of
the first digit, from 0–9.
4. Short press the Control Turret to switch between the three digits.
The two blue arrow icons will move to indicate the selected digit.
5. Long press the Control Turret to save the custom zero distance
and return to the zero distance submenu.
6. The new zero distance appears in the bottom status bar.
Calibration
Select the non-uniformity
correction mode
The BOLT TX60C has
three non-uniformity
correction (NUC) modes:
Automatic(A), Manual(M), and
Background(B).
1. Long press the Control
Turret to enter the main
menu.
2. Rotate the Control Turret
to select the calibration
menu item.
3. Short press the Control Turret to enter the submenu.
Zeroing
109y
219y
109y
328
1 0 9 y
Calibration
A
4. Rotate the Control

38
STANDBY NOTES:
• When , , or is selected:2min 4min 6min
• After the set number of minutes of inactivity, the TX60C will
enter standby automatically when it is tilted up or down at
an angle of more than 70° or left or right at an angle of more
than 30°.
• The TX60C will not enter standby mode while it is in a level
(horizontal) position.
• Short press the Power Button to exit standby mode.
• When is selected, standby mode is turned o and the rifle o
scope will operate until the batteries run out.
Pixel Defect Correction
Select and correct defective
pixels
Defective pixels are pixels
that do not change correctly
compared to the other
image pixels—they are
either brighter or darker
than surrounding pixels. The
BOLT TX60C has a tool that
corrects defective pixels on
the sensor using its internal
software.
1. Long press the Control
Turret to enter the main
menu.
2. Rotate the Control Turret
to select the pixel defect
correction menu
option.
3. Short press the Control
Turret to enter the
defective pixel correction
interface.
4. The pixel correction
interface has the
following features:
1 X: Select to move
the cursor horizontally.
2 Y: Select to move the cursor vertically.
3 0: Shows the number of defective pixels in the “to be
corrected” list.
A
4 Cursor: The cursor appe
Produkt Specifikationer
| Mærke: | InfiRay |
| Kategori: | Kikkert |
| Model: | TX60C |
Har du brug for hjælp?
Hvis du har brug for hjælp til InfiRay TX60C stil et spørgsmål nedenfor, og andre brugere vil svare dig
Kikkert InfiRay Manualer

19 December 2024
18 December 2024
Kikkert Manualer
- Kikkert Sony
- Kikkert Canon
- Kikkert Braun
- Kikkert Technaxx
- Kikkert Bushnell
- Kikkert Nikon
- Kikkert Kodak
- Kikkert Olympus
- Kikkert Biltema
- Kikkert Nedis
- Kikkert Hama
- Kikkert Focus
- Kikkert Crivit
- Kikkert Rocktrail
- Kikkert Leica
- Kikkert Auriol
- Kikkert Maginon
- Kikkert Bresser
- Kikkert National Geographic
- Kikkert Pentax
- Kikkert Rollei
- Kikkert Swarovski
- Kikkert Zeiss
- Kikkert Carson
- Kikkert Celestron
- Kikkert Blaser
- Kikkert Vortex
- Kikkert Barska
- Kikkert Asaklitt
- Kikkert Yukon
- Kikkert Vivitar
- Kikkert SIG Sauer
- Kikkert Pulsar
- Kikkert Levenhuk
- Kikkert AGM
- Kikkert Kayoba
- Kikkert Minox
- Kikkert Explore Scientific
- Kikkert Apeman
- Kikkert ATN
- Kikkert Tevion
- Kikkert Cresta
- Kikkert Swarovski Optik
- Kikkert Meade
- Kikkert Traveler
- Kikkert Umarex
- Kikkert Steiner
- Kikkert Vanguard
- Kikkert Lunt Solar Systems
- Kikkert NEWTON
- Kikkert Dorr
- Kikkert Praktica
- Kikkert Bynolyt
- Kikkert Eagle Optics
- Kikkert Berger & Schröter
- Kikkert Snypex
- Kikkert Goview
- Kikkert Eschenbach
- Kikkert Liemke
- Kikkert Sharper Image
- Kikkert Night Owl
- Kikkert Leupold
- Kikkert SVBONY
- Kikkert IGEN
- Kikkert Rexing
- Kikkert Armasight
- Kikkert Opticron
- Kikkert Alpen Optics
- Kikkert Kite Optics
- Kikkert Meopta
- Kikkert Hawke
- Kikkert RIX
- Kikkert PARD
Nyeste Kikkert Manualer

9 April 2025
8 April 2025
31 Marts 2025
31 Marts 2025
26 Februar 2025
15 Januar 2025
15 Januar 2025
15 Januar 2025
15 Januar 2025
14 Januar 2025