Kenwood DNX4330 Manual
Kenwood
Navigation
DNX4330
Læs nedenfor 📖 manual på dansk for Kenwood DNX4330 (132 sider) i kategorien Navigation. Denne guide var nyttig for 26 personer og blev bedømt med 4.5 stjerner i gennemsnit af 2 brugere
Side 1/132

What Do You Want To Do?
Thank you for purchasing the KENWOOD GPS NAVIGATION SYSTEM.
In this manual, you will learn various convenient functions of the system.
Click the icon of the media you want to play.
With one-click, you can jump to the section of each media!
iPod USB VCD
DVD VIDEO
Music CD
Disc Media
BT Audio ahaPandora
Tuner
Digital Radio
TV
13DNX_IM366_Ref_M_En_02 (M)© 2012 JVC KENWOOD Corporation
DNX7330BT
DNX7330BTM
DNX5330BT
DNX5330BTM
DNX4330DAB
DNX4330
GPS NAVIGATION SYSTEM
INSTRUCTION MANUAL
Before reading this manual, click the button below to check the latest edition and the
modified pages.
Check the latest edition


22 3
Before Use 4
2 WARNING _______________________ 4
How to Read this Manual 5
Basic Operations 6
Functions of the Buttons
on the Front Panel _________________ 6
Turning on the Unit _________________ 12
How to Play Media __________________ 15
Operating with the Top Menu Screen ___ 16
Common Operations ________________ 18
Navigation Operation ________________ 20
DVD/Video CD (VCD)
Operation 22
DVD/VCD Basic Operation ____________ 22
DVD Disc Menu Operation ____________ 25
Zoom Control For DVD And VCD _______ 26
DVD Setup ________________________ 28
CD/Audio and Visual Files/
iPod Operation 32
Music/Video/Picture Basic Operation ___ 32
Search Operation ___________________ 38
Movie Control ______________________ 43
PANDORA® Internet Radio Operation ___ 44
Aha Operation _____________________ 48
USB/iPod/DivX Setup ________________ 52
Radio and TV Operation 54
Radio Basic Operation _______________ 54
Digital Radio Basic Operation _________ 56
TV Basic Operation __________________ 58
Memory Operation __________________ 60
Selecting Operation _________________ 61
Traffic Information __________________ 63
Replay (Digital Radio only) ____________ 63
Tuner Setup _______________________ 64
Digital Radio Setup __________________ 65
TV Setup __________________________ 66
Bluetooth Control 68
Registering And Connecting
Bluetooth Unit ____________________ 68
Playing Bluetooth Audio Device _______ 70
Using Hands-Free Unit _______________ 71
Smartphone Link ___________________ 76
Hands-Free Setup ___________________ 78
Setting Up 80
Monitor Screen Setup _______________ 80
View Camera Control ________________ 81
System Setup ______________________ 81
Display Setup ______________________ 87
Navigation Setup ___________________ 90
Camera Setup ______________________ 91
Software Information ________________ 92
AV Input Setup _____________________ 92
AV Output Interface Setup ____________ 93
Controlling Audio 94
Setting Audio ______________________ 94
Controlling General Audio ____________ 98
Equalizer Control ___________________ 100
Zone Control _______________________ 102
Sound Effect _______________________ 103
Listening Position ___________________ 106
Contents Remote control 108
Battery Installation __________________ 108
Functions of the Remote control Buttons 109
Troubleshooting 112
Problems and Solutions ______________ 112
Error Messages _____________________ 113
Resetting the Unit __________________ 115
Appendix 116
Playable Media and Files _____________ 116
Status Bar Indicator Items ____________ 119
Region Codes in the World ____________ 121
DVD Language Codes _______________ 122
Specifications ______________________ 123
About this Unit _____________________ 126


44 5
Return to the Top page
Before Use
Return to the Top page
How To Read This Manual
2 WARNING
To prevent injury or fire, take
the following precautions:
• Topreventashortcircuit,neverputor
leaveanymetallicobjects(suchascoinsor
metaltools)insidetheunit.
• Donotwatchorfixyoureyesontheunit’s
displaywhenyouaredrivingforany
extendedperiod.
• Ifyouexperienceproblemsduring
installation,consultyourKenwooddealer.
Precautions on using this unit
• Whenyoupurchaseoptionalaccessories,
checkwithyourKenwooddealertomake
surethattheyworkwithyourmodelandin
yourarea.
• Youcanselectlanguagetodisplaymenus,
audiofiletags,etc.SeeLanguage setup
(P.89).
• TheRadioDataSystemorRadioBroadcast
DataSystemfeaturewon’tworkwhere
theserviceisnotsupportedbyany
broadcastingstation.
Protecting the monitor
Toprotectthemonitorfromdamage,donot
operatethemonitorusingaballpointpenor
similartoolwiththesharptip.
Cleaning the unit
Ifthefaceplateofthisunitisstained,wipeit
withadrysoftclothsuchasasiliconcloth.
Ifthefaceplateisstainedbadly,wipethe
stainoffwithaclothmoistenedwithneutral
cleaner,thenwipeitagainwithacleansoft
drycloth.
¤
• Applying spray cleaner directly to the unit
may affect its mechanical parts. Wiping the
faceplate with a hard cloth or using a volatile
liquid such as thinner or alcohol may scratch
the surface or erase screened print.
Lens fogging
Whenyouturnonthecarheaterincold
weather,deworcondensationmayform
onthelensinthediscplayeroftheunit.
Calledlensfogging,thiscondensationon
thelensmaynotallowdiscstoplay.Insuch
asituation,removethediscandwaitforthe
condensationtoevaporate.Iftheunitstill
doesnotoperatenormallyafterawhile,
consultyourKenwooddealer.
Precautions on handling discs
• Donottouchtherecordingsurfaceofthe
disc.
• Donotsticktapeetc.onthedisc,orusea
discwithtapestuckonit.
• Donotusedisctypeaccessories.
• Cleanfromthecenterofthediscandmove
outward.
• Whenremovingdiscsfromthisunit,pull
themouthorizontally.
• Ifthedisccenterholeoroutsiderimhas
burrs,usethedisconlyafterremovingthe
burrswithaballpointpenetc.
• Discsthatarenotroundcannotbeused.
• 8-cm(3inch)discscannotbeused.
• Discswithcoloringontherecording
surfaceordiscsthataredirtycannotbe
used.
• ThisunitcanonlyplaytheCDswith
.
Thisunitmaynotcorrectlyplaydiscswhich
donothavethemark.
• Youcannotplayadiscthathasnotbeen
finalized.(Forthefinalizationprocesssee
yourwritingsoftware,andyourrecorder
instructionmanual.)
Before Use How to Read this Manual
27
Return to the Top page
CD, Disc, iPod, USB device
Search Operation
You can search the music, video, or picture
file by some operations.
NOTE
• If you use a remote controller, you can jump
directly to the desired track/file with entering the
track/folder/file number, play time, etc. For details,
see “Direct search mode” (p.81).
List search
You can search tracks, folders, and files
a ording to hierarchy.cc
For USB devices and iPo , you can list and ds
search files in the device by using playlist.
1 Press the <MENU> button during
playback.
Simple Control screen appears.
2 Touch [ ].
List Control screen appears.
3 Touch desired track/file.
Playback starts.
Other search
When you want to nar w the list down, ro
there are other search ways.
1 Press the <MENU> button during
playback.
Simple Control screen appears.
2 Touch [ ].
The search type screen appears.
NOTE
• Thescreensandpanelsshowninthis
manualareexamplesusedtoprovideclear
explanationsoftheoperations.
Forthisreason,theymaybedifferentfromthe
actualscreensorpanelsused,orsomedisplay
patternsmaybedifferent.
Link header
Youcanrefereachsectionortoppage
withone-click.
Reference mark
Displayedinbluenotes.
Withone-click,youcanjumptothe
articlerelatedtothecurrentsection.
Screen shot
Showssomescreenshotsdisplayedduring
operationforreference.
Theareaorkeystotoucharesurrounded
witharedframe.
Operation procedure
Explainsnecessaryproceduresto
achievetheoperation.
<>:Indicatesthenameofpanel
buttons.
[]:Indicatesthenameoftouch
keys.
Operation title
Introducesthefunction.
NOTE
Introducessometips,notes,etc.


66 7
Return to the Top page
Basic Operations
Return to the Top page
Basic Operations
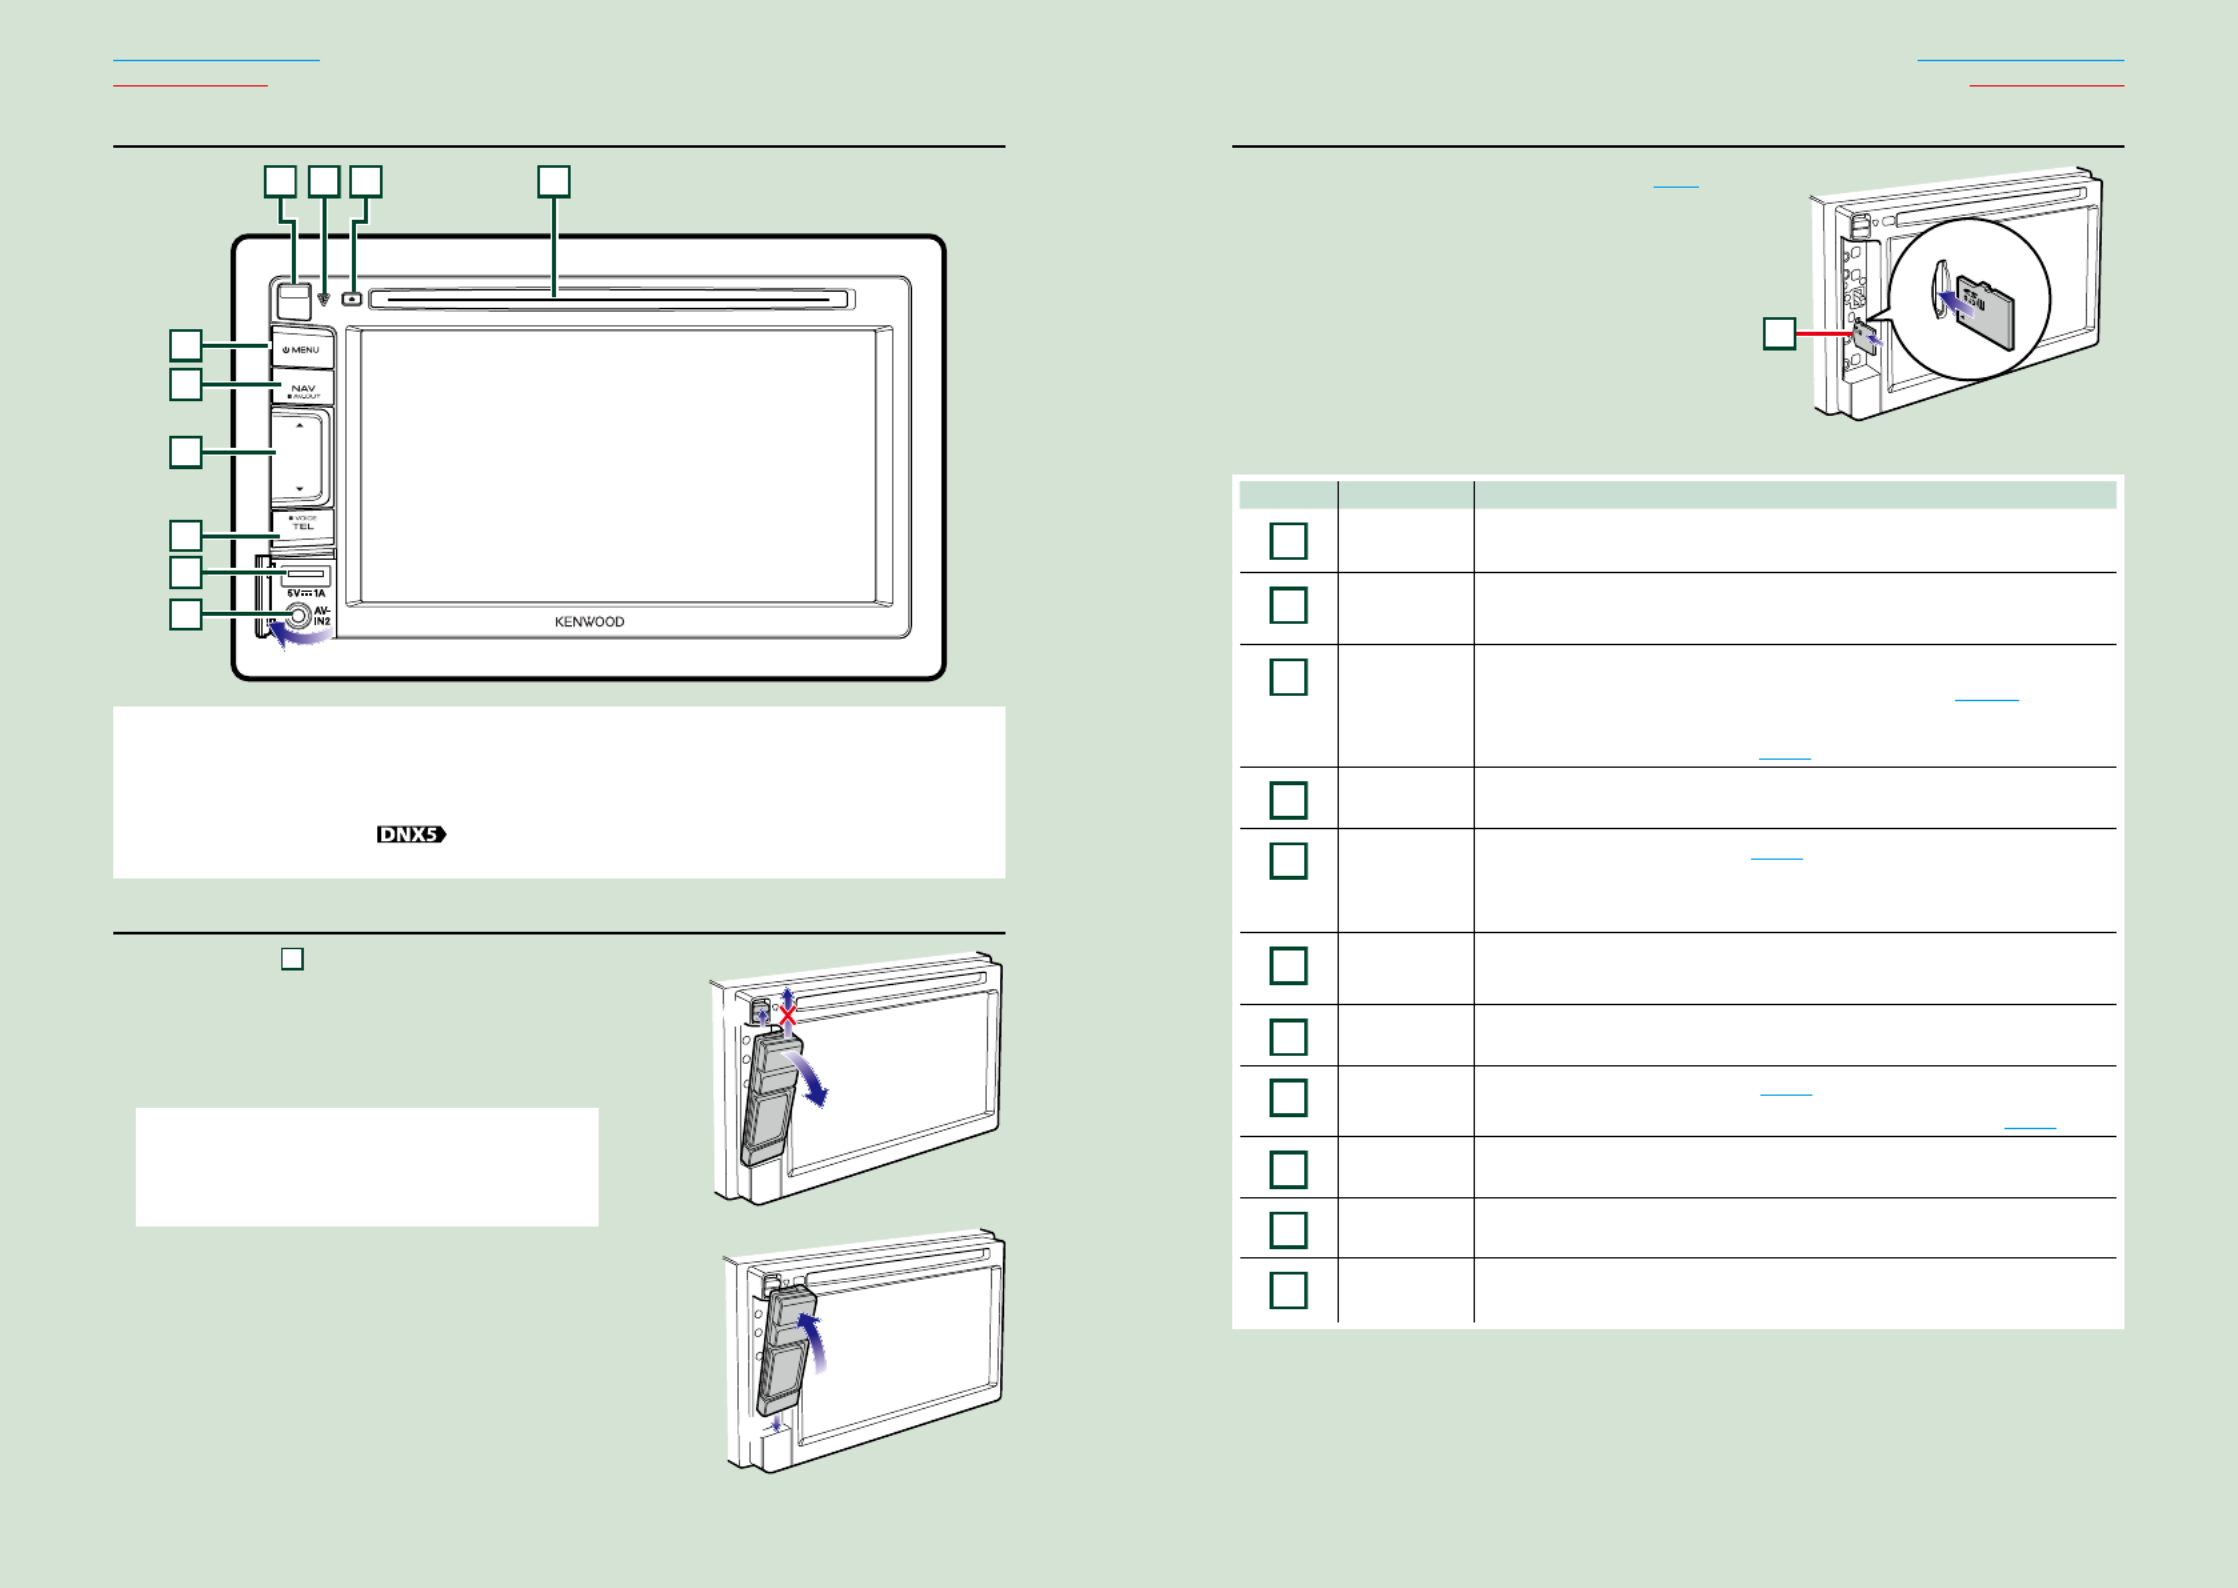
Functions of the Buttons on the Front Panel
DNX7330BT/DNX7330BTM
123456789
11
10
NOTE
• Thepanelsshowninthisguideareexamplesusedtoprovideclearexplanationsoftheoperations.Forthisreason,
theymaybedifferentfromtheactualpanels.
• Inthismanual,eachmodelnameisabbreviatedasfollows.
DNX7330BT, DNX7330BTM:
Ifaboveiconisshowed,readthearticleapplicabletotheunityouuse.
How to insert an SD Card
1) Press 8 < > button for 1 second.0
Thepanelfullyopens.
2) Hold the SD card as the illustration in the right
and insert it into the slot until it clicks.
● To eject the card:
Push the card until it clicks and then remove your finger
from the card.
The card pops up so that you can pull it out with your
fingers.
Basic Operations Number Name Motion
1
fi(Reset) •Iftheunitortheconnectedunitfailstooperateproperly,theunit
returnstofactorysettingswhenthisbuttonispressed .(P.115)
•IftheSecurityIndicator(SI)functionisturnedon,thisindicatorflashes
whenthevehicleignitionisoff .(P.85)
2
ATT •Switchesattenuationofthevolumeon/off.
•Pressingfor1secondturnsthescreenoff.
3
∞ 5, (Vol) Adjustsvolume.
4AUD •DisplaysGraphicEqualizerscreen .*(P.101)
•Pressingfor1secondswitchescameraviewdisplayon/off.
5NAV •Displaysthenavigationscreen.
•Pressingfor1secondswitchesAVoutsources.
6MENU •DisplaystheTopMenuscreen .(P.16)
•Pressingfor1secondturnsthepoweroff.
•Whenthepoweroff,turnsthepoweron.
7TEL •DisplaystheHandsFreescreen .(P.68)
•Pressingfor1seconddisplaystheVoiceRecognitionscreen.(P.76)
80(Eject) •Ejectsthedisc.
•Whenthepanelisopened,pressingclosesthepanelandpressingfor1
secondejectsthediscforcibly.
•Whenthepanelisclosed,pressingfor1secondfullyopensthepanelto
thelocationoftheSDcardslot.
9
Remote
Sensor
Receivestheremotecontrolsignal.
10 Discinsert
slot
Aslottoinsertadiscmedia.
11
SDcardslot AnSDcardslotforupgradingthemap.Forhowtoupgradethemap,refer
totheinstructionmanualofthenavigationsystem.
*ThedisplaymaynotswitchtotheGraphicEqualizerscreeninsomeconditions.
0
Labelled
side

88 9
Return to the Top page
Basic Operations
Return to the Top page
Basic Operations
DNX5330BT/DNX5330BTM
4312
5
6
7
8
9
10
NOTE
• Thepanelsshowninthisguideareexamplesusedtoprovideclearexplanationsoftheoperations.Forthisreason,
theymaybedifferentfromtheactualpanels.
• Inthismanual,eachmodelnameisabbreviatedasfollows.
DNX5330BT, DNX5330BTM :
Ifaboveiconsareshowed,readthearticleapplicabletotheunityouuse.
Detaching The Front Panel
1) Slide the
4
Release key upward to detach the
part of the front panel.
● Attaching the front panel:
Hold the panel securely so as not to drop it accidentally,
and fit it onto the attaching plate until it is firmly locked.
NOTE
• Whendetachingapartofthefrontpanel,detachit
towardthefrontsideasshowninthediagramright.Ifit
isdetachedupward,thefrontpanelwillbebroken.
1
2
How to insert a microSD Card
1) Detach the part of the front panel. (P.8)
2) Hold the microSD card with the label side
facing left and the notched section up, and
insert it into the slot until it clicks.
3) Attach the part of the front panel.
● To eject the card:
Push the card until it clicks and then remove your
finger from the card.
The card pops up so that you can pull it out with
your fingers.
Number Name Motion
1Discinsert
slot
Aslottoinsertadiscmedia.
20(Eject) •Ejectsthedisc.
•Pressingfor1secondejectsthediscforcibly.
3fi(Reset) •Iftheunitortheconnectedunitfailstooperateproperly,theunit
returnstofactorysettingswhenthisbuttonispressed .(P.115)
•IftheSecurityIndicator(SI)functionisturnedon,thisindicatorflashes
whenthevehicleignitionisoff .(P.85)
4Releasekey Detachesthepartoffrontpanel.
5
MENU •DisplaystheTopMenuscreen .(P.16)
•Pressingfor1secondturnsthepoweroff.
•Whenthepoweroff,turnsthepoweron.
6NAV •Displaysthenavigationscreen.
•Pressingfor1secondswitchesAVoutsources.
7∞ 5, •Adjustsvolume.
8
TEL •DisplaystheHandsFreescreen .(P.68)
•Pressingfor1seconddisplaystheVoiceRecognitionscreen.(P.76)
9
USBtarminal •AterminaltoconnectaUSBdeviceoriPod.
10
Inputjack •Aninputjackforexternaldevice.
11 microSD
cardslot
AnSDcardslotforupgradingthemap.Forhowtoupgradethemap,refer
totheinstructionmanualofthenavigationsystem.
1
2
11

1010 11
Return to the Top page
Basic Operations
Return to the Top page
Basic Operations
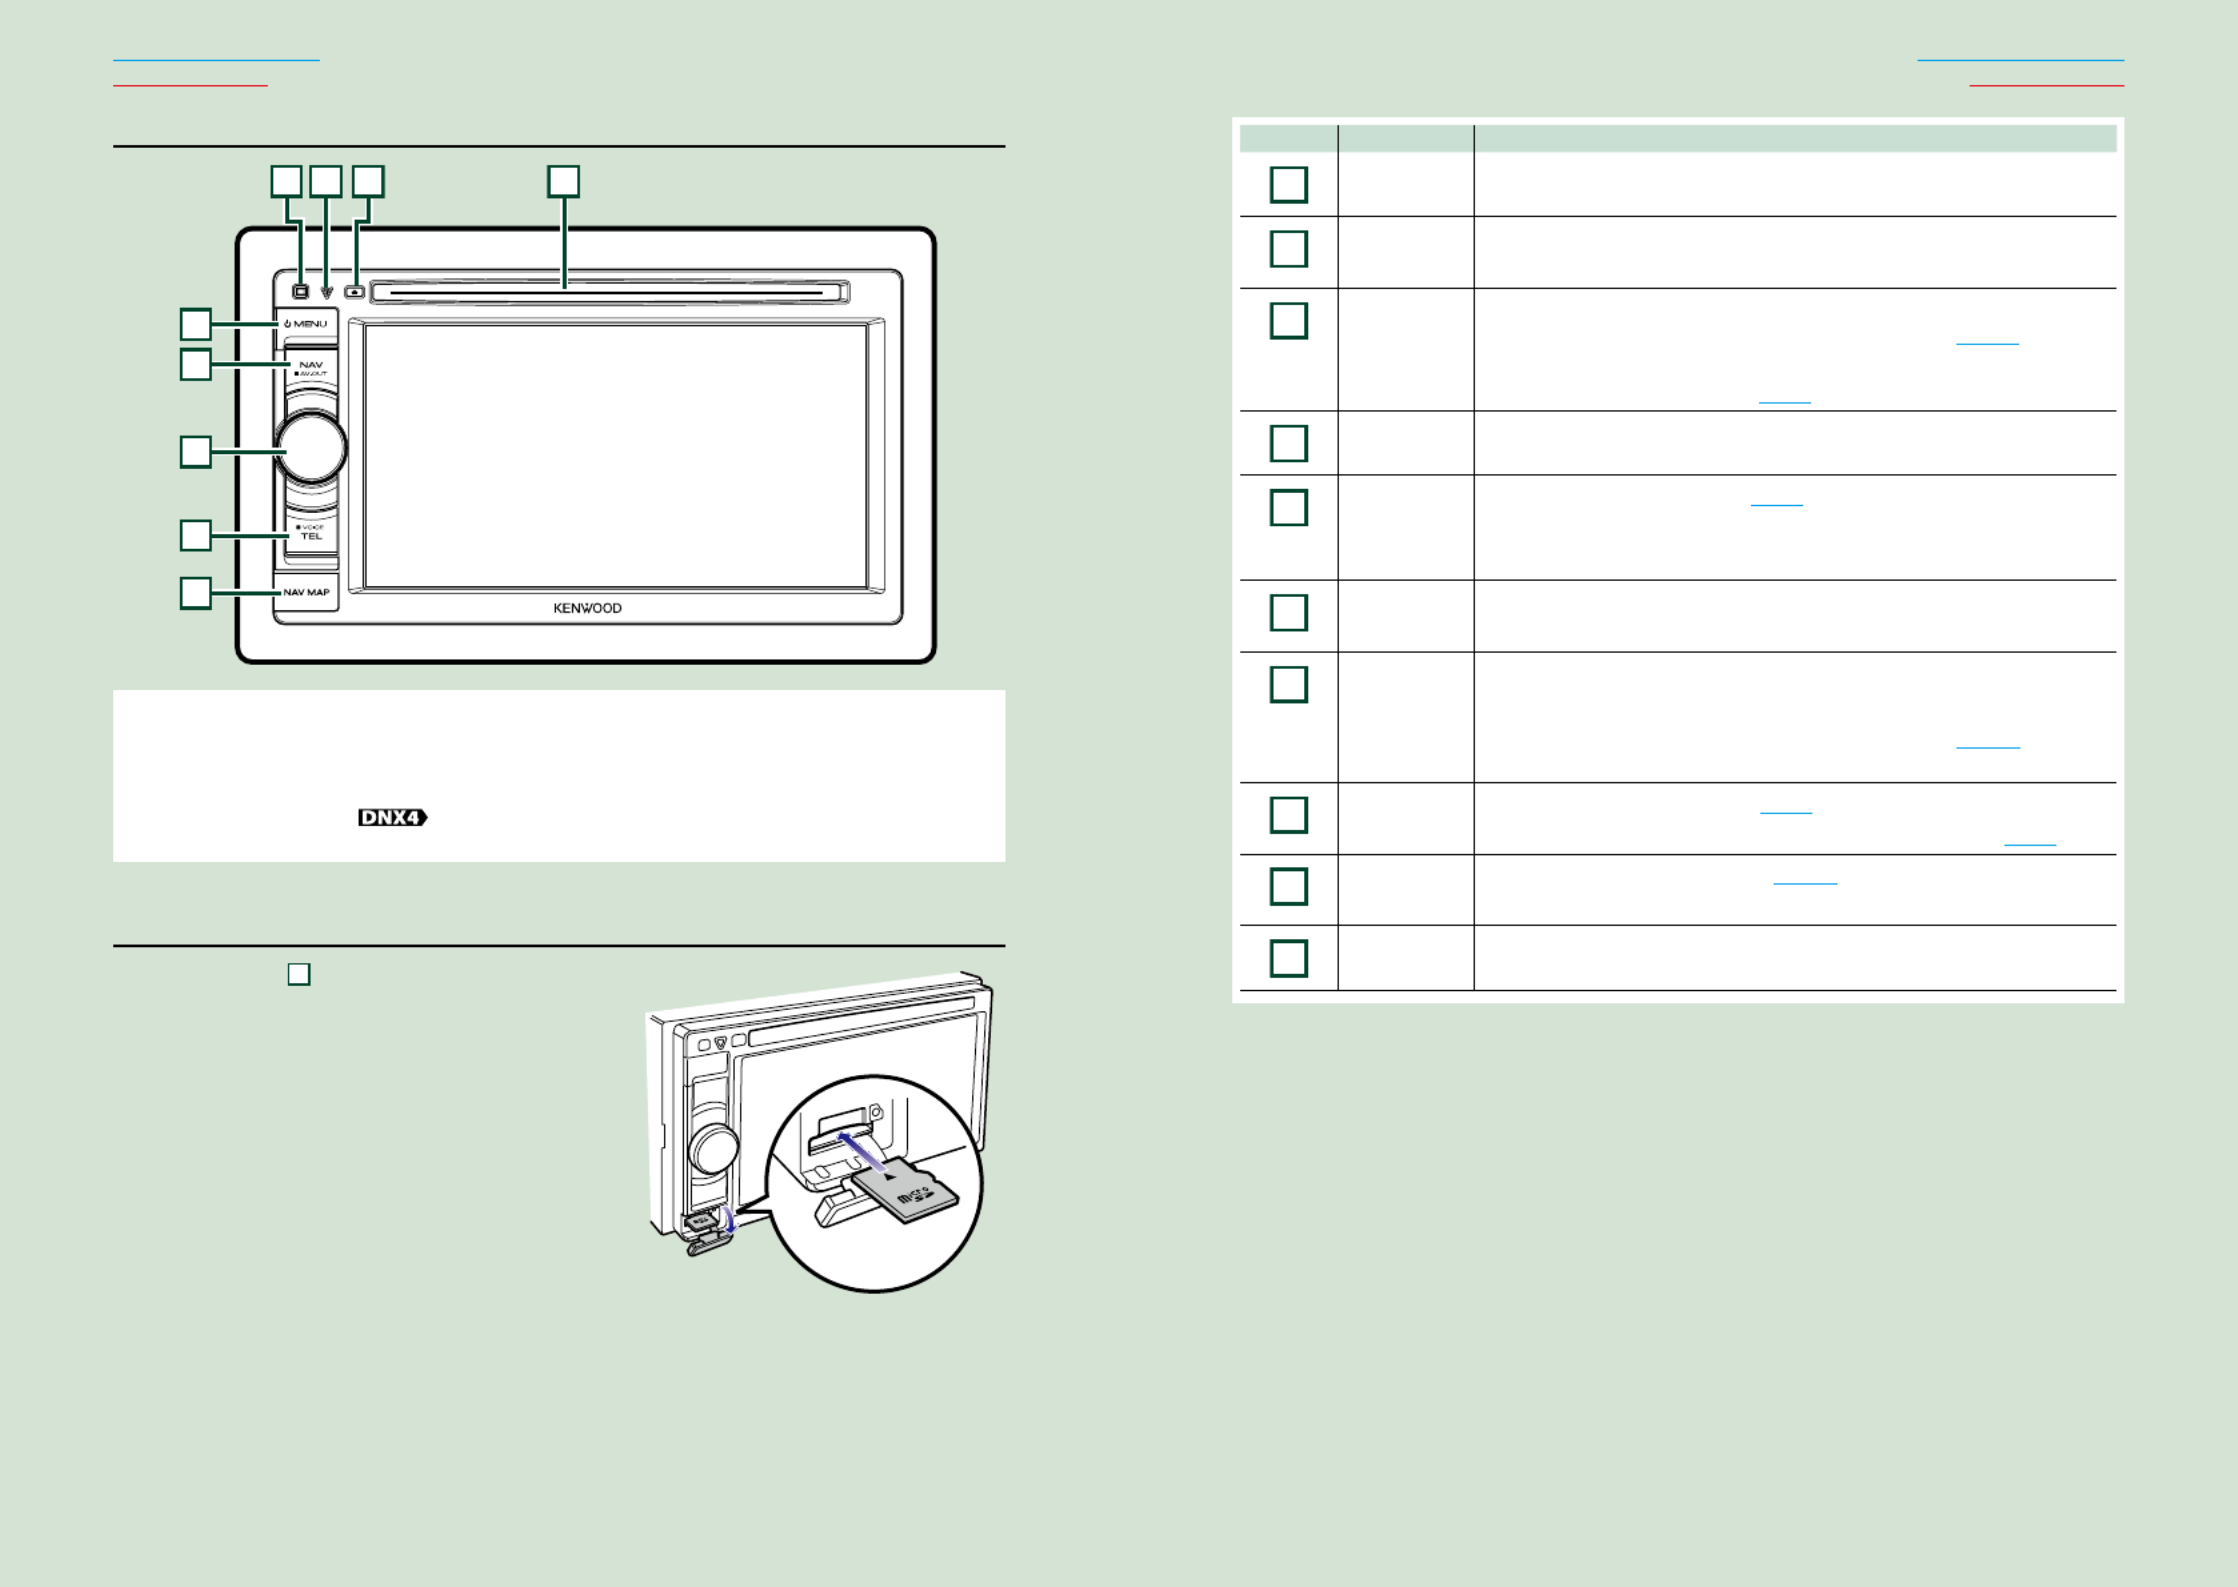
DNX4330DAB/DNX4330
4312
5
6
9
7
8
NOTE
• Thepanelsshowninthisguideareexamplesusedtoprovideclearexplanationsoftheoperations.Forthisreason,
theymaybedifferentfromtheactualpanels.
• Inthismanual,eachmodelnameisabbreviatedasfollows.
:DNX4330DAB, DNX4330
Ifaboveiconsareshowed,readthearticleapplicabletotheunityouuse.
How to insert a microSD Card
1) Open the
9
microSD card slot cover
as the illustration in the right.
2) Hold the microSD card with the label
facing up and the notched section right,
and insert it into the slot until it clicks.
● To eject the card:
Push the card until it clicks and then remove your
finger from the card.
The card pops up so that you can pull it out with
your fingers.
Number Name Motion
1
Discinsert
slot
Aslottoinsertadiscmedia.
2
0(Eject) •Ejectsthedisc.
•Pressingfor1secondejectsthediscforcibly.
3
fi(Reset) •Iftheunitortheconnectedunitfailstooperateproperly,theunit
returnstofactorysettingswhenthisbuttonispressed .(P.115)
•IftheSecurityIndicator(SI)functionisturnedon,thisindicatorflashes
whenthevehicleignitionisoff .(P.85)
4
Remote
Sensor
Receivestheremotecontrolsignal.
5
MENU •DisplaystheTopMenuscreen .(P.16)
•Pressingfor1secondturnsthepoweroff.
•Whenthepoweroff,turnsthepoweron.
6NAV •Displaysthenavigationscreen.
•Pressingfor1secondswitchesAVoutsources.
7
VolumeKnob •Turningadjustsvolumeupordown.
•Pressingswitchesattenuationofthevolumeon/off.
•Pressingfor1seconddisplaystheToneControlscreen .*(P.102)
(DNX4330DABonly)
8
DNX4330DAB
TEL
•DisplaystheHandsFreescreen .(P.68)
•Pressingfor1seconddisplaystheVoiceRecognitionscreen.(P.76)
8
DNX4330
AUD
•DisplaystheToneControlscreen .*(P.102)
•Pressingfor1secondturnsoffthedisplay.
9
microSD
cardslot
AmicroSDcardslotforupgradingthemap.Forhowtoupgradethemap,
refertotheinstructionmanualofthenavigationsystem.
*ThedisplaymaynotswitchtotheToneControlscreeninsomeconditions.


1212 13
Return to the Top page
Basic Operations
Return to the Top page
Basic Operations
Turning on the Unit
Themethodofturningonisdifferentdependingonthemodel.
Press the <MENU> button.
Theunitisturnedon.
● To turn off the unit:
Pressthe<MENU>buttonfor1second.
Ifitisyourfirsttimeturningtheunitonafterinstallation,itwillbenecessarytoperform
Initial setup (P.13).
1
Initial setup
Performthissetupwhenyouusethisunitfirsttimeorwhenyouresettheunit .(P.115)
Set each item as follows.
Language
Selectthelanguageusedforthecontrolscreenandsettingitems.Defaultis“BritishEnglish(en)”.
1Touch[SET].
2Touch[ ]or[ ]toselectthedesiredlanguage.2 3
3Touch[Enter].
Fordetailedoperation,seeLanguage setup (P.83).
Angle
Adjustthepositionofthemonitor.Defaultis“0”.
1Touch[SET].
2Touchdesiredanglenumberand[ ].
Fordetailedoperation,seeMonitor angle control (P.87).
iPod AV Interface Use
SettheterminalwhichyouriPodisconnectedto.Defaultis“iPod”.
1Touch[iPod]or[AV-IN2].
Color
Setthescreenandbuttonilluminationcolor.Youcanselectwhethertoallowcolorscanoperationor
selectafixedcolorforoperation.
1Touch[SET].
2Touch[ON]or[OFF]of[PanelColorScan].
3Ifyouwanttochangecolor,touch[SET]of[PanelColorCoordinate].
4Touchyourdesiredcolorand[ ].
Fordetailedoperation,seePanel color coordinate (P.88).
Camera
Settheparametersforthecamera.
1Touch[SET].
2Seteachitemandtouch[ ].
Fordetailedoperation,seeCamera Setup (P.91).
1
Continued

1414 15
Return to the Top page
Basic Operations
Return to the Top page
Basic Operations
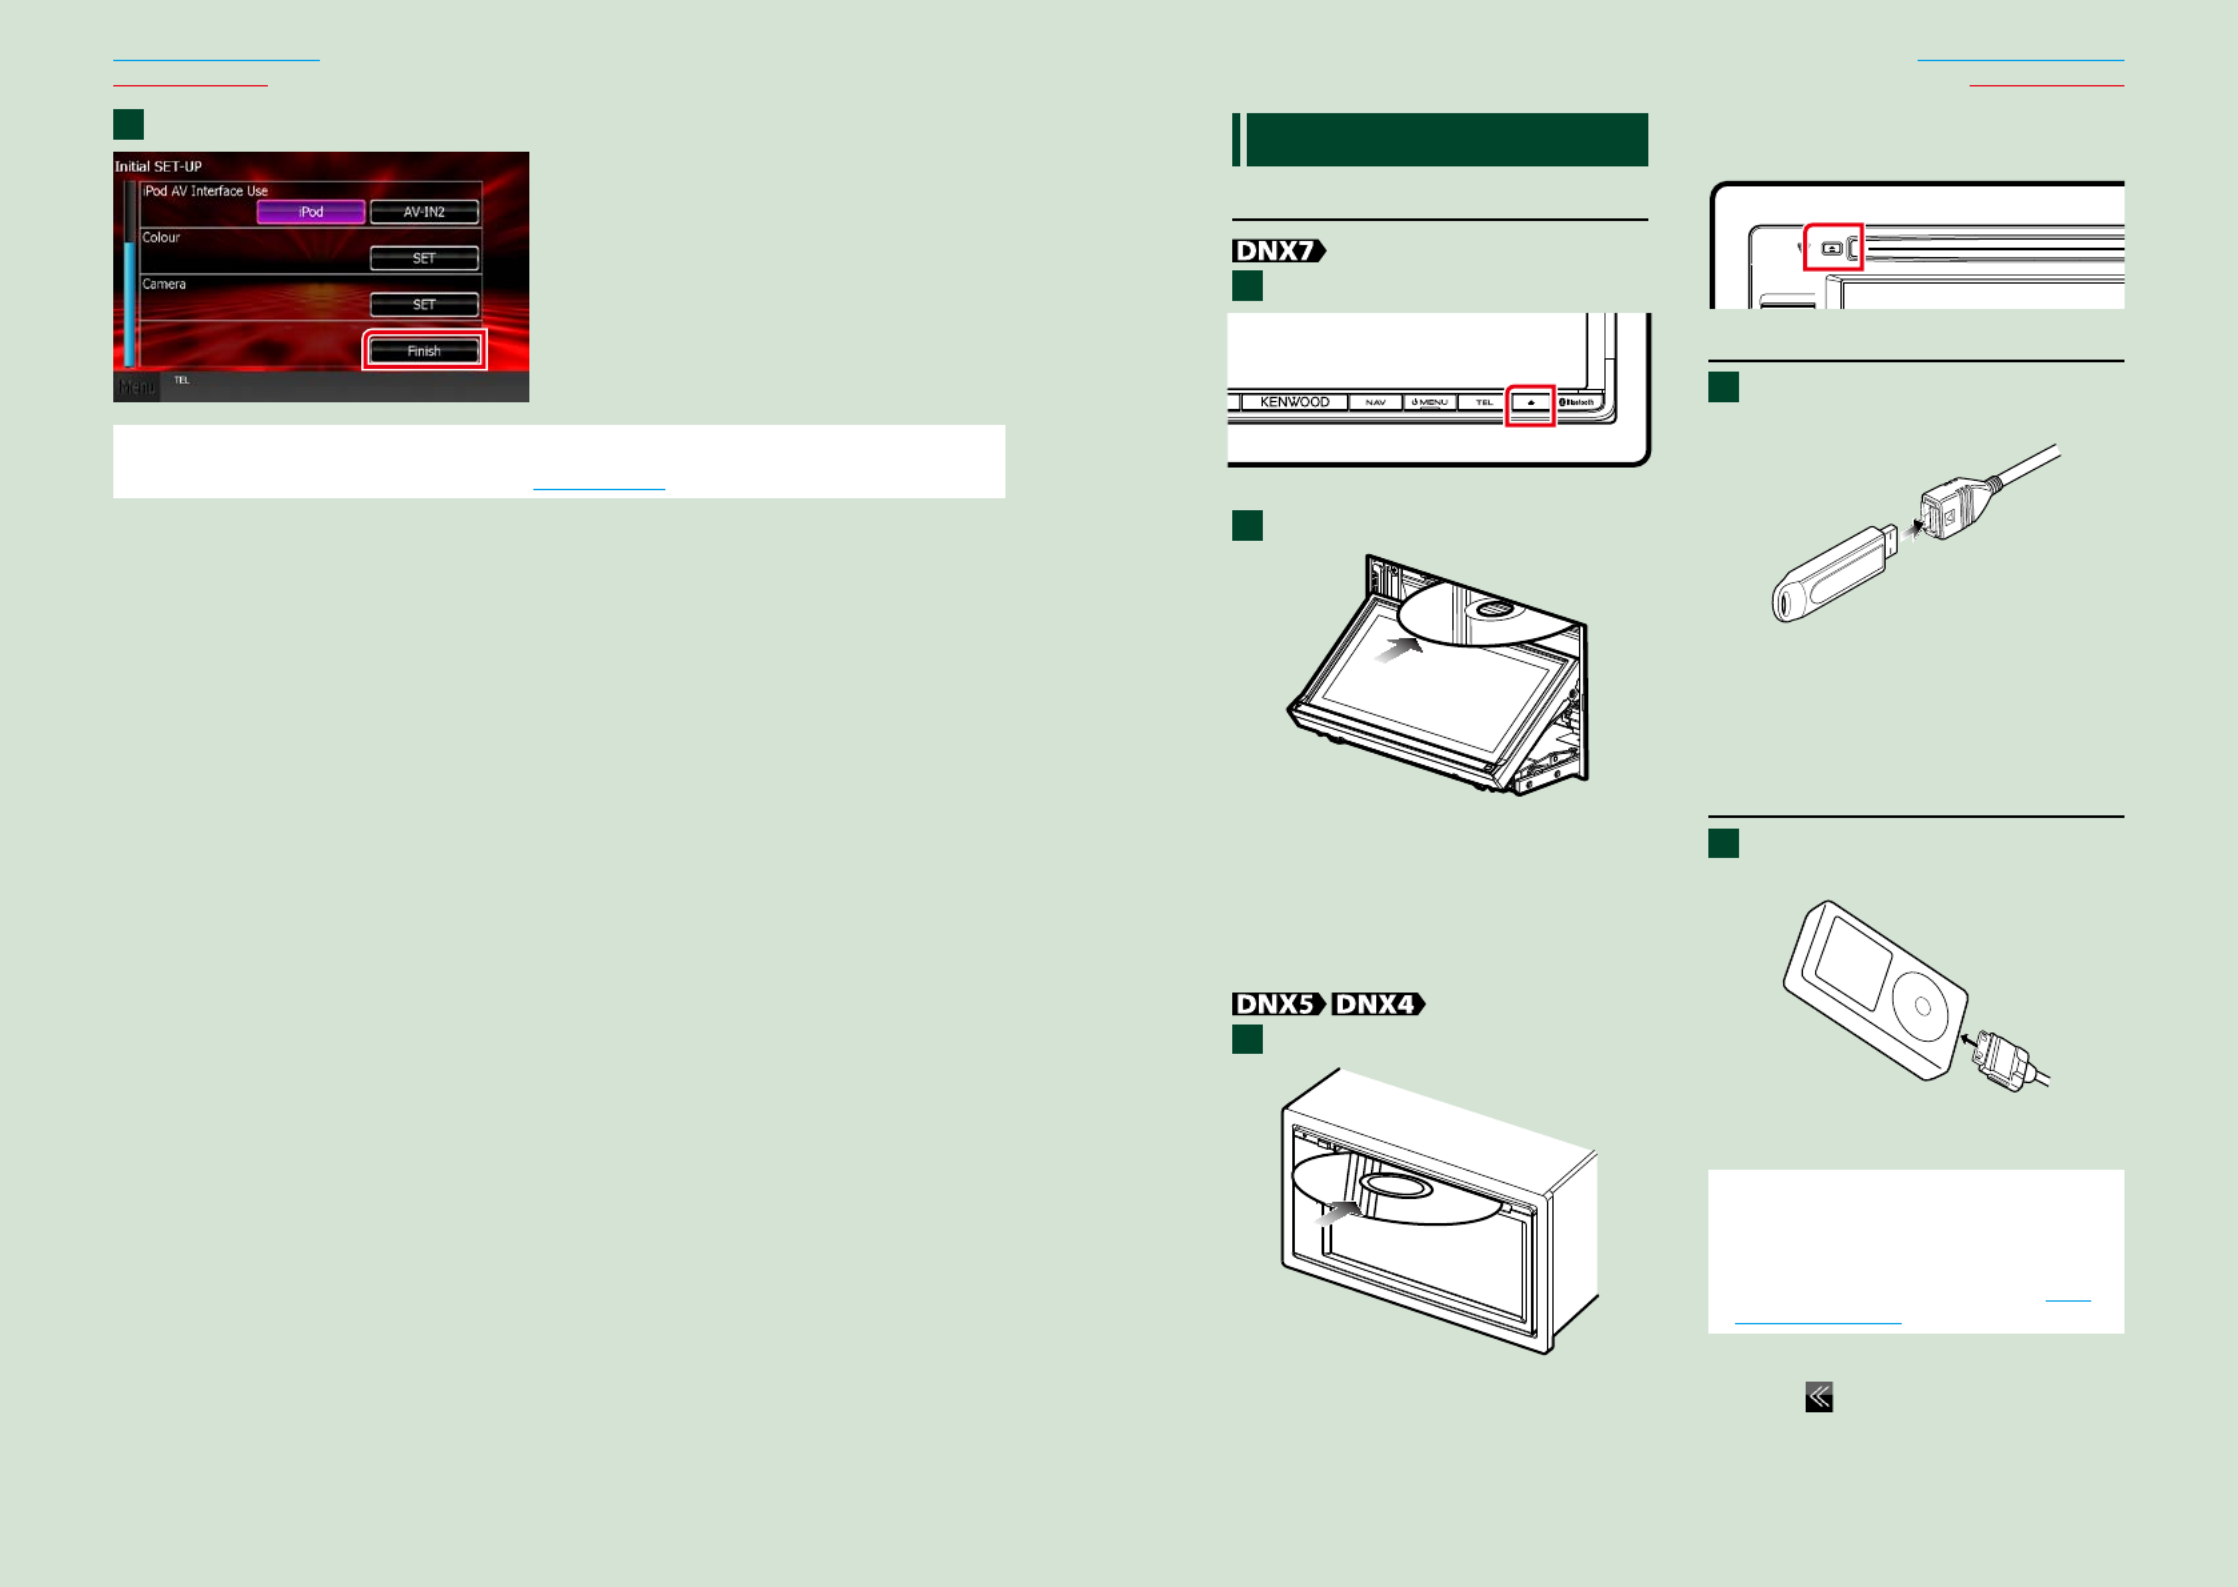
Touch [Finish].
NOTE
• ThesesettingscanbesetfromtheSETUPmenu.SeeSetting Up (P.80).
2How to Play Media
Music CD and disc media
Press the < > button.0
Thepanelopens.
Insert the disc into the slot.
Thepanelclosesautomatically.
Theunitloadsthediscandplayback
starts.
● To eject the disc:
Pressthe< >button.0
Insert the disc into the slot.
Theunitloadsthediscandplayback
starts.
● To eject the disc:
Pressthe< >button.0
USB device
Connect the USB device with the
USB cable.
Theunitreadsthedeviceandplayback
starts.
● To disconnect the device:
Touch[ ]onthescreenanddisconnect0
thedevicefromthecable.
iPod
Connect the iPod with the iPod
cable.
TheunitreadstheiPodandplayback
starts.
NOTE
• WhenaniPodisconnectedwhileanapplication
otherthanMusic,Pandora,andAhaRadio
applicationshasstarted,theunitautomatically
enterstheAppmodeofiPodsource.SeeMulti
function menu (P.36).
● To disconnect the device:
Touch[ ]onthescreenandthentouch
[ ].DisconnecttheiPodfromthecable.0
1
2
1
1
1


1616 17
Return to the Top page
Basic Operations
Return to the Top page
Basic Operations
Operating with the Top Menu Screen
MostfunctionscanbeperformedfromtheTopMenuscreen.
Touch [Menu] on any screen.
NOTE
• If[Menu]isnot
displayedduring
video/picture
playback,pressthe
<MENU>button.
(P. , P.6 10)
TopMenuscreenappears.
NOTE
• Youcanselectthe
hidingiconby
scrollingthescreen
leftorright.
Fromthisscreen,youcanperformthefollowingfunctions.
Function Icon Operation
Switchtheaudiosource
etc.
Touchtheiconofthe
desiredsource.
Entersetupmode
etc.
Touchtheiconofthe
desiredsetupfunction.
Displaynavigation
screen
or
Touch[NAV]or
navigationinformation.
Turnoffallaudio
function
Touch[STANDBY].
1
● Customizing Top Menu screen
Dragtheiconyouwanttoregistertothe
upperline.
Youcanmoveuptothreeicons.


2020 21
Return to the Top page
Basic Operations
Return to the Top page
Basic Operations
Touch [ ] or [ ] in the navigation screen.
Touchingthisareadisplays
theaudioscreen.
:Displaysthenavigationandcontrol
keysofthecurrentsource.
:Displaysthenavigationandcurrent
video/pictureplaybackdisplay.
NOTE
• Thescreenswitchesbetweenplaybackscreen
andcameravieweachtimetheviewingareais
touched.
• Touchingthesourceiconinthebottomofthe
screendisplaysthefullaudioscreen.
● To return to the full navigation screen:
Touch[ ].
NOTE
• Fordetailsoncontrolkeys,refertotheinstructionsineachsection.
2
Navigation Operation
Fordetailsonthenavigationfunction,pleaserefertotheNavigationInstructionManual.
Display the navigation screen
Press the <NAV> button.
Thenavigationscreenappears.
Control audio from the navigation screen
Youcancontrolaudiosourceswhilethenavigationscreenisdisplayed.
Also,youcanviewthenavigationinformationwhilethesourcecontrolscreenisdisplayed.
Touch the information bar.
Thenavigationscreenwithaudioinformationappears.
1
1


2222 23
Return to the Top page
DVD, VCD
Return to the Top page
DVD, VCD
DVD/VCD Basic Operation
Mostfunctionscanbecontrolledfromthesourcecontrolscreenandplaybackscreen.
NOTE
• SettheremotecontrolmodeswitchtoDVDmodebeforestartingoperation,seeSwitching the operation mode
(P.109).
• ThescreenshotbelowisforDVD.ItmaybedifferentfromtheoneforVCD.
234
1
5
Video screenControl screen
6
6
78
1 Information display
Displaysthefollowinginformation.
• :DVDtitleandchapternumberdisplayTitle #, Chap #
•Track #/Scene #:VCDtrackorscenenumberdisplay
Scene#isdisplayedonlywhenPlaybackcontrol(PBC)ison.
• , , , , :Currentplaymodedisplay3 ¡ ¢ 7 etc.
Themeaningsofeachiconareasfollows; (play), (fastforward), (fastbackward),3 ¡ 1
¢ 4 7(searchup), (searchdown), (stop), R(resumestop), (pause), (slowplayback),8
(slowreverseplayback).
Touchthisareatodisplaythedisclablename.
2 Multi function key
Touchtoswitchthemultifunctionmenu.Fordetailsonthemenu,seeMulti function menu (P.24).
3 Multi function menu
Variousfunctionscanbeperformedbyusingkeysinthisarea.Fordetailsonthekeys,seeMulti
function menu (P.24).
4 Control switching key
UnavailableinDVD/VCDsource.
DVD/Video CD (VCD) Operation 5 Sub function menu
Thefollowingfunctionscanbeperformedbyusingkeysinthisarea.
• :Touch[Repeats the current content ].Eachtimeyoutouchthekey,repeatmodeswitchesinthe
followingsequence;
DVD:"titlerepeat" ,"chapterrepeat" ,"functionoff"
VCD(PBCOn):Doesnotrepeat
VCD(PBCOff ):"trackrepeat" ,"functionoff"
• :Touch[Hides all keys ].
•Fast forward or fast backward:Touch[ ]or[ ].Eachtimeyoutouchthekey,thespeed1 ¡
changes;standard,2times,3times.
• :See#:##:##.Confirms play time
DVD:Youcanswitchthetimedisplaybetweentitleplaytime,chapterplay
time,andtitleremainingtime.Eachtimeyoutouch,thedisplayswitches
between“T#:##:##”(titleplaytimedisplay),“C#:##:##”(chapterplaytime
display),and“R#:##:##”(titleremainingtimedisplay).
Aswellasthetimedisplay,thebarindicatingcurrentlocationappears.
VCD (PBC off):Youcanalsoconfirmdiscremainingtimebytouchingtime
display.Eachtimeyoutouch,thedisplayswitchesbetween“P
##:##”(playtimedisplay)and“R##:##”(discremainingtime).
• :Seethebarincenter(DVDonly).ThebardoesnotappearwhentheConfirms the current location
timedisplayisremainingtimedisplay.
6 Searching area
Touchtosearchthenext/previouscontent.
Scrollingfromcenterofdisplaytoleftorrightperformsfastbackwardorfastforward.Eachtimeyou
toucheacharea,thespeedchanges;standard,2times,3times.Tostopfastbackward/forward,touch
centerofthedisplay.
7 Menu display area
Thisareafunctionsdifferentlydependingonthecurrentstatus.
• :DisplaystheDVDmenu.Duringthemenudisplay,displaysthehighlightDuring DVD playback
controlscreen.
• :DisplaystheZoomControlscreen .During VCD playback (P.26)
8 Key display area
Touchtodisplaythelastcontrolscreen.
NOTE
• Ifyouusearemotecontrol,youcanjumpdirectlytothedesiredimagewithenteringthechapternumber,scene
number,playtime,etc .(P.109)

2424 25
Return to the Top page
DVD, VCD
Return to the Top page
DVD, VCD
Multi function menu
DVD VCD
Thefunctionsofeachkeyareasfollows.
[ ] [ ]4 ¢
Searchestheprevious/nextcontent.
[ ]38
Playsorpauses.
[ ] or [ ] (DVD only)
Playsinslowmotionforwardorbackward.
[ ]7
Stopsplayback.Whentouchedtwice,thediscisplayedfromthebeginningwhenyouplayitthenext
time.
[PBC] (VCD only)
TurnPlaybackcontrol(PBC)onoroff.
[
SETUP]
TouchtodisplaytheSETUPMenuscreen.SeeSetting Up (P.80).
[
AUDIO]
TouchtodisplaytheAudioControlscreen.SeeControlling Audio (P.94).
[ REAR
]
Touchtomutetherearspeaker.
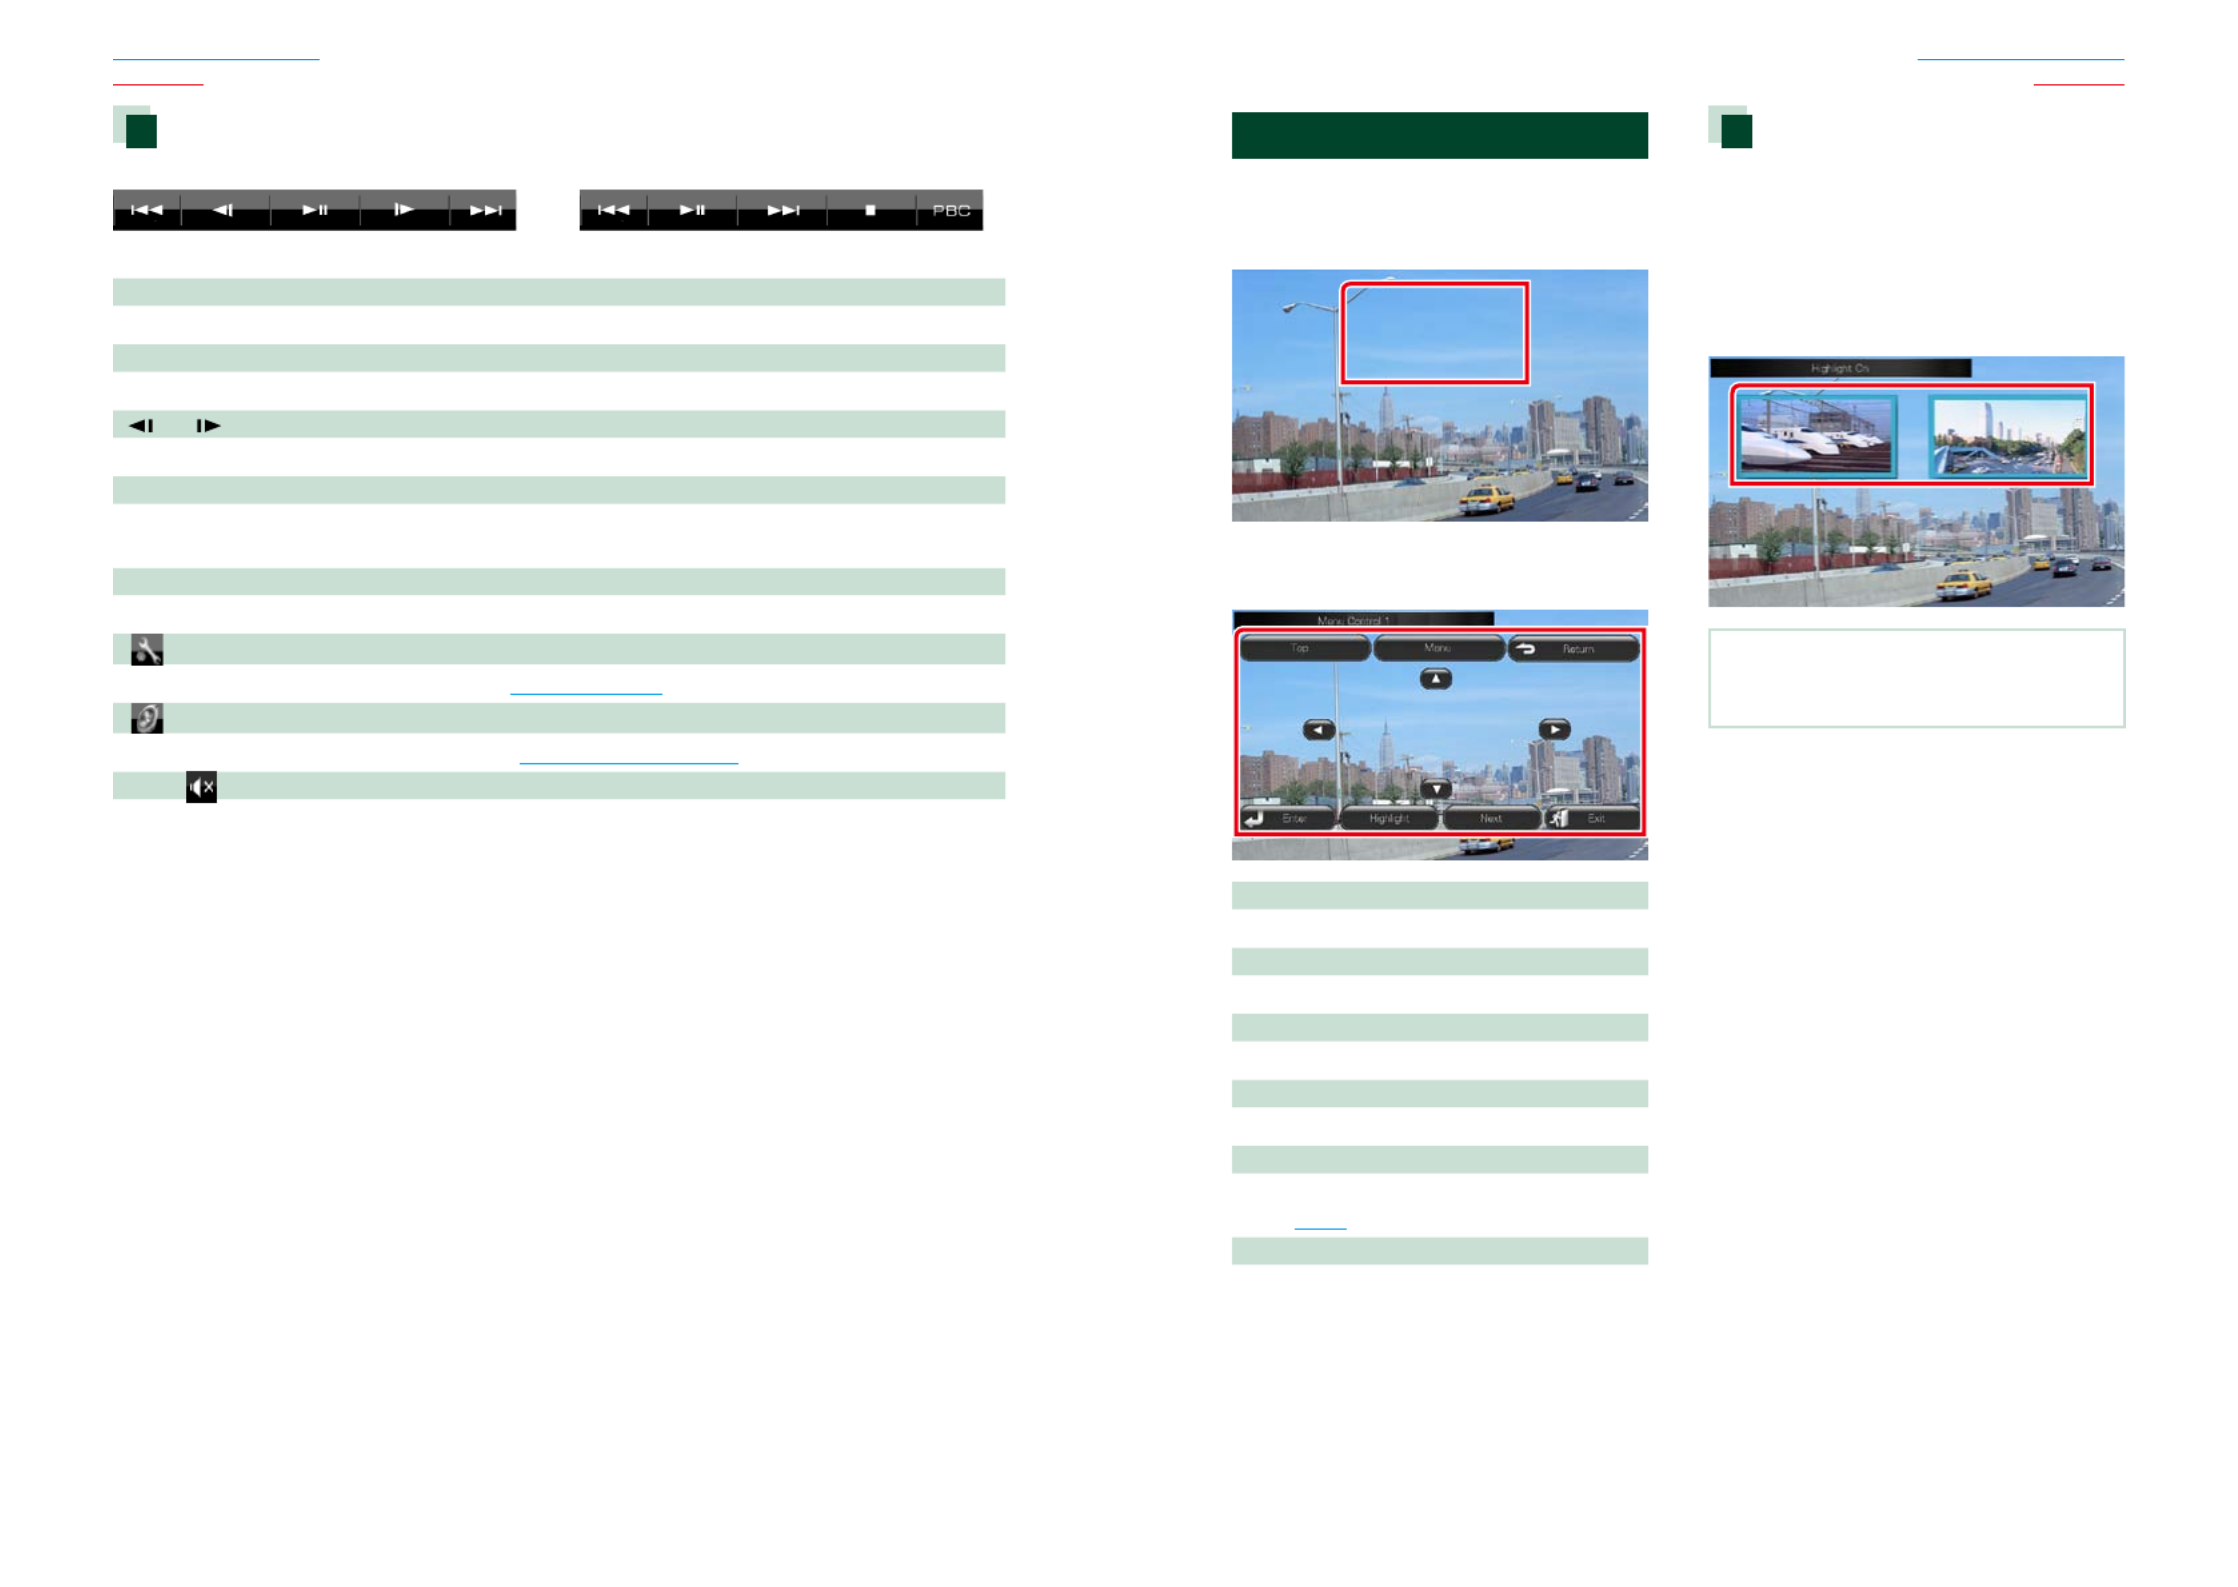
DVD Disc Menu Operation
YoucansetupsomeitemsintheDVD-VIDEO
discmenu.
1 Touch illustrated area during playback.
Menu Control screen appears.
2 Perform desired operation as follows.
Displays the top menu
Touch[Top].*
Displays the menu
Touch[Menu].*
Displays the previous menu
Touch[Return].*
Enters selected item
Touch[Enter].
Enables direct operation
Touch[Highlight]toenterthehighlightcontrol
mode .(P.25)
Moves the cursor
Touch[ ],[ ],[ ],[ ].5 ∞ 2 3
*Thesekeysmaynotfunctiondependingon
thedisc.
Highlight control
HighlightcontrolletsyoucontroltheDVD
menubytouchingthemenukeydirectlyon
thescreen.
1 Touch [Highlight] in the Menu Control
screen.
2 Touch desired item on the screen.
NOTE
• Thehighlightcontrolisclearedautomaticallyif
youdonotoperateforaconstanttime.


2626 27
Return to the Top page
DVD, VCD
Return to the Top page
DVD, VCD
DVD play mode setting
YoucanselectDVDplaymode.
1 Touch [Next] in the Menu Control
screen.
Menu Control 2 screen appears.
2 Touch the key which corresponds to
desired setting item.
Switches the subtitle language
Touch[Subtitle].Eachtimeyoutouchthiskey,
languageisswitched.
Switches the audio language
Touch[Audio].Eachtimeyoutouchthiskey,
languageisswitched.
Controls zoom ratio
Touch[Zoom].Fordetails,seestep2 in Zoom
Control For DVD And VCD (P.26).
Switches the picture angle
Touch[Angle].Eachtimeyoutouchthiskey,
pictureangleisswitched.
Exits menu control
Touch[Exit].
Displays the Menu Control 1 screen
Touch[Previous].
Zoom Control For DVD And VCD
YoucanenlargePlaybackscreenforDVDand
VCD.
1 For VCD, touch illustrated area during
playback.
Zoom Control screen appears.
NOTE
• ForDVD,pleaserefertoDVD play mode setting
(P.26)todisplaytheZoomControlscreen.
2 Perform desired operation as follows.
Switches zoom ratio
Touch[Zoom].
ForDVD,changesthezoomratioat4levels;
Off,2times,3times,4times.
ForVCD,changesthezoomratioat2levels;
Off,2times.
Scrolls the screen
Touch[ ],[ ],[ ],or[ ]toscrollthescreen5 ∞ 2 3
inthedirectionyoutouch.
Exits menu control
Touch[Exit].
Displays the previous menu*
Touch[Return].
*Thisfunctionmaynotbeperformed
dependingonthedisc.
NOTE
• Youcannottouchthemenukeysdirectlyonthe
screenwhenzooming.


2828 29
Return to the Top page
DVD, VCD
Return to the Top page
DVD, VCD
DVD Setup
YoucansetuptheDVDplaybackfunctions.
NOTE
• Eachoperationinthissectioncanbestartedfrom
theTopMenuscreen.Fordetails,seeOperating
with the Top Menu Screen (P.16).
1 Touch [ ] in the control screen.
Multi function menu appears.
2 Touch [SETUP].
SETUP Menu screen appears.
3 Touch [Source].
Source SETUP Menu screen appears.
4 Touch [DVD SETUP] in the list.
DVD SETUP screen appears.
5 Set each item as follows.
Menu/Subtitle/Audio Language*
SeeLanguage setup (P.29).
Dynamic Range Control*
Setsthedynamicrange.
Wide:Thedynamicrangeiswide.
Normal:Thedynamicrangeisnormal.
Dialog (Default):Makesthetotalsound
volumelargerthanother
modes.Thisiseffectiveonly
whenyouareusingDolby
Digitalsoftware.
Angle Mark
Setsananglemarkdisplay.
ON (Default):Ananglemarkappears.
OFF:Ananglemarkdoesnotappear.
Screen Ratio*
Setsthescreendisplaymode.
16:9 (Default):Displayswidepictures.
4:3 LB:DisplayswidepicturesintheLetterBox
format(havingblackstripesatthetop
andbottomofscreen).
4:3 PS:DisplayswidepicturesinthePan&
Scanformat(showingpicturescutat
therightandleftends).
Parental Level*
SeeParental level (P.29).
DISC SETUP
SeeDisc setup (P.30).
Stream Information
Displaysthepresentsourceinformation.
Thestream(DolbyDigital,dts,LinearPCM,
MPEG,WMAorAAC)appears.
*TheseitemsaredisabledwhenaDVDis
beingplayed.
Language setup
Thissettingisforthelanguageusedinthe
menu,subtitle,andvoice.Youcannotsetup
theseitemsduringDVDplayback.
1 Touch [SET] of the desired item;
[Menu Language], [Subtitle Language],
[Audio Language].
Language Set screen appears.
2 Enter the desired language code and
touch [Enter].
Sets the entered language and returns to
the DVD SETUP screen.
NOTE
• Tocancelthesetupandreturntotheprevious
screen,touch[Cancel].
• Tocleartheenteredcode,touch[Clear].
• TosettheDVD’soriginallanguageforaudio
language,touch[Original].
Parental level
Setsaparentallevel.Youcannotsetupthis
itemduringDVDplayback.
1 Touch [SET] of [Parental Level].
Parental Pass screen appears.
2 Enter the parental code and touch
[Enter].
Parental Level screen appears.
NOTE
• Tocancelthesetupandreturntotheprevious
screen,touch[Cancel].
• Tocleartheenteredcode,touch[Clear].
• Currentparentallevelappearsas[Level#].
3 Touch [ ] or [ ] to select a parental 2 3
level.
NOTE
• Ifadischashigherparentallocklevel,youneed
toenterthecodenumber.
• Theparentallocklevelvariesdependingona
loadeddisc.
• Ifadischasnoparentallock,anybodycanplayit
backevenwhenyouhavesettheparentallock.


3232 33
Return to the Top page
CD, Disc, iPod, USB device
Return to the Top page
CD, Disc, iPod, USB device
Music/Video/Picture Basic Operation
Mostfunctionscanbecontrolledfromthesourcecontrolscreenandplaybackscreen.
NOTE
• SettheremotecontrollermodeswitchtoAUDmodebeforestartingoperation,seeSwitching the operation
mode (P.109).
• ToconnectiPodtothisunit,optionalaccessoryKCA-iP202orKCA-iP102isnecessary.
WheniPodisconnectedusingtheKCA-iP202,youcanlistentoaudioandwatchvideo.WheniPodisconnected
usingtheKCA-iP102,youcanonlylistentoaudio.
WhenusingtheKCA-iP202toconnectyouriPod,set“iPodAVInterfaceUse”to“iPod”,inAV Input Setup (P.92),or
to“AV-IN2”whenusingKCA-iP102
Seethefollowingsectionsforeachsourceoperation.
• Music CD (P.32)
• Disc media (P.32)
• USB device (P.34)
• iPod (P.34)
Music CD and disc media
NOTE
• Inthismanual,“MusicCD”willbereferredtoasthegeneralCDswhichincludemusictracksin.
“Discmedia”willbereferredtoasCD/DVDdiscwhichincludesaudio,pictureorvideofiles.
• ThescreenshotbelowisforCD.Itmaybedifferentfromtheonefordiscmedia.
2
3
3
4
4
5
8
6
2
7
Simple Control screen List Control screen
1
1 Information display
Displaysthefollowinginformation.
• :Eachtimeyoutouchthisarea,displayswitchesbetweencurrenttracknumber,text,etc.Track #
• , , , , :Currentplaymodedisplay3 ¡ ¢ 7 etc.
Themeaningsofeachiconareasfollows; (play), (fastforward), (fast3 ¡ 1
backward), (searchup), (searchdown), (stop),¢ 4 7 R(resumestop), 8
(pause).
2 Movie display area/Control switching area
TouchtoswitchbetweentheSimpleControlandListControlscreen.
CD/Audio and Visual Files/iPod Operation 3 Multi function key
Touchtoswitchthemultifunctionmenu.Fordetailsonthemenu,seeMulti function menu (P.36).
4 Multi function menu
Variousfunctionscanbeperformedbyusingkeysinthisarea.Fordetailsonthemenu,seeMulti
function menu (P.36).
5 Sub function key
Touchtodisplay“Subfunctionmenu”(7inthistable).
6 Track information
Displaystheinformationofthecurrenttrack.
FormusicCDanddiscmedia,youcanswitchthecurrenttrackinformationandthecurrentfolderlistby
touchingthelistswitchingkey(8inthistable).
However,only"NoInformation"isdisplayedformusicCD.
7 Sub function menu
Variousfunctionscanbeperformedbyusingkeysinthisarea.Fordetailsonthekeys,seeSub function
menu (P.37).
8 List switching key
TouchtoswitchbetweenthetracklistandtheCD-TEXTdisplay(CD)/ID3taginformation(discmedia
only).
Video screen (disc media only)
9 9
10
11
9 Searching file area (disc media only)
Touchtosearchthenext/previousfile.
Scrollingfromcenterofdisplaytoleftorrightperformsfastbackwardorfastforward.Eachtimeyou
toucheacharea,thespeedchanges;standard,2times,3times.Tostopfastbackward/forward,touch
centerofthedisplay.
10
Menu display area (disc media only)
Touchtodisplaythediscmenu.Fordetails,seeMovie Control (P.43).
11
Key display area (disc media only)
Touchtodisplaythelastcontrolscreen.


3434 35
Return to the Top page
CD, Disc, iPod, USB device
Return to the Top page
CD, Disc, iPod, USB device
USB device and iPod
NOTE
• ThescreenshotbelowisforUSBdevice.ItmaybedifferentfromtheoneforiPod.
2
3
3
4
4
5
8
6
2
7
Simple Control screen List Control screen
1
1 Information display
Displaysthefollowinginformation.
• :Eachtimeyoutouchthisarea,displayswitchesbetweenfilenumber/folderCurrent file name
numberandfilename.
• , :Currentplaymodedisplay3 ¡, etc.
Themeaningsofeachiconareasfollows; (play,searching), (pause), (forward3 8 ¡
manualsearch), (reversemanualsearch).1
2 Artwork/Control switching area
Thepicturedataisdisplayedifavailablefromthecurrentfile.Whenthepictureisnotavailable,“No
Photo”isdisplayed.
TouchtoswitchbetweentheSimpleControlandListControlscreen.
3 Multi function key
Touchtoswitchthemultifunctionmenu.Fordetailsonthemenu,seeMulti function menu (P.36).
4 Multi function menu
Variousfunctionscanbeperformedbyusingkeysinthisarea.Fordetailsonthekeys,seeMulti
function menu (P.36).
5 Sub function key
Touchtodisplay“Subfunctionmenu”(7inthistable).
6 Contents list
Displaysthelistandcontents.Thecontentsofthelistdifferdependingontheplaybackstatusand
source.
7 Sub function menu
Variousfunctionscanbeperformedbyusingkeysinthisarea.Fordetailsonthekeys,seeSub function
menu (P.37).
8 List switching key
Touchtoswitchbetweenthefilelistandthecurrentfileinformation.
Picture/video screen
9 9
10
9 Searching file area (picture/video file only)
•Touchtosearchthenext/previousfile.
•DuringslideshowinUSBmode,touchingeachareasearchesthenext/previousmusicfile.
•Scrollingfromcenterofdisplaytoleftorrightperformsfastbackwardorfastforward.Tostopfast
backward/forward,touchcenterofthedisplay.Thisfunctionisnotavailablewhenthereisnomusic
fileinthecurrentfolder.
10
Key display area (picture/video file only)
Touchtodisplaythelastcontrolscreen.


3636 37
Return to the Top page
CD, Disc, iPod, USB device
Return to the Top page
CD, Disc, iPod, USB device
Multi function menu
Music CD
iPod
Disc media
USB device
Thefollowingfunctionscanbeperformedbyusingkeysinthisarea.
[ ] (Disc media, iPod, USB device only)
Searchestrack/file.Fordetailsonsearchoperation,seeSearch Operation (P.38).
[ ] [ ]4 ¢
Searchestheprevious/nexttrack/file.
[ ] [ ] (iPod only) / [ ] 3 8 38
Playsorpauses.
[ ] (music CD and disc media only)7
Stopsplayback.
[ ] (iPod and USB device only)0
Touchfor1secondtodisconnectthedevice.Fordetails,seeHow to Play Media (P.15).
[APP] (iPod only)
TouchtoswitchamongtheAppmodeandNormalmodecyclically.
App mode:Allowsthisunittooutputthesoundsandimagesproducedbytheapplicationrunningon
youriPodtouchoriPhone.
IntheAppmode,youcancontrolonlythe“Pauseandplay”and“Selectingasong”functionsfromthis
unit.
[ ] [ ] (disc media and USB device only)
Searchesprevious/nextfolder.
[
] (picture files in USB device only)
Duringpictureplayback,switchestopicturedisplay.
[
SETUP]
TouchtodisplaytheSETUPMenuscreen.SeeSetting Up (P.80).
[
AUDIO]
TouchtodisplaytheAudioControlscreen.SeeControlling Audio (P.94).
[ REAR
]
Touchtomutetherearspeaker.
Sub function menu
Music CD
iPod
Disc media
USB device
Thefollowingfunctionscanbeperformedbyusingkeysinthisarea.
[ ]
Repeatsthecurrenttrack/folder.Eachtimeyoutouchthekey,repeatmodeswitchesinthefollowing
sequence;
CD, iPod:"trackrepeat" ,"repeatoff"
Disc media, USB device:"filerepeat" ,"folderrepeat" ,"repeatoff"
[ ] (USB device and iPod only)
Searchestrackfromthealbumartworklist.Fordetailsonsearchoperation,seeSearch from album
artwork (P.41).
[ ] (During video file playback only)
Hidesallkeys.
[ ] [ ] (Music CD and disc media only)1 ¡
Fastforwardorfastbackward.
[ ] [ ] (USB device and iPod only)
PlaysthepreviousornextalbuminFavorite list (P.42).
#:##:## or ##:##
Confirmsplaytime.
DuringmusicCDplayback,youcanalsoconfirmdiscremainingtimebytouchingtimedisplay.
Eachtimeyoutouch,thedisplayswitchesbetween“P##:##”(trackplaytimedisplay)and“R##:##”(disc
remainingtime).
[ ]
Randomlyplaysalltracksincurrentfolder/discorincurrentplaylistintheconnectediPod.
Eachtimeyoutouchthekey,randommodeswitchesinthefollowingsequence;
CD:"trackrandom" ,"randomoff"
Disc media, USB device:"filerandom" ,"randomoff"
iPod:"trackrandom" ,"albumrandom" ,"randomoff"
Status bar in center (USB device and iPod only)
Confirmsthecurrentlocation.
DuringUSBdeviceandiPodplayback,youcandragthecircleleftorrighttochangetheplaying
position.


3838 39
Return to the Top page
CD, Disc, iPod, USB device
Return to the Top page
CD, Disc, iPod, USB device
Search Operation
Youcansearchmusic,videoorpicturefiles
bythefollowingoperations.
NOTE
• Ifyouusearemotecontrol,youcanjumpdirectly
tothedesiredtrack/filewithenteringthetrack/
folder/filenumber,playtime,etc.Fordetails,see
Direct search mode (P.109).
List search
Youcansearchtracks,folders,andfiles
accordingtohierarchy.
1 Touch illustrated area.
List Control screen appears.
2 Touch desired track/file.
Playback starts.
NOTE
• Fordiscmedia,youcanswitchthefilelistand
folderlistbytouching[ ].
• Fordiscmedia,youcannotdisplaythelistduring
randomplayandstop.
Other search
Whenyouwanttonarrowthelistdown,
thereareothersearchways.
ThisfunctionisnotavailablewhenmusicCD
isthecurrentsource.
1 Touch [ ] in the control screen.
The search type screen appears.
2 Touch desired search way.
USBdevice
iPod
The list sorted in the way you selected
appears.
See the following sections for each
operation.
• [CategoryList]:Youcansearchafileby
selectingcategory .(P.39)
• [LinkSearch]:Youcansearchafileof
sameartist/album/genre/composerasthe
currenttrack .(P.39)
• [FolderList]:Youcansearchafileaccording
tohierarchy .(P.40)
• [ThumbnailViewer]:Youcansearcha
picturefile .(P.40)
NOTE
• Fordiscmedia,youcandisplaythefolderlist
directlybytouching[ ].
Category search (USB device and iPod only)
1 Touch the desired category from the
left part of the screen.
2 The list is sorted by selected category.
3 Touch desired item.
Playback starts.
NOTE
• Tonarrowthesearchyoucanselectaletterfrom
thealphabetlistinthecenterofthedisplay.
• Foroperationsinthelistscreen,seeCommon
Operations (P.18).
Link search (USB device and iPod only)
1 Touch the desired item from the left
part of the screen. You can select from
artist, album, genre and composer.
The list corresponding to your selection
appears.
NOTE
• Thelistissortedbythewayyouselected.
• :Displaysthealbumlistoftheartist.artist
• :Displaysalltunesofthecurrentalbum.album
• :Displaystheartistslistinwhichartistsgenre
belongtothesamegenre.
• :Displaysthealbumlistofthecomposer
composerofthecurrentfile.
2 Touch to select desired item in the
list. Repeat this step until you find the
desired file.
NOTE
• Tonarrowthesearchyoucanselectaletterfrom
thealphabetlistinthecenterofthedisplay.
• Foroperationsinthelistscreen,seeCommon
Operations (P.18).


4040 41
Return to the Top page
CD, Disc, iPod, USB device
Return to the Top page
CD, Disc, iPod, USB device
Folder search (USB device and disc
media only)
1 Touch the desired folder.
Contents of the folder are displayed in the
right area of the screen.
2 Touch desired item from the content
list.
Playback starts.
NOTE
• Foroperationsinthelistscreen,seeCommon
Operations (P.18).
Picture search (USB device only)
1 Touch the desired picture.
The selected picture appears in full screen.
See number 9-10 in USB device and iPod
(P.34) for operation of picture screen.
Search from album artwork
(USB device and iPod only)
Youcansearchmusicfilesbyselectingthe
albumartwork.
1 Touch [ ].
Sub function menu appears.
2 Touch [ ].
Favorite screen appears.
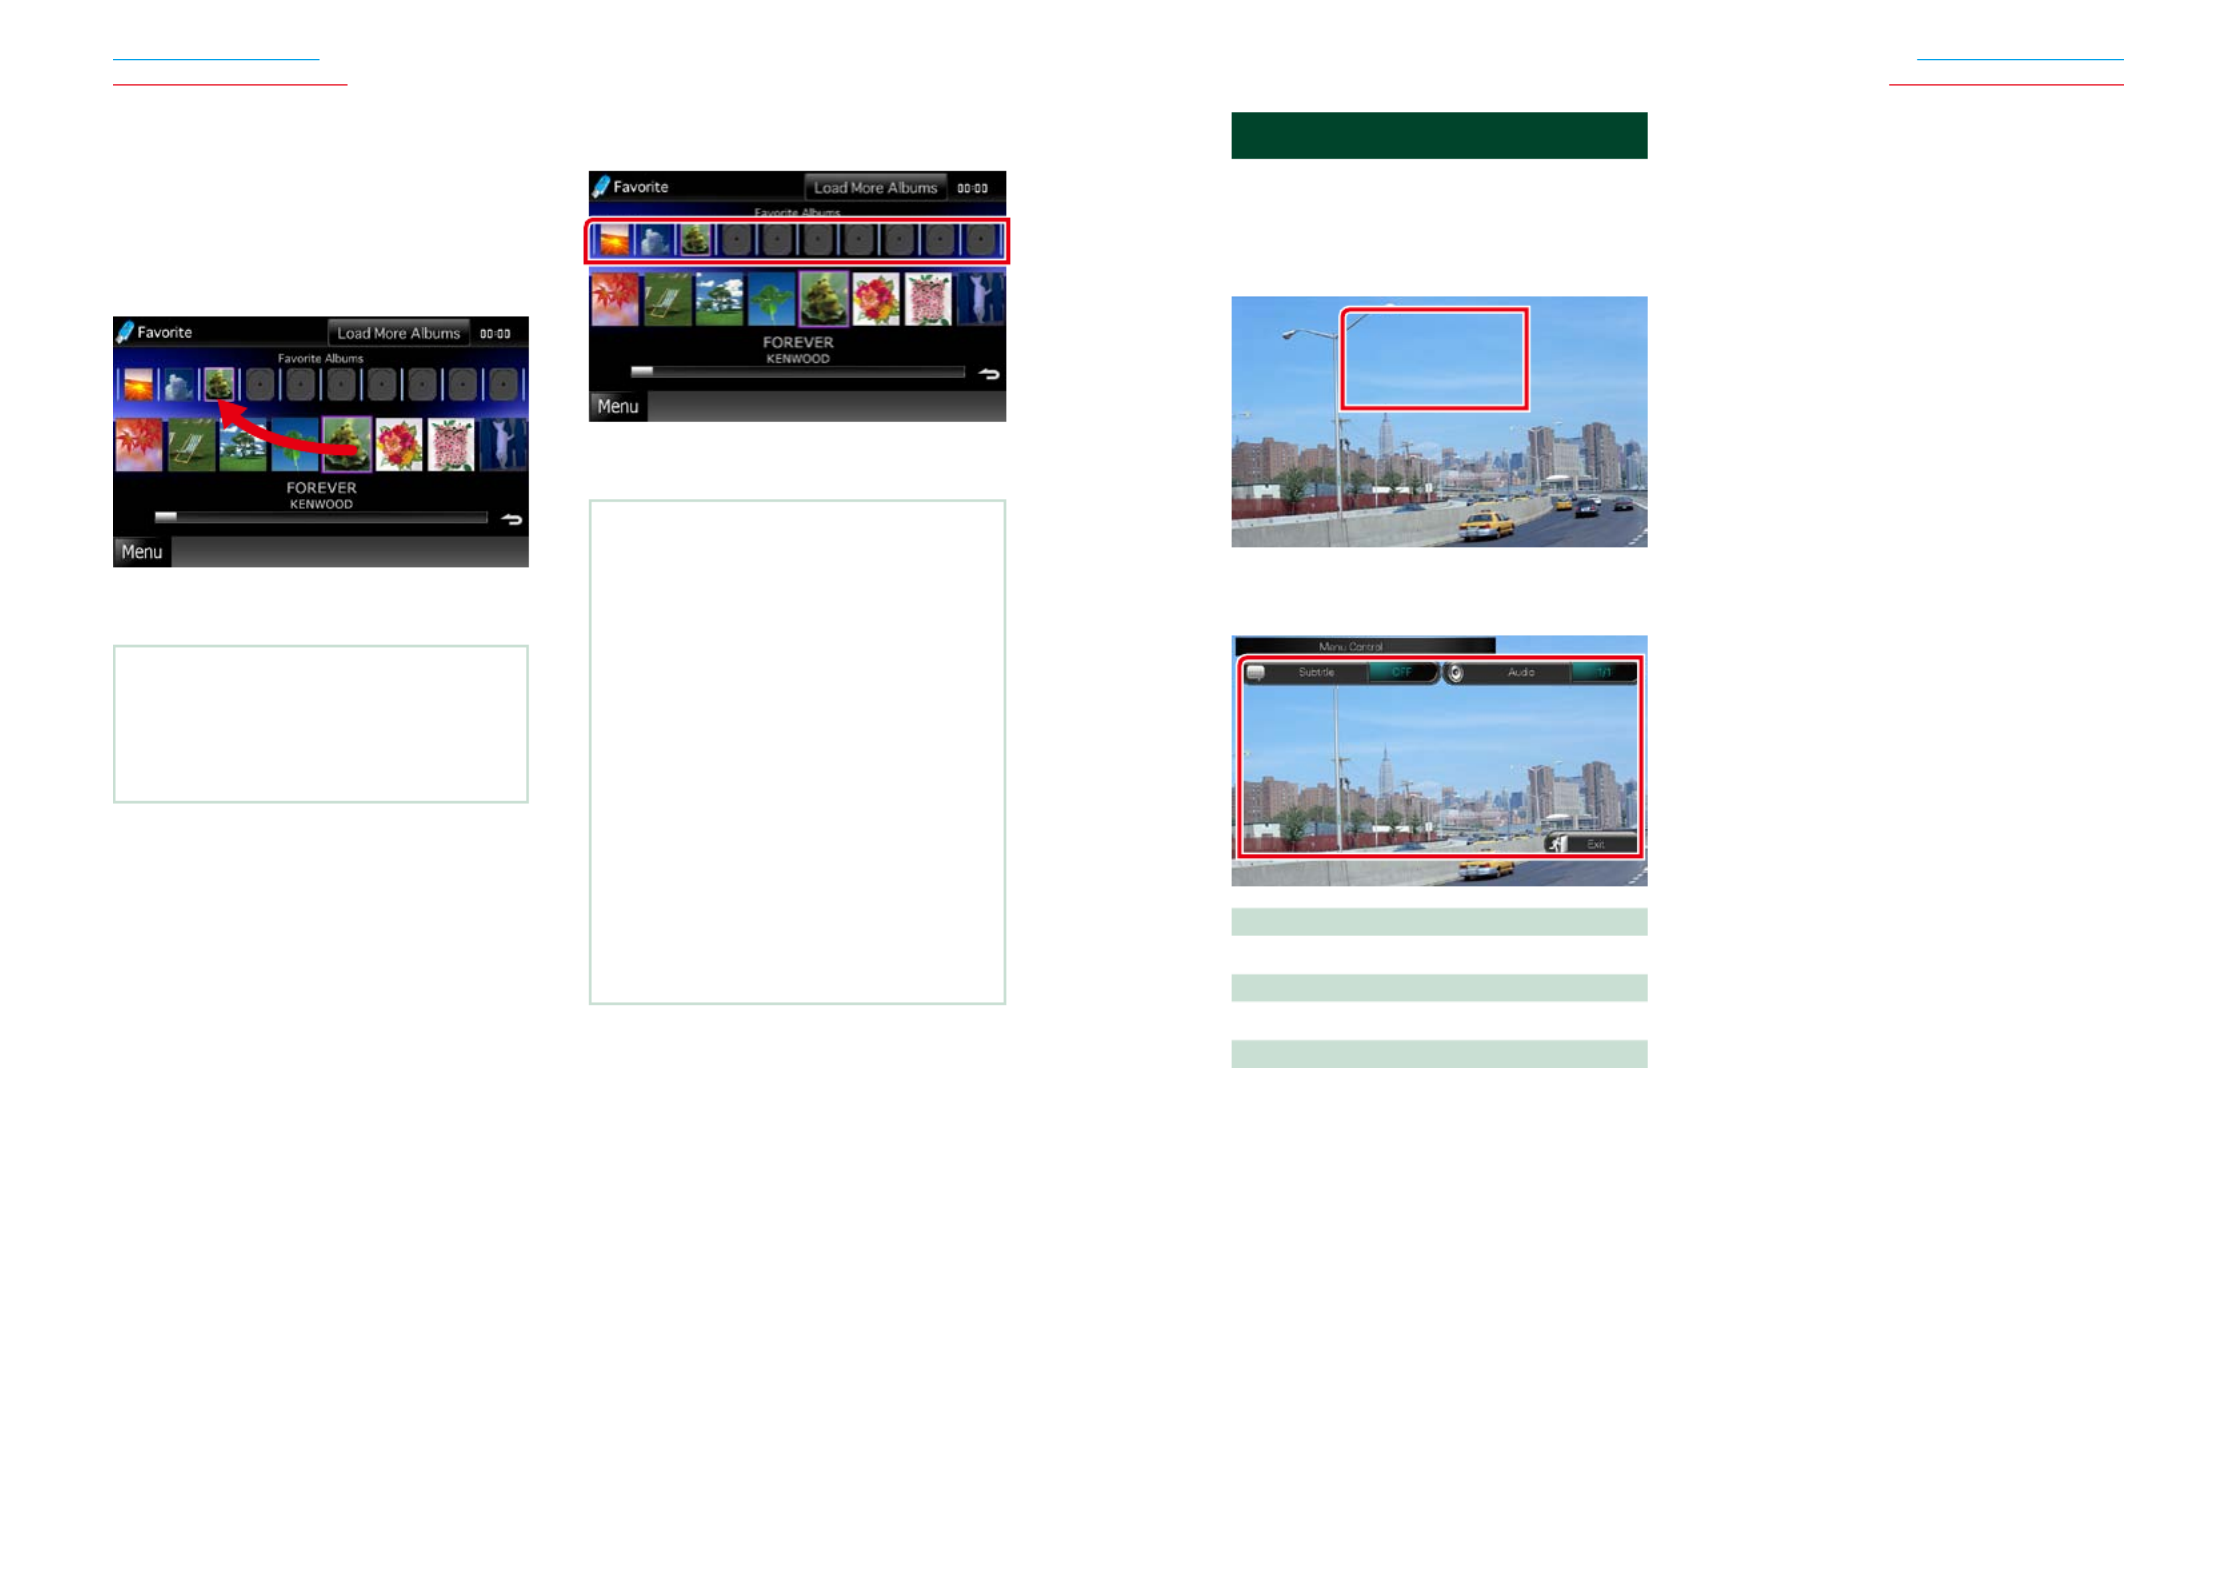
3 Touch desired artwork in the lower line.
NOTE
• Thekeyintheuppersideofthescreenfunctions
differentlydependingonthestatus.
When [Load Albums] appears:
Youhavenotyetloadedanyartworks.Touchthe
keytostartloading.
When [Load More Albums] appears:
Someartworksarenotloaded.Touchthekeyto
loadallartworks.Ifyoutouchthekey,thetrack
beingplayedmaystopandanothertrackmay
startplayback.
When the key does not available:
Allartworksarealreadyloaded.
4 Touch [ ] on the selected artwork.3
The first song in the album is played.
In addition, you can create your original
playlist from this screen. For details, see
Favorite list (P.42).
NOTE
• Afteralltracksinthealbumareplayed,thesame
albumisplayedagainfromthefirsttrack.
• Thealbumswithnophotoarenotdisplayed.
4242 43
Return to the Top page
CD, Disc, iPod, USB device
Return to the Top page
CD, Disc, iPod, USB device
Favorite list
Youcancreateanoriginalplaylistofyour
favorite10albumsbyselectingalbum
artworks.
1 Touch and drag the desired album
artwork in the lower line to the upper
line.
Selected album is registered to the favorite
list.
NOTE
• Theaddedalbumisplacedontheextremeright.
• Youcannotregisterthesamealbumalready
registeredtothefavoritelist.
• Upto10albumscanberegisteredtothelist.
2 Touch the desired artwork in the
favorite list.
Selected album is played and the control
screen appears.
NOTE
• Thefavoritelistisplayedtotherightstartingwith
theselectedalbum.
• Todeletethealbumfromthefavoritelist,touch
anddragittothelowerline.
• Youcanchangetheplayingorderofthefavorite
listbydraggingtheartworkinthelist.
• Thefavoritelistmodeiscanceledinthefollowing
situations.
• Playinganotheralbumfromotherlist(folderlist,
categorylist,etc.)
• Playinganotheralbumbytouchingtheartwork
inthelowerlineintheartworklistscreen.
• Thefavoritelistmoderesumesafter
disconnecting/connectingthedeviceorturning
on/off.Filebeingplayed,playingtimecode,
favoritelistcontents,favoritelistorder,etc.
resumesiffileconfigurationofthedeviceisnot
changed.
Movie Control
Youcanadjustthemovieplaybackfroma
discmedia.
1 In the playback screen, touch
illustrated area.
Movie Control screen appears.
2 Perform desired operation as follows.
Changes subtitle language
Touch[Subtitle].
Changes audio language
Touch[Audio].
Exits the menu
Touch[Exit].

4444 45
Return to the Top page
CD, Disc, iPod, USB device
Return to the Top page
CD, Disc, iPod, USB device
PANDORA® Internet Radio Operation (region code 4 area only)
YoucanlistentothePANDORA®internetradioonthisunitbycontrollingtheapplication
installedintheiPhoneorBluetoothdevice.
ToenterPANDORAmode,touch[Pandora]iconintheTopMenuscreen.
NOTE
• InstallthelatestversionofthePandora®applicationonyouriPhone,AndroidorBlackBerry.
iPhone:Searchfor"PANDORA"intheAppleiTunesAppStoretofindandinstallthemostcurrentversion.
Android:VisittheGoogleplayandsearchforPandoratoinstall.
BlackBerry:Visitwww.pandora.comfromthebuiltinbrowsertodownloadthePandoraapplication.
• ForhowtoregistertheBluetoothdevice,
seeRegistering the Bluetooth Unit (P.69).
2
3 34 45 8
6
2
7
Simple Control screen List Control screen
1
1 Information display
Displaystextinformationofcurrentcontentsthatisbeingplayed.
2 Artwork/Control switching area
Thepicturedataisdisplayedifavailablefromcurrentcontent.
TouchtoswitchbetweentheSimpleControlandListControlscreen.
3 Multi function key
Touchtoswitchthemultifunctionmenu.Fordetailsonthemenu,seeMulti function menu (P.45).
4 Multi function menu
Variousfunctionscanbeperformedbyusingthekeysinthisarea.Fordetailsonthekeys,seeMulti
function menu (P.45).
5 Sub function key
Touchtodisplay“Subfunctionmenu”(7inthistable).
6 Content information
Displaystheinformationofthecurrentcontentbeingplayed.
7 Sub function menu
Variousfunctionscanbeperformedbyusingkeysinthisarea.Fordetailsonthekeys,seeSub function
menu (P.45).
8 List switching key
Touchtoswitchbetweenthecontentlistandthecurrentcontentinformation.
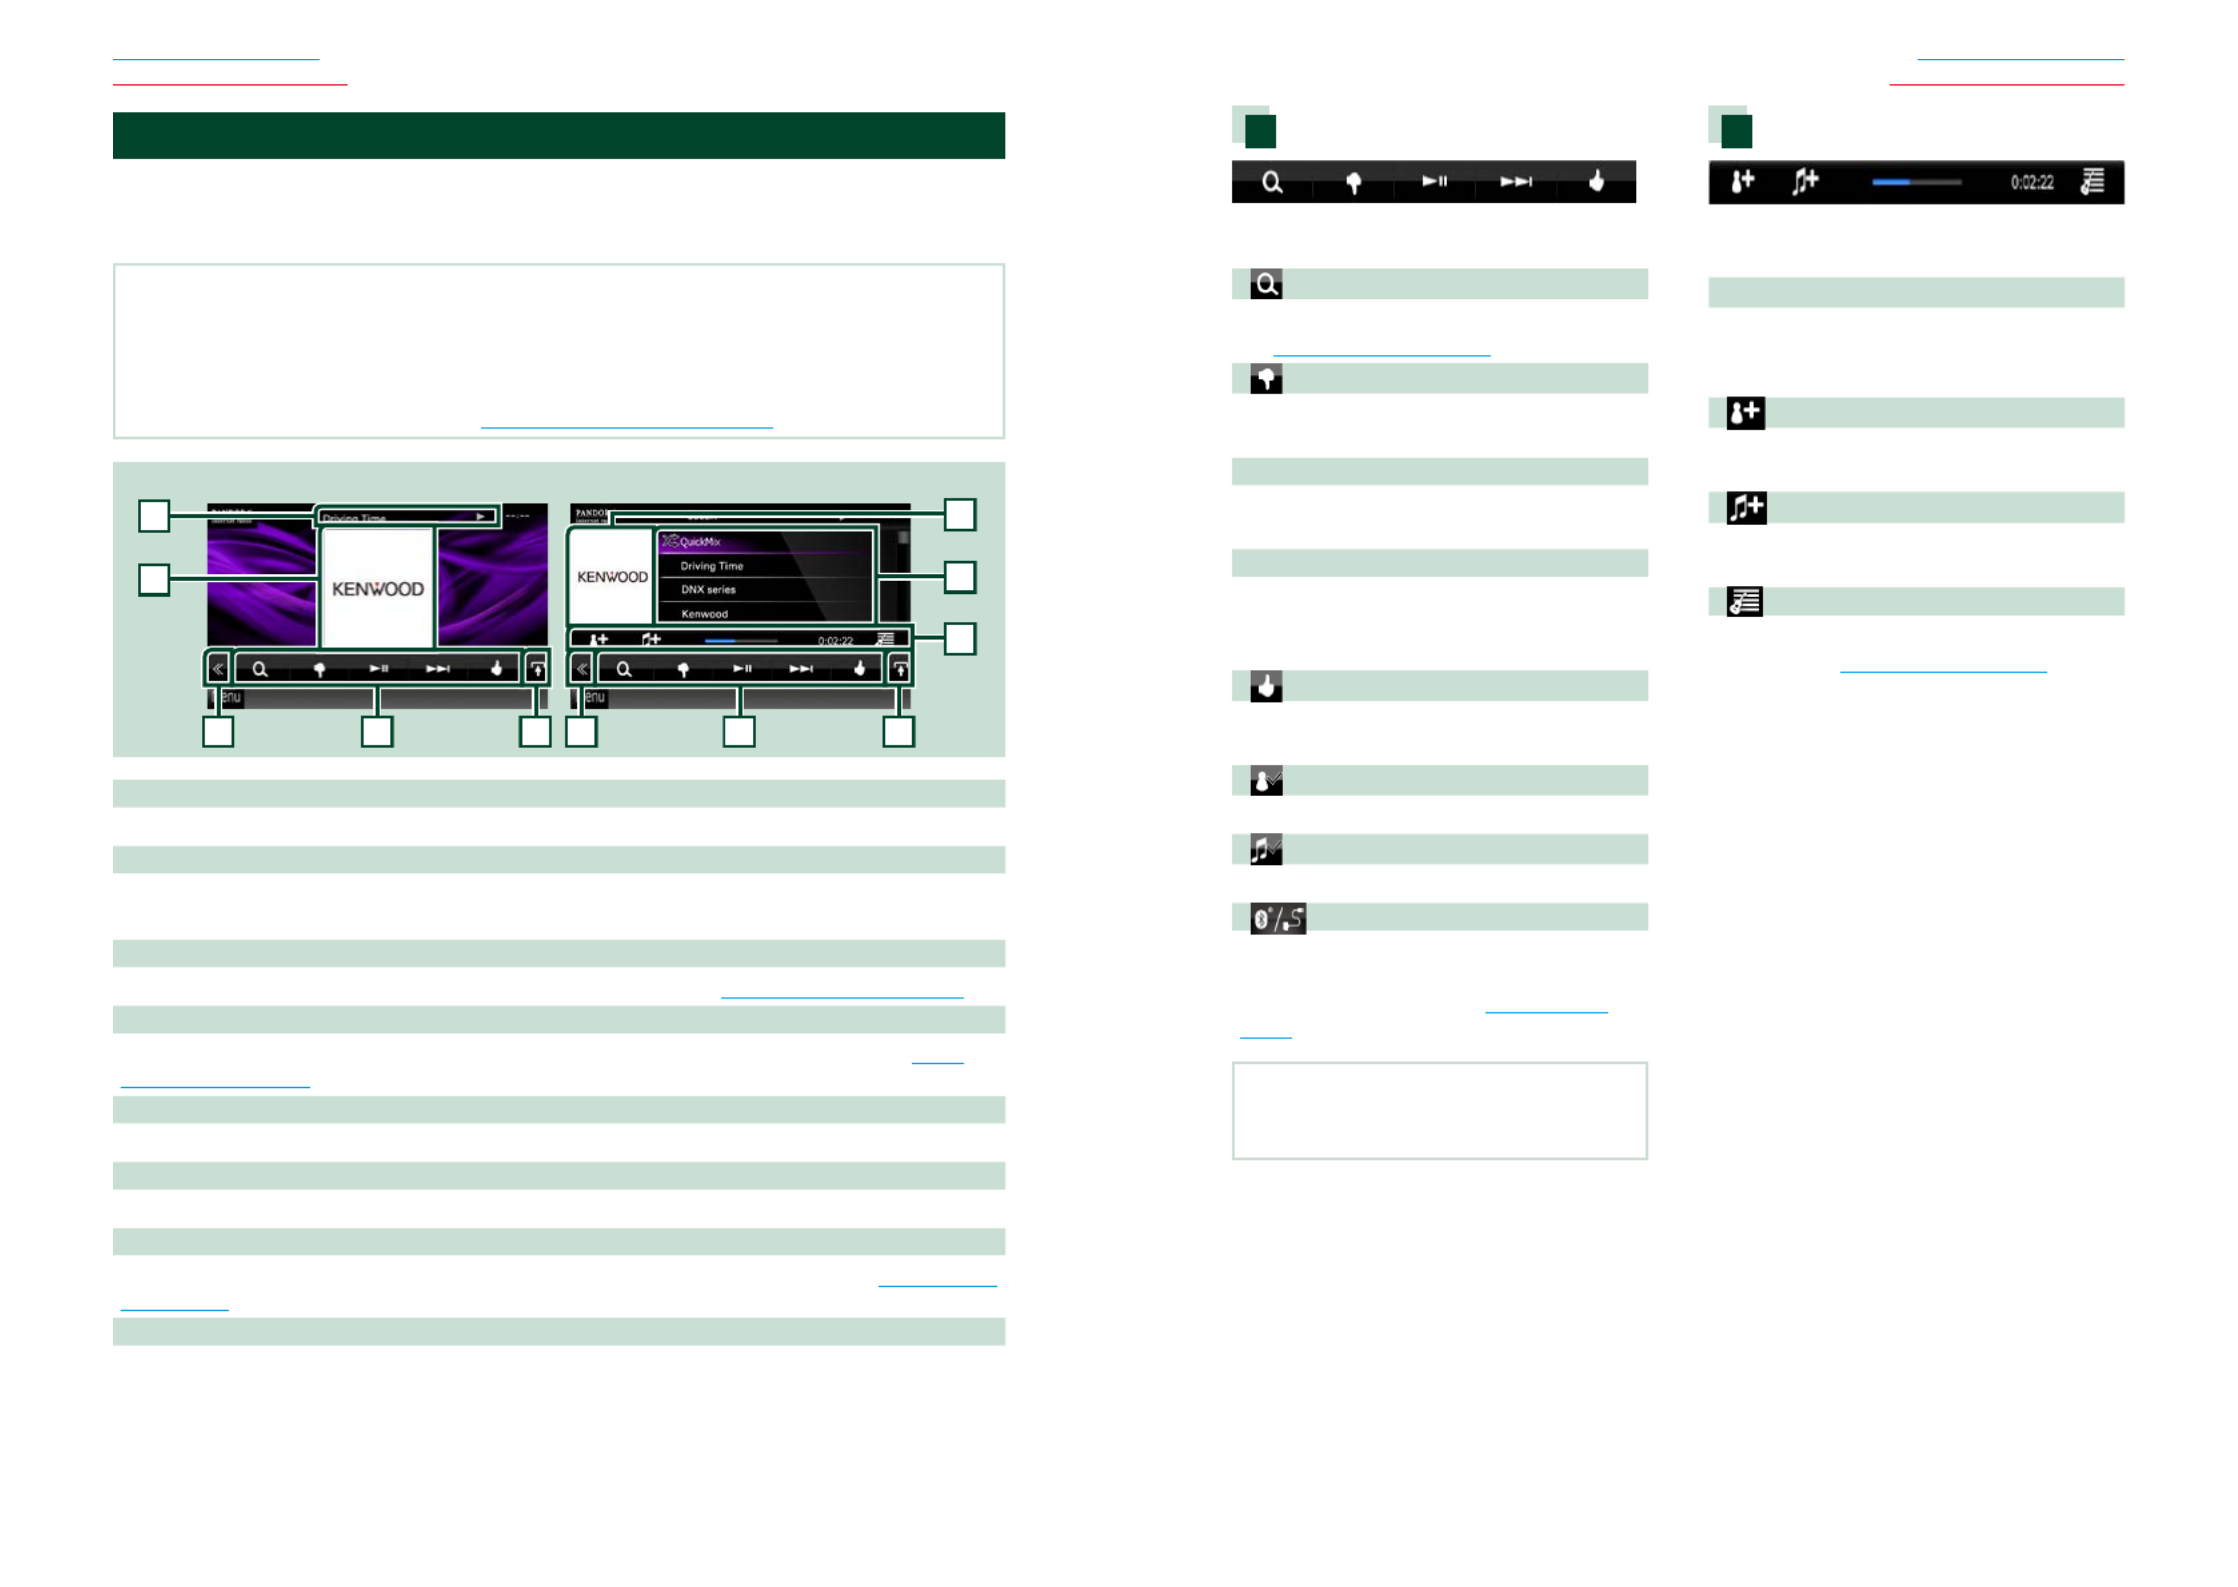
Multi function menu
Thefollowingfunctionscanbeperformedby
usingkeysinthisarea.
[ ]
Searchesthestation.Fordetailsonsearching,
seeStation list screen (P.46).
[ ] (Thumbs down)
Thumbsdowntothecurrentsongandskipto
thenextsong.
[ ]38
Displaysorpausesthecontentofthecurrent
station/channel.
[ ]¢
Skipsthecurrentsong.
(Notethisfunctionisdisabledwhenthe
PANDORAskiplimitationisexceeded.)
[ ] (Thumbs up)
Registersthecurrentcontentsasfavorite
content.
[
] (Bookmark Artist)
Bookmarkanartistinthecurrentcontents.
[ ] (Bookmark Song)
Bookmarkasonginthecurrentcontents.
[ ]
DisplaysaDeviceselectscreenthatallowsyou
toselectthedevicetobeusedforPANDORA
Internetradioreception.SeeDevice select
(P.46)
NOTE
• [SETUP],[AUDIO],[EXTSW],and[REAR]functions
sameasiPod.
Sub function menu
Thefollowingfunctionscanbeperformedby
usingkeysinthisarea.
Status bar in center
Displaystheelapsedtimesincewhenyou
selectthestationandstatusbarwhichshows
currentlocation.
[ ]
Createsanewstationbasedonanartistbeing
played.
[ ]
Createsanewstationbasedonasongbeing
played.
[ ]
Displaysthegenrelistscreen.Fordetailson
searching,seeGenre list screen (P.47).

4646 47
Return to the Top page
CD, Disc, iPod, USB device
Return to the Top page
CD, Disc, iPod, USB device
Genre list screen
Youcanperformthefollowingfunctions
fromthisscreen.
Theselectedgenreiscreatedasanew
station.
Device select
YoucandisplayaDeviceselectscreenfor
deviceselection.
1 Touch [ ] in the control screen.
The Device select screen appears.
Device selection
Bluetooth:Usesthedeviceconnectedvia
BluetoothforPANDORAInternet
radioreception.
Wired:UsestheiPhoneconnectedviathe
KCA-iP202orKCA-iP102(optional
accessory)forPANDORAInternetradio
reception.
NOTE
• Ifyoutouch[ ]whennodevicehasbeen
connected,apopupscreenthatallowsdevice
selectiononlyappears.
• AniPhoneconnectedviaBluetoothcannotbe
usedforPandoraInternetradioreception.
• IfthevolumeofPandoraInternetradioreceived
byaBluetoothdeviceistoolow,raiseitonthe
Bluetoothdevice.
Station list screen
Youcanperformthefollowingfunctions
fromthisscreen.
Selects the station
Touchthestationnameinthelist.
Sort the list in alphabetical order
Youcanselectthedesiredletterfromthelist
whichcorrespondstothestationnametohelp
narrowthesearch.
Sort the list by registered date
Touch[ByDate].Thelistissortedtobeginwith
thelastregisteredstation.
NOTE
•YoucanoperatePANDORAbyusingthe
remotecontrol.However,onlyplaying,
pausing,andskippingareavailable.
•YoucannotselectiPodasrearsourcewhen
youselectPANDORAasmainsourceindual
zonefunction.


4848 49
Return to the Top page
CD, Disc, iPod, USB device
Return to the Top page
CD, Disc, iPod, USB device
Multi function menu
Thefollowingfunctionscanbeperformedby
usingkeysinthisarea.
[ ]
Setsthecontentbackward15seconds.
[ ]
Setsthecontentforward30seconds.
[ ]
Setsthereceivedlocationinformationat
thedestinationofnavigation.SeeNavigate
(P.51).
[ ]
PoststhelocationinformationtoFacebook.
[ ]
RedeliversbyTwitter.
[ ]
Dialsthereceivedtelephonenumber.
[ ]
DisplaysaDeviceselectscreenthatallowsyou
toselectthedevicetobeusedforAha.See
Device select (P.46)
NOTE
• [SETUP],[AUDIO],and[EXTSW]functionssame
asiPod.
Sub function menu
Thefollowingfunctionscanbeperformedby
usingkeysinthisarea.
[ ]
Searchesthestation.Fordetailsonsearching,
seeStation list screen (P.50).
[ ] [ ]4 ¢
Searchestheprevious/nexttrack.
[ ] 38
Playsorpauses.
[ ]
Touchingthekey"dislikes"currentcontent.
[ ]
Touchingthekey"likes"currentcontent.
Aha Operation
YoucanlistentotheAhaonthisunitbycontrollingtheapplicationinstalledintheiPhoneor
Android.
ToenterAhamode,touch[aha]iconintheTopMenuscreen.
NOTE
• InstallthelatestversionoftheAhaapplicationonyouriPhoneorAndroid. (P.127)
iPhone:Searchfor"Aha"intheAppleiTunesAppStoretofindandinstallthemostcurrentversion.
Android:Searchfor"Aha"intheGoogleplaytofindandinstallthemostcurrentversion.
• ForhowtoregistertheBluetoothdevice(Android),
seeRegistering the Bluetooth Unit (P.69).
3 3
4 46 6
5
1
2
2
Content List screen Text information screen
1 Content information
Displaysthecontentofthecurrentstationbeingplayed.
2 Sub function menu
Variousfunctionscanbeperformedbyusingkeysinthisarea.Fordetailsonthekeys,seeSub function
menu (P.49).
3 Multi function key
Touchtoswitchthemultifunctionmenu.Fordetailsonthemenu,seeMulti function menu (P.49).
4 Multi function menu
Variousfunctionscanbeperformedbyusingthekeysinthisarea.Fordetailsonthekeys,seeMulti
function menu (P.49).
5 Text information
Displaystheinformationofthecurrentcontentbeingplayed.
6 List switching key
Touchtoswitchbetweenthecontentlistandthetextinformationofcurrentcontent.


5050 51
Return to the Top page
CD, Disc, iPod, USB device
Return to the Top page
CD, Disc, iPod, USB device
Navigate
Setsthelocationinformationreceivedfrom
Ahaatthedestinationofnavigation.
1 Touch [ ] in the control screen.
[ ]
Savesthelocationinformation.
[Go!]
Setsthelocationinformationatthedestination
andstartsnavigation.
Device select
YoucandisplayaDeviceselectscreenfor
deviceselection.
1 Touch [ ] in the control screen.
The Device select screen appears.
Device selection
Bluetooth:UsestheAndroidsmartphone
connectedviaBluetoothforanAha
connection.
Wired:UsestheiPhoneconnectedviathe
KCA-iP202orKCA-iP102(optional
accessory)foranAhaconnection.
NOTE
• Ifyoutouch[ ]whennodevicehasbeen
connected,apopupscreenthatallowsdevice
selectiononlyappears.
• AniPhoneconnectedviaBluetoothcannotbe
usedforanAhaconnection.
• IfthevolumeofAhareceivedbyaBluetooth
deviceistoolow,raiseitontheBluetoothdevice.
Station list screen
Youcanperformthefollowingfunctions
fromthisscreen.
Selects the station
Touchthestationnameinthelist.
NOTE
•YoucannotselectiPodasrearsourcewhen
youselectAhaasmainsourceindualzone
function.


5454 55
Return to the Top page
Radio, Digital Radio, TV
Return to the Top page
Radio, Digital Radio, TV
Radio Basic Operation
Mostfunctionscanbecontrolledfromthesourcecontrolscreen.
NOTE
• SettheremotecontrollermodeswitchtoAUDmodebeforestartingoperation,seeSwitching the operation
mode (P.109).
2
1
3
3
4
4
5
8
6
2
7
Simple Control screen List Control screen
1 PS/Station name display (FM Tuner for models with region code 2 or 3 only)
DisplaysthePSname.
2 Information display/Control switching area
Displaysthefollowinginformation.
•[FM1] etc.:Banddisplay
• :FrequencydisplayMHz/kHz
• :PresetnumberPreset #
TouchtoswitchbetweentheSimpleControlandListControlscreen.
3 Multi function key
Touchtoswitchthemultifunctionmenu.Fordetailsonthemenu,seeMulti function menu (P.55).
4 Preset key/Multi function menu
Recallsthememorizedstationorchannel.Whentouchedfor2seconds,storesthecurrentreceiving
stationorchannelinmemory.
Whenswitched,variousfunctionscanbeperformedbyusingkeysinthisarea.
Fordetailsonthemenu,seeMulti function menu (P.55).
5 Sub function key
Touchtodisplay“Subfunctionmenu”(7inthistable).
6 Preset list
Displaysthelistofpresetstationsorchannelsandtheinformation.
Radio and TV Operation 7 Sub function menu
Thefollowingfunctionscanbeperformedbyusingkeysinthisarea.
• :Touch[AM]or[FM].Switches the band
•Tunes in a station:Touch[ ][ ].Themethodoffrequencyswitchingcanbechanged.See1 ¡ Multi
function menu (P.55).
Thebarincenter(tuneronly)showsthecurrentfrequencylocation.
8 List switching key
Touchtoswitchbetweenthepresetlistandtheinformationlist.
Intunermode,radiotextpluswillbedisplayed(formodelswithregioncode2or3only).
Multi function menu
Thefunctionsofeachkeyareasfollows.
[P1] - [P6]
Selectsthepresetstation.Touchfor2secondstostorethecurrentstationintothepresetmemory.
[ ]
Displaysthelistofpresetstationsorservices.Fordetails,seeList select (P.62).
[TI] (FM Tuner for models with region code 2 or 3 only)
Setsthetrafficinformationmodeon.Fordetails,see Traffic Information (P.63).
[SEEK]
Switchestheseekmodeinthefollowingsequence;[AUTO1],[AUTO2],[MANUAL].
•AUTO1:Tunesinastationwithgoodreceptionautomatically.
•AUTO2:Tunesinstationsinmemoryoneafteranother.
•MANUAL:Switchestothenextfrequencymanually.
[AME]
Selectstheautomemorymode.Fordetails,seeAuto memory (P.60).
[PTY] (FM Tuner for models with region code 2 or 3 only)
Searchesaprogrambysettingprogramtype.Fordetails,seeSearch by program type (P.62).
[MONO] (FM Tuner for models with region code 2 or 3 only)
SelecttheMonauralreception.
[LO.S] (FM Tuner for models with region code 2 or 3 only)
TurnstheLocalSeekfunctiononoroff.
[
SETUP]
TouchtodisplaytheSETUPMenuscreen.SeeSetting Up (P.80).
[
AUDIO]
TouchtodisplaytheAudioControlscreen.SeeControlling Audio (P.94).
[ REAR
]
Touchtomutetherearspeaker.

5858 59
Return to the Top page
Radio, Digital Radio, TV
Return to the Top page
Radio, Digital Radio, TV
TV Basic Operation
MostfunctionscanbecontrolledfromthesourcecontrolscreenandTVscreen.
NOTE
• SettheremotecontrollermodeswitchtoTVmodebeforestartingoperation,seeSwitching the operation mode
(P.109).
• YoucanonlyoperateTVwiththeoptionalaccessoryTVtunerKTC-V500N/PV300/N/Pconnected.
• Duringplayback,pressthe<MENU>buttontodisplaythesourcecontrolscreen.
1
2233
4
1
Simple Control screen List Control screen
55
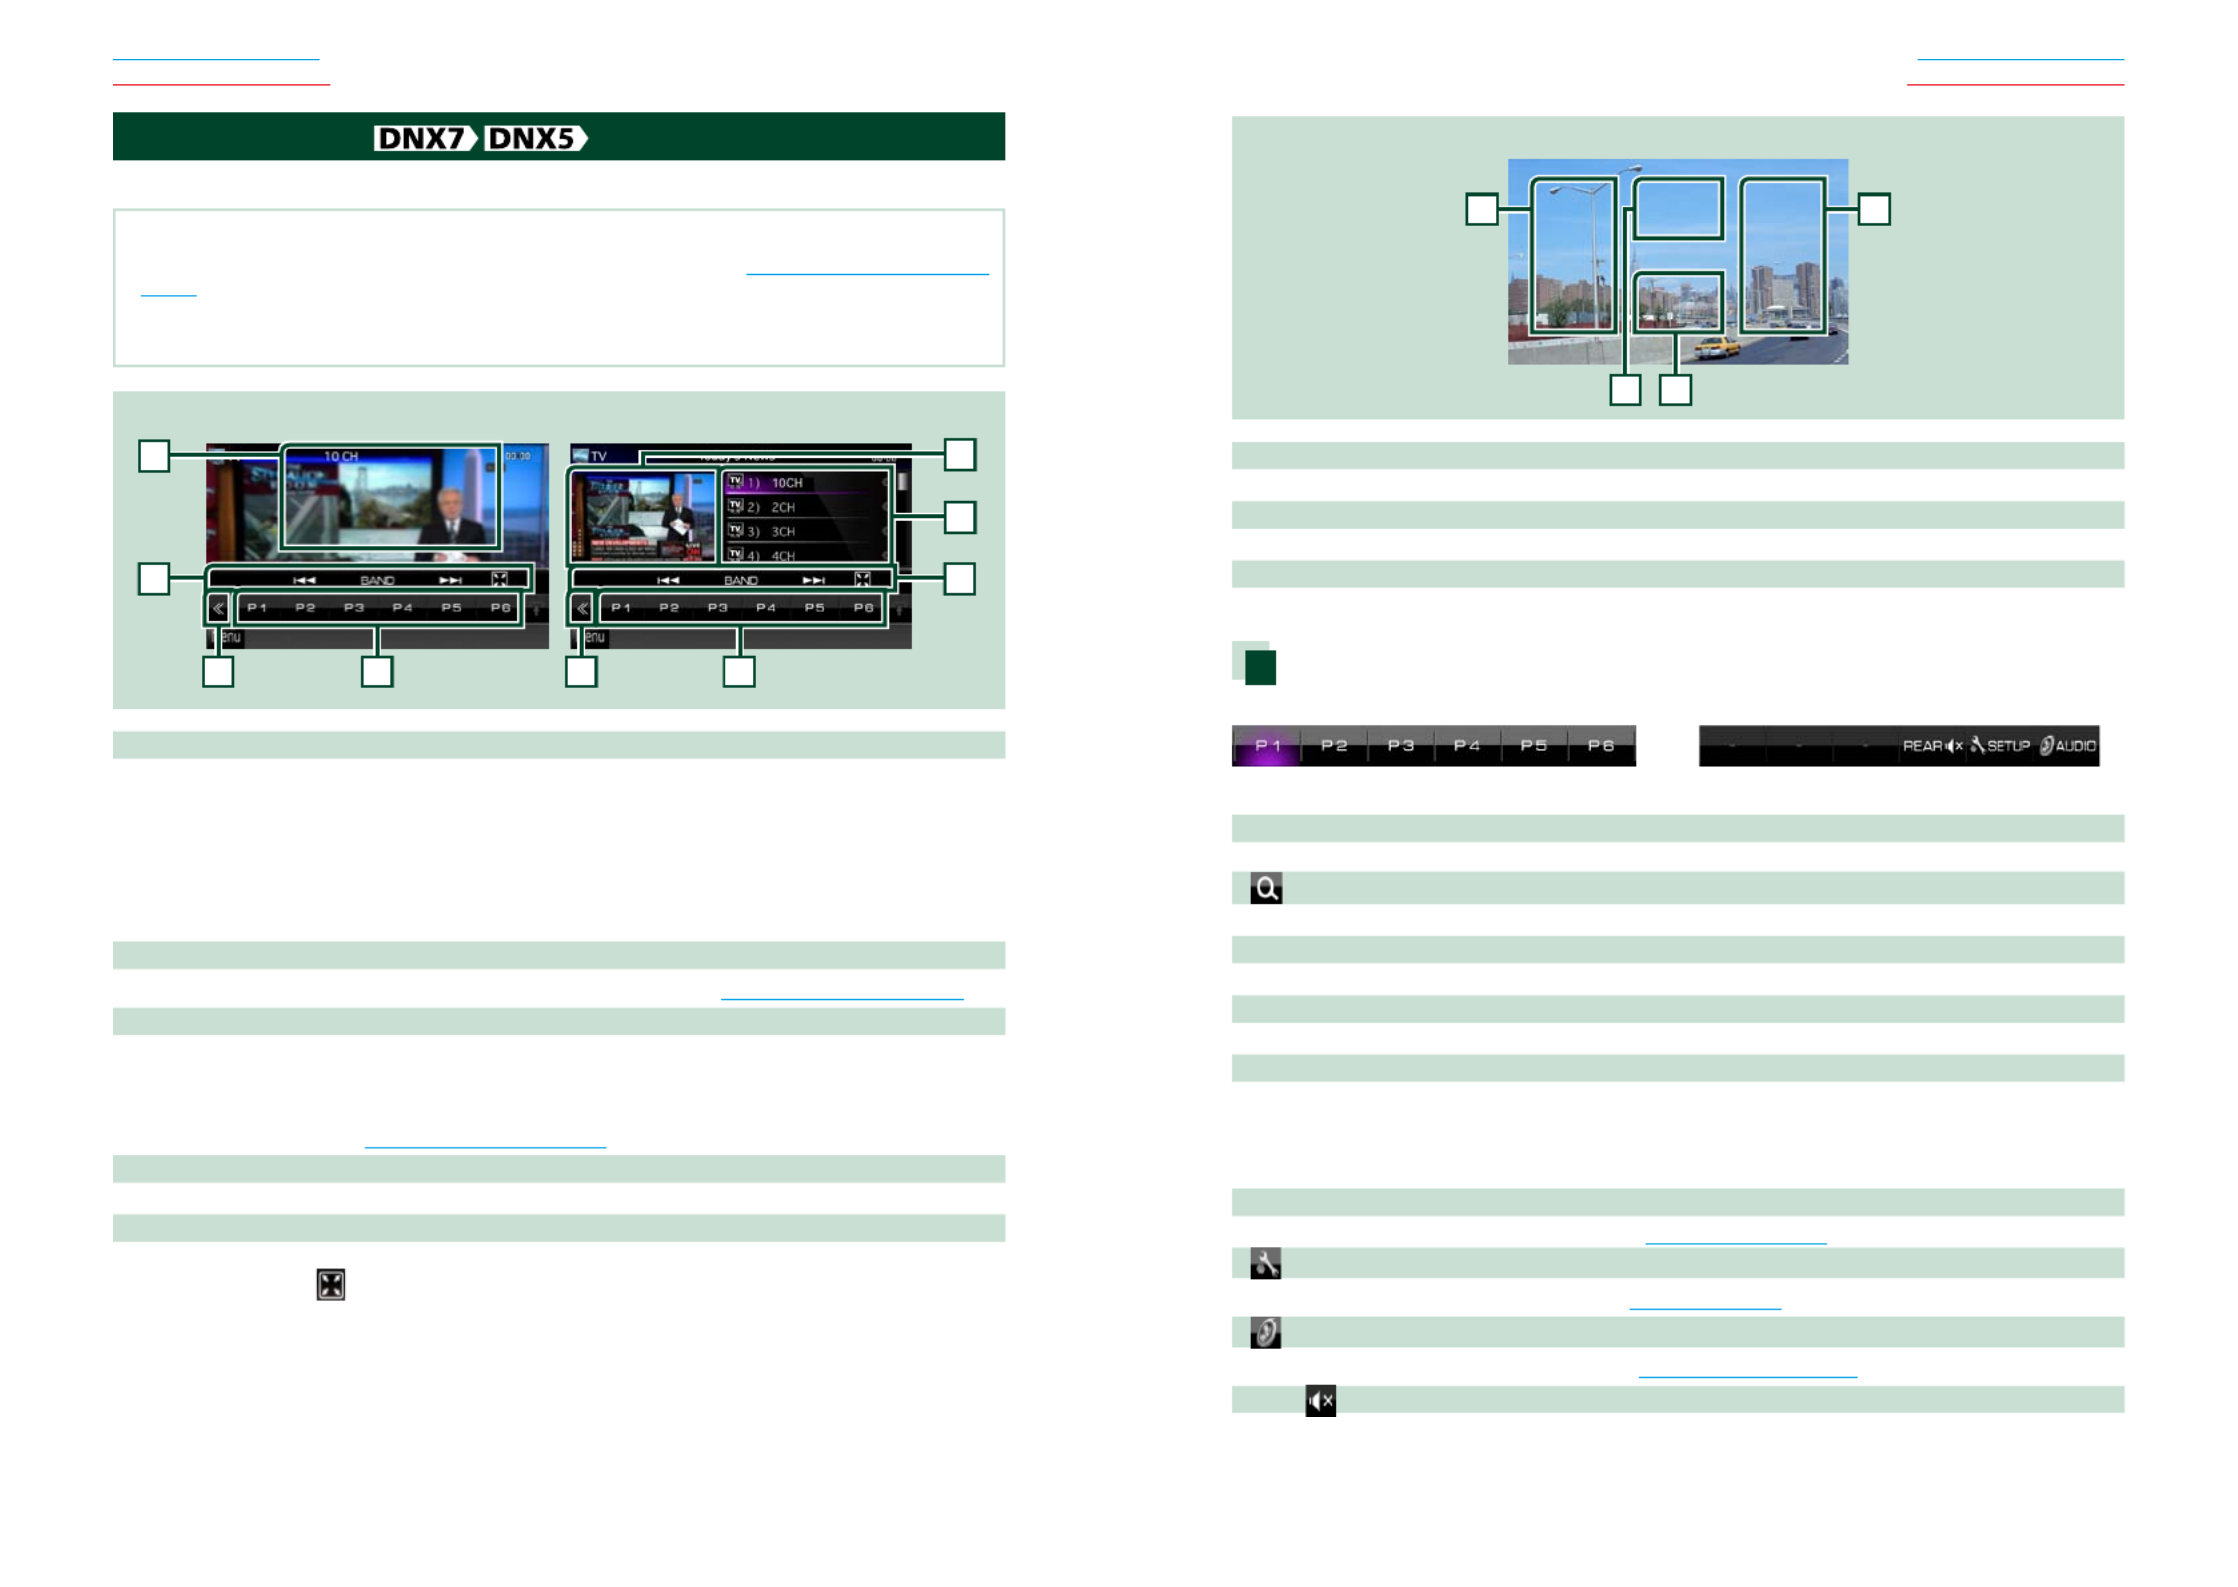
1 Information display/Control switching area
Displaysthefollowinginformation.
• :Banddisplay[TV1], [TV2]
• :PresetnumberPreset #
• :TVareagroupGroup
• :Channeldisplay#ch
TouchingthisareaswitchesbetweentheSimpleControlandListControlscreen.
2 Multi function key
Touchtoswitchthemultifunctionmenu.Fordetailsonthemenu,seeMulti function menu (P.59).
3 Preset key (analog TV only)/Multi function menu
Recallsthememorizedchannel.Whentouchedfor2seconds,storethecurrentreceivingstationor
channelinmemory.
Whenswitched,variousfunctionscanbeperformedbyusingkeysinthisarea.
Fordetailsonthemenu,seeMulti function menu (P.59).
4 Preset list (analog TV only)
Displaysthelistofpresetchannels.
5 Sub function menu
Thefollowingfunctioncanbeperformedbyusingkeysinthisarea.
• :Touch[Hide all keys ].
• :Touch .Switches the channel [ ] [ ]4 ¢
• :Touch .Switches the band [BAND]
TV screen
6
6
7
8
6 Switching channel area
Touchtoswitchthechannel.
7 Switching band area
Touchtoswitchtheband.
8 Key display area
Touchtodisplaythelastcontrolscreen.
Multi function menu
Analog TV Digital TV
Thefunctionsofeachkeyareasfollows.
[P1] - [P6] (analog TV only)
Selectsthepresetchannel.Touchfor2secondstostorethecurrentstationintothepresetmemory.
[ ] (analog TV only)
Displaysthelistofpresetchannels.
[ ] [ ]4 ¢
Switchesthechannel.
[BAND] (analog TV only)
Touchtoswitchtheband.
[SEEK] (analog TV only)
Switchestheseekmodeinthefollowingsequence;[AUTO1],[AUTO2],[MANUAL].
• :Tunesinchannelswithgoodreceptionautomatically.AUTO1
• :Tunesinchannelsinmemoryoneafteranother.AUTO2
• :Switchestothenextchannelmanually.MANUAL
[AME] (analog TV only)
Selectstheautomemorymode.Fordetails,seeAuto memory (P.60).
[
SETUP]
TouchtodisplaytheSETUPMenuscreen.SeeSetting Up (P.80).
[
AUDIO]
TouchtodisplaytheAudioControlscreen.SeeControlling Audio (P.94).
[ REAR
]
Touchtomutetherearspeaker.


6262 63
Return to the Top page
Radio, Digital Radio, TV
Return to the Top page
Radio, Digital Radio, TV
List select
Youcanselectanensemblefromalistof
memorizedensemblesorselectaservice
fromalistofallservicesreceived.
1 Touch [ ] in the control screen.
The multi function menu appears.
2 Touch [ ] in the multi function menu.
The list type screen appears.
3 Touch desired list way.
List screen appears.
4 Select a service from the list.
Search by program type
(FM tuner and Digital Radio
only)
Youcantunetoastationwithaspecific
programtypewhenlisteningtoFM/Digital
Radio.
1 Touch [ ] in the control screen.
The multi function menu appears.
2 Touch [PTY] in the multi function menu.
PTY Mode screen appears.
3 Select a program type from the list.
4 Touch [Search].
You can search a station of the selected
program type.
Traffic Information
(FM tuner and Digital Radio
only)
Youcanlistenandwatchthetraffic
informationautomaticallywhenatraffic
bulletinstarts.
However,thisfeaturerequiresaRadioData
SystemandDigitalRadiothatincludestheTI
information.
1 Touch [ ] in the control screen.
The multi function menu appears.
2 Touch [TI] in the multi function menu.
Traffic information mode is set.
When the traffic bulletin starts
TheTrafficInformationscreenappears
automatically.
NOTE
• ItisnecessarytohaveTrafficInformationfunction
settooninordertohavetheTrafficInformation
screenappearautomatically.
• Thevolumesettingduringreceptionoftraffic
informationisautomaticallystored.Thenexttime
thetrafficinformationisreceived,thisunitrecalls
thevolumesettingautomatically.
Replay (Digital Radio only)
Youcanreplaylast15minutesofcurrent
station.
1 Touch [ ] in the sub function menu.
[ ] [ ]4 ¢
Forward/backward15secondswhentouchit.
[ ]38
Playsorpauses.
[ ] [ ]1 ¡
Fastforward/fastbackwardwhenkeepon
touching.
Replay time bar
Displayrecordedcapacity
[ ]
ChangetheLivemode
NOTE
• PTYWatchstartsoperatingandReplayfunction
cannotbeusedwhilereceivingaprogram.
• Whilereplayingthecurrentstation,youcannot
storethestationbyAuto memory (P.60)and
Manual memory (P.61)


6464 65
Return to the Top page
Radio, Digital Radio, TV
Return to the Top page
Radio, Digital Radio, TV
Digital Radio Setup
YoucansetDigitalRadiorelatedparameters.
1 Touch [ ] in the control screen.
Multi function menu appears.
2 Touch [SETUP] in the multi function
menu.
SETUP Menu screen appears.
3 Touch [Source].
Source SETUP Menu screen appears.
4 Touch [Digital Radio SETUP] in the list.
Digital Radio SETUP screen appears.
5 Set each item as follows.
Priority
IfthesameserviceisprovidedbyDigitalRadio
duringRDSreception,automaticallyswitches
toDigitalRadio.Ifthesameserviceisprovided
byRDSwhenreceptionoftheservicebeing
providedbyDigitalRadiobecomespoor,
automaticallyswitchestoRDS.
PTY Watch
Iftheserviceofthesetprogramtypebegins
withtheensemblebeingreceived,switches
fromanysourcetoDigitalRadioforservice
reception.
Announcement Select
SwitchestothesetAnnouncementservice.For
details,seeAnnouncement setup (P.66).
Seamless Band
Preventsaudiobreakwhenswitchingfrom
DigitalRadiotoAnalogRadio.Defaultis“ON”.
Antenna Power*
SetspowersupplytotheDigitalRadio
antenna.Setto“ON”whentheDigitalRadio
antennainuseisequippedwithabooster.
Defaultis“ON”.
L-Band Tuning*
SetsL-bandreception.Whensetto“ON”,also
receivesL-bandensembles.
*ThisitemcanbesetwheninSTANDBY
source.
Tuner Setup
Youcansettunerrelatedparameters.
Thisfunctionisavailableformodelswith
regioncode2or3.
1 Touch [ ] in the control screen.
Multi function menu appears.
2 Touch [SETUP] in the multi function
menu.
SETUP Menu screen appears.
3 Touch [Source].
Source SETUP Menu screen appears.
4 Touch [TUNER SETUP] in the list.
TUNER SETUP screen appears.
5 Set each item as follows.
NEWS
Setsanewsbulletininterrupttime.Defaultis
“OFF”.
AF
Whenstationreceptionispoor,automatically
switchestothestationthatisbroadcasting
thesameprogramoverthesameRadioData
Systemnetwork.Defaultis“ON”.
Regional
Setswhethertoswitchtothestationonly
inthespecificregionusingthe“AF”control.
Defaultis“ON”.
Auto TP Seek
Whentrafficinformationstationreceptionis
poor,automaticallysearchesforastationthat
canbereceivedbetter.Defaultis“ON”.
Language Select
SelectsadisplaylanguageforthePTYfunction.
Antenna Control SETUP
AllowsyoutoturnofftheRadioDataSystem
functiontopreventthemotor-drivenantenna
fromextending.Defaultis“ON”.


6666 67
Return to the Top page
Radio, Digital Radio, TV
Return to the Top page
Radio, Digital Radio, TV
5 Set each item as follows.
TV1 Area/TV2 Area
SetsthepresentTV1orTV2receivingarea.
Touch[SET],andselecttheareaandnumber.
Thisfunctionisavailableonlywhen
KTC-V500N/PV300/N/Poptionalaccessoryis
connected.
On Screen TV
SetshowtodisplaytheinformationoftheTV.
Auto (Default):Informationappearsfor5
secondswhenupdated.
OFF:Doesnotdisplayanyinformation.
Announcement setup
WhentheserviceforwhichONisselected
starts,switchesfromanysourceto
Announcementtoreceiveit.
1 Touch [SET] of [Announcement Select]
in the Digital Radio SETUP screen.
The Announcement Select screen appears.
2 Touch each Announcement list and set
on or off.
NOTE
• Thevolumesettingduringreceptionof
Announcementserviceisautomaticallystored.
ThenexttimetheAnnouncementserviceis
received,thisunitrecallsthevolumesetting
automatically.
TV Setup
YoucansettheTVsignalreceivingareas.
NOTE
• Eachoperationinthissectioncanbestartedfrom
theTopMenuscreen.Fordetails,seeOperating
with the Top Menu Screen (P.16).
1 Touch [ ] in the control screen.
Multi function menu appears.
2 Touch [SETUP] in the multi function
menu.
SETUP Menu screen appears.
3 Touch [Source].
Source SETUP Menu screen appears.
4 Touch [TV SETUP] in the list.
TV SETUP screen appears.
6868 69
Return to the Top page
Bluetooth Operation
Return to the Top page
Bluetooth Operation
UsingtheBluetoothfunction,various
functionscanbeused:listeningtotheaudio
file,making/receivingacall.
NOTE
• Bluetoothcontrolisafunctionofthe
DNX7330BT/DNX7330BTM/DNX5330BT/
DNX5330BTM/DNX4330DAB.
About the cell-phone and
Bluetooth audio player
Thisunitconformstothefollowing
Bluetoothspecifications:
Version
BluetoothVer.2.1+EDRCertified
Profile
Cell-phone:
HFP(HandsFreeProfile)
SPP(SerialPortProfile)
PBAP(PhonebookAccessProfile)
SSP(SimpleSecurePairing)
Audio player:
A2DP(AdvancedAudioDistributionProfile)
AVRCP(Audio/VideoRemoteControlProfile)
NOTE
• Forthecell-phonesverifiedforcompatibility,
accessthefollowingURL:
http://www.kenwood.com/cs/ce/bt/.
• TheunitssupportingtheBluetoothfunctionhave
beencertifiedforconformitywiththeBluetooth
Standardfollowingtheprocedureprescribedby
BluetoothSIG.
However,itmaybeimpossibleforsuchunitsto
communicatewithyourcell-phonedepending
onitstype.
Registering And Connecting
Bluetooth Unit
ItisnecessarytoregistertheBluetoothaudio
playerorcell-phonetothisunitbeforeusing
theBluetoothfunction.
Youcanregisterupto5Bluetoothunits.
1 Touch [Menu] on any screen.
2 Touch [SETUP].
SETUP Menu screen appears.
3 Touch [Bluetooth].
Bluetooth SETUP screen appears.
See the following section for each setting.
• Registering the Bluetooth Unit (P.69)
• Connecting the Bluetooth unit (P.69)
Bluetooth Control Registering the Bluetooth Unit
1 Touch [Search].
Searched Device List screen appears.
NOTE
• Anewdevicecannotberegisteredifthereare5
registeredBluetoothunits.Deleteunnecessary
registration.SeeConnecting the Bluetooth unit
(P.69).
• TheSearchedDeviceListscreencannotbe
displayed,whenthereceivingsourceisPANDORA
internetradio,aha,orBluetoothAudio.
• ThisunitiscompatiblewiththeAppleEasy
Pairingfunction.WhenaniPodtouchoriPhone
isconnectedtothisunitusingDockConnector
toUSBCable,anauthenticationdialogappears.
Performingoperationforauthenticationonthis
unitoriOSsmartphoneregistersthesmartphone
asaBluetoothdevice.
2 Touch [PIN Code Set].
PIN Code Set screen appears.
NOTE
• Iftheunitcannotbesearchedinstep1,youcan
searchtheunitagainbytouching[Search]in
abovescreen.
• ABluetoothdevicecannotbesearchedwhilethe
sourceisPandora,aha,orBluetoothaudio.
• Touch[Cancel]tocancelsearchingforthe
Bluetoothunit.
3 Enter PIN code and touch [Enter].
The entered code is recognized and
Searched Device List screen appears again.
4 Select the Bluetooth unit to register
from the list.
The Bluetooth SETUP screen appears.
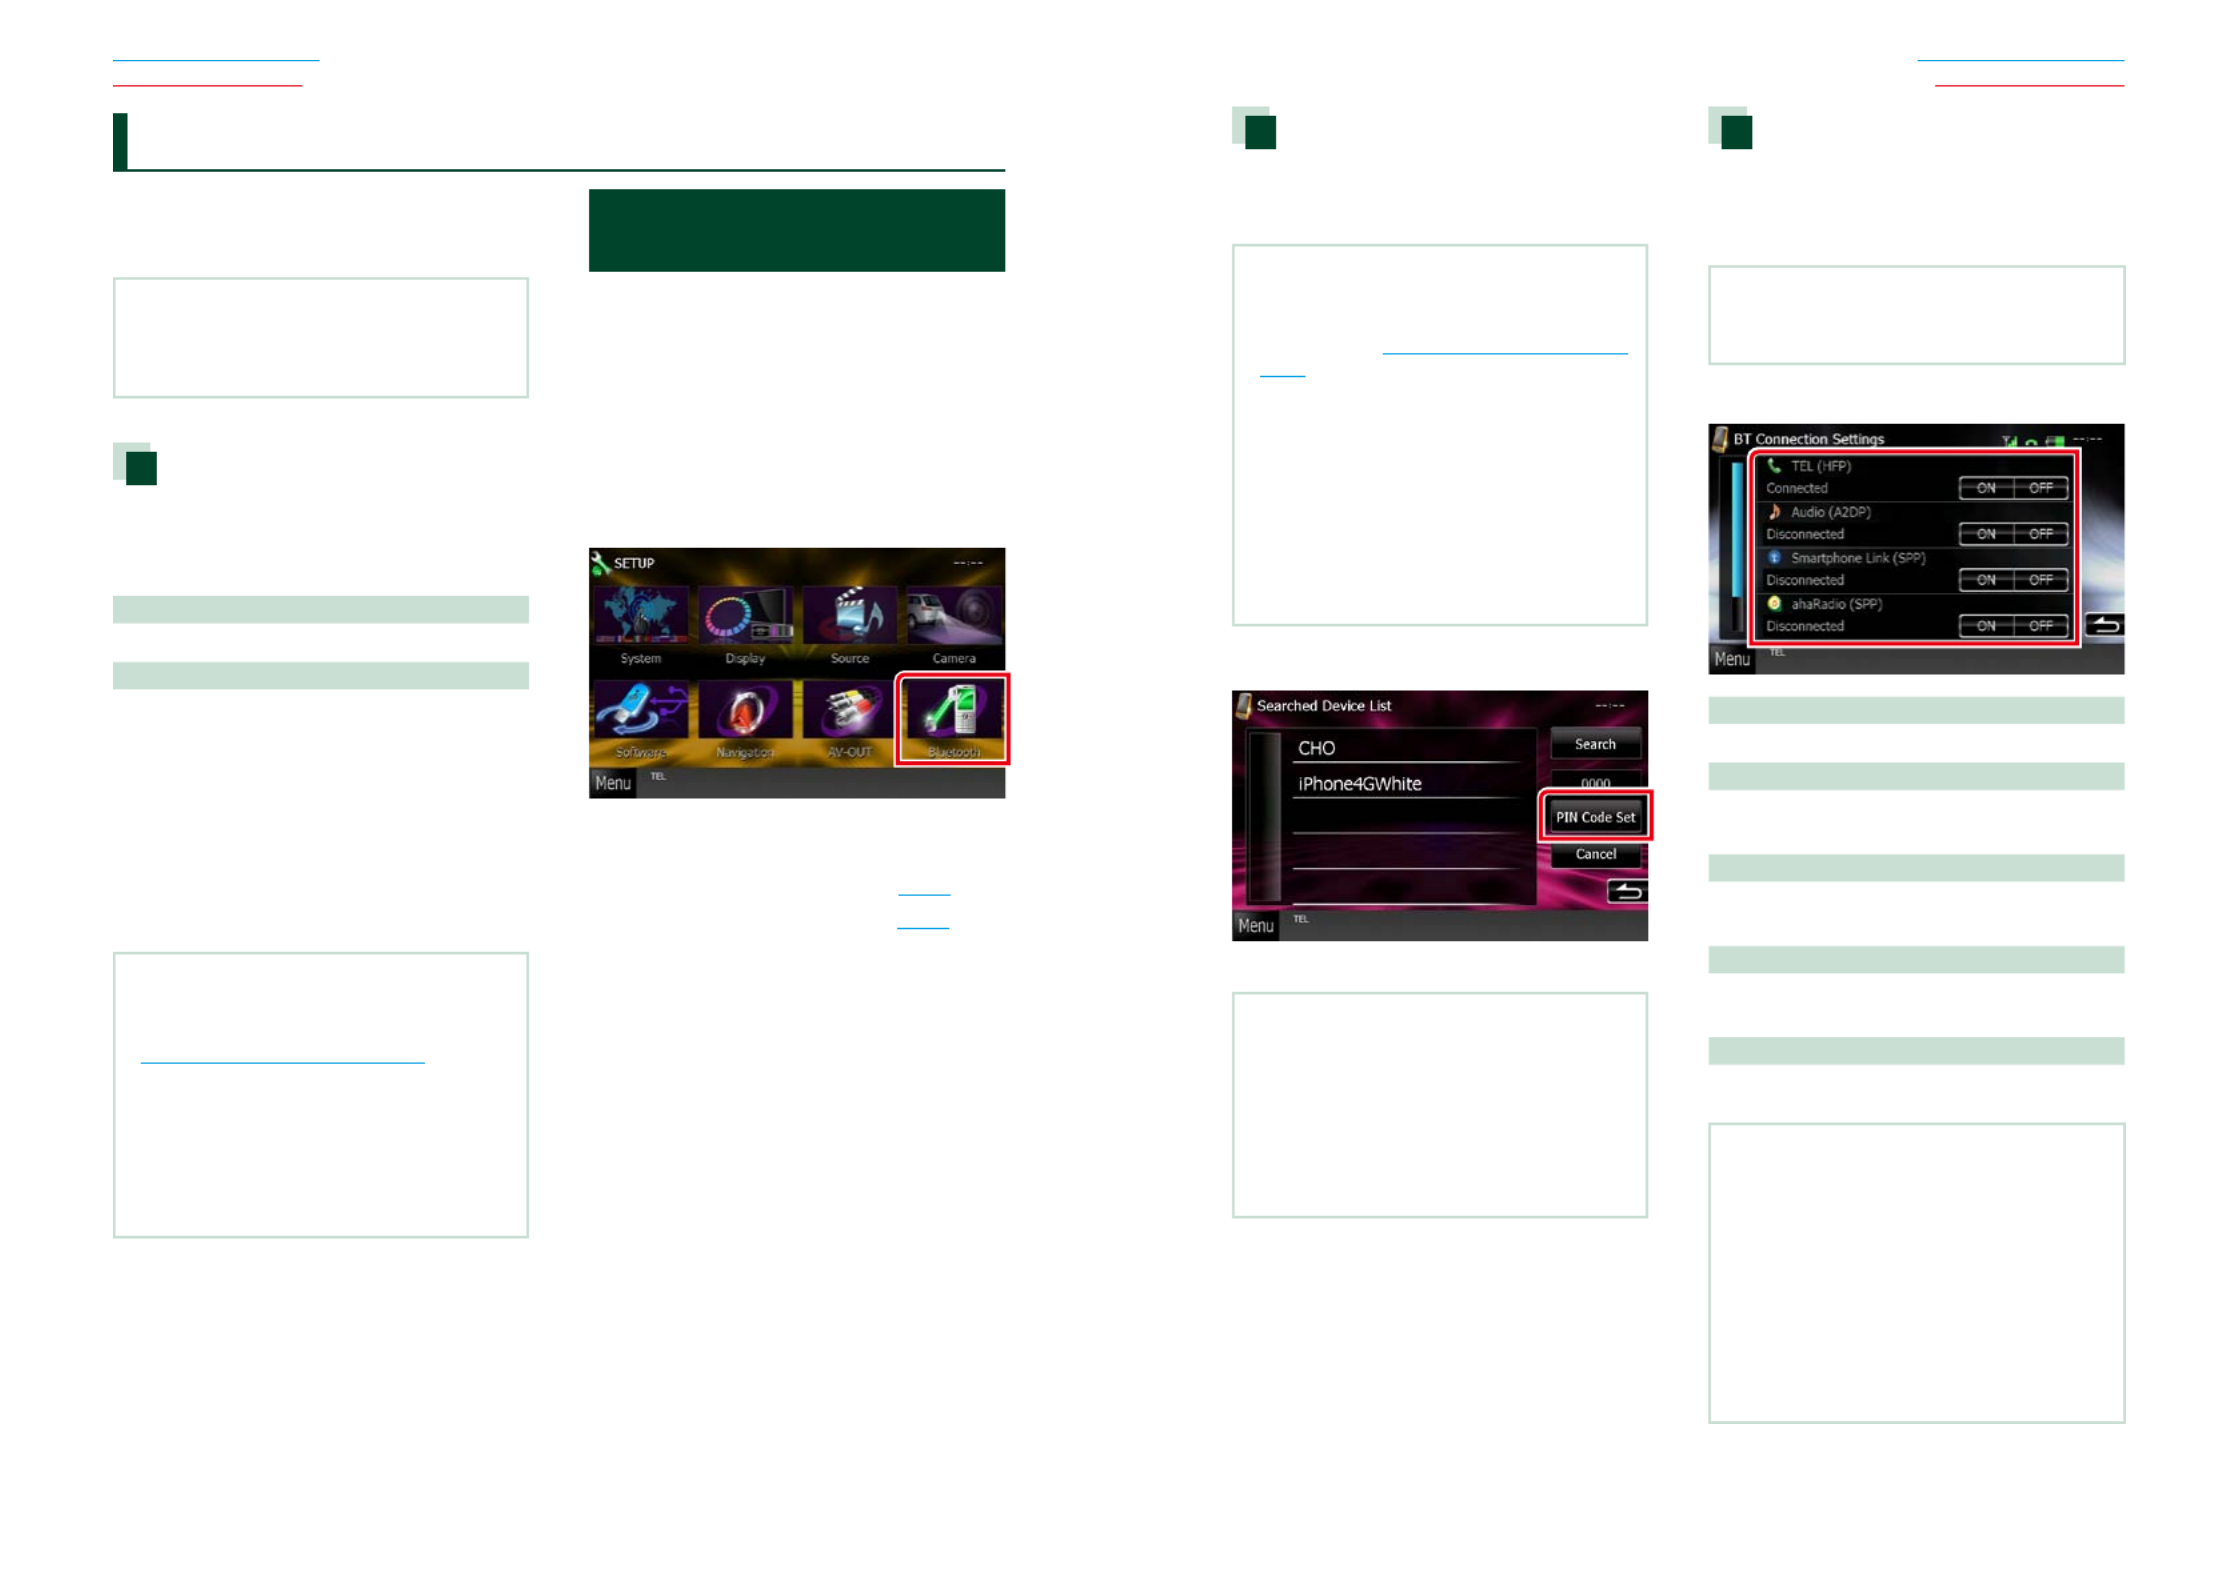
Connecting the Bluetooth unit
1 Touch the device name you want to
connect.
Profile select screen appears.
NOTE
• Iftheiconislighted,itmeansthattheunitwill
usethatdevice.
2 Set each profile as follows.
TEL (HFP)
Meansthatthedeviceisacell-phone.
Audio (A2DP)
Meansthatthedeviceisanaudioplayeror
cell-phonewithaudioplayer.
Smartphone Link (SPP)
MeansthatthedeviceisGarminSmartphone
Link-ready.
Pandora (SPP)
MeansthatthedeviceisaPANDORAinternet
radio-ready.
ahaRadio (SPP)
MeansthatthedeviceisAha-ready.
NOTE
• Ifadevicehasbeenpaired,theBluetoothunit
cannotbeconnectedfromthepaireddevice.
• Touching[Remove]of[DeviceRemoveConfirm]
removesregistrationinformation.Afteryoutouch
thekey,aconfirmationmessageappears.Follow
themessageandcompletetheoperation.
• Toset[SmartphoneLink(SPP)]toON,set
[Pandora(SPP)]and[ahaRadio(SPP)]toOFF.
• Toset[Pandora(SPP)]or[ahaRadio(SPP)]toON,
set[SmartphoneLink(SPP)]toOFF.

7070 71
Return to the Top page
Bluetooth Operation
Return to the Top page
Bluetooth Operation
Playing Bluetooth Audio Device
Bluetooth basic operation
2
2
3
3
5
Simple Control screen List Control screen
1
4
1 Information display
Displaysthenameofthetrackinformation.Iftheinformationisnotavailable,devicenameisdisplayed.
2 Multi function key
Touchtoswitchthemultifunctionmenu.
3 Multi function menu
Thefunctionsofeachkeyareasfollows.
• :Searchestheprevious/nextcontent.*[ ] [ ]4 ¢
• Plays.*[ ]: 3
• Pauses.*[ ]: 8
•[
AUDIO]: TouchtodisplaytheAudioControlscreen.SeeControlling Audio (P.94).
•[
SETUP]:TouchtodisplaytheSETUPMenuscreen.SeeSetting Up (P.80).
• Stopsplayback.*[ ]: 7
•[ REAR ]: Touchtomutetherearspeaker.
4 Control switching area
TouchtoswitchbetweentheSimpleControlandListControlscreen.
5 File information
Displaystheinformationofthecurrentfile.
*TheseitemsappearonlywhentheaudioplayerwhichsupportsAVRCPprofileisconnected.
NOTE
• Iftheoperationkeysdonotappear,operatefromtheplayer.
• Dependingonyourcell-phoneoraudioplayer,audiomaybeheardandcontrolledbuttextinformationmaynot
appear.
• Ifthevolumeistoolow,raiseitonyourcell-phoneoraudioplayer.
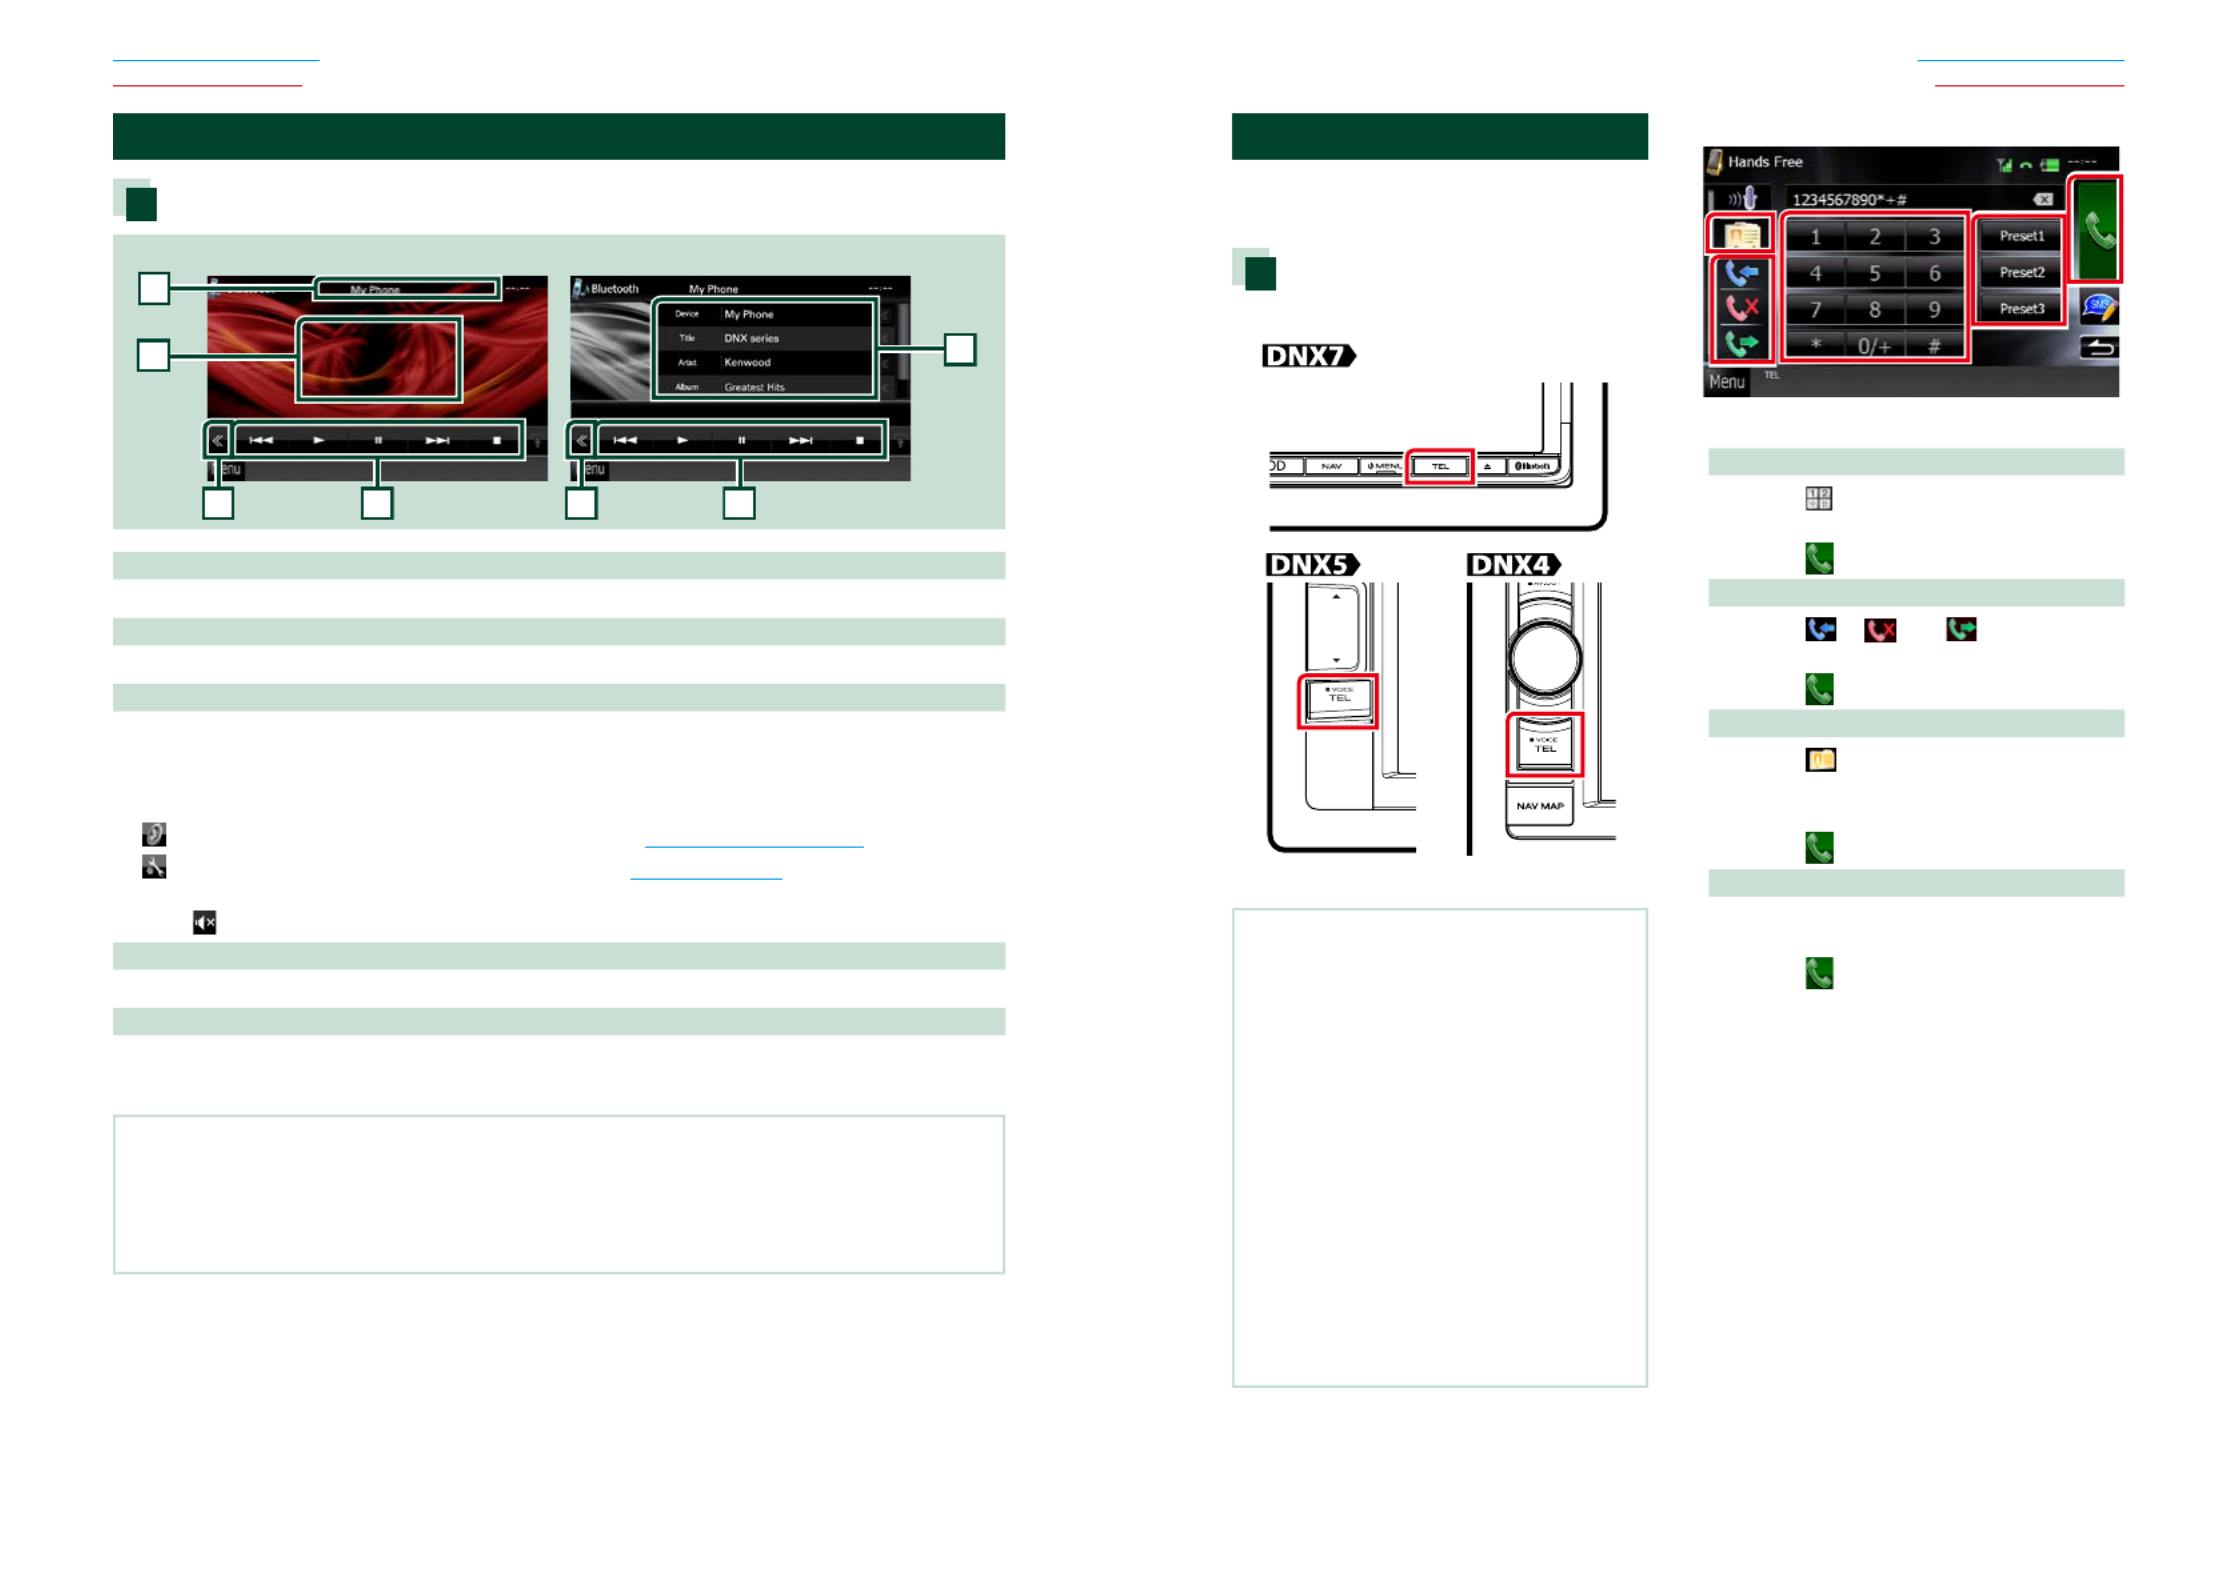
Using Hands-Free Unit
Youcanusetelephonefunctionby
connectingtheBluetoothtelephonetothis
unit.
Making a call
1 Press the <TEL> button.
Hands Free screen appears.
NOTE
• Whenregistrationofyourcell-phoneis
completed,thephonebookofthecell-phoneis
automaticallydownloadedtothisunit.
• Upto600phonenumberscanberegisteredfor
eachregisteredcell-phone.
• Upto32digitscanberegisteredforeach
phonenumberalongwithupto50characters
representinganame.(50isthenumberof
alphabeticalcharacters.Fewercharacterscanbe
inputdependingonthetypeofcharacters.)
• Dependingonthetypeofyourcell-phone,the
followingrestrictionsareplaced;
• Thephonebookdatacannotbedownloaded
normally.
• Charactersinthephonebookaregarbled.
• Tocanceldownloadingthephonebookdata,
operatethecell-phone.
2 Select a dialing method.
See the following table for each method.
Call by entering a phone number
1Touch[ ].
2Enteraphonenumberwithnumberkeys.
3Touch[ ].
Call using call records
1Touch[ ],[ ],or[ ].
2Selectthephonenumberfromthelist.
3Touch[ ].
Call using the phonebook
1Touch[ ].
2Selectthenamefromthelist.*1*2
3Selectthenumberfromthelist.
4Touch[ ].
Call using the preset number
1Touch[Preset#]tostartcallingthe
correspondingphonenumber.
2Touch[ ].


7272 73
Return to the Top page
Bluetooth Operation
Return to the Top page
Bluetooth Operation
*1Youcansortthelisttobeginwithtouched
character.
• Characterswithnocorrespondingname
willnotappear.
• Duringsearch,anon-accentcharacter
suchas“u”issearchedforinsteadofan
accentcharactersuchas“ü”.
*2Youcansetthelisttoarrangeintheorder
oflastnameorfirstname.Fordetails,see
Hands-Free Setup (P.78).
NOTE
• Ifyoueditedthephonebookinyourcell-phone,
touch“Download”ontopofthephonebooklistin
thisunittodownloaditfromyourcell-phone.The
phonebookinthisunitwillbeupdatedwiththe
latestdownloadeddata.
• Whileyourcarismoving,somefunctionsare
disabledforsafetyreasons.Thekeysassociated
withthedisabledfunctionsbecomeineffective
iftouched.
• Thestatusiconssuchasbatteryandantenna
displayedmaydifferfromthosedisplayedonthe
cell-phone.
• Settingthecell-phoneintheprivatemodecan
disablethehands-freefunction.
Receiving a call
1 Touch [ ] to answer a phone call or
[ ] to reject an incoming call.
NOTE
• Whilemonitoringthecameraview,thisscreen
doesnotappearevenifacallcomesin.Todisplay
thisscreen,pressthe<TEL>buttonorreturnthe
shiftknobofcartothedriverposition.
Operations during a call
Adjust the receiver volume
Pressthe< >or< >button.∞ 5
Pressthe< >or< >button.∞ 5
Turnthevolumeknob.
Output the dial tone
Touch[DTMF]todisplaythetoneinputscreen.
Youcansendtonesbytouchingdesiredkeys
onthescreen.
Switching the speaking voice output
Touching[ ]/[ ]eachtime
switchesthespeakingvoiceoutputbetween
cell-phoneandspeaker.
Phone number preset
Youcanregisterfrequentlyusedphone
numberstothisunit.
1 Enter the number you want to register
in Hands Free screen.
2 Touch [Preset 1], [Preset 2], or [Preset 3]
for 2 seconds in the Hands Free screen.


7474 75
Return to the Top page
Bluetooth Operation
Return to the Top page
Bluetooth Operation
Reading SMS (Short Message
Service) Message
1 Touch [ ] (received SMS message) or
[ ] (sent SMS message) in the Hands
Free screen.
Received and sent SMS messages list
appears on the screen.
2 Select a SMS message to read from the
Received or Sent SMS messages list.
The selected SMS message appears.
[ ]
IndicatesthenumberofunreadSMS
messages.
[ ]
IndicatesthenumberofreadSMSmessages.
NOTE
• WhenthereisanunreadSMSmessage(s),unread
SMSmessageisindicatedin[ ](number).
Creating an SMS (Short
Message Service)
1 Touch [ ], [ ], [ ], [ ], [ ],
or [ ] in the Hands Free screen.
The phone numbers list appears.
2 From the phone numbers list, select a
phone number to send a SMS.
3 Touch [SMS].
SMS Create Menu screen appears.
4 Touch [SET] of [Message] in the SMS
Create Menu screen.
Create SMS Message screen appears.
5 Enter a message using keys and touch
[SET].
Moves the cursor
Use[ ][ ].2 3
Switches the keyboard layout
Use[ ][ ].Thelayoutchangesinthe5 ∞
followingsequence;Alphabet,numbers,local
language.
Toggles between uppercase and lowercase
Touch[Shift].
Changes the layout of the character keys
[ABC]:Alphabeticallayout
[QWE]:Qwertylayout
[ALT]:Alternatekey
Erases the entered character
Touch[Clear].Toerasealltheinputcharacters,
touchfor2seconds.
Enters a space
Touch[Space]atdesiredposition.
6 Touch [Send].
The message is sent.
NOTE
• YoucancreateaSMSmessagebydirectly
enteringaphonenumberandashortmessage
ontheHandsFreescreen.
• [Delete]appearsonlywhenadraftmessage
isbeingedited.Touching[Delete]deletesthe
message.Afteryoutouch[Delete],aconfirmation
messageappears.Followthemessageand
completetheoperation.
Using templates
Youcancreateamessageeasilybyselecting
thedesiredsentencefromthetemplatelist.
1 Touch [Create Message] in the SMS
Select screen.
SMS Create Menu screen appears.
2 Touch [Template].
Template list screen appears.
3 Touch the desired template.
Selected template is entered.

Produkt Specifikationer
| Mærke: | Kenwood |
| Kategori: | Navigation |
| Model: | DNX4330 |
Har du brug for hjælp?
Hvis du har brug for hjælp til Kenwood DNX4330 stil et spørgsmål nedenfor, og andre brugere vil svare dig
Navigation Kenwood Manualer

6 Juli 2024
6 Juli 2024
5 Juli 2024
5 Juli 2024
5 Juli 2024
4 Juli 2024
4 Juli 2024
4 Juli 2024
4 Juli 2024
4 Juli 2024
Navigation Manualer
- Navigation Toyota
- Navigation Mazda
- Navigation Audi
- Navigation Panasonic
- Navigation Pioneer
- Navigation Becker
- Navigation Garmin
- Navigation Grundig
- Navigation Volvo
- Navigation Sygic
- Navigation Skoda
- Navigation Seat
- Navigation Mio
- Navigation JVC
- Navigation Tacx
- Navigation Medion
- Navigation Fiat
- Navigation Navman
- Navigation Ford
- Navigation Packard Bell
- Navigation Zenec
- Navigation TomTom
- Navigation Kia
- Navigation GlobalTronics
- Navigation Binatone
- Navigation Raymarine
- Navigation Simrad
- Navigation Navitel
- Navigation GoClever
- Navigation Airis
- Navigation Audiovox
- Navigation TakeMS
- Navigation Navigon
- Navigation IGo
- Navigation Magellan
- Navigation Prestigio
- Navigation Fujitsu Siemens
- Navigation Eagle
- Navigation Quintezz
- Navigation A-Rival
- Navigation Apelco
- Navigation LX NAV
- Navigation Marquant
- Navigation Targa
- Navigation Hagenuk
- Navigation Autovision
- Navigation Danew
- Navigation Snooper
- Navigation VDO Dayton
- Navigation Macrom
- Navigation Mappy
- Navigation Bluetech
- Navigation Route 66
- Navigation Falk
- Navigation Seecode
- Navigation Nav N Go
- Navigation Bullit
- Navigation Viamichelin
- Navigation Xzent
- Navigation Navteq
- Navigation Igo 8
- Navigation Keomo
- Navigation RoHS
- Navigation Invion
- Navigation VW
- Navigation Raystar
- Navigation Eclipse
- Navigation Holux
- Navigation PENTAGRAM
- Navigation Roadnavigator
- Navigation WayteQ
- Navigation GoRider
Nyeste Navigation Manualer

15 Januar 2025
11 Januar 2025

5 Oktober 2024

5 Oktober 2024
5 Oktober 2024
5 Oktober 2024
5 Oktober 2024
5 Oktober 2024
5 Oktober 2024
5 Oktober 2024