Korg AX10A Manual
Korg
Hi-Fi system
AX10A
Læs nedenfor 📖 manual på dansk for Korg AX10A (52 sider) i kategorien Hi-Fi system. Denne guide var nyttig for 47 personer og blev bedømt med 4.5 stjerner i gennemsnit af 2 brugere
Side 1/52

Owner’s Manual
Manuel d’utilisation
Bedirnungshandbuch
取扱説明書
B Oedirnungshandbuch Manuel d'utilisation wner's Manual
取 扱 説 明 書

2

3
B Oedirnungshandbuch Manuel d'utilisation wner's Manual
Owner’s Manual
Introduction
Thank you for purchasing the AX10A — Tone Works
modeling signal processor. To ensure trouble-free
enjoyment, please read this manual carefully and use
the product as described. When you have finished
reading the manual, keep it for future reference.
❑Korg’s “REMS” modeling technology is used to
provide numerous sophisticated effects including
— 3 types of pre-effects, tone, 11 types of mic &
body modeling, 11 types of ambience effects, and
1 type of chorus effect are built-in.
The controls for mic & body modeling and effects
are located on the AX10A’s panel in the order of
the signal flow from the electric acoustic guitar
input through the output. This intuitive design
makes it easy for you to create a wide variety of
your own sounds.
PRE FX
3 TYPES
INPUT OUTPUT
NOTCH
MIC&BODY
11 TYPES
AMBIENCE/CHORUS
11 AMBI TYPES+CHORUS
TONE
AX10A signal routing
❑The mic & body models simulate the resonances
of various famous acoustic guitars with different
miking techniques. Compression, reverb, and
chorus (all tuned for acoustic guitar sounds) are
also provided.
❑40 presets that take full advantage of the AX10A’s
potential are provided for immediate use, and you
can store your own settings in another 40 user
programs.
❑The built-in expression pedal gives you realtime
control of volume or delay/reverb/chorus depth.
There’s also a pedal notch mode that lets you use
the pedal to control the cutoff frequency of a notch
filter. By using the pedal to control the notch, you
can suppress acoustic feedback while you con-
tinue to play your instrument.
❑The built-in Auto Chromatic Tuner lets you tune
silently which is ideal for live situations.
Table of contents
Introduction .............................................................. 3
Precautions .............................................................. 4
Quick Start ............................................................... 5
Parts and what they do ............................................ 6
Front panel ......................................................... 6
Rear panel ......................................................... 7
Setup ........................................................................ 8
Tur ning the power on/off .................................... 8
Connections ....................................................... 8
Playing the AX10A ................................................... 9
Selecting programs ........................................... 9
Bypass and Mute ............................................... 9
Tuner .................................................................. 9
Using the expression pedal ............................. 10
Creating sounds .................................................... 10
Creating sounds on the AX10A ....................... 10
PRE FX ............................................................ 11
TONE ............................................................... 11
NOTCH ............................................................ 11
MIC&BODY ...................................................... 11
AMB&CHORUS ............................................... 11
Expression pedal ............................................. 12
NR (Noise Reduction) ..................................... 12
Storing a program .................................................. 12
Other functions ...................................................... 13
Calibrating (adjusting) the expression pedal .. 13
Restoring programs to the factory settings ..... 13
Troubleshooting ..................................................... 13
Main specifications ................................................ 14
AX10A Program Chart ........................................... 51

4
Precautions
Location
Using the unit in the following locations can result in a malfunction.
• In direct sunlight
• Locations of extreme temperature or humidity
• Excessively dusty or dirty locations
• Locations of excessive vibration
• Close to magnetic fields
Power supply
Please connect the designated AC adapter to an AC outlet of the correct voltage. Do not connect it to an AC outlet
of voltage other than that for which your unit is intended.
Interference with other electrical devices
Radios and televisions placed nearby may experience reception interference. Operate this unit at a suitable
distance from radios and televisions.
Handling
To avoid breakage, do not apply excessive force to the switches or controls.
Care
If the exterior becomes dirty, wipe it with a clean, dry cloth. Do not use liquid cleaners such as benzene or thinner,
or cleaning compounds or flammable polishes.
Keep this manual
After reading this manual, please keep it for later reference.
Keeping foreign matter out of your equipment
Never set any container with liquid in it near this equipment. If liquid gets into the equipment, it could cause a
breakdown, fire, or electrical shock.
Be careful not to let metal objects get into the equipment. If something does slip into the equipment, unplug the AC
adapter from the wall outlet. Then contact your nearest Korg dealer or the store where the equipment was purchased.
THE FCC REGULATION WARNING (for U.S.A.)
This equipment has been tested and found to comply with the limits for a Class B digital device, pursuant to Part
15 of the FCC Rules. These limits are designed to provide reasonable protection against harmful interference in a
residential installation. This equipment generates, uses, and can radiate radio frequency energy and, if not
installed and used in accordance with the instructions, may cause harmful interference to radio communications.
However, there is no guarantee that interference will not occur in a particular installation. If this equipment does
cause harmful interference to radio or television reception, which can be determined by turning the equipment off
and on, the user is encouraged to try to correct the interference by one or more of the following measures:
• Reorient or relocate the receiving antenna.
• Increase the separation between the equipment and receiver.
• Connect the equipment into an outlet on a circuit different from that to which the receiver is connected.
• Consult the dealer or an experienced radio/TV technician for help.
Unauthorized changes or modification to this system can void the user’s authority to operate this equipment.
CE mark for European Harmonized Standards
CE mark which is attached to our company’s products of AC mains operated apparatus until December 31,
1996 means it conforms to EMC Directive (89/336/EEC) and CE mark Directive (93/68/EEC).
And, CE mark which is attached after January 1, 1997 means it conforms to EMC Directive (89/336/EEC), CE
mark Directive (93/68/EEC) and Low Voltage Directive (73/23/EEC).
Also, CE mark which is attached to our company’s products of Battery operated apparatus means it conforms
to EMC Directive (89/336/EEC) and CE mark Directive (93/68/EEC).
IMPORTANT NOTICE TO CONSUMERS
This product has been manufactured according to strict specifications and voltage requirements that are
applicable in the country in which it is intended that this product should be used. If you have purchased this
product via the internet, through mail order, and/or via a telephone sale, you must verify that this product is
intended to be used in the country in which you reside.
WARNING: Use of this product in any country other than that for which it is intended could be dangerous and
could invalidate the manufacturer’s or distributor’s warranty.
Please also retain your receipt as proof of purchase otherwise your product may be disqualified from the
manufacturer’s or distributor’s warranty.
What is ?
(Resonant structure and Electronic circuit Modeling System) is KORG’s proprietary sound modeling
technology which precisely reproduces the complex character and nature of both acoustic and electric
instruments as well as electronic circuits in real world environments. emulates a wide variety of sound
generation characteristics including instrument bodies, speakers & cabinets, acoustic fields, microphones,
vacuum tubes, transistors, etc.
6
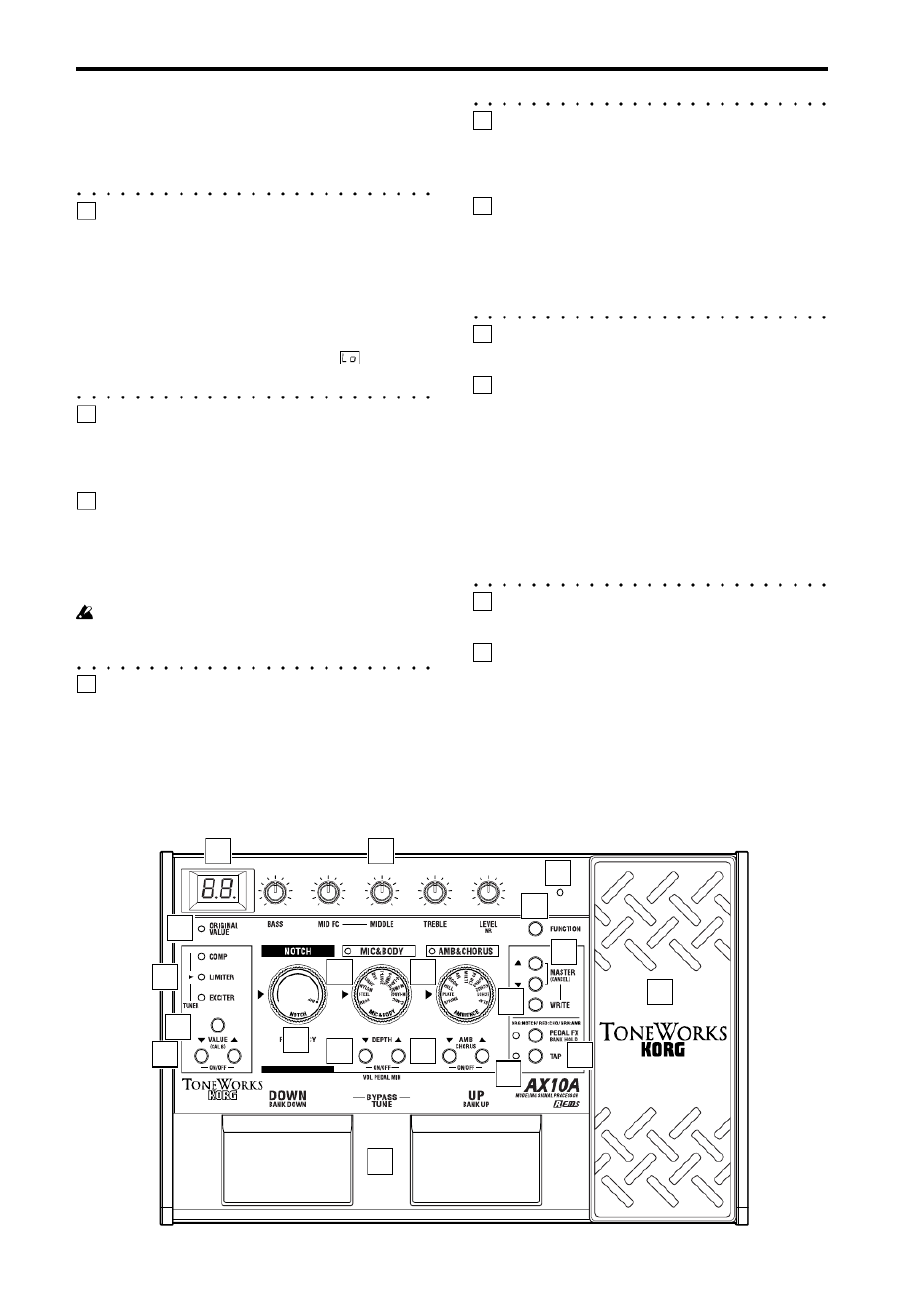
Parts and what they do
Front panel
1
Display
Indicates the program number. When you operate a
knob, selector or button, or move the pedal when the
pedal FX is set to Notch, the parameter value will
briefly appear in the display.
• This will light when the power is on.
• The dot in the lower right of the display will light
when you edit a parameter value.
• If the AX10A is running on batteries, will blink
when the batteries run low.
2
NOTCH selector
Adjusts the frequency of the notch filter. You can
suppress acoustic feedback by using the notch filter to
cut the frequency region at which feedback is occurring.
3
Tone control knobs
These knobs adjust the overall tone and volume of
the AX10A.
By turning the LEVEL/NR knob while you hold down
the FUNCTION button, you can adjust the amount of
noise reduction (NR).
Some settings may cause distortion in your sound.
If this occurs, adjust the tone control LEVEL/NR
knob (or the MASTER buttons).
4
PRE FX (TUNER) LED
These indicate the selected pre-effect.
The LEDs will not light if the pre-effect is off.
When the tuner is operating, these LEDs indicate the
difference from the correct pitch. (p.9)
5
PRE FX button
Each time you press this button, the pre-effect type
will change in the order of COMP → LIMITER →
EXCITER → COMP etc.
6
VALUE (CALIB) buttons –ON/OFF–
These buttons adjust the value of the pre-effect.
You can switch PRE FX on/off by pressing the
VALUE ▲ and ▼ buttons simultaneously.
When the tuner is operating, you can use these
buttons to adjust the calibration (CALIB).
7
MIC & BODY selector
Selects one of eleven types of mic or body modeling.
8
DEPTH (VOL PEDAL MIN) buttons -ON/OFF-
These buttons adjust the depth of the mic or body
modeling effect (DEPTH).
If you’ve assigned the expression pedal to control
Volume, you can set the minimum volume when the
pedal is fully returned (i.e., toward yourself) by
holding down the FUNCTION button and pressing ▲
or ▼ (VOL PEDAL MIN).
You can switch the MIC & BODY effect on/off by
pressing the DEPTH uttons together.▲ ▼ and b
When off, the MIC & BODY LED will not be lit.
9
AMBIENCE selector
This selects one of 11 ambience effects.
10
AMB/CHORUS buttons -ON/OFF-
These buttons adjust the depth of the ambience effect.
You can adjust the depth of the chorus by holding
down the FUNCTION button and pressing these
buttons.
You can simultaneously switch the ambience effect
and chorus effect on/off by pressing the AMB and▲
▼ buttons together.
13
3
3
33
4
5
62
7
8
9
10
12
13
14
11
16
17
18
19
15

7
TIPS
If you want to turn off either the ambience effect or
the chorus effect, use the AMB (CHORUS) ▼
button to set its value to “00”.
11
TAP button
You can set the delay or reverb time of the ambience
effect by tapping this button at the desired interval. The
LED located at the left will blink to indicate the tempo.
12
FUNCTION button
By holding down this button and operating a knob or
button that has a function printed in green on the
front panel, you can edit the parameter printed in
green.
13
MASTER (CANCEL) buttons
These buttons adjust the overall volume of the
AX10A (MASTER).
When the AX10A is ready to write (store), pressing
either of these buttons will cancel the Write operation
(CANCEL).
14
WRITE button
Use this button to write (store) a program.
When you press this button, the AX10A will enter
“write-ready” mode; if you press this button again, the
program will be written (stored). (p.12)
15
PEDAL FX/BANK HOLD button
This button selects the effect that will be controlled
by the expression pedal (Pedal Effect).
Each time you press the button, the LED will change
color to indicate the pedal effect that will be controlled.
ORG: NOTCH (orange): Notch filter frequency
RED : CHO (red): Chorus effect
GRN : AMB (green):
Effect selected by AMBIENCE
OFF : VOLUME (dark): Volume pedal
By holding down the FUNCTION button and pressing
this button, you can select “bank hold” mode as the
way in which programs will be selected (BANK
HOLD). Refer to “Selecting programs: b” (p.9).
16
Expression pedal
You can use this expression pedal to control effects or
volume. By advancing the pedal all the way forward
you can switch the selected pedal effect on/off.
VOLUME and NOTCH cannot be switched on/off by
advancing the pedal.
17
PEDAL LED
This LED will light if the expression pedal is active.
18
ORIGINAL VALUE LED
This LED will light if the edited value is identical to
the saved (original) value.
19
Program select switches DOWN/BANK DOWN, UP/
BANK UP –BYPASS, TUNE–
Use these switches to select programs. You can
select programs in one of three ways. Refer to
“Selecting programs” (p.9).
If you press the UP and DOWN switches simulta-
neously, the effects will be bypassed and the tuner
will operate (BYPASS) (p.9).
Rear panel
20
INPUT L/H select switch
Set this switch according to the pickup output of your
guitar.
H : Suitable for guitars with a high output pickup
L : Suitable for guitars with a low output pickup
21
INPUT jack
Connect your guitar to this jack. Use a 1/4" mono
plug. If the AX10A is running on batteries, the power
will come on when you plug into this jack.
If the AX10A is running on batteries, the power will
not come on if a 1/4" stereo plug is inserted.
22
OUTPUT jack
Connect this jack to your guitar amp, recorder, or
headphones.
2425 20 21 22 23
23
AMP/LINE select switch
Set this to “AMP” if you’re plugging in to a PA system
or guitar amp for use at high volume. Set this to
“LINE” if you’re plugging in to a recorder or head-
phones etc.
24
DC9V
The separately sold AC adapter can be connected
here (p.8). When this is connected, the power will be
turned on automatically.
You must only use the specified AC adaptor (p.14).
25
Cable hook
If the separately sold AC adapter is used, connect
the cable of the AC adapter around this hook (p.8).

8
Setup
Turning the power on/off
Before you turn the power on or off, you must turn
down the volume of any connected devices.
When using batteries:
1. To open the battery compartment, lightly press
the tab located by the arrow and lift the cover up.
Install four AA alkaline batteries (sold separately)
observing the correct polarity and close the
cover.
2. When using batteries, the power will turn on
when a mono cable is plugged into the INPUT
jack. The display will light while the power is on.
The power will turn off when you remove the
cable from the INPUT jack.
Be sure to remove the cable from the INPUT jack
when you are not using the AX10A to preserve
battery life.
If you connect a stereo cable, the power will not be
turned on.
When the batteries run down, an indication of
will blink in the display. Please replace the batteries
as soon as possible. If dead batteries are left in the
unit, they may leak or cause other malfunctions. You
should also remove the batteries if you will not be
using the AX10A for an extended period.
When using the AC adaptor:
1. Connect the separately sold AC adaptor to the
DC 9V jack, and plug the AC adaptor into an AC
outlet. The POWER LED will light, and the power
will turn on.
Use only the specified external AC adaptor. (p.14)
Be sure to disconnect the AC adaptor from the AC
outlet when you are not using the AX10A.
Do not apply excessive force to the cable.
Wrap the AC adaptor cable around the hook as
shown in the diagram.
Connections
1. Turn off the power of the equipment you want to
connect, and lower each volume control.
2. Set the INPUT L/H switch according to the output
of your pickups.
The “H” position is suitable for guitars with a high
output pickup. The “L” position is suitable for
guitars with a low output pickup.
3. Connect your guitar to the INPUT jack.
4. Set the AMP/LINE select switch to the appropriate
position.
Select the “AMP” position if you’re connecting the
output of the AX10A to a PA system or guitar
amp for use at high volume, or the “LINE” position
if you’re connecting the output to a recorder,
audio device, or headphones.
5. Connect the OUTPUT jack to your amp or
recorder, etc.
The OUTPUT jack is stereo (TRS), so if you use
a mono cable to connect it to your guitar amp
etc., only the sound of the L (left) channel will be
heard.
If you are listening through headphones, connect
them to this jack.
If you are running into two channels of a mixer or
using two amplifiers in stereo, use a stereo to
dual mono cable.
6. When you have finished making connections,
turn on the power of your guitar amp, recorder, or
other equipment, and adjust the volume.
Use the MASTER buttons to adjust the overall
volume (master level) of the AX10A. (p.7
13
)
TIPS
If the sound is distorted when the AX10A is
bypassed, set the INPUT L/H switch to the “H”
position. If the sound is still distorted, lower the
volume of your guitar.
INPUTOUTPUT
AMP/LINE
LINE
L/H
INPUT
AMP/LINE
AMP
INPUT
Headphones
Recorder, mixer, etc.
1/4" mono
– 1/4" mono
1/4" mono x 2
–1/4" stereo
1/4" mono
– 1/4" mono
Guitar amp
AC adaptor
to an AC outlet
Audio equipment
Stereo phono
– 1/4" stereo
Guitar
1/4" mono
– 1/4" mono

9
Playing the AX10A
Selecting programs
When you’ve finished setting up, you can select
programs and try them out.
The AX10A has 40 preset programs and 40 user
programs. There are ten preset banks (0–9) and ten
user banks (0.–9.), with four programs in each bank.
User programs
Program: 1~4
Preset programs
Bank: 0.~9. Bank: 0~9 Program: 1~4
You can select programs in any of the following three
ways.
a: Step through the programs of all banks
1. Press the program select UP or DOWN switch.
...9.4 01 02 03 04 11 ... 93 94 0.1...÷ ÷ ÷ ÷ ÷ ÷ ÷ ÷ ÷
b: Step through the programs in a bank
1. Hold down the FUNCTION button and press the
PEDAL FX (BANK HOLD) button to select “bank
hold” mode. The bank will appear as “ in the”
display.
2. Press the program select UP or DOWN switch.
Only the program will change; the bank will
remain the same.
...H4 H1 H2 H3 H4 H1 H2...÷ ÷ ÷ ÷ ÷ ÷
3. To defeat “bank hold” mode, hold down the
FUNCTION button and press the PEDAL FX
(BANK HOLD) button.
c: Step through the banks (leaving the program fixed)
1. Hold down the FUNCTION button and press the
program select UP (BANK UP) or DOWN (BANK
DOWN) switch. The bank will change. You can
also use this method while Bank Hold mode is
selected. (The following example is when
program 1 is selected)
...11 21 31 41 ... 91 0.1 ... 9.1...÷ ÷ ÷ ÷ ÷ ÷ ÷ ÷
a1 c1 b2
c1
b1
b1
Bypass and Mute
If you bypass the AX10A, your sound will be direct
(dry) without any effects (wet).
If you mute the AX10A, there will be no sound.
1. Simultaneously press the UP and DOWN
program select switches.
Bypass: Simultaneously press UP and DOWN
and release them immediately.
Mute: Simultaneously press UP and DOWN
and hold them for about one second;
then release them.
When you press UP and DOWN simultaneously,
the display will blink slowly, and after approxi-
mately one second will blink more rapidly. To
bypass, release the buttons while the display is
blinking slowly. To mute, release the buttons when
the display is blinking rapidly.
2. To cancel Bypass or Mute, press either the UP or
DOWN program select switch.
Tuner
You can use the AX10A’s built-in auto chromatic
tuner to tune your guitar. To activate the tuner,
simultaneously press the UP and DOWN program
select switches.
TIPS
You can activate the tuner by selecting either
Bypass or Mute. If you select Mute, you will be able
to tune silently.
Tuning procedure
1. To activate the tuner, simultaneously press the
UP and DOWN program select switches to either
Bypass or Mute the AX10A. For the procedure,
refer to “Bypass and Mute” (above).
2. Pluck the string that you want to tune, and the
closest note name will appear in the display. A
decimal point “.” at the right of the note name
indicates a sharp (#).
Do not play two or more strings simultaneously
when tuning.
3. Tune the string approximately so that the correct
note name is shown in the display.
4. Fine-tune the string so that only the middle LED
of the PRE FX (TUNER) section is lit.
When the note name is A#
Too low Too high Correct tuning
5. When you have finished tuning, press the UP or
DOWN program select switch to return to
normal operation.
Adjusting the tuner calibration
When you turn on the power, middle A is set to a
reference frequency of 440 Hz. If desired, you can
adjust (calibrate) this reference pitch.
1. While the tuner is activated, use the VALUE
(CALIB) buttons to adjust the calibration.
The range is 438–445 Hz. When you adjust the
value, the display will show the lower two digits of
the calibration frequency (e.g., “41” for 441 Hz).
The AX10A does not remember the tuner calibra-
tion setting when powered-off.

10
Using the expression pedal
You can use the expression pedal to control the
volume, ambience level, chorus depth, or notch filter
frequency.
The effect controlled by the pedal can be one of the
eleven AMBIENCE effects, CHORUS, NOTCH, or
volume. You can use the pedal to control one of
these.
Using the expression pedal
1. Select a program for which the PEDAL LED
(located at the upper left of the expression pedal)
is lit.
If you have selected a program for which the
PEDAL LED is lit, you can use the expression
pedal to control a pedal effect.
Even for programs for which the PEDAL LED is
not lit, you can advance the pedal all the way to
switch it on (the PEDAL LED will light).
If the pedal is assigned to volume or NOTCH, you
can’t switch the effect on/off by advancing the
pedal.
PEDAL
LED
If the PEDAL LED
is not lit, advance
the pedal
2. Operate the expression pedal while you play. The
output sound will change as you move the pedal
up and down. If you’ve assigned PEDAL FX to
NOTCH, you’ll be able to suppress acoustic
feedback by operating the pedal when it occurs;
move the pedal to the point at which the feedback
disappears. If you are not experiencing acoustic
feedback, we recommend that you set the pedal
to the minimum position to turn off the effect.
Do not apply excessive force to the expression
pedal. Before you begin using the expression pedal,
you should determine the amount of force that is
needed to make the PEDAL LED light or to control
the effect, and use only the necessary amount of
force.
TIPS
You can press the PEDAL FX button to change the
effect or volume being controlled by the expression
pedal. The color of the LED located at the left of the
pedal indicates the assignment (p.12). Page 12 also
explains how you can save a sound you created by
operating the pedal.
Creating sounds
Creating sounds on the AX10A
You can create sounds in one of two ways; you can
edit an existing preset program or user program, or
you can create a sound “from scratch.”
If you want to create a sound that’s based on an
existing program, select the program that’s closest to
what you have in mind, and make the desired
changes. Adjust the BASS, MID FC, MIDDLE, and
TREBLE tone control knobs, and use the VALUE,
DEPTH, and TAP buttons to adjust the depth of each
effect.
If you want to create a sound from scratch, one
method is to start by choosing a MIC & BODY TYPE.
When doing so, leaving the PRE FX and AMB &
CHORUS effects turned off will make it easier for you
to hear the differences between the various mic or
body models. Simultaneously press both VALUE or
DEPTH ▲ and ▼ buttons to turn the corresponding
effect on/off.
When you’ve decided on a mic & body type, adjust
the tone control knobs BASS, MID FC, MIDDLE,
TREBLE, and LEVEL as desired.
When you’ve finished making the mic & body
settings, you can add effects. AMB & CHORUS is
located after the mic & body section. Simultaneously
press both DEPTH and buttons to turn on the▲ ▼
effect, and turn the AMB & CHORUS selector to
choose the effect you want to use. Then use the
DEPTH buttons to adjust the depth of the effect. For
the chorus effect, you can hold down the FUNCTION
button and use the DEPTH buttons to adjust the
effect depth. You can adjust the delay/reverb time of
the ambience effect by pressing the TAP button at the
desired timing interval.
Next you can adjust the , which is located inPRE FX
front of the mic & body section. Turn the effect on,
and then press the PRE FX button to select an effect.
Use the PRE FX VALUE buttons to adjust the amount
of effect. You may want to turn AMB & CHORUS
temporarily off while adjusting the PRE FX.
Finally, use the PEDAL FX button to specify what the
expression pedal will control. The pedal assignment
(effect or volume) will change each time you press
the button.
If you hear unwanted noise, you can adjust the noise
reduction (p.12). Hold down the FUNCTION button
and turn the tone control NR knob (the knob at the
far right) to adjust the amount of reduction.
Finally, when you have come up with a sound you
like, you should write (store) it into memory. If you
switch to a different program or turn off the power
without writing your new program, it will be lost.
Some effect settings may produce unwanted
distortion. If this happens, lower the VOLUME knob.
11
PRE FX
Use the PRE FX button to select the pre effect type, and use the VALUE buttons to adjust the amount of effect.
TYPE Explanation VALUE
COMP Compressor that makes picking volume more consistent. Adjusts sensitivity: 0…30
LIMITER Limiter that suppresses excessive levels. Limiting amount: 0…30
EXCITER (*1) Exciter that adds sparkle to the high-frequency range. Effect depth: 0…30
TONE (*1)
This is a three-band tone control. You can adjust the noise reduction by holding down the FUNCTION button and turning the
LEVEL (NR) knob.
BASS Low-frequency adjustment (00…30).
MID FC
Adjusts the mid peak frequency in a range of
170 Hz…3 kHz (1…10).
MIDDLE Mid-frequency adjustment (00…30).
TREBLE High-frequency adjustment (00…30).
LEVEL Volume adjustment (00…30).
NR Amount of noise reduction.
NOTCH
You can eliminate acoustic feedback by turning this selector to set the frequency of the notch filter. Turning the knob all the
way to the left will turn the notch filter off. Turn the knob toward the right to raise the notch filter frequency, and find the point
at which acoustic feedback is occurring. If acoustic feedback is not occurring, we recommend that you leave the notch filter
turned off. If you’ve assigned PEDAL FX to NOTCH, you can use the expression pedal to set the notch filter frequency.
FREQUENCY Notch filter frequency (low-high). Far left is OFF.
MIC&BODY (*1)
Use the MIC & BODY selector to select a mic & body type, and use the DEPTH buttons to adjust the DEPTH parameter.
TYPE Explanation DEPTH
AMB&CHORUS
Use the AMBIENCE selector to select the ambience effect type, and use the AMB buttons to adjust the AMB parameter. By
pressing the TAP button twice at the desired interval you can set the delay time or reverb time. To adjust the chorus effect
depth, hold down the FUNCTION button and use the AMB buttons. AMBIENCE and CHORUS can be used simultaneously. If
you want to turn either AMBIENCE or CHORUS off separately, set the corresponding parameter to a value of “0”. If you
assign PEDAL FX to AMB or CHO, the expression pedal will control that effect.
TYPE Explanation TAP Normal PEDAL FX:AMB
AMB PEDAL AMB
Delay time:
up to 250 [ms]
Delay time:
up to 1.0 [s]
N/A (*2)
Reverb time:
up to 4.0 [s]
Reverb time:
up to 8.0 [s]
Effect level:
0…30
Controls the
effect depth
Specifies the
effect depth at
maximum
pedal position
(*1) Some settings may produce distortion. If this occurs, reduce the parameter value. (*2) The button will not change the value. (*3) The reverb
time is set to double the interval at which you press TAP.
C-MIC Condenser mic simulation.
M-LARGE A large old body suitable for a variety of situations.
M-SMALL A small old body suitable for delicate arpeggios, etc.
G-LARGE A large old body with a tough sound, suitable for strumming chords.
G-SMALL A small body with a distinctive mid-range, favored by country and
blues performers.
T-LARGE A large body distinguished by a sophisticated sound suitable for
pop. The sound of one of the newer American manufacturers.
DRY Large body with a distinctive dry sound.
LIGHT Light sounding body suitable for a band or ensemble.
NYLON Simulates a nylon-string sound.
STEEL Body with distinctively metallic highs, suitable for rock.
RESO Resonator guitar body, suitable for slide playing.
Mic distance 0 (distant)…30 (close)
SLAP The delay time will be set to 1/4th of the interval at
which you press TAP.
ECHO1 Tape echo simulation with a warm tone (feedback low).
ECHO2 Tape echo simulation with a warm tone (feedback medium).
ECHO3 Tape echo simulation with a warm tone (feedback high).
PP DLY Ping-pong delay that bounces from to left to right.
MULTI Multi-tap delay.
AIR Reverb with an airy feel.
ROOM Room reverb.
HALL Hall reverb (*3).
PLATE Plate reverb (*3).
SPRING Spring reverb (*3).
Effect depth 0…30
Produkt Specifikationer
| Mærke: | Korg |
| Kategori: | Hi-Fi system |
| Model: | AX10A |
Har du brug for hjælp?
Hvis du har brug for hjælp til Korg AX10A stil et spørgsmål nedenfor, og andre brugere vil svare dig
Hi-Fi system Korg Manualer

15 November 2024
7 August 2024
31 Juli 2024
24 Juli 2024
23 Juli 2024
23 Juli 2024
21 Juli 2024
19 Juli 2024
19 Juli 2024
19 Juli 2024
Hi-Fi system Manualer
- Hi-Fi system SilverCrest
- Hi-Fi system Denver
- Hi-Fi system Sencor
- Hi-Fi system TCL
- Hi-Fi system Sony
- Hi-Fi system Fenton
- Hi-Fi system Samsung
- Hi-Fi system Panasonic
- Hi-Fi system Sony Ericsson
- Hi-Fi system Pro-Ject
- Hi-Fi system Anthem
- Hi-Fi system Philips
- Hi-Fi system Lenco
- Hi-Fi system OK
- Hi-Fi system LG
- Hi-Fi system AEG
- Hi-Fi system Audio-Technica
- Hi-Fi system Peavey
- Hi-Fi system Pioneer
- Hi-Fi system TOA
- Hi-Fi system Sharp
- Hi-Fi system Qtx
- Hi-Fi system Logitech
- Hi-Fi system Behringer
- Hi-Fi system Kenwood
- Hi-Fi system Technaxx
- Hi-Fi system Lowrance
- Hi-Fi system MB Quart
- Hi-Fi system Sennheiser
- Hi-Fi system Harman Kardon
- Hi-Fi system AOC
- Hi-Fi system Garmin
- Hi-Fi system Grundig
- Hi-Fi system Nikkei
- Hi-Fi system D-Link
- Hi-Fi system Motorola
- Hi-Fi system Roland
- Hi-Fi system Toshiba
- Hi-Fi system Pyle
- Hi-Fi system Argon
- Hi-Fi system Denon
- Hi-Fi system Yamaha
- Hi-Fi system Olympus
- Hi-Fi system Bowers & Wilkins
- Hi-Fi system Avante
- Hi-Fi system Scansonic
- Hi-Fi system AVM
- Hi-Fi system Nedis
- Hi-Fi system Sonoro
- Hi-Fi system Logik
- Hi-Fi system Kicker
- Hi-Fi system LD Systems
- Hi-Fi system Hama
- Hi-Fi system Auna
- Hi-Fi system Muse
- Hi-Fi system Thomson
- Hi-Fi system Hyundai
- Hi-Fi system Aiwa
- Hi-Fi system Nokia
- Hi-Fi system Rega
- Hi-Fi system Belkin
- Hi-Fi system Pyle Pro
- Hi-Fi system JBL
- Hi-Fi system AKAI
- Hi-Fi system TriStar
- Hi-Fi system Teufel
- Hi-Fi system DataVideo
- Hi-Fi system Audio Pro
- Hi-Fi system RCF
- Hi-Fi system Pure
- Hi-Fi system Trevi
- Hi-Fi system Topcom
- Hi-Fi system Adler
- Hi-Fi system Camry
- Hi-Fi system Blaupunkt
- Hi-Fi system JVC
- Hi-Fi system Champion
- Hi-Fi system Clatronic
- Hi-Fi system Hitachi
- Hi-Fi system Crunch
- Hi-Fi system Razer
- Hi-Fi system Skytec
- Hi-Fi system Medion
- Hi-Fi system Cambridge
- Hi-Fi system Huawei
- Hi-Fi system König
- Hi-Fi system TechniSat
- Hi-Fi system Massive
- Hi-Fi system Tivoli Audio
- Hi-Fi system Gembird
- Hi-Fi system Sanus
- Hi-Fi system Bang And Olufsen
- Hi-Fi system Bose
- Hi-Fi system Geemarc
- Hi-Fi system Jabra
- Hi-Fi system Klipsch
- Hi-Fi system Vivax
- Hi-Fi system Loewe
- Hi-Fi system Crosley
- Hi-Fi system Alpine
- Hi-Fi system Netgear
- Hi-Fi system EnVivo
- Hi-Fi system Kärcher
- Hi-Fi system Telefunken
- Hi-Fi system Vtech
- Hi-Fi system Tripp Lite
- Hi-Fi system Exibel
- Hi-Fi system BeamZ
- Hi-Fi system Dali
- Hi-Fi system KEF
- Hi-Fi system Technics
- Hi-Fi system Jensen
- Hi-Fi system Plantronics
- Hi-Fi system SteelSeries
- Hi-Fi system Homedics
- Hi-Fi system Krüger&Matz
- Hi-Fi system Marmitek
- Hi-Fi system Oppo
- Hi-Fi system NGS
- Hi-Fi system PreSonus
- Hi-Fi system Soundmaster
- Hi-Fi system Victrola
- Hi-Fi system Sonos
- Hi-Fi system NAD
- Hi-Fi system ESI
- Hi-Fi system Tascam
- Hi-Fi system Cobra
- Hi-Fi system DPA
- Hi-Fi system Omnitronic
- Hi-Fi system Velleman
- Hi-Fi system Marshall
- Hi-Fi system Energy Sistem
- Hi-Fi system Sonance
- Hi-Fi system Zoom
- Hi-Fi system TC Helicon
- Hi-Fi system Geneva
- Hi-Fi system Bush
- Hi-Fi system Honor
- Hi-Fi system Apogee
- Hi-Fi system MIPRO
- Hi-Fi system Dual
- Hi-Fi system Electro-Voice
- Hi-Fi system Arturia
- Hi-Fi system RME
- Hi-Fi system Salora
- Hi-Fi system Sagem
- Hi-Fi system Onkyo
- Hi-Fi system Focal
- Hi-Fi system Nevir
- Hi-Fi system HK Audio
- Hi-Fi system Teac
- Hi-Fi system Imperial
- Hi-Fi system Autotek
- Hi-Fi system Nextbase
- Hi-Fi system Magnat
- Hi-Fi system Saramonic
- Hi-Fi system Marantz
- Hi-Fi system Anchor Audio
- Hi-Fi system ELAC
- Hi-Fi system Sven
- Hi-Fi system McIntosh
- Hi-Fi system IDance
- Hi-Fi system American Audio
- Hi-Fi system Albrecht
- Hi-Fi system Scott
- Hi-Fi system ART
- Hi-Fi system Bluesound
- Hi-Fi system Rode
- Hi-Fi system Polk
- Hi-Fi system Monacor
- Hi-Fi system Samson
- Hi-Fi system ION
- Hi-Fi system Audizio
- Hi-Fi system JL Audio
- Hi-Fi system ADE
- Hi-Fi system Alba
- Hi-Fi system RCA
- Hi-Fi system ECG
- Hi-Fi system Jamo
- Hi-Fi system FiiO
- Hi-Fi system DBX
- Hi-Fi system Digigram
- Hi-Fi system Galaxy Audio
- Hi-Fi system General Electric
- Hi-Fi system Chord
- Hi-Fi system Cardo
- Hi-Fi system Alto
- Hi-Fi system Shokz
- Hi-Fi system AudioSonic
- Hi-Fi system Manhattan
- Hi-Fi system SPC
- Hi-Fi system Aquatic AV
- Hi-Fi system Caliber
- Hi-Fi system OneConcept
- Hi-Fi system Native Instruments
- Hi-Fi system Audiolab
- Hi-Fi system Music Hall
- Hi-Fi system Electro Harmonix
- Hi-Fi system Numan
- Hi-Fi system WAGAN
- Hi-Fi system Altec Lansing
- Hi-Fi system Brandson
- Hi-Fi system IK Multimedia
- Hi-Fi system Lynx
- Hi-Fi system Kramer
- Hi-Fi system Rotel
- Hi-Fi system ILive
- Hi-Fi system Gemini
- Hi-Fi system Solid State Logic
- Hi-Fi system Paradigm
- Hi-Fi system Motu
- Hi-Fi system Senal
- Hi-Fi system Roadstar
- Hi-Fi system VIZIO
- Hi-Fi system Clarion
- Hi-Fi system Watson
- Hi-Fi system Sound Devices
- Hi-Fi system Universal Audio
- Hi-Fi system Hercules
- Hi-Fi system M-Audio
- Hi-Fi system Monster
- Hi-Fi system Fender
- Hi-Fi system Vision
- Hi-Fi system Majestic
- Hi-Fi system Morel
- Hi-Fi system Steinberg
- Hi-Fi system Xantech
- Hi-Fi system Walrus Audio
- Hi-Fi system ATen
- Hi-Fi system Shure
- Hi-Fi system Sangean
- Hi-Fi system Vimar
- Hi-Fi system Power Dynamics
- Hi-Fi system Continental Edison
- Hi-Fi system Dynaudio
- Hi-Fi system Rockford Fosgate
- Hi-Fi system Oregon Scientific
- Hi-Fi system Smart-AVI
- Hi-Fi system GPX
- Hi-Fi system Canton
- Hi-Fi system Lenoxx
- Hi-Fi system Terratec
- Hi-Fi system Sharkoon
- Hi-Fi system Memphis Audio
- Hi-Fi system Duronic
- Hi-Fi system Vonyx
- Hi-Fi system Scosche
- Hi-Fi system Speco Technologies
- Hi-Fi system Boss
- Hi-Fi system Ruark Audio
- Hi-Fi system Focusrite
- Hi-Fi system Crestron
- Hi-Fi system DAP-Audio
- Hi-Fi system Kunft
- Hi-Fi system SPL
- Hi-Fi system GoGen
- Hi-Fi system Arcam
- Hi-Fi system Russound
- Hi-Fi system Audison
- Hi-Fi system Crown
- Hi-Fi system Rolls
- Hi-Fi system Cyrus
- Hi-Fi system Werma
- Hi-Fi system Adastra
- Hi-Fi system Konig & Meyer
- Hi-Fi system Atlas Sound
- Hi-Fi system Boston Acoustics
- Hi-Fi system AKG
- Hi-Fi system Tannoy
- Hi-Fi system MXL
- Hi-Fi system DreamGEAR
- Hi-Fi system Xoro
- Hi-Fi system AudioControl
- Hi-Fi system Starkey
- Hi-Fi system Ibiza Sound
- Hi-Fi system Steren
- Hi-Fi system PowerBass
- Hi-Fi system Reflexion
- Hi-Fi system HiFi ROSE
- Hi-Fi system REVO
- Hi-Fi system Audioengine
- Hi-Fi system Musical Fidelity
- Hi-Fi system BSS Audio
- Hi-Fi system Glide Gear
- Hi-Fi system Hosa
- Hi-Fi system Key Digital
- Hi-Fi system KanexPro
- Hi-Fi system Sonifex
- Hi-Fi system TV One
- Hi-Fi system RGBlink
- Hi-Fi system AVer
- Hi-Fi system Stereoboomm
- Hi-Fi system Ferguson
- Hi-Fi system Goodis
- Hi-Fi system WyreStorm
- Hi-Fi system The Box
- Hi-Fi system IFi Audio
- Hi-Fi system Orbitsound
- Hi-Fi system House Of Marley
- Hi-Fi system Brigmton
- Hi-Fi system Sunstech
- Hi-Fi system Swissvoice
- Hi-Fi system Marquant
- Hi-Fi system AudioAffairs
- Hi-Fi system Magnum
- Hi-Fi system Coby
- Hi-Fi system Mac Audio
- Hi-Fi system Bigben Interactive
- Hi-Fi system Nacon
- Hi-Fi system Bigben
- Hi-Fi system Laser
- Hi-Fi system Naxa
- Hi-Fi system Mpman
- Hi-Fi system Peaq
- Hi-Fi system Ematic
- Hi-Fi system Vankyo
- Hi-Fi system Superior
- Hi-Fi system Quantis
- Hi-Fi system Irradio
- Hi-Fi system Karcher Audio
- Hi-Fi system Cmx
- Hi-Fi system Revox
- Hi-Fi system Comica
- Hi-Fi system Audient
- Hi-Fi system PAC
- Hi-Fi system Luxman
- Hi-Fi system Infinity
- Hi-Fi system Wolfgang
- Hi-Fi system Elta
- Hi-Fi system Iluv
- Hi-Fi system Monitor Audio
- Hi-Fi system Aplic
- Hi-Fi system Nxg
- Hi-Fi system OSD Audio
- Hi-Fi system Andover
- Hi-Fi system Mark Levinson
- Hi-Fi system Soundstream
- Hi-Fi system Block
- Hi-Fi system SVS
- Hi-Fi system JB Systems
- Hi-Fi system HUMANTECHNIK
- Hi-Fi system SIIG
- Hi-Fi system Primare
- Hi-Fi system Griffin
- Hi-Fi system MoFi
- Hi-Fi system Eissound
- Hi-Fi system MTX Audio
- Hi-Fi system Astell&Kern
- Hi-Fi system Mission
- Hi-Fi system Extron
- Hi-Fi system Franklin
- Hi-Fi system Leviton
- Hi-Fi system ClearOne
- Hi-Fi system Ebode
- Hi-Fi system Vocopro
- Hi-Fi system Glorious
- Hi-Fi system Devialet
- Hi-Fi system TCM
- Hi-Fi system Zvox
- Hi-Fi system Antelope Audio
- Hi-Fi system CE Labs
- Hi-Fi system Z CAM
- Hi-Fi system Avid
- Hi-Fi system Roku
- Hi-Fi system Accsoon
- Hi-Fi system Icon
- Hi-Fi system Parasound
- Hi-Fi system Promate
- Hi-Fi system SoundCast
- Hi-Fi system Hollyland
- Hi-Fi system Boytone
- Hi-Fi system ESX
- Hi-Fi system Maretron
- Hi-Fi system Xact
- Hi-Fi system Magnavox
- Hi-Fi system Lotronic
- Hi-Fi system Esoteric
- Hi-Fi system ANT
- Hi-Fi system Rane
- Hi-Fi system NUVO
- Hi-Fi system JK Audio
- Hi-Fi system Lexicon
- Hi-Fi system Fluance
- Hi-Fi system Altra
- Hi-Fi system Kiloview
- Hi-Fi system On-Q
- Hi-Fi system Vantage Point
- Hi-Fi system Planet Audio
- Hi-Fi system Fluid
- Hi-Fi system Atlona
- Hi-Fi system IFi
- Hi-Fi system E-bench
- Hi-Fi system Roon
- Hi-Fi system Voco
- Hi-Fi system Linear
- Hi-Fi system SSV Works
- Hi-Fi system DAP
- Hi-Fi system 2N
- Hi-Fi system SWIT
- Hi-Fi system CAD Audio
- Hi-Fi system Polsen
- Hi-Fi system AmpliVox
- Hi-Fi system Audiofrog
- Hi-Fi system Juke Audio
- Hi-Fi system Best Buy
- Hi-Fi system Meridian
- Hi-Fi system DiGiGrid
- Hi-Fi system CLXmusic
- Hi-Fi system Nuheara
- Hi-Fi system Majority
- Hi-Fi system Acoustic Solutions
- Hi-Fi system Metric Halo
- Hi-Fi system Universal Remote Control
- Hi-Fi system Prism Sound
- Hi-Fi system Antelope
- Hi-Fi system Auvi
- Hi-Fi system Technical Pro
- Hi-Fi system Switchcraft
- Hi-Fi system CSL
- Hi-Fi system Defender
- Hi-Fi system Titanwolf
- Hi-Fi system Liam&Daan
- Hi-Fi system Crystal Video
- Hi-Fi system Atoll
- Hi-Fi system Bennett & Ross
- Hi-Fi system Pronomic
- Hi-Fi system Beatfoxx
- Hi-Fi system NEAR
- Hi-Fi system INKEE
- Hi-Fi system Vaxis
Nyeste Hi-Fi system Manualer
8 April 2025
1 April 2025
31 Marts 2025
26 Marts 2025
26 Marts 2025

12 Marts 2025

5 Marts 2025
5 Marts 2025
4 Marts 2025
4 Marts 2025