Marshall Electronics VS-570-HDSDI Manual
Marshall Electronics
Overvågningskamera
VS-570-HDSDI
Læs nedenfor 📖 manual på dansk for Marshall Electronics VS-570-HDSDI (53 sider) i kategorien Overvågningskamera. Denne guide var nyttig for 12 personer og blev bedømt med 4.5 stjerner i gennemsnit af 2 brugere
Side 1/53
User Manual ver.1.0
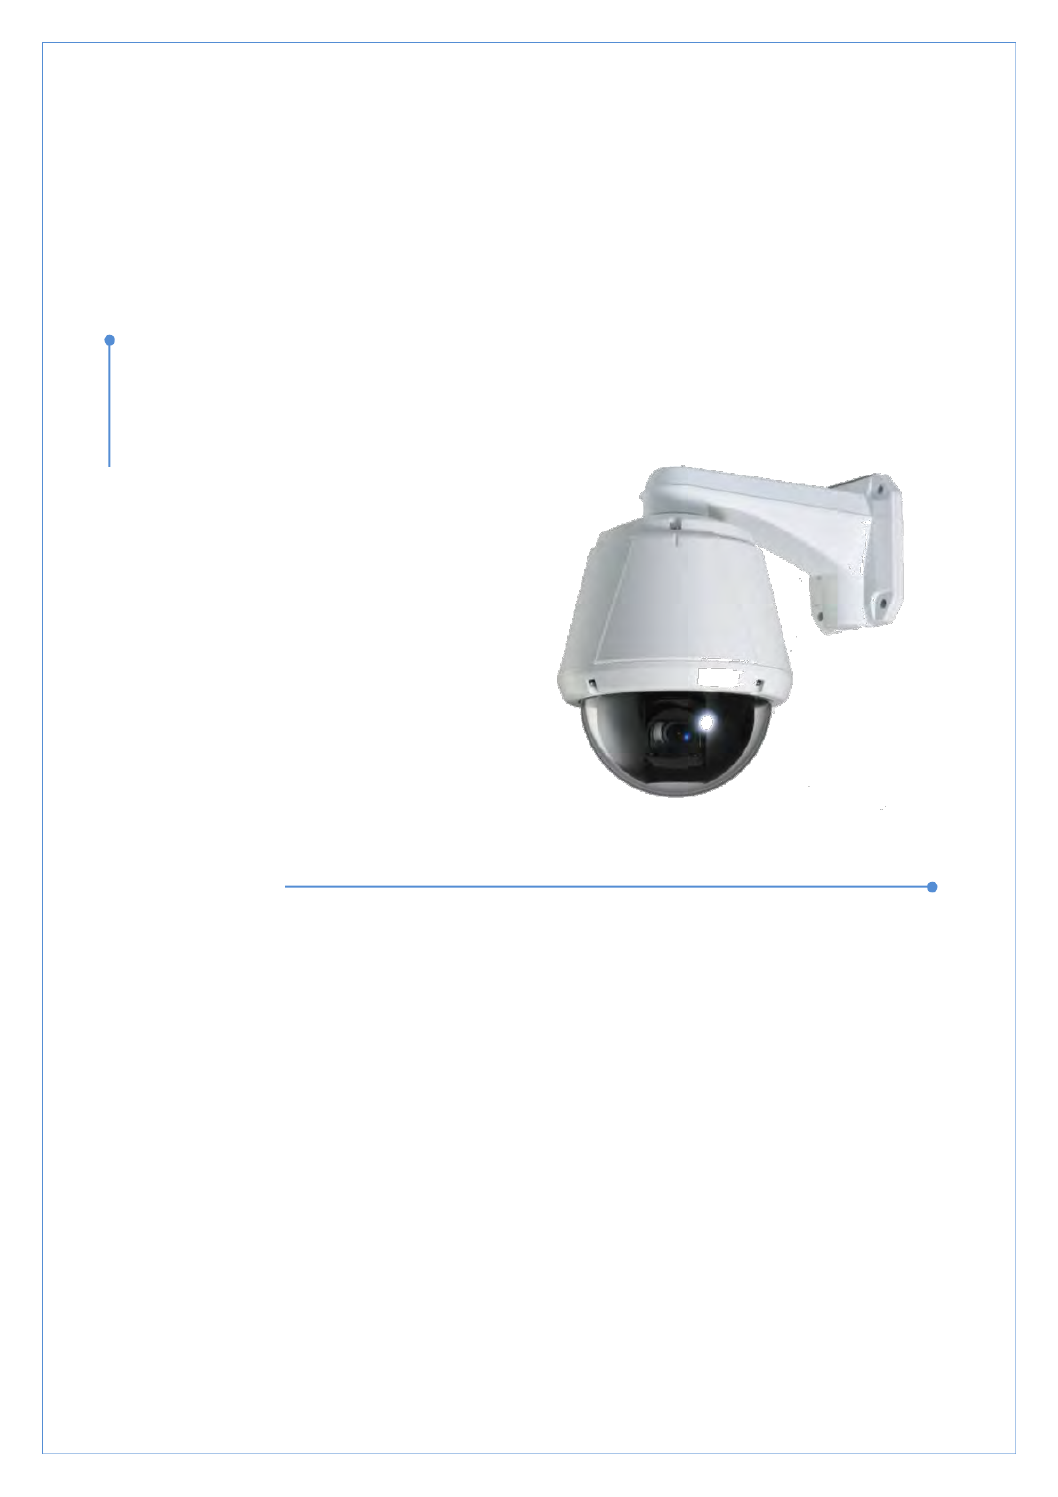
VS-570-HDSDI
2.0 Megapixel Speed Dome
v1.0 10062010570

VS-570-HDSDI User Manual
2.0 Megapixel Speed Dome Manual
2/54
Safety Precaution
Make sure to turn off the power before installing VS-570-HDSDI.
Do not install under the direct sunlight or in dusty areas.
Make sure to use the product within the temperature and humidity specified in the specification.
Do not operate the product in the presence of vibrations or strong magnetic fields.
Do not put electrically conducting materials in the ventilation hole.
Do not open the top cover of the product. It may cause a failure or electric shock on the
components.
To prevent from overheating, make sure to keep the distance at least 10cm from the ventilation
hole.
Make sure of proper voltage (220V/100V) before connecting the power.
We appreciate your purchasing VS-570-HDSDI.
Before installing the product, please read the following with care.

VS-570-HDSDI User Manual
2.0 Megapixel Speed Dome Manual
3/54
Table of Content
1. Introduction ................................................................................................................................. 4
About this manual ..................................................................................................................... 4
Features ................................................................................................................................... 4
Product and Accessories .......................................................................................................... 7
Part Names and Functions ....................................................................................................... 8
System Connections ................................................................................................................. 9
2. Installation ................................................................................................................................. 12
DIP Switch Setup .................................................................................................................... 12
Installation Camera with Brackets ........................................................................................... 14
Wiring/Cabling & Connecting .................................................................................................. 16
Check if it works ..................................................................................................................... 19
3. System Operation ..................................................................................................................... 20
Remote Video Monitoring ....................................................................................................... 20
Initialization of IP address ....................................................................................................... 23
4. Remote Configuration ............................................................................................................... 24
Using Web Brower .................................................................................................................. 24
System Configuration ............................................................................................................. 25
Video Configuration ................................................................................................................ 29
Audio Configuration ................................................................................................................ 34
Network Configuration ............................................................................................................ 35
Serial Configuration ................................................................................................................ 40
Event Configuration ................................................................................................................ 42
PTZ Configuration .................................................................................................................. 45
Record Configuration .............................................................................................................. 49
User Configuration .................................................................................................................. 50
Camera Configuration ............................................................................................................ 52

VS-570-HDSDI User Manual
2.0 Megapixel Speed Dome Manual
4/54
1. Introduction
About this manual
This User Manual provides information on operating and managing the premium network camera VS-570-,
HDSDI. The Manual includes instructions of installation, operation and configuration of VS-570-HDSDI
troubleshooting tips.
Features
VS-570-HDSDI is a 2.0M PTZ network-based camera with remote live monitoring, audio monitoring and
control via IP network such as LAN, ADSL/VDSL, and Wireless LAN. an
Camera
• 1/3” 2Megapixel CMOS Image Sensor
• X10 optical zoom, x12 digital zoom
• True Day & Night (ICR)
Video
• Highly efficient compression algorithm, H & MJPEG support .264
• 18 kinds of compression and resolutions: CIF (352x240) - Full HD (1920x1080)
• Wide range of transmission rates: 32kbps ~ 8Mbps
• Various transmission modes: CBR, VBR
• Motion detection
• Composite video output
• HD-SDI video output (Option)
Audio
• Multi-transmission mode Simplex (VS-570-HDSDI Client PC Decoder, Client PC or : or
Decoder VS-570-HDSDI), Full Duplex
Network
• Fixed IP & Dynamic (DHCP) support IP
• 1:1, 1:N support
• Multicasting
• Various types of Protocol support: TCP/IP, UDP, Multicast, DHCP, SMTP, HTTP, SNMP, RTP,
RTSP

VS-570-HDSDI User Manual
2.0 Megapixel Speed Dome Manual
5/54
Serial Data
• RS-485 support:
• Data pass-through mode: Serial data communication between VS-570-HDSDI Decoder. and
Sensor and Alarm
• Supports direct connections of external sensor and alarm devices.
• Event Alarm notification.
• 2 alarm sensor Inputs and 2 alarm Output relays are available.
• If an external sensor is activated, camera can be set to move to the corresponding Preset
position.
User Interface
• Diagnose and upgrade a through dedicated program called True Manager.
• System configuration using Internet Explorer
High Reliability
• Reliable embedded system.
Powerful Pan/Tilt Functions
• Max. 360 /sec high speed Pan/Tilt Motion.
• Using Vector Drive Technology, Pan/Tilt motions are accomplished in the shortest path.
As a result, the time to target view is reduced dramatically and the video on the monitor is very
stable.
• When using a PTZ controller, the ultra slow speed of 0.05 /sec is usefull for accurately moving
the camera to a desired view. Additionally, the zoom-proportional pan/tilt movement improves
the ability to follow a moving object.
Preset, Pattern, Swing, Group
• MAX. 128 Presets are assignable and characteristics of each preset can be set up
independently.
• Max. 8 sets of Swing action can be stored. This enables you to move the camera repetitively
between two preset positions with a designated speed.
• Max. 4 of Patterns can be recorded and played back. This enables to move camera to follow
any trajectory operated by a joystick as closely as possible.
• Max. 8 sets of Group actions can be stored. This enables you to move camera repetitively
with a combination of Preset or Pattern or Swing. A Group is composed of a maximum
of 20 entities of Preset/Pattern/Swings.

VS-570-HDSDI User Manual
2.0 Megapixel Speed Dome Manual
6/54
PTZ(Pan/Tilt/Zoom) Control
• With RS-485 communication, a maximum of 255 cameras can be controlled at the same time.
• Pelco-D or Pelco-P protocol can be selected as a control protocol in the current version of
firmware.
Easy Installation and Perfect Outdoor Environment Compatibility
• Fans and heaters are built into the camera enclosure for both hot and cold temperature
environments. Advanced mechanical design protects the camera from damaging water and dust.
• It is easy to install and maintain the camera with a cable channel built into the mountin brackets.

VS-570-HDSDI User Manual
2.0 Megapixel Speed Dome Manual
9/54
System Connections
VS-570-HDSDI IP Cameras can be connected in either 1 to 1 connection where one VS-570-HDSDI
is connect to one PC client or a decoder system or, 1 many connections where one VS-570-ed to
HDSDI can be connected several PCs and decoder systems The VS-101 video server can work as a to .
video decoder which takes the data from a video server or IP camera, decodes and outputs analog
or digital video, HDMI and HDSDI.
Topology
Generally, the VS-570-HDSDI and PC or a decoder is connected in 1-to-1 mode 1- many configuration. or to
. 1:1 Connection
One VS-570-HDSDI is installed at a site where video images are transmitted. A PC or a decoder is
installed at a central location to receive and view the video images on an analog monitor. Audio and
serial data are transferred in either direction.
Site
Remote Center (Decoder)
Remote Center
Site
Remote Center (PC SW)

VS-570-HDSDI User Manual
2.0 Megapixel Speed Dome Manual
11/54
CMS (Central Monitoring System)
CMS (Central Monitoring System) is a Window-based remote monitoring program used to monitor or
control video, audio, and events in real time from several IP cameras or video servers. Please refer to
the CMS User Manual for more detail.
Site
Remote Center
Site
Remote Center (Decoder)
CMS

VS-570-HDSDI User Manual
2.0 Megapixel Speed Dome Manual
12/54
2. Installation
DIP Switch Setup
When you control the camera through RS-485, before installation, you should set the DIP switches to
configure the camera ID, communication protocol.
Camera ID setup
ON
ON
1 2 3 4 5 6 7 8
ID numbers of each camera are set up using binary number s.
See the examples shown below:
Switch
1
2
3
4
5
6
7
8
ID Value
1
2
4
8
16
32
64
128
ex) ID=5
On
off
On
off
off
off
off
off
ex) ID=10
off
On On off
off
off
off
off
The camera ID range is 1~255. The Camera ID must not be 0.
Factory default of Camera ID is 1.
Match the camera ID with Cam ID setting of your DVR or Controller
to control the camera.

VS-570-HDSDI User Manual
2.0 Megapixel Speed Dome Manual
13/54
Communication Protocol Setup
1 2 3 4
ON
ON
Select the appropriate Protocol with DIP switch combination.
Switch State
Protocol/Baud rate
S0
(Pin 1)
S1
(Pin 2)
S2
(Pin 3)
OFF
OFF
OFF
PELCO-D, 2400 bps
ON
OFF
OFF
PELCO-D, 9600 bps
OFF
ON
OFF
PELCO-P, 4800 bps
ON
ON
OFF
PELCO-P, 9600 bps
Otherwise
Reserved
If you want to control using a DVR or P/T controller, their protocol must
be identical to the camera otherwise, you can not control the camera.
Turn off the camera before adjusting the DIP switches. If you change the
camera protocol by changing the DIP switches, the change will be effective
after you reboot the camera.
Factory default of protocol is “Pelco-D, 2400 bps”.

VS-570-HDSDI User Manual
2.0 Megapixel Speed Dome Manual
14/54
Camera Installation using Brackets
Installation using a Ceiling Mount Bracket (not supplied)
① Remove the ceiling tile from the ceiling and cut a
hole whose diameter is 30~40mm on the ceiling tile
to pass the wire(s) and cable(s) through to the
upside of the ceiling. Then prepare the ceiling
mount bracket. Pull the wire(s) for the system
as below.
(Anchor Bolt 3/8" ×70)
② Hook up the “Drop Prevention Spring” on main body
to prevent the camera from unexpected drops. Pull
the wire(s) and cable(s) for the system as shown below.
③ Align the index marks and assemble the main
body to the mounting adaptor and turn it. Attach
the main body to the camera mounting adaptor
with the included screws. (Torx screw M4X18).
Please make certain the screws are securely
tightened to maintain a waterproof seal.
④ Screw the dome cover to the main body and
remove the protection vinyl from the dome cover.
Notice
Before starting the installation, make sure that the Camera ID and Protocol are set up properly.
To adjust the installation height from the mounting surface, pipes and couplers may be needed
between the surface mount part of the ceiling mount bracket and the camera mount part of the ceiling
mount bracket ote that these are not supplied by the manufacturer. . Please n

VS-570-HDSDI User Manual
2.0 Megapixel Speed Dome Manual
15/54
Installation using the Wall Mount Bracket
① Make a hole whose diameter is 30~40mm on
the mounting surface to pass the wire(s) and
cable(s) through the mounting surface.
Prepare the wall mount bracket by Pulling the
wire(s) and cable(s) for the system as below. Attach
the wall mount bracket to the mounting surface.
(Hex Lag #14 50)×
②
Hook up the “Drop Prevention Spring” on main body to
prevent the camera from unexpected drops. Pull the
wire(s) and cable(s) for the system as below.
③
Line up the index marks and assemble the main
body to the mounting ring and turn it. Attach the
main body to the mounting adaptor with the supplied
(Torx screw M4X18). Please make certain the screws
are securely tightened to maintain a waterproof seal.
④ Screw the dome cover to the main body and
remove the protection vinyl from the dome.
Notice
Before starting the installation, make sure that the Camera ID and Protocol are set up properly.

VS-570-HDSDI User Manual
2.0 Megapixel Speed Dome Manual
16/54
Wiring/Cabling & Connecting
Port Description
Main Cable
Port Pin Number (RJ45)
Connector / Wire Color
Signal
1
Black
RS485 +
2
Brown
RS485
3
Red
DC 12V
4
Orange
Ground
5
Yellow
OUT COM (Relay Output Common)
6
Green
OUT 2 (Relay Output 2)
7
Blue
OUT 1 (Relay Output 1)
8
Violet
IN COM (Sensor Input Common)
9
Gray
IN 1 (Sensor Input 1)
10
White
IN 2 (Sensor Input 2)
Audio Cable
Port Pin Number
Connector/ Wire Color
Signal
1
RCA (Yellow)
Audio IN
2
Audio GND
3
RCA (White)
Audio OUT

VS-570-HDSDI User Manual
2.0 Megapixel Speed Dome Manual
17/54
Connecting Power
1. Carefully check the voltage and current capacity of the rated power. The rated power is indicated in
the back of main unit.
2. After confirming the voltage, connect the power adaptor to the AC power source
then connect the 12V DC connector to the system .
For the DC input models, be careful with the polarity of the DC power. The system will be
permanently damaged if connected to reverse polarity power supplies.
In cases where the power wire is very long, there may be a voltage drop and the stem sy
may not work properly. Make the length of the power wire as short as possible.
Connecting Network
1. Plug thne network cable to Ethernet port (RJ-45 network port).
Connecting Video
1. To display video through the HD-SDI port, connect the port to a monitor using a BNC
coaxial cable rated for HDSDI video.
2. et S Enable Preview “ ” option ON on the Video tab of web page.
(Please refer to the Video Configuration part of this manual)
When using HD-SDI, video may contain errors if the correct type of BNC coaxial cable is not used.
If the video transmission distance exceeds 100 meters, video data may lost due to a
reduction in the video signal. In order to prevent this use of a repeater is recommended.
When using HD-SDI, video can be only be viewed on a HD-SDI monitor.
Connecting Audio
Audio is full-duplex. It is possible to set the mode as Tx-only, Rx-only or Tx-Rx.
1. Connect the audio input and output ports to the corresponding audio devices.
2. The Audio signal required is line level. Audio equipment using an amp, mixer or other amplifier
should be used.
VS-570-HDSDI User Manual
2.0 Megapixel Speed Dome Manual
18/54
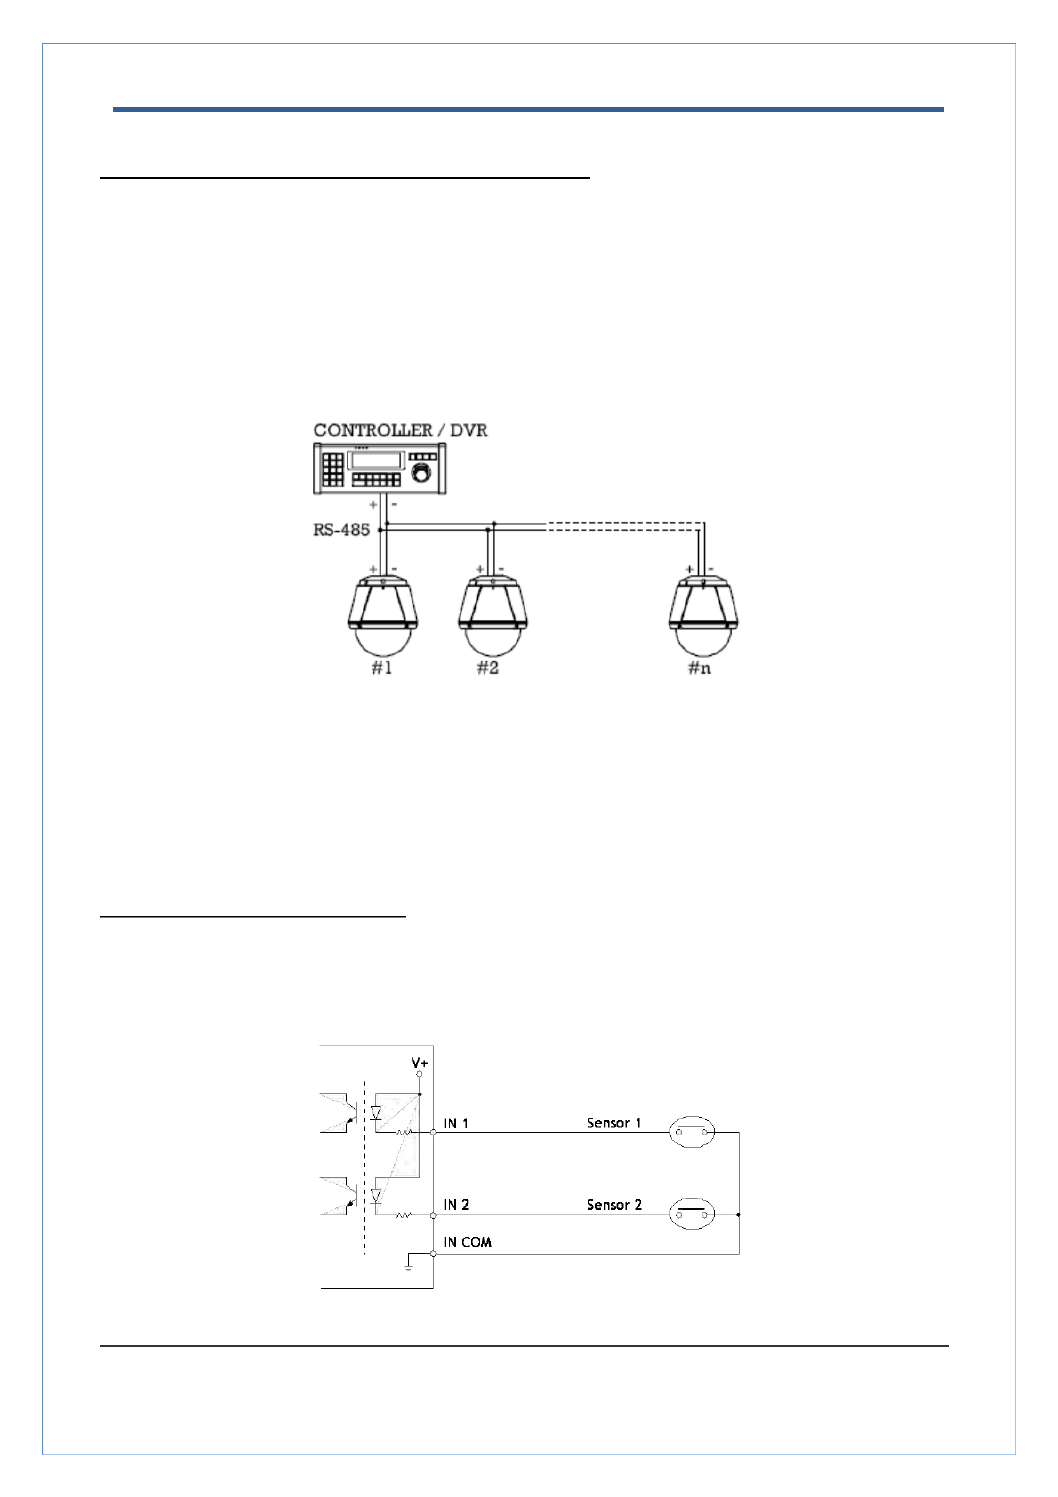
Connecting Serial Port (RS-485 Communication)
For PTZ control, connect the cable(s) to your keyboard or DVR. To connect multiple cameras to a
single controller, the RS-485 communication should be connected in parallel as shown below. If you are
connecting a single camera to a controller, you must terminate the camera. When connecting more
than one camera to a single controller, terminate the last camera on the communication line.
The last camera means the camera farthest in cable length from the controller. Note that the total length
of the communication cable between a controller and the camera(s) on the same communication
line must be less than 1.2Km.
-485 port of VS-570-HDSDI can be connected to external equipment such as PT receiver etc. The RS
A PC client can send PT commands to the external equipment via the serial port.
When a decoder system instead of a PC client is connected to VS-570-HDSDI, the serial port and
that of the decoder system work in pass-through mode. That is, data from one port is delivered
to the other port and vice versa.
Connecting Sensor and Alarm
Connect sensor and alarm devices to corresponding terminals accordingly.
Sensor Input
VS-570-HDSDI User Manual
2.0 Megapixel Speed Dome Manual
19/54
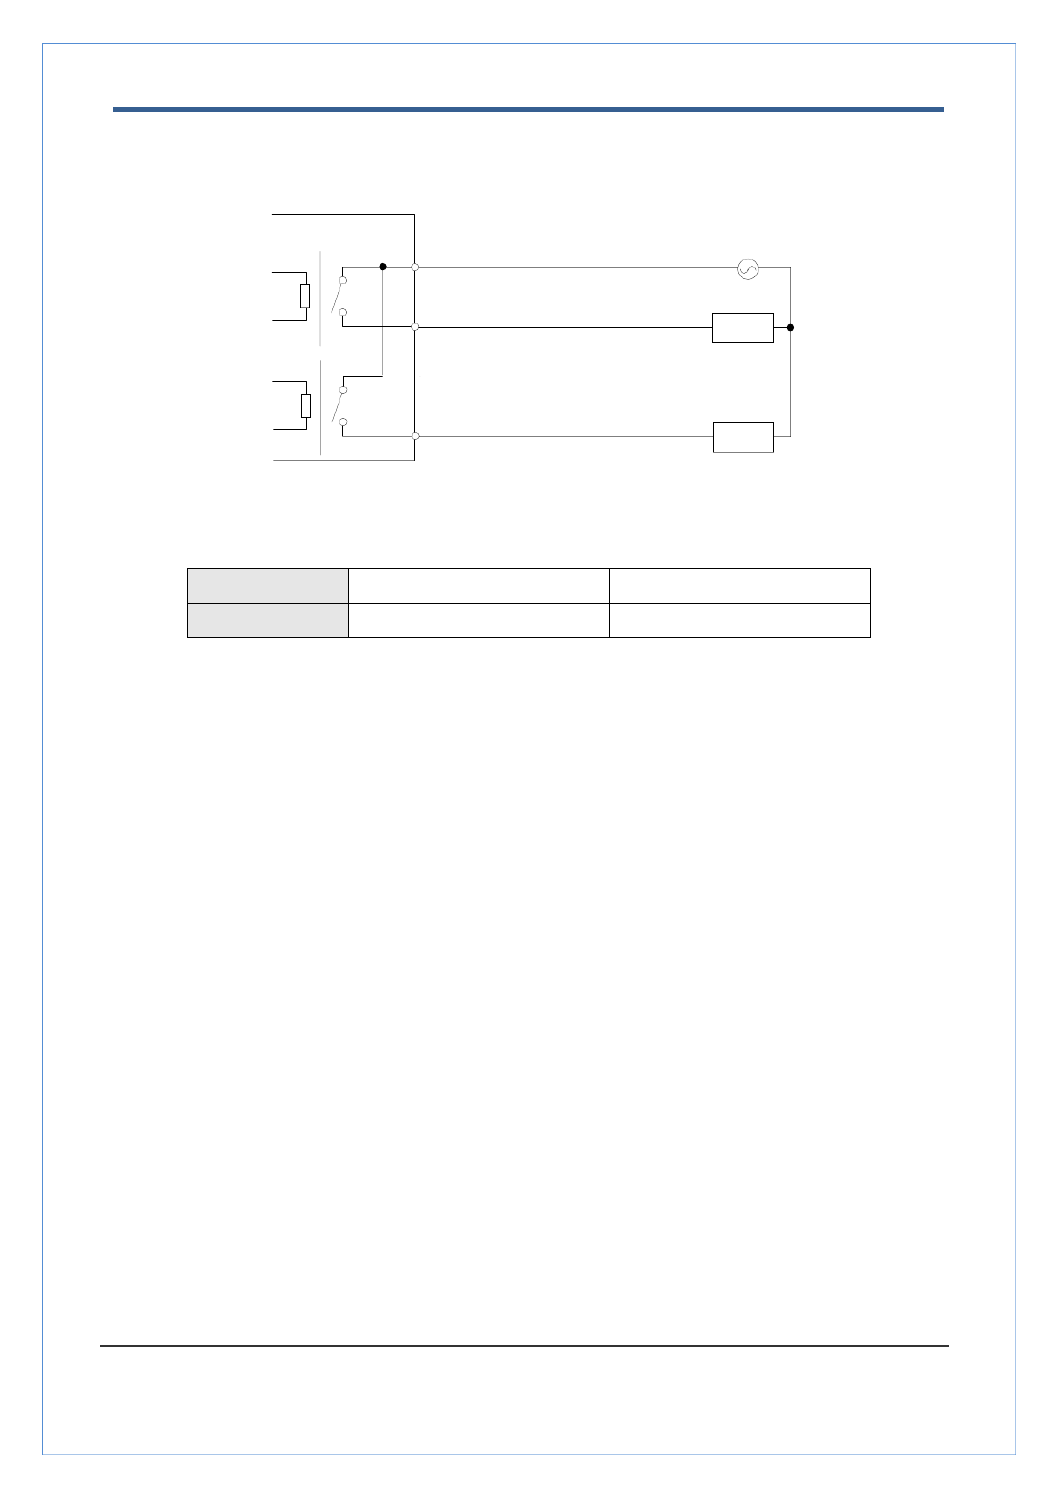
Relay Output
Maximum allowable electrical load of relay is shown bellow table.
Drive Power
DC Power
AC Power
Max. Load
Max DC 24V, 1A
Max AC 125V, A 0.5
Check if it works
Onc the power is supplied to the camera, it will start ing. The system will boot up to an operating mode e boot
after approximately 40-60 seconds. The green LED on the Ethernet port will flash indicating the system is
ready.
The software provided the called True Manager allows you to check IP address and other network in CD the
details of the camera. Please refer to the True Manager manual for instructions on how to find the IP address
of the camera and change it if required.
OUT
1
AC or DC
LOAD
Internal
OUT
2
LOAD
OUT COM

VS-570-HDSDI User Manual
2.0 Megapixel Speed Dome Manual
20/54
3. System Operation
Remote Video Monitoring
There are two ways to monitor video when the center system VS-570-HDSDI are connected. In order and
for proper operation, an IP address must be set accordingly. Please refer to True Manager in Chapter 3 or
Remote Setting in Chapter 4 for further details.
Default ID : admin
Default Password : 1234
.
Video Monitoring using Internet Explorer
Open Internet Explorer and enter VS-570-HDSDI‟s IP address. The system will ask for confirmation to
install Active-X control. Once authorized, the Internet Explorer will start to display video images from VS-570-
HDSDI as shown below.
Default IP Address : http://192.168.10.100

VS-570-HDSDI User Manual
2.0 Megapixel Speed Dome Manual
22/54
Select Preset
Set the preset position, move to the specific preset position or clear the preset position.
- Go Moves to the selected preset entry if the preset entry is set. to:
- Set: Sets the current position to the selected preset entry.
- Clear: Deletes the selected preset entry.
Select List
Operate the selected Pattern or Swing or Group.
(Please refer to the to set Pattern, Swing and Group) PTZ tab
Sensor Input
Displays the status of the installed sensors in real time.
The VS-570-HDSDI supports two sensor inputs. When the sensor(s) VS-570-HDSDI installed and of are
working, the sensor light turns re d.
Alarm Output
Operates the alarm device by pressing the number icon
VS-570-HDSDI supports two alarm outputs. A number icon indicates the status of the alarm device.
Screen Capture
Captures video images and stores them as BMP or JPEG files.
Audio Transfer
Transfer audio from a PC that is displaying the current video image to VS-570-HDSDI.
File record
Recording the video appearing on the Live view page to an AVI file is available The AVI files are generated .
in the specified folder or in a specified file name on the PC where web browser is running.
1. Enter the drive and the folder name on the PC and enter the AVI
file name to be used.
2. Press the button to begin recording. “Start”
3. Press button to end recording. “Stop”
4. AVI file named “ will be generated in the specified folder. File name_IP address_hh_mm_ss”

VS-570-HDSDI User Manual
2.0 Megapixel Speed Dome Manual
23/54
Video Monitoring with Decoder System
Once the VS-570-HDSDI IP address is set in the remote IP address section of the decoder the decoder ‟s ,
system will connect to VS-570-HDSDI and start receiving the video images. Normally, a monitor connected
to the decoder will display video images.
Initialization of IP address
If a system IP address is lost, the system can be reset to the system default IP address using the reset
button in the rear of the system.
1. While the system is in operation, press and hold the button for more than 5 seconds. reset
2. The system will automatically reboot.
3. Once the system reboots, the IP address will be set to the system default as below:
IP mode
Fixed IP
IP address
192.168.10.100
Subnet mask
255.255.255.0
Gateway
192.168.10.1
Base port
2222
HTTP port
80

VS-570-HDSDI User Manual
2.0 Megapixel Speed Dome Manual
24/54
4. Remote Configuration
Using Web Brower
Remote setting is available by using the web browser. Enter the IP address of a VS-570-HDSDI, a live view
screen appears as below. Press the button located in the upper right area of the monitoring screen to Setup
go to the server setup. To change Remote Settings, the user must be authorized higher than manager level.
The configurations are grouped into categories: 10 System, Video, Audio Network Serial Event, Z, , , PT ,
Record, User Camera. Apply and Configuration changes are not applied until the button is pressed. If
you leave the page without pressing the button, any changes made on the page will not be saved. Apply
Enter IP Address
Press Setup button

VS-570-HDSDI User Manual
2.0 Megapixel Speed Dome Manual
25/54
System Configuration

VS-570-HDSDI User Manual
2.0 Megapixel Speed Dome Manual
26/54
General
System ID
Enter the System ID that will be used as the camera title.
The set System ID will be displayed with video image on the web browser. The System ID is
also transferred to remote software, such as CMS, and displayed on it.
Language
Select the language to be used for web-based configuration.
Firmware
Firmware version
Displays the current firmware version.
Board ID
Display the Network board ID of VS-570-HDSDI recognized by system.
Upgrade
Upgrade firmware :
1. Press the button to select a firmware file from your PC. Browse
2. Press the button to start the upgrade. Firmware Upgrade
3. Messages showing the status (downloading / upgrading) will be displayed.
4. The camera will reboot automatically after completing the upgrade. Do not turn the camera off
during the upgrade process.

VS-570-HDSDI User Manual
2.0 Megapixel Speed Dome Manual
27/54
Time
Start Time
This is the date and time when the camera was last booted.
Current Time
This is the current date & time.
Enter a new date and time and press the button to update. Set Current Time
Time Format
This allows you to change the time format. Selectable time formats are as follows:
- YYYY/MM/DD hh:mm:ss (Ex. 2010- 4-11 18:18:42)
- DD/MM/YYYY hh:mm:ss (Ex.11- 4-2010 18:18:42)
- MM/DD/YYYY hh:mm:ss (Ex. 4- -2010 18:18:42) 11
Time Zone
This allows you to select the time zone of where the camera is installed.
Depending on the time zone, Daylight Saving Time will work automatically.
.
Automatically synchronize with NTP server
Checking this box will Synchronize the camera time with an NTP server using NTP (network time protocol).
Enter the NTP server name of the NTP server to be used.
Reboot
Pressing this button will Reboot the camera .
Do not press the Reboot button unless required.
A time zone local is a region of the earth that has uniform standard time, usually referred to as the
time. By convention, time zones compute their local time as an offset from UTC (Coordinated
Universal Time). In casual use, GMT (Greenwich Mean Time) can be considered equivalent to UTC.
Local time is UTC plus the current time zone offset for the considered location.
The ( ) is a protocol for synchronizing the clocks of computer systems Network Time Protocol NTP
over packet-switched, variable-latency data networks. It is designed particularly to resist the effects
of variable latency by using a jitter buffer.
Produkt Specifikationer
| Mærke: | Marshall Electronics |
| Kategori: | Overvågningskamera |
| Model: | VS-570-HDSDI |
Har du brug for hjælp?
Hvis du har brug for hjælp til Marshall Electronics VS-570-HDSDI stil et spørgsmål nedenfor, og andre brugere vil svare dig
Overvågningskamera Marshall Electronics Manualer

3 Januar 2025
24 August 2024
4 August 2024
21 Juli 2024
9 April 2024
15 August 2023
5 Juni 2023
3 Marts 2023
17 Januar 2023
16 November 2022
Overvågningskamera Manualer
- Overvågningskamera Bosch
- Overvågningskamera Denver
- Overvågningskamera Sony
- Overvågningskamera Canon
- Overvågningskamera Netis
- Overvågningskamera Samsung
- Overvågningskamera Panasonic
- Overvågningskamera Extech
- Overvågningskamera Moog
- Overvågningskamera TP-Link
- Overvågningskamera Philips
- Overvågningskamera Vitek
- Overvågningskamera Gigaset
- Overvågningskamera Pioneer
- Overvågningskamera Mitsubishi
- Overvågningskamera Braun
- Overvågningskamera Logitech
- Overvågningskamera Emos
- Overvågningskamera Google
- Overvågningskamera Technaxx
- Overvågningskamera HP
- Overvågningskamera Waeco
- Overvågningskamera Garmin
- Overvågningskamera Sanyo
- Overvågningskamera Grundig
- Overvågningskamera D-Link
- Overvågningskamera Arlo
- Overvågningskamera Motorola
- Overvågningskamera Asus
- Overvågningskamera Toshiba
- Overvågningskamera Pyle
- Overvågningskamera Kodak
- Overvågningskamera Furrion
- Overvågningskamera InFocus
- Overvågningskamera Nedis
- Overvågningskamera Friedland
- Overvågningskamera Abus
- Overvågningskamera Planet
- Overvågningskamera Adj
- Overvågningskamera Hama
- Overvågningskamera Creative
- Overvågningskamera Thomson
- Overvågningskamera Belkin
- Overvågningskamera Edimax
- Overvågningskamera Burg Wächter
- Overvågningskamera Clas Ohlson
- Overvågningskamera DataVideo
- Overvågningskamera Strong
- Overvågningskamera TRENDnet
- Overvågningskamera Smartwares
- Overvågningskamera Trevi
- Overvågningskamera Trust
- Overvågningskamera Laserliner
- Overvågningskamera Blaupunkt
- Overvågningskamera JVC
- Overvågningskamera Honeywell
- Overvågningskamera Uniden
- Overvågningskamera Buffalo
- Overvågningskamera Linksys
- Overvågningskamera Megasat
- Overvågningskamera Cisco
- Overvågningskamera EZVIZ
- Overvågningskamera König
- Overvågningskamera Elro
- Overvågningskamera Gembird
- Overvågningskamera Powerfix
- Overvågningskamera Alpine
- Overvågningskamera Netgear
- Overvågningskamera Maginon
- Overvågningskamera Yale
- Overvågningskamera Withings
- Overvågningskamera Nest
- Overvågningskamera Kerbl
- Overvågningskamera Vtech
- Overvågningskamera Exibel
- Overvågningskamera Genie
- Overvågningskamera Vaddio
- Overvågningskamera Bresser
- Overvågningskamera Western Digital
- Overvågningskamera Anker
- Overvågningskamera Digitus
- Overvågningskamera Zebra
- Overvågningskamera Jensen
- Overvågningskamera Alecto
- Overvågningskamera Flamingo
- Overvågningskamera Rollei
- Overvågningskamera Olympia
- Overvågningskamera Xiaomi
- Overvågningskamera Niceboy
- Overvågningskamera Aiptek
- Overvågningskamera Schneider
- Overvågningskamera B/R/K
- Overvågningskamera Marmitek
- Overvågningskamera Tesla
- Overvågningskamera Imou
- Overvågningskamera Ricoh
- Overvågningskamera Nexxt
- Overvågningskamera Aida
- Overvågningskamera APC
- Overvågningskamera Foscam
- Overvågningskamera Lorex
- Overvågningskamera Ikan
- Overvågningskamera Velleman
- Overvågningskamera LevelOne
- Overvågningskamera Marshall
- Overvågningskamera FLIR
- Overvågningskamera Perel
- Overvågningskamera Swann
- Overvågningskamera Vivotek
- Overvågningskamera Joblotron
- Overvågningskamera JUNG
- Overvågningskamera ORNO
- Overvågningskamera Binatone
- Overvågningskamera ZyXEL
- Overvågningskamera Fortinet
- Overvågningskamera Netatmo
- Overvågningskamera Tenda
- Overvågningskamera Eufy
- Overvågningskamera Ring
- Overvågningskamera M-e
- Overvågningskamera Overmax
- Overvågningskamera Somfy
- Overvågningskamera Y-cam
- Overvågningskamera Hikvision
- Overvågningskamera Monacor
- Overvågningskamera ION
- Overvågningskamera Raymarine
- Overvågningskamera Ubiquiti Networks
- Overvågningskamera AVerMedia
- Overvågningskamera EnGenius
- Overvågningskamera Reolink
- Overvågningskamera Grandstream
- Overvågningskamera Trebs
- Overvågningskamera EVE
- Overvågningskamera Renkforce
- Overvågningskamera Manhattan
- Overvågningskamera SPC
- Overvågningskamera Caliber
- Overvågningskamera Pentatech
- Overvågningskamera Switel
- Overvågningskamera AVtech
- Overvågningskamera LogiLink
- Overvågningskamera Orion
- Overvågningskamera Eminent
- Overvågningskamera Kramer
- Overvågningskamera QSC
- Overvågningskamera Hanwha
- Overvågningskamera Brilliant
- Overvågningskamera Lanberg
- Overvågningskamera Hive
- Overvågningskamera Siedle
- Overvågningskamera BirdDog
- Overvågningskamera Evolveo
- Overvågningskamera Genius
- Overvågningskamera KJB Security Products
- Overvågningskamera Valueline
- Overvågningskamera Provision-ISR
- Overvågningskamera Quantum
- Overvågningskamera Axis
- Overvågningskamera ACTi
- Overvågningskamera CRUX
- Overvågningskamera Avanti
- Overvågningskamera Vimar
- Overvågningskamera Aluratek
- Overvågningskamera Dahua Technology
- Overvågningskamera Chacon
- Overvågningskamera SereneLife
- Overvågningskamera ZKTeco
- Overvågningskamera AG Neovo
- Overvågningskamera Stabo
- Overvågningskamera EtiamPro
- Overvågningskamera First Alert
- Overvågningskamera Speco Technologies
- Overvågningskamera Boss
- Overvågningskamera Broan
- Overvågningskamera Conceptronic
- Overvågningskamera Avidsen
- Overvågningskamera Crestron
- Overvågningskamera Lindy
- Overvågningskamera Kogan
- Overvågningskamera AVMATRIX
- Overvågningskamera Delta Dore
- Overvågningskamera Promise Technology
- Overvågningskamera Sitecom
- Overvågningskamera DiO
- Overvågningskamera Minox
- Overvågningskamera Intellinet
- Overvågningskamera V-TAC
- Overvågningskamera Qian
- Overvågningskamera August
- Overvågningskamera IDIS
- Overvågningskamera Geovision
- Overvågningskamera Schwaiger
- Overvågningskamera Steren
- Overvågningskamera Elmo
- Overvågningskamera AViPAS
- Overvågningskamera UniView
- Overvågningskamera Equip
- Overvågningskamera Alfatron
- Overvågningskamera REVO
- Overvågningskamera Aqara
- Overvågningskamera Ernitec
- Overvågningskamera Setti+
- Overvågningskamera BZBGear
- Overvågningskamera PTZ Optics
- Overvågningskamera AVer
- Overvågningskamera Ferguson
- Overvågningskamera Moxa
- Overvågningskamera Inovonics
- Overvågningskamera Bea-fon
- Overvågningskamera Profile
- Overvågningskamera WyreStorm
- Overvågningskamera Allnet
- Overvågningskamera Aldi
- Overvågningskamera Airlive
- Overvågningskamera Aritech
- Overvågningskamera ACME
- Overvågningskamera KlikaanKlikuit
- Overvågningskamera Marquant
- Overvågningskamera Ednet
- Overvågningskamera Lumens
- Overvågningskamera Hombli
- Overvågningskamera Naxa
- Overvågningskamera Miniland
- Overvågningskamera Xavax
- Overvågningskamera Gira
- Overvågningskamera Interlogix
- Overvågningskamera DSC
- Overvågningskamera Boyo
- Overvågningskamera Iget
- Overvågningskamera EverFocus
- Overvågningskamera Adesso
- Overvågningskamera Satel
- Overvågningskamera Notifier
- Overvågningskamera Monoprice
- Overvågningskamera Beafon
- Overvågningskamera Chuango
- Overvågningskamera MicroView
- Overvågningskamera ETiger
- Overvågningskamera Videcon
- Overvågningskamera INSTAR
- Overvågningskamera Advantech
- Overvågningskamera Digital Watchdog
- Overvågningskamera Moen
- Overvågningskamera Ganz
- Overvågningskamera MEE Audio
- Overvågningskamera Mobotix
- Overvågningskamera Kwikset
- Overvågningskamera Ikegami
- Overvågningskamera Leviton
- Overvågningskamera Pelco
- Overvågningskamera Approx
- Overvågningskamera ClearOne
- Overvågningskamera Ebode
- Overvågningskamera Oplink
- Overvågningskamera Dorr
- Overvågningskamera Sonic Alert
- Overvågningskamera Linear PRO Access
- Overvågningskamera Summer Infant
- Overvågningskamera SMC
- Overvågningskamera Topica
- Overvågningskamera Iiquu
- Overvågningskamera Verint
- Overvågningskamera Brinno
- Overvågningskamera Rostra
- Overvågningskamera Caddx
- Overvågningskamera Spyclops
- Overvågningskamera EKO
- Overvågningskamera Kguard
- Overvågningskamera Woonveilig
- Overvågningskamera Accsoon
- Overvågningskamera Mobi
- Overvågningskamera Surveon
- Overvågningskamera Hollyland
- Overvågningskamera Epcom
- Overvågningskamera Indexa
- Overvågningskamera Lutec
- Overvågningskamera Whistler
- Overvågningskamera ClearView
- Overvågningskamera VideoComm
- Overvågningskamera IMILAB
- Overvågningskamera 3xLOGIC
- Overvågningskamera Inkovideo
- Overvågningskamera Weldex
- Overvågningskamera SecurityMan
- Overvågningskamera Mach Power
- Overvågningskamera Canyon
- Overvågningskamera CNB Technology
- Overvågningskamera Tapo
- Overvågningskamera Aigis
- Overvågningskamera Exacq
- Overvågningskamera Brickcom
- Overvågningskamera Laxihub
- Overvågningskamera Securetech
- Overvågningskamera EFB Elektronik
- Overvågningskamera NetMedia
- Overvågningskamera Videotec
- Overvågningskamera Illustra
- Overvågningskamera Atlona
- Overvågningskamera Nivian
- Overvågningskamera Arenti
- Overvågningskamera E-bench
- Overvågningskamera Blow
- Overvågningskamera Syscom
- Overvågningskamera Tecno
- Overvågningskamera Night Owl
- Overvågningskamera Guardzilla
- Overvågningskamera Astak
- Overvågningskamera Blink
- Overvågningskamera Milestone Systems
- Overvågningskamera Zavio
- Overvågningskamera Campark
- Overvågningskamera IPX
- Overvågningskamera Dedicated Micros
- Overvågningskamera Hamlet
- Overvågningskamera Annke
- Overvågningskamera Qoltec
- Overvågningskamera Digimerge
- Overvågningskamera Feelworld
- Overvågningskamera Wisenet
- Overvågningskamera Infortrend
- Overvågningskamera Epiphan
- Overvågningskamera HiLook
- Overvågningskamera Compro
- Overvågningskamera Vimtag
- Overvågningskamera Sonoff
- Overvågningskamera Gewiss
- Overvågningskamera Alula
- Overvågningskamera Insteon
- Overvågningskamera Costar
- Overvågningskamera ALC
- Overvågningskamera Security Labs
- Overvågningskamera Comtrend
- Overvågningskamera Seneca
- Overvågningskamera Avigilon
- Overvågningskamera American Dynamics
- Overvågningskamera Vosker
- Overvågningskamera Sentry360
- Overvågningskamera Owltron
- Overvågningskamera Petcube
- Overvågningskamera Enabot
- Overvågningskamera Luis Energy
- Overvågningskamera Sir Gawain
- Overvågningskamera VisorTech
- Overvågningskamera Atlantis Land
- Overvågningskamera B & S Technology
- Overvågningskamera I3International
- Overvågningskamera Ecobee
- Overvågningskamera Turing
- Overvågningskamera Wasserstein
- Overvågningskamera Qolsys
- Overvågningskamera Control4
- Overvågningskamera Milesight
- Overvågningskamera GVI Security
- Overvågningskamera Conbrov
- Overvågningskamera HuddleCamHD
- Overvågningskamera Defender
- Overvågningskamera IOIO
- Overvågningskamera BIRDFY
- Overvågningskamera I-PRO
- Overvågningskamera DVDO
- Overvågningskamera TCP
- Overvågningskamera Bolin Technology
- Overvågningskamera Nextech
- Overvågningskamera Tuya
- Overvågningskamera Bolide
- Overvågningskamera Telycam
- Overvågningskamera Arecont Vision
- Overvågningskamera Schlage
Nyeste Overvågningskamera Manualer
7 April 2025
7 April 2025
6 April 2025
29 Marts 2025
28 Marts 2025
20 Marts 2025
20 Marts 2025
20 Marts 2025
13 Marts 2025
8 Marts 2025