Motorola Edge 30 Pro Manual
Motorola
Smartphone
Edge 30 Pro
Læs nedenfor 📖 manual på dansk for Motorola Edge 30 Pro (240 sider) i kategorien Smartphone. Denne guide var nyttig for 6 personer og blev bedømt med 4.5 stjerner i gennemsnit af 2 brugere
Side 1/240

User guide

© 2022 Motorola Mobility LLC. All rights reserved.
MOTOROLA, the stylised M logo, MOTO and the MOTO family of marks are trademarks or registered
trademarks of Motorola Trademark Holdings, LLC. LENOVO is a trademark of Lenovo. Google, Android,
Google Play and other marks are trademarks of Google LLC. Manufactured under licence from Dolby
Laboratories. Dolby, Dolby Atmos and the double-D symbol are registered trademarks of Dolby Laboratories
Licensing Corporation.
Certain features, services and applications are network-dependent and may not be available in all areas;
additional terms, conditions and/or charges may apply. Contact your service provider for details.
All features, functionality and other product specifications, as well as the information contained in this help
content, are based on the latest available information and believed to be accurate at the time of release.
Motorola reserves the right to change or modify any information or specifications without notice or
obligation.
Some images in the help content are examples only.
To read the help content on your phone, go to > .Settings Help

Contents
Set up phone 1
About your hardware 1
Insert or remove SIM card 3
Copy data from old phone 4
Manage dual SIMs 6
Set up voicemail 7
Set up email 8
Make it yours 9
Learn the basics 10
About your home screen 10
About your lock screen 11
New to Android? 12
If this is your first smartphone 12
If you had an iPhone 13
About your Google account 14
Status bar icons 15
Phone terms you should know 18
Get around on your phone 21
Learn gestures 21
Move between apps and screens 22
Use quick settings 23
Turn screen off and on 26
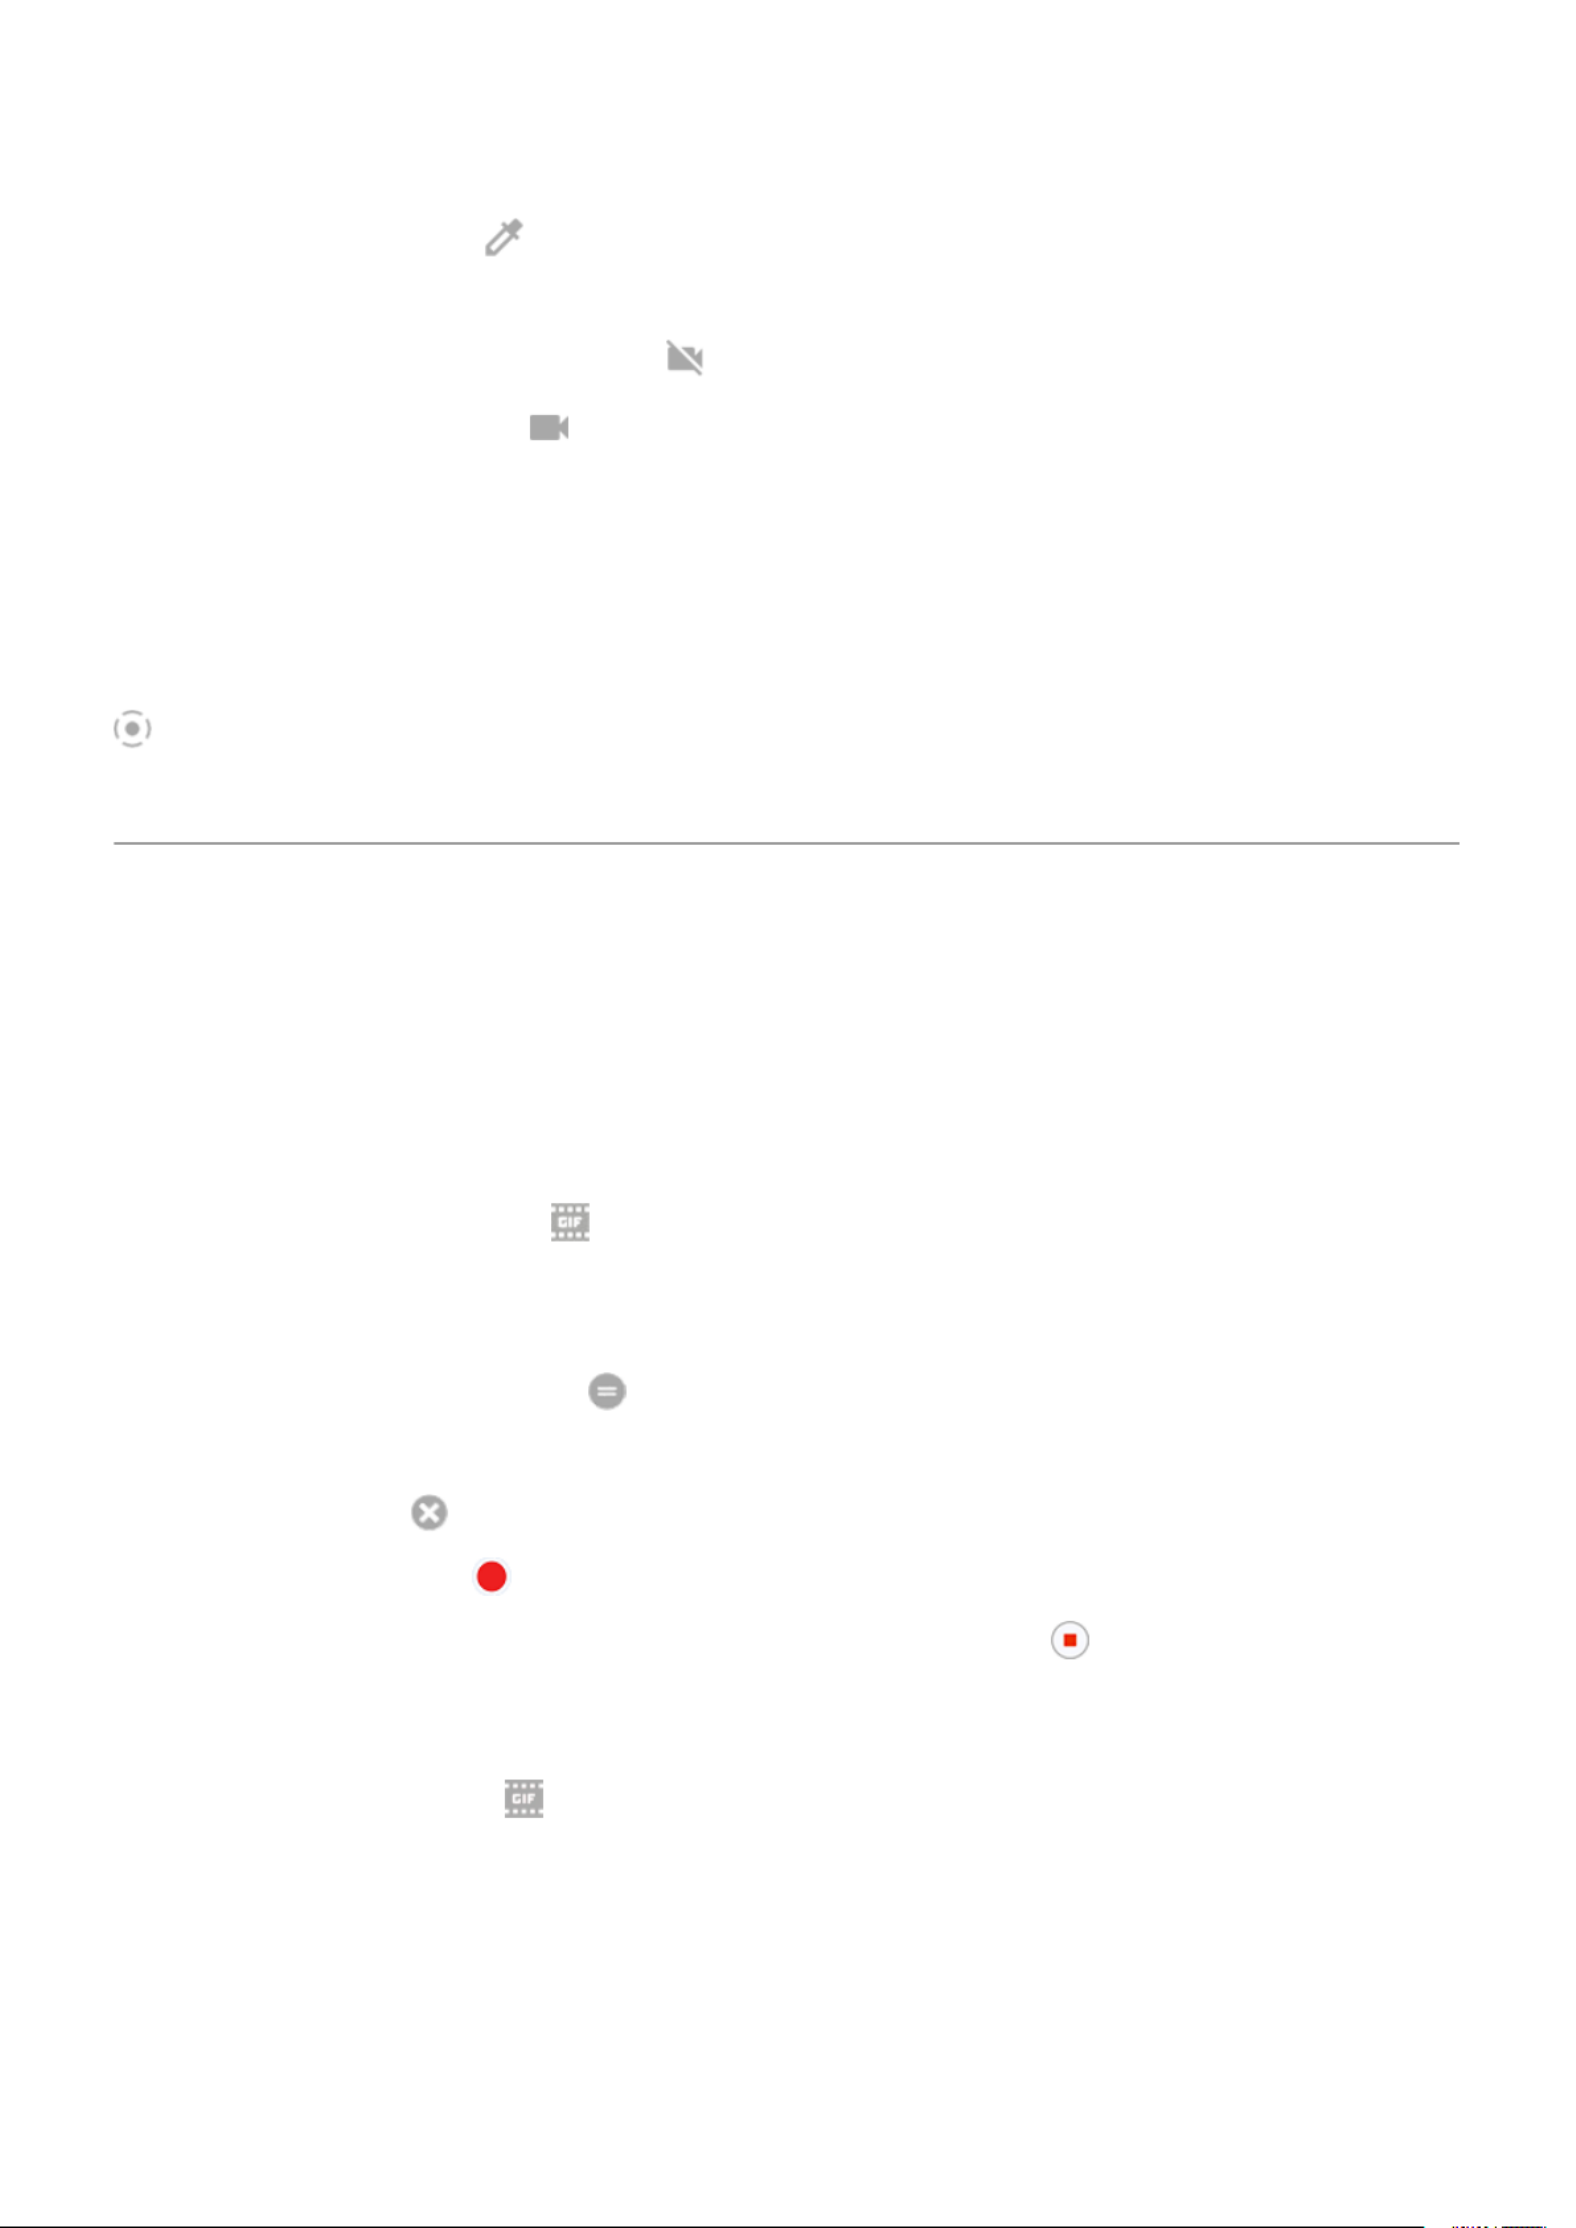
Capture your screen 28
Take screenshots 28
Record your screen 29
Create GIFs from video 31
Discover useful tools 32
Turn torch on and off 32
Record audio notes 32
Control phone with your voice 34
Get directions to a location 35
Use clock and weather widget 36
Manage time spent on your phone 38
Work with text 41
Use onscreen keyboard 41
Cut, copy, paste text 42
Use voice typing 43
Fill in forms automatically 43
Personalise your phone 44
motorola edge 30 pro iii

Home screen 44
Change wallpaper 44
Use widgets, shortcuts or folders 44
Arrange apps and control an icon's look 48
Allow or prevent Home screen rotation 49
Remove Google feed 49
Remake your Home screen with launchers 49
Lock screen 51
Use a screen saver 51
Use apps 52
Open, close and switch apps 52
View two apps on screen 52
View notifications 53
About pre-loaded apps 55
About the Moto app 59
Focus on gaming 60
Get, delete, manage apps 64
Install or update apps 64
Manage or delete apps 66
Protect against harmful apps 68
Search and browse 70
Search the web 70
Search your phone 72
Browse websites 72
Text messaging 74
About text and multimedia messages 74
Read, send messages 74
Manage, delete messages 77
Change default messaging app 79
Change text message reply to incoming calls 79
Get text messages on your computer 79
Email 81
Read, send, manage emails 81
View email attachments 82
Preview inboxes from the Home screen 83
Add email signature 83
Control email notifications 83
Calendar app 85
About the calendar 85
Find calendar events 85
Create and manage events 86
motorola edge 30 pro iv

Control notifications for calendar events 87
Clock app 88
Set alarms 88
Use timer or stopwatch 88
"Set date and time" 89
Photos app 91
Share photos and videos 91
Upload photos and videos 91
Contacts, calls, voicemail 93
Contacts 93
Add contacts 93
Edit or delete contacts 94
Star your favourite contacts 95
Sort contacts 95
Share contacts 96
Phone calls 98
Answer calls 98
Make calls 99
During a call 101
Make video calls 102
Make conference calls 103
Block calls and texts 103
Turn call waiting on and off 105
View and delete call history 106
Make emergency call from locked phone 107
Voicemail 108
Use voicemail 108
Send all calls from contact to voicemail 109
Music 110
Listen to music 110
Transfer music files 111
Connect a MIDI device 112
Settings 113
Network and Internet 113
Connect to Wi Fi networks 113‑
Connect with Wi-Fi Direct 114
Use Aeroplane mode 115
Control data usage 115
Share your Internet connection 116
Connect to VPNs 119
motorola edge 30 pro v

Hear other notification sounds 156
Display 157
Adjust screen brightness 157
Use Dark theme 157
Adjust colours at night 157
Choose colour mode 158
Stop screen flicker 159
Show apps full screen 159
See Peek display notifications 159
Change screen timeout 161
Stop automatic rotation 161
Adjust refresh rate 162
Change font and display size 162
Set recording options 162
Set lock screen preferences 163
Accessibility 164
Visual assistance 164
Hearing assistance 167
Dexterity assistance 169
Use accessibility shortcuts 170
Security 172
About security 172
Protect against harmful apps 173
Make sure your phone can be found 173
Lock and unlock phone 174
Set screen lock 174
Adjust lock options 175
Unlock with trusted devices 176
Unlock with your face 177
Unlock at trusted places 178
Keep phone unlocked while it's on you 179
Use fingerprint security 179
Pin an app screen 181
Lock SIM card 182
Privacy 184
Adjust app permissions 184
Control access to your mic and camera 184
Hide your password or pattern 185
Location 186
Use location services 186
Safety & emergency 188
motorola edge 30 pro vii

Prepare for emergencies 188
Passwords accounts 190
Add or remove accounts 190
Change name and info in your Google account 191
Sync apps with your Google account 191
Control what info Google collects 192
System 194
Languages and input 194
Customise the keyboard 194
Use multiple languages 195
Open apps faster 196
Gestures 197
Set power button gestures 197
Change System navigation 197
Use one-handed mode 198
Turn torch on and off 199
Twist phone to open camera 199
Adjust screenshot settings 200
Back up phone 200
Users and guests 202
Share your phone 202
Add, modify and remove users 203
Add or delete guest 204
About phone 205
Record your IMEI number 205
Find legal and product information 205
Fix issues 206
Hardware issues 206
The phone is slow or unstable 206
Phone feels warm or hot 206
Phone won't turn on 207
Phone restarts or crashes 207
Screen is frozen or won't respond 208
Screen displays wrong colours 208
Call and SIM issues 210
Issues making/receiving calls 210
Issues during calls 211
Battery issues 214
Charging issues 214
Battery drains too fast 214
motorola edge 30 pro viii

Bluetooth, Wi-Fi, USB issues 216
Bluetooth issues 216
Wi-Fi issues 218
Can't transfer files or connect to computer 219
Account and sign-in issues 221
Forgot the unlock code 221
Can't sign in to Google 221
Account sync issues 221
App issues 223
App or widget issues 223
Camera issues 224
Messaging issues 225
Gmail issues 227
Play Store issues 227
Maintenance procedures 228
Update Android software 228
Reset Wi-Fi, mobile data and Bluetooth 228
Reset phone 229
See more help 230
motorola edge 30 pro ix
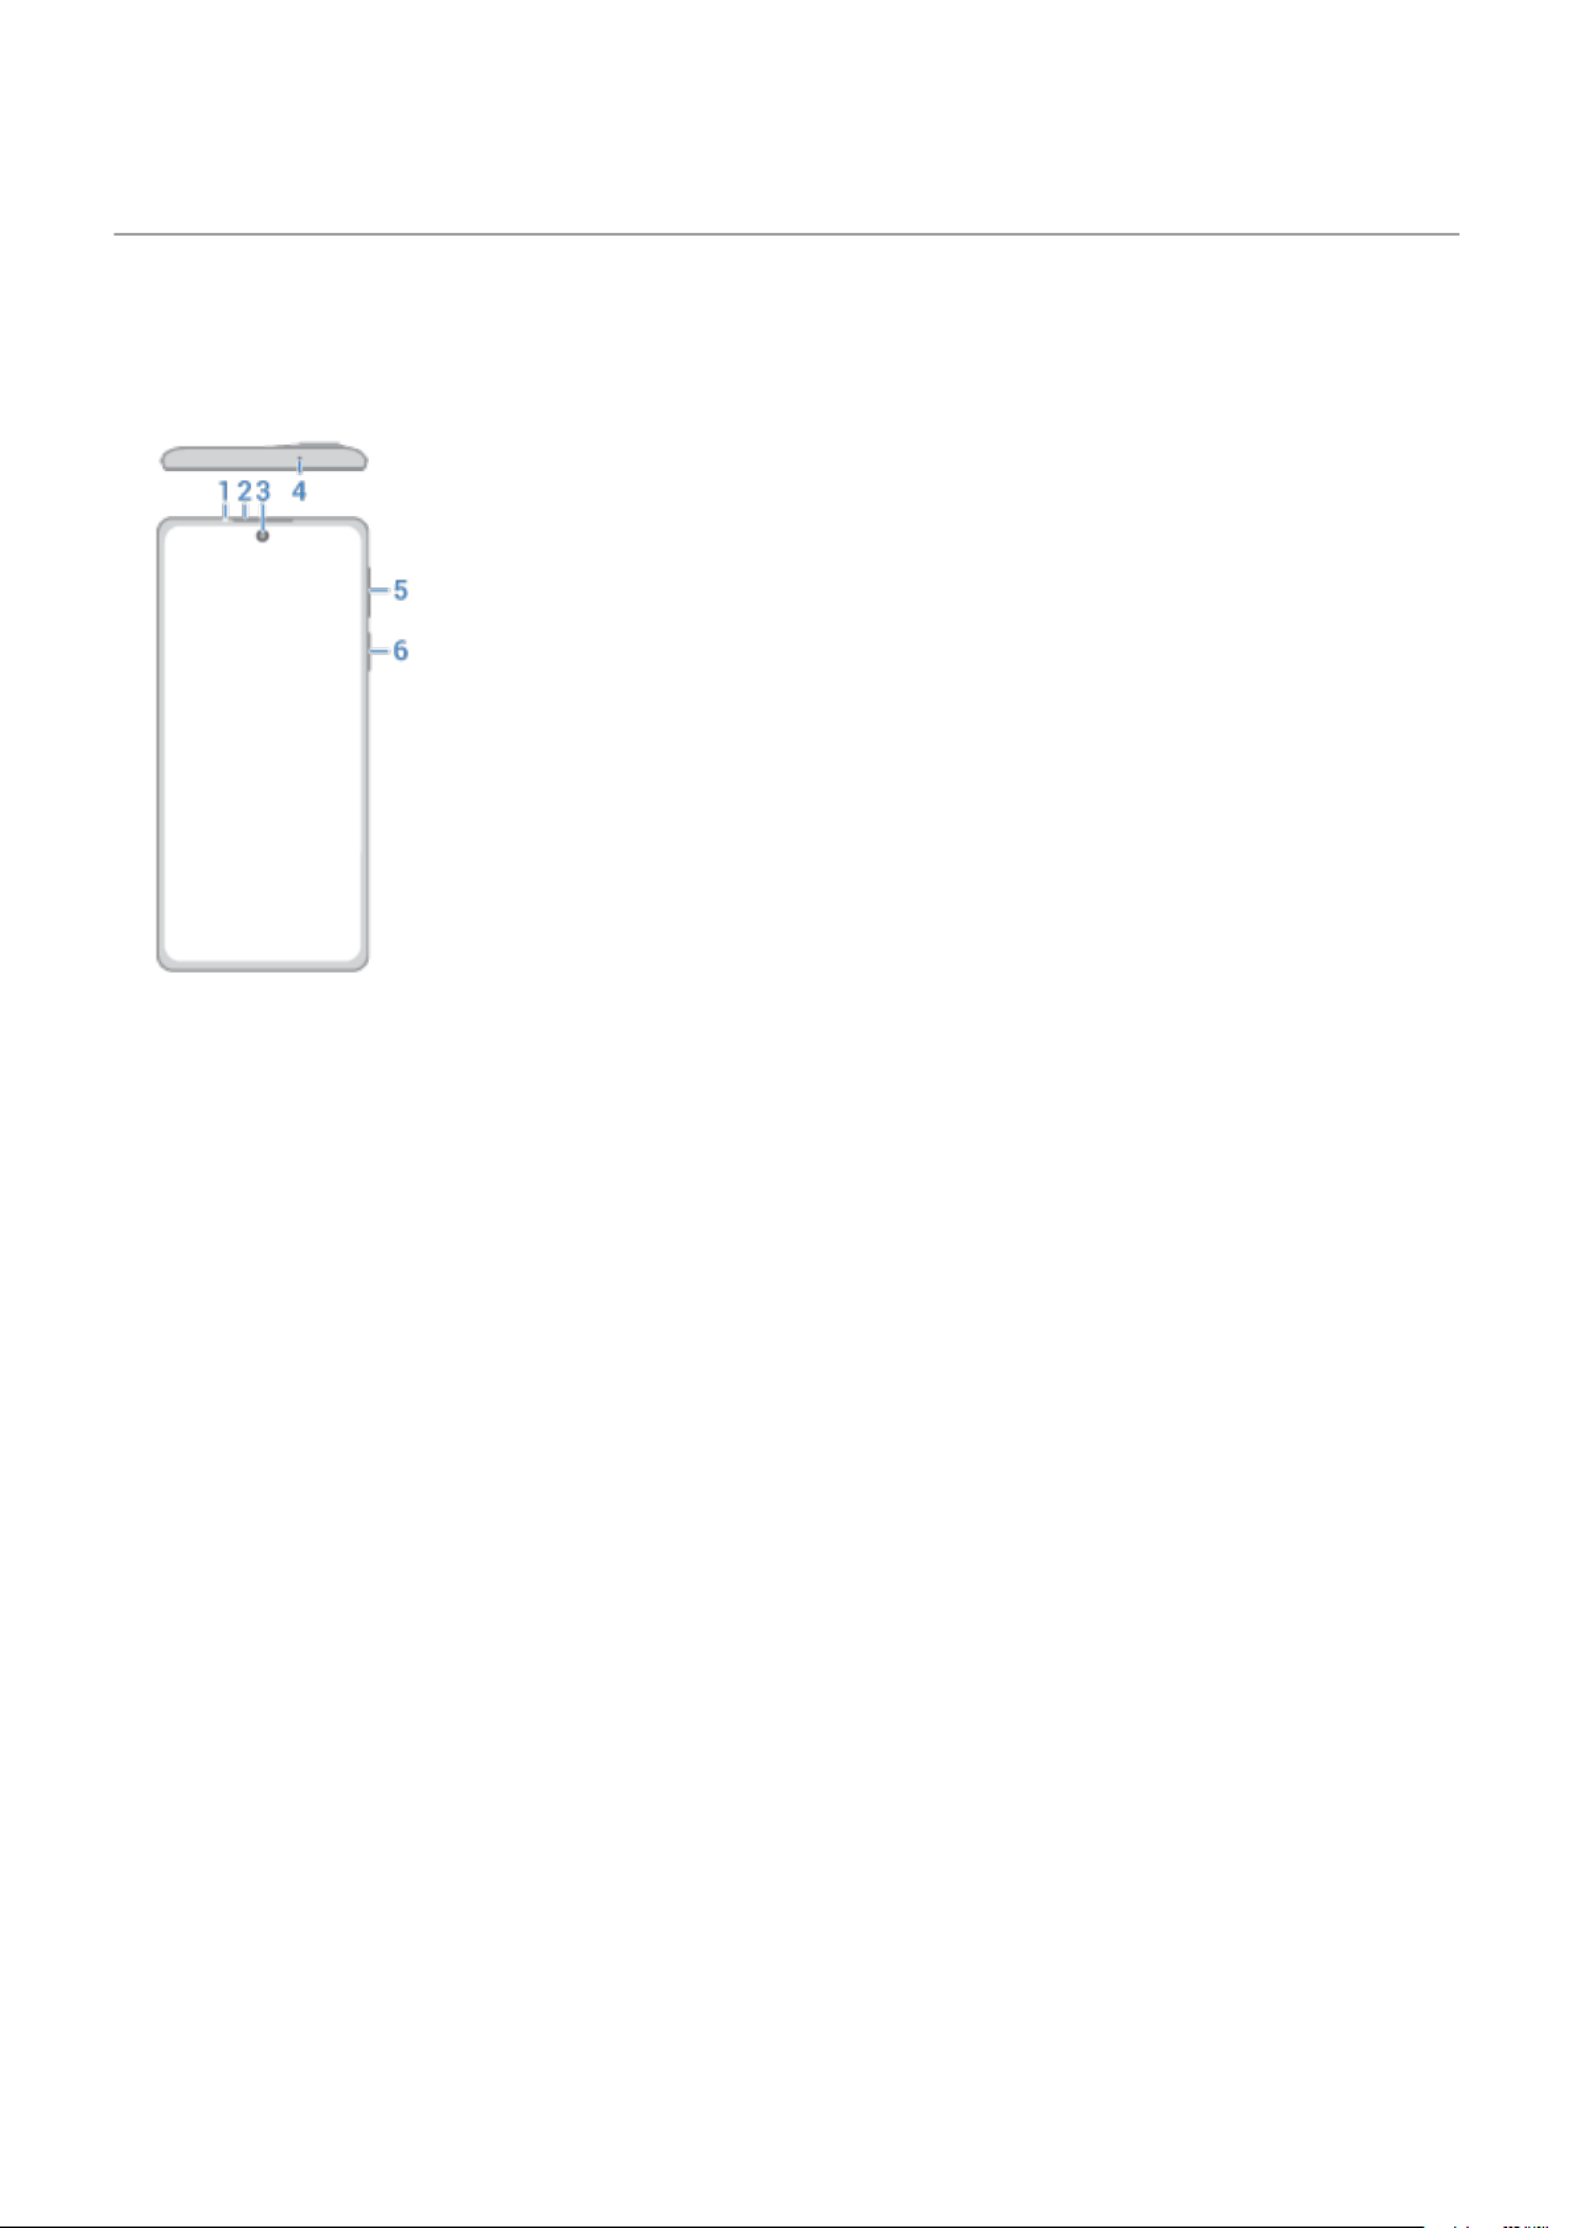
About your hardware
Hardware diagram
1. Proximity sensor
2. Earpiece
3. Learn more in Camera help.Front camera ( )
4. Microphone
5. Volume button
6. Power button fingerprint sensor and
Set up phone 1
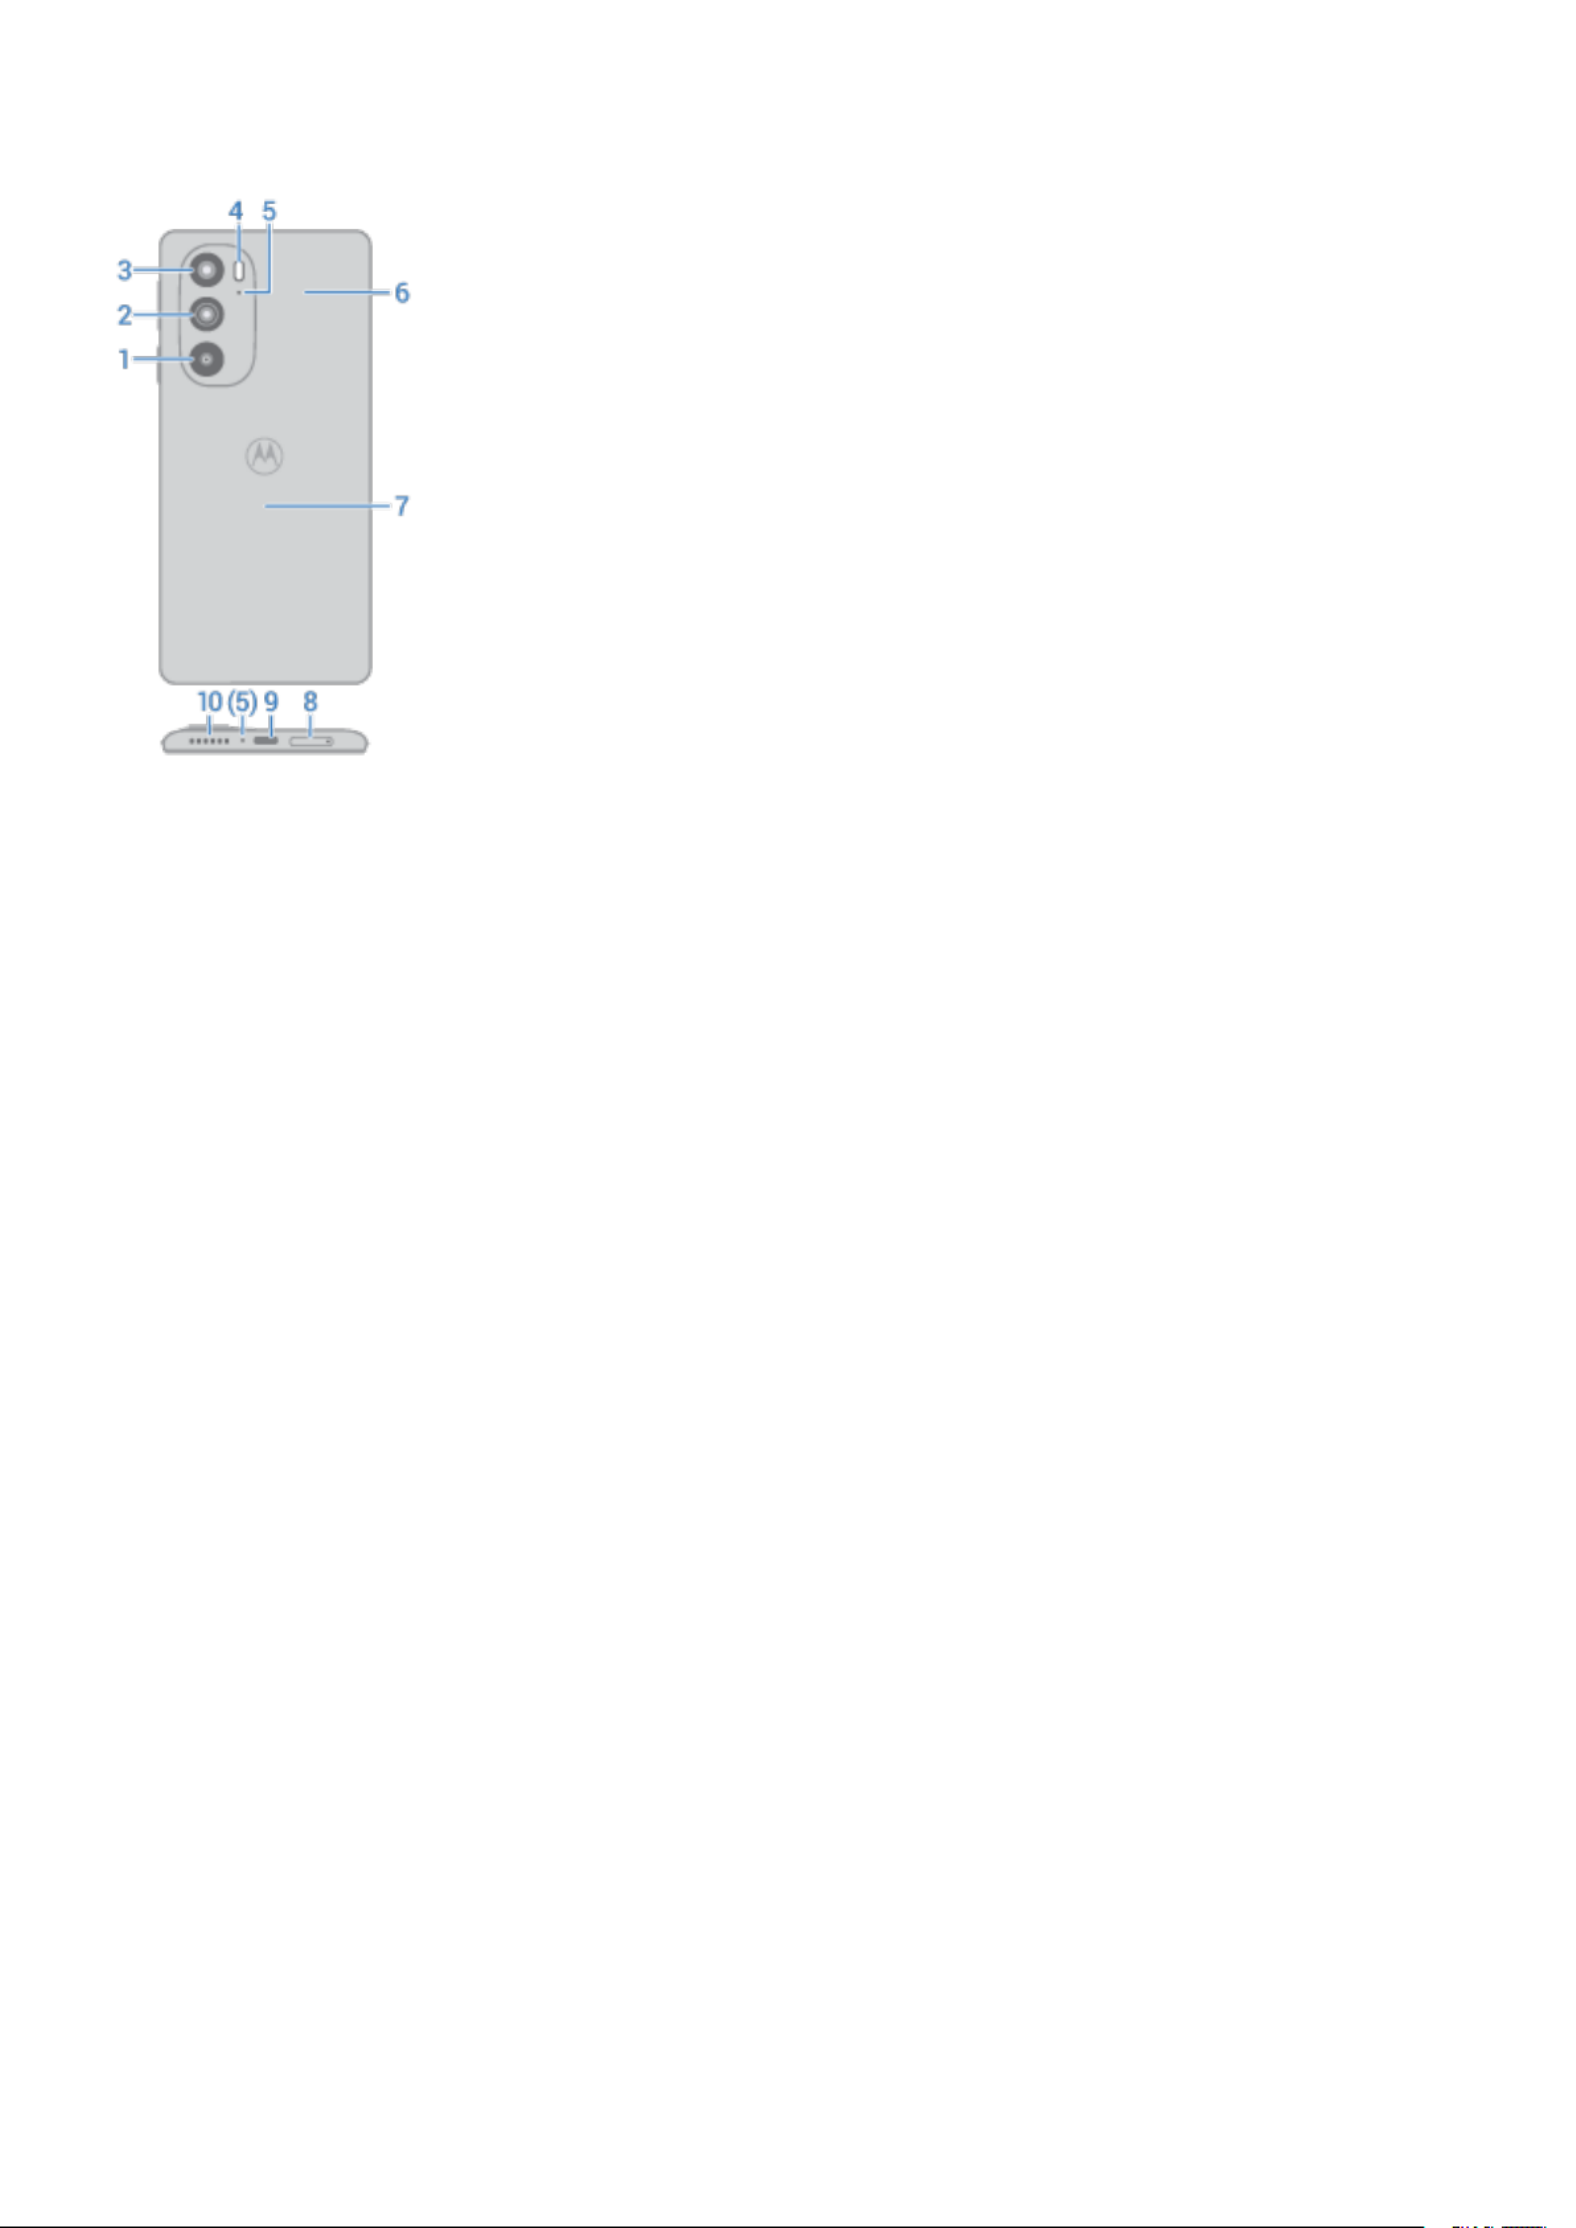
1. Depth camera
2. Main camera
3. Ultra-wide and macro camera
4. Flash
5. Microphone
6. sharing content payingNFC touchpoint for or with your phone
7. Wireless charging touchpoint
8. Tray for SIM card
9. charge phone transfer files share data connection with tethered devicesUSB-C port to , , and use digital
headphones. (3.5 mm to USB-C adapters with analogue headphones are not supported).
10. Speaker
Care for your phone
To clean the screen:
•While this does not disinfect your phone, the best way to keep your phone clean is to wipe it thoroughly
with a dry, soft cloth. Avoid abrasive cloths, including paper towels and other materials with rough
surfaces.
•if the screen gets drops of liquid on it, wipe it with a clean, dry cloth.
To disinfect your phone:
•It is okay to use wipes or cloths moistened with 70% isopropyl alcohol to gently wipe your screen.
•When disinfecting or cleaning your phone, turn it off and avoid getting any moisture in its openings,
including the charging port, headphone jack, microphones and speakers.
•Don't submerge your phone in any cleaning agents, avoid using any cleaners with bleach or abrasives
and avoid spraying cleaners directly on the screen.
Set up phone 2

Insert or remove SIM card
Insert or replace cards
1. Insert the tool into the hole in the tray and gently push to pop it out.
2. Insert (gold contacts up) or remove the card.
2. If you're using two SIMs, turn the tray over. Then insert (gold contacts up) or remove that card.
3. Push the tray back into the phone.
If you inserted two SIMs, you'll receive a notification to set them up. Swipe the notification down and tap it
to . If you see , .manage dual SIMs troubleshoot the issue
Set up phone 3
Note: If you need to activate a SIM, contact your carrier.
Fix an issue
If you're having problems, try these troubleshooting steps.
Copy data from old phone
Copy data from iPhone
You'll use Google Drive to copy files from your iPhone and iCloud account to your new phone and Google
account:
•Photos will back up to Photos.
•Contacts will back up to Contacts.
•Calendar will back up to Calendar.
1. Charge both phones and connect them to a Wi-Fi network.
2. To ensure you don’t miss any messages or calls, on your iPhone:
a. Turn off iMessage. ( > off. Or, if your SIM has been removed, Settings Messages deregister your
phone.)
b. Turn off FaceTime. ( > > off).Settings FaceTime
3. on your iPhone.Download the Google Drive app
4. On your iPhone, open Drive and then:
a. Sign in with your Google account. If you don't have one, you can create it now.
b. Touch > > and start the backup.Settings Backup & reset
5. Wait for the backup to complete.
6. When complete, on your new phone, ( > sign in with the same Google Account Settings Passwords
accounts Add account > ).
Copy data from Android phone
During setup, you can copy your apps, music, contacts, messages and more. Learn what does and doesn't
get copied.
If you no longer have your old phone or can't turn it on, you can copy files using a backup from the cloud
with your Google account.
To copy files:
1. Charge both phones and turn them on.
2. On your new phone:
a. If this is the first time you've turned it on, select your language on the setup screen.
b. If you skipped copying files during setup, open the app and touch Settings Finish setting up your
device.
Set up phone 4

3. Touch .Start
4. Insert your SIM to connect to the mobile network or touch .Skip
5. Connect to a Wi-Fi network and touch .Next
6. Follow the onscreen instructions to select the old phone or backup associated with your Google account
and to choose which apps and data to copy.
Tip: Back up to Google DriveBe sure to leave turned on.
What gets copied from Android phone
If you copy data from another Android phone during setup, here's what gets copied:
•Apps and app data
•Music, photos and videos
•Google accounts
•Contacts stored on your phone or SIM card
•Text messages
•Multimedia attachments in messages
•Most phone settings
•Wallpaper
•Call history
You'll see these when you sign in to your Google account on your new phone.
What won't copy:
•Downloads, such as PDF files
•Apps that aren't from Play Store
•Accounts other than Google accounts
•Contacts and calendars for services other than Google (such as WhatsApp)
•Ringtones
Import contacts from SIM
If you have a SIM card with contacts saved on it, you can import them into your Google account.
1. in your phone.Insert the SIM
Or if your old phone is an Android phone and can connect to Wi-Fi, turn it on.
2. Open the Contacts app.
3. Touch > .
4. If your phone has dual SIMs, select the SIM.
Set up phone 5

5. Select where to save the contacts:
•If you have multiple Google accounts, touch and choose the account where you want to save
them.
•To save them to your phone, touch .Device
6. Select the contacts to import and touch .Import
Manage dual SIMs
About dual SIMs
When two SIMs are :inserted
•You see at the top of the Home screen. If you see , .troubleshoot the issue
•Both SIMs can make and receive calls and text messages.
•Only the of the phone (not additional users or guests) can access dual SIM settings.owner
Set up SIM profile
Set SIM options based on how you expect to use the cards:
1. Go to > > .Settings Network & Internet SIM cards
2. Select the option that best meets your needs:
•Smart SIM: Automatically select SIM for voice calls based on your call history. In Brazil, selection is
also based on your contact's carrier.
•Personal and work: Use one SIM for personal and the other for work-related voice calls.
•Manual: Choose which SIM to use for voice calls, for data, and for SMS.
3. Follow onscreen instructions to complete setup.
Change SIM profile
1. Go to > > .Settings Network & Internet SIM cards
2. Touch .Dual SIM usage profile
3. Select a different profile and touch .CHANGE PROFILE
4. Select a new profile.
5. Follow onscreen instructions to complete setup.
To keep the same profile but adjust options for data, SMS, voice calls, video calls or contacts:
1. Go to > > .Settings Network & Internet SIM cards
2. Touch each preferred SIM and contact option to change.
This information applies only to phones that support dual SIM cards and have both cards inserted.
Set up phone 6
Change SIM name, colour or ringtone
When two SIMs are inserted, you'll see them referenced in apps like Contacts, Messages and Phone. The
SIM name shows your carrier and, if you're using the Personal and work profile, shows which one it's
assigned to. You can rename the SIMs. You can also change the SIM icon colour to make them easy to
differentiate.
1. Go to > > .Settings Network & Internet SIM cards
2. Touch the SIM to change.
3. Change settings as needed.
Set up voicemail
Set voicemail password
Contact your carrier for help setting or recovering your password/PIN for voicemail.
Set mailbox greeting
Your carrier provides and manages your voicemail.
To set your greeting:
1. Touch > .
2. Touch & hold to dial into your mailbox.
3. Follow your carrier’s system prompts. If your voicemail is not set up, contact your carrier for
instructions.
Change voicemail options
1. Touch > > .Settings
(If you don't see , swipe down on the screen.)
2. Touch .Voicemail
3. If you have two SIM cards, touch the SIM for the account to change.
4. Change any of the options:
•To change voicemail service from your carrier to a different service or app, touch Advanced
settings Service > .
•To change the number dialled to access voicemail, touch > .Advanced settings Setup
•Your carrier might include additional options here, like notification and Visual Voicemail settings.
Contact your carrier for help.
Set up phone 7
4. Follow the onscreen instructions to enter your email address, password and other information from
your company's IT department.
Switch account views
In the app, touch your profile icon , then select an account.Gmail
To open each inbox with one touch from your Home screen, :add task shortcuts
1. Touch & hold .
2. Drag for each account to a blank space on your Home screen.
Make it yours
This topic lists things that most people want to do with their new phone, with links to instructions on how to
do them.
Personalise your phone
•Set the wallpaper.
•Add apps to your Home screen.
•Adjust screen settings, such as , and font size rotation settings dark background.
•You can use either the buttons or gestures to move between apps and screens. Choose which
System navigation to use.
•Assign or to friends you call.ringtones photos
•Set your schedule for , to automatically silence your phone when you don't want to be Do Not Disturb
interrupted.
Protect your phone
•Set up a screen lock.
•Set up fingerprint security to unlock your screen safely and quickly with a touch.
•In case you lose your phone, set up and record your .Find My Device IMEI number
Other common set up tasks
•Connect with your and .Bluetooth devices Wi-Fi networks
•If you , set them up so they appear on your keyboard.use multiple languages
Set up phone 9

About your home screen
You see the home screen when you turn on and unlock your phone or swipe up from the bottom of the
screen.
Swipe right or left to move between Home screens.
What’s on the screen
1. iconsStatus bar: displays the time and that tell you about your phone's battery and network
connections. Swipe down to see your and .notifications quick settings
2. add widgets to your Home screenWidget: You can for quick access to information or frequent tasks.
3. add shortcuts to open apps web pagesShortcut: You can or you use frequently.
4. Favourites tray: A customisable set of your most used apps, accessible from any Home screen. Swipe up
to search for an app or view the app tray.
5. move between apps and screensNavigation bar: Use gestures to . You can replace the bar with the
instead.navigation icons
6. Add foldersFolder: to organise app shortcuts.
Add/remove screens
You can add more Home screens to the right. To add a page, drag an app shortcut or widget to the edge of
an existing page and place it on the new screen.
To remove a Home screen, drag all apps, shortcuts, widgets, and folders off the screen. After you remove
the last item, the Home screen will be removed.
Customise your home screen
Organise it:
Learn the basics 10
•touch and hold an item you want to move, then drag it to the new location.
•group icons into folders.
•choose where to find your list of all apps: in the app tray or directly on the Home screen.
Change how you get around: you can replace the navigation bar with the .navigation icons
Change how it looks:
•to see options for customising , and , touch and hold a blank wallpaper widgets other Home settings
space on the Home screen.
•For an entirely new look and feel for your Home screen, you can .install a different launcher
About your lock screen
The lock screen appears when you're using a screen lock turn on the and you power on your phone or
screen.
Tip: If you're using , you'll see that screen before you get to your lock screen.Peek display
From the lock screen, you can:
•Make an emergency call.
•View and respond to notifications. Double tap one to open it.
•Open Quick settings. Swipe down from the top of the screen for your four top settings and notifications,
then swipe again to see the rest.
•Start a voice command. Swipe up diagonally from either bottom corner.
•Go into Lockdown. Temporarily turn off notifications and fingerprint unlocking.
You can customise your lock screen to add a message and control which notifications appear.
Learn the basics 11

If this is your first smartphone
Learn the basics
To get around your phone, here are the key concepts.
•You can choose how you : gestures or icons.move between apps and screens
•In addition to touching the screen to select items, you can use , such as pinch to zoom.other gestures
•The at the top of your Home screen tell you important stuff at a glance, such as your phone's icons
battery level and network connection and whether you've missed a call.
•Your phone and apps send you notifications for things such as new messages, calendar events and
upcoming alarms. You'll in several places and can with them.find notifications do a lot
To learn about these common tasks, touch one below:
•Answer a call
•Make a call
•Set an alarm
•Turn the torch on/off
•Listen to music
Get apps
Your phone comes with many , but you can really unlock its power by fun and useful apps installing apps
that suit your lifestyle. Go to Play Store to explore free and paid apps that help you be more productive,
organised, informed, in touch and entertained.
Protect your phone
You carry your phone around with you, and accidents happen; phones get lost sometimes. So set up some
security and prevent heartache if you and your phone become separated.
Set up a screen lock. This is your first line of defence in keeping your sensitive information safe. Prefer
numbers, shapes, words? Set up a PIN, pattern or password that is required to unlock your phone. Learn
how.
A screen lock doesn't prevent you from immediately answering a call or accessing your camera.
Display your owner info. On your lock screen, you can discreetly display a ‘please return’ message with
some of your contact info so that, if your phone is lost, someone can return it to you. Learn how.
Enable lost phone features. For peace of mind, check out , in case you ever need to Find My Device
remotely locate and lock or erase your phone.
Personalise your phone
While is probably your first , but don't stop there. Be sure to explore changing your wallpaper customisation
your to set ringtones, font sizes, data usage preferences, keyboard preferences and much more. Settings
It's a great way to learn many of your phone's capabilities while customising it to suit your needs.
Learn the basics : New to Android? 12

In most apps you can touch or for app-specific settings. Be sure to see what options are available to
you there, too.
Manage mobile data
Understand your data usage. Keep an eye on your data usage and to make the most of it. See learn how
which apps use and adjust their settings. If your phone is using too much data, you large amounts of data
can also .stop accounts from auto-syncing
Use Wi-Fi to conserve mobile data. When you connect to a Wi-Fi network, your data will use that network
connection instead of your carrier's network, saving your mobile data for when you need it. Learn how to
connect to Wi-Fi networks.
Useful to know
Find phone info. To find your phone number, device name and other information, go to > Settings About
phone.
Tell your phone what to do. Use your phone hands-free with . Tell it to navigate you and voice commands
listen to it speak the directions to you as you drive — it'll even reroute you if you've gone off course. Tell it to
set alarms, find information on the web, make calls.
Never miss a photo opportunity. Automatically open the camera right from your lock screen. Just twist
your phone twice. You can your photos and videos with your Google account or with automatically back up
other photo sharing apps available from .Play Store
Wi-Fi hotspot. You can use your phone as a Wi-Fi hotspot to share your Internet connection with your other
devices that need Internet access (for example, a laptop or tablet).
Reboot phone. In the unlikely event that your phone becomes unresponsive, frozen, shows a blank or black
screen or doesn't respond to the Power button, you can reboot it. Press and hold the Power button for 7–10
seconds. The phone will restart normally.
Certain features, services and applications are network or carrier dependent and may not be available in all areas.
If you had an iPhone
Welcome to Android! Here are some differences between your old iPhone and your new phone.
Your assistant: you've retired Siri. Now, find info and get things done with Google Assistant. Just ‘OK, set up
Google’. Then ask for info or help with everyday tasks.
Apps:
•Goodbye Apple App Store, hello Google Play Store. is now your default app store. Apps aren't Play Store
compatible between iPhone and Android. However, many developers make iPhone and Android
versions of their apps; if the app stores your data online, then you can switch with little effort. Just
download the Android version from Play Store and log in.
•Continue listening to podcasts. You can listen with the Podcasts app. Or, there are lots of podcast apps
on Play Store — search for ‘podcast’ in Play Store and a podcast of your choice.download
•install apps remotely. On a computer, visit play.google.com. Browse apps on the bigger screen and then
install them on your phone from your computer.
Your Home screen: your old phone showed all apps on your Home screen. With your new phone, you can
put to your most important apps on your Home screen for easy access. Or, by shortcuts find your full list
swiping up from your Favourites tray. This frees up room on your Home screen for widgets, making your
new home much more lively.
Learn the basics : New to Android? 13

Status bar icons
About status icons
The at the top of the Home screen contains icons that help you monitor your phone.status bar
•On the left, icons tell you about apps, such as new messages or downloads. If you don't know what one
of these icons means, swipe the status bar down for details.
•On the right, icons tell you about your phone's battery level and network connections.
A dot means there are more icons to view. Drag down from the top of the screen to see all icons.
What status icons mean
These are the icons from apps that came on your phone and the phone status icons.
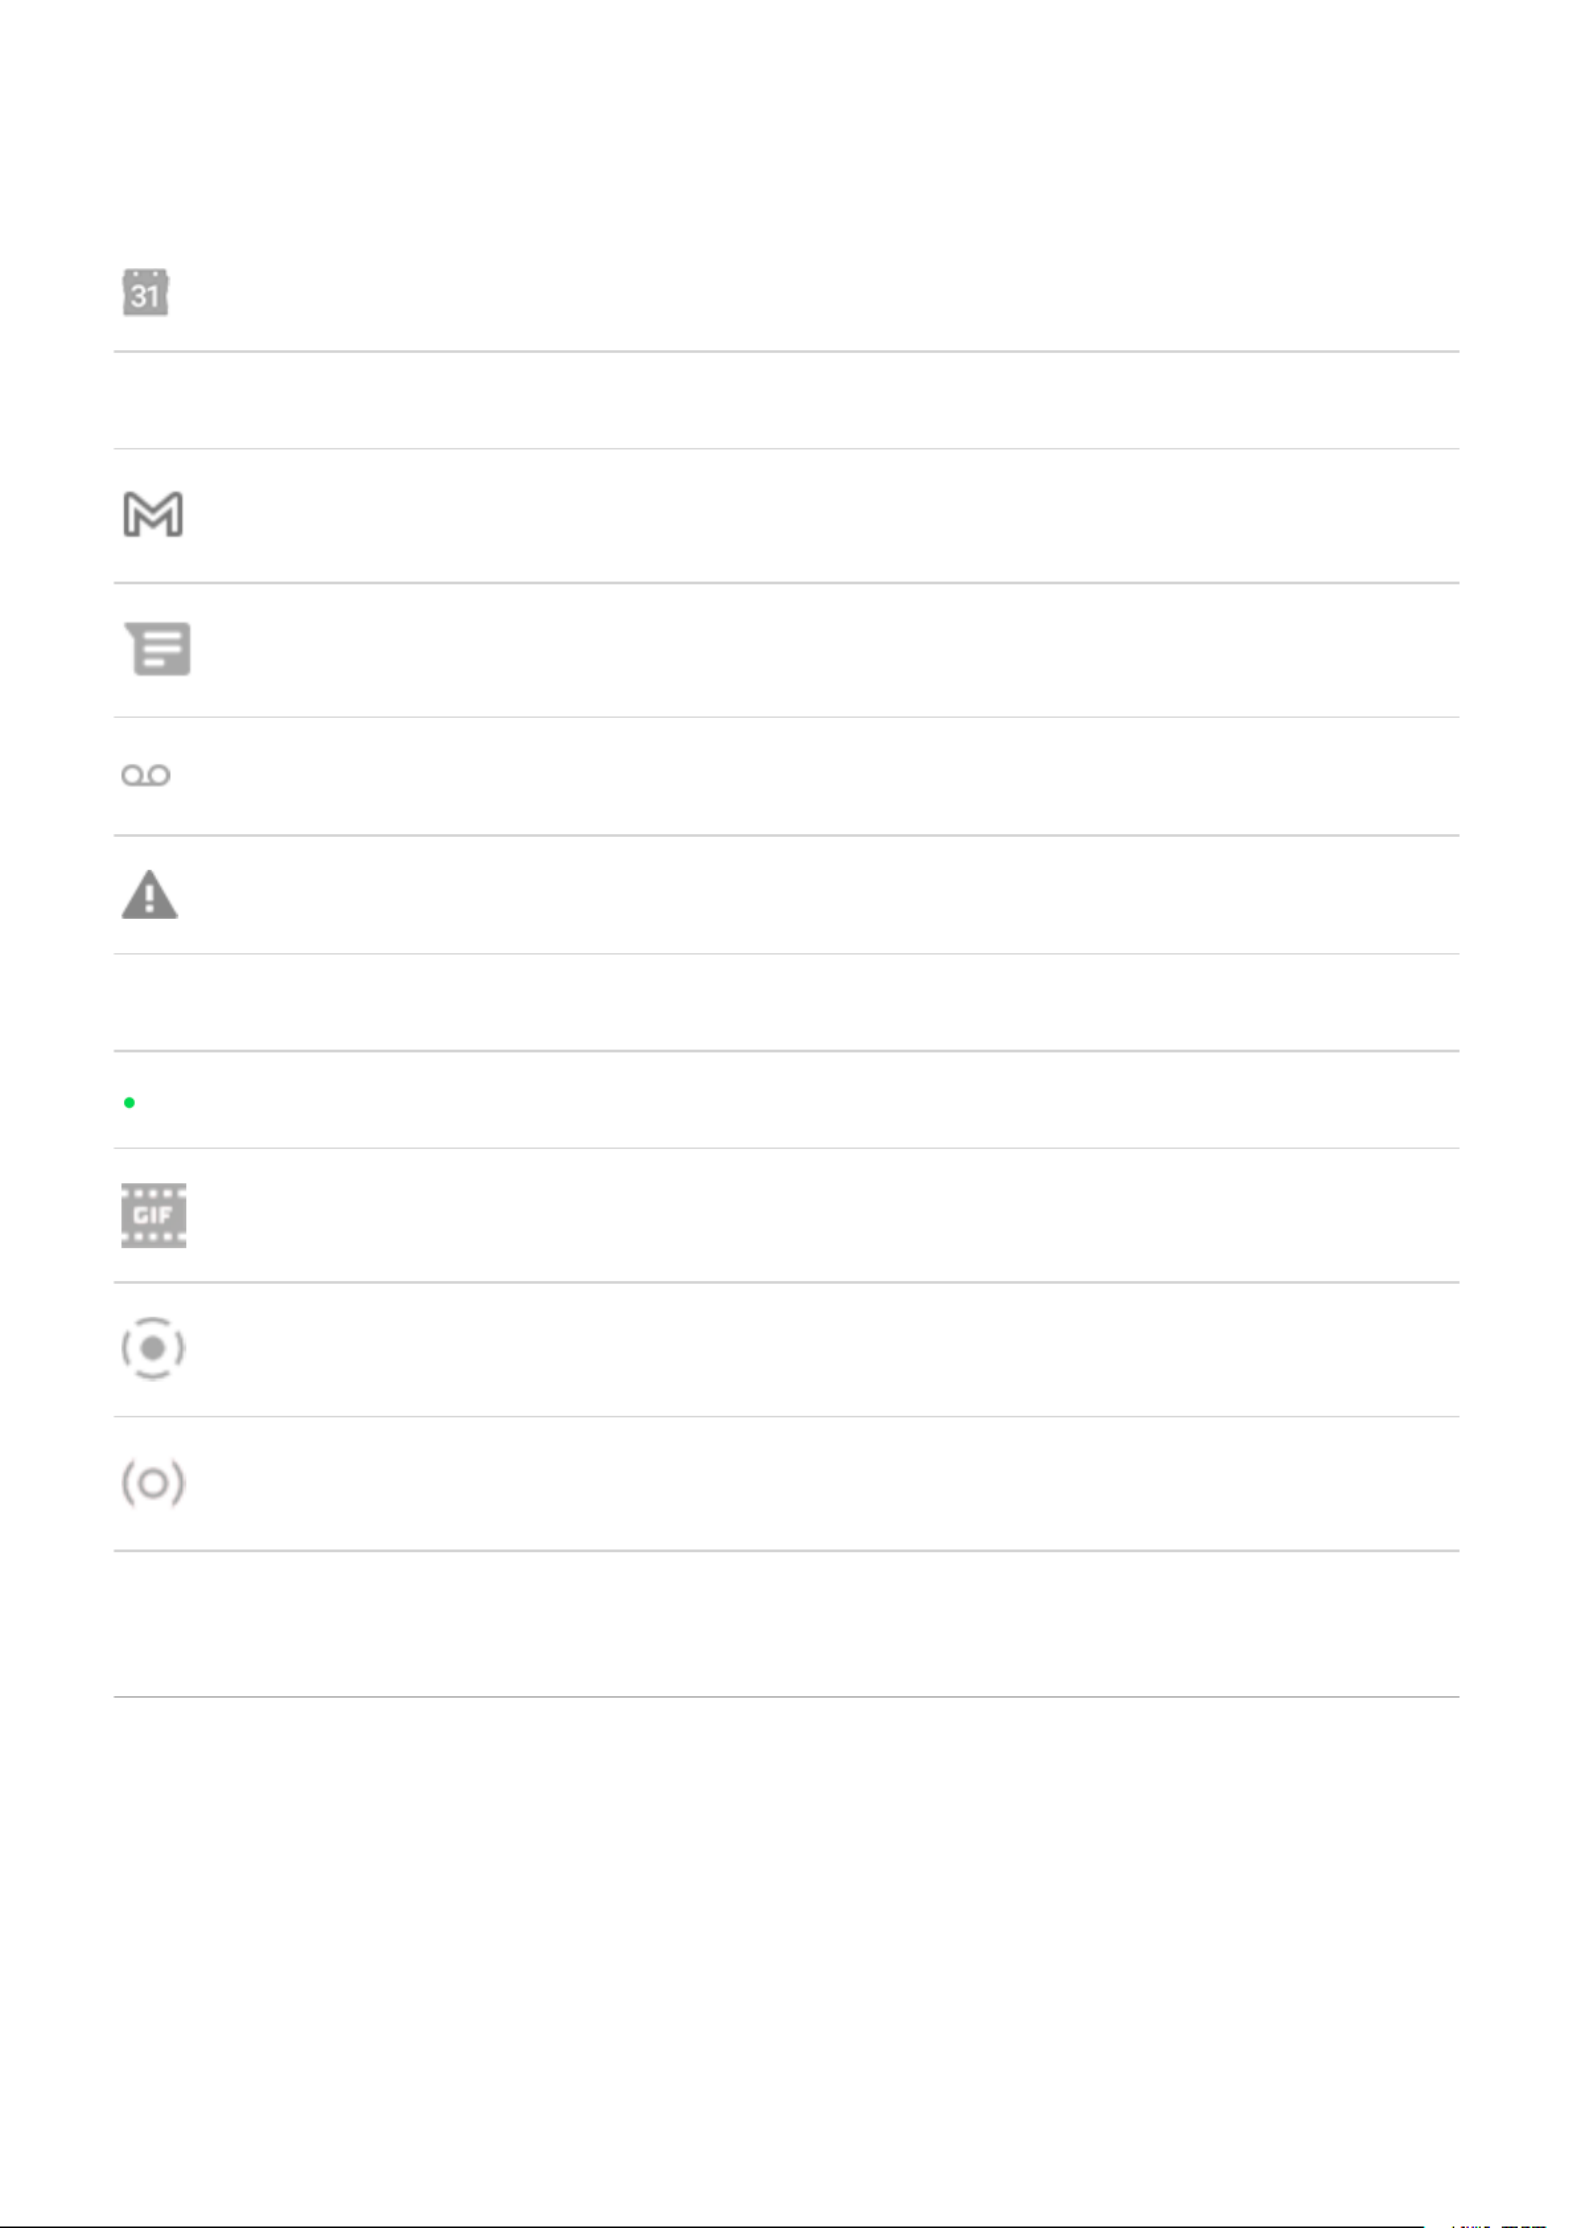
Icon Meaning
CALLS
Active call.
Missed call.
Speakerphone on.
Microphone muted.
NETWORK
Connected to mobile network (full signal). The speed of your network connection is also shown.
Possible speeds, from slowest to fastest, are 3G, H, H+, 4G, 5G. Available speeds depend on your
carrier and your location.
Connected to different cellular/mobile network (roaming).
Data Saver is on, preventing apps from using background data.
Learn the basics : New to Android? 15

Wi Fi network within range.‑
Connected to Wi-Fi network.
No SIM card.
Location services are in use.
Aeroplane mode on.
CONNECTIVITY
Bluetooth connected.
Trusted device connected.
Your phone is a . Devices can connect to share your data connection.Wi-Fi hotspot
Wireless display or adapter connected.
Connected by .USB cable
USB tethering enabled.
NFC enabled. Only some versions of this phone, sold in certain countries, support this feature.
SYNC AND UPDATES
App updates are available for from Play Store.download
Learn the basics : New to Android? 16
Upcoming event.calendar
EMAIL AND MESSAGING
New Gmail message.
New text message.
New voicemail.
Important alert.
OTHER ICONS
Privacy indicator. An app is using your microphone or camera.
Animated GIF is available.
Screen recording in process.
Focus mode is on.
Apps that you might show other icons to alert you about their status.download
Certain features, services and applications are network or carrier dependent and may not be available in all areas.
Phone terms you should know
Aeroplane mode
This allows you to use your phone's non-wireless functions (music, games, etc.), while disabling its mode
wireless radio functions that are banned on aeroplanes during flight.
app
Software that you can download for added functionality, such as games, email apps, bar code scanners and
more. Some apps are already on your phone, and more can be downloaded from your phone's app store.
Learn the basics : New to Android? 18

Bluetooth™
A short-range wireless technology you can use to connect a device to other nearby Bluetooth-capable
devices and accessories, such as headsets, speakers, printers, etc. Use Bluetooth to make hands-free calls
on a headset or in your car, listen to music on wireless speakers, use a wireless mouse or keyboard, or print
a document in another room. .Set up Bluetooth
cellular network or mobile network
A network of radio-transmitting towers. You make calls on your phone using radio waves sent between the
phone and the network towers. You also send data and access the Internet on this network. Carriers use
different technologies to handle these radio transmissions (GSM, CDMA, Edge, 3G, 4G, LTE, HSPA, iDEN).
data usage
The amount of data your phone uploads or downloads over a network in a given period. Your phone uses
your carrier's mobile network or over a Wi-Fi network. Depending on your plan with your carrier, you may
be charged additional fees when your data usage exceeds your plan's monthly limits.
data
Information sent or received from your phone other than calls and text messages. You may use data when
you access the Internet, check your email, play games, use apps and more. Background tasks, such as
syncing or location services, may also use data.
GPS
Global Positioning System. A global satellite-based system for determining precise locations on Earth.With
GPS, your phone becomes your navigator when you're driving and your concierge when you're looking for a
nearby meal, film or cup of coffee.
mobile hotspot
A device or app that lets you share your mobile data connection with multiple devices via Wi Fi. You can ‑
connect different devices to your hotspot, including notebooks, netbooks, MP3 players, cameras,
Smartphones and portable gaming systems. The number of devices that can connect at one time depends
on your carrier and connection speed.
NFC
Near-field communication. A wireless technology that transfers information between two compatible
devices. Tap the devices together to share web addresses, contact info, apps, GPS locations and more.
notification
An alert from your phone or an app on your phone. Your phone displays icons in the status bar to notify you
of new messages, calendar events and alarms. Icons can also indicate on-going status, such as connection
to a Wi-Fi network.
Play Store
Google's store where you can download apps, books, movies, and music. Choose from an assortment of
free books or apps; purchase from an even larger selection.
shortcut
An icon you can add to your Home screen that lets you quickly open an app. for apps you Create shortcuts
use frequently.
SIM card
Subscriber Identity Module (SIM) card. A card that securely stores information your mobile operator uses to
authenticate your phone on the mobile network.
software update
An update to your phone's operating system that typically includes new features and fixes reported
problems. The update is wirelessly downloaded to your phone at no additional cost to you.
status bar
Thin bar at the top of your that displays the time and icons that tell you about your phone's Home screen
battery and network connections. Apps display in the status bar to alert you to events, such as new icons
messages.
Learn the basics : New to Android? 19

sync
The process of sharing the same information across multiple devices and websites. Contacts, calendars and
email are often synced through cloud services, so you can enter information on one device and access it
through another.
Wi-Fi
A short-range wireless technology that provides a high-speed Internet connection to wireless data devices.
Many locations offer Wi-Fi connections, including airports, hotels, restaurants and more. Using a Wi-Fi
connection instead of your mobile network can help reduce your mobile data usage. Some public Wi-Fi
connections may not be secure. You should only connect to those you trust and use some form of Internet
security on your devices. .Set up Wi-Fi
widget
An element you can add to your home screen that gives you quick access to information or frequent tasks.
For example, widgets can provide weather updates or upcoming calendar events. Many are pre-installed on
your phone. Apps you may also include widgets.download
Certain features, services and applications are network or carrier dependent and may not be available in all areas.
Learn the basics : New to Android? 20

Learn gestures
You can use gestures on your touch screen to move between apps and choose or manipulate items.
There are also gestures to perform everyday tasks such as taking screenshots or turning on the torch. These
gestures .can be turned on/off
Touch, drag, swipe, zoom
Gesture Description
Touch Press with one finger and lift.
Result: open something (app or email) or choose something (tickbox, icon).
Touch & hold Press and wait before lifting one finger.
Result: select something (app icon, text on a page) and see possible actions.
Try it: touch & hold text on this page to see the copy feature.
Drag Touch & hold an item and then, without lifting, slide your finger until you reach the
target position.
Result: move elements on the screen; for example, change a toggle from on to off
.
Try it: drag an app shortcut from one spot on your Home screen to another.
Swipe Quickly move one finger across the screen, without pausing when you first touch (so you
don't drag instead).
Result: switch between Home screens or between tabs in an app or move quickly
through a list. You can swipe different directions (up, down, left/right) for different
results. Learn more.
Try it: open the Phone app and swipe left/right to switch between tabs. Or, swipe up
from the bottom of this screen to go home.
Pinch out to
zoom Put two fingers on the screen and then drag them apart.
Result: zoom in to see larger versions of photos and maps. Or, open expandable
notifications.
Try it: open a photo and pinch out to zoom in on an area.
Learn the basics : Get around on your phone 21

Tip: If you have visual impairments, you can enable additional magnification
gestures.
Pinch in to zoom Put two fingers on the screen, far apart, and then drag them together.
Result: zoom out to see smaller versions of photos or maps. Or, close expandable
notifications.
Use gestures with Power button
Press
Lock and unlock the phone. You'll enter your PIN, pattern or password to unlock.
Press twice
Open the camera. If this doesn't work, check that .the setting is turned on
Press and hold
Turn off the phone or view your emergency information.
Tap
Unlock with your fingerprint, if you've .set up fingerprint security
Tap twice
See shortcuts for opening apps, actions, tools and contacts.
You can turn this gesture ( ) onPower touch in Settings or in the Moto app.
1. Open the app or contact
2. Customise these shortcuts – replace, delete or rearrange
Move between apps and screens
Choose how to get around
You can change how you move between apps and screens using your touchscreen: > > Settings System
Gestures > System navigation.
Learn the basics : Get around on your phone 22

Use gesture navigation
Use these gestures to move between screens and apps if you and see chose Gesture navigation
at the bottom of your Home screen.
Action Gesture to use
Switch between apps At the very bottom of the screen, swipe left or right.
See all recent apps Drag up from the bottom, hold, then let go.
See all apps Swipe up from the bottom of the screen.Home
Go back Swipe towards the middle from the left or right edge of any screen.
Go Home Swipe up from the bottom of any screen.
Open Google Assistant Swipe diagonally from either lower corner of the screen.
Tip: For even more gestures, .turn on One-handed mode
Use three-button navigation
Use these icons to move between screens and apps if you .chose 3-button navigation
takes you back one screen.
returns you to the Home screen from any app.
lets you switch between recent apps.
Tip: For visual assistance, you can add to open the or what's on the Accessibility Menu magnify
screen.
Use quick settings
Open quick settings
Settings you adjust frequently, like Bluetooth, are ‘quick settings’, easy to get to from any screen.
To see your first few quick settings, swipe down once from the top of your screen.
Learn the basics : Get around on your phone 23

Dolby Atmos.
GIF maker
Alarm
Battery Saver
Aeroplane mode
Screen cast
Screen record
Camera access
Mic access
Nearby Share
Data Saver (Appears after you turn on Data Saver for the first time.)
Night light
Bedtime mode (Appears after you turn on Bedtime mode for the first time.)
NFC
Learn the basics : Get around on your phone 25

Power sharing
System update
Wi-Fi hotspot (Appears after you turn on hotspot for the first time.)
Extra dim (Appears after you turn on Extra dim for the first time.)
You can also slide to adjust screen .brightness
Open all settings
To open the full list of all settings:
•Open Quick settings and touch .
•Or, the app.open Settings
Tip: You can search the Settings app to find what you need quickly. Just touch at the top of the app
and type your search term.
Customise quick settings
You can rearrange quick settings, putting your most-used at the top. You can also add or remove them.
1. Open quick settings.
2. Touch .
3. Drag to rearrange. Or swipe up to add new tiles.
To return quick settings to its original state, touch > .Reset
Turn screen off and on
Why your screen turns off automatically
•To save battery power, your screen turns off if you haven't used it for some time. You can lengthen or
shorten the time before your screen automatically turns off.
You can also use Attentive display to keep your screen from turning off when you're looking at it.
Learn the basics : Get around on your phone 26

•When you bring the phone to your face to speak into it during calls, the screen turns off to prevent
accidental touches. When you pull the phone away from your face, the screen turns on so you can use it.
(If the screen stays dark, .)follow these steps
Turn screen off and on manually
To turn the screen on:
•Press the Power button. If you've set up a screen lock, you need to unlock it.
•If you've to the phone, touch the sensor to wake and unlock your phone.added your fingerprint
•Your screen automatically turns on when you have an incoming call.
To turn the screen off:
•Press the Power button. When you set down your phone, it's a good habit to do this. You prevent
accidental touches, save a bit of battery and keep it secure with the screen lock.
•To keep your screen off and phone quiet when you don't want interruptions, such as at night, use Do
Not Disturb settings.
When your screen is off, battery-friendly notifications fade in and out, showing only Peek display
notifications delivered since the screen was last on.
Learn the basics : Get around on your phone 27

Take screenshots
Take a screenshot
1. Do one of the following:
•Touch and hold three fingers on the screen. (If this doesn't work, turn Three-finger screenshot
on.)
•Drag from the bottom of the screen and hold to see recent apps, then touch .Screenshot
•Press and hold + power Volume down simultaneously until the screen is captured.
2. To scroll and capture more content, touch .
To stop scrolling before the end of the page, touch or .STOP
3. Do any of the following:
•To edit the screenshot, touch .
•To share it, touch .
•To , touch .analyse it with Google Lens
•To delete it, touch .
•For more time to review it before taking an action, touch the thumbnail to open the screenshot.
Edit screenshots
If you touched after taking the screenshot, you have these options:
Icon Meaning
Crop. To switch between standard, circular or freeform, touch again.
Learn the basics : Capture your screen 28

Draw. To change colour or thickness, touch again
Highlight. To change colour or thickness, touch again.
Insert a text box. Touch the icons to change the background and text colour.
Blur with mosaic effect. Swipe over the area to blur.
Undo change.
Redo change.
Close without saving.
Save.
Delete.
Share.
Find screenshots later
Open the Photos app and touch > .Library Screenshots
Record your screen
You can record a video of your screen while you're using it. You can choose to include your audio or a selfie
video when recording.
Record screen
1. If you want the recording to show when you touch screen elements, .turn onRecord touch points
Learn the basics : Capture your screen 29
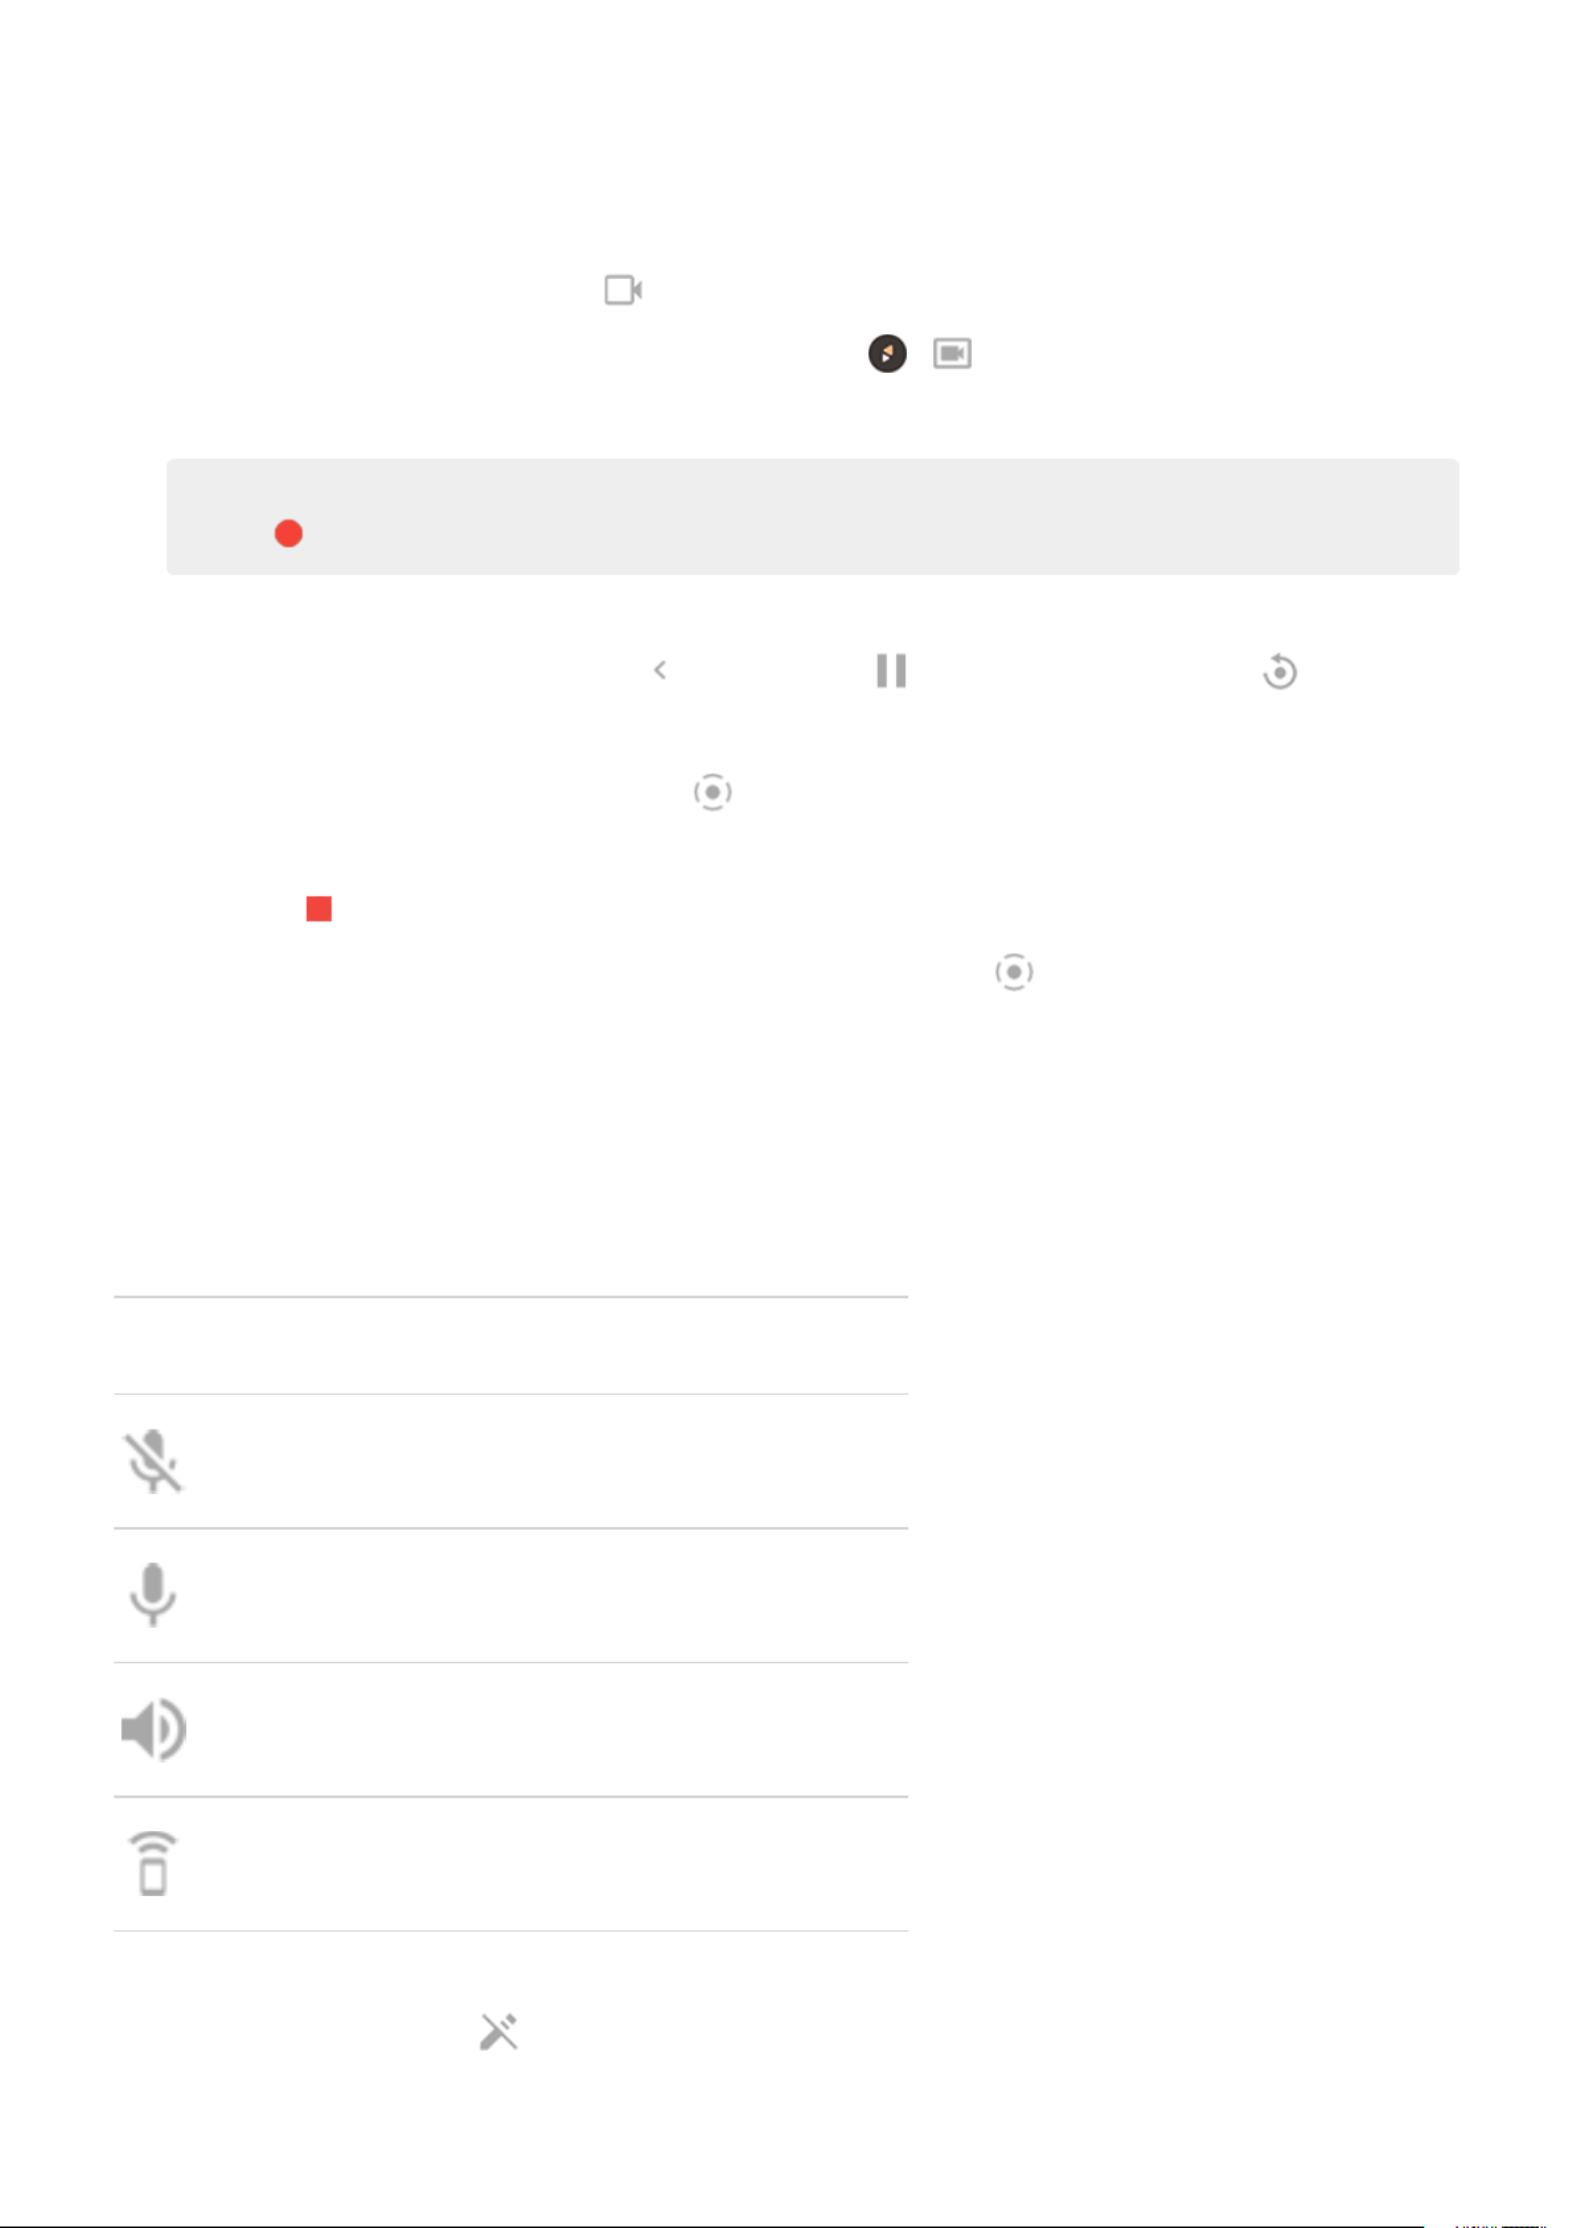
2. To start recording:
•Open quick settings and touch .
•If you're playing a game and is on, touch > .Gametime
3. Touch to open the recorder and see a 3-second countdown before recording.Start
Tip: to before recording, touch the countdown timer to stop and make changes. adjust options
Touch to restart.
4. Make your recording. While recording:
•To , touch and then touch . To restart recording, touch .adjust recording options
•You can drag the recorder to reposition it.
•You'll see a timer on the recorder and in the status bar.
5. To stop recording:
•Touch on the recorder.
•Or, swipe down from the top of the screen, then touch the red notification.
Adjust recording options
Sound
You can mute or record your phone's sound, and you can include your own narration.
To adjust sound, touch the current setting and change it.
Icon Meaning
Mute
Record your narration using the microphone
Record only your phone's sound
Record both your narration and your phone's sound
Drawing
To write on the screen, touch .
Learn the basics : Capture your screen 30
To change pen colours, touch .
Video
To include a selfie video in the corner, touch .
To turn the selfie video off, touch .
Other options
You can adjust more options, such as frames per second or screen touches, in phone Settings. Learn more.
View recordings
To view a recording immediately after you capture it, swipe down from the top of the screen and touch the
notification.
To view any time, open the Photos, Files or other media viewing app, and look for the Screen record folder.
Create GIFs from video
You can make an animated GIF from a video on your screen.
Record a GIF
1. Open the video in the Photos, Files, or other media viewing app and pause the video where you want to
start the GIF.
2. Open quick settings and touch .GIF maker
3. Touch .Start
4. Adjust the GIF's frame over the video:
•To reposition the frame, drag .
•To change dimensions, drag the corners or sides.
•To close, touch .
5. To start recording touch .
You can capture up to 15 seconds. To stop recording before that, touch .
View your GIF
To view immediately, touch the notification.
To view any time, open the Photos, Files or other media viewing app, and look for the Screenshots folder.
Learn the basics : Capture your screen 31
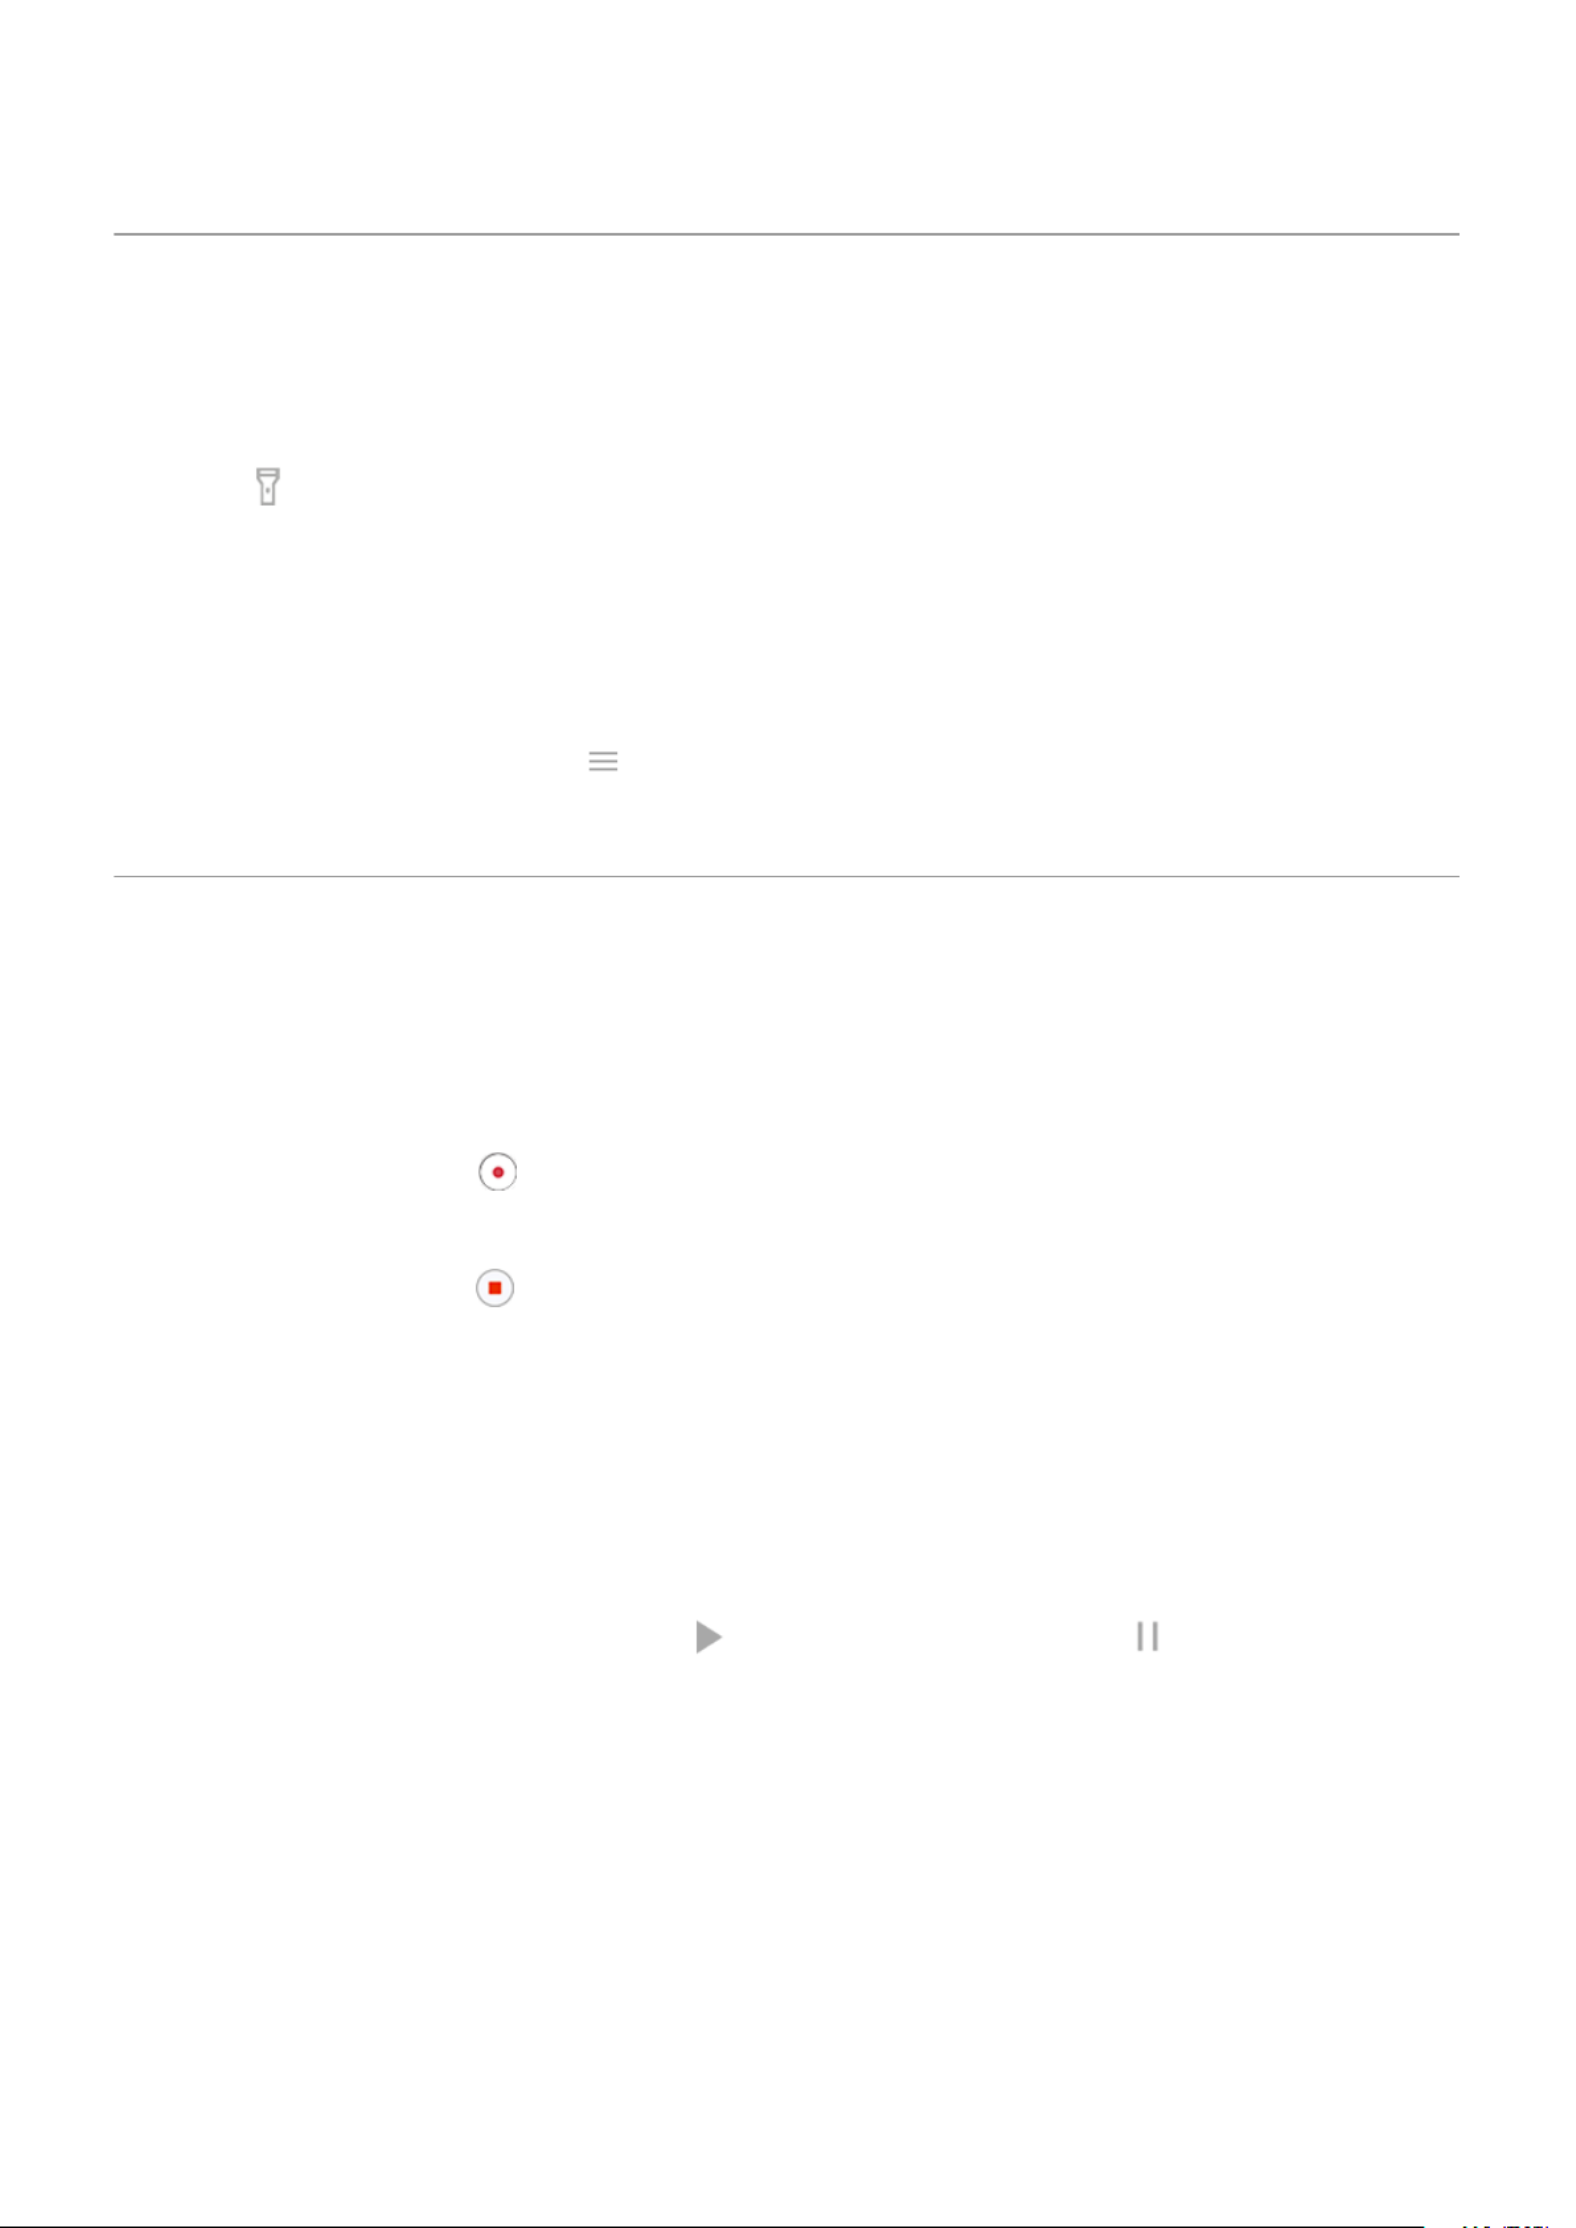
Turn torch on and off
To turn your torch on or off:
1. .Open Quick settings
2. Touch .
Or, make a chopping motion to turn the torch on or off.
If the camera opens instead of turning on the torch, be sure to use a chop gesture, not a .twist gesture
To control the chop gesture:
1. Go to > > .Settings System Gestures
Or the app and touch > .open Moto Gestures
2. Touch and turn it on or off.Fast torch
Record audio notes
Record a note
1. the app.Open Recorder
2. To start recording, touch .
3. If needed, touch to pause and to resume recording.
4. To stop recording, touch .
5. Add a title, then touch .Save
Listen to recordings
You can listen to and share audio recordings in Recorder or other apps. To limit access to your recordings,
you can .restrict listening and sharing to only the Recorder app
1. the app.Open Recorder
2. If you want to just play a recording, touch by it in the list. If needed, touch to pause.
Learn the basics : Discover useful tools 32

3. If you want more control of playback, touch the recording to open it in the full player. Then use icons as
needed:
Icon Action
Increase or decrease playback speed.
Drag to skip to a specific point in the recording.
Skip forwards a few seconds.
Skip backwards a few seconds.
Adjust looping.
Trim a recording
1. In the app, touch the recording.Recorder
2. Touch .
3. Drag the handles around the audio to save.
4. Touch Trim to cut away the audio outside the handles.
5. Touch , then choose to retain the original audio file and the trimmed version or touch Save Save as copy
Save to save only the trimmed audio file.
Manage recordings
Rename, delete, share or view details
1. the app.Open Recorder
2. Next to the recording, touch .
3. Select options to rename, delete, or share the recording, or view file details.
Control whether other apps can play and share your recordings
1. In the app, touch .Recorder
2. Set access to your recordings:
•To restrict playing and sharing to only the Recorder app, select .Audio recorder only
•To permit playing and sharing of recordings with other apps, select Audio recorder + other apps.
Learn the basics : Discover useful tools 33

Change recording settings
Adjust sound quality/file size
1. In the app, touch .Recorder
2. Adjust settings for new recordings:
•To change the audio quality, touch , then select (better sound) or (smaller file Quality High Low
size).
•To prevent background noise in your recordings, be sure is on .Noise Reduction
Change file format
1. In the app, touch .Recorder
2. Touch .Recording format
3. Select the file type for new recordings (m4a, wav, aac).
Allow/prevent notification sounds while recording
1. In the app, touch .Recorder
2. Touch .Notification Sounds
3. Choose to allow or silence notifications.
Allow/prevent the screen from turning off while recording
1. In the app, touch .Recorder
2. Turn Keep screen on while recording on or off .
Control phone with your voice
Speak a command
Not all languages support voice commands.
You can tell Google Assistant to call people, get directions, send messages and set alarms. Or, you can ask
questions.
1. Get your assistant's attention by doing any of these:
•Press the Power button twice.
•For hands-free control, say ‘Hey Google’ or ‘OK Google’, if you've taught it to .recognise your voice
•Swipe up from the bottom left or right corner of your phone. Learn more.
•Touch .
2. Ask a question or say a command. For example, you can say ‘What's the weather today?’ or ‘Set alarm
for 7 AM tomorrow.’
Tip: To see a list of commands, say ‘Help’.
Learn the basics : Discover useful tools 34

1. Touch & hold .
2. Drag to a blank space on your Home screen.
3. If you haven't set your home or work address yet in Maps, touch the shortcut and follow the onscreen
instructions to add it.
When you're ready to roll, just touch the shortcut and your phone will talk you through the directions.
Use clock and weather widget
Add widget to Home screen
Put a clock on your home screen and get quick access to alarms, your calendar, and the weather.
1. Touch & hold the home screen.
2. Touch .Widgets
3. Under Moto Widget, touch & hold (or or ) then drag it to your Home screen.Beyond Classic Clean
Set or delete alarms
1. Touch the time.
2. Adjust alarms:
•To add a new alarm, touch and set the time and ringtone.
•To use an existing alarm, switch it on . Touch to view or edit its ringtone.
•To delete an alarm, touch , then touch .
3. To control general alarm settings, such as alarm volume and snooze duration, touch > .Settings
When an alarm is set, shows in the .status bar
Manage weather forecasts
Display current conditions for your location or for a city you select.
Show temperature and conditions for current location
Learn the basics : Discover useful tools 36

1. Do one of the following:
•Touch .Add cities
•Or touch the current temperature, then touch .
2. Turn Current location on.
Tip: Temperature unitto switch between Fahrenheit and Celsius, touch .
Add location
1. Do one of the following:
•If you haven't added locations yet, touch .Add cities
•Or touch the current temperature, then touch .
2. Touch .Add new location
3. Enter a city name or postcode, then touch .
4. Touch the city to add.
5. When you add a city, it is set to show on the widget. If you want a different city's weather shown on the
widget, select its button from the list of locations.
Remove location
1. Touch the temperature.
2. Touch .
3. Touch next to the city's name.
View forecasts
1. Touch the current temperature on the widget to open the forecast.
2. Then:
•To switch between forecasts for multiple locations that you have added, swipe right and left.
•To see more details on the weather provider's website, touch an item on the forecast.
•To change the frequency of forecast updates, touch > Forecast update period, then select a
duration.
Control weather alert notifications
The widget sends notifications about weather conditions that need special attention.
To turn notifications on or off:
1. Touch the temperature.
2. Touch .
3. Turn Weather alert notifications on or off.
View your calendar
Touch the current date to open your calendar, where you can view or add events.
Learn the basics : Discover useful tools 37
Manage time spent on your phone
Set up Digital Wellbeing
You can get info about how you spend time on your phone, like how often you unlock it and how long you
use each app. Then, use that info to improve your digital habits.
The first time you use this feature:
1. Go to > Settings Digital Wellbeing & parental controls.
2. Touch .Show your data
3. If you want to find this feature as an app, rather than opening Settings, turn on Show icon in the app
list.
Understand your habits
1. Go to > Settings Digital Wellbeing & parental controls.
2. Review the chart to see:
•Time you spent using phone today
•Which apps you've had on screen and for how long
•How often you unlocked the phone today
•How many notifications you have received
3. For more information, touch a label on the chart. For example, to see your screen time for the week,
touch today's usage time.
Limit daily screen time
For individual apps, you can set a timer that limits the amount of time you spend on the app every day.
Tip: To manage your child's screen time, use parental controls.
To set an app timer:
1. Go to > Settings Digital Wellbeing & parental controls Dashboard > .
Or > > .Settings Apps Screen time
2. Next to the app you want to limit, touch .
3. Set the total time that you can use the app per day.
When you reach your time limit in an app:
•The app closes.
•Its icon dims and no longer opens the app.
The app timer resets at midnight. To use the app before midnight, go back to the timer in and Settings
extend the time or delete the timer.
Learn the basics : Discover useful tools 38

Pause distracting apps to focus
Use Focus mode to pause selected apps for fewer distractions.
1. Go to > Settings Digital Wellbeing & parental controls Focus mode > .
2. Choose which apps you want to pause.
3. Do one of the following:
•To turn it on, touch Turn on now.
•To have it turn on automatically, touch , then select days of the week and start/end Set a schedule
times.
When Focus mode is on:
•You'll see in the .status bar
•You won't be able to use the selected apps and won't get notifications from them.
Tip: To add Focus mode to Quick settings, , touch , then drag the tile where open Quick settings
you want it.
To turn Focus mode off:
•Open Quick settings and touch .
•Alternatively, on the notification, touch Turn off now. To turn it off for a short period, touch Take a
break.
To remove the schedule:
1. Do one of the following:
•Open quick settings, then touch and hold .
•Go to > Settings Digital Wellbeing & parental controls Focus mode > .
2. Next to Schedule, touch .
Tip: To mute sounds, stop vibration and block notifications for all calls and notifications, use Do Not
Disturb.
Make it easier to put your phone away at bedtime
You can schedule changes to get ready for sleep.
1. Go to > Settings Digital Wellbeing & parental controls Bedtime mode > .
2. Select when to turn on .Bedtime mode
3. Adjust start and end times if required.
4. Touch to set what your phone should do during this scheduled time:Customise
•Remove screen colours (turn on Greyscale).
•Silence your phone (turn on ).Do Not Disturb
Learn the basics : Discover useful tools 39

Use parental controls
You can:
•Control your child's access to devices and apps
•Control location settings and view the location of your child's supervised device
•Set daily usage limits, monitor app usage and remotely lock supervised devices
•Set filters and controls on what your child can browse, purchase or download using Chrome, Google
Search, Play Store and YouTube
You'll need to set up parental controls on your and your child's devices.
To set up parental controls on this phone:
1. Go to > Settings Digital Wellbeing & parental controls.
2. touch .Set up parental controls
3. Follow the onscreen instructions to set up the phone for child or adult usage.
4. To set up parental controls on the other device, refer to the help information for that device.
To learn more, .read Google's help
Learn the basics : Discover useful tools 40

Use onscreen keyboard
Open, close, resize keyboard
To open the keyboard, just touch an area where you can enter text or numbers.
To close the keyboard so you can see other parts of the screen, touch .
To make the keyboard larger, turn your phone horizontally. If your screen doesn't rotate, check your auto-
rotate setting.
Tip: If you installed other keyboards, you'll see next to the navigation buttons when you're typing.
To switch to a different keyboard, touch .
Type special characters
Touch & hold a key to see related special characters. For example:
•Touch & hold to see other punctuation marks..
•Touch & hold to see and .e é 3
Tip: To insert a period followed by a space, touch the spacebar twice quickly.
Capitalise letters
To type in ALL CAPS, touch twice quickly, so you see . Touch it once more to turn ALL CAPS off.
To change the capitalisation of a word that you've already typed:
1. Select the word.
2. Touch until you see the capitalisation you want: first letter only, ALL CAPS or lowercase.
Use glide typing
You have two options for entering text: type one letter at a time (multi-touch typing) or slide your finger
through all the letters in a word using one continuous motion (glide typing). Start typing either way and
switch whenever you like.
When you're using glide typing, you can:
•Type a word. Drag your finger over the letters in the word.
•Enter apostrophes in common words. Drag through the letters and the apostrophe is automatically
inserted.
•Add a space. There's no need to use the space bar. Just lift your finger and start the next word.
You can glide typing.disable
Learn the basics : Work with text 41

Get suggestions
Use suggestions to type faster.
When you're typing, you'll see a list of suggested next words above the keys:
•Touch a word in the list to insert it in your text.
•If you don't like a suggested word, touch & hold it, then drag it to .
You can limit or turn suggestions off.
Spell check and auto correct
Misspelled words are automatically corrected as you type.
To prevent that word from being auto-corrected again, add it to your dictionary by touching the word in the
list of suggestions above the keys.
If auto-correction is , you can still check spelling:turned off
1. After you're done typing, review your text; misspelt words (and words not in your dictionary) are
underlined.
2. Touch an underlined word:
•If the word is spelled correctly, touch it in the suggestion bar.
•If the word is misspelled, select the correct word in the suggestion bar or type the correction.
Type in multiple languages
If you have as a system language in your phone settings, keyboards and text added multiple languages
suggestion are available for those languages:
•When using a keyboard language other than your primary system language, available keyboard
languages are shown on the spacebar.
•To toggle between languages, touch
•To see a list of available keyboards, touch & hold or the spacebar.
You can add keyboards for other languages.
Cut, copy, paste text
You can select and copy text from webpages and messages.
1. To select text, touch & hold a word.
2. Touch , , , or:Copy Cut Share Select all
•Select more text. Drag the sliders .
•Get information about selected text. Touch Web search.
•Translate selected text. Touch > Translate. (If you don't see this option, the Google install
Translate app.)
Learn the basics : Work with text 42
3. To paste text, touch to insert at the cursor or select a block of text to replace. Then touch .Paste
Tips:
•In some apps, you need to double-tap a word to select it (instead of touching & holding it).
•When you use , the text is copied to the clipboard in your phone's memory, overwriting Copy
previous text in the clipboard. If you want to save and manage everything you copy into the
clipboard, search for ‘clipboard manager’ in Play Store to select and an app.download
Use voice typing
1. Touch a text field to show the on-screen keyboard.
2. Touch on the onscreen keyboard.
3. Say what you want to type:
•Speak naturally but clearly. There's no need to shout or hold the phone close to your mouth.
•To include punctuation, say ‘comma,’ ‘full stop,’ ‘question mark’ or ‘exclamation mark’.
•To pause or restart, touch .
•To delete a word, touch .
Fill in forms automatically
Don’t retype your personal information again and again. Save it securely, then with just one touch, fill in
passwords, addresses, credit cards and other information saved to your .Google account
To set it up:
1. Go to > > .Settings Privacy Autofill service from Google
2. Touch .CONTINUE
3. Touch categories to review and edit personal information, addresses, credit cards and passwords.
Learn the basics : Work with text 43

Change wallpaper
You can change the background image on your or .Home screen lock screen
Set the wallpaper
1. Touch & hold a blank area on your home screen, then touch Wallpapers.
2. Do one of the following:
•To set a single wallpaper, select a photo or wallpaper.
•To use an animated background, select a live wallpaper. Many live wallpapers include settings. Look
for or to set options.
•If you select a wallpaper from a category (such as landscapes), you can see a different image every
day. Open the category and touch .
3. Touch or .Set wallpaper
4. Select whether you want to use the wallpaper on your home screen, lock screen, or both.
If your photo is too large
Open the photo and . Then edit the screenshot as needed and set it as the wallpaper.take a screenshot of it
If you selected a live or interactive wallpaper
If your battery is low, temporarily change wallpaper to a static image to save power.
Create a stylised wallpaper
You can stylise your photos with AI visual effects and use them as wallpaper.
1. Touch and hold a blank area on your Home screen, then touch Wallpapers Stylise > .
2. Select an image.
3. Select a style to apply to the image.
4. Touch , then follow onscreen instructions to apply it.Set wallpaper
Use widgets, shortcuts or folders
Add widgets
Widgets stream information, giving some of an app’s functionality without opening the app. For example,
the Calendar widget shows your daily agenda and gives you one-touch access to your full calendar.
Add a widget
1. Touch & hold the home screen.
2. Touch .Widgets
Widgets are listed under their related apps.
3. Touch & hold a widget to add it.
Personalise your phone : Home screen 44

Adjust a widget's size
You can make some widgets larger to view more content:
1. Touch & hold the widget until it's highlighted.
2. Release it to see an outline.
3. Drag a corner or side to resize.
Add app shortcuts
1. Swipe up from the bottom of the Home screen to open your app tray.
2. Touch & hold the app you want.
3. Drag the app to an empty spot on your Home screen. Or, drag it to the edge of the screen and drop it
onto a new Home screen.
Add task shortcuts
Many apps include shortcuts to common tasks, so you don't have to open and navigate through the app.
1. Touch & hold an app icon to see available task shortcuts.
2. Do one of the following:
•To perform the task, touch it.
•To create a shortcut for that task, drag to an empty space on your Home screen.
Here are examples of task shortcuts for various apps. Not all apps include task shortcuts.
App Task shortcuts
Gmail •Compose new email
•Open to specific account
Maps •Navigate to work
•Navigate to home
YouTube •Search
•Subscriptions
•Explore
Chrome •New incognito tab
•New tab
Personalise your phone : Home screen 45

Calendar •New reminder
•New event
•New task
Messages •Open most recent conversation
•New conversation
Clock •Start screen saver
•Start stopwatch
•Create new timer
•Create new alarm
Settings •Bluetooth
•Battery
•Data usage
•Wi-Fi
Add web page shortcuts
1. the app.Open Chrome
2. Navigate to the web page.
3. Touch > .Add to Home screen
4. Edit the name if desired.
5. Touch .Add
6. Do one of the following:
•Touch & hold the icon to drag it where you want on the home screen.
•Touch .Add to Home screen
Add folders
Folders organise your shortcuts. You can create folders on your Home screen or in your app tray.
Home screen folders
To create a folder on your Home screen:
1. Touch and hold an app shortcut on your home screen.
Personalise your phone : Home screen 46
2. Drag it onto another to group them together, then release when you see a frame around them.
3. To name the folder, touch to open it, touch , and type a new name.Edit Name
To add apps to the folder:
1. Touch and hold the app's icon.
2. Drag it onto the folder.
To remove apps from the folder:
1. Open the Home screen folder.
2. Drag the app's icon onto the Home screen or drag it up and drop it on .Remove
App tray folders
To create a folder in your app tray:
1. Open the app tray.
2. Touch > .Create folder
3. Type the folder's name.
4. Touch app icons to select what to put in the folder.
5. Touch .Done
To change apps in the folder:
1. Touch and hold the folder.
2. Touch .Edit
3. Touch app icons to add or remove them.
To add one app to the folder:
1. Touch and hold the app's icon.
2. Touch .
3. Select the folder.
To remove one app from the folder:
1. Open the folder.
2. Touch and hold the app's icon.
3. Touch .
Remove widgets, shortcuts or folders
To remove items from your Home screen:
1. Touch & hold it until it vibrates.
2. Drag it to .Remove
For app tray folders, touch .Delete
Personalise your phone : Home screen 47
App icons on the Home screen are to installed apps found in the shortcuts app tray. Removing an app
shortcut from the Home screen doesn't uninstall the app. Learn how to uninstall apps.
To select a totally new user interface for your Home screen, download a different launcher.
Arrange apps and control an icon's look
Choose where to find apps: app tray or Home screen
The app tray holds all of your installed apps. Swipe up from the bottom of the Home screen to open the tray.
This simplifies your Home screen, showing only .apps you choose
To see apps on your Home screen instead, you can remove the app tray.all
You can switch at any time.
1. Touch and hold a blank space on your Home screen.
2. Touch > and then:Home settings Home screen style
•To see all apps on your Home screen, touch .Open
•To see all apps in the app tray, touch App tray.
3. Touch to see more customisations, described below.
If you’re using the app tray
You can make these customisations in Home settings:
•Turn on/off suggested apps at the top of the list and bottom of the home screen.
•If you don’t want the app’s icon added to your Home screen when you install a new app, turn Add app
icons to the Home screen off . The icon is only added to the app tray.
If you put all apps on the Home screen
You can customise how app icons are arranged:
•To be able to position icons anywhere on the Home screen, touch Free arrangements.
•To have icons move automatically to fill empty spaces, touch .Auto fill
Adjust icon size and names
You can make the app icons on your Home screen and in the app tray larger or smaller. You can also remove
or expand the names below the icon.
1. Touch and hold a blank space on your Home screen.
2. Touch .Home settings
3. Adjust settings:
•To make the icons smaller or larger, touch and move the slider to choose a size.Icon size
•To remove the names below the icons, touch > .App label Don't show
•To restore the names below the icons, touch > App label 2 rows 1 row (full names) or (short
names).
Personalise your phone : Home screen 48

Show or hide notification dots
You can control whether app icons show dots to alert you about unread notifications.
1. Touch and hold a blank space on your Home screen.
2. Touch .Home settings
3. Touch .Notification dots
4. Turn on or off .Notification dot on app icon
Allow or prevent Home screen rotation
In , when you turn Auto-rotate on, apps rotate when you turn your phone. If desired, you quick settings
can keep your Home screen from rotating while other apps auto-rotate:
1. Touch and hold a blank space on your Home screen.
2. Touch .Home settings
3. Turn Allow Home screen rotation on or off .
Remove Google feed
When you swipe to the farthest-left Home screen, you’ll see the Google news feed. To remove it:
1. Touch and hold a blank space on your Home screen.
2. Touch .Home settings
3. Touch > .Swipe access Nothing
To add the feed back again, change to .Swipe access Google feed
Remake your Home screen with launchers
About launchers
A launcher app defines what your Home screen looks like and how you organise and interact with all of your
apps. The launcher that came with your phone puts the Google search widget and a clock widget on the
Home screen. See what that Home screen looks like and how you can customise it.
If you want to totally change the look and feel of your Home screen, you’ll need to download a new launcher
and update settings to use that launcher. Launchers frequently include new sets of wallpapers, new
gestures for interacting with your phone and customisable elements for your Home screen.
You can switch back to the original launcher and its Home screen at any time.
Personalise your phone : Home screen 49

Use a screen saver
Set up screen saver
While your phone is idle on a dock or charger, turn it into a desk clock, a photo frame to show off your pics,
or more.
1. Go to > .Settings Display
2. Touch .Screen saver
3. Do any of the following:
•To change screen savers, touch Current screen saver, then select one. To set options for that
screensaver, touch .
•To preview your selection, touch . Touch the screen anywhere (unlock if Use screen saver
necessary) to return to settings.
•To adjust when the screen saver starts (while docked, charging, or both), touch When to start.
Start screen saver
The screen saver automatically starts when you connect your phone to a dock or charger and the screen
turns off.
To exit the screen saver and return to your home or lock screen:
•Press the Power button.
•Or, if you're using , touch the sensor.fingerprint security
To manually start your screen saver any time, go to > > and turn Settings Display Screen saver Use screen
saver on .
Turn off screen saver
To prevent the screen saver from starting automatically:
1. Go to > .Settings Display
2. Touch > > .Screen saver When to start Never
Add screen savers
Search for ‘Screen saver’ in Play Store for apps that give you more.
After you an app, you can select the new ones in > > .install Settings Display Screen saver
Personalise your phone : Lock screen 51

Open, close and switch apps
Open and close apps
To open an app, touch its icon on the Home screen or swipe up from the bottom of your Home screen to
open the , then touch the app.app tray
To leave an app, just swipe up from the bottom of the screen. You'll go back to your Home screen.
You don't need to close apps. Android manages the memory and battery that apps use, so you don't need
to worry about leaving apps open.
To close one app, drag up from the bottom of the screen, hold, then let go. In your recent apps, swipe up
on the app.
To close all apps, drag up from the bottom of the screen, hold, then let go. In your recent apps, swipe right
until you see the start of the list, then touch .Clear all
Switch between open apps
1. To switch between recently used apps, swipe left or right at the bottom of the screen.
To see your list of recent apps, drag up from the bottom of the screen, hold, then let go.
2. In the list of recent apps:
•To see more apps, swipe left or right.
•To switch to an app, touch it in the list.
Tip:
Use two apps at once with split screen.
View two apps on screen
Use split screen view
1. Open the first app.
2. from the bottom of the Home screen, hold, then release.Drag up
3. In the list of recent apps, touch the app's icon at the top of the preview to see and .
Be sure to touch the app's icon instead of the preview, which opens the app.
4. Touch .Split screen
5. Select the second app to use.
Use a gesture to split the screen
To set it up:
Use apps 52
1. Go to > > .Settings System Gestures
Or the app and touch > .open Moto Gestures
2. Touch and turn it on .Swipe to split
To use it:
1. In the first app you want to view in split screen, swipe once back and forth across the screen.
2. Select the second app to use.
Exit split screen view
Drag the black divider all the way up or down.
Use Picture-in-picture
With some apps, you can watch video in a small, movable frame while you do other things. Use it when
navigating with Google Maps, too.
1. When you’re playing a video or navigating with Maps, go to the Home screen or app you want to use.
The video (or navigation) shrinks.
2. You can drag the video (or navigation) anywhere on the screen.
•To return it to full size, touch it twice.
•To close it, drag it to the bottom of the screen. Or, touch it, then touch .
•To turn off Picture-in-picture for the app in use, touch it, then touch and turn Allow picture-in-
picture off .
To see all apps that support Picture-in-picture:
1. Go to > .Settings Apps
2. Touch > .Special app access Picture-in-picture
3. To turn off Picture-in-picture for an app, touch it and turn Allow picture-in-picture off .
View notifications
Find your notifications
Apps send notifications to alert you about things such as new messages, calendar events and alarms.
You can check your notifications from a few places:
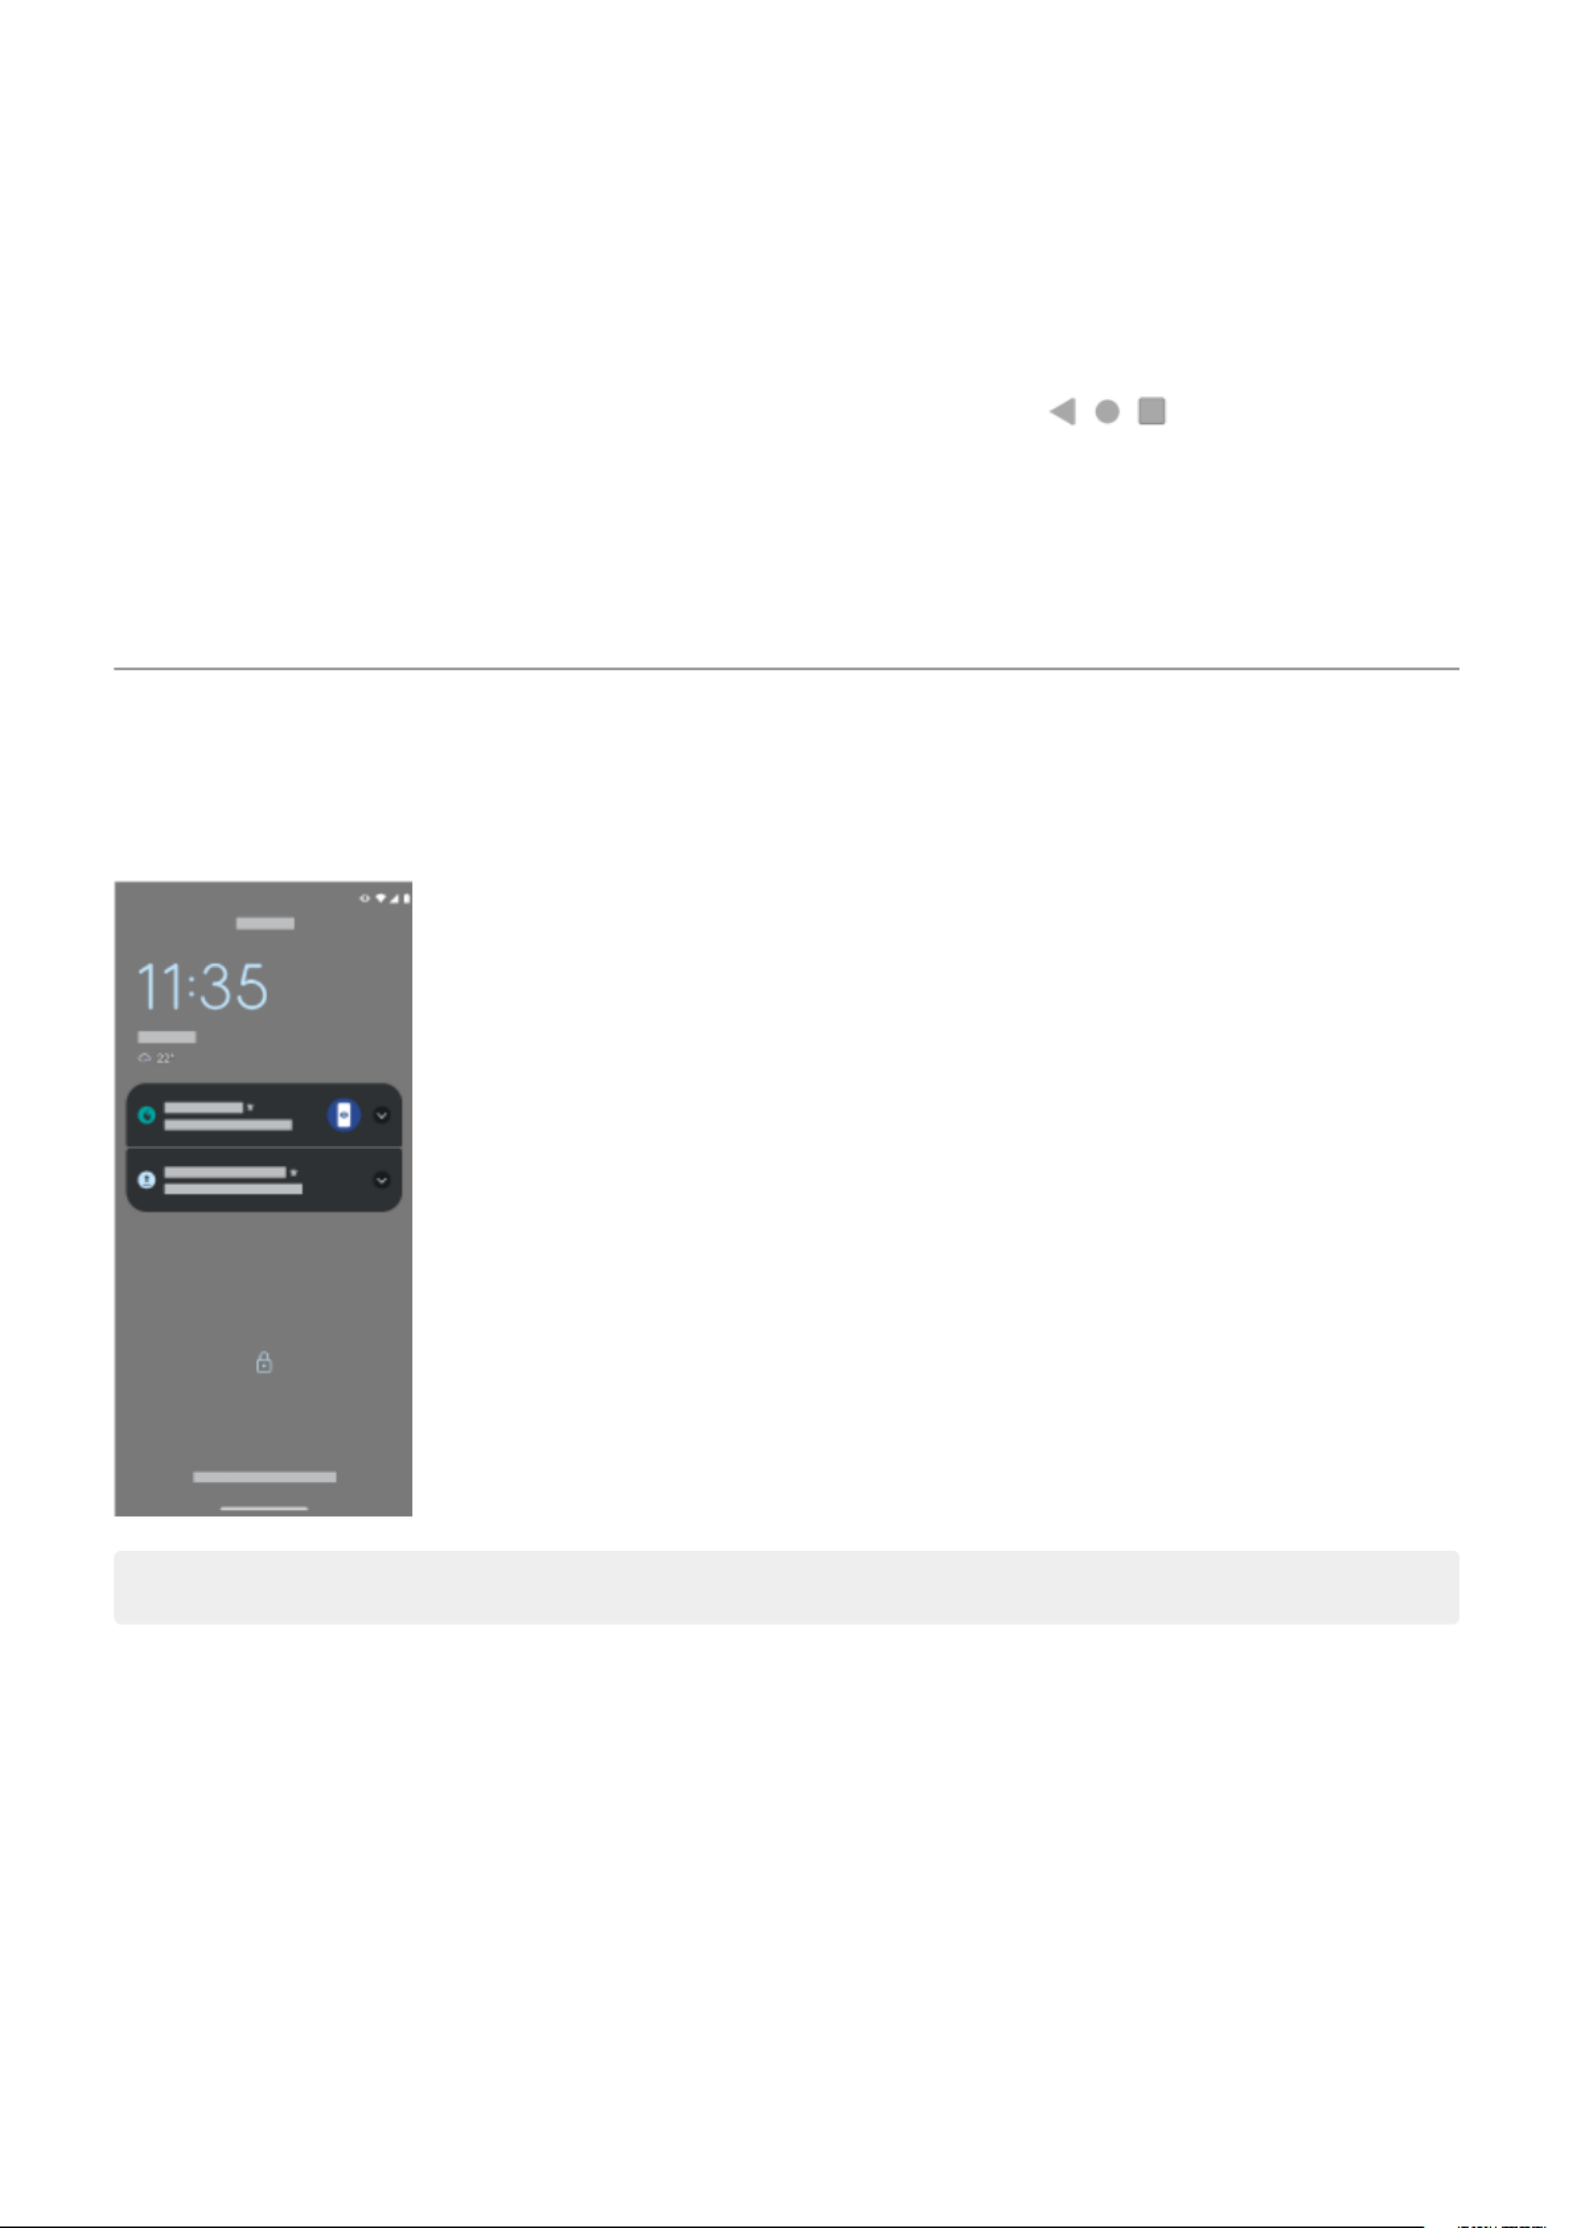
•When your screen is off, you'll see notifications in .Peek display
•They appear on your .lock screen
Use apps 53

•You see them when you swipe the status bar down on any screen.
If you receive multiple notifications from an app, they're bundled together. Swipe down to view more
details. Conversation notifications are bundled together at the top of your other notifications so you can
easily return to them any time.
Some important notifications pop up briefly over your current app so that you can take action. For example,
a notification for an incoming call might appear while you're watching a video, so that you can answer or
dismiss the call.
If an app icon has a , you can touch and hold it to see the most recent notification:notification dot
What you can do with lock screen and status bar notifications
Respond from a notification
Many notifications include actions at the bottom that let you complete common tasks without opening the
full app. If you have several notifications, these actions are hidden. When you see , touch it to reveal
actions.
Open the app that sent the notification
Swipe down from the top of the screen and touch the notification to open the app. From your lock screen,
touch the notification twice and enter your PIN, pattern, or password to unlock your screen and open the
app.
Snooze a notification
Swipe left or right slowly. Then touch and select a duration to snooze notifications. To snooze
notifications, first .turn on snoozing
Dismiss a notification
Swipe it sideways. Some notifications, like voicemails, require an action and cannot be dismissed.
Dismiss all notifications
Swipe to the end of your notifications and touch .Clear all
Use apps 54

Customise your notifications
Use to silence all notifications when you don't want interruptions.Do Not Disturb
Touch & hold a notification to customise that app's notifications. Then you can:
•stop all notifications from that app.
•change the app's notifications to be instead of .Silent Default
About pre-loaded apps
Apps that came with your phone
The following apps are pre-loaded on your phone.
Don't want some of them? Need other apps? Delete or disable them. You can download free and paid apps.
Icon App Description
Assistant Use your voice to control your phone.
Calculator Make some quick calculations.
Calendar Keep track of your upcoming events, get automatic reminders on your phone
and co-ordinate with others by sharing calendars.
Camera Capture photos or videos. To learn more, read the Camera app's help.
Chrome Browse the web. Access your browser bookmarks from any device, and sync tabs
with your computer or Android devices.
Use apps 55

Clock Use a or stopwatch.Set alarms. timer
Contacts with your contacts. Assign to people.Organise and connect ringtones
Docs Create, edit and collaborate with others on documents.
Dolby Atmos Optimise and adjust audio for your phone's speaker and any connected listening
device.
Drive Store and synchronise your files on Google's cloud, then access them anywhere
you have an Internet connection. Create and share spreadsheets, documents and
presentations. and share or print them.Scan documents
Files Browse and manage files and folders stored on your phone.
Games Find tools and settings to help you focus on gaming.
Gmail Compose, send, view or search your email from your phone or computer.
Google the web, see your updates, and adjust Google settings, including .Search privacy
Use apps 56

Google Pay Pay with your phone or online and send cash using this secure digital in-store
wallet.
Google TV Get films and TV programmes for instant viewing from Play Store. (Not available
in all countries.)
Maps , explore locations.Find your destination
Meet Video call with your friends via Android and iOS.
Messages Send and receive text messages.
Moto Customise your phone's look, sound and how you interact with it using gestures.
Phone Make calls.
Photos Manage photos and them automatically to your private album.upload
Play Store for your phone, as well as books, magazines, music and films and Get apps
access them from your computer or any Android device.
Use apps 57

Podcasts Find the latest episodes of your favourite podcasts, browse popular and trending
podcasts or discover new podcasts based on your listening history and
preferences.
Ready For Amplify everything your phone is capable of. Use your phone with PC, desktop
and an external display. Learn more.
Recorder and review Record voice memos call recordings.
Settings Customise your phone settings.
Sheets Create, edit and collaborate with others on spreadsheets.
Slides Create, edit and collaborate with others, and play presentations.
YouTube Find, view and upload videos to the web.
YT Music your favorite albums, singles, and live performances and get Stream
recommendations for new music.
Get help using an app
1. Open the app.
2. Touch or .
3. Look for or > .Help Settings Help
Use apps 58

About the Moto app
The Moto app groups together features and settings that help you customise the way your phone looks,
sounds and behaves. Several of these features are available only on Motorola phones.
In the Moto app, touch to access these features and settings:
Personalise
Change your phone's layout, fonts, icon shapes, themes and wallpapers.
Gestures
Control your phone with simple motions, like using a karate chop motion to turn on the torch.
Display
See what's going on while your screen is off ( ) or keep your screen on when you're looking at it Peek display
( ).Attentive display
Play
Adjust display and sound features for immersive, refined and uninterrupted entertainment experiences.
( and )Gametime Dolby Atmos
Tips
Learn more about your phone with a guided tour and demos of favourite features.
Turn gestures on/off
Perform everyday tasks with quick motions.
You turn each gesture on/off independently.
Touch ‘Learn more’ links to learn how to use and turn gestures on/off.
•Use three fingers to take a screenshot. Learn more.
•Make a karate chop motion to turn the torch on or off. Learn more.
•Twist your wrist twice quickly to open the camera from any screen. Learn more.
•Use the Volume buttons to switch tracks when listening to music. Learn more.
•Place your phone face down on a surface to start Do Not Disturb mode. Learn more.
•Pick up your ringing phone to silence it and switch to vibrate. Learn more.
•Swipe back and forth to use split screen. Learn more.
Get help with other features and settings
For information about other features or settings on your phone:
•To search Help, at the top of this screen, touch and type keywords.
•To browse the entire Help menu (table of contents), at the top of this help screen, touch your phone's
model.
Use apps 59
Focus on gaming
Find your games and gaming tools in one place
Open the app and then:Games
•To play a game, touch .
•If you don't have any games yet, touch and choose one from Play Store.Download
•To , and adjust display settings prevent interruptions turn off gestures during games, touch .
•To see moments you captured during games, touch .
•To turn Gametime on or off for a game, touch .
Turn Gametime on/off
To turn it on/off for all games:
1. Open the app.Games
2. Touch and turn on or off .Gametime
To turn it on/off for a specific game:
1. Open the app and touch .Games
2. Touch a game to add or remove it.
Open sidebar
Use the sidebar to quickly adjust settings during a game.
To open it, you can either:
•Touch .
•Swipe right.
•Swipe right but don't show . This gives maximum space for and interferes least with gaming.
To change between touch or swipe for opening the sidebar:
1. Open the app.Games
2. Touch > Sidebar access
Use apps 60

3. Do one of the following:
•To touch , select Tap the icon.
•To swipe right, select .Swipe right from the edge
•To swipe without showing , select , then touch and turn Swipe right from the edge Show
visual hint off .
To reposition , just drag it to the top, middle, bottom or opposite side of the screen.
To reposition :
1. Swipe it right.
2. Touch > .Sidebar access
3. Touch next to .Swipe right from the edge
4. Select the top, middle or bottom third of the screen.
If you don't want to use the sidebar, you can remove it. Open the sidebar and touch > > Sidebar access
Hide the sidebar.
Turn off calls and notifications
From sidebar
1. During a game, .open the sidebar
2. Touch to block calls and to block notifications.
3. When Block calls is on , calls from are allowed as exceptions. To block starred starred contacts
contacts as well, or to permit calls from certain contacts, touch > Caller exceptions.
From Games app
1. Open the app.Games
2. Touch .
3. Turn and on or off .Block notifications Block calls
4. When Block calls is on, calls from are allowed as exceptions:starred contacts
•To block starred contacts as well or to permit calls from all contacts, touch Caller exceptions.
•To permit urgent calls if the same person calls a second time within a 15 minute period, turn Allow
repeat callers on .
Turn off gestures that conflict with game controls
Some may conflict with game controls. You can turn them off while you're playing games.gestures
Turn off all gestures
To disable all gestures (system navigation, swiping for quick settings and gestures like torch) during your
game, and touch to turn on .open the sidebar Locked mode
Use apps 61

Turn off individual gestures
1. During a game, and touch .open the sidebar
2. Touch and turn on the gestures that you want to block.Block gestures
Customise display and sound for gaming
1. During a game, .open the sidebar
2. If needed:
•For smoother gaming, touch . High performance increases battery usage, and your phone may
feel warmer while in use.
•To show lights on the edges when game sound is detected, touch .
•To make details clearer in dark scenes, touch .
3. Touch and adjust settings:
•To filter unintentional corner touches in landscape mode, touch and set it to use Corner detection
a large area, small area or turn it off.
•To improve display, adjust Display refresh rate.
•To keep brightness at a fixed level while gaming, turn on .Disable adaptive brightness
•To hide labels below sidebar icons, turn off .Show labels
•To enhance sound with while gaming, turn on .Dolby Atmos Audio enhancements
•To improve voice quality in landscape mode, turn Voice enhancements on .
Use social apps while you play
Stream on Twitch
1. During a game, and touch .open the sidebar
2. If you haven't installed or set up Twitch, follow the on-screen instructions to do so.
3. Log in and follow the on-screen instructions to stream.
For help streaming, go to .help.twitch.tv
Other social apps
You can add up to two shortcuts in to social apps such as WhatsApp or Discord, for quick access the sidebar
to your gaming friends. When you open the app during a game, it appears in a small freeform window that
you can reposition.
To add apps:
1. During a game, and touch .open the sidebar
If needed, the app you want to use from Play Store.download
2. Select the apps to add.
To use the social apps:
Use apps 62
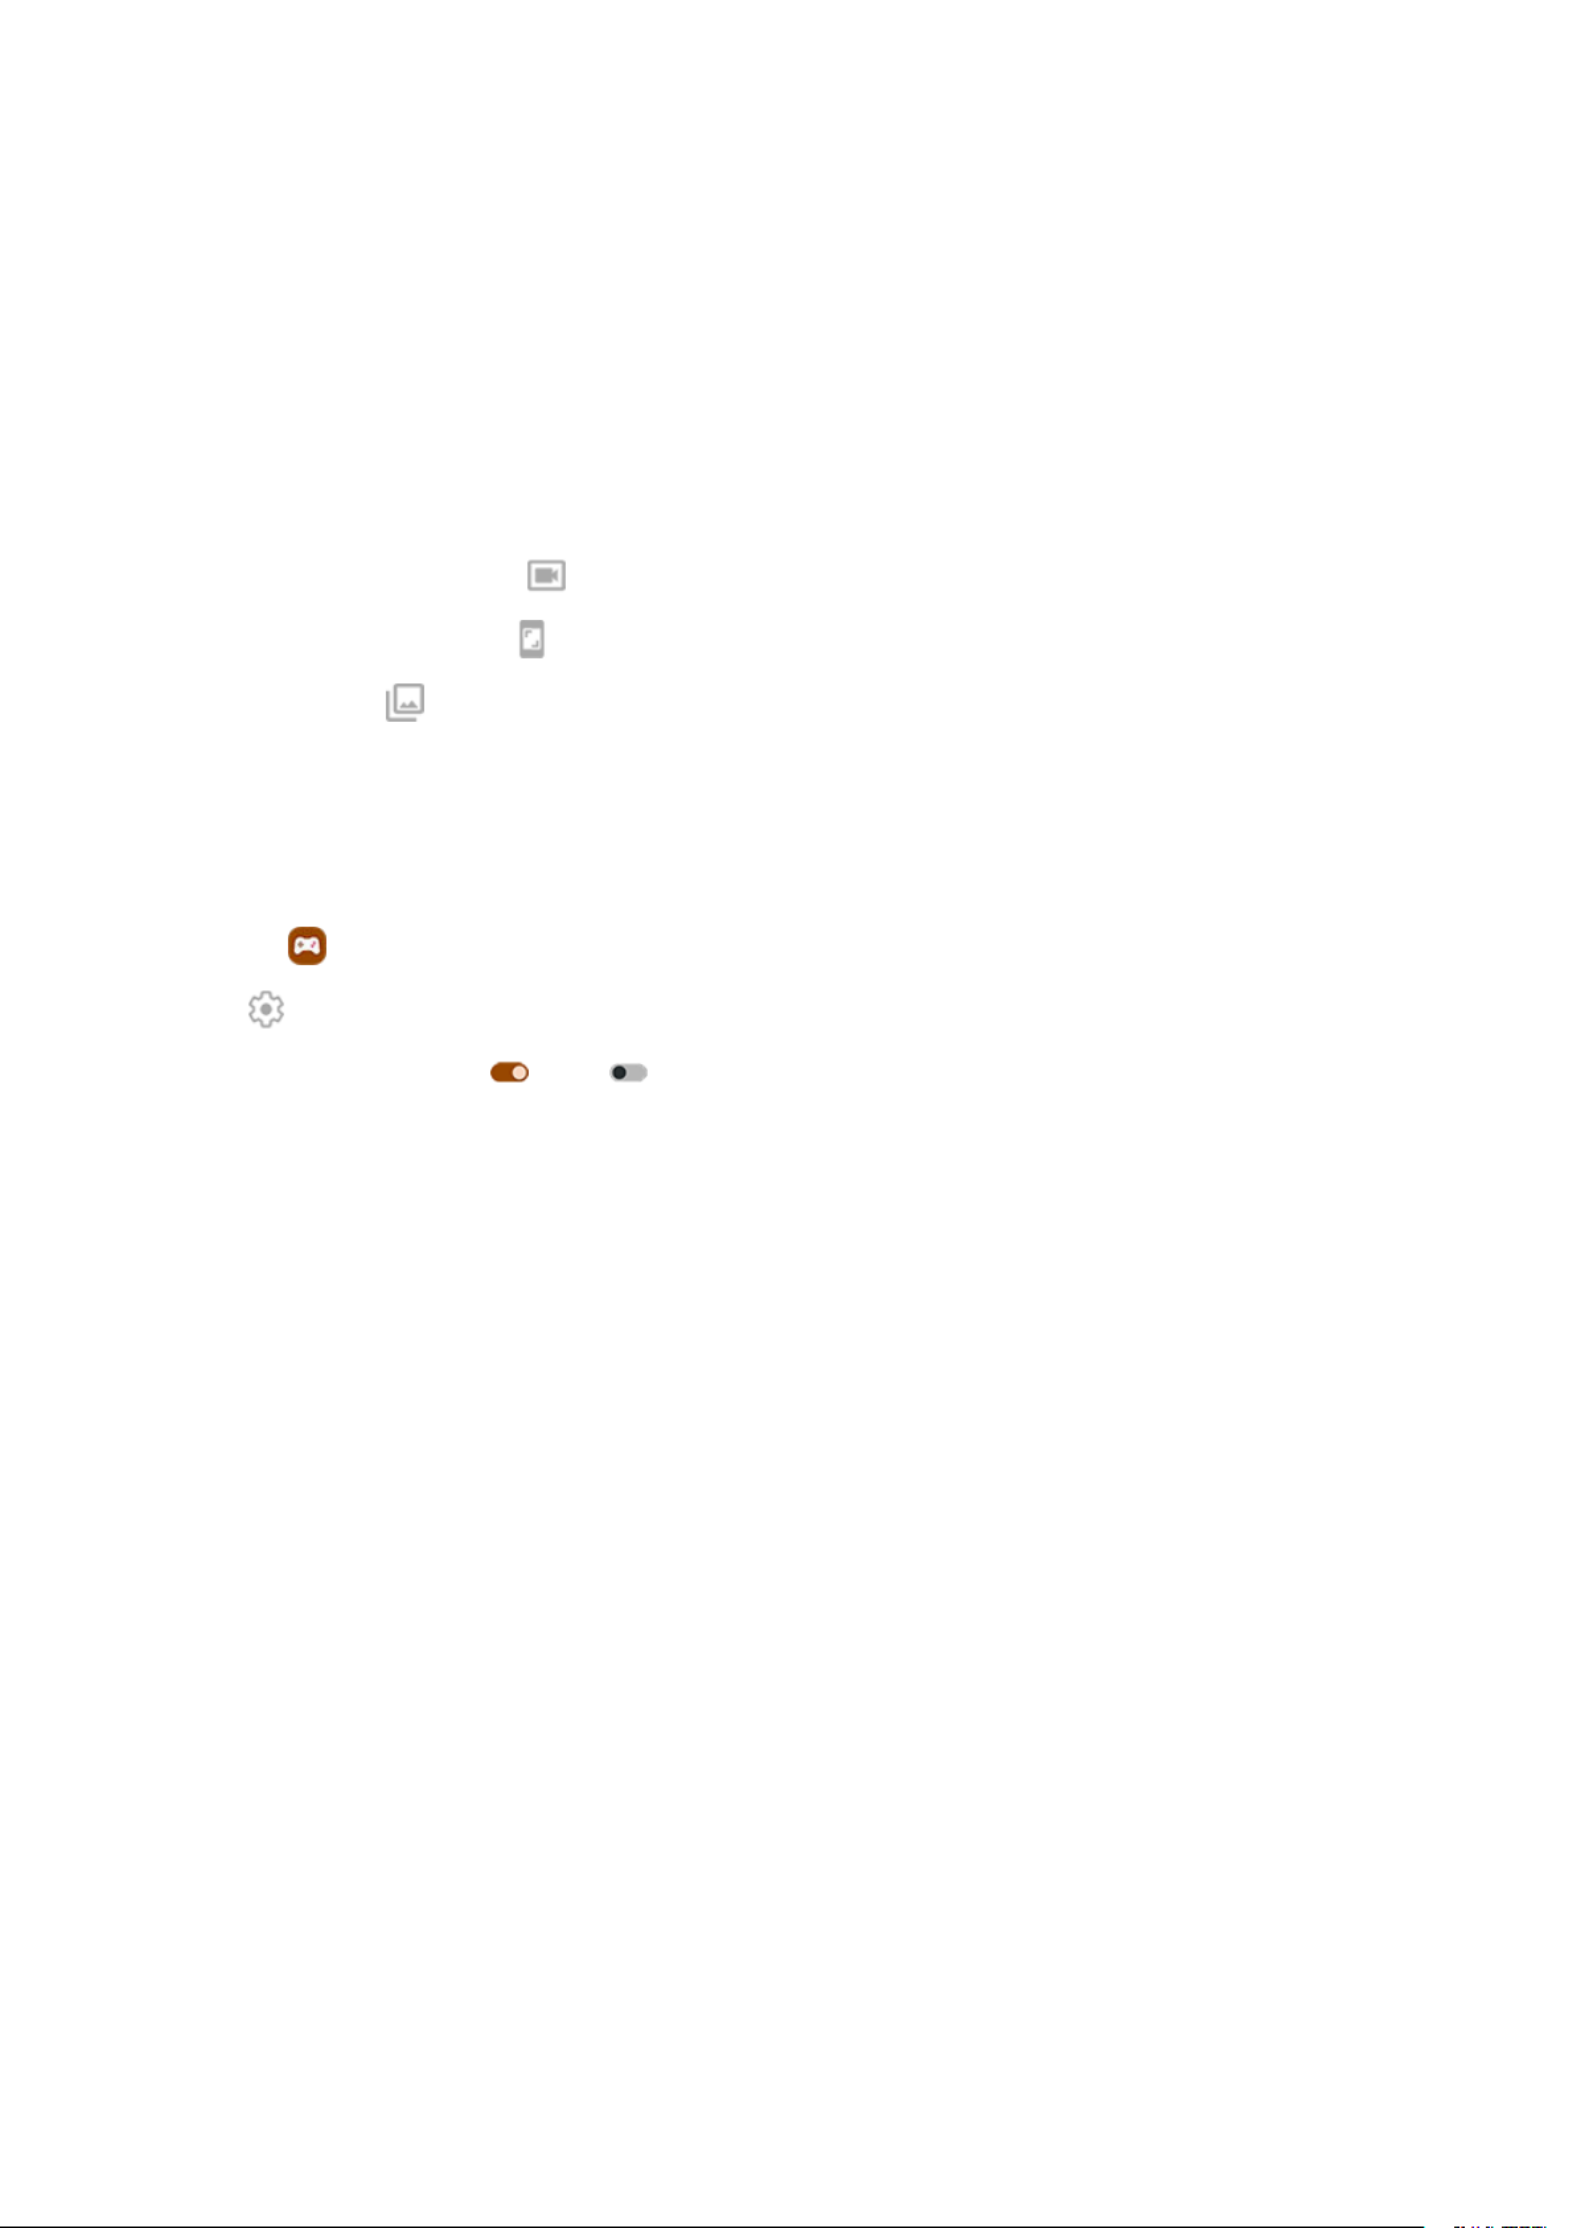
1. During a game, and touch the app's icon.open the sidebar
2. Drag the app window where you want it.
3. Use available app features as you normally do. Certain app features may not be available in free-form
mode.
Record or take screenshot during game
1. During a game, .open the sidebar
2. To record your screen, touch . Learn more.
To take a screenshot, touch .
3. To share it, touch .
Allow game play over mobile data
To save mobile data, Gametime prevents games from using mobile data when Wi-Fi is available. But you can
change the settings and allow games to use mobile data.
1. Open the app.Games
2. Touch .
3. Turn Use mobile data on or off .
Use apps 63

Install or update apps
Get apps from Google Play Store
Need a voice recorder, notepad or compass? You can download more apps, in addition to the apps
preloaded on your phone.
To download apps:
1. the app.Open Play Store
2. Browse by category or search.
3. Touch an item to see a description, read reviews and download it.
Tips:
•If you don't want the app's icon added to your Home screen when you install an app, touch and hold
a blank space on your Home screen, touch > > Home settings Home screen style App tray and
turn off .Add app icons to the Home screen
•To view Play Store apps you've installed on this phone, touch your profile icon > Manage apps
and device Manage Installed Not installed > > > to see apps you've installed on other devices
using the same Google account.
•To prevent accidental or unwanted purchases, touch your profile icon > > Settings
Authentication Require authentication for purchases > .
Get apps from other sources
Before downloading, do some research: check the app's rating and read the comments.
To download apps:
1. the app and go to the appropriate site to download the app.Open Chrome
If you see a warning, touch to continue.OK
You'll see in the when the download completes.status bar
2. Touch the download notification to install the app. Or, open the app to install it later.Files
3. When installing the app, review what information the app will access. If you don’t want the app to
access this information, cancel the installation. For example, if you're installing an app that makes a
shopping list, the app should not require access to your contacts.
Update Play Store apps automatically
Updating your apps gives you the latest features and improves security and stability. For best performance,
apps are set to update automatically.
If an app changes the information it wants to access on your phone, you will receive a notification to update
the app manually and will be required to review and accept the new permissions.
To control when your apps are automatically updated:
1. the app.Open Play Store
Use apps : Get, delete, manage apps 64

2. Touch your profile icon > .Settings
3. Touch > .Network preferences Auto-update apps
4. Select whether apps should:
•Auto-update over any network
•Auto-update only over Wi-Fi — save data charges on your mobile plan
Update Play Store apps manually
1. the app.Open Play Store
2. Touch your profile icon > .Manage apps and device
3. Under :Updates available
•Touch .Update all
•Or, to update a specific app, touch , then touch by its name.See details Update
Tip: To read the summary of what changed, touch the app name before you update it.
Turn off Play Store auto-updates
To stop a specific app from updating automatically:
1. the app.Open Play Store
2. Touch your profile icon > .Manage apps and device
3. Touch , then touch the app's name.Manage
4. Touch and turn off .Enable auto update
To stop all apps from updating automatically:
1. the app.Open Play Store
2. Touch your profile icon > .Settings
3. Touch > > .Network preferences Auto-update apps Don't auto-update apps
Restore Play Store apps
If you you got from Play Store, you can reinstall it anytime. Have apps you use infrequently, uninstall an app
such as a flight tracker? Delete them and easily reinstall when needed.
1. the app.Open Play Store
2. Touch your profile icon > > .Manage apps and device Manage
3. Touch and change to .Installed Not installed
4. Check the box for each app to re-install, then touch .
5. If you have multiple Google accounts, touch your profile icon and next to your account touch .
Select the other account and repeat the process to restore apps downloaded in that account.
Use apps : Get, delete, manage apps 65

Manage or delete apps
Organise apps
To organise apps into groups on your Home screen, .use folders
Control app permissions
The first time you use an , and sometimes when you , , or haven't used it for a while, you app install update
are asked to grant the app permission to access certain data and phone features.
You can adjust these permissions any time.
To adjust permissions by app:
1. Touch & hold the app icon, then touch .
2. Touch .Permissions
3. Turn each permission on or off as needed.
Tip: To see how the app uses each permission, touch > .All permissions
You can also review each feature and .adjust which apps have permission
Troubleshoot with safe mode
Issues such as apps crashing, unexpected reboots or fast battery drain could be caused by an app you
installed. Use safe mode to start your phone with only the original software and apps. If the issues go away
in safe mode, the problem is probably from an app you downloaded.
To restart in safe mode:
1. Press and hold the power button.
2. Touch & hold . Then touch to restart in safe mode.Power off OK
When it restarts, you'll see across the bottom of the Home screen and all widgets and third-Safe mode
party apps will be disabled.
3. Use your phone and see if the problem has gone away. Remember, you won't be able to use any
downloaded apps.
If the problem goes away:
1. To exit safe mode, restart your phone.
2. One by one, uninstall recently downloaded apps. After each removal, restart your phone. See whether
removing that app solved the problem.
3. Once you delete the problematic app, you can restore the other apps you removed during testing.
If the problem doesn't go away: Try these troubleshooting steps for phone performance issues.
Exit safe mode
Press and hold the power button, then touch .Restart
Use apps : Get, delete, manage apps 66

Or, hold the Power button for about 30 seconds, or until your phone restarts.
Clear app's cache or data
Clearing the cache and data can free up phone memory, improve performance and fix some problems with
apps and webpages.
1. Touch & hold the app icon, then touch .
2. Do one of the following:
•To free up space by removing temporary files, touch Storage & cache Clear cache > . Over time, the
cache builds up again, so repeat if a problem occurs.
•If problems still occur, then delete all data saved in the app by touching Storage & cache Clear >
storage. Be careful – there's no way to undo this.
Force stop apps
Force stop an app only if it seems to be causing a problem. To completely shut down an app, including any
background services:
1. Touch & hold the app icon, then touch .
2. Touch .Force stop
Delete apps you installed
You can delete (uninstall) apps that you downloaded. For many , you can disable but not preloaded apps
delete them.
1. Touch & hold the app's icon.
2. Do one of the following:
•Drag the icon up and drop it on . This removes the app and frees storage space.
•If you don't see a delete option, touch & hold the app icon, then touch > .Disable
Delete apps installed by others
If you are the of the phone and owner shared it with users or guests, you can uninstall apps they installed.
Although their apps don't appear in your app tray or on your Home screen, they do reduce available storage
space.
1. Go to > > .Settings Apps See all # apps
Apps installed by others show the message .Not installed for this user
2. Touch the app name.
3. Touch > .Uninstall for all users
Back up to Google
You can automatically back up the following items to your :Google account
•Apps and app data
Use apps : Get, delete, manage apps 67

•Call history
•Contacts
•Phone settings (including Wi-Fi passwords and permissions)
•Photos and videos (synced to , not to Google Drive)your Google Photos library
•SMS text messages (if using Messages)
Tip: Back up over to prevent mobile data charges.Wi-Fi
Not all apps back up data automatically. Check with the app developer.
To automatically back up to Google Drive:
1. Go to > .Settings System
2. Touch .Backup
3. Check that is on . If needed, turn it on.Backup by Google One
4. If you have multiple Google accounts, touch to select an account.Account
5. Follow the onscreen instructions.
To back up other files that aren't automatically backed up, such as attachments or downloads:
1. Open the Drive app.
2. Touch .
3. Touch , then choose the files or folder to upload.Upload
Protect against harmful apps
Scan phone for harmful apps
Play Protect helps keep your phone secure by automatically scanning your apps, including sideloaded apps,
to check for potentially harmful apps (malware).
If Play Protect finds a potentially harmful app, it stops the app from running and warns you so that you can
uninstall it.
To see the results or to rescan:
1. the app.Open Play Store
2. Touch your profile icon > .Play Protect
3. Review the results of the latest scan or touch .Scan
Play Protect is on by default.
To learn more, .read Google's help
Use apps : Get, delete, manage apps 68

If your phone seems slow
If you've scanned your phone to confirm there aren't any potentially harmful apps but your phone seems
slow, .troubleshoot the issue
Use apps : Get, delete, manage apps 69

Search the web
Search from anywhere
You don't have to leave your current app to search for the info you need. Use Google Assistant from any
screen to get search results and options for your next action.
To search:
1. Say ‘OK, Google’ or ‘Hey, Google’. (Make sure you've .) set up the launch phrase
Or swipe diagonally from either lower corner of the screen.
2. Tell the assistant what you're looking for. For example, search for a local restaurant by saying ‘Find
[restaurant name].’
3. Below the search result, touch options for related actions: make a call, get directions, read reviews and
more.
For more help with Google Assistant, .read Google's support information
Search with the widget
Type search terms
1. Touch the blank space on the Search widget.
2. Start typing a search term.
As you type, suggested terms appear.
3. Touch a suggestion to search for it.
Use voice search
Touch to call Assistant. Learn more.
Use camera to search for info
Touch , then follow onscreen instructions.
Use camera to search for info
You can use Google Lens with your camera to:
•Search for information about objects and surroundings: Learn about products, landmarks and
buildings, plants and animals, books and visual art
•Scan barcodes and QR codes: search for related information, open a website to purchase a product
•Digitise real-world text: Copy text to paste in another app, translate text, save business card
information to Contacts, create calendar events from dates on posters or billboards
To use Google Lens:
Use apps : Search and browse 70
1. On the Home screen, touch on the search widget.
Or open the Camera app and touch .
2. Frame the item you want to learn about and touch .
3. Touch the item you want to learn about.
For text, touch it to select it and use to select more.
4. In the list of results:
•Review results then touch a selection to view it or take the suggested action.
•To crop the area of your search for more accurate results, adjust the frame corners.
You can also use Google Lens on captured photos and screenshots. In the Photos app, open the photo
or screenshot then touch .
To learn more, .read Google's help
Search for nearby phone numbers
To find and call a nearby business:
1. Open the app.Phone
2. Touch or .
3. Say or type the name of place to call or a search term about the place (for example, ‘restaurant’).
You'll see a list of nearby search results.
4. Touch the place to dial its number.
If it doesn't work:
•Make sure is enabled.Location
•Touch > > , touch and turn it on .Settings Nearby places
Delete Google search history
To learn how, .read Google's help
Use search engine other than Google
To use a search engine other than Google:
1. Search for ‘search engine’ in Play Store and one of the apps.install
2. Open that app to search.
3. Optionally:
•Delete the Google search widget from your Home screen. If you can't delete it, use a different
launcher for your Home screen that doesn't include the widget.
•Install a browser to replace Chrome and make it your default browser.
•Turn off Google's collection of your information.
Use apps : Search and browse 71
Search your phone
Find an app
1. Swipe up from the bottom of the .Home screen
2. Touch .Search apps
3. Type the app's name.
4. If the app is on your phone, touch its icon to open it.
If the app isn't on your phone, touch to go to Play Store and install with one Search for more apps
touch.
Find a setting
1. Go to .Settings
2. At the top of Settings, touch .
3. Type your search term and touch on the keyboard.
4. In the list of search results, touch a setting to open it.
Find your phone number
1. Go to .Settings
2. Touch > .About phone Phone number
Find photos, videos, files
To find photos or videos on your phone, use the Photos app.
To find downloaded files, use the .Files app
Browse websites
Visit and bookmark websites
Your phone connects to your carrier's mobile network or to a Wi‑Fi network to access the Internet. To save
data charges on your mobile plan, .use a Wi Fi connection‑
1. Open the app.Chrome
2. Go to a site by touching the bar at the top and typing the address.
Use apps : Search and browse 72

3. On a web page:
•To bookmark it, touch > .
Or, touch > to put a on your Home screen.Add to Home screen shortcut
•To search for text on that page, touch > .Find in page
•To open a link, touch it.
•To see options for opening a link in a new tab and copying or sharing a link, touch and hold the link.
•To print the page, touch > > . If you don't see your printer listed, Share Print set up your print
service.
4. To return to the previous page, touch .
To learn more about browsing or managing bookmarks, open Chrome and touch > .Help & Feedback
Open and switch browser tabs
In the app:Chrome
•To switch tabs, touch the switcher icon .
•To open a new tab, touch the switcher icon , then touch .
Clear browsing history
1. Open the app.Chrome
2. Touch > .History
3. Touch CLEAR BROWSING DATA.
To learn more, .read Google's help
You can also review and delete your search history.
Change default browser
You can download other browsers from Play Store. After you've installed one, you can make it your default
browser.
1. Go to > .Settings Apps
2. Touch > .Default apps Browser app
3. Touch the app to use.
Use apps : Search and browse 73
About text and multimedia messages
Text messages - SMS
SMS (Short Message Service) messages contain text only. One text message can contain 160 characters;
when you near the limit, a counter appears. If you type more, your message is sent in a series of SMS
messages.
You can send one SMS message to multiple people, and replies are delivered in separate, not group,
conversation threads (unless you and your recipients have group messaging enabled).
SMS messages are included in most carriers' text messaging plans and do not use mobile data.
Multimedia messages - MMS
MMS (Multimedia Messaging Service) messages can include unlimited text plus a photo, picture slideshow,
video or sound file.
You can send one MMS message to multiple people using group messaging, containing text only or text and
media, and replies are delivered in group conversation threads to each person in the group.
MMS messages use mobile data and require a mobile data plan or pay-per-use payment.
Group messaging
Group messaging lets multiple people carry on a group conversation. All replies from recipients are
delivered to all recipients, in a group conversation thread.
Though you send one message to multiple recipients, you are charged for each message received. Group
messaging:
•Converts multiple-recipient SMS messages to MMS for all who can receive them
•Is available for MMS messages only
Note: Recipients who cannot receive MMS messages receive SMS messages instead and, if media is
attached, a link to download it over Wi-Fi (when offered by carrier). Replies are to the sender only, in an
individual conversation.
If you don’t want to receive replies in group conversations, you can in the turn off group messaging
Messages app.
Read, send messages
Read and reply to a message
When you receive a text message with the Messages app, you'll see in the .status bar
1. Swipe the status bar down and touch .
2. To respond, type in the text box and touch .
Use apps : Text messaging 74

3. Optionally:
•to open an attached photo or file, touch it.
•to , touch and hold it, then touch > .save an attachment Save
•if the message is important, .star it so you can find it later
•If the message is from an unassigned number, to associate a name with that create a contact
number.
Tips:
•You can control message notifications, changing the sound or turning them on/off.
•If you don't want multi-recipient SMS messages converted to MMS and want replies sent in separate
conversations (threads) to you only, .turn off group messaging
•To protect your privacy, you can .hide sensitive content for lock screen notifications
Send a message
1. Open the app.Messages
2. Touch .
3. Enter recipients, then type the message.
4. Optionally:
•To add an attachment, touch or .
•To add a smiley or other icons, touch on the on-screen keyboard.
•If you're using two SIMs and want to switch to the other to send the text, touch and select the
SIM.
5. Touch .
Tips for sending messages:
•To text your best friend with one touch from your Home screen, . Press and hold add a task shortcut
and drag to your Home screen.
•To change the text message reply to incoming calls, open the Phone app and touch > > Settings
Quick responses.
Add or save attachments
Add attachment
1. In the app, compose a or a .Messages reply new message
Use apps : Text messaging 75

2. Do one of the following:
•Touch & hold to start recording a voice message. When you're done, lift your finger.
•Touch to attach a photo or video or capture a new one. Touch to expand the viewfinder to
full screen, where you can switch to a selfie camera or capture a video.
•Touch for other types of attachments (emoji, GIF, your location, contacts).
3. Touch .
If you're having trouble attaching files, check that:
•mobile data is turned on.
•Your data plan supports MMS (multimedia messages).
Save the attachment you received
In the message, touch & hold the attachment, then touch > . Or, touch the attachment to open it and Save
look for save options.
If you don't save an attached photo or video, it is kept within the message only. So, if you delete the
message, you also delete the attachment. (You can try to .)recover recently deleted messages
View saved attachments
For photos or videos, the Photos app and touch .open Library
For other attachments, open the Files app.
Manage drafts
When you begin composing a text message reply or a new message with recipients, it is saved in your
message list as a draft until you send or delete it.
1. Open the message list and touch the conversation marked .Draft
2. Do one of the following:
•Finish composing the message and touch .
•Delete the characters in the text field to delete the draft.
Forward a message
1. Open the app.Messages
2. Open the conversation.
3. Touch & hold the message.
4. Touch > .Forward
Copy text from a message
1. Open the app.Messages
2. Open the conversation.
3. Touch & hold the message.
Use apps : Text messaging 76
4. Touch .
You can now it elsewhere, like in an email you're .paste composing
Manage, delete messages
Keep track of important messages
To access your important messages and conversations in the Messages app:
star messages you want to find later.
pin up to 3 conversations to keep these groups of messages at the top when you open the app.
Pin/unpin conversations
To pin a conversation:
1. Open the Messages app.
2. in your conversation list, touch & hold the conversation
3. Touch .
To unpin a conversation, touch & hold it, then touch .
Star messages
1. open the conversation that has the message you want to star.
2. Touch & hold the message.
3. Touch .
To remove a star, on the message, touch .
Find starred messages
To find starred messages across all conversations, go to the top of your conversation list and touch >
Starred.
To find starred messages within a specific conversation, open the conversation and touch > .Starred
Delete or archive texts
When you delete a message, you also delete any attached photos or videos. If you want the attachments, be
sure to save them before deleting the message.
•To delete a single message, open the conversation (thread) and touch and hold the message, then
touch .
•To delete or archive all messages in a conversation, touch and hold the conversation, then touch to
delete or to archive.
•To delete or archive multiple conversations, touch and hold each conversation, then touch or .
•To see archived messages, touch > .Archived
Use apps : Text messaging 77

Control notifications for text messages
If you use the Messages app:
1. Open the app.Messages
2. Touch > .Settings
3. If you have dual SIMs, touch .General
4. Touch and:Notifications
•Turn notifications on or off
•Change the sound
•Add or remove vibration
If you use a different messaging app:
1. Touch & hold the app's icon.
2. Touch > .App info Notifications
3. Make changes.
Tip: in your phone settings, you can by restricting text message notifications prevent interruptions
during hours you specify or from specific people.
Request text delivery reports
See whether recipients receive your messages by requesting delivery reports.
1. Open the app.Messages
2. Touch > .Settings
3. If you have dual SIMs, touch the SIM.
If you have one SIM, touch .Advanced
4. Turn on Get SMS delivery reports.
Turn group messaging on or off
Group messaging allows conversation participants to reply to all recipients in a single thread. If you do not
want multi-recipient SMS messages converted to MMS and want replies sent in separate threads only to
you, turn off group messaging.
This feature is not available in all countries.
To adjust the group messaging setting:
1. In the Messages app, touch > .Settings
2. If you have dual SIMs, touch the SIM.
3. Touch and select an option.Group messaging
Use apps : Text messaging 78

Change default messaging app
You can download additional messaging apps from Play Store. After you've installed one, you can make it
your default messaging app.
To select a different app to send and receive text (SMS) and multimedia (MMS) messages:
1. Go to > .Settings Apps
2. Touch > .Default apps SMS app
3. Touch the app to use.
Change text message reply to incoming calls
When your phone rings, you can drag towards to see a list of quick responses you can send by text
message instead of .answering the call
To edit these quick responses:
1. Touch .
2. Touch > .Settings
3. Touch .Quick responses
4. Touch one of the responses to edit it.
Get text messages on your computer
Set up Device Pairing
If you use the Messages app on your phone, you can see and send text messages on your computer.
Pair your computer and the Messages app on your phone by scanning a QR code:
•The QR code is unique to that computer.
•You can set up multiple computers, getting individual QR codes, but only one is active at a time.
To set up a computer:
1. Be sure your phone and computer are connected to the Internet.
2. On your phone, the app and touch > .open Messages Device Pairing
3. On your computer, go to https://messages.android.com.
4. Follow onscreen instructions to scan the QR code on the webpage with your phone.
Once paired, you'll see your latest conversations in your computer's browser.
Use apps : Text messaging 79

See and send messages
When you have unread messages, you'll see a red notification and number of unread messages in the
browser tab on your computer.
To send messages from your computer, your phone must be on and connected to the Internet.
Usual carrier fees for sending text messages from your phone also apply to messages sent from your
computer.
Sign out of Device Pairing
If you don't use Messages on a paired computer for 14 days, you're automatically signed out from that
computer for security reasons.
If you're using a shared or public computer, sign out when you're done.
To sign out from your phone:
1. Open the app.Messages
2. Touch > .Device Pairing
3. Do one of the following:
•Touch next to an individual computer to sign out of it.
•Touch .Unpair all devices
To sign out from the computer, at the top of the message list, click .
Use apps : Text messaging 80

Read, send, manage emails
Read email
If you've , you'll start receiving emails after your account with your phone. When you set up email syncs
receive an email , you'll see in the .notification status bar
1. To open email from a notification, swipe the status bar down and touch the notification:
•A single email notification opens the message directly.
•A multiple email notification opens the email list; touch an email to open it.
If you dismiss the notification and want to view the email later, the app.open Gmail
2. Do any of the following:
•To view other folders, touch from your email list.
•Attachments appear at the end of the email. You can them.view or save
•you can emails from your phone.print
Reply to or forward an email
1. Touch to reply to the sender. Or swipe to the end of the email and touch to reply to all recipients
or to forward.
2. Enter your message.
3. To copy someone on the email, in the To field, touch .
4. Touch .
Send new email
1. the app and touch .Open Gmail Compose
Or, press and hold , then touch . (If you send lots of emails, . Drag Compose add a task shortcut
Compose to your Home screen.)
2. Enter the recipient and your message.
3. To copy someone on the email, in the To field, touch .
4. Touch .
Add attachment to email
1. In the email you're composing, touch > to add a file stored on your phone, or attach one Attach file
saved on .Drive
2. Browse to the file and touch it to add it to the email. The attachment appears at the bottom of the
email.
Use apps : Email 81
Find emails
When you open the Gmail app, you see your Inbox.
To view sent email, drafts, recently deleted email and other categories, touch .
To search for emails, at the top of your email list, enter terms such as the topic or the sender's name.
Delete emails
To delete an open email, touch .
To delete multiple emails, go to your email list, touch & hold each message to delete, then touch .
To delete large quantities of email, sign in to your email account on your computer, and see your email
provider's help for more information.
Tips:
•To delete that you saved from emails, use the Files app.attachments
•You can also remove email accounts from your phone.
Learn more
For more help with Gmail, read .Google's support information
For help managing email from other providers, sign in to your email account on your computer and look for
the provider's instructions.
View email attachments
View attachments
Attachments appear at the end of an .email
To view or play the attachment, touch it.
If you see a message for which you can't open the attachment type, most file types have a free viewer that
you can use. In Play Store, search for the file type, then select and download an app.
Save attachments from email
In the email, touch on the attachment to download and save it to your phone or touch to save it in
Drive.
To view attachments later, open the app (go to Download) or the app.Files Drive
Delete attachments saved from email
1. the app.Open Files
2. Touch > Browse Downloads.
Use apps : Email 82
3. Do one of the following:
•to select one item, touch & hold it.
•To select multiple items, touch & hold the first one, then touch the others.
4. Touch .
Prevent previews of attachments
Attached photos or videos appear as thumbnails, showing a preview.
To see a generic thumbnail instead of a preview thumbnail until you open the file:
1. the app.Open Gmail
2. Touch > , then touch the account name.Settings
3. Touch > .Images Ask before displaying external images
Preview inboxes from the Home screen
To preview your inboxes, open emails or quickly start a new email, add the Gmail widget to your Home
screen.
With the widget, you can:
•Open a message. Touch the message.
•Compose a message. Touch .
•View more messages. Scroll down the list.
•Open the app. Touch the folder name at the top of the widget.
Add email signature
To add a signature automatically to the end of emails you :send
1. the app.Open Gmail
2. Touch > .Settings
3. Select the account.
4. Touch and edit the text you want to appear at the end of every email.Mobile Signature
Control email notifications
You can control whether you see notifications when you .receive an email
1. Touch & hold .
2. Touch > .Notifications
Use apps : Email 83

About the calendar
Keep track of upcoming events and get automatic reminders on your phone with your calendar. Google
calendars let you save all your events in one place, which is secure, synced and accessible from any web-
enabled device or computer when you've signed in to your account.
You can:
•Review existing events.
•Create new events.
•Control notifications for events.
Your calendar can automatically create new events based on your incoming Gmail messages. For example, if
you make restaurant reservations or book a flight, these events will show up automatically on your calendar;
you don't have to add them.
If you created multiple calendars within your , or if you have multiple Google accounts on Google account
your phone, you can control which events are with your phone.synced
Find calendar events
Open calendar events
You'll see in the to alert you of upcoming events. Just swipe the status bar down and touch status bar
the notification to see the event details in your calendar.
To see your list of upcoming events, the Calendar app.open
Tip: For an overview of your upcoming events from your home screen, a Calendar widget.add
Find your way around the calendar
To glance at the month view:
1. Touch the month's name.
2. Touch a date to jump to it and see its events.
To change the view:
1. In your calendar, touch .
2. Touch , , , or . This view remains the default until you change it.Schedule Day 3 days Week Month
From these views, you can:
•Read or edit event details. Touch the event to open it and touch to edit it.
•Add new events. Touch .
•Search your calendar. Touch .
Use apps : Calendar app 85

Control notifications for calendar events
1. Touch & hold the app icon.
2. Touch > .Notifications
3. Adjust notification settings.
If you have for the notification but you silence your phone, your phone won't play the assigned a ringtone
ringtone.
Tip: To automatically silence notifications during hours you specify, use .Do Not Disturb
Use apps : Calendar app 87
2. Enter the time to count down.
3. Touch .
4. Do any of the following:
•To pause the countdown, touch .
•To add a label to the timer, touch (helpful when using multiple timers).Label
•To add a minute to the countdown, touch .+ 1:00
•To reset the counter to the original time, touch > .Reset
•To add a timer, touch .
•To delete a timer, touch .
•To change the timer's sound, touch > > .Settings Timer sound
•If you leave this app, quickly return to it by swiping the status bar down with one finger to see the
timer notification and remaining time. To open the timer, touch the notification.
Tip: If you use timers frequently, . Press and hold , then drag to add a task shortcut Create new timer
your Home screen.
Use a stopwatch
Record your time.
1. In the Clock app, touch for the Stopwatch tab.
2. Touch .
3. Do any of the following:
•To pause the stopwatch, touch .
•To record laps (or multiple durations) while the stopwatch is running, touch .
•To reset the counter to zero, touch > .
•If you leave this app, quickly return to it by swiping the status bar down with one finger and
touching a control. To open the stopwatch, touch the notification.
Tip: If you use stopwatches frequently, . Press and hold , then drag add a task shortcut Start
stopwatch to your Home screen.
"Set date and time"
Change time format
1. Go to > > .Settings System Date & time
Use apps : Clock app 89

2. To change how times are displayed:
•To use military time such as 13:00, turn off and turn on Use locale default Use 24-hour format
.
•To use the time format of your current location, turn on .Use locale default
•To use 12-hour format, turn both and off .Use locale default Use 24-hour format
Set date and time automatically
1. Go to > > .Settings System Date & time
2. Turn and on .Set time automatically Use location to set time zone
Your phone automatically syncs with the local time (using the mobile network). The local time is used for
alarms and is displayed on the lock screen and other displays.
Set date and time manually
1. Go to > > .Settings System Date & time
2. Turn off .Set time automatically
3. To make corrections, touch and .Date Time
Switch time zones
1. Go to > > .Settings System Date & time
2. Turn off .Set time zone automatically
3. Touch . Then choose a regional time zone (which is applied to the current time).Time zone
Show multiple time zones
You can view multiple time zones in the Clock app, so you can co-ordinate plans with friends and colleagues
in other cities or stay in touch with family back home when you’re travelling.
1. Open the app and touch .Clock
2. To add time zones, touch , then select cities in the time zone you want to view.
Show home time zone
When travelling, you can view your home time zone in the Clock app.
1. Open the app and touch .Clock
2. Touch > .Settings
3. Turn on .Automatic home clock
Use apps : Clock app 90

Share photos and videos
You can wirelessly share one, multiple or all items from any Photos view, sending them as email or message
attachments, uploading to the cloud or using device-to-device connections such as Bluetooth.
In addition to sharing wirelessly, you can with a USB connection.transfer photos to your computer
To share wirelessly:
1. Open the app.Photos
2. Navigate to the thumbnail of the item that you want to share.
3. Select the item to share:
•To select one item, touch & hold its thumbnail.
•To select multiple items, touch & hold the first thumbnail, then touch the others to select them.
Tip: To clear all selections, touch at the top of the screen next to the number selected.
4. Touch and select the .way you want to share
Upload photos and videos
Back up automatically
1. Open the app.Photos
2. Touch your profile icon > Turn on backup.
3. Select back up and sync settings and touch .Confirm
You can any time.change back up settings
Adjust back up settings
1. Open the app.Photos
2. Touch your profile icon > > .Photos settings Back up & sync
3. Adjust settings as needed:
•To choose high quality or original size for uploads, touch .Upload size
•To back up items in your Download, Screenshots and third-party app folders, touch Back up device
folders.
•To back up items over your mobile network, touch , then adjust options for Mobile data usage
photos, videos and roaming.
Use apps : Photos app 91
Edit or delete contacts
Edit contacts
After creating a contact, you can change the name, photo and other contact information.
1. Open the app.Contacts
2. Touch the person's name.
3. Adjust settings as needed:
•To , touch > .assign a custom ringtone Set ringtone
•To send calls directly to voicemail, touch > . You can also .Route to voicemail block calls
•To edit contact info, touch , then touch a field to make changes, touch to change the photo,
or touch > to undo changes.Discard
Merge contacts
If you have two contacts for the same person, you can merge the information (including all emails and
phone numbers) into a single listing.
Automatically merge contacts
1. Open the app.Contacts
2. Touch .
3. Touch .
4. Touch .Merge duplicates
If you don't see this option, contacts can't be automatically merged.
5. Select Options to merge one or all duplicates.
Merge contacts manually
1. Open the app.Contacts
2. Touch & hold the primary contact to merge.
By default, this contact’s name is used for the new listing.
3. Touch the second contact.
4. Touch > .Merge
Tip: You can edit the primary contact name (for the merged listing), or delete or change other contact
information as needed.
Contacts, calls, voicemail : Contacts 94
Produkt Specifikationer
| Mærke: | Motorola |
| Kategori: | Smartphone |
| Model: | Edge 30 Pro |
Har du brug for hjælp?
Hvis du har brug for hjælp til Motorola Edge 30 Pro stil et spørgsmål nedenfor, og andre brugere vil svare dig
Smartphone Motorola Manualer

15 Januar 2025
12 Oktober 2024
23 September 2024
12 September 2024
20 August 2024
18 August 2024
15 August 2024
14 August 2024
13 August 2024
10 August 2024
Smartphone Manualer
- Smartphone SilverCrest
- Smartphone Acer
- Smartphone Amplicomms
- Smartphone Denver
- Smartphone Sencor
- Smartphone TCL
- Smartphone Sony
- Smartphone Samsung
- Smartphone Panasonic
- Smartphone Sony Ericsson
- Smartphone TP-Link
- Smartphone Philips
- Smartphone OK
- Smartphone LG
- Smartphone AEG
- Smartphone Doro
- Smartphone Gigaset
- Smartphone AT&T
- Smartphone Mitsubishi
- Smartphone Apple
- Smartphone Sharp
- Smartphone Konrow
- Smartphone Google
- Smartphone HP
- Smartphone Emporia
- Smartphone Sanyo
- Smartphone Easypix
- Smartphone Asus
- Smartphone Gigabyte
- Smartphone Toshiba
- Smartphone Kodak
- Smartphone InFocus
- Smartphone Lenovo
- Smartphone OnePlus
- Smartphone Nedis
- Smartphone Thomson
- Smartphone Hyundai
- Smartphone Nokia
- Smartphone Hisense
- Smartphone Hannspree
- Smartphone Trevi
- Smartphone Fysic
- Smartphone Mio
- Smartphone Blaupunkt
- Smartphone Facom
- Smartphone Medion
- Smartphone Intex
- Smartphone Haier
- Smartphone Huawei
- Smartphone Echo
- Smartphone Geemarc
- Smartphone BURY
- Smartphone Yarvik
- Smartphone Sunny
- Smartphone Telefunken
- Smartphone BenQ
- Smartphone Microsoft
- Smartphone Alcatel
- Smartphone Alecto
- Smartphone Plum
- Smartphone Olympia
- Smartphone Xiaomi
- Smartphone Krüger&Matz
- Smartphone Dell
- Smartphone RugGear
- Smartphone Intermec
- Smartphone Mustang
- Smartphone CAT
- Smartphone Oppo
- Smartphone NGS
- Smartphone Tesla
- Smartphone Polaroid
- Smartphone NGM
- Smartphone Wileyfox
- Smartphone Kyocera
- Smartphone Energy Sistem
- Smartphone Bush
- Smartphone Honor
- Smartphone Tiptel
- Smartphone Sagem
- Smartphone Nevir
- Smartphone TrekStor
- Smartphone Lava
- Smartphone Vivo
- Smartphone Vodafone
- Smartphone Overmax
- Smartphone Albrecht
- Smartphone Infinix
- Smartphone Archos
- Smartphone Alba
- Smartphone RCA
- Smartphone MaxCom
- Smartphone Pantech
- Smartphone SPC
- Smartphone ZTE
- Smartphone Verykool
- Smartphone Lark
- Smartphone Switel
- Smartphone Garmin-Asus
- Smartphone Amazon
- Smartphone HTC
- Smartphone GoClever
- Smartphone ITTM
- Smartphone ITT
- Smartphone Keneksi
- Smartphone BlackBerry
- Smartphone Evolveo
- Smartphone Audioline
- Smartphone Coolpad
- Smartphone Wiko
- Smartphone Xtreamer
- Smartphone Majestic
- Smartphone ESTAR
- Smartphone Phicomm
- Smartphone Umidigi
- Smartphone Telstra
- Smartphone ToughGear
- Smartphone BLU
- Smartphone CRUX
- Smartphone Bq
- Smartphone Lexibook
- Smartphone Prestigio
- Smartphone MyPhone
- Smartphone Realme
- Smartphone Kogan
- Smartphone Micromax
- Smartphone Cyrus
- Smartphone Energizer
- Smartphone CUSTOM
- Smartphone Manta
- Smartphone Tecdesk
- Smartphone Media-Tech
- Smartphone I.safe Mobile
- Smartphone Bea-fon
- Smartphone Aligator
- Smartphone Allview
- Smartphone AQISTON
- Smartphone Amplicom
- Smartphone Androidtech
- Smartphone Ecom
- Smartphone Sonim
- Smartphone Brigmton
- Smartphone Sunstech
- Smartphone Swissvoice
- Smartphone Nordmende
- Smartphone KPN
- Smartphone Wolder
- Smartphone Profoon
- Smartphone Hammer
- Smartphone GreatCall
- Smartphone Mpman
- Smartphone Logicom
- Smartphone Karbonn
- Smartphone Klipad
- Smartphone Iget
- Smartphone T-Mobile
- Smartphone JCB
- Smartphone Unnecto
- Smartphone Avus
- Smartphone Wolfgang
- Smartphone Aplic
- Smartphone Primux
- Smartphone UTStarcom
- Smartphone Zipy
- Smartphone Mediacom
- Smartphone Beafon
- Smartphone BGH
- Smartphone Billow
- Smartphone Ulefone
- Smartphone Benefon
- Smartphone Komu
- Smartphone Doogee
- Smartphone Tremay
- Smartphone Kurio
- Smartphone Piranha
- Smartphone Mobistel
- Smartphone Itel
- Smartphone Handheld
- Smartphone Fero
- Smartphone AT Telecom
- Smartphone O2
- Smartphone General Mobile
- Smartphone Syco
- Smartphone Pharos
- Smartphone Storex
- Smartphone Freeman
- Smartphone HomTom
- Smartphone Auro
- Smartphone Maxx
- Smartphone Posh Mobile
- Smartphone THL
- Smartphone NGM-Mobile
- Smartphone Nothing
- Smartphone Oukitel
- Smartphone NUU Mobile
- Smartphone HMD
- Smartphone Senifone
- Smartphone Tecno
- Smartphone Telme
- Smartphone UMi
- Smartphone Olitech
- Smartphone Mobiola
- Smartphone Meizu
- Smartphone Neffos
- Smartphone Gionee
- Smartphone TIM
- Smartphone Cubot
- Smartphone Leotec
- Smartphone Leagoo
- Smartphone NTech
- Smartphone Nubia
- Smartphone LeEco
- Smartphone Best Buy
- Smartphone Saiet
- Smartphone Bluebird
- Smartphone Jitterbug
- Smartphone CSL
- Smartphone POCO
- Smartphone Opis
Nyeste Smartphone Manualer

20 Februar 2025

30 Januar 2025

15 Januar 2025
13 Januar 2025
13 Januar 2025
12 Januar 2025
12 Januar 2025
12 Januar 2025
12 Januar 2025
12 Januar 2025