Nelson 8518 SmartZone EZ Manual
Nelson
Vandingscomputere
8518 SmartZone EZ
Læs nedenfor 📖 manual på dansk for Nelson 8518 SmartZone EZ (173 sider) i kategorien Vandingscomputere. Denne guide var nyttig for 23 personer og blev bedømt med 4.5 stjerner i gennemsnit af 2 brugere
Side 1/173

SmartZone™EZ
INSTALLATION AND PROGRAMMING GUIDE
For Models:
8504
8506
8508
8512
8514
8516
8518
8522
8574
8576
8578
8582

1
THANK YOU for purchasing the SmartZoneTM EZ electronic irrigation
controller. You’ll soon discover why we’ve dubbed it the “ ”. We are EZ
condent it will be the easiest and most reliable controller you will ever use.
It’s so “EZ”, you’ll probably be able to install and program this feature-packed
controller without instructions. However, before installing and programming
the controller, we recommend you read these instructions carefully to take full
advantage of all the SmartZoneTM EZ has to offer.
If you have questions, problems or comments on your new SmartZoneTM EZ,
please call our Technical Services Department toll-free at 1-800-NELSON8.
Leaders in Turf Irrigation Since 1911
NOTE: In our efforts to continually improve and update our products, features
and specications in this manual may change without notice.

TABLE OF CONTENTS
Features 3
Installation 4-9
Terminal Strip 5
Connecting Master Valve or Pump-Start Relay 5
Wiring the Transformer 5-6
Connecting Rain/Moisture Sensor 7
Connecting Battery & Resetting Controller 8-9
Programming the SmartZoneTM EZ 10-19
Programming Overview 10
Front Panel Layout 11-12
Set Time of Day 13
Set Current Day 13
Set Today's Date 13
Select Zones and Set Their Run Times 13-14
Set Start Times 15
Set % Water Budget 15
Scheduling 16-17
Set Water Days Scheduling Option 17
Set Odd/Even Day Scheduling Option 18
Set Interval Scheduling Option 18
Program Review 19
Turning the Controller Off 19
Advanced Features 20-21
Run A Zone Manually 20-21
Run A Program Manually 21
Run A 3 Minute Test (Syringe) 21
Technical Data/Specications 22-24
Troubleshooting/Service 25
FCC Rules 26
Warranty 27
2

FEATURES
• Professional grade
• Easy to use dials and buttons for programming
• Large and clear LCD (Liquid Crystal Display)
• Non-volatile memory for program retention without AC power or
batteries
• 3 independent programs
• 3 start times per program (9 total starts)
• 3 scheduling options (7 day calendar, odd/even, 1-30 day interval)
• 3 test cycles (manual, cycle, 3 minute test)
• Water budgeting
• Programmable run times from 1 minute to 9 hours 59 minutes
• Exclusive Select&AdjustTM programming
• Internal transformer
• 2 year warranty on materials and workmanship
3

INSTALLATION INSTRUCTIONS
NOTE: Instructions are for indoor or outdoor use.
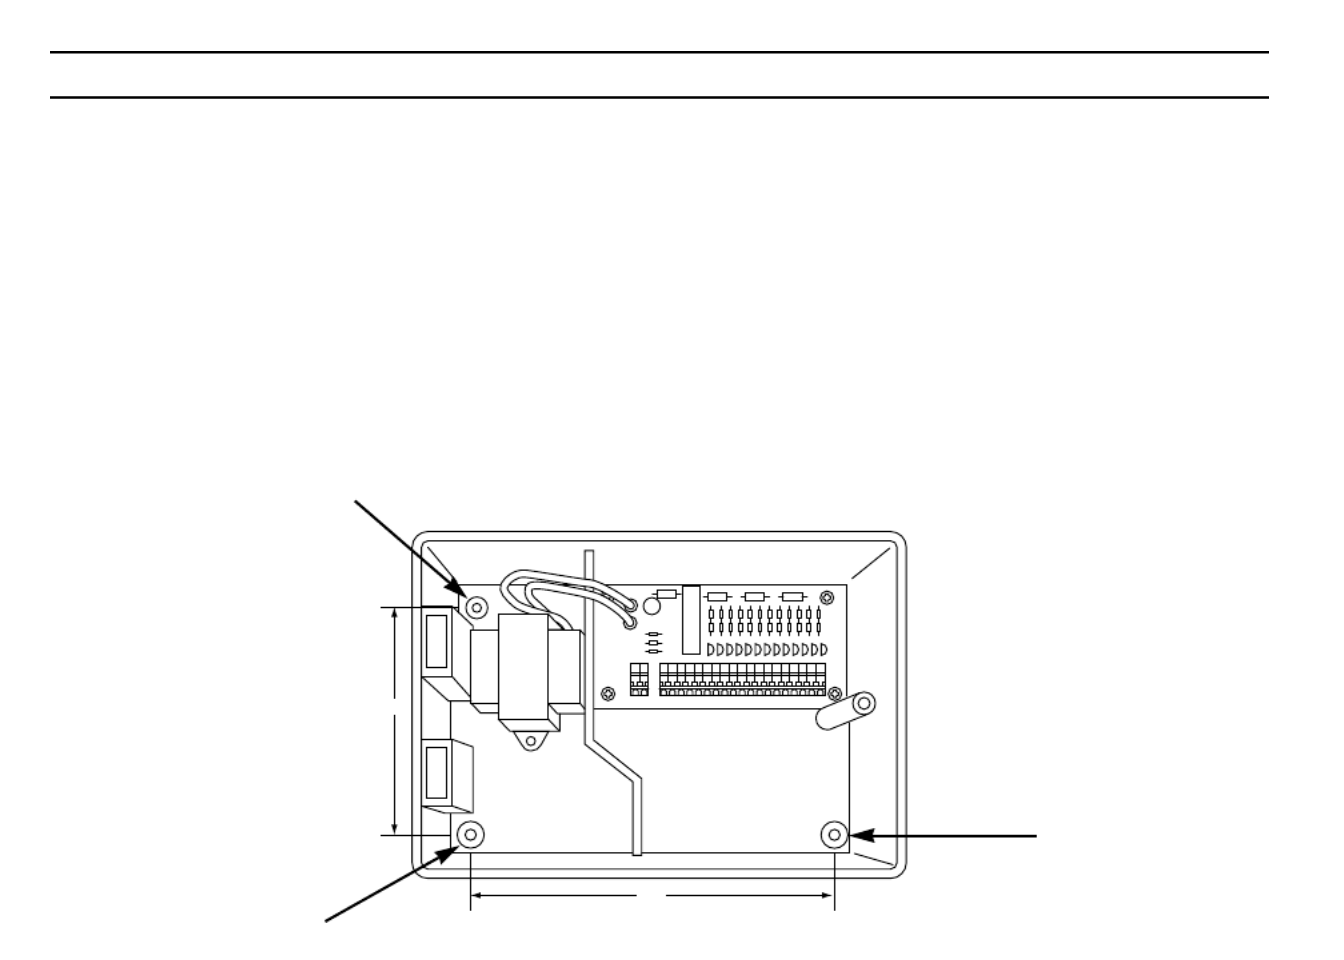
Find a location near a 110V (220V for 8574, 8576, 8578, and 8582 models) outlet or a 110V wiring
source. Install the SmartZoneTM EZ near eye level if possible. Open the face panel by
loosening the panel locking screw and pulling the tab on the right of the front panel to swing the
panel open on its hinges. Use the three holes in the case to mark and pre-drill pilot holes in the
wall. The left two hole guides in the SmartZoneTM EZ are vertically aligned for mounting the
controller to a stud. (See Figure 1) Insert screws through the holes in the case and screw each
into the corresponding pilot hole in the wall.
NOTE: The front panel can be removed to aid in installation by removing the ribbon
connector from the interconnect board and pulling the front panel off its hinges.
FIGURE 1
4.375"
6.875"
4

INSTALLATION INSTRUCTIONS
Terminal Strip
All zone, pump and sensor wire connections made inside the SmartZoneTM EZ utilize tool-less
connectors. Press on the terminal strip lever with a pen or small screwdriver and insert the wire
into the bottom. The terminal strips in the SmartZoneTM EZ controller accept 12 AWG (4.8mm)
wire or smaller.
Connecting Master Valve or Pump-Start Relay
The SmartZoneTM EZ is equipped with a shared circuit to operate either a pump-start relay or a
master valve. Connect one wire from the pump-start relay to COM (common) on terminal strip,
the other to PMP/MV (pump/master valve) on the terminal strip. Refer to the pump-start relay
manufacturer’s instructions for specic installation details.
Wiring the Transformer*
*110 VAC in United States, Canada and Mexico; 220 VAC in Europe and Australia
NOTE: Refer to and follow local codes if different from these instructions.
CAUTION:
Disconnect 110V (220V for 8574, 8576, 8578, and 8582 models) power source
before wiring transformer. Complete all wiring and installation before connecting
the transformer to power source. This will avoid accidental shorting which could
damage the controller.
5

INSTALLATION INSTRUCTIONS
For models 8504, 8506, 8508, 8512
With front panel open to provide access to the internal transformer, bring 110V wires up through
1/2" conduit hole in the bottom of the case. (For eld connection, AC wires must have an
insulation rated at 75°C minimum). Conduit should be secured to the case (follow local codes).
Attach AC wires to transformer wires using wire nuts. Also, ensure earth ground wire is attached
to green with yellow stripe ground wire. Please check local codes for the grounding requirements
in your area. Bundle wire within cable tie loop and tighten cable tie to prevent loose wiring from
touching secondary circuits.The transformer is now wired. DO NOT turn on power yet.
For models 8574, 8576, 8578, 8582
With front panel open to provide access to the internal transformer, bring 220V wires up through
1/2" conduit into the left hole in the bottom of the case. (For eld connection, AC wires must have
an insulation rated at 75°C minimum). Conduit should be secured to the case (follow local codes).
Connect AC wires to connector provided and tighten screws. Observe proper polarity of wires as
you install them (ie. L1, L2 and ground). Bundle wire within tie loop and tighten cable tie to prevent
loose wiring from touching secondary circuits. The transformer is now wired. DO NOT turn on
power yet.
NOTE: Failure to ground unit properly may cause severe damage to the controller and/or
personal property and will void warranty.
For models 8514, 8516, 8518, 8522:
The transformer has been pre-wired with a 6 foot AC power cord with grounding plug. We
recommend that you do not alter this connection. Replacement of this cord must follow local
codes and in all cases the unit must be properly grounded.
6

INSTALLATION INSTRUCTIONS
Connecting Rain/Moisture Sensor
The SmartZoneTM EZ is equipped to operate a sensor with normally-closed leads. The sensor
port on the SmartZoneTM EZ is the rst tool-less connector on the interconnect board (see Figure
2). To install a sensor, remove the factory-installed jumper wire from the sensor connector on the
terminal strip and insert the sensor wires. Refer to the sensor manufacturer’s instructions for
specic installation details.
FIGURE 2
If a sensor has suspended watering, the sensor indicator segment will appear on the LCD .
The symbol will go off when the sensor has dried out or when the controller is set in one of the
manual modes (see pages 23-25). The SmartZoneTM EZ will resume operation based on the
selected program. 7
Sensor Port

INSTALLATION INSTRUCTIONS
Connecting Battery and Resetting Controller
Connect one 9V Alkaline battery to the battery clip and insert into the battery holder on the back of
the front panel. The battery enables the SmartZoneTM EZ to be programmed without AC power
and maintains the real time clock in the event of a power outage. If a battery is not installed, the
controller will lose real time in the event of a power outage. The battery should be replaced once
a year.
CAUTION:
Use a 9V alkaline battery only. A 9V NiCad battery may leak or explode causing
personal injury or property damage.
After installing the battery, press the black reset button on the back of the front panel to reset the
controller (does not affect program(s)). To reset the controller to its default settings, press both the
black reset button and the key simultaneously. Release reset button before releasingSELECT
select key. Close the front panel, being sure not to damage wires. If wires are stiff, you may
nd it helpful to pre-bend them. Tighten the panel screw to secure the front panel to the case.
Plug in the AC cord for the transformer or turn on the power source.
NOTE: Since all programs are stored in non-volatile memory, you will not lose program
settings during a power failure - even if there is no battery installed.
8

INSTALLATION INSTRUCTIONS
Figure 3
You’re now ready to start programming!
9
Reset Button

PROGRAMMING INSTRUCTIONS
Programming Overview
Before programming the SmartZoneTM EZ, it may be helpful to become familiar with some general
programming guidelines:
• If a segment(s) on the LCD is ashing, it means that it can be changed by the user.
•When using or keys, hold the button three seconds to start a fast scroll.
• Be sure the appropriate program letter is displayed when you are programming; program
changes are specic to the program letter displayed on the LCD.
• There is no “ENTER” key. Key-presses and dial settings are stored automatically for you.
• If you make a programming change while a program is running, the program terminates
immediately. The new program starts at the next start time scheduled.
• When not running, the controller displays the current time and the current day.
• During manual operations, there is a 10 second delay before the operation begins. During
this time, you can change your settings. Each time you make a change, the delay resets to
10 seconds.
•MANUAL, CYCLE, and 3 MINUTE TEST procedures only operate with the Program dial set in
the AUTO position.
• After a test procedure runs, the controller reverts back to the AUTO procedure and runs the
next program scheduled.
• The test procedures ignore the sensor connection; this allows you to water or run your
program even if the sensor has suspended operation.
10

PROGRAMMING INSTRUCTIONS
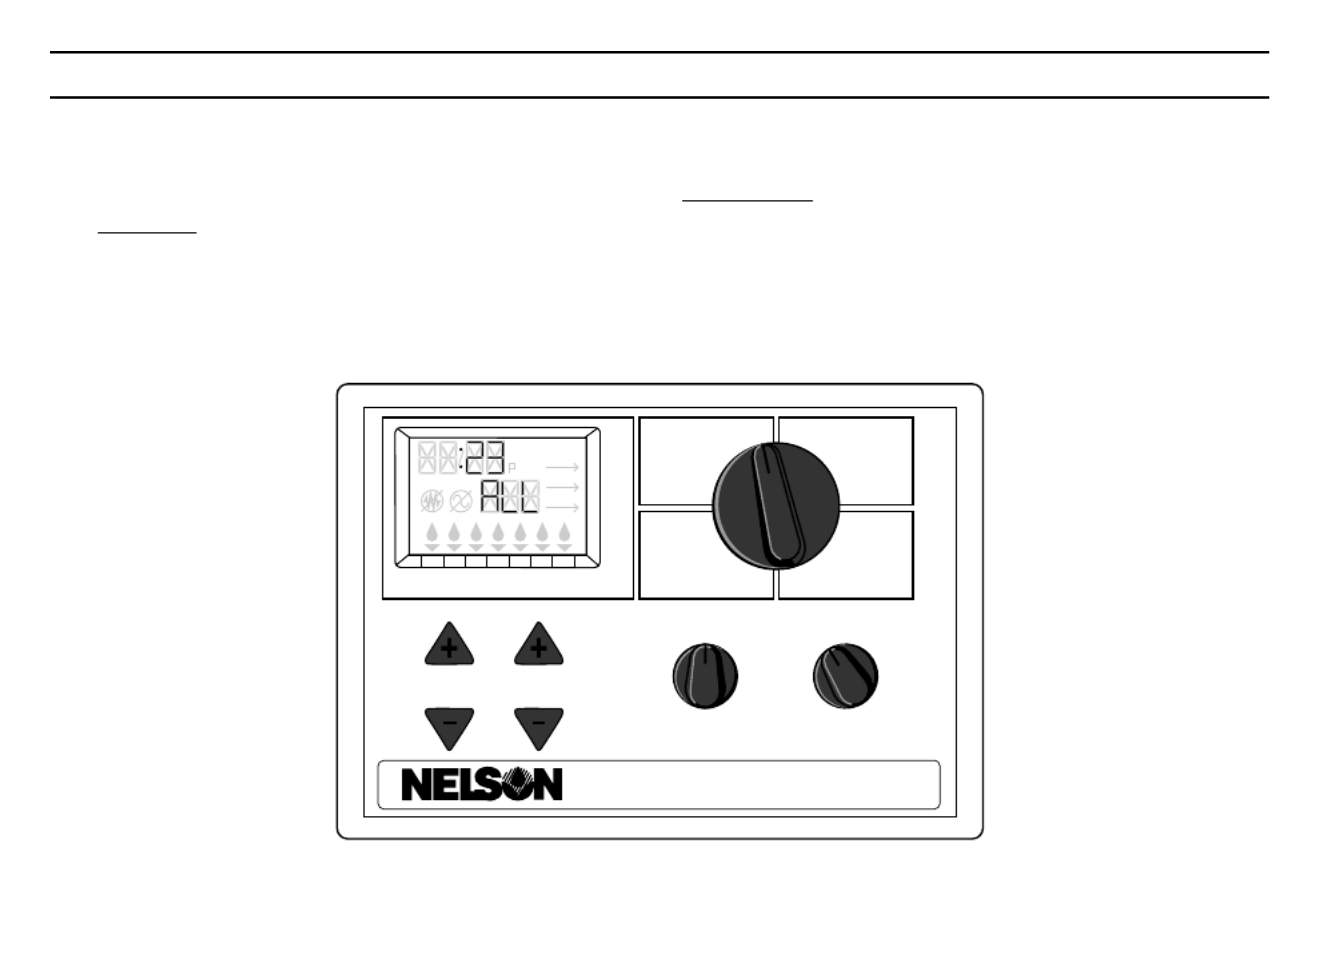
Front Panel Layout
Looking at the front panel (see gure 4), you see a large LCD, 4 rubber buttons, one large rotary
dial, and two small rotary dials. The rubber buttons are marked “SELECT ADJUST” and “ ” and are
the heart of Nelson’s exclusive SELECT&ADJUSTprogramming. The keys are identied
with for increasing or decreasing the segment you’re working on.
SELECT&ADJUST SELECT works on the principle that you rst what you want to set, and
ADJUST the variables of what you selected. For example, if you want a run time of 10 minutes
on zone 5, you would use the keys to select zone 5 and, once on zone 5, youSELECT
would use the keys to set the run time to 10 minutes.ADJUST
There are instances when only or only is required. They will be explained inSELECT ADJUST
this guide where appropriate.
A Rule of Thumb: SELECT will select zones or a particular
start time (1,2 or 3). ADJUST will adjust Times, Dates, and % Water Budget.
See the hang
card inside the lid of the SmartZoneTM EZ for a quick reference on what buttons to use for
different dial positions.
11

PROGRAMMING INSTRUCTIONS
FIGURE 4
NOTE: The MODE dial must be in the “Program” position.
NOTE: Every time the or key is pressed, the time will increase or decrease one
minute. Hold the or key for three seconds to initiate a fast scroll.
NOTE: Please refer to the Technical Data section for an explanation of the LCD segments
12
Time
Current Day
Date
Manual
Semi-Auto
3 Minute TestInterval
Odd/Even
AUTO OFF
Program
ProgramMode
A C
B
Water Days
% Water
Budget
Start Times
Zone/Run Time
ODD
EVEN
INT.
S SFTHWTM
•
•
•
•
•
•
•
•
•
•
•
•
•
•
•
•
•
•
Select Adjust
®SmartZone™ EZ
A B C
M

PROGRAMMING INSTRUCTIONS
Set Time of Day
Turn the large dial to the position. Press to scroll to the correct time. There isTIME ADJUST
no A.M. indicator.
Set Current Day
Turn the large dial to the CURRENT DAY SELECTposition. Press to position the current day
indicator over the current day. will advance the indicator to the right;SELECT
SELECT will advance the indicator to the left.
Set Today’s Date
Turn the large dial to the DATE ADJUSTposition. Press keys to scroll to the current date.
The YEAR will automatically advance upon rolling over 12/31.
NOTE: A DATE is only required if you intend to use ODD/EVEN scheduling or to set a start
date, other than the current date, for INTERVAL scheduling.
Select Zones and Set Their Run Times
A zone run time determines the duration a zone will run.
Turn the large dial to the ZONE / RUN TIME SELECTposition. Press to select the zone you
want for the selected program (A, B, or C). With the zone number displayed on the LCD, press
ADJUST to adjust the RUN TIME for that zone. RUN TIMES can be set from 1 minute to 9
hours 59 minutes. Continue selecting zones and adjusting their run times until you have all the
zones you want in the selected program.
13
PROGRAMMING INSTRUCTIONS
After the last zone and before the rst zone, a RUN TIME summation is provided. This is useful
for determining the total run time for a program. The LCD displays the letters “ALL” and a total
RUN TIME is displayed. The time displayed is a summation of all the RUN TIMES for the
selected program (100% water budget). (ex. A program has a run time of 5 minutes on zone 1; 12
minutes on zone 2; and 6 minutes on zone 4. The display at this position displays ALL and a run
time of 23 minutes).
FIGURE 5
14
Time
Current Day
Date
Manual
Semi-Auto
3 Minute TestInterval
Odd/Even
AUTO OFF
Program
ProgramMode
A C
B
Water Days
% Water
Budget
Start Times
Zone/Run Time
ODD
EVEN
INT.
S SFTHWTM
•
•
•
•
•
•
•
•
•
•
•
•
•
•
•
•
•
•
Select Adjust
®SmartZone™ EZ
A B C
M

PROGRAMMING INSTRUCTIONS
Set Start Times
A START TIME is the time of day a program will start running. The SmartZoneTM EZ allows three
start times per program.
Turn the large dial to the START TIMES SELECTposition. Press to select the start time you
want to set (1, 2, or 3). Press to set the time of day the program will start. RepeatADJUST
as needed.
Set % Water Budget
% WATER BUDGET changes the duration of run times in a program by the percentage entered 5
- 200% (i.e., a 10 minute run time at 50% water budget will run 5 minutes). This feature is useful
when changes in weather occur. If it is unusually dry, you may want to extend your run time for
each zone in a program. With % Water Budget, you can change one number, and all run times in
the program are adjusted.
Turn the large dial to the % WATER BUDGET position. A % symbol will appear on the LCD to let
you know you are working on the % Water Budget amount. Press to choose theADJUST
desired percentage amount.
15

PROGRAMMING INSTRUCTIONS
If water budget is set for 110% or greater, the SmartZoneTM EZ will split the run time in half to reduce
runoff. Half of the calculated run time will operate for each zone in that program, followed by the
second half of the run time for each zone.
Remember, % Water Budget is changeable by program. If you have programming in A, B, and C, you
must enter three water budget values if you want every program to be changed.
SCHEDULING
A quick note on scheduling and the SmartZone
TM
EZ …
The SmartZoneTM EZ controller has three scheduling options:
• WATER DAYS, or daily, lets you choose which days of the week you want to water (i.e.,
Monday, Wednesday, Friday only).
• ODD/EVEN tells the controller to water on either the odd or even days of the month (i.e., the
controller will water on the 31st and the 1st when an ODD schedule is chosen).
•INTERVAL waters every X number of days (from 1 to 30 days) (i.e., water every 3 days,
water every 10 days, etc.). A value of 1 in an interval schedule means to water every day.
When using the interval option, you have the exibility to tell the controller what day to start
the interval program on (up to 30 days out).
16

PROGRAMMING INSTRUCTIONS
NOTE: The MODE dial must be in the “Program” position to set a schedule.
When the dial is set to any of the scheduling options, the LCD will display the currently scheduled
program (default is a 1 day interval schedule with today’s date for a start date). Be sure the
PROGRAM dial is set on the program you want to change (A, B, or C) and that you want to
change the current schedule. A scheduling option is chosen after you press a button, either
SELECT or ADJUST. The old schedule is replaced with the new one. If you want the old
schedule back, it’s easy to reprogram with the following procedures.
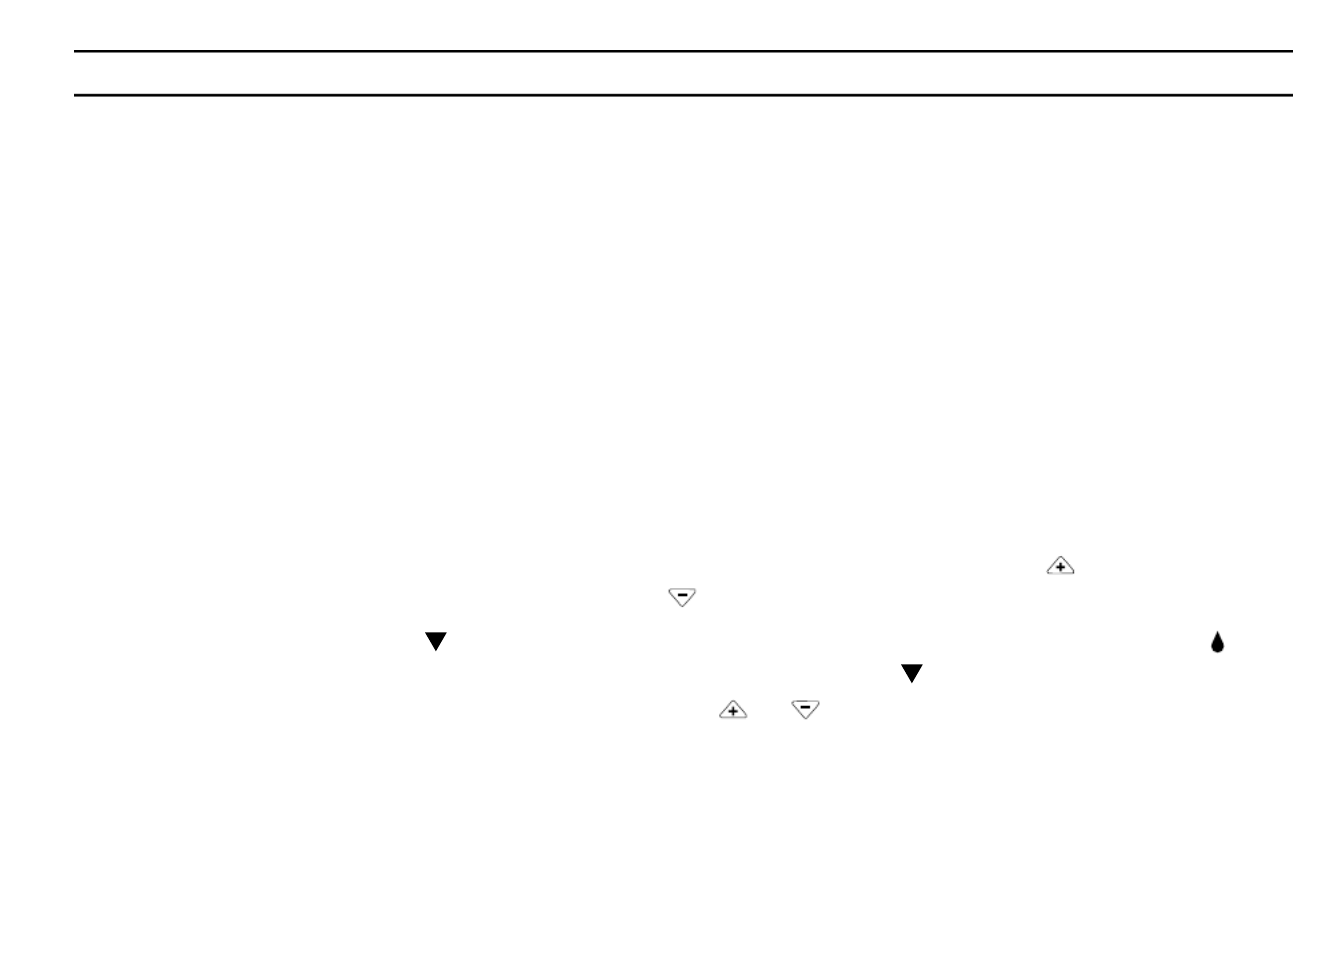
Set Water Days Scheduling Option
Turn the large dial to the WATER DAYS scheduling option. The last scheduling option chosen for
the current program or the default 1 day interval scheduling option will appear on the LCD. Press
the button to select that day for watering or press for non-watering days.SELECT SELECT
A ashing indicator appears over the day you’re about to set. Rain drops appear over
selected days to water. The indicator automatically moves one day to the right after a SELECT
or key press. Continue selecting or deselecting the days you want the controller to water
until you have your 7 day calendar set.
NOTE: Programming a WATER DAYS schedule deletes any other schedule for the selected
program.
17
PROGRAMMING INSTRUCTIONS
Set Odd/Even Day Scheduling Option
Turn the large dial to the position. The last scheduling option chosen for the currentODD/EVEN
program or the default 1 day interval scheduling option will appear on the LCD. To set either an
odd or an even schedule press the button (a date must be set for odd/evenSELECT
watering). An arrow will appear on the LCD next to the appropriate schedule (Odd or Even). The
SELECT buttons act as toggle keys and will toggle between odd or even.
NOTE: Programming an ODD/EVEN schedule deletes any other schedule for the selected
program.
Set Interval Scheduling Option
Turn the large dial to the INTERVAL position. The last scheduling option chosen for the current
program or the default 1 day interval scheduling option appears on the LCD. Press SELECT
to set the interval days between watering (1-30). The date displayed is day one of the interval
schedule. (today’s date if one has been set). As needed, change the date for day one of the
interval schedule with (can only be set up to 30 days out).ADJUST
Repeat the above procedures for each program (A, B, or C) you require.
That’s it! Your SmartZoneTM EZ is now programmed. Turn the dial to the MODE AUTO position to
run the program you entered.
NOTE: Programming an ODD/EVEN schedule deletes any other schedule for the selected
program.
PROGRAMMING INSTRUCTIONS
18

PROGRAM REVIEW
To review the current program, Turn the dial to the position and turn the largeMODE PROGRAM
dial to the setting you wish to review (i.e., turn the large dial to TIME to review the time set for the
controller). When you need to view different zones or run times (1, 2, 3), use the SELECT
buttons only.
NOTE: Since you are in the program mode, the potential exists to change the program
accidentally.
TURNING THE CONTROLLER OFF
There are instances when you’ll want to suspend watering, either for short periods (while it’s
raining if you don’t have a sensor connected), or long periods (during winter). To accommodate
this, the SmartZoneTM EZ can be turned “Off”. Turn the dial to the position. ThisMODE OFF
suspends all watering operations (including manual/test procedures) from operating. The clock
continues to maintain the current time and date and your program(s) is retained until you want to
run your program(s) again. To run your program, turn the dial back to the MODE AUTO position.
NOTE: The non-volatile memory of the SmartZoneTM EZ will maintain your program without
power. If a battery is not present and AC power is lost, the real time for the clock
will be lost. The time will need to be reprogrammed.
19

ADVANCED FEATURES
The SmartZoneTM EZ incorporates three manual/test procedures for checking the function of the
controller or allowing you to bypass the current program to water immediately. The following
section will show you how to set up the controller to:
• run a zone manually
• run a program manually
• run a 3 minute test of every programmed zone
NOTE: All test procedures are run with the MODE dial in the AUTO position. This allows the
controller to reset to the AUTO setting after running a manual/test procedure. It also
allows you the ability to walk away from the controller after setting up a manual/test
procedure and not have to come back to reset the controller to AUTO.
NOTE: All manual/test procedures ignore the sensor connection. Therefore, you can water
utilizing one of the manual/test procedures even if the sensor has suspended your
scheduled program.
Run a Zone Manually
Turn the large dial to the MANUAL position. The default of zone 01 and 00:10 minutes will be
ashing (recall that this means you can change them). Press to select the zoneSELECT
number that you want to run. Press to set the run time for the selected zone. TheADJUST
controller will delay 10 seconds before starting the zone.
20

ADVANCED FEATURES
The SmartZoneTM EZ incorporates Nelson’s ManualAdvancefeature in the MANUAL
procedure. ManualAdvance allows you to cease the currently running zone and immediately
advance to any new zone you select. With the MANUAL procedure running a zone, press
SELECT to advance to a new zone. The last entered run time will be displayed. Press
ADJUST to enter a new run time for the new zone (the controller will delay 10 seconds before
starting the new zone).
Run a Program Manually
Turn the large dial to the position. The current program letter will ash. To change to aCYCLE
different program, turn the PROGRAM dial to the desired program (A, B, or C). The controller will
delay 10 seconds before starting the selected program. After running, the controller resets to the
AUTO procedure.
NOTE: CYCLE runs your current program immediately. Changes cannot be made to the
program in the CYCLE procedure.
Run a 3 Minute Test (Syringe)
Turn the large dial to the 3 MINUTE TEST position. A B C will ash on the LCD (they cannot be
changed). This is to let you know the controller will review all three programs and run a 3 minute
test on only those zones that have been programmed. We call this SmartSyringe .
This feature allows the controller to skip zones that have not been programmed. These may be
zones that are not hooked-up, hence, saving your pump (if equipped).
21

TECHNICAL DATA
1. Transformer
24 VAC internal transformer; 20 VA, .83A for zones and logic. The transformer can run a pump or
master valve and one zone valve, maximum.
2. Surge Protection
7 joule MOV across secondaries. (see Circuit Breaker below)
3. Sensor Operation
The SmartZoneTM EZ is congured to operate the controller with or without a sensor. Sensors
must have normally closed connections (leads). The factory-installed jumper wire must be in
place if no sensor is used.
4. Zone Lines
The SmartZoneTM EZ will operate a maximum of two (2) outputs concurrently, providing one is the
pump/master valve. Each zone output can operate one solenoid.
I inrush .52A max
I hold .40A max
22

TECHNICAL DATA
5. Temperature Range
Operating: -5 to +55 C (23 to 131 Fahrenheit)° ° ° °
Storage: -30 to +85 C (-22 to 185 Fahrenheit)° ° ° °
6. Display
7. Batteries
One 9V Alkaline battery is required. .Do not use NiCad batteries
8. Program Retention
Non-volatile memory is used to retain programs when battery and AC power are lost. The
non-volatile memory is updated when the program is changed and at 5 minute intervals.
Non-volatile memory will operate for a minimum of 5 years, worst case.
9. Case Dimensions (approx.)
6" H x 9.5" W x 3.75" D (lid is removable without tools)
23
ODD
EVEN
INT.
Su SFTHWTM
A B C
M
Time, Date, Run Time, Start Time,
% (symbol), Interval start date
Sensor suspend symbol
No AC power symbol
Current day
Program letter A, B or C
PM indicator
Year, Zone number, Start Time
number, Water Budget %,
Interval number
Water days

TECHNICAL DATA
10. Default Program
12:00 a.m. (there is no “a.m.” indicator on the LCD)
Sunday
Date is 01/01 96
No Run Times (zone 01, —:—)
No Start Times (start number 01, —:—)
100% Water Budget
Every day watering schedule (Interval = 01; Start date = today)
Mode dial is at OFF position
Program dial is on A program
3 second delay between zones (cannot be changed)
11. Circuit Breaker
An electronic poly-switch is incorporated on the interconnect PCB of the controller. This type of
circuit breaker does not require resetting or replacement by the user.
24

25
SYMPTOM POSSIBLE CAUSE SOLUTION
no output to zone, pump or • AC disconnected • check AC source, if AC is not detected
master valve by the controller, the no AC indicator
will be lit
no AC and blank display • no battery or dead battery • replace battery and press reset
LCD is blank • no AC and no battery • install battery to regain use of display,
check AC to ensure output to eld
• ribbon cable is disconnected • ensure ribbon cable between the front
panel and controller board is
connected at both ends
LCD is scrambled or is missing • controller needs to be reset • press the reset button. If still
segments scrambled, press the reset button and
the select + button at the same time
(returns to factory defaults)
“M-X” appears on the LCD when • MODE dial is in program position • position the MODE dial in the AUTO
trying to run a zone manually position to run a zone manually
“C-X” appears on the LCD when • MODE dial is in program position • position the MODE dial in the AUTO
trying to CYCLE a program position to cycle a program
“S-X” appears on the LCD when • MODE dial is in program position • position the MODE dial at the AUTO
trying to run a 3 MINUTE TEST position to run the 3 Minute Test
procedure
The controller won’t run a • No programs on A, B, or C • enter a program with run times for the
3 MINUTE TEST zones you need. The 3 MINUTE TEST
only runs those zones with programmed
run times on them
Er1 is displayed on the LCD This is a communications error between the • press reset. If the error does not clear,• micro-controller and the non-volatile memory replace the board
Er2 is displayed on the LCD This is telling the user there is more than 24•
• Review your total run times on all programs
hours of run time programmed and correct - OR -
• Press reset and select + at the same
time to return to factory default settings.
REPLACEABLE PARTS
• Transformer • 6' AC cord
• Interconnect ribbon • Interconnect board
• Front panel
TROUBLESHOOTING/SERVICE

FCC RULES
This electronic irrigation controller generates and uses radio frequency energy and if not installed and used properly, that is, in
strict accordance with the manufacturer’s instructions, may cause interference to radio and television reception. It has been type
tested and found to comply with the limits for a Class B computing device in accordance with the specications in Subpart J of
Part 15 of FCC Rules, which are designed to provide reasonable protection against such interference in a residential
installation. However, there is no guarantee that interference will not occur in a particular installation. If this controller does
cause interference to radio or television reception, which can be determined by turning the controller off and on, the user is
encouraged to try to correct the interference by one or more of the following measures:
Reorient the receiving antenna
Relocate the controller with respect to the receiver
Move the controller away from the receiver
Plug the controller into a different outlet so that the controller and receiver are on different branch circuits
If necessary, the user should consult the dealer or an experienced radio/television technician for additional suggestions. The
user may nd the following booklet prepared by the Federal Communications Commission helpful:
“How to Identify and Resolve Radio-TV Interference Problems”
This booklet is available from the U.S. Government Printing Ofce, Washington, DC 20402. Stock No. 004-000-00345-4.
CANADIAN RADIO INTERFERENCE REGULATIONS
NOTE: This digital apparatus does not exceed the Class B limits for radio noise emissions
from digital apparatus set out in the radio interference regulations of the Canadian
Department of Communications.
26

WARRANTY
Limited Warranty
L.R. Nelson Corporation (“Nelson”) warrants all electronic products to be free of defects in material and workmanship for a period of two (2) years from the original date of purchase. In
the event of such defects, Nelson will repair or replace, at its option, the product or the defective part.
This warranty does not extend to damage to a Nelson product or part resulting from accident, misuse, alteration, neglect, abuse, improper installation or normal wear and tear, or to
exterior appearance and color. This warranty extends only to the original user of the Nelson product.
If defect arises in a Nelson product or part within the warranty period, you should contact your installing contractor, Nelson retailer, distributor, or L.R. Nelson Corporation at one of the
following locations:
One Sprinkler Lane 1961 Miraloma Ave. 3462 Maggie Blvd.
Peoria, IL 61615 Suite B Orlando, FL 32811
(309) 690-2200 Placentia, CA 92670 (407) 648-1020
Fax (309) 692-5847 (714) 993-0496 Fax (407) 648-0924
Fax (714) 993-0496
Nelson may, at its option, require that the product or part be returned to a Nelson service point or your retailer or distributor. Nelson will determine whether the claimed defect is covered
by the warranty. If coverage is found, the product will be repaired or replaced. Please allow 4 to 6 weeks for completion of repairs or replacement and return of the product or part. If a
product or part is replaced, the replacement is warranted only for the remainder of the original product or part warranty period.
This warranty gives you specic legal rights, and you may also have other rights which vary from state to state. L.R. Nelson Corporation does not authorize any person to create for it
any other obligation or liability in connection with Nelson products.
TO THE EXTEND ALLOWED BY LAW, ANY IMPLIED WARRANTY OR MERCHANTABILITY OR FITNESS FOR A PARTICULAR PURPOSE APPLICABLE TO THE NELSON
PRODUCTS IS LIMITED IN DURATION TO THE DURATION OF THESE WRITTEN WARRANTIES. NEITHER L.R. NELSON CORPORATION NOR ITS DISTRIBUTORS OR DEALERS
SHALL BE LIABLE FOR LOSS OF TIME, INCONVENIENCE, ECONOMIC LOSS, OR INCIDENTAL OR CONSEQUENTIAL DAMAGES ARISING FROM THE SALE OR DISTRIBUTION
OF NELSON PRODUCTS WHETHER FOR BREACH OF WARRANTY HEREUNDER OF FOR NEGLIGENCE OR IN TORT. Some states do not allow limitations on how long an implied
warranty will last of the exclusion or limitation on incidental or consequential damages, so the above limitations or exclusions may not apply to you.
If you have any questions concerning the warranty or its application, please write to L.R. Nelson Corporation, One Sprinkler Lane, Peoria, Illinois 61615, U.S.A. Attention: Customer
Service.
CLAIMED DEFECTIVE MERCHANDISE POLICY
Products returned to the retailer or distributor and claimed defective must be inspected by the Nelson sales representative to determine warranty compliance. If approval is granted,
products will be repaired or replaced or a credit memorandum covering the net purchase price will be issued.
27

SmartZone™EZ
GUÍA DE INSTALACIÓN Y PROGRAMACIÓN
Para los modelos:
8504
8506
8508
8512
8514
8516
8518
8522
8574
8576
8578
8582

1
GRACIAS por comprar el programador de riego . UstedSmartZone™ EZ
descubrirá muy pronto por qué lo llamamos (suena como "easy","EZ"
"sencillo" en inglés). Estamos seguros de que será el programador de riego
más sencillo y able que usted usará en su vida. Es un programador
multifunciones tan fácil de usar que es posible que usted lo pueda instalar y
programar sin leer las instrucciones. Sin embargo, le recomendamos que
antes de instalarlo y programarlo, lea este manual cuidadosamente para
aprovechar al máximo todas las ventajas que le ofrece.SmartZone™ EZ
Si tiene alguna pregunta, problema o comentario sobre su nuevo
SmartZone™ EZ, llame por favor a nuestro Departamento de Servicios
Técnicos al número de acceso gratuito 1-800-NELSON8.
Líderes en el riego de céspedes desde 1911
NOTA: Dados nuestros esfuerzos continuos de mejorar y actualizar
nuestros productos, las características y especicaciones en
este manual pueden cambiarse sin aviso previo.

2
CONTENIDO
Funciones 3
Instrucciones de instalación 4-9
Regletas de conexión 5
Conectar la válvula maestra o relevador de arranque de la bomba 5
Cableado del transformador 5-6
Conectar el sensor de lluvia y de humedad 7
Conectar la pila y reinicializar (reponer) el programador 8-9
Instrucciones de programación 10-19
Vista global 10
Diseño del panel frontal 11-12
Fijar la hora del día 13
Fijar el día actual 13
Fijar la fecha de hoy 13
Seleccionar zonas y jar sus tiempos de ejecución 13-14
Fijar las horas de inicio 15
Fijar % del volumen de agua 15
Fijar calendarios de riego 16-17
Fijar la opción día de riego 17
Fijar la opción día impar y par 18
Fijar la opción intervalo 18
Revisión del programa 19
Para apagar el programador 19
Funciones avanzadas 20-21
Ejecución manual de una zona 20-21
Ejecución manual de un programa de riego 21
Ejecución de una prueba de tres minutos (jeringa) 21
Datos técnicos 22-24
Detección y corrección de fallas, y servicio 25
Reglas de la Comisión Federal de Comunicaciones de EE.UU. (FCC) 26
Garantía 27

3
FUNCIONES
• Clase profesional
• Teclas y botones fáciles de usar en la programación
• Pantalla de cristales líquidos (LCD, en inglés) grande y clara
• Memoria no volátil para la retención de los programas sin alimentación CA
ni pilas
• 3 programas independientes
• 3 horas de inicio por programa (9 en total)
• 3 opciones de programación (7 días calendarios, impares y pares, e
intervalo de 1 a 30 días)
• 3 ciclos de prueba (manual, ciclo, prueba de 3 minutos)
• % de volumen de agua
• Horas de operación programables desde 1 minuto hasta 9 horas 59
minutos
• Programación de Seleccionar/Ajustar (Select&Adjust) exclusiva
• Transformador interno
• Garantía de 2 años en los materiales y la mano de obra
4
INSTRUCCIONES DE INSTALACIÓN
NOTA: Estas instrucciones son válidas para uso en interiores o exteriores.
Designar un lugar cerca de un tomacorriente de 110 V (220 V para 8574, 8576, 8578 y 8582) o
una fuente de cableado de 110 V. Instalar el tan al nivel de la vista como seaSmartZone™ EZ
posible. Abrir el panel frontal aojando el tornillo que lo asegura y tirando de la lengüeta a la
derecha del panel frontal para abrirlo sobre sus bisagras. Utilizar las tres perforaciones en la caja
para marcar y pretaladrar los agujeros para las guías de los tornillos en la pared. Los dos
agujeros guía de la izquierda en el están alineados verticalmente para montarSmartZone™ EZ
el programador en un poste. (Vea la Figura 1) Insertar los tornillos a través de las perforaciones
en la caja y ajustarlos en el oricio guía correspondiente en la pared.
NOTA: El panel frontal puede retirarse para facilitar la instalación quitando la banda de
conexión de la tarjeta de interconexiones y tirando del panel frontal fuera de sus
bisagras.
FIGURA 1
4.375"
6.875"

5
INSTRUCCIONES DE INSTALACIÓN
Regletas de conexión
Todas las conexiones de los alambres de zona, bomba y sensor hechas dentro del SmartZone TM
EZ utilizan conectores de simple encaje (sin necesidad de herramientas). Aplicar presión sobre
las palancas en la regleta de conexiones terminales con un bolígrafo o un destornillador pequeño
e insertar el alambre hasta el fondo. La regleta de conexiones terminales del programador
SmartZone™ EZ acepta alambres de 12 AWG (4,8 mm) o más pequeños.
Conectar la válvula maestra o relevador de arranque de la bomba
El SmartZoneTM EZ viene equipado con un circuito compartido para operar ya sea un relevador
de arranque o una válvula maestra. Conectar un alambre del relevador de arranque a la terminal
COM (común) y el otro alambre a la terminal PMP/MV (bomba/válvula maestra) en la regleta de
conexiones. Consultar el manual del fabricante del relevador de arranque para mayores detalles
sobre la instalación especíca.
Cableado del transformador*
*110 V de CA en Estados Unidos, Canadá y México; 220 V de CA en Europa y Australia.
NOTA: Consulte y cíñase a los códigos locales si son diferentes de lo indicado en este
manual.
PRECAUCIÓN:
Desconecte la fuente de alimentación de 110 V (220 V para los modelos 8574, 8576,
8578 y 8582) antes de conectar el transformador. Complete todo el cableado y la
instalación antes de conectar el transformador a la alimentación. Ésto evitará
corto-circuitos accidentales que pudieran dañar el programador.

6
INSTRUCCIONES DE INSTALACIÓN
Para los modelos 8504, 8506, 8508, 8512:
Con el panel frontal abierto para tener acceso al transformador interno, subir los alambres de
110V a través de la perforación de conducto de 1/2" en la parte inferior de la caja. (Para hacer la
conexión de campo, los alambres de CA deben tener un aislante clasicado a un mínimo de
75°C). El conducto debe quedar asegurado a la caja (siga los códigos lacales). Unir los alambres
de CA a los alambres del transformador utilizando tuercas para alambre. Asimismo, asegurarse
de unir el alambre de conexión a tierra al alambre correspondiente en la terminal verde-amarilla.
Revisar por favor los codigas locales para informarse de los requistos de conexión a tierra en su
área. Enrolle el cordón dentro del lazo plástico y apriételo para prevenir que el alambrado toque
circuitos secundarios. El transformador está ahora cableado. encender todavía la almentación.No
Para los modelos 8574, 8576, 8578, 8582:
Con el panel frontal abierto para tener acceso al transformador interno, subir los alambres de
110V a través de la perforación de conducto de 1/2" en la parte inferior de la caja. Para hacer la
conexión de campo, los alambres de CA deben tener un aislante clasicado a un mínimo de 75°
C). El conducto debe quedar asegurado a la caja (siga los códigos lacales). Conecte los alambres
de corriente alterna (AC) al conector proporcionado y apriete los tornillos. Tenga cuidado de la
polaridad de los alambres cuando los instale (ej: L1, L2 y negativo). Enrolle el cordón dentro del
lazo plástico y apriételo para prevenir que el alambrado toque circuitos secundarios. El
transformador está ahora cableado. encender todavía la almentación.No
NOTA: Si la unidad no se conecta a tierra adecuadamente, se podrían causar daños graves
al programador y/o daños materiales y personales, y anular la garantía.
Para los modelos 8514, 8516, 8518 y 8522:
El transformador ha sido precableado con un cordón eléctrico de CA de 6 pies (1,8 m) con una
clavija de conexión a tierra. Le recomendamos no alterar esta conexión. El reemplazo de este
cordón debe ceñirse a los códigos locales y en todos los casos la unidad debe estar debidamente
conectada a tierra.

8
INSTRUCCIONES DE INSTALACIÓN
Conectar la pila y reinicializar (reponer) el programador
Conectar una pila alcalina de 9 V a la pinza del conector e insertarla dentro del compartimiento
correspondiente atrás del panel frontal. La pila habilita al SmartZone™ EZ para ser programado
sin alimentación de CA y mantiene el reloj de tiempo real en caso de una interrupción de la
alimentación eléctrica. Si no se instala una pila, el programador perderá el tiempo real en caso de
una interrupción de la alimentación. La pila debe ser reemplazada cada año.
PRECAUCIÓN:
Utilice únicamente una pila alcalina de 9 V. Una pila NiCad de 9 V podría causar una
fuga o explotar causando lesiones personales o daños materiales.
Después de instalar la pila, oprimir el botón de reinicialización (reposición) negro en la parte de
atrás del panel frontal para reinicializar el programador (no afecta(n) el (los) programa(s)). Para
reinicializar el programador a sus ajustes por omisión (default), oprimir el botón negro de
reinicialización y la tecla a la vez. Soltar el botón de reinicializaciónSELECCIONAR
(reposición) antes de soltar la tecla Seleccionar . Cerrar el panel frontal, asegurándose de no
dañar los alambres. Si los alambres están rígidos, le podría convenir predoblarlos. Ajustar el
tornillo del panel para sujetar el panel frontal en la caja. Enchufar el cordón de CA del
transformador o encienda la fuente de alimentación.
NOTA: Dado que todos los programas se almacenan en memoria no volátil, no se perderán
los ajustes de los programas durante una falla eléctrica, aun en caso de que no se
haya instalado una pila.

9
INSTRUCCIONES DE INSTALACIÓN
Figura 3
¡Ya está usted listo para empezar la programación!
Botón de reinicialización
(reposición)

10
INSTRUCCIONES DE PROGRAMACIÓN
Vista global
Antes de programar el , podría serle útil familiarizarse con algunos lineamientos deSmartZone™ EZ
programación generales:
• Si un(os) segmento(s) en la pantalla LCD destella(n), éso signica que puede(n) ser
modicado(s) por el usuario.
•Al usar las teclas o , mantener oprimido el botón durante tres segundos para comenzar
un repaso rápido de las opciones.
• Asegurarse de que la letra adecuada del programa esté en pantalla en el momento de
programar; los cambios en la programación son especícos para la letra del programa que
aparece en la pantalla LCD.
• No hay tecla “INTRO(DUCIR)”. Al oprimir una tecla o ajustar un botón, estos ajustes se
almacenan automáticamente.
• Al introducir un cambio en la programación mientras el programa está en ejecución, el programa
naliza de inmediato. El nuevo programa comienza en la siguiente hora de inicio programada.
• Cuando no está ejecutando ningún programa, el programador mostrará en pantalla la hora y día
actuales.
• Durante las operaciones manuales, hay un retraso de 10 segundos antes de que comience la
operación. Durante este lapso, usted puede alterar los ajustes. Cada vez que usted introduce un
cambio, el retraso se reajusta a 10 segundos.
•Los procedimientos MANUAL, CICLO y PRUEBA DE 3 MINUTOS sólo funcionan con el botón
Programa en la posición AUTO.
• Después de ejecutar el procedimiento de prueba, el programador regresa al procedimiento
AUTO y ejecuta el siguiente programa jado.
• Los procedimientos de prueba ignoran la conexión del sensor; ésto le permite regar o ejecutar
su programa, aun si el sensor ha suspendido la operación.

11
INSTRUCCIONES DE PROGRAMACIÓN
Diseño del panel frontal
De frente al panel frontal (vea la Figura 4), usted ve una pantalla LCD grande, 4 botones de
goma, un botón giratorio grande y dos botones giratorios pequeños. Los botones de goma están
marcados como y "SELECCIONAR" "AJUSTAR" y son el corazón del exclusivo sistema de
programación ™ (SELECT&ADJUST SELECCIONAR/AJUSTAR) de Nelson. Las teclas están
identicadas con los símbolos para incrementar o reducir el segmento en el que está
trabajando.
SELECT&ADJUST SELECCIONA ™ funciona bajo el principio de que usted primero lo que desea
jar y, luego, AJUSTA las variables que seleccionó. Por ejemplo, si desea una duración del riego
de 10 minutos en la zona 5, usted tendría que usar las teclas paraSELECCIONAR
seleccionar la zona 5 y, una vez en la zona 5, usted utilizaría las teclas AJUSTAR para
ajustar la duración del riego a 10 minutos.
Hay casos en los que sólo se requiere usar y SELECCIONAR AJUSTAR. Estos casos se
explicarán en esta guía en el lugar correspondiente.
Como regla general, SELECCIONAR
escogerá las zonas o una hora de inicio especíca (1, 2 o 3). AJUSTAR jará las horas,
fechas y el volúmen de agua
. Vea en la tarjeta para colgar dentro de la tapa del SmartZone™
EZ una referencia rápida sobre los botones a utilizarse para las diferentes posiciones de los
botones.

12
INSTRUCCIONES DE PROGRAMACIÓN
FIGURA 4
NOTA: El botón de MODO debe estar en la posición "Programación".
NOTA: Cada vez que se oprime la tecla o , el tiempo se incrementa o reduce en un
minuto. Mantenga la tecla o oprimida durante tres segundos para iniciar un
repaso rápido de las opciones.
NOTA: Consulte por favor en la sección de datos técnicos una explicación de los
segmentos de la pantalla LCD.
Hora
Día corriente
Fecha
Manual
Ciclo
Cicol de prueba
de 3 minutos
Intervalo
Impar/Par
AUTO APAGADO
PROGRAMACIÓN
ProgramaModo
A C
B
Días de
riego
% Volumen
de agua
Hora de Inicio
Zona/Duración
IMPAR
PAR
INTERV.
D SVJXML
•
•
•
•
•
•
•
•
•
•
•
•
•
•
•
•
•
•
Seleccionar Adjustar
®SmartZone™ EZ
A B C
M

13
INSTRUCCIONES DE PROGRAMACIÓN
Fijar la hora del día
Girar el botón grande a la posición . Oprimir HORA AJUSTAR para cambiar y ajustar la hora
correcta. No hay indicador de A.M.
Fijar el día actual
Girar el botón grande a la posición DÍA ACTUAL SELECCIONAR. Oprimir para desplazar el
indicador del día actual y ponerlo sobre el día actual. desplazará elSELECCIONAR
indicador hacia la derecha; lo desplazará hacia la izquierda.SELECCIONAR
Fijar la fecha de hoy
Girar el botón grande a la posición . Oprimir las teclas FECHA AJUSTAR para cambiar y
ajustar la fecha actual. El AÑO avanzará automáticamente al pasar por 12/31 [31 de diciembre].
NOTA: Se requiere una FECHA únicamente si busca utilizar programación IMPAR/PAR o
jar una fecha de inicio que no sea la fecha corriente para la programación
INTERVALO.
Seleccionar zonas y jar sus tiempos de ejecución
El tiempo de ejecución del riego de zona determina la duración o lapso en que se ejecutará un
programa para una zona.
Girar el botón grande a la posición ZONA/DURACIÓN SELECCIONAR. Oprimir para
seleccionar la zona que desee para el programa seleccionado (A, B o C). Con el número de zona
mostrado en la pantalla LCD, oprimir AJUSTAR para ajustar la DURACIÓN del riego para
esa zona. La DURACIÓN se puede ajustar desde 1 minuto hasta 9 horas y 59 minutos. Seguir
seleccionando las zonas y ajustando las duraciones hasta que tenga todas las zonas deseadas
en el programa seleccionado.

14
INSTRUCCIONES DE PROGRAMACIÓN
Después de la última zona y antes de la primera, se proporciona una suma total de la
DURACIÓN del riego. Ésto es útil para determinar el tiempo de ejecución de un programa. La
pantalla LCD muestra las letras "ALL" [TOTAL] y aparece la DURACIÓN total. El tiempo mostrado
en pantalla es una suma total de todas las DURACIONES de riego para el programa
seleccionado (a 100% del volumen de agua total). (Ejemplo: Un programa tiene una duración de
5 minutos en la zona 1, 12 minutos en la zona 2; y 6 minutos en la zona 4. La pantalla en esta
posición muestra ALL [TOTAL] y una duración de 23 minutos).
FIGURA 5
Hora
Día corriente
Fecha
Manual
Ciclo
Ciclo de prueba
de 3 minutos
Intervalo
Impar/Par
AUTO APAGADO
Programa
ProgramaModo
A C
B
Días de
riego
% Volumen
de agua
Hora de inicio
Zona/Duración
IMPAR
PAR
INTERV.
D SVJXML
•
•
•
•
•
•
•
•
•
•
•
•
•
•
•
•
•
•
Seleccionar Adjustar
®SmartZone™ EZ
A B C
M

15
INSTRUCCIONES DE PROGRAMACIÓN
Fijar las horas de inicio
HORA DE INICIO es el tiempo del día en que un programa comienza a ejecutarse. El
SmartZone™ EZ permite tres horas distintas de inicio por programa.
Girar el botón grande a la posición . Oprimir paraHORAS DE INICIO SELECCIONAR
seleccionar la hora de comienzo que desea programar (1, 2 o 3). Oprimir AJUSTAR para
ajustar la hora del día en que el programa comenzará. Repetir este procedimiento, según se
necesite.
Fijar % del volumen de agua
El % de VOLUMEN DE AGUA cambia la duración de los tiempos de ejecución de un programa
según el porcentaje introducido de 5 a 200% (por ejemplo, el tiempo de ejecución del riego de 10
minutos a un 50% del volúmen de agua dura 5 minutos). Esta función es útil cuando ocurren
cambios climáticos. Si es extraordinariamente seco, usted querrá extender la duración del riego
para cada zona en un programa. Con % de volumen de agua, usted puede cambiar un número y
todas las duraciones del riego en el programa se ajustan.
Girar el botón grande a la posición % VOLUMEN DE AGUA. Aparecerá un símbolo "%" en la
pantalla LCD para indicarle que está ajustando la cantidad porcentual del volumen de agua.
Oprima AJUSTAR para seleccionar el porcentaje deseado.

16
INSTRUCCIONES DE PROGRAMACIÓN
Si el % de volumen de agua se ajusta para 110% o más, el dividirá la duración delSmartZone™ EZ
riego a la mitad para reducir el despilfarro de agua. La mitad de la duración del riego calculada
funcionará para cada zona en ese programa, seguido por la segunda mitad de la duración para cada
zona.
Recuerde, el % de volumen de agua cambia de un programa a otro. Si usted está programando en A,
B y C, usted debe introducir tres valores de volumen de agua si desea que cada uno de los
programas se cambie.
FIJAR CALENDARIOS DE RIEGO
Una nota rápida sobre programación y SmartZone™ EZ ...
El programador tiene tres opciones de programación de calendarios de riego:SmartZone™ EZ
• DÍAS DE RIEGO o diariamente, le permite seleccionar los días de la semana en que desea
regar (por ejemplo, lunes, miércoles y viernes únicamente).
• IMPAR Y PAR le indica al programador regar en días impares o pares del mes (por ejemplo,
el programador regará los días 31 y 1 cuando se elige un día IMPAR.
• INTERVALO riega cada cierto número de días (de 1 a 30 días) (por ejemplo, regar cada tres
días, regar cada 10 días, etc). Un valor de 1 en una programación de intervalo indica regar
diariamente. Cuando se usa la opción de intervalo, usted tiene la exibilidad de decirle al
programador qué día comenzar el programa de intervalo (hasta 30 días).
17
INSTRUCCIONES DE PROGRAMACIÓN
NOTA: El botón de MODO debe estar en la posición "Programa" para jar un horario o día
de riego.
Cuando el botón se ja en cualquiera de las opciones de programación de horarios o días de
riego, la pantalla muestra el programa actualmente jado (por omisión (default) es un intervalo de
un día con la fecha de hoy como fecha de inicio). Asegurarse de que el botón PROGRAMA se
haya ajustado en el programa que usted desea cambiar (A, B o C) y de que usted quiere cambiar
el horario o calendario actual. Una opción de programación se selecciona después de oprimir un
botón, ya sea SELECCIONAR o AJUSTAR. El viejo calendario es reemplazado por el nuevo. Si
usted desea retornar al viejo calendario, es fácil reprogramar a través de los procedimientos
siguientes.
Fijar la opción días de riego
Girar el botón grande a la opción de programación . La última opción deDÍAS DE RIEGO
programación seleccionada para el programa actual o la opción de programación de intervalos de
1 día por omisión aparecerá en la pantalla. Oprimir el botón para seleccionarSELECCIONAR
ese día para riego u oprima para días sin riego.SELECCIONAR
Un indicador destellando aparecerá sobre el día que usted está por jar. Gotas de lluvia
aparecerán sobre los días seleccionados para riego. El indicador se desplaza automáticamente
un día a la derecha después de oprimir una tecla o SELECCIONAR. Seguir
seleccionando o rehusando los días que desee que el programador riegue hasta que complete su
conjunto calendario de 7 días.
NOTA: La programación de un calendario DÍAS DE RIEGO borra cualquier otro calendario
para el programa seleccionado.

19
INSTRUCCIONES DE PROGRAMACIÓN
REVISAR EL PROGRAMA
Para revisar el programa actual, girar el botón de a la posición MODO PROGRAMA y girar el
botón grande al ajuste que desee revisar (por ejemplo, girar el botón grande a HORA para revisar
el tiempo seleccionado para el programador). Cuando necesite ver zonas o duraciones de riego
diferentes (1, 2, 3), utilizar únicamente los botones .SELECCIONAR
NOTA: Dado que usted se halla en el modo de programa, existe la posibilidad de cambiar el
programa de manera accidental.
PARA APAGAR EL PROGRAMADOR
Hay casos en los que usted querrá suspender el riego, ya sea por períodos cortos (mientras está
lloviendo, si no tiene un sensor conectado) o períodos largos (durante el invierno). Para facilitar
ésto, se puede "apagar" el . Girar el botón de a la posición SmartZone™ EZ MODO APAGADO.
Esto suspende todas las operaciones de riego (incluyendo los procedimientos manuales y de
prueba). El reloj sigue manteniendo la hora y la fecha corrientes y su(s) programa(s) se retiene(n)
hasta que usted desee ejecutarlo(s) de nuevo. Para ejecutar su programa, volver a colocar el
botón de en la posición MODO AUTO.
NOTA: La memoria no volátil de su SmartZone™ EZ mantendrá su programa aun sin
alimentación eléctrica. Si no hay una pila puesta y se suspende la alimentación, se
perderá el tiempo real del reloj. Se tendrá que volver a programar la hora.

20
FUNCIONES AVANZADAS
El SmartZone™ EZ incorpora tres procedimientos manuales y de prueba para vericar el
funcionamiento del programador o para permitirle saltarse el programa actual para regar de
inmediato. La sección siguiente le mostrará cómo ajustar el programador para:
• ejecutar una zona manualmente
• ejecutar un programa manualmente
• ejecutar una prueba de 3 minutos de todas las zonas programadas
NOTA: Todos los procedimientos de prueba se ejecutan con el botón de MODO en la
posición AUTO. Ésto permite al programador reinicializar o sea reponer el ajuste
AUTOMÁTICO después de ejecutar un procedimiento manual y de prueba. Le permite
también dejar sólo el programador después de programar un procedimiento manual y de
prueba, y no tener que regresar a reinicializar el programador a AUTO.
NOTA: Todos los procedimientos manuales y de prueba ignoran la conexión del sensor.
Por ende, usted puede regar utilizando uno de los procedimientos manuales y de
prueba aun si el sensor ha suspendido su programa jado.
Ejecución manual de una zona
Girar el botón grande a la posición MANUAL. Los valores por omisión, zona 01 y 00:10 minutos,
destellarán (recuerde que esto signica que puede cambiarlos). Oprimir SELECCIONAR
para seleccionar el número de zona que desea regar. Oprimir AJUSTAR para ajustar la
duración del riego para la zona seleccionada. El programador retrasará 10 segundos antes de
comenzar la zona.

21
FUNCIONES AVANZADAS
El SmartZone™ EZ incorpora la característica ManualAdvance™ de Nelson en el procedimiento
MANUAL. ManualAdvance™ le permite suspender la zona en ejecución actualmente y avanzar
de inmediato a cualquier nueva zona que usted seleccione. Con el procedimiento MANUAL
ejecutando una zona, oprimir para desplazarse a una nueva zona. LaSELECCIONAR
última duración introducida aparecerá en pantalla. Oprimir AJUSTAR para introducir una
nueva duración para la nueva zona (el programador retrasará 10 segundos antes de comenzar la
nueva zona).
Ejecución manual de un programa de riego
Girar el botón grande a la posición . La letra del programa actual destellará. Para cambiarCICLO
a un programa diferente, girar el botón PROGRAMA al programa deseado (A, B o C). El
programador retrasará 10 segundos antes de comenzar el programa seleccionado. Después de la
ejecución, el botón restablece el procedimiento AUTOMATICO.
NOTA: CICLO ejecuta de inmediato el programa actual. No se pueden introducir cambios al
programa durante el procedimiento CICLO.
Ejecución de una prueba de tres minutos (jeringa)
Girar el botón grande a la posición CICLO DE PRUEBA DE 3 MINUTOS. A B C destellarán en la
pantalla (no se pueden cambiar). Ésto es para indicar que el programador revisará los tres
programas y ejecutará una prueba de 3 minutos en únicamente aquellas zonas en que ha sido
programado. A ésto le llamamos ™.SmartSyringe
Esta función permite al programador saltarse zonas que no han sido programadas. Éstas pueden
ser zonas no conectadas, ahorrándole así su bomba (si la tiene).

22
DATOS TÉCNICOS
1. Transformador
Transformador interno de 24 V de CA; 20 VA, 0,83 A para zonas y lógica. El transformador puede
operar una bomba o válvula maestra y una válvula de zona, como máximo.
2. Protección contra picos eléctricos
MOV de 7 julios a través de los circuitos secundarios. (Ver Disyuntor más abajo.)
3. Operación de sensor
El está congurado para operar el programador con o sin un sensor. LosSmartZone™ EZ
sensores deben tener normalmente conexiones cerradas (conductores). El alambre de empalme
instalado de fábrica debe estar en su sitio si no se utiliza sensor.
4. Líneas de zona
El operará a un máximo de cos (2) slidas al mismo tiempo, una de ellas siendoSmartZone™ EZ
lo bomba principal de la válvula. La salida de cada zona puede operar con un soleniode.
I consomo de corriente con carga .52A max
I consumo de corriente constante .40A max

23
DATOS TÉCNICOS
5. Rango de temperaturas
En funcionamiento: de -5° a +55° C (de 23° a 131° F)
En almacén: de -30° a +85° C (de -22° a 185° F)
6. Pantalla
7. Pilas
Se requiere una pila alcalina de 9 V. .No utilizar pilas NiCad
8. Retención del programa
Se utiliza memoria no volátil para retener programas cuando se pierde la energía de las pilas y el
suministro de CA. La memoria no volátil se actualiza cuando se cambia el programa y a intervalos
de 5 minutos. La memoria no volátil funcionará durante un mínimo de 5 años, en el peor de los
casos.
9. Dimensiones de la caja (aproximadas)
6" de altura x 9,5" de ancho x 3,75" de largo (la tapa se puede quitar sin herramientas).
ODD
EVEN
INT.
Su SFTHWTM
A B C
M
Hora, fecha, duración del riego,
hora de inicio, % (símbolo), fecha
de inicio del intervalo
Símbolo de sensor suspendido
Símbolo de falta de alimentación
eléctrica CA
Día actual
Letra del programa A, B o C
Indicador de PM
Año, número de zona, número de
hora de inicio, % de volúmen de
agua, Número de intervalo
Días de riego
IMPAR
PAR
INTERVALO
D L M X J V S

24
DATOS TÉCNICOS
10. Programa por omisión (ajustes de fábrica)
12:00 AM (no hay indicador "AM" en la pantalla)
Domingo
La fecha es 01/01 96
Sin tiempos de ejecución (zona 01, --:--)
Sin horas de inicio (número de inicio 01, --:--)
Volumen de agua al 100%
Calendario de riego diario (intervalo = 01; fecha de inicio = hoy)
El botón de Modo está en posición de APAGADO
El botón de Programa está en programa A
3 segundos de retraso entre zonas (no se puede cambiar)
11. Disyuntor
Un interruptor electrónico "poly-switch" está incorporado en el PCB de interconexión del
programador. Este tipo de disyuntor no requiere de reinicialización ni de reemplazo por parte del
usuario.

25
SÍNTOMA CAUSA POSIBLE SOLUCIÓN
Sin salida a la zona, bomba • CA desconectada • Verique la fuente de alimentación CA.
o válvula maestra Si el programador no detecta CA, el
indicador de no CA estará encendido
Sin CA y pantalla en blanco • Sin pila o pila gastada • Reemplace la pila y oprima reinicializar
Pantalla en blanco • Sin CA ni pila • Instalar una pila para volver a tener uso de
• El cable de banda está desconectado la pantalla, vericar la CA para asegurar
salida al campo
• Asegurarse de que el cable de banda entre
el panel frontal y la tarjeta programadora
esté conectado en ambos extremos
La pantalla muestra signos raros • El programador necesita ser reinicializado • Oprimir el botón de reinicializar. Si la pantalla
o tiene segmentos apagados sigue con signos raros, oprimir el botón de
reinicializar y el botón Seleccionar + al
mismo tiempo (regresa a los ajustes de
fábrica)
Aparece "M-X" en pantalla cuando • El botón de MODO se halla en posición • Colocar el botón de MODO en posición
trata de ejecutar una zona manualmente de programa AUTO para ejecutar una zona manualmente
Aparece "C-X" en pantalla cuando • El botón de MODO se halla en posición • Coloque el botón de MODO en posición
trata de dar CICLO a un programa de programa AUTO para dar ciclo a un programa
Aparece "S-X" en pantalla cuando • El botón de MODO se halla en posición • Colocar el botón de MODO en posición
trata de ejecutar una PRUEBA de programa AUTO para ejecutar la PRUEBA DE
DE 3 MINUT 3 MINUTOS OS
El programador no ejecuta una • Sin programas en A, B o C • Introducir un programa con tiempos de
PRUEBA DE 3 MINUT ejecución para las zonas que necesite. La OS PRUEBA DE 3 MINUTOS sólo ejecuta
aquellas zonas con tiempos de ejecución
programados en ellas
Aparece Er1 en pantalla • Ésto es un error de comunicación entre el • Oprima reinicializar. Si el error no se despeja,
microprogramador y la memoria no volátil reemplace la tarjeta
Aparece Er2 en pantalla • Ésto indica al usuario que hay más de 24 horas • Revisar su duración del riego total en todos
de duración del riego programadas los programas - O BIEN -
• Oprimir reinicializar y seleccionar + al mismo
tiempo para regresar a los ajustes de fábrica.
PIEZAS DE REPUESTO
• Transformador • Cordón de CA de 6'
• Banda de interconexión • Tarjeta de interconexión
• Panel frontal
DETECCIÓN Y CORRECCIÓN DE FALLAS,Y SERVICIO

26
REGLAS DE LA COMISIÓN FEDERAL DE COMUNICACIONES DE EE.UU. (FCC)
Este programador de riego electrónico genera y utiliza energía de frecuencia de radio y si no se instala y usa
adecuadamente, es decir, de estricto acuerdo con las instrucciones del fabricante, puede causar interferencias a
la recepción de radio y televisión. Su tipo ha sido puesto a prueba y se ha encontrado que cumple con los límites
para dispositivos de ordenadores de Clase B de acuerdo con las especicaciones en Subparte J de la Parte 15
de las Reglas de la FCC, las cuales están diseñadas para ofrecer una protección razonable contra tales
interferencias en una instalación residencial. Sin embargo, no hay garantía de que no ocurrirán interferencias en
una determinada instalación. Si el programador causa interferencias a la recepción de radio o televisión, lo que
se puede determinar apagando y encendiendo el programador, se sugiere al usuario que trate de corregir las
interferencias tomando una o más de las medidas siguientes:
Reorientar la antena receptora
Reubicar el programador alejándolo del receptor
Enchufar el programador en un tomacorriente diferente, para que el programador y el receptor se hallen en
diferentes circuitos ramales
Si es necesario, el usuario debe consultar al distribuidor o a un técnico de radio y televisión experimentado para
obtener sugerencias adicionales. El usuario puede encontrar útil el siguiente folleto elaborado por la Comisión
Federal de Comunicaciones:
"Cómo identicar y resolver problemas de interferencia de radio y televisión"
Este folleto está disponible en la Ocina de Publicaciones del Gobierno de Estados Unidos, Washington, DC
20402. Artículo No. 004-000-00345-4.
REGLAMENTOS CANADIENSES SOBRE INTERFERENCIAS DE RADIO
NOTA: Este aparato digital no excede los límites de Clase B para emisiones de ruido de
radio de aparatos digitales según lo estipulan los reglamentos sobre interferencias
de radio del Departamento de Comunicaciones de Canadá.

L.R. Nelson Corporation
One Sprinkler Lane
Peoria, Illinois 61615
Tel. (309) 690-2200
Fax. (309) 693-0363
900-04862
Printed in U.S.A.
©1996 L.R. Nelson Corporation

SmartZone™EZ
GUIDE D'INSTALLATION ET DE PROGRAMMATION
Pour les modèles:
8504
8506
8508
8512
8514
8516
8518
8522
8574
8576
8578
8582
Français. . . . . . . . . . . . pgs. 1-28
Deutsch . . . . . . . . . . . pgs. 29-57
900-04856

1
Nous vous remercions d'avoir acheté le programmateur électronique d'irrigation
SmartZone™ EZ. Vous découvrirez bientôt pourquoi nous l'avons appelé le
"EZ". Nous sommes sûrs qu'il sera le programmateur le plus simple et le plus
fiable que vous ayez jamais utilisé. Il est si simple d'emploi que vous pourriez
sans doute installer et programmer sans instruction ce programmateur plein
d'options. Nous recommandons cependant, qu'avant d'installer et de
programmer ce programmateur, vous lisiez attentivement ces instructions pour
tirer tous les avantages que le a à vous offrir.SmartZone™ EZ
Si vous avez des questions, des problèmes ou des commentaires sur votre
nouveau , appelez notre service technique au numéroSmartZone™ EZ
d'appel gratuit 1-800-NELSON-8.
Leader de l'irrigation de gazons et jardins depuis 1911
REMARQUE : En raison de nos efforts pour améliorer et mettre à jour en
permanence nos produits, les caractéristiques et spécications de
ce manuel peuvent changer sans préavis.

2
TABLE DES MATIÈRES
Caractéristiques 3
Instructions d'Installation 4-9
Bornier 5
Connexion de vanne principale ou de relais de pompe 5
Câblage du transformateur 5-6
Connexion du capteur de pluie et d'humidité 7
Branchement de la pile et remise à zero du programmateur 8-9
Programmation du Smartzone™ EZ 10-19
Généralités sur la programmation 10
Description du panneau avant 11-12
Réglage de l'heure du jour 13
Réglage du jour de la semaine 13
Réglage de la date 13
Sélection des voies et réglages de leur durée d’arrosage 13-14
Réglage des démarrages 15
Réglage du de coefcient d'arrosage 15
Planication 16-17
Réglage de l’option programmation de jours d'arrosage 17
Réglage de l’option de programmation les jours IMPAIR/PAIR 18
Réglage de l’option par intervalle 18
Examen de programmation 19
Couper le programmateur 19
Caractéristiques avancées 20-21
Arrosage manuel d’une voie 20-21
Exécution manuelle d’un programme 21
Effectuer un essai de 3 minutes (seringage) 21
Données techniques 22-24
Dépannage 25
Règlements FCC 26
Garantie 27

CARACTÉRISTIQUES
• Qualité professionnelle
• Cadrans et boutons faciles à utiliser pour la programmation
• Grand afchage à cristaux liquides (LCD) facile à lire
• Mémoire non volatile pour retenir les programmes sans alimentation secteur et
sans pile
• 3 programmes indépendants
• 3 heures de démarrage par programme (9 démarrages au total)
• 3 options de programmation (7 jours de la semaine, impairs et pairs, intervalle
de 1 à 30 jours)
• 3 cycles d'essai (manuel, cycle, essai de 3 minutes)
• Coefcient d'arrosage
• Durée de fonctionnement programmable de 1 minute à 9 heures et 59 minutes
• Programmation exclusive Select&Adjust™ (Selectionner et Régler)
• Transformateur interne
• Garantie de 2 ans sur le matériel et la main d'oeuvre
3

INSTRUCTIONS D'INSTALLATION
Connexion du capteur de pluie et d'humidité
Le est équipé pour fonctionner avec un capteur à contacts normalement fermés.SmartZone™ EZ
La prise de capteur sur le est le premier connecteur sans outil sur le circuit deSmartZone™ EZ
connexion (voir la gure 2). Pour installer un capteur, retirer le cavalier installé en usine
duconnecteur de capteur sur le bornier et insérer les ls de capteur. Voir les instructions du
fabricant de capteur pour des détails d'installation spéciques.
FIGURE 2
Si un capteur a arrêté l'arrosage, le segment indicateur de capteur apparait sur l'écran à cristaux
liquides . Le symbole s'éteint lorsque le capteur a séché ou que le programmateur est sur un
des modes manuels (voir page 25). Le recommence le fonctionnement selon leSmartZone™ EZ
programme sélectionné.
7
Prise de capteur
INSTRUCTIONS D'INSTALLATION
Branchement de la pile et remise à zéro du programmateur
Brancher une pile alcaline de 9 V sur la pince de pile et insérer dans le support de pile au dos du
panneau avant. La pile permet de programmer le sans alimentation alternativeSmartZone™ EZ
et de maintenir l'horloge d'heure réelle en cas de panne de courant. Si une pile n'est pas installée,
le programmateur perd l'heure en cas de panne de courant. Les piles doivent être remplacées une
fois par an.
ATTENTION :
Utiliser uniquement une pile 9 V alcaline. Une pile 9 V NiCad peut fuir ou exploser et
causer des blessures et des dégâts matériels.
Après avoir installé la pile, appuyer sur le bouton noir de remise à zéro au dos du panneau avant
(voir page 9) pour ré-initialiser le programmateur (ceci n'affecte pas les programmes). Pour
ré-initialiser le programmateur à ses réglages par défaut, appuyer en même temps sur le bouton
de remise à zéro noir et sur la touche . Fermer le panneau avant, enSÉLECTIONNER
s'assurant de ne pas endommager les ls. Si les ls sont raides, il peut être utile de les
pré-former. Serrer la vis du panneau avant pour le bloquer sur le boîtier. Brancher le cordon
d'alimentation alternative du transformateur ou mettre sous tension.
REMARQUE : Comme tous les programmes sont stockés en mémoire non-volatile, vous ne
perdrez pas de réglage de programme pendant une panne de courant -
même s'il n'y a pas de pile installée.
8

INSTRUCTIONS D'INSTALLATION
Figure 3
Vous êtes maintenant prêt à programmer !
9
Botón de remise à zéro

INSTRUCTIONS DE PROGRAMMATION
Réglage de l'heure du jour
Tourner le grand cadran sur la position . Appuyer sur pour faire délerHEURE RÉGLER
l'heure. Il n'y a pas d'indicateur du matin ou de l'après-midi.
Réglage du jour de la semaine
Tourner le grand cadran sur la position JOUR ACTUEL. Appuyer sur pourSÉLECTIONNER
placer l'indicateur de jour de la semaine sur le jour actuel. fait avancerSÉLECTIONNER
l'indicateur vers la droite; fait avancer l'indicateur vers la gauche.SÉLECTIONNER
Réglage de la date
Tourner le grand cadran sur la position DATE. Appuyer sur pour faire déler laRÉGLER
date. L'ANNÉE avance automatiquement au passage de 31/12.
REMARQUE : Une DATE n'est nécessaire que si vous comptez utiliser la programmation en
jours IMPAIR/PAIR, ou pour régler une date de démarrage, différente de la
date actuelle, pour la programmation par INTERVALLE.
Sélection des voies et réglages de leur durée d’arrosage
La durée de fonctionnement d'une voie détermine la durée d'arrosage d'une voie.
Tourner le grand cadran sur la position . Appuyer surVOIE/DURÉE D'ARROSAGE
SÉLECTIONNER pour sélectionner la voie pour le programme sélectionné (A, B ou C). Avec
le numéro de voie afché sur l'écran à cristaux liquides, appuyer sur le bouton RÉGLER
pour régler la durée d'arrosage pour cette voie. Les DURÉES D'ARROSAGE peuvent être réglées
de 1 minute à 9 heures et 59 minutes. Continuer de sélectionner des voies et de régler leur
DURÉE D'ARROSAGE jusqu'à avoir toutes les voies désirées dans le programme sélectionné.
13

INSTRUCTIONS DE PROGRAMMATION
Réglage des démarrages
Un DÉMARRAGE est l'heure à laquelle le programme commence à tourner. Le SmartZone™ EZ
permet trois démarrages par programme.
Tourner le cadran dans la position . Appuyer sur pourDÉMARRAGES SÉLECTIONNER
sélectionner l'heure de démarrage à régler (1, 2 ou 3). Appuyer sur pour réglerRÉGLER
l'heure à laquelle le programme démarrera. Répéter le cas échéant.
Réglage du coefcient d'arrosage
Le COEFFICIENT D'ARROSAGE modie la durée d'arrosage d'un programme par le pourcentage
entré, de 5 à 200% (par exemple, une durée d'arrosage de 10 minutes durera 5 minutes avec un
coefcient d'arrosage de 50%). Cette fonction est utile lors de variations de temps. Si le temps est
exceptionnellement sec, vous pouvez désirer étendre la durée d'arrosage pour toutes les voies
d'un programme. Avec le coefcient d'arrosage, vous changez un seul nombre, et toutes les
durées d'arrosage du programme sont réglées.
Tourner le grand cadran dans la position . Un symbole % apparaîtCOEFFICIENT D'ARROSAGE
sur l'écran à cristaux liquides pour vous faire savoir que vous modiez le coefcient d'arrosage.
Appuyer sur pour choisir le pourcentage désiré.RÉGLER
15
Produkt Specifikationer
| Mærke: | Nelson |
| Kategori: | Vandingscomputere |
| Model: | 8518 SmartZone EZ |
Har du brug for hjælp?
Hvis du har brug for hjælp til Nelson 8518 SmartZone EZ stil et spørgsmål nedenfor, og andre brugere vil svare dig
Vandingscomputere Nelson Manualer

10 Juli 2024
8 Juli 2024
8 Juli 2024
Vandingscomputere Manualer
Nyeste Vandingscomputere Manualer
7 Oktober 2024
10 Juli 2024
10 Juli 2024
9 Juli 2024