Oyster Premium Manual
Oyster
televisión
Premium
Læs nedenfor 📖 manual på dansk for Oyster Premium (77 sider) i kategorien televisión. Denne guide var nyttig for 31 personer og blev bedømt med 4.5 stjerner i gennemsnit af 2 brugere
Side 1/77

Premium
Stand: 10/2014 Sprache: english
Artn: 3.150.0114
Innovative Mobile Technology
Operating instructions
„Oyster® TV“
Premium
Premium


3
Contents
GeneralI
a) Introduction 4
b) Intended use 5
c) Safety 6
ControlsII
a) The first steps / inputs and switching off 8
b) Antenna operation 9
c) Remote control 10
d) Interfaces / Operation on device 13
Operation of the systemIII
a) Turn on / Turn off 15
b) Key functions 16
Operating the „OysterIV ® TV“
a) Begin 17
b) Tuning 19
c) Basic operation and FAV list 23
d) Picture and sound 26
e) Channel settings and channel list 28
f) More settings 31
g) Storage media 41
h) Technical specifications „Oyster® TV“ 46
AppendixV
a) 47Notes on the protection of the environment
b) Contact & Service 47

I General
a) Introduction
This manual describes the function and operation of the automatic TV satellite
reception system. Instructions regarding the installation can be found in the
co-installation instructions supplied.
Error-free and reliable operation can only be guaranteed if you note both for the
installation and for the operation of these instructions.
Your automatic satellite reception system is an intelligent system for receiving
satellite television.
It is able to automatically preset a align satellite , as long as the receiving system
within the range of this particular satellite is located.
Delivery: „Oyster® TV“ Premium with remote control and control panel
Outdoor unit with antenna - optional with SKEW Turntable for
receiving optimization.
Always look for „free view towards the south“. All satellites are of Europe seen from
about in the south.
If the direct line to the satellite through obstacles (buildings, mountains, trees etc.
is blocked), neither an automatic alignment can take place, nor is television
reception possible.
In the first pages of this manual for instructions on operating the general functions
of your system, there after, the adjustment explained.
4

I General
b) Intended use
The intended use of this product is the fixed mounting on Mobile homes or travel
trailers (caravans) with a maximum speed of not more than 130 km/h.
The product is able to support the vehicle is parked, the built-in parabolic antenna
automatically to one of Europe for conventional geostationary, directly beaming
satellite television align fixed.
The power supply must through a standards-compliant vehicle electrical system
with a nominal voltage of 12V / 24V DC for one.
Use for Oyster® Premium Television in any case the supplied 12V DC stabilized power
supply.
When installing in caravans no switching regulator can be used to power supply.
Any use other than specified is not allowed.
Please also note the following manufacturer‘s instructions:
l The installation is only on hard vehicle roofs with sufficient strength and
inherent stability allowed. Relevant, recognized guidelines of automobile
industry must be observed and complied with.
lThe product requires no regular maintenance. The housing must not be
opened. Let checking work always only one qualified professional.
lAvoid the Motorhome satellite system in a brush washer, Wash car wash or
high pressure water hoses.
lA change in the overall device by removing individual components or
adding other components is not permitted. The use of other than the original
parabolic or LNBs mounted Components is not permitted.
lThe Assembly has in strict accordance with the installation instructions
supplied, the part of this manual is to carry sufficient qualified personnel to
be made. In case of doubt or problems, contact. They recognized, please
contact the manufacturer or by the manufacturer Workshop.
l Turn the unit on in strong winds or storms.
5
I General
c) Safety
For proper operation of your satellite system, it is basically required
that the system is connected correctly to the ignition of your vehicle
(see installation instructions).
When correctly installed, the antenna moves when you turn the vehicle ignition
automatically within a short time in the recovery position and locked there. It is for
your responsibility as the driver of the motor vehicle to proof the complete retrac-
tion of the antenna before start to drive.
The complete retract of the antenna must be ensured by the user
before starting the journey. After pushing the ignition, the antenna is
retracted automatically. To activate the antenna again, it is
imperative to reboot the „Oyster® TV“ Premium
(off and on again Turn on).
Before every ride you convince yourself as leader of the motor vehicle
through, a look at the outdoor unit please personally thereof, that
the antenna is fully retracted.
Please note that in the different countries legal requirements for the operation of
electrical and electronic equipment are different. As a user of such a system, you
are responsible for compliance with the respective Rules responsible.
It is recommended by the manufacturer to connect your automatic TV satellite
rception system with a marketable lead-acid batteries with a nominal voltage of
12V / 24V DC with a nominal capacity of at least 50Ah.
6
!
ACHTUNG
!
ATTENTION
Zündung / Klemme 15
muss angeschlossen werden
Zum automatischen Einfahren der Antenne
bei Fahrzeugstart
Ignition switch has to be connected
For automatic retraction of the antenna
at vehicle start
Allumage doit être connecté
Pour rétracter automatiquement l‘antenne
au démarrage du véhicule

The connection to other, unsuitable battery systems can destroy the battery system,
the satellite system; or can lead to a release of flammable or toxic gases or cause
spontaneous ignition of improper battery systems.
The manufacturer assumes no liability for any direct or indirect damages or con-
sequential damage to the plant itself, to battery systems, motor vehicles or other
goods caused of the connection to unsuitable battery systems or assembly errors or
cabling errors occur.
Stop function on the remote control and removing the operating
voltage at Maintenance.
The STOP button on the remote control stops the movement of the antenna. In stop
mode, no DiSEqC commands of the integrated „Oyster® TV“ Premium receiver is per-
formed. The function of the STOP button is cancelled by the START or PARK button.
A precondition of the function the STOP key is that the receiver is not in state of in-
itializing. Likewise, the receiver is not in standby mode or no OSD display was called
by the MENU or OK button. The same applies to the PARK and START button.
When performing maintenance on the antenna system it is essential that the
operation voltage of the entire system, „Oyster® TV“ Premium and VISION III control
box is switched off.
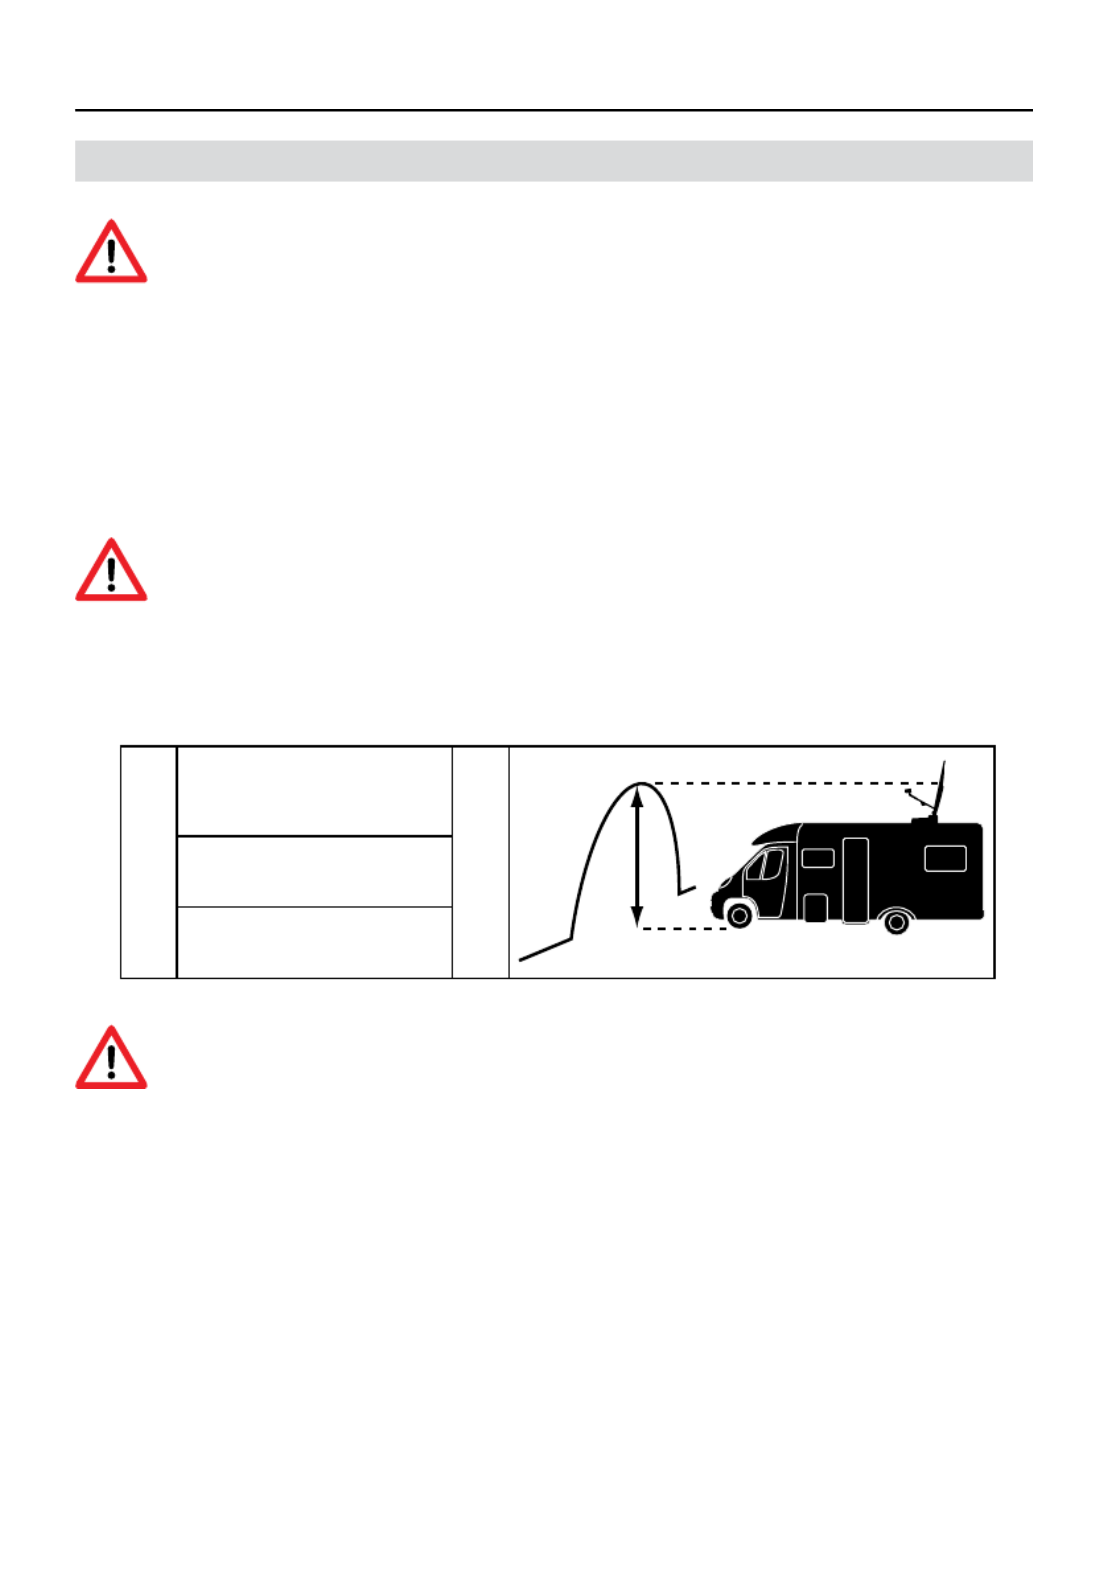
In reversing, especially for truck or rail loading the vehicle carrying
the antenna at speeds greater than 30km/h, the antenna against
unwanted erection must be protected by appropriate measures.
7
I General

II Controls
a) The first steps
The controls for the fully automatic satellite system, the Oyster® Premium TV device
consist exclusively of the integrated receiver in the „Oyster® TV“ Premium and the
remote control.
The remote control buttons work only when the „Oyster® TV“ Premium is switched
on and the initialization is complete.
Switching on / off
The system is the switch on the bottom of the „Oyster® TV“ Premium device on
Standby and off.
Further operation starts with the POWER button on the remote control.
Attention!
When you turn on the „Oyster ® TV“ Premium device, the automatic search for
satellite antenna is started. Its initialization can take up to a minute.
After turning on the antenna does extend and starts the automatic satellite search.
8

II Controls
b) Antenna operation
In normal means of the antenna system, there is no require of any antenna
operation. The system automatically searches for the corresponding satellite.
The „Oyster® TV“ Premium unit is factory designed for the control of the antenna
preconfigured.
In case of one great location change is only recommended on the button COUNTRY
enter own site.
The antenna function affects only the following 4 keys on the remote control.
The Country button: location input to optimize the satellite search.
Stop button; Start button; Park button - For direct control of the antenna.
If the integrated receiver of the „Oyster® TV“ Premium is off, the antennas keys do
not have any function.
The other buttons on the remote control used to operate the integrated receiver is
in „Oyster® TV“ Premium. See Settings „Oyster® TV“ Premium device.
9

Starts the „Oyster® TV“ Premium out of the Stand-by mode.
0-9 NUMBER / NUMBER BUTTONS: With the press of a Number
keys (0-9) to enter a channel directly to or make a number of
adjustments in the menu.
EPG / ELECTRONIC PROGRAMME GUIDE. With keystroke show
the current and next program information for each channel.
Furthermore, a 7-day preview available.
LEFT: With key press to exit the menu without
Save the changes and go to the menu a step back.
MUTE : With keystroke all Audio outputs of the receiver is mut-
ed. Returning keystroke is unmuted again.
For Personal Video Recorder function - optional via USB
Timeshifting TV
SWAP: RECALL / LAST CHANNEL: With these buttons are pressed
for previous channel back.
For Personal Video Recorder function - optional via USB
For Personal Video Recorder function - optional via USB
For Personal Video Recorder function - optional via USB
For Personal Video Recorder function - optional via USB
SOURCE Select input / source
FILE External data interface
OK / ENTER key to confirm your selection by pressing a button
or save Settings from the menu.
CHANNEL Calling the program table
1 - 9
EPG
SWAP
Source
EXIT
File
Time
Shift
c) Remote Control
10
OK
CHANNEL
II Controls

NAVIGATION UP: With dedicated button brings up the
next channel in the channel list. In the menu, navigate
upwards.
NAVIGATION LINKS: With push of a button lowers the volume
the receiver. In the menu you can switch between available
options to.
NAVIGATION RIGHT. With push of a button to increase the volu-
me the receiver. In the menu you can switch between available
options to.
NAVIGATION DOWN: With dedicated button brings up the
previous Channel in the channel list. In the menu, scroll down.
MENU: With dedicated button brings up the main menu of the
receiver on.
RED / menu are respectively different functions of these Button
assigned.
GREEN / In the menu are respectively different functions of
these Button assigned.
YELLOW / menu are respectively different functions of these
Button assigned.
BLUE / TELETEXT: menu are each different Assigned functions of
this key.
Teletext
START channel scan DVB-T / T2, (DTV Terre table television)
SUBT - Subtitles
INFORMATION current channel
Page up / in station list
Page down / in station list
FAVORITES: With dedicated button brings up your previously
saved Favorite service lists on / . selection favorites list
Exchange TV / radio
AUDIO - Audio Language
TV Setup
TEXT
SUBT
INFO
PAGE+
PAGE-
FAV
TV/
AUDIO
AQT
RED
GREEN
YELLOW
BLUE
11
II Controls

STOP
START
PARK
COUNTRY
12
Stop the antenna movement
Starts the antenna movement
Antenna retracts.
Location input. Useful for large relocation
II Controls
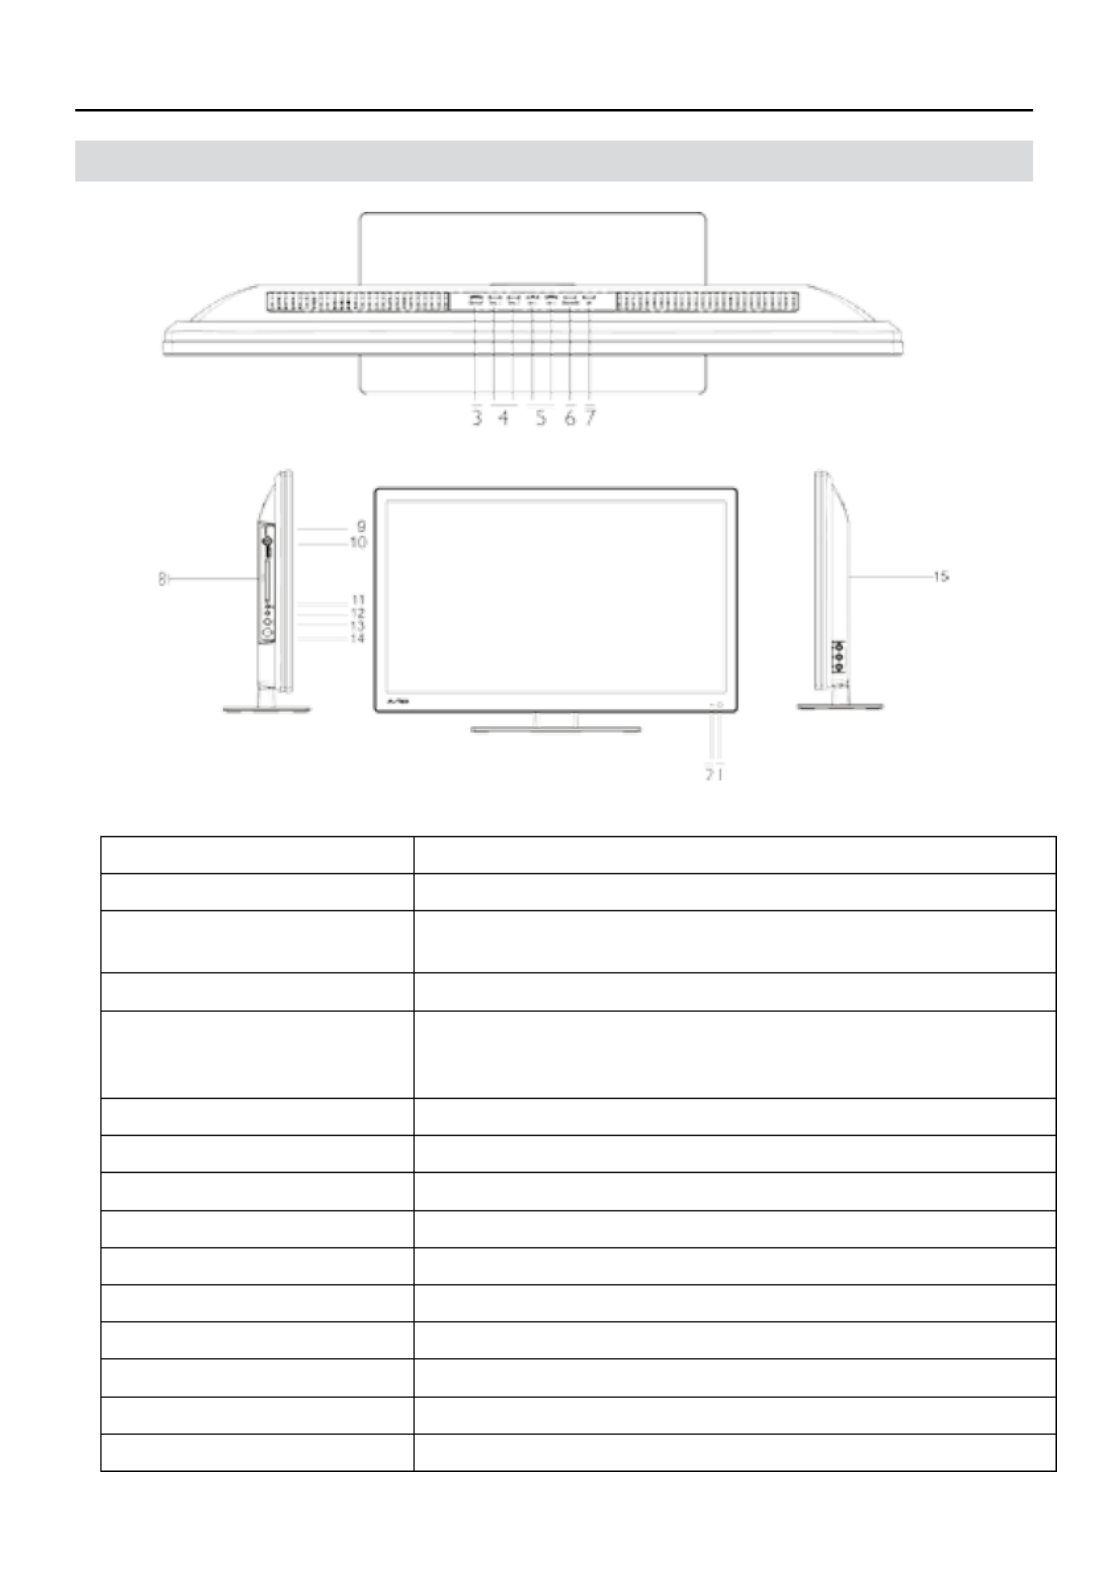
d) Interfaces / Operation on device
13
II Controls
1. Standby LED
2. Remote control sensor
3. Setup
AQT
Enter or exit setup menu
Press and hold (more than 3 seconds) the button to start autoscan in DTV
4. VOL +/- Increases / Decreases the volume
5. CH
Play
Eject
+/- Increases / Decreases the vhannel number
To play normally or pause playing in USB
To Exit in USB
6. Source Accesses the SOURCE menu
7. Standby TV standby mode
8. PCMCIA Slots for external Conditional Access (CA) - modules)
9. 12 V mains connection
10. USB1
11. Headphone
12. Audio IN
13. SAT-In
14. RF IN
15. AV - Input

Back of the TV
14
1 HDMI 1 / HDMI 2
2 USB jack
3 12 V / 24 V DC input terminal
4 Headphone output terminal
5 Audio in
6 Satellite input terminal
7 RF input terminal (Aerial)
8 AV input
9 Coaxial Audio out
II Controls

a) Turning on / off
Attention!
After turning on the antenna does extend and starts the
automatic satellite search! When you turn on the „Oyster ®
TV“
premium device, the automatic search for satellite antenna is
started. Its initialization can take up to a half of a minute.
Before turning on the „Oyster
®
TV“ Premium make sure that when the anten-
na is raising, no obstacle in the way is z. Example, a branch or Garage roof.
Select on the remote control just the programs you want. The antenna
automatically aligns itself.
For safety reasons, the system retracts when the vehicle‘s ignition is actua-
ted. To activate the antenna again, it is absolutely the necessary „Oyster
®
TV“
Premium device to reboot (off and on again Turn on).
Synchronizing the antenna system to the receiver.
If for any valid reason, the antenna system independently retracts, then
turn off the „Oyster
®
TV“ Premium.
Reasons may be triggered by an independent safety testing the antenna
system or below the operating voltage or a short on and off the ignition.
After retraction of the antenna of the „Oyster
®
TV“ Premium can again be
turned on.
III Operation of the system
15

16
b) Key Functions
key function
COUNTRY ICOUNTRY Especially with a larger change of location, the alignment
time of the antenna will be shortened if the correct locale is selected.
The „COUNTRY“ - key invokes the menu „Select Location“ on. In this
Menu are displayed for selection 47 European countries.
PARK PARK The „PARK“ - button retracts the antenna. For example, during
a storm, it is useful retract the antenna, the operation of the receiver
for a DVD player but is still active.
STOP STOP The „STOP“ - button stops the antenna in any position.
START The START „START“ - key will start the „Automatic Search“. it
the last selected satellite will re looking for.
Please note:
The STOP / PARK / START buttons you do not need in normal operation. These
Buttons give you the ability to intervene into the antenna movement.
Useful:
If you want the antenna stays extended, after the „Oyster
®
TV“ have turned
premium, press 20 sec. before Turning off the „PARK BUTTON“.
START
PARK
COUNTRY
STOP
III Operation of the system
IV Operating the „Oyster
®
TV“
a) Switching on - START
Note: Unless otherwise stated, all referneces to buttons refer to the remote
control.
Attention!
If you turn on the „Oyster ®
TV“ Premium with integrated receiver, the
antenna raises and starts the automatic satellite search.
1 Press the switch on the under side of the TV.
The standby indicator on the front of the TV will glow red.
2 Press the button on the remote control. The standby indicator will Standby
change to green.
Switching off
To switch the TV to standby press the button on the remote control. The Standby
standby indicator will change to red.
To save energy do not leave the TV in standby mode for long periods such as over-
night. Switch the TV off using the switch on the under side of the TV.
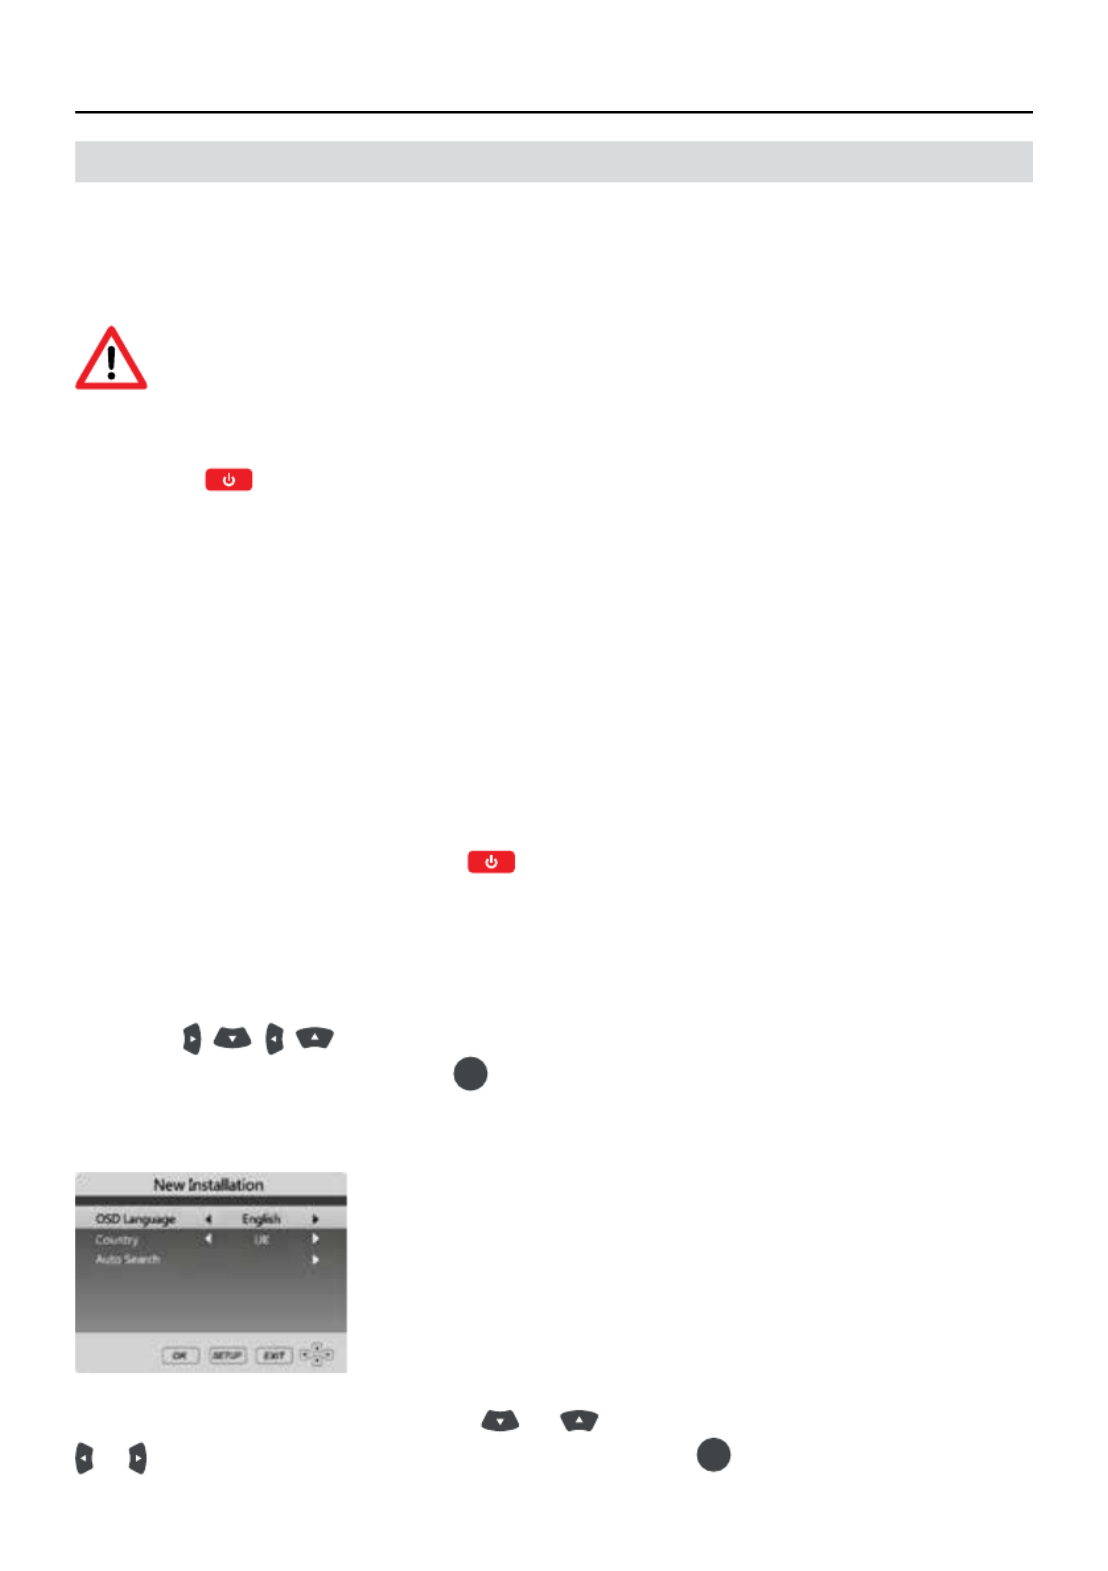
Tuning in digital TV
When the TV is switched On for the rst time, the following screen will appear,
press the buttons to selcet your On Screen Display (OSD) language.
Select Auto Search and press the button.
Note: You will not be able to select the country mode.
When this screen appears press the or buttons to selcet item, press
or buttons to selcet country or channel. Press the button to conrm the
selection. The auto tune will start and must not be interrupted once started.
17
OK
OK

18
When this screen appears, wait for the TV to tune your digital channels. This may
take a few minutes.
Once the auto search is completed, the TV will display the target region setting. If
more than one regional transmitter is available use to select your primary regi-
on prefernece, then press , to leave thie menu press .
Once the target region setting or Auto search is completed, the TV will display the
first available digital channel. All other available digital channels will be displayed
in the Channel List by pressing the button. For more information, please refer to
other sections of the User guide.
EXIT
CHANNEL
OK
IV Operating the „Oyster
®
TV“

b) To perform a full scan
For your convenience your 186/21 DRS comes with a default channel list from first
switch on, you are able to edit and sort this list to your own personal prefrece. If
any further channels are required then you must start a full scan.
Operating the „Oyster® TV“
Press TV SETUP and select “Channel”, press or . Select the wanted satellite
(default is Astra 28.2). Confirm there is signal in the indicator Scroll down and
select “Search Transponder”, press . This will then start a complete scan of the
selected satellite.
A scan will locate all new services on the selected satellite and add after the default
channel list.
Any new / wanted channels can now be edited / sorted to the users desired
preferance, please refer to page 17 for channel edit feature.
IV Operating the „Oyster
®
TV“
19
OK
OK
For your convenience your 187 / 217 / 247DRS comes with a default channel list
from first switch on, you are able to edit and sort this list to your own personal
preference. If any further channels are required then you must start a full scan.
20
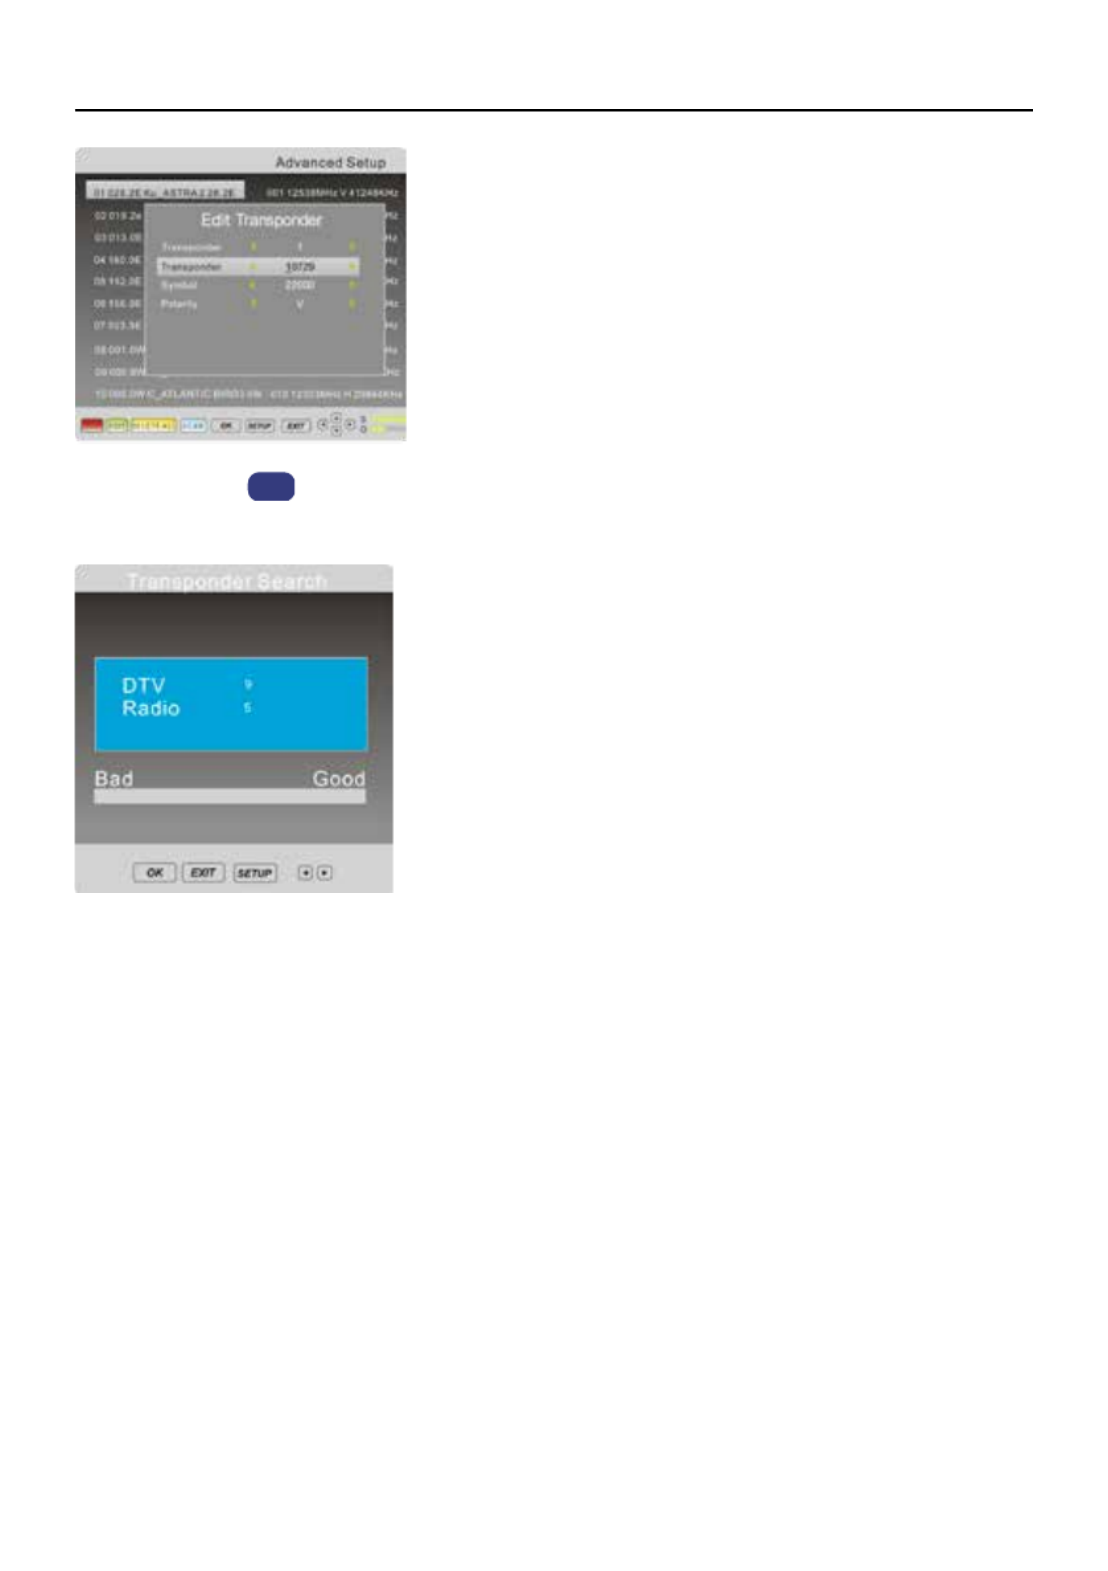
To Add New Services / Channels
Due to broadcast changes and to future proof your Satellite TV it is possible to
add additional transponders so you have the opportunity to add any new channels
that may get added to the channel list. To add a transponder follow the procedure
below:
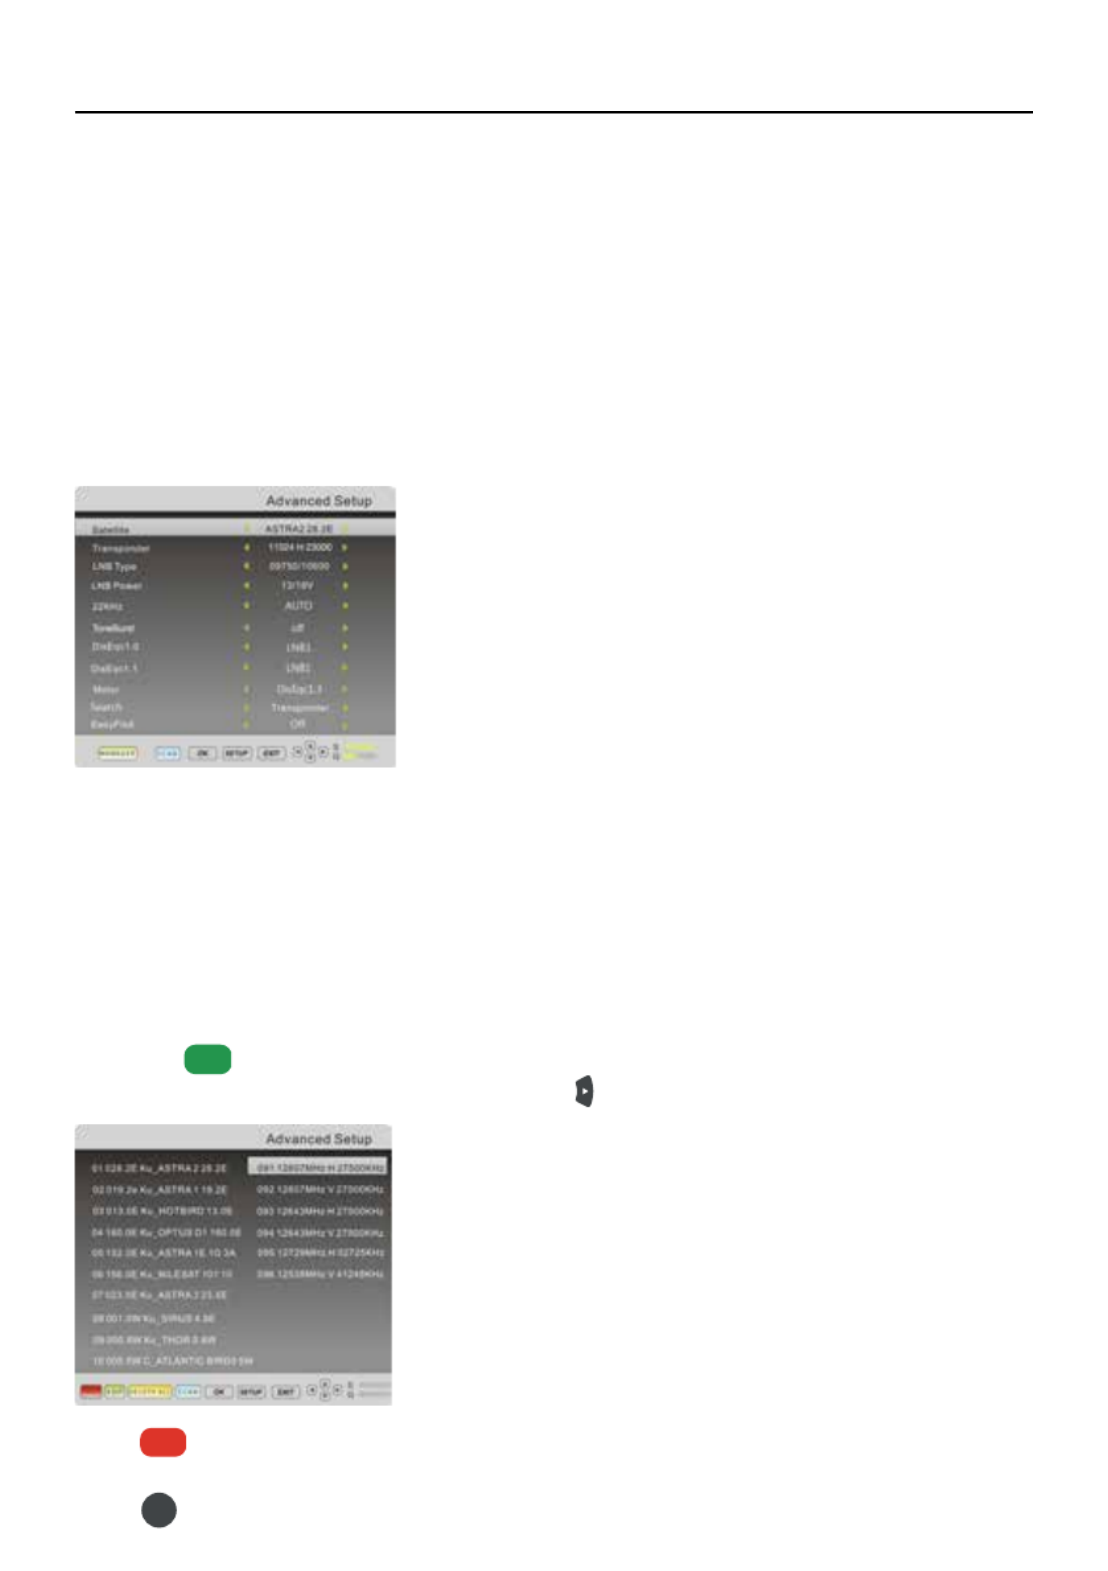
Access Advanced Setup menu, you will need to input password (default 0000)
Press the button to enter satellite and TP Manager Select the satellite you are
tuned to (default Astra 28.2), and press the button enter TP list.
Press button Add the new frequency. Symbol rate and polarity.
Press to store.
Advanced Setup
By default your satellite TV will automatically scan all Free To Air or all Scramble
channels on the satellite you have chosen in the Channel menu. There is however an
opportunity to modify any of these auto settings in the Advanced Setup
menu. It is advised not to change any default setting unless advised by qualified
personnel.
To enter Advanced Setup you will need to input password (default 0000).
RED
GREEN
OK
IV Operating the „Oyster
®
TV“
21
Press scanning button, your Satellite TV will then automatically scan the new
transponder and add any new channels found and add them to you channel list.
FAQ For satellite setup -
1 No channels found, signal and quality bars are zero?
Please check satellite dish / LNB setup, also all cables are in position correctly
Confirm there is a clear line of sight to where the dish is pointing with no obst
ructions, i.e. trees, buildings etc. Ensure your location is within the footprint of
the desired satellite transponder.
2 Full scan performed but limited or incorrect channels are received?
Ensure the dish is aligned with selected satellite correctly, e.g. Astra 28.2.
BLUE
IV Operating the „Oyster
®
TV“

2222
3 Picture or sound is breaking up or dropping out whilst viewing?
Confirm signal quality, enter Channel Search menu and check strenght and quality
bars. A slight missaligment could cause a large redeuction in signal strenght. Also
confrim cable quality for satellite reception and cable lenght. A long cable run
could incur significant signal loss (this can be copensated with a signal
amplifier / booster). Ensure dish is correct size to receive wanted signal.
4 Loss of signal in light rain or snow
Usually due to signal strenght, please confirm all items above.
5 Loss of signal in windy conditions
Confirm all dish and mountings are secure and are not moving in the wind. Check
there are no abstacles such as trees moving back and forth in front of dish.
6 Subtitles or audio language are incorrect
Confirm preferred settings in language settings.
7 How do I add additional channels not in orginal line up?
You will need to add additional transponder, please follow detailed instruction in
the manual.
IV Operating the „Oyster
®
TV“

IV Operating the „Oyster
®
TV“
23
c) Basic operation and FAV - List
Press the button to display the source menu. The following sources
are available:
Use the buttons to scroll between inputs and press to select the source.
If no source is manually selected using the button, the TV will automatically
switch to the highlighted input after 15 seconds.
Press the button to exit the display.
The following sources can also be selected by pressing the individual buttons on the
remote control. The following are available:
• Digital TV
• Satellite TV
• DVD
• AV
TV channel selection
Press the buttons or use the buttons on the remote control to Numeric
selcet a channel you require.
Return
Press the button to swap between the channel you are watching and the previ-
ously selected channel i.e. If you were watching channel I and change to channel 3,
press the button to return to channel I.
Press the button again to return to channel 3.
Source
EXIT
OK
OK
• HDMI 1
• HDMI 2
• USB

Volume
Press the V+ / V- buttons to increase or decrease the volume. The volume level will
be displayed at the bottom of the screen.
Mute
Press the button to mute the sound. Mute will apear at the buttom left hand
side of the screen.
Press the button again or the V+ button to restore the sound. Mute will
disappear from the screen.
Favourite
You can enter the Favourite menu while watching a channel by pressing the
button. The following menu will appear on the screen.
To add channel to the Favourite List, press the button and scroll down to the
Channel Setup, Press the button to acsess the menu. Press the button to
select Channel Edit then press .
In the Channel Edit menu is a list of all channels. Select the channel that available
you want to add to the Favourite List. Press the button to add the selected
channel. A heart will appear next to the selected channel. Press the button to
exit the menu.
24
FAV
FAV
EXIT
IV Operating the „Oyster
®
TV“
OK
TV Setup

Subtitle
If a channel has subtitles available, you can select the subtitles by pressing the
button. Select the required language using the buttons then press .
Programminformation
You can view the programme information for the channel you are watching by
pressing the button. The following menu is a typical example of the programme
details that will be displayed.
You can view the information for the next programme by pressing the button.
Audio
• In Digital mode press the button to change the audio language and sound
track. The following menu will be displayed.
• Select the required audio language using the buttons then press .
25
INFO
OK
IV Operating the „Oyster
®
TV“
SUBT
AUDIO
OK

Menus
The setup menus allow you to adjust and control the TV.
1 To accsess the on screen menus, press the button.
2 Press the buttons to navigate around the menu screens and
available options.
3 To exit the setup menu press the or button.
d) Picture + Sound
This menu gives the options for adjusting the appearance of the TV picture. The
following options are available.
Picture mode
Allows you to select preset levels of contrast, brightness and colour. You can choose
from the following settings.
• User
• Standard
Brightness
Allows you to increase or decrease the brightness of the picture.
Contrast
Allows you to increase or decrease the contrast of the picture.
Colour
Allows you to increase or decrease the colour of the picture.
Sharpness
Allows you to increase or decrease the sharpness of the picture.
Tint
Allows you to increase or decrease the level of tint of the picture (only NTSC signal).
26
IV Operating the „Oyster
®
TV“
TV
Press the button to switch between Digital TV and Digital radio modes.
TV/
EXIT
• Dynamic
• Soft
TV Setup
TV Setup
e) Channel setup and Sender List
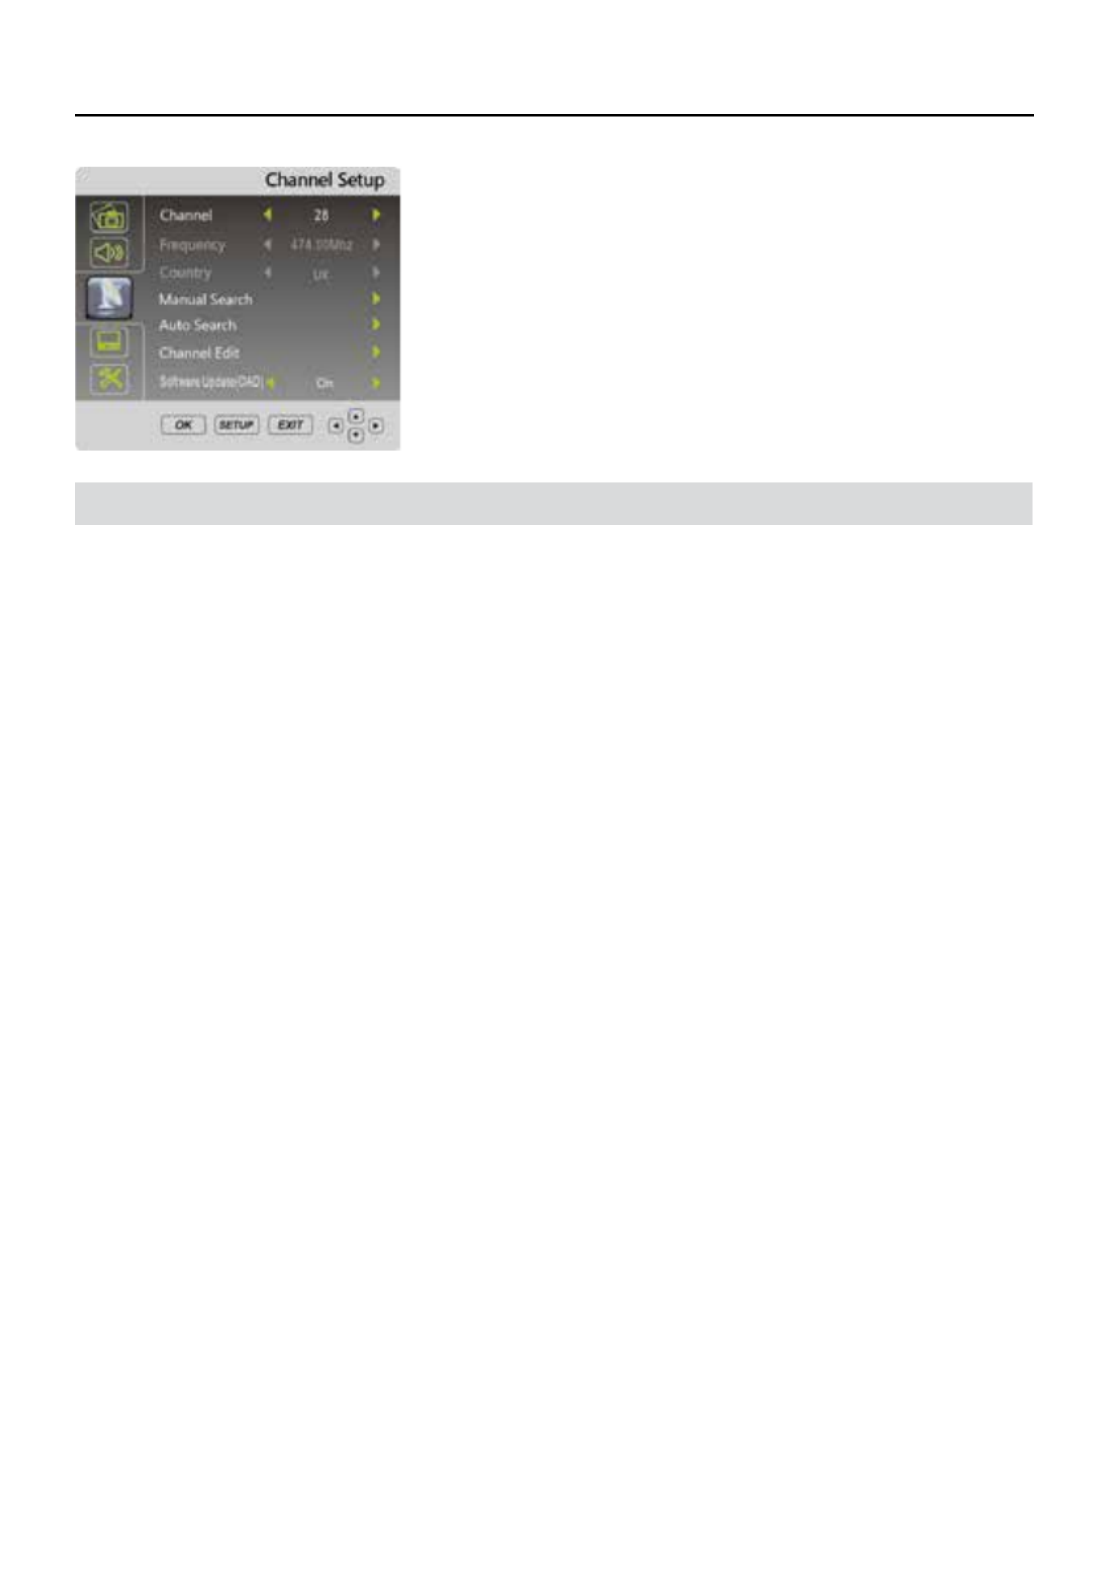
This menu allows you to adjust the channels and the channel settings.
Channel
Allows you to select the channel you want to adjust.
Frequency
Not able to be adjusted.
Country
Not able to be adjusted.
Manual Search
Allows you to manually search and tune the TV.
Auto search
Allows you to automatically search for channels.
Channel Edit
Allows you to delete, skip and add channels to the Favourite list.
28
IV Operating the „Oyster
®
TV“

Channel Edit (Satellite TV mode only)
Press the buttons to select a channel.
You can do the following to an Satellite channel using the coloured buttons.
Red
Press the button to delete a channel. Use the buttons to select the
channel to be deleted.
Yellow
Press the button to select the channel to be moved. Use the buttons to
move the highlighted channel to the required place then press the button to be
same as OSD:
Blue
Navigate to the channel you want to skip then press the button. You will no
longer be able to view this channel in normal viewing mode. Unless direct digit
entry.
Channel Edit (digitalTV mode only)
Press the buttons to selct a channel. You can do the following to
a Digital channel using the coloured buttons:
Red - Press the button to delete a channel. Use the buttons to select
the channel to be deleted. Press the button to delte the selected channel.
29
RED
RED
YELLOW
BLUE
OK
OK
PAGE+
PAGE+
PAGE-
PAGE-
IV Operating the „Oyster
®
TV“

30
Blue
Navigate to the channel you want to skip then press the button. You will no
longer be able to view this channel oin normal viweing mode.
BLUE
IV Operating the „Oyster
®
TV“

IV Operating the „Oyster
®
TV“
f) More settings
DVB-T facility
This menu allows you to change the general settings for digital TV. The following
options are available.
Lock - Allows you to prevent access to certain features of the TV:
Note: The default password is 0000
Audio language
Allows you to set the subtitle languages.
Subtitle language
Allows you to set the subtitle language.
Time zone
Allows you to change the time zone.
CI Information
Allows you to access the Common Interface Card and its status.
Antenna Power
Allows you to turn on / off the antenna power.
PVR File system
Allows you to setup record le system.
31

1 Enter the new password.
2 Re-enter the new password to confirm it. The password is now changed.
Functions
This menu allows you to chnage the following functions:
Display Language
Allows you to change the on screen display language.
Aspect Ratio
Allows you to change the aspect ratio. The following options are available:
• Auto
• zoom 1
• zoom 2
• 16:9
• 4:3
Noise Reduction
Allows you to reduce / alter any noise on the images. The following options are
available:
• Low
• Mid
• High
• Off
33
IV Operating the „Oyster
®
TV“

Electronic Programme Guide
The Electronic Programme Guide displays information about current and future
programmes for the hilighted channel.
Press the button to display the Electronic Programme Guide. The following Guide
menu will be displayed.
Use the buttons to navigate through the available channels and
programmes.
Press the + I2H - I2H scroll information about programmes for the next seven
days.
Press the button to watch the currently selected programme (only the first
programme on each channel can be selected to watch as the other programmes
have not yet started).
Press the or button to exit the EPG.Guide
You can view information about any programme by pressing the button.
You can also set time recording from the , select the desired programmes and
press .
INFO
PAGE+ PAGE-
EPG
EXIT
OK
35
IV Operating the „Oyster® TV“

After finished setup, press to confirm.
Recorder schedule list will display as below. You can delete schedule here.
Press the Guide or buttons to exit the EPG.
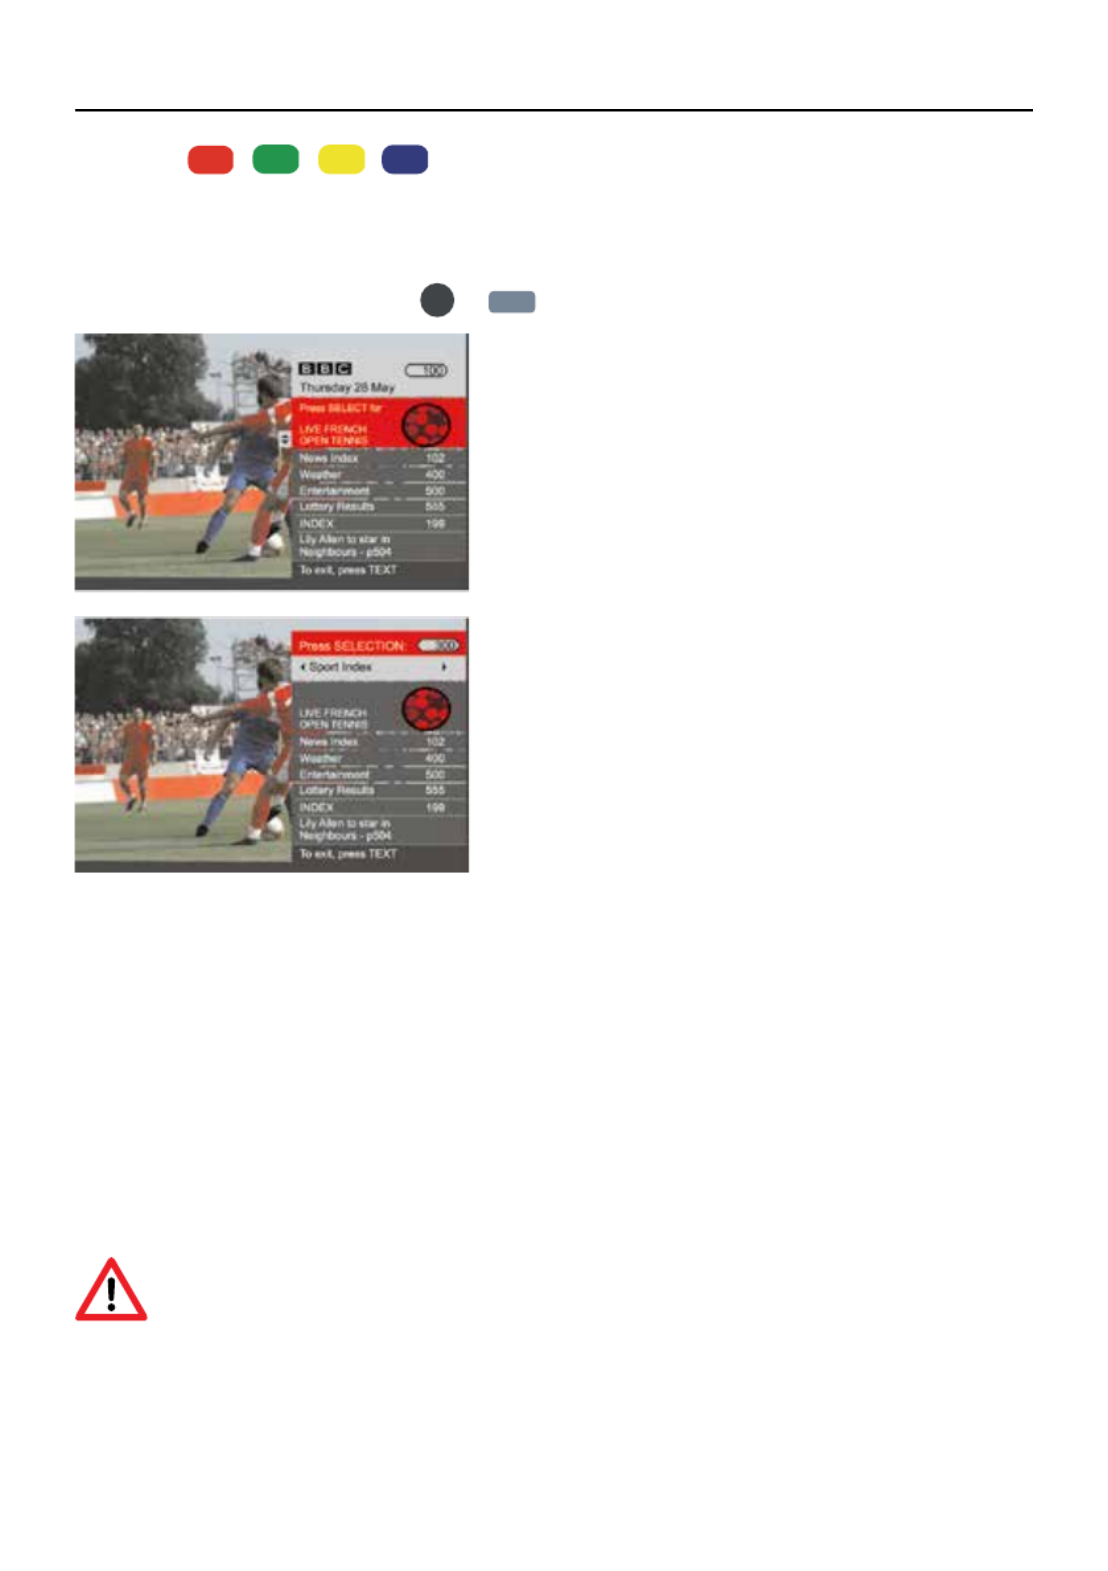
Analogue Teletext (AV mode only)
Teletext is an information system that displays text on the TV screen. Using the
telext control buttons you can view the pages of information that are listed in the
teletext index.
Note: No on screen menus can be displayed in text mode. The colour, contrast
and brightness cannot be changed but the volume can still be adjusted.
Press the button to enter text mode. The text page, normally the index page,
will be displayed.
Press the button again to exit text mode, The screen will return to video you
were viewing.
36
EXIT
TEXT
TEXT
OK
IV Operating the „Oyster
®
TV“

Mix
Press the button to enter mix mode. The next page will display with the picture Mix
behind it.
Cancel
Press the button to view the programme you are watching without any text Cancel
in the background.
Selecting a page
1 To select a page in text mode, find the page number you require on the Index
page and enter the page number using the buttons. The number will Numeric
appear in the top left hand corner of the screen. A page search will begin. Once the
page is found, it will be displayed.
2 To return to the Index page, press the button.Index
3 To select ab Subpage, press the button.Subpage
Subtitle
1 To display subtitles while watching video, press the button and go page 888.
The picture will be displayed and provided with subtitles, these will appear at the
buttom of the screen.
2 Press the button to exit text mode.
Reveal information
1 Press the button to reveal concealed information (quiz answers etc.).Reveal
2 Press the Reveal button again to conceal the information.
Fast text
At the bottom of the teletext screen are subject headings in red, green, yellow and
blue.
1 Press the coloured ( ) buttons on the remote control to
access these pages.
2 Press the Index button to return to the index page.
37
TEXT
TEXT
RED GREEN YELLOW BLUE
IV Operating the „Oyster
®
TV“

Page hold
When in text mode and you are viewing a text page with sub pages, these will au-
tomatically be displayed in order with a delay to allow you to read the page.
1 Press the button to stop the next subpage being displayed. The hold symbol Hold
will appear in the top left hand comer of the screen.
2 Press the button again to continue moving through the sub-pages.Hold
Text enlargement
1 Press the button to enlarge the text shown on the text mode screen. Once Size
selected, half a page will be displayed at the time.
2 Press the button again to view second half of the page.Size
3 Press the button a third time to return to normal text mode.Size
Digital text
Freeview digital text is an information system that displays text on your TV screen.
Note: No on screen menus can be displayed in text mode. The colour, contrast
and brightness cannot be altered but the volume can be changed.
Follow the on screen commands. The following menu is an example of the BBC
digital text service.
1 Press the button to select digital text.
2 To select the page you require, press the buttons and press button to
select. Alternatively you can enter the page number using the Numeric buttons.
Press the button to view the page.
3 Press the buttons to navigate the digital text menus.
38
TEXT
OK
OK
IV Operating the „Oyster
®
TV“
4 Use the buttons to access the subject shortcuts, please note
the colour buttons have same feature in satelite mode but are not shown on the
screen.
5 To exit digital text press the or button.
Common Interface Schacht
The Common Interface (CI) slot is designed to accept the Conditional Access Module
(CAM) and Smart card in order to view the pay TV programmes and additional
services. Contact your Pay per View TV provider to get more information about the
modules and subscription.
Note: Conditional Access Modules and Smart cards are sold separately.
Warning! Switch off your TV before any modules are inserted in the
CI slot.
The CI slot is located on the rear of xour TV. Insert the CAM correctly into the CI
slot, then add the Smart card to the CAM.
39
TEXT
RED GREEN YELLOW BLUE
EXIT
IV Operating the „Oyster
®
TV“

Wait for a few moments until the card is activated.
1 Turn on the TV.
2 If the CAM is detected the TV will display the following message on the screen:
Common Interface Module Inserted
3 Selected the relevant digital channel.
4 Detailed information on the Smart card in use is displayed.
5 Press the button to access the card menu. Refer to the module instruction
manual for setting details.
6 When the module is removed, the following message will appear on the screen:
Common Interface Module Removed.
HDMI / AV Setup
The menu setup of HDMI / AV modes is similar to the TV mode setup, exept that
Channel Setup is not available.
If there is no signal input when the TV is in HDMI / AV mode, the following screen
will be displayed.
40
OK
IV Operating the „Oyster
®
TV“

If a signal input is not detected within 5 minutes, the TV will go into Standby mode.
Audio In
Please select AV as source to use with audio in (e.g. music player). After 5 minutes
screen with time out, however the speaker will reamain active.
g) Memory device
To format your memory device and create a PVR file, press the setup key on the
remote whilst in Digital TV / Satellite TV mode. Scroll down through the menu using
the keys to Digital TV / Satellite TV.
Press keys to navigate through the PVR FILE SYSTEM menu options, select
CHECK THE PVR FILE SYSTEM and then FORMAT part or all of the USB / HDD.
41
IV Operating the „Oyster
®
TV“

1 PVR File System Menu
Select Disk will select the destination disk for recording TV program.
• Check PVR file system.
• Format will format the disk.
• Max record time will limit the max record time.
• After recording, press button to display files information. list
Pressing button to display details.Info
Key to abbreviations:
PVR: Personal video recorder, HDD: Hard disk drive, DTV Ditial television,
SD: Standard definition, HD: High definition
Insert USB or HDD. Then enter SELECT DISK.
If using a USB device, default disk name is DISK C:
If using a HDD, and HDD has two or more partitions, the system allows you to select
C: / D: disk and so on by pressing .
Select to continue.
Select to exit.
2 PVR Dateisystem prüfen
42
EXIT
OK
IV Operating the „Oyster
®
TV“

Allows you select USB disk or HDD size for recording.
Pressing to change.
System will show max recording time for SD and HD signal. You can‘t select
definition for recordings. It‘s determined by the input signal.
Select to continue.
Select to exit.
Allows you toset size for recording. For example, if USB is 4GB. System allows you
select 1 GB / 2 GB / 3 GB / all by pressing
Select to continue.
Select to exit.
3 Formatting
If you want to format disk, please note all date will be lost. Select start to format,
during formating, do not power off the TV, select to cancel.
EXIT
EXIT
EXIT
OK
OK
IV Operating the „Oyster
®
TV“
43

Press button to start recording.
After recording, press List to view information on recordings.
Warning: Please make sure your USB has at least 500 MB free space
and the create PVR file system before you record Digital TV / Satellite
TV program.
You can stop recording by pressing button. In record, play and time shift mode,
you can use and buttons to selct funtion.
You can list all recorded files by pressing button.List
44
OK
IV Operating the „Oyster
®
TV“

You can playback files in the recorded list. By pressing or to playback.
By pressing to stop.
Press the button to enter Time hift recording mode.
Press the button to enter time shift playback mode.
Press button to exit.
In record, play and time shift mode, you can use , and buttons to select
function.
45
Time
Shift
OK
OK
IV Operating the „Oyster
®
TV“

46
IV Operating the „Oyster
®
TV“
h) Technical specifications „Oyster® TV“
**Terrestrial antenna not included in supply.
ten Haaft TV sets „Oyster® TV“ - 19“ „Oyster® TV“ - 21.5“ „Oyster® TV“ - 24“
Type L187TRS L217TRS L247TRS
EU energy efciency category BB B
Display size 19“ / 47 cm 21.5“ / 55 cm 24“ / 61 cm
Operating power 23 W max. 26 W max. 35 W max.
Annual energy consumption in
kWh / year* 34 kWh / year 37 kWh / year 51 kWh / year
Power consumption in standby /
off state < 0,5 W < 0,5 W < 0,5 W
Resolution (pixel) HD Ready 1366 x 768 Full HD 1920 x 1080 Full HD 1920 x 1080
Viewing angle H / V 170° / 160° 170° / 160° 170° / 160°
Tuner DVB-S, DVB-S2,
DVB-T**, DVB-T2**
DVB-S, DVB-S2,
DVB-T**, DVB-T2**
DVB-S, DVB-S2,
DVB-T**, DVB-T2**
Dimensions including base
(W x H x D)
43.7 x 28.9 x 11.1 cm 50.2 x 32.7 x 11.1 cm 56.3 x 35.8 x 11.1 cm
Dimensions excluding base
(W x H x D) 43.7 x 26.1 x 4.6 cm 50.2 x 29.9 x 4.6 cm 56.3 x 33.0 x 4.6 cm
Weight including base /
Weight excluding base
~ 2.8 kg / ~ 2.5 kg ~ 3.4 kg / ~ 3.1 kg ~ 3.8 kg / ~ 3.5 kg
VESA standard mounting pattern 100 x 100 mm 100 x 100 mm 100 x 100 mm
Operating voltage
12V DC / 24V DC / 230V AC1
1
requires mains power
adapter
12V DC / 24V DC / 230V AC
1
1requires mains power
adapter
12V DC / 24V DC / 230V AC1
1requires mains power
adapter
Ports
2 x HDMI a a a
2 x USB 2.0 Video / audio / photo Video / audio / photo Video / audio / photo
3 x Cinch (RCA) Analogue audio / FBAS In Analogue audio / FBAS In Analogue audio / FBAS In
3.5-mm stereo jack Headphone jack Headphone jack Headphone jack
Digital audio output, coaxial (RCA) a a a
On / Off mains switch a a a
CI / CI+ module slot a a a
Scope of supply
TV set a a a
Base a a a
Power cable 12 V / 24 V
(with on-board system connector) a a a
Remote control a a a
Mains power adapter 110 V... 240
V AC with EURO mains plug a a a
*Energy consumption XYZ kWh per year on the basis of a daily four-hour operation of the television on 365 days.
The daily energy consumption depends on the type of use of the TV.
47
a) Notes on the protection of the environment
At the end of its lifecycle, this product must not be disposed of with
your normal waste, but instead must be returned to a recycling faci-
lity for electric and electronic devices. This is indicated by the symbol
on the product, the operating manual or the packaging.
The materials can be reused in accordance with their identification.
By reusing or recycling old equipment or making use of it in other
ways you are making an important contribution to protecting our environment.
Please contact your local council to find out where your nearest disposal facility is.
EC End-of-Life Vehicle Directive
The system is certified and intended for use as an accessory of a motor vehicle.
The system may be disposed of together with the vehicle in accordance with the
End-of-Life Vehicle Directive ELV, 2000 / 53/ EC. The receiver does not contain any
materials rated as hazardous to the environment according to the directive.
V Appendix
b) Contact Service&
If you have any questions about using your Vision system, please feel free to call us:
Telephone: +49 (0) 72 37 / 48 55– 0 or send an e-mail to: info@ten-haaft.de
Office hours: Monday to Friday from 08 a.m. – 12 p.m. and from 01 p.m. – 04.30 p.m.
We hope you get a lot of enjoyment out of your Vision system.
ten Haaft GmbH

18
ten Haaft GmbH
Oberer Strietweg 8
75245 Neulingen-Göbrichen
GERMANY
Telefon + 49 (0) 72 37 / 48 55– 0
Telefax + 49 (0) 72 37 / 48 55– 50
E-Mail: info@ten-haaft.com
Önungszeiten:
Montag – Freitag 08:00 – 12:00 Uhr
13:00 – 16:30 Uhr
www.ten-haaft.com
Produkt Specifikationer
| Mærke: | Oyster |
| Kategori: | televisión |
| Model: | Premium |
Har du brug for hjælp?
Hvis du har brug for hjælp til Oyster Premium stil et spørgsmål nedenfor, og andre brugere vil svare dig
televisión Oyster Manualer

25 August 2024
25 August 2024
televisión Manualer
- televisión SilverCrest
- televisión Acer
- televisión Denver
- televisión Sencor
- televisión TCL
- televisión Sony
- televisión Siemens
- televisión Samsung
- televisión Panasonic
- televisión VOX
- televisión Philips
- televisión Lenco
- televisión OK
- televisión LG
- televisión AEG
- televisión Pioneer
- televisión Mitsubishi
- televisión Sharp
- televisión Daewoo
- televisión Arçelik
- televisión AOC
- televisión Sanyo
- televisión Grundig
- televisión Nikkei
- televisión Toshiba
- televisión Pyle
- televisión Furrion
- televisión Lenovo
- televisión Infiniton
- televisión Nedis
- televisión Logik
- televisión Abus
- televisión Optoma
- televisión Westinghouse
- televisión Element
- televisión Thomson
- televisión Hyundai
- televisión Aiwa
- televisión Nokia
- televisión Casio
- televisión AKAI
- televisión Hisense
- televisión Strong
- televisión Brandt
- televisión Hannspree
- televisión Trevi
- televisión Blaupunkt
- televisión JVC
- televisión BEKO
- televisión Uniden
- televisión Clatronic
- televisión Hitachi
- televisión Medion
- televisión Sweex
- televisión Citizen
- televisión Megasat
- televisión Haier
- televisión TechniSat
- televisión Innoliving
- televisión NewStar
- televisión Bang And Olufsen
- televisión Luxor
- televisión Vivax
- televisión Loewe
- televisión Walker
- televisión Sunny
- televisión Finlux
- televisión Telefunken
- televisión Kernau
- televisión BenQ
- televisión Packard Bell
- televisión Xiaomi
- televisión Peerless-AV
- televisión Krüger&Matz
- televisión Viewsonic
- televisión Schneider
- televisión Fujitsu
- televisión Oppo
- televisión Zalman
- televisión Tesla
- televisión Polaroid
- televisión NEC
- televisión TERRIS
- televisión OKI
- televisión MT Logic
- televisión Yasin
- televisión Bush
- televisión Dual
- televisión Aspes
- televisión Salora
- televisión Sagem
- televisión Nevir
- televisión Teac
- televisión Nextbase
- televisión Techwood
- televisión Vivo
- televisión Albrecht
- televisión SVAN
- televisión Sogo
- televisión Alba
- televisión RCA
- televisión ECG
- televisión AudioSonic
- televisión Manhattan
- televisión Proline
- televisión JGC
- televisión Orion
- televisión ITT
- televisión ILive
- televisión Intenso
- televisión Fantec
- televisión Cecotec
- televisión Roadstar
- televisión VIZIO
- televisión XD Enjoy
- televisión Wharfedale
- televisión Technika
- televisión Seiki
- televisión TechLine
- televisión Monster
- televisión Bauhn
- televisión V7
- televisión Airis
- televisión Majestic
- televisión Star-Light
- televisión Vestel
- televisión Continental Edison
- televisión Iiyama
- televisión RevolutionHD
- televisión GPX
- televisión CHiQ
- televisión MBM
- televisión Orima
- televisión SereneLife
- televisión Lexibook
- televisión AG Neovo
- televisión Philco
- televisión Kunft
- televisión GoGen
- televisión Kogan
- televisión Graetz
- televisión Emerson
- televisión Kemo
- televisión Insignia
- televisión Xoro
- televisión Manta
- televisión SunBriteTV
- televisión JTC
- televisión Reflexion
- televisión Planar
- televisión QBell Technology
- televisión SYLVOX
- televisión Dyon
- televisión Schaub Lorenz
- televisión Daitsu
- televisión Xiron
- televisión Alden
- televisión Alphatronics
- televisión Aldi
- televisión Allview
- televisión AYA
- televisión Aristona
- televisión Apex
- televisión Ziggo
- televisión Icy Box
- televisión Palsonic
- televisión Funai
- televisión Saba
- televisión Antarion
- televisión Tevion
- televisión Proscan
- televisión Tucson
- televisión Sunstech
- televisión Nabo
- televisión Sylvania
- televisión Marquant
- televisión Nordmende
- televisión AudioAffairs
- televisión Magnum
- televisión Kubo
- televisión Coby
- televisión Seg
- televisión Metz
- televisión Qilive
- televisión Changhong
- televisión Naxa
- televisión Mpman
- televisión Cello
- televisión Mx Onda
- televisión Peaq
- televisión Humax
- televisión Superior
- televisión Difrnce
- televisión Grunkel
- televisión Avtex
- televisión Odys
- televisión NPG
- televisión Bluesky
- televisión Videocon
- televisión Durabase
- televisión HKC
- televisión Edenwood
- televisión Woxter
- televisión Premier
- televisión Teleco
- televisión Opera
- televisión LTC
- televisión Horizon
- televisión Elements
- televisión Viewpia
- televisión CGV
- televisión Online
- televisión Doffler
- televisión DirecTV
- televisión Tele 2
- televisión Mystery
- televisión Telesystem
- televisión Jay-tech
- televisión EKO
- televisión E-motion
- televisión Mitsai
- televisión Selfsat
- televisión High One
- televisión Tve
- televisión ISymphony
- televisión Pantel
- televisión Magnavox
- televisión ATYME
- televisión HCI
- televisión Inno-Hit
- televisión Lin
- televisión Engel
- televisión Digihome
- televisión Englaon
- televisión Reflex
- televisión Astar
- televisión Visco
- televisión Tivax
- televisión H&B
- televisión Norcent
- televisión TELE System
- televisión TIM
- televisión Belson
- televisión Vision Plus
- televisión Sbr
- televisión Voxx
- televisión Rm 2000
- televisión Hoher
- televisión Felson
- televisión Elbe
- televisión Axing
- televisión FFalcon
- televisión Smart Tech
- televisión Séura
- televisión Mitzu
- televisión Caratec
- televisión JTC24
- televisión Kivi
- televisión Smart Brand
- televisión FOX Electronics
Nyeste televisión Manualer

20 Februar 2025
19 Februar 2025
19 Februar 2025

10 Februar 2025
5 Februar 2025
30 Januar 2025

30 Januar 2025

15 Januar 2025
15 Januar 2025

15 Januar 2025