Panasonic FZ-N1 Manual
Læs nedenfor 📖 manual på dansk for Panasonic FZ-N1 (52 sider) i kategorien Tablet. Denne guide var nyttig for 11 personer og blev bedømt med 4.5 stjerner i gennemsnit af 2 brugere
Side 1/52

Operating Instructions
Basic Guide
Tablet Computer
Model No.
FZ-N1
series
Thank you for purchasing a Panasonic product.
For optimum performance and safety, please read these
instructions carefully.
For detailed information about this product, refer to the Reference
Manual, which is available by tapping [Online Manual] in the
product’s app list. (Download required.)

2
Table of Contents
Introduction .............................................................. 3
Regulatory information................................................... 3
Handling cautions .......................................................... 5
Terms and illustrations in this document ....................... 9
Disclaimers .................................................................. 10
Getting Started ....................................................... 11
Confirming the included items ..................................... 11
Description of parts...................................................... 12
Opening and closing the interface cover ..................... 16
Removing and attaching the battery cover .................. 17
Installing SIM cards (certain models only)................... 19
Installing an SD card.................................................... 20
Installing and removing the battery.............................. 22
Charging the battery.................................................... 24
Turning the unit on and off........................................... 25
Home screen, status bar, notifications......................... 26
Navigation and function buttons .................................. 27
Factory data reset........................................................ 28
Troubleshooting .................................................... 29
Appendix ................................................................ 33
Specifications............................................................... 33
LIMITED WARRANTY................................................. 40
LIMITED WARRANTY / GARANTIE LIMITÉE............. 45

3Introduction
Introduction
Regulatory information
For USA
FCC RF exposure information
The highest SAR value for this product as reported to the FCC when
tested for use at the ear is listed below:
And when worn on the body in a holder or carry case, is listed below:
For Canada / Pour le Canada
RF exposure information
The highest SAR value for this product as reported to the IC when
tested for use at the ear is listed below:
And when worn on the body in a holder or carry case, is listed below:
Regulatory information
Highest value
0.28 W/kg
Highest value
0.45 W/kg
Highest value
0.27 W/kg
Highest value
0.45 W/kg

4
Information sur l’exposition aux radiofréquences (RF)
La valeur de DAS la plus élevée obtenue pour ce produit, telle que
rapportée à l’IC lors des essais pour une utilisation près de l’oreille,
est telle que décrite ci-dessous :
Et avec l’appareil porté sur soi dans un portoir ou un boîtier, la valeur
est telle que ci-dessous :
Valeur la plus élevée
0,27 W/kg
Valeur la plus élevée
0,45 W/kg

5Introduction
Handling cautions
General use
• Operating environment
Temperature: Operation: -10 °C to 50 °C {14 °F to 122 °F}
(IEC60068-2-1, 2)
*1
Storage: -30 °C to 70 °C {-22 °F to 158 °F}
Humidity: Operation: 30 % to 80 % RH (No condensation)
Storage: 30 % to 90 % RH (No condensation)
Even within the above temperature/humidity ranges, operation for
a long time in extreme environments, smoking nearby, or operation
in places where oil is used or where there is a lot of dust will result
in product deterioration and will shorten the product life.
Also, when using the product in cold environments, the product
may take longer to start up and battery operation time may be
reduced.
If the product is wet in temperatures of 0 °C {32 °F} or below,
freeze damage may occur. Make sure to dry off the computer in
such temperatures.
*1 Do not directly touch this product with your bare hands when
using it in a hot or cold environment.
• Do not place the product in the following areas, as doing so may
damage the product.
– Near electric appliances. The image may be distorted or noise
may occur.
• This product is designed to reduce physical shock applied to the
LCD and internal electrical components. However, protection
against malfunction due to such shock is not guaranteed. As with
any portable device, precautions should be taken to avoid any
damage.
• When operating the screen using the dedicated stylus, do not
firmly press it down. Doing so may damage the dedicated stylus or
result in scratches or dents on the screen.
• Do not place objects on the surface of the product or press down
hard on the product with sharp objects. The screen surface may
get scratched.
Handling cautions

6
• Do not scratch the rear camera, barcode reader, or flash panel.
• Do not use the dedicated stylus (sold separately) when dust or dirt
(e.g., oil) is on the screen. Otherwise foreign particles on the
screen/dedicated stylus may scratch the screen surface or
obstruct operation of the dedicated stylus.
• Use the dedicated stylus only for touching the screen. Using it for
any other purpose may damage the dedicated stylus and result in
scratches on the screen.
• Confirm the safety and security of software before downloading or
installing it on the product. Installing malware or viruses can cause
malfunction and the disclosure of any private information stored in
the product, or may cause excessive sound volume.
• Turn off the product before removing the SIM card or SD card.
Failure to do so can result in data loss or damage to the SIM card,
SD card, or product.
• Do not place the product near a television or radio receiver. This
may cause television or radio interference.
• Keep the product away from magnets. Failure to do so may cause
malfunction.
• It is illegal in many areas to record a call without permission.
Always ask the other party for permission before recording a call.
• Follow these instructions and the Reference Manual to avoid any
damage to the devices. Carefully read the instruction manuals of
the peripheral devices.
– Use peripheral devices that conform to the product's
specifications.
– Connect to the connectors in the correct direction.
– If a connector is hard to insert, do not try forcibly. Check its
shape, direction, alignment of pins, etc.
Protecting your data
• To prevent accidental loss of data, we recommend that you back
up any important data that you store in the product, SIM card, and
SD card.
• To prevent the unintended disclosure of private information,
always confirm the destination before sending messages, file
attachments, or any other communications, such as email.

7Introduction
• To prevent the unintended disclosure of sensitive information
stored in the SD card, we recommend using the unit's SD card
encryption feature to encrypt the SD card (see the Reference
Manual for more information).
• Before disposing of the product or handing the product over to a
third party, remove the SIM card, SD card, and any other
accessories.
• Before disposing of the product or handing the product over to a
third party, perform a factory data reset (page 28 ) to erase any
data stored in the product.
• Before using Wi-Fi or Bluetooth features, take appropriate action to
secure your data.
Waterproof/dustproof
• The product is waterproof/dustproof when the interface cover and
headset jack cover are closed, and the battery and battery cover
are attached. Therefore, keep water and dust away from product's
internal components, accessories, and optional products.
• To prevent liquids, sand, dust, or any foreign objects from entering
the product, always keep the battery cover and battery clean and
make sure to firmly close the cover after opening. Take care not to
get anything caught between the cover or battery and the product.
• If the product is exposed to water droplets, wipe them off with a
dry, soft cloth and shake the product to remove the water droplets.
Next, remove the battery cover, and shake the product while
holding down the battery so that it does not detach to remove the
water. Then, with the battery still attached, wipe off the water
droplets on the battery and back side of the battery cover, and dry
thoroughly.
• Do not leave any water droplets on the product. Water droplets
may cause the micro USB port or headset jack to short circuit, or
create smears on the screen.
• If the unit is wet, wipe off the moisture before connecting with
peripheral devices.
• Do not dry the product with an appliance or heat source such as a
microwave oven or dryer.

8
• Accessories
Do not use in the rain or in very humid places such as bathrooms
because the accessories are not waterproof/dustproof. Stop use if
they are worn on the body, because the inside may corrode due to
humidity from sweat and cause malfunction.
Maintenance
• When cleaning the product, make sure to turn it off.
• When cleaning the product, wipe it with a soft, dry cloth. An
alcohol-based disinfectant may be used if necessary.
– If the product is particularly dirty, thoroughly wring a cloth
soaked in water, wipe off the dirt, and then wipe with a dry cloth.
– Do not clean the product with solvents such as benzene, thinner,
or strong alkaline detergent because they may affect the surface
of the product.
Battery
• The battery is a consumable item, and battery life varies with
usage conditions. Typical battery life is approximately one year or
about 500 charge cycles. As the battery reaches the end of its life,
the amount of time it can be used becomes dramatically shorter
and repeated charging does not restore its performance. When
this occurs, the battery should be replaced with a new one.
• Do not touch the terminals of the battery. Failure to observe this
may cause poor contact.
• When the battery is left installed in the product, it discharges
electricity gradually in small amounts even if the product's power is
off. If left for a long period (several months or more), the battery will
over discharge and its performance may deteriorate.
• Store the battery in environments with an ambient temperature
of -20 °C to 35 °C (-4 °F to 95 °F). If the battery is stored in other
environments, battery performance and battery life may be
reduced.
• When storing or transporting the battery, make sure that the
battery's terminals do not become dirty and that no foreign objects
or debris become attached to the battery's terminals.

9Introduction
• If battery charging is not completed after the specified charging
time has passed, remove the battery from the unit. The battery
protection device may be damaged.
• You cannot charge an installed battery if it is not recognized by the
product. Make sure that you use the specified battery.
Terms and illustrations in this document
• Panasonic Corporation and/or its affiliates are referred to
collectively as “we” or “Panasonic”.
• This product supports microSD, microSDHC, and microSDXC
memory cards. In this document, the term “SD card” is used as a
generic term for any supported memory card.
• This product supports Micro SIM cards (certain models only). In
this document, the term “SIM card” is used as a generic term for
any supported SIM card.
• Some illustrations in this document may look different from the
actual product. Also, the details of the descriptions may vary due to
differences between the software versions or automatic updates of
some software.
• Information in this document is subject to change without notice.
• For the latest information about optional products, refer to the
product catalogs, etc.
Terms and illustrations in this document

10
Disclaimers
Panasonic shall not be liable for loss of data or other incidental or
consequential damages resulting from the use of this product. This
product can download, store, forward, and receive additional content,
such as applications, ringtones, contact information, and media files.
The use of such content may be restricted or prohibited by the rights
of third parties, including but not limited to restriction under
applicable copyright laws. You are entirely responsible for additional
content that you download to or forward from this product; Panasonic
is not responsible for such content or its use. Before using such
content, it is your responsibility to verify that your intended use is
properly licensed or is otherwise authorized. Panasonic does not
warrant or guarantee the accuracy, integrity or quality of any
additional content or any other third-party content. Under no
circumstances will Panasonic be liable in any way for the improper
use of additional content or other third-party content by this product
or its operator. This document and any related product
documentation may refer to services and applications that are
provided by third parties. The use of such services or programs may
require separate registration with the third party provider and may be
subject to additional terms of use. For applications accessed on or
through a third-party web site, please review the web sites’ terms of
use and applicable privacy policy in advance. Panasonic does not
warrant or guarantee the availability or performance of any third-
party web sites, services, or applications.
Disclaimers

11Getting Started
Getting Started
Confir ming the included it ems
If any items are missing, please contact your technical support
representative.
–
Main unit
×
1
–
Battery
×
1
–
Operating Instructions - Read Me First
×
1
Confirming the included items

12
Descri ption of part s
Front view
A
A
A
AA
Indicator
Orange, lit: Battery is charging
Green, lit: Battery charging is complete
Red, lit: Battery level is less than 15 % of a full charge
B
B
B
BB
Front camera
C
C
C
CC
Earpiece
Description of parts

13Getting Started
D
D
D
DD
Ambient light sensor, proximity sensor
The ambient light sensor automatically adjusts the screen
brightness. The proximity sensor prevents accidental operations
on the touch panel during phone calls.
E
NFC antenna
(internal)
When using an NFC card or other NFC device, touch the card/
device to this area of the unit.
F
F
F
FF
Display (touch panel)
Can also be operated while using gloves (glove touch mode).
G
G
G
GG
Speaker
H
Application button [A1]
(page 27 )
I
Application button [
A2
]
(page 27 )
J
Application button [
A3
]
(page 27 )
K
Headset jack cover
(page )15
L
L
L
LL
Headset jack
M
Power button
(page 25 )
N
N
N
NN
Microphone
O
Interface cover
(page 16 )
P
P
P
PP
micro USB port
Q
Q
Q
QQ
Strap attachment hole
R
Side button
(page 27 )
S
Camera button
(page 27 )
T
T
T
TT
Cradle rail
Used when connecting the unit to an optional cradle, etc.

14
Rear view
A
A
A
AA
Microphone
B
B
B
BB
Rear camera
C
C
C
CC
Barcode reader
D
D
D
DD
Battery cover
E
E
E
EE
Battery lock lever
F
Cellular antenna
(internal)
G
GPS antenna
(internal)
H
H
H
HH
Flash
Can be used when taking pictures.
I
I
I
II
Strap attachment hole
J
Wi-Fi, Bluetooth antenna
(internal)
K
Side button
(page )27
L
L
L
LL
Volume buttons

15Getting Started
M
M
M
MM
Cradle rail
Used when connecting the unit to an optional cradle, etc.
N
N
N
NN
Expansion bus connector
Used when connecting an optional cradle, etc. or for other future
expansion options.
Opening and closing the headset jack cover
Pull back at the protrusion of the headset jack cover with your
fingertip. When closing, make sure the cover is closed firmly.
IMPORTANT
• Observe the following to ensure the waterproof and dustproof
performance of the unit.
– Make sure the headset jack cover is securely closed when the
headset jack is not being used.
– When closing the headset jack cover, make sure there is no
debris lodged in and around the cover.

16
Opening and closing the interface cover
Opening the interface cover
Closing the interface cover
Opening and closing the interface cover
1.
Slide in the direction of the
arrow at the protrusion
(circled in the illustration
above) with your fingertip.
2.
Pull back the cover and
rotate it downward.
1.
Rotate the cover upward
and insert it to its original
position.
2.
Firmly slide in the direction
of the arrow until the red
area (circled in the
illustration above) of the
cover is no longer visible.

17Getting Started
IMPORTANT
• Observe the following to ensure the waterproof and dustproof
performance of the unit.
– Make sure the interface cover is securely closed and locked
when the micro USB port is not being used.
– When closing the interface cover, make sure there is no debris
lodged in the gasket that seals the cover.
Removing and attaching the battery cover
Removing the battery cover
1.
Slide the battery lock lever (circled in the illustration) in direction
of (A), then slide the battery cover in direction of the arrow
(B).
Removing and attaching the battery cover

18
Attaching the battery cover
1.
Place the battery cover on the unit as shown in the illustration
below (A), and then slide it until you hear a click (B).
2.
Lock the cover by sliding the battery lock lever (circled in the
illustration) toward .
• Firmly slide until the red area is no longer visible.
IMPORTANT
• Observe the following to ensure the waterproof and dustproof
performance of the unit.
– Always make sure the battery cover is securely closed and
locked.

19Getting Started
Installing SIM cards (certain models only)
You can install up to two SIM cards.
1.
Remove the battery cover (page 17).
• If a battery is installed, remove it (page 23 ).
2.
Slide the Micro SIM card slot in the direction of the arrow (A),
and then open it (B).
3.
Insert the SIM card into the desired Micro SIM card slot.
• Install only Micro SIM cards.
• If only one SIM card is installed, insert it into Micro SIM card
slot 1.
• Hold the SIM card so that the metal terminals are facing you,
and insert with the notch facing in the same direction of the
circled area in the illustration below.
Installing SIM cards (certain models only)
Slot 1
Slot 2

20
4.
Close the Micro SIM card slot (A), and slide it in the direction of
the arrow (B) until you hear a click.
• To remove a SIM card, follow the same procedure, and then
pull out the SIM card at step 3.
Note
• See the
Reference Manual
(tap
[Online Manual]
in the app
list) for information on selecting the active SIM card slot and the
preferred mobile network mode.
Installing an SD card
When installing or removing an SD card, place the unit on a flat
surface.
1.
Remove the battery cover (page 17 ).
• If a battery is installed, remove it (page 23 ).
2.
Slide the microSD card slot in the direction of the arrow (A), and
then open it (B).
Installing an SD card
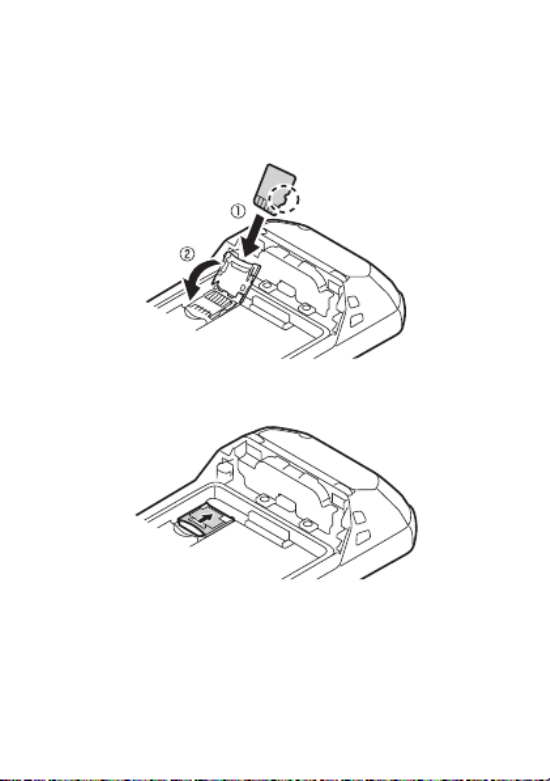
21Getting Started
3.
Insert the microSD card into the microSD card slot (A), and then
close the slot (B).
• Install only microSD cards.
• Hold the microSD card so that the metal terminals are facing
you, and insert with the notch facing in the same direction of
the circled area in the illustration below.
4.
Slide the microSD card slot in the direction of the arrow until you
hear a click.
• To remove a microSD card, follow the same procedure, and
then pull out the microSD card at step 3.

22
Installing and removing the battery
Installing the battery
1.
Remove the battery cover (page 17 ).
2.
Insert the tab (circled in the illustration below) on the terminal side
of the battery into the groove of the unit (A), and then push
downward (B).
IMPORTANT
• Observe the following to ensure the waterproof and dustproof
performance of the unit.
– When installing the battery, make sure there is no debris lodged
in the gasket that seals the unit.
Installing and removing the battery

23Getting Started
Removing the battery
1.
Remove the battery cover (page 17).
2.
Lift the battery up using the tab (circled in the illustration) (A),
then remove it (B).
IMPORTANT
• Do not remove the battery while the unit is wet. When the unit is
wet, remove the water by wiping off the water droplets and
thoroughly drying the unit before removing the battery. (See
"Waterproof/dustproof", page 7.)
Replacing the battery without turning the unit off (Battery warm
swap)
• Replace the battery within 30 seconds. If more than 30 seconds
has passed, apps that are running are forced to close and you may
lose unsaved data.
• During warm swapping, all wireless functions are turned off
temporarily.
1.
Press and hold (power button) until the power options dialog
is displayed.
2.
Tap
[Battery Warm Swap]
.
3.
Follow the on-screen instructions.
• It may take some time until the indicator lights in green.
4.
Replace the battery.
24
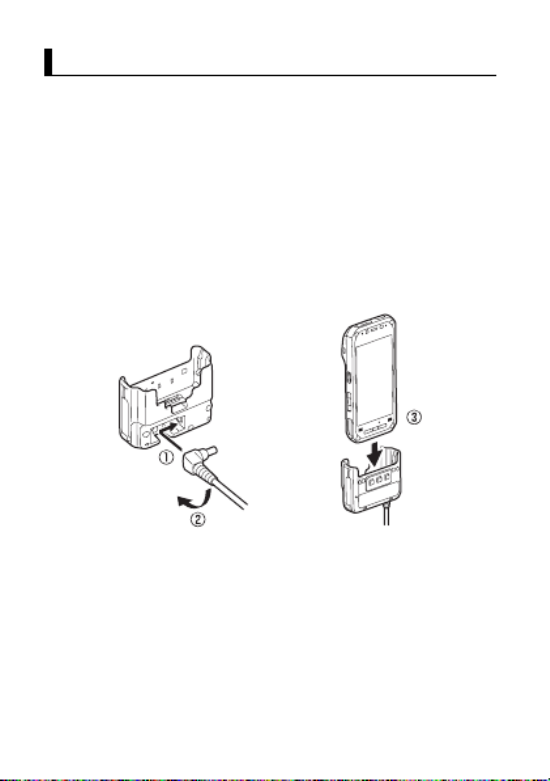
Charging the ba ttery
You can charge the unit by using the optional Charging Cup and the
optional adaptor. For more information, refer to the Operating
Instructions of the Charging Cup.
•
Optional accessories
Charging Cup: FZ-VCBN11U
AC Adaptor: CF-AA6373A
1.
Insert the adaptor straight into the rear indentation as shown in
the figure, and insert into the DC input jack (A).
• Plug the power plug into a power outlet.
2.
Rotate the adaptor downward (B), and firmly insert the unit until
you hear a click (C).
• The battery is not charged at the time of purchase. Charge the
battery before turning on the unit for the first time or after an
extended period of storage.
• Charge the battery in environments with an ambient temperature
of 10 °C to 35 °C (50 °F to 95 °F).
• The indicator lights in orange while the battery is charging, and
lights in green when charging is complete.
Charging the battery

25Getting Started
• The product prevents overcharging of the battery by charging only
when the remaining battery level is less than approximately 95 %
of its full capacity.
• You can also charge the unit by connecting it to the USB port of a
computer or other device using a USB connection cable.
Note
• When removing the USB connection cable, make sure to
remove it while holding the plug. Do not pull by the cable.
• When connecting a USB connection cable, note the shape of
the micro USB plug and the micro USB port. Do not attempt to
connect the USB connection cable upside down.
• Remove any dust or water droplets from plugs before
connecting them. Do not use excessive force when inserting
plugs or insert them at an angle.
Confirming the battery level
The battery level is displayed in the upper-right corner of the screen,
in the status bar.
You can also confirm the specific amount of battery level remaining.
From the home screen, tap
→
[Settings]
→
[Battery]
.
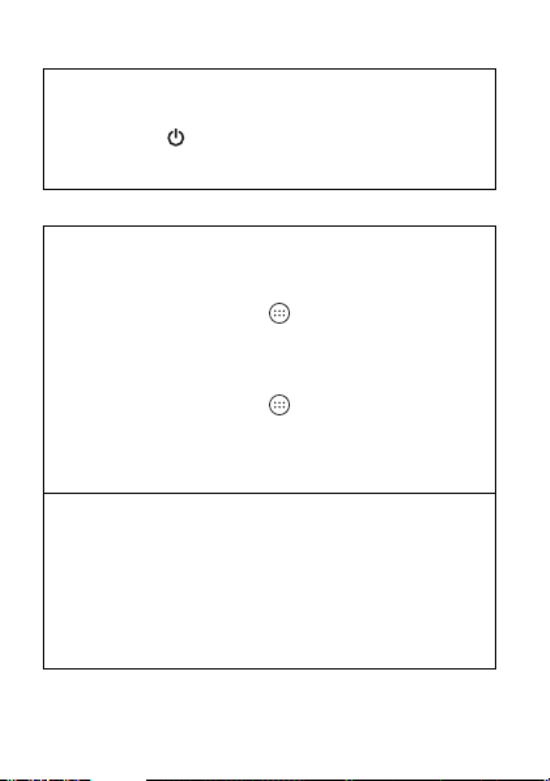
Turning the unit on and off
Turning the unit on
Press and hold (power button) on the top of the unit until the unit
briefly vibrates.
Turning the unit off
1.
Press and hold until the power options dialog is displayed.
2.
Select the power off option.
Fully charged Charging Very low
Turning the unit on and off

26
Turning the screen on and off
1.
Press .
2.
Swipe up from the bottom of the screen to release the screen
lock.
• Swiping the bottom-left to the right launches the
[Phone]
app (certain models only), and swiping the bottom-right to
the left launches the
[Camera]
app.
Configuring the unit for the first time
The first time you turn the unit on, you will be prompted to configure
different settings. Follow the on-screen instructions and configure
each item as needed. An Internet connection is required to configure
certain items.
Home screen, status bar, notifications
Using the home screen
The home screen is the main screen from which you can launch
apps, check widgets, etc. You can customize the home screen to suit
your needs by adding, moving, and removing items as desired.
You can also view a list of all installed apps by tapping .
While the screen is on, you can display the home screen at any time
by tapping or
A2
(default setting).
Using the status bar
The status bar is displayed at the top of the screen when using most
apps. It displays icons that let you know the status of the battery,
network signal, and other features.
• See the Reference Manual for a list of commonly used icons and
their meanings.
Home screen, status bar, notifications

27Getting Started
Using the notifications panel
The notifications panel provides detailed information about incoming
email messages, app updates, calendar events, etc. You can open
the notifications panel by sliding your finger down slowly from the top
of the screen toward the center of the screen. To close the
notifications panel, slide your finger up slowly from the bottom of the
screen toward the center of the screen. While the notifications panel
is open, you can tap a notification and open the corresponding app,
or swipe a notification left or right to delete it from the panel.
Naviga tion and function buttons
The navigation buttons are available in most screens and help you
navigate the unit's screens. They appear at the bottom or side of the
touch panel screen, depending on the unit’s orientation.
The unit also features physical buttons that can be used to access
various functions quickly.
The default button assignments are described below.
Some buttons can be customized using the
[UserButtonManager]
app; see the Reference Manual for more information.
Navigation and function buttons
Returns to the previous screen or closes the current dialog
box, menu, etc.
Displays the home screen.
Displays a list of recently used apps. Once the list is
displayed, tap an app to launch it, or swipe left or right to
remove an app from the list.
A1
The same function as .
A2
The same function as .
A3
Displays the list of options (if available) for the
current screen.
Side button
No function by default.
Camera
button
Press and hold to launch the camera app. When
using the camera app, press this button to take
a picture, start and stop video recording, etc.

28
Factory data reset
CAUTION
• The following procedure resets all settings and erases any data
you have stored in the unit. Back up important data before
performing this procedure.
1.
From the home screen, tap
→
[Settings]
→
[Backup &
reset]
.
2.
Tap
[Factory data reset]
→
[RESET TABLET]
→
[ERASE
EVERYTHING]
.
• The unit restarts when the factory data reset is complete.
• All data in the /mnt/sdcard folder will be erased. Data stored in
the SD card will not be erased.
Factory data reset

29Troubleshooting
Troubleshooting
If you experience any trouble while using the unit, refer to the
information in this section for troubleshooting. See the Reference
Manual (tap
[Online Manual]
in the app list) for additional
troubleshooting information.
If the problem persists, contact your technical support representative.
Starting up
The unit does not turn on.
• To turn the unit on, press and hold (power button) until the unit
briefly vibrates.
• The battery may be low or completely discharged. Charge the
battery.
• The unit may be too hot or too cold. Leave the unit in an
environment of 10
°
C to 35
°
C (50
°
F to 95
°
F) for about an hour,
and then try again.
The unit does not wake up from sleep.
• The battery may have become completely discharged while the
unit was in sleep mode. In this case, any data which has not been
saved will be lost, and the unit will not wake up. Charge the
battery.
• The unit may be too hot or too cold. Leave the unit in an
environment of 10
°
C to 35
°
C (50
°
F to 95
°
F) for about an hour,
and then try again.
Nothing appears on the screen.
• The screen may have turned off to save power. Press (power
button).
• Charge the battery.
• Install the battery correctly.
• Replace the battery with a fully-charged one.
• The screen is too dark. See “The screen is too dark.” (page .30)
Other startup problems
• Disconnect and remove all peripheral devices.
30
Shutting down
Screen
The unit does not turn off.
• It may take one or two minutes for the unit to turn off. This is not a
malfunction.
• Press and hold (power button) for at least 10 seconds to force
the unit to restart, and then try again.
• Disconnect and remove all peripheral devices.
The screen is too dark.
• The
[Adaptive brightness]
setting reduced the brightness
according to the ambient brightness. Manually adjust the screen
brightness.
1.
From the home screen, tap
→
[Settings]
→
[Display]
.
2.
Tap the
[Adaptive brightness]
switch to turn it off.
3.
Tap
[Brightness level]
and then adjust the slider.
• The
[Minimum limit brightness]
setting of customized silent
mode was turned on. Turn the setting off.
1.
From the home screen, tap
→
[Settings]
→
[Sound &
notification]
→
[Customized silent mode]
.
2.
Tap the
[Customized silent mode]
switch to turn it off, then
tap the
[Minimum limit brightness]
switch to turn it off.
3.
Tap the
[Customized silent mode]
switch to turn it on.
There are red, green, or blue dots on the screen, or there is
unevenness in screen colors or brightness.
• The following are not malfunctions.
– Although advanced high-precision technologies are used in the
production of color LCD screens, a very small number of the
screen pixels may be dark or remain constantly lit.
– Due to the natural characteristics of LCD screens, you may
notice unevenness in colors and brightness depending on your
angle of view. Hues may also vary by product.
Produkt Specifikationer
| Mærke: | Panasonic |
| Kategori: | Tablet |
| Model: | FZ-N1 |
Har du brug for hjælp?
Hvis du har brug for hjælp til Panasonic FZ-N1 stil et spørgsmål nedenfor, og andre brugere vil svare dig
Tablet Panasonic Manualer

31 August 2024
28 August 2024
28 August 2024
26 August 2024
6 August 2024
22 Juli 2024
28 Juni 2024
28 Juni 2024
13 Maj 2024
16 Juni 2023
Tablet Manualer
- Tablet SilverCrest
- Tablet Acer
- Tablet Denver
- Tablet Sencor
- Tablet TCL
- Tablet Sony
- Tablet Samsung
- Tablet Philips
- Tablet Lenco
- Tablet LG
- Tablet Doro
- Tablet Gigaset
- Tablet Apple
- Tablet Logitech
- Tablet Konrow
- Tablet Google
- Tablet HP
- Tablet AOC
- Tablet Easypix
- Tablet Grundig
- Tablet Motorola
- Tablet Asus
- Tablet Gigabyte
- Tablet Toshiba
- Tablet Pyle
- Tablet Lenovo
- Tablet OnePlus
- Tablet Butler
- Tablet Adj
- Tablet Creative
- Tablet Thomson
- Tablet Hyundai
- Tablet Aiwa
- Tablet Nokia
- Tablet AKAI
- Tablet Hisense
- Tablet Maxell
- Tablet Hannspree
- Tablet Trevi
- Tablet Blaupunkt
- Tablet Honeywell
- Tablet Razer
- Tablet Medion
- Tablet Olivetti
- Tablet Haier
- Tablet Huawei
- Tablet TechniSat
- Tablet Vivax
- Tablet PocketBook
- Tablet Yarvik
- Tablet Wacom
- Tablet Telefunken
- Tablet Vtech
- Tablet Packard Bell
- Tablet Microsoft
- Tablet Alcatel
- Tablet Zebra
- Tablet Plum
- Tablet Xiaomi
- Tablet Aiptek
- Tablet Krüger&Matz
- Tablet Viewsonic
- Tablet Dell
- Tablet RugGear
- Tablet Fujitsu
- Tablet CAT
- Tablet Tesla
- Tablet MSI
- Tablet Polaroid
- Tablet Energy Sistem
- Tablet Bush
- Tablet Binatone
- Tablet Honor
- Tablet Salora
- Tablet Nevir
- Tablet TrekStor
- Tablet Lava
- Tablet Vodafone
- Tablet Overmax
- Tablet Infinix
- Tablet Newland
- Tablet ECS
- Tablet Archos
- Tablet RCA
- Tablet Hema
- Tablet ECG
- Tablet Navitel
- Tablet Pantech
- Tablet AudioSonic
- Tablet SPC
- Tablet ZTE
- Tablet Lark
- Tablet Barnes & Noble
- Tablet Kobo
- Tablet Amazon
- Tablet GoClever
- Tablet Gemini
- Tablet Intenso
- Tablet BlackBerry
- Tablet Evolveo
- Tablet VIZIO
- Tablet Zagg
- Tablet Bauhn
- Tablet Vorago
- Tablet Majestic
- Tablet ESTAR
- Tablet Audiovox
- Tablet Rand McNally
- Tablet Vivitar
- Tablet Bq
- Tablet Dragon Touch
- Tablet Aqprox
- Tablet Oregon Scientific
- Tablet Aluratek
- Tablet Terratec
- Tablet Lexibook
- Tablet Prestigio
- Tablet Realme
- Tablet GoGen
- Tablet Kogan
- Tablet Micromax
- Tablet Cyrus
- Tablet Insignia
- Tablet Xoro
- Tablet Manta
- Tablet CnMemory
- Tablet TechBite
- Tablet Logic
- Tablet Media-Tech
- Tablet I.safe Mobile
- Tablet Ferguson
- Tablet Allview
- Tablet Proscan
- Tablet Sonim
- Tablet Cresta
- Tablet Brigmton
- Tablet Sunstech
- Tablet Sylvania
- Tablet Exagerate
- Tablet Coby
- Tablet Bigben Interactive
- Tablet Wolder
- Tablet Tesco
- Tablet Disgo
- Tablet Laser
- Tablet Naxa
- Tablet Ricatech
- Tablet Arnova
- Tablet Mpman
- Tablet Cello
- Tablet Essentiel B
- Tablet Logicom
- Tablet Ematic
- Tablet Ingo
- Tablet Difrnce
- Tablet Iget
- Tablet Nextbook
- Tablet Memup
- Tablet Engel Axil
- Tablet Odys
- Tablet Primux
- Tablet DEXP
- Tablet Eken
- Tablet Tom-tec
- Tablet Mediacom
- Tablet Billow
- Tablet Empire
- Tablet Woxter
- Tablet Advantech
- Tablet Kurio
- Tablet Linx
- Tablet Leap Frog
- Tablet Elements
- Tablet Getac
- Tablet Approx
- Tablet I-onik
- Tablet Microtech
- Tablet Empire Electronix
- Tablet Vulcan
- Tablet Storex
- Tablet ModeCom
- Tablet Skytex
- Tablet Electrovaya
- Tablet Durabook
- Tablet Mymaga
- Tablet Vinci
- Tablet Vizmo
- Tablet General Dynamics Itronix
- Tablet Xplore
- Tablet Bookeen
- Tablet I-Joy
- Tablet Hamlet
- Tablet Leotec
- Tablet ADS-TEC
- Tablet Nabi
- Tablet Sungale
- Tablet Digiland
- Tablet Best Buy
- Tablet Unitech
- Tablet Fossibot
- Tablet Control4
- Tablet Bluebird
- Tablet Logic Instrument
- Tablet Kiano
- Tablet Hip Street
Nyeste Tablet Manualer

31 Marts 2025
29 Marts 2025
29 Marts 2025
29 Marts 2025
18 Marts 2025

12 Marts 2025

2 Marts 2025
25 Februar 2025
25 Februar 2025
25 Februar 2025