Panasonic Viera TH-42PX45B Manual
Panasonic
televisión
Viera TH-42PX45B
Læs nedenfor 📖 manual på dansk for Panasonic Viera TH-42PX45B (24 sider) i kategorien televisión. Denne guide var nyttig for 9 personer og blev bedømt med 4.5 stjerner i gennemsnit af 2 brugere
Side 1/24

IDTV
REC VCR DVD
VCR
TEXT
N
MODE
EXIT
TV/AVGUIDE
STT L INDEX HOLD
123
456
789
C0
PROGRAMME
DIRECT
TV REC
DVB
Analogue
ASPECT
MENU
OK
6
Operating Instructions
Plasma Television
English Please read these instructions before operating your set and retain them for future reference.
The images shown in this manual are for illustrative purposes only.
U.K. Standard
Information on Disposal for Users of Waste Electrical & Electronic Equipment
(private households)
This symbol on the products and/or accompanying documents means that used electrical and
electronic products should not be mixed with general household waste.
For proper treatment, recovery and recycling, please take these products to designated collection
points, where they will be accepted on a free of charge basis. Alternatively, in some countries you
may be able to return your products to your local retailer upon the purchase of an equivalent new
product.
Disposing of this product correctly will help to save valuable resources and prevent any potential negative
effects
on
human
health
and
the
environment
which
could
otherwise
arise
from
inappropriate
waste handling. Please contact your local authority for further details of your nearest designated collection point.
Penalties may be applicable for incorrect disposal of this waste, in accordance with national legislation.
For business users in the European Union
If you wish to discard electrical and electronic equipment, please contact your dealer or supplier for
further information.
Information on Disposal in other Countries outside the European Union
This symbol is only valid in the European Union.
If you wish to discard this product, please contact your local authorities or dealer and ask for the correct method
of disposal.
Printed in Czech Republic
Model No. TH-37PX45B
TH-42PX45B
Customer’s Record
The model number and serial number of this product may be found on its rear panel. You should note this serial
number in the space provided below and retain this book, plus your purchase receipt, as a permanent record
of your purchase to aid in identifi cation in the event of theft or loss, and for Warranty Service purposes.
Model Number Serial Number
Licence
Trademark
Credits
Trade Mark of the DVB Digital Video Broadcasting Project (1991 to 1996)
TH-37PX45B Declaration of Conformity No 3985, 19th January 2006
TH-42PX45B Declaration of Conformity No 3984, 19th January 2006
•
DVB is a trademark of the DVB Digital Video Broadcasting Project (1991 to 1996).
•
VGA is a trademark of International Business Machines Corporation.
•
Macintosh is a registered trademark of Apple Computer, USA.
•
S-VGA is a registered trademark of the Video Electronics Standard Association. Even if no special
notation has been made of company or product trademarks, these trademarks have been fully respected.
•
HDMI, the HDMI Logo and High-Defi nition Multimedia Interface are trademarks or registered trademarks
of HDMI Licensing LLC.

2
3
Viewing Advanced FAQs, etc.Quick Start Guide
Contents
Turn your living room into a home theatre!
Experience an amazing level of multi-media excitement
•Safety Precautions ······································ 4
(Warning & Caution)
•Notes ··························································· 5
•Maintenance ··············································· 5
Be Sure to Read
Basic Features
•Watching TV ·············································· 11
•Using TV Guide (DVB) ······························ 12
•Viewing Teletext ········································ 14
•Watching VCR, DVD and Satellites ·········· 17
Advanced Features
•How to Use Menu Functions ····················· 18
(picture, sound quality, etc.)
•DVB Settings (DVB) ·································· 24
(pay-TV, subtitles, etc.)
•Profi le Edit / Child Lock (DVB) ·················· 26
•DVB Tuning Menu (DVB) ·························· 28
•Displaying PC Screen on TV ····················· 29
•
Editing and Setting Channels (Analogue)
···· 30
•Restore Settings ······································· 32
•Owner ID ··················································· 33
•Recording Controls ··································· 34
•Q-Link Functions ······································· 36
•HDMI Functions ········································ 37
•External Equipment ··································· 40
Enjoy your TV!
•Technical Information ································ 42
•FAQs ························································· 44
•On screen messages ································ 46
•Index ························································· 47
•Specifi cations ············································ 47
•Licence ······················································ 48
FAQs, etc.
Accessories/Options ············ 6
Identifying Controls ·············· 7
Basic Connection ·················· 8
Auto Setup ······························ 10
Enjoy rich multi-media
Camcorder
Amplifi er with
Speaker system
VCR DVD player
DVD recorder
Personal
computer
Satellite receiver
Quick Start Guide
Receive terrestrial digital services using an integrated (Digital Video Broadcasting) tuner
(Display DVB programmes with TV Guide (p. 12) / Timer recording (p. 34) /
Register and instantly call up favourite programmes with Profi le Edit (p. 26))
Sharp pictures with HDMI terminal
Control DVD recorder / VCR via TV with Q-Link connection (p. 36)
Create home theatre and DVD recorder link-ups with
"Control with HDMI" without complicated settings!

6
7
Quick Start Guide
AV4
S-V V L R
+
-
-
+
IDTV
REC VCR DVD
VCR
TEXT
N
MODE
EXIT
TV/AVGUIDE
STTL INDEX HOLD
123
456
789
C0
PROGRAMME
DIRECT
TV REC
DVB
Analogue
ASPECT
MENU
OK
123
456
789
0
OK
C
IDTV
N
MO D E
Optional accessories
Pedestal Plasma TV stand Wall-hanging
bracket
(vertical)
TY-WK42PV3W
(angle)
TY-WK42PR2W
TY-ST42P600W TY-S37PX60W
(TH-37PX45B)
TY-ST42P60W
TY-S42PX60W
(TH-42PX45B)
Installing remote's batteries
Batteries for the Remote
Control Transmitter (2)
•
R6 (UM3)
Identifying ControlsAccessories/Options
Clamper (2)
•
TMME258 Mains Lead
•
K2CT3DH00018
1Pull
open
Hook
2
Note the correct
polarity (+ or -)
Close
Snap open
Snap shut
Rear of the TV
Caution
•
Incorrect installation may cause battery
leakage and corrosion, resulting in
damage to the remote control unit.
Do not mix old and new batteries.
Do not mix different battery types (such
as alkaline and manganese batteries).
Do not use rechargeable (Ni-Cd)
batteries.
•
Do not burn or breakup batteries.
Remote Control
Transmitter
•
EUR7651080
Operating Instructions
Pan European Guarantee Card
1 Year Guarantee Registration
CRM
(Customer Relationship Management)
Attaching the cable clampers
•
Do not bundle the RF cable and mains lead together (could cause
distorted image).
•
Fix cables with clampers as necessary.
•
When using the optional accessory, follow the option’s assembly
manual to fi x cables.
Function
select
Increases or decreases the programme position by one. When
a function is already displayed, press to increase or decrease
the selected function. When in Standby mode, switches TV On.
Standby On / Off switch
(Switches TV On or Off standby)
MAINS Power
On / Off switch
Lift door to open
C.A.T.S. (Contrast Automatic Tracking System) sensor
(senses brightness to adjust picture quality in "Auto" viewing mode) (p. 21)
DVB LEDPower LED
Remote control
signal receiver
STR (Normalisation store)
(Stores tuning and other
function settings)
TV/AV switch
Switches DVB (digital broadcasting)
/ Analogue mode (p. 11)
•
Volume / Contrast / Brightness / Colour /
Sharpness / Tint (NTSC mode) / Bass / Treble /
Balance / Manual tuning (analogue mode) (p. 30)
Changes picture aspect ratio
(p. 11)
Normalises (p. 20)
(Resets all settings to their default levels)
Selects programmes in sequence
Direct channel access
Use together with numeric buttons to
access analogue TV channels by entering
UHF broadcast channel number.
(p. 11)
Programme / channel change buttons (0-9)
and Teletext page buttons.
(p. 11 and p. 14)
When in Standby mode, switches TV On.
Subtitles (p. 11)
(To view subtitles)
Teletext (p. 14)
MENU
Press to access the Picture, Sound
and Setup menus (p. 20 and p. 22)
Cursor buttons to make
selections and adjustments
TV Guide (p. 12)
VCR / DVD operations (p. 17)
Sound mute On / Off
Volume
Programme Information (p. 11)
Teletext Index (p. 16)
Still Picture (p. 11)
Coloured buttons used for
the selection, navigation and
operation of various functions.
EXIT (Returns to TV screen)
Switch between viewing TV or
AV input. (p. 17)
DIRECT TV Recording
To immediately record programme
in VCR / DVD recorder with Q-Link
connection (p. 36)
Standard accessories
•
Identifying Controls
•
Accessories/Options
Check that you have the accessories and items shown
Remove from the TV unit
Push both side
hooks and pull
out
•
Active for Timer Programming or
Standby for Direct TV Recording
:orange (fl ash)
Timer Programming On :orange
Headphones jack (p. 40)
AV4 terminals
(p. 40)
Ferrite core
•
J0KF00000018
•
Red light indicates Standby
mode. When using the remote
control, indicates the TV has
received a command.
OK button to confi rm
selections and choices.
Press after selecting programme positions
1 - 99 (0 - 9 in Analogue mode) to avoid delay.

8
9
Quick Start Guide
RF OUT
RF IN
RF OUT
RF IN
RF IN
RGB
VIDEO
S-VIDEO
AV1
VIDEO
S-VIDEO
RGB
VIDEO
AV3
(Q-Link)
AV2
(Q-Link)
COMPONENT
COMPONENT
RGB
VIDEO
S-VIDEO
VIDEO
S-VIDEO
RGB
VIDEO
AV3
(Q-Link)
AV2
(Q-Link)
AV1
COMPONENT
AV1
RF OUT
RF IN
RGB
VIDEO
S-VIDEO
VIDEO
S-VIDEO
RGB
VIDEO
AV3
(Q-Link)
AV2
(Q-Link)
Basic Connection
DVD Recorder
or VCR
SCART cable
(fully wired)
RF cable
Aerial
Mains lead (supplied)
Clamper
•
To unfasten
Mains lead (supplied) Mains lead (supplied)
SCART cable
(fully wired)
DVD Recorder or VCR
RF
cable
Aerial Aerial
Rear of the TV Rear of the TV
SCART:
21 pin connection used for video, audio and switching signals (Also known as Euro SCART and Peritel)
RF: Radio Frequency - Signal received from terrestrial aerial.
RGB / S-Video / Video:
Choose between these three video formats depending on personal preference and equipment requirement.
(RGB - Red, Green and Blue)
VCR: Video Cassette Recorder
Rear of the TV
Satellite receiver
External equipment and cables shown are not supplied with this TV.
Please ensure that the TV is disconnected from the mains socket before attaching or disconnecting any leads.
•
Basic Connection
SCART cable
(fully wired)
Ex.1Connecting aerial
(TV only) Ex.2
Connecting DVD Recorder (VCR)
(TV, DVD Recorder and VCR
)
Note
•
Connect to AV3 for a DVD Recorder / VCR supporting Q-Link (p. 36).
•
Connect to AV1 for a Satellite receiver.
•
If connecting the TV and Satellite receiver with SCART cable, you can watch satellite broadcast by RGB input signal.
Ex.3Connecting DVD Recorder (VCR) and Satellite receiver
(
TV, DVD Recorder, VCR and satellite
)
AC 220-240 V
50 / 60 Hz
SCART cable
(fully wired)
RF cable
RF cable
RF cable
RF cable
RF cable
10 11
MENU
OK
OK
OK
EXIT
ViewingQuick Start Guide
VCR
EXITMENU
123
456
789
0
OK
012 345 67 89
You now hav e the oppo rt uni t y
t o ent er y our d etail s and
he lp t he pol ice cr ack crime
see ins t r uct i on bo o k
PIN NUMBER :
NAME :
POSTCODE :
Owner ID
HOUSE NO :
∗ ∗ ∗ ∗ ∗ ∗ ∗ ∗ ∗ ∗ ∗ ∗ ∗ ∗
∗ ∗ ∗ ∗ ∗ ∗ ∗ ∗ ∗ ∗ ∗
∗ ∗ ∗ ∗ ∗ ∗ ∗ ∗ ∗ ∗ ∗
∗ ∗ ∗ ∗
Exit
Select character
Change character
Store Owner ID
Please Wait !
DVB Auto Setup
Prog. Channel Service Name NetID. TS ID. Quality
This will take about 3 mins.
4
5
6
7
8
30
30
30
30
30
12302
12302
12302
12302
12302
4158
4158
4158
4158
4158
9
9
9
9
9
BBC NEWS 24
BBCI
CBBC Channel
BBC Radio Wales
BBC Radio Cymru
6821
Exit
DOWNLOAD IN PROGRESS
PLEASE WAIT
Programme : 63
Remote control unavailable
0123456789
You n ow ha ve t he op po rt un it y
t o en t er you r d e ta il s a nd
h el p t h e pol ic e c ra ck c ri me
se e in st ru ct io n b ook
PIN NUMBER :
NAME :
POSTCODE :
Owner ID
HOUSE NO :
∗ ∗ ∗ ∗ ∗ ∗ ∗ ∗ ∗ ∗ ∗ ∗ ∗ ∗
∗ ∗ ∗ ∗ ∗ ∗ ∗ ∗ ∗ ∗ ∗
∗ ∗ ∗ ∗ ∗ ∗ ∗ ∗ ∗ ∗ ∗
∗ ∗ ∗ ∗
Exit
Select character
Change character
Store Owner ID
VCR
MODE
EXIT
GUIDE
STTL HOLD
123
456
789
C0
DVB
Analogue
ASPECT
OK
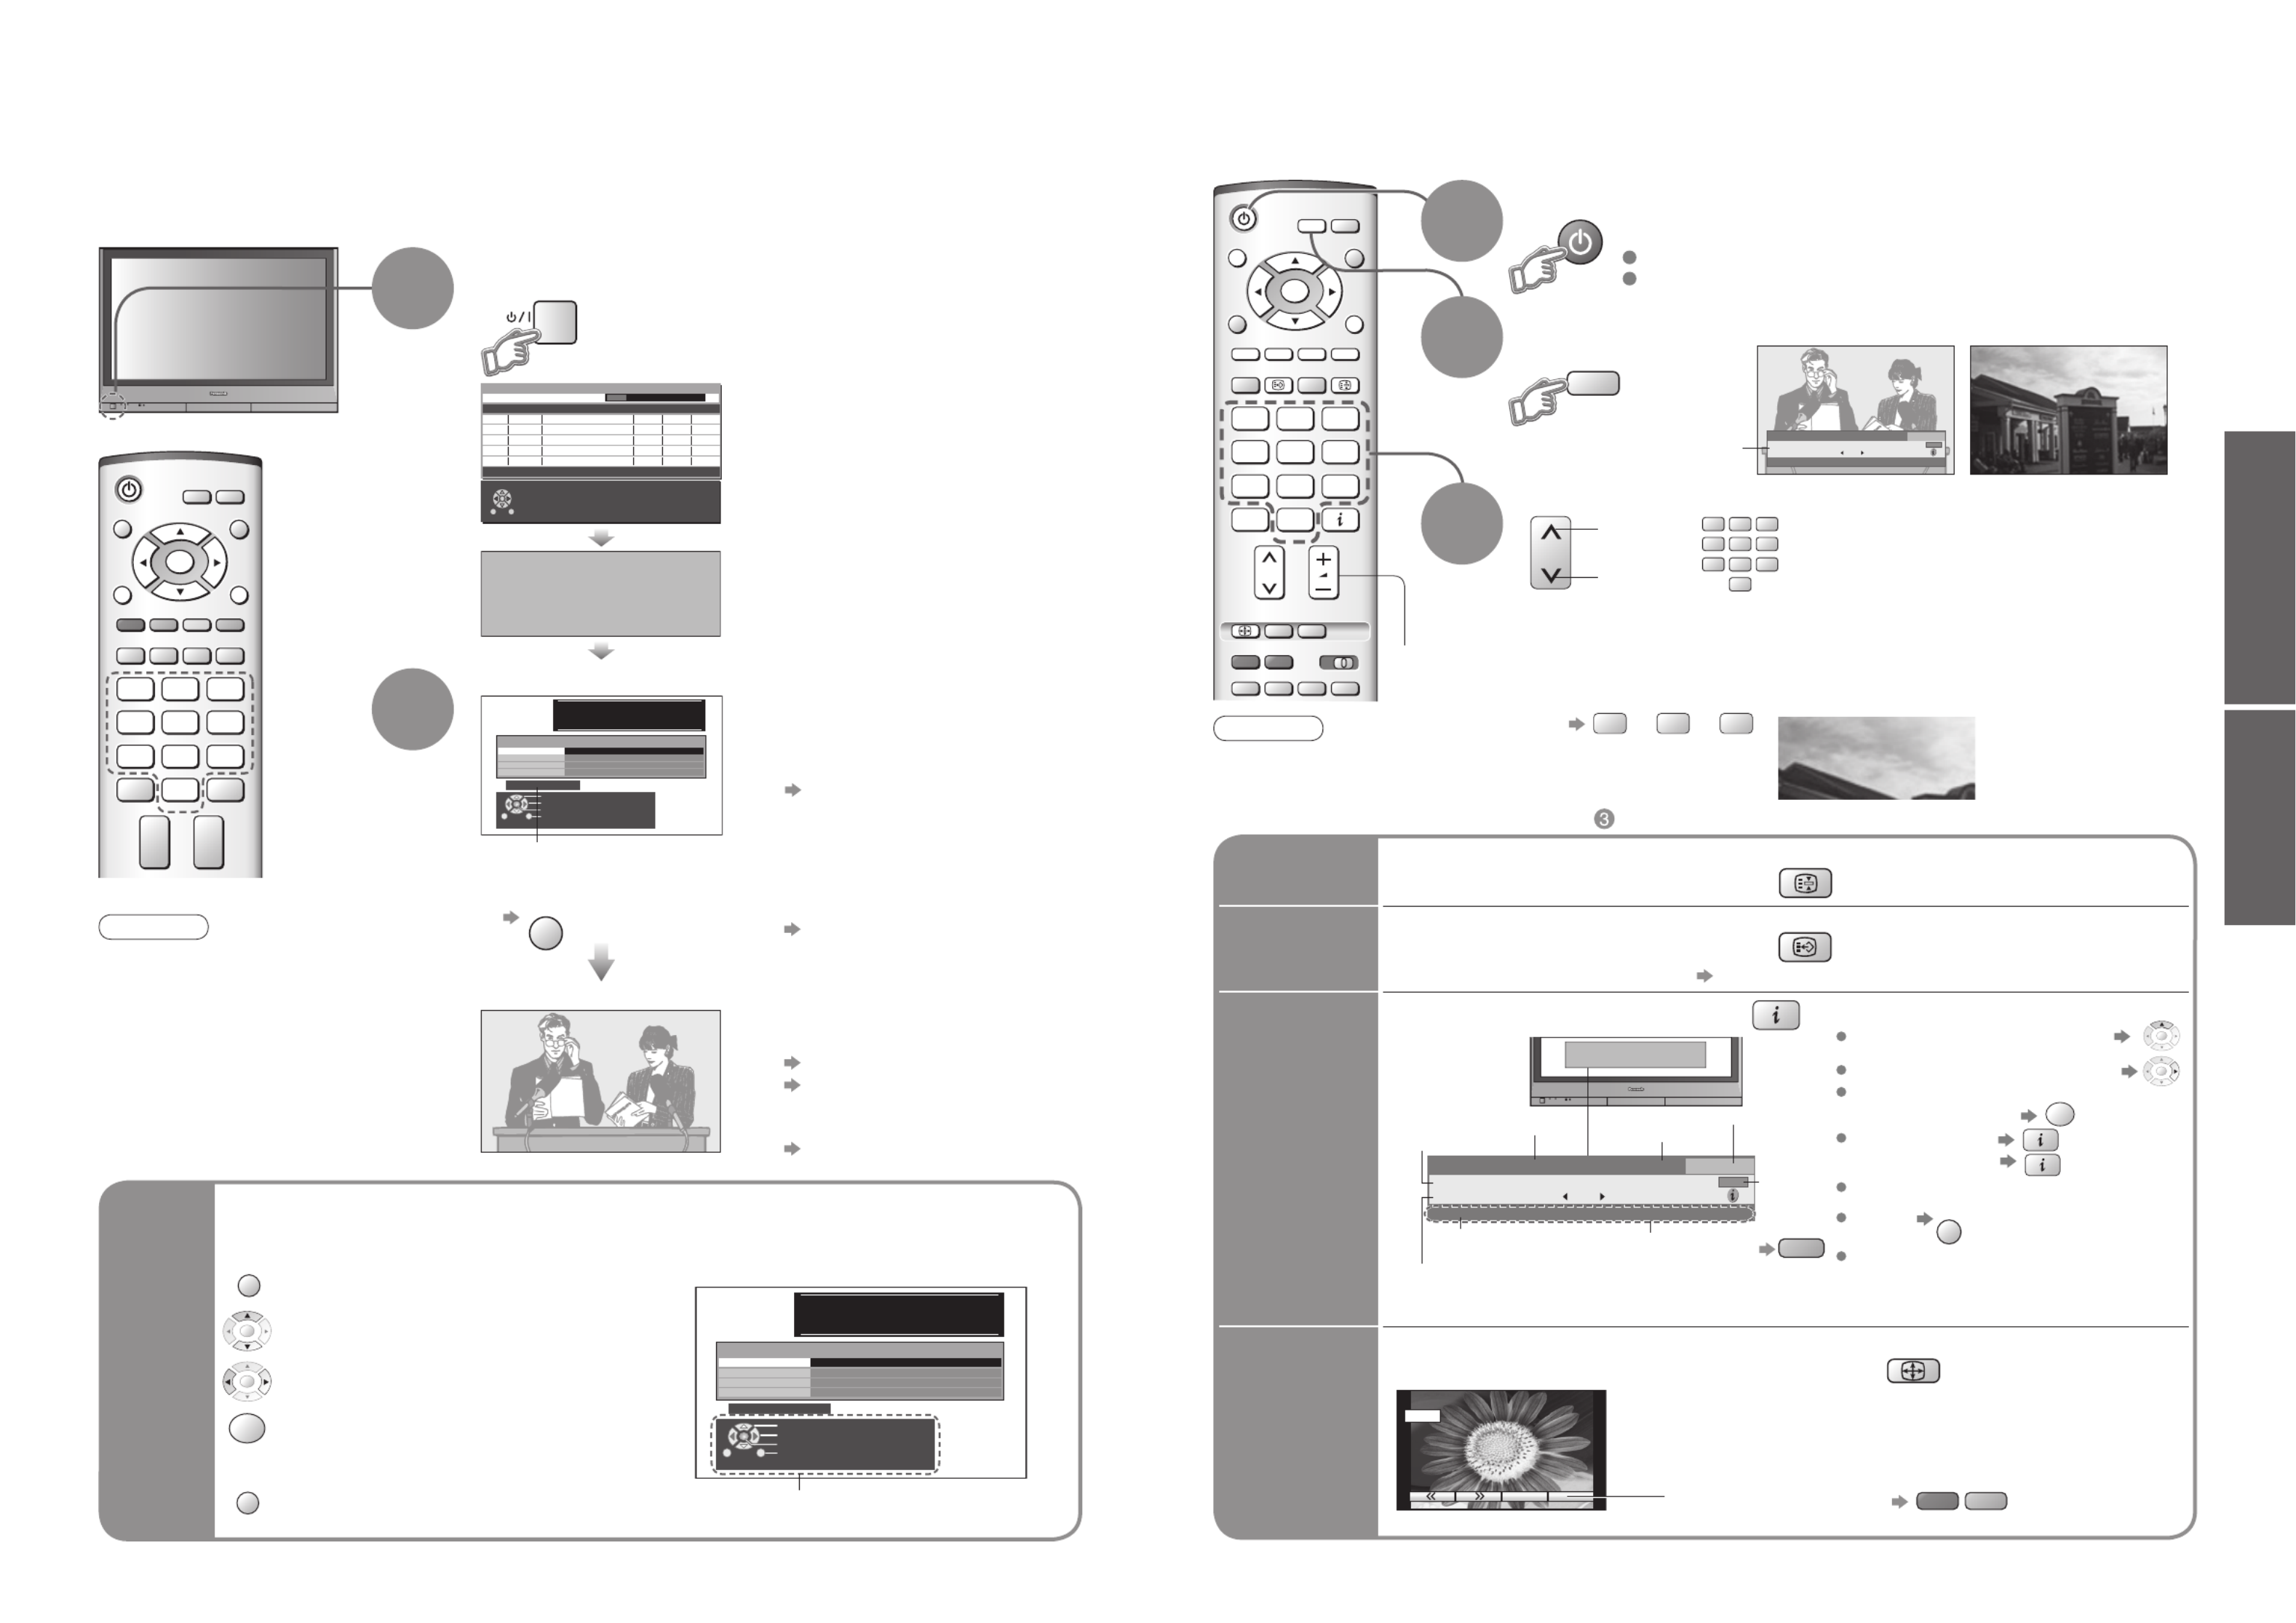
Plug the TV into mains socket and switch On
(Takes a few seconds to be displayed)
Usable characters and numbers
1
(example: Owner ID)
On-screen operation
guide will help you.
Auto Setup
Following the on-screen operation
guide, enter your own choice of PIN
number, name, etc.
•
For detailed procedures
"Owner ID" (p. 33)
•
Make a note of the PIN number
in case you forget it.
Search and store TV channels automatically.
These steps are not necessary if the setup has been completed your local dealer.
■
When inputting owner ID
Auto Setup is now complete and your TV is ready for viewing.
■
When inputting owner ID later
EXIT
•
You can now use the remote
control to turn On the unit or turn
the unit to standby mode.
(Power LED: On)
2
•
If you input the ID later
"Owner ID" (p. 33)
•
If a compatible recording equipment
with Q-Link or similar technologies
(p. 36) is connected, analogue
channel information is automatically
downloaded to the equipment.
•
Auto Setup will start to search for
TV channels and store them.
•
To check programme list
at-a-glance
TV Guide (DVB) (p. 12)
Programme Guide (Analogue)
(p. 13)
•
To edit analogue channels
"Programme edit" (p. 31)
•
Watching TV
•
Auto Setup
•
The sorted programme order
depends upon the TV signal,
the broadcasting system and
reception conditions.
■
ON SCREEN HELP Instructions box
used to open the main menus and to
return to the previous menu
used to exit the menu system and
return to the normal viewing screen
used to move the cursor and select
menus
used to access menus, adjust levels or
to select from a range of options
used to store settings after adjustments
have been made or options have been
set
Many features available on this TV can be accessed via the On Screen Display menu.
Note
•
If tuning and downloading
data have failed, perform
"Auto
Setup" (
p. 31).
•
If you turned the TV Off during
Standby mode last time, the
TV will be in Standby mode
when you turn the TV On with
MAINS power On / Off switch.
■
In DVB
•
To select programmes using TV Guide (p. 12)
■
In Analogue
•
To select a channel using programme guide (p. 13)
•
To select a channel inputting the channel number, e.g. 39.
C
→
3
→
9
VCR
123
456
789
0
MODE
DVB
Analogue
Cor on ta ti on St r eet
2 0 : 0 0~ 2 0 : 5 5
Ch an ge Ca te go ry
F or i nf o p re ss
1 BBC ONE WALES 20:30
M u l t i - A u d i o
E n c r yp t e d TXT S u b t i t l e
Now
Pr of il e 1
Watching TV
Select a channel
up
Volume
3
2DVB Analogue
1
1
CH_ _
Note
•
To watch pay-TV (p. 25)
Select DVB (Digital Video Broadcasting) or Analogue
Information
banner
Turn power on
BCC 1
HOLD
Freeze / unfreeze picture
Hold
Display
subtitles
STTL
Display / hide subtitles (if available)
•
To change the language for DVB "Preferred subtitles" (p. 25) (If available)
■
Other useful functions (Operate after )
MAINS power On / Off switch should be On.
Picture will appear.
(Press for about 1 second)
down
Display
information
banner
Display programme information
■
In DVB:
■ In Analogue: Displays analogue information for a few seconds.
To set display timeout (p. 25)
To hide EXIT
Change
aspect
ratio
or
14 : 9
A
SPECT
•
Each press changes the mode.
While the bar is displayed
red
green
Auto aspect / 16:9 / 14:9 / 4:3 /
Zoom1 / Zoom2 / Zoom3
Coro nt a t i o n S tr e et
20:0 0 ~20 :5 5
Chang e Ca t eg or y
Fo r inf o p r ess
1 BBC ONE WALES 20:30
M u lt i-Aud i o
E ncr yp t e d TXT S ub t i t le
Now
Pro f ile 1
Channel
Programme
Broadcast time
Current time
During scrambled
broadcasting
Category
Features
available
To
change
the
category
blue
Using the
On Screen
Displays
■
How to use remote control
Information of another channel OK
Information on next programme OK
To watch the programme
listed in the banner OK
Extra information
(To normal banner
)
Appears also when changing channel.
•
To change the mode with colour buttons
Change the aspect ratio (p. 42)
Enjoy viewing the picture at its optimum size and aspect
1

12
13
Viewing
MODE
DVB
A
nalogue
MODE
DVB
A
nalogue
Exit
Info
Change display mode
Select Programme
Select channel
Timer Programming
Cat egory Prog. type+24 Hr
DVB TV Gu ide
: Por tra it Wed 12/05/04 10:46
Wed 1 2th
Pr og. t ype
Cat egory
All S e rvi ces
All Type s
Page up
Page down
Cat egory
All S e rvi ces
19:3 0~20 : 00
20:0 0~20 : 30
20:3 0~21 : 00
21:0 0~22 : 00
22:0 0~22 : 30
22:3 0~23 : 00
23:0 0~23 : 10
23:1 0~00 : 00
E as t end er
DlY SOS
The B ill
Red C ap
Live junction
POP 100
Cinema inf o
S por t s
1 BB C 1 2 BB C 2 44 C hannel 4 4 44 S C 4
All Services
Free T V
Pay T V
Radio
Inf o rma tion
Prof i le 1
Prof i le 2
Prof i le 3
Prof i le 4
Category
All Services
All Services
Free T V
Pay T V
Radio
Inf o rma tion
Prof i le 1
Prof i le 2
Prof i le 3
Prof i le 4
Category
All Services
Red Cap
The Bill
Goo d bye
Te r m in a t o r
News
The Bill
So
Hell
The
21: 0 0 21:30
Red Cap
The Bill
Goo d bye
Te r m in a t o r
News
The Bill
So
Hell
The
21: 0 0 21:30
All Type s
M o v ie s
News
Ent er t ainment
Spo r t
C h il d r en’ s
E d u c at i o n
L if e s t y le
Drama
Prog. type
All Types
IDTV
EXIT
GUIDE
MENU
OK
MODE
DVB
Analogue
Exit
Info
Change display mode
Select channel
Select Programme
Timer Programming
Cate gor y Pr o g. typ e
-24 Hr +24 H r
DVB TV Gu ide
:L a ndsc ape Thu 05/ 08/ 04 18: 50
BBC1
BBC2
ITV1
Channel4
five
ITV2
SC4
1
2
21
44
122
142
144
East e n de r
Hot War s
Emme rdal.
10 O
'
clock Ne ws BBC
Pan orom a
I'm A Celeb r ity
Rugb y
Re d Cap
Th e Bill
Good bye
Te rmi n ato r
Ne w s
Th e Bill
So
He l l
Th e
Fr i 6 th
DIY S OS
Cor onation Str ee t
Se x An d Th e City
15 To1
Th e Bill
Holi day Pr o gram
Pe p si Ch ar.
Pop Idol
20 :00 - 20: 30
Ti m e: 19: 30 20: 00
DIY SOS: W e o pen in t he Ba t t er s d ys
Prog . t ype
Ca te go ry
All Se rvi ce s
20:30 21:00 21:30
All Types
Page up
Page dow n
Ca te go ry
All Se rvi ce s
OK
GUIDE
OK
■
To change the layout
GUIDE
(Landscape / Portrait)
■
To previous day
red
■
To next day
green
■
To view a
programme list
of the selected
category
yellow
■
To view a
programme list
of the
selected type
blue
Using TV Guide
Portrait (Displays by
broadcaster)
select
category
TV Guide
―
Electronic Programme Guide (EPG) provides an on-screen listing of programmes currently
broadcast and future broadcasts over the next seven days (depending on the broadcaster).
TV Guide
date
Programme (TV Guide start page)
TV Guide
time
Channel
View TV Guide (landscape or portrait)
select
type
Current date and time
(Category list)
(Type list)
To list favourite
channels (p. 27)
■
To return to the
start page
MENU
■
To return to TV
EXIT
(DVB mode)
Note
•
When this TV unit is turned on for the fi rst time, or the unit is switched off for more than a week, it may take some
time before the TV Guide is completely shown.
•
When recording programmes, you must make the proper settings on the external recording equipment connected to the unit.
If a compatible recording equipment with Q-Link or similar technologies is connected to the unit (p. 8) and the
"Q-Link" settings (p. 23) are completed, no setting of the equipment is required.
•
Also read the manual of the recording equipment.
Exit Return to List
View Programme
DV B T V G u id e T hu 05/08/ 04 1 8: 49
OK
Select
the programme
select
Details
View details
of the
programme
To return
to the start page
OK
select
Select the programme
now on the air (TV screen)
Watch the
programme
watch
Exit
Return
Select timer
Edit timer
D e le t e
DV B Time r Pr o gr a mmi ng T h u 0 5/ 08/04 1 8: 49
1
3
BBC 1
IT V1
6/8 FR
7/8 SA
18:00
21:30
20:00
22:30
120
60
Of f
Of f
P o s.
N a me
Da t e St ar t E n d
min.
0 9
OK
DVB LED
Select the programme
to be broadcast
Timer
programming
to record
(Timer Programming screen)
■
To check / change / cancel a timer programming event
"Timer Programming" (p. 34)
•
Orange DVB LED
(Rapid blinking during recording)
set
view
•
Using TV Guide (DVB)
view
In Analogue – Analogue Programme Guide (Analogue mode)
The Analogue Programme Guide shows channel list only. (No programme info in Analogue mode)
If in DVB mode
Select Analogue
View a channel list
Select the channel and watch
■
To change pages
Analogue Programme Guide
Prog. Name Chan.
VCR :
1 :
2 :
3 :
4 :
5 :
6 :
7 :
8 :
9 :
10 :
11 :
12 :
CH21
CH44
CH51
CH41
CH47
CH23
CH26
CH58
-
-
-
-
-
BBC1
BBC2
ITV
S4C
Prog. Name Chan.
13 :
14 :
15 :
16 :
17 :
18 :
19 :
20 :
21 :
22 :
23 :
24 :
-
-
-
-
-
-
-
-
-
-
-
-
If in Analogue mode
Select DVB
Landscape
(Displays by
broadcaster)
■
Other useful functions (Operate after )
View details
select
(Analogue mode)
OK
select
watch
GUIDE
View "Portrait" to see one channel at a time
View "Landscape" to see many channels
2
1

14
15
Viewing
VCR
TEXT STTL INDEX HOLD
123
456
789
0
MENU
OK
MODE
DVB
Analogue
VCR
TEXT STTL INDEX HOLD
123
456
789
0
MENU
OK
MODE
DVB
Analogue
MENU
MENU
red
green
MODE
DVB
A
nalogue
MODE
DVB
A
nalogue
■
To return to TV TEXT
TEXT
Viewing Teletext
Switch to Teletext
How to use
In all cases, it is possible to navigate the pages using buttons on the
remote control, but because the commands available must apply to all
manufacturers of DVB equipment, some on screen commands may
not correspond exactly to the remote control buttons.
For example:
3
You can enjoy news, weather forecasts and subtitles, etc. (depending on the broadcaster)
Note
•
As soon as you switch to a DVB channel with links to a teletext service,
software is downloaded in the background to enable the teletext function.
This means that when switching to a DVB channel, you should wait for
approximately 5 seconds before pressing the TEXT button - this will allow
the software to download. If you press the TEXT button before download is
complete, there will be a short delay before the text screen is displayed.
•
While navigating DVB teletext, you will fi nd there is a short delay when
moving between pages while the page downloads. There is often a prompt
shown somewhere on the page (for example "Loading") to let you know that
this is happening.
DVB (digital broadcasting) mode
FULL /
TOP /
BOTTOM
Reveal
hidden
data
(TOP) (BOTTOM) Normal (FULL)
•
Re-hide
red
Reveal hidden words e.g. quiz page answers
•
Viewing Teletext
DVB teletext services
DVB teletext services differ greatly from analogue teletext.
When you switch to a DVB teletext service, the images
you see can contain graphics and text, laid out and
controlled in a manner decided by the broadcaster.
•
You can check if the programme has teletext information.
17:51 28 Feb
Co ro nta tio n Str ee t
20 :00~20:55
Ch an ge Cat egory
For i nfo pr es s
1 BBC ONE WALES 20:30
M u lt i - A ud i o TXT S u bt i t l e
Now
Pr of i l e 1
■
To change the
channel
•
When "select" or "go" is displayed OK
•
When " ", " ", " ", " " symbol is displayed ◄►▲▼ OK
•
When the key words are displayed on colour bar red
green
yellow
blue
•
When options with numbers are displayed
VCR
123
456
789
0
•
When "i" is displayed (information)
Displayed if
programme has
teletext information
1If in Analogue mode
Select DVB
Switch to Teletext
Select the page
3
Analogue mode
■
To adjust contrast
MENU
1If in DVB mode
Select Analogue
<< 01 02 03 04 05 06 07 >>
TELETEXT
INFORMATION
17:51 28 Feb
•
Displays the
index page
(content varies
depending on the
broadcasters)
VCR
123
456
789
0
up
or or
(Corresponds to the colour bar)
down
red
green
yellow
blue
(Press twice)
(Press twice)
■
Using Analogue teletext
What is FASTEXT mode ?(default)
In FASTEXT mode, four differently coloured subjects are situated at the bottom of the display. To access more information about one
of these subjects, press the appropriately coloured button. This facility enables fast access to information on the subjects shown.
What is List mode?
In List mode, four differently coloured page numbers are situated at the bottom of the screen. Each of these
numbers can be altered and stored in the TV’s memory. ("Store Frequently viewed pages", p. 16)
■
To change mode "Teletext" in Setup menu (p. 23)
OK
Note
•
Contrast will be lowered
in the still picture to
prevent after-image.
Time / date
Current
page
number
Sub page number
Information
banner (p. 11)
Colour bar
As the blue bar is displayed
(Expand the BOTTOM half)
(Continued)
TEXT
2
2
■
To return to TV
TEXT
•
Press once to have picture and text.
Press again to return to TV.
•
If cannot be switched to Teletext,
set Subtitles OFF. (p. 11)

16
17
Viewing
IDTV
TV/AV
PROGRAMME
OK
REC VCR DVD
HDMI1/2
TV/AV
Store
frequently
viewed
pages
View in
multi
window
HOLD
Subtitles
Watch
TV while
waiting
for update
HOLD
If you wish to hold the current page without updating
Stop automatic updating
MENU
yellow
yellow
Appears
when
updating is
completed
(You cannot change the channel.)
Teletext automatically updates itself when new information becomes available.
•
The news page provides a function that indicates arrival of latest news ("News Flash").
Changes to TV screen temporarily
View the
updated
page
TEXT
Watch TV and Teletext in two windows at once
•
Operations can be made only in Teletext screen.
•
Each time pressed: Teletext TV and Teletext
TV
Viewing Teletext
(Continued)
INDEX
View sub
page
INDEX
STTL •
Factory setting is "P888" (subtitle service) on blue button.
View subtitles by pressing STTL button
•
FASTEXT mode only
Return to the main index page
OK
Enter the
4-digit number
example: P6
Appears at top of the
screen
■
To view specifi c sub page
MENU
blue
•
Sub pages:
The number of sub pages varies depending on the broadcasters (up to 79 pages).
It may take some time for searching, during which time you can watch TV.
OK
Store frequently viewed pages
(only on fi rst 25 channels on Programme Guide)
in the colour bar
(List mode only)
press
and
hold
As page is
displayed
The number changes to white.
Corresponding
colour button
•
If you wish to use
Subtitles, do not
change number on
blue button.
■
To change stored pages
VCR
123
456
789
0
OK press
and
hold
Enter new page number
■
Using Analogue teletext (Continued)
■
To resume HOLD
Colour button you
want to change
View sub page (Only when teletext is more than one page)
View theTV picture while searching for a teletext page
Analogue mode
Watching VCR, DVD and Satellites
2
3
The Remote Control is capable of operating some functions of selected Panasonic VCRs and DVD
(Digital Versatile Disc) equipment.
Connect the Satellite receiver and you can watch satellite broadcasts.
To connect the equipment (p. 8)
Select the connector
connected to the equipment
AV1 AV2/
S-video
AV3/
S-video
AV4/
S-video
Component/
PC
(AV mode screen)
Note
•
If the external equipment has an aspect adjustment function, set to "16:9".
•
For details, see the manual of the equipment or ask your local dealer.
•
HDMI (p. 37)
■
To return to TV
TV/AV
•
example: AV1
red
PC
blue
yellow
(twice)
Select the external input
green
red
yellow
green
yellow
blue
red
HDMI1/
HDMI2
blue
Displays the selected connector
1Turn the TV on
■
When connecting with SCART as example 2 or 3 (p. 8 and p. 9)
Receives input signals automatically when playback starts or
satellite receiver is switched on
•
Input signals are automatically identifi ed by the SCART (pin 8) terminal.
•
This function will be available for HDMI connection too (p. 37).
■
If input mode is not switched automatically
Perform and
•
When colour bar disappears Press any coloured buttons
•
You can also select the connector using the TV/AV button on the front panel of the TV.
Press the button repeatedly until you reach the connector to view.
Some Panasonic VCR and DVD equipment connected to the TV unit can be directly operated with the remote control.
VCR DVD
VCR / DVD switch
Select VCR / DVD
Standby
Set to Standby mode / Turn on
Play
Playback videocassette / DVD
Stop
Stop the operations
Rewind / Skip / Search
VCR: Rewind, view the picture rapidly in
reverse
DVD:
Skip to the previous track or title
Press and hold to search backward
Fast-forward / Skip / Search
VCR: Fast-forward, view the picture
rapidly forward
DVD: Skip to the next track or title
Press and hold to search forward
Pause
Pause / Restart
DVD: Press and hold to play at slow speed
PROGRAMME
Programme Up / Down
Select programme
REC Record
Start recording
•
Watching VCR, DVD and Satellites
•
Viewing Teletext
•
Dependant on DVD/VCR setup
Terminal
AV1 AV2 AV3 AV4
Compo-
nent PC HDMI1 HDMI2
Manual input
selection
AV1
AV2
AV2S
(S-video input)
AV3
AV3S
(S-video input)
AV4
AV4S
(S-video input)
Compo-
nent PC HDMI1 HDMI2
Auto input
selection
EC1/RGB
AV1/RGB
(RGB input)
EC2
EC3/RGB
AV3/RGB
(RGB input)
― ―
―
EC/
HDMI1 HDMI2
Screen display
0
0
6
0

18
Advanced
OK
Colour balance Normal
Sharpness
AccessTuning Menu
19
Ma in menu
Pi cture me nu
Sou nd menu
Setup menu
Viewing mode
Contrast
Brightness
Colour
Sharpness
Tint
Colour balance
Colour management
3D-COMB
Normal
On
On
P-NR Off
Picture menu
Dynamic
Advanced setting Access
-
+
-
+
-
+
-
+
change or access
select
Only available in NTSC / PAL
Bass
-
+
-
+
-
+
Treble
Balance
Headphone volume
NICAM
Mode
Ambience
Sound menu
Off
Music
HDMI1 input Auto
Off
Not available in DVB
Only available in HDMI
Changed
Number and positions
of alternatives
Moved
Displays the next
screen
■
Choose from among alternatives
■
Adjust using the slide bar
■
Go to the next screen
W / B High R
W / B High B
W / B Low R
W / B Low B
Gamma 2.2
Advanced setting
Only available in PC
How to Use Menu Functions
Not available in PC, HDMI and HD signal
Only available in NTSC signal
•
How to operate (p. 20 and p. 22)
NTSC (National Television System Committee): One of television signal used in USA, etc.
HD signal: High-defi nition signal
AUTO SETUP IN PROGRESS
SEARCHING : PLEASE WAIT
21 68
CH44
Exit
Return
Manual tuning
21 68
CH44
1
Exit
Search down/up
Return
Direct entry
Store
C
0 9
Timer Programming
Child Lock
DVB Setup menu
Multi Audio
Access
Access
Access
Access
AccessDVB System Setup
eng
DVB Tuning Menu
Profile Edit
English
3 seconds
Common Interface Module
System Update
DVB System Setup
Access
Access
Display Timeout
Preferred Subtitles
Auto Update Search in Standby
Software Licence
System Update
On
Access
Access
System Update Search Now
DVB Auto Setup
New Service Message
DVB Tuning Menu
Access
Access
Access
On
Signal Condition
Add New Service
Programme edit
Auto setup
Manual tuning
Tuning Menu
Access
Access
Access
Delete Add Move Download
Programme edit
Prog. Chan. Name Lock
1 :
2 :
3 :
4 :
5 :
CH44
CH51
CH41
CH47
CH37
ABC
XYZ
FTP
123
456
Off
Off
Off
Off
Off
PC setup
Control with HDMI
Off timer
Tuning Menu
Owner ID
Shipping condition
Setup menu
Access
On
Q-Link AV2
AV2 out Monitor
Off
Power on preference TV
Access
DVB Setup Menu Access
Access
Access
Teletext FASTEXT
Power save Off
Side panel Off
Volume correction
0123456789
You no w have t he oppor t un i ty
t o ente r yo ur d eta il s an d
h el p th e poli ce c ra ck c rim e
see i n st ru cti on boo k
PIN NUMBER :
NAME :
POSTCODE :
Owner ID
HOUSE NO :
∗ ∗ ∗ ∗ ∗ ∗ ∗ ∗ ∗ ∗ ∗ ∗ ∗ ∗
∗ ∗ ∗ ∗ ∗ ∗ ∗ ∗ ∗ ∗ ∗
∗ ∗ ∗ ∗ ∗ ∗ ∗ ∗ ∗ ∗ ∗
∗ ∗ ∗ ∗
Exit
Select character
Change character
Store Owner ID
All tuning data will be erased
Shipping condition
Exit
Return
Start
DV B T i me r Pr ogramm i ng T hu 05/ 08/ 04 18: 49
1
3
BBC1
I T V 1
6/8 FR
7/8 SA
1 8 : 0 0
2 1 : 3 0
2 0 : 0 0
2 2 : 3 0
120
60
Off
Off
Pos .
Name
Da te St ar t E nd
min .
Pr of i le Ed itor
1 BBC ONE Wales
2 BBC 2 W
7 BBC T HRE E
10 BBC FOUR
30 CBBC Ch annel
31 CB ee bi es
40 BBC NE WS 2 4
Al l S ervices Pr of i l e 1
Ch ild Lock S er vi ce Li st
1 BBC ON E Wa le s
2 B BC 2 W
7 B BC T HR EE
3 0 CBB C Ch an ne l
5 1 BBC i
8 9 BBC Radi o Wa le s
9 0 B BC R a di o C ym r u
Ma i n me nu
Pi c ture me nu
Sou nd menu
Setu p me nu
Clock
Input resolution
H-pos
V-pos
Clock phase
Sync H & V
VGA
PC setup
Only available in PC
Slot 1: No module inserted
Common Interface
Access
Please Wait !
DVB Auto Setup
Prog. Channel Service Name NetID. TS ID. Quality
This will take about 3 mins.
4
5
6
7
8
30
30
30
30
30
12302
12302
12302
12302
12302
4158
4158
4158
4158
4158
9
9
9
9
9
BBC NEWS 24
BBCI
CBBC Channel
BBC Radio Wales
BBC Radio Cymru
68 21
DVB Programme
0 5 10
Signal Condition
CH30 1 BBC ONE Wales
Signal Strength
Signal Quality
•How to Use Menu Functions
(picture, sound quality, etc.)
(p. 29)
(p. 29)
(p. 30)
(p. 26 and p. 34)
(p. 32)
(p. 33)
(p. 35)
(p. 27)
(p. 27)
(p. 28)
(p. 24)

Advanced
Ma i n me nu
Pi c ture me nu
Sou nd menu
Set u p me nu
Viewing mode
Contrast
Brightness
Colour
Sharpness
Tint
Colour balance
Colour management
P-NR
Normal
On
Off
Picture menu
Dynamic
3D-COMB On
IDTV
N
EXITMENU
OK
Viewing mode
Contrast
Brightness
Colour
Sharpness
Tint
Colour balance
Colour management
P-NR
Normal
On
Off
3D-COMB On
Picture menu
Dynamic
Colour balance Normal
Sharpness
OK
MENU
OK
OK
20
21
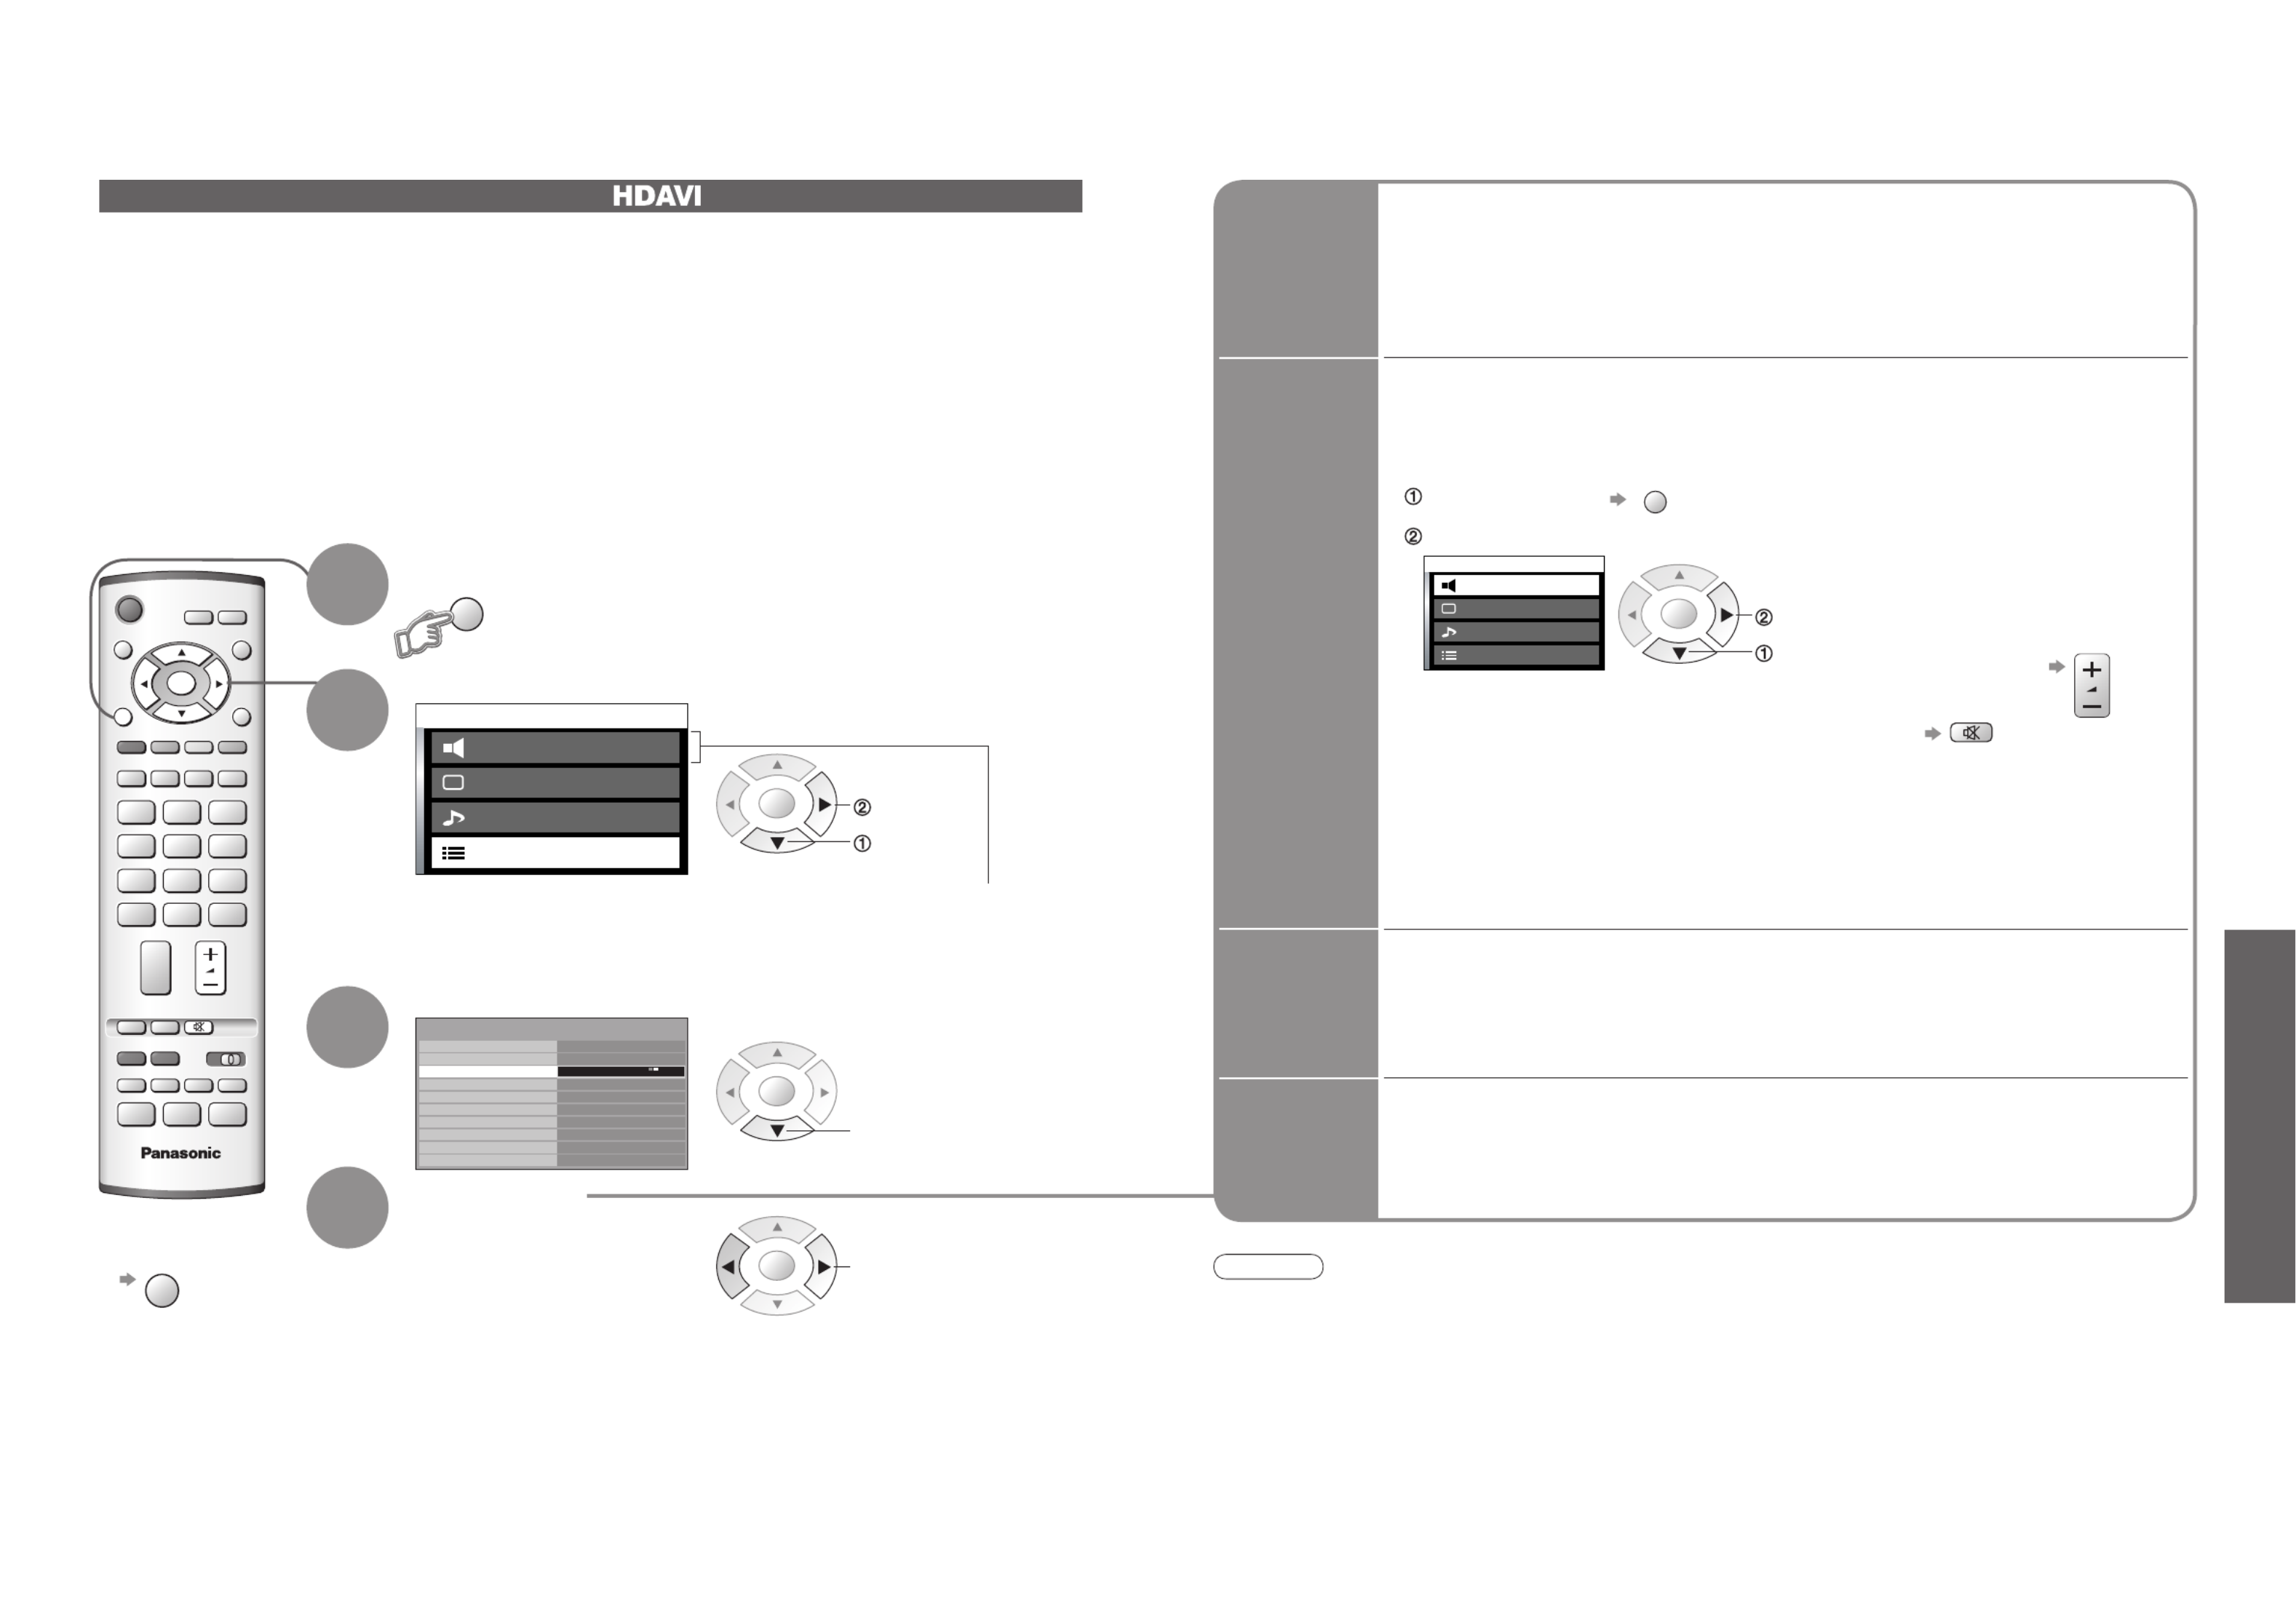
How to Use Menu Functions
Display menu
3
2
4
Various menus allow you to make settings for the picture, sound, and other functions.
•
Displays the functions that can be set
(varies according to the input signal)
Note
•
To initialize all settings
"Shipping condition"
(p. 32).
■
To return to TV
at any time
EXIT
■
To return to the
previous screen
MENU
Select the menu
Select the item
(example: Picture menu)
select
select
Adjust or select
change
(example: Picture menu)
(example: Picture menu)
Changed
Number and positions
of alternatives
Moved
■
Choose from among alternatives
■
Adjust using the slide bar
■
To reset the setting
N
access
store
(Required by some
functions)
•
Setup menu (p. 22)
■
Menu list
•How to Use Menu Functions
(picture, sound quality, etc.)
•
A different menu will be displayed while PC is used. (p. 29)
•
In AV mode, the Sound menu gives a reduced number of options.
Menu Item Adjustments / Confi gurations (alternatives)
Picture menu
Viewing mode
Selects four different screen settings (Dynamic / Normal / Cinema / Auto)
In each Viewing mode setting, Contrast, Brightness, Colour, Sharpness, Tint (in NTSC
only), Colour balance, Colour management and 3D-COMB can be adjusted and stored
to suit your particular viewing requirement (e.g., you may require different settings for
viewing sports, fi lms, news etc.)
Changes to any settings in a viewing mode will affect all signal sources: RF, AV1, AV2,
AV3, AV4, Component, PC and HDMI
Changes will be stored automatically. By analysing and processing the incoming
picture, all four modes feature automatic enhancement
Adjust by each viewing mode
Contrast
Brightness
Colour
Sharpness
Increases or decreases the levels of these options according to your personal preference
Tint With an NTSC signal source connected to the TV, the picture hue can be adjusted to
suit your taste
Colour balance Allows you to set the overall colour tone of the picture (Cool / Normal / Warm)
Colour
management Automatically adjusts colours to vivid ones (Off / On)
P-NR
Picture Noise Reduction
Automatically reduces unwanted picture noise (Off / Min / Mid / Max)
•
Not valid on PC and HD signal
3D-COMB
Occasionally, whilst viewing still or slow moving pictures, colour patterning may be seen
Set to On to display sharper and more accurate colours (Off / On)
•
For PAL or NTSC signal reception only
•
Not valid on RGB, S-Video, components, PC and HDMI
•
Analogue mode only
Sound menu
Bass Increases or decreases level to enhance or minimise lower, deeper sound output
Treble Increases or decreases level to enhance or minimise sharper, higher sound output
Balance Adjusts volume level of right and left speakers
Headphone volume Adjusts the volume of the headphones
NICAM
NICAM (Near Instantaneous Companded Audio Multiplex)
A format for digital sound over television
Reproduces stereo sound (Off / On)
•
Off if reception is poor (FM monaural sound)
•
Analogue mode only
Mode Sound quality can be improved when watching music scene or drama (Music / Speech)
Ambience Provides a dynamic enhancer to simulate improved spatial effects (Off / On)
HDMI1 input
Select to fi t the input signal
(Auto / Digital / Analogue) (p. 37)
Auto : Automatic detection of digital or analogue sound source
Digital : HDMI cable connection
Analogue : HDMI-DVI adapter cable connection
•
HDMI input mode only
•
HDMI2 terminal is for digital signal only
•
No setting for HDMI2 available
1
•
Resets each Viewing mode (Dynamic / Normal / Cinema) to the default
settings.
P-NR in Picture menu is reset to off.
•
Aspect mode is also reset to Auto aspect.
Advanced
Ma i n me nu
Pi c ture me nu
Sou nd menu
Set u p me nu
Q-Link
Control with HDMI
Off timer
Tuning Menu
Owner ID
Shipping condition
Setup menu
AV2
On
AV2 out Monitor
Off
Power on preference TV
Teletext FASTEXT
Power save Off
Side panel Off
IDTV
N
EXITMENU
OK
Q-Link AV2
Access
Tuning Menu
MENU
OK
OK
OK
22
23
How to Use Menu Functions
Display menu
3
2
4
•
Displays the functions that can be set
(varies according to the input signal)
Note
•
To initialize all settings
"Shipping condition"
(p. 32).
■
To return to TV
at any time
EXIT
■
To return to the
previous screen
MENU
Select "Setup menu"
Select the item
Adjust or select change or access
store
(Required by some
functions)
•
Picture menu, Sound menu (p. 20) ■
Menu list
•How to Use Menu Functions
(picture, sound quality, etc.)
Menu Item Adjustments / Confi gurations (alternatives)
Setup menu
Q-Link Selects which AV terminal is to be used for data communication between this TV and a
compatible recording equipment (AV2 / AV3) (p. 36)
AV2/AV3 out
Chooses the signal to be transmitted from the TV to Q-Link (Analogue / DVB / AV1 /
AV2 / AV3 / AV4 / Monitor)
•
Monitor: Image displayed on screen
•
Component signals cannot be outputted
Control with HDMI Control with HDMI function (p. 38)(Off / On)
Teletext Analogue teletext display mode (FASTEXT / List) (p. 14)
Off timer Sets the time the unit automatically turns Off. (minutes)(Off / 15 / 30 / 45 / 60 / 75 / 90)
Volume correction Adjusts volume for AV, PC and HDMI mode
Side panel Increases the brightness of the side panel (Off / Low / Mid / High)
•
The recommended setting is "High" to prevent panel "after-image"
Power save Reduces brightness of picture to economise on power consumption (Off / On)
Power on preference
Set to "TV" to view picture from TV tuner.
Set to "AV" to view input from an external equipment connected to a SCART terminal,
e.g. satellite receiver
(TV / AV)
•
The external equipment must be switched on and sending a control signal for
automatic switching at power on to occur
Tuning Menu Edits or sets channels (Analogue) (p. 30)
DVB Setup Menu
Timer
Programming Records future programmes (p. 34)
Profi le Edit Creates list of favourite programmes (p. 27)
Child Lock Locks a DVB programme channel to prevent access to it (p. 27)
DVB Tuning
Menu Auto Setup, Add New Service, New Service Message, Signal Condition (p. 28)
DVB System
Setup
Common Interface Module, Preferred Subtitles, System Update, Display Timeout
(p. 24)
Multi Audio Chooses the sub voice for watching DVB (Alternatives vary depending on the
broadcaster)
Owner ID Inputs the owner ID (p. 33)
Shipping condition Resets all settings, for example, when moving (p. 32)
•
A different menu will be displayed while PC is used. (p. 29)
•
In AV mode, the Setup menu gives a reduced number of options.
select
select
access
Changed
Number and positions
of alternatives
Displays the next
screen
■
Choose from among alternatives
■
Go to the next screen
1

Advanced
Ma i n me nu
Pi c ture me nu
Sou nd menu
Setu p me nu
Setup menu
AV2Q-Link
Off
Control with HDMI On
AV2 out Monitor
TV
Access
Power on preference
DVB Setup Menu
Owner ID
Shipping condition
Off timer
Power save Off
Side panel Off
Timer Programming
Child Lock
DVB Setup menu
Multi Audio
AccessDVB System Setup
eng
DVB Tuning Menu
Profile Edit
IDTV
MODE
EXIT
DVB
Analogue
MENU
OK
OK
MENU
MODE
DVB
A
nalogue
OK
OK
OK
24
25
DVB Settings
4
3
5
6
7
Select "Setup menu"
Select "DVB Setup Menu"
Select "DVB System Setup"
Display the menu
Select a function and set
Store
•
If you exit after , the setting is not stored after
turning off the unit.
■
To return to TV
EXIT
(DVB mode)
access
select
1If in Analogue mode
Select DVB
The "DVB Setup Menu" provides access to various advanced features.
•DVB Settings (DVB)
(pay-TV, subtitles, etc.)
Pay-TV
Common
Interface
Module
System
Update
Update
unit's
software
system
English
3 seconds
Common Interface Module
System Update
DVB System Setup
Access
Display Timeout
Preferred Subtitles
OK
select, go OK OK
Coloured characters
red
green
yellow
blue
Select "Common Interface Module"
The Common Interface Module menu provides access to software contained on Common
Interface (CI) Modules.
Insert the CI module (optional) (Rear of the TV)
CI slot
Insert or
remove
straightly
and
completely
CI module
access
Follow the on-screen instructions
example:
•
The features that appear on
screen are dependent on the
contents of the selected CI
module.
•
For more details, see the
manual of the CI module, or
check with the broadcaster.
•
On-screen operation guide
may not correspond to the
remote control buttons.
Caution
•
Turn Off MAINS power On / Off switch
whenever inserting or removing the CI
module.
•
If a view card and a card reader
come as a set, fi rst insert the card
reader, then insert the view
card into the card reader.
•
Do not insert the module up side down.
English
3 seconds
Common Interface Module
System Update
DVB System Setup
Display Timeout
Preferred Subtitles
OK
Information
banner
display time
Display
Timeout
Select "Display Timeout" and set the time •
0 (none displayed) to 10 sec.
in 1-sec. increments
set
select
English
3 seconds
Common Interface Module
System Update
DVB System Setup
Display Timeout
Preferred Subtitles
OK
Language
of subtitles
Preferred
Subtitles
Select "Preferred Subtitles" and set the language
■
To display subtitles (p. 11)
set
select
English
3 seconds
Common Interface Module
System Update
DVB System Setup
Access
Display Timeout
Preferred Subtitles
Auto Update Search in Standby
Software Licence
System Update
On
System Update Search Now
OK
OK
■
To update immediately
Select "System Update Search Now" Searches for an update (for several min.)
and displays a corresponding message if any OK Downloads (for about 20 min.)
Select "System Update"
Select "Auto Update Search in Standby" and then select "On" or "Off"
•
On: Automatically performs
a search in standby and
downloads an update, if any
set
select
access
select
■
To view software licence information
Select "Software Licence" Display
•
Normally pay-TV services will appear without and
.
If pay-TV services does not appear, perform and
.
Download new software to TV.
•
For details (p. 42)
Set how long the information banner (p. 11) stays on screen
access
select
access
select
OK
2
If System Update is performed,
the software will be updated (it
may change TV functions). If you
do not wish to do so, set "Auto
Update Search in Standby" to
Off.

Advanced
Ma i n me nu
Pi c ture me nu
Sou nd menu
Setu p me nu
Setup menu
AV2
Q-Link
Off
Control with HDMI On
AV2 out Monitor
TV
Access
Power on preference
DVB Setup Menu
Owner ID
Shipping condition
Off timer
Power save Off
Side panel Off
Timer Programming
Child Lock
DVB Setup menu
Multi Audio
Access
Access
DVB System Setup
eng
DVB Tuning Menu
Profile Edit
IDTV
VCR
EXIT
123
456
789
0
MENU
OK
MODE
DVB
Analogue
* * * *
Please enter new PIN
Child Lock-PIN Entry
PIN
Change PIN
Child Lock
Child Lock Service List
Access
Child Lock S er vice Li st
1 B BC ON E Wa l es
2 B BC 2W
7 B BC TH REE
30 CB BC Ch an n el
51 BB Ci
89 BB C Rad io Wal e s
90 B BC R ad io Cym r u
MENU
VCR
123
456
789
0
OK
OK
MODE
DVB
A
nalogue
OK
OK
OK
26
27
Profi le Edit / Child Lock
Select "Setup menu"
Select "DVB Setup Menu"
4
3
Select "Profi le Edit" or
"Child Lock"
5
Display the menu
6How to set
Your favourite channels can be listed, and control channel audience.
■
To return to TV
EXIT
(DVB mode)
Control
channel
audience
Child Lock
List
favourite
channels
Profi le
Edit
■
To change the PIN number
Select "Change PIN" in and enter a new PIN number twice.
You can lock specifi c channels and control who watches them.
(When a channel is selected, a message appears; by entering the PIN number, you can
watch the channel.)
select
Appears when the channel is locked
Enter the PIN number (4 digits)
Select "Child Lock Service List"
•
To cancel
Select the locked channel
OK
•
To lock all channels
yellow
•
To cancel all channel locks
blue
Select the channel to be locked
Note
•
Setting "Shipping condition" (p. 32) or "DVB Auto Setup" (p. 28) erases the PIN number
and all settings.
•
Enter the PIN number twice at fi rst
setting.
•
Make a note of the PIN number in
case you forget it.
Pr ofile Editor
1 BB C ON E W al es
2 BB C 2 W
7 BB C T HRE E
10 BB C F OU R
30 CB BC Ch an ne l
3 1 C B ee b i e s
Al l Se rvic es Pr ofile 1
Pr ofile Editor
1 BB C ON E W al es
2 BB C 2 W
1 BB C 2 W
7 BB C T HRE E
10 BB C F OU R
30 CB BC Ch an ne l
3 1 C B ee b i e s
Al l Se rvic es Pr ofile 1
OK
OK
■
To edit Profi le
OK Select the fi eld of Profi le to edit and:
•To name the Profi le
red
•
To move the channel
green
Select the new
position
OK
Confi rm
green
OK
•
To delete the channel
yellow
•
To delete all channels
blue
•
To add all channels
to the list
blue
Create your favourite channel list (Profi le) from various broadcasters (up to 4: Profi le 1 to 4).
The list is added to "Category" in TV Guide (p. 12) and information banner (p. 11) and then
easily accessed.
store
select
To change
the category
red
To display
another Profi le
green
A channel is added
Select a channel and add it to the list
Store
yellow
•Profi le Edit / Child Lock
(DVB)
access
select
set
1If in Analogue mode
Select DVB
access
select
access
select
access
select
•
Channel numbers (Known as logical channel numbers) cannot be changed, due to
broadcast restrictions.
2

Menu
Item Adjustments / Confi gurations
DVB Tuning Menu
DVB Auto Setup Automatically sets the DVB channels in the area.
•
The current setting is erased.
•
If a Child Lock PIN number (p. 27) has been set, it must be entered again.
Add New Service Adds a new DVB station.
•
A new station is added to the DVB channel list, when found.
•
The new station is added with the current settings saved as they are.
New Service
Message
Selects whether to give a notifi cation message
when a new DVB station is found.
(On / Off)
•
Selecting OK (Auto Setup) will delete current
Profi le and Childlock settings.
Signal Condition
Select a channel and check the DVB signal
condition.
Use for adjusting the direction of the aerial.
•
Green bar Good
•
Red bar Poor (Check the aerial)
Advanced
Ma i n me nu
Pi c ture me nu
Sou nd menu
Setu p me nu
Timer Programming
Child Lock
DVB Setup menu
Multi Audio
Access
DVB System Setup
eng
DVB Tuning Menu
Profile Edit
EXITMENU
OK
MODE
DVB
Analogue
DVB Auto Setup
New Service Message
DVB Tuning Menu
Access
On
Signal Condition
Add New Service
New DVB Service Found!
Press OK to start Auto Setup
Press EXIT to lgnore.
Warning! Selecting Auto Setup will delete
current Profile and Childlock settings
DVB Programme
0 5 10
Signal Condition
CH30 1 BBC ONE Wales
Signal Strength
Signal Quality
TV/AV
OK
HDMI1/2
MENU
OK
MODE
DVB
A
nalogue
TV/AV
OK
OK
OK
28
29
DVB Tuning Menu
(DVB mode)
Select "Setup menu"
4
3
Select "DVB Tuning Menu"
5
Display the menu
Select
"DVB Setup Menu"
Select the function and access
6 change or access
You can re-tune all TV channels when moving house or search for new services which may have recently
started broadcasting.
•
No data is stored
if an Auto Setup
sequence is
interrupted.
■
To return to TV
EXIT
1If in Analogue mode
Select DVB
■
To return to TV TV/AV
yellow
(Press twice)
Displaying PC Screen on TV
Select the external input
Select "PC"
2
The screen of the PC connected to the unit can be displayed on the TV.
You can also listen to PC sound with the audio cable connected. To connect PC (p. 40)
Displays PC screen
•
Corresponding signals
(p. 43)
•
If "H-freq." or "V-freq."
is shown in red, the
signals may not be
supported.
■
PC menu setting (changed as desired)
•
To make settings "How to Use Menu Functions" to (p. 18)
Menu Item Adjustments / Confi gurations (options)
Picture menu
Viewing mode, Contrast, Brightness, Sharpness, Colour balance (p. 21)
Advanced
setting
W/B High R White balance of bright red area
and
repeatedly adjusted
W/B High B White balance of bright blue area
W/B Low R White balance of dark red area
W/B Low B White balance of dark blue area
Gamma (2.0 / 2.2 / 2.5 / S Curve)
Setup menu
PC
setup
Input
resolution
Switches to a wide view
•
VGA (640 x 480 dots), WVGA (852 x 480 dots),
XGA (1,024 x 768 dots), WXGA (1,366 x 768 dots)
•
Options change depending on signals
Clock Set to the minimum level if noise occurs
H-pos
Adjusts horizontal position
OK
V-pos
Adjusts vertical position
OK
Clock phase Eliminates fl icker and distortion
•
Adjust after Clock adjustment •
Set to the minimum level if noise occurs
Sync
Chooses another synchronous signal if the image is distorted (H&V / On G)
•
H&V : by the horizontal and vertical signals from your PC
On G : by the green signal from your PC (if available)
Volume correction, Side panel, Power save (p. 23)
•
Sound menu (p. 20)
•Displaying PC Screen on TV
•DVB Tuning Menu (DVB)
access
select
access
select
access
select
select
1
blue
2
To
next
page

Advanced
Ma i n me nu
Pi c ture me nu
Sou nd menu
Setu p me nu
Access
Q-Link
Control with HDMI
Off timer
Tuning Menu
Owner ID
Shipping condition
Setup menu
AV2
On
AV2 out Monitor
Off
Power on preference TV
Teletext FASTEXT
Side panel Off
Power save Off
Programme edit
Auto setup
Manual tuning
Tuning Menu
Access
IDTV
EXITMENU
OK
MODE
DVB
Analogue
CH44
1
Manual tuning
21 68
-
, + : Search
TV / AV : Move cursor
STR : To store
F : To exit
STR F
-
/ + / TV / AV
AdDelete d DownloadMove
Programme edit
Prog. Chan. Name Lock
2 :
4 :
5 :
CH51
CH47
CH37
Off
Off
Off
XYZ
1 : CH44 OffABC
123
456
:3 CH41 OffFTP
Programme edit
Prog.
ABCDEFGHIJKLMNOPQRST
UVWXYZ+
-
. 0123456789
Chan. Name Lock
1 :
2 :
3 :
4 :
5 :
CH44
CH51
CH41
CH47
CH37
Off
Off
Off
Off
Off
XYZ
FTP
123
456
Programme edit
Prog. Chan. Name Lock
1 :
2 :
3 :
4 :
5 :
CH44
CH51
CH41
CH47
CH37
ABC
XYZ
FTP
123
456
Off
Off
Off
Off
Off
All analogue tuning
data will be erased
WARNING
Exit
Return
Start Auto Setup
AUTO SETUP IN PROGRESS
SEARCHING : PLEASE WAIT
21 68
CH44
Exit
Return
Manual tuning
21 68
CH44
1
Exit
Search down/up
Return
Direct entry
Store
C
0 9
3 FTP
MENU
MODE
DVB
A
nalogue
OK
OK
OK
OK
OK
OK
OK
OK
OK
OK
OK
OK
OK
30
31
(Press repeatedly until "Tuning Mode" appears)
or (Access "Manual tuning")
(Select programme position or channel number)
•
Selected item will fl ash.
or (Change programme position or start searching channels)
(Store)
- (Repeat)
Editing and Setting Channels
Select "Setup menu"
Select "Tuning Menu"
4
3
Select the function
5
Display the menu
6How to set
For Manual tuning, using the buttons on
the front of the set
("Manual tuning" on p. 31)
Programme
position (fl ash)
Channel number
(fl ash)
Channel
The analogue channel settings can be changed according to your needs and reception conditions.
■
To return to TV
■
To return to TV
EXIT
1If in DVB mode
Select Analogue
(Manual tuning screen)
Edit
channels
■
Delete
■
Add
■
Move
■
Change
name
■
Lock
■
Download to
equipment
Programme
edit
Set
automatically
Auto setup
Set
manually
Manual
tuning
(Analogue mode)
■
To download channel
information to a Q-Link
compatible equipment
connected to the unit
blue Automatically
transmitted
(for a few sec.)
•For details (p. 36)
■
To lock
■
To change the name of the broadcaster
displayed when selecting channels
Cursor
Usable characters
Select the
"Name" fi eld
Select the
character
To next
character
Repeat
Select the
"Lock" fi eld
Select "On"
Start Auto setup
start
Settings are made automatically
Select the programme position
and search through the channel
Store
search
Programme
position
Channel
Repeat
and
Select the channel to edit
Note
•
If a VCR is
connected with
only the RF
cable, select
programme
position "0".
Channel
Name
Edit
•
You cannot select the channel with numeric
buttons or the "C" button when locked.
Store
•
The settings are
downloaded to a Q-Link
compatible equipment
connected to the unit.
•
All previous settings are
erased.
•
No data is stored if an
Auto setup sequence is
interrupted.
•
The
programme
position
blinks.
Automatically set the channels received in the area
To freely change settings after Auto setup
■
To delete
red
After confi rming, press
red
■
To add
green
After confi rming, press
green
■
To move
yellow
OK Select new
position
yellow
•Editing and Setting Channels
(Analogue)
Edit the analogue programme position settings
•
When the operation is completed,
the broadcast of programme
number "1" will appear.
"Off" to
unlock
)(
access
select
access
select
access
select
2
select
Advanced
VCR
EXIT
123
456
789
0
MENU
OK
GUIDE
MODE
DVB
Analogue
OK
MENU
MODE
DVB
A
nalogue
OK
OK
OK
34
35
M ai n menu
Pi cture menu
Sound menu
Setup me nu
Setup menu
AV2
Q-Link
Off
Control with HDMI On
AV2 out Monitor
TV
Access
Power on preference
DVB Setup Menu
Owner ID
Shipping condition
Off timer
Power save Off
Side panel Off
Timer Programming
Child Lock
DVB Setup menu
Multi Audio
Access
DVB System Setup
eng
DVB Tuning Menu
Profile Edit
Recording Controls
Select "Setup menu"
Select "DVB Setup Menu"
4
3
Select "Timer Programming"
5
The Timer programming menu allows you to choose programmes that you wish to record. At the correct time, the DVB
system will switch on and tune to the correct station (even if the TV is in Standby mode). If the recording equipment is
compatible with Q-Link or similar technologies (p. 36) and connected to the TV’s AV3 terminal using a SCART cable
(p. 40), you do not need to programme the device – the DVB system will control the recording process.
TV Guide may also be used to set timer programmes. (p. 12)
Display the menu
6How to set the details
■
To return to TV
EXIT
Caution
•
The TV must either
be On or in standby.
•
For preparations
of a recording
equipment, read
the manual of
equipment.
■
To stop
recording
GUIDE
EXIT
Timer Programming (DVB mode) from Menu
7Store
1If in Analogue mode
Select DVB
Set timer
programming
details
Caution
•
No other DVB channel can be selected during recording. However you can watch analogue channels.
•
It may not be possible to record an encrypted programme (which is copy-protected).
Note
•
A message will appear if you try to programme a timer event which overlaps an already programmed event.
•
2 min. before the starting time: a reminder message appears.
(To remove the message OK button; To cancel the programming EXIT button)
•
10 sec. before the starting time: in DVB mode, the unit automatically selects the programmed channel.
•
Cancelling the programming may not be valid immediately before the starting time. In this case, directly operate
the recording equipment to cancel recording.
•
Please set the Starting time more than 2 minutes interval from the present time. If you want to record, use Direct
TV recording (p. 36).
DVB Timer Prog ra mming
Th u 05/08/ 04 1 8:4 9
1
3
BBC1
ITV1
6/8 FR
7/8 SA
18: 00
21: 30
20: 00
22: 30
120
60
Off
Off
Pos.
Name
Date Start End
min .
OKOK
OK
OK
set
select
the item
Channel
Previous
timer
programming
event
Date
Starting
time
Ending
time
Subtitles
(Off / Auto)
one day ahead
daily or weekly
(press repeatedly)
Current timer
programming
event
Select the programme to be changed using OK and press OK
Correct as necessary (as above)
Repeat the operations as below,
and set items in the order of to
Recording time
(automatic display)
Daily SU-SA: Sunday to Saturday
Daily MO-SA: Monday to Saturday
Daily MO-FR: Monday to Friday
Weekly SA/FR/TH/WE/TU/MO/SU:
Same time on the same day every week
To change a timer programming event
To cancel a timer programming event
Select the programme to be deleted using OK and press
red
, and can
also be entered
with numeric
buttons.
start
Start making
the settings
•Recording Controls
access
OK
2
access
select
access
select
Direct TV recording:
You can record the current programme to DVD Recorder or VCR immediately. (p. 36)
TV Guide–Electronic Programme Guide (EPG)–Timer Recording
Operate and in p. 12 (mode and Guide switches)
•
There are two styles of display for TV Guide (Landscape / Portrait)
Select the programme to be broadcast
Exit
Return
Select timer
Edit timer
D e l e t e
DVB T im er P ro gra mm ing
T hu 0 5/ 08/ 04 1 8: 49
1
3
BBC1
I T V 1
6/8 FR
7/8 SA
18 :00
21 :30
20:00
22:30
120
60
Off
Off
Po s.
N am e
Dat e St a rt E nd
mi n.
0 9
OK DVB LED
(Timer
Programming
screen)
■
To check / change / cancel a timer programming event "Timer Programming" (p. 35)
•
Orange DVB LED
(Rapid blinking during recording)
set
select
Advanced
Control with HDMI
Setup menu
AV2Q-Link
Off
On
AV2 out Monitor
TVPower on preference
DVB Setup Menu
Owner ID
Shipping condition
Off timer
Power save Off
Side panel Off
IDTV
MENU
OK
MENU
OK
OK
OK
OK
38
39
Select "On"
(default is On)
Select "Setup menu"
Select "Control with HDMI"
2
1
3
Display the menu
∗Enjoy additional HDMI Inter-Operability with Panasonic products which have "HDAVI Control" function.
HDMI connections to some Panasonic equipment (Panasonic DVD Recorder DIGA, Panasonic Player
theatre, Panasonic Amplifi er, etc.) allow you to enjoy easy playback or home theatre.
About connections, see "External Equipment" (p. 40). Read the manuals of the equipment too.
This function needs an HDMI compliant (fully wired) cable.
Non-HDMI-compliant cables cannot be utilized.
Consult your local Panasonic dealer or refer to the URL for applicable equipment: www.panasonic.co.uk
Control with HDMI " Control"∗
Preparations
(For the fi rst time / When adding new equipment, reconnecting equipment or changing setup)
After connection turn the equipment on and then switch the TV unit on.
Select the input mode to HDMI1 or HDMI2 (p. 17), and make sure that an
image is displayed correctly.
4
Ma i n me nu
Pi c ture me nu
Sou nd menu
Set u p me nu
Home theatr e
HDMI Functions
(Continued)
■
To return to TV
EXIT
Easy
playback
Automatic Input switching-When the connected Panasonic equipment is operated,
input mode is switched automatically. When it is stopped operating, input mode is
returned.
Power on
link
When the connected equipment starts playback or direct navigator or function
menu are activated, the TV is automatically turned on. (Only when TV is in
Standby mode.)
Power off
link
When TV is set to Standby mode, the connected Panasonic equipment is also
automatically set to Standby.
Theatre
speaker
You can control the theatre speaker with TV’s remote control.
This function is available when Panasonic Amplifi er or Player theatre is connected.
Display the menu
MENU
Select "Home theatre" or "TV speaker" ■
Home theatre:
Adjustment for equipment
(automatically turned on if it is in
Standby mode)
•
When selecting "Home theatre", the sound of TV speakers is mute.
•
When the equipment is turned off, TV speakers will be active.
Volume up / down
Mute
■
TV speaker:
TV speakers are active.
Main me n u
Pi cture men u
So u n d me n u
Se tup men u
Ho me th eatr e
•HDMI Functions
•
Setup the equipment to enable this function. Read the manual of the equipment.
•
This function may not work normally depending on the equipment condition.
•
This function may not work normally when Panasonic Player theatre is connected.
•
The equipment can be operated by TV’s remote control with this function on even if TV is in Standby mode.
•
Image or sound may not be available for the fi rst few seconds when the playback starts.
•
Image or sound may not be available for the fi rst few seconds when Input mode is switched.
•
Volume function will be displayed when adjusting the volume of the equipment.
•
Easy playback is also available by using the remote control for Amplifi er. Read the manuals of Amplifi er.
Note
access
select
select
select
access
select
•
Displayed when Amplifi er or Player theatre is connected.
This may be displayed after disconnecting the equipment.
In this case, set "Control with HDMI" in Setup menu to
"Off", then set to "On" again.
•
It is recommended that you use Panasonic’s HDMI cable.
Recommended part number:
RP-CDHG15 (1.5 m)
RP-CDHG30 (3.0 m)
RP-CDHG50 (5.0 m)
Produkt Specifikationer
| Mærke: | Panasonic |
| Kategori: | televisión |
| Model: | Viera TH-42PX45B |
Har du brug for hjælp?
Hvis du har brug for hjælp til Panasonic Viera TH-42PX45B stil et spørgsmål nedenfor, og andre brugere vil svare dig
televisión Panasonic Manualer

12 Januar 2025
6 Januar 2025
4 Januar 2025
25 December 2024
25 December 2024
25 December 2024
21 December 2024
20 December 2024
19 December 2024
19 December 2024
televisión Manualer
- televisión SilverCrest
- televisión Acer
- televisión Denver
- televisión Sencor
- televisión TCL
- televisión Sony
- televisión Siemens
- televisión Samsung
- televisión VOX
- televisión Philips
- televisión Lenco
- televisión OK
- televisión LG
- televisión AEG
- televisión Pioneer
- televisión Mitsubishi
- televisión Sharp
- televisión Daewoo
- televisión Arçelik
- televisión AOC
- televisión Sanyo
- televisión Grundig
- televisión Nikkei
- televisión Toshiba
- televisión Pyle
- televisión Furrion
- televisión Lenovo
- televisión Infiniton
- televisión Nedis
- televisión Logik
- televisión Abus
- televisión Optoma
- televisión Westinghouse
- televisión Element
- televisión Thomson
- televisión Hyundai
- televisión Aiwa
- televisión Nokia
- televisión Casio
- televisión AKAI
- televisión Hisense
- televisión Strong
- televisión Brandt
- televisión Hannspree
- televisión Trevi
- televisión Blaupunkt
- televisión JVC
- televisión BEKO
- televisión Uniden
- televisión Clatronic
- televisión Hitachi
- televisión Medion
- televisión Sweex
- televisión Citizen
- televisión Megasat
- televisión Haier
- televisión TechniSat
- televisión Innoliving
- televisión NewStar
- televisión Bang And Olufsen
- televisión Luxor
- televisión Vivax
- televisión Loewe
- televisión Walker
- televisión Sunny
- televisión Finlux
- televisión Telefunken
- televisión Kernau
- televisión BenQ
- televisión Packard Bell
- televisión Xiaomi
- televisión Peerless-AV
- televisión Krüger&Matz
- televisión Viewsonic
- televisión Schneider
- televisión Fujitsu
- televisión Oppo
- televisión Zalman
- televisión Tesla
- televisión Polaroid
- televisión NEC
- televisión TERRIS
- televisión OKI
- televisión MT Logic
- televisión Yasin
- televisión Bush
- televisión Dual
- televisión Aspes
- televisión Salora
- televisión Sagem
- televisión Nevir
- televisión Teac
- televisión Nextbase
- televisión Techwood
- televisión Vivo
- televisión Albrecht
- televisión SVAN
- televisión Sogo
- televisión Alba
- televisión RCA
- televisión ECG
- televisión AudioSonic
- televisión Manhattan
- televisión Proline
- televisión JGC
- televisión Orion
- televisión ITT
- televisión ILive
- televisión Intenso
- televisión Fantec
- televisión Cecotec
- televisión Roadstar
- televisión VIZIO
- televisión XD Enjoy
- televisión Wharfedale
- televisión Technika
- televisión Seiki
- televisión TechLine
- televisión Monster
- televisión Bauhn
- televisión V7
- televisión Airis
- televisión Majestic
- televisión Star-Light
- televisión Vestel
- televisión Continental Edison
- televisión Iiyama
- televisión RevolutionHD
- televisión GPX
- televisión CHiQ
- televisión MBM
- televisión Orima
- televisión SereneLife
- televisión Lexibook
- televisión AG Neovo
- televisión Philco
- televisión Kunft
- televisión GoGen
- televisión Kogan
- televisión Graetz
- televisión Emerson
- televisión Kemo
- televisión Insignia
- televisión Xoro
- televisión Manta
- televisión SunBriteTV
- televisión JTC
- televisión Reflexion
- televisión Planar
- televisión QBell Technology
- televisión SYLVOX
- televisión Dyon
- televisión Schaub Lorenz
- televisión Daitsu
- televisión Xiron
- televisión Alden
- televisión Alphatronics
- televisión Aldi
- televisión Allview
- televisión AYA
- televisión Aristona
- televisión Apex
- televisión Ziggo
- televisión Icy Box
- televisión Palsonic
- televisión Funai
- televisión Saba
- televisión Antarion
- televisión Tevion
- televisión Proscan
- televisión Tucson
- televisión Sunstech
- televisión Nabo
- televisión Sylvania
- televisión Marquant
- televisión Nordmende
- televisión AudioAffairs
- televisión Magnum
- televisión Kubo
- televisión Coby
- televisión Seg
- televisión Metz
- televisión Qilive
- televisión Changhong
- televisión Naxa
- televisión Mpman
- televisión Cello
- televisión Mx Onda
- televisión Peaq
- televisión Humax
- televisión Superior
- televisión Difrnce
- televisión Grunkel
- televisión Avtex
- televisión Odys
- televisión NPG
- televisión Bluesky
- televisión Videocon
- televisión Durabase
- televisión HKC
- televisión Edenwood
- televisión Woxter
- televisión Premier
- televisión Teleco
- televisión Opera
- televisión LTC
- televisión Horizon
- televisión Elements
- televisión Viewpia
- televisión CGV
- televisión Online
- televisión Doffler
- televisión DirecTV
- televisión Tele 2
- televisión Mystery
- televisión Telesystem
- televisión Jay-tech
- televisión EKO
- televisión E-motion
- televisión Mitsai
- televisión Selfsat
- televisión High One
- televisión Tve
- televisión ISymphony
- televisión Pantel
- televisión Magnavox
- televisión ATYME
- televisión HCI
- televisión Inno-Hit
- televisión Lin
- televisión Engel
- televisión Digihome
- televisión Englaon
- televisión Reflex
- televisión Astar
- televisión Visco
- televisión Tivax
- televisión H&B
- televisión Norcent
- televisión TELE System
- televisión TIM
- televisión Oyster
- televisión Belson
- televisión Vision Plus
- televisión Sbr
- televisión Voxx
- televisión Rm 2000
- televisión Hoher
- televisión Felson
- televisión Elbe
- televisión Axing
- televisión FFalcon
- televisión Smart Tech
- televisión Séura
- televisión Mitzu
- televisión Caratec
- televisión JTC24
- televisión Kivi
- televisión Smart Brand
- televisión FOX Electronics
Nyeste televisión Manualer

20 Februar 2025

19 Februar 2025
19 Februar 2025

10 Februar 2025
5 Februar 2025
30 Januar 2025

30 Januar 2025

15 Januar 2025
15 Januar 2025

15 Januar 2025