Philips 20MC4304 Manual
Philips
Tv / DVD kombination
20MC4304
Læs nedenfor 📖 manual på dansk for Philips 20MC4304 (160 sider) i kategorien Tv / DVD kombination. Denne guide var nyttig for 20 personer og blev bedømt med 4.5 stjerner i gennemsnit af 2 brugere
Side 1/160

OWNER’SMANUAL
THANK YOU FOR CHOOSING MAGNAVOX.
NEED HELP FAST?
READ YOUR QUICK-USE GUIDE AND/OR OWNER’SMANUAL FIRST FOR
QUICK TIPS THAT MAKE USING YOUR MAGNAVOXPRODUCT MORE ENJOYABLE.
IFYOU HAVE READ YOUR INSTRUCTIONS AND STILL NEED ASSISTANCE,
YOUMAY ACCESS OUR ONLINE HELP AT WWW.MAGNAVOX.COM
OR CALL 1-800-705-2000 WHILE WITH YOUR PRODUCT.
20MC4304
27MC4304
COLOR TV WITH BUILT-IN VCR
AND DVD PLAYER
20_27MC4304_1.qx3 04.5.12 11:09 AM Page 1

Safety Precautions
Warning:To prevent fire or shock hazard, do not expose this equipment to rain or moisture.
Federal Communications Commission (FCC) Warning: Any unauthorized changes or
modifications to this equipment void the user’s authority to operate it.
Laser Safety: This unit employs a laser. Only a qualified service person should remove the cover or
attempt to service this device, due to possible eye injury.
CAUTION: USE OF CONTROLS OR ADJUSTMENTS OR PERFORMANCE OF PROCEDURES OTHER
THAN THOSE SPECIFIED HEREIN MAY RESULT IN HAZARDOUS RADIATION EXPOSURE.
CAUTION:VISIBLE AND INVISIBLE LASER RADIATION WHEN OPEN AND INTERLOCK DEFEATED. DO
NOT STARE INTO BEAM.THE BEAM IS LOCATED INSIDE, NEAR THE DECK MECHANISM.
Special Information for Canadian Users: This Class B digital apparatus complies with Canadian
ICES-003. Cet appareil numérique de la classe B est conforme à la norme NMB-003 du Canada.
Radio/TV Interference: This equipment has been tested and found to comply with the limits for a
Class B digital device, pursuant to Part 15 of the FCC Rules.These limits are designed to provide reasonable
protection against harmful interference in a residential installation.This equipment generates, uses, and can
radiate radio frequency energy and, if not installed and used in accordance with the instructions, may cause
harmful interference to radio communications. However, there is no guarantee that interference will not occur
in a particular installation. If this equipment does cause harmful interference to radio or television reception,
which can be determined by turning the equipment off and on, the user is encouraged to try to correct the
interference by one or more of the following measures:
1)Reorient or relocate the receiving antenna.
2) Increase the separation between the equipment and the receiver.
3) Connect the equipment into an outlet on a circuit different from that to which the receiver is connected.
4) Consult the dealer or an experienced radio/TV technician for help.
Copyright Protection: Unauthorized copying, broadcasting, public performance and lending of Discs
are prohibited.This product incorporates copyright protection technology that is protected by method claims
of certain U.S. patents and other intellectual property rights owned by Macrovision Corporation and other
rights owners. Use of this copyright protection technology must be authorized by Macrovision Corporation
and is intended for home and other limited viewing uses only unless otherwise authorized by Macrovision
Corporation. Reverse engineering or disassembly is prohibited.
Note to the Cable TV System Installer: This reminder calls the Cable TV system installer’s
attention to Article 820-40 of the National Electrical Code, which provides guidelines for proper grounding –
in particular, specifying that the cable ground shall be connected to the grounding system of the building, as
close to the point of cable entry as possible.
Declaration of Conformity
Model Number: 20MC4304
27MC4304
Trade Name: Magnavox
Responsible Party: Philips Consumer Electronics North America
P. O. B o x 14810
Knoxville,TN 37914-1810
(865) 521-4316
Safety and General Information 3
Manufactured under license from Dolby Laboratories. "Dolby" and the double-D symbol are trademarks of Dolby Laboratories.
Copyright 2004 Magnavox.All rights reserved.
20_27MC4304_1.qx3 04.5.12 11:09 AM Page 3
Before Using the TV/VCR/DVD 7
12
12
3
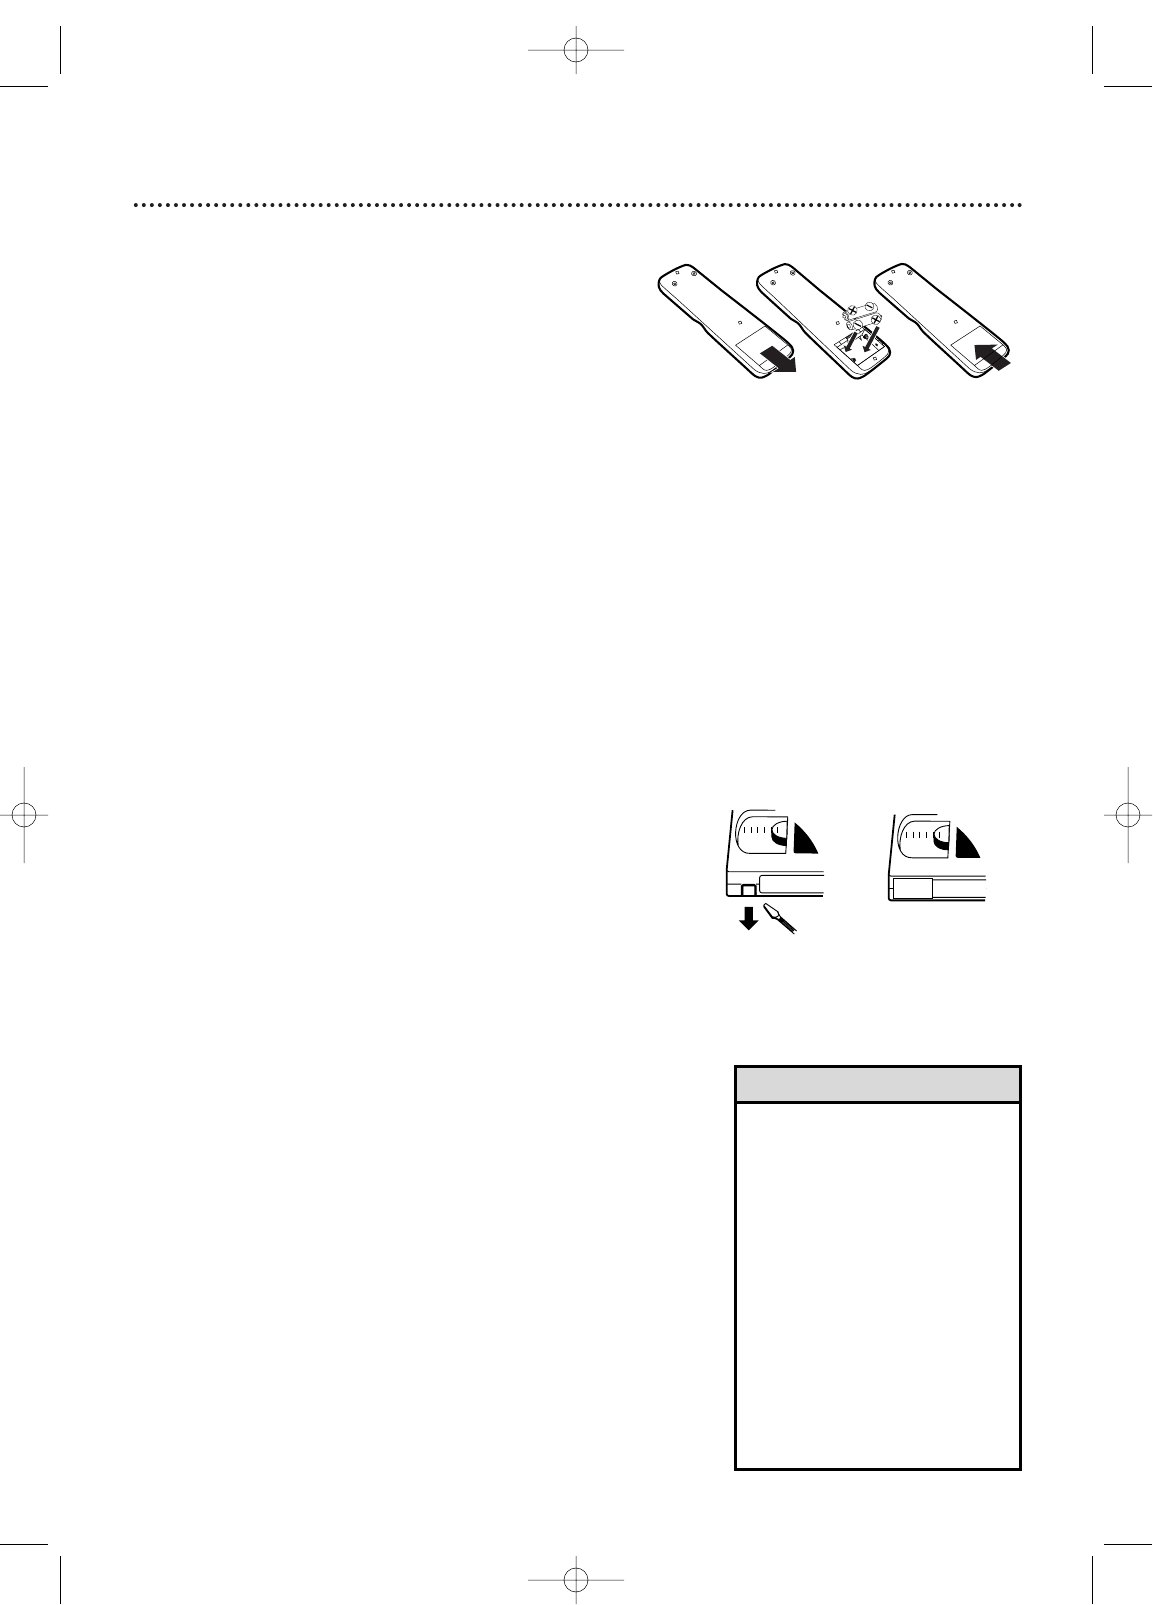
Remote Control Battery Installation
1Remove the battery compartment lid on the
bottom of the remote control. Slide the lid down and
off. Follow the direction of the arrow on the lid.
2Place two AA batteries inside the battery com-
partment. Align the +and –ends as indicated.
3Replace the battery compartment lid.
Battery Safety
Battery Usage CAUTION - To prevent battery leakage that
may result in bodily injury, property damage, or damage to
the unit:
●Install ALL batteries correctly, with the + and - markings on
the battery aligned as indicated on the unit;
●Do not mix batteries, for example, old with new or carbon
with alkaline; and
●Remove batteries when the unit will not be used for a long
time.
Recording Prevention
Videotapes have record tabs to ensure you do not erase
recordings accidentally.
1To prevent accidental recording, break off the
tab with a screwdriver.
2To r ecord again, cover the hole with cellophane
tape.
Using the Remote Control
●Point the remote control at the remote sensor on the
front of the TV/VCR/DVD. Details are on page 16.
●Do not put objects between the remote control and the
TV/VCR/DVD.
TV/VCR/DVD Maintenance
●Remove any light adhesive stick-on notes from the video
cassette before putting the cassette in the TV/VCR/DVD.
Removable labels can jam the TV/VCR/DVD.
●The TV/VCR/DVD requires periodic maintenance to main-
tain its excellent performance.This TV/VCR/DVD has an
internal head cleaning system. However, the video heads
will eventually require cleaning or replacement. Only an
authorized service center should perform this service.
• Your new product, its packaging,
and this manual contain materials
that can be recycled and reused.
Specialized companies can recycle
your product to increase the
amount of reusable materials and
to minimize the amount that
needs to be properly disposed.
Your product uses batteries that
should not be thrown away when
depleted but should be disposed
of as small chemical waste.
Please find out about the local
regulations on disposal of your old
product, batteries, manual, and
packaging when you replace exist-
ing equipment.
Helpful Hint
20_27MC4304_1.qx3 04.5.12 11:09 AM Page 7

8 Hooking Up the TV/VCR/DVD
ANT.
AUDIO OUT
COAXIAL
ANT.
IN
OUT
ANT.
AUDIO OUT
COAXIAL
ANT.
Connect an RF
coaxial cable
(not supplied) to
the OUT Jack
on the Cable
Box/ Satellite
Receiver and to
the ANT(enna)
Jack on the
TV/VCR/DVD.
Connect a Cable TV
signal or an antenna to
the ANT(enna) Jack.
1Hook up your TV/VCR/DVD using
one of the connections shown.
AHooking Up Your TV/VCR/DVD
with a Cable TV Signal or
Outdoor Antenna
Connect the Cable TV
or Satellite signal to the
IN Jack on the Cable
Box/Satellite Receiver.
BHooking Up Your TV/VCR/DVD
with a Cable Box/Satellite Receiver
To view any channel, set the TV/VCR/DVD to
the output channel (channel 03 or 04) of the
Cable Box/Satellite Receiver.Then, select chan-
nels at the Cable Box/Satellite Receiver.
Your Cable Box/Satellite Receiver may have Audio and Video Out jacks instead of the single
Antenna Out jack (RF coaxial or 75 ohm) shown here.
If so, connect Audio and Video cables to the Audio/Video Out jacks of the Cable Box/Satellite
Receiver and to the AUDIO/VIDEO In jacks on the front of the TV/VCR/DVD.
Press SELECT on the remote to set the TV/VCR/DVD to AUX, not channel 3 or 4. Select chan-
nels you want to watch or record at the Cable Box/Satellite Receiver as usual, leaving the
TV/VCR/DVD on AUX.
20_27MC4304_1.qx3 04.5.12 11:09 AM Page 8

ANT.
AUDIO OUT
COAXIAL
AUDIO OUT
COAXIAL
10 Optional Connections
• You cannot use a Mini-Disc or
Digital Audio Tape deck to copy
Dolby Digital 5.1channel sur-
round sound Discs.
•Discs recorded in Dolby Digital
should show this on the Disc or
case. If the Disc is not recorded
in Dolby Digital 5.1channel sur-
round sound, you will not hear
multi-channel sound even if you
use the Digital Stereo hookup.
Helpful Hints
Digital Stereo Hookups
You can connect the TV/VCR/DVD to a Stereo
that has a Digital Coaxial In jack. Use this
hookup if you want to hear the TV/VCR/DVD
sound through the Stereo instead. Use these
connections for a Dolby Digital-compatible
Stereo or for a Receiver that has a Mini-Disc or
Digital Audio Tape deck.
1Connect the antenna/Cable TV
signal. Details are on pages eight-nine.
2Connect a digital audio coaxial
cable (not supplied) to the AUDIO
OUT COAXIAL jack on the
TV/VCR/DVD.
Also connect the cable to the
Stereo’s COAXIAL DIGITAL
AUDIO IN jack.
3If the Stereo is Dolby Digital-com-
patible, set DOLBY DIGITAL to
ON. If the Stereo is not Dolby Digital-
compatible or if you connected to a
Mini-Disc or Digital Audio Tape Deck,
set DOLBY DIGITAL to OFF. Details are
on page 72.
An incorrect setting causes noise distor-
tion and damages speakers.
To see if your Stereo has Dolby Digital,
look for a Dolby Digital logo on your
Stereo. Or, refer to the Stereo owner’s
manual.
To A UDIO OUT
COAXIAL jack
on TV/VCR/DVD
To Stereo’s COAXIAL
DIGITAL AUDIO IN jack
20_27MC4304_1.qx3 04.5.12 11:09 AM Page 10
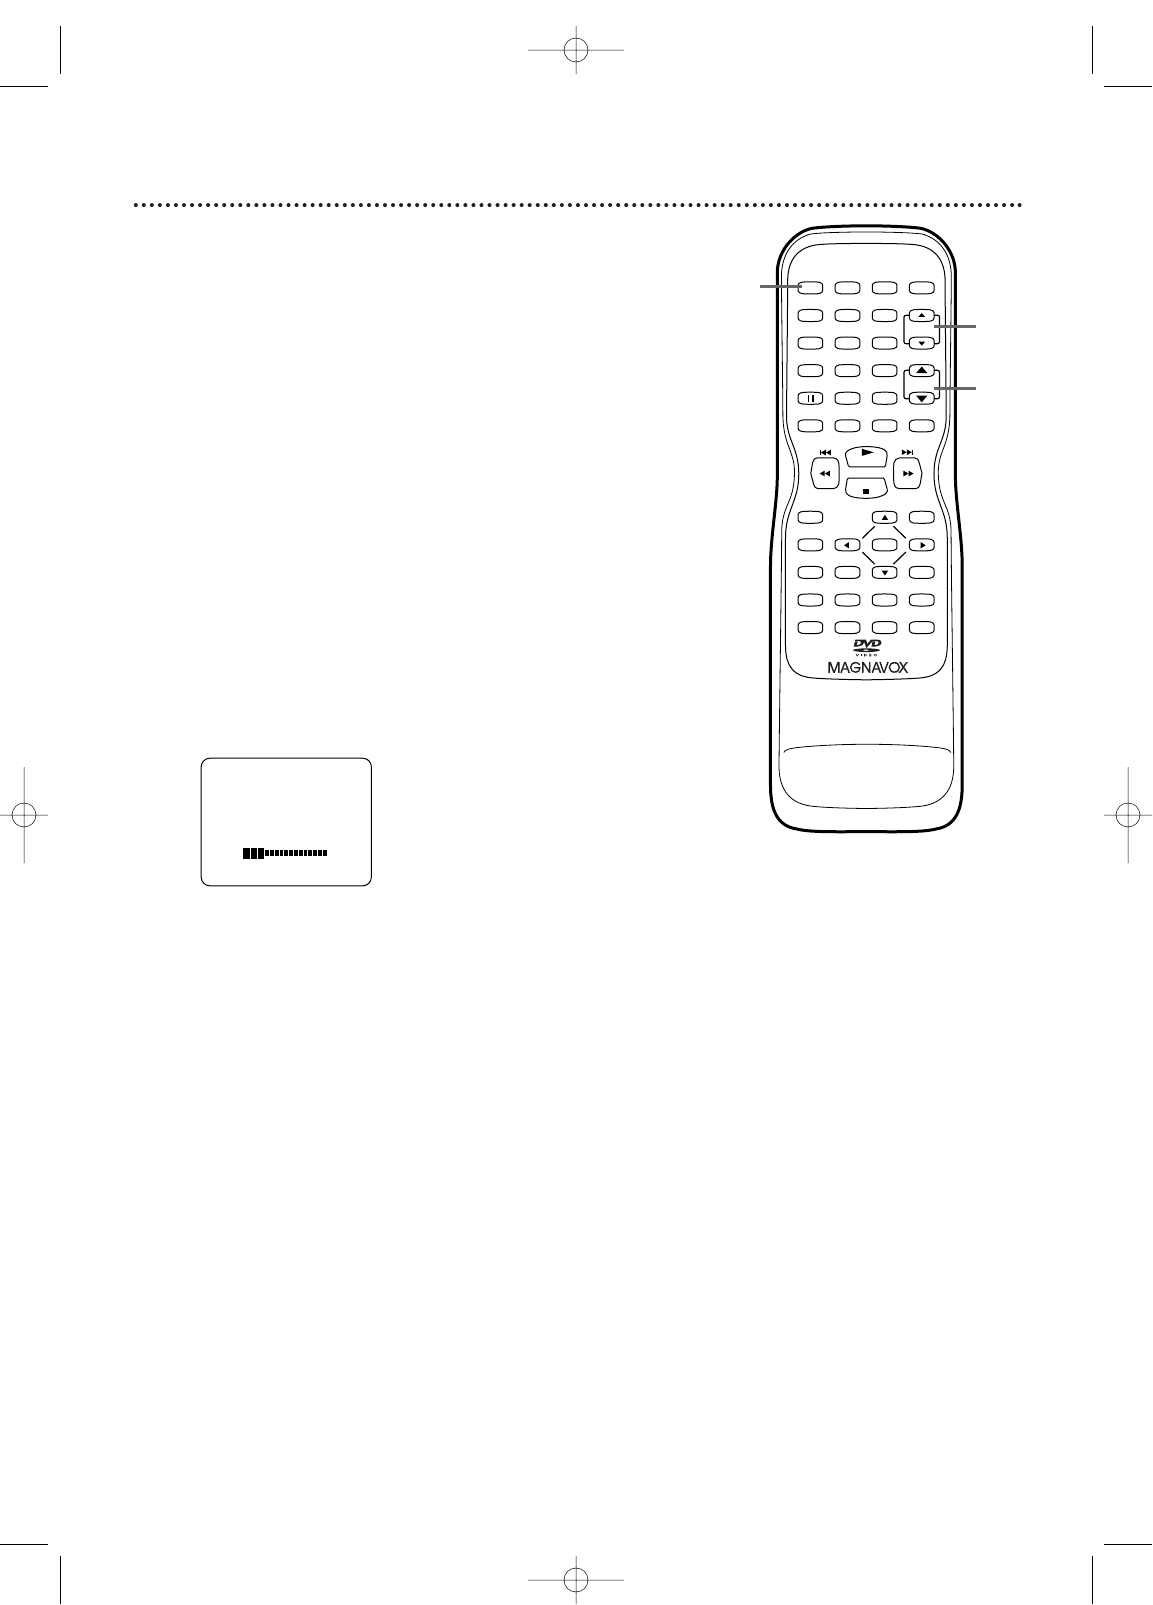
Watching TV 11
The unit selects available TV channels automatically when you
connect an Antenna or Cable TV signal to it.To reset TV
channels, see page 18.
If you are using a Cable Box or Satellite Receiver, you do not
need to set channels at the TV/VCR/DVD.
1Press STANDBY-ON to turn on the TV/VCR/DVD.
2To watch TV, press the CH. ▲/▼buttons to
select memorized channels. Memorized channels are
those that appear when you flip through channels. If a
channel is skipped, you still can use the Number but-
tons to select it.This is a non-memorized channel; it
may have weak reception in your area.
To update your memorized and non-memorized chan-
nels, see page 18.
Remember, if you are using a Cable Box/Satellite
Receiver, set the TV/VCR/DVD to channel 3, 4, or
AUX. Change channels at the Cable Box/Satellite
Receiver.
3Press VOL. ▲/▼to adjust the volume.
VOLUME 20
PLAY
STOP
ENTER
RECORD
DISC
MENU
RETURNTITLESETUP
A
-
B
REPEATSEARCH MODE
CLEAR
MODE ANGLESUBTITLEAUDIO
DISPLAY
SPEED C.RESET
STANDBY-ON
PICTURE SELECTSLEEP
CH.
VOL.
MUTE
ZOOM
123
456
789
0+10
+100
REPEAT
2
3
1
20_27MC4304_1.qx3 04.5.12 11:09 AM Page 11
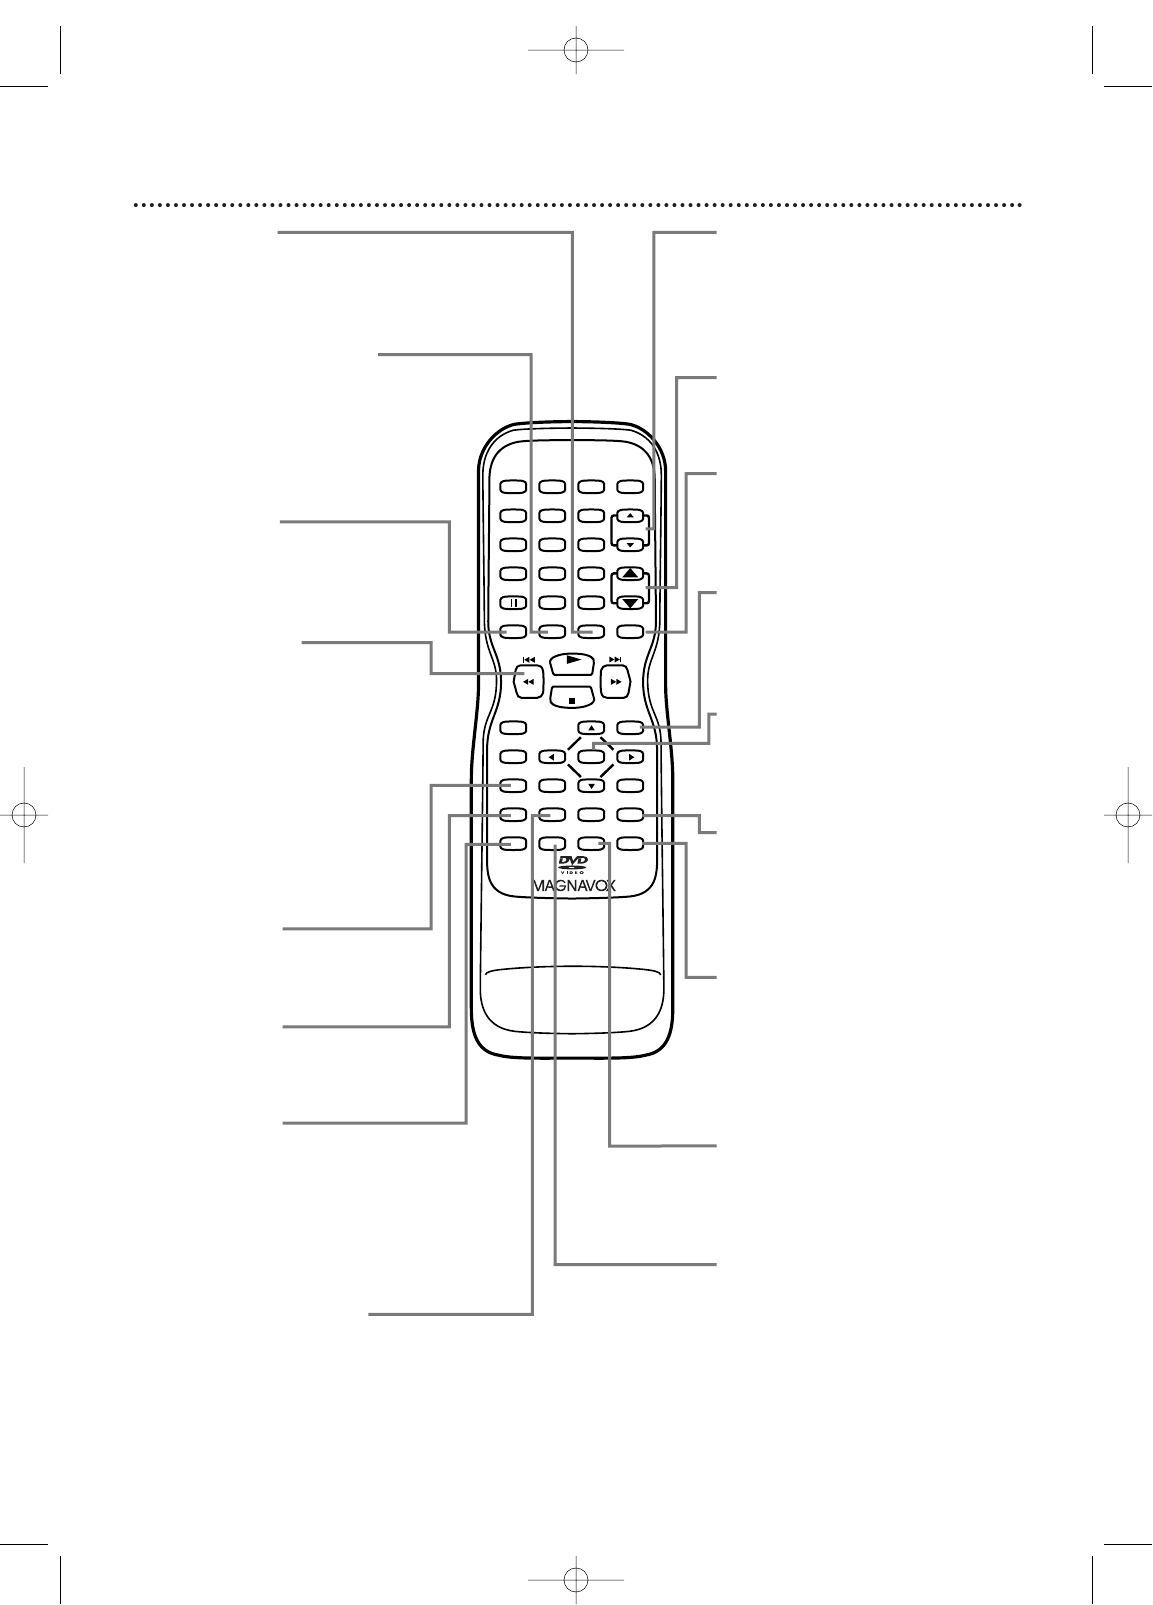
Remote Control Buttons (cont’d) 15
PLAY
STOP
ENTER
RECORD
DISC
MENU
RETURNTITLESETUP
A
-
B
REPEATSEARCH MODE
CLEAR
MODE ANGLESUBTITLEAUDIO
DISPLAY
SPEED C.RESET
STANDBY-ON
PICTURE SELECTSLEEP
CH.
VOL.
MUTE
ZOOM
123
456
789
0+10
+100
REPEAT
ZOOM Button
Press to enlarge the picture during
DVD playback. Details are on page
59.
C.RESET (counter reset)
Button
Press to reset the tape counter to
0:00:00. Details are on page 36.
Press to cancel a timer recording.
Details are on page 31.
SPEED Button
Press to choose a tape recording
speed (SP or SLP). Details are on
page 26.
j / h Button
During Disc play, press briefly to
skip to the beginning of the current
Track/Chapter. Press repeatedly to
skip to previous Tracks/Chapters.
Details are on page 54.
Or, press and hold for two seconds
to search backward during Disc
playback. Details are on page 52.
Press to reverse a videotape. Details
are on page 39.
SETUP Button
Press to access or remove the
TV/VCR/DVD's Setup menu.
CLEAR Button
Press to reset or erase a setting or
wrong information.
MODE Button
Press to play a Program or to start
Random playback. Details are on
page 65.
Press to select a Black Level or
Virtual Surround setting. Details are
on page 74.
SEARCH MODE Button
Press to find a specific time,
Chapter, Track, or Title on a Disc.
Details are on pages 53-54.
Press to set up Markers. Details are
on page 57.
CH. (channel) K/L Buttons
Press to select memorized TV
channels.
Details are on page 11.
VOL. (volume) K/L Buttons
Press to adjust the volume.
MUTE Button
Press to mute or restore the
sound.
DISC MENU Button
Press to access DVD Disc menus.
Details are on page 51.
ENTER Button
Press to accept or change a menu
setting.
REPEAT A-B Button
Press to set a section of a Disc to
play repeatedly. Details are on page
56.
ANGLE Button
Press to change the camera angle
and watch a Disc sequence from a
different perspective. Details are on
page 58.
SUBTITLE Button
Press to select a subtitle language.
Details are on page 58.
AUDIO Button
Press to select an audio language or
sound mode. Details are on page 64.
20_27MC4304_1.qx3 04.5.12 11:09 AM Page 15
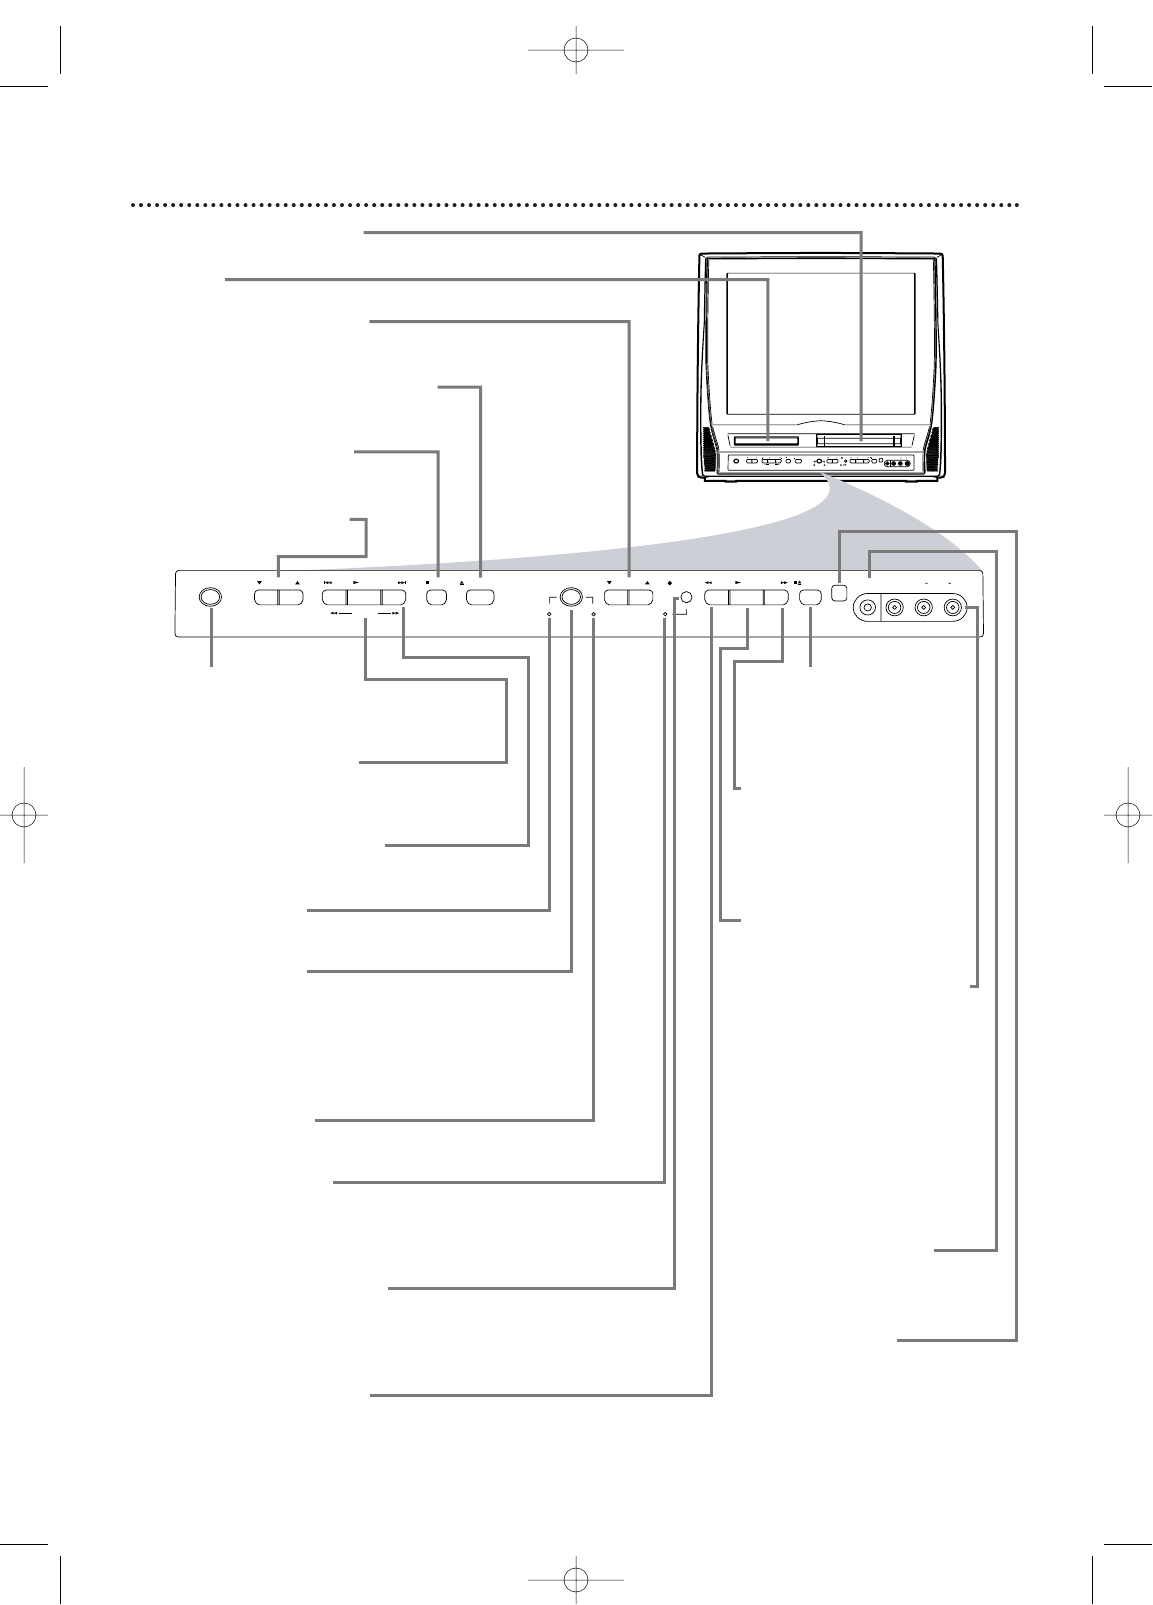
16 Front Panel
VIDEO
HEADPHONE
RL AUDIO
SOURCE CHANNEL REC/OTR
VCR/TVDVD
F.FWDPLAYREWSTANDBY-ON
STOP/EJECT
STOP OPEN/CLOSE
VOLUME NEXTPLAYPREV
SEARCH
VIDEO
HEADPHONE
RL AUDIO
SOURCE CHANNEL REC/OTR
VCR/TVDVD
F.FWDPLAYREWSTANDBY-ON
STOP/EJECT
STOP OPEN/CLOSE
VOLUME NEXTPLAYPREV
SEARCH
STOP/EJECT C A
Button (VCR)
Press to stop tape playback.
Press while play is stopped
to remove the tape.
F.FWD D Button
(VCR)
Press to fast forward the
tape or to search forward
quickly during playback.
Details are on page 39.
PLAY B Button (VCR)
Press to start tape playback.
Details are on page 12.
VIDEO and AUDIO L/R
(left/right) In jacks
Use audio and video cables
to connect these jacks to
the Audio and Video Out
jacks of a Camcorder, DVD
Player, or VCR. This lets you
watch materials playing on
the other equipment when
you choose AUX at the
TV/VCR/DVD. Details are on
pages nine and 33.
HEADPHONE jack
Connect headphones (not
supplied) here for personal
listening.
Remote Sensor
Receives a signal from your
remote control so you can
operate the TV/VCR/DVD
from a distance.
STANDBY-ON Button
Press to turn the TV/VCR/DVD on or
off. Turn off the TV/VCR/DVD for a
timer recording.
PLAY B Button (DVD)
Press to start Disc playback.
Details are on page 13.
PREV H,
NEXTi Buttons (DVD)
Press to go to a different Chapter or
Track. Details are on page 54.
DVD light (green)
Appears if the TV/VCR/DVD is in DVD
mode.
SOURCE Button
Press to select AUX, TV/VCR, or DVD
mode. If you switch to TV/VCR mode,
wait about four seconds before
switching back to DVD mode. This
button works the same as the SELECT
button on the remote.
VCR/TV light (red)
Appears if the TV/VCR/DVD is in
TV/VCR mode.
REC/OTR light (red)
This light flashes during recording. It
lights when the TV/VCR/DVD is in
Standby mode (power off) for a timer
recording.
REC/OTR I Button (VCR)
Press to start a videotape recording.
Details are on page 26.
Press repeatedly to start a One-Touch
Recording. Details are on page 27.
REW E Button (VCR)
Press to rewind the tape or to search
backward quickly during playback.
Details are on page 39.
Cassette Compartment
Insert a videotape here.
Disc tray
Insert a Disc here.
CHANNEL K/L Buttons
Press to select TV channels.
Details are on page 11.
OPEN/CLOSE A Button (DVD)
Press to open or close the disc tray.
Details are on page 13.
STOP C Button (DVD)
Press to stop Disc playback.
Details are on page 13.
VOLUME K/L Buttons
Press to adjust the volume.
20_27MC4304_1.qx3 04.5.12 11:09 AM Page 16
Produkt Specifikationer
| Mærke: | Philips |
| Kategori: | Tv / DVD kombination |
| Model: | 20MC4304 |
Har du brug for hjælp?
Hvis du har brug for hjælp til Philips 20MC4304 stil et spørgsmål nedenfor, og andre brugere vil svare dig
Tv / DVD kombination Philips Manualer

5 Juli 2024
4 Juli 2024
4 Juli 2024
4 Juli 2024
4 Juli 2024
Tv / DVD kombination Manualer
- Tv / DVD kombination AEG
- Tv / DVD kombination Daewoo
- Tv / DVD kombination Grundig
- Tv / DVD kombination Toshiba
- Tv / DVD kombination Medion
- Tv / DVD kombination Finlux
- Tv / DVD kombination Prosonic
- Tv / DVD kombination Telefunken
- Tv / DVD kombination RCA
- Tv / DVD kombination Onn
- Tv / DVD kombination Lexibook
- Tv / DVD kombination Reflexion
- Tv / DVD kombination Xiron
- Tv / DVD kombination Sansui
- Tv / DVD kombination Magnum
- Tv / DVD kombination Avtex
- Tv / DVD kombination Watsvision
- Tv / DVD kombination Tve
- Tv / DVD kombination Axxion
Nyeste Tv / DVD kombination Manualer

27 August 2024
26 August 2024
26 August 2024
25 August 2024
23 August 2024
23 August 2024
23 August 2024
22 August 2024

21 August 2024
21 August 2024