Rand McNally IntelliRoute TND 525 Manual
Rand McNally
GPS-enhed
IntelliRoute TND 525
Læs nedenfor 📖 manual på dansk for Rand McNally IntelliRoute TND 525 (139 sider) i kategorien GPS-enhed. Denne guide var nyttig for 35 personer og blev bedømt med 4.5 stjerner i gennemsnit af 2 brugere
Side 1/139

Quick Start Guide .......................
1
Guide de Démarrage Rapide ....
18
Guía de Inicio Rápido ...............
36


1
Important Information About Your IntelliRoute
®
TND™ 525
RAND MCNALLY DOCK: Keep your device up to date by downloading the Rand McNally Dock for your home
computer at www.randmcnally.com/dock and connecting your device with the USB cable provided.
POWER BUTTON: Press and hold the orange power button to turn the device on or off. The power button
can also be used for quick access to certain features while the device is running. See Preferences > General >
Quick Power Press for options. A red light indicates the battery is charging; a green light indicates the battery is
fully charged.
RESET: Use the reset button on the back of the device to restart. This will cancel the current route, but
preferences, address book, and other personal data will be saved.
LEARN MORE: Access Tutorial & Tips
under
Preferences > General on your device for more information,
or visit www.randmcnally.com/support to download the user manual.
Some screens include help tips. Tap this button to access.
WARNING: This product contains chemicals known to the State of California to cause cancer and/or other harm.


2
Install the Mount
NOTE: Follow all local regulations governing the placement of the mount. Select an area with a line of sight to the
sky and GPS satellites to ensure reliable GPS information.
1. Clean and dry the mounting area.
2. Remove the suction cup protective fi lm.
3. Adjust the angle of the mount using the
thumbscrew.
4. Pull the suction cup lever up to release
suction.
5. Plug the power cord into the device and
the vehicle’s 12-volt power source.
6. Slide the device onto the mount.
7. Place and hold the mount suction cup against the
mounting surface.
8. Press the suction cup lever down until it snaps into place.
9. Adjust the device so that it can be easily seen and does not block the driver’s line of sight.


3
1
4 5
8
6
7
23
Main Menu
1 Enter truck information and access
truck-specifi c use tools.
2 Show location on the map and
view navigation instructions.
3 Choose a destination.
4 Select device, route and map
preferences. Access the tutorial.
5 Mute/unmute the speaker.
6 Adjust speaker volume.
7 Indicates charge when running on
battery.
8 Change driver profi le, trailer load,
or driver status.
Note: You can select different color schemes in > Preferences General Skin Style > . The following screen
images appear in the “Ice” style. Some screens may appear different, based on model number.
Note: From other screens, tap the Main Menu icon in the bottom right corner to return to the Main Menu.


4
Enter Truck Information and Set Warnings
1. Tap Truck Tools > Truck Info Warnings. or
2. Tap and to view options.
3. Tap the option button to be changed.
4. Enter new settings.
5. Tap to save changes.
Set Routing and Device Options
1. Tap Preferences.
2. Tap the General, Route Map or tab.
3. Tap and to view options.
4. Tap the option button to be changed.
5. Enter new settings.
6. Tap to save changes.
On the left,
tap on an
option
On the left,
tap on an
option
On the
right,
enter
settings
for the
option
On the
right,
enter
settings
for the
option


5
Destination
1 Route to a new location. (See page 6.)
2 Return to a previously entered address.
3 Access the Address Book.
4 Plan a multi-stop trip.
5 Route to a point of interest. (See page 10.)
1 2 3
4 5


6
Route to a New Location
1. Tap Choose Destination > New Location.
2. Tap Address.
3. Enter the name of the city. ( As you type, NOTE:
the keyboard displays only the next possible letter.)
4. Prompts appear in the top bar. Tap the city to
select. Or, tap to view cities beginning with List
the letter(s) you entered.
5. Enter the street name. ( If the letters you NOTE:
need do not appear, tap .)Expand Search
6. Enter the house number. ( To enter the NOTE:
house number before the street, tap the house
number button in the previous step.)
See (page 7.)Confirm Destination Window
Tips
• You can also route to a new location by City
Center Intersection, , or Latitude/Longitude,
or choose .Address > Zip Code Search
• View recent destinations by tapping . View recent cities by tapping Choose Destination > History Choose
Destination > New Location > Address > History.
• View saved locations by tapping Choose Destination > Address Book.


7
Confi rm Destination Window
1 Destination address.
2 Begin route to destination.
3 Compare a primary and alternate route and
choose one.
4 Add the location as a via point on the way to
a previously entered destination.*
5 Save the location to the Address Book.
6 Cross reference to printed Rand McNally
Motor Carriers’ Road Atlas.
7 View the map.
8 Change the starting location for a route to the
location displayed here.
9 Return to Main Menu.
10 Return to previous window.
*To manage via points, Tap Choose Destination >
Multi-Stop Trips. You can add up to 50 destinations in
a multi-stop trip, and optimize routing for trips of up to
10 stops.
NOTE: This window may include
additional buttons based on the
type of destination selected.
1
3
5
6 7
98
10
2
4

8
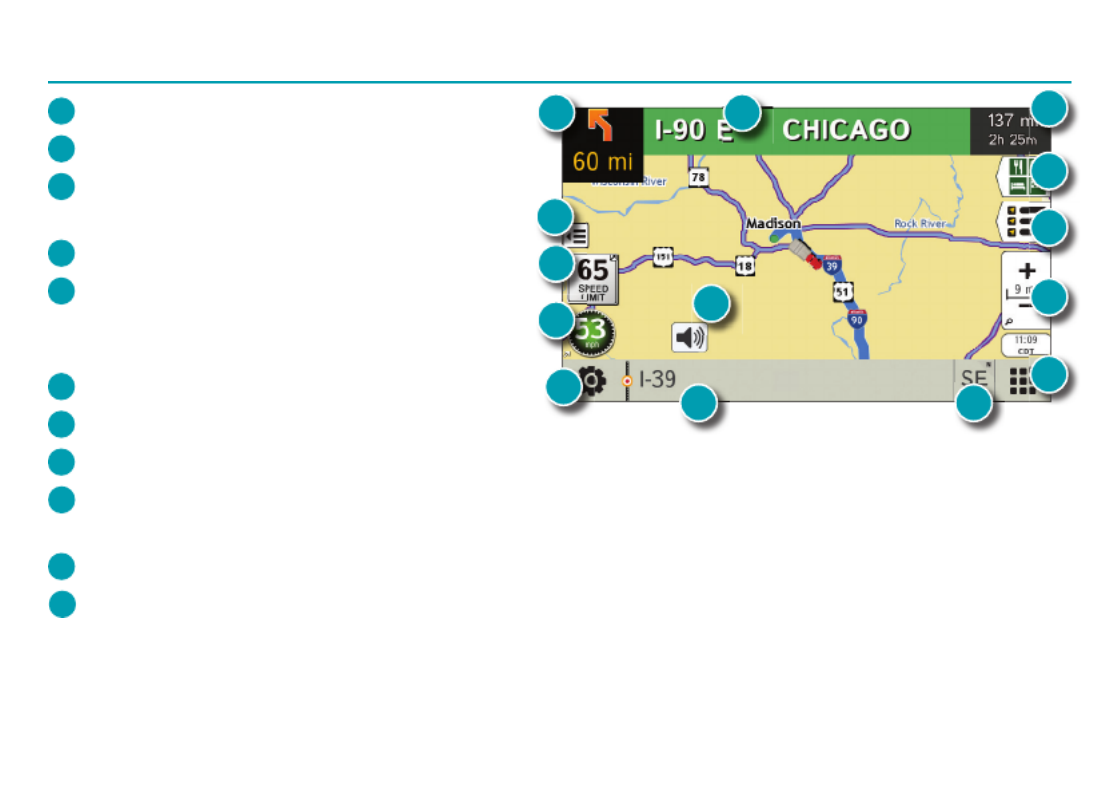
Route Map Window
1 Repeat spoken next-maneuver instructions.
2 Name of street you will turn onto next.
3 Show arrival time, remaining time, or other
options.
4 Slide out to show upcoming exit information.
5 Directions list slideout. Tap Route Display
Options to select detail view, highway view,
trip summary, or summary map view.
6 Zoom in/zoom out.
7 Return to .Main Menu
8
Current direction. Tap to select a map display option (Heading Up, North Up, or
3D View
).
9 View current road name, upcoming cross road name, or city, county and state. Also displays advanced lane
guidance. Tap to change.
10 View and save current location, detour, or cancel a route.
11 Tap on the current speed to display the Turns red for speed warnings; set in Virtual Dashboard. (NOTE:
Truck Tools > Warnings.)
13
4
5
6
7
8
2
9
10
11
12
14
13

9
Route Map Window - continued
12 Current speed limit—orange for truck limit, white for general limit. Tap to open a “Tell Rand” about
speed limits.
13 Mute the speaker.
14 Minimize icons to show simply the map and next maneuver.
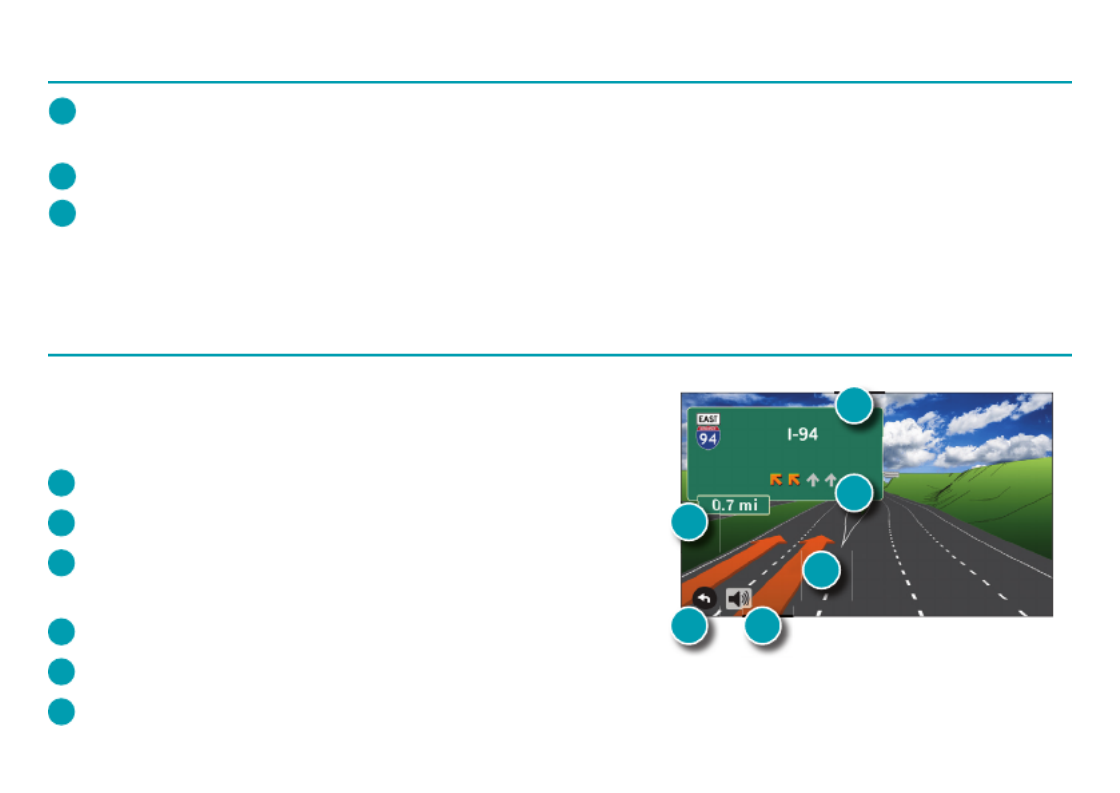
Junction View
When on a route, Junction View displays when you have an upcoming
maneuver. Once past the maneuver, Junction View closes and the
previous window displays.
1 Signs to follow for the next maneuver.
2 Number and direction of lanes for the next maneuver.
3 Distance to the upcoming maneuver. Distance decreases as
you approach the ramp.
4 Lane assist arrow.
5 Mute the speaker.
6 Return to previous window.
1
3
2
4
56


10
Find a Point of Interest (POI)
Tap Choose Destination > Points of Interest.
1 Find popular truck-friendly POIs near your current location.
Search for a POI:
2 Near your truck
3 In a particular city
4 Along your route
5 Along the last 30 minutes of your driving day
(using the time remaining in Truck Tools >
Timers)
6 Near your destination
POI Categories
7 Select a category.
8 Find restaurants, hotels, and other subcategories.
9 View custom POIs that have been uploaded
through the Rand McNally Dock.
8
7
9
1
3
4 5 6
2


11
Find a Point of Interest (POI) - continued
10 Tap location to select.
11 View and edit ratings and comments.
12 Tap to search by available services.
13 Apply or remove services fi lter for search results.
14 Search POI by name.
10 11
12 13 14


15
More Information
For a detailed description of the features of your device, please see the IntelliRoute® TND™ 525 User Manual.
The User Manual can be downloaded from the Rand McNally Dock, and is also available at
www.randmcnally.com/support.
Rand McNally Dock™
The Rand McNally Dock enables you to receive software upgrades and access map updates, construction updates,
and additional features. Simply download the Dock software for your PC or Mac at www.randmcnally.com/dock
and connect your device using the USB cable provided.
With the Rand McNally Dock, you can also:
• Export mileage and fuel logs to your home computer
• Upload custom POIs, such as red light cameras, to your device
• Download the User Manual
• Access the Rand McNally support site and online store
• Read product news and announcements
• Send feedback and suggestions to Rand McNally through “Tell Rand”
Produkt Specifikationer
| Mærke: | Rand McNally |
| Kategori: | GPS-enhed |
| Model: | IntelliRoute TND 525 |
Har du brug for hjælp?
Hvis du har brug for hjælp til Rand McNally IntelliRoute TND 525 stil et spørgsmål nedenfor, og andre brugere vil svare dig
GPS-enhed Rand McNally Manualer

1 December 2022
1 December 2022
1 December 2022
1 December 2022
1 December 2022
1 December 2022
GPS-enhed Manualer
- GPS-enhed Acer
- GPS-enhed Samsung
- GPS-enhed IFM
- GPS-enhed LG
- GPS-enhed Kenwood
- GPS-enhed Lowrance
- GPS-enhed Garmin
- GPS-enhed Bushnell
- GPS-enhed Nedis
- GPS-enhed Humminbird
- GPS-enhed Polar
- GPS-enhed Fysic
- GPS-enhed Mio
- GPS-enhed Uniden
- GPS-enhed Hitachi
- GPS-enhed Ventus
- GPS-enhed Alpine
- GPS-enhed Navman
- GPS-enhed TomTom
- GPS-enhed Dual
- GPS-enhed GlobalSat
- GPS-enhed Celestron
- GPS-enhed Renkforce
- GPS-enhed Lezyne
- GPS-enhed Audiovox
- GPS-enhed Magellan
- GPS-enhed First Alert
- GPS-enhed Teltonika
- GPS-enhed Kogan
- GPS-enhed Coyote
- GPS-enhed Orbit
- GPS-enhed QStarz
- GPS-enhed Tile
- GPS-enhed Spotter
- GPS-enhed Trackilive
- GPS-enhed Falk
- GPS-enhed Tractive
- GPS-enhed Navilock
- GPS-enhed Tragant
- GPS-enhed Nedsoft
- GPS-enhed Canyon
- GPS-enhed Avidyne
- GPS-enhed Hamlet
- GPS-enhed Moki
- GPS-enhed Lantronix
- GPS-enhed LifeWatcher
- GPS-enhed PAJ GPS
- GPS-enhed Cobblestone
- GPS-enhed UAvionix
Nyeste GPS-enhed Manualer

21 Februar 2025
21 Februar 2025
12 Februar 2025
12 Februar 2025
12 Februar 2025
30 Januar 2025
11 Januar 2025
9 Januar 2025
28 December 2024
17 November 2024