REVO Heritage Shadow Manual
Læs nedenfor 📖 manual på dansk for REVO Heritage Shadow (176 sider) i kategorien DAB radio. Denne guide var nyttig for 23 personer og blev bedømt med 4.5 stjerner i gennemsnit af 2 brugere
Side 1/176
DELUXE TABLE RADIO
With docking for iPod and iPhone
DAB | DAB+ | FM | Internet Radio | Audio Streaming
Version 2.0
Owner’s Manual
Bedienungsanleitung
Manuel de l’utilisateur
Manuale dell’utente
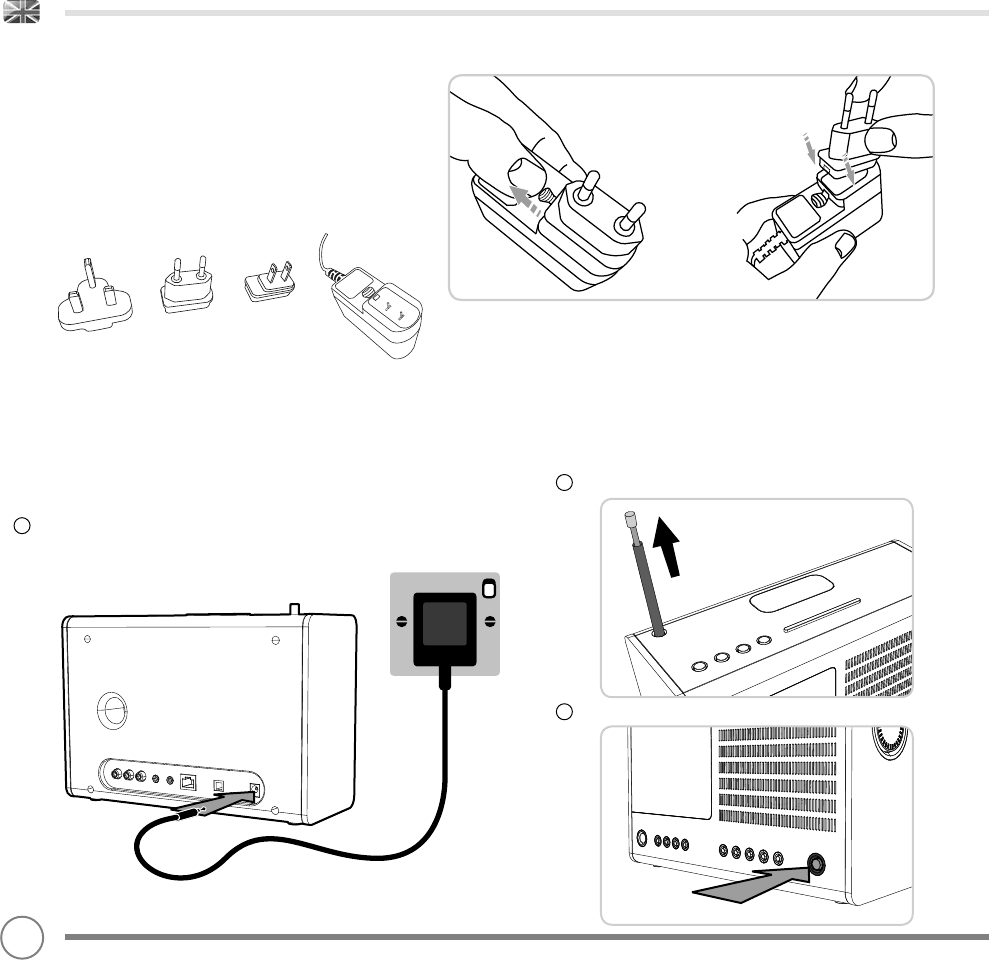
POWER SUPPLY (PSU)
Your Heritage radio is supplied with a multi-region power supply,
meaning that it can be operated in a number of countries around
the world.
Simply choose the correct adaptor for your country from the
selection supplied, then follow the instructions below.
UK EURO U.S.A
PUSH
Press the POWER button once to start the initialisation process.
Fully extend the antenna for DAB or FM operation
SET-UP
Using the PSU supplied, connect one end to the DC power socket found on the
rear of Heritage, then plug the opposite end into the mains socket on the wall.
1
2
3
06

MODE MENUS
The Mode Menus are so called because they show the functions
available within the currently selected mode.
Pressing the button at any time will take you to the Mode
Menu for the mode of operation your radio is currently in.
Each of the Mode Menus also includes a listing for MAIN MENU,
allowing you to return to the top level MAIN MENU.
MAIN MENU
The MAIN MENU provides access to the following modes and
sub-menus:
• Internet radio • iPod
• Music player • Auxiliary Input
• Last.fm • Alarms
• DAB radio • System settings
• FM radio
CONTROLLING HERITAGE
In order for you to get the most from your radio, it is important for you
to understand how its control and menu system operates.
CURSOR CONTROL
Your radio uses a cursor based control system for ease of use.
The cursor control has fi ve functions as follows:
UP Scrolls Up
DOWN Scrolls Down
LEFT Scrolls Left and moves back through menus
RIGHT Scrolls Right and moves forward through menus
PRESS Selects current option
MENU BUTTON
Pressing the button will take you to the Mode Menu for the
particular mode of operation you are in. For example, pressing
when in DAB Mode will take you to the DAB MODE MENU.
Pressing the button for a second time will return you to the
‘playing screen’ that you just left.
MODE BUTTON
Pressing the MODE button will sequentially cycle through each of
Heritage’s modes of operation. It is also possible to move between
modes of operation via the MAIN MENU (see below).
MENU STRUCTURE EXPLAINED
‘UP’
‘DOWN’
‘LEFT’
(BACK)
SELECT ‘RIGHT’
(FORWARD)
‘PRESS’
(TO SELECT)
CURSOR
07

u to vote for a track that
missed out on the 6:00 AM
Music playlist
BBC Radio 6Music
Station list
Amazing
BBC 1Xtr
BBC 6Mus
BBC Gael
Absolute
09
SELECTING A STATION
To access your radio’s station list, press UP, DOWN or LEFT on the cursor
control at any time, alternatively press then select STATION LIST.
Scroll through the available stations using UP and DOWN on the
cursor control then either press the select button to select your station
choice, or tap RIGHT.
FAVOURITE STATION PRESETS
Heritage allows you to store your favourite stations as presets, either
via its 5 front panel mounted ‘hot-keys’, or 10 preset buttons located
on the Heritage remote control.
To store the station you are currently listening to as a preset, simply
press and hold a preset button until “Preset Stored” is display on your
radio’s screen. The preset number that has been assigned to the
station will be displayed at the bottom of the screen.
If you want to change a particular preset in the future, repeat the
process and the previously stored preset will be automatically
overwritten.
DAB RADIO MODE
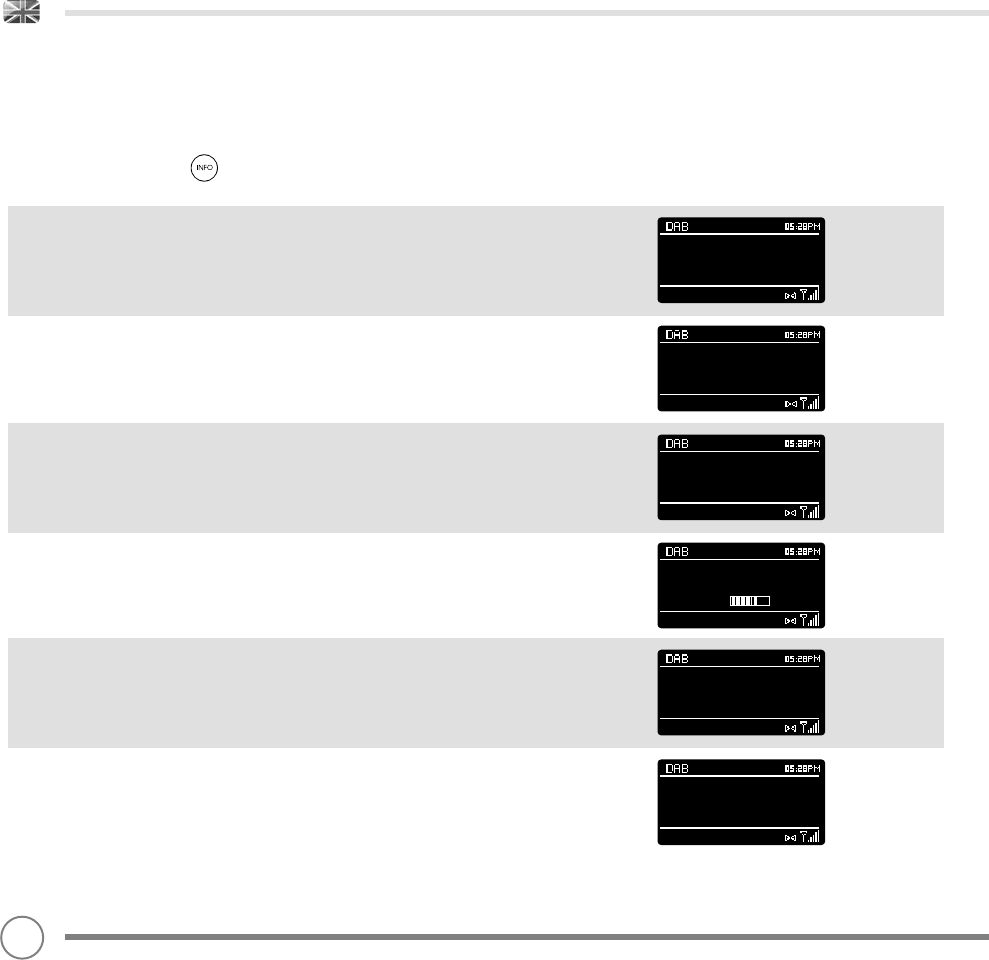
STATION INFO
In DAB MODE, Heritage is capable of displaying various pieces of information on
its screen. By pressing the button, you can sequentially cycle through the
following types of information.
STANDARD DAB SCREEN Shows scrolling text info from broadcaster
PROGRAMME TYPE For example News, Rock Music, Classical etc.
MULTIPLEX AND FREQUENCY Multiplex owner and station frequency
SIGNAL STRENGTH Station’s current signal strength
BIT RATE AND CODEC Audio format, sample rate, mono or stereo
DATE Today’s date
10
DAB MODE MENU OPTIONS
BBC Radio 6Music
Rock Music
BBC National DAB
Freq: 225.648 MHz
BBC Radio 6Music
Signal Level : 90
Strength
BBC Radio 6Music
Bit rate: 128 kbps
Codec : MP2
Channels : Joint Stereo
BBC Radio 6Music
22/12/09
BBC Radio 6Music
Today’s Date :
Go Square Go!
BBC Radio 6Music
Now Playing : Glasvegas

11
DYNAMIC RANGE COMPRESSION (DRC)
If you are listening to music with a high dynamic range in a noisy
environment (for example, classical music while cooking), you may
wish to compress the audio’s dynamic range. This has the effect of
making quiet sounds louder, and loud sounds quieter.
To change the DRC setting, press then choose the DRC option,
before selecting OFF, LOW or HIGH.
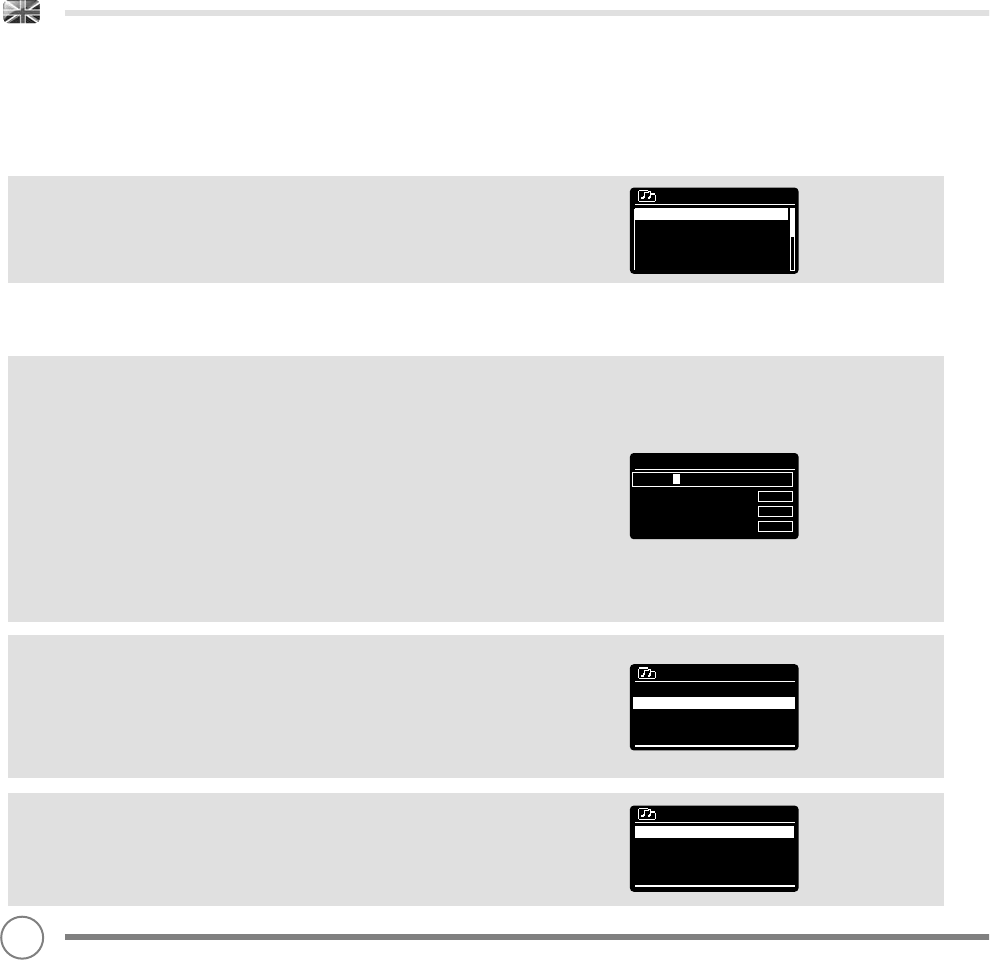
STATION ORDER
It is possible to choose the order of the DAB station list to be either
ALPHANUMERIC, ENSEMBLE or VALID.
As the name implies, ALPHANUMERIC lists stations in alphanumeric
order.
ENSEMBLE lists groups of stations that are broadcast together on the
same ensemble, for example BBC or Central Scotland Local.
VALID lists valid stations fi rst, alphanumerical, then off-air stations.
To change the station order, press then select STATION ORDER,
before choosing either ALPHANUMERIC, ENSEMBLE or VALID.
DAB MODE MENU OPTIONS
DRC
DRC Low
DRC High
DRC Off #
STATION ORDER DESCRIPTION
ALPHANUMERIC Display all stations in alphanumeric order.
ENSEMBLE List active stations [ones that are currently broadcasting] before inactive ones.
VALID Remove inactive stations from the station list.
Station order
Alphanumeric #
Ensemble
Valid

BBC R3
Composer of the Week
Coming next - Proms
Chamber Music 2009
12
FM RADIO MODE
FM OPERATION
Please ensure that the radio’s antenna is extended before operation
in FM MODE.
To enter FM MODE, press the button until the FM MODE intro
screen is displayed, alternatively press then select MAIN MENU,
then FM from menu option list.
If this is the fi rst time that Heritage has been used in FM MODE,
scanning will start at the beginning of the frequency range -
otherwise Heritage will default to the station you were listening to last.
Pressing the select button will start the radio scanning for the next
available station. Heritage will automatically stop scanning when a
station is found.
To fi ne tune, use UP or DOWN on the cursor control to
incrementally change the frequency.
When on an FM station that has a strong signal and is broadcasting
RDS information, Heritage will display the station name and other
pieces of text information on-screen.
FAVOURITE STATION PRESETS
Heritage allows you to store your favourite stations as presets, either
via its 5 front panel mounted ‘hot-keys’, or 10 preset buttons located
on the Heritage remote control.
To store the station you are currently listening to as a preset, simply
press and hold a preset button until “Preset Stored” is display on your
radio’s screen. The preset number that has been assigned to the
station will be displayed at the bottom of the screen.
If you want to change a particular preset in the future, repeat
the process and the previously stored preset will be automatically
overwritten.
FM
radio
87.50 MHz
Preset stored

FM RADIO MODE
FM SETTINGS
Press the button to access the FM MODE MENU. From here
you can set some FM preferences such as SCAN SETTING and AUDIO
SETTING.
SCAN SETTING allows you to decide whether the radio should stop
scanning only when it fi nds a station with a strong signal.
AUDIO SETTING gives you the option of listening to a station in mono,
should the signal strength not be suffi ciently strong to allow stereo
reception.
AUX IN MODE
AUX IN MODE allows you to play audio from an external source (such
as an MP3 player) through your radio.
To do so, connect your external audio source to the 3.5mm AUX IN
connector on the rear of Heritage.
Turn the volume down low on both Heritage and, if adjustable, the
external device.
Now press until the AUX IN screen is displayed, alternatively
press then select MAIN MENU, then choose AUX IN.
Adjust the volume of Heritage and, if necessary, the external audio
device as required.
13
Scan setting
Audio setting
Main menu >
Aux in
Audio in
Today’s Date :
Auxiliary Input
15/10/09

iPod MODE
FITTING A DOCK ADAPTOR
Heritage is supplied with a selection of dock adaptors to fi t most
iPod/iPhone models.
Select the adaptor that is compatible with your iPod/iPhone using the
compatibility table on the right - each one is numbered
(see illustration below).
To fi t the adaptor, remove the dock dust cover before inserting the
adaptor into the recess that surrounds the dock connector
(see illustration ). If a dock adaptor for your specifi c iPod/iPhone
model is not one of the adaptors included with your radio, please use
the adaptor supplied by Apple as part of your iPod/iPhone kit.
ENTERING iPod MODE
Connect your iPod/iPhone to the dock connector. Heritage will
automatically ask if you would like to switch to iPod mode.
Select YES or NO using the cursor control.
If an iPod/iPhone is already connected to Heritage, press until
the iPod MODE intro screen is displayed, or press then select
MAIN MENU, then iPod.
iPod attached -
switch to iPod mode?
YES NO
iPod
Adaptor No. iPod Model
9 iPod classic 80GB
10 iPod classic 120GB
12 iPhone
13 iPod nano (3rd generation)
15 iPhone 3G
16 iPod touch (2nd and 3rd generation)
17 iPod nano (4th generation)
18 iPod nano (5th generation)
19 iPhone 4
20 iPod touch (4th generation)
19
12
1
2
14

iPod MODE
CONTROL AND PLAYBACK
Basic track control functions can be carried out by using the media
controls located on the top face of Heritage.
Pressing will start the currently selected track. Pressing it when a
track is playing will PAUSE the current track.
Pressing will advance to the next track. Pressing and holding will
fast-forward.
Pressing will skip-back to the previous track. Pressing and holding
will fast-rewind.
Alternatively, your iPod/iPhone can be operated using the Heritage
remote control, which offers advanced control of menus etc.
Lastly, it is possible to control the iPod/iPhone by using the controls on
the iPod/iPhone itself.
VIDEO
Heritage is equipped with a set of composite video-out connectors,
making it possible to view iPod/iPhone movies, slideshows etc. on your
television - all directly from your radio.
To use this functionality, go to SETTINGS on your iPod/iPhone, select
VIDEO, then switch TV OUT to ON. Now set the TV SIGNAL to either PAL
or NTSC, depending on the broadcast system that your TV uses.
Should you need to buy a composite video cable, they can be
purchased directly from the Apple Store.
Composite Video-Out
15

As you Are
Travis
iPod MODE
NOW PLAYING INFO
When an iPod/iPhone has been docked and the authentication process has
been completed, your radio will display the artist and track information for the
current track (if this information is stored on your iPod/iPhone).
Heritage is capable of displaying various pieces of information about the current
track and the iPod/iPhone that is connected. By pressing the button, it is
possible to sequentially cycle through the following types of information.
STANDARD SCREEN Shows track name and artist
iPod/iPhone TYPE Shows model of iPod/iPhone currently connected
AUTHENTICATION STATUS Whether authentication was successful or not
TRACK TIME Shows track length and current position in track
DATE Today’s date
ALBUM TITLE Displays album title if available
As you Are
iPod touch
As you Are
iPod touch
Authentication:
Success
3:54 4:14
As you Are
As you Are
The Man Who
As you Are
Today’s Date:
14/10/09
16

INTERNET SETUP
USING THE INTERNET RADIO SETUP WIZARD
The fi rst time you use Heritage in INTERNET RADIO MODE, you will be
asked whether you would like to run the SETUP WIZARD. The ‘WIZARD’
will run through a series of questions, and is the simplest way to get
internet radio up and running on your device.
You can run the SETUP WIZARD again at any time, it can be found
under the NETWORK heading, in the SYSTEM SETTINGS MENU.
To set up your radio for online operation using the INTERNET WIZARD,
follow these steps:
Press the select button to select YES, and start the SETUP WIZARD
procedure.
1
2
Date/Time
12/24 hour format
12 24*
3
4
5
Choose and select your preferred hour format (12 or 24 hour).
Choose and select UPDATE FROM NETWORK.
Scroll and select your local timezone from the menu.
Choose and select your preferred daylight savings status.
Scroll and select your Wlan region.
Auto update
Update from Network *
No update
Update from DAB
Update from FM
Set Timezone
UTC + 00 : 00 : Dublin , London#
UTC + 00 : 30 :
UTC + 01 : 00 : Madrid , Ar
UTC + 01 : 30 :
UTC + 02 : 00 : Athens , Ci
YES NO
Daylight savings
Daylight savings
Wlan region
Most of Europe
USA
Canada
Spain
France
17

If your wireless network is not password protected, Heritage will
automatically connect, and the following screen will be displayed:
If you do use password protection, enter your network password us-
ing the cursor control to scroll over and select the correct
alphanumeric characters. When you have correctly entered your
password, select OK.
Select (back space) if you have entered an incorrect
character.
Heritage will save the password into its memory. There will be no
need to re-enter the password again.
7
8
INTERNET SETUP
BKSP
Scroll and select your NETWORK. In some cases your radio may fi nd
more than one. Simply choose the one you want to use.
WIRED CONNECTIONS
If you would like to use your radio over a wired connection, rather
than a wireless one, simply choose the WIRED option from the SSID list.
6
SSID
Homehub
FAMILY net
[Rescan]
[Wired]
[Manual config]
Internet Radio
Last Listened
Station List >
Main Menu >
Key:
xxxxx
BKSP
OK
CANCEL
0 1 2 3 4 5 6 7 8 9 . , a b
c d e f g h i j k l m n o p q
r s t u v w x y z A B C D E
F G H I J K L M N O P Q
18

INTERNET RADIO MODE
GETTING STARTED
To enter INTERNET RADIO MODE, press the button until the
INTERNET RADIO MODE intro screen is displayed, alternatively press
then select MAIN MENU, then INTERNET RADIO from the menu
option list.
The INTERNET RADIO MENU comprises of the following options:
My Favourites: Used to navigate to your favourite stations. These can
be set up by visiting the Frontier Silicon Radio Portal (using your PC or
Mac). See page 23 for further information.
Local: A comprehensive list of all the stations being broadcast from
within your own geographical area (or country).
BBC: Used as a shortcut to all BBC stations broadcast worldwide.
Stations: Find stations using a number of search criteria such as:
location, genre, most popular etc.
Podcasts: Find Podcasts or ‘Listen-Again’ broadcasts by location,
genre or search by name.
My Added Stations: Shows stations that you have personally added
to your radio’s station list via the Frontier Silicon Radio Portal.
See page 23 for full details.
Help: Find your radio’s ACCESS CODE here. Required to access the
Frontier Silicon Radio Portal. See page 23.
CHOOSING A STATION
To choose a station, select STATION LIST from the INTERNET RADIO
MENU, then select STATIONS using the cursor control.
You now have the option to choose or fi nd a station using the
following search criteria:
LOCATION (country of origin) GENRE
SEARCH STATIONS (by name) POPULAR STATIONS
NEW STATIONS
Internet
radio
Internet radio
My Favourites >
Local United Kingdom >
BBC >
Stations >
Podcasts >
Stations
Location >
Genre >
Search Stations
Popular Stations >
New Stations >
19
INTERNET RADIO MODE
CHOOSING A STATION (Continued)
Using the cursor control, scroll through the options and press select
to choose your search criteria.
For example, choosing LOCATION will give you an alphabetical list of
continents/regions, and then a list of countries. Use the cursor control
to scroll through the list and press select to choose the continent,
then country. You will then be given the option of choosing
ALL STATIONS or a GENRE, to further refi ne your search.
After selecting your search criteria, you will be presented with a list of
stations. Simply select a station from the list to begin listening.
SEARCH
You can search for an internet radio station by name (if you know it),
or by using a keyword from within its title.
To SEARCH for a station, select SEARCH STATIONS from the STATIONS
MENU, then enter a keyword using the keyboard input screen (similar
to the keyboard screen you used for password input).
If your station is found, simply select to listen.
If you searched for a keyword, Heritage will list all the stations found
that contain that particular keyword. Scroll through the list and
select your station.
CHOOSING A PODCAST
Podcasts (also referred to as ‘Listen Again’) are searched and
selected in the same way as a regular station.
Select PODCAST from the INTERNET RADIO MENU, then search by
location, genre or a combination of both.
The main difference when searching for a Podcast, is that when
you have selected a station, you will then be presented with a list of
Shows (or Podcasts) available from that station.
Simply select your choice from the list.
Stations
ROCKF
BKSP
OK
CANCEL
0123456789 ABCD
EFGHIJKLMNOPQRS
TUVWXYZ
BBC Radio 1
BBC Radio 1
Podcasts >
Location
Africa >
Asia >
Caribbean >
Central America >
Europe >
Podcasts
Adam and Joe
BBC Introducing
Bruce Dickinson
Chris Hawkins
Clare McDonnell
20

INTERNET RADIO MODE
MY FAVOURITES
It is possible to compile a list (or lists) of your favourite stations,
allowing quick and easy access to a number of stations from different
countries and genres.
To do this you must fi rst register your radio with the Frontier Silicon
Radio Portal. See the INTERNET RADIO PORTAL section on page 23.
To store a station as a favourite, press and hold the select button until
FAVOURITE ADDED appears on the screen. The chosen station will
now appear in the default favourites stations list.
To access the MY FAVOURITES list, select STATION LIST, then MY
FAVOURITES, followed by STATIONS. You can now scroll through and
select any station in the list.
MY ADDED STATIONS
If you have added any of your own stations to the internet radio
station list (via the Frontier Silicon Radio Portal, see page 23), they will
be listed here. The MY ADDED STATIONS option can be found under
the STATION LIST MENU, in INTERNET RADIO MODE.
BBC
The BBC option is a shortcut to the entire BBC station list.
Simply select this option from the STATION LIST MENU, then scroll
through and select a station in the normal way.
LAST LISTENED
When you enter INTERNET RADIO MODE, the last-listened station is
automatically selected. To select another station that you’ve listened
to recently, select LAST LISTENED. A full list will be displayed (the most
recent being at the top).
Your Rock Favourites
Kerrang! >
North Sea Classic rock >
Rock FM >
Takeover Radio >
The Arrow >
BBC
BBC Radio 1 >
BBC Radio 1Xtra >
BBC Radio 2 >
BBC Radio 3 >
BBC Radio 3 >
Last Listened
Clyde 1 >
West FM >
BBC Radio6 >
BBC Radio 1 >
Chill >
21

INTERNET RADIO MODE
HELP
The HELP option can be found in the STATIONS LIST MENU. Under HELP,
you will fi nd the ACCESS CODE that you require to register your radio
on the Frontier Silicon Radio Portal (see page 23 for full instructions).
A helpful FAQ audio track can also be found under the HELP
heading.
LOCAL
The LOCAL station list can be found under the STATION LIST MENU and
will differ depending on which country you are currently located in.
For example, if you are based in the UK, this selection will display
stations originating from the UNITED KINGDOM. Likewise, if you are
using your radio in Germany, this selection will display only stations
that are being broadcast from Germany.
Select this option to navigate either all of the available local stations,
or alternatively you can search the list by genre.
Local United Kingdom
All Stations >
Highlighted Stations >
Alternative >
Ambient >
Big Band >
Get access code
Access code
HEBZM0Z
22

INTERNET RADIO PORTAL
ACCESSING ADDITIONAL FEATURES
Some of Heritage’s more advanced internet radio features can only
be accessed by visiting the Frontier Silicon Radio Portal.
In order to access these features you must fi rst register your radio.
REGISTERING YOUR RADIO
In order to register your radio, you will need your radio’s unique
access code.
To fi nd the access code, fi rstly enter INTERNET RADIO MODE, then
press . Select STATION LIST, then HELP. Now select GET ACCESS
CODE.
Write down the access code.
Now, using your PC or Mac, visit the portal website at -
www.wifiradio-frontier.com
Click on the REGISTER HERE link (located on the left hand panel) to
begin the registration process.
If you already have an account and wish to add an additional
radio, log in to your account and select MY PREFERENCES, then ADD
ANOTHER Wi-Fi RADIO.
When you have registered your radio with the portal, you can
immediately take advantage of various additional features and
services that it provides.
23
SETTING UP A MUSIC SERVER
In order for Heritage to be able to play music fi les from a connected
computer, the computer must fi rst be set up for media sharing.
UPnP media sharing allows devices like Heritage to play music from
a shared media library, navigating through tag menus such as Artist,
Album or Genre.
If you are running a PC with Windows Media Player 11 or later (WMP),
or an Apple Mac with OS X 10 or later and a UPnP application
installed, you can connect Heritage and stream audio.
NOTE: iTunes does not currently operate as a UPnP media server, but
there are a number of third party software add-ons available that will
allow you to access your iTunes library.
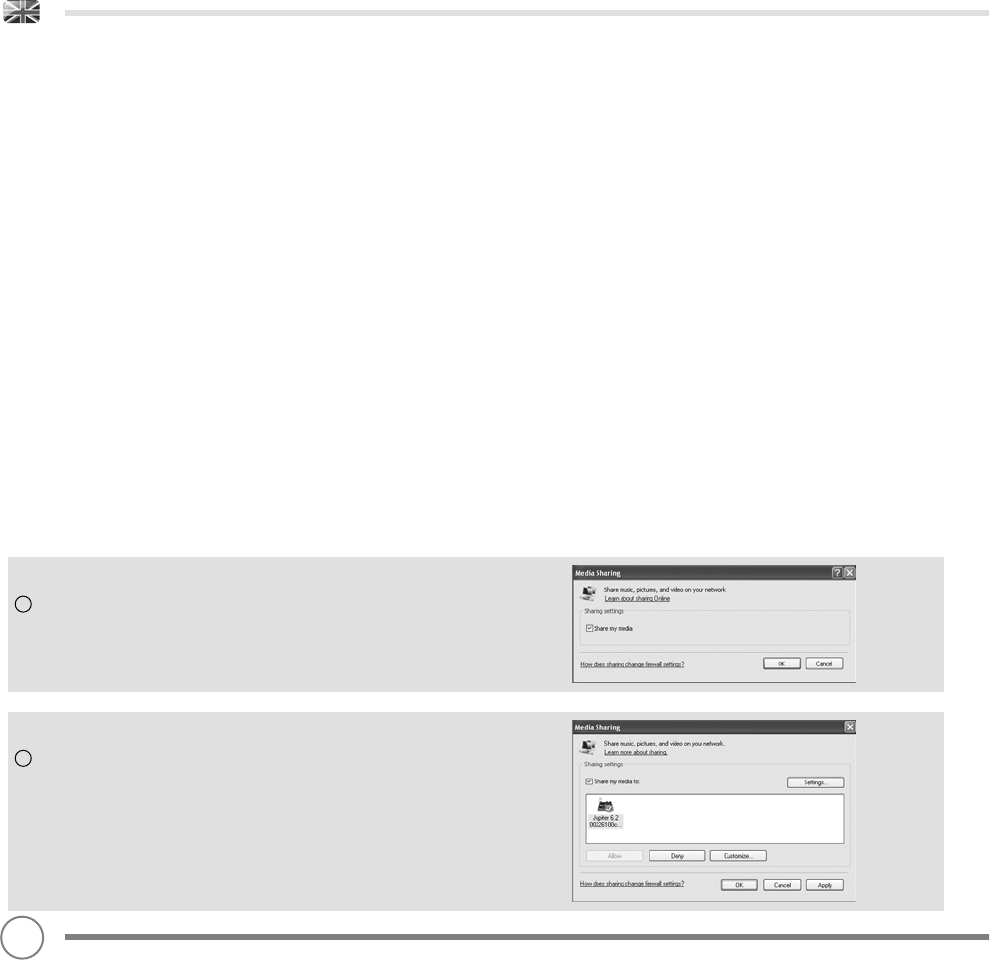
SHARING MEDIA WITH WINDOWS MEDIA PLAYER
The most common UPnP server is Windows Media Player (version11
or later) although other UPnP platforms and servers may be used.
To set up WMP for media sharing, performs the following steps:
Ensure that your PC and radio are connected to the same network.
Heritage will be recognised as ‘Heritage’ by your PC.
In WMP, add to the media library the audio fi les and folders you want
to share with Heritage (LIBRARY > ADD TO LIBRARY . . . .).
Make sure that the radio has access to the shared media by
selecting it and clicking ALLOW. You can also set a name for the
shared media settings.
The PC is now ready to stream music to your radio. The WMP UPnP
service runs in the background; there is no need to start WMP
explicitly.
1
2
24

3
SETTING UP A MUSIC SERVER
SHARING MEDIA WITH A MAC
In order to connect Heritage to your Apple Mac, a third party UPnP
server application is required. There are a number of applications
available to download from the Internet.
One such application is EyeConnect. This is an easy to install media
sharing application that enables Heritage to stream audio.
EyeConnect can be downloaded from:
http://www.elgato.com
Once installed, EyeConnect can be found on the System Preference
panel. When connecting Heritage, make sure EyeConnect is shown
as running on its setup screen.
Heritage will appear as ‘Jupiter 6.2’ in the EyeConnect list of devices.
The ENABLE box must be checked and the ACCESS selection set to
ENABLE NEW DEVICES.
Your Mac is now ready to stream music to your radio. EyeConnect
will normally run automatically after boot up.
25

MUSIC PLAYER MODE
PLAYING AUDIO TRACKS IN THE MUSIC PLAYER
MUSIC PLAYER MODE allows you to play audio fi les such as MP3s,
AACs, WMAs or FLACs directly from a computer or music server on
your local network.
To enter MUSIC PLAYER MODE, press until the MUSIC PLAYER
MODE intro screen is displayed, alternatively press then select
MAIN MENU, then MUSIC PLAYER from the menu option list.
Once in music player mode, press , then select either SHARED
MEDIA.
You can navigate your way through the list using the cursor control,
using UP and DOWN to scroll through the list, and either Push (SELECT)
or RIGHT to advance through folders. When you reach your desired
track, a short press of the select button will start the track playing, a
long press will add the track to the playlist (see PLAYLISTS on page 28
for more information).
Audio tracks can also be controlled using the buttons
mounted on your radio’s top panel.
Pressing and holding the button will fast-rewind the track your
are currently playing, while doing the same with the button will
fast-forward.
Music player
My playlist >
Repeat play: Off
Shuffle play: Off
Shared media >
26

MUSIC PLAYER MODE
SHARED MEDIA (From a UPnP Media Server)
In MUSIC PLAYER MODE select SHARED MEDIA. If you have set up
shared media (as described on page 24), you should see an entry,
for the server you set up, example “SB-Laptop: Audio”. If you have
more than one computer sharing media, the alternatives are listed.
Select the shared media you want to play.
From this point on, the menus are generated from the shared media
server (typically Windows Media Player). The fi rst menu shows a
list of media types, for example music, video, pictures and playlists.
Heritage can only play music and playlists.
There is also a search function, which fi nds tracks in a similar way to
Internet radio search, as described on page 20.
For music there are numerous ways of selecting tracks, including:
Genre | Artist | Album | Composer | Rating
Once you have found a track you want to play, press the select but-
ton to select. A short press plays the track immediately, while a long
press will add the track to the PLAYLIST.
Note
: Tracks played in UPnP mode are SROBBLED to Last.fm, if
SCROBBLING is turned on in the Last.fm menu. For more information
about SCROBBING, see page 29.
SB-laptop: Audio
Music >
Video >
Pictures >
Playlists >
<Search>
Music
Music >
All Artists >
Contributing Artists >
Album Artists >
Composers >
27

MUSIC PLAYER MODE
PLAYLISTS
Heritage is capable of holding a queue of up to 500 tracks in its
playlist. Playlist tracks can be mixed from multiple UPnP servers and
USB devices. To manage the playlist, select MY PLAYLIST from the
MUSIC PLAYER MENU.
To view the contents of the playlist, scroll through it using the cursor
control. To play the playlist from a certain track, give the select
button a short press. To delete a track from the playlist, give the
select button a long press, then confi rm YES to erase.
If you select a track/album/folder for instant playback, without using
the playlist feature, the playlist will be preserved and will continue to
be stored by your radio until you choose to delete it.
REPEAT/SHUFFLE
You can choose to repeat tracks or play them in random order by
selecting REPEAT PLAY or SHUFFLE PLAY from the MUSIC PLAYER MENU.
NOW PLAYING INFORMATION
While a track is playing, Heritage will display the track and artist
name (UPnP). There is also a progress bar with displays elapsed and
total track time.
To view further track information, press .
Each time you press , another piece of information is displayed
as follows:
UPnP: Track name/artist, progress bar/track times, album, codec/
sampling rate, playback buffer and today’s date.
Music player
1:01 3:08
Human.mp3
My playlist
Human >
Just My Imagination.wma
Back At One
Can’t Fight This Feelng. . . . . .
Three birds.mp3
Music player
Letter To Me
Album:
5th Gear
28

LAST.FM MODE
In addition to its terrestrial and internet radio capabilities, Heritage
is also capable of providing access to online music service Last.fm.
Simply choose an artist or genre and let Last.fm build the perfect
playlist from its library of 5 million tracks – unique to you, and fresh
every time.
If you already subscribe to the service, you can use your existing
Last.fm profi le on Heritage, alternatively visit www.last.fm, complete
a profi le, then subscribe.
If you have a Trial Subscription Voucher, visit www.last.fm/voucher
and follow the on-screen prompts.
ADDING A USER ACCOUNT
To enter LAST.FM MODE, press until the LAST.FM MODE intro
screen is displayed, alternatively press then select MAIN MENU,
then LAST.FM from the menu list.
To add an account, select LAST.FM SETUP from the menu, then select
USER ACCOUNTS.
Now select ADD NEW ACCOUNT and enter your LAST.FM user name
and password using the on-screen keyboard.
SCROBBLING AND LOVE/BAN TRACKS
To get the most from LAST.FM, you can SCROBBLE all the tracks that
you’ve listened to, in both UPnP and LAST.FM modes (and even those
from an iPod or computer media server with the correct software
plug-ins). This sends track names to LAST.FM, adding them to your
library, and helps the service tailor recommendations (and neigh-
bours) to your musical tastes. You can playback your LAST.FM library
by selecting the YOUR LIBRARY station in the LAST.FM MENU.
To turn SCROBBLING ON or OFF, select LAST.FM SETUP, then
SCROBBLING, now select ON or OFF.
Note
: if you intend to let other people use Heritage in LAST.FM MODE,
you may want to turn SCROBBLING OFF. Alternatively, you could
switch to another account.
Last.fm setup
User Accounts >
Scrobbling: on
Search:
Rolling
BKSP
OK
CANCEL
0 1 2 3 4 5 6 7 8 9 . , a b
c d e f g h i j k l m n o p q
r s t u v w x y z A B C D E
F G H I J K L M N O P Q
Last.fm
Station list >
last.fm setup >
System settings >
Main menu >
User Accounts
<Add new account>
Last.fm
Your library
Your Recommendations
Your neighbourhood
Artist radio
Tag radio
29

LAST.FM MODE
While listening to LAST.FM you can choose to LOVE or BAN tracks
(which SCROBBLES them even if SCROBBLING is set to OFF). Telling
LAST.FM that you LOVE a track will add that particular track to your
YOUR LOVED TRACKS list, allowing playback at a future time.
BANNING a track will mean it will never be played again.
To LOVE or BAN a track press the button and use the cursor to
select either LOVE or BAN.
The button can be found on the top face of your radio,
or alternatively on the remote control. When listening to LAST.FM
you can choose to SKIP a track by pressing the button. It is
not possible to PAUSE a track in LAST.FM.
Note
: You can edit your library and track ratings by visiting
the LAST.FM website.
PLAYING MUSIC
There are several types of streams, or ‘radio stations’ available in LAST.
FM. To choose one, select STATION LIST from the LAST.FM MODE menu.
If you are new to LAST.FM, we recommend that you perhaps start off
with ARTIST or TAG RADIO, to allow you to be fully comfortable with
the basic features of the service.
The following options are available:
YOUR LIBRARY
Plays all the tracks SCROBBLED to your profi le, or tracks by artists
you’ve added to your library. Can be edited on the LAST.FM website.
YOUR RECOMMENDATIONS
Plays tracks recommended to you based on your music profi le and
that of other listeners with similar tastes.
YOUR LOVED TRACKS
Plays tracks you have rated as LOVED.
YOUR NEIGHBOURHOOD
Plays tracks from the libraries of people on LAST.FM with similar music
tastes to yours.
Last.fm
Love Ban
Last.fm
Your library
Your Recommendations
Your neighbourhood
Artist radio
Tag radio
30

Alarm off
ALARM CLOCK
SETTING AN ALARM
Heritage is able to store two individual alarm settings. To set or
change an alarm, either press the button, or select MENU,
then MAIN MENU, then ALARM. Select which of the ALARM SETTINGS
(Alarm 1 or Alarm 2) you would like to modify or enable.
Using the cursor control, scroll through the options below, setting your
preferences.
• Enable: on/off
• Frequency: Daily, Once, Weekends or Weekdays.
• Time
• Mode: Buzzer, Internet Radio, DAB, FM or iPod or Last.fm
• Preset: Last listened or favourite station preset 1-10
• Volume: 0 - 20
When your preferences have been set, remember to select SAVE.
Heritage shows any active alarms by displaying an icon at the
bottom of its screen.
When in STANDBY MODE, by simply pressing the button, you can
turn any alarms held in memory ON or OFF. Pressing will cycle
through ALARM 1 and ALARM 2 settings, enabling, and disabling
them. If the ALARM icons are displayed, the alarm is enabled.
If no alarm icon is shown, the alarms are switched off.
STOPPING AN ALARM
When an alarm is sounding, pressing any one of Heritage’s
buttons will STOP the alarm.
When the alarm has been cancelled, an ALARM OFF message will be
displayed on Heritage’s screen.
14:30
12/10/2009
06:55AM 07:50AM
Alarm 1
Time : 7:30AM
Mode : internet radio
Preset : last listened
Volume : 6
Enable : Daily
Alarms
Alarm 2: Off [07:50AM]
Alarm 1: Off [06:55AM]
32

15 MINS
Set sleep time
ALARM CLOCK
SLEEP MODE
By using the SLEEP function, you can set Heritage to automatically
switch itself into STANDBY mode. The SLEEP mode can be engaged in
one of two ways:
The quickest method is via the SNOOZE BAR. Simply tap the SNOOZE
BAR to cycle through a range of pre-set SLEEP durations, from SLEEP
OFF, through 15, 30, 45 and 60 minutes.
Alternatively, press then select MAIN MENU, then SLEEP. You can
now set the SLEEP timer to any one of the following pre-sets.
When you have selected a sleep duration, Heritage will return to the
MAIN MENU.
Press to return to the NOW PLAYING screen.
SNOOZE FUNCTION
Heritage includes a SNOOZE feature and incorporates a dedicated
SNOOZE BAR, found on the top face of the radio. SNOOZE allows you
to temporarily silence the alarm for a period of up to 30 minutes.
The SNOOZE duration can only be set when your radio is actually in
the process of alarming. At this point, simply tap the SNOOZE BAR to
cycle through a range of pre-set SNOOZE durations, either 5, 10, 15 or
30 minutes.
When SNOOZE is activated, Heritage will return to standby for the set
period with the icon of the SNOOZED alarm shown on-screen.
5 MINS
Set snooze
33
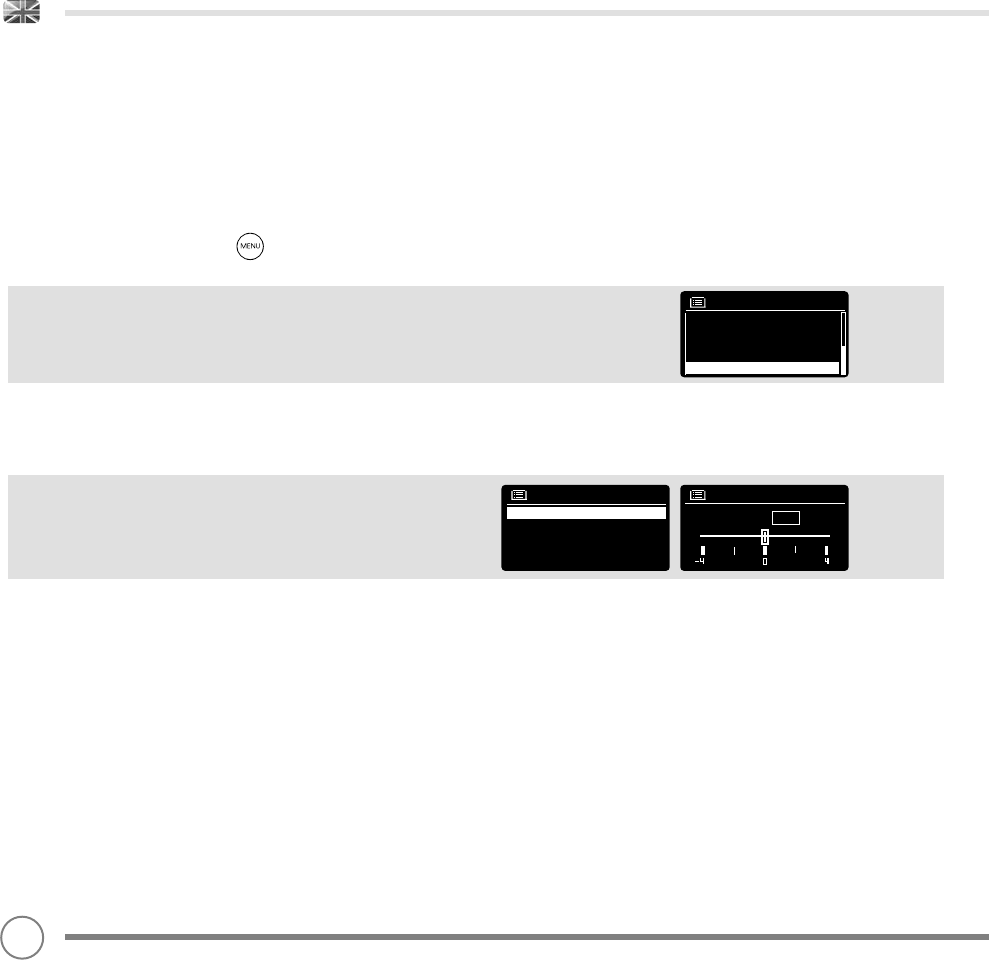
SYSTEM SETTINGS
EQUALISER
Heritage provides the user with a signifi cant degree of control over its
standard (factory default) audio settings. This includes control over
BASS and TREBLE, LOUDNESS and the ability to use one of a number of
preset EQ settings. It is also possible to create your own personalised
EQ setting - known as “My EQ”.
To adjust the audio settings , press then select MAIN MENU,
followed by SYSTEM SETTINGS. Now select EQUALISER from the menu.
Heritage will display a list of nine EQ options as follows:
Normal, Flat, Jazz, Rock, Movie, Classic, Pop, News and My EQ.
Simply select your preference from the list by highlighting your option
and pressing the select button. Heritage will now store this setting in
its memory. For reference, the current EQ setting is highlighted by an
asterisk (*) in the EQ list.
To confi gure your own personal EQ setting, select MY EQ PROFILE
SETUP from the EQUALISER menu. Now adjust the BASS and TREBLE
levels, decide whether you would like the LOUDNESS function OFF or
ON - before selecting SAVE. Your personalised EQ setting can now be
selected by choosing MY EQ from the EQUALISER menu.
Equaliser
Pop
News
My EQ
My EQ profile setup >
Classic
Bass
Bass dB
0
My EQ profile
Bass : 0
Treble : 0
Loudness : Off
34
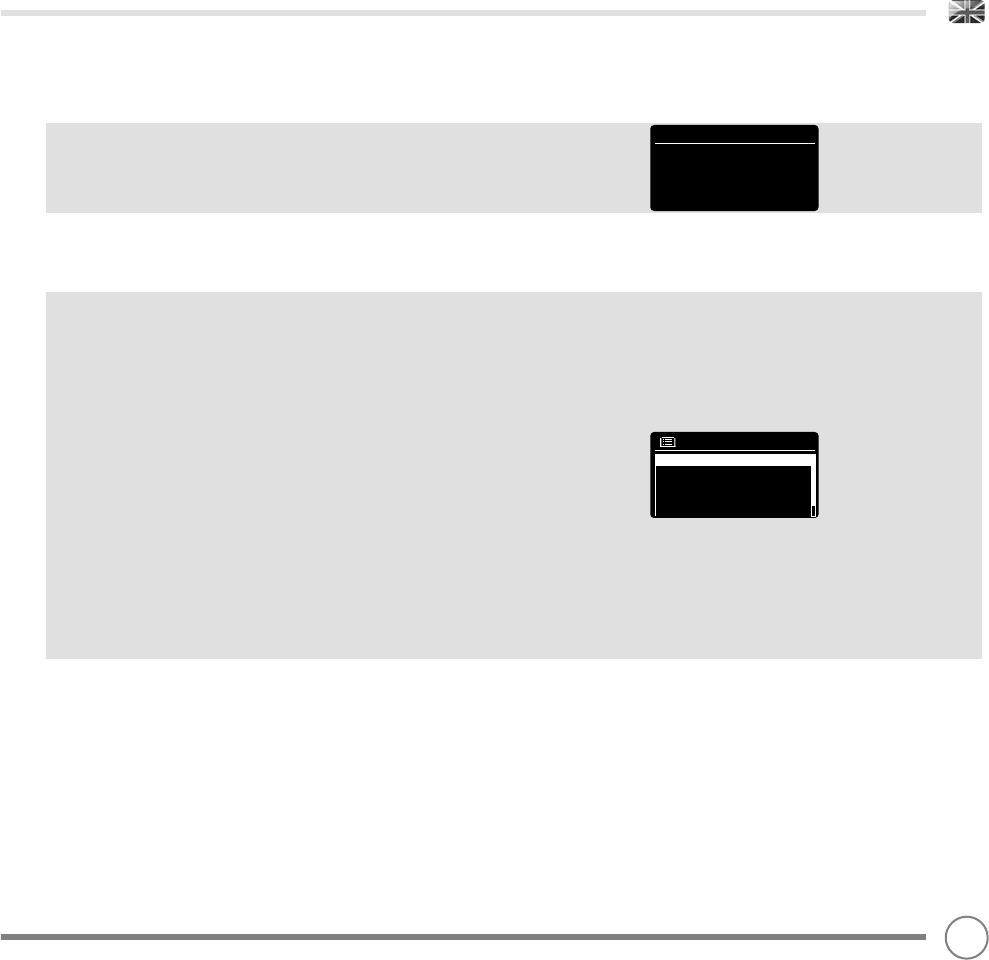
SYSTEM SETTINGS
NETWORK
The NETWORK MENU can be found under SYSTEM SETTINGS in the
MAIN MENU and includes an entry for the INTERNET WIZARD, which
will assist you in setting up your radio’s internet connection.
For the more experienced user, a variety of manual settings can also
be accessed from here, as follows:
INTERNET WIZARD :
Simplifi es the setup of your radio’s internet connection by taking you
through step-by-step instructions.
PBC WLAN SETUP :
Used to pair your radio with a router that uses WPS security.
VIEW SETTINGS :
View the MAC address, Wlan region, etc.
WLAN REGION :
Where you are using your radio - Europe, USA etc.
MANUAL SETTINGS :
Detailed control of Wired and Wireless connections.
NETWORK PROFILE :
Shows the names of the last four wireless networks Heritage has been
connected to.
NOTE: Heritage remembers the last four wireless networks it has
connected to, and automatically tries to connect to whichever
one of them it can fi nd. It’s possible however to delete unwanted
networks, simply select SYSTEM SETTINGS, then NETWORK, then
NETWORK PROFILE. Now select the network profi le you’d like to
delete by selecting and confi rming delete YES.
Internet Setup
Internet Wizard
PBC Wlan setup
View settings
Wlan region >
Manual settings
Internet Setup
Network Wizard
scanning/
35
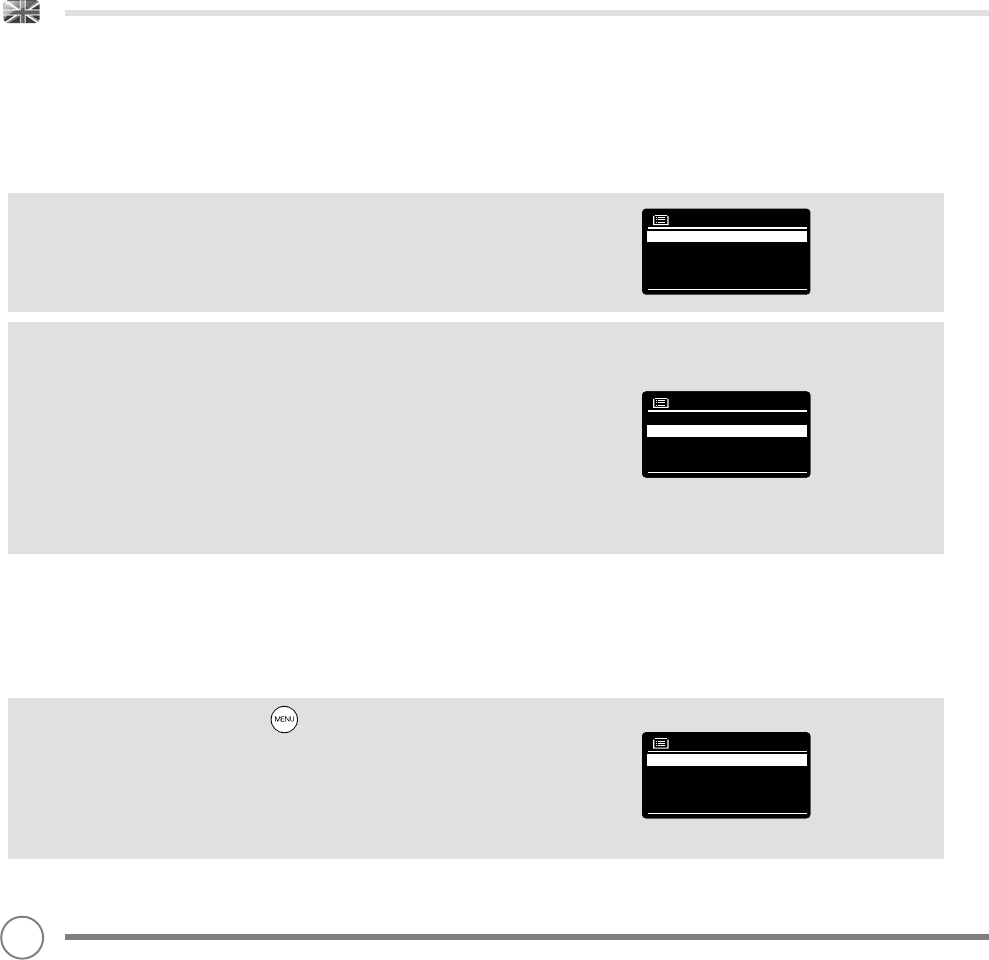
TIME / DATE
Found in the SYSTEM SETTINGS menu, this menu offers you the option
of changing a number of time/date related settings. The TIME/DATE
menu has three listings as follows:
SET TIME / DATE : Allows you to manually set the time/date.
AUTO UPDATE : Choose from three different automatic setting options.
SET FORMAT : Choose whether you would like to use 12hr or 24hr
formats.
Update from DAB :
Automatically takes time/date from DAB signal. Heritage needs to
have been operated in DAB MODE (and have received a signal)
before this information can be extracted.
Update from FM :
Sets time/date from FM broadcast. Like DAB, Heritage needs to have
been operated in FM MODE, and have received RDS information
before time/date information can be extracted.
Update from Network :
Takes time/date from your internet connection.
BRIGHTNESS
Heritage allows a degree of control over the brightness of its OLED
display, meaning that both its STANDBY and POWER ON brightness
levels can be independently set to either HIGH, MEDIUM or LOW
brightness levels.
To change the brightness settings, press then select MAIN
MENU, followed by SYSTEM SETTINGS. Now select BRIGHTNESS from the
menu list. You will now be able to modify the default brightness level
settings for the two modes of operation - STANDBY and POWER ON.
Select the mode you’d like to change from these two options, then
choose your desired brightness level. Your chosen settings will be
held in memory indefi nitely, but can be changed at any time.
SYSTEM SETTINGS
Time/Date
Auto update >
Set format
Set timezone >
Daylight savings
Set Time/Date
Auto update
Update from Network *
No update
Update from DAB
Brightness
Standby Level
Power-On Level *
36

LANGUAGE
The default language on your radio is English, though 12 other
languages are supported as follows:
Danish Dutch Finnish French German Italian
Norwegian Polish Portuguese Spanish Swedish Turkish
To change the current language setting, select SYSTEM SETTINGS from
the MAIN MENU, then LANGUAGE, then select your choice.
FACTORY RESET
By selecting FACTORY RESET from the SYSTEM SETTINGS menu, you can
reset Heritage to its default factory values, erasing any personal
settings that may have been confi gured (time/date, network
confi guration and presets will be erased). However, Heritage’s
current software version is maintained, as is its registration with the
internet radio portal. Internet radio favourites are therefore retained,
unless you re-register your radio with another account on the portal.
To perform a factory reset, press then select MAIN MENU,
followed by SYSTEM SETTINGS, then FACTORY RESET. Now answer YES.
SOFTWARE UPDATES
From time to time we will make software updates available for your
radio. These are necessary for general maintenance reasons, as well
as for adding additional functionality to your radio. Software updates
are carried out ‘over-the-air’, via your broadband connection.
Heritage will to check for software updates each time it is switched
on, and if an update is available, will ask you to confi rm that you’d
like to go ahead and commence the download.
Please note that after a software upgrade, all user settings are
maintained.
SYSTEM SETTINGS
Language
Danish
English *
Italian
Norweigian
German
Factory Reset
Proceed?
YES NO
37

Software update
Check now
Auto-Check setting *
SYSTEM SETTINGS
SOFTWARE UPDATES (Continued)
If you’d prefer to manually check for software updates, press
then select MAIN MENU. Now choose SYSTEM SETTINGS, then
SOFTWARE UPDATES. Select AUTO-CHECK SETTING then choose NO
when prompted.
To manually check for updates, select CHECK NOW from the
SOFTWARE UPDATES menu.
CAUTION
: Before commencing a software upgrade, ensure that
Heritage is plugged into a stable mains power connection.
Disconnecting power during a software update may permanently
damage your radio.
SETUP WIZARD
The SETUP WIZARD simplifi es the set-up of both time/date and internet
settings, by running through a series of questions.
To access the SETUP WIZARD, press then select MAIN MENU,
followed by SYSTEM SETTINGS. Now select SETUP WIZARD from the
menu list.
INFO
When dealing with a technical support issue, you may be asked for
the SOFTWARE VERSION or RADIO ID number. Both these pieces of
information can be found under the INFO heading, in the SYSTEM
SETTINGS menu.
Press then select MAIN MENU, followed by SETTINGS, then INFO.
System settings
Factory reset
Software Update
Setup Wizard >
Info
Language
Info
domino_V2.0.16.25756-5
SW version:
00226100C3D6
Radio ID:
38

TROUBLESHOOTING
PROBLEM CAUSE SOLUTIONS
FM: HISS
DAB: Burbling/Intermittent
Cut-Out
Low signal strength. Check/move antenna.
Move radio to another location.
Rescan local (high-strength)
stations only.
For DAB, check local coverage at
www.ukdigitalradio.com/coverage
DAB: ‘No stations available’ Low signal strength. As above, then rescan stations.
Cannot connect to network Network down. Check that network is working
between computer and the router.
Router restricts access to listed
MAC addresses.
Obtain the Heritage MAC address
from MENU > SYSTEM SETTINGS >
NETWORK > VIEW SETTINGS and
add to router list
NOTE: Heritage has separate MAC addresses for
wired and wireless networks; only the current net-
work adaptor method address is displayed, but
the other address can be obtained by changing
the fi rst pair of digits between ‘00’ (wireless) and
‘02’ (wired)
Insuffi cient Wi-Fi signal strength. Check distance to router.
See if a computer can connect to
the network in this location.
Unknown encryption method. Change encryption method on
router. Heritage supports WEP, WPA
and WPA2.
Unusual network confi guration. Setup network manually through
MENU > SYSTEM SETTINGS >
NETWORK > MANUAL SETTINGS
Firewall preventing access. Check the following ports are open
on the router:
UDP and TCP ports 80 and 123
DNS port 53
Windows shares: ports 135 - 139
and 445
Windows media player: varies -
Non-Microsoft fi rewalls may require
confi guration for UPnP.
39
TROUBLESHOOTING
PROBLEM CAUSE SOLUTIONS
Cannot connect to Internet Internet connection down Check that the Internet is working
for a computer connected to the
same network.
Firewall preventing access Check the following ports are
open:
UDP and TCP ports 80 and 123
DNS port 53.
Some Internet radio stations may
require additional ports to be
opened.
Cannot play particular Internet
radio station
Station not broadcasting
Overloaded or insuffi cient
bandwidth.
Station broadcasting using
unknown codec.
Link out of date.
Try other stations.
Try listening on computer via
Internet radio portal website.
Try later.
Cannot play Last.fm ‘Unauthorized’ message Account details wrong.
Account details not entered.
Region not supported.
(Last.fm is currently restricted to
particular regions e.g. US/UK)
due to licensing issues.
Last.fm: Insuffi cient content to play There are not enough tracks
available and licensed to play for
the particular artist or tag radio
station you have.
Select a different radio station.
40

NOTES
42

STROMZUFUHR (PSU)
Ihr Heritage Radio ist mit einem Mehrregionenadapter ausgestattet.
Es kann somit in verschiedenen Ländern in der ganzen Welt problem-
los genutzt werden.
Wählen Sie einfach den korrekten Adapter für Ihr Land und folgen Sie
den unten angezeigten Anweisungen.
Drücken Sie den Knopf An/Aus einmal, um den
Initialisierungsprozess zu starten.
Ziehen Sie die Antenne für DAB und FM
Betrieb voll aus.
AUFBAU
Nutzen Sie den beigefügten Netzadapter und verbinden Sie das eine Ende mit dem
DC Stromanschluss auf der hinteren Seite von Heritage und das andere mit einer
normalen Wandsteckdose.
1
2
3
50
UK EURO U.S.A
PUSH

SENDERINFORMATIONEN
Im DAB MODUS kann Heritage verschiedene Informationen auf seinem Bildschirm
anzeigen. Durch drücken der Infotaste können Sie in Reihenfolge durch die
folgenden Informationen wechseln:
STANDARD DAB ANZEIGE Zeigt Rolltextinformationen der Sendeanstalt
PROGRAMMTYP Zum Beispiel News, Rock Music, Klassisch etc.
MULTIPLEX UND FREQUENZ Multiplex Besitzer und Sendefrequenz
SIGNALSTÄRKE Gegenwärtige Signalstärke
BITRATE UND CODEC Audioformat, Abtastrate, Mono oder Stereo
DATUM Heutiges Datum
54
DAB MODUS MENÜOPTIONEN
BBC Radio 6Music
Rock Music
BBC National DAB
Freq: 225.648 MHz
BBC Radio 6Music
Signal Level : 90
Strength
BBC Radio 6Music
Bit rate: 128 kbps
Codec : MP2
Channels : Joint Stereo
BBC Radio 6Music
22/12/09
BBC Radio 6Music
Today’s Date :
Go Square Go!
BBC Radio 6Music
Now Playing : Glasvegas
Produkt Specifikationer
| Mærke: | REVO |
| Kategori: | DAB radio |
| Model: | Heritage Shadow |
Har du brug for hjælp?
Hvis du har brug for hjælp til REVO Heritage Shadow stil et spørgsmål nedenfor, og andre brugere vil svare dig
DAB radio REVO Manualer

20 August 2024
20 August 2024
16 August 2024
11 August 2024
9 August 2024
6 August 2024
5 August 2024
3 August 2024
2 August 2024
DAB radio Manualer
- DAB radio Philips
- DAB radio AEG
- DAB radio Grundig
- DAB radio Argon
- DAB radio Scansonic
- DAB radio Hama
- DAB radio Pure
- DAB radio Medion
- DAB radio TechniSat
- DAB radio Soundmaster
- DAB radio TERRIS
- DAB radio Dual
- DAB radio Imperial
- DAB radio Albrecht
- DAB radio IRC
- DAB radio Audizio
- DAB radio Renkforce
- DAB radio Numan
- DAB radio Sangean
- DAB radio Pinell
- DAB radio Boston Acoustics
- DAB radio Xoro
- DAB radio Schaub Lorenz
- DAB radio Peaq
- DAB radio View Quest
- DAB radio Noxon
- DAB radio HDigit
- DAB radio Roberts Radio
- DAB radio Tiny Audio
- DAB radio FlinQ
- DAB radio Sailor
Nyeste DAB radio Manualer
15 Januar 2025
26 August 2024
26 August 2024
25 August 2024
25 August 2024
25 August 2024
24 August 2024
24 August 2024
24 August 2024
24 August 2024