Samsung Galaxy A54 5G Manual
Samsung
Mobiltelefon
Galaxy A54 5G
Læs nedenfor 📖 manual på dansk for Samsung Galaxy A54 5G (158 sider) i kategorien Mobiltelefon. Denne guide var nyttig for 89 personer og blev bedømt med 4.5 stjerner i gennemsnit af 2 brugere
Side 1/158
www.samsung.com
USER MANUAL
English. 03/2023. Rev.1.0
SM-A346B/DSN
SM-A346E/N
SM-A346E/DSN
SM-A546B/DS
SM-A546E
SM-A546E/DS

2
Table of Contents
Getting started
5 Device layout and functions
10 Charging the battery
13 Nano-SIM card and eSIM
17 microSD card
20 Turning the device on and off
21 Initial setup
22 Samsung account
23 Transferring data from your previous
device (Smart Switch)
26 Understanding the screen
34 Notification panel
36 Screen capture and screen record
37 Entering text
Apps and features
40 Installing or uninstalling apps
41 Phone
44 Contacts
46 Messages
47 Camera
62 Gallery
66 AR Zone
72 Bixby
73 Bixby Vision
74 Multi window (Using multiple apps
at once)
77 Samsung Internet
78 Samsung Wallet
79 Samsung Pay
81 Samsung Health
82 Samsung Notes
83 Samsung Members
83 Samsung Kids
84 Samsung Global Goals
84 Samsung TV Plus
84 Galaxy Shop
84 Galaxy Wearable
85 Calendar
86 Reminder (Receiving notifications
for to-do items)
87 Voice Recorder
88 My Files (Checking and managing
the files)
88 Clock
88 Calculator
89 Game Launcher
90 Game Booster (Configuring your
gaming environment)
91 SmartThings
91 Sharing content
93 Music Share
95 Smart View (Mirroring on a TV
screen)
95 Link to Windows (Using the device
through a computer connection)
97 Google apps

Table of Contents
3
118 Security and privacy
119 Face recognition
121 Fingerprint recognition
124 Samsung Pass
126 Secure Folder
129 Secure Wi-Fi
130 Location
131 Safety and emergency
131 Accounts and backup
132 Samsung Cloud
133 Google
133 Advanced features
134 Motions and gestures
135 Video call effects
136 Dual Messenger
137 Digital Wellbeing and parental
controls
137 Battery and device care
137 Optimising your device
138 Battery
138 Storage
138 Memory
138 Device protection
139 Auto optimisation
139 Software update
139 Diagnostics
139 Maintenance mode
139 Ultra data saving
140 Apps
140 General management
141 Accessibility
142 Software update
142 Remote support (Galaxy A34 5G)
143 About phone
Settings
98 Introduction
98 Samsung account
98 Connections
100 Wi-Fi
101 Bluetooth
102 NFC and contactless payments
104 Data saver
104 Mobile data only apps
105 Mobile Hotspot
105 More connection settings
107 Connected devices
108 Modes and Routines
108 Using modes
108 Using routines
109 Sounds and vibration
110 Sound quality and effects
110 Separate app sound
111 Notifications
111 Display
113 Motion smoothness
113 Changing the screen mode or
adjusting the display colour
114 Wallpaper and style
114 Themes
115 Home screen
115 Lock screen
116 Smart Lock
116 Always On Display (Displaying
information when the screen is
turned off)

Table of Contents
4
Usage notices
144 Precautions for using the device
146 Notes on package contents and
accessories
147 Maintaining water and dust
resistance
148 Device overheating situations and
solutions
Appendix
152 Troubleshooting
157 Removing the battery

5
Getting started
Device layout and functions
▶
Galaxy A34 5G:
Speaker
Fingerprint
recognition sensor
Side key
Volume key
Touch screen
Front camera
Light sensor
Headphone jack /
Multipurpose jack
(USB Type-C)
SIM card / microSD
card tray

Getting started
6
Rear camera
Flash
Microphone
Main antenna
Speaker Microphone
NFC antenna
GPS antenna
Air vent hole

Getting started
7
▶
Galaxy A54 5G:
Speaker
Fingerprint
recognition sensor
Side key
Volume key
Touch screen
Front camera
Headphone jack /
Multipurpose jack
(USB Type-C)
SIM card / microSD
card tray
Light sensor
NFC antenna
Rear camera
Main antenna
Microphone
Speaker
GPS antenna
Flash
Air vent hole
Microphone

Getting started
10
Charging the battery
Charge the battery before using it for the first time or when it has been unused for
extended periods.
Wired charging
Connect the USB cable to the USB power adapter and plug the cable into the device’s
multipurpose jack to charge the battery. After fully charging, disconnect the charger
from the device.
Quick charging
Use a super fast charger or fast charger.
You can check the connection status of the charger by opening
Settings
and tapping
Battery and device care
→
Battery
.
•
If fast charging does not work, open
Settings
, tap
Battery and device care
→
Battery
→
More battery settings
, and then check if the feature you want
is turned on. Also, check if the USB cable and the USB power adapter are
connected properly.
•
You can charge the battery more quickly while the device or its screen is turned
off.

Getting started
11
Charging other devices
Use the USB cable to charge another mobile device with your phone’s battery.
Connect your phone and the other device using your phone’s USB cable. A USB connector
may be needed depending on the other device.
When charging starts, the battery charging icon will appear on the other device’s screen.
The app selection pop-up window that appears on your phone is for data transfer.
Do not select an app from the pop-up window.
Reducing the battery consumption
Your device provides various options that help you conserve battery power.
•
Optimise the device using the device care feature.
•
When you are not using the device, turn off the screen by pressing the Side key.
•
Turn on power saving mode.
•
Close unnecessary apps.
•
Turn off the Bluetooth feature when not in use.
•
Turn off auto-syncing of apps that need to be synced.
•
Decrease the backlight time.
•
Decrease the screen brightness.

Getting started
12
Battery charging tips and precautions
Use only Samsung-approved battery, charger, and cable specifically designed for
your device. Incompatible battery, charger, and cable can cause serious injuries or
damage to your device.
•
Connecting the charger improperly may cause serious damage to the device. Any
damage caused by misuse is not covered by the warranty.
•
Use only USB Type-C cable supplied with the device. The device may be
damaged if you use Micro USB cable.
•
If you charge the device while the multipurpose jack is wet, the device may be
damaged. Thoroughly dry the multipurpose jack before charging the device.
•
To save energy, unplug the charger when not in use. The charger does not have a
power switch, so you must unplug the charger from the electric socket when not
in use to avoid wasting power. The charger should remain close to the electric
socket and easily accessible while charging.
•
When using a charger, it is recommended to use an approved charger that
guarantees the charging performance.
•
If the battery is completely discharged, the device cannot be turned on
immediately when the charger is connected. Allow a depleted battery to charge
for a few minutes before turning on the device.
•
If you use multiple apps at once, network apps, or apps that need a connection
to another device, the battery will drain quickly. To avoid losing power during a
data transfer, always use these apps after fully charging the battery.
•
Using a power source other than the charger, such as a computer, may result in a
slower charging speed because of a lower electric current.
•
The device can be used while it is charging, but it may take longer to fully charge
the battery.
•
If the device receives an unstable power supply while charging, the touch screen
may not function. If this happens, unplug the charger from the device.
•
While charging, the device and the charger may heat up. This is normal and
should not affect the device’s lifespan or performance. If the battery gets hotter
than usual, the charger may stop charging.
•
If the device is not charging properly, take the device and the charger to a
Samsung Service Centre or an authorised service centre.

Getting started
13
Nano-SIM card and eSIM
Insert the SIM or USIM card provided by your carrier.
To have two phone numbers or carriers for a single device, activate the eSIM or insert
two SIM cards. Differing from a physical nano-SIM card, an eSIM is an embedded digital
SIM. Using both the nano-SIM card and the eSIM may result in slower data transfer
speeds in some areas.
•
eSIM may not be available depending on the region, carrier, or model.
•
Some services that require a network connection may not be available
depending on the carrier.
Inserting the SIM or USIM card
▶
Galaxy A34 5G:
Single SIM card tray
Dual SIM card tray
21 3 4

Getting started
14
▶
Galaxy A54 5G:
21 3 4
Single SIM card tray
Dual SIM card tray
<Underside>
1 Insert the ejection pin into the hole on the tray to loosen the tray.
2 Pull out the tray gently from the tray slot.
3
▶
Galaxy A34 5G: Place the SIM or USIM card on the tray with the gold-coloured
contacts facing downwards and gently press the SIM or USIM card into the tray to
secure it.
▶
Galaxy A54 5G: Place the SIM or USIM card on the tray with the gold-coloured
contacts facing upwards and gently press the SIM or USIM card into the tray to secure
it.
4 Insert the tray back into the tray slot.
•
Use only a nano-SIM card.
•
Use caution not to lose or let others use the SIM or USIM card. Samsung is not
responsible for any damages or inconveniences caused by lost or stolen cards.
•
Ensure that the ejection pin is perpendicular to the hole. Otherwise, the device
may be damaged.
•
If the card is not fixed firmly into the tray, the SIM card may leave or fall out of
the tray.
•
If you insert the tray into your device while the tray is wet, your device may be
damaged. Always make sure the tray is dry.
•
Fully insert the tray into the tray slot to prevent liquid from entering your device.

Getting started
15
Correct card insertion (dual SIM card tray)
▶
Galaxy A34 5G:
Nano-SIM card 1 Nano-SIM card
Nano-SIM card 2 microSD card
▶
Galaxy A54 5G:
<Underside>
Nano-SIM card 1 Nano-SIM card
Nano-SIM card 2 microSD card
<Underside>

Getting started
16
Activating an eSIM
Open
Settings
and tap
Connections
→
SIM manager
→
Add eSIM
. When a mobile plan is
found, follow the on-screen instructions to activate the eSIM.
If you have a QR code provided by your carrier, open
Settings
, tap
Connections
→
SIM
manager
→
Add eSIM
→
Scan QR code from service provider
, and then scan the QR
code.
SIM manager (dual SIM models)
Open
Settings
and tap
Connections
→
SIM manager
.
•
SIM cards
: Activate the SIM card to use and customise the SIM card settings.
•
eSIMs
: Activate the eSIM.
•
Preferred SIMs
: Select to use specific SIM cards for some features, such as voice
calls, when two cards are activated.
•
Data switching
: Set the device to use another SIM card for data services if the
preferred SIM card cannot connect to the network.
You may incur additional charges when using this feature.
•
More SIM settings
: Customise the call or eSIM settings.

Getting started
17
microSD card
Inserting an SD card
Your device’s SD card capacity may vary from other models and some SD cards may not
be compatible with your device depending on the SD card manufacturer and type. To
check out your device’s maximum SD card capacity, refer to the Samsung website.
▶
Galaxy A34 5G:
21 43
▶
Galaxy A54 5G:
2
13 4
<Underside>
1 Insert the ejection pin into the hole on the tray to loosen the tray.
2 Pull out the tray gently from the tray slot.

Getting started
18
3
▶
Galaxy A34 5G: Place an SD card on the tray with the gold-coloured contacts facing
downwards and gently press the SD card into the tray to secure it.
▶
Galaxy A54 5G: Place an SD card on the tray with the gold-coloured contacts facing
upwards and gently press the SD card into the tray to secure it.
4 Insert the tray back into the tray slot.
•
Use only a microSD card.
•
Some SD cards may not be fully compatible with the device. Using an
incompatible card may damage the device, the SD card, or the data stored in it.
•
Use caution to insert the SD card right-side up.
•
Ensure that the ejection pin is perpendicular to the hole. Otherwise, the device
may be damaged.
•
When you remove the tray from the device, the mobile data connection will be
disabled.
•
If the card is not fixed firmly into the tray, the SD card may leave or fall out of the
tray.
•
If you insert the tray into your device while the tray is wet, your device may be
damaged. Always make sure the tray is dry.
•
Fully insert the tray into the tray slot to prevent liquid from entering your device.
•
The device supports the FAT and the exFAT file systems for SD cards. When
inserting a card formatted in a different file system, the device will ask to
reformat the card or will not recognise the card. To use the SD card, you must
format it. If your device cannot format or recognise the SD card, contact the SD
card manufacturer, a Samsung Service Centre or an authorised service centre.
•
Frequent writing and erasing of data shortens the lifespan of SD cards.
•
When inserting an SD card into the device, the SD card’s file directory appears in
the
My Files
→
SD card
folder.

Getting started
19
Removing the SD card
Before removing the SD card, first unmount it for safe removal.
1 Open
Settings
and tap
Battery and device care
→
Storage
.
2 Swipe to the left to access the
SD card
page.
3 Tap
→
Unmount
.
Do not remove external storage, such as an SD card or USB storage, while the
device is transferring or accessing information, or right after transferring data.
Doing so can cause data to be damaged or lost or cause damage to the external
storage or phone. Samsung is not responsible for losses, including loss of data,
resulting from the misuse of external storage devices.
Formatting the SD card
An SD card formatted on a computer may not be compatible with the device. Format the
SD card on the device.
1 Open
Settings
and tap
Battery and device care
→
Storage
.
2 Swipe to the left to access the
SD card
page.
3 Tap
→
Format
.
Before formatting the SD card, remember to make backup copies of all important
data stored in the SD card. The manufacturer’s warranty does not cover loss of data
resulting from user actions.

Getting started
20
Turning the device on and off
Follow all posted warnings and directions from authorised personnel in areas
where the use of wireless devices is restricted, such as aeroplanes and hospitals.
Side key
Volume Down key
Turning the device on
Press and hold the Side key for a few seconds to turn on the device.
Turning the device off
1 To turn off the device, press and hold the Side key and the Volume Down key
simultaneously. Alternatively, open the notification panel, swipe downwards, and
then tap .
2 Tap
Power off
.
To restart the device, tap
Restart
.
You can set the device to turn off when you press and hold the Side key. Open
Settings
, tap
Advanced features
→
Side key
, and then tap
Power off menu
under
Press and hold
.
Forcing restart
If your device is frozen and unresponsive, press and hold the Side key and the Volume
Down key simultaneously for more than 7 seconds to restart it.

Getting started
21
Emergency call
You can make an emergency call or check the medical information you saved.
Press and hold the Side key and the Volume Down key simultaneously, and then tap
Emergency call
. Alternatively, open the notification panel, swipe downwards, and then
tap
→
Emergency call
.
To manage your medical information and emergency contacts, open
Settings
and
tap
Safety and emergency
.
Initial setup
When you turn on your device for the first time or after performing a data reset, follow
the on-screen instructions to set up your device.
If you do not connect to a Wi-Fi network, you might not be able to set up some
device features during the initial setup.

Getting started
22
Samsung account
Using the Samsung account, you can use a variety of Samsung services that are provided
through mobile devices, TVs, and the Samsung website.
To check the list of services that can be used with your Samsung account, visit
account.samsung.com.
1 Open
Settings
and tap
Samsung account
.
Alternatively, open
Settings
and tap
Accounts and backup
→
Manage accounts
→
Add account
→
Samsung account
.
2 Sign in to your Samsung account. If you do not have a Samsung account, tap
Create
account
.
Finding your ID and resetting your password
If you forget your Samsung account ID or password, tap
Find ID
or
Forgot password?
on
the Samsung account sign-in screen. You can find your ID or reset your password after
you enter the required information.
Signing out of your Samsung account
When you sign out of your Samsung account, your data, such as contacts or events, will
also be removed from your device.
1 Open
Settings
and tap
Accounts and backup
→
Manage accounts
.
2 Tap
Samsung account
→
My profile
and tap
Sign out
at the bottom of the screen.
3 Tap
Sign out
, enter your Samsung account password, and then tap
OK
.

Getting started
23
Transferring data from your previous device
(Smart Switch)
You can use Smart Switch to transfer data from your previous device to your new phone.
Open
Settings
and tap
Accounts and backup
→
Bring data from old device
.
•
This feature may not be supported on some devices or computers.
•
Limitations apply. Visit www.samsung.com/smartswitch for details. Samsung
takes copyright seriously. Only transfer content that you own or have the right to
transfer.
Transferring data using a USB cable
You can connect your previous device to your new phone with the USB cable to transfer
data.
1 Connect your new phone and the previous device using your new phone’s USB cable.
A USB connector may be needed depending on the previous device.
2 When the app selection pop-up window appears, tap
Smart Switch
→
Receive data
.
3 In the previous device, tap
OK
.
If you do not have the app, download it from
Galaxy Store
or
Play Store
.
Your new phone will recognise the previous device and a list of data you can transfer
will appear.
4 On your new phone, select an option you want, tap
Next
, and then follow the
on-screen instructions to transfer data.
Do not disconnect the USB cable from the device when you are transferring files.
Doing so may cause data loss or device damage.
Transferring data increases the battery power consumption of your device. Ensure
that your device is sufficiently charged before transferring data. If the battery
power is low, data transfer may be interrupted.

Getting started
24
Transferring data wirelessly
Transfer data from your previous device to your new phone wirelessly through Wi-Fi
Direct.
1 On the previous device, open
Smart Switch
.
If you do not have the app, download it from
Galaxy Store
or
Play Store
.
2 On your new phone, open
Settings
and tap
Accounts and backup
→
Bring data from
old device
.
3 Place the devices near each other.
4 On the previous device, tap
Send data
→
Wireless
.
5 On your new phone, tap
Receive data
, select your previous device’s operating system,
and then tap
Wireless
.
6 On the previous device, tap
Allow
.
7 On your new phone, select an option you want, tap
Next
, and then follow the
on-screen instructions to transfer data.
Backing up and restoring data using external storage
Transfer data using external storage, such as a microSD card.
1 Back up data from your previous device to external storage.
2 Insert or connect the external storage device to your phone.
3 On your phone, open
Settings
and tap
Accounts and backup
→
External storage
transfer
.
4 Select the backup date under
Restore from SD card
.
5 Select an option you want, tap
Next
, and then follow the instructions to on-screen
transfer data.

Getting started
25
Transferring backup data from a computer
Back up data from your previous device to a computer and import the data to your new
phone.
1 On the computer, visit www.samsung.com/smartswitch to download Smart Switch.
2 On the computer, open Smart Switch.
If your previous device is not a Samsung device, back up data to a computer using
an app provided by the device’s manufacturer. Then, skip to the fifth step.
3 Connect your previous device to the computer using the device’s USB cable.
4 On the computer, follow the on-screen instructions to back up data from the device.
Then, disconnect your previous device from the computer.
5 Connect your new phone to the computer using the USB cable.
6 On the computer, follow the on-screen instructions to transfer data to your new
phone.

Getting started
26
Understanding the screen
Controlling the touch screen
Tapping
Tap the screen.
Touching and
holding
Touch and hold
the screen for
approximately
2 seconds.
Dragging
Touch and hold
an item and
drag it to the
target position.
Double tapping
Double tap the
screen.
Swiping
Swipe upwards,
downwards, to
the left, or to the
right.
Spreading and
pinching
Spread two
fingers apart
or pinch on the
screen.
•
Do not allow the touch screen to come into contact with other electrical devices.
Electrostatic discharges can cause the touch screen to malfunction.
•
To avoid damaging the touch screen, do not tap it with anything sharp or apply
excessive pressure to it with your fingertips or other object.
•
It is recommended not to use fixed graphics on part or all of the touch screen
for extended periods. Doing so may result in afterimages (screen burn-in) or
ghosting.
The device may not recognise touch inputs close to the edges of the screen, which
are outside of the touch input area.

Getting started
27
Navigation bar (soft buttons)
When you turn on the screen, the soft buttons will appear on the navigation bar at the
bottom of the screen. The soft buttons are set to the Recents button, Home button, and
Back button by default. The functions of the buttons can change according to the app
currently being used or usage environment.
Button Function
Recents
•
Tap to open the list of recent apps.
Home
•
Tap to return to the Home screen.
•
Touch and hold to open the
Google Assistant
app.
Back
•
Tap to return to the previous screen.
Hiding the navigation bar
Check files or use apps on a wider screen by hiding the navigation bar.
Open
Settings
, tap
Display
→
Navigation bar
, and then tap
Swipe gestures
under
Navigation type
. The navigation bar will be hidden and the gesture hints will appear. Tap
More options
and select an option you want.
Swipe from bottom Swipe from sides and bottom
If you want to hide the gesture hints at the bottom of the screen, tap the
Gesture hint
switch to turn it off.
Getting started
33
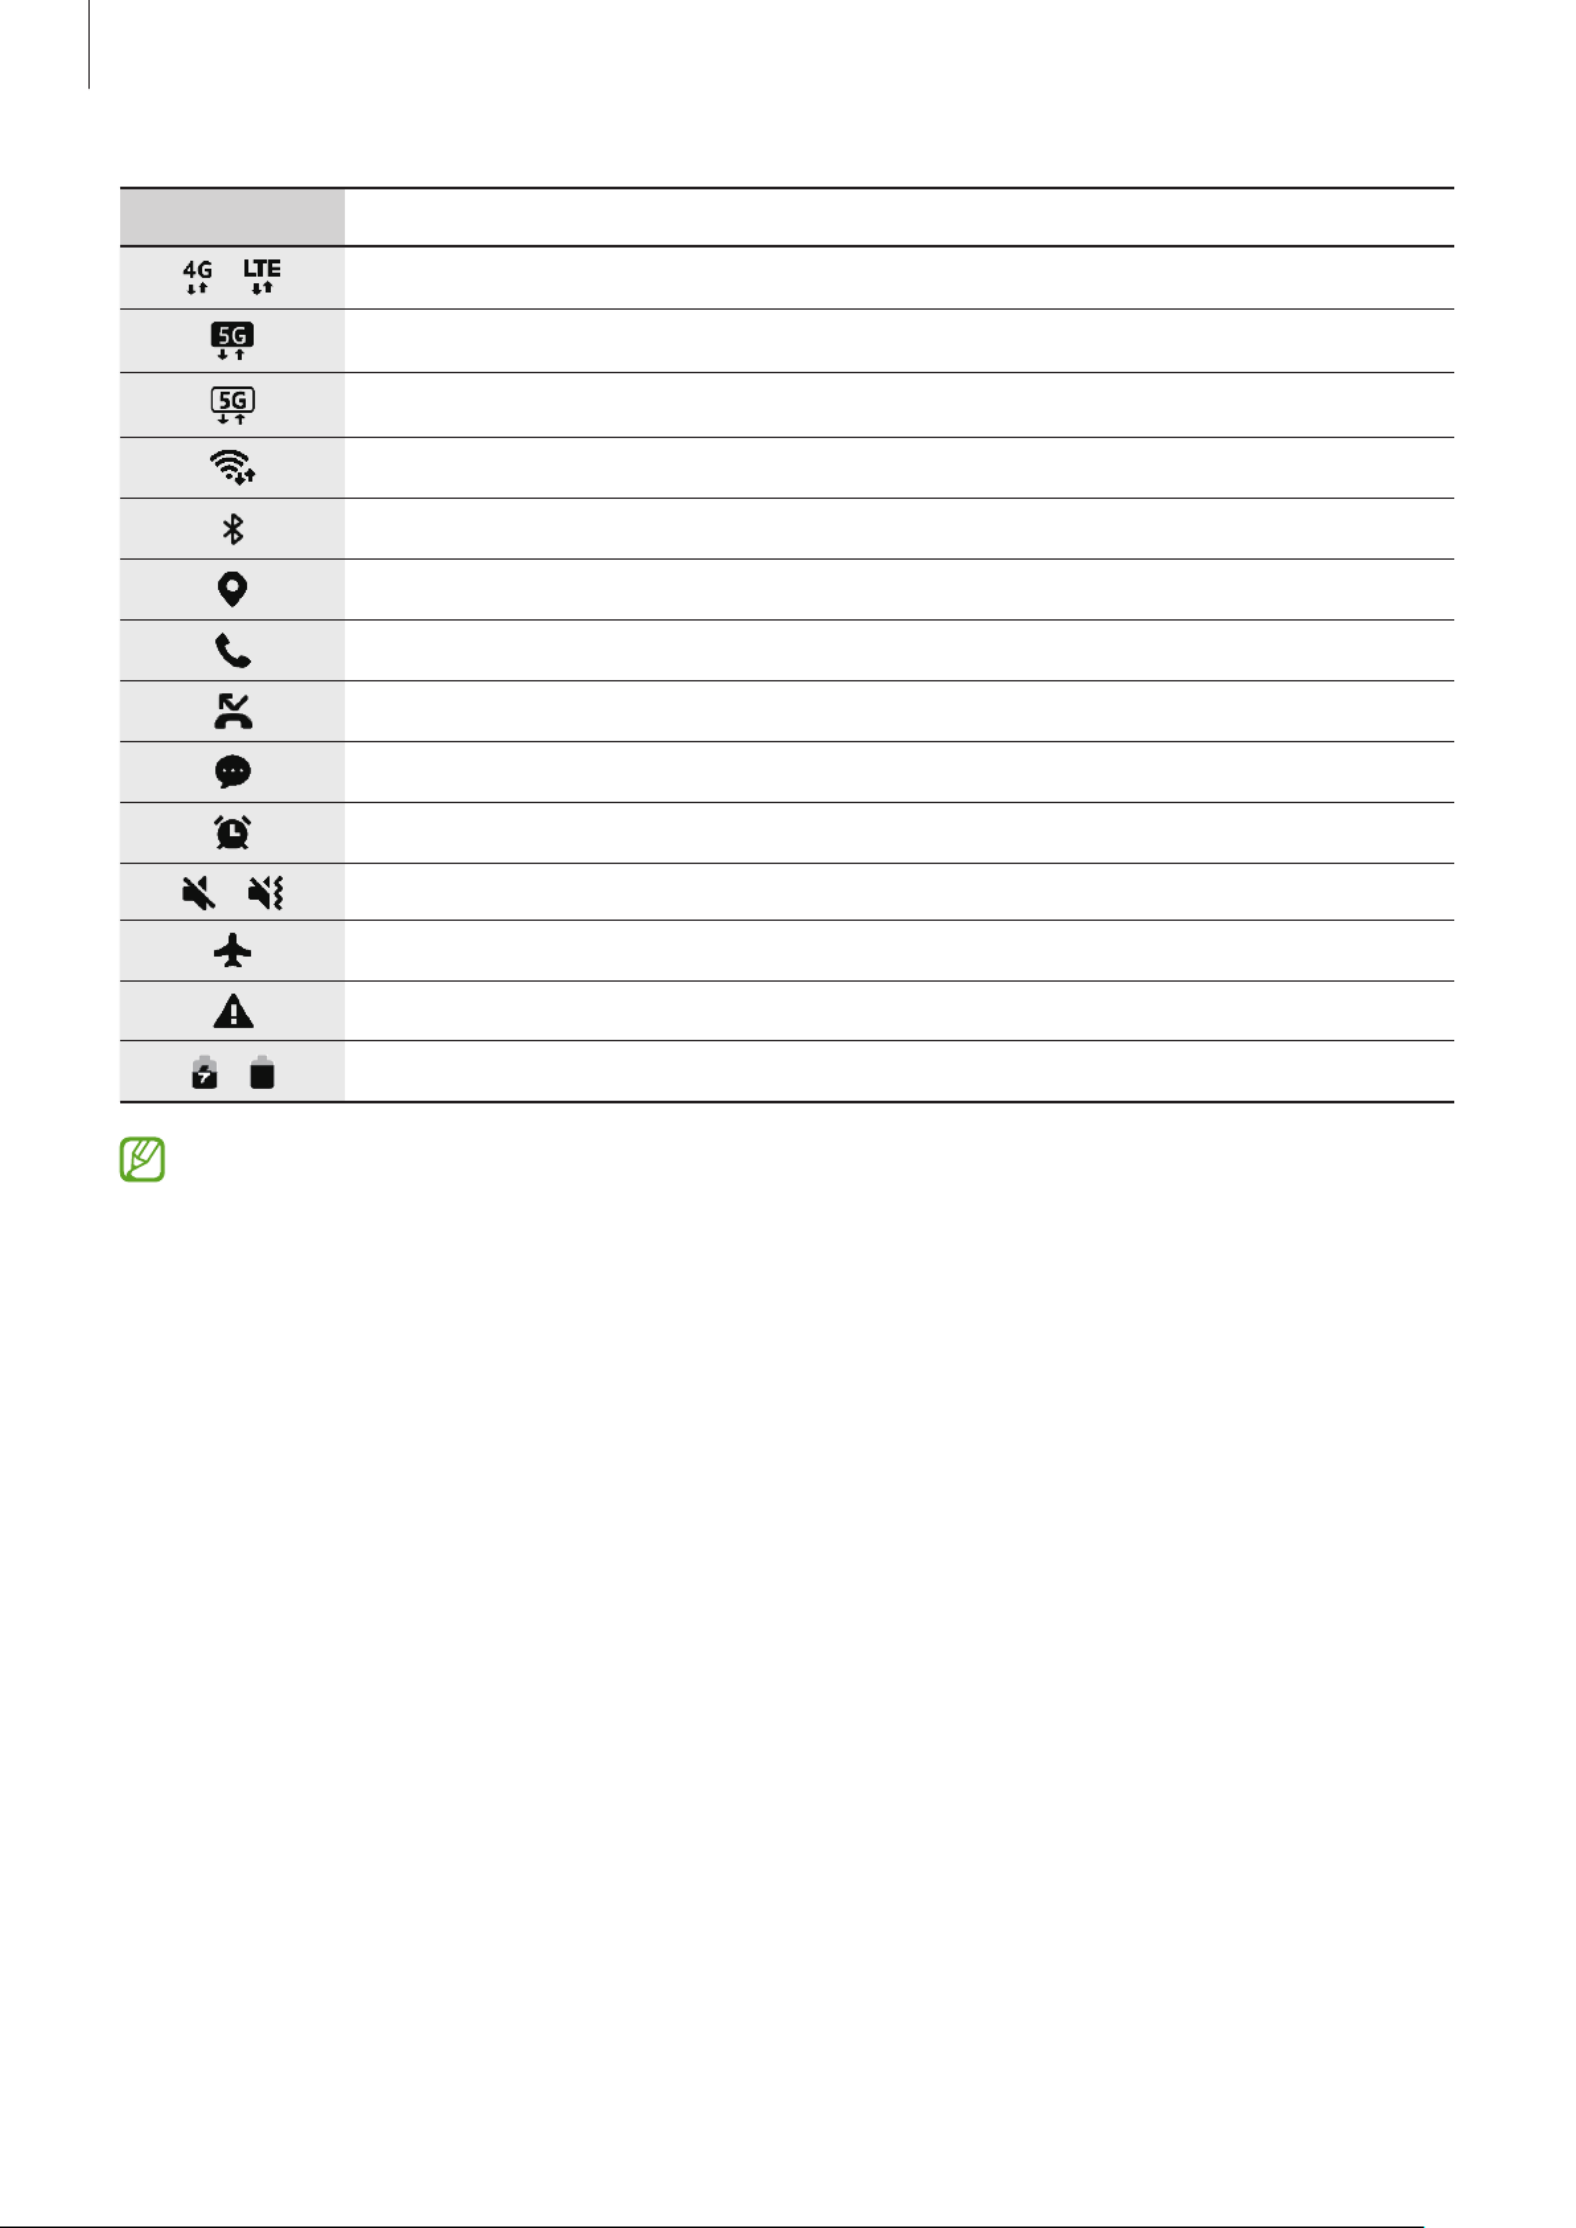
Icon Meaning
/ LTE network connected
5G network connected
LTE network connected in LTE network that includes the network5G
Wi-Fi connected
Bluetooth feature turned on
Location services being used
Call in progress
Missed call
New text or multimedia message
Alarm turned on
/ Mute mode / Vibration mode
Flight mode turned on
Error occurred or caution required
/ Battery charging / Battery power level
•
The status bar may not appear at the top of the screen in some apps. To display
the status bar, drag down from the top of the screen.
•
Some indicator icons appear only when you open the notification panel.
•
The indicator icons may appear differently depending on the carrier or model.
Getting started
36
Screen capture and screen record
Screen capture
Capture a screenshot while using the device and write on, draw on, crop, or share the
captured screen. You can capture the current screen and scrollable area.
How to capture a screenshot
Use the following methods to capture a screenshot. You can check the captured
screenshots in
Gallery
.
Method 1) Key capture: Press the Side key and the Volume Down key simultaneously.
Method 2) Swipe capture: With the edge of your hand, swipe your hand to the left or
right across the screen.
•
It is not possible to capture a screenshot while using some apps and features.
•
If capturing a screenshot by swiping is not turned on, open
Settings
, tap
Advanced features
→
Motions and gestures
, and then tap the
Palm swipe to
capture
switch to turn it on.
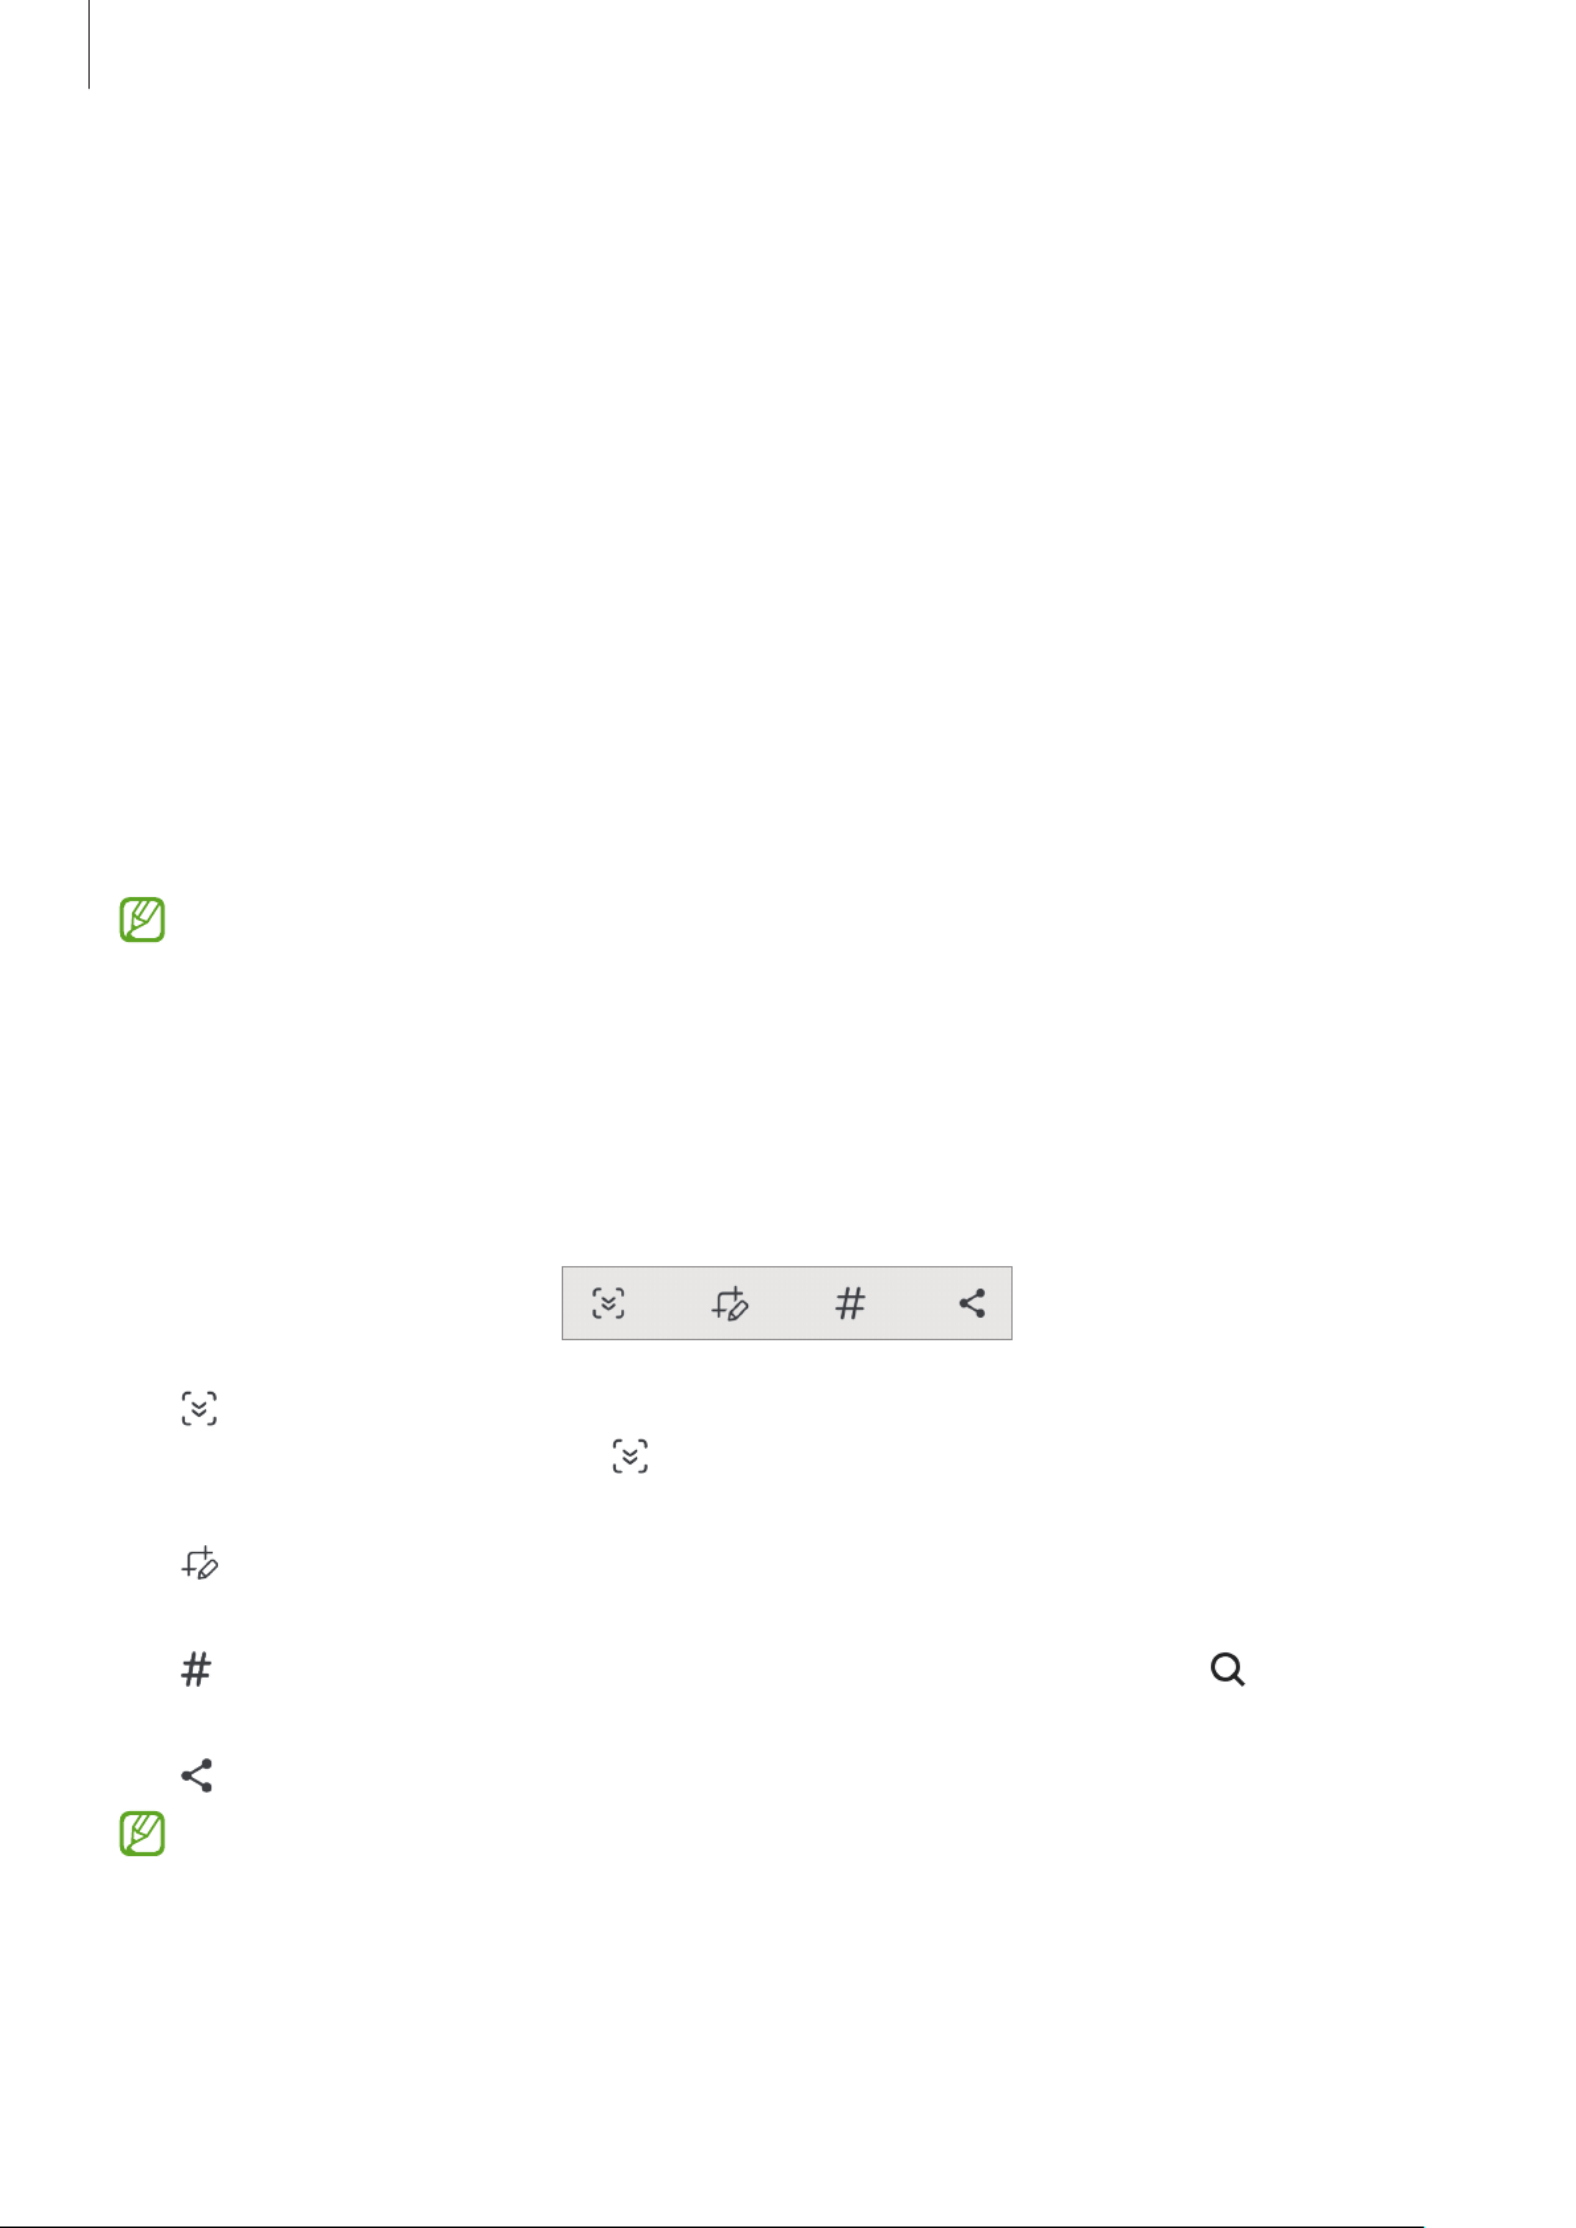
After capturing a screenshot, use the following options on the toolbar at the bottom of
the screen:
•
: Capture the current content and the hidden content on an elongated page, such
as a webpage. When you tap , the screen will automatically scroll down and more
content will be captured.
•
: Write or draw on the screenshot or crop a portion from the screenshot. You can
check the cropped area in
Gallery
.
•
: Add tags to the screenshot. To search for screenshots by tag, tap in
Gallery
.
You can access the tags list and search for the screenshot you want.
•
: Share the screenshot with others.
If the options are not visible on the captured screen, open
Settings
, tap
Advanced
features
→
Screenshots and screen recorder
, and then tap the
Show toolbar after
capturing
switch to turn it on.

Getting started
38
Changing the input language
Tap
→
Languages and types
→
Manage input languages
and select the languages
to use. When you select two or more languages, you can switch between the input
languages by tapping .
Changing the keyboard
On the navigation bar, tap to change the keyboard.
To change the keyboard type, tap
→
Languages and types
, select a language, and
then select the keyboard type you want.
•
If the keyboard button ( ) does not appear on the navigation bar, open
Settings
, tap
General management
→
Keyboard list and default
, and then tap
the
Keyboard button on navigation bar
switch to turn it on.
•
On a
3 x 4
keyboard, a key has three or four characters. To enter a character, tap
the corresponding key repeatedly until the desired character appears.
Additional keyboard functions
•
: Enter emojis, stickers, and more. You can also enter your emoji stickers that look
like you. Refer to Using your AR emoji stickers in chats for more information.
•
: Add an item from the clipboard.
•
: Switch to one-handed operation mode.
•
: Enter text by voice.
•
: Change the keyboard settings.
Tap to use more keyboard functions.
•
: Switch to the split keyboard.
•
: Switch to the floating keyboard. You can move the keyboard to another location
by dragging the tab.
•
: Search for content and enter it.
•
: Translate text and enter it.
•
: Recognise text from documents or images and enter it.

Getting started
39
•
: Enter your personal information registered to Samsung Pass.
•
: Find spelling and grammatical mistakes and get suggestions when writing in
English.
•
: Share music links.
•
: Share video links.
•
: Enter emojis.
•
: Attach GIFs.
•
/ / : Enter stickers.
•
: Change the keyboard size.
•
: Open the text editing panel.
Some features may not be available depending on the carrier or model.
Copying and pasting
1 Touch and hold over text.
2 Drag or to select the desired text, or tap
Select all
to select all text.
3 Tap
Copy
or
Cut
.
The selected text is copied to the clipboard.
4 Touch and hold where the text is to be inserted and tap
Paste
.
To paste text that you have previously copied, tap
Clipboard
and select the text.

Apps and features
45
Deleting contacts
1 Open the
Contacts
app and tap
→
Edit
.
2 Select contacts and tap
Delete
.
To delete contacts one by one, tap a contact from the contacts list and tap
More
→
Delete
.
Sharing contacts
You can share contacts with others by using various sharing options.
1 Open the
Contacts
app and tap
→
Edit
.
2 Select contacts and tap
Share
.
3 Select a sharing method.
Creating groups
You can add groups, such as family or friends, and manage contacts by group.
1 Open the
Contacts
app and tap
→
Groups
→
Create group
.
2 Follow the instructions to create a group.on-screen
Merging duplicate contacts
If your contacts list includes duplicate contacts, merge them into one to streamline your
contacts list.
1 Open the
Contacts
app and tap
→
Manage contacts
→
Merge contacts
.
2 Tick contacts and tap
Merge
.
Apps and features
50
Locking the focus (AF) and exposure (AE)
You can lock the focus or exposure on a selected area to prevent the camera from
automatically adjusting based on changes to the subjects or light sources.
Touch and hold the area to focus, the AF/AE frame will appear on the area and the focus
and exposure setting will be locked. The setting remains locked even after you take a
picture.
This feature may not be available depending on the shooting mode.
Using the camera button
•
Touch and hold the camera button to record a video.
•
To take burst shots, swipe the camera button to the edge of the screen and hold it.
•
If you add another camera button, you can move it anywhere on the screen and take
pictures more conveniently. On the preview screen, tap
→
Shooting methods
and
tap the
Floating Shutter button
switch to turn it on.
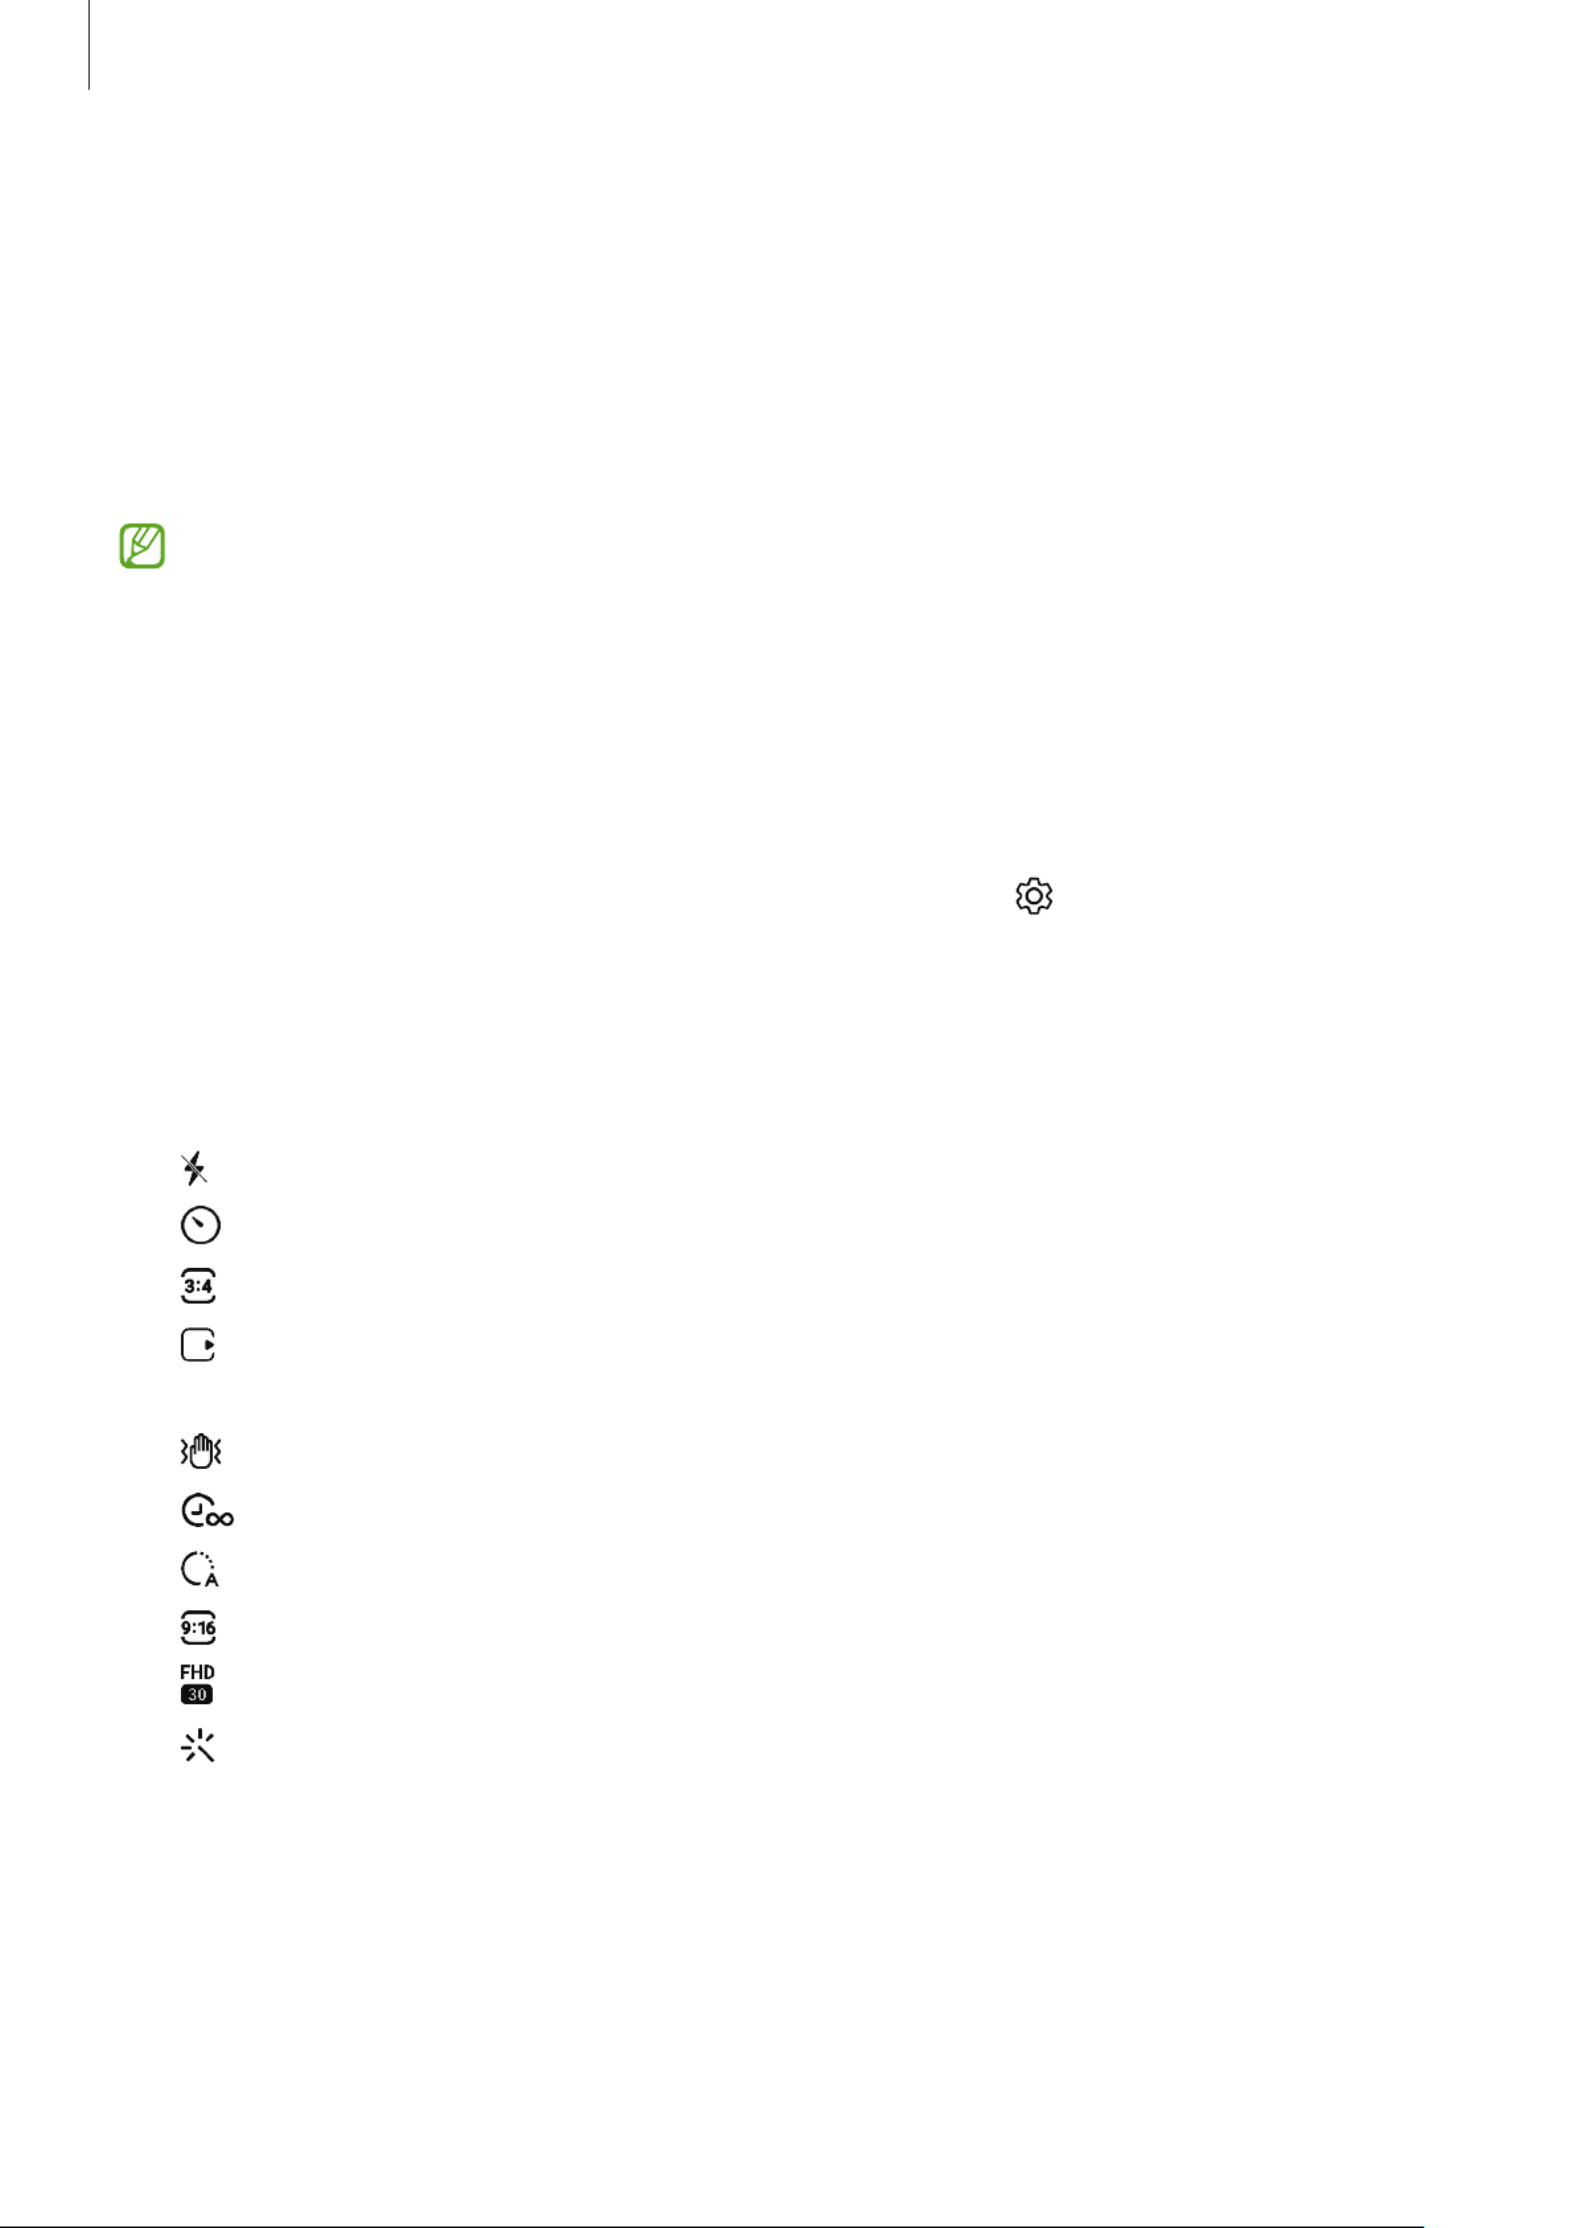
Options for current shooting mode
On the preview screen, use the following options.
•
: Turn the flash on or off.
•
: Select the length of the delay before the camera automatically takes a picture.
•
: Select an aspect ratio and resolution for pictures.
•
: Turn the motion photo feature on or off. If you turn it on, a video clip will also be
taken from a few seconds before tapping the camera button.
•
: Turn the super steady feature on or off.
•
: Change the recording time for hyperlapse videos.
•
: Select a frame rate for hyperlapse videos.
•
: Select an aspect ratio for videos.
•
: Select a resolution for videos.
•
: Apply a filter effect or beauty effects.

Apps and features
52
Shot suggestions
The camera suggests the ideal composition for the picture by recognising the position
and angle of your subject.
On the preview screen, tap and tap the
Shot suggestions
switch to turn it on.
1 On the shooting modes list, tap
PHOTO
.
A guide will appear on the preview screen.
2 Point the guide at the subject.
The camera recognises the composition, and the recommended composition appears
on the preview screen.
3 Move the device so the guide matches the recommended composition.
When the ideal composition is achieved, the guide will change to yellow.
4 Tap to take a picture.
Guide
Ideal composition
Taking selfies
You can take self-portraits with the front camera.
1 On the preview screen, swipe upwards or downwards, or tap to switch to the front
camera for self-portraits.
2 Face the front camera lens.
To take self-portraits with a wide-angle shot of the landscape or people, tap .
3 Tap to take a picture.

Apps and features
65
Stories
When you capture or save images and videos, the device will read their date and location
tags, sort the images and videos, and then create stories.
Open the
Gallery
app, tap
Stories
, and then select a story. If you tap , you can use
various options, such as managing story content or changing the story title.
If you tap
→
Create story
on the stories list, you can create stories manually.
Syncing images and videos
Open the
Gallery
app, tap , and then follow the instructions to complete on-screen
the sync. The
Gallery
app and the cloud will be synced.
When your
Gallery
app is synced with the cloud, pictures and videos you take will also be
saved in the cloud. You can access images and videos saved in the cloud in your
Gallery
app and from other devices.
When you connect your Samsung account and Microsoft account, you can set the
cloud storage as Microsoft OneDrive.
Deleting images or videos
Open the
Gallery
app, touch and hold an image, a video, or a story to delete, and then tap
Delete
.
Using the recycle bin feature
You can keep the deleted images and videos in the recycle bin. The files will be deleted
after a certain period.
Open the
Gallery
app, tap
→
Settings
, and then tap the
Recycle bin
switch to turn it
on.
To access files in the recycle bin, open the
Gallery
app and tap
→
Recycle bin
.
Apps and features
67
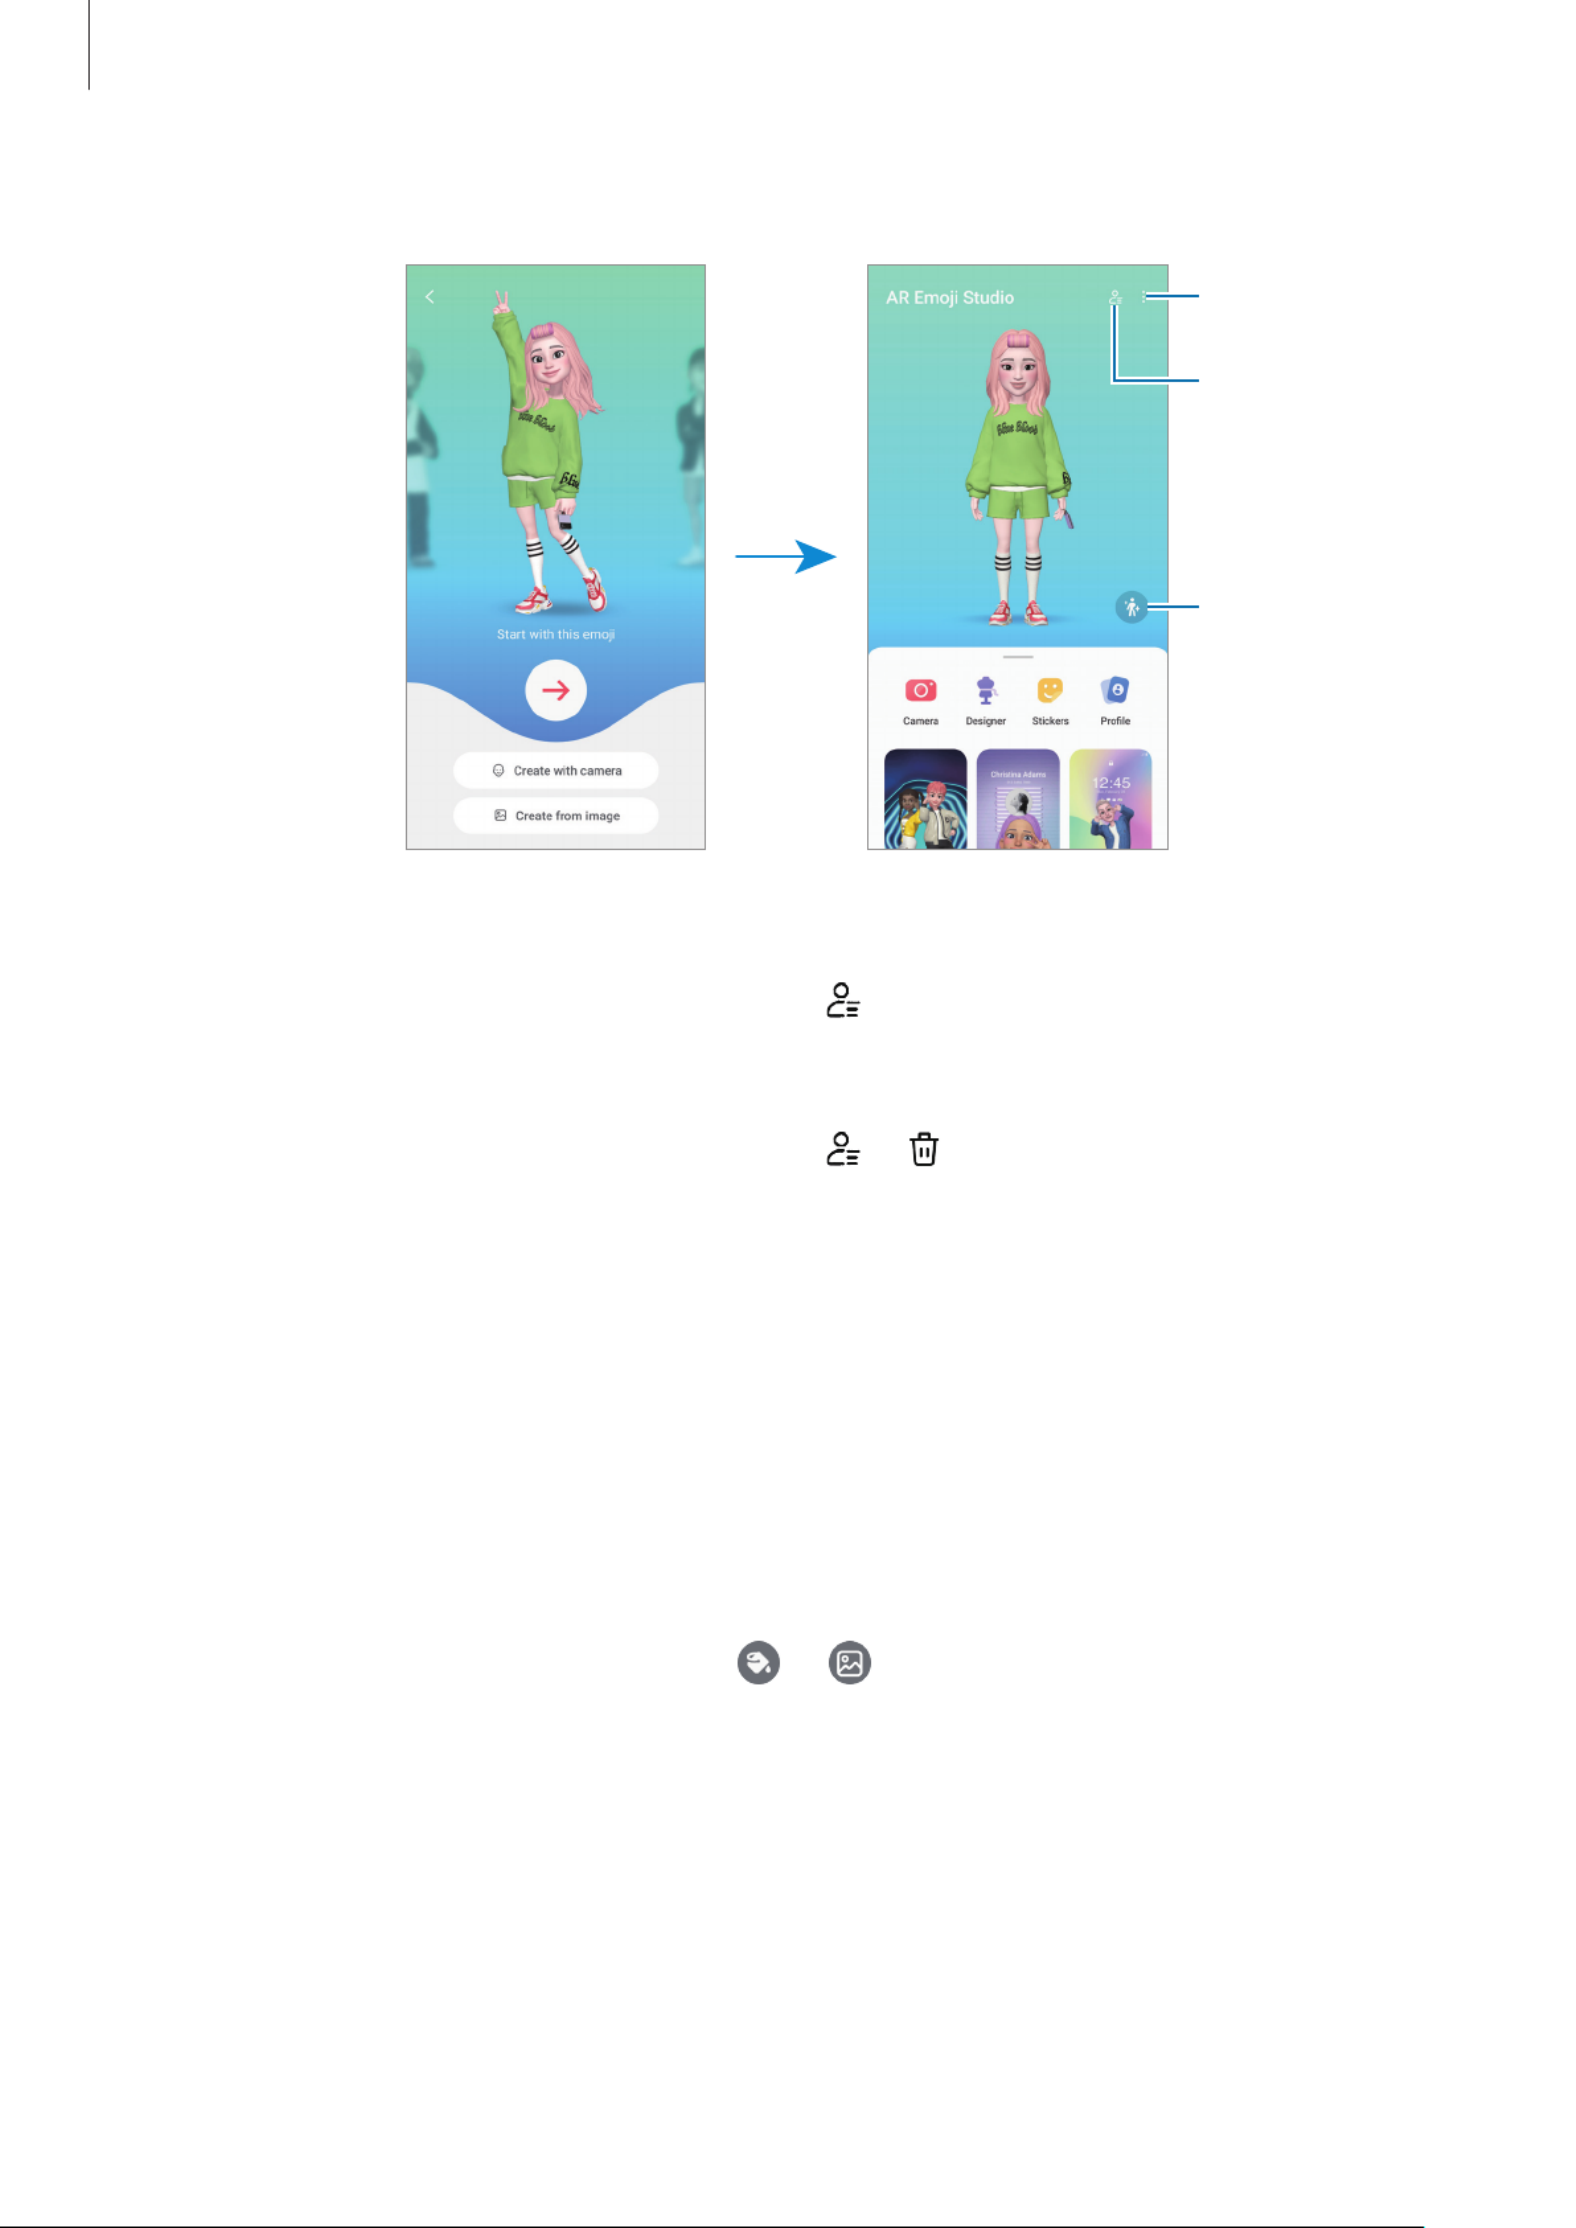
3 Follow the on-screen instructions to create an emoji.
Edit the emoji.
My emojis list
More options
Selecting an AR emoji to use
Open the
AR Zone
app, tap
AR Emoji Studio
→
, and then select an emoji you want.
Deleting AR emojis
Open the
AR Zone
app, tap
AR Emoji Studio
→
→
, tick emojis to delete, and then
tap
Delete
.
Creating an AR emoji short video and decorating your device with it
You can create a short video with an emoji and use it as a wallpaper or call background
image.
1 Open the
AR Zone
app and tap
AR Emoji Studio
.
2 Select
Create video
,
Call screen
, or
Lock screen
.
3 Select a template you want.
To change the background image, tap
→
.
4 Tap
Save
to save the video.
You can check the saved videos in
Gallery
.
5 To use the video directly, select an option at the bottom of the screen.

Settings
106
Printing
Configure settings for printer plug-ins installed on the device. You can connect the
device to a printer through Wi-Fi or Wi-Fi Direct, and print images or documents.
Some printers may not be compatible with the device.
Adding printer plug-ins
Add printer plug-ins for printers you want to connect the device to.
1 On the Settings screen, tap
Connections
→
More connection settings
→
Printing
→
Download plugin
.
2 Select a printer plug-in and install it.
3 Select the installed printer plug-in.
The device will automatically search for printers that are connected to the same Wi-Fi
network as your device.
4 Select a printer to add.
To add printers manually, tap
→
Add printer
.
Printing content
While accessing content, such as images or documents, access the options list, tap
Print
→
→
All printers...
, and then select a printer.
Printing methods may vary depending on the content type.

Settings
107
Connected devices
Change settings for device connections.
On the Settings screen, tap
Connected devices
.
•
Quick Share
: Change the Quick Share settings. Refer to Quick Share for more
information.
•
Auto switch Buds
: Set the Galaxy Buds to switch from another device to your phone
when you make or answer a call, play media, and more. You can use this feature only
when you signed in to the same Samsung account on the other device and you are
wearing your Galaxy Buds.
•
Call & text on other devices
: Connect your tablet and phone to use calling and
messaging features on the tablet with your phone number. You must register and
sign in to the same Samsung account on the tablet and phone. Some calling and
messaging features may not be available.
•
Continue apps on other devices
: Use your phone’s apps on other devices signed in to
your Samsung account.
•
Link to Windows
: Instantly access data saved in your device on your computer. Refer
to Link to Windows for more information.
•
Multi control
: Use a mouse and keyboard connected to a Samsung computer that
supports this feature on your phone.
•
Smart View
: View your phone’s displayed content on a large screen by connecting
your phone to a screen mirroring-enabled TV or monitor. Refer to Smart View for
more information.
•
Galaxy Wearable
: When you connect your phone to the wearable device, you can
customise the wearable device’s settings and apps. Refer to Galaxy Wearable for
more information.
•
SmartThings
: Control and manage smart appliances and Internet of Things (IoT)
products. Refer to for more information.SmartThings
•
Android Auto
: Connect your device to a vehicle and control some of your device’s
features on the vehicle’s display.
Produkt Specifikationer
| Mærke: | Samsung |
| Kategori: | Mobiltelefon |
| Model: | Galaxy A54 5G |
Har du brug for hjælp?
Hvis du har brug for hjælp til Samsung Galaxy A54 5G stil et spørgsmål nedenfor, og andre brugere vil svare dig
Mobiltelefon Samsung Manualer

24 August 2024
20 August 2024
15 August 2024
6 August 2024
Mobiltelefon Manualer
- Mobiltelefon Acer
- Mobiltelefon Amplicomms
- Mobiltelefon Denver
- Mobiltelefon Sencor
- Mobiltelefon Sony
- Mobiltelefon Siemens
- Mobiltelefon Panasonic
- Mobiltelefon Sony Ericsson
- Mobiltelefon Philips
- Mobiltelefon LG
- Mobiltelefon AEG
- Mobiltelefon Doro
- Mobiltelefon AT&T
- Mobiltelefon Mitsubishi
- Mobiltelefon Apple
- Mobiltelefon Sharp
- Mobiltelefon Google
- Mobiltelefon HP
- Mobiltelefon Emporia
- Mobiltelefon Garmin
- Mobiltelefon Sanyo
- Mobiltelefon Motorola
- Mobiltelefon Asus
- Mobiltelefon Gigabyte
- Mobiltelefon Toshiba
- Mobiltelefon InFocus
- Mobiltelefon Lenovo
- Mobiltelefon OnePlus
- Mobiltelefon Thomson
- Mobiltelefon Hyundai
- Mobiltelefon Aiwa
- Mobiltelefon Nokia
- Mobiltelefon Casio
- Mobiltelefon Palm
- Mobiltelefon AKAI
- Mobiltelefon Hisense
- Mobiltelefon Fysic
- Mobiltelefon Blaupunkt
- Mobiltelefon Leica
- Mobiltelefon Razer
- Mobiltelefon Medion
- Mobiltelefon Huawei
- Mobiltelefon Telefunken
- Mobiltelefon BenQ
- Mobiltelefon Primo
- Mobiltelefon Alcatel
- Mobiltelefon Plum
- Mobiltelefon Olympia
- Mobiltelefon Xiaomi
- Mobiltelefon Viewsonic
- Mobiltelefon Dell
- Mobiltelefon CAT
- Mobiltelefon Oppo
- Mobiltelefon Polaroid
- Mobiltelefon Crosscall
- Mobiltelefon NGM
- Mobiltelefon NEC
- Mobiltelefon Kyocera
- Mobiltelefon Energy Sistem
- Mobiltelefon Bush
- Mobiltelefon Binatone
- Mobiltelefon Honor
- Mobiltelefon Bixolon
- Mobiltelefon Tiptel
- Mobiltelefon Sagem
- Mobiltelefon Lava
- Mobiltelefon Vivo
- Mobiltelefon Infinix
- Mobiltelefon Archos
- Mobiltelefon MaxCom
- Mobiltelefon Pantech
- Mobiltelefon SPC
- Mobiltelefon ZTE
- Mobiltelefon Switel
- Mobiltelefon Brondi
- Mobiltelefon HTC
- Mobiltelefon Lupilu
- Mobiltelefon BlackBerry
- Mobiltelefon Evolveo
- Mobiltelefon GPO
- Mobiltelefon BLU
- Mobiltelefon Oricom
- Mobiltelefon MyPhone
- Mobiltelefon Realme
- Mobiltelefon Micromax
- Mobiltelefon Cyrus
- Mobiltelefon I.safe Mobile
- Mobiltelefon Bea-fon
- Mobiltelefon Allview
- Mobiltelefon Amplicom
- Mobiltelefon Sonim
- Mobiltelefon Sunstech
- Mobiltelefon Swissvoice
- Mobiltelefon Profoon
- Mobiltelefon Hammer
- Mobiltelefon Mpman
- Mobiltelefon Logicom
- Mobiltelefon Beafon
- Mobiltelefon Teleline
- Mobiltelefon Benefon
- Mobiltelefon Doogee
- Mobiltelefon Syco
- Mobiltelefon GSmart
- Mobiltelefon Auro
- Mobiltelefon Oukitel
- Mobiltelefon NUU Mobile
- Mobiltelefon Orange
- Mobiltelefon Telme
- Mobiltelefon Hummer
- Mobiltelefon Modu
- Mobiltelefon Maxwest
Nyeste Mobiltelefon Manualer

2 April 2025
2 April 2025
2 April 2025
9 Marts 2025

20 Februar 2025
20 Februar 2025
20 Februar 2025
20 Februar 2025
20 Februar 2025

5 Februar 2025