Samsung HW-T420 Manual
Læs nedenfor 📖 manual på dansk for Samsung HW-T420 (152 sider) i kategorien Soundbar. Denne guide var nyttig for 6 personer og blev bedømt med 4.5 stjerner i gennemsnit af 2 brugere
Side 1/152

FULL MANUAL
Imagine the possibilities
Thank you for purchasing this Samsung product.
To receive more complete service, please register
your product at www.samsung.com/register
HW-T420

ENG - iii
PRECAUTIONS
1. Ensure that the AC power supply in your
house complies with the power
requirements listed on the identication
sticker located on the bottom of your
product. Install your product horizontally, on
a suitable base (furniture), with enough
space around it for ventilation (7~10 cm).
Make sure the ventilation slots are not
covered. Do not place the unit on ampliers
or other equipment which may become hot.
This unit is designed for continuous use. To
fully turn off the unit, disconnect the AC plug
from the wall outlet. Unplug the unit if you
intend to leave it unused for a long period of
time.
2. During thunderstorms, disconnect the AC
plug from the wall outlet. Voltage peaks due
to lightning could damage the unit.
3. Do not expose the unit to direct sunlight or
other heat sources. This could lead to
overheating and cause the unit to
malfunction.
4. Protect the product from moisture (i.e.
vases), and excess heat (e.g. a replace) or
equipment creating strong magnetic or
electric elds. Unplug the power cable from
the AC wall socket if the unit malfunctions.
Your product is not intended for industrial
use. It is for personal use only. Condensation
may occur if your product has been stored in
cold temperatures. If transporting the unit
during the winter, wait approximately
2 hours until the unit has reached room
temperature before using.
5. The battery used with this product contains
chemicals that are harmful to the
environment. Do not dispose of the battery
in the general household trash. Do not
expose the battery to excess heat, direct
sunlight, or re. Do not short circuit,
disassemble, or overheat the battery.
Danger of explosion if the battery is replaced
incorrectly. Replace only with the same or
equivalent type.
ABOUT THIS MANUAL
The user manual has two parts: this simple paper
USER MANUAL and a detailed FULL MANUAL you
can download.
USER MANUAL
See this manual for safety instructions,
product installation, components,
connections, and product specications.
FULL MANUAL
You can access the FULL MANUAL on
Samsung’s on-line customer support centre by
scanning the QR code. To see the manual on
your PC or mobile device, download the
manual in document format from Samsung’s
website. (http://www.samsung.com/support)
Design and specications are subject to change
without prior notice.

ENG - iv
CONTENTS
01 Checking the Components 2
Inserting Batteries before using the Remote Control (AA batteries X 2) ------------------------- 2
02 Product Overview 3
Front Panel / Top Panel of the Soundbar ------------------------- 3
Bottom Panel of the Soundbar ------------------------- 4
03 Connecting the Soundbar 5
Connecting Electrical Power ------------------------- 5
Connecting the Subwoofer to the Soundbar ------------------------- 5
04 Connecting to your TV 6
Method 1. Connecting with a Cable ------------------------- 6
– Connecting using an Optical Cable ------------------------- 6
Method 2. Connecting Wirelessly ------------------------- 7
– Connecting a TV via Bluetooth ------------------------- 7
05 Connecting an External Device 9
Connecting using an Optical Cable ------------------------- 9
06 Connecting a USB Storage Device 10
07 Connecting a Mobile Device 12
Connecting via Bluetooth ------------------------- 12

ENG - v
08 Using the Remote Control 15
How to Use the Remote Control ------------------------- 15
Adjusting the Soundbar volume with a TV remote control ------------------------- 18
Using the Hidden Buttons (Buttons with more than one function) ------------------------- 19
Output specications for the different sound effect modes ------------------------- 19
09 Installing the Wall Mount 20
Installation Precautions ------------------------- 20
Wallmount Components ------------------------- 20
10 Software Update 22
Update Procedure ------------------------- 23
If UPDATE is not displayed ------------------------- 23
11 Troubleshooting 24
12 Licence 25
13 Open Source Licence Notice 25
14 Important Notes About Service 25
15 SpecicationsandGuide 26
Specications ------------------------- 26

ENG - 4
Bottom Panel of the Soundbar
USB (5V 0.5 A)
DIGITAL AUDIO IN
(OPTICAL)
POWERSUBWOOFER
POWER
SUBWOOFER
USB (5V 0.5A)
DIGITAL AUDIO IN
(OPTICAL)
DIGITAL AUDIO IN (OPTICAL)
Connect to the digital (optical) output of an external device.
USB (5V 0.5A)
Connect a USB device here to play music les stored on the USB device through the Soundbar.
SUBWOOFER
Connect the speaker cable on the subwoofer.
POWER
Connect the Soundbar's AC power cable.
•When disconnecting the power cord from a wall outlet, pull the plug. Do not pull the cable.
•Do not connect this unit or other components to an AC outlet until all connections between
components are complete.

ENG - 5
03 CONNECTING THE SOUNDBAR
Connecting Electrical Power
For more information about the required electrical power and power consumption, refer to the label
attached to the product. (Label: Bottom of the Soundbar Main Unit)
PO WER
POWER
Bottom of the Soundbar Main Unit
Connecting Electrical Power
Power Cord
Connecting the Subwoofer to the Soundbar
When the subwoofer is connected, you can enjoy rich bass sound.
SUBWOOFER
SUBWOOFER
Bottom of the Soundbar Main Unit
Connect the Subwoofer
to the SUBWOOFER jack
of the Soundbar.
Rear of Subwoofer

ENG - 6
04 CONNECTING TO YOUR TV
Hear TV sound from your Soundbar through wired or wireless connections.
•When the Soundbar is connected to selected Samsung TVs, the Soundbar can be controlled using
the TV’s remote control.
– This feature is supported by 2017 and later Samsung Smart TVs that support Bluetooth when
you connect the Soundbar to the TV using an optical cable.
– This function also allows you to use the TV menu to adjust the sound eld and various settings
as well as the volume and mute.
Method 1. Connecting with a Cable
When the audio in a broadcast is encoded in Dolby Digital and the “Digital Output Audio Format” on
your TV is set to PCM, we recommend that you change the setting to Dolby Digital. When the setting on
the TV is changed, you will experience better sound quality. (The TV menu may use different words for
Dolby Digital and PCM depending on the TV manufacturer.)
Connecting using an Optical Cable
USB (5V 0.5A)
DIGITAL AUDIO IN
(OPTICAL)
OPTICAL OUT
Top of the Soundbar
D.IN
Optical Cable
(not supplied)
Bottom of the Soundbar
1. Connect the DIGITAL AUDIO IN (OPTICAL) jack on the Soundbar to the OPTICAL OUT jack of the TV
with a digital optical cable (not supplied).
2. Press the (Source) button on the top panel or remote control, and then select the “D.IN” mode.

ENG - 9
05 CONNECTING AN EXTERNAL DEVICE
Connect to an external device via a wired connection or Bluetooth connection to play the external
device’s sound through the Soundbar.
Connecting using an Optical Cable
USB (5V 0.5A)
DIGITAL AUDIO IN
(OPTICAL)
OPTICAL OUT
Top of the Soundbar
D.IN
Optical Cable
(not supplied)
Bottom of the Soundbar
BD / DVD player /
Set-top box /
Game console
1. Connect DIGITAL AUDIO IN (OPTICAL) on the main unit to the OPTICAL OUT jack of the Source
Device using a digital optical cable (not supplied).
2. Select “D.IN” mode by pressing the (Source) button on the top panel or on the remote control.

ENG - 10
06 CONNECTING A USB STORAGE DEVICE
You can play music les located on USB storage devices through the Soundbar.
USB
USB (5V 0.5A)
DIGITAL AUDIO IN
(OPTICAL)
POWERSUB WOOFER
USB (5V 0.5A)
USB port
1. Connect the USB device to the USB port on the bottom of the product.
2. Press the (Source) button on the top panel or on the remote control, and then select “USB”.
3. “USB” appears in the display screen.
4. Play music les from the USB storage device through the Soundbar.
•The Soundbar automatically turns off (Auto Power Down) if no USB device has been connected
for more than 18 minutes.
ENG - 12
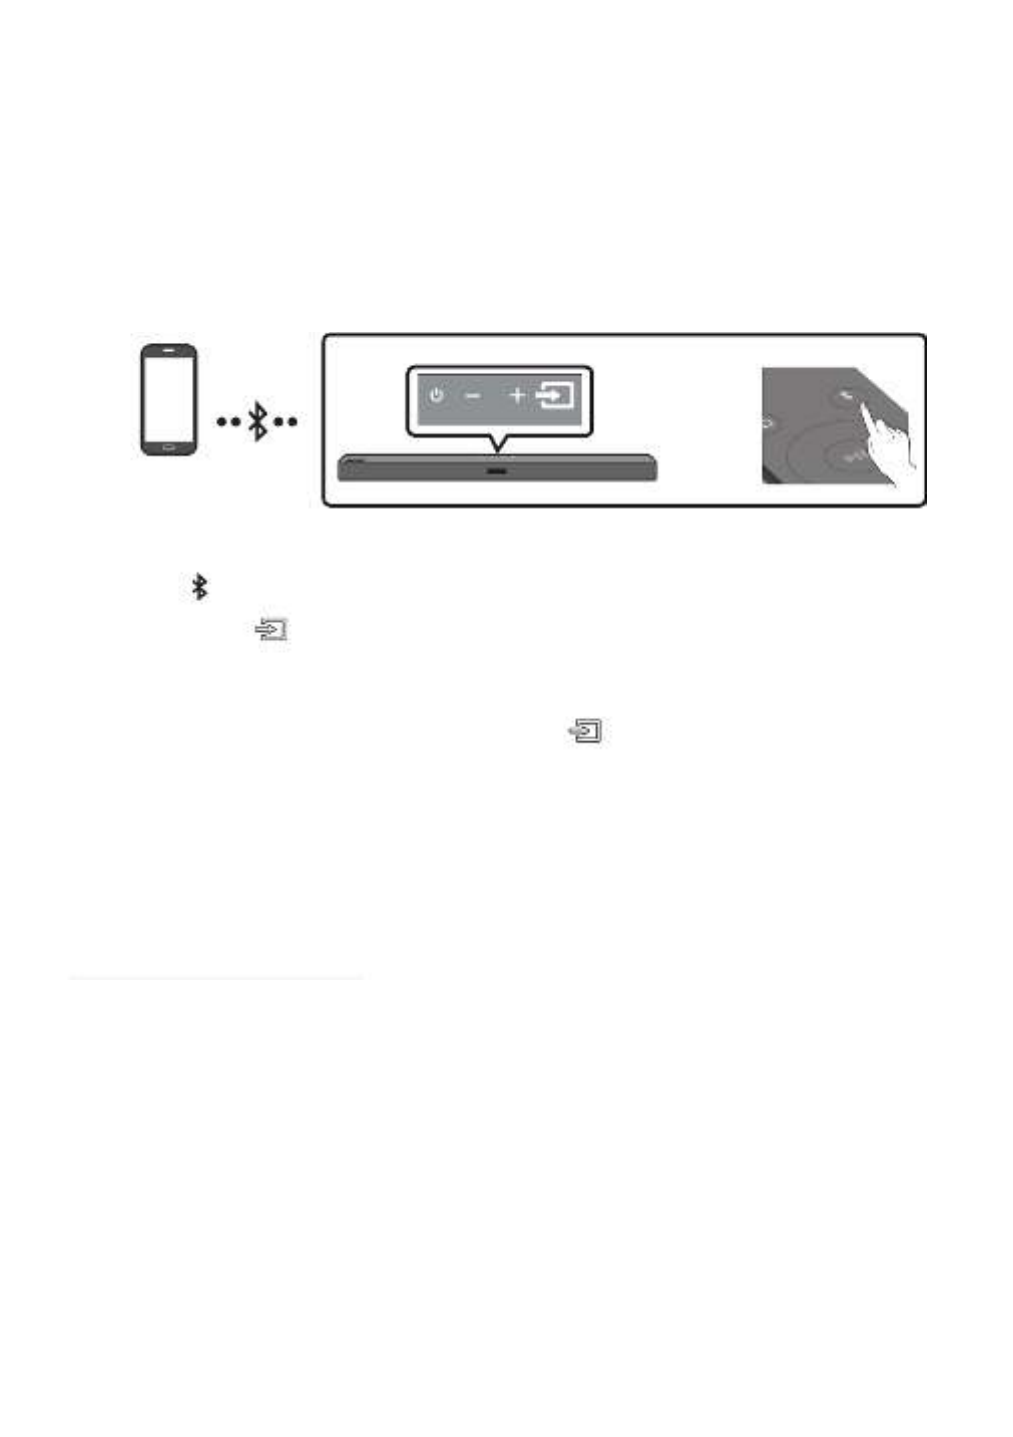
07 CONNECTING A MOBILE DEVICE
Connecting via Bluetooth
When a mobile device is connected using Bluetooth, you can hear stereo sound without the hassle of
cabling.
•You cannot connect more than one Bluetooth device at a time.
PAIR
OR
Bluetooth device
The initial connection
1. Press the PAIR button on the remote control to enter the “BT PAIRING” mode.
(OR) a. Press the (Source) button on the top panel and then select “BT”.
“BT” changes to “ ” in a few seconds automatically or changes to “ ” if BT PAIRING BT READY
there is a connect record.
b. When “BT READY” appears, press and hold the (Source) button on the top panel of the
Soundbar for more than 5 seconds to display “BT PAIRING”.
2. On your device, select “[AV] Samsung Soundbar T4-Series” from the list that appears.
•When the Soundbar is connected to the Bluetooth device, [Bluetooth Device Name] → “BT”
appears in the front display.
3. Play music les from the device connected via Bluetooth through the Soundbar.
If the device fails to connect
•If a previously connected Soundbar listing (e.g. “ ”) appears in the [AV] Samsung Soundbar T4-Series
list, delete it.
•Then repeat steps 1 and 2.
NOTE
• After you have connected the Soundbar to your mobile device the rst time, use the “BT READY”
mode to reconnect.

ENG - 17
Sound Control
You can select , or TREBLE, BASS AUDIO SYNC.
•To control the volume of the treble or bass sound, press the Sound Control button to
select TREBLE or BASS and then adjust the volume between -6~+6 by using the Up/
Down buttons.
•Press and hold the button for about 5 seconds to adjust the sound (Sound Control)
for each frequency band. 150Hz, 300Hz, 600Hz, 1.2kHz, 2.5kHz, 5kHz, and 10kHz are
selectable using the Left/Right buttons and each can be adjusted to a setting between
-6 to +6 using the Up/Down buttons.
•If the video on the TV and audio from the Soundbar are not synchronised, press the
Sound Control button to select AUDIO SYNC and then
set the audio delay between
0~300 milliseconds
by using the buttons. (Not available in “ ” mode.)Up/Down USB
•AUDIO SYNC is only supported for some functions.
WOOFER
SOUND
MODE
VOL WOOFER
SOUNDBA
SOUND
MODE
VOL WOOFER
SOUNDBA
Rock the button forward or backward to adjust the volume of the subwoofer to WOOFER
-12 or between -6 to +6. To set the subwoofer volume level to 0, press the button in.
VOL
SOUND
MODE
VOL WOOFER
SOUNDBA
SOUND
MODE
VOL WOOFER
SOUNDBA
Rock the button forward or backward to adjust the volume.VOL
•Mute
Press the button in to mute the sound. Press it in again to unmute the sound.VOL

ENG - 21
2. Align the Wall Mount Guide’s Centre Line
with the centre of your TV (if you are
mounting the Soundbar below your TV), and
then x the Wall Mount Guide to the wall
using tape.
•If you are not mounting below a TV, place
the Centre Line in the centre of the
installation area.
Centre Line
3. Push a pen tip or sharpened pencil tip
through the centre of the B-TYPE images on
each end of the Guide to mark the holes for
the supporting screws, and then remove the
Wall Mount Guide.
4. Using an appropriately sized drill bit, drill a
hole in the wall at each marking.
•If the markings do not correspond to the
positions of studs, make sure you insert
appropriate anchors or mollies into the
holes before you insert the support
screws. If you use anchors or mollies,
make sure the holes you drill are large
enough for the anchors or mollies you
use.
5. Push a screw (not supplied) through each
Holder-Screw, and then screw each screw
rmly into a support screw hole.
6. Install the 2 Bracket-Wall Mounts in the
correct orientation on the bottom of the
Soundbar using 2 Screws.
•When assembling, make sure the hanger
part of the Bracket-Wall Mounts are
located behind the rear of the Soundbar.
Rear of Soundbar
Right end of Soundbar
Produkt Specifikationer
| Mærke: | Samsung |
| Kategori: | Soundbar |
| Model: | HW-T420 |
| Bredde: | 860 mm |
| Dybde: | 74 mm |
| Højde: | 54 mm |
| Produktfarve: | Sort |
| Pakkevægt: | 7200 g |
| Pakkedybde: | 228 mm |
| Pakkebredde: | 932 mm |
| Pakkehøjde: | 431 mm |
| Wi-Fi: | Ingen |
| Bluetooth: | Ja |
| Udgangseffekt (RMS): | 150 W |
| Lyddekodere: | Dolby Digital |
| Understøttede lydformater: | AAC, AIFF, FLAC, MP3, OGG, WAV |
| Strømforbrug (standby): | 0.5 W |
| Fjernbetjening inkluderet: | Ja |
| Forbindelsesteknologi: | Ledningsført |
| Lyd-output kanaler: | 2.1 kanaler |
| Kan monteres på væggen: | Ja |
| Spiltilstand: | Ja |
| Harmoniseret systemkode (HS): | 85182200 |
| Subwoofer inkluderet: | Ja |
| Soundbar-højttaler RMS-effekt: | 30 W |
| Soundbar vægt: | 1500 g |
| Monteringsbeslag inkluderet: | Ja |
| Subwoofer type: | Passiv subwoofer |
| Subwoofer dybde: | 272 mm |
| Subwoofer bredde: | 181.5 mm |
| Subwoofer vægt: | 4100 g |
| Subwoofer forbindelse: | Trådløs |
| Subwoofer højde: | 343 mm |
| Soundbar strømforbrug: | 30 W |
Har du brug for hjælp?
Hvis du har brug for hjælp til Samsung HW-T420 stil et spørgsmål nedenfor, og andre brugere vil svare dig
Soundbar Samsung Manualer

14 Januar 2025
25 December 2024
2 November 2024
19 Oktober 2024
4 Oktober 2024
25 September 2024
21 September 2024
12 September 2024
7 September 2024
5 September 2024
Soundbar Manualer
- Soundbar Denver
- Soundbar TCL
- Soundbar Sony
- Soundbar Panasonic
- Soundbar Philips
- Soundbar Lenco
- Soundbar OK
- Soundbar LG
- Soundbar Pioneer
- Soundbar Sharp
- Soundbar Technaxx
- Soundbar MB Quart
- Soundbar HP
- Soundbar Sennheiser
- Soundbar Harman Kardon
- Soundbar Grundig
- Soundbar Livoo
- Soundbar Pyle
- Soundbar Furrion
- Soundbar Denon
- Soundbar Yamaha
- Soundbar Infiniton
- Soundbar Bowers & Wilkins
- Soundbar Nedis
- Soundbar Kicker
- Soundbar Adj
- Soundbar Hama
- Soundbar Auna
- Soundbar Muse
- Soundbar Element
- Soundbar Creative
- Soundbar Thomson
- Soundbar Aiwa
- Soundbar JBL
- Soundbar AKAI
- Soundbar Hisense
- Soundbar Teufel
- Soundbar Maxell
- Soundbar Trevi
- Soundbar Trust
- Soundbar Blaupunkt
- Soundbar JVC
- Soundbar Razer
- Soundbar Medion
- Soundbar Megasat
- Soundbar Haier
- Soundbar Cambridge
- Soundbar König
- Soundbar Bang And Olufsen
- Soundbar Bose
- Soundbar Klipsch
- Soundbar Kärcher
- Soundbar Libratone
- Soundbar Vaddio
- Soundbar Dali
- Soundbar Peerless-AV
- Soundbar Krüger&Matz
- Soundbar Dell
- Soundbar Schneider
- Soundbar NGS
- Soundbar NEC
- Soundbar Sonos
- Soundbar Reflecta
- Soundbar Energy Sistem
- Soundbar Sonance
- Soundbar Bush
- Soundbar Salora
- Soundbar Onkyo
- Soundbar Focal
- Soundbar Nevir
- Soundbar Magnat
- Soundbar ELAC
- Soundbar Sven
- Soundbar Bluesound
- Soundbar Polk
- Soundbar Yealink
- Soundbar Audizio
- Soundbar Jamo
- Soundbar AV:link
- Soundbar Renkforce
- Soundbar Altec Lansing
- Soundbar BlueAnt
- Soundbar ILive
- Soundbar Paradigm
- Soundbar Fantec
- Soundbar VIZIO
- Soundbar Wharfedale
- Soundbar Bauhn
- Soundbar Vision
- Soundbar Voxicon
- Soundbar Continental Edison
- Soundbar GPX
- Soundbar Martin Logan
- Soundbar Fosi Audio
- Soundbar Canton
- Soundbar Memphis Audio
- Soundbar Boss
- Soundbar Crestron
- Soundbar GoGen
- Soundbar Kogan
- Soundbar Russound
- Soundbar Definitive Technology
- Soundbar Insignia
- Soundbar Audac
- Soundbar Boston Acoustics
- Soundbar AMX
- Soundbar Xoro
- Soundbar SunBriteTV
- Soundbar Steren
- Soundbar PowerBass
- Soundbar Aconatic
- Soundbar Orbitsound
- Soundbar Klip Xtreme
- Soundbar Proscan
- Soundbar Sylvania
- Soundbar Kubo
- Soundbar Mac Audio
- Soundbar Bigben
- Soundbar Laser
- Soundbar Naxa
- Soundbar Sherwood
- Soundbar Ices
- Soundbar Pure Acoustics
- Soundbar Ematic
- Soundbar Integra
- Soundbar Bazooka
- Soundbar Avtex
- Soundbar Monitor Audio
- Soundbar Monoprice
- Soundbar Neets
- Soundbar PSB
- Soundbar Wet Sounds
- Soundbar MTX Audio
- Soundbar Astell&Kern
- Soundbar Q Acoustics
- Soundbar Legamaster
- Soundbar Devialet
- Soundbar Logic3
- Soundbar GOgroove
- Soundbar GoldenEar
- Soundbar EKO
- Soundbar Roku
- Soundbar GoldenEar Technology
- Soundbar MusicMan
- Soundbar Selfsat
- Soundbar FALLER
- Soundbar Magnavox
- Soundbar Vifa
- Soundbar Thonet & Vander
- Soundbar Planet Audio
- Soundbar Energy
- Soundbar SoundTube
- Soundbar Edis
- Soundbar Séura
- Soundbar Majority
- Soundbar Phase Technology
Nyeste Soundbar Manualer

9 April 2025

26 Marts 2025

11 Marts 2025
5 Marts 2025
26 Februar 2025

14 Januar 2025

13 Januar 2025
11 Januar 2025
11 Januar 2025

10 Januar 2025