Sitecom Greyhound Manual
Læs nedenfor 📖 manual på dansk for Sitecom Greyhound (100 sider) i kategorien Router. Denne guide var nyttig for 30 personer og blev bedømt med 4.5 stjerner i gennemsnit af 2 brugere
Side 1/100


mm® StreamBoost™ and Beamforming, Greyhound
Connect speakers to this ac router and play your music wirelessly. Insert your camera’s SD card


This router’s design and
uter’s power voltage is DC 12V
router’s power jack. When placing the adapter cable, make sure it can’
or cable’s wire or connector.


Wait for the icon to display that it’s connected to the network.
Wait for the icon to display that it’s connected to the network.

Wait for the icon to display that it’s connected to the network.

•
•
in the address bar and press [Enter] . You’ll see the following
•
•
•

From the menu, select “ ”.
From the top menu, select “Interfaces” and then “WAN”


From the top menu, select “Interfaces” and then “WAN6” for configuring IPv6
–
–
–
––

By clicking the ‘Edit’ button you can enable or d
network name and change the password. Click ‘Apply’ to save the modifications.
Guest network. By clicking the ‘Edit’
security, change the network name and change the password. Click ‘Apply’ to save the


‘Storage Settings’ shows the devices that are connec
–
–
–
‘Storage Available’ shows the available free spa


Click ‘Apply’ to save the settings.
connection, or use the ‘Test Bandwidth’ button to run the test again.
you’ll see a graph representing your home network and all devices in it. You

On this page you can view the current firmware version that’s installed in the route
The ‘View Changelog’ button shows the changes that have been made in the firmware version
that’s available on our update server. The ‘Check for new firmware’ button allows the router to

–
–
–
––
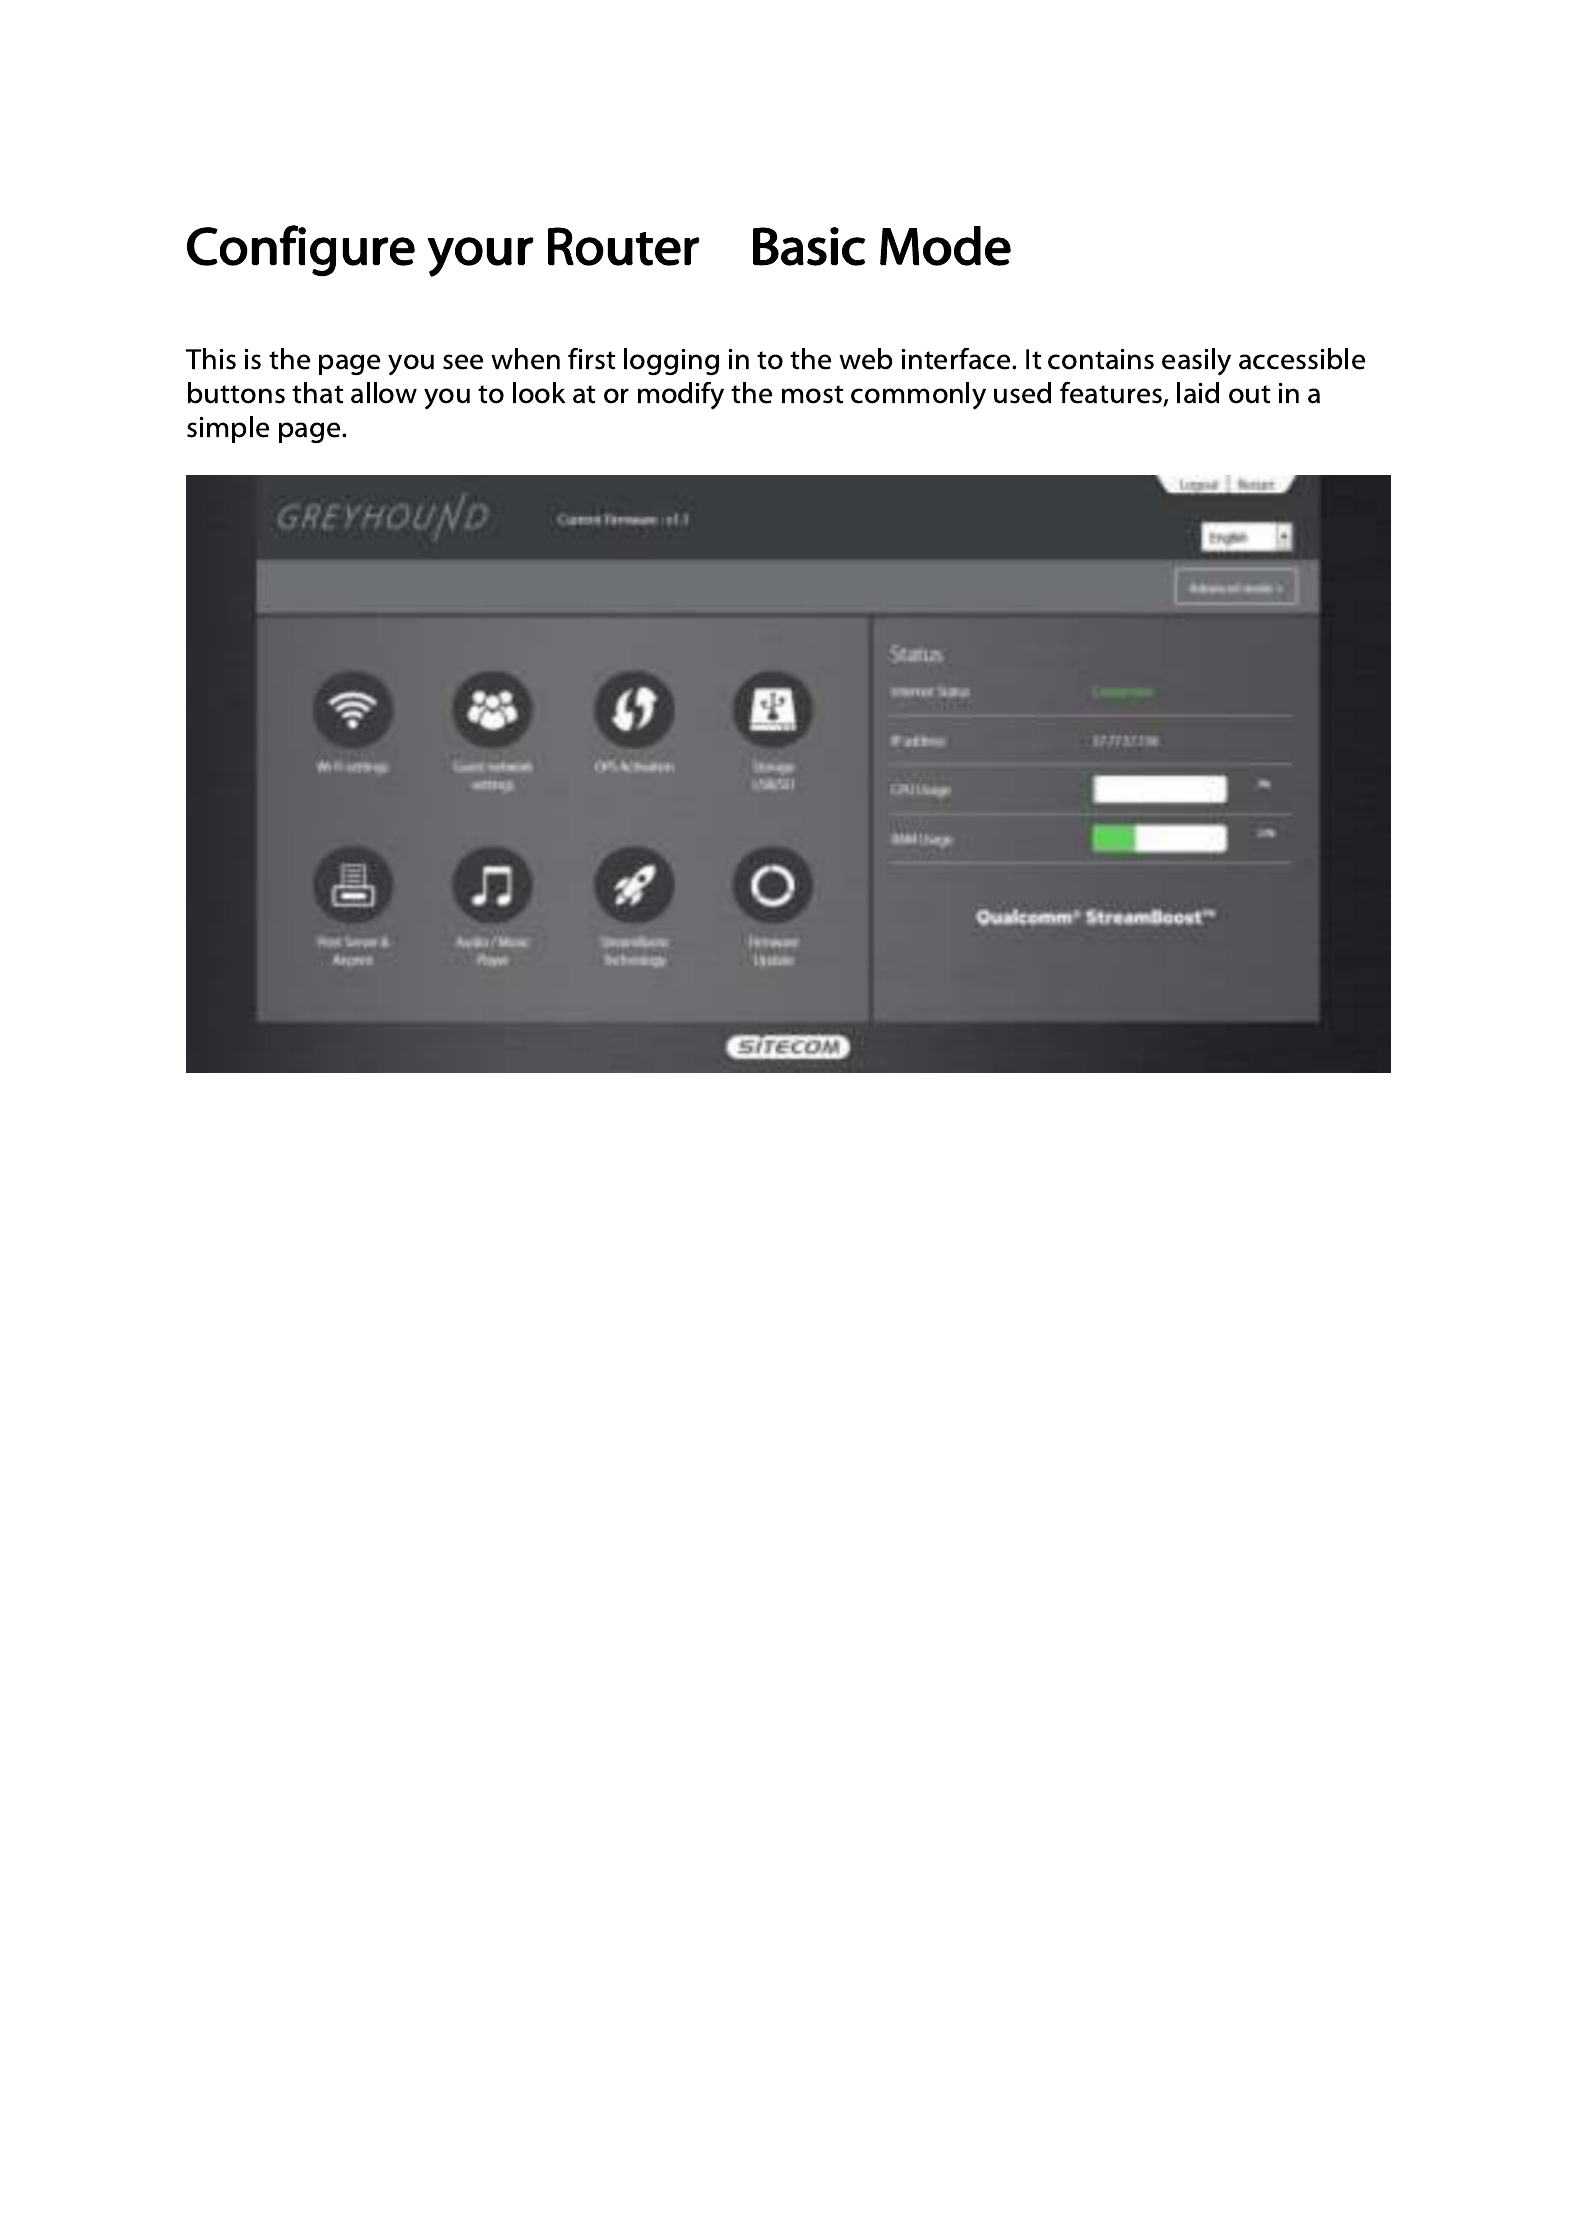
By clicking the ‘Advanced Mode’ button you’ll enter this mode. The Advanced Mode allows for a


–
–
–
––
•
•
z and 5GHz SSID’s need
•
•
•
•
• : The “Data Rate” is the rate that this access point uses to transmit data
•
•
•
•
router “buffers”
clients know when to “wake up” to receive
• : The “Long Preamble” can provide better wireless LAN compatibility
while the “Short Preamble” can provide better wireless LAN perform
•

–
–
–
––
•
•
•
•
•
•

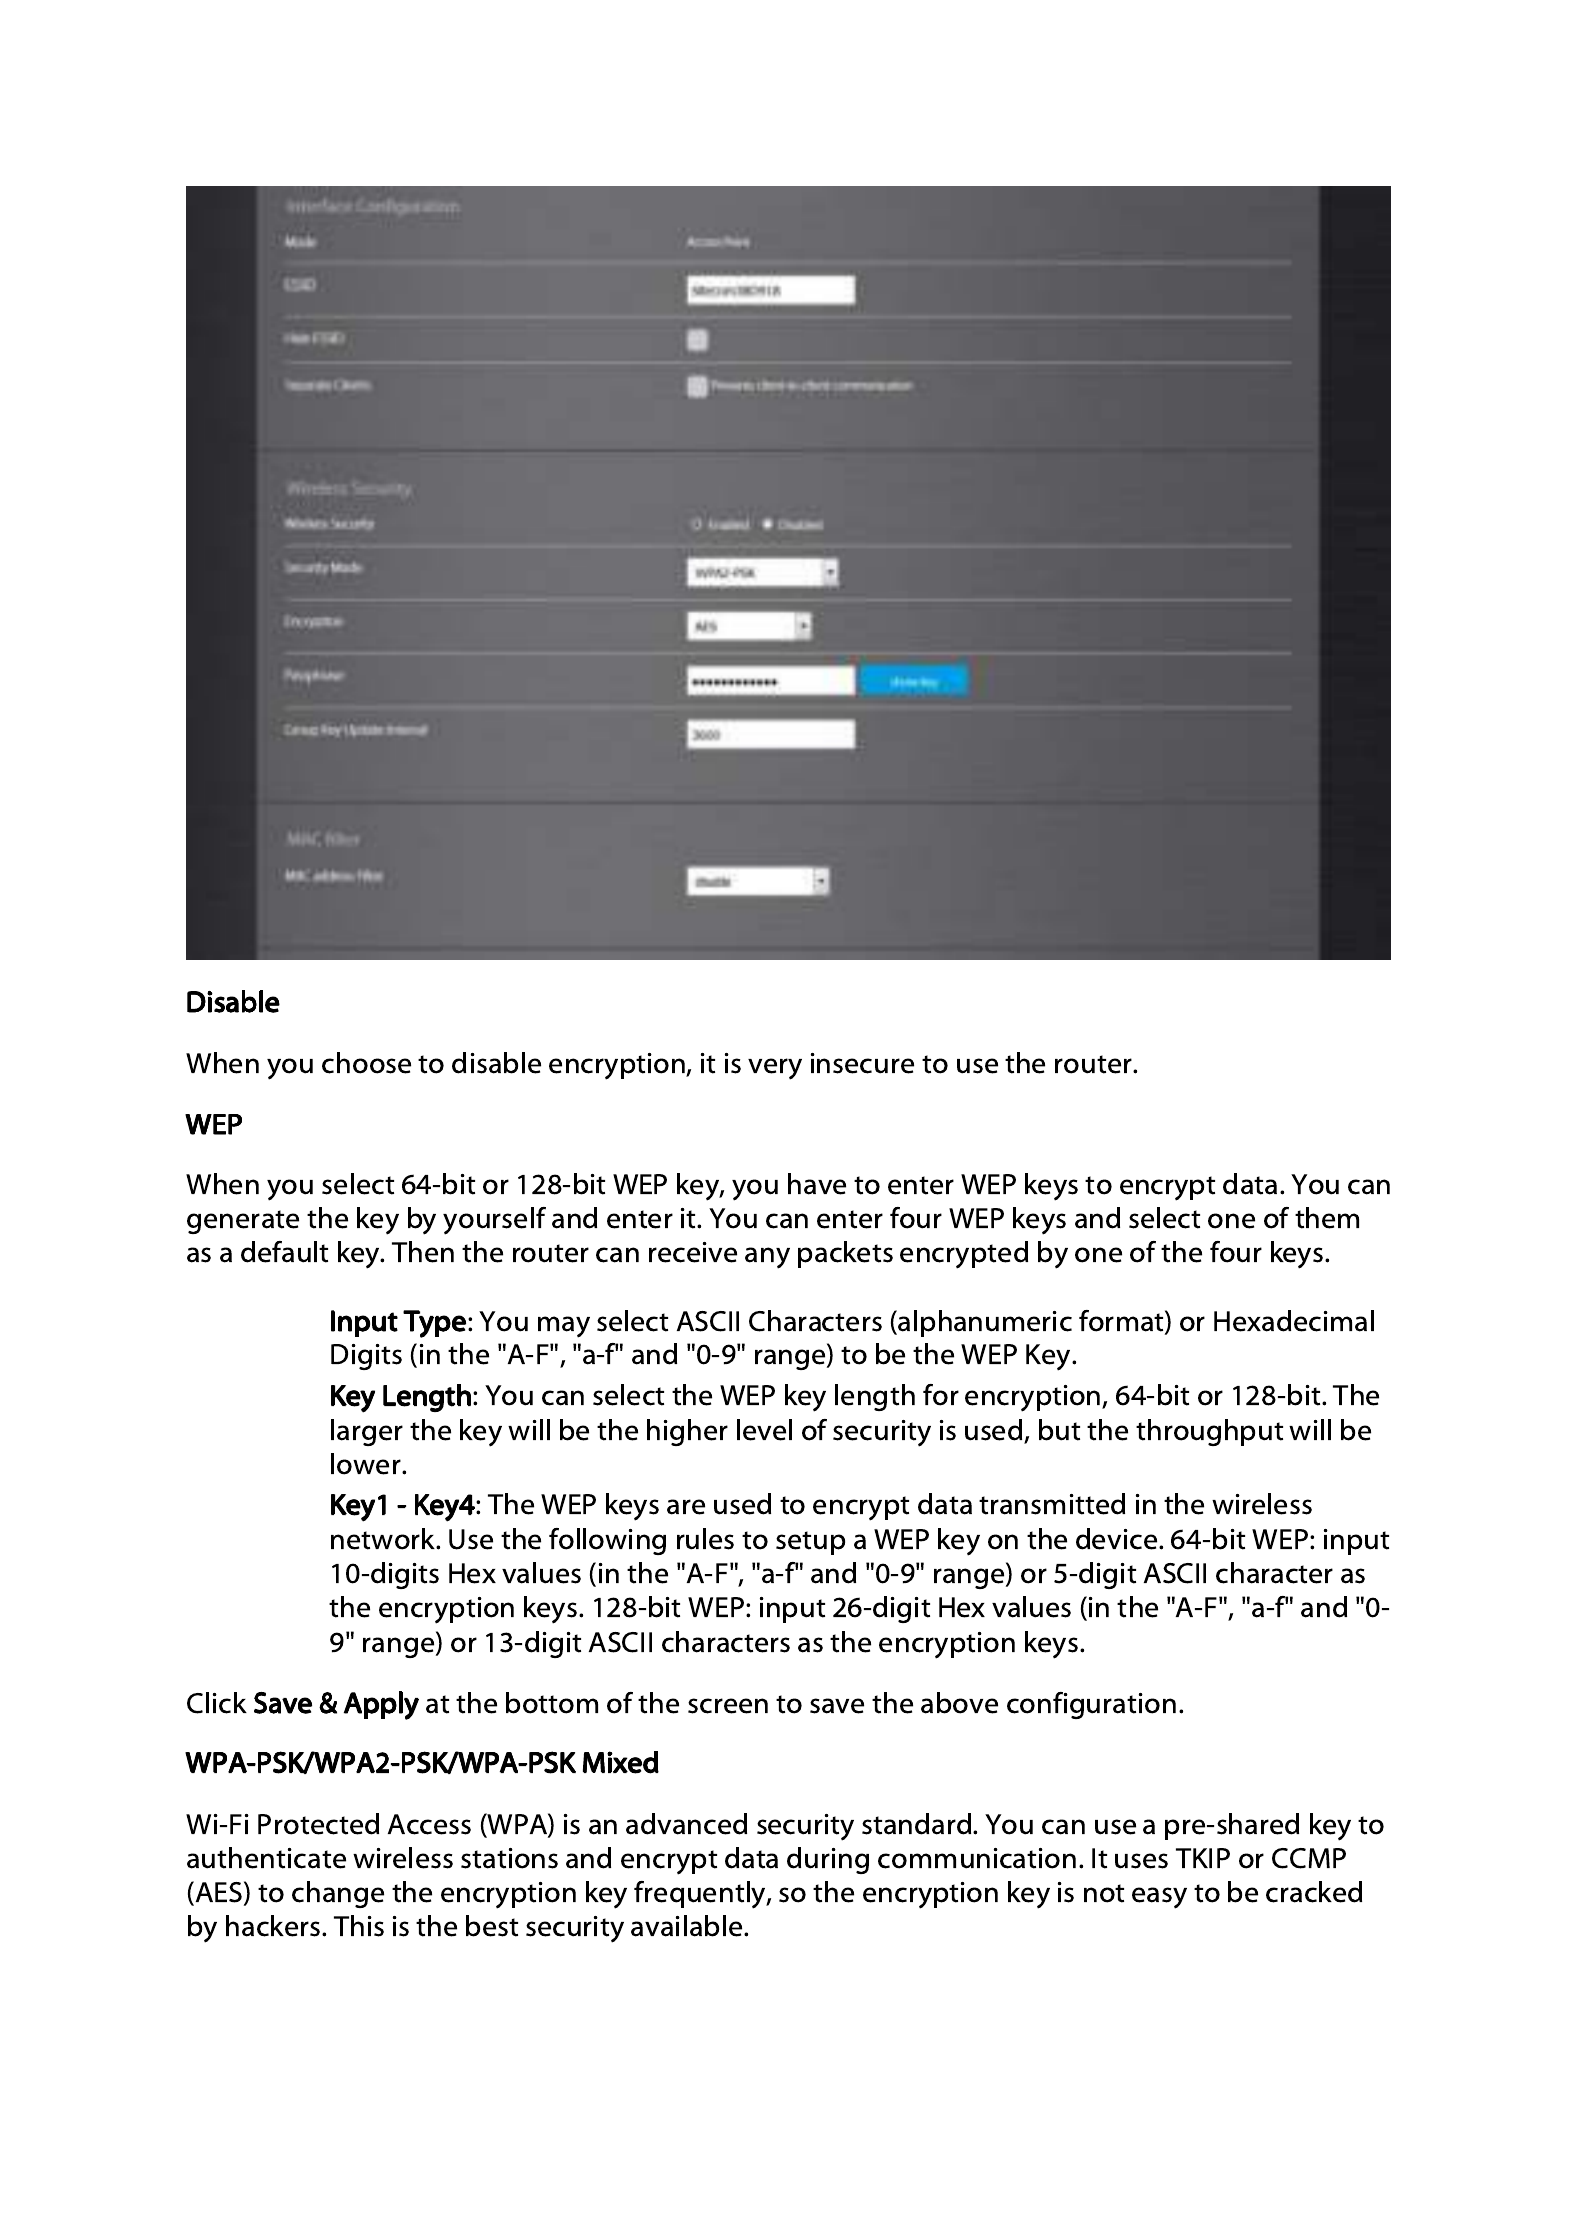
Group Key Update Interv
Group Key Update Interv
Group Key Update Interv
Group Key Update IntervGroup Key Update Interval
al
al
alal: Enter the amount of time before the group key used for
broadcast and multicast data is changed (3600 is default).
Passphrase
Passphrase
Passphrase
PassphrasePassphrase: Enter a Wi-Fi password (key/passphrase). The password must be between 8-
63 characters.
WPA-/WPA2-/WPA M
WPA-/WPA2-/WPA M
WPA-/WPA2-/WPA M
WPA-/WPA2-/WPA MWPA-/WPA2-/WPA Mixed-Enterprise
ixed-Enterprise
ixed-Enterprise
ixed-Enterprise ixed-Enterprise
Wi-Fi Protected Access (WPA) is an advanced security standard. You can use an external RADIUS
server to authenticate wireless stations and provide the session key to encrypt data during
communication. It uses TKIP or CCMP (AES) to change the encryption key frequently.
Group Key Update Interv
Group Key Update Interv
Group Key Update Interv
Group Key Update IntervGroup Key Update Interval
al
al
alal: Enter the amount of time before the group key used for
broadcast and multicast data is changed (3600 is default).
RADIUS Server
RADIUS Server
RADIUS Server
RADIUS ServerRADIUS Server: Enter the IP Address of your RADIUS server.
RADIUS Server Port
RADIUS Server Port
RADIUS Server Port
RADIUS Server PortRADIUS Server Port: Enter the port you are using with your RADIUS server. The default
port is 1812.
RADIUS Secret
RADIUS Secret
RADIUS Secret
RADIUS SecretRADIUS Secret: Enter the security key.

MAC Filter
MAC Filter
MAC Filter
MAC Filter MAC Filter
This wireless router supports MAC Address Control, which prevents unauthorized clients from
accessing your wireless network.
• Enable wireless acces
Enable wireless acces
Enable wireless acces
Enable wireless accesEnable wireless access control
s control
s control
s controls control: Enables the wireless access control function. You can
choose between ‘Allow listed only’ or ‘Allow all except listed’.
• Adding an address into t
Adding an address into t
Adding an address into t
Adding an address into tAdding an address into the list
he list
he list
he listhe list: Select the client to be added from the list and then
click "Save & Apply". You can add more clients by pressing the + sign.
• Remove an address fro
Remove an address fro
Remove an address fro
Remove an address froRemove an address from the list
m the list
m the list
m the listm the list: If you want to remove a client from the "MAC List ",
select the client that you want to remove in the list and then click the - sign Click .
“Save & Apply” to save.
Click
Save & Apply
Save & Apply
Save & Apply
Save & ApplySave & Apply at the bottom of the screen to save the above configurations.

Wi
Wi
Wi
WiWi-Fi - Guest Network
-Fi - Guest Network
-Fi - Guest Network
-Fi - Guest Network -Fi - Guest Network
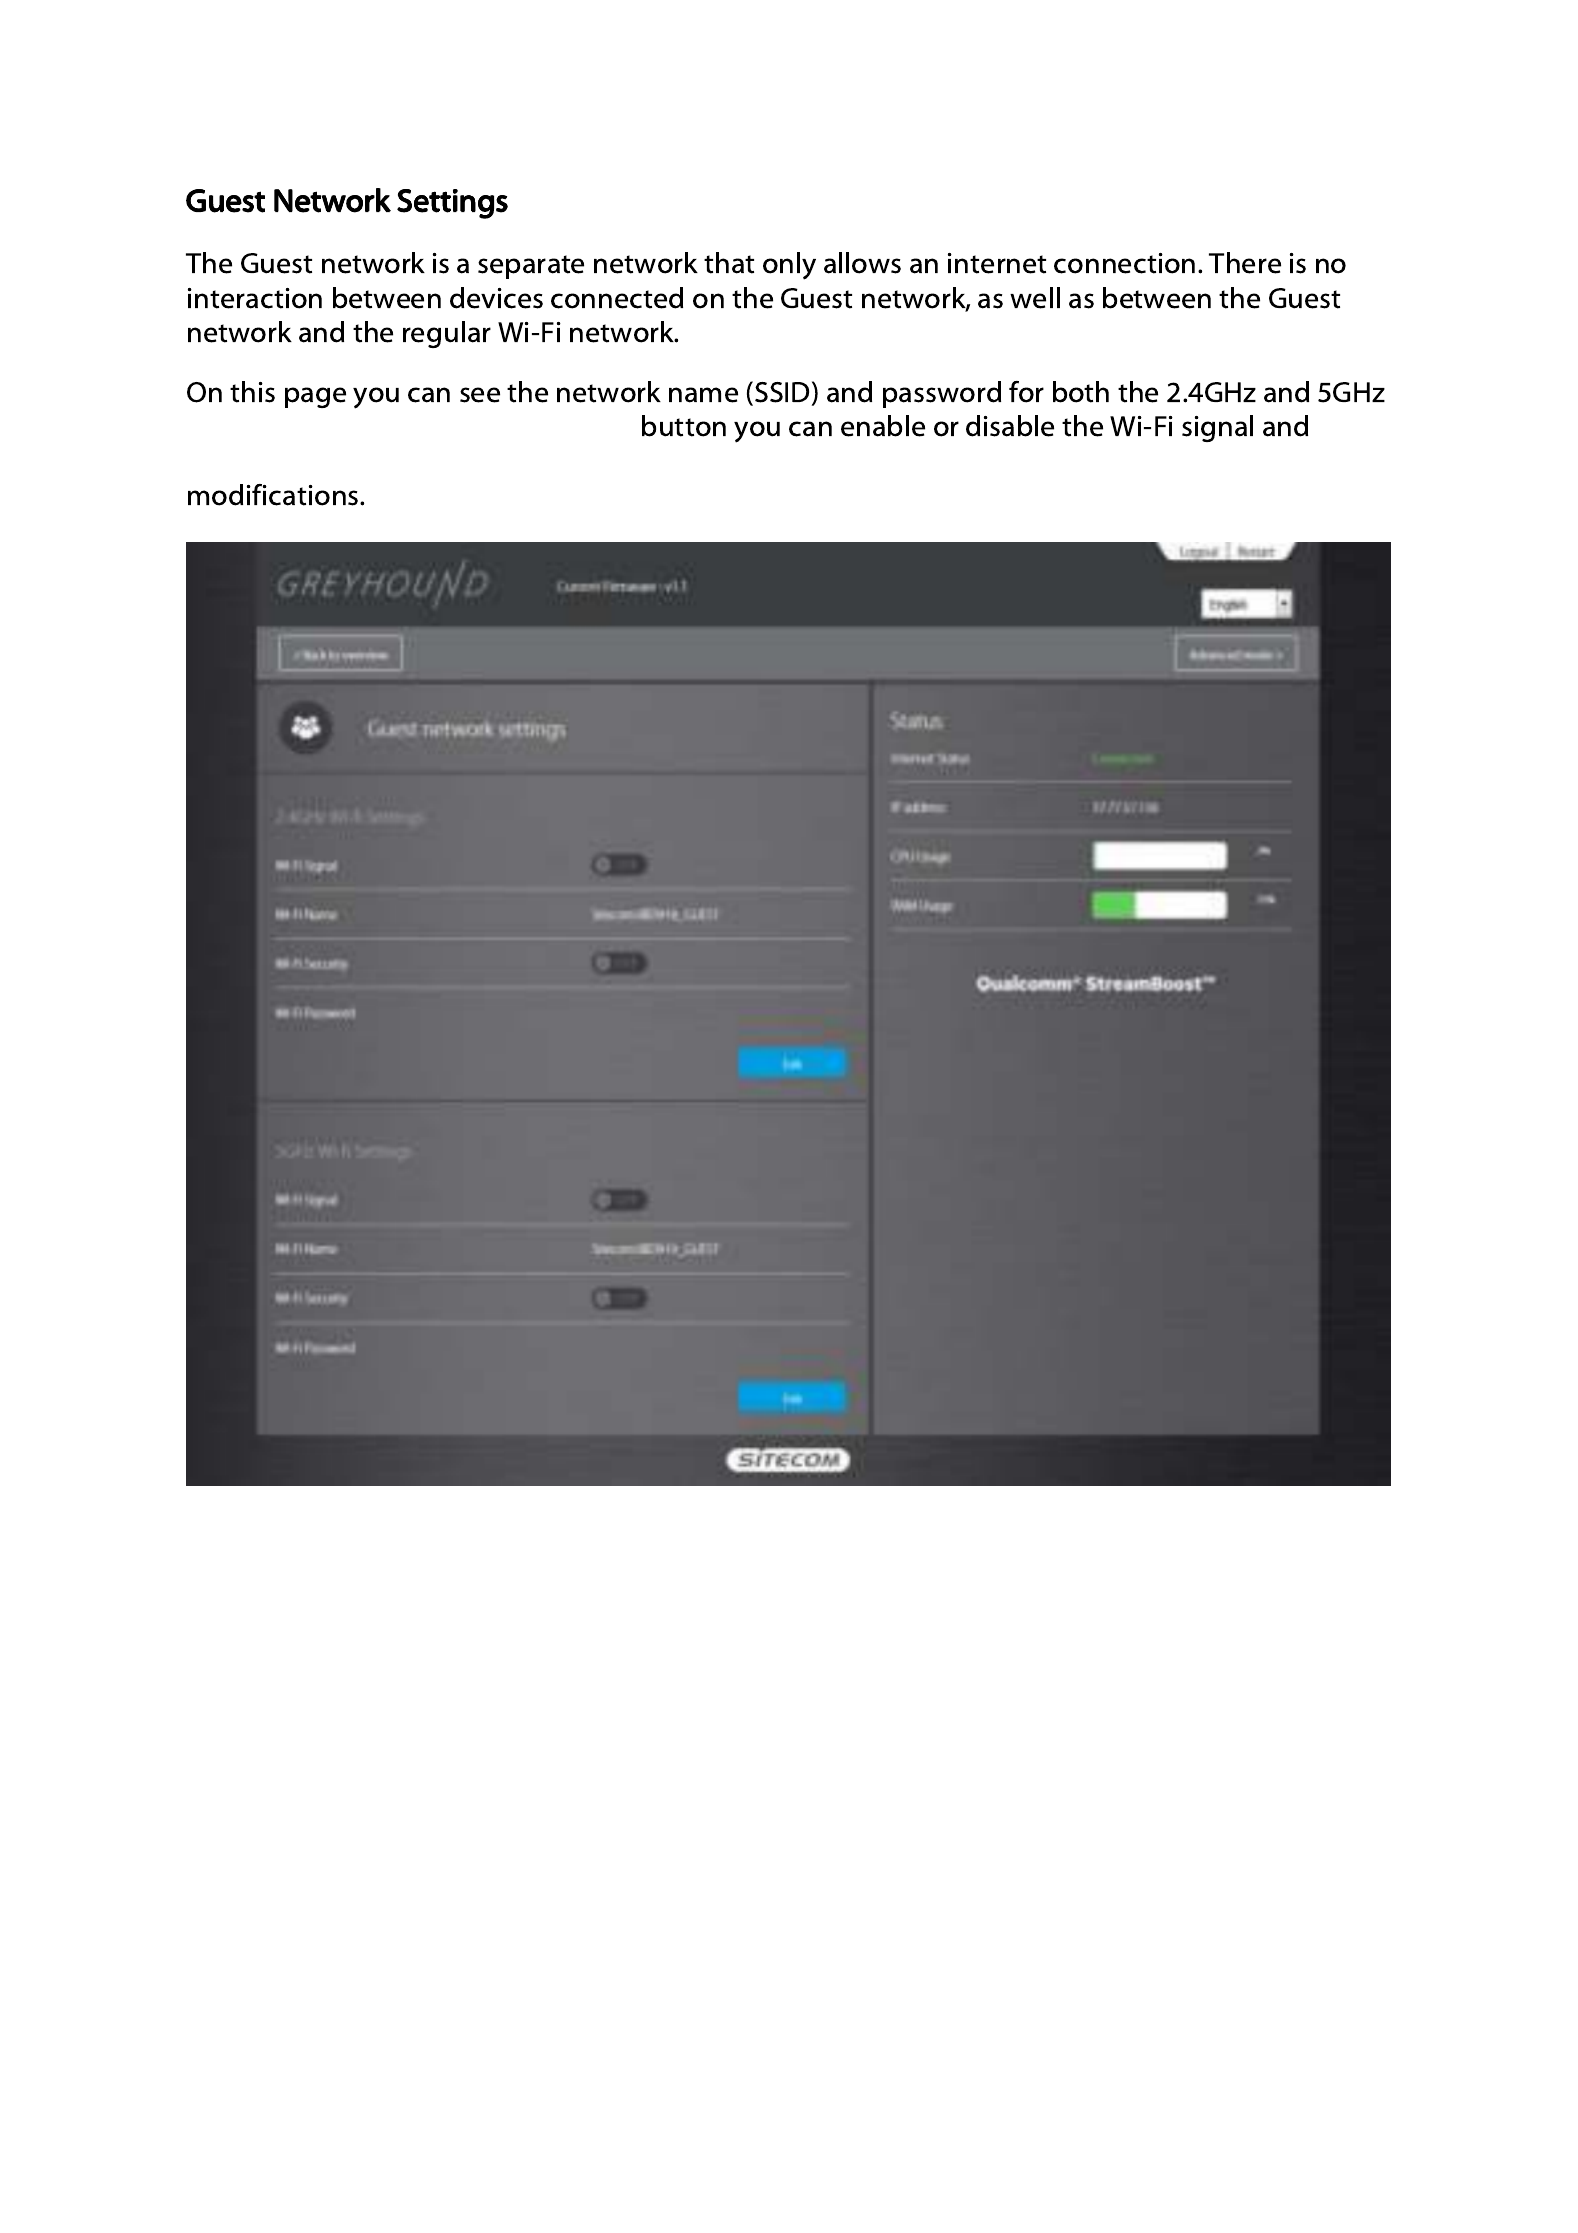
Guest Network Access provides secure -Fi access for guests to share your home or office Wi
network. When you have visitors in your house, apartment, or workplace, you can enable the
guest network for them. You can set different access options for Guest Network users, which is
very effective to ensure the security and privacy of your main network.
• ESSID
ESSID
ESSID
ESSIDESSID: This is the name of the wireless signal which is broadcasted as the Guest
Network. This name cannot be the same as the default SSID.
• Hide ESSID
Hide ESSID
Hide ESSID
Hide ESSIDHide ESSID: H the network name (SSID) from being broadcast publicly. ides
• Separate Clients
Separate Clients
Separate Clients
Separate ClientsSeparate Clients: Prevents client- -client communication on this network. to
• IP Address
IP Address
IP Address
IP AddressIP Address: The gateway address for the Guest Network. This address cannot be the
same as the default router’s IP Address.
• Subnet Mask
Subnet Mask
Subnet Mask
Subnet MaskSubnet Mask: The Subnet Mask for the Guest network. This address cannot be the
same as the default router’s Subnet Mask.
• Guest Start IP + End IP
Guest Start IP + End IP
Guest Start IP + End IP
Guest Start IP + End IPGuest Start IP + End IP: You can select a particular IP address range for your DHCP
server to issue IP addresses to your LAN Clients. The default IP range is
192.168.169.100 ~ 192.168.169.149. This address pool cannot be the same as the
default router’s DHCP Address pool.

WiFi
WiFi
WiFi
WiFi WiFi OPS
OPS
OPS
OPS OPS
–
–
–
––
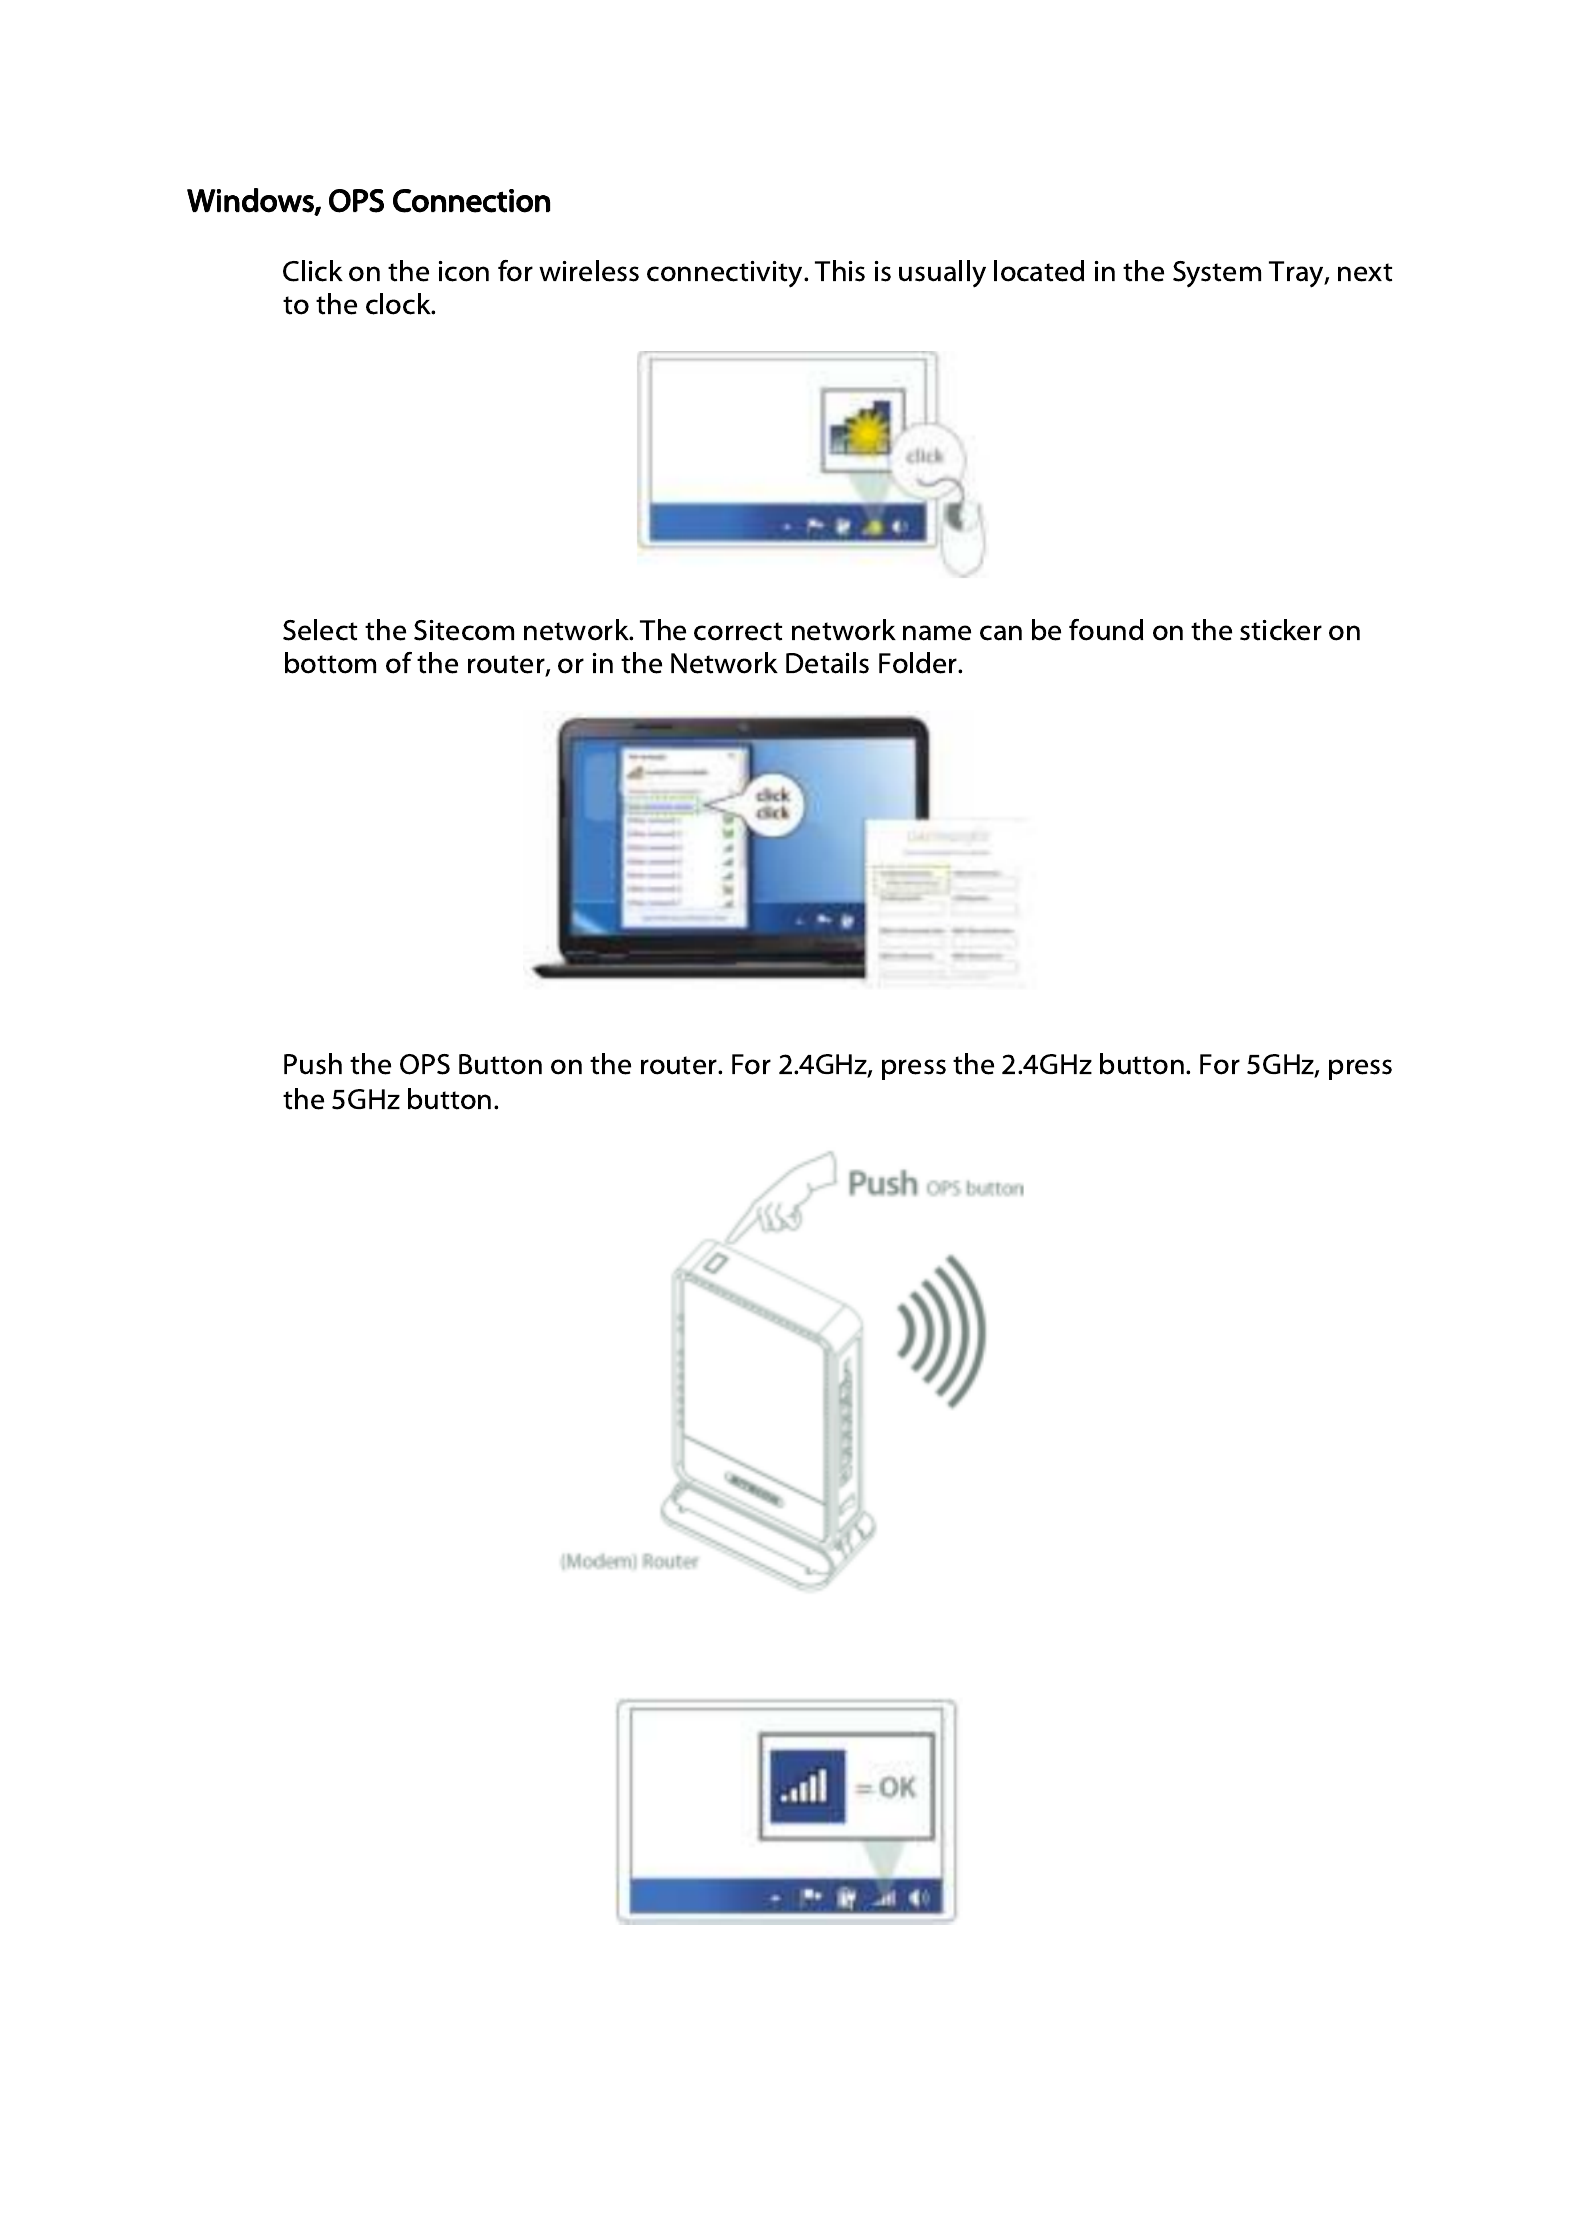
One Push Setup (OPS) is the simplest way to establish a connection between the wireless clients
and the wireless router. You don’t have to select the encryption mode and fill in a long
encryption passphrase every time when you try to setup a wireless connection. You only need
to press a button on both wireless client and wireless router, and OPS will do the rest for you.
The wireless router supports two types of OPS: OPS via Push Button and OPS via PIN code. If you
want to use the Push Button, you have to push a specific button on the wireless client or in the
utility of the wireless client to start the OPS mode, and switch the wireless router to OPS mode.
You can simply push the OPS button of the wireless router, or click the ‘Start to Process’ button
in the web configuration interface. If you want to use the PIN code, you have to know the PIN
code of the wireless client and switch it to OPS mode, then fill-in the PIN code of the wireless
client through the web configuration interface of the wireless router.
• O
O
O
OOPS
PS
PS
PSPS: Check the box to enable OPS function and uncheck it to disable the OPS
function.
• OPS Current Stat
OPS Current Stat
OPS Current Stat
OPS Current StatOPS Current Status
us
us
usus: If the wireless security (encryption) function of this wireless
router is properly set, you’ll see a ‘Configured’ message here. Otherwise, you’ll see
‘UnConfigured’.
• Pin Code
Pin Code
Pin Code
Pin CodePin Code: This is the OPS PIN code of the wireless router. You may need this
information when connecting to other OPS/WPS-enabled wireless devices.
• SSID
SSID
SSID
SSIDSSID: This is the network broadcast name (SSID) of the router.
• Authentication M
Authentication M
Authentication M
Authentication MAuthentication Mode
ode
ode
odeode: It shows the active authentication mode for the wireless
connection.
• Passphrase Key
Passphrase Key
Passphrase Key
Passphrase KeyPassphrase Key: It shows the passphrase key that is randomly generated by the
wireless router during the WPS process. You may need this information when using
a device which doesn’t support WPS.
• OPS via Push Butto
OPS via Push Butto
OPS via Push Butto
OPS via Push ButtoOPS via Push Button
n
n
nn: Press the button to start the OPS process. The router will wait
for the OPS/WPS request from the wireless devices within 2 minutes.

Interface Settings
Interfaces
Interfaces
Interfaces
Interfaces Interfaces Overview
Overview
Overview
Overview Overview
–
–
–
––
On this page you can see the various wired connections of your router. You can also connect
and disconnect the WAN port to troubleshoot your internet connection. By clicking ‘Edit’ you’ll
enter the settings page.

Interfaces - LAN
Interfaces - LAN
Interfaces - LAN
Interfaces - LAN Interfaces - LAN
The LAN tab gives you the opportunity to change the IP settings of the router.
Click at the bottom of this screen to save any changes.
Save & Apply
Save & Apply
Save & Apply
Save & ApplySave & Apply
• IP
IP
IP
IPIPv4 address 192.1
v4 address 192.1
v4 address 192.1
v4 address 192.1v4 address 192.168.0.1
68.0.1
68.0.1
68.0.168.0.1: It is the router’s LAN IP address (Your LAN clients default
gateway IP address).
• IP
IP
IP
IPIPv4 netmask 255
v4 netmask 255
v4 netmask 255
v4 netmask 255v4 netmask 255.255.255.0
.255.255.0
.255.255.0
.255.255.0.255.255.0: Specify a Subnet Mask for your LAN segment.
• DHCP Server
DHCP Server
DHCP Server
DHCP ServerDHCP Server: Enabled by default. You can enable or disable the DHCP server. When
DHCP is disabled no ip-addresses are assigned to clients and you have to use static
ip-addresses. When DHCP server is enabled your computers will be assigned an ip-
address automatically until the lease time expires.
• IP Address Pool
IP Address Pool
IP Address Pool
IP Address PoolIP Address Pool: You can select a particular IP address range for your DHCP server to
issue IP addresses to your LAN Clients. The default IP range is 192.168.0.100 ~
192.168.0.200. If you want your PC(s) to have a static/fixed IP address, then you’ll
have to choose an IP address outside this IP address Pool
• Lease Time
Lease Time
Lease Time
Lease TimeLease Time: Half day. In the Lease Time setting you can specify the time period that
the DHCP lends an IP address to your LAN clients. The DHCP will change your LAN
client’s IP address when this time threshold period is reached.
• Domain Name
Domain Name
Domain Name
Domain NameDomain Name: You can specify a Domain Name for your LAN or st keep the default ju
(sitecom.router ).

Static DHCP IP
Static DHCP IP
Static DHCP IP
Static DHCP IP Static DHCP IP
If you want a client to always have the same IP address assigned, you can create a DHCP
reservation. The router will assign the IP address only to that client This IP address must be .
within the DHCP IP Address Range specified above, under DHCP Server.
Click the + sign to add a client to the list.
IP Address
IP Address
IP Address
IP AddressIP Address: Enter the IP Address you want to assign to the client. This IP Address must be
within the DHCP IP Address Range.
MAC address
MAC address
MAC address
MAC addressMAC address: Enter the MAC Address of the client.
Click ‘
Save & Apply
Save & Apply
Save & Apply
Save & ApplySave & Apply’ to save your selections.
Interfaces
Interfaces
Interfaces
Interfaces Interfaces WAN
WAN
WAN
WAN WAN
–
–
–
––
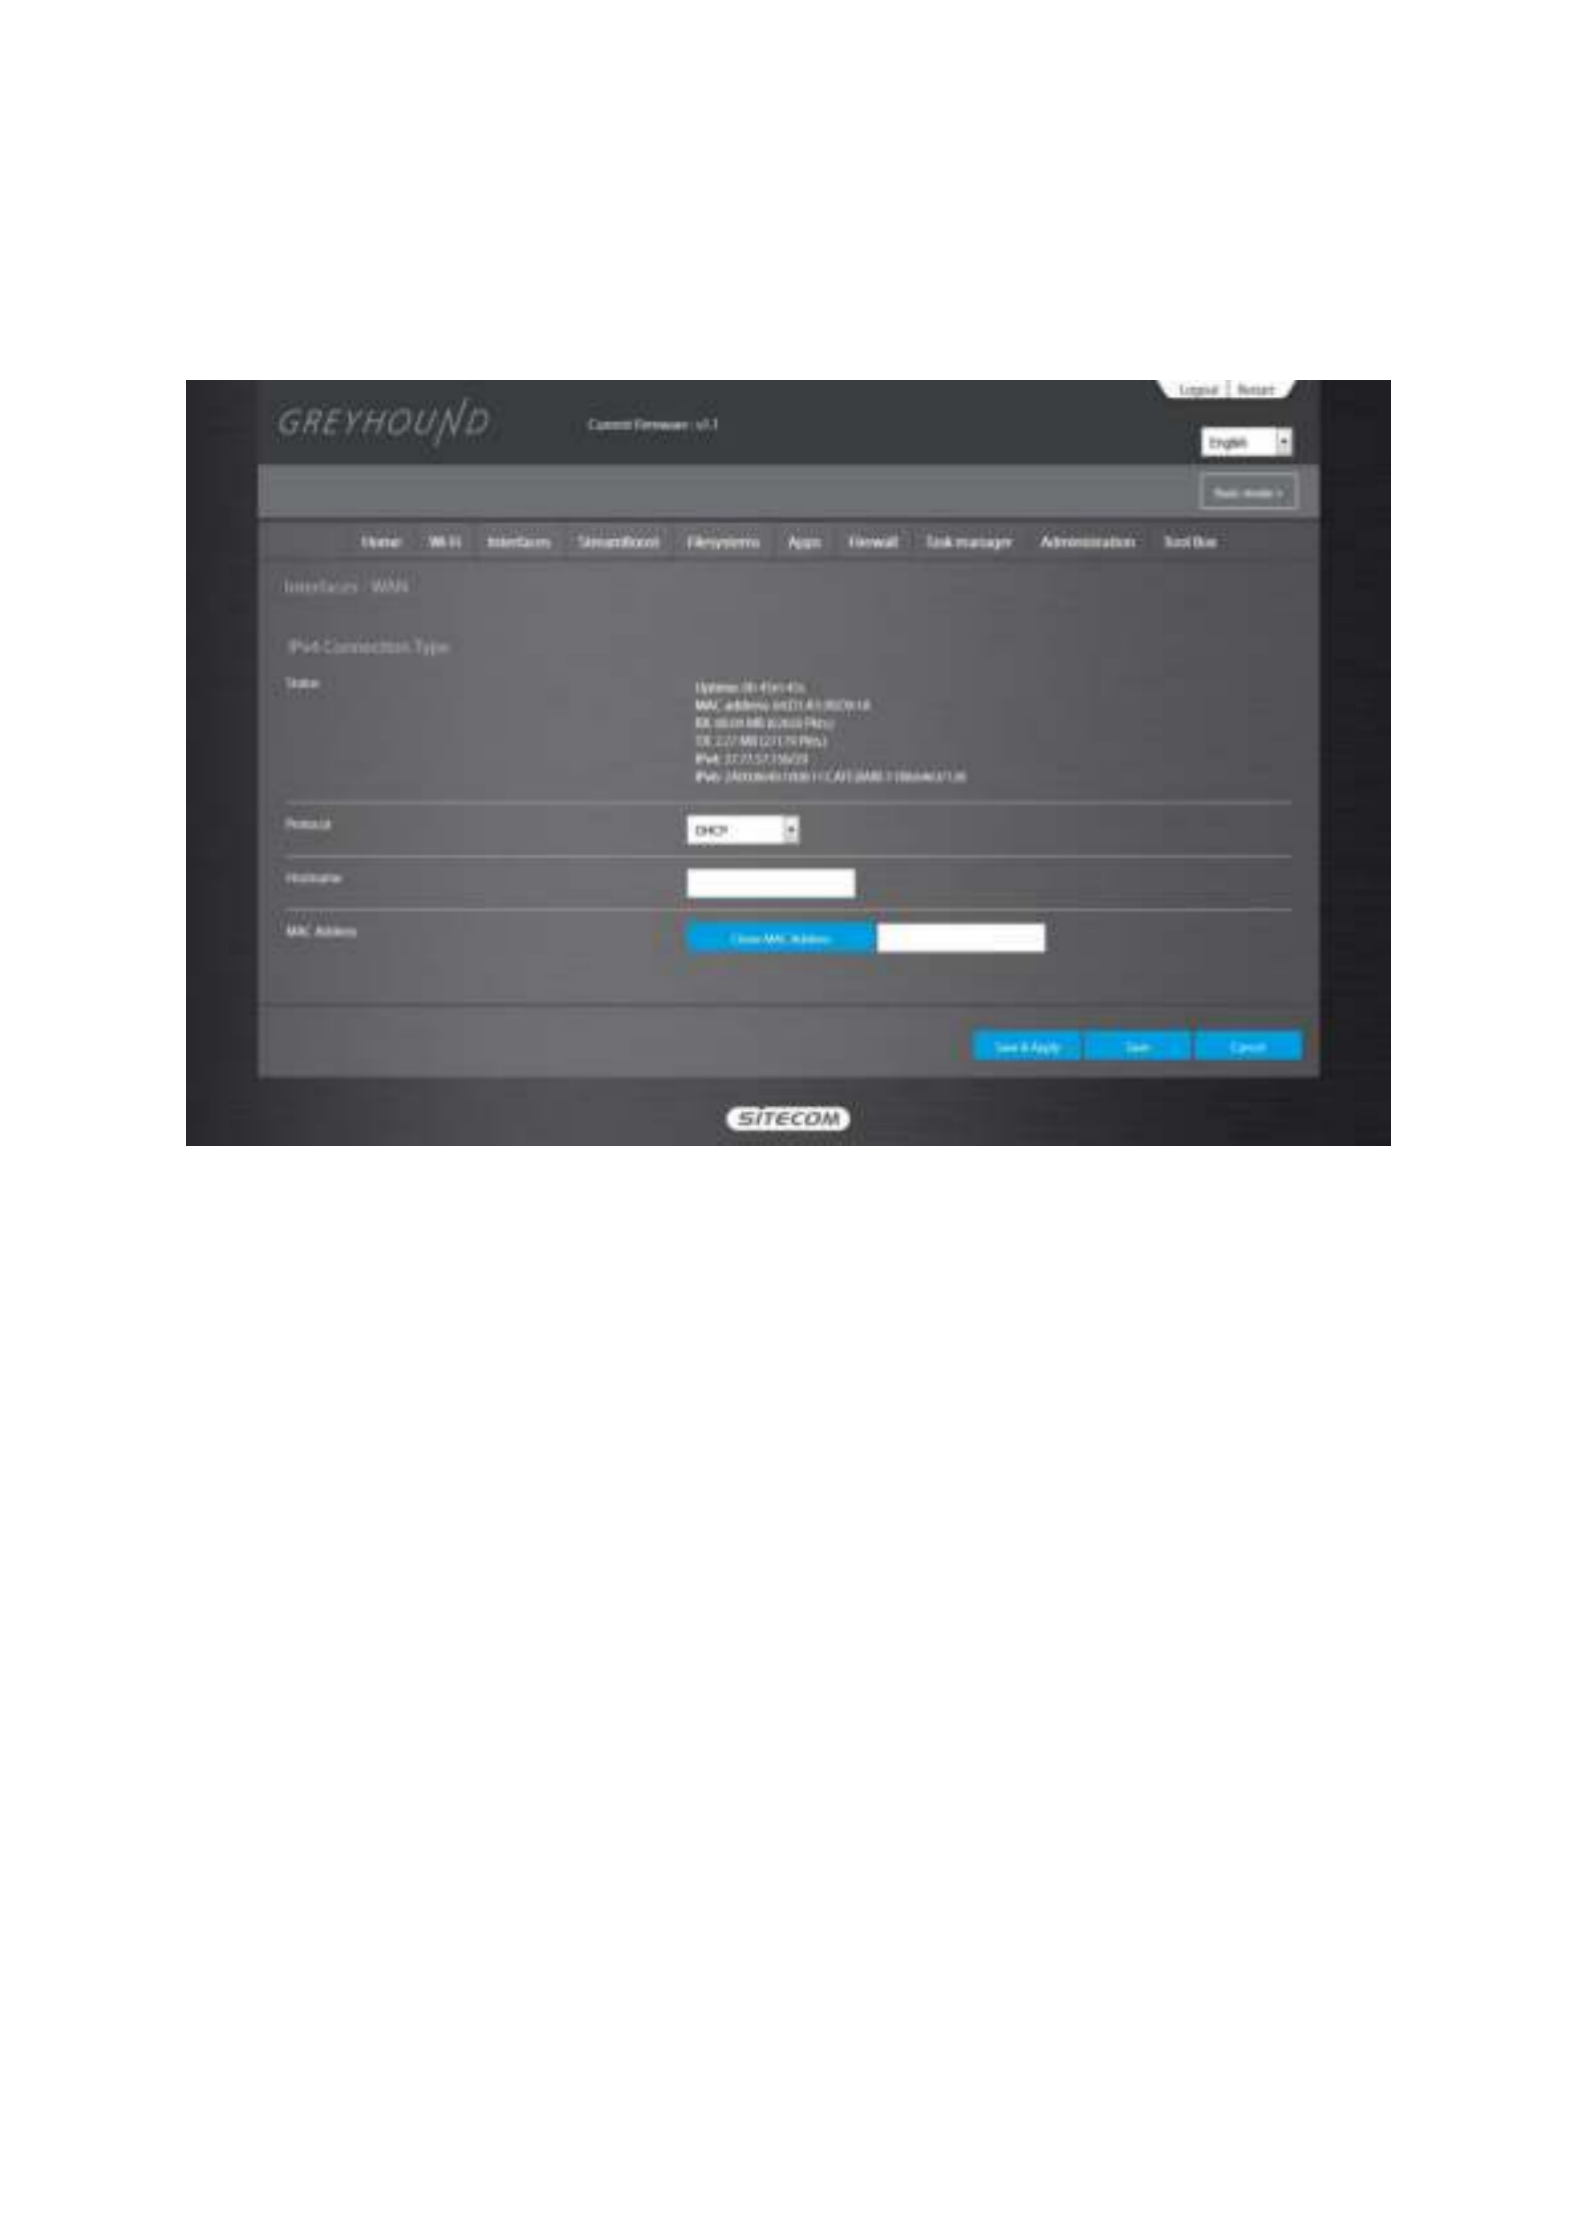
Depending on the chosen setting, you may need to enter your user name and password, MAC
address or hostname in the following window. After you have entered the correct information,
click Save & Apply
Save & Apply
Save & Apply
Save & ApplySave & Apply.

Interfaces
Interfaces
Interfaces
Interfaces Interfaces Switch
Switch
Switch
Switch Switch
–
–
–
––
A VLAN is a switched network that is logically segmented by function, project team, or
application, without regard to the physical locations of the users. VLANs have the same
attributes as physical LANs, but you can group end stations even if they are not physically
located on the same LAN segment. Any switch module port can belong to a VLAN, and unicast,
broadcast, and multicast packets are forwarded and flooded only to end stations in the VLAN.

Interfaces
Interfaces
Interfaces
Interfaces Interfaces Routes
Routes
Routes
Routes Routes
–
–
–
––
Static routing is a form of routing that occurs when a router uses a manually-configured routing
entry, rather than information from a dynamic routing traffic Unlike dynamic routing, static .
routes are fixed and do not change if the network is changed or reconfigured.
Destination LAN IP
Destination LAN IP
Destination LAN IP
Destination LAN IPDestination LAN IP: The IP address of the network to include in the routing table.
Subnet Mask
Subnet Mask
Subnet Mask
Subnet MaskSubnet Mask: The subnet mask for this destination. If the destination is a single host,
type 255.255.255.255
Default Gateway
Default Gateway
Default Gateway
Default GatewayDefault Gateway: This must be a router on the same LAN segment as the router.
Metric
Metric
Metric
MetricMetric: Represents the number of routers between your network and the destination.
Interface
Interface
Interface
InterfaceInterface: Select WAN or LAN, depending on which side you want the route to be active.
Click the + sign to add more routes. Click ‘ Save & Apply
Save & Apply
Save & Apply
Save & ApplySave & Apply’ to save the settings.

StreamBoost
StreamBoost
StreamBoost
StreamBoost StreamBoost
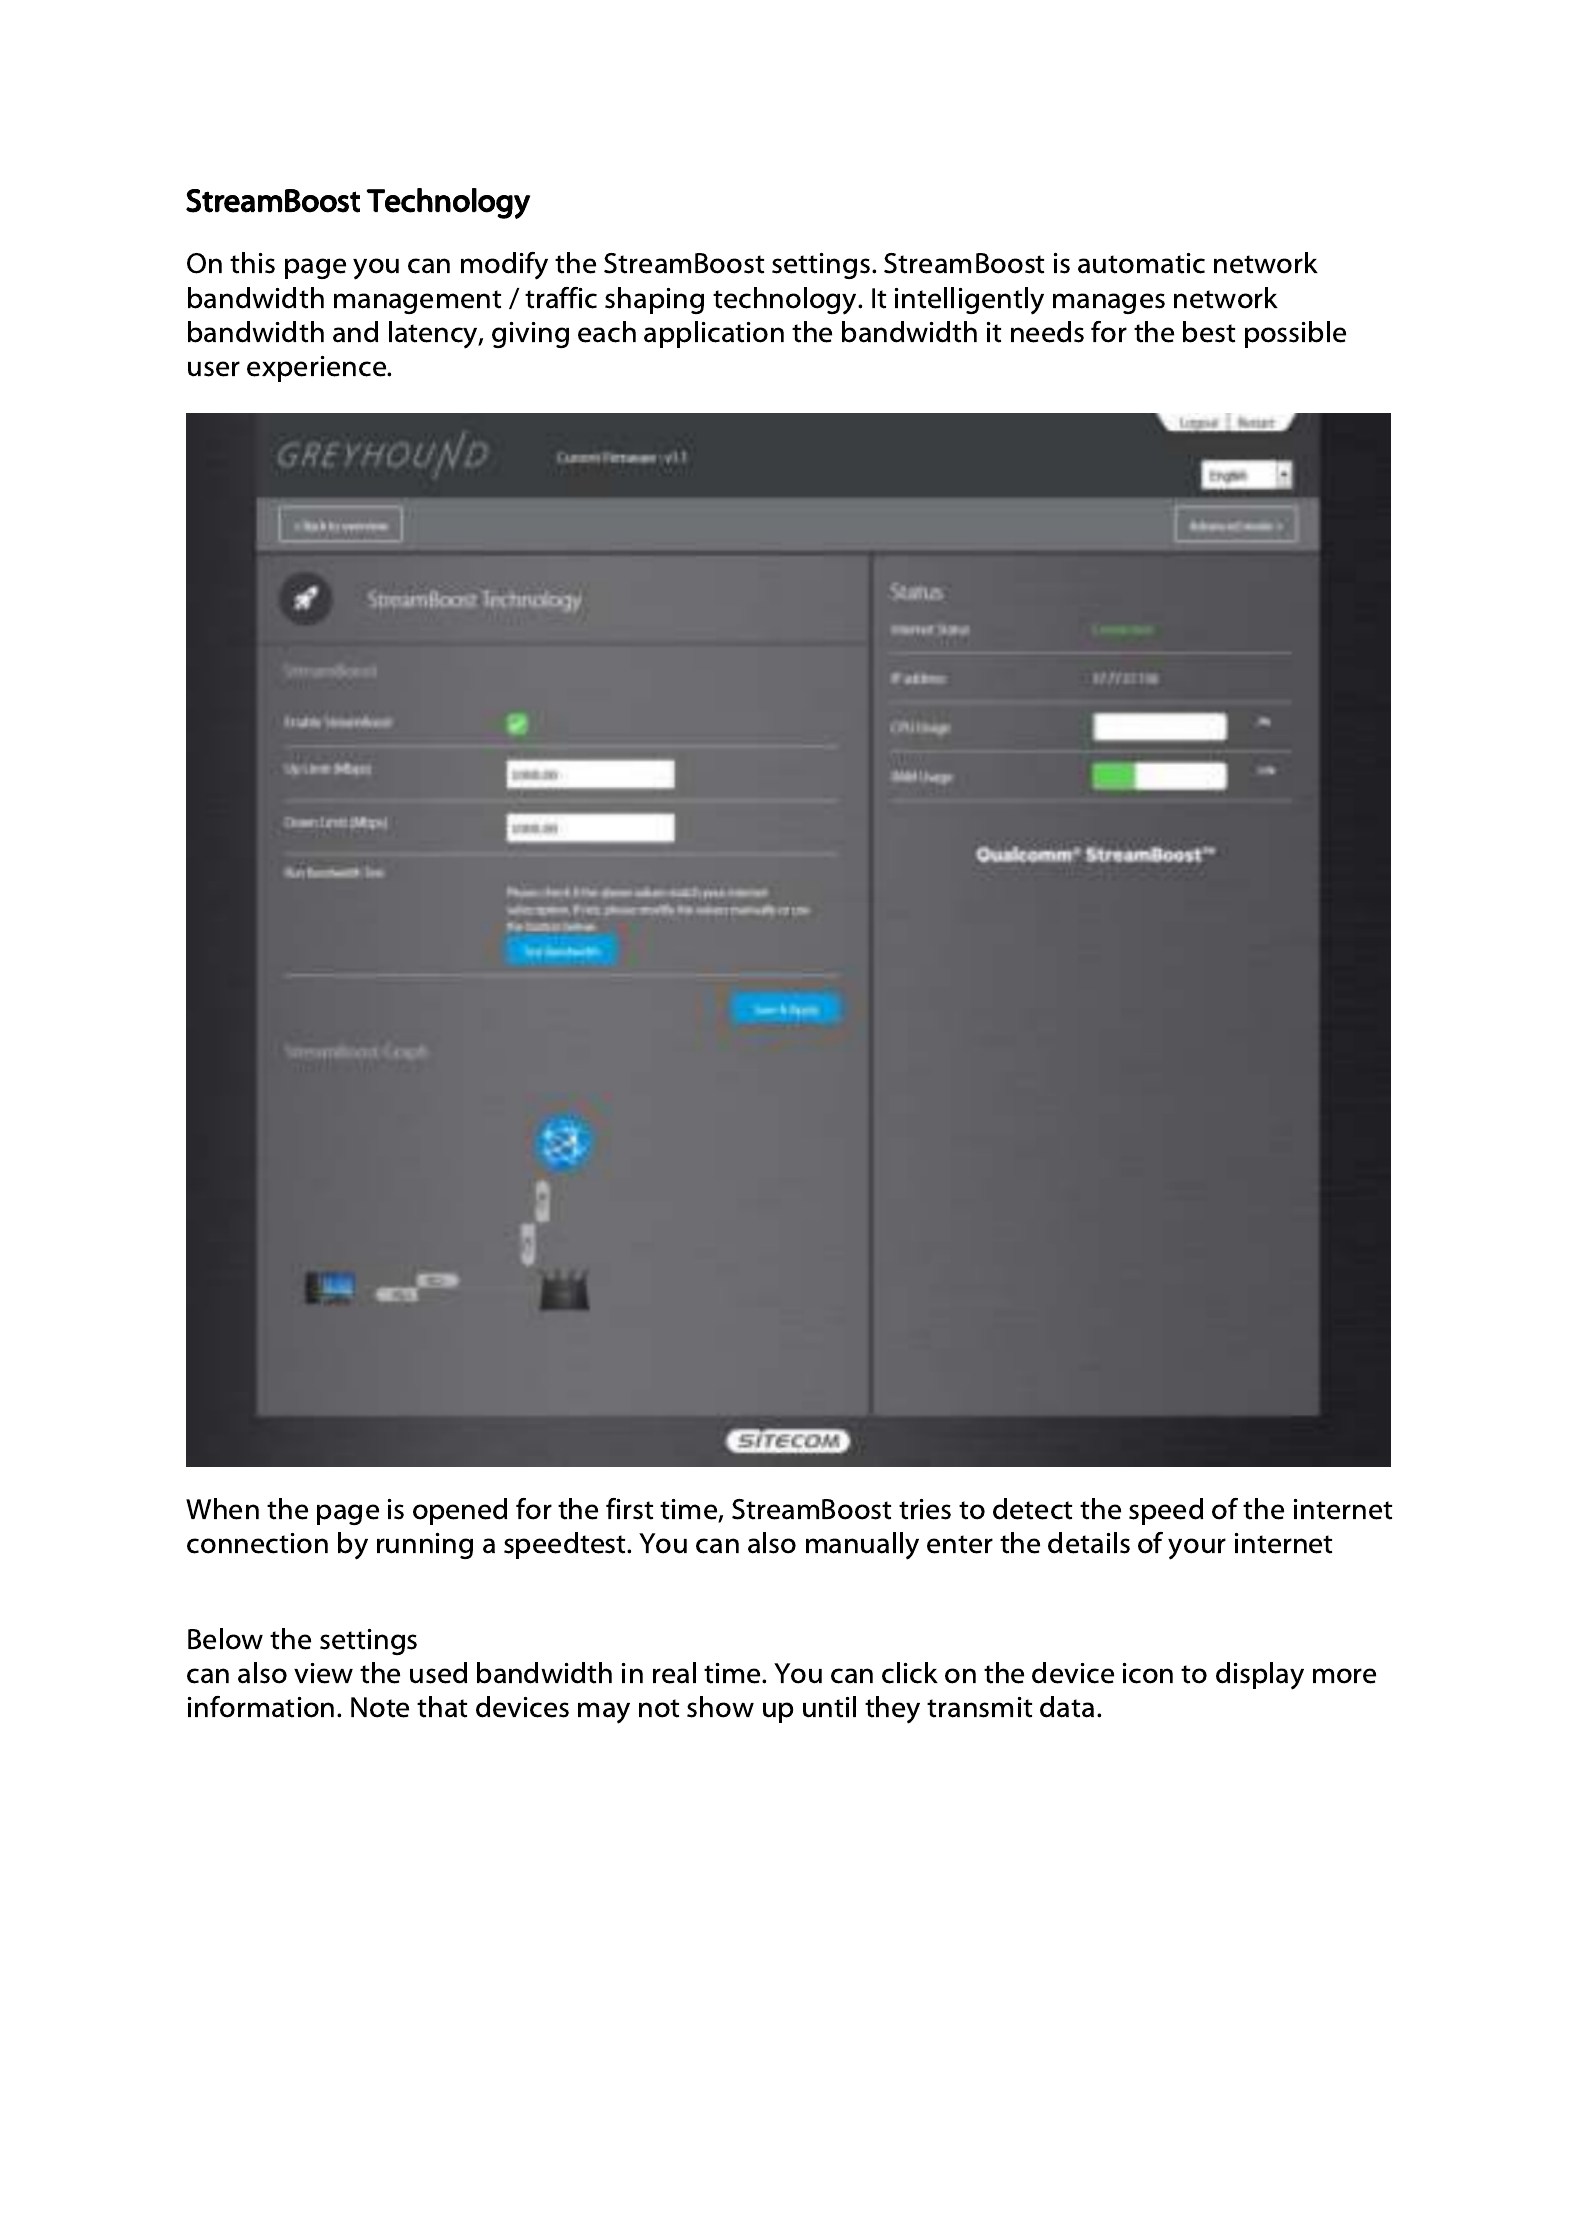
StreamBoost is automatic network bandwidth management / traffic shaping technology. It
intelligently manages network bandwidth and latency, giving each application the bandwidth it
needs for the best possible user experience.
StreamBoost
StreamBoost
StreamBoost
StreamBoost StreamBoost Priorities
Priorities
Priorities
Priorities Priorities
–
–
–
––
You can select the priority of each device on your local network. The priority control buttons are
the arrows within the boxes to the left of each icon representing a device. Click the up arrow to
move the device higher in the priority list, or click the down arrow to lower the priority.

StreamBoost
StreamBoost
StreamBoost
StreamBoost StreamBoost Up Time
Up Time
Up Time
Up Time Up Time
–
–
–
––
Here you can view the Active Time (in minutes) and see what applications are being used. You
can select the time frame from the drop-down menu. Choose from last month, last week, or last
day.

StreamBoost
StreamBoost
StreamBoost
StreamBoost StreamBoost Downloads
Downloads
Downloads
Downloads Downloads
–
–
–
––
Here you can view the type of traffic that is mostly used on your network, including the
consumed bandwidth.
StreamBoost
StreamBoost
StreamBoost
StreamBoost StreamBoost Consumption Per Dev
Consumption Per Dev
Consumption Per Dev
Consumption Per Dev Consumption Per Device
ice
ice
ice ice
–
–
–
––
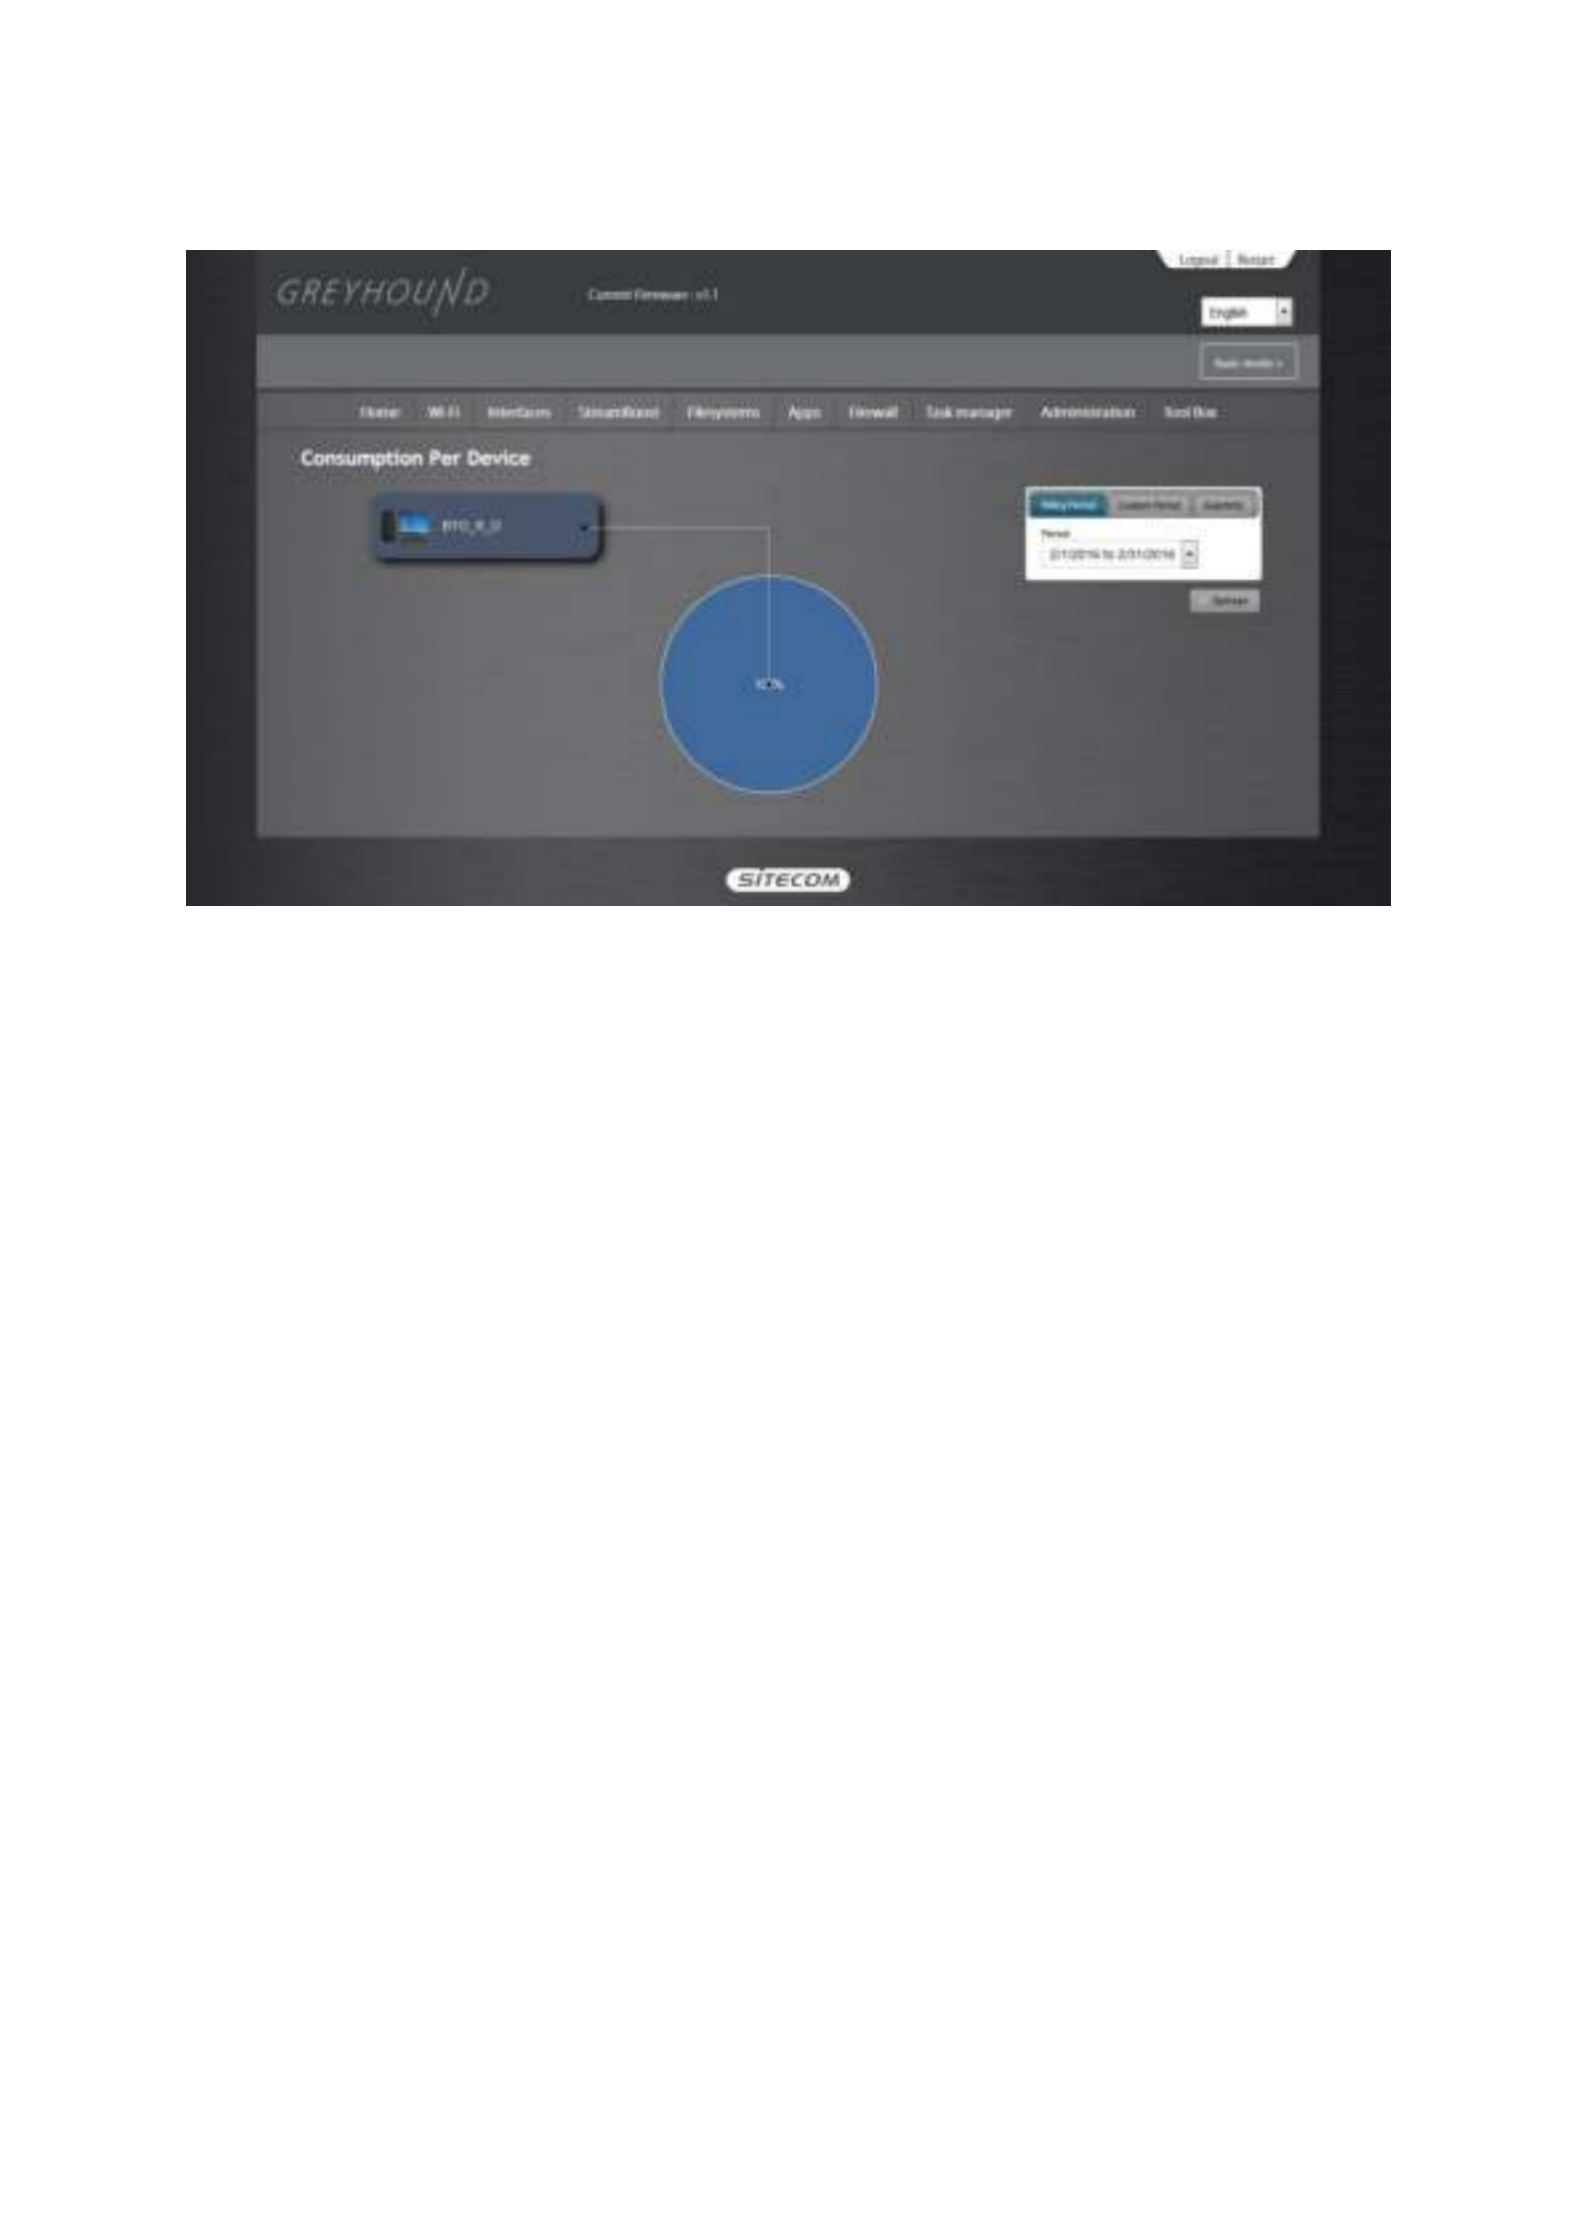
Here you can view the bandwidth consumption per device. You can click on the device to
highlight it. You can select the time frame from the drop-down menu.

StreamBoost
StreamBoost
StreamBoost
StreamBoost StreamBoost Consumption per Flow
Consumption per Flow
Consumption per Flow
Consumption per Flow Consumption per Flow
–
–
–
––
Here you can view the bandwidth consumption per traffic type. You can click on traffic type to
highlight it. You can select the time frame from the drop-down menu.

File System Settings
File System Settings
File System Settings
File System Settings File System Settings
File Systems
File Systems
File Systems
File Systems File Systems Mount Poi
Mount Poi
Mount Poi
Mount Poi Mount Points
nts
nts
nts nts
–
–
–
––
On this page you will find all the storage points that the OpenWRT operating system uses.
Under the ‘Mount Points’ section you’ll find the attached USB storage devices.

File Systems
File Systems
File Systems
File Systems File Systems FTP
FTP
FTP
FTP FTP
–
–
–
––
On this page you can configure the users that have access to the FTP server. The default admin
user already has access.
Add User
Add User
Add User
Add UserAdd User: Click here to add a new user. You can enter a username and a password and
choose to assign ‘Read’, ‘Read/Write’, ‘Read/Delete’ or ‘All’ rights to the files and folders
on the storage device attached to the router.
Edit User
Edit User
Edit User
Edit UserEdit User: Click on the radio button in front of the user you want to edit and click the
button. Now you can modify the same settings as in the ‘Add User’ section.
Remove User
Remove User
Remove User
Remove UserRemove User: Click on the radio button in front of the user you want to edit and click the
button. The user will be removed.
File Systems
File Systems
File Systems
File Systems File Systems Network S
Network S
Network S
Network S Network Shares
hares
hares
hares hares
–
–
–
––
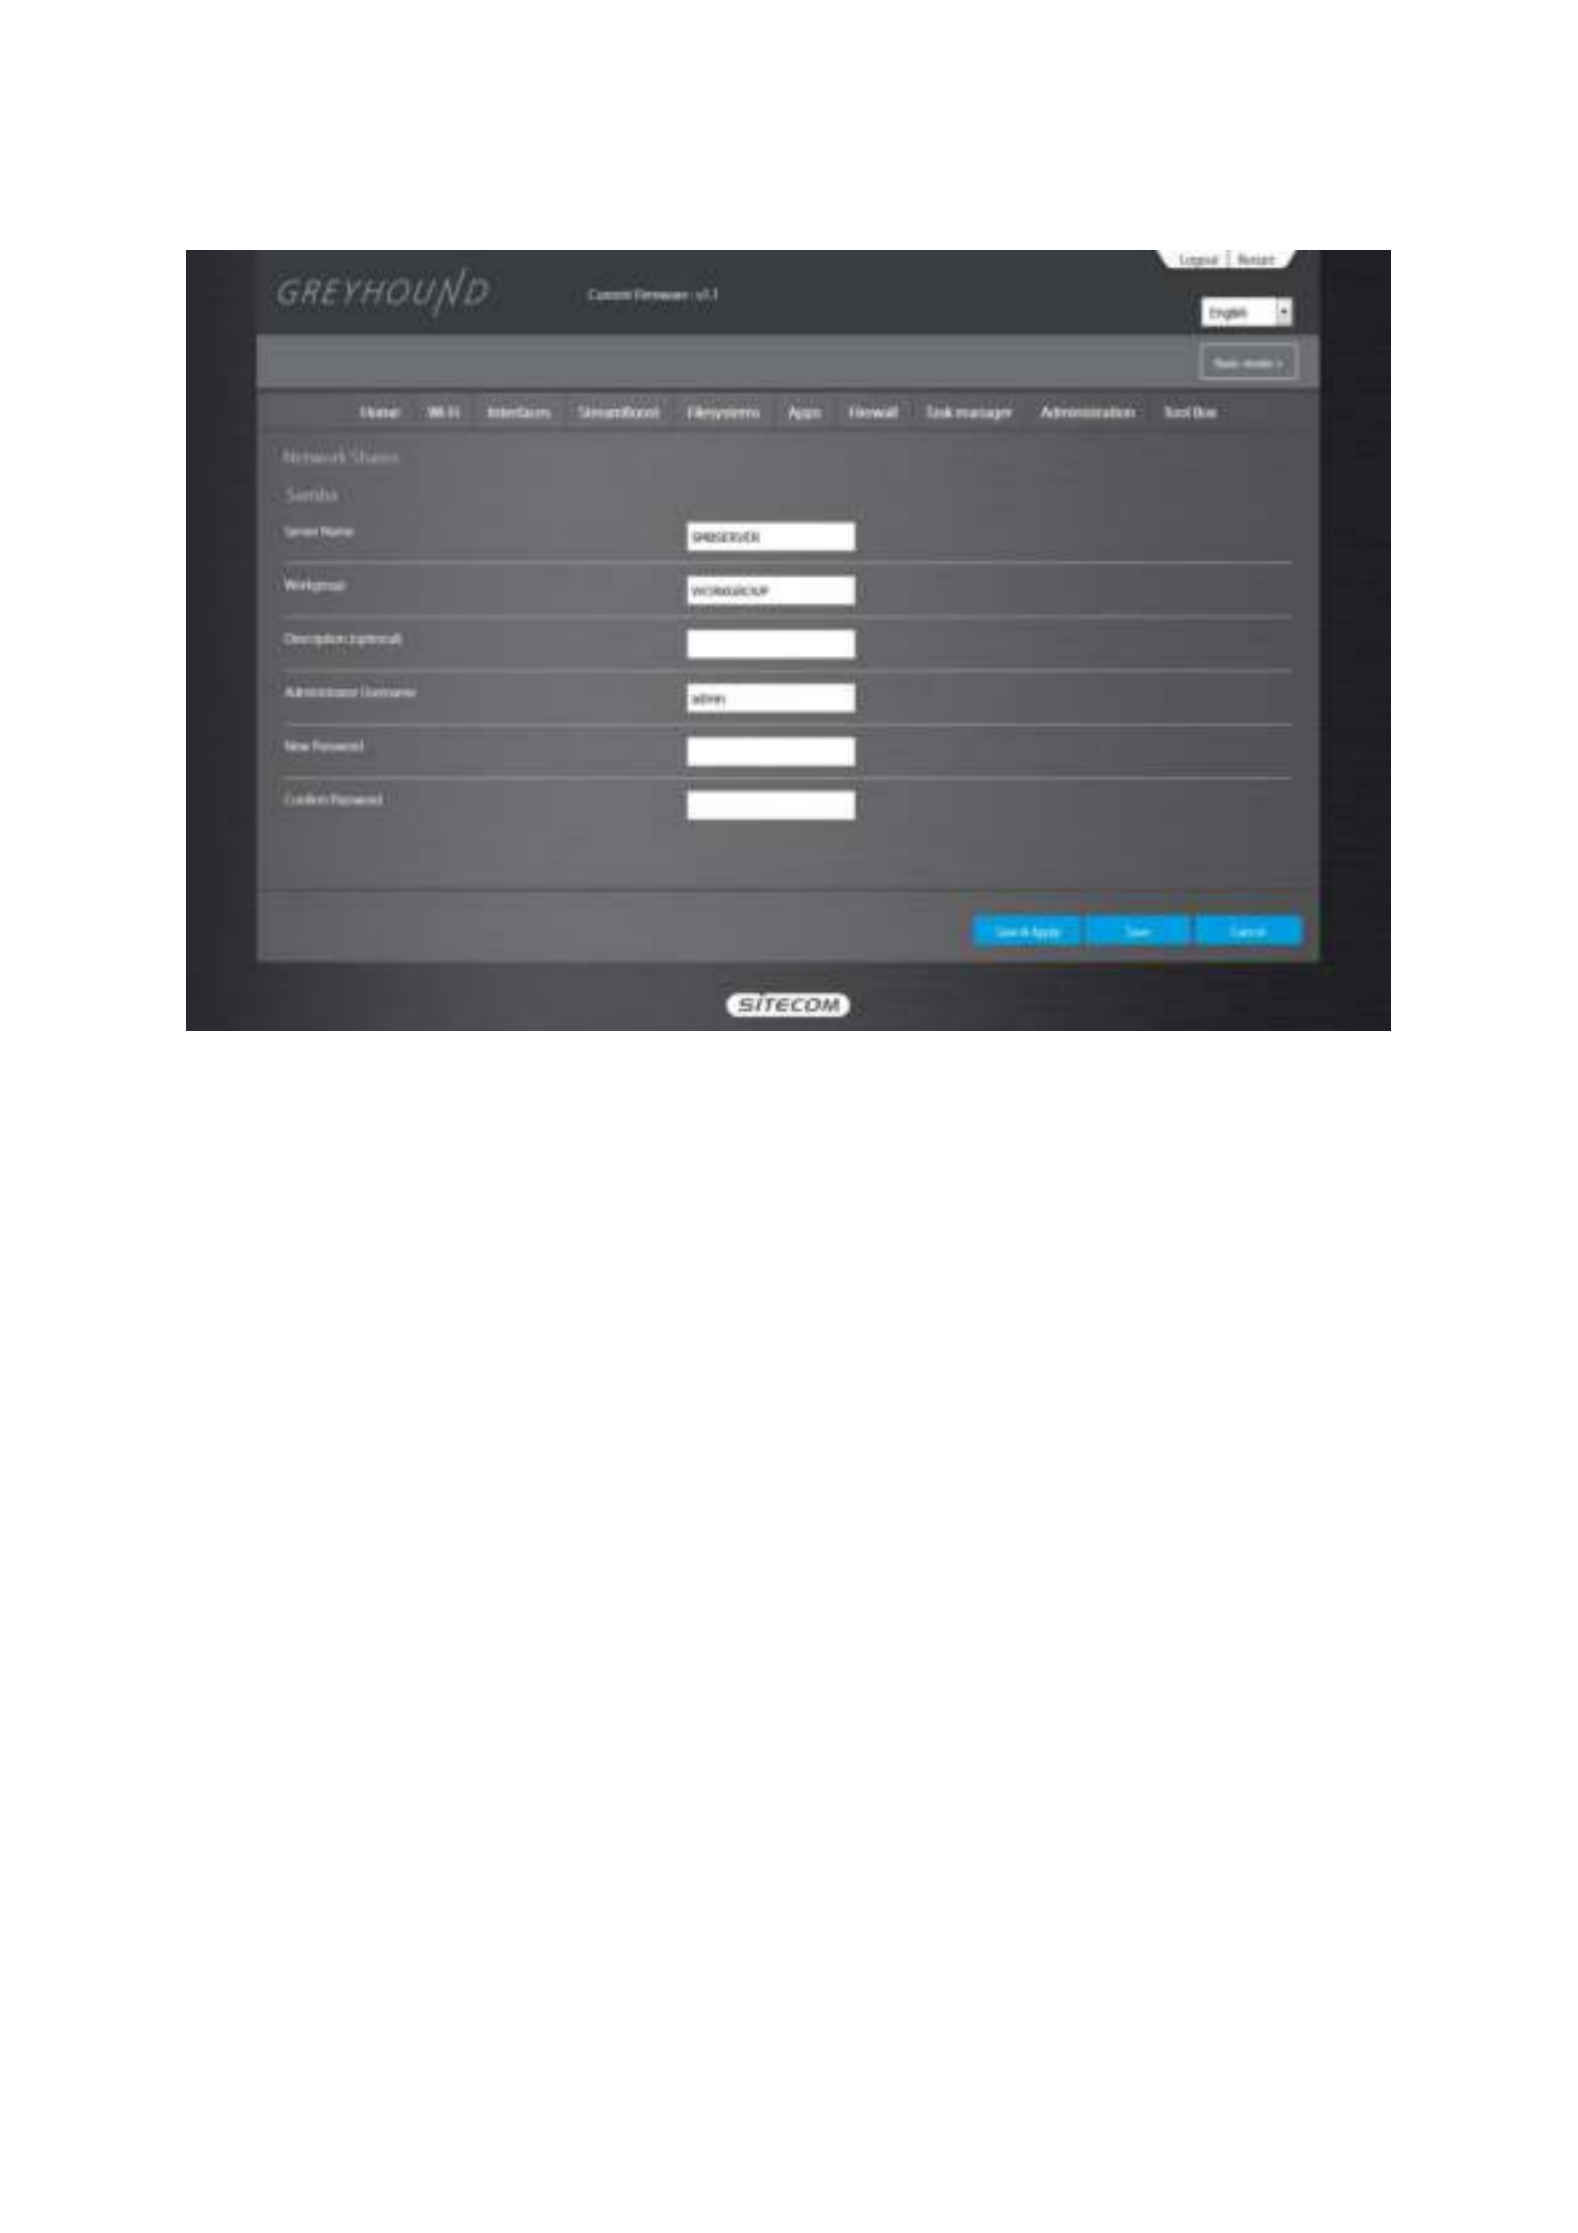
On this page you can edit the settings for the SMB server.
Server name
Server name
Server name
Server nameServer name: Enter a name for the network share.
Workgroup
Workgroup
Workgroup
WorkgroupWorkgroup: If you wish to add the share to your workgroup enter the workgroup name
here.
Description
Description
Description
DescriptionDescription: Enter a desired description for the share.
Administrator
Administrator
Administrator
AdministratorAdministrator: Enter a desired username for access to the share.
New Password
New Password
New Password
New PasswordNew Password: Enter the password for access to the share and confirm this password by
re-entering it in the Confirm password field
File Systems
File Systems
File Systems
File Systems File Systems Transmission
Transmission
Transmission
Transmission Transmission
–
–
–
––
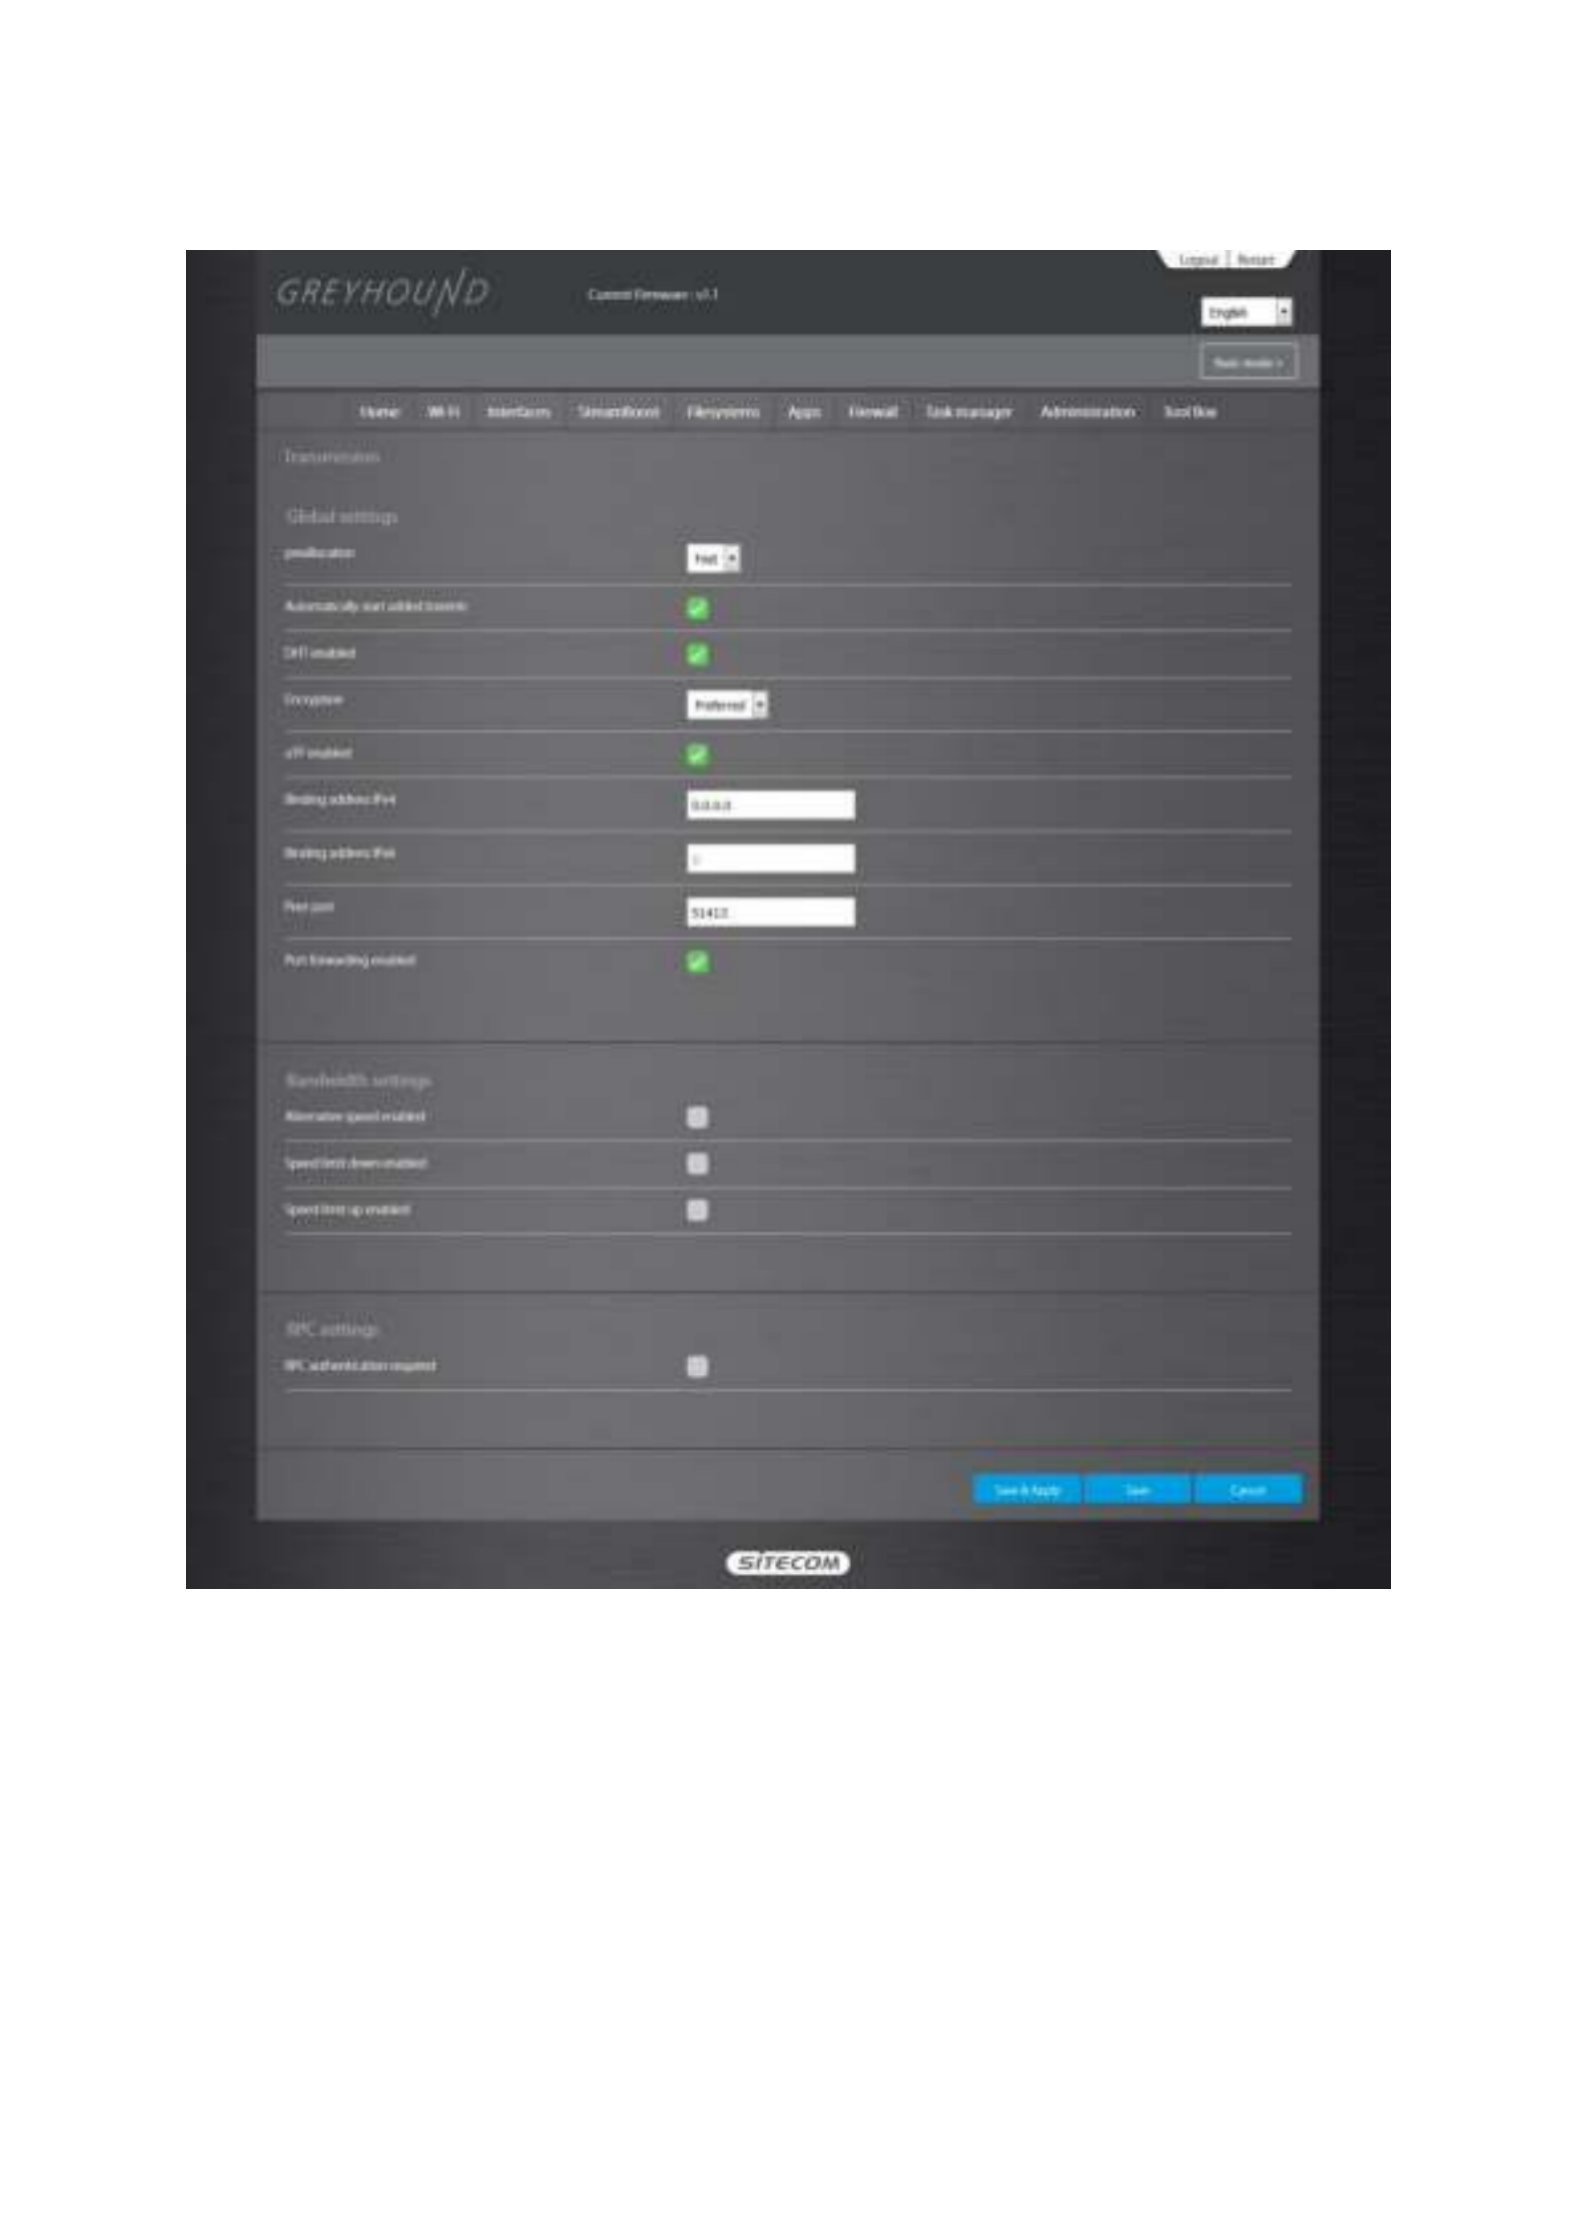
On this page you can edit the settings for the Bittorrent client Transmission. Transmission has its
own web interface that can be opened via the ‘Open Web Interface’ button.
Preallocation
Preallocation
Preallocation
PreallocationPreallocation: Whether to fill the space for chunks not yet downloaded with "0" (helps
avoiding fragmentation).
DHT enabled
DHT enabled
DHT enabled
DHT enabledDHT enabled: Whether to enable dht (distributed hash tables).
Encryption
Encryption
Encryption
EncryptionEncryption: Whether to use encrypted connections only.
uTP enabled
uTP enabled
uTP enabled
uTP enableduTP enabled: Whether or not to enable the Micro Transport Protocol. This function is
intended to mitigate poor latency and other congestion control issues found in
conventional BitTorrent.
Binding address
Binding address
Binding address
Binding addressBinding address: Where to listen for peer connections.
App Settings
App Settings
App Settings
App Settings App Settings
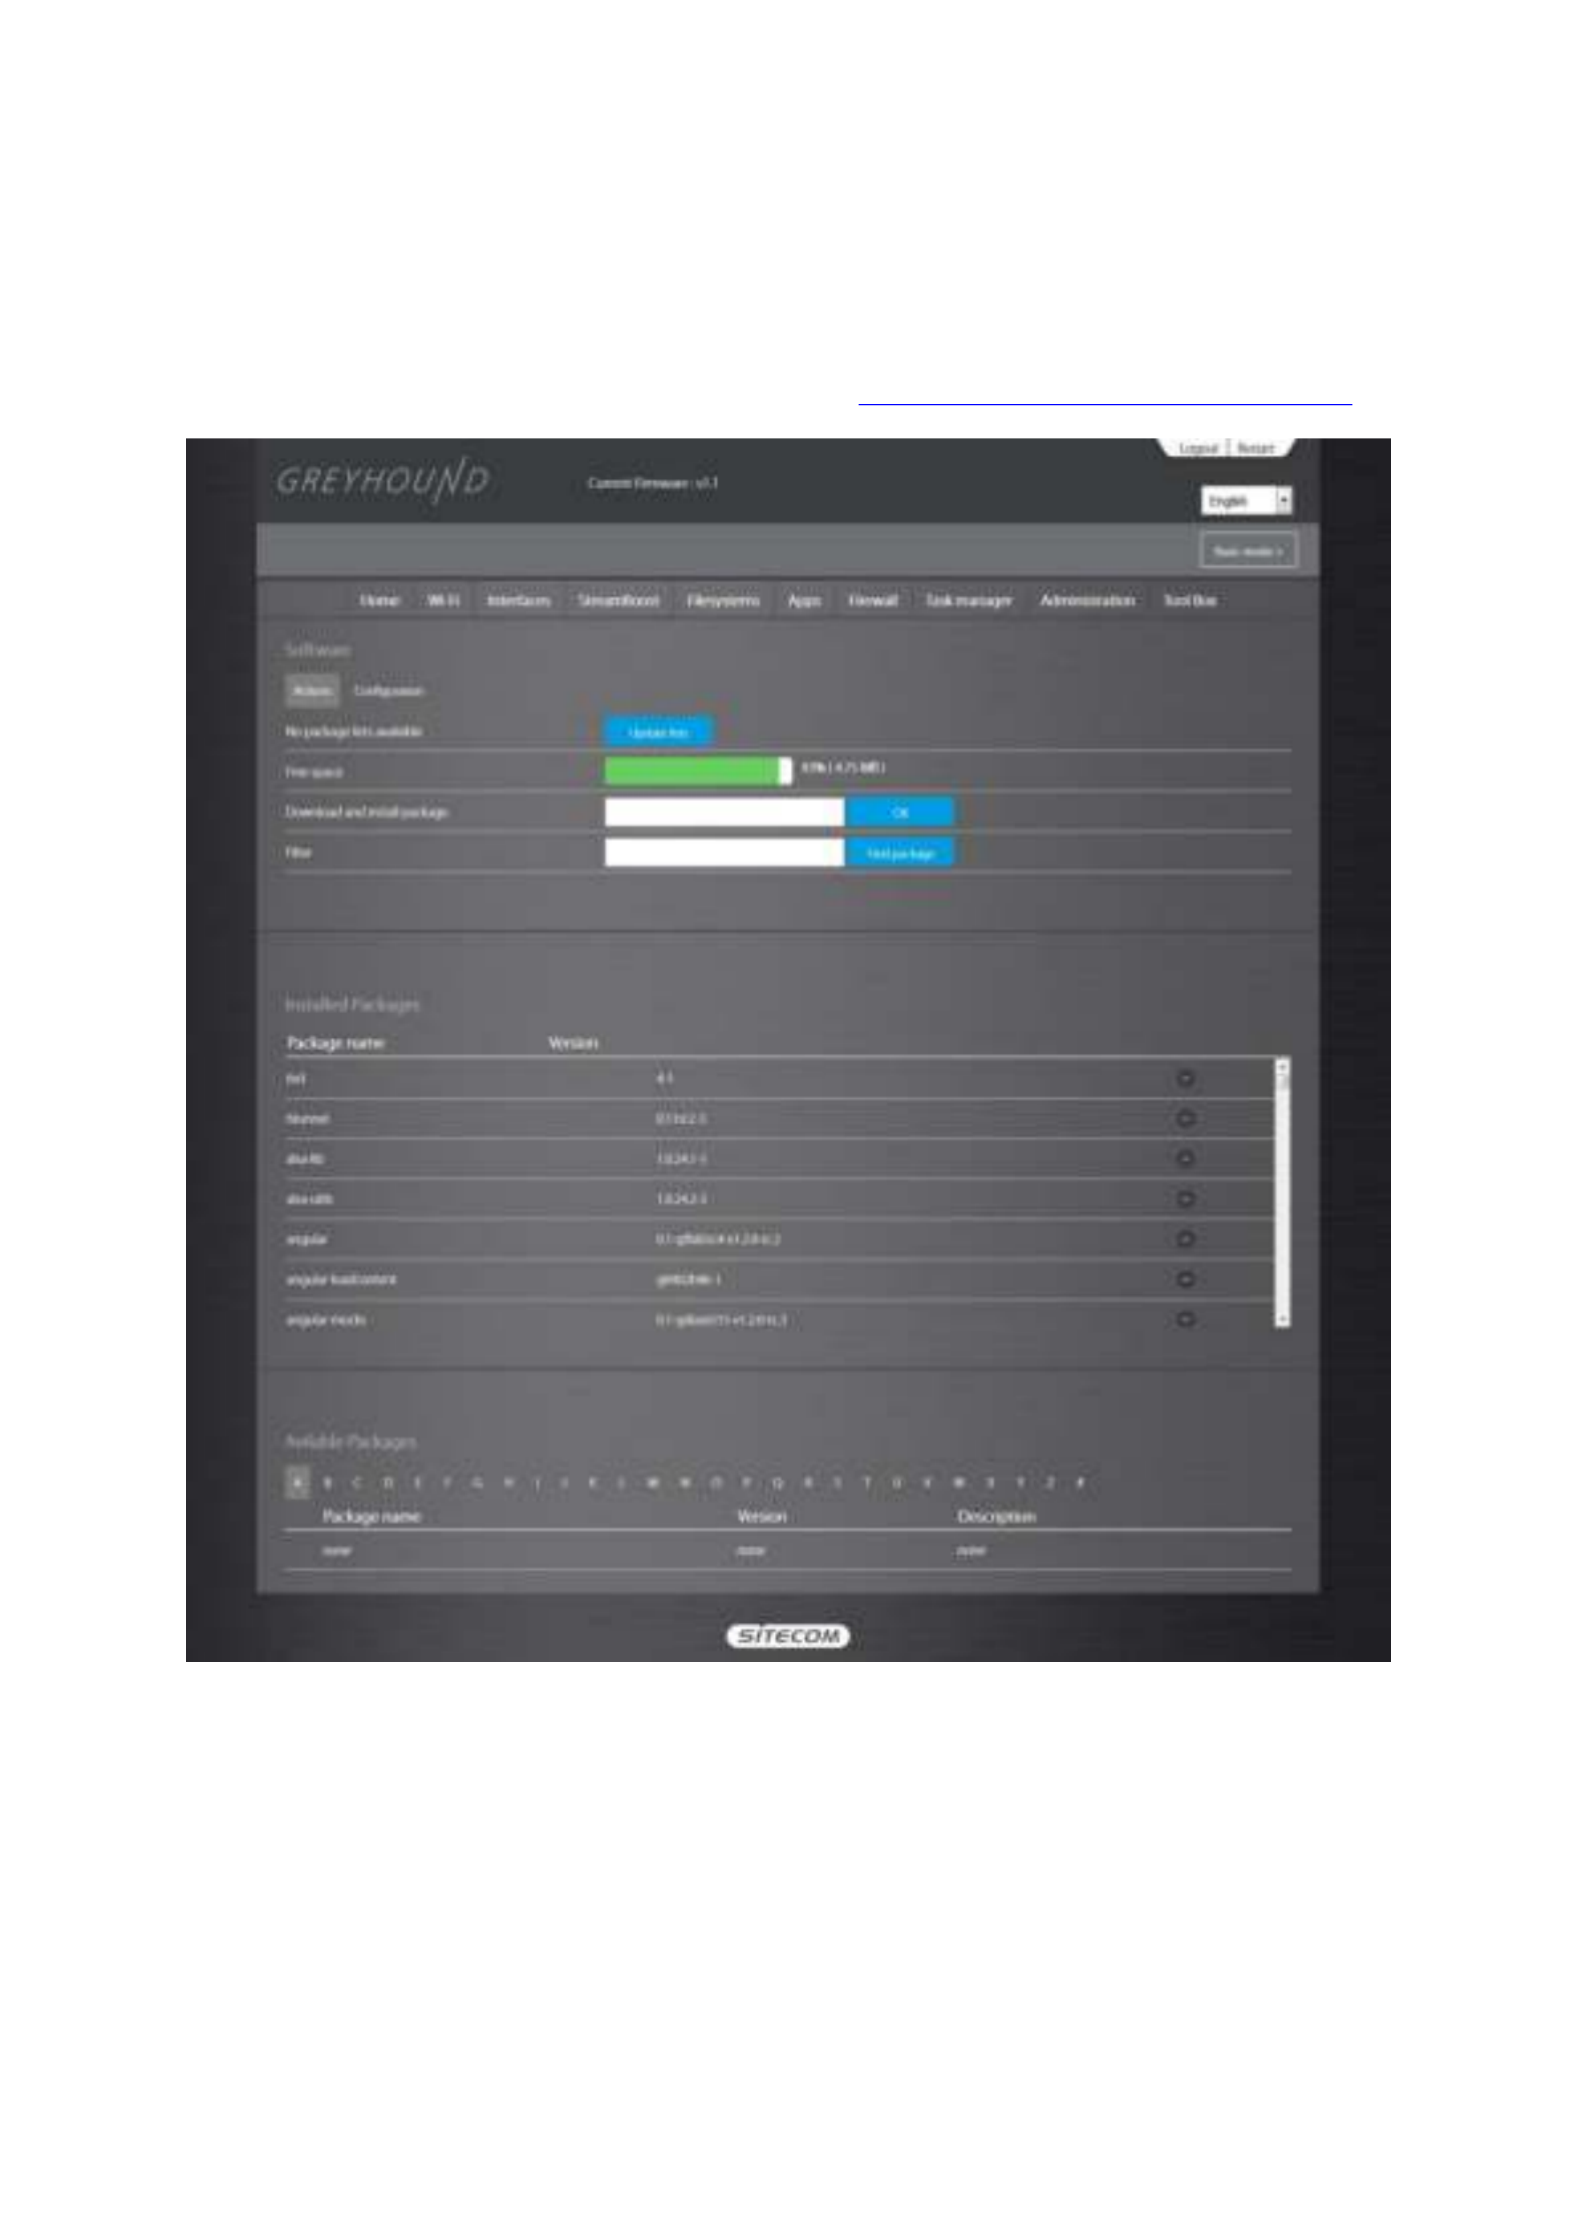
This page allows you to install OpenWRT packages. With this unique feature you can easily add
or remove functionality to your router, just like installing and uninstalling applications on your
computer. For more information on this, please go to https://wiki.openwrt.org/doc/packages.
You can add packages by typing in the URL into the ‘Download and install package’ field. You
can remove packages by selecting it from the list of ‘Installed Packages’ and clicking the –
button.

Firewall Settings
Firewall Settings
Firewall Settings
Firewall Settings Firewall Settings
Firewall
Firewall
Firewall
Firewall Firewall Enable
Enable
Enable
Enable Enable
–
–
–
––
The router provides extensive firewall protection by restricting connection parameters, thus
limiting the risk of hacker attacks, and defending against a wide array of common Internet
attacks. However, for applications that require unrestricted access to the Internet, you can
configure a specific client/server as a Demilitarized Zone (DMZ).
Note
Note
Note
NoteNote: To enable the Firewall settings select Enable and click
Save & Apply.
Save & Apply.
Save & Apply.
Save & Apply.Save & Apply.
Firewall
Firewall
Firewall
Firewall Firewall DMZ
DMZ
DMZ
DMZ DMZ
–
–
–
––
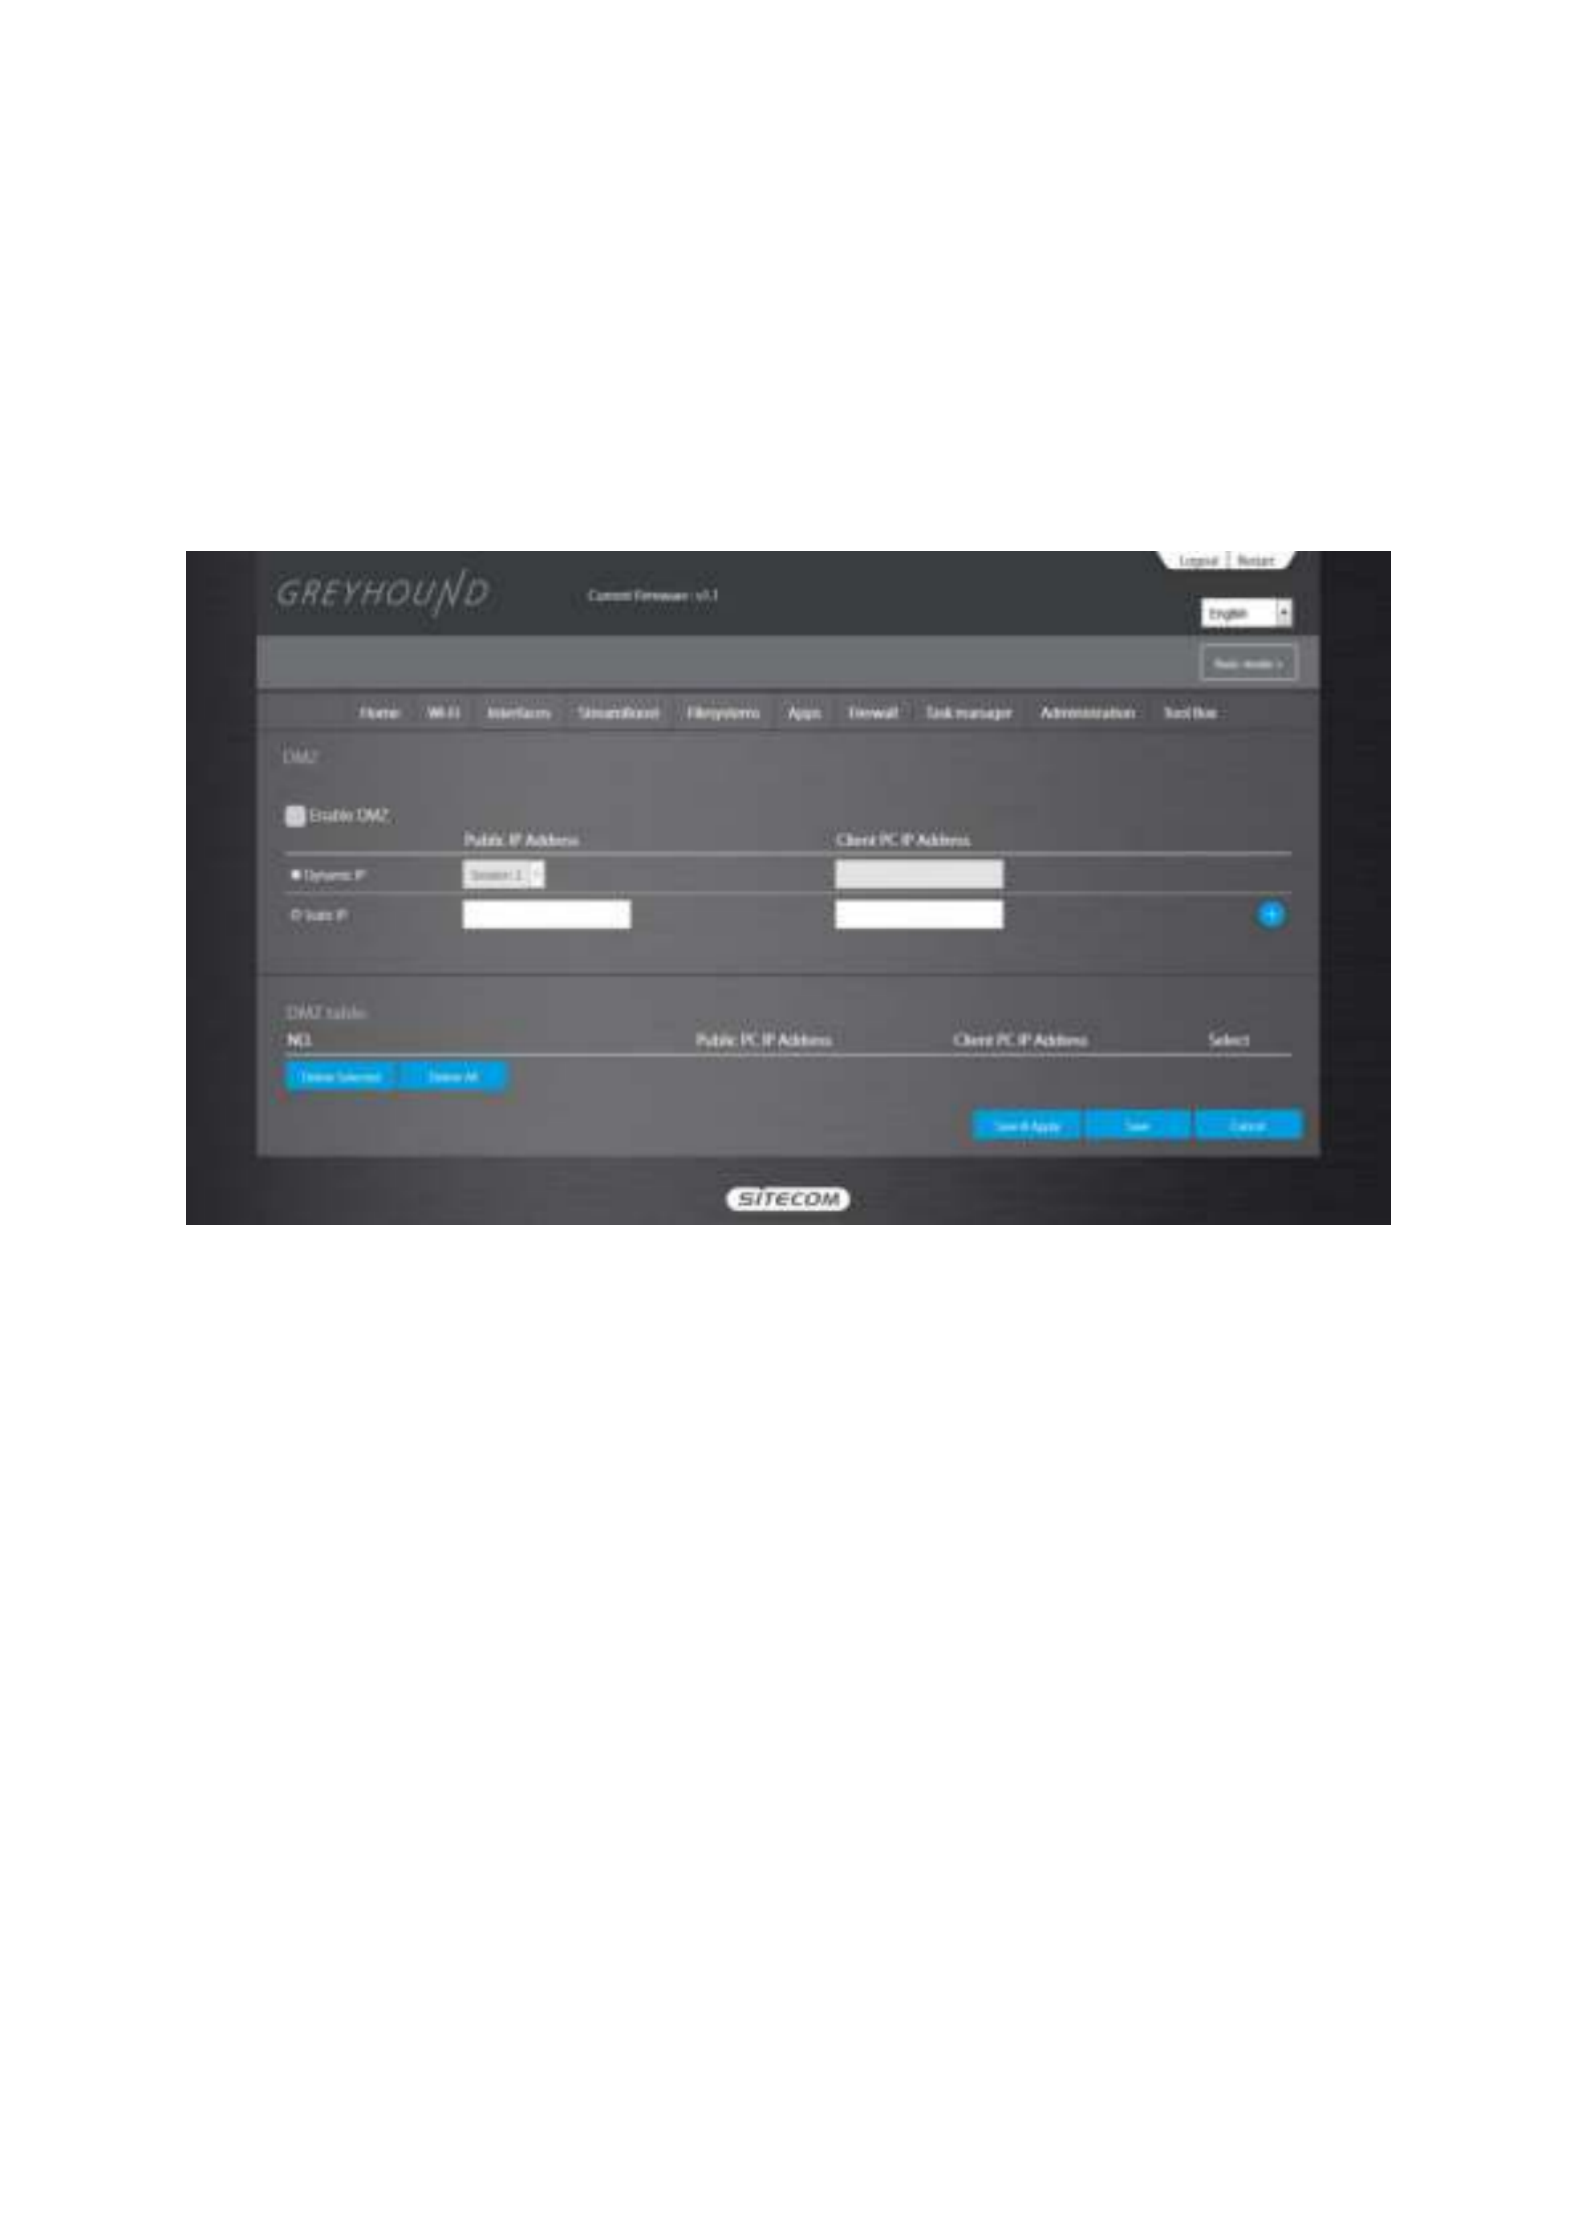
If you have a client PC that cannot run an Internet application (e.g. Games) properly from
behind the NAT firewall, then you can open up the firewall restrictions to unrestricted two-way
Internet access by defining a DMZ Host. The DMZ function allows you to re-direct all packets
going to your WAN port IP address to a particular IP address in your LAN. The difference
between the virtual server and the DMZ function is that the virtual server re-directs a particular
service/Internet application (e.g. FTP, websites) to a particular LAN client/server, whereas DMZ
re-directs all packets (regardless of services) going to your WAN IP address to a particular LAN
client/server.
Enable DMZ
Enable DMZ
Enable DMZ
Enable DMZEnable DMZ: Enable/disable DMZ
Public IP Address
Public IP Address
Public IP Address
Public IP AddressPublic IP Address: The IP address of the WAN port or any other Public IP addresses given
to you by your ISP
Client PC IP Address
Client PC IP Address
Client PC IP Address
Client PC IP AddressClient PC IP Address: Fill-in the IP address of a particular host in your LAN that will
receive all the packets originally going to the WAN port/Public IP address above.
Click
Save & Apply
Save & Apply
Save & Apply
Save & ApplySave & Apply at the bottom of the screen to save the above configurations.
Firewall
Firewall
Firewall
Firewall Firewall DoS
DoS
DoS
DoS DoS
–
–
–
––
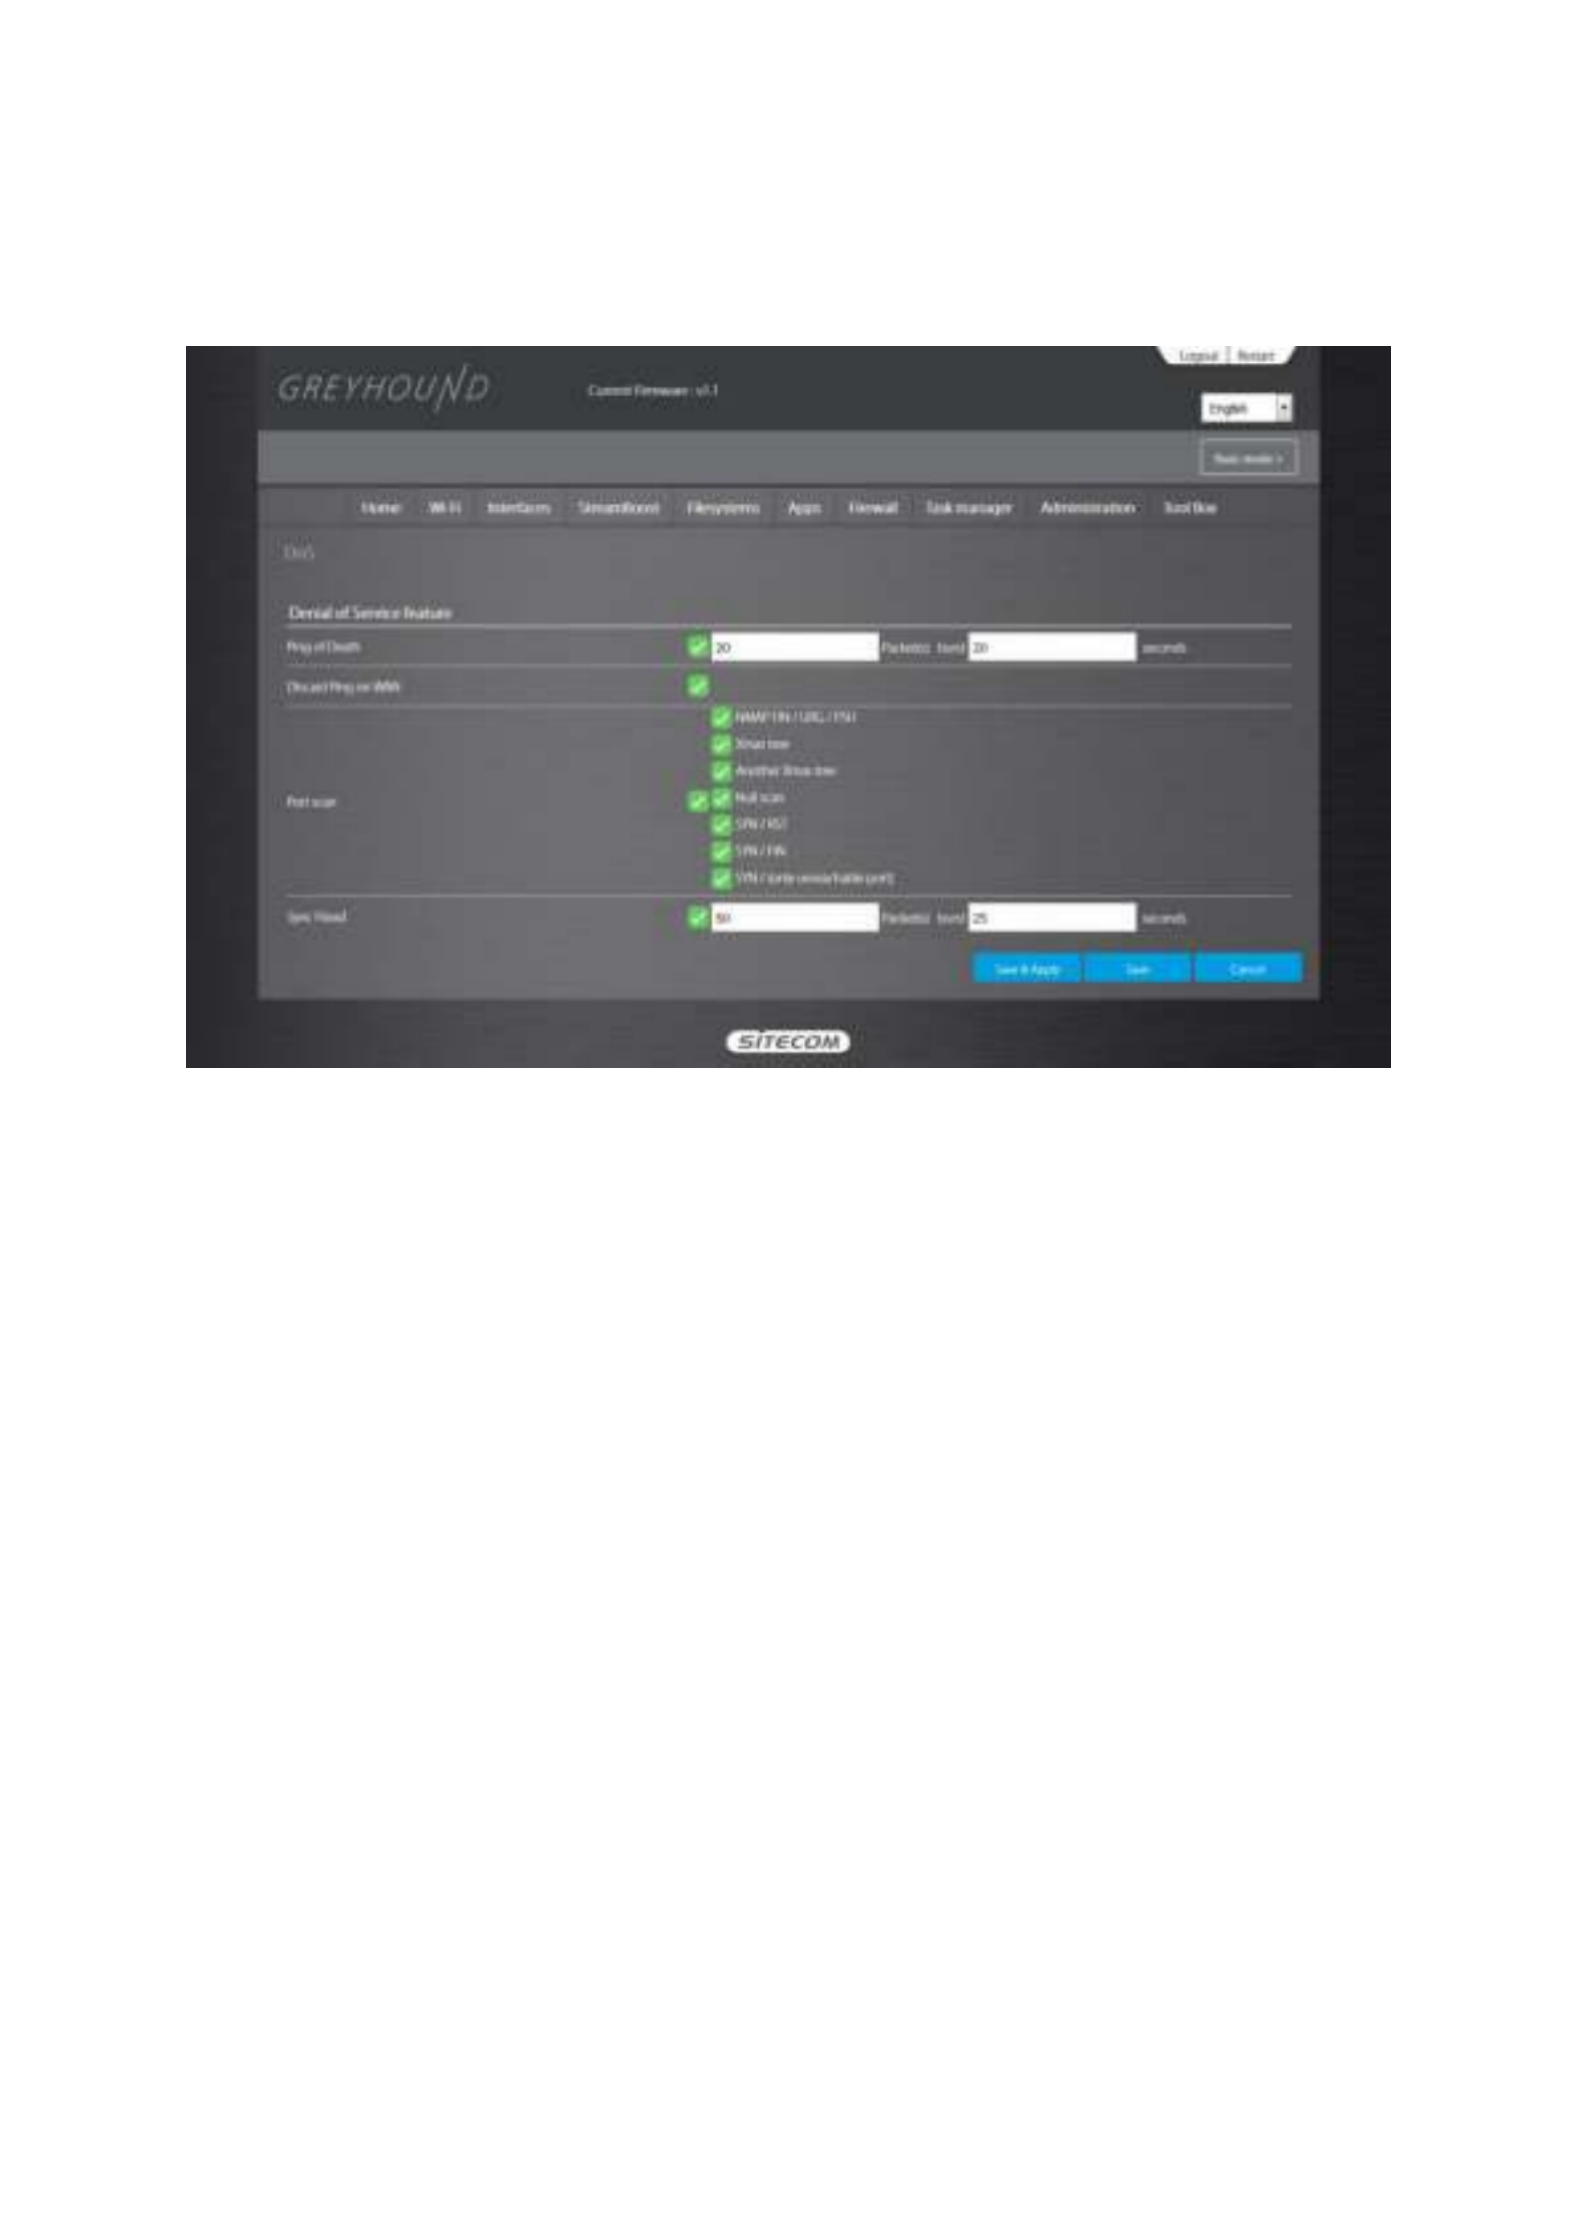
The Broadband router's firewall can block common hacker attacks, including Denial of Service,
Ping of Death, Port Scan and Sync Flood. If Internet attacks occur the router can log the events.
Ping of Death
Ping of Death
Ping of Death
Ping of DeathPing of Death: Protection from Ping of Death attacks
Discard Ping From WAN
Discard Ping From WAN
Discard Ping From WAN
Discard Ping From WANDiscard Ping From WAN: The router’s WAN port will not respond to any Ping requests
Port Scan
Port Scan
Port Scan
Port ScanPort Scan: Protects the router from Port Scans.
Sync Flood
Sync Flood
Sync Flood
Sync FloodSync Flood: Protects the router from Sync Flood attack.
Click
Save & Apply
Save & Apply
Save & Apply
Save & ApplySave & Apply at the bottom of the screen to save the above configuration.

Firewall
Firewall
Firewall
Firewall Firewall Access
Access
Access
Access Access
–
–
–
––
You can restrict users from accessing certain Internet applications/services (e.g. Internet
websites, email, FTP etc.). Access Control allows users to define the traffic type permitted in your
LAN. You can control which PC client can have access to these services.
Deny
Deny
Deny
DenyDeny: If you select “Deny” then all clients will be allowed to access Internet accept for
the clients in the list below.
Allow
Allow
Allow
AllowAllow: If you select “Allow” then all clients will be denied to access Internet accept for
the PCs in the list below.
Filter client PC by MA
Filter client PC by MA
Filter client PC by MA
Filter client PC by MAFilter client PC by MAC
C
C
CC: Check “Enable MAC Filtering” to enable MAC Filtering.
Add PC
Add PC
Add PC
Add PCAdd PC: Fill in “Client PC MAC Address” and “Comment” of the PC that is allowed to
access the Internet, and then click “Add”. If you find any typo before adding it and want
to retype again, just click "Reset" and the fields will be cleared.
Remove PC
Remove PC
Remove PC
Remove PCRemove PC: If you want to remove some PC from the "MAC Filtering Table", select the
PC you want to remove in the table and then click "Delete Selected". If you want to
remove all PCs from the table, just click the "Delete All" button. If you want to clear the
selection and re-select again, just click “Reset”.
Filter client PCs by IP
Filter client PCs by IP
Filter client PCs by IP
Filter client PCs by IPFilter client PCs by IP: Fill in “IP Filtering Table” to filter PC clients by IP.
Add PC
Add PC
Add PC
Add PCAdd PC: You can click Add PC to add an access control rule for users by IP addresses.
Remove PC
Remove PC
Remove PC
Remove PCRemove PC: If you want to remove some PCs from the "IP Filtering Table", select the PC
you want to remove in the table and then click “Delete Selected". If you want to remove
all PCs from the table, just click the "Delete All" button.
Click
Save & Apply
Save & Apply
Save & Apply
Save & ApplySave & Apply at the bottom of the screen to save the above configuration.

Firewall
Firewall
Firewall
Firewall Firewall URL block
URL block
URL block
URL block URL block
–
–
–
––
You can block access to some Web sites from particular PCs by entering a full URL address or
just keywords of the Web site.
Enable
Enable
Enable
EnableEnable: URL Blocking Enable/disable URL Blocking
Add URL
Add URL
Add URL
Add URLAdd URL eyword
eyword
eyword
eywordeyword
/k
/k
/k
/k/k : Fill in “URL/Keyword” and then click “Add”. You can enter the full URL
address or the keyword of the web site you want to block.
Remove URL
Remove URL
Remove URL
Remove URLRemove URL eyword
eyword
eyword
eywordeyword
/k
/k
/k
/k/k : If you want to remove some URL keywords from the "Current
URL Blocking Table", select the URL keyword you want to remove in the table and then
click "Delete Selected". If you want remove all URL keywords from the table, just click
"Delete All" button. If you want to clear the selection and re-select again, just click
“Reset”.
Click
Save & Apply
Save & Apply
Save & Apply
Save & ApplySave & Apply at the bottom of the screen to save the above configuration.

Firewall
Firewall
Firewall
Firewall Firewall ALG
ALG
ALG
ALG ALG
–
–
–
––
An application gateway is an application program that runs on the router. When a client
program establishes a connection to a destination service, it connects to an application
gateway, or proxy. The client then negotiates with the proxy server in order to communicate
with the destination service. In effect, the proxy establishes the connection with the destination
behind the firewall and acts on behalf of the client, hiding and protecting individual computers
on the network behind the firewall.
This creates two connections: one between the client and the proxy server and one between
the proxy server and the destination. Once connected, the proxy makes all packet-forwarding
decisions. Since all communication is conducted through the proxy server, computers behind
the firewall are protected.
You can select the pre-programmed ALG’s on this page.

Task manager
Task manager
Task manager
Task manager Task manager
System Logs
System Logs
System Logs
System Logs System Logs
On this page you can find the system log. If you’re using an external logging server you can
enable the ‘Remote Log’ functionality and enter the IP Address of the server in the appropriate
field.

Kernel log
Kernel log
Kernel log
Kernel log Kernel log
Here you can view the messages the kernel puts out.
Processes
Processes
Processes
Processes Processes
Here you can see the running processes. There are 3 buttons to alter the functionality of the
process.
Hang up
Hang up
Hang up
Hang upHang up: This signal is used to report the termination of the controlling process on a
terminal to jobs associated with that session; this termination effectively disconnects all
processes in the session.
Terminate
Terminate
Terminate
TerminateTerminate: generic signal used to cause program termination. It is the normal way to A
politely ask a program to terminate.

Kill
Kill
Kill
KillKill: Used to cause immediate program termination. It cannot be handled or ignored,
and is therefore always fatal. It is also not possible to block this signal.
Realtime Load
Realtime Load
Realtime Load
Realtime Load Realtime Load
On this page you can view the actual load on the entire network. The page shows 3 graphs in 3
different colors.

Initscripts
Initscripts
Initscripts
Initscripts Initscripts
On this page you can see the scripts controlling the various functions of the router. There are 4
buttons available.
Enable/Disable
Enable/Disable
Enable/Disable
Enable/DisableEnable/Disable: You can choose whether you want the service to be automatically
started during bootup.
Start
Start
Start
StartStart: Start the service.
Restart
Restart
Restart
RestartRestart: Restart the service.
Stop
Stop
Stop
StopStop: Stop the service.

Scheduled Tasks
Scheduled Tasks
Scheduled Tasks
Scheduled Tasks Scheduled Tasks
This window allows you to edit the crontab file. This contains the schedule of cron entries to be
run at specified times. The commands that can be used are standard Unix commands.
Produkt Specifikationer
| Mærke: | Sitecom |
| Kategori: | Router |
| Model: | Greyhound |
Har du brug for hjælp?
Hvis du har brug for hjælp til Sitecom Greyhound stil et spørgsmål nedenfor, og andre brugere vil svare dig
Router Sitecom Manualer

2 Oktober 2024
23 September 2024
22 September 2024
19 September 2024
19 September 2024
14 September 2024
29 August 2024
26 August 2024
19 August 2024
19 August 2024
Router Manualer
- Router QNAP
- Router Nilox
- Router Bosch
- Router Acer
- Router TCL
- Router Aruba
- Router Siemens
- Router Netis
- Router Samsung
- Router Metabo
- Router DeWalt
- Router TP-Link
- Router Silverline
- Router IFM
- Router AT&T
- Router Apple
- Router Google
- Router Technaxx
- Router HP
- Router Makita
- Router D-Link
- Router Motorola
- Router Roland
- Router Asus
- Router Gigabyte
- Router Güde
- Router AVM
- Router Planet
- Router Hama
- Router Thomson
- Router Milwaukee
- Router Nokia
- Router Belkin
- Router Edimax
- Router Black Box
- Router Clas Ohlson
- Router Strong
- Router TRENDnet
- Router Trust
- Router Topcom
- Router Black And Decker
- Router Einhell
- Router Hikoki
- Router Hitachi
- Router Buffalo
- Router Medion
- Router Sweex
- Router Vivanco
- Router Linksys
- Router Festool
- Router Cisco
- Router EZVIZ
- Router Huawei
- Router König
- Router Technicolor
- Router Gembird
- Router Netgear
- Router EnVivo
- Router Totolink
- Router Nest
- Router Vtech
- Router BenQ
- Router Powerplus
- Router Alcatel
- Router Western Digital
- Router Anker
- Router Digitus
- Router Zebra
- Router Thrustmaster
- Router Xiaomi
- Router Techly
- Router Dell
- Router Schneider
- Router Kopul
- Router MSI
- Router NEC
- Router Nexxt
- Router APC
- Router Foscam
- Router Kathrein
- Router Kyocera
- Router Sonos
- Router AJA
- Router LevelOne
- Router Mercusys
- Router Zoom
- Router Porter-Cable
- Router JUNG
- Router ZyXEL
- Router Sagem
- Router Tenda
- Router Vodafone
- Router Synology
- Router Hikvision
- Router Ubiquiti Networks
- Router Cotech
- Router EnGenius
- Router Devolo
- Router Patton
- Router Renkforce
- Router Kraun
- Router Manhattan
- Router ZTE
- Router Mikrotik
- Router Aztech
- Router LogiLink
- Router Alfa
- Router Eminent
- Router Kramer
- Router BT
- Router Hercules
- Router Evolution
- Router MuxLab
- Router Phicomm
- Router Telstra
- Router Upvel
- Router Arris
- Router Milan
- Router Xantech
- Router Mercku
- Router Kasda
- Router Iogear
- Router Digi
- Router ATen
- Router Vimar
- Router Smart-AVI
- Router Dahua Technology
- Router StarTech.com
- Router Draytek
- Router Conceptronic
- Router Rocstor
- Router Teltonika
- Router Toolcraft
- Router SPL
- Router Lindy
- Router Kogan
- Router AVMATRIX
- Router Barco
- Router Peak
- Router Lumantek
- Router Lancom
- Router FSR
- Router RAVPower
- Router Intellinet
- Router Holzmann
- Router Ocean Matrix
- Router Comprehensive
- Router Intelix
- Router Digitalinx
- Router Alfatron
- Router Media-Tech
- Router BZBGear
- Router Key Digital
- Router KanexPro
- Router Gefen
- Router RGBlink
- Router Moxa
- Router Bea-fon
- Router Blustream
- Router WyreStorm
- Router Allnet
- Router Allied Telesis
- Router Airlive
- Router Actiontec
- Router Proximus
- Router KPN
- Router ICIDU
- Router Verizon
- Router Billion
- Router T-Mobile
- Router Hawking Technologies
- Router Beafon
- Router Zolid
- Router Sagemcom
- Router SIIG
- Router Eero
- Router Advantech
- Router Approx
- Router Arcadyan
- Router Digiconnect
- Router Ubee
- Router SMC
- Router Tele 2
- Router Cambium Networks
- Router CradlePoint
- Router ModeCom
- Router Extreme Networks
- Router Davolink
- Router Sixnet
- Router 7inova
- Router AVPro Edge
- Router Cudy
- Router Kiloview
- Router F-Secure
- Router Mach Power
- Router Rosewill
- Router Digicom
- Router Sabrent
- Router On Networks
- Router Atlona
- Router PENTAGRAM
- Router Leoxsys
- Router Readynet
- Router OneAccess
- Router Accelerated
- Router Nexaira
- Router Hamlet
- Router T-com
- Router A-NeuVideo
- Router Amped Wireless
- Router 3Com
- Router I-Tec
- Router Avenview
- Router Ruckus Wireless
- Router Dovado
- Router StarIink
- Router EXSYS
- Router NetComm
- Router Juniper
- Router Comtrend
- Router Premiertek
- Router GL.iNet
- Router Shinybow
- Router Edgewater
- Router Atlantis Land
- Router Lantronix
- Router Keenetic
- Router Starlink
- Router Keewifi
- Router Milesight
- Router PulseAudio
- Router Predator
- Router Luxul
- Router DVDO
- Router Silentwind
- Router Keezel
- Router United Telecom
- Router Wisetiger
- Router Zurn
- Router Digital Forecast
Nyeste Router Manualer
8 April 2025
22 Marts 2025
9 Marts 2025
6 Marts 2025

23 Februar 2025
23 Februar 2025

22 Februar 2025
20 Februar 2025
20 Februar 2025
12 Februar 2025