Sony KLV-21SR2 Manual
Sony
Fjernsyn og projektorer
KLV-21SR2
Læs nedenfor 📖 manual på dansk for Sony KLV-21SR2 (312 sider) i kategorien Fjernsyn og projektorer. Denne guide var nyttig for 17 personer og blev bedømt med 4.5 stjerner i gennemsnit af 2 brugere
Side 1/312

Quick Start Guide
Operating Instructions
Anleitung zur schnellen Inbetriebnahme
Bedienungsanleitung
Guide de mise en route
Mode d’emploi
Beknopte gebruiksgids
Gebruiksaanwijzing
Before operating the TV, please read the “Safety Information” section of this
manual. Retain this manual for future reference.
Lesen Sie vor der Inbetriebnahme des Fernsehgeräts bitte den Abschnitt
„Sicherheitsinformationen“ in dieser Anleitung. Bewahren Sie die Anleitung
zum späteren Nachschlagen auf.
Avant d’utiliser le téléviseur, lisez la section « Consignes de sécurité » de ce
mode d’emploi. Conservez ce mode d’emploi pour vous y référer
ultérieurement.
Lees het hoofdstuk "Veiligheidsinformatie" van deze gebruiksaanwijzing
alvorens de TV in gebruik te nemen. Bewaar deze gebruiksaanwijzing zodat
u ze achteraf nog kunt raadplegen.
4-096-367-13(1)
KLV-23HR2
KLV-21SR2
2003 Sony Corporation
GB
DE
FR
NL
LCD Colour TV

1
GB
Quick Start Guide
Operating Instructions

2
NOTICE FOR CUSTOMERS IN THE UNITED KINGDOM
A moulded plug complying with BS1363 is fitted to this equipment for your safety and convenience.
Should the fuse in the plug supplied need to be replaced, a 5 AMP fuse approved by ASTA or BSI to BS
1362 (i.e. marked with or ) must be used.
When an alternative type of plug is used it should be fitted with a 5 AMP FUSE, otherwise the circuit
should be protected by a 5 AMP FUSE at the distribution board.
If the plug supplied with this equipment has a detachable fuse cover, be sure to attach the fuse cover after
you change the fuse. Never use the plug without the fuse cover. If you should lose the fuse cover, please
contact your nearest Sony service station.
How to replace the fuse
Open the fuse compartment with a blade screwdriver, and replace the fuse.
IMPORTANT
If the plug supplied is not suitable for the socket outlets in your home, it should be cut off and an
appropriate plug fitted in accordance with the following instructions:
The wires in this mains lead are coloured in accordance with the following code:
Blue Neutral
Brown Live
As the colours of the wires in the mains lead of this apparatus may not correspond with the coloured
markings identifying the terminals in your plug, proceed as follows:
The wire which is coloured blue must be connected to the terminal which is marked with the letter N or
coloured black. The wire which is coloured brown must be connected to the terminal which is marked with
the letter L or coloured red. Do not connect either wire to the earth terminal in the plug which is marked
by the letter E or by the safety earth symbol I or coloured green or green and yellow.
WARNING
• To prevent the risk of electric shock, do not insert the plug cut off from the mains lead into a socket
outlet. This plug cannot be used and should be destroyed.
• To prevent the risk of fire or electric shock, do not expose the unit to rain or moisture.
• Dangerously high voltages are present inside the unit. Do not open the cabinet. Refer servicing to
qualified personnel only.
Introduction
Thank you for choosing this Sony LCD Colour Television.
Before operating the TV, please read this manual thoroughly and retain it for future reference.
Symbols used in the manual
FUSE
........Important information.
........Information on a feature.
1
, 2..........Sequence of instructions.
......Shaded buttons on the remote control
show you the buttons you have to press
to follow the sequence of instructions.
.........Informs you of the result of instructions
followed.
* The illustrations used in this manual are of the KLV-23HR2 unless otherwise stated.

3
Table of Contents
GB
Table of Contents
Quick Start Guide .............................................................4
Operating Instructions ................................................................................................12
Safety Information ...........................................12
Precautions .......................................................18
Overview
Checking the Accessories Supplied .................20
Overview of the TV Buttons and Indicators ....21
Overview of the Remote Control Buttons .......22
Installation
Inserting Batteries into the Remote Control .... 24
Removing the Rear Cover ...............................25
Connecting an Aerial and a VCR ....................26
First Time Operation
Switching On the TV and
Tuning the TV Automatically ..................29
Menu System
Introducing and Using the Menu System ........ 31
Picture Adjustment ..........................................32
Sound Adjustment ...........................................34
Screen Control .................................................36
Features ............................................................39
Set Up ..............................................................41
Other Functions
Sleep Timer Function ......................................45
Screen Memo Function ....................................46
Teletext ............................................................47
NexTView .......................................................48
“Memory Stick”
(KLV-23HR2 only)
About the “Memory Stick” Feature .................51
Inserting and Removing a “Memory Stick” .... 54
Using the “Memory Stick”
(Memory Stick Home) ..............................55
Additional Information
Connecting Optional Equipment .....................63
Using Optional Equipment ..............................66
Remote Control Configuration
for VCR/DVD ...........................................67
Specifications ...................................................69
Troubleshooting ...............................................71
Television Channel Number Guide
for the United Kingdom ............................75

4Quick Start Guide
Thank you for purchasing this Sony product.
After following this step by step guide you will be able to:
– Insert batteries into the remote control.
– Remove the rear cover.
– Connect an aerial, VCR, and mains lead to your TV.
– Select the language of the menu screens.
– Select the country/region in which you want to operate your TV.
– Tune your TV.
– Change the broadcast channels into a different order.
Quick Start Guide
1Checking the Accessories Supplied
Remote Control
RM-Y1103 (KLV-23HR2) (1) or
RM-Y1102 (KLV-21SR2) (1):
Size AA Batteries
(R6 Type) (2):
Coaxial Cable (1):
Mains Lead
(Type
C-6
) (1):
Use this mains lead if you
use the unit outside the
United Kingdom.
Mains Lead
(Type BF) (1):
• Use this mains lead if you
use the unit in the United
Kingdom.
• Refer to “NOTICE FOR
CUSTOMERS IN THE
UNITED KINGDOM” on
page 2 when using this
mains lead.
• This mains lead may not
be supplied depending on
the country/region.
Do not remove ferrite cores.

5
Quick Start Guide
GB
Quick Start Guide
When you connect the cables, remove the rear cover of the TV. Be sure to attach the rear cover
back on the TV after you finish connecting the cables.
2Inserting Batteries into the Remote
Control
• Make sure you insert the supplied batteries observing the correct polarity.
• Always remember to dispose of used batteries in an environmentally friendly way.
• Do not use different types of batteries together or mix old and new batteries.
3Removing the Rear Cover
Removing the rear cover
1Hold the lower right (or left)
corner of the rear cover and pull
it towards you. In the same way,
detach the lower left (or right)
corner of the rear cover from the
TV.
2Hold and lift up the rear cover
with both hands as illustrated on
the right, and remove it from the
TV.
Attaching the rear cover
Hold the rear cover as illustrated below, fitting the
four detents on the rear cover into the
corresponding holes on the TV, then push the rear
cover back onto the TV.
(continued)

7
Quick Start Guide
GB
Quick Start Guide
You can store the cables in the back of the TV.
5Bundling the Cables
1 Bundle the cables and secure them with
the clips on both sides of the TV.
2 Pass the cables through the grooves. Be
sure to place the cables inside the tabs at
the bottom of the TV.
3 Put the cables from both sides together and
secure them with the clip at the bottom.
• It may not be possible to fasten cables
that are too thick with the clips.
• If all the cables cannot be stored inside,
leave some of them hanging down on
both sides of the TV.
If the cables are not neatly stored in the
grooves, you may not be able to attach the
rear cover.
Clips
Tabs
Clip
(continued)

8Quick Start Guide
Adjusting the viewing angle of the TV
You can adjust the angle to avoid the reflection of light and get a better view of the TV.
6Switching On the TV
1Connect the TV to the mains (100–240 V AC, 50/60 Hz).
2Press the & (Power) switch on the TV to switch it on.
• When you adjust the angle, make sure that the
cables are not caught between the TV and the
stand. If some of the cables get caught, divide
them into two groups at the clip and pull them
in the opposite direction to free them up.
• When adjusting the angle, hold the stand with
your hand so that it does not come loose or
fall off. Be careful not to catch your fingers
between the TV and the stand.
30°
30°
15°
Backward direction
Horizontal direction

10 Quick Start Guide
You must tune the TV to receive channels (TV Broadcast). If you follow the instructions below, the TV
automatically searches and stores all available broadcast channels.
1 Press OK to select Yes.
2 The TV starts searching and storing all
available broadcast channels.
When the auto tuning is finished, the
Programme Sorting menu appears
automatically on the screen.
8Tuning the TV Automatically
• This procedure could take
some minutes. Please be
patient and do not press any
buttons, otherwise the auto
tuning will not be completed
properly.
• If no channels are found
during the auto tuning process,
a new menu appears
automatically on the screen
asking you to connect the
aerial. Please connect the
aerial (see page 6) and press
OK. The auto tuning process
will start again.
Do you want to start
automatic tuning ?
Yes No
No channel found.
Please connect aerial
Confirm
Auto Tuning
Programme :
System :
Channel :
Searching...
01
I
C23
Programme Sorting
Select channel
01
02
03
04
05
06
07
08
09
10
11
TVE
TVE2
TV3
C33
C27
C58
S02
S06
S08
S12
S14
Exit:
MENU
m
m
m

11
Quick Start Guide
GB
Quick Start Guide
By following the instructions below, you can rearrange the order in which the broadcast channels appear
on the screen.
9Changing the Programme Order of the
Broadcast Channels
A) If you want to keep the broadcast channels in the tuned
order
B) If you want to store the broadcast channels in a different
order
Your TV is now ready for use.
Press MENU to exit and return to the normal
TV screen.
Programme Sorting
Select channel
01
02
03
04
05
06
07
08
09
10
11
TVE
TVE2
TV3
C33
C27
C58
S02
S06
S08
S12
S14
Exit:
MENU
1Press or to select the programme
number with the channel you want to
rearrange, then press .
2Press or to select the new
programme number position for your
selected channel, then press .
3Repeat steps 1 and 2 if you want to change
the order of the other channels.
4Press MENU to exit and return to the normal
TV screen.
The selected channel now moves to
its new programme position and the
other channels move accordingly.
Programme Sorting
Select channel
01
02
03
04
05
06
07
08
09
10
11
TVE
TVE2
TV3
C33
C27
C58
S02
S06
S08
S12
S14
Exit:
MENU
Programme Sorting
Select channel
TVE
TVE2
TV3
C33
C27
C58
S02
S06
S08
S12
S14
01 TVE
01
02
03
04
05
06
07
08
09
10
11
Exit:
MENU
m

12 Safety Information
Safety Information
For Safety
Operating Instructions
Mains lead
Unplug the mains lead when
moving the unit. Do not
move the unit with the mains
lead plugged in. It may
damage the mains lead and
result in fire or electric
shock. If the unit has been
dropped or damaged, have it
checked immediately by qualified service personnel.
Medical institutions
Do not place this unit
in a place where
medical equipment is
in use. It may cause
malfunction of
medical instruments.
Installation
Installation of the unit on the
wall should be carried out by
qualified servicemen.
Improper installation may
render the unit unsafe in the
event of an earthquake, etc.
Carrying
• Before carrying the unit,
disconnect all the cables
from the unit.
• When you carry the unit by
hand, hold the unit as
illustrated on the right. Do
not hold the rear cover only.
As the rear cover comes off
easily, the unit may fall and
be damaged or cause serious injury.
• When transporting it, do not subject the unit to
shocks or excessive vibration. The unit may fall
and be damaged or cause serious injury.
• When you carry the unit in for repair or when you
move it, pack it using the original carton and
packing material.

13
Safety Information
GB
Installation and Moving
Ventilation
Never cover the ventilation
holes in the cabinet. It may
cause overheating and result in
fire. Unless proper ventilation
is provided, the unit may gather
dust and get dirty. For proper ventilation, observe the
following:
• Do not install the unit turned backwards or sideways.
• Do not install the unit turned over or upside down.
• Do not install the unit on a shelf or in a closet.
• Do not place the unit on a rug or bed.
• Do not cover the unit with cloth, such as curtains, or
items such as newspapers, etc.
Outdoor use
Do not install this unit
outdoors. If the unit is
exposed to rain, it may
result in fire or electric
shock. If the unit is
exposed to direct
sunlight, the unit may
heat up and this may result in damage to the unit.
Vehicle or ceiling
Do not install this unit in a
vehicle. The motion of the
vehicle may cause the unit to
fall down and cause injury.
Do not hang this unit from
the ceiling.
Ships and other
vessels
Do not install this unit
on a ship or other
vessel. If the unit is
exposed to seawater, it
may cause fire or
damage the unit.
Water and moisture
Do not use this unit near water
– for example, near a bathtub or
shower room. Also do not
expose to rain, moisture or
smoke. This may result in fire or electric shock. Do not
use this unit where insects may enter.
To prevent the unit from
falling
Place the unit on a secure, stable
stand. Do not hang anything on
the unit. If you do, the unit may
fall from the stand or wall-mount
bracket, causing damage or serious injury.
Do not allow children to climb on the unit.
Optional accessories
Observe the following when installing
the unit using a stand or wall-mount
bracket. If you do not do so, the unit
may fall and cause serious injury.
• Be sure to follow the instructions supplied with your
stand or wall-mount bracket when installing the unit.
• Be sure to attach the brackets supplied with your
stand.
(continued)

14 Safety Information
Power Sources
Overloading
This unit is designed to operate
on a 100–240 V AC supply
only. Take care not to connect
too many appliances to the
same mains socket as this
could result in fire or electric shock.
Mains lead
protection
Pull out the mains lead
by the plug. Do not
pull on the mains lead
itself.
Mains
Do not use a poor fitting mains socket.
Insert the plug fully into the mains. If it
is loose, it may cause arcing and result in
fire. Contact your electrician to have the
mains socket changed.
Wiring
Unplug the mains lead when wiring cables. Be sure
to unplug the mains lead for your safety, when
hooking up.
Moisture
Do not touch the mains lead with a
wet hand. If you plug/unplug the
mains lead with a wet hand, it may
cause electric shock.
Cleaning
Clean the mains plug regularly. If
the plug is covered with dust and it
picks up moisture, its insulation
may deteriorate and result in fire.
Unplug the mains plug and clean it
regularly.
Lightning storms
For your own safety, do not
touch any part of the unit,
mains lead, or aerial lead
during lightning storms.

15
Safety Information
GB
Use
Damage requiring service
If the surface of the unit cracks, do not touch it until you
have unplugged the mains lead. Otherwise electric shock
may result.
Ventilation holes
Do not insert anything in the
ventilation holes. If metal or
something flammable is inserted
in these holes, it may result in
fire or electric shock.
Servicing
Do not open the cabinet.
Entrust the unit to qualified
service personnel only.
Moisture and
flammable objects
• Do not let this
unit get wet.
Never spill liquid
of any kind on the
unit. If any liquid or solid object does fall through
openings in the cabinet, do not operate the unit. It
may result in electric shock or damage to the unit.
Have it checked immediately by qualified
service personnel.
• To prevent fire, keep flammable objects or naked
lights (e.g. candles) away from the unit.
(continued)

17
Safety Information
GB
LCD Screen
• Although the LCD screen is made with high-precision
technology and 99.99% or more of the pixels are
effective, black dots may appear or bright points of
light (red, blue, or green) may appear constantly on
the LCD screen. This is a structural property of the
LCD panel and is not a malfunction.
• Do not expose the LCD screen surface to the sun.
Doing so may damage the screen surface.
• Do not push or scratch the front filter, or place objects
on top of this unit. The image may be uneven or the
LCD panel may be damaged.
• If this unit is used in a cold place, a smear may occur
in the picture or the picture may become dark.
This does not indicate a failure. These phenomena
disappear as the temperature rises.
• Ghosting may occur when still pictures are displayed
continuously. It may disappear after a few moments.
• The screen and cabinet get warm when this unit is in
use. This is not a malfunction.
Mains lead
If you damage the mains
lead, it may result in fire
or electric shock.
• Do not pinch, bend, or
twist the mains lead
excessively. The core
lines may be exposed
or cut, causing a
short-circuit which
may induce fire or
electric shock.
• Do not convert or
damage the mains lead.
• Do not put anything heavy on the mains lead. Do
not pull the mains lead.
• Keep the mains lead away from heat sources.
• Be sure to grasp the plug when disconnecting the
mains lead.
If the mains lead is damaged, stop using it and ask
your dealer or Sony service centre to exchange it.
Fluorescent lamp
This unit uses a special fluorescent lamp as its light
source. If the screen image becomes dark, flickers, or
does not appear, the fluorescent lamp has run down and
should be replaced. For replacement, consult qualified
service personnel.
When not in use
For environmental
and safety reasons,
it is recommended
that the unit be
switched off when
not in use – not left in standby mode. Disconnect it
from the mains.
Heat
Do not touch the surface of the unit. It remains hot, even
after the unit has been turned off for some time.
Cable wiring
Take care not to catch your feet on the cables. It may
damage the unit.
Cleaning the screen surface
The screen surface is finished with a special coating to
prevent strong light reflections. Be sure to observe the
following precautions to avoid damaging the finish.
• To remove dust from the screen surface, wipe gently
with a soft cloth. If dust is persistent, wipe with a soft
cloth slightly moistened with a diluted mild detergent
solution. You can wash and repeatedly use the soft
cloth.
• Never use any type of abrasive pad, alkaline/acid
cleaner, scouring powder, or strong solvent such as
alcohol, benzine or thinner.
Installation
Do not install optional components too close to the
unit. Keep optional components at least 30 cm away
from the unit. If a VCR is installed in front of the
unit or beside the unit, the picture may become
distorted.
Adjusting the viewing angle of the TV
When adjusting the angle, hold the stand with your hand
so that it does not come loose or fall off.
Be careful not to catch your fingers between the TV and
the stand.

18 Precautions
Precautions
Precautions concerning ventilation
Leave space around the unit. Otherwise, adequate air-circulation may be blocked causing overheating,
which may cause fire or damage to the unit.
When installing the unit on the wall
When installing the unit using a stand
Never install the unit as follows:
Leave at least this much space.
10 cm
30 cm
10 cm
10 cm
Leave at least this much space.
10 cm
30 cm
10 cm
Air circulation is blocked. Air circulation is blocked.
Wall
Wall

20 Overview
Overview
Checking the Accessories Supplied
Remote Control
RM-Y1103 (KLV-23HR2) (1) or
RM-Y1102 (KLV-21SR2) (1):
Size AA Batteries
(R6 Type) (2):
Coaxial Cable (1):
Mains Lead
(Type C-6) (1):
Mains Lead
(Type BF) (1):
Use this mains lead if you
use the unit outside the
United Kingdom.
• Use this mains lead if
you use the unit in the
United Kingdom.
• Refer to “NOTICE FOR
CUSTOMERS IN THE
UNITED KINGDOM”
on page 2 when using
this mains lead.
• This mains lead may not
be supplied depending
on the country/region.
Do not remove ferrite cores.

21
Overview
GB
Overview of the TV Buttons and Indicators
Status of the indicators
( “Memory Stick”) indicator lights up or flashes in red (KLV-23HR2 only)
The “Memory Stick” is being accessed.
& (Power) indicator lights up in green
The power of the TV is on.
/ (Standby/Sleep) indicator lights up in red
The TV is in the standby mode.
The Sleep Timer function is on when the TV is turned on.
/ (Standby/Sleep) indicator flashes in red
The TV is receiving remote control signals.
/ (Standby/Sleep) indicator flashes in red repeatedly and the & (Power) indicator is off
There is a problem with the TV. For more details, refer to “Self-diagnosis function” on page 71.
For the connectors on the rear panel of the TV, refer to “Connecting Optional Equipment” on
page 63.
I
P
2
I1/
I1/
& (Power) indicator
Remote
control
sensor
Remote control sensor
( “Memory Stick”)
indicator / (Standby/
Sleep) indicator
& (Power)
indicator
KLV-23HR2
KLV-21SR2
/ (Standby/Sleep) indicator
& (Power)
switch
P (Channel)
+/– buttons
2 (Volume)
+/– buttons
“Memory Stick” slot
(KLV-23HR2 only)
(Input
Select)
button

22 Overview
Overview of the Remote Control Buttons
dSelecting the input source:
Press this button repeatedly until the input symbol of the desired source appears on the screen.
eTurning on the Sleep Timer function:
Press this button to set the TV to automatically switch to the standby mode after a specified time
period. For more details, refer to “Sleep Timer Function” on page 45.
fSelecting channels:
Press this button to select channels.
For double-digit programme numbers, enter the second digit within 2.5 seconds.
ga) If the TV is selected:
Press this button to watch the last channel selected (the last channel watched for at least five seconds).
b) If the VCR is selected:
For Sony’s VCR double-digit programme numbers, e.g. 23, press this button first then press the 2 and
3 buttons.
hSelecting a screen format:
Press this button repeatedly to change the screen format. For more details, refer to “Screen Control”
on page 36.
aSwitching the TV to the standby mode:
Press this button to temporarily turn off the
TV and switch it to the standby mode (the
/ (Standby/Sleep) indicator on the TV
lights up in red). Press it again to switch on
the TV from the standby mode.
To save energy, we recommend switching
the TV off completely when the TV is not in
use. If no signal is received or no
operation is performed in the TV
mode for 10 minutes, the TV
automatically switches to the standby
mode.
bSwitching the VCR or DVD on/off:
Press this button to switch your VCR or DVD
on or off.
cSelecting the VCR, TV or DVD (Media
Selector):
With this remote control you can operate not
only this TV but also the main functions of
your VCR or DVD.
Switch on the equipment you want to operate
and press this button repeatedly to select
VCR, TV, or DVD. The green light just
above the selected equipment lights up
momentarily.
An initial setup is required to
synchronise this remote control to
your VCR or DVD. This setup
depends on the manufacturer. For
more details, refer to “Remote
Control Configuration for VCR/
DVD” on page 67.
*
*Remote control of
the KLV-21SR2

23
Overview
GB
iProgramming the remote control:
Use this button to programme the remote control to operate your VCR or DVD. For more details, refer
to “Remote Control Configuration for VCR/DVD” on page 67.
jSelecting Teletext:
Press this button to switch on Teletext. For more details, refer to “Teletext” on page 47.
k/ / / /OK buttons
a) If the TV is selected:
• When the menu is displayed, use these buttons to operate the menu system. For more details, refer to
“Introducing and Using the Menu System” on page 31.
• When the menu is turned off, press OK to show an overview of all TV channels. Then press or
to select the channel and press OK to watch the selected channel.
b) If the VCR or DVD is selected:
Use these buttons to control the main functions of your VCR or DVD.
lDisplaying the menu system:
Press this button to display the menu on the screen. Press it again to remove the menu display from the
screen.
mDisplaying NexTView:
For more details, refer to “NexTView” on page 48.
nSelecting channels:
Press these buttons to select the next or previous channel.
oAdjusting the TV volume:
Press these buttons to adjust the volume of the TV.
pRecording programmes on your VCR:
If the VCR is selected, press this button to record programmes.
qSelecting the TV mode:
Press this button to switch off Teletext or video input.
rSelecting a picture mode:
Press this button repeatedly to change the picture mode. For more details, refer to “Picture
Adjustment” on page 32.
sSelecting a sound effect:
Press this button repeatedly to change the style of sound used by your TV. For more details on the
styles available, refer to “Sound Adjustment” on page 34.
tDisplaying on-screen information:
Press this button to display all on-screen indicators. Press it again to cancel.
uTurning on the Screen Memo function:
Press this button to temporarily freeze the picture on the screen. For more details, refer to “Screen
Memo Function” on page 46.
v(KLV-23HR2)
Displaying the Memory Stick Home (“Memory Stick” picture viewer):
Press this button to display the Memory Stick Home (“Memory Stick” picture viewer). For more
details, refer to “Using the “Memory Stick” (Memory Stick Home)” on page 55.
(KLV-21SR2)*
Turning on the Power Saving function:
Press this button to turn on the Power Saving function. “Power Saving” appears on the screen for a
few seconds. Press this button again to cancel. For more details, refer to “Features” on page 39.
* This button is marked with on the remote control of the KLV-21SR2.
wMuting the sound:
Press this button to mute the sound from the TV. Press it again to restore the sound.
In addition to the TV functions, the coloured buttons (except for the TV &/ and VIDEO &/
buttons) are used for Teletext operations. The buttons with green symbols (except for
the button) are also used. For more details, refer to “Teletext” on page 47.

24 Installation
Installation
Inserting Batteries into the Remote Control
• Make sure you insert the supplied batteries observing the correct polarity.
• Always remember to dispose of used batteries in an environmentally friendly way.
• Do not use different types of batteries together or mix old and new batteries.

25
Installation
GB
Removing the Rear Cover
Removing the rear cover
Attaching the rear cover
Hold the rear cover as illustrated below, fitting the four detents on the rear cover into the corresponding
holes on the TV, then push the rear cover back onto the TV.
When you connect the cables, remove the rear cover of the TV. Be sure to attach the rear cover
back on the TV after you finish connecting the cables.
1Hold the lower right (or left) corner of the rear
cover and pull it towards you. In the same way,
detach the lower left (or right) corner of the rear
cover from the TV.
2Hold and lift up the rear cover with both hands as
illustrated below, and remove it from the TV.

26 Installation
Connecting an Aerial and a VCR
• Use the supplied mains lead (Type C-6 or Type BF, see page 20).
• Use the supplied coaxial cable for aerial connection.
Do not connect to the mains before all connections are complete.
• For more details regarding VCR connection, refer to “Connecting Optional Equipment” on
page 63.
• Note that some Scart leads may not fit into the connector on the TV.
OUT IN
VCR
Connect the supplied
coaxial cable. Connect the supplied mains
lead (Type C-6 or Type BF,
with safety earth).
Scart lead is optional.
Connecting an aerial
Connect the supplied
mains lead (Type C-6
or Type BF, with
safety earth).
Connecting a VCR with an aerial

27
Installation
GB
Bundling the cables
You can store the cables in the back of the TV.
1Bundle the cables and secure them with the
clips on both sides of the TV.
2Pass the cables through the grooves. Be sure to
place the cables inside the tabs at the bottom of
the TV.
3Put the cables from both sides together and
secure them with the clip at the bottom.
• It may not be possible to fasten cables that
are too thick with the clips.
• If all the cables cannot be stored inside,
leave some of them hanging down on both
sides of the TV.
If the cables are not neatly stored in the
grooves, you may not be able to attach the
rear cover.
Clips
Tabs
Clip
(continued)

29
First Time Operation
GB
First Time Operation
Switching On the TV and Tuning the TV
Automatically
The first time you switch on your TV, a sequence of menu screens appear on the TV enabling you
to: 1) choose the language of the menu screen, 2) choose the country/region in which you want to
operate the TV, 3) search and store all available channels (TV Broadcast), and 4) change the order
in which the channels (TV Broadcast) appear on the screen.
However, if you need to change any of these settings at a later date, you can do so by selecting the
appropriate option in the “Set Up” menu (see page 41).
1Connect the TV to the mains (100–240 V AC, 50/60 Hz).
2Press the & (Power) switch on the TV to switch it on.
The first time you switch on the TV, the Language menu
appears automatically on the screen (Auto Startup).
To perform Auto Startup later, press 0 on the rear
panel of the TV.
3Press / / or on the remote control to select
the language, then press OK to confirm your selection.
From now on, all the menus will appear in the selected
language.
4The Country menu appears automatically on the screen.
Press or to select the country/region in which you
will operate the TV, then press OK to confirm your
selection.
If the country/region in which you want to use the TV
does not appear in the list, select “– ” instead of a
country/region.
Language
Select language
English
Nederlands
Français
Italiano
Deutsch
Türkçe
Ελληνικά
Español
Português
Polski
Česky
Magyar
Русский
Бьлгарски
Suomi
Dansk
Svenska
Norsk
Country
Select country
–
United Kingdom
Ireland
Nederland
België/Belgique
Luxembourg
France
Italia
Schweiz/Suisse/Svizzera
Deutschland
Österreich
(continued)

30 First TIme Operation
Your TV is now ready for use.
5The Auto Tuning menu appears automatically on the
screen.
Press OK to select Yes.
6The TV starts searching and storing all available
broadcast channels.
• This procedure could take some minutes. Please be
patient and do not press any buttons, otherwise the
auto tuning will not be completed properly.
• If no channels are found during the auto tuning
process, a new menu appears automatically on the
screen asking you to connect the aerial. Please
connect the aerial (see page 26) and press OK. The
auto tuning process will start again.
7When the auto tuning is finished, the Programme
Sorting menu appears automatically on the screen.
A) If you want to keep the broadcast channels in the
tuned order, go to step 8.
B) If you want to store the broadcast channels in a
different order:
1Press or to select the programme number
with the channel you want to rearrange, then press
.
2Press or to select the new programme
number position for your selected channel, then
press .
The selected channel now moves to its new
programme position and the other channels
move accordingly.
3Repeat steps 1 and 2 if you want to change the
order of the other channels.
8Press MENU to turn off the menu.
Do you want to start
automatic tuning ?
Yes No
Auto Tuning
Programme :
System :
Channel :
Searching...
01
I
C23
No channel found.
Please connect aerial
Confirm
Programme Sorting
Select channel
01
02
03
04
05
06
07
08
09
10
11
TVE
TVE2
TV3
C33
C27
C58
S02
S06
S08
S12
S14
Exit:
MENU
Programme Sorting
Select channel
TVE
TVE2
TV3
C33
C27
C58
S02
S06
S08
S12
S14
01 TVE
01
02
03
04
05
06
07
08
09
10
11
Exit:
MENU

31
Menu System
GB
Menu System
Introducing and Using the Menu System
Your TV uses an on-screen menu system to guide you through the operations. Use the following
buttons on the remote control to operate the menu system.
1Press MENU to switch the first level menu on.
2Do the following to operate the menu.
• To highlight the desired menu or option, press or .
• To enter the selected menu or option, press .
• To return to the last menu or option, press .
• To alter the settings of your selected option, press / / or .
• To confirm your selection, press OK.
3Press MENU to turn off the menu.

33
Menu System
GB
NR (Noise Reduction) Auto/Off
Select to reduce the noise level.
NR (Noise Reduction) cannot be adjusted for “Memory Stick” input.
Dynamic Picture On/Off
Select to enhance the picture contrast.
Dynamic Picture cannot be adjusted for “Memory Stick” input.
Colour Tone Cool/Normal/Warm
Select to give bright colours a red tint (setting is variable from Cool to
Warm).
Reset Cancel/OK
Select OK to reset the picture to the factory preset levels.
Only “Mode,” “Contrast,” and “Reset” can be adjusted when “Mode” is set to “Live” or “Movie.”

34 Menu System
Sound Adjustment
The “Sound Adjustment” menu allows
you to alter the sound adjustments.
To do this:
After selecting the item you want to alter,
press , then press / / or
repeatedly to adjust it.
Effect
*
Off
No effect.
Natural
Enhances clarity, detail and presence of sound by using the “BBE High
Definition Sound system.”
Dynamic
Intensifies clarity and presence of sound for better intelligibility and
musical realism by using the “BBE High Definition Sound system.”
Dolby Virtual
Uses the TV speakers to simulate the surround effect produced by a multi
channel system.
If you set “Auto Volume” to “On” when Dolby Virtual is selected, the Effect option
automatically changes to Natural.
The “BBE High Definition Sound system” is manufactured by Sony Corporation
under licence from BBE Sound, Inc. It is covered by U.S. Patent No. 4,638,258 and
No. 4,482,866. The word “BBE” and BBE Symbol are trademarks of BBE sound.
* Manufactured under licence from Dolby Laboratories. “Dolby,” “Pro Logic,” and the
double-D symbol are trademarks of Dolby Laboratories.
Treble Press or to decrease higher-frequency sounds.
Press or to increase higher-frequency sounds.
Bass Press or to decrease lower-frequency sounds.
Press or to increase lower-frequency sounds.
Balance Press or to emphasise the left speaker.
Press or to emphasise the right speaker.
Select: Set: End:
OK
MENU
Mode :
Contrast :
Brightness :
Colour :
Hue :
Sharpness :
Backlight :
NR :
Dynamic Picture :
Colour Tone :
Reset
Personal
50
50
25
0
3
5
Off
On
Cool
Picture Adjustment
Select: Set: End:
OK
MENU
Effect :
Treble :
Bass :
Balance :
Auto Volume :
Dual Sound :
Volume :
Dual Sound :
Reset
Dolby Virtual
0
0
0
Off
Stereo
50
Stereo
Sound Adjustment
Select: Set: Back:
OK End:
MENU
Effect :
Treble :
Bass :
Balance :
Auto Volume :
Dual Sound :
Volume :
Dual Sound :
Reset
Dolby Virtual
0
0
0
Off
Stereo
50
Stereo
Sound Adjustment
,
m

35
Menu System
GB
Auto Volume On/Off
Volume level of the channels will stay the same, independent of the
broadcast signal (e.g. in the case of advertisements).
If you set “Effect” to “Dolby Virtual,” Off is selected automatically.
Dual Sound Mono/Stereo
For a stereo broadcast, select Stereo or Mono.
Mono/A/B
For a bilingual broadcast, select A for sound channel 1, B for sound
channel 2, or Mono for a mono channel, if available.
If you select other equipment connected to the TV, set the Dual Sound option to Stereo,
A, or B.
i Volume Press or to turn the volume of the headphones down.
Press or to turn the volume of the headphones up.
Even if headphones are connected to the TV, you can hear the sound from the TV
speakers.
i Dual Sound Select the “Dual Sound” option of the headphones.
Mono/Stereo
For a stereo broadcast, select Stereo or Mono.
Mono/A/B
For a bilingual broadcast, select A for sound channel 1, B for sound
channel 2, or Mono for a mono channel, if available.
If you select other equipment connected to the TV, set the i Dual Sound option to Stereo,
A, or B.
Reset Cancel/OK
Select OK to reset the sound to the factory preset.
Only “Treble,” “Bass,” and “Balance” are restored to the factory settings when you reset
the sound.

36 Menu System
Screen Control
The “Screen Control” menu allows you to
alter the screen adjustments.
Auto Format
(KLV-23HR2 only) The “Auto Format” option allows you to automatically change the aspect
ratio of the screen.
To do this:
1After selecting this option, press .
2Press or to select On (if you want the TV to automatically
switch the screen format according to the video input signal) or Off (if
you want to keep your preference).
Even if you have selected On or Off in the Auto Format option, you can always modify
the format of the screen by pressing repeatedly on the remote control.
Select: Set: End:
OK
MENU
Mode :
Contrast :
Brightness :
Colour :
Hue :
Sharpness :
Backlight :
NR :
Dynamic Picture :
Colour Tone :
Reset
Personal
50
50
25
0
3
5
Off
On
Cool
Picture Adjustment
Select: Set: End:
OK
MENU
Auto Format :
Screen Format :
Screen Shift
On
Smart
Screen Control
Select: Set: Back:
OK End:
MENU
Auto Format :
Screen Format :
Screen Shift
On
Smart
Screen Control
Select: Set: End:
OK
MENU
Screen Format :
Screen Shift 4:3
Screen Control
Select: Set: Back:
OK End:
MENU
Screen Format :
Screen Shift 4:3
Screen Control
m
,
(KLV-23HR2)
(KLV-21SR2)
,

37
Menu System
GB
Screen Format The “Screen Format” option allows you to modify the format of the
screen.
To do this (KLV-23HR2):
1After selecting this option, press .
2Press or to select the desired screen format and press OK.
Smart
Imitation of the wide screen
effect for a 4:3 broadcast.
4:3
Conventional 4:3 picture size,
full picture information.
14:9
Compromise between 4:3 and
16:9 picture size.
Zoom
Wide screen format for
letterbox movies.
Wide
For a 16:9 broadcast.
To do this (KLV-21SR2):
1After selecting this option, press .
2Press or to select the desired screen format and press OK.
4:3
Conventional 4:3 picture size.
16:9
For a 16:9 broadcast.
• You can adjust the position of the image when Smart, 14:9, or Zoom is selected. If
parts of the top and bottom of the screen are cut off, press or to move the image
up or down (e.g. to read subtitles).
•Screen Format cannot be adjusted for “Memory Stick” input.
Smart
4:3
14:9
Zoom
Wide
4:3
16:9
(continued)

38 Menu System
Screen Shift The “Screen Shift” option allows you to adjust the position of the picture
for each screen format.
To do this:
1After selecting this option, press .
2Press or to select the desired option and press . Then Press
// or to adjust the position of the picture.
V Shift (Vertical Shift) (KLV-23HR2 only)
Press to move the screen up.
Press to move the screen down.
H Shift (Horizontal Shift)
Press to move the screen to the left.
Press to move the screen to the right.
Reset
Select OK to reset to the factory settings.
•Screen Shift cannot be adjusted for “Memory Stick” input.
•H Shift (Horizontal Shift) can only be adjusted for an input signal from the Scart
connector 1/ 1.
• When “Screen Format” is set to “4:3” or “Wide,” V Shift (Vertical Shift) cannot be
adjusted.

39
Menu System
GB
Features
The “Features” menu allows you to alter
various adjustments of the TV.
Power Saving The “Power Saving” option allows you to reduce the power consumption
of the TV.
To do this:
1After selecting this option, press .
2Press or to select Reduce.
If you switch the TV off then on again when the Power Saving option is set to Reduce,
the setting remains unchanged.
Speaker The “Speaker” option allows you to control the sound of the TV speakers
when external audio equipment is connected.
To do this:
1After selecting this option, press .
2Press or to select the desired output.
On
The sound of the TV is output through the TV speakers.
Off
The sound of the TV is not output through the TV speakers.
Select: Set: End:
OK
MENU
Mode :
Contrast :
Brightness :
Colour :
Hue :
Sharpness :
Backlight :
NR :
Dynamic Picture :
Colour Tone :
Reset
Personal
50
50
25
0
3
5
Off
On
Cool
Picture Adjustment
Select: Set: End:
OK
MENU
Power Saving :
Speaker :
AV2 Output :
Menu Colour :
Standard
On
Auto
White
Features
Select: Set: Back:
OK End:
MENU
Power Saving :
Speaker :
AV2 Output :
Menu Colour :
Standard
On
Auto
White
Features
m
,
(continued)

40 Menu System
AV2 Output The “AV2 Output” option allows you to select the source to be output
from the Scart connector 2/ 2. You can record from this Scart any
signal coming from the TV or from external equipment connected to the
other connectors.
If your VCR supports SmartLink, this procedure is not necessary.
To do this:
1After selecting this option, press .
2Press or to select the desired output signal: Auto, TV, AV1,
or AV3.
• If you select Auto, the output signal will always be the same one that is displayed on
the screen.
• If you have connected a decoder to the Scart connector 2/ 2 or to a VCR
connected to this Scart, please remember to set AV2 Output to Auto for correct
unscrambling.
• Even if AV2 Output is set to Auto, signals input through a “Memory Stick” are not
output from Scart connector 2/ 2.
Menu Colour The “Menu Colour” option allows you to alter the background colour of
the menus.
To do this:
1After selecting this option, press .
2Press or to select White or Black.
S
S
S

41
Menu System
GB
Set Up
The “Set Up” menu allows you to alter
various options on the TV.
Language The “Language” option allows you to select the language that the menus
are displayed in.
To do this:
1After selecting this option, press .
2Follow step 3 of “Switching On the TV and Tuning the TV
Automatically” on page 29.
Country The “Country” option allows you to select the country/region in which
you want to operate the TV.
To do this:
1After selecting this option, press .
2Follow step 4 of “Switching On the TV and Tuning the TV
Automatically” on page 29.
Auto Tuning The “Auto Tuning” option allows you to automatically search and store
all available channels (TV Broadcast).
To do this:
1After selecting this option, press .
2Follow steps 5 and 6 of “Switching On the TV and Tuning the TV
Automatically” on page 29.
Programme Sorting The “Programme Sorting” option allows you to change the order in which
the channels (TV Broadcast) appear on the screen.
To do this:
1After selecting this option, press .
2Follow step 7 B) of “Switching On the TV and Tuning the TV
Automatically” on page 29.
Select: Set: End:
OK
MENU
Mode :
Contrast :
Brightness :
Colour :
Hue :
Sharpness :
Backlight :
NR :
Dynamic Picture :
Colour Tone :
Reset
Personal
50
50
25
0
3
5
Off
On
Cool
Picture Adjustment
Select: Set: End:
OK
MENU
Language :
Country :
Auto Tuning
Programme Sorting
Programme Labels
AV Preset
Manual Programme Preset
English
–
Set Up
Select: Set: Back:
OK End:
MENU
Language :
Country :
Auto Tuning
Programme Sorting
Programme Labels
AV Preset
Manual Programme Preset
English
–
Set Up
m
,
(continued)

42 Menu System
Programme Labels The “Programme Labels” option allows you to name a channel using up
to five characters (letters or numbers).
To do this:
1After selecting this option, press .
2Press or to select the programme number with the channel you
want to name, then press OK.
3Press / / or to select the character, then press OK.
4When you have finished, press / / or to select the word
“End” on the screen and press OK to exit the character input screen.
• If you input a wrong character, select the character using or on
the screen. Then press / / or to select the correct
character and press OK.
• For a blank, select on the screen and press OK.
AV Preset The “AV Preset” option allows you to designate a name for any external
equipment you have connected to the TV.
To do this:
1After selecting this option, press .
2Press or to select the input source you want to name, then press
.
3A label automatically appears in the label column.
a) If you want to use one of the predefined labels, press or to
select the desired label: AV1/AV2/AV3, VIDEO, DVD, CABLE,
GAME, CAM or SAT.
b) If you want to set a different label, select Edit and press OK. Then
with the first element highlighted, press / / or to
select the character, then press OK.
When you have finished, press / / or to select the
word “End” on the screen and press OK to exit the character input
screen.
• If you input a wrong character, select the character using or on
the screen. Then press / / or to select the correct
character and press OK.
• For a blank, select on the screen and press OK.

43
Menu System
GB
Manual
Programme Preset The “Manual Programme Preset” option (A–E) allows you to:
A) Preset channels, one by one, in the programme order of your choice.
To do this:
1After selecting this option, press .
2Highlight the Programme option and press .
3Press or to select a programme number for which you want to
preset the channel, then press . If you do not want to preset other
options for the channel, press OK instead of and go to step 8.
4After selecting the System option, press .
Depending on the country/region you have selected in the
“Country” option, this option may not be available (see
page 41).
5Press or to select the TV Broadcast system (B/G for western
European countries/regions, D/K for eastern European countries/
regions, I for the United Kingdom, or L for France), then press . If
you do not want to preset other options for the channel, press OK
instead of and go to step 8.
6After selecting the Channel option, press .
7Press or to select the type of channel to be tuned (S for cable
channels or C for terrestrial channels), then press .
After that, press the number buttons to enter the channel number of
the TV Broadcast directly. If you do not know the channel number,
press or to search for it.
When you have tuned the desired channel, press OK.
8Highlight the Confirm option and press OK. Then press to select
OK and finally press OK to store your channel selection.
Repeat all the above steps to tune and store other channels.
B) Label a channel using up to five characters (letters or numbers).
To do this:
1Press PROG +/– to select the programme number with the channel
you want to name.
You cannot select the programme number set to skip in the
“Skip” option (see step D on page 44).
2When the programme you want to name appears on the screen, select
the Label option and press .
3Press / / or to select the first character, then press OK.
4When you have finished, press / / or to select the word
“End” on the screen and press OK to exit the character input screen.
• If you input a wrong character, select the character using or on
the screen. Then press / / or to select the correct
character and press OK.
• For a blank, select on the screen and press OK.
(continued)

44 Menu System
C) Normally the automatic fine tuning (AFT) option will give the best
possible picture, however you can manually fine-tune the TV to
obtain a better picture if the picture is distorted.
To do this:
1Press PROG +/– to select the programme number with the channel
you want to fine-tune manually.
You cannot select the programme number set to skip in the
“Skip” option (see step D on page 44).
2When the programme you want to fine-tune appears on the screen,
select the AFT option and press .
3Press or to adjust the fine tuning between –15 and +15 and
press OK.
4Highlight the Confirm option and press OK. Then press to
select OK and finally press OK to store your choice.
To restore automatic fine tuning, select On in step 3 above.
D) Skip any unwanted programme numbers when they are selected with
the PROG +/– buttons.
To do this:
1Highlight the Programme option and press . Then press or
to select the programme number you want to skip.
2When the programme you want to skip appears on the screen, select
the Skip option and press .
3Press or to select Yes and press OK.
4Highlight the Confirm option and press OK. Then press to select
OK and finally press OK to store your choice.
To cancel this function afterwards, select No instead of Yes in step 3
above.
E) View and record scrambled channels when using a decoder connected
to the Scart connector 2/ 2 either directly or via a VCR.
Depending on the country/region you have selected in the
“Country” option, this option may not be available (see page 41).
To do this:
1Press PROG +/– to select the programme number with the scrambled
channel you want to view.
You cannot select the programme number set to skip in the
“Skip” option (see step D on page 44).
2When the programme you want to view appears on the screen, select
the Decoder option and press .
3Press or to select On and press OK.
4Highlight the Confirm option and press OK. Then press to select
OK and finally press OK to store your choice.
To cancel this function afterwards, select Off instead of On in step 3
above.
S

47
Other Functions
GB
Teletext
To switch on Teletext
After selecting the TV channel which carries the Teletext service you want to
view, press .
To select a Teletext page
Input three digits for the page number, using the number buttons.
• If you make a mistake, retype the correct page number.
• If the counter on the screen continues searching, it is because this page is not available. In this case,
input another page number.
To access the next or preceding page
Press PROG + ( ) or PROG – ().
To superimpose Teletext on to the TV
Whilst you are viewing Teletext, press . Press it again to cancel the Teletext mode.
To freeze a Teletext page
Some Teletext pages have sub-pages which follow on automatically. To stop them, press / . Press
it again to cancel the freeze.
To reveal concealed information (e.g. answers to a quiz)
Press / . Press it again to conceal the information.
To select a sub page
A Teletext page may consist of several sub pages. In this case, the page number that appears on the upper
left corner will change from white to green and one or more arrows will appear next to the page number.
Repeatedly press or on the remote control to watch the desired page.
To switch off Teletext
Press .
Fastext
Teletext is an information service transmitted by most TV stations. The index page of the Teletext
service (usually page 100) gives you information on how to use the service. To operate Teletext, use
the remote control buttons as indicated below.
Make sure you use a channel (TV Broadcast) with a strong signal, otherwise Teletext errors may
occur.
Each time you press , the screen changes cyclically as follows:
Teletext mode t Teletext Superimpose mode t TV mode t
Teletext mode t (repeat).
The Fastext service lets you access pages with one push of a button.
Whilst you are in the Teletext mode and Fastext is broadcast, a colour coded menu appears at the
bottom of the Teletext page. Press the colour button (red, green, yellow or blue) to access the
corresponding page.
TELETEXT
Index
Programme
News
Sport
Weather
25
153
101
98
TELETEXT
Index
Programme
News
Sport
Weather
25
153
101
98
TELETEXT
Index
Programme
News
Sport
Weather
25
153
101
98
TELETEXT
Index
Programme
News
Sport
Weather
25
153
101
98
TELETEXT
Index
Programme
News
Sport
Weather
25
153
101
98
TELETEXT
Index
Programme
News
Sport
Weather
25
153
101
98
TELETEXT
Index
Programme
News
Sport
Weather
25
153
101
98
TELETEXT
Index
Programme
News
Sport
Weather
25
153
101
98

48 Other Functions
NexTView*
* Depending on availability of service.
Displaying NexTView
1Select a broadcast channel providing the NexTView service. In this case, the indication “NexTView”
is displayed as soon as data is available.
2To see the NexTView service, you have two different NexTView interface types, depending on the
percentage of available data.
a)“Programme List” interface
Whilst you are watching TV, and after the indication “NexTView” in orange is displayed on the
screen, press on the remote control to see the “Programme List” interface (see fig. 1 on page 49).
b)“Overview” interface
Whilst you are watching TV, and after more than 50% of NexTView data is available (100% data
may not be available depending on your area), the indication “NexTView” in black or white is
displayed on the screen. (The colour of the indication “NexTView” may vary depending on the
Menu Colour option. See page 40.) Then press on the remote control to see the “Overview”
interface (see fig. 2 on page 49).
3To navigate through NexTView:
• Moving right or left, press or .
• Moving up or down, press or .
• Confirming a selection, press OK.
4To switch off NexTView, press on the remote control.
NexTView is an on-screen electronic programme guide, providing you with programme
information for different broadcasters.
When looking for information, you can search by theme (sports, art, etc.) or date.
When you are viewing the NexTView service, wrong characters appear on the screen if the language
used in the NexTView service does not match the language set on your TV. To resolve this problem,
select the “Language” option in the “Set Up” menu and set the same language as that used in the
NexTView service. Also select the “Country” option in the “Set Up” menu and set the country/
region in which the NexTView service is provided (see page 41).
As soon as you enter the NexTView service, the lower left corner of the screen will show the
percentage of NexTView data available. Once you have entered this service, the percentage of data
available will not increase.

49
Other Functions
GB
“Programme List” interface (fig. 1)
“Overview” interface (fig. 2)
AIcons for different themes
Refer to “Icon key” on
page 50.
BDate
CProgramme list
DRecord This function only works if you have connected a
VCR which supports SmartLink and Timer
Programming features.
If you want to record the selected programme, press the red
button on the remote control.
ERemind
If you want to be reminded when the selected programme is
broadcast, press the green button on the remote control. At
the time that programme should be broadcast a reminder
message is displayed on the TV.
• The “Record” and “Remind” options will be shown on the screen as soon as a programme has
been selected, but they will not be shown if you are watching the NexTView service on a TV
channel which is not a NexTView provider.
• The “Record” and “Remind” options will not be available if the programme that you have
selected has already started.
01
Mon
TV1
TV2
TV3
TV4
TV5
TV6
TV7
TV8
00 : 30
01 : 30
05 : 30
06 : 30
07 : 30
08 : 30
09 : 30
10 : 30
Songs from the shows
Weather forecast informat i
A1 news magazine
Arts show
Oclock news
Weather forecast informat i
A1 news magazine
Arts show
02
Tue 03
Wed 04
Thu 05
Fri 06
Sat 07
Sun 7 : 07 : 01
Songs from the shows
TV1 00:30 - 01:30 Thursday 04
Programme descriptio n
Record Remind
45
1
2
3
01
Mon
TV1
TV2
TV3
TV4
TV5
TV6
TV7
TV8
02
Tue 03
Wed 04
Thu 05
Fri 06
Sat 07
Sun 9 : 15 : 03
9 : 00 9 : 30 10 : 00
Magazine | Songs from the shows
Weather Forecast | Mike's show
Euronews | Fantasy film |Star Wars
Home Shopping Europe |Euro Sports
News | Arts show | Magazine
Larry King's live | Euro Sports
Euro magazine | Euro Sports
Home Shopping Europe | Euronews
Songs from the shows
TV1 00:30 - 01:30 Thursday 04
Programme descriptio n
Record Remind
1
2
3
45
(continued)

50 Other Functions
Icon key
Full selection list
All the programme information is listed
by time and broadcast channels order.
Channel selection
If the NexTView provider sends
information on more than eight broadcast
channels, you can select eight of them to
create a personal list.
After you have created your personal list,
the default list can be restored. To restore
it, select “Auto B” by pressing on
the remote control.
Entertainment Remind list
Shows you a list with all the programmes
(maximum of five programmes) that you
have selected to be reminded about.
Children
Arts
Sports
News
Movies
Music

53
“Memory Stick”
GB
On handling the “Memory Stick”
• You cannot record or erase images when the write-protect switch on the “Memory Stick” is set to
LOCK.
• We recommend that you back up important data on the hard disk of your computer.
• Image data may be damaged in the following cases:
– If you remove the “Memory Stick,” or turn the power off whilst the access lamp is lit or flashing.
– If you use the “Memory Stick” near magnets or magnetic fields, such as speakers.
– If you unplug the mains lead whilst the access lamp is lit or flashing.
• Prevent metallic objects or your finger from coming into contact with the metal parts of the connecting
section.
• Do not attach any material other than the supplied label in the labelling position.
• Do not attach the label so that it sticks out from the proper labelling position.
• Do not write forcefully on the “Memory Stick Duo” memo area.
• Do not bend, drop or apply strong shock to the “Memory Stick.”
• Do not disassemble or modify the “Memory Stick.”
• Do not allow the “Memory Stick” to get wet.
• Do not use or keep the “Memory Stick” in a location that is subject to:
– extremely high temperature, such as in a car parked in the sun or on a radiator
– under direct sunlight
– high humidity or places with corrosive substances present
• When you carry or store a “Memory Stick,” put it in its supplied case.
On formatting the “Memory Stick”
The “Memory Stick” is shipped with an exclusive standard format.
When the access lamp is lit or flashing
When the access lamp is lit or flashing, the “Memory Stick” is reading or writing data. In this case, do not
shake or strike the TV, turn the power off, or eject the “Memory Stick,” otherwise the image data may be
damaged.
• “Memory Stick” and are trademarks of Sony Corporation.
• “Memory Stick PRO” and are trademarks of Sony Corporation.
• “Memory Stick Duo” and are trademarks of Sony Corporation.
A “Memory Stick” formatted by a computer does not have a guaranteed compatibility with this TV.
LOCK
LOCK
Write-protect switch
Labelling
position
54 “Memory Stick”
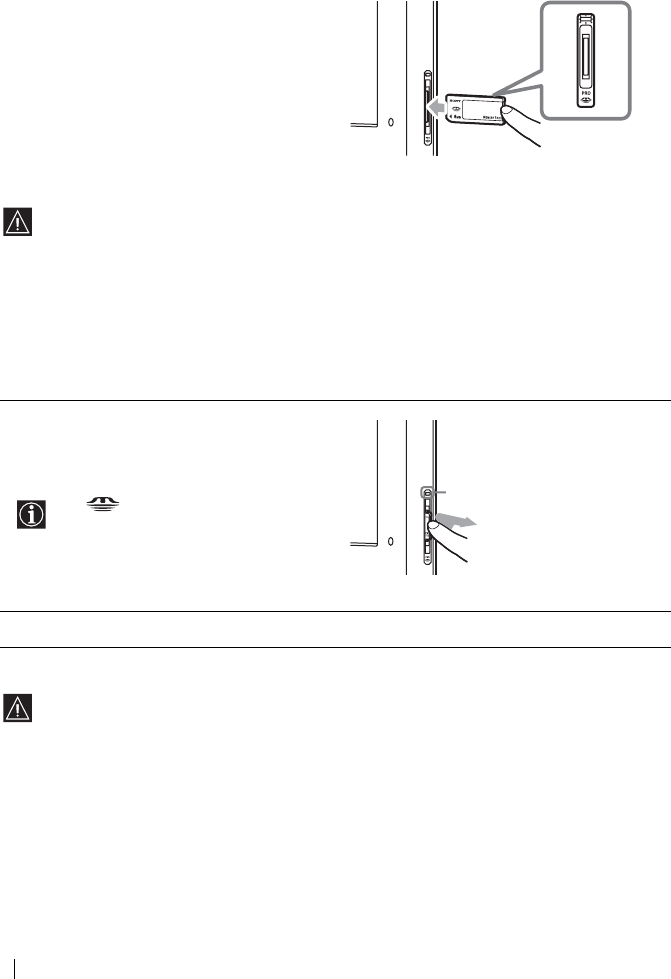
Inserting and Removing a “Memory Stick”
Inserting a “Memory Stick”
Removing a “Memory Stick”
Insert the “Memory Stick” into the “Memory Stick”
slot with the b mark facing forward as illustrated on
the right until it clicks. The “Memory Stick” access
lamp flashes, then goes out.
• Be sure to insert the “Memory Stick” correctly. If the “Memory Stick” is forced in the wrong way,
the “Memory Stick” or the slot may be damaged.
• Insert only a “Memory Stick” into the “Memory Stick” slot. Attempting to insert other objects
into the slot may damage the TV.
• To use a “Memory Stick Duo,” be sure to attach it to the Memory Stick Duo adapter before
inserting it into the “Memory Stick” slot. Inserting a Memory Stick Duo adapter without a
“Memory Stick Duo” may damage the “Memory Stick” slot.
1Check that the “Memory Stick” access lamp is
off, then push the “Memory Stick” gently into
the “Memory Stick” slot.
The “Memory Stick” is ejected.
The (“Memory Stick”) indicator
on the front panel of the TV works in
the same manner as the “Memory
Stick” access lamp.
2Pull the “Memory Stick” completely out of the “Memory Stick” slot.
• Do not turn the power off whilst the “Memory Stick” access lamp is lit or flashing in red.
If you do so, the “Memory Stick” may be damaged.
• When removing the “Memory Stick,” do not attempt to just pull it from the “Memory Stick” slot.
If you do so, the “Memory Stick” or the slot may be damaged.
• If, when removing the “Memory Stick,” you release it immediately after pushing it into the
“Memory Stick” slot, the “Memory Stick” may jump out.
Right side of the TV
“Memory Stick” access lamp
Right side of the TV

56 “Memory Stick”
Selecting the index menu of the Memory Stick Home
Press or to highlight the menu item, then press OK. The selected option is highlighted in yellow.
Option Description
Slide Show Displays a slideshow of images that are on the “Memory Stick.” For more
details, refer to “Using “Memory Stick” Slide Show” on page 61.
Option Displays the Option menu. You can select any of the following options.
File: Displays the following options:
Sort: Sorts the image file according to the file name or the renewal date
in ascending/descending order.
Filter: Filters only still images (Still) or moving images (Movie) out from
the content. To cancel the filter, select Off.
The Sort/Filter functions can be activated only when “Digi.
Camera Mode” is set to “Off.” Filter setting information is
displayed on the Memory Stick Home.
Memory Stick: Displays the type, the used capacity, and the capacity of the
“Memory Stick” in use.
Select Folder Allows you to select a specific folder on the “Memory Stick.” For more details,
refer to “Selecting a folder that you want to view on the “Memory Stick”” on
page 57.

57
“Memory Stick”
GB
Selecting a folder that you want to view on the “Memory Stick”
Sorting out image files (Digital Camera Mode)
“Digi. Camera Mode” allows you to sort out image files in JPEG and MPEG compression format that were
recorded on digital still cameras and digital video cameras which are DCF-compliant.
In step 4 above, select Digi. Camera Mode. Then press or to select On, and press OK.
1Insert a “Memory Stick” that contains the images you want to view.
2Press (“Memory Stick”) on the remote control.
The Memory Stick Home appears on the screen.
3Press or to highlight Select Folder, then press OK.
The Select Folder menu appears.
4Press to select the list of contents, and press or to select a folder that you want to view.
Then press OK.
An index of thumbnail images of the selected folder appears.
To select folders which are not displayed on the screen, press to select the slider and press
or . The next or previous 10 folders appear.
• You cannot select Digi. Camera Mode if there are more than 2,000 image files recorded on the
“Memory Stick” using a digital still camera or digital video camera.
• For an image file recorded with the Voice Memo function of a Sony digital camera, a still image
file is displayed.
• When Digi. Camera Mode is set to On, the response to remote control operation may slow down,
depending on the number of subfolders in the folder and the number of files in the subfolder. In
this case, wait until the “Memory Stick” access lamp goes off before performing any operations,
or set Digi. Camera Mode to Off.
Filter: Still
100MSDCF
Slide Show…
Option…
Memory Stick Home
Select Folder
Sel: Back: Set: OK
No.: 1/1234
Size: 1024x768 File: SPJP0001.JPG
Date: 7/15/2002 12:34
Close
Currently selected folder
List of folders included in the
currently selected folder
To upper stage First image file contained in the
currently selected folder
(continued)

58 “Memory Stick”
Using the Memory Stick Home
The Memory Stick Home allows you to display selected images on the full screen and playback a moving
image using the index screen. You can also protect, rotate, and delete images using the index menu.
Index menu for a thumbnail image
1Insert a “Memory Stick” that contains the images you want to view.
2Press (“Memory Stick”) on the remote control.
The Memory Stick Home appears on the screen.
3Press or to highlight Select Folder, then press OK.
The Select Folder menu appears.
4Press to select the list of contents, and press or to select a folder that you want to view.
Then press OK.
An index of thumbnail images from the selected folder appears.
5Press , and press / / or to select an image file that you want to view. Then press OK.
The index menu for a thumbnail image appears. You can select any of the following options. Press
or to select the option, and press OK.
If the selected folder contains more image files than can be displayed on the screen, press ,
or press to select the slider and press . The index of subsequent images appears as you
scroll the screen.
Option Description
Full Screen
(for a still image only) Displays the still image on the full screen. For more details, refer to
“Displaying a still image on the full screen” on page 59.
Movie Player
(for a moving image only) Displays Movie Player. For more details, refer to “Playing back a moving
image (Movie Player)” on page 60.
Slide Show Displays a slideshow of images that are on the “Memory Stick.” For more
details, refer to “Using “Memory Stick” Slide Show” on page 61.
Protect Protects the selected image file against being erased. is marked on the
protected image.
Rotate
(for a still image only) Rotates only a still image 90 degrees clockwise or anticlockwise. Each time
you press OK, the image rotates 90 degrees.
Delete Deletes the selected image file.
Close Closes the index menu.
• You cannot rotate or delete a protected image ( ).
• You cannot rotate or delete the images on the “Memory Stick” if the write-protect switch is set to
LOCK.
• If an image has been rotated, it remains on the “Memory Stick,” and is displayed this way again
the next time.

60 “Memory Stick”
Playing back a moving image (Movie Player)
Select Movie Player in the index menu for a thumbnail image, Movie Player appears on the screen. You
can operate Movie Player as follows. Press or to select the button or the option, and press OK.
Guide display
The guide display guides the function of and on the remote control when Movie Player is
displayed.
Rew: Rewinds the moving image.
FF : Fast forwards the moving image.
If you are starting a slideshow and stop or pause the moving image, the guide display is changed to
Prev. and Next . For more details on the slideshow, refer to “Using “Memory Stick” Slide Show”
on page 61.
Prev.: Displays the previous image.
Next : Displays the next image.
Button/Option Description
N (Play/Pause) Plays back a moving image. During playback, the button display is changed to the
X (Pause) button. When the playback is finished, playback stops with the first
image of the moving image file displayed.
x (Stop) Stops playback.
Full Screen Displays a moving image on the full screen and starts playback automatically. To
return to Movie Player, press /// or OK.
The TV automatically displays the appropriate image size for each moving
image on the full screen.
Menu Displays Menu. You can select any of the following options.
Information: Displays the information of the selected image file.
Protect: Protects the selected image file against being erased.
Delete: Deletes the selected image file.
Close: Closes Menu.
You cannot delete a protected image ( ).
Return Returns to the Memory Stick Home.
No.: 1/1234
Size: 320x240 File: BASEBALL.MPG
Date: 7/15/2002 12:34
Prev. Next
Full Screen
Menu
Return

61
“Memory Stick”
GB
Using “Memory Stick” Slide Show
“Slide Show” allows you to watch a slideshow of the images on the “Memory Stick.”
To start Slide Show
When you set “Advan. Slds.” to “Auto”
The images change automatically. When a moving image file is selected, it plays back automatically, and
after playback, the next image file is displayed automatically.
When you set “Advan. Slds.” to “Manual”
Press or to change the images displayed.
: Displays the next image.
: Displays the previous image.
When you display a still image on the full screen, you can change the images in the same way as was
described above.
When a moving image file is selected, it does not play back and “Movie Player” is displayed. For more
details on using “Movie Player,” refer to “Playing back a moving image (Movie Player)” on page 60.
To stop Slide Show
If you want to stop Slide Show, do the following to return to the Memory Stick Home.
If you have set “Advan. Slds.” to “Auto”
Press OK.
If you have set “Advan. Slds.” to “Manual”
Press OK to display the index menu for Slide Show, then press or to select Return and press OK.
1Insert a “Memory Stick” that contains the images you want to view.
2Press (“Memory Stick”) on the remote control.
The Memory Stick Home appears on the screen.
3Press or to highlight Select Folder, then press OK.
The Select Folder menu appears.
4Press to select the list of contents, and press or to select a folder that you want to view.
Then press OK.
An index of thumbnail images of the selected folder appears.
5Press or to highlight Slide Show, then press OK.
The index menu for Slide Show appears. You can select any of the following options. Press or
to select the option, and press OK.
Advan. Slds.: Sets Slide Show to run automatically (Auto) or manually (Manual).
Interval: Selects the period for which one image is displayed from 5sec, 10sec, 30sec, 1min,
5min, or 10min.
• The time is approximate.
• When Advan. Slds. is set to Manual, the Interval option is not available.
6Press or to select Start, and press OK.
“Movie Player” is not displayed when you set Advan. Slds. to Auto.
(continued)

62 “Memory Stick”
Caution displays whilst you are using the “Memory Stick”
If an image file has a problem, the following indicators may appear on the screen. Use the list below to
check the meaning of the caution display.
Caution messages whilst you are using the “Memory Stick”
Use the list below to check the meaning of the messages.
The image file is in the JPEG or MPEG1 format but is not DCF-compatible.
There is a thumbnail image but it is not DCF-compatible.
There is no selected image file.
There is an image file but the thumbnail image is corrupted.
The image file is corrupted.
No Memory Stick Insert the “Memory Stick” into the “Memory Stick” slot correctly.
No file No image files are contained in the currently selected folder.
No movie file No moving image files are contained in the currently selected folder,
even though “Filter” is set to “Movie” in the “Option” menu.
No still file No still image files are contained in the currently selected folder, even
though “Filter” is set to “Still” in the “Option” menu.
Cannot play Data in the moving image file is corrupted.
Memory Stick locked The write-protect switch on the “Memory Stick” is set to LOCK.
Release the lock.
Memory Stick error • The image file may be corrupted.
• The image file may not be stored in JPEG or MPEG1 format. Check
to see if the image file can be viewed on other equipment compatible
with the “Memory Stick,” such as a digital camera, etc.
Memory Stick type error A “Memory Stick” that is not compatible or cannot be used with the TV
has been inserted.
Format error The “Memory Stick” has not been formatted correctly.
File error The selected folder has not been named correctly. Re-enter the name
with fewer than 66 characters, including “/” by displaying the “Select
Folder” menu.
Read Only Memory A read-only “Memory Stick” on which image files are recorded has been
inserted. You cannot record or delete the data on a read-only “Memory
Stick.”

63
Additional Information
GB
Additional Information
Connecting Optional Equipment
* “PlayStation” is a product of Sony Computer Entertainment, Inc.
* “PlayStation” is a trademark of Sony Computer Entertainment, Inc.
Using the following instructions, you can connect a wide range of optional equipment to your TV.
(Connecting cables are not supplied.)
12
VCR
DVD recorder
Decoder
Decoder
S VHS/Hi8/DVC
camcorder
“PlayStation”*
Hi-Fi
Headphones
Rear panel of the TV
(continued)

64 Additional Information
AConnect the supplied coaxial cable.
B3: AV3 S video input jack
C3: AV3 Video input jack
D3: AV3 Audio input jacks
E: Audio output jacks
F0: Auto Startup button
G: “Memory Stick” slot
(KLV-23HR2 only)
HConnect the supplied mains lead.
I2/ 2: AV2 Scart connector
(SmartLink)
J1/ 1: AV1 Scart connector
Ki: Headphones jack
0
A
B
C
D
E
H
I
J
K
G
F
S S
• To avoid a noisy picture, do not connect external equipment to connectors B and C at the same
time.
• Even if headphones are connected to the TV, you can hear the sound from the TV speakers.
• Note that some Scart leads may not fit into the connector on the TV.

65
Additional Information
GB
Connecting a VCR
To connect a VCR, refer to “Connecting an Aerial and a VCR” on page 26. We recommend you connect
your VCR using a Scart lead. If you do not have a Scart lead, tune in the VCR test signal to the TV
programme number “0” by using the “Manual Programme Preset” option. For details on how to manually
programme these presets, see page 43, step A.
Refer to the instruction manual of your VCR to find out how to find the output channel of your VCR.
Connecting a VCR or a DVD recorder that supports SmartLink
If you use a VCR or a DVD recorder that supports SmartLink, please connect the VCR or the DVD
recorder using a Scart lead to the Scart connector 2/ 2 (I).
Connecting a decoder
If you have connected a decoder to the Scart connector 2/ 2 (I), or through
a VCR connected to this Scart
Select the “Manual Programme Preset” option in the “Set Up” menu and, after entering the “Decoder”*
option, select “On” (using or ). Repeat this option for each scrambled signal.
Connecting external audio equipment
To listen to the sound from the TV on Hi-Fi equipment
Connect your Hi-Fi equipment to the audio output jacks (E) if you want to amplify the audio output
from the TV. Next, using the menu system, select the “Features” menu and set “Speaker” to “Off” (see
page 39).
SmartLink is a direct link between the TV and a VCR or a DVD recorder. For more information on
SmartLink, refer to the instruction manual of your VCR or DVD recorder.
Depending on the country/region you have selected in the “Country” option, this option may not be
available (see page 41).
S
S

66 Additional Information
Using Optional Equipment
For mono equipment
Connect the phono plug to the L/G/S/I jack and press / repeatedly until the input symbol 3
or 3 appears on the screen.
Select the “Sound Adjustment” menu and set “Dual Sound” to “A” (see page 35).
“Memory Stick” input (KLV-23HR2 only)
To view still images or moving images stored on a “Memory Stick” inserted into the “Memory Stick” slot
G, press (“Memory Stick”) on the remote control.
“MEMORY STICK” appears on the screen when you press (“Memory Stick”).
For more details on using “Memory Stick” media, refer to “Using the “Memory Stick” (Memory Stick
Home)” on page 55.
1Connect your equipment to the designated TV socket, as indicated on pages 63 to 65.
2Switch on the connected equipment.
3To watch the picture of the connected equipment, press the / button on the remote control
repeatedly until the correct input symbol appears on the screen.
Symbol Input Signals
1 or 2 • Audio/video input signal through the Scart connector J or I.
1• RGB input signal through the Scart connector J. This symbol appears only if
an RGB source has been connected.
2• S video input signal through the Scart connector I.
3• Video input signal through the phono jack C and audio input signal through
D.
3• S video input signal through the S video input jack B and audio input signal
through D.
4Press the button on the remote control to return to the normal TV picture.
S
S
S

67
Additional Information
GB
Remote Control Configuration for VCR/DVD
This remote control is set by default to operate the basic functions of this Sony TV, most Sony DVDs and
Sony VCRs when batteries are initially installed. To control VCRs and DVDs of other major brands, and
certain Sony VCR models, please complete the following steps:
Before you start, look up the three digit code for your brand of DVD or VCR from the list on
page 68. For those brands that have more than one code, enter the first code number.
1Press the Media Selector button on the remote control repeatedly until the
required VCR or DVD green light lights up.
If the Media Selector is in the TV position, code numbers will not
be stored.
2Before the green light goes out, press and hold the yellow button for
approximately six seconds until the green light starts flashing.
3Whilst the green light is flashing, enter all three digits of the code for your
brand (see page 68) using the number buttons on the remote control.
If your selected code is entered correctly, all three green lights will
be lit momentarily.
4Turn on your VCR or DVD and check that the main functions work.
• If your equipment is not working or some of the functions do
not work, please check to be sure you entered the correct code
set or try the next code listed against the brand (see page 68).
• Your brand codes may be lost if weak batteries are not replaced
within a few minutes. To reset your DVD or VCR code number,
please repeat the above steps. A small label is attached inside
the battery cover to allow you to record your brand codes.
• Not all brands are covered and not all models of every brand are
covered.
1
3
2
(continued)

69
Additional Information
GB
Specifications
Display Unit:
(KLV-23HR2)
Power Requirement:
100–240 V AC, 50/60 Hz
Screen Size: 23 inches
Approx. 58.7 cm measured
diagonally
Display Resolution:
1,280 dots (horizontal) × 768 lines
(vertical)
Power Consumption:
90 W
Standby Power Consumption:
1 W or less
Dimensions (w × h × d):
Approx. 59.8 × 50.6 × 23.0 cm
(with stand)
Approx. 59.8 × 47.8 × 11.9 cm
(without stand)
Weight: Approx. 11.2 kg (with stand)
Approx. 10.0 kg (without stand)
(KLV-21SR2)
Power Requirement:
100–240 V AC, 50/60 Hz
Screen Size: 21 inches
Approx. 53.7 cm measured
diagonally
Display Resolution:
1,024 dots (horizontal) × 768 lines
(vertical)
Power Consumption:
90 W
Standby Power Consumption:
1 W or less
Dimensions (w × h × d):
Approx. 52.8 × 51.6 × 23.0 cm
(with stand)
Approx. 52.8 × 49.1 × 11.8 cm
(without stand)
Weight: Approx. 10.6 kg (with stand)
Approx. 9.4 kg (without stand)
Panel System:
LCD (Liquid Crystal Display) Panel
TV System:
Depending on your country/region selection:
B/G/H, D/K, L, I
Colour System:
PAL, SECAM
NTSC 3.58, 4.43 (only Video In)
Aerial:
75 ohm external terminal for VHF/UHF
Channel Coverage:
VHF: E2–E12
UHF: E21–E69
CATV: S1–S20
HYPER: S21–S41
D/K: R1–R12, R21–R69
L: F2–F10, B–Q, F21–F69
I: UHF B21–B69
(continued)

70 Additional Information
Terminals:
1/ 1
21-pin Scart connector (CENELEC standard)
including audio/video input, RGB input, and
TV audio/video output.
2/ 2 (SMARTLINK)
21-pin Scart connector (CENELEC standard)
including audio/video input, S video input,
selectable audio/video output, and SmartLink
interface.
3
S video input (4-pin mini DIN)
3
Video input (phono jack)
3
Audio input (phono jacks)
Audio output (Left/Right) (phono jacks)
iHeadphones jack
“Memory Stick” slot (KLV-23HR2 only)
Sound Output:
Full range speaker:
2.6 W × 2
Woofer: 3.8 W
Accessories Supplied:
• Remote control
RM-Y1103 (KLV-23HR2) (1) or
RM-Y1102 (KLV-21SR2) (1)
• Size AA batteries (R6 type) (2)
• Coaxial cable (1)
• Mains lead (Type C-6) (1)
• Mains lead (Type BF) (1)
The mains lead Type BF may not be
supplied depending on the country/region.
Optional Accessory:
Wall-Mount Bracket SU-W210
Other Features:
• Teletext, Fastext, TOPtext
• Sleep Timer
• SmartLink (Direct link between your TV and a
compatible VCR or DVD recorder. For more
information on SmartLink, please refer to the
instruction manual of your VCR or DVD
recorder.)
• TV system autodetection
• Auto Format (KLV-23HR2 only)
• Screen Memo
• NexTView (depending on availability of
service)
S
S

71
Additional Information
GB
Troubleshooting
Self-diagnosis function
This TV is equipped with a self-diagnosis function. If there is a problem with your TV, the /
(Standby/Sleep) indicator will flash in red repeatedly. Writing down the duration of flashes and interval
between flashes helps you inform your dealer or Sony service centre of the TV’s condition.
1Measure how long the / (Standby/Sleep) indicator flashes and stops flashing.
For example, the indicator flashes for two seconds, stops flashing for one second, and flashes for two
seconds.
2Press the & (Power) switch on the TV to switch it off, disconnect the mains lead, and inform your dealer
or Sony service centre of how the indicator flashes (duration and interval).
Trouble symptoms and remedies
• Here are some simple solutions to problems which may affect the picture and sound.
• If you continue to experience problems, have your TV serviced by qualified service personnel.
Never open the casing yourself.
Problem Possible remedies
No picture
No picture (screen is dark) and no sound • Check the aerial connection.
• Connect the TV to the mains, and press the & (Power) switch
on the TV.
•If the / (Standby/Sleep) indicator lights up in red,
press TV &/ on the remote control.
The TV turns off automatically (the TV
enters the standby mode). • Check if the Sleep Timer function is activated (page 45).
• If no signal is received or no operation is performed in the TV
mode for 10 minutes, the TV automatically switches to the
standby mode.
No picture or no menu information from
equipment connected to the Scart
connector
• Check that the optional equipment is on and press /
on the remote control repeatedly until the correct input
symbol is displayed on the screen.
• Check the connection between the optional equipment and
the TV.
/ (Standby/Sleep) indicator (flashing in red)
KLV-23HR2 KLV-21SR2
(continued)

72 Additional Information
Poor picture/Unstable picture
Double images or ghosting • Check aerial/cable connections.
• Check the aerial location and direction.
Only snow and noise appear on the screen. • Check if the aerial is broken or bent.
• Check if the aerial has reached the end of its serviceable life
(three to five years in normal use, one to two years at the
seaside).
Dotted lines or stripes • Keep the TV away from electrical noise sources such as cars,
motorcycles, or hair-dryers.
No colour on colour programmes • Using the menu system, select the “Picture Adjustment”
menu and select “Reset” to return to the factory settings
(page 33).
• If you set the “Power Saving” option to “Reduce,” picture
colours may become dimmer (page 39).
Some tiny black points and/or bright
points on the screen • The picture of a display unit is composed of pixels. Tiny
black points and/or bright points (pixels) on the screen do not
indicate a malfunction.
The picture is too bright. • Using the menu system, select the “Picture Adjustment”
menu and select “Mode.” Then select the desired picture
mode (page 32).
Picture (stripe) noise • Make sure that the aerial is connected using the supplied
coaxial cable.
• Keep the aerial cable away from other connecting cables.
• Do not use 300-ohm twin lead cables as interference may
occur.
Poor picture (white saturation) when
viewing a signal from the Scart connector
2/ 2
• Make sure that the output signal of the equipment connected
to the Scart connector 2/ 2 is not an RGB signal. If
it is an RGB signal, please connect the equipment to the Scart
connector 1/ 1.
Distorted picture and noisy sound • Check if any connected optional equipment is installed in
front of the TV or beside the TV. When installing optional
equipment, leave some space between the optional
equipment and the TV.
Stripe noise during playback/recording of
a VCR • Video head interference. Keep your VCR away from the TV.
• Leave a space of 30 cm between your VCR and the TV to
avoid noise.
• Avoid installing your VCR in front of the TV or beside the
TV.
Poor or no picture (screen is dark), but
good sound • Using the menu system, select the “Picture Adjustment”
menu and select “Reset” to return to the factory settings
(page 33).
Noisy picture when viewing a TV channel • Using the menu system, select the “Manual Programme
Preset” option in the “Set Up” menu and adjust “AFT”
(Automatic Fine Tuning) to obtain better picture reception
(page 44).
• Using the menu system, set the “NR” (Noise Reduction)
option in the “Picture Adjustment” menu to reduce the noise
in the picture (page 33).
Problem Possible remedies
SS

73
Additional Information
GB
Distorted picture when changing
programmes or selecting Teletext • Turn off any equipment connected to the Scart connector on
the rear of the TV.
Wrong characters appear when viewing
Teletext. • Using the menu system, select the “Language” and
“Country” options in the “Set Up” menu and set the language
and country/region in which you view Teletext (page 41).
For Cyrillic languages, we recommend that you select Russia
in case your own country/region does not appear in the list.
Wrong characters appear when viewing
NexTView. • Using the menu system, select the “Language” and
“Country” options in the “Set Up” menu and set the language
and country/region in which NexTView is provided
(page 41).
No sound/Noisy sound
Good picture, no sound • Press 2 +/– or % (Mute) on the remote control.
• Check that the “Speaker” option is set to “On” in the
“Features” menu (page 39).
Audio noise • Make sure that the aerial is connected using the supplied
coaxial cable.
• Keep the aerial cable away from other connecting cables.
• Do not use 300-ohm twin lead cables as interference may
occur.
Menu item is not displayed. • Some items cannot be selected depending on the signal or
other settings. Refer to the instructions on each menu item.
Strange sound
The TV cabinet creaks. • Changes in room temperature sometimes cause the TV
cabinet to expand or contract, which can make slight noises.
This does not indicate a malfunction.
The TV ticks. • An electrical circuit inside the TV is activated when the TV
is turned on. This does not indicate a malfunction.
The TV buzzes. • There might be a surge sound when turning on the TV. This
does not indicate a malfunction.
Remote control does not function. • Check that the remote control is set correctly for the device
you are using (VCR, TV, or DVD).
• If the remote control does not operate the VCR or DVD even
when the remote control has been set correctly to VCR or
DVD, enter the necessary code set as explained in “Remote
Control Configuration for VCR/DVD” (page 67).
• Replace the batteries.
The / (Standby/Sleep) indicator on
the TV flashes. • Refer to “Self-diagnosis function” (page 71) and contact
your nearest Sony service centre.
Problem Possible remedies
(continued)

74 Additional Information
“Memory Stick” (KLV-23HR2 only)
Problem Possible remedies
Cannot insert the “Memory Stick” into
the “Memory Stick” slot. • The “Memory Stick” is not facing in the correct direction.
Insert the “Memory Stick” with the b mark facing forward
into the “Memory Stick” slot (page 54).
Cannot delete a file or all materials. • The write-protect switch on the “Memory Stick” is set to
LOCK. Release the lock.
• The image file is protected. Release the protection using the
index screen.
The still image files in the JPEG format
stored in a “Memory Stick” cannot be
displayed.
• Select “Option” in the Memory Stick Home and select “File.”
Then set “Filter” to “Still” or “Off” (page 56).
The moving image files in the MPEG1
format stored in a “Memory Stick”
cannot be displayed.
• Select “Option” in the Memory Stick Home and select “File.”
Then set “Filter” to “Movie” or “Off” (page 56).
The image is not displayed and or
appears. • The image file is not DCF-compatible.

75
Additional Information
GB
Television Channel Number Guide for the United
Kingdom
Only the main transmitters are listed. Information regarding the regional sub-relay channel numbers can
be obtained by contacting the BBC Engineering Information Dept., Telephone Number 020 7852 5040.

1
DE
Anleitung zur schnellen
Inbetriebnahme
Bedienungsanleitung

3
Inhaltsverzeichnis
DE
Inhaltsverzeichnis
Anleitung zur schnellen
Inbetriebnahme ......................4
Bedienungsanleitung ....................................................................................................12
Sicherheitsinformationen .................................12
Sicherheitsmaßnahmen .................................... 18
Übersicht
Überprüfen des mitgelieferten Zubehörs .........20
Übersicht über die Bedienelemente und Anzeigen
am Fernsehgerät ........................................21
Übersicht über die Bedienelemente auf der
Fernbedienung ..........................................22
Installation
Einlegen der Batterien in die Fernbedienung .. 24
Abnehmen der hinteren Abdeckung ................25
Anschließen einer Antenne und eines
Videorecorders .........................................26
Erste Inbetriebnahme
Einschalten des Fernsehgeräts und automatisches
Einstellen von Fernsehkanälen .................29
Menüsystem
Arbeiten mit dem Menüsystem ........................32
Bild-Einstellungen ...........................................33
Ton-Einstellungen ...........................................35
Bildschirm einstellen ....................................... 37
Funktionen .......................................................40
Grundeinstellungen ..........................................42
Weitere Funktionen
Der Abschalttimer ............................................48
Anhalten des Bildes .........................................49
Videotext .........................................................50
NexTView .......................................................51
„Memory Stick“ (nur KLV-23HR2)
Die „Memory Stick“-Funktion ........................54
Einsetzen und Herausnehmen eines „Memory
Sticks“ .......................................................57
Verwenden des „Memory Sticks“ (Memory Stick
Home) .......................................................58
Weitere Informationen
Anschließen zusätzlicher Geräte ......................66
Verwenden zusätzlicher Geräte .......................69
Einstellen der Fernbedienung auf einen
Videorecorder bzw. ein DVD-Gerät .........70
Technische Daten .............................................72
Störungsbehebung ............................................74

4Anleitung zur schnellen Inbetriebnahme
Danke, dass Sie sich für dieses Produkt von Sony entschieden haben.
In dieser schrittweisen Anleitung wird Folgendes erläutert:
– Einlegen von Batterien in die Fernbedienung
– Abnehmen der hinteren Abdeckung
– Anschließen einer Antenne, eines Videorecorders und des Netzkabels an das Fernsehgerät
– Auswählen der Sprache für die Menübildschirme
– Auswählen des Landes/Gebiets, in dem das Fernsehgerät verwendet werden soll
– Einstellen von Fernsehkanälen
– Anordnen der Kanäle in einer anderen Reihenfolge
Anleitung zur schnellen
Inbetriebnahme
1Überprüfen des mitgelieferten Zubehörs
Batterien der Größe AA
(Typ R6) (2):
Koaxialkabel (1):
Netzkabel
(Typ
C-6
) (1):
Verwenden Sie dieses
Netzkabel, wenn Sie das
Gerät außerhalb
Großbritanniens
verwenden.
Netzkabel
(Typ BF) (1):
• Verwenden Sie dieses Netzkabel,
wenn Sie das Gerät in
Großbritannien verwenden.
• Dieses Netzkabel wird in einigen
Ländern/Gebieten unter
Umständen nicht mitgeliefert.
Fernbedienung
RM-Y1103 (KLV-23HR2) (1) oder
RM-Y1102 (KLV-21SR2) (1):
Die Ferritkerne nicht
entfernen.

5
Anleitung zur schnellen Inbetriebnahme
DE
Anleitung zur schnellen Inbetriebnahme
Nehmen Sie zum Anschließen der Kabel die hintere Abdeckung des Fernsehgeräts ab. Bringen Sie
nach dem Anschließen der Kabel unbedingt die hintere Abdeckung wieder am Fernsehgerät an.
2Einlegen der Batterien in die
Fernbedienung
• Legen Sie die mitgelieferten Batterien unbedingt polaritätsrichtig ein.
• Entsorgen Sie gebrauchte Batterien immer umweltfreundlich.
• Verwenden Sie nicht Batterien verschiedenen Typs oder alte und neue Batterien zusammen.
3Abnehmen der hinteren Abdeckung
Abnehmen der hinteren
Abdeckung
1Ziehen Sie die Ecke unten rechts
(oder links) der hinteren
Abdeckung auf sich zu. Lösen
Sie auf dieselbe Weise die Ecke
unten links (bzw. rechts) der
hinteren Abdeckung vom
Fernsehgerät.
2Halten Sie die hintere
Abdeckung wie in der Abbildung
rechts dargestellt mit beiden
Händen, heben Sie sie an und
nehmen Sie sie vom Fernsehgerät
ab.
Anbringen der hinteren
Abdeckung
Halten Sie die hintere Abdeckung wie in der
Abbildung unten dargestellt und setzen Sie die
vier Stifte an der hinteren Abdeckung in die
entsprechenden Aussparungen am Fernsehgerät
ein. Drücken Sie dann die hintere Abdeckung auf
das Fernsehgerät.
(Fortsetzung)

6Anleitung zur schnellen Inbetriebnahme
4Anschließen einer Antenne, eines
Videorecorders und des Netzkabels an
das Fernsehgerät
• Verwenden Sie das mitgelieferte Netzkabel (Typ C-6 oder Typ BF, Seite 4).
• Verwenden Sie zum Anschließen der Antenne das mitgelieferte Koaxialkabel.
Schließen Sie das Netzkabel erst an, wenn alle anderen Anschlüsse vorgenommen wurden.
OUT IN
• Weitere Informationen zum Anschließen eines Videorecorders finden Sie unter „Anschließen
zusätzlicher Geräte“ auf Seite 66.
• Beachten Sie, dass einige Scart-Kabel möglicherweise nicht in den Anschluss am
Fernsehgerät passen.
Videorecorder
Schließen Sie das
mitgelieferte
Koaxialkabel an.
Schließen Sie das
mitgelieferte Netzkabel (Typ
C-6 oder Typ BF, mit
Schutzerdung) an.
Scart-Kabel optional
Anschließen einer Antenne
Anschließen eines Videorecorders mit Antenne Schließen Sie das
mitgelieferte Netzkabel
(Typ C-6 oder Typ BF,
mit Schutzerdung) an.

7
Anleitung zur schnellen Inbetriebnahme
DE
Anleitung zur schnellen Inbetriebnahme
Sie können die Kabel an der Rückseite des Fernsehgeräts verstauen.
5Bündeln der Kabel
1 Bündeln Sie die Kabel und sichern Sie sie
mit den Klemmen an beiden Seiten des
Fernsehgeräts.
2 Führen Sie die Kabel durch die
Vertiefungen. Achten Sie darauf, dass die
Kabel sich hinter den Laschen unten am
Fernsehgerät befinden.
3 Führen Sie die Kabel von beiden Seiten
zusammen und sichern Sie sie mit der
Klemme unten.
• Zu dicke Kabel lassen sich
möglicherweise nicht mit den
Klemmen befestigen.
• Wenn nicht alle Kabel innen verstaut
werden können, lassen Sie einige
davon an den Seiten des Fernsehgeräts
herunterhängen.
Wenn die Kabel nicht ordentlich in den
Vertiefungen liegen, lässt sich die hintere
Abdeckung unter Umständen nicht
anbringen.
Klemmen
Laschen
Klemme
(Fortsetzung)

8Anleitung zur schnellen Inbetriebnahme
Einstellen des Sichtwinkels des Fernsehgeräts
Durch das Einstellen des Winkels können Sie Lichtreflexionen vermeiden und das Bild besser sehen.
6Einschalten des Fernsehgeräts
1Schließen Sie das Fernsehgerät an das Stromnetz an (100–
240 V Wechselstrom, 50/60 Hz).
2Schalten Sie das Fernsehgerät am Netzschalter & am Gerät
ein.
• Achten Sie beim Einstellen des Winkels
darauf, dass die Kabel nicht zwischen dem
Fernsehgerät und dem Ständer eingeklemmt
werden. Wenn Kabel eingeklemmt werden,
teilen Sie sie an der Klemme in zwei Gruppen
und ziehen Sie sie in entgegengesetzter
Richtung, um sie zu lösen.
• Halten Sie beim Einstellen des Winkels den
Ständer mit einer Hand fest, damit er sich nicht
löst oder der Bildschirm herunterfällt. Achten
Sie darauf, sich nicht die Finger zwischen dem
Fernsehgerät und dem Ständer einzuklemmen.
30°
30°
15°
Neigung nach hinten
Drehung

9
Anleitung zur schnellen Inbetriebnahme
DE
Anleitung zur schnellen Inbetriebnahme
Dieses Fernsehgerät arbeitet mit Menübildschirmen. Gehen Sie nach den Anweisungen unten vor und
wählen Sie die gewünschte Sprache für die Menübildschirme sowie das Land bzw. Gebiet, in dem Sie das
Fernsehgerät verwenden wollen.
Wenn Sie das Fernsehgerät zum ersten Mal
einschalten, erscheint automatisch das Menü
Language auf dem Bildschirm
(Automatische Ersteinstellung).
1 Wählen Sie mit / / oder auf
der Fernbedienung die Sprache aus und
bestätigen Sie die Auswahl mit OK.
Nun werden alle Menüs in der
ausgewählten Sprache angezeigt.
2 Das Menü Land erscheint automatisch
auf dem Bildschirm.
Wählen Sie mit oder das Land
bzw. Gebiet aus, in dem Sie das
Fernsehgerät verwenden, und bestätigen
Sie die Auswahl mit OK.
Das Menü Autom. Progr. erscheint
automatisch auf dem Bildschirm.
7Auswählen der Sprache für die
Menübildschirme und des Landes bzw.
Gebiets
Wenn das Land bzw. Gebiet, in
dem Sie das Fernsehgerät
verwenden wollen, in der Liste
nicht enthalten ist, wählen Sie „–“
statt eines Landes bzw. Gebiets.
Wenn die automatische
Ersteinstellung später erneut
ausgeführt werden soll, drücken Sie
0 auf der Rückseite des
Fernsehgeräts.
Automatisches Abspeichern
jetzt starten?
Ja Nein
Language
Select language
English
Nederlands
Français
Italiano
Deutsch
Türkçe
Ελληνικά
Español
Português
Polski
Česky
Magyar
Русский
Бьлгарски
Suomi
Dansk
Svenska
Norsk
m
Land
Land wählen
–
United Kingdom
Ireland
Nederland
België/Belgique
Luxembourg
France
Italia
Schweiz/Suisse/Svizzera
Deutschland
Österreich
m
(Fortsetzung)

10 Anleitung zur schnellen Inbetriebnahme
Sie müssen das Fernsehgerät für den Empfang von Kanälen (Fernsehprogrammen) einstellen. Wenn Sie
wie im Folgenden erläutert vorgehen, sucht das Fernsehgerät automatisch alle verfügbaren Fernsehkanäle
und speichert diese.
1 Wählen Sie mit OK die Option Ja.
2 Das Fernsehgerät beginnt, alle
verfügbaren Kanäle zu suchen und
abzuspeichern.
Wenn der automatische Sendersuchlauf
abgeschlossen ist, erscheint automatisch
das Menü Programme ordnen auf dem
Bildschirm.
8Automatisches Einstellen von
Fernsehkanälen
• Dieser Vorgang kann einige
Minuten in Anspruch
nehmen. Bitte haben Sie
etwas Geduld und drücken
Sie keine Taste. Andernfalls
wird der automatische
Sendersuchlauf nicht
ordnungsgemäß
abgeschlossen.
• Wenn beim automatischen
Sendersuchlauf keine
Kanäle gefunden werden
können, erscheint
automatisch eine weitere
Meldung auf dem
Bildschirm, mit der Sie
aufgefordert werden, die
Antenne anzuschließen.
Schließen Sie bitte die
Antenne an (Seite 6) und
drücken Sie OK. Der
automatische
Sendersuchlauf wird erneut
gestartet.
Automatisches Abspeichern
jetzt starten?
Ja Nein
Keinen Sender gefunden.
Bitte Antenne anschliessen.
Bestätigen
Autom. Progr.
Programm :
TV-System :
Kanal :
Suche...
01
I
C23
Programme ordnen
Prog. wählen
01
02
03
04
05
06
07
08
09
10
11
TVE
TVE2
TV3
C33
C27
C58
S02
S06
S08
S12
S14
Beenden:
MENU
m
m
m

12 Sicherheitsinformationen
Sicherheitsinformationen
Sicherheitshinweise
Bedienungsanleitung
Netzkabel
Ziehen Sie den Netzstecker
aus der Steckdose, wenn Sie
das Gerät umstellen. Stellen
Sie das Gerät nicht um,
wenn das Netzkabel
eingesteckt ist. Andernfalls
kann das Netzkabel
beschädigt werden und es
besteht Feuergefahr und die Gefahr eines elektrischen
Schlags. Wenn das Gerät heruntergefallen ist bzw.
beschädigt wurde, lassen Sie es umgehend von
qualifiziertem Fachpersonal überprüfen.
Medizinische
Einrichtungen
Stellen Sie dieses
Gerät nicht an Orten
wie Krankenhäusern
auf, an denen
medizinische Geräte
eingesetzt werden.
Dieses Gerät kann Fehlfunktionen medizinischer
Geräte verursachen.
Installation
Wenn das Gerät an einer
Wand installiert werden
soll, lassen Sie die
entsprechenden Arbeiten
unbedingt von
qualifiziertem Fachpersonal
ausführen. Bei unsachgemäßer Installation stellt das
Gerät im Falle eines Erdbebens usw. eine potenzielle
Gefahrenquelle dar.
Transport
• Lösen Sie alle Kabel vom
Gerät, bevor Sie das Gerät
transportieren.
• Wenn Sie das Gerät tragen,
halten Sie es wie in der
Abbildung rechts
dargestellt. Halten Sie es
auf keinen Fall nur an der
hinteren Abdeckung. Da
sich die hintere Abdeckung leicht lösen kann,
fällt das Gerät möglicherweise herunter und wird
beschädigt oder verursacht schwere
Verletzungen.
• Setzen Sie das Gerät beim Transport keinen
Stößen und keinen starken Erschütterungen aus.
Andernfalls kann das Gerät herunterfallen und
beschädigt werden oder schwere Verletzungen
verursachen.
• Wenn Sie das Gerät wegen einer Reparatur oder
bei einem Umzug transportieren müssen,
verpacken Sie es mithilfe der
Originalverpackungsmaterialien im
Originalkarton.

13
Sicherheitsinformationen
DE
Installation und Transport
Luftzufuhr
Decken Sie auf keinen Fall die
Lüftungsöffnungen im
Gehäuse ab. Andernfalls
besteht Feuergefahr aufgrund
einer Überhitzung des Geräts.
Ohne ausreichende Luftzufuhr kann sich auf und im
Gerät Staub und Schmutz ansammeln. Beachten Sie
Folgendes, um eine ausreichende Luftzufuhr zu
gewährleisten:
• Installieren Sie das Gerät nicht nach hinten oder
seitwärts geneigt.
• Installieren Sie das Gerät nicht auf dem Kopf oder
falsch herum.
• Installieren Sie das Gerät nicht in einem Regal oder
einem Schrank.
• Stellen Sie das Gerät nicht auf einer Decke oder einem
Bett auf.
• Decken Sie das Gerät nicht mit Decken oder
Vorhängen ab und legen Sie keine Gegenstände wie
Zeitungen usw. darauf.
Nutzung im Freien
Installieren Sie das
Gerät nicht im Freien.
Wenn das Gerät Regen
ausgesetzt wird, besteht
Feuergefahr und die
Gefahr eines
elektrischen Schlags.
Wenn das Gerät direktem Sonnenlicht ausgesetzt
wird, kann es sich überhitzen und beschädigt
werden.
Installation in einem
Fahrzeug oder an der
Decke
Installieren Sie das Gerät
nicht in einem Fahrzeug.
Durch die Bewegung beim
Fahren kann das Gerät
herunterfallen und Verletzungen verursachen.
Installieren Sie das Gerät auch nicht an der Decke.
Boote und andere
Wasserfahrzeuge
Installieren Sie das
Gerät nicht in einem
Boot oder einem
anderen
Wasserfahrzeug.
Wenn das Gerät Seewasser ausgesetzt wird, besteht
Feuergefahr und die Gefahr von Schäden am Gerät.
Wasser und Feuchtigkeit
Installieren Sie das Gerät
nicht in der Nähe von
Wasser, wie z. B. neben
einer Badewanne oder einer
Dusche. Schützen Sie das
Gerät außerdem vor Regen, Feuchtigkeit und Rauch.
Andernfalls besteht Feuergefahr und die Gefahr eines
elektrischen Schlags. Verwenden Sie das Gerät nicht an
Orten, an denen die Gefahr besteht, dass Insekten in das
Gerät eindringen.
So verhindern Sie ein
Herunterfallen des Geräts
Stellen Sie das Gerät auf einem
sicheren, stabilen Ständer auf.
Hängen Sie nichts an das Gerät.
Andernfalls könnte das Gerät
vom Ständer oder von der Wandhalterung
herunterfallen und Sachschäden oder schwere
Verletzungen verursachen.
Sorgen Sie dafür, dass Kinder nicht auf das Gerät
klettern.
Sonderzubehör
Beachten Sie folgende Hinweise,
wenn Sie das Gerät auf einem
Ständer aufstellen oder mithilfe einer
Wandhalterung installieren.
Andernfalls kann das Gerät
herunterfallen und schwere Verletzungen verursachen.
• Befolgen Sie bei der Installation des Geräts unbedingt
die mit dem Ständer oder der Wandhalterung
gelieferten Anweisungen.
• Verwenden Sie unbedingt die mit dem Ständer oder
der Wandhalterung gelieferten Halterungs- und
Befestigungsteile.
(Fortsetzung)

51
Weitere Funktionen
DE
NexTView*
* je nach Verfügbarkeit
Anzeigen von NexTView
1Wählen Sie einen Kanal aus, der den NexTView-Dienst zur Verfügung stellt. Bei einem solchen Kanal
erscheint die Anzeige „NexTView“, sobald Daten zur Verfügung stehen.
2Je nach Prozentsatz der verfügbaren Daten stehen beim NexTView-Dienst zwei verschiedene
Darstellungstypen zur Verfügung.
a)„Programmliste“
Wenn beim Fernsehen die Anzeige „NexTView“ orange auf dem Bildschirm erscheint, können Sie
mit auf der Fernbedienung die „Programmliste“ aufrufen (siehe Abb. 1 auf Seite 52).
b)„Übersicht“
Wenn beim Fernsehen über 50 % der NexTView-Daten zur Verfügung stehen (je nach Gebiet ist es
nicht möglich, 100 % der Daten zu empfangen), erscheint die Anzeige „NexTView“ schwarz oder
weiß auf dem Bildschirm. (Die Farbe der Anzeige „NexTView“ hängt in der Regel von der
Einstellung der Menü Farbe ab. Schlagen Sie dazu bitte auf Seite 41 nach.) Drücken Sie in diesem
Fall auf der Fernbedienung, um die „Übersicht“ aufzurufen (siehe Abb. 2 auf Seite 52).
3So navigieren Sie in NexTView:
• Um den Cursor nach rechts oder links zu verschieben, drücken Sie oder .
• Um den Cursor nach oben oder unten zu verschieben, drücken Sie oder .
• Zur Bestätigung der Auswahl drücken Sie OK.
4Um NexTView auszuschalten, drücken Sie auf der Fernbedienung.
NexTView ist eine elektronische Programmzeitschrift, in der Sie Programminformationen für
verschiedene Sender finden.
Sie können dabei nach Themen (Sport, Kunst usw.) oder nach dem Datum suchen.
Beim NexTView-Dienst werden auf dem Bildschirm falsche Zeichen angezeigt, wenn die im
NexTView-Dienst verwendete Sprache nicht mit der am Fernsehgerät eingestellten Sprache
übereinstimmt. Um dieses Problem zu beheben, wählen Sie die Option „Sprache“ im Menü
„Grundeinstellungen“ und stellen die gleiche Sprache ein, die im NexTView-Dienst verwendet
wird. Wählen Sie außerdem die Option „Land“ im Menü „Grundeinstellungen“ und stellen Sie das
Land/Gebiet ein, in dem der NexTView-Dienst ausgestrahlt wird (siehe Seite 42).
Sobald Sie den NexTView-Dienst aufrufen, wird unten links auf dem Bildschirm der Prozentsatz
der verfügbaren NexTView-Daten angezeigt. Nachdem Sie den Dienst aufgerufen haben, erhöht
sich der Prozentsatz der verfügbaren Daten nicht weiter.
(Fortsetzung)

59
„Memory Stick“
DE
Auswählen einer Menüoption auf der Seite Memory Stick Home
Heben Sie mit oder die gewünschte Menüoption hervor und drücken Sie OK. Die ausgewählte
Menüoption wird gelb hervorgehoben.
Option Beschreibung
Diaschau Eine Diaschau der auf dem „Memory Stick“ gespeicherten Bilder wird
angezeigt. Erläuterungen dazu finden Sie unter „Verwenden der „Memory
Stick“-Diaschau“ auf Seite 64.
Option Das Menü Option wird angezeigt. Folgende Optionen stehen zur Auswahl.
Datei: Die folgenden Optionen werden angezeigt:
Sortieren: Sie können die Bilddateien nach dem Dateinamen oder dem
Änderungsdatum in auf- bzw. absteigender Reihenfolge
sortieren.
Filter: Sie können den Inhalt nach Standbildern (Standbild) oder
bewegten Bildern (Film) filtern. Wenn Sie den Filter deaktivieren
möchten, wählen Sie Aus.
Die Funktion Sortieren bzw. Filter können nur ausgewählt
werden, wenn „DigiCam-Modus“ auf „Aus“ gesetzt ist.
Informationen zu den Filtereinstellungen werden auf der Seite
Memory Stick Home angezeigt.
Memory Stick: Der Typ, der belegte Speicherplatz und der
Gesamtspeicherplatz des verwendeten „Memory Sticks“
werden angezeigt.
Verzeichnis wählen Hiermit können Sie ein bestimmtes Verzeichnis auf dem „Memory Stick“
auswählen. Erläuterungen dazu finden Sie unter „Auswählen eines
Verzeichnisses auf dem „Memory Stick““ auf Seite 60.
(Fortsetzung)

60 „Memory Stick“
Auswählen eines Verzeichnisses auf dem „Memory Stick“
Herausfiltern von Bilddateien (Digitalkameramodus)
Mit „DigiCam-Modus“ können Sie Bilddateien im Komprimierungsformat JPEG und MPEG
herausfiltern, die mit DCF-kompatiblen digitalen Standbildkameras oder digitalen Videokameras
aufgezeichnet wurden.
Wählen Sie in Schritt 4 oben DigiCam-Modus. Wählen Sie dann mit oder die Option Ein und
drücken Sie OK.
1Setzen Sie den „Memory Stick“ mit den Bildern ein, die Sie anzeigen möchten.
2Drücken Sie („Memory Stick“) auf der Fernbedienung.
Die Seite Memory Stick Home erscheint auf dem Bildschirm.
3Heben Sie mit oder die Option Verzeichnis wählen hervor und drücken Sie OK.
Das Menü Verzeichnis wählen wird angezeigt.
4Wählen Sie mit die Inhaltsliste aus und wählen Sie mit oder das Verzeichnis aus, dessen
Inhalt angezeigt werden soll. Drücken Sie anschließend OK.
Ein Indexbildschirm mit Miniaturbildern der im ausgewählten Verzeichnis enthaltenen Bilder wird
angezeigt.
Wenn Sie Verzeichnisse auswählen möchten, die nicht auf dem Bildschirm angezeigt werden,
wählen Sie mit den Schieberegler aus und drücken Sie dann oder . Die nächsten
bzw. vorherigen 10 Verzeichnisse erscheinen.
• Sie können DigiCam-Modus nicht auswählen, wenn mit einer digitalen Standbildkamera oder
einer digitalen Videokamera mehr als 2.000 Bilddateien auf dem „Memory Stick“ aufgezeichnet
wurden.
• Für eine Bilddatei, die mit der Sprach-Memo-Funktion einer Digitalkamera von Sony
aufgezeichnet wurde, wird ein Standbild angezeigt.
• Wenn DigiCam-Modus auf Ein gesetzt ist, reagiert das Gerät je nach Anzahl der
Unterverzeichnisse im Verzeichnis sowie der Anzahl der Dateien im Unterverzeichnis
möglicherweise langsamer als üblich auf die Fernbedienung. Warten Sie in diesem Fall, bis die
„Memory Stick“-Zugriffsanzeige erlischt, bevor Sie eine Funktion ausführen, oder setzen Sie
DigiCam-Modus auf Aus.
Diaschau...
Option...
Memory Stick Home
Verzeichnis wählen
Auswählen: Zurück: Eingeben: OK
Nr.: 1/1234
Grösse: 1024x768 Datei: SPJP0001.JPG
Datum: 7/15/2002 12:34
Beenden
DigiCam-Modus
Aus
Ausgewähltes Verzeichnis
Liste der Verzeichnisse im
ausgewählten Verzeichnis
Eine Ebene höher Erste Bilddatei im ausgewählten
Verzeichnis

62 „Memory Stick“
Anzeigen eines Standbildes in voller Größe
Wählen Sie im Menü für Miniaturbilder die Option Volle Größe.
So zeigen Sie das nächste Bild an
Drücken Sie .
So zeigen Sie das vorherige Bild an
Drücken Sie .
Menü für in voller Größe angezeigte Bilder
Drücken Sie OK, wenn das Bild in voller Größe angezeigt wird.
Das Menü für in voller Größe angezeigte Bilder wird angezeigt. Folgende Optionen stehen zur Auswahl.
Wählen Sie mit oder die gewünschte Option und drücken Sie OK.
• Wie lange es dauert, bis das Standbild in voller Größe angezeigt wird, hängt von der Bildgröße ab.
• Das Fernsehgerät wählt automatisch die jeweils geeignete Bildgröße aus, wenn die Bilder in
voller Größe angezeigt werden.
Option Beschreibung
Zurück Die Seite „Memory Stick Home“ wird wieder angezeigt.
Information Informationen zur ausgewählten Bilddatei werden angezeigt.
Schutz Hiermit können Sie die ausgewählte Bilddatei schützen. Ein geschütztes Bild wird
mit gekennzeichnet.
Drehen
(nur für Standbilder) Das ausgewählte Standbild wird um 90 Grad im oder gegen den Uhrzeigersinn
gedreht. Mit jedem Tastendruck auf OK wird das Bild um 90 Grad gedreht.
Lösch. Die ausgewählte Bilddatei wird gelöscht.
Beenden Das Menü wird geschlossen.
• Ein geschütztes Bild kann nicht gedreht bzw. gelöscht werden ( ).
• Sie können Bilder auf dem „Memory Stick“ nicht drehen bzw. löschen, wenn der
Schreibschutzschalter auf LOCK gestellt ist.
• Wenn ein Bild gedreht wurde, bleibt es auf dem „Memory Stick“ und wird wieder so angezeigt,
wenn Sie es das nächste Mal auswählen.
Nr.: 1/1234
Grösse: 1024x768 Datei: SPJP0001.JPG
Datum: 7/15/2002 12:34

70 Weitere Informationen
Einstellen der Fernbedienung auf einen
Videorecorder bzw. ein DVD-Gerät
Die Fernbedienung ist werkseitig so eingestellt, dass Sie damit sofort nach dem Einlegen der Batterien die
Grundfunktionen dieses Fernsehgeräts sowie der meisten DVD-Geräte und Videorecorder von Sony
ausführen können.Wenn Sie Videorecorder und DVD-Geräte anderer gängiger Hersteller und bestimmte
Videorecorder von Sony bedienen möchten, führen Sie bitte die folgenden Schritte aus:
Schlagen Sie zunächst in der Liste auf Seite 71 die dreistellige Codenummer für den Hersteller des
DVD-Geräts oder Videorecorders nach. Sind für einen Hersteller mehrere Codenummern
aufgelistet, geben Sie die zuerst aufgelistete Nummer ein.
1Drücken Sie den Medienwählschalter auf der Fernbedienung so oft, bis
die Anzeige für den Videorecorder bzw. das DVD-Gerät grün leuchtet.
Wenn der Medienwählschalter auf die Position TV eingestellt ist,
können keine Codenummern gespeichert werden.
2Bevor die grüne Anzeige erlischt, drücken Sie die gelbe Taste und halten
sie etwa sechs Sekunden lang gedrückt, bis die grüne Anzeige anfängt zu
blinken.
3Geben Sie alle drei Stellen der Codenummer für den gewünschten
Hersteller (siehe Seite 71) mithilfe der Zahlentasten auf der
Fernbedienung ein, solange die grüne Anzeige blinkt.
Wenn Sie die ausgewählte Codenummer richtig eingegeben
haben, leuchten alle drei grünen Anzeigen kurz auf.
4Schalten Sie den Videorecorder oder das DVD-Gerät ein und überprüfen
Sie, ob sich die Grundfunktionen ausführen lassen.
• Wenn sich nur einige oder keine Funktionen des Geräts
ausführen lassen, überprüfen Sie bitte, ob Sie die richtige
Codenummer eingegeben haben oder versuchen Sie es mit der
nächsten für den Hersteller angegebenen Codenummer (siehe
Seite 71).
• Die gespeicherten Herstellercodes gehen möglicherweise
verloren, wenn schwache Batterien nicht innerhalb von
wenigen Minuten ausgetauscht werden. Um die Codenummer
für das DVD-Gerät bzw. den Videorecorder erneut zu
speichern, gehen Sie bitte wie oben erläutert vor. Innen an der
Batteriefachabdeckung befindet sich ein kleiner Aufkleber, auf
dem Sie die benötigen Codenummern notieren können.
• Codenummern gibt es nicht für alle Hersteller und nicht für alle
Modelle der einzelnen Hersteller.
1
3
2
Produkt Specifikationer
| Mærke: | Sony |
| Kategori: | Fjernsyn og projektorer |
| Model: | KLV-21SR2 |
Har du brug for hjælp?
Hvis du har brug for hjælp til Sony KLV-21SR2 stil et spørgsmål nedenfor, og andre brugere vil svare dig
Fjernsyn og projektorer Sony Manualer

15 Oktober 2024
10 Oktober 2024
4 Juli 2024
4 Juli 2024
4 Juli 2024
4 Juli 2024
4 Juli 2024
4 Juli 2024
28 Juni 2024
28 Juni 2024
Sony Manualer
26 Februar 2025
21 Februar 2025
13 Februar 2025
9 Februar 2025
6 Februar 2025
5 Februar 2025
5 Februar 2025
22 Januar 2025
21 Januar 2025
18 Januar 2025