V7 L238E-2K Manual
Læs nedenfor 📖 manual på dansk for V7 L238E-2K (60 sider) i kategorien overvåge. Denne guide var nyttig for 18 personer og blev bedømt med 4.5 stjerner i gennemsnit af 2 brugere
Side 1/60

USER MANUAL
L238E
24" Class Slim HD Widescreen Monitor

TABLE OF CONTENTS
1 Getting Started
Package includes
Installation
2 Control Panel/ Back Panel
Control Panel
Back Panel
3 On Screen Display
4 Technical Specs
5 Care & Maintenance
6 Troubleshooting
No Power
Power on but no screen image
Wrong or Abnormal Colors
7 Safety info & FCC warning

1
GETTING STARTED
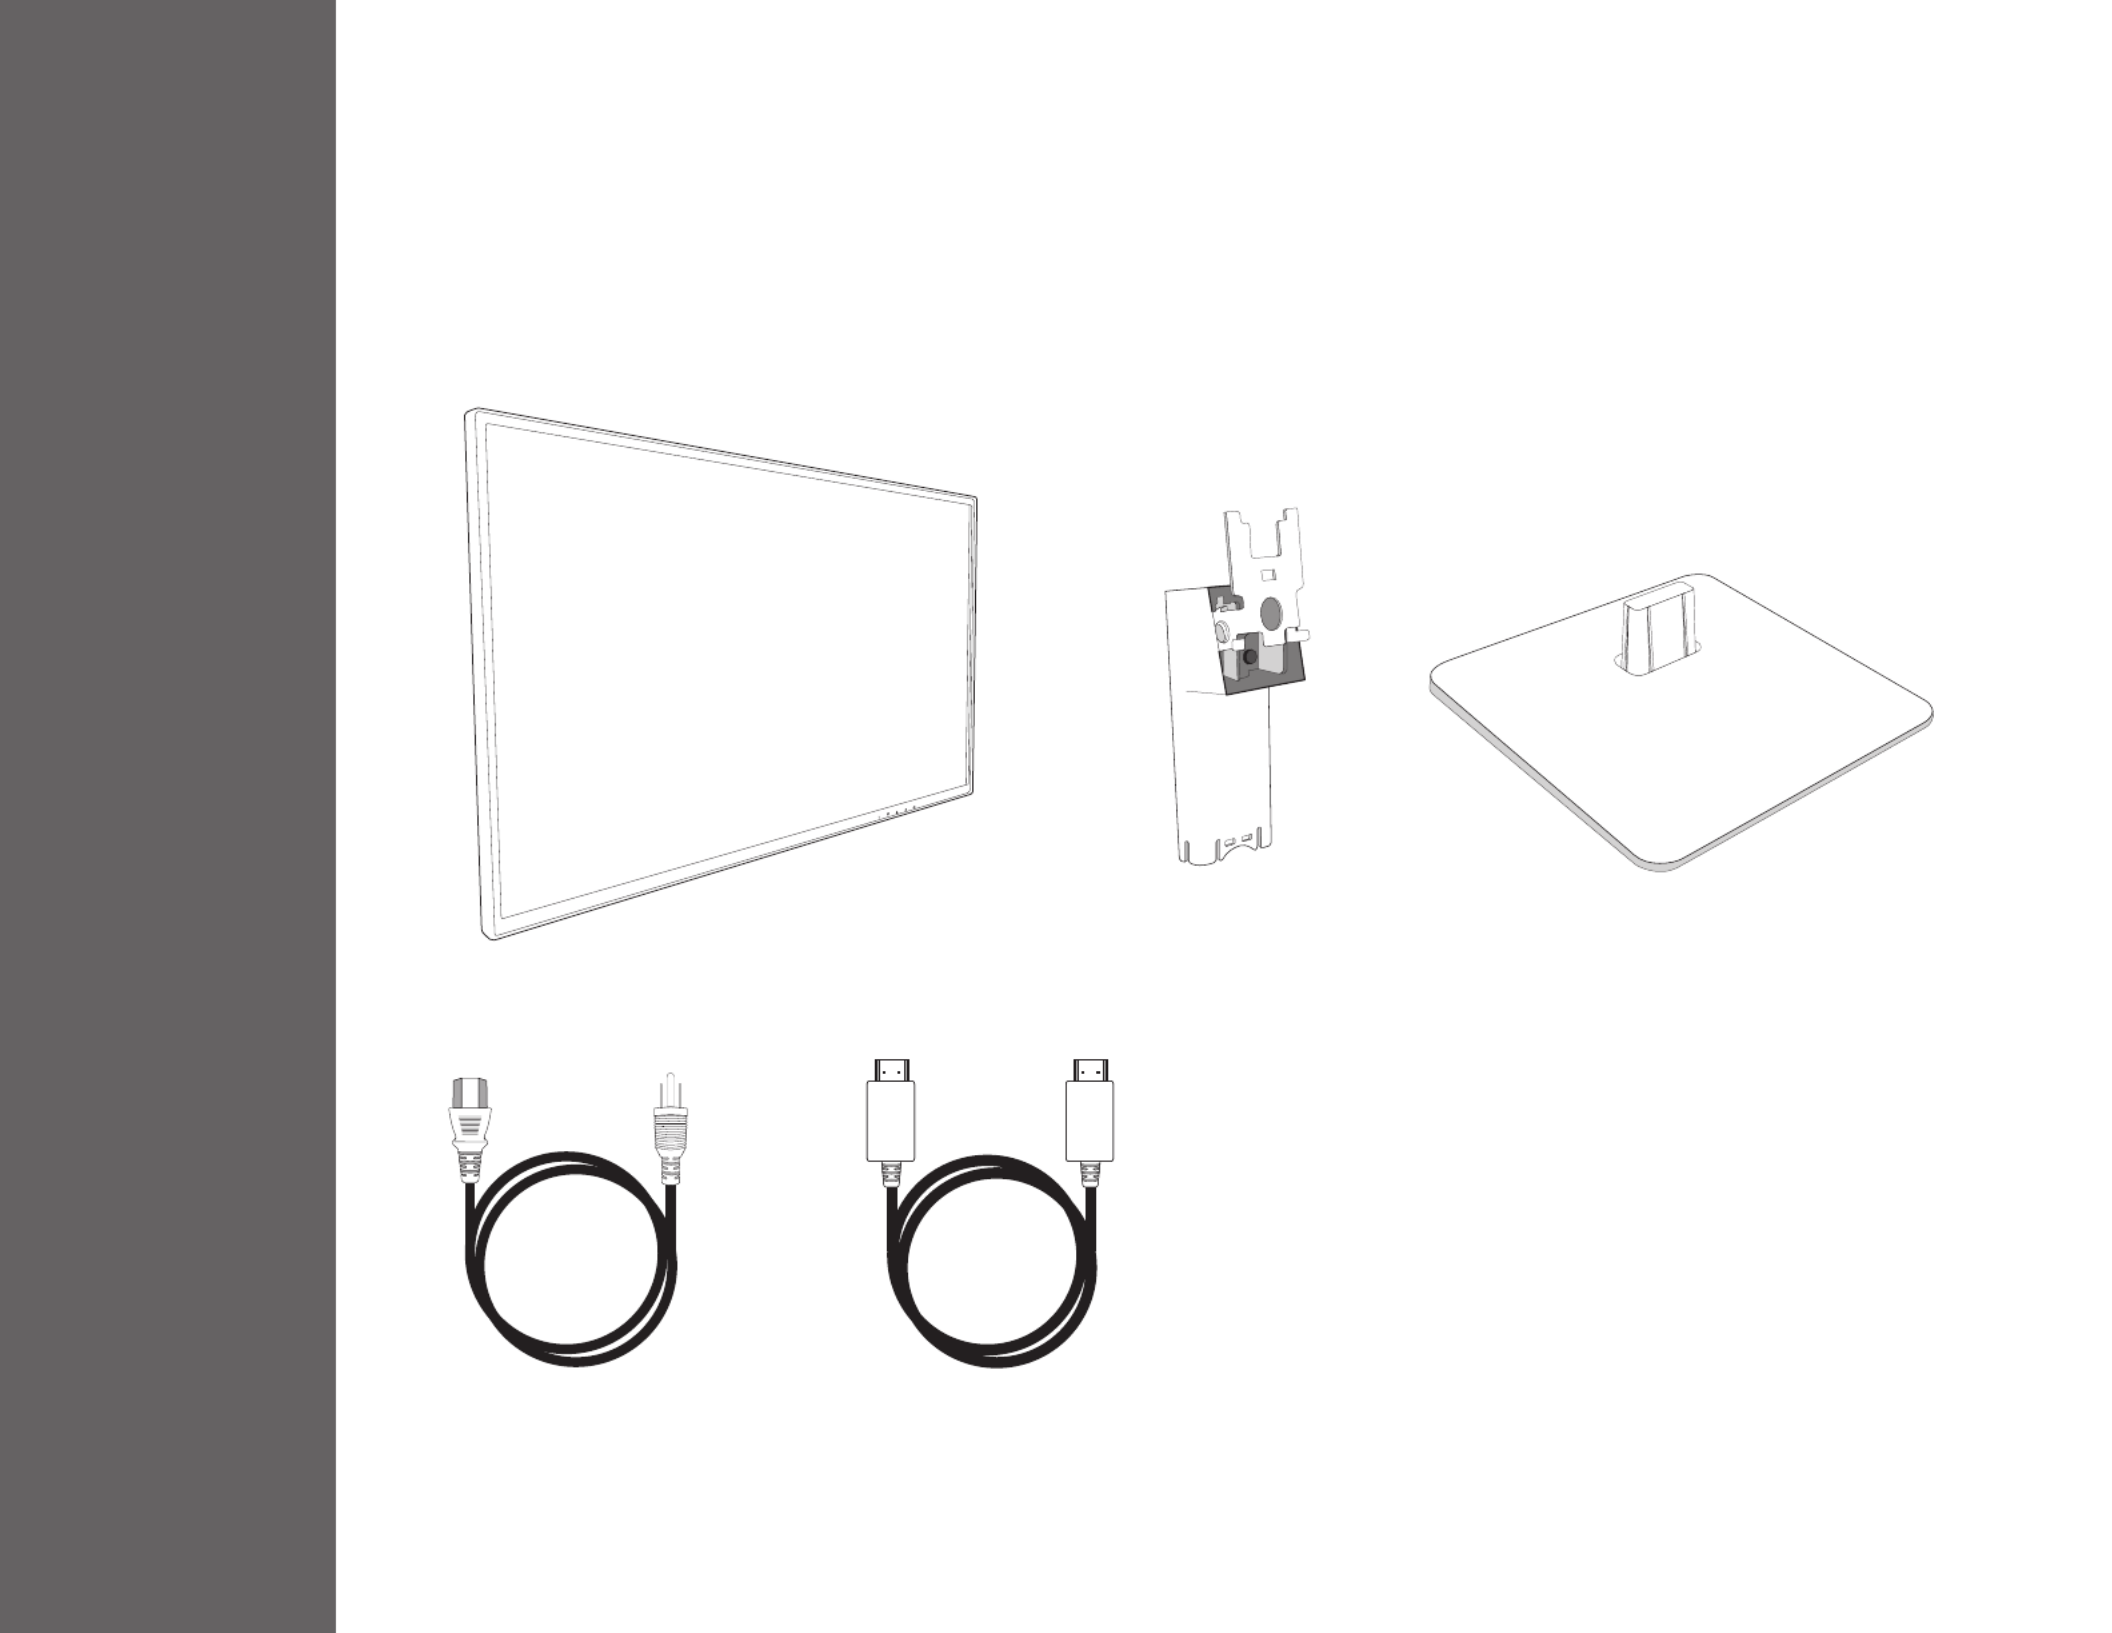
Package includes
• AC Power Cord
• HDMI Cable
• Quick start guide
AC Power Cord HDMI Cable

GETTING STARTED
Installation
Connect video cable, Connect power cord, Connect Audio cable
Power on computer and monitor
POWER
DVI HDMI
DisplayPort VGA Audio
Out
Audio
In

CONTROL PANEL/ BACK PANEL
Control Panel
Back Panel
2
OSD Menu On/O
Scroll Down/Decrease
Scroll Up/Increase
Conrm Select
Power On/O
LED Indicator
1 2
VESA 100x100
Audio Input
Audio Output
VGA
HDMI
DVI
Display
Power Cable

ON SCREEN DISPLAY
3
1
Display main menu
Exit from OSD menu
2 Manual adjust mode select for VGA, DVI, HDMI, DisplayPort, Auto mode
Select the desired item when in OSD menu
When not in OSD menu, directly enters Contrast/Brightness menu
Select the desired item when in OSD menu
When not in OSD menu, directly enters Picture mode
Recall both of Contrast and Brightness (when not in OSD menu)
Power Lock (when not in OSD menu)
OSD Lock (when not in OSD menu)
Using On Screen Display (OSD) Functions
+
1 +
2 +
Main Menu

Short Cuts Function from the button(s)
Auto Image Adjust To auto adjust Horizontal Position, Vertical Position, Phase (Fine Tune) and Clock (H. Size) of the screen.
Contrast/Brightness
To manually adjust the Contrast, Brightness, DCR, ECO and OD of screen image.
Contrast: To adjust the foreground white level of screen image.
increase contrast, decrease contrast.
Brightness: To adjust the luminance of the video.
increase brightness, decrease brightness.
DCR: To detect the distribution of the visual signals inputs, and create an optimized contrast. Brightness and ECO adjustment will be
disabled when DCR is active.
ECO: Allows the user to change the ECO mode. Contrast, Brightness and DCR adjustment will be disabled when ECO is active.
OD: Allows the user to change the Over Drive strength. Improve the quality of the motion pictures.
Input Source When Input Select is pressed, change Input signal to VGA, DVI, HDMI, DisplayPort or Auto.
Audio Adjust
To adjust the audio functions.
Volume: To adjust the volume of speaker output.
Mute: To turn the Mute ON/OFF.
Audio input: When in HDMI input, select where the audio source comes from Line-In or HDMI.
When in DisplayPort input, select where the audio source comes from Line-in or DisplayPort.
Color Adjust
To select the color for improving brightness and color saturation between Cool, Normal, Warm and User colour and
Picture mode.
Cool: Adds blue to screen image for cooler white.
Normal: Adds red to screen image for warmer white and richer red.
Warm: Adds green to screen image for a darker color.
User colour: Individual adjustments for red (R), green (G), blue (B).
1. Press button to select the desired color.2
2. Press or button to adjust selected color.
ON SCREEN DISPLAY

Short Cuts Function from the button(s)
Picture mode: Provides an optimum display environment depending on the contents displayed. It contains 5 user-selectable
presets.
• is for general windows environment and monitor default setting. Standard
• optimized for PC game environmentGame
• optimized for movie and video environmentVideo
• optimized for displaying outdoor scenery images. Landscape
• optimized for text editing and viewing in a word processing environmentText
Information To display the information, regarding the current input signal coming from the graphic card in your computer.
Note: See your graphic card user guide for more information about changing the resolution and refresh rate.
Manual Image
Adjustment
To manually adjust the H. /V. Position, Horizontal size, Fine tune and Sharpness.
H. / V. Position: To adjust the horizontal and vertical position of the video.
H. Position: : move screen to the right, move screen to the left. :
V. Position: : move screen up, : move screen down.
Horizontal Size: To adjust the width of the screen image.
: increase the width of the screen image, : decrease the width of the screen image
Phase: To adjust the delay time of data and clock.
Press or to adjust to your preference.
Sharpness: To adjust the clarity of a non-Full HD Resolution (1920x1080) signal with or button
Video mode adjust: To select the video mode from Aspect Ratio 4:3 or Full Screen.
Aspect Ratio 4:3: To select 4:3 image size.
Full Screen: To select full-screen size image.
Menu Setting
To set up Language select, OSD Position, OSD time out and OSD background.
Language Select: To allow users to choose from available languages
OSD Position: Press or button to select between horizontal and vertical OSD Position Adjustment.
OSD H. Position: To horizontally adjust the OSD Position
: move OSD to the right, : move OSD to the left
OSD V. Position: To vertically adjust the OSD position.
: move OSD up, : move OSD down.
OSD time out: To automatically turn o On Screen Display (OSD) after a preset period of time.
OSD background: Allows the user to turn the OSD background On or O
Memory recall To recall factory settings for Video & Audio controls. Press button to select the Memory Recall menu option.2
ON SCREEN DISPLAY

TECHNICAL SPECS
4
LCD Panel 60.4 cm (23.8”) TFT (with LED back light)
Power
Management
Energy Star
VESA DPMS compatible
O Mode, < 0.5 W
Displayable
Resolution
Full HD 1920 x 1080 max.
Vertical Frequency 60Hz max.
Pixel Dimension 0.2745 x 0.2745 mm
LCD Display Color 16.7M
Tilt -5°~22° (±2°)
Active Display
Area 527.0 mm x 296.4 mm
Temperature Operating: 0°C ~ + 40°C
Storage: -20°C ~ + 60°C
Compliance FCC, CE, Energy Star
Power Input Voltage AC100-240 V
Technical Specication

CARE & MAINTENANCE
5
Care
• Avoid exposing your monitor directly to sunlight or other heat source. Place your monitor away from the sun to reduce glare.
• Put your monitor in a well ventilated area.
• Do not place any heavy things on top of your monitor
• Make certain your monitor is installed in a clean and moisture-free area.
• Keep your monitor away from magnets, motors, transformers, speakers, and TV sets.
Safety Tips
• If smoke, abnormal noise or odor came out from your monitor, caution you should remove the power cord immediately and
call your service center.
• Never remove the rear cover of your monitor cabinet. The display unit inside contains high-voltage parts and may cause
electric shock to human bodies.
• Never try to repair your monitor yourself. Always call your service center or a qualied technician to x it.

TROUBLESHOO
6
No Power
• Make sure A/C power cord is securely inserted to both the AC-INLET socket on the monitor and wall outlet.
• Plug another electrical device into the power outlet to verify that the outlet is supplying proper voltage.
• Make sure all signal cables are installed.
Power on but no screen image
• Make sure the video cable supplied with the monitor is tightly secured to the video output port on back of the computer. If
not, tightly secure it.
• Adjust brightness
Wrong or abnormal colors
• If any colors (red, green, blue) are missing, check the video cable to make sure it is securely connected. Loose or broken pins
in the cable connector could cause an improper connection
• Connect the monitor to another computer

SAFETY & FCC WARNING
7Safety Precautions
FCC RADIO FREQUENCY INTERFERENCE STATEMENT
WARNING: (FOR FCC CERTIFIED MODELS)
This monitor is manufactured and tested on a ground principle that a user’s safety comes rst. However, improper use or installation may result danger to the monitor as
well as to the user. Carefully go over the following WARNINGS before installation and keep this guide handy.
This monitor has been tested and found compliant with the limits for a Class B digital device, pursuant to part 15 of the FCC Rules. These limits are designed to provide proper protection against harmful interference to a
residential installation. This monitor generates, uses, and can radiate radio frequency energy. Harmful interference to radio communication may be led as a result if it‘s not properly installed and used. However, there is no
guarantee that interference will not occur in a particular installation. If this monitor does cause serious interference to radio or television reception, resetting the monitor may determine it. Moreover, users are encouraged to
correct interference by doing one or more of the following:
FCC Warning:
To assure a continued FCC compliance, a user must use a grounded power supply cord and the provided shielded video interface cable with bonded ferrite cores. Also, any unauthorized changes or modi-
cations to this monitor would void the user‘s authority to operate this device.
Each country in the European Union should have its collection centers for electrical and electronic equipment recycling. For information about your recycling drop o area, please contact your related
electrical and electronic equipment waste management authority or the retailer where you bought the product.
Note: If necessary, shielded interface cables and AC power cord must be used to meet the emission level limits.
WARNINGS
• This monitor should be operated only at the correct power sources indicated on the label on the rear end of the monitor. If you’re unsure of the power supply in your residence, consult your local dealer or power
company.
• Do not try to repair the monitor yourself as it contains no user-serviceable parts. The monitor should only be repaired by a qualied technician.
• Do not remove the monitor cabinet. There is high-voltage parts inside that may cause electric shock to human bodies, even when the power cord is disconnected.
• Stop using the monitor if the cabinet is damaged. Have it checked by a service technician.
• Put your monitor only in a clean, dry environment. Unplug the monitor immediately if gets wet and consult your service technician.
• Always unplug the monitor before cleaning it. Clean the cabinet with a clean, dry cloth. Apply non-ammonia based cleaner onto the cloth, not directly onto the glass screen.
• Keep the monitor away from magnetic objects, motors, TV sets, and transformer.
• Do not place heavy objects on the cable or power cord.
• Due to safety concerns, if the VESA mounting kit is purchased separately, please make sure the mounting kit is UL-Listed, and replaceable only by service personnel.
• Reorient or relocate the receiving antenna.
• Move the monitor and the receiver further away from each other.
• Connect the monitor into an outlet on a circuit dierent from that to which the receiver is connected.
• Consult your local dealer or an qualied technician.
Regulatory Information: Disposal of Waste Electrical and Electronic Equipment (WEEE) The Waste Electrical and Electronic Equipment (WEEE) Directive aims to minimize the impact of electrical and electronic goods on the environment, by
increasing re-use and recycling and by reducing the amount of WEEE going to landll. The symbol on your V7 product or its packaging signies that this product must be disposed separately from ordinary household wastes at its end of life.
Please kindly be aware that this is your responsibility to dispose electronic equipment at recycling centers so as to help conserve natural resources.
Each country in the European Union should have its collection centers for electrical and electronic equipment recycling. For information about your recycling drop o area, please contact your related electrical and electronic equipment
waste management authority or the retailer where you bought the product.
ID 1419050639
BENUTZERHANDBUCH
L238DPH
Höhenverstellbarer
23,8-Zoll-LED-Monitor mit Full HD

INHALTSVERZEICHNIS
1 Erste Schritte
Paket beinhaltet
Installation
2 Systemsteuerung/Rückseite
Systemsteuerung
Rückseite
3 Bildschirmanzeige
4 Technische Daten
5 Pege und Wartung
6 Fehlerbehebung
Kein Strom
Eingeschaltet aber kein Bildschirmbild
Falsche oder ungewöhnliche Farben
7 Sicherheitsinformationen und FCC-Warnung
1
ERSTE SCHRITTE
Paket beinhaltet:
• AC-Netzkabel
• HDMI-Kabel
AC-Netzkabel HDMI-Kabel

ERSTE SCHRITTE
Installation
Videokabel anschließen, Netzkabel anschließen, Audiokabel anschließen
Computer und Monitor einschalten
POWER
DVI HDMI
DisplayPort VGA Audio
Out
Audio
In
Produkt Specifikationer
| Mærke: | V7 |
| Kategori: | overvåge |
| Model: | L238E-2K |
Har du brug for hjælp?
Hvis du har brug for hjælp til V7 L238E-2K stil et spørgsmål nedenfor, og andre brugere vil svare dig
overvåge V7 Manualer

30 Januar 2025
9 Januar 2025
28 December 2024
28 December 2024
28 December 2024
24 December 2024
30 August 2024
30 August 2024
30 August 2024
30 August 2024
overvåge Manualer
- overvåge Bosch
- overvåge SilverCrest
- overvåge Acer
- overvåge Denver
- overvåge TCL
- overvåge Sony
- overvåge Samsung
- overvåge Panasonic
- overvåge Philips
- overvåge Vitek
- overvåge IFM
- overvåge LG
- overvåge Pioneer
- overvåge Mitsubishi
- overvåge Sharp
- overvåge Behringer
- overvåge Emos
- overvåge Epson
- overvåge Neumann
- overvåge Smart
- overvåge HP
- overvåge AOC
- overvåge Sanyo
- overvåge Akuvox
- overvåge Asus
- overvåge Gigabyte
- overvåge Toshiba
- overvåge Pyle
- overvåge InFocus
- overvåge Lenovo
- overvåge Asrock
- overvåge Yamaha
- overvåge Abus
- overvåge Optoma
- overvåge Da-Lite
- overvåge Westinghouse
- overvåge Element
- overvåge Thomson
- overvåge Hyundai
- overvåge Yorkville
- overvåge JBL
- overvåge Hisense
- overvåge DataVideo
- overvåge RCF
- overvåge Maxell
- overvåge Hannspree
- overvåge Omron
- overvåge Blaupunkt
- overvåge JVC
- overvåge Honeywell
- overvåge Hitachi
- overvåge Medion
- overvåge Citizen
- overvåge Haier
- overvåge Huawei
- overvåge König
- overvåge ProXtend
- overvåge Deltaco
- overvåge NewStar
- overvåge Alpine
- overvåge 3M
- overvåge Festo
- overvåge Danfoss
- overvåge Sunny
- overvåge BlueBuilt
- overvåge Tripp Lite
- overvåge BenQ
- overvåge Packard Bell
- overvåge Mad Catz
- overvåge Jensen
- overvåge Plantronics
- overvåge Xiaomi
- overvåge Peerless-AV
- overvåge Viewsonic
- overvåge Dell
- overvåge Schneider
- overvåge ELO
- overvåge Fujitsu
- overvåge Cooler Master
- overvåge Zalman
- overvåge PreSonus
- overvåge MSI
- overvåge Ricoh
- overvåge NEC
- overvåge Godox
- overvåge APC
- overvåge CTOUCH
- overvåge Ikan
- overvåge AJA
- overvåge GlobalTronics
- overvåge Velleman
- overvåge Marshall
- overvåge JUNG
- overvåge Fostex
- overvåge Salora
- overvåge Focal
- overvåge Genelec
- overvåge KRK
- overvåge NZXT
- overvåge Newline
- overvåge Hikvision
- overvåge Samson
- overvåge Yealink
- overvåge Allen & Heath
- overvåge Midas
- overvåge Simrad
- overvåge Renkforce
- overvåge Marshall Electronics
- overvåge Caliber
- overvåge I3-Technologies
- overvåge Viessmann
- overvåge Brandson
- overvåge Orion
- overvåge QSC
- overvåge BOOX
- overvåge Hanwha
- overvåge LaCie
- overvåge ARRI
- overvåge Onyx
- overvåge ITek
- overvåge Prowise
- overvåge Seiki
- overvåge Ozone
- overvåge M-Audio
- overvåge Bauhn
- overvåge Christie
- overvåge Provision-ISR
- overvåge Vorago
- overvåge Atomos
- overvåge EMachines
- overvåge Eurolite
- overvåge Mackie
- overvåge ACTi
- overvåge Faytech
- overvåge Krom
- overvåge Voxicon
- overvåge Chauvet
- overvåge Shure
- overvåge Vimar
- overvåge Continental Edison
- overvåge Dynaudio
- overvåge Iiyama
- overvåge PeakTech
- overvåge Dahua Technology
- overvåge AG Neovo
- overvåge Speco Technologies
- overvåge Prestigio
- overvåge Joy-It
- overvåge Boss
- overvåge IStarUSA
- overvåge Crestron
- overvåge SPL
- overvåge Kogan
- overvåge Barco
- overvåge SMART Technologies
- overvåge Insignia
- overvåge LC-Power
- overvåge AMX
- overvåge Tannoy
- overvåge Qian
- overvåge Xoro
- overvåge HyperX
- overvåge TVLogic
- overvåge Geovision
- overvåge Postium
- overvåge Planar
- overvåge Ernitec
- overvåge Bearware
- overvåge Sonifex
- overvåge TV One
- overvåge AVer
- overvåge Alienware
- overvåge Aputure
- overvåge Maxdata
- overvåge Sunstech
- overvåge Marquant
- overvåge Kubo
- overvåge Swissonic
- overvåge IHealth
- overvåge Peaq
- overvåge Avocor
- overvåge Interlogix
- overvåge Eizo
- overvåge Kindermann
- overvåge EverFocus
- overvåge POSline
- overvåge Peerless
- overvåge Monoprice
- overvåge Promethean
- overvåge Odys
- overvåge HKC
- overvåge Ibm
- overvåge Drawmer
- overvåge Iadea
- overvåge Advantech
- overvåge Kali Audio
- overvåge Ganz
- overvåge Extron
- overvåge Legamaster
- overvåge Ikegami
- overvåge Pelco
- overvåge Approx
- overvåge Belinea
- overvåge Palmer
- overvåge Adam
- overvåge GVision
- overvåge Posiflex
- overvåge Jay-tech
- overvåge MicroTouch
- overvåge X-Rite
- overvåge EKO
- overvåge IBoardTouch
- overvåge Mirai
- overvåge Elite Screens
- overvåge Hollyland
- overvåge Mitsai
- overvåge Skytronic
- overvåge COMMBOX
- overvåge Yiynova
- overvåge Lilliput
- overvåge LightZone
- overvåge AOpen
- overvåge Planet Audio
- overvåge EC Line
- overvåge Datacolor
- overvåge Fluid
- overvåge Atlona
- overvåge HELGI
- overvåge Desview
- overvåge Syscom
- overvåge Allsee
- overvåge Alogic
- overvåge Night Owl
- overvåge ProDVX
- overvåge Varad
- overvåge DoubleSight
- overvåge CTL
- overvåge Game Factor
- overvåge Nixeus
- overvåge Chimei
- overvåge Blue Sea
- overvåge AMCV
- overvåge Hamlet
- overvåge Wyse - Dell
- overvåge SWIT
- overvåge Feelworld
- overvåge GeChic
- overvåge Oecolux
- overvåge ADS-TEC
- overvåge Casalux
- overvåge Positivo
- overvåge Jupiter
- overvåge Transvideo
- overvåge Innocn
- overvåge KeepOut
- overvåge Shimbol
- overvåge Raysgem
- overvåge Motrona
- overvåge AORUS
- overvåge Elvid
- overvåge Wohler
- overvåge Portkeys
- overvåge Mimo Monitors
- overvåge Gamber-Johnson
- overvåge Enttec
- overvåge American Dynamics
- overvåge AIS
- overvåge Eve Audio
- overvåge Wortmann AG
- overvåge Viotek
- overvåge Vidi-Touch
- overvåge KTC
- overvåge CoolerMaster
- overvåge Atlantis Land
- overvåge HEDD
- overvåge Colormetrics
- overvåge Monkey Banana
- overvåge SmallHD
- overvåge UPERFECT
- overvåge Freedom Scientific
- overvåge OSEE
- overvåge CSL
- overvåge Mybeo
- overvåge IOIO
- overvåge DTEN
- overvåge Cocopar
- overvåge Titan Army
- overvåge Delvcam
- overvåge Xenarc
- overvåge Wimaxit
Nyeste overvåge Manualer

4 April 2025
5 Marts 2025
5 Marts 2025

27 Februar 2025

21 Februar 2025

18 Februar 2025
11 Februar 2025
11 Februar 2025
11 Februar 2025
11 Februar 2025