Vtech CS6929 Manual
Læs nedenfor 📖 manual på dansk for Vtech CS6929 (51 sider) i kategorien Telefon. Denne guide var nyttig for 16 personer og blev bedømt med 4.5 stjerner i gennemsnit af 2 brugere
Side 1/51

Go to
phones.vtechcanada.com
for the latest VTech product news.
User’s manual
(Canada version)
CS6929
CS6929-2
CS6929-26
CS6929-3
CS6929-4
DECT 6.0 cordless telephone

your dealer or local power company.
9. Do not allow anything to rest on
the power cord. Do not install this
product where the cord may be
walked on.
10. Never push objects of any kind into
this product through the slots in the
telephone base or handset because
they may touch dangerous voltage
points or create a short circuit. Never
spill liquid of any kind on the product.
11. To reduce the risk of electric shock,
do not disassemble this product,
but take it to an authorized service
facility. Opening or removing parts of
the telephone base or handset other
than specified access doors may
expose you to dangerous voltages or
other risks. Incorrect reassembling
can cause electric shock when the
product is subsequently used.
12. Do not overload wall outlets and
extension cords.
13. Unplug this product from the wall
outlet and refer servicing to an
authorized service facility under the
following conditions:
• When the power supply cord or
plug is damaged or frayed.
• If liquid has been spilled onto the
product.
• If the product has been exposed
to rain or water.
• If the product does not operate
normally by following the
operating instructions. Adjust only
those controls that are covered
by the operation instructions.
Improper adjustment of other
controls may result in damage and
often requires extensive work by
an authorized technician to restore
the product to normal operation.
• If the product has been dropped
and the telephone base and/or
handset has been damaged.
• If the product exhibits a distinct
change in performance.
14. Avoid using a telephone (other than
cordless) during an electrical storm.
There is a remote risk of electric
shock from lightning.
15. Do not use the telephone to report
a gas leak in the vicinity of the
leak. Under certain circumstances,
a spark may be created when the
adapter is plugged into the power
outlet, or when the handset is
replaced in its cradle. This is a
common event associated with the
closing of any electrical circuit. The
user should not plug the phone
into a power outlet, and should
not put a charged handset into
the cradle, if the phone is located
in an environment containing
concentrations of flammable or
flame-supporting gases, unless there
is adequate ventilation. A spark in
such an environment could create a
fire or explosion. Such environments
might include: medical use of
oxygen without adequate ventilation;
industrial gases (cleaning solvents;
gasoline vapors; etc.); a leak of
natural gas; etc.
16. Only put the handset of your
telephone next to your ear when it is
in normal talk mode.
17. The power adapters are intended to
be correctly oriented in a vertical or
floor mount position. The prongs are
not designed to hold the plug in place
if it is plugged into a ceiling,
under-the-table or cabinet outlet.
18. For pluggable equipment, the
socket-outlet shall be installed near
the equipment and shall be easily
accessible.
SAVE THESE INSTRUCTIONS

Battery
• CAUTION: Use Only Supplied
Battery.
• Do not dispose of the battery in a fire.
Check with local waste management
codes for special disposal instructions.
• Do not open or mutilate the battery.
Released electrolyte is corrosive and
may cause burns or injury to the eyes
or skin. The electrolyte may be toxic if
swallowed.
• Exercise care in handling batteries in
order not to create a short circuit with
conductive materials.
• Charge the battery provided with this
product only in accordance with the
instructions and limitations specified
in this manual.
Precautions for users of
implanted cardiac pacemakers
Cardiac pacemakers (applies only to
digital cordless telephones):
Wireless Technology Research, LLC
(WTR), an independent research entity,
led a multidisciplinary evaluation of the
interference between portable wireless
telephones and implanted cardiac
pacemakers. Supported by the U.S.
Food and Drug Administration, WTR
recommends to physicians that:
Pacemaker patients
• Should keep wireless telephones at
least six inches from the pacemaker.
• Should NOT place wireless telephones
directly over the pacemaker, such as in
a breast pocket, when it is turned ON.
• Should use the wireless telephone at
the ear opposite the pacemaker.
WTR’s evaluation did not identify any
risk to bystanders with pacemakers
from other persons using wireless
telephones.
About cordless telephones
• Privacy: The same features that make
a cordless telephone convenient
create some limitations. Telephone
calls are transmitted between the
telephone base and the cordless
handset by radio waves, so there is a
possibility that the cordless telephone
conversations could be intercepted
by radio receiving equipment within
range of the cordless handset. For
this reason, you should not think of
cordless telephone conversations as
being as private as those on corded
telephones.
• Electrical power: The telephone
base of this cordless telephone must
be connected to a working electrical
outlet. The electrical outlet should not
be controlled by a wall switch. Calls
cannot be made from the cordless
handset if the telephone base is
unplugged, switched off or if the
electrical power is interrupted.
• Potential TV interference: Some
cordless telephones operate
at frequencies that may cause
interference to televisions and
VCRs. To minimize or prevent
such interference, do not place
the telephone base of the cordless
telephone near or on top of a TV or
VCR. If interference is experienced,
moving the cordless telephone farther
away from the TV or VCR often
reduces or eliminates the interference.
• Rechargeable batteries: Exercise
care in handling batteries in order
not to create a short circuit with
conducting material such as rings,
bracelets and keys. The battery or
conductor may overheat and cause
harm. Observe proper polarity
between the battery and the battery
charger.
• Nickel-metal hydride rechargeable
batteries: Dispose of these batteries
in a safe manner. Do not burn or
puncture the battery. Like other
batteries of this type, if burned or
punctured, they could release caustic
material which could cause injury.

Table of contents
What’s in the box.........................1
Overview ......................................2
Handset overview 2 ...............................
Telephone base overview 3 ...................
Charger overview 4 ...............................
Display icons overview 4 .......................
Handset and Telephone base lights
overview 5 ..........................................
Connect ........................................6
Connect the telephone base 6 ...............
Connect the charger 6 ...........................
Mount the telephone base 6 ..................
Install and charge the battery 7 .............
Charge the battery 8 ..............................
Before use ....................................9
Set date and time 9 ...............................
Set answering system through
voice guide 9 ......................................
Check for dial tone 9 ..............................
Operating range 9 ..................................
Configure your telephone ........10
Using the handset menu 10 ...................
Set language 10 ....................................
Set date and time 10 .............................
Dial mode 11 .........................................
Temporary tone dialing 11 .....................
Telephone Operations ..............12
Make a call 12 .......................................
Predial a call 12 .....................................
Answer a call 12 ....................................
End a call 12 ..........................................
Speakerphone 12 ..................................
Volume 13 ..............................................
Mute 13 ..................................................
Join a call in progress 13 .......................
Call waiting 13 .......................................
Chain dialing 13 .....................................
Find handset 14 .....................................
Redial list ..................................15
Review a redial list entry 15 ...................
Dial a redial list entry 15 ........................
Delete a redial list entry 15 ....................
Multiple handset use .................15
Intercom 15 ...........................................
Answer an incoming call during an
intercom call 16 ..................................
Call transfer using intercom 16 ..............
Phonebook .................................17
Add a phonebook entry 17 ....................
Review the phonebook entries 17 .........
Alphabetical search 18 ..........................
Edit a phonebook entry 18 ....................
Delete a phonebook entry 18 ................
Dial a phonebook entry 18 ....................
Caller ID ......................................19
Review the caller ID log 19 ....................
Memory match 19 ..................................
Missed call indicator 19 .........................
View dialing options 20 ..........................
Dial a caller ID log entry 20 ...................
Save a caller ID log entry to the
phonebook 20 ....................................
Delete the caller ID log entries 21 .........
Call block ...................................21
Block unknown calls 21 .........................
Add a call block entry 21 .......................
Review call block list 22 .........................
Edit a call block list entry 22 ..................
Save a caller ID log entry to call
block list 22 ........................................
Delete a call block list entry 22 ..............
Mute rings of blocked calls 23 ...............
Sound settings .........................23
Key tone 23 ............................................
Ringer tone 23 .......................................
Handset ringer volume 24 .....................
Telephone base ringer volume 24 .........
Quiet mode 24 .......................................

About the built-in answering
system and voicemail service ...
25
Set your built-in answering
system .....................................25
Turn the answering system on
or off 25 ..............................................
Set voice language 26 ...........................
Default announcement 26 .....................
Record your own announcement 26 ......
Play your announcement 26 ..................
Options during playback: ..................26
Delete your announcement 27 ..............
Set number of rings 27 .........................
Turn the call screening on or off 27 .......
Turn the message alert tone on
or off 27 ..............................................
Voice guide 28 .......................................
Using your built-in answering
system .....................................28
New message indication 28 ...................
Message playback 29 ............................
Delete all messages 29 .........................
Remote access 30 .................................
Set remote access code 30 ...................
Call screening 30 ...................................
Call intercept 31 .....................................
Record, play, and delete memos 31 ......
Using your built-in answering
system and voicemail service ...
32
Retrieve voicemail from
telephone service ...................32
Retrieve voicemail 32 ............................
Set your voicemail number 32 ...............
Turn off the new voicemail
indicators 33 .......................................
Expand your telephone system ...
33
Screen messages ......................34
Frequently asked questions .....36
ECO mode ..................................39
General product care ................39
The RBRC® seal .........................40
FCC, ACTA and IC regulations ...
40
Limited Warranty .......................42
Technical Specifications ........... 44
1
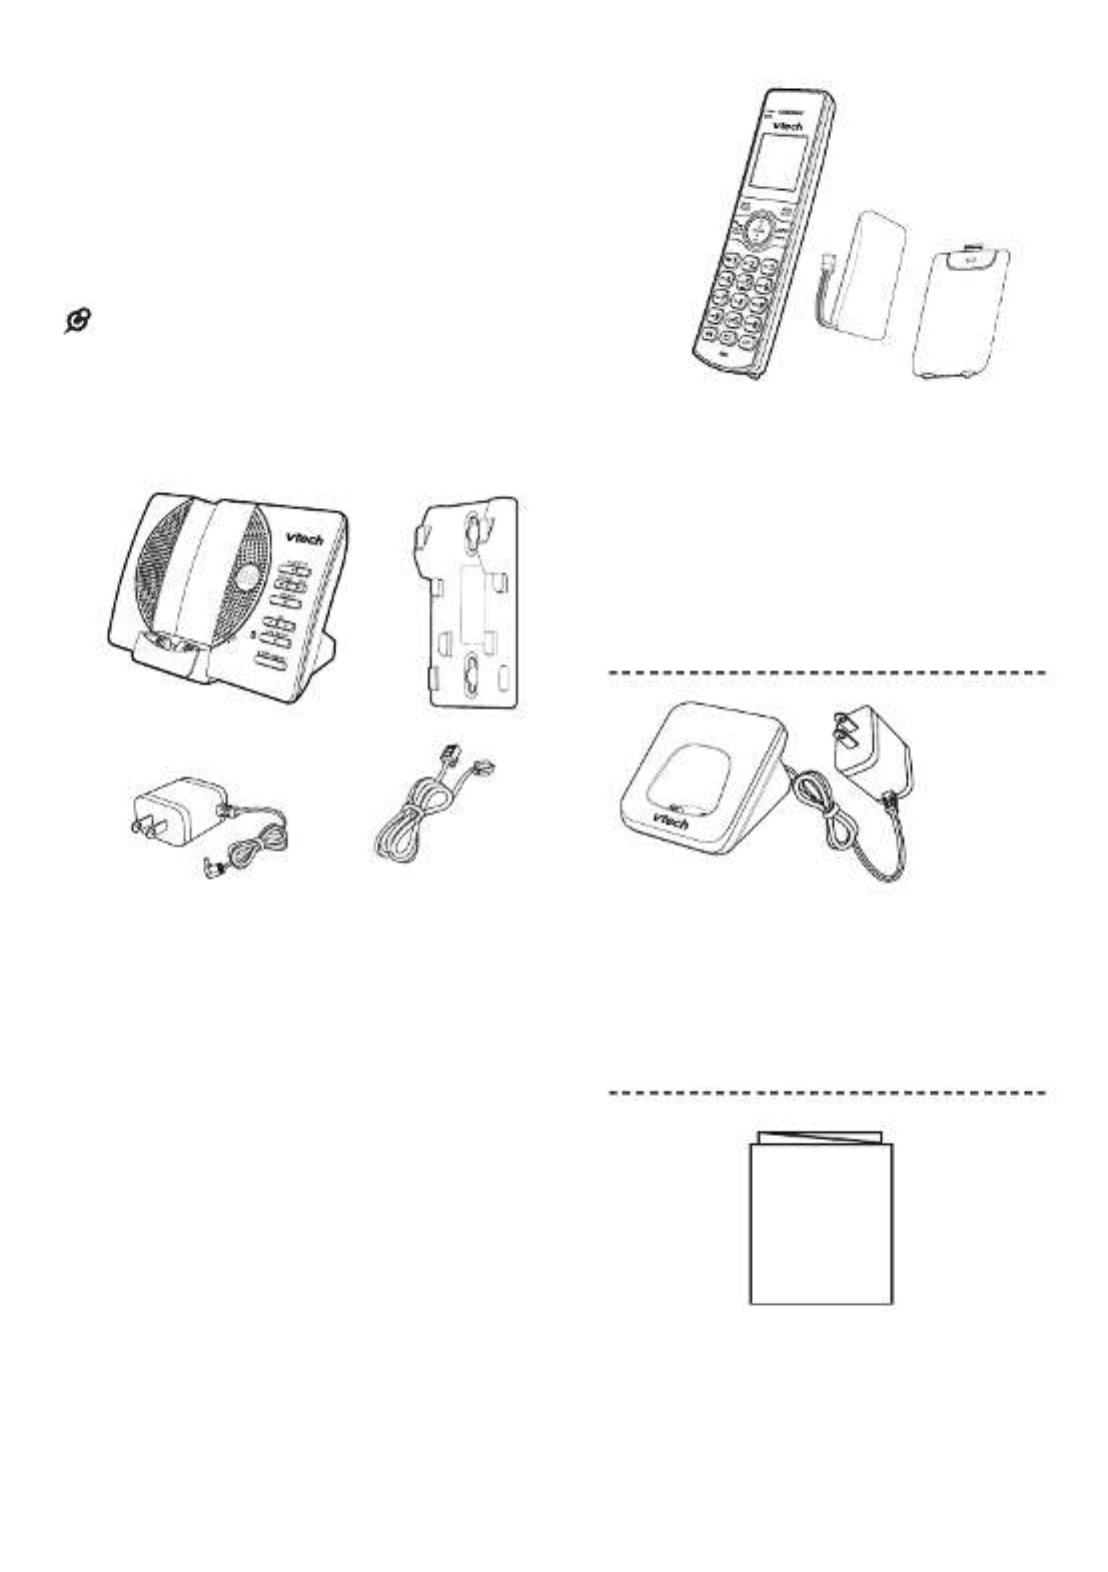
What’s in the box
Your telephone package contains the
following items. Save your sales receipt
and original packaging in case it is
necessary to ship your telephone for
warranty service.
NOTE
To purchase replacement batteries or power
adapters, visit our website at
phones.vtechcanada.com or call
1 (800) 267-7377.1 set for CS6929
2 sets for CS6929-2/CS6929-26
3 sets for CS6929-3
4 sets for CS6929-4
Abridged user’s
manual
1 set for CS6929-2/CS6929-26
2 sets for CS6929-3
3 sets for CS6929-4
1 set for CS6929/CS6929-2/CS6929-26/
CS6929-3/CS6929-4
1 set for CS6929/CS6929-2/
CS6929-26/CS6929-3/CS6929-4

2
Overview
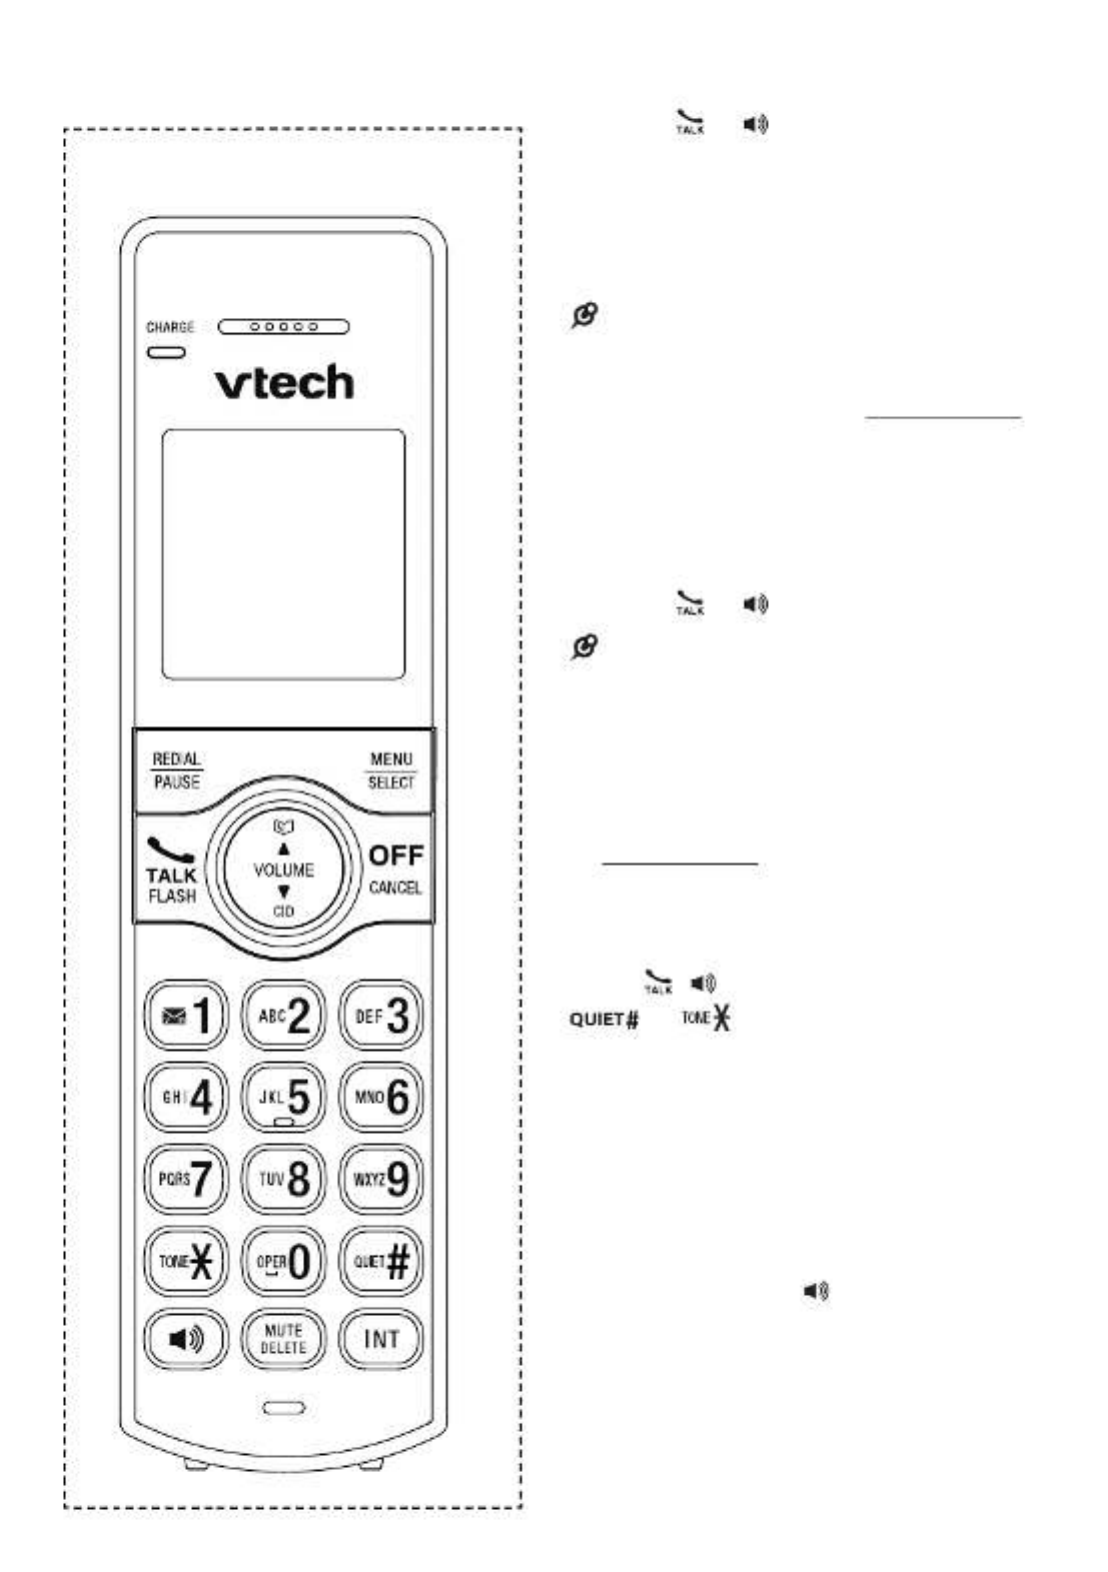
Handset overview
1 – Handset earpiece
2 – LCD display
3 –
• Show the menu.
• While in a menu, press to select
an item, or save an entry or
setting.
4 –
• Hang up a call.
• Silence the ringer temporarily
while the handset is ringing.
• Press and hold to erase the
missed call indicator while the
phone is not in use.
• Press to return to the previous
menu; or press and hold to return
to idle mode, without making
changes.
5 –
• Press repeatedly to show other
dialing options when reviewing a
caller ID log entry.
6 –
• Press to start an intercom
conversation or transfer a call (for
multi-handset models only).
7 – Microphone
8 –
• Mute the microphone during a
call.
• Delete digits or characters while
using the dialing keys.
• Silence the ringer temporarily
while the handset is ringing.
9 –
• Make or answer a call using the
handset speakerphone.
• During a call, press to switch
between the speakerphone and
the handset earpiece.
10 –
• While you have set the dial mode
to pulse and on a call, press to
switch to tone dialing temporarily.
11 –
• Press to add a space when
entering names.
12 –
• Press repeatedly to add or
remove 1 in front of the caller ID
log entry before dialing or saving
it to the phonebook.
• Press and hold to set or dial your
voicemail number.
13 –
• Make or answer a call.
• Answer an incoming call when
you hear a call waiting alert.
h
i
j
n
p
o
k
l
m
a
b
c
d
e
f
g

3
14 –
• Press repeatedly to review the
redial list.
• Press and hold to insert a dialing
pause while entering a number.
15 –
• Review the phonebook when the
phone is not in use.
• Increase the listening volume
during a call.
• Scroll up while in a menu,
phonebook, caller ID log, or
redial list.
• Move the cursor to the right when
entering numbers or names.
• Review the caller ID log when the
phone is not in use.
• Decrease the listening volume
during a call.
• Scroll down while in a menu,
phonebook, caller ID log, or
redial list.
• Move the cursor to the left when
entering numbers or names.
16 – light
• On when the handset is
charging.
Telephone base overview
1 – Message window
• Shows the number of messages,
and other information of the
answering system or telephone
base.
2 –
• ress to play messages.P
• ress to stop playing a messageP .
3 –
• Press to repeat the playing
message.
• Press twice to play the previous
message.
• Press to skip to the next message.
4 –
• Press to delete the playing
message.
• When the phone is not in use,
press twice to delete all old
messages.
5 –
• Press to adjust the volume during
message playback.
• When the phone is not in use,
press to adjust the telephone
base ringer volume.
b
c
d
a
e
f
g
hh
ii
j
k

4
6 –
• Press to turn the answering
system on or off.
7 –
• Press to page all system
handsets.
8 – light
• On when the answering system is
turned on.
9 – light
• Flashes when there is an incoming
call, or another telephone sharing
the same line is in use.
• Flashes when handsets are being
deregistered.
• On when the handset is in use or
being registered.
• On when the answering system is
answering a call.
10 – Speakerphone
11 – Charging pole
Charger overview
1 – Charging pole
Display icons overview
The battery icon flashes
when the battery is low
and needs charging.
The battery icon animates
when the battery is charging.
The handset ringer is off.
There are new voicemail
received from your
telephone service
provider.
1/13 The message number
currently playing and total
number of new/old
messages recorded.
ANS ON The answering system is
turned on.
ECO The ECO mode activates
automatically to reduce
power consumption when
the handset is within range
from the telephone base.
NEW There are new caller ID
log entries.
a

5
Handset and Telephone base
lights overview
Handset lights
On when the handset
speakerphone is in use.
On when the handset
is charging in the
telephone base or
handset charger.
Telephone base lights
On when the
telephone line is in
use.
On when you are
registering a handset.
Flashes quickly when
there is an incoming
call.
Flashes when
another telephone
sharing the same line
is in use.
Flashes when you
are deregistering all
handsets.
On when the
answering system is
turned on.

6
Connect
You can choose to connect the telephone
base for desktop usage or wall mounting.
NOTE
S
• Use only the adapters provided.
• Make sure the electrical outlets are not
controlled by wall switches.
• The adapters are intended to be correctly
oriented in a vertical or floor mount
position. The prongs are not designed to
hold the plug in place if it is plugged into a
ceiling, under-the-table or cabinet outlet.
TIP
• If you subscribe to digital subscriber line
(DSL) high-speed Internet service through
your telephone line, make sure you install
a (not included) between the DSL filter
telephone line cord and telephone wall
jack. Contact your DSL service provider
for more information.
Connect the telephone base
Connect the charger
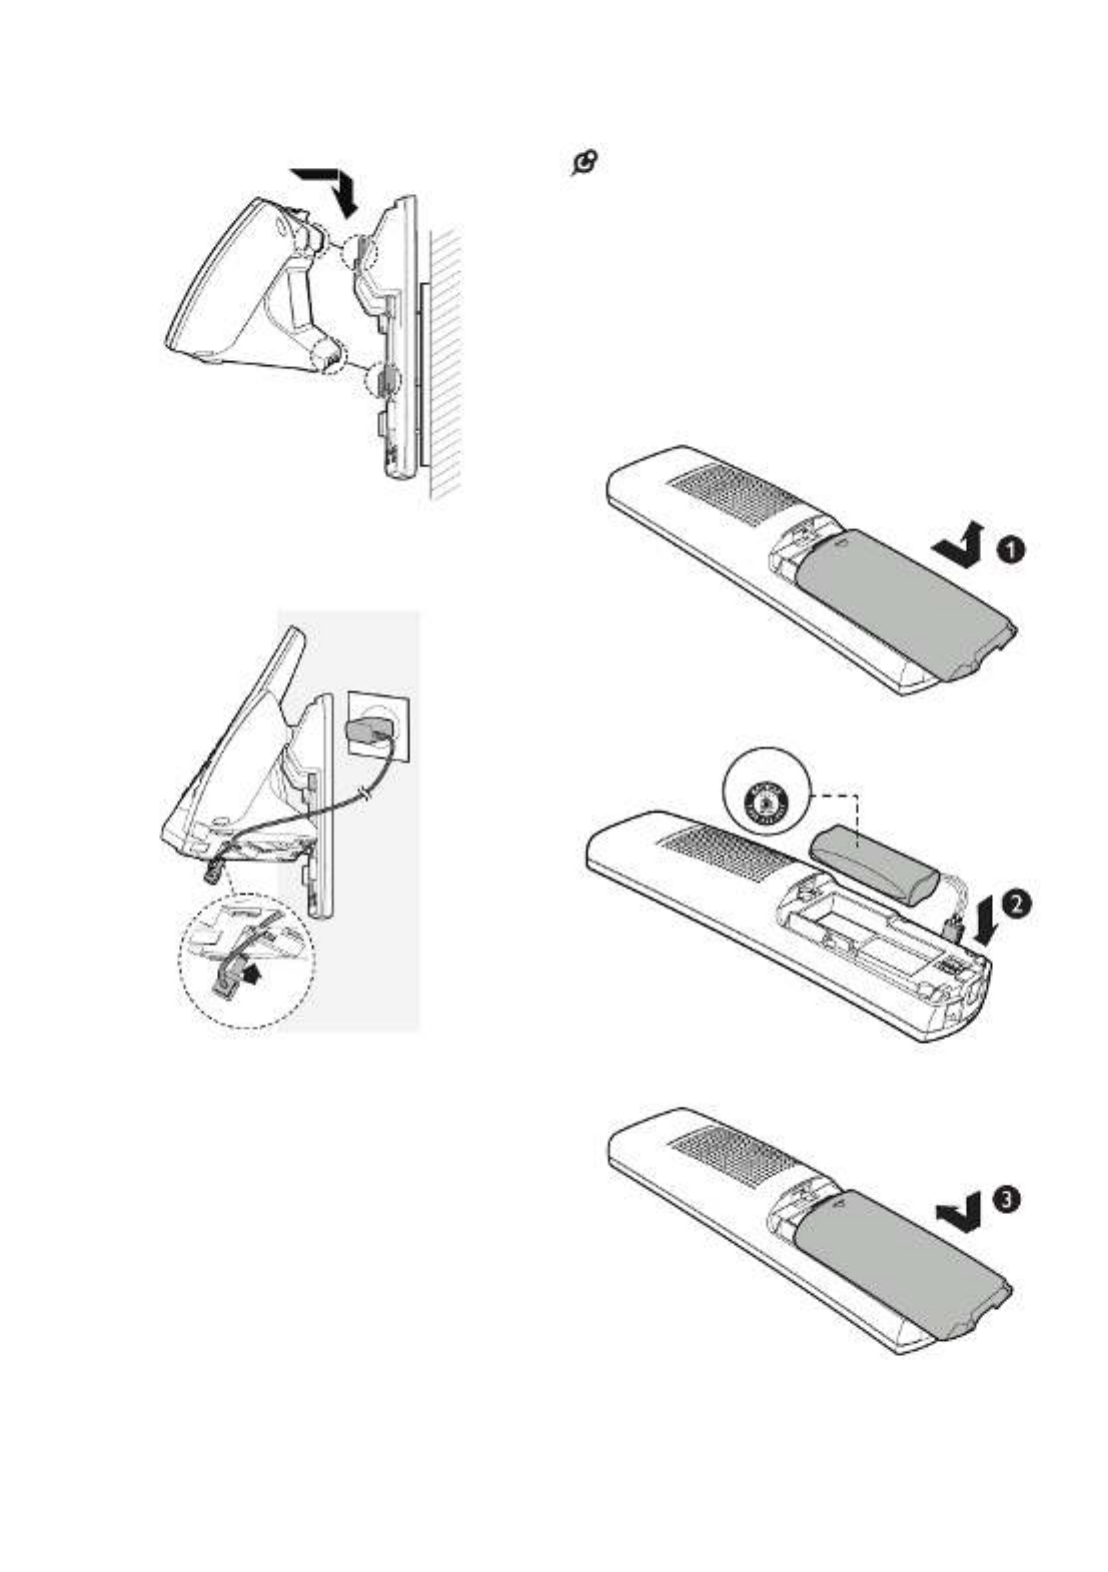
Mount the telephone base
2 Align and place the wall mount
bracket on the standard wall plate.
1. Connect the telephone line cord to
the telephone base. Route it through
the wall mount bracket, and then
connect it to the wall jack.
A
7
Install and charge the battery
Install the battery as shown below.
NOTE
S
• Use only the battery provided.
• Charge the battery provided with this
product only in accordance with the
instructions and limitations specified in this
manual.
• If the handset will not be used for a long
time, disconnect and remove the battery to
prevent possible leakage.
4. Connect the power adapter.
3. Align and place the telephone base on
the wall mount bracket. Slide it down
until it clicks securely in place.
THIS SIDE UP

8
Charge the battery
Place the handset in the telephone base
or the charger to charge.
Once you have installed the battery,
the handset LCD display indicates the
battery status (see the table below).
NOTE
S
• For best performance, keep the handset in
the telephone base or charger when not
in use.
• The battery is fully charged after 12 hours
of continuous charging.
• If you place the handset in the telephone
base or the charger without plugging
in the battery, the screen displays
No battery.
Battery
indicators
Battery
status
Action
The screen
is blank, or
shows Put
in charger
and
flashes.
The battery
has no
charge or
very little
charge. The
handset
cannot be
used.
Charge
without
interruption
(at least 30
minutes).
The screen
shows Low
battery and
flashes.
The battery
has enough
charge to be
used for a
short time.
Charge
without
interruption
(at least 30
minutes).
The screen
shows
HANDSET X.
The battery is
charged.
To keep
the battery
charged,
place it in the
telephone
base or
charger when
not in use.
When it is fully charged, you can expect
the following performance:
Operation Operating time
While in handset
use (talking*)
Seven hours
While in
speakerphone
mode (talking*)
Three and a half
hours
While not in use
(standby**)
Five days
* Operating times vary depending on your actual
use and the age of the battery.
** Handset is not charging or in use.

9
Before use
After you install your telephone or
power returns following a power outage,
the handset will prompt you to set
the date and time, and the answering
system through voice guide.
Set date and time
NOTE
• Make sure you set the date and time
including the year correctly; otherwise the
answering system does not announce the
correct day of the week for your recorded
messages time stamp.
1. Use the dialing keys (0-9) to enter
the month (MM), date (DD) and year
( ). Then press YY SELECT.
2. Use the dialing keys (0-9) to enter the
hour ( ) and minute (HH MM). Then
press or to choose or AM PM.
3. Press to save. SELECT
After the setting for the date and time, the
handset will display Voice guide to... and
set up Ans sys? alternatively.
Set answering system through
voice guide
This feature assists you to do the basic
setup of the answering system. You can
follow the voice guide to record your own
announcement, set the number of rings
and the message alert tone.
1. Press SELECT to start the voice
guide for the answering system
setup. You hear the voice prompt
“Hello! This voice guide will assist
you with the basic setup of your
answering system.”
2. Setup your answering system by
inputting the designated numbers as
instructed in the voice guide.
Check for dial tone
Press . If you hear a dial tone, the
installation is successful.
If you do not hear a dial tone:
• Make sure the installation procedures
described above are properly done.
• It may be a wiring problem. If you
have changed your telephone
service to digital service from a cable
company or a VoIP service provider,
the telephone line may need to be
rewired to allow all existing telephone
jacks to work. Contact your cable/
VoIP service provider for more
information.
Operating range
This cordless telephone operates with
the maximum power allowed by the
Federal Communications Commission
(FCC). Even so, this handset and
telephone base can communicate over
only a certain distance - which can
vary with the locations of the telephone
base and handset, the weather, and the
layout of your home or office.
When the handset is out of range, the
handset displays Out of range or no pwr
at base.
If there is a call while the handset is
out of range, it may not ring, or if it
does ring, the call may not connect well
when you press . Move closer to the
telephone base, and then press
to answer the call. If the handset
moves out of range during a telephone
conversation, there may be interference.
To improve reception, move closer to the
telephone base.

10
Configure your telephone
Using the handset menu
1. Press MENU when the phone is not
in use.
2. until the screen displays Press or
the desired feature menu.
3. to enter that menu.Press SELECT
• To return to the previous menu, press
CANCEL on the handset.
• To return to idle mode, press and hold
CANCEL on the handset.
Set language
The LCD language is preset to English.
You can select English, French or
Spanish to be used in all screen displays.
1. Press MENU when the handset is not
in use.
2. to choose Press or Settings,
and then press SELECT.
3. to choose Press SELECT LCD
language.
4. Press or to choose , English
Français or Español, and then press
SELECT. Then the handset returns
to the previous menu. You hear a
confirmation tone.
Set date and time
NOTE
• Make sure you set the date and time
including the year correctly; otherwise the
answering system does not announce the
correct day of the week for your recorded
messages time stamp.
1. Press MENU when the handset is not
in use.
2. Press or to choose Set date/time,
and then press SELECT.
3. Use the dialing keys (0-9) to enter
the month (MM), date (DD) and year
( ). Then press YY SELECT.
4. Use the dialing keys (0-9) to enter the
hour ( ) and minute (HH MM). Then
press or to choose or AM PM.
5. Press to save. SELECT Then the
handset returns to the previous
menu. You hear a confirmation tone.
12
Telephone Operations Make a call
1. Press or on the handset.
2. When you hear a dial tone, dial the
number.
• The handset displays Unable to
call if the telephone line is in use.
NOTE
S
• The handset shows the elapsed time as
you talk (in hours, minutes and seconds).
• While entering numbers, press and hold
PAUSE to insert a dialing pause
(a appears).p
Predial a call
1. Enter the telephone number.
2. Press or to dial.
NOTE
S
• The handset displays if Unable to call
the telephone line is in use.
• The handset shows the elapsed time as
you talk (in hours, minutes and seconds).
• While entering numbers, press DELETE
or to make corrections; CANCEL
press and hold PAUSE to insert a dialing
pause (a appears).p
Answer a call
Press , , or any dialing key ( - , 0 9
, or ) to answer.
End a call
Press OFF on the handset, or place the
handset in the telephone base or
handset charger.
Speakerphone
During a call, press to switch
between the speakerphone
and the handset earpiece. When the
speakerphone is active, the handset
displays Speaker.
Handset control key panel:

13
Volume
During a call, press to /VOLUME/
adjust the listening volume.
NOTE
S
• The handset and speakerphone volume
settings are independent.
• When the volume reaches the minimum
or maximum setting, you hear two beeps.
Mute
The mute function allows you to hear
the other party but the other party
cannot hear you.
• During a call, press . The MUTE
handset displays until the Muted
mute function is turned off.
• Press again to resume the MUTE
conversation. The handset briefly
displays .Microphone on
Join a call in progress
You can use up to two system handsets
at a time on an outside call.
• When a handset is already on a call,
press or on another handset to
join the call.
• Press or place the handset OFF
in the telephone base or handset
charger to exit the call. The call
continues until all handsets hang up.
NOTE
• If you have paired a DECT 6.0 cordless
headset and speakerphone to the
telephone base, you can also join a call
in progress using the paired device. Refer
to the user’s manuals of the respective
product for more information.
Call waiting
When you subscribe to call waiting
service with your telephone service
provider, you hear an alert tone if there
is an incoming call while you are on
another call.
• to put the current call Press FLASH
on hold and take the new call.
• at any time to switch Press FLASH
back and forth between calls.
If you also subscribe to caller ID
service, it will let you see the name and
telephone number of the caller during
call waiting.
It may be necessary to change your
telephone service to use this feature.
Contact your telephone service provider
if:
• You have both caller ID and call
waiting, but as separate service (you
may need to combine these service);
• You have only caller ID service, or
only call waiting service; or
• You do not subscribe to caller ID or
call waiting services.
There are fees for caller ID services. In
addition, services may not be available
in all areas.
Chain dialing
Use this feature to initiate a dialing
sequence from numbers stored in the
phonebook, caller ID log or redial list
while you are on a call.
Chain dialing can be useful if you wish
to access other numbers (such as bank
account numbers or access codes)
from the phonebook, caller ID log or
redial list.

16
• If there is an incoming call while the
originating handset displays Calling HS X,
the intercom request will be stopped and
the screen displays Incoming call.
• You can use four handsets on two pairs
of intercom calls. For example, when four
handsets are used on two pairs of intercom
calls, use the fifth handset for an outside call.
Answer an incoming call during
an intercom call
When you receive an outside call during
an intercom call, there is an alert tone.
• To answer the outside call, press .
The intercom call ends automatically.
• To end the intercom call without
answering the outside call, press
OFF. The telephone continues to
ring.
Call transfer using intercom
Use the intercom feature to transfer an
outside call to another system handset.
1. During a call, press INT.
• If you have two handsets, the
outside call is put on hold and your
handset displays Calling HS X.
• If you have three or more
handsets, your handset displays
Intercom to. Use the dialing keys
to enter a handset number. The
outside call is put on hold and your
handset displays Calling HS X.
The destination handset rings and its
screen displays .HS X is calling
2. To answer the intercom call on the
destination handset, press , , INT or
any dialing key ( - , 0 9 ,
or ).
The outside call is still on hold
and both handsets now display
Intercom. You can now have a private
conversation with the destination
handset.
NOTE
S
• To cancel the intercom call before it is
answered, press , or OFF INT on your
handset.
• If the destination handset does not
answer within 100 seconds, is in use, on
a call or is out of range, the originating
handset displays Unable to call and then
reconnects to the outside call.
3. From this intercom call, you have the
following options:
• You can let the destination handset
join you on the outside call in
a three-way conversation.
Press and hold on the INT
originating handset.
• You can transfer the call. Press
OFF, or place your handset back
in the telephone base or charger.
Your handset displays .Line in use
The destination handset is then
connected to the outside call.
• You can press to switch INT
between the outside call (Outside
call displays) and the intercom call
( displays). Intercom
• The destination handset can end
the intercom call by pressing , OFF
or by placing the handset back
in the telephone base or charger.
The outside call continues with the
original system handset.

17
Phonebook
The phonebook can store up to
50 entries, which are shared by all
handsets. Each entry may consist of a
telephone number up to 30 digits, and a
name up to 15 characters.
Any additions, deletions or edits made
on one handset will be reflected on
other handsets.
If the telephone number in the
phonebook exceeds 15 digits, a dash
appears after the 14th digit and then the
remaining digits are shown beginning
with a dash alternately.
Add a phonebook entry
1. Enter the number when the phone is
not in use. Press SELECT, then go to
Step 4.
-OR-
Press Menu when the handset is not
in use.
2. to choose , Press or Phonebook
and then press SELECT.
3. to choose Press SELECT Add new
entry.
4. When Enter number displays, use
the dialing keys to enter a number
(up to 30 digits).
-OR-
Copy a number from the redial list
by pressing . Then press , REDIAL
, or repeatedly to find the REDIAL
desired number. Press to SELECT
copy the number.
5. Press SELECT to move on to the
name.
6. When displays, use the Enter name
dialing keys to enter a name (up to 15
characters). Additional key presses
show other characters on that key.
The first character of every word is
capitalized.
7. Press SELECT to save. You hear
a confirmation tone and then the
handset returns to the previous
menu.
While entering names and numbers,
you can:
• or to move the cursor to Press
the left or right.
• to erase a digit.Press DELETE
• Press and hold to erase all DELETE
digits.
• Press and hold to enter a PAUSE
dialing pause (a p appears).
• to add a space.Press 0
Review the phonebook entries
Entries are sorted alphabetically.
1. Press when the phone is not in
use. The handset displays the first
entry in the phonebook.
2. to browse through the Press or
phonebook, or use the dialing keys to
start a name search.
-OR-
1. Press MENU when the phone is not
in use.
2. to choose Press or Phonebook,
and then press SELECT.
3. to choose Press or Review, and
then press SELECT.
4. The handset displays the first
phonebook entry. Press or to
browse through the phonebook.
NOTE
S
• If the telephone number in the phonebook
exceeds 15 digits, appears in front of -
the telephone number and shows the
remaining numbers alternately.
• You hear a double beep when you reach
the beginning or end of the phonebook.

18
Alphabetical search
1. Follow the steps in Review the
phonebook entries to enter the
phonebook.
2. Use the dialing keys to enter the
letter associated with the name.
For example, if you have entries for
Jenny, Jessie, Kristen and Laura in
your phonebook, press (JKL) once 5
to see Jenny (when displays, Jenny
press to see ), twice to see Jessie
Kristen, or three times to see Laura.
If there is no name entry matching
your search, the next closest match
in alphabetical order appears. If
necessary, press or to browse.
Edit a phonebook entry
1. Search for the desired entry in
the phonebook (see Review the
phonebook entries or
Alphabetical search).
2. When the desired entry displays,
press SELECT.
3. Use the dialing keys to edit the
number, and then press SELECT.
4. Use the dialing keys to edit the name,
and then press to save. You SELECT
hear a confirmation tone.
Delete a phonebook entry
1. Search for the desired entry in
the phonebook (see Review the
phonebook entries or
Alphabetical search).
2. When the desired entry appears,
press . The screen displays DELETE
Delete entry?.
3. Press to confirm. The SELECT
screen displays . Then Deleting ...
you hear a confirmation tone.
Dial a phonebook entry
1. Search for the desired entry in
the (see phonebook Review the
phonebook entries or Alphabetical
search).
2. or to dial.Press

19
Caller ID
If you subscribe to caller ID service,
information about each caller appears
after the first or second ring. If
you answer a call before the caller
information appears on the screen, it
will not be saved in the caller ID log.
The caller ID log stores up to 30 entries.
Each entry has up to 24 digits for the phone
number and 15 characters for the name.
If the telephone number has more that
15 digits, only the last 15 digits appear.
If the name has more than 15 characters,
only the first 15 characters are shown
and saved in the caller ID log.
Entries appear in reverse chronological
order. When the caller ID log is full, the
oldest entry is deleted to make room for
new incoming call information.
Caller ID log entries are shared by all
system handsets (for multiple handset
models only). Any deletions made on
one handset are reflected on all other
handsets.
NOTE
• This product can provide information
only if both you and the caller are in
areas offering caller ID service and if
both telephone service providers use
compatible equipment. The time and
date are sent by your telephone service
provider along with the call information.
Review the caller ID log
Review the caller ID log to find out who
called, to return the call, or to copy the
caller’s name and number into your
phonebook.
1. Press CID when the phone is not in
use. The handset displays the first
entry in the caller ID log.
2. to browse. Press or
-OR-
1. Press MENU when the phone is not
in use.
2. to scroll to Press or Caller ID
log, and then press SELECT twice
to choose Review. The handset
displays the first entry in the caller ID
log.
3. to browse. Press or
NOTE
• You hear a double beep when you reach
the beginning or end of the caller ID log.
Memory match
If the incoming telephone number
matches the last seven digits of a
telephone number in your directory,
the name that appears on the screen
matches the corresponding name in
your phonebook.
For example, if Linda Jones Smith calls,
his name appears as if this is Linda
how you entered it into your phonebook.
NOTE
• The number shown in the caller ID log
is in the format sent by the telephone
service provider. It usually delivers
10-digit phone numbers (area code plus
telephone number). If the last seven digits
of the incoming telephone number do not
match a number in your phonebook, the
name appears as it is delivered by the
telephone service provider.
Missed call indicator
When there are calls that have not
been reviewed in the caller ID log, the
handsets display . XX missed calls
Each time you review a caller ID log
entry marked , the number of NEW
missed calls decreases by one.
When you have reviewed all the
missed calls, the missed call indicator
no longer displays.

21
NOTE
• If you save an entry which already exists
in the , the handset displays phonebook
Number repeated and then returns to
previous screen.
Delete the caller ID log entries
1. Search for the desired caller ID log
entry (see Review the Caller ID log).
2. to delete the Press DELETE
displayed entry. The screen displays
Deleting.... Then you hear a
confirmation tone.
To delete all entries:
1. Press MENU when the phone is not
in use.
2. to scroll to Press or Caller ID
log, and then press SELECT.
3. to scroll to , Press or Delete all
and then press SELECT.
4. When the screen shows Delete all?.
Press SELECT to confirm. The
screen displays Deleting... and then
you hear a confirmation tone. The
screen returns to the previous menu.
Call block
If you have subscribed to caller ID
service, you can set the telephone
to block unknown calls and certain
undesired calls. The call block list can
store up to 20 entries.
When a call is blocked, the caller will
hear a simulated busy tone for one ring
cycle. The call recipient may pick up the
call during the first ring when there is no
caller ID information. Otherwise, the call
is disconnected.
Block unknown calls
All incoming calls with unknown
numbers will be blocked.
1. Press MENU when the handset is not
in use.
2. , Press or to choose Call block
then press SELECT.
3. Press or to choose Calls w/o
num, then press SELECT.
4. Press or to choose or Unblock
Block, then press SELECT. You hear
a confirmation tone.
Add a call block entry
1. Press MENU when the phone is not
in use.
2. to choose , Press or Call block
and then press SELECT.
3. to choose Press SELECT
Block list.
4. Press or to choose Add new
entry, and then press SELECT.
5. When Enter number displays, use
the dialing keys to enter a number (up
to 30 digits).

22
-OR-
Copy a number from the redial list
by pressing . Then press , REDIAL
, or repeatedly to find the REDIAL
desired number. Press to SELECT
copy the number.
6. Press to move on to the SELECT
name.
7. When displays, use the Enter name
dialing keys to enter a name (up to
15 characters). Additional key
presses show other characters on
that key. The first character of every
word is capitalized.
8. Press to save. You hear SELECT
a confirmation tone and then the
handset returns to the previous
menu.
While entering names and numbers,
you can:
• or to move the cursor to Press
the left or right.
• to erase a digit.Press DELETE
• Press and hold to erase all DELETE
digits.
• Press and hold to enter a PAUSE
dialing pause (a p appears).
• to add a space.Press 0
Review call block list
1. Press MENU when the phone is not
in use.
2. to choose Press or Call block,
and then press SELECT.
3. to choose , Press or Block list
and then press SELECT.
4. Press or to choose , and Review
then press SELECT.
5. orPress to browse through the
directory.
NOTE
• The handset displays if there List empty
are no block entries.
Edit a call block list entry
1. Search for the desired call block entry
(see Review call block list).
2. When the desired entry displays,
press SELECT. The handset displays
Enter number.
3. Use the dialing keys to edit the
number.
4. Press SELECT. The handset displays
Enter name.
5. Use the dialing keys to edit the name.
6. Press to save. SELECT
Save a caller ID log entry to call
block list
1. Search for the desired caller ID log
entry (see Review the Caller ID log).
2. When the desired entry displays,
press SELECT.
3. Press or to scroll to To Call
block, then press SELECT.
4. The handset displays Enter Number.
Use the dialing keys to edit the
number, when necessary. Press
SELECT to move to the name. The
handset displays .Enter name
5. Use the dialing keys to add or edit the
name.
6. Press when done. You hear SELECT
a confirmation tone.
Delete a call block list entry
1. Search for the desired call block entry
(see Review the call block list).
2. . You hear a Press DELETE
confirmation tone and the handset
displays the next entry.
NOTE
• If the call block list is empty after an entry
is deleted, the handset displays List
empty. You hear a confirmation tone.

23
Mute rings of blocked calls
An incoming call will ring once and then
the system will check if the call should
be blocked. You can mute the first ring
of blocked calls.
1. Press MENU when the handset is not
in use.
2. Press 7464# on the handset.
3. to choose Press or First
ring:On or and then First ring:Off
press SELECT to save. You hear a
confirmation tone.
Sound settings
Key tone
You can turn the key tone on or off for
each handset. If you turn the key tone
off, there are no beeps when you press
the handset keys.
1. Press MENU when the handset is not
in use.
2. to choose Press or Settings,
and then press SELECT.
3. to choose , Press or Key tone
and then press SELECT.
4. Press or to choose orOn Off.
5. Press SELECT to save your
selection. Then the handset returns
to the previous menu. You hear a
confirmation tone.
Ringer tone
You can choose from different ringer
tones for each handset.
1. Press MENU when the handset is not
in use.
2. to choose , and Press or Ringers
then press SELECT.
3. to choose , Press or Ringer tone
and then press SELECT.
4. Press or to sample each ringer
tone.
5. Press SELECT to save your
selection. Then the handset returns
to the previous menu. You hear a
confirmation tone.
NOTE
• If you turn off the ringer volume, you will
not hear ringer tone samples.

24
Handset ringer volume
You can set the ringer volume or turn
the ringer off on each handset. When
the ringer is off, appears on the
screen.
1. Press MENU when the handset is not
in use.
2. to choose , and Press or Ringers
then press SELECT.
3. to select Press or Ringer
volume, and then press SELECT.
4. Press or to sample each volume
level.
5. Press SELECT to save your
selection. Then the handset returns
to the previous menu. You hear a
confirmation tone.
NOTE
• If the ringer volume is set to off, that
handset is silenced for all incoming calls
except paging tone.
Telephone base ringer volume
Press VOL+ or on the telephone VOL-
base to adjust the ringer volume when
the telephone base is not in use.
When you set the ringer volume to zero,
the base ringer is off. The telephone
base announces, “Base ringer is off.”.
Temporary ringer silencing
When the telephone is ringing, you can
temporarily silence the ringer of the
handset and telephone base without
disconnecting the call. The next call
rings normally at the preset volume.
• or on the handset Press OFF MUTE
and it displays and .Ringer muted
• or on the Press VOL+ VOL-
telephone base to adjust the ringer
volume.
NOTE
S
• ach handset and the base ring when E
there is an incoming call unless the ringer
volume of that device is turned off.
Quiet mode
You can turn on the quiet mode for a
period of time (1-12 hours). During this
period, all tones (except paging tone)
are muted. When you turn on the quiet
mode, the answering system turns on
automatically.
To set the duration and turn on the
quiet mode:
1. Press and hold when the
handset is not in use.
2. The handset displays _ _ Quiet:
hours. Use the dialing keys ( - ) to 0 9
enter the desired duration (1-12).
3. to save. You hear Press SELECT
a confirmation tone. The handset
displays Quiet mode on and .
To turn off the quiet mode:
• Press and hold when the
handset is not in use. The handset
displays Quiet mode off briefly and
then returns to idle.
NOTE
• When you change the settings of the
ringer tone or ringer volume, you can still
hear the samples even if the quiet mode
is on.

25
About the built-in
answering system and
voicemail service
For message recording, your telephone
has a built-in answering system, and it
also supports voicemail service offered
by your telephone service provider
(subscription is required, and fee may
apply).
The main differences between them are:
Category
Built-in
answering
system
Voicemail from
telephone
service
Storage Messages
are stored in
the telephone
base.
Messages are
stored in a
server or system
provided by
your telephone
service.
Your messages
will not be
deleted
automatically.
You have to
delete your
messages
manually.
Your messages
may be
automatically
deleted after a
period of time.
Contact your
telephone
service provider
for more details.
Method
to retrieve
messages
When you
received new
messages,
handset
displays
XX new
messages and
the message
window on the
telephone base
flashes.
When you
received new
messages,
the handset
displays and
New voicemail.
To retrieve
messages,
usually there
are two ways:
• on Press
the telephone
base; or
• Access
remotely with
an access
code.
To retrieve
messages, you
need an access
number and/
or a passcode
provided by
your telephone
service
provider.
Set your built-in answering
system
The answering system can record
and store up to 99 messages. Each
message can be up to three minutes in
length. The total storage capacity for the
announcement, messages and memos
is approximately 23 minutes. The actual
recording time depends on individual
message characteristics.
Your answering system allows you to set
your announcement, to save and delete
messages, activate call screening, to
set number of rings before pick up, and
to access remotely.
Turn the answering system on
or off
The answering system must be turned
on to answer and record messages.
When the answering system is turned
on, the light on the /ANS ON/OFF
telephone base turns on and ANS ON
displays on the handset.
Telephone base control key panel:

26
To turn on or off with the
telephone base:
• ss Pre /ANS ON/OFF to turn the
built-in answering system on or
off. When the answering system is
turned on, it announces, “Calls will
be answered.” When the answering
system is turned off, it announces,
“Calls will not be answered.”
To turn on or off with the handset:
1. Press MENU when the phone is not
in use.
2. Press or Answering to choose
sys, and then press SELECT.
3. Press or Answer on/ to choose
off, and then press SELECT.
4. Press or On to choose or Off,
and then press to save. The SELECT
screen returns to the previous menu.
You hear a confirmation tone.
Set voice language
The voice prompt language is preset
to English. You can select English or
French to be used for the voice prompts
in your answering system.
1. Press MENU when the phone is not
in use.
2. Press to scroll to or Answering
sys SELECT, and then press .
3. Press to scroll to or Ans sys
setup and then press SELECT.
4. Press to scroll to or Voice
language and then press SELECT.
5. Press or to choose English or
Français.
6. to save and you hear Press SELECT
a confirmation tone.
Default announcement
The telephone is preset with a greeting
that answers calls with “Hello, please
leave a message after the tone.” You
can use this preset announcement, or
replace it with your own.
Record your own announcement
The announcement can be up to
90 seconds in length.
1. Press MENU when the phone is not
in use.
2. Press to scroll to or Answering
sys SELECT, and then press .
3. Press again to choose SELECT
Announcement.
4. The handset displays Play [2] Del [3]
Rec [7] and it announces,
“
To play,
press . To record, press .2 7
”
Press 7
to record.
5. The handset announces, “Record
after the tone. Press when you are 5
done.” After the tone, speak towards
the handset microphone.
6. when done.Press 5
Play your announcement
1. Press MENU when the phone is not
in use.
2. Press to scroll to or Answering
sys SELECT, and then press .
3. Press again to choose SELECT
Announcement.
4. The handset displays Play [2] Del [3]
Rec [7] and it announces,
“
To play,
press . To record, press .2 7
”
Press 2
to play the current announcement.
Options during playback:
• Press /VOLUME/ to adjust the
listening volume.
• or to stop at any time.Press 5 OFF
• to switch between the Press
speakerphone and handset earpiece.

27
Delete your announcement
1. Press MENU when the phone is not
in use.
2. Press to scroll to or Answering
sys SELECT, and then press .
3. Press again to choose SELECT
Announcement.
4. The handset displays Play [2] Del
[3] Rec [7] and it announces,
“
To
play, press . To record, press .2 7
”
Press to delete your recorded 3
announcement. The handset displays
Annc deleted and then the system
announces, “Announcement deleted.”
You hear a confirmation tone.
NOTE
• After you deleted your own recorded
announcement, the answering
system answers calls with the default
announcement.
Set number of rings
You can set the answering system to
answer an incoming call after two, three,
four, five or six rings; or toll saver.
If you choose toll saver, the answering
system answers a call after two rings
when you have new messages, or
after four rings when you have no new
messages. This enables you to check
for new messages and avoid paying
unnecessary long distance charges if you
are calling from outside your local area.
1. Press MENU when the phone is not
in use.
2. to scroll to Press or Answering
sys, and then press SELECT.
3. to scroll to Press or Ans sys
setup, and then press SELECT.
4. Press or # of rings to scroll to ,
and then press SELECT.
5. Press or 2 3 4 5 6 to choose , , , , or
Toll saver, and then press SELECT.
You hear a confirmation tone.
Turn the call screening on
or off
Use this feature to choose whether
incoming messages can be heard while
they are being recorded.
1. Press MENU when the phone is not
in use.
2. to scroll to Press or Answering
sys, and then press SELECT.
3. to scroll to Press or Ans sys
setup, and then press SELECT.
4. Press SELECT to choose Call
screening.
5. Press or to choose On or Off.
6. to save and you hear Press SELECT
a confirmation tone.
Turn the message alert tone on
or off
When the message alert tone is set to
on, and there is at least one new
message, the telephone base beeps
every 10 seconds. The message alert
tone is preset to off.
1. Press MENU when the phone is not
in use.
2. to scroll Press or to Answering
sys, then press SELECT.
3. to scroll Press or to Ans sys
setup, then press SELECT.
4. Press or Msg alert to scroll to
tone, then press SELECT.
5. Press or On to choose or Off.
6. to save and you hear Press SELECT
a confirmation tone.

28
NOTE
S
• The answering system must be turned on
for the message alert tone to be functional.
• Press any key on the telephone base
(except ) to temporarily /FIND HANDSET
silence the message alert tone.
Voice guide
This feature is an alternative way for you
to do the basic setup of the answering
system. You can follow the voice guide
to record your own announcement, set
the number of rings and the message
alert tone.
1. Press MENU when the phone is not
in use.
2. to scroll to Press or Answering
sys, and then press SELECT.
3. to scroll to Press or Voice guide,
the press SELECT. You hear the
voice prompt “Hello! This voice guide
will assist you with the basic setup of
your answering system.”
4. Setup your answering system by
inputting designated numbers as
instructed in the voice guide.
NOTE
• You can press to quit the voice CANCEL
guide at anytime.
U s i n g y o u r b u i l t - i n
answering system
New message indication
The message window in the telephone
base flashes and XX new messages
displays on the handset when there are
new answering system messages.
Message
window
display
Description
0No messages.
1-99 Total number of old messages
and memos recorded.
The message number currently
playing.
0-99
(flashing)
Total number of new messages
recorded, or the current message
number during new message
playback.
The clock needs to be set.
1-99 & F
(alternating)
The answering system memory is
full with total number of messages
recorded.
1-8 The telephone base speaker
volume level while adjusting.
0-6 The telephone base ringer level
while adjusting.
-- The answering system is
answering a call, or recording a
memo or announcement.
The handset is on a call, or in the
caller ID log.
The answering system is being
accessed remotely.
If the message alert tone is turned on,
the telephone base beeps every
10 seconds when there are messages
that have not been reviewed.

29
Message playback
If you have new messages, the
telephone plays only the new messages
(oldest first). If there are no new
messages, the telephone plays back all
messages (oldest first).
When playback begins, you hear the
total number of messages followed
by the date and time of the message.
After the last message, the telephone
announces, “End of messages.”
NOTE
• Make sure you set the date and time
correctly. Refer to Set date and time
under the Configure your telephone
section for more details.
To playback messages at the
telephone base:
• when the telephone Press /PLAY
base is not in use.
Options during playback:
• to adjust the Press VOL+ or VOL-
message playback volume.
• to skip to the next Press /SKIP
message.
• to repeat the Press /REPEAT
message. Press twice to hear the
previous message.
• to delete the Press X/DELETE
playing message.
• to stop the playback.Press /STOP
To playback messages with a
handset:
1. Press MENU when the phone is not
in use.
2. to choosePress SELECT
Play messages.
Options during playback:
• Press /VOLUME/ to adjust the
message playback volume.
• to skip to the next message.Press 6
• to repeat the message. Press 4
Press 4 twice to listen to the previous
message.
• to delete the playing Press 3
message.
• to stop the playback.Press OFF
• to switch between Press
speakerphone and the handset
earpiece.
NOTE
S
• Only one handset or the telephone base
can access the answering system at a
time.
• During message playback, if there is an
incoming call or another handset makes a
call, message playback will be stopped.
Delete all messages
You can only delete old (reviewed)
messages. You cannot delete new
messages until you review them. You
cannot retrieve deleted messages.
To delete all messages with the
telephone base:
1. When the phone is not in use, press
X/DELETE. The system announces,
“To delete all old messages, press
DELETE again.”
2. again. The system Press X/DELETE
announces, “All old messages deleted.”
You hear a confirmation tone.
To delete all messages with a
handset:
1. Press MENU when the phone is not
in use.
2. to scroll to Press or Answering
sys, and then press SELECT.
3. to scroll to Press or Delete all
old, and then press SELECT. The
handset shows Delete all msg?
4. Press SELECT to confirm. The
handset displays Deleting...
then No old messages and then
returns to the previous menu. You
hear a confirmation tone.

30
Remote access
A two-digit security code is required to
access the answering system remotely
from any touch-tone telephone. The
preset code is . You can use this 19
preset code, or set your own.
1. Dial your telephone number from any
touch-tone telephone.
2. When the system plays your
announcement, enter the two-digit
security code.
3. Enter one of the following remote
commands.
Command Description
1Play all messages.
2Play new messages.
3Delete the current
message (during
playback).
33 Delete all old messages.
4Repeat the current
message (during
playback).
5Stop.
*5 Hear a list of remote
commands.
6Skip to the next message
(during playback).
*7 Record a new
announcement.
8End the call.
0Turn the answering
system on or off.
4. Hang up or press to end the call.8
NOTE
S
• If you do not press any keys after you
enter the remote access code, all new
messages play. If there are no new
messages, all old messages play.
• Once the new messages have played,
the telephone announces the help menu
options. If you do not press any key within
20 seconds, the remote access call
automatically disconnects.
• When the answering system memory is
full, the telephone announces,
“Memory is full. Enter the remote access
code.”
Set remote access code
You can set your own remote access
code from 00 to 99.
1. Press MENU when the phone is not
in use.
2. to scroll to Press or Answering
sys then press SELECT.
3. to scroll to Press or Ans sys
setup then press SELECT.
4. Press or Remote to scroll to
code, and then press SELECT.
5. Use the dialing keys to enter a
two-digit number.
-OR-
Press or to scroll to a desired
two-digit number.
6. to save and you hear Press SELECT
a confirmation tone.
Call screening
To screen a call at the telephone
base:
If the answering system and call
screening are turned on, the
announcement and the incoming
message broadcast at the telephone
base while the call is answered by the
answering system.
Produkt Specifikationer
| Mærke: | Vtech |
| Kategori: | Telefon |
| Model: | CS6929 |
Har du brug for hjælp?
Hvis du har brug for hjælp til Vtech CS6929 stil et spørgsmål nedenfor, og andre brugere vil svare dig
Telefon Vtech Manualer

7 Januar 2025
14 December 2024
14 December 2024
14 December 2024
14 December 2024
14 December 2024
13 December 2024
13 December 2024
13 December 2024
13 December 2024
Telefon Manualer
- Telefon SilverCrest
- Telefon Acer
- Telefon Amplicomms
- Telefon Denver
- Telefon Sencor
- Telefon Sony
- Telefon Siemens
- Telefon Samsung
- Telefon GE
- Telefon Panasonic
- Telefon Philips
- Telefon LG
- Telefon AEG
- Telefon Audio-Technica
- Telefon Doro
- Telefon Gigaset
- Telefon AT&T
- Telefon Pioneer
- Telefon Apple
- Telefon Logitech
- Telefon Daewoo
- Telefon Sennheiser
- Telefon Emporia
- Telefon OpenVox
- Telefon Grundig
- Telefon Akuvox
- Telefon D-Link
- Telefon Motorola
- Telefon Roland
- Telefon Asus
- Telefon Toshiba
- Telefon Pyle
- Telefon Brother
- Telefon Lenovo
- Telefon Yamaha
- Telefon Infiniton
- Telefon OnePlus
- Telefon AVM
- Telefon Logik
- Telefon Planet
- Telefon Hama
- Telefon Thomson
- Telefon Nokia
- Telefon JBL
- Telefon TriStar
- Telefon TRENDnet
- Telefon Trevi
- Telefon Trust
- Telefon Fysic
- Telefon Topcom
- Telefon Flex
- Telefon Blaupunkt
- Telefon Sandstrøm
- Telefon Uniden
- Telefon Hitachi
- Telefon Medion
- Telefon Sweex
- Telefon Linksys
- Telefon Cisco
- Telefon Huawei
- Telefon Ranex
- Telefon Bang And Olufsen
- Telefon Geemarc
- Telefon Jabra
- Telefon Loewe
- Telefon Crosley
- Telefon Netgear
- Telefon EnVivo
- Telefon Lifetec
- Telefon Avaya
- Telefon Parrot
- Telefon Telefunken
- Telefon Microsoft
- Telefon Jacob Jensen
- Telefon Alcatel
- Telefon Anker
- Telefon Zebra
- Telefon Olympia
- Telefon Plantronics
- Telefon Xiaomi
- Telefon Krüger&Matz
- Telefon RugGear
- Telefon CAT
- Telefon Marmitek
- Telefon Oppo
- Telefon Crosscall
- Telefon NEC
- Telefon Alcatel-Lucent
- Telefon MT Logic
- Telefon Kyocera
- Telefon Xblitz
- Telefon Bogen
- Telefon LevelOne
- Telefon Marshall
- Telefon ArtDio
- Telefon Binatone
- Telefon Honor
- Telefon ZyXEL
- Telefon Tiptel
- Telefon Sagem
- Telefon Fortinet
- Telefon Overmax
- Telefon Archos
- Telefon Yealink
- Telefon RCA
- Telefon Ubiquiti Networks
- Telefon AVerMedia
- Telefon Currys Essentials
- Telefon EnGenius
- Telefon Grandstream
- Telefon MaxCom
- Telefon Patton
- Telefon Renkforce
- Telefon SPC
- Telefon ZTE
- Telefon Mikrotik
- Telefon Switel
- Telefon Brondi
- Telefon HTC
- Telefon Escene
- Telefon BlackBerry
- Telefon Evolveo
- Telefon Audioline
- Telefon BT
- Telefon XD Enjoy
- Telefon Mitel
- Telefon GPO
- Telefon Wiko
- Telefon Telstra
- Telefon Aastra
- Telefon Snom
- Telefon Mackie
- Telefon Vimar
- Telefon Oricom
- Telefon Oregon Scientific
- Telefon Lexibook
- Telefon Scosche
- Telefon Prestigio
- Telefon MyPhone
- Telefon Draytek
- Telefon Realme
- Telefon Crestron
- Telefon Lindy
- Telefon MXL
- Telefon Cortelco
- Telefon Legrand
- Telefon CTA Digital
- Telefon Steren
- Telefon Neat
- Telefon Tecdesk
- Telefon Dnake
- Telefon Gamdias
- Telefon Lewitt
- Telefon Allview
- Telefon Alcon
- Telefon Airlive
- Telefon AGFEO
- Telefon Amplicom
- Telefon Ascom
- Telefon Proximus
- Telefon BeeWi
- Telefon Sonim
- Telefon Sunstech
- Telefon Sylvania
- Telefon Swissvoice
- Telefon Marquant
- Telefon Nordmende
- Telefon KPN
- Telefon Belgacom
- Telefon Auerswald
- Telefon Profoon
- Telefon Teledex
- Telefon Valcom
- Telefon Innovaphone
- Telefon Hagenuk
- Telefon Essentiel B
- Telefon Logicom
- Telefon Peaq
- Telefon Vogtec
- Telefon T-Mobile
- Telefon Fanvil
- Telefon Spectralink
- Telefon VXi
- Telefon Unify
- Telefon Sagemcom
- Telefon Edenwood
- Telefon Premier
- Telefon HUMANTECHNIK
- Telefon Polycom
- Telefon Primare
- Telefon Mobotix
- Telefon Edge-Core
- Telefon ClearOne
- Telefon Clarity
- Telefon Syco
- Telefon SMC
- Telefon Pixel
- Telefon Digium
- Telefon FlyingVoice
- Telefon Davolink
- Telefon KONFTEL
- Telefon Mitsai
- Telefon Clear Sounds
- Telefon ALLO
- Telefon Oukitel
- Telefon On-Q
- Telefon Canyon
- Telefon HMD
- Telefon Tecno
- Telefon Olitech
- Telefon Dopod
- Telefon Hamlet
- Telefon Sedna
- Telefon Cubot
- Telefon AudioCodes
- Telefon 3Com
- Telefon British Telecom
- Telefon CyberData Systems
- Telefon Bintec-elmeg
- Telefon Wantec
- Telefon Algo
- Telefon Future Call
- Telefon 4family
- Telefon Tador
- Telefon CSL
- Telefon POCO
- Telefon Liam&Daan
- Telefon Lively
- Telefon EMeet
- Telefon Cyber Acoustics
Nyeste Telefon Manualer

9 April 2025

1 Marts 2025
1 Marts 2025
25 Februar 2025
22 Februar 2025
22 Februar 2025
11 Februar 2025
7 Februar 2025
30 Januar 2025
24 Januar 2025