VXi Envoy Office 2031U Manual
VXi
Hovedtelefoner
Envoy Office 2031U
Læs nedenfor 📖 manual på dansk for VXi Envoy Office 2031U (2 sider) i kategorien Hovedtelefoner. Denne guide var nyttig for 16 personer og blev bedømt med 4.5 stjerner i gennemsnit af 2 brugere
Side 1/2
SO TRAGEN SIE IHR HEADSET UND STELLEN ES EIN
1. Setzen Sie das Headset auf.
2. Platzieren Sie den/die Lautsprecher direkt über Ihrem Ohr/Ihren Ohren. Stellen Sie das Headset auf
die optimale Passform für Ihren Kopf ein, indem Sie den Kopfbügel aus der Seitenstrebe herausziehen
bzw. in die Seitenstrebe hineinschieben.
3. Richten Sie das Mikrofon ca. eine Fingerbreite von Ihrem Gesicht entfernt auf Ihren Mundwinkel.
Die letzten Zentimeter des Mikrofonarms sind recht flexibel. Sie können ihn so, wie Sie es für eine
optimale Klangqualität benötigen, zu Ihrem Mund hinbiegen.
SO SCHLIESSEN SIE IHR HEADSET AN
Verbinden Ihres Envoy Office
1. Schließen Sie den USB-Stecker an einem USB-Anschluss an Ihrem Computer (jedoch nicht am
Tastaturanschluss) an.
2. Überprüfen Sie die Audioeinstellungen (Lautsprecher und Mikrofon) an Ihrem Softphone und in
Windows, um sicherzustellen, dass die Anfangseinstellungen innerhalb der Grenzwerte liegen.
Installieren Ihres Envoy Office
Unter Windows XP oder höher: Die Installation erfolgt automatisch, nachdem der Stecker am
USB-Anschluss Ihres Computers angeschlossen wurde.
Unter Macintosh: Weitere Informationen erhalten Sie im USB-Support-Bereich unter vxicorp.com/usb.
WEITERE INFORMATIONEN
Weitere Informationen zu den Konnektivitätsoptionen des Envoy Office erfahren Sie unter vxicorp.com/usb.
Technischen Support oder Produktinformationen erhalten Sie beim Kundendienst von VXi unter der gebührenfreien
Rufnummer (US und Kanada) +800-742-8588 bzw. +1-603-742-2888 (Internationale Anrufer).
Anweisungen zum VXi EnvoyTM Office-Headset
Leicht einzurichten und anwenderfreundlich
HOW TO WEAR AND ADJUST YOUR HEADSET
1. Place the headset on your head.
2. Position the speaker(s) directly on your ear(s). You can slide the headband in or out of the side support
for proper fit.
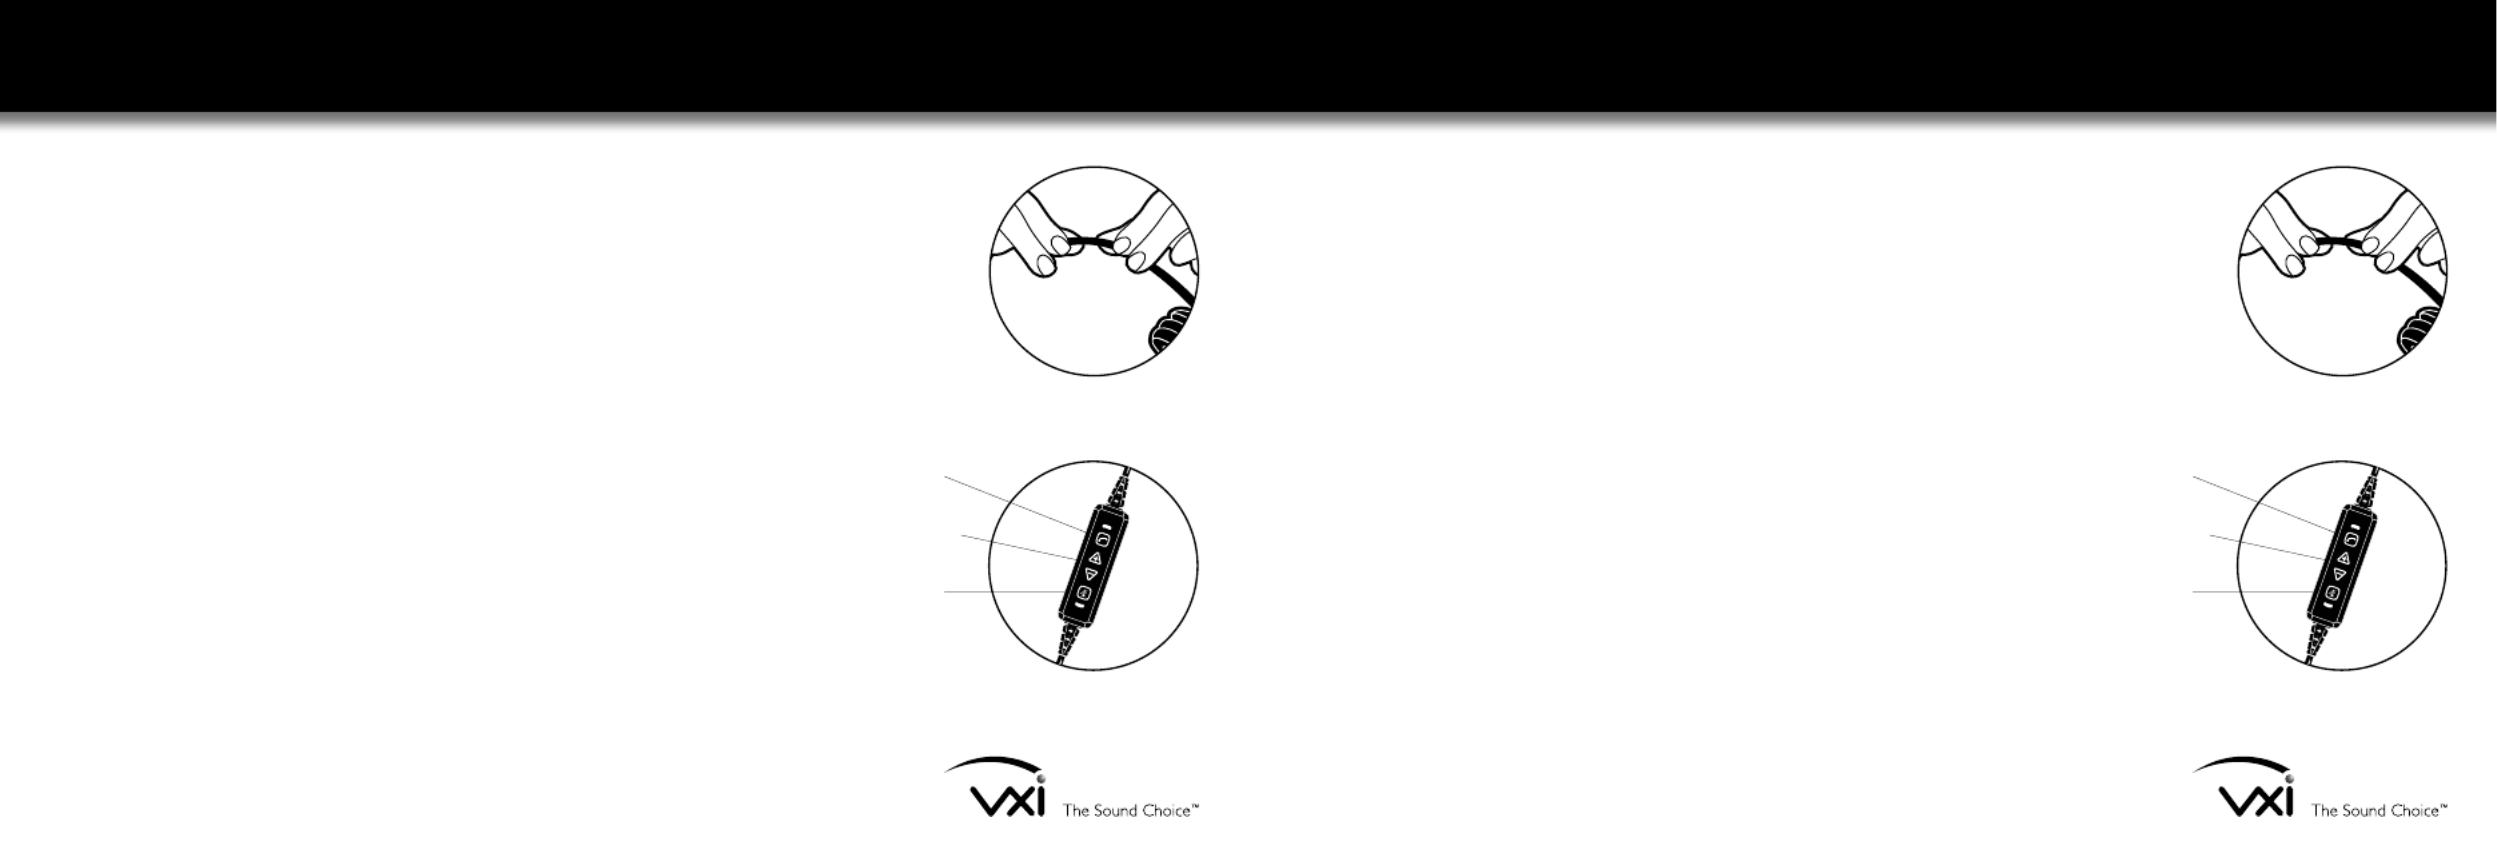
3. Position the microphone about one finger’s width away from your face at the corner of your mouth.
The last several inches of the microphone boom are quite flexible, so you can bend it toward your
mouth as needed for optimum sound quality.
HOW TO CONNECT YOUR HEADSET
Connecting to your Envoy Office
1. Insert the USB connector into a USB port on your computer (not into the keyboard).
2. Check the audio settings (speaker and microphone) on your softphone and in Windows
to ensure that the initial settings are at an appropriate level.
Installing your Envoy Office
For Windows XP or higher: Installation is automatic once inserted into the USB port of your computer.
For Macintosh: Please visit the USB support section at for more information.vxicorp.com/usb
FOR MORE INFORMATION
Visit vxicorp.com/usb to learn more about the Envoy Office connectivity options. For technical
support, or for more information on our products, contact VXi Customer Service toll-free in the U.S.
and Canada at 800-742-8588, or at +1-603-742-2888 for international callers.
VXi EnvoyTM Office Headset Instructions
Simple to set up and use.
APN 203703A 08/15APN 203703A-DE 08/15
Hook
Volume
Mute
Haken
Lautstärke
Stumm
schalten
Adjust the flexible microphone
boom for proper positioning.
Stellen Sie den flexiblen
Mikrofonarm so ein, dass er
korrekt ausgerichtet ist.
Produkt Specifikationer
| Mærke: | VXi |
| Kategori: | Hovedtelefoner |
| Model: | Envoy Office 2031U |
Har du brug for hjælp?
Hvis du har brug for hjælp til VXi Envoy Office 2031U stil et spørgsmål nedenfor, og andre brugere vil svare dig
Hovedtelefoner VXi Manualer

26 Juli 2024
Hovedtelefoner Manualer
- Hovedtelefoner Bosch
- Hovedtelefoner SilverCrest
- Hovedtelefoner Amplicomms
- Hovedtelefoner Denver
- Hovedtelefoner TCL
- Hovedtelefoner Sony
- Hovedtelefoner Samsung
- Hovedtelefoner Panasonic
- Hovedtelefoner Sony Ericsson
- Hovedtelefoner Pro-Ject
- Hovedtelefoner RYOBI
- Hovedtelefoner Philips
- Hovedtelefoner Lenco
- Hovedtelefoner LG
- Hovedtelefoner Audio-Technica
- Hovedtelefoner Gigaset
- Hovedtelefoner Pioneer
- Hovedtelefoner Apple
- Hovedtelefoner Logitech
- Hovedtelefoner Behringer
- Hovedtelefoner Kenwood
- Hovedtelefoner Google
- Hovedtelefoner Sandberg
- Hovedtelefoner Daewoo
- Hovedtelefoner Sennheiser
- Hovedtelefoner Harman Kardon
- Hovedtelefoner Emporia
- Hovedtelefoner JLab
- Hovedtelefoner Motorola
- Hovedtelefoner Roland
- Hovedtelefoner Asus
- Hovedtelefoner Livoo
- Hovedtelefoner Pyle
- Hovedtelefoner Argon
- Hovedtelefoner Tracer
- Hovedtelefoner Denon
- Hovedtelefoner One For All
- Hovedtelefoner Lenovo
- Hovedtelefoner Yamaha
- Hovedtelefoner OnePlus
- Hovedtelefoner Bowers & Wilkins
- Hovedtelefoner Nedis
- Hovedtelefoner Kicker
- Hovedtelefoner Optoma
- Hovedtelefoner LD Systems
- Hovedtelefoner Hama
- Hovedtelefoner Auna
- Hovedtelefoner Muse
- Hovedtelefoner Creative
- Hovedtelefoner Thomson
- Hovedtelefoner Aiwa
- Hovedtelefoner Nokia
- Hovedtelefoner Sena
- Hovedtelefoner Dyson
- Hovedtelefoner JBL
- Hovedtelefoner AKAI
- Hovedtelefoner Teufel
- Hovedtelefoner Maxell
- Hovedtelefoner Skullcandy
- Hovedtelefoner Trust
- Hovedtelefoner Camry
- Hovedtelefoner Crivit
- Hovedtelefoner Mio
- Hovedtelefoner Blaupunkt
- Hovedtelefoner JVC
- Hovedtelefoner Uniden
- Hovedtelefoner Champion
- Hovedtelefoner Buffalo
- Hovedtelefoner Razer
- Hovedtelefoner IWantit
- Hovedtelefoner T'nB
- Hovedtelefoner Medion
- Hovedtelefoner Speedlink
- Hovedtelefoner Sweex
- Hovedtelefoner Vivanco
- Hovedtelefoner Tangent
- Hovedtelefoner Huawei
- Hovedtelefoner König
- Hovedtelefoner TechniSat
- Hovedtelefoner Gembird
- Hovedtelefoner Meliconi
- Hovedtelefoner Bang And Olufsen
- Hovedtelefoner Bose
- Hovedtelefoner Geemarc
- Hovedtelefoner Goji
- Hovedtelefoner Jabra
- Hovedtelefoner Klipsch
- Hovedtelefoner Soundcore
- Hovedtelefoner Alpine
- Hovedtelefoner Maginon
- Hovedtelefoner Parrot
- Hovedtelefoner 3M
- Hovedtelefoner Vtech
- Hovedtelefoner Exibel
- Hovedtelefoner Mad Catz
- Hovedtelefoner Microsoft
- Hovedtelefoner Rapoo
- Hovedtelefoner Anker
- Hovedtelefoner KEF
- Hovedtelefoner Technics
- Hovedtelefoner OTL Technologies
- Hovedtelefoner Cabstone
- Hovedtelefoner Plantronics
- Hovedtelefoner SteelSeries
- Hovedtelefoner Tritton
- Hovedtelefoner Turtle Beach
- Hovedtelefoner Dymond
- Hovedtelefoner Urban Revolt
- Hovedtelefoner Genesis
- Hovedtelefoner Niceboy
- Hovedtelefoner Nodor
- Hovedtelefoner Krüger&Matz
- Hovedtelefoner Dell
- Hovedtelefoner CAT
- Hovedtelefoner Marmitek
- Hovedtelefoner Oppo
- Hovedtelefoner Maxxter
- Hovedtelefoner NGS
- Hovedtelefoner Cooler Master
- Hovedtelefoner Zalman
- Hovedtelefoner PreSonus
- Hovedtelefoner KitSound
- Hovedtelefoner Adidas
- Hovedtelefoner TERRIS
- Hovedtelefoner Beats
- Hovedtelefoner NAD
- Hovedtelefoner Defunc
- Hovedtelefoner Tascam
- Hovedtelefoner Xblitz
- Hovedtelefoner Ultimate Ears
- Hovedtelefoner Omnitronic
- Hovedtelefoner Marshall
- Hovedtelefoner Corsair
- Hovedtelefoner Energy Sistem
- Hovedtelefoner Telestar
- Hovedtelefoner Fostex
- Hovedtelefoner Honor
- Hovedtelefoner Ausounds
- Hovedtelefoner JAZ Audio
- Hovedtelefoner Onkyo
- Hovedtelefoner Focal
- Hovedtelefoner Nevir
- Hovedtelefoner Imperial
- Hovedtelefoner Magnat
- Hovedtelefoner Saramonic
- Hovedtelefoner Anchor Audio
- Hovedtelefoner JAYS
- Hovedtelefoner Sven
- Hovedtelefoner AudioQuest
- Hovedtelefoner KRK
- Hovedtelefoner NZXT
- Hovedtelefoner Lamax
- Hovedtelefoner Thermaltake
- Hovedtelefoner SBS
- Hovedtelefoner Veho
- Hovedtelefoner Polk
- Hovedtelefoner Midland
- Hovedtelefoner Monacor
- Hovedtelefoner Samson
- Hovedtelefoner Yealink
- Hovedtelefoner Audizio
- Hovedtelefoner Sogo
- Hovedtelefoner Cellular Line
- Hovedtelefoner Master & Dynamic
- Hovedtelefoner AV:link
- Hovedtelefoner FiiO
- Hovedtelefoner Prixton
- Hovedtelefoner Renkforce
- Hovedtelefoner Edifier
- Hovedtelefoner Cardo
- Hovedtelefoner Shokz
- Hovedtelefoner Ifrogz
- Hovedtelefoner AudioSonic
- Hovedtelefoner Manhattan
- Hovedtelefoner SPC
- Hovedtelefoner Caliber
- Hovedtelefoner Electro Harmonix
- Hovedtelefoner Altec Lansing
- Hovedtelefoner LogiLink
- Hovedtelefoner BlueAnt
- Hovedtelefoner Saitek
- Hovedtelefoner Audeze
- Hovedtelefoner Olive
- Hovedtelefoner Antec
- Hovedtelefoner Connect IT
- Hovedtelefoner ITT
- Hovedtelefoner ILive
- Hovedtelefoner Gemini
- Hovedtelefoner Etymotic
- Hovedtelefoner Fantec
- Hovedtelefoner Senal
- Hovedtelefoner Evolveo
- Hovedtelefoner Audioline
- Hovedtelefoner VIZIO
- Hovedtelefoner Genius
- Hovedtelefoner IHome
- Hovedtelefoner Dcybel
- Hovedtelefoner Zagg
- Hovedtelefoner Hercules
- Hovedtelefoner Beoplay
- Hovedtelefoner Miiego
- Hovedtelefoner Ozone
- Hovedtelefoner M-Audio
- Hovedtelefoner Boompods
- Hovedtelefoner Monster
- Hovedtelefoner V7
- Hovedtelefoner Aftershokz
- Hovedtelefoner Austrian Audio
- Hovedtelefoner AQL
- Hovedtelefoner MiTone
- Hovedtelefoner Audiovox
- Hovedtelefoner Umidigi
- Hovedtelefoner Mackie
- Hovedtelefoner Reloop
- Hovedtelefoner Krom
- Hovedtelefoner Supra
- Hovedtelefoner Iogear
- Hovedtelefoner Shure
- Hovedtelefoner Sangean
- Hovedtelefoner Klein Tools
- Hovedtelefoner Grace Design
- Hovedtelefoner Aluratek
- Hovedtelefoner Martin Logan
- Hovedtelefoner Fosi Audio
- Hovedtelefoner Speed-Link
- Hovedtelefoner Lexibook
- Hovedtelefoner Music Hero
- Hovedtelefoner Sharkoon
- Hovedtelefoner Scosche
- Hovedtelefoner Boss
- Hovedtelefoner Fresh 'n Rebel
- Hovedtelefoner Conceptronic
- Hovedtelefoner S.M.S.L
- Hovedtelefoner InLine
- Hovedtelefoner Focusrite
- Hovedtelefoner DAP-Audio
- Hovedtelefoner Vincent
- Hovedtelefoner Lindy
- Hovedtelefoner GoGen
- Hovedtelefoner Kogan
- Hovedtelefoner ADATA
- Hovedtelefoner Rolls
- Hovedtelefoner Blue Microphones
- Hovedtelefoner Cyrus
- Hovedtelefoner Definitive Technology
- Hovedtelefoner Westone
- Hovedtelefoner Natec
- Hovedtelefoner LC-Power
- Hovedtelefoner Beyerdynamic
- Hovedtelefoner AKG
- Hovedtelefoner AMX
- Hovedtelefoner Tannoy
- Hovedtelefoner Satechi
- Hovedtelefoner DreamGEAR
- Hovedtelefoner V-TAC
- Hovedtelefoner August
- Hovedtelefoner Manta
- Hovedtelefoner HyperX
- Hovedtelefoner Silverstone
- Hovedtelefoner Audix
- Hovedtelefoner Schwaiger
- Hovedtelefoner Sudio
- Hovedtelefoner RHA
- Hovedtelefoner SoundMagic
- Hovedtelefoner Savio
- Hovedtelefoner Musical Fidelity
- Hovedtelefoner Media-Tech
- Hovedtelefoner Artsound
- Hovedtelefoner Stereoboomm
- Hovedtelefoner IFi Audio
- Hovedtelefoner Amplicom
- Hovedtelefoner Aiaiai
- Hovedtelefoner ACME
- Hovedtelefoner BeeWi
- Hovedtelefoner House Of Marley
- Hovedtelefoner Kensington
- Hovedtelefoner Brigmton
- Hovedtelefoner Sunstech
- Hovedtelefoner Swissvoice
- Hovedtelefoner Marquant
- Hovedtelefoner Ednet
- Hovedtelefoner Magnum
- Hovedtelefoner Coby
- Hovedtelefoner Jam
- Hovedtelefoner Nacon
- Hovedtelefoner Bigben
- Hovedtelefoner Rocketfish
- Hovedtelefoner Naxa
- Hovedtelefoner Mpman
- Hovedtelefoner Vakoss
- Hovedtelefoner Pure Acoustics
- Hovedtelefoner Peaq
- Hovedtelefoner Mr Handsfree
- Hovedtelefoner Ewent
- Hovedtelefoner BOYA
- Hovedtelefoner Celly
- Hovedtelefoner Adesso
- Hovedtelefoner Cleer
- Hovedtelefoner Wentronic
- Hovedtelefoner Infinity
- Hovedtelefoner Jawbone
- Hovedtelefoner 4smarts
- Hovedtelefoner Iluv
- Hovedtelefoner Monoprice
- Hovedtelefoner Avanca
- Hovedtelefoner ASTRO Gaming
- Hovedtelefoner DEXP
- Hovedtelefoner Grado
- Hovedtelefoner Mark Levinson
- Hovedtelefoner PSB
- Hovedtelefoner Native Union
- Hovedtelefoner SoundBot
- Hovedtelefoner Woxter
- Hovedtelefoner Yurbuds
- Hovedtelefoner Macrom
- Hovedtelefoner DeTeWe
- Hovedtelefoner Bowers Wilkins
- Hovedtelefoner One2track
- Hovedtelefoner Verbatim
- Hovedtelefoner HMDX
- Hovedtelefoner Nocs
- Hovedtelefoner Polycom
- Hovedtelefoner MEE Audio
- Hovedtelefoner Frends
- Hovedtelefoner Koss
- Hovedtelefoner EarFun
- Hovedtelefoner Konix
- Hovedtelefoner Ebode
- Hovedtelefoner BML
- Hovedtelefoner Novero
- Hovedtelefoner Vocopro
- Hovedtelefoner Phonocar
- Hovedtelefoner I-onik
- Hovedtelefoner In-akustik
- Hovedtelefoner Soul
- Hovedtelefoner FreeVoice
- Hovedtelefoner Adam
- Hovedtelefoner QCY
- Hovedtelefoner GOgroove
- Hovedtelefoner Forever
- Hovedtelefoner POGS
- Hovedtelefoner ONU
- Hovedtelefoner Swingson
- Hovedtelefoner Avantree
- Hovedtelefoner Urbanista
- Hovedtelefoner ModeCom
- Hovedtelefoner SureFire
- Hovedtelefoner Nura
- Hovedtelefoner V-Moda
- Hovedtelefoner DMV
- Hovedtelefoner OneOdio
- Hovedtelefoner Peltor
- Hovedtelefoner Promate
- Hovedtelefoner PowerLocus
- Hovedtelefoner Naztech
- Hovedtelefoner SleepPhones
- Hovedtelefoner B-Speech
- Hovedtelefoner Velodyne
- Hovedtelefoner ISY
- Hovedtelefoner PowerA
- Hovedtelefoner Whistler
- Hovedtelefoner Master Dynamic
- Hovedtelefoner HiFiMAN
- Hovedtelefoner Fun Generation
- Hovedtelefoner Karma
- Hovedtelefoner X-Zero
- Hovedtelefoner Jaybird
- Hovedtelefoner ShotTime
- Hovedtelefoner FURY
- Hovedtelefoner Magnavox
- Hovedtelefoner BlueParrott
- Hovedtelefoner Eikon
- Hovedtelefoner Oehlbach
- Hovedtelefoner Perfect Choice
- Hovedtelefoner White Shark
- Hovedtelefoner 1More
- Hovedtelefoner Audictus
- Hovedtelefoner Hi-Fun
- Hovedtelefoner Sabrent
- Hovedtelefoner Teenage Engineering
- Hovedtelefoner Bluedio
- Hovedtelefoner Bang Olufsen
- Hovedtelefoner JTS
- Hovedtelefoner PENTAGRAM
- Hovedtelefoner Krux
- Hovedtelefoner Dr. Dre Beats
- Hovedtelefoner Sol Republic
- Hovedtelefoner Soundlogic
- Hovedtelefoner Konig Electronic
- Hovedtelefoner Tek Republic
- Hovedtelefoner KRK Systems
- Hovedtelefoner Able Planet
- Hovedtelefoner Hamlet
- Hovedtelefoner DAP
- Hovedtelefoner NuForce
- Hovedtelefoner Leotec
- Hovedtelefoner CAD Audio
- Hovedtelefoner SoundPEATS
- Hovedtelefoner Polsen
- Hovedtelefoner R Products
- Hovedtelefoner MTX
- Hovedtelefoner Luxa2
- Hovedtelefoner 3MK
- Hovedtelefoner KeepOut
- Hovedtelefoner KLH Audio
- Hovedtelefoner Onanoff
- Hovedtelefoner Bluefox
- Hovedtelefoner Liquid Ears
- Hovedtelefoner Solight
- Hovedtelefoner Best Buy
- Hovedtelefoner Ryght
- Hovedtelefoner EarMen
- Hovedtelefoner Eversolo
- Hovedtelefoner Axagon
- Hovedtelefoner Quad
- Hovedtelefoner Nuheara
- Hovedtelefoner Moki
- Hovedtelefoner Final
- Hovedtelefoner CoolerMaster
- Hovedtelefoner Lasmex
- Hovedtelefoner Topping
- Hovedtelefoner Stax
- Hovedtelefoner Ultrasone
- Hovedtelefoner Gustard
- Hovedtelefoner Audeeo
- Hovedtelefoner Cayin
- Hovedtelefoner CSL
- Hovedtelefoner Defender
- Hovedtelefoner Hecate
- Hovedtelefoner Sprout
- Hovedtelefoner Meze Audio
- Hovedtelefoner Oglo
Nyeste Hovedtelefoner Manualer
3 Marts 2025
23 Februar 2025
21 Februar 2025
21 Februar 2025
21 Februar 2025
21 Februar 2025
21 Februar 2025
21 Februar 2025
21 Februar 2025

19 Februar 2025