Yamaha CRXE300 Manual
Læs nedenfor 📖 manual på dansk for Yamaha CRXE300 (192 sider) i kategorien Radio. Denne guide var nyttig for 7 personer og blev bedømt med 4.5 stjerner i gennemsnit af 2 brugere
Side 1/192

CRX-E300
OWNER’S MANUAL
MODE D’EMPLOI
BEDIENUNGSANLEITUNG
BRUKSANVISNING
MANUALE DI ISTRUZIONI
MANUAL DE INSTRUCCIONES
GEBRUIKSAANWIJZING
CD Receiver
Ampli-Tuner CD
GB
YAMAHA ELECTRONICS CORPORATION, USA 6660 ORANGETHORPE AVE., BUENA PARK, CALIF. 90620, U.S.A.
YAMAHA CANADA MUSIC LTD. 135 MILNER AVE., SCARBOROUGH, ONTARIO M1S 3R1, CANADA
YAMAHA ELECTRONIK EUROPA G.m.b.H. SIEMENSSTR. 22-34, 25462 RELLINGEN BEI HAMBURG, F.R. OF GERMANY
YAMAHA ELECTRONIQUE FRANCE S.A. RUE AMBROISE CROIZAT BP70 CROISSY-BEAUBOURG 77312 MARNE-LA-VALLEE CEDEX02, FRANCE
YAMAHA ELECTRONICS (UK) LTD. YAMAHA HOUSE, 200 RICKMANSWORTH ROAD WATFORD, HERTS WD1 7JS, ENGLAND
YAMAHA SCANDINAVIA A.B. J A WETTERGRENS GATA 1, BOX 30053, 400 43 VÄSTRA FRÖLUNDA, SWEDEN
YAMAHA MUSIC AUSTRALIA PTY, LTD. 17-33 MARKET ST., SOUTH MELBOURNE, 3205 VIC., AUSTRALIA
Printed in Malaysia V921790
CRX-E300
0101CRXE300(M).H1-H4.E 02.5.24, 3:30 PM1

1
English
FEATURES
<Receiver>
• Minimum RMS output power per channel
25 W + 25 W
(6Ω, 1 kHz, 0.1% THD)
• Full operation system remote control
• 40-station FM/AM preset tuning
• Multi-function RDS reception
• SUBWOOFER output terminal
<CD player>
• S-bit DAC and 8fs digital filter
• Optical digital output
• Random, repeat, and program play
• CD TEXT display
• Copy time control
• CD-RW compatible
The CD receiver CRX-E300 is the main unit of the YAMAHA Piano Craft Series. You can upgrade the system by adding
the cassette deck (KX-E300) and MD recorder (MDX-E300)*.
* The cassette deck (KX-E300) and MD recorder (MDX-E300) may not be available for some areas.
SUPPLIED ACCESSORIES ....................... 2
CD PREVENTIVE CARE .......................... 2
NAMES OF BUTTONS AND CONTROLS
Front panel ............................................................ 3
Display .................................................................. 3
Remote control ..................................................... 4
GETTING STARTED
Remote control ..................................................... 5
Connecting the speakers and antennas .................6
Connecting other components .............................. 7
Setting the clock ...................................................8
Adjusting the brightness of the display ................8
LISTENING TO A SOURCE ...................... 9
TUNING ............................................... 10
Presetting stations ............................................... 11
RECEIVING RDS STATIONS
Receiving RDS data............................................ 12
PTY SEEK mode................................................ 13
Optional settings for RDS functions................... 14
CD OPERATIONS
Playing a disc...................................................... 15
Selecting the time display and CD TEXT .......... 16
Random-sequence play....................................... 16
Repeat play ......................................................... 17
Program play ...................................................... 17
USING THE BUILT-IN TIMER
Before using the timer ........................................ 19
Timer play and recording ................................... 19
Sleep timer .......................................................... 20
SYSTEM CONTROL
Controlling other components with the remote
control ................................................................. 21
Before recording ................................................. 22
Dubbing setting .................................................. 22
CD synchronized recording ................................ 22
Copy time control ............................................... 23
ADDITIONAL INFORMATION
Troubleshooting .................................................. 24
Specifications...................................................... 26
CONTENTS
0103CRXE300(M).01-07.E 02.5.24, 3:34 PM1
2
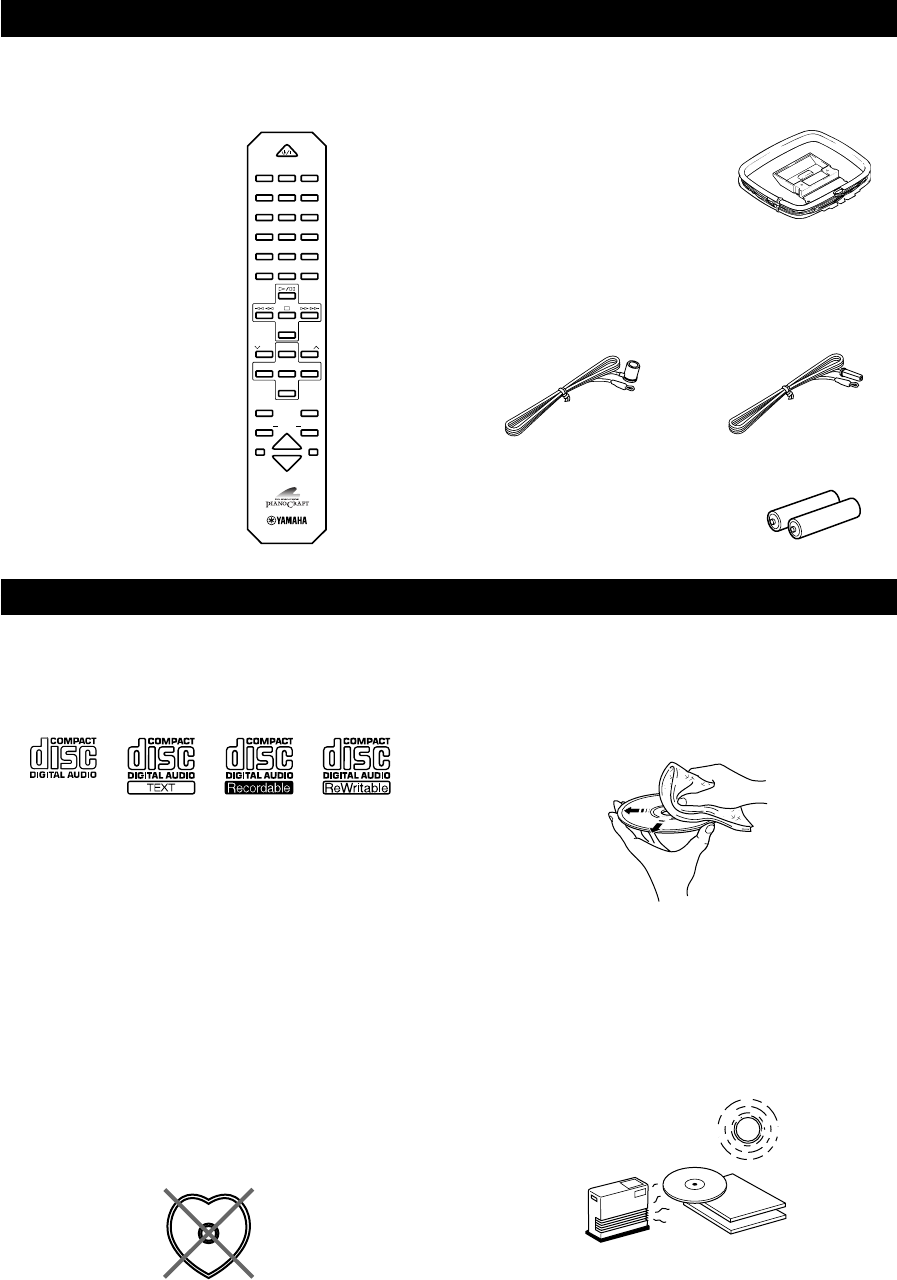
SUPPLIED ACCESSORIES
•Remote control •AM loop antenna
•Indoor FM antenna
•Batteries (AA, R6, UM-3)
POWER
1 2 3
123
4 5 6
456
7 8 9
78
0+10 +100
FREQ
/
RDS MODE
–
PTY SEEK
–
START
REP
RANDOM
PROG
ABC
TEXT
/
TIME
R. TIME
DE
TAPE
DIRECTION
PRESET
TUNER
PRESET
MD CD TAPE
AUX
MD
REC
/
PAUS E
TAPE
REC
/
PAUSE
MODE
SLEEP
DISPLAY
DUBBING
VOLUME
START
After unpacking, check that the following parts are contained.
CD PREVENTIVE CARE
No!
•Compact discs are not affected by small particles of
dust or fingerprints on their playing surface, but even so
they should be kept clean. Wipe by using a clean, dry
cloth. Do not wipe with a circular motion; wipe straight
outward from the center.
•Do not try to clean the disc’s surface by using any type
of disc cleaner, record spray, antistatic spray or liquid,
or any other chemical-based liquid, because such
substances might irreparably damage the disc’s surface.
•Do not expose discs to direct sunlight, high temperature
or high humidity for a long period of time, because
these might warp or otherwise damage the disc.
•This compact disc player is designed for use with
following types of disc only. Never attempt to load any
other type of disc into the unit. The unit will also play
8-cm (3-inch) compact discs.
•Be sure to use only CD-R and CD-RW discs made by
reliable manufacturers.
•Some discs cannot be played depending on the disc
characteristics or recording conditions (copyright-
protected in a particular way, etc.).
•Compact discs are not subjected to wear during play,
but damage to the disc surface when the disc is being
handled can adversely affect the disc’s play.
•Do not use cleaning discs or warped discs. All of these
could damage the unit.
To prevent a malfunction of this unit
•Do not use any non standard shaped CD (heart, etc.)
available on the market, because it may damage the
unit.
•Do not use a CD with tape, seals, or paste on it, because
damage to the unit may result.
(U.S.A., Canada, China,
Korea and General
models)
(Europe, U.K., and
Australia models)
(Playback only)
0103CRXE300(M).01-07.E 02.5.24, 3:34 PM2

3
English
NAMES OF BUTTONS AND CONTROLS
Front panel
1STANDBY/ON (P.9)
2TIMER indicator (P.19)
3DISPLAY (P.8,19)
4TIME ADJ/MEMORY (P.8,11)
5TIMER/AUTO/MAN’L (P.10,19)
6PRESET/BAND (P.10)
7Display (P.3)
8PRESET/TUNING / (P.10)
When TUNER is selected as an input
source
$/!/⁄/› (P.15)
When CD is selected as an input
source
9VOLUME (P.9)
0PHONES (P.9)
qDisc tray
wBASS (P.9)
eTREBLE (P.9)
rBALANCE (P.9)
t (Open/Close) (P.15)
y& (Stop) (P.15)
uINPUT (P.9)
i^ (Play/Pause) (P.15)
BALANCE
INPUT
VOLUME
LR
TREBLEBASS
PHONES
STANDBY/ON
TIMER DISPLAY MEMORY
NATURAL SOUND CD RECEIVER CRX-E300
AUTO/MAN'L
PRESET/BAND
TIMER HOUR MIN
MIN MAX
PRESET/TUNING
TIMER ADJ
+–+–
12 345678 9
0qw e rtyui
Display
TIMER SLEEP
STEREO AUTO RDS PS RT CT F PROG A B
RANDOM
SREPPTY
MEMORY TUNED PTY HOLD CD-TEXTTITLEARTIST TRACK
PRESET
1q
we r t y
23456 7890
1Multi information display
2PRESET indicator (P.11)
3STEREO indicator (P.10)
4AUTO indicator (P.10)
5RDS indicator (P.12)
6RDS mode indicators (P.12)
7PTY HOLD indicator (P.13)
8REP S/F (repeat single/full) indicator
(P.17)
9PROG (program) indicator (P.17)
0RANDOM indicator (P.16)
qA B Tape side indicator (P.23)
wTIMER indicator (P.19)
eSLEEP indicator (P.20)
rMEMORY indicator (P.11)
tTUNED indicator (P.10)
yCD Text indicators (P.16)
0103CRXE300(M).01-07.E 02.5.24, 3:34 PM3

4
Remote control
1POWER (P.9)
2Preset numbers (1–8)* (P.11)
3FREQ/RDS* (P.12)
4PTY SEEK MODE* (P.13,14)
5PTY SEEK START* (P.13,14)
6A/B/C/D/E* (P.11)
7PRESET / * (P.11)
8TUNER (P.11)
9MD (MDX-E300) (P.21)
0TAPE (KX-E300) (P.21)
qCD (P.15)
wAUX (The equipment connected to the AUX
terminal)
eSLEEP (P.20)
rDISPLAY (P.19)
tVOLUME + – (P.9)
* When TUNER is selected as an input source
Note
•8–w are input selectors for each component.
When CD is selected as an input source
1POWER (P.15)
2Numeric buttons (P.15)
•+100 button is used when operating
MDX-E300.
3REP (Repeat) (P.17)
4PROG (Program) (P.17)
5RANDOM (Random) (P.16)
6TEXT/TIME (P.16)
7^ (Play/Pause) (P.15)
8$ ! (Skip/Seach backward) (P.15)
9⁄ › (Skip/Seach forward) (P.15)
0& (Stop) (P.15)
qCD input (P.15)
NAMES OF BUTTONS AND CONTROLS
POWER
1 2 3
123
4 5 6
456
7 8 9
78
0+10 +100
REP
RANDOM
PROG
ABC
TEXT
/
TIME
R. TIME
DE
TAPE
DIRECTION
PRESET
TUNER
PRESET
MD CD TAPE
AUX
MD
REC
/
PAUSE
TAPE
REC
/
PAUSE
MODE
SLEEP
DISPLAY
DUBBING
VOLUME
START
FREQ
/
RDS MODE
–
PTY SEEK
–
START
1,1
2,2
8
0
5
4
q,q
w
r
t
6
3
7
9
e
43
6
5
7
98
0
0103CRXE300(M).01-07.E 02.5.24, 3:34 PM4

5
English
Remote control
This remote control controls a whole system: not only
CRX-E300 but also a cassette deck (KX-E300) and MD
recorder (MDX-E300) that enhance your system.
Battery installation
1Remove the battery compartment cover.
2Insert batteries into the battery compartment.
3Replace the battery compartment cover.
Battery replacement
If you find that the remote control must be used closer to
the main unit than usual, the batteries are weak. Replace
batteries with new ones.
Notes
•Use only AA, R6, UM-3 batteries for replacement.
•Be sure the polarities are correct. (See the illustration inside
the battery compartment.)
•Remove the batteries if the remote control will not be used for
an extended period of time.
•If batteries leak, dispose of them immediately. Avoid touching
the leaked material or letting it come in contact with clothing,
etc. Clean the battery compartment thoroughly before
installing new batteries.
Remote control operation range
Notes
•There should be no large obstacles between the remote control
and the main unit.
•If the remote control sensor is directly illuminated by strong
lighting (especially an inverter type of fluorescent lamp, etc.),
it might cause the remote control not to work correctly. In this
case, reposition the main unit to avoid direct lighting.
Removing the protection sheet
The remote control is shipped with a protection sheet to
prevent the surface from being scratched during
transportation.
When removing the sheet, first put adhesive tape on an
edge of the remote control so that the tape sticks to the
sheet. Then peel the sheet off with the tape.
Note
•Do not scratch the remote control surface when peeling the
sheet off.
GETTING STARTED
2
1
3
PO
W
E
R
1
1
2
2
3
3
4
4
7
7
8
8
9
5
5
6
6
PO
W
E
R
1
1
2
2
3
3
4
4
7
7
8
8
9
5
5
6
6
BALANCE
INPUT
VOLUME
LR
TREBLEBASS
PHONES
STANDBY/ON
TIMER DISPLAY MEMORY
NATURAL SOUND CD RECEIVER CRX-E300
AUTO/MAN'L
PRESET/BAND
TIMER HOUR MIN
MIN MAX
PRESET/TUNING
TIMER ADJ
+–+–
30°
30°
Remote control
sensor
Within approximately
6 m (20 feet)
0103CRXE300(M).01-07.E 02.5.24, 3:34 PM5

6
Connecting the speakers and antennas
Never plug the AC power cord to the wall outlet until all connections are
completed.
Follow the steps as shown below to connect the system using the supplied cords and accessories. Be sure all connections are
made correctly, that is to say L (left) to L, R (right) to R, “+” to “+” and “–” to “–”.
1Connect the Speakers.
1Unscrew the knob.
2Remove approx. 10 mm (4”) of insulation from
each of the speaker wires and insert the bare wire
into the terminal.
3Tighten the knob to secure the wire.
2Connect the AM Antenna.
Set up the AM loop antenna, then connect it.
3Connect the FM Antenna.
4Connect the AC power cord to a wall outlet.
Notes
•Use external FM/AM antennas if you need better reception.
Consult your dealer.
•The AM loop antenna should be placed apart from the main
unit. The antenna may be hung on a wall.
To connect the subwoofer (optional)
You can reinforce the bass frequencies by adding a
subwoofer (optional).
Connect the SUBWOOFER OUT terminal of the unit to
the INPUT terminal of the subwoofer.
1
3 FM antenna 2 AM loop antenna
Right speaker Left speaker
GETTING STARTED
Red: positive(+)
Black: negative(–)
GND AM ANT
1
2
3
4 To wall outlet
MD
TAPE
IN
OUT
IN
IN
OUT
AUX
D
A
B
L
R
C
SYSTEM CONNECTOR
OUT
SUBWOOFER
OUT
DIGITAL
OPTICAL
SPEAKERS
RL
6
Ω MIN. /SPEAKER
CLASS 2 WIRING
FM ANT GND – AM ANT
75
Ω UNBAL.
FM ANT
75 Ω UNBAL
0103CRXE300(M).01-07.E 02.5.24, 3:34 PM6

8
Setting the clock
You must set the clock before you use the timer functions.
The clock is based on a 24-hour system.
1Turn on the power by pressing STANDBY/ON on
the front panel, or POWER on the remote control.
2While the power is on, press DISPLAY to display
the time.
3While holding TIME ADJ, press HOUR to set the
hour.
•If you want to move the time in the reverse
direction, press HOUR while holding TIME ADJ
and PRESET/BAND.
4While holding TIME ADJ, press MIN to set the
minutes.
•If you want to move the time in the reverse
direction, press MIN while holding TIME ADJ
and PRESET/BAND.
To display the clock
Press DISPLAY.
The current time appears for about 8 seconds, then the
normal display returns. Some buttons and controls may
not work while the current time is displayed.
Note
•In the event of a power failure or when the AC power cord is
disconnected for more than five minutes, you must reset the
clock.
Adjusting the brightness
of the display
You can adjust the brightness of the display. If you have
connected cassette deck (KX-E300) and/or MD recorder
(MDX-E300) to this unit, the brightness of the displays is
automatically adjusted to that of this unit.
Press and hold DISPLAY for about two seconds so that
“Dimmer ±0” appears on the display. While holding
DISPLAY, turn INPUT clockwise to increase or
counterclockwise to decrease brightness.
Control Range: ±0 to –6 (Preset value: ±0)
INPUT
DISPLAY
BALANCE
INPUT
VOLUME
LR
TREBLEBASS
PHONES
STANDBY/ON
TIMER DISPLAY MEMORY
NATURAL SOUND CD RECEIVER CRX-E300
AUTO/MAN'L
PRESET/BAND
TIMER HOUR MIN
MIN MAX
PRESET/TUNING
TIMER ADJ
+–+–
HOUR
DISPLAY
PRESET/BANDTIME ADJ
MIN
BALANCE
INPUT
VOLUME
LR
TREBLEBASS
PHONES
STANDBY/ON
TIMER DISPLAY MEMORY
NATURAL SOUND CD RECEIVER CRX-E300
AUTO/MAN'L
PRESET/BAND
TIMER HOUR MIN
MIN MAX
PRESET/TUNING
TIMER ADJ
+–+–
GETTING STARTED
STANDBY/ON
0104CRXE300(M).08-09.E 02.5.24, 3:34 PM8

English
9
LISTENING TO A SOURCE
1Set the volume to “MIN” by turning VOLUME.
2Turn on the power by pressing STANDBY/ON on
the front panel, or POWER on the remote control.
•Piano Craft series components that have correct
system connections made to CRX-E300 can be
controlled to turn to the on or standby mode by
CRX-E300. However, once the connected
components are turned to the standby mode with
their respective STANDBY/ON button, they
cannot be controlled by CRX-E300 STANDBY/
ON button.
3Select the desired input source by turning INPUT so
that the source appears on the display.
•When you operate the component connected to the
AUX terminal, turn INPUT to select AUX.
4Play the source. (Refer to the owner’s manual
supplied with each selected component.)
5Adjust the volume level by turning VOLUME on the
front panel or pressing VOLUME + on the remote
control.
6If desired, adjust BASS, TREBLE, and BALANCE.
BASS: Turn this control clockwise to increase (or
counterclockwise to decrease) the low frequency
response.
TREBLE: Turn this control clockwise to increase (or
counterclockwise to decrease) the high frequency
response.
BALANCE: Adjust the balance of the output volume
from the left and right speakers to compensate for
sound imbalance caused by the speaker location or
listening room conditions.
When you use headphones
Connect the headphones to the PHONES jack. You can
listen to the sound to be output from the main speakers
through the headphones.
When you have finished using this
unit
Press STANDBY/ON on the front panel again or
POWER on the remote control to set this unit to the
standby mode.
•STANDBY appears for a moment on the display.
Auto standby function
This unit will be put automatically into the standby mode
under the following conditions:
•A component connected with a system control cable is
selected as an input source.
•The component connected to this unit is in stop mode
and not operated for 30 minutes.
POWER
VOLUME –/+
POWER
1 2 3
123
4 5 6
456
7 8 9
78
0+10 +100
FREQ
/
RDS MODE
–
PTY SEEK
–
START
REP
RANDOM
PROG
ABC
TEXT
/
TIME
R. TIME
DE
TAPE
DIRECTION
PRESET
TUNER
PRESET
MD CD TAPE
AUX
MD
REC
/
PAUSE
TAPE
REC
/
PAUSE
MODE
SLEEP
DISPLAY
DUBBING
VOLUME
START
VOLUMESTANDBY/ON
INPUTBALANCE
TREBLE
BASSPHONES
BALANCE
INPUT
VOLUME
LR
TREBLEBASS
PHONES
STANDBY/ON
TIMER DISPLAY MEMORY
NATURAL SOUND CD RECEIVER CRX-E300
AUTO/MAN'L
PRESET/BAND
TIMER HOUR MIN
MIN MAX
PRESET/TUNING
TIMER ADJ
+–+–
This chapter explains the basic operations common to
tuning, playing CD and other connected components.
0104CRXE300(M).08-09.E 02.5.24, 3:34 PM9

10
TUNING
Automatic tuning
1Select TUNER by turning INPUT so that the
frequency of a radio station appears in the display.
2Press PRESET/BAND to select the reception band.
Do not select the preset tuning mode (in which
“PRESET” appears on the display).
3Press AUTO/MAN’L so that “AUTO” appears in the
display.
4Press PRESET/TUNING (for a higher
frequency) or (for a lower frequency).
5The unit starts searching for a station.
When the unit finds a station, the unit stops searching
and “TUNED” appears on the display.
6If the located station is not the one you want, repeat
steps 4 and 5 until a station you want is tuned.
Notes
•If automatic tuning search does not find the desired station, try
manual tuning as described next.
•When an FM stereo broadcast with sufficient signal strength is
received, “STEREO” appears on the display and you can listen
to stereo sound.
You can find radio stations automatically and manually. Manual tuning
1Follow steps 1 and 2 described in “Automatic
tuning.”
2Press AUTO/MAN’L so that “AUTO” disappears
from the display.
3Press PRESET/TUNING (for a higher
frequency) or (for a lower frequency) to select
your desired station.
•Each time you press PRESET/TUNING or
, the frequency changes step by step.
STEREO AUTO
TUNED
PRESET/TUNING /
PRESET/BAND
BALANCE
INPUT
VOLUME
LR
TREBLEBASS
PHONES
STANDBY/ON
TIMER DISPLAY MEMORY
NATURAL SOUND CD RECEIVER CRX-E300
AUTO/MAN'L
PRESET/BAND
TIMER HOUR MIN
MIN MAX
PRESET/TUNING
TIMER ADJ
+–+–
INPUT
AUTO/MAN’L
0105CRXE300(M).10-11.E 02.5.24, 3:34 PM10

11
English
TUNING
English
To preset stations manually
1Tune in a desired station.
(Refer to the previous page for the tuning procedure.)
2Press MEMORY.
3Within about 5 seconds, use PRESET/TUNING /
to select a desired preset number. Continue
pressing PRESET/TUNING / to select the
group of the preset stations (A, B, C, D, and E).
4Press MEMORY.
•“MEMORY”, “PRESET”, and preset number will
appear on the display.
5Repeat steps 1 to 4 until all desired stations are
preset.
Presetting stations
The unit can preset station frequencies selected by
Automatic tuning or Manual tuning. Up to 40 stations can
be stored. With this function, you can select any desired
station by pressing the corresponding preset station
number.
Notes
•A new setting can be preset in place of a previous one.
•The preset stations are retained for a week after you disconnect
the AC power cord or a power failure occurs.
To preset stations automatically
1Select TUNER as input source by turning INPUT.
2Press MEMORY for about 2 seconds.
•The unit starts presetting stations, “AUTO” and
“MEMORY” will flash on the display.
Received stations are stored to A1, A2...A8 sequentially.
After 40 stations or all FM and AM stations are stored, the
display will show the preset station A1.
To recall a preset station
Press TUNER and select the desired number by pressing
PRESET/BAND and PRESET/TUNING / on the
front panel or PRESET /, A/B/C/D/E and 1–8 on
the remote control. Press and hold PRESET/TUNING
/ (or PRESET / on the remote control) to
switch the preset group (A–E).
INPUTPRESET/BANDMEMORY
1–8
A/B/C/D/E
TUNER
PRESET /
BALANCE
INPUT
VOLUME
LR
TREBLEBASS
PHONES
STANDBY/ON
TIMER DISPLAY MEMORY
NATURAL SOUND CD RECEIVER CRX-E300
AUTO/MAN'L
PRESET/BAND
TIMER HOUR MIN
MIN MAX
PRESET/TUNING
TIMER ADJ
+–+–
PRESET/TUNING /
POWER
1 2 3
123
4 5 6
456
7 8 9
78
0+10 +100
FREQ
/
RDS MODE
–
PTY SEEK
–
START
REP
RANDOM
PROG
ABC
TEXT
/
TIME
R. TIME
DE
TAPE
DIRECTION
PRESET
TUNER
PRESET
MD CD TAPE
AUX
MD
REC
/
PAUSE
TAPE
REC
/
PAUSE
MODE
SLEEP
DISPLAY
DUBBING
VOLUME
START
STEREO
MEMORY TUNED
PRESET
STEREO
MEMORY TUNED
PRESET
The arrow will appear for a second when
it is preset.
0105CRXE300(M).10-11.E 02.5.24, 3:34 PM11

12
Receiving RDS data
RDS (Radio Data System) is a data transmission system
by FM stations in many countries. Stations using this
system transmit an inaudible stream of data in addition to
the normal radio signal. RDS data contains various types
of information, such as PS (Program Service), PTY
(Program Type), RT (Radio Text), and CT (Clock Time).
1Tune in the FM station.
2Press FREQ/RDS to choose the mode. Each time
you press FREQ/RDS, the type changes as follows:
FREQ/RDS
POWER
1 2 3
123
4 5 6
456
7 8 9
78
0+10 +100
FREQ
/
RDS MODE
–
PTY SEEK
–
START
REP
RANDOM
PROG
ABC
TEXT
/
TIME
R. TIME
DE
TAPE
DIRECTION
PRESET
TUNER
PRESET
MD CD TAPE
AUX
MD
REC
/
PAUSE
TAPE
REC
/
PAUSE
MODE
SLEEP
DISPLAY
DUBBING
VOLUME
START
PS
The name of the RDS station being received is displayed.
•If the unit cannot find a station with PS data, the unit stops
searching and “NO PS” appears on the display.
PTY
The type of the program on the RDS station now being
received is displayed. You can make this unit search for a
station which is broadcasting a program of a desired
program type. (Refer to PTY program mode in the next
section for details.)
RT
Information about the program (such as the title of the
song, name of the singer, etc.) on the RDS station being
received is displayed by a maximum of 64 alphanumeric
characters, including the umlaut symbol. If other
characters are used in the RT data, they are displayed with
an under-bar.
•If the unit cannot find a station with RT data, the unit stops
searching and “NO RT” appears on the display.
CT
Current time is displayed.
•If the unit cannot find a station with CT data, the unit stops
searching and “NO CT” appears on the display.
Notes
•RDS may not work properly if the station you are tuned to is
not transmitting the RDS signal properly or if the signal
strength is weak.
•Some FM stations do not offer RDS service. Of those that do,
not all provide the same types of services. The types provided
by the received RDS station are dimmed on the display. Check
with your local radio stations for details on RDS services in
your area.
RDS PS
RDS PTY
RDS CT
RECEIVING RDS STATIONS
0106CRXE300(M).12-14.E 02.5.24, 3:34 PM12

13
Playing CDsGetting Started
RECEIVING RDS STATIONS
English
PTY SEEK mode
You can locate a desired station by selecting a program
type. The unit searches all preset stations into the type of
programs currently being broadcast from the RDS
stations.
To locate a station
1Tune in the FM station.
2Press PTY SEEK MODE once so that “PTY” and a
PTY program flashes on the display.
3Within about 20 seconds, press PRESET /
repeatedly until the desired program type appears on
the display.
4Within about 20 seconds, press PTY SEEK START.
•If a station broadcasting the selected program type
is found, the unit stops searching and the Program
Service name appears on the display.
“PTY HOLD” appears on the display.
5Repeat step 4 until the desired station is located.
If there is no station broadcasting the program type
you select, “NO PTY” appears on the display, then
the Program Service name or frequency appears on
the display.
List of PTY (Program Type)
PTY SEEK MODE
PRESET /
PTY SEEK START
POWER
1 2 3
123
4 5 6
456
7 8 9
78
0+10 +100
FREQ
/
RDS MODE
–
PTY SEEK
–
START
REP
RANDOM
PROG
ABC
TEXT
/
TIME
R. TIME
DE
TAPE
DIRECTION
PRESET
TUNER
PRESET
MD CD TAPE
AUX
MD
REC
/
PAU SE
TAPE
REC
/
PAU SE
MODE
SLEEP
DISPLAY
DUBBING
VOLUME
START
PTY
RDS PTY
PTY HOLD
PRESET
NEWS
AFFAIRS
INFO
SPORT
EDUCATE
DRAMA
CULTURE
SCIENCE
VARIED
POP M
ROCK M
M.O.R. M
LIGHT M
CLASSICS
OTHER M
News
Current Affairs
General Information
Sports
Education
Drama
Culture
Science
Light Entertainment
Pops
Rock
Middle of the Road
Music (Easy-listening)
Light Classics
Serious Classics
Other Music
0106CRXE300(M).12-14.E 02.5.24, 3:34 PM13

14
Optional settings for
RDS functions
The tuner has the following functions which make use of
the RDS data service. These are originally in operation
ON. However, you can turn these functions OFF, if so
desired.
1Select the FM band by pressing TUNER.
2Press DISPLAY to display the current time.
3Press FREQ/RDS.
4Each time you press PTY SEEK MODE the display
will change as follows:
1. CT = CLOCK (ON/OFF)
The tuner corrects the time of the built-in clock
automatically by synchronizing it with the CT
data on the RDS station being received.
•If you receive an RDS station of some other
country, the built-in clock is synchronized with
the time setting of the country.
•If the built-in clock is not yet set for the current
time or reset due to a power failure, etc., it will be
set for the time of the CT data automatically,
whether this setting is ON or OFF.
2. LOCAL = CT (ON/OFF)
If the RDS station being received employs the
local time (summer time, etc.) data service, its
time is displayed in the CT mode.
3. A.M. = RDS (ON/OFF)
RDS stations are searched instead of all FM
stations by the automatic preset tuning operation
when the setting is ON. (Refer to page 11.)
4. RT SPEED: ±0
Changes the scrolling speed of the radio text
decreasing the value and, in turn, reducing the
speed.
Control Range: ±0 to ±3 (Preset value: ±0)
5Choose the function ON or OFF by pressing PTY
SEEK START, confirming it in the display. Press
PTY SEEK START repeatedly to change the value
for RT SPEED.
•If there is no operation for about 20 seconds, this
mode is cancelled and turns into the frequency
display. If the station has PS data, it turns into the
PS mode.
6Press FREQ/RDS again to restore the frequency
display mode.
PTY SEEK MODE
PTY SEEK STARTFREQ/RDS
TUNER
POWER
1 2 3
123
4 5 6
456
7 8 9
78
0+10 +100
FREQ
/
RDS MODE
–
PTY SEEK
–
START
REP
RANDOM
PROG
ABC
TEXT
/
TIME
R. TIME
DE
TAPE
DIRECTION
PRESET
TUNER
PRESET
MD CD TAPE
AUX
MD
REC
/
PAUSE
TAPE
REC
/
PAUSE
MODE
SLEEP
DISPLAY
DUBBING
VOLUME
START
DISPLAY
RECEIVING RDS STATIONS
0106CRXE300(M).12-14.E 02.5.24, 3:34 PM14

16
Each time you press TEXT/TIME, the display changes as
follows:
Note
•The disc title, artist names, or track names may not be
displayed with some CD TEXT discs. In this case, “(NO
ENTRY)” appears on the display for about two seconds and
then go back to the time display.
Press RANDOM.
•“RANDOM” indicator lights up on the display.
The unit starts random sequence play.
To cancel random-sequence play
mode
Press & or RANDOM.
•“RANDOM” disappears from the display.
Notes
•This feature will not function during programming, or during
programmed play.
•If ⁄/› is pressed during random-sequence play, the next
randomly programmed track will be played.
If $/! is pressed, play will return to the beginning of the
current track.
•Total remaining time on the disc will not be displayed during
random-sequence play.
Random-sequence play
The unit can play all the tracks in a random sequence.
RANDOM
Selecting the time
display and CD TEXT
You can select any of four time displays by pressing
TEXT/TIME. When you play a CD with CD TEXT, the
disc title, artist name, and track name are also displayed.
POWER
1 2 3
123
4 5 6
456
7 8 9
78
0+10 +100
FREQ
/
RDS MODE
–
PTY SEEK
–
START
REP
RANDOM
PROG
ABC
TEXT
/
TIME
R. TIME
DE
TEXT/TIME
POWER
1 2 3
123
4 5 6
456
7 8 9
78
0+10 +100
FREQ
/
RDS MODE
–
PTY SEEK
–
START
REP
RANDOM
PROG
ABC
TEXT
/
TIME
R. TIME
DE
Elapsed time of the
current track
•“CD-TEXT” appears on the display if
a CD has CD TEXT.
Total remaining time of
the disc
Total disc play time
Remaining time of the
current track
Disc title
Artist name
Track name
The current track number
CD OPERATIONS
0107CRXE300(M).15-18.E 02.5.24, 3:35 PM16

17
English
SINGLE REPEAT
The current track is played repeatedly.
FULL REPEAT
The current disc is played repeatedly.
•In random-sequence play mode, all randomly
sequenced tracks are played repeatedly in each-time-
different order.
To cancel repeat play mode
Press REP successively until “REP S” and “REP F”
disappear from the display. 1Press & to stop the unit.
2Press PROG.
3Use the numeric buttons to select a track number
until the desired track number appears on the display.
4Repeat step 3 to program more tracks. You can select
the same track again.
5Press ^ to start program play.
Program play
By creating a program, you can enjoy listening to your
favourite tracks in any desired order. As many as 20
tracks can be programmed in sequence.
PROG
Repeat play
You can play any desired track or disc repeatedly.
Press REP to select the repeat mode.
REP
Numeric
buttons
$ !/⁄ ›
^
&
POWER
1 2 3
123
4 5 6
456
7 8 9
78
0+10 +100
REP
RANDOM
PROG
ABC
TEXT
/
TIME
R. TIME
DE
FREQ
/
RDS MODE
–
PTY SEEK
–
START
POWER
1 2 3
123
4 5 6
456
7 8 9
78
0+10 +100
FREQ
/
RDS MODE
–
PTY SEEK
–
START
REP
RANDOM
PROG
ABC
TEXT
/
TIME
R. TIME
DE
TAPE
DIRECTION
PRESET
TUNER
PRESET
MD CD TAPE
AUX
MD
REC
/
PAUSE
TAPE
REC
/
PAU SE
MODE
SLEEP
DISPLAY
DUBBING
VOLUME
START
PROG
SREP
FREP
CD OPERATIONS
0107CRXE300(M).15-18.E 02.5.24, 3:35 PM17

18
To stop program play mode
Press &.
Note
•⁄/› or $/! can be used during program play to skip
to tracks within the program.
To check program data
1. Press & to stop program play.
2. Press PROG. Then each time you press ⁄/› /
$/!, the track number and the program number
are displayed in the order of the program.
To change program data
1. Follow the preceding procedure described in “To
check program data.”
2. Display the track number to be changed by pressing
⁄/› / $/!.
3. Press the numeric button of the desired track. The
previously programmed track will be cleared from
memory and the new one will be programmed.
To delete all program data
When program play is stopped, press &.
Note
•Turning the unit to the standby mode or opening the disc tray
also deletes the program data.
CD OPERATIONS
0107CRXE300(M).15-18.E 02.5.24, 3:35 PM18

20
Sleep timer
The unit can be turned off automatically at a selected
SLEEP time.
1Play the desired sound source.
2Press SLEEP repeatedly until the desired sleep time
appears in the display. Each time you press SLEEP,
the sleep time changes as follows:
About 4 seconds after setting, the normal display will
resume.
•“SLEEP” will appear in the display.
3The unit will turn off automatically when the selected
sleep time is reached.
Note
•If you press SLEEP while sleep timer is functioning, the
remaining time is displayed. Then pressing the button
successively changes the sleep time described as above.
SLEEP
SLEEP 2h00m
SLEEP 1h30m
SLEEP 1h00m
SLEEP 0h30m
SLEEP OFF
PRESET
TUNER
PRESET
MD CD TAPE
AUX
MD
REC
/
PAU SE
TAPE
REC
/
PAUSE
MODE
SLEEP
DISPLAY
DUBBING
VOLUME
START
USING THE BUILT-IN TIMER
0108CRXE300(M).19-20.E 02.5.24, 3:35 PM20

21
English
Controlling other components with the remote
control
MDX-E300
1POWER
2Numeric buttons
3REP (Repeat)
4RANDOM
5TEXT/TIME
6PROG (Program)
7^ (Play/Pause)
8⁄ › (Skip/Search forward)
9$ ! (Skip/Search backward)
0& (Stop)
qMD input
wMD REC/PAUSE
KX-E300
1POWER
2^ (Play)
3⁄ › (Fast-foward)
4$ ! (Rewind)
5& (Stop)
6TAPE input
7TAPE REC/PAUSE
POWER
123
123
456
456
789
78
0 +10 +100
REP
RANDOM
PROG
ABC
TEXT
/
TIME
R. TIME
DE
TAPE
DIRECTION
PRESET
TUNER
PRESET
MD CD TAPE
AUX
MD
REC
/
PAUSE
TAPE
REC
/
PAUSE
MODE
SLEEP
DISPLAY
DUBBING
VOLUME
START
FREQ
/
RDS MODE
–
PTY SEEK
–
START
1,1
2
36
7,2
4
5
8,3
6
q
w7
9,4
0,5
SYSTEM CONTROL
0109CRXE300(M).21-23.E 02.5.24, 3:35 PM21

22
Before recording
When you record by using MDX-E300 or KX-E300, you
must first make the connections as shown in “Connecting
other components” on page 7. For details, refer to the
instructions supplied with the MDX-E300 or KX-E300. A
source from the component which is connected to the
AUX terminal component can be recorded on a tape or
MD.
Dubbing setting
There are four combinations of components. Once you
choose a certain mode, recording starts and ends
automatically in a certain way for each mode.
DUBBING
START
DUBBING
MODE
1
2
1Turn CRX-E300 and all the components connected to
it to stop mode.
2Decide the combination of the components. Each
time you press DUBBING MODE, the mode will
change in the below order.
•Recording automatically starts from the beginning
of the tape. (By pressing DUBBING START, the
tape automatically rewinds to the beginning if it is
in the middle.)
•When the recording on side A finishes while a
track is being played back, the recording on side B
starts from the beginning of the same track.
•The sound is automatically faded out when it gets
close to the end of side B.
3
4
Record unitPlay unit
DE
TAPE
DIRECTION
PRESET
TUNER
PRESET
MD CD TAPE
AUX
MD
REC
/
PAUSE
TAPE
REC
/
PAUSE
MODE
SLEEP
DISPLAY
DUBBING
START
•Recording automatically starts at the beginning of
the tape. (By pressing DUBBING START, the
tape automatically rewinds to the beginning if it is
in the middle.)
3Press DUBBING START to start recording.
Note
•The displays 1–4 which include the component you have not
connected to CRX-E300 will be skipped.
To stop dubbing
Press &.
CD synchronized
recording
You can start and stop recording a CD on an MD or a tape
by pressing just one button.
1Press CD.
2Press MD REC/PAUSE to record on an MD or
TAPE REC/PAUSE to record on a tape.
3Press ^ or the play button on the CD player.
When playback starts on the CD player, recording
starts automatically on MDX-E300 or KX-E300.
To stop recording
Press &.
•Playback stops on the CD player and the recording
component enters recording pause mode.
•When & is pressed on the recording component,
recording stops and recording standby mode is cleared.
Playback continues on the CD player.
Record unitPlay unit
•Same as CD = TAPE
MD
REC/PAUSE
TAPE
REC/PAUSE
^
&
CD
SYSTEM CONTROL
0109CRXE300(M).21-23.E 02.5.24, 3:35 PM22

24
Troubleshooting
If the unit fails to operate normally, check the following points to determine whether the fault can be corrected by the
simple measures suggested. If it cannot be corrected, or if the fault is not listed in the SYMPTOM column, disconnect the
power cord and contact your authorized YAMAHA dealer or service center for help. When taking the service, the
MDX-E300 or KX-E300 may be needed. For details, contact your authorized YAMAHA dealer or service center.
The unit does not switch ON when
the STANDBY/ON switch is pressed.
No sound from one speaker.
The sound suddenly goes off.
No sound from an external unit
connected with this unit or play does
not begin.
Sound distorted.
Excessive static in FM broadcasts.
Noise increases during stereo
broadcasts.
Stereo broadcasts are noisy and
STEREO indicator blinks on and off.
Cannot select preset stations.
Buzzing or static during AM
broadcasts.
AM broadcast sensitivity is poor.
Cannot set timer.
The unit does not work normally.
SYMPTOM CAUSE REMEDY
Securely connect the power cord.
Connect properly.
Check that the speaker wires are not touching each
other and then turn the unit back on.
Connect the cords properly. If the problem persists,
the cords may be defective.
Make a proper input source selection.
Connect the AC power cord of the component to an
AC outlet.
Position the FM antenna as high and as far away
from nearby roads as possible. Connect using a
coaxial cable.
Check the antenna connection.
Install a multi-element type FM antenna if possible.
Install an antenna appropriate for the electric field
strength of your area.
Reprogram memory presets.
The problem is difficult to eliminate, but can be
lessened by grounding AM loop antenna.
Move away from TV or microprocessor.
Properly connect the AM loop antenna.
Change orientation of the AM loop antenna.
Install an external AM loop antenna.
Set current time.
Unplug the AC power cord from the wall outlet, and
then plug in again after about one minute.
The AC power cord is not connected or not
completely connected.
Loose speaker connections.
The protection circuit has been activated
because of a short circuit, etc.
Incorrect cord connections.
Input source selection is not proper.
The component connected to this unit is
disconnected from AC outlet.
Interference from starting motor of a nearby
car.
Interference from the thermostat of a nearby
electrical appliance.
Antenna input is too weak due to obstructions
or excessive distance from the broadcasting
station.
Insufficient antenna input.
Preset memory has been erased.
Interference from sources such as lightning,
fluorescent lights, electric motors or
thermostat of nearby electrical appliance.
TV or microprocessor is being used nearby.
Radio signal is weak or the antenna is not
properly connected.
Current time is not set.
The internal microcomputer has been frozen
by an external electric shock (lightning,
excessive static electricity, etc.) or the power
supply with low voltage.
RECEIVER
ADDITIONAL INFORMATION
0110CRXE300(M).24-26.E 02.5.24, 3:35 PM24

26
Specifications
Amplifier section
Minimum RMS output power per channel
................................................ 25 W + 25 W (6Ω 1kHz 0.1% THD)
DIN Standard output power per channel (Europe model)
................................................ 28 W + 28 W (4Ω 1kHz 0.7% THD)
Input sensitivity/Impedance
TAPE/MD/AUX ........................................................ 170 mV/47 kΩ
Frequency response
MD etc. .................................................... 20 Hz to 20 kHz, ±0.5 dB
Total Harmonic Distortion (20 Hz to 20 kHz)
MD etc. 12.5 W, 6 Ω ............................................................... 0.04%
Signal-to-Noise ratio (IHF-A Network)
MD etc. (250 mV, Input shorted) ............................................ 98 dB
Output level/Impedance
REC OUT ................................................................. 170 mV/1.2 kΩ
SUBWOOFER ............................................................. 2.0 V/1.2 kΩ
PHONES ..................................................................... 0.35 V/270 Ω
Tuner section
Tuning range
FM
[U.S.A. and Canada models] ................................ 87.5 – 107.9 MHz
[U.K., Europe, Australia, Korea and General models]
.......................................................................... 87.50 – 108.00 MHz
AM
[U.S.A. and Canada models] ................................... 530 – 1710 kHz
[U.K., Europe and Australia models] ...................... 531 – 1611 kHz
[Korea and General models] .................... 530/531 – 1710/1611 kHz
Sensitivity
FM (IHF, MONO) .................................................................. 1.0 µV
AM .................................................................................... 300 µV/m
CD player section
D/A converter ...................................................................... S-bit DAC
Laser diode properties
•Material: GaAIAs
•Wavelength: 780 nm
•Emission duration: continuous
•Laser output: max. 44.6 µW*
* This output is the value measured at a distance of about 200 mm
from the objective lens surface on the Optical Pick-up Block.
General
Power supply
[U.S.A. and Canada models] ................................. AC 120 V, 60 Hz
[Australia model] ................................................... AC 240 V, 50 Hz
[U.K. and Europe models] ..................................... AC 230 V, 50 Hz
[General model] .......................... AC 110/120/220/240 V, 50/60 Hz
[Korea model]................................................. AC 110/220 V, 60 Hz
Power consumption
[U.S.A. and Canada models] .................................................... 70 W
[U.K., Europe, Australia, Korea and General models]...............85 W
Power consumption (standby mode)
[U.S.A. and Canada models] ................................................. 0.65 W
[U.K., Europe and Australia models] ...................................... 0.9 W
Dimensions (W x H x D) ..................................... 217 x 168 x 312 mm
Weight ........................................................................................ 5.0 kg
Specifications are subject to change without notice.
ADDITIONAL INFORMATION
0110CRXE300(M).24-26.E 02.5.24, 3:35 PM26

1Pour utiliser l’appareil au mieux de ses possibilités,
lisez attentivement ce mode d’emploi. Conservez-le
soigneusement pour référence.
2Installez l’appareil dans un endroit bien ventilé, frais,
sec, propre et à l’abri de la lumière directe du soleil,
ainsi que des sources de chaleur, des vibrations, de la
poussière, de l’humidité ou du froid. Dans un meuble,
veillez à ménager un espace libre d’au moins 10 cm tout
autour de l’appareil pour qu’il soit bien ventilé.
3Placez l’appareil loin des équipements, moteurs et
transformateurs électriques, pour éviter les ronflements
parasites.
4N’exposez pas l’appareil à des variations brutales de
température, ne le placez pas dans un environnement
très humide (par exemple dans une pièce contenant un
humidificateur) car cela peut entraîner la condensation
d’humidité à l’intérieur de l’appareil qui elle-même peut
être responsable de secousse électrique, d’incendie, de
dommage à l’appareil ou de blessure corporelle.
5Evitez d’installer l’appareil dans un endroit où des
objets peuvent tomber, ainsi que là où l’appareil pourrait
être exposé à des éclaboussures ou des gouttes d’eau.
Sur le dessus de l’appareil, ne placez pas:
•D’autres appareils qui peuvent endommager la surface
de l’appareil ou provoquer sa décoloration.
•Des objets se consumant (par exemple, une bougie) qui
peuvent être responsables d’incendie, de dommage à
l’appareil ou de blessure corporelle.
•Des récipients contenant des liquides qui peuvent être à
l’origine de secousse électrique ou de dommage à
l’appareil.
6Ne couvrez pas le panneau arrière de l’appareil d’un
journal, d’une nappe, d’un rideau, etc. car cela
empêcherait l’évacuation de la chaleur. Toute
augmentation de la température intérieure de l’appareil
peut être responsable d’incendie, de dommage à
l’appareil ou de blessure corporelle.
7Ne branchez pas la fiche du cordon d’alimentation de
l’appareil sur une prise secteur aussi longtemps que tous
les raccordements n’ont pas été effectués.
8Ne pas faire fonctionner l’appareil à l’envers. Il
risquerait de chauffer et d’être endommagé.
9N’exercez aucune force excessive sur les commutateurs,
les boutons et les cordons.
10 Pour débrancher la fiche du cordon d’alimentation au
niveau de la prise secteur, saisissez la fiche et ne tirez
pas sur le cordon.
11 Ne nettoyez pas l’appareil au moyen d’un solvant
chimique, ce qui pourrait endommager la finition.
Utilisez un chiffon sec et propre.
12 N’alimentez l’appareil qu’à partir de la tension
prescrite. Alimenter l’appareil sous une tension plus
élevée est dangereux et peut être responsable
d’incendie, de dommage à l’appareil ou de blessure
corporelle. YAMAHA ne saurait être tenue responsable
des dommages résultant de l’alimentation de l’appareil
sous une tension autre que celle prescrite.
13 Pour empêcher tout dommage causé par les éclairs,
déconnectez le cordon d’alimentation de la prise murale
pendant un orage.
ATTENTION: VEUILLEZ LIRE CE QUI SUIT AVANT D’UTILISER L’APPAREIL
L’appareil n’est pas isolé de la source d’alimentation
aussi longtemps qu’il reste branché sur une prise murale,
même lorsqu’il est éteint. Il est alors dit en mode “Veille”.
Dans ce mode, l’appareil consomme très peu de courant.
PRÉCAUTIONS DE TRANSPORT
Avant de transporter l’appareil, retirez le disque de
l’appareil, puis appuyez sur la touche STANDBY/
ON pour l’éteindre, puis débranchez le cordon
d’alimentation de la prise secteur.
ATTENTION
L’empoloi de commandes, de réglages ou un choix
de procédures différents des spécifications de cette
brochure peut entraîner une exposition à
d’éventuelles radiations pouvant être dangereses.
Le circuit à laser de ce produit peut émettre des
radiations dépassant les limites définies pour la
classe 1.
14 Ne tentez pas de modifier ni de réparer l’appareil.
Consultez le service YAMAHA compétent pour toute
réparation qui serait requise. Le coffret de l’appareil ne
doit jamais être ouvert, quelle que soit la raison.
15 Si vous envisagez de ne pas vous servir de l’appareil
pendant une longue période (par exemple, pendant les
vacances), débranchez la fiche du cordon d’alimentation
au niveau de la prise secteur.
16 Lisez la section intitulée “Guide de dépannage” où
figurent une liste d’erreurs de manipulation communes
avant de conclure que l’appareil présente une anomalie
de fonctionnement.
17 Avant de déplacer l’appareil, appuyez sur STANDBY/
ON pour placer l’appareil en veille puis débranchez la
fiche du cordon d’alimentation au niveau de la prise
secteur.
18 Sélecteur de tension (VOLTAGE SELECTOR) (Modèle
pour la Chine et modèle standard)
Le sélecteur de tension (VOLTAGE SELECTOR) qui se
trouve sur le panneau arrière de l’appareil doit être
positionné en fonction de la tension du secteur local
AVANT de brancher la fiche du cordon d’alimentation
sur une prise secteur. Les tensions possibles sont 110/
120/220/240 V CA, 50/60 Hz.
0202CRXE300(M).Cau.FR 02.5.24, 3:35 PM2

Français
1
FONCTIONNALITÉS
<Récepteur>
•Puissance RMS minimale par canal de
sortie : 25 W + 25 W
(6Ω, 1 kHz, 0,1% THD)
•Télécommande intégrale du système
•Mémorisation des fréquences de 40
stations FM/AM
•Réception RDS multifonctions
•Sortie SUBWOOFER
<Lecteur de compact disque>
•
Circuit DAC S-bit et filtre numérique 8fs
•Sortie numérique optique
•Lecture programmée, avec répétition ou
aléatoire
•Affichage des données CD TEXT
•Contrôle du temps de copie
•Compatible CD-RW
Le récepteur-lecteur de compact disque CRX-E300 est l’appareil principal de la série YAMAHA Piano Craft. Vous pouvez
compléter votre chaîne en leur ajoutant la platine cassette (KX-E300) et la platine minidisc (MDX-E300)*.
* La platine cassette (KX-E300) et la platine minidisc (MDX-E300) ne sont pas disponibles dans tous les pays.
ACCESSOIRES FOURNIS ........................ 2
PRÉCAUTIONS À PRENDRE AVEC
LES CD ................................................... 2
NOM DES TOUCHES ET DES
COMMANDES
Face avant ............................................................. 3
Afficheur ............................................................... 3
Télécommande ..................................................... 4
PRISE EN MAIN
Télécommande ..................................................... 5
Raccordement des haut-parleurs et des antennes ..
6
Raccordement d’autres composants ..................... 7
Réglage de l’horloge............................................. 8
Réglage de luminosité de l’afficheur .................... 8
REPRODUCTION DE LA SOURCE ........... 9
ACCORD .............................................. 10
Mémorisation des stations ..........................................
11
RÉCEPTION DES STATIONS RDS
Réception des données RDS ............................... 12
Recherche par genre (PTY SEEK) ..................... 13
Réglages facultatifs liés aux fonctions RDS ...... 14
FONCTIONNEMENT DU LECTEUR DE
COMPACT DISQUE
Ecoute d’un disque ............................................. 15
Affichage du temps et des CD TEXT ................. 16
Lecture aléatoire ................................................. 16
Lecture répétitive ................................................ 17
Lecture programmée ........................................... 17
UTILISATION DE LA MINUTERIE INTÉGRÉE
Avant d’utiliser la minuterie ............................... 19
Temporisation en lecture ou en enregistrement .. 19
Minuterie de mise en veille ................................ 20
COMMANDE DU SYSTÈME
Réglage des autres appareils à l’aide de la
télécommande ..................................................... 21
Avant d’enregistrer ............................................. 22
Réglages de copie ............................................... 22
Enregistrement synchronisé d’un compact
disque .................................................................. 22
Contrôle du temps de copie ................................ 23
INFORMATIONS COMPLÉMENTAIRES
Guide de dépannage ........................................... 24
Caractéristiques techniques ................................ 26
SOMMAIRE
0203CRXE300(M).01-07.FR 02.5.24, 3:35 PM1

2
ACCESSOIRES FOURNIS
•Télécommande •Antenne cadre AM
•Antenne intérieure FM
•Piles (AA, R6, UM-3)
POWER
1 2 3
123
4 5 6
456
7 8 9
78
0+10 +100
FREQ
/
RDS MODE
–
PTY SEEK
–
START
REP
RANDOM
PROG
ABC
TEXT
/
TIME
R. TIME
DE
TAPE
DIRECTION
PRESET
TUNER
PRESET
MD CD TAPE
AUX
MD
REC
/
PAUS E
TAPE
REC
/
PAUSE
MODE
SLEEP
DISPLAY
DUBBING
VOLUME
START
Après le déballage, vérifier que les pièces suivantes sont incluses.
PRÉCAUTIONS À PRENDRE AVEC LES CD
Non!
•N’utilisez pas de CD comportant du ruban adhésif, une
étiquette collée ou un autre matériau étranger, car cela
peut aussi endommager le lecteur.
•Les disques compacts ne sont pas sensibles à la
poussière ou des traces de doigt qui peuvent affecter
leur surface, mais vous devez tout de même les
nettoyer. Essuyez-les à l’aide d’un chiffon propre et
sec. N’essuyez pas en faisant un mouvement circulaire
mais par mouvement rectiligne du centre vers le bord.
•Pour nettoyer un CD, n’utilisez pas de liquide de
nettoyage, d’aérosol pour disque, d’aérosol ou de
liquide antistatique, ou tout autre produit chimique, car
ces substances peuvent endommager de façon
irréparable la surface du disque.
•N’exposez pas vos disques à la lumière directe du
soleil, à des températures ou des niveaux d’humidité
élevés pendant une période prolongée, car cela pourrait
voiler vos disques ou simplement les endommager.
•Ce lecteur de compact disque ne peut être utilisé
qu’avec les types de disque ci-dessous. N’essayez pas
d’introduire un autre type de disque dans cet appareil.
Cet appareil peut également lire les CD de 8 cm.
•Pour l’enregistrement, vous pouvez utiliser soit un
CD-R, soit un CD-RW; choisissez des disques
provenant qu’un fabricant réputé.
•Certains disques ne peuvent pas être lus du fait de leurs
caractéristiques ou des conditions d’enregistrement
(protection spéciale des droits d’auteur, etc.)
•Les CD ne s’usent pas à la lecture, mais les rayures
qu’ils peuvent subir en cours de manipulation peut
altérer leur lecture.
•N’utilisez pas de disque de nettoyage ou de disque
voilé; ces derniers peuvent endommager le lecteur.
Pour prévenir tout dysfonctionnement de
cet appareil
•N’utilisez pas de CD de forme spéciale (en forme de
cœur, par exemple) ; ce type de CD peut endommager
le lecteur.
(Modèles standard et pour
les Etats-Unis, le Canada,
la Chine et la Corée)
(Modèles pour
l’Europe, la G-B et
l’Australie)
(Lecture uniquement)
0203CRXE300(M).01-07.FR 02.5.24, 3:35 PM2

Français
3
Afficheur
Face avant
1
Touche STANDBY/ON de mise en marche (P.9)
2
Indicateur de programmation TIMER (P.19)
3Touche DISPLAY (P.8,19)
4Touche TIME ADJ/MEMORY (P.8,11)
5
Touche TIMER/AUTO/MAN’L (P.10,19)
6
Touche de sélection PRESET/BAND (P.10)
7Afficheur (P.3)
8Touches de sélection PRESET/TUNING
/ (P.10)
Lorsque TUNER est sélectionné comme
source d’entrée
$/!/⁄/› (P.15)
Lorsque CD est sélectionné comme source d’entrée
9Bouton de VOLUME (P.9)
0Prise PHONES pour casque (P.9)
qTiroir du disque
w
Bouton BASS de réglage des basses (P.9)
e
Bouton TREBLE de réglage des aigus (P.9)
rBouton BALANCE stéréo (P.9)
t (Ouvrir/Fermer) (P.15)
y& (Arrêt) (P.15)
uSélecteur INPUT d’entrée (P.9)
i^ (Lecture/Pause) (P.15)
1Afficheur alphanumérique polyvalent
2Indicateur PRESET (P.11)
3Indicateur STEREO (P.10)
4Indicateur AUTO (P.10)
5Indicateur RDS (P.12)
6Indicateurs de mode RDS (P.12)
7Indicateur PTY HOLD (P.13)
8Indicateur REP S/F (Répét. une piste ou
toutes) (P.17)
9
Indicateur PROG (Lecture programmée) (P.17)
0
Indicateur RANDOM (Lecture aléatoire) (P.16)
q
Indicateur A B de face de cassette (P.23)
wIndicateur TIMER (P.19)
eIndicateur SLEEP (P.20)
rIndicateur MEMORY (P.11)
tIndicateur TUNED (P.10)
yIndicateur CD-TEXT (P.16)
NOM DES TOUCHES ET DES COMMANDES
BALANCE
INPUT
VOLUME
LR
TREBLEBASS
PHONES
STANDBY/ON
TIMER DISPLAY MEMORY
NATURAL SOUND CD RECEIVER CRX-E300
AUTO/MAN'L
PRESET/BAND
TIMER HOUR MIN
MIN MAX
PRESET/TUNING
TIMER ADJ
+–+–
12 345678 9
0qw e rtyui
TIMER SLEEP
STEREO AUTO RDS PS RT CT F PROG A B
RANDOM
SREPPTY
MEMORY TUNED PTY HOLD CD-TEXTTITLEARTIST TRACK
PRESET
1q
we r t y
23456 7890
0203CRXE300(M).01-07.FR 02.5.24, 3:35 PM3

4
Télécommande
1POWER (P.9)
2Numéros de programmes préréglés (1–8)* (P.11)
3FREQ/RDS* (P.12)
4PTY SEEK MODE* (P.13,14)
5PTY SEEK START* (P.13,14)
6A/B/C/D/E* (P.11)
7PRESET / * (P.11)
8TUNER (P.11)
9MD (MDX-E300) (P.21)
0TAPE (KX-E300) (P.21)
qCD (P.15)
wAUX (Appareil raccordé aux bornes AUX)
eSLEEP (P.20)
rDISPLAY (P.19)
tVOLUME + – (P.9)
* Lorsque TUNER est sélectionné comme source
d’entrée
Remarque
•Les commandes 8 à w sont des sélecteurs d’entrée pour
chaque appareil.
Lorsque CD est sélectionné comme source d’entrée
1POWER (Alimentation) (P.15)
2Touches numériques (P.15)
•La touche +100 s’utilise pour la MDX-E300.
3REP (Répétition) (P.17)
4PROG (Lecture programmée) (P.17)
5RANDOM (Lecture aléatoire) (P.16)
6TEXT/TIME (P.16)
7^ (Lecture/Pause) (P.15)
8$ ! (Saut/Recherche arrière) (P.15)
9⁄ › (Saut/Recherche avant) (P.15)
0& (Arrêt) (P.15)
qCD (Sélection source CD) (P.15)
NOM DES TOUCHES ET DES COMMANDES
POWER
1 2 3
123
4 5 6
456
7 8 9
78
0+10 +100
REP
RANDOM
PROG
ABC
TEXT
/
TIME
R. TIME
DE
TAPE
DIRECTION
PRESET
TUNER
PRESET
MD CD TAPE
AUX
MD
REC
/
PAUSE
TAPE
REC
/
PAUSE
MODE
SLEEP
DISPLAY
DUBBING
VOLUME
START
FREQ
/
RDS MODE
–
PTY SEEK
–
START
1,1
2,2
8
0
5
4
q,q
w
r
t
6
3
7
9
e
43
6
5
7
98
0
0203CRXE300(M).01-07.FR 02.5.24, 3:35 PM4

Français
5
BALANCE
INPUT
VOLUME
LR
TREBLEBASS
PHONES
STANDBY/ON
TIMER DISPLAY MEMORY
NATURAL SOUND CD RECEIVER CRX-E300
AUTO/MAN'L
PRESET/BAND
TIMER HOUR MIN
MIN MAX
PRESET/TUNING
TIMER ADJ
+–+–
30°
30°
Télécommande
Cette télécommande permet de commander tout un
système : non seulement le CRX-E300, mais aussi une
platine cassette (KX-E300) et une platine minidisc
(MDX-E300), si vous les ajoutez au système.
Chargement des piles
1Retirez le capot du compartiment des piles de la
télécommande.
2Introduisez piles dans le compartiment.
3Remettez le capot du compartiment des piles.
Remplacement des piles
Si vous vous apercevez que vous devez utiliser la
télécommande plus près de l’appareil que d’habitude, cela
signifie que les piles sont déchargées. Remplacez-les.
Remarques
•Utilisez uniquement des piles AA, R6, UM-3.
•Veillez à respecter les polarités indiquées (schéma à l’intérieur
du compartiment des piles).
•Retirez les piles si vous ne comptez pas utiliser la
télécommande pendant un certain temps.
•Si les piles fuient, jetez-les immédiatement. Évitez de toucher
le liquide des piles ou de le laisser entrer en contact avec vos
vêtements, etc. Nettoyez complètement le compartiment des
piles avant d’en installer de nouvelles.
Champ d’utilisation de la
télécommande
Remarques
•Il ne doit pas y avoir de gros obstacle entre la télécommande et
l’appareil.
•Si le capteur du signal de la télécommande est exposé à une
lumière intense (surtout fluorescente), cela peut empêcher un
bon fonctionnement de la télécommande. Dans ce cas,
déplacez l’appareil pour éviter cette exposition directe à la
lumière.
Retrait du film protecteur
La télécommande est livrée avec un film protecteur pour
empêcher que sa surface puisse être rayée pendant le
transport.
Pour retirer ce film, collez d’abord du ruban adhésif sur
l’un des bords de la télécommande de façon qu’il adhère
au film. Décollez ensuite le film avec le ruban adhésif.
Remarque
•Veillez à ne pas rayer la télécommande en décollant le film.
Environ 6 mètres au
maximum
PRISE EN MAIN
Capteur du signal
de la télécommande
2
1
3
PO
W
E
R
1
1
2
2
3
3
4
4
7
7
8
8
9
5
5
6
6
PO
W
E
R
1
1
2
2
3
3
4
4
7
7
8
8
9
5
5
6
6
0203CRXE300(M).01-07.FR 02.5.24, 3:35 PM5

6
MD
TAPE
IN
OUT
IN
IN
OUT
AUX
D
A
B
L
R
C
SYSTEM CONNECTOR
OUT
SUBWOOFER
OUT
DIGITAL
OPTICAL
SPEAKERS
RL
6
Ω MIN. /SPEAKER
CLASS 2 WIRING
FM ANT GND – AM ANT
75
Ω UNBAL.
Raccordement des haut-parleurs et des antennes
Ne branchez jamais le cordon d’alimentation dans une prise secteur avant
d’avoir effectué tous les raccordements.
Suivez les instructions ci-dessous pour relier les éléments de la chaîne à l’aide des câbles et accessoires fournis. Assurez-
vous que toutes les connexions sont faites correctement, ce qui veut dire: L (gauche) à L, R (droite) à R, “+” à “+” et “–” à
“–”.
1Raccordez les haut-parleurs.
1Dévissez le capuchon.
2
Dénudez les câbles de raccordement des haut-
parleurs sur environ 10 mm et appliquez l’extrémité
dénudée du câble sur la borne.
3Resserrez le capuchon pour fixer le câble.
2Branchez l’antenne AM.
Préparez l’antenne cadre AM puis branchez-la.
3Raccordez l’antenne FM.
4Branchez le cordon d’alimentation dans une prise de
courant.
Remarques
•Utilisez des antennes FM et AM externes si la réception n’est
pas assez bonne. Consultez à ce sujet votre revendeur.
•Le cadre-antenne AM doit être placé à un endroit séparé de
l’appareil principal. On pourra l’accrocher au mur.
Raccordement du subwoofer (en option)
Vous pouvez renforcer les basses fréquences en ajoutant à
la chaîne une enceinte appelée Subwoofer (en option).
Raccordez la borne SUBWOOFER OUT de l’appareil à
la borne d’entrée du subwoofer.
3 Antenne FM
4
Haut-parleur droit Haut-parleur gauche
Rouge : positif (+)
Noir : négatif (–)
2 Antenne cadre AM
1Vers une prise de
courant
PRISE EN MAIN
GND AM ANT
1
2
3
FM ANT
75 Ω UNBAL
0203CRXE300(M).01-07.FR 02.5.24, 3:35 PM6

Français
7
Raccordement d’autres composants
Pour étendre votre système, vous pouvez raccorder d’autres composants. Reportez-vous également au mode d’emploi qui
accompagne ces composants.
Interconnexion des KX-E300 et MDX-E300
PRISE EN MAIN
1Raccordez Å à Å et ı à ı (pour le raccordement de la KX-E300), Ç à Ç et Î à Î (pour le raccordement de la
MDX-E300) à l’aide d’un câble audio à fiche.
2Raccordez la borne DIGITAL OPTICAL OUT du CRX-E300 à la borne DIGITAL OPTICAL IN de la MDX-E300.
Retirez les capuchons des connecteurs du câble optique, de la borne DIGITAL OPTICAL OUT et de la borne
DIGITAL OPTICAL IN avant d’effectuer les raccordements numériques. Veillez à remettre ces capuchons en place
sur les bornes du panneau arrière lorsqu’elles ne sont pas utilisées de manière à la protéger de la poussière.
3Raccordez un appareil externe aux bornes AUX du CRX-E300.
4Raccordez le CRX-E300 à la MDX-E300 et la MDX-E300 à la KX-E300 à l’aide des câbles de commande du système.
Le raccordement par la prise SYSTEM CONNECTOR vous permet de commander cet appareil ainsi que les appareils
connectés de la série YAMAHA Piano Craft.
•Si votre système ne comporte pas de MDX-E300, raccordez directement le CRX-E300 et la KX-E300.
5AC OUTLET
Branchez la fiche secteur de la MDX-E300 à la prise secteur (AC Outlet) du CRX-E300. Branchez ensuite la fiche
secteur de la KX-E300 à la prise secteur (AC Outlet) de la MDX-E300.
•Si votre système ne comporte pas de MDX-E300, branchez la fiche de la KX-E300 à la prise secteur (AC Outlet) du
CRX-E300.
Attention
•Ne mettez jamais le CRX-E300 sous tension tant que tous les raccordements entre les appareils ne sont pas terminés.
•Ne branchez ou ne débranchez jamais les câbles de commande système et/ou le cordon d’alimentation alors des appareils de
la chaîne sont allumés.
OUT
A
L
IN
B
R
SYSTEM
CONNECTOR
OUT
FM ANT GND – AM ANT
SPEAKERS
RL
75
Ω UNBAL.
6
Ω MIN. /SPEAKER
CLASS 2 WIRING
SYSTEM CONNECTOR
SUBWOOFER
DIGITAL
OUT
OPTICAL
IN
TAPE
OUT
IN
IN
OUT
AUX
D
A
B
L
R
C
MD
ANALOG DIGITAL
OPTICAL
IN L
DOUT
1
IN
2
R
C
SYSTEM
CONNECTOR
<MDX-E300>
<KX-E300>
<CRX-E300>
Vers une
prise de
courant
Câble de commande
du système (fourni
avec la MDX-E300)
Câbles audio à fiche 1
2
3
5
Câble de
commande du
système
(fourni avec la
KX-E300)
Câble à fibre optique (au standard
EIA) (en vente dans le commerce)
4
Cette prise est utilisée pour des
contrôles en usine. Ne raccordez aucun
appareil à cette prise.
0203CRXE300(M).01-07.FR 02.5.24, 3:35 PM7

PRISE EN MAIN
8
Réglage de l’horloge
Pour pouvoir utiliser les fonctions de minuterie de
l’appareil, vous devez d’abord régler son horloge interne.
L’heure est exprimée sur 24 heures.
1Allumez l’appareil en appuyant sur STANDBY/ON
ou sur la touche POWER de la télécommande.
2L’appareil étant allumé, appuyez sur la touche
DISPLAY pour afficher l’heure.
3Tout en appuyant sur TIME ADJ, appuyez sur
HOUR pour changer les heures.
•Si vous voulez aller en arrière, appuyez sur TIME
ADJ et sur PRESET/BAND tout en appuyant sur
HOUR.
4Tout en appuyant sur TIME ADJ, appuyez sur MIN
pour changer les minutes.
•Si vous voulez aller en arrière, appuyez sur TIME
ADJ et sur PRESET/BAND tout en appuyant sur
MIN.
Affichage de l’heure
Appuyez sur la touche DISPLAY.
L’heure s’affiche pendant environ 8 secondes, puis
l’affichage normal est restitué. Il se peut que certaines
touches et commandes soient inopérantes lorsque l’heure
est affichée.
Remarque
•En cas de panne de courant, ou si le cordon d’alimentation de
l’alimentation est débranché pendant plus de cinq minutes,
vous devez régler l’heure à nouveau.
Réglage de luminosité
de l’afficheur
Vous pouvez régler la luminosité de l’afficheur. Si vous
avez connecté la platine cassette (KX-E300) et/ou la
platine minidisc (MDX-E300) à cet appareil, la luminosité
de leurs afficheurs s’adapte automatiquement au réglage
effectué.
Maintenez la touche DISPLAY appuyée pendant environ
deux secondes ; la mention “Dimmer ±0” s’affiche. Tout
en maintenant DISPLAY appuyée, tournez le bouton
INPUT dans le sens horaire pour accroître ou dans le sens
antihoraire pour faire baisser la luminosité.
Plage de réglages : de
±
0 à –6 (valeur préréglée : ±0)
INPUT
DISPLAY
BALANCE
INPUT
VOLUME
LR
TREBLEBASS
PHONES
STANDBY/ON
TIMER DISPLAY MEMORY
NATURAL SOUND CD RECEIVER CRX-E300
AUTO/MAN'L
PRESET/BAND
TIMER HOUR MIN
MIN MAX
PRESET/TUNING
TIMER ADJ
+–+–
HOUR
DISPLAY
PRESET/BANDTIME ADJ
MIN
BALANCE
INPUT
VOLUME
LR
TREBLEBASS
PHONES
STANDBY/ON
TIMER DISPLAY MEMORY
NATURAL SOUND CD RECEIVER CRX-E300
AUTO/MAN'L
PRESET/BAND
TIMER HOUR MIN
MIN MAX
PRESET/TUNING
TIMER ADJ
+–+–
STANDBY/ON
0204CRXE300(M).08-09.FR 02.5.24, 3:35 PM8

REPRODUCTION DE LA SOURCE
Français
9
Ce chapitre explique les opérations de base pour la
mémorisation des fréquences, la lecture de compact
disques et l’utilisation des autres appareils connectés.
1Réglez le volume sonore au minimum “MIN” en
tournant le bouton VOLUME vers la gauche.
2Allumez l’appareil en appuyant sur STANDBY/ON
ou sur la touche POWER de la télécommande.
•Les appareils de la série Piano Craft peuvent être
allumés et mis en veille par le CRX-E300 si leur
raccordement système à celui-ci a été
correctement effectué. Toutefois, si un appareil
raccordé a été mis en veille avec sa propre touche
STANDBY/ON, vous ne pouvez pas l’allumer
avec la touche STANDBY/ON du CRX-E300.
3Sélectionnez la source désirée en tournant le sélecteur
INPUT jusqu’à ce qu’elle apparaisse sur l’afficheur.
•Si vous voulez écouter l’appareil raccordé aux
bornes AUX, tournez le bouton INPUT pour
sélectionner AUX.
4Démarrez l’appareil source en lecture (pour plus de
précisions consultez le mode d’emploi de l’appareil).
5Réglez le volume sonore via le bouton rotatif
VOLUME ou la touche VOLUME + de la
télécommande.
6Si nécessaire, réglez les basses (BASS), les aigus
(TREBLE) et la balance (BALANCE).
BASS: Tournez ce bouton dans le sens horaire pour
augmenter le niveau des fréquences basses (ou dans
le sens antihoraire pour le diminuer).
TREBLE: Tournez ce bouton dans le sens horaire
pour augmenter le niveau des fréquences aigus (ou
dans le sens antihoraire pour le diminuer).
BALANCE: Réglez l’équilibre des niveaux des haut-
parleurs gauche et droit pour compenser les
déséquilibres causés par la position des haut-parleurs
ou la forme de la pièce.
Utilisation d’un casque d’écoute
Raccordez le casque au connecteur PHONES. C’est le
son réglé pour sortir sur les haut-parleurs principaux que
vous entendez dans le casque.
Mise en veille de l’appareil
Lorsque vous avez fini de vous servir de l’appareil,
appuyez sur la touche STANDBY/ON de la face avant ou
sur la touche POWER de la télécommande pour mettre
l’appareil en veille.
•STANDBY apparaît un instant sur l’affichage.
Fonction de veille automatique
L’appareil se met automatiquement en veille dans l’une
des conditions suivantes:
•Un appareil connecté avec un câble de commande de
système est choisi comme source d’entrée.
•L’appareil relié à celui-ci est à l’arrêt et ne fonctionne
plus depuis 30 minutes.
POWER
1 2 3
123
4 5 6
456
7 8 9
78
0+10 +100
FREQ
/
RDS MODE
–
PTY SEEK
–
START
REP
RANDOM
PROG
ABC
TEXT
/
TIME
R. TIME
DE
TAPE
DIRECTION
PRESET
TUNER
PRESET
MD CD TAPE
AUX
MD
REC
/
PAUSE
TAPE
REC
/
PAUSE
MODE
SLEEP
DISPLAY
DUBBING
VOLUME
START
BALANCE
INPUT
VOLUME
LR
TREBLEBASS
PHONES
STANDBY/ON
TIMER DISPLAY MEMORY
NATURAL SOUND CD RECEIVER CRX-E300
AUTO/MAN'L
PRESET/BAND
TIMER HOUR MIN
MIN MAX
PRESET/TUNING
TIMER ADJ
+–+–
POWER
VOLUME –/+
VOLUMESTANDBY/ON
INPUTBALANCE
TREBLE
BASS
PHONES
0204CRXE300(M).08-09.FR 02.5.24, 3:35 PM9

ACCORD
10
Accord automatique des fréquences
1Sélectionnez le TUNER en tournant le sélecteur
INPUT afin que la fréquence d’une station radio
apparaisse sur l’afficheur.
2Appuyez sur la touche PRESET/BAND pour
sélectionner la bande de fréquences souhaitée. Ne
sélectionnez pas le mode de mémorisation des
fréquences (pour lequel la mention “PRESET”
s’affiche).
3Appuyez sur la touche AUTO/MAN’L de sorte que la
mention “AUTO” s’affiche.
4Appuyez sur la touche PRESET/TUNING (pour
monter dans les fréquences) ou (pour descendre
dans les fréquences).
5L’appareil commence le balayage la recherche d’une
station.
Lorsqu’il trouve une station, l’appareil interrompt son
balayage et affiche la mention “TUNED” (accordé).
6Si la station trouvée n’est pas celle que vous désirez,
répétez les étapes 4 et 5 jusqu’à ce que vous la
trouviez.
Remarques
•Si vous n’arrivez pas à localiser la station voulue en accord
automatique, essayez de recourir à l’accord manuel, comme
indiqué ci-après.
•Lorsqu’une station FM stéréo suffisamment puissante est
reçue, la mention “STEREO” s’affiche et l’écoute est en
stéréophonie.
Accord manuel
1Effectuez les étapes 1 et 2 du paragraphe “Accord
automatique des fréquences”.
2Appuyez sur la touche AUTO/MAN’L de sorte que la
mention “AUTO” ne soit pas affichée.
3Appuyez sur la touche PRESET/TUNING (pour
monter dans les fréquences) ou (pour descendre
dans les fréquences).
•Chaque pression sur la touche PRESET/
TUNING ou modifie la fréquence d’un
incrément.
PRESET/TUNING /
INPUT
AUTO/MAN’L
PRESET/BAND
Vous pouvez localiser les stations de radio
automatiquement ou manuellement.
BALANCE
INPUT
VOLUME
LR
TREBLEBASS
PHONES
STANDBY/ON
TIMER DISPLAY MEMORY
NATURAL SOUND CD RECEIVER CRX-E300
AUTO/MAN'L
PRESET/BAND
TIMER HOUR MIN
MIN MAX
PRESET/TUNING
TIMER ADJ
+–+–
STEREO AUTO
TUNED
0205CRXE300(M).10-11.FR 02.5.24, 3:36 PM10

ACCORD
Français
11
Mémorisation manuelle des stations
1Localisez la station voulue (reportez-vous en page
précédente pour procéder à l’accord).
2Appuyez sur la touche MEMORY.
3Avant que ne s’écoulent environ 5 secondes, utilisez
les touches PRESET/TUNING / pour
sélectionner le numéro de mémoire voulu. Continuez
d’appuyer sur les touches PRESET/TUNING /
pour sélectionner un des 5 groupes de mémoires (A,
B, C, D ou E).
4Appuyez sur la touche MEMORY.
•Les mentions “MEMORY”, “PRESET” et le
numéro de mémoire choisi apparaissent sur
l’afficheur.
5Répétez les étapes 1 à 4 jusqu’à ce que toutes les
stations voulues soient mémorisées.
Mémorisation des stations
Les stations localisées par accord automatique ou manuel
peuvent être mémorisées. Il est possible de mémoriser
jusqu’à 40 stations dans l’appareil. Vous pouvez ensuite
sélectionner n’importe laquelle de ces stations en
composant le numéro que vous lui aurez attribué.
1–8
A/B/C/D/E
TUNER
PRESET /
Remarques
•Une nouvelle station peut être mémorisée à la place d’une
station déjà mémorisée.
•Les stations mémorisées sont conservées en mémoire pendant
une semaine lorsque l’appareil est débranché du secteur ou en
cas de panne secteur.
Mémorisation automatique des
stations
1Sélectionnez la source TUNER en tournant le bouton
INPUT.
2Appuyez sur la touche MEMORY pendant environ 2
secondes.
•L’appareil commence à mémoriser les stations
qu’il détecte. “AUTO” et “MEMORY” clignotent
sur l’afficheur.
Les stations reçues sont mémorisées dans les
emplacements A1, A2...A8, et ainsi de suite dans l’ordre
alphanumérique. Une fois 40 stations ou toutes les
stations recevables sur les bandes FM et AM mémorisées,
l’afficheur présente la station mémorisée en A1.
Rappel d’une station mémorisée
Sélectionnez la source TUNER puis choisissez le numéro
de station mémorisée voulu, en appuyant sur les touches
PRESET/BAND et PRESET/TUNING / de la face
avant ou sur les touches PRESET /, A/B/C/D/E et
1 à 8 de la télécommande. Appuyez continuellement sur
PRESET/TUNING / (ou PRESET / de la
télécommande) pour passer au groupe de stations
mémorisées (A–E).
PRESET/TUNING /
INPUT
PRESET/BANDMEMORY
La flèche s’affiche pendant une seconde au
moment de la mémorisation.
BALANCE
INPUT
VOLUME
LR
TREBLEBASS
PHONES
STANDBY/ON
TIMER DISPLAY MEMORY
NATURAL SOUND CD RECEIVER CRX-E300
AUTO/MAN'L
PRESET/BAND
TIMER HOUR MIN
MIN MAX
PRESET/TUNING
TIMER ADJ
+–+–
STEREO
MEMORY TUNED
PRESET
STEREO
MEMORY TUNED
PRESET
POWER
1 2 3
123
4 5 6
456
7 8 9
78
0+10 +100
FREQ
/
RDS MODE
–
PTY SEEK
–
START
REP
RANDOM
PROG
ABC
TEXT
/
TIME
R. TIME
DE
TAPE
DIRECTION
PRESET
TUNER
PRESET
MD CD TAPE
AUX
MD
REC
/
PAUSE
TAPE
REC
/
PAUSE
MODE
SLEEP
DISPLAY
DUBBING
VOLUME
START
0205CRXE300(M).10-11.FR 02.5.24, 3:36 PM11

12
Réception des données
RDS
RDS (Radio Data System) désigne un système de
transmission d’informations via les fréquences des radios
FM, disponible dans de nombreux pays européens. Les
stations s’en servent pour transmettre un flux inaudible de
données en plus du signal radio. Les données RDS
véhiculent diverses informations désignées PS (Program
Service, Nom de la station), PTY (Program Type, Genre
du programme), RT (Radio Text, Texte informatif) et CT
(Clock Time, Horloge).
FREQ/RDS
1Sélectionnez une station FM.
2Appuyez sur la touche FREQ/RDS pour choisir les
informations voulues. Chaque appui sur cette touche
sélectionne une des catégories d’informations
disponibles, dans l’ordre suivant :
PS
Le nom de la station RDS reçue est affiché.
•Si l’appareil ne trouve pas de station diffusant des données PS,
il arrête sa recherche et affiche la mention “NO PS”.
PTY
Le genre de programme diffusé actuellement par la station
RDS est affiché. Vous pouvez demander à rechercher une
station diffusant un genre de programme donné (voir la
section suivante pour plus de précisions).
RT
Des informations sur le programme en cours (titre de la
chanson, nom de l’artiste, etc.) diffusé par la station RDS
reçue sont affichées sur 64 caractères alphabétiques (plus
le tréma). Si d’autres caractères sont diffusés dans ces
données RT, ils sont représentés par un trait de
soulignement.
•Si l’appareil ne trouve pas de station diffusant des données RT,
il arrête sa recherche et affiche la mention “NO RT”.
CT
L’heure qu’il est s’inscrit sur l’afficheur.
•Si l’appareil ne trouve pas de station diffusant des données CT,
il arrête sa recherche et affiche la mention “NO CT”.
Remarques
•La fonctionnalité RDS peut ne pas donner de résultats si la
station sélectionnée ne transmet pas correctement le signal
RDS ou si l’intensité du signal est trop faible.
•Certaines stations FM n’offrent pas de service RDS. Celles qui
en proposent n’offrent pas toutes les mêmes catégories
d’informations. Les catégories fournies par la station
sélectionnée apparaissent estompés sur l’afficheur. Vérifiez
auprès de vos stations de radio favorites si elles diffusent ces
informations.
RÉCEPTION DES STATIONS RDS
POWER
1 2 3
123
4 5 6
456
7 8 9
78
0+10 +100
FREQ
/
RDS MODE
–
PTY SEEK
–
START
REP
RANDOM
PROG
ABC
TEXT
/
TIME
R. TIME
DE
TAPE
DIRECTION
PRESET
TUNER
PRESET
MD CD TAPE
AUX
MD
REC
/
PAUSE
TAPE
REC
/
PAUSE
MODE
SLEEP
DISPLAY
DUBBING
VOLUME
START
RDS PS
RDS PTY
RDS CT
0206CRXE300(M).12-14.FR 02.5.24, 3:36 PM12

Playing CDsGetting Started
RÉCEPTION DES STATIONS RDS
Français
13
Recherche par genre
(PTY SEEK)
Vous pouvez rechercher des stations proposant des
programmes d’un genre donné. L’appareil recherche, dans
toutes les stations mémorisées diffusant des données RDS,
le genre de programme que vous avez choisi.
Localisation d’une station
1Sélectionnez une station FM.
2Appuyez une fois sur la touche PTY SEEK MODE
de sorte que “PTY” et un genre de programme
clignotent sur l’afficheur.
3Dans les 20 secondes environ, appuyez plusieurs fois
sur PRESET / jusqu’à ce que le genre de
programme désiré s’affiche.
4Avant que ne s’écoulent environ 20 secondes,
appuyez sur PTY SEEK START.
•Si une station diffusant actuellement le genre
demandé est localisée, l’appareil arrête la
recherche et le nom de la station en question
s’affiche, ainsi que l’indicateur “PTY HOLD”
(sélection d’un genre).
5Répétez l’étape 4 jusqu’à ce que vous obteniez la
station voulue.
S’il n’y a pas actuellement de station diffusant le
genre de programme demandé, la mention “NO
PTY” s’affiche d’abord, puis le nom ou la fréquence
de la station sélectionné.
Liste des genres de programme (PTY)
PTY SEEK MODE PTY SEEK START
PRESET /
NEWS
AFFAIRS
INFO
SPORT
EDUCATE
DRAMA
CULTURE
SCIENCE
VARIED
POP M
ROCK M
M.O.R. M
LIGHT M
CLASSICS
OTHER M
Nouvelles
Actualités
Informations générales
Sports
Éducation
Programme dramatique
Programme culturel
Programme scientifique
Variétés
Musique pop
Musique rock
Musique d’ambiance
Classique/Variétés
Musique classique
Autres genres musicaux
POWER
1 2 3
123
4 5 6
456
7 8 9
78
0+10 +100
FREQ
/
RDS MODE
–
PTY SEEK
–
START
REP
RANDOM
PROG
ABC
TEXT
/
TIME
R. TIME
DE
TAPE
DIRECTION
PRESET
TUNER
PRESET
MD CD TAPE
AUX
MD
REC
/
PAU SE
TAPE
REC
/
PAU SE
MODE
SLEEP
DISPLAY
DUBBING
VOLUME
START
PTY
RDS PTY
PTY HOLD
PRESET
0206CRXE300(M).12-14.FR 02.5.24, 3:36 PM13

14
Réglages facultatifs liés
aux fonctions RDS
Le tuner dispose des fonctions suivantes, fondées sur la
réception des données RDS. Ces fonctions sont
normalement activées, mais vous pouvez les désactiver si
vous le souhaitez.
defs
1Sélectionnez la bande FM en appuyant sur la touche
TUNER de la télécommande.
2Appuyez sur la touche DISPLAY pour afficher
l’heure.
3Appuyez sur la touche FREQ/RDS.
4Chaque appui sur la touche PTY SEEK MODE
modifie l’affichage dans l’ordre suivant :
1. CT = CLOCK (ON/OFF)
Le tuner corrige automatiquement son horloge
interne en fonction des données CT diffusées par
la station RDS reçue.
•Si vous recevez une station RDS d’un pays
étranger, l’horloge interne est synchronisée avec
l’heure de ce pays étranger.
•Si l’horloge interne n’est pas réglée (vous ne
l’ayez jamais réglée, une panne de courant a eu
lieu, etc.), elle est automatiquement réglée en
fonction des données CT, que cette option soit
activée (ON) ou désactivée (OFF).
2. LOCAL = CT (ON/OFF)
Si la station RDS diffuse l’heure locale (heure
d’été, etc.), c’est cette heure qui est affichée en
mode CT.
3. A.M. = RDS (ON/OFF)
Lorsque cette option est activée (ON), ce sont les
stations RDS et non toutes les stations FM qui
sont balayées lors de la mémorisation automatique
des fréquences. (Voir page 11.)
4. RT SPEED: ±0
Permet de modifier la vitesse de défilement des
informations textuelles RT.
Plage de réglages : de ±0 à ±3 (valeur préréglée : ±0)
5Choisissez d’activer (ON) ou de désactiver l’option
sélectionnée en appuyant sur la touche PTY SEEK
START tout en vérifiant votre choix sur l’afficheur.
Dans le cas de l’option RT SPEED, appuyez sur la
touche PTY SEEK START pour changer sa valeur.
•Si aucune touche n’est appuyée pendant environ
20 secondes, ce mode est annulé et l’afficheur
présente à nouveau la fréquence de la station
sélectionnée. Si la station diffuse des données PS,
c’est le nom de la station qui est affiché.
6Appuyez de nouveau sur la touche FREQ/RDS pour
revenir à l’affichage de la fréquence.
DISPLAY
PTY SEEK MODE PTY SEEK START
FREQ/RDS
TUNER
RÉCEPTION DES STATIONS RDS
POWER
1 2 3
123
4 5 6
456
7 8 9
78
0+10 +100
FREQ
/
RDS MODE
–
PTY SEEK
–
START
REP
RANDOM
PROG
ABC
TEXT
/
TIME
R. TIME
DE
TAPE
DIRECTION
PRESET
TUNER
PRESET
MD CD TAPE
AUX
MD
REC
/
PAUSE
TAPE
REC
/
PAUSE
MODE
SLEEP
DISPLAY
DUBBING
VOLUME
START
0206CRXE300(M).12-14.FR 02.5.24, 3:36 PM14

Français
15
1Appuyez sur la touche STANDBY/ON pour allumer
cet appareil.
2Appuyez sur la touche CD de la télécommande ou
sélectionnez CD au moyen du bouton d’entrée.
Ecoute d’un disque 3Appuyez sur la touche pour ouvrir le tiroir, puis
placez un CD sur celui-ci.
4Appuyez sur ^ pour lancer la lecture.
L’appareil entame la lecture du CD.
Pour effectuer une pause pendant la lecture
Appuyez sur ^.
Pour reprendre la lecture, appuyez de nouveau sur ^.
Pour arrêter la lecture
Appuyez sur &.
Pour éjecter le CD
Appuyez sur pour ouvrir le tiroir du lecteur, puis retirez
le disque de celui-ci.
Lecture d’une plage spécifique du
disque (Saut)
Lecture directe
Sélectionnez la plage voulue à l’aide des touches
numériques. (Exemple : Pour sélectionner la plage 35,
appuyez trois fois sur la touche +10 pour afficher “3 _”,
puis appuyez sur la touche 5.)
Lecture par saut
Appuyez sur ⁄/› pour faire un saut de plage avant
ou sur $/! pour faire un saut arrière. Appuyez une
fois sur ces touches pour chaque plage à sauter.
Remarques
•Il n’est pas possible d’entrer un nombre supérieur au nombre
de pistes du disque.
•Ces opérations peuvent aussi être effectuées lorsque l’appareil
est en pause ou arrêté.
•Lorsque l’appareil n’est pas en fonctionnement, l’appui sur les
touches ⁄/› ou $/! fait incrémenter ou décrémenter
le numéro de pistes.
Lecture rapide en avant ou en arrière
(Recherche)
Maintenez la touche ⁄/› appuyée pour accélérer la
lecture ou la touche $/! appuyée pour revenir en
arrière rapidement.
Remarque
•Cet appareil ne peut lire un CD-R ou CD-RW que si celui-ci a
été finalisé. Finalisez le disque sur le graveur de compact
disque avant de l’utiliser sur cet appareil.
^
&
^&
$ !/⁄ ›
STANDBY/ON
POWER
CD
Touches
numériques
⁄/›
$/!
FONCTIONNEMENT DU LECTEUR DE COMPACT DISQUE
BALANCE
INPUT
VOLUME
LR
TREBLEBASS
PHONES
STANDBY/ON
TIMER DISPLAY MEMORY
NATURAL SOUND CD RECEIVER CRX-E300
AUTO/MAN'L
PRESET/BAND
TIMER HOUR MIN
MIN MAX
PRESET/TUNING
TIMER ADJ
+–+–
POWER
1 2 3
123
4 5 6
456
7 8 9
78
0+10 +100
FREQ
/
RDS MODE
–
PTY SEEK
–
START
REP
RANDOM
PROG
ABC
TEXT
/
TIME
R. TIME
DE
TAPE
DIRECTION
PRESET
TUNER
PRESET
MD CD TAPE
AUX
MD
REC
/
PAU SE
TAPE
REC
/
PAUSE
MODE
SLEEP
DISPLAY
DUBBING
VOLUME
START
0207CRXE300(M).15-18.FR 02.5.24, 3:36 PM15

18
Arrêt de la lecture programmée
Appuyez sur &.
Remarque
•Les touches ⁄/› et $/! peuvent être utilisées
pendant la lecture programmée pour passer d’une plage
programmée à l’autre.
Vérification des plages programmées
1. Appuyez sur & pour arrêter la lecture programmée.
2. Appuyez sur la touche PROG. Chaque appui sur les
touches ⁄/› ou $/! affiche le numéro de
séquence et le numéro de plage suivants ou
précédents du programme.
Modification des plages
programmées
1. Suivez les instructions du paragraphe précédent,
“Vérification des plages programmées”.
2. Utilisez les touches ⁄/› ou $/! pour
afficher la plage à changer.
3. Appuyez sur la touche numérique correspondant à la
plage voulue. La plage précédemment programmée
est remplacée par cette nouvelle plage.
Suppression des données du
programme
Appuyez de nouveau sur & lorsque l’appareil est à l’arrêt.
Remarque
•Les données de programme sont également supprimées
lorsqu’on place cet appareil en veille ou que l’on ouvre le
tiroir.
FONCTIONNEMENT DU LECTEUR DE COMPACT DISQUE
0207CRXE300(M).15-18.FR 02.5.24, 3:36 PM18

UTILISATION DE LA MINUTERIE INTÉGRÉE
Français
19
3. Timer REC (Cible d’enregistrement)
Sélectionnez l’appareil avec lequel enregistrer en
tournant le bouton INPUT. Si vous désirez utiliser
le programmateur de lecture pour TUNER ou
AUX, sélectionnez “REC Mode OFF”.
4. ON Time (Heure de début)
La mention “ON Time” s’affiche pendant une
seconde, puis l’afficheur passe en mode de réglage
de l’heure.
Appuyez sur HOUR pour régler les heures.
Appuyez sur MIN pour régler les minutes.
5. OFF Time (Heure de fin)
Réglez l’heure de fin de la même manière que
vous avez réglé l’heure de début. Si vous
définissez une heure de début mais pas une heure
de fin, la lecture ou l’enregistrement se terminent
automatiquement au bout d’une heure.
Remarques
•L’appareil revient en mode normal après 8 secondes sans
appui sur une touche. Si vous n’avez pas encore terminé
votre réglage, revenez en mode de minuterie en appuyant
une ou plusieurs fois sur la touche DISPLAY.
•Si vous sélectionnez une source autre que TUNER ou
AUX à l’étape “2. Timer Input”, l’étape “3. Timer REC”
est sautée.
2Appuyez sur la touche TIMER pour terminer le
réglage de minuterie.
•Si vous appuyez sur la touche TIMER en modes
“ON Time” ou “OFF Time”, le système se met en
veille et l’indicateur TIMER s’allume. Pour
continuer d’utiliser le système, appuyez sur la
touche STANDBY/ON pour mettre en service cet
appareil-ci.
Annulation d’une temporisation
Appuyez sur DISPLAY pour afficher l’heure, puis
appuyez sur TIMER pour éteindre l’indicateur “TIMER”.
Vous pouvez également annuler la temporisation en
appuyant sur TIMER lorsque l’appareil est en mode
veille.
Remarque
•En cas de panne de courant, ou si le cordon d’alimentation de
l’alimentation est débranché pendant plus de cinq minutes,
vous devez régler l’heure à nouveau.
1Appuyez sur la touche DISPLAY.
À chaque appui sur cette touche, l’affichage présente
les invites suivantes :
1. Heure (Activation/désactivation de la minuterie)
Si vous n’avez pas encore réglé l’horloge, la
mention “Set Clock” (Réglez l’horloge) s’affiche.
Reportez-vous en page 8 pour régler l’horloge.
2. Timer Input (Source de lecture)
Sélectionnez la source à lire en tournant le bouton
INPUT.
•La temporisation en enregistrement n’est
possible que si vous choisissez TUNER ou
AUX.
MIN
INPUT
DISPLAY HOUR
TIMER
Avant d’utiliser la
minuterie
Si vous voulez recourir à une temporisation en lecture ou
en enregistrement des platines cassette (KX-E300) ou
minidisc (MDX-E300), vous devez d’abord effectuer les
raccordements indiqués à la section “Raccordement
d’autres composants”, en page 7. Pour plus de précisions,
reportez-vous au mode d’emploi du KX-E300 ou du
MDX-E300.
Temporisation en lecture
ou en enregistrement
Grâce à la minuterie intégrée à l’appareil, vous pouvez
allumer l’appareil à une heure donnée et lancer
automatiquement la lecture ou l’enregistrement. Vous
pouvez également indiquer une heure d’extinction de
l’appareil.
(Exemple)
BALANCE
INPUT
VOLUME
LR
TREBLEBASS
PHONES
STANDBY/ON
TIMER DISPLAY MEMORY
NATURAL SOUND CD RECEIVER CRX-E300
AUTO/MAN'L
PRESET/BAND
TIMER HOUR MIN
MIN MAX
PRESET/TUNING
TIMER ADJ
+–+–
0208CRXE300(M).19-20.FR 02.5.24, 3:36 PM19

UTILISATION DE LA MINUTERIE INTÉGRÉE
20
Minuterie de mise en
veille
L’appareil peut être programmé pour passer
automatiquement en mode veille après un temps donné
(SLEEP).
1Lancez la lecture de la source sonore voulue.
2Appuyez une ou plusieurs fois sur la touche SLEEP
jusqu’à ce que la durée voulue s’affiche.
Chaque appui sur cette touche fait évoluer l’affichage
de la façon suivante :
Environ 4 secondes après le réglage, l’affichage
revient en mode normal.
•La mention “SLEEP” est affichée.
3L’appareil passe automatiquement en mode veille
lorsque la durée choisie est écoulée.
Remarque
•Si vous appuyez sur SLEEP alors que la minuterie de mise en
veille fonctionne, la durée restante s’affiche. De nouvelles
pressions sur la touche changent la durée de la minuterie
d’arrêt indiquée ci-dessus.
SLEEP
SLEEP 2h00m
SLEEP 1h30m
SLEEP 1h00m
SLEEP 0h30m
SLEEP OFF
PRESET
TUNER
PRESET
MD CD TAPE
AUX
MD
REC
/
PAUSE
TAPE
REC
/
PAUSE
MODE
SLEEP
DISPLAY
DUBBING
VOLUME
START
0208CRXE300(M).19-20.FR 02.5.24, 3:36 PM20

Français
21
Réglage des autres appareils à l’aide de la
télécommande
MDX-E300
1POWER
2Touches numériques
3REP (Répétition)
4RANDAM
5TEXT/TIME
6PROG (Lecture programmée)
7^ (Lecture/Pause)
8⁄ › (Saut/Recherche avant)
9$ ! (Saut/Recherche arrière)
0& (Arrêt)
qMD (Sélection source MD)
wMD REC/PAUSE
KX-E300
1POWER
2^ (Lecture)
3⁄ › (Bobinage rapide)
4$ ! (Rembobinage)
5& (Arrêt)
6TAPE (Sélection source cassette)
7TAPE REC/PAUSE
COMMANDE DU SYSTÈME
POWER
123
123
456
456
789
78
0 +10 +100
REP
RANDOM
PROG
ABC
TEXT
/
TIME
R. TIME
DE
TAPE
DIRECTION
PRESET
TUNER
PRESET
MD CD TAPE
AUX
MD
REC
/
PAUSE
TAPE
REC
/
PAUSE
MODE
SLEEP
DISPLAY
DUBBING
VOLUME
START
FREQ
/
RDS MODE
–
PTY SEEK
–
START
1,1
2
36
7,2
4
5
8,3
6
q
w7
9,4
0,5
0209CRXE300(M).21-23.FR 02.5.24, 3:36 PM21

Français
23
1Introduisez le disque voulu dans le lecteur de CD et
placez une cassette vierge dans le KX-E300.
2Appuyez sur CD.
3Appuyez une ou plusieurs fois sur la touche R.TIME
pour indiquer la durée de la cassette. Les durées
possibles s’affichent dans l’ordre suivant :
•Vous pouvez aussi vous servir des touches
numériques pour indiquer la durée de la cassette.
4Appuyez sur PROG pour effectuer la
programmation.
•“A B” s’affiche pour indiquer la direction du
défilement de la cassette (c’est-à-dire la face
sélectionnée).
5Sélectionnez la première plage voulue à l’aide des
touches numériques.
•Répétez l’étape 5 pour programmer d’autres
plages.
•Le temps restant sur la cassette est affiché. Si la
plage choisie est plus longue que la durée restante,
la mention “TM Over” s’affiche.
6Appuyez sur R.TIME pour poursuivre la
programmation sur la face B de la cassette.
•Répétez l’étape 5.
7Choisissez CD = TAPE en appuyant sur DUBBING
MODE, puis appuyez sur DUBBING START pour
lancer l’enregistrement.
2Programmation automatique de la
cassette
1Répétez les étapes 1–3 de la section “Programmation
manuelle de la cassette”.
2Appuyez sur REP pour lancer la programmation.
•La programmation s’effectue dans l’ordre des
plages du CD, sur la face A puis sur la face B.
Lorsqu’elle est terminée, l’affichage suivant
apparaît.
(Exemple) Lorsque 11 plages ont été programmées
Vous pouvez changer les données de programme en
procédant comme il est indiqué à la page 18,
“Modification des plages programmées”.
3Choisissez CD = TAPE en appuyant sur DUBBING
MODE, puis appuyez sur DUBBING START pour
lancer l’enregistrement.
Pour arrêter la copie
Appuyez sur & du KX-E300.
Pour annuler la programmation
d’une cassette
Appuyez sur & du CRX-E300 lorsque la copie est arrêtée.
Contrôle du temps de
copie
Si vous indiquez la longueur de la cassette utilisée, le
récepteur-lecteur de compact disque CRX-E300
programme ou vous aide à programmer l’enregistrement
des plages de telle sorte qu’il reste le moins d’espace vide
possible à la fin de chaque face de la cassette.
1Programmation manuelle de la
cassette
90 60
46 54
DUBBING
START
DUBBING
MODE
PROGREP
CD
R.TIME
COMMANDE DU SYSTÈME
POWER
1 2 3
123
4 5 6
456
7 8 9
78
0+10 +100
REP
RANDOM
PROG
ABC
TEXT
/
TIME
R. TIME
DE
TAPE
DIRECTION
PRESET
TUNER
PRESET
MD CD TAPE
AUX
MD
REC
/
PAU SE
TAPE
REC
/
PAU SE
MODE
SLEEP
DISPLAY
DUBBING
VOLUME
START
FREQ
/
RDS MODE
–
PTY SEEK
–
START
PROG B
0209CRXE300(M).21-23.FR 02.5.24, 3:36 PM23

9
Deutsch
WIEDERGABE EINER SIGNALQUELLE
2Die Stromversorgung einschalten, indem
STANDBY/ON an der Frontplatte oder POWER an
der Fernbedienung gedrückt wird.
•
Komponenten der Piano Craft-Serie, deren Anschlüsse
an den CRX-E300 richtig durchgeführt worden sind,
können mittels des CRX-E300 eingeschaltet oder in den
Bereitschaftsmodus ausgeschaltet werden. Falls die
angeschlossenen Komponenten jedoch mit ihren
STANDBY/ON-Tasten in den Bereitschaftsmodus
ausgeschaltet wurden, können sie nicht mit der
STANDBY/ON-Taste des CRX-E300 gesteuert werden.
3Die gewünschte Eingangssignalquelle wählen, indem
INPUT gedreht wird, bis die Signalquelle am Display
angezeigt wird.
•Wenn eine mit dem AUX-Anschluß verbundene
Komponente wiedergegeben werden soll, muß
INPUT auf AUX gestellt werden.
4Die Signalquelle wiedergeben (sich auf die bei jeder
Komponente mitgelieferte Anleitung beziehen).
5Die Lautstärke durch Drehen von VOLUME an der
Frontplatte bzw. durch Drücken der VOLUME + -
Taste an der Fernbedienung einstellen.
6Wenn gewünscht, auch BASS, TREBLE oder
BALANCE einstellen.
BASS: Den Regler im Uhrzeigersinn drehen, um die
niedrigen Frequenzen zu verstärken (durch Drehen im
Gegenuhrzeigersinn werden diese Frequenzen abgeschwächt).
TREBLE: Den Regler im Uhrzeigersinn drehen, um die
hohen Frequenzen zu verstärken (durch Drehen im
Gegenuhrzeigersinn werden diese Frequenzen abgeschwächt).
BALANCE: Die Lautstärke-Balance zwischen den rechten und
linken Lautsprechern einstellen, um eventuelle Unterschiede
auszugleichen, die durch die Lautsprecherposition oder
akustische Bedingungen des Hörraums bedingt sind.
Verwendung der Kopfhörer
Die Kopfhörer sind an der PHONES-Anschlußbuchse
anzuschließen. Das Tonsignal der Hauptlautsprecher kann
über die Kopfhörer mitgehört werden.
Nach dem Betrieb des Geräts
STANDBY/ON an der Frontplatte, oder POWER an der
Fernbedienungseinheit noch einmal drücken, um das
Gerät in den Bereitschaftsmodus zu schalten.
•STANDBY wird für kurze Zeit am Display angezeigt.
Automatische Bereitschaftsfunktion
Dieses Gerät schaltet unter den folgenden Bedingungen
automatisch in den Bereitschaftsmodus;
•
Eine Komponente, die über ein Systemsteuerkabel
angeschlossen ist, wurde als Eingangssignalquelle gewählt.
•Die mit diesem Gerät verbundene Komponente ist in
den Stopp-Modus geschaltet, und es wird während 30
Minuten kein Bedienungsschritt ausgeführt.
POWER
VOLUME –/+
POWER
1 2 3
123
4 5 6
456
7 8 9
78
0+10 +100
FREQ
/
RDS MODE
–
PTY SEEK
–
START
REP
RANDOM
PROG
ABC
TEXT
/
TIME
R. TIME
DE
TAPE
DIRECTION
PRESET
TUNER
PRESET
MD CD TAPE
AUX
MD
REC
/
PAUSE
TAPE
REC
/
PAUSE
MODE
SLEEP
DISPLAY
DUBBING
VOLUME
START
VOLUMESTANDBY/ON
INPUT
BALANCE
TREBLE
BASSPHONES
BALANCE
INPUT
VOLUME
LR
TREBLEBASS
PHONES
STANDBY/ON
TIMER DISPLAY MEMORY
NATURAL SOUND CD RECEIVER CRX-E300
AUTO/MAN'L
PRESET/BAND
TIMER HOUR MIN
MIN MAX
PRESET/TUNING
TIMER ADJ
+–+–
Dieses Kapitel erklärt die grundlegenden
Bedienungsschritte zum Abstimmen eines Senders sowie
zur Wiedergabe von CDs und der Steuerung der
angeschlossenen Komponenten.
1Den VOLUME-Regler drehen, um die Lautstärke auf
“MIN” zu stellen.
0304CRXE300(M).08-09.G 02.5.24, 3:58 PM9
Produkt Specifikationer
| Mærke: | Yamaha |
| Kategori: | Radio |
| Model: | CRXE300 |
Har du brug for hjælp?
Hvis du har brug for hjælp til Yamaha CRXE300 stil et spørgsmål nedenfor, og andre brugere vil svare dig
Radio Yamaha Manualer

20 September 2024
22 Juli 2024
18 Juli 2024
4 Juli 2024
4 Juli 2024
28 Juni 2024
19 Februar 2024
3 Maj 2023
18 December 2022
Radio Manualer
- Radio Bosch
- Radio SilverCrest
- Radio Ozito
- Radio Denver
- Radio Sencor
- Radio Sony
- Radio EasyMaxx
- Radio Panasonic
- Radio Hager
- Radio Metabo
- Radio DeWalt
- Radio RYOBI
- Radio Philips
- Radio Lenco
- Radio Vitek
- Radio OK
- Radio AEG
- Radio Audio-Technica
- Radio Pioneer
- Radio Sharp
- Radio Logitech
- Radio Emos
- Radio Kenwood
- Radio Zeniq
- Radio Daewoo
- Radio Technaxx
- Radio Lowrance
- Radio MB Quart
- Radio Sennheiser
- Radio Harman Kardon
- Radio Garmin
- Radio Sanyo
- Radio Grundig
- Radio Makita
- Radio Nikkei
- Radio Motorola
- Radio Toshiba
- Radio Pyle
- Radio Argon
- Radio Furrion
- Radio Denon
- Radio Matsui
- Radio Biltema
- Radio Scansonic
- Radio Nedis
- Radio Sonoro
- Radio Logik
- Radio Kicker
- Radio Vonroc
- Radio Moulinex
- Radio Hama
- Radio Auna
- Radio Muse
- Radio Thomson
- Radio Roberts
- Radio Hyundai
- Radio Aiwa
- Radio Milwaukee
- Radio JBL
- Radio AKAI
- Radio TriStar
- Radio Teufel
- Radio Clas Ohlson
- Radio Audio Pro
- Radio Pure
- Radio Smartwares
- Radio Trevi
- Radio Trust
- Radio Topcom
- Radio Adler
- Radio Black And Decker
- Radio Camry
- Radio Busch-Jaeger
- Radio Blaupunkt
- Radio Clint
- Radio JVC
- Radio Einhell
- Radio Sandstrøm
- Radio Stanley
- Radio Uniden
- Radio Clatronic
- Radio Quigg
- Radio Hikoki
- Radio Hilti
- Radio Hitachi
- Radio Noveen
- Radio BasicXL
- Radio Medion
- Radio Sweex
- Radio Festool
- Radio Cambridge
- Radio Tangent
- Radio König
- Radio TechniSat
- Radio Tivoli Audio
- Radio Bose
- Radio Constellation
- Radio Crosley
- Radio Alpine
- Radio EnVivo
- Radio Maginon
- Radio Navman
- Radio Parrot
- Radio Kärcher
- Radio Balance
- Radio Telefunken
- Radio Tronic
- Radio Exibel
- Radio Craftsman
- Radio Powerplus
- Radio Technics
- Radio Zebra
- Radio Jensen
- Radio Alecto
- Radio Icom
- Radio Olympia
- Radio HQ
- Radio Krüger&Matz
- Radio Schneider
- Radio Basetech
- Radio NGS
- Radio Oxx
- Radio Radionette
- Radio Timex
- Radio Soundmaster
- Radio TERRIS
- Radio MT Logic
- Radio Kathrein
- Radio Victrola
- Radio GlobalTronics
- Radio Cobra
- Radio Bogen
- Radio Omnitronic
- Radio Telestar
- Radio Geneva
- Radio Porter-Cable
- Radio Bush
- Radio JUNG
- Radio Binatone
- Radio Dual
- Radio Telex
- Radio Salora
- Radio Sagem
- Radio AIC
- Radio Nevir
- Radio Teac
- Radio Imperial
- Radio TrekStor
- Radio Sven
- Radio Swan
- Radio Hertz
- Radio Albrecht
- Radio Scott
- Radio Veho
- Radio Yaesu
- Radio La Crosse Technology
- Radio Polk
- Radio Midland
- Radio Monacor
- Radio IRC
- Radio Audizio
- Radio JL Audio
- Radio Brennenstuhl
- Radio Sogo
- Radio Alba
- Radio RCA
- Radio Cotech
- Radio ECG
- Radio Renkforce
- Radio AudioSonic
- Radio Manhattan
- Radio SPC
- Radio Aquatic AV
- Radio Proline
- Radio Caliber
- Radio OneConcept
- Radio Switel
- Radio JGC
- Radio Numan
- Radio Easy Home
- Radio Be Cool
- Radio Brondi
- Radio Viper
- Radio Lexon
- Radio PerfectPro
- Radio ILive
- Radio Irox
- Radio Roth
- Radio Roadstar
- Radio Clarion
- Radio Watson
- Radio IHome
- Radio Dcybel
- Radio Acoustic Energy
- Radio Eton
- Radio GPO
- Radio Sirius
- Radio Majestic
- Radio Audiovox
- Radio CRUX
- Radio SACK It
- Radio Xhdata
- Radio Futaba
- Radio Sangean
- Radio Vimar
- Radio Power Dynamics
- Radio Oricom
- Radio Rockford Fosgate
- Radio Klein Tools
- Radio Oregon Scientific
- Radio Aluratek
- Radio GPX
- Radio Lenoxx
- Radio Terratec
- Radio Lexibook
- Radio Pinell
- Radio Stabo
- Radio Memphis Audio
- Radio Duronic
- Radio Boss
- Radio Ruark Audio
- Radio DAP-Audio
- Radio Kunft
- Radio GoGen
- Radio Lutron
- Radio Delta
- Radio Emerson
- Radio BLUEPALM
- Radio Fusion
- Radio Audac
- Radio Boston Acoustics
- Radio AMX
- Radio H-Tronic
- Radio DreamGEAR
- Radio August
- Radio Xoro
- Radio Manta
- Radio Schwaiger
- Radio Steren
- Radio Orava
- Radio Reflexion
- Radio Graphite
- Radio REVO
- Radio Artsound
- Radio Data-Tronix
- Radio Ferguson
- Radio Aconatic
- Radio Hitec
- Radio Equity
- Radio Icy Box
- Radio Tevion
- Radio Brigmton
- Radio Sunstech
- Radio Marquant
- Radio Nordmende
- Radio AudioAffairs
- Radio Coby
- Radio Mac Audio
- Radio Bigben Interactive
- Radio Listo
- Radio Bigben
- Radio Sunwind
- Radio Laser
- Radio Naxa
- Radio Ricatech
- Radio Mpman
- Radio Ices
- Radio Peaq
- Radio Freecom
- Radio Gira
- Radio Dnt
- Radio Irradio
- Radio Karcher Audio
- Radio PAC
- Radio Infinity
- Radio Ruarkaudio
- Radio Go Green
- Radio Wolfgang
- Radio Linn
- Radio Elta
- Radio Iluv
- Radio Monitor Audio
- Radio Multiplex
- Radio Soundstream
- Radio Zolid
- Radio Sagemcom
- Radio Block
- Radio Berker
- Radio Woxter
- Radio View Quest
- Radio Noxon
- Radio Brionvega
- Radio Wet Sounds
- Radio Eissound
- Radio MTX Audio
- Radio Digitech
- Radio Tecsun
- Radio TFA Dostmann
- Radio Audisse
- Radio Kruger Matz
- Radio Intertechno
- Radio EKO
- Radio Videologic
- Radio Tivoli
- Radio Roswell
- Radio Intek
- Radio Digitalbox
- Radio Whistler
- Radio Xact
- Radio Magnavox
- Radio GME
- Radio NUVO
- Radio Narex
- Radio Tiny Audio
- Radio R-MUSIC
- Radio E-bench
- Radio Konig Electronic
- Radio Peha
- Radio SiriusXM
- Radio Sanwa
- Radio SW-Stahl
- Radio Sailor
- Radio SSV Works
- Radio Microlab
- Radio QFX
- Radio Voxx
- Radio Ices Electronics
- Radio AmpliVox
- Radio Elbe
- Radio GBS Elettronica
- Radio Sang
- Radio Gewiss
- Radio Axxess
- Radio Majority
- Radio Retekess
- Radio Wintal
- Radio Acoustic Solutions
- Radio Atlantis Land
- Radio Ranger
- Radio MAAS
- Radio Weather X
- Radio Mebby
- Radio Yamazen
- Radio Blonder Tongue
- Radio RoadKing
Nyeste Radio Manualer

28 Marts 2025
26 Marts 2025
21 Marts 2025
10 Marts 2025
10 Marts 2025
9 Marts 2025
4 Marts 2025
4 Marts 2025
26 Februar 2025

24 Februar 2025