Zoom F8 Manual
Læs nedenfor 📖 manual på dansk for Zoom F8 (140 sider) i kategorien Digital multitrack optager. Denne guide var nyttig for 25 personer og blev bedømt med 4.5 stjerner i gennemsnit af 2 brugere
Side 1/140

© 2015 ZOOM CORPORATION
Copying or reprinting this manual in part or in whole without
permission is prohibited.
Operation Manual
Introduction
04
Introduction
Thank you very much for purchasing a ZOOM Multitrack Field
Recorder. The has the following features:
• 8 analog input channels with super high-quality preamps
The 8 lockable XLR/TRS combo jacks provide high-quality analog
inputs with EIN of −127 dBu or less, +75dB maximum input gain and
support for +4dB input.
• PCM recording at up to 192kHz/24-bit resolution
• Recording of up to 10 tracks simultaneously
Inputs 1–8 and a stereo mix (left and right) can be recorded at the
same time (8 tracks when the sampling rate is 192 kHz).
• Dual channel recording of separate files at lower levels
simultaneously with ordinary recording (Inputs 1–4)
Using dual channel recording at a lower input level, you can create
backup recordings to use when unexpected loud noise causes regu-
lar recordings to distort, for example.
• Newly redesigned limiters for overload protection
With 10 dB of headroom, this limiter prevents distortion even more
than ordinary ones. The threshold can also be set to keep the signal
below that level.
• Time code with pinpoint accuracy
The utilizes a high-precision oscillator that generates time-
code with accuracy of 0.2ppm, ensuring rock-solid stability when
syncing audio and video.
• Outputs include a stereo headphone jack with a powerful
100mW amp as well as MAIN OUT 1/2 and SUB OUT 1/2 jacks
This allows you to send the audio signal to a video camera or other
device while monitoring with headphones.
• Built-in digital mixer with flexible signal routing
Prefader and postfader signals from inputs 1–8 can be freely routed
to any out puts.
• Phantom power (+24V/+48V) can be supplied
This can be turned on/off for each input separately.
• Three possible power sources—batteries, AC adapter and
an external DC power supply
In addition to AA batteries and an AC adapter, a 9-16V external DC
power supply can also be used.
• Double SDXC card slots
Simultaneous recording on 2 SD cards is possible, and support for
SDXC cards up to 512 GB enables long-duration recording. In addi-
tion, the can be used as a card reader by connecting to a
computer using USB.
• USB audio interface capabilities with up to 8 ins and 4 outs
The can be used not only as a 2-in/2-out audio interface, but
also as an 8-in/4-out audio interface (driver required for Windows).
• Other useful features
Other convenient functions include a built-in slate mic for voice
memos and a variable frequency slate tone generator to confirm lev-
els. There’s also both input and output delay, and pre-recording of up
to 6 seconds.
• ZOOM mic capsules can be connected
Use any ZOOM mic capsule instead of inputs 1/2.
Please read this manual carefully to fully understand the functions of
the so that you can make the most of it for many years. After
reading this manual, please keep it with the warranty in a safe place.

Names of parts
05
F8 Multi Track Field Recorder
Back
Front
Display
Select
encoder
Slate
switch
MENU
key
Headphone
volume
Search
backward
key
MIC IN
connector
Battery slotTimecode IN/OUT
connectors
DC IN connector
Search
forward
key
Play/pause
key
Record
key
POWER
switch
Stop
key
Track
key
Track
indicator
Input volume
knob
LED level
meter
Slate mic
PFL key
LED level meter
−48
Green Orange Red
−30 −18 −12 −6 0
(dBFS)
Names of parts

Names of parts
06
Left side
Inputs 1–8EXT DC IN MAIN OUT
XLR TA-3TRS
Right side
1: GND
2: HOT
3: COLD
1: GND
2: HOT
3: COLD
DC 9–16V
HIROSE 4-pin
TIP: HOT
RING: COLD
SLEEVE: GND
EXT DC IN
connector
SUB OUT 1/2
jack
Headphone
jack
USB
port
SD card
slots
Inputs 5–8
Inputs 1–4
MAIN OUT 1/2
jacks
Lock release
button
12
1: −4: +
2: NC3: NC
21
3
3
Names of parts (continued)

Connecting mics/other devices to Inputs 1–8
07
F8 Multi Track Field Recorder
Connecting mics
Connect dynamic and condenser mics with XLR plugs to
Inputs 1–8.
Phantom power (+24V/+48V) can be supplied to condenser
mics. (→ P.65)
Dynamic mic
(XLR cable)
Condenser mic
(XLR cable)
NOTE
When disconnecting a mic, gently pull on the XLR plug while simul-
taneously pushing the connector lock release button.
Connecting line level equipment
Connect the TRS plugs of keyboards and mixers directly to
Inputs 1–8.
Direct input of passive guitars and basses is not supported.
Connect these instruments through a mixer or effects device.
(TRS cable)
Keyboard
(TRS cable)
Mixer
The can record a total of 10 tracks simultaneously: 8 individual tracks with signals coming from Inputs 1–8 and a stereo
mix of these inputs on left and right tracks.
You can connect mics and the outputs of line-level devices such as keyboards, mixers, or instruments with active electronics
to Inputs 1–8 and record them to tracks 1–8. Alternatively, Inputs 1 and 2 can instead receive input from a ZOOM mic capsule
connected to the MIC IN connector.
Connecting mics/other devices to Inputs 1–8
Connecting mics/other devices to Inputs 1–8
08
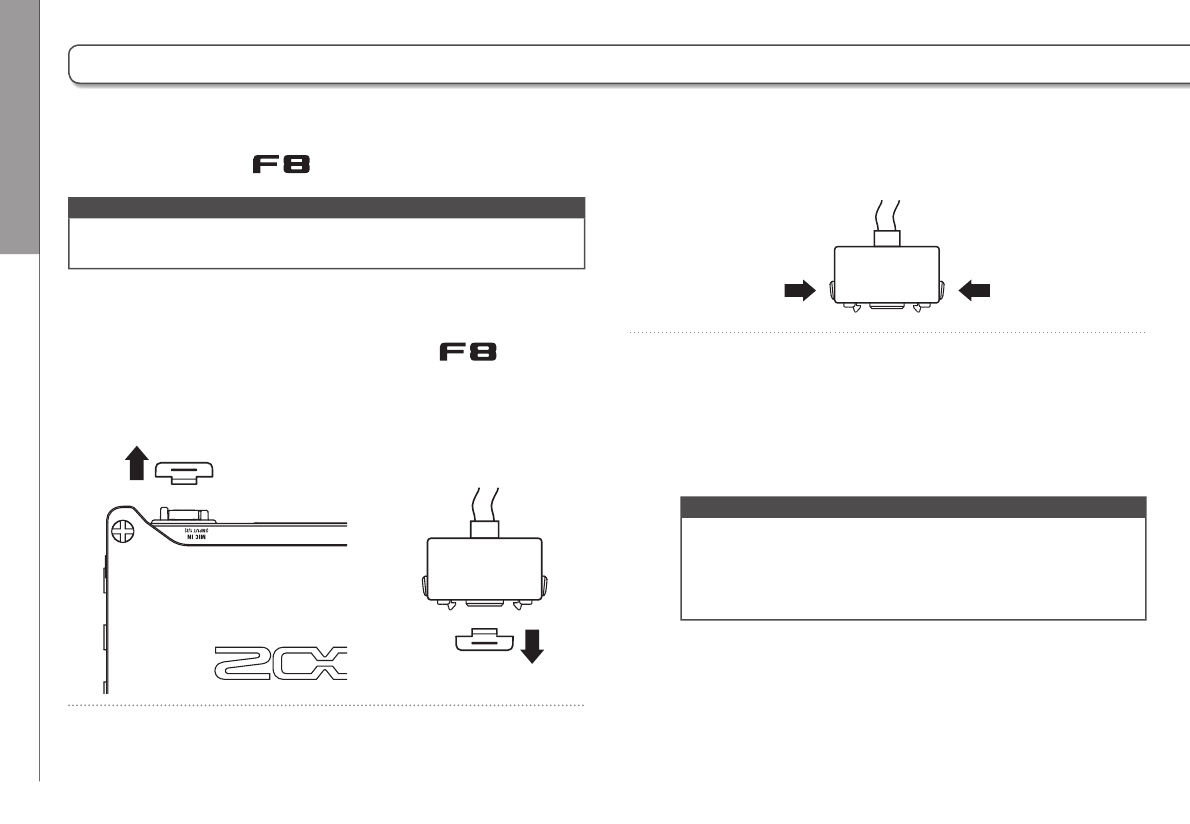
Connecting mic capsules
A ZOOM mic capsule can be connected to the MIC IN connec-
tor on the back of the .
NOTE
• The mic capsule input is assigned to tracks 1/2.
• When a mic capsule is connected, Inputs 1/2 cannot be used.
Connecting and disconnecting mic capsules
1. Remove the protective caps from the and the
mic capsule or extension cable.
2. While pressing the side buttons on the mic capsule or
extension cable, connect it to the main unit, inserting
it completely.
3. To disconnect the mic capsule or extension cable, pull
it away from the main unit while simultaneously
pressing the buttons on its sides.
NOTE
• Do not use too much force when disconnecting. Doing so
could damage the mic capsule, extension cable or main
unit.
• Reattach the protective cap when a mic capsule is not
connected.
Stereo input
By enabling the stereo link for tracks 1/2, 3/4, 5/6 or 7/8, the
corresponding Inputs (1/2, 3/4, 5/6 or 7/8) can be handled as a
stereo pair. (→ P.24)
When linked, Input 1, 3, 5 or 7 becomes the left channel and
Input 2, 4, 6 or 8 becomes the right channel.
Connecting mics/other devices to Inputs 1–8 (continued)

LCD display
10
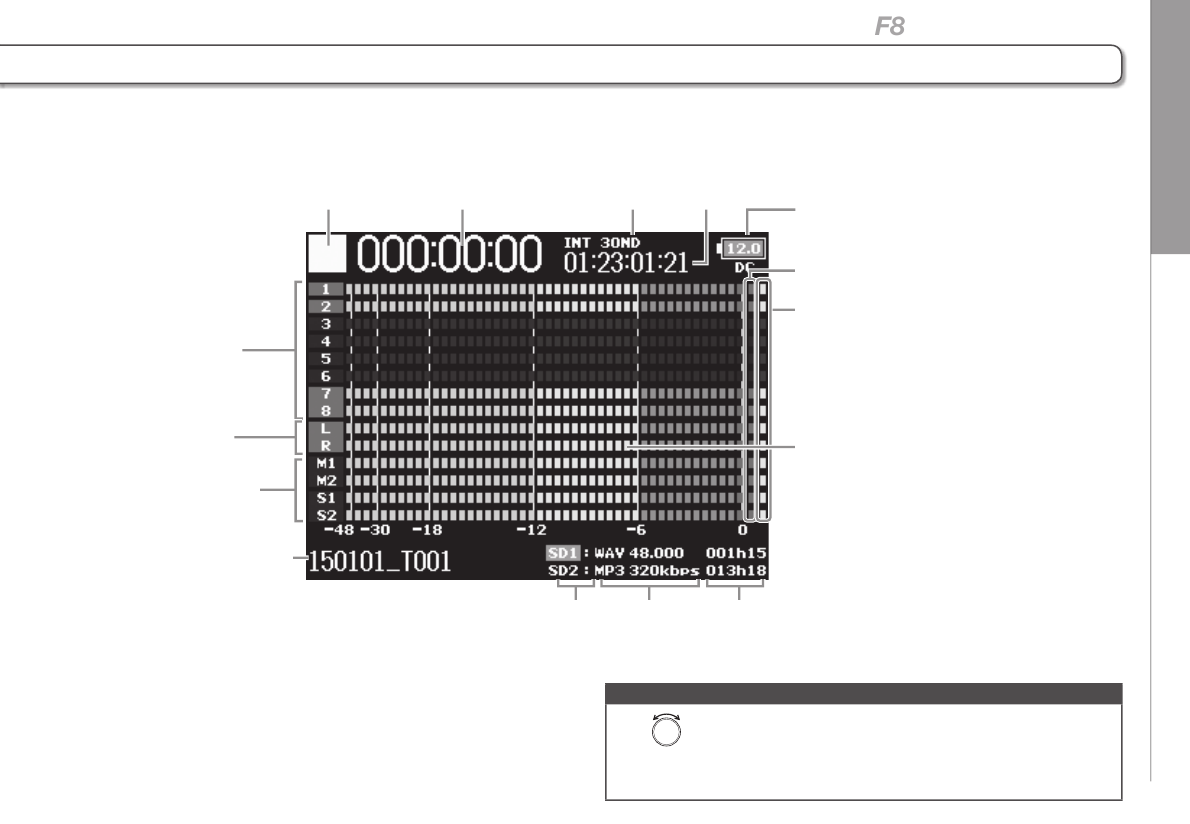
Recording/playback
file format and
sampling rate
(by card)
When recording: remaining recordable time
When playing: remaining playback time
(by card)
L/R tracks
Fader
Pan
Recording/playback take name
Press when stopped to show the
name of the next track to be recorded.
Track number
Red: input enabled
Green: playback track enabled
Grey: input disabled
Recording/playback tracks
Red: recording tracks
Green: playback tracks
Grey: disabled tracks
(by card)
Playback card
Green: used for playback
Grey: no card
Stopped
Status icon
Recording
Counter
(playback/elapsed recording time)
Frame rate
INT: internal timecode enabled
EXT: external input timecode enabled
Recording/playback timecode
Power type and remaining power
DC: AC adapter
EXT: external DC
power supply
AA: batteries
Full
Empty
Level meters
Stereo-linked
inputs
Clip indicators
Limiter indicators
Yellow: limiter functioning
Paused
Playing
Limiter status
Grey: disabled
Red: enabled
Yellow: functioning
Phantom power status
Lit: enabled
Unlit: disabled
HINT
• Stereo-linked tracks are shown together i.e., "7/8".
• When the Home Screen is not displayed, press and hold to
return to the Home Screen.
Home Screen
■ Mixer
LCD display
LCD display
11
F8 Multi Track Field Recorder
Power type and
remaining power
Limiter
indicators
Tracks 1–8
MAIN OUT 1/2,
SUB OUT 1/2
tracks
L/R tracks Level
meters
Status icon Counter Frame rate
Recording/playback
timecode
Recording/playback
take name
Playback
card
Recording/playback
file format and
sampling rate
(by card)
When recording: remaining recordable time
When playing: remaining playback time
(by card)
Clip indicators
■ Level meters
NOTE
Turn to switch between showing the mixer (Tracks 1–8, MAIN
OUT 1/2, SUB OUT 1/2) and level meters (Views 1–4 can be set →
P.113) on the display.

LCD display
12
Character input screen
MENU::
abc
#+=
Number of characters input/
Maximum number of characters
Press
Press
ABC
Press
Keyboard
Instructions
Automatic
input keys
Text box
■ Editing operations
Move cursor in box: and
Select character: Turn
Confirm character: Press
Complete editing: Move cursor to “Enter” and press
Cancel editing: Press
■ Automatic input keys
(Date): Automatically inputs the date. Example: 150210
(Time): Automatically inputs the time. Example: 180950
(Project): Automatically inputs “Project***” in the character
field.
(Scene): Automatically inputs the scene name.
NOTE
• The following characters can be used in project names:
(space) ! # $ ' ( ) + , - 0 1 2 3 4 5 6 7 8 9 ; = @ A B C D E F G H I J K L M N O P Q R S T
U V W X Y Z [ ] ^ _ ` a b c d e f g h i j k l m n o p q r s t u v w x y z { } ~
LCD display (continued)

Preparations Supplying power
13
F8 Multi Track Field Recorder
Using AA batteries
1. Turn the power off and then loosen the screw in the
battery cover to open it.
2. Remove the battery case from the battery slot.
3. Open the battery case cover.
4. Install the batteries.
+
−
−
+
+
−
−
+
+−
+
+
−
−
5. Replace the battery case cover.
6. Load the battery case.
NOTE
Load the case so that the side with the protruding rail is up.
7. Close the battery cover and tighten the screw.
NOTE
• Be careful because the battery case could become loose
unexpectedly if the cover screw is not tightened firmly.
• Use only one type of batteries (alkaline, NiMH or lithium)
at a time.
• After loading batteries, set "Power Source" to the correct
type of battery. (→ P.20)
• If the remaining battery power indicator turns red, turn the
power off immediately and install new batteries.
Supplying power
Produkt Specifikationer
| Mærke: | Zoom |
| Kategori: | Digital multitrack optager |
| Model: | F8 |
Har du brug for hjælp?
Hvis du har brug for hjælp til Zoom F8 stil et spørgsmål nedenfor, og andre brugere vil svare dig
Digital multitrack optager Zoom Manualer

15 August 2024
14 August 2024
9 August 2024
6 August 2024
Digital multitrack optager Manualer
- Digital multitrack optager Kenwood
- Digital multitrack optager Roland
- Digital multitrack optager Yamaha
Nyeste Digital multitrack optager Manualer

22 August 2024
21 August 2024
21 August 2024

4 Juli 2024

4 Juli 2024