Bintec-elmeg S530 Manual
Bintec-elmeg
Telefon
S530
Læs nedenfor 📖 manual på dansk for Bintec-elmeg S530 (2 sider) i kategorien Telefon. Denne guide var nyttig for 12 personer og blev bedømt med 4.5 stjerner i gennemsnit af 2 brugere
Side 1/2
xDSL
elmeg hybird System
Internet
Public
network
5500001619 - V. 1.4
The connectors for the receiver and the headset must be inserted prior to fixing
the wall bracket.
Fix the unit to a flat wall. It is important that you get the distances between the drill
holes absolutely accurate.
The wall brackets are screwed on underneath, at the back of the system telephone.
The system telephone is supplied without the receiver brackets for wall mounting.
To mount the system telephone on the wall, the receiver bracket needs to be
replaced by the receiver bracket from the assembly kit. To change it over, it can
be pulled gently upwards and out.
Refer to the manual for information on installation.
Wall mounting
Note the ambient temperature for storing and operating the device in the specifications.
The device must only be connected once the permissible ambient operating temperature
is reached.
Please note that condensation may form on or within the device during transitions from
cold to warm temperatures . Only remove the device from the packaging when the
permissible ambient operating temperature has been reached.
During a storm, you should not connect or disconnect any cables and do not make
any calls.
Only connect the cords to the connectors provided.
Position the cords where they will not cause accidents.
Avoid the following influencing factors:
- Direct sunlight
- Heat sources (e. g. heating elements)
- Electronic devices (e. g. sound systems, office equipment or microwaves)
- Penetration of humidity or liquids
- Corrosive liquids or vapours
- High levels of dust
Do not use the device in humid or explosive areas.
Only open those parts of the unit which are shown in the assembly/operating instructions.
Do not touch the plug contacts with sharp, metal or damp objects.
If the device is not permanently mounted, position the device or the accessory on a
non-slip surface.
Only clean the device with the antistatic cloth provided.
Use approved accessories only.
Only terminals that offer SELV (safety extra low voltage) and/or comply with ETS
300047 may be connected to the device. Proper use of approved terminals complies
with this directive.
Plug power supply unit
Only use the plug power supply unit which is available as an accessory.
Do not use any plug power supply units that show signs of damage (breaks or cracks
in the casing).
Electrostatic charges (ESD protection)
The ESD protection that the supplied system telephone has against the effects of
electrostatic charges is greater than certification values. Nonetheless, you should avoid
excessive static charges. Various causes can result in the electrostatic charge achieving
values that far exceed the permissible values required and that exceed the system
telephone's interference immunity. Such causes or circumstances, such as low humidity
and carpets, must be eliminated. The manufacturer of the system telephone accepts
no liability for damages resulting from these causes.
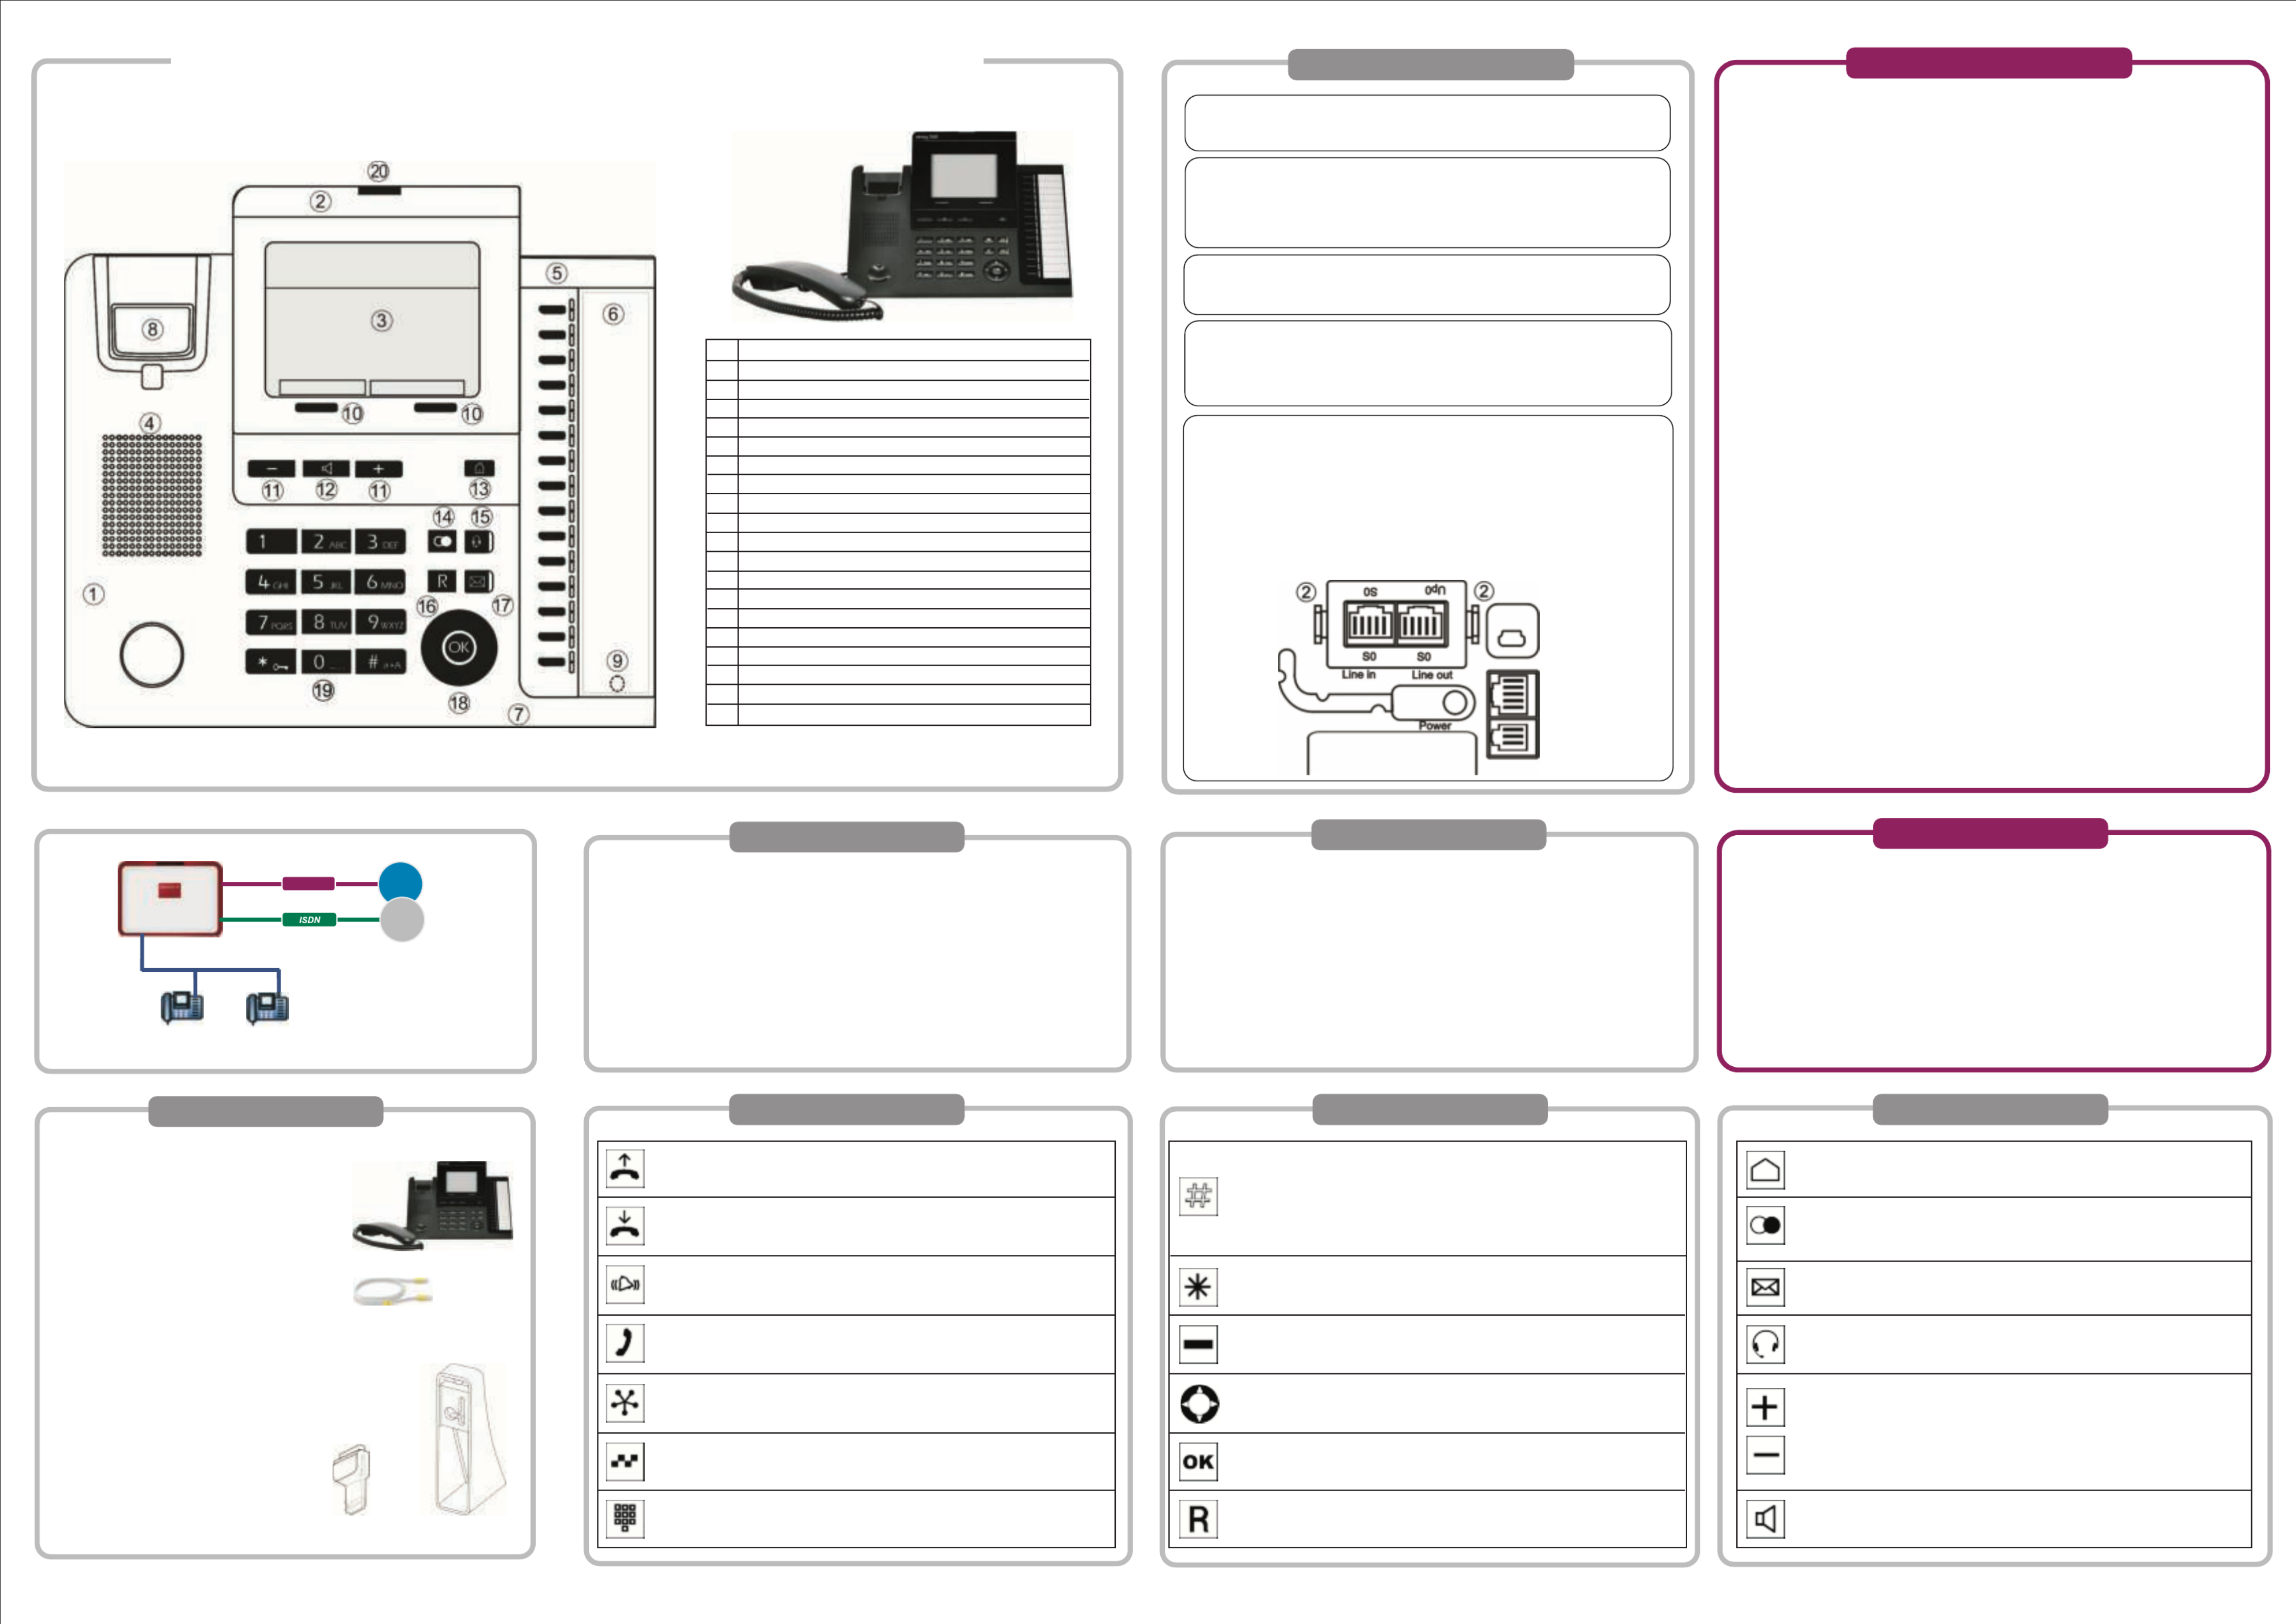
Mount and connect
The system telephone can be used as a desk or wall unit.
An assembly kit (not supplied) is required to attach it to a wall.
Connection sockets for S0 / Up0: The socket for selecting the connection is
located on the underside of the system telephone. Here you can select between
the S0 and Up0 connection. To do this, you press the module's two (2) clips
together, take the module out and, depending on the connection type, turn it
round and put it back in.
The picture shows the connector for S0.
The external S0 connector is connected to the »Line in« socket.
Another ISDN system telephone or ISDN telephone can be connected to the
"Line out" socket.
The maximum length of the cable to the telephone here is 10 metres.
In order to operate your system telephone, you must insert the cords for the
telephone connector and the receiver.
Connect your telephone to the S0 or Up0 connector.elmeg hybird system's
Label strips: Two hooks are used to put the cover into the holder for label
strips, and a magnet is used to secure it on the underside
Headset: You can connect a headset to the system telephone (not supplied).
Connect the headset to the headset socket on the system telephone. Then
insert the headset cable into the cable guide and secure it beneath the cable
retainers.
Line-in connection socket: Either S0 or Up0
Line-out connection socket: S0 in every mode
Mini USB connection (latest release)
Receiver port (handset)
Headset connector
Socket for the plug power supply unit (accessory)
Required for the 1st and subsequent T500 key extension on
the elmeg S530 / elmeg S560 and for installations for which
the existing power supply is insufficient.
Available connections
Receiver bracket Wall bracket
System telephones
elmeg S560 / elmeg S530
system telephoneelmeg S560 / S530
Receiver with cord
Base
One connector cord with RJ45 plugs
Installation instructions
Antistatic cloth
Assembly kit (not supplied)
10 wall brackets
5 receiver brackets
20 screws for connecting the
system telephone to the wall brackets
10 wood screws 3x30
10 dowels for 5 mm holes
1 drilling template
*elmeg S530 has a 4-line graphic display with LED backlight
1 System telephone
2 Display
3 8-line graphic display with LED backlight*
4 Loudspeaker port
5 Function keys with LED
6 Label field
7 Microphone
8 Cradle switch
9 Magnetic clamp in label field
10 Softkeys
11 + / - keys for settings
12 Key for loudspeaker / hands-free
13 Home key
14 Redial key
15 Headset key
16 Hold key
17 Mail key
18 Navigator with OK key
19 Dialling keys
20 Blue status LED
Safety information
Contact
Scope of supply
elmeg S560 / S530 System Telephone - Installation
Functions
Lift receiver, turn on Hands-free, turn on headset, or start preparatory
dialling. When you enter a number to dial via an SIP provider, the output is only dialled
around 5 seconds after entering the last digit. If you end the call number
with the hash key, the system dials automatically. The terminal must be able
to dial the hash key in to the telephone system.
Use the Home key to go back to the Idle menu.
When idle, the device info is displayed.
Keys Keys
Replace receiver, turn off hands-free or turn off headset.
The system telephone is in idle status
A call is signalled. The call melody sounds.
You are in a call.
You hear the positive or negative acknowledge tone.
A conference call is initiated.
Key 0-9, * or #: Choose call number, code, character or text.
You can use this key to protect the system telephone from
certain types of use.
You can use the Navigator to navigate in the display.
Softkeys. The softkeys' available functions are shown in the bottom row in
the display.
The OK key is used to confirm and save inputs.
From the Idle menu, pressing twice opens the phone book.
You can use the hold key to go from a call to a hold for enquiry.
Pressing the key again terminates the hold and you are once more connected
with the person you were first speaking to.
When the receiver is hung up:
Use the Redial Last Number key to dial the last number dialled again.
When the receiver is off the hook:
Use the Redial Last Number key to display the last 30 numbers dialled.
Use the Mail key to query the system's voicebox.
When the key's blue LED flashes, it means there are new messages.
The Headset key is used to switch the headset on and off.
These keys are used to adjust the volume and the display.
The Loudspeaker key is used to switch the hands free
or loudspeaker on and off.
Manual, software and workshops:
You will find the latest manual, the Dime Manager and additional information on our website
at www.bintec-elmeg.com.
Contact:
If you have any questions about your new product, or if you require further information,
the bintec elmeg GmbH Support Centre can be reached Monday to Friday, between the
hours of 9 am and 5 pm, at
Telephone: +49 911 9673 0
Fax: +49 911 688 0725
For detailed information about our support and service offers please visit our website
at www.bintec-elmeg.com.
Produkt Specifikationer
| Mærke: | Bintec-elmeg |
| Kategori: | Telefon |
| Model: | S530 |
Har du brug for hjælp?
Hvis du har brug for hjælp til Bintec-elmeg S530 stil et spørgsmål nedenfor, og andre brugere vil svare dig
Telefon Bintec-elmeg Manualer

28 August 2024
28 August 2024
28 August 2024
28 August 2024
28 August 2024
28 August 2024
Telefon Manualer
- Telefon SilverCrest
- Telefon Acer
- Telefon Amplicomms
- Telefon Denver
- Telefon Sencor
- Telefon Sony
- Telefon Siemens
- Telefon Samsung
- Telefon GE
- Telefon Panasonic
- Telefon Philips
- Telefon LG
- Telefon AEG
- Telefon Audio-Technica
- Telefon Doro
- Telefon Gigaset
- Telefon AT&T
- Telefon Pioneer
- Telefon Apple
- Telefon Logitech
- Telefon Daewoo
- Telefon Sennheiser
- Telefon Emporia
- Telefon OpenVox
- Telefon Grundig
- Telefon Akuvox
- Telefon D-Link
- Telefon Motorola
- Telefon Roland
- Telefon Asus
- Telefon Toshiba
- Telefon Pyle
- Telefon Brother
- Telefon Lenovo
- Telefon Yamaha
- Telefon Infiniton
- Telefon OnePlus
- Telefon AVM
- Telefon Logik
- Telefon Planet
- Telefon Hama
- Telefon Thomson
- Telefon Nokia
- Telefon JBL
- Telefon TriStar
- Telefon TRENDnet
- Telefon Trevi
- Telefon Trust
- Telefon Fysic
- Telefon Topcom
- Telefon Flex
- Telefon Blaupunkt
- Telefon Sandstrøm
- Telefon Uniden
- Telefon Hitachi
- Telefon Medion
- Telefon Sweex
- Telefon Linksys
- Telefon Cisco
- Telefon Huawei
- Telefon Ranex
- Telefon Bang And Olufsen
- Telefon Geemarc
- Telefon Jabra
- Telefon Loewe
- Telefon Crosley
- Telefon Netgear
- Telefon EnVivo
- Telefon Lifetec
- Telefon Avaya
- Telefon Parrot
- Telefon Telefunken
- Telefon Vtech
- Telefon Microsoft
- Telefon Jacob Jensen
- Telefon Alcatel
- Telefon Anker
- Telefon Zebra
- Telefon Olympia
- Telefon Plantronics
- Telefon Xiaomi
- Telefon Krüger&Matz
- Telefon RugGear
- Telefon CAT
- Telefon Marmitek
- Telefon Oppo
- Telefon Crosscall
- Telefon NEC
- Telefon Alcatel-Lucent
- Telefon MT Logic
- Telefon Kyocera
- Telefon Xblitz
- Telefon Bogen
- Telefon LevelOne
- Telefon Marshall
- Telefon ArtDio
- Telefon Binatone
- Telefon Honor
- Telefon ZyXEL
- Telefon Tiptel
- Telefon Sagem
- Telefon Fortinet
- Telefon Overmax
- Telefon Archos
- Telefon Yealink
- Telefon RCA
- Telefon Ubiquiti Networks
- Telefon AVerMedia
- Telefon Currys Essentials
- Telefon EnGenius
- Telefon Grandstream
- Telefon MaxCom
- Telefon Patton
- Telefon Renkforce
- Telefon SPC
- Telefon ZTE
- Telefon Mikrotik
- Telefon Switel
- Telefon Brondi
- Telefon HTC
- Telefon Escene
- Telefon BlackBerry
- Telefon Evolveo
- Telefon Audioline
- Telefon BT
- Telefon XD Enjoy
- Telefon Mitel
- Telefon GPO
- Telefon Wiko
- Telefon Telstra
- Telefon Aastra
- Telefon Snom
- Telefon Mackie
- Telefon Vimar
- Telefon Oricom
- Telefon Oregon Scientific
- Telefon Lexibook
- Telefon Scosche
- Telefon Prestigio
- Telefon MyPhone
- Telefon Draytek
- Telefon Realme
- Telefon Crestron
- Telefon Lindy
- Telefon MXL
- Telefon Cortelco
- Telefon Legrand
- Telefon CTA Digital
- Telefon Steren
- Telefon Neat
- Telefon Tecdesk
- Telefon Dnake
- Telefon Gamdias
- Telefon Lewitt
- Telefon Allview
- Telefon Alcon
- Telefon Airlive
- Telefon AGFEO
- Telefon Amplicom
- Telefon Ascom
- Telefon Proximus
- Telefon BeeWi
- Telefon Sonim
- Telefon Sunstech
- Telefon Sylvania
- Telefon Swissvoice
- Telefon Marquant
- Telefon Nordmende
- Telefon KPN
- Telefon Belgacom
- Telefon Auerswald
- Telefon Profoon
- Telefon Teledex
- Telefon Valcom
- Telefon Innovaphone
- Telefon Hagenuk
- Telefon Essentiel B
- Telefon Logicom
- Telefon Peaq
- Telefon Vogtec
- Telefon T-Mobile
- Telefon Fanvil
- Telefon Spectralink
- Telefon VXi
- Telefon Unify
- Telefon Sagemcom
- Telefon Edenwood
- Telefon Premier
- Telefon HUMANTECHNIK
- Telefon Polycom
- Telefon Primare
- Telefon Mobotix
- Telefon Edge-Core
- Telefon ClearOne
- Telefon Clarity
- Telefon Syco
- Telefon SMC
- Telefon Pixel
- Telefon Digium
- Telefon FlyingVoice
- Telefon Davolink
- Telefon KONFTEL
- Telefon Mitsai
- Telefon Clear Sounds
- Telefon ALLO
- Telefon Oukitel
- Telefon On-Q
- Telefon Canyon
- Telefon HMD
- Telefon Tecno
- Telefon Olitech
- Telefon Dopod
- Telefon Hamlet
- Telefon Sedna
- Telefon Cubot
- Telefon AudioCodes
- Telefon 3Com
- Telefon British Telecom
- Telefon CyberData Systems
- Telefon Wantec
- Telefon Algo
- Telefon Future Call
- Telefon 4family
- Telefon Tador
- Telefon CSL
- Telefon POCO
- Telefon Liam&Daan
- Telefon Lively
- Telefon EMeet
- Telefon Cyber Acoustics
Nyeste Telefon Manualer

9 April 2025
1 Marts 2025
1 Marts 2025
25 Februar 2025
22 Februar 2025
22 Februar 2025
11 Februar 2025
7 Februar 2025
30 Januar 2025
24 Januar 2025