Christie LWU755-DS Manual
Læs nedenfor 📖 manual på dansk for Christie LWU755-DS (39 sider) i kategorien Beamer. Denne guide var nyttig for 15 personer og blev bedømt med 4.5 stjerner i gennemsnit af 2 brugere
Side 1/39

DS Series
LWU900-DS, LHD878-DS, LWU755-DS
User’s Manual (Detailed)
Instant Stack Guide
020-001617-01

1
LWU900-DS/LHD878-DS/LWU755-DS
User's Manual - Instant Stack Guide 020-001617-01 Rev. 1 (12-2018)
LIT MAN USR DS Series ISG
LCD Projector
LWU900-DS/LHD878-DS/LWU755-DS
User's Manual (detailed)
Instant Stack Guide
Thank you for purchasing this projector.
WARNING ►Before using this projector, be sure to read all manuals for this
projector. After reading them, store them in a safe place for future reference.
►Follow all the instructions in the manuals or on the projector. The manufacturer
assumes no responsibility for any damage caused by mishandling that is beyond
normal usage dened in the manuals.
NOTE • The information in this manual is subject to change without notice.
•The illustrations in this manual are for illustrative purposes. They may dier
slightly from your projector.
• The manufacturer assumes no responsibility for any errors that may appear in
this manual.
• The reproduction, transfer or copy of all or any part of this document is not
permitted without express written consent.
Trademark acknowledgment
All the trademarks in this manual are the properties of their respective owners.
Various symbols are used in this manual. The meanings of these symbols are
described below.
A b o u t t h i s m a n u a l
WARNING
CAUTION
NOTICE
This symbol indicates information that, if ignored, could possibly
result in personal injury or even death due to incorrect handling.
This symbol indicates information that, if ignored, could possibly result
in personal injury or physical damage due to incorrect handling.
This entry notices of fear of causing trouble.
Refer to the pages written following this symbol.
Features
This projector can be used with another projector of the same model to project an
image on the same screen using the Instant Stack feature.
The two projectors can be operated simultaneously to make the image brighter.
Moreover, if you connect two projectors with RS-232C cross-over cable, it turns
to an intellectual stacking system. The two projectors can work alternately by
themselves, and once one projector has an accident the other voluntarily starts to
work to keep your presentation going.
These features, generically called Instant Stack, provide you with the broad use.

3
LWU900-DS/LHD878-DS/LWU755-DS
User's Manual - Instant Stack Guide 020-001617-01 Rev. 1 (12-2018)
LIT MAN USR DS Series ISG
(continued on next page)
1. Introduction
1.1 Basic information and preparations
Instant Stack
Instant Stack is a feature that allows you to superimpose images projected from
two projectors easily.
Intellectual Stack and Simple Stack
Instant Stack includes the following two features.
When two projectors are connected using an RS-232C cable with necessary
settings performed on the projectors, these two projectors automatically operate
in synchronization with each other according to the settings.
This is known as
Intellectual Stack in this manual.
The two projectors operate individually without the RS-232C connection. This is
known as Simple Stack in this manual.
Remote control for Intellectual Stack and Simple Stack
For Intellectual Stack, one projector is set as Main and the other is set as Sub.
Only the projector is capable of receiving the remote control signals. Main
Operate
the projectors from the control panel of the Main projector or with the remote control
pointing at the Main projector. For details on operating by remote control and from the
control panel, refer to 3.7 Important Information for Intellectual Stack.
For Simple Stack, both projectors can receive the remote control signals. To avoid
incorrect operations with the remote control, it is recommended to operate with
the control panel or a wired remote control. KEYLOCK or REMOTE ID function is
also available. ( → Operating Guide OPTION menu)
If you require more information on Instant Stack, consult your dealer.
CAUTION ► Place the projector in a cool place with sucient ventilation.
Keep a space of 50 cm or more between a side of the projector and other
objects such as a wall. Keep a space of 50 cm or more between the two
projectors, especially if you are installing the projectors side by side. Take care
not to let the hot exhaust air from other projectors enter the intake vents of the
projector.
WARNING ► Do not place projectors directly on top of other projectors.

Installation
6
LWU900-DS/LHD878-DS/LWU755-DS
User's Manual - Instant Stack Guide
020-001617-01 Rev. 1 (12-2018)
LIT MAN USR DS Series ISG
NOTE • Set the tilt angle of Set to within 3 degrees from the level line.A
(continued on next page)
Deciding installation position
Decide on the position of Set and its projection angle. (AUser’s Manual (concise)
→ and Arrangement Adjusting the projector’s elevator)
2.2 Installing the rst projector (Set A)
Setting up Set A
2. Run the INSTALLATION setting if necessary as it may change the
image position. ( →Operating Guide SETUP menu )
3. ZOOMAdjust the image of Set to t the screen with the A, FOCUS and LENS
SHIFT ( → features. Operating Guide ) Adjusting the lens
Adjust the image position using KEYSTONE and 3D KEYSTONE if necessary.
( →Operating Guide or EASY MENU SETUP menu)
NOTE • KEYSTONE, 3D KEYSTONE, and WARPING functions cannot be
used at the same time. Use an appropriate function.
• .If using Simple Stack, go to 2.3 Installing the second projector (Set B) (
8
)
1. Turn on Set A.
WARNING ►
You can install the projector for any direction with specied
mounting accessories. Consult with your dealer about such a special installation.
Installation
8
LWU900-DS/LHD878-DS/LWU755-DS
User's Manual - Instant Stack Guide
020-001617-01 Rev. 1 (12-2018)
LIT MAN USR DS Series ISG
2.3 Installing the second projector (Set ) B
Connecting projectors
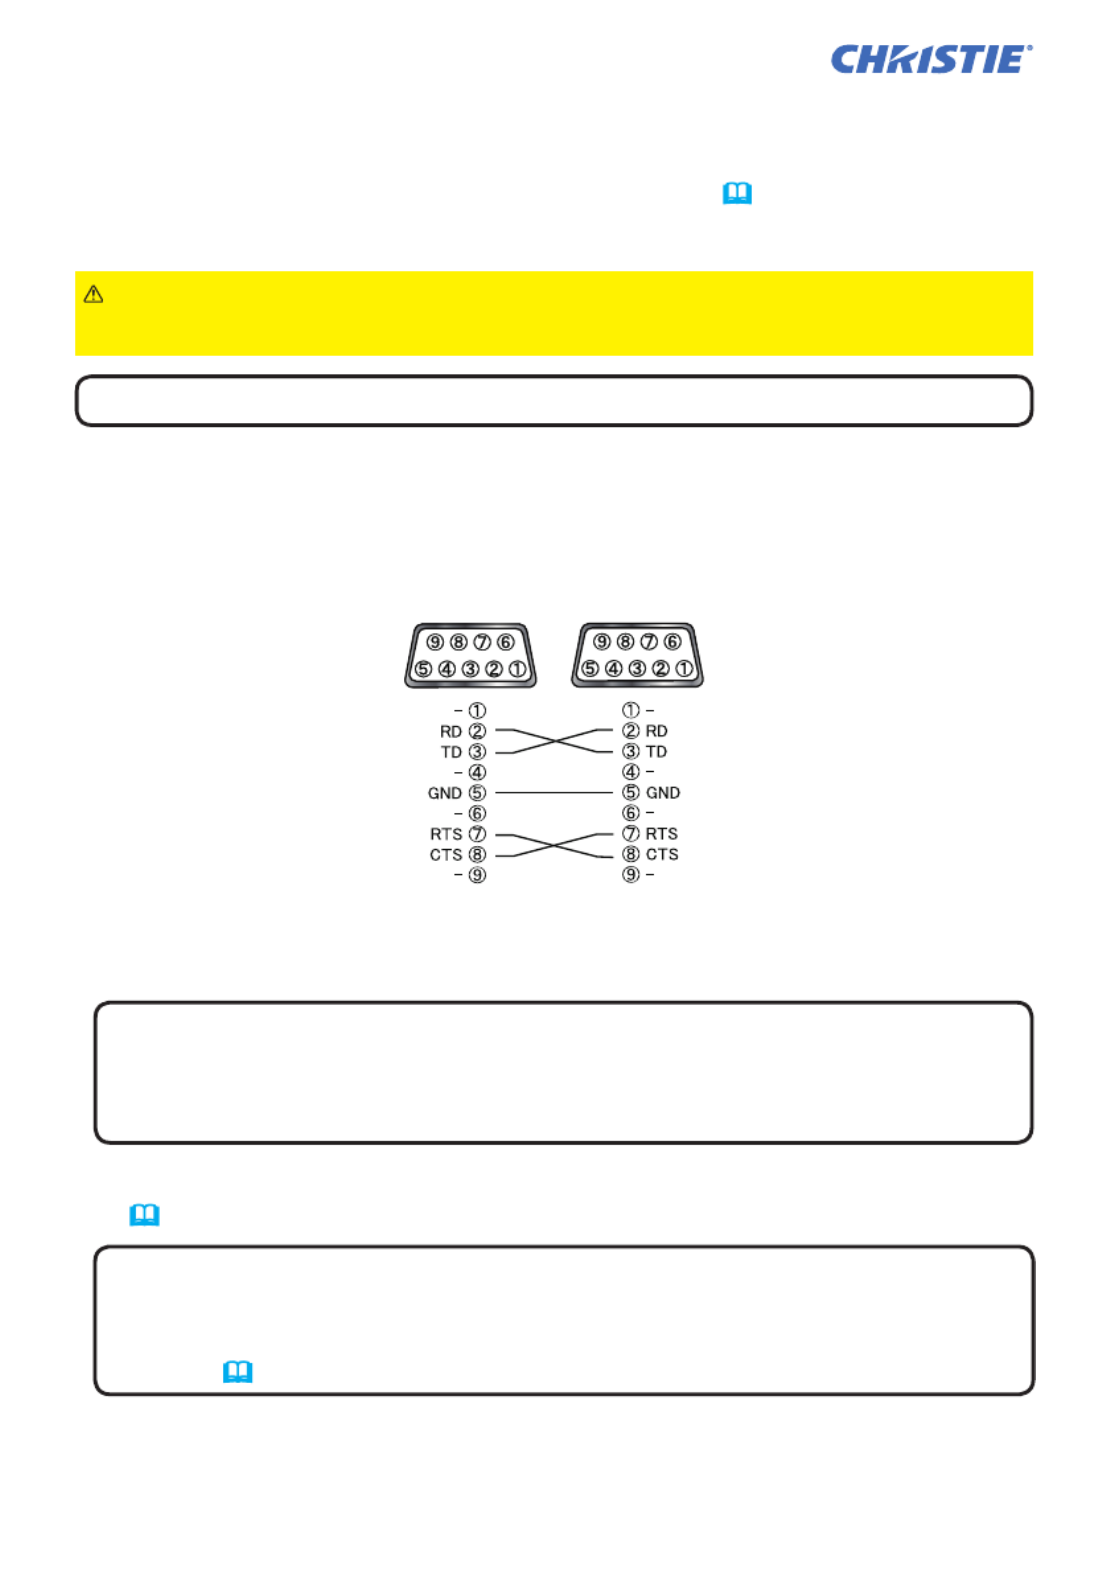
To use Intellectual Stack, connect an RS-232C cross cable between the CONTROL
port of Set and Set A B.
(continued on next page)
NOTE • KEYSTONE, 3D KEYSTONE, and WARPING functions cannot be
used at the same time. Use an appropriate function.
• Run the INSTALLATION setting rst if necessary as it may change the image
position. (Operating Guide SETUP menu →)
2. Reset the adjustment of KEYSTONE and 3D KEYSTONE on Set B.
( →Operating Guide or EASY MENU SETUP menu)
1. Turn on .Set B
NOTE • After turning on is not Set , make sure the image of Set B B
signicantly tilted compared to the image of Set . If the image is overly tilted, A
rotate the elevator feet of Set to adjust the angle such that the tilt is just B
about right.
Setting up Set B
NOTE • Set the tilt angle of Set to within 3 degrees from the level line.B
Deciding installation position
Decide on the position of Set and its projection angle. (BUser’s Manual (concise)
→ and Arrangement Adjusting the projector’s elevator)
WARNING ►You can install the projector for any direction with specied
mounting accessories. Consult with your dealer about this installation.

Installation
11
LWU900-DS/LHD878-DS/LWU755-DS
User's Manual - Instant Stack Guide 020-001617-01 Rev. 1 (12-2018)
LIT MAN USR DS Series ISG
2.5 Fine adjusting image position
To superimpose the images of Main (Set ) and Sub (Set ), ne adjust theB A
image size and position of Main (Set 3D KEYSTONEB) using .
3. Using 3D KEYSTONE on Main (Set ), adjust theB
image size and position of Main (Set B) to
superimpose to the image of Sub (Set A).
( →Operating Guide EASY MENU or SETUP menu)
Adjust 3D KEYSTONE in the following ways.
(1) Roughly adjust the four corners in the order below.
Top left → Top right
→ Bottom right → Bottom left
(2) Fine adjust the four corners in the same way.
NOTE • Refer to NOTES for all users. (
12
)
For Intellectual Stack users
1. Press the button on the remote control or the MENU
control panel on Main (Set ) to display the MENUB
dialog.
Highlight MAIN with the ▲/▼ buttons, and press the
► button.
Menu on Main (Set B) appears.
2. Using the ▲/▼/◄/► buttons on the remote control
or the control panel on Main (Set ), select 3D B
KEYSTONE from EASY MENU, or the SETUP menu
of ADVANCED MENU. ( →Operating Guide EASY
MENU SETUP menu or )
The image for Intellectual Stack appears on screen.
This image includes a TEMPLATE screen with the 3D
KEYSTONE dialog from Main (Set ) and another B
TEMPLATE screen from Sub (Set A).
Main (Set )B
Image from Sub (Set )A
Superimposed image
Superimposed image
Image from Main (Set )B

Installation
12
LWU900-DS/LHD878-DS/LWU755-DS
User's Manual - Instant Stack Guide
020-001617-01 Rev. 1 (12-2018)
LIT MAN USR DS Series ISG
NOTES for all users • For details on 3D KEYSTONE, refer to 3D KEYSTONE
of or EASY MENU SETUP menu Operating Guide in the .
• It is strongly recommended to use a at screen. If a curved or skewed screen
is used, it is dicult to align the two images even if you use the pin/barrel
adjustment of 3D KEYSTONE.
• Even through ne adjustment of the images from the two projectors, it may not
be possible to superimpose the images depending on the input signals. In this
case, try the following methods.
- Press the button on the remote control or execute AUTO IMAGE AUTO
(Operating Guide menu →SIZE AND POSITION ) on each of the projectors.
- Adjust H POSITION and V POSITION ( Operating Guide →SIZE AND
POSITION menu) on each of the projectors.
- Check the RESOLUTION INPUT menu, and change to the same setting in the
setting if the setting diers between Main and Sub. ( Operating Guide →
INPUT menu)
For Simple Stack users
1. Press the button on the remote control to display the menu on Set MENU A.
2. Use the ▲/▼/◄/► buttons to open the TEMPLATE
dialog, then select STACK on the dialog.
( →Operating Guide )MENU PREFERENCES
3. Press the button on the control panel of MENU
Set to display the menu.B
4. Use the ▲/▼/◄/► buttons to select 3D KEYSTONE
from EASY MENU, or the SETUP menu of
ADVANCED MENU ( →. Operating Guide EASY
MENU SETUP menu or )
3D KEYSTONE dialog appears on screen.
Set TEST PATTERNS settings to ON to display the
test pattern.
STACK of TEMPLATE
3D KEYSTONE dialog
on STACK of TEMPLATE
5.
Using 3D KEYSTONE on Set , adjust the image size B
and position of Set to superimpose well to the image B
of Set . Adjust 3D KEYSTONE in the following ways.A
(1) Roughly adjust the four corners in the order below.
Top left → Top right → Bottom right → Bottom left
(2) Fine adjust the four corners in the same way.
13
LWU900-DS/LHD878-DS/LWU755-DS
User's Manual - Instant Stack Guide 020-001617-01 Rev. 1 (12-2018)
LIT MAN USR DS Series ISG
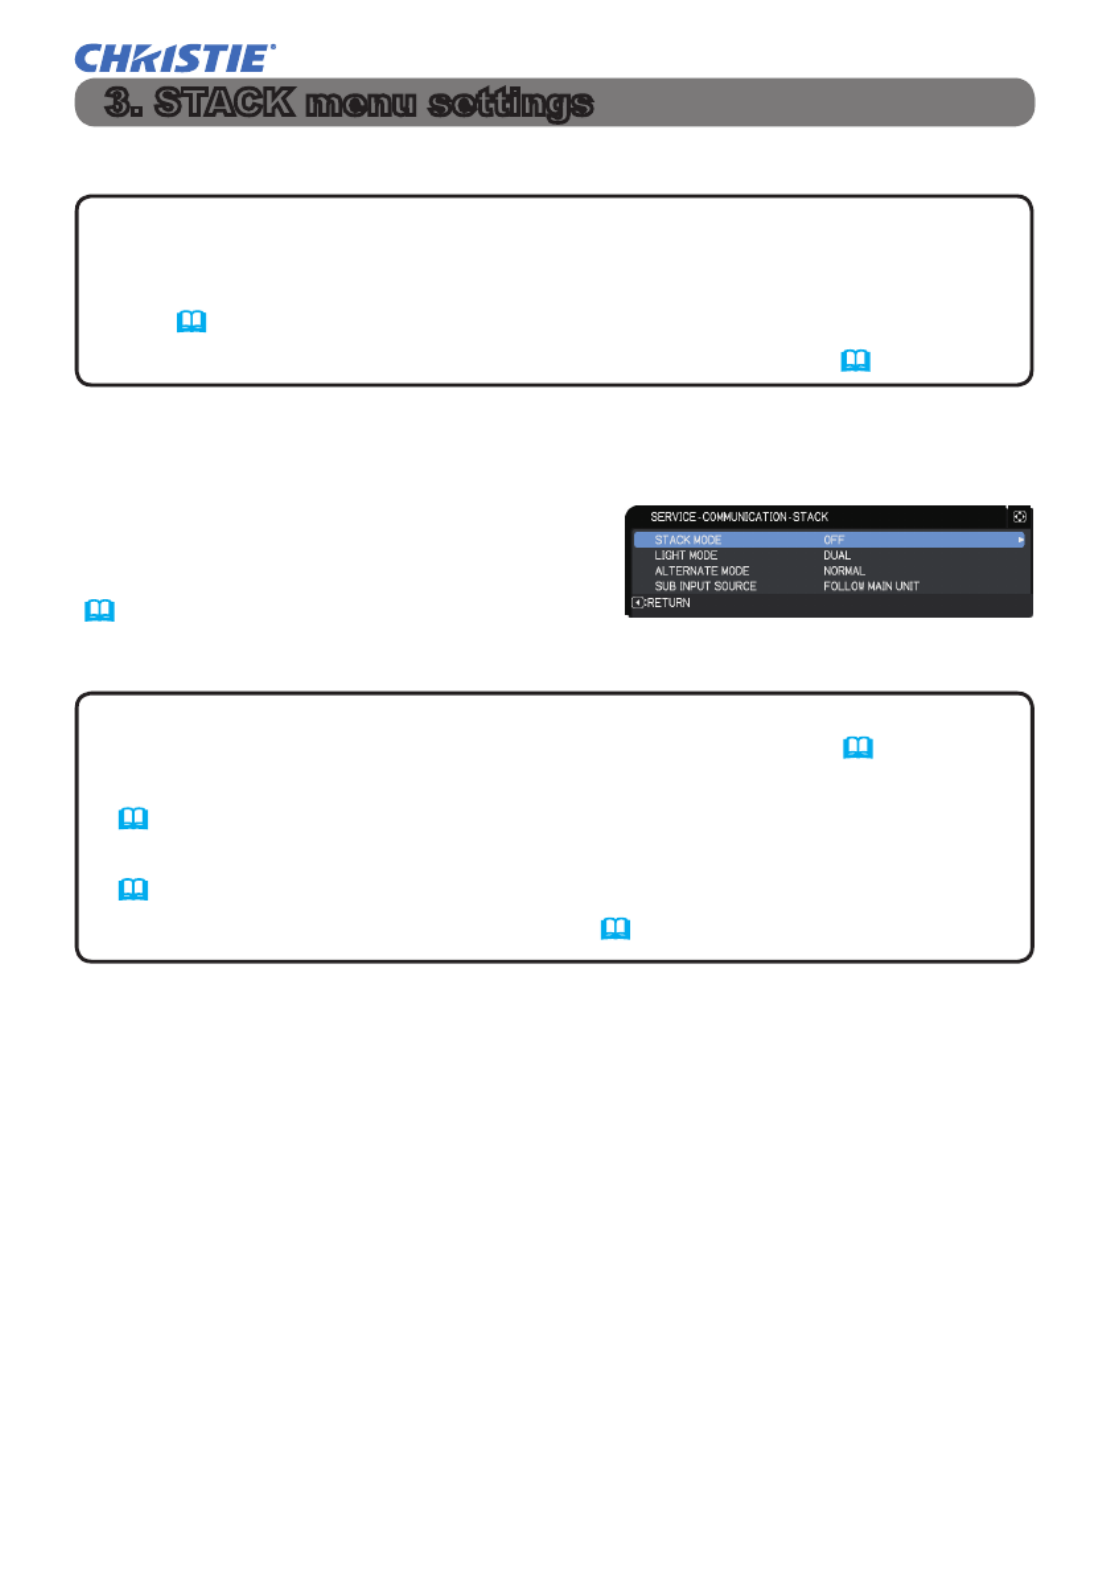
3.1 Displaying STACK menu
Use the ▲/▼/◄/► buttons to go into the following menu.
ADVANCED MENU OPTION >
> > SERVICE COMMUNICATION STACK >
STACK menu appears on screen.
(Operating Guide OPTION menu →)
The setting for Intellectual Stack operation starts from this menu.
Set the Intellectual Stack operation using the STACK menu.
NOTE • If using Simple Stack without RS-232C connection, skip this chapter.
• If you do not need to change the settings made during the installation
explained prior to this chapter, go to 3.3 Selecting the light source operation
mode. (
15
)
• Read carefully. (3.7 Important information for Intellectual Stack
21
)
NOTE • Check that the following settings are made on both projectors.
Otherwise, STACK menu on the projectors cannot be operated. (
5
)
- STANDBY MODE in SETUP menu: NORMAL
(Operating Guide SETUP menu →)
- COMMUNICATION TYPE under COMMUNICATION SERVICE menu: OFF in
(Operating Guide OPTION menu →)
- STACK LOCK SECURITY menu: OFF ( in
5
)
3. STACK menu settings
Produkt Specifikationer
| Mærke: | Christie |
| Kategori: | Beamer |
| Model: | LWU755-DS |
Har du brug for hjælp?
Hvis du har brug for hjælp til Christie LWU755-DS stil et spørgsmål nedenfor, og andre brugere vil svare dig
Beamer Christie Manualer

3 Januar 2025
17 December 2024
17 December 2024
17 December 2024
17 December 2024
24 September 2024
23 September 2024
23 September 2024
26 August 2024
26 August 2024
Beamer Manualer
- Beamer Acer
- Beamer Sony
- Beamer Canon
- Beamer Samsung
- Beamer Panasonic
- Beamer Philips
- Beamer Lenco
- Beamer OK
- Beamer Derksen
- Beamer LG
- Beamer Mitsubishi
- Beamer Sharp
- Beamer Epson
- Beamer Technaxx
- Beamer Smart
- Beamer HP
- Beamer Sanyo
- Beamer D-Link
- Beamer Asus
- Beamer Toshiba
- Beamer Pyle
- Beamer Klarstein
- Beamer Kodak
- Beamer InFocus
- Beamer Lenovo
- Beamer Adj
- Beamer Optoma
- Beamer Da-Lite
- Beamer Hama
- Beamer Auna
- Beamer Casio
- Beamer Hisense
- Beamer Maxell
- Beamer Smartwares
- Beamer Blaupunkt
- Beamer JVC
- Beamer Leica
- Beamer Hitachi
- Beamer Medion
- Beamer 3M
- Beamer BenQ
- Beamer Acco
- Beamer Anker
- Beamer Aiptek
- Beamer Viewsonic
- Beamer Dell
- Beamer Vivitek
- Beamer Polaroid
- Beamer Ricoh
- Beamer NEC
- Beamer Stairville
- Beamer OKI
- Beamer Reflecta
- Beamer Nebula
- Beamer Salora
- Beamer Vogel's
- Beamer Overmax
- Beamer RCA
- Beamer Prixton
- Beamer Renkforce
- Beamer Eurolite
- Beamer Yaber
- Beamer XGIMI
- Beamer GPX
- Beamer Dahua Technology
- Beamer Cameo
- Beamer Kogan
- Beamer Barco
- Beamer Planar
- Beamer Speaka
- Beamer ASK Proxima
- Beamer Eiki
- Beamer Naxa
- Beamer Vankyo
- Beamer Emtec
- Beamer Promethean
- Beamer Odys
- Beamer Laserworld
- Beamer Ibm
- Beamer La Vague
- Beamer Tzumi
- Beamer EKO
- Beamer MicroVision
- Beamer Elite Screens
- Beamer Celexon
- Beamer Fun Generation
- Beamer PLUS
- Beamer Futurelight
- Beamer Varytec
- Beamer Ultimea
- Beamer Dracast
- Beamer Dukane
- Beamer Dream Vision
- Beamer Knoll
- Beamer DTS
- Beamer Touchjet
- Beamer Boxlight
- Beamer AAXA Technologies
- Beamer Miroir
- Beamer Mimio
- Beamer AWOL Vision
- Beamer Smart Tech
- Beamer Atlantis Land
- Beamer KickAss
- Beamer Microtek
- Beamer Panamorph
Nyeste Beamer Manualer

5 Marts 2025
5 Marts 2025

30 Januar 2025
30 Januar 2025
30 Januar 2025
30 Januar 2025
30 Januar 2025
30 Januar 2025

29 Januar 2025
13 Januar 2025