Dell S560T Manual
Læs nedenfor 📖 manual på dansk for Dell S560T (48 sider) i kategorien Beamer. Denne guide var nyttig for 11 personer og blev bedømt med 4.5 stjerner i gennemsnit af 2 brugere
Side 1/48

Dell Interactive Projector
S560P/ S560T
User’s Guide

Notes, Cautions, and Warnings
NOTE: A NOTE indicates important information that helps you make
better use of your projector
CAUTION: A CAUTION indicates potential damage to hardware or
loss of data if instructions are not followed.
WARNING: A WARNING indicates a potential for property damage,
personal injury, or death.
____________________
Information in this document is subject to change without notice.
© 2016 Dell Inc. All rights reserved.
Reproduction of these materials in any manner whatsoever without the written
permission of Dell Inc. is strictly forbidden.
Trademarks used in this text: Dell and the DELL logo are trademarks of Dell Inc.; DLP
and DLP logo are trademarks of TEXAS INSTRUMENTS INCORPORATED; Microsoft and
Windows are either trademarks or registered trademarks of Microsoft Corporation in
the United States and/or other countries.
Other trademarks and trade names may be used in this document to refer to either
the entities claiming the marks and names or their products. Dell Inc. disclaims any
proprietary interest in trademarks and trade names other than its own.
Model: Dell Projector S560P/S560T
June 2016 Rev. A00

Contents | 3
Contents
1 About Your Dell Projector . . . . . . . . . . . . . . . . . 5
Projector Box Contents . . . . . . . . . . . . . . . . . . . . 5
Projector Top and Bottom View . . . . . . . . . . . . . . . 7
Projector Connections . . . . . . . . . . . . . . . . . . . . . 8
Adjusting Image Size . . . . . . . . . . . . . . . . . . . . . 10
Remote Control . . . . . . . . . . . . . . . . . . . . . . . . 12
2 Using Interactive Pen (Only for S560P) . . . . . 16
System Requirements. . . . . . . . . . . . . . . . . . . . . 16
About Your Interactive Pen . . . . . . . . . . . . . . . . . 17
Replacing the Interactive Pen Tips . . . . . . . . . . . . 18
Replacing the Interactive Pen Batteries . . . . . . . . . 19
Using Interactive Pen with S560P . . . . . . . . . . . . . 20
Touch Area Setting. . . . . . . . . . . . . . . . . . . . . . . 21
Pen Calibration . . . . . . . . . . . . . . . . . . . . . . . . . 23
3 Using Interactive Touch (Only for S560T) . . . 24
System Requirements. . . . . . . . . . . . . . . . . . . . . 24
Setting Up Interactive Touch . . . . . . . . . . . . . . . . 25
Using Interactive Touch with S560T . . . . . . . . . . . 25
Touch Area Setting. . . . . . . . . . . . . . . . . . . . . . . 27
Interactive Touch Calibration . . . . . . . . . . . . . . . . 29
Using S560T and Dry Erase Whiteboard. . . . . . . . . 30
4 Connecting Wireless Display Adapter . . . . . . 31
Installing Wireless Display Adapter . . . . . . . . . . . . 31
Setting up the Wireless Display Adapter . . . . . . . . . 32
5 Troubleshooting. . . . . . . . . . . . . . . . . . . . . . . . 33
Troubleshooting Tips . . . . . . . . . . . . . . . . . . . . . 33
Guiding Signals . . . . . . . . . . . . . . . . . . . . . . . . . 37
6 Maintenance . . . . . . . . . . . . . . . . . . . . . . . . . . . 38
Changing the Lamp . . . . . . . . . . . . . . . . . . . . . . 38
Replacing Remote Control Batteries . . . . . . . . . . . 40

4| Contents
7 Specifications . . . . . . . . . . . . . . . . . . . . . . . . . . 41
8 Additional Information . . . . . . . . . . . . . . . . . . 45
9 Contacting Dell . . . . . . . . . . . . . . . . . . . . . . . . 46

About Your Dell Projector 5
Your projector comes with all the items shown below. Ensure that you have
all the items, and contact Dell if anything is missing.
Projector Box Contents
1
About Your Dell Projector
Package Contents
Power cable 5 m VGA cable (VGA to VGA)
Remote control AAA Batteries (2 for S560T; 6 for
S560P)
CD, User’s Guide, and Documentation
5 m Mini cable (USB-A to Mini B)
Calibrate
Touch VGA
Free z e
Blank
Scre e n
Vide o
Mode
Info
HDMI
AAA
AAA
Inf ormac ion Im port ant e
De ll™ Pr oje ct or
S 560 P/T
Co nte nts :
• Us er 's G uide
Do c u m e n t
atio n
P/N 18 TWN
Re v. A00
P/N 36.76G04G001
June 20 16
Ma de in C hina
©
2
0
1
6
D
e
l
l
I
n
c
.
A
ll
r
i
g
h
t
s
r
e
s
e
r
v
e
d
.
De ll
™
Projector S560P/T
018 T WNA 0 0

6About Your Dell Projector
Package Contents (S560P only)
Interactive pen (2 pcs)/
Pen tip cap (4 pcs)
Wrist strap (2pcs)
Package Contents (S560T only)
Touch Unit 2 m DC to DC power cable (for
Touch unit)
Passive Pen (2 pcs)/ Pen Nib(2 pcs) Touch unit Base Plate kit

About Your Dell Projector 7
Projector Top and Bottom View
NOTE: Wall mount screw hole M4 X 4. Recommended torque < 15
kgf-cm.
1 Infrared (IR) receivers
2 Power button
3 Camera
4 Lens
5 Lamp cover
6 Mounting holes for wall mount
A : Dell S560 wall mount
B : Universal wall mount
1
4
2
3 5
6
Top View Bottom View

8About Your Dell Projector
Projector Connections
CAUTION: Before you begin any of the procedures in this section,
follow the Safety Instructions as described on page 9.
1 Mini USB (Mini Type B) 9 Microphone connector
2 VGA Out connector (monitor
loop through)
10 Audio Output connector
3 VGA In connector 11 Power cord connector
4 Composite Video connector 12 USB A connector
5 HDMI 2 connector 13 RJ 45 connector
6 HDMI 1 connector 14 RS232 connector
7 Audio Input connector 15 Touch Unit power
8 Audio RCA connector
1 2 3 4 5 6 7 8 910
11
12131415

About Your Dell Projector 9
CAUTION: Safety Instructions
1
Do not use the projector near appliances that generate a lot of heat.
2
Do not use the projector in areas where there is an excessive amount of
dust. The dust may cause the system to fail and the projector will
automatically shutdown.
3
Ensure that the projector is mounted in a well-ventilated area.
4
Do not block the ventilation slots and openings on the projector.
5
Ensure the projector operates between ambient temperatures (5 °C to 40
°C).
6
Do not try to touch the ventilation outlet as it can become very hot after
the projector has been turned on or immediately after it is turned off.
7
Do not look into the lens while the projector is on as it may cause injury to
your eyes.
8
Do not place any objects near or in front of the projector or cover its lens
while the projector is on as the heat may cause the object to melt or burn.
9
Do not use alcohol to wipe the lens.
NOTE:
Do not attempt to wall mount the projector by yourself. It should be
installed by a qualified technician.
Recommended Projector Wall Mount Kit. For more information, see
the Dell Support website at
dell.com/support
.
For more information, see the Safety Information that shipped with
your projector.
The S560P/ S560T projector can only be used indoors.

10 About Your Dell Projector
Adjusting Image Size
0.66' (20cm)
0.73' (22.2 cm)
0.82' (25cm)
0.805' (24.5 cm)
0.913' (27.7 cm)
1.004' (30.6cm)
81" (205.7 cm)
85" (215.9 cm)
90" (228.6 cm)
95" (241.3cm)
89.1" (226.3 cm)
100" (254 cm)
Projector to screen distance

About Your Dell Projector 11
Adjusting Image Shape
Screen Size H1 H2 L1 L2
Diagonal Width Height wide wide
inch mm inch mm inch mm inch mm inch mm inch mm inch mm
81 2057 71 1793 40 1009 6 145 45 1153 8 200 18 452
85 2159 74 1882 42 1059 6 154 48 1212 9 222 19 474
89.1 2263 78 1972 44 1110 6 163 50 1273 10 245 20 497
90 2286 78 1992 44 1121 7 165 51 1286 10 250 20 502
95 2413 83 2103 47 1183 7 177 54 1360 11 278 21 530
100 2540 87 2214 49 1245 7 188 56 1434 12 306 22 558
H1
H2
L1
L2

12 About Your Dell Projector
Remote Control
1 Power Turns the projector on or off.
2 Up Press to navigate through the On-Screen
Display (OSD) Menu items.
3 Right Press to navigate through the On-Screen
Display (OSD) Menu items.
4 Down Press to navigate through the On-Screen
Display (OSD) Menu items.
Calibrate
Touch
VGA
Freeze
Blank
Screen
Video
Mode
Info
HDMI
1
2
316
20
22
24
26
15
17
18
19
21
23
25
4
5
6
7
9
8
11
10
12
13
14

About Your Dell Projector 13
5 Laser Point the remote control at the screen, press
and hold the laser button to activate the laser
light.
WARNING: Do not look at the laser
point when it is active. Avoid directing
the laser light on your eyes.
6 Freeze Press to pause the screen image, then press
"Freeze" again to unfreeze the image.
7 Brightness + Press to increase the brightness.
8 Keystone adjustment
+
Press to adjust image distortion caused by
tilting the projector (+/-40 degrees).
9 Brightness - Press to decrease the brightness.
10 Keystone adjustment
-
Press to adjust image distortion caused by
tilting the projector (+/-40 degrees).
11 Blank screen Press to toggle among displaying blank white
and black screens and return to presentation.
12 Info Press to display the projector information.
13 Video mode The projector has preset configurations that
are optimized for displaying data
(presentation slides) or video (movies, games,
etc.).
Press the Video Mode button to toggle
between Presentation mode, , Bright mode
Movie mode, sRGB, or Custom mode.
Pressing the Video Mode button once will
show the current display mode. Pressing the
Video Mode button again will switch
between modes.
14 HDMI Press to choose HDMI source.
15 Enter Press to confirm the selection.
16 Left Press to navigate through the On-Screen
Display (OSD) Menu items.
17 Menu Press to activate the OSD.
18 Source Press to switch between VGA, Composite,
HDMI-1, and HDMI-2 source.

14 About Your Dell Projector
19 Volume up Press to increase the volume.
20 Zoom + Press to increase the image.
21 Volume down Press to decrease the volume.
22 Zoom - Press to decrease the image.
23 Mute Press to mute or un-mute the projector
speaker.
24 Auto Adjust Press to auto adjust the displayed image.
25 Calibrate Touch Press to calibrate touch to adjust for better
accuracy.
NOTE: Setup Utility is required.
26 VGA Press to choose VGA source.

About Your Dell Projector 15
Remote Control Operating Range
NOTE: Actual operating range may slightly differ from the diagram.
Weak batteries will also prevent the remote control from properly
operating the projector.
Angle
Distance
Angle
Distance
Calibrate
Touch VGA
Fre e z e
Blank
Scr e e n
Video
Mode
Info
HDMI
Calibrate
Touch
VGA
Fre e z e
BlankScr e e n
VideoMode
Info
HDMI
Operating range
Angle ±30°
Distance 7 m/22.97 feet

16 Using Interactive Pen (Only for S560P)
The S560P projector projects the connected computer’s desktop image onto
the whiteboard and it acts as input device to the computer. You can navigate,
select, and interact with your computer programs from the whiteboard.
The S560P is a pen-based interactive projector. Download and install
Dell S560x Interactive Utility for first-time setup and interactivity calibration.
System Requirements
NOTE: Your computer must have the following minimum system
requirements:
*1 : Get S560x Interactive Utility from provided CD or download it from Dell
Support
*2 : S560P requires first-time calibration, ensure you calibrate the interactive
pen(s) before use
*3 : .NET Framework 4.0 installation is required
*4 : Mac OS support 1 touch point only
2
Using Interactive Pen (Only
for S560P)
Operating
System
Number of touch
points supported
Installation of S560x Interactive Utility*1
For first-time setup For subsequent use
Windows
7/8/10
10 touch points Supported*3 Not required
MAC OS X
(10.7~10.11)
1 touch point*4 Supported Required, please
install the setup
utility on all Mac OS
computers, to use
them with the
S560P
ChromeBook 10 touch points Not supported,
please use a
Windows OS or Mac
OS computer to
complete first-time
setup for the S560P
Not required

Using Interactive Pen (Only for S560P) 17
NOTE: For better accuracy, you should set to "Projector Only"
display mode before calibration. More details about touch function
and calibration in different display modes, please go to "S560T
Touch setup Guide" Troubleshooting Q2.
About Your Interactive Pen
The interactive pen allows user to interact with projected content in the
same fashion as a mouse input.
1 Power switch
2 Power indicator
As you turn on the pen, the power indicator flashes a few seconds
and goes off.
Green: Normal operation
Red: Battery is low
No light: Battery is empty
3 Wrist strap holder
4 Battery compartment access. Turn to open and replace batteries.
5 Pen tip
1
2
4
3
5

18 Using Interactive Pen (Only for S560P)
Replacing the Interactive Pen Tips
NOTE: If the pen tip becomes damaged, or no longer works well,
you should replace them.

Using Interactive Pen (Only for S560P) 19
Replacing the Interactive Pen Batteries
NOTE: If the battery is low, the LED indicator starts flashing red as
you turn on the pen. You should replace with two new AAA batteries.
1
You can access the battery compartment by turning open the pen head.
2
Insert the batteries and align their polarity correctly according to the
marking on the pen head.
NOTE: Avoid mixing different types of batteries or using new and
old batteries together.
3
Place the pen head back, turn until the battery compartment access is fully
closed.

20 Using Interactive Pen (Only for S560P)
Using Interactive Pen with S560P
Step 1: Connect the computer with the projector using HDMI/ VGA cable to
display image. Connect the USB cable for using in interactive mode. If using
Mac OS, run the S560x Interactive utility to setup the pen.
Step 2. Run Dell S560x Interactive Utility, users can select default Interactive
Mode ( ) for multi-point touch. Switch to Active Pen Mode for S560P.
Only single-point touch supported for Mac OSX
NOTE: For Mac OS computer, Dell S560x Interactive Utility must be
executed.
MO LEX
MO LEX

Using Interactive Pen (Only for S560P) 21
Touch Area Setting
Switch to display mode "Projector only".
1
Select Auto Touch Area Setting:
NOTE:
Quit all software applications
Reduce ambient light
Do not obstruct or shake lens during Touch Area Setting
Check if projection image is clear. If not, adjust focus to sharpen the
image
If fail message pops up, switch to Manual Touch Area Setting.
2
Select Manual Touch Area Setting:

22 Using Interactive Pen (Only for S560P)
2-1 After the camera captures the projection image, a Touch Area
window will pop up. If the captured image is not clear enough,
please re-select "Ambient light mode selection" from "Auto" to
"Bright" or "Dim" according to actual ambient light condition.
Remark: Captured image shows the actual camera view, which is
reversed from projection image. For example: P1 is lower right
corner, P2 is lower left corner and so on.
2-2 Touch Area Boundary Fine-tuning
Step 1: Click on P1, use mouse to drag P1 to upper left corner. Align
adjustable green zone with projected white frame.
Step 2: Adjust P2 to P4 accordingly; adjustable green zone should
completely overlaps the projected white frame.
Step 3: Finally, check again if the green frame completely overlaps the
projected white frame. If not, fineadjust again.
2-3 When the Touch Area is correctly located then click exit button.

Using Interactive Pen (Only for S560P) 23
Pen Calibration
1
Switch to display mode "Projector only".
2
Perform touch calibration on S560P using the S560x interactive utility
(Win, Mac).
3
Select auto-calibration while running the S560X interactive utility.
NOTE: If the fail message pops up, follow below steps to trouble-
shoot and do Auto Calibration again.
Close all software applications
Reduce ambient light
Do not obstruct or shake lens during calibration
Check if projected image is clear, if not, adjust focus to sharpen the
image
If auto-calibration fails, setup using 'manual calibration'.
4
Select Manual Calibration, and follow the steps for calibration. Manual
Calibration is suggested to get a better accuracy.
24 Using Interactive Touch (Only for S560T)
The S560T projector projects the connected computer's desktop image onto
the whiteboard and it acts as input device to the computer. You can navigate,
select, and interact with your computer programs from the whiteboard.
The S560T projector is a 10-pt multi-touch interactive projector. To setup the
interactive function, install the touch unit as described in the 'Touch setup
guide'. Also, use the Dell S560x Interactive utility for first-time setup and
calibration which can be found in CD & download from Dell Support.
System Requirements
NOTE: You computer must have the following minimum system
requirements::
*1 : Get S560x Interactive Utility from provided CD or download it from Dell
Support
*2 : S560T requires first-time alignment and calibration, ensure you complete
setup process before use
*3 : NET Framework 4.0 installation is required
3
Using Interactive Touch (Only
for S560T)
Operating
System
Number of touch
points supported
Installation of S560x Interactive Utility*1
For first-time setup For subsequent use
Windows
7/8/10
10 touch points Supported*3 Not required
MAC OS X
(10.7~10.11)
1 touch point*4 Supported
Required, please
install the setup
utility on all Mac OS
computers, to use
them with the S560T
ChromeBook 10 touch points Not supported,
please use a
Windows OS or Mac
OS computer to
complete first-time
setup for the S560T
Not required

Using Interactive Touch (Only for S560T) 25
*4 : Mac OS support 1 touch point only
NOTE: For better accuracy, you should set to "Projector Only"
display mode before calibration. More details about touch function
and calibration in different display modes, please go to "S560T
Touch setup Guide" Troubleshooting Q2.
Setting Up Interactive Touch
To setup the interactive function, install the touch unit as described in the
'Touch setup guide'.
Using Interactive Touch with S560T
Step 1: Connect the computer with the projector using HDMI/ VGA cable to
display image. Connect the USB cable for using in interactive mode. If using
Mac OS, run the S560x Interactive utility to setup the touch functionality.
MOLEX
MOLEX

26 Using Interactive Touch (Only for S560T)
Step 2:
Running Dell S560x Interactive Utility, users can select default Interactive
Mode ( ) for multi-point touch. Switch to Finger/Stylus Mode for S560T
with Touch Unit interactive touch.
Only single-point touch is available for Mac OS X system.
NOTE: For Mac OS computer, Dell S560x Interactive Utility must be
executed.

Using Interactive Touch (Only for S560T) 27
Touch Area Setting
Switch to display mode "Projector only".
1
Select Auto Touch Area Setting:
NOTE:
Quit all software applications
Reduce ambient light
Do not obstruct or shake lens during Touch Area Setting
Check if projection image is clear. If not, adjust focus to sharpen the
image
If fail message pops up, switch to Manual Touch Area Setting.
2
Select Manual Touch Area Setting:

28 Using Interactive Touch (Only for S560T)
2-1 After the camera captures the projection image, a Touch Area
window will pop up. If the captured image is not clear enough,
please re-select "Ambient light mode selection" from "Auto" to
"Bright" or "Dim" according to actual ambient light condition.
Remark: Captured image shows the actual camera view, which is
reversed from projection image. For example: P1 is lower right
corner, P2 is lower left corner and so on.
2-2 Touch Area Boundary Fine-tuning
Step 1: Click on P1, use mouse to drag P1 to upper left corner. Align
adjustable green zone with projected white frame.
Step 2: Adjust P2 to P4 accordingly; adjustable green zone should
completely overlaps the projected white frame.
Step 3: Finally, check again if the green frame completely overlaps the
projected white frame. If not, fineadjust again.
2-3 When the Touch Area is correctly located then click exit button.

Using Interactive Touch (Only for S560T) 29
Interactive Touch Calibration
1
Switch to display mode "Projector only".
2
Perform touch calibration on S560P using the S560x interactive utility
(Win, Mac).
3
Select auto-calibration while running the S560X interactive utility.
NOTE: If the fail message pops up, follow below steps to trouble-
shoot and do Auto Calibration again.
Close all software application
Reduce ambient light
Do not obstruct or shake lens during calibration
Check if projection image is clear, if not, adjust focus to sharpen the
image
If auto-calibration fails, setup using 'manual calibration'.
4
Select Manual Calibration, and follow the steps for calibration. Manual
Calibration is suggested to get a better accuracy.
30 Using Interactive Touch (Only for S560T)
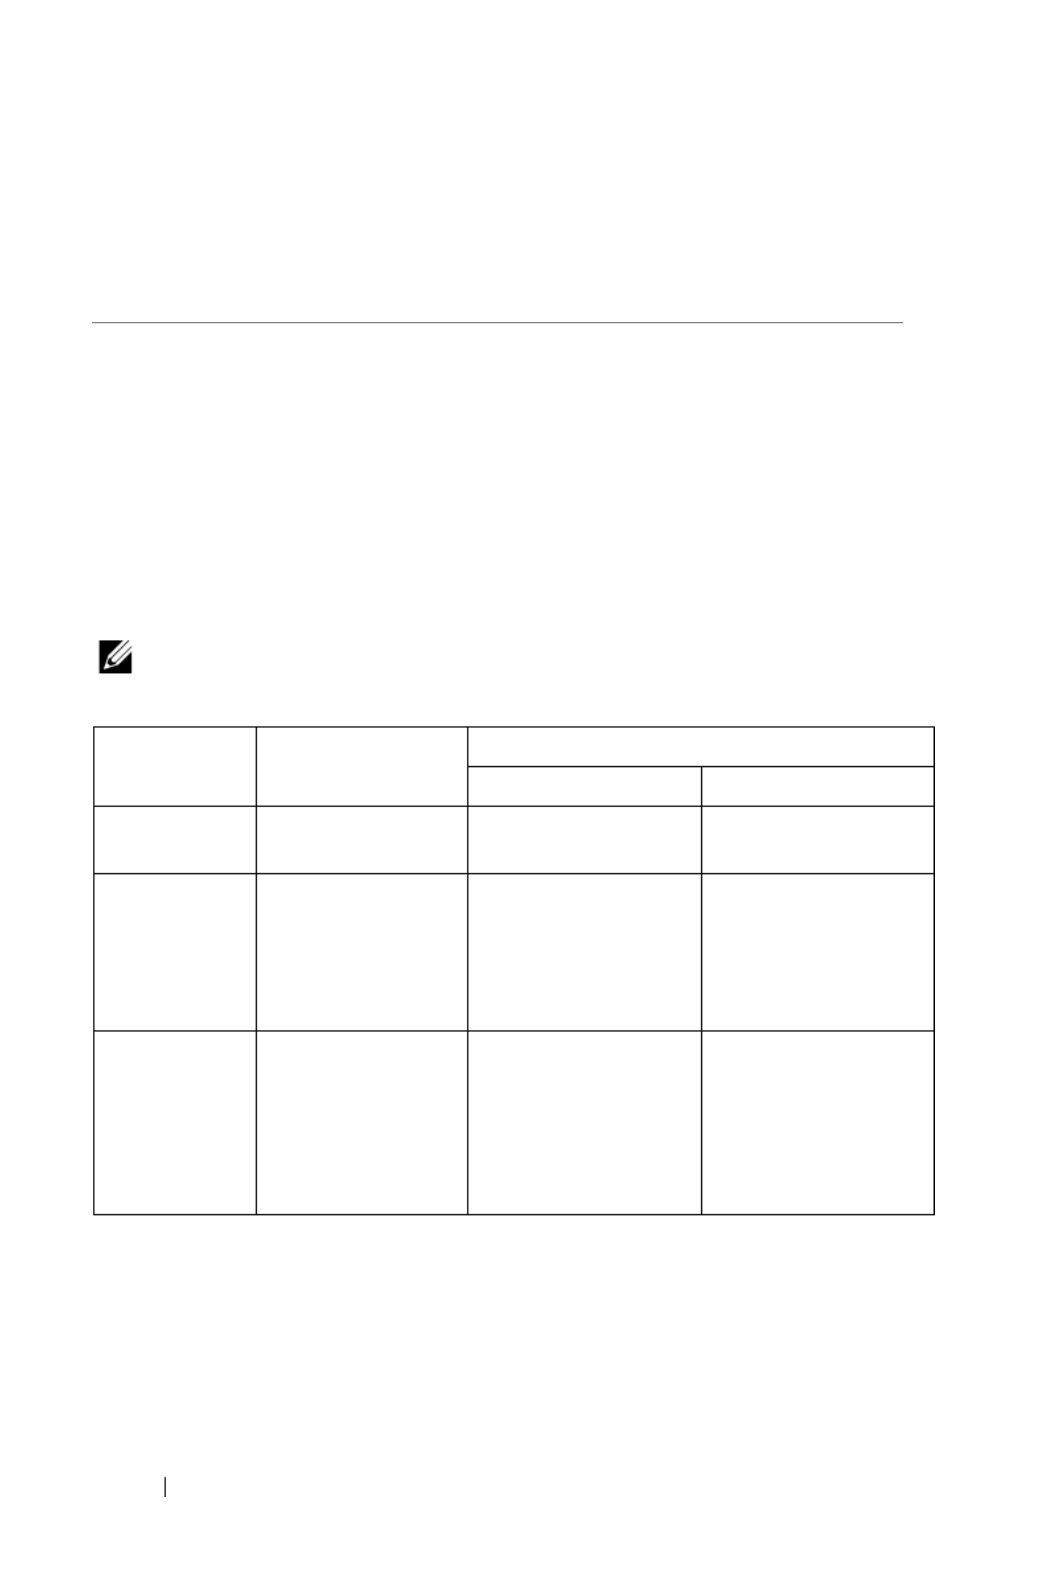
Using S560T and Dry Erase Whiteboard
To use the dry-erase marker on whiteboard without affecting the touch
operation, use the 'freeze' key or the 'blank screen' key on the remote.
1
Freeze: Use the freeze key to pause the image on the screen and suspend
touch functionality Press the freeze key again to resume touch operation.
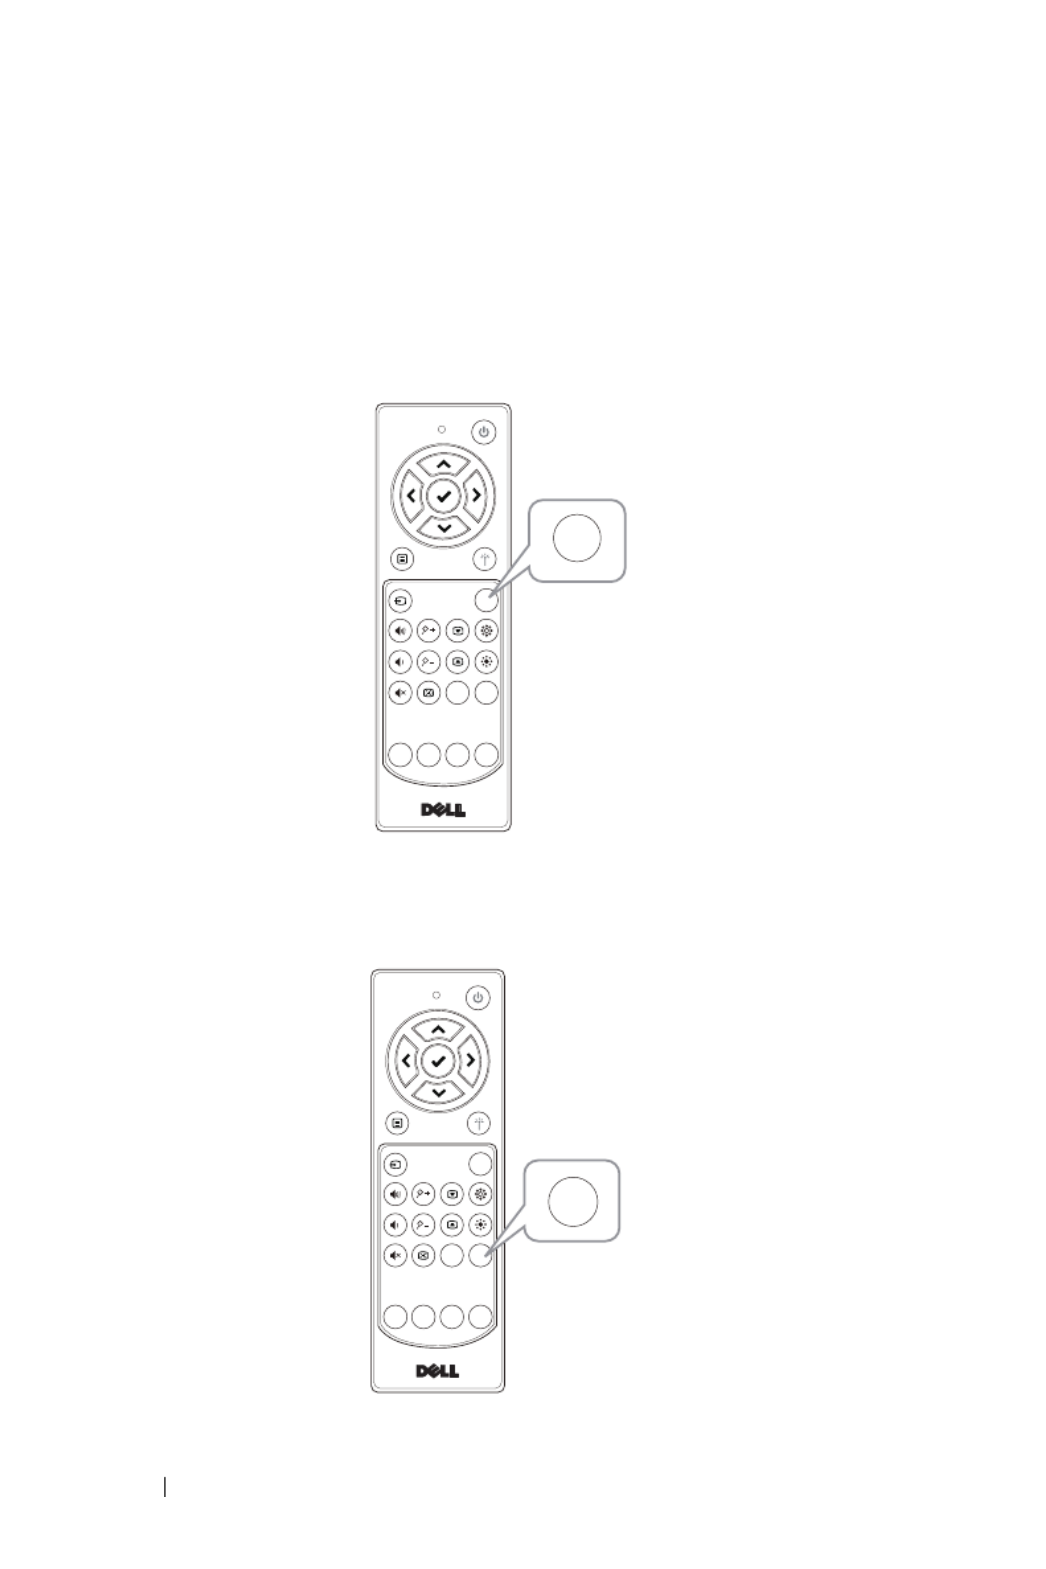
2
Blank screen: Use Blank screen key to display a blank screen on the
projector. Press the key to toggle between white background/ black
background and to resume normal operation. During 'blank screen' mode,
touch operation is suspended.
Cali brat e
T o uch
VGA
Freez e
Blank
Scree n
Video
Mod e
Inf o
HDMI
Freeze
Cal ibrat e
To uc h
VGA
Freez e
Bla nk
Scre en
Video
Mod e
Inf o
HDMI
Blank
Screen

Connecting Wireless Display Adapter 31
Installing Wireless Display Adapter
Your projector has HDMI and USB power port for wireless display adapter.
The wireless display adapter is not shipped with your S560P/S560T.
The installation steps are as below:
1
Make sure projector is already powered off.
2
Attach the power USB cable to the wireless display adapter and then attach
the wireless display adapter.
NOTE: The power USB cable is shipped with wireless display
adapter and not shipped with your projector.
4
Connecting Wireless Display
Adapter
Produkt Specifikationer
| Mærke: | Dell |
| Kategori: | Beamer |
| Model: | S560T |
Har du brug for hjælp?
Hvis du har brug for hjælp til Dell S560T stil et spørgsmål nedenfor, og andre brugere vil svare dig
Beamer Dell Manualer

10 August 2024
3 August 2024
2 August 2024
31 Juli 2024
31 Juli 2024
28 Juli 2024
27 Juli 2024
23 Juli 2024
22 Juli 2024
21 Juli 2024
Beamer Manualer
- Beamer Acer
- Beamer Sony
- Beamer Canon
- Beamer Samsung
- Beamer Panasonic
- Beamer Philips
- Beamer Lenco
- Beamer OK
- Beamer Derksen
- Beamer LG
- Beamer Mitsubishi
- Beamer Sharp
- Beamer Epson
- Beamer Technaxx
- Beamer Smart
- Beamer HP
- Beamer Sanyo
- Beamer D-Link
- Beamer Asus
- Beamer Toshiba
- Beamer Pyle
- Beamer Klarstein
- Beamer Kodak
- Beamer InFocus
- Beamer Lenovo
- Beamer Adj
- Beamer Optoma
- Beamer Da-Lite
- Beamer Hama
- Beamer Auna
- Beamer Casio
- Beamer Hisense
- Beamer Maxell
- Beamer Smartwares
- Beamer Blaupunkt
- Beamer JVC
- Beamer Leica
- Beamer Hitachi
- Beamer Medion
- Beamer 3M
- Beamer BenQ
- Beamer Acco
- Beamer Anker
- Beamer Aiptek
- Beamer Viewsonic
- Beamer Vivitek
- Beamer Polaroid
- Beamer Ricoh
- Beamer NEC
- Beamer Stairville
- Beamer OKI
- Beamer Reflecta
- Beamer Nebula
- Beamer Salora
- Beamer Vogel's
- Beamer Overmax
- Beamer RCA
- Beamer Prixton
- Beamer Renkforce
- Beamer Christie
- Beamer Eurolite
- Beamer Yaber
- Beamer XGIMI
- Beamer GPX
- Beamer Dahua Technology
- Beamer Cameo
- Beamer Kogan
- Beamer Barco
- Beamer Planar
- Beamer Speaka
- Beamer ASK Proxima
- Beamer Eiki
- Beamer Naxa
- Beamer Vankyo
- Beamer Emtec
- Beamer Promethean
- Beamer Odys
- Beamer Laserworld
- Beamer Ibm
- Beamer La Vague
- Beamer Tzumi
- Beamer EKO
- Beamer MicroVision
- Beamer Elite Screens
- Beamer Celexon
- Beamer Fun Generation
- Beamer PLUS
- Beamer Futurelight
- Beamer Varytec
- Beamer Ultimea
- Beamer Dracast
- Beamer Dukane
- Beamer Dream Vision
- Beamer Knoll
- Beamer DTS
- Beamer Touchjet
- Beamer Boxlight
- Beamer AAXA Technologies
- Beamer Miroir
- Beamer Mimio
- Beamer AWOL Vision
- Beamer Smart Tech
- Beamer Atlantis Land
- Beamer KickAss
- Beamer Microtek
- Beamer Panamorph
Nyeste Beamer Manualer

5 Marts 2025
5 Marts 2025

30 Januar 2025
30 Januar 2025
30 Januar 2025
30 Januar 2025
30 Januar 2025
30 Januar 2025

29 Januar 2025
13 Januar 2025