Gefen EXT-HDVGA-3G-SC Manual
Gefen
Audio/video konverter
EXT-HDVGA-3G-SC
Læs nedenfor 📖 manual på dansk for Gefen EXT-HDVGA-3G-SC (76 sider) i kategorien Audio/video konverter. Denne guide var nyttig for 12 personer og blev bedømt med 4.5 stjerner i gennemsnit af 2 brugere
Side 1/76

EXT-HDVGA-3G-SC
User Manual
HDMI & VGA to 3GSDI
Scaler/Converter
Release A4

ii
1. Read these instructions.
2. Keep these instructions.
3. Heed all warnings.
4. Follow all instructions.
5. Do not use this product near water.
6. Clean only with a dry cloth.
7. Do not block any ventilation openings. Install in accordance with the manufacturer’s
instructions.
8. Do not install or place this product near any heat sources such as radiators, heat
registers, stoves, or other apparatus (including ampliers) that produce heat.
9. Do not defeat the safety purpose of the polarized or grounding-type plug. A polarized
plug has two blades with one wider than the other. A grounding type plug has two
blades and a third grounding prong. The wide blade or the third prong are provided for
your safety. If the provided plug does not t into your outlet, consult an electrician for
replacement of the obsolete outlet.
10. Protect the power cord from being walked on or pinched particularly at plugs,
convenience receptacles, and the point where they exit from the apparatus.
11. Only use attachments/accessories specied by the manufacturer.
12. To reduce the risk of electric shock and/or damage to this product, never handle or
touch this unit or power cord if your hands are wet or damp. Do not expose this
product to rain or moisture.
13. Unplug this apparatus during lightning storms or when unused for long periods of time.
14. Refer all servicing to qualied service personnel. Servicing is required when the
apparatus has been damaged in any way, such as power-supply cord or plug is
damaged, liquid has been spilled or objects have fallen into the apparatus,
the apparatus has been exposed to rain or moisture, does not operate normally,
or has been dropped.
15. Batteries that may be included with this product and/or accessories should never be
exposed to open ame or excessive heat. Always dispose of used batteries
according to the instructions.
Important Safety Instructions

Gefen warrants the equipment it manufactures to be free from defects in material and
workmanship.
If equipment fails because of such defects and Gefen is notied within two (2) years from
the date of shipment, Gefen will, at its option, repair or replace the equipment, provided
that the equipment has not been subjected to mechanical, electrical, or other abuse or
modications. Equipment that fails under conditions other than those covered will be
repaired at the current price of parts and labor in effect at the time of repair. Such repairs
are warranted for ninety (90) days from the day of reshipment to the Buyer.
This warranty is in lieu of all other warranties expressed or implied, including without
limitation, any implied warranty or merchantability or tness for any particular purpose, all of
which are expressly disclaimed.
1. Proof of sale may be required in order to claim warranty.
2. Customers outside the US are responsible for shipping charges to and from Gefen.
3. Copper cables are limited to a 30 day warranty and cables must be in their original
condition.
The information in this manual has been carefully checked and is believed to be accurate.
However, Gefen assumes no responsibility for any inaccuracies that may be contained
in this manual. In no event will Gefen be liable for direct, indirect, special, incidental, or
consequential damages resulting from any defect or omission in this manual, even if
advised of the possibility of such damages. The technical information contained herein
regarding the features and specications is subject to change without notice.
For the latest warranty coverage information, refer to the Warranty and Return Policy under
the Support section of the Gefen Web site at www.gefen.com.
iii
Warranty Information

iv
Technical Support
(818) 772-9100 (800) 545-6900
8:00 AM to 5:00 PM Monday - Friday, Pacic Time
Fax
(818) 772-9120
Email
support@gefen.com
Web
http://www.gefen.com
Mailing Address
Gefen, LLC
c/o Customer Service
20600 Nordhoff St.
Chatsworth, CA 91311
Product Registration
Register your product here: http://www.gefen.com/kvm/Registry/Registration.jsp
iv
Contacting Gefen Technical Support

v
• By default, the current input and output resolution will be displayed whenever the
HDMI & VGA to 3GSDI Scaler/Converter is disconnected from the source or display
or if a change in the video output settings are made. This feature can be disabled
through the Display Notify option See Display Notify (page 37).
• Two-channel analog audio, from the port, will be embedded with the VGA L/R In
signal and output on the port.SDI Out
• Always make sure that the HDMI & VGA to 3GSDI Scaler/Converter is running
the latest rmware. The Gefen Syner-G™ Software Suite is a free downloadable
application from Gefen that provides automatic download and installation of rmware
upgrades for this product.
Download the application here: http://www.gefen.com/synerg/
HDMI & VGA to 3GSDI Scaler/Converter is a trademark of Gefen, LLC.
© 2015 Gefen, LLC. All Rights Reserved. All trademarks are the property of their respective owners.
Gefen, LLC reserves the right to make changes in the hardware, packaging, and any accompanying documentation
without prior written notice.
v
Operating Notes
This product uses UL or CE listed power supplies.
Pb

vi
Features and Packing List
Features
• Converts and scales HDMI and VGA with L/R analog audio to SDI
• Input resolutions up to 1920 x 1200 (WUXGA) and 1080p60 (HDMI only)
• Output resolutions up to 1080p60 (3G-A / 3G-B)
• On-screen display (OSD) menu allows easy set-up and control
• Aspect Ratio Control: Full Screen, Panoramic, Letter/Pillar, Extract/Crop
• Test Pattern Generator for quick system conguration
• Embeds 2-channel analog stereo audio in SDI signal (VGA Input only)
• Up to LPCM 7.1 audio support (HDMI input only)
• Gefen Syner-G™ simplies in-eld rmware updates and advanced EDID
management including custom input timings
• USB port for use with Gefen Syner-G™
• Wide power supply operating range (6V to 24V DC)
• Locking power supply connector
• Surface mountable
Packing List
The HDMI & VGA to 3GSDI Scaler/Converter ships with the items listed below. If any of
these items are not present in the box when you rst open it, immediately contact your
dealer or Gefen.
• 1 x HDMI & VGA to 3GSDI Scaler/Converter
• 1 x 6 ft. VGA cable (M-M)
• 1 x 6 ft. HDMI cable (M-M)
• 1 x 6 ft. 3.5mm mini-stereo cable
• 1 x 12V Power Supply
• 1 x Quick-Start Guide
®
1080P

This page left intentionally blank.

viii
Table of Contents
1 Getting Started
Introduction............................................................................................................ 2
Installation 4 .............................................................................................................
Connection Instructions 4 .................................................................................
Sample Wiring Diagram ................................................................................ 5
2 Basic Operation
Selecting the Input Source .................................................................................... 8
Menu System ........................................................................................................ 9
Displaying the Menu System ......................................................................... 9
Moving around within the Menu System ..................................................... 10
Output Resolution 13 .......................................................................................
Output Lock 15 .................................................................................................
Source Select .............................................................................................. 17
Contrast 19 .......................................................................................................
Brightness 20 ...................................................................................................
Saturation .................................................................................................... 21
Hue 22 ..............................................................................................................
Color Temperature 23 ......................................................................................
Color Balance 24 ..............................................................................................
Edge Enhance ............................................................................................. 25
Sharpness ................................................................................................... 26
Underscan/Overscan 27 ..................................................................................
Aspect Ratio 28 ................................................................................................
Horizontal Mirror 29 ..........................................................................................
Vertical Mirror 31 ..............................................................................................
Horizontal Shift ............................................................................................ 33
Vertical Shift ................................................................................................ 34
Phase 35 ..........................................................................................................
OSD Timeout .............................................................................................. 36
Display Notify 37 ..............................................................................................
Input Resolution Information 39 .......................................................................
F/W Version 40 ................................................................................................
Factory Reset 41 ..............................................................................................
Test Patterns 42 ...............................................................................................
DIP Switch Conguration .................................................................................... 44

ix
Table of Contents
3 Appendix
Menu System Summary ...................................................................................... 48
Default Settings ................................................................................................... 53
USB Interface ...................................................................................................... 54
Installing the Virtual COM Port 54 ....................................................................
Updating the Firmware 56 ........................................................................................
Surface Mounting Instructions ............................................................................. 61
Specications ...................................................................................................... 62
Index.................................................................................................................... 63

This page left intentionally blank.

HDMI & VGA to 3G
Scaler/Converter
1 Getting Started

page | 2
Page Title
HDMI & VGA to 3GSDI
Scaler/Converter
®
SDI Out Input Select
HDMI
Up Dn Menu
USB Pwr
12V DC
VGA
VGA In L/R In HDMI In
EXT-HDVGA-3G-SC
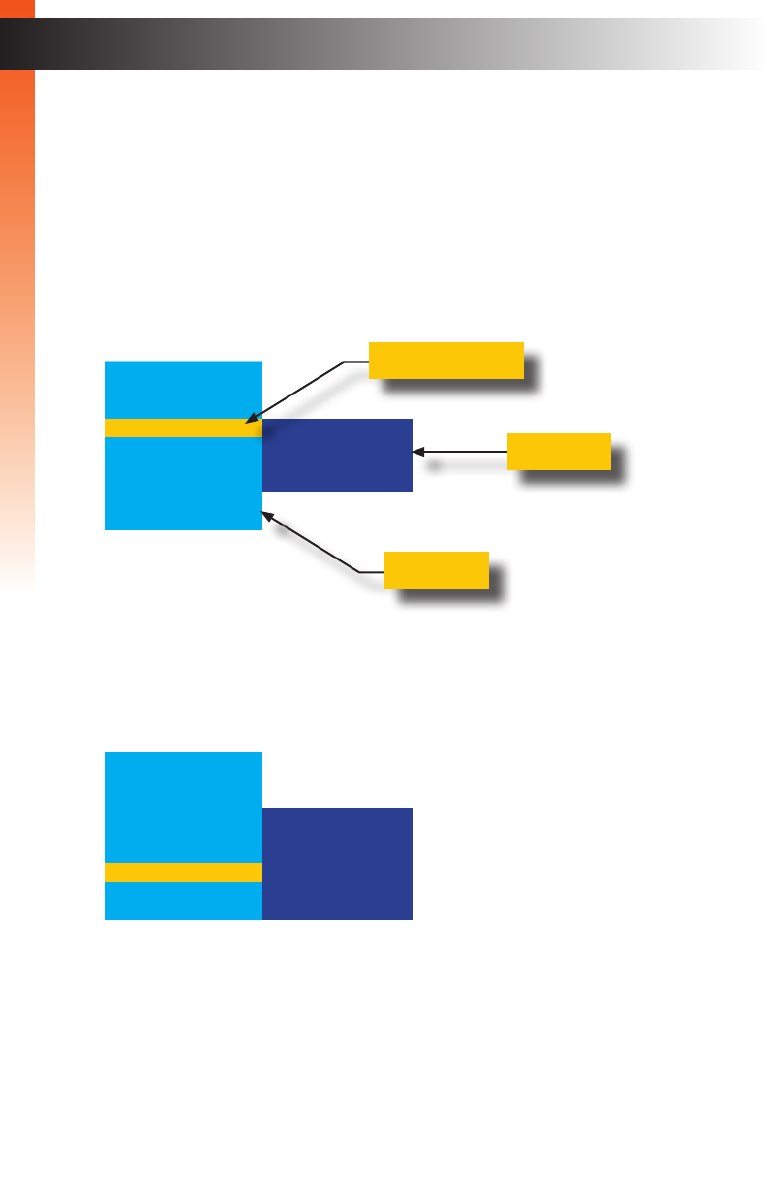
Introduction
6 7 9 108
Getting Started
1 2 3 4 5

page | 3
Page TitleIntroduction
ID Name Description
1 VGA In (LED) This LED indicator will glow bright blue
when the VGA input is selected.
2 VGA In Connect the included VGA cable from
source device (e.g. computer) to this port.
3 L/R In Connect the included 3.5mm mini-stereo
cable from this port to the audio output port
on the audio source device.
4 HDMI In (LED) This LED indicator will glow bright blue
when the HDMI input is selected.
5 HDMI In Connect the included HDMI cable from the
HD display to this HDMI port.
6 Connect a BNC-type cable from this port to SDI Out
the SDI display.
7 Up/HDMI, Dn/VGA, Menu These push-buttons are used to change
settings within the on-screen menu system.
See Menu System (page 9) for more
information.
8 USB This mini-USB port is used for upgrading
the rmware. See ## for more information.
9 12V DC Connect the included 12V DC power supply
to this power receptacle.
10 Pwr Under normal operating conditions, this
LED indicator will glow bright blue.
Getting Started

page | 4
Connection Instructions
► Video
1. Connect the included VGA cable from the video source (e.g. computer) to the VGA In
port on the HDMI & VGA to 3GSDI Scaler/Converter.
2. Connect the included HDMI cable from the source (e.g. DVD player) to the HDMI In
port on the HDMI & VGA to 3GSDI Scaler/Converter.
3. Connect a BNC-type cable from the SDI Out port on the HDMI & VGA to 3GSDI
Scaler/Converter to the SDI display.
► Audio
4. Connect the included 3.5mm mini-stereo cable from the audio source to the L/R In
port on the HDMI & VGA to 3G Scaler/Converter.
► USB (optional Syner-G™ software control)
5. Connect a USB-to-mini USB cable from the HDMI & VGA to 3G Scaler/Converter to
a computer that is running the Syner-G™ Software Suite. To complete this portion
of the installation, see . This connection is for USB Interface (page 54) required
updating the rmware.
► Power
6. Connect the included power supply to the 12V DC power receptacle and connect the
power cord to an available electrical outlet.
Installation
Getting Started
Information
The L/R In port is used only when the VGA In port is the active input.
Refer to for information on switching Selecting the Input Source (page 8)
between HDMI and VGA inputs.

page | 5
Sample Wiring Diagram
Getting Started
VGA & Analog
Audio Source
SDI Display
HDMI Source
EXT-HDVGA-3G-
SC
Scaler/Converter
VGA CABLE
HDMI CABLE
SDI CABLE
EXT-HDVGA-3G-SC
MINI STEREO AUDIO CABLE
Installation

This page left intentionally blank.

HDMI & VGA to 3G
Scaler/Converter
2 Basic Operation

page | 8
Use the buttons to switch between HDMI and VGA inputs.Input Select
• To switch to the HDMI input, press the button: HDMI / Up
• To switch to the VGA input, press the VGA / Dn button:
SDI Out Input Select
HDMI
Up Dn Menu
USB Pwr
12V DC
VGA
SDI Out Input Select
HDMI
Up Dn Menu
USB Pwr
12V DC
VGA
Selecting the Input Source
Basic OperationBasic Operation
VGA & Audio Source
SDI Out
HD Source
VGA & HDMI to 3GSDI
Scaler/Converter
VGA & Audio Source
SDI Out
HD Source
VGA & HDMI to 3GSDI
Scaler/Converter
HDMI / Up button
VGA / Dn button

page | 9
Displaying the Menu System
The HDMI & VGA to 3GSDI Scaler/Converter uses a built-in menu system to manage and
control all video features.
1. To display the menu system, press the button on the front panel. Menu
2. The menu system will be displayed in the upper-left corner of the screen, as shown
below:
If the menu system is not used within the time interval specied by the OSD Timeout
setting, then the menu system will automatically be hidden. By default, the OSD
Timeout setting is 5 seconds. See OSD Timeout (page 36) for instructions on
setting the OSD Timeout value.
(continued on next page)
®
SDI Out Input Select
HDMI
Up Dn Menu
USB Pwr
12V DC
VGA
Menu System
Basic OperationBasic Operation
Gefen
Converter
----------------
1.Output Setup
2.Picture
3.Adjustment
4.System
5.Test Patterns
6.Exit
1.Output Setup Output Resolu.
Output Lock
Source Select
<- Back
Menu controls
page | 10
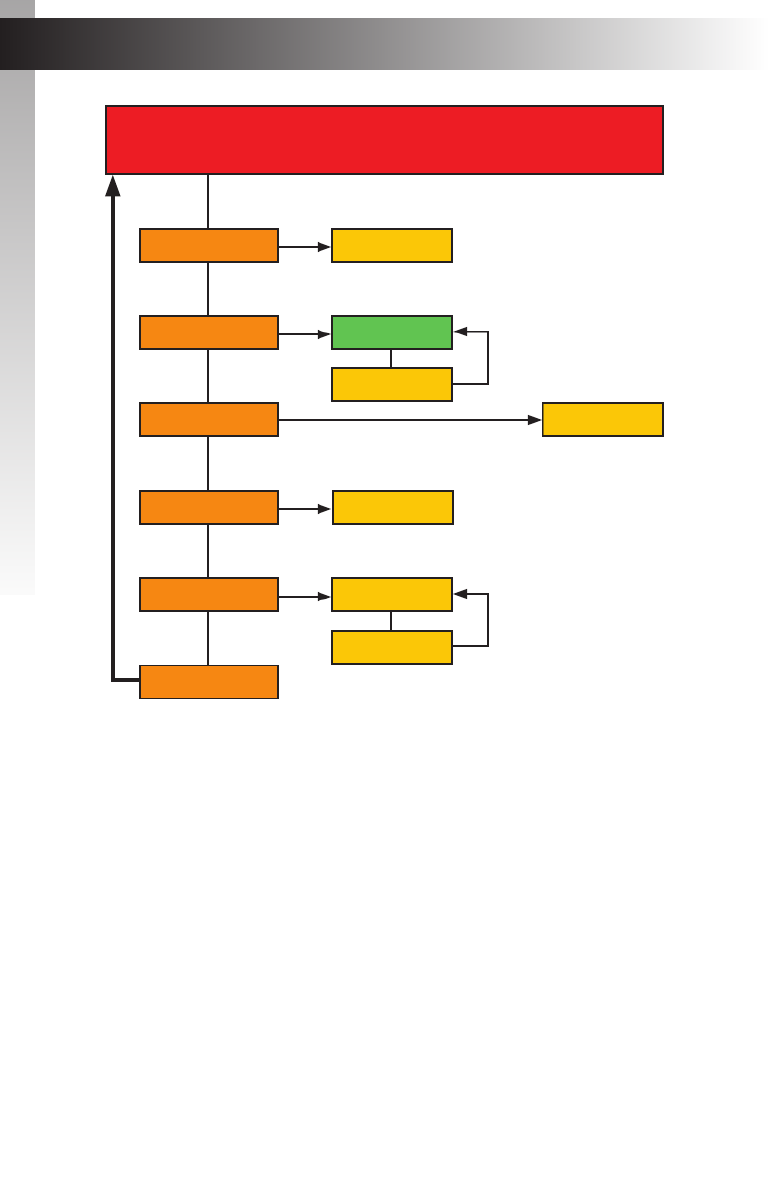
Moving around within the Menu System
1. There are six menu items within the : , , , main menu Output Setup Picture Adjustment
System Test Patterns Exit, , and .
2. The currently selected item within the main menu will always be highlighted in
yellow.
3. , contains a . Each item within the main menu, with the exception of Exit submenu
The submenu, for each item in the main menu, is displayed automatically.
4. Use the or button to highlight the desired item within the main menu. Up Dn
For example, if we press the button three times, the menu item will be Dn System
highlighted and it’s submenu will be displayed.
(continued on next page)
Basic OperationBasic Operation
Gefen
Converter
----------------
1.Output Setup
2.Picture
3.Adjustment
4.System
5.Test Patterns
6.Exit
Output Resolu.
Output Lock
Source Select
<- Back
Main menu
Current selection
OSD Timeout
Display Notify
Input Res.Info
F/W Version
Factory Reset
<- Back
Gefen
Converter
----------------
1.Output Setup
2.Picture
3.Adjustment
4.System
5.Test Patterns
6.Exit
Menu System
Submenu

page | 11
5. To access the submenu for the highlighted item within the main menu, press the Menu
button a second time. When a submenu is activated, a green bar is used to indicate
the current selection. By default, the top submenu item will always be highlighted
once a submenu is activated.
6. Use the or button to select the desired option within the submenu. Up Dn
7. To select the highlighted submenu item, press the button. Menu
For example, if we press the button when the option is Menu Input Res. Info
highlighted, the menu system will be hidden and the following will be displayed:
8. Press the button to return to the menu system. Menu
Basic OperationBasic Operation
Menu System
OSD Timeout
Display Notify
Input Res.Info
F/W Version
Factory Reset
<- Back
Gefen
Converter
----------------
1.Output Setup
2.Picture
3.Adjustment
4.System
5.Test Patterns
6.Exit
OSD Timeout
Display Notify
Input Res.Info
F/W Version
Factory Reset
<- Back
Gefen
Converter
----------------
1.Output Setup
2.Picture
3.Adjustment
4.System
5.Test Patterns
6.Exit
[ ] 720p(HD)60
a
a
Input Res.Info
OSD Timeout
Display Notify
Input Res.Info
F/W Version
Factory Reset
<- Back
Gefen
Converter
----------------
1.Output Setup
2.Picture
3.Adjustment
4.System
5.Test Patterns
6.Exit
Current selection

page | 12
9. To exit the submenu and return to the main menu, use the or button Up Dn
to highlight the option. <- Back
10. Press the button to return to the main menu. Menu
11. To exit the menu system, use the or button to highlight the option: Up Dn Exit
12. Press the button to select the option.Menu Exit
13. The menu system is now hidden. To display the menu system again, press the
Menu button.
Basic OperationBasic Operation
Menu System
Gefen
Converter
----------------
1.Output Setup
2.Picture
3.Adjustment
4.System
5.Test Patterns
6.Exit
Information
By default, the menu system will automatically time-out if no action is
taken within 5 seconds. To exit the menu system manually (before the
time-out period), highlight the Exit Menu option then press the button.
See OSD Timeout (page 36) for more information.
OSD Timeout
Display Notify
Input Res.Info
F/W Version
Factory Reset
<- Back
Gefen
Converter
----------------
1.Output Setup
2.Picture
3.Adjustment
4.System
5.Test Patterns
6.Exit
OSD Timeout
Display Notify
Input Res.Info
F/W Version
Factory Reset
<- Back
Gefen
Converter
----------------
1.Output Setup
2.Picture
3.Adjustment
4.System
5.Test Patterns
6.Exit

page | 13
Output Resolution
1. Press the button on the front panel. The option will be Menu Output Setup
highlighted.
2. Press the button to access the Menu Output Setup submenu. The Output Resolu.
option will be highlighted.
3. Press the button to select the option. Menu Output Resolu.
4. The selection box be displayed: Output Resolu.
5. Use the or button to select the desired resolution. For a list of available output Up Dn
resolutions that are supported by the HDMI & VGA to 3GSDI Scaler/Converter, see
Menu System Summary (page 48).
6. After the desired output resolution is selected, press the Menu button to conrm the
change.
7. After the output resolution has been changed, the current input and output resolution
will be displayed above the selection box: Output Resolu.
(continued on next page)
Basic Operation
Menu System
Gefen
Converter
----------------
1.Output Setup
2.Picture
3.Adjustment
4.System
5.Test Patterns
6.Exit
Output Resolu.
Output Lock
Source Select
<- Back
[ ]1080p(HD)60
a
a
Output Resolu.
Input 720p(HD)60
Output 1080p(HD)60
Warning
Before changing this setting, make sure that the connected display can
support the selected output resolution. If an unsupported resolution is
selected, the unit will need to be reset using the DIP switch on the bottom
of the unit. See DIP Switch Conguration (page 44) for more information.

page | 14
8. After a few seconds, the input and output resolution information dialog will disappear.
9. The dialog is still displayed: Output Resolu.
10. Press the button to return to the submenu: Menu Output Setup
11. Use the or button to select the option.Up Dn <- Back
12. Press the button.Menu
13. Use the or button to select the optionUp Dn Exit
14. Press the button to exit the main menu. Menu
Gefen
Converter
----------------
1.Output Setup
2.Picture
3.Adjustment
4.System
5.Test Patterns
6.Exit
Output Resolu.
Output Lock
Source Select
<- Back
Basic Operation
Menu System
Information
The input/output resolution information dialog will only be displayed if Display
Notify is set to On. See Display Notify (page 37) for more information.
[ ]1080p(HD)60
a
a
Output Resolu.

page | 15
Output Lock
1. Press the button on the front panel. The option will be Menu Output Setup
highlighted.
2. Press the button to access the Menu Output Setup submenu. The Output Resolu.
option will be highlighted.
3. Use the or button to highlight the option. Up Dn Output Lock
4. Press the button to select the option.Menu Output Lock
5. The selection box will be displayed: Output Lock
6. Use the or D button to select either or mode.Up n FreeRun HDMI
7. After the desired signal lock is selected, press the Menu button to conrm the change.
8. The dialog is still displayed: Output Lock
(continued on next page)
Information
This menu option is available only when the HDMI input is active.
Basic Operation
Menu System
Gefen
Converter
----------------
1.Output Setup
2.Picture
3.Adjustment
4.System
5.Test Patterns
6.Exit
Output Resolu.
Output Lock
Source Select
<- Back
[ ] FreeRun
a
a
Output Lock
[ ] HDMI
a
a
Output Lock

page | 16
10. Press the button to return to the submenu: Menu Output Setup
11. Use the or button to select the option.Up Dn <- Back
12. Press the button.Menu
13. Use the or button to select the optionUp Dn Exit
14. Press the button to exit the main menu. Menu
Basic Operation
Menu System
Gefen
Converter
----------------
1.Output Setup
2.Picture
3.Adjustment
4.System
5.Test Patterns
6.Exit
Output Resolu.
Output Lock
Source Select
<- Back

page | 17
Basic Operation
Menu System
Source Select
1. Press the button on the front panel. The option will be Menu Output Setup
highlighted.
2. Press the button to access the submenu. The Menu Output Setup Output Resolu.
option will be highlighted.
3. Use the or D button to highlight the option. Up n Source Select
4. Press the button to select the option.Menu Source Select
5. The dialog box will be displayed: Source Select
Before selecting a new source, make sure that the source is connected to the correct
port on the HDMI & VGA to 3GSDI Scaler/Converter.
6. Use the or button to select between Up Dn VGA HDMIor .
7. After the source has been selected, press the Menu button to conrm the change.
8. The current input and output resolution will be displayed above the current output
mode selection.
(continued on next page)
Gefen
Converter
----------------
1.Output Setup
2.Picture
3.Adjustment
4.System
5.Test Patterns
6.Exit
Output Resolu.
Output Lock
Source Select
<- Back
[ ] VGA
a
a
Source Select
Input 1280x1024p60
Output HD(720p)60
Information
The input/output resolution information dialog will only be displayed if Display
Notify is set to On. See Display Notify (page 37) for more information.

page | 18
Basic Operation
Menu System
8. The dialog is still displayed: Source Select
9. Press the button to return to the submenu: Menu Output Setup
10. Use the or button to select the option.Up Dn <- Back
11. Press the button.Menu
12. Use the or button to select the optionUp Dn Exit
13. Press the button to exit the main menu. Menu
Gefen
Converter
----------------
1.Output Setup
2.Picture
3.Adjustment
4.System
5.Test Patterns
6.Exit
Output Resolu.
Output Color
Output Mode
<- Back
[ ] HDMI
a
a
Source Select

page | 19
Contrast
1. Press the button on the front panel. The option will be Menu Output Setup
highlighted.
2. Use the or button to highlight the option.Up Dn Picture
3. Press the button to access the option will be Menu Picture submenu. The Contrast
highlighted.
4. Press the button to select the option.Menu Contrast
5. The selection box will be displayed: Contrast
6. Use the or D button to set the desired contrast level.Up n
7. Press the submenu.Menu Picture button to conrm the change and return to the
8. Use the or button to select the option.Up Dn <- Back
9. Press the button.Menu
10. Use the or button to select the optionUp Dn Exit
11. Press the button to exit the main menu.Menu
Basic Operation
Menu System
Gefen
Converter
----------------
1.Output Setup
2.Picture
3.Adjustment
4.System
5.Test Patterns
6.Exit
Contrast
Brightness
Saturation
Hue
Color Temp.
Color Balance
Edge Enhance
Sharpness
<- Back
a
a
Contrast 50

page | 20
Brightness
1. Press the button on the front panel. The option will be Menu Output Setup
highlighted.
2. Use the or button to highlight the option.Up Dn Picture
3. Press the button to access the option will be Menu Picture submenu. The Contrast
highlighted.
4. Use the or D button to highlight the option. Up n Brightness
5. Press the button to select the option.Menu Brightness
6. The selection box will be displayed: Brightness
7. Use the or button to set the desired brightness level.Up Dn
8. Press the submenu.Menu Picture button to conrm the change and return to
9. Use the or button to select the option.Up Dn <- Back
10. Press the button.Menu
11. Use the or button to select the optionUp Dn Exit
12. Press the button to exit the main menu.Menu
Basic Operation
Menu System
a
a
Brightness 50
Gefen
Converter
----------------
1.Output Setup
2.Picture
3.Adjustment
4.System
5.Test Patterns
6.Exit
Contrast
Brightness
Saturation
Hue
Color Temp.
Color Balance
Edge Enhance
Sharpness
<- Back

page | 21
Saturation
1. Press the button on the front panel. The option will be Menu Output Setup
highlighted.
2. Use the or button to highlight the option.Up Dn Picture
3. Press the button to access the option will be Menu Picture submenu. The Contrast
highlighted.
4. Use the or button to highlight the option. Up Dn Saturation
5. Press the button to select the option.Menu Saturation
6. The selection box will be displayed: Saturation
7. Use the or button to set the desired saturation level.Up Dn
8. Press the submenu.Menu Picture button to conrm the change and return to the
9. Use the or button to select the option.Up Dn <- Back
10. Press the button.Menu
11. Use the or button to select the optionUp Dn Exit
12. Press the button to exit the main menu.Menu
a
a
Saturation 50
Basic Operation
Menu System
Gefen
Converter
----------------
1.Output Setup
2.Picture
3.Adjustment
4.System
5.Test Patterns
6.Exit
Contrast
Brightness
Saturation
Hue
Color Temp.
Color Balance
Edge Enhance
Sharpness
<- Back

page | 23
Color Temperature
1. Press the button on the front panel. The option will be Menu Output Setup
highlighted.
2. Use the or button to highlight the option.Up Dn Picture
3. Press the button to access the option will be Menu Picture submenu. The Contrast
highlighted.
4. Use the or button to highlight the Up Dn Color Temp. option.
5. Press the button to select the Menu Color Temp. option.
6. The Color Temp. selection box will be displayed:
7. Use the or button to select between , , or Up Dn Neutral Cool Warm.
8. Press the submenu.Menu Picture button to conrm the change and return to the
9. Use the or button to select the option.Up Dn <- Back
10. Press the button.Menu
11. Use the or button to select the optionUp Dn Exit
12. Press the button to exit the main menu.Menu
Gefen
Converter
----------------
1.Output Setup
2.Picture
3.Adjustment
4.System
5.Test Patterns
6.Exit
Contrast
Brightness
Saturation
Hue
Color Temp.
Color Balance
Edge Enhance
Sharpness
<- Back
Basic Operation
Menu System
[ ] Neutral
a
a
Color Temp.

page | 25
Edge Enhance
1. Press the button on the front panel. The option will be Menu Output Setup
highlighted.
2. Use the or button to highlight the option.Up Dn Picture
3. Press the button to access the option will be Menu Picture submenu. The Contrast
highlighted.
4. Use the or button to highlight the option. Up Dn Edge Enhance
5. Press the button to select the option.Menu Edge Enhance
6. The selection box will be displayed: Edge Enhance
7. Use the or button to select between , , , or .Up Dn User Off Mid Max
8. Press the submenu.Menu Picture button to conrm the change and return to the
9. Use the or button to select the option.Up Dn <- Back
10. Press the button.Menu
11. Use the or button to select the optionUp Dn Exit
12. Press the button to exit the main menu.Menu
Basic Operation
Menu System
[ ] User
a
a
Edge Enhance
Gefen
Converter
----------------
1.Output Setup
2.Picture
3.Adjustment
4.System
5.Test Patterns
6.Exit
Contrast
Brightness
Saturation
Hue
Color Temp.
Color Balance
Edge Enhance
Sharpness
<- Back

page | 26
Sharpness
1. Press the button on the front panel. The option will be Menu Output Setup
highlighted.
2. Use the or button to highlight the option.Up Dn Picture
3. Press the button to access the option will be Menu Picture submenu. The Contrast
highlighted.
4. Use the or button to highlight the option. Up Dn Sharpness
5. Press the button to select the option.Menu Sharpness
6. The selection box will be displayed: Sharpness
7. Use the or button to set the sharpness level. Larger values increase the Up Dn
sharpness of the image.
8. Press the submenu.Menu Picture button to conrm the change and return to the
9. Use the or button to select the option.Up Dn <- Back
10. Press the button.Menu
11. Use the or button to select the optionUp Dn Exit
12. Press the button to exit the main menu.Menu
Basic Operation
Menu System
a
a
Sharpness 0
Gefen
Converter
----------------
1.Output Setup
2.Picture
3.Adjustment
4.System
5.Test Patterns
6.Exit
Contrast
Brightness
Saturation
Hue
Color Temp.
Color Balance
Edge Enhance
Sharpness
<- Back

page | 27
Basic Operation
Menu System
Underscan/Overscan
1. Press the button on the front panel. The option will be Menu Output Setup
highlighted.
2. Use the or button to highlight the option.Up Dn Adjustment
3. Press the button to access the Menu Adjustment submenu. The Under/Over Scan
option will be highlighted.
4. Press the button to select the option.Menu Under/Over Scan
5. The selection box will be displayed: Under/Over Scan
6. Use the or button to set the amount of overscan or underscan. Negative Up Dn
values increase the amount of . Positive values increase the amount of underscan
overscan.
7. Press the submenu.Menu Adjustment button to conrm the change and return to the
8. Use the or button to select the option.Up Dn <- Back
9. Press the button.Menu
10. Use the or button to select the optionUp Dn Exit
11. Press the button to exit the main menu.Menu
a
a
Under/Over Scan Off
Gefen
Converter
----------------
1.Output Setup
2.Picture
3.Adjustment
4.System
5.Test Patterns
6.Exit
Under/Over Scan
Aspect Ratio
H-Mirror
V-Mirror
H-Shift
V-Shift
Phase
<- Back

page | 28
Aspect Ratio
1. Press the button on the front panel. The option will be Menu Output Setup
highlighted.
2. Use the or button to highlight the option.Up Dn Adjustment
3. Press the button to access the Menu Adjustment submenu. The Under/Over Scan
option will be highlighted.
4. Use the or button to highlight the option. Up Dn Aspect Ratio
5. Press the button to select the option.Menu Aspect Ratio
6. The selection box will be displayed: Aspect Ratio
7. Use the or button to select between , , , or .Up Dn Source 16:9 4:3 Stretch
8. Press the submenu.Menu Adjustment button to conrm the change and return to the
9. Use the or button to select the option.Up Dn <- Back
10. Press the button.Menu
11. Use the or button to select the optionUp Dn Exit
12. Press the button to exit the main menu.Menu
Basic Operation
Menu System
[ ] Source
a
a
Aspect Ratio
Gefen
Converter
----------------
1.Output Setup
2.Picture
3.Adjustment
4.System
5.Test Patterns
6.Exit
Under/Over Scan
Aspect Ratio
H-Mirror
V-Mirror
H-Shift
V-Shift
Phase
<- Back

page | 29
Horizontal Mirror
1. Press the button on the front panel. The option will be Menu Output Setup
highlighted.
2. Use the or button to highlight the option.Up Dn Adjustment
3. Press the button to access the Menu Adjustment submenu. The Under/Over Scan
option will be highlighted.
4. Use the or button to highlight the option. Up Dn H-Mirror
5. Press the button to select the option.Menu H-Mirror
6. The selection box will be displayed: H-Mirror
7. Use the or D button to toggle between and . When the Up n On Off H-Mirror
option is set to On, then the picture will be ipped horizontally (about the Y-axis).
(continued on next page)
Basic Operation
Menu System
[ ] Off
a
a
H-Mirror
[ ] Off
a
a
H-Mirror [ ] On
a
a
H-Mirror
Gefen
Converter
----------------
1.Output Setup
2.Picture
3.Adjustment
4.System
5.Test Patterns
6.Exit
Under/Over Scan
Aspect Ratio
H-Mirror
V-Mirror
H-Shift
V-Shift
Phase
<- Back

page | 30
Basic Operation
Menu System
8. Press the submenu.Menu Adjustment button to conrm the change and return to the
9. Use the or button to select the option.Up Dn <- Back
10. Press the button.Menu
11. Use the or button to select the optionUp Dn Exit
12. Press the button to exit the main menu.Menu

page | 31
Vertical Mirror
1. Press the button on the front panel. The option will be Menu Output Setup
highlighted.
2. Use the or button to highlight the option.Up Dn Adjustment
3. Press the button to access the Menu Adjustment submenu. The Under/Over Scan
option will be highlighted.
4. Use the or button to highlight the Up Dn V-Mirror option.
5. Press the button to select the Menu V-Mirror option.
6. The V-Mirror selection box will be displayed:
7. Use the or button to toggle between and . When the Up Dn On Off V-Mirror
option is set to On, then the picture will be ipped vertically (about the X-axis).
(continued on next page)
Basic Operation
Menu System
[ ] Off
a
a
V-Mirror
[ ] Off
a
a
V-Mirror [ ] On
a
a
V-Mirror
Gefen
Converter
----------------
1.Output Setup
2.Picture
3.Adjustment
4.System
5.Test Patterns
6.Exit
Under/Over Scan
Aspect Ratio
H-Mirror
V-Mirror
H-Shift
V-Shift
Phase
<- Back

page | 32
Basic Operation
Menu System
8. Press the submenu.Menu Adjustment button to conrm the change and return to the
9. Use the or button to select the option.Up Dn <- Back
10. Press the button.Menu
11. Use the or button to select the optionUp Dn Exit
12. Press the button to exit the main menu.Menu

page | 33
Horizontal Shift
1. Press the button on the front panel. The option will be Menu Output Setup
highlighted.
2. Use the or button to highlight the option.Up Dn Adjustment
3. Press the button to access the Menu Adjustment submenu. The Under/Over Scan
option will be highlighted.
4. Use the or button to highlight the option. Up Dn H-Shift
5. Press the button to select the option.Menu H-Shift
6. The selection box will be displayed: H-Shift
7. Use the or button to shift the picture to the left or to the right. Negative values, Up Dn
move the image to the left. Positive values move the image to the right.
8. Press the submenu.Menu Adjustment button to conrm the change and return to the
9. Use the or button to select the option.Up Dn <- Back
10. Press the button.Menu
11. Use the or button to select the optionUp Dn Exit
12. Press the button to exit the main menu.Menu
Basic Operation
Menu System
a
a
H-Shift Off
Gefen
Converter
----------------
1.Output Setup
2.Picture
3.Adjustment
4.System
5.Test Patterns
6.Exit
Under/Over Scan
Aspect Ratio
H-Mirror
V-Mirror
H-Shift
V-Shift
Phase
<- Back

page | 34
Basic Operation
Menu System
Vertical Shift
1. Press the button on the front panel. The option will be Menu Output Setup
highlighted.
2. Use the or button to highlight the option.Up Dn Adjustment
3. Press the button to access the Menu Adjustment submenu. The Under/Over Scan
option will be highlighted.
4. Use the or button to highlight the Up Dn V-Shift option.
5. Press the button to select the Menu V-Shift option.
6. The V-Shift selection box will be displayed:
7. Use the or button to shift the picture up or down. Negative values, move the Up Dn
image upwards. Positive values move the image downwards.
8. Press the submenu.Menu Adjustment button to conrm the change and return to the
9. Use the or button to select the option.Up Dn <- Back
10. Press the button.Menu
11. Use the or button to select the optionUp Dn Exit
12. Press the button to exit the main menu.Menu
a
a
V-Shift Off
Gefen
Converter
----------------
1.Output Setup
2.Picture
3.Adjustment
4.System
5.Test Patterns
6.Exit
Under/Over Scan
Aspect Ratio
H-Mirror
V-Mirror
H-Shift
V-Shift
Phase
<- Back

page | 35
Basic Operation
Menu System
Phase
1. Press the button on the front panel. The option will be Menu Output Setup
highlighted.
2. Use the or button to highlight the option.Up Dn Adjustment
3. Press the button to access the Menu Adjustment submenu. The Under/Over Scan
option will be highlighted.
4. Use the or button to highlight the option. Up Dn Phase
5. Press the button to select the option.Menu Phase
6. The selection box will be displayed: Phase
7. Use the or button to adjust the phase.Up Dn
8. Press the submenu.Menu Adjustment button to conrm the change and return to the
9. Use the or button to select the option.Up Dn <- Back
10. Press the button.Menu
11. Use the or button to select the optionUp Dn Exit
12. Press the button to exit the main menu.Menu
Gefen
Converter
----------------
1.Output Setup
2.Picture
3.Adjustment
4.System
5.Test Patterns
6.Exit
Under/Over Scan
Aspect Ratio
H-Mirror
V-Mirror
H-Shift
V-Shift
Phase
<- Back
a
a
Phase Auto

page | 36
OSD Timeout
1. Press the button on the front panel. The option will be Menu Output Setup
highlighted.
2. Use the or button to highlight the option.Up Dn System
3. Press the button to access the option Menu System submenu. The OSD Timeout
will be highlighted.
4. Press the button to select the option.Menu OSD Timeout
5. The selection box will be displayed: OSD Timeout
6. Use the or or from any time interval Up Dn Offbutton to set the OSD timeout to
between 5 and 60 seconds, inclusive. The default setting is 5 seconds.
7. Press the submenu.Menu System button to conrm the change and return to the
8. Use the or button to select the option.Up Dn <- Back
9. Press the button.Menu
10. Use the or button to select the optionUp Dn Exit
11. Press the button to exit the main menu.Menu
Basic Operation
Menu System
Gefen
Converter
----------------
1.Output Setup
2.Picture
3.Adjustment
4.System
5.Test Patterns
6.Exit
OSD Timeout
Display Notify
Input Res.Info
F/W Version
Factory Reset
<- Back
[ ]5sec
a
a
OSD Timeout

page | 37
Display Notify
1. Press the button on the front panel. The option will be Menu Output Setup
highlighted.
2. Use the or button to highlight the option.Up Dn System
3. Press the button to access the option Menu System submenu. The OSD Timeout
will be highlighted.
4. Use the or button to highlight the option. Up Dn Display Notify
5. Press the button to select the option.Menu Display Notify
6. The selection box will be displayed: Display Notify
7. Use the or button to toggle between and . When Up Dn On Off Display Notify
is set to , then the input/output resolution information dialog will be displayed, On
momentarily, whenever the HDMI & VGA to 3GSDI Scaler/Converter is disconnected
from the source or display:
In addition, the following operations also trigger the input/output resolution
information dialog: , , or Output Resolution (page 13) Output Lock (page 15) Out-
put Mode (page 37). When set to , the input/output resolution information dialog is Off
never displayed.
(continued on next page)
Basic Operation
Menu System
Gefen
Converter
----------------
1.Output Setup
2.Picture
3.Adjustment
4.System
5.Test Patterns
6.Exit
OSD Timeout
Display Notify
Input Res.Info
F/W Version
Factory Reset
<- Back
[ ] On
a
a
Display Notify
Input 1600x1200p60
Output 640x480p60

page | 39
Input Resolution Information
1. Press the button on the front panel. The option will be Menu Output Setup
highlighted.
2. Use the or button to highlight the option.Up Dn System
3. Press the button to access the option Menu System submenu. The OSD Timeout
will be highlighted.
4. Use the or button to highlight the option. Up Dn Input Res. Info
5. Press the button to select the option.Menu Input Res. Info
6. The current input resolution will be displayed in the box. Input Res. Info
7. Press the button to return to the submenu.Menu System
8. Use the or button to select the option.Up Dn <- Back
9. Press the button.Menu
10. Use the or button to select the optionUp Dn Exit
11. Press the button to exit the main menu.Menu
Basic Operation
Menu System
Gefen
Converter
----------------
1.Output Setup
2.Picture
3.Adjustment
4.System
5.Test Patterns
6.Exit
OSD Timeout
Display Notify
Input Res.Info
F/W Version
Factory Reset
<- Back
[ ] 1600x1200p60
a
a
Input Res.Info

page | 40
F/W Version
1. Press the button on the front panel. The option will be Menu Output Setup
highlighted.
2. Use the or button to highlight the option.Up Dn System
3. Press the button to access the option Menu System submenu. The OSD Timeout
will be highlighted.
4. Use the or button to highlight the Up Dn F/W Version option.
5. Press the button to select the Menu F/W Version option.
6. The current version of rmware will be displayed in the F/W Version box.
7. Press the button to return to the submenu.Menu System
8. Use the or button to select the option.Up Dn <- Back
9. Press the button.Menu
10. Use the or button to select the optionUp Dn Exit
11. Press the button to exit the main menu.Menu
Basic Operation
Menu System
Gefen
Converter
----------------
1.Output Setup
2.Picture
3.Adjustment
4.System
5.Test Patterns
6.Exit
OSD Timeout
Display Notify
Input Res.Info
F/W Version
Factory Reset
<- Back
[ ] V1.013
a
a
F/W Version

page | 41
Factory Reset
1. Press the button on the front panel. The option will be Menu Output Setup
highlighted.
2. Use the or button to highlight the option.Up Dn System
3. Press the button to access the option Menu System submenu. The OSD Timeout
will be highlighted.
4. Use the or button to highlight the option. Up Dn Factory Reset
5. Press the button to select the option.Menu Factory Reset
6. The selection box will be displayed. Factory Reset
7. Use the or D button to toggle between and .Up n No Yes
► is selected, then the HDMI & VGA to 3GSDI Scaler/Converter will reset to If Yes
factory-default settings and will automatically reboot.
► is selected, then the HDMI & VGA to 3GSDI Scaler/Converter will return to If No
the submenu.System
a. Use the or button to select the option.Up Dn <- Back
b. Press the button.Menu
c. Use the or button to select the option.Up Dn Exit
d. Press the button to exit the main menu.Menu
Basic Operation
Menu System
Gefen
Converter
----------------
1.Output Setup
2.Picture
3.Adjustment
4.System
5.Test Patterns
6.Exit
OSD Timeout
Display Notify
Input Res.Info
F/W Version
Factory Reset
<- Back
[ ] No
a
a
Factory Reset

page | 43
Basic Operation
Menu System
6. Press the button to return to the Menu Test Patterns submenu and select a different
pattern.
7. To disable the pattern and view the source image, select from the Off Test Patterns
submenu.
WindowGray
page | 44
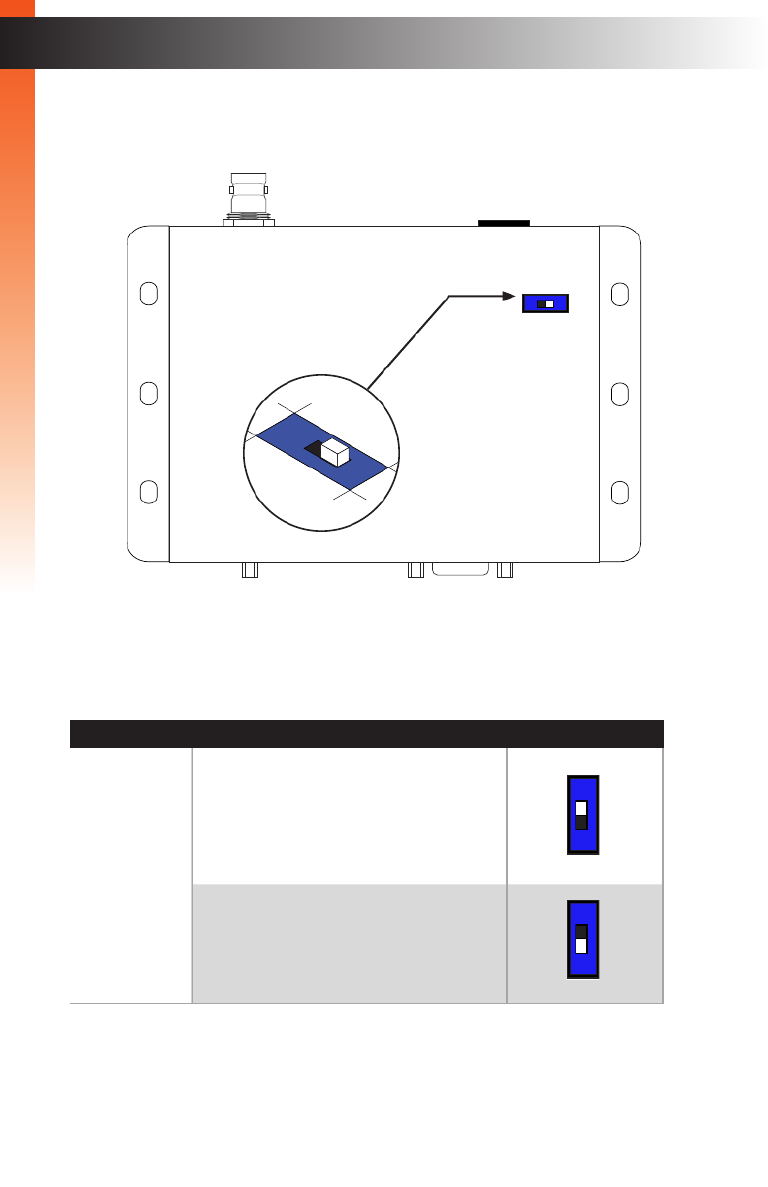
DIP Switch Conguration
Basic Operation
On the bottom panel of the HDMI & VGA to 3GSDI Scaler/Converter is a single DIP switch.
Remove the piece of colored tape to reveal the DIP switch bank.
By default, the DIP switch is in the OFF (1) position. The DIP switch should remain in this
position during normal operation.
DIP Switch Description
1 Factory reset
• Toggle the DIP switch from the OFF
(1) position to the ON position, then
back to the OFF (1) position.
Normal Operation
• DIP switch is in the OFF (1) position.
ON
1
ON
1
ON
1
ON
1

This page left intentionally blank.

This page left intentionally blank.

page | 47
HDMI & VGA to 3GSDI
Scaler/Converter
3 Appendix

page | 48
HDMI
Free Run
Appendix
Menu System Summary
720p 59.95Hz
720p 30Hz
720p 25Hz
1080i 59Hz
1080p 60Hz (3G-A)
576i 50Hz
1080p 50Hz (3G-A)
1080p 29.97Hz
1080p 25Hz
1080p 24Hz
1080p 23Hz
1080p 60Hz (3G-B)
1080p 59Hz (3G-B)
1080p 50Hz (3G-B)
720p 60Hz
OUTPUT SETUP
OUTPUT RESOLUTION
720p 50Hz
720p 29.97Hz
1080i 60Hz
1080i 50Hz
480i 60Hz
1080p 59Hz (3G-A)
1080p 30Hz
OUTPUT LOCK
BACK
Boxes in green indicate the default setting.
The Output Lock menu is only available when using the HDMI input.
page | 51
Appendix
Menu System Summary
[Off, 5 ... 60]
Display Info
Display Info
Yes
On
No
Off
SYSTEM
OSD TIMEOUT
DISP. NOTIFY
INPUT RES. INFO
FIRMWARE VER.
FACTORY RESET
BACK
Boxes in green indicate the default setting.
Produkt Specifikationer
| Mærke: | Gefen |
| Kategori: | Audio/video konverter |
| Model: | EXT-HDVGA-3G-SC |
Har du brug for hjælp?
Hvis du har brug for hjælp til Gefen EXT-HDVGA-3G-SC stil et spørgsmål nedenfor, og andre brugere vil svare dig
Audio/video konverter Gefen Manualer

4 September 2024
16 August 2024
15 August 2024
13 August 2024
12 August 2024
12 August 2024
11 August 2024
10 August 2024
9 August 2024
9 August 2024
Audio/video konverter Manualer
- Audio/video konverter Pro-Ject
- Audio/video konverter TP-Link
- Audio/video konverter Philips
- Audio/video konverter Pioneer
- Audio/video konverter Behringer
- Audio/video konverter D-Link
- Audio/video konverter Roland
- Audio/video konverter Pyle
- Audio/video konverter Yamaha
- Audio/video konverter AVM
- Audio/video konverter Nedis
- Audio/video konverter Abus
- Audio/video konverter Planet
- Audio/video konverter Optoma
- Audio/video konverter Hama
- Audio/video konverter Rega
- Audio/video konverter Black Box
- Audio/video konverter DataVideo
- Audio/video konverter TRENDnet
- Audio/video konverter Vivanco
- Audio/video konverter Cambridge
- Audio/video konverter König
- Audio/video konverter Gembird
- Audio/video konverter Bose
- Audio/video konverter Tripp Lite
- Audio/video konverter Genie
- Audio/video konverter Digitus
- Audio/video konverter Techly
- Audio/video konverter EnerGenie
- Audio/video konverter Marmitek
- Audio/video konverter Thor
- Audio/video konverter Kathrein
- Audio/video konverter NAD
- Audio/video konverter AJA
- Audio/video konverter Tascam
- Audio/video konverter LevelOne
- Audio/video konverter Zoom
- Audio/video konverter JUNG
- Audio/video konverter RME
- Audio/video konverter Focal
- Audio/video konverter Teac
- Audio/video konverter Tenda
- Audio/video konverter Vogel's
- Audio/video konverter Monacor
- Audio/video konverter JL Audio
- Audio/video konverter AVerMedia
- Audio/video konverter FiiO
- Audio/video konverter Renkforce
- Audio/video konverter Manhattan
- Audio/video konverter Eminent
- Audio/video konverter Kramer
- Audio/video konverter Metra
- Audio/video konverter Naim
- Audio/video konverter Mean Well
- Audio/video konverter VIZIO
- Audio/video konverter Evolution
- Audio/video konverter MuxLab
- Audio/video konverter Wavtech
- Audio/video konverter Iogear
- Audio/video konverter ATen
- Audio/video konverter Shure
- Audio/video konverter Power Dynamics
- Audio/video konverter Rockford Fosgate
- Audio/video konverter Aluratek
- Audio/video konverter Smart-AVI
- Audio/video konverter Scosche
- Audio/video konverter StarTech.com
- Audio/video konverter Rocstor
- Audio/video konverter GEM
- Audio/video konverter Adder
- Audio/video konverter Crestron
- Audio/video konverter Lindy
- Audio/video konverter Audison
- Audio/video konverter Audac
- Audio/video konverter FSR
- Audio/video konverter CYP
- Audio/video konverter Sitecom
- Audio/video konverter AMX
- Audio/video konverter Intellinet
- Audio/video konverter AudioControl
- Audio/video konverter Audiotec Fischer
- Audio/video konverter Silverstone
- Audio/video konverter Steren
- Audio/video konverter Ocean Matrix
- Audio/video konverter Comprehensive
- Audio/video konverter Intelix
- Audio/video konverter Digitalinx
- Audio/video konverter Audioengine
- Audio/video konverter Speaka
- Audio/video konverter Data-Tronix
- Audio/video konverter Key Digital
- Audio/video konverter KanexPro
- Audio/video konverter TV One
- Audio/video konverter Sescom
- Audio/video konverter Apantac
- Audio/video konverter RGBlink
- Audio/video konverter Blustream
- Audio/video konverter C2G
- Audio/video konverter WyreStorm
- Audio/video konverter Twelve South
- Audio/video konverter Ewent
- Audio/video konverter PAC
- Audio/video konverter Wentronic
- Audio/video konverter Luxman
- Audio/video konverter Monoprice
- Audio/video konverter SIIG
- Audio/video konverter Televés
- Audio/video konverter Micro Connect
- Audio/video konverter Extron
- Audio/video konverter PureLink
- Audio/video konverter Sunix
- Audio/video konverter Ebode
- Audio/video konverter INOGENI
- Audio/video konverter Antelope Audio
- Audio/video konverter CE Labs
- Audio/video konverter Epcom
- Audio/video konverter J5create
- Audio/video konverter Karma
- Audio/video konverter SmartAVI
- Audio/video konverter Puls Dimension
- Audio/video konverter AVPro Edge
- Audio/video konverter Cudy
- Audio/video konverter Sabrent
- Audio/video konverter FoneStar
- Audio/video konverter Atlona
- Audio/video konverter HELGI
- Audio/video konverter Sharper Image
- Audio/video konverter A-NeuVideo
- Audio/video konverter SWIT
- Audio/video konverter I-Tec
- Audio/video konverter Newell
- Audio/video konverter Kanex
- Audio/video konverter TechLogix Networx
- Audio/video konverter Audibax
- Audio/video konverter Atlantis Land
- Audio/video konverter PTN-electronics
- Audio/video konverter Spatz
- Audio/video konverter PulseAudio
- Audio/video konverter ShieldRock
- Audio/video konverter Decimator
- Audio/video konverter Ferrofish
- Audio/video konverter VigilLink
- Audio/video konverter Recom
Nyeste Audio/video konverter Manualer
25 Marts 2025
25 Marts 2025
12 Marts 2025
9 Marts 2025
9 Marts 2025
27 Februar 2025
27 Februar 2025
20 Februar 2025
4 Februar 2025
27 Januar 2025