Getac RX10H Manual
Getac
Tegnetablet
RX10H
Læs nedenfor 📖 manual på dansk for Getac RX10H (100 sider) i kategorien Tegnetablet. Denne guide var nyttig for 35 personer og blev bedømt med 4.5 stjerner i gennemsnit af 2 brugere
Side 1/100

Rugged Mobile Computing Solutions
RX10
USER MANUAL

O ber 16 cto 20
T rademarks
All brand and product names are trademarks or registered trademarks of
their respective companies.
Notes
The information in this manual is subject to change without notice.
For the latest version of the manual, please visit the Getac website
at www.getac.com.
Manufacturer Contact Information
Name: Getac Technology Corp.
Address : 5F., Building A, No. 209, Sec. 1, Nangang Rd., Nangang Dist.,
Taipei City, 11568, Taiwan, R.O.C.
Phone: -2- -+886 2785 7888

i
Table of Contents
Chapter 1 Getting Started ................................................................. 1
Getting the Tablet PC Running ................................................. 2
Unpacking .............................................................................. 2
Installing the Micro Card (Optional) and Battery Pack- SIM 3
Connecting to AC Power ....................................................... 4
Using the Tether .................................................................... 5
Taking a Look at the Tablet PC ................................................. 6
Front Components ................................................................. 6
Rear Components .................................................................. 9
Left- tsSide Componen ......................................................... 11
Top Components .................................................................. 12
Bottom Components ........................................................... 12
Chapter 2 Operating Your Tablet PC .............................................. 13
Product Applications ................................................................ 14
Turning On and Off the Tablet PC .......................................... 16
Turning On ........................................................................... 16
Turning Off .......................................................................... 16
Navigating on the Screen ........................................................ 17
Using the Touchscreen ........................................................ 17
Using the Dual Mode Display (Optional) ........................... 20
Using Wireless Connections ..................................................... 21
Using the WLAN ................................................................... 21
Using the Bluetooth Feature .............................................. 22
Using the WWAN Feature (Optional) ................................ 24
Chapter 3 Managing Power ............................................................ 26
AC Adapter ............................................................................... 27
Battery Pack .............................................................................. 28
Charging the Battery Pack .................................................. 28
Initializing the Battery Pack ................................................ 29
Checking the Battery Level ................................................. 29
Battery Low Signals and Actions ........................................ 30

ii
Replacing the Battery Pack ................................................. 31
Hot Swapping the Battery Pack .......................................... 33
Power-Saving Tips .................................................................... 35
Chapter 4 Models with High Capacity Battery .............................. 36
Enhanced and Additional Features ........................................ 37
Using Smart Cards .................................................................... 38
Chapter 5 Using Options and Peripherals ...................................... 40
Using the Fingerprint Scanner (Optional) .............................. 41
Enrolling a Fingerprint ........................................................ 41
Fingerprint Login ................................................................. 43
Cleaning the Fingerprint Scanner ....................................... 43
Using the NFC/RFID Reader (Optional) ................................... 44
Using the Barcode Scanner (Optional) ................................... 45
Connecting Peripheral Devices ............................................... 46
Connecting a USB Device .................................................... 46
Connecting an Audio Device .............................................. 47
Connecting an HDMI Display Monitor ............................... 47
Chapter 6 Using BIOS Setup ............................................................ 48
When and How to Use ............................................................. 49
Menu Descriptions ................................................................... 50
Information Menu ............................................................... 50
Main Menu ........................................................................... 50
Advanced Menu ................................................................... 51
Security Menu ...................................................................... 52
Boot Menu ........................................................................... 53
Exit Menu ............................................................................. 53
Chapter 7 Using Getac Software .................................................... 54
OSD Control Panel ................................................................... 55
G-Manager ............................................................................... 56
Getac Camera ........................................................................... 58
Chapter 8 Care and Maintenance ................................................... 59
Taking Care of the Tablet PC .................................................. 60
Location Guidelines ............................................................. 60
General Guidelines .............................................................. 60
Cleaning Guidelines ............................................................. 61
Battery Pack Guidelines ....................................................... 61
Touchscreen Guidelines ....................................................... 63
When Traveling ........................................................................ 64

iii
Chapter 9 Troubleshooting ............................................................. 65
Preliminary Checklist ................................................................ 66
Solving Common Problems ...................................................... 67
Battery Problems . ................................................................ 67
Bluetooth Wireless Transmission Problems ....................... 67
Display Problems .................................................................. 68
Hardware Device Problems ................................................. 68
Power Management Problems ........................................... 69
Sensor Problems (for Windows 10 Models Only) .............. 69
Software Problems .............................................................. 70
Sound Problems ................................................................... 70
Startup Problems ................................................................. 71
WLAN Problems ................................................................... 71
Other Problems .................................................................... 73
Resetting the Tablet PC ........................................................... 74
System Recovery ....................................................................... 75
System Restore, Recovery, or Reset (for Windows 10
Models) ................................................................................. 75
System Recovery (a Tool for Windows 7 Models) .............. 75
Using the Driver Disc ................................................................ 77
Appendix A Specifications ................................................................. 78
Appendix B Regulatory Information ................................................. 81
Marks and Meanings ............................................................... 82
On the Use of the System ........................................................ 83
Class B Regulations .............................................................. 83
ANSI Warning ....................................................................... 84
Cautions and Warnings ....................................................... 85
On the Use of the RF Device .................................................... 88
USA and Canada Safety Requirements and Notices .......... 88
European Union CE Marking and Compliance Notices ..... 90
User Notification of Take-back Service ................................... 92
ENERGY STAR 6.1 ..................................................................... 93
Battery Recycling ...................................................................... 95

1
Chapter 1
Getting Started
Congratulations on purchasing this healthcare Tablet PC.
This chapter first tells you step by step how to get the Tablet PC up and
running. Then, you will find a section briefly introducing the external
components of the Tablet PC.

2
Getting the RunningTablet PC
Unpacking
After unpacking the shipping carton, you should find these standard items:
RX10 Tablet PC
AC adapter
AC power cord
Battery pack
Stylus
Tether
Driver disc Document(s)
Inspect all the items. If any item is dam or missing, notify your dealer age
immediately.
NOTE: This packing list applies to standard models. Select models may have
different items.

3
Installing the Micro-SIM Card (Optional) and
Battery Pack
1. Select models only:
With the s chip side facing up and the micro- ’SIM card beveled corner
pointing to the slot, insert the card all the way into the slot.
NOTE: To remove the SIM card, just push in the card to out and micro- pop-
remove the card.
2. With the battery pack correctly oriented, attach its connector to the side
battery compartment at an angle () and then press down the other side
(). The battery latch should be engaged in the locked position ( ).

4
CAUTION: Make sure the latch is correctly locked, not revealing the battery
underneath red part.
Connecting to AC Power
CAUTION: Use only the AC adapter included with your Tablet PC. Using
other AC adapters may damage the Tablet PC.
NOTE:
The battery pack is shipped to you in power saving mode that protects it
from charging/discharging. It will get out of the mode to be ready for
use when you install the battery pack and connect AC power to the
Tablet PC for the very first time.
When the AC adapter is connected, it also charges the battery pack. For
information on using battery power, see Chapter 3.
You must use AC power when start up the for the very first ing Tablet PC
time.
1. Plug the DC cord of the AC adapter to the power connector of the Tablet
PC ().
2. Plug the female end of the AC power cord to the AC adapter and the
male end to an electrical outlet ().
3. Power is being supplied from the electrical outlet to the AC adapter and
onto your . Now, you are ready to turn on the Tablet PC Tablet PC.

5
Using the Tether
A tether is provided for attaching the stylus to your Tablet PC.
1. Insert one of the tether s loop ends through the hole of the stylus (as ’
indicated by below). Then, insert the other end through the first loop
(as indicated by below) and pull it tight.
2. Insert the other loop end to the tether hole on the T blet PC (as indicated a
by below). Then, insert the stylus end through the loop (as indicated
by below) and pull it tight.

6
Taking a Look at the Tablet PC
NOTE: Depending on the specific model purchased, the color and look you
of graphics document. your model may not exactly match the shown in this
CAUTION: You need to open the protective covers to access the connectors.
When not using a connector, make sure to close the cover completely for
water- dust-, and fire-, proof integrity. Engage the locking mechanism if (
existing.)
Front Components
Ref
Component Description See Also
Camera Lens Allows you to use the camera function. When
the camera lens is in use, the indicator beside
it lights up.
P. 58
7
Ref
Component Description See Also
None
Or can be one of the below components depending on your model:
Fingerprint
Scanner
Serves as the fingerprint verification,
preventing unauthorized access to your
Tablet PC.
P. 41
NFC/RFID
Reader
Reads data from NFC/ tags. RFID P. 44
Microphone Receives sound and voice.
Light Sensor Se nses the ambient light for automatic
adjustments of the display backlight.
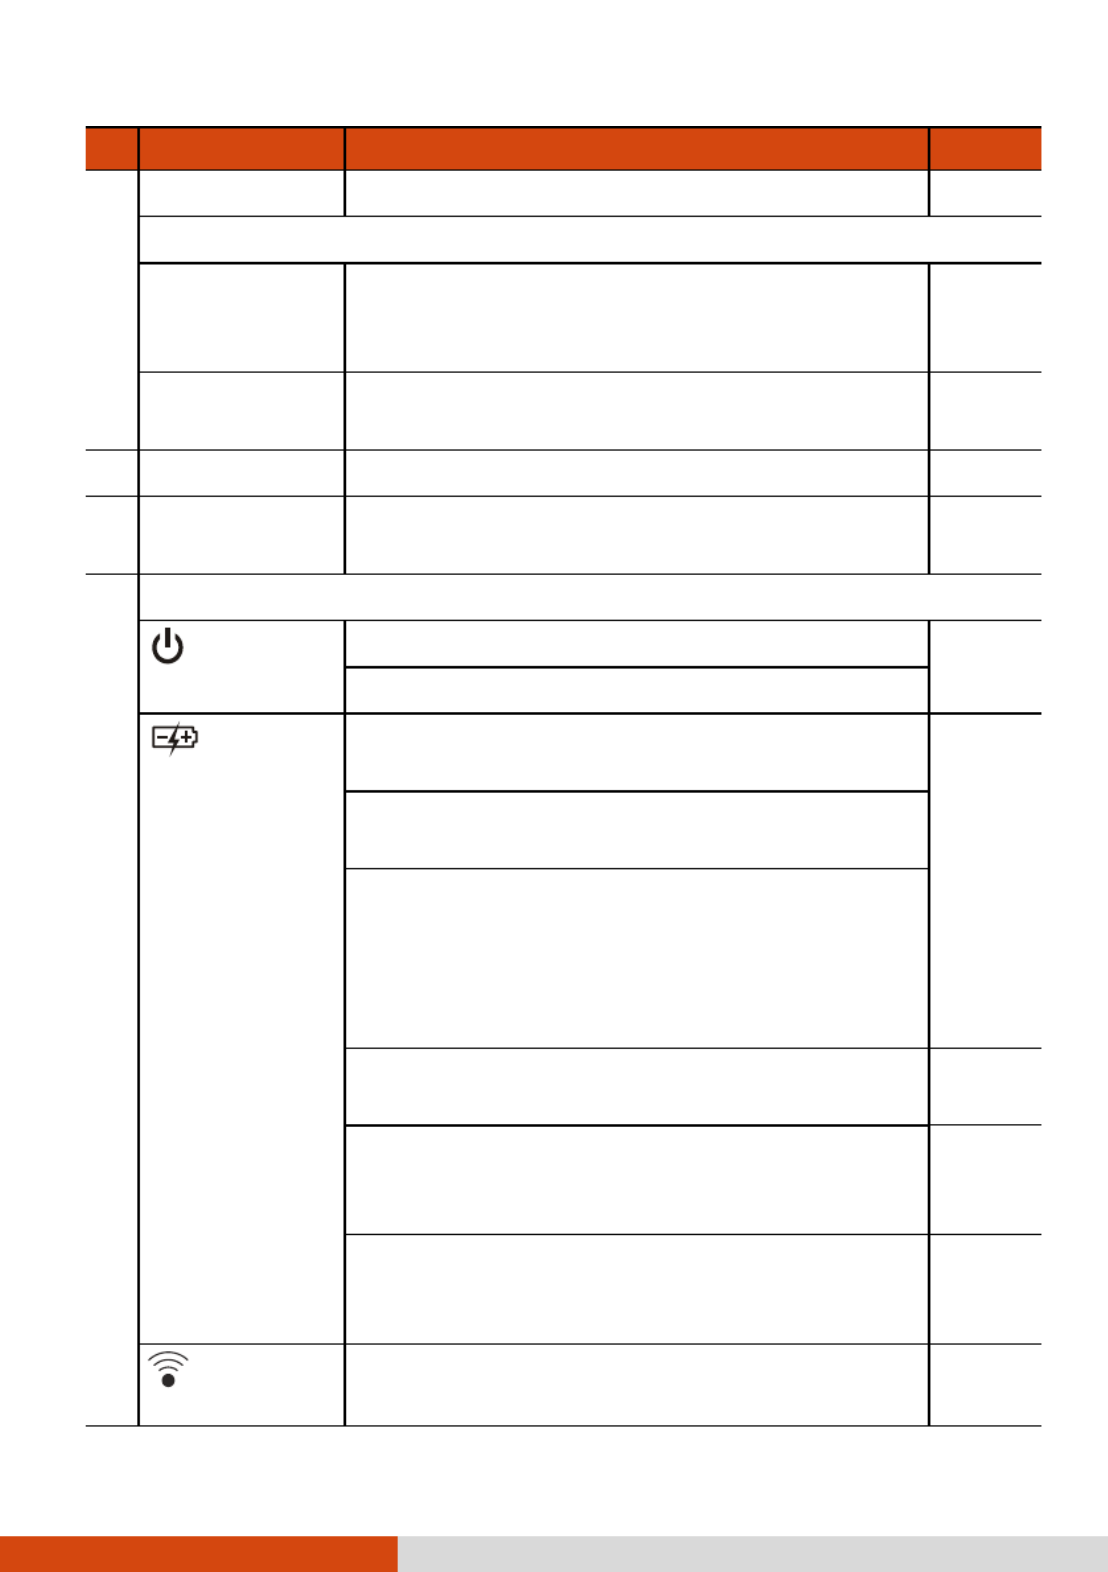
Indicators
Power Lights blue the power when is on.
Blinks blue when the system is in Sleep mode.
Battery
Charge
Lights amber when the battery is being
charged.
P. 28
Lights green when battery charging is
completed.
Blinks green to indicate -the battery’s built in
high temperature protection mechanism is
activated.
CAUTION: D during o not remove the battery
this period.
Blinks red (once per second) when the
battery’ s capacity is below 10%.
P. 30
Blinks red rapidly (once per 0.5 second) when
there is a t protection problem Ask for hermal .
repair service in case this happens.
Blinks amber when the battery charging is in
an abnormal state. Replace the battery in case
this happens.
RF (Radio
Frequency)
Lights blue when the RF radio of any RF
feature (WLAN/Bluetooth/WWAN) is on.

8
Ref
Component Description See Also
P1 Button Starts the Camera program and serves Getac
as the shutter release button.
P. 58
Can be changed to another set of predefined
functions using G-Manager.
P. 56
Provides a keyboard key function for specific
occasions.
P. 80
P2 Button Opens or closes the OSD Control Panel. P. 55
When pressed longer:
Serves as the keyboard keys.Ctrl+Alt+Del
P. 67
Can be changed to another set of predefined
functions using G-Manager.
P. 56
Provides a keyboard key function for specific
occasions.
P. 80
Windows Logo
Button
Opens or closes the Start menu.
Provides a keyboard key function for specific
occasions.
P. 80
Volume Up
Button
Increases the sound volume.
Provides a keyboard key function for specific
occasions.
P. 80
Volume Down
Button
Decreases the sound volume.
Provides a keyboard key function for specific
occasions.
P. 80
Power Button Turns the power on or off. (The default “off”
state is Sleep mode.“ ” )
With a default setting of 2 second delay, you -
have to press the button for at least 2 seconds
for it to function.
P. 16
Touchscreen D s s or isplay and receive information f the
Tablet PC.
P. 17

9
Rear Components
NOTE: For supplementary information on models with high capacity
battery, see Chapter 4.
Ref
Component Description See Also
Tether Hole Stylus can be tethered to this hole. 5 P.
Stylus/
Digitizer P en
Serves as the input device by t on the apping
touchscreen to make selections and enter
information.
P. 17
Bridge Battery
Indicator
Lights up if you unlock the battery latch while
operating the compute on battery power. r
The indicator is intended to inform whether
you can safely hot swap the battery pack.
P. 33
Green light: The bridge battery can sustain
power for up to 1 minute, during which you
can hot swap the battery pack.
Red light: The bridge battery level is too low
for you to safely hot swap the battery pack.

10
Ref
Component Description See Also
Blinking in amber: The bridge battery
charging is in an abnormal state. Ask for
repair service in case this happens.
Battery Pack Supplies power to your Tablet PC when
external power is not connected.
P. 28
Inside is the SIM card slot (optional).micro- 3 P.
Expansion
Connector
Connects to a proprietary expansion module
(available as an option).
SSD (inside the
cover)
Inside is the SSD (Solid-S Dtate isk), storage device
of your Tablet PC.
When needed, you can open the cover by
removing 4 screws to replace the SSD.
Speaker Sends out sound and voice from your Tablet
PC.
Camera Lens Allows you to use the camera function. When
the camera lens is in use, the indicator beside
it lights up.
P. 58
Flash Provides extra light when taking pictures.
Reserved
11
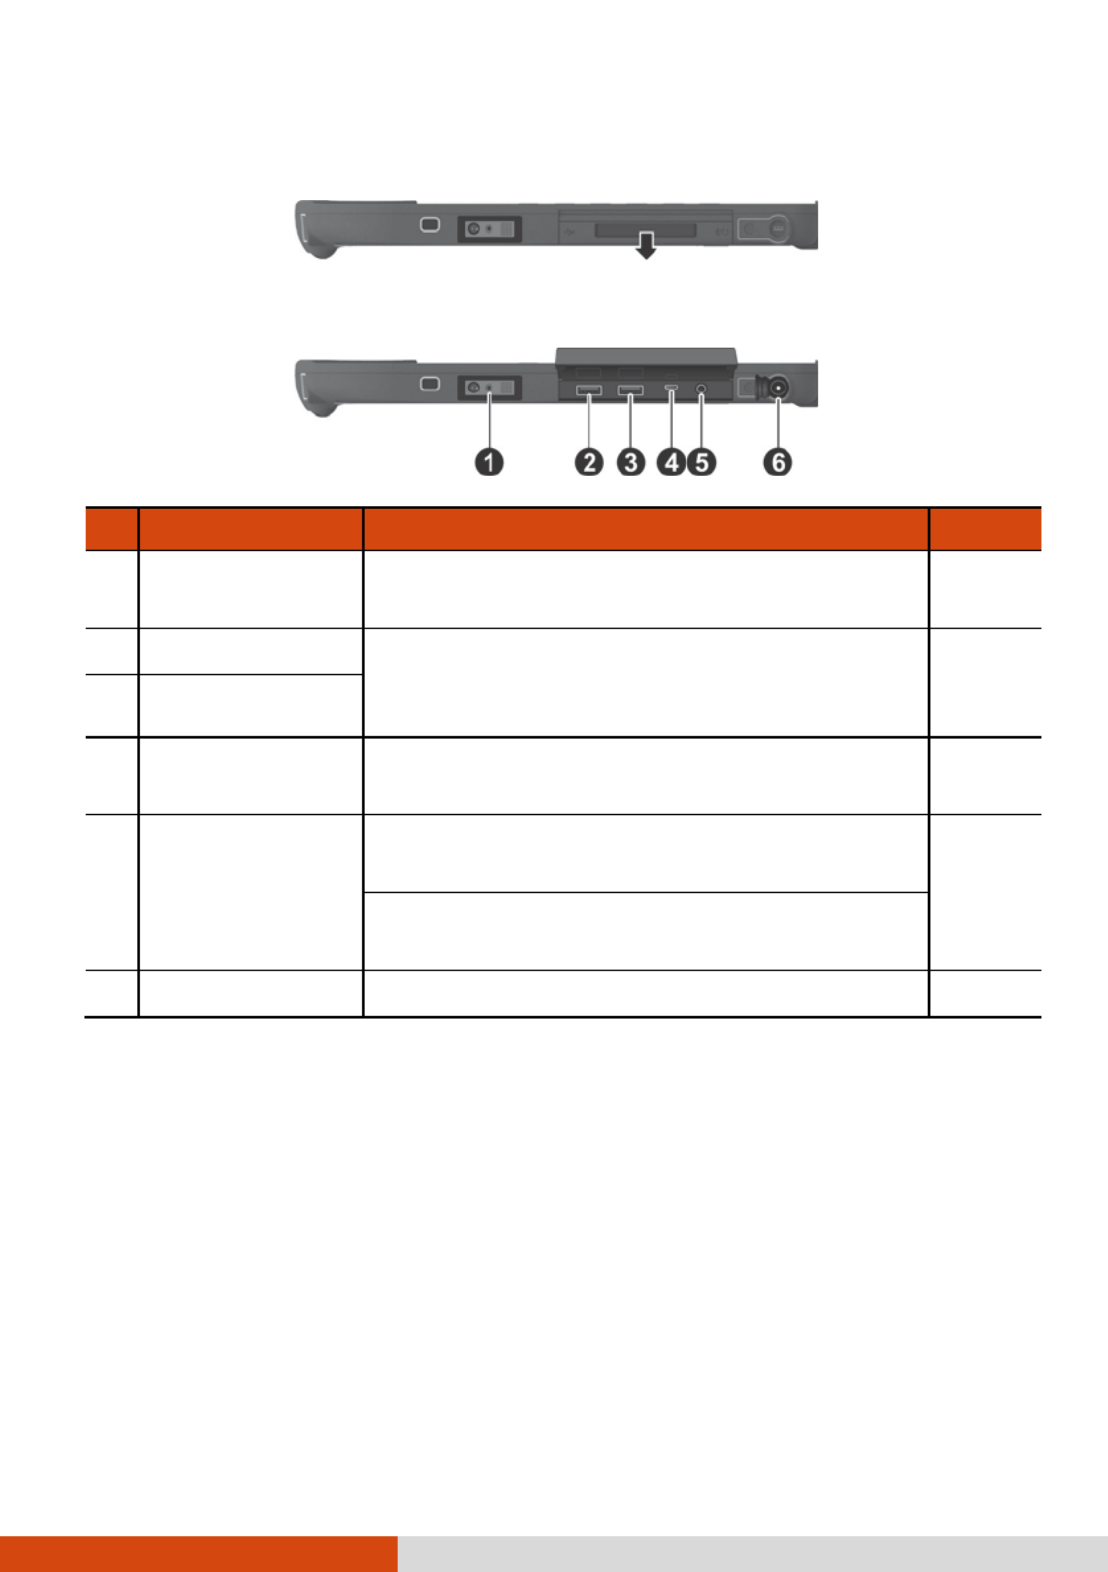
Left- Side Components
Ref
Component Description See Also
Barcode Scanner
Lens (optional)
Emits scanning. red light for barcode P. 45
USB 2.0 Port
Connects flash a USB device, such as a USB
disk, printer, digital camera, joystick, and
more.
P. 41
USB 3.0 Port
Micro HDMI
Connector
Connects a HDMI monitor or TV set. P. 47
Combo Audio
Connector
Connects a set of headphones or external
speakers with amplifier
P. 47
Supports a headset microphone with 4-pole
TRRS 3.5mm jack.
Power Connector
Connects the AC adapter. 4 P.
Slide down to open the
protective cover.
12
Top Components
Ref
Component Description See Also
Trigger Button
(optional)
Activates . the scanning of one barcode P. 45
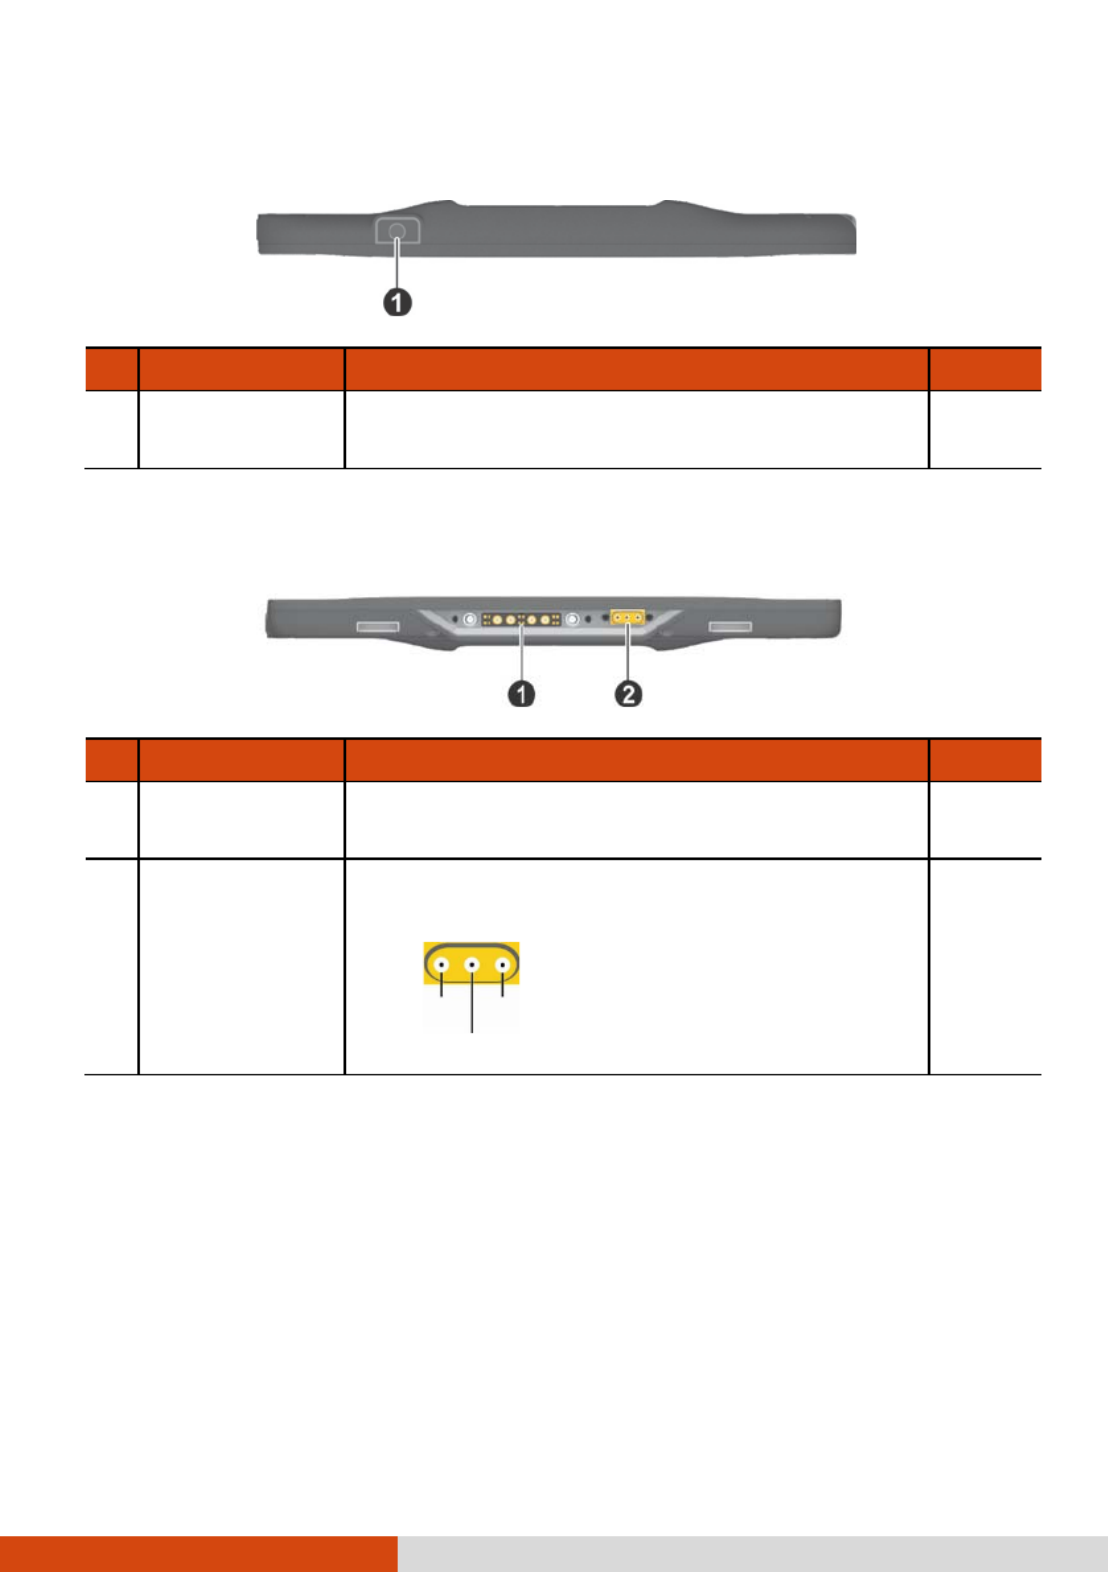
Bottom Components
Ref
Component Description See Also
Docking
Connector
Connects to the docking station (available as
an option).
Antenna P - ass
through
(optional)
Connects to the docking station for using
external GPS/W AN/L WW antenna. AN
WWAN
W LAN
GPS
Reserved

13
Chapter 2
Operating Your
Tablet PC
This chapter provides information about the use of the Tablet PC.
If you are new to , reading this chapter will help you learn the computers
operating basics. If you are already a computer user, you may choose to read
only the parts containing information unique to your Tablet PC.
CAUTION:
Do not expose your skin to the when operating it in a very hot Tablet PC
or cold environment.
The Tablet PC can get uncomfortably warm when you use it in high
temperatures. As a safety precaution in such a , do not circumstance
place the Tablet PC on your lap or touch it with your bare hands for
extended periods of time. Prolonged body contact can cause discomfort
and potentially a burn.

14
Product Applications
RX10 is a Tablet PC designed for healthcare environments. Some possible
applications include:
A mobile device for health care professionals
H ealth care professionals such as doctors and nurses can use the device to
access and maintain patients’ health records while on ward rounds. Health
data can be transmitted in real time over the wireless network to the -
hospital’s health information management system, where are stored.data
Information accuracy
With the device’s barcode/RFID/NFC reader and appropriate software*,
hospital staff can access data by scanning patients’ wristbands and
barcode/RFID tags/NFC tags attached to medications. The patient’s
identification and his/her matching medication can be quickly verified.
This eliminates errors that can occur when data are first written by hand
and then manually entered into the computer system.
Communications and information gathering
On hospital ward rounds, doctors/nurses can use the device to show
graphical information to the patients for better understanding and
communications. Using the device’s front/ functionrear camera ,
doctors/nurses can take photos on the spot right when information
gathering . and recording is needed
C securityonfidentiality and
Hospitals are responsible for protecting electronic health records. With
specific hardware component on the device and appropriate software*,
hospitals can implement fingerprint recognition, barcode scanning, or
RFID/NFC scanning in staff authentication the ir process dditional . This a
layer of authentication besides passwords ensures the security of the
hospital’s health information management system.
Use in emergency medical services
At the location of the emergency, mergency services personnel can use e
the device to record the patient’s physical health conditions and instantly
sen d the data back to the hospital over wireless network. The patient’s
information can be registered while the patient is on the way to the
hospital.
NOTE: * “Appropriate software” means application software developed by
the hospital’s internal staff or a third party, using the provided SDK -
(software development kit).

15
WARNING: This device is for use by qualified operators only. The
antenna ocking/ /battery /d SIM card connector pins must not be allowed to
directly or indirectly contact the patients. to prevent causing For example,
indirect contact, the operator must not touch patients and connector pins
simultaneously.

17
Navigating on the Screen
The screen of your Tablet PC is touch . You can control the location -sensitive
of the pointer oncursor/ the screen using the included stylus or your finger to
communicate with the Tablet PC.
CAUTION: Do not use a sharp object such as a ballpoint pen or pencil on the
touchscreen. Doing so may damage the touchscreen surface. Use the
included stylus or your finger.
NOTE: An optical film has been attached to the screen before shipment. The
film is a consumable, which will be worn out by possible scratches. You can
purchase a new one when replacement is required.
Using the Touchscreen
Your Tablet PC has a c touchscreen. This type of touchscreen apacitive
responds to objects that have conductive properties, such as fingertips and a
capacitive- . tipped stylus
You can change the touchscreen sensitivity settings to suit your scenario.
Double-tap shortcut the Touch Screen Mode on Windows desktop to open
the settings menu and select one of the options (as shown below).
NOTE: If liquid is spilled on the touchscreen causing a wet area, the area will
stop responding to any inputs. For the area to function again, you must dry it.
Select the this if you are using
s . (Ytylus ou must use the one
supplied with your model.)
Select this if you are wearing gloves
( referring to warm gloves or work gloves,
not referring -to touchscreen capable gloves).
Select this if you prefer using
fingertips. Also, select this
when raindrops are falling
on the screen and should be
rejected as input.

19
Gestures Actions
( = finger down; = finger up) Descriptions
Rotate
or
Move two fingers in opposing
directions.
-or-
Use one finger to pivot around
another.
Use rotating to move a
picture or other item
on the screen in a
circular direction
(clockwise or counter-
clockwise). The gesture
works in applications
that support the
specific gesture.
Press and
Tap
Press on target and tap using a
second finger.
Use press and tap to
access the shortcut
menu.
Two-
finger
Tap
Tap two fingers at the same time
(where the target is in the midpoint
between the fingers).
The function is defined
by applications that
support the specific
gesture.
Flicks
Make quick drag gestures in the
desired direction.
Flick left or right to
navigate back and
forward in a browser
and other applications.
The gesture works in
most applications that
support back and
forward.

20
Using the Dual Mode Display (Optional)
Dual mode (if your model has the feature) incorporate display s both
touchscreen and digitizer functions.
The display set to n mode by default. Touchscreen mode is Touchscree
provides all the functionalities that an ordinary touchscreen has. When the
Tablet PC irece ves signals from the digitizer pen, the display automatically
switches to D igitizer mode.
You can move the cursor by bringing the digitizer pen close to the screen,
without actually touching the screen’s surface.

21
Using Wireless s Connection
Using the WLAN
The WLAN (Wireless Local Area Network) module supports IEEE 802.11ac,
compatible with 802.11a/b/g /n.
Turning On /Off the WLAN Radio
To turn on the WLAN radio:
1. Make sure that the Airplane mode is switched off. You can control the
Airplane mode using one of the below methods.
• Use the on in the OSD Control Panel.Airplane Mode butt
• For Windows 10
2. If you have previously turned off the WLAN radio, use one of the below
methods to turn it on.
: Tap Settings Network & Internet
Airplane mode Airplane mode. Slide the switch to the Off position.
• T ap and hold the Getac Utility icon on Windows taskbar and
select Quick Bar. Tap the WLAN button in the Quick Bar (an X over
the button means the radio is currently off).
• Use Windows settings.
For Windo Network & Internet w Settingss 10: Tap Wi-Fi.
Slide the switch to the Wi-Fi On position.
For Windows 7
To turn off the WLAN radio:
: Use Windows Mobility Center.
You can turn off the WLAN radio the same way you turn it on.

22
If you want to quickly turn off all wireless radio, simply switch on Airplane
mode.
Connecting to a WLAN Network
1. Make sure that the WLAN function is enabled (as described above).
2. For Windows 10: Tap the network icon in the lower right of the task
bar.
For Windows 7
3. In the list of available wireless networks, a network, and then tap tap
Connect.
: T ap the Wireless Network icon on the taskbar. (An
orange light in the icon indicates connections are available.)
4. Some networks require a network security key or passphrase. To connect
to one of those networks, ask your network administrator or Internet
service provider (ISP) for the security key or passphrase.
For more information on setting a wireless network , refer to connection
Windows online help.
NOTE: You can use PROSet Wireless to take full advantage of the Intel®
Wi- Fi capabilities. See the Help of the utility for instructions.
Using the Bluetooth Feature
The Bluetooth technology allows wireless communications short-range
between devices without requiring a Data can be cable connection.
transmitted through walls, pockets and briefcases as long as two devices are
within range.
Turning On/Off the Bluetooth Radio
To turn on the Bluetooth radio:
1. Make sure that the Airplane mode is switched off. You can control the
Airplane mode using one of the below methods.
• Use the button in the OSD Control Panel.Airplane Mode
• For Windows 10: Tap Settings Network & Internet
Airplane mode Airplane mode. Slide the switch to the Off position.

23
2. If you have previously turned off the radio, use one of the Bluetooth
below methods to turn it on.
• T ap and hold the Getac Utility icon on Windows taskbar and
select Bluetooth Quick Bar. Tap the button in the Quick Bar (an X
over the button means t radio is currently off).he
• For Windows 10
To turn off the Bluetooth radio:
: Tap Settings Devices . Bluetooth Slide
the position. Bluetooth switch to the On
You can turn off the radio the same way you turn it on.Bluetooth
If you want to quickly turn off all wireless radio, simply switch on Airplane
mode.
Connecting to another Bluetooth Device
1. Make sure that the function is enabled (as described above).Bluetooth
2. Make sure that the target device is turned on, discoverable Bluetooth
and within close range. (See the documentation that came with the
Bluetooth device.)
3. For : SettingsWindows 10 Tap Devices . Bluetooth
For Windows 7
4. Select the device you want to connect from the search results.
: Tap and hold the on Windows Bluetooth icon
taskbar. Tap Add a Device.
5. Depending on the type of device that you want to connect to, Bluetooth
you will need to enter the pertinent information.
For detailed information on using the feature, see WindowsBluetooth ’
online Help.

24
Using the ature (Optional)WWAN Fe
A ireless W A NWWAN (W ide rea etwork) uses mobile telecommunication
cellular network technologies to transfer data. The WWAN module of your
Tablet PC supports 3G and 4G LTE.
NOTE:
Your model only supports data transmission. Voice transmission is not
supported.
For instructions on installing the Installing tmicro- “SIM card, see he
Micro- ” SIM Card (Optional) and Battery Pack in Chapter 1.
Turning On/Off the WWAN Radio
To turn on the WWAN radio:
1. Make sure that the Airplane mode is switched off. You can control the
Airplane mode using one of the below methods.
• Use the button in the Airplane Mode OSD Control Panel.
• For Windows 10
2. If you have previously turned off the WWAN radio, use one of the below
methods to turn it on.
: Tap Settings Network & Internet
Airplane mode Airplane mode. Slide the switch to the Off position.
• T ap and hold the Getac Utility icon on Windows taskbar and
select WWAN Quick Bar. Tap the button in the Quick Bar (an X over
the button means the radio is currently off).
• Use the WWAN utility.
• For Windows 10 Network & Internet : Tap Settings
Airplane mode. Slide the Cellular switch to the On position.

25
To turn off the WWAN radio:
You can turn off the WWAN radio the same way you turn it on.
If you want to quickly turn off all wireless radio, simply switch on Airplane
mode.
Se tting up a WWAN Connection
1. Make sure that the SIM card is inserted and the WWAN function is micro-
enabled (as described above).
2. S ). tart the WWAN utility software (Skylight
3. You can use the WWAN utility software to configure and use WWAN
connections. See the online help for information.

26
Chapter 3
Managing Power
Your Tablet PC operates either on external AC power or on internal battery
power.
This chapter tells you how you can effectively manage power. To maintain
optimal battery performance, it is important that you use the battery in the
proper way.

27
AC Adapter
CAUTION:
The AC adapter is designed for use with your Tablet PC only. Connecting
the AC adapter to another device can damage the adapter.
The AC power cord supplied with your Tablet PC is for use in the country
where you purchased your Tablet PC. If you plan to go overseas with the
Tablet PC, consult your dealer for the appropriate power cord.
When you disconnect the AC adapter, disconnect from the electrical outlet
first and then from the Tablet PC. A reverse procedure may damage the
AC adapter or Tablet PC.
When unplugging the connector, always hold the plug head. Never pull
on the cord.
The AC adapter serves as a converter from AC (Alternating Current) to DC
(Direct Current) power because your Tablet PC runs on DC power, but an
electrical outlet usually provides AC power. It also charges the battery pack
when connected to AC power.
The adapter operates on any voltage in the range of 100~240 V AC.

28
Battery Pack
The battery pack is the internal power source for the Tablet PC. It is
rechargeable using the AC adapter.
NOTE: Care and maintenance information for the battery is provided in the
“ Battery Pack Guidelines” section in Chapter 7.
Charging the Battery Pack
NOTE:
Charging will not start if the battery’s temperature is outside the allowed
range, which is between 50 122 0 °C (32 °F) and °C ( °F). Once the battery’s
temperature meets the requirements, charging automatically resumes.
During charging, do not disconnect the AC adapter before the battery
has been fully charged; otherwise you will get a prematurely charged
battery.
The battery has a high temperature protection mechanism which limits
the maximum charge of the battery to 80% of its total capacity in the
event of temperature condition In such s, the battery high s. condition
will be regarded as fully charged at 80% capacity.
The battery level may automatically lessen due to the self-discharge
process (0.21% per day), even when the battery pack is fully charged
(100%). This happens no matter if the battery pack is installed in the
Tablet PC.
To charge the battery pack, connect the AC adapter to the Tablet PC and an
electrical outlet. The Battery Charge Indicator ( ) on the Tablet PC glows
amber to indicate that charging is in progress.
You are advised to keep the power off while the battery is being Tablet PC
charged. When the battery is fully charged, the Battery Charge Indicator
glows green It takes approximately . 2.5 hours to fully charge the ery packbatt
(for standard models).
CAUTION: After the Tablet PC has been fully recharged, do not immediately
disconnect and reconnect the AC adapter to charge it again. Doing so may
damage the battery.

29
Initializing the Battery Pack
You need to initialize a new battery pack before using it for the first time or
when the actual operating time of a battery pack is much less than expected.
Initializing is the process of fully charging, discharging, and then charging. It
can take several hours.
A software “ ” tool called Gauge Reset is provided for the purpose. Use the
G- Manager program and select the Battery tab to find the tool.
Checking the Battery Level
NOTE: Any battery level indication is an estimated result. The actual
operating time can be different from the estimated time, depending on
how you are using the Tablet PC.
The operating time of a fully charged battery pack depends on how you are
using the Tablet PC. When your applications often access peripherals, you
will experience a shorter operating time.
By Operating System
You can check the approximate battery level using the battery meter
function of the operating system. To read the battery level in Windows, tap
the battery icon on the taskbar.
By Gas Gauge
On the exterior side of the battery pack is a gas gauge for displaying the
estimated battery charge. When the battery pack is not installed in the Tablet
PC and you want to know the battery charge, you can press the push-button
to see the number of LEDs that light up. Each LED represents 20% charge.
Push- button

30
Battery Low Signals and Actions
The battery icon changes appearance to display the current state of the
battery.
Battery Icon Battery
Level Description
Windows 10
Windows 7
Discharging The icon shows the charge remaining in
10-percent increments until the charge
reaches the low-battery level.
Low The battery charge has reached the low-
battery level.
Critically
low
The battery charge has reached the critical
battery level. By default, Windows will
display a notification and put your Tablet
PC into Hibernation.
When the battery is low, t ’s Battery Charge Indicator (he Tablet PC ) also
blinks red to alert you to take actions.
Always respond to by connecting the AC adapter,low-battery placing your
Tablet PC or in Hibernation mode, turning off the Tablet PC.

31
Replacing the Battery Pack
CAUTION:
There is danger of explosion if the battery is incorrectly replaced.
Replace the battery only with the Tablet PC manufacturer’s battery
packs. Discard used batteries according to the dealer’s instructions.
Do not attempt to disassemble the battery pack.
NOTE: You can hot swap the battery pack as described “Hot later in
Swapping the Battery Pack” later.
1. Turn off the Tablet PC and disconnect the AC adapter. (Skip this step if
you are hot swapping the battery pack.)
2. Slide the battery latch to the unlocked position ( ). The battery pack
will slightly pop up.
3. Remove the battery pack from its compartment.
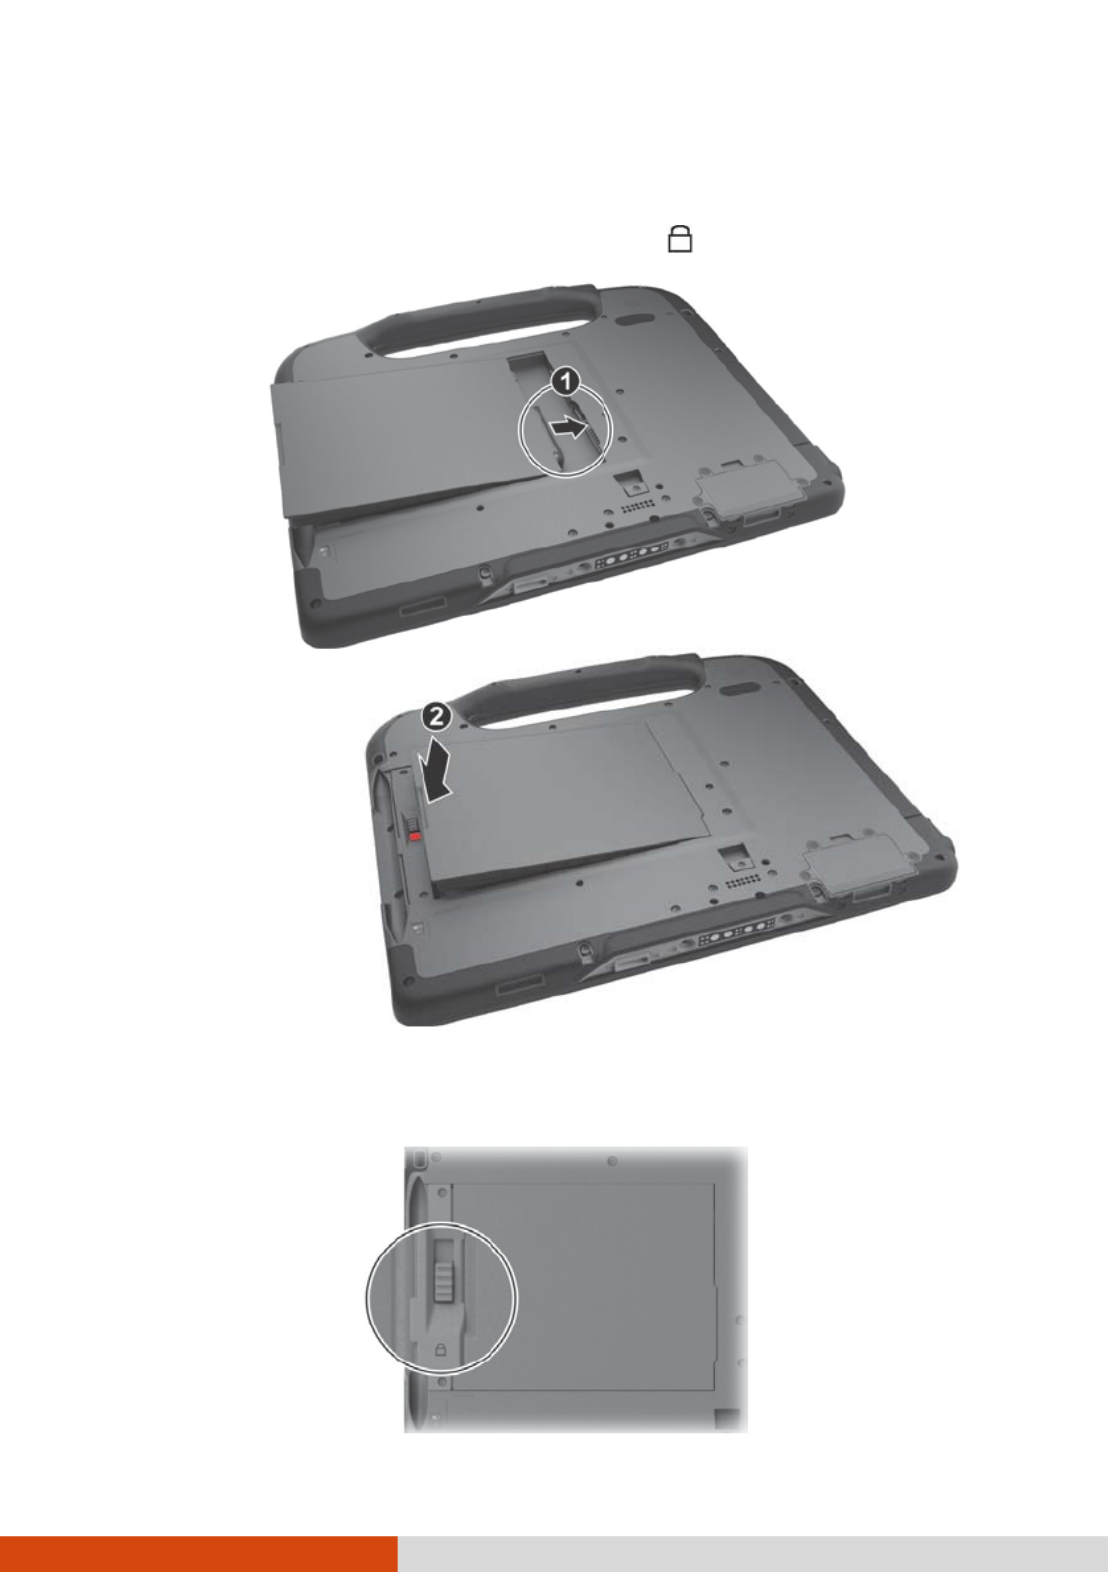
32
4. Fit another battery pack into place. With the battery pack correctly
oriented, attach its connector side to the battery compartment at an
angle ( ) and then press down the other side ( ). The battery latch
should be engaged in the locked position ( ).
CAUTION: Make sure the latch is correctly locked, not revealing the battery
underneath red part.

35
Power-Saving Tips
Aside from your Tablet PC’s power enabling saving mode, you can do your
part to maximize the battery’s operating time by following these
suggestions.
Do not disable Power Management.
Decrease the LCD brightness to the lowest comfortable level.
Shorten the length of time before Windows turn off the display.
When not using a connected device, disconnect it.
Turn off the wireless radio if you are not using the wireless module (such
as WLAN, Bluetooth WWAN). , or
Turn off the when you are not using it.Tablet PC

37
Enhanced and Additional Features
This model has the following different or additional features when
compared with the standard models.
High capacity battery pack
Expansion module (with the smart card reader and keyboard connector)
Ref
Component Description
High Capacity
Battery Pack
It takes approximately 6 hours to fully charge the
battery pack.
NOTE: The ways of replacing, handling, and caring
the high capacity battery pack is the same as those
for the standard battery pack. The information in the
other chapters appl though the pictures ies even
shown are the standard . models
Smart Card
Reader
Accepts a smart card for additional security feature.
Keyboard
Connector
Connects to the detachable keyboard (purchased
separately).

41
Using the Fingerprint Scanner
(Optional)
CAUTION:
For optimal performance, both the scanning surface and the finger
should be clean and dry. Clean the scanning surface when needed. (See
“ ” Cleaning the Fingerprint Scanner later.)
It is not recommended that you use the fingerprint scanner in a below -
freezing temperature. The moisture on your finger can freeze to the
scanner’s metal surface when you touch it, resulting in a failed operation.
Besides, touching freezing metal with your finger can cause frostbite.
T he fingerprint scanner (if your model has the feature) provides a strong
authentication mechanism based on fingerprint recognition. You can log on
to Windows and dismiss the lock screen with an enrolled fingerprint instead
of a password.
Enroll ngerprint ing a Fi
NOTE: enroll You can a fingerprint only after creating a password for the
Windows user account.
For Windows 10
1. Tap . Settings Accounts -Sign in options
2. On the right side under Fingerprint, tap Set up.
Fingerprint
scanner

42
3. Follow the onscreen instructions to complete.
For Windows 7
1. Log in to Windows as the user whose fingerprint is to be enrolled.
2. Double-tap iMD Fingerprint Reader on Windows desktop.
3. In the fingerprint configuration menu, tap Add another.
4. You will be asked to enter the password of the selected user. Enter the
password and tap OK.
5. Place any finger of your choice on the scanner surface. Keep the finger
still until . you’re asked to lift your finger and repeat the action again
Several scans of the fingerprint are required.
NOTE: Place your finger in a natural position that matches the way you
normally hold your device.
6. When completed, tap Finish.

43
NOTE: For information detailed on the program, see the program s online ’
help.
Fingerprint Login
NOTE:
The fingerprint process can take a while. This is because the system login
has to check hardware devices and security configuration before
initiating the fingerprint scanner.
The fingerprint scanner has degree readability. You can 360- place your
finger in any orientation for the scanner to recognize an enrolled
fingerprint.
With an enrolled fingerprint, the user can log on by tapping the Fingerprint
option in Windows screen and placing the finger on the scanner.login then
The user can also dismiss the lock screen with the fingerprint.
If loginfingerprint attempts fail three times, you will be switched to
password . login
Cleaning the Fingerprint Scanner
You can use adhesive tape to remove dirt and oil from the scanner surface .
To clean with cleaner:
1. Shut down the Tablet PC, disconnect the AC adapter, and remove the
battery pack.
2. Slightly moisten a free cloth with household window cleaner. clean, lint-
You can also use a cotton swab as an alternative.
NOTE:
Do not use paper products to clean the scanner.
Do not use bleach, solvents, or abrasives.
Do not directly spray the scanner.
3. Gently rub the cloth over the scanner surface, turning the cloth to always
use a clean surface of the cloth.
4. After cleaning, gently rub the surface again with a clean, dry, lint-free
cloth or cotton swab.
46
Connecting Peripheral Devices
You can expand the capabilities of your Tablet PC by connecting other
peripheral devices.
When using a device, be sure to read the instructions accompanying the
device together with the relevant section in this chapter.
NOTE (for medical use only): The external device connected must be a
MOPP ( ) -1 Means of Patient Protection 60601 compliant device.
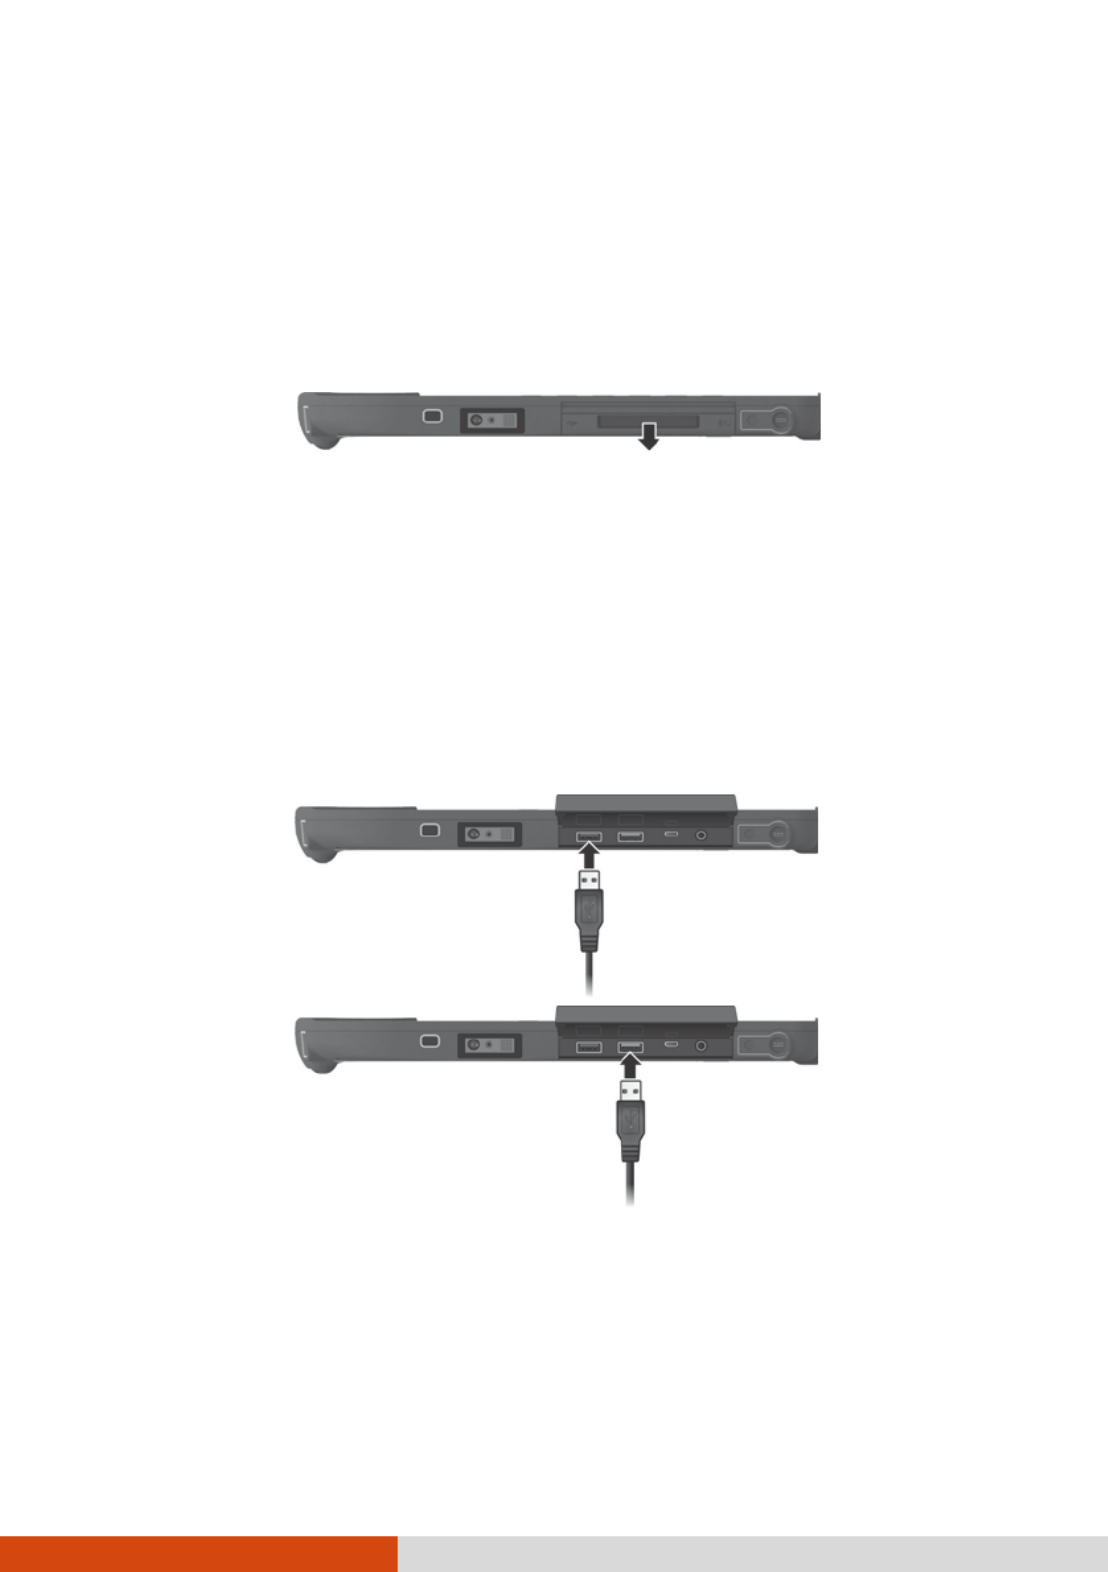
Connecting a USB Device
Your has a port Tablet PC USB 3.0 and a USB 2.0 port for connecting USB
devices, such as digital camera, scanner, printer, and mouse.a
Slide down to open the
protective cover.
USB 3 .0
USB 2 .0

51
Advanced Menu
The Advanced menu contains the advanced settings.
Wake Up Capability
USB Wake-Up From S3 allow a USB device activity to wake up the system
from S3 (Sleep) state.
Power Button Delay sets power button delay time (1 second or 2
seconds) so that accidental touching of the :power button does not cause
undesired operation. You can also disable the delay.
System Policy allows you to choose between Performance and Balance. If
battery life is your first priority, select . If you need system Balance
performance more than battery life, select Performance.
AC Initiation sets if connecting AC power will automatically start or
resume the system.
Screen Tapping for Boot Options sets if tapping the screen during
startup will invoke the boot options menu which provides access to some
pre-boot operations. If disabled, tapping the screen during startup has
no effect to the system s booting process.’
Charging Bridge Battery allows the main battery to charge the bridge
battery. When set to , the bridge battery can be charged by the Enabled
main battery if the AC adapter is not connected. When set to Disabled,
the bridge battery will be charged by the AC adapter only.
A Management Tctive echnology Support (This item appears only on
models supporting vPro.)
Intel T Support AM enables or disables Intel Active Management ®
Technology BIOS extension execution. AMT allows the system
administrator computer remotely. to access an AMT featured
Intel AMT PromptSetup determines whether the prompt for entering
Intel MEBx Setup appears or not during POST.
Virtualization Technology Setup
Intel(R) Virtualization Technology enables or disables Intel® VT (Intel
Virtualization Technology) feature which provides hardware support for
processor virtualization. When enabled, a VMM (Virtual Machine
Monitor) can utilize the additional hardware virtualization capabilities
provided by this technology.

53
Change Status TPM allows you to select between No Change, Clear,
Enable and Activate, and Disable and Deactivate.
Intel Trusted Execution Technology enables utilization of additional
hardware capabilities provided by Intel® Trusted Execution Technology.
Boot Menu
The Boot menu sets the sequence of the devices to be searched for the
operating system.
Boot Type Order determines the boot order. You can rearrange the
order by dragging the boot device name up or down in the list.
Each boot device can be individually set to . If you want to On Off or
exclude a boot device from the boot order, set the device to Off.
Exit Menu
The Exit menu displays ways of exiting BIOS Setup Utility. After finishing
with your settings, you must save and exit so that the changes can take
effect.
Exit Saving Changes saves the changes you have made and exits BIOS
Setup Utility.
Exit Discarding Changes exits BIOS Setup Utility without saving the
changes you have made.
Load Setup Defaults loads the factory default values for all the items.
Discard Changes restores the previous val ues for all the items.
Saves Changes saves the changes you have made.
Produkt Specifikationer
| Mærke: | Getac |
| Kategori: | Tegnetablet |
| Model: | RX10H |
Har du brug for hjælp?
Hvis du har brug for hjælp til Getac RX10H stil et spørgsmål nedenfor, og andre brugere vil svare dig
Tegnetablet Getac Manualer

5 September 2024
5 September 2024
3 September 2024
16 August 2024
15 August 2024
10 August 2024
10 August 2024
7 August 2024
6 August 2024
6 August 2024
Tegnetablet Manualer
- Tegnetablet SilverCrest
- Tegnetablet Acer
- Tegnetablet Denver
- Tegnetablet Samsung
- Tegnetablet Panasonic
- Tegnetablet Doro
- Tegnetablet HP
- Tegnetablet Leitz
- Tegnetablet Asus
- Tegnetablet Gigabyte
- Tegnetablet Toshiba
- Tegnetablet InFocus
- Tegnetablet Lenovo
- Tegnetablet Creative
- Tegnetablet Thomson
- Tegnetablet Trust
- Tegnetablet Trimble
- Tegnetablet Medion
- Tegnetablet Vivax
- Tegnetablet Wacom
- Tegnetablet Alcatel
- Tegnetablet Zebra
- Tegnetablet Boogie Board
- Tegnetablet Viewsonic
- Tegnetablet Archos
- Tegnetablet Prixton
- Tegnetablet Manhattan
- Tegnetablet Barnes & Noble
- Tegnetablet BOOX
- Tegnetablet Genius
- Tegnetablet BakkerElkhuizen
- Tegnetablet XP-PEN
- Tegnetablet Boss
- Tegnetablet Royole
- Tegnetablet Sylvania
- Tegnetablet Laser
- Tegnetablet Ematic
- Tegnetablet Huion
- Tegnetablet Vankyo
- Tegnetablet Monoprice
- Tegnetablet Beafon
- Tegnetablet Rocketbook
- Tegnetablet Vulcan
- Tegnetablet Cydle
- Tegnetablet Cybernet
- Tegnetablet Xplore
- Tegnetablet Punos
- Tegnetablet Tivax
- Tegnetablet Kocaso
- Tegnetablet Wikipad
- Tegnetablet ICAN!
- Tegnetablet Leotec
- Tegnetablet Sungale
- Tegnetablet Veikk
- Tegnetablet Xencelabs
- Tegnetablet Ugee
- Tegnetablet AARP
- Tegnetablet Aegex
- Tegnetablet Zeki
- Tegnetablet Iskn
Nyeste Tegnetablet Manualer
27 December 2024
27 December 2024
27 December 2024
27 December 2024
27 December 2024
18 December 2024
8 December 2024
8 December 2024

13 Oktober 2024

9 Oktober 2024