Griffin AirClick Manual
Læs nedenfor 📖 manual på dansk for Griffin AirClick (2 sider) i kategorien Sund. Denne guide var nyttig for 20 personer og blev bedømt med 4.5 stjerner i gennemsnit af 2 brugere
Side 1/2
What Do I Need?
To use AirClick, you’ll need either:
• iPod with dock connector (not included); or…
• iPod mini (not included).
What Is All This Stuff?
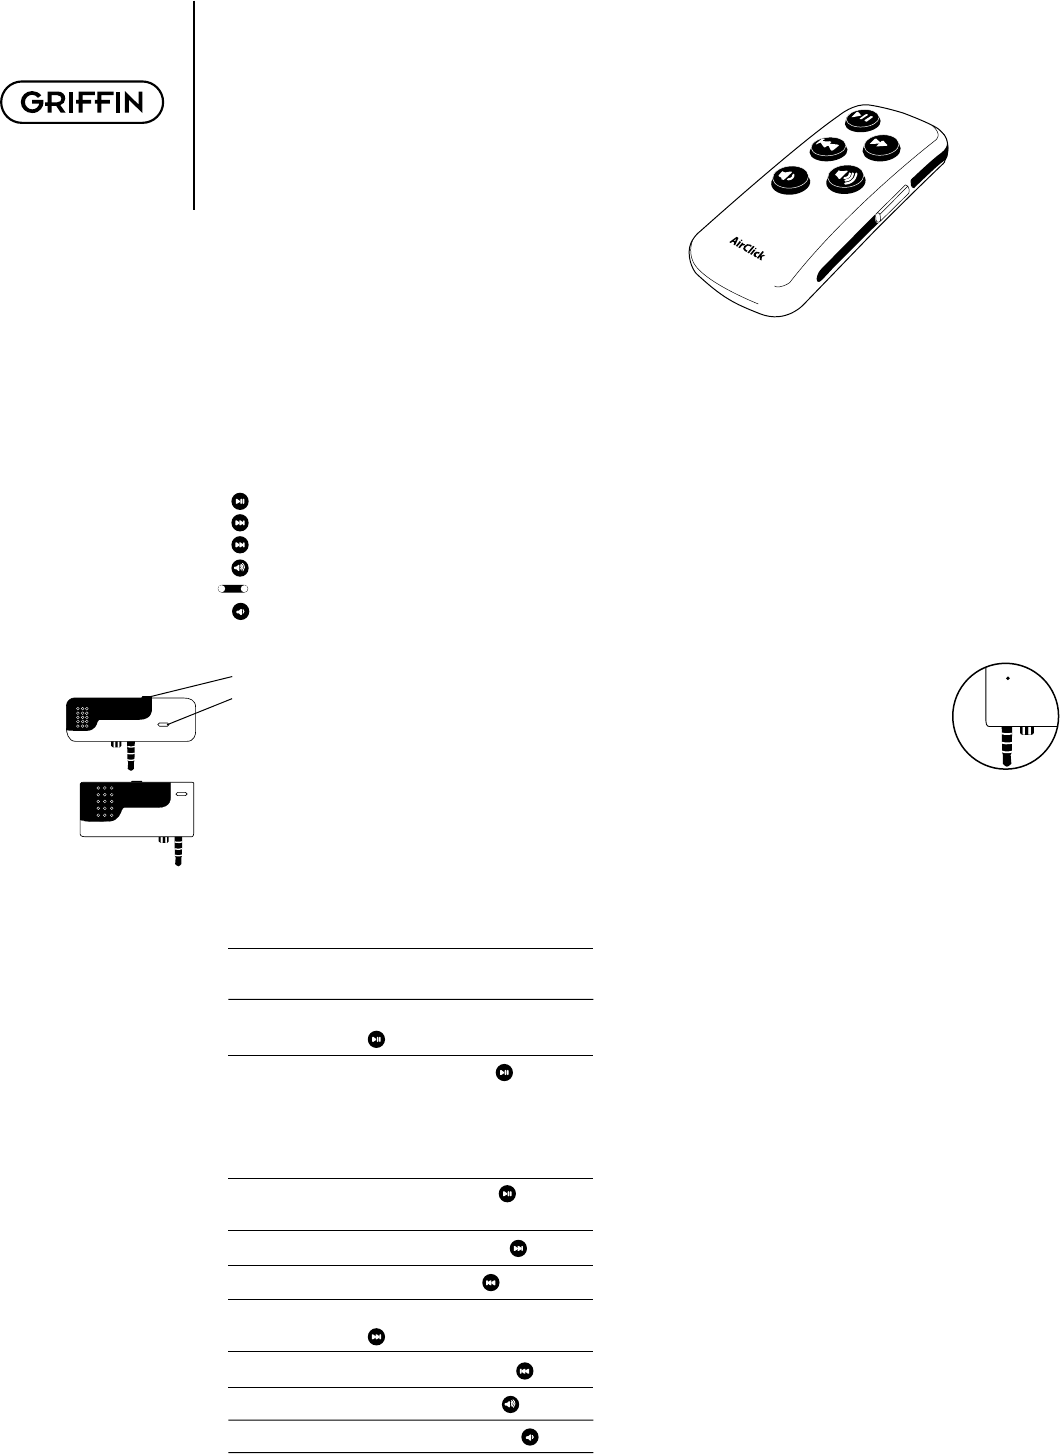
AirClick features two key pieces: the Remote Control
and the Receiver Module. Let’s take a look:
Remote Control
Play/Pause
Next/Fast Forward
Previous/Rewind
Volume Up
Hold Switch (Orange = Hold)
Volume Down
Receiver Module
• Headphone Jack (connect headphones or speakers)
• LED (illuminates when receiving a command)
• Pairing Switch (Back of unit. See PAIRING)
Let’s Install it!
To install the AirClick, simply plug the receiver module
into the top of your iPod or iPod mini. That’s it!
How Do I Use it?
Controlling your AirClick is as simple as using your
iPod. Here’s how:
Turn iPod On: Press any button on the Remote
Control to wake the iPod.
Turn iPod Off: Press and hold the Play/Pause
( ) Button for two seconds.
Play a Song: Press the Play/Pause( ) Button.
Note: If the iPod is at the Main
Menu, pressing Play/Pause will
cause the iPod to start playing
all of its music.
Pause a Song: Press the Play/Pause( ) Button
while a song is playing.
Go to Next Song: Press the Fast Forward ( ) Button.
Go to Previous Song: Press the Rewind ( ) Button.
Fast Forward Song: Press/Hold the Fast Forward
( ) Button.
Rewind Song: Press/Hold the Rewind ( ) Button.
Increase Volume: Press the Volume Up ( ) Button.
Decrease Volume: Press the Volume Down ( ) Button.
Pairing
By default, all AirClicks work on the same “channel.”
If you have more than one AirClick Remote Control
within range of an AirClick Receiver, the Receiver will
happily take commands from both Remotes.
Since you probably don’t want this to happen (unless
you like your neighbor controlling your iPod), you can
tell the Receiver to accept commands only from a spe-
cifi c AirClick Remote Control through a process called
Pairing. Use Pairing whenever more than one AirClick
Remote Control will be used in the same area.
To Turn Pairing On:
• Press the Pairing Switch on the Receiver
Module by inserting a paper clip or similar device.
The LED on the Receiver will light up.
• Press any button on the Remote within fi ve seconds
• The LED on the Receiver will fl ash rapidly for one
second, indicating that the Pairing was successful
Turn Pairing Off:
To reverse the process, allowing the Receiver Module
to once again be controlled by any Remote Control,
simply use a straightened paper clip or similar device
to press the Pairing Switch on the Receiver Module
and DO NOT press any buttons on the Remote Control.
After fi ve seconds, the LED on the Receiver will turn
off, and it will again respond to any AirClick Remote.
Photo Browsing:
AirClick can be used to display images on your iPod
Photo. To do so, you’ll need to put the AirClick Remote
Control into Photo Mode:
• Set the Hold Switch on the AirClick Remote
(an orange dot will appear).
• Press and hold the Play/Pause button.
• With the Play/Pause button depressed, slide the
Hold Switch to Active.
You can now browse forward or backward through
photographs by pressing the Volume Up and Volume
Down buttons, respectively. (Not enabled for TV out.)
To exit Photo Mode, just slide the Hold Switch from
Active to Hold, then back to Active.
AirClick Quick Start Manual
AirClick
AirClick
You‘ll fi nd the pairing button on the back of your receiver.
Produkt Specifikationer
| Mærke: | Griffin |
| Kategori: | Sund |
| Model: | AirClick |
Har du brug for hjælp?
Hvis du har brug for hjælp til Griffin AirClick stil et spørgsmål nedenfor, og andre brugere vil svare dig
Sund Griffin Manualer

21 August 2024
19 August 2024
15 August 2024
13 August 2024
6 August 2024
4 August 2024
3 August 2024
Sund Manualer
- Sund Sony
- Sund Siemens
- Sund Sony Ericsson
- Sund Philips
- Sund Logitech
- Sund Behringer
- Sund Kenwood
- Sund Sennheiser
- Sund Motorola
- Sund Roland
- Sund Gigabyte
- Sund Yamaha
- Sund Olympus
- Sund Nokia
- Sund JBL
- Sund Trust
- Sund Speedlink
- Sund Sweex
- Sund Gear4
- Sund Bose
- Sund Geemarc
- Sund Jabra
- Sund EnVivo
- Sund Iqua
- Sund NEC
- Sund Reflecta
- Sund Zoom
- Sund TC Helicon
- Sund Korg
- Sund Samson
- Sund FiiO
- Sund Cardo
- Sund Bluetrek
- Sund Power Dynamics
- Sund Focusrite
- Sund DAP-Audio
- Sund Phonak
- Sund Starkey
- Sund Advance Acoustic
- Sund Advanced Bionics
- Sund Alto Professional
- Sund Profoon
- Sund Mr Handsfree
- Sund Bellman Symfon
- Sund HUMANTECHNIK
- Sund Plawa
- Sund Native
- Sund Inakustik
- Sund Plextor
- Sund Timewave
- Sund Gioteck
- Sund Nxzen
- Sund MCS
- Sund Velodyne
- Sund Datel
- Sund Bang Olufsen
- Sund Bellman
- Sund Konig Electronic
- Sund Xqisit
Nyeste Sund Manualer
14 Januar 2025
26 August 2024
26 August 2024
26 August 2024
26 August 2024
26 August 2024
26 August 2024
26 August 2024
26 August 2024
26 August 2024