La Crosse Technology WS-9077U-IT Manual
La Crosse Technology
Vejrstation
WS-9077U-IT
Læs nedenfor 📖 manual på dansk for La Crosse Technology WS-9077U-IT (3 sider) i kategorien Vejrstation. Denne guide var nyttig for 50 personer og blev bedømt med 4.5 stjerner i gennemsnit af 2 brugere
Side 1/3
Battery
Cover
INSTANT TRANSMISSION is the state- -the-art new of
wireless transmission technology, exclusively designed and
developed by LA CROSSE TECHNOLOGY.
INSTANT TRANSMISSION oers you an immediate update
( !) of all your outdoor data measured from every 4 seconds
the transmitters: follow your climatic variations in real-time!
This product oers:
INTRODUCTION:
The Wireless Forecast Station features radio-controlled time, date, forecast
icons, indoor temperature and outdoor temperature on a stylish display.
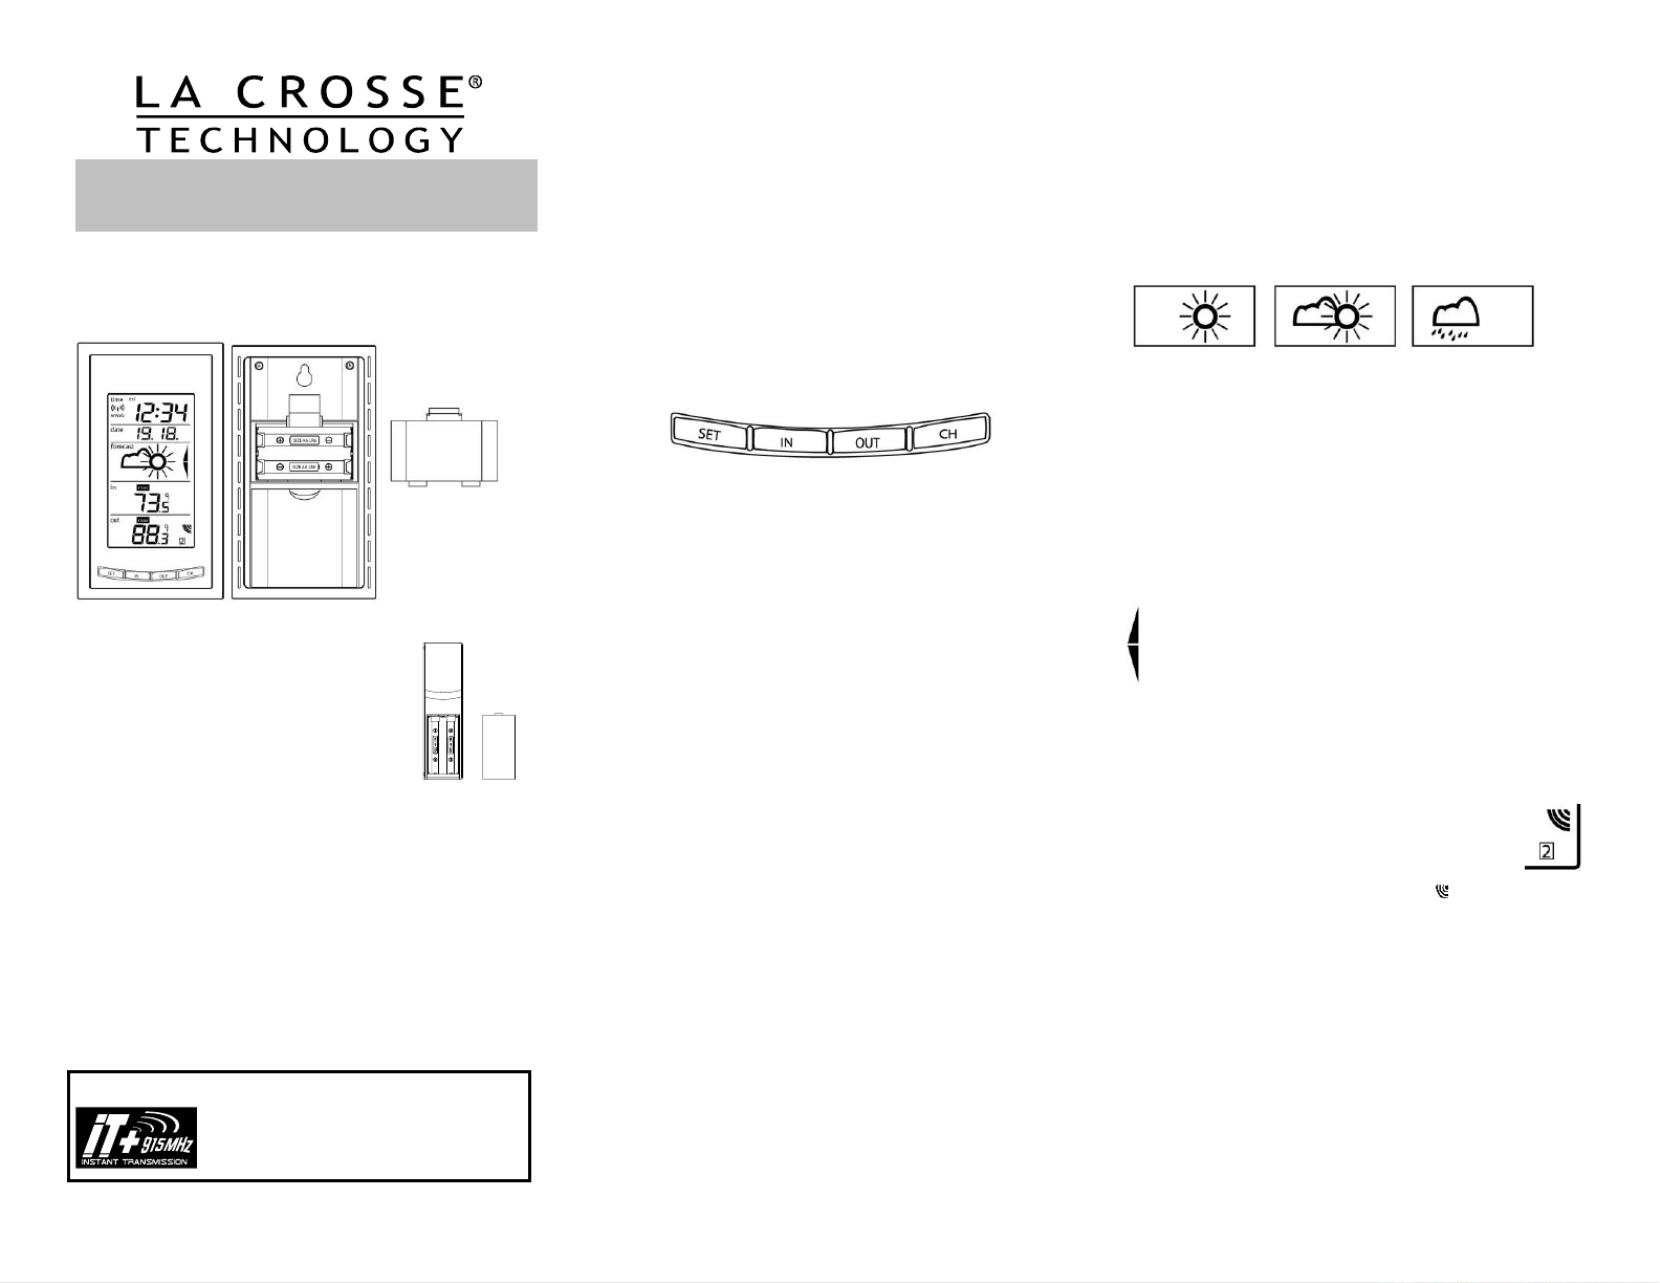
WIRELESS FORECAST STATION:
SETUP INSTRUCTIONS STEP BY STEP:
Step 1:
Remove battery cover from the outdoor transmitter.
Slide the battery cover down and lift off the back of
the transmitter
Insert 2 NEW AA batteries (not included) into the
TX29U-IT transmitter. Observe the correct polarity.
Keep the Forecast Station and transmitte within 10 r
feet during setup (15 minutes).
Step 2:
Remove battery cover from Forecast Station: insert a solid object in the
space provided at the upper-central position of the battery cover, then push
down and pull out to remove the battery cover.
Insert 2 NEW AA batteries (not included) into the back of the Forecast
Station. Observe the correct polarity (see marking inside the battery
compartment).Do NOT mix old and new batteries.
The will display, time (12:00) and indoor temperature. Forecast Station
Within 3 minutes the Outdoor temperature should be displayed.
Trouble shooting:
After 3 minutes, the Outdoor temperature does not show up in the if
designated area on the Forecast Station, remove batteries from both units
and start the setup process again.
For optimal reception performance, of the 915MHz signal, the outdoor
transmitter should be placed within 330 feet (100 meters) from the Forecast
Station.
WWVB RADIO CONTROLLED TIME
The NIST radio station, WWVB, is located in Ft. Collins, Colorado and
transmits the exact time signal continuously throughout the United States at
60 kHz. The signal can be received up to 2,000 miles away through the
internal antenna in the Forecast Station. However, due to the nature of the
Earth’s Ionosphere, reception is very limited during daylight hours. The
Forecast Station will search for a signal every night when reception is best.
The tower icon will show solid when the Forecast Station has received the
WWVB signal.
No tower icon displayed. The Forecast Station was unable to receive a
signal at this time.
Reposition the Forecast Station for better signal reception or try again at
bedtime.
Note: In case the Forecast Station is not able to detect the WWVB signal
(disturbances, transmitting distance, etc.); the time can be manually set by
following the . Program Menu
FUNCTION BUTTONS:
PROGRAM MENU:
The forecaste station has four function buttons on the front. The SET button
will move through the program menu. The IN or OUT button will change a
value. Press and release the SET button after each step to be moved to the
next step. Exit the programming mode at any time by pressing the CH
button.
CONTRAST: Hold the SET button for ve seconds. LCD and a number
from 0-7 will ash. To increase or decrease the contrast of the LCD
display, press and release the IN button. Press and release the SET
button to confirm and move to the next item.
TIME ZONE: The Time Zone will ash, showing a number following by
the letter h. Use the IN to change the Time Zone. North American Note:
Time Zones are negative numbers: -4h Atlantic, -5h Eastern,- -6h Central,
7h Mountain, -8h Pacic, -9h Alaskan and -10h Hawaiian. Press and
release the SET button to confirm and move to the next item.
DAYLIGHT SAVING TIME: 0 1 DST will show with either (O) or (On)
flashing. Most states use DST, so this should be set to 1. However if
your location does not use DST, use the IN button to turn it 0. Press and
release the SET button to confirm and move to the next item.
RADIO-CONTROLLED TIME: RCC will show with ON or OFF ashing.
Use the IN button to set the RCC signal. Press and release the SET
button to confirm and move to the next item.
12/24-HOUR TIME MODE: Either 12h or 24h will flash on the display.
Use the IN button to change from 12-hour to 24-hour time. Press and
release the SET button to confirm and move to the next item.
HOUR AND MINUTES: The Hour and Minutes Use the will flash. IN
button to advance the Hour. Use the button to advance the OUT
Minutes. Press and release the SET button to confirm and move to the
next item.
YEAR: The Year will ash. Use the IN button to set the year. Press and
release the SET button to confirm and move to the next item.
MONTH AND DATE: The Month and Day will ash. Use the IN button to
advance the . button to advance the . Press and Month Use the OUT Date
release the SET button to confirm and move to the next item.
SNOOZE TIME: Although numbers will flash, this feature is not used as
there is no alarm on this unit. Press and release the SET button to
conrm and move to the next item.
FAHRENHEIT OR CELSIUS: °C°F or will ash. Use the IN button to
select your preference. Press and release the SET button to conrm and
move to the next item.
FORECAST SENSITIV arrowsITY: Two air pressure tendency will
appear and a number will ash under the forecast icon. Press and
release the IN button to select the desired forecast sensitivity setting. The
lowest number is used near the coastline, the highest number is for the
desert, and middle number is for everywhere else. Press and release the
SET button to conrm and exit.
WEATHER FORECAST ICO NS:
The weather forecasting feature is estimated to be 75% accurate. The
weather forecast is based solely upon the change of air pressure over time.
In areas where the weather is not affected by the change of air pressure, this
feature will be less accurate.
There are 3 possible weather forecast icons that will be displayed :
Sunny—indicates that the weather is expected to improve (not that the
weather will be sunny).
Sun with Clouds—indicates that the weather is expected to be fair (not that
the weather will be sunny with clouds).
Clouds with Rain—indicates that the weather is expected to get worse (not
that the weather will be rainy).
The weather icons change when the unit detects a change in air pressure.
The icons change in order, from “sunny” to “partly sunny” to “cloudy” or the
reverse. If the symbols do not change then the weather has not changed, or
the change has been slow and gradual.
Weather Tendency Arrows:
These arrows reect current changes in the air pressure.
Up arrow: indicates air pressure is increasing, weather expected to
improve or remain good.
Down arrow: indicates air pressure is decreasing, weather is
expected to become worse or remain poor.
No arrow: No arrow means the pressure is stable.
VIEW CHANNELS:
The Forecast Station can receive up to 3 outdoor transmitters. Extra TX29U-
IT s may be found online or at your retailer. Additional transmitters transmitter
allow you to monitor remote temperature of up to 3 locations within a 330 Ft
wireless range of the Forecast Station.
Press and release the CH button to view a dierent channel. A
shift from one “boxed” number to the next should be observed
in the OUTDOOR LCD.
Note: When only one transmitter is connected, you cannot see
other channels and the channel indicator will not show.
OUTDOOR TRANSMITTER RECEPTION ICON:
When the signal is successfully received from the outdoor transmitter, the
icon will be solid.
The icon will ash when searching for the outdoor transmitter signal.
If reception is not successful, the icon will not be shown in LCD.
MIN/MAX DATA:
View Indoor MIN/MAX Data: Press and release the IN button to view the
Minimum, Maximum and Current Indoor Temperatures and humidity records.
The Time and Date will ash to show when the Minimum or Maximum
Temperature occurred.
Note: The indoor Humidity is not time and date stamped.
Reset Indoor MIN/MAX Data:
tton to select the individual indoor Max or Min Press and release the IN bu
record you wish to reset.
The record is now reset to the Hold the SET button for five seconds.
current day's reading.
Wireless Forecast Station
Model WS-9077U-IT | Quick Setup Guide
Produkt Specifikationer
| Mærke: | La Crosse Technology |
| Kategori: | Vejrstation |
| Model: | WS-9077U-IT |
Har du brug for hjælp?
Hvis du har brug for hjælp til La Crosse Technology WS-9077U-IT stil et spørgsmål nedenfor, og andre brugere vil svare dig
Vejrstation La Crosse Technology Manualer

4 Marts 2025
8 Januar 2025
8 Januar 2025
26 December 2024
26 December 2024
26 December 2024
8 Oktober 2024
29 September 2024
27 September 2024
22 September 2024
Vejrstation Manualer
- Vejrstation OBH Nordica
- Vejrstation Denver
- Vejrstation Sencor
- Vejrstation Day
- Vejrstation Beurer
- Vejrstation Daikin
- Vejrstation Extech
- Vejrstation Vitek
- Vejrstation Medisana
- Vejrstation Braun
- Vejrstation Tanita
- Vejrstation Emos
- Vejrstation Daewoo
- Vejrstation Lowrance
- Vejrstation TFA
- Vejrstation Livoo
- Vejrstation Pyle
- Vejrstation Biltema
- Vejrstation Hama
- Vejrstation Muse
- Vejrstation Thomson
- Vejrstation Hyundai
- Vejrstation Theben
- Vejrstation Clas Ohlson
- Vejrstation Optex
- Vejrstation Trevi
- Vejrstation Rocktrail
- Vejrstation Blaupunkt
- Vejrstation Honeywell
- Vejrstation Clatronic
- Vejrstation Soehnle
- Vejrstation König
- Vejrstation Elro
- Vejrstation Auriol
- Vejrstation Ventus
- Vejrstation Balance
- Vejrstation Sjöbo
- Vejrstation Bresser
- Vejrstation Davis
- Vejrstation Jacob Jensen
- Vejrstation National Geographic
- Vejrstation Alecto
- Vejrstation Krontaler
- Vejrstation GlobalTronics
- Vejrstation Rain Bird
- Vejrstation Velleman
- Vejrstation Perel
- Vejrstation JUNG
- Vejrstation Netatmo
- Vejrstation Eurochron
- Vejrstation Technoline
- Vejrstation Fluke
- Vejrstation EQ3
- Vejrstation Techno Line
- Vejrstation ADE
- Vejrstation Cotech
- Vejrstation ECG
- Vejrstation Elgato
- Vejrstation EVE
- Vejrstation Renkforce
- Vejrstation Waldbeck
- Vejrstation Brandson
- Vejrstation Orion
- Vejrstation Irox
- Vejrstation Majestic
- Vejrstation Steinberg
- Vejrstation Mebus
- Vejrstation EQ-3
- Vejrstation Vimar
- Vejrstation Oregon Scientific
- Vejrstation PeakTech
- Vejrstation Chacon
- Vejrstation Lexibook
- Vejrstation Ascot
- Vejrstation AcuRite
- Vejrstation Avidsen
- Vejrstation Chauvin Arnoux
- Vejrstation Taylor
- Vejrstation GoGen
- Vejrstation Levenhuk
- Vejrstation Minox
- Vejrstation Homematic IP
- Vejrstation ClimeMET
- Vejrstation Steren
- Vejrstation Bearware
- Vejrstation Setti+
- Vejrstation Profile
- Vejrstation Cresta
- Vejrstation Brigmton
- Vejrstation Marquant
- Vejrstation Goddess
- Vejrstation Conrad
- Vejrstation UPM
- Vejrstation Gira
- Vejrstation ELV
- Vejrstation Dexford
- Vejrstation Kemot
- Vejrstation Buienradar
- Vejrstation Saxon
- Vejrstation HomeMatic
- Vejrstation La Crosse
- Vejrstation Durabase
- Vejrstation Meade
- Vejrstation Guardo
- Vejrstation Sempre
- Vejrstation Digi-tech
- Vejrstation Unitec
- Vejrstation TFA Dostmann
- Vejrstation Greisinger
- Vejrstation Nor-tec
- Vejrstation DMV Electronics
- Vejrstation Inovalley
- Vejrstation Balance Meteo
- Vejrstation Ease Electronicz
- Vejrstation Rebel
- Vejrstation Saphir
- Vejrstation Paget Trading
- Vejrstation YONO
- Vejrstation Ytora
- Vejrstation JDC
- Vejrstation Greenure
- Vejrstation PCE Instruments
- Vejrstation Nasa
- Vejrstation Global Water
- Vejrstation ChiliTec
- Vejrstation Uzoli
- Vejrstation Xeecom ApS
- Vejrstation Marathon
- Vejrstation Ea2 LABS
- Vejrstation Hesdo
- Vejrstation Weinberger
- Vejrstation EMOS SELECT
- Vejrstation Prologue
- Vejrstation Gewiss
- Vejrstation Browin
- Vejrstation Otio
- Vejrstation Baldr
- Vejrstation Thierry Mugler
Nyeste Vejrstation Manualer
14 Marts 2025
9 Marts 2025
9 Marts 2025
9 Marts 2025
9 Marts 2025
9 Marts 2025
9 Marts 2025
9 Marts 2025
9 Marts 2025
9 Marts 2025