Panasonic Toughpad FZ-F1 Manual
Panasonic
Smartphone
Toughpad FZ-F1
Læs nedenfor 📖 manual på dansk for Panasonic Toughpad FZ-F1 (56 sider) i kategorien Smartphone. Denne guide var nyttig for 11 personer og blev bedømt med 4.5 stjerner i gennemsnit af 2 brugere
Side 1/56

Operating Instructi ons
Smart Handhel d
EB-3901
Operating Instructions
Basic Guide
Tablet Computer
Model No.
FZ-F1
series
Thank you for purchasing a Panasonic product.
For optimum performance and safety, please read these
instructions carefully.
For detailed information about this product, refer to the Reference
Manual, which is available by flicking the Start screen to the left,
and then tapping [Online Manual] in the All apps list. (Download
required.)

6
• Do not place objects on the surface of the product or press down
hard on the product with sharp objects. The screen surface may
get scratched.
• Do not scratch the rear camera, barcode reader, or flash panel.
• Do not use the dedicated stylus when dust or dirt (e.g., oil) is on
the screen. Otherwise foreign particles on the screen/dedicated
stylus may scratch the screen surface or obstruct operation of the
dedicated stylus.
• Use the dedicated stylus only for touching the screen. Using it for
any other purpose may damage the dedicated stylus and result in
scratches on the screen.
• Confirm the safety and security of software before downloading or
installing it on the product. Installing malware or viruses can cause
malfunction and the disclosure of any private information stored in
the product, or may cause excessive sound volume.
• Turn off the product before removing the SIM card or SD card.
Failure to do so can result in data loss or damage to the SIM card,
SD card, or product.
• Do not place the product near a television or radio receiver. This
may cause television or radio interference.
• Keep the product away from magnets. Failure to do so may cause
malfunction.
• It is illegal in many areas to record a call without permission.
Always ask the other party for permission before recording a call.
• Follow these instructions and the Reference Manual to avoid any
damage to the devices. Carefully read the instruction manuals of
the peripheral devices.
– Use peripheral devices that conform to the product's
specifications.
– Connect to the connectors in the correct direction.
– If a connector is hard to insert, do not try forcibly. Check its
shape, direction, alignment of pins, etc.
Protecting your data
• To prevent accidental loss of data, we recommend that you back
up any important data that you store in the product, SIM card, and
SD card.

10
Disclaimers
Panasonic shall not be liable for loss of data or other incidental or
consequential damages resulting from the use of this product. This
product can download, store, forward, and receive additional content,
such as applications, ringtones, contact information, and media files.
The use of such content may be restricted or prohibited by the rights
of third parties, including but not limited to restriction under
applicable copyright laws. You are entirely responsible for additional
content that you download to or forward from this product; Panasonic
is not responsible for such content or its use. Before using such
content, it is your responsibility to verify that your intended use is
properly licensed or is otherwise authorized. Panasonic does not
warrant or guarantee the accuracy, integrity or quality of any
additional content or any other third-party content. Under no
circumstances will Panasonic be liable in any way for the improper
use of additional content or other third-party content by this product
or its operator. This document and any related product
documentation may refer to services and applications that are
provided by third parties. The use of such services or programs may
require separate registration with the third party provider and may be
subject to additional terms of use. For applications accessed on or
through a third-party web site, please review the web sites’ terms of
use and applicable privacy policy in advance. Panasonic does not
warrant or guarantee the availability or performance of any third-
party web sites, services, or applications.
Disclaimers

13Getting Started
D
D
D
DD
Ambient light sensor, proximity sensor
The ambient light sensor automatically adjusts the screen
brightness. The proximity sensor prevents accidental operations
on the touch panel during phone calls.
E
NFC antenna
(internal)
When using an NFC card or other NFC device, touch the card/
device to this area of the unit.
F
F
F
FF
Display (touch panel)
Can also be operated while using gloves (glove touch mode).
G
G
G
GG
Speaker
H
H
H
HH
Back button
Press to return to the previous screen.
I
I
I
II
Start button
Press to display the Start screen.
J
J
J
JJ
Search button
*1
Press to search the web.
K
Headset jack cover
(page )15
L
L
L
LL
Headset jack
M
Power button
(page 27 )
N
N
N
NN
Microphone
O
Interface cover
(page 16 )
P
P
P
PP
micro USB port
Q
Q
Q
QQ
Strap attachment hole
R
R
R
RR
Side button
*1
S
S
S
SS
Camera button
T
T
T
TT
Cradle rail
Used when connecting the unit to an optional cradle, etc.
*1 The registered function can be changed. See the Reference
Manual.
17Getting Started
IMPORTANT
• Observe the following to ensure the waterproof and dustproof
performance of the unit.
– Make sure the interface cover is securely closed and locked
when the micro USB port is not being used.
– When closing the interface cover, make sure there is no debris
lodged in the gasket that seals the cover.
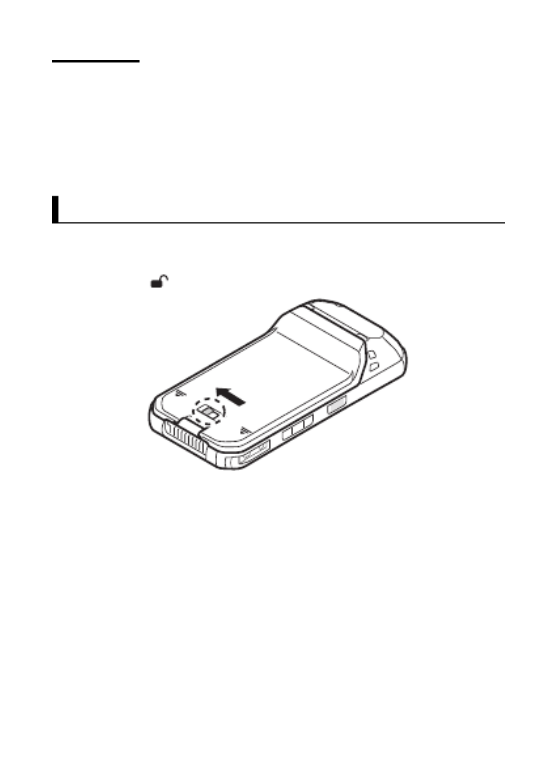
Removing and attaching the battery cover
Removing the battery cover
1.
Slide the battery lock lever (circled in the illustration) in the
direction of .
Removing and attaching the battery cover
20
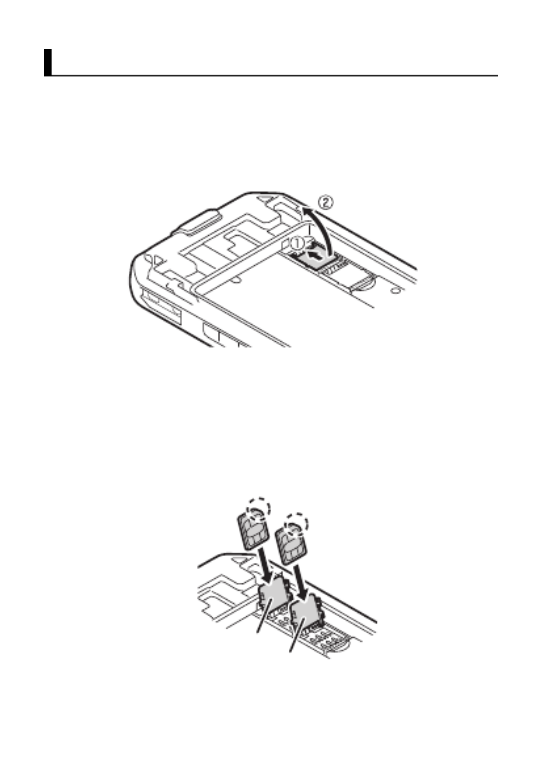
Installing SIM cards (certain models only)
You can install up to two SIM cards.
1.
Remove the battery cover (page 17 ).
• If a battery is installed, remove it (page 25 ).
2.
Slide the Micro SIM card slot in the direction of the arrow (A),
and then open it (B).
3.
Insert the SIM card into the desired Micro SIM card slot.
• Install only Micro SIM cards.
• If only one SIM card is installed, insert it into Micro SIM card
slot 1 (Micro SIM Slot1).
• Hold the SIM card so that the metal terminals are facing you,
and insert with the notch facing in the same direction of the
circled area in the illustration below.
Installing SIM cards (certain models only)
Micro SIM Slot1
Micro SIM Slot2

21Getting Started
4.
Close the Micro SIM card slot (A), and slide it in the direction of
the arrow (B) until you hear a click.
• To remove a SIM card, follow the same procedure, and then
pull out the SIM card at step 3.
Note
• See the
Reference Manual
(flick the Start screen to the left,
and then tap
[Online Manual]
in the All apps list) for
information on selecting the active SIM card slot and the
preferred mobile network mode.

22
Installing an SD card
When installing or removing an SD card, place the unit on a flat
surface.
1.
Remove the battery cover (page 17 ).
• If a battery is installed, remove it (page 25 ).
2.
Slide the microSD card slot in the direction of the arrow (A), and
then open it (B).
3.
Insert the microSD card into the microSD card slot (A), and then
close the slot (B).
• Install only microSD cards.
• Hold the microSD card so that the metal terminals are facing
you, and insert with the notch facing in the same direction of
the circled area in the illustration below.
Installing an SD card
24
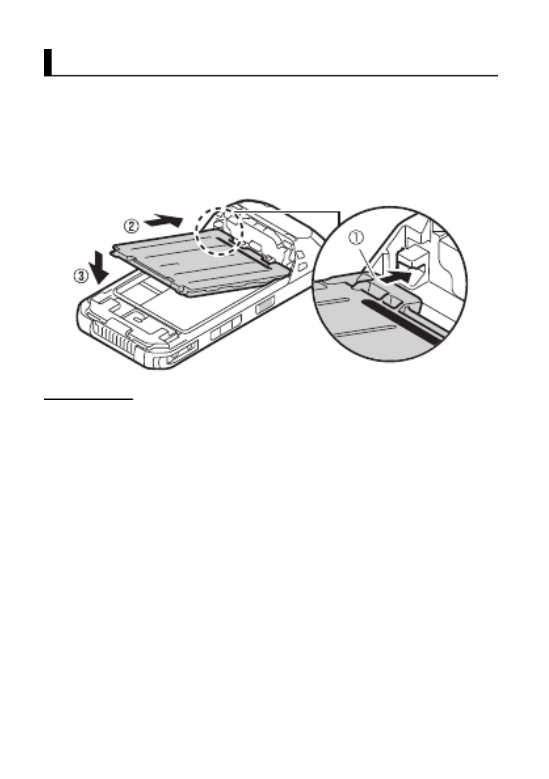
Installing and removing the battery
Make sure to turn off the unit before replacing the battery.
Installing the battery
1.
Remove the battery cover (page 17 ).
2.
Insert the tabs at the battery’s terminal side (A) into the notches
of the unit (B), and then lower the battery into place (C).
IMPORTANT
• Observe the following to ensure the waterproof and dustproof
performance of the unit.
– When installing the battery, make sure there is no debris lodged
in the gasket that seals the unit and in the area around the
battery.
Installing and removing the battery
29Getting Started
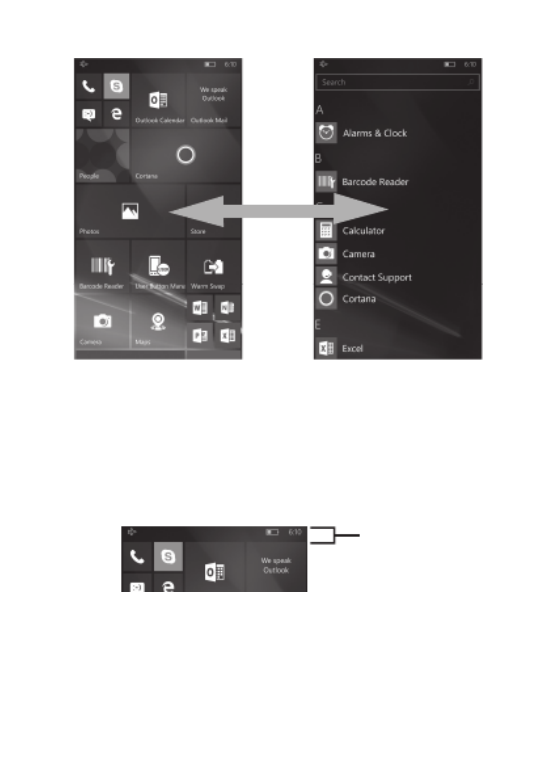
• Tap any letter on the All apps list to jump to a specific section of
the list.
Using the status bar
The status icons displayed on the status bar at the top of the screen
indicate the current status of the device.
• See the Reference Manual for an explanation of the icons.
Using the action center
Detailed information about incoming calls, text messages, and app
update information is displayed in the action center. The action
center is displayed by flicking downward from the top of the screen
and is hidden by flicking up from the bottom of the screen.
Start screen All apps list
Status ba
r

39Appendix
Bluetooth
Version 4.1, Class 1
Transmission method
FHSS system
Wireless channels used
0 - 78 ch (Low energy: 0 - 39 ch)
RF frequency band
2402 MHz - 2480 MHz
Supported profile
A2DP, AVRCP, HFP, HID, HOGP, MAP, OPP,
PAN, PBAP, SPP, GATT, DI
Mobile networking
(certain models
only)
LTE, HSPA+, UMTS, EDGE, GPRS, GSM,
CDMA 1x, EVDO Rev. A
SIM card slot
Micro SIM card slot
2
Sound Speaker
Twin speakers (100 dBA), phone speaker
Microphone
3 microphones, noise suppressor
Security
ARM
®
TrustZone
®
(built-in), TPM (TCG V2.0
compliant)
Camera Front
5 megapixels
Video: 1920
1080 pixels, 30 fps
Still: 2592
1944 pixels
Rear
8 megapixels
Video: 1920
1080 pixels, 30 fps
Still: 3264
2448 pixels
GNSS
GPS/GLONASS (
±
2 to 4
m)
Barcode reader
1D, 2D support
Enhanced data
security
FIPS
140-2 level-1 compliant

45Appendix
Optional: Panasonic “Protection Plus” Warranty
Any unit for which the Panasonic “Protection Plus” warranty has been purchased will
receive additional coverage for any failure that occurs due to accidental damage. All
other terms and conditions of the standard warranty apply and this additional coverage
will exist for the duration of the standard warranty period of the unit.
If an extended Protection Plus warranty program is purchased, coverage is extended to
the end of the last year of extended coverage purchased.
This warranty does not cover failures or defects that are caused by fire, intentional acts,
loss, theft, improper maintenance, modification or service by anyone other than the
Panasonic National Service Center or a Panasonic Authorized Service Provider, or
damage that is attributable to acts of God.
Cosmetic damage that does not affect functionality is not covered. Cosmetic damage
on units with hardware failures will be repaired in accordance with the warranty terms.
This warranty is extended solely to the original purchaser on the unit serial number for
which it was purchased.
Complete unit replacement fulfills the full obligation and is at the discretion of Panasonic
and is limited to once during the coverage term.
Refer to the Panasonic web site for full terms and conditions on the above programs.
Options and Accessories Warranties
The below listed Panasonic brand or supplied options and accessories are covered
under this limited warranty for the period specified from the date of purchase or as
specifically stated.
• AC Adaptor and Power Cord: 3 Years
• Car Adaptor and Power Cord: 3 Years
• Cradle: 3 Years
• Charging Cup: 3 Years
• Optional Battery: 1 Year
• Battery Charger: 1 Year
• Integrated Panasonic supplied options and kits including, but not limited to,
Cameras, GPS devices, Bluetooth devices, Smartcard Readers, Magnetic Card
Readers, Barcode Scanners, and Fingerprint Readers: 3 years or the warranty
period of the unit in which it is installed provided the installation was performed by
Panasonic or an Authorized Integrator.
Produkt Specifikationer
| Mærke: | Panasonic |
| Kategori: | Smartphone |
| Model: | Toughpad FZ-F1 |
Har du brug for hjælp?
Hvis du har brug for hjælp til Panasonic Toughpad FZ-F1 stil et spørgsmål nedenfor, og andre brugere vil svare dig
Smartphone Panasonic Manualer

30 August 2024
1 August 2024
28 Juli 2024
27 Juli 2024
28 Juni 2024
28 Juni 2024
28 Juni 2024
Smartphone Manualer
- Smartphone SilverCrest
- Smartphone Acer
- Smartphone Amplicomms
- Smartphone Denver
- Smartphone Sencor
- Smartphone TCL
- Smartphone Sony
- Smartphone Samsung
- Smartphone Sony Ericsson
- Smartphone TP-Link
- Smartphone Philips
- Smartphone OK
- Smartphone LG
- Smartphone AEG
- Smartphone Doro
- Smartphone Gigaset
- Smartphone AT&T
- Smartphone Mitsubishi
- Smartphone Apple
- Smartphone Sharp
- Smartphone Konrow
- Smartphone Google
- Smartphone HP
- Smartphone Emporia
- Smartphone Sanyo
- Smartphone Easypix
- Smartphone Motorola
- Smartphone Asus
- Smartphone Gigabyte
- Smartphone Toshiba
- Smartphone Kodak
- Smartphone InFocus
- Smartphone Lenovo
- Smartphone OnePlus
- Smartphone Nedis
- Smartphone Thomson
- Smartphone Hyundai
- Smartphone Nokia
- Smartphone Hisense
- Smartphone Hannspree
- Smartphone Trevi
- Smartphone Fysic
- Smartphone Mio
- Smartphone Blaupunkt
- Smartphone Facom
- Smartphone Medion
- Smartphone Intex
- Smartphone Haier
- Smartphone Huawei
- Smartphone Echo
- Smartphone Geemarc
- Smartphone BURY
- Smartphone Yarvik
- Smartphone Sunny
- Smartphone Telefunken
- Smartphone BenQ
- Smartphone Microsoft
- Smartphone Alcatel
- Smartphone Alecto
- Smartphone Plum
- Smartphone Olympia
- Smartphone Xiaomi
- Smartphone Krüger&Matz
- Smartphone Dell
- Smartphone RugGear
- Smartphone Intermec
- Smartphone Mustang
- Smartphone CAT
- Smartphone Oppo
- Smartphone NGS
- Smartphone Tesla
- Smartphone Polaroid
- Smartphone NGM
- Smartphone Wileyfox
- Smartphone Kyocera
- Smartphone Energy Sistem
- Smartphone Bush
- Smartphone Honor
- Smartphone Tiptel
- Smartphone Sagem
- Smartphone Nevir
- Smartphone TrekStor
- Smartphone Lava
- Smartphone Vivo
- Smartphone Vodafone
- Smartphone Overmax
- Smartphone Albrecht
- Smartphone Infinix
- Smartphone Archos
- Smartphone Alba
- Smartphone RCA
- Smartphone MaxCom
- Smartphone Pantech
- Smartphone SPC
- Smartphone ZTE
- Smartphone Verykool
- Smartphone Lark
- Smartphone Switel
- Smartphone Garmin-Asus
- Smartphone Amazon
- Smartphone HTC
- Smartphone GoClever
- Smartphone ITTM
- Smartphone ITT
- Smartphone Keneksi
- Smartphone BlackBerry
- Smartphone Evolveo
- Smartphone Audioline
- Smartphone Coolpad
- Smartphone Wiko
- Smartphone Xtreamer
- Smartphone Majestic
- Smartphone ESTAR
- Smartphone Phicomm
- Smartphone Umidigi
- Smartphone Telstra
- Smartphone ToughGear
- Smartphone BLU
- Smartphone CRUX
- Smartphone Bq
- Smartphone Lexibook
- Smartphone Prestigio
- Smartphone MyPhone
- Smartphone Realme
- Smartphone Kogan
- Smartphone Micromax
- Smartphone Cyrus
- Smartphone Energizer
- Smartphone CUSTOM
- Smartphone Manta
- Smartphone Tecdesk
- Smartphone Media-Tech
- Smartphone I.safe Mobile
- Smartphone Bea-fon
- Smartphone Aligator
- Smartphone Allview
- Smartphone AQISTON
- Smartphone Amplicom
- Smartphone Androidtech
- Smartphone Ecom
- Smartphone Sonim
- Smartphone Brigmton
- Smartphone Sunstech
- Smartphone Swissvoice
- Smartphone Nordmende
- Smartphone KPN
- Smartphone Wolder
- Smartphone Profoon
- Smartphone Hammer
- Smartphone GreatCall
- Smartphone Mpman
- Smartphone Logicom
- Smartphone Karbonn
- Smartphone Klipad
- Smartphone Iget
- Smartphone T-Mobile
- Smartphone JCB
- Smartphone Unnecto
- Smartphone Avus
- Smartphone Wolfgang
- Smartphone Aplic
- Smartphone Primux
- Smartphone UTStarcom
- Smartphone Zipy
- Smartphone Mediacom
- Smartphone Beafon
- Smartphone BGH
- Smartphone Billow
- Smartphone Ulefone
- Smartphone Benefon
- Smartphone Komu
- Smartphone Doogee
- Smartphone Tremay
- Smartphone Kurio
- Smartphone Piranha
- Smartphone Mobistel
- Smartphone Itel
- Smartphone Handheld
- Smartphone Fero
- Smartphone AT Telecom
- Smartphone O2
- Smartphone General Mobile
- Smartphone Syco
- Smartphone Pharos
- Smartphone Storex
- Smartphone Freeman
- Smartphone HomTom
- Smartphone Auro
- Smartphone Maxx
- Smartphone Posh Mobile
- Smartphone THL
- Smartphone NGM-Mobile
- Smartphone Nothing
- Smartphone Oukitel
- Smartphone NUU Mobile
- Smartphone HMD
- Smartphone Senifone
- Smartphone Tecno
- Smartphone Telme
- Smartphone UMi
- Smartphone Olitech
- Smartphone Mobiola
- Smartphone Meizu
- Smartphone Neffos
- Smartphone Gionee
- Smartphone TIM
- Smartphone Cubot
- Smartphone Leotec
- Smartphone Leagoo
- Smartphone NTech
- Smartphone Nubia
- Smartphone LeEco
- Smartphone Best Buy
- Smartphone Saiet
- Smartphone Bluebird
- Smartphone Jitterbug
- Smartphone CSL
- Smartphone POCO
- Smartphone Opis
Nyeste Smartphone Manualer

20 Februar 2025
20 Februar 2025

30 Januar 2025

15 Januar 2025

15 Januar 2025
13 Januar 2025
13 Januar 2025
12 Januar 2025
12 Januar 2025
12 Januar 2025