INTENDED USE: FIRE SAFETY
ESSENTIAL CHARACTERISTICS: PASSED
Nominal activation conditions/ Sensitivity, Response
-
delay
(response
time)
and Performance under
condition
- Operational reliability
- Tolerance to supply voltage
- Durability of operational reliability and response delay,
temperature resistance
- Durability of operational reliability, vibration resistance
- Durability of operational reliability, humidity resistance
- Durability of operational reliability, corrosion resistance
- Durability of operational reliability, electrical stability
FSM-128
Fire Safety
1008
FSM-128-010CPR
23
EN14604:2005/AC:2008
EN Smoke alarm device / Manual
DECLARATION OF PERFORMANCE - DoP
www.smartwares.eu/dop and follow the instructions.
DE Rauchwarnmelder / Gebrauchsanweisung
LEISTUNGSERKLÄRUNG - DoP
www.smartwares.eu/dop und folgen Sie den Anweisungen.
FR Détecteur de fumée / Mode d’emploi
DECLARATION DE PERFORMANCE - DoP
www.smartwares.eu/dop et suivez les instructions.
NL Rookmelder / Gebruiksaanwijzing
VERKLARING VAN PRESTATIES - DoP
www.smartwares.eu/dop en volg de aanwijzingen.
ES Detector de humo / Instrucciones de uso
DECLARACIÓN DE PRESTACIONES - DoP
www.smartwares.eu/dop y siga las instrucciones.
IT Rilevatore di fumo / Manuale
DICHIARAZIONE DI PRESTAZIONE - DoP
www.smartwares.eu/dop e seguire le istruzioni.
SV Detektor dymu / Manuál
VYHLÁSENIE O VÝKONE - DoP
www.smartwares.eu/dop a nasledujte pokyny.
CS Detektor kouře / Návod k obsluze
PROHLÁŠENÍ O VLASTNOSTECH - DoP
www.smartwares.eu/dop a postupujte podle pokynů.
SK Detektor dymu / Manuál
VYHLÁSENIE O VÝKONE - DoP
www.smartwares.eu/dop a nasledujte pokyny.
PL Czujka dymu / instrukcja użytkowania
DEKLARACJA WŁAŚCIWOŚCI UŻYTKOWYCH - DoP
www.smartwares.eu/dop i postępuj zgodnie z instrukcjami.
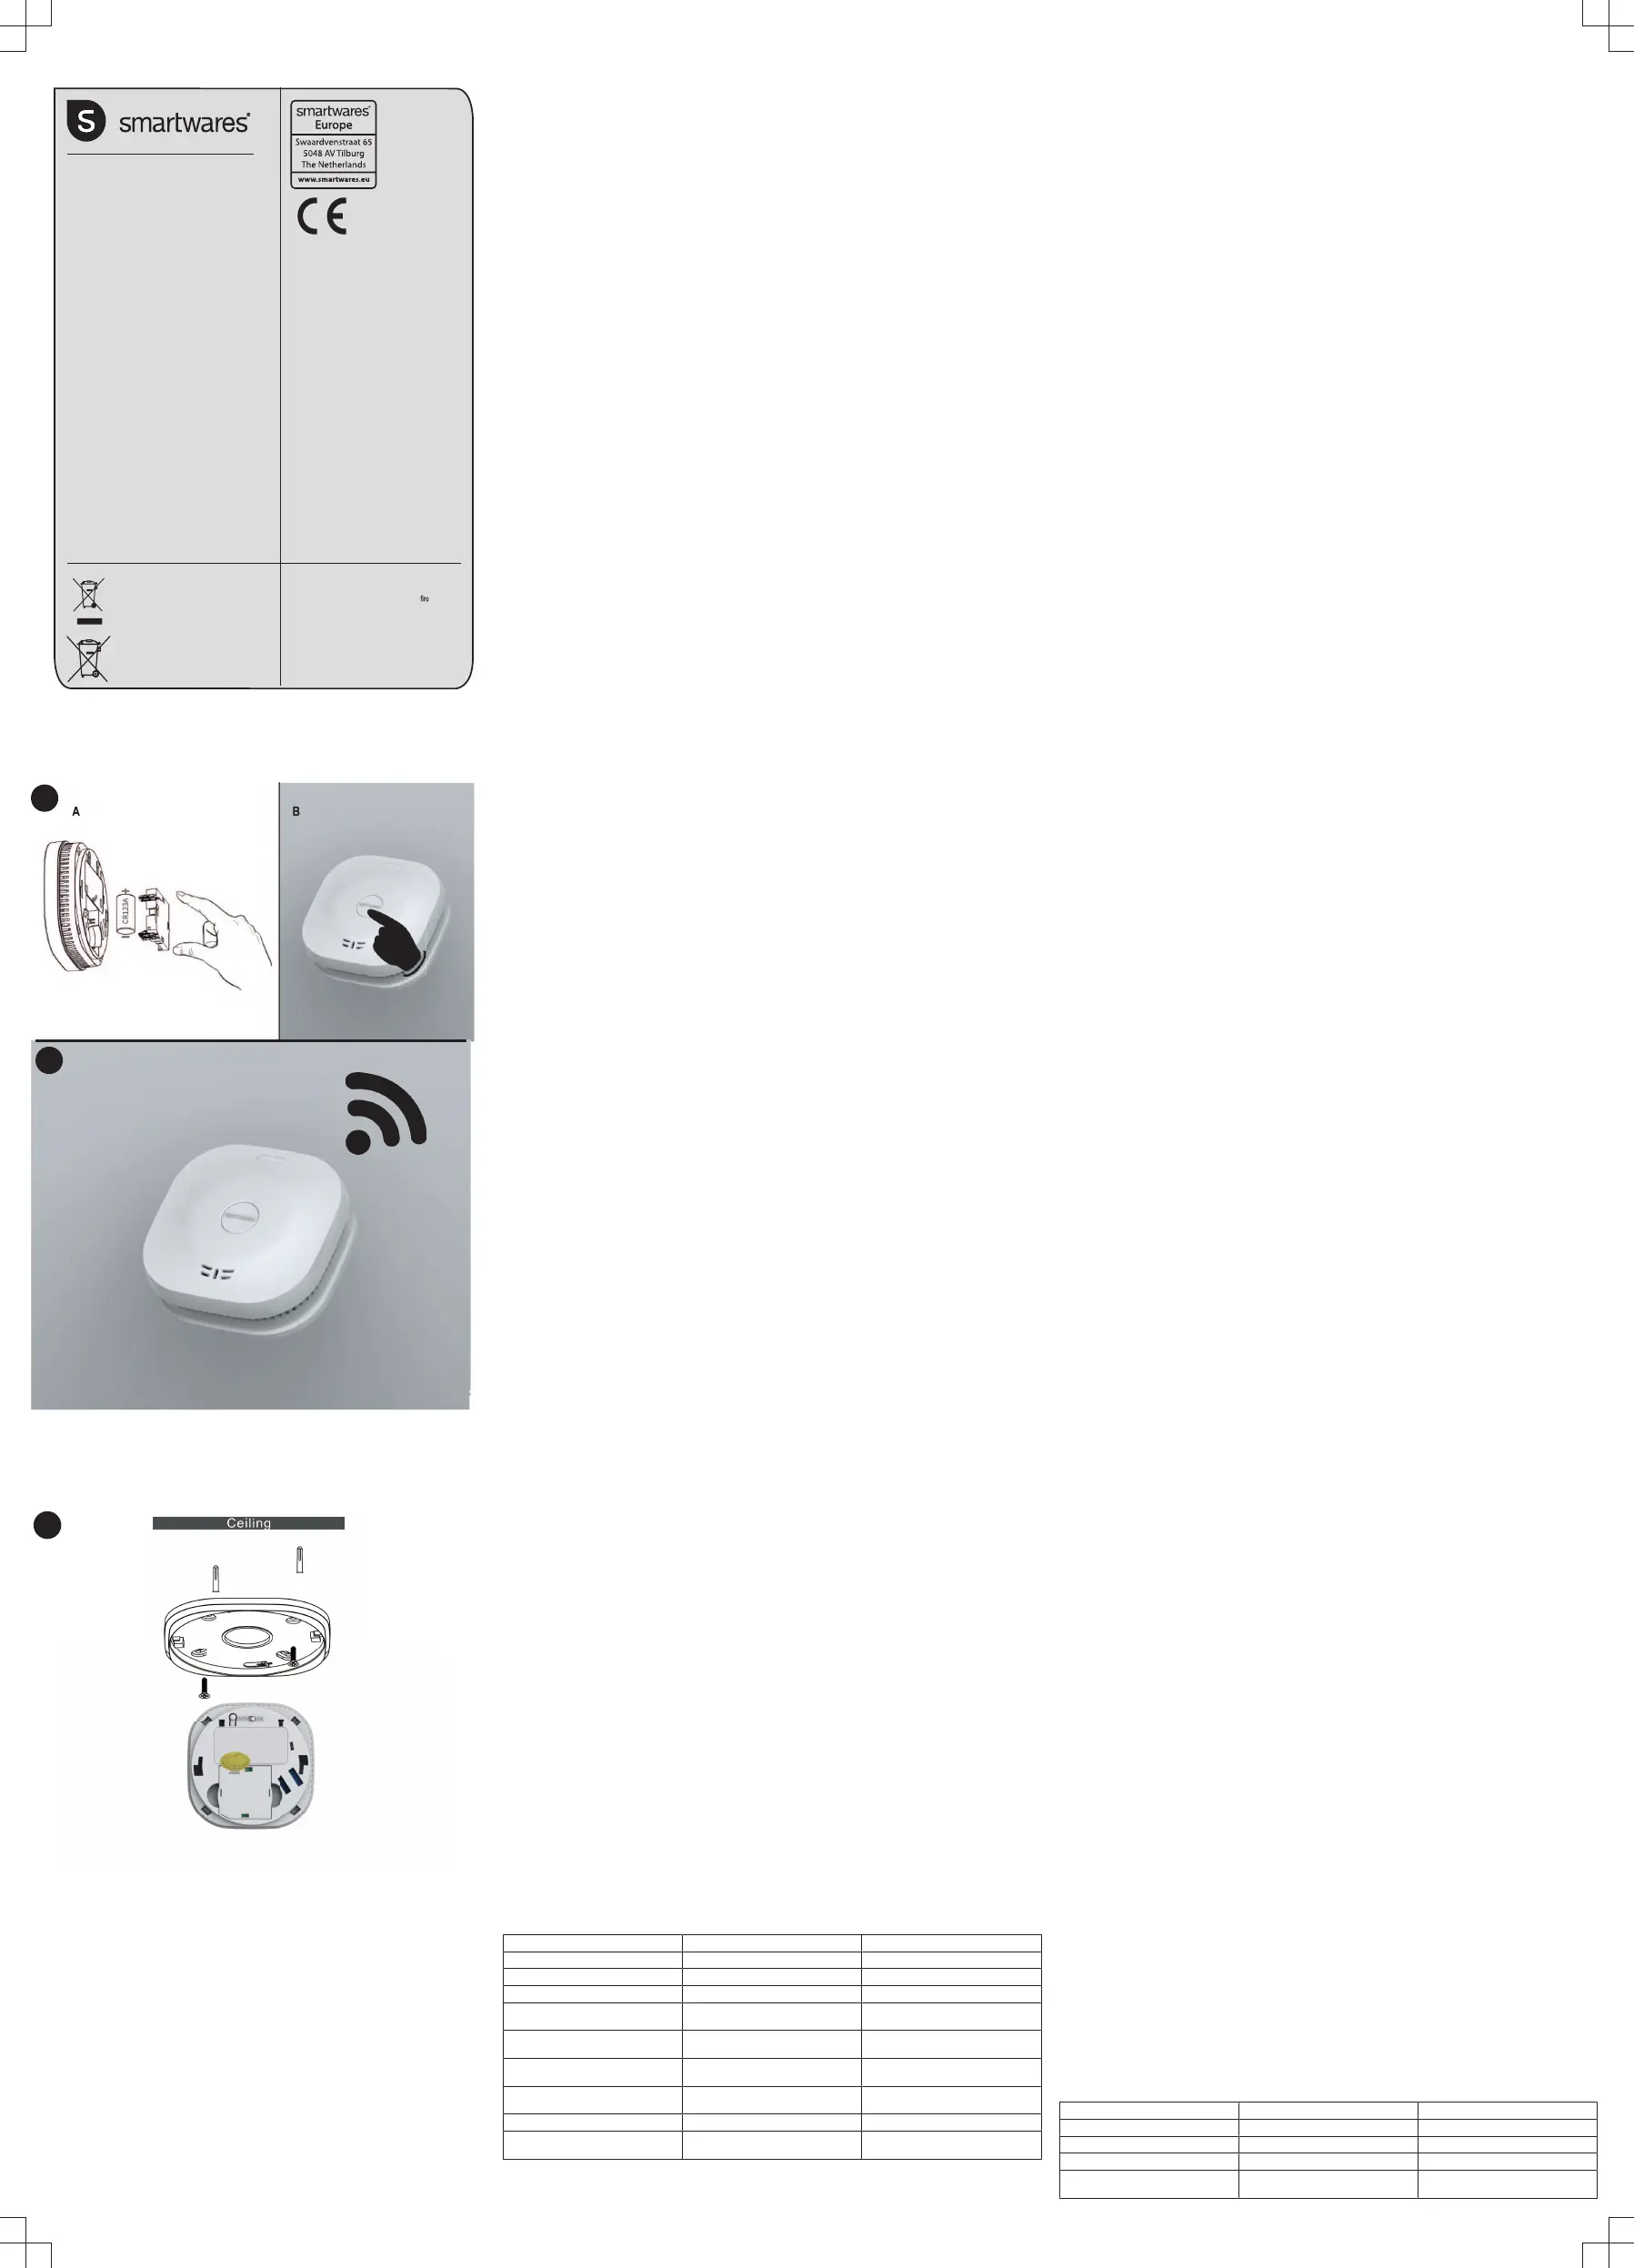
1
Wifi pairing mode:
Press button 3 times
within 5 seconds
2
5 sec.
ENInstruction manual
GENERAL INFORMATION
Thank you for purchasing this smoke alarm device! Please read these instructions carefully before using the smoke alarm device.
Retain this information in a safe and easily accessible place for future use and maintenance. If you have any questions or if you are
looking for additional information about your smoke alarm device, please visit our website www.smartwares.eu/doc
• Make/model number: FSM-128
• Description: Smoke alarm device based on the photocell principle, which means that the alarm monitors the air for smoke caused
by fire. This apparatus contains a sealed lithium battery with a lifetime of 10 years for the smoke alarm itself and a replaceable 3
year battery type CR123A 3V DC for the Wi-Fi part.
• Function: Smoke alarm device intended to alert the persons present near a fire/fire smoke, to give them time to react properly to
the danger.
• Scope of application: Smoke alarm device for buildings with residential function.
IMPORTANT:
• Caution: The alarm is designed in order to detect smoke; it cannot prevent a fire!
• Caution: The smoke alarm may not be painted or covered because this may cause loss of functionality.
• Caution: Using a smoke alarm is part of your fire protection, just as fire extinguishers, emergency ladders, ropes, but also your
choice in the use of building materials for renovation. Always ensure that there is an evacuation plan and discuss this with your
children. Ensure that each room can be left without opening the door, e.g. by the window. If there is any question as to the cause of
an alarm, it should be assumed that the alarm is due to an actual fire and the dwelling evacuated immediately.
• Warning: Smoke alarm devices must be replaced no later than 10 years after initial activation. Fill out the activation date on the
rating label on the product and mark the replacement date in your calendar.
INITIAL ACTIVATION
Installing the battery.
• Open the apparatus by pressing down on the base plate and turning it anti-clockwise.
• Remove any protective plastic tab from the battery and install it in the smoke alarm. Make sure that it is fitted in accordance with
the polarity markings (+ or -) within the battery compartment (see image 1A). The device will emit one beep when the battery is
installed.
• To reattach the base plate align the pins with the holes on the base plate then turn the base plate clockwise
Mounting the alarm
• To mount the smoke alarm, fix the base plate with the screws supplied and gently tighten the alarm onto the base plate (see image
3).
• Attach the alarm to the mounted base plate by aligning the pins on the alarm with the holes on the base plate and turning the alarm
anti-clockwise.
• After installing the smoke alarm always test its functionality by using the test button.
Testing the alarm
It is important to test the alarm before and after mounting it, whenever a new battery has been installed, and on a monthly basis.
Lithium batteries must be activated on a regular basis to prevent the battery from “falling asleep”. To test the alarm -
• Hold the TEST/HUSH button for 5 seconds. (see image 1B). The red LED will flash and the device will emit 3 beeps then release
the button. This confirms that the alarm is in good working condition.
• If the alarm signal does not sound after pressing the [TEST/HUSH] button, the smoke alarm is not working properly and the advice
of Smartwares should be sought.
MOUNTING
Important:
Pay close attention to these siting recommendations below in order to guarantee optimal performance of your smoke alarm.
• For the safety of the end-user, the smoke alarm cannot be mounted if the battery is not placed.
• WARNING: To prevent injury, this apparatus must be securely attached to the ceiling in accordance with the installation
instructions.
• Smoke alarm devices should be installed in such a way that they can be reached unimpeded by the fire smoke so that fires can be
detected reliably in the development phase.
• Requirements for smoke alarm devices vary from state to state and from region to region. Always check the relevant requirements
in your area with your local authorities!
Where to mount a smoke alarm device?
• Centered at the ceiling of the room
• Max height: 6m
• Min 0,5 m distance to walls/ barriers:
• Small rooms with a width of <1m: Centered at the ceiling
• Corridors with a maximum width of 3m: Max.15m distance between 2 smoke alarms. Max. 7,5m between the front and smoke
alarm devices at edges/crossings of corridors.
• Galleries: If the length and width of the gallery are >2m and the gallery area is >16m2, an additional smoke alarm will be required.
• In roof slopes: If >20°, minimal 0,5m and maximal 1m to roof top. If ≤20°, consider as flat ceiling. In partial roof slopes: if flat ceiling
≤1m width, consider as roof slope. If flat ceiling is >1m wide, consider as flat ceiling.
• Ceiling joists (or similar): If height ≤0,2m, installation at ceiling or on joist. If height > 0,2m and separated area > 36m2 => additional
smoke alarm devices in between.
• Ceiling joists (or similar): If the height is ≤0,2m, install the alarm to the ceiling or on the joist. If height > 0,2m and in separated
areas > 36m2 => additional smoke alarms will be required in between.
Where not to mount your smoke alarm device?
• Close to air conditioning/ventilation systems;
• Locations where the ventilation can be impeded items such curtains etc.;
• In rooms where temperature can reach below -10 - + 50 ⁰C.
• In damp spaces/kitchens/bathrooms, because steam can cause false alarms. Please visit our website for alarms that are suitable
for usage in these rooms;
• Closer than 50 cm to light sources/electrical sources;
• Locations that are difficult to reach and impede the accessibility of the test/hush button, battery replacement, and maintenance.
Wireless Connection
Follow the next steps to create a wireless connection between the smoke alarm and your smartphone or tablet.
Preparation
• Go to the Apple or Android Play Store.
• Download the Connected at Home / Smartlife app on your smartphone or tablet.
Making a wireless connection between your smart device(s) and the smoke alarm
Open the Connected at Home / Smartlife app on your smartphone or tablet. Follow the app instructions to add your device(s). Hold
down the TEST/HUSH button on the smoke alarm and don't release it. Then rotate the smoke alarm onto the mounting bracket to
power the smoke alarm. At this time, the green LED will light up and emit one beep. Now you can release the test button. Press the
test button three times within 5 seconds (see image 2) and the green LED will flash rapidly, this indicates that the smoke alarm
networking is in progress. Networking process will stop after approximately 60 seconds.
Note: If Wi-Fi pairing failed, users need to repeat the above steps for making a wireless connection.
ALARM SILENCE / HUSH MODE
To silence the alarm long-press the TEST/HUSH button. The alarm will be silenced for 9 minutes. If the smoke concentration is still
above the alarming point, the smoke alarm will send out another alarm. Use repeatedly until the smoke has been cleared.
Smoke alarms are designed to minimize nuisance alarms. Combustion particles from cooking may set off the alarm if the alarm is
located close to the cooking area. Large quantities of combustible particles are generated from spills or when grilling/frying. Using the
fan on a range hood that vents to the outside (non-recirculating type) will also help remove these combustible particles from the
kitchen. The hush mode is extremely useful in a kitchen area or other areas prone to nuisance. The hush feature is to be used only
when a known alarm condition, such as smoke from cooking activates the alarm. The smoke alarm is desensitized by pushing the
test/hush button, if the smoke is not too dense, the alarm will silence to indicate that the alarm is in a temporarily desensitized
condition. The smoke alarm will automatically reset after approximately 9 minutes. If particles of combustion are still present after this
period, the alarm will sound again. The hush mode can be used repeatedly until the air has been cleared of the condition causing the
alarm.
Note: Dense smoke will override the hush mode and sound a continuous alarm.
Caution: Before using the alarm silence (hush mode), identify the source of the smoke and make sure the situation is safe.
EMPTY BATTERY SIGNAL
Battery Replacement
If the Wi-Fi battery is running low, the smoke alarm will indicate this by flashing the yellow LED and emitting an audible “beep”, once
every 45 seconds. To replace the battery, open the apparatus, remove the empty battery and insert a new one. To ensure timely
replacement. We highly recommend you replace the battery on a fixed date.
• IMPORTANT: After replacing the Wi-Fi battery, always test the smoke alarm for correct operation using the test/hush button.
• IMPORTANT: Only replace the Wi-Fi battery with one of the certified battery types: CR123A 3V DC Lithium battery.
End of Life
This smoke alarm is equipped with a non-replaceable battery. When the battery is running low, the smoke alarm will indicate this with
3 yellow flashes every 45 seconds together with 3 beeps at the same time. Replace the device as soon as possible.
MAINTENANCE
Testing: We highly recommend you to test the functionality of your smoke alarm every month. Press the [TEST/HUSH] button. The
red LED will flash and the device will emit 3 beeps twice. If the alarm signal does not sound after pressing the test/hush button, the
smoke alarm device is not working properly and the advice of Smartwares should be sought.
Warning: Do not use an open flame to test your smoke alarm, this could damage the apparatus or ignite combustible materials and
start a fire.
Cleaning: For optimal performance, the smoke alarm must be cleaned with a moist cloth once a month and vacuumed every six
months. Do not touch the inside of the smoke alarm with the nozzle of the vacuum cleaner. Always test the functionality of the
apparatus after cleaning by pressing the test/hush button.
TROUBLE SHOOTING
• False alarm may be caused by: welding and cutting operations, soldering and other hot work, sawing and grinding, dust due to
construction work or cleaning, water vapor, cooking fumes, extreme electromagnetic effects, temperature fluctuations, which lead
to the condensation of the humidity in the smoke alarm.
• Dust is the most common cause of false alarms/failing alarm, therefore always clean the smoke alarm as described in paragraph
‘maintenance’ if you experience any issues. If this does not solve the problem, the advice of Smartwares should be sought.
• Smartwares can never be made liable for loss and/or damage of whatever nature, including incidental and/or consequential loss,
arising from the fact that the signal from the smoke alarm did not sound during smoke or fire. Smartwares can never be made liable
for loss and/or damage of whatever nature, including incidental and/or consequential loss, arising from the fact that the signal from
the smoke alarm did not sound during smoke or fire.
TECHNICAL DATA
• Smoke sensor: Optical
• Battery (Wi-Fi) type: CR123A, 3VDC
• Battery replaceable: Yes
• Battery (Wi-Fi) lifetime: 3 year
• Lifetime device battery (not replaceable): 10 years
• Operating temperature: -10 - + 50°C
• Operating humidity: ≤95% RH (no condensation)
• Alarm volume: >85dB (A) at 3m
• Mounting type: Ceiling
• Detection area: Max 40m2
• Hush function: Yes
• Installation in (LAV): No
• Max. radio frequency power: ≤ 20.0 dBm
• Frequency range: 2.412 - 2.472GHz
• Wireless protocol: Wi-Fi
For indoor use only.
Please read manual before use, and store it carefully for future use and maintenance.
Condition LED Sound
Normal operation Red LED flashes every 45 seconds None
Testing Red LED flashes rapidly 3 beeps
Alarm Red LED flashes rapidly Beeps consecutively
Hush mode Yellow LED flashed every 9 seconds for
9 minutes
None
Low Battery Yellow LED flashes once every 45
seconds
Beeps once every 45 seconds
End of life Yellow LED flashes 3 x every 45
seconds
Beeps 3 times every 45 seconds
Device failure Yellow LED flashes twice every 45
seconds
Beeps twice every 45 seconds
Wi-fi pairing mode Yellow LED flashes for 45 seconds None
Wi-fi pairing failure Green LED flashes rapidly for
approximately 60 seconds
3 beeps every 40 seconds
NEW NODE
Smartwares Europe B.V. hereby declares that the radio equipment type FSM-128 is in compliance with Directive 2014/53/EU.
The full text of the EU declaration of conformity is available at the following internet address - www.smartwares.eu/doc
NLInstruction manual
ALGEMENE INFORMATIE
Bedankt voor de aankoop van deze rookmelder. Lees deze instructies zorgvuldig door voordat u de rookmelder gaat gebruiken.
Bewaar deze informatie op een veilige en eenvoudig toegankelijke locatie voor toekomstig gebruik en onderhoud. Als u vragen hebt
of aanvullende informatie zoekt over uw rookmelder, bezoekt u onze website www.smartwares.eu/doc
• Merk/modelnummer: FSM-128
• Omschrijving: Rookmelder gebaseerd op het fotocelprincipe, wat betekent dat het alarm de lucht controleert op rook veroorzaakt
door brand. Dit apparaat bevat een verzegelde lithiumbatterij met een levensduur van 10 jaar voor de rookmelder zelf en een
vervangbare batterij van het type CR123A 3V DC met een levensduur van 3 jaar voor het wifi-gedeelte.
• Functie: Rookmelder die bedoeld is om personen die zich in de buurt van een brand/rook bevinden te waarschuwen, zodat ze de
tijd hebben om adequaat op het gevaar te reageren.
• Toepassingsbereik: Rookmelder voor gebouwen met een woonbestemming.
BELANGRIJK:
• Voorzichtig: De melder is bedoeld voor het detecteren van rook; de melder kan een brand dus niet voorkomen!
• Voorzichtig: De rookmelder mag niet worden overgeschilderd of bedekt. Dit kan de werking verminderen.
• Voorzichtig: Gebruik van een rookmelder is een onderdeel van uw bescherming tegen brand, net zoals brandblussers,
noodladders, touwen, maar ook uw keuze van voor renovatie gebruikte bouwmaterialen. Zorg dat er altijd een evacuatieplan
aanwezig is en bespreek dit met uw kinderen. Zorg dat iedere kamer kan worden verlaten zonder de deur te openen, bijvoorbeeld
via het raam. Ga als de oorzaak van een alarm niet duidelijk is ervan uit dat de melding het gevolg is van een werkelijke brand en
verlaat onmiddellijk de woning.
• Waarschuwing: Vervang rookmelders uiterlijk 10 jaar na de eerste activering. Vul de activeringsdatum op de typeplaat op het
product in en noteer de vervangingsdatum in uw agenda.
EERSTE ACTIVERING
De batterij plaatsen
• Open het apparaat door op de basisplaat te drukken en deze tegen de klok in te draaien.
• Verwijder het plastic beschermlipje van de batterij en plaats deze in de rookmelder. Zorg ervoor dat de batterij wordt geplaatst in
overeenstemming met de polariteitsmarkeringen (+ of -) in het batterijvak (zie afbeelding 1A). Het apparaat geeft één pieptoon als
de batterij is geplaatst.
• Als u de basisplaat weer wilt bevestigen, lijnt u de pinnen uit met de gaten op de basisplaat. Draai de basisplaat vervolgens met de
klok mee.
Installatie van de melder
• Om de rookmelder te monteren bevestig je de bodemplaat met de meegeleverde schroeven en draai je de melder voorzichtig vast
op de bodemplaat (zie afbeelding 3).
• Bevestig de melder aan de gemonteerde basisplaat door de pinnen op de melder uit te lijnen met de gaten op de basisplaat en de
melder tegen de klok in te draaien.
• Test na installatie van de rookmelder altijd de werking ervan met behulp van de testknop.
De melder testen
Het is belangrijk om de melder te testen, zowel voor als na montage, wanneer er een nieuwe batterij is geplaatst en maandelijks.
Lithiumbatterijen moeten regelmatig worden geactiveerd om te voorkomen dat de batterij 'in slaap valt'. Om de melder te testen -
• Houd de TEST/HUSH-knop 5 seconden ingedrukt. (zie afbeelding 1B). Het rode ledlampje knippert en het apparaat geeft 3
piepjes. Laat dan de knop los. Dit bevestigt dat de melder in goede staat is.
• Als het alarmsignaal niet klinkt nadat u op de knop [TEST/HUSH] (TESTEN/DEMPEN) hebt gedrukt, werkt de rookmelder niet naar
behoren en moet u contact opnemen met Smartwares.
MONTAGE
Belangrijk:
Houd u aan de onderstaande aanbevelingen voor de plaatsing om een optimale werking van de rookmelder te waarborgen.
• Voor de veiligheid van de eindgebruiker kan de rookmelder niet gemonteerd worden als de batterij niet geplaatst is.
• WAARSCHUWING: Bevestig om letsel te voorkomen dit toestel stevig aan het plafond volgens de installatie-instructies.
• Rookmelders moeten zo worden geplaatst dat eventuele rook ze ongehinderd kan bereiken. Zo zorgt u ervoor dat een brand al in
de ontwikkelingsfase kan worden gedetecteerd.
• Eisen voor rookmelders variëren per staat en per regio. Controleer altijd de betreffende eisen voor uw gebied bij de lokale
instanties!
Waar moet een rookmelder worden gemonteerd?
• In het midden van het plafond van een ruimte
• Max. hoogte: 6m
• Min. 0,5 m afstand tot wanden / afsluitingen:
• Kleine ruimten van minder dan 1meter breed: in het midden van het plafond
• Gangen met een maximale breedte van 3meter: maximaal 15meter afstand tussen 2rookmelders. Maximaal 7,5meter afstand tot
de voorzijde en rookmelders bij randen/kruisingen op gangen.
• Galerijen: als de lengte en breedte van de galerij meer dan 2meter is en het oppervlak van de galerij meer dan 16m2 is, is een
extra rookmelder vereist.
• Onder schuine daken: Als >20°, minimaal 0,5m en maximaal 1m tot de punt van het dak. Als ≤20°, hetzelfde als bij een vlak
plafond. Bij gedeeltelijk schuine daken: bij vlak plafond ≤ 1m breed, hetzelfde als bij een schuin dak. Bij vlak plafond >1m breed,
hetzelfde als bij vlak plafond.
• Plafond met balken (of vergelijkbaar): Bij hoogte ≤0,2m, installatie op plafond of op balk. Bij hoogte > 0,2m en afgescheiden
ruimte > 36m2 => extra rookmelder ertussen.
• Dwarsbalken (of vergelijkbaar): Als de hoogte kleiner dan of gelijk aan 0,2meter is, monteert u de rookmelder op het plafond of de
dwarsbalk. Als de hoogte groter dan 0,2meter is en bij gescheiden oppervlakken van meer dan 36m2, moet u extra rookmelders
tussen de dwarsbalken plaatsen.
Waar mag een rookmelder niet worden gemonteerd?
• In de buurt van airconditioning/ventilatiesystemen;
• Op plaatsen waar de ventilatie kan worden belemmerd, zoals bij gordijnen, enz.;
• In ruimten waar de temperatuur onder -10°C en boven 50°C kan komen.
• In vochtige ruimten/keukens/badkamers, omdat stoom een vals alarm kan veroorzaken. Breng een bezoek aan onze website voor
melders die geschikt zijn voor deze ruimten;
• Dichter dan 50 cm bij lichtbronnen/elektriciteitsbronnen;
• Locaties die moeilijk te bereiken zijn en waar de test-/dempknop moeilijk in te drukken is, de batterij moeilijk te vervangen is of
waar onderhoud moeilijk uit te voeren is.
Draadloze verbinding
Volg de onderstaande stappen op om een draadloze verbinding tussen de rookmelder en uw smartphone of tablet tot stand te
brengen.
Voorbereiding
• Ga naar de Apple of Android Play Store.
• Download de Connected at Home app / Smartlife app op je smartphone of tablet.
Een draadloze verbinding tussen uw smart device(s) en de rookmelder tot stand brengen
Open de Connected at Home app / Smartlife app op je smartphone of tablet. Volg de instructies van de app om je toestel(len) toe te
voegen. Houd de TEST/HUSH-knop op de rookmelder ingedrukt en laat het niet los. Draai de rookmelder vervolgens op de
montagebeugel om de rookmelder van stroom te voorzien. Op dit moment zal het groene ledlampje gaan branden en één pieptoon
laten horen. Nu kun je de testknop loslaten. Druk binnen 5 seconden drie keer op de testknop (zie afbeelding 2) en het groene
ledlampje gaat snel knipperen, dit geeft aan dat het rookmeldernetwerk bezig is. Het netwerkproces stopt na ongeveer 60 seconden.
Opmerking: Als het koppelen met wifi mislukt, moeten gebruikers de bovenstaande stappen herhalen om een draadloze verbinding
tot stand te brengen.
ALARMONDERDRUKKING / STILTEFUNCTIE
Druk lang op de TEST/HUSH-knop om het alarm uit te zetten. Het alarm wordt gedurende 9 minuten uitgeschakeld. Als de
rookconcentratie nog steeds boven het alarmeringsniveau ligt, geeft de rookmelder opnieuw een alarm. Herhaal dit totdat de rook is
verdwenen.
Rookmelders zijn ontworpen om hinderlijke alarmsignalen tot een minimum te beperken. Verbrandingsdeeltjes van het koken kunnen
het alarm doen afgaan als het alarm zich dicht bij het kookgedeelte bevindt. Er ontstaan grote hoeveelheden verbrandingsdeeltjes bij
morsen of bij grillen/bakken. Als u de ventilator van een afzuigkap gebruikt die naar buiten uitblaast (niet recirculerend type), kunt u
deze verbrandingsdeeltjes ook uit de keuken afvoeren. De stiltefunctie is bijzonder handig in een keuken of andere ruimtes waar veel
verstoring optreedt. De "hush"-functie mag alleen worden gebruikt als een bekende alarmtoestand, zoals rook van koken, het alarm
activeert. De rookmelder wordt gedesensibiliseerd door op de testknop te drukken. Als de rook niet te dicht is, zal het alarm dempen
om aan te geven dat het alarm tijdelijk gedesensibiliseerd is. Na ongeveer 9 minuten keert de rookmelder automatisch terug naar de
normale modus. Als er na deze periode nog steeds verbrandingsdeeltjes aanwezig zijn, gaat het alarm opnieuw af. De
onderdrukkingsfunctie kan herhaaldelijk gebruikt worden totdat de lucht vrij is van de oorzaak van het alarm.
Opmerking: dichte rook overschrijft de stiltemodus en geeft een continu alarm.
Let op: Voordat u de alarmonderdrukkingsfunctie (hush-functie) gebruikt, moet u de bron van de rook identificeren en u ervan
verzekeren dat de situatie veilig is.
SIGNAAL LEGE BATTERIJ
Batterij vervangen
Als de wifi-batterij bijna leeg is, geeft de rookmelder dit aan door het gele ledlampje te laten knipperen en een hoorbare "piep" te laten
horen, eens in de 45 seconden. Om de batterij te vervangen, open je het apparaat, verwijder je de lege batterij en plaats je een
nieuwe. Om tijdige vervanging te garanderen. We raden je sterk aan om de batterij op een vaste datum te vervangen.
• BELANGRIJK: Test na het vervangen van de wifi-batterij altijd of de rookmelder goed werkt met de testknop.
• BELANGRIJK: Vervang de wifi-batterij alleen door een van de gecertificeerde batterijtypen: CR123A 3V DC Lithium batterij.
Einde levensduur
Deze rookmelder is uitgerust met een niet-vervangbare batterij. Als de batterij bijna leeg is, geeft de rookmelder dit aan met 3 gele
flitsen om de 45 seconden en tegelijkertijd 3 piepjes. Vervang het apparaat zo snel mogelijk.
ONDERHOUD
Testen: Het wordt sterk aanbevolen de functionaliteit van de rookmelder elke maand te testen. Druk op de knop TEST/HUSH
(TESTEN/DEMPEN). Het rode ledlampje knippert en er klinken 2keer 3pieptonen. Als het alarmsignaal niet klinkt nadat u op de
test-/dempknop hebt gedrukt, werkt de rookmelder niet naar behoren en moet u contact opnemen met Smartwares.
Waarschuwing: Gebruik geen open vuur om uw rookmelder te testen. Hiermee kunt u het apparaat beschadigen of brandbare
materialen tot ontbranding brengen en een brand veroorzaken.
Schoonmaken: Voor een optimale werking moet de rookmelder eenmaal per maand met een vochtige doek schoongemaakt worden
en om de zes maanden gestofzuigd worden. Raak de binnenkant van de rookmelder niet aan met het mondstuk van de stofzuiger.
Test altijd de werking van het apparaat na het schoonmaken door op de test- en stopknop te drukken.
PROBLEMEN OPLOSSEN
• Een vals alarm kan worden veroorzaakt door: las- en snijwerkzaamheden, soldeerwerkzaamheden en overige werkzaamheden
waarbij hitte vrijkomt, zagen en slijpen, stof als gevolg van bouw- of reinigingswerkzaamheden, waterdamp, kookdampen, extreme
elektromagnetische effecten, temperatuurschommelingen die leiden tot condensatie van in de rookmelder aanwezig vocht.
• Stof is de meest voorkomende oorzaak voor valse alarmen en alarmstoringen. Reinig de rookmelder daarom altijd zoals wordt
beschreven in het hoofdstuk Onderhoud als u problemen ervaart. Als dit het probleem niet verhelpt, neemt u contact op met
Smartwares.
• Smartwares kan nooit verantwoordelijk worden gehouden voor verlies en/of schade van welke aard dan ook, inclusief incidentele
en/of gevolgschade die het gevolg is van het feit dat het signaal van de rookmelder niet heeft geklonken bij rookontwikkeling of
brand. Smartwares kan nooit verantwoordelijk worden gehouden voor verlies en/of schade van welke aard dan ook, inclusief
incidentele en/of gevolgschade die het gevolg is van het feit dat het signaal van de rookmelder niet heeft geklonken bij
rookontwikkeling of brand.
TECHNISCHE GEGEVENS
• Rooksensor: Optisch
• Batterij (wifi) type: CR123A, 3VDC
• Batterij vervangbaar: Ja
• Levensduur batterij (wifi): 3 jaar
• Levensduur van apparaatbatterij (niet vervangbaar): 10 jaar
• Werkingstemperatuur: -10 - + 50°C
• Vochtigheid in bedrijf: ≤95% RV (geen condens)
• Alarmvolume: >85dB (A) op 3meter
• Type montage: Plafond
• Detectiegebied: Max. 40m2
• Dempfunctie: Ja
• Installatie in (camper): Nee
• Max. radiofrequentie vermogen: ≤ 20.0 dBm
• Frequentiebereik: 2.412 - 2.472GHz
• Draadloos protocol: Wifi
Uitsluitend voor gebruik binnenshuis.
Lees voor gebruik de handleiding en bewaar deze zorgvuldig voor toekomstig gebruik en het uitvoeren van
onderhoudswerkzaamheden.
Stand Led Geluid
Normale werking Rode led knippert elke 45 seconden Geen
Testen Rode led knippert snel 3 piepjes
Alarm Rode led knippert snel Piept achtereenvolgens
Stille modus Geel ledlampje knipperde elke 9
seconden gedurende 9 minuten
Geen


